Данный раздел представляет большой выбор инструкций по эксплуатации стиральных машин Whirlpool. Вы можете бесплатно скачать любое руководство.
Whirlpool Corporation — крупнейший мировой производитель «белой бытовой техники». Компания существует на мировом рынке более 100 лет, на российском — более 20. Сегодня Whirlpool имеет более 70 производственных и технических центров по всему миру и насчитывает более 100 000 сотрудников. Купить продукцию компании возможно в 170 странах мира.
Бумажное руководство, даже если имеется, не всегда удобно в использовании, поэтому мы собрали некоторое количество инструкций на нашем сайте. Вы можете абсолютно бесплатно скачать любую из инструкций в формате pdf или воспользоваться просмотром в браузере.
Whirlpool Top Loading Washing Machine Owners Manual
WASHER SAFETY
Your safety and the safety of others are very important.
We have provided many important safety messages in this manual and on your appliance. Always read and obey all safety messages.
This is the safety alert symbol.
This symbol alerts you to potential hazards that can kill or hurt you and others.
All safety messages will follow the safety alert symbol and either the word «DANGER» or «WARNING.» These words mean:
You can be killed or seriously injured if you don’t immediately follow instructions.
You can be killed or seriously injured if you don’t follow WARNING instructions.
All safety messages will tell you what the potential hazard is, tell you how to reduce the chance of injury, and tell you what can happen if the instructions are not followed.
IMPORTANT SAFETY INSTRUCTIONS
To reduce the risk of fire, electric shock, or injury to persons when using the washer, follow basic precautions, including the following:
- Read all instructions before using the washer.
- Do not wash articles that have been previously cleaned in, washed in, soaked in, or spotted with gasoline, dry-cleaning solvents, other flammable, or explosive substances as they give off vapors that could ignite or explode.
- Do not add gasoline, dry-cleaning solvents, or other flammable, or explosive substances to the wash water. These substances give off vapors that could ignite or explode.
- Under certain conditions, hydrogen gas may be produced in a hot water system that has not been used for 2 weeks or more. HYDROGEN GAS IS
- EXPLOSIVE. If the hot water system has not been used for such a period, before using the washing machine, turn on all hot water faucets and let the water flow from each for several minutes. This will release any accumulated hydrogen gas. As the gas is flammable, do not smoke or use an open flame during this time.
- Do not allow children to play on or in the washer. Close supervision of children is necessary when the washer is used near children.
- Before the washer is removed from service or discarded, remove the door or lid.
- Do not reach into the washer if the drum, tub or agitator is moving.
- Do not install or store the washer where it will be exposed to the weather.
- Do not tamper with controls.
- Do not repair or replace any part of the washer or attempt any servicing unless specifically recommended in this manual or in published user-repair instructions that you understand and have the skills to carry out.
- See Installation Instructions for grounding instructions.
SAVE THESE INSTRUCTIONS
INSTALLATION REQUIREMENTS
Tools and Parts
Gather required tools and parts before starting installation.
Tools needed
Pliers that open to 1¾»
Level
Wood Block
Ruler or measuring tape
Bucket
Parts supplied:
NOTE: All parts supplied for installation are in cardboard insert in the top of the washer.
Drain hose with clamp, U-form, and cable tie
Parts needed (Not supplied with washer):
Inlet hoses with flat washers
Location Requirement
Select proper location for your washer to improve performance and minimize noise and possible «washer walk». Install your washer in a basement, laundry room, closet, or recessed area.
You will need
- A water heater set to 120°F (49°C).
- A grounded electrical outlet located within 4 ft. (1.2 m) of power cord on back of washer.
- Hot and cold water faucets located within 3 ft. (0.9 m) of hot and cold water fill valves on washer, and water pressure of 20-100 psi (138-690 kPa).
- A level floor with maximum slope of 1″ (25 mm) under entire washer. Installing on carpet is not recommended.
- Floor must support washer’s total weight (with water and load) of 315 lbs (143 kgs).
Do not install, store, or operate washer where it will be exposed to weather or in temperatures below 32°F (0°C).Water remaining in washer after use may cause damage in low temperatures. See the «Winter Storage Care» section for winterizing information.
Proper installation is your responsibility.
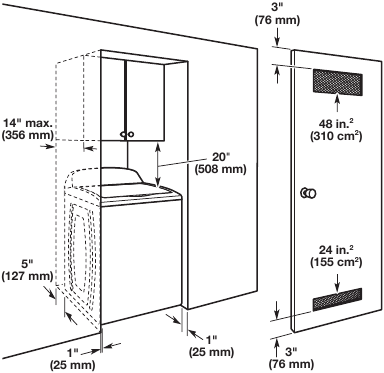
Recessed area or closet installation
Dimensions show recommended spacing allowed, except for closet door ventilation openings which are minimum required. This washer has been tested for installation with spacing of 0″ (0 mm) clearance on the sides. Consider allowing more space for ease of installation and servicing, and spacing for companion appliances and clearances for walls, doors, and floor moldings. Add spacing of 1″ (25 mm) on all sides of washer to reduce noise transfer. If a closet door or louvered door is installed, top and bottom air openings in door are required.
Drain System
Drain system can be installed using a floor drain, wall standpipe, floor standpipe, or laundry tub. Select method you need.
Floor standpipe drain system
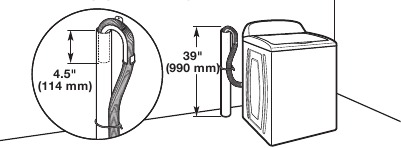
Minimum diameter for a standpipe drain: 2″ (51 mm). Minimum carry-away capacity: 17 gal. (64 L) per minute. Top of standpipe must be at least 39″ (990 mm) high; install no higher than 96″ (2.44 m) from bottom of washer. If you must install higher than 96″ (2.44 m), you will need a sump pump system.
Wall standpipe drain system
See requirements for floor standpipe drain system.
Floor drain system
Floor drain system requires a Siphon Break Kit
(Part Number 285834), 2 Connector Kits (Part Number 285835), and an Extension Drain Hose (Part Number 285863) that may be purchased separately. To order, please see toll-free phone numbers in «Assistance or Service» section. Minimum siphon break: 28″ (710 mm) from bottom of washer. (Additional hoses may be needed.)
Laundry tub drain system
Minimum capacity: 20 gal. (76 L). Top of laundry tub must be at least 39″ (990 mm) above floor; install no higher than 96″ (2.44 m) from bottom of washer.
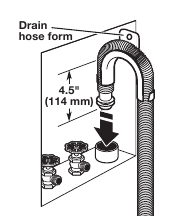
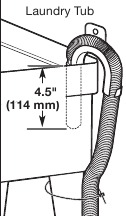
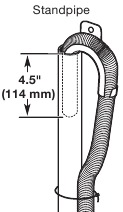
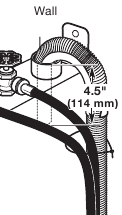
To avoid siphoning, no more than 4.5″ (114 mm) of drain hose should be inside standpipe or below the top of wash tub. Secure drain hose with cable tie.
Electrical Requirements
Electrical Shock Hazard
Plug into a grounded 3 prong outlet.
Do not remove ground prong.
Do not use an adapter.
Do not use an extension cord.
Failure to follow these instructions can result in death, fire, or electrical shock.
- A 120 V, 60 Hz., AC only, 15 or 20 A, fused electrical supply is required. A time-delay fuse or circuit breaker is recommended. It is recommended that a separate circuit breaker serving only this appliance be provided.
- This washer is equipped with a power supply cord having a 3 prong grounding plug.
- To minimize possible shock hazard, the cord must be plugged into a mating, 3 prong, grounding-type outlet, grounded in accordance with local codes and ordinances. If a mating outlet is not available, it is the personal responsibility and obligation of the customer to have the properly grounded outlet installed by a qualified electrician.
- If codes permit and a separate ground wire is used, it is recommended that a qualified electrician determine that the ground path is adequate.
- Do not ground to a gas pipe.
- Check with a qualified electrician if you are not sure the washer is properly grounded.
- Do not have a fuse in the neutral or ground circuit.
GROUNDING INSTRUCTIONS
For a grounded, cord-connected washer:
This washer must be grounded. In the event of a malfunction or breakdown, grounding will reduce the risk of electrical shock by providing a path of least resistance for electric current. This washer is equipped with a cord having an equipment-grounding conductor and a grounding plug. The plug must be plugged into an appropriate outlet that is properly installed and grounded in accordance with all local codes and ordinances.
Improper connection of the equipment-grounding conductor can result in a risk of electric shock. Check with a qualified electrician or serviceman if you are in doubt as to whether the appliance is properly grounded.
Do not modify the plug provided with the appliance — if it will not fit the outlet, have a proper outlet installed by a qualified electrician.
For a permanently connected washer:
This washer must be connected to a grounded metal, permanent wiring system, or an equipment grounding conductor must be run with the circuit conductors and connected to the equipment-grounding terminal or lead on the appliance.
INSTALLATION INSTRUCTIONS
Excessive Weight Hazard
Use two or more people to move and install washer.
Failure to do so can result in back or other injury.
Before you start: Remove shipping materials.
It is necessary to remove all shipping materials for proper operation and to avoid excessive noise from washer.
- Move washer
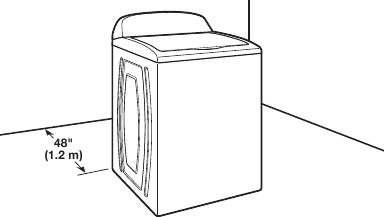
Move washer to within 4 ft. (1.2 m) of its final location; it must be in a fully upright position.
NOTE: To avoid floor damage, set washer onto cardboard before moving it and make sure lid is taped shut. - Remove shipping base
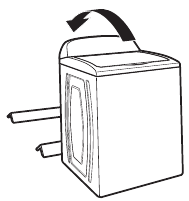
To avoid damaging floor, place cardboard supports from shipping carton on floor behind washer. Tip washer back and place on cardboard supports. Remove shipping base. Set washer upright.
Removing shipping base is necessary for proper operation. If your washer includes a sound shield, please refer to the instructions included with the sound shield to install it at this time. - Remove packing tray from tub
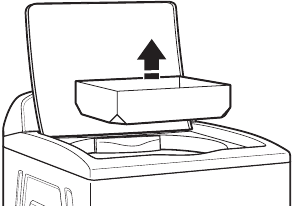
Remove tape from washer lid, open lid, and remove cardboard packing tray from tub. Remove all other packaging materials from washer tub. Be sure to remove all parts from tray.
NOTE: Keep tray in case you need to move washer later. - Free power cord
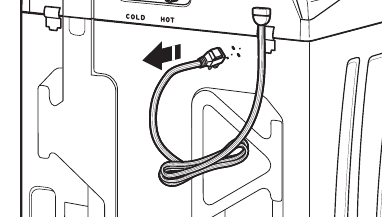
Firmly grasp power cord plug and pull to free from rear panel.
Gently place power cord over console to allow free access to back of washer.
Connect Drain Hose
- Attach drain hose to drain port
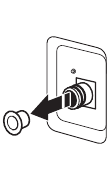
Remove the red plastic plug from the black drain port on the back of the washer.
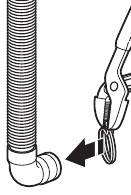
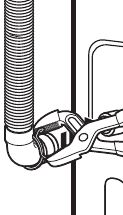
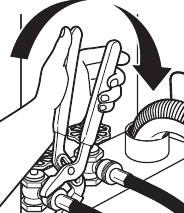
If clamp is not already in place on elbow end of drain hose, slide it over end as shown. Squeeze clamp with pliers and slide black elbow end of drain hose onto black drain port and secure with clamp.
For a laundry tub or standpipe drain, go to step 6.
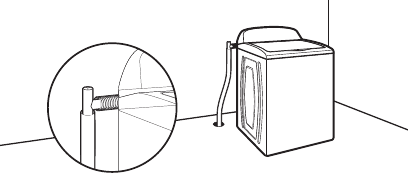
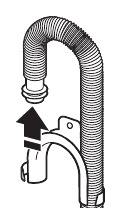
For a floor drain, remove the preinstalled drain hose form as shown in Step 7. You may need additional parts with separate directions. See the «Tools and Parts» section. - Place drain hose in standpipe
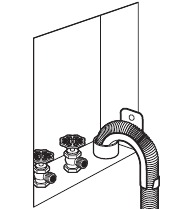
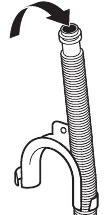
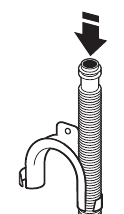
Place hose into standpipe (shown in picture) or over side of laundry tub.
4.5″ (114 mm) of drain hose should be inside standpipe; do not force excess hose into standpipe or lay on bottom of laundry tub. Drain hose form must be used. - Remove drain hose form (floor drain installations only)
For floor drain installations, you will need to remove the drain hose form from the end of the drain hose. You may need additional parts with separate directions. See the «Tools and Parts» section.
Connect Inlet Hoses
Washer must be connected to water faucets with new inlet hoses with flat washers (not provided). Do not use old hoses.
NOTE: Both hoses must be attached and have water flowing to inlet valves. If you are only connecting to a cold water faucet, you must use a Y-adapter (not provided).
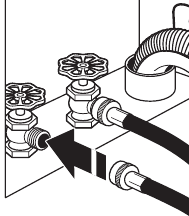
- Connect inlet hoses to water faucets
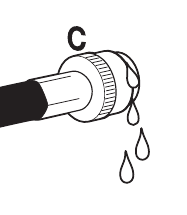
Attach hose to hot water faucet. Screw on coupling by hand until it is seated on washer. Use pliers to tighten couplings an additional two-thirds turn. Repeat this step with second hose for cold water faucet.
Do not overtighten or use tape or sealants on valve when attaching to faucets or washer. Damage can result. - Clean water lines
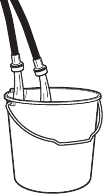
Run water for a few seconds through hoses into a laundry tub, drainpipe, or bucket to avoid clogs. Water should run until clear.
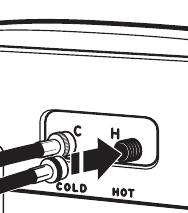
Make note of which hose is connected to hot water to help in attaching hoses to washer correctly. - Connect inlet hoses to washer
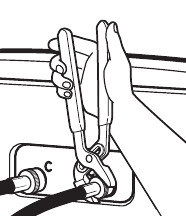
Attach hot water hose to hot water inlet valve marked with a red ring. Screw coupling by hand until it is snug. Use pliers to tighten couplings an additional two-thirds turn. Repeat with cold water inlet valve.
To reduce risk of hose failure, replace the hoses every five years. Record hose installation or replacement dates for future reference.- Periodically inspect and replace hoses if bulges, kinks, cuts, wear, or leaks are found.
- Check for leaks
Turn on water faucets to check for leaks. A small amount of water may enter washer. It will drain later. - Secure drain hose
Secure drain hose to laundry tub leg, drain standpipe, or inlet hoses for wall standpipe with cable tie.
Level Washer
Level washer properly to reduce excess noise and vibration.
- Check levelness of washer
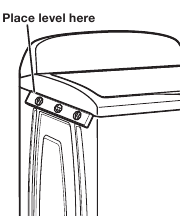
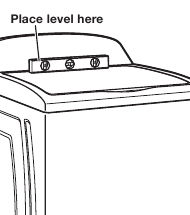
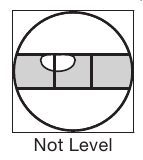
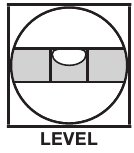
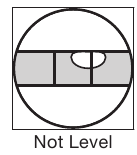
Move the washer to its final location. Place a level on top edges of washer. Use side seam as a guide to check levelness of sides. Check levelness of front using lid, as shown. Rock washer back and forth to make sure all four feet make solid contact with floor. If washer is level, skip to step 15. - Adjust leveling feet
If washer is not level:
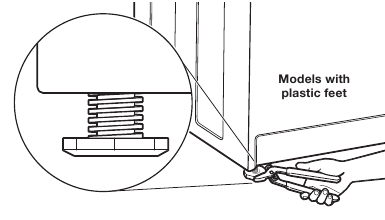
Use adjustable pliers to turn the plastic leveling foot counterclockwise to lower the washer or clockwise to raise the washer. On all models, recheck levelness of washer and repeat as needed.
HELPFUL TIPS:- You may need to adjust two different feet to level your unit. Ensure each foot remains secured to the washer’s base.
- You may want to prop up the front of the washer about 4″ (102 mm) with a wood block or similar object that will support the weight of the washer when making the adjustments.
Electrical Shock Hazard
Plug into a grounded 3 prong outlet.
Do not remove ground prong.
Do not use an adapter.
Do not use an extension cord.
Failure to follow these instructions can result in death, fire, or electrical shock.
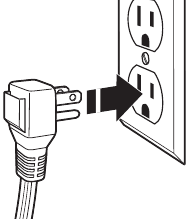
- Plug into a grounded 3 prong outlet
Complete Installation Checklist
❑ Check electrical requirements. Be sure you have correct electrical supply and recommended grounding method.
❑ Check that all parts are now installed. If there is an extra part, go back through steps to see what was skipped.
❑ Check that you have all of your tools.
❑ Check that shipping materials were completely removed from washer.
❑ Check that the washer is level.
❑ Check that water faucets are on.
❑ Check for leaks around faucets and inlet hoses.
❑ Remove protective film from console and any tape remaining on washer.
❑ Check that washer is plugged into a grounded 3 prong outlet.
❑ Dispose of/recycle all packaging materials.
❑ Read the «Washer Care» section in this book.
❑ To test and clean your washer, measure 1/2 of normal recommended amount of powdered or liquid detergent and pour it into washer basket or detergent dispenser (on some models). Close lid. Select any cycle. Start washer and allow to complete full cycle.
WASHER MAINTENANCE AND CARE
WATER INLET HOSES
Replace inlet hoses after 5 years of use to reduce the risk of hose failure. Periodically inspect and replace inlet hoses if bulges, kinks, cuts, wear, or leaks are found.
When replacing your inlet hoses, mark the date of replacement on the label with a permanent marker.
NOTE: This washer does not include inlet hoses. See the «Installation & Care Instructions Manual» for more information.
WASHER CARE
Recommendations to Help Keep Your Washer Clean and Performing at its Best
- Always use High Efficiency (HE) detergents and follow the HE detergent manufacturer’s instructions regarding the amount of HE detergent to use. Never use more than the recommended amount because that may increase the rate at which detergent and soil residue accumulate inside your washer, which in turn may result in undesirable odor.
- Use warm and hot wash water settings sometimes (not exclusively cold water washes), because they do a better job of controlling the rate at which soils and detergent accumulate.
- Always leave the washer lid open between uses to help dry out the washer and prevent the buildup of odor-causing residue.
Cleaning Your Top Loading Washer
Read these instructions completely before beginning the routine cleaning processes recommended below. This Washer Maintenance Procedure should be performed, at a minimum, once per month or every 30 wash cycles, whichever occurs sooner, to control the rate at which soils and detergent may otherwise accumulate in your washer.
Cleaning the Inside of the Washer
To keep your washer odor-free, follow the usage instructions provided above, and use this recommended monthly cleaning procedure:
Clean Washer Cycle
This washer has a special cycle that uses higher water volumes in combination with affresh® Washer Cleaner or liquid chlorine bleach to clean the inside of the washer.
Begin procedure
- affresh® Washer Cleaner Cycle Procedure (Recommended for Best Performance):
- Open the washer lid and remove any clothing or items.
- Place an affresh® Washer Cleaner tablet in the bottom of the washer basket.
- Do not place an affresh® Washer Cleaner tablet in the detergent dispenser.
- Do not add any detergent or other chemical to the washer when following this procedure.
- Close the washer lid.
- Select the CLEAN WASHER cycle.
- Touch and hold the START/PAUSE button to begin the cycle. The Clean Washer Cycle Operation is described below.NOTE: For best results, do not interrupt cycle. If cycle must be interrupted, touch POWER. After the Clean Washer cycle has stopped, run a RINSE & SPIN cycle to rinse cleaner from washer.
- Chlorine Bleach Procedure (Alternative):
- Open the washer lid and remove any clothing or items.
- Add 1 cup (236 mL) of liquid chlorine bleach to the bleach compartment.
NOTE: Use of more liquid chlorine bleach than is recommended above could cause washer damage over time. - Close the washer lid.
- Do not add any detergent or other chemical to the washer when following this procedure.
- Select the CLEAN WASHER cycle.
- Touch and hold the START/PAUSE button to begin the cycle. The Clean Washer Cycle Operation is described below.
NOTE: For best results, do not interrupt cycle. If cycle must be interrupted, touch POWER. After the Clean Washer cycle has stopped, run a RINSE & SPIN cycle to rinse cleaner from washer.
Description of Clean Washer Cycle Operation:
- This cycle will fill to a water level higher than in normal wash cycles to provide rinsing at a level above the water line for normal wash cycle.
- During this cycle, there will be some agitation and spinning to increase the removal of soils. After this cycle is complete, leave the lid open to allow for better ventilation and drying of the washer interior.
Cleaning the Dispensers
After a period of using your washer, you may find some residue buildup in the washer’s dispensers. To remove residue from the dispensers, wipe them with a damp cloth and towel dry. Do not attempt to remove the dispensers or trim for cleaning. The dispensers and trim are not removable. If your model has a dispenser drawer, however, remove the drawer and clean it before or after you run the Clean Washer cycle. Use an all purpose surface cleaner, if needed.
Cleaning the Outside of the Washer
Use a soft, damp cloth or sponge to wipe away any spills. Use only mild soaps or cleaners when cleaning external washer surfaces.
To avoid damaging the washer’s finish, do not use abrasive products.
NON-USE AND VACATION CARE
Operate your washer only when you are home. If moving, or not using your washer for a period of time, follow these steps:
- Unplug or disconnect power to washer.
- Turn off water supply to washer, to avoid flooding due to water pressure surge.
CLEANING YOUR DISPENSER
(*Varies according to model)
You may find laundry product residue leftover in your dispenser drawer or in bulk dispenser. To remove residue, follow below recommended cleaning procedures:
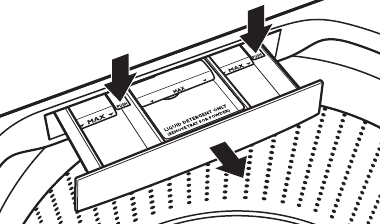
Dispenser Drawer
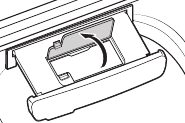
- Pull drawer out until you feel resistance.
- Push 2 tabs downward, and then continue pulling out.
- Wash in warm, soapy water, using a mild detergent.
- Rinse with warm water.
- Air dry, or dry with a towel, then place back into slot.
Dispenser drawer and tray are not dishwasher safe.
Bulk Dispenser
- Pull drawer completely out.
- Open dispenser lid.
- Rinse with warm water.
- Air dry or dry with a towel, then place back into slot.
Bulk dispenser and tray are not dishwasher safe.
WINTER STORAGE CARE
To avoid damage, install and store washer where it will not freeze. Because some water may stay in hoses, freezing can damage washer. If storing or moving during freezing weather, winterize your washer.
To winterize washer:
- Shut off both water faucets; disconnect and drain water inlet hoses.
- Put 1 qt. (1 L) of R/V/-type antifreeze into empty basket.
- Unplug washer or disconnect power.
TRANSPORTING YOUR WASHER
- Shut off both water faucets. Disconnect and drain water inlet hoses.
- If washer will be moved during freezing weather, follow WINTER STORAGE CARE directions before moving.
- Disconnect drain hose from drain system and drain any remaining water into a pan or bucket. Disconnect drain hose from back of washer.
- Unplug power cord.
- Place inlet hoses and drain hose inside washer basket.
- Drape power cord over edge and into washer basket.
- Place packing tray from original shipping materials back inside washer. If you do not have packing tray, place heavy blankets or towels into basket opening. Close lid and place tape over lid and down front of washer. Keep lid taped until washer is placed in new location. Transport washer in upright position.
Electrical Shock Hazard
Plug into a grounded 3 prong outlet.
Do not remove ground prong.
Do not use an adapter.
Do not use an extension cord.
Failure to follow these instructions can result in death, fire, or electrical shock.
REINSTALLING/USING WASHER AGAIN
To reinstall washer after non-use, vacation, winter storage, or moving:
- Refer to «Installation & Care Instructions Manual» to locate, level, and connect washer.
- Before using again, run washer through the following recommended procedure:
To use washer again:
- Flush water pipes and hoses. Reconnect water inlet hoses. Turn on both water faucets.
- Plug in washer or reconnect power.
- Run washer through BEDDING cycle to clean washer and remove antifreeze, if used. Use only HE (High Efficiency) detergent. Use ½ the manufacturer’s recommended amount for a medium-size load.
©2019 All rights reserved.
Videos
How to Install Your Whirlpool Top Load Washing Machine Мшвущ
Documents / Resources
Download manual
Here you can download full pdf version of manual, it may contain additional safety instructions, warranty information, FCC rules, etc.
Download Whirlpool Top Loading Washing Machine Owners Manual
Главная
» Инструкции к стиральным машинам Whirlpool
инструкция для Whirlpool AQUASTEAM 1400(Инструкция)
скачать
инструкция для Whirlpool AQUASTEAM 1400(Таблица прог
скачать
инструкция для Whirlpool AWE 10727(Таблица программ)
скачать
инструкция для Whirlpool AWE 10727
скачать
инструкция для Whirlpool AWE 2117(Инструкция)
скачать
инструкция для Whirlpool AWE 2117(Таблица программ)
скачать
инструкция для Whirlpool AWE 2214(Инструкция)
скачать
инструкция для Whirlpool AWE 2214(Таблица программ)
скачать
инструкция для Whirlpool AWE 2221(Инструкция)
скачать
инструкция для Whirlpool AWE 2221(Таблица программ)
скачать
инструкция для Whirlpool AWE 2316(инструкция)
скачать
инструкция для Whirlpool AWE 2316(Таблица программ)
скачать
инструкция для Whirlpool AWE 2322(Инструкция)
скачать
инструкция для Whirlpool AWE 2322(Таблица программ)
скачать
инструкция для Whirlpool AWE 2519 P(Инструкция)
скачать
инструкция для Whirlpool AWE 2519 P(Таблица программ
скачать
инструкция для Whirlpool AWE 4516
скачать
инструкция для Whirlpool AWE 4519(Таблица программ)
скачать
инструкция для Whirlpool AWE 4519_AWE 5419_AWE 6516(
скачать
инструкция для Whirlpool AWE 5561
скачать
инструкция для Whirlpool AWE 6314(Инструкция)
скачать
инструкция для Whirlpool AWE 6314(Таблица программ)
скачать
инструкция для Whirlpool AWE 6315(Инструкция)
скачать
инструкция для Whirlpool AWE 6315(Таблица программ)
скачать
инструкция для Whirlpool AWE 6316(Инструкция)
скачать
инструкция для Whirlpool AWE 6316(Таблица программ)
скачать
инструкция для Whirlpool AWE 6318
скачать
инструкция для Whirlpool AWE 6377(Таблица программ)
скачать
инструкция для Whirlpool AWE 6377
скачать
инструкция для Whirlpool AWE 6416(Инструкция)
скачать
инструкция для Whirlpool AWE 6416(Таблица программ)
скачать
инструкция для Whirlpool AWE 6514(Инструкция)
скачать
инструкция для Whirlpool AWE 6514(Таблица программ)
скачать
инструкция для Whirlpool AWE 6515(инструкция)
скачать
инструкция для Whirlpool AWE 6515(таблица программ)
скачать
инструкция для Whirlpool AWE 6516(Таблица программ)
скачать
инструкция для Whirlpool AWE 6519(Инструкция)
скачать
инструкция для Whirlpool AWE 6519(Таблица программ)
скачать
инструкция для Whirlpool AWE 6628_AWE 7629_AWE 7727(
скачать
инструкция для Whirlpool AWE 6725(Инструкция)
скачать
инструкция для Whirlpool AWE 6725(Таблица программ)
скачать
инструкция для Whirlpool AWE 7515(Инструкция)
скачать
инструкция для Whirlpool AWE 7515(Таблица программ)
скачать
инструкция для Whirlpool AWE 7526
скачать
инструкция для Whirlpool AWE 7527(Инструкция)
скачать
инструкция для Whirlpool AWE 7527(Таблица программ)
скачать
инструкция для Whirlpool AWE 7615(Инструкция)
скачать
инструкция для Whirlpool AWE 7615(Таблица программ)
скачать
инструкция для Whirlpool AWE 7615_2
скачать
инструкция для Whirlpool AWE 7619(Инструкция)
скачать
инструкция для Whirlpool AWE 7619(Таблица программ)
скачать
инструкция для Whirlpool AWE 7629(Таблица программ)
скачать
инструкция для Whirlpool AWE 7726(Таблица программ)
скачать
инструкция для Whirlpool AWE 7727(Таблица программ)
скачать
инструкция для Whirlpool AWE 7729(Инструкция)
скачать
инструкция для Whirlpool AWE 7729(Таблица программ)
скачать
инструкция для Whirlpool AWE 8523(инструкция)
скачать
инструкция для Whirlpool AWE 8523(таблица программ)
скачать
инструкция для Whirlpool AWE 8525(Таблица программ)
скачать
инструкция для Whirlpool AWE 8525
скачать
инструкция для Whirlpool AWE 8629(Таблица программ)
скачать
инструкция для Whirlpool AWE 8629_AWE 8727(Инструкци
скачать
инструкция для Whirlpool AWE 8679(Таблица программ)
скачать
инструкция для Whirlpool AWE 8723(инструкция)
скачать
инструкция для Whirlpool AWE 8723(таблица программ)
скачать
инструкция для Whirlpool AWE 8725(Инструкция)
скачать
инструкция для Whirlpool AWE 8725(Таблица программ)
скачать
инструкция для Whirlpool AWE 8727(Таблица программ)
скачать
инструкция для Whirlpool AWE 8729(Инструкция)
скачать
инструкция для Whirlpool AWE 8729(Таблица программ)
скачать
инструкция для Whirlpool AWE 8730(Инструкция)
скачать
инструкция для Whirlpool AWE 8730(Таблица программ)
скачать
инструкция для Whirlpool AWE 9629(Инструкция)
скачать
инструкция для Whirlpool AWE 9629(Таблица программ)
скачать
инструкция для Whirlpool AWE 9630(Таблица программ)
скачать
инструкция для Whirlpool AWE 9630
скачать
инструкция для Whirlpool AWE 9725(Инструкция)
скачать
инструкция для Whirlpool AWE 9725(Таблица программ)
скачать
инструкция для Whirlpool AWE 9729(Таблица программ)
скачать
инструкция для Whirlpool AWE 9729_AWE 9730(Инструкци
скачать
инструкция для Whirlpool AWE 9730(Таблица программ)
скачать
инструкция для Whirlpool AWG 215_AWG 216_AWG 217_AWG
скачать
инструкция для Whirlpool AWG 218_AWG 233_AWG 236_AWG
скачать
инструкция для Whirlpool AWG 2311
скачать
инструкция для Whirlpool AWG 232_AWG 234_AWG 235_AWG
скачать
инструкция для Whirlpool AWG 2351
скачать
инструкция для Whirlpool AWG 238_AWG 239_AWG 249_AWG
скачать
инструкция для Whirlpool AWG 263
скачать
инструкция для Whirlpool AWG 294 (Таблица программ)
скачать
инструкция для Whirlpool AWG 294
скачать
инструкция для Whirlpool AWG 308 E(Инструкция)
скачать
инструкция для Whirlpool AWG 308 E(Таблица программ)
скачать
инструкция для Whirlpool AWG 308(Инструкция)
скачать
инструкция для Whirlpool AWG 308(Таблица программ)
скачать
инструкция для Whirlpool AWG 310 D(Таблица программ)
скачать
инструкция для Whirlpool AWG 310 E(Таблица программ)
скачать
инструкция для Whirlpool AWG 310_AWG 400_AWG 908(Инс
скачать
инструкция для Whirlpool AWG 328 (Таблица программ)
скачать
инструкция для Whirlpool AWG 328_AWG x3x
скачать
инструкция для Whirlpool AWG 330(Таблица программ)
скачать
инструкция для Whirlpool AWG 338(Таблица программ)
скачать
инструкция для Whirlpool AWG 350(Таблица программ)
скачать
инструкция для Whirlpool AWG 358(Таблица программ)
скачать
инструкция для Whirlpool AWG 400(Таблица программ)
скачать
инструкция для Whirlpool AWG 528(Таблица программ)
скачать
инструкция для Whirlpool AWG 530(Таблица программ)
скачать
инструкция для Whirlpool AWG 538(Таблица программ)
скачать
инструкция для Whirlpool AWG 550(Таблица программ)
скачать
инструкция для Whirlpool AWG 558(Таблица программ)
скачать
инструкция для Whirlpool AWG 630(Таблица программ)
скачать
инструкция для Whirlpool AWG 638(Таблица программ)
скачать
инструкция для Whirlpool AWG 640_AWG 653_AWG 671
скачать
инструкция для Whirlpool AWG 650(Инструкция)
скачать
инструкция для Whirlpool AWG 650(Таблица программ)
скачать
инструкция для Whirlpool AWG 658(Таблица программ)
скачать
инструкция для Whirlpool AWG 680-1_WP
скачать
инструкция для Whirlpool AWG 7010_AWG 7011_AWG 7013_
скачать
инструкция для Whirlpool AWG 7010_AWG 7080(Таблица п
скачать
инструкция для Whirlpool AWG 7011_AWG 7021_AWG 7081(
скачать
инструкция для Whirlpool AWG 7013_AWG 7043(Таблица п
скачать
инструкция для Whirlpool AWG 7043_AWG 7080_AWG 7081(
скачать
инструкция для Whirlpool AWG 800(Таблица программ)
скачать
инструкция для Whirlpool AWG 800_AWG 853_AWG 860_AWG
скачать
инструкция для Whirlpool AWG 852(Таблица программ)
скачать
инструкция для Whirlpool AWG 852
скачать
инструкция для Whirlpool AWG 853(Таблица программ)
скачать
инструкция для Whirlpool AWG 860(Таблица программ)
скачать
инструкция для Whirlpool AWG 870(Таблица программ)
скачать
инструкция для Whirlpool AWG 874_AWG 875(Краткое рук
скачать
инструкция для Whirlpool AWG 874_AWG 875_AWG 876(Инс
скачать
инструкция для Whirlpool AWG 876(Краткое руководство
скачать
инструкция для Whirlpool AWG 878(Таблица программ)
скачать
инструкция для Whirlpool AWG 878_AWG 879(Инструкция)
скачать
инструкция для Whirlpool AWG 879(Таблица программ)
скачать
инструкция для Whirlpool AWG 908 D_AWG 910 D_AWG 912
скачать
инструкция для Whirlpool AWG 908 E(Инструкция)
скачать
инструкция для Whirlpool AWG 908 E_AWG 910 E(Таблица
скачать
инструкция для Whirlpool AWG 908(Таблица программ)
скачать
инструкция для Whirlpool AWG 910(Инструкция)
скачать
инструкция для Whirlpool AWG 910(Таблица программ)
скачать
инструкция для Whirlpool AWM 031
скачать
инструкция для Whirlpool AWM 040(Таблица программ)
скачать
инструкция для Whirlpool AWM 1000(Инструкция)
скачать
инструкция для Whirlpool AWM 1000(Таблица программ)
скачать
инструкция для Whirlpool AWM 1011(Таблица программ)
скачать
инструкция для Whirlpool AWM 1111(Инструкция)
скачать
инструкция для Whirlpool AWM 1111(Таблица программ)
скачать
инструкция для Whirlpool AWM 245_3
скачать
инструкция для Whirlpool AWM 247
скачать
инструкция для Whirlpool AWM 248_AWM 250
скачать
инструкция для Whirlpool AWM 5085(Таблица программ)
скачать
инструкция для Whirlpool AWM 5085_AWM 5105(Инструкци
скачать
инструкция для Whirlpool AWM 5105(Таблица программ)
скачать
инструкция для Whirlpool AWM 6027(Инструкция)
скачать
инструкция для Whirlpool AWM 6027(Таблица программ)
скачать
инструкция для Whirlpool AWM 6081(Инструкция)
скачать
инструкция для Whirlpool AWM 6081(Таблица программ)
скачать
инструкция для Whirlpool AWM 6082(Инструкция)
скачать
инструкция для Whirlpool AWM 6082(Таблица программ)
скачать
инструкция для Whirlpool AWM 6085(Инструкция)
скачать
инструкция для Whirlpool AWM 6085(Таблица программ)
скачать
инструкция для Whirlpool AWM 6100(Инструкция)
скачать
инструкция для Whirlpool AWM 6100(Таблица программ)
скачать
инструкция для Whirlpool AWM 6102(Таблица программ)
скачать
инструкция для Whirlpool AWM 6102_AWM 6125(Инструкци
скачать
инструкция для Whirlpool AWM 6105(Инструкция)
скачать
инструкция для Whirlpool AWM 6105(Таблица программ)
скачать
инструкция для Whirlpool AWM 6125(Таблица программ)
скачать
инструкция для Whirlpool AWM 7109
скачать
инструкция для Whirlpool AWM 8000(Инструкция)
скачать
инструкция для Whirlpool AWM 8000(Таблица программ)
скачать
инструкция для Whirlpool AWM 8000_PRO(Инструкция)
скачать
инструкция для Whirlpool AWM 8000_PRO(Таблица програ
скачать
инструкция для Whirlpool AWM 8085(1)_AWM 8105(1)_AWM
скачать
инструкция для Whirlpool AWM 8085(Таблица программ)
скачать
инструкция для Whirlpool AWM 8085_AWM 8105_AWM 8125(
скачать
инструкция для Whirlpool AWM 8105(Таблица программ)
скачать
инструкция для Whirlpool AWM 8125(Таблица программ)
скачать
инструкция для Whirlpool AWM 8125_1(Таблица программ
скачать
инструкция для Whirlpool AWM 8143(Инструкция)
скачать
инструкция для Whirlpool AWM 8143(Таблица программ)
скачать
инструкция для Whirlpool AWM 8145(Инструкция)
скачать
инструкция для Whirlpool AWM 8145_2(Таблица программ
скачать
инструкция для Whirlpool AWM 8500(Инструкция)
скачать
инструкция для Whirlpool AWM 8500(Таблица программ)
скачать
инструкция для Whirlpool AWM 8900(Инструкция)
скачать
инструкция для Whirlpool AWM 8900(Таблица программ)
скачать
инструкция для Whirlpool AWO 10561(Инструкция)
скачать
инструкция для Whirlpool AWO 10561(Таблица программ)
скачать
инструкция для Whirlpool AWO 10761
скачать
инструкция для Whirlpool AWO 12363(Инструкция)
скачать
инструкция для Whirlpool AWO 12363(Таблица программ)
скачать
инструкция для Whirlpool AWO 12763(Инструкция)
скачать
инструкция для Whirlpool AWO 12763(Краткое руководст
скачать
инструкция для Whirlpool AWO 5340
скачать
инструкция для Whirlpool AWO 7131(Инструкция)
скачать
инструкция для Whirlpool AWO 7131(Таблица программ)
скачать
инструкция для Whirlpool AWO 8103_AWO 9161
скачать
инструкция для Whirlpool AWO 9361(Инструкция)
скачать
инструкция для Whirlpool AWO 9361(Таблица программ)
скачать
инструкция для Whirlpool AWO 9561(Инструкция)
скачать
инструкция для Whirlpool AWO 9561(Таблица программ)
скачать
инструкция для Whirlpool AWOD D041
скачать
инструкция для Whirlpool AWOE 7100(Инструкция)
скачать
инструкция для Whirlpool AWOE 7100(Таблица программ)
скачать
инструкция для Whirlpool AWOE 8559(Таблица программ)
скачать
инструкция для Whirlpool AWOE 8559_AWOE 9558(Инструк
скачать
инструкция для Whirlpool AWOE 8560
скачать
инструкция для Whirlpool AWOE 9140(Инструкция)
скачать
инструкция для Whirlpool AWOE 9140(Таблица программ)
скачать
инструкция для Whirlpool AWOE 9348(WP)(Инструкция)
скачать
инструкция для Whirlpool AWOE 9348(WP)(Таблица прогр
скачать
инструкция для Whirlpool AWOE 9349(Инструкция)
скачать
инструкция для Whirlpool AWOE 9349(Таблица программ)
скачать
инструкция для Whirlpool AWOE 9548(WP)(Инструкция)
скачать
инструкция для Whirlpool AWOE 9548(WP)(Таблица прогр
скачать
инструкция для Whirlpool AWOE 9558(Таблица программ)
скачать
инструкция для Whirlpool AWOE 9759
скачать
инструкция для Whirlpool AWO_D 040(Инструкция)
скачать
инструкция для Whirlpool AWO_D 040(Таблица программ)
скачать
инструкция для Whirlpool AWO_D 041(Инструкция)
скачать
инструкция для Whirlpool AWO_D 041(Таблица программ)
скачать
инструкция для Whirlpool AWO_D 062(Инструкция)
скачать
инструкция для Whirlpool AWO_D 062(Таблица программ)
скачать
инструкция для Whirlpool AWO_D 41105(Таблица програм
скачать
инструкция для Whirlpool AWO_D 41105_AWO_D 41109_AWO
скачать
инструкция для Whirlpool AWO_D 41109(Таблица програм
скачать
инструкция для Whirlpool AWO_D 41139(Таблица програм
скачать
инструкция для Whirlpool AWO_D 41140(Таблица програм
скачать
инструкция для Whirlpool AWO_D 41140_AWO_D 43125_AWO
скачать
инструкция для Whirlpool AWO_D 42115(Таблица програм
скачать
инструкция для Whirlpool AWO_D 42115_AWO_D 43115_AWO
скачать
инструкция для Whirlpool AWO_D 43115(Таблица програм
скачать
инструкция для Whirlpool AWO_D 43125(Таблица програм
скачать
инструкция для Whirlpool AWO_D 43129(Таблица програм
скачать
инструкция для Whirlpool AWO_D 43130(Таблица програм
скачать
инструкция для Whirlpool AWO_D 43135(Инструкция)
скачать
инструкция для Whirlpool AWO_D 43135(Таблица програм
скачать
инструкция для Whirlpool AWO_D 43136(Инструкция)
скачать
инструкция для Whirlpool AWO_D 43136(Таблица програм
скачать
инструкция для Whirlpool AWO_D 45135(Таблица програм
скачать
инструкция для Whirlpool AWO_D 45135_AWO_D 53205(Инс
скачать
инструкция для Whirlpool AWO_D 6100(Таблица программ
скачать
инструкция для Whirlpool AWO_D 6100_AWO_D 7012(Инстр
скачать
инструкция для Whirlpool AWO_D 7012(Таблица программ
скачать
инструкция для Whirlpool AWO_D 7300(Таблица программ
скачать
инструкция для Whirlpool AWO_D 7300_AWO_D 8500(Инстр
скачать
инструкция для Whirlpool AWO_D 7700(Таблица программ
скачать
инструкция для Whirlpool AWO_D 7700_AWO_D 8550(Инстр
скачать
инструкция для Whirlpool AWO_D 8500(Таблица программ
скачать
инструкция для Whirlpool AWO_D 8550(Таблица программ
скачать
инструкция для Whirlpool AWO_D 8715(Таблица программ
скачать
инструкция для Whirlpool AWO_В 7012(Таблица программ
скачать
инструкция для Whirlpool AWS 51011(Инструкция)
скачать
инструкция для Whirlpool AWS 51011(Таблица программ)
скачать
инструкция для Whirlpool AWSE 7100
скачать
инструкция для Whirlpool AWT 2040_AWT 2050(Таблица п
скачать
инструкция для Whirlpool AWT 2040_AWT 2050_AWT 2074_
скачать
инструкция для Whirlpool AWT 2074(Таблица программ)
скачать
инструкция для Whirlpool AWT 2084(Таблица программ)
скачать
инструкция для Whirlpool AWT 2205(Инструкция)
скачать
инструкция для Whirlpool AWT 2205(Таблица программ)
скачать
инструкция для Whirlpool AWT 2240(1)_AWT 2250(1)(Таб
скачать
инструкция для Whirlpool AWT 2240_AWT 2250(Таблица п
скачать
инструкция для Whirlpool AWT 2240_AWT 2250_AWT 2274_
скачать
инструкция для Whirlpool AWT 2241(Инструкция)
скачать
инструкция для Whirlpool AWT 2241(Таблица программ)
скачать
инструкция для Whirlpool AWT 2245(Инструкция)
скачать
инструкция для Whirlpool AWT 2245(Таблица программ)
скачать
инструкция для Whirlpool AWT 2256(Инструкция)
скачать
инструкция для Whirlpool AWT 2256(Таблица программ)
скачать
инструкция для Whirlpool AWT 2260(Таблица программ)
скачать
инструкция для Whirlpool AWT 2260_AWT 2285_AWT 2295(
скачать
инструкция для Whirlpool AWT 2262(Таблица программ)
скачать
инструкция для Whirlpool AWT 2262_AWT 2289(Инструкци
скачать
инструкция для Whirlpool AWT 2267_3(Таблица программ
скачать
инструкция для Whirlpool AWT 2267_3_AWT 2288_3(Инстр
скачать
инструкция для Whirlpool AWT 2274_3(Инструкция)
скачать
инструкция для Whirlpool AWT 2274_3(Таблица программ
скачать
инструкция для Whirlpool AWT 2275(Инструкция)
скачать
инструкция для Whirlpool AWT 2275(Таблица программ)
скачать
инструкция для Whirlpool AWT 2284(Таблица программ)
скачать
инструкция для Whirlpool AWT 2285(Таблица программ)
скачать
инструкция для Whirlpool AWT 2288_3(Таблица программ
скачать
инструкция для Whirlpool AWT 2289(Таблица программ)
скачать
инструкция для Whirlpool AWT 2290(Таблица программ)
скачать
инструкция для Whirlpool AWT 2295(Таблица программ)
скачать
инструкция для Whirlpool AWT 2296(Инструкция)
скачать
инструкция для Whirlpool AWT 2296(Таблица программ)
скачать
инструкция для Whirlpool AWT 2352(таблица программ)
скачать
инструкция для Whirlpool AWT 2352_AWT 5080_AWT 5100(
скачать
инструкция для Whirlpool AWT 4105
скачать
инструкция для Whirlpool AWT 5080(Таблица программ)
скачать
инструкция для Whirlpool AWT 5088_4(Инструкция)
скачать
инструкция для Whirlpool AWT 5088_4(Таблица программ
скачать
инструкция для Whirlpool AWT 5100(Таблица программ)
скачать
инструкция для Whirlpool AWT 5107(Инструкция)
скачать
инструкция для Whirlpool AWT 5107_AWT 5108(3)(Таблиц
скачать
инструкция для Whirlpool AWT 5108(Инструкция)
скачать
Продолжить
Как пользоваться стиральной машиной Вирпул
Торговая марка Whirlpool выпускает стиральные машины, как с вертикальной загрузкой, так и с горизонтальной загрузкой. Если брать СМ с вертикальной загрузкой, то они более привычные нашему брату, но сравнительно недавно в магазинах появились стиралки с фронтальной загрузкой и надо сказать, они начали пользоваться довольно большой популярностью. Хотя бренд довольно серьезный и на рынке бытовой техники, он существует уже не один год, даже не одно десятилетие, мало кто знает, что стиральные машины с фронтальной загрузкой, это точная копия Ардо, со всеми вытекающими отсюда последствиями, то есть покупая такую технику вы покупаете стиральную машину Ardo, на которой наклеена бирка Whirlpool. Надеюсь я доступно рассказал, что из себя представляет наш бренд. Теперь можно поговорить про эксплуатацию этой стиральной машины автомат. Ниже я дам очень нужные советы, которые помогут продлить срок работы этой техники на несколько лет
- Лимонная кислота и другие чистящие средства → Вообще для меня загадка, почему эта хрень получила такое большое распространение. Ведь даже школьник знает, что кислоты разъедают алюминий. Если в стиральных машинках с горизонтальной загрузкой, качество крестовины довольно хорошее, то на СМА с вертикальной загрузкой, качество опор барабана вообще никуда не годится. Поймите, в каждой стиральной машине присутствует электролиз, а в совокупности с лимонной кислотой или уксусом, эта хрень становится гремучей смесью для стиралки. Вообще, в стиральном порошке, уже имеются все нужные компоненты для чистки бака и тэна и выдумывать ничего не надо. Если в вашем доме или квартире вода плохая, то вы ничего не сделаете, а чтобы не было запаха из СМ, надо сделать одну простую вещь — прочитать предпоследний пункт
- Отдельная розетка и проводка от счетчика → Это обязательный пункт для выполнения. Если вы почитаете инструкцию по эксплуатации, то узнаете, что стиральная машина потребляет от 2,5 до 3 кВт. В этой технике стоит такой же нагревательный элемент, как и в бойлере, плюс к этому мотор, помпа и другие комплектующие, которые потребляют электроэнергию. В общем идёт довольно серьезная нагрузка, на проводку в вашем домовладении
- Переноска и европереходник → Ни в коем случае не подсоединяйте через эту гадость свою бытовую технику. Выше я написал сколько тока потребляет машинка. Только мощный удлинитель сможет выдержать такую нагрузку, а что касается переходников, то за них речи вообще не может идти
- Скорость отжима → Не должна превышать 800 об/мин, всё что выше, это уже замануха от производителя. Если пользоваться высокими оборотами, то намного быстрее израсходуется ресурс подшипников и сальника. Нормальный отжим начинается с 600 об/мин
- Подложите резиновый коврик → Вроде бы мелочь, но благодаря коврику уменьшится вибрации и стиральная машина будет более устойчивой, то есть не бегать по помещению
- Чтобы не было запаха из стиральной машины → Приоткройте на 3-4 см контейнер для порошка и дверцу люка, благодаря этому произойдёт проветривание, и вони как таковой не будет
- Чтобы из под манжеты люка не текла вода → Надо после каждой стирки протирать стекло люка, благодаря этому вы будете убирать накипь, которая оседает на стекле во время стирки. Если этого не сделать, то через три-четыре года эта накипь будет действовать как наждачка, приводя в негодность уплотнительную резинку люка
Может что-то и забыл упомянуть, но думаю и тех советов, которые я дал выше, вполне хватит чтобы продлить жизнь вашей стиральной машине на несколько лет. Единственное, что ещё могу добавить, это-то что желательно выбирать место установки, там где присутствует как можно меньше влаги, хотя в наших условиях это практически невозможно, всё-таки надо постораться. Ещё желательно сделать заземление, благодаря этому ваша стиралка не будет биться током, кроме того уйдет такой порок, как электролиз. В общем как-то так
Скачать инструкцию по эксплуатации для стиральной машины Вирпул
Ниже можно скачать очень много инструкций по эксплуатации на русском языке для стиральной машины Whirlpool. Вам очень важно понять, что инструкция по эксплуатации предназначена не для того, чтобы лежать где-то и пылиться, она нужна для того чтобы её прочитать от корки и до корки. В моей практике было очень много случаев, когда вроде бы пустяковые поломки, вызывали большое затруднение в их устранения, я имею в виду хозяев этих стиральных машин, которые просто платили мне деньги, практически за то, что я им цитировал из мануала строки, в которых говорилось о том, что надо делать в том или ином случаи. К примеру очень часто в мастерскую приходят с таким вопросом, почему стиральная машина не сливает воду, на вопрос — а вы инструкцию читали, подавляющее большинство людей отвечало что нет. Так вот, для того чтобы вы не попали в подобную ситуацию и не платили лишние деньги за устранение пустяковых поломок, вам надо обязательно прочитать мануал для СМА от начала до конца. Дело в том, что в инструкции написано, не только, как пользоваться стиральной машинкой, а и много чего связанного с ремонтом стиралки, в том числе и коды ошибок, благодаря которым можно найти неисправную деталь. Зная код ошибки сделать ремонт стиральной машины своими руками, будет гораздо легче. Коды ошибок стиральных машин, обычно выводится на панель управления в виде цифр или букв. В том случае, если машинка без дисплея, определить код ошибки можно по миганию индикаторов. Также в инструкции по эксплуатации пишется, как подсоединить стиральную машинку к канализации и водопроводу, как правильно её выставить, какие неисправности можно устранить самому и многое другое. Все инструкции на этой странице закачены на Яндекс диск, скачать с Яндекс диска, какой нибудь файл довольно просто, к тому же если вам не нужна инструкция, то есть вы хотите её просто просмотреть, этот файлообменник предоставит вам эту возможность. Все инструкции по эксплуатации для стиральной машины Whirlpool находится в свободном доступе, то есть скачивать их можно бесплатно и без СМС
- Whirlpool Aquasteam 1200
- Whirlpool AWE 10727
- Whirlpool AWE 6314
- Whirlpool AWE 6314 1
- Whirlpool AWE 6315
- Whirlpool AWE 6316
- Whirlpool AWE 6377
- Whirlpool AWE 6416
- Whirlpool AWE 6514
- Whirlpool AWE 6516
- Whirlpool AWE 7526
- Whirlpool AWE 7527
- Whirlpool AWE 7527 1
- Whirlpool AWE 7726
- Whirlpool AWE 8525
- Whirlpool AWE 8725
- Whirlpool AWE 9630
- Whirlpool AWE 9725
- Whirlpool AWE 10727
- Whirlpool AWE 2214
- Whirlpool AWE 2215
- Whirlpool AWE 2221
- Whirlpool AWE 2316
- Whirlpool AWE 2319
- Whirlpool AWE 2320
- Whirlpool AWE 2550
- Whirlpool AWE 4519
- Whirlpool AWE 6316-1
- Whirlpool AWE 6415
- Whirlpool AWE 6416-1
- Whirlpool AWE 6419
- Whirlpool AWE 6514-1
- Whirlpool AWE 7515
- Whirlpool AWE 7526
- Whirlpool AWE 7619
- Whirlpool AWE 7629
- Whirlpool AWE 7727
- Whirlpool AWE 7730
- Whirlpool AWE 8523
- Whirlpool AWE 8529
- Whirlpool AWE 8629
- Whirlpool AWE 8723
- Whirlpool AWE 8727
- Whirlpool AWE 8730
- Whirlpool AWE 9527
- Whirlpool AWE 9529
- Whirlpool AWE 9723
- Whirlpool AWE 9725
- Whirlpool AWE 9729
- Whirlpool AWE 65149
- Whirlpool AWE 6515
- Whirlpool AWE 6517
- Whirlpool AWE 6519
- Whirlpool AWE 6520
- Whirlpool AWE 6522
- Whirlpool AWE 6619
- Whirlpool AWE 6628
- Whirlpool AWE 6629
- Whirlpool AWE 6725
- Whirlpool AWE 7615-2
- Whirlpool AWE 7729
- Whirlpool AWE 8530
- Whirlpool AWE 8729
- Whirlpool AWE 9629
- Whirlpool AWE 9730
- Whirlpool AWE 99612 ZEN
- Whirlpool AWG 263 1
- Whirlpool AWG 852
- Whirlpool AWG 860
- Whirlpool AWG 870
- Whirlpool AWG 2311
- Whirlpool AWG 2351
- Whirlpool AWG 215
- Whirlpool AWG 216
- Whirlpool AWG 217
- Whirlpool AWG 222
- Whirlpool AWG 223
- Whirlpool AWG 231
- Whirlpool AWG 232
- Whirlpool AWG 235
- Whirlpool AWG 247
- Whirlpool AWG 252
- Whirlpool AWG 253
- Whirlpool AWG 263
- Whirlpool AWG 292
- Whirlpool AWG 294
- Whirlpool AWG 800
- Whirlpool AWG 874
- Whirlpool AWG 875
- Whirlpool AWG 878
- Whirlpool AWG 908 E
- Whirlpool AWG 910 D
- Whirlpool AWG 910 E
- Whirlpool AWM 040
- Whirlpool AWM 6027 1
- Whirlpool AWM 6027 2
- Whirlpool AWM 6081 1
- Whirlpool AWM 6081 2
- Whirlpool AWM 8000
- Whirlpool AWM 8900
- Whirlpool AWM 1000
- Whirlpool AWM 1011
- Whirlpool AWM 5083
- Whirlpool AWM 5085
- Whirlpool AWM 6080
- Whirlpool AWM 6081
- Whirlpool AWM 6082
- Whirlpool AWM 6085
- Whirlpool AWM 6100
- Whirlpool AWM 6102
- Whirlpool AWM 6105
- Whirlpool AWM 6120
- Whirlpool AWM 6125
- Whirlpool AWM 8085
- Whirlpool AWM 8105
- Whirlpool AWM 8125
- Whirlpool AWM 8143
- Whirlpool AWM 8145
- Whirlpool AWM 8500
- Whirlpool AWO 10561
- Whirlpool AWO 10761
- Whirlpool AWO C 6104
- Whirlpool AWO C 6340
- Whirlpool AWO C 7113
- Whirlpool AWO C 7121
- Whirlpool AWO C 7340
- Whirlpool AWO D 040
- Whirlpool AWO-D 041
- Whirlpool AWO-D 043
- Whirlpool AWO-D 062
- Whirlpool AWO-D 3080
- Whirlpool AWO-D 4520
- Whirlpool AWO-D 4605
- Whirlpool AWO-D 5120
- Whirlpool AWO-D 5320 P
- Whirlpool AWO-D 5520 P
- Whirlpool AWO-D 5526
- Whirlpool AWO-D 5720 P
- Whirlpool AWO-D 6012
- Whirlpool AWO-D 6100
- Whirlpool AWO-D 6204 D
- Whirlpool AWO-D 6527
- Whirlpool AWO-D 7010
- Whirlpool AWO-D 7012
- Whirlpool AWO-D 41105
- Whirlpool AWO-D 41109
- Whirlpool AWO-D 41135
- Whirlpool AWO-D 41139
- Whirlpool AWO-D 41140
- Whirlpool AWO-D 42115
- Whirlpool AWO-D 43115
- Whirlpool AWO-D 43125
- Whirlpool AWO-D 43129
- Whirlpool AWO-D 43130
- Whirlpool AWO-D 43135
- Whirlpool AWO-D 43136
- Whirlpool AWO-D 45130
- Whirlpool AWO-D 45135
- Whirlpool AWO-D 45140
- Whirlpool AWO-D 53105
- Whirlpool AWO-D 53110
- Whirlpool AWO-D 53205
- Whirlpool AWO-D 55135
- Whirlpool AWO-D 61000
- Whirlpool AWO-D 431361
- Whirlpool AWO 9161
- Whirlpool AWO 9361
- Whirlpool AWO 9561
- Whirlpool AWO 12363
- Whirlpool AWO DD041
- Whirlpool AWO 10360
- Whirlpool AWOE 7100
- Whirlpool AWOE 7448
- Whirlpool AWOE 7758
- Whirlpool AWOE 8359
- Whirlpool AWOE 8758
- Whirlpool AWOE 8759
- Whirlpool AWOE 8759 B
- Whirpool AWOE 8914
- Whirpool AWOE 9140
- Whirpool AWOE 9348
- Whirpool AWOE 9349
- Whirpool AWOE 9548
- Whirpool AWOE 9759
- Whirpool AWOE 10142
- Whirpool AWOE 10914
- Whirpool AWOE 81400
- Whirpool AWS 51001
- Whirpool AWS 51011
- Whirpool AWS 51012
- Whirpool AWS 61012
- Whirpool AWS 61212
- Whirpool AWS 63013
- Whirpool AWS 63213
- Whirpool AWSX 63213
- Whirpool AWT 2205
- Whirpool AWT 2250
- Whirpool AWT 2256
- Whirpool AWT 2261
- Whirpool AWT 2262
- Whirpool AWT 2274
- Whirpool AWT 2275
- Whirpool AWT 2284
- Whirpool AWT 2285
- Whirpool AWT 5088 4
- Whirpool FL 5054
- Whirpool WTLS 60912 ZEN
- Whirpool WTLS 70712
- Whirlpool AWG 853
- Whirpool FL 5064
- Whirpool FL 5085
- Whirpool FL 5105
- Whirpool WTL 55712
- Whirpool WTLS 60712
- Whirpool WTLS 60812 ZEN
- Whirpool FL 5053
- Whirpool AWZ 410
- Whirpool AWT 7125
- Whirpool AWT 7105
- Whirpool AWT 5108
- Whirpool AWT 5100
- Whirpool AWT 2289
- Whirpool AWT 2290
- Whirpool AWT 2295
- Whirpool AWT 5080
- Whirpool AWT 5085


