Данная лицензия не предназначена для продажи этого Руководства и Вы не становитесь владельцем этого Руководства после приобретения любого продукта, загрузки и/или использования. Nikon сохраняет за собой право владения данным Руководством и, следовательно, всеми копиями и все соответствующие права, относящиеся к интеллектуальной собственности, и сохраняет за собой все права, которые явно не предоставлены Вам в рамках данного Соглашения. Данное Соглашение представляет собой полное и эксклюзивное соглашение, устное и письменное, между Вами и Nikon.
1. РУКОВОДСТВО
Руководство предназначено для клиентов, которые приобрели наши продукты. Мы можем не иметь возможности ответить на запрос физических лиц, которые не приобрели наши продукты. Пожалуйста, имейте в виду, что данное руководство и контактная информация, указанные здесь, могут быть изменены без уведомления.
Данное Руководство защищено Законом об авторском праве Японии и международными законами об авторском праве и международными договорами. Вам необходимо воспроизвести на каждой копии уведомление об авторском праве Nikon и любую другую информацию о праве собственности, которые присутствовали на оригинале.
2. ОГРАНИЧЕНИЯ
Кроме случаев, когда в данном Соглашении указано иное, нельзя делать или передавать копии данного Руководства другим или передавать в электронной форме Руководство с одного компьютера на другой по сети. НЕЛЬЗЯ ИЗМЕНЯТЬ ИЛИ УДАЛЯТЬ ЛЮБЫЕ УВЕДОМЛЕНИЯ ОБ АВТОРСКОМ ПРАВЕ, ТОРГОВОЙ МАРКЕ ИЛИ ДРУГИЕ ЗАЩИТНЫЕ УВЕДОМЛЕНИЯ, СОДЕРЖАЩИЕСЯ В ДАННОМ РУКОВОДСТВЕ. НЕЛЬЗЯ ПРИСВАИВАТЬ ИЛИ ИНЫМ ОБРАЗОМ ИЗБАВЛЯТЬСЯ, МОДИФИЦИРОВАТЬ, НАСТРАИВАТЬ, ПЕРЕВОДИТЬ, АРЕНДОВАТЬ, БРАТЬ В НАЕМ, ЗАНИМАТЬ, ПЕРЕПРОДАВАТЬ, РАСПРОСТРАНЯТЬ, ПЕРЕДАВАТЬ ПО СЕТИ ИЛИ СОЗДАВАТЬ ИЛИ ИМЕТЬ СОЗДАННЫЕ ПРОИЗВОДСТВЕННЫЕ РАБОТЫ, ОСНОВАННЫЕ НА ДАННОМ РУКОВОДСТВЕ ИЛИ ЛЮБОЙ ЧАСТИ ТАКОВОГО.
3. ОГРАНИЧЕННАЯ ГАРАНТИЯ И ОТКАЗ
В НАИБОЛЬШЕЙ СТЕПЕНИ, РАЗРЕШЕННОЙ В СИЛУ ДЕЙСТВУЮЩЕГО ЗАКОНОДАТЕЛЬСТВА, ДАННОЕ РУКОВОДСТВО ПРЕДОСТАВЛЕНО НА ОСНОВЕ ПРИНЦИПА «КАК ЕСТЬ», БЕЗ ГАРАНТИИ В ЛЮБОЙ ФОРМЕ, И КОМПАНИЯ NIKON, ЕЕ СОТРУДНИКИ, РАСПРОСТРАНИТЕЛИ, ДИЛЕРЫ И АГЕНТЫ ПРЯМО НЕ ПРИЗНАЮТ ЛЮБУЮ ГАРАНТИЮ В ЛЮБОЙ ФОРМЕ, ВЫРАЖЕННУЮ ИЛИ ПОДРАЗУМЕВАЕМУЮ, ВКЛЮЧАЯ, НО НЕ ОГРАНИЧИВАЯСЬ, ЛЮБОЙ ПОДРАЗУМЕВАЕМОЙ ГАРАНТИЕЙ ПРИГОДНОСТИ ДЛЯ ТОРГОВЛИ, ПРИГОДНОСТИ ДЛЯ ОПРЕДЕЛЕННОГО НАЗНАЧЕНИЯ ИЛИ ОТСУТСТВИЯ НАРУШЕНИЙ. В НАИБОЛЬШЕЙ СТЕПЕНИ, РАЗРЕШЕННОЙ В СИЛУ ДЕЙСТВУЮЩЕГО ЗАКОНОДАТЕЛЬСТВА, КОМПАНИЯ NIKON, ЕЕ СОТРУДНИКИ, РАСПРОСТРАНИТЕЛИ, ДИЛЕРЫ И АГЕНТЫ НЕ ГАРАНТИРУЮТ ИСПОЛНЕНИЕ ИЛИ РЕЗУЛЬТАТЫ, КОТОРЫЕ ВЫ МОЖЕТЕ ПОЛУЧИТЬ ИЗ ДАННОГО РУКОВОДСТВА, ИЛИ ЧТО ДАННОЕ РУКОВОДСТВО БУДЕТ СООТВЕТСТВОВАТЬ ВАШИМ ТРЕБОВАНИЯМ ИЛИ ЧТО РАБОТА РУКОВОДСТВА БУДЕТ БЕСПЕРЕБОЙНОЙ, БЕЗОШИБОЧНОЙ ИЛИ НЕ БУДЕТ СОДЕРЖАТЬ ВИРУСОВ. В НАИБОЛЬШЕЙ СТЕПЕНИ, РАЗРЕШЕННОЙ В СИЛУ ДЕЙСТВУЮЩЕГО ЗАКОНОДАТЕЛЬСТВА, НИ КОМПАНИЯ NIKON, НИ ЕЕ СОТРУДНИКИ, РАСПРОСТРАНИТЕЛИ, ДИЛЕРЫ И АГЕНТЫ НЕ ДОЛЖНЫ НЕСТИ ПЕРЕД ВАМИ ОТВЕТСТВЕННОСТЬ ЗА ЛЮБЫЕ КОСВЕННЫЕ, ПОСЛЕДУЮЩИЕ ИЛИ НЕПРЕДНАМЕРЕННЫЕ УБЫТКИ, ПОТЕРИ ИЛИ ИЗДЕРЖКИ ЛЮБОГО ТИПА, БУДЬ ТО ПОТЕРЯ ПРИБЫЛИ, ПЕРЕРЫВ В ДЕЯТЕЛЬНОСТИ ИЛИ ИНЫМ СПОСОБОМ ВОЗНИКАЮЩИЙ ИЛИ ЯВЛЯЮЩИЙСЯ СЛЕДСТВИЕМ ДАННОГО РУКОВОДСТВА, ВЫЗВАННЫЙ КАКИМ-ЛИБО СПОСОБОМ, ДАЖЕ ЕСЛИ КОМПАНИЯ NIKON, ЕЕ СОТРУДНИКИ, РАСПРОСТРАНИТЕЛИ, ДИЛЕРЫ ИЛИ АГЕНТЫ УВЕДОМЛЕНЫ О ВОЗМОЖНОСТИ ВОЗНИКНОВЕНИЯ ТАКИХ УБЫТКОВ, ПОТЕРЬ ИЛИ ИЗДЕРЖЕК. ЭТОТ ОТКАЗ СОСТАВЛЯЕТ СУЩЕСТВЕННУЮ ЧАСТЬ ДАННОГО СОГЛАШЕНИЯ, И НЕИСПОЛЬЗОВАНИЕ ДАННОГО РУКОВОДСТВА УПОЛНОМОЧЕНО, КРОМЕ СЛУЧАЕВ В РАМКАХ ДАННОГО ОТКАЗА.
4. ОБЩИЕ СВЕДЕНИЯ
Данное соглашение регулируется и должно истолковываться в соответствии с законами Японии независимо от его принципов коллизионного права. В случае возникновения спора в рамках или в связи с данным соглашением Вы, таким образом, даете согласие на персональную юрисдикцию Японии и отказываетесь от любого возражения, что такая дискуссия вызывает затруднение. Далее Вы соглашаетесь на получение судебных извещений в любом действии, возникающем из данного Соглашения по обычной почте или другими коммерчески оправданными способами доставки расписки в получении. Если любое положение данного Соглашения должно быть определено недействительным по какой-либо причине, то оставшиеся положения не должны быть признаны недействительными и должны остаться в силе без изменений. Данное Соглашение устанавливает в дальнейшем целое соглашение и понимание между Вами и компанией Nikon, и замещает собой и заменяет любые другие соглашения, относящиеся к сути дела данного Соглашения. Неуспех любой стороны в настаивании на строгом исполнении любого правила или положения данного соглашения, или выполнение любой опции, права или защиты прав, содержащихся в данном документе, не должны толковаться в качестве отказа от любого применения такого правила, положения, опции, права или защиты прав в будущем, и такое правило, положение, опция, право или защита прав должны продолжиться и сохранить полную юридическую силу и действие. Заголовки разделов данного Соглашения вставлены только для удобства и не должны составлять часть данного документа или влиять каким-либо образом на значение или толкование данного Соглашения. Кроме случаев, когда иначе явно указано в данном документе, положения раздела 3 и раздела 4 вместе с любыми положениями, которые с помощью своих прямо выраженных условий относятся к периодам после прекращения срока действия данного Соглашения, должны оставаться в силе после прекращения действия данного Соглашения по какой-либо причине.
Руководства для продуктов Nikon/ 2018/02/15/ Вер. 2.0.0

Данное руководство не может быть воспроизведено в любой форме целиком или
частично (за исключением краткого цитирования в статьях или обзорах) без
письменного разрешения компании NIKON.
AMA15525
Отпечатано в Европе
SB3I01(1D)
6MB1961D-01
Дата изготовления :
Поддержка пользователей Nikon
Посетите следующий сайт, чтобы зарегистрировать фотокамеру и получать последнюю
информацию об изделии. Здесь можно найти ответы на часто задаваемые вопросы и
обратиться к нам для получения технической поддержки.
http://www.europe-nikon.com/support
ЦИФРОВАЯ ФОТОКАМЕРА
Руководство пользователя
Ru
Ru
инструкцияNikon D610

Данное руководство не может быть воспроизведено в любой форме целиком или
частично (за исключением краткого цитирования в статьях или обзорах) без
письменного разрешения компании NIKON.
AMA15525 Отпечатано в Европе
SB3I01(1D)
6MB1961D-01
Дата изготовления :
Поддержка пользователей Nikon
Посетите следующий сайт, чтобы зарегистрировать фотокамеру и получать последнюю
информацию об изделии. Здесь можно найти ответы на часто задаваемые вопросы и
обратиться к нам для получения технической поддержки.
http://www.europe-nikon.com/support
ЦИФРОВАЯ ФОТОКАМЕРА
Руководство пользователя
Ru
Ru
Посмотреть инструкция для Nikon D610 бесплатно. Руководство относится к категории фотокамеры, 12 человек(а) дали ему среднюю оценку 8.6. Руководство доступно на следующих языках: русский. У вас есть вопрос о Nikon D610 или вам нужна помощь? Задайте свой вопрос здесь
- Вопросы и ответы
- Пункты меню
- Оглавление
- Меры безопасности
- Уведомления
- Содержание упаковки
- Введение
- Съемка и просмотр снимков
- Фотосъемка в режиме Live view
- Видеосъемка в режиме Live view
- Режимы P, S, A и M
- Настройки пользователя: Режимы U1 и U2
- Режим съемки
- Параметры записи изображения
- Фокусировка
- Чувствительность ISO
- Экспозиция
- Баланс белого
- Коррекция изображения
- Съемка со вспышкой
- Другие параметры съемки
- Дополнительные сведения о просмотре снимков
- Подключения
- Сведения о параметрах меню
- Технические примечания
Фотокамера Nikon D610 является зеркальной камерой, которая обладает разрешением около 24.3 МП. Сенсор CMOS позволяет получать изображения максимального разрешения 6016 х 4016 пикселей. Данная камера имеет возможность снятия фотографий с различными разрешениями: 6016 х 4016, 4512 х 3008, 3008 х 2008, 3936 х 2624, 2944 х 1968, 1968 х 1312, 6016 х 3376, 4512 х 2528, 3008 х 1688, 3936 х 2224, 2944 х 1664, 1968 х 1112. Камера не имеет стабилизатора изображения, а общее количество пикселей составляет приблизительно 24.7 МП. Размер матрицы изображения составляет 35.9 х 24 мм. Камера поддерживает форматы изображений JPG и RAW. Данная модель никак не обладает определёнными характеристиками, которые могут привести к выводу о том, что данная камера является лучшей, или наименьшей.
Главная
| Nikon | |
| D610 | VBA430AE | |
| фото камера | |
| 18208997152, 0018208937424 | |
| русский | |
| Руководство пользователя (PDF) |
Качество изображения
| Мегапиксели | 24.3 MP |
| Тип камеры | Однообъективный зеркальный фотоаппарат без объектива |
| Размер сенсора изображения | — « |
| Тип сенсора | CMOS |
| Максимальное разрешение изображения | 6016 x 4016 пикселей |
| Разрешение фотоснимков | 6016 x 4016, 4512 x 3008, 3008 x 2008\r\n3936 x 2624, 2944 x 1968, 1968 x 1312\r\n6016 x 3376, 4512 x 2528, 3008 x 1688\r\n3936 x 2224, 2944 x 1664, 1968 x 1112 |
| Стабилизатор изображения | Нет |
| Всего мегапикселей | 24.7 MP |
| Размер сенсора (Ш х В) | 35.9 x 24 mm |
| Поддерживаемые форматы изображения | JPG, RAW |
Объектив
| Оптическое увеличение | — x |
| Цифровой зум | — x |
| Фокусное расстояние | — mm |
| Минимальное фокусное расстояние (эквив. пленки 35 мм) | — mm |
| Максимальное фокусное расстояние (эквив. пленки 35 мм ) | — mm |
| Минимальное число установки диафрагмы | — |
| Максимальное число установки диафрагмы | — |
| Интерфейс крепления объектива | Nikon F |
| Тип крепления | Байонет |
Фокус
| Фокус | TTL |
| Фокусировка | Автофокус/Ручной |
| Режимы автофокусировки | Contrast Detection Auto Focus, Multi Point Auto Focus, Single Auto Focus, Tracking Auto Focus |
| Точки автофокусировки | 39 |
| Удержание автофокусировки | Да |
| Вспомогательный луч автофокусировки | Да |
Экспозиция
| Чувствительность по ISO | 100,125,160,200,250,320,400,500,640,800,1000,1250,1600,2000,2250,2500,3200,4000,5000,6400 |
| Режимы световой экспозиции | Aperture priority AE, Auto, Manual, Shutter priority AE |
| Экспонометр | Centre-weighted, Spot |
| Удержание автоматической настройки экспозиции | Да |
| Коррекция световой экспозиции | ±5EV (1/2; 1/3 EV step) |
| ISO чувствительность (мин) | 100 |
| ISO чувствительность (макс) | 6400 |
Затвор
| Наивысшая скорость выдержки камеры | 1/4000 s |
| Самая низкая скорость выдержки камеры | 30 s |
| Тип затвора камеры | Электронный |
Вспышка
| Режимы вспышки | Auto, Fill-in, Flash off, Manual, Red-eye reduction, Slow synchronization |
| Разъем подключения внешней вспышки | Да |
| Синхронизация скорости вспышки | 0.005 s |
Прочие свойства
| Встроенная вспышка | Да |
| Тип источника питания | Аккумулятор |
Видео
| Максимальное разрешение видео | 1920 x 1080 пикселей |
| Разрешение видео | 1280 x 720,1920 x 1080 пикселей |
| Частота кадров Motion JPEG | 60 fps |
| Тип HD | Full HD |
| Поддерживаемый видеоформат | MOV |
| Запись видео | Да |
| Разрешение при скорости захвата | 1280×720@25fps, 1280×720@50fps, 1920×1080@24fps, 1920×1080@25fps, 1920×1080@30fps |
Аудио
| Встроенный микрофон | Да |
| Поддерживаемые форматы аудио | LPCM |
Память
| Оперативная память | — MB |
| Совместимые карты памяти | SD, SDHC, SDXC |
| Слоты памяти | 2 |
| Максимальный объем флеш-карты | 64 GB |
Экран
| Дисплей | TFT |
| Диагональ экрана | 3.2 « |
| Разрешение дисплея (числовое) | 921000 пикселей |
Видоискатель
| Увеличение | 0.7 x |
| Тип видоискателя | Оптический |
Порты и интерфейсы
| PictBridge | Да |
| Версия USB | 2.0 |
| HDMI | Да |
| Тип HDMI коннектора | Мини |
| Линейный вход микрофона | Да |
| Линейные выходы наушников | 1 |
Дизайн
Камера
| Баланс белого | Direct sunlight, Auto, Cloudy, Flash, Fluorescent, Incandescent, Manual, Shade |
| Сюжетные режимы | Portrait, Landscape (scenery) |
| Фотоэффекты | Black&White, Neutral, Vivid |
| Задержка автоcпуска | 2, 5,10, 20 s |
| Режимы воспроизведения | Highlights, Movie, Single image, Slide show |
| Поддерживается монтаж на штатив | Да |
| Языки экранных меню | ARA, CHI (SIMPL), CHI (TR), CZE, DAN, DEU, DUT, ENG, ESP, FIN, FRE, GRE, HUN, ITA, JPN, KOR, NOR, POL, POR, RUS, SWE, THA, TUR, UKR |
| Файловая система камеры | DPOF, DCF 2.0, Exif 2.3 |
| Диапазон изменения диоптрий (D-D) | -3 — 1 |
| Просмотр в реальном времени | Да |
| Удаление выходного зрачка | 21 mm |
Вес и размеры
| Ширина | 141 mm |
| Глубина | 82 mm |
| Высота | 113 mm |
| Вес | 760 g |
| Вес с батареей | 850 g |
Батарея
| Технология батареи | Литий-ионная (Li-Ion) |
| Тип батареек | EN-EL15 |
Условия эксплуатации
| Диапазон температур при эксплуатации | 0 — 40 °C |
Содержимое упаковки
| Поставляемые кабели | USB |
| Зарядное устройство включено | Да |
| Батарейки в комплекте | Да |
показать больше
Не можете найти ответ на свой вопрос в руководстве? Вы можете найти ответ на свой вопрос ниже, в разделе часто задаваемых вопросов о Nikon D610.
Какой вес Nikon D610?
Nikon D610 имеет вес 760 g.
Какой размер экрана Nikon D610?
Размер экрана Nikon D610 составляет 3.2 «.
Какая высота Nikon D610?
Nikon D610 имеет высоту 113 mm.
Какая ширина Nikon D610?
Nikon D610 имеет ширину 141 mm.
Какая толщина Nikon D610?
Nikon D610 имеет толщину 82 mm.
Инструкция Nikon D610 доступно в русский?
Да, руководствоNikon D610 доступно врусский .
Не нашли свой вопрос? Задайте свой вопрос здесь
-
Contents
-
Table of Contents
-
Troubleshooting
-
Bookmarks
Quick Links
DIGITAL CAMERA
User’s Manual
En
Related Manuals for Nikon D610
Summary of Contents for Nikon D610
-
Page 1
DIGITAL CAMERA User’s Manual… -
Page 2
Thank you for your purchase of a Nikon single-lens reflex (SLR) digital camera. To get the most from your camera, please be sure to read all instructions thoroughly and keep them where they will be read by all who use the product. -
Page 3
Where to Find It Find what you’re looking for from: The Table of Contents …. 0 The Index……… 0 The Q&A Index……0 Error Messages……0 Menu Options……0 Troubleshooting ….. 0 Introduction 0 35 Basic Photography and Playback Live View Photography 0 49 Movie Live View 0 57… -
Page 4
Q&A Index Find what you’re looking for using this “question and answer” index. Taking Photographs Shooting Modes and Framing Options Is there a quick and easy way to take snapshots (i mode)? 35–39 How do I quickly adjust settings for different scenes? 40–45 Can I adjust shutter speed to freeze or blur motion (mode S)? Can I adjust aperture to blur backgrounds or bring them into focus… -
Page 5
Retouching Photographs How do I create retouched copies of photos? 261–279 How do I remove “red-eye”? How do I make JPEG copies of RAW (NEF) photos? Can I overlay two NEF (RAW) photos to make a single image? 269–270 Can I create a copy of a photo that looks like a painting? Can I trim movie footage on the camera or save movie stills? Menus and Settings How do I use the menus? -
Page 6: Menu Options
Save/load settings > Save settings option in the camera setup menu (0 249). The saved settings can be copied to other D610 cameras by inserting the memory card into the camera and selecting Save/load settings > Load…
-
Page 7: A Custom Setting Menu
Set Picture Standard (default) Interval timer Choose start time Control shooting Neutral Vivid Start time Monochrome Interval Portrait Select no. of times×no. of shots Landscape Start Manage Picture Save/edit Control Time-lapse Start Rename photography Interval Delete Shooting time Load/save Movie settings Frame size/frame rate Auto distortion control…
-
Page 8
b Metering/exposure d Shooting/display b1 ISO sensitivity 1/3 step (default) d1 Beep Volume step value 1/2 step Pitch b2 EV steps for 1/3 step (default) d2 Viewfinder exposure grid display 1/2 step (default) cntrl d3 ISO display Show ISO sensitivity b3 Easy exposure On (Auto reset) Show ISO/Easy ISO… -
Page 9
e Bracketing/flash f Controls e1 Flash sync 1/250 s (Auto FP) Assign Fn Preview speed button 1/200 s (Auto FP) FV lock 1/200 s (default) AE/AF lock 1/160 s AE lock only 1/125 s AE lock (Hold) 1/100 s AF lock only 1/80 s AF-ON 1/60 s… -
Page 10
f Controls g Movie Assign AE-L/ AE/AF lock (default) g3 Assign AE-L/ Index marking AF-L button AF-L button AE lock only View photo shooting info AE lock (Hold) AE/AF lock (default) AF lock only AE lock only AF-ON AE lock (Hold) FV lock AF lock only None… -
Page 11
Image comment Done Color balance – Input comment Image overlay – Attach comment NEF (RAW) – processing Auto image (default) rotation Resize Select image Choose destination Battery info – Choose size Copyright Done information Quick retouch – Artist Straighten – Copyright Distortion Auto… -
Page 12: Table Of Contents
Table of Contents Q&A Index ………………………. ii Menu Options ……………………..iv For Your Safety ……………………xviii Notices……………………….xx Package Contents…………………….xxiv Introduction Getting to Know the Camera………………..1 The Camera Body ……………………1 The Mode Dial……………………..5 The Release-Mode Dial ………………….6 The Control Panel……………………7 The Viewfinder……………………..8 The Information Display………………….9 The Command Dials ………………….
-
Page 13
Creative Photography (Scene Modes) …………….40 k Portrait……………………..41 l Landscape……………………41 p Child………………………41 m Sports……………………..41 n Close Up……………………..42 o Night Portrait ……………………42 r Night Landscape………………….42 s Party/Indoor ……………………42 t Beach/Snow ……………………43 u Sunset……………………..43 v Dusk/Dawn ……………………43 w Pet Portrait……………………43 x Candlelight……………………44 y Blossom……………………..44 z Autumn Colors …………………..44 0 Food……………………….44 1 Silhouette…………………….45… -
Page 14
P, S, A, and M Modes P: Programmed Auto ………………….75 S: Shutter-Priority Auto ………………….76 A: Aperture-Priority Auto…………………. 77 M: Manual……………………… 78 Long Time-Exposures (M Mode Only)……………. 79 User Settings: U1 and U2 Modes Saving User Settings………………….81 Recalling User Settings ………………….82 Resetting User Settings …………………. -
Page 15
Exposure Metering……………………… 109 Autoexposure Lock ………………….110 Exposure Compensation………………..112 White Balance Fine-Tuning White Balance ………………..117 Choosing a Color Temperature ………………120 Preset Manual ……………………121 Image Enhancement Picture Controls……………………129 Selecting a Picture Control………………..129 Modifying Picture Controls ………………..131 Creating Custom Picture Controls …………….. -
Page 16
More on Playback Full-Frame Playback………………….177 Photo Information……………………179 Thumbnail Playback ………………….185 Calendar Playback …………………… 186 Taking a Closer Look: Playback Zoom…………….187 Protecting Photographs from Deletion……………. 188 Deleting Photographs ………………….189 Full-Frame, Thumbnail, and Calendar Playback…………189 The Playback Menu………………….190 Connections Connecting to a Computer ……………….. -
Page 17
A Custom Settings: Fine-Tuning Camera Settings…………..219 Reset Custom Settings………………..221 a: Autofocus ……………………… 221 a1: AF-C Priority Selection ……………….. 221 a2: AF-S Priority Selection ……………….. 221 a3: Focus Tracking with Lock-On…………….222 a4: AF Point Illumination ………………..222 a5: Focus Point Wrap-Around………………222 a6: Number of Focus Points……………… -
Page 18
f: Controls ……………………..241 f1: OK Button (Shooting Mode)……………….241 f2: Assign Fn Button ………………….242 f3: Assign Preview Button …………………244 f4: Assign AE-L/AF-L Button ………………244 f5: Customize Command Dials ………………245 f6: Release Button to Use Dial………………246 f7: Slot Empty Release Lock………………246 f8: Reverse Indicators………………….246 f9: Assign MB-D14 4 Button………………247 g: Movie……………………….247 g1: Assign Fn Button…………………..247… -
Page 19
Recent Settings……………………283 Technical Notes Compatible Lenses………………….. 285 Optional Flash Units (Speedlights)…………….. 292 The Nikon Creative Lighting System (CLS) …………..293 Other Accessories ……………………. 297 Attaching a Power Connector and AC Adapter …………299 Caring for the Camera………………….300 Storage……………………….. 300 Cleaning …………………….. -
Page 20: For Your Safety
For Your Safety To prevent damage to your Nikon product or injury to yourself or to others, read the following safety precautions in their entirety before using this equipment. Keep these safety instructions where all those who use the product will read them.
-
Page 21
• Do not expose the battery to flame or to sold by Nikon for the purpose to maintain excessive heat. compliance with product regulations. • Do not immerse in or expose to water. -
Page 22: Notices
Notices • No part of the manuals included with this • Nikon will not be held liable for any product may be reproduced, transmitted, damages resulting from the use of this transcribed, stored in a retrieval system, or product. translated into any language in any form, •…
-
Page 23
Nikon may cause harmful interference to radio Corporation may void the user’s authority to communications. -
Page 24
Notice Concerning Prohibition of Copying or Reproduction Note that simply being in possession of material that has been digitally copied or reproduced by means of a scanner, digital camera, or other device may be punishable by law. • Items prohibited by law from being copied or •… -
Page 25
Before taking pictures on important occasions (such as at weddings or before taking the camera on a trip), take a test shot to ensure that the camera is functioning normally. Nikon will not be held liable for damages or lost profits that may result from product malfunction. -
Page 26: Package Contents
• BS-1 accessory • DK-21 rubber shoe cover eyecup • BM-14 monitor • BF-1B body cover • D610 camera • AN-DC10 strap • UC-E15 USB cable • EN-EL15 rechargeable Li-ion battery • ViewNX 2 CD (with terminal cover) • User’s Manual (this guide) •…
-
Page 27: Introduction
Introduction Getting to Know the Camera Take a few moments to familiarize yourself with camera controls and displays. You may find it helpful to bookmark this section and refer to it as you read through the rest of the manual. The Camera Body E button Release mode dial ……….6, 83…
-
Page 28
The Camera Body (Continued) Built-in flash …………143 HDMI/USB connector cover …. 194, 196, 204 Mirror …………… 88, 303 Cover for accessory terminal ……298 Meter coupling lever………..328 Lens release button……….26 Lens mounting mark……….26 AF-mode button ……..51, 98, 100 M/Y button Focus-mode selector …….. -
Page 29
The Camera Body (Continued) AF-assist illuminator ………..223 Contact cover for optional MB-D14 battery pack Self-timer lamp …………86 …………….297 Red-eye reduction lamp ……..145 Power connector cover ……..299 Sub-command dial……..12, 245 CPU contacts Depth-of-field preview button…60, 77, 244, 248 Lens mount………….26, 103 Fn (function) button…. -
Page 30
The Camera Body (Continued) Viewfinder eyepiece……….33 W/S button Rubber eyecup …………86 Playback zoom out/thumbnails..185, 186 O/Q button ISO sensitivity ……….. 105 Auto ISO sensitivity control……107 Delete …………47, 189 Two-button reset……….151 Formatting memory cards……. 31 K button Diopter adjustment control …….. -
Page 31: The Mode Dial
The Mode Dial The camera offers the modes Mode dial listed below. To choose a mode, press the mode dial lock release and rotate the mode dial. Mode dial lock release P, S, A, and M Modes Select these modes for full control over camera settings. •…
-
Page 32: The Release-Mode Dial
The Release-Mode Dial To choose a release mode, press the Release mode dial lock release release mode dial lock release and turn the release mode dial to the desired setting (0 83). Release mode dial Mode Description One photograph is taken each time the shutter- Single frame release button is pressed.
-
Page 33: The Control Panel
The Control Panel MB-D14 battery indicator……..233 Battery indicator………….35 Flash mode…………144 Autofocus mode ………….97 Image size …………..95 Image quality …………93 White balance fine-tuning indicator ….118 White balance …………115 Aperture stop indicator …….73, 288 Aperture (f-number)……..77, 78 Aperture (number of stops)……73, 288 Color temperature indicator ……120 Bracketing increment……..
-
Page 34: The Viewfinder
The Viewfinder Framing grid (displayed when is selected for FV lock indicator ……….149 Custom Setting d2) ……….229 Flash sync indicator……….234 Focus points ………. 38, 101, 222 Aperture stop indicator……. 73, 288 AF-area mode …………99 Exposure indicator ……….78 AF area brackets……..
-
Page 35: The Information Display
The Information Display Press the R button to display shutter speed, aperture, the number of exposures remaining, AF-area mode, and other shooting information in the monitor. R button Release mode…………. 6, 83 Continuous shooting speed ……229 Exposure indicator ……….78 Exposure compensation display……
-
Page 36
ADL bracketing amount……..138 Multiple exposure indicator……162 “Beep” indicator ……….. 228 Exposure compensation indicator ….112 Flash compensation indicator ……148 FV lock indicator ……….149 Interval timer indicator ……..166 Time-lapse indicator……….. 170 GPS connection indicator……..175 Depth-of-field preview button assignment..244 Vignette control indicator ……… -
Page 37
Changing Settings in the Information Display To change settings for the items listed below, press the R button in the information display. Highlight items using the multi selector and press J to view options for the highlighted item. R button Movie settings…………65 High ISO noise reduction …….. -
Page 38: The Command Dials
The Command Dials The main- and sub-command dials are used alone or in combination with other controls to adjust a variety of settings. M/Y button Flash mode Flash compensation D button AF-mode button Bracketing Autofocus mode AF-area mode Sub-command dial Mode dial E button Exposure compensation…
-
Page 39
Scene Mode Choose a scene (h; 0 40). h mode Main command dial Monitor Image Quality and Size Set image quality (0 93). X (T) button Main command dial Control panel Choose an image size (0 95). X (T) button Sub-command dial Control panel Autofocus Choose an autofocus mode… -
Page 40
ISO Sensitivity Set ISO sensitivity (0 105). W (S) button Main command dial Control panel Set auto ISO sensitivity control (0 107). W (S) button Sub-command dial Control panel Exposure Choose a combination of aperture and shutter speed (mode P; 0 75). Mode P Main command dial Control panel… -
Page 41
Set exposure compensation (mode P, S, A, or M; 0 112). E button Main command dial Control panel Activate or cancel bracketing/ select number of shots in bracketing sequence (mode P, S, A, or M; 0 153). D button Main command dial Control panel Select bracketing increment (mode P, S, A, or M;… -
Page 42
Flash Settings Choose a flash mode (0 144). M (Y) button Main command dial Control panel Set flash compensation (mode P, S, A, or M; 0 148). M (Y) button Sub-command dial Control panel… -
Page 43: The Bm-14 Monitor Cover
The BM-14 Monitor Cover A clear plastic cover is provided with the camera to keep the monitor clean and protect it when the camera is not in use. To attach the cover, insert the projection on the top of the cover into the matching indentation above the camera monitor ( and press the bottom of the cover until it clicks into place ( To remove the cover, hold the camera firmly and pull the…
-
Page 44: Camera Menus
Camera Menus Most shooting, playback, and setup options can be accessed from the camera menus. To view the menus, press the G button. G button Tabs Choose from the following menus: • : Playback (0 207) • : Setup (0 249) •…
-
Page 45: Using Camera Menus
Using Camera Menus The multi selector and J button are used to navigate the camera menus. Move cursor up J button: select highlighted item Cancel and return to Select highlighted item or previous menu display sub-menu Move cursor down Follow the steps below to navigate the menus. Display the menus.
-
Page 46
Highlight a menu item. Press 1 or 3 to highlight a menu item. Display options. Press 2 to display options for the selected menu item. Highlight an option. Press 1 or 3 to highlight an option. Select the highlighted item. Press J to select the highlighted item. -
Page 47: First Steps
First Steps Charge the Battery The camera is powered by an EN-EL15 rechargeable Li-ion battery (supplied). To maximize shooting time, charge the battery in the supplied MH-25 battery charger before use. About 2 hours and 35 minutes are required to fully recharge the battery when no charge remains.
-
Page 48
The AC Wall Adapter Depending on the country or region of purchase, an AC wall adapter may also be supplied with the charger. To use the adapter, insert it into the charger AC inlet (q). Slide the AC wall adapter latch in the direction shown (w) and rotate the adapter 90 °… -
Page 49: Insert The Battery
Insert the Battery Before inserting the battery, rotate the power switch to OFF. Inserting and Removing Batteries Always turn the camera off before inserting or removing batteries. Open the battery-chamber cover. Unlatch (q) and open (w) the battery-chamber cover. Insert the battery. Insert the battery in the orientation shown (q), using the battery to keep the orange battery latch pressed to one side.
-
Page 50
If the problem persists, cease use immediately and take battery and charger to your retailer or a Nikon-authorized service representative. Do not short the charger terminals; failure to observe this precaution could result in overheating and damage to the charger. -
Page 51: Attach A Lens
Attach a Lens Care should be taken to prevent dust from entering the camera when the lens is removed. The lens generally used in this manual for illustrative purposes is an AF-S NIKKOR 24-120mm f/4G ED VR. Focal length scale index Mounting index Focal length scale CPU contacts (0 287)
-
Page 52
Attach the lens. Keeping the mounting index on the lens aligned with the mounting index on the camera body, position the lens in the camera’s bayonet mount (q). Being careful not to press the lens-release button, rotate the lens counter-clockwise until it clicks into place (w). -
Page 53: Basic Setup
Basic Setup A language-selection dialog will be displayed the first time the camera is turned on. Choose a language and set the time and date. Photographs can not be taken until you have set the time and date. Turn the camera on. A language-selection dialog will be displayed.
-
Page 54
Setting the Clock Language and date/time settings can be changed at any time using the Language (0 253) and Time zone and date (0 253) options in the setup menu. The camera clock can also be synchronized with GPS devices (0 175). The Clock Battery The camera clock is powered by an independent, rechargeable power source, which is charged as necessary when the main battery is installed or the camera is powered by an… -
Page 55: Insert A Memory Card
Insert a Memory Card The camera stores pictures on Secure Digital (SD) memory cards (available separately; 0 334). The camera has two memory card slots (Slot 1 and Slot 2); if you will be using only one memory card, insert it in Slot 1 (0 30). Turn the camera off.
-
Page 56
No Memory Card If the camera is turned off with a charged EN-EL15 battery and no memory card inserted, S will be displayed in the control panel and viewfinder. Using Two Memory Cards Slot 1 is for the main card; the card in slot 2 plays a backup or Slot 1 secondary role. -
Page 57: Format The Memory Card
Format the Memory Card Memory cards must be formatted before first use or after being used or formatted in other devices. Formatting Memory Cards Formatting memory cards permanently deletes any data they may contain. Be sure to copy any photographs and other data you wish to keep to a computer before proceeding (0 193). Turn the camera on.
-
Page 58
The Write Protect Switch SD memory cards are equipped with a write protect switch to prevent accidental loss of data. When this switch is in the “lock” position, the memory card can not be formatted and photos can not be deleted or recorded (a Write-protect switch warning will be displayed in the monitor if you attempt to release the shutter). -
Page 59: Adjust Viewfinder Focus
Adjust Viewfinder Focus The camera is equipped with diopter adjustment to accommodate individual differences in vision. Check that the display in the viewfinder is in focus before framing pictures in the viewfinder. Turn the camera on. Remove the lens cap and turn the camera on. Focus the viewfinder.
-
Page 61: Basic Photography And Playback
Basic Photography and Playback “Point-and-Shoot” Photography (i and j Modes) This section describes how to take photographs in i (auto) mode, an automatic “point-and-shoot” mode in which the majority of settings are controlled by the camera in response to shooting conditions, and in which the flash will fire automatically if the subject is poorly lit.
-
Page 62: Step 2: Select I Or J Mode
Check the number of exposures remaining. The control panel and viewfinder show the number of photographs that can be taken at current settings (values over 1,000 are rounded down to the nearest hundred; e.g., values between 2,000 and 2,099 are shown as 2.0 K). If two memory cards are inserted, the displays show the space available on the card in Slot 1 (0 30).
-
Page 63: Step 3: Frame The Photograph
Step 3: Frame the Photograph Ready the camera. When framing photographs in the viewfinder, hold the handgrip in your right hand and cradle the camera body or lens with your left. Keep your elbows propped lightly against your torso for support and place one foot half a pace ahead of the other to keep your upper body stable.
-
Page 64: Step 4: Focus
Step 4: Focus Press the shutter-release button halfway. Press the shutter-release button halfway to focus. The active focus point will be displayed. If the subject is poorly lit, the flash may pop up and the AF-assist illuminator may light. Check the indicators in the viewfinder. Focus point When the focus operation is complete, the in- focus indicator (I) will appear in the viewfinder.
-
Page 65
The Shutter-Release Button The camera has a two-stage shutter-release button. The camera focuses when the shutter- release button is pressed halfway. To take the photograph, press the shutter-release button the rest of the way down. Focus: press halfway Shoot: press all the way down The Standby Timer The viewfinder and the control panel shutter speed and aperture displays will turn off if no operations are performed for about 6 seconds, reducing the drain on the battery. -
Page 66: Creative Photography (Scene Modes)
Creative Photography (Scene Modes) The camera offers a choice of “scene” modes. Choosing a scene mode automatically optimizes settings to suit the selected scene, making creative photography as simple as selecting a mode, framing a picture, and shooting as described on pages 35–39. h Mode To view the currently selected scene, rotate the mode dial to h and press the R button.
-
Page 67: Portrait
Scene Modes Portrait Child Use for portraits with soft, natural- Use for snapshots of children. Clothing looking skin tones. If the subject is far and background details are vividly from the background or a telephoto lens rendered, while skin tones remain soft is used, background details will be and natural.
-
Page 68: Close Up
Close Up Night Landscape Use for close-up shots of flowers, insects, Reduce noise and unnatural colors when and other small objects (a macro lens can photographing night landscapes, be used to focus at very close ranges). including street lighting and neon signs. Use of a tripod is recommended to The built-in flash and AF-assist prevent blur.
-
Page 69: Beach/Snow
Beach/Snow Dusk/Dawn Capture the brightness of sunlight Preserves the colors seen in the weak expanses of water, snow, or sand. The natural light before dawn or after sunset. built-in flash and AF-assist illuminator The built-in flash and AF-assist turn off. illuminator turn off;…
-
Page 70: Candlelight
Candlelight Autumn Colors For photographs taken by candlelight. Captures the brilliant reds and yellows in The built-in flash turns off; use of a tripod autumn leaves. The built-in flash turns is recommended to prevent blur when off; use of a tripod is recommended to lighting is poor.
-
Page 71: Silhouette
Silhouette Low Key Silhouette subjects against bright Use when shooting dark scenes to create backgrounds. The built-in flash turns off; dark, somber images that bring out use of a tripod is recommended to highlights. The built-in flash turns off; prevent blur when lighting is poor. use of a tripod is recommended to prevent blur when lighting is poor.
-
Page 72: Basic Playback
View additional pictures. Additional pictures can be displayed by pressing 4 or 2. To view additional information on the current photograph, press 1 and 3 (0 179). NIKON D610 F5 . 6 1 125 85mm 0, 0 100ND610 DSC _ 0001 . JPG…
-
Page 73: Deleting Unwanted Photographs
Deleting Unwanted Photographs To delete the photograph currently displayed in the monitor, press the O (Q) button. Note that photographs can not be recovered once deleted. Display the photograph. Display the photograph you wish to delete as described on the preceding page. The location of the current image is shown by an icon at the bottom left corner of the display.
-
Page 75: Live View Photography
Live View Photography Follow the steps below to take photographs in live view. Rotate the live view selector to C (live view photography). Cover the Viewfinder To prevent light entering via the viewfinder from interfering with exposure, remove the rubber eyecup and cover the Live view selector viewfinder with the supplied DK-5 eyepiece cap before shooting (0 86).
-
Page 76
Take the picture. Press the shutter-release button the rest of the way down to shoot. The monitor will turn off. Exit live view mode. Press the a button to exit live view mode. Ending Live View Live view ends automatically if the lens is removed. Live view may also end automatically to prevent damage to the camera’s internal circuits;… -
Page 77: Focusing In Live View
Focusing in Live View To focus using autofocus, rotate the focus-mode Focus-mode selector selector to AF and follow the steps below to choose autofocus and AF-area modes. For information on focusing manually, see page 55. Choosing a Focus Mode The following autofocus modes are available in live view: Mode Description Single-servo AF: For stationary subjects.
-
Page 78
Choosing an AF-Area Mode The following AF-area modes can be selected in live view: Mode Description Face-priority AF: Use for portraits. The camera automatically detects and focuses on portrait subjects; the selected subject is indicated by a double yellow border (if multiple faces, up to a maximum of 35, are detected, the camera will focus on the closest subject;… -
Page 79: The Live View Display: Live View Photography
The Live View Display: Live View Photography Item Description The amount of time remaining before live view ends q Time remaining automatically. Displayed if shooting will end in 30 s or less. w Guide A guide to the options available during live view photography. —…
-
Page 80
The Live View Display Although they will not appear in the final picture, jagged edges, color fringing, moire, and bright spots may appear in the monitor, while bright bands may appear in some areas with flashing signs and other intermittent light sources or if the subject is briefly illuminated by a strobe or other bright, momentary light source. -
Page 81: The Information Display: Live View Photography
The Information Display: Live View Photography To hide or display indicators in the monitor during live view photography, press the R button. Information on Information off Virtual horizon Framing guides (0 258) Manual Focus To focus in manual focus mode (0 103), rotate the lens focus ring until the subject is in focus.
-
Page 82
Non-CPU Lenses When using non-CPU lenses, be sure to enter the focal length and maximum aperture using the Non-CPU lens data option in the setup menu (0 172). Non-CPU lenses can be used only in A and M modes (0 73); aperture can be adjusted using the lens aperture ring. The Count Down Display A count down will be displayed 30 s before live view ends automatically (0 53;… -
Page 83: Movie Live View
Movie Live View Movies can be recorded in live view. Rotate the live view selector to 1 (movie live view). Live view selector Press the a button. The mirror will be raised and the view through the lens will be displayed in the camera monitor as it would appear in the actual movie, modified for the effects of exposure.
-
Page 84: Start Recording
Focus. Frame the opening shot and focus as described in Steps 3 and 4 on pages 49 (for more information on focusing in movie live view, see page 51). Note that the number of subjects that can be detected in face-priority AF drops in movie live view. Exposure The following settings can be adjusted in movie live view: Aperture…
-
Page 85
End recording. Press the movie-record button again to end recording. Recording will end automatically when the maximum length is reached, or the memory card is full. Maximum Length The maximum length for individual movie files is 4 GB (for maximum recording times, see page 65);… -
Page 86: Indices
Indices If Index marking is selected for Custom Setting g1 (Assign Fn button, 0 247), g2 (Assign preview button, 0 248), or g3 (Assign AE-L/AF-L button, 0 248), you can press the button during recording to add indices that can be used to locate frames during editing and playback (0 68).
-
Page 87: The Live View Display: Movie Live View
The Live View Display: Movie Live View Item Description q “No movie” icon Indicates that movies can not be recorded. — w Headphone volume Volume of audio output to headphones. e Microphone sensitivity Microphone sensitivity for movie recording. Sound level for audio recording. Displayed in red if level is too high;…
-
Page 88: The Information Display: Movie Live View
Adjusting Settings in the Live View Display Microphone sensitivity, headphone volume, and monitor brightness can be adjusted as described below. Note that microphone sensitivity and headphone volume can not be adjusted during recording, and that brightness affects the monitor only (0 61);…
-
Page 89: Image Area
Image Area Regardless of the option selected for Image area in the shooting menu (0 89), all movies and photographs recorded in movie live view (0 57) have an aspect ratio of 16 : 9. Images recorded with On selected for Image area > Auto DX crop and a DX lens attached use a DX-based movie format, as do images recorded with DX (24×16) 1.5×…
-
Page 90
HDMI If the camera is connected to an HDMI device (0 204), the view through the lens will appear both in the camera monitor and on the HDMI device. The indicators that appear in the HDMI device during movie recording are shown at right. The camera monitor does not show the sound level or virtual horizon;… -
Page 91: Movie Settings
Movie Settings Use the Movie settings option in the shooting menu to adjust the following settings. • Frame size/frame rate, Movie quality: Choose from the following options: Frame size/frame rate Movie quality Maximum length Maximum bit rate (Mbps) ( high quality/Normal) Frame size (pixels) Frame rate ( high quality/Normal)
-
Page 92
Select Movie settings. Press the G button to display the menus. Highlight Movie settings in the shooting menu and press 2. G button Choose movie options. Highlight the desired item and press 2, then highlight an option and press J. Frame Size and Rate Frame size and rate affects the distribution and amount of noise (randomly-spaced bright pixels, fog, or bright spots). -
Page 93: Viewing Movies
Viewing Movies Movies are indicated by a 1 icon in full-frame playback (0 177). Press J to start playback. 1 icon Length Current position/total length Movie progress bar Volume Guide The following operations can be performed: Description Pause Pause playback. Resume playback when movie is paused or during rewind/ Play advance.
-
Page 94
The p Icon Movies with indices (0 60) are indicated by a p icon in full-frame playback. The 2 Icon 2 is displayed in full-frame and movie playback if the movie was recorded without sound. -
Page 95: Editing Movies
Editing Movies Trim footage to create edited copies of movies or save selected frames as JPEG stills. Option Description Create a copy from which the opening or closing footage has been 9 Choose start/end point removed. 4 Save selected frame Save a selected frame as a JPEG still.
-
Page 96
Select Choose start/end point. Highlight Choose start/end point and press The dialog shown at right will be displayed; choose whether the current frame will be the starting or end point of the copy and press J. Delete frames. If the desired frame is not currently displayed, press 4 or 2 to advance or rewind (to skip to 10 s ahead or back, rotate the main command dial;… -
Page 97
Trimming Movies Movies must be at least two seconds long. If a copy can not be created at the current playback position, the current position will be displayed in red in Step 5 and no copy will be created. The copy will not be saved if there is insufficient space available on the memory card. -
Page 98: Saving Selected Frames
Saving Selected Frames To save a copy of a selected frame as a JPEG still: View the movie and choose a frame. Play the movie back as described on page 67; your approximate position in the movie can be ascertained from the movie progress bar.
-
Page 99: P, S, A, And M Modes
P, S, A, and M Modes P, S, A, and M modes offer different degrees of control over shutter speed and aperture. Lens Types When using a CPU lens equipped with an aperture ring (0 287), lock the aperture ring at the minimum aperture (highest f-number).
-
Page 100
Shutter Speed and Aperture Two of the chief factors in determining exposure are shutter speed and aperture. By slowing shutter speed while increasing aperture, or increasing shutter speed while reducing aperture, you can achieve different effects while keeping exposure constant. Fast shutter speeds and large apertures freeze moving objects and soften background details, while slow shutter speeds and small apertures blur moving objects and bring out background details. -
Page 101: P: Programmed Auto
P: Programmed Auto In this mode, the camera automatically adjusts shutter speed and aperture according to a built-in program to ensure optimal exposure in most situations. This mode is recommended for snapshots and other situations in which you want to leave the camera in charge of shutter speed and aperture.
-
Page 102: S: Shutter-Priority Auto
S: Shutter-Priority Auto In shutter-priority auto, you choose the shutter speed while the camera automatically selects the aperture that will produce the optimal exposure. Use slow shutter speeds to suggest motion by blurring moving subjects, fast shutter speeds to “freeze” motion. Fast shutter speed ( Slow shutter speed ( 1,600…
-
Page 103: A: Aperture-Priority Auto
A: Aperture-Priority Auto In aperture-priority auto, you choose the aperture while the camera automatically selects the shutter speed that will produce the optimal exposure. Large apertures (low f-numbers) increase flash range (0 147) and reduce depth of field, blurring objects behind and in front of the main subject.
-
Page 104: M: Manual
M: Manual In manual exposure mode, you control both shutter speed and aperture. While the exposure meters are on, rotate the main command dial to choose a shutter speed, and the sub-command dial to set aperture. Shutter speed can be set to “v” or to values between 30 s and s, or the shutter can be held open indefinitely for a 4,000…
-
Page 105: Long Time-Exposures (M Mode Only)
Long Time-Exposures (M Mode Only) Select the following shutter speeds for long time- exposures of moving lights, the stars, night scenery, or fireworks. • Bulb (A): The shutter remains open while the shutter-release button is held down. To Length of exposure: 35 s prevent blur, use a tripod or an optional Aperture: f/25 MC-DC2 remote cord (0 298).
-
Page 106
Choose a shutter speed. While the exposure meters are on, rotate the main command dial to choose a shutter speed of A. Main command dial For a shutter speed of “time” (%), select remote control release mode (0 85) after choosing the shutter speed. -
Page 107: User Settings: U1 And U2 Modes
User Settings: U1 and U2 Modes Assign frequently-used settings to the U1 and U2 positions on the mode dial. Saving User Settings Select a mode. Mode dial Rotate the mode dial to the desired mode. Adjust settings. Make the desired adjustments to flexible program (mode P), shutter speed (modes S and M), aperture (modes A and M), exposure and flash compensation, flash mode, focus point, metering, autofocus and AF-area modes, bracketing, and settings in the shooting (0 214) and Custom Settings (0 219) menus (note…
-
Page 108: Recalling User Settings
Save user settings. Highlight Save settings and press J to assign the settings selected in Steps 1 and 2 to the mode dial position selected in Step 4. Recalling User Settings Simply rotate the mode dial to U1 to recall the Mode dial settings assigned to Save to U1, or to U2 to recall the settings assigned to Save to U2.
-
Page 109: Release Mode
Release Mode Choosing a Release Mode To choose a release mode, press the release mode dial lock release and turn the release mode dial to the desired setting. Mode Description Single frame: Camera takes one photograph each time shutter-release button is pressed. Continuous low speed: While shutter-release button is held down, camera records 1–5 frames per second.
-
Page 110
The Memory Buffer The camera is equipped with a memory buffer for temporary storage, allowing shooting to continue while photographs are being saved to the memory card. Up to 100 photographs can be taken in succession; note, however, that the frame rate will drop when the buffer is full (t00). -
Page 111: Self-Timer And Remote Control Modes
Self-Timer and Remote Control Modes The self-timer and optional ML-L3 remote control (0 298) can be used to reduce camera shake or for self-portraits. Mount the camera on a tripod. Mount the camera on a tripod or place the camera on a stable, level surface. Select a release mode.
-
Page 112
Frame the photograph. Cover the Viewfinder When taking photos without your eye to DK-21 rubber eyecup DK-5 eyepiece cap the viewfinder, remove the DK-21 rubber eyecup (q) and insert the supplied DK-5 eyepiece cap as shown (w). This prevents light entering via the viewfinder interfering with exposure. -
Page 113
Before Using the Remote Control Before using the remote control for the first time, remove the clear plastic battery-insulator sheet. Using the Built-in Flash Before taking a photograph with the flash in P, S, A, M, or 0 modes, press the M (Y) button to raise the flash and wait for the M indicator to be displayed in the viewfinder (0 143). -
Page 114: Mirror Up Mode
Mirror up Mode Choose this mode to minimize blurring caused by camera movement when the mirror is raised. Use of a tripod is recommended. Select mirror up mode. Press the release mode dial lock release and rotate the release mode dial to M Release mode dial Raise the mirror.
-
Page 115: Image Recording Options
Image Recording Options Image Area Choose the aspect ratio and angle of view (image area). Thanks to the camera’s FX format (35.9 × 24 mm) image sensor, you can choose from angles of view as wide as those supported by 35 mm (135) format film cameras, while automatically cropping pictures to the DX angle of view when using DX format lenses.
-
Page 116
Choose Image Area Choose the image area used when a non-DX lens is attached or a DX-lens is attached with Off selected for Auto DX crop (0 91). Option Description Images are recorded in FX format using the full FX (36×24) area of the image sensor (35.9 ×… -
Page 117
Image area can be set using the Image area option in the shooting menu or by pressing a control and rotating a command dial. The Image Area Menu Select Image area in the shooting menu. Press G to display the menus. Highlight Image area in the shooting menu (0 214) and press 2. -
Page 118
Camera Controls Assign image area selection to a camera control. Select Choose image area for a camera control in the Custom Settings menu (0 219). Image area selection can be assigned to the Fn button (Custom Setting f2, Assign Fn button, 0 242) or the depth-of-field preview button (Custom Setting f3, Assign preview button, 0 244). -
Page 119: Image Quality And Size
Image Quality and Size Together, image quality and size determine how much space each photograph occupies on the memory card. Larger, higher quality images can be printed at larger sizes but also require more memory, meaning that fewer such images can be stored on the memory card (0 335).
-
Page 120
The following options can be accessed from the shooting menu. Press the G button to display the menus, highlight the desired option and press 2. JPEG Compression Choose the type of compression for JPEG images. Option Description O Size priority Images are compressed to produce relatively uniform file size. -
Page 121: Image Size
Image Size Image size is measured in pixels. Choose from # Large, $ Medium, or % Small (note that image size varies depending on the option selected for Image area, 0 89): Image area Option Size (pixels) Print size (cm/in.) Large 6,016 ×…
-
Page 122: Using Two Memory Cards
Using Two Memory Cards When two memory cards are inserted in the camera, you can use the Role played by card in Slot 2 item in the shooting menu to choose the role played by the card in Slot 2. Choose from Overflow (the card in Slot 2 is used only when the card in Slot 1 is full), Backup (each picture is recorded twice, once to the card in Slot 1 and again to the card in Slot 2), and RAW Slot 1—JPEG Slot 2 (as for Backup, except that the NEF/ RAW copies of photos recorded at settings of NEF/RAW + JPEG are recorded only to…
-
Page 123: Focus
Focus This section describes the focus options available when photographs are framed in the viewfinder. Focus can be adjusted automatically (see below) or manually (0 103). The user can also select the focus point for automatic or manual focus (0 101) or use focus lock to focus to recompose photographs after focusing (0 102). Autofocus To use autofocus, rotate the focus-mode selector to AF.
-
Page 124
Autofocus mode can be selected by pressing the AF- mode button and rotating the main command dial until the desired setting is displayed in the viewfinder or control panel. AF-mode button Main command dial AF-A AF-S AF-C Getting Good Results with Autofocus Autofocus does not perform well under the conditions listed below. -
Page 125: Af-Area Mode
AF-Area Mode Choose how the focus point for autofocus is selected. • Single-point AF: Select the focus point as described on page 101; the camera will focus on the subject in the selected focus point only. Use with stationary subjects. •…
-
Page 126
AF-area mode can be selected by pressing the AF-mode button and rotating the sub- command dial until the desired setting is displayed in the viewfinder or control panel. AF-mode button Sub-command dial Control panel Viewfinder 3D-tracking When the shutter-release button is pressed halfway, the colors in the area surrounding the focus point are stored in the camera. -
Page 127: Focus Point Selection
Focus Point Selection The camera offers a choice of 39 focus points that can be used to compose photographs with the main subject positioned almost anywhere in the frame. Rotate the focus selector lock to . This allows the multi selector to be used to select the focus point.
-
Page 128: Focus Lock
Focus Lock Focus lock can be used to change the composition after focusing, making it possible to focus on a subject that will not be in a focus point in the final composition. If the camera is unable to focus using autofocus (0 98), focus lock can also be used to recompose the photograph after focusing on another object at the same distance as your original subject.
-
Page 129: Manual Focus
Manual Focus Manual focus is available for lenses that do not support autofocus (non-AF NIKKOR lenses) or when the autofocus does not produce the desired results (0 98). • AF-S lenses: Set the lens focus mode switch to M. • AF lenses: Set the lens focus mode switch (if present) Focus-mode selector and camera focus-mode selector to M.
-
Page 131: Iso Sensitivity
ISO Sensitivity “ISO sensitivity” is the digital equivalent of film speed. Choose from settings that range from ISO 100 to ISO 6400 in steps equivalent to EV. Settings of from about 0.3 to 1 EV below ISO 100 and 0.3 to 2 EV above ISO 6400 are also available for special situations.
-
Page 132
AUTO If the mode dial is rotated to P, S, A, or M after AUTO is selected for ISO sensitivity in another mode, the ISO sensitivity last selected in P, S, A, or M mode will be restored. Hi 0.3–Hi 2 The settings Hi 0.3 through Hi 2 correspond to ISO sensitivities 0.3–2 EV over ISO 6400 (ISO 8000–25600 equivalent). -
Page 133: Auto Iso Sensitivity Control
Auto ISO Sensitivity Control (P, S, A, and M Modes Only) If On is selected for ISO sensitivity settings > Auto ISO sensitivity control in the shooting menu, ISO sensitivity will automatically be adjusted if optimal exposure can not be achieved at the value selected by the user (ISO sensitivity is adjusted appropriately when the flash is used).
-
Page 134
When On is selected, the viewfinder and control panel show ISO-AUTO. When sensitivity is altered from the value selected by the user, these indicators Control panel Viewfinder flash and the altered value is shown in viewfinder. Auto ISO Sensitivity Control Noise (randomly-spaced bright pixels, fog, or lines) is more likely at higher sensitivities. -
Page 135: Exposure
Exposure Metering (P, S, A, and M Modes Only) Choose how the camera sets exposure in P, S, A, and M modes (in other modes, the camera selects the metering method automatically). Option Description Matrix: Produces natural results in most situations. Camera meters a wide area of the frame and set exposure according to tone distribution, color, composition, and, with type G, E, or D lenses (0 287), distance information (3D color matrix metering II;…
-
Page 136: Autoexposure Lock
Autoexposure Lock Use autoexposure lock to recompose photographs after using center-weighted metering and spot metering to meter exposure. Note that matrix metering will not produce the desired results. Lock exposure. Shutter-release button Position the subject in the selected focus point and press the shutter-release button halfway.
-
Page 137
Metered Area In spot metering, exposure will be locked at the value metered in a 4-mm (0.16 in.) circle centered on the selected focus point. In center-weighted metering, exposure will be locked at the value metered in a 12-mm circle in the center of the viewfinder. Adjusting Shutter Speed and Aperture While exposure lock is in effect, the following settings can be adjusted without altering the metered value for exposure:… -
Page 138: Exposure Compensation
Exposure Compensation (P, S, A, and M Modes Only) Exposure compensation is used to alter exposure from the value suggested by the camera, making pictures brighter or darker. It is most effective when used with center-weighted or spot metering (0 109). Choose from values between –5 EV (underexposure) and +5 EV (overexposure) in increments of EV.
-
Page 139
Mode M In mode M, exposure compensation affects only the exposure indicator; shutter speed and aperture do not change. Using a Flash When a flash is used, exposure compensation affects both flash level and exposure, altering the brightness of both the main subject and the background. Custom Setting e4 (Exposure comp. -
Page 141: White Balance
White Balance (P, S, A, and M Modes Only) White balance ensures that colors are unaffected by the color of the light source. In modes other than P, S, A, and M, white balance is set automatically by the camera. Auto white balance is recommended for most light sources in P, S, A, and M modes, but other values can be selected if necessary according to the type of source: Option…
-
Page 142
The Shooting Menu White balance can also be adjusted using the White balance option in the shooting menu (0 214), which also can be used to fine-tune white balance (0 117) or measure a value for preset white balance (0 121). The Auto option in the White balance menu offers a choice of Normal and Keep warm lighting colors, which preserves the warm colors produced by incandescent lighting, while the I Fluorescent option can be used to select the… -
Page 143: Fine-Tuning White Balance
Fine-Tuning White Balance White balance can be “fine-tuned” to compensate for variations in the color of the light source or to introduce a deliberate color cast into an image. White balance is fine-tuned using the White balance option in the shooting menu or by pressing the L (U) button and rotating the sub-command dial.
-
Page 144
Press J. Press J to save settings and return to the shooting menu. If white balance has been fine-tuned, an asterisk (“E”) will be displayed in the control panel. The L (U) Button At settings other than K (Choose color temp.) and L (Preset manual), the L (U) button can be used to fine-tune white balance on the amber (A)–… -
Page 145
White Balance Fine-Tuning The colors on the fine-tuning axes are relative, not absolute. For example, moving the cursor to B (blue) when a “warm” setting such as J (incandescent) is selected for white balance will make photographs slightly “colder” but will not actually make them blue. Color Temperature Fine-Tuning When Choose color temp. -
Page 146: Choosing A Color Temperature
Choosing a Color Temperature When K (Choose color temp.) is selected for white balance, color temperature can be selected by pressing the L (U) button and rotating the sub- command dial. The color temperature is displayed in the control panel. L (U) button Sub-command dial Control panel…
-
Page 147: Preset Manual
Preset Manual Preset manual is used to record and recall custom white balance settings for shooting under mixed lighting or to compensate for light sources with a strong color cast. The camera can store up to four values for preset white balance in presets d-1 through d-4.
-
Page 148
Select a preset. Press the L (U) button and rotate the sub-command dial until the desired white balance preset (d-1 to d-4) is displayed in the control panel. L (U) button Sub-command dial Control panel Select direct measurement mode. Release the L (U) button briefly and then press the button until the L icon in the control panel starts to flash. -
Page 149
Check the results. If the camera was able to measure a value for white balance, C will flash in the control panel for about six seconds, while the viewfinder will show a flashing Control panel Viewfinder If lighting is too dark or too bright, the camera may be unable to measure white balance. -
Page 150
Copying White Balance from a Photograph Follow the steps below to copy a value for white balance from an existing photograph to a selected preset. Select L (Preset manual) for White balance in the shooting menu. Press the G button and select White balance in the shooting menu. -
Page 151
Choosing a Source Image To view the image highlighted in Step 4 full frame, press and hold the X (T) button. X (T) button To view images in other locations, hold the D button and press 1. The dialog shown at right will be displayed;… -
Page 152
Entering a Comment Follow the steps below to enter a descriptive comment of up to thirty-six characters for a selected white balance preset. Select L (Preset manual). Highlight Preset manual in the white balance menu and press 2. Select a preset. Highlight the desired preset and press W (S). -
Page 153
Protecting a White Balance Preset Follow the steps below to protect the selected white balance preset. Protected presets can not be modified and the Fine-tune and Edit comment options can not be used. Select L (Preset manual). Highlight Preset manual in the white balance menu and press 2. -
Page 155: Image Enhancement
Image Enhancement Picture Controls (P, S, A, and M Modes Only) Nikon’s unique Picture Control system makes it possible to share image processing settings, including sharpening, contrast, brightness, saturation, and hue, among compatible devices and software. Selecting a Picture Control The camera offers a choice of preset Picture Controls.
-
Page 156
Custom Picture Controls Custom Picture Controls are created through modifications to existing Picture Controls using the Manage Picture Control option in the shooting menu (0 134). Custom Picture Controls can be saved to a memory card for sharing among other cameras of the same model and compatible software (0 136). -
Page 157: Modifying Picture Controls
Modifying Picture Controls Existing preset or custom Picture Controls (0 134) can be modified to suit the scene or the user’s creative intent. Choose a balanced combination of settings using Quick adjust, or make manual adjustments to individual settings. Select a Picture Control. Highlight the desired Picture Control in the Picture Control list (0 129) and press 2.
-
Page 158
Picture Control Settings Option Description Choose from options between –2 and +2 to reduce or exaggerate the effect of the selected Picture Control (note that this resets all manual adjustments). Quick adjust For example, choosing positive values for Vivid makes pictures more vivid. Not available with Neutral or Monochrome Picture Controls. -
Page 159
The Picture Control Grid Pressing the W (S) button in Step 2 on page 131 displays a Picture Control grid showing the contrast and saturation for the selected Picture Control in relation to the other Picture Controls (only contrast is displayed when Monochrome is selected). Release the W (S) button to return to the Picture Control menu. -
Page 160: Creating Custom Picture Controls
Creating Custom Picture Controls The Picture Controls supplied with the camera can be modified and saved as custom Picture Controls. Select Manage Picture Control in the shooting menu. To display the menus, press the G button. Highlight Manage Picture Control in the shooting menu and press 2.
-
Page 161
Name the Picture Control. The text-entry dialog shown at right will be Keyboard displayed. By default, new Picture Controls area are named by adding a two-digit number Name area (assigned automatically) to the name of the existing Picture Control; to use the default name, proceed to Step 7. -
Page 162: Sharing Custom Picture Controls
ViewNX 2 or optional software such as Capture NX 2 can be copied to a memory card and loaded into the camera, or custom Picture Controls created with the camera can be copied to the memory card to be used in other D610 cameras and software and then deleted when no longer needed.
-
Page 163: Preserving Detail In Highlights And Shadows
Preserving Detail in Highlights and Shadows Active D-Lighting (P, S, A, and M Modes Only) Active D-Lighting preserves details in highlights and shadows, creating photographs with natural contrast. Use for high contrast scenes, for example when photographing brightly lit outdoor scenery through a door or window or taking pictures of shaded subjects on a sunny day.
-
Page 164
To use Active D-Lighting: Select Active D-Lighting in the shooting menu. To display the menus, press the G button. Highlight Active D-Lighting in the shooting menu and press 2. G button Choose an option. Highlight the desired option and press J. If Y Auto is selected, the camera will automatically adjust Active D-Lighting according to shooting conditions (in mode… -
Page 165: High Dynamic Range (Hdr)
High Dynamic Range (HDR) Used with high-contrast subjects, High Dynamic Range (HDR) preserves details in highlights and shadows by combining two shots taken at different exposures. HDR is most effective when used with matrix metering (0 109; with other metering methods and a non-CPU lens, an exposure differential of Auto is equivalent to about 2 EV).
-
Page 166
Select a mode. Highlight HDR mode and press 2. Highlight one of the following and press J. • To take a series of HDR photographs, select 6 On (series). HDR shooting will continue until you select Off for HDR mode. •… -
Page 167
Choose the amount of smoothing. To choose how much the boundaries between the two images are smoothed, highlight Smoothing and press 2. The options shown at right will be displayed. Highlight an option and press J. Higher values produce a smoother composite image. -
Page 169: Flash Photography
Flash Photography Using the Built-in Flash The built-in flash has a Guide Number (GN) 12/39 (m/ft, ISO 100, 20 °C/68 °F) and provides coverage for the angle of view of 24 mm lens, or a 16 mm lens in DX format. It can be used not only when natural lighting is inadequate but to fill in shadows and backlit subjects or to add a catch light to the subject’s eyes.
-
Page 170: Flash Mode
Flash Mode The flash modes available vary with shooting mode: i, k, p, n, s, w Auto+slow sync+ Auto Fill flash red-eye reduction Auto+red-eye reduction Auto+slow sync P, A S, M Fill flash Fill flash Red-eye reduction Red-eye reduction Slow sync+red-eye reduction Rear-curtain sync Slow sync Rear curtain+slow sync…
-
Page 171
Default Flash Modes Default flash modes are shown below. Mode Default Mode Default i, k, p, n, w Auto Auto+slow sync Auto+red-eye reduction 0, P, S, A, M Fill flash Flash Modes The flash modes listed on the previous page may combine one or more of the following settings, as shown by the flash mode icon: •… -
Page 172
Shutter Speeds Available with the Built-in Flash The following shutter speeds are available with the built-in flash. Mode Shutter speed Mode Shutter speed i, P *, A *, k, p, s, w – –30 s n, 0 – –30 s, A –1 s * Speeds as fast as s are available with optional SB-910, SB-900, SB-800, SB-700, and SB-600 flash… -
Page 173
Aperture, Sensitivity, and Flash Range Flash range varies with sensitivity (ISO equivalency) and aperture. Aperture at ISO equivalent of Range 1600 3200 6400 0.7–8.5 2ft 4in.–27ft 11in. 0.6–6.0 2ft–19ft 8in. 0.6–4.2 2ft–13ft 9in. 0.6–3.0 2ft–9ft 10in. — 0.6–2.1 2ft–6ft 11in. —… -
Page 174: Flash Compensation
+1.0 EV Optional Flash Units Flash compensation is also available with optional flash units that support the Nikon Creative Lighting System (CLS). The SB-910, SB-900, SB-800, SB-700, and SB-600 also allow flash compensation to be set using the controls on the flash unit; the value selected with the flash unit is added to the value selected with the camera.
-
Page 175: Fv Lock
FV Lock This feature is used to lock flash output, allowing photographs to be recomposed without changing the flash level and ensuring that flash output is appropriate to the subject even when the subject is not positioned in the center of the frame. Flash output is adjusted automatically for any changes in ISO sensitivity and aperture.
-
Page 176
Recompose the photograph. Take the photograph. Press the shutter-release button the rest of the way down to shoot. If desired, additional pictures can be taken without releasing FV lock. Release FV lock. Press the Fn button to release FV lock. Confirm that the FV lock icon (e) is no longer displayed in the viewfinder. -
Page 177: Other Shooting Options
Other Shooting Options Two-Button Reset: Restoring Default Settings The camera settings listed below can be restored to E button default values by holding the W (S) and E buttons down together for more than two seconds (these buttons are marked by a green dot). The control panel turns off briefly while settings are reset.
-
Page 178
Option Default Autofocus (live view/movie) Autofocus mode AF-S AF-area mode m, r, w, 1, 2, 3, P, S, A, M Wide-area AF n, 0 Normal-area AF i, j, k, l, p, o, s, t, u, v, x, y, z Face-priority AF Focus point Center Metering… -
Page 179: Bracketing
Bracketing (P, S, A, and M Modes Only) Bracketing automatically varies exposure, flash level, Active D-Lighting (ADL), or white balance slightly with each shot, “bracketing” the current value. Choose in situations in which it is difficult to set exposure, flash level (i-TTL and, where supported, auto aperture flash control modes only;…
-
Page 180
Select a bracketing increment. Pressing the D button and rotate the sub-command dial to choose a bracketing increment. Bracketing increment D button Sub-command dial Control panel See Also For information on choosing the size of the increment, see Custom Setting b2 (EV steps for exposure cntrl, 0 224). -
Page 181
Exposure and Flash Bracketing In continuous low speed, continuous high speed, and Qc (quiet continuous) release modes, shooting will pause after the number of shots specified in the bracketing program have been taken. Shooting will resume the next time the shutter-release button is pressed. In self-timer mode, the camera will take the number of shots selected in Step 2 on page 153 each time the shutter-release button is pressed, regardless of the option selected for Custom Setting c3 (Self-timer) >… -
Page 182: White Balance Bracketing
White Balance Bracketing The camera creates multiple copies of each photograph, each with a different white balance. For more information on white balance, see page 115. Select white balance bracketing. Choose WB bracketing for Custom Setting e6 Auto bracketing set. Choose the number of shots.
-
Page 183
Frame a photograph, focus, and shoot. Each shot will be processed to create the number of copies specified in the bracketing program, and each copy will have a different white balance. Modifications to white balance are added to the white balance adjustment made with white balance fine-tuning. -
Page 184
ADL Bracketing The camera varies Active D-Lighting over a series of exposures. For more information on Active D-Lighting, see page 137. Select ADL bracketing. Choose ADL bracketing for Custom Setting e6 Auto bracketing set. Choose the number of shots. Pressing the D button, rotate the main command dial to choose the number of shots in the bracketing sequence. -
Page 185
Frame a photograph, focus, and shoot. The camera will vary Active D-Lighting shot-by-shot according to the bracketing program selected. While bracketing is in effect, a bracketing progress indicator will be displayed in the control panel. A segment will disappear from the indicator after each shot: the y segment when the first shot is taken, the 0 segment when the second shot is taken, and the 1 segment when the third shot (if applicable) is taken. -
Page 186: Multiple Exposure
Multiple Exposure (P, S, A, and M Modes Only) Follow the steps below to record a series of two or three exposures in a single photograph. Multiple exposures can make use of RAW data from the camera image sensor to produce colors noticeably superior to those in software-generated photographic overlays.
-
Page 187
Select a mode. Highlight Multiple exposure mode and press 2. Highlight one of the following and press J. • To take a series of multiple exposures, select 6 On (series). Multiple exposure shooting will continue until you select Off for Multiple exposure mode. •… -
Page 188
Choose the amount of gain. Highlight Auto gain and press 2. The following options will be displayed. Highlight an option and press J. • On: Gain is adjusted according to number of exposures actually recorded (gain for each exposure is set to for 2 exposures, for 3 exposures, etc.). -
Page 189
Interrupting Multiple Exposures To interrupt a multiple exposure before the specified number of exposures have been taken, select Off for multiple exposure mode. If shooting ends before the specified number of exposures have been taken, a multiple exposure will be created from the exposures that have been recorded to that point. -
Page 190: Interval Timer Photography
Interval Timer Photography The camera is equipped to take photographs automatically at preset intervals. Before Shooting Do not select self-timer (E), remote (4), or M release mode when using the interval timer. Before beginning interval timer photography, take a test shot at current settings and view the results in the monitor.
-
Page 191
Choose the number of intervals and number of shots per interval. Press 4 or 2 to highlight number of intervals or number of shots; press 1 or 3 to change. Press 2 to continue. Number of Number Total intervals of shots/ number of interval shots… -
Page 192
Interval Timer Photography Interval timer photography can not be combined with long time-exposures (bulb photography, 0 79) or live view (0 49) or time-lapse (0 168) photography and is not available in movie live view (0 57) or when Record movies is selected for Custom Setting g4 (Assign shutter button, 0 248). -
Page 193
Pausing Interval Timer Photography Interval timer photography can be paused by: • Pressing the J button between intervals • Highlighting Start > Pause in the interval timer menu and pressing J • Turning the camera off and then on again (if desired, the memory card can be replaced while the camera is off) •… -
Page 194: Time-Lapse Photography
Time-Lapse Photography The camera automatically takes photos at selected intervals to create a silent time- lapse movie using the options currently selected for Movie settings in the shooting menu (0 65). Before Shooting Before beginning time-lapse photography, take a test shot at current settings (framing the photo in the viewfinder for an accurate exposure preview) and view the results in the monitor.
-
Page 195
Select the shooting time. Press 4 or 2 to highlight hours or minutes; press 1 or 3 to change. The maximum shooting time is 7 hours and 59 minutes. Press 2 to continue. Start shooting. Highlight On and press J (to return to the shooting menu without starting time-lapse photography, highlight Off and press J). -
Page 196
Time-Lapse Photography Time-lapse is not available in live view (0 49, 57), at a shutter speed of A (0 79), when bracketing (0 153), High Dynamic Range (HDR, 0 139), multiple exposure (0 160), or interval timer photography (0 164) is active. Release Mode Regardless of the release mode selected, the camera will take one shot at each interval. -
Page 197
Interrupting Time-Lapse Photography Time-lapse photography will end automatically if the battery is exhausted. The following will also end time-lapse photography: • Selecting Start > Off in the Time-lapse photography menu • Pressing the J button between frames or immediately after a frame is recorded •… -
Page 198: Non-Cpu Lenses
Non-CPU Lenses By specifying lens data (lens focal length and maximum aperture), the user can gain access to a variety of CPU lens functions when using a non-CPU lens. If the focal length of the lens is known: • Power zoom can be used with optional flash units (0 294) •…
-
Page 199
The camera can store data for up to nine non-CPU lenses. To enter or edit data for a non-CPU lens: Select Non-CPU lens data. Press the G button to display the menus. Highlight Non-CPU lens data in the setup menu and press 2. G button Choose a lens number. -
Page 200
To recall lens data when using a non-CPU lens: Assign non-CPU lens number selection to a camera control. Select Choose non-CPU lens number for Custom Setting f2 (Assign Fn button, 0 242) or Custom Setting f3 (Assign preview button, 0 244). Use the selected control to choose the lens number. -
Page 201: The Gp-1/Gp-1A Gps Unit
The GP-1/GP-1A GPS Unit The GP-1/GP-1A GPS unit (available separately) can be connected to the camera’s accessory terminal (0 298) using the cable supplied with the GP-1/GP-1A, allowing information on the camera’s current position to be recorded when photographs are taken.
-
Page 203: More On Playback
More on Playback Full-Frame Playback To play photographs back, press the K button. The most recent photograph will be displayed in the monitor. K button Multi selector Sub-command dial O (Q) button K button G button c (b) button L (U) button X (T) button W (S) button J button…
-
Page 204
Description View additional Press 2 to view photographs in order recorded, 4 to view photographs photographs in reverse order. Press 1 or 3 to view information about current photograph View photo information (0 179). W (S) View thumbnails See page 185 for more information. Zoom in on X (T) See page 187 for more information. -
Page 205: Photo Information
N N OR ORM AL AL N N OR ORM AL AL 2013 10 : 02 : 28 2013 10 : 02 : 28 6016×4016 6016×4016 100 — 1 N I KON D610 File information None (image only) Overview GPS data 100 — 1 Highlights…
-
Page 206
Highlights Image highlights Folder number—frame number ….. 215 100 — 1 Current channel Select R, G, B Highlights 1 Flashing areas indicate highlights (areas that may be overexposed) for the current channel. Hold W (S) button and press 4 or 2 to cycle through channels as follows: (all channels) (red) -
Page 207
Playback Zoom To zoom in on the photograph when the histogram is displayed, press X (T). Use the X (T) and W (S) buttons to zoom in and out and scroll the image with the multi selector. The histogram will be updated to show only the data for the portion of the image visible in the monitor. -
Page 208
Lens data…………172 Focus mode……….97, 103 Lens VR (vibration reduction) Flash type……….143, 292 Commander mode ……… 237 100 — 1 N I KON D610 Flash mode…………144 Flash control ……..236, 294, 295 Flash compensation……..148 Camera name Image area …………89… -
Page 209
9 The fourth page of the shooting data is only displayed if copyright information was recorded with the photograph as described on page 256. GPS Data Latitude Longitude Altitude º ‘ º ‘ Coordinated Universal Time (UTC) 100 — 1 N I KON D610 * Data for movies are for start of recording. -
Page 210
Overview Data NIKON D610 1 4000 F2 . 8 Hi 0 . 3 85mm + 1 . 0 – 1. 3 SLOW 1 4000 F2 . 8 Hi 0 . 3 85mm 0, 0 + 1 . 0 – 1. 3… -
Page 211: Thumbnail Playback
Thumbnail Playback To display images in “contact sheets” of four, nine, or 72 images, press the W (S) button. W (S) W (S) X (T) X (T) Full-frame Thumbnail playback Calendar playback playback Description Press W (S) to increase the number of images Display more images W (S) displayed.
-
Page 212: Calendar Playback
Calendar Playback To view images taken on a selected date, press the W (S) button when 72 images are displayed. Date list W (S) W (S) X (T) X (T) Thumbnail list Full-frame Thumbnail playback Calendar playback playback The operations can be performed depend on whether the cursor is in the date list or the thumbnail list: Description Press W (S) button in date list to place cursor in…
-
Page 213: Taking A Closer Look: Playback Zoom
Taking a Closer Look: Playback Zoom Press the X (T) button to zoom in on the image displayed in full-frame playback or on the image currently highlighted in thumbnail playback. The following operations can be performed while zoom is in effect: Description Press X (T) to zoom in to maximum of approximately 38 ×…
-
Page 214: Protecting Photographs From Deletion
Protecting Photographs from Deletion In full-frame, zoom, thumbnail, and calendar playback, the L (U) button can be used to protect photographs from accidental deletion. Protected files can not be deleted using the O (Q) button or the Delete option in the playback menu. Note that protected images will be deleted when the memory card is formatted (0 31, 250).
-
Page 215: Deleting Photographs
Deleting Photographs To delete the photograph displayed in full-frame playback or highlighted in the thumbnail list, press the O (Q) button. To delete multiple selected photographs, all photographs taken on a selected date, or all photographs in the current playback folder, use the Delete option in the playback menu.
-
Page 216: The Playback Menu
The Playback Menu The Delete option in the playback menu contains the following options. Note that depending on the number of images, some time may be required for deletion. Option Description Q Selected Delete selected pictures. n Select date Delete all pictures taken on a selected date (0 191). Delete all pictures in the folder currently selected for R All playback (0 207).
-
Page 217
Press J to complete the operation. A confirmation dialog will be displayed; highlight Yes and press J. Select Date: Deleting Photographs Taken on a Selected Date Choose Select date. In the delete menu, highlight Select date and press 2. Highlight a date. Press 1 or 3 to highlight a date. -
Page 219: Connections
Do not turn the camera off or disconnect the USB cable while transfer is in progress. Windows To visit the Nikon website after installing ViewNX 2, select All Programs > Link to Nikon from the Windows start menu (Internet connection required).
-
Page 220: Connecting The Camera
If a message is displayed prompting you to choose a program, select Nikon Transfer 2. Windows 7 If the following dialog is displayed, select Nikon Transfer 2 as described below. 1 Under Import pictures and videos, click Change program. A program selection dialog will be displayed;…
-
Page 221
At default settings, all the pictures on the memory card will be copied to the computer (for more information on using Nikon Transfer 2, start ViewNX 2 or Nikon Transfer 2 and select ViewNX 2 Help from the Help menu). -
Page 222: Printing Photographs
Printing Photographs Selected JPEG images can be printed on a PictBridge printer (0 333) connected directly to the camera. Connecting the Printer Connect the camera using the supplied USB cable. Turn the camera off. Connect the USB cable. Turn the printer on and connect the USB cable as shown. Do not use force or attempt to insert the connectors at an angle.
-
Page 223: Printing Pictures One At A Time
Printing Via Direct USB Connection Be sure the EN-EL15 battery is fully charged or use an optional EH-5b AC adapter and EP-5B power connector. When taking photographs to be printed via direct USB connection, set Color space to sRGB (0 217). Selecting Photographs for Printing NEF (RAW) photographs (0 93) can not be selected for printing.
-
Page 224: Start Printing
Adjust printing options. Press 1 or 3 to highlight an option and press 2 to select. Option Description Highlight a page size (only sizes supported by the current printer are listed) and press J to select and exit to the previous menu (to print at the default Page size page size for the current printer, select Printer default).
-
Page 225: Printing Multiple Pictures
Printing Multiple Pictures Display the PictBridge menu. Press the G button in the PictBridge playback display (see Step 3 on page 196). G button Choose an option. Highlight one of the following options and press 2. • Print select: Select pictures for printing. •…
-
Page 226
Select pictures or choose a date. If you chose Print select or Print (DPOF) in Step 2, use the multi selector to scroll through the pictures on the memory card; to view images in other locations, hold the D button, press 1, and select the desired card and folder as described on page 178. -
Page 227
Display printing options. Press J to display PictBridge printing options. Adjust printing options. Choose page size, border, and time stamp options as described on page 198 (a warning will be displayed if the selected page size is too small for an index print). -
Page 228: Creating A Dpof Print Order: Print Set
Creating a DPOF Print Order: Print Set The DPOF print order option in the playback menu is used to create digital “print orders” for PictBridge-compatible printers and devices that support DPOF. Choose Select/set for the DPOF print order item in the playback menu. Press the G button and select DPOF print order in the playback menu.
-
Page 229
Select imprint options. Highlight the following options and press 2 to toggle the highlighted option on or off (to complete the print order without including this information, proceed to Step 5). • Print shooting data: Print shutter speed and aperture on all pictures in print order. •… -
Page 230: Viewing Photographs On Tv
Viewing Photographs on TV A type C mini-pin High-Definition Multimedia Interface (HDMI) cable (available separately from commercial sources) can be used to connect the camera to high- definition video devices. Turn the camera off. Always turn the camera off before connecting or disconnecting an HDMI cable. Connect the HDMI cable as shown.
-
Page 231
HDMI Options The HDMI option in the setup menu (0 249) controls output resolution and can be used to enable the camera for remote control from devices that support HDMI-CEC (High-Definition Multimedia Interface–Consumer Electronics Control, a standard that allows HDMI devices to be used to control peripherals to which they are connected). -
Page 233: Menu Guide
Choose a folder for playback (0 177): Option Description ND610 Pictures in all folders created with the D610 will be visible during playback. Pictures in all folders will be visible during playback. Current Only pictures in the current folder will be visible during playback.
-
Page 234: Hide Image
Hide Image G button D playback menu Hide or reveal pictures. Hidden pictures are visible only in the Hide image menu and can only be deleted by formatting the memory card. Option Description Select/set Hide or reveal selected pictures. Selecting this option displays a list of dates. To hide all pictures taken on a date, highlight the date and press 2.
-
Page 235: Playback Display Options
Playback Display Options G button D playback menu Choose the information available in the playback photo information display (0 179). Press 1 or 3 to highlight an option, then press 2 to select the option for the photo information display. A L appears next to selected items;…
-
Page 236
Choose Select image(s). Highlight Select image(s) and press 2. Select the source folder. Highlight the folder containing the images to be copied and press 2. Make the initial selection. Before going on to select or deselect individual images, you can mark all or all protected images in the folder for copying by choosing Select all images or Select protected images. -
Page 237
Select a destination folder. To enter a folder number, choose Select folder by number, enter the number (0 215), and press J. If the folder with the selected number does not already exist, a new folder will be created. To choose from a list of existing folders, choose Select folder from list, highlight a folder, and press J. -
Page 238: Image Review
Image Review G button D playback menu Choose whether pictures are automatically displayed in the monitor immediately after shooting. If Off is selected, pictures can only be displayed by pressing the K button. After Delete G button D playback menu Choose the picture displayed after an image is deleted.
-
Page 239: Slide Show
Slide Show G button D playback menu Create a slide show of the pictures in the current playback folder (0 207). Hidden images (0 208) are not displayed. Option Description Start slide show. Start Choose type of image displayed from Still images and movies, Still Image type images only, and Movies only.
-
Page 240: C The Shooting Menu: Shooting Options
C The Shooting Menu: Shooting Options To display the shooting menu, press G and select the C (shooting menu) tab. G button The shooting menu contains the following options: Option Option Reset shooting menu Color space Storage folder Active D-Lighting File naming HDR (high dynamic range) Role played by card in Slot 2…
-
Page 241: Storage Folder
Storage Folder G button C shooting menu Select the folder in which subsequent images will be stored. Selecting Folders by Folder Number Choose Select folder by number. Highlight Select folder by number and press 2. The dialog shown at right will be displayed. Choose a folder number.
-
Page 242: File Naming
Selecting Folders from a List Choose Select folder from list. Highlight Select folder from list and press 2. Highlight a folder. Press 1 or 3 to highlight a folder. Select the highlighted folder. Press J to select the highlighted folder and return to the shooting menu. Subsequent photographs will be stored in the selected folder.
-
Page 243: Auto Distortion Control
Auto Distortion Control G button C shooting menu Select On to reduce barrel distortion when shooting with wide- angle lenses and to reduce pin-cushion distortion when shooting with long lenses (note that the edges of the area visible in the viewfinder may be cropped out of the final photograph, and that the time needed to process photographs before recording begins may increase).
-
Page 244: Vignette Control
Vignette Control G button C shooting menu “Vignetting” is a drop in brightness at the edges of a photograph. Vignette control reduces vignetting for type G, E, and D lenses (DX and PC lenses excluded). Its effects vary from lens to lens and are most noticeable at maximum aperture. Choose from High, Normal, Low, and Off.
-
Page 245: A Custom Settings: Fine-Tuning Camera Settings
A Custom Settings: Fine-Tuning Camera Settings To display the Custom Settings menu, press G and select the A (Custom Settings menu) tab. G button Custom Settings are used to customize camera settings Custom Setting groups to suit individual preferences. Main menu Reset custom settings (0 221)
-
Page 246
The following Custom Settings are available: Custom Setting Custom Setting Reset custom settings d Shooting/display a Autofocus d9 LCD illumination a1 AF-C priority selection d10 Exposure delay mode a2 AF-S priority selection d11 Flash warning a3 Focus tracking with lock-on d12 MB-D14 battery type a4 AF point illumination d13 Battery order… -
Page 247: Reset Custom Settings
Reset Custom Settings G button A Custom Settings menu Select Yes to restore Custom Settings to their default values (0 313). a: Autofocus a1: AF-C Priority Selection G button A Custom Settings menu When AF-C is selected for viewfinder photography (0 97), this option controls whether photographs can be taken whenever the shutter-release button is pressed (release priority) or only when the camera is in focus (focus priority).
-
Page 248: A3: Focus Tracking With Lock-On
a3: Focus Tracking with Lock-On G button A Custom Settings menu This option controls how autofocus adjusts to sudden large changes in the distance to the subject when AF-C is selected or continuous-servo autofocus is selected when the camera is in AF-A mode for viewfinder photography (0 97). Option Description C 5 (Long)
-
Page 249: A6: Number Of Focus Points
a6: Number of Focus Points G button A Custom Settings menu Choose the number of focus points available for manual focus-point selection. Option Description # 39 points Choose from the 39 focus points shown at right. Choose from the 11 focus points shown at right. Use for A 11 points quick focus-point selection.
-
Page 250: B: Metering/Exposure
b: Metering/Exposure b1: ISO Sensitivity Step Value G button A Custom Settings menu Select the increments used when making adjustments to ISO sensitivity. If possible, the current ISO sensitivity setting is maintained when the step value is changed. If the current setting is not available at the new step value, ISO sensitivity will be rounded to the nearest available setting.
-
Page 251: B3: Easy Exposure Compensation
b3: Easy Exposure Compensation G button A Custom Settings menu This option controls whether the E button is needed to set exposure compensation (0 112). If On (Auto reset) or On is selected, the 0 at the center of the exposure display will flash even when exposure compensation is set to ±0.
-
Page 252: B4: Center-Weighted Area
b4: Center-Weighted Area G button A Custom Settings menu When calculating exposure, center-weighted metering assigns the greatest weight to a circle in the center of the frame. The diameter (φ ) of this circle can be set to 8, 12, 15, or 20 mm or to the average of the entire frame.
-
Page 253: C2: Standby Timer
c2: Standby timer G button A Custom Settings menu Choose how long the camera continues to meter exposure when no operations are performed. The shutter-speed and aperture displays in the control panel and viewfinder turn off automatically when the timer expires. Choose a shorter standby timer delay for longer battery life.
-
Page 254: C4: Monitor Off Delay
c4: Monitor off Delay G button A Custom Settings menu Choose how long the monitor remains on when no operations are performed during playback (Playback; defaults to 10 s) and image review (Image review; defaults to 4 s), when menus (Menus;…
-
Page 255: D2: Viewfinder Grid Display
d2: Viewfinder Grid Display G button A Custom Settings menu Choose On to display on-demand grid lines in the viewfinder for reference when composing photographs (0 8). d3: ISO Display and Adjustment G button A Custom Settings menu If Show ISO sensitivity or Show ISO/Easy ISO is selected, the control panel will show ISO sensitivity in place of the number of exposures remaining.
-
Page 256: D6: Max. Continuous Release
d6: Max. Continuous Release G button A Custom Settings menu The maximum number of shots that can be taken in a single burst in continuous mode can be set to any value between 1 and 100. The Memory Buffer Regardless of the option selected for Custom Setting d6, shooting will slow when the memory buffer fills (t00).
-
Page 257: D8: Information Display
d8: Information Display G button A Custom Settings menu If Auto (v) is selected, the color of the lettering in the information display (0 9) will automatically change from black to white or white to black to maintain contrast with the background.
-
Page 258: D12: Mb-D14 Battery Type
d12: MB-D14 Battery Type G button A Custom Settings menu To ensure that the camera functions as expected when the optional MB-D14 battery pack is used with AA batteries, match the option selected in this menu to the type of batteries inserted in the battery pack.
-
Page 259: D13: Battery Order
d13: Battery Order G button A Custom Settings menu Choose whether the battery in the camera or the batteries in the battery pack are used first when an optional MB-D14 battery pack is attached. Note that if the MB-D14 is powered by an optional EH-5b AC adapter and EP-5B power connector, the AC adapter will be used regardless of the option selected.
-
Page 260: E: Bracketing/Flash
e: Bracketing/Flash e1: Flash Sync Speed G button A Custom Settings menu This option controls flash sync speed. Option Description Auto FP high-speed sync is used when a compatible flash unit is attached (0 294). If the built-in flash or other flash units are used, shutter speed is set 1/250 s s.
-
Page 261: E2: Flash Shutter Speed
Auto FP High-Speed Sync When 1/250 s (Auto FP) or 1/200 s (Auto FP) is selected for Custom Setting e1 (Flash sync speed, 0 234), the built-in flash can be used at shutter speeds as fast as s, while compatible optional flash units (0 294) can be used at any shutter speed (Auto FP High-Speed Sync).
-
Page 262: E3: Flash Cntrl For Built-In Flash
e3: Flash Cntrl for Built-in Flash G button A Custom Settings menu Choose the flash mode for the built-in flash. Option Description Flash output is adjusted automatically in response to shooting 1 TTL conditions. Choose the flash level (0 236). The camera does not emit monitor pre- 2 Manual flashes.
-
Page 263
The SB-400 and SB-300 When an optional SB-400 or SB-300 flash unit is attached and turned on, Custom Setting e3 changes to Optional flash, allowing the flash control mode for the optional flash unit to be selected from TTL and Manual (Repeating flash and Commander mode options are not available). -
Page 264
Follow the steps below to take photographs in commander mode. Adjust settings for the built-in flash. Choose the flash control mode and output level for the built-in flash. Note that output level can not be adjusted in – – mode. Adjust settings for group A. -
Page 265
Compose the shot. Compose the shot and arrange the flash units as shown below. Note that the maximum distance at which the remote flash units can be placed may vary with shooting conditions. Wireless remote sensors 60 ° or less 5 m/15 ft or on flash units should face less… -
Page 266: E4: Exposure Comp. For Flash
The Flash Sync Mode Display M does not appear in the control panel flash sync mode display when – – is selected for Built- in flash > Mode. Flash Compensation The flash compensation value selected with the M (Y) button and sub-command dial is added to the flash compensation values selected for the built-in flash, group A, and group B in the Commander mode menu.
-
Page 267: E5: Modeling Flash
e5: Modeling Flash G button A Custom Settings menu If On is selected when the camera is being used with the built-in flash or an optional CLS-compatible flash unit (0 294), a modeling flash will be emitted when the camera depth-of-field preview button is pressed (0 77).
-
Page 268: F2: Assign Fn Button
f2: Assign Fn Button G button A Custom Settings menu Choose the role played by the Fn button. Option Description Press the Fn button to preview depth of field (0 77). Preview Press the Fn button to lock flash value (built-in flash and compatible FV lock optional flash units only, 0 149, 294).
-
Page 269
Option Description Press the Fn button and rotate the main command dial to turn the framing Framing grid grid display in the viewfinder on or off (0 8). Press the Fn button and rotate a command dial to choose an image area Choose image area (0 89). -
Page 270: F3: Assign Preview Button
f3: Assign Preview Button G button A Custom Settings menu Choose the role played by the depth-of-field preview button. The options available are the same as for Assign Fn button (0 242). The default setting is Preview. f4: Assign AE-L/AF-L Button G button A Custom Settings menu Choose the role played by the A AE-L/AF-L button.
-
Page 271: F5: Customize Command Dials
f5: Customize Command Dials G button A Custom Settings menu This option controls the operation of the main and sub-command dials. • Reverse rotation: Reverse the direction of rotation of the command dials when they are used to make adjustments to Exposure compensation and/or Shutter speed/aperture.
-
Page 272: F6: Release Button To Use Dial
f6: Release Button to Use Dial G button A Custom Settings menu Selecting Yes allows adjustments that are normally made by holding the E, M (Y), W (S), X (T), L (U), AF-mode, Z (Q), or D button and rotating a command dial to be made by rotating the command dial after the button is released (this also applies to the Fn and depth-of-field preview buttons if they have been assigned Active D-Lighting using Custom Setting f2, Assign Fn button, or Custom…
-
Page 273: F9: Assign Mb-D14 4 Button
f9: Assign MB-D14 4 Button G button A Custom Settings menu Choose the function assigned to the A AE-L/AF-L button on the optional MB-D14 battery pack. Option Description B AE/AF lock Focus and exposure lock while the MB-D14 A AE-L/AF-L button is pressed. C AE lock only Exposure locks while the MB-D14 A AE-L/AF-L button is pressed.
-
Page 274: G2: Assign Preview Button
g2: Assign Preview Button G button A Custom Settings menu Choose the role played by the depth-of-field preview button during movie live view. The options available are the same as for Assign Fn button (0 247), except that the default setting is Index marking. g3: Assign AE-L/AF-L Button G button A Custom Settings menu…
-
Page 275: B The Setup Menu: Camera Setup
B The Setup Menu: Camera Setup To display the setup menu, press G and select the B (setup menu) tab. G button The setup menu contains the following options: Option Option Format memory card Image comment Save user settings Auto image rotation Reset user settings Battery info Monitor brightness…
-
Page 276: Format Memory Card
Format Memory Card G button B setup menu To begin formatting, choose a memory card slot and select Yes. Note that formatting permanently deletes all pictures and other data on the card in the selected slot. Before formatting, be sure to make backup copies as required.
-
Page 277: Image Dust Off Ref Photo
Image Dust Off Ref Photo G button B setup menu Acquire reference data for the Image Dust Off option in Capture NX 2 (available separately; for more information, see the Capture NX 2 manual). Image Dust Off ref photo is available only when a CPU lens is mounted on the camera.
-
Page 278: Flicker Reduction
Acquire dust off reference data. Press the shutter-release button the rest of the way down to acquire Image Dust Off reference data. The monitor turns off when the shutter-release button is pressed. Note that noise reduction will be performed if the subject is poorly lit, increasing recording times.
-
Page 279: Time Zone And Date
Time Zone and Date G button B setup menu Change time zones, set the camera clock, choose the date display order, and turn daylight saving time on or off (0 27). Option Description Choose a time zone. The camera clock is automatically set to the time in Time zone the new time zone.
-
Page 280: Auto Image Rotation
Auto Image Rotation G button B setup menu Photographs taken while On is selected contain information on camera orientation, allowing them to be rotated automatically during playback (0 177) or when viewed in ViewNX 2 (supplied) or in Capture NX 2 (available separately; 0 298). The following orientations are recorded: Landscape (wide) Camera rotated 90°…
-
Page 281: Battery Info
Battery Info G button B setup menu View information on the battery currently inserted in the camera. Item Description The current battery level expressed as a percentage. Charge The number of times the shutter has been released with the current battery since the battery was last charged.
-
Page 282: Copyright Information
Artist and Copyright fields are blank before lending or transferring the camera to another person. Nikon does not accept liability for any damages or disputes arising from the use of the Copyright information option.
-
Page 283: Save/Load Settings
B setup menu Select Save settings to save the following settings to the memory card in Slot 1 (0 96; if the card is full, an error will be displayed). Use this option to share settings among D610 cameras. Menu Option…
-
Page 284: Virtual Horizon
Virtual Horizon G button B setup menu Display roll and pitch information based on information from the camera tilt sensor. If the camera is tilted neither left nor right, the roll reference line will turn green, while if the camera is tilted neither forward nor back, the pitch reference line will turn green and a dot will appear in the center of the display.
-
Page 285: Af Fine-Tune
AF Fine-tune G button B setup menu Fine-tune focus for up to 12 lens types. AF tuning is not recommended in most situations and may interfere with normal focus; use only when required. Option Description • On: Turn AF tuning on. AF fine-tune (On/Off) •…
-
Page 286: Eye-Fi Upload
Eye-Fi Upload G button B setup menu This option is displayed only when an Eye-Fi memory card (available separately from third-party suppliers) is inserted in the camera. Choose Enable to upload photographs to a preselected destination. Note that pictures will not be uploaded if signal strength is insufficient.
-
Page 287: N The Retouch Menu: Creating Retouched Copies
N The Retouch Menu: Creating Retouched Copies To display the retouch menu, press G and select the N (retouch menu) tab. G button The options in the retouch menu are used to create trimmed or retouched copies of existing pictures. The retouch menu is only displayed when a memory card containing photographs is inserted in the camera (note that if the memory card is being used to store both RAW/NEF and JPEG copies of the same photographs as described on page 93, retouch other than Image overlay and NEF (RAW)
-
Page 288: Creating Retouched Copies
Creating Retouched Copies To create a retouched copy: Select an item in the retouch menu. Press 1 or 3 to highlight an item, 2 to select. Select a picture. Highlight a picture and press J (to view the highlighted picture full screen, press and hold the X (T) button;…
-
Page 289
Creating Retouched Copies During Playback Retouched copies can also be created during playback. Display picture full frame and Highlight an option and Create retouched copy. press J or c (b). press J. -
Page 290: D-Lighting
D-Lighting G button N retouch menu D-lighting brightens shadows, making it ideal for dark or backlit photographs. Before After Press 1 or 3 to choose the amount of correction performed. The effect can be previewed in the edit display. Press J to copy the photograph.
-
Page 291: Trim
Trim G button N retouch menu Create a cropped copy of the selected photograph. The selected photograph is displayed with the selected crop shown in yellow; create a cropped copy as described in the following table. Description W (S) Press W (S) to reduce the size of the crop. Reduce size of crop X (T) Press X (T) to increase the size of the crop.
-
Page 292: Monochrome
Monochrome G button N retouch menu Copy photographs in Black-and-white, Sepia, or Cyanotype (blue and white monochrome). Selecting Sepia or Cyanotype displays a preview of Increase saturation the selected image; press 1 to increase color saturation, 3 to decrease. Press J to create a monochrome copy.
-
Page 293: Filter Effects
Filter Effects G button N retouch menu Choose from the following filter effects. After adjusting filter effects as described below, press J to copy the photograph. Option Description Creates the effect of a skylight filter, making the Skylight picture less blue. The effect can be previewed in the monitor as shown at right.
-
Page 294: Color Balance
Color Balance G button N retouch menu Use the multi selector to create a copy with modified color balance as shown below. The effect is displayed in the monitor together with red, green, and blue histograms (0 181) giving the distribution of tones in the copy. Increase amount of green Create retouched copy Increase amount of blue…
-
Page 295: Image Overlay
Image Overlay G button N retouch menu Image overlay combines two existing NEF (RAW) photographs to create a single picture that is saved separately from the originals; the results, which make use of RAW data from the camera image sensor, are noticeably better than overlays created in an imaging application.
-
Page 296
Adjust gain. Highlight Image 1 or Image 2 and optimize exposure for the overlay by pressing 1 or 3 to select gain from values between 0.1 and 2.0. Repeat for the second image. The default value is 1.0; select 0.5 to halve gain or 2.0 to double it. The effects are visible in the Preview column. -
Page 297: Nef (Raw) Processing
NEF (RAW) Processing G button N retouch menu Create JPEG copies of NEF (RAW) photographs. Select NEF (RAW) processing. Highlight NEF (RAW) processing in the retouch menu and press 2 to display a picture selection dialog listing only NEF (RAW) images created with this camera.
-
Page 298: Resize
Copy the photograph. Highlight EXE and press J to create a JPEG copy of the selected photograph (to exit without copying the photograph, press the G button). Resize G button N retouch menu Create small copies of selected photographs. Select Resize. To resize selected images, press G to display the menus and select Resize in the retouch menu.
-
Page 299: Quick Retouch
Choose pictures. Highlight Select image and press 2. The dialog shown at right will be displayed; highlight pictures using the multi selector and press the W (S) button to select or deselect (to view the highlighted picture full screen, press and hold the X (T) button;…
-
Page 300: Straighten
Straighten G button N retouch menu Create a straightened copy of the selected image. Press 2 to rotate the image clockwise by up to five degrees in increments of approximately 0.25 degrees, 4 to rotate it counterclockwise (the effect can be previewed in the edit display; note that edges of the image will be trimmed to create a square copy).
-
Page 301: Color Outline
Color Outline G button N retouch menu Create an outline copy of a photograph to use as a base for painting. The effect can be previewed in the edit display. Press J to copy the photograph. Before After Color Sketch G button N retouch menu Create a copy of a photograph that resembles a sketch made…
-
Page 302: Miniature Effect
Miniature Effect G button N retouch menu Create a copy that appears to be a photo of a diorama. Works best with photos taken from a high vantage point. The area that will be in focus in the copy is indicated by a yellow frame.
-
Page 303: Selective Color
Selective Color G button N retouch menu Create a copy in which only selected hues appear in color. Select Selective color. Highlight Selective color in the retouch menu and press 2 to display a picture selection dialog. Select a photograph. Highlight a photograph (to view the highlighted photograph full frame, press and hold the X (T) button;…
-
Page 304
Choose the color range. Press 1 or 3 to increase or decrease the range of similar hues that will be included in the final photograph or movie. Choose from values between 1 and 7; note that higher values may include hues from other colors. The effect can be previewed in the edit display. -
Page 305: Side-By-Side Comparison
Side-by-side Comparison Compare retouched copies to the original photographs. This option is only available if J or c (b) button is pressed to display the retouch menu when a copy or original is played back full frame. Select a picture. In full-frame playback, select a retouched copy (shown by a o icon) or a photograph that has been retouched and press J or c (b).
-
Page 306: O My Menu/M Recent Settings
O My Menu/m Recent Settings To display My Menu, press G and select the O (My Menu) tab. G button The My Menu option can be used to create and edit a customized list of options from the playback, shooting, Custom Settings, setup, and retouch menus for quick access (up to 20 items).
-
Page 307
Add more items. The items currently displayed in My Menu are indicated by a check mark. Items indicated by a V icon can not be selected. Repeat steps 1–4 to select additional items. Deleting Options from My Menu Select Remove items. In My Menu (O), highlight Remove items and press 2. -
Page 308
Reordering Options in My Menu Select Rank items. In My Menu (O), highlight Rank items and press 2. Select an item. Highlight the item you wish to move and press J. Position the item. Press 1 or 3 to move the item up or down in My Menu and press J. -
Page 309: Recent Settings
Recent Settings To display the twenty most recently used settings, select m Recent settings for O My Menu > Choose tab. Select Choose tab. In My Menu (O), highlight Choose tab and press 2. Select m Recent settings. Highlight m Recent settings and press J. The name of the menu will change from “MY MENU”…
-
Page 311: Technical Notes
PC Micro 85mm f/2.8D — — — AF-S / AF-I Teleconverter — Other AF NIKKOR (except lenses for F3AF) — AI-P NIKKOR — — AI-, AI-modified, NIKKOR or Nikon Series E — — — lenses Medical-NIKKOR 120mm f/4 — — — — —…
-
Page 312
11 Range of rotation for AI 80–200mm f/2.8 ED tripod mount is limited by camera body. Filters can not be exchanged while AI 200–400mm f/4 ED is mounted on camera. 12 If maximum aperture is specified using Non-CPU lens data (0 172), aperture value will be displayed in viewfinder and control panel. -
Page 313
Recognizing CPU and Type G, E, and D Lenses CPU lenses (particularly types G, E, and D) are recommended, but note that IX-NIKKOR lenses can not be used. CPU lenses can be identified by the presence of CPU contacts, type G, E, and D lenses by a letter on the lens barrel. -
Page 314
Incompatible Accessories and Non-CPU Lenses The following can be used with the D610: • TC-16AS AF teleconverter • AF lenses for the F3AF (AF 80mm f/2.8, AF •… -
Page 315
When used with the AF-S NIKKOR 14–24mm f/2.8G ED, the flash will be unable to light the entire subject at all ranges. The built-in flash can also be used with AI-S, AI-, AI-modified NIKKOR, Nikon Series E and non- CPU lenses with a focal length of 24–300mm. AI 50–300mm f/4.5, modified AI 50–300mm f/4.5, AI-S 50–300mm f/4.5 ED, and AI 50–300mm f/4.5 ED lenses must be used at a zoom… -
Page 316
AF-Assist Illumination AF-assist illumination is not available with the following lenses: • AF-S NIKKOR 200mm f/2G ED VR II • AF-S NIKKOR 200–400mm f/4G ED VR II • AF-S VR Zoom-Nikkor 200–400mm f/4G • AF-S NIKKOR 300mm f/2.8G ED VR II IF-ED At ranges under 0.7 m (2 ft 4 in.), the following lenses may block the AF-assist illuminator and interfere with autofocus when lighting is poor:… -
Page 317
Calculating Angle of View The D610 can be used with Nikon lenses for 35mm (135) format cameras. If Auto DX crop is on (0 90) and a 35mm format lens is attached, the angle of view will be the same as a frame of 35mm film (35.9 ×… -
Page 318: Optional Flash Units (Speedlights)
Use Only Nikon Flash Accessories Use only Nikon flash units. Negative voltages or voltages over 250 V applied to the accessory shoe could not only prevent normal operation, but damage the sync circuitry of the camera or flash.
-
Page 319: The Nikon Creative Lighting System (Cls)
The Nikon Creative Lighting System (CLS) Nikon’s advanced Creative Lighting System (CLS) offers improved communication between the camera and compatible flash units for improved flash photography. Refer to the documentation provided with the flash unit for details. CLS-Compatible Flash Units The camera can be used with the following CLS-compatible flash units: •…
-
Page 320
The following features are available with CLS-compatible flash units: Flash unit Advanced Wireless Lighting Master/commander Remote SB-910 SB-910 SB-910 SB-900 SB-400 SB-900 SB-900 SB-700 Flash mode/feature SB-800 SB-700 SB-600 SB-300 SB-800 SB-700 SU-800 SB-800 SB-600 SB-R200 i-TTL i-TTL balanced fill-flash for digital SLR —… -
Page 321
Other Flash Units The following flash units can be used in non-TTL auto and manual modes. Flash unit SB-80DX, SB-28DX, SB-28, SB-30, SB-27 , SB-22S, SB-23, SB-29 Flash mode SB-26, SB-25, SB-24 SB-50DX SB-22, SB-20, SB-16B, SB-15 SB-21B , SB-29S —… -
Page 322
Refer to the Speedlight manual for detailed instructions. If the flash unit supports CLS, refer to the section on CLS-compatible digital SLR cameras. The D610 is not included in the “digital SLR” category in the SB-80DX, SB-28DX, and SB-50DX manuals. -
Page 323: Other Accessories
• Filters intended for special-effects photography may interfere with autofocus or the electronic rangefinder. • The D610 can not be used with linear polarizing filters. Use C-PL or C-PL II circular polarizing filters instead. • Use NC filters to protect the lens.
-
Page 324
Software Note: Use the latest versions of Nikon software; see the websites listed on page xxiii for the latest information on supported operating systems. At default settings, Nikon Message Center 2 will periodically check for updates to Nikon software and firmware while you are logged in to an account on the computer and the computer is connected to the Internet. -
Page 325: Attaching A Power Connector And Ac Adapter
Attaching a Power Connector and AC Adapter Turn the camera off before attaching an optional power connector and AC adapter. Ready the camera. Open the battery-chamber (q) and power connector (w) covers. Insert the EP-5B power connector. Be sure to insert the connector in the orientation shown, using the connector to keep the orange battery latch pressed to one side.
-
Page 326: Caring For The Camera
Do not use alcohol, thinner, or other volatile chemicals. Servicing the Camera and Accessories The camera is a precision device and requires regular servicing. Nikon recommends that the camera be inspected by the original retailer or Nikon-authorized service representative once every one to two years, and that it be serviced once every three to five years (note that fees apply to these services).
-
Page 327: The Low-Pass Filter
The Low-Pass Filter The image sensor that acts as the camera’s picture element is fitted with a low-pass filter to prevent moiré. If you suspect that dirt or dust on the filter is appearing in photographs, you can clean the filter using the Clean image sensor option in the setup menu.
-
Page 328: Clean At Startup/Shutdown
Cleaning is performed by vibrating the low-pass filter. If dust can not be fully removed using the options in the Clean image sensor menu, clean the image sensor manually (0 303) or consult a Nikon-authorized service representative. If image sensor cleaning is performed several times in succession, image sensor cleaning may be temporarily disabled to protect the camera’s internal circuitry.
-
Page 329: Manual Cleaning
(0 301), the filter can be cleaned manually as described below. Note, however, that the filter is extremely delicate and easily damaged. Nikon recommends that the filter be cleaned only by Nikon-authorized service personnel.
-
Page 330
Remove any dust and lint from the filter with a blower. Do not use a blower-brush, as the bristles could damage the filter. Dirt that can not be removed with a blower can only be removed by Nikon-authorized service personnel. Under no circumstances should you touch or wipe the filter. -
Page 331
Nikon takes every possible precaution to prevent foreign matter from coming into contact with the low-pass filter during production and shipping. The D610, however, is designed to be used with interchangeable lenses, and foreign matter may enter the camera when lenses are removed or exchanged. -
Page 332: Caring For The Camera And Battery: Cautions
Caring for the Camera and Battery: Cautions Do not drop: The product may malfunction if subjected to strong shocks or vibration. Keep dry: This product is not waterproof, and may malfunction if immersed in water or exposed to high levels of humidity. Rusting of the internal mechanism can cause irreparable damage. Avoid sudden changes in temperature: Sudden changes in temperature, such as those that occur when entering or leaving a heated building on a cold day, can cause condensation inside the device.
-
Page 333
Storage: To prevent mold or mildew, store the camera in a dry, well-ventilated area. If you are using an AC adapter, unplug the adapter to prevent fire. If the product will not be used for an extended period, remove the battery to prevent leakage and store the camera in a plastic bag containing a desiccant. -
Page 334
• Continuing to charge the battery after it is fully charged can impair battery performance. • A marked drop in the time a fully charged battery retains its charge when used at room temperature indicates that it requires replacement. Purchase a new EN-EL15 battery. •… -
Page 335: Available Settings
Available Settings The following table lists the settings that can be adjusted in each mode. k, p, l, m, n, o, r, t, x, y, 1, 2, s, 0 u, v S, A, M Storage folder File naming Role played by card in Slot 2 1, 2 Image quality 1, 2…
-
Page 336
k, p, l, m, n, o, r, t, x, y, 1, 2, s, 0 u, v S, A, M a1: AF-C priority selection a2: AF-S priority selection a3: Focus tracking with lock-on a4: AF point illumination a5: Focus point wrap-around a6: Number of focus points a7: Built-in AF-assist illuminator —… -
Page 337
k, p, l, m, n, o, r, t, x, y, 1, 2, s, 0 u, v S, A, M e1: Flash sync speed e2: Flash shutter speed — — — — — — — e3: Flash cntrl for built-in flash/ —… -
Page 338: Defaults
Defaults The default settings for the options in the camera menus are listed below. For information on two-button resets, see page 151. Playback Menu Defaults Option Default Option Default Playback folder ND610 Slide show Image review Still images and Image type movies After delete Show next…
-
Page 339
Custom Settings Menu Defaults Option Default Option Default a1 AF-C priority selection Release d8 Information display Auto a2 AF-S priority selection Focus d9 LCD illumination a3 Focus tracking with lock-on 3 (Normal) d10 Exposure delay mode a4 AF point illumination Auto d11 Flash warning a5 Focus point wrap-around… -
Page 340
Setup Menu Defaults Option Default Option Default Save user settings Flicker reduction Auto Save to U1 Time zone and date Shooting mode defaults to P Save to U2 Daylight saving time Monitor brightness Manual Auto image rotation Manual Clean image sensor Standby timer Enable Clean at startup &… -
Page 341: Exposure Program (Mode P)
Exposure Program (Mode P) The exposure program for mode P is shown in the following graph: ISO 100; lens with maximum aperture of f/1.4 and minimum aperture of f/16 (e.g., AF-S NIKKOR 50mm f/1.4G) f/1.4 f/2.8 f/5.6 f/11 f/16 f/22 f/32 30″…
-
Page 342: Troubleshooting
Troubleshooting If the camera fails to function as expected, check the list of common problems below before consulting your retailer or Nikon-authorized service representative. Battery/Display The camera is on but does not respond: Wait for recording to end. If the problem persists, turn the camera off.
-
Page 343: Shooting (All Modes)
Shooting (All Modes) Camera takes time to turn on: Delete files or folders. Shutter-release disabled: • Memory card is locked, full, or not inserted (0 29, 31). • Release locked is selected for Custom Setting f7 (Slot empty release lock; 0 246) and no memory card is inserted (0 32).
-
Page 344
Noise (bright spots, randomly-spaced bright pixels, fog, or lines) appear in photos: • Choose lower ISO sensitivity or use high ISO noise reduction (0 105, 218). • Shutter speed is slower than 1 s: use long exposure noise reduction (0 218). •… -
Page 345: Shooting (P, S, A, M)
• Adjust Set Picture Control settings (0 129). Can not measure white balance: Subject is too dark or too bright (0 123). Image can not be selected as source for preset white balance: Image was not created with D610 (0 124). White balance bracketing unavailable: •…
-
Page 346: Playback
(0 252). Computer displays NEF (RAW) images differently from camera: Third-party software does not display effects of Picture Controls, Active D-Lighting, or vignette control. Use ViewNX 2 (supplied) or optional Nikon software such as Capture NX 2 (available separately).
-
Page 347: Miscellaneous
Miscellaneous Date of recording is not correct: Set camera clock (0 27, 253). Menu item can not be selected: Some options are not available at certain combinations of settings or when no memory card is inserted. Note that Battery info option is not available when camera is powered by an optional EP-5B power connector and EH-5b AC adapter (0 255).
-
Page 348: Error Messages
Ready a fully-charged spare Low battery. battery. • Battery exhausted. • Recharge or replace battery. • Battery can not be used. • Contact Nikon-authorized service representative. • An extremely exhausted • Replace the battery, or xxiii, 21, rechargeable Li-ion battery…
-
Page 349
• Delete photographs. (flashes) (flashes) settings, or camera has run out • Insert new memory card. of file or folder numbers. Release shutter. If error persists or appears frequently, consult Camera malfunction. — (flashes) Nikon-authorized service representative. -
Page 350
Camera cannot detect Turn camera off and confirm No memory card. memory card. that card is correctly inserted. • Error accessing • Use Nikon-approved card. memory card. • Check that contacts are — clean. If card is damaged, This memory card contact retailer or Nikon- cannot be used. -
Page 351
Indicator Control Monitor panel Problem Solution Select folder containing No images on memory Folder contains no images from Playback folder — card or in folder(s) 29, 207 menu or insert memory card images. selected for playback. containing images. No images can be played back until another folder has All images are All photos in current… -
Page 352: Specifications
Specifications Nikon D610 Digital Camera Type Type Single-lens reflex digital camera Lens mount Nikon F mount (with AF coupling and AF contacts) Effective angle of view Nikon FX format Effective pixels Effective pixels 24.3 million Image sensor 35.9 × 24.0 mm CMOS sensor…
-
Page 353
Viewfinder –1 Diopter adjustment –3–+1 m Focusing screen Type B BriteView Clear Matte Mark VIII screen with AF area brackets (framing grid can be displayed) Quick return Reflex mirror Depth-of-field preview Pressing depth-of-field preview button stops lens aperture down to value selected by user (A and M modes) or by camera (other modes) Instant return, electronically controlled Lens aperture… -
Page 354
Auto, Extra high, High, Normal, Low, Off Active D-Lighting Focus Nikon Multi-CAM 4800 autofocus sensor module with TTL phase Autofocus detection, fine-tuning, 39 focus points (including 9 cross-type sensors; the center 33 points are available at apertures slower than f/5.6 and faster than f/8, while the center 7 focus points are available at f/8), and AF-assist illuminator (range approx. -
Page 355
Accessory shoe ISO 518 hot-shoe with sync and data contacts and safety lock Nikon Creative Lighting Advanced Wireless Lighting supported with built-in flash, SB-910, SB-900, SB-800, or SB-700 as a master flash and SB-600 or SB-R200 as System (CLS) remotes, or SU-800 as commander;… -
Page 356
• Nikon reserves the right to change the specifications of the hardware and software described in this manual at any time and without prior notice. Nikon will not be held liable for damages that may result from any mistakes that this manual may contain. -
Page 357
Nikon reserves the right to change the specifications of the hardware and software described in this manual at any time and without prior notice. Nikon will not be held liable for damages that may result from any mistakes that this manual may contain. -
Page 358
ViewNX 2 Windows Mac OS • Photos: Intel Celeron, Pentium 4, • Photos: Intel Core or Xeon series Core series, 1.6 GHz or better • Movies (playback): Core Duo 2 GHz • Movies (playback): 3.0 GHz or better or better; Intel Core i5 or better Pentium D;… -
Page 359
HDMI logo and High-Definition Multimedia Interface are trademarks or registered trademarks of HDMI Licensing LLC. All other trade names mentioned in this manual or the other documentation provided with your Nikon product are trademarks or registered trademarks of their respective holders. -
Page 360: Approved Memory Cards
Approved Memory Cards The following SD memory cards have been tested and approved for use in the camera. Cards with class 6 or faster write speeds are recommended for movie recording. Recording may end unexpectedly when cards with slower write speeds are used.
-
Page 361: Memory Card Capacity
Memory Card Capacity The following table shows the approximate number of pictures that can be stored on an 8 GB SanDisk Extreme Pro SDHC UHS-I card at different image quality (0 93), image size (0 95), and image area settings (0 89). FX (36×24) Image Area Image quality Image size…
-
Page 362
DX (24×16) Image Area Image quality Image size File size No. of images Buffer capacity NEF (RAW), Lossless — 10.9 MB compressed, 12-bit NEF (RAW), Lossless — 13.4 MB compressed, 14-bit NEF (RAW), Compressed, 12-bit — 9.7 MB NEF (RAW), Compressed, 14-bit —… -
Page 363: Battery Life
• Using a WU-1b wireless mobile adapter • Using VR (vibration reduction) mode with VR lenses To ensure that you get the most from rechargeable Nikon EN-EL15 batteries: • Keep the battery contacts clean. Soiled contacts can reduce battery performance.
-
Page 364: Index
Index Symbols D switch……….2 Attaching the lens……25 m (White balance) …….115 Auto (White balance)….115 i (Auto mode)……35 , 36 L (Preset manual) ..115 , 121 Auto bracketing….153 , 241 j (Auto (flash off) mode) ..35 , 36 D (Bracketing) ….
-
Page 365
Clean image sensor….. 301 DPOF……199 , 202 , 333 Focal plane mark ……103 Clock ………. 27 , 253 DPOF print order……202 Focus indicator….38 , 102 , 103 Clock battery ……..28 DX (24 × 16) 1.5 ×…..63 , 90 Focus lock …….. -
Page 366
Lens focus ring ….25 , 55 , 103 Neutral (Set Picture Control) ..129 Lens mount ……3 , 26 , 103 Nikon Transfer 2….193 , 194 Live view…….49 – 56 , 57 – 64 Non-CPU lens …..172 , 285 , 288 Live view photography …. -
Page 367
Resize……….272 Start printing (PictBridge)198 , 201 Restoring default settings..151 , Storage folder……..215 214 , 221 , 312 Straighten ……..274 Retouch menu ……261 Sub-command dial……12 Reverse indicators……246 Subject-tracking AF……. 52 RGB………..180 , 217 Role played by card in Slot 2..96 Rotate tall……..212 Television …….. -
Page 368
No reproduction in any form of this manual, in whole or in part (except for brief quotation in critical articles or reviews), may be made without written authorization from NIKON CORPORATION. Printed in Thailand 6MB19511-01…
![]()
ЦИФРОВАЯ ФОТОКАМЕРА
Руководство пользователя
Ru

Благодарим Вас за приобретение цифровой зеркальной фотокамеры Nikon. Чтобы наилучшим образом использовать все возможности фотокамеры, внимательно прочтите все инструкции и сохраните их в таком месте, где с ними смогут ознакомиться все пользователи данного изделия в дальнейшем.
Символы и обозначения
Для упрощения поиска необходимой информации используются следующие символы и обозначения:
|
Этим символом обозначены предупреждения; с данной информацией |
|
|
D |
необходимо ознакомиться перед тем, как приступить к использованию, чтобы не |
|
повредить фотокамеру. |
|
|
A |
Этим символом обозначены примечания; с данной информацией необходимо |
|
ознакомиться перед началом работы с фотокамерой. |
|
|
0 |
Этот символ обозначает ссылки на другие страницы данного руководства. |
Элементы меню, параметры и сообщения, отображаемые на мониторе фотокамеры, набраны
жирным шрифтом.
Настройки фотокамеры
Объяснения в данном руководстве даны с учетом использования заводских настроек.
Справка
Используйте функцию справки фотокамеры для получения справки об элементах меню и по другим вопросам. Подробности см. на стр. 18.
A Меры безопасности
Перед началом работы с фотокамерой прочтите сведения о мерах безопасности в разделе «Меры безопасности» (0 xviii–xix).

Содержание данного руководства
Поищите информацию для решения проблемы в следующих разделах:
|
i Оглавление…………………………….. |
0 x |
i Предметный указатель ………….. |
0 338 |
||
|
i |
Вопросы и ответы ………………….. |
0 ii |
i |
Сообщения об ошибках …………. |
0 322 |
|
Поиск и устранение |
|||||
|
i |
Пункты меню …………………………. |
0 iv |
i |
неисправностей……………………… |
0 316 |
 X
X
 s
s
 x
x
 y
y
 #
#
 $
$
 k
k
 d
d
 N
N
 S
S
 Z
Z
 r
r
 J
J
 l
l
 t
t
 I
I
 Q
Q
 U
U
 n
n
|
Введение |
0 |
1 |
|
Съемка и просмотр снимков |
||
|
0 |
35 |
|
|
Фотосъемка в режиме Live view |
||
|
0 |
49 |
|
|
Видеосъемка в режиме Live view |
||
|
0 |
57 |
|
|
Режимы P, S, A и M |
||
|
0 |
73 |
|
|
Настройки пользователя: Режимы U1 и U2 |
||
|
0 |
81 |
|
|
Режим съемки |
||
|
0 |
83 |
|
|
Параметры записи изображения |
||
|
0 |
89 |
|
|
Фокусировка |
||
|
0 |
97 |
|
|
Чувствительность ISO |
||
|
0 105 |
||
|
Экспозиция |
||
|
0 109 |
||
|
Баланс белого |
||
|
0 115 |
||
|
Коррекция изображения |
||
|
0 129 |
||
|
Съемка со вспышкой |
||
|
0 143 |
||
|
Другие параметры съемки |
||
|
0 151 |
||
|
Дополнительные сведения о просмотре снимков |
||
|
0 177 |
||
|
Подключения |
||
|
0 193 |
||
|
Сведения о параметрах меню |
||
|
0 207 |
||
|
Технические примечания |
||
|
0 285 |
||
i
Вопросы и ответы
Данный указатель поможет найти ответы на любые вопросы.
|
Съемка |
0 |
||
|
i Режимы съемки и параметры кадрирования |
|||
|
Существует ли быстрый и легкий способ делать моментальные снимки |
35–39 |
||
|
(режим i)? |
|||
|
Как быстро отрегулировать настройки для съемки различных сюжетов? |
40–45 |
||
|
Можно ли отрегулировать выдержку так, чтобы остановить или смазать |
76 |
||
|
движение (режим S)? |
|||
|
Можно ли настроить диафрагму так, чтобы смазать детали фона или |
77 |
||
|
сфокусировать их (режим A)? |
|||
|
Как воспользоваться длительной экспозицией («время») (режим M)? |
79 |
||
|
Можно ли выводить снимки на монитор (Cфотосъемка в режиме Live view)? |
49 |
||
|
Можно ли снимать видеоролики (1видеосъемка в режиме Live view)? |
57 |
||
|
Можно ли соединять снимки, сделанные с равными интервалами, для |
168 |
||
|
создания видеороликов с интервальной съемкой? |
|||
|
i Режимы съемки |
|||
|
Как сделать один снимок и как сделать серию снимков? |
6, 83 |
||
|
Как выполнить съемку с автоспуском или дистанционным управлением? |
85 |
||
|
Можно ли уменьшить издаваемый затвором шум в местах, где |
6, 83 |
||
|
желательно соблюдать тишину (тихий спуск затвора)? |
|||
|
i Фокусировка |
|||
|
Можно ли выбирать способ фокусировки фотокамеры? |
97–100 |
||
|
Можно ли выбрать точку фокусировки? |
101 |
||
|
i Экспозиция |
|||
|
Можно ли сделать снимки светлее или темнее? |
112 |
||
|
Как сохранить детали в затененных и подсвеченных областях? |
137 |
||
|
i Использование вспышки |
|||
|
Можно ли установить вспышку в режим автоматического срабатывания |
|||
|
при необходимости? |
35, 143–147 |
||
|
Как отключить вспышку? |
|||
|
Как избежать эффекта «красных глаз»? |
|||
|
i Качество и размер изображения |
|||
|
Как делать снимки для печати большого размера? |
93–95 |
||
|
Можно ли сохранить больше снимков на карту памяти? |
|||
|
Просмотр снимков |
0 |
|
|
i Просмотр |
||
|
Как просматривать снимки на фотокамере? |
46, 177 |
|
|
Как посмотреть более подробную информацию о снимке? |
179–184 |
|
|
Можно ли просматривать снимки в режиме автоматического показа |
213 |
|
|
слайдов? |
||
|
Можно ли просматривать снимки на экране телевизора? |
204–205 |
|
|
Можно ли защитить снимки от случайного удаления? |
188 |
|
|
i Удаление |
||
|
Как удалять ненужные снимки? |
47, 189–191 |
|
ii

|
Обработка снимков |
0 |
|
|
Как создавать отредактированные копии снимков? |
261–279 |
|
|
Как удалить эффект «красных глаз»? |
264 |
|
|
Как создавать копии в формате JPEG снимков RAW (NEF)? |
271 |
|
|
Можно ли наложить две фотографии в формате NEF (RAW) друг на друга |
269–270 |
|
|
и создать одно изображение? |
||
|
Можно ли создать копию снимка, который будет выглядеть как рисунок? |
275 |
|
|
Можно ли удалить ненужные части видеоролика с помощью фотокамеры |
69 |
|
|
или сохранить снимки из видеороликов? |
||
|
Меню и настройки |
0 |
|
|
Как пользоваться меню? |
18–20 |
|
|
Как можно показать меню на другом языке? |
27, 253 |
|
|
Как использовать диски управления? |
12–16 |
|
|
Как отключить автоматическое выключение дисплеев? |
228 |
|
|
Как настроить фокус видоискателя? |
33 |
|
|
Как показать сетку кадрирования в видоискателе и на мониторе? |
55, 62, 229 |
|
|
Как узнать, находится ли фотокамера в ровном положении? |
258 |
|
|
Как настроить часы фотокамеры? |
27, 253 |
|
|
Как отформатировать карту памяти? |
31, 250 |
|
|
Как восстановить значения параметров, заданные по умолчанию? |
151, 214, 221 |
|
|
Как получить справку о меню или сообщении? |
18, 322 |
|
|
Подключения |
0 |
|
|
Как скопировать снимки на компьютер? |
193–195 |
|
|
Как распечатывать снимки? |
196–203 |
|
|
Можно ли напечатать на снимках дату их записи? |
198, 203 |
|
|
Уход за фотокамерой и дополнительные аксессуары |
0 |
|
|
Какие карты памяти можно использовать? |
334 |
|
|
Какие объективы можно использовать? |
285 |
|
|
Какие дополнительные вспышки (Speedlights) можно использовать? |
292 |
|
|
Какие прочие аксессуары доступны для моей фотокамеры? |
297–298 |
|
|
Какое программное обеспечение разработано для моей фотокамеры? |
||
|
Для чего нужна крышка окуляра? |
86 |
|
|
Как чистить фотокамеру? |
300 |
|
|
Куда следует обращаться для обслуживания и ремонта фотокамеры? |
||
iii
Пункты меню
DМЕНЮ РЕЖИМА ПРОСМОТРА (0 207)
|
Удалить |
Выбранные |
|||
|
Выбор даты |
||||
|
Все |
||||
|
Папка просмотра |
ND610 |
(по умолчанию) |
||
|
Все |
||||
|
Текущая |
||||
|
Скрыть |
Выбрать/установить |
|||
|
изображение |
||||
|
Выбор даты |
||||
|
Отменить выбор? |
||||
|
Настройки |
Готово |
|||
|
просмотра |
||||
|
Базовая информация о снимке |
||||
|
Точка фокусировки |
||||
|
Доп. информация о снимке |
||||
|
Нет (только изображение) |
||||
|
Засветка |
||||
|
Гистограмма RGB |
||||
|
Данные съемки |
||||
|
Обзор |
||||
|
Копировать |
Выбрать источник |
|||
|
изображения |
||||
|
Выбрать изображения |
||||
|
Выбрать папку назначения |
||||
|
Копировать изображения? |
||||
|
Просмотр |
Вкл. |
|||
|
изображения |
||||
|
Выкл. |
(по умолчанию) |
|||
|
После |
Показать следующее |
|||
|
удаления |
(по умолчанию) |
|||
|
Показать предыдущее |
||||
|
Продолжить без изменений |
||||
|
Повернуть |
Вкл. |
(по умолчанию) |
||
|
вертикально |
Выкл. |
|||
|
Показ слайдов |
Запуск |
|||
|
Тип изображения |
||||
|
Интервал кадра |
||||
|
Задание печати |
Выбрать/установить |
|||
|
DPOF |
||||
|
Отменить выбор? |
||||
CМЕНЮ РЕЖИМА СЪЕМКИ (0 214)
|
Сброс меню |
Да |
|
|
режима съемки |
Нет |
|
|
Папка для |
Выбрать папку по номеру |
|
|
хранения |
Выбрать папку из списка |
|
|
Наименование |
Наименование файлов |
|
|
файлов |
||
|
Д-вие для карты в |
Переполнение |
(по умолчанию) |
|
Гнезде 2 |
Резервирование |
|
|
RAW — Гн. 1/JPEG — Гн. 2 |
||
|
Качество |
NEF (RAW) + JPEG выс. кач. |
|
|
изображения |
NEF (RAW) + JPEG сред. кач. |
|
|
NEF (RAW) + JPEG низ. кач. |
||
|
NEF (RAW) |
||
|
(0 93) |
JPEG выс. кач. |
|
|
JPEG сред. кач. |
(по умолчанию) |
|
|
JPEG низ. кач. |
||
|
Размер |
Большой |
(по умолчанию) |
|
изображения |
Средний |
|
|
Маленький |
||
|
(0 95) |
||
|
Область |
Авт. кадрирование DX |
|
|
изображения |
Выбрать область изобр. |
|
|
Сжатие JPEG |
Приоритет размера |
|
|
(по умолчанию) |
||
|
Оптимальное качество |
||
|
Запись изобр. NEF |
Тип |
|
|
(RAW) |
Глубина цвета NEF (RAW) |
|
|
Баланс белого |
Авто |
(по умолчанию) |
|
Лампы накаливания |
||
|
Лампы дневного света |
||
|
(0 115) |
Прямой солнечный свет |
|
|
Вспышка |
Облачно
Тень
Выбор цвет. температуры
Ручная настройка
Элементы, отмеченные символом  , можно сохранить на карту памяти с помощью параметра
Сохр./загр. параметры > Сохранить параметры в меню настройки фотокамеры (0 249). Сохраненные настройки можно скопировать на другие фотокамеры D610, вставив карту памяти в фотокамеру и выбрав Сохр./загр. параметры > Загрузить параметры.
iv

|
Режим Picture |
Стандартный |
(по умолчанию) |
|||
|
Control |
|||||
|
Нейтральный |
|||||
|
Насыщенный |
|||||
|
Монохромный |
|||||
|
Портрет |
|||||
|
Пейзаж |
|||||
|
Работа с реж. |
Сохранить/изменить |
||||
|
Picture Control |
|||||
|
Переименовать 1 |
|||||
|
Удалить 1 |
|||||
|
Загрузить/сохранить |
|||||
|
Авт. управление |
Вкл. |
||||
|
искаж-ями |
|||||
|
Выкл. |
(по умолчанию) |
||||
|
Цветовое |
sRGB |
(по умолчанию) |
|||
|
пространство |
|||||
|
Adobe RGB |
|||||
|
Активный |
Авто |
||||
|
D-Lighting 2 |
|||||
|
Сверхусиленный |
|||||
|
Усиленный |
|||||
|
Нормальный |
|||||
|
Умеренный |
|||||
|
Выкл. |
|||||
|
HDR (расшир. |
Режим HDR |
||||
|
динам. диап.) |
|||||
|
Диффер-л экспозиции |
|||||
|
Смягчение |
|||||
|
Контроль |
Усиленное |
||||
|
виньетирования |
|||||
|
Нормальное |
(по умолчанию) |
||||
|
Умеренный |
|||||
|
Выкл. |
|||||
|
Под. шума для |
Вкл. |
||||
|
длинн. экспоз. |
|||||
|
Выкл. |
(по умолчанию) |
||||
|
Под. шума для |
Усиленный |
||||
|
выс. ISO |
|||||
|
Нормальный |
(по умолчанию) |
||||
|
Умеренный |
|||||
|
Выкл. |
|||||
|
Настройки |
Чувствительность ISO |
||||
|
чувствит. ISO |
|||||
|
Авт. управл. чувствит. ISO |
|||||
|
(0 105) |
|||||
|
Реж. пульта |
Спуск с задержкой |
||||
|
дистан-го упр-ния |
(по умолчанию) |
||||
|
Быстрый спуск |
|||||
|
Подъем зеркала |
|||||
|
Мультиэкспозиция |
Режим мультиэкспозиции |
||||
|
Количество снимков |
|||||
|
Автоусиление |
|||||
|
Съемка с |
Выбор времени запуска |
||
|
интервалом |
|||
|
Сейчас |
|||
|
Время запуска |
|||
|
Интервал |
|||
|
Выб. кол. раз×кол. сним. |
|||
|
Запуск |
|||
|
Цейтраферная |
Запуск |
||
|
видеосъемка |
|||
|
Интервал |
|||
|
Время съемки |
|||
|
Настройки видео |
Разм. кадра/част. кадров |
||
|
Качество видео |
|||
|
Микрофон |
|||
|
Назначение |
|||
1Недоступно, если нет заданных пользователем Picture Controls.
2Настройки по умолчанию Выкл. (режимы P, S, A, M, 1, 2и 3) или Авто (другие режимы).
AМЕНЮ ПОЛЬЗ. НАСТРОЕК (0 219)
|
Сброс польз. |
Да |
|||
|
настроек |
||||
|
Нет |
||||
|
a Автофокусировка |
||||
|
a1 |
Выбор приор. |
Спуск |
(по умолчанию) |
|
|
для AF-C |
||||
|
Фокусировка |
||||
|
a2 |
Выбор приор. |
Спуск |
||
|
для AF-S |
||||
|
Фокусировка |
(по умолчанию) |
|||
|
a3 |
Следящ. АФ с |
5 (Долго) |
||
|
сист. Lock-On |
||||
|
4 |
||||
|
3 (Нормально) |
(по умолчанию) |
|||
|
2 |
||||
|
1 (Быстро) |
||||
|
Выкл. |
||||
|
a4 |
Подсветка |
Авто |
(по умолчанию) |
|
|
точки АФ |
||||
|
Вкл. |
||||
|
Выкл. |
||||
|
a5 |
Закольц. |
Закольцовывать |
||
|
выбор точки |
||||
|
Не закольцовывать |
||||
|
ф-ки |
||||
|
(по умолчанию) |
||||
|
a6 |
Число точек |
39 точек |
(по умолчанию) |
|
|
фокусировки |
||||
|
11 точек |
||||
|
a7 |
Встроенная |
Вкл. |
(по умолчанию) |
|
|
подсветка АФ |
||||
|
Выкл. |
||||
v

|
b Замер/экспозиция |
d Съемка/дисплей |
|||||||
|
b1 |
Шаг |
1/3 ступени |
(по умолчанию) |
d1 |
Звуковой |
Громкость |
||
|
изменения |
сигнал |
|||||||
|
1/2 ступени |
Тон |
|||||||
|
чувст. ISO |
||||||||
|
d2 |
Показ сетки в |
Вкл. |
||||||
|
b2 |
Шаг EV |
1/3 ступени |
(по умолчанию) |
|||||
|
видоискат. |
||||||||
|
Выкл. |
(по умолчанию) |
|||||||
|
контроля |
||||||||
|
1/2 ступени |
||||||||
|
d3 |
Отобр. и |
Показывать чувств. ISO |
||||||
|
экспоз. |
||||||||
|
регулировка |
||||||||
|
b3 |
Простая |
Вкл. (Авто сброс) |
Показывать ISO/Удобный ISO |
|||||
|
ISO |
||||||||
|
коррекция |
Показывать счетчик кадров |
|||||||
|
Вкл. |
||||||||
|
экспоз. |
(по умолчанию) |
|||||||
|
Выкл. |
(по умолчанию) |
|||||||
|
d4 |
Подсказки |
Вкл. |
(по умолчанию) |
|||||
|
b4 |
Зона |
φ 8 мм |
||||||
|
Выкл. |
||||||||
|
центровзвеш. |
φ12 мм |
(по умолчанию) |
||||||
|
замера |
d5 |
Скорость |
5 к/с |
|||||
|
φ15 мм |
||||||||
|
съемки в реж. |
||||||||
|
4 к/с |
||||||||
|
φ20 мм |
||||||||
|
CL |
||||||||
|
3 к/с |
(по умолчанию) |
|||||||
|
Средняя |
||||||||
|
2 к/с |
||||||||
|
b5 |
Точная настр. |
Да |
||||||
|
1 к/с |
||||||||
|
оптим. эксп. |
||||||||
|
Нет |
(по умолчанию) |
|||||||
|
d6 |
Макс. при |
1–100 |
||||||
|
c Таймеры/блокировка АЭ |
непрер. |
|||||||
|
c1 |
Блок. АЭ |
Вкл. |
съемке |
|||||
|
спусков. |
d7 |
Посл. |
Вкл. |
(по умолчанию) |
||||
|
Выкл. |
(по умолчанию) |
|||||||
|
кнопкой |
нумерации |
|||||||
|
Выкл. |
||||||||
|
файлов |
||||||||
|
c2 |
Таймер |
4 с |
||||||
|
Сброс |
||||||||
|
режима |
||||||||
|
6 с |
(по умолчанию) |
d8 |
Информационный |
Авто |
(по умолчанию) |
|||
|
ожидания |
||||||||
|
10 с |
экран |
|||||||
|
Ручной |
||||||||
|
30 с |
d9 |
Подсветка ЖК |
Вкл. |
|||||
|
1 мин |
монитора |
|||||||
|
Выкл. |
(по умолчанию) |
|||||||
|
5 мин |
d10 Задержка |
3 с |
||||||
|
10 мин |
спуска затвора |
|||||||
|
2 с |
||||||||
|
30 мин |
||||||||
|
1 с |
||||||||
|
Нет ограничения |
||||||||
|
Выкл. |
(по умолчанию) |
|||||||
|
c3 |
Автоспуск |
Задержка автоспуска |
d11 Предупр. |
Вкл. |
(по умолчанию) |
|||
|
Количество снимков |
вспышки |
|||||||
|
Выкл. |
||||||||
|
Инт-л между съемкой к-ов |
d12 Тип батареи |
LR6 (AA, щелочная) |
||||||
|
c4 |
Задержка откл. Просмотр |
MB-D14 |
(по умолчанию) |
|||||
|
монитора |
||||||||
|
Меню |
HR6 (AA, Ni-MH) |
|||||||
|
Информационный экран |
FR6 (AA, литиевая) |
|||||||
|
Просмотр изображения |
d13 Порядок |
Исп. сначала батареи MB-D14 |
||||||
|
батарей |
(по умолчанию) |
|||||||
|
Live view |
||||||||
|
Исп. снач. батареи фотокам. |
||||||||
|
c5 |
Время ожид. |
1 мин |
(по умолчанию) |
|||||
|
дист. упр. |
5 мин |
|
10 мин |
|
|
15 мин |
|
vi

e Брекетинг/вспышка
|
e1 |
Выдержка |
1/250 с (Авто FP) |
|
|
синхронизации |
|||
|
1/200 с (Авто FP) |
|||
|
1/200 с |
(по умолчанию) |
||
|
1/160 с |
|||
|
1/125 с |
|||
|
1/100 с |
|||
|
1/80 с |
|||
|
1/60 с |
|||
|
e2 |
Выдержка |
1/60 с |
(по умолчанию) |
|
вспышки |
|||
|
1/30 с |
|||
|
1/15 с |
|||
|
1/8 с |
|||
|
1/4 с |
|||
|
1/2 с |
|||
|
1 с |
|||
|
2 с |
|||
|
4 с |
|||
|
8 с |
|||
|
15 с |
|||
|
30 с |
|||
|
e3 |
Управлен. |
TTL |
(по умолчанию) |
|
встр. |
|||
|
Ручной |
|||
|
вспышкой |
|||
|
Многократная вспышка |
|||
|
Режим управления |
|||
|
e3 |
Дополнительная |
TTL |
(по умолчанию) |
|
вспышка * |
|||
|
Ручной |
|||
|
e4 |
Корр. экспоз. |
Весь кадр |
(по умолчанию) |
|
для вспышки |
|||
|
Только фон |
|||
|
e5 |
Моделирующая |
Вкл. |
(по умолчанию) |
|
вспышка |
|||
|
Выкл. |
|||
|
e6 |
Установка |
АЭ и вспышка |
(по умолчанию) |
|
автобрекетинга |
|||
|
Только АЭ |
|||
|
Только вспышка |
|||
|
Брекетинг баланса белого |
|||
|
Брекетинг активн. D-Lighting |
|||
|
e7 |
Порядок |
Норма > Меньше > Больше |
|
|
брекетинга |
(по умолчанию) |
||
|
Меньше > Норма > Больше |
|||
*Отображается, только когда установлена дополнительная вспышка SB-400 или SB-300.
f Управление
|
f1 Кнопка OK |
Выбор центр. точки фокус. |
|
(реж. съемки) |
(по умолчанию) |
|
Выделение акт. точки фокус. |
|
|
Не используется |
|
f Управление
|
f2 |
Функция |
Предварительный просмотр |
|
кнопки «Fn» |
||
|
Блокировка FV |
||
|
Блокировка АЭ/АФ |
||
|
Блокировка только АЭ |
||
|
Фиксация блокировки АЭ |
||
|
Блокировка только АФ |
||
|
AF-ON |
||
|
Вспышка выключена |
||
|
Серия брекетинга |
||
|
Активный D-Lighting |
||
|
+ NEF (RAW) |
||
|
Матричный замер |
||
|
Центровзвешенный замер |
||
|
Точечный замер |
||
|
Сетка кадрирования |
||
|
Выбор области изображения |
||
|
(по умолчанию) |
||
|
Вирт. горизонт видоискателя |
||
|
МОЕ МЕНЮ |
||
|
Верхний пункт МОЕ МЕНЮ |
||
|
Выд./диаф. в 1 ступени |
||
|
Выбор номера объек. без CPU |
||
|
Просмотр |
||
|
Нет |
||
|
f3 |
Функция кн. |
Предварительный просмотр |
|
предв. просм. |
(по умолчанию) |
|
|
Блокировка FV |
||
|
Блокировка АЭ/АФ |
Блокировка только АЭ
Фиксация блокировки АЭ
Блокировка только АФ
AF-ON
Вспышка выключена
Серия брекетинга
Активный D-Lighting
+ NEF (RAW)
Матричный замер
Центровзвешенный замер
Точечный замер
Сетка кадрирования
Выбор области изображения
Вирт. горизонт видоискателя
МОЕ МЕНЮ
Верхний пункт МОЕ МЕНЮ
Выд./диаф. в 1 ступени
Выбор номера объек. без CPU
Просмотр
Нет
vii

f Управление
|
f4 |
Функция кн. |
Блокировка |
|||||
|
«AE-L/AF-L» |
АЭ/АФ |
(по умолчанию) |
|||||
|
Блокировка только АЭ |
|||||||
|
Фиксация блокировки АЭ |
|||||||
|
Блокировка только АФ |
|||||||
|
AF-ON |
|||||||
|
Блокировка FV |
|||||||
|
Нет |
|||||||
|
f5 |
Настр. дисков |
Обратный поворот |
|||||
|
управления |
|||||||
|
Перекл. глав./вспом. |
|||||||
|
Установка диафрагмы |
|||||||
|
Меню и просмотр |
|||||||
|
f6 |
Отп. кн. для |
Да |
|||||
|
исп. диска |
|||||||
|
Нет |
(по умолчанию) |
||||||
|
f7 |
Блок. спуск без |
Заблокировать спуск затвора |
|||||
|
карты |
|||||||
|
Разрешить спуск затвора |
|||||||
|
(по умолчанию) |
|||||||
|
f8 |
Инвертировать |
||||||
|
индик-ры |
|||||||
|
(по умолчанию) |
|||||||
|
f9 |
Функция кн. 4 |
Блокировка |
|||||
|
на MB-D14 |
АЭ/АФ |
(по умолчанию) |
|||||
|
Блокировка только АЭ |
|||||||
|
Фиксация блокировки АЭ |
|||||||
|
Блокировка только АФ |
|||||||
|
AF-ON |
|||||||
|
Блокировка FV |
|||||||
|
То же, что кнопка «Fn» |
|||||||
|
g Видео |
|||||||
|
g1 |
Функция |
Индексная маркировка |
|||||
|
кнопки «Fn» |
|||||||
|
Просмотр съем. инф. о фото |
|||||||
|
Блокировка АЭ/АФ |
|||||||
|
Блокировка только АЭ |
|||||||
|
Фиксация блокировки АЭ |
|||||||
|
Блокировка только АФ |
|||||||
|
AF-ON |
|||||||
|
Нет |
(по умолчанию) |
||||||
|
g2 |
Функция кн. |
Индексная |
|||||
|
предв. просм. |
маркировка |
(по умолчанию) |
|||||
|
Просмотр съем. инф. о фото |
|||||||
|
Блокировка АЭ/АФ |
Блокировка только АЭ
Фиксация блокировки АЭ
Блокировка только АФ
AF-ON
Нет
g Видео
|
g3 |
Функция кн. |
Индексная маркировка |
|
|
«AE-L/AF-L» |
|||
|
Просмотр съем. инф. о фото |
|||
|
Блокировка |
|||
|
АЭ/АФ |
(по умолчанию) |
||
|
Блокировка только АЭ |
|||
|
Фиксация блокировки АЭ |
|||
|
Блокировка только АФ |
|||
|
AF-ON |
|||
|
Нет |
|||
|
g4 |
Функ. спусков. |
Фотосъемка |
(по умолчанию) |
|
кн. затвора |
|||
|
Видеосъемка |
|||
BМЕНЮ НАСТРОЙКИ (0 249)
|
Форматировать |
Гнездо 1 |
|||||||||||||||
|
карту памяти |
||||||||||||||||
|
Гнездо 2 |
||||||||||||||||
|
Сох-ть настр-ки |
Сохранить в U1 |
|||||||||||||||
|
пользователя |
||||||||||||||||
|
Сохранить в U2 |
||||||||||||||||
|
Сбросить |
Сброс U1 |
|||||||||||||||
|
настройки польз- |
||||||||||||||||
|
Сброс U2 |
||||||||||||||||
|
ля |
||||||||||||||||
|
Яркость монитора |
Авто |
|||||||||||||||
|
Ручной |
(по умолчанию) |
|||||||||||||||
|
Очистка матрицы |
Очистить сейчас |
|||||||||||||||
|
Очищать при вкл./выкл. |
||||||||||||||||
|
Подъем зеркала |
Запуск |
|||||||||||||||
|
для чистки 1 |
||||||||||||||||
|
Эталон. снимок |
Запуск |
|||||||||||||||
|
для уд. пыли |
||||||||||||||||
|
Очистить матр. и запустить |
||||||||||||||||
|
HDMI |
Разрешение на выходе |
|||||||||||||||
|
Управление устройством |
||||||||||||||||
|
Подавление |
Авто |
(по умолчанию) |
||||||||||||||
|
мерцания |
||||||||||||||||
|
50 Гц |
||||||||||||||||
|
60 Гц |
||||||||||||||||
|
Часовой пояс и |
Часовой пояс |
|||||||||||||||
|
дата |
||||||||||||||||
|
Дата и время |
||||||||||||||||
|
Формат даты |
||||||||||||||||
|
Летнее время |
||||||||||||||||
|
Язык (Language) |
, |
, |
, |
, |
||||||||||||
|
, |
, |
, |
||||||||||||||
|
, |
, |
, |
||||||||||||||
|
, |
, |
, |
||||||||||||||
|
, |
, |
|||||||||||||||
|
, |
, |
, |
||||||||||||||
|
, |
, |
, |
||||||||||||||
|
, |
, |
, |
||||||||||||||
|
, |
, |
, |
||||||||||||||
viii
![]()
|
Комментарий к |
Готово |
||
|
изображению |
|||
|
Ввести комментарий |
|||
|
Добавить комментарий |
|||
|
Авт. поворот |
Вкл. |
(по умолчанию) |
|
|
изображения |
|||
|
Выкл. |
|||
|
Информация о |
– |
||
|
батарее |
|||
|
Инф. об авторских |
Готово |
||
|
правах |
|||
|
Фотограф |
|||
|
Авторские права |
|||
|
Добавить инф. об авт. праве |
|||
|
Сохр./загр. |
Сохранить параметры |
||
|
параметры |
|||
|
Загрузить параметры |
|||
|
GPS |
Таймер режима ожидания |
||
|
Расположение |
|||
|
Исп. GPS для настр. часов |
|||
|
Виртуальный |
– |
||
|
горизонт |
|||
|
Данные |
Готово |
||
|
объектива без |
|||
|
Номер объектива |
|||
|
CPU |
|||
|
Фокус. расстояние (мм) |
|||
|
Макс. диафрагма |
|||
|
Тонкая настройка |
Тонк. настр. АФ (Вкл/Выкл) |
||
|
АФ |
|||
|
Сохраненное значение |
|||
|
По умолчанию |
|||
|
Вывести сохр. значения |
|||
|
Загрузка Eye-Fi 2 |
Гнездо 1 |
Гнездо 2
Версия прошивки –
1Недоступно при уровнях заряда батареи Jили менее.
2Доступно только с совместимыми картами памяти Eye-Fi.
NМЕНЮ ОБРАБОТКИ (0 261)
D-Lighting –
Подавление –
«красных глаз»
Кадрирование –
Монохромный Черно-белый Сепия
Цианотипия
Эффекты фильтра Скайлайт
Теплый фильтр
Усилить красный цвет
Усилить зеленый цвет
Усилить синий цвет
«Звездный» фильтр
Фильтр сглаживания
|
Цветовой баланс |
– |
|
|
Наложение |
– |
|
|
изображений 1 |
||
|
Обработка NEF |
– |
|
|
(RAW) |
||
|
Изменить размер |
Выбрать изображение |
|
|
Выбрать место назначения |
||
|
Выбрать размер |
||
|
Быстрая |
– |
|
|
обработка |
||
|
Выравнивание |
– |
|
|
Управление |
Авто |
|
|
искажениями |
||
|
Ручное |
||
|
«Рыбий глаз» |
– |
|
|
Цветовой контур |
– |
|
|
Цветной эскиз |
– |
|
|
Управление |
– |
|
|
перспективой |
||
|
Эффект |
– |
|
|
миниатюры |
||
|
Выборочный цвет |
– |
|
|
Изменить |
Выбор точки нач./оконч. |
|
|
видеоролик |
||
|
Сохр. выбранный кадр |
||
|
Наглядное |
– |
|
|
сравнение 2 |
1Доступно, только когда нажата кнопка Gи выбрана закладка Nв меню.
2Доступна, только когда нажата кнопка Jили c(b) для отображения меню обработки во время полнокадрового просмотра.
OМОЕ МЕНЮ (0 280)
|
Добавить |
Меню режима просмотра |
|
элементы |
Меню режима съемки |
|
Меню польз. настроек |
|
|
Меню настройки |
|
|
Меню обработки |
|
|
Удалить элементы * |
– |
|
Упорядочить |
– |
|
элементы |
|
|
Выбор закладки |
Мое меню |
|
Недавние настройки |
|
*Элементы также можно удалять, выделив их в МОЕ МЕНЮ и дважды нажав кнопку O(Q).
ix

Оглавление
|
Вопросы и ответы…………………………………………………………………………………………………………………….. |
ii |
|
Пункты меню…………………………………………………………………………………………………………………………….. |
iv |
|
Меры безопасности……………………………………………………………………………………………………………. |
xviii |
|
Уведомления……………………………………………………………………………………………………………………………. |
xx |
|
Содержание упаковки……………………………………………………………………………………………………….. |
xxiv |
|
Введение |
1 |
|
Знакомство с фотокамерой……………………………………………………………………………………………………. |
1 |
|
Корпус фотокамеры………………………………………………………………………………………………………………….. |
1 |
|
Диск выбора режимов……………………………………………………………………………………………………………… |
5 |
|
Диск режима съемки………………………………………………………………………………………………………………… |
6 |
|
Панель управления…………………………………………………………………………………………………………………… |
7 |
|
Видоискатель……………………………………………………………………………………………………………………………… |
8 |
|
Информационный экран…………………………………………………………………………………………………………. |
9 |
|
Диски управления ………………………………………………………………………………………………………………….. |
12 |
|
Крышка монитора BM-14………………………………………………………………………………………………………. |
17 |
|
Меню фотокамеры ………………………………………………………………………………………………………………… |
18 |
|
Использование меню фотокамеры ……………………………………………………………………………………. |
19 |
|
Перед началом работы ………………………………………………………………………………………………………… |
21 |
|
Зарядите батарею…………………………………………………………………………………………………………………… |
21 |
|
Вставьте батарею……………………………………………………………………………………………………………………. |
23 |
|
Установите объектив……………………………………………………………………………………………………………… |
25 |
|
Основные настройки …………………………………………………………………………………………………………….. |
27 |
|
Установка карты памяти……………………………………………………………………………………………………….. |
29 |
|
Форматирование карты памяти………………………………………………………………………………………….. |
31 |
|
Настройка фокуса видоискателя………………………………………………………………………………………… |
33 |
|
Съемка и просмотр снимков |
35 |
|
Фотосъемка «Наведи и снимай» (режимы iи j)…………………………………………………………. |
35 |
|
Шаг 1: Включение фотокамеры …………………………………………………………………………………………… |
35 |
|
Шаг 2: Выберите режим iили j……………………………………………………………………………………….. |
36 |
|
Шаг 3: Скомпонуйте фотографию……………………………………………………………………………………….. |
37 |
|
Шаг 4: Фокусировка ……………………………………………………………………………………………………………….. |
38 |
|
Шаг 5: Снимайте………………………………………………………………………………………………………………………. |
38 |
x

|
Творческая фотосъемка (Сюжетные режимы) ……………………………………………………………….. |
40 |
|
kПортрет…………………………………………………………………………………………………………………………….. |
41 |
|
lПейзаж ……………………………………………………………………………………………………………………………… |
41 |
|
pРебенок…………………………………………………………………………………………………………………………….. |
41 |
|
mСпорт…………………………………………………………………………………………………………………………………. |
41 |
|
nМакро ……………………………………………………………………………………………………………………………….. |
42 |
|
oНочной портрет……………………………………………………………………………………………………………… |
42 |
|
rНочной пейзаж……………………………………………………………………………………………………………….. |
42 |
|
sПраздник/в помещении……………………………………………………………………………………………….. |
42 |
|
tПляж/снег ………………………………………………………………………………………………………………………… |
43 |
|
uЗакат………………………………………………………………………………………………………………………………….. |
43 |
|
vСумерки/рассвет ……………………………………………………………………………………………………………. |
43 |
|
wПортрет питомца……………………………………………………………………………………………………………. |
43 |
|
xСвет от свечи…………………………………………………………………………………………………………………….. |
44 |
|
yЦветение…………………………………………………………………………………………………………………………… |
44 |
|
zКраски осени …………………………………………………………………………………………………………………… |
44 |
|
0Еда………………………………………………………………………………………………………………………………………. |
44 |
|
1Силуэт……………………………………………………………………………………………………………………………….. |
45 |
|
2Высокий ключ …………………………………………………………………………………………………………………. |
45 |
|
3Низкий ключ ……………………………………………………………………………………………………………………. |
45 |
|
Основные функции просмотра…………………………………………………………………………………………… |
46 |
|
Удаление ненужных фотографий ……………………………………………………………………………………….. |
47 |
|
Фотосъемка в режиме Live view |
49 |
|
Фокусировка в режиме Live view………………………………………………………………………………………… |
51 |
|
Дисплей Live view: Съемка в режиме Live view ……………………………………………………………….. |
53 |
|
Информационный экран: Съемка в режиме Live view…………………………………………………… |
55 |
|
Ручная фокусировка ………………………………………………………………………………………………………………. |
55 |
|
Видеосъемка в режиме Live view |
57 |
|
Индексы …………………………………………………………………………………………………………………………………….. |
60 |
|
Дисплей Live view: Видеосъемка в режиме Live view …………………………………………………….. |
61 |
|
Информационный экран: Видеосъемка в режиме Live view………………………………………… |
62 |
|
Область изображения……………………………………………………………………………………………………………. |
63 |
|
Настройки видео …………………………………………………………………………………………………………………….. |
65 |
|
Просмотр видеороликов……………………………………………………………………………………………………… |
67 |
|
Редактирование видеороликов …………………………………………………………………………………………. |
69 |
|
Обрезка видеороликов …………………………………………………………………………………………………………. |
69 |
|
Сохранение выбранных кадров………………………………………………………………………………………….. |
72 |
xi

|
Режимы P, S, A и M |
73 |
|
P: Программный автоматический режим …………………………………………………………………………. |
75 |
|
S: Автоматический режим с приоритетом выдержки ……………………………………………………. |
76 |
|
A: Автоматический режим с приоритетом диафрагмы …………………………………………………. |
77 |
|
M: Ручной…………………………………………………………………………………………………………………………………… |
78 |
|
Длительные экспозиции (только режим M)………………………………………………………………… |
79 |
|
Настройки пользователя: Режимы U1 и U2 |
81 |
|
Сохранение настроек пользователя …………………………………………………………………………………. |
81 |
|
Вызов настроек пользователя…………………………………………………………………………………………….. |
82 |
|
Сброс настроек пользователя…………………………………………………………………………………………….. |
82 |
|
Режим съемки |
83 |
|
Выбор режима съемки …………………………………………………………………………………………………………. |
83 |
|
Pежимы автоспуска и дистанционного управления …………………………………………………….. |
85 |
|
Режим подъема зеркала………………………………………………………………………………………………………. |
88 |
|
Параметры записи изображения |
89 |
|
Область изображения ………………………………………………………………………………………………………….. |
89 |
|
Качество и размер изображения ………………………………………………………………………………………. |
93 |
|
Качество изображения………………………………………………………………………………………………………….. |
93 |
|
Размер изображения …………………………………………………………………………………………………………….. |
95 |
|
Использование двух карт памяти ……………………………………………………………………………………… |
96 |
|
Фокусировка |
97 |
|
Автофокусировка ………………………………………………………………………………………………………………….. |
97 |
|
Режим автофокусировки………………………………………………………………………………………………………. |
97 |
|
Режим зоны АФ ……………………………………………………………………………………………………………………….. |
99 |
|
Выбор точки фокусировки …………………………………………………………………………………………………. |
101 |
|
Блокировка фокусировки…………………………………………………………………………………………………… |
102 |
|
Ручная фокусировка……………………………………………………………………………………………………………. |
103 |
|
Чувствительность ISO |
105 |
|
Автоматическое управление чувствительностью ISO………………………………………………… |
107 |
xii

|
Экспозиция |
109 |
|
Замер экспозиции……………………………………………………………………………………………………………….. |
109 |
|
Блокировка автоматической экспозиции …………………………………………………………………….. |
110 |
|
Коррекция экспозиции ……………………………………………………………………………………………………… |
112 |
|
Баланс белого |
115 |
|
Тонкая настройка баланса белого ………………………………………………………………………………….. |
117 |
|
Выбор цветовой температуры…………………………………………………………………………………………. |
120 |
|
Ручная настройка………………………………………………………………………………………………………………… |
121 |
|
Коррекция изображения |
129 |
|
Picture Controls …………………………………………………………………………………………………………………….. |
129 |
|
Выбор Picture Control ………………………………………………………………………………………………………….. |
129 |
|
Изменение Picture Controls………………………………………………………………………………………………… |
131 |
|
Создание пользовательских Picture Controls………………………………………………………………… |
134 |
|
Совместное использование пользовательских Picture Controls………………………………. |
136 |
|
Сохранение деталей в светлых и затененных участках …………………………………………….. |
137 |
|
Активный D-Lighting ……………………………………………………………………………………………………………. |
137 |
|
Расширенный динамический диапазон (HDR)………………………………………………………………. |
139 |
|
Съемка со вспышкой |
143 |
|
Использование встроенной вспышки……………………………………………………………………………. |
143 |
|
Режим вспышки…………………………………………………………………………………………………………………….. |
144 |
|
Коррекция вспышки …………………………………………………………………………………………………………… |
148 |
|
Блокировка мощности вспышки……………………………………………………………………………………… |
149 |
|
Другие параметры съемки |
151 |
|
Двухкнопочный сброс: Восстановление настроек по умолчанию …………………………. |
151 |
|
Брекетинг………………………………………………………………………………………………………………………………. |
153 |
|
Мультиэкспозиция ……………………………………………………………………………………………………………… |
160 |
|
Интервальная съемка ………………………………………………………………………………………………………… |
164 |
|
Цейтраферная видеосъемка…………………………………………………………………………………………….. |
168 |
|
Объективы без микропроцессора………………………………………………………………………………….. |
172 |
|
Устройство GPS GP-1/GP-1A ……………………………………………………………………………………………… |
175 |
xiii

|
Дополнительные сведения о просмотре снимков |
177 |
|
Полнокадровый просмотр………………………………………………………………………………………………… |
177 |
|
Информация о снимке…………………………………………………………………………………………………………. |
179 |
|
Просмотр уменьшенных изображений………………………………………………………………………….. |
185 |
|
Просмотр календаря…………………………………………………………………………………………………………… |
186 |
|
Просмотр крупным планом: Увеличение при просмотре…………………………………………. |
187 |
|
Защита фотографий от удаления……………………………………………………………………………………… |
188 |
|
Удаление фотографий ………………………………………………………………………………………………………… |
189 |
|
Полнокадровый просмотр, просмотр уменьшенных изображений и |
|
|
календаря…………………………………………………………………………………………………………………………… |
189 |
|
Меню режима просмотра …………………………………………………………………………………………………… |
190 |
|
Подключения |
193 |
|
Подключение к компьютеру……………………………………………………………………………………………… |
193 |
|
Перед подключением фотокамеры………………………………………………………………………………….. |
193 |
|
Подключение фотокамеры ………………………………………………………………………………………………… |
194 |
|
Печать фотографий……………………………………………………………………………………………………………… |
196 |
|
Подключение принтера………………………………………………………………………………………………………. |
196 |
|
Печать снимков по одному ………………………………………………………………………………………………… |
197 |
|
Печать нескольких снимков ………………………………………………………………………………………………. |
199 |
|
Создание задания печати DPOF: задание печати …………………………………………………………. |
202 |
|
Просмотр фотографий на экране телевизора ……………………………………………………………… |
204 |
|
Сведения о параметрах меню |
207 |
|
DМеню режима просмотра: Управление изображениями ……………………………………………………. |
207 |
|
Папка просмотра ……………………………………………………………………………………………………………… |
207 |
|
Скрыть изображение ………………………………………………………………………………………………………. |
208 |
|
Настройки просмотра …………………………………………………………………………………………………….. |
209 |
|
Копировать изображения ……………………………………………………………………………………………… |
209 |
|
Просмотр изображения …………………………………………………………………………………………………. |
212 |
|
После удаления ………………………………………………………………………………………………………………… |
212 |
|
Повернуть вертикально …………………………………………………………………………………………………. |
212 |
|
Показ слайдов …………………………………………………………………………………………………………………… |
213 |
|
CМеню режима съемки: Параметры съемки ……………………………………………………………………… |
214 |
|
Сброс меню режима съемки …………………………………………………………………………………………. |
214 |
|
Папка для хранения…………………………………………………………………………………………………………. |
215 |
|
Наименование файлов……………………………………………………………………………………………………. |
216 |
|
Авт. управление искаж-ями …………………………………………………………………………………………… |
217 |
|
Цветовое пространство………………………………………………………………………………………………….. |
217 |
|
Контроль виньетирования…………………………………………………………………………………………….. |
218 |
|
Под. шума для длинн. экспоз. (Подавление шума для длинных экспозиций)……. |
218 |
|
Под. шума для выс. ISO ……………………………………………………………………………………………………. |
218 |
xiv
|
AПользовательские настройки: Тонкая настройка параметров фотокамеры …………………….. |
219 |
|
Сброс польз. настроек……………………………………………………………………………………………………. |
221 |
|
a: Автофокусировка……………………………………………………………………………………………………………… |
221 |
|
a1: Выбор приор. для AF-C …………………………………………………………………………………………….. |
221 |
|
a2: Выбор приор. для AF-S……………………………………………………………………………………………… |
221 |
|
a3: Следящ. АФ с сист. Lock-On……………………………………………………………………………………… |
222 |
|
a4: Подсветка точки АФ………………………………………………………………………………………………….. |
222 |
|
a5: Закольц. выбор точки ф-ки……………………………………………………………………………………… |
222 |
|
a6: Число точек фокусировки……………………………………………………………………………………….. |
223 |
|
a7: Встроенная подсветка АФ……………………………………………………………………………………….. |
223 |
|
b: Замер/экспозиция……………………………………………………………………………………………………………. |
224 |
|
b1: Шаг изменения чувст. ISO………………………………………………………………………………………… |
224 |
|
b2: Шаг EV контроля экспоз…………………………………………………………………………………………… |
224 |
|
b3: Простая коррекция экспоз……………………………………………………………………………………… |
225 |
|
b4: Зона центровзвеш. замера ……………………………………………………………………………………… |
226 |
|
b5: Точная настр. оптим. эксп……………………………………………………………………………………….. |
226 |
|
c: Таймеры/блокировка АЭ………………………………………………………………………………………………… |
226 |
|
c1: Блок. АЭ спусков. кнопкой ………………………………………………………………………………………. |
226 |
|
c2: Таймер режима ожидания ………………………………………………………………………………………. |
227 |
|
c3: Автоспуск …………………………………………………………………………………………………………………….. |
227 |
|
c4: Задержка откл. монитора ………………………………………………………………………………………… |
228 |
|
c5: Время ожид. дист. упр. ……………………………………………………………………………………………… |
228 |
|
d: Съемка/дисплей……………………………………………………………………………………………………………….. |
228 |
|
d1: Звуковой сигнал ………………………………………………………………………………………………………… |
228 |
|
d2: Показ сетки в видоискат………………………………………………………………………………………….. |
229 |
|
d3: Отобр. и регулировка ISO ……………………………………………………………………………………….. |
229 |
|
d4: Подсказки……………………………………………………………………………………………………………………. |
229 |
|
d5: Скорость съемки в реж. CL……………………………………………………………………………………… |
229 |
|
d6: Макс. при непрер. съемке……………………………………………………………………………………….. |
230 |
|
d7: Посл. нумерации файлов…………………………………………………………………………………………. |
230 |
|
d8: Информационный экран…………………………………………………………………………………………. |
231 |
|
d9: Подсветка ЖК монитора………………………………………………………………………………………….. |
231 |
|
d10: Задержка спуска затвора………………………………………………………………………………………. |
231 |
|
d11: Предупр. вспышки ………………………………………………………………………………………………….. |
231 |
|
d12: Тип батареи MB-D14……………………………………………………………………………………………….. |
232 |
|
d13: Порядок батарей …………………………………………………………………………………………………….. |
233 |
|
e: Брекетинг/вспышка …………………………………………………………………………………………………………. |
234 |
|
e1: Выдержка синхронизации ………………………………………………………………………………………. |
234 |
|
e2: Выдержка вспышки …………………………………………………………………………………………………… |
235 |
|
e3: Управлен. встр. вспышкой ………………………………………………………………………………………. |
236 |
|
e4: Корр. экспоз. для вспышки ……………………………………………………………………………………… |
240 |
|
e5: Моделирующая вспышка ………………………………………………………………………………………… |
241 |
|
e6: Установка автобрекетинга………………………………………………………………………………………. |
241 |
|
e7: Порядок брекетинга …………………………………………………………………………………………………. |
241 |
xv
|
f: Управление …………………………………………………………………………………………………………………………. |
241 |
|
f1: Кнопка OK (реж. съемки) …………………………………………………………………………………………… |
241 |
|
f2: Функция кнопки «Fn»………………………………………………………………………………………………….. |
242 |
|
f3: Функция кн. предв. просм…………………………………………………………………………………………. |
244 |
|
f4: Функция кн. «AE-L/AF-L»……………………………………………………………………………………………… |
244 |
|
f5: Настр. дисков управления………………………………………………………………………………………… |
245 |
|
f6: Отп. кн. для исп. диска ……………………………………………………………………………………………….. |
246 |
|
f7: Блок. спуск без карты…………………………………………………………………………………………………. |
246 |
|
f8: Инвертировать индик-ры …………………………………………………………………………………………. |
246 |
|
f9: Функция кн. 4на MB-D14 …………………………………………………………………………………………. |
247 |
|
g: Видео …………………………………………………………………………………………………………………………………… |
247 |
|
g1: Функция кнопки «Fn»…………………………………………………………………………………………………. |
247 |
|
g2: Функция кн. предв. просм. ………………………………………………………………………………………. |
248 |
|
g3: Функция кн. «AE-L/AF-L» ……………………………………………………………………………………………. |
248 |
|
g4: Функ. спусков. кн. затвора……………………………………………………………………………………….. |
248 |
|
BМеню настройки: Настройка фотокамеры…………………………………………………………………………… |
249 |
|
Форматировать карту памяти……………………………………………………………………………………….. |
250 |
|
Яркость монитора ……………………………………………………………………………………………………………. |
250 |
|
Эталон. снимок для уд. пыли …………………………………………………………………………………………. |
251 |
|
Подавление мерцания ……………………………………………………………………………………………………. |
252 |
|
Часовой пояс и дата ………………………………………………………………………………………………………… |
253 |
|
Язык (Language)………………………………………………………………………………………………………………… |
253 |
|
Комментарий к изображению ………………………………………………………………………………………. |
253 |
|
Авт. поворот изображения ……………………………………………………………………………………………. |
254 |
|
Информация о батарее…………………………………………………………………………………………………… |
255 |
|
Инф. об авторских правах………………………………………………………………………………………………. |
256 |
|
Сохр./загр. параметры ……………………………………………………………………………………………………. |
257 |
|
Виртуальный горизонт……………………………………………………………………………………………………. |
258 |
|
Тонкая настройка АФ………………………………………………………………………………………………………. |
259 |
|
Загрузка Eye-Fi…………………………………………………………………………………………………………………… |
260 |
|
Версия прошивки …………………………………………………………………………………………………………….. |
260 |
|
NМеню обработки: Создание обработанных копий ………………………………………………………………… |
261 |
|
Создание обработанных копий ………………………………………………………………………………………… |
262 |
|
D-Lighting …………………………………………………………………………………………………………………………… |
264 |
|
Подавление «красных глаз»……………………………………………………………………………………………. |
264 |
|
Кадрирование …………………………………………………………………………………………………………………… |
265 |
|
Монохромный…………………………………………………………………………………………………………………… |
266 |
|
Эффекты фильтра …………………………………………………………………………………………………………….. |
267 |
|
Цветовой баланс ………………………………………………………………………………………………………………. |
268 |
|
Наложение изображений ………………………………………………………………………………………………. |
269 |
|
Обработка NEF (RAW)………………………………………………………………………………………………………. |
271 |
|
Изменить размер ……………………………………………………………………………………………………………… |
272 |
|
Быстрая обработка ………………………………………………………………………………………………………….. |
273 |
|
Выравнивание…………………………………………………………………………………………………………………… |
274 |
|
Управление искажениями ……………………………………………………………………………………………… |
274 |
|
«Рыбий глаз» ………………………………………………………………………………………………………………………. |
274 |
|
Цветовой контур………………………………………………………………………………………………………………. |
275 |
xvi

|
Цветной эскиз…………………………………………………………………………………………………………………… |
275 |
|
Управление перспективой ……………………………………………………………………………………………. |
275 |
|
Эффект миниатюры…………………………………………………………………………………………………………. |
276 |
|
Выборочный цвет ……………………………………………………………………………………………………………. |
277 |
|
Наглядное сравнение …………………………………………………………………………………………………….. |
279 |
|
OМое меню/mНедавние настройки…………………………………………………………………………….. |
280 |
|
Недавние настройки……………………………………………………………………………………………………………. |
283 |
|
Технические примечания |
285 |
|
Совместимые объективы ………………………………………………………………………………………………….. |
285 |
|
Дополнительные вспышки (Speedlights)……………………………………………………………………….. |
292 |
|
Система креативного освещения (CLS) Nikon……………………………………………………………….. |
293 |
|
Прочие принадлежности…………………………………………………………………………………………………… |
297 |
|
Подключение разъема питания и сетевого блока питания ………………………………………. |
299 |
|
Уход за фотокамерой …………………………………………………………………………………………………………. |
300 |
|
Хранение………………………………………………………………………………………………………………………………… |
300 |
|
Чистка ……………………………………………………………………………………………………………………………………… |
300 |
|
Низкочастотный фильтр …………………………………………………………………………………………………….. |
301 |
|
«Очистить сейчас» …………………………………………………………………………………………………………… |
301 |
|
«Очищать при вкл./выкл.» ……………………………………………………………………………………………… |
302 |
|
Чистка вручную………………………………………………………………………………………………………………… |
303 |
|
Уход за фотокамерой и батареей: предупреждения………………………………………………….. |
306 |
|
Доступные настройки ………………………………………………………………………………………………………… |
309 |
|
Настройки по умолчанию …………………………………………………………………………………………………. |
312 |
|
Программный режим экспозиции (Режим Р)……………………………………………………………….. |
315 |
|
Поиск и устранение неисправностей…………………………………………………………………………….. |
316 |
|
Батарея/Дисплей………………………………………………………………………………………………………………….. |
316 |
|
Съемка (Все режимы) ………………………………………………………………………………………………………….. |
317 |
|
Съемка (P, S, A, M)………………………………………………………………………………………………………………… |
319 |
|
Просмотр ……………………………………………………………………………………………………………………………….. |
320 |
|
Прочее…………………………………………………………………………………………………………………………………….. |
321 |
|
Сообщения об ошибках …………………………………………………………………………………………………….. |
322 |
|
Технические характеристики…………………………………………………………………………………………… |
326 |
|
Рекомендованные карты памяти…………………………………………………………………………………….. |
334 |
|
Емкость карты памяти………………………………………………………………………………………………………… |
335 |
|
Ресурс работы от батареи…………………………………………………………………………………………………. |
337 |
|
Предметный указатель………………………………………………………………………………………………………. |
338 |
|
Условия гарантии — Гарантия обслуживания европейского представительства |
|
|
Nikon…………………………………………………………………………………………………………………………………… |
345 |
xvii

Меры безопасности
Перед началом работы с данным устройством внимательно изучите следующие меры безопасности во избежание получения травм и повреждения изделия Nikon. Сохраните инструкции по технике безопасности в месте, доступном всем пользователям данного устройства для дальнейшего ознакомления.
Возможные последствия невыполнения указанных мер безопасности, список которых представлен в данном разделе, обозначены следующим символом:
AЭтот символ обозначает предупреждение. Во избежание возможных травм прочтите все предупреждения до начала использования данного изделия Nikon.
ПРЕДУПРЕЖДЕНИЯ
AНе допускайте попадания солнечных лучей в кадр
При съёмке освещенных сзади объектов не допускайте попадания солнечных лучей в кадр. Солнечные лучи, сфокусированные в фотокамеру, когда солнце находится в кадре или рядом с ним, могут стать причиной пожара.
AНе смотрите на солнце через видоискатель
Взгляд на солнце или другой яркий источник света через видоискатель может вызвать необратимое ухудшение зрения.
AИспользование регулятора диоптрийной настройки
видоискателя
При использовании регулятора диоптрийной настройки видоискателя в процессе съемки будьте осторожны: не повредите случайно глаз пальцем или ногтем.
AПри появлении неисправности немедленно
выключите фотокамеру
При появлении дыма или необычного запаха, исходящих из фотокамеры или сетевого блока питания (приобретается дополнительно), немедленно отсоедините сетевой блок питания от сети и извлеките батарею из фотокамеры, стараясь избежать ожогов. Продолжение эксплуатации может привести к телесному повреждению. Вынув батарею, отнесите устройство в официальный сервисный центр Nikon на проверку.
AНе пользуйтесь устройством в среде горючих газов
Не работайте с электронным оборудованием и с фотокамерой в присутствии горючих газов: это может привести к взрыву или пожару.
AНе надевайте ремень для переноски детям на шею
Надевание ремня фотокамеры на шею младенца или ребенка может привести к удушению.
AХраните устройство в недоступном для детей месте
Несоблюдение этого требования может привести к травме. Кроме того, имейте в виду, что при проглатывании мелких деталей ими можно поперхнуться. В случае проглатывания детьми каких-либо деталей данного устройства немедленно обратитесь к врачу.
AНе разбирайте устройство
Прикосновение к внутренним частям изделия может вызвать телесные повреждения. В случае неисправности ремонт изделия должен выполнять только квалифицированный специалист. Если изделие разбилось в результате падения или при других обстоятельствах, извлеките батарею и/или отключите сетевой блок питания, а затем отнесите изделие для проверки в официальный сервисный центр Nikon.
AНе допускайте длительного контакта с
фотокамерой, батареей или зарядным устройством, когда они включены или используются
Некоторые части устройства нагреваются. При длительном непосредственном контакте устройства с кожей возможно появление низкотемпературных ожогов.
AНе оставляйте изделие в местах, подвергающихся
воздействию очень высоких температур, например, в закрытом автомобиле или под воздействием прямых солнечных лучей
Несоблюдение этой меры предосторожности может привести к поломке или возгоранию.
AНе направляйте вспышку на людей, управляющих
транспортными средствами
Несоблюдение этого требования может привести к аварии.
AИзбегайте контакта с жидкокристаллическим
веществом
Если монитор фотокамеры разбился, соблюдайте осторожность, чтобы не пораниться осколками стекла и избежать контакта жидкокристаллического вещества с кожей, а также попадания этого вещества в глаза или рот.
xviii
AСоблюдайте осторожность при использовании
вспышки
•Прикосновение вспышки во время ее срабатывания к коже или другим объектам может привести к ожогам.
•Использование вспышки на близком расстоянии от глаз объекта съемки может вызвать временное ухудшение зрения. Вспышка должна находиться на расстоянии не менее одного метра от объекта. Особую осторожность следует соблюдать при фотографировании младенцев.
AСоблюдайте осторожность при обращении с батареями
Неправильное обращение с батареями может привести к их протеканию или взрыву. Соблюдайте следующие меры предосторожности при использовании батарей с данным изделием:
•Используйте с данным изделием только рекомендованные батареи.
•Не разбирайте батарею и не замыкайте ее контакты.
•Перед извлечением батареи убедитесь, что фотокамера выключена. Если используется сетевой блок питания, убедитесь, что он отключен от сети.
•При установке батареи соблюдайте правильную ориентацию.
•Не подвергайте батарею сильному нагреву или воздействию открытого огня.
•Не погружайте батареи в воду и не допускайте попадания на них воды.
•При транспортировке батареи закройте контакты защитной крышкой. Не храните и не транспортируйте батареи вместе с металлическими предметами, например шпильками или украшениями.
•Полностью разряженные батареи имеют тенденцию протекать. Во избежание повреждения изделия извлекайте из него разряженные батареи.
•Если батарея не используется, закройте ее контакты защитной крышкой и поместите батарею на хранение в сухое прохладное место.
•Батарея может быть горячей сразу после использования или при длительной работе изделия от батареи. Перед извлечением батареи, выключите фотокамеру и дайте батарее остыть.
•Немедленно прекратите использовать батарею, если заметили в ней какие-либо изменения, например, изменение окраски или деформацию.
AСоблюдайте необходимые меры предосторожности
при работе с зарядным устройством
•Берегите устройство от влаги. Несоблюдение данной меры предосторожности может привести к травме, повреждению изделия вследствие возгорания или поражению электрическим током.
•Пыль на металлических частях сетевой вилки или вокруг них необходимо удалять сухой тканью. Продолжение эксплуатации может привести к возгоранию.
•Не прикасайтесь к сетевому шнуру и не находитесь рядом с зарядным устройством во время грозы. Несоблюдение этого требования может привести к поражению электрическим током.
•Не повреждайте, не модифицируйте, не тяните с силой и не сгибайте сетевой шнур. Не кладите на него тяжелые предметы и не подвергайте воздействию высокой температуры или пламени. При повреждении изоляции сетевого шнура и оголении проводов отнесите шнур для проверки в сервисный центр компании Nikon. Несоблюдение этого требования может привести к возгоранию или поражению электрическим током.
•Не прикасайтесь к сетевой вилке или зарядному устройству мокрыми руками. Несоблюдение данной меры предосторожности может привести к травме, повреждению изделия вследствие возгорания или поражению электрическим током.
•Не используйте с преобразователями напряжения или преобразователями постоянного тока. Несоблюдение этого указания может привести к повреждению изделия, а также к его перегреву или возгоранию.
AИспользуйте соответствующие кабели
При подключении кабелей к входным и выходным разъёмам и гнездам фотокамеры используйте только специальные кабели Nikon, поставляемые вместе с фотокамерой или продаваемые отдельно.
AКомпакт-диски
Запрещается воспроизводить компакт-диски с программным обеспечением и руководствами, прилагаемые к изделию, на проигрывателях компакт-дисков. Воспроизведение компакт-дисков с данными на проигрывателе может привести к потере слуха или повреждению оборудования.
AНе переносите штативы с установленным
объективом или установленной фотокамерой
Вы можете споткнуться или нечаянно ударить других, что приведет к травмам.
AСледуйте указаниям персонала авиалиний и больниц
Данная камера передает радиочастоты, которые могут мешать работе медицинского или бортового навигационного оборудования.
Отключите функцию беспроводных сетей и снимите все беспроводные принадлежности с фотокамеры перед посадкой в самолет и выключите фотокамеру во время взлета и приземления. В медицинских учреждениях, следуйте инструкциям персонала относительно использования беспроводных устройств.
xix
Уведомления
•Никакая часть руководств, включенных в комплект поставки изделия, не может быть воспроизведена, передана, переписана, сохранена в информационно-поисковой системе или переведена на любой язык, в любой форме, любыми средствами без предварительного письменного разрешения компании Nikon.
•Компания Nikon сохраняет за собой право изменять любые характеристики аппаратного и программного обеспечения, описанного в данных руководствах, в любое время и без предварительного уведомления.
Памятка для пользователей Европы
•Компания Nikon не несет ответственности за какой-либо ущерб, вызванный эксплуатацией данного изделия.
•Были приложены все усилия, чтобы обеспечить точность и полноту приведенной в руководствах информации. Компания Nikon будет благодарна за любую информацию о замеченных ошибках и упущениях, переданную в ближайшее представительство компании (адрес предоставляется по запросу).
ВНИМАНИЕ
СУЩЕСТВУЕТ РИСК ВЗРЫВА, ЕСЛИ УСТАНОВЛЕН НЕВЕРНЫЙ ТИП БАТАРЕИ. ЛИКВИДИРУЙТЕ ИСПОЛЬЗОВАННЫЕ БАТАРЕИ СОГЛАСНО ИНСТРУКЦИЯМ.
Данный символ означает, что электрическое и электронное оборудование должно утилизироваться отдельно.
Следующие замечания касаются только пользователей в европейских странах:
•Данное изделие предназначено для раздельной утилизации в соответствующих пунктах утилизации. Не выбрасывайте изделие вместе с бытовым мусором.
•Раздельные сбор и утилизация помогают сберегать природные ресурсы и предотвращают отрицательные последствия для здоровья людей и окружающей среды, которые могут возникнуть из-за неправильной утилизации.
•Подробные сведения можно получить у продавца или в местной организации, ответственной за вторичную переработку отходов.
Этот символ на батарее указывает на то, что данная батарея подлежит раздельной утилизации.
Следующие замечания касаются только пользователей в европейских странах:
•Все батареи, независимо от того, обозначены ли они этим символом или нет, подлежат раздельной утилизации в соответствующих пунктах сбора. Не выбрасывайте их вместе с бытовыми отходами.
•Подробные сведения можно получить у продавца или в местной организации, ответственной за вторичную переработку отходов.
xx
Уведомление о запрещении копирования или репродукции
Необходимо помнить, что даже простое обладание материалом, скопированным или воспроизведенным цифровым способом с помощью сканера, цифровой фотокамеры или другого устройства, может преследоваться по закону.
•Материалы, копирование или воспроизведение которых запрещено законом
Не копируйте и не воспроизводите денежные банкноты, монеты, ценные бумаги, ценные государственные бумаги и ценные бумаги органов местного самоуправления, даже если такие копии и репродукции отмечены штампом «образец».
Запрещено копирование и репродукция денежных банкнот, монет и ценных бумаг других государств.
Запрещено копирование и репродукция негашеных почтовых марок и почтовых открыток, выпущенных государством, без письменного разрешения государственных органов.
Запрещено копирование и репродукция печатей государственных учреждений и документов, заверенных в соответствии с законодательством.
•Предупреждения на копиях и репродукциях
Копии и репродукции ценных бумаг, выпущенных частными компаниями (акции, векселя, чеки, подарочные сертификаты и т.
д.), проездных билетов или купонов помечаются предупреждениями согласно требованиям государственных органов, кроме минимального числа копий, необходимых для использования компанией в деловых целях. Не копируйте и не воспроизводите государственные паспорта; лицензии, выпущенные государственными учреждениями и частными компаниями; удостоверения личности и такие документы, как пропуски или талоны на питание.
•Уведомления о соблюдении авторских прав
Копирование или репродукция продуктов интеллектуального труда, защищенных авторским правом – книг, музыкальных произведений, произведений живописи, гравюр, печатной продукции, географических карт, чертежей, фильмов и фотографий – охраняется государственным и международным законодательством об авторском праве. Не используйте изделие для изготовления незаконных копий, нарушающих законодательство об авторском праве.
Утилизация устройств хранения данных
Следует учитывать, что при удалении изображений или форматировании карт памяти или других устройств хранения данных исходные данные уничтожаются не полностью. В некоторых случаях файлы, удаленные с отслуживших свой срок устройств хранения данных, можно восстановить с помощью имеющихся в продаже программных средств. Информацией личного характера могут воспользоваться злоумышленники. Обеспечение конфиденциальности таких данных является обязанностью пользователя.
Прежде чем утилизировать неиспользуемые устройства хранения данных или передать право собственности на них другому лицу, следует стереть всю информацию с помощью имеющегося в продаже специального программного обеспечения или отформатировать устройство, а затем заполнить его изображениями, не содержащими личной информации (например, видами чистого неба). Не забудьте также заменить снимки, выбранные для ручной предустановки (0 121). При физическом уничтожении устройств хранения данных следует соблюдать осторожность, чтобы не пораниться.
AVC Patent Portfolio License
Данный продукт имеет лицензию AVC Patent Portfolio License для личного и некоммерческого использования клиентом в целях (i) кодирования видео в соответствии со стандартом AVC («видеосодержимое AVC») и/или (ii) декодирования видеосодержимого AVC, закодированного клиентом в рамках личной и некоммерческой деятельности и/или полученного от поставщика видеосодержимого, имеющего лицензию на предоставление видеосодержимого AVC. Эта лицензия не распространяется на любое другое использование, а также не подразумевается для такого использования. Дополнительную информацию можно получить от MPEG LA, L.L.C. См. веб-сайт http://www.mpegla.com
xxi

Используйте только электронные принадлежности компании Nikon
Фотокамеры Nikon изготавливаются по высочайшим стандартам с установкой сложных электронных схем. Только фирменные электронные принадлежности Nikon (в том числе зарядные устройства, батареи, сетевые блоки питания и вспышки), одобренные компанией Nikon специально для использования с данной моделью цифровой фотокамеры, полностью соответствуют необходимым эксплуатационным параметрам и требованиям техники безопасности для данной электронной схемы.
|
Использование электронных принадлежностей сторонних производителей может |
|
повредить фотокамеру и аннулировать гарантию Nikon. Использование |
|
аккумуляторных литий-ионных батарей сторонних производителей, на которых нет |
|
голографического знака Nikon (см. справа), может привести к нарушению работы |
|
фотокамеры, а также к сильному нагреванию, воспламенению, разрушению или протечке батарей. |
Для получения сведений о дополнительных принадлежностях Nikon обратитесь к официальному местному дилеру компании Nikon.
D Пользуйтесь только фирменными принадлежностями Nikon
Только фирменные принадлежности Nikon, одобренные компанией Nikon специально для использования с Вашей моделью цифровой фотокамеры, полностью соответствуют необходимым эксплуатационным параметрам и требованиям техники безопасности. Использование принадлежностей, не произведенных компанией Nikon, может повредить фотокамеру и послужить причиной аннулирования гарантии Nikon.
D Техническое обслуживание фотокамеры и принадлежностей
Фотокамера является устройством высокой точности и требует регулярного обслуживания. Компания Nikon рекомендует проверять фотокамеру у официального представителя или в сервисном центре компании Nikon не реже одного раза в один-два года и производить ее техническое обслуживание каждые три-пять лет (такие услуги являются платными). При использовании фотокамеры на профессиональном уровне ее проверку и обслуживание рекомендуется проводить чаще. Одновременно следует производить проверку и обслуживание всех принадлежностей, которые постоянно используются вместе с фотокамерой, например объективов и дополнительных вспышек.
A Перед съёмкой важных событий
Перед съёмкой важных событий, например свадьбы, или перед тем, как взять фотокамеру в путешествие, сделайте пробный снимок, чтобы убедиться в правильности работы фотокамеры. Компания Nikon не несет ответственность за убытки или упущенную выгоду, возникшие в результате неправильной работы изделия.
A Постоянное совершенствование
В рамках развиваемой компанией Nikon концепции «постоянного совершенствования» пользователям регулярно предоставляются обновляемая информация о поддержке выпущенных продуктов и учебные материалы на следующих сайтах:
•Для пользователей в США: http://www.nikonusa.com/
•Для пользователей в Европе и Африке: http://www.europe-nikon.com/support/
•Для пользователей в странах Азии, Океании и Ближнего Востока: http://www.nikon-asia.com/
Посетите один из этих сайтов, чтобы получить последнюю информацию об изделиях, ответы на часто задаваемые вопросы, а также общие рекомендации по фотосъёмке и обработке цифровых изображений. Дополнительные сведения можно получить у региональных представителей компании Nikon. Контактную информацию см. на сайте: http://imaging.nikon.com/
xxii

Информация для декларации Таможенного Союза / сертификата
D610
Дата изготовления: См. заднюю обложку руководства пользователя Изготовитель: Никон Корпорейшн
Шин-Юракучо Билдинг, 12-1, Юракучо 1-тёме, Тийода-ку, Токио 100-8331, Япония Телефон: +81-3-3214-5311
Импортер: ООО «Никон» Российская Федерация, Москва, 115280, ул. Ленинская Слобода, д.19
Телефон: +7 (495) 663-77-64
Страна изготовления: Таиланд
Сертификат /декларация соответствия: ТС № RU Д-JP.АЯ46.B.60315
Срок действия: с 03.07.2013 по 02.07.2016 Орган по сертификации: ФГУ «РОСТЕСТ-МОСКВА»
Зарядное устройство MH-25
xxiii
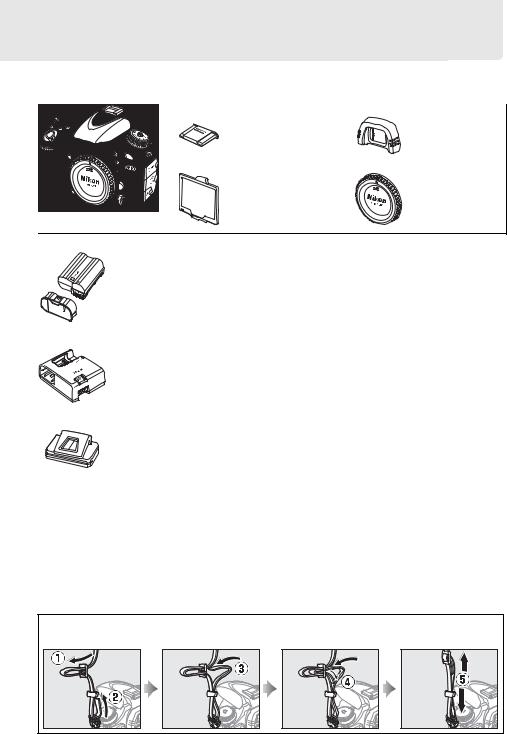
Содержание упаковки
Проверьте наличие всех перечисленных здесь элементов, поставляемых с фотокамерой.
|
• |
Крышка |
• |
Резиновый |
|
башмака для |
|||
|
наглазник |
|||
|
принадлежностей |
|||
|
DK-21 |
|||
|
BS-1 |
|||
|
• |
Крышка |
• |
Защитная |
|
монитора BM-14 |
крышка BF-1B |
• Фотокамера D610
• Литий-ионная аккумуляторная батарея EN-EL15 (с защитной крышкой)
•Зарядное устройство MH-25 (Сетевой блок питания
поставляется только в тех странах или регионах, где это необходимо. Форма сетевого шнура зависит от страны продажи.)
•Ремень AN-DC10
•USB-кабель UC-E15
•Компакт-диск ViewNX 2
•Руководство пользователя (данное руководство)
Карты памяти продаются отдельно.
• Крышка окуляра DK-5
|
A Ремень фотокамеры |
|
Присоедините ремень к двум проушинам на корпусе фотокамеры, как показано ниже. |
|
xxiv |

Введение |
|
|
X |
|
Знакомство с фотокамерой |
|
|
Ознакомьтесь с элементами управления фотокамерой и средствами отображения |
|
|
информации. При необходимости отметьте этот раздел закладкой и обращайтесь к нему |
X |
|
во время чтения остальных разделов руководства. |
Корпус фотокамеры
|
1 |
………………………………………….Диск режима съемки |
6, 83 |
10 |
Кнопка E |
||||||||||||||
|
2 |
Диск выбора режимов……………………………………………… |
5 |
Коррекция экспозиции ……………………………………. |
112 |
||||||||||||||
|
3 |
Кнопка разблокировки диска выбора режимов…..5 |
11 |
Двухкнопочный сброс……………………………………… |
151 |
||||||||||||||
|
4 |
Проушина для ремня фотокамеры |
Кнопка видеосъемки ……………………………………………… |
58 |
|||||||||||||||
|
5 |
Кнопка разблокировки диска режима |
12 |
Кнопка Z/Q |
|||||||||||||||
|
съемки………………………………………………………………. |
6, 83 |
Замер экспозиции…………………………………………….. |
109 |
|||||||||||||||
|
6 |
Башмак для принадлежностей (для |
Форматирование карт памяти …………………………. |
31 |
|||||||||||||||
|
13 |
Метка фокальной плоскости (E) |
103 |
||||||||||||||||
|
дополнительной вспышки)……………………………… |
292 |
|||||||||||||||||
|
7 |
Крышка башмака для принадлежностей………….. |
292 |
14 |
Панель управления………………………………………………….. |
7 |
|||||||||||||
|
8 |
………………………………………………Выключатель питания |
1 |
||||||||||||||||
|
9 |
Спусковая кнопка затвора ………………………………. |
38, 39 |
||||||||||||||||
|
A Выключатель питания |
||||||||||||||||||
|
Поверните выключатель питания, как показано |
Поверните выключатель питания, как показано |
|||||||||||||||||
|
на рисунке, чтобы включить фотокамеру. |
на рисунке, чтобы выключить фотокамеру. |
|||||||||||||||||
1
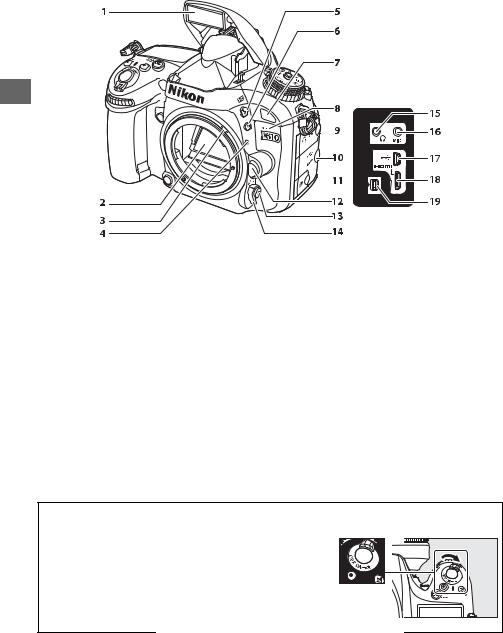
Корпус фотокамеры (Продолжение)
X
|
1 |
…………………………………………………………..Вст. вспышка |
143 |
10 |
…………………Крышка разъема HDMI/USB |
194, 196, 204 |
|
|
2 |
Зеркало ……………………………………………………………. |
88, 303 |
11 |
Крышка разъема для дополнительных |
||
|
3 |
Рычаг сопряжения замера ………………………………….. |
328 |
принадлежностей……………………………………………… |
298 |
||
|
4 |
Метка крепления объектива ………………………………… |
26 |
12 |
Кнопка отсоединения объектива …………………………. |
26 |
|
|
5 |
Кнопка M/Y |
13 |
Кнопка режима АФ …………………………………… |
51, 98, 100 |
||
|
Режим вспышки………………………………………………… |
143 |
14 |
Переключатель режимов фокусировки |
……….97, 103 |
||
|
Коррекция вспышки ………………………………………… |
148 |
15 |
Разъем для наушников ………………………………………….. |
61 |
||
|
6 |
Кнопка D |
16 |
Разъем для внешнего микрофона………………………… |
61 |
||
|
7 |
Брекетинг ………………………………………….. |
153, 156, 158 |
17 |
Разъем USB |
||
|
Инфракрасный приемник (спереди) …………………… |
86 |
Подключение к компьютеру…………………………… |
194 |
|||
|
8 |
Встроенный микрофон…………………………………….. |
58, 65 |
Подключение к принтеру ……………………………….. |
196 |
||
|
9 |
Крышка аудиоразъема ………………………………….. |
61, 298 |
18 |
Мини-контактный разъем HDMI………………………… |
204 |
|
|
19 |
Разъем для дополнительных |
|||||
|
принадлежностей……………………………………… |
175, 298 |
|||||
|
A Подсветка ЖК монитора |
|
|
Поворот выключателя питания в направлении Dвключает |
Выключатель питания |
|
таймер режима ожидания и подсветку панели управления |
|
|
(подсветку ЖК монитора), что позволяет видеть дисплей в |
|
|
темноте. После отпускания выключателя питания и возврата в |
|
|
положение ON подсветка будет оставаться включенной в |
|
|
течение шести секунд, пока работает таймер режима |
|
|
ожидания или до тех пор, пока не будет выполнен спуск |
|
|
затвора или выключатель питания не будет снова повернут в |
|
|
направлении D. |
2

Корпус фотокамеры (Продолжение)
X
|
1 |
Вспомогательная подсветка АФ |
…………………………. |
223 |
7 |
Крышка разъема для дополнительного |
|
|
Индикатор автоспуска……………………………………………. |
86 |
батарейного блока MB-D14 …………………………….. |
297 |
|||
|
Лампа подавления эффекта «красных ……..глаз» |
145 |
8 |
Крышка разъема питания……………………………………. |
299 |
||
|
2 |
Вспом. диск управления ………………………………… |
12, 245 |
9 |
Контакты микропроцессора |
||
|
3 |
Кнопка предварительного |
10 |
Байонет объектива…………………………………………. |
26, 103 |
||
|
просмотра………………………………………. |
60, 77, 244, 248 |
11 |
Сопряжение АФ |
|||
|
4 |
Кнопка «Fn» (функция) ……………………. |
92, 149, 174, 242 |
12 |
Штативное гнездо |
||
|
5 |
Крышка батарейного отсека …………………………………. |
23 |
13 |
Защитная крышка…………………………………………… |
25, 298 |
|
|
6 |
………………….Защелка крышки батарейного отсека |
23 |
D Микрофон и динамик
Не помещайте микрофон и динамик близко к магнитным устройствам. В результате несоблюдения данного предостережения могут быть повреждены данные, записанные на магнитных устройствах.
3

Корпус фотокамеры (Продолжение)
X
|
1 |
Окуляр видоискателя…………………………………………….. |
33 |
|
2 |
Резиновый наглазник ……………………………………………. |
86 |
|
3 |
Кнопка O/Q |
|
|
Удалить………………………………………………………… |
47, 189 |
|
|
Форматирование карт памяти …………………………. |
31 |
|
|
4 |
Кнопка K |
|
|
Просмотр …………………………………………………….. |
46, 177 |
|
|
5 |
Монитор |
|
|
Настройки просмотра ………………………………………….. |
9 |
|
|
Live view …………………………………………………………. |
49, 57 |
|
|
Просмотр изображений ……………………………………. |
46 |
|
|
Полнокадровый просмотр ……………………………… |
177 |
|
|
6 |
Кнопка G |
|
|
Меню ……………………………………………………………. |
18, 207 |
|
|
7 |
Кнопка c/b |
|
|
Обработка……………………………………………………. |
69, 261 |
|
|
Picture Control……………………………………………… |
50, 129 |
|
|
8 |
Кнопка L/U |
|
|
Help (Справка)…………………………………………………….. |
18 |
|
|
Защита ……………………………………………………………….. |
188 |
|
|
Баланс белого……………………………………. |
115, 117, 120 |
|
|
9 |
Кнопка X/T |
|
|
Увеличение при просмотре ……………………………. |
187 |
|
|
Качество/размер изображения ………………….. |
93, 95 |
|
10 |
Кнопка W/S |
||
|
Уменьшение при просмотре/уменьшенные |
|||
|
изображения …………………………………………. |
185, 186 |
||
|
Чувствительность ISO ……………………………………… |
105 |
||
|
Авт. управл. чувствит. ISO……………………………….. |
107 |
||
|
Двухкнопочный сброс …………………………………….. |
151 |
||
|
11 |
Регулятор диоптрийной настройки……………………… |
33 |
|
|
12 |
Кнопка A |
||
|
Использование кнопки блокировки АЭ/ |
|||
|
АФ……………………………………………………. |
102, 110, 244 |
||
|
13 |
Главный диск управления……………………………… |
12, 245 |
|
|
14 |
Мультиселектор ……………………………………………………… |
19 |
|
|
15 |
Кнопка J(OK)…………………………………………………. |
19, 241 |
|
|
16 |
Блокировка переключателя фокусировки……….. |
101 |
|
|
17 |
Крышка гнезда для карты памяти………………………… |
29 |
|
|
18 |
Датчик яркости окружающего освещения для |
||
|
автоматического управления яркостью |
|||
|
монитора………………………………………………………. |
53, 250 |
||
|
19 |
Переключатель режима Live view |
||
|
Фотосъемка в режиме Live view……………………….. |
49 |
||
|
Видеосъемка в режиме Live view……………………… |
57 |
||
|
20 |
Кнопка a ………………………………………………………….. |
49, 57 |
|
|
21 |
Инфракрасный приемник (сзади) ………………………… |
86 |
|
|
22 |
Индикатор доступа к карте памяти ……………….. |
29, 38 |
|
|
23 |
Динамик …………………………………………………………………… |
67 |
|
|
24 |
Кнопка R(информация)…………………………………… |
9, 11 |
4
![]()
Диск выбора режимов
Фотокамера имеет следующие перечисленные ниже режимы. Чтобы выбрать режим, нажмите кнопку разблокировки диска выбора режимов и поверните диск выбора режимов.
Диск выбора режимов
Кнопка разблокировки диска выбора режимов
X
Режимы P, S, A и M
Выберите эти режимы для получения полного управления настройками фотокамеры.
•P—Программный автоматический режим (0 75)
•S—Автоматический режим с приоритетом выдержки (0 76)
•A—Автоматический режим с приоритетом диафрагмы (0 77)
•M—Ручной (0 78)
Автоматические режимы
Выберите эти режимы для выполнения простой фотосъемки по принципу «наведи и снимай».
|
• iАвто (0 35) |
• jАвто (вспышка |
|
выключена) (0 35) |
|
Сюжетные режимы (0 40)
Фотокамера автоматически оптимизирует настройки в соответствии с выбранным сюжетом. Выберите режим, который подходит к съемке данного сюжета.
Режимы U1 и U2 (0 81)
Сохранение и вызов пользовательских настроек съемки.
A Объективы без микропроцессора
Объективы без микропроцессора (0 285) могут использоваться только в режимах A и M. При выборе другого режима, когда установлен объектив без микропроцессора, блокируется спуск затвора.
5

Диск режима съемки
Чтобы выбрать режим съемки, нажмите Кнопка разблокировки диска режима съемки
кнопку разблокировки диска режима съемки и поверните диск режима съемки на необходимую настройку (0 83).
X
|
Диск режима съемки |
|||
|
Режим |
Описание |
||
|
S |
Покадровая |
При каждом нажатии спусковой кнопки затвора |
|
|
делается одна фотография. |
|||
|
CL |
Непрерывный |
Фотокамера делает фотографии с низкой скоростью, |
|
|
низкоскоростной |
пока нажата спусковая кнопка затвора. |
||
|
CH |
Непрерывный |
Фотокамера делает фотографии с высокой |
|
|
высокоскоростной |
скоростью, пока нажата спусковая кнопка затвора. |
||
|
J |
Тихий спуск затвора |
Аналогично покадровому режиму, за исключением |
|
|
того, что шум фотокамеры уменьшается. |
|||
|
Qc (тихий непрерывный) |
Фотокамера делает фотографии, пока спусковая |
||
|
M спуск затвора |
кнопка затвора нажата до конца; шум, издаваемый |
||
|
фотокамерой, уменьшается. |
|||
|
E Автоспуск |
Фотосъемка с автоспуском. |
||
|
4 |
Дистанционное |
Фотосъемка с помощью дополнительного |
|
|
управление |
дистанционного управления ML-L3. |
||
|
MUP |
Подъем зеркала |
Подъем зеркала перед фотосъемкой. |
6

Панель управления
|
1 |
Индикатор цветовой температуры……………………. |
120 |
|
2 |
Выдержка…………………………………………………………… |
76, 78 |
|
Величина коррекции экспозиции ……………………… |
112 |
|
|
Величина коррекции вспышки ………………………….. |
148 |
|
|
Тонкая настройка баланса белого……………………… |
118 |
|
|
Цветовая температура ………………………………… |
115, 120 |
|
|
Баланс белого, номер предустановки ………………. |
121 |
|
|
Количество снимков в последовательности |
||
|
брекетинга экспозиции и вспышки ……………….. |
153 |
|
|
Количество снимков в последовательности |
||
|
брекетинга баланса белого……………………………… |
156 |
|
|
Количество интервалов для интервальной |
||
|
съемки………………………………………………………………… |
165 |
|
|
Фокусное расстояние (объективы без |
||
|
микропроцессора)……………………………………………. |
172 |
|
17 |
Замер экспозиции………………………………………………… |
109 |
|
18 |
Индикатор синхронизации вспышки………………… |
234 |
|
19 |
Индикатор режима гибкой программы ………………. |
75 |
|
20 |
Индикатор автоматического выбора зоны АФ…… |
99 |
|
Индикатор режима зоны АФ………………………………. |
100 |
|
|
Индикатор 3D слежения ………………………………………… |
99 |
|
|
21 |
Индикатор расширенного динамического |
|
|
диапазона…………………………………………………………… |
140 |
|
|
22 |
Индикатор мультиэкспозиции …………………………… |
161 |
|
3 |
Индикатор |
…………………………………батареи MB — D14 |
233 |
||
|
4 |
Индикатор батареи ………………………………………………… |
35 |
|||
|
5 |
Режим вспышки…………………………………………………….. |
144 |
|||
|
6 |
Режим автофокусировки……………………………………….. |
97 |
|||
|
7 |
Размер изображения……………………………………………… |
95 |
|||
|
8 |
Качество изображения ………………………………………….. |
93 |
|||
|
9 |
Индикатор тонкой настройки баланса белого |
……118 |
|||
|
10 |
Баланс белого………………………………………………………… |
115 |
|||
|
11 |
Индикатор остановки диафрагмы ……………….. |
73, 288 |
|||
|
12 |
………………………………………….Диафрагма (число f) |
77, 78 |
X |
||
|
Диафрагма (кол-во остановок) …………………….. |
73, 288 |
||||
|
………………………………………………Шаг брекетинга |
154, 156 |
||||
|
Количество снимков в последовательности |
|||||
|
брекетинга активного D-Lighting ……………………. |
158 |
||||
|
Количество снимков за определенный |
|||||
|
интервал |
……………………………………………………………… |
165 |
|||
|
Максимальная диафрагма (объективы без |
|||||
|
микропроцессора)…………………………………………….. |
174 |
||||
|
Индикатор ………………………………………….режима ПК |
195 |
||||
|
13 |
Индикатор гнезда для карты памяти |
||||
|
(Гнездо 1)………………………………………………………… |
30, 96 |
||||
|
14 |
Индикатор гнезда для карты памяти |
||||
|
(Гнездо 2)………………………………………………………… |
30, 96 |
||||
|
15 |
Индикатор ……………………….чувствительности ISO |
105 |
|||
|
Индикатор автоматической чувствительности |
|||||
|
ISO………………………………………………………………………… |
108 |
||||
|
16 |
Индикатор ……………………………..интервала съемки |
166 |
|||
|
Индикатор ……………интервальной видеосъемки |
170 |
||||
|
Индикатор брекетинга экспозиции и |
|||||
|
23 |
|||||
|
вспышки ……………………………………………………………… |
153 |
||||
|
Индикатор ……………..брекетинга баланса белого |
156 |
||||
|
Индикатор ……брекетинга активного D-Lighting |
158 |
||||
|
24 |
Индикатор …..выполнения брекетинга |
153, 156, 158 |
|||
|
25 |
Индикатор …………………….коррекции экспозиции |
112 |
|||
|
26 |
Индикатор ………………………….коррекции вспышки |
148 |
|||
|
27 |
«K» (отображается, когда свободной памяти |
||||
|
хватает более …………………..чем на 1 000 кадров) |
36 |
||||
|
28 |
Число оставшихся ………………………………………кадров |
36 |
|||
|
Число кадров, оставшихся до заполнения буфера |
|||||
|
памяти…………………………………………………….. |
38, 84, 335 |
||||
|
Чувствительность ……………………………………………ISO |
105 |
||||
|
Индикатор записи предустановки баланса |
|||||
|
белого …………………………………………………………………. |
122 |
||||
|
Величина активного …………………………..D-Lighting |
138 |
||||
|
Индикатор записи интервальной |
|||||
|
видеосъемки………………………………………………………. |
170 |
||||
|
Номер объектива, ……………….заданный вручную |
174 |
||||
|
Индикатор ………………………………….режима съемки |
195 |
||||
|
Индикатор ……………………подключения HDMI-CEC |
205 |
||||
7

1
2
3
4
5
6
7
8
9
10
11
12
13
|
Сетка кадрирования (отображается, когда выбран |
14 |
Индикатор |
…….блокировки мощности вспышки |
149 |
|
|
параметр Вкл. для пользовательской настройки |
15 |
Индикатор |
синхронизации вспышки………………… |
234 |
|
|
d2)………………………………………………………………………… |
229 |
16 |
Индикатор |
остановки диафрагмы ……………….. |
73, 288 |
|
Точки фокусировки………………………………… |
38, 101, 222 |
17 |
Индикатор экспозиции ………………………………………….. |
78 |
|
|
Режим зоны АФ ………………………………………………………. |
99 |
Индикация коррекции экспозиции …………………… |
112 |
||
|
Границы зоны АФ ……………………………………… |
33, 37, 179 |
Индикатор наклона влево-вправо…………………….. |
243 |
||
|
Индикатор фокусировки……………………….. |
38, 102, 103 |
18 |
Предупреждение о низком уровне заряда |
||
|
Замер экспозиции ………………………………………………… |
109 |
батареи …………………………………………………………………. |
35 |
||
|
Блокировка автоматической экспозиции (АЭ)….110 |
19 |
Индикатор брекетинга экспозиции и |
|||
|
Выдержка …………………………………………………………… |
76, 78 |
вспышки……………………………………………………………… |
153 |
||
|
Режим автофокусировки ………………………………………. |
97 |
Индикатор брекетинга баланса белого…………….. |
156 |
||
|
Диафрагма (число f)………………………………………….. |
77, 78 |
20 |
Индикатор брекетинга активного D-Lighting…… |
158 |
|
|
Диафрагма (кол-во остановок) …………………….. |
73, 288 |
Индикатор автоматической чувствительности |
|||
|
Индикатор коррекции вспышки ………………………… |
148 |
21 |
ISO ……………………………………………………………………….. |
108 |
|
|
Индикатор коррекции экспозиции……………………. |
112 |
Число оставшихся кадров……………………………………… |
36 |
||
|
Индикатор чувствительности ISO |
105 |
Число кадров, оставшихся до заполнения буфера |
|||
|
памяти |
38, 84, 335 |
||||
|
Чувствительность ISO |
105 |
||||
|
Индикатор записи предустановки баланса |
|||||
|
Величина активного D-Lighting |
138 |
||||
|
белого |
122 |
||||
|
Режим зоны АФ |
99 |
||||
|
Величина коррекции экспозиции |
112 |
||||
|
Индикатор готовности вспышки |
39, 231 |
||||
|
Величина коррекции вспышки |
148 |
||||
|
22 |
«K» (отображается, когда свободной памяти |
||||
|
хватает более чем на 1 000 кадров)………………….. |
36 |
D Нет батареи
Если батарея полностью разряжена или не вставлена, изображение в видоискателе потускнеет. Это допустимо и не является признаком неисправности. Нормальная яркость экрана видоискателя восстановится после установки полностью заряженной батареи.
D Панель управления и индикации в видоискателе
Яркость панели управления и индикации в видоискателе зависит от температуры, и при низкой температуре время отклика может увеличиться. Это допустимо и не является признаком неисправности.
8

Информационный экран
Нажмите кнопку R, чтобы отобразить выдержку, диафрагму, число оставшихся кадров, режим зоны АФ, и другую съемочную информацию на мониторе.
|
1 |
Режим съемки …………………………………………….. |
35, 40, 73 |
|
2 |
Индикатор режима гибкой программы ………………. |
75 |
|
3 |
Индикатор синхронизации вспышки………………… |
234 |
|
4 |
Выдержка…………………………………………………………… |
76, 78 |
|
Величина коррекции экспозиции ……………………… |
112 |
|
|
Величина коррекции вспышки ………………………….. |
148 |
|
|
Количество снимков в последовательности |
||
|
брекетинга экспозиции и вспышки ……………….. |
153 |
|
|
Количество снимков в последовательности |
||
|
брекетинга баланса белого……………………………… |
156 |
|
|
Фокусное расстояние (объективы без |
||
|
микропроцессора)……………………………………………. |
172 |
|
|
Цветовая температура ………………………………… |
115, 120 |
|
|
5 |
Индикатор цветовой температуры……………………. |
120 |
|
6 |
Индикатор остановки диафрагмы ……………….. |
73, 288 |
|
7 |
Диафрагма (число f) …………………………………………. |
77, 78 |
|
Диафрагма (кол-во остановок)……………………… |
73, 288 |
|
|
Шаг брекетинга…………………………………………….. |
154, 155 |
|
|
Количество снимков в последовательности |
||
|
брекетинга активного D-Lighting……………………. |
158 |
|
|
Максимальная диафрагма (объективы без |
||
|
микропроцессора)……………………………………………. |
174 |
|
8 |
Режим съемки |
6, 83 |
||
|
X |
||||
|
9 |
Непрерывная скорость съемки …………………………. |
229 |
||
|
Индикатор экспозиции |
78 |
|||
|
Индикация коррекции экспозиции……………………. |
112 |
|||
|
Индикатор выполнения брекетинга |
||||
|
Брекетинг экспозиции и вспышки …………………. |
153 |
|||
|
Брекетинг баланса белого ………………………………. |
156 |
|||
|
10 |
Индикатор расширенного динамического |
|||
|
диапазона …………………………………………………………… |
140 |
|||
|
Дифференциал экспозиции для расширенного |
||||
|
динамического диапазона……………………………….. |
140 |
|||
|
11 |
Индикатор батареи фотокамеры …………………………. |
35 |
||
|
12 |
Индикация типа батареи MB-D14……………………….. |
232 |
||
|
Индикатор батареи MB-D14………………………………… |
232 |
|||
|
13 |
«K» (отображается, когда свободной памяти |
|||
|
хватает более чем на 1 000 кадров)………………….. |
36 |
|||
|
14 |
Число оставшихся кадров……………………………………… |
36 |
||
|
Индикатор записи интервальной |
||||
|
видеосъемки………………………………………………………. |
170 |
|||
|
Номер объектива, заданный вручную ………………. |
174 |
|||
|
15 |
Назначение кнопки «Fn» ……………………………………… |
242 |
||
|
16 |
Назначение кнопки «AE-L/AF-L» (АЭ-Б/АФ-Б) ………… |
244 |
||
|
17 |
Реж. пульта дистан-го упр-ния……………………………… |
85 |
||
|
18 |
Индикатор подавления шума для длинных |
|||
|
выдержек……………………………………………………………. |
218 |
|||
|
19 |
Д-вие для карты в Гнезде 2……………………………………. |
96 |
||
|
20 |
Баланс белого………………………………………………………… |
115 |
||
|
Индикатор тонкой настройки баланса белого …. |
118 |
|||
|
21 |
Индикатор автоматического выбора зоны АФ …. |
100 |
||
|
Индикатор точек фокусировки…………………………… |
101 |
|||
|
Индикатор режима зоны АФ……………………………….. |
100 |
|||
|
Индикатор 3D слежения………………………………………. |
100 |
|||
|
22 |
Качество изображения ………………………………………….. |
93 |
||
|
23 |
Размер изображения……………………………………………… |
95 |
||
|
24 |
Режим вспышки…………………………………………………….. |
144 |
9

|
32 |
||||||||||||||||||||||||||||||
|
33 |
||||||||||||||||||||||||||||||
|
34 |
||||||||||||||||||||||||||||||
|
35 |
||||||||||||||||||||||||||||||
|
36 |
||||||||||||||||||||||||||||||
|
37 |
||||||||||||||||||||||||||||||
|
38 |
||||||||||||||||||||||||||||||
|
39 |
||||||||||||||||||||||||||||||
|
40 |
||||||||||||||||||||||||||||||
|
41 |
||||||||||||||||||||||||||||||
|
42 |
||||||||||||||||||||||||||||||
|
25 |
Индикатор области изображения |
90 |
||||||||||||||||||||||||||||
|
43 |
||||||||||||||||||||||||||||||
|
26 |
Замер экспозиции |
109 |
||||||||||||||||||||||||||||
|
27 |
Авт. управление искаж-ями………………………………… |
217 |
44 |
|||||||||||||||||||||||||||
|
28 |
Индикатор «Часы не установлены» |
28, 253 |
||||||||||||||||||||||||||||
|
45 |
||||||||||||||||||||||||||||||
|
29 |
Индикатор комментария к изображению |
253 |
||||||||||||||||||||||||||||
|
46 |
||||||||||||||||||||||||||||||
|
30 |
Инф. об авторских правах |
256 |
||||||||||||||||||||||||||||
|
47 |
||||||||||||||||||||||||||||||
|
31 |
Индикатор брекетинга экспозиции и |
|||||||||||||||||||||||||||||
|
вспышки……………………………………………………………… |
153 |
|||||||||||||||||||||||||||||
|
Индикатор брекетинга баланса белого…………….. |
156 |
|||||||||||||||||||||||||||||
|
Индикатор брекетинга активного D-Lighting |
……158 |
48 |
||||||||||||||||||||||||||||
|
Величина брекетинга активного D-Lighting …….. |
138 |
|
Индикатор мультиэкспозиции …………………………… |
162 |
|
Индикатор «Звуковой сигнал»……………………………. |
228 |
|
Индикатор коррекции экспозиции……………………. |
112 |
|
Индикатор коррекции вспышки………………………… |
148 |
|
Индикатор блокировки мощности вспышки……. |
149 |
|
Индикатор интервала съемки ……………………………. |
166 |
|
Индикатор интервальной видеосъемки…………… |
170 |
|
Индикатор подключения устройства GPS ………… |
175 |
|
Назначение кнопки предварительного |
|
|
просмотра………………………………………………………….. |
244 |
|
Индикатор контроля виньетирования……………… |
218 |
|
Индикатор активного D-Lighting……………………….. |
138 |
|
Индикатор подавления шума для высокой |
|
|
чувствительности ISO……………………………………….. |
218 |
|
Настройки видео…………………………………………………….. |
65 |
|
Режим автофокусировки……………………………………….. |
97 |
|
Индикатор подключения устройства Eye-Fi …….. |
260 |
|
Индикатор чувствительности ISO………………………. |
105 |
|
Чувствительность ISO ………………………………………….. |
105 |
|
Индикатор автоматической чувствительности |
|
|
ISO ……………………………………………………………………….. |
108 |
|
Индикатор Picture Control …………………………………… |
130 |
A Выключение монитора
Чтобы удалить съемочную информацию с монитора, нажмите кнопку Rеще два раза или нажмите спусковую кнопку затвора наполовину. Монитор выключится автоматически, если в течение 10 секунд не выполняется никаких действий с фотокамерой.
A См. также
Для получения информации о том, как долго монитор остается включенным, см. пользовательскую настройку c4 (Задержка откл. монитора, 0 228). Для получения информации об изменении цвета букв на информационном экране см. пользовательскую настройку d8 (Информационный экран, 0 231).

Изменение настроек на информационном экране
Чтобы изменить значения перечисленных ниже настроек, нажмите кнопку Rна информационном экране. Выделите нужный элемент с помощью мультиселектора и нажмите J, для просмотра параметров для выделенного элемента.
|
1 |
……………………………………………………..Настройки видео |
65 |
|
|
2 |
Подавление шума для высокой чувствительности |
X |
|
|
ISO………………………………………………………………………… |
218 |
||
|
3 |
……………………………………………..Активный D-Lighting |
137 |
|
|
4 |
Контроль виньетирования………………………………….. |
218 |
|
|
5 |
Назначение кнопки предварительного |
||
|
просмотра…………………………………………………………… |
244 |
||
|
6 |
Назначение кнопки «Fn»………………………………………. |
242 |
|
|
7 |
Назначение кнопки «AE-L/AF-L» (АЭ-Б/АФ-Б) ………… |
244 |
|
|
8 |
Реж. пульта дистан-го упр-ния……………………………… |
85 |
|
|
9 |
Подавление шума для длинных выдержек……….. |
218 |
|
|
10 |
Д-вие для карты в Гнезде 2……………………………………. |
96 |
A Подсказки
Подсказка дает название выбранного элемента, отображаемого на информационном экране. Подсказки можно выключить с помощью пользовательской настройки d4 (Подсказки; 0 229).
11

Диски управления |
||
|
Главный и вспомогательный диски управления используются отдельно или в |
||
|
комбинации с другими элементами управления для регулировки разных настроек. |
||
|
Кнопка M/Y |
||
|
Режим вспышки |
||
|
Коррекция вспышки |
||
|
Кнопка D |
||
|
X |
Брекетинг |
Кнопка режима АФ |
|
Режим автофокусировки |
||
|
Режим зоны АФ |
||
|
Вспом. диск управления |
|
Диск выбора |
Кнопка E |
|
режимов |
Коррекция экспозиции
Кнопка Z/Q
Замер экспозиции
Главный диск управления
Кнопка L/U
Баланс белого
Кнопка X/T
Качество/размер
изображения
Кнопка W/S
Чувствительность ISO Авт. управл. чувствит. ISO
12

Сюжетный режим
Выберите сюжет (h; 0 40).
Режим h
|
Главный диск |
Монитор |
|
управления |
|
Качество и размер изображения |
X |
|
|
Задайте качество изображения |
||
|
(0 93). |
+ |
|
|
Кнопка X(T) |
Главный диск |
Панель управления |
|
управления |
||
|
Выберите размер изображения |
||
|
(0 95). |
+ |
|
|
Кнопка X(T) |
Вспом. диск |
Панель управления |
|
управления |
||
|
Автофокусировка |
||
|
Выберите режим |
||
|
автофокусировки (0 98). |
+ |
|
|
Кнопка режима АФ |
Главный диск |
Панель управления |
|
управления |
||
|
Выберите режим зоны АФ (0 100). |
||
|
+ |
||
|
Кнопка режима АФ |
Вспом. диск |
Панель управления |
|
управления |
13

Чувствительность ISO
Задайте чувствительность ISO (0 105).
|
+ |
||
|
Кнопка W(S) |
Главный диск |
Панель управления |
|
управления |
|
Установите автоматическое |
||
|
X |
управление чувствительностью |
+ |
|
ISO (0 107). |
||
|
Кнопка W(S) |
Вспом. диск |
Панель управления |
|
управления |
Экспозиция
Выберите комбинацию выдержки и диафрагмы (режим P; 0 75).
|
Главный диск |
Панель управления |
|
управления |
Выберите выдержку (режим S или M; 0 76, 78).
|
Режим S или M |
Главный диск |
Панель управления |
|
управления |
|
Выберите диафрагму (режим A или |
||
|
M; 0 77, 78). |
||
|
Режим A или M |
Вспом. диск |
Панель управления |
|
управления |
||
|
Выберите способ замера |
||
|
экспозиции (режим P, S, A или M; |
+ |
|
|
0 109). |
||
|
Кнопка Z(Q) |
Главный диск |
Панель управления |
|
управления |
14
![]()
|
Задайте коррекцию экспозиции |
||
|
(режим P, S, A или M; 0 112). |
+ |
|
|
Кнопка E |
Главный диск |
Панель управления |
|
управления |
||
|
Включите или отмените |
||
|
брекетинг/выберите количество |
+ |
|
|
снимков в последовательности |
X |
|
|
брекетинга (режим P, S, A или M; |
||
|
0 153). |
||
|
Кнопка D |
Главный диск |
Панель управления |
|
управления |
||
|
Выберите шаг брекетинга (режим |
||
|
P, S, A или M; 0 154). |
+ |
|
|
Кнопка D |
Вспом. диск |
Панель управления |
|
управления |
||
|
Баланс белого |
||
|
Выберите параметр баланса |
||
|
белого (режим P, S, A или M; 0 115). |
+ |
|
|
Кнопка L(U) |
Главный диск |
Панель управления |
|
управления |
||
|
Выполните тонкую настройку |
||
|
баланса белого (0 117), задайте |
+ |
|
|
цветовую температуру (0 120), |
||
|
или выберите предустановку |
||
|
баланса белого (0 121) в режиме |
||
|
P, S, A или M. |
||
|
Кнопка L(U) |
Вспом. диск |
Панель управления |
|
управления |
15

|
Настройки вспышки |
||
|
Выберите режим вспышки (0 144). |
||
|
+ |
||
|
Кнопка M(Y) |
Главный диск |
Панель управления |
|
управления |
||
|
Задайте коррекцию вспышки |
||
|
X (режим P, S, A или M; 0 148). |
+ |
|
|
Кнопка M(Y) |
Вспом. диск |
Панель управления |
|
управления |
16

Крышка монитора BM-14
Крышка из прозрачной пластмассы входит в комплект с фотокамерой, чтобы сохранить монитор чистым и защитит его, когда фотокамера не используется. Чтобы присоединить крышку, вставьте выступы на верхней части крышки в соответствующие отверстия над монитором фотокамеры (q) и надавите на нижнюю часть крышки до щелчка (w).
Чтобы снять крышку, крепко возьмите фотокамеру и аккуратно потяните за нижнюю часть крышки по направлению от фотокамеры, как показано на рисунке справа.
17

Меню фотокамеры
К большинству параметров съемки, просмотра и настройки можно получить доступ из меню фотокамеры. Для просмотра меню нажмите кнопку G.
|
X |
Закладки |
||||||||
|
Выберите одно из следующих меню: |
|||||||||
|
• |
D: Просмотр (0 207) |
• |
B: Настройка (0 249) |
||||||
|
• |
C: Съемка (0 214) |
• |
N: Обработка (0 261) |
||||||
|
• |
A: Пользовательские настройки (0 219) |
• O/m: Мое меню или Недавние настройки (по |
|||||||
|
умолчанию Мое меню; 0 280) |
|||||||||
|
Бегунок показывает расположение в текущем меню. |
|||||||||
Текущие настройки показаны символами.
|
Пункты меню |
|
Пункты текущего меню. |
d
Если в нижнем левом углу монитора отображается символ d, для отображения справки нажмите кнопку L(U). После нажатия кнопки появится описание выбранного в настоящий момент параметра или меню. Для прокрутки экрана нажмите кнопку 1 или 3.
18

Использование меню фотокамеры
Мультиселектор и кнопка Jиспользуются для навигации по меню фотокамеры.
Переместить курсор вверх
|
Кнопка J: Выбор выделенного |
|
|
элемента |
|
|
Отмена выбора и возврат |
Выбор выделенного элемента или |
|
в предыдущее меню |
отображение вспом. меню |
Переместить курсор вниз
Для навигации по меню выполните описанные ниже действия.
X
1Откройте меню.
Чтобы открыть меню, нажмите кнопку G.
2Выделите символ текущего меню.
Чтобы выделить символ текущего меню, нажмите кнопку 4.
3Выберите меню.
Чтобы выбрать нужное меню, нажмите 1 или 3.
4Поместите курсор в выбранное меню.
Чтобы переместить курсор в выбранное меню, нажмите 2.
19

5Выделите элемент меню.
Чтобы выделить элемент меню, нажмите 1 или 3.
6 Отобразите список параметров.
X
Чтобы просмотреть параметры выбранного элемента меню, нажмите 2.
7Выделите параметр.
Чтобы выделить параметр, нажмите 1 или 3.
8Выберите выделенный элемент.
Чтобы выбрать выделенный элемент, нажмите J. Для выхода без выбора элемента нажмите кнопку
G.
Учитывайте следующее:
•Элементы меню, которые отображаются серым цветом, в данный момент недоступны.
•Хотя при нажатии 2 обычно происходит то же, что и при нажатии J, существуют случаи, когда выбор можно сделать только при нажатии J.
•Чтобы выйти из меню и вернуться в режим съемки, нажмите спусковую кнопку затвора наполовину (0 39).
20

Перед началом работы
Зарядите батарею
Питание фотокамеры осуществляется от литий-ионной аккумуляторной батареи EN-EL15 (входит в комплект поставки). Для максимальной продолжительности съемки, перед использованием зарядите батарею с помощью зарядного устройства MH-25 (входит в комплект поставки). Для полной перезарядки полностью разряженной батареи требуется приблизительно 2 часа 35 минут.
1Подключите сетевой шнур.
Подключите сетевой шнур. Штекер сетевого блока питания должен быть в положении, как показано на рисунке справа; не поворачивайте его.
2Снимите защитную крышку.
Снимите защитную крышку с батареи.
3 Вставьте батарею.
Вставьте батарею в батарейный отсек зарядного устройства, как показано на рисунке.
|
4 Подключите зарядное устройство к сети. |
Батарея |
Зарядка |
|||
|
Пока батарея заряжается, будет медленно мигать |
заряжается |
закончена |
|||
|
индикатор CHARGE (ЗАРЯДКА). |
|||||
D Зарядка батареи
Заряжайте батарею в помещении при температуре окружающей среды 5 °C–35 °C. Батарея не будет заряжаться, если ее
температура ниже 0 °C или выше 60 °C.
5После завершения зарядки извлеките батарею из зарядного устройства.
Зарядка завершается, когда индикатор CHARGE (ЗАРЯДКА) перестает мигать. Отключите зарядное устройство от сети и извлеките батарею.
21

A Сетевой блок питания
В зависимости от страны или региона целевого назначения, сетевой блок питания может комплектоваться зарядным устройством. Чтобы использовать блок питания, вставьте его в гнездо питания зарядного устройства (q). Сдвиньте защелку сетевого блока питания в направлении, показанном на рисунке (w), и поверните блок питания на 90°, чтобы закрепить его в указанном положении (e). Чтобы отсоединить блок питания, повторите шаги в обратном порядке.
|
Защелка сетевого |
|
|
X |
блока питания |
|
90° |
22

Вставьте батарею
Прежде чем вставить батарею, поверните выключатель питания в положение OFF.
D Установка и извлечение батарей
Всегда выключайте фотокамеру перед установкой или извлечением батарей.
1Откройте крышку батарейного отсека.
Освободите защелку (q) и откройте (w) крышку батарейного отсека.
2Вставьте батарею.
Вставьте батарею правильной стороной (q), сдвинув батареей оранжевую защелку в сторону. Защелка удерживает батарею, когда она полностью вставлена (w).
3 Закройте крышку батарейного отсека.
A Извлечение батареи
Выключите фотокамеру и откройте крышку батарейного отсека. Нажмите на защелку батареи в направлении, показанном стрелкой, чтобы освободить батарею, а затем выньте ее рукой.
23

D Батарея и зарядное устройство
Прочтите все предупреждения, приведенные на страницах xviii–xix и 306–308 данного руководства, и соблюдайте их. Не используйте батарею при температуре окружающей среды
ниже 0 °C или выше 40 °C; несоблюдение данного предостережения может вызвать повреждение батареи или ухудшить ее работу. Емкость батареи может уменьшиться, а время зарядки – увеличиться, при температуре батареи от 0 °C до 15 °C и от 45 °C до 60 °C.
Если индикатор CHARGE (ЗАРЯДКА) быстро мигает во время зарядки (примерно восемь раз в секунду), убедитесь, что температура не выходит за допустимые пределы, затем отключите зарядное устройство из сети, выньте и еще раз вставьте батарею. Если проблема не устраняется, незамедлительно отключите устройство и отнесите батарею и зарядное устройство дилеру или в сервисный центр компании Nikon.
X Не замыкайте накоротко контакты зарядного устройства; несоблюдение этого требования может привести к перегреву и повреждению зарядного устройства. Не перемещайте зарядное устройство и не касайтесь батареи во время зарядки. В некоторых случаях несоблюдение данного правила может привести к тому, что индикатор будет указывать на полную зарядку, когда батарея заряжена лишь частично. Выньте и еще раз вставьте батарею, чтобы начать зарядку снова. Емкость батареи может временно уменьшиться в случае зарядки при низких температурах или эксплуатации при температуре ниже температуры зарядки. Если батарея заряжается при температуре ниже 5 °C, то индикатор ресурса работы батареи на экране Информация о батарее (0 255) может показывать временное уменьшение.
Батарея может быть горячей сразу после использования. Перед зарядкой дождитесь, пока батарея остынет.
Входящий в комплект сетевой шнур и сетевой блок питания, используются только с MH-25. Используйте зарядное устройство только для зарядки совместимых с ним батарей. Отключайте от сети неиспользуемое зарядное устройство.
Заметное уменьшение времени, в течение которого полностью заряженная батарея сохраняет заряд, в условиях комнатной температуры, свидетельствует о том, что ее необходимо заменить. Приобретите новую батарею EN-EL15.
A Литий-ионные аккумуляторные батареи EN-EL15
Входящий в комплект EN-EL15 обменивается информацией с совместимыми устройствами, что позволяет фотокамере показывать уровень заряда на шести уровнях (0 35). Параметр Информация о батарее в меню настройки показывает заряд батареи, ресурс работы батареи и количество фотографий, сделанных после последней зарядки батареи (0 255).
24
 Loading…