На чтение 12 мин. Просмотров 1.6k. Опубликовано

Synology предлагает очень удобное для пользователя устройство сетевого подключенного хранилища (NAS), но это не означает, что его нужно распаковывать и запускать – это всего лишь один клик. Давайте приступим к работе, чтобы мы могли перейти ко всем интересным проектам, которые может облегчить компактный NAS с серверной функциональностью.
Содержание
- Что такое NAS-устройство Synology?
- Физическая настройка: заполните, подключите, загрузите и наслаждайтесь тишиной
- Выбор жесткого диска
- Добавление дисков
- Где оставить свой NAS
- Первая загрузка: настройка вашего NAS
- Знакомство с DiskStation Manager: основы
- Что теперь?
Что такое NAS-устройство Synology?
Synology – это компания, основанная в 2000 году, специализирующаяся на устройствах сетевого хранилища (NAS). Проще говоря, NAS – это компьютер, оптимизированный для хранения данных, часто с дополнительными функциями, расположенными сверху. Synology имеет две основные линейки продуктов, DiskStation и RackStation, первая из которых предназначена для домашних пользователей и небольших офисов, а вторая – для более крупных коммерческих сред.
Размеры моделей DiskStation варьируются от простых моделей с одним отсеком (от 150 долларов США), которые предлагают место для хранения данных без избыточности, вплоть до более крупных моделей, которые поддерживают 12 дисков (от 1000 долларов США) с поддержкой. для расширенного многодискового резервирования и даже расширения через отсеки для вспомогательных дисков. Между двумя концами спектра размеров они могут эффективно покрывать потребности домашнего использования каждого: от толпы «Мне нужно сделать резервную копию моих семейных фотографий» до толпы «Мне нужно сделать резервную копию всего Интернета».
Модели DiskStation поставляются с собственной операционной системой Linux, известной как DiskStation Manager. DiskStation Manager поставляется с очень интуитивно понятным веб-интерфейсом, который выглядит так, как будто вы используете настольный компьютер, в комплекте с легко распознаваемыми значками, хорошо продуманными меню и множеством файлов справки. В дополнение к основным функциям NAS, таким как управление файлами, вы можете добавить большой набор пользовательских плагинов, которые обрабатывают такие вещи, как организация ваших семейных фотографий, торрент-файлы и все, что между ними. Конечным результатом является многофункциональное устройство, которое может выполнять задачи полноразмерного компьютера, но без энергопотребления. (Даже самые мощные модели DiskStation потребляют менее половины, чем настольный компьютер или домашний сервер в натуральную величину).
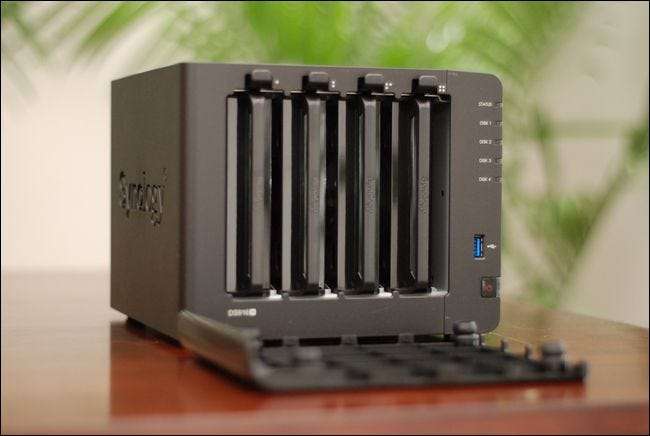
Давайте рассмотрим процесс установки Synology DS916 +, модели с четырьмя отсеками, с большим пространством для хранения и большим объемом памяти и вычислительной мощности (включая транскодирование видео на лету для домашних потоковых приложений). Это отличная модель для демонстрации процесса установки, так как она использует дополнительные порты и другие, которые есть в более крупных моделях, но при этом использует ту же операционную систему, что и во всех моделях DiskStation.
Физическая настройка: заполните, подключите, загрузите и наслаждайтесь тишиной
NAS-устройство Synology поставляется с кабелем питания, кабелем Ethernet, винтами для крепления дисков, и, если у вас модель более высокого уровня, оно может также поставляться с лотками отсека для горячей замены жестких дисков и вторым кабелем Ethernet (поддержка высокопроизводительных дисковых станций две сетевые карты для увеличения пропускной способности сети). Прежде чем мы рассмотрим фактическую единицу и как ее заполнить, давайте поговорим о выборе диска.
Выбор жесткого диска
Для обеспечения оптимальной работы NAS мы рекомендуем начинать с новых накопителей, в том размере, который позволяет ваш бюджет. Для наших целей мы будем использовать накопители Western Digital Red емкостью 8 ТБ, которые специально предназначены для использования с сетевыми хранилищами, где предполагается, что работа будет осуществляться круглосуточно в условиях ограниченного пространства. Независимо от марки жестких дисков, с которыми вы работаете, вы должны, как минимум, избегать бюджетных или настольных дисков и придерживаться дисков сервера/NAS.
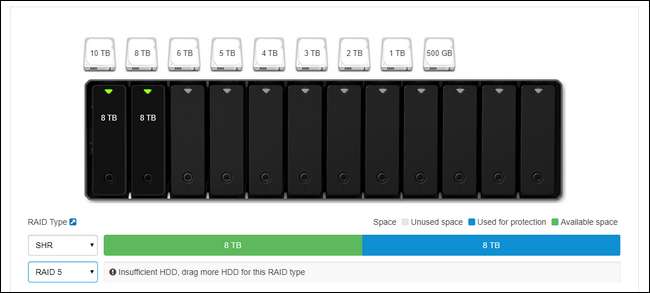
Если вы размышляете над тем, какой размер дисков использовать (или с эффектами смешивания дисков разных размеров), мы настоятельно рекомендуем использовать простой в использовании RAID-калькулятор Synology с функцией перетаскивания, чтобы визуализировать, как различные комбинации дисков дают разный объем используемого пространства.

Synology использует настраиваемую настройку RAID, которая называется Synology Hybrid RAID (SHR) – как показано на выбранном параметре на снимке экрана выше, – предназначенную для сохранения избыточности ваших дисков. Это означает, что вам понадобится больше дисков, но если один из них выйдет из строя, вы не потеряете данные, поскольку они будут отражены на другом диске. Вы можете прочитать больше о RAID здесь, если вы не знакомы с ним.
Однако даже если вы знакомы с базовой терминологией RAID, вы, скорее всего, не знакомы с настройкой Synolgy Hybrid RAID, если раньше вы не использовали продукты Synology. Это превосходный вариант практически для любого потребительского сценария, не обращайте внимания. Он предлагает больше гибкости, чем традиционный RAID, гораздо проще расширять хранилище в будущем, если вы его используете, и значительно повышает эффективность использования дискового пространства, когда дисковый массив не имеет идеально подходящих дисков. Не верьте нам на слово – если вы хотите погрузиться в технический сбой между SHR и RAID, вы можете прочитать об этом здесь.
Добавление дисков
Давайте посмотрим на чехол со снятой крышкой, а затем вытолкнем (и заполним) отсеки для дисков.Чтобы снять лицевую панель, просто отведите ее в сторону от корпуса NAS. Пластина удерживается на месте толстыми резиновыми пальцами (чтобы уменьшить вибрацию) и должна легко оторваться при первом касании.

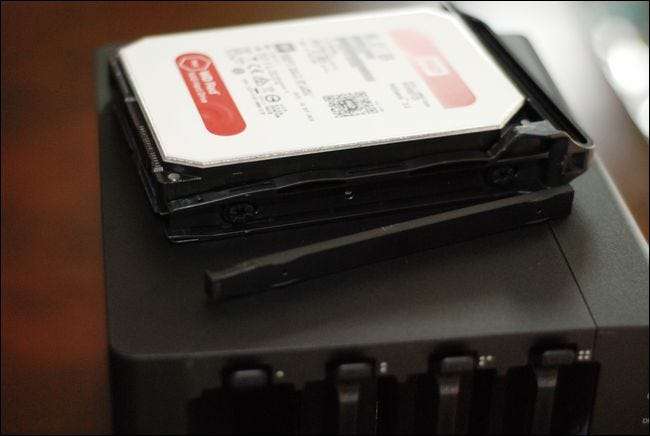
Обратите внимание на вкладки в верхней части каждого отсека для дисков. Просто осторожно сдвиньте язычок вверх и выдвиньте лоток. Несмотря на то, что винты лотка включены во все модели (некоторые из более экономичных моделей линейки Synology не имеют лотков для дисков и требуют непосредственного монтажа дисков с помощью винтов), вам не нужно использовать их на лотках с горячей заменой , Хотя вы можете сделать это, если вы действительно настроены по-своему, гораздо лучше использовать жесткие диски в их лотках без винтов, аккуратно потянув боковые ограждения (см. Ниже), вставив жесткий диск в лоток, и затем возвращая боковые щитки на место. (Единственное исключение для использования винтов на поддонах с горячей заменой – это использование 2,5-дюймовых накопителей – их необходимо закрепить винтами, чтобы они не скользили.)

Жесткие диски очень надежно удерживаются на месте благодаря резиновым втулкам на боковых стенках лотков, а отсутствие жесткого контакта между диском и лотком (благодаря резиновому амортизатору) делает удивительную работу, сводя к минимуму вибрацию. После того, как вы загрузили все свои диски, вставьте их обратно в NAS.
Где оставить свой NAS
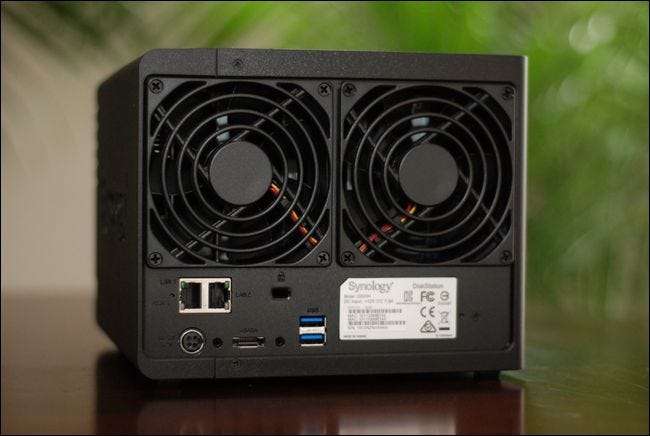
С накопителями в вашем NAS пришло время взглянуть на заднюю часть NAS, чтобы увидеть, где все будет подключено, и кратко рассказать о том, где вы разместите его в своем доме. Во-первых, вот обратная сторона.

В этой конкретной модели вы найдете разъем питания, два порта LAN, порт eSATA, два порта USB (которые можно использовать как для расширения хранилища и резервного копирования, так и для использования Synology в качестве сервера печати) и, конечно же, Охлаждающие вентиляторы. Почему два порта LAN на более крупных моделях премиум-класса? Если вы используете эти модели в среде с высокими требованиями (например, ваша Synology является файловым сервером для большого домохозяйства или организации, которые одновременно получают доступ к NAS), вы можете использовать оба подключения к локальной сети для значительного увеличения пропускной способности. Такая схема выгодна, когда все люди одновременно транслируют HD-видео, но менее важна, если вы используете только одну потоковую передачу видео в один пункт назначения.
Имея это в виду, давайте поговорим о размещении NAS. Где бы вы ни размещали NAS, в идеале это должна быть более прохладная зона вашего дома (цокольный этаж и подвалы великолепны, а в душных комнатах на чердаке нет) с жестким доступом к маршрутизатору или сетевому коммутатору. Если вы в основном используете беспроводную сеть, это означает, что вы можете ограничить размещение своего NAS рядом с тем местом, где установлен маршрутизатор.
Первая загрузка: настройка вашего NAS
Как только вы нашли подходящее место для своего NAS и подключили его, пришло время загрузить его в первый раз. В отличие от традиционного компьютера, к нему не будут подключены мышь, клавиатура и монитор. Когда вы нажимаете кнопку питания, она быстро загружается, а затем просто остается там (не беспокойтесь, если вы ничего не слышите, мы не сможем услышать вентиляторы на нашем устройстве, если у нас не будет нашего уха на несколько дюймов с обратной стороны).
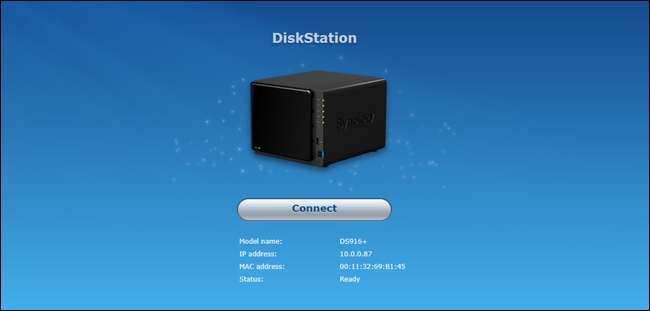
После включения подключитесь к любому компьютеру в вашей локальной сети (соединение Ethernet или Wi-Fi в порядке, если оно находится в той же сети, что и NAS). Откройте ваш веб-браузер и перейдите на http://find.synology.com, это вызовет мастер запуска Web Assistant, как показано ниже. Нажмите «Подключиться», чтобы начать настройку Synology NAS.

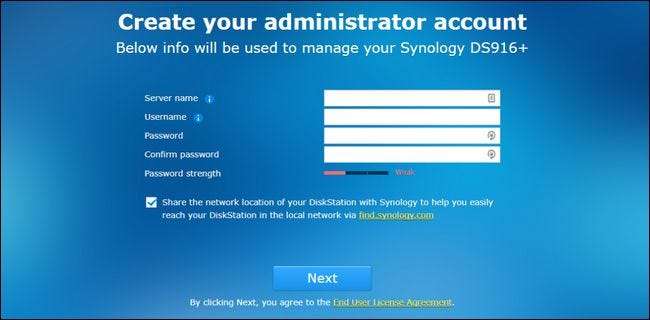
Первым шагом является присвоение имени вашему серверу и создание учетной записи администратора. На этом этапе необходимо рассмотреть несколько вещей. Во-первых, имя вашего сервера – это то, как ваш NAS будет отображаться в вашей сети и будет отображаться в различных приложениях. Компактное имя, которое легко набрать, например, «черный ящик» или «диск-станция», предпочтительнее длинных имен с пробелами, как «Miltons Magic Download Fun Time Box».
Ваше имя пользователя и пароль могут быть любыми, но вот профессиональный совет для пользователей Windows: если вы сделаете имя пользователя и пароль для учетной записи администратора вашего NAS такими же, как имя пользователя и пароль вашего ПК с Windows, вы сможете для беспрепятственного доступа ко всем сетевым ресурсам на NAS с вашего ПК с Windows без ввода пароля или имени пользователя.

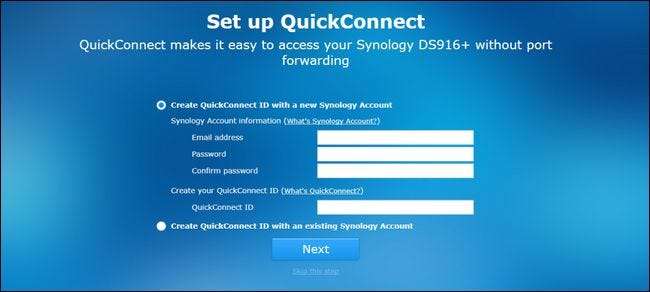
На следующем шаге вы можете создать учетную запись Synology и идентификатор быстрого подключения. Этот шаг не является обязательным, однако , если вы планируете получить доступ к Synology NAS за пределами вашей сети для каких-либо целей (и по ряду причин вы можете захотеть сделать это, например, получить доступ к своим файлам, находясь вдали от дома, резервное копирование фотографий из отпуска или обмен файлами с друзьями) это удобный способ пропустить манипуляции с настройками конфигурации позже.QuickConnect – это бесплатная служба динамического DNS от Synology, которая позволяет вам всегда звонить домой на ваш NAS с помощью легко запоминаемых адресов, таких как http://quickconnect.to/ yourNASname вместо вашего домашний IP-адрес.

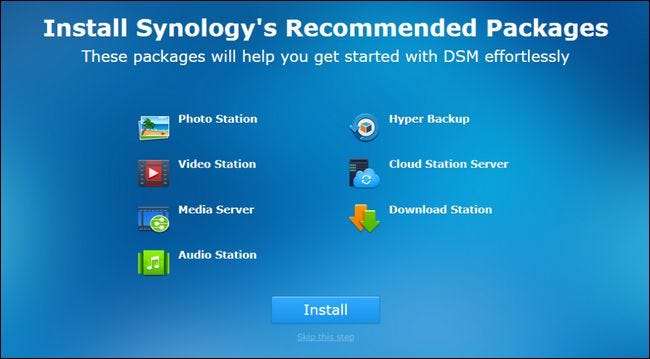
После настройки (или пропуска) шага Quick Connect вам будет предложено установить несколько основных пакетов приложений. Вы также можете пропустить этот шаг и выбрать их один за другим позже, но, учитывая полезность основных пакетов, мы предлагаем установить их все (они занимают тривиальное пространство при установке).

После установки (или пропуска) вы закончили базовый процесс установки, и мастер закроется.
Знакомство с DiskStation Manager: основы
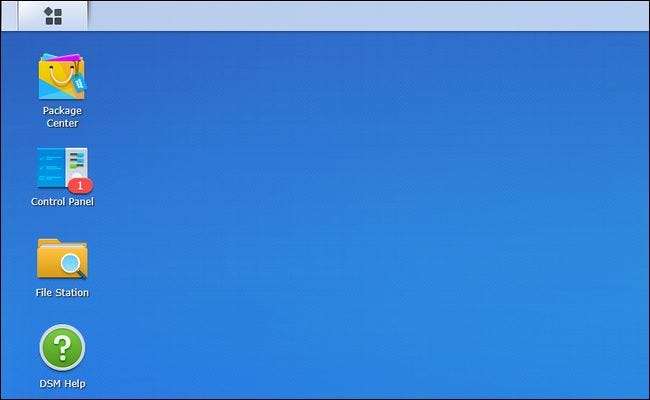
После этого последнего шага вам будет предложено сделать очень краткий обзор интерфейса DiskStation Manager. Давайте посмотрим на некоторые из этих ключевых областей сейчас. Вот как выглядит «рабочий стол» DiskStation Manager. Доступ к приложениям с помощью системы ярлыков и меню, уведомлений в правом верхнем углу и монитора работоспособности системы и ресурсов в правом нижнем углу.

С левой стороны у вас есть главное меню и ярлыки на рабочем столе. Кнопка «Пуск», подобная меню в верхней части экрана, откроет все ваши приложения, но прямо на рабочем столе имеется прямой доступ к четырем часто используемым приложениям: Центру пакетов, Панели управления, File Station и Справке DSM, как показано ниже.

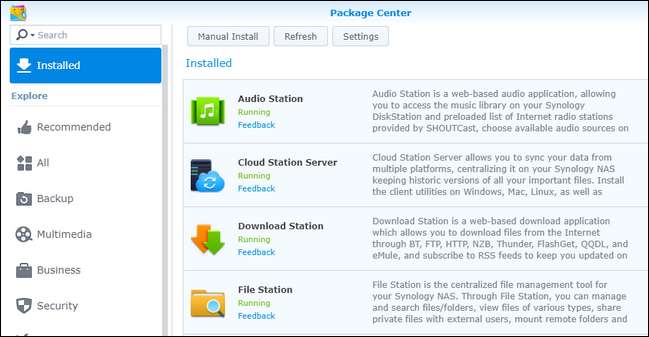
Центр пакетов – это место, где вы можете устанавливать, обновлять и удалять приложения. Если вы видите уведомления из Центра пакетов, это означает, что одно или несколько установленных приложений требуют обновления.

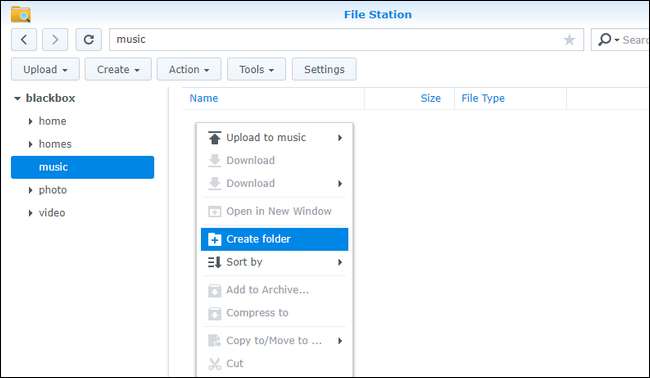
File Station – это файловый менеджер, который позволяет вам легко создавать и просматривать папки на вашем NAS с поддержкой манипулирования файлами (например, вырезать, вставлять, перемещать и удалять), встроенной прямо в контекстное меню, вызываемое правой кнопкой мыши.

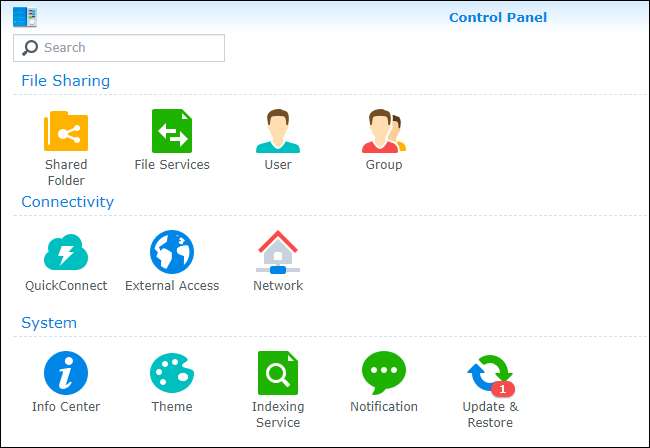
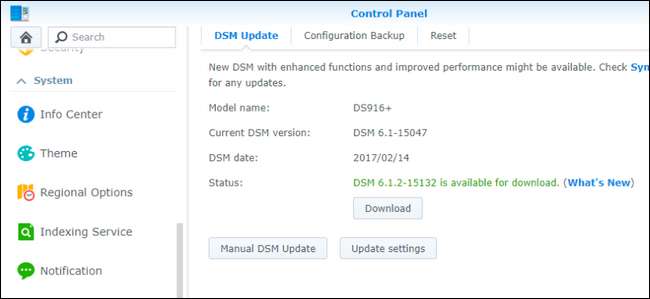
Панель управления аналогична панели управления в других операционных системах и содержит настройки для всего: от конфигурации сети до управления группами пользователей. Панель управления – это отличная последняя остановка для учебника по настройке, поскольку она позволяет нам показать вам, как обновить операционную систему вашего NAS перед тем, как отправлять вас на игру. После того, как вы открыли панель управления, щелкнув по ней, щелкните значок «Обновление и восстановление» в разделе «Система».

Здесь вы найдете все доступные обновления ядра. Нажмите «Загрузить», чтобы загрузить обновление, а затем, как только оно загрузится, нажмите «Установить».

Ваш NAS перезагрузится, и вы будете использовать самую последнюю версию DiskStation Manager.
Что теперь?
К этому моменту у вас уже есть новый NAS-сервер Synology. Вы можете спросить себя: «А как насчет конфигурации диска? Форматирование? Сетевые акции? Почему мы не настраиваем это? ». Ну, мы не настраиваем это, потому что DiskStation Manager автоматически настраивает его в фоновом режиме. В зависимости от количества дисков, которые вы вставили во время начальной настройки, NAS автоматически выбирает оптимальную конфигурацию для этих дисков, чтобы максимизировать потенциал вашего хранилища (при этом сохраняя избыточность с RAID). Вы можете зайти в меню настроек и поэкспериментировать с конфигурацией, чтобы распределить диски по-разному, но если у вас нет острой необходимости делать это, мы рекомендуем вам придерживаться оптимизированного по умолчанию пространства/избыточности.
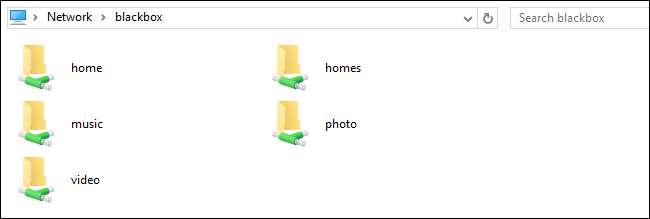
Кроме того, уже есть сетевые ресурсы, настроенные с учетной записью администратора вашего NAS в качестве пользователя по умолчанию. Кроме того, если вы установили пакеты приложений, для многих из этих пакетов уже есть каталоги по умолчанию. Вы можете просматривать эти каталоги либо в приложении File Station, которое вы видели в предыдущем разделе учебного пособия, либо просто указав обозревателю файлов на своем ПК имя сетевого ресурса. Мы назвали наш NAS-устройство Synology «черным ящиком», чтобы он был доступен в Windows как «черный ящик», как показано ниже.

С этой базовой настройкой вы не сможете использовать готовые к работе приложения, вы готовы начать изучение установленных пакетов (и доступных пакетов) в Центре пакетов, а также заполнить доступное хранилище всем, что подходит для резервного копирования. ,

Synology предлагает очень удобную для пользователя работу с сетевым хранилищем (NAS), но это не означает, что ее распаковка и запуск выполняется одним щелчком мыши. Давайте приступим к работе, чтобы мы могли перейти ко всем интересным проектам, которые может облегчить компактный NAS с функциональностью, подобной серверу.
Что такое Synology NAS?
Synology
— компания, основанная в 2000 году, специализирующаяся на сетевых хранилищах (NAS). Проще говоря, NAS — это компьютер, оптимизированный для хранения данных, часто с дополнительными функциональными возможностями, расположенными поверх. Synology предлагает две основные линейки продуктов: DiskStation и RackStation, первая из которых предназначена для домашних пользователей и небольших офисов, а вторая — для более крупных коммерческих сред.
В
Модели DiskStation
варьируются по размеру от простых моделей с одним отсеком (от 150 долларов США), которые предлагают неизбыточное место для хранения ваших данных, до более крупных моделей, поддерживающих 12 дисков (от 1000 долларов США +) с поддержкой расширенных многопользовательских -дисковое резервирование и даже расширение за счет дополнительных дисковых отсеков. На двух концах диапазона размеров они могут эффективно удовлетворить потребности в домашнем использовании всех, от группы «мне нужно сделать резервную копию моих семейных фотографий» до группы «мне нужно сделать резервную копию всего Интернета».
Модели DiskStation поставляются с собственной операционной системой на основе Linux, известной как DiskStation Manager. DiskStation Manager поставляется с очень интуитивно понятным веб-интерфейсом, который создает впечатление, будто вы используете настольный компьютер, с легко узнаваемыми значками, хорошо продуманными меню и множеством файлов справки. В дополнение к основным функциям NAS, таким как управление файлами, вы можете добавить большой набор настраиваемых плагинов, которые обрабатывают такие вещи, как организация ваших семейных фотографий, торрент-файлы и все, что между ними. Конечным результатом является многофункциональное устройство, которое может выполнять задачи полноразмерного компьютера, но без энергопотребления. (Даже самые мощные модели DiskStation потребляют вдвое меньше, чем настольный компьютер или полноразмерный домашний сервер.)
Давайте посмотрим на процесс настройки для
Synology DS916 +
, модель с четырьмя отсеками и большим объемом памяти, а также большим объемом памяти и вычислительной мощности (включая транскодирование видео на лету для домашних потоковых приложений). Это отличная модель для демонстрации процесса установки, поскольку она поддерживает дополнительные порты и тому подобное, которые есть на более крупных моделях, но при этом использует ту же операционную систему, что и все модели DiskStation.
Физическая настройка: заполнение, подключение, загрузка и тишина
Synology NAS поставляется с кабелем питания, кабелем Ethernet, крепежными винтами для диска, а также, если у вас модель более высокого класса, он также может поставляться с отсеками для дисков с возможностью горячей замены и вторым кабелем Ethernet (поддержка DiskStations высокого класса двойные сетевые карты для увеличения пропускной способности сети). Прежде чем мы рассмотрим фактический блок и способы его заполнения, давайте поговорим о выборе диска.
Выбор жесткого диска
Для оптимального использования NAS мы рекомендуем начать с новых дисков максимально возможного размера, который позволит ваш бюджет. Для наших целей мы будем использовать
Диски Western Digital Red емкостью 8 ТБ
, которые специально разработаны для использования NAS, где предполагается круглосуточная работа в ограниченном пространстве. Независимо от марки жестких дисков, которые вы используете, вы хотите, как минимум, избегать бюджетных или настольных дисков и придерживаться дисков серверов / NAS.
Если вы задумываетесь о том, какой размер дисков использовать (или о последствиях смешивания дисков разного размера), мы настоятельно рекомендуем
Простой в использовании калькулятор RAID с перетаскиванием мышью от Synology
чтобы помочь визуализировать, как разные комбинации дисков дают разное количество полезного пространства.
СВЯЗАННЫЕ С:
Как разумно использовать несколько дисков: введение в RAID
Synology использует настраиваемую настройку RAID под названием Synology Hybrid RAID (SHR) — выбранную на снимке экрана выше — предназначенную для обеспечения резервирования дисков. Это означает, что вам понадобится больше дисков, но если один из них выйдет из строя, вы не потеряете никаких данных, потому что они будут отражены на другом диске. Вы можете
подробнее о RAID здесь
, если вы с ним не знакомы.
Тем не менее, даже если вы знакомы с базовой терминологией RAID, вы, вероятно, не знакомы с настройкой Synolgy Hybrid RAID, если раньше не использовали продукты Synology. Это превосходный вариант практически для любого потребительского сценария. Он предлагает большую гибкость, чем традиционный RAID, гораздо проще расширить хранилище в будущем, если вы его используете, и он значительно более эффективно использует дисковое пространство, когда дисковый массив не имеет идеально согласованных дисков. Однако не верьте нам на слово — если вы хотите погрузиться в техническую разбивку между SHR и RAID,
Вы можете прочитать об этом здесь
.
Добавление дисков
Давайте посмотрим на корпус со снятой съемной крышкой, а затем вставим (и заполним) отсеки для дисков. Чтобы снять лицевую панель, просто отведите ее от шасси NAS. Пластина удерживается на месте толстыми резиновыми пальцами (предназначенными для уменьшения вибрации) и должна легко сниматься с первого прикосновения.
Обратите внимание на выступы в верхней части каждого отсека для дисков. Просто осторожно нажмите на язычок вверх и выдвиньте лоток. Хотя винты лотка входят в комплект поставки всех моделей (некоторые из более экономичных моделей линейки Synology не имеют лотков для дисков и требуют прямого крепления дисков с помощью винтов), вам не нужно использовать их на лотках с горячей заменой. . Хотя вы можете это сделать, если вы действительно настроены на свой лад, гораздо лучше использовать жесткие диски в лотках без винтов, осторожно сняв боковые ограждения (см. Ниже), вставив жесткий диск в лоток и затем защелкните боковые ограждения на место. (Единственное исключение для использования винтов на лотках с горячей заменой — это использование 2,5-дюймовых дисков — их нужно крепить винтами, чтобы они не соскальзывали.)
Жесткие диски очень надежно удерживаются на месте благодаря резиновым втулкам по бокам лотков, а отсутствие жесткого контакта между диском и лотком (благодаря резиновому амортизатору) отлично справляется с минимизацией вибрации. Поместив все диски в лотки, вставьте их обратно в NAS.
Где припарковать NAS
Имея диски в вашем NAS, пришло время взглянуть на заднюю часть NAS, чтобы увидеть, где все будет подключено, и кратко поговорить о том, где вы его разместите в своем доме. Во-первых, обратная сторона.
В этой конкретной модели вы найдете разъем питания, два порта LAN, порт eSATA, два порта USB (которые можно использовать как для расширения хранилища, так и для резервного копирования, а также для использования Synology в качестве сервера печати) и, конечно же, , охлаждающие вентиляторы. Почему два порта LAN на больших моделях премиум-класса? Если вы используете эти модели в среде с высокими требованиями (например, ваша Synology является файловым сервером для большой семьи или организации, которые одновременно получают доступ к NAS), вы можете использовать оба подключения к локальной сети для значительного увеличения пропускной способности. Такая схема удобна, когда несколько человек одновременно транслируют HD-видео, но менее важна, если вы единственный, кто транслирует потоковое видео в один пункт назначения.
Имея это в виду, давайте поговорим о размещении NAS. Где бы вы ни разместили NAS, в идеале это должно быть более прохладное место в вашем доме (цокольный этаж и подвал — это здорово, душные комнаты на чердаке — нет) с жестким доступом к вашему маршрутизатору или сетевому коммутатору. Если вы в основном пользуетесь беспроводной сетью, это означает, что вы можете ограничиться размещением NAS рядом с местом, где установлен маршрутизатор.
Настройка при первой загрузке: настройка NAS
После того, как вы нашли подходящее место для своего NAS и все это подключили, самое время загрузить его в первый раз. В отличие от обычного компьютера, к нему не будут подключены мышь, клавиатура и монитор. Когда вы нажимаете кнопку питания, он быстро загружается, а затем просто сидит там (не беспокойтесь, если вы ничего не слышите, мы не можем слышать вентиляторы на нашем устройстве, если у нас нет уха на несколько дюймов с обратной стороны).
После включения перейдите к любому компьютеру в вашей локальной сети (подключение Ethernet или Wi-Fi в порядке, если он находится в той же сети, что и NAS). Откройте свой веб-браузер и перейдите в
хттп://финд.синологий.ком
, откроется мастер запуска веб-помощника, показанный ниже. Нажмите «Подключиться», чтобы начать процесс настройки Synology NAS.
Первый шаг — это присвоение имени вашему серверу и создание учетной записи администратора. На этом этапе нужно учесть несколько моментов. Во-первых, имя вашего сервера — это то, как ваш NAS будет отображаться в вашей сети и будет отображаться в различных приложениях. Компактное имя, которое легко набрать, например, «blackbox» или «diskstation», предпочтительнее, чем более длинные имена с пробелами, например «Miltons Magic Download Fun Time Box».
Вашим именем пользователя и паролем может быть что угодно, но вот совет для пользователей Windows: если вы сделаете имя пользователя и пароль для учетной записи администратора вашего NAS такими же, как имя пользователя и пароль вашего ПК с Windows, тогда вы сможете для беспрепятственного доступа ко всем общим сетевым ресурсам на NAS с ПК с Windows без ввода пароля или имени пользователя.
На следующем шаге вы можете создать учетную запись Synology и идентификатор быстрого подключения. Этот шаг не требуется,
Однако
, если вы планируете получить доступ к Synology NAS за пределами сети для каких-либо целей (и есть ряд причин, по которым вы можете захотеть это сделать, например, доступ к своим файлам вдали от дома, резервное копирование фотографий из отпуска или обмен файлами с друзьями), — удобный способ позже не возиться с настройками конфигурации. QuickConnect — это бесплатная динамическая DNS-служба Synology, которая входит в комплект поставки NAS, которая позволяет вам всегда звонить домой на NAS с помощью легко запоминающихся адресов, таких как http://quickconnect.to/
yourNASname
вместо вашего домашнего IP-адреса.
После настройки (или пропуска) шага быстрого подключения вам будет предложено установить некоторые основные пакеты приложений. Вы также можете пропустить этот шаг и выбрать их один за другим позже, но, учитывая полезность основных пакетов, мы предлагаем установить их все (при установке они занимают незначительное место).
После установки (или пропуска) вы закончите основной процесс настройки, и мастер закроется.
Знакомство с DiskStation Manager: основы
После этого последнего шага вам будет предложено очень кратко ознакомиться с интерфейсом DiskStation Manager. Давайте теперь рассмотрим некоторые из этих ключевых областей. Вот как выглядит «рабочий стол» DiskStation Manager. Доступ к приложениям с помощью системы ярлыков и меню, уведомлений в правом верхнем углу и монитора состояния системы и ресурсов в правом нижнем углу.

С левой стороны у вас есть главное меню и ярлыки на рабочем столе. Кнопка в виде меню «Пуск» в верхней части экрана открывает все ваши приложения, но есть прямой доступ к четырем часто используемым приложениям прямо на рабочем столе: Центр пакетов, Панель управления, File Station и Справка DSM, как показано ниже.
Центр пакетов — это место, где вы можете устанавливать, обновлять и удалять приложения. Если вы видите уведомления из Центра пакетов, это означает, что одно или несколько установленных приложений требуют обновления.
File Station — это файловый менеджер, который позволяет вам легко создавать и просматривать папки на вашем NAS с поддержкой операций с файлами (таких как вырезание, вставка, перемещение и удаление), встроенной прямо в контекстное меню, вызываемое правой кнопкой мыши.
Панель управления похожа на панель управления в других операционных системах и включает в себя настройки для всего, от конфигурации сети до управления группами пользователей. Панель управления — отличная последняя остановка для руководства по установке, поскольку она позволяет нам показать вам, как обновить операционную систему вашего NAS, прежде чем отправлять вас поиграть с ней. После того, как вы открыли панель управления, нажав на нее, нажмите значок «Обновить и восстановить» в разделе «Система».
Здесь вы найдете все доступные основные обновления. Нажмите «Загрузить», чтобы загрузить обновление, а затем, когда оно будет загружено, нажмите «Установить».
Ваш NAS перезагрузится, и вы будете использовать самую последнюю версию DiskStation Manager.
Что теперь?
На этом этапе у вас есть новое устройство Synology NAS, которое работает. Вы можете спросить себя: «А как насчет конфигурации диска? Форматирование? Сетевые ресурсы? Почему мы этого не настраиваем? » Что ж, мы не настраиваем его, потому что DiskStation Manager настроил его автоматически в фоновом режиме для вас. В зависимости от количества дисков, которые вы вставляете во время первоначальной настройки, NAS автоматически выбирает оптимальную конфигурацию для этих дисков, чтобы максимизировать ваш потенциал хранения (при сохранении избыточности с помощью RAID). Вы можете войти в меню настроек и повозиться с конфигурацией, чтобы распределить диски по-другому, но если у вас нет особой необходимости в этом, мы рекомендуем вам придерживаться оптимизированного по умолчанию пространства / избыточности.
Кроме того, уже есть сетевые ресурсы, настроенные с учетной записью администратора вашего NAS в качестве пользователя по умолчанию. Кроме того, если вы установили пакеты приложений, для многих из этих пакетов уже существуют каталоги по умолчанию. Вы можете просматривать эти каталоги либо в приложении File Station, которое использовалось в предыдущем разделе руководства, либо просто указав в проводнике файлов на своем компьютере имя общего сетевого ресурса. Мы назвали наш Synology NAS «черным ящиком», чтобы он был доступен в \\ blackbox \ в Windows, как показано ниже.
С этой базовой настройкой вы готовы к использованию, вы готовы начать изучать установленные пакеты (и доступные пакеты) в Центре пакетов, а также заполнять доступное хранилище всем, что подходит для резервного копирования. .
Getting Started With Synology
Synology DS218+ Getting Started
Unboxing And Setup Of The Synology DISKSTATION DS220j #synology #NAS #DS220j
Synology DS918+ 4 Bay NAS Initial Setup
How To Setup A Synology NAS For The First Time | 4K TUTORIAL
First-time NAS Installation & Setup Guide | Synology
Synology NAS Setup Guide! (Full Tutorial)
Synology NAS Setup Guide 2020 — Setting Up Internet Access
How To Setup A Synology NAS (DSM 6) Part 1: Familiarising Yourself With A Synology NAS
Synology NAS Setup Guide 2020 — Creating Users & Groups And Installing Apps
Synology NAS Setup Guide Part 2 — Users, Groups And App Installation
Synology NAS Setup Guide 2020 — Build, Setup, RAID, Volumes IP And Shared Folders
Synology NAS Setup Guide Part 1 — Setup, RAID, Volumes IP And Shared Folders
How To Setup & Config The SYNOLOGY DS920+ NAS (EASY Overview, Guide, Configuration)
How To Setup A Synology NAS (DSM 6) — Part 34: Configuring A NAS For External Access
How To Setup A Synology NAS (DSM 6) — Part 8: Creating User Accounts
How To Setup A Synology NAS (DSM 6) — Part 6: Reviewing The Basic User Account Settings
How To Setup A Synology NAS (DSM 6) — Part 2: The Initial Setup Of The Disk Station Manager
Synology Drive Setup Guide
Synology NAS DS220+ Manual
Before You Start
Note: All images below are for illustrative purposes only, and may differ from the actual product.
Package Contents

Main unit x 1

AC power cord x 1

AC power adapter x 1

RJ-45 LAN cable x 2

Screws for 2.5″ drives x 10
Synology DS220+ at a Glance

| No. | Article Name | Location | Description |
| 1 | Status Indicator | Front | Displays the status of the system. For more information, see «LED Indicator Table.» |
| 2 | LAN Indicator | Displays the status of the network connection. For more information, see «LED Indicator Table.» | |
| 3 | Disk Indicator | Displays the status of the installed drives. For more information, see «LED Indicator Table.» | |
| 4 | USB 3.0 Port | Connect external drives or other USB devices to the Synology NAS here. | |
| 5 | Copy Button | Lights up when you connect a USB device (e.g. digital camera, USB storage device, etc.). Press the copy button to copy data from the connected USB device to internal drives. | |
| 6 | Power Button |
|
|
| 7 | Fan | Rear | Disposes of excess heat and cools the system. If the fan malfunctions, the Synology NAS will emit a beeping sound. |
| 8 | LAN Port | Connect network cable here. | |
| 9 | RESET Button |
|
|
| 10 | USB 3.0 Port | Connect external drives or other USB devices to the Synology NAS here. | |
| 11 | Power Port | Connect power cords here. | |
| 12 | Kensington Security Slot | Attach a Kensington security lock here. |
LED Indicator Table
| LED Indicator | Color | Status | Description |
| Power | Blue | Static | Powered on |
| Blinking | Booting up/Shutting down | ||
| Off | Powered off | ||
| STATUS | Green | Static | Volume normal |
| Orange | Blinking | Volume degraded/Volume crashed | |
| Volume not created | |||
| DSM not installed | |||
| Off | HDD hibernation | ||
| Disk 1-2 | Green | Static | Drive ready and idle |
| Blinking | Accessing drive | ||
| Orange | Static | Drive error/Port disabled1 | |
| Off | No internal drive/Advanced HDD hibernation | ||
| Copy2 | Green | Static | Device detected |
| Blinking | Copying data | ||
| Off | No device connected | ||
| Rear LAN (on upper side of jack) |
Green | Static | Network connected |
| Blinking | Network active | ||
| Off | No network | ||
| Rear LAN (on lower side of jack) |
Green | Static | 1 Gbps connection |
| Orange | Static | 100 Mbps connection | |
| Off | 10 Mbps connection/No network |
Note: This table is applicable to Synology NAS running DSM 6.2.3 and earlier.
1 Please try to restart your Synology NAS or re-insert the drives, then run the HDD/SSD manufacturer’s diagnostic tool to check the health status of the drives. If you can sign in to DSM, please run the built-in S.M.A.R.T. test to scan the drives. If the problem remains unresolved, please contact Synology Technical Support for help.
2 For models with Copy Button, the USB Copy package is installed on your DSM by default.
Hardware Specification
| Item | DS220+ |
| Compatible Drive Type | 3.5″/2.5″ SATA x 2 |
| Maximum Internal Raw Capacity | 32 TB (2 x 16 TB HDD) |
| External Port | USB 3.0 x 2 |
| LAN Port | 1GbE (RJ-45) x 2 |
| Size (H x W x D) (mm) | 165 x 108 x 232.2 |
| Weight (kg) | 1.3 |
| Supported Client |
|
| File System |
|
| Supported RAID Type |
|
| Agency Certification |
|
| HDD Hibernation | Yes |
| Scheduled Power On/Off | Yes |
| Wake on LAN | Yes |
| Environment Requirement |
|
Note: Model specifications are subject to change without notice. Please refer to www.synology.com for the latest information.
1 Support for exFAT can be enabled by purchasing and downloading exFAT Access in Package Center.
Optional Accessories
With Synology accessories, you can customize your Synology NAS to fit different business environments without worrying about compatibility and stability. Visit www.synology.com/compatibility for more information.
- Memory Module
| Model Name | Picture | Description |
| D4NESO-2666-4G |  |
DDR4 non-ECC unbuffered SO-DIMM 4GB |
Spare Part
Visit www.synology.com/products/spare_parts if you need to replace system fans, disk trays, or power supply units.
| Model Name | Picture | Description |
| Disk Tray (Type D7) | 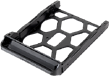 |
3.5″/2.5″ HDD Tray |
| Fan 92*92*25_1 | 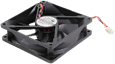 |
System Fan 92*92*25 mm |
| Adapter 60W_1 | 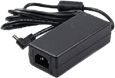 |
Adapter 60W Level VI |
Safety Instructions
 |
Keep away from direct sunlight and from chemicals. Make sure the environment does not experience abrupt changes in temperature or humidity. |
 |
Place the product right side up at all times. |
 |
Do not place near any liquids. |
 |
Before cleaning, unplug the power cord. Wipe with damp paper towels. Do not use chemical or aerosol cleaners. |
 |
To prevent the unit from falling over, do not place on carts or any unstable surfaces. |
 |
The power cord must plug in to the correct supply voltage. Make sure that the supplied AC voltage is correct and stable. |
 |
To remove all electric current from the device, ensure that all power cords are disconnected from the power source. |
 |
Risk of explosion if battery is replaced with an incorrect type. Dispose of used batteries appropriately. |
Hardware Setup
Tools and Parts for Component Installation
Please prepare the following tools and parts before setting up your Synology NAS:
- A screwdriver (only for 2.5″ drives)
- At least one 3.5″ or 2.5″ SATA drive (please visit www.synology.com/compatibility for compatible drive models)
If you install a drive that contains data, the system will format the drive and erase all existing data. Please back up any important data before installation.
Install Drives
- Remove the drive bay cover from the front panel.

- Push the latch upward and pull the handle to remove the drive tray from your Synology NAS.
- Load drives in the drive trays.
- Insert the loaded drive tray into the empty drive bay. Make sure the side marked «UP» is facing up, and insert the drive tray into the empty drive bay. You should hear a click when the tray is locked in place.
- Repeat the steps above to install another drive if you have prepared one.
- Drives are numbered as shown below.
- Replace the hard drive bay cover to finish the installation.
Note: If you plan to create a RAID volume, we recommend installing drives of identical size to make the best use of drive capacity.


Start Up Your Synology NAS
- Use the LAN cable to connect the Synology NAS to your switch, router, or hub.
- Connect one end of the AC power adapter to the power port of your Synology NAS. Connect one end of the AC power cord to the AC power adapter, and the other to the power outlet.
- Press the power button to turn on your Synology NAS.
Congratulations! Your Synology NAS is now online and detectable from a network computer.


Add a Memory Module to Synology NAS
Optional Synology memory modules are designed to expand the memory of your Synology NAS. Follow the steps below to install, check, or remove a memory module on your Synology NAS.
To install the memory module
- Shut down your Synology NAS. Disconnect all cables from your Synology NAS to prevent possible damage.
- Remove the hard drive trays from the drive bays. An empty memory slot is located on the inner right side of your Synology NAS.
Note: When you remove the drive trays, sensitive internal components are exposed. Avoid touching anything other than the memory assembly when removing or adding memory.
- Insert the new memory module into the empty slot:
- Align the small gap between the gold connectors of the memory module with the notch on the empty slot. Insert the memory module into the slot. Make sure that the module is properly inserted.
- Gently push down the memory module until you hear a click.
Note:
- Hold the memory module by its edges and avoid touching the gold connectors.
- Synology will not provide full product warranty or technical support if a non-Synology memory module is used for memory upgrade.
- Insert the drive trays back into the drive bays.
- Reconnect the cables removed in step 1, then press the power button to turn on your Synology NAS.


To make sure your Synology NAS recognizes the new memory capacity
- Install DiskStation Manager (DSM). Please see «Install DSM on Synology NAS» for more information.
- Sign into to DSM as admin or a user belonging to the administrators group.
- Go to Control Panel > Info Center and check Total Physical Memory.
If your Synology NAS does not recognize the memory or does not start up successfully, please make sure that the memory module is installed correctly.
To remove the memory module
- Follow step 1 and 2 of the «To install the memory module» section to shut down your Synology NAS, disconnect the cables and remove the drive trays.
- Push the levers on both sides of the memory module outward. The memory module will be released from its slot.
- Hold the memory module by its edges and remove it from the slot.
- Insert the drive trays back into the drive bays.
- Reconnect the cables removed in step 1, then press the power button to turn on your Synology NAS.

Install DSM on Synology NAS
After hardware setup is completed, please install DiskStation Manager (DSM) – Synology’s browser-based operating system – on your DS220+.
Install DSM with Web Assistant
Your DS220+ comes with a built-in tool called Web Assistant that helps you download the latest version of DSM from the Internet and install it on your DS220+. To use Web Assistant, please follow the steps below.
- Power on your DS220+.
- Open a web browser on a computer connected to the same network as the DS220+.
- Enter either of the following into the address bar of your browser:
- find.synology.com
- synologynas: 5000
- Web Assistant will be launched in your web browser. It will search for and find the Synology NAS within the local network. The status of the DS220+ should be Not Installed.
- Click Connect to start the setup process and follow the onscreen instructions.
Note:
- The Synology NAS must be connected to the Internet to install DSM with Web Assistant.
- Recommended browsers: Chrome, Firefox.
- Both the Synology NAS and the computer must be in the same local network.
- If you accidentally leave the installation process before it is finished, sign into DSM as admin (default administrative account name) with the password left blank.

Learn More
Your DS220+ is now ready for action. For more information or online resources about your DS220+, please visit www.synology.com.
SYNOLOGY, INC. END USER LICENSE AGREEMENT
IMPORTANT–READ CAREFULLY: THIS END USER LICENSE AGREEMENT («EULA») IS A LEGAL AGREEMENT BETWEEN YOU (EITHER AN INDIVIDUAL OR A LEGAL ENTITY) AND SYNOLOGY, INC. («SYNOLOGY») FOR THE SYNOLOGY SOFTWARE INSTALLED ONTO THE SYNOLOGY PRODUCT PURCHASED BY YOU (THE «PRODUCT»), OR LEGALLY DOWNLOADED FROM WWW.SYNOLOGY.COM, OR ANY OTHER CHANNEL PROVIDED BY SYNOLOGY ( «SOFTWARE»).
YOU AGREE TO BE BOUND BY THE TERMS OF THIS EULA BY USING THE PRODUCTS CONTAINING THE SOFTWARE, INSTALLING THE SOFTWARE ONTO THE PRODUCTS OR DEVICE CONNECTED TO THE PRODUCTS. IF YOU DO NOT AGREE TO THE TERMS OF THIS EULA, DO NOT USETHE PRODUCTS CONTAINING THE SOFTWAREOR DOWNLOAD THE SOFTWARE FROM WWW.SYNOLOGY.COM, OR ANY OTHER CHANNEL PROVIDED BY SYNOLOGY.INSTEAD, YOU MAY RETURN THE PRODUCT TO THE RESELLER WHERE YOU PURCHASED IT FOR A REFUND IN ACCORDANCE WITH THE RESELLER’S APPLICABLE RETURN POLICY.
Section 1. Limited Software License. Subject to the terms and conditions of this EULA, Synology grants you a limited, nonexclusive, non-transferable, personal license to install, run and use one copy of the Software loaded on the Product or on your device connected to the Product solely relating to your authorized use of the Product.
Section 2. Documentation. You may make and use a reasonable number of copies of any documentation provided with the Software; provided that such copies will only be used for internal business purposes and are not to be republished or redistributed (either in hard copy or electronic form) to any third party.
Section 3. Backup. You may make a reasonable number of copies of the Software for backup and archival purposes only.
Section 4. Updates. Any software provided to you by Synology or made available on the Synology website at www.synology.com («Website») or any other channel provided by Synology that updates or supplements the original Software is governed by this EULA unless separate license terms are provided with such updates or supplements, in which case, such separate terms will govern.
Section 5. License Limitations. The license set forth in Sections 1, 2 and 3 applies only to the extent that you have ordered and paid for the Product and states the entirety of your rights with respect to the Software. Synology reserves all rights not expressly granted to you in this EULA. Without limiting the foregoing, you shall not authorize or permit any third party to: (a) use the Software for any purpose other than that in connection with the Product; (b) license, distribute, lease, rent, lend, transfer, assign or otherwise dispose of the Software; (c) reverse engineer, decompile, disassemble or attempt to discover the source code of or any trade secrets related to the Software, except and only to the extent that such conduct is expressly permitted by applicable law notwithstanding this limitation; (d) adapt, modify, alter, translate or create any derivative works of the Software; (e) remove, alter or obscure any copyright notice or other proprietary rights notice on the Software or Product; or (f) circumvent or attempt to circumvent any methods employed by Synology to control access to the components, features or functions of the Product or Software. Subject to the limitations specified in this Section 5, you are not prohibited from providing any services hosted by Synology NAS server to any third party for commercial purpose.
Section 6. Open Source. The Software may contain components licensed to Synology under the GNU General Public License («GPL Components»), currently available at http://www.gnu.org/licenses/gpl.html. The terms of the GPL will control solely with respect to the GPL Components to the extent that this EULA conflicts with the requirements of the GPL with respect to your use of the GPL Components, and, in such event, you agree to be bound by the GPL with respect to your use of such components.
Section 7. Audit. Synology will have the right to audit your compliance with the terms of this EULA. You agree to grant Synology a right to access to your facilities, equipment, books, records and documents and to otherwise reasonably cooperate with Synology in order to facilitate any such audit by Synology or its agent authorized by Synology.
Section 8. Ownership. The Software is a valuable property of Synology and its licensors, protected by copyright and other intellectual property laws and treaties. Synology or its licensors own all rights, titles and interests in and to the Software, including but not limited to copyright and any other intellectual property rights.
Section 9. Limited Warranty. Synology provides a limited warrant that the Software will substantially conform to Synology’s published specifications for the Software, if any, or otherwise set forth on the Website, for a period required by your local law. Synology will use commercially reasonable efforts to, in Synology’s sole discretion, either correct any such nonconformity in the Software or replace any Software that fails to comply with the foregoing warranty, provided that you give Synology written notice of such noncompliance within the warranty period. The foregoing warranty does not apply to any noncompliance resulting from any: (w) use, reproduction, distribution or disclosure not in accordance with this EULA; (x) any customization, modification or other alteration of the Software by anyone other than Synology; (y) combination of the Software with any product, services or other items provided by anyone other than Synology; or (z) your failure to comply with this EULA.
Section 10. Support. During the period specified in the Section 9, Synology will make available to you the support services. Following the expiration of the applicable period, support for Software may be available from Synology upon written request.
Section 11. Disclaimer of Warranties. EXCEPT AS EXPRESSLY SET FORTH ABOVE, THE SOFTWARE IS PROVIDED «AS IS» AND WITH ALL FAULTS. SYNOLOGY AND ITS SUPPLIERS HEREBY DISCLAIM ALL OTHER WARRANTIES, EXPRESS, IMPLIED OR STATUTORY, ARISING BY LAW OR OTHERWISE, INCLUDING BUT NOT LIMITED TO ANY IMPLIED WARRANTIES OF MERCHANTABILITY, FITNESS FOR A PARTICULAR PURPOSE OR USE, TITLE AND NONINFRINGEMENT, WITH REGARD TO THE SOFTWARE. WITHOUT LIMITING THE FOREGOING, SYNOLOGY DOES NOT WARRANT THAT THE SOFTWARE WILL BE FREE OF BUGS, ERRORS, VIRUSES OR OTHER DEFECTS.
Section 12. Disclaimer of Certain Damages. IN NO EVENT WILL SYNOLOGY OR ITS LICENSORS BE LIABLE FOR ANY INCIDENTAL, INDIRECT, SPECIAL, PUNITIVE, CONSEQUENTIAL OR SIMILAR DAMAGES OR LIABILITIES WHATSOEVER (INCLUDING, BUT NOT LIMITED TO LOSS OF DATA, INFORMATION, REVENUE, PROFIT OR BUSINESS) ARISING OUT OF OR RELATING TO THE USE OF OR INABILITY TO USE THE SOFTWARE OR OTHERWISE UNDER OR IN CONNECTION WITH THIS EULA OR THE SOFTWARE, WHETHER BASED ON CONTRACT, TORT (INCLUDING NEGLIGENCE), STRICT LIABILITY OR OTHER THEORY EVEN IF SYNOLOGY HAS BEEN ADVISED OF THE POSSIBILITY OF SUCH DAMAGES.
Section 13. Limitation of Liability. SYNOLOGY’S AND ITS SUPPLIERS’ LIABILITY ARISING OUT OF OR RELATING TO THE USE OF OR INABILITY TO USE THE SOFTWARE OR OTHERWISE UNDER OR IN CONNECTION WITH THIS EULA OR THE SOFTWARE IS LIMITED TO THE AMOUNT ACTUALLY PAID BY YOU FOR THE PRODUCT REGARDLESS OF THE AMOUNT OF DAMAGES YOU MAY INCUR AND WHETHER BASED ON CONTRACT, TORT (INCLUDING NEGLIGENCE), STRICT LIABILITY OR OTHER THEORY. The foregoing disclaimer of warranties, disclaimer of certain damages and limitation of liability will apply to the maximum extent permitted by applicable law. The laws of some states/jurisdictions do not allow the exclusion of implied warranties or the exclusion or limitation of certain damages. To the extent that those laws apply to this EULA, the exclusions and limitations set forth above may not apply to you.
Section 14. Export Restrictions. You acknowledge that the Software is subject to U.S. export restrictions. You agree to comply with all applicable laws and regulations that apply to the Software, including without limitation the U.S. Export Administration Regulations.
Section 15. Termination. Without prejudice to any other rights, Synology may terminate this EULA if you do not abide by the terms and conditions contained herein. In such event, you must cease use of the Software and destroy all copies of the Software and all of its component parts.
Section 16. Assignment. You may not transfer or assign your rights under this EULA to any third party, except for that preinstalled in the Products. Any such transfer or assignment in violation of the foregoing restriction will be void.
Section 17. Applicable Law. Unless expressly prohibited by local law, this EULA is governed by and construed in accordance with the laws of the country, in accordance with which Synology Inc. was organized without regard to any conflict of law principles to the contrary.
Section 18. Dispute Resolution. Any dispute, controversy or claim arising out of or relating to this EULA will be resolved exclusively and finally by arbitration conducted by three neutral arbitrators in accordance with the procedures of the Arbitration Law and related enforcement rules of the country in which Synology Inc. was organized. In such cases, the arbitration will be limited solely to the dispute between you and Synology. The arbitration, or any portion of it, will not be consolidated with any other arbitration and will not be conducted on a class-wide or class action basis. The arbitration shall take place in Taipei and the arbitration proceedings shall be conducted in English or, if both parties so agree, in Mandarin Chinese. The arbitration award shall be final and binding on the parties and may be enforced in any court having jurisdiction. You understand that, in the absence of this provision, you would have had a right to litigate any such dispute, controversy or claim in a court, including the right to litigate claims on a class-wide or class-action basis, and you expressly and knowingly waive those rights and agree to resolve any disputes through binding arbitration in accordance with the provisions of this Section 18. Nothing in this Section shall be deemed to prohibit or restrict Synology from seeking injunctive relief or seeking such other rights and remedies as it may have at law or equity for any actual or threatened breach of any provision of this EULA relating to Synology’s intellectual property rights.
Section 19. Attorneys’ Fees. In any arbitration, mediation, or other legal action or proceeding to enforce rights or remedies under this EULA, the prevailing party will be entitled to recover, in addition to any other relief to which it may be entitled, costs and reasonable attorneys’ fees.
Section 20. Severability. If any provision of this EULA is held by a court of competent jurisdiction to be invalid, illegal, or unenforceable, the remainder of this EULA will remain in full force and effect.
Section 21. Entire Agreement. This EULA sets forth the entire agreement of Synology and you with respect to the Software and the subject matter hereof and supersedes all prior and contemporaneous understandings and agreements whether written or oral. No amendment, modification or waiver of any of the provisions of this EULA will be valid unless set forth in a written instrument signed by the party to be bound thereby.
SYNOLOGY, INC.LIMITED PRODUCT WARRANTY
THIS LIMITED WARRANTY («WARRANTY») APPLIES TO THE PRODUCTS (AS DEFINED BELOW) OF SYNOLOGY, INC. AND ITS AFFILIATES, INCLUDING SYNOLOGY AMERICA CORP, (COLLECTIVELY, «SYNOLOGY»). YOU ACCEPT AND AGREE TO BE BOUND BY THE TERMS OF THIS WARRANTY BY OPENING THE PACKAGE CONTAINING AND/OR USING THE PRODUCT. PLEASE BE ADVISED THAT THIS LIMITED WARRANTY DOES NOT APPLY TO THE SOFTWARE CONTAINED IN THE PRODUCTS WHICH SHALL BE SUBJECT TO ITS END USER LICENSE AGREEMENT, AND THAT SYNOLOGY RESERVES THE RIGHT TO MAKE ADJUSTMENTS AND/OR MODIFICATION TO THIS PRODUCT WARRANTY FROM TIME TO TIME WITHOUT PROVIDING PRIOR NOTICE TO YOU. IF YOU DO NOT AGREE TO THE TERMS OF THIS WARRANTY, DO NOT USE THE PRODUCT. INSTEAD, YOU MAY RETURN THE PRODUCT TO THE RESELLER WHERE YOU PURCHASED IT FOR A REFUND IN ACCORDANCE WITH THE RESELLER’S APPLICABLE RETURN POLICY.PLEASE NOTE THAT SYNOLOGY’S WARRANTY SUPPORTS ARE NOT AVAILABLE IN EVERY COUNTRY, AND THAT SYNOLOGY MAY REFUSE TO PROVIDE THIS LIMITED WARRANTY SUPPORTS TO YOU IF YOU REQUEST SUCH SUPPORTS NOT AT THE COUNTRY AT WHICH THE PRODUCT WAS ORIGINALLY PURCHASED. THE COUNTRY AT WHICH THE PRODUCT WAS ORIGINALLY PURCHASED SHALL BE DETERMINED BASED ON THE SYNOLOGY’S INTERNAL RECORDS.
Section 1. Products
(a) «Products» refer to New Products or Refurbished Products.(b) «New Product» means the Synology-branded hardware product and Synology-branded accessories contained in the original packaging Customer bought from an authorized Synology distributor or reseller. You may see our «New Product» at https://www.synology.com/products/status.(c) «Refurbished Product» means all Synology products which have been refurbished by Synology’s affiliate or an authorized Synology distributor or reseller, not including those sold as «as is» or with «no warranty» by anyone.(d) Other definition: «Customer» means the original person or entity purchasing the Product from Synology or an authorized Synology distributor or reseller; «Online Store» means an online shop operated by Synology or Synology’s affiliate; «Software» means the Synology proprietary software that accompanies the Product when purchased by Customer, is downloaded by Customer from the Web Site, or is pre-installed on the Product by Synology, and includes any firmware, associated media, images, animations, video, audio, text and applets incorporated into the software or Product and any updates or upgrades to such software.
Section 2. Warranty Period
(a) «Warranty Period»: The warranty period commences on the purchase date is shown on the purchase receipt or invoice to be presented by Customer and ending at the day after the end of the Warranty Period for each New Product. You may see the Warranty Period for each New Product at https://www.synology.com/products/status. For the Refurbished Product or repaired parts, it’s the remainder of the warranty period of the product they are replacing, or ninety (90) days from the date the product was replaced or repaired, whichever is longer; except for those sold as «as is» or with «no warranty» by any stores. Without presenting such purchase receipt or invoice, the warranty period shall commence on the date of manufacture based on our internal record.(b) «Extended Warranty Period»: For Customer purchasing EW201/ EW202 optional service for applicable Products specified in Section 1 (b), the Warranty Period specified in Section 2 (a) of the applicable Product registered with EW201/EW202 optional service will be extended by two years. You may see the applied model at https://www.synology.com/products/Extended_Warranty.
Section 3. Limited Warranty and Remedies
3.1 Limited Warranty. Subject to Section 3.2, Synology warrants to the Customer that each Product (a) will be free of material defects in workmanship and (b) under normal use will perform substantially in accordance with Synology’s published specifications for the Product during the Warranty Period. Such limited warranty does not apply to the Software contained in the product or purchased by Customer which shall be subject to the accompanying end user license agreement provided with the Product. Synology provides no warranty to Refurbished Product sold as «as is» or with «no warranty». This Limited Warranty is NOT transferable and applies only to the customers who directly purchase products from Synology’s affiliate, the resellers, and distributor that Synology authorized. The warranty set forth in Section 3 will terminate upon Customer’s sale or transfer of the Product to a third party.
3.2 Exclusions. The foregoing warranties and warranty obligations do not apply to any Product that (a) has been installed or used in a manner not specified or described in the Product or its related documents (b) has been damaged by service (including upgrades and expansions) performed by anyone who is not a representative of Synology or any Synology Authorized Service Provider; (c) has been in any way misused, abused, or damaged; (d) has been used with items not provided by Synology other than the hardware or software for which the Product is designed; or (e) otherwise fails to conform to the Product specifications and such failure is attributable to causes not within or under Synology’s control. (f) has been tie-in any non-Synology branded hardware products or any software, even if packaged or sold with Synology hardware. (g) Customer disassembles the Product except as authorized by Synology; (h) Customer fails to implement any correction, modification, enhancement, improvement or other update made available to Customer by Synology; or (i) Customer implements, installs or uses any correction, modification, enhancement, improvement or other update made available by any third party. (j) Any compatibility issues occurred when installing hardware products, software, or components not supported by Synology. (k) product damage caused by accident, fire, liquid contact, earthquake or other external cause. (l) cosmetic damage caused by normal wear and tear or otherwise due to the normal aging of the Product, including but not limited to scratches, dents and broken plastic on ports unless failure has occurred due to a defect in materials or workmanship; (m) serial number has been removed or defaced from Product, resulting in not able to identify.
3.3 Warranty Support and Exclusive Remedy. If Customer gives notice of noncompliance with any of the warranties set forth in Section 3.1 within the applicable Warranty Period in the manner set forth below, then, upon verification of the noncompliance by Synology, Synology will, at Synology’s option: (a) use commercially reasonable efforts to repair the Product, (b) provide technical support, or (c) replace the noncomplying Product or part thereof upon return of the complete Product in accordance with Section 3.4 The foregoing sets forth Synology’s entire liability and Customer’s sole and exclusive remedy for any breach of warranty under Section 3.1 or any other defect or deficiency in the Product. Customer will reasonably assist Synology to diagnose and validate any nonconformity with the Product.
3.4 Return. Any Product return by Customer under Section 3.3 must be made in accordance with Synology’s then-current return procedures with the purchase receipt or invoice. You may see more information about return procedure at https://www.synology.com/knowledgebase/DSM/tutorial/Service_Application/How_to_make_warranty_claim_for_Synology_NAS, for warranty claims, Customer must return the complete Product to Synology in accordance with this Section 3.4. Any Product returned that has been disassembled (except under the direction of Synology) will be refused and returned to Customer at Customer’s expense. Any Product must be returned in the same condition as it was received from Synology to the address designated by Synology, freight pre-paid, in packaging sufficient to protect the contents thereof. Customer is responsible for insurance and risk of loss with respect to returned items until they are properly received by Synology.
3.5 Replacement by Synology. If Synology elects to replace any Product under this Warranty set forth in Section 3.1, then Synology will ship a replacement Product at Synology’s expense via the shipping method selected by Synology after receipt of the nonconforming Product returned in accordance with Section 3.4 and validation by Synology that the Product does not conform to the warranty. In some countries, Synology may at its own discretion apply the Synology Replacement Service to certain Products, through which Synology will ship a replacement Product to Customer before its receipt of the nonconforming Product returned by Customer («Synology Replacement Service»).
3.6 Disclaimer of Warranties. THE WARRANTIES, OBLIGATIONS, AND LIABILITIES OF SYNOLOGY AND THE REMEDIES OF CUSTOMER SET FORTH IN THIS WARRANTY ARE EXCLUSIVE AND IN SUBSTITUTION FOR, AND CUSTOMER HEREBY WAIVES, RELEASES AND DISCLAIMS, ALL OTHER WARRANTIES, OBLIGATIONS AND LIABILITIES OF SYNOLOGY AND ALL OTHER RIGHTS, CLAIMS AND REMEDIES OF CUSTOMER AGAINST SYNOLOGY, EXPRESS OR IMPLIED, ARISING BY LAW OR OTHERWISE, WITH RESPECT TO THE PRODUCT, ACCOMPANYING DOCUMENTATION OR SOFTWARE AND ANY OTHER GOODS OR SERVICES DELIVERED UNDER THIS WARRANTY, INCLUDING, BUT NOT LIMITED TO ANY: (A) IMPLIED WARRANTY OF MERCHANTABILITY OR FITNESS FOR A PARTICULAR PURPOSE OR USE; (B) IMPLIED WARRANTY ARISING FROM COURSE OF PERFORMANCE, COURSE OF DEALING, OR USAGE OF TRADE; (C) CLAIM OF INFRINGEMENT OR MISAPPROPRIATION; OR (D) CLAIM IN TORT (WHETHER BASED ON NEGLIGENCE, STRICT LIABILITY, PRODUCT LIABILITY OR OTHER THEORY). SYNOLOGY MAKES NO GUARANTEE AND SPECIFICALLY DISCLAIMS ANY WARRANTY THAT THE DATA OR INFORMATION STORED ON ANY SYNOLOGY PRODUCT WILL BE SECURE AND WITHOUT RISK OF DATA LOSS. SYNOLOGY RECOMMENDS THAT CUSTOMER TAKES APPROPRIATE MEASURES TO BACK UP THE DATA STORED ON THE PRODUCT. SOME STATES/JURISDICTIONS DO NOT ALLOW LIMITATIONS ON IMPLIED WARRANTIES, SO THE ABOVE LIMITATION MAY NOT APPLY TO CUSTOMER.
Section 4. Limitations of Liability
4.1 Force Majeure. Synology will not be liable for, or be considered to be in breach of or default under this Warranty on account of, any delay or failure to perform as required by this Warranty as a result of any cause or condition beyond its reasonable control (including, without limitation, any act or failure to act by Customer).
4.2 Disclaimer of Certain Damages. IN NO EVENT WILL SYNOLOGY OR ITS SUPPLIERS BE LIABLE FOR THE COST OF COVER OR FOR ANY INCIDENTAL, INDIRECT, SPECIAL, PUNITIVE, CONSEQUENTIAL OR SIMILAR DAMAGES OR LIABILITIES WHATSOEVER (INCLUDING, BUT NOT LIMITED TO LOSS OF DATA, INFORMATION, REVENUE, PROFIT OR BUSINESS) ARISING OUT OF OR RELATING TO THE USE OR INABILITY TO USE THE PRODUCT, ANY ACCOMPANYING DOCUMENTATION OR SOFTWARE AND ANY OTHER GOODS OR SERVICES PROVIDED UNDER THIS WARRANTY, WHETHER BASED ON CONTRACT, TORT (INCLUDING NEGLIGENCE), STRICT LIABILITY OR OTHER THEORY EVEN IF SYNOLOGY HAS BEEN ADVISED OF THE POSSIBILITY OF SUCH DAMAGES.
4.3 Limitation of Liability. SYNOLOGY’S AND ITS SUPPLIERS’ LIABILITY ARISING OUT OF OR RELATING TO THE USE OR INABILITY TO USE THE PRODUCT, ANY ACCOMPANYING DOCUMENTATION OR SOFTWARE AND ANY OTHER GOODS OR SERVICES PROVIDED UNDER THIS WARRANTY IS LIMITED TO THE AMOUNT ACTUALLY PAID BY CUSTOMER FOR THE PRODUCT REGARDLESS OF THE AMOUNT OF DAMAGES CUSTOMER MAY INCUR AND WHETHER BASED ON CONTRACT, TORT (INCLUDING NEGLIGENCE), STRICT LIABILITY OR OTHER THEORY. The foregoing disclaimer of certain damages and limitation of liability will apply to the maximum extent permitted by applicable law. The laws of some states/jurisdictions do not allow exclusion or limitation of certain damages. To the extent that those laws apply to the Product, the exclusions and limitations set forth above may not apply to Customer.
Section 5. Miscellaneous
5.1 Proprietary Rights. The Product and any accompanying Software and documentation provided with the Product include proprietary and intellectual property rights of Synology and its third party suppliers and licensors. Synology retains and reserves all right, title, and interest in the intellectual property rights of the Product, and no title to or ownership of any intellectual property rights in or to the Product, any accompanying Software or documentation and any other goods provided under this Warranty is transferred to Customer under this Warranty. Customer will (a) comply with the terms and conditions of the Synology end user license agreement accompanying any Software furnished by Synology or an authorized Synology distributor or reseller; and (b) not attempt to reverse engineer any Product or component thereof or accompanying Software or otherwise misappropriate, circumvent or violate any of Synology’s intellectual property rights.
5.2 Assignment. Customer will not assign any of its rights under this Warranty directly, by operation of law or otherwise, without the prior written consent of Synology.
5.3 No Additional Terms. Except as expressly permitted by this Warranty, neither party will be bound by, and each party specifically objects to, any term, condition or other provision that conflicts with the provisions of this Warranty that is made by the other party in any purchase order, receipt, acceptance, confirmation, correspondence or otherwise, unless each party specifically agrees to such provision in writing. Further, if this Warranty conflicts with any terms or conditions of any other agreement entered into by the parties with respect to the Product, this Warranty will prevail unless the other agreement specifically references the sections of this Warranty that it supersedes.
5.4 Applicable Law. Unless explicitly prohibited by local law, this Warranty is governed by the laws of the State of Washington, U.S.A. for the Customers residing within the United States; and by the laws of the Republic of China (Taiwan) for Customers not residing within the United States, without regard to any conflict of law principles to the contrary. The 1980 U.N. Convention on Contracts for the International Sale of Goods or any successor thereto does not apply.
5.5 Dispute Resolution. Any dispute, controversy or claim arising out of or relating to this Warranty, the Product or services provided by Synology with respect to the Product or the relationship between Customers residing within the United States and Synology will be resolved exclusively and finally by arbitration under the current commercial rules of the American Arbitration Association, except as otherwise provided below. The arbitration will be conducted before a single arbitrator, and will be limited solely to the dispute between Customer and Synology. The arbitration, or any portion of it, will not be consolidated with any other arbitration and will not be conducted on a class-wide or class action basis. The arbitration shall be held in King County, Washington, U.S.A. by submission of documents, by telephone, online or in person as determined by the arbitrator at the request of the parties. The prevailing party in any arbitration or legal action occurring within the United States or otherwise shall receive all costs and reasonable attorneys’ fees, including any arbitration fee paid by the prevailing party. Any decision rendered in such arbitration proceedings will be final and binding on the parties, and judgment may be entered thereon in any court of competent jurisdiction. Customer understands that, in the absence of this provision, Customer would have had a right to litigate any such dispute, controversy or claim in a court, including the right to litigate claims on a class-wide or class-action basis, and Customer expressly and knowingly waives those rights and agrees to resolve any disputes through binding arbitration in accordance with the provisions of this Section 5.5. For Customers not residing within the United States, any dispute, controversy or claim described in this section shall be finally resolved by arbitration conducted by three neutral arbitrators in accordance with the procedures of the R.O.C. Arbitration Law and related enforcement rules. The arbitration shall take place in Taipei, Taiwan, R.O.C., and the arbitration proceedings shall be conducted in English or, if both parties so agree, in Mandarin Chinese. The arbitration award shall be final and binding on the parties and may be enforced in any court having jurisdiction. Nothing in this Section shall be deemed to prohibit or restrict Synology from seeking injunctive relief or seeking such other rights and remedies as it may have at law or equity for any actual or threatened breach of any provision of this Warranty relating to Synology’s intellectual property rights.
5.6 Attorneys’ Fees. In any arbitration, mediation, or other legal action or proceeding to enforce rights or remedies under this Warranty, the prevailing party will be entitled to recover, in addition to any other relief to which it may be entitled, costs and reasonable attorneys’ fees.
5.7 Export Restrictions. You acknowledge that the Product may be subject to U.S. export restrictions. You will comply with all applicable laws and regulations that apply to the Product, including without limitation the U.S. Export Administration Regulations.
5.8 Severability. If any provision of this Warranty is held by a court of competent jurisdiction to be invalid, illegal, or unenforceable, the remainder of this Warranty will remain in full force and effect.
5.9 Entire Agreement. This Warranty constitutes the entire agreement, and supersedes any and all prior agreements, between Synology and Customer related to the subject matter hereof. No amendment, modification or waiver of any of the provisions of this Warranty will be valid unless set forth in a written instrument signed by the party to be bound thereby.
FCC Declaration of Conformity
This device complies with Part 15 of the FCC Rules. Operation is subject to the following two conditions: (1) this device may not cause harmful interference, and (2) this device must accept any interference received, including interference that may cause undesired operation.

Videos
Synology DS220+ NAS Setup Video
Synology DS220+ — Review Video
Documents / Resources
References
Download manual
Here you can download full pdf version of manual, it may contain additional safety instructions, warranty information, FCC rules, etc.
Download Synology NAS DS220+ Manual