-
Contents
-
Table of Contents
-
Bookmarks
Quick Links
Related Manuals for Asus P5Q — Motherboard — ATX
Summary of Contents for Asus P5Q — Motherboard — ATX
-
Page 2
Product warranty or service will not be extended if: (1) the product is repaired, modified or altered, unless such repair, modification of alteration is authorized in writing by ASUS; or (2) the serial number of the product is defaced or missing. -
Page 3: Table Of Contents
Special features …………….1-2 1.3.1 Product highlights …………1-2 1.3.2 ASUS special features ………… 1-3 1.3.3 ASUS Exclusive Overclocking Features ……1-7 Chapter 2: Hardware information Before you proceed …………..2-1 Motherboard overview …………..2-2 Motherboard layout …………2-2 2.2.1 2.2.2…
-
Page 4: Contents
3.1.1 ASUS Update utility …………3-1 3.1.2 Creating a bootable floppy disk ……..3-4 3.1.3 ASUS EZ Flash 2 utility ……….. 3-5 3.1.4 AFUDOS utility …………..3-6 3.1.5 ASUS CrashFree BIOS 3 utility ……..3-8 BIOS setup program …………..3-9 3.2.1…
-
Page 5
Contents 3.3.7 AHCI Configuration …………3-15 3.3.8 System Information …………3-16 Ai Tweaker menu ……………. 3-17 3.4.1 Ai Overclock Tuner [Auto] ……….3-17 3.4.2 CPU Ratio Setting [Auto] ……….3-18 3.4.3 FSB Strap to North Bridge [Auto] ……..3-18 3.4.4 DRAM Frequency [Auto] ………. -
Page 6
3.7.2 Boot Settings Configuration ………. 3-36 3.7.3 Security …………….. 3-37 Tools menu …………….. 3-39 3.8.1 ASUS EZ Flash 2 …………3-39 3.8.2 Drive Xpert Control [Auto] ……….3-40 3.8.3 Drive Xpert Mode Update [Last Setting] ……. 3-40 3.8.4 Express Gate …………..3-41 3.8.5… -
Page 7
Contents 4.3.9 ASUS AI Direct Link …………4-28 4.3.10 Audio configurations …………. 4-30 4.3.11 ASUS Drive Xpert …………4-34 4.3.12 ASUS Express Gate …………. 4-45 RAID configurations …………..4-55 4.4.1 RAID definitions …………4-55 4.4.2 Installing Serial ATA hard disks ……..4-56 4.4.3… -
Page 8: Notices
Notices Federal Communications Commission Statement This device complies with Part 15 of the FCC Rules. Operation is subject to the following two conditions: • This device may not cause harmful interference, and • This device must accept any interference received including interference that may cause undesired operation.
-
Page 9: Safety Information
Safety information Electrical safety • To prevent electrical shock hazard, disconnect the power cable from the electrical outlet before relocating the system. • When adding or removing devices to or from the system, ensure that the power cables for the devices are unplugged before the signal cables are connected. If possible, disconnect all power cables from the existing system before you add a device.
-
Page 10: About This Guide
Refer to the following sources for additional information and for product and software updates. ASUS websites The ASUS website provides updated information on ASUS hardware and software products. Refer to the ASUS contact information. Optional documentation Your product package may include optional documentation, such as warranty flyers, that may have been added by your dealer.
-
Page 11: Conventions Used In This Guide
Conventions used in this guide To make sure that you perform certain tasks properly, take note of the following symbols used throughout this manual. DANGER/WARNING: Information to prevent injury to yourself when trying to complete a task. CAUTION: Information to prevent damage to the components when trying to complete a task.
-
Page 12: P5Q Specifications Summary
4 x DIMM, max. 16GB, DDR2 1200 / 1066 / 800 / 667 MHz, non-ECC, un-buffered memory Dual channel memory architecture * Refer to www.asus.com or this user manual for the Memory QVL (Qualified Vendors Lists). ** When installing total memory of 4 GB capacity or more,…
-
Page 13
— AI Nap ASUS Unique Features: — ASUS Express Gate — ASUS AI Direct Llink ASUS Quiet Thermal Solution: — ASUS Fanless Design: unique stylish heatsink — ASUS Fan Xpert ASUS Crystal Sound: — AI Noise Filtering ASUS EZ DIY:… -
Page 14
Manageability WOL by PME, WOR by PME, WOR by Ring, Chassis Intrusion, PXE Support DVD contents Drivers Express Gate ASUS PC Probe II ASUS Update ASUS AI Suite Image-Editing Suite Anti-virus software (OEM version) Form Factor ATX Form Factor, 12” x 8.8” (30.5 cm x 22.4 cm) -
Page 15: Chapter 1: Product Introduction
This chapter describes the motherboard features and the new technologies it supports. Chapter 1: Product introduction…
-
Page 16
Chapter summary Welcome! ………………1-1 Package contents …………….. 1-1 Special features …………….1-2 ASUS P5Q… -
Page 17: Welcome
® The motherboard delivers a host of new features and latest technologies, making it another standout in the long line of ASUS quality motherboards! Before you start installing the motherboard, and hardware devices on it, check the items in your package with the list below.
-
Page 18: Special Features
Special features 1.3.1 Product highlights Intel Core™2 Extreme / Core™ 2 Quad / ® Core™2 Duo Processor Support This motherboard supports the latest Intel Core™ 2 Extreme / Core™ 2 Quad / ® Core™ 2 Duo processors in the LGA775 package. It is excellent for multi-tasking, multi-media and enthusiastic gamers with 1600 / 1333 / 1066 / 800 MHz FSB.
-
Page 19: Asus Special Features
Green ASUS This motherboard and its packaging comply with the European Union’s Restriction on the use of Hazardous Substances (RoHS). This is in line with the ASUS vision of creating environment-friendly and recyclable products/packagings to safeguard consumers’ health while minimizing the impact on the environment.
-
Page 20: Asus Ai Direct Link
ASUS EPU-6 Engine The new ASUS EPU—the world’s first power saving engine, has been upgraded to a new six-engine version, which provides total system power savings by detecting current PC loadings and intelligently moderating power in real-time.
-
Page 21: Asus Crystal Sound
Fan Xpert ASUS Fan Xpert intelligently allows you to adjust both the CPU and chassis fan speeds according to different ambient temperatures caused by different climate conditions in different geographic regions and your PC’s loading. The built-in variety of useful profiles offer flexible controls of fan speed to achieve a quiet and cool environment.
-
Page 22: Asus Mylogo2
ASUS CrashFree BIOS 3 The ASUS CrashFree BIOS 3 allows users to restore corrupted BIOS data from a USB flash disk containing the BIOS file. See page 3-8 for details. ASUS Q-Shield The specially designed ASUS Q-Shield does without the usual “fingers”…
-
Page 23: Asus Exclusive Overclocking Features
1.3.3 ASUS Exclusive Overclocking Features AI Booster The ASUS AI Booster allows you to overclock the CPU speed in Windows environment without the hassle of booting the BIOS. See page 4-23 for details. Precision Tweaker 2 Allows the user to adjust the NB Voltage, FSB termination Voltage, CPU PLL Voltage and the DRAM Voltage in 0.02v steps to finetune voltages to achieve the…
-
Page 24
Chapter 1: Product Introduction… -
Page 25: Chapter 2: Hardware Information
This chapter lists the hardware setup procedures that you have to perform when installing system components. It includes description of the jumpers and connectors on the motherboard. Chapter 2: Hardware information…
-
Page 26
Motherboard overview …………..2-2 Central Processing Unit (CPU) ……….. 2-5 System memory …………….. 2-11 Expansion slots …………….2-17 Jumper ………………2-20 Connectors …………….. 2-23 Starting up for the first time …………2-37 Turning off the computer …………2-38 ASUS P5Q… -
Page 27: Before You Proceed
ON, in sleep mode, or in soft-off mode. This is a reminder that you should shut down the system and unplug the power cable before removing or plugging in any motherboard component. The illustration below shows the location of the onboard LED. ASUS P5Q…
-
Page 28: Motherboard Overview
Motherboard overview 2.2.1 Motherboard layout Refer to 2.7 Connectors for more information about rear panel connectors and internal connectors. Chapter 2: Hardware information…
-
Page 29: Layout Contents
Chassis intrusion connector (4-1 pin CHASSIS) 2-25 Floppy disk drive connector (34-1 pin FLOPPY) 2-31 Optical drive audio connector (4-pin CD) 2-33 Front panel audio connector (10-1 pin AAFP) 2-32 Digital audio connector (4-1 pin SPDIF_OUT) Serial port connector (10-1 pin COM1) 2-33 ASUS P5Q…
-
Page 30: Placement Direction
2.2.3 Placement direction When installing the motherboard, make sure that you place it into the chassis in the correct orientation. The edge with external ports goes to the rear part of the chassis as indicated in the image below. 2.2.4 Screw holes Place six (6) screws into the holes indicated by circles to secure the motherboard to the chassis.
-
Page 31: Central Processing Unit (Cpu)
ASUS will shoulder the cost of repair only if the damage is shipment/transit-related. • Keep the cap after installing the motherboard. ASUS will process Return Merchandise Authorization (RMA) requests only if the motherboard comes with the cap on the LGA775 socket.
-
Page 32: Installing The Cpu
2.3.1 Installing the CPU To install a CPU: Locate the CPU socket on the motherboard. Before installing the CPU, make sure that the cam box is facing towards you and the load lever is on your left. Press the load lever with your thumb Retention tab (A), then move it to the left (B) until it is released from the retention tab.
-
Page 33
The Thermal Interface Material is toxic and inedible. If it gets into your eyes or touches your skin, ensure to wash it off immediately, and seek professional medical help. To prevent contaminating the paste, DO NOT spread the paste with your finger directly. ASUS P5Q… -
Page 34
Close the load plate (A), then push the load lever (B) until it snaps into the retention tab. The motherboard supports Intel ® LGA775 processors with the Intel ® Enhanced Memory 64 Technology (EM64T), Enhanced Intel SpeedStep Technology ® (EIST), and Hyper-Threading Technology. Refer to the Appendix for more information on these CPU features. -
Page 35: Installing The Cpu Heatsink And Fan
Push down two fasteners at a time in a diagonal sequence to secure the heatsink and fan assembly in place. Orient the heatsink and fan assembly such that the CPU fan cable is closest to the CPU fan connector. ASUS P5Q…
-
Page 36: Uninstalling The Cpu Heatsink And Fan
Connect the CPU fan cable to the connector on the motherboard labeled CPU_FAN. DO NOT forget to connect the CPU fan connector! Hardware monitoring errors can occur if you fail to plug this connector. 2.3.3 Uninstalling the CPU heatsink and fan To uninstall the CPU heatsink and fan: Disconnect the CPU fan cable from the connector on the motherboard.
-
Page 37: System Memory
The motherboard comes with four Double Data Rate 2 (DDR2) Dual Inline Memory Modules (DIMM) sockets. The figure illustrates the location of the DDR2 DIMM sockets: Channel Sockets Channel A DIMM_A1 and DIMM_A2 Channel B DIMM_B1 and DIMM_B2 ASUS P5Q 2-11…
-
Page 38: Memory Configurations
2.4.2 Memory configurations You may install 512 MB, 1 GB, 2 GB and 4 GB unbuffered and non-ECC DDR2 DIMMs into the DIMM sockets. • You may install varying memory sizes in Channel A and Channel B. The system maps the total size of the lower-sized channel for the dual-channel configuration.
-
Page 39
512MB Hynix HY5PS12821CFP-S5 5-5-5 Hynix HYMP564U64CP8-S5 1024MB Hynix HY5PS12821CFP-S5 5-5-5 Hynix HYMP512U64CP8-S5 512MB KINGMAX KKA8FEIBF-HJK-25A KINGMAX KLDC28F-A8KI5 1024MB KINGMAX KKA8FEIBF-HJK-25A KINGMAX KLDD48F-ABKI5 2048MB KINGMAX KKB8FFBXF-CFA-25A KINGMAX KLDE88F-B8KB5 512MB KINGSTON E5108AJBG-8E-E ELPIDA KVR800D2N5/512 512MB KINGSTON E5108AJBG-8E-E ELPIDA KVR800D2N6/512 ASUS P5Q 2-13… -
Page 40
P5Q Motherboard Qualified Vendors Lists (QVL) DDR2-800 MHz capability (cont.) DIMM socket support (Optional) Size Vendor Chip No. Chip Brand SS/DS Part No. 1024MB KINGSTON Heat-Sink Package 4-4-4-12 N/A KHX6400D2LLK2/1GN (EPP) V 1024MB KINGSTON Heat-Sink Package KHX6400D2ULK2/1G 1024MB KINGSTON Heat-Sink Package 4-4-4-12 N/A KHX6400D2LL/1G 1024MB… -
Page 41: Memory Configuration
• C*: Supports four modules inserted into both the yellow and black slots as two pairs of dual-channel memory configuration. Visit the ASUS website for the latest QVL. ASUS P5Q 2-15…
-
Page 42: Installing A Dimm
2.4.3 Installing a DIMM Make sure to unplug the power supply before adding or removing DIMMs or other system components. Failure to do so may cause severe damage to both the motherboard and the components. Unlock a DDR2 DIMM socket DDR2 DIMM notch by pressing the retaining clips outward.
-
Page 43: Expansion Slots
IRQ” or that the cards do not need IRQ assignments. Otherwise, conflicts will arise between the two PCI groups, making the system unstable and the card inoperable. Refer to the table on the next page for details. ASUS P5Q 2-17…
-
Page 44: Interrupt Assignments
2.5.3 Interrupt assignments Priority Standard function System timer Keyboard controller – Re-direct to IRQ#9 IRQ holder for PCI steering* Communications port (COM1)* IRQ holder for PCI steering* Floppy disk controller Printer port (LPT1)* System CMOS/Real Time Clock IRQ holder for PCI steering* IRQ holder for PCI steering* IRQ holder for PCI steering* PS/2 compatible mouse port*…
-
Page 45: Pci Slots
PCI Express specifications. Refer to the figure below for the location of the slot. PCI Express 2.0 x16 slot (blue) PCI slot 3 PCI Express x1 slot 1 PCI slot 2 PCI Express x1 slot 2 PCI slot 1 ASUS P5Q 2-19…
-
Page 46: Jumper
Jumper Clear RTC RAM (3-pin CLRTC) This jumper allows you to clear the Real Time Clock (RTC) RAM in CMOS. You can clear the CMOS memory of date, time, and system setup parameters by erasing the CMOS RTC RAM data. The onboard button cell battery powers the RAM data in CMOS, which include system setup information such as system passwords.
-
Page 47
For system failure due to the wrong setting of the OV_CPU jumper, shut down the computer and move the cap back to pins 2-3. • The system may need a better cooling system (for example, a water-cooling system) to work stably under high voltage settings. ASUS P5Q 2-21… -
Page 48
Keyboard/mouse power (3-pin PS2_USBPW56) This jumper allows you to enable or disable the keyboard/mouse and USB port 5-6 wake-up feature. When you set this jumper to pins 2-3 (+5VSB), you can wake up the computer by pressing a key on the keyboard (the default is the Space Bar), clicking the mouse or using a USB device. -
Page 49: Connectors
Line Out port (lime). This port connects a headphone or a speaker. In 4-channel, 6-channel, and 8-channel configuration, the function of this port becomes Front Speaker Out. Microphone port (pink). This port connects a microphone. ASUS P5Q 2-23…
-
Page 50
Side Speaker Out port (gray). This port connects the side speakers in an 8-channel audio configuration. Refer to the audio configuration table below for the function of the audio ports in 2, 4, 6, or 8-channel configuration. Audio 2, 4, 6, or 8-channel configuration Headset Port 4-channel… -
Page 51: Internal Connectors
This connector supports a Trusted Platform Module (TPM) system, which can securely store keys, digital certificates, passwords, and data. A TPM system also helps enhance network security, protects digital identities, and ensures platform integrity. The TPM module is purchased separately. ASUS P5Q 2-25…
-
Page 52
IDE connector (40-1 pin PRI_EIDE) The onboard IDE connector is for the Ultra DMA 133/100/66 signal cable. There are three connectors on each Ultra DMA 133/100/66 signal cable: blue, black, and gray. Connect the blue connector to the motherboard’s IDE connector, then select one of the following modes to configure your device. -
Page 53
Connect the right-angle side of SATA signal cable to SATA device. Or you may connect the right-angle side of SATA cable to the onboard SATA port to avoid mechanical conflict with huge graphics cards. ASUS P5Q 2-27… -
Page 54
Super Speed erases all original data in both hard disks. Before using the Drive Xpert technology, make sure that you have connected the SATA signal cables and installed SATA hard disk drives. Refer to 4.3.11 ASUS Drive Xpert for detailed application instructions. 2-28 Chapter 2: Hardware information… -
Page 55
If your chassis suppots front panel USB ports, you can attach a front panel USB cable to these connectors. Connect the USB cable to ASUS Q-Connector (USB, blue) first, and then install the Q-Connector (USB) to the USB connector onboard. -
Page 56
You can attach a FireWire/1394 cable to this connector if your chassis suppots the front panel IEEE1394 port. Connect the 1394 cable to ASUS Q-Connector (1394, red) first, and then install the Q-Connector (1394) to the 1394 connector onboard. -
Page 57
These are not jumpers! DO NOT place jumper caps on the fan connectors! Only the CPU_FAN and CHA_FAN1-2 connectors support the ASUS Fan Xpert feature. Optical drive audio connector (4-pin CD) This connector allows you to receive stereo audio input from sound sources such as a CD-ROM, TV tuner, or MPEG card. -
Page 58
10. Chassis intrusion connector (4-1 pin CHASSIS) This connector is for a chassis-mounted intrusion detection sensor or switch. Connect one end of the chassis intrusion sensor or switch cable to this connector. The chassis intrusion sensor or switch sends a high-level signal to this connector when a chassis component is removed or replaced. -
Page 59
Front Panel Type item in the BIOS is set to [HD Audio]. If you want to connect an AC’ 97 front panel audio module to this connector, set the item to [AC97]. Refer to page 3-28 for details. ASUS P5Q 2-33… -
Page 60
• If you are uncertain about the minimum power supply requirement for your system, refer to the Recommended Power Supply Wattage Calculator at http://support.asus.com/PowerSupplyCalculator/PSCalculator. aspx?SLanguage=en-us for details. 2-34 Chapter 2: Hardware information… -
Page 61: System Panel Connector
BIOS settings. Pressing the power switch for more than four seconds while the system is ON turns the system OFF. • Reset button (2-pin RESET) This 2-pin connector is for the chassis-mounted reset button for system reboot without turning off the system power. ASUS P5Q 2-35…
-
Page 62: Asus Q-Connector
16. ASUS Q-Connector (system panel) You can use the ASUS Q-Connector to connect/disconnect chassis front panel cables in a few steps. Refer to the instructions below to install the ASUS Q-Connector. Connect the front panel cables to the ASUS Q-Connector.
-
Page 63: Starting Up For The First Time
One continuous beep followed by three No VGA detected short beeps One continuous beep followed by four Hardware component failure short beeps At power on, hold down the <Delete> key to enter the BIOS Setup. Follow the instructions in Chapter 3. ASUS P5Q 2-37…
-
Page 64: Turning Off The Computer
Turning off the computer 2.9.1 Using the OS shut down function If you are using Windows Vista™: ® Click the Start button then select ShutDown. The power supply should turn off after Windows shuts down. ® If you are using Windows ®…
-
Page 65: Chapter 3: Bios Setup
This chapter tells how to change the system settings through the BIOS Setup menus. Detailed descriptions of the BIOS parameters are also provided. Chapter 3: BIOS setup…
-
Page 66
Managing and updating your BIOS ……….3-1 BIOS setup program …………..3-9 Main menu ……………… 3-12 Ai Tweaker menu ……………. 3-17 Advanced menu …………….. 3-24 Power menu …………….3-31 Boot menu ……………… 3-35 Tools menu …………….. 3-39 Exit menu ………………3-44 ASUS P5Q… -
Page 67: Managing And Updating Your Bios
® ASUS EZ Flash 2 (Updates the BIOS using a floppy disk or USB flash disk.) AFUDOS (Updates the BIOS using a bootable floppy disk) ASUS CrashFree BIOS 3 (Updates the BIOS using a USB flash disk or the motherboard support CD when the BIOS file fails or gets corrupted.)
-
Page 68
To update the BIOS through the Internet: desktop by clicking Start Launch the ASUS Update utility from the Windows ® > Programs > ASUS > ASUSUpdate > ASUSUpdate. The ASUS Update main window appears. Select Update BIOS from the Select the ASUS FTP site nearest… -
Page 69
To update the BIOS through a BIOS file: desktop by clicking Start Launch the ASUS Update utility from the Windows ® > Programs > ASUS > ASUSUpdate > ASUSUpdate. The ASUS Update main window appears. Select Update BIOS from a file option from the drop-down menu, then click Next. -
Page 70: Creating A Bootable Floppy Disk
3.1.2 Creating a bootable floppy disk Do either one of the following to create a bootable floppy disk. DOS environment a. Insert a 1.44MB floppy disk into the drive. b. At the DOS prompt, type format A:/S then press <Enter>. Windows XP environment ®…
-
Page 71: Asus Ez Flash 2 Utility
3.1.3 ASUS EZ Flash 2 utility The ASUS EZ Flash 2 feature allows you to update the BIOS without having to go through the long process of booting from a floppy disk and using a DOS-based utility. The EZ Flash 2 utility is built-in the BIOS chip so it is accessible by pressing <Alt>…
-
Page 72: Afudos Utility
Updating the BIOS file To update the BIOS file using the AFUDOS utility: Visit the ASUS website (www.asus.com) and download the latest BIOS file for the motherboard. Save the BIOS file to a bootable floppy disk. Chapter 3: BIOS setup…
-
Page 73
A:\>afudos /iP5Q.ROM The utility verifies the file and starts updating the BIOS. A:\>afudos /iP5Q.ROM AMI Firmware Update Utility — Version 1.19(ASUS V2.07(03.11.24BB)) Copyright (C) 2002 American Megatrends, Inc. All rights reserved. WARNING!! Do not turn off power during flash BIOS Reading file ..done Reading flash .. -
Page 74: Asus Crashfree Bios 3 Utility
3.1.5 ASUS CrashFree BIOS 3 utility The ASUS CrashFree BIOS 3 is an auto recovery tool that allows you to restore the BIOS file when it fails or gets corrupted during the updating process. You can update a corrupted BIOS file using the motherboard support CD or the USB flash disk that contains the updated BIOS file.
-
Page 75: Bios Setup Program
The BIOS setup screens shown in this section are for reference purposes only, and may not exactly match what you see on your screen. • Visit the ASUS website (www.asus.com) to download the latest BIOS file for this motherboard. ASUS P5Q…
-
Page 76: Bios Menu Screen
3.2.1 BIOS menu screen Menu items Menu bar Configuration fields General help BIOS SETUP UTILITY Main Ai Tweaker Advanced Power Boot Tools Exit Use [ENTER], [TAB] System Time [10:55:25] or [SHIFT-TAB] to System Date [Mon 05/12/2008] select a field. Legacy Diskette A [1.44M, 3.5 in.] Language [English]…
-
Page 77: Menu Items
Up/Down arrow keys or <Page Up> /<Page Down> keys to display the other items on the screen. 3.2.9 General help Pop-up window At the top right corner of the menu screen Scroll bar is a brief description of the selected item. ASUS P5Q 3-11…
-
Page 78: Main Menu
Main menu When you enter the BIOS Setup program, the Main menu screen appears, giving you an overview of the basic system information. Refer to section 3.2.1 BIOS menu screen for information on the menu screen items and how to navigate through them. BIOS SETUP UTILITY Main Ai Tweaker…
-
Page 79: Sata 1-6
When set to [Disabled], the data transfer from and to the device occurs one sector at a time. Configuration options: [Disabled] [Auto] PIO Mode [Auto] Allows you to select the data transfer mode. Configuration options: [Auto] [0] [1] [2] [3] [4] ASUS P5Q 3-13…
-
Page 80: Storage Configuration
DMA Mode [Auto] Selects the DMA mode. Configuration options: [Auto] [SWDMA0] [SWDMA1] [SWDMA2] [MWDMA0] [MWDMA1] [MWDMA2] [UDMA0] [UDMA1] [UDMA2] [UDMA3] [UDMA4] [UDMA5] SMART Monitoring [Auto] Sets the Smart Monitoring, Analysis, and Reporting Technology. Configuration options: [Auto] [Disabled] [Enabled] 32Bit Data Transfer [Enabled] Enables or disables 32-bit data transfer.
-
Page 81: Ahci Configuration
SATA Port1 [Auto] Allows you to select the type of device connected to the system. Configuration options: [Auto] [Not Installed] SMART Monitoring [Enabled] Allows you to set the Self-Monitoring, Analysis and Reporting Technology. Configration options: [Disabled] [Enabled] ASUS P5Q 3-15…
-
Page 82: System Information
3.3.8 System Information This menu gives you an overview of the general system specifications. The BIOS automatically detects the items in this menu. BIOS SETUP UTILITY Main BIOS Information Version : 0204 Build Date: 05/06/08 Processor Type : Intel(R) CPU 3.60GHz Speed : 3600MHz Count…
-
Page 83: Ai Tweaker Menu
Allows selection of CPU overclocking options to achieve desired CPU internal frequency. Select either one of the preset overclocking configuration options: Manual Allows you to individually set overclocking parameters. Auto Loads the optimal settings for the system. ASUS P5Q 3-17…
-
Page 84: Cpu Ratio Setting [Auto]
3.4.2 CPU Ratio Setting [Auto] Allows you to adjust the ratio between CPU Core Clock and FSB Frequency. Use the <+> and <-> keys to adjust the ratio. If an invalid ratio is set in CMOS, then actual and setpoint values may differ. The following two items appear only when you set the Ai Overclock Tuner item to [Manual].
-
Page 85: Dram Timing Control [Auto]
Configuration options: [Auto] [1 DRAM Clocks] – [15 DRAM Clocks] WRITE to READ Delay(S) [Auto] Configuration options: [Auto] [1 DRAM Clocks] – [15 DRAM Clocks] WRITE to READ Delay(D) [Auto] Configuration options: [Auto] [1 DRAM Clocks] – [15 DRAM Clocks] ASUS P5Q 3-19…
-
Page 86: Dram Static Read Control [Auto]
READ To READ Delay(S) [Auto] Configuration options: [Auto] [1 DRAM Clocks] – [15 DRAM Clocks] READ To READ Delay(D) [Auto] Configuration options: [Auto] [1 DRAM Clocks] – [15 DRAM Clocks] WRITE To WRITE Delay(S) [Auto] Configuration options: [Auto] [1 DRAM Clocks] – [15 DRAM Clocks] WRITE To WRITE Delay(D) [Auto] Configuration options: [Auto] [1 DRAM Clocks] –…
-
Page 87: Ai Transaction Booster [Auto]
FSB Termination Voltage [Auto] Allows you to set the front side bus termination voltage. The values range from 1.20V* to 1.90V with a 0.02V interval. The minimum value of this item becomes 1.10V when a 45nm CPU is installed. ASUS P5Q 3-21…
-
Page 88: Dram Voltage [Auto]
3.4.14 DRAM Voltage [Auto] Allows you to set the DRAM voltage. The values range from 1.80V to 3.08V with a 0.02V interval. 3.4.15 NB Voltage [Auto] Allows you to set the North Bridge voltage. The values range from 1.10V to 2.20V* with a 0.02V interval.
-
Page 89: Load-Line Calibration [Auto]
Set to [Disabled] to enhance FSB overclocking ability or [Auto] for EMI control. Configuration options: [Auto] [Disabled] 3.4.20 PCIE Spread Spectrum [Auto] Set to [Disabled] to enhance PCIE overclocking ability or [Auto] for EMI control. Configuration options: [Auto] [Disabled] ASUS P5Q 3-23…
-
Page 90: Advanced Menu
Advanced menu The Advanced menu items allow you to change the settings for the CPU and other system devices. Take caution when changing the settings of the Advanced menu items. Incorrect field values can cause the system to malfunction. BIOS SETUP UTILITY Main Ai Tweaker Advanced…
-
Page 91: Cpu Configuration
C1E Support [Enabled] Change Option Max CPUID Value Limit [Disabled] General Help Intel(R) Virtualization Tech [Enabled] Save and Exit CPU TM Function [Enabled] Exit Execute Disable Bit [Enabled] Intel(R) SpeedStep(TM) Tech [Enabled] v02.61 (C)Copyright 1985-2008, American Megatrends, Inc. ASUS P5Q 3-25…
-
Page 92
CPU Ratio Setting [Auto] Allows you to adjust the ratio between CPU Core Clock and FSB Frequency. Use the <+> and <-> keys to adjust the value. Configuration options: [Auto] [12.0] [13.0] [14.0] [15.0] [16.0] [17.0] [18.0] C1E Support [Enabled] Allows you to enable or disable Enhanced Halt State support. -
Page 93: Chipset
Memory Hole [Disabled] Allows you to set the memory hole mode. Configuration options: [Disabled] [15MB-16MB] Initiate Graphic Adapter [PEG/PCI] Allows you to decide which graphics controller to use as the primary boot device. Configuration options: [PCI/PEG] [PEG/PCI] ASUS P5Q 3-27…
-
Page 94: Onboard Devices Configuration
3.5.4 Onboard Devices Configuration BIOS SETUP UTILITY Advanced Onboard Devices Configuration Enable or Disable High Definition Audio High Definition Audio [Enabled] Controller Front Panel Type [HD Audio] SPDIF_OUT Mode Setting [SPDIF Output] Marvell IDE [Enabled] Marvell IDE Boot ROM [Enabled] Atheros GigaBit LAN [Enabled] LAN Boot ROM…
-
Page 95: Usb Configuration
Allows you to enable or disable the USB Host Controllers. Configuration options: [Disabled] [Enabled] The following items appear only when you set USB Functions to [Enabled]. USB 2.0 Controller [Enabled] Allows you to enable or disable the USB 2.0 controller. Configuration options: [Enabled] [Disabled] ASUS P5Q 3-29…
-
Page 96: Pcipnp
USB 2.0 Controller Mode [HiSpeed] Allows you to set the USB 2.0 controller mode to HiSpeed (480 Mbps) or FullSpeed (12 Mbps). Configuration options: [FullSpeed] [HiSpeed] The USB 2.0 Controller Mode item appears only when you enable the USB 2.0 Controller. BIOS EHCI Hand-off [Enabled] Allows you to enable the support for operating systems without an EHCI hand-off feature.
-
Page 97: Power Menu
Allows you to enable or disable the Advanced Configuration and Power Interface (ACPI) support in the Advanced Programmable Interrupt Controller (APIC). When set to [Enabled], the ACPI APIC table pointer is included in the RSDT pointer list. Configuration options: [Disabled] [Enabled] ASUS P5Q 3-31…
-
Page 98: Apm Configuration
3.6.5 APM Configuration BIOS SETUP UTILITY Power APM Configuration <Enter> to select whether or not to Restore on AC Power Loss [Power Off] restart the system after AC power loss. Power On By RTC Alarm [Disabled] Power On By External Modems [Disabled] Power On By PCI Devices [Disabled]…
-
Page 99: Hardware Monitor
(RPM). If the fan is not connected to the motherboard, the field shows [N/A]. CPU Q-Fan Control [Disabled] Allows you to enable or disable the CPU Q-fan control feature. Configuration options: [Disabled] [Enabled] ASUS P5Q 3-33…
-
Page 100
The following item appears only when you enable the CPU Q-Fan Control item. CPU Fan Profile [Silent] Allows you to set the appropriate performance level of the CPU fan. When set to [Standard], the CPU fan automatically adjusts depending on the CPU temperature. -
Page 101: Boot Menu
These items specify the boot device priority sequence from the available devices. The number of device items that appears on the screen depends on the number of devices installed in the system. Configuration options: [1st FLOPPY DRIVE] [Hard Drive] [ATAPI CD-ROM] [Disabled] ASUS P5Q 3-35…
-
Page 102: Boot Settings Configuration
This allows you to enable or disable the full screen logo display feature. Configuration options: [Disabled] [Enabled] Set this item to [Enabled] to use the ASUS MyLogo2™ feature. AddOn ROM Display Mode [Force BIOS] Sets the display mode for option ROM.
-
Page 103: Security
If you forget your BIOS password, you can clear it by erasing the CMOS Real Time Clock (RTC) RAM. See section 2.6 Jumper for information on how to erase the RTC RAM. After you have set a supervisor password, the other items appear to allow you to change other security settings. ASUS P5Q 3-37…
-
Page 104: Change User Password
BIOS SETUP UTILITY Boot Security Settings <Enter> to change password. Supervisor Password : Installed <Enter> again to User Password : Installed disabled password. Change Supervisor Password User Access Level [Full Access] Change User Password Clear User Password Password Check [Setup] Select Screen Select Item…
-
Page 105: Tools Menu
3.8.1 ASUS EZ Flash 2 Allows you to run ASUS EZ Flash 2. When you press <Enter>, a confirmation message appears. Use the left/right arrow key to select between [Yes] or [No], then press <Enter> to confirm your choice. Please see page 3-5, section 3.1.3 for details.
-
Page 106: Drive Xpert Control [Auto]
3.8.2 Drive Xpert Control [Auto] Allows you to enable or disable the Drive Xpert feature. Configuration options: [Auto] [Enabled] [Disabled] 3.8.3 Drive Xpert Mode Update [Last Setting] This item appears only when you set Drive Xpert Control to [Auto] or [Enabled]. Set this item to [Mode Change] to show further settings of the Drive Xpert function.
-
Page 107: Express Gate
3.8.4 Express Gate Allows you to enable or disable the ASUS Express Gate feature. The ASUS Express Gate feature is a unique instant-on environment that provides quick access to the Internet browser and Skype. Refer to section 4.3.12 for details.
-
Page 108: Asus O.c. Profile
3.8.5 ASUS O.C. Profile This item allows you to store or load multiple BIOS settings. BIOS SETUP UTILITY Tools O.C. PROFILE Configuration Save to Profile 1 O.C. Profile 1 Status : Not Installed O.C. Profile 2 Status : Not Installed…
-
Page 109: Ai Net 2
Select Item Change Option General Help Save and Exit Exit v02.58 (C)Copyright 1985-2008, American Megatrends, Inc. Check Atheros LAN cable [Disabled] Enables or disables checking of the LAN cable during the Power-On Self-Test (POST). Configuration options: [Disabled] [Enabled] ASUS P5Q 3-43…
-
Page 110: Exit Menu
Exit menu The Exit menu items allow you to load the optimal or failsafe default values for the BIOS items, and save or discard your changes to the BIOS items. BIOS SETUP UTILITY Main Ai Tweaker Advanced Power Boot Tools Exit Exit system setup Exit &…
-
Page 111: Chapter 4: Software Support
This chapter describes the contents of the support DVD that comes with the motherboard package and the software. Software support…
-
Page 112
Chapter summary Installing an operating system ……….. 4-1 Support DVD information …………4-1 Software information …………..4-9 RAID configurations …………..4-55 Creating a RAID driver disk …………4-64 ASUS P5Q… -
Page 113: Installing An Operating System
The support DVD that came with the motherboard package contains the drivers, software applications, and utilities that you can install to avail all motherboard features. The contents of the support DVD are subject to change at any time without notice. Visit the ASUS website(www.asus.com) for updates. 4.2.1 Running the support DVD Place the support DVD to the optical drive.
-
Page 114: Drivers Menu
Installs the Atheros L1e Gigabit Ethernet driver. Marvell 61xx SATA Driver Installs the Marvell 61xx SATA driver. ® ASUS EPU-Six Engine Installs the ASUS EPU-6 Engine driver and utility. USB 2.0 Driver Installs the USB 2.0 driver. Chapter 4: Software support…
-
Page 115: Utilities Menu
ASUS InstAll — Installation Wizard for Utilities Installs all of the utilities through the Installation Wizard. ASUS Update The ASUS Update utility allows you to update the motherboard BIOS in Windows ® environment. This utility requires an Internet connection either through a network or an Internet Service Provider (ISP).
-
Page 116
This utility helps you keep your computer in healthy operating condition. ASUS AI Suite The ASUS AI Suite is an innovative application to do overclocking, fan control, power saving and quiet thermal control. ASUS AI Direct Link The ASUS AI Direct Link provides up to 70% transferring speed improvement when compared to traditional USB 2.0 and is the easiest and fastest way for users to… -
Page 117: Make Disk Menu
Drive Xpert Installs the ASUS Drive Xpert utility. Anti-Virus Utility The anti-virus application detects and protects your computer from viruses that destroys data. Anti-Virus Utility Download Downloads and installs the latest anti-virus application. 4.2.4 Make disk menu The Make disk menu contains items to create the Intel ICH10R or Marvell 61xx ®…
-
Page 118: Manual Menu
Reader from the Utilities menu before opening a user manual ® ® file. 4.2.6 ASUS Contact information Click the Contact tab to display the ASUS contact information. You can also find this information on the inside front cover of this user guide. Chapter 4: Software support…
-
Page 119: Other Information
The icons on the top right corner of the screen give additional information on the motherboard and the contents of the support DVD. Click an icon to display the specified information. Motherboard Info Displays the general specifications of the motherboard. Browse this DVD Displays the support DVD contents in graphical format. ASUS P5Q…
-
Page 120: Technical Support Form
Technical support Form Displays the ASUS Technical Support Request Form that you have to fill out when requesting technical support. Filelist Displays the contents of the support DVD in text format. Chapter 4: Software support…
-
Page 121: Software Information
4.3.1 ASUS MyLogo2™ The ASUS MyLogo2™ utility lets you customize the boot logo. The boot logo is the image that appears on screen during the Power-On-Self-Tests (POST). The ASUS MyLogo2™ is automatically installed when you install the ASUS Update utility from the support DVD.
-
Page 122
Ratio box. When the screen returns to the ASUS Update utility, flash the original BIOS to load the new boot logo. 10. After flashing the BIOS, restart the computer to display the new boot logo during POST. -
Page 123: Ai Net2
LAN cable(s) connected to the LAN port(s). • If you want the system to check the status of the LAN cable before entering the OS, enable the item Post Check LAN Cable in the BIOS Setup. ASUS P5Q 4-11…
-
Page 124: Asus Pc Probe Ii
To launch the PC Probe II from the Windows ® > ASUS > PC Probe II > PC Probe II v1.xx.xx. The PC Probe II main window appears. After launching the application, the PC Probe II icon appears in the Windows ®…
-
Page 125
When displayed, the monitor panel for that sensor also turns red. Refer to the Monitor panels section for details. Preference You can customize the application using the Preference section in the main window. Click the box before each preference to activate or deactivate. ASUS P5Q 4-13… -
Page 126
Hardware monitor panels The hardware monitor panels display the current value of a system sensor such as fan rotation, CPU temperature, and voltages. The hardware monitor panels come in two display modes: hexagonal (large) and rectangular (small). When you check the Enable Monitoring Panel option from the Preference section, the monitor panels appear on your computer’s desktop. -
Page 127
You can enlarge or reduce the browser size by dragging the bottom right corner of the browser. DMI browser Click to display the DMI (Desktop Management Interface) browser. This browser displays various desktop and system information. Click the plus sign (+) before DMI Information to display the available information. ASUS P5Q 4-15… -
Page 128
PCI browser Click to display the PCI (Peripheral Component Interconnect) browser. This browser provides information on the PCI devices installed on your system. Click the plus sign (+) before the PCI Information item to display available information. Usage The Usage browser displays real-time information on the CPU, hard disk drive space, and memory usage. -
Page 129
The Preference tab allows you to customize sensor alerts, or change the temperature scale. Loads the default Loads your saved threshold values for Cancels or configuration each sensor ignores your changes Applies your Saves your changes configuration ASUS P5Q 4-17… -
Page 130: Asus Ai Suite
4.3.4 ASUS AI Suite ASUS AI Suite allows you to launch EPU-6 Engine, AI Booster, AI Nap, and Fan Xpert utilities easily. Installing AI Suite To install AI Suite on your computer: Place the support DVD to the optical drive. The Drivers installation tab appears if your computer has an enabled Autorun feature.
-
Page 131
Displays the CPU/ system temperature, CPU/memory/PCIE voltage, and CPU/ chassis fan speed Displays the FSB/CPU frequency Click on right corner of the expanded window to switch the temperature from degrees Centigrade to degrees Fahrenheit. ASUS P5Q 4-19… -
Page 132: Asus Ai Nap
4.3.5 ASUS AI Nap This feature allows you to minimize the power consumption of your computer whenever you are away. Enable this feature for minimum power consumption and a more quiet system operation. After installing AI Suite from the bundled support DVD, you can launch the utility by double-clicking the AI Suite icon on the Windows OS taskbar and click the AI Nap button on the AI Suite main window.
-
Page 133: Asus Fan Xpert
4.3.6 ASUS Fan Xpert Asus Fan Xpert intelligently allows you to adjust both the CPU and chassis fan speeds according to different ambient temperatures caused by different climate conditions in different geographic regions and your PC’s system loading. The built-in variety of useful profiles offer flexible controls of fan speed to achieve a quiet and cool environment.
-
Page 134: Fan Profile Modes
Fan profile modes Disable: Select this mode to disable the Fan Xpert function. • Standard: This mode makes the fan adjust speed in moderate pattern. • Silent: This mode minimizes fan speed for quiet fan operation. • Turbo: This mode boosts the fan to achieve maximal fan speed for the best •…
-
Page 135: Asus Ai Booster
4.3.7 ASUS AI Booster The ASUS AI Booster application allows you to overclock the CPU speed in WIndows environment without the hassle of booting the BIOS. ® After installing AI Suite from the bundled support DVD, you can launch the utility…
-
Page 136: Asus Epu-6 Engine
4.3.8 ASUS EPU-6 Engine ASUS EPU-6 Engine is an energy-efficient tool that satisfies different computing needs. This utility provides four modes that you can select to enhance system performance or save power. Selecting Auto mode will have the system shift modes automatically according to current system status.
-
Page 137: Engine Main Menu
Advanced settings for each mode (refer to the next page for further information) Click Current *• to show the CO2 that has been reduced since you click the Renew button *• Click Total to show the total CO2 that has been reduced since you launched 6 Engine. ASUS P5Q 4-25…
-
Page 138: Advanced Settings Menu
Advanced settings menu Click Advance ( ) from the 6 Engine main menu to display configuration options in each mode. Some options in certain modes are dimmed, meaning that they are not available. Click to select a mode Move the slider to adjust Click the arrow to see more…
-
Page 139
CPU Loadline Light/Medium/ Light/Medium/ Heavy Heavy Fan Control Keep Bios Keep Bios Setting/Slow Setting/Quiet AI Nap Never/After 3 Never/After 3 Never/After 3 Never/After 3 Idle Time mins–After 5 mins–After 5 mins–After 5 mins–After 5 hours hours hours hours ASUS P5Q 4-27… -
Page 140: Asus Ai Direct Link
You must first connect two computers (at least one of them is ASUS product) using a network cable, and then install the utility to both computers to avail the AI Direct Link feature.
-
Page 141
The default path of the AIDirectLinkIncoming folder is C:\Program Files\ASUS\AI Direct Link. To change its location, disable the incoming folder first. Then, select Incoming folder > Change incoming folder to open the system directories, and move the AIDirectLinkIncoming folder under another directory. -
Page 142: Audio Configurations
4.3.10 Audio configurations The Realtek ® ALC1200 audio CODEC provides 8-channel audio capability to deliver the ultimate audio experience on your computer. The software provides Jack-Sensing function, S/PDIF Out support, and interrupt capability. The ALC1200 also includes the Realtek ® proprietary UAJ ®…
-
Page 143: Configuration Options
Manager, click the Sound Effect tab. Click the shortcut buttons or the drop-down menus for options on changing the acoustic environment, adjust the equalizer, or set the karaoke to your desired settings. Click to effect the Sound Effect settings and exit. ASUS P5Q 4-31…
-
Page 144
Mixer The Mixer option allows you to configure audio output (playback) volume and audio input (record) volume. To set the mixer options: From the Realtek HD Audio Manager, click the Mixer tab. Turn the volume buttons to adjust the Playback and/or Record volume. -
Page 145
From the Realtek HD Audio Manager, click the 3D Audio Demo tab. Click the option buttons to change the sound, moving path, or environment settings. Click to test your settings. Click to effect the 3D Audio Demo settings and exit. ASUS P5Q 4-33… -
Page 146: Asus Drive Xpert
4.3.11 ASUS Drive Xpert Drive Xpert, an ASUS exclusive technology, secures the data on your hard disk and enhances hard drive performance without the hassles of complicated configurations. With its user-friendly graphical user interface, you can easily arrange hard drive backups or enhance the hard drive’s transfer rate.
-
Page 147
The setup is completed. Click Ok to restart your computer at once. After restarting your computer, the Drive Xpert icon on the Windows notification area ® turns green to indicate that EZ Backup is set up successfully. ASUS P5Q 4-35… -
Page 148
Configuring Super Speed This mode allows two hard disks to access data simultaneously. The dual channel design can largely enhance hard disk transfer rate. • We recommend that you use two new hard disks for this setup. • This setup erases all original data in both hard disks. Ensure to back up all data in the hard disks before using this setup. -
Page 149
The setup is completed. Click Ok to restart your computer at once. After restarting your computer, the Drive Xpert icon on the Windows notification area turns ® gray to indicate that the Drive Xpert function is disabled. ASUS P5Q 4-37… -
Page 150: Partitioning Volumes
Partitioning volumes You have to partition volumes for the hard disk after Super Speed configuration. To partition volumes: Right-click My Computer on the Windows desktop, ® and then select Manage from the pop-up window. Select Disk Management. Right-click the unallocated space of the disk, and then select New Partition.
-
Page 151
New Schedule Allows you to set specific date and time for the schedule. Physical Drive Allows you to set schedule for the selected hard disk. Scheduled Displays the date and time for the setup schedule. ASUS P5Q 4-39… -
Page 152
Event Log Displays event log list that might be helpful for troubleshooting and locating a system malfunction. Click Refresh to update the event log list; and click Ok to close the window. Setup Password Allows you to set the password for configuration access. -
Page 153
Restart the system, and launch the Express Gate. Launching Drive Xpert To open the ASUS Utility panel, click . Launch Drive Xpert from the ASUS Utility panel. The main screen as shown below appears. Select EZ Backup or Super Speed according to your need. -
Page 154
EZ Backup To start EZ Backup configuration: Click EZ Backup from the main screen. Check if the SATA cables and power cords are installed properly. Click Next to continue. Click Next to continue the configuration. Before proceeding, ensure that you have back up all original data in the hard disk connected to the SATA_E2 (white, port 1) connector on the motherboard. -
Page 155
Before proceeding, ensure to back up all original data in the two hard disks. Otherwise, the system erases all data in both hard disks. Click Next to continue. The setup is completed. Click OK to close the configuration window. ASUS P5Q 4-43… -
Page 156
• BIOS SETUP UTILITY Main Ai Tweaker Advanced Power Boot Tools Exit ASUS EZ Flash 2 Press ENTER to run the utility to select Drive Xpert Control [Auto] and update BIOS. Drive Xpert Mode Update [Mode Change] This utility doesn’t… -
Page 157: Asus Express Gate
4.3.12 ASUS Express Gate ASUS Express Gate is an instant-on environment that gives you quick access to the Internet. Within a few seconds of powering on your computer, you will be at the Express Gate menu where you can start the web browser, Skype, or other Express Gate softwares.
-
Page 158
Select the target disk volume for you to install Express Gate. If you have multiple volumes and OS installed in your hard drive, it is recommended to install Express Gate in Volume C. Click Next to continue. Follow the screen instructions to complete installation. -
Page 159
Enter Boot selection pop-up In the Express Gate Environment: Function <Alt> + <Tab> Switch between softwares <Ctrl> + <Alt> + <Del> Bring up Power-Off dialog box <Ctrl> + <Alt> + <Print Screen> Save screen snapshot as picture to file ASUS P5Q 4-47… -
Page 160: Using The Configuration Panel
Using the Configuration Panel Use the configuration panel to change various Express Gate settings. Click on an icon to open a particular configuration tool. The following tools are available: Date and Time: set current date and time as well as time zone. •…
-
Page 161: Using The Launchbar
USB drive. If a USB device is detected, the icon contains a green arrow. ASUS Express Gate supports file uploading from SATA HDDs, ODDs and USB drive and downloading to USB drives only. Shows network status; click to configure network.
-
Page 162
Click to choose input language and method as well as keyboard shortcuts (Ctrl-Space by default). Click to change LaunchBar options (auto-hide, docking position, etc). Click to show the “ASUS Utility” panel. Click to show “About Express Gate ”. Click to open Express Gate Help. -
Page 163
The most common scenario is for your computer to automatically obtain network settings (i.e. DHCP). If this is the case, you don’t need to click Setup for any LAN port. If this is not the case, click Setup to configure the static IP settings manually. ASUS P5Q 4-51… -
Page 164
Shows user- created image album(s) Image control bar ASUS Express Gate supports HDDs connected to motherboard chipset- controlled onboard SATA ports only. All onboard extended SATA ports and external SATA ports are NOT supported. 4-52 Chapter 4: Software support… -
Page 165
Using ASUS Drive Xpert Without drivers or BIOS setups, the ASUS exclusive Drive Xpert is ideal for anyone who needs to secure data on their hard drives or enhance hard drive performances without the hassles of complicated configurations. To start ASUS Drive Xpert application Open the ASUS Utility panel. -
Page 166: Updating Express Gate
Express Gate software will be released regularly, adding refinements or new applications. You can find original version of the software on the support DVD or download new versions from the ASUS support website. To update Express Gate Double-click the Express Gate setup file to start software update.
-
Page 167: Raid Configurations
RAID driver from the support DVD to a floppy disk before you install an operating system to the selected hard disk drive. Refer to section 4.5 Creating a RAID driver disk for details. ASUS P5Q 4-55…
-
Page 168: Installing Serial Ata Hard Disks
4.4.2 Installing Serial ATA hard disks The motherboard supports Serial ATA hard disk drives. For optimal performance, install identical drives of the same model and capacity when creating a disk array. To install the SATA hard disks for a RAID configuration: Install the SATA hard disks into the drive bays.
-
Page 169: Intel Matrix Storage Manager Option Rom Utility
The navigation keys at the bottom of the screen allow you to move through the menus and select the menu options. The RAID BIOS setup screens shown in this section are for reference only and may not exactly match the items on your screen. ASUS P5Q 4-57…
-
Page 170: Creating A Raid 0 Set (Striped)
Creating a RAID 0 set (striped) To create a RAID 0 set: From the utility main menu, select 1. Create RAID Volume and press <Enter>. The following screen appears. Intel(R) Matrix Storage Manager option ROM v8.0.0.1027 ICH10R wRAID5 Copyright(C) 2003-08 Intel Corporation. All Rights Reserved. [ CREATE VOLUME MENU ] Name:…
-
Page 171
WARNING: ALL DATA ON SELECTED DISKS WILL BE LOST. Are you sure you want to create this volume? (Y/N): Press <Y> to create the RAID volume and return to the main menu, or <N> to go back to the Create Volume menu. ASUS P5Q 4-59… -
Page 172: Creating A Raid 1 Set (Mirrored)
Creating a RAID 1 set (mirrored) To create a RAID 1 set: From the utility main menu, select 1. Create RAID Volume and press <Enter>. The following screen appears. Intel(R) Matrix Storage Manager option ROM v8.0.0.1027 ICH10R wRAID5 Copyright(C) 2003-08 Intel Corporation. All Rights Reserved. [ CREATE VOLUME MENU ] Name:…
-
Page 173
We recommend a lower stripe size for server systems, and a higher stripe size for multimedia computer systems used mainly for audio and video editing. Enter the RAID volume capacity that you want and press <Enter>. The default value indicates the maximum capacity allowed. ASUS P5Q 4-61… -
Page 174
Press <Enter> when the Create Volume item is highlighted. The following warning message appears. WARNING: ALL DATA ON SELECTED DISKS WILL BE LOST. Are you sure you want to create this volume? (Y/N): Press <Y> to create the RAID volume and return to the main menu or <N> to go back to the Create Volume menu. -
Page 175
WARNING: ALL DATA ON SELECTED DISKS WILL BE LOST. Are you sure you want to create this volume? (Y/N): Press <Y> to create the RAID volume and return to the main menu or <N> to go back to the Create Volume menu. ASUS P5Q 4-63… -
Page 176: Creating A Raid Driver Disk
Creating a RAID driver disk A floppy disk with the RAID driver is required when installing Windows ® XP/Vista and later operating system on a hard disk drive that is included in a RAID set. For Windows Vista user, you can create a RAID driver disk with a floppy disk drive or a USB flash disk drive.
-
Page 177
To install the RAID driver in Windows Vista: ® Insert the floppy disk/USB device with RAID driver into the floppy disk drive/USB port. During the OS installation, select Intel(R) SATA RAID Controller (Desktop ICH10R). Follow the succeeding screen instructions to complete the installation. ASUS P5Q 4-65… -
Page 178
4-66 Chapter 4: Software support… -
Page 179: Appendix: Cpu Features
The Appendix describes the CPU features and technologies that the motherboard supports. CPU features…
-
Page 180: A.1 Intel ® Em64T
Chapter summary Intel ® EM64T ………………A-1 Enhanced Intel SpeedStep Technology (EIST) ……A-1 ® Intel Hyper-Threading Technology ………..A-3 ® ASUS P5Q…
-
Page 181: Intel ® Em64T
32-bit operating systems. • The motherboard comes with a BIOS file that supports EM64T. You can download the latest BIOS file from the ASUS website (www.asus.com/ support/download/) if you need to update the BIOS file. See Chapter 3 for details.
-
Page 182: Using The Eist
A.2.2 Using the EIST To use the EIST feature: Turn on the computer, then enter the BIOS Setup. Go to the Advanced Menu, highlight CPU Configuration, then press <Enter>. Set the Intel(R) SpeedStep Technology item to [Automatic], then press <Enter>. Press <F10>…
-
Page 183: Intel ® Hyper-Threading Technology
Power up the system and enter the BIOS Setup. Under the Advanced Menu, make sure that the item Hyper-Threading Technology is set to [Enabled]. The BIOS item appears only if you installed a CPU that supports Hyper- -Threading Technology. Restart the computer. ASUS P5Q…
-
Page 184
Appendix: CPU features…
[Материнская плата] Установка и часто задаваемые вопросы (FAQ)
Общие проблемы с новыми материнскими платами ASUS, включая установку деталей, часто задаваемые вопросы (FAQ) Вы можете узнать, обратившись к следующему списку:
Как определить модель материнской платы Вы можете узнать, обратившись к: [Материнская плата] Как проверить наименование модели?
| Категория проблемы | Проблемный элемент | Вопросы и ответы (FAQ) |
| Установка деталей, связанных с материнской платой | CPU(Intel CPU、AMD CPU) | Пожалуйста, перейдите на страницу поддержки Asus чтобы найти и скачать руководство пользователя соответствующей модели материнской платы |
| Вентилятор CPU | ||
| Память (DDR5,DDR4) | ||
| HDD/SSD(M.2 SSD,SATA SSD) | ||
| Видеокарта и другие устройства PCI-E | ||
| Установка операционной системы Windows | Windows 11 | [Материнская плата] Как установить Windows 11? |
| Windows 10/11 | [Windows 11/10] Как создать и использовать установочный USB-накопитель для переустановки Windows. | |
| Шаги по устранению неполадок и решения для распространенных проблем | Устранение проблем нет питания/нет изображения | [Материнская плата] Устранение неполадок — Не включается/Не запускается/Нет изображения |
| Автоматическое выключение или перезагрузка |
Решение проблемы по автоматическому выключению/перезагрузке |
|
| Устранение неполадок при сбое |
Устранение сбоев в работе компьютера |
|
Оптимизация скорости загрузки системы |
Как оптимизировать устройство для повышения скорости загрузки и работы системы |
|
| Поиск и устранение неисправностей с помощью Q-Code/Q-LED/Q-Core | [Материнская плата] Возможные Q-CODE(коды ошибок) и их устранение | |
| [Материнская плата] ASUS Q-LED устранение неполадок при отсутствии питания / не загружается/ нет изображения | ||
| [Материнская плата] Устранение неполадок материнской платы ASUS с помощью индикатора питания | ||
| Проблемы с BIOS и устранение неполадок | [Материнская плата] Как обновить BIOS материнской платы? | |
| [Материнская плата/Desktop] Как восстановить настройки BIOS? | ||
| Общие настройки BIOS для материнских плат ASUS |
Инструкции:
Для установки каждой части компьютера, такой как ЦП, процессорный кулер, память, жесткий диск, видеокарта и другие устройства PCIe, обратитесь к руководству пользователя соответствующей модели материнской платы на официальном сайте ASUS.
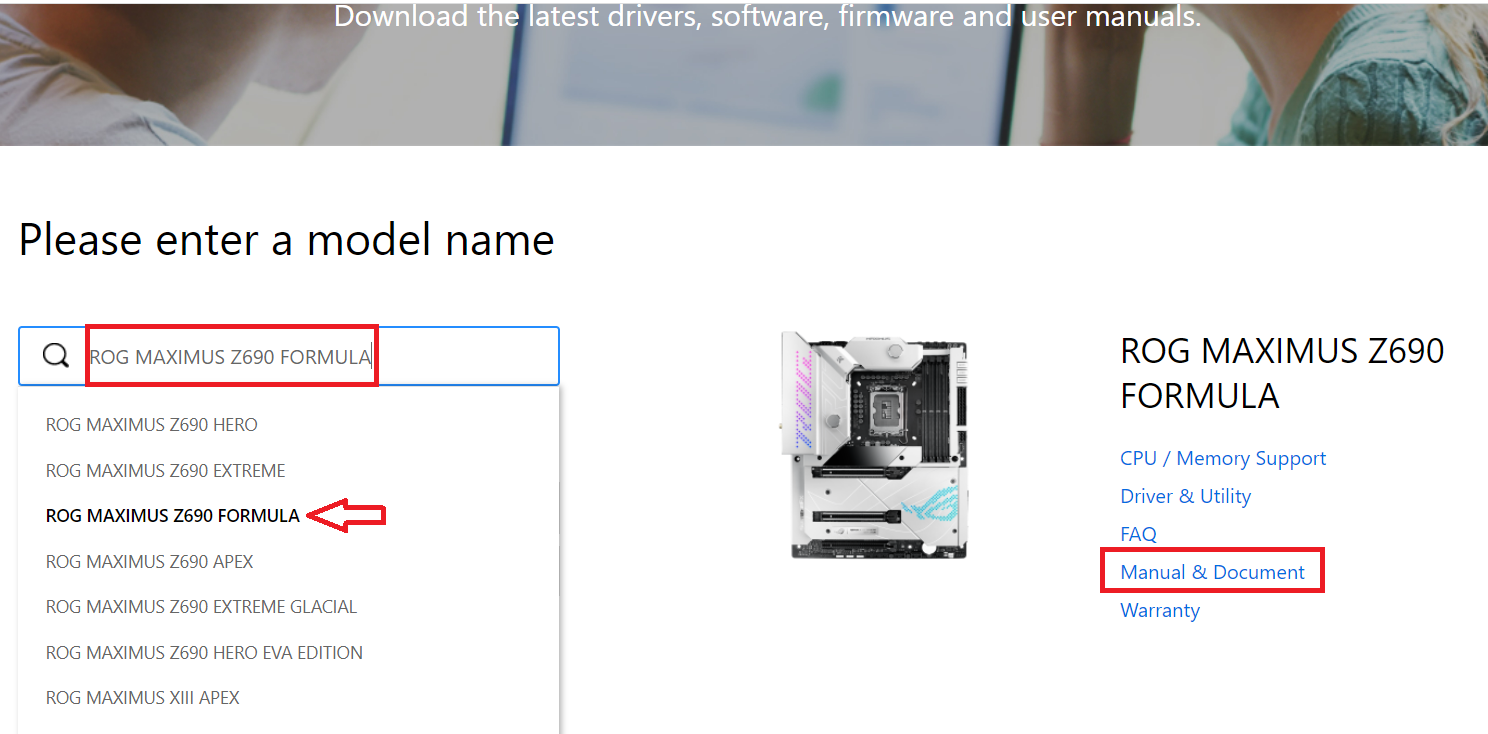
1. Сначала найдите и загрузите руководство пользователя для вашей модели материнской платы с сайта поддержки Asus. Введите модель материнской платы в поле поиска слева, щелкните соответствующую модель в списке моделей, предложенном ниже, а затем выберите «Руководство и документация» справа. Обратитесь к изображению ниже:
(ROG MAXIMUS Z690 FORMULA для примера)
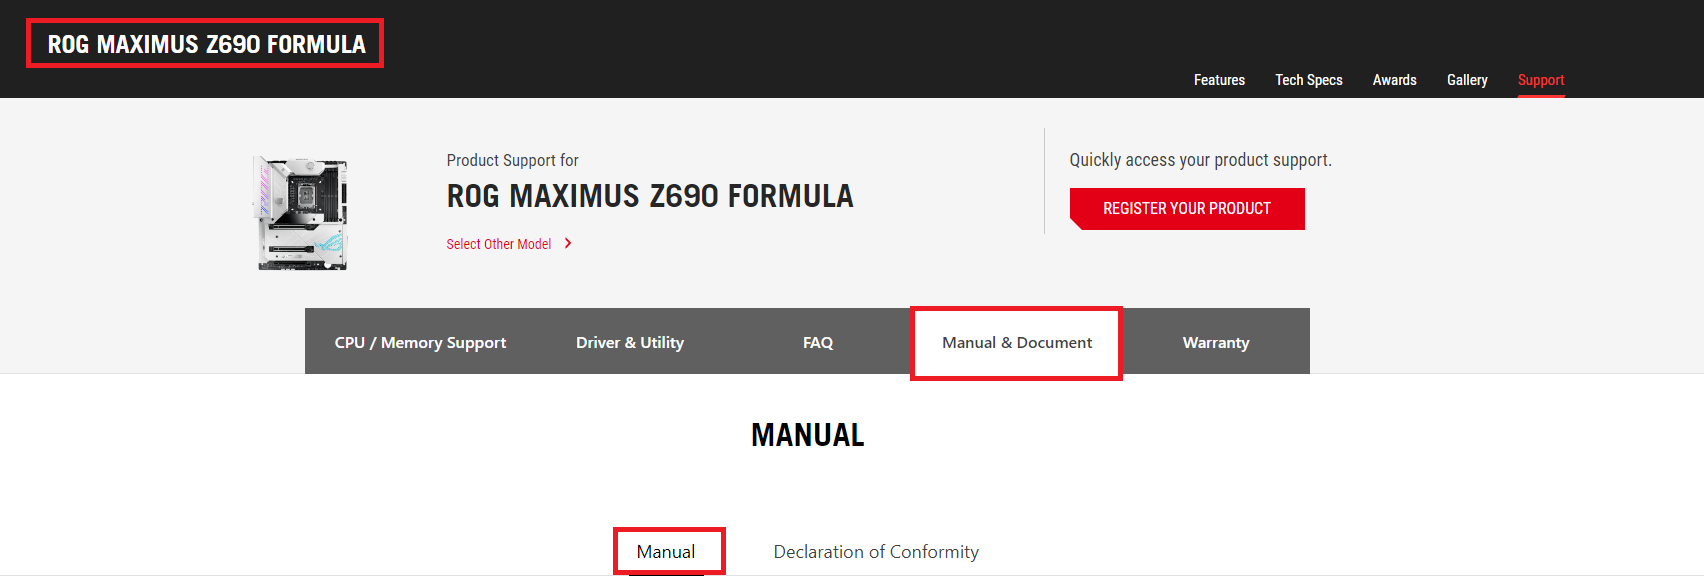
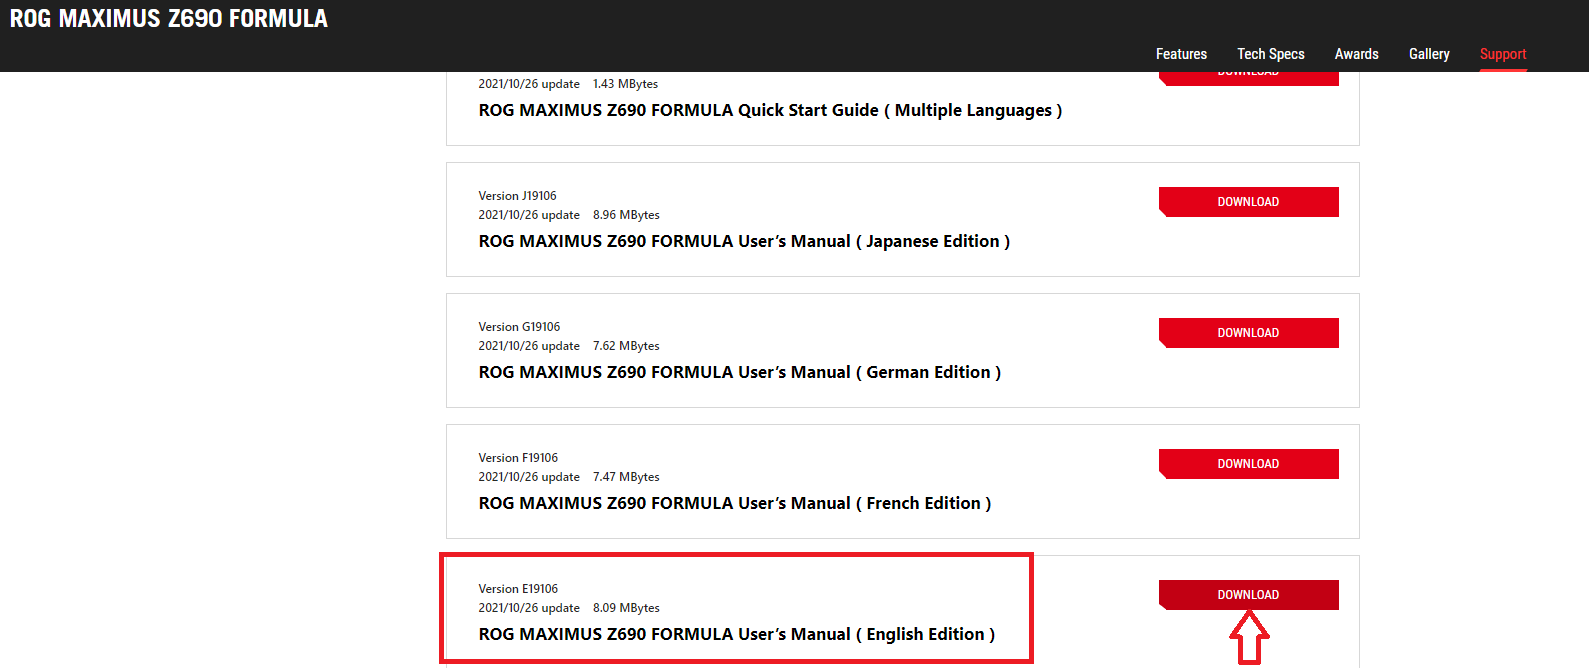
2. На примере ROG MAXIMUS Z690 FORMULA скриншоты руководства на английском языке выглядят следующим образом. Благодаря каталогу и функции поиска получить необходимую информацию относительно легко (в основном см. Раздел 2.1)
Эта информация была полезной?
Yes
No
- Приведенная выше информация может быть частично или полностью процитирована с внешних веб-сайтов или источников. Пожалуйста, обратитесь к информации на основе источника, который мы отметили. Пожалуйста, свяжитесь напрямую или спросите у источников, если есть какие-либо дополнительные вопросы, и обратите внимание, что ASUS не имеет отношения к данному контенту / услуге и не несет ответственности за него.
- Эта информация может не подходить для всех продуктов из той же категории / серии. Некоторые снимки экрана и операции могут отличаться от версий программного обеспечения.
- ASUS предоставляет вышеуказанную информацию только для справки. Если у вас есть какие-либо вопросы о содержании, пожалуйста, свяжитесь напрямую с поставщиком вышеуказанного продукта. Обратите внимание, что ASUS не несет ответственности за контент или услуги, предоставляемые вышеуказанным поставщиком продукта.
Материнская плата ASUS Руководство пользователя

E16383
Первое издание
Март 2020
© ASUSTeK COMPUTER INC, 2020. Все права защищены.
Никакая часть этого руководства, включая описанные в нем продукты и программное обеспечение, не может быть воспроизведена, передана, переписана, сохранена в поисковой системе или переведена на любой язык в любой форме и любыми средствами, за исключением документации, хранящейся у покупателя для резервного копирования. в целях без явного письменного разрешения ASUSTeK COMPUTER INC. («ASUS»).
Гарантия на продукт или обслуживание не будут продлены, если: (1) продукт будет отремонтирован, модифицирован или изменен, кроме случаев, когда такой ремонт, модификация изменений санкционированы ASUS в письменной форме; или (2) серийный номер продукта поврежден или отсутствует.
ASUS ПРЕДОСТАВЛЯЕТ ДАННОЕ РУКОВОДСТВО «КАК ЕСТЬ», БЕЗ КАКИХ-ЛИБО ГАРАНТИЙ, ЯВНЫХ ИЛИ ПОДРАЗУМЕВАЕМЫХ, ВКЛЮЧАЯ, НЕ ОГРАНИЧИВАясь, ПОДРАЗУМЕВАЕМЫЕ ГАРАНТИИ ИЛИ УСЛОВИЯ КОММЕРЧЕСКОЙ ЦЕННОСТИ ИЛИ ПРИГОДНОСТИ ДЛЯ ОПРЕДЕЛЕННОЙ ЦЕЛИ. НИ ПРИ КАКИХ ОБСТОЯТЕЛЬСТВАХ ASUS, ЕЕ ДИРЕКТОРЫ, ОФИЦЕРЫ, СОТРУДНИКИ ИЛИ АГЕНТЫ НЕ НЕСЕТ ОТВЕТСТВЕННОСТИ ЗА ЛЮБЫЕ КОСВЕННЫЕ, СПЕЦИАЛЬНЫЕ, СЛУЧАЙНЫЕ ИЛИ КОСВЕННЫЕ УБЫТКИ (ВКЛЮЧАЯ УБЫТКИ ЗА ПОТЕРИ ПРИБЫЛИ, ПОТЕРЮ БИЗНЕСА, ПОТЕРЮ ИСПОЛЬЗОВАНИЯ ИЛИ ДАННЫХ НРАВИТСЯ), ДАЖЕ ЕСЛИ ASUS СОВЕТАЛАСЬ О ВОЗМОЖНОСТИ ТАКИХ УБЫТКОВ ИЗ-ЗА ЛЮБОГО ДЕФЕКТА ИЛИ ОШИБКИ В ЭТОМ РУКОВОДСТВЕ ИЛИ ПРОДУКТЕ.
ТЕХНИЧЕСКИЕ ХАРАКТЕРИСТИКИ И ИНФОРМАЦИЯ, СОДЕРЖАЩИЕСЯ В ДАННОМ РУКОВОДСТВЕ, ПРЕДНАЗНАЧЕНЫ ТОЛЬКО ДЛЯ ИНФОРМАЦИОННОГО ИСПОЛЬЗОВАНИЯ, МОГУТ БЫТЬ ИЗМЕНЕНЫ В ЛЮБОЕ ВРЕМЯ БЕЗ ПРЕДВАРИТЕЛЬНОГО УВЕДОМЛЕНИЯ, И НЕ ДОЛЖНЫ БЫТЬ ОБЯЗАТЕЛЬНЫ ASUS. ASUS НЕ НЕСЕТ НИКАКОЙ ОТВЕТСТВЕННОСТИ ЗА ЛЮБЫЕ ОШИБКИ ИЛИ НЕТОЧНОСТИ, КОТОРЫЕ МОГУТ ОТЛИЧАТЬСЯ В ДАННОМ РУКОВОДСТВЕ, ВКЛЮЧАЯ ОПИСАНИЕ ПРОДУКТОВ И ПРОГРАММНОГО ОБЕСПЕЧЕНИЯ.
Названия продуктов и компаний, представленные в этом руководстве, могут быть или не быть зарегистрированными товарными знаками или авторскими правами соответствующих компаний и использоваться только для идентификации или объяснения и в интересах владельцев без намерения нарушить авторские права.
Предложение предоставить исходный код определенного программного обеспечения
Этот продукт содержит защищенное авторским правом программное обеспечение, которое лицензируется по Стандартной общественной лицензии («GPL»), в рамках Стандартной общественной лицензии ограниченного применения («LGPL») и / или других лицензий на бесплатное программное обеспечение с открытым исходным кодом. Такое программное обеспечение в этом продукте распространяется без каких-либо гарантий в пределах, разрешенных применимым законодательством. Копии этих лицензий включены в этот продукт.
Если применимая лицензия дает вам право на исходный код такого программного обеспечения и / или другие дополнительные данные, вы можете получить их в течение трех лет после нашей последней поставки продукта, либо
(1) бесплатно, скачав с https://www.asus.com/support/
or
(2) на стоимость воспроизведения и доставки, которая зависит от предпочтительного перевозчика и места, куда вы хотите отправить его, отправив запрос по адресу:
ASUSTeK Computer Inc.
Департамент юридического соответствия
1F., № 15, Лиде Роуд,
Район Бэйтоу, Тайбэй 112
Тайвань
В своем запросе укажите название, номер модели и версию, как указано в поле «О программе» продукта, для которого вы хотите получить соответствующий исходный код, и свои контактные данные, чтобы мы могли согласовать с вами условия и стоимость доставки.
Исходный код будет распространяться БЕЗ КАКИХ-ЛИБО ГАРАНТИЙ и лицензироваться по той же лицензии, что и соответствующий двоичный / объектный код.
Это предложение действительно для всех, кто получил эту информацию.
ASUSTeK стремится предоставить полный исходный код в соответствии с требованиями различных лицензий на бесплатное программное обеспечение с открытым исходным кодом. Однако если у вас возникнут проблемы с получением полного соответствующего исходного кода, мы будем очень признательны, если вы отправите нам уведомление на адрес электронной почты. gpl@asus.com, указав продукт и описав проблему (НЕ присылайте на этот адрес электронной почты большие вложения, такие как архивы исходного кода и т. д.).
Информация по технике безопасности
Электрическая безопасность
- Во избежание поражения электрическим током отключите кабель питания от электрической розетки перед перемещением системы.
- При добавлении или удалении устройств в систему или из системы убедитесь, что силовые кабели для устройств отключены, прежде чем подключать сигнальные кабели. Если возможно, отключите все кабели питания от существующей системы перед добавлением устройства.
- Перед подключением или отключением сигнальных кабелей от материнской платы убедитесь, что все кабели питания отключены.
- Перед использованием адаптера или удлинителя обратитесь за профессиональной помощью. Эти устройства могут нарушить цепь заземления.
- Убедитесь, что ваш блок питания настроен на правильную громкость.tagе в вашем районе. Если вы не уверены в объемеtagе используемой электрической розетки, обратитесь в местную энергетическую компанию.
- Если блок питания сломан, не пытайтесь починить его самостоятельно. Обратитесь к квалифицированному специалисту по обслуживанию или к продавцу.
Безопасность при эксплуатации
- Перед установкой материнской платы и добавлением компонентов внимательно прочтите все руководства, идущие в комплекте.
- Перед использованием продукта убедитесь, что все кабели правильно подключены и силовые кабели не повреждены. Если вы обнаружите какое-либо повреждение, немедленно обратитесь к вашему дилеру.
- Во избежание короткого замыкания держите скрепки, винты и скобы подальше от разъемов, разъемов, розеток и схем.
- Избегайте попадания пыли, влажности и экстремальных температур. Не размещайте продукт в местах, где он может подвергнуться воздействию влаги.
- Поместите изделие на устойчивую поверхность. · Если у вас возникнут технические проблемы с продуктом, обратитесь к квалифицированному специалисту по обслуживанию или к продавцу.
- Системную плату следует использовать только в среде с температурой окружающей среды от 0 ° C до 40 ° C.
Об этом руководстве
Это руководство пользователя содержит информацию, необходимую для установки и настройки материнской платы.
Как организовано это руководство
Это руководство состоит из следующих частей:
- Глава 1: Введение в продукт
В этой главе описываются функции материнской платы и поддерживаемые ею новые технологии. Он включает описание переключателей, перемычек и разъемов на материнской плате. - Глава 2: Информация о BIOS
В этой главе рассказывается, как загрузить BIOS и обновить BIOS с помощью EZ Flash Utility.
Где найти дополнительную информацию
Обратитесь к следующим источникам для получения дополнительной информации и обновлений продукта и программного обеспечения.
- ASUS webсайт
ASUS webНа сайте представлена обновленная информация об аппаратной и программной продукции ASUS. См. Контактную информацию ASUS. - Дополнительная документация
В комплект поставки вашего продукта может входить дополнительная документация, например гарантийные листки, которые, возможно, были добавлены вашим дилером. Эти документы не входят в стандартный пакет.
Условные обозначения, используемые в этом руководстве
Чтобы обеспечить правильное выполнение определенных задач, обратите внимание на следующие символы, используемые в этом руководстве.
![]() ВНИМАНИЕ!: Информация по предотвращению повреждения компонентов и получения травм при выполнении задания.
ВНИМАНИЕ!: Информация по предотвращению повреждения компонентов и получения травм при выполнении задания.
![]() ВАЖНАЯ ИНФОРМАЦИЯ: Инструкции, которым вы ДОЛЖНЫ следовать для выполнения задачи.
ВАЖНАЯ ИНФОРМАЦИЯ: Инструкции, которым вы ДОЛЖНЫ следовать для выполнения задачи.
![]() ЗАМЕТКА: Советы и дополнительная информация, которые помогут вам выполнить задачу.
ЗАМЕТКА: Советы и дополнительная информация, которые помогут вам выполнить задачу.
Содержимое пакета
Проверьте упаковку материнской платы на наличие следующих предметов.

![]() Если что-либо из вышеперечисленного повреждено или отсутствует, обратитесь к продавцу.
Если что-либо из вышеперечисленного повреждено или отсутствует, обратитесь к продавцу.
Обзор технических характеристик PRIME H410M-E


![]() Технические характеристики могут быть изменены без предварительного уведомления.
Технические характеристики могут быть изменены без предварительного уведомления.
Внедрение продукции
Прежде чем продолжить
Примите к сведению следующие меры предосторожности перед установкой компонентов материнской платы или изменением каких-либо настроек материнской платы.
![]()
- Прежде чем прикасаться к какому-либо компоненту, отключите шнур питания от розетки.
- Перед работой с компонентами наденьте заземленный браслет или прикоснитесь к надежно заземленному или металлическому предмету, например к корпусу блока питания, чтобы не повредить их статическим электричеством.
- Перед установкой или удалением любого компонента убедитесь, что блок питания ATX выключен или шнур питания отсоединен от блока питания. Несоблюдение этого правила может привести к серьезному повреждению материнской платы, периферийных устройств или компонентов.
Материнская плата надview

![]() Перед установкой или снятием материнской платы отключите шнур питания. Несоблюдение этого правила может привести к травмам и повреждению компонентов материнской платы.
Перед установкой или снятием материнской платы отключите шнур питания. Несоблюдение этого правила может привести к травмам и повреждению компонентов материнской платы.
Содержание макета
1. Разъем ЦП
Материнская плата оснащена разъемом Intel® Socket LGA1200 для поверхностного монтажа, предназначенным для процессоров Intel® CoreTM 10-го поколения, Pentium® Gold и Celeron®.
![]() Для получения дополнительной информации обратитесь к Центральному процессору (ЦП).
Для получения дополнительной информации обратитесь к Центральному процессору (ЦП).
2. Слоты DDR4 DIMM.
Материнская плата оснащена слотами для модулей памяти Dual Inline (DIMM), предназначенных для модулей памяти DDR4 (Double Data Rate 4).
![]() Для получения дополнительных сведений см. Системная память.
Для получения дополнительных сведений см. Системная память.
3. Слоты расширения
Эта материнская плата поддерживает одну графическую карту PCIe x16 и две сетевые карты PCIe 3.0 x1, карты SCSI и другие карты, соответствующие спецификации PCI Express.
4. Заголовки вентилятора
Разъемы для вентиляторов позволяют подключать вентиляторы для охлаждения системы.

5. Разъемы питания
Эти разъемы питания позволяют подключать материнскую плату к источнику питания. Вилки блока питания рассчитаны только на одну ориентацию. Найдите правильную ориентацию и сильно надавите, пока вилки блока питания не будут полностью вставлены.
![]() Обязательно подключите 8-контактный штекер питания.
Обязательно подключите 8-контактный штекер питания.
![]() Для полностью настроенной системы мы рекомендуем использовать блок питания (PSU), соответствующий спецификации ATX 12V Specification 2.0 (или более поздней версии) и обеспечивающий минимальную мощность 350 Вт.
Для полностью настроенной системы мы рекомендуем использовать блок питания (PSU), соответствующий спецификации ATX 12V Specification 2.0 (или более поздней версии) и обеспечивающий минимальную мощность 350 Вт.
![]()
- Мы рекомендуем вам использовать блок питания с более высокой выходной мощностью при настройке системы с более энергоемкими устройствами. Система может работать нестабильно или не загружаться при недостаточном питании.
- Если вы не уверены в минимальных требованиях к источнику питания для вашей системы, мы рекомендуем вам обратиться к онлайн-ресурсам для Power Supply Wattagе Калькулятор.
6. Слот M.2 (клавиша M)
Слот M.2 позволяет устанавливать устройства M.2, такие как модули SSD M.2.

![]()
- Слот M.2 (Key M), тип 2242/2260/2280 (поддерживает режимы PCIe 3.0 x2 и SATA).
- Слот M.2 поддерживает скорость передачи данных до 16 Гбит / с.
- Когда устройство в режиме SATA установлено в слот M.2, порт SATA6G_2 использовать нельзя.
7. Порты SATA 6 Гбит / с.
Порты SATA 6 Гбит / с позволяют подключать устройства SATA, такие как приводы оптических дисков и жесткие диски, через кабель SATA.
8. Разъем USB 3.2 Gen 1.
Разъем USB 3.2 Gen 1 позволяет подключать модуль USB 3.2 Gen 1 для дополнительных портов USB 3.2 Gen 1. Заголовок USB 3.2 Gen 1 обеспечивает скорость передачи данных до 5 Гбит / с.
![]() Модуль USB 3.2 Gen 1 приобретается отдельно.
Модуль USB 3.2 Gen 1 приобретается отдельно.

9. Разъемы USB 2.0.
Разъемы USB 2.0 позволяют подключать USB-модуль для дополнительных портов USB 2.0. Заголовки USB 2.0 обеспечивают скорость передачи данных до 480 Мбит / с.
![]() НЕ ПОДКЛЮЧАЙТЕ кабель 1394 к разъемам USB. Это приведет к повреждению материнской платы!
НЕ ПОДКЛЮЧАЙТЕ кабель 1394 к разъемам USB. Это приведет к повреждению материнской платы!
![]() Модуль USB 2.0 приобретается отдельно.
Модуль USB 2.0 приобретается отдельно.

10. Очистить заголовок CMOS.
Этот заголовок позволяет очистить данные CMOS RTC RAM от информации о настройке системы, такой как дата, время и системные пароли.

Чтобы стереть RTC RAM:
1. Выключите компьютер и отсоедините шнур питания. PIN 1
2. С помощью металлического предмета, например отвертки, закоротите два контакта.
3. Подключите шнур питания и включите компьютер.
4. Удерживайте во время загрузки и войдите в программу настройки BIOS, чтобы повторно ввести данные.
![]() Если описанные выше действия не помогли, извлеките бортовую батарею и снова закоротите два контакта, чтобы очистить данные CMOS RTC RAM. После очистки CMOS переустановите аккумулятор.
Если описанные выше действия не помогли, извлеките бортовую батарею и снова закоротите два контакта, чтобы очистить данные CMOS RTC RAM. После очистки CMOS переустановите аккумулятор.
11. Заголовок COM-порта.
Этот заголовок предназначен для последовательного (COM) порта. Подключите кабель модуля последовательного порта к этому разъему, затем установите модуль в проем на задней части системного шасси.

12. Аудиоразъем на передней панели.
Этот заголовок предназначен для монтируемого на шасси модуля ввода / вывода звука на передней панели, который поддерживает стандарт звука HD. Подключите один конец кабеля аудиомодуля ввода / вывода на передней панели к этому разъему.
![]()
- Мы рекомендуем вам подключить к этому разъему аудиомодуль высокой четкости на передней панели, чтобы использовать возможности материнской платы для воспроизведения звука высокой четкости.
- Если вы хотите подключить к этому разъему аудиомодуль передней панели высокого разрешения, установите для параметра Front Panel Type в настройках BIOS значение [HD Audio]. По умолчанию для этого заголовка установлено значение [HD Audio].

13. Заголовок S / PDIF Out
Этот заголовок предназначен для дополнительного порта цифрового интерфейса Sony / Philips (S / PDIF). Подключите кабель модуля S / PDIF Out к этому разъему, а затем установите модуль в отверстие слота на задней панели системного шасси.

14. Заголовок динамика.
4-контактный разъем предназначен для системного предупреждающего динамика, установленного на шасси. Динамик позволяет слышать системные гудки и предупреждения.

15. 10-1-контактный разъем системной панели
Этот заголовок поддерживает несколько функций, установленных на шасси.
- Светодиод системного питания (2-контактный + PWR_LED-)
Этот 2-контактный разъем предназначен для светодиода питания системы. Подключите кабель светодиода питания корпуса к этому разъему. Индикатор питания системы загорается, когда вы включаете питание системы, и мигает, когда система находится в спящем режиме. - Индикатор активности жесткого диска (2-контактный + HDD_LED-)
Этот 2-контактный разъем предназначен для светодиода активности жесткого диска. Подключите кабель индикатора активности жесткого диска к этому разъему. Светодиод HDD загорается или мигает, когда данные + HDD_LED- RESET считываются с жесткого диска или записываются на него. - Кнопка питания / кнопка мягкого выключения (2-контактный PWR_BTN)
Этот заголовок предназначен для кнопки питания системы. - Кнопка сброса (2-контактный RESET)
Этот 2-контактный разъем предназначен для установленной на шасси кнопки сброса для перезагрузки системы без отключения питания системы.

Разъемы на задней панели

1. Порт PS / 2 для мыши (зеленый). Этот порт предназначен для мыши PS / 2.
2. Порт видеоадаптера (VGA). Этот 15-контактный порт предназначен для монитора VGA или других VGA-совместимых устройств.
3. Порты USB 3.2 Gen 1 (до 5 Гбит / с). Эти 9-контактные порты универсальной последовательной шины (USB) подключаются к устройствам USB 3.2 Gen 1.
4. Порт Ethernet. Этот порт обеспечивает гигабитное соединение с локальной сетью (LAN) через сетевой концентратор. В приведенной ниже таблице указаны индикаторы порта Ethernet.

5. Порт линейного входа (голубой). Этот порт служит для подключения магнитной ленты, CD, DVD-плеера или других аудиоисточников.
6. Порт Line Out (лайм). К этому порту подключаются наушники или динамик. В 4-канальной, 5.1-канальной и 7.1-канальной конфигурациях этот порт выполняет функцию выхода на передние динамики.
7. Порт клавиатуры PS / 2 (фиолетовый). Этот порт предназначен для клавиатуры PS / 2.
8. Порт HDMITM. Этот порт предназначен для разъема мультимедийного интерфейса высокой четкости (HDMI) и совместим с HDCP, что позволяет воспроизводить HD DVD, Blu-ray и другой защищенный контент.
9. Порты USB 2.0. Эти 4-контактные порты универсальной последовательной шины (USB) предназначены для устройств USB 2.0.
10 Порт для микрофона (розовый). К этому порту подключается микрофон.
![]() Обратитесь к таблице конфигурации аудио на следующей странице, чтобы узнать о функциях аудиопортов в 2, 4, 5.1 или 7.1-канальной конфигурации.
Обратитесь к таблице конфигурации аудио на следующей странице, чтобы узнать о функциях аудиопортов в 2, 4, 5.1 или 7.1-канальной конфигурации.
Аудио 2, 4, 5.1 или 7.1-канальная конфигурация

![]() Чтобы настроить 7.1-канальный аудиовыход:
Чтобы настроить 7.1-канальный аудиовыход:
Используйте шасси с аудиомодулем HD на передней панели для поддержки 7.1-канального аудиовыхода.
Центральный процессор (ЦП)
Эта материнская плата оснащена разъемом Intel® Socket LGA1200 для поверхностного монтажа, предназначенным для процессоров Intel® CoreTM 10-го поколения, Pentium® Gold и Celeron®.

![]() Перед установкой процессора отключите все кабели питания.
Перед установкой процессора отключите все кабели питания.
![]()
- Убедитесь, что вы устанавливаете правильный ЦП, предназначенный только для сокета LGA1200. НЕ УСТАНАВЛИВАЙТЕ ЦП, предназначенный для разъемов LGA1150, LGA1151, LGA1155 и LGA1156, в разъем LGA1200.
- При покупке материнской платы убедитесь, что заглушка PnP находится на гнезде, а контакты гнезда не погнуты. Немедленно обратитесь к продавцу, если крышка PnP отсутствует или если вы видите какие-либо повреждения крышки PnP / контактов гнезда / компонентов материнской платы.
- Сохраните колпачок после установки материнской платы. ASUS будет обрабатывать запросы на возврат товара (RMA) только в том случае, если на материнской плате есть заглушка на разъеме LGA1200.
- Гарантия на продукт не распространяется на повреждение контактов сокета в результате неправильной установки / снятия ЦП или неправильной установки / потери / неправильного снятия крышки PnP.
Установка ЦП

![]() При необходимости нанесите материал термоинтерфейса на радиатор ЦП и ЦП перед установкой радиатора и вентилятора.
При необходимости нанесите материал термоинтерфейса на радиатор ЦП и ЦП перед установкой радиатора и вентилятора.
Системная память
Эта материнская плата оснащена двумя разъемами для модулей памяти DIMM с двойной скоростью передачи данных 4 (DDR4). На рисунке показано расположение разъемов DDR4 DIMM:

![]()
- Вы можете установить различный объем памяти в канале A и канале B. Система отображает общий размер канала меньшего размера для двухканальной конфигурации. Любая избыточная память из канала большего размера затем отображается для одноканальной работы.
- Всегда устанавливайте модули DIMM с одинаковой задержкой CAS. Для обеспечения оптимальной совместимости мы рекомендуем устанавливать модули памяти с одинаковой версией или кодом даты (D / C) от одного производителя. Обратитесь к продавцу, чтобы получить правильные модули памяти.
- Для процессоров Intel® 10-го поколения только процессоры CoreTM i9 / i7 изначально поддерживают 2933/2800/2666/2400/2133, другие будут работать с максимальной скоростью передачи DDR4 2666 МГц.
![]()
- Частота работы памяти по умолчанию зависит от ее последовательного обнаружения присутствия (SPD), которое является стандартным способом доступа к информации из модуля памяти. В состоянии по умолчанию некоторые модули памяти для разгона могут работать на более низкой частоте, чем указано производителем.
- Для стабильности системы используйте более эффективную систему охлаждения памяти для поддержки полной загрузки памяти (2 модуля DIMM).
- Посетите сайт www.asus.com для получения последней версии QVL памяти (Список квалифицированных поставщиков).
Рекомендуемые конфигурации памяти

Установка DIMM 1

Информация о BIOS
Знание BIOS
![]() Новый ASUS UEFI BIOS — это унифицированный расширяемый интерфейс, соответствующий архитектуре UEFI, предлагающий удобный интерфейс, выходящий за рамки традиционных элементов управления BIOS только с клавиатуры, что обеспечивает более гибкий и удобный ввод с помощью мыши. Вы можете легко перемещаться по новому UEFI BIOS с той же плавностью, что и ваша операционная система. Термин «BIOS» в этом руководстве пользователя относится к «UEFI BIOS», если не указано иное.
Новый ASUS UEFI BIOS — это унифицированный расширяемый интерфейс, соответствующий архитектуре UEFI, предлагающий удобный интерфейс, выходящий за рамки традиционных элементов управления BIOS только с клавиатуры, что обеспечивает более гибкий и удобный ввод с помощью мыши. Вы можете легко перемещаться по новому UEFI BIOS с той же плавностью, что и ваша операционная система. Термин «BIOS» в этом руководстве пользователя относится к «UEFI BIOS», если не указано иное.
BIOS (базовая система ввода и вывода) хранит системные аппаратные настройки, такие как конфигурация запоминающего устройства, настройки разгона, расширенное управление питанием и конфигурация загрузочного устройства, которые необходимы для запуска системы в CMOS материнской платы. В нормальных условиях настройки BIOS по умолчанию применимы к большинству условий для обеспечения оптимальной производительности. НЕ меняйте настройки BIOS по умолчанию, за исключением следующих случаев:
- Во время загрузки системы на экране появляется сообщение об ошибке с просьбой запустить программу настройки BIOS.
- Вы установили новый системный компонент, который требует дополнительных настроек или обновления BIOS.
![]() Несоответствующие настройки BIOS могут привести к нестабильности или сбою загрузки. Мы настоятельно рекомендуем изменять настройки BIOS только с помощью обученного обслуживающего персонала.
Несоответствующие настройки BIOS могут привести к нестабильности или сбою загрузки. Мы настоятельно рекомендуем изменять настройки BIOS только с помощью обученного обслуживающего персонала.
![]()
- При загрузке или обновлении BIOS file, переименуйте его в PH410ME.CAP для этой материнской платы.
- Настройки и параметры BIOS могут различаться в зависимости от версии BIOS. Пожалуйста, обратитесь к последней версии BIOS для настроек и опций.
![]() Для получения дополнительной информации о конфигурации BIOS, пожалуйста, обратитесь к https://www.asus.com/supportили загрузите руководство по BIOS, отсканировав QR-код.
Для получения дополнительной информации о конфигурации BIOS, пожалуйста, обратитесь к https://www.asus.com/supportили загрузите руководство по BIOS, отсканировав QR-код.

Программа настройки BIOS
Используйте программу настройки BIOS, чтобы обновить BIOS или настроить его параметры. Экран BIOS включает навигационные клавиши и краткую экранную справку, которая поможет вам в использовании программы настройки BIOS.
Вход в BIOS при запуске
Чтобы войти в программу настройки BIOS при запуске, нажмите или же во время самотестирования при включении (POST). Если вы не нажмете или же , POST продолжает свои процедуры.
Вход в программу настройки BIOS после POST
Чтобы войти в программу настройки BIOS после POST:
- Нажмите + + одновременно.
- Нажмите кнопку сброса на системном шасси.
- Нажмите кнопку питания, чтобы выключить и снова включить систему. Используйте эту опцию только в том случае, если вам не удалось войти в программу настройки BIOS с использованием первых двух опций.
После выполнения любого из трех вариантов нажмите ключ для входа в BIOS.
![]()
- Убедитесь, что к материнской плате подключена USB-мышь, если вы хотите использовать мышь для управления программой настройки BIOS.
- Если после изменения любого параметра BIOS система становится нестабильной, загрузите настройки по умолчанию, чтобы обеспечить совместимость и стабильность системы. Выберите пункт Load Optimized Defaults в меню Exit или нажмите горячую клавишу. .
- Если система не загружается после изменения любого параметра BIOS, попробуйте очистить CMOS и сбросить системную плату до значения по умолчанию.
- Программа настройки BIOS не поддерживает устройства Bluetooth.
Экран меню BIOS
Программа настройки BIOS может использоваться в двух режимах: EZ Mode и Advanced Mode. Вы можете изменить режимы в режиме настройки в меню загрузки или нажав кнопку горячая клавиша.
ASUS EZ Flash 3
Функция ASUS EZ Flash 3 позволяет обновлять BIOS без использования утилит для ОС.
![]() Обязательно загрузите настройки BIOS по умолчанию, чтобы обеспечить совместимость и стабильность системы. Выберите пункт Load Optimized Defaults в меню Exit или нажмите горячую клавишу. .
Обязательно загрузите настройки BIOS по умолчанию, чтобы обеспечить совместимость и стабильность системы. Выберите пункт Load Optimized Defaults в меню Exit или нажмите горячую клавишу. .
Чтобы обновить BIOS через USB:
![]()
- Эта функция может поддерживать такие устройства, как USB-флеш-накопитель с форматом FAT 32/16 и только с одним разделом.
- НЕ выключайте и не перезагружайте систему во время обновления BIOS, чтобы предотвратить сбой загрузки системы!
- Вставьте USB-накопитель с последней версией BIOS. file к USB-порту.
- Войдите в расширенный режим программы настройки BIOS. В меню «Инструменты» выберите «Утилита ASUS EZ Flash 3» и нажмите. .
- Выберите через запоминающее устройство (а).
- Нажмите чтобы переключиться в поле Drive.
- С помощью клавиш со стрелками вверх / вниз найдите USB-накопитель с последней версией BIOS, а затем нажмите .
- Нажмите для перехода в поле Папка.
- Нажимайте клавиши со стрелками вверх / вниз, чтобы найти BIOS. file, а затем нажмите для выполнения процесса обновления BIOS. Перезагрузите систему, когда процесс обновления будет завершен.
ASUS CrashFree BIOS 3
Утилита ASUS CrashFree BIOS 3 — это инструмент автоматического восстановления, позволяющий восстанавливать BIOS. file когда он выходит из строя или повреждается в процессе обновления. Вы можете восстановить поврежденный BIOS file использование DVD с поддержкой материнской платы или USB-накопителя, содержащего BIOS file.
![]() BIOS file на материнской плате DVD поддержки может быть старше BIOS file опубликовано на официальном сайте ASUS webсайт. Если вы хотите использовать более новую версию BIOS file, Скачать file на https://www.asus.com/support/ и сохраните его на USB-накопитель.
BIOS file на материнской плате DVD поддержки может быть старше BIOS file опубликовано на официальном сайте ASUS webсайт. Если вы хотите использовать более новую версию BIOS file, Скачать file на https://www.asus.com/support/ и сохраните его на USB-накопитель.
Восстановление BIOS
Чтобы восстановить BIOS:
- Включите систему.
- Вставьте DVD с поддержкой материнской платы в оптический привод или USB-накопитель с BIOS. file к USB-порту.
- Утилита автоматически проверяет устройства на наличие BIOS. file. При обнаружении утилита читает BIOS file и автоматически войдет в ASUS EZ Flash 3.
- Система требует, чтобы вы зашли в программу настройки BIOS, чтобы восстановить настройки BIOS. Чтобы обеспечить совместимость и стабильность системы, мы рекомендуем вам нажать для загрузки значений BIOS по умолчанию.
![]() НЕ выключайте и не перезагружайте систему во время обновления BIOS! Это может привести к сбою загрузки системы!
НЕ выключайте и не перезагружайте систему во время обновления BIOS! Это может привести к сбою загрузки системы!
Приложение
Уведомления
Информация о соответствии требованиям FCC
Ответственная сторона: Асус Компьютер Интернэшнл
Адрес: 48720 Kato Rd., Fremont, CA 94538, США.
Номер телефона / факса: (510)739-3777 / (510)608-4555
Данное устройство соответствует части 15 Правил FCC. Работа устройства зависит от следующих двух условий: (1) Это устройство не должно вызывать вредных помех, и (2) это устройство должно принимать любые получаемые помехи, включая помехи, которые могут вызывать сбои в работе.
Это оборудование было протестировано и признано соответствующим ограничениям для цифровых устройств класса B в соответствии с частью 15 правил FCC. Эти ограничения разработаны для обеспечения разумной защиты от вредных помех при установке в жилых помещениях. Это оборудование генерирует, использует и может излучать радиочастотную энергию и, если оно установлено и используется не в соответствии с инструкциями, может создавать вредные помехи для радиосвязи. Однако нет гарантии, что помехи не возникнут при конкретной установке. Если это оборудование действительно создает недопустимые помехи для приема радио или телевидения, что можно определить путем включения и выключения оборудования, пользователю рекомендуется попытаться устранить помехи одним или несколькими из следующих способов:
- Изменить ориентацию или местоположение приемной антенны.
- Увеличьте расстояние между оборудованием и приемником.
- Подключить оборудование к розетке в цепи, отличной от той, к которой подключен приемник.
- Обратитесь за помощью к дилеру или опытному радио / телевизионному технику.
Заявление о соответствии Министерства инноваций, науки и экономического развития Канады (ISED)
Это устройство соответствует требованиям лицензии Канады по инновациям, науке и экономическому развитию, за исключением стандартов RSS. Эксплуатация возможна при соблюдении следующих двух условий:
(1) это устройство не должно вызывать помех, и
(2) это устройство должно принимать любые помехи, включая помехи, которые могут вызвать сбои в работе устройства. КАНАЛА ICES-3 (Б) / НМБ-3 (Б)
VCCI: Заявление о соответствии для Японии
ITE класса B
KC: Предупреждение для Кореи
Условия лицензии Google ™
© Google Inc., 2020.Все права защищены.
Под лицензией Apache License версии 2.0 («Лицензия»); вы не можете использовать это file кроме случаев, предусмотренных Лицензией. Вы можете получить копию лицензии по адресу: http://www.apache.org/licenses/LICENSE-2.0
Если это не требуется применимым законодательством или не согласовано в письменной форме, программное обеспечение, распространяемое по Лицензии, распространяется на УСЛОВИЯХ «КАК ЕСТЬ», БЕЗ КАКИХ-ЛИБО ГАРАНТИЙ ИЛИ УСЛОВИЙ, явных или подразумеваемых.
См. Лицензию для получения информации о конкретных языках, регулирующих разрешения и ограничения в соответствии с Лицензией.
Декларация о соответствии продукции экологическим нормам
Компания ASUS следует экологической концепции дизайна при разработке и производстве наших продуктов и следит за тем, чтобы каждыйtagЖизненный цикл продукции ASUS соответствует мировым экологическим нормам. Кроме того, ASUS раскрывает соответствующую информацию в соответствии с нормативными требованиями. Пожалуйста, обратитесь к http://csr.asus.com/Compliance.htm В отношении раскрытия информации в соответствии с нормативными требованиями компания ASUS соблюдает:
REACH ЕС и статья 33
В соответствии с нормативной базой REACH (регистрация, оценка, авторизация и ограничение использования химических веществ) мы опубликовали химические вещества в наших продуктах на ASUS REACH. webсайт по адресу http://csr.asus.com/english/REACH.htm.
ЕС RoHS
Этот продукт соответствует директиве ЕС RoHS. Подробнее см. http://csr.asus.com/english/article.aspx?id=35
RoHS для Индии
Этот продукт соответствует «Правилам обращения с электронными отходами Индии, 2016 г.» и запрещает использование свинца, ртути, шестивалентного хрома, полибромированных дифенилов (ПБД) и полибромированных дифениловых эфиров (ПБДЭ) в концентрациях, превышающих 0.1% по весу в однородных материалах. и 0.01% по весу в однородных материалах для кадмия, за исключением исключений, перечисленных в Приложении II Правил.
Вьетнам RoHS
Продукты ASUS, проданные во Вьетнаме 23 сентября 2011 г. или позднее, соответствуют требованиям Вьетнамского циркуляра 30/2011 / TT-BCT.
RoHS для Турции
АЕЕЕ
Услуги ASUS по утилизации / возврату
Программы ASUS по утилизации и возврату являются результатом нашей приверженности высочайшим стандартам защиты окружающей среды. Мы верим в то, что можем предложить решения, позволяющие ответственно утилизировать нашу продукцию, аккумуляторы, другие компоненты, а также упаковочные материалы. Пожалуйста, зайдите в http://csr.asus.com/english/Takeback.htm для получения подробной информации об утилизации в разных регионах.
 ЗАПРЕЩАЕТСЯ выбрасывать материнскую плату вместе с бытовыми отходами. Этот продукт был разработан для обеспечения возможности повторного использования деталей и их переработки. Этот символ перечеркнутого мусорного бака указывает на то, что продукт (электрическое и электронное оборудование) нельзя выбрасывать вместе с бытовыми отходами. Ознакомьтесь с местными правилами утилизации электронных продуктов.
![]() ЗАПРЕЩАЕТСЯ выбрасывать ртутьсодержащие батарейки типа «таблетка» вместе с бытовыми отходами. Этот символ перечеркнутого мусорного ведра на колесах указывает на то, что аккумулятор нельзя выбрасывать вместе с бытовыми отходами.
ЗАПРЕЩАЕТСЯ выбрасывать ртутьсодержащие батарейки типа «таблетка» вместе с бытовыми отходами. Этот символ перечеркнутого мусорного ведра на колесах указывает на то, что аккумулятор нельзя выбрасывать вместе с бытовыми отходами.
Региональное уведомление для Калифорнии
ПРЕДУПРЕЖДЕНИЕ
Рак и репродуктивный вред www.P65Warnings.ca.gov
ASUSTeK Computer Inc. настоящим заявляет, что это устройство соответствует основным требованиям и другим соответствующим положениям соответствующих Директив. Полный текст декларации соответствия ЕС доступен по адресу: www.asus.com/support
Контактная информация ASUS
ASUSTEC COMPUTER INC.
Адрес: 1F., No. 15, Lide Rd., Beitou Dist., Taipei City 112, Тайвань.
Телефон: + 886-2-2894-3447
Факс: + 886-2-2890-7798
Web сайт: https://www.asus.com
Техподдержка
Телефон: + 86-21-38429911
Онлайн поддержка : https://qr.asus.com/techserv
ASUS COMPUTER INTERNATIONAL (Америка)
Адрес: 48720 Kato Rd., Fremont, CA 94538, США.
Телефон: + 1-510-739-3777
Факс: + 1-510-608-4555
Web сайт: https://www.asus.com/us/
Техподдержка
Факс поддержки: + 1-812-284-0883
Телефон: + 1-812-282-2787
Онлайн поддержка : https://qr.asus.com/techserv
ASUS COMPUTER GmbH (Германия и Австрия)
Адрес: Harkortstrasse 21-23, 40880 Ратинген, Германия.
Web сайт: https://www.asus.com/de
Онлайн-контакт: https://www.asus.com/support/Product/ContactUs/Services/questionform/?lang=de-de
Техподдержка
Телефон (DE): + 49-2102-5789557
Телефон (AT): + 43-1360-2775461
Онлайн поддержка : https://www.asus.com/de/support
Документы / Ресурсы
Рекомендации

Официальная поддержка | ASUS Global
Вы можете бесплатно скачать инструкции в PDF для ASUS Материнские платы.
У нас есть 1,441 бесплатных инструкций в PDF для 1,434 ASUS Материнские платы.
-
a
-
b
-
c
-
e
-
f
-
g
-
h
-
i
-
j
-
m
-
p
-
r
-
s
-
u
-
v
-
x
-
z
Инструкции по эксплуатации
Укажите здесь торговую марку и тип
В настоящее время вы находитесь на странице с руководствами Asus материнская плата. Выберите один из продуктов, чтобы сразу перейти к руководству по этому продукту. Не можете найти Asus ? Тогда попробуйте вбить в поле поиска Asus и модель, чтобы найти нужное руководство Asus. На ManualsPDF.ru в настоящее время имеется 947 руководств Asus . Самые популярные Asus материнская плата:
- Asus Prime A320M-K
- Asus PRIME B450M-A II/CSM
- Asus ROG Strix B550-F
Последнее добавленное руководство Asus было добавлено 2023-09-18, и это Asus PRO H310M-R R2.0 WI-FI.