Дата последнего обновления : 12-07-2022
Функционал часов Galaxy Watch может быть самым разнообразным, благодаря добавлению приложений, обмену электронной почтой, подключению к сервису Spotify или синхронизации со смартфоном для удовлетворения ежедневных потребностей владельца. Далее описано несколько способов настройки часов Galaxy Watch, чтобы вы могли немедленно воспользоваться всеми их функциями.

После подключения часов Galaxy Watch к смартфону вы сможете воспользоваться несколькими функциями.
Настройка даты и времени
Click to Expand
Учтите, что: В процессе синхронизации часов со смартфоном дата и время будут установлены автоматически. Вручную настройку даты и времени на часах можно сделать, только если связь между часами и смартфоном не установлена.
Чтобы настроить дату и время вручную, выполните следующие действия:


Шаг 1. На главном экране выберите пиктограмму Настройки.


Шаг 2. Выберите элемент «Общие настройки».


Шаг 3. Выберите элемент «Дата и время».


Шаг 4. Выберите элемент «Настроить дату».


Шаг 5. Выполните настройку дня, месяца и года, затем нажмите кнопку «Выполнить».


Шаг 6. Выберите элемент «Настроить время».


Шаг 7. Выполните настройку времени , для этого выберите значения часа и минут, затем нажмите кнопку «Выполнить».
Подключение к сети Wi-Fi
Click to Expand
Чтобы вручную подключиться к сети Wi-Fi, выполните следующие действия:


Шаг 1. На главном экране проведите по поверхности экрана пальцем снизу вверх выберите пиктограмму Настройки.


Шаг 2. Выберите элемент «Соединения».


Шаг 3. Выберите элемент Wi-Fi.


Шаг 4. Переведите переключатель в положение «Вкл.».


Шаг 5. Выберите в списке сеть Wi-Fi, к которой необходимо подключиться.


Шаг 6. Введите пароль для входа в сеть Wi-Fi и нажмите кнопку «Подключиться».
Учтите, что: Подключение часов Galaxy Watch к смартфону с помощью интерфейса Bluetooth приведет к автоматическому отключению интерфейса Wi-Fi. Используйте интерфейс Wi-Fi тогда, когда он действительно нужен.
Как установить приложение
Click to Expand
Выполните следующие действия, чтобы установить приложение на часы Galaxy Watch:
Учтите, что: Чтобы получить доступ к магазину Play Store, необходимо зарегистрироваться на веб-портале Google™.


Шаг 1. На главном экране проведите по поверхности экрана пальцем снизу вверх выберите пиктограмму Play Store.


Шаг 2. Введите название приложения, которое необходимо скачать, затем нажмите кнопку клавиатуры Искать.


Шаг 3. В списке результатов поиска выберите приложение, которое нужно загрузить.


Шаг 4. Нажмите кнопку «Установить».


Шаг 5. Если приложение загружено и установлено, нажмите кнопку «Открыть».
Учтите, что: Для правильной работы некоторых приложений на часах требуются системные права или установка специального приложения на сопряженное устройство. Перед загрузкой приложения на устройство прочтите правила и условия и убедитесь, что у вас есть соответствующие права, а необходимое приложение на смартфоне установлено.
Как совершить телефонный звонок
Click to Expand
Чтобы совершить телефонный звонок с помощью часов Galaxy Watch, выполните следующие действия:


Шаг 1. На главном экране проведите пальцем по поверхности экрана снизу вверх и выберите пиктограмму Телефон.


Шаг 2. Выберите пиктограмму Клавиатура или Контакты.


Шаг 3. Введите номер телефона или выберите контакт, на который необходимо сделать звонок.


Шаг 4. Выберите пиктограмму Телефон.
Учтите, что: Чтобы сделать звонок, необходимо, чтобы устройство поддерживало технологию связи 4G. Телефонные звонки можно совершать только на часах модели Galaxy Watch 4G.
Как использовать режим энергосбережения
Click to Expand
Режим энергосбережения является ключевым для увеличения срока службы аккумулятора часов Galaxy Watch. Он позволяет снизить яркость экрана и ограничить количество приложений, использующих энергию аккумулятора во время работы в фоновом режиме.
Чтобы включить или отключить режим энергосбережения, выполните следующие действия:


Шаг 1. На главном экране проведите пальцем по поверхности экрана снизу вверх и выберите пиктограмму Настройки.


Шаг 2. Выберите пиктограмму «Аккумулятор».


Шаг 3. Выберите режим энергосбережения нажатием переключателя, чтобы включить или выключить режим энергосбережения.
Учтите, что: Функции часов Galaxy Watch разных моделей могут отличаться.
Благодарим за отзыв!
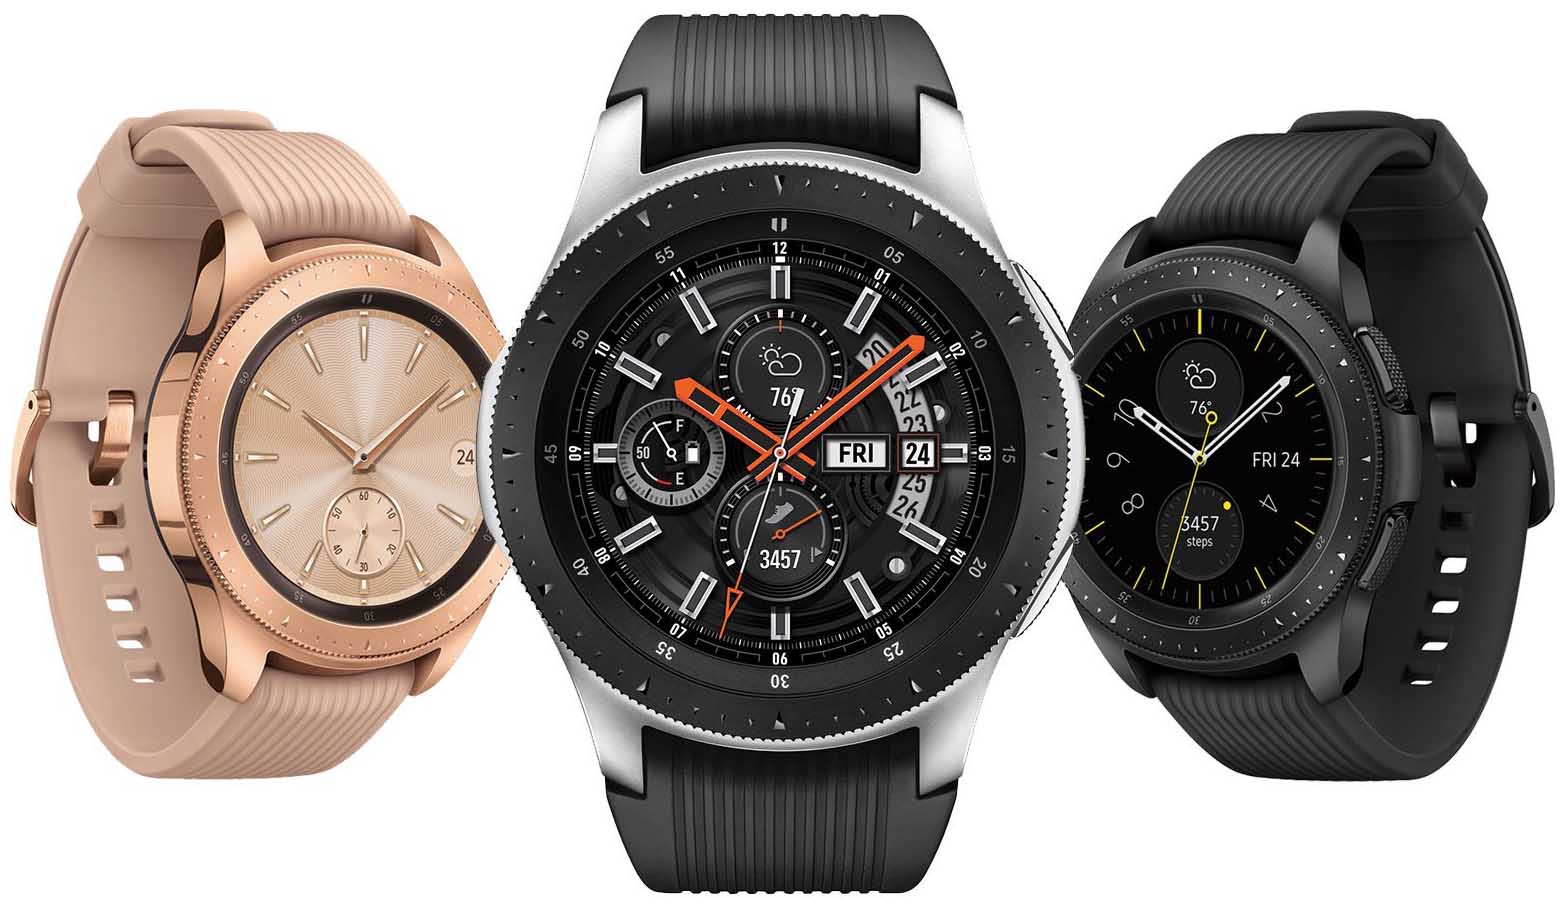
Использование умных часов Samsung Galaxy Watch может вызвать много вопросов, ответы на часть из которых мы разберем в этой статье. Мы рассмотрим основные элементы управления часами, способы их подключения к телефону и кратко разберем основные настройки.
В комплекте с умными часами Samsung Galaxy Watch идет своя док-станция, поэтому их не получится зарядить через классический USB-провод от телефонной зарядки. Зато на док-станции часы восполняют энергию по принципу беспроводной зарядки, что избавляет от необходимости подключать их к проводу. Рассмотрим процесс зарядки подробнее.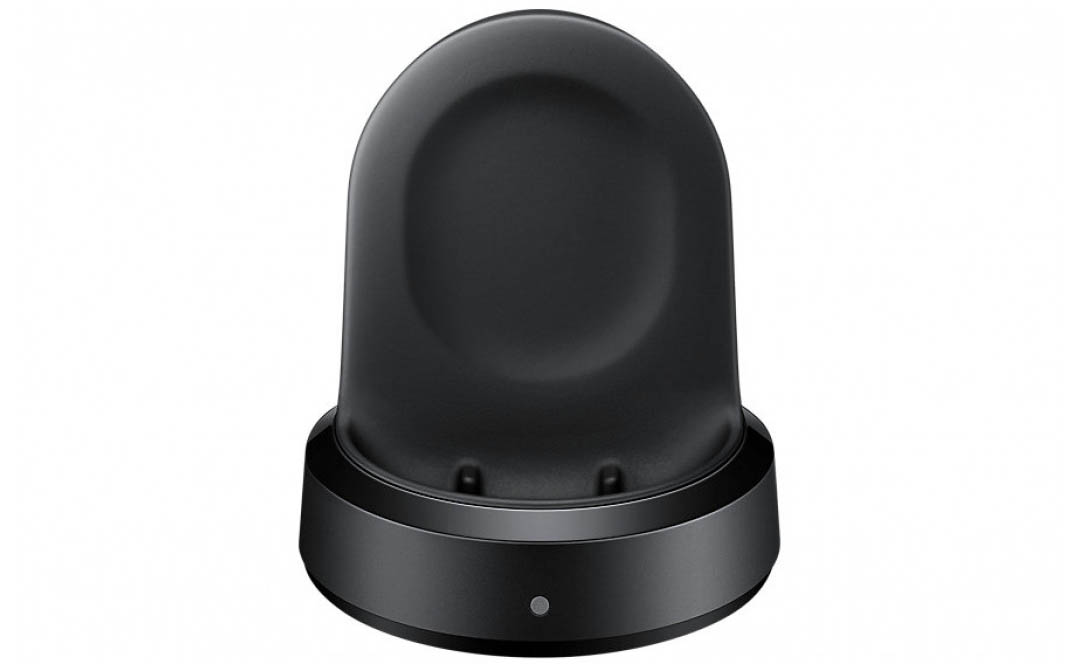 Сама док-станция получает энергию от обычной бытовой сети. В вертикальной площадке станции расположена индукционная катушка, которая при включении в розетку начинает генерировать электрическое поле. В смарт-часах тоже есть индукционная катушка. Если прижать часы к вертикальной площадке станции, то в их катушке под действием катушки станции вырабатывается электрический ток. По этой причине в часах нет зарядных контактов, которые нужно было бы совмещать с контактами док-станции. Однако для эффективности процесса зарядки расстояние между обеими индукционными катушками должно быть маленьким.
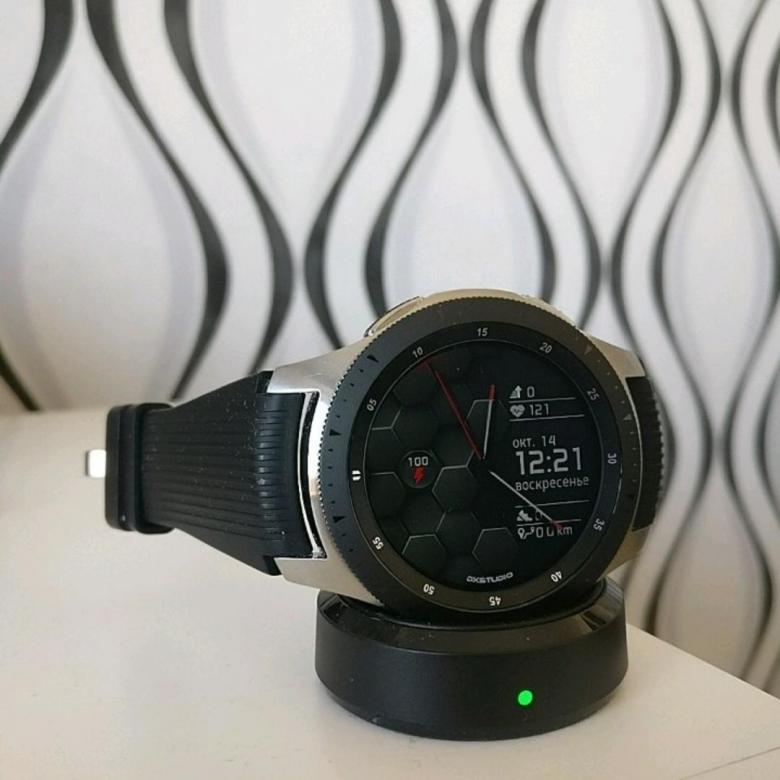 Чтобы зарядить ваши смарт-часы, вставьте в разъем док-станции зарядный кабель и подключите его к розетке. Поместите часы на станцию таким образом, чтобы центр вертикальной площадки станции совпал с центром задней стороны часов. В процессе зарядки на станции будет гореть красный индикатор, который сменится зеленым при полном восстановлении энергии. Если индикатор загорится оранжевым, значит, напряжение для зарядки слишком низкое, а мигающий красный говорит о неполадках с зарядкой. В последнем случае снимите часы с зарядки, дождитесь прекращения мигания индикатора и снова поставьте их на док-станцию. Если это не помогло, придется обратиться в сервисный центр.
 Если на ваших часах стоит металлический ремешок, после их установки на док-станцию надавите на нижнюю часть часов так, как показано на рисунке. Это обеспечит более плотное прилегание к станции.
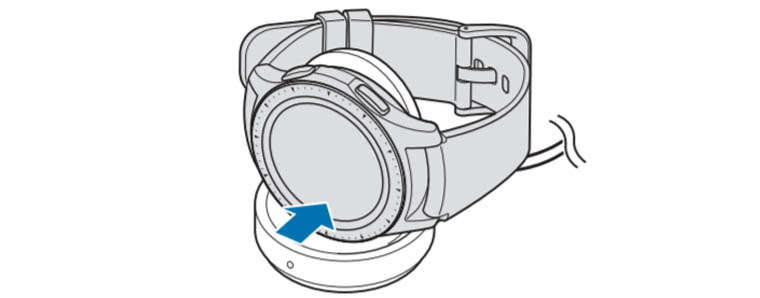 Обратите внимание, что при полном разряде часов вы не сможете включить их сразу даже при подключении к зарядному устройству. Часы включатся только через несколько минут пребывания на зарядке.
Может оказаться, что у вас нет под рукой зарядки, тогда продлить время работы часов поможет переход в режим энергосбережения. В нем вам не будут доступны сети Wi-Fi, процессор будет работать медленнее, с экрана исчезнут цвета, отключатся основные функции, но вы по-прежнему сможете получать уведомления от приложений по Bluetooth.
Устройство часов
На передней стороне корпуса смарт-часов Samsung Galaxy Watch расположен сенсорный экран, безель (вращающееся кольцо), датчик освещенности и две антенны. Одна антенна отвечает за прием сигнала GPS, а другая необходима для NFC-контакта. Сбоку часов расположены две управляющие кнопки, микрофон и внешний динамик. Сзади корпуса есть еще несколько датчиков и клапан сброса давления (см. рисунок ниже).
Ремешок у гаджета съемный и меняется одним движением. Чтобы снять ремешок, найдите на его обратной стороне пружинный стерженек и отодвиньте его в сторону, как показано на рисунке ниже. После этого можно вытащить ремешок из корпуса и при желании заменить его другим.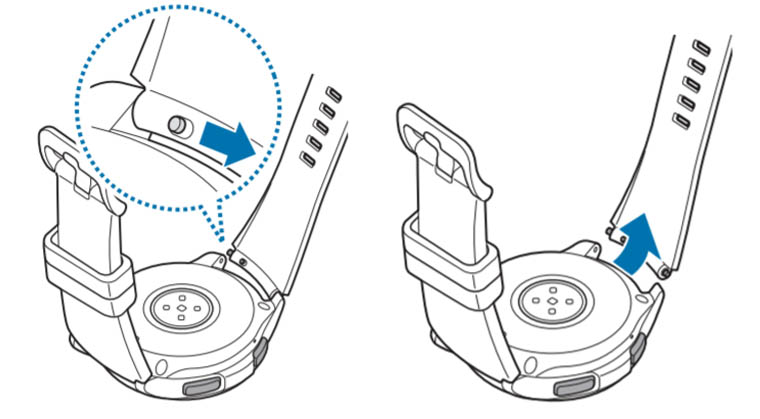
Управляющие элементы часов
Управление умными часами Samsung Galaxy Watch происходит при помощи сенсорного экрана, безеля, двух кнопок сбоку корпуса и жестов.
Управление экраном
Сенсорный экран реагирует на традиционные для сенсорных устройств свайпы (перелистывания) экрана вверх, вниз или в стороны. Нажатие на экран переведет вас внутрь раздела, выведет дополнительную информацию, а долгое нажатие выделит значок для его редактирования. Нажав и двигая значок, можно перенести его в другое место экрана. Быстрое двойное касание пальцем экрана поможет увеличить или уменьшить масштаб изображения. Экран может не реагировать на касания в том случае, если они слишком близко к его краю или если он заблокирован.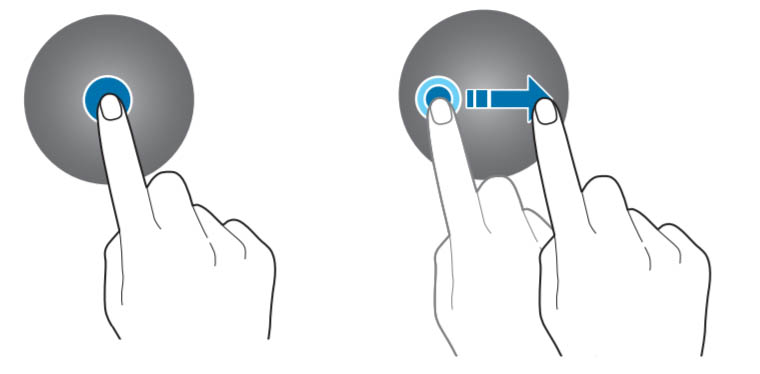
Управление безелем
Безель представляет собой кольцо по контуру часов, поворачивая которое, вы сможете перелистывать пункты меню, выбирать конкретные элементы или настраивать параметры. Рассмотрим примеры. Если вам звонят, на экране появится два значка: слева значок трубки, справа значок отмены звонка. Поворотом безеля в нужную сторону вы поднимете трубку или прервете звонок. Если вы настраиваете яркость, то при помощи безеля сможете прибавить или убавить ее поворотами вправо или влево соответственно. При нахождении в списке элементов просто поворачивайте безель до выделения нужного элемента, а затем кликните по этому элементу пальцем. Также безелем можно включать экран при условии настройки такой функции (включить переключатель в разделе часов Настройки / Дополнительные / Пробуждение с помощью кольца).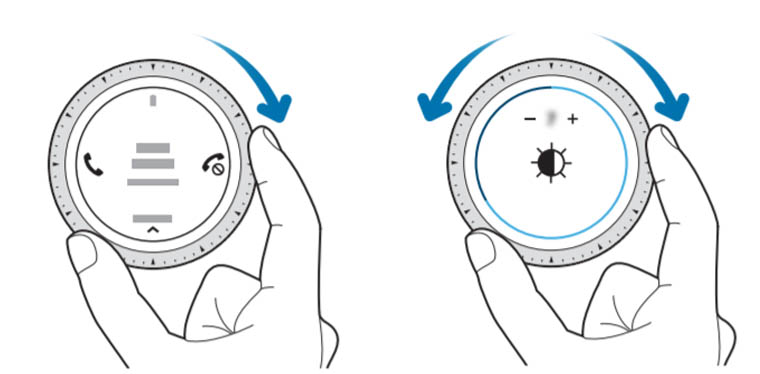
Управление кнопками
Основной является нижняя кнопка (кнопка питания), так как она отвечает за включение/выключение часов и ряд других функций. Поэтому у кнопки питания есть несколько способов нажатия. Чтобы включить или выключить смарт-часы, нажмите эту кнопку и удерживайте ее. Короткое нажатие поможет вам включить погашенный экран, перейти на главный экран (экран часов) с любого другого экрана или перейти с главного экрана в раздел приложений. Если часы ни на что не реагируют или работают некорректно, удерживайте кнопку питания дольше 7 секунд для перезагрузки. Верхняя кнопка (кнопка «Назад») нужна для возврата на предыдущий экран. У нее есть только короткое нажатие, но вы можете настроить и двойное нажатие в разделе часов Настройки (значок шестеренки) / Дополнительные. На двойное нажатие задается любое из представленных в часах действий: музыка, новости, последнее открытое приложение и другое.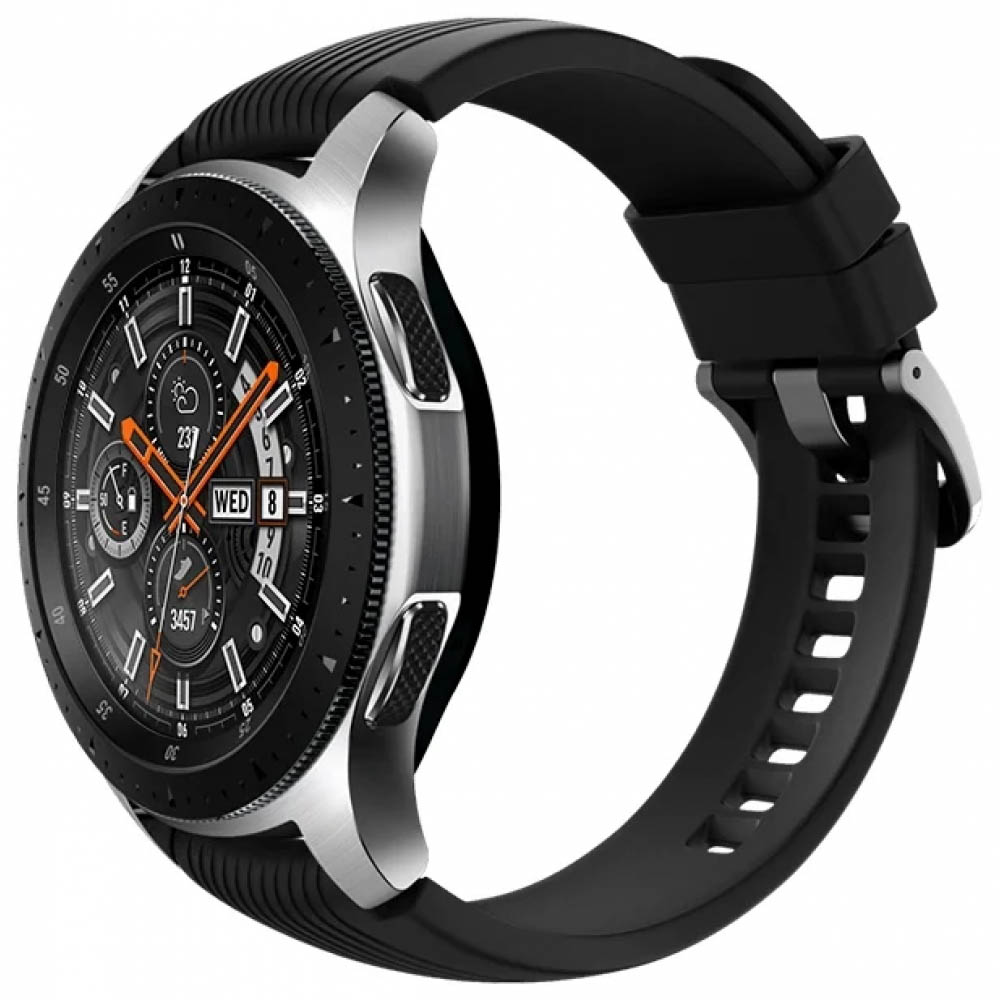
Управление жестами
Включать и выключать экран можно не только кнопками или безелем, но и специальными жестами. Для выключения экрана просто накройте его ладонью. При этом сработает расположенный на передней стороне часов датчик освещенности, и экран погаснет. То же самое произойдет при помещении часов в карман куртки или сумку. Для включения экрана предусмотрен жест включения — подъем и поворот запястья так, как будто вы хотите посмотреть время на часах. Но этот жест должен быть включен в разделе Настройки / Дополнительные / Жест включения.
Как подключить часы Samsung Galaxy Watch к телефону
Для управления смарт-часами с мобильного телефона вам понадобится приложение Galaxy Wearable. Найдите его в «Play Маркет» или в Galaxy Apps: наберите в поисковой строке название приложения, кликните «Установить» и затем «Открыть». Если приложение начнет обновляться, дождитесь завершения этого процесса. Одновременно с этим включите ваши часы, коснитесь значка глобуса и при необходимости выберите нужный вам язык.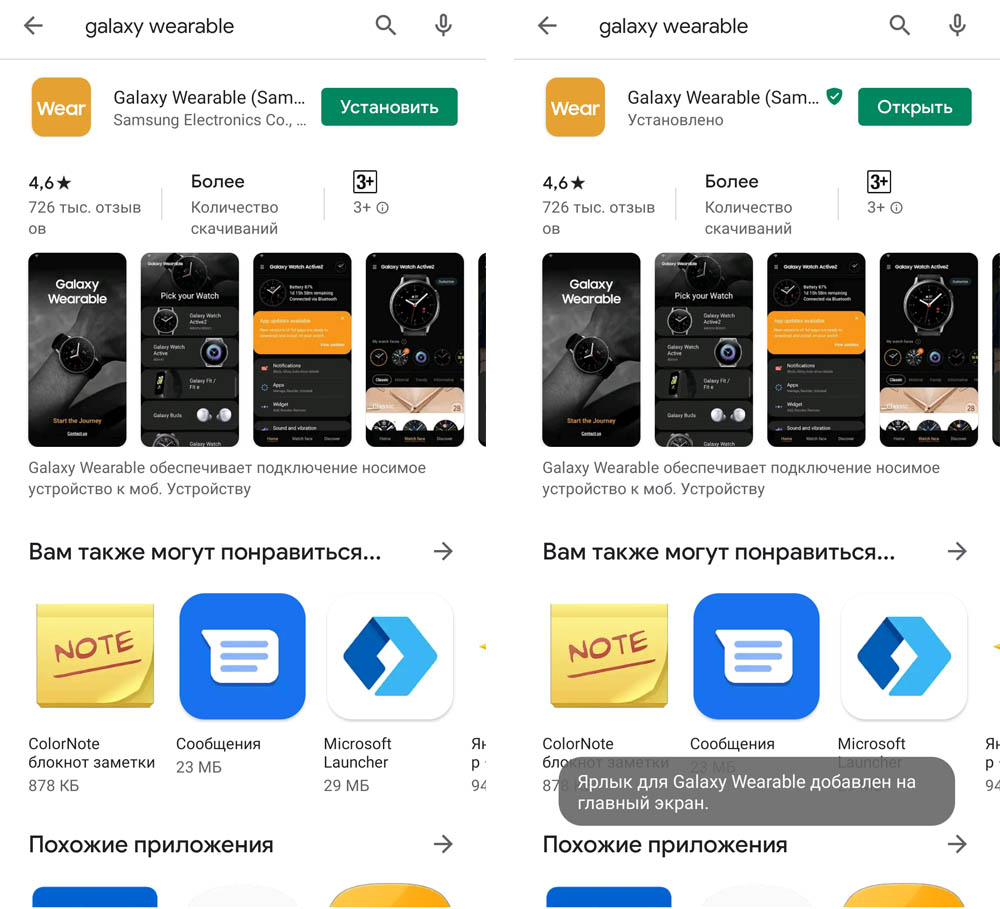
После запуска приложения нажмите кнопку «Начать» внизу экрана. Перед вами раскроется список из названий и картинок часов Samsung Galaxy. Кликните по строке с названием Galaxy Watch 46 mm/42 mm. Если такой строки в вашем списке нет, пролистайте его вниз и кликните по кнопке «Моего устройства нет».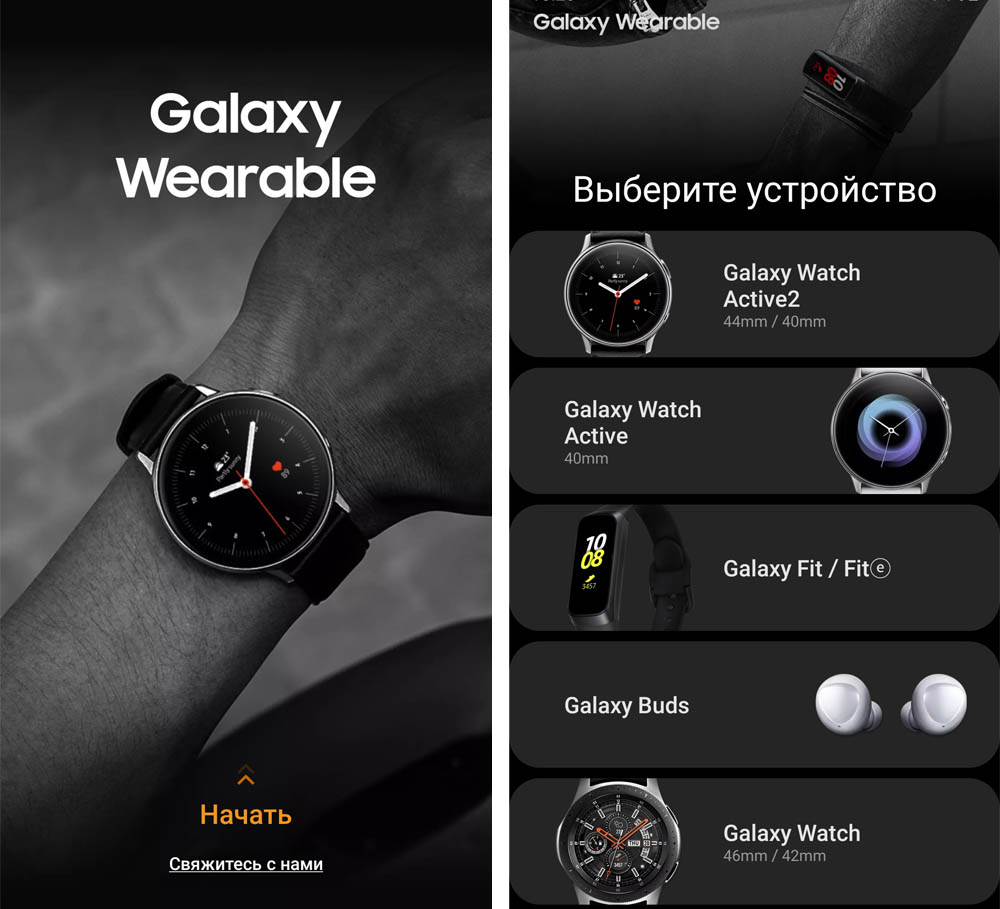
На следующем шаге приложение запросит разрешение на определение местоположения телефона, доступ к хранилищу, контактам и другое. Дайте все требуемые разрешения, и телефон начнет сопряжение с часами. Кликните по галочке на часах, при необходимости включите Bluetooth, подтвердите сопряжение на телефоне и сделайте базовые настройки, которые предложит телефон. У Samsung Galaxy Watch есть собственное учебное руководство, с которым вы можете ознакомиться на экране часов или телефона при первом подключении.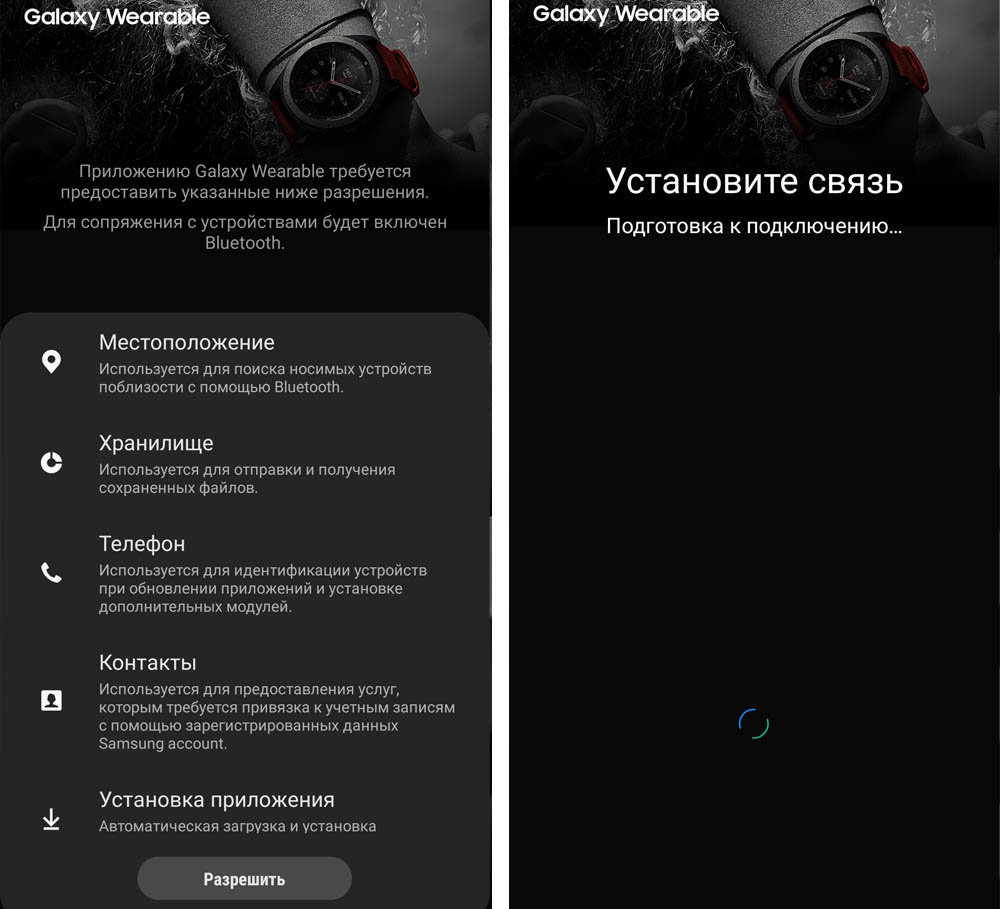
Если вы хотите подключить часы к другому смартфону, вам понадобится сделать сброс умных часов. Но перед этим обязательно сделайте резервное копирование хранящихся в часах данных. На экране приложений выберите пункт настроек (значок шестеренки) и строку «Подключение к новому телефону». Часы отключатся от прежнего смартфона и будут готовы к новому сопряжению. Дальнейшие шаги такие же, как описано выше. Если к новому смартфону привязаны другие умные часы, зайдите в приложение Galaxy Wearable, кликните по значку трех точек и выберите «Подключить новое устройство».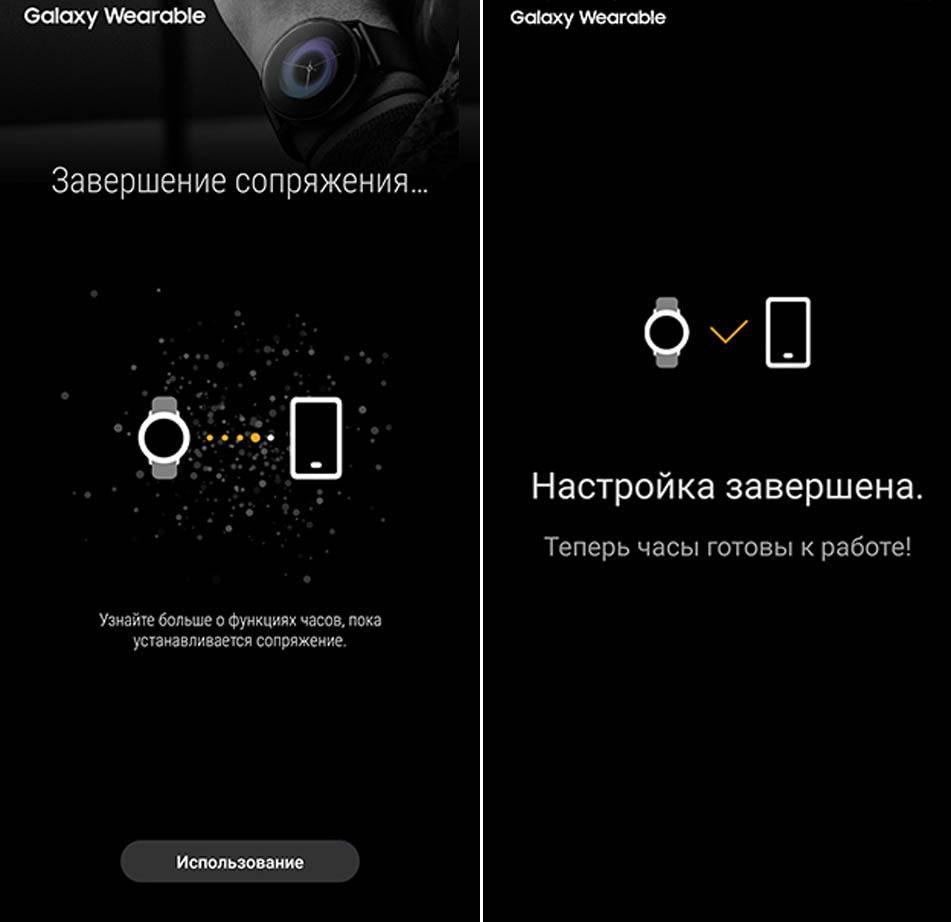
Работа по Wi-Fi
По умолчанию часы подключаются к телефону через Bluetooth. Но можно подключаться и по сетям Wi-Fi через учетную запись Samsung. Функция включается автоматически, но если она у вас не работает, зайдите в раздел Настройки / Подключение часов и включите переключатель в строке «Удаленное подключение». Часами можно пользоваться и без подключения к телефону, но в этом случае будут доступны не все функции.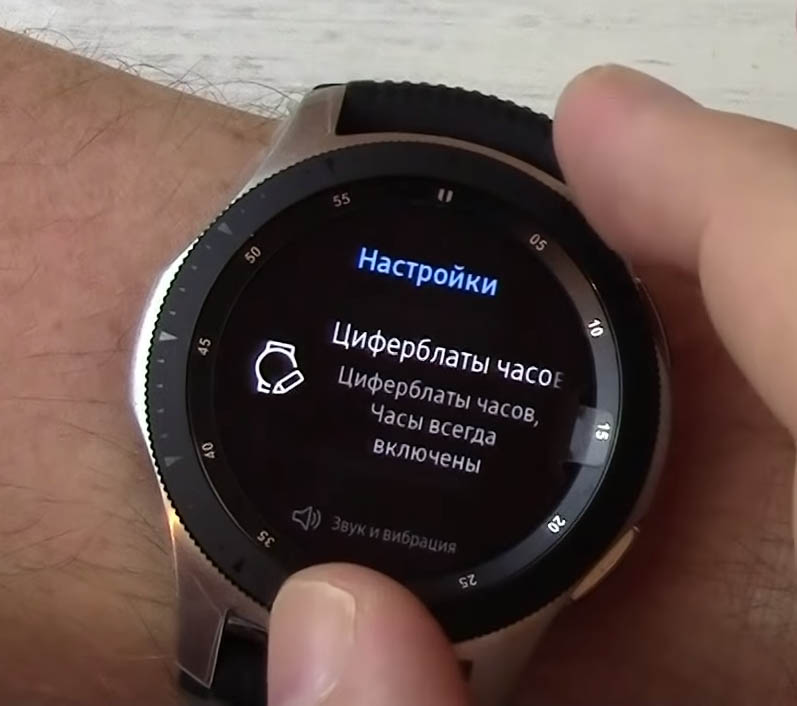
Как настроить часы Samsung Galaxy Watch
Как настроить или сменить циферблат
Циферблаты настраиваются на самих часах и в мобильном приложении. Для смены циферблата на часах кликните по экрану часов и удержите палец. При этом вы попадаете в раздел доступных циферблатов и можете перемещаться по нему при помощи безеля или свайпов в стороны. В этом же разделе есть пункт «Персонализация», в котором загружаются другие циферблаты из приложения GALAXY Apps или выбирается свое фото в роли типа часов. Для загрузки фото с телефона в приложении Galaxy Wearable зайдите в раздел «Настройки» (значок шестеренки), затем кликните по строке «Добавление содержимого на часы». Найдите пункт «Копирование изображений», выберите нужные файлы и нажмите «Готово».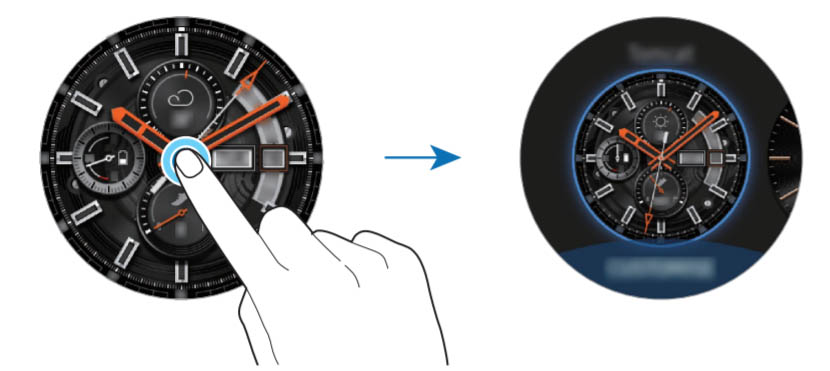
В приложении Galaxy Wearable настройка циферблатов ведется в одноименном разделе (Watch Faces). Для настройки нажимайте кнопку «Настроить» (Customize) и «Сохранить» (Save).
Как изменить расположение виджетов и приложений
На часах вы можете оставлять только те приложения, которые вам нужны. Для этого свайпом вниз по главному экрану вызовите панель быстрого запуска. Нажмите и удерживайте палец на экране и попадете в раздел редактирования. Теперь можно удалять ненужные значки и заменять тем, что вам нравится. В мобильном приложении перейдите в раздел настроек, найдите в нем раздел «Приложения», нажмите на значок трех точек и выберите «Изменить порядок». То же самое вы можете проделать для виджетов, зайдя в разделы Настройки / Виджеты.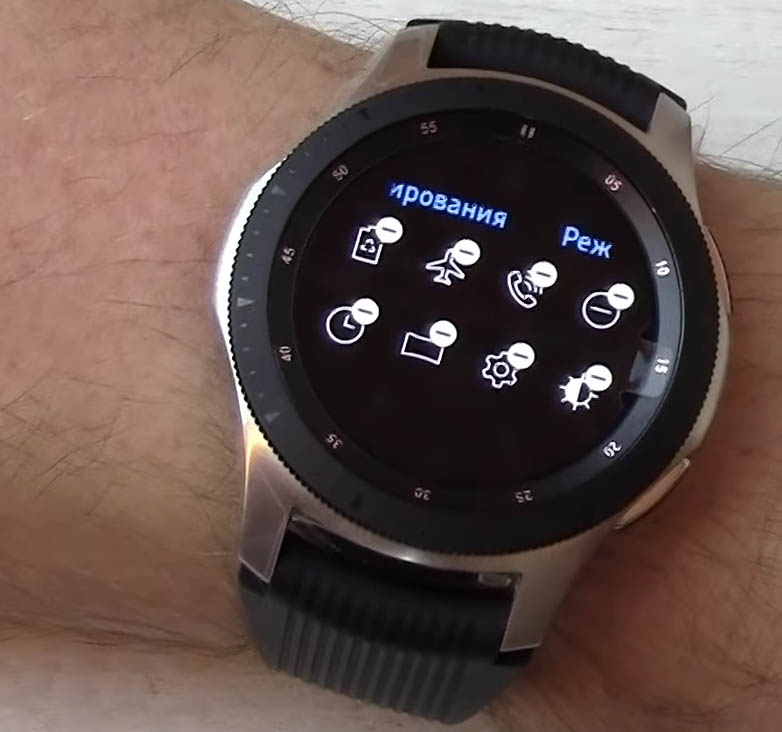
Другие настройки
В часах есть огромная группа настроек, расположенная все в том же разделе настроек (значок шестеренки). Помимо циферблатов и расположения элементов вы можете настраивать звуки часов, работу экрана, способы подключения к телефону, работу приложений, выбирать режим работы аккумулятора, синтез речи и многое другое. Мы рассмотрели лишь базовые настройки часов Samsung Galaxy Watch. Как и любой сложный инструмент, умный гаджет требует детального изучения, запоминания кнопок и функций и освоения на практике.
- Manuals
- Brands
- Samsung Manuals
- Watch
- Galaxy Watch4
- User manual
-
Contents
-
Table of Contents
-
Bookmarks
Quick Links
Related Manuals for Samsung Galaxy Watch4
Summary of Contents for Samsung Galaxy Watch4
-
Page 1
User manual… -
Page 2
Contents Getting started Device Layout: Galaxy Watch4 Galaxy Watch4 Classic Set up your device: Charge the battery Wireless PowerShare Wear the Watch Start using your device: Start using your device | Activation | Galaxy Wearable app | Lock or unlock your device … -
Page 3
Visibility enhancements | Hearing enhancements | Advanced settings Installed services Security and privacy: Set a screen lock Permission manager Accounts: Samsung account | Google account Other: Software update | Tips and tutorials About watch Learn More Videos Tips Samsung Care… -
Page 4
Getting started Galaxy Watch4 Galaxy Watch4 Classic Set up your device Start using your device… -
Page 5
Getting started Galaxy Watch4 Home key Speaker Touchscreen Back key Band Microphone Heart rate sensor Devices and software are constantly evolving — the illustrations you see here are for reference only. -
Page 6
Getting started Galaxy Watch4 Classic Home key Speaker Bezel Back key Touchscreen Band Microphone Heart rate sensor Devices and software are constantly evolving — the illustrations you see here are for reference only. -
Page 7
Getting started Set up your device Learn more about your device hardware, assembling and charging, and how to get started using your new device. Charge the battery Wireless PowerShare Wear the Watch Charge the battery Your device is powered by a rechargeable battery. 1. -
Page 8
CAUTION The charging head for plugging the USB cable into a wall outlet is not included. Use only Samsung charging devices rated with an output voltage of 5v and an output current of over 150mA (sold separately). Samsung accessories are designed for your device to maximize battery life. -
Page 9
Getting started Wireless PowerShare Wirelessly charge your device using a supported Samsung smartphone. Some features are not available while sharing power. 1. From your phone, enable the Wireless PowerShare feature. 2. With the phone face down, place the compatible device on the back of the phone to charge. -
Page 10
Getting started NOTE Wireless PowerShare works with most Qi-Certified devices. Requires minimum 30% battery to share. Speed and power efficiency of charge varies by device. May not work with some accessories, covers, or other manufacturer’s devices. If you have trouble connecting or charging is slow, remove any cover from each device. -
Page 11
Getting started Wear the Watch Wrap the watch firmly around your lower arm just above your wrist as shown below. Do not fasten the watch too tightly. WARNING Wear the device correctly. If you feel discomfort while using the device, stop using it. -
Page 12
Getting started Replace the strap Detach the strap from the watch to replace it with a new one. To remove the strap: ◌ Slide the strap’s spring bar inward and pull the strap away from the watch. Spring bar To replace the strap: 1. -
Page 13
TIP To restart the watch, press and hold the Home and Back keys for more than seven seconds. Activation Galaxy Watch4 and Galaxy Watch4 Classic (R865U, R875U, R885U, and R895U) are 4G LTE-enabled. Get texts, alerts, make and receive calls, even when you leave your phone behind. -
Page 14
Getting started Connect the watch to a smartphone Turn on the watch before connecting to your phone. 1. From the smartphone, tap Galaxy Wearable. If necessary, update the app to Wear the latest version. 2. Tap Start and select your device. ®… -
Page 15
2. Tap an option under Home key to choose a shortcut. Double press: Choose which feature is launched when the Home key is pressed twice. By default this option is set to open Samsung Pay. Press and hold: Choose which feature is launched when you press and hold the Home key. -
Page 16
Getting started Navigation The touchscreen responds best to a light touch from the pad of your finger. Using excessive force or a metallic object on the touchscreen may damage the tempered glass surface and void the warranty. Lightly tap the screen to launch an app or select a menu item. Devices and software are constantly evolving —… -
Page 17
Getting started Swipe Lightly drag your finger vertically or horizontally across the screen to view panels. Drag Touch and hold an item, and then move it to a new location. Devices and software are constantly evolving — the illustrations you see here are for reference only. -
Page 18
Getting started Rotate The Galaxy Watch4 Classic features a physical bezel that you can rotate with your fingers. The Galaxy Watch4 has a digital bezel. Lightly press and drag your finger clockwise or counterclockwise using the digital bezel on the edge of the screen to move through a list. -
Page 19
Getting started Change the watch face The first screen when you turn on the Galaxy Watch4 and Galaxy Watch4 Classic is the watch face. You can choose a watch face with different colors, styles, and information displayed. 1. On your smartphone, tap Galaxy Wearable >… -
Page 20
Getting started Quick panel Instead of navigating through the Settings menu, you can access commonly used settings through the Quick panel, where you can also view the Status bar. ◌ Swipe down from the top of the watch screen to open the Quick panel. Tap a quick setting to open it. -
Page 21
Getting started Status bar Indicator icons display at the top of the screen in the Status bar. Swipe down from the top of the watch screen to view the Status bar. Indicator icons Battery full Bluetooth connected Bluetooth enabled, but not connected Wi-Fi connected Airplane mode LTE … -
Page 22
Getting started Notifications Stay up to date with events, notifications, and messages from your smartphone. When you receive a notification, information about the notification, such as its type, is displayed on the screen while the watch is vibrating. ◌ From the watch screen, swipe right and tap a notification to view details. App icon Notification Devices and software are constantly evolving —… -
Page 23
Getting started Bedtime mode Bedtime mode mutes all alerts, except for alarms and notifications. This keeps the screen off and mutes most sounds while you sleep. ◌ From the Quick settings panel, tap to put the watch in Bedtime mode. TIP … -
Page 24
Getting started Water lock mode You can use Water lock mode to exercise in the water while wearing your watch. While in Water lock mode, touchscreen, wake-up gestures, and watch always on will be disabled. ◌ From the Quick settings panel, tap to put the watch in Water lock mode. -
Page 25
Getting started Enter text Text can be entered by speaking, drawing, or by using a keyboard. Change keyboard Emojis Default keyboard Select a default keyboard type for text input. ◌ From Settings, tap General > Input > Default keyboard and select your default keyboard. -
Page 26
Change the Samsung keyboard settings. ◌ From Settings, tap General > Input > Samsung keyboard, and tap options to customize: • Input languages: Select languages for text input. • Smart typing: Customize features like predictive text, auto capitalize, and auto punctuate. -
Page 27
Apps Navigate the apps screen Tools Media Health Google Microsoft… -
Page 28
Apps Navigate the apps screen Uninstall apps | Apps Settings The Apps list displays all preloaded and downloaded apps. Apps can be downloaded from the Google Play store. ◌ From the watch screen, swipe up from the bottom of the screen to open the Apps screen. -
Page 29
Apps App permissions Configure permissions for each installed app. 1. From Apps, tap Settings. 2. Tap Apps > Permissions. 3. Tap each feature to enable or disable permission to access or use the feature. -
Page 30
The following apps are useful tools that come pre-installed or downloaded over-the- air to your device. Alarm | Bixby | Calculator Calendar Compass Contacts Find My Phone Reminder Samsung Pay | Stopwatch | Timer | Voice Recorder | Weather | World clock Alarm Set an alarm to ring at a specific time. -
Page 31
Bixby to launch a function or provide you with information. To use Bixby, your mobile device must be connected to a Wi-Fi or mobile network, and you must sign in to your Samsung account. 1. From Apps, tap Bixby. -
Page 32
Apps Contacts View your smartphone’s contact list on your watch. Find a contact You can search for a contact or scroll through the list to find one by name. ◌ From Contacts, tap Search, and then enter characters to find contacts that match. -
Page 33
• To view completed reminders, tap Completed. Samsung Pay Pay almost anywhere that accepts a debit, credit, or gift card. Samsung Pay supports Near Field Communication (NFC) to allow quick and secure payment through standard credit card readers. For more information, see samsung.com/us/samsung- pay. -
Page 34
2. Swipe to select a card. 3. Hold the watch near an NFC reader to pay. NOTE You can use Samsung Pay for up to 5 transactions without the smartphone. This may vary depending on the bank/institution issuing the account. -
Page 35
Apps Voice Recorder Use your voice to record memos. 1. From Apps, tap Voice Recorder. 2. Tap Record and begin recording your message. • To convert your speech to text, tap Speech-to-text before recording. • To pause the recording, tap Pause. -
Page 36
Apps Media The following media apps come pre-installed or downloaded over-the-air to your device. Buds controller Camera controller | Gallery Media controller | Messages | Phone Buds controller Control your earbuds with your watch. Connect your earbuds directly to your watch or to the Galaxy Wearable app on your phone. -
Page 37
Apps Import and export images Images can be exchanged between your watch and smartphone. Import images from your smartphone Send images or entire albums from your smartphone to your watch. 1. From Galaxy Wearable, tap Watch settings. Wear 2. Tap Manage content > Copy images to watch. 3. -
Page 38
Apps Media controller You can use the Media controller to connect to a computer, phone, or tablet using Bluetooth and control media with your watch. To connect: 1. From Apps, tap Media Controller. 2. Tap a device in the list to connect your watch. 3. -
Page 39
Apps Import music Import music saved on your smartphone to your watch. 1. From Galaxy Wearable, tap Watch settings. Wear 2. Tap Manage content > Add tracks. 3. Select files and tap Done. To sync recently added music on your smartphone with your watch: 1. -
Page 40
Apps Messages View messages and reply to or call the sender using the watch. View and Send messages You may incur additional charges for receiving messages while you are roaming. ◌ From the notifications screen, tap message to view it. Swipe down for additional keyboards, quick… -
Page 41
Apps Send messages Create and send messages from your watch. 1. From Apps, tap Messages > Compose. 2. Tap Enter recipient to enter a phone number, or Contacts to add a number you have saved. 3. Choose a keyboard to compose your message. 4. -
Page 42
Apps Phone Make and answer calls on your phone from your watch. Volume More options Mute End call Make a call Make a call from your watch. 1. From Apps, tap Phone. 2. Tap Keypad and enter a number or tap Contacts and select a contact to call. -
Page 43
Apps Answer a call Answer incoming calls. ◌ On the incoming call screen, drag Answer to the right to answer the call on your phone. Reject a call Reject incoming calls. ◌ Decline and drag it to the left to reject a call and send it to your voicemail. -
Page 44
Apps Gestures Use gestures as shortcuts on the watch. ◌ From Settings, tap Advanced features, and tap an option under Gestures: • Answer calls: Shake your arm twice bending at the elbow to answer incoming calls. • Dismiss alerts and calls: Rotate your wrist twice to dismiss alarms or decline incoming calls. -
Page 45
Samsung Health helps you manage your wellness and fitness. Set fitness goals and regularly record and check your progress. When the watch is synced with the Samsung Health app, you can save and manage health-related data and receive useful information about your health every day. -
Page 46
Apps Before you start exercising Although the Samsung Health application is a great companion to your exercise routine, it is always best to make sure you consult with your physician before beginning any exercise regimen. While moderate physical activity, such as brisk… -
Page 47
View a summary of your daily activity broken down by your step count, active time, and active calories. ◌ From Samsung Health, tap Daily activity and swipe down to view a graph of your activity. Steps Your watch counts your number of steps, measures the distance traveled, calories burned, and floors climbed. -
Page 48
Measure and record your heart rate. Take heart rate measurements when you are seated and relaxed. 1. From Samsung Health, tap Heart rate. 2. Tap Measure to begin measuring your heart rate. • After a moment, your current heart rate is displayed on the screen. -
Page 49
Keep track of your oxygen level, also known as saturation of percutaneous oxygen (SpO2). 1. From Samsung Health, tap Blood oxygen. 2. Tap Measure and follow the prompts to begin measuring your blood oxygen level. • After a moment, your current blood oxygen level is displayed on the screen. -
Page 50
Compete with other Samsung Health users. Steps leaderboard Add challenges through Samsung Health on your smartphone. ◌ From Apps, tap Samsung Health > Together > Start. Here you can add friends and challenges. Women’s health Record and track your menstrual cycle. ◌… -
Page 51
• Connected services: Configure connected services such as the Health platform. Samsung Health Monitor Use the Samsung Health Monitor app to track your blood pressure and record electrocardiogram (ECG) measurements, analyze them quickly, and share the results with experts. To view detailed reports of your blood pressure and ECG readings on your smartphone, install the Samsung Health Monitor app. -
Page 52
ECG. The ECG Monitor app will also check the recording for signs of Atrial Fibrillation-a common form of irregular heart rhythm. Requires Samsung Galaxy smartphone with Android 7 or later, and Samsung Health Monitor app (available only at the Samsung Galaxy app store). -
Page 53
Apps Google Enjoy these apps from Google. Certain apps require a Google Account. Visit google.com to learn more. Play store Maps Play store Find new, recommended, and essential apps as well as watch faces and games in the Google Play store. ◌… -
Page 54
Apps Microsoft The following Microsoft apps may be preloaded on your device. Apps can be downloaded from Galaxy Store and the Google Play store. Outlook View new emails on your watch. 1. From Apps, tap Outlook. 2. Tap a message to view its content. View calendar events View your Outlook calendar events on your watch. -
Page 55
Settings Access Settings Connections Notifications Sounds and vibration Display Device maintenance Accessibility Security and privacy Accounts Other settings… -
Page 56
Settings Access Settings You can personalize your device by configuring various setting options. ◌ From Apps, tap Settings, or swipe down from the top of the screen to open the status panel and tap Settings. Connections Manage connections between your device and a variety of networks and other devices. -
Page 57
Settings Connect to a Wi-Fi network This feature is available when the watch is not connected to the smartphone through Bluetooth. 1. From Settings, tap Connections > Wi-Fi. 2. Tap a network from the Available networks list. • Networks that require a password display a lock icon. •… -
Page 58
Settings Make payments with the NFC feature Before you can use the NFC feature to make payments, you must register for the mobile payment service. To register or get more information about the service, contact your service provider. ◌ Touch the top of the watch’s touchscreen to the credit card reader. NOTE … -
Page 59
Settings Mobile networks Customize your mobile networks. This feature is only available on the LTE model. 1. From Settings, tap Connections. 2. Tap Mobile networks, and tap an option for mobile network use. 3. Swipe down and tap Mobile plans to view available mobile plans for your device Data usage Explore options for your data plan. -
Page 60
Settings Notifications You can prioritize and streamline app alerts by changing which apps send notifications and how notifications alert you. Notification settings Advanced notification settings Wireless emergency alerts Notification settings Coordinate notifications between your phone and watch. ◌ From Settings, tap Notifications, and tap an option to enable it: •… -
Page 61
Settings Wireless emergency alerts Emergency alerts notify you of imminent threats and other situations. There is no charge for receiving an Emergency alert message. ◌ From Settings, tap Notifications > Wireless emergency alerts. • Allow alerts: Allow your watch to receive wireless emergency alert notifications. -
Page 62
Settings Vibration Set how long and intensely the device vibrates for notifications. 1. From Settings, tap Sounds and vibration > Vibration. 2. Select options under Vibration duration and Vibration intensity to set your preference. Call vibration Vibrate for calls. 1. From Settings, tap Sounds and vibration. -
Page 63
Settings System vibration Enable vibrations when the watch screen is tapped. ◌ From Settings, tap Sounds and vibration > System vibration to enable. System sounds Enable sounds for actions like tapping the screen and charging the watch. 1. From Settings, tap Sounds and vibration. -
Page 64
Settings Always on Display Keep the screen on without unlocking your device using Always On Display (AOD). ◌ From Settings, tap Display, and tap Always on Display to enable the feature. Screen wake-up Use a gesture to turn on the watch screen. ◌… -
Page 65
Settings Font style Customize the font style and size on your watch. ◌ From Settings, tap Display, and tap an option under Font to customize: • Font style: View and select a font. • Font size: Choose from small, medium, and large. Touch sensitivity Set the watch to allow use of the touch screen with gloves on. -
Page 66
Settings Power saving mode Activate Power saving mode to save battery power by limiting the watch’s functions, such as: Use a grayscale Home screen. Turn off all functions except calls, messages, and notifications. Turn off Wi-Fi and mobile networks (if applicable). Limit performance. -
Page 67
Settings Date and time You can set the date and time manually. These options are only available when your watch is not connected to your mobile device. ◌ From Settings, tap General > Date and time. • Automatic: Use the network to set date and time. •… -
Page 68
Settings Accessibility Accessibility services are special features that make using the device easier for those with certain physical disabilities. For more information about Accessibility for Samsung products, please contact us at accessibility@sea.samsung.com. TalkBack | Visibility enhancements | Hearing enhancements |… -
Page 69
Settings Hearing enhancements You can configure Accessibility features to assist with audial aspects of the device. ◌ From Settings, tap Accessibility > Hearing enhancements and tap an option: • Mute all sounds: Turn off all notifications and audio for privacy. •… -
Page 70
Settings Security and privacy You can secure your device and protect your data by setting a screen lock. Set a screen lock Permission manager Set a screen lock It is recommended that you secure your device using a screen lock. 1. -
Page 71
Set up and manage your accounts. Samsung account | Google account Samsung account Sign in to your Samsung account to access exclusive Samsung content and make full use of Samsung apps. ◌ From Settings, tap Account and backup > Samsung account to add your account information. -
Page 72
Settings Tips and tutorials View tips and techniques as well as tutorials for your device. ◌ From Settings, tap Tips and tutorials to view tips on your phone, and tutorials on your watch. TIP To view the user manual from the Galaxy Wearable app on your Wear smartphone, tap… -
Page 73
Learn more Videos youtube.com/samsungcare Tips samsung.com/us/support/tips Samsung Care samsung.com/us/support Talk to an agent Contact us on Facebook Messenger Find us on Facebook Follow us on Twitter… -
Page 74
Samsung Knox Samsung Knox is Samsung’s security platform and is a mark for a Samsung device tested for security with enterprise use in mind. Additional licensing fee may be required. For more information about Knox, please refer to: samsung.com/us/knox. -
Page 75
Legal information Follow these tips carefully to prevent damage to the device and maintain dust and water resistance performance: Water resistant based on 5ATM rating, which means submersion up to 50 meters per ISO standard 22810:2010. Not intended for scuba diving. Avoid excessive, sudden temperature changes, and high velocity activities. -
Page 76
New Jersey 07660 Phone: 1-800-SAMSUNG (726-7864) Internet: samsung.com ©2021 Samsung Electronics America, Inc. Samsung, Samsung Galaxy, and Samsung Health are all trademarks of Samsung Electronics Co., Ltd. Other marks are the property of their respective owners. Some multimedia (audio/video) files contain Digital Rights Management (DRM) technology to verify you have the right to use the files.
This manual is also suitable for:
Galaxy watch4 classic
Перейти к контенту
![]()
Русские электронные инструкции по эксплуатации
Постоянно обновляемый большой каталог документации по эксплуатации и использованию современных устройств и оборудования на русском языке. Бесплатное скачивание файлов.
Поиск:
Главная
♥ В закладки
Просмотр инструкции в pdf


.jpg)
Инструкция по эксплуатации умных часов Samsung Galaxy Watch4 40mm розовое золото (SM-R860N).
Скачать инструкцию к умным часам Samsung Galaxy Watch4 40mm розовое золото (SM-R860N) (3,56 МБ)

Инструкции по эксплуатации умных часов Samsung
« Инструкция к умным часам 70mai Saphir Watch Silver (WT1004)
» Инструкция к умным часам Samsung Galaxy Watch4 40mm черный (SM-R860N)
Вам также может быть интересно

Инструкция к встраиваемой микроволновой печи Samsung FG87SUT

Инструкция к наушникам Samsung EO-EG920L Red

Инструкция к телевизору Smart TV Samsung UE43TU7500U

Инструкция к телевизору Samsung T32E315EX

Инструкция к стиральной машине Samsung WW60A4S00CE

Инструкция к смартфону Samsung Galaxy A23 64GB White
.jpg)
Инструкция к смартфону Samsung Galaxy A31 64GB Red (SM-A315F)

Инструкция к встраиваемой микроволновой печи Samsung FW87SUG
Добавить комментарий
Имя *
Email *
Сайт
Комментарий


![]()


Сохранить моё имя, email и адрес сайта в этом браузере для последующих моих комментариев.
- Добавить инструкцию
- Заказать инструкцию
- Политика конфиденциальности