-
Contents
-
Table of Contents
-
Bookmarks
Quick Links
AVerTV 6
User Manual
English
DISCLAIMER
All the screen shots in this documentation are only example images. The images may vary depending on the product and software version.
Information presented in this documentation has been carefully checked for reliability; however, no responsibility is assumed for inaccuracies.
The information contained in this documentation is subject to change without notice.
COPYRIGHT
© 2007 by AVerMedia TECHNOLOGIES, Inc. All rights reserved. No part of this publication may be reproduced, transmitted, transcribed, stored
in a retrieval system, or translated into any language in any form by any means without the written permission of AVerMedia TECHNOLOGIES,
Inc.
AP-6.0.11
200709
Summary of Contents for Avermedia AVerTV 6
![]()
AVerTV 6
User Manual  English
DISCLAIMER
All the screen shots in this documentation are only example images. The images may vary depending on the product and software version. Information presented in this documentation has been carefully checked for reliability; however, no responsibility is assumed for inaccuracies. The information contained in this documentation is subject to change without notice.
COPYRIGHT
© 2008 by AVerMedia TECHNOLOGIES, Inc. All rights reserved. No part of this publication may be reproduced, transmitted, transcribed, stored in a retrieval system, or translated into any language in any form by any means without the written permission of AVerMedia TECHNOLOGIES, Inc.
AP-6.0.18 200808

|
AVerTV 6 |
|||
|
Table of Contents |
|||
|
Chapter 1 |
Device Introduction………………………………………………… |
1 |
|
|
Chapter 2 AVerTV 6 Introduction ……………………………………………. |
7 |
||
|
Chapter 3 Introducing the AVerTV 6 Application……………………… |
8 |
||
|
3.1 |
Launching the AVerTV 6 Application ………………………………………………………………………. |
8 |
|
|
3.2 |
Running the AVerTV 6 Application for the First Time ……………………………………………….. |
9 |
|
|
3.2.1 Scanning for Analog Programs………………………………………………………………………………………. |
9 |
||
|
3.2.2 Scanning for Digital Programs …………………………………………………………………………………….. |
11 |
||
|
3.2.3 Scanning for Digital Satellite Programs ………………………………………………………………………… |
12 |
||
|
3.3 |
Introducing the User Interface ………………………………………………………………………………… |
14 |
|
|
3.4 |
The Control Panel…………………………………………………………………………………………………. |
15 |
|
|
3.5 |
Remote Control (Optional) …………………………………………………………………………………….. |
17 |
|
|
3.5.1 Remote Control Buttons (Model 1) ………………………………………………………………………………. |
17 |
||
|
3.5.2 Remote Control Buttons (Model 2) ………………………………………………………………………………. |
18 |
||
|
3.5.3 Remote Control Buttons (Model 3) ………………………………………………………………………………. |
20 |
||
|
3.5.4 Remote Control Buttons (Model 4) ………………………………………………………………………………. |
22 |
||
|
3.5.5 Remote Control Buttons (Model 5) ………………………………………………………………………………. |
24 |
||
|
3.5.6 Remote Control Buttons (Model 6) ………………………………………………………………………………. |
25 |
||
|
3.6 |
Changing TV Monitor Resolution …………………………………………………………………………… |
28 |
|
|
3.7 |
Resizing the TV Monitor Window ………………………………………………………………………….. |
28 |
|
|
3.8 |
Changing Display Aspect Ratio………………………………………………………………………………. |
28 |
|
|
3.9 |
Always on Top……………………………………………………………………………………………………… |
28 |
|
|
3.10 |
Setting Windows® Power Options…………………………………………………………………………… |
29 |
|
|
3.11 |
Setting Time for Turning on the Application ……………………………………………………………. |
30 |
|
|
3.12 |
Minimize the Application ………………………………………………………………………………………. |
31 |
|
|
3.13 |
Changing Video Renderer ……………………………………………………………………………………… |
31 |
|
|
Chapter 4 |
TV………………………………………………………………………… |
32 |
|
|
4.1 |
Analog TV …………………………………………………………………………………………………………… |
32 |
|
|
4.1.1 Scanning Channels …………………………………………………………………………………………………….. |
32 |
||
|
4.1.2 Scanning Channels (For Advanced Users) …………………………………………………………………….. |
33 |
||
|
4.1.3 Customize Video Recording Settings……………………………………………………………………………. |
34 |
||
|
4.1.4 Fine Tuning Color and Display Quality ………………………………………………………………………… |
38 |
||
|
i |

|
AVerTV 6 |
||
|
4.1.5 |
Enhancing the Video Quality……………………………………………………………………………………….. |
39 |
|
4.2 |
Digital Satellite TV……………………………………………………………………………………………….. |
40 |
|
4.2.1 |
Scanning channels (Importing a Frequency Table) …………………………………………………………. |
40 |
|
4.2.2 |
Scanning channels (Adding Frequencies Manually) ……………………………………………………….. |
44 |
|
4.2.3 |
Editing or Removing Frequencies ………………………………………………………………………………… |
45 |
|
4.2.4 |
Scanning Channels (For Advanced Users) …………………………………………………………………….. |
45 |
|
4.3 |
Digital TV……………………………………………………………………………………………………………. |
46 |
|
4.3.1 |
Scanning Channels …………………………………………………………………………………………………….. |
46 |
|
4.3.2 |
Scanning Channels (For Advanced Users) …………………………………………………………………….. |
48 |
|
4.3.3 |
Customize Video Recording Settings……………………………………………………………………………. |
49 |
|
4.3.4 |
Using the EPG Function ……………………………………………………………………………………………… |
53 |
|
4.3.5 |
Fine Tuning Color and Display Quality ………………………………………………………………………… |
53 |
|
4.3.6 |
Enabling the Subtitle Function …………………………………………………………………………………….. |
54 |
|
4.4 |
Adding and Deleting Channel Groups……………………………………………………………………… |
55 |
|
4.5 |
Selecting a TV/ Digital Radio Channel ……………………………………………………………………. |
56 |
|
4.6 |
Adding and Deleting Program Grouping List……………………………………………………………. |
57 |
|
4.7 |
Adjusting Volume…………………………………………………………………………………………………. |
58 |
|
4.8 |
Specifying a Channel Name or Description ……………………………………………………………… |
58 |
|
4.9 |
Modifying a Program List Name…………………………………………………………………………….. |
58 |
|
4.10 |
Removing Unwanted Channels ………………………………………………………………………………. |
59 |
|
4.11 |
Using the OverScan Function…………………………………………………………………………………. |
59 |
|
4.12 |
16-Channel Preview………………………………………………………………………………………………. |
60 |
|
4.13 |
Changing the OSD Attributes…………………………………………………………………………………. |
61 |
|
4.14 |
Changing Signal Source ………………………………………………………………………………………… |
62 |
|
4.15 |
Sound Controlling (Optional) …………………………………………………………………………………. |
63 |
|
Chapter 5 AM/FM Radio ……………………………………………………….. |
64 |
|
|
5.1 |
AM/FM Radio Controls…………………………………………………………………………………………. |
64 |
|
5.2 |
How to Auto Scan AM/FM Radio Channels …………………………………………………………….. |
65 |
|
5.3 |
Manually Scanning Specific AM/FM Channels………………………………………………………… |
65 |
|
5.4 |
Selecting a Channel ………………………………………………………………………………………………. |
66 |
|
5.5 |
Skipping Unwanted Channels…………………………………………………………………………………. |
66 |
|
5.6 |
Adding a Radio Frequency …………………………………………………………………………………….. |
66 |
|
5.7 |
Modifying a Channel Name……………………………………………………………………………………. |
66 |
|
ii |

|
AVerTV 6 |
|||
|
5.8 |
Adding and Deleting Channel Groups……………………………………………………………………… |
67 |
|
|
5.9 |
Customizing Audio Recording Settings …………………………………………………………………… |
67 |
|
|
Chapter 6 |
TimeShift ……………………………………………………………… |
69 |
|
|
6.1 |
TimeShift Controls ……………………………………………………………………………………………….. |
69 |
|
|
6.2 |
Customizing TimeShift Recording Settings ……………………………………………………………… |
70 |
|
|
6.3 |
Customizing TimeShift Video Quality Settings (Analog TV only) ……………………………… |
70 |
|
|
6.4 |
Using the TimeShift Function ………………………………………………………………………………… |
71 |
|
|
Chapter 7 |
PVR ……………………………………………………………………… |
72 |
|
|
7.1 |
PVR Controls……………………………………………………………………………………………………….. |
72 |
|
|
7.2 |
Recording Settings………………………………………………………………………………………………… |
73 |
|
|
7.3 |
Using the Recording Function ………………………………………………………………………………… |
73 |
|
|
7.4 |
Playing the Recorded Programs………………………………………………………………………………. |
73 |
|
|
7.5 |
Picture-in-Picture Display ……………………………………………………………………………………… |
74 |
|
|
Chapter 8 |
Image Capture ……………………………………………………… |
76 |
|
|
8.1 |
Before Capturing ………………………………………………………………………………………………….. |
76 |
|
|
8.2 |
Capturing a TV/ Video Image ………………………………………………………………………………… |
76 |
|
|
8.3 |
Multiple Image Sequence Capture…………………………………………………………………………… |
78 |
|
|
Chapter 9 Teletext / MHEG-5…………………………………………………. |
79 |
||
|
9.1 |
MHEG-5 Support (UK Digital Teletext Service) ………………………………………………………. |
79 |
|
|
9.2 |
Teletext |
……………………………………………………………………………………………………………….. |
80 |
|
9.2.1 Customize the Display Mode……………………………………………………………………………………….. |
80 |
||
|
9.2.2 |
Overview ………………………………………………………………………………………………………………….. |
81 |
|
|
9.2.3 |
Toolbar ………………………………………………………………………………………………………….Buttons |
82 |
|
|
9.2.4 |
LED …………………………………………………………………………………………………………………Lamp |
82 |
|
|
9.2.5 |
Using ……………………………………………………………………………………………………………Teletext |
83 |
|
|
Chapter 10 ……………………………………………………………. |
Scheduler |
85 |
|
|
10.1 |
Schedule ……………………………………………………………………………………………Management |
85 |
|
|
10.2 |
Adding Schedules …………………………………………………………………………………………………. |
86 |
|
|
Chapter 11 ……………………………………………………………… |
Hot Keys |
88 |
|
|
Chapter 12 ………………………………………………… |
Customer Service |
89 |
|
|
Appendix ……………………………………………………………………………….. |
90 |
||
|
Satellite ……………………………………………………………………………………….Internet Access |
90 |
||
|
Universal ………………………………………………………………………………………..DVB Plug-in |
92 |
||
|
iii |

|
AVerTV 6 |
||
|
Video Gaming Plug-in (for Microsoft Vista MCE only) ……………………………………….. |
92 |
|
|
Video Quality Enhancement Plug-in (for Microsoft Vista MCE only) …………………… |
93 |
|
|
Common Interface for Conditional Access (optional) …………………………………………… |
94 |
iv

AVerTV 6
Chapter 1 Device Introduction
Thanks for purchasing AVerMedia’s product. The table below lists an overview of the product you purchased. From this table, you can quickly learn about your product features and know which chapter you need to read. Please do read this table before using AVerTV 6 application.
Product Name:
AVerTV Volar AX
AVerTV Hybrid Volar HX
AVerTV Volar Lite
AVerTV DVB-T Volar X
1

AVerTV 6
|
Product Name |
AVerTV Volar AX |
|||||||
|
Model No. |
A827A |
|||||||
|
TV System |
Digital TV ( DVB-T ATSC DVB-S) |
|||||||
|
; Analog TV (; NTSC ; PAL ; SECAM) |
||||||||
|
Audio Mode |
; Stereo ; Mono ; SAP |
|||||||
|
AM/FM Radio |
; Support Not Support |
|||||||
|
Remote Control |
; Support ( Model 1 Model 2 Model 3 ; Model 4 |
|||||||
|
; Model 5 Model 6) |
||||||||
|
Not Support |
||||||||
|
External Signal |
; S-Video ; Composite |
|||||||
|
Source |
||||||||
|
Others |
; Teletext MHEG-5 |
|||||||
|
EPG ; iEPG (USA only) |
||||||||
|
; Closed Caption |
Digital Subtitle |
|||||||
|
CI/CA |
||||||||
|
Reference |
; Chapter 1 |
|||||||
|
Chapter |
; Chapter 2 |
|||||||
|
; Chapter 3 (;3.1 |
; 3.2.1 ;3.3 — 3.4 ;3.5.4-3.5.5 ;3.6 — |
|||||||
|
3.13) |
||||||||
|
; Chapter 4 (;4.1 ;4.4 — 4.15) |
||||||||
|
; Chapter 5 |
||||||||
|
; Chapter 6 |
||||||||
|
; Chapter 7 |
||||||||
|
; Chapter 8 |
||||||||
|
; Chapter 9 |
||||||||
|
; Chapter 10 |
||||||||
|
; Chapter 11 |
||||||||
|
; Chapter 12 |
||||||||
|
Appendix |
Satellite Internet Access (Window XP only) |
|||||||
|
Universal DVB Plug-in |
(for Microsoft XP / Vista MCE only) |
|||||||
|
; Video Gaming Plug-in |
(for Microsoft Vista MCE only) |
|||||||
|
;Video Quality Enhancement Plug-in (for Microsoft Vista |
||||||||
|
2 |
||||||||

AVerTV 6
|
MCE only) |
||||||
|
Common Interface for Conditional Access (optional) |
||||||
|
Product Name |
AVerTV Hybrid Volar HX |
|||||
|
Model No. |
A827 |
|||||
|
TV System |
; Digital TV (; DVB-T ATSC DVB-S) |
|||||
|
; Analog TV (; NTSC ; PAL ; SECAM) |
||||||
|
Audio Mode |
; Stereo ; Mono ; SAP |
|||||
|
AM/FM Radio |
; Support Not Support |
|||||
|
Remote Control |
; Support (; Model 1 Model 2 Model 3 Model 4 ; |
|||||
|
Model 5 Model 6) |
||||||
|
Not Support |
||||||
|
External Signal |
; S-Video ; Composite |
|||||
|
Source |
||||||
|
Others |
; Teletext ; MHEG-5 |
|||||
|
; EPG ; iEPG (USA only) |
||||||
|
; Closed Caption ;Digital Subtitle |
||||||
|
CI/CA |
||||||
|
Reference |
; Chapter 1 |
|||||
|
Chapter |
; Chapter 2 |
|||||
|
; Chapter 3 (;3.1 ;3.2.1-3.2.2 ;3.3 – 3.4 ;3.5.1 ; 3.5.5 |
||||||
|
;3.6 — 3.13) |
||||||
|
; Chapter 4 (;4.1 ; 4.3 — 4.15) |
||||||
|
; Chapter 5 |
||||||
|
; Chapter 6 |
||||||
|
; Chapter 7 |
||||||
|
; Chapter 8 |
||||||
|
; Chapter 9 |
||||||
|
; Chapter 10 |
||||||
|
; Chapter 11 |
||||||
|
; Chapter 12 |
||||||
|
Appendix |
Satellite Internet Access (Window XP only) |
|||||
|
3 |
||||||

AVerTV 6
Universal DVB Plug-in (for Microsoft XP / Vista MCE only)
;Video Gaming Plug-in (for Microsoft Vista MCE only)
;Video Quality Enhancement Plug-in (for Microsoft Vista MCE only)
Common Interface for Conditional Access (optional)
|
Product Name |
AVerTV Volar Lite |
|||||
|
Model No. |
A827A |
|||||
|
TV System |
Digital TV ( DVB-T ATSC DVB-S) |
|||||
|
; Analog TV (; NTSC ; PAL ; SECAM) |
||||||
|
Audio Mode |
; Stereo ; Mono ; SAP |
|||||
|
AM/FM Radio |
; Support Not Support |
|||||
|
Remote Control |
; Support ( Model 1 Model 2 Model 3 ; Model 4 |
|||||
|
; Model 5 Model 6) |
||||||
|
Not Support |
||||||
|
External Signal |
S-Video Composite |
|||||
|
Source |
||||||
|
Others |
; Teletext MHEG-5 |
|||||
|
EPG ; iEPG (USA only) |
||||||
|
; Closed Caption Digital Subtitle |
||||||
|
CI/CA |
||||||
|
Reference |
; Chapter 1 |
|||||
|
Chapter |
; Chapter 2 |
|||||
|
; Chapter 3 (;3.1 ;3.2.1 ;3.3 — 3.4 ;3.5.4 — 3.5.5 ;3.6 — |
||||||
|
3.13) |
||||||
|
; Chapter 4 (;4.1 ;4.4 — 4.15) |
||||||
|
; Chapter 5 |
||||||
|
; Chapter 6 |
||||||
|
; Chapter 7 |
||||||
|
; Chapter 8 |
||||||
|
; Chapter 9 |
||||||
|
; Chapter 10 |
||||||
|
4 |
||||||

|
AVerTV 6 |
||||||||
|
; Chapter 11 |
||||||||
|
; Chapter 12 |
||||||||
|
Appendix |
Satellite Internet Access (Window XP only) |
|||||||
|
Universal DVB Plug-in |
(for Microsoft XP / Vista MCE only) |
|||||||
|
Video Gaming Plug-in |
(for Microsoft Vista MCE only) |
|||||||
|
Video Quality Enhancement Plug-in (for Microsoft Vista |
||||||||
|
MCE only) |
||||||||
|
Common Interface for Conditional Access (optional) |
||||||||
|
Product Name |
AVerTV DVB-T Volar X |
|||||||
|
Model No. |
A815 |
|||||||
|
TV System |
; Digital TV (; DVB-T ATSC DVB-S) |
|||||||
|
Analog TV ( NTSC PAL SECAM) |
||||||||
|
Audio Mode |
; Stereo ; Mono ; SAP |
|||||||
|
AM/FM Radio |
Support ; Not Support |
|||||||
|
Remote Control |
; Support ( Model 1 ; Model 2 Model 3 Model 4 ; |
|||||||
|
Model 5 Model 6) |
||||||||
|
Not Support |
||||||||
|
External Signal |
S-Video Composite |
|||||||
|
Source |
||||||||
|
Others |
; Teletext ; MHEG-5 |
|||||||
|
; EPG iEPG (USA only) |
||||||||
|
Closed Caption ; Digital Subtitle |
||||||||
|
CI/CA |
||||||||
|
Reference |
; Chapter 1 |
|||||||
|
Chapter |
; Chapter 2 |
|||||||
|
; Chapter 3 (;3.1 ; 3.2.2 ; 3.3 -3.4 ; 3.5.2 ;3.5.5 ;3.6 |
||||||||
|
— 3.13) |
||||||||
|
; Chapter 4 (; 4.2 — 4.14) |
||||||||
|
Chapter 5 |
||||||||
|
; Chapter 6 (; 6.1 — 6.2 ; 6.4) |
||||||||
|
; Chapter 7 |
||||||||
|
5 |
||||||||
![]()
AVerTV 6
|
; Chapter 8 |
||
|
; Chapter 9 |
||
|
; Chapter 10 |
||
|
; Chapter 11 |
||
|
; Chapter 12 |
||
|
Appendix |
Satellite Internet Access (Window XP only) |
|
|
Universal DVB Plug-in |
(for Microsoft XP / Vista MCE only) |
|
|
Video Gaming Plug-in |
(for Microsoft Vista MCE only) |
|
|
Video Quality Enhancement Plug-in (for Microsoft Vista |
||
|
MCE only) |
||
|
Common Interface for Conditional Access (optional) |
||
6

AVerTV 6
Chapter 2 AVerTV 6 Introduction
Now, with this product, you can watch TV, listen to the radio, record your favorite programs and enjoy other features on your PC. Turn your computer system into a real multimedia entertainment center.
You’ll never miss your favorite ball games, soaps or game shows anymore because the TimeShift function performs background recording of a TV program. This means you can return and watch from the part of the program where you left off.
To enjoy high quality TV or radio programs, AVerMedia® product is your best choice.
Please be noted that the functions or the remote control mentioned in this manual may vary depending on the product you purchase and the area you live.
7
AVerTV 6
Chapter 3 Introducing the AVerTV 6
Application
The AVerTV 6 application allows you to watch TV, listen to the radio, record programs, and capture still images while you work on your computer.
3.1 Launching the AVerTV 6 Application
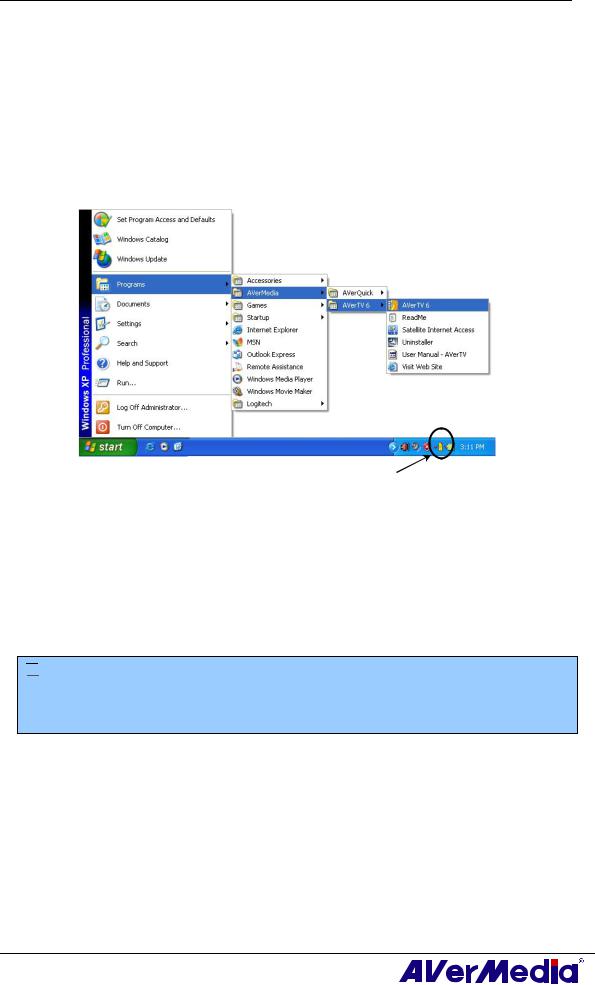
Run the AVerTV 6 application from the Programs menu.
AVerQuick
To run the application, click Start, point to Programs, choose AVerMedia, AVerTV 6, and then click AVerTV 6. Another way is to double-click the AVerTV 6 program icon
“ ”on the desktop. Or, you can double-click the AVerQuick launcher located in the lower right corner of the screen.
 Note: AVerQuick allows to set the desired default application, which means you can choose either AVerTV 6 or AVer MediaCenter as the default application when
double clicking AVerQuick icon . To do this, right click AVerQuick, choose “Setting”, and select the preferred application in the “Application” tab.
8

AVerTV 6
3.2 Running the AVerTV 6 Application for the First Time
If this is your first time running the application, the Setup dialog box will appear to prompt you to scan for channels. (For details, please refer to the section Scanning Channels).
3.2.1Scanning for Analog Programs
1.Select Analog TV (or Programs) on the left pane of the Setup dialog box.
 Note: Before choosing the signal input, please make sure that your country/region is correct. For more information, please refer to “Scanning Channels” in Chapter 4.
a.First, select an available AVermedia device in the left pane.
b.From the Region/Country drop-down list, select your country or region.
c.Click Apply to save the settings.
(This picture is only for reference.)
2.On this page, choose the TV option to search only for air channels or select CATV to scan for cable channels.
3.Click New and the Program List dialog box will appear. Type in the desirable name and click OK.
4. Click Program Scan for searching for available channels/programs in your area.
9

AVerTV 6
5.After scanning, the active TV channels will be listed inside the box. Click Apply to save the scanned channels.
6.To exit the current dialog box, click OK.
 Note: After Media Center Edition scan, you may not be able to lock channels with AVerTV 6. Please restart the computer to make it function normally.
10

AVerTV 6
3.2.2Scanning for Digital Programs
1.Select Digital TV (or Programs) on the left pane of the Setup dialog box.
2. Click New and the Program List dialog box will appear. Type in the desirable name and click OK.
3.Click Program Scan for searching for available channels/programs in your area.
4.After scanning, the active TV channels will be listed inside the box. Click Apply to save the scanned channels.
5.To exit the current dialog box, click OK.
 Note:
Note:
1.This can only supports DVB-T Radio Broadcasts, not the Digital Audio Broadcast system.
2.When scanning digital signals and if your country broadcasts logical channel data, the scanned channel will be allocated based on the assigned logical channel number.
11

AVerTV 6
3.2.3Scanning for Digital Satellite Programs
1.Select Digital TV on the left pane of the Setup dialog box.
(This picture is only for reference.)
2.Choose the switch type that is used by your satellite system.
3.From the Satellite drop-down list under Input 1, choose the correct satellite. If you cannot find the satellite you want but the input port DOES receive satellite signals, choose Custom…. Otherwise, choose None.
4.Click Edit to configure the satellite information.
5.In the Satellite Information dialog box, type in the satellite’s name in the Satellite box.
(This picture is only for reference.)
6. Specify the frequencies that you want to scan for available satellite programs.
There are two ways to do this:
12

AVerTV 6
Import the existing frequency data: refer to the section 4.2.1 Scanning Channels (Importing a Frequency Table) for details.
Manually add frequencies: refer to 4.2.2 Scanning Channels (Adding Frequencies Manually) for details. If you add frequencies manually, please make sure you specify the correct longitude data.
7.Click OK to exit the Satellite Information dialog box.
8.From the LNB drop-down list, choose the appropriate setting.
•None: If you do not use any LNB device, choose this option.
•Universal Ku Band LNB or C Band LNB: Choose this option if your LNB device is this type.
•Custom: When you choose this option, click Edit to configure your own LNB information, such as specifying an LNB name, its frequency type, input range, etc. For related data, refer to the documentation that comes with your LNB device.
9.Repeat steps 1 to 8 if you need to configure Input 2, Input 3, etc. Then click Apply to save the settings.
10.Select Programs under the Digital TV icon on the left pane, and click Program Scan to start the scanning process.
11.Click Apply to save the scanning results.
 Note: After Media Center Edition scan, you may not be able to lock channels with AVerTV 6. Please restart the computer to make it function normally.
13

AVerTV 6
3.3 Introducing the User Interface
The TV monitor allows you to watch live TV or video.
|
1 |
Panel On / Off |
8 |
Channel Up/Down |
|
2 |
Playback Seek Slider |
9 |
Resize Window |
|
3 |
Play / Pause |
10 |
Show / Hide Video Frame |
|
4 |
Stop |
11 |
Minimize |
|
5 |
TimeShift |
12 |
Full Screen |
|
6 |
Record |
13 |
Exit |
|
7 |
Volume |
The Control Panel provides button controls for selecting channels, adjusting volume, capturing images, and more. It has a panel display that shows the current channel number and channel name.
|
To display or hide the Control Panel, click the button |
located in the lower left |
|
corner of the TV Monitor. |
14

AVerTV 6
3.4 The Control Panel
30 29 28 27 26 25 24 23
1
|
2 |
3 |
4 |
5 |
6 |
7 |
8 |
9 |
10 11 12 13 14 15 16 |
31
(This picture is only for reference.)
The table below describes functions of the buttons on the Control Panel.
|
BUTTON |
FUNCTION |
|||||
|
1 |
Signal Status / |
TV/Radio mode: Display the current signal status. |
||||
|
Enable or disable Repeat |
Playback mode: Right click and enable the Repeat function. The |
|||||
|
Play |
system will continuously playback the files in the playlist. |
|||||
|
2 |
Signal Strength |
Display signal strength. |
||||
|
3 |
Backward |
Move backwards in intervals. |
||||
|
4 |
Channel Loop |
Return to previously accessed channel. |
||||
|
5 |
16-Channel Preview |
Display 16 consecutive TV channels on the TV Monitor |
||||
|
window. |
||||||
|
6 |
Channel Up/ Down |
Go to the next upper or lower active channel. |
||||
|
7 |
Mute |
Turn off the sound. |
||||
|
8 |
Setup |
Allows you to: |
||||
|
* Scan channels. |
||||||
|
* Set the Windows power options. |
||||||
|
* Configure snapshot settings. |
||||||
|
* Customize recording settings. |
||||||
|
* Customize the TimeShift function. |
||||||
|
9 |
Teletext |
View Teletext/MHEG-5/Closed Caption information |
||||
|
10 |
EPG |
View EPG information. |
||||
|
11 |
Snapshot |
Capture a single image or a sequence of images. |
||||
|
12 |
Forward |
Skip forward in intervals. |
||||
|
13 |
Always on Top |
Make the TV monitor float over the top of other program |
||||
|
windows. |
||||||
|
14 |
Full Screen |
Show TV/Video programs in full screen. |
||||
|
15 |
Program List |
Display the program list. |
||||
|
16 |
Audio Mode |
Switch between available audio modes. |
||||
|
17 |
Schedule |
Display Schedule dialog box. |
||||
|
18 |
Play List |
Create a playlist of video files to playback. |
||||
|
15 |
||||||
![]()
|
AVerTV 6 |
||||
|
19 |
Show/ Hide Numeric |
Toggle between displaying or hiding the Numeric Panel. |
||
|
Panel |
||||
|
20 |
Radio Source |
Switch to radio mode. (AM/FM or Digital Radio) |
||
|
21 |
Change Video Source |
Switch between available video sources. |
||
|
22 |
Record |
Record the current program. |
||
|
23 |
TimeShift / Pause |
Performs background recording of the live program. This |
||
|
function lets you view the recorded parts, while at the same |
||||
|
time, recording is in progress. / Freeze the TimeShift |
||||
|
temporarily. |
||||
|
24 |
Next File |
Play the next file in the playlist. |
||
|
25 |
Previous File |
Play the previous file in the playlist. |
||
|
26 |
Stop |
Stop the playback, recording, TimeShift, etc. |
||
|
27 |
Play / Pause |
Play back recorded video files. / Freeze the playback |
||
|
temporarily. |
||||
|
28 |
Volume Control |
Drag your mouse up/down to increase/decrease the volume |
||
|
level. |
||||
|
29 |
Help |
View User’s Manual. |
||
|
30 |
Numeric Buttons |
Select channels/programs. |
||
|
31 |
Playback Seek |
Drag the slider tab to move to any part of the recorded TV |
||
|
program. |
||||
16

AVerTV 6
3.5 Remote Control (Optional)
After installing drivers and applications, you can use remote control to turn on/off the programs, select channels, adjust volume and so on.
(The remote control can only be used on AVerMedia AVerTV 6 application.)
 Note: To control two or more than two cards/devices with a remote control, it is recommended to enable the multiple infrared receiver function first. To do this,
right click AVerQuick icon  at the lower right corner of the screen, choose “Setting”, “Remote control” tab and select check boxes next to the device name. Please check your supported remote control model before activating this function.
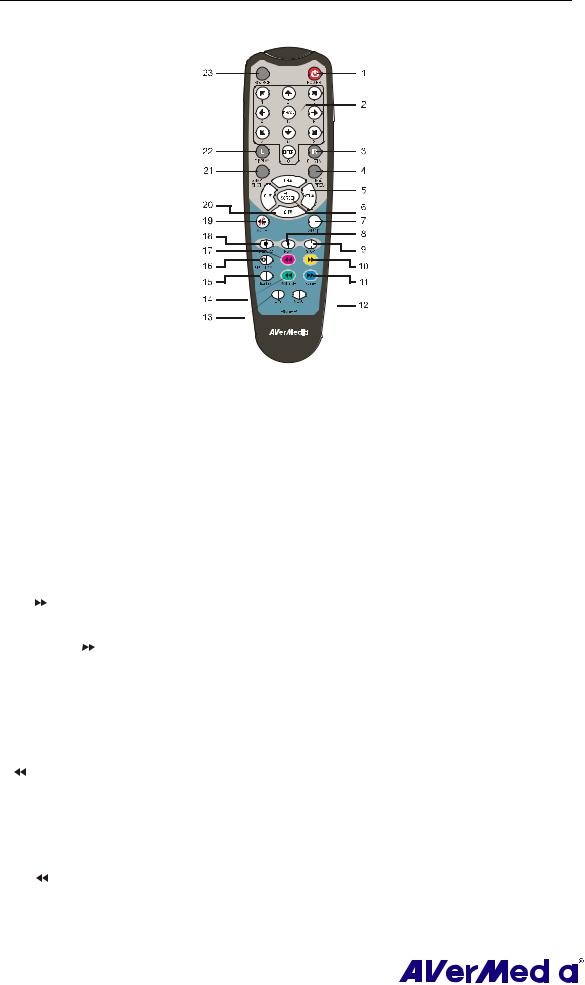
3.5.1 Remote Control Buttons (Model 1)
|
Button |
Description |
|
|
1. |
Power |
Turn on/off the application |
|
2. |
VOL +/- |
Volume up/down. |
|
3. |
Source |
Switch between available signal sources. |
|
4. |
Numeric Buttons |
Select a TV channel. |
|
5. |
MUTE |
Turn on/off the sound. |
|
6. |
CH ▲/▼ |
Go up or down to the next active channel. |
|
7. |
CH RTN |
Go to the previously selected channel. |
17
AVerTV 6
3.5.2 Remote Control Buttons (Model 2)
|
Button |
Description |
|||||||||||||
|
1. |
Power |
Turn on/off the application |
||||||||||||
|
2. |
Numeric Buttons |
— Select a TV channel. |
||||||||||||
|
— Under the 16-Channel preview mode, use↑↓← → to highlight the |
||||||||||||||
|
intended channel. |
||||||||||||||
|
3. |
CH RTN |
Go to the previously selected channel. |
||||||||||||
|
4. |
16-CH PREV |
16-Channel Preview. |
||||||||||||
|
5. |
VOL▲/▼ |
Volume up/down. |
||||||||||||
|
6. |
FULL SCREEN |
Display TV in full screen. |
||||||||||||
|
7. |
AUDIO |
Switch between available audio modes. |
||||||||||||
|
8. |
► (Play) |
Play the last recorded or played file. |
||||||||||||
|
9. |
■ (Stop) |
— End the Playback or recording. |
||||||||||||
|
— End the TimeShift mode and return to real-time TV or Radio |
||||||||||||||
|
mode. |
||||||||||||||
|
10. |
(Forward) |
— Advance the playback. |
||||||||||||
|
— Jump to the Teletext page of the corresponding color according |
||||||||||||||
|
to this button. |
||||||||||||||
|
11. SLEEP |
— Go to the next file in the playlist. |
|||||||||||||
|
— Set the time to put your computer in Stand By or Hibernate |
||||||||||||||
|
mode. |
||||||||||||||
|
— Jump to the Teletext page of the corresponding color according |
||||||||||||||
|
to this button. |
||||||||||||||
|
12. MENU |
Display or hide the Control Panel. |
|||||||||||||
|
13. EPG |
Launch the Electronic Programme Guide. |
|||||||||||||
|
14. WAKE UP |
— Go to the previous file in the playlist. |
|||||||||||||
|
— Set the time to bring your computer out of Stand By or Hibernate |
||||||||||||||
|
mode. |
||||||||||||||
|
— Jump to the Teletext page of the corresponding color according |
||||||||||||||
|
to this button. |
||||||||||||||
|
15. TELETEXT |
View Teletext/MHEG-5/ Closed Caption information. |
|||||||||||||
|
16. TIMESHIFT |
— Freeze the playback. |
|||||||||||||
|
/PAUSE |
— Switch from real-time TV or Radio to TimeShift mode. |
|||||||||||||
|
17. |
(Rewind) |
— Rewind the playback. |
||||||||||||
|
— Jump to the Teletext page of the corresponding color according |
||||||||||||||
|
to this button. |
||||||||||||||
|
18 |
||||||||||||||

|
AVerTV 6 |
|||
|
18. |
● (Record) |
Switch to PVR mode and record the current program or video into |
|
|
your hard drive. |
|||
|
19. |
MUTE |
Turn on/off the sound. |
|
|
20. |
CH ▲/▼ |
Go up or down to the next active channel. |
|
|
21. |
SNAPSHOT |
Capture the on-screen image to a bitmap file. |
|
|
22. |
DISPLAY |
Display information. |
|
|
23. |
Source |
Switch between available signal sources. |
19

AVerTV 6
3.5.3 Remote Control Buttons (Model 3)
|
Button |
Description |
|||||||||
|
1. |
Power |
Turn on/off the application |
||||||||
|
2. |
Numeric Buttons |
— Select a TV channel. |
||||||||
|
— Under the 16-Channel preview mode, use↑↓← → to highlight the |
||||||||||
|
intended channel. |
||||||||||
|
3. |
CH RTN |
Go to the previously selected channel. |
||||||||
|
4. |
16-CH PREV |
16-Channel Preview. |
||||||||
|
5. |
VOL▲/▼ |
Volume up/down. |
||||||||
|
6. |
FULL SCREEN |
Display TV in full screen. |
||||||||
|
7. |
AUDIO |
Switch between available audio modes. |
||||||||
|
8. |
► (Play) |
Play the last recorded or played file. |
||||||||
|
9. |
■ (Stop) |
— End the Playback or recording. |
||||||||
|
— End the TimeShift mode and return to real-time TV or Radio |
||||||||||
|
mode. |
||||||||||
|
10. |
(Rewind) |
— Rewind the playback. |
||||||||
|
— Jump to the Teletext page of the corresponding color according |
||||||||||
|
to this button. |
||||||||||
|
11. |
(Forward) |
— Advance the playback. |
||||||||
|
— Jump to the Teletext page of the corresponding color according |
||||||||||
|
to this button. |
||||||||||
|
12. |
(Next File) |
— Go to the next file in the playlist. |
||||||||
|
— Jump to the Teletext page of the corresponding color according |
||||||||||
|
to this button. |
||||||||||
|
13. |
(Previous File) |
— Go to the previous file in the playlist. |
||||||||
|
— Jump to the Teletext page of the corresponding color according |
||||||||||
|
to this button. |
||||||||||
|
14. TELETEXT |
View Teletext/MHEG-5/ Closed Caption information. |
|||||||||
|
15. TIMESHIFT |
— Freeze the playback. |
|||||||||
|
— Switch from real-time TV or Radio to TimeShift mode. |
||||||||||
|
16. ● (Record) |
Switch to PVR mode and record the current program or video into |
|||||||||
|
your hard drive. |
||||||||||
|
20 |
||||||||||

AVerTV 6
|
17. |
MUTE |
Turn on/off the sound. |
|
18. |
EPG |
Launch the Electronic Program Guide. |
|
19. |
CH ▲/▼ |
Go up or down to the next active channel. |
|
20. |
DISPLAY |
Display information. |
|
21. |
Source |
Switch between available signal sources. |
21

AVerTV 6
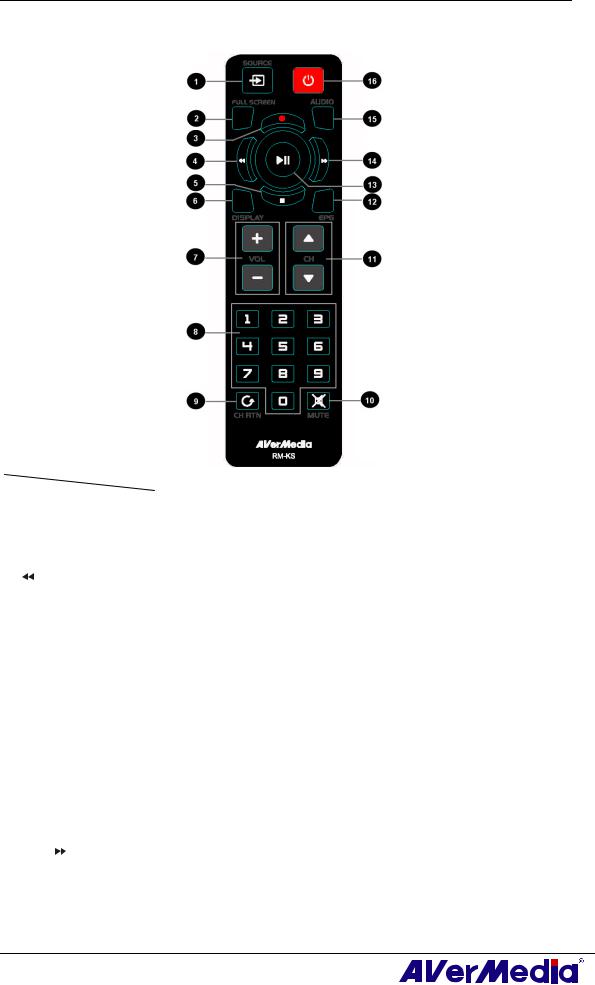
3.5.4 Remote Control Buttons (Model 4)
|
1. |
POWER |
Turn on/off the application |
|
2. |
SOURCE |
Switch between available signal sources. |
|
3. |
Numeric Buttons |
— Select a TV channel. |
—Under the 16-Channel preview mode, use↑↓← → to highlight the intended channel.
|
4. |
CH RTN |
Go to the previously selected channel. |
||
|
5. |
16-CH PREV |
16-Channel Preview. |
||
|
6. |
VOL▲/▼ |
Volume up/down. |
||
|
7. |
FULL SCREEN |
Display TV in full screen. |
||
|
8. |
AUDIO |
Switch between available audio modes. |
||
|
9. |
MENU |
Display or hide the Control Panel. |
||
|
10.PIP |
Display or hide the PIP window. |
|||
|
11.SLEEP |
— Go to the next file in the playlist. |
|||
—Set the time to put your computer in Stand By or Hibernate mode.
—Jump to the Teletext page of the corresponding color according to this button.
|
12.WAKE UP |
— Go to the previous file in the playlist. |
—Set the time to bring your computer out of Stand By or Hibernate mode.
—Jump to the Teletext page of the corresponding color according to this button.
|
13.■ (Stop) |
— End the Playback or recording. |
—End the TimeShift mode and return to real-time TV or Radio mode.
|
14. |
► (Play) |
Play the last recorded or played file. |
|
15. |
● (Record) |
Switch to PVR mode and record the current program or video into |
|
your hard drive. |
||
|
16.TIMESHIFT |
— Freeze the playback. |
|
|
/PAUSE |
— Switch from real-time TV or Radio to TimeShift mode. |
|
|
17. |
(Rewind) |
— Rewind the playback. |
—Jump to the Teletext page of the corresponding color according to this button.
|
18. (Forward) |
— Advance the playback. |
—Jump to the Teletext page of the corresponding color according to this button.
|
19.TELETEXT |
View Teletext/MHEG-5/ Closed Caption information. |
22

AVerTV 6
|
20.EPG |
Launch the Electronic Program Guide. |
|
21.MUTE |
Turn on/off the sound. |
|
22.CH ▲/▼ |
Go up or down to the next active channel. |
|
23.SNAPSHOT |
Capture the on-screen image to a bitmap file. |
|
24.DISPLAY |
Display information. |
23
AVerTV 6
3.5.5 Remote Control Buttons (Model 5)
|
Button |
Description |
|||
|
1. |
SOURCE |
Switch between available signal sources. |
||
|
2. |
FULL SCREEN |
Display TV in full screen. |
||
|
3. |
● (Record) |
Switch to PVR mode and record the current program or video into |
||
|
your hard drive. |
||||
|
4. |
(Rewind) |
Rewind the playback. |
||
|
5. |
■ (Stop) |
— End the Playback or recording. |
||
|
— End the TimeShift mode and return to real-time TV or Radio |
||||
|
mode. |
||||
|
6. |
DISPLAY |
Display information. |
||
|
7. |
VOL / |
Volume up/down. |
||
|
8. |
Numeric Buttons |
— Select a TV channel. |
||
|
— Under the 16-Channel preview mode, use 2 4 6 8 to highlight the |
||||
|
intended channel. |
||||
|
9. |
CH RTN |
Go to the previously selected channel. |
||
|
10. |
MUTE |
Turn on/off the sound. |
||
|
11. |
CH ▲/▼ |
Go up or down to the next active channel. |
||
|
12. |
EPG |
Launch the Electronic Program Guide. (DVB-T only) |
||
|
13. |
► (Play) |
/ |
Play the last recorded or played file. / Freeze the playback. |
|
|
PAUSE |
||||
|
14. |
(Forward) |
Advance the playback. |
||
|
15. |
AUDIO |
Switch between available audio modes. |
||
|
16. |
POWER |
Turn on/off the application |
24

AVerTV 6
3.5.6 Remote Control Buttons (Model 6)
|
Button |
Description |
|||||
|
(1) |
Turn on/off the application. |
|||||
|
(2) |
Turn off/on the sound. |
|||||
|
(3) |
Use numeric buttons to select a channel. |
|||||
|
(4) |
Live TV: Watch live TV |
|||||
|
Fullscreen: Display TV in full screen. |
||||||
|
(5) |
Change between available audio modes. |
|||||
|
(6) |
MCS: Main Screen: Use the arrow button to navigate all on-screen items. |
|||||
|
Use OK to confirm the selection. |
||||||
|
PIP Mode: Change size or position of the selected screen by the arrow |
||||||
|
buttons. |
||||||
|
(7) |
Volume up / Volume down. |
|||||
|
25 |
||||||
 Loading…

2
Глава 2 Введение в AVerTV 6
С помощью данного устройства и программного приложения AVerTV 6 вы сможете
смотреть ТВ, слушать радио, записывать любимые передачи на компьютер, а также
многое другое. Превратите свой компьютер в настоящий мультимедийный центр
развлечений!
Отныне Вы никогда не пропустите свою любимую игру, сериал или шоу, т.к. функция
«Сдвиг во времени» произведет фоновую запись ТВ программы и позволит Вам
вернуться и продолжить просмотр программы с того места, на котором Вы остановились.
Изделие AVerMedia® призвано обеспечить превосходное качество ТВ и радио программ.
Пожалуйста, обратите внимание на то, что функции пульта дистанционного управления,
описанные в этом руководстве, могут отличаться в зависимости от модели и места
покупки.
![]()
AVerTV 6
User Manual English
DISCLAIMER
All the screen shots in this documentation are only example images. The images may vary depending on the product and software version. Information presented in this documentation has been carefully checked for reliability; however, no responsibility is assumed for inaccuracies. The information contained in this documentation is subject to change without notice.
COPYRIGHT
© 2008 by AVerMedia TECHNOLOGIES, Inc. All rights reserved. No part of this publication may be reproduced, transmitted, transcribed, stored in a retrieval system, or translated into any language in any form by any means without the written permission of AVerMedia TECHNOLOGIES, Inc.
AP-6.0.18 200808
|
AVerTV 6 |
|||
|
Table of Contents |
|||
|
Chapter 1 |
Device Introduction………………………………………………… |
1 |
|
|
Chapter 2 AVerTV 6 Introduction ……………………………………………. |
7 |
||
|
Chapter 3 Introducing the AVerTV 6 Application……………………… |
8 |
||
|
3.1 |
Launching the AVerTV 6 Application ………………………………………………………………………. |
8 |
|
|
3.2 |
Running the AVerTV 6 Application for the First Time ……………………………………………….. |
9 |
|
|
3.2.1 Scanning for Analog Programs………………………………………………………………………………………. |
9 |
||
|
3.2.2 Scanning for Digital Programs …………………………………………………………………………………….. |
11 |
||
|
3.2.3 Scanning for Digital Satellite Programs ………………………………………………………………………… |
12 |
||
|
3.3 |
Introducing the User Interface ………………………………………………………………………………… |
14 |
|
|
3.4 |
The Control Panel…………………………………………………………………………………………………. |
15 |
|
|
3.5 |
Remote Control (Optional) …………………………………………………………………………………….. |
17 |
|
|
3.5.1 Remote Control Buttons (Model 1) ………………………………………………………………………………. |
17 |
||
|
3.5.2 Remote Control Buttons (Model 2) ………………………………………………………………………………. |
18 |
||
|
3.5.3 Remote Control Buttons (Model 3) ………………………………………………………………………………. |
20 |
||
|
3.5.4 Remote Control Buttons (Model 4) ………………………………………………………………………………. |
22 |
||
|
3.5.5 Remote Control Buttons (Model 5) ………………………………………………………………………………. |
24 |
||
|
3.5.6 Remote Control Buttons (Model 6) ………………………………………………………………………………. |
25 |
||
|
3.6 |
Changing TV Monitor Resolution …………………………………………………………………………… |
28 |
|
|
3.7 |
Resizing the TV Monitor Window ………………………………………………………………………….. |
28 |
|
|
3.8 |
Changing Display Aspect Ratio………………………………………………………………………………. |
28 |
|
|
3.9 |
Always on Top……………………………………………………………………………………………………… |
28 |
|
|
3.10 |
Setting Windows® Power Options…………………………………………………………………………… |
29 |
|
|
3.11 |
Setting Time for Turning on the Application ……………………………………………………………. |
30 |
|
|
3.12 |
Minimize the Application ………………………………………………………………………………………. |
31 |
|
|
3.13 |
Changing Video Renderer ……………………………………………………………………………………… |
31 |
|
|
Chapter 4 |
TV………………………………………………………………………… |
32 |
|
|
4.1 |
Analog TV …………………………………………………………………………………………………………… |
32 |
|
|
4.1.1 Scanning Channels …………………………………………………………………………………………………….. |
32 |
||
|
4.1.2 Scanning Channels (For Advanced Users) …………………………………………………………………….. |
33 |
||
|
4.1.3 Customize Video Recording Settings……………………………………………………………………………. |
34 |
||
|
4.1.4 Fine Tuning Color and Display Quality ………………………………………………………………………… |
38 |
||
|
i |
|
AVerTV 6 |
||
|
4.1.5 |
Enhancing the Video Quality……………………………………………………………………………………….. |
39 |
|
4.2 |
Digital Satellite TV……………………………………………………………………………………………….. |
40 |
|
4.2.1 |
Scanning channels (Importing a Frequency Table) …………………………………………………………. |
40 |
|
4.2.2 |
Scanning channels (Adding Frequencies Manually) ……………………………………………………….. |
44 |
|
4.2.3 |
Editing or Removing Frequencies ………………………………………………………………………………… |
45 |
|
4.2.4 |
Scanning Channels (For Advanced Users) …………………………………………………………………….. |
45 |
|
4.3 |
Digital TV……………………………………………………………………………………………………………. |
46 |
|
4.3.1 |
Scanning Channels …………………………………………………………………………………………………….. |
46 |
|
4.3.2 |
Scanning Channels (For Advanced Users) …………………………………………………………………….. |
48 |
|
4.3.3 |
Customize Video Recording Settings……………………………………………………………………………. |
49 |
|
4.3.4 |
Using the EPG Function ……………………………………………………………………………………………… |
53 |
|
4.3.5 |
Fine Tuning Color and Display Quality ………………………………………………………………………… |
53 |
|
4.3.6 |
Enabling the Subtitle Function …………………………………………………………………………………….. |
54 |
|
4.4 |
Adding and Deleting Channel Groups……………………………………………………………………… |
55 |
|
4.5 |
Selecting a TV/ Digital Radio Channel ……………………………………………………………………. |
56 |
|
4.6 |
Adding and Deleting Program Grouping List……………………………………………………………. |
57 |
|
4.7 |
Adjusting Volume…………………………………………………………………………………………………. |
58 |
|
4.8 |
Specifying a Channel Name or Description ……………………………………………………………… |
58 |
|
4.9 |
Modifying a Program List Name…………………………………………………………………………….. |
58 |
|
4.10 |
Removing Unwanted Channels ………………………………………………………………………………. |
59 |
|
4.11 |
Using the OverScan Function…………………………………………………………………………………. |
59 |
|
4.12 |
16-Channel Preview………………………………………………………………………………………………. |
60 |
|
4.13 |
Changing the OSD Attributes…………………………………………………………………………………. |
61 |
|
4.14 |
Changing Signal Source ………………………………………………………………………………………… |
62 |
|
4.15 |
Sound Controlling (Optional) …………………………………………………………………………………. |
63 |
|
Chapter 5 AM/FM Radio ……………………………………………………….. |
64 |
|
|
5.1 |
AM/FM Radio Controls…………………………………………………………………………………………. |
64 |
|
5.2 |
How to Auto Scan AM/FM Radio Channels …………………………………………………………….. |
65 |
|
5.3 |
Manually Scanning Specific AM/FM Channels………………………………………………………… |
65 |
|
5.4 |
Selecting a Channel ………………………………………………………………………………………………. |
66 |
|
5.5 |
Skipping Unwanted Channels…………………………………………………………………………………. |
66 |
|
5.6 |
Adding a Radio Frequency …………………………………………………………………………………….. |
66 |
|
5.7 |
Modifying a Channel Name……………………………………………………………………………………. |
66 |
|
ii |
|
AVerTV 6 |
|||
|
5.8 |
Adding and Deleting Channel Groups……………………………………………………………………… |
67 |
|
|
5.9 |
Customizing Audio Recording Settings …………………………………………………………………… |
67 |
|
|
Chapter 6 |
TimeShift ……………………………………………………………… |
69 |
|
|
6.1 |
TimeShift Controls ……………………………………………………………………………………………….. |
69 |
|
|
6.2 |
Customizing TimeShift Recording Settings ……………………………………………………………… |
70 |
|
|
6.3 |
Customizing TimeShift Video Quality Settings (Analog TV only) ……………………………… |
70 |
|
|
6.4 |
Using the TimeShift Function ………………………………………………………………………………… |
71 |
|
|
Chapter 7 |
PVR ……………………………………………………………………… |
72 |
|
|
7.1 |
PVR Controls……………………………………………………………………………………………………….. |
72 |
|
|
7.2 |
Recording Settings………………………………………………………………………………………………… |
73 |
|
|
7.3 |
Using the Recording Function ………………………………………………………………………………… |
73 |
|
|
7.4 |
Playing the Recorded Programs………………………………………………………………………………. |
73 |
|
|
7.5 |
Picture-in-Picture Display ……………………………………………………………………………………… |
74 |
|
|
Chapter 8 |
Image Capture ……………………………………………………… |
76 |
|
|
8.1 |
Before Capturing ………………………………………………………………………………………………….. |
76 |
|
|
8.2 |
Capturing a TV/ Video Image ………………………………………………………………………………… |
76 |
|
|
8.3 |
Multiple Image Sequence Capture…………………………………………………………………………… |
78 |
|
|
Chapter 9 Teletext / MHEG-5…………………………………………………. |
79 |
||
|
9.1 |
MHEG-5 Support (UK Digital Teletext Service) ………………………………………………………. |
79 |
|
|
9.2 |
Teletext |
……………………………………………………………………………………………………………….. |
80 |
|
9.2.1 Customize the Display Mode……………………………………………………………………………………….. |
80 |
||
|
9.2.2 |
Overview ………………………………………………………………………………………………………………….. |
81 |
|
|
9.2.3 |
Toolbar ………………………………………………………………………………………………………….Buttons |
82 |
|
|
9.2.4 |
LED …………………………………………………………………………………………………………………Lamp |
82 |
|
|
9.2.5 |
Using ……………………………………………………………………………………………………………Teletext |
83 |
|
|
Chapter 10 ……………………………………………………………. |
Scheduler |
85 |
|
|
10.1 |
Schedule ……………………………………………………………………………………………Management |
85 |
|
|
10.2 |
Adding Schedules …………………………………………………………………………………………………. |
86 |
|
|
Chapter 11 ……………………………………………………………… |
Hot Keys |
88 |
|
|
Chapter 12 ………………………………………………… |
Customer Service |
89 |
|
|
Appendix ……………………………………………………………………………….. |
90 |
||
|
Satellite ……………………………………………………………………………………….Internet Access |
90 |
||
|
Universal ………………………………………………………………………………………..DVB Plug-in |
92 |
||
|
iii |
|
AVerTV 6 |
||
|
Video Gaming Plug-in (for Microsoft Vista MCE only) ……………………………………….. |
92 |
|
|
Video Quality Enhancement Plug-in (for Microsoft Vista MCE only) …………………… |
93 |
|
|
Common Interface for Conditional Access (optional) …………………………………………… |
94 |
iv
AVerTV 6
Chapter 1 Device Introduction
Thanks for purchasing AVerMedia’s product. The table below lists an overview of the product you purchased. From this table, you can quickly learn about your product features and know which chapter you need to read. Please do read this table before using AVerTV 6 application.
Product Name:
AVerTV Volar AX
AVerTV Hybrid Volar HX
AVerTV Volar Lite
AVerTV DVB-T Volar X
1
AVerTV 6
|
Product Name |
AVerTV Volar AX |
|||||||
|
Model No. |
A827A |
|||||||
|
TV System |
Digital TV ( DVB-T ATSC DVB-S) |
|||||||
|
; Analog TV (; NTSC ; PAL ; SECAM) |
||||||||
|
Audio Mode |
; Stereo ; Mono ; SAP |
|||||||
|
AM/FM Radio |
; Support Not Support |
|||||||
|
Remote Control |
; Support ( Model 1 Model 2 Model 3 ; Model 4 |
|||||||
|
; Model 5 Model 6) |
||||||||
|
Not Support |
||||||||
|
External Signal |
; S-Video ; Composite |
|||||||
|
Source |
||||||||
|
Others |
; Teletext MHEG-5 |
|||||||
|
EPG ; iEPG (USA only) |
||||||||
|
; Closed Caption |
Digital Subtitle |
|||||||
|
CI/CA |
||||||||
|
Reference |
; Chapter 1 |
|||||||
|
Chapter |
; Chapter 2 |
|||||||
|
; Chapter 3 (;3.1 |
; 3.2.1 ;3.3 — 3.4 ;3.5.4-3.5.5 ;3.6 — |
|||||||
|
3.13) |
||||||||
|
; Chapter 4 (;4.1 ;4.4 — 4.15) |
||||||||
|
; Chapter 5 |
||||||||
|
; Chapter 6 |
||||||||
|
; Chapter 7 |
||||||||
|
; Chapter 8 |
||||||||
|
; Chapter 9 |
||||||||
|
; Chapter 10 |
||||||||
|
; Chapter 11 |
||||||||
|
; Chapter 12 |
||||||||
|
Appendix |
Satellite Internet Access (Window XP only) |
|||||||
|
Universal DVB Plug-in |
(for Microsoft XP / Vista MCE only) |
|||||||
|
; Video Gaming Plug-in |
(for Microsoft Vista MCE only) |
|||||||
|
;Video Quality Enhancement Plug-in (for Microsoft Vista |
||||||||
|
2 |
||||||||
AVerTV 6
|
MCE only) |
||||||
|
Common Interface for Conditional Access (optional) |
||||||
|
Product Name |
AVerTV Hybrid Volar HX |
|||||
|
Model No. |
A827 |
|||||
|
TV System |
; Digital TV (; DVB-T ATSC DVB-S) |
|||||
|
; Analog TV (; NTSC ; PAL ; SECAM) |
||||||
|
Audio Mode |
; Stereo ; Mono ; SAP |
|||||
|
AM/FM Radio |
; Support Not Support |
|||||
|
Remote Control |
; Support (; Model 1 Model 2 Model 3 Model 4 ; |
|||||
|
Model 5 Model 6) |
||||||
|
Not Support |
||||||
|
External Signal |
; S-Video ; Composite |
|||||
|
Source |
||||||
|
Others |
; Teletext ; MHEG-5 |
|||||
|
; EPG ; iEPG (USA only) |
||||||
|
; Closed Caption ;Digital Subtitle |
||||||
|
CI/CA |
||||||
|
Reference |
; Chapter 1 |
|||||
|
Chapter |
; Chapter 2 |
|||||
|
; Chapter 3 (;3.1 ;3.2.1-3.2.2 ;3.3 – 3.4 ;3.5.1 ; 3.5.5 |
||||||
|
;3.6 — 3.13) |
||||||
|
; Chapter 4 (;4.1 ; 4.3 — 4.15) |
||||||
|
; Chapter 5 |
||||||
|
; Chapter 6 |
||||||
|
; Chapter 7 |
||||||
|
; Chapter 8 |
||||||
|
; Chapter 9 |
||||||
|
; Chapter 10 |
||||||
|
; Chapter 11 |
||||||
|
; Chapter 12 |
||||||
|
Appendix |
Satellite Internet Access (Window XP only) |
|||||
|
3 |
||||||
AVerTV 6
Universal DVB Plug-in (for Microsoft XP / Vista MCE only)
;Video Gaming Plug-in (for Microsoft Vista MCE only)
;Video Quality Enhancement Plug-in (for Microsoft Vista MCE only)
Common Interface for Conditional Access (optional)
|
Product Name |
AVerTV Volar Lite |
|||||
|
Model No. |
A827A |
|||||
|
TV System |
Digital TV ( DVB-T ATSC DVB-S) |
|||||
|
; Analog TV (; NTSC ; PAL ; SECAM) |
||||||
|
Audio Mode |
; Stereo ; Mono ; SAP |
|||||
|
AM/FM Radio |
; Support Not Support |
|||||
|
Remote Control |
; Support ( Model 1 Model 2 Model 3 ; Model 4 |
|||||
|
; Model 5 Model 6) |
||||||
|
Not Support |
||||||
|
External Signal |
S-Video Composite |
|||||
|
Source |
||||||
|
Others |
; Teletext MHEG-5 |
|||||
|
EPG ; iEPG (USA only) |
||||||
|
; Closed Caption Digital Subtitle |
||||||
|
CI/CA |
||||||
|
Reference |
; Chapter 1 |
|||||
|
Chapter |
; Chapter 2 |
|||||
|
; Chapter 3 (;3.1 ;3.2.1 ;3.3 — 3.4 ;3.5.4 — 3.5.5 ;3.6 — |
||||||
|
3.13) |
||||||
|
; Chapter 4 (;4.1 ;4.4 — 4.15) |
||||||
|
; Chapter 5 |
||||||
|
; Chapter 6 |
||||||
|
; Chapter 7 |
||||||
|
; Chapter 8 |
||||||
|
; Chapter 9 |
||||||
|
; Chapter 10 |
||||||
|
4 |
||||||
|
AVerTV 6 |
||||||||
|
; Chapter 11 |
||||||||
|
; Chapter 12 |
||||||||
|
Appendix |
Satellite Internet Access (Window XP only) |
|||||||
|
Universal DVB Plug-in |
(for Microsoft XP / Vista MCE only) |
|||||||
|
Video Gaming Plug-in |
(for Microsoft Vista MCE only) |
|||||||
|
Video Quality Enhancement Plug-in (for Microsoft Vista |
||||||||
|
MCE only) |
||||||||
|
Common Interface for Conditional Access (optional) |
||||||||
|
Product Name |
AVerTV DVB-T Volar X |
|||||||
|
Model No. |
A815 |
|||||||
|
TV System |
; Digital TV (; DVB-T ATSC DVB-S) |
|||||||
|
Analog TV ( NTSC PAL SECAM) |
||||||||
|
Audio Mode |
; Stereo ; Mono ; SAP |
|||||||
|
AM/FM Radio |
Support ; Not Support |
|||||||
|
Remote Control |
; Support ( Model 1 ; Model 2 Model 3 Model 4 ; |
|||||||
|
Model 5 Model 6) |
||||||||
|
Not Support |
||||||||
|
External Signal |
S-Video Composite |
|||||||
|
Source |
||||||||
|
Others |
; Teletext ; MHEG-5 |
|||||||
|
; EPG iEPG (USA only) |
||||||||
|
Closed Caption ; Digital Subtitle |
||||||||
|
CI/CA |
||||||||
|
Reference |
; Chapter 1 |
|||||||
|
Chapter |
; Chapter 2 |
|||||||
|
; Chapter 3 (;3.1 ; 3.2.2 ; 3.3 -3.4 ; 3.5.2 ;3.5.5 ;3.6 |
||||||||
|
— 3.13) |
||||||||
|
; Chapter 4 (; 4.2 — 4.14) |
||||||||
|
Chapter 5 |
||||||||
|
; Chapter 6 (; 6.1 — 6.2 ; 6.4) |
||||||||
|
; Chapter 7 |
||||||||
|
5 |
||||||||
![]()
AVerTV 6
|
; Chapter 8 |
||
|
; Chapter 9 |
||
|
; Chapter 10 |
||
|
; Chapter 11 |
||
|
; Chapter 12 |
||
|
Appendix |
Satellite Internet Access (Window XP only) |
|
|
Universal DVB Plug-in |
(for Microsoft XP / Vista MCE only) |
|
|
Video Gaming Plug-in |
(for Microsoft Vista MCE only) |
|
|
Video Quality Enhancement Plug-in (for Microsoft Vista |
||
|
MCE only) |
||
|
Common Interface for Conditional Access (optional) |
||
6
AVerTV 6
Chapter 2 AVerTV 6 Introduction
Now, with this product, you can watch TV, listen to the radio, record your favorite programs and enjoy other features on your PC. Turn your computer system into a real multimedia entertainment center.
You’ll never miss your favorite ball games, soaps or game shows anymore because the TimeShift function performs background recording of a TV program. This means you can return and watch from the part of the program where you left off.
To enjoy high quality TV or radio programs, AVerMedia® product is your best choice.
Please be noted that the functions or the remote control mentioned in this manual may vary depending on the product you purchase and the area you live.
7
AVerTV 6
Chapter 3 Introducing the AVerTV 6
Application
The AVerTV 6 application allows you to watch TV, listen to the radio, record programs, and capture still images while you work on your computer.
3.1 Launching the AVerTV 6 Application
Run the AVerTV 6 application from the Programs menu.
AVerQuick
To run the application, click Start, point to Programs, choose AVerMedia, AVerTV 6, and then click AVerTV 6. Another way is to double-click the AVerTV 6 program icon
“”on the desktop. Or, you can double-click the AVerQuick launcher located in the lower right corner of the screen.
Note: AVerQuick allows to set the desired default application, which means you can choose either AVerTV 6 or AVer MediaCenter as the default application when
double clicking AVerQuick icon. To do this, right click AVerQuick, choose “Setting”, and select the preferred application in the “Application” tab.
8
AVerTV 6
3.2 Running the AVerTV 6 Application for the First Time
If this is your first time running the application, the Setup dialog box will appear to prompt you to scan for channels. (For details, please refer to the section Scanning Channels).
3.2.1Scanning for Analog Programs
1.Select Analog TV (or Programs) on the left pane of the Setup dialog box.
Note: Before choosing the signal input, please make sure that your country/region is correct. For more information, please refer to “Scanning Channels” in Chapter 4.
a.First, select an available AVermedia device in the left pane.
b.From the Region/Country drop-down list, select your country or region.
c.Click Apply to save the settings.
(This picture is only for reference.)
2.On this page, choose the TV option to search only for air channels or select CATV to scan for cable channels.
3.Click New and the Program List dialog box will appear. Type in the desirable name and click OK.
4. Click Program Scan for searching for available channels/programs in your area.
9
AVerTV 6
5.After scanning, the active TV channels will be listed inside the box. Click Apply to save the scanned channels.
6.To exit the current dialog box, click OK.
Note: After Media Center Edition scan, you may not be able to lock channels with AVerTV 6. Please restart the computer to make it function normally.
10
AVerTV 6
3.2.2Scanning for Digital Programs
1.Select Digital TV (or Programs) on the left pane of the Setup dialog box.
2. Click New and the Program List dialog box will appear. Type in the desirable name and click OK.
3.Click Program Scan for searching for available channels/programs in your area.
4.After scanning, the active TV channels will be listed inside the box. Click Apply to save the scanned channels.
5.To exit the current dialog box, click OK.
Note:
1.This can only supports DVB-T Radio Broadcasts, not the Digital Audio Broadcast system.
2.When scanning digital signals and if your country broadcasts logical channel data, the scanned channel will be allocated based on the assigned logical channel number.
11
AVerTV 6
3.2.3Scanning for Digital Satellite Programs
1.Select Digital TV on the left pane of the Setup dialog box.
(This picture is only for reference.)
2.Choose the switch type that is used by your satellite system.
3.From the Satellite drop-down list under Input 1, choose the correct satellite. If you cannot find the satellite you want but the input port DOES receive satellite signals, choose Custom…. Otherwise, choose None.
4.Click Edit to configure the satellite information.
5.In the Satellite Information dialog box, type in the satellite’s name in the Satellite box.
(This picture is only for reference.)
6. Specify the frequencies that you want to scan for available satellite programs.
There are two ways to do this:
12
AVerTV 6
Import the existing frequency data: refer to the section 4.2.1 Scanning Channels (Importing a Frequency Table) for details.
Manually add frequencies: refer to 4.2.2 Scanning Channels (Adding Frequencies Manually) for details. If you add frequencies manually, please make sure you specify the correct longitude data.
7.Click OK to exit the Satellite Information dialog box.
8.From the LNB drop-down list, choose the appropriate setting.
•None: If you do not use any LNB device, choose this option.
•Universal Ku Band LNB or C Band LNB: Choose this option if your LNB device is this type.
•Custom: When you choose this option, click Edit to configure your own LNB information, such as specifying an LNB name, its frequency type, input range, etc. For related data, refer to the documentation that comes with your LNB device.
9.Repeat steps 1 to 8 if you need to configure Input 2, Input 3, etc. Then click Apply to save the settings.
10.Select Programs under the Digital TV icon on the left pane, and click Program Scan to start the scanning process.
11.Click Apply to save the scanning results.
Note: After Media Center Edition scan, you may not be able to lock channels with AVerTV 6. Please restart the computer to make it function normally.
13
AVerTV 6
3.3 Introducing the User Interface
The TV monitor allows you to watch live TV or video.
|
1 |
Panel On / Off |
8 |
Channel Up/Down |
|
2 |
Playback Seek Slider |
9 |
Resize Window |
|
3 |
Play / Pause |
10 |
Show / Hide Video Frame |
|
4 |
Stop |
11 |
Minimize |
|
5 |
TimeShift |
12 |
Full Screen |
|
6 |
Record |
13 |
Exit |
|
7 |
Volume |
The Control Panel provides button controls for selecting channels, adjusting volume, capturing images, and more. It has a panel display that shows the current channel number and channel name.
|
To display or hide the Control Panel, click the button |
located in the lower left |
|
corner of the TV Monitor. |
14
AVerTV 6
3.4 The Control Panel
30 29 28 27 26 25 24 23
1
|
2 |
3 |
4 |
5 |
6 |
7 |
8 |
9 |
10 11 12 13 14 15 16 |
31
(This picture is only for reference.)
The table below describes functions of the buttons on the Control Panel.
|
BUTTON |
FUNCTION |
|||||
|
1 |
Signal Status / |
TV/Radio mode: Display the current signal status. |
||||
|
Enable or disable Repeat |
Playback mode: Right click and enable the Repeat function. The |
|||||
|
Play |
system will continuously playback the files in the playlist. |
|||||
|
2 |
Signal Strength |
Display signal strength. |
||||
|
3 |
Backward |
Move backwards in intervals. |
||||
|
4 |
Channel Loop |
Return to previously accessed channel. |
||||
|
5 |
16-Channel Preview |
Display 16 consecutive TV channels on the TV Monitor |
||||
|
window. |
||||||
|
6 |
Channel Up/ Down |
Go to the next upper or lower active channel. |
||||
|
7 |
Mute |
Turn off the sound. |
||||
|
8 |
Setup |
Allows you to: |
||||
|
* Scan channels. |
||||||
|
* Set the Windows power options. |
||||||
|
* Configure snapshot settings. |
||||||
|
* Customize recording settings. |
||||||
|
* Customize the TimeShift function. |
||||||
|
9 |
Teletext |
View Teletext/MHEG-5/Closed Caption information |
||||
|
10 |
EPG |
View EPG information. |
||||
|
11 |
Snapshot |
Capture a single image or a sequence of images. |
||||
|
12 |
Forward |
Skip forward in intervals. |
||||
|
13 |
Always on Top |
Make the TV monitor float over the top of other program |
||||
|
windows. |
||||||
|
14 |
Full Screen |
Show TV/Video programs in full screen. |
||||
|
15 |
Program List |
Display the program list. |
||||
|
16 |
Audio Mode |
Switch between available audio modes. |
||||
|
17 |
Schedule |
Display Schedule dialog box. |
||||
|
18 |
Play List |
Create a playlist of video files to playback. |
||||
|
15 |
||||||
![]()
|
AVerTV 6 |
||||
|
19 |
Show/ Hide Numeric |
Toggle between displaying or hiding the Numeric Panel. |
||
|
Panel |
||||
|
20 |
Radio Source |
Switch to radio mode. (AM/FM or Digital Radio) |
||
|
21 |
Change Video Source |
Switch between available video sources. |
||
|
22 |
Record |
Record the current program. |
||
|
23 |
TimeShift / Pause |
Performs background recording of the live program. This |
||
|
function lets you view the recorded parts, while at the same |
||||
|
time, recording is in progress. / Freeze the TimeShift |
||||
|
temporarily. |
||||
|
24 |
Next File |
Play the next file in the playlist. |
||
|
25 |
Previous File |
Play the previous file in the playlist. |
||
|
26 |
Stop |
Stop the playback, recording, TimeShift, etc. |
||
|
27 |
Play / Pause |
Play back recorded video files. / Freeze the playback |
||
|
temporarily. |
||||
|
28 |
Volume Control |
Drag your mouse up/down to increase/decrease the volume |
||
|
level. |
||||
|
29 |
Help |
View User’s Manual. |
||
|
30 |
Numeric Buttons |
Select channels/programs. |
||
|
31 |
Playback Seek |
Drag the slider tab to move to any part of the recorded TV |
||
|
program. |
||||
16
AVerTV 6
3.5 Remote Control (Optional)
After installing drivers and applications, you can use remote control to turn on/off the programs, select channels, adjust volume and so on.
(The remote control can only be used on AVerMedia AVerTV 6 application.)
Note: To control two or more than two cards/devices with a remote control, it is recommended to enable the multiple infrared receiver function first. To do this,
right click AVerQuick icon at the lower right corner of the screen, choose “Setting”, “Remote control” tab and select check boxes next to the device name. Please check your supported remote control model before activating this function.
3.5.1 Remote Control Buttons (Model 1)
|
Button |
Description |
|
|
1. |
Power |
Turn on/off the application |
|
2. |
VOL +/- |
Volume up/down. |
|
3. |
Source |
Switch between available signal sources. |
|
4. |
Numeric Buttons |
Select a TV channel. |
|
5. |
MUTE |
Turn on/off the sound. |
|
6. |
CH ▲/▼ |
Go up or down to the next active channel. |
|
7. |
CH RTN |
Go to the previously selected channel. |
17
AVerTV 6
3.5.2 Remote Control Buttons (Model 2)
|
Button |
Description |
|||||||||||||
|
1. |
Power |
Turn on/off the application |
||||||||||||
|
2. |
Numeric Buttons |
— Select a TV channel. |
||||||||||||
|
— Under the 16-Channel preview mode, use↑↓← → to highlight the |
||||||||||||||
|
intended channel. |
||||||||||||||
|
3. |
CH RTN |
Go to the previously selected channel. |
||||||||||||
|
4. |
16-CH PREV |
16-Channel Preview. |
||||||||||||
|
5. |
VOL▲/▼ |
Volume up/down. |
||||||||||||
|
6. |
FULL SCREEN |
Display TV in full screen. |
||||||||||||
|
7. |
AUDIO |
Switch between available audio modes. |
||||||||||||
|
8. |
► (Play) |
Play the last recorded or played file. |
||||||||||||
|
9. |
■ (Stop) |
— End the Playback or recording. |
||||||||||||
|
— End the TimeShift mode and return to real-time TV or Radio |
||||||||||||||
|
mode. |
||||||||||||||
|
10. |
(Forward) |
— Advance the playback. |
||||||||||||
|
— Jump to the Teletext page of the corresponding color according |
||||||||||||||
|
to this button. |
||||||||||||||
|
11. SLEEP |
— Go to the next file in the playlist. |
|||||||||||||
|
— Set the time to put your computer in Stand By or Hibernate |
||||||||||||||
|
mode. |
||||||||||||||
|
— Jump to the Teletext page of the corresponding color according |
||||||||||||||
|
to this button. |
||||||||||||||
|
12. MENU |
Display or hide the Control Panel. |
|||||||||||||
|
13. EPG |
Launch the Electronic Programme Guide. |
|||||||||||||
|
14. WAKE UP |
— Go to the previous file in the playlist. |
|||||||||||||
|
— Set the time to bring your computer out of Stand By or Hibernate |
||||||||||||||
|
mode. |
||||||||||||||
|
— Jump to the Teletext page of the corresponding color according |
||||||||||||||
|
to this button. |
||||||||||||||
|
15. TELETEXT |
View Teletext/MHEG-5/ Closed Caption information. |
|||||||||||||
|
16. TIMESHIFT |
— Freeze the playback. |
|||||||||||||
|
/PAUSE |
— Switch from real-time TV or Radio to TimeShift mode. |
|||||||||||||
|
17. |
(Rewind) |
— Rewind the playback. |
||||||||||||
|
— Jump to the Teletext page of the corresponding color according |
||||||||||||||
|
to this button. |
||||||||||||||
|
18 |
||||||||||||||
|
AVerTV 6 |
|||
|
18. |
● (Record) |
Switch to PVR mode and record the current program or video into |
|
|
your hard drive. |
|||
|
19. |
MUTE |
Turn on/off the sound. |
|
|
20. |
CH ▲/▼ |
Go up or down to the next active channel. |
|
|
21. |
SNAPSHOT |
Capture the on-screen image to a bitmap file. |
|
|
22. |
DISPLAY |
Display information. |
|
|
23. |
Source |
Switch between available signal sources. |
19
AVerTV 6
3.5.3 Remote Control Buttons (Model 3)
|
Button |
Description |
|||||||||
|
1. |
Power |
Turn on/off the application |
||||||||
|
2. |
Numeric Buttons |
— Select a TV channel. |
||||||||
|
— Under the 16-Channel preview mode, use↑↓← → to highlight the |
||||||||||
|
intended channel. |
||||||||||
|
3. |
CH RTN |
Go to the previously selected channel. |
||||||||
|
4. |
16-CH PREV |
16-Channel Preview. |
||||||||
|
5. |
VOL▲/▼ |
Volume up/down. |
||||||||
|
6. |
FULL SCREEN |
Display TV in full screen. |
||||||||
|
7. |
AUDIO |
Switch between available audio modes. |
||||||||
|
8. |
► (Play) |
Play the last recorded or played file. |
||||||||
|
9. |
■ (Stop) |
— End the Playback or recording. |
||||||||
|
— End the TimeShift mode and return to real-time TV or Radio |
||||||||||
|
mode. |
||||||||||
|
10. |
(Rewind) |
— Rewind the playback. |
||||||||
|
— Jump to the Teletext page of the corresponding color according |
||||||||||
|
to this button. |
||||||||||
|
11. |
(Forward) |
— Advance the playback. |
||||||||
|
— Jump to the Teletext page of the corresponding color according |
||||||||||
|
to this button. |
||||||||||
|
12. |
(Next File) |
— Go to the next file in the playlist. |
||||||||
|
— Jump to the Teletext page of the corresponding color according |
||||||||||
|
to this button. |
||||||||||
|
13. |
(Previous File) |
— Go to the previous file in the playlist. |
||||||||
|
— Jump to the Teletext page of the corresponding color according |
||||||||||
|
to this button. |
||||||||||
|
14. TELETEXT |
View Teletext/MHEG-5/ Closed Caption information. |
|||||||||
|
15. TIMESHIFT |
— Freeze the playback. |
|||||||||
|
— Switch from real-time TV or Radio to TimeShift mode. |
||||||||||
|
16. ● (Record) |
Switch to PVR mode and record the current program or video into |
|||||||||
|
your hard drive. |
||||||||||
|
20 |
||||||||||
AVerTV 6
|
17. |
MUTE |
Turn on/off the sound. |
|
18. |
EPG |
Launch the Electronic Program Guide. |
|
19. |
CH ▲/▼ |
Go up or down to the next active channel. |
|
20. |
DISPLAY |
Display information. |
|
21. |
Source |
Switch between available signal sources. |
21
AVerTV 6
3.5.4 Remote Control Buttons (Model 4)
|
1. |
POWER |
Turn on/off the application |
|
2. |
SOURCE |
Switch between available signal sources. |
|
3. |
Numeric Buttons |
— Select a TV channel. |
—Under the 16-Channel preview mode, use↑↓← → to highlight the intended channel.
|
4. |
CH RTN |
Go to the previously selected channel. |
||
|
5. |
16-CH PREV |
16-Channel Preview. |
||
|
6. |
VOL▲/▼ |
Volume up/down. |
||
|
7. |
FULL SCREEN |
Display TV in full screen. |
||
|
8. |
AUDIO |
Switch between available audio modes. |
||
|
9. |
MENU |
Display or hide the Control Panel. |
||
|
10.PIP |
Display or hide the PIP window. |
|||
|
11.SLEEP |
— Go to the next file in the playlist. |
|||
—Set the time to put your computer in Stand By or Hibernate mode.
—Jump to the Teletext page of the corresponding color according to this button.
|
12.WAKE UP |
— Go to the previous file in the playlist. |
—Set the time to bring your computer out of Stand By or Hibernate mode.
—Jump to the Teletext page of the corresponding color according to this button.
|
13.■ (Stop) |
— End the Playback or recording. |
—End the TimeShift mode and return to real-time TV or Radio mode.
|
14. |
► (Play) |
Play the last recorded or played file. |
|
15. |
● (Record) |
Switch to PVR mode and record the current program or video into |
|
your hard drive. |
||
|
16.TIMESHIFT |
— Freeze the playback. |
|
|
/PAUSE |
— Switch from real-time TV or Radio to TimeShift mode. |
|
|
17. |
(Rewind) |
— Rewind the playback. |
—Jump to the Teletext page of the corresponding color according to this button.
|
18. (Forward) |
— Advance the playback. |
—Jump to the Teletext page of the corresponding color according to this button.
|
19.TELETEXT |
View Teletext/MHEG-5/ Closed Caption information. |
22
AVerTV 6
|
20.EPG |
Launch the Electronic Program Guide. |
|
21.MUTE |
Turn on/off the sound. |
|
22.CH ▲/▼ |
Go up or down to the next active channel. |
|
23.SNAPSHOT |
Capture the on-screen image to a bitmap file. |
|
24.DISPLAY |
Display information. |
23
AVerTV 6
3.5.5 Remote Control Buttons (Model 5)
|
Button |
Description |
|||
|
1. |
SOURCE |
Switch between available signal sources. |
||
|
2. |
FULL SCREEN |
Display TV in full screen. |
||
|
3. |
● (Record) |
Switch to PVR mode and record the current program or video into |
||
|
your hard drive. |
||||
|
4. |
(Rewind) |
Rewind the playback. |
||
|
5. |
■ (Stop) |
— End the Playback or recording. |
||
|
— End the TimeShift mode and return to real-time TV or Radio |
||||
|
mode. |
||||
|
6. |
DISPLAY |
Display information. |
||
|
7. |
VOL / |
Volume up/down. |
||
|
8. |
Numeric Buttons |
— Select a TV channel. |
||
|
— Under the 16-Channel preview mode, use 2 4 6 8 to highlight the |
||||
|
intended channel. |
||||
|
9. |
CH RTN |
Go to the previously selected channel. |
||
|
10. |
MUTE |
Turn on/off the sound. |
||
|
11. |
CH ▲/▼ |
Go up or down to the next active channel. |
||
|
12. |
EPG |
Launch the Electronic Program Guide. (DVB-T only) |
||
|
13. |
► (Play) |
/ |
Play the last recorded or played file. / Freeze the playback. |
|
|
PAUSE |
||||
|
14. |
(Forward) |
Advance the playback. |
||
|
15. |
AUDIO |
Switch between available audio modes. |
||
|
16. |
POWER |
Turn on/off the application |
24
AVerTV 6
3.5.6 Remote Control Buttons (Model 6)
|
Button |
Description |
|||||
|
(1) |
Turn on/off the application. |
|||||
|
(2) |
Turn off/on the sound. |
|||||
|
(3) |
Use numeric buttons to select a channel. |
|||||
|
(4) |
Live TV: Watch live TV |
|||||
|
Fullscreen: Display TV in full screen. |
||||||
|
(5) |
Change between available audio modes. |
|||||
|
(6) |
MCS: Main Screen: Use the arrow button to navigate all on-screen items. |
|||||
|
Use OK to confirm the selection. |
||||||
|
PIP Mode: Change size or position of the selected screen by the arrow |
||||||
|
buttons. |
||||||
|
(7) |
Volume up / Volume down. |
|||||
|
25 |
||||||
File Specifications:717/717195-avertv_6.pdf file (06 May 2023) |
Accompanying Data:
Avermedia AVerTV 6 Computer Hardware, Software PDF Operation & User’s Manual (Updated: Saturday 6th of May 2023 07:48:07 PM)
Rating: 4.1 (rated by 92 users)
Compatible devices: AVerTV 6.3, AVerTV Hybrid +FM PCI, AVerTV MediaPort, AVerTV Volar HD 2, 1500 MCE, DVB-S Hybrid+FM, AVerTV Studio 509, BoxW9.
Recommended Documentation:
Operation & User’s Manual (Text Version):
(Ocr-Read Summary of Contents of some pages of the Avermedia AVerTV 6 Document (Main Content), UPD: 06 May 2023)
-
Avermedia AVerTV 6 User Manual
-
Avermedia AVerTV 6 User Guide
-
Avermedia AVerTV 6 PDF Manual
-
Avermedia AVerTV 6 Owner’s Manuals
Recommended: UltraHD 20276, CE870, 10, CD-JUC22, LB4800
Links & Tools
-
February 2003Order Number: C30525-001The Intel®Desktop Board D845GLVA may contain design defects or errors known as errata that may cause the product to deviate from published specifications. Currentcharacterized errata are documented in the Intel Desktop Board D845GLVA Specification Update.Intel®Desktop …
BOXD845GLVAL — 845GL CEL/P4 400MHZ FSB UATX 114
-
4-Port-SATA-II-RAID-PCI-KarteVersion 09/08Best.-Nr. 97 19 45°Bestimmungsgemäße VerwendungDas Produkt ist zum Einbau in einen Computer vorgesehen und stellt dort Serial-ATA-Schnittstellen zur Verfügung, die zum Aufbau eines RAID-Sets verwendet werden können.Dieses Produkt erfüllt die gesetzlichen, nationalen …
97 19 45 4
-
QUICK START GUIDE1INTEGRATION TOOLSGalileo™ 616 Remote Computer ControlTo control the Galileo 616 remotely from a computer:1. Attach the Galileo 616 to the computer’s Ethernet port.2. Configure the computer’s network settings. 3. Configure the Galileo 616’s network settings.4. Launch and confi …
Galileo 616 8
-
User’s ManualCNPS7500 LED Serieswww.ZALMAN.comV 2.4Intel Socket 1155/1156/775 CPUsCore i7Core i5Core i3Core 2 QuadCore 2 DuoPentium Dual CorePentium DPentium 4Celeron DAMD Socket AM3/AM2+/AM2/754/939/940 CPUsPhenom IIPhenomAthlon IIAthlon X2Athlon FXAthlon OpteronDual-Core OpteronSempronTo ensure safe and easy instal …
CNPS7500-Cu LED 8
Operating Impressions, Questions and Answers: