Последнее обновление: 28.01.2023
-
Глава 1. Введение в Windows Forms
-
Первое приложение с .NET CLI
-
Первое приложение в Visual Studio
-
Создание графического приложения
-
-
Глава 2. Работа с формами
-
Основы форм
-
Основные свойства форм
-
Добавление форм. Взаимодействие между формами
-
События в Windows Forms. События формы
-
Создание непрямоугольных форм. Закрытие формы
-
-
Глава 3. Контейнеры в Windows Forms
-
Динамическое добавление элементов
-
Элементы GroupBox, Panel и FlowLayoutPanel
-
TableLayoutPanel
-
Размеры элементов и их позиционирование в контейнере
-
Панель вкладок TabControl и SplitContainer
-
-
Глава 4. Элементы управления
-
Кнопка
-
Метки и ссылки
-
Текстовое поле TextBox
-
Элемент MaskedTextBox
-
Элементы Radiobutton и CheckBox
-
ListBox
-
Элемент ComboBox
-
Привязка данных в ListBox и ComboBox
-
Элемент CheckedListBox
-
Элементы NumericUpDown и DomainUpDown
-
ImageList
-
ListView
-
TreeView
-
TrackBar, Timer и ProgressBar
-
DateTimePicker и MonthCalendar
-
PictureBox
-
WebBrowser
-
Элемент NotifyIcon
-
Окно сообщения MessageBox
-
OpenFileDialog и SaveFileDialog
-
FontDialog и ColorDialog
-
ErrorProvider
-
-
Глава 5. Меню и панели инструментов
-
Панель инструментов ToolStrip
-
Создание меню MenuStrip
-
Строка состояния StatusStrip
-
Контекстное меню ContextMenuStrip
-
-
Глава 6. Привязка и паттерн Model-View-ViewModel
-
Введение в привязку. Форматирование значения привязки
-
Привязка объектов. Интерфейс INotifyPropertyChanged
-
DataContext
-
Паттерн Model-View-ViewModel
-
Команды и взаимодействие с пользователем в MVVM
-
Параметры команды
-
- Глава 1. Введение в Windows Forms
- Первое приложение с .NET CLI
- Первое приложение в Visual Studio
- Создание графического приложения
- Глава 2. Работа с формами
- Основы форм
- Основные свойства форм
- Добавление форм. Взаимодействие между формами
- События в Windows Forms. События формы
- Создание непрямоугольных форм. Закрытие формы
- Глава 3. Контейнеры в Windows Forms
- Динамическое добавление элементов
- Элементы GroupBox, Panel и FlowLayoutPanel
- TableLayoutPanel
- Размеры элементов и их позиционирование в контейнере
- Панель вкладок TabControl и SplitContainer
- Глава 4. Элементы управления
- Кнопка
- Метки и ссылки
- Текстовое поле TextBox
- Элемент MaskedTextBox
- Элементы Radiobutton и CheckBox
- ListBox
- Элемент ComboBox
- Привязка данных в ListBox и ComboBox
- Элемент CheckedListBox
- Элементы NumericUpDown и DomainUpDown
- ImageList
- ListView
- TreeView
- TrackBar, Timer и ProgressBar
- DateTimePicker и MonthCalendar
- PictureBox
- WebBrowser
- Элемент NotifyIcon
- Окно сообщения MessageBox
- OpenFileDialog и SaveFileDialog
- FontDialog и ColorDialog
- ErrorProvider
- Глава 5. Меню и панели инструментов
- Панель инструментов ToolStrip
- Создание меню MenuStrip
- Строка состояния StatusStrip
- Контекстное меню ContextMenuStrip
- Глава 6. Привязка и паттерн Model-View-ViewModel
- Введение в привязку. Форматирование значения привязки
- Привязка объектов. Интерфейс INotifyPropertyChanged
- DataContext
- Паттерн Model-View-ViewModel
- Команды и взаимодействие с пользователем в MVVM
- Параметры команды
Помощь сайту
YooMoney:
410011174743222
Перевод на карту
Номер карты:
4048415020898850
So far we have seen how to work with C# to create console based applications. But in a real-life scenario team normally use Visual Studio and C# to create either Windows Forms or Web-based applications.
A windows form application is an application, which is designed to run on a computer. It will not run on web browser because then it becomes a web application.
This Tutorial will focus on how we can create Windows-based applications. We will also learn some basics on how to work with the various elements of C# Windows application.
Windows Forms Basics
A Windows forms application is one that runs on the desktop computer. A Windows forms application will normally have a collection of controls such as labels, textboxes, list boxes, etc.
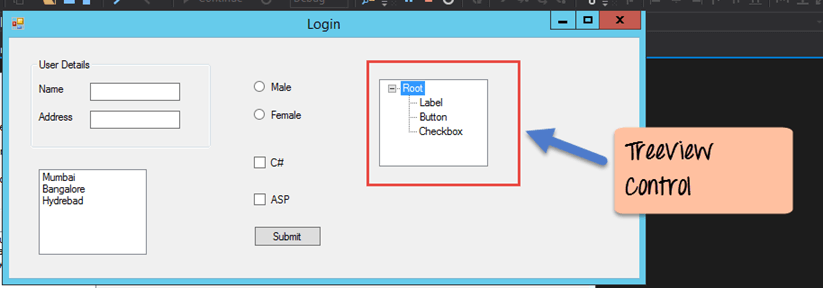
Below is an example of a simple Windows form application C#. It shows a simple Login screen, which is accessible by the user. The user will enter the required credentials and then will click the Login button to proceed.

So an example of the controls available in the above application
- This is a collection of label controls which are normally used to describe adjacent controls. So in our case, we have 2 textboxes, and the labels are used to tell the user that one textbox is for entering the user name and the other for the password.
- The 2 textboxes are used to hold the username and password which will be entered by the user.
- Finally, we have the button control. The button control will normally have some code attached to perform a certain set of actions. So for example in the above case, we could have the button perform an action of validating the user name and password which is entered by the user.
C# Hello World
Now let’s look at an example of how we can implement a simple ‘hello world’ application in Visual Studio. For this, we would need to implement the below-mentioned steps
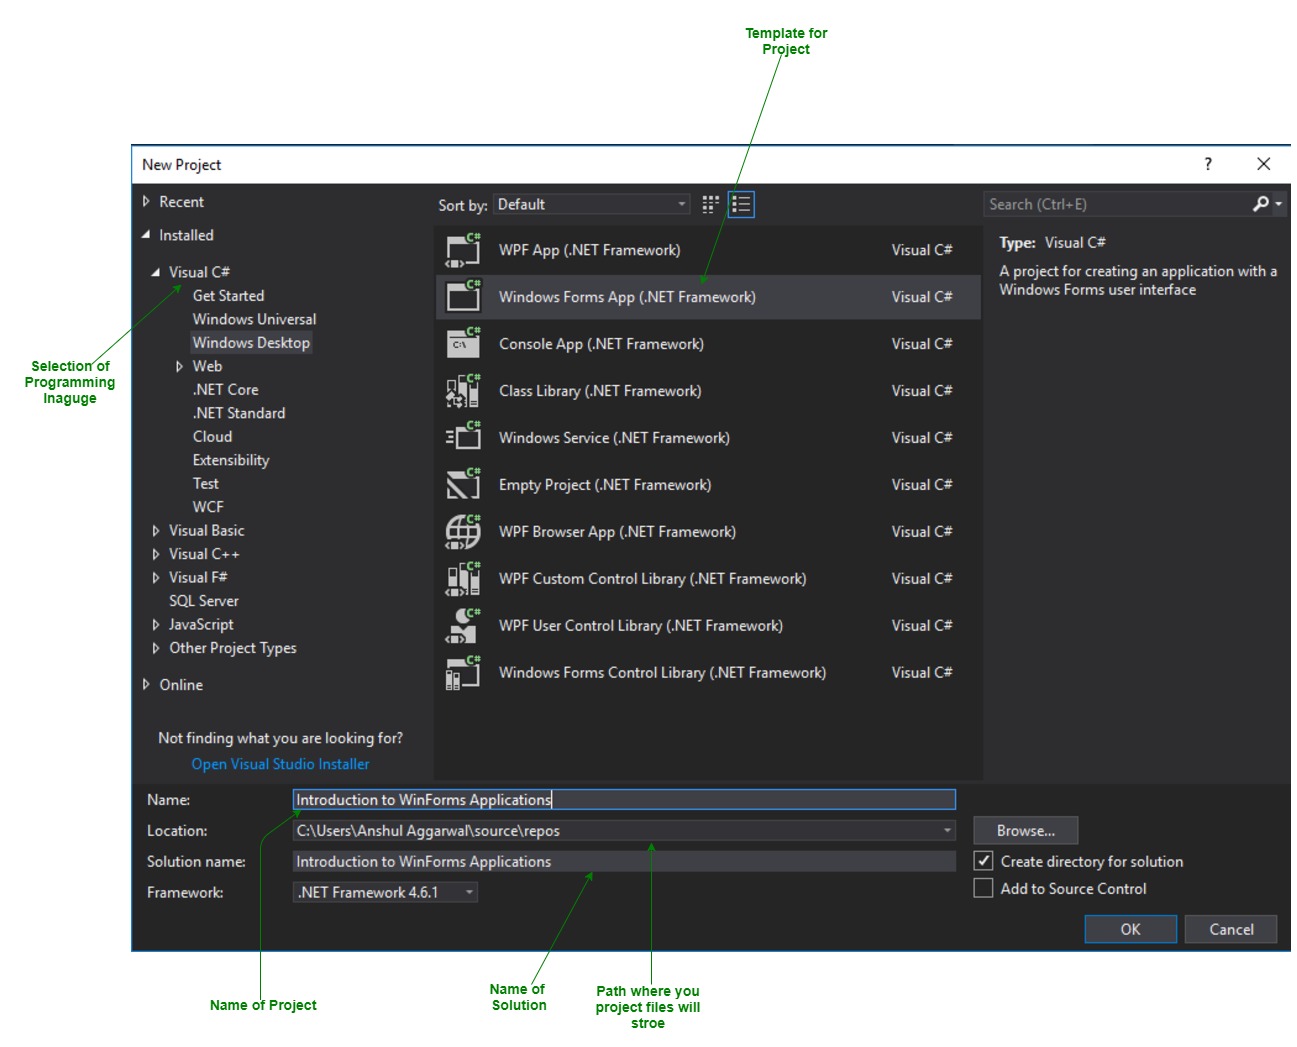
Step 1) The first step involves the creation of a new project in Visual Studio. After launching Visual Studio, you need to choose the menu option New->Project.

Step 2) The next step is to choose the project type as a Windows Forms application. Here we also need to mention the name and location of our project.

- In the project dialog box, we can see various options for creating different types of projects in Visual Studio. Click the Windows option on the left-hand side.
- When we click the Windows options in the previous step, we will be able to see an option for Windows Forms Application. Click this option.
- We will give a name for the application. In our case, it is DemoApplication. We will also provide a location to store our application.
- Finally, we click the ‘OK’ button to let Visual Studio create our project.
If the above steps are followed, you will get the below output in Visual Studio.
Output:-

You will see a Form Designer displayed in Visual Studio. It’s in this Form Designer that you will start building your Windows Forms application.

In the Solution Explorer, you will also be able to see the DemoApplication Solution. This solution will contain the below 2 project files
- A Form application called Forms1.cs. This file will contain all of the code for the Windows Form application.
- The Main program called Program.cs is default code file which is created when a new application is created in Visual Studio. This code will contain the startup code for the application as a whole.
On the left-hand side of Visual Studio, you will also see a ToolBox. The toolbox contains all the controls which can be added to a Windows Forms. Controls like a text box or a label are just some of the controls which can be added to a Windows Forms.
Below is a screenshot of how the Toolbox looks like.

Step 3) In this step, we will now add a label to the Form which will display “Hello World.” From the toolbox, you will need to choose the Label control and simply drag it onto the Form.

Once you drag the label to the form, you can see the label embedded on the form as shown below.

Step 4) The next step is to go to the properties of the control and Change the text to ‘Hello World’.
To go to the properties of a control, you need to right-click the control and choose the Properties menu option

- The properties panel also shows up in Visual Studio. So for the label control, in the properties control, go to the Text section and enter “Hello World”.
- Each Control has a set of properties which describe the control.

If you follow all of the above steps and run your program in Visual Studio, you will get the following output
Output:-

In the output, you can see that the Windows Form is displayed. You can also see ‘Hello World’ is displayed on the form.
Adding Controls to a form
We had already seen how to add a control to a form when we added the label control in the earlier section to display “Hello World.”
Let’s look at the other controls available for Windows forms and see some of their common properties.
In our Windows form application in C# examples, we will create one form which will have the following functionality.
- The ability for the user to enter name and address.
- An option to choose the city in which the user resides in
- The ability for the user to enter an option for the gender.
- An option to choose a course which the user wants to learn. There will make choices for both C# and ASP.Net
So let’s look at each control in detail and add them to build the form with the above-mentioned functionality.
Group Box
A group box is used for logical grouping controls into a section. Let’s take an example if you had a collection of controls for entering details such as name and address of a person. Ideally, these are details of a person, so you would want to have these details in a separate section on the Form. For this purpose, you can have a group box. Let’s see how we can implement this with an example shown below
Step 1) The first step is to drag the Groupbox control onto the Windows Form from the toolbox as shown below

Step 2) Once the groupbox has been added, go to the properties window by clicking on the groupbox control. In the properties window, go to the Text property and change it to “User Details”.

Once you make the above changes, you will see the following output
Output:-

In the output, you can clearly see that the Groupbox was added to the form. You can also see that the text of the groupbox was changed to “User Details.”
Label Control
Next comes the Label Control. The label control is used to display a text or a message to the user on the form. The label control is normally used along with other controls. Common examples are wherein a label is added along with the textbox control.
The label indicates to the user on what is expected to fill up in the textbox. Let’s see how we can implement this with an example shown below. We will add 2 labels, one which will be called ‘name’ and the other called ‘address.’ They will be used in conjunction with the textbox controls which will be added in the later section.
Step 1) The first step is to drag the label control on to the Windows Form from the toolbox as shown below. Make sure you drag the label control 2 times so that you can have one for the ‘name’ and the other for the ‘address’.

Step 2) Once the label has been added, go to the properties window by clicking on the label control. In the properties window, go to the Text property of each label control.

Once you make the above changes, you will see the following output
Output:-

You can see the label controls added to the form.
Textbox
A textbox is used for allowing a user to enter some text on the Windows application in C#. Let’s see how we can implement this with an example shown below. We will add 2 textboxes to the form, one for the Name and the other for the address to be entered for the user
Step 1) The first step is to drag the textbox control onto the Windows Form from the toolbox as shown below

Step 2) Once the text boxes have been added, go to the properties window by clicking on the textbox control. In the properties window, go to the Name property and add a meaningful name to each textbox. For example, name the textbox for the user as txtName and that for the address as txtAddress. A naming convention and standard should be made for controls because it becomes easier to add extra functionality to these controls, which we will see later on.

Once you make the above changes, you will see the following output
Output:-

In the output, you can clearly see that the Textboxes was added to the form.
List box
A Listbox is used to showcase a list of items on the Windows form. Let’s see how we can implement this with an example shown below. We will add a list box to the form to store some city locations.
Step 1) The first step is to drag the list box control onto the Windows Form from the toolbox as shown below

Step 2) Once the list box has been added, go to the properties window by clicking on the list box control.

- First, change the property of the Listbox box control, in our case, we have changed this to lstCity
- Click on the Items property. This will allow you to add different items which can show up in the list box. In our case, we have selected items “collection”.
- In the String Collection Editor, which pops up, enter the city names. In our case, we have entered “Mumbai”, “Bangalore” and “Hyderabad”.
- Finally, click on the ‘OK’ button.
Once you make the above changes, you will see the following output
Output:-

In the output, you can see that the Listbox was added to the form. You can also see that the list box has been populated with the city values.
RadioButton
A Radiobutton is used to showcase a list of items out of which the user can choose one. Let’s see how we can implement this with an example shown below. We will add a radio button for a male/female option.
Step 1) The first step is to drag the ‘radiobutton’ control onto the Windows Form from the toolbox as shown below.

Step 2) Once the Radiobutton has been added, go to the properties window by clicking on the Radiobutton control.

- First, you need to change the text property of both Radio controls. Go the properties windows and change the text to a male of one radiobutton and the text of the other to female.
- Similarly, change the name property of both Radio controls. Go the properties windows and change the name to ‘rdMale’ of one radiobutton and to ‘rdfemale’ for the other one.
One you make the above changes, you will see the following output
Output:-

You will see the Radio buttons added to the Windows form.
Checkbox
A checkbox is used to provide a list of options in which the user can choose multiple choices. Let’s see how we can implement this with an example shown below. We will add 2 checkboxes to our Windows forms. These checkboxes will provide an option to the user on whether they want to learn C# or ASP.Net.
Step 1) The first step is to drag the checkbox control onto the Windows Form from the toolbox as shown below

Step 2) Once the checkbox has been added, go to the properties window by clicking on the Checkbox control.

In the properties window,
- First, you need to change the text property of both checkbox controls. Go the properties windows and change the text to C# and ASP.Net.
- Similarly, change the name property of both Radio controls. Go the properties windows and change the name to chkC of one checkbox and to chkASP for the other one.
Once you make the above changes, you will see the following output
Output:-

Button
A button is used to allow the user to click on a button which would then start the processing of the form. Let’s see how we can implement this with an example shown below. We will add a simple button called ‘Submit’ which will be used to submit all the information on the form.
Step 1) The first step is to drag the button control onto the Windows Form from the toolbox as shown below

Step 2) Once the Button has been added, go to the properties window by clicking on the Button control.

- First, you need to change the text property of the button control. Go the properties windows and change the text to ‘submit’.
- Similarly, change the name property of the control. Go the properties windows and change the name to ‘btnSubmit’.
Once you make the above changes, you will see the following output
Output:-

Congrats, you now have your first basic Windows Form in place. Let’s now go to the next topic to see how we can do Event handling for Controls.
C# Event Handling for Controls
When working with windows form, you can add events to controls. An event is something that happens when an action is performed. Probably the most common action is the clicking of a button on a form. In C# Windows Forms, you can add code which can be used to perform certain actions when a button is pressed on the form.
Normally when a button is pressed on a form, it means that some processing should take place.
Let’s take a look at one of the event and how it can be handled before we go to the button event scenario.
The below example will showcase an event for the Listbox control. So whenever an item is selected in the listbox control, a message box should pop up which shows the item selected. Let’s perform the following steps to achieve this.
Step 1) Double click on the Listbox in the form designer. By doing this, Visual Studio will automatically open up the code file for the form. And it will automatically add an event method to the code. This event method will be triggered, whenever any item in the listbox is selected.

Above is the snippet of code which is automatically added by Visual Studio, when you double-click the List box control on the form. Now let’s add the below section of code to this snippet of code, to add the required functionality to the listbox event.

- This is the event handler method which is automatically created by Visual Studio when you double-click the List box control. You don’t need to worry about the complexity of the method name or the parameters passed to the method.
- Here we are getting the SelectedItem through the lstCity.SelectedItem property. Remember that lstCity is the name of our Listbox control. We then use the GetItemText method to get the actual value of the selected item. We then assign this value to the text variable.
- Finally, we use the MessageBox method to display the text variable value to the user.
One you make the above changes, and run the program in Visual Studio you will see the following output
Output:-

From the output, you can see that when any item from the list box is selected, a message box will pops up. This will show the selected item from the listbox.
Now let’s look at the final control which is the button click Method. Again this follows the same philosophy. Just double click the button in the Forms Designer and it will automatically add the method for the button event handler. Then you just need to add the below code.

- This is the event handler method which is automatically created by Visual Studio when you double click the button control. You don’t need to worry on the complexity of the method name or the parameters passed to the method.
- Here we are getting values entered in the name and address textbox. The values can be taken from the text property of the textbox. We then assign the values to 2 variables, name, and address accordingly.
- Finally, we use the MessageBox method to display the name and address values to the user.
One you make the above changes, and run the program in Visual Studio you will see the following output
Output:-

- First, enter a value in the name and address field.
- Then click on the Submit button
Once you click the Submit button, a message box will pop, and it will correctly show you what you entered in the user details section.
Tree and PictureBox Control
There are 2 further controls we can look at, one is the ‘Tree Control’ and the other is the ‘Image control’. Let’s look at examples of how we can implement these controls
Tree Control
– The tree control is used to list down items in a tree like fashion. Probably the best example is when we see the Windows Explorer itself. The folder structure in Windows Explorer is like a tree-like structure.
Let’s see how we can implement this with an example shown below.
Step 1) The first step is to drag the Tree control onto the Windows Form from the toolbox as shown below

Step 2) The next step is to start adding nodes to the tree collection so that it can come up in the tree accordingly. First, let’s follow the below sub-steps to add a root node to the tree collection.

- Go to the properties toolbox for the tree view control. Click on the Node’s property. This will bring up the TreeNode Editor
- In the TreeNode Editor click on the Add Root button to add a root node to the tree collection.
- Next, change the text of the Root node and provide the text as Root and click ‘OK’ button. This will add Root node.
Step 3) The next step is to start adding the child nodes to the tree collection. Let’s follow the below sub-steps to add child root node to the tree collection.

- First, click on the Add child button. This will allow you to add child nodes to the Tree collection.
- For each child node, change the text property. Keep on repeating the previous step and this step and add 2 additional nodes. In the end, you will have 3 nodes as shown above, with the text as Label, Button, and Checkbox respectively.
- Click on the OK button
Once you have made the above changes, you will see the following output.
Output:-
You will be able to see the Tree view added to the form. When you run the Windows form application, you can expand the root node and see the child nodes in the list.
PictureBox Control
This control is used to add images to the Winforms C#. Let’s see how we can implement this with an example shown below.
Step 1) The first step is to drag the PictureBox control onto the C# Windows Form from the toolbox as shown below

Step 2) The next step is to actually attach an image to the picture box control. This can be done by following the below steps.

- First, click on the Image property for the PictureBox control. A new window will pops out.
- In this window, click on the Import button. This will be used to attach an image to the picturebox control.
- A dialog box will pop up in which you will be able to choose the image to attach the picturebox
- Click on the OK button
One you make the above changes, you will see the following output
Output:-

From the output, you can see that an image is displayed on the form.
Summary
- A Windows form in C# application is one that runs on the desktop of a computer. Visual Studio Form along with C# can be used to create a Windows Forms application.
- Controls can be added to the Windows forms C# via the Toolbox in Visual Studio. Controls such as labels, checkboxes, radio buttons, etc. can be added to the form via the toolbox.
- One can also use advanced controls like the tree view control and the PictureBox control.
- Event handlers are used to respond to events generated from controls. The most common one is the one added for the button clicked event.
Windows Forms is a Graphical User Interface(GUI) class library which is bundled in .Net Framework. Its main purpose is to provide an easier interface to develop the applications for desktop, tablet, PCs. It is also termed as the WinForms. The applications which are developed by using Windows Forms or WinForms are known as the Windows Forms Applications that runs on the desktop computer. WinForms can be used only to develop the Windows Forms Applications not web applications. WinForms applications can contain the different type of controls like labels, list boxes, tooltip etc.
Creating a Windows Forms Application Using Visual Studio 2017
- First, open the Visual Studio then Go to File -> New -> Project to create a new project and then select the language as Visual C# from the left menu. Click on Windows Forms App(.NET Framework) in the middle of current window. After that give the project name and Click OK.
 Here the solution is like a container which contains the projects and files that may be required by the program.
 - After that following window will display which will be divided into three parts as follows:
- Editor Window or Main Window: Here, you will work with forms and code editing. You can notice the layout of form which is now blank. You will double click the form then it will open the code for that.
- Solution Explorer Window: It is used to navigate between all items in solution. For example, if you will select a file form this window then particular information will be display in the property window.
- Properties Window: This window is used to change the different properties of the selected item in the Solution Explorer. Also, you can change the properties of components or controls that you will add to the forms.
- Now to add the controls to your WinForms application go to Toolbox tab present in the extreme left side of Visual Studio. Here, you can see a list of controls. To access the most commonly used controls go to Common Controls present in Toolbox tab.
- Now drag and drop the controls that you needed on created Form. For example, if you can add TextBox, ListBox, Button etc. as shown below. By clicking on the particular dropped control you can see and change its properties present in the right most corner of Visual Studio. In the above image, you can see the TextBox is selected and its properties like TextAlign, MaxLength etc. are opened in right most corner. You can change its properties’ values as per the application need. The code of controls will be automatically added in the background. You can check the Form1.Designer.cs file present in the Solution Explorer Window.
- To run the program you can use an F5 key or Play button present in the toolbar of Visual Studio. To stop the program you can use pause button present in the ToolBar. You can also run the program by going to Debug->Start Debugging menu in the menubar.
 Here the solution is like a container which contains the projects and files that may be required by the program.
 In the above image, you can see the TextBox is selected and its properties like TextAlign, MaxLength etc. are opened in right most corner. You can change its properties’ values as per the application need. The code of controls will be automatically added in the background. You can check the Form1.Designer.cs file present in the Solution Explorer Window.
C# Windows Forms is a graphical user interface (GUI) framework that enables developers to create desktop applications for the Windows operating system. Windows Forms applications are created using the C# programming language and the .NET framework. They are built by dragging and dropping controls such as buttons, text boxes, labels, and other user interface elements onto a form.
- The Windows Forms framework provides a rich set of controls that developers can use to build applications with. These controls are designed to provide a consistent and familiar user interface for Windows users. Developers can customize the appearance and behavior of these controls by setting various properties and handling events.
- To create a Windows Forms application in C#, you can use Microsoft Visual Studio, which is an integrated development environment (IDE) that provides a visual designer to create and layout the user interface elements. The visual designer is a drag-and-drop interface for building your UI, and you can easily configure each control’s properties through a user-friendly interface.
- In addition to the visual designer, Visual Studio also provides a code editor that enables developers to write the C# code for the application’s logic. Developers can handle events and perform tasks such as data validation, data manipulation, and business logic implementation.
- Windows Forms applications are versatile and can be used to create various types of applications such as data entry, management, and reporting applications, as well as games and multimedia applications.
Overall, Windows Forms applications provide an easy-to-use and familiar graphical user interface for Windows users, making it an ideal choice for building desktop applications that require a high degree of interactivity and user engagement.
Last Updated :
04 May, 2023
Like Article
Save Article
![]()
Windows Forms
За последние несколько лет Web-ориентированные приложения стали чрезвычайно популярными. Возможность размещать всю логику приложений на централизованном сервере выглядит очень привлекательной с точки зрения администратора. Развертывание программного обеспечения, базирующегося на клиенте, очень трудно, особенно, если оно основано на COM-объектах. Недостаток Web-ориентированных приложений состоит в том, что они не могут предоставить достаточно богатых возможностей пользователю.
Платформа .NET Framework позволяет разрабатывать интеллектуальные клиентские приложения с богатыми возможностями, при этом избегая проблем с развертыванием и “DLL-адом”, как это было раньше. Независимо от того, что будет выбрано — Windows Forms или Windows Presentation Foundation (см. главу 34) — разработка или развертывание клиентских приложений теперь не представляет особой сложности.
Windows Forms уже оказал влияние на разработки для Windows. Теперь, когда приложение находится на начальной стадии проектирования, принять решение о том, нужно ли строить Web-ориентированное приложение либо же полностью клиентское, стало немного труднее. Клиентские приложения Windows могут быть разработаны быстро и эффективно, при этом они предлагают пользователям гораздо более широкие возможности.
Windows Forms покажется вам знакомым, если у вас есть опыт разработки на Visual Basic. Вы создаете новые формы (также известные как окна или диалоги) в той же манере — перетаскивая и размещая элементы управления из панели инструментов на поверхность визуального дизайнера форм (Form Designer). Однако если ваш опыт в основном касается классического стиля языка C для Windows-программирования, где приходилось создавать конвейеры сообщений и отслеживать эти сообщения, или же если вы — программист, применяющий MFC, то в этом случае вы обнаружите, что и здесь при необходимости у вас есть возможность работать с низкоуровневыми деталями. Вы можете переопределить оконную процедуру (WndProc) и перехватывать сообщения, но в действительности вас удивит, что делать это придется нечасто.
В этой главе мы рассмотрим следующие аспекты Windows Forms:
класс Form;
иерархия классов Windows Forms;
элементы управления и компоненты, являющиеся частью пространства имен
System.Windows.Forms;
меню и панели инструментов;
создание элементов управления;
создание пользовательских элементов управления.

Глава 31. Windows Forms 1055
Создание приложения Windows Forms
Первое, что необходимо сделать — создать приложение Windows Forms. Для примера создадим пустую форму и отобразим ее на экране. При разработке этого примера мы не будем использовать Visual Studio .NET. Наберем его в текстовом редакторе и соберем с помощью компилятора командной строки. Ниже показан код примера.
using System;
using System.Windows.Forms; namespace NotepadForms
{
public class MyForm : System.Windows.Forms.Form
{
public MyForm()
{
}
[STAThread] static void Main()
{
Application.Run(new MyForm());
}
}
}
Когда мы скомпилируем и запустим этот пример, то получим маленькую пустую форму без заголовка. Никаких реальных функций, но это — Windows Forms.
В приведенном коде заслуживают внимания две вещи. Первая — тот факт, что при создании класса MyForm используется наследование. Следующая строка объявляет
MyForm как наследника System.Windows.Forms.Form:
public class MyForm : System.Windows.Forms.Form
Класс Form — один из главных классов в пространстве имен System.Windows.Forms. Следующий фрагмент кода стоит рассмотреть более подробно:
[STAThread] static void Main()
{
Application.Run(new MyForm());
}
Main — точка входа по умолчанию в любое клиентское приложение на C#. Как правило, в более крупных приложениях метод Main() не будет находиться в классе формы, а скорее в классе, отвечающем за процесс запуска. В данном случае вы должны установить имя такого запускающего класса в диалоговом окне свойств проекта. Обратите внимание на атрибут [STAThread]. Он устанавливает модель многопоточности COM в STA (однопоточный апартамент). Модель многопоточности STA требуется для взаимодействия с COM и устанавливается по умолчанию в каждом проекте Windows Forms.
Метод Application.Run() отвечает за запуск стандартного цикла сообщений приложения. Application.Run() имеет три перегрузки.
Первая из них не принимает параметров; вторая принимает в качестве параметра объект ApplicationContext. В нашем примере объект MyForm становится главной формой приложения. Это означает, что когда форма закрывается, то приложение завершается. Используя класс ApplicationContext, можно в большей степени контролировать завершение главного цикла сообщений и выход из приложения.

1056 Часть V. Презентации
Класс Application содержит в себе очень полезную функциональность. Он предоставляет группу статических методов и свойств для управления процессом запуска и останова приложения, а также обеспечивает доступ к сообщениям Windows, обрабатываемым приложением. В табл. 31.1 перечислены некоторые из этих наиболее полезных методов и свойств.
Таблица 31.1. Некоторые полезные методы и свойства класса Application
|
Метод/свойство |
Описание |
|
|
CommonAppDataPath |
Путь к данным, общий для всех пользователей приложения. Обычно |
|
|
это БазовыйПуть\Название компании\Название продукта\Версия, |
||
|
где БазовыйПуть — C:\Documents and Settings\имя пользователя\ |
||
|
ExecutablePath |
ApplicationData. Если путь не существует, он будет создан. |
|
|
Путь и имя исполняемого файла, запускающего приложение. |
||
|
LocalUserAppDataPath |
Подобно |
, но с тем отличием, что поддерживается |
|
CommonAppDataPath |
||
|
роуминг (перемещаемость). |
||
|
MessageLoop |
True или false — в зависимости от того, существует ли цикл сообще- |
|
|
StartupPath |
ний в текущем потоке. |
|
|
Подобно |
, с тем отличием, что имя файла не возвра- |
|
|
щается. |
ExecutablePath |
|
|
AddMessageFilter |
Используется для предварительной обработки сообщений. Объект, |
|
|
реализующий IMessageFilter, позволяет фильтровать сообщения в |
||
|
цикле или организовать специальную обработку, выполняемую перед |
||
|
тем, как сообщение попадет в цикл. |
||
|
DoEvents |
Аналогично оператору DoEvents языка Visual Basic. Позволяет обрабо- |
|
|
тать сообщения в очереди. |
||
|
EnableVisualStyles |
Обеспечивает визуальный стиль Windows XP для различных визуальных |
|
|
элементов приложения. Существуют две перегрузки, принимающие |
||
|
информацию манифеста. Одна работает с потоком манифеста, вто- |
||
|
рая — принимает полное имя и путь файла манифеста. |
||
|
Exit и ExitThread |
Exit завершает текущий работающий цикл сообщений и вызывает вы- |
|
|
ход из приложения. ExitThread завершает цикл сообщений и закры- |
||
|
вает все окна текущего потока. |
А теперь как будет выглядеть это приложение, если его сгенерировать в Visual Studio 2008? Первое, что следует отметить — будет создано два файла. Причина в том, что Visual Studio 2008 использует возможность частичных (partial) классов и выделяет весь код, сгенерированный визуальным дизайнером, в отдельный файл. Если используется имя по умолчанию — Form1, то эти два файла будет называться Form1.cs и Form1.Designer.cs. Если только у вас не включена опция Show All Files (Показать все файлы) в меню Project (Проект), то вы не увидите в проводнике Solution Explorer файла Form1.Designer.cs. Ниже показан код этих двух файлов, сгенерированных Visual Studio. Сначала — Form1.cs:
using System;
using System.Collections.Generic; using System.ComponentModel; using System.Data;
using System.Drawing; using System.Linq; using System.Text;

Глава 31. Windows Forms 1057
using System.Windows.Forms;
namespace VisualStudioForm
{
public partial class Form1 : Form
{
public Form1()
{
InitializeComponent();
}
}
}
Здесь мы видим только операторы using и простой конструктор. А вот код Form1. Designer.cs:
namespace VisualStudioForm
{
partial class Form1
{
///<summary>
///Required designer variable.
///</summary>
private System.ComponentModel.IContainer components = null;
///<summary>
///Clean up any resources being used.
///</summary>
///< param name=»disposing» > true if managed resources should be disposed; otherwise, false. < /param >
protected override void Dispose(bool disposing)
{
if (disposing && (components != null))
{
components.Dispose();
}
base.Dispose(disposing);
}
#region Windows Form Designer generated code
///<summary>
///Required method for Designer support — do not modify
///the contents of this method with the code editor.
///</summary>
private void InitializeComponent()
{
this.components = new System.ComponentModel.Container(); this.AutoScaleMode = System.Windows.Forms.AutoScaleMode.Font; this.Text = «Form1»;
}
#endregion
}
}
Файл, сгенерированный дизайнером форм, редко подвергается ручному редактированию. Единственным исключением может быть случай, когда необходима специальная обработка в методе Dispose(). Метод InitializeComponent мы обсудим позднее в этой главе.
Если взглянуть на этот код примера приложения в целом, то мы увидим, что он намного длиннее, чем простой пример командной строки. Здесь перед началом класса присутствует несколько операторов using, и большинство из них в данном примере не нужны. Однако их присутствие ничем не мешает. Класс Form1 наследуется от

1058 Часть V. Презентации
System.Windows.Forms.Form, как и в предыдущем, введенном в Notepad примере, но в этой точке начинаются расхождения. Во-первых, в файле Form1.Designer появляется строка:
private System.ComponentModel.IContainer components = null;
В данном примере эта строка кода ничего не делает. Но, добавляя компонент в форму, вы можете также добавить его в объект components, который представляет собой контейнер. Причина добавления этого контейнера — в необходимости правильной обработки уничтожения формы. Класс формы поддерживает интерфейс IDisposable, потому что он реализован в классе Component. Когда компонент добавляется в контейнер, то этот контейнер должен позаботиться о корректном уничтожении своего содержимого при закрытии формы. Это можно увидеть в методе Dispose нашего примера:
protected override void Dispose(bool disposing)
{
if (disposing && (components != null))
{
components.Dispose();
}
base.Dispose(disposing);
}
Здесь мы видим, что когда вызывается метод Dispose формы, то также вызывается метод Dispose объекта components, поскольку он содержит в себе другие компоненты, которые также должны быть корректно удалены.
Конструктор класса Form1, находящийся в файле Form1.cs, выглядит так:
public Form1()
{
InitializeComponent();
}
Обратите внимание на вызов InitializeComponent().
Метод InitializeComponent() находится в файле Form1.Designer.cs и делает то, что следует из его наименования — инициализирует все элементы управления, которые могут быть добавлены к форме. Он также инициализирует свойства формы.
В нашем примере метод InitializeComponent() выглядит следующим образом:
private void InitializeComponent()
{
this.components = new System.ComponentModel.Container(); this.AutoScaleMode = System.Windows.Forms.AutoScaleMode.Font; this.Text = «Form1»;
}
Как видите, здесь присутствует лишь базовый код инициализации. Этот метод связан с визуальным дизайнером Visual Studio. Когда в форму вносятся изменения в дизайнере, они отражаются на InitializeComponent(). Если вы вносите любые изменения в InitializeComponent(), то следующий раз после того, как что-то будет изменено в дизайнере, эти ручные изменения будут утеряны. InitializeComponent() повторно генерируется после каждого изменения дизайна формы. Если возникает необходимость добавить некоторый дополнительный код для формы или элементов управления и компонентов формы, это должно быть сделано после вызова InitializeComponent(). Этот метод также отвечает за создание экземпляров элементов управления, поэтому любой вызов, ссылающийся на них, выполненный до InitializeComponent(), завершится возбуждением исключения нулевой ссылки.

Глава 31. Windows Forms 1059
Чтобы добавить элемент управления или компонент в форму, нажмите комбинацию клавиш <Ctrl+Alt+X> или выберите пункт меню View Toolbox (Вид Панель инструментов) в среде Visual Studio .NET. Щелкните правой кнопкой мыши на Form1.cs в проводнике Solution Explorer и в появившемся контекстном меню выберите пункт View Designer (Показать дизайнер). Выберите элемент управления Button и перетащите на поверхность формы в визуальном дизайнере. Можно также дважды щелкнуть на выбранном элементе управления, и он будет добавлен в форму. То же самое следует проделать с элементом TextBox.
Теперь, после добавления этих двух элементов управления на форму, метод InitializeComponent() расширяется и содержит такой код:
private void InitializeComponent()
{
this.button1 = new System.Windows.Forms.Button(); this.textBox1 = new System.Windows.Forms.TextBox(); this.SuspendLayout();
//
//button1
this.button1.Location = new System.Drawing.Point(77, 137); this.button1.Name = «button1»;
this.button1.Size = new System.Drawing.Size(75, 23); this.button1.TabIndex = 0;
this.button1.Text = «button1»; this.button1.UseVisualStyleBackColor = true;
//textBox1
//
this.textBox1.Location = new System.Drawing.Point(67, 75); this.textBox1.Name = «textBox1»;
this.textBox1.Size = new System.Drawing.Size(100, 20); this.textBox1.TabIndex = 1;
//
// Form1
//
this.AutoScaleDimensions = new System.Drawing.SizeF(6F, 13F); this.AutoScaleMode = System.Windows.Forms.AutoScaleMode.Font; this.ClientSize = new System.Drawing.Size(284, 264); this.Controls.Add(this.textBox1); this.Controls.Add(this.button1);
this.Name = «Form1»; this.Text = «Form1»; this.ResumeLayout(false); this.PerformLayout();
}
Если посмотреть на первые три строки кода этого метода, мы увидим в них создание экземпляров элементов управления Button и TextBox. Обратите внимание на имена, присвоенные им — textBox1 и button1. По умолчанию дизайнер в качестве имен использует имя класса элемента управления, дополненное целым числом. Когда вы добавляете следующую кнопку, дизайнер называет ее button2 и т.д. Следующая строка — часть пары SuspendLayout/ResumeLayout. Метод SuspendLayout() временно приостанавливает события размещения, которые имеют место при первоначальной инициализации элемента управления. В конце метода вызывается ResumeLayout(), чтобы вернуть все в норму. В сложной форме с множеством элементов управления метод InitializeComponent() может стать достаточно большим.

1060 Часть V. Презентации
Чтобы изменить значения свойств элемента управления, нужно либо нажать <F4>, либо выбрать пункт меню View Properties Window (Вид Окно свойств). Это окно позволяет модифицировать большинство свойств элемента управления или компонента. При внесении изменений в окне свойств метод InitializeComponent() автоматически переписывается с тем, чтобы отразить новые значения свойств. Например, изменив свойство Text на My Button в окне свойств, получим следующий код в
InitializeComponent():
//
// button1
//
this.button1.Location = new System.Drawing.Point(77, 137); this.button1.Name = «button1»;
this.button1.Size = new System.Drawing.Size(75, 23); this.button1.TabIndex = 0;
this.button1.Text = «My Button»; this.button1.UseVisualStyleBackColor = true;
Даже если вы предпочитаете использовать какой-то редактор, отличный от Visual Studio .NET, то наверняка захотите включать функции вроде InitializeComponent() в свои проекты. Сохранение всего кода инициализации в одном месте обеспечит возможность его вызова из каждого конструктора.
Иерархия классов
Важность понимания иерархии становится очевидной в процессе проектирования и конструирования пользовательских элементов управления. Если такой элемент управления унаследован от конкретного библиотечного элемента управления, например, когда создается текстовое поле с некоторыми дополнительными методами и свойствами, то имеет смысл унаследовать его от обычного текстового поля и затем переопределить и добавить необходимые методы. Однако если приходится создавать элемент управления, который не соответствует ни одному из существующих в .NET Framework, то его придется унаследовать от одного из базовых классов: Control или ScrollableControl, если нужны возможности прокрутки, либо ContainerControl, если он должен служить контейнером для других элементов управления.
Остальная часть этой главы посвящена изучению большинства из этих классов — как они работают вместе, и как их можно использовать для построения профессионально выглядящих клиентских приложений.
Класс Control
Пространство имен System.Windows.Forms включает один класс, который является базовым почти для всех элементов управления и форм — System.Windows.Forms. Control. Он реализует основную функциональность для создания экранов, которые видит пользователь. Класс Control унаследован от System.ComponentModel.Component. Класс Component обеспечивает классу Control инфраструктуру, необходимую для того, чтобы его можно было перетаскивать и помещать на поле дизайнера, а также, чтобы он мог включать в себя другие элементы управления. Класс Control предлагает огромный объем функциональности классам, наследуемым от него. Этот список слишком большой, чтобы приводить его здесь, поэтому в данном разделе мы рассмотрим только наиболее важные возможности, предоставляемые классом Control. Позднее в этой главе, когда мы будем рассматривать специфические элементы управления, основанные на Control, мы увидим эти методы и свойства в коде примеров. Следующие

Глава 31. Windows Forms 1061
подразделы группируют методы и свойства по их функциональности, поэтому взаимосвязанные элементы могут быть рассмотрены вместе.
Размер и местоположение
Размер и местоположение элементов управления определяются свойствами Height, Width, Top, Bottom, Left и Right, вместе с дополняющими их Size и Location. Отличие состоит в том, что Height, Width, Top, Bottom, Left и Right принимают одно целое значение. Size принимает значение структуры Size, а Location — значение структуры Point. Структуры Size и Point включают в себя координаты X, Y. Point обычно описывает местоположение, а Size — высоту и ширину объекта. Size и Point определены в пространстве имен System.Drawing. Обе структуры очень похожи в том, что представляют пары координат X, Y, но, кроме того — переопределенные операции, упрощающие сравнения и преобразования. Вы можете, например, складывать вместе две структуры Size. В случае структуры Point операция сложения переопределена таким образом, что можно прибавить к Point структуру Size и получить в результате Point. Это дает эффект прибавления расстояния к местоположению, чтобы получить новое местоположение, что очень удобно для динамического создания форм и элементов управления.
Свойство Bounds возвращает объект Rectangle, представляющий экранную область, занятую элементом управления. Эта область включает полосы прокрутки и заголовка. Rectangle также относится к пространству имен System.Drawing. Свойство ClientSize — структура Size, представляющая клиентскую область элемента управления за вычетом полос прокрутки и заголовка.
Методы PointToClient и PointToScreen — удобные методы преобразования, которые принимают Point и возвращают Point. Метод PointToClient принимает структуру Point, представляющую экранные координаты, и транслирует их в координаты текущего клиентского объекта. Это удобно для операций перетаскивания. Метод PointToScreen выполняет обратную операцию — принимает координаты в клиентском объекте и транслирует их в экранные координаты.
Методы RectangleToScreen и ScreenToRectangle выполняют те же операции, но со структурами Rectangle вместо Point.
Свойство Dock определяет, к какой грани родительского элемента управления должен пристыковываться данный элемент. Перечисление DockStyle задает возможные значения этого свойства. Они могут быть такими: Top, Bottom, Right, Left, Fill и None. Значение Fill устанавливает размер данного элемента управления равным размеру родительского.
Свойство Anchor (якорь) прикрепляет грань данного элемента управления к грани родительского элемента управления. Это отличается от стыковки (docking) тем, что не устанавливает грань дочернего элемента управления точно на грань родительского, а просто выдерживает постоянное расстояние между ними. Например, если якорь правой грани элемента управления установлен на правую грань родительского элемента, и если родитель изменяет размер, то правая грань данного элемента сохраняет постоянную дистанцию от правой грани родителя — т.е. он изменяет размер вместе с родителем. Свойство Anchor принимает значения из перечисления AnchorStyle, а именно: Top, Bottom, Left, Right и None. Устанавливая эти значения, можно заставить элемент управления изменять свой размер динамически вместе с родителем. Таким образом, кнопки и текстовые поля не будут усечены или скрыты при изменении размеров формы пользователем.
Свойства Dock и Anchor применяются в сочетании с компоновками элементов управления Flow и Table (о которых мы поговорим позднее в этой главе) и позволя-

1062 Часть V. Презентации
ют создавать очень сложные пользовательские окна. Изменение размеров окна может оказаться достаточно непростой задачей для сложных форм с множеством элементов управления. Эти инструменты существенно облегчают задачу.
Внешний вид
Свойства, имеющие отношение к внешнему виду элемента управления — это
BackColor и ForeColor, которые принимают объект System.Drawing.Color в качестве значения. Свойство BackGroundImage принимает объект графического образа как значение. Класс System.Drawing.Image — абстрактный класс, служащий в качестве базового для классов Bitmap и Metafile. Свойство BackgroundImageLayout использует перечисление ImageLayout для определения способа отображения графического образа в элементе управления. Допустимые значения таковы: Center, Tile, Stretch,
Zoom или None.
Свойства Font и Text работают с надписями. Чтобы изменить Font, необходимо создать объект Font. При создании этого объекта указывается имя, стиль и размер шрифта.
Взаимодействие с пользователем
Взаимодействие с пользователем лучше всего описывается серией событий, которые генерирует элемент управления и на которые он реагирует. Некоторые из наиболее часто используемых событий: Click, DoubleClick, KeyDown, KeyPress,
Validating и Paint.
События, связанные с мышью — Click, DoubleClick, MouseDown, MouseUp,
MouseEnter, MouseLeave и MouseHover — описывают взаимодействие мыши и экранного элемента управления. Если вы обрабатываете оба события — Click и DoubleClick — то всякий раз, когда перехватывается событие DoubleClick, также возбуждается и событие Click. Это может привести к нежелательным последствиям при неправильной обработке. К тому же и Click, и DoubleClick принимают в качестве аргумента EventArgs, в то время как события MouseDown и MouseUp принимают MouseEventArgs. Структура MouseEventArgs содержит несколько частей полезной информации — например, о кнопке, на которой был выполнен щелчок, количестве щелчков на кнопке, количестве щелчков колесика мыши (при условии его наличия), текущих координатах X и Y указателя мыши. Если нужен доступ к любой подобной информации, то вместо событий Click или DoubleClick потребуется обрабатывать события MouseDown и MouseUp.
События клавиатуры работают подобным образом. Объем необходимой информации определяет выбор обрабатываемых событий. Для простейших случаев событие KeyPress принимает KeyPressEventArgs. Эта структура включает KeyChar, представляющий символ нажатой клавиши. Свойство Handled используется для определения того, было ли событие обработано. Установив значение Handled в true, можно добиться того, что событие не будет передано операционной системе для совершения стандартной обработки. Если необходима дополнительная информация о нажатой клавише, то больше подойдут события KeyDown или KeyUp. Оба принимают структуру KeyEventArgs. Свойства KeyEventArgs включают признак одновременного состояния клавиш <Ctrl>, <Alt> или <Shift>. Свойство KeyCode возвращает значение типа перечисления Keys, идентифицирующее нажатую клавишу. В отличие от свойства KeyPressEventArgs.KeyChar, свойство KeyCode сообщает о каждой клавише клавиатуры, а не только о буквенно-цифровых клавишах. Свойство KeyData возвращает значение типа Keys, а также устанавливает модификатор. Значение модификатора со-

Глава 31. Windows Forms 1063
провождает значение клавиши, объединяясь с ним двоичной логической операцией “ИЛИ”. Таким образом, можно получить информацию о том, была ли одновременно нажата клавиша <Shift> или <Ctrl>. Свойство KeyValue — целое значение из перечисления Keys. Свойство Modifiers содержит значение типа Keys, представляющее нажатые модифицирующие клавиши. Если было нажато более одной такой клавиши, их значения объединяются операцией “ИЛИ”. События клавиш поступают в следующем порядке:
1.KeyDown
2.KeyPress
3.KeyUp
События Validating, Validated, Enter, Leave, GotFocus и LostFocus имеют отношение к получению фокуса элементами управления (т.е. когда становятся активными) и утере его. Это случается, когда пользователь нажатием клавиши <Tab> переходит к данному элементу управления либо выбирает его мышью. Может показаться, что события Enter, Leave, GotFocus и LostFocus очень похожи в том, что они делают. События GotFocus и LostFocus относятся к низкоуровневым, и связаны с событиями Windows WM_SETFOCUS и WM_KILLFOCUS. Обычно когда возможно, лучше использовать события Enter и Leave. События Validating и Validated возбуждаются при проверке данных в элементе управления. Эти события принимают аргумент CancelEventArgs. С его помощью можно отменить последующие события, установив свойство Cancel в true. Если вы разрабатываете собственный проверочный код, и проверка завершается неудачно, то в этом случае можно установить Cancel в true — тогда элемент управления не утратит фокус. Validating происходит во время проверки, а Validated — после нее. Порядок возникновения событий следующий:
1.Enter
2.GotFocus
3.Leave
4.Validating
5.Validated
6.LostFocus
Понимание последовательности этих событий важно, чтобы избежать рекурсивных ситуаций. Например, попытка установить фокус элемента управления внутри обработчика события LostFocus создает ситуацию взаимоблокировки в цикле событий, и приложение перестает реагировать на внешние воздействия.
Функциональность Windows
Пространство имен System.Windows.Forms — одно из немногих, полагающихся на функциональность операционной системы Windows. Класс Control — хороший тому пример. Если выполнить дизассемблирование System.Windows.Forms.dll, то можно увидеть список ссылок на класс UnsafeNativeMethods. Среда .NET Framework использует этот класс как оболочку для всех стандартных вызовов Win32 API. Благодаря возможности взаимодействия с Win32 API, внешний вид и поведение стандартного приложения Windows можно обеспечить средствами пространства имен System. Windows.Forms.
Функциональность, которая поддерживает взаимодействие с Windows, включает свойства Handle и IsHandleCreated. Свойство Handle возвращает IntPtr, содержащий HWND (дескриптор окна) элемента управления. Дескриптор окна — это HWND, уни-