Fedora Draft Documentation
Руководство по установке
Установка Fedora 17 на архитектуры x86, AMD64 и Intel 64
Редакция 17.0.1
Fedora Документация
Юридическое уведомление
Copyright © 2012 Red Hat, Inc. and others.
The text of and illustrations in this document are licensed by Red Hat under a Creative Commons Attribution–Share Alike 3.0 Unported license («CC-BY-SA»). An explanation of CC-BY-SA is available at http://creativecommons.org/licenses/by-sa/3.0/. The original authors of this document, and Red Hat, designate the Fedora Project as the «Attribution Party» for purposes of CC-BY-SA. In accordance with CC-BY-SA, if you distribute this document or an adaptation of it, you must provide the URL for the original version.
Red Hat, as the licensor of this document, waives the right to enforce, and agrees not to assert, Section 4d of CC-BY-SA to the fullest extent permitted by applicable law.
Red Hat, Red Hat Enterprise Linux, the Shadowman logo, JBoss, MetaMatrix, Fedora, the Infinity Logo, and RHCE are trademarks of Red Hat, Inc., registered in the United States and other countries.
Linux® is the registered trademark of Linus Torvalds in the United States and other countries.
Java® is a registered trademark of Oracle and/or its affiliates.
XFS® is a trademark of Silicon Graphics International Corp. or its subsidiaries in the United States and/or other countries.
MySQL® is a registered trademark of MySQL AB in the United States, the European Union and other countries.
All other trademarks are the property of their respective owners.
Аннотация
Руководство по процессу установки.
- Preface
-
- 1. Соглашения документа
-
- 1.1. Типографические соглашения
- 1.2. Соглашения по выделению текста
- 1.3. Примечания и предупреждения
- 2. Нам нужны ваши отзывы!
- 3. Acknowledgments
- Введение
-
- 1. Предыстория
-
- 1.1. О Fedora
- 1.2. Получение дополнительно помощи
- 2. Об этом руководстве
-
- 2.1. Цели
- 2.2. Аудитория
- 1. Quick Start for Experts
-
- 1.1. Overview
- 1.2. Download Files
- 1.3. Prepare for Installation
- 1.4. Install Fedora
- 1.5. Perform Post-installation Steps
- 2. Получение Fedora
-
- 2.1. Загрузка Fedora
-
- 2.1.1. Как загрузить установочные файлы?
- 2.1.2. Как узнать архитектуру моего компьютера?
- 2.1.3. Какие файлы нужно загрузить?
- 2.2. Получение Fedora на CD/DVD
- 3. Making Media
-
- 3.1. Making an installation DVD
- 3.2. Preparing a USB flash drive as an installation source
-
- 3.2.1. Making Fedora USB Media on a Windows Operating System
- 3.2.2. Making Fedora USB Media in UNIX, Linux, and Similar Operating Systems
- 3.3. Making Minimal Boot Media
-
- 3.3.1. UEFI-based systems
- I. Installation and Booting
-
- 4. Планирование установки на платформе x86
-
- 4.1. Upgrade or Install?
- 4.2. Is Your Hardware Compatible?
- 4.3. RAID and Other Disk Devices
-
- 4.3.1. Hardware RAID
- 4.3.2. Software RAID
- 4.3.3. FireWire and USB Disks
- 4.4. Достаточно ли дискового пространства?
- 4.5. Selecting an Installation Method
- 4.6. Choose a boot method
- 5. Preparing for Installation
-
- 5.1. Preparing for a Network Installation
-
- 5.1.1. Preparing for FTP and HTTP installation
- 5.1.2. Подготовка к NFS-установке
- 5.2. Preparing for a Hard Drive Installation
- 6. System Specifications List
- 7. Booting the Installer
-
- 7.1. Starting the Installation Program
-
- 7.1.1. Booting the Installation Program on x86, AMD64, and Intel 64 Systems
- 7.1.2. The Boot Menu
- 7.1.3. Additional Boot Options
- 7.2. Booting from the Network using PXE
- 8. Configuring Installation Source
-
- 8.1. Installation Method
-
- 8.1.1. Installing from DVD
- 8.1.2. Installing from a Hard Drive
- 8.1.3. Installing via NFS
- 8.1.4. Installing via FTP or HTTP
- 9. Installing using anaconda
-
- 9.1. The Text Mode Installation Program User Interface
-
- 9.1.1. Using the Keyboard to Navigate
- 9.2. The Graphical Installation Program User Interface
-
- 9.2.1. Screenshots during installation
- 9.2.2. A Note about Virtual Consoles
- 9.3. Language Selection
- 9.4. The Pre-Installation Hub
- 9.5. Configuring date and time
- 9.6. Keyboard Configuration
- 9.7. Language Selection
- 9.8. Installation Source
- 9.9. Network configuration
-
- 9.9.1. Изменение сетевых подключений
- 9.10. Software Selection
-
- 9.10.1. Installing from Additional Repositories
- 9.10.2. Core Network Services
- 9.11. Устройства хранения
-
- 9.11.1. Окно выбора устройств хранения
- 9.12. Assign Storage Devices
- 9.13. Initializing the Hard Disk
- 9.14. Upgrading an Existing System
-
- 9.14.1. Экран обновления системы
- 9.14.2. Upgrading Using the Installer
- 9.14.3. Upgrading Boot Loader Configuration
- 9.15. Disk Partitioning Setup
- 9.16. Encrypt Partitions
- 9.17. Creating a Custom Layout or Modifying the Default Layout
-
- 9.17.1. Create Storage
- 9.17.2. Adding Partitions
- 9.17.3. Create Software RAID
- 9.17.4. Create LVM Logical Volume
- 9.17.5. Recommended Partitioning Scheme
- 9.18. Write changes to disk
- 9.19. Настройка загрузчика на платформах x86, AMD64 и Intel 64
-
- 9.19.1. Advanced Boot Loader Configuration
- 9.19.2. Rescue Mode
- 9.19.3. Alternative Boot Loaders
- 9.20. The Progress Hub
-
- 9.20.1. Set the Root Password
- 9.21. Installation Complete
- 10. Диагностика проблем при установке в системах Intel и AMD
-
- 10.1. Невозможно загрузить Fedora
-
- 10.1.1. Are You Unable to Boot With Your RAID Card?
- 10.1.2. Is Your System Displaying Signal 11 Errors?
- 10.2. Trouble Beginning the Installation
-
- 10.2.1. Problems with Booting into the Graphical Installation
- 10.3. Проблемы во время установки
-
- 10.3.1. Ошибка:
Не найдены устройства для установки Fedora - 10.3.2. Сохранение сообщений отладки
- 10.3.3. Trouble with Partition Tables
- 10.3.4. Using Remaining Space
- 10.3.5. Other Partitioning Problems
- 10.3.1. Ошибка:
- 10.4. Problems After Installation
-
- 10.4.1. Trouble With the Graphical GRUB Screen on an x86-based System?
- 10.4.2. Blocked by a GRUB command line after upgrading?
- 10.4.3. Booting into a Graphical Environment
- 10.4.4. Problems with the X Window System (GUI)
- 10.4.5. Problems with the X Server Crashing and Non-Root Users
- 10.4.6. Problems When You Try to Log In
- 10.4.7. Is Your RAM Not Being Recognized?
- 10.4.8. Your Printer Does Not Work
- 10.4.9. Apache HTTP Server or Sendmail stops responding during startup
- II. Advanced installation options
-
- 11. Boot Options
-
- 11.1. Configuring the Installation System at the Boot Menu
-
- 11.1.1. Specifying the Language
- 11.1.2. Configuring the Interface
- 11.1.3. Updating anaconda
- 11.1.4. Specifying the Installation Method
- 11.1.5. Specifying the Network Settings
- 11.2. Enabling Remote Access to the Installation System
-
- 11.2.1. Enabling Remote Access with VNC
- 11.2.2. Connecting the Installation System to a VNC Listener
- 11.2.3. Enabling Remote Access with ssh
- 11.3. Logging to a Remote System During the Installation
-
- 11.3.1. Configuring a Log Server
- 11.4. Automating the Installation with Kickstart
- 11.5. Enhancing Hardware Support
-
- 11.5.1. Overriding Automatic Hardware Detection
- 11.6. Using the Maintenance Boot Modes
-
- 11.6.1. Загрузка режима тестирования памяти (ОЗУ)
- 11.6.2. Verifying boot media
- 11.6.3. Booting Your Computer with the Rescue Mode
- 11.6.4. Upgrading your computer
- 12. Installing Without Media
-
- 12.1. Retrieving Boot Files
- 12.2. Editing the GRUB Configuration
- 12.3. Booting to Installation
- 13. Setting Up an Installation Server
-
- 13.1. Setting Up cobbler
- 13.2. Setting Up the Distribution
- 13.3. Mirroring a Network Location
- 13.4. Importing the Distribution
- 13.5. Manually configure a PXE server
-
- 13.5.1. Setting up the Network Server
- 13.5.2. PXE Boot Configuration
- 13.5.3. Starting the
tftpServer - 13.5.4. Adding a Custom Boot Message
- 13.5.5. Performing the PXE Installation
- 14. Installing Through VNC
-
- 14.1. VNC Viewer
- 14.2. VNC Modes in Anaconda
-
- 14.2.1. Direct Mode
- 14.2.2. Connect Mode
- 14.3. Installation Using VNC
-
- 14.3.1. Installation Example
- 14.3.2. Kickstart Considerations
- 14.3.3. Firewall Considerations
- 14.4. References
- 15. Kickstart Installations
-
- 15.1. What are Kickstart Installations?
- 15.2. How Do You Perform a Kickstart Installation?
- 15.3. Creating the Kickstart File
- 15.4. Kickstart Options
-
- 15.4.1. Advanced Partitioning Example
- 15.5. Package Selection
- 15.6. Pre-installation Script
-
- 15.6.1. Example
- 15.7. Post-installation Script
-
- 15.7.1. Example
- 15.8. Making the Kickstart File Available
-
- 15.8.1. Creating Kickstart Boot Media
- 15.8.2. Making the Kickstart File Available on the Network
- 15.9. Making the Installation Tree Available
- 15.10. Starting a Kickstart Installation
- 16. Kickstart Configurator
-
- 16.1. Basic Configuration
- 16.2. Installation Method
- 16.3. Boot Loader Options
- 16.4. Partition Information
-
- 16.4.1. Creating Partitions
- 16.5. Network Configuration
- 16.6. Authentication
- 16.7. Firewall Configuration
-
- 16.7.1. SELinux Configuration
- 16.8. Display Configuration
- 16.9. Package Selection
- 16.10. Pre-Installation Script
- 16.11. Post-Installation Script
-
- 16.11.1. Chroot Environment
- 16.11.2. Use an Interpreter
- 16.12. Saving the File
- III. After installation
-
- 17. Firstboot
-
- 17.1. License Agreement
- 17.2. Create User
-
- 17.2.1. Authentication Configuration
- 17.3. Date and Time
- 17.4. Hardware Profile
- 18. Your Next Steps
-
- 18.1. Updating Your System
- 18.2. Finishing an Upgrade
- 18.3. Switching to a Graphical Login
-
- 18.3.1. Активация доступа к репозиториям из командной строки
- 18.4. Подписка на объявления и новости Fedora
- 18.5. Документация и поддержка
- 18.6. Вступление в сообщество Fedora
- 19. Basic System Recovery
-
- 19.1. Rescue Mode
-
- 19.1.1. Common Problems
- 19.1.2. Booting into Rescue Mode
- 19.1.3. Booting into Single-User Mode
- 19.1.4. Booting into Emergency Mode
- 19.2. Using rescue mode to fix or work around driver problems
-
- 19.2.1. Using RPM to add, remove, or replace a driver
- 19.2.2. Blacklisting a driver
- 20. Upgrading Your Current System
-
- 20.1. Determining Whether to Upgrade or Re-Install
- 20.2. Upgrading Your System
- 21. Удаление Fedora
-
- 21.1. Fedora является единственной операционной системой
- 21.2. Двойная загрузка: Fedora и другая операционная система
-
- 21.2.1. Настроена двойная загрузка (Fedora и Microsoft Windows)
- 21.2.2. Двойная загрузка: Fedora и Mac OS X
- 21.2.3. Двойная загрузка: Fedora и другой дистрибутив Linux
- 21.3. Замена Fedora ранними версиями Microsoft Windows и MS-DOS
- IV. Technical appendixes
-
- A. An Introduction to Disk Partitions
-
- A.1. Hard Disk Basic Concepts
-
- A.1.1. It is Not What You Write, it is How You Write It
- A.1.2. Partitions: Turning One Drive Into Many
- A.1.3. Partitions within Partitions — An Overview of Extended Partitions
- A.1.4. Выделение места для Fedora
- A.1.5. Partition Naming Scheme
- A.1.6. Disk Partitions and Other Operating Systems
- A.1.7. Disk Partitions and Mount Points
- A.1.8. How Many Partitions?
- B. ISCSI disks
-
- B.1. iSCSI disks in anaconda
- B.2. iSCSI disks during start up
- C. Disk Encryption
-
- C.1. What is block device encryption?
- C.2. Encrypting block devices using dm-crypt/LUKS
-
- C.2.1. Overview of LUKS
- C.2.2. How will I access the encrypted devices after installation? (System Startup)
- C.2.3. Choosing a Good Passphrase
- C.3. Creating Encrypted Block Devices in Anaconda
-
- C.3.1. What Kinds of Block Devices Can Be Encrypted?
- C.3.2. Saving Passphrases
- C.3.3. Creating and Saving Backup Passphrases
- C.4. Creating Encrypted Block Devices on the Installed System After Installation
-
- C.4.1. Create the block devices
- C.4.2. Optional: Fill the device with random data
- C.4.3. Format the device as a dm-crypt/LUKS encrypted device
- C.4.4. Create a mapping to allow access to the device’s decrypted contents
- C.4.5. Create filesystems on the mapped device, or continue to build complex storage structures using the mapped device
- C.4.6. Add the mapping information to
/etc/crypttab - C.4.7. Add an entry to
/etc/fstab
- C.5. Common Post-Installation Tasks
-
- C.5.1. Set a randomly generated key as an additional way to access an encrypted block device
- C.5.2. Add a new passphrase to an existing device
- C.5.3. Remove a passphrase or key from a device
- D. Understanding LVM
- E. The GRUB Boot Loader
-
- E.1. Boot Loaders and System Architecture
- E.2. GRUB
-
- E.2.1. GRUB and the boot process on BIOS-based x86 systems
- E.2.2. GRUB and the boot process on UEFI-based x86 systems
- E.2.3. Features of GRUB
- E.3. Installing GRUB
- E.4. GRUB Terminology
-
- E.4.1. Device Names
- E.4.2. File Names and Blocklists
- E.4.3. The Root File System and GRUB
- E.5. GRUB Interfaces
-
- E.5.1. Interfaces Load Order
- E.6. GRUB Commands
- E.7. GRUB Menu Configuration File
-
- E.7.1. Configuration File Structure
- E.7.2. Configuration File Directives
- E.8. Changing Runlevels at Boot Time
- E.9. Additional Resources
-
- E.9.1. Installed Documentation
- E.9.2. Useful Websites
- F. Boot Process, Init, and Shutdown
-
- F.1. The Boot Process
- F.2. A Detailed Look at the Boot Process
-
- F.2.1. The firmware interface
- F.2.2. UEFI-based x86 systems
- F.3. The Boot Loader
-
- F.3.1. The GRUB2 boot loader for x86 systems
- F.3.2. Boot Loaders for Other Architectures
- F.4. The Kernel
- F.5. Booting with systemd
- F.6. systemd
units - F.7. systemd targets
- F.8. Running Additional Programs at Boot Time
- F.9. Administering services with systemd
-
- F.9.1. Checking up on services
- F.9.2. Starting and stopping services
- F.9.3. Running services automatically
- F.9.4. Killing and Masking services
- F.9.5. Getting more from
systemd
- G. Logging the Installation
-
- G.1. Log files and formats
-
- G.1.1. Logging on the installed system
- G.2. Remote logging with rsyslog
- G.3. Remote logging via virtio
- H. Other Technical Documentation
- I. Contributors and production methods
-
- I.1. Contributors
- I.2. Production methods
- J. Revision History
- Предметный указатель
Preface
1. Соглашения документа
В этом руководстве используются различные стили для выделения текста.
В PDF и бумажной версиях руководства используются шрифты семейства Liberation. Эти же шрифты будут использоваться для отображения HTML-версии, если они установлены в вашей системе. В противном случае будут использоваться аналогичные шрифты. Red Hat Enterprise Linux 5 и более поздние версии включают в свой состав комплект Liberation по умолчанию.
1.1. Типографические соглашения
Для выделения текста используются четыре стиля, которые будут перечислены далее.
Моноширинный жирный шрифт
Используется для выделения вводимого текста, включая команды оболочки, а также имен файлов, путей и комбинаций клавиш. Пример:
Чтобы просмотреть содержимое файла
my_next_bestselling_novelв текущем каталоге, в строке приглашения оболочки введитеcat my_next_bestselling_novelи нажмите Enter для выполнения этой команды.
Приведенный текст содержит имя файла, команду оболочки и имя клавиши, которые выделены моноширинным жирным шрифтом.
Для разделения клавиш в составе комбинаций используется дефис. Пример:
Нажмите Enter для исполнения команды.
Нажмите Ctrl+Alt+F2 для перехода в первый виртуальный терминал. Нажмите Ctrl+Alt+F1 , чтобы вернуться в сессию X-Windows.
В первом примере жирным шрифтом выделено название отдельной клавиши, во втором — комбинаций клавиш.
Этим же шрифтом выделяются имена классов, методов, функций, переменных и возвращаемые ими значения. Пример:
Классы файлов включают
filesystemдля файловых систем,fileдля файлов,dirдля каталогов. Каждому классу соответствует набор разрешений.
Пропорциональный жирный
Выделяет системные слова и фразы, что включает имена приложений, текст диалогов, названия меню, текст кнопок, флажков и других элементов графического интерфейса. Пример:
В главном меню выберите → → для запуска утилиты Настройки мыши. На вкладке Кнопки установите флажок Настроить мышь под левую руку и нажмите кнопку Закрыть, чтобы настроить мышь для левши.
Чтобы вставить специальный символ в файл gedit, выберите → → . Затем в меню выберите → , введите имя символа и нажмите кнопку Найти следующее. Найденный символ будет выделен в таблице символов. Дважды щелкните на этом символе, чтобы вставить его в поле Текст для копирования и нажмите кнопку Копировать. Теперь вернитесь к вашему документу и в меню выберите → .
Приведенный выше текст содержит имя приложения, названия меню, кнопок и текста элементов графического интерфейса.
Моноширинный жирный курсивпропорциональный жирный курсив
Оба типа выделения обозначают изменяемый или заменяемый текст. Курсив сообщает о том, что не следует вводить приведенный текст напрямую, а изменить в соответствии с вашими настройками. Пример:
Для подключения к удаленной машине с помощью SSH в строке приглашения выполните
ssh. Скажем, имя удаленной машины –имя_пользователя@имя_доменаexample.com, а ваше имя пользователя – john, тогда команда будет выглядеть так:ssh john@example.com.Команда
mount -o remountповторно подключит заданную файловую систему. Например, дляфайловая_система/homeкоманда будет выглядеть так:mount -o remount /home.Чтобы просмотреть версию установленного пакета, выполните команду
rpm -q. Результат команды будет представлен в форматепакет.пакет-версия-выпуск
В приведенных примерах жирным курсивом выделяются имя пользователя, имя домена, файловой системы, пакет, его версия и выпуск.
Также курсивом выделяются термины, которые встречаются в тексте документа впервые. Пример:
Publican — система публикации DocBook.
1.2. Соглашения по выделению текста
Вывод экрана и листинг исходного кода будут отделены от окружающего текста.
Для отображения текста, который вы увидите на экране, используется моноширинный шрифт:
books        Desktop   documentation  drafts  mss    photos   stuff  svn
books_tests  Desktop1  downloads      images  notes  scripts  svgs
Для отображения содержимого исходного кода используется моноширинный шрифт:
package org.jboss.book.jca.ex1;

import javax.naming.InitialContext;

public class ExClient
{
   public static void main(String args[])
       throws Exception
   {
      InitialContext iniCtx = new InitialContext();
      Object         ref    = iniCtx.lookup("EchoBean");
      EchoHome       home   = (EchoHome) ref;
      Echo           echo   = home.create();

      System.out.println("Created Echo");

      System.out.println("Echo.echo('Hello') = " + echo.echo("Hello"));
   }
}
1.3. Примечания и предупреждения
Наконец, чтобы привлечь внимание читателя к важной информации, используются три стиля.
Примечания обычно содержат дополнительную информацию. Если вы их проигнорируете, это не критично, но вы можете пропустить совет, который, возможно, поможет сэкономить время при выполнении задания.
На информацию, отмеченную как важную, следует обратить особое внимание. Она может включать изменения настроек текущего сеанса или, например, перечень служб, которые нужно запустить, прежде чем обновления вступят в силу. Ознакомление с важной информацией значительно облегчит вашу работу.
Не стоит игнорировать предупреждения, так как они содержат важную информацию, которая позволит избежать потери данных.
2. Нам нужны ваши отзывы!
Если вы нашли опечатку в этом руководстве, или у вас есть идеи по его усовершенствованию, мы будем рады их выслушать. Пожалуйста, оставьте сообщение в Bugzilla по адресу http://bugzilla.redhat.com/bugzilla/, выбрав компонент Fedora Documentation.
Не забудьте указать в запросе идентификатор данного руководства: install-guide.
Если у вас есть предложения по улучшению этого руководства, постарайтесь описать их как можно подробнее. Если же вы нашли ошибку, пожалуйста, укажите номер раздела и окружающий текст, чтобы мы могли быстро ее найти.
3. Acknowledgments
Certain portions of this text first appeared in the Red Hat Enterprise Linux Installation Guide, copyright © 2011 Red Hat, Inc. and others, published by Red Hat at http://docs.redhat.com/docs.
Введение
Данное руководство охватывает вопрос установки Fedora — дистрибутива Linux, созданногона основе свободного и открытого программного обеспечения. Данное руководство поможет вам установиь Fedora на рабочий компьютер, ноутбук или сервер. Программа установки проста в использовании даже, если у вас нет предварительных знаний о Linux или компьютерных сетях. Если вы выберете настройки по умолчанию, то получите готовую к использованию операционную систему, iвключающую производительные приложения и инструменты для работы.
В этом документе подробно рассматриваются все варианты настоек при установке, включая те, которые используются при очень специфических обстоятельствах. ВКраткой инструкции по установке Fedora 17 представлены более сжатые сведения о скачивании Fedora, создании установочного диска и установке Fedora на стандартный рабочий компьютер или ноутбук. Краткая инструкция по установке Fedora 17 Installation Quick Start Guide доступна по ссылке http://docs.fedoraproject.org/installation-quick-start-guide/.
1. Предыстория
1.1. О Fedora
1.2. Получение дополнительно помощи
2. Об этом руководстве
2.1. Цели
Данное руководство помогает читателю:
-
Понять как определить местонахождение дистрибутива Fedora онлайн
-
Создать конфигурацию данных, позволяющую загрузить Fedora
-
Понять как взаимодействовать с установщиком Fedora
-
Выполнить стандарную настройку Fedora после установки
Это руководство не охватывает вопросы использования Fedora. Чтобы узнать как работать с установленной системой Fedora, см. http://docs.fedoraproject.org/ на предмет другой документации.
2.2. Аудитория
Это руководство ориентировано на пользователей Fedora с разным опытом. Однако, процесс установки и параметры этого процесса рассматриваются в нем намного подробней, чем того бы хотели начинающие пользователи. Нет необходимости читать и понимать этот документ, чтобы установить Fedora на компьютер. Он скорее создан помочь опытным пользователям в проведении улучшенных и необычных вариантов установки.
Глава 1. Quick Start for Experts
This section offers a very brief overview of installation tasks for experienced readers who are eager to get started. Note that many explanatory notes and helpful hints appear in the following chapters of this guide. If an issue arises during the installation process, consult the appropriate chapters in the full guide for help.
This section is intended only for experts. Other readers may not be familiar with some of the terms in this section, and should move on to Глава 2, Получение Fedora instead.
1.1. Overview
The installation procedure is fairly simple, and consists of only a few steps:
-
Download files to make media or another bootable configuration.
-
Prepare system for installation.
-
Boot the computer and run the installation process.
-
Reboot and perform post-installation configuration.
1.2. Download Files
Do any one of the following:
Downloads may fail for any number of reasons. Always verify the sha256sum of the downloaded files.
-
Download the ISO image for a Live image. Create CD media from the ISO file using your preferred application. You may also use the livecd-tools package to write the image to other bootable media such as a USB flash disk. To install the distribution to your hard disk, use the shortcut on the desktop after you log in.
-
Download the ISO images for the full distribution on DVD. Create DVD media from the ISO files using your preferred application, or put the images on a Windows FAT32 or Linux ext2, ext3, or ext4 partition.
-
Download the
boot.isoimage for a minimal boot CD or USB flash drive. Write the image to the approriate physical media to create bootable media. The boot media contains no packages but must be pointed at a hard disk or online repository to complete the installation. -
Download the
vmlinuzkernel file and theinitrd.imgramdisk image from the distribution’sisolinux/directory. Configure your operating system to boot the kernel and load the ramdisk image. For further information on installation without media, refer to Глава 12, Installing Without Media.For information on setting up a network boot server from which you can install Fedora, refer to Глава 13, Setting Up an Installation Server.
1.3. Prepare for Installation
Back up any user data you need to preserve.
The installation program provides functions for resizing ext2, ext3, ext4, and NTFS formatted partitions. Refer to Раздел 9.17, « Creating a Custom Layout or Modifying the Default Layout » for more information.
1.4. Install Fedora
Boot from the desired media, with any options appropriate for your hardware and installation mode. Refer to Глава 11, Boot Options for more information about boot options. If you boot from the Live CD, select the Install to Hard Disk option from the desktop to run the installation program. (Alternatively, the option can be found in → .) If you boot from minimal media or a downloaded kernel, select a network or hard disk resource from which to install.
Proceed through all the steps of the installation program. The installation program does not change your system until you make a final confirmation to proceed. When installation is finished, reboot your system.
1.5. Perform Post-installation Steps
After the system reboots, it displays additional configuration options. Make appropriate changes to your system and proceed to the login prompt.
Глава 2. Получение Fedora
This chapter explains how to get the files you need to install and run Fedora on your computer. Concepts in this chapter may be new, especially if this is your first free and open source operating system. If you have any trouble with this chapter, find help by visiting the Fedora Forums at http://www.fedoraforum.org/.
Проект Fedora предоставляет множество способов получения дистрибутива, в большинстве своем, бесплатных и открытых для загрузки. Наиболее распространенный способ установки — с помощью CD или DVD, включая:
-
Полный комплект программ на DVD
-
Live-образы, с помощью которых можно познакомиться с Fedora, а уже потом выполнить установку, если Fedora вам понравилась
-
Загрузочные образы CD и USB-накопителей небольшого размера, с помощью которых можно выполнить установку Fedora по сети
-
Исходный код на DVD
Most users want the Fedora Live image or the full set of installable software on DVD. The reduced bootable images are suitable for use with a fast Internet connection and install Fedora on one computer. Source code discs are not used for installing Fedora, but are resources for experienced users and software developers.
Пользователи с доступом к широкополосному Интернету могут загрузить ISO-образы дисков CD/DVD или USB-носителей. ISO-образ представляет собой копию целого диска в формате, достаточном для прямой записи на CD или DVD. Образ USB — копия, готовая для записи на флэш-накопитель.
For more information on burning CDs and DVDs, refer to Глава 3, Making Media.
If downloading the Fedora ISO images and burning them to CD or DVD is impossible or impractical for you, refer to Раздел 2.2, «Получение Fedora на CD/DVD» to learn about other ways that you can obtain Fedora.
2.1. Загрузка Fedora
2.1.1. Как загрузить установочные файлы?
Программное обеспечение Fedora доступно для бесплатной загрузки. Способы:
2.1.1.1. Зеркало
The Fedora installation files are freely available from web servers located in many parts of the world. These servers mirror the files available from the Fedora Project. If you visit http://download.fedoraproject.org/, you are redirected to a mirror, based on a calculation of which mirror is likely to offer you the best download speed. Alternatively, you can choose a mirror from the list maintained at http://mirrors.fedoraproject.org/publiclist. This page lists mirrors according to geographic location. The mirrors geographically closest to you are likely to provide you with the fastest downloads. If the company or organization that provides your internet access maintains a mirror, this mirror is likely to provide you with the fastest downloads of all.
Mirrors publish Fedora software under a well-organized hierarchy of folders. For example, the Fedora 17 distribution normally appears in the directory fedora/linux/releases/17/. This directory contains a folder for each architecture supported inside that folder, in a folder called iso/. For example, you can find the file for the DVD distribution of Fedora 17 for x86_64 at fedora/linux/releases/17/Fedora/x86_64/iso/Fedora-17-x86_64-DVD.iso.
2.1.1.2. BitTorrent
BitTorrent позволяет загрузить файлы при взаимодействии с другими компьютерами. Каждый компьютер в группе получает информацию по частям от раздающих компьютеров. Если загрузка данных завершена, то компьютер переходит на сторону раздачи, то есть предоставляет эти данные другим компьютерам для загрузки.
If your computer does not have software installed for BitTorrent, visit the BitTorrent home page at http://www.bittorrent.com/download/ to download it. BitTorrent client software is available for Windows, Mac OS, Linux, and many other operating systems.
You do not need to find a special mirror for BitTorrent files. The BitTorrent protocol ensures that your computer participates in a nearby group. To download and use the Fedora BitTorrent files, visit http://torrent.fedoraproject.org/.
Образы минимальных загрузочных CD и USB недоступны в сети BitTorrent.
2.1.2. Как узнать архитектуру моего компьютера?
Архитектура, по большому счету, определяет тип процессора. Ниже приведена таблица, которая поможет узнать архитектуру компьютера исходя из типа процессора, который, в свою очередь, можно определить, обратившись к документации его производителя.
Таблица 2.1. Типы процессоров и архитектур
| Производитель процессора и его модель | Тип архитектуры для Fedora |
|---|---|
| Intel Atom (see note below,) Core series, Pentium 4, and recent vintage Xeon; AMD Athlon, Duron, some Semprons; and older; VIA C3, C7 |
i386
|
| Intel Atom (See note below), Core 2 series, Core i series and Xeon; AMD: Athlon 64, Athlon II, Sempron64, Phenom series, Fusion series, Bulldozer series and Opteron; Apple MacBook, MacBook Pro, and MacBook Air |
x86_64
|
Если вы не знаете модель процессора, выберите i386.
The Z Series and N200 Series Atom processors are based on the i386 architecture. The 230 and 330 Series and the rest of the N Series Atom processors are based on thex86_64 architecture. Refer to http://ark.intel.com/products/family/29035 for more details.
2.1.3. Какие файлы нужно загрузить?
Ниже будут рассмотрены способы загрузки Fedora.
Each file available for download in a Fedora distribution includes the architecture type in the file name. For example, the file for the DVD distribution of Fedora 17 for x86_64 is named Fedora-17-x86_64-DVD.iso. Refer to Раздел 2.1.2, «Как узнать архитектуру моего компьютера?» if you are unsure of your computer’s architecture.
-
Полный дистрибутив на DVD
Если в вашем распоряжении есть быстрое Интернет-соединение, свободное время и желание получить максимальную свободу в выборе программ, загрузите полную DVD-версию. Создайте загрузочный диск, записав полученный образ на DVD. В случае проблем этот диск также может служить как восстанавливающий. Полную версию можно загрузить с зеркального сервера или через BitTorrent.
-
Live-образ
If you want to try Fedora before you install it on your computer, download the Live image version. If your computer supports booting from CD or USB, you can boot the operating system without making any changes to your hard disk. The Live image also provides an
Install to Hard Diskdesktop shortcut (alternatively, the shortcut can be found in → ). If you decide you like what you see, and want to install it, simply activate the selection to copy Fedora to your hard disk. You can download the Live image directly from a mirror, or using BitTorrent.For more detailed instructions on setting up a Live image installation, including selecting a language for the installation process, refer to the Fedora Installation Quick Start Guide.
-
Минимальный загрузочный носитель
Если у вас есть быстрое Интернет-соединение, но вы не ходите загружать весь дистрибутив, можно загрузить загрузочный образ CD для минимального окружения Fedora, позволяющего выполнить сетевую установку. И хотя этот метод подразумевает загрузку достаточно большого объема информации, он все же не превысит размер полного дистрибутива. По желанию, программы можно добавить или удалить после установки.
Установка стандартного набора пакетов Fedora по Интернету требует больше времени чем образ Live, но меньше чем целый дистрибутив на DVD. Конечно, влияние окажет и сетевой трафик, и программное обеспечение, которое вы выбрали для установки.
В приведенной ниже таблице перечислены образы с файлами на зеркальном сервере. Вместо архитектура укажите архитектуру компьютера.
Таблица 2.2. Расположение файлов
| Тип носителя | Расположение файлов |
|---|---|
| Полный дистрибутив на DVD |
fedora/linux/releases/17/Fedora/
|
| Live-образ |
fedora/linux/releases/17/Live/, fedora/linux/releases/17/Live/
|
| Минимальный загрузочный CD |
fedora/linux/releases/17/Fedora/
|
2.2. Получение Fedora на CD/DVD
If you do not have a fast Internet connection, or if you have a problem creating boot media, downloading may not be an option. Fedora DVD and CD distribution media is available from a number of online sources around the world at a minimal cost. Use your favorite Web search engine to locate a vendor, or refer to http://fedoraproject.org/wiki/Distribution.
Часть I. Installation and Booting
This part of the Fedora Installation Guide details the installation process itself, from various methods of booting the installer up to the point where the computer must restart to finalize the installation. This part of the manual also includes a chapter on troubleshooting problems with the installation process.
Глава 4. Планирование установки на платформе x86
4.1. Upgrade or Install?
Глава 20, Upgrading Your Current System содержит информацию, которая поможет сделать выбор в пользу обновления или переустановки.
4.2. Is Your Hardware Compatible?
Совместимость оборудования имеет большое значение, если у вас довольно старая система или вы собрали ее сами. Fedora 17 совместима с большей частью оборудования в системах, выпущенных в течение последних двух лет. Однако спецификации оборудования меняются практически ежедневно, поэтому трудно гарантировать, что ваше оборудование совместимо на 100%.
At the end of a successful Fedora installation process, the installation program offers you the option to provide details of your hardware configuration anonymously to the Fedora Project (refer to Раздел 17.4, «Hardware Profile»). You can view the statistics gathered by this method at http://smolt.fedoraproject.org/static/stats/devices.html. Viewing the list of hardware that makes up systems on which other people have successfully installed Fedora might help you determine how suitable your hardware is.
4.3. RAID and Other Disk Devices
Fedora 17 uses mdraid instead of dmraid for installation onto Intel BIOS RAID sets. These sets are detected automatically, and devices with Intel ISW metadata are recognized as mdraid instead of dmraid. Note that the device node names of any such devices under mdraid are different from their device node names under dmraid. Therefore, special precautions are necessary when you migrate systems with Intel BIOS RAID sets.
Local modifications to /etc/fstab, /etc/crypttab or other configuration files which refer to devices by their device node names will not work in Fedora 17. Before migrating these files, you must therefore edit them to replace device node paths with device UUIDs instead. You can find the UUIDs of devices with the blkid command.
4.3.1. Hardware RAID
Массив RAID (Redundant Array of Independent Disks) обеспечивает функционирование группы или массива дисков как единого целого. Прежде чем приступить к процессу установки, настройте все доступные параметры RAID. В Fedora каждый активный массив RAID будет представлен как отдельный диск.
Несколько жестких дисков в системах Fedora можно объединить в один RAID-массив, исключая тем самым необходимость в дополнительном оборудовании.
4.3.2. Software RAID
You can use the Fedora installation program to create Linux software RAID arrays, where RAID functions are controlled by the operating system rather than dedicated hardware. These functions are explained in detail in Раздел 9.17, « Creating a Custom Layout or Modifying the Default Layout ».
4.3.3. FireWire and USB Disks
Некоторые жесткие диски FireWire и USB могут быть не распознаны механизмом установки Fedora. Если настройка этих дисков в процессе установки не так уж важна, отсоедините их во избежание путаницы.
You can connect and configure external FireWire and USB hard disks after installation. Most such devices are recognized by the kernel and available for use at that time.
4.4. Достаточно ли дискового пространства?
Nearly every modern-day operating system (OS) uses disk partitions, and Fedora is no exception. When you install Fedora, you may have to work with disk partitions. If you have not worked with disk partitions before (or need a quick review of the basic concepts), refer to Приложение A, An Introduction to Disk Partitions before proceeding.
The disk space used by Fedora must be separate from the disk space used by other OSes you may have installed on your system, such as Windows, OS/2, or even a different version of Linux. For x86, AMD64, and Intel 64 systems, at least two partitions (/ and swap) must be dedicated to Fedora.
Before you start the installation process, you must
-
have enough unpartitioned[1] disk space for the installation of Fedora, or
-
убедиться в том, что в системе есть один или несколько разделов, которые можно удалить и, таким образом, освободить дисковое пространство для установки Fedora.
Раздел 9.17.5, «Recommended Partitioning Scheme» поможет определить необходимый объем пространства.
If you are not sure that you meet these conditions, or if you want to know how to create free disk space for your Fedora installation, refer to Приложение A, An Introduction to Disk Partitions.
4.5. Selecting an Installation Method
What type of installation method do you wish to use? The following installation methods are available:
- DVD
-
If you have a DVD drive and the Fedora DVD you can use this method. Refer to Раздел 8.1.1, «Installing from DVD», for DVD installation instructions.
If you booted the installation from a piece of media other than the installation DVD, you can specify the DVD as the installation source with the
linux repo=cdrom:boot option, or by selecting on the menu (refer to Раздел 8.1, «Installation Method»).device:/device - Live CD
-
If you have a CD drive and the Fedora live CD you can use this method. The live CD desktop includes an icon labeled Install to Hard Drive. Refer to Раздел 8.1.1, «Installing from DVD» for CD installation instructions.
- Hard Drive
-
If you have copied the Fedora ISO images to a local hard drive, you can use this method. You need a boot CD-ROM (use the
linux repo=hd:boot option), or by selecting on the menu (refer to Раздел 8.1, «Installation Method»). Refer to Раздел 8.1.2, «Installing from a Hard Drive», for hard drive installation instructions.device:/path - NFS
-
If you are installing from an NFS server using ISO images or a mirror image of Fedora, you can use this method. You need a boot CD-ROM (use the
linux repo=nfs:boot option, or the option on the menu described in Раздел 8.1, «Installation Method»). Refer to Раздел 8.1.3, «Installing via NFS» for network installation instructions. Note that NFS installations may also be performed in GUI mode.server:options:/path - URL
-
If you are installing directly from an HTTP (Web) server or FTP server, use this method. You need a boot CD-ROM (use the
linux repo=ftp://, oruser:password@host/pathlinux repo=http://boot option, or the option on the menu described in Раздел 8.1, «Installation Method»). Refer to Раздел 8.1.4, «Installing via FTP or HTTP», for FTP and HTTP installation instructions.host/path
4.6. Choose a boot method
You can use several methods to boot Fedora.
Для установки с дисков CD/DVD потребуется наличие CD или DVD-дисков Fedora 17 и привод CD/DVD в системе, поддерживающей загрузку с CD/DVD.
Для загрузки с CD/DVD может потребоваться изменить настройки BIOS (см. Раздел 7.1.1, «Booting the Installation Program on x86, AMD64, and Intel 64 Systems»).
Other than booting from an installation CD or DVD, you can also boot the Fedora installation program from minimal boot media in the form of a bootable CD or USB flash drive. After you boot the system with a piece of minimal boot media, you complete the installation from a different installation source, such as a local hard drive or a location on a network. Refer to Раздел 3.3, «Making Minimal Boot Media» for instructions on making boot CDs and USB flash drives.
Наконец, программу установки можно загрузить по сети с сервера PXE (Preboot Execution environment). Глава 13, Setting Up an Installation Server содержит подробную информацию. После успешной загрузки выполните установку по сети или локально с жесткого диска.
Глава 5. Preparing for Installation
5.1. Preparing for a Network Installation
Make sure no installation DVD (or any other type of DVD or CD) is in your system’s CD or DVD drive if you are performing a network-based installation. Having a DVD or CD in the drive might cause unexpected errors.
Проверьте наличие загрузочного CD/DVD-диска или USB-носителя.
The Fedora installation medium must be available for either a network installation (via NFS, FTP, or HTTP) or installation via local storage. Use the following steps if you are performing an NFS, FTP, or HTTP installation.
The NFS, FTP, or HTTP server to be used for installation over the network must be a separate, network-accessible server. It must provide the complete contents of the installation DVD-ROM.
The Fedora installation program has the ability to test the integrity of the installation media. It works with the CD, DVD, hard drive ISO, and NFS ISO installation methods. We recommend that you test all installation media before starting the installation process, and before reporting any installation-related bugs (many of the bugs reported are actually due to improperly-burned discs). To use this test, type the following command at the boot: prompt:
linux rd.live.check
The public directory used to access the installation files over FTP, NFS, or HTTP is mapped to local storage on the network server. For example, the local directory /var/www/inst/Fedora17 on the network server can be accessed as http://network.server.com/inst/Fedora17.
In the following examples, the directory on the installation staging server that will contain the installation files will be specified as /location/of/disk/space/publicly_available_directory. For example, /location/of/disk/space/var/isos. /publicly_available_directory/var/www/html/Fedora17, for an HTTP install.
Далее потребуется образ ISO, содержащий точную копию содержимого DVD. Чтобы создать образ диска DVD, выполните команду
dd if=/dev/dvd of=/path_to_image/name_of_image.iso
where dvd is your DVD drive device, name_of_image is the name you give to the give to the resulting ISO image file, and path_to_image is the path to the location on your system where the resulting ISO image will be stored.
Чтобы скопировать файлы с установочного DVD на компьютер Linux, который будет выполнять функции сервера установки, выполните действия, описанные в следующих секциях (см. Раздел 5.1.1, «Preparing for FTP and HTTP installation», Раздел 5.1.2, «Подготовка к NFS-установке»).
5.1.1. Preparing for FTP and HTTP installation
Extract the files from the ISO image of the installation DVD and place them in a directory that is shared over FTP or HTTP.
Проверьте доступ: попробуйте подключиться к нему с сервера и любой другой машины, принадлежащей той же сети, где будет выполняться установка.
5.1.2. Подготовка к NFS-установке
For NFS installation it is not necessary to extract all the files from the ISO image. It is sufficient to make the ISO image available on the network server via NFS.
-
Скопируйте образ ISO в экспортируемый каталог. Для этого в Linux выполните команду
mv /path_to_image/name_of_image.iso /publicly_available_directory/where
path_to_imageis the path to the ISO image file,name_of_imageis the name of the ISO image file, andpublicly_available_directoryis a directory that is available over NFS or that you intend to make available over NFS. -
Проверьте контрольную сумму SHA256 носителя. Для этой цели существует множество программ для разных операционных систем. Так, в Linux можно выполнить:
$ sha256sumобраз.isowhere
name_of_imageis the name of the ISO image file. The SHA256 checksum program displays a string of 64 characters called a hash. Compare this hash to the hash displayed for this particular image on the GPG Keys page on the Fedora Project site at http://fedoraproject.org/en/keys. The two hashes should be identical. -
Ensure that an entry for the publicly available directory exists in the
/etc/exportsfile on the network server so that the directory is available via NFS.Чтобы экспортировать каталог в конкретную систему:
/publicly_available_directoryclient.ip.address(ro)Чтобы экспортировать каталог во все системы:
/publicly_available_directory* (ro) -
On the network server, start the NFS daemon (on a Fedora system, use
/sbin/service nfs start). If NFS is already running, reload the configuration file (on a Fedora system use/sbin/service nfs reload). -
Be sure to test the NFS share following the directions in the Fedora Deployment Guide. Refer to your NFS documentation for details on starting and stopping the NFS server.
The Fedora installation program has the ability to test the integrity of the installation media. It works with the CD, DVD, hard drive ISO, and NFS ISO installation methods. We recommend that you test all installation media before starting the installation process, and before reporting any installation-related bugs (many of the bugs reported are actually due to improperly-burned discs). To use this test, type the following command at the boot: prompt:
linux rd.live.check5.2. Preparing for a Hard Drive Installation
Hard drive installations only work from ext2, ext3, ext4, or FAT file systems. You cannot use a hard drive formatted for any other file system as an installation source for Fedora.
Проверить тип файловой системы в Windows можно с помощью системной программы управления дисками, а в Linux — с помощью fdisk.
You cannot use ISO files on partitions controlled by LVM (Logical Volume Management).
Use this option to install Fedora on systems without a DVD drive or network connection.
Hard drive installations use an ISO image of the installation DVD. An ISO image is a file that contains an exact copy of the content of a DVD.
При наличии этих файлов на жестком диске можно выполнить установку с жесткого диска (см. Раздел 8.1, «Installation Method»).
Проверьте наличие загрузочного CD/DVD-диска или USB-носителя.
Подготовка жесткого диска в качестве источника установки включает следующее:
-
Obtain an ISO image of the Fedora installation DVD (refer to Глава 2, Получение Fedora). Alternatively, if you have the DVD on physical media, you can create an image of it with the following command on a Linux system:
dd if=/dev/dvdof=/path_to_image/name_of_image.isowhere
dvdis your DVD drive device,name_of_imageis the name you give to the give to the resulting ISO image file, andpath_to_imageis the path to the location on your system where the resulting ISO image will be stored. -
Скопируйте образ на жесткий диск.
The ISO image must be located on a hard drive that is either internal to the computer on which you will install Fedora, or on a hard drive that is attached to that computer by USB.
-
Проверьте контрольную сумму SHA256 носителя. Для этой цели существует множество программ для разных операционных систем. Так, в Linux можно выполнить:
$ sha256sumобраз.isowhere
name_of_imageis the name of the ISO image file. The SHA256 checksum program displays a string of 64 characters called a hash. Compare this hash to the hash displayed for this particular image on the GPG Keys page on the Fedora Project site at http://fedoraproject.org/en/keys. The two hashes should be identical.
The Fedora installation program has the ability to test the integrity of the installation media. It works with the CD, DVD, hard drive ISO, and NFS ISO installation methods. We recommend that you test all installation media before starting the installation process, and before reporting any installation-related bugs (many of the bugs reported are actually due to improperly-burned discs). To use this test, type the following command at the boot: prompt:
linux rd.live.checkГлава 6. System Specifications List
The installation program automatically detects and installs your computer’s hardware. Although you should make sure that your hardware meets the minimum requirements to install Fedora (refer to Раздел 4.2, «Is Your Hardware Compatible?») you do not usually need to supply the installation program with any specific details about your system.
However, when performing certain types of installation, some specific details might be useful or even essential.
-
If you plan to use a customized partition layout, record:
-
The model numbers, sizes, types, and interfaces of the hard drives attached to the system. For example, Seagate ST3320613AS 320 GB on SATA0, Western Digital WD7500AAKS 750 GB on SATA1. This will allow you to identify specific hard drives during the partitioning process.
-
-
Если Fedora устанавливается в качестве дополнительной операционной системы поверх существующей, запишите следующее:
-
The mount points of the existing partitions on the system. For example,
/bootonsda1,/onsda2, and/homeonsdb1. This will allow you to identify specific partitions during the partitioning process. -
Whether the hardware clock uses local time or UTC. In Linux systems, this information can be found in
/etc/adjtime. Changing the hardware clock setting in Раздел 9.5, «Configuring date and time» may cause unexpected behavior in Fedora.
-
-
If you plan to install from an image on a local hard drive:
-
Жесткий диск и каталог, содержащий образ.
-
-
If you plan to install from a network location, or install on an iSCSI target:
-
The make and model numbers of the network adapters on your system. For example, Netgear GA311. This will allow you to identify adapters when manually configuring the network.
-
IP, DHCP, and BOOTP addresses
-
Netmask
-
Gateway IP address
-
One or more name server IP addresses (DNS)
If any of these networking requirements or terms are unfamiliar to you, contact your network administrator for assistance.
-
-
If you plan to install from a network location:
-
Расположение образа на FTP, HTTP или NFS-сервере (см. Раздел 8.1.4, «Installing via FTP or HTTP», Раздел 8.1.3, «Installing via NFS»).
-
-
If you plan to install on an iSCSI target:
-
Расположение цели iSCSI. В зависимости от сети может потребоваться имя пользователя CHAP, пароль, обратное имя пользователя и пароль (см. Раздел 9.11.1.1, « Advanced Storage Options »).
-
-
If your computer is part of a domain:
-
You should verify that the domain name will be supplied by the DHCP server. If not, you will need to input the domain name manually during installation.
-
Глава 7. Booting the Installer
Fedora 17 does not support UEFI booting for 32-bit x86 systems. Only BIOS booting is supported.
Note that the boot configurations of UEFI and BIOS differ significantly from each other. Therefore, the installed system must boot using the same firmware that was used during installation. You cannot install the operating system on a system that uses BIOS and then boot this installation on a system that uses UEFI.
Fedora 17 supports version 2.2 of the UEFI specification. Hardware that supports version 2.3 of the UEFI specification or later should boot and operate with Fedora 17, but the additional functionality defined by these later specifications will not be available. The UEFI specifications are available from http://www.uefi.org/specs/agreement/
To start the installation program from a Fedora DVD or from minimal boot media, follow this procedure:
-
Disconnect any external FireWire or USB disks that you do not need for installation. Refer to Раздел 4.3.3, « FireWire and USB Disks » for more information.
-
Power on your computer system.
-
Insert the media in your computer.
-
Power off your computer with the boot media still inside.
-
Power on your computer system.
You might need to press a specific key or combination of keys to boot from the media. On most computers, a message appears briefly on the screen very soon after you turn on the computer. Typically, it is worded something like Press F10 to select boot device, although the specific wording and the key that you must press varies widely from computer to computer. Consult the documentation for your computer or motherboard, or seek support from the hardware manufacturer or vendor. On Apple computers, the C key boots the system from the DVD drive. On older Apple hardware you might need to press Cmd+Opt+Shift+Del to boot from the DVD drive.
If your computer does not allow you to select a boot device as it starts up, you might need to configure your system’s Basic Input/Output System (
BIOS
) to boot from the media.
To change your BIOS settings on an x86, AMD64, or Intel 64 system, watch the instructions provided on your display when your computer first boots. A line of text appears, telling you which key to press to enter the BIOS settings.
Once you have entered your BIOS setup program, find the section where you can alter your boot sequence. The default is often C, A or A, C (depending on whether you boot from your hard drive [C] or a diskette drive [A]). Change this sequence so that the DVD is first in your boot order and that C or A (whichever is your typical boot default) is second. This instructs the computer to first look at the DVD drive for bootable media; if it does not find bootable media on the DVD drive, it then checks your hard drive or diskette drive.
Save your changes before exiting the BIOS. For more information, refer to the documentation that came with your system.
To abort the installation, either press Ctrl +Alt+Del or power off your computer with the power switch. You may abort the installation process without consequence at any time prior to selecting Write changes to disk on the Write partitioning to disk screen. Fedora makes no permanent changes to your computer until that point. Please be aware that stopping the installation after partitioning has begun can leave your computer unusable.
7.1. Starting the Installation Program
Fedora 17 does not support UEFI booting for 32-bit x86 systems. Only BIOS booting is supported.
Note that the boot configurations of UEFI and BIOS differ significantly from each other. Therefore, the installed system must boot using the same firmware that was used during installation. You cannot install the operating system on a system that uses BIOS and then boot this installation on a system that uses UEFI.
Fedora 17 supports version 2.2 of the UEFI specification. Hardware that supports version 2.3 of the UEFI specification or later should boot and operate with Fedora 17, but the additional functionality defined by these later specifications will not be available. The UEFI specifications are available from http://www.uefi.org/specs/agreement/
To start, first make sure that you have all necessary resources for the installation. If you have already read through Глава 4, Планирование установки на платформе x86, and followed the instructions, you should be ready to start the installation process. When you have verified that you are ready to begin, boot the installation program using the Fedora DVD or any boot media that you have created.
7.1.1. Booting the Installation Program on x86, AMD64, and Intel 64 Systems
You can boot the installation program using any one of the following media (depending upon what your system can support):
-
Fedora DVD — Your machine supports a bootable DVD drive and you have the Fedora installation DVD.
-
Fedora live CD — Your machine supports a bootable CD drive and you have a Fedora live CD.
-
Boot CD-ROM — Your machine supports a bootable CD-ROM drive and you want to perform network or hard drive installation.
-
USB flash drive — Your machine supports booting from a USB device.
-
PXE boot via network — Your machine supports booting from the network. This is an advanced installation path. Refer to Глава 13, Setting Up an Installation Server for additional information on this method.
To create a boot CD-ROM or to prepare your USB flash drive for booting or installation, refer to Раздел 3.3, «Making Minimal Boot Media».
Insert the boot media and reboot the system.
You might need to press a specific key or combination of keys to boot from the media. On most computers, a message appears briefly on the screen very soon after you turn on the computer. Typically, it is worded something like Press F10 to select boot device, although the specific wording and the key that you must press varies widely from computer to computer. Consult the documentation for your computer or motherboard, or seek support from the hardware manufacturer or vendor. On Apple computers, the C key boots the system from the DVD drive. On older Apple hardware you might need to press Cmd+Opt+Shift+Del to boot from the DVD drive.
If your computer does not allow you to select a boot device as it starts up, you might need to configure your system’s Basic Input/Output System (
BIOS
) to boot from the media.
To change your BIOS settings on an x86, AMD64, or Intel 64 system, watch the instructions provided on your display when your computer first boots. A line of text appears, telling you which key to press to enter the BIOS settings.
Once you have entered your BIOS setup program, find the section where you can alter your boot sequence. The default is often C, A or A, C (depending on whether you boot from your hard drive [C] or a diskette drive [A]). Change this sequence so that the DVD is first in your boot order and that C or A (whichever is your typical boot default) is second. This instructs the computer to first look at the DVD drive for bootable media; if it does not find bootable media on the DVD drive, it then checks your hard drive or diskette drive.
Save your changes before exiting the BIOS. For more information, refer to the documentation that came with your system.
After a short delay, the graphical boot screen appears, which contains information on a variety of boot options. Installation program automatically begins if you take no action within the first minute. For a description of the options available on this screen, refer to Раздел 7.1.2, «The Boot Menu».
Alternatively, press the Esc key to access the boot: prompt, at which you can enter additional boot options as described in Раздел 7.1.3, «Additional Boot Options».
7.1.3. Additional Boot Options
While it is easiest to boot using a DVD and perform a graphical installation, sometimes there are installation scenarios where booting in a different manner may be needed. This section discusses additional boot options available for Fedora.
To pass options to the boot loader on an x86, AMD64, or Intel 64 system, press the Esc key at boot time. The boot: prompt appears, at which you can use the boot loader options described below.
Refer to Глава 8, Configuring Installation Source for boot options to specify your installation source, or to Глава 11, Boot Options for additional boot options not covered in this section.
-
To perform a text mode installation, at the installation boot prompt, type:
linux text -
ISO images have an SHA256 checksum embedded in them. To test the checksum integrity of an ISO image, at the installation boot prompt, type:
linux rd.live.checkThis checksum operation can be performed on any Fedora DVD. It is strongly recommended to perform this operation on any Fedora DVD that was created from downloaded ISO images. This command works with the DVD, hard drive ISO, and NFS ISO installation methods.
-
If you need to perform the installation in serial mode, type the following command:
linux console=<device>For text mode installations, use:
linux text console=<device>In the above command,
<device>should be the device you are using (such as ttyS0 or ttyS1). For example,linux text console=ttyS0.Text mode installations using a serial terminal work best when the terminal supports UTF-8. Under UNIX and Linux, Kermit supports UTF-8. For Windows, Kermit ’95 works well. Non-UTF-8 capable terminals works as long as only English is used during the installation process. An enhanced serial display can be used by passing the
utf8command as a boot-time option to the installation program. For example:linux console=ttyS0 utf8
7.1.3.1. Kernel Options
Options can also be passed to the kernel. For example, to apply updates for the anaconda installation program from a USB storage device enter:
linux updatesFor text mode installations, use:
linux text updates
This command results in a prompt for the path to the device that contains updates for anaconda. It is not needed if you are performing a network installation and have already placed the updates image contents in rhupdates/ on the server.
After entering any options, press Enter to boot using those options.
If you need to specify boot options to identify your hardware, please write them down. The boot options are needed during the boot loader configuration portion of the installation (refer to Раздел 9.19, «Настройка загрузчика на платформах x86, AMD64 и Intel 64» for more information).
For more information on kernel options refer to Глава 11, Boot Options.
7.2. Booting from the Network using PXE
To boot with
PXE, you need a properly configured server, and a network interface in your computer that supports PXE. For information on how to configure a PXE server, refer to Глава 13, Setting Up an Installation Server.
Configure the computer to boot from the network interface. This option is in the BIOS, and may be labeled Network Boot or Boot Services. Once you properly configure PXE booting, the computer can boot the Fedora installation system without any other media.
To boot a computer from a PXE server:
-
Ensure that the network cable is attached. The link indicator light on the network socket should be lit, even if the computer is not switched on.
-
Switch on the computer.
-
A menu screen appears. Press the number key that corresponds to the desired option.
If your PC does not boot from the netboot server, ensure that the BIOS is configured to boot first from the correct network interface. Some BIOS systems specify the network interface as a possible boot device, but do not support the PXE standard. Refer to your hardware documentation for more information.
Cерверы с несколькими сетевыми интерфейсами могут не присвоить имя «eth0» первому интерфейсу. Это может привести к тому, что установщик будет пытаться использовать другой интерфейс, а не тот, который используется PXE. Чтобы это изменить, в файл конфигурации pxelinux.cfg/* добавьте следующее:
IPAPPEND 2
APPEND ksdevice=bootif
Эти параметры заставят установщик использовать сетевой интерфейс, который уже используется BIOS и PXE. Также можно определить следующий параметр:
ksdevice=link
This option causes the installer to use the first network device it finds that is linked to a network switch.
Глава 8. Configuring Installation Source
Before the graphical installation program starts, you may need to configure the installation source depending on the method you are using.
8.1. Installation Method
If you are installing from DVD, additional configuration will not be required unless the DVD drive is not detected. If you booted the installation from minimal boot media, use a boot prompt to select an installation method.
8.1.1. Installing from DVD
To install Fedora from a DVD, place the DVD in your DVD drive and boot your system from the DVD. Even if you booted from alternative media, you can still install Fedora from DVD media.
The installation program then probes your system and attempts to identify your DVD drive. It starts by looking for an IDE (also known as an ATAPI) DVD drive.
To abort the installation process at this time, reboot your machine and then eject the boot media. You can safely cancel the installation at any point before the Write changes to disk screen. Refer to Раздел 9.18, «Write changes to disk» for more information.
If your DVD drive is not detected, and it is a SCSI DVD, the installation program prompts you to choose a SCSI driver. Choose the driver that most closely resembles your adapter. You may specify options for the driver if necessary; however, most drivers detect your SCSI adapter automatically.
If you booted the installer from other media and wish to use a DVD as your installation source, use the following boot option:
linux repo=cdrom:device
If you later encounter problems with the installer, you should reboot and perform the media check by running the boot option linux rd.live.check before seeking support.
8.1.2. Installing from a Hard Drive
To specify a partition from which to install Fedora, use the linux repo= boot option:
linux repo=hd:device
Select the partition containing the ISO files from the list of available partitions. Internal IDE, SATA, SCSI, and USB drive device names begin with /dev/sd. Each individual drive has its own letter, for example /dev/sda. Each partition on a drive is numbered, for example /dev/sda1.
Also specify the full directory path from the drive that contains the ISO image files. The following table shows some examples of how to enter this information:
Таблица 8.1. Location of ISO images for different partition types
| Partition type | Volume | Original path to files | Directory to use |
|---|---|---|---|
| VFAT | D:\ | D:\Downloads\Fedora17 | /Downloads/Fedora17 |
| ext2, ext3, ext4 | /home | /home/user1/Fedora17 | /user1/Fedora17 |
If the ISO images are in the root (top-level) directory of a partition, enter a /. If the ISO images are located in a subdirectory of a mounted partition, enter the name of the directory holding the ISO images within that partition. For example, if the partition on which the ISO images is normally mounted as /home/, and the images are in /home/new/, you would enter /new/.
An entry without a leading slash may cause the installation to fail.
After entering the linux repo= boot command, proceed with Глава 9, Installing using anaconda.
8.1.3. Installing via NFS
To specify an installation source for Fedora accessible by NFS, use the linux repo= boot option. To specify an expanded tree of installation files, type:
linux repo=nfs:options:server:/pathTo specify an ISO image file, type:
linux repo=nfsiso:options:server:/path-
options— specify any NFS mount options that you require. Refer to the man pages for mount and nfs for a comprehensive list of options. -
server— enter the domain name or IP address of your NFS server. For example, if you are installing from a host namedeastcoastin the domainexample.com, entereastcoast.example.com. -
path— the path to the exported directory.-
If the NFS server is exporting a mirror of the Fedora installation tree, enter the directory which contains the root of the installation tree.
-
If the NFS server is exporting the ISO image of the Fedora DVD, enter the directory which contains the ISO image.
If you followed the setup described in Раздел 5.1.2, «Подготовка к NFS-установке», the exported directory is the one that you specified as
publicly_available_directory -
After entering the linux repo= command, proceed with Глава 9, Installing using anaconda.
8.1.4. Installing via FTP or HTTP
When you provide a URL to an installation source, you must explicitly specify http:// or ftp:// as the protocol.
To specify an installation source for Fedora that is available over the Internet, use the linux repo= boot option:
linux repo={ftp|http}://URL
For URL, enter the name or IP address of the FTP or HTTP site from which you are installing, and the name of the directory that contains the /images directory for your architecture. For example:
http://name.example.com/mirrors/fedora/F-17/Server/i386/
If your FTP or HTTP server requires user authentication, specify user and password as part of the URL as follows:
{ftp|http}://<user>:<password>@<hostname>[:<port>]/<directory>/
For example:
http://install:fedora17pw@name.example.com/mirrors/fedora/F-17/Server/i386/
After entering the linux repo= command, proceed with Глава 9, Installing using anaconda.
Глава 9. Installing using anaconda
This chapter describes an installation using the graphical user interface of anaconda.
9.1. The Text Mode Installation Program User Interface
We recommend that you install Fedora using the graphical interface. If you are installing Fedora on a system that lacks a graphical display, consider performing the installation over a VNC connection – see Глава 14, Installing Through VNC. If anaconda detects that you are installing in text mode on a system where installation over a VNC connection might be possible, anaconda asks you to verify your decision to install in text mode even though your options during installation are limited.
If your system has a graphical display, but graphical installation fails, try booting with the xdriver=vesa option – refer to Глава 11, Boot Options
Installing in text mode does not prevent you from using a graphical interface on your system once it is installed.
Apart from the graphical installer, anaconda also includes a text-based installer.
If one of the following situations occurs, the installation program uses text mode:
-
The installation system fails to identify the display hardware on your computer
-
You choose the text mode installation by entering the following command at the
boot:promptlinux text
While text mode installations are not explicitly documented, those using the text mode installation program can easily follow the GUI installation instructions. However, because text mode presents you with a simpler, more streamlined installation process, certain options that are available in graphical mode are not also available in text mode. These differences are noted in the description of the installation process in this guide, and include:
-
нестандартные схемы хранения данных (LVM, RAID, FCoE, zFCP, iSCSI);
-
изменение стандартной схемы разделов;
-
изменение конфигурации загрузчика;
-
выбор пакетов в процессе установки;
-
configuring the installed system with firstboot
If you choose to install Fedora in text mode, you can still configure your system to use a graphical interface after installation. Refer to Раздел 18.3, «Switching to a Graphical Login» for instructions.
To configure options not available in text mode, consider using a boot option. For example, the linux ip option can be used to configure network settings. Refer to Раздел 11.1, «Configuring the Installation System at the Boot Menu» for instructions.
Not every language supported in graphical installation mode is also supported in text mode. Specifically, languages written with a character set other than the Latin or Cyrillic alphabets are not available in text mode. If you choose a language written with a character set that is not supported in text mode, the installation program will present you with the English versions of the screens.
9.1.1. Using the Keyboard to Navigate
Navigation through the installation dialogs is performed through a simple set of keystrokes. To move the cursor, use the Left, Right, Up, and Down arrow keys. Use Tab, and Shift—Tab to cycle forward or backward through each widget on the screen. Along the bottom, most screens display a summary of available cursor positioning keys.
To «press» a button, position the cursor over the button (using Tab, for example) and press Space or Enter. To select an item from a list of items, move the cursor to the item you wish to select and press Enter. To select an item with a checkbox, move the cursor to the checkbox and press Space to select an item. To deselect, press Space a second time.
Pressing F12 accepts the current values and proceeds to the next dialog; it is equivalent to pressing the OK button.
Unless a dialog box is waiting for your input, do not press any keys during the installation process (doing so may result in unpredictable behavior).
9.2. The Graphical Installation Program User Interface
If you have used a graphical user interface (GUI) before, you are already familiar with this process; use your mouse to navigate the screens, click buttons, or enter text fields.
You can also navigate through the installation using the keyboard. The Tab key allows you to move around the screen, the Up and Down arrow keys to scroll through lists, + and — keys expand and collapse lists, while Space and Enter selects or removes from selection a highlighted item. You can also use the Alt+X key command combination as a way of clicking on buttons or making other screen selections, where X is replaced with any underlined letter appearing within that screen.
9.2.1. Screenshots during installation
Anaconda allows you to take screenshots during the installation process. At any time during installation, press Shift+Print Screen and anaconda will save a screenshot to /root/anaconda-screenshots.
If you are performing a Kickstart installation, use the autostep --autoscreenshot option to generate a screenshot of each step of the installation automatically. Refer to Раздел 15.3, «Creating the Kickstart File» for details of configuring a Kickstart file.
9.2.2. A Note about Virtual Consoles
The Fedora installation program offers more than the dialog boxes of the installation process. Several kinds of diagnostic messages are available to you, as well as a way to enter commands from a shell prompt. The installation program displays these messages on five virtual consoles, among which you can switch using a single keystroke combination.
A virtual console is a shell prompt in a non-graphical environment, accessed from the physical machine, not remotely. Multiple virtual consoles can be accessed simultaneously.
These virtual consoles can be helpful if you encounter a problem while installing Fedora. Messages displayed on the installation or system consoles can help pinpoint a problem. Refer to Таблица 9.1, «Console, Keystrokes, and Contents» for a listing of the virtual consoles, keystrokes used to switch to them, and their contents.
Generally, there is no reason to leave the default console (virtual console #6) for graphical installations unless you are attempting to diagnose installation problems.
Таблица 9.1. Console, Keystrokes, and Contents
| console | keystrokes | contents |
|---|---|---|
| 1 | Ctrl+alt+f1 | graphical display |
| 2 | Ctrl+alt+f2 | shell prompt |
| 3 | Ctrl+alt+f3 | install log (messages from installation program) |
| 4 | Ctrl+alt+f4 | system-related messages |
| 5 | Ctrl+alt+f5 | other messages |
9.3. Language Selection
At the Welcome screen, use your mouse to select the language (for example, English (United States)) you would prefer to use for the installation and as the system default.
Alternatively, type your preferred language into the search box (refer to the figure below).
Once you have made your selection, click Continue.
Рисунок 9.1. Language Configuration
9.4. The Pre-Installation Hub
The Pre-Installation Hub is the central screen for setting up an installation.
Рисунок 9.2. The pre-installation hub
Instead of directing you through consecutive screens, anaconda allows you to configure your installation in the order you choose.
Use your mouse to select a section. When you have completed configuring a section, or if you would like to complete that section later, click Done.
Sections that still require your attention are marked with a warning symbol. If any required work is outstanding, a note at the bottom of the screen warns you that these sections must be completed before you can continue.
Once all required sections are complete, click Begin Installation.
To cancel the installation, click Quit.
9.5. Configuring date and time
Select Date and Time from the Pre-Installation Hub.
Set your time zone by selecting the city closest to your computer’s physical location.
Specify a time zone even if you plan to use NTP (Network Time Protocol) to maintain the accuracy of the system clock.
From here there are two ways for you to select your time zone:
-
Using your mouse, click on the interactive map to select a specific city. A red pin appears indicating your selection.
-
You can also scroll through the Region and City drop-down menus at the top of the screen to select your time zone.
Рисунок 9.3. Configuring the Time Zone
To set the date and time using NTP, leave the Network Time switch in the ON position and click the configuration icon to select which NTP servers Fedora should use. To set the date and time manually, move the switch to the OFF position. The system clock should use your time zone selection to display the correct date and time at the bottom of the screen. If they are still incorrect, adjust them manually.
Once you have made your selection, click Done to return to the pre-installation hub.
To change your time zone configuration after you have completed the installation, use the Time and Date Properties Tool.
Type the system-config-date command in a shell prompt to launch the Time and Date Properties Tool. If you are not root, it prompts you for the root password to continue.
9.6. Keyboard Configuration
Select Keyboard from the Pre-Installation Hub.
The language you selected in Раздел 9.3, «Language Selection» will be listed in the left-hand pane and serves as the default keyboard layout. To add additional layouts for other languages, click the + button and select from the list. Click the — button to delete layouts. Use the arrow buttons to arrange the layouts in order of preference.
For a visual preview of the keyboard layout, select it and click the keyboard button. To test a layout, select it and then use the mouse to click inside the text box at the right. Type some text to confirm that your selection functions correctly.
If you choose multiple keyboard layouts, you will be able to toggle between keyboard layouts in Fedora using the Alt+Shift keystroke combination. To choose a different combination, click Options to open the Layout Switching Options dialog. Choose a combination from the list by selecting its check box.
Once you have made your selection, click Done to return to the pre-installation hub.
Рисунок 9.4. Keyboard Configuration
Fedora includes support for more than one keyboard layout for many languages. In particular, most European languages include a latin1 option, which uses dead keys to access certain characters, such as those with diacritical marks. When you press a dead key, nothing will appear on your screen until you press another key to «complete» the character. For example, to type é on a latin1 keyboard layout, you would press (and release) the ‘ key, and then press the E key. By contrast, you access this character on some other keyboards by pressing and holding down a key (such as Alt-Gr) while you press the E key. Other keyboards might have a dedicated key for this character.
To change your keyboard layout type after you have completed the installation, use the Keyboard Configuration Tool.
Type the system-config-keyboard command in a shell prompt to launch the Keyboard Configuration Tool. If you are not root, it prompts you for the root password to continue.
9.7. Language Selection
The language currently selected for the installation and as the system default is displayed on the Pre-Installation Hub, under Language.
If you need to change the language – perhaps if you accepted the default of English (United States) in error – select Language from the Pre-Installation Hub.
Use your mouse to select the language (for example, English (United States)) you would prefer to use for the installation and as the system default.
Alternatively, type your preferred language into the search box (refer to the figure below).
Once you have made your selection, click Done to return to the Pre-Installation Hub.
Рисунок 9.5. Language Configuration
9.8. Installation Source
Specify the location you would like to install Fedora from. Choose between an ISO file or a network location.
Рисунок 9.6. Installation source
If you initiated the installation using a full DVD ISO, the installer will detect the ISO and display it under Auto-detected install media. Select the ISO to use it as the installation source.
If an ISO has not been detected automatically, specify a locally-stored ISO file. Click Choose an ISO and browse to the file’s location on your system. After selecting an ISO, click Verify to check that the file is suitable for installation.
To specify a network location, choose from the following options in the drop-down menu: Closest mirror, http://, https://, ftp://, and nfs.
Using your selection as the start of the location URL, type the rest into the address box. (If you selected Closest mirror, an address is not required.)
If you choose NFS, the address box will be grayed out. Another box will appear for you to specify any NFS mount options.
To configure a proxy, click Proxy setup unless you are installing via FTP and NFS. Proxies are unavailable for these methods.
Check Enable HTTP proxy and type the URL into the Proxy URL box. If your proxy requires authentication, check Use Authentication and enter a username and password. Click Add.
Check the Updates option if you do not want to install the latest available updates and would prefer to install the default versions from your specified installation source.
Once you have selected your installation source, click Back to return to the Pre-Installation Hub.
9.9. Network configuration
Появится запрос ввода имени узла либо в виде полностью квалифицированного имени домена, либо в формате узел.домен, либо можно просто указать имя_узла. Многие сети используют протокол DHCP (Dynamic Host Configuration Protocol) для автоматического назначения системе доменного имени. При этом пользователю остается только указать имя узла.
Рисунок 9.7. Network configuration
Если система Fedora напрямую подключена к Интернету, примите во внимание правила вашего провайдера. Их обсуждение выходит за рамки этого документа.
The installation program does not configure modems. Configure these devices after installation with the Network utility. The settings for your modem are specific to your particular Internet Service Provider (ISP).
9.9.1. Изменение сетевых подключений
When a Fedora 17 installation boots for the first time, it activates any network interfaces that you configured during the installation process. However, the installer does not prompt you to configure network interfaces on some common installation paths, for example, when you install Fedora from a DVD to a local hard drive.
When you install Fedora from a local installation source to a local storage device, be sure to configure at least one network interface manually if you require network access when the system boots for the first time.
Чтобы изменить настройки сетевых подключений после завершения установки, воспользуйтесь программой настройки сети.
Выполните в приглашении оболочки команду system-config-network для ее запуска. Если вы не являетесь пользователем root, для продолжения будет предложено ввести пароль root.
To configure the selected network connection manually, click the button Configure. A Network Manager dialog appears that allows you to configure the selected connection. The configuration options presented will depend on whether the connection is wired, wireless, mobile broadband, VPN, or DSL. A full description of all configurations possible with NetworkManager is beyond the scope of this guide. This section only details the most typical scenario of how to configure wired connections during installation. Configuration of other types of network is broadly similar, although the specific parameters that you must configure are necessarily different.
When you have finished editing network settings, click Save to save the new configuration. If you reconfigured a device that was already active during installation, you must restart the device to use the new configuration — refer to Раздел 9.9.1.6, «Restart a network device».
9.9.1.1. Аналогичные параметры для разных типов подключений
Некоторые параметры совпадают для всех типов соединений.
Заполните поле Название соединения.
Select Connect automatically to start the connection automatically when the system boots.
When NetworkManager runs on an installed system, the Available to all users option controls whether a network configuration is available system-wide or not. During installation, ensure that Available to all users remains selected for any network interface that you configure.
9.9.1.2. The Ethernet tab
Use the Ethernet tab to specify or change the media access control (MAC) address for the network adapter, and set the maximum transmission unit (MTU, in bytes) that can pass through the interface either manually or automatically.
Рисунок 9.8. The Ethernet tab
9.9.1.3. Вкладка защиты 802.1x
На вкладке Защита 802.1x можно настроить контроль сетевого доступа в зависимости от порта. Для этого выберите Использовать защиту 802.1X для этого соединения и введите необходимые данные. Параметры настройки включают:
- Аутентификация
-
Выберите метод аутентификации:
-
TLS (Transport Layer Security);
-
Туннельный TLS (TTLS или EAP-TTLS);
-
Защищенный EAP (PEAP) (Protected Extensible Authentication Protocol).
-
- Идентификация
-
Введите данные сервера.
- Сертификат пользователя
-
Путь к файлу сертификата X.509, закодированному с помощью правил DER (Distinguished Encoding Rules) или PEM (Privacy Enhanced Mail).
- Сертификат CA
-
Путь к файлу сертификата CA, закодированному с помощью правил DER (Distinguished Encoding Rules) или PEM (Privacy Enhanced Mail).
- Секретный ключ
-
Путь к файлу секретного ключа, закодированному с помощью правил DER (Distinguished Encoding Rules), PEM (Privacy Enhanced Mail) или PKCS#12 (Personal Information Exchange Syntax Standard).
- Пароль к секретному ключу
-
Пароль для ключа, заданного в поле Секретный ключ. Отметьте Показывать пароль, чтобы видеть вводимый пароль.
Рисунок 9.9. Вкладка защиты 802.1x
9.9.1.4. The IPv4 Settings tab
На вкладке параметров IPv4 можно изменить настройки существующего соединения.
В меню Профиль выберите настройки, которые будут определяться службой DHCP.
- Автоматически (DHCP)
-
Параметры IPv4 определяются службой DHCP.
- Автоматические адреса (DHCP)
-
Адрес IPv4, маска сети и адрес шлюза настраиваются службой DHCP, но серверы имен и домены поиска должны быть настроены вручную.
- Manual
-
Параметры IPv4 для статической конфигурации определяются вручную.
- Link-Local Only
-
Интерфейсу будет назначен локальный адрес в диапазоне 169.254/16.
- Общий с другими компьютерами
-
В этом случае система будет предоставлять доступ к сети для других компьютеров. Интерфейсу будет назначен адрес в диапазоне 10.42.x.1/24. Серверы DHCP и DNS будут запущены, а при подключении интерфейса к системе с NAT (Network Address Translation) будут использоваться настройки по умолчанию.
- Не указывать адрес
-
IPv4 отключен.
При выборе профиля, для которого необходимо настроить параметры вручную, в поле адреса укажите IP-адрес интерфейса, маску сети и шлюз. Для добавления и удаления адресов используются одноименные кнопки. В поле Серверы DNS введите список серверов, разделив их запятой, а в поле Домены поиска перечислите домены, которые будут участвовать в поиске сервера имен.
Или можно ввести имя сетевого соединения в поле ID клиента DHCP. Значение должно быть уникально в пределах подсети.
Отмените выбор Требовать адресацию IPv4 для этого соединения, чтобы разрешить это соединение в сети IPv6. Используется в случаях, если настройка IPv4 завершилась неудачей, а настройка IPv6 удалась.
Рисунок 9.10. The IPv4 Settings tab
9.9.1.4.1. Изменение маршрутов IPv4
Red Hat Enterprise Linux выполняет автоматическую настройку маршрутов на основе IP-адресов устройства. Чтобы добавить дополнительные маршруты, нажмите кнопку Маршруты. Появится диалог Изменение маршрутов IPv4.
Рисунок 9.11. Диалог изменения маршрутов IPv4
Click Add to add the IP address, netmask, gateway address, and metric for a new static route.
Выберите Игнорировать автоматически полученные маршруты, чтобы использовать только заданные здесь маршруты.
Select Use this connection only for resources on its network to restrict connections only to the local network.
9.9.1.5. Вкладка параметров IPv6
На вкладке Параметры IPv6 можно изменить настройки IPv6 для выбранного соединения.
В меню Профиль выберите настройки, которые будут определяться службой DHCP.
- Игнорировать
-
Игнорировать IPv6 для заданного соединения.
- Автоматически
-
NetworkManager uses router advertisement (RA) to create an automatic, stateless configuration.
- Автоматически, только адреса
-
NetworkManager uses RA to create an automatic, stateless configuration, but DNS servers and search domains are ignored and must be configured manually.
- Automatic, DHCP only
-
NetworkManager does not use RA, but requests information from DHCPv6 directly to create a stateful configuration.
- Manual
-
Параметры IPv6 для статической конфигурации определяются вручную.
- Link-Local Only
-
Интерфейсу будет назначен локальный адрес с префиксом fe80::/10.
При выборе профиля, для которого необходимо настроить параметры вручную, в поле адреса укажите IP-адрес интерфейса, маску сети и шлюз. Для добавления и удаления адресов используются одноименные кнопки. В поле Серверы DNS введите список серверов, разделив их запятой, а в поле Домены поиска перечислите домены, которые будут участвовать в поиске сервера имен.
Или можно ввести имя сетевого соединения в поле ID клиента DHCP. Значение должно быть уникально в пределах подсети.
Отмените выбор Требовать адресацию IPv6 для этого соединения, чтобы разрешить это соединение в сети IPv4. Используется в случаях, если настройка IPv6 завершилась неудачей, а настройка IPv4 удалась.
Рисунок 9.12. Вкладка параметров IPv6
9.9.1.5.1. Изменение маршрутов IPv6
Fedora configures a number of routes automatically based on the IP addresses of a device. To edit additional routes, click the Routes button. The Editing IPv6 routes dialog appears.
Рисунок 9.13. Диалог изменения маршрутов IPv6
Click Add to add the IP address, netmask, gateway address, and metric for a new static route.
Select Use this connection only for resources on its network to restrict connections only to the local network.
9.9.1.6. Restart a network device
If you reconfigured a network that was already in use during installation, you must disconnect and reconnect the device in anaconda for the changes to take effect. Anaconda uses interface configuration (ifcfg) files to communicate with NetworkManager. A device becomes disconnected when its ifcfg file is removed, and becomes reconnected when its ifcfg file is restored, as long as ONBOOT=yes is set. Refer to the Fedora Deployment Guide available from http://docs.fedoraproject.org/en-US/index.html for more information about interface configuration files.
-
Press Ctrl+Alt+F2 to switch to virtual terminal
tty2. -
Move the interface configuration file to a temporary location:
mv /etc/sysconfig/network-scripts/ifcfg-
device_name/tmpwhere
device_nameis the device that you just reconfigured. For example,ifcfg-eth0is the ifcfg file foreth0.The device is now disconnected in anaconda.
-
Open the interface configuration file in the vi editor:
vi /tmp/ifcfg-
device_name -
Verify that the interface configuration file contains the line
ONBOOT=yes. If the file does not already contain the line, add it now and save the file. -
Exit the vi editor.
-
Move the interface configuration file back to the
/etc/sysconfig/network-scripts/directory:mv /tmp/ifcfg-
device_name/etc/sysconfig/network-scripts/The device is now reconnected in anaconda.
-
Press Ctrl+Alt+F6 to return to anaconda.
9.10. Software Selection
При установке Fedora в текстовом режиме выбор пакетов для установки будет недоступен. Установщик автоматически выберет из основной группы пакеты, необходимые для работы системы после завершения процесса установки и обеспечения ее готовности к установке новых пакетов и обновлений. После завершения установки изменить набор пакетов можно с помощью специального приложения добавления и удаления программ.
Рисунок 9.14. Software Selection
By default, Fedora installs the GNOME Desktop Environment, but in Software Selection you can choose from a range of other environments and customise additional packages to be installed as add-ons. Available environments are listed in the left-hand pane. To select an environment, click the radio button that corresponds to one of the following options:
- Graphical Desktops (multiple options)
-
Fedora offers a variety of graphical desktop environments, which can be enhanced with add-ons such as the LibreOffice productivity suite, graphical tools such as the GIMP, and multimedia applications. The available environments are:
-
GNOME Desktop
-
KDE Plasma Workspaces
-
Xfce Desktop
-
LXDE Desktop
-
Cinnamon Desktop
-
MATE Desktop
-
Sugar Desktop Environment
-
- Development and Creative Workstation
-
This option provides the necessary tools to compile software and develop graphics and other content on your Fedora system.
- Web Server
-
Эта опция позволяет установить веб-сервер Apache.
- Infrastructure Server
-
This option provides a server for operating network infrastructure services.
- Basic X Window System
-
This option provides the X Window System without a full graphical desktop environment.
- Minimal Install
-
This option provides only the packages essential to run Fedora. A minimal installation provides the basis for a single-purpose server or desktop appliance and maximizes performance and security on such an installation.
Fedora will automatically install the base and mandatory packages for the environment you select, but you can select additional package groups, or add-ons, from the right-hand pane. The list of add-ons is refreshed when a new environment is selected. Add-ons range from common utilities such as Administrative Tools and LibreOffice to specialist tools such as Medical Applications and Robotics
To specify add-ons for installation as part of the environment, select the check box next to each add-on.
Once you have selected an environment and any additional packages you may wish to install, click Done to return to the pre-installation hub.
The packages that you select are not permanent. After you boot your system, use the Add/Remove Software tool to either install new software or remove installed packages. To run this tool, from the main menu, select → → . The Fedora software management system downloads the latest packages from network servers, rather than using those on the installation discs.
9.10.1. Installing from Additional Repositories
You can define additional repositories to increase the software available to your system during installation. A repository is a network location that stores software packages along with metadata that describes them. Many of the software packages used in Fedora require other software to be installed. The installer uses the metadata to ensure that these requirements are met for every piece of software you select for installation.
The basic options are:
-
Репозиторий установки будет выбран автоматически. Он включает программное обеспечение для установочного CD/DVD.
-
Fedora 17 — i386 содержит полную коллекцию программ Fedora 17 плюс стабильные версии дополнительных программ. При выполнении установки Fedora 17 с набора дисков CD или DVD эта опция не предложит дополнительных функций, но при установке с LiveCD вы получите доступ к широкому диапазону пакетов. Для этого компьютер должен иметь доступ к Интернету.
-
Репозиторий Fedora 17 — i386 — Updates содержит полную коллекцию пакетов Fedora 17 плюс стабильные версии дополнительных программ. Этот вариант не только установит выбранное программное обеспечение, но и гарантирует наличие последних версий. Для этого компьютер должен иметь доступ к Интернету.
Рисунок 9.15. Adding a software repository
To include software from extra repositories, select Add additional software repositories and provide the location of the repository.
To edit an existing software repository location, select the repository in the list and then select Modify repository.
If you change the repository information during a non-network installation, such as from a Fedora DVD, the installer prompts you for network configuration information.
If you change the repository information during a non-network installation, such as from a Fedora DVD, the installer prompts you for network configuration information.
Рисунок 9.16. Select network interface
-
Select an interface from the drop-down menu.
-
Click OK.
Anaconda activates the interface that you selected, then starts NetworkManager to allow you to configure the interface.
Рисунок 9.17. Сетевые соединения
For details of how to use NetworkManager, refer to Раздел 9.9, «Network configuration»
If you select Add additional software repositories, the Edit repository dialog appears. Provide a Repository name and the Repository URL for its location.
Once you have located a mirror, to determine the URL to use, find the directory on the mirror that contains a directory named repodata.
Once you provide information for an additional repository, the installer reads the package metadata over the network. Software that is specially marked is then included in the package group selection system.
If you choose Back from the package selection screen, any extra repository data you may have entered is lost. This allows you to effectively cancel extra repositories. Currently there is no way to cancel only a single repository once entered.
9.10.2. Core Network Services
Все установки Fedora включают следующие сетевые службы:
-
centralized logging through syslog
-
email through SMTP (Simple Mail Transfer Protocol)
-
network file sharing through NFS (Network File System)
-
remote access through SSH (Secure SHell)
-
resource advertising through mDNS (multicast DNS)
The default installation also provides:
-
network file transfer through HTTP (HyperText Transfer Protocol)
-
printing through CUPS (Common UNIX Printing System)
-
remote desktop access through VNC (Virtual Network Computing)
Некоторые автоматизированные процессы в Fedora для отправки отчетов и сообщений системному администратору используют электронную почту. Службы электронной почты, журналирования и печати по умолчанию не принимают подключения из других систем. Fedora устанавливает компоненты совместного доступа NFS, HTTP и VNC, но не активирует их по умолчанию.
Можно настроить систему Fedora так, чтобы она предоставляла службы электронной почты, совместного доступа, журналирования, печати и доступа к удаленному рабочему столу. SSH в Fedora активируется по умолчанию. Для доступа к файлам, расположенным в другой системе, можно использовать NFS без необходимости активации службы совместного доступа NFS.
9.11. Устройства хранения
You can install Fedora on a large variety of storage devices. This screen allows you to select either basic or specialized storage devices.
Рисунок 9.18. Устройства хранения
- Basic Storage Devices
-
Select to install Fedora on the following storage devices:
-
на напрямую подключенные жесткие диски и твердотельные накопители.
-
- Specialized Storage Devices
-
Select to install Fedora on the following storage devices:
-
в сети хранения данных (SAN, Storage Area Networks);
-
Direct access storage devices (DASDs)
-
на микропрограммные RAID-устройства;
-
на многопутевые устройства.
Use the option to configure Internet Small Computer System Interface (iSCSI) and FCoE (Fiber Channel over Ethernet) connections.
-
Если вы выбрали пункт , anaconda автоматически обнаружит подключенное устройство. Раздел 9.9, «Network configuration» содержит дальнейшую информацию.
9.11.1. Окно выбора устройств хранения
В этом окне показаны все доступные программе anaconda устройства хранения.
Рисунок 9.19. Выбор устройств хранения. Стандартные устройства
Рисунок 9.20. Выбор устройств хранения. Многопутевые устройства.
Рисунок 9.21. Выбор устройств хранения. Другие устройства SAN.
Устройства сгруппированы следующим образом:
- Basic Devices
-
Это устройства, напрямую подключенные в локальную систему (например, жесткие диски).
- Firmware RAID
-
Накопители, подключенные к микропрограммному RAID-контроллеру.
- Multipath Devices
-
Storage devices accessible through more than one path, such as through multiple SCSI controllers or Fiber Channel ports on the same system.
The installer only detects multipath storage devices with serial numbers that are 16 or 32 characters in length.
- Other SAN Devices
-
Любые другие устройства в сети хранения данных.
Если настройка устройств iSCSI и FCoE не требуется, нажмите кнопку Добавить (см. Раздел 9.11.1.1, « Advanced Storage Options »).
To assign non-friendly multipath device names, click Device Options and uncheck Use friendly names for multipath devices.
Экран выбора устройств содержит вкладку поиска, где можно отфильтровать устройства хранения по идентификатору WWID (World Wide Identifier), порту, цели или номеру LUN (Logical Unit Number).
Рисунок 9.22. Вкладка поиска устройств хранения
На этой вкладке вы увидите раскрывающееся меню, где можно выбрать критерий поиска (порт, цель, LUN, WWID) и соответствующие текстовые поля.
На каждой вкладке будет представлен список обнаруженных программой anaconda устройств и критерии, помогающие их идентифицировать. Справа от заголовков столбцов расположено небольшое раскрывающееся меню, где можно выбрать характеристики устройства для просмотра. Например, в меню на вкладке Многопутевые устройства можно дополнительно показать , , , , .
Рисунок 9.23. Выбор столбцов
Each device is presented on a separate row, with a checkbox to its left. Click the checkbox to make a device available during the installation process, or click the radio button at the left of the column headings to select or deselect all the devices listed in a particular screen. Later in the installation process, you can choose to install Fedora onto any of the devices selected here, and can choose to automatically mount any of the other devices selected here as part of the installed system.
Обратите внимание, что выбранные здесь устройства не будут очищены автоматически. Сам по себе выбор устройства на этом экране не подвергает его данные риску. Также стоит заметить, что даже если устройства не выбраны на этом этапе, их можно будет добавить в систему после установки, отредактировав файл /etc/fstab.
Any storage devices that you do not select on this screen are hidden from anaconda entirely. To chain load the Fedora boot loader from a different boot loader, select all the devices presented in this screen.
Выбрав устройства, нажмите кнопку продолжения. Раздел 9.13, «Initializing the Hard Disk» содержит дальнейшую информацию.
9.11.1.1. Advanced Storage Options
From this screen you can configure an iSCSI (SCSI over TCP/IP) target or FCoE (Fibre channel over ethernet) SAN (storage area network). Refer to Приложение B, ISCSI disks for an introduction to iSCSI.
Рисунок 9.24. Advanced Storage Options
9.11.1.1.1. Select and configure a network interface
If a network interface is not already active on the system, anaconda must activate one through which to connect to the storage devices. If your system has only a single network interface, anaconda automatically activates it. However, if your system has more than one network interface available, anaconda prompts you with the Select network interface dialog to choose one to use during installation.
Рисунок 9.25. Select network interface
-
Select an interface from the drop-down menu.
-
Click OK.
Anaconda activates the interface that you selected, then starts NetworkManager to allow you to configure the interface.
Рисунок 9.26. Сетевые соединения
For details of how to use NetworkManager, refer to Раздел 9.9, «Network configuration»
9.11.1.1.2. Configure iSCSI parameters
To use iSCSI storage devices for the installation, anaconda must be able to discover them as iSCSI targets and be able to create an iSCSI session to access them. Each of these steps might require a username and password for CHAP (Challenge Handshake Authentication Protocol) authentication. Additionally, you can configure an iSCSI target to authenticate the iSCSI initiator on the system to which the target is attached (reverse CHAP), both for discovery and for the session. Used together, CHAP and reverse CHAP are called mutual CHAP or two-way CHAP. Mutual CHAP provides the greatest level of security for iSCSI connections, particularly if the username and password are different for CHAP authentication and reverse CHAP authentication.
Repeat the iSCSI discovery and iSCSI login steps as many times as necessary to add all required iSCSI storage. However, you cannot change the name of the iSCSI initiator after you attempt discovery for the first time. To change the iSCSI initiator name, you must restart the installation.
Процедура 9.1. iSCSI discovery
Use the iSCSI Discovery Details dialog to provide anaconda with the information that it needs to discover the iSCSI target.
Рисунок 9.27. The iSCSI Discovery Details dialog
-
Enter the IP address of the iSCSI target in the Target IP Address field.
-
Provide a name in the iSCSI Initiator Name field for the iSCSI initiator in iSCSI qualified name (IQN) format.
A valid IQN contains:
-
the string
iqn.(note the period) -
a date code that specifies the year and month in which your organization’s Internet domain or subdomain name was registered, represented as four digits for the year, a dash, and two digits for the month, followed by a period. For example, represent September 2010 as
2010-09. -
your organization’s Internet domain or subdomain name, presented in reverse order with the top-level domain first. For example, represent the subdomain
storage.example.comascom.example.storage -
a colon followed by a string that uniquely identifies this particular iSCSI initiator within your domain or subdomain. For example,
:diskarrays-sn-a8675309.
A complete IQN therefore resembles:
iqn.2010-09.storage.example.com:diskarrays-sn-a8675309, and anaconda pre-populates the iSCSI Initiator Name field with a name in this format to help you with the structure. -
-
Use the drop-down menu to specify the type of authentication to use for iSCSI discovery:
Рисунок 9.28. iSCSI discovery authentication
-
-
If you selected as the authentication type, provide the username and password for the iSCSI target in the CHAP Username and CHAP Password fields.
Рисунок 9.29. CHAP pair
-
If you selected as the authentication type, provide the username and password for the iSCSI target in the CHAP Username and CHAP Password field and the username and password for the iSCSI initiator in the Reverse CHAP Username and Reverse CHAP Password fields.
Рисунок 9.30. CHAP pair and a reverse pair
-
-
Click Start Discovery. Anaconda attempts to discover an iSCSI target based on the information that you provided. If discovery succeeds, the iSCSI Discovered Nodes dialog presents you with a list of all the iSCSI nodes discovered on the target.
-
Each node is presented with a checkbox beside it. Click the checkboxes to select the nodes to use for installation.
Рисунок 9.31. The iSCSI Discovered Nodes dialog
-
Click Login to initiate an iSCSI session.
Процедура 9.2. Starting an iSCSI session
Use the iSCSI Nodes Login dialog to provide anaconda with the information that it needs to log into the nodes on the iSCSI target and start an iSCSI session.
Рисунок 9.32. The iSCSI Nodes Login dialog
-
Use the drop-down menu to specify the type of authentication to use for the iSCSI session:
Рисунок 9.33. iSCSI session authentication
If your environment uses the same type of authentication and same username and password for iSCSI discovery and for the iSCSI session, select to reuse these credentials.
-
-
If you selected as the authentication type, provide the username and password for the iSCSI target in the CHAP Username and CHAP Password fields.
Рисунок 9.34. CHAP pair
-
If you selected as the authentication type, provide the username and password for the iSCSI target in the CHAP Username and CHAP Password fields and the username and password for the iSCSI initiator in the Reverse CHAP Username and Reverse CHAP Password fields.
Рисунок 9.35. CHAP pair and a reverse pair
-
-
Click Login. Anaconda attempts to log into the nodes on the iSCSI target based on the information that you provided. The iSCSI Login Results dialog presents you with the results.
Рисунок 9.36. The iSCSI Login Results dialog
-
Click OK to continue.
9.11.1.1.3. Configure FCoE Parameters
To configure an FCoE SAN, select Add FCoE SAN and click Add Drive.
On the menu that appears in the next dialog box, select the network interface that is connected to your FCoE switch and click Add FCoE Disk(s).
Рисунок 9.37. Configure FCoE Parameters
Data Center Bridging (DCB) is a set of enhancements to the Ethernet protocols designed to increase the efficiency of Ethernet connections in storage networks and clusters. Enable or disable the installer’s awareness of DCB with the checkbox in this dialog.
9.12. Assign Storage Devices
If you selected more than one storage device on the storage devices selection screen (refer to Раздел 9.11, «Устройства хранения»), anaconda asks you to select which of these devices should be available for installation of the operating system, and which should only be attached to the file system for data storage. If you selected only one storage device, anaconda does not present you with this screen.
В процессе установки диски, выбранные на данном этапе в качестве устройств хранения, будут смонтированы без форматирования и создания разделов.
Рисунок 9.38. Выбор устройств хранения
The screen is split into two panes. The left pane contains a list of devices to be used for data storage only. The right pane contains a list of devices that are to be available for installation of the operating system.
Each list contains information about the devices to help you to identify them. A small drop-down menu marked with an icon is located to the right of the column headings. This menu allows you to select the types of data presented on each device. Reducing or expanding the amount of information presented might help you to identify particular devices.
Move a device from one list to the other by clicking on the device, then clicking either the button labeled with a left-pointing arrow to move it to the list of data storage devices or the button labeled with a right-pointing arrow to move it to the list of devices available for installation of the operating system.
The list of devices available as installation targets also includes a radio button beside each device. Use this radio button to specify the device that you want to use as the boot device for the system.
If any storage device contains a boot loader that will chain load the Fedora boot loader, include that storage device among the Install Target Devices. Storage devices that you identify as Install Target Devices remain visible to anaconda during boot loader configuration.
Storage devices that you identify as Install Target Devices on this screen are not automatically erased by the installation process unless you selected the Use All Space option on the partitioning screen (refer to Раздел 9.15, «Disk Partitioning Setup»).
When you have finished identifying devices to be used for installation, click Next to continue.
9.13. Initializing the Hard Disk
If no readable partition tables are found on existing hard disks, the installation program asks to initialize the hard disk. This operation makes any existing data on the hard disk unreadable. If your system has a brand new hard disk with no operating system installed, or you have removed all partitions on the hard disk, click Re-initialize drive.
The installation program presents you with a separate dialog for each disk on which it cannot read a valid partition table. Click the Ignore all button or Re-initialize all button to apply the same answer to all devices.
Рисунок 9.39. Warning screen – initializing hard drive
Certain RAID systems or other nonstandard configurations may be unreadable to the installation program and the prompt to initialize the hard disk may appear. The installation program responds to the physical disk structures it is able to detect.
To enable automatic initializing of hard disks for which it turns out to be necessary, use the kickstart command clearpart --initlabel (refer to Глава 15, Kickstart Installations)
If you have a nonstandard disk configuration that can be detached during installation and detected and configured afterward, power off the system, detach it, and restart the installation.
9.14. Upgrading an Existing System
Fedora предоставляет утилиту командной строки preupgrade, позволяющую выполнить обновление существующей установки Fedora до новой версии.
The installation system automatically detects any existing installation of Fedora. The upgrade process updates the existing system software with new versions, but does not remove any data from users’ home directories. The existing partition structure on your hard drives does not change. Your system configuration changes only if a package upgrade demands it. Most package upgrades do not change system configuration, but rather install an additional configuration file for you to examine later.
Обратите внимание, что установочный носитель может не содержать все пакеты для обновления.
9.14.1. Экран обновления системы
If your system contains a Fedora installation, a dialog appears asking whether you want to upgrade that installation. To perform an upgrade of an existing system, choose the appropriate installation from the drop-down list and select Next.
Рисунок 9.40. Экран обновления системы
Software you have installed manually on your existing Fedora system may behave differently after an upgrade. You may need to manually reinstall or recompile this software after an upgrade to ensure it performs correctly on the updated system.
If you are re-installing the same version of Fedora, preserve your user data by placing it on a separate /home partition.
9.14.2. Upgrading Using the Installer
In general, the Fedora Project recommends that you keep user data on a separate /home partition and perform a fresh installation. For more information on partitions and how to set them up, refer to Раздел 9.15, «Disk Partitioning Setup».
If you choose to upgrade your system using the installation program, any software not provided by Fedora that conflicts with Fedora software is overwritten. Before you begin an upgrade this way, make a list of your system’s current packages for later reference:
rpm -qa --qf '%{NAME} %{VERSION}-%{RELEASE} %{ARCH}\n' > ~/old-pkglist.txtAfter installation, consult this list to discover which packages you may need to rebuild or retrieve from sources other than the Fedora Project.
Next, make a backup of any system configuration data:
su -c 'tar czf /tmp/etc-`date +%F`.tar.gz /etc'su -c 'mv /tmp/etc-*.tar.gz /home'
Make a complete backup of any important data before performing an upgrade. Important data may include the contents of your entire /home directory as well as content from services such as an Apache, FTP, or SQL server, or a source code management system. Although upgrades are not destructive, if you perform one improperly there is a small possibility of data loss.
Note that the above examples store backup materials in a /home directory. If your /home directory is not a separate partition, you should not follow these examples verbatim! Store your backups on another device such as CD or DVD discs or an external hard disk.
Раздел 18.2, «Finishing an Upgrade» содержит дополнительную информацию о завершении процесса обновления.
9.14.3. Upgrading Boot Loader Configuration
Your completed Fedora installation must be registered in the boot loader to boot properly. A boot loader is software on your machine that locates and starts the operating system. Refer to Приложение E, The GRUB Boot Loader for more information about boot loaders.
Рисунок 9.41. Диалог обновления загрузчика
If the existing boot loader was installed by a Linux distribution, the installation system can modify it to load the new Fedora system. To update the existing Linux boot loader, select Update boot loader configuration. This is the default behavior when you upgrade an existing Fedora installation.
GRUB is the standard boot loader for Fedora on 32-bit and 64-bit x86 architectures. If your machine uses another boot loader, such as BootMagic, System Commander, or the loader installed by Microsoft Windows, then the Fedora installation system cannot update it. In this case, select Skip boot loader updating. When the installation process completes, refer to the documentation for your product for assistance.
Install a new boot loader as part of an upgrade process only if you are certain you want to replace the existing boot loader. If you install a new boot loader, you may not be able to boot other operating systems on the same machine until you have configured the new boot loader. Select Create new boot loader configuration to remove the existing boot loader and install GRUB.
Сделав выбор, нажмите кнопку продолжения. Прочитайте Раздел 9.19, «Настройка загрузчика на платформах x86, AMD64 и Intel 64», если вы выбрали пункт Создать новую конфигурацию загрузчика. Если же вы решили обновить загрузчик или вообще пропустить его настройку, процесс установки продолжит работу.
9.15. Disk Partitioning Setup
It is always a good idea to back up any data that you have on your systems. For example, if you are upgrading or creating a dual-boot system, you should back up any data you wish to keep on your storage devices. Mistakes do happen and can result in the loss of all your data.
If you install Fedora in text mode, you can only use the default partitioning schemes described in this section. You cannot add or remove partitions or file systems beyond those that the installer automatically adds or removes. If you require a customized layout at installation time, you should perform a graphical installation over a VNC connection or a kickstart installation.
Furthermore, advanced options such as LVM, encrypted filesystems, and resizable filesystems are available only in graphical mode and kickstart.
If you have a RAID card, be aware that some BIOSes do not support booting from the RAID card. In cases such as these, the /boot/ partition must be created on a partition outside of the RAID array, such as on a separate hard drive. An internal hard drive is necessary to use for partition creation with problematic RAID cards.
A /boot/ partition is also necessary for software RAID setups.
If you have chosen to automatically partition your system, you should select Review and manually edit your /boot/ partition.
Partitioning allows you to divide your hard drive into isolated sections, where each section behaves as its own hard drive. Partitioning is particularly useful if you run multiple operating systems. If you are not sure how you want your system to be partitioned, read Приложение A, An Introduction to Disk Partitions for more information.
Рисунок 9.42. Disk Partitioning Setup
On this screen you can choose to create the default partition layout in one of four different ways, or choose to partition storage devices manually to create a custom layout.
The first four options allow you to perform an automated installation without having to partition your storage devices yourself. If you do not feel comfortable with partitioning your system, choose one of these options and let the installation program partition the storage devices for you. Depending on the option that you choose, you can still control what data (if any) is removed from the system.
Your options are:
- Use All Space
-
Select this option to remove all partitions on your hard drives (this includes partitions created by other operating systems such as Windows VFAT or NTFS partitions).
If you select this option, all data on the selected hard drives is removed by the installation program. Do not select this option if you have information that you want to keep on the hard drives where you are installing Fedora.
In particular, do not select this option when you configure a system to chain load the Fedora boot loader from another boot loader.
- Replace Existing Linux System(s)
-
Select this option to remove only partitions created by a previous Linux installation. This does not remove other partitions you may have on your hard drives (such as VFAT or FAT32 partitions).
- Shrink Current System
-
Select this option to resize your current data and partitions manually and install a default Fedora layout in the space that is freed.
If you shrink partitions on which other operating systems are installed, you might not be able to use those operating systems. Although this partitioning option does not destroy data, operating systems typically require some free space in their partitions. Before you resize a partition that holds an operating system that you might want to use again, find out how much space you need to leave free.
- Use Free Space
-
Select this option to retain your current data and partitions and install Fedora in the unused space available on the storage drives. Ensure that there is sufficient space available on the storage drives before you select this option — refer to Раздел 4.4, «Достаточно ли дискового пространства?».
If your 64-bit x86 system uses UEFI instead of BIOS, you will need to manually create a /boot partition. This partition must have an ext3 file system. If you choose to partition automatically, your system will not boot.
- Create Custom Layout
-
Select this option to partition storage devices manually and create customized layouts. Refer to Раздел 9.17, « Creating a Custom Layout or Modifying the Default Layout »
Choose your preferred partitioning method by clicking the radio button to the left of its description in the dialog box.
Select Encrypt system to encrypt all partitions except the /boot partition. Refer to Приложение C, Disk Encryption for information on encryption.
Select Use LVM to enable Logical Volume Management. Refer to Приложение D, Understanding LVM for information on LVM.
To review and make any necessary changes to the partitions created by automatic partitioning, select the Review option. After selecting Review and clicking Next to move forward, the partitions created for you by anaconda appear. You can make modifications to these partitions if they do not meet your needs.
To configure the Fedora boot loader to chain load from a different boot loader, you must specify the boot drive manually. If you chose any of the automatic partitioning options, you must now select the Review and modify partitioning layout option before you click Next or you cannot specify the correct boot drive.
When you install Fedora on a system with multipath and non-multipath storage devices, the automatic partitioning layout in the installer might create volume groups that contain a mix of multipath and non-multipath devices. This defeats the purpose of multipath storage.
We advise that you select only multipath or only non-multipath devices on the disk selection screen that appears after selecting automatic partitioning. Alternatively, select custom partitioning.
Сделав выбор, нажмите Далее для продолжения установки.
9.16. Encrypt Partitions
If you selected the Encrypt System option, the installer prompts you for a passphrase with which to encrypt the partitions on the system.
Partitions are encrypted using the Linux Unified Key Setup — refer to Приложение C, Disk Encryption for more information.
Рисунок 9.43. Enter passphrase for encrypted partition
Choose a passphrase and type it into each of the two fields in the dialog box. You must provide this passphrase every time that the system boots.
If you lose this passphrase, any encrypted partitions and the data on them will become completely inaccessible. There is no way to recover a lost passphrase.
Note that if you perform a kickstart installation of Fedora, you can save encryption passphrases and create backup encryption passphrases during installation. Refer to Раздел C.3.2, «Saving Passphrases» and Раздел C.3.3, «Creating and Saving Backup Passphrases».
9.17. Creating a Custom Layout or Modifying the Default Layout
If you chose one of the four automatic partitioning options and did not select Review, skip ahead to Раздел 9.10, «Software Selection».
If you chose one of the automatic partitioning options and selected Review, you can either accept the current partition settings (click Next), or modify the setup manually in the partitioning screen.
If you chose to create a custom layout, you must tell the installation program where to install Fedora. This is done by defining mount points for one or more disk partitions in which Fedora is installed. You may also need to create and/or delete partitions at this time.
If you have not yet planned how to set up your partitions, refer to Приложение A, An Introduction to Disk Partitions and Раздел 9.17.5, «Recommended Partitioning Scheme». At a bare minimum, you need an appropriately-sized root partition, and usually a swap partition appropriate to the amount of RAM you have on the system.
Anaconda can handle the partitioning requirements for a typical installation.
Рисунок 9.44. Partitioning on x86, AMD64, and Intel 64 Systems
The partitioning screen contains two panes. The top pane contains a graphical representation of the hard drive, logical volume, or RAID device selected in the lower pane.
Above the graphical representation of the device, you can review the name of the drive (such as /dev/sda or LogVol00), its size (in MB), and its model as detected by the installation program.
Using your mouse, click once to highlight a particular field in the graphical display. Double-click to edit an existing partition or to create a partition out of existing free space.
The lower pane contains a list of all drives, logical volumes, and RAID devices to be used during installation, as specified earlier in the installation process — refer to Раздел 9.12, « Assign Storage Devices »
Devices are grouped by type. Click on the small triangles to the left of each device type to view or hide devices of that type.
Anaconda displays several details for each device listed:
- Device
-
the name of the device, logical volume, or partition
- Size (MB)
-
the size of the device, logical volume, or partition (in MB)
- Mount Point/RAID/Volume
-
the mount point (location within a file system) on which a partition is to be mounted, or the name of the RAID or logical volume group of which it is a part
- Type
-
the type of partition. If the partition is a standard partition, this field displays the type of file system on the partition (for example, ext4). Otherwise, it indicates that the partition is a
physical volume (LVM), or part of asoftware RAID - Format
-
A check mark in this column indicates that the partition will be formatted during installation.
Beneath the lower pane are four buttons: Create, Edit, Delete, and Reset.
Select a device or partition by clicking on it in either the graphical representation in the upper pane of in the list in the lower pane, then click one of the four buttons to carry out the following actions:
- Create
-
create a new partition, logical volume, or software RAID
- Edit
-
change an existing partition, logical volume, or software RAID. Note that you can only shrink partitions with the Resize button, not enlarge partitions.
- Delete
-
remove a partition, logical volume, or software RAID
- Reset
-
undo all changes made in this screen
9.17.1. Create Storage
The Create Storage dialog allows you to create new storage partitions, logical volumes, and software RAIDs. Anaconda presents options as available or unavailable depending on the storage already present on the system or configured to transfer to the system.
Рисунок 9.45. Creating Storage
Options are grouped under Create Partition, Create Software RAID and Create LVM as follows:
Create Partition
Refer to Раздел 9.17.2, «Adding Partitions» for details of the Add Partition dialog.
-
Standard Partition — create a standard disk partition (as described in Приложение A, An Introduction to Disk Partitions) in unallocated space.
Create Software RAID
Refer to Раздел 9.17.3, « Create Software RAID » for more detail.
-
RAID Partition — create a partition in unallocated space to form part of a software RAID device. To form a software RAID device, two or more RAID partitions must be available on the system.
-
RAID Device — combine two or more RAID partitions into a software RAID device. When you choose this option, you can specify the type of RAID device to create (the RAID level). This option is only available when two or more RAID partitions are available on the system.
Create LVM Logical Volume
Refer to Раздел 9.17.4, « Create LVM Logical Volume » for more detail.
-
LVM Physical Volume — create a physical volume in unallocated space.
-
LVM Volume Group — create a volume group from one or more physical volumes. This option is only available when at least one physical volume is available on the system.
-
LVM Logical Volume — create a logical volume on a volume group. This option is only available when at least one volume group is available on the system.
9.17.2. Adding Partitions
Для создания нового раздела нажмите кнопку Создать. Появится диалоговое окно (см. Рисунок 9.46, «Создание нового раздела»).
You must dedicate at least one partition for this installation, and optionally more. For more information, refer to Приложение A, An Introduction to Disk Partitions.
Рисунок 9.46. Создание нового раздела
-
Mount Point: Enter the partition’s mount point. For example, if this partition should be the root partition, enter
/; enter/bootfor the/bootpartition, and so on. You can also use the pull-down menu to choose the correct mount point for your partition. For a swap partition the mount point should not be set — setting the filesystem type toswapis sufficient. -
File System Type: Using the pull-down menu, select the appropriate file system type for this partition. For more information on file system types, refer to Раздел 9.17.2.1, «File System Types».
-
Доступные устройства: В этом поле содержится список жестких дисков, установленных в вашей системе. Если жесткий диск выделен, значит требуемый раздел может быть создан на этом диске. Если диск не выделен, раздел на этом диске не может быть создан. С помощью различных настроек можно добиться того, чтобы anaconda разместила разделы там, где вам нужно, или позволить anaconda решать, где должны быть разделы.
-
Size (MB): Enter the size (in megabytes) of the partition. Note, this field starts with 200 MB; unless changed, only a 200 MB partition will be created.
-
Дополнительные опции размера: Определите, будет ли этот раздел иметь фиксированный размер, или вы позволите ему «вырасти» (заполнить все свободное дисковое пространство) до определенного размера, или же занять без ограничений все доступное на диске пространство.
If you choose Fill all space up to (MB), you must give size constraints in the field to the right of this option. This allows you to keep a certain amount of space free on your hard drive for future use.
-
Шифрование: позволяет зашифровать раздел. Тогда доступ к данным в этом разделе можно будет получить только при наличии парольной фразы. При выборе этой опции программа установки запросит ввод парольной фразы. Приложение C, Disk Encryption содержит подробную информацию о шифровании устройств хранения.
-
OK: Select OK once you are satisfied with the settings and wish to create the partition.
-
Cancel: Select Cancel if you do not want to create the partition.
9.17.2.1. File System Types
Fedora allows you to create different partition types and file systems. The following is a brief description of the different partition types and file systems available, and how they can be used.
Типы разделов
-
стандартный раздел может содержать файловую систему, пространство подкачки или может служить в качестве основы для создания программного RAID-массива или физического тома LVM.
-
swap — Swap partitions are used to support virtual memory. In other words, data is written to a swap partition when there is not enough RAM to store the data your system is processing. Refer to the Fedora Deployment Guide for additional information.
-
software RAID — Creating two or more software RAID partitions allows you to create a RAID device. For more information regarding RAID, refer to the chapter RAID (Redundant Array of Independent Disks) in the Fedora Deployment Guide.
-
physical volume (LVM) — Creating one or more physical volume (LVM) partitions allows you to create an LVM logical volume. LVM can improve performance when using physical disks. For more information regarding LVM, refer to the Fedora Deployment Guide.
File systems
-
ext4 — The ext4 file system is based on the ext3 file system and features a number of improvements. These include support for larger file systems and larger files, faster and more efficient allocation of disk space, no limit on the number of subdirectories within a directory, faster file system checking, and more robust journaling. The ext4 file system is selected by default and is highly recommended.
-
ext3 — The ext3 file system is based on the ext2 file system and has one main advantage — journaling. Using a journaling file system reduces time spent recovering a file system after a crash as there is no need to
fsck[2] the file system. -
ext2 — An ext2 file system supports standard Unix file types (regular files, directories, symbolic links, etc). It provides the ability to assign long file names, up to 255 characters.
-
xfs — XFS is a highly scalable, high-performance file system that supports filesystems up to 16 exabytes (approximately 16 million terabytes), files up to 8 exabytes (approximately 8 million terabytes) and directory structures containing tens of millions of entries. XFS supports metadata journaling, which facilitates quicker crash recovery. The XFS file system can also be defragmented and resized while mounted and active.
-
vfat — файловая система Linux, совместимая с FAT и поддерживающая длинные имена файлов Microsoft Windows.
The Btrfs file system is unavailable in Fedora 17.
9.17.3. Create Software RAID
Redundant arrays of independent disks (RAIDs) are constructed from multiple storage devices that are arranged to provide increased performance and — in some configurations — greater fault tolerance. Refer to the Fedora Deployment Guide for a description of different kinds of RAIDs.
To make a RAID device, you must first create software RAID partitions. Once you have created two or more software RAID partitions, select RAID to join the software RAID partitions into a RAID device.
- RAID Partition
-
Choose this option to configure a partition for software RAID. This option is the only choice available if your disk contains no software RAID partitions. This is the same dialog that appears when you add a standard partition — refer to Раздел 9.17.2, «Adding Partitions» for a description of the available options. Note, however, that File System Type must be set to
software RAIDРисунок 9.47. Create a software RAID partition
- RAID Device
-
Choose this option to construct a RAID device from two or more existing software RAID partitions. This option is available if two or more software RAID partitions have been configured.
Рисунок 9.48. Create a RAID device
Select the file system type as for a standard partition.
Anaconda automatically suggests a name for the RAID device, but you can manually select names from
md0tomd15.Click the checkboxes beside individual storage devices to include or remove them from this RAID.
The RAID Level corresponds to a particular type of RAID. Choose from the following options:
-
RAID 0 — distributes data across multiple storage devices. Level 0 RAIDs offer increased performance over standard partitions, and can be used to pool the storage of multiple devices into one large virtual device. Note that Level 0 RAIDS offer no redundancy and that the failure of one device in the array destroys the entire array. RAID 0 requires at least two RAID partitions.
-
RAID 1 — mirrors the data on one storage device onto one or more other storage devices. Additional devices in the array provide increasing levels of redundancy. RAID 1 requires at least two RAID partitions.
-
RAID 4 — distributes data across multiple storage devices, but uses one device in the array to store parity information that safeguards the array in case any device within the array fails. Because all parity information is stored on the one device, access to this device creates a bottleneck in the performance of the array. RAID 4 requires at least three RAID partitions.
-
RAID 5 — distributes data and parity information across multiple storage devices. Level 5 RAIDs therefore offer the performance advantages of distributing data across multiple devices, but do not share the performance bottleneck of level 4 RAIDs because the parity information is also distributed through the array. RAID 5 requires at least three RAID partitions.
-
RAID 6 — level 6 RAIDs are similar to level 5 RAIDs, but instead of storing only one set of parity data, they store two sets. RAID 6 requires at least four RAID partitions.
-
RAID 10 — level 10 RAIDs are nested RAIDs or hybrid RAIDs. Level 10 RAIDs are constructed by distributing data over mirrored sets of storage devices. For example, a level 10 RAID constructed from four RAID partitions consists of two pairs of partitions in which one partition mirrors the other. Data is then distributed across both pairs of storage devices, as in a level 0 RAID. RAID 10 requires at least four RAID partitions.
-
9.17.4. Create LVM Logical Volume
LVM initial set up is not available during text-mode installation. If you need to create an LVM configuration from scratch, press Alt+F2 to use a different virtual console, and run the lvm command. To return to the text-mode installation, press Alt+F1.
Logical Volume Management (LVM) presents a simple logical view of underlying physical storage space, such as a hard drives or LUNs. Partitions on physical storage are represented as physical volumes that can be grouped together into volume groups. Each volume group can be divided into multiple logical volumes, each of which is analogous to a standard disk partition. Therefore, LVM logical volumes function as partitions that can span multiple physical disks.
To read more about LVM, refer to the Fedora Deployment Guide. Note, LVM is only available in the graphical installation program.
- LVM Physical Volume
-
Choose this option to configure a partition or device as an LVM physical volume. This option is the only choice available if your storage does not already contain LVM Volume Groups. This is the same dialog that appears when you add a standard partition — refer to Раздел 9.17.2, «Adding Partitions» for a description of the available options. Note, however, that File System Type must be set to
physical volume (LVM)Рисунок 9.49. Create an LVM Physical Volume
- Make LVM Volume Group
-
Choose this option to create LVM volume groups from the available LVM physical volumes, or to add existing logical volumes to a volume group.
Рисунок 9.50. Make LVM Volume Group
To assign one or more physical volumes to a volume group, first name the volume group. Then select the physical volumes to be used in the volume group. Finally, configure logical volumes on any volume groups using the Add, Edit and Delete options.
You may not remove a physical volume from a volume group if doing so would leave insufficient space for that group’s logical volumes. Take for example a volume group made up of two 5 GB LVM physical volume partitions, which contains an 8 GB logical volume. The installer would not allow you to remove either of the component physical volumes, since that would leave only 5 GB in the group for an 8 GB logical volume. If you reduce the total size of any logical volumes appropriately, you may then remove a physical volume from the volume group. In the example, reducing the size of the logical volume to 4 GB would allow you to remove one of the 5 GB physical volumes.
- Make Logical Volume
-
Choose this option to create an LVM logical volume. Select a mount point, file system type, and size (in MB) just as if it were a standard disk partition. You can also choose a name for the logical volume and specify the volume group to which it will belong.
Рисунок 9.51. Make Logical Volume
9.17.5. Recommended Partitioning Scheme
9.17.5.1. x86, AMD64, and Intel 64 systems
Unless you have a reason for doing otherwise, we recommend that you create the following partitions for x86, AMD64, and Intel 64 systems:
-
A
swappartition -
A
/bootpartition -
A
/partition -
A
/homepartition
-
Раздел подкачки (swap) (по меньшей мере 256 МБ) используется для поддержки виртуальной памяти. Данные попадают в раздел подкачки, когда вашей системе не хватает оперативной памяти для обработки данных.
In years past, the recommended amount of swap space increased linearly with the amount of RAM in the system. But because the amount of memory in modern systems has increased into the hundreds of gigabytes, it is now recognized that the amount of swap space that a system needs is a function of the memory workload running on that system.
Swap space is usually designated during installation, but determining the memory workload of a system at this point can be difficult. During a kickstart installation, you can request that the amount of swap space be set automatically (refer to Раздел 15.4, «Kickstart Options».
However, this setting is not precisely calibrated for your system, so use the following table if you require the amount of swap space to be set more precisely.
Таблица 9.2. Рекомендуемый размер пространства подкачки
Объем ОЗУ Рекомендуемый объем пространства подкачки до 4 ГБ ОЗУ минимум 2 ГБ для пространства подкачки от 4 до 16 ГБ ОЗУ минимум 4 ГБ для пространства подкачки от 16 до 64 ГБ ОЗУ минимум 8 ГБ для пространства подкачки от 64 до 256 ГБ ОЗУ минимум 16 ГБ для пространства подкачки от 256 до 512 ГБ ОЗУ минимум 32 ГБ для пространства подкачки Можно повысить производительность, распределив пространство подкачки между несколькими устройствами хранения. Разница будет особенно заметна в системах с быстрыми дисками, контроллерами и интерфейсами.
-
A
/boot/partition (250 MB)The partition mounted on
/boot/contains the operating system kernel (which allows your system to boot Fedora), along with files used during the bootstrap process. For most users, a 250 MB boot partition is sufficient.The GRUB bootloader in Fedora 17 supports only the ext2, ext3, and ext4 (recommended) file systems. You cannot use any other file system for
/boot, such as Btrfs, XFS, or VFAT.If your hard drive is more than 1024 cylinders (and your system was manufactured more than two years ago), you may need to create a
/boot/partition if you want the/(root) partition to use all of the remaining space on your hard drive.If you have a RAID card, be aware that some BIOSes do not support booting from the RAID card. In cases such as these, the
/boot/partition must be created on a partition outside of the RAID array, such as on a separate hard drive. -
A
rootpartition (3.0 GB — 5.0 GB)This is where «
/» (the root directory) is located. In this setup, all files (except those stored in/boot) are on the root partition.A 3.0 GB partition allows you to install a minimal installation, while a 5.0 GB root partition lets you perform a full installation, choosing all package groups.
The
/(or root) partition is the top of the directory structure. The/rootdirectory/root(sometimes pronounced «slash-root») directory is the home directory of the user account for system administration. -
A
homepartition (at least 100 MB)To store user data separately from system data, create a dedicated partition within a volume group for the
/homedirectory. This will enable you to upgrade or reinstall Fedora without erasing user data files.
Many systems have more partitions than the minimum listed above. Choose partitions based on your particular system needs. Refer to Раздел 9.17.5.1.1, «Advice on Partitions» for more information.
If you create many partitions instead of one large / partition, upgrades become easier. Refer to the description of the Edit option in Раздел 9.17, « Creating a Custom Layout or Modifying the Default Layout » for more information.
The following table summarizes minimum partition sizes for the partitions containing the listed directories. You do not have to make a separate partition for each of these directories. For instance, if the partition containing /foo must be at least 500 MB, and you do not make a separate /foo partition, then the / (root) partition must be at least 500 MB.
Таблица 9.3. Minimum partition sizes
| Directory | Minimum size |
|---|---|
/
|
250 MB |
/usr
|
250 MB, but avoid placing this on a separate partition |
/tmp
|
50 MB |
/var
|
384 MB |
/home
|
100 MB |
/boot
|
250 MB |
Only assign storage capacity to those partitions you require immediately. You may allocate free space at any time, to meet needs as they occur. To learn about a more flexible method for storage management, refer to Приложение D, Understanding LVM.
If you are not sure how best to configure the partitions for your computer, accept the default partition layout.
9.17.5.1.1. Advice on Partitions
Optimal partition setup depends on the usage for the Linux system in question. The following tips may help you decide how to allocate your disk space.
-
Рассмотрите возможность шифрования разделов, содержащих важные данные, для их защиты от неавторизованного доступа. Как минимум рекомендуется зашифровать раздел
/home. -
Each kernel installed on your system requires approximately 10 MB on the
/bootpartition. Unless you plan to install a great many kernels, the default partition size of 250 MB for/bootshould suffice.The GRUB bootloader in Fedora 17 supports only the ext2, ext3, and ext4 (recommended) file systems. You cannot use any other file system for
/boot, such as Btrfs, XFS, or VFAT. -
The
/vardirectory holds content for a number of applications, including the Apache web server. It also is used to store downloaded update packages on a temporary basis. Ensure that the partition containing the/vardirectory has enough space to download pending updates and hold your other content.The PackageKit update software downloads updated packages to
/var/cache/yum/by default. If you partition the system manually, and create a separate/var/partition, be sure to create the partition large enough (3.0 GB or more) to download package updates. -
Каталог
/usrсодержит основную часть программного обеспечения Fedora. Для установки стандартного набора пакетов потребуется примерно 4 ГБ пространства. Программистам, планирующим использовать Fedora для разработки ПО, рекомендуется как минимум удвоить это число.If
/usris on a separate file system from/, the boot process becomes much more complex because/usrcontains boot-critical components. In some situations (like installations on iSCSI drives), the boot process might not work at all. -
Consider leaving a portion of the space in an LVM volume group unallocated. This unallocated space gives you flexibility if your space requirements change but you do not wish to remove data from other partitions to reallocate storage.
-
Распределение подкаталогов между разными разделами позволит сохранить их содержимое в случае переустановки Fedora. Например, если база данных MySQL хранится в
/var/lib/mysql, можно поместить этот каталог в отдельный раздел, тогда ее не надо будет восстанавливать при переустановке. -
If you are creating a custom partition layout on a non-EFI x86 system, you are strongly advised to create a separate, 1MB BIOS boot partition. This is only recommended on the disk you are installing the bootloader on and if any of the following conditions apply:
-
The disk contains a GPT partition table.
-
The installer has already initialized the disk for you.
-
You selected Use All Space in the Disk Partitioning Setup.
This boot partition will be used by the GRUB boot loader for storage.
-
The following table is a possible partition setup for a system with a single, new 80 GB hard disk and 1 GB of RAM. Note that approximately 10 GB of the volume group is unallocated to allow for future growth.
This setup is not optimal for all use cases.
Пример 9.1. Example partition setup
Таблица 9.4. Example partition setup
| Partition | Size and type |
|---|---|
/boot
|
250 МБ, ext3
|
swap
|
2 GB swap |
| LVM physical volume | Remaining space, as one LVM volume group |
The physical volume is assigned to the default volume group and divided into the following logical volumes:
Таблица 9.5. Example partition setup: LVM physical volume
| Partition | Size and type |
|---|---|
/
|
13 GB ext4 |
/var
|
4 GB ext4 |
/home
|
50 GB ext4 |
9.18. Write changes to disk
Программа установки попросит подтвердить выбранные настройки разбиения диска. Нажмите Сохранить изменения на диск для продолжения установки.
Рисунок 9.52. Writing storage configuration to disk
If you are certain that you want to proceed, click Write changes to disk.
До этого момента в процессе установки программа установки не сохраняла изменения на вашем компьютере. При нажатии кнопки Сохранить изменения на диск программа установки выделит место на жестком диске и начнет установку Fedora. В зависимости от выбранной схемы разбиения диска на разделы, этот процесс может включать удаление существующих данных.
To revise any of the choices that you made up to this point, click Go back. To cancel installation completely, switch off your computer. To switch off most computers at this stage, press the power button and hold it down for a few seconds.
После того, как вы нажали Записать изменения на диск, отменить установку будет невозможно. Если установка была прервана (например, компьютер был выключен), Вы не сможете использовать свой компьютер до тех пор, пока не перезапустите и не завершите процесс установки или пока не установите другую ОС.
9.19. Настройка загрузчика на платформах x86, AMD64 и Intel 64
To boot the system without boot media, you usually need to install a boot loader. A boot loader is the first software program that runs when a computer starts. It is responsible for loading and transferring control to the operating system kernel software. The kernel, in turn, initializes the rest of the operating system.
При выполнении установки в текстовом режиме загрузчик будет настроен автоматически и в процессе установки его настройки нельзя будет изменить.
GRUB (GRand Unified Bootloader), which is installed by default, is a very powerful boot loader. GRUB can load a variety of free operating systems, as well as proprietary operating systems with chain-loading (the mechanism for loading unsupported operating systems, such as Windows, by loading another boot loader). Note that Fedora 17 uses GRUB 2. GRUB Legacy is no longer actively developed.[3]
The GRUB menu defaults to being hidden, except on dual-boot systems. To show the GRUB menu during system boot, press and hold the Shift key before the kernel is loaded. (Any other key works as well but the Shift key is the safest to use.)
Рисунок 9.53. Настройка загрузчика
Если на компьютере нет других операционных систем, программа установки установит загрузчик GRUB. Раздел 9.10, «Software Selection» содержит дальнейшую информацию.
You may have a boot loader installed on your system already. An operating system may install its own preferred boot loader, or you may have installed a third-party boot loader. If your boot loader does not recognize Linux partitions, you may not be able to boot Fedora. Use GRUB as your boot loader to boot Linux and most other operating systems. Follow the directions in this chapter to install GRUB.
If you install GRUB, it may overwrite your existing boot loader.
By default, the installation program installs GRUB in the master boot record or MBR, of the device for the root file system. To decline installation of a new boot loader, unselect Install boot loader on /dev/sda.
If you choose not to install GRUB for any reason, you will not be able to boot the system directly, and you must use another boot method (such as a commercial boot loader application). Use this option only if you are sure you have another way of booting the system!
Если на компьютере установлены другие операционные системы, Fedora попытается автоматически определить их и настроить GRUB для их загрузки. Это можно сделать самостоятельно, если GRUB не обнаружил системы.
Для добавления, удаления или изменения обнаруженных операционных систем воспользуйтесь соответствующими опциями.
- Добавить
-
Выберите Добавить для добавления другой операционной системы в GRUB.
Из списка выберите раздел диска, содержащий операционную систему, и присвойте ему метку. GRUB будет показывать эту метку в меню загрузки.
- Изменить
-
Для изменения записи в меню GRUB необходимо выбрать запись и нажать кнопку Изменить.
- Удалить
-
Для удаления записи из меню GRUB необходимо ее выбрать и нажать кнопку Удалить.
Отметьте флажок По умолчанию напротив предпочитаемого раздела, чтобы выбрать систему, загружаемую по умолчанию. Если вы не выберете образ, загружаемый по умолчанию, вы не сможете продолжить установку.
The Label column lists what you must enter at the boot prompt, in non-graphical boot loaders, in order to boot the desired operating system.
Once you have loaded the GRUB boot screen, use the arrow keys to choose a boot label or type e for edit. You are presented with a list of items in the configuration file for the boot label you have selected.
Boot loader passwords provide a security mechanism in an environment where physical access to your server is available.
Если вы установили загрузчик, рекомендуется определить пароль для защиты системы. Если пароль загрузчика не задан, пользователи, имеющие доступ к компьютеру, могут передать ядру параметры и взломать защиту. Если пароль загрузчика установлен, для изменения его параметров сначала потребуется ввести пароль. Но если у кого-то есть физический доступ к компьютеру, то все же возможно его загрузить с дискеты, CD, DVD или устройства USB при условии поддержки BIOS. План по обеспечению безопасности систем также должен учитывать альтернативные методы загрузки.
Если ваша система находится в безопасном окружении, то есть доступ к ней открыт только авторизованному персоналу, то пароль GRUB можно не задавать. Если же существует вероятность физического доступа к клавиатуре и монитору неавторизованными пользователями, они смогут перезагрузить систему и войти в GRUB. В таких случаях следует задать пароль.
If you choose to use a boot loader password to enhance your system security, be sure to select the checkbox labeled Use a boot loader password.
Once selected, enter a password and confirm it.
Whenever you are required to enter this password, you will also be asked for a username, which is root.
GRUB stores the password in encrypted form, so it cannot be read or recovered. If you forget the boot password, boot the system normally and then change the password entry in the /etc/grub.d/00_header file. Then, run grub2-mkconfig with root privileges to update the grub.cfg file with your updated password. If you cannot boot, you may be able to use the rescue mode on the Fedora installation DVD to reset the GRUB password.
You can later change the username in the /etc/grub.d/01_users file.
When selecting a GRUB password, be aware that GRUB recognizes only the QWERTY keyboard layout, regardless of the keyboard actually attached to the system. If you use a keyboard with a significantly different layout, it might be more effective to memorize a pattern of keystrokes rather than the word that the pattern produces.
To configure more advanced boot loader options, such as changing the drive order or passing options to the kernel, be sure Configure advanced boot loader options is selected before clicking Next.
9.19.1. Advanced Boot Loader Configuration
Now that you have chosen which boot loader to install, you can also determine where you want the boot loader to be installed. You may install the boot loader in one of two places:
-
Основная загрузочная запись (MBR, Master Boot Record) — рекомендуемое размещение загрузчика, если только в MBR не установлен другой загрузчик операционных систем, например System Commander. MBR — специальная область на диске, которую BIOS вашего компьютера автоматически загружает и передает ей управление процессом загрузки в первую очередь. При установке загрузчика в MBR, сразу после включения компьютера GRUB покажет строку приглашения, откуда можно загрузить Fedora или любую другую настроенную операционную систему.
-
The first sector of your boot partition — This is recommended if you are already using another boot loader on your system. In this case, your other boot loader takes control first. You can then configure that boot loader to start GRUB, which then boots Fedora.
If you install GRUB as a secondary boot loader, you must reconfigure your primary boot loader whenever you install and boot from a new kernel. The kernel of an operating system such as Microsoft Windows does not boot in the same fashion. Most users therefore use GRUB as the primary boot loader on dual-boot systems.
Рисунок 9.54. Boot Loader Installation
If you have a RAID card, be aware that some BIOSes do not support booting from the RAID card. In cases such as these, the boot loader should not be installed on the MBR of the RAID array. Rather, the boot loader should be installed on the MBR of the same drive as the /boot/ partition was created.
Если вы будете использовать только Fedora, выберите MBR.
Click the Change Drive Order button if you would like to rearrange the drive order or if your BIOS does not return the correct drive order. Changing the drive order may be useful if you have multiple SCSI adapters, or both SCSI and IDE adapters, and you want to boot from the SCSI device.
If you are installing Fedora from a USB, the boot loader will by default be installed to the MBR on the USB rather than the MBR on the hard drive. This will prevent the system booting once the installation is complete. To avoid this, select Change Device and reverse the order of the BIOS drives. /dev/sda is typically the hard drive and should be first in the BIOS Drive Order.
While partitioning your hard drive, keep in mind that the BIOS in some older systems cannot access more than the first 1024 cylinders on a hard drive. If this is the case, leave enough room for the /boot Linux partition on the first 1024 cylinders of your hard drive to boot Linux. The other Linux partitions can be after cylinder 1024.
In parted, 1024 cylinders equals 528MB. For more information, refer to:
http://www.pcguide.com/ref/hdd/bios/sizeMB504-c.html
9.19.2. Rescue Mode
Режим восстановления позволяет загрузить минимальное окружение Fedora целиком с загрузочного носителя вместо жесткого диска. Бывают ситуации, когда вы не можете полностью запустить Fedora, и не можете получить доступ к файлам на жестком диске компьютера. В режиме восстановления вы можете обращаться к файлам на жестком диске компьютера, даже если вы не смогли запустить Fedora с этого диска. Если нужно воспользоваться режимом восстановления, это можно сделать следующим способом:
-
Загрузить компьютер x86, AMD64 или Intel® 64 с выбранного установочного носителя (CD, DVD, USB, PXE) и ввести в строке приглашения загрузчика команду
linux rescue. Глава 19, Basic System Recovery содержит подробную информацию о режиме восстановления.
For additional information, refer to the Fedora Deployment Guide.
9.19.3. Alternative Boot Loaders
GRUB is the default bootloader for Fedora, but is not the only choice. A variety of open-source and proprietary alternatives to GRUB are available to load Fedora, including LILO, SYSLINUX, and Acronis Disk Director Suite.
The Fedora Project does not support third-party boot loaders.
9.20. The Progress Hub
Once you have completed all the required sections of the Pre-Installation Hub, click Continue and the installation will begin. How quickly this happens depends on the number of packages you have selected and your computer’s speed.
Fedora reports the installation progress on the screen as it writes the selected packages to your system.
Рисунок 9.55. Packages completed
For your reference, a complete log of your installation can be found in /root/install.log once you reboot your system.
While the packages are being installed, more configuration is required. Above the installation progress bar are items that need to be configured for Fedora to be fully installed. These items can be configured either while the packages are being installed or afterwards, but you will not be able to complete the installation process until they have been configured.
When you have configured the required items, click Finish configuration to complete the installation process.
9.20.1. Set the Root Password
Определение учетной записи и пароля root является одним из важнейших этапов установки системы. Учетная запись root подобна учетной записи администратора в Microsoft Windows и используется для установки, обновления пакетов и обслуживания системы. При входе в систему в режиме root пользователь получает полный контроль над системой.
The root user (also known as the superuser) has complete access to the entire system; for this reason, logging in as the root user is best done only to perform system maintenance or administration.
Рисунок 9.56. Root Password
Use the root account only for system administration. Create a non-root account for your general use and use the su command to change to root only when you need to perform tasks that require superuser authorization. These basic rules minimize the chances of a typo or an incorrect command doing damage to your system.
To become root, type su - at the shell prompt in a terminal window and then press Enter. Then, enter the root password and press Enter.
The installation program requires you to set a root password[4] for your system. . You cannot proceed to the installation itself without entering a root password.
The root password must be at least six characters long; the password you type is not echoed to the screen. You must enter the password twice; if the two passwords do not match, the installation program asks you to enter them again.
You should make the root password something you can remember, but not something that is easy for someone else to guess. Your name, your phone number, qwerty, password, root, 123456, and anteater are all examples of bad passwords. Good passwords mix numerals with upper and lower case letters and do not contain dictionary words: Aard387vark or 420BMttNT, for example. Remember that the password is case-sensitive. If you write down your password, keep it in a secure place. However, it is recommended that you do not write down this or any password you create.
Do not use one of the example passwords offered in this manual. Using one of these passwords could be considered a security risk.
Чтобы изменить пароль root после завершения установки, можно использовать утилиту настройки пароля root.
Выполните в приглашении оболочки команду system-config-users. Если вы не являетесь пользователем root, для продолжения будет предложено ввести пароль root.
Enter the root password into the Root Password field. Fedora displays the characters as asterisks for security. Type the same password into the Confirm field to ensure it is set correctly. After you set the root password, select Back to return to the Pre-Installation Hub.
9.21. Installation Complete
Congratulations! Now that you have configured the remaining settings, your Fedora installation is now complete!
Click Reboot to reboot your system and begin using Fedora. Remember to remove any installation media if it is not ejected automatically upon reboot.
After your computer’s normal power-up sequence has completed, Fedora loads and starts. By default, the start process is hidden behind a graphical screen that displays a progress bar. Eventually, a login: prompt or a GUI login screen (if you installed the X Window System and chose to start X automatically) appears.
The first time you start your Fedora system in run level 5 (the graphical run level), the FirstBoot tool appears, which guides you through the Fedora configuration. Using this tool, you can set your system time and date, install software, configure your machine to receive software updates, and more. FirstBoot lets you configure your environment at the beginning, so that you can get started using your Fedora system quickly.
Глава 10. Диагностика проблем при установке в системах Intel и AMD
В этой секции обсуждаются некоторые общие проблемы установки и их решения.
В целях отладки anaconda сохраняет журналы установки в каталог /tmp. Файлы включают:
/tmp/anaconda.log-
общие сообщения anaconda
/tmp/program.log-
все внешние программы, которые выполняет anaconda
/tmp/storage.log-
информация о модулях хранения
/tmp/yum.log-
сообщения установки с помощью yum
/tmp/syslog-
сообщения об оборудовании
If the installation fails, the messages from these files are consolidated into /tmp/anaconda-tb-, where identifieridentifier is a random string.
All of the files above reside in the installer’s ramdisk and are thus volatile. To make a permanent copy, copy those files to another system on the network using scp on the installation image (not the other way round).
10.1. Невозможно загрузить Fedora
10.1.1. Are You Unable to Boot With Your RAID Card?
If you have performed an installation and cannot boot your system properly, you may need to reinstall and create your partitions differently.
Some BIOSes do not support booting from RAID cards. At the end of an installation, a text-based screen showing the boot loader prompt (for example, GRUB: ) and a flashing cursor may be all that appears. If this is the case, you must repartition your system.
Whether you choose automatic or manual partitioning, you must install your /boot partition outside of the RAID array, such as on a separate hard drive. An internal hard drive is necessary to use for partition creation with problematic RAID cards.
You must also install your preferred boot loader (GRUB or LILO) on the MBR of a drive that is outside of the RAID array. This should be the same drive that hosts the /boot/ partition.
Once these changes have been made, you should be able to finish your installation and boot the system properly.
10.1.2. Is Your System Displaying Signal 11 Errors?
A signal 11 error, commonly known as a segmentation fault, means that the program accessed a memory location that was not assigned to it. A signal 11 error may be due to a bug in one of the software programs that is installed, or faulty hardware.
Если во время установки получена критическая ошибка «signal 11», возможно, это связано с аппаратной ошибкой памяти системной шины. Аппаратные сбои памяти могут быть вызваны ошибками программ или сбоями оборудования. Так же, как и другие операционные системы, Fedora выдвигает свои требования к оборудованию. Некоторые типы оборудования могут не соответствовать этим требованиям, даже если они корректно работали с другой операционной системой.
Ensure that you have the latest installation updates and images. Review the online errata to see if newer versions are available. If the latest images still fail, it may be due to a problem with your hardware. Commonly, these errors are in your memory or CPU-cache. A possible solution for this error is turning off the CPU-cache in the BIOS, if your system supports this. You could also try to swap your memory around in the motherboard slots to check if the problem is either slot or memory related.
Another option is to perform a media check on your installation DVD. Anaconda, the installation program, has the ability to test the integrity of the installation media. It works with the DVD, hard drive ISO, and NFS ISO installation methods. The Fedora Project recommends that you test all installation media before starting the installation process, and before reporting any installation-related bugs (many of the bugs reported are actually due to improperly-burned DVDs). To use this test, type the following command at the boot: or yaboot: prompt:
linux rd.live.check
For more information concerning signal 11 errors, refer to:
http://www.bitwizard.nl/sig11/
10.2. Trouble Beginning the Installation
10.2.1. Problems with Booting into the Graphical Installation
There are some video cards that have trouble booting into the graphical installation program. If the installation program does not run using its default settings, it tries to run in a lower resolution mode. If that still fails, the installation program attempts to run in text mode.
В качестве решения попробуйте использовать стандартный видеодрайвер в процессе установки. Для этого в меню загрузки выберите Установить систему со стандартным видеодрайвером или в строке приглашения загрузчика укажите параметр xdriver=vesa. Также можно явно задать разрешение экрана с помощью параметра загрузки resolution=. Этот параметр особенно поможет пользователям ноутбуков. Кроме того, можно указать драйвер с помощью параметра driver=. Если это поможет, пожалуйста, сообщите в систему регистрации ошибок Bugzilla о том, что установщик не смог автоматически определить вашу видеокарту. Глава 11, Boot Options содержит дальнейшую информацию о параметрах загрузки.
To disable frame buffer support and allow the installation program to run in text mode, try using the nofb boot option. This command may be necessary for accessibility with some screen reading hardware.
10.3. Проблемы во время установки
10.3.1. Ошибка: Не найдены устройства для установки Fedora
Если вы получили сообщение об ошибке, сообщающее о том, что не найдено устройств, пригодных для установки Fedora, возможно, SCSI-контроллер не распознан программой установки.
10.3.2. Сохранение сообщений отладки
Если anaconda столкнулась с проблемами после начала графической установки, появится информационное окно:
Рисунок 10.1. Окно создания отчета для сбоя
- Debug
-
показывает подробную информацию об ошибке:
Рисунок 10.2. Подробности сбоя
- Save
-
сохраняет информацию об ошибке на локальный или удаленный ресурс:
- Exit
-
завершает процесс установки.
If you select from the main dialog, you can choose from the following options:
Рисунок 10.3. Report destination
- Red Hat Global Support
-
helps you to create a new support case for the issue that you encountered, or to append the details of the issue to an existing support case. Click Create Case or Attach to Existing Case as appropriate, or click Cancel to abandon sending details of the incident to Red Hat Global Support.
Рисунок 10.4. Open or Update a case with Red Hat Global Support
- Red Hat Global Support (FTP)
-
automatically saves details of the error to a location within Red Hat Global Support using FTP.
Рисунок 10.5. Save Crash Report to Red Hat Global Support (FTP)
- ftp
-
saves details of the error to a remote directory using FTP.
Рисунок 10.6. Сохранить отчет о сбое на удаленный сервер
- local
-
saves details of the error to the local hard drive, in a directory that you select:
Рисунок 10.7. Сохранить отчет о сбое на локальный диск
- scp
-
saves details of the error to a remote host using SCP.
Рисунок 10.8. Сохранить отчет о сбое на удаленный сервер
- Cancel
-
cancels saving the error report.
10.3.3. Trouble with Partition Tables
Если после этапа настройки разбиения диска (см. Раздел 9.15, «Disk Partitioning Setup») вы получаете сообщение, подобное следующему:
Таблица разделов на устройстве hda нечитаема. Для создания новых разделов устройство должно быть инициализировано. ВСЕ ДАННЫЕ на этом устройстве будут утеряны.
возможно, на диске отсутствует таблица разделов или эта таблица не опознается используемой программой разбиения диска.
Users who have used programs such as EZ-BIOS have experienced similar problems, causing data to be lost (assuming the data was not backed up before the installation began) that could not be recovered.
Вне зависимости от выбранного типа установки следует создавать резервную копию данных вашего компьютера.
10.3.4. Using Remaining Space
You have a swap and a / (root) partition created, and you have selected the root partition to use the remaining space, but it does not fill the hard drive.
If your hard drive is more than 1024 cylinders, you must create a /boot partition if you want the / (root) partition to use all of the remaining space on your hard drive.
10.3.5. Other Partitioning Problems
If you create partitions manually, but cannot move to the next screen, you probably have not created all the partitions necessary for installation to proceed.
You must have the following partitions as a bare minimum:
-
A
/(root) partition -
A <swap> partition of type swap
Определив тип раздела как swap, не назначайте ему точку подключения. Anaconda назначит точку подключения такого диска автоматически.
10.4. Problems After Installation
10.4.1. Trouble With the Graphical GRUB Screen on an x86-based System?
If you are experiencing problems with GRUB, you may need to disable the graphical boot screen. To do this, temporarily alter the setting at boot time before changing it permanently.
At boot time, press Esc to reach the GRUB splash screen. Select the GRUB line, and type e.
Edit the kernel line to remove rhgb.
Press Enter to exit the editing mode.
Once the boot loader screen has returned, type b to boot the system.
If your problems with GRUB are now resolved and you want to make the change permanent, become the root user and edit the /etc/default/grub file.
Within the grub file, comment out the line which begins with GRUB_TERMINAL=console by inserting the # character at the beginning of the line.
Refresh the grub.cfg file by running grub2-mkconfig with root privileges. The changes you have made will then take effect.
You may re-enable the graphical boot screen by uncommenting (or adding) the above line back into the /etc/default/grub file.
10.4.2. Blocked by a GRUB command line after upgrading?
If you have restarted your machine after upgrading Fedora but cannot progress beyond the GRUB command line, you will need to issue commands to boot the operating system and then make the changes persistent once Fedora has loaded.
-
At the GRUB command line, display the superseded GRUB configuration file with the following command:
cat (hdpartitionnumber,drivenumber)/grub/grub.confpartitionnumberanddrivenumberrefer to the location of your Fedora/bootdirectory. If you do not know the location, boot the machine using a Fedora live CD to find out and then reboot to return to the GRUB command line. Refer to Раздел E.4.1, «Device Names» for help with partition numbering. -
In the GRUB configuration file, locate the first
linuxandinitrdlines and paste them as individual commands. For example:linux /vmlinuz-3.3.0-1.fc17.x86_64 ro root=/dev/mapper/VolGroup-lv_root rd_LVM_LV=VolGroup/lv_root rd_LVM_LV=VolGroup/lv_swap rd_NO_LUKS rd_NO_MD rd_NO_DM LANG=en_US.UTF-8 SYSFONT=latarcyrheb-sun16 KEYTABLE=us rhgb quietinitrd /initramfs-3.3.0-1.fc17.x86_64.img -
Run the
bootcommand. -
Once Fedora has loaded, refresh the GRUB configuration file to make the changes persistent:
grub2-mkconfig -o /boot/grub2/grub.cfg
10.4.3. Booting into a Graphical Environment
If you have installed the X Window System but are not seeing a graphical desktop environment once you log into your system, you can start the X Window System graphical interface using the command startx.
Once you enter this command and press Enter, the graphical desktop environment is displayed.
Note, however, that this is just a one-time fix and does not change the log in process for future log ins.
To set up your system so that you can log in at a graphical login screen, you must edit one file, /etc/inittab, by changing just one number in the runlevel section. When you are finished, reboot the computer. The next time you log in, you are presented with a graphical login prompt.
Open a shell prompt. If you are in your user account, become root by typing the su command.
Now, type gedit /etc/inittab to edit the file with gedit. The file /etc/inittab opens. Within the first screen, a section of the file which looks like the following appears:
# Default runlevel. The runlevels used are:
#   0 - halt (Do NOT set initdefault to this)
#   1 - Single user mode
#   2 - Multiuser, without NFS (The same as 3, if you do not have networking)
#   3 - Full multiuser mode
#   4 - unused
#   5 - X11
#   6 - reboot (Do NOT set initdefault to this)
#
id:3:initdefault:
To change from a console to a graphical login, you should change the number in the line id:3:initdefault: from a 3 to a 5.
Change only the number of the default runlevel from 3 to 5.
Your changed line should look like the following:
id:5:initdefault:
When you are satisfied with your change, save and exit the file using the Ctrl+Q keys. A window appears and asks if you would like to save the changes. Click Save.
The next time you log in after rebooting your system, you are presented with a graphical login prompt.
10.4.4. Problems with the X Window System (GUI)
If you are having trouble getting X (the X Window System) to start, you may not have installed it during your installation.
Если вам нужна система X, вы можете либо установить пакеты с установочных носителей Fedora, либо выполнить обновление.
If you elect to upgrade, select the X Window System packages, and choose GNOME, KDE, or both, during the upgrade package selection process.
Раздел 18.3, «Switching to a Graphical Login» содержит дальнейшую информацию об установке окружения рабочего стола.
10.4.5. Problems with the X Server Crashing and Non-Root Users
If you are having trouble with the X server crashing when anyone logs in, you may have a full file system (or, a lack of available hard drive space).
To verify that this is the problem you are experiencing, run the following command:
df -h
The df command should help you diagnose which partition is full. For additional information about df and an explanation of the options available (such as the -h option used in this example), refer to the df man page by typing man df at a shell prompt.
A key indicator is 100% full or a percentage above 90% or 95% on a partition. The /home/ and /tmp/ partitions can sometimes fill up quickly with user files. You can make some room on that partition by removing old files. After you free up some disk space, try running X as the user that was unsuccessful before.
10.4.6. Problems When You Try to Log In
If you did not create a user account in the firstboot screens, switch to a console by pressing Ctrl+Alt+F2, log in as root and use the password you assigned to root.
If you cannot remember your root password, boot your system as linux single.
If you are using an x86-based system and GRUB is your installed boot loader, type e for edit when the GRUB boot screen has loaded. You are presented with a list of items in the configuration file for the boot label you have selected.
Choose the line that starts with kernel and type e to edit this boot entry.
At the end of the kernel line, add:
single
Press Enter to exit edit mode.
Once the boot loader screen has returned, type b to boot the system.
Once you have booted into single user mode and have access to the # prompt, you must type passwd root, which allows you to enter a new password for root. At this point you can type shutdown -r now to reboot the system with the new root password.
If you cannot remember your user account password, you must become root. To become root, type su - and enter your root password when prompted. Then, type passwd <username>. This allows you to enter a new password for the specified user account.
If the graphical login screen does not appear, check your hardware for compatibility issues.
10.4.7. Is Your RAM Not Being Recognized?
Sometimes, the kernel does not recognize all of your memory (RAM). The following procedure will allow you to confirm this and then adjust the kernel if necessary.
-
Run the
cat /proc/meminfocommand and verify that the displayed quantity is the same as the known amount of RAM in your system. If they are not equal, you can first make a temporary change to confirm whether editing the kernel will be effective. -
Reboot, and once you have loaded the GRUB boot screen, type
efor edit. -
You are presented with a list of items in the configuration file for the boot label you have selected. Choose the line that starts with
kerneland typeeto edit this boot entry. -
At the end of the
kernelline, addmem=xxMwhere
xxequals the amount of RAM in your system, then press Enter to exit edit mode. -
Once the boot loader screen has returned, type
bto boot the system. -
Run
cat /proc/meminfoagain. If the known amount of RAM in your system is now displayed, add the following line to the/etc/grub.d/10_linuxfile to make the change permanent:mem=xxMReplace
xxwith the amount of RAM you have in megabytes. -
To update the
grub.cfgfile so that the change will take effect, rungrub2-mkconfigwith root privileges.
In 10_linux, the above example would look similar to the following:
default=0
timeout=30
splashimage=(hd0,1)/grub/splash.xpm.gz
menuentry 'Fedora Linux, with Linux 3.1.0-0.rc6.git0.3.fc16.x86_64'
set root=(hd0,1)
linux /vmlinuz-(2.6.32.130.el6.i686 ro root=UUID=04a07c13-e6bf-6d5a-b207-002689545705 mem=8192M
initrd /initrd-(2.6.32.130.el6.i686.img
10.4.8. Your Printer Does Not Work
If you are not sure how to set up your printer or are having trouble getting it to work properly, try using the Printer Configuration Tool.
Type the system-config-printer command at a shell prompt to launch the Printer Configuration Tool. If you are not root, it prompts you for the root password to continue.
10.4.9. Apache HTTP Server or Sendmail stops responding during startup
If Apache HTTP Server (httpd) or Sendmail stops responding during startup, make sure the following line is in the /etc/hosts file:
127.0.0.1 localhost.localdomain localhost
Часть II. Advanced installation options
This part of the Fedora Installation Guide covers more advanced or uncommon methods of installing Fedora, including:
-
boot options.
-
installing without media.
-
installing through VNC.
-
using kickstart to automate the installation process.
Глава 11. Boot Options
Система установки Fedora включает целый ряд возможностей и опций для администраторов. Для использования параметров загрузки введите linux в приглашении параметрboot:.
To access the boot: prompt on a system that displays a graphical boot screen, press the Esc key while the graphical boot screen is displayed.
If you specify more than one option, separate each of the options by a single space. For example:
linux option1 option2 option3
На странице http://fedoraproject.org/wiki/KernelCommonProblems перечислены типичные параметры загрузки ядра. Полный список параметров содержится в файле /usr/share/doc/kernel-doc-версия/Documentation/kernel-parameters.txt, который устанавливается вместе с пакетом kernel-doc.
The Fedora installation and rescue discs may either boot with rescue mode, or load the installation system. For more information on rescue discs and rescue mode, refer to Раздел 11.6.3, «Booting Your Computer with the Rescue Mode».
11.1. Configuring the Installation System at the Boot Menu
You can use the boot menu to specify a number of settings for the installation system, including:
-
язык
-
display resolution
-
interface type
-
Installation method
-
network settings
11.1.1. Specifying the Language
To set the language for both the installation process and the final system, specify the ISO code for that language with the lang option. Use the keymap option to configure the correct keyboard layout.
For example, the ISO codes el_GR and gr identify the Greek language and the Greek keyboard layout:
linux lang=el_GR keymap=gr11.1.2. Configuring the Interface
Для использования конкретного разрешения экрана введите resolution= в качестве параметра загрузки. Например, для разрешения 1024×768 введите:
значение
linux resolution=1024x768To run the installation process in
text mode, enter:
linux textTo enable support for a
serial console, enter serial as an additional option.
Use display= to allow remote display forwarding. In this command, ip:0ip should be replaced with the IP address of the system on which you want the display to appear.
On the system you want the display to appear on, you must execute the command xhost +, where remotehostnameremotehostname is the name of the host from which you are running the original display. Using the command xhost + limits access to the remote display terminal and does not allow access from anyone or any system not specifically authorized for remote access.
remotehostname
11.1.3. Updating anaconda
Для установки Fedora можно использовать новую версию программы установки anaconda, возможно, более новую по сравнению с версией на вашем установочном носителе.
The boot option
linux updates
покажет запрос дискеты с обновлениями anaconda. Не требуется задавать этот параметр, если вы выполняете установку по сети и уже поместили содержимое образа с обновлениями в rhupdates/ на сервере.
To load the anaconda updates from a network location instead, use:
linux updates=
followed by the URL for the location where the updates are stored.
11.1.4. Specifying the Installation Method
The askmethod and asknetwork options are no longer available. Use root= to specify the installation method, and see Раздел 11.1.5, «Specifying the Network Settings» to configure network interfaces.
Чтобы задать метод установки в приглашении boot:, используйте параметр repo (см. Таблица 11.1, «Installation methods»).
Таблица 11.1. Installation methods
| Installation method | Option format |
|---|---|
| привод CD/DVD |
repo=cdrom:
|
| Hard Drive |
repo=hd:
|
| HTTP Server |
repo=http://
|
| FTP Server |
repo=ftp://
|
| NFS Server |
repo=nfs:
|
| ISO images on an NFS Server |
repo=nfsiso:
|
11.1.5. Specifying the Network Settings
Normally, anaconda prompts you to configure a network interface if one is needed during installation. However, if your network cannot be configured automatically via DHCP and you need a network connection from the beginning of the installation, you can provide network settings with options at the boot: prompt. Such a connection may be required if you need to access an updates.img or kickstart file over a network, for example.
The available network configuration boot options include:
ip-
the IP address for system
netmask-
the netmask for the system
gateway-
the IP address of the network gateway
dns-
the IP address of the network DNS server
ksdevice-
the network device to use with these settings
This example configures the network settings for an installation system that uses the IP address 192.168.1.10 for interface eth0:
linux ip=192.168.1.10 netmask=255.255.255.0 gateway=192.168.1.1 dns=192.168.1.3 ksdevice=eth0
If you specify the network configuration and network device at the boot: prompt, these settings are used for the installation process and the Networking Devices and Configure TCP/IP dialogs do not appear.
11.2. Enabling Remote Access to the Installation System
You may access a graphical interface for the installation system from any other system. To remotely access the graphical display of an installation system, use client software that supports the VNC (Virtual Network Computing) display protocol.
Fedora includes the VNC client vncviewer. To obtain vncviewer, install the tigervnc package.
The installation system supports two methods of establishing a VNC connection. You may start the installation, and manually login to the graphical display with a VNC client on another system. Alternatively, you may configure the installation system to automatically connect to a VNC client on the network that is running in listening mode.
11.2.1. Enabling Remote Access with VNC
Чтобы включить удаленный графический доступ к системе установки, в строке приглашения введите два параметра:
linux vnc vncpassword=qwerty
The vnc option enables the VNC service. The vncpassword option sets a password for remote access. The example shown above sets the password as qwerty.
The VNC password must be at least six characters long.
Specify the language, keyboard layout and network settings for the installation system with the screens that follow. You may then access the graphical interface through a VNC client. The installation system displays the correct connection setting for the VNC client:
Starting VNC...
The VNC server is now running.
Please connect to computer.mydomain.com:1 to begin the install...
Starting graphical installation...
Press <enter> for a shell
Затем вы можете войти в систему установки с помощью клиента VNC. Для запуска клиента vncviewer в Fedora выберите → → или выполните команду vncviewer в окне терминала. В открывшемся окне введите имя сервера и номер экрана. В приведенном выше примере в качестве VNC-сервера будет выступать узел computer.mydomain.com:1.
11.2.2. Connecting the Installation System to a VNC Listener
Чтобы система установки автоматически подключалась к VNC-клиенту, сначала запустите клиент в режиме прослушивания
. В Fedora используйте параметр -listen для запуска vncviewer в режиме прослушивания. В окне терминала выполните:
vncviewer -listen
By default, vncviewer uses TCP port 5500 when in listening mode. To permit connections to this port from other systems, choose → → . Select Other ports, and Add. Enter 5500 in the Port(s) field, and specify tcp as the Protocol.
Once the listening client is active, start the installation system and set the VNC options at the boot: prompt. In addition to vnc and vncpassword options, use the vncconnect option to specify the name or IP address of the system that has the listening client. To specify the TCP port for the listener, add a colon and the port number to the name of the system.
For example, to connect to a VNC client on the system desktop.mydomain.com on the port 5500, enter the following at the boot: prompt:
linux vnc vncpassword=qwerty vncconnect=desktop.mydomain.com:550011.2.3. Enabling Remote Access with ssh
To enable remote access to a text mode installation to monitor and debug the installer, use the sshd=1 option at the boot: prompt:
linux sshd=1
You can then connect to the installation system with the ssh utility. The ssh command requires the name or IP address of the installation system, and a password if you specified one (for example, in a kickstart file).
11.3. Logging to a Remote System During the Installation
By default, the installation process sends log messages to the console as they are generated. You may specify that these messages go to a remote system that runs a
syslog service.
To configure remote logging, add the syslog option. Specify the IP address of the logging system, and the UDP port number of the log service on that system. By default, syslog services that accept remote messages listen on UDP port 514.
For example, to connect to a syslog service on the system 192.168.1.20, enter the following at the boot: prompt:
linux syslog=192.168.1.20:51411.3.1. Configuring a Log Server
Службу syslog в Fedora предоставляет rsyslog. Стандартная настройка rsyslog не принимает сообщения от удаленных систем.
The rsyslog configuration detailed below does not make use of any of the security measures available in rsyslog Crackers may slow or crash systems that permit access to the logging service, by sending large quantities of false log messages. In addition, hostile users may intercept or falsify messages sent to the logging service over the network.
Чтобы настроить в Fedora прием сообщений журналирования из других систем в сети, потребуется внести изменения в файл /etc/rsyslog.conf. Для его редактирования нужны привилегии root. Снимите комментарий со следующих строк, удалив символ «решетки» в начале каждой строки:
$ModLoad imudp.so$UDPServerRun 514
Restart the rsyslog service to apply the change:
su -c '/sbin/service rsyslog restart'
По запросу введите пароль пользователя root.
By default, the syslog service listens on UDP port 514. To permit connections to this port from other systems, choose → → . Select Other ports, and Add. Enter 514 in the Port(s) field, and specify udp as the Protocol.
11.4. Automating the Installation with Kickstart
You can allow an installation to run unattended by using Kickstart. A
Kickstart file specifies settings for an installation. Once the installation system boots, it can read a Kickstart file and carry out the installation process without any further input from a user.
The Fedora installation process automatically writes a Kickstart file that contains the settings for the installed system. This file is always saved as /root/anaconda-ks.cfg. You may use this file to repeat the installation with identical settings, or modify copies to specify settings for other systems.
Firstboot does not run after a system is installed from a Kickstart file unless a desktop and the X Window System were included in the installation and graphical login was enabled. Either specify a user with the user option in the Kickstart file before installing additional systems from it (refer to Раздел 15.4, «Kickstart Options» for details) or log into the installed system with a virtual console as root and add users with the adduser command.
Fedora включает в свой состав графическое приложение для создания и редактирования кикстарт-файлов путем выбора требуемых параметров. Для его установки используйте пакет system-config-kickstart. Чтобы запустить редактор, выберите → → .
Kickstart files list installation settings in plain text, with one option per line. This format lets you modify your Kickstart files with any text editor, and write scripts or applications that generate custom Kickstart files for your systems.
To automate the installation process with a Kickstart file, use the ks option to specify the name and location of the file:
linux ks=location/kickstart-file.cfg
Допускается использовать файлы, расположенные на съемных устройствах хранения, жестком диске или сервере в сети (см. Таблица 11.2, «Kickstart sources»).
Таблица 11.2. Kickstart sources
| Kickstart source | Option format |
|---|---|
| привод CD/DVD |
ks=
|
| Hard Drive |
ks=
|
| Other Device |
ks=
|
| HTTP Server |
ks=
|
| FTP Server |
ks=
|
| NFS Server |
ks=
|
To obtain a Kickstart file from a script or application on a Web server, specify the URL of the application with the ks= option. If you add the option kssendmac, the request also sends HTTP headers to the Web application. Your application can use these headers to identify the computer. This line sends a request with headers to the application http://server.mydomain.com/kickstart.cgi:
linux ks=http://server.mydomain.com/kickstart.cgi kssendmac11.5. Enhancing Hardware Support
По умолчанию Fedora пытается автоматически определить и настроить поддержку всех компонентов компьютера. Fedora поддерживает большинство типов оборудования с помощью программных драйверов, которые поставляются с операционной системой. Для поддержки других устройств вы можете предоставить дополнительные драйверы во время процесса установки или позже.
11.5.1. Overriding Automatic Hardware Detection
For some models of device automatic hardware configuration may fail, or cause instability. In these cases, you may need to disable automatic configuration for that type of device, and take additional steps to manually configure the device after the installation process is complete.
Refer to the Release Notes for information on known issues with specific devices.
To override the automatic hardware detection, use one or more of the following options:
Таблица 11.3. Hardware Options
| Compatibility | Option |
|---|---|
| Disable all hardware detection |
noprobe
|
| Disable graphics, keyboard, and mouse detection |
headless
|
| Disable passing keyboard and mouse information to stage 2 of the installation program |
nopass
|
| Use basic VESA driver for video |
xdriver=vesa
|
| Disable shell access on virtual console 2 during installation |
noshell
|
| Disable advanced configuration and power interface (ACPI) |
acpi=off
|
| Disable machine check exception (MCE) CPU self-diagnosis. |
nomce
|
| Disable non-uniform memory access on the AMD64 architecture |
numa-off
|
Force kernel to detect a specific amount of memory, where xxx is a value in megabytes
|
mem=
|
| Enable DMA only for IDE and SATA drives |
libata.dma=1
|
| Disable BIOS-assisted RAID |
nodmraid
|
| Disable Firewire device detection |
nofirewire
|
| Disable parallel port detection |
noparport
|
| Disable PC Card (PCMCIA) device detection |
nopcmcia
|
| Disable all probing of network hardware |
nonet
|
The isa option causes the system to display an additional text screen at the beginning of the installation process. Use this screen to configure the ISA devices on your computer.
Other kernel boot options have no particular meaning for anaconda and do not affect the installation process. However, if you use these options to boot the installation system, anaconda will preserve them in the bootloader configuration.
11.6. Using the Maintenance Boot Modes
11.6.1. Загрузка режима тестирования памяти (ОЗУ)
Сбои в модулях памяти могут привести к непредсказуемому зависанию или падению системы. Иногда сбои памяти могут приводить к появлению ошибок лишь при определенных сочетаниях программного обеспечения. По этой причине следует проверить память компьютера перед установкой Fedora в первый раз, даже если на нем ранее работали другие операционные системы.
Fedora предоставляет специальное приложение для тестирования памяти — Memtest86+. Чтобы загрузить компьютер в
режим тестирования памяти, выберите в меню загрузки. Первый тест сразу же запустится. Memtest86+ по умолчанию выполняет 10 проверок.
В большинстве случаев одной успешной проверки Memtest86+ достаточно. Но в редких случаях ошибки, которые остались незамеченными при первом проходе, могут появиться на последующих проходах. Чтобы выполнить тщательный тест ОЗУ, оставьте Memtest86+ работать на всю ночь или даже на протяжении нескольких дней.
Чтобы остановить проверку и перезагрузить компьютер, просто нажмите Esc.
11.6.3. Booting Your Computer with the Rescue Mode
Можно загрузить Linux в режиме командной строки как с
диска восстановления, так и с установочного диска без необходимости установки Fedora. Это даст возможность использовать утилиты и функции работающей Linux-системы для изменения или восстановления систем, которые уже установлены на вашем компьютере.
The rescue disc starts the rescue mode system by default. To load the rescue system with the installation disc, choose from the boot menu.
Specify the language, keyboard layout and network settings for the rescue system with the screens that follow. The final setup screen configures access to the existing system on your computer.
By default, rescue mode attaches an existing operating system to the rescue system under the directory /mnt/sysimage/.
11.6.4. Upgrading your computer
Существовавший раньше параметр загрузки upgrade удален, так как в процессе установки в любом случае вам будет предложено обновить или переустановить предыдущие версии Fedora.
However, the installation program may not correctly detect a previous version of Fedora if the contents of the /etc/redhat-release file have changed. The boot option upgradeany relaxes the test that the installation program performs and allows you to upgrade a Fedora installation that the installation program has not correctly identified.
Глава 13. Setting Up an Installation Server
This appendix is intended for users with previous Linux experience. If you are a new user, you may want to install using minimal boot media or the distribution DVD instead.
The instructions in this appendix configures an automated install server. The default configuration includes destruction of all existing data on all disks for hosts that install using this method. This is often different from other network install server configurations which may provide for an interactive installation experience.
Fedora allows for installation over a network using the NFS, FTP, or HTTP protocols. A network installation can be started from a boot CD-ROM, a bootable flash memory drive, or by using the repo= boot option with the Fedora DVD. Alternatively, if the system to be installed contains a network interface card (NIC) with Pre-Execution Environment (PXE) support, it can be configured to boot from files on another networked system rather than local media such as a DVD.
Итак, для выполнения сетевой PXE-установки сетевая карта клиента отправит широковещательный запрос информации DHCP. DHCP-сервер предоставит IP-адрес, а также необходимую информацию о сети, в том числе сведения о сервере имен, IP-адрес или имя узла сервера tftp (который предоставляет необходимые для начала установки файлы), расположение файлов на сервере tftp. Это осуществляется за счет PXELINUX в составе пакета syslinux.
In the past, administrators needed to perform a great deal of manual configuration to produce an installation server. However, if you have a server running Fedora or a similar operating system on your local network, you can use cobbler to perform these tasks. To configure a PXE server manually, see Раздел 13.5, «Manually configure a PXE server».
Для выполнения перечисленных в этой секции действий сначала исполните команду su - для перехода в режим root или каждую команду вводите в формате su -c '.
команда'
13.1. Setting Up cobbler
To install cobbler use the following command:
yum -y install cobbler
The cobbler command can check its own settings for validity and report the results. Run the following command to check the settings:
cobbler checkVerify SELinux is configured for cobbler:
setsebool -P httpd_can_network_connect_cobbler 1Other SELinux booleans may apply, and can be listed with:
getsebool -a|grep cobbler
Измените настройки в файле /etc/cobbler/settings так, чтобы они отражали IP-адрес сервера (как минимум потребуется изменить параметры server и next_server, хотя оба значения могут содержать один и тот же адрес).
If you are not already running a DHCP server, you should also change the manage_dhcp option to 1. If you are running a DHCP server, configure it according to the instructions found in the syslinux package documentation. For more information, refer to your local files /usr/share/doc/syslinux- and version/syslinux.doc/usr/share/doc/syslinux-.
version/pxelinux.doc
13.2. Setting Up the Distribution
Чтобы настроить DVD или ISO-образ в качестве источника установки, следуйте приведенным ниже шагам.
Раздел 13.3, «Mirroring a Network Location» содержит информацию о создании локального зеркала на основе существующего сетевого ресурса.
-
If you are using a DVD disc or ISO image, Create a directory mount point:
mkdir /mnt/dvdTo mount a physical DVD disc, use the following command:
mount -o context=system_u:object_r:httpd_sys_content_t:s0 /dev/dvd /mnt/dvdTo mount a DVD ISO image, use the following command:
mount -ro loop,context=system_u:object_r:httpd_sys_content_t:s0 /путь/к/image.iso /mnt/dvdIf SELinux is enabled, use the default
iso9660_tlabel instead ofhttpd_sys_content_t. -
To support NFS installation, create a file
/etc/exportsand add the following line to it:/mnt/dvd *(ro,async)
Start the NFS server using the following commands:
/sbin/service rpcbind start /sbin/service nfs start -
To support HTTP installation, use
yumto install the Apache web server if it is not already installed:yum -y install httpdMake a link to the mounted disc in the Apache public content area:
ln -s /mnt/dvd /var/www/html/дистрибутив
13.3. Mirroring a Network Location
If you do not have discs or ISO images for a distribution, you can use cobbler to create an installation server. The cobbler command can fetch the distribution over the network as part of the import process.
Найдите расположение дистрибутива в сети. Он может быть расположен в локальной сети или на удаленном сайте (FTP, HTTP, rsync).
13.4. Importing the Distribution
Чтобы обеспечить несколько доступных способов установки, можно их импортировать, присвоив каждому способу имя. Это имя будет показано в меню загрузки клиента, поэтому рекомендуется сделать его понятным.
-
To import the DVD disc or ISO distribution into
cobbler, run this command:cobbler import --path=/mnt/dvd --name=дистрибутивFor
distro_name, substitute a meaningful name for the distribution.Следующая команда позволяет импортировать локальный или удаленный дистрибутив. Замените
URIссылкой из предыдущей секции (см. Раздел 13.3, «Mirroring a Network Location») и укажите описательное имя дистрибутива:cobbler import --path=URI--name=дистрибутивПри импортировании таким образом дистрибутива
cobblerбудет копировать файлы в локальную систему, что может занять некоторое время.If you do not want to make local copies of the distribution because clients can already reach its location, use the
--available-asoption.cobbler import --path=/mnt/dvd --name=дистрибутив--available-as=URIcobbler import --path=URI--name=дистрибутив--available-as=URIFor
nework_URI, substitute the appropriate network location of the distribution. This URI indicates how the server makes the distribution available to its clients. The examples above assume that yourcobblerserver reaches the mirror location at the same URI as the clients. If not, substitute an appropriate URI for the--pathoption. The following examples are URI locations that work if you have been following the procedures in this section, and your server’s IP address is192.168.1.1:-
nfs://192.168.1.1:/mnt/dvd -
http://192.168.1.1:/distro
If necessary, replace
192.168.1.1with the IP address for yourcobblerserver. -
-
Run the command
cobbler syncto apply the changes. To check that yourcobblerserver is listening on the correct ports, use thenetstat -lpcommand.В зависимости от конфигурации сервера может понадобиться выполнить команду
system-config-securitylevelдля разрешения доступа к следующим сетевым службам:-
67 or bootps, for the DHCP/BOOTP server
-
69 or tftp, for providing the PXE loader
-
80 or http, if the
cobblerserver is to provide HTTP installation service -
20 and 21 or ftp, if the
cobblerserver is to provide FTP installation service -
111 or sunrpc, if the
cobblerserver is to provide NFS installation service
-
13.5. Manually configure a PXE server
The following steps must be performed to prepare for a PXE installation:
-
Configure the network (NFS, FTP, HTTP) server to export the installation tree.
-
Configure the files on the
tftpserver necessary for PXE booting. -
Configure which hosts are allowed to boot from the PXE configuration.
-
Start the
tftpservice. -
Configure DHCP.
-
Boot the client, and start the installation.
13.5.1. Setting up the Network Server
First, configure an NFS, FTP, or HTTP server to export the entire installation tree for the version and variant of Fedora to be installed. Refer to Раздел 5.1, «Preparing for a Network Installation» for detailed instructions.
13.5.2. PXE Boot Configuration
The next step is to copy the files necessary to start the installation to the tftp server so they can be found when the client requests them. The tftp server is usually the same server as the network server exporting the installation tree.
BIOS and EFI configuration differs for this procedure.
13.5.2.1. Configuring for BIOS
-
If tftp-server is not yet installed, run
yum install tftp-server. -
In the tftp-server config file at
/etc/xinet.d/tftp, change thedisabledparameter fromyestono. -
Configure your DHCP server to use the boot images packaged with SYSLINUX. (If you do not have a DHCP server installed, refer to the DHCP Servers chapter in the Fedora Deployment Guide.)
A sample configuration in
/etc/dhcp/dhcpd.confmight look like:option space pxelinux; option pxelinux.magic code 208 = string; option pxelinux.configfile code 209 = text; option pxelinux.pathprefix code 210 = text; option pxelinux.reboottime code 211 = unsigned integer 32; subnet 10.0.0.0 netmask 255.255.255.0 { option routers 10.0.0.254; range 10.0.0.2 10.0.0.253; class "pxeclients" { match if substring (option vendor-class-identifier, 0, 9) = "PXEClient"; next-server 10.0.0.1; if option arch = 00:06 { filename "pxelinux/bootia32.efi"; } else if option arch = 00:07 { filename "pxelinux/bootx64.efi"; } else { filename "pxelinux/pxelinux.0"; } } host example-ia32 { hardware ethernet XX:YY:ZZ:11:22:33; fixed-address 10.0.0.2; } } -
You now need the
pxelinux.0file from the SYSLINUX package installed with Fedora. Create apxelinuxdirectory withintftpbootand copypxelinux.0into it:mkdir /var/lib/tftpboot/pxelinuxcp /usr/share/syslinux/pxelinux.0 /var/lib/tftpboot/pxelinux -
Create a
pxelinux.cfgdirectory withinpxelinux:mkdir /var/lib/tftpboot/pxelinux/pxelinux.cfg -
Add a config file to this directory. The file should either be named
defaultor named after the IP address. For example, if your machine’s IP address is 10.0.0.1, the filename would be0A000001.A sample config file at
/var/lib/tftpboot/pxelinux/pxelinux.cfg/defaultmight look like:default vesamenu.c32 prompt 1 timeout 600 display boot.msg label linux menu label ^Install or upgrade an existing system menu default kernel vmlinuz append initrd=initrd.img inst.repo=http://dl.fedoraproject.org/pub/fedora/linux/development/17/x86_64/os/ label vesa menu label Install system with ^basic video driver kernel vmlinuz append initrd=initrd.img xdriver=vesa nomodeset label rescue menu label ^Rescue installed system kernel vmlinuz append initrd=initrd.img rescue label local menu label Boot from ^local drive localboot 0xffff label memtest86 menu label ^Memory test kernel memtest append -
If both the stage 2 installer image and the package repositories you intend to download from are on the same server, use the
repo=boot option. If they are on separate servers, usestage2=instead.For instructions on how to specify the installation source, refer to Глава 8, Configuring Installation Source
-
Copy the splash image into your
tftproot directory:cp /boot/grub/splash.xpm.gz /var/lib/tftpboot/pxelinux/splash.xpm.gz -
Copy the boot images into your
tftproot directory:cp /path/to/x86_64/os/images/pxeboot/{vmlinuz,initrd.img} /var/lib/tftpboot/pxelinux/rawhide-x86_64/ -
Reboot the system, and select the network device as your boot device when prompted.
13.5.2.2. Configuring for EFI
-
If tftp-server is not yet installed, run
yum install tftp-server. -
In the tftp-server config file at
/etc/xinet.d/tftp, change thedisabledparameter fromyestono. -
Create a directory path within
tftpbootfor the EFI boot images, and then copy them from your boot directory:mkdir /var/lib/tftpboot/pxelinuxmkdir /var/lib/tftpboot/pxelinux/bootx64.eficp /boot/efi/EFI/redhat/grub.efi /var/lib/tftpboot/pxelinux/bootx64.efi -
Configure your DHCP server to use the EFI boot images packaged with GRUB. (If you do not have a DHCP server installed, refer to the DHCP Servers chapter in the Fedora Deployment Guide.)
A sample configuration in
/etc/dhcp/dhcpd.confmight look like:option space PXE; option PXE.mtftp-ip code 1 = ip-address; option PXE.mtftp-cport code 2 = unsigned integer 16; option PXE.mtftp-sport code 3 = unsigned integer 16; option PXE.mtftp-tmout code 4 = unsigned integer 8; option PXE.mtftp-delay code 5 = unsigned integer 8; option arch code 93 = unsigned integer 16; # RFC4578 subnet 10.0.0.0 netmask 255.255.255.0 { option routers 10.0.0.254; range 10.0.0.2 10.0.0.253; class "pxeclients" { match if substring (option vendor-class-identifier, 0, 9) = "PXEClient"; next-server 10.0.0.1; if option arch = 00:06 { filename "pxelinux/bootia32.efi"; } else if option arch = 00:07 { filename "pxelinux/bootx64.efi"; } else { filename "pxelinux/pxelinux.0"; } } host example-ia32 { hardware ethernet XX:YY:ZZ:11:22:33; fixed-address 10.0.0.2; } } -
Create a
pxelinux.cfgdirectory withinpxelinux:mkdir /var/lib/tftpboot/pxelinux/pxelinux.cfg -
Add a config file to this directory. The file should either be named
efidefaultor named after the IP address. For example, if your machine’s IP address is 10.0.0.1, the filename would be0A000001.A sample config file at
/var/lib/tftpboot/pxelinux/pxelinux.cfg/efidefaultmight look like:default=0 timeout=1 splashimage=(nd)/splash.xpm.gz hiddenmenu title RHEL root (nd) kernel /rawhide-x86_64/vmlinuz initrd /rawhide-x86_64/initrd.imgFor instructions on how to specify the installation source, refer to Глава 8, Configuring Installation Source
-
Copy the splash image into your
tftproot directory:cp /boot/grub/splash.xpm.gz /var/lib/tftpboot/pxelinux/splash.xpm.gz -
Copy the boot images into your
tftproot directory:cp /path/to/x86_64/os/images/pxeboot/{vmlinuz,initrd.img} /var/lib/tftpboot/pxelinux/rawhide-x86_64/ -
Reboot the system, and select the network device as your boot device when prompted.
13.5.3. Starting the tftp Server
On the DHCP server, verify that the tftp-server package is installed with the command rpm -q tftp-server.
tftp is an xinetd-based service. Configure xinetd to process tftp requests by editing /etc/xinetd.d/tftp so that disable = no.
Start the tftp service with the following commands:
systemctl start xinetd.servicesystemctl enable xinetd.service
These commands configure the tftp and xinetd services to immediately turn on and also configure them to start at boot.
13.5.4. Adding a Custom Boot Message
Optionally, modify /tftpboot/linux-install/msgs/boot.msg to use a custom boot message.
13.5.5. Performing the PXE Installation
For instructions on how to configure the network interface card with PXE support to boot from the network, consult the documentation for the NIC. It varies slightly per card.
If your NIC does not support PXE booting, you can still PXE boot your system by using the gPXE bootloader. The Fedora Project does not distribute gPXE — refer to the Etherboot Project website at http://etherboot.org/wiki/start for more information.
Глава 9, Installing using anaconda описывает дальнейшие действия после запуска программы установки.
Глава 14. Installing Through VNC
The Fedora installer (anaconda) offers you two interactive modes of operation. The original mode is a text-based interface. The newer mode uses GTK+ and runs in the X Window environment. This chapter explains how you can use the graphical installation mode in environments where the system lacks a proper display and input devices typically associated with a workstation. This scenario is typical of systems in datacenters, which are often installed in a rack environment and do not have a display, keyboard, or mouse. Additionally, a lot of these systems even lack the ability to connect a graphical display. Given that enterprise hardware rarely needs that ability at the physical system, this hardware configuration is acceptable.
Even in these environments, however, the graphical installer remains the recommended method of installation. The text mode environment lacks a lot of capabilities found in the graphical mode. Many users still feel that the text mode interface provides them with additional power or configuration ability not found in the graphical version. The opposite is true. Much less development effort is put in to the text-mode environment and specific things (for example, LVM configuration, partition layout, package selection, and bootloader configuration) are deliberately left out of the text mode environment. The reasons for this are:
-
Less screen real estate for creating user interfaces similar to those found in the graphical mode.
-
Difficult internationalization support.
-
Desire to maintain a single interactive installation code path.
Anaconda therefore includes a Virtual Network Computing (VNC) mode that allows the graphical mode of the installer to run locally, but display on a system connected to the network. Installing in VNC mode provides you with the full range of installation options, even in situations where the system lacks a display or input devices.
14.1. VNC Viewer
Performing a VNC installation requires a VNC viewer running on your workstation or other terminal computer. Locations where you might want a VNC viewer installed:
-
Your workstation
-
Laptop on a datacenter crash cart
VNC is open source software licensed under the GNU General Public License.
-
VNC clients are available in the repositories of most Linux distributions. Use your package manager to search for a client for your chosen distribution. For example, on Fedora, install the tigervnc package:
#
yum install tigervnc -
MacOS X includes built-in VNC support as of version 10.5. In the Finder, click the Go menu and choose Connect to Server. In the server address field, you can type
vnc://, where SERVER is the IP address or DNS host name of the VNC server you wish to connect to and DISPLAY is the VNC display number (usually 1), and click Connect.SERVER:DISPLAY
Once you have verified you have a VNC viewer available, it’s time to start the installation.
14.2. VNC Modes in Anaconda
Anaconda offers two modes for VNC installation. The mode you select will depend on the network configuration in your environment.
14.2.1. Direct Mode
Direct mode VNC in anaconda is when the client initiates a connection to the VNC server running in anaconda. Anaconda will tell you when to initiate this connection in the VNC viewer. Direct mode can be activated by either of the following commands:
-
Specify
vncas a boot argument. -
Specify the
vnccommand in the kickstart file used for installation.
When you activate VNC mode, anaconda will complete the first stage of the installer and then start VNC to run the graphical installer. The installer will display a message on the console in the following format:
Запускается AnacondaВЕРСИЯ, программа установкиОС, подождите, пожалуйста.
Anaconda will also tell you the IP address and display number to use in your VNC viewer. At this point, you need to start the VNC viewer and connect to the target system to continue the installation. The VNC viewer will present anaconda to you in graphical mode.
There are some disadvantages to direct mode, including:
-
Requires visual access to the system console to see the IP address and port to connect the VNC viewer to.
-
Requires interactive access to the system console to complete the first stage of the installer.
If either of these disadvantages would prevent you from using direct mode VNC in anaconda, then connect mode is probably more suited to your environment.
14.2.2. Connect Mode
Certain firewall configurations or instances where the target system is configured to obtain a dynamic IP address may cause trouble with the direct VNC mode in anaconda. In addition, if you lack a console on the target system to see the message that tells you the IP address to connect to, then you will not be able to continue the installation.
Режим подключения изменяет способ запуска VNC. То есть в этом случае не Anaconda не ожидает вашего подключения после запуска, а автоматически подключается сама. Таким образом, не требуется знать IP-адрес целевой системы.
To activate the VNC connect mode, pass the vnc vncconnect boot parameter:
boot: linux vnc vncconnect=HOST[:port]
Replace HOST with your VNC viewer’s IP address or DNS host name. Specifying the port is optional. Before starting the installation process on the target system, start up your VNC viewer and have it wait for an incoming connection.
Start the installation and when your VNC viewer displays the graphical installer, you are ready to go.
14.3. Installation Using VNC
Now that you have installed a VNC viewer application and selected a VNC mode for use in anaconda, you are ready to begin the installation.
14.3.1. Installation Example
The easiest way to perform an installation using VNC is to connect another computer directly to the network port on the target system. The laptop on a datacenter crash cart usually fills this role. If you are performing your installation this way, make sure you follow these steps:
-
Connect the laptop or other workstation to the target system using a crossover cable. If you are using regular patch cables, make sure you connect the two systems using a small hub or switch. Most recent Ethernet interfaces will automatically detect if they need to be crossover or not, so it may be possible to connect the two systems directly using a regular patch cable.
-
Configure the VNC viewer system to use a RFC 1918 address with no gateway. This private network connection will only be used for the purpose of installation. Configure the VNC viewer system to be 192.168.100.1/24. If that address is in use, just pick something else in the RFC 1918 address space that is available to you.
-
Start the installation on the target system.
-
Загрузка установочного DVD
При загрузке с установочного DVD не забудьте добавить параметр загрузки
vnc. Для передачи параметров процессу загрузки необходимо, чтобы к целевой системе была подключена консоль. В строке приглашения введите:boot:
linux vnc -
Boot over the network.
If the target system is configured with a static IP address, add the
vnccommand to the kickstart file. If the target system is using DHCP, addvnc vncconnect=to the boot arguments for the target system. HOST is the IP address or DNS host name of the VNC viewer system. Specifying the port is optional. Enter the following at the prompt:HOST[:port]boot:
linux vnc vncconnect=HOST[:port]
-
-
When prompted for the network configuration on the target system, assign it an available RFC 1918 address in the same network you used for the VNC viewer system. For example, 192.168.100.2/24.
This IP address is only used during installation. You will have an opportunity to configure the final network settings, if any, later in the installer.
-
Once the installer indicates it is starting anaconda, you will be instructed to connect to the system using the VNC viewer. Connect to the viewer and follow the graphical installation mode instructions found in the product documentation.
14.3.2. Kickstart Considerations
If your target system will be booting over the network, VNC is still available. Just add the vnc command to the kickstart file for the system. You will be able to connect to the target system using your VNC viewer and monitor the installation progress. The address to use is the one the system is configured with via the kickstart file.
If you are using DHCP for the target system, the reverse vnc vncconnect method may work better for you. Rather than adding the vnc boot parameter to the kickstart file, add the vnc vncconnect= parameter to the list of boot arguments for the target system. For HOST, put the IP address or DNS host name of the VNC viewer system. Specifying the port is optional. See the next section for more details on using the vncconnect mode.
HOST[:port]
14.3.3. Firewall Considerations
If you are performing the installation where the VNC viewer system is a workstation on a different subnet from the target system, you may run in to network routing problems. VNC works fine so long as your viewer system has a route to the target system and ports 5900 and 5901 are open. If your environment has a firewall, make sure ports 5900 and 5901 are open between your workstation and the target system.
In addition to passing the vnc boot parameter, you may also want to pass the vncpassword parameter in these scenarios. While the password is sent in plain text over the network, it does provide an extra step before a viewer can connect to a system. Once the viewer connects to the target system over VNC, no other connections are permitted. These limitations are usually sufficient for installation purposes.
Be sure to use a temporary password for the vncpassword option. It should not be a password you use on any systems, especially a real root password.
If you continue to have trouble, consider using the vnc vncconnect parameter. In this mode of operation, you start the viewer on your system first telling it to listen for an incoming connection. Pass vnc vncconnect= at the boot prompt and the installer will attempt to connect to the specified HOST (either a hostname or IP address). Specifying the port is optional.
HOST[:port]
14.4. References
Глава 15. Kickstart Installations
15.1. What are Kickstart Installations?
Many system administrators would prefer to use an automated installation method to install Fedora on their machines. To answer this need, Red Hat created the kickstart installation method. Using kickstart, a system administrator can create a single file containing the answers to all the questions that would normally be asked during a typical installation.
Kickstart files can be kept on a single server system and read by individual computers during the installation. This installation method can support the use of a single kickstart file to install Fedora on multiple machines, making it ideal for network and system administrators.
Kickstart provides a way for users to automate a Fedora installation.
All kickstart scriptlets and the log files of their execution are stored in the /tmp directory to assist with debugging installation failures.
Anaconda now configures network interfaces with NetworkManager. Consequently, kickstart users that referenced the network settings located in /tmp/netinfo in previous versions of Fedora must now source the ifcfg files in /etc/sysconfig/network-scripts.
15.2. How Do You Perform a Kickstart Installation?
Kickstart installations can be performed using a local DVD, a local hard drive, or via NFS, FTP, or HTTP.
To use kickstart, you must:
-
Create a kickstart file.
-
Create a boot media with the kickstart file or make the kickstart file available on the network.
-
Make the installation tree available.
-
Start the kickstart installation.
This chapter explains these steps in detail.
15.3. Creating the Kickstart File
The kickstart file is a simple text file, containing a list of items, each identified by a keyword. You can create it by using the Kickstart Configurator application, or writing it from scratch. The Fedora installation program also creates a sample kickstart file based on the options that you selected during installation. It is written to the file /root/anaconda-ks.cfg. You should be able to edit it with any text editor or word processor that can save files as ASCII text.
First, be aware of the following issues when you are creating your kickstart file:
-
Sections must be specified in order. Items within the sections do not have to be in a specific order unless otherwise specified. The section order is:
-
Command section — Refer to Раздел 15.4, «Kickstart Options» for a list of kickstart options. You must include the required options.
-
The
%packagessection — Refer to Раздел 15.5, «Package Selection» for details. -
The
%preand%postsections — These two sections can be in any order and are not required. Refer to Раздел 15.6, «Pre-installation Script» and Раздел 15.7, «Post-installation Script» for details.
-
-
Items that are not required can be omitted.
-
Omitting any required item results in the installation program prompting the user for an answer to the related item, just as the user would be prompted during a typical installation. Once the answer is given, the installation continues unattended (unless it finds another missing item).
-
Lines starting with a pound (also known as hash) sign (#) are treated as comments and are ignored.
-
For kickstart upgrades, the following items are required:
-
Language
-
Installation method
-
Device specification (if device is needed to perform the installation)
-
Keyboard setup
-
The
upgradekeyword -
Boot loader configuration
If any other items are specified for an upgrade, those items are ignored (note that this includes package selection).
-
15.4. Kickstart Options
The following options can be placed in a kickstart file. If you prefer to use a graphical interface for creating your kickstart file, use the Kickstart Configurator application. Refer to Глава 16, Kickstart Configurator for details.
If the option is followed by an equals mark (=), a value must be specified after it. In the example commands, options in brackets ([]) are optional arguments for the command.
authorauthconfig(required)-
Sets up the authentication options for the system. It is similar to the
authconfigcommand, which can be run after the install. By default, passwords are normally encrypted and are not shadowed.-
--enablenis— Turns on NIS support. By default,--enablenisuses whatever domain it finds on the network. A domain should almost always be set by hand with the--nisdomain=option. -
--nisdomain=— NIS domain name to use for NIS services. -
--nisserver=— Server to use for NIS services (broadcasts by default). -
--useshadowor--enableshadow— Use shadow passwords. -
--enableldap— Turns on LDAP support in/etc/nsswitch.conf, allowing your system to retrieve information about users (for example, their UIDs, home directories, and shells) from an LDAP directory. To use this option, you must install thenss-pam-ldapdpackage. You must also specify a server and a base DN (distinguished name) with--ldapserver=and--ldapbasedn=. -
--enableldapauth— Use LDAP as an authentication method. This enables thepam_ldapmodule for authentication and changing passwords, using an LDAP directory. To use this option, you must have thenss-pam-ldapdpackage installed. You must also specify a server and a base DN with--ldapserver=and--ldapbasedn=. If your environment does not use TLS (Transport Layer Security), use the--disableldaptlsswitch to ensure that the resulting configuration file works. -
--ldapserver=— If you specified either--enableldapor--enableldapauth, use this option to specify the name of the LDAP server to use. This option is set in the/etc/ldap.conffile. -
--ldapbasedn=— If you specified either--enableldapor--enableldapauth, use this option to specify the DN in your LDAP directory tree under which user information is stored. This option is set in the/etc/ldap.conffile. -
--enableldaptls— Use TLS (Transport Layer Security) lookups. This option allows LDAP to send encrypted usernames and passwords to an LDAP server before authentication. -
--disableldaptls— Do not use TLS (Transport Layer Security) lookups in an environment that uses LDAP for authentication. -
--enablekrb5— Use Kerberos 5 for authenticating users. Kerberos itself does not know about home directories, UIDs, or shells. If you enable Kerberos, you must make users’ accounts known to this workstation by enabling LDAP, NIS, or Hesiod or by using the/usr/sbin/useraddcommand. If you use this option, you must have thepam_krb5package installed. -
--krb5realm=— The Kerberos 5 realm to which your workstation belongs. -
--krb5kdc=— The KDC (or KDCs) that serve requests for the realm. If you have multiple KDCs in your realm, separate their names with commas (,). -
--krb5adminserver=— The KDC in your realm that is also running kadmind. This server handles password changing and other administrative requests. This server must be run on the master KDC if you have more than one KDC. -
--enablehesiod— Enable Hesiod support for looking up user home directories, UIDs, and shells. More information on setting up and using Hesiod on your network is in/usr/share/doc/glibc-2.x.x/README.hesiod, which is included in theglibcpackage. Hesiod is an extension of DNS that uses DNS records to store information about users, groups, and various other items. -
--hesiodlhsand--hesiodrhs— TheHesiodLHS (left-hand side) and RHS (right-hand side) values, set in/etc/hesiod.conf. TheHesiodlibrary uses these values to search DNS for a name, similar to the way that LDAP uses a base DN.To look up user information for the username
jim, the Hesiod library looks upjim.passwd<, which should resolve to a TXT record that contains a string identical to an entry for that user in theLHS><RHS>passwdfile:jim:*:501:501:Jungle Jim:/home/jim:/bin/bash. To look up groups, the Hesiod library looks upjim.group<instead.LHS><RHS>To look up users and groups by number, make
501.uida CNAME forjim.passwd, and501.gida CNAME forjim.group. Note that the library does not place a period (.) in front of the LHS and RHS values when performing a search. Therefore, if the LHS and RHS values need to have a period placed in front of them, you must include the period in the values you set for--hesiodlhsand--hesiodrhs. -
--enablesmbauth— Enables authentication of users against an SMB server (typically a Samba or Windows server). SMB authentication support does not know about home directories, UIDs, or shells. If you enable SMB, you must make users’ accounts known to the workstation by enabling LDAP, NIS, or Hesiod or by using the/usr/sbin/useraddcommand. -
--smbservers=— The name of the servers to use for SMB authentication. To specify more than one server, separate the names with commas (,). -
--smbworkgroup=— The name of the workgroup for the SMB servers. -
--enablecache— Enables thenscdservice. Thenscdservice caches information about users, groups, and various other types of information. Caching is especially helpful if you choose to distribute information about users and groups over your network using NIS, LDAP, or Hesiod. -
--passalgo— To set up the SHA-256 hashing algorithm, run the commandauthconfig --passalgo=sha256 --kickstart.To set up the SHA-512 hashing algorithm, run
authconfig --passalgo=sha512 --kickstart.Remove the
--enablemd5option if it is present.
-
autopart(optional)-
Automatically create partitions — 1 GB or more root (
/) partition, a swap partition, and an appropriate boot partition for the architecture. One or more of the default partition sizes can be redefined with thepartdirective.-
--encrypted— Should all devices with support be encrypted by default? This is equivalent to checking the Encrypt checkbox on the initial partitioning screen. -
--passphrase=— Provide a default system-wide passphrase for all encrypted devices. -
--escrowcert=— Store data encryption keys of all encrypted volumes as files inURL_of_X.509_certificate/root, encrypted using the X.509 certificate from the URL specified withURL_of_X.509_certificate. The keys are stored as a separate file for each encrypted volume. This option is only meaningful if--encryptedis specified. -
--backuppassphrase=— Add a randomly-generated passphrase to each encrypted volume. Store these passphrases in separate files in/root, encrypted using the X.509 certificate specified with--escrowcert. This option is only meaningful if--escrowcertis specified.
-
autostep(optional)-
Similar to
interactiveexcept it goes to the next screen for you. It is used mostly for debugging.-
--autoscreenshot— Take a screenshot at every step during installation and copy the images over to/root/anaconda-screenshotsafter installation is complete. This is most useful for documentation.
-
bootloader(required)-
Specifies how the boot loader should be installed. This option is required for both installations and upgrades.
If you select text mode for a kickstart installation, make sure that you specify choices for the partitioning, bootloader, and package selection options. These steps are automated in text mode, and anaconda cannot prompt you for missing information. If you do not provide choices for these options, anaconda will stop the installation process.
-
--append=— Specifies kernel parameters. To specify multiple parameters, separate them with spaces. For example:bootloader --location=mbr --append="hdd=ide-scsi ide=nodma"
-
--driveorder— Specify which drive is first in the BIOS boot order. For example:bootloader --driveorder=sda,hda
-
--location=— Specifies where the boot record is written. Valid values are the following:mbr(the default),partition(installs the boot loader on the first sector of the partition containing the kernel), ornone(do not install the boot loader). -
--password=— If using GRUB, sets the GRUB boot loader password to the one specified with this option. This should be used to restrict access to the GRUB shell, where arbitrary kernel options can be passed. -
--md5pass=— If using GRUB, similar to--password=except the password should already be encrypted. -
--timeout=— Specify the number of seconds before the bootloader times out and boots the default option. Specifying 0 will tell GRUB not to display these menus. -
--upgrade— Upgrade the existing boot loader configuration, preserving the old entries. This option is only available for upgrades.
-
clearpart(optional)-
Removes partitions from the system, prior to creation of new partitions. By default, no partitions are removed.
If the
clearpartcommand is used, then the--onpartcommand cannot be used on a logical partition.-
--all— Erases all partitions from the system. -
--drives=— Specifies which drives to clear partitions from. For example, the following clears all the partitions on the first two drives on the primary IDE controller:clearpart --drives=hda,hdb --all
To clear a multipath device that does not use logical volume management (LVM), use the format
disk/by-id/dm-uuid-mpath-, whereWWIDWWIDis the world-wide identifier for the device. For example, to clear a disk with WWID2416CD96995134CA5D787F00A5AA11017, use:clearpart --drives=disk/by-id/dm-uuid-mpath-2416CD96995134CA5D787F00A5AA11017
Multipath devices that use LVM are not assembled until after anaconda has parsed the kickstart file. Therefore, you cannot specify these devices in the format
dm-uuid-mpath. Instead, to clear a multipath device that uses LVM, use the formatdisk/by-id/scsi-, whereWWIDWWIDis the world-wide identifier for the device. For example, to clear a disk with WWID58095BEC5510947BE8C0360F604351918, use:clearpart --drives=disk/by-id/scsi-58095BEC5510947BE8C0360F604351918
Device names like
mpathaare not specific to a particular disk. The disk named/dev/mpathaduring installation might not be the one that you expect it to be. Therefore, theclearpartcommand could target the wrong disk. -
--initlabel— Initializes the disk label to the default for your architecture (for examplemsdosfor x86). It is useful so that the installation program does not ask if it should initialize the disk label if installing to a brand new hard drive. -
--linux— Erases all Linux partitions. -
--none(default) — Do not remove any partitions.
-
cmdline(optional)-
Perform the installation in a completely non-interactive command line mode. Any prompts for interaction halts the install.
device(optional)-
On most PCI systems, the installation program autoprobes for Ethernet and SCSI cards properly. On older systems and some PCI systems, however, kickstart needs a hint to find the proper devices. The
devicecommand, which tells the installation program to install extra modules, is in this format:device
<moduleName>--opts=<options>-
<moduleName>— Replace with the name of the kernel module which should be installed. -
--opts=— Mount options to use for mounting the NFS export. Any options that can be specified in/etc/fstabfor an NFS mount are allowed. The options are listed in thenfs(5)man page. Multiple options are separated with a comma.
-
driverdisk(optional)-
Driver diskettes can be used during kickstart installations. You must copy the driver diskettes’s contents to the root directory of a partition on the system’s hard drive. Then you must use the
driverdiskcommand to tell the installation program where to look for the driver disk.driverdisk
<partition>--source=<url>--biospart=<biospart>[--type=<fstype>]Alternatively, a network location can be specified for the driver diskette:
driverdisk --source=ftp://path/to/dd.img
driverdisk --source=http://path/to/dd.img
driverdisk --source=nfs:host:/path/to/img
-
<partition>— Partition containing the driver disk. -
<url>— URL for the driver disk. NFS locations can be given in the formnfs:.host:/path/to/img -
<biospart>— BIOS partition containing the driver disk (for example,82p2). -
--type=— File system type (for example, vfat or ext2).
-
firewall(optional)-
This option corresponds to the Firewall Configuration screen in the installation program:
firewall --enabled|--disabled [--trust=]
<device>[--port=]-
--enabledor--enable— Reject incoming connections that are not in response to outbound requests, such as DNS replies or DHCP requests. If access to services running on this machine is needed, you can choose to allow specific services through the firewall. -
--disabledor--disable— Do not configure any iptables rules. -
--trust=— Listing a device here, such as eth0, allows all traffic coming from that device to go through the firewall. To list more than one device, use--trust eth0 --trust eth1. Do NOT use a comma-separated format such as--trust eth0, eth1. -
<incoming>— Replace with one or more of the following to allow the specified services through the firewall.-
--ssh -
--smtp -
--http -
--ftp
-
-
--port=— You can specify that ports be allowed through the firewall using the port:protocol format. For example, to allow IMAP access through your firewall, specifyimap:tcp. Numeric ports can also be specified explicitly; for example, to allow UDP packets on port 1234 through, specify1234:udp. To specify multiple ports, separate them by commas.
-
firstboot(optional)-
Determine whether the firstboot starts the first time the system is booted. If enabled, the firstboot package must be installed. If not specified, this option is disabled by default.
-
--enableor--enabled— The Setup Agent is started the first time the system boots. -
--disableor--disabled— The Setup Agent is not started the first time the system boots. -
--reconfig— Enable the Setup Agent to start at boot time in reconfiguration mode. This mode enables the language, mouse, keyboard, root password, security level, time zone, and networking configuration options in addition to the default ones.
-
graphical(optional)-
Perform the kickstart installation in graphical mode. This is the default.
halt(optional)-
Halt the system after the installation has successfully completed. This is similar to a manual installation, where anaconda displays a message and waits for the user to press a key before rebooting. During a kickstart installation, if no completion method is specified, this option is used as the default.
The
haltoption is equivalent to theshutdown -hcommand.For other completion methods, refer to the
poweroff,reboot, andshutdownkickstart options. ignoredisk(optional)-
Causes the installer to ignore the specified disks. This is useful if you use autopartition and want to be sure that some disks are ignored. For example, without
ignoredisk, attempting to deploy on a SAN-cluster the kickstart would fail, as the installer detects passive paths to the SAN that return no partition table.The syntax is:
ignoredisk --drives=
drive1,drive2,...where
driveNis one ofsda,sdb,…,hda,… etc.To ignore a multipath device that does not use logical volume management (LVM), use the format
disk/by-id/dm-uuid-mpath-, whereWWIDWWIDis the world-wide identifier for the device. For example, to ignore a disk with WWID2416CD96995134CA5D787F00A5AA11017, use:ignoredisk --drives=disk/by-id/dm-uuid-mpath-2416CD96995134CA5D787F00A5AA11017
Multipath devices that use LVM are not assembled until after anaconda has parsed the kickstart file. Therefore, you cannot specify these devices in the format
dm-uuid-mpath. Instead, to ignore a multipath device that uses LVM, use the formatdisk/by-id/scsi-, whereWWIDWWIDis the world-wide identifier for the device. For example, to ignore a disk with WWID58095BEC5510947BE8C0360F604351918, use:ignoredisk --drives=disk/by-id/scsi-58095BEC5510947BE8C0360F604351918
Device names like
mpathaare not specific to a particular disk. The disk named/dev/mpathaduring installation might not be the one that you expect it to be. Therefore, theignorediskcommand could target the wrong disk.-
--only-use— specifies a list of disks for the installer to use. All other disks are ignored. For example, to use disksdaduring installation and ignore all other disks:ignoredisk --only-use=sda
To include a multipath device that does not use LVM:
ignoredisk --only-use=disk/by-id/dm-uuid-mpath-2416CD96995134CA5D787F00A5AA11017
To include a multipath device that uses LVM:
ignoredisk --only-use=disk/by-id/scsi-58095BEC5510947BE8C0360F604351918
-
install(optional)-
Tells the system to install a fresh system rather than upgrade an existing system. This is the default mode. For installation, you must specify the type of installation from
cdrom,harddrive,nfs, orurl(for FTP or HTTP installations). Theinstallcommand and the installation method command must be on separate lines.-
cdrom— Install from the first optical drive on the system. -
harddrive— Install from a Fedora installation tree on a local drive, which must be either vfat or ext2.-
--biospart=BIOS partition to install from (such as 82).
-
--partition=Partition to install from (such as sdb2).
-
--dir=Directory containing the
variant
For example:
harddrive --partition=hdb2 --dir=/tmp/install-tree
-
-
nfs— Install from the NFS server specified.-
--server=Server from which to install (hostname or IP).
-
--dir=Directory containing the
variant -
--opts=Mount options to use for mounting the NFS export. (optional)
For example:
nfs --server=nfsserver.example.com --dir=/tmp/install-tree
-
-
url— Install from an installation tree on a remote server via FTP or HTTP.For example:
url --url http://
<server>/<dir>or:
url --url ftp://
<username>:<password>@<server>/<dir>
-
iscsi(optional)-
iscsi —ipaddr= [options].
Specifies additional iSCSI storage to be attached during installation. If you use the
iscsiparameter, you must also assign a name to the iSCSI node, using theiscsinameparameter earlier in the kickstart file.We recommend that wherever possible you configure iSCSI storage in the system BIOS or firmware (iBFT for Intel systems) rather than use the
iscsiparameter. Anaconda automatically detects and uses disks configured in BIOS or firmware and no special configuration is necessary in the kickstart file.If you must use the
iscsiparameter, ensure that networking is activated at the beginning of the installation, and that theiscsiparameter appears in the kickstart file before you refer to iSCSI disks with parameters such asclearpartorignoredisk.-
--port=(mandatory) — the port number (typically,--port=3260) -
--user=— the username required to authenticate with the target -
--password=— the password that corresponds with the username specified for the target -
--reverse-user=— the username required to authenticate with the initiator from a target that uses reverse CHAP authentication -
--reverse-password=— the password that corresponds with the username specified for the initiator
-
iscsiname(optional)-
Assigns a name to an iSCSI node specified by the iscsi parameter. If you use the
iscsiparameter in your kickstart file, you must specifyiscsinameearlier in the kickstart file. keyboard(required)-
Sets the default keyboard type for the system. The available keyboard types are:
-
be-latin1— Belgian -
bg_bds-utf8— Bulgarian -
bg_pho-utf8— Bulgarian (Phonetic) -
br-abnt2— Brazilian (ABNT2) -
cf— French Canadian -
croat— Croatian -
cz-us-qwertz— Czech -
cz-lat2— Czech (qwerty) -
de— German -
de-latin1— German (latin1) -
de-latin1-nodeadkeys— German (latin1 without dead keys) -
dvorak— Dvorak -
dk— Danish -
dk-latin1— Danish (latin1) -
es— Spanish -
et— Estonian -
fi— Finnish -
fi-latin1— Finnish (latin1) -
fr— French -
fr-latin9— French (latin9) -
fr-latin1— French (latin1) -
fr-pc— French (pc) -
fr_CH— Swiss French -
fr_CH-latin1— Swiss French (latin1) -
gr— Greek -
hu— Hungarian -
hu101— Hungarian (101 key) -
is-latin1— Icelandic -
it— Italian -
it-ibm— Italian (IBM) -
it2— Italian (it2) -
jp106— Japanese -
ko— Korean -
la-latin1— Latin American -
mk-utf— Macedonian -
nl— Dutch -
no— Norwegian -
pl2— Polish -
pt-latin1— Portuguese -
ro— Romanian -
ru— Russian -
sr-cy— Serbian -
sr-latin— Serbian (latin) -
sv-latin1— Swedish -
sg— Swiss German -
sg-latin1— Swiss German (latin1) -
sk-qwerty— Slovak (qwerty) -
slovene— Slovenian -
trq— Turkish -
uk— United Kingdom -
ua-utf— Ukrainian -
us-acentos— U.S. International -
us— U.S. English
The file
/usr/lib/python2.6/site-packages/system_config_keyboard/keyboard_models.pyon 32-bit systems or/usr/lib64/python2.6/site-packages/system_config_keyboard/keyboard_models.pyon 64-bit systems also contains this list and is part of the system-config-keyboard package. -
lang(required)-
Sets the language to use during installation and the default language to use on the installed system. For example, to set the language to English, the kickstart file should contain the following line:
lang en_US
The file
/usr/share/system-config-language/locale-listprovides a list of the valid language codes in the first column of each line and is part of thesystem-config-languagepackage.Certain languages (for example, Chinese, Japanese, Korean, and Indic languages) are not supported during text-mode installation. If you specify one of these languages with the
langcommand, the installation process continues in English, but the installed system uses your selection as its default language. langsupport(deprecated)-
The langsupport keyword is deprecated and its use will cause an error message to be printed to the screen and installation to halt. Instead of using the langsupport keyword, you should now list the support package groups for all languages you want supported in the
%packagessection of your kickstart file. For instance, adding support for French means you should add the following to%packages:@french-support
logvol(optional)-
Create a logical volume for Logical Volume Management (LVM) with the syntax:
logvol
<mntpoint>--vgname=<name>--size=<size>--name=<name><options>The options are as follows:
-
--noformat— Use an existing logical volume and do not format it. -
--useexisting— Use an existing logical volume and reformat it. -
--fstype=— Sets the file system type for the logical volume. Valid values arexfs,ext2,ext3,ext4,swap,vfat, andhfs. -
--fsoptions=— Specifies a free form string of options to be used when mounting the filesystem. This string will be copied into the/etc/fstabfile of the installed system and should be enclosed in quotes. -
--grow=— Tells the logical volume to grow to fill available space (if any), or up to the maximum size setting. -
--maxsize=— The maximum size in megabytes when the logical volume is set to grow. Specify an integer value here such as500(do not include the unit). -
--recommended=— Determine the size of the logical volume automatically. -
--percent=— Specify the amount by which to grow the logical volume, as a percentage of the free space in the volume group after any statically-sized logical volumes are taken into account. This option must be used in conjunction with the--sizeand--growoptions forlogvol. -
--encrypted— Specifies that this logical volume should be encrypted, using the passphrase provided in the--passphraseoption. If you do not specify a passphrase, anaconda uses the default, system-wide passphrase set with theautopart --passphrasecommand, or stops the installation and prompts you to provide a passphrase if no default is set. -
--passphrase=— Specifies the passphrase to use when encrypting this logical volume. You must use this option together with the--encryptedoption; by itself it has no effect. -
--escrowcert=— Store data encryption keys of all encrypted volumes as files inURL_of_X.509_certificate/root, encrypted using the X.509 certificate from the URL specified withURL_of_X.509_certificate. The keys are stored as a separate file for each encrypted volume. This option is only meaningful if--encryptedis specified. -
--backuppassphrase=— Add a randomly-generated passphrase to each encrypted volume. Store these passphrases in separate files in/root, encrypted using the X.509 certificate specified with--escrowcert. This option is only meaningful if--escrowcertis specified. -
--label=— assign a label to an individual volume.
Create the partition first, create the logical volume group, and then create the logical volume. For example:
part pv.01 --size 3000
volgroup myvg pv.01
logvol / --vgname=myvg --size=2000 --name=rootvol
Create the partition first, create the logical volume group, and then create the logical volume to occupy 90% of the remaining space in the volume group. For example:
part pv.01 --size 1 --grow
volgroup myvg pv.01
logvol / --vgname=myvg --size=1 --name=rootvol --grow --percent=90
-
logging(optional)-
This command controls the error logging of anaconda during installation. It has no effect on the installed system.
-
--host=— Send logging information to the given remote host, which must be running a syslogd process configured to accept remote logging. -
--port=— If the remote syslogd process uses a port other than the default, it may be specified with this option. -
--level=— One of debug, info, warning, error, or critical.Specify the minimum level of messages that appear on tty3. All messages will still be sent to the log file regardless of this level, however.
-
mediacheck(optional)-
If given, this will force anaconda to run mediacheck on the installation media. This command requires that installs be attended, so it is disabled by default.
monitor(optional)-
If the monitor command is not given, anaconda will use X to automatically detect your monitor settings. Please try this before manually configuring your monitor.
-
--hsync=— Specifies the horizontal sync frequency of the monitor. -
--monitor=— Use specified monitor; monitor name should be from the list of monitors in /usr/share/hwdata/MonitorsDB from the hwdata package. The list of monitors can also be found on the X Configuration screen of the Kickstart Configurator. This is ignored if —hsync or —vsync is provided. If no monitor information is provided, the installation program tries to probe for it automatically. -
--noprobe=— Do not try to probe the monitor. -
--vsync=— Specifies the vertical sync frequency of the monitor.
-
mouse(deprecated)-
The mouse keyword is deprecated.
network(optional)-
Configures network information for the target system and activates network devices in the installer environment. The device specified in the first
networkcommand is activated automatically if network access is required during installation, for example, during a network installation or installation over VNC. You can also explicitly require device to activate in the installer environment with the--activateoption.If you need to manually specify network settings during an otherwise-automated kickstart installation, do not use
network. Instead, enter your network settings at the boot prompt (refer to Раздел 15.10, «Starting a Kickstart Installation» for available boot options).Once the network connection is established, you can only reconfigure network settings with those specified in your kickstart file.
You will only be prompted for information about your network:
-
before fetching the kickstart file if you are using the
asknetworkboot option -
when the network is first accessed once the kickstart file has been fetched, if the network was not used to fetch it and you have provided no kickstart network commands
-
--activate— activate this device in the installer environment.If you use the
--activateoption on a device that has already been activated (for example, an interface you configured with boot options so that the system could retrieve the kickstart file) the device is reactivated to use the details specified in the kickstart file.Use the
--nodefrouteoption to prevent the device from using the default route.The
activateoption is new in Fedora 16. -
--biosdevname=0— disables consistent network device naming (refer to Appendix A in the Fedora System Administrators Guide). -
--bootproto=— One ofdhcp,bootp,ibft, orstatic.The
ibftoption is new in Fedora 16.The
bootprotooption defaults todhcp.bootpanddhcpare treated the same.The DHCP method uses a DHCP server system to obtain its networking configuration. As you might guess, the BOOTP method is similar, requiring a BOOTP server to supply the networking configuration. To direct a system to use DHCP:
network --bootproto=dhcp
To direct a machine to use BOOTP to obtain its networking configuration, use the following line in the kickstart file:
network --bootproto=bootp
To direct a machine to use the configuration specified in iBFT, use:
network --bootproto=ibft
The static method requires that you specify the IP address, netmask, gateway, and nameserver in the kickstart file. As the name implies, this information is static and is used during and after the installation.
All static networking configuration information must be specified on one line; you cannot wrap lines using a backslash as you can on a command line. A line that specifies static networking in a kickstart file is therefore more complex than lines that specify DHCP, BOOTP, or iBFT. Note that the examples on this page have line breaks in them for presentation reasons; they would not work in an actual kickstart file.
network --bootproto=static --ip=10.0.2.15 --netmask=255.255.255.0
 --gateway=10.0.2.254 --nameserver=10.0.2.1
You can also configure multiple nameservers here. To do so, specify them as a comma-delimited list in the command line.
network --bootproto=static --ip=10.0.2.15 --netmask=255.255.255.0
 --gateway=10.0.2.254 --nameserver 192.168.2.1,192.168.3.1
-
--device=— specifies the device to be configured (and eventually activated) with thenetworkcommand. For the firstnetworkcommand,--device=defaults (in order of preference) to one of:-
the device specified by the
ksdeviceboot option -
the device activated automatically to fetch the kickstart file
-
the device selected in the Networking Devices dialog
The behavior of any subsequent
networkcommand is unspecified if its--deviceoption is missing. Take care to specify a--deviceoption for any network command beyond the first.You can specify a device in one of five ways:
-
the device name of the interface, for example,
eth0 -
the MAC address of the interface, for example,
00:12:34:56:78:9a -
the keyword
link, which specifies the first interface with its link in theupstate -
the keyword
bootif, which uses the MAC address that pxelinux set in theBOOTIFvariable. SetIPAPPEND 2in yourpxelinux.cfgfile to have pxelinux set theBOOTIFvariable. -
the keyword
ibft, which uses the MAC address of the interface specified by iBFT
network --bootproto=dhcp --device=eth0
-
-
--ip=— IP address of the device. -
--ipv6=— IPv6 address of the device, orautoto use automatic neighbor discovery, ordhcpto use DHCPv6. -
--gateway=— Default gateway as a single IPv4 or IPv6 address. -
--nameserver=— Primary nameserver, as an IP address. Multiple nameservers must each be separated by a comma. -
--nodefroute— Prevents the interface being set as the default route. Use this option when you activate additional devices with the--activate=option, for example, a NIC on a separate subnet for an iSCSI target.The
nodefrouteoption is new in Fedora 16. -
--nodns— Do not configure any DNS server. -
--netmask=— Network mask of the device. -
--hostname=— Hostname for the installed system. -
--ethtool=— Specifies additional low-level settings for the network device which will be passed to the ethtool program. -
--onboot=— Whether or not to enable the device at boot time. -
--dhcpclass=— The DHCP class. -
--mtu=— The MTU of the device. -
--noipv4— Disable IPv4 on this device. -
--noipv6— Disable IPv6 on this device.
-
-
partorpartition(required for installs, ignored for upgrades) -
Creates a partition on the system.
If more than one Fedora installation exists on the system on different partitions, the installation program prompts the user and asks which installation to upgrade.
As of Fedora 16, you need a biosboot partition in order to successfully install the bootloader on a disk that contains a GPT/GUID partition table. This includes disks initialized by the installer. This partition can be created with the kickstart option
part biosboot --fstype=biosboot --size=1.However, if the disk already has a biosboot partition, adding a
"part biosboot"option is unnecessary.All partitions created are formatted as part of the installation process unless
--noformatand--onpartare used.If you select text mode for a kickstart installation, make sure that you specify choices for the partitioning, bootloader, and package selection options. These steps are automated in text mode, and anaconda cannot prompt you for missing information. If you do not provide choices for these options, anaconda will stop the installation process.
For a detailed example of
partin action, refer to Раздел 15.4.1, «Advanced Partitioning Example».-
<mntpointmultipath --name= --device= --rule=>— The<mntpoint>is where the partition is mounted and must be of one of the following forms:-
/<path>For example,
/,/usr,/home -
swapThe partition is used as swap space.
To determine the size of the swap partition automatically, use the
--recommendedoption:swap --recommended
The size assigned will be effective but not precisely calibrated for your system.
If you wish to set the swap partition more precisely, refer to Раздел 9.17.5, «Recommended Partitioning Scheme».
-
raid.<id>The partition is used for software RAID (refer to
raid). -
pv.<id>The partition is used for LVM (refer to
logvol).
-
-
--size=— The minimum partition size in megabytes. Specify an integer value here such as500(do not include the unit).If the
--sizevalue is too small, the installation will fail. Set the--sizevalue as the minimum amount of space you require. For size recommendations, refer to Раздел 9.17.5, «Recommended Partitioning Scheme». -
--grow— Tells the partition to grow to fill available space (if any), or up to the maximum size setting.If you use
--grow=without setting--maxsize=on a swap partition, Anaconda will limit the maximum size of the swap partition. For systems that have less than 2GB of physical memory, the imposed limit is twice the amount of physical memory. For systems with more than 2GB, the imposed limit is the size of physical memory plus 2GB. -
--maxsize=— The maximum partition size in megabytes when the partition is set to grow. Specify an integer value here such as500(do not include the unit). -
--noformat— Specifies that the partition should not be formatted, for use with the--onpartcommand. -
--onpart=or--usepart=— Specifies the device on which to place the partition. For example:partition /home --onpart=hda1
puts
/homeon/dev/hda1.The device must already exist on the system; the
--onpartoption will not create it. -
--ondisk=or--ondrive=— Forces the partition to be created on a particular disk. For example,--ondisk=sdbputs the partition on the second SCSI disk on the system.To specify a multipath device that does not use logical volume management (LVM), use the format
disk/by-id/dm-uuid-mpath-, whereWWIDWWIDis the world-wide identifier for the device. For example, to specify a disk with WWID2416CD96995134CA5D787F00A5AA11017, use:part / --fstype=ext3 --grow --asprimary --size=100 --ondisk=disk/by-id/dm-uuid-mpath-2416CD96995134CA5D787F00A5AA11017
Multipath devices that use LVM are not assembled until after anaconda has parsed the kickstart file. Therefore, you cannot specify these devices in the format
dm-uuid-mpath. Instead, to specify a multipath device that uses LVM, use the formatdisk/by-id/scsi-, whereWWIDWWIDis the world-wide identifier for the device. For example, to specify a disk with WWID58095BEC5510947BE8C0360F604351918, use:part / --fstype=ext3 --grow --asprimary --size=100 --ondisk=disk/by-id/scsi-58095BEC5510947BE8C0360F604351918
Device names like
mpathaare not specific to a particular disk. The disk named/dev/mpathaduring installation might not be the one that you expect it to be. Therefore, thepartcommand could target the wrong disk or partition. -
--asprimary— Forces automatic allocation of the partition as a primary partition, or the partitioning fails. -
--type=(replaced byfstype) — This option is no longer available. Usefstype. -
--fsoptions— Specifies a free form string of options to be used when mounting the filesystem. This string will be copied into the/etc/fstabfile of the installed system and should be enclosed in quotes. -
--fsprofile— Specifies a usage type to be passed to the program that makes a filesystem on this partition. A usage type defines a variety of tuning parameters to be used when making a filesystem. For this option to work, the filesystem must support the concept of usage types and there must be a configuration file that lists valid types. For ext2, ext3, and ext4, this configuration file is/etc/mke2fs.conf. -
--fstype=— Sets the file system type for the partition. Valid values arexfs,ext2,ext3,ext4,swap,vfat, andhfs. -
--recommended— Determine the size of the partition automatically. -
--onbiosdisk— Forces the partition to be created on a particular disk as discovered by the BIOS. -
--encrypted— Specifies that this partition should be encrypted, using the passphrase provided in the--passphraseoption. If you do not specify a passphrase, anaconda uses the default, system-wide passphrase set with theautopart --passphrasecommand, or stops the installation and prompts you to provide a passphrase if no default is set. -
--passphrase=— Specifies the passphrase to use when encrypting this partition. You must use this option together with the--encryptedoption; by itself it has no effect. -
--escrowcert=— Store data encryption keys of all encrypted partitions as files inURL_of_X.509_certificate/root, encrypted using the X.509 certificate from the URL specified withURL_of_X.509_certificate. The keys are stored as a separate file for each encrypted partition. This option is only meaningful if--encryptedis specified. -
--backuppassphrase=— Add a randomly-generated passphrase to each encrypted partition. Store these passphrases in separate files in/root, encrypted using the X.509 certificate specified with--escrowcert. This option is only meaningful if--escrowcertis specified. -
--label=— assign a label to an individual partition.
If partitioning fails for any reason, diagnostic messages appear on virtual console 3.
-
poweroff(optional)-
Shut down and power off the system after the installation has successfully completed. Normally during a manual installation, anaconda displays a message and waits for the user to press a key before rebooting. During a kickstart installation, if no completion method is specified, the
haltoption is used as default.The
poweroffoption is equivalent to theshutdown -pcommand.The
poweroffoption is highly dependent on the system hardware in use. Specifically, certain hardware components such as the BIOS, APM (advanced power management), and ACPI (advanced configuration and power interface) must be able to interact with the system kernel. Contact your manufacturer for more information on you system’s APM/ACPI abilities.For other completion methods, refer to the
halt,reboot, andshutdownkickstart options. -
raid(optional) -
Assembles a software RAID device. This command is of the form:
raid
<mntpoint>--level=<level>--device=<mddevice><partitions*>-
<mntpoint>— Location where the RAID file system is mounted. If it is/, the RAID level must be 1 unless a boot partition (/boot) is present. If a boot partition is present, the/bootpartition must be level 1 and the root (/) partition can be any of the available types. The<partitions*>(which denotes that multiple partitions can be listed) lists the RAID identifiers to add to the RAID array. -
--level=— RAID level to use (0, 1, or 5). -
--device=— Name of the RAID device to use (such as md0 or md1). RAID devices range from md0 to md15, and each may only be used once. -
--spares=— Specifies the number of spare drives allocated for the RAID array. Spare drives are used to rebuild the array in case of drive failure. -
--grow=— Only supported for RAID0. Tells the RAID device to grow to fill available space (if any), or up to the maximum size setting. -
--fsprofile— Specifies a usage type to be passed to the program that makes a filesystem on this partition. A usage type defines a variety of tuning parameters to be used when making a filesystem. For this option to work, the filesystem must support the concept of usage types and there must be a configuration file that lists valid types. For ext2, ext3, and ext4, this configuration file is/etc/mke2fs.conf. -
--fstype=— Sets the file system type for the RAID array. Valid values arexfs,ext2,ext3,ext4,swap,vfat, andhfs. -
--fsoptions=— Specifies a free form string of options to be used when mounting the filesystem. This string will be copied into the /etc/fstab file of the installed system and should be enclosed in quotes. -
--noformat— Use an existing RAID device and do not format the RAID array. -
--useexisting— Use an existing RAID device and reformat it. -
--encrypted— Specifies that this RAID device should be encrypted, using the passphrase provided in the--passphraseoption. If you do not specify a passphrase, anaconda uses the default, system-wide passphrase set with theautopart --passphrasecommand, or stops the installation and prompts you to provide a passphrase if no default is set. -
--passphrase=— Specifies the passphrase to use when encrypting this RAID device. You must use this option together with the--encryptedoption; by itself it has no effect. -
--escrowcert=— Store the data encryption key for this device in a file inURL_of_X.509_certificate/root, encrypted using the X.509 certificate from the URL specified withURL_of_X.509_certificate. This option is only meaningful if--encryptedis specified. -
--backuppassphrase=— Add a randomly-generated passphrase to this device. Store the passphrase in a file in/root, encrypted using the X.509 certificate specified with--escrowcert. This option is only meaningful if--escrowcertis specified.
The following example shows how to create a RAID level 1 partition for
/, and a RAID level 5 for/usr, assuming there are three SCSI disks on the system. It also creates three swap partitions, one on each drive.part raid.01 --size=60 --ondisk=sda part raid.02 --size=60 --ondisk=sdb part raid.03 --size=60 --ondisk=sdc
part swap --size=128 --ondisk=sda
part swap --size=128 --ondisk=sdb
part swap --size=128 --ondisk=sdc
part raid.11 --size=1 --grow --ondisk=sda
part raid.12 --size=1 --grow --ondisk=sdb
part raid.13 --size=1 --grow --ondisk=sdc
raid / --level=1 --device=md0 raid.01 raid.02 raid.03
raid /usr --level=5 --device=md1 raid.11 raid.12 raid.13
For a detailed example of
raidin action, refer to Раздел 15.4.1, «Advanced Partitioning Example». -
reboot(optional)-
Reboot after the installation is successfully completed (no arguments). Normally, kickstart displays a message and waits for the user to press a key before rebooting.
The
rebootoption is equivalent to theshutdown -rcommand.For other completion methods, refer to the
halt,poweroff, andshutdownkickstart options.The
haltoption is the default completion method if no other methods are explicitly specified in the kickstart file.Use of the
rebootoption may result in an endless installation loop, depending on the installation media and method. repo(optional)-
Configures additional yum repositories that may be used as sources for package installation. Multiple repo lines may be specified.
repo --name=
<repoid>[--baseurl=<url>| --mirrorlist=<url>]-
--name=— The repo id. This option is required. -
--baseurl=— The URL for the repository. The variables that may be used in yum repo config files are not supported here. You may use one of either this option or —mirrorlist, not both. -
--mirrorlist=— The URL pointing at a list of mirrors for the repository. The variables that may be used in yum repo config files are not supported here. You may use one of either this option or —baseurl, not both.
-
rootpw(required)-
Sets the system’s root password to the
<password>argument.rootpw [--iscrypted]
<password>-
--iscrypted— If this is present, the password argument is assumed to already be encrypted.
-
selinux(optional)-
Sets the state of SELinux on the installed system. SELinux defaults to enforcing in anaconda.
selinux [--disabled|--enforcing|--permissive]
-
--enforcing— Enables SELinux with the default targeted policy being enforced.If the
selinuxoption is not present in the kickstart file, SELinux is enabled and set to--enforcingby default. -
--permissive— Outputs warnings based on the SELinux policy, but does not actually enforce the policy. -
--disabled— Disables SELinux completely on the system.
For more information regarding SELinux for Fedora, refer to the Fedora Deployment Guide.
-
services(optional)-
Modifies the default set of services that will run under the default runlevel. The list of disabled services is processed before the list of enabled services. Therefore, if a service appears on both lists, it is enabled.
-
--disabled— Disable the services given in the comma separated list. -
--enabled— Enable the services given in the comma separated list.
If you include spaces in the comma-separated list, kickstart will enable or disable only the services up to the first space. For example:
services --disabled auditd, cups,smartd, nfslockwill disable only the auditd service. To disable all four services, this entry should include no spaces between services:
services --disabled auditd,cups,smartd,nfslock -
shutdown(optional)-
Shut down the system after the installation has successfully completed. During a kickstart installation, if no completion method is specified, the
haltoption is used as default.The
shutdownoption is equivalent to theshutdowncommand.For other completion methods, refer to the
halt,poweroff, andrebootkickstart options. skipx(optional)-
If present, X is not configured on the installed system.
If you install a display manager among your package selection options, this package will create an X configuration, and the installed system will default to run level 5. The effect of the skipx option is overridden.
sshpw(optional)-
During installation, you can interact with anaconda and monitor its progress over an SSH connection. Use the
sshpwcommand to create temporary accounts through which to log on. Each instance of the command creates a separate account that exists only in the installation environment. These accounts are not transferred to the installed system.sshpw --username=
<name><password>[--iscrypted|--plaintext] [--lock]-
--username— Provides the name of the user. This option is required. -
--iscrypted— Specifies that the password is already encrypted. -
--plaintext— Specifies that the password is in plain text and not encrypted. -
--lock— If this is present, the new user account is locked by default. That is, the user will not be able to login from the console.
By default, the ssh server is not started during installation. To make
sshavailable during installation, boot the system with the kernel boot optionsshd=1. Refer to Раздел 11.2.3, «Enabling Remote Access with ssh» for details of how to specify this kernel option at boot time. -
text(optional)-
Perform the kickstart installation in text mode. Kickstart installations are performed in graphical mode by default.
If you select text mode for a kickstart installation, make sure that you specify choices for the partitioning, bootloader, and package selection options. These steps are automated in text mode, and anaconda cannot prompt you for missing information. If you do not provide choices for these options, anaconda will stop the installation process.
timezone(required)-
Sets the system time zone to
<timezone>which may be any of the time zones listed bytimeconfig.timezone [--utc]
<timezone>-
--utc— If present, the system assumes the hardware clock is set to UTC (Greenwich Mean) time.
-
upgrade(optional)-
Tells the system to upgrade an existing system rather than install a fresh system. You must specify one of
cdrom,harddrive,nfs, orurl(for FTP and HTTP) as the location of the installation tree. Refer toinstallfor details. user(optional)-
Creates a new user on the system.
user --name=
<username>[--groups=<list>] [--homedir=<homedir>] [--password=<password>] [--iscrypted] [--shell=<shell>] [--uid=<uid>]-
--name=— Provides the name of the user. This option is required. -
--groups=— In addition to the default group, a comma separated list of group names the user should belong to. The groups must exist before the user account is created. -
--homedir=— The home directory for the user. If not provided, this defaults to /home/<username>. -
--password=— The new user’s password. If not provided, the account will be locked by default. -
--iscrypted=— Is the password provided by —password already encrypted or not? -
--shell=— The user’s login shell. If not provided, this defaults to the system default. -
--uid=— The user’s UID. If not provided, this defaults to the next available non-system UID.
-
vnc(optional)-
Allows the graphical installation to be viewed remotely via VNC. This method is usually preferred over text mode, as there are some size and language limitations in text installs. With no options, this command will start a VNC server on the machine with no password and will print out the command that needs to be run to connect a remote machine.
vnc [--host=
<hostname>] [--port=<port>] [--password=<password>]-
--host=— Instead of starting a VNC server on the install machine, connect to the VNC viewer process listening on the given hostname. -
--port=— Provide a port that the remote VNC viewer process is listening on. If not provided, anaconda will use the VNC default. -
--password=— Set a password which must be provided to connect to the VNC session. This is optional, but recommended.
-
volgroup(optional)-
Use to create a Logical Volume Management (LVM) group with the syntax:
volgroup
<name><partition><options>The options are as follows:
-
--noformat— Use an existing volume group and do not format it. -
--useexisting— Use an existing volume group and reformat it. -
--pesize=— Set the size of the physical extents.
Create the partition first, create the logical volume group, and then create the logical volume. For example:
part pv.01 --size 3000
volgroup myvg pv.01
logvol / --vgname=myvg --size=2000 --name=rootvol
For a detailed example of
volgroupin action, refer to Раздел 15.4.1, «Advanced Partitioning Example». -
xconfig(optional)-
Configures the X Window System. If you install the X Window System with a kickstart file that does not include the
xconfigcommand, you must provide the X configuration manually during installation.Do not use this command in a kickstart file that does not install the X Window System.
-
--driver— Specify the X driver to use for the video hardware. -
--videoram=— Specifies the amount of video RAM the video card has. -
--defaultdesktop=— Specify either GNOME or KDE to set the default desktop (assumes that GNOME Desktop Environment and/or KDE Desktop Environment has been installed through%packages). -
--startxonboot— Use a graphical login on the installed system.
-
zerombr(optional)-
If
zerombris specified any invalid partition tables found on disks are initialized. This destroys all of the contents of disks with invalid partition tables.Note that this command was previously specified as
zerombr yes. This form is now deprecated; you should now simply specifyzerombrin your kickstart file instead. %include(optional)-
Use the
%includecommand to include the contents of another file in the kickstart file as though the contents were at the location of the/path/to/file%includecommand in the kickstart file.
15.4.1. Advanced Partitioning Example
The following is a single, integrated example showing the clearpart, raid, part, volgroup, and logvol kickstart options in action:
clearpart --drives=hda,hdc --initlabel
# Raid 1 IDE config
part raid.11    --size 1000     --asprimary     --ondrive=hda
part raid.12    --size 1000     --asprimary     --ondrive=hda
part raid.13    --size 2000     --asprimary     --ondrive=hda
part raid.14    --size 8000                     --ondrive=hda
part raid.15    --size 16384 --grow             --ondrive=hda
part raid.21    --size 1000     --asprimary     --ondrive=hdc
part raid.22    --size 1000     --asprimary     --ondrive=hdc
part raid.23    --size 2000     --asprimary     --ondrive=hdc
part raid.24    --size 8000                     --ondrive=hdc
part raid.25    --size 16384 --grow             --ondrive=hdc

# You can add --spares=x
raid /          --fstype ext3 --device md0 --level=RAID1 raid.11 raid.21
raid /safe      --fstype ext3 --device md1 --level=RAID1 raid.12 raid.22
raid swap       --fstype swap --device md2 --level=RAID1 raid.13 raid.23
raid /usr       --fstype ext3 --device md3 --level=RAID1 raid.14 raid.24
raid pv.01      --fstype ext3 --device md4 --level=RAID1 raid.15 raid.25

# LVM configuration so that we can resize /var and /usr/local later
volgroup sysvg pv.01
logvol /var             --vgname=sysvg  --size=8000     --name=var
logvol /var/freespace   --vgname=sysvg  --size=8000     --name=freespacetouse
logvol /usr/local       --vgname=sysvg  --size=1 --grow --name=usrlocal
This advanced example implements LVM over RAID, as well as the ability to resize various directories for future growth.
15.5. Package Selection
You can use a kickstart file to install every available package by specifying @Everything or simply * in the %packages section. However, using a kickstart file in this way will introduce package and file conflicts onto the installed system
Use the %packages command to begin a kickstart file section that lists the packages you would like to install (this is for installations only, as package selection during upgrades is not supported).
You can specify packages by group or by their package names. The installation program defines several groups that contain related packages. Refer to the variant/repodata/comps-*.xmlmandatory in the package list are always installed, the packages marked default are installed if they are not specifically excluded elsewhere, and the packages marked optional must be specifically included elsewhere even when the group is selected.
Specify groups, one entry to a line, starting with an @ symbol, a space, and then the full group name or group id as given in the comps.xml file. For example:
%packages
@ X Window System
@ Desktop
@ Sound and Video
Note that the Core and Base groups are always selected by default, so it is not necessary to specify them in the %packages section.
Specify individual packages by name, one entry to a line. You can use asterisks as wildcards to glob package names in entries. For example:
sqlite
curl
aspell
docbook*
The docbook* entry includes the packages docbook-dtds, docbook-simple, docbook-slides and others that match the pattern represented with the wildcard.
Use a leading dash to specify packages or groups to exclude from the installation. For example:
-@ Graphical Internet
-autofs
-ipa*fonts
Using a kickstart file to install every available package by specifying * will introduce package and file conflicts onto the installed system. Packages known to cause such problems are assigned to the @Conflicts ( group, where variant)variant is Client, ComputeNode, Server or Workstation. If you specify * in a kickstart file, be sure to exclude @Conflicts ( or the installation will fail:
variant)
*
-@Conflicts (Server)
Note that the Fedora Project does not support the use of * in a kickstart file, even if you exclude @Conflicts (.
variant)
The following options are available for the %packages option:
--nobase-
Do not install the @Base group. Use this option to perform a minimal installation, for example, for a single-purpose server or desktop appliance.
--resolvedeps-
The —resolvedeps option has been deprecated. Dependencies are now always resolved automatically.
--ignoredeps-
The —ignoredeps option has been deprecated. Dependencies are resolved automatically every time now.
--ignoremissing-
Ignore the missing packages and groups instead of halting the installation to ask if the installation should be aborted or continued. For example:
%packages --ignoremissing
15.6. Pre-installation Script
You can add commands to run on the system immediately after the ks.cfg has been parsed. This section must be placed towards the end of the kickstart file, after the kickstart commands described in Раздел 15.4, «Kickstart Options», and must start with the %pre command. If your kickstart file also includes a %post section, the order of the %pre and %post sections does not matter.
You can access the network in the %pre section; however, name service has not been configured at this point, so only IP addresses work.
Note that the pre-install script is not run in the change root environment.
--interpreter/usr/bin/python-
Allows you to specify a different scripting language, such as Python. Replace
/usr/bin/pythonwith the scripting language of your choice.
15.6.1. Example
Here is an example %pre section:
%pre
#!/bin/sh
hds=""
mymedia=""
for file in /proc/ide/h* do
	mymedia=`cat $file/media`
	if [ $mymedia == "disk" ] ; then
		hds="$hds `basename $file`"
	fi
done
set $hds
numhd=`echo $#`
drive1=`echo $hds | cut -d' ' -f1`
drive2=`echo $hds | cut -d' ' -f2`
#Write out partition scheme based on whether there are 1 or 2 hard drives
if [ $numhd == "2" ] ; then
	#2 drives
	echo "#partitioning scheme generated in %pre for 2 drives" > /tmp/part-include
	echo "clearpart --all" >> /tmp/part-include
	echo "part /boot --fstype ext3 --size 75 --ondisk hda" >> /tmp/part-include
	echo "part / --fstype ext3 --size 1 --grow --ondisk hda" >> /tmp/part-include
	echo "part swap --recommended --ondisk $drive1" >> /tmp/part-include
	echo "part /home --fstype ext3 --size 1 --grow --ondisk hdb" >> /tmp/part-include
else
	#1 drive
	echo "#partitioning scheme generated in %pre for 1 drive" > /tmp/part-include
	echo "clearpart --all" >> /tmp/part-include
	echo "part /boot --fstype ext3 --size 75" >> /tmp/part-include
	echo "part swap --recommended" >> /tmp/part-include
	echo "part / --fstype ext3 --size 2048" >> /tmp/part-include
	echo "part /home --fstype ext3 --size 2048 --grow" >> /tmp/part-include
fi
This script determines the number of hard drives in the system and writes a text file with a different partitioning scheme depending on whether it has one or two drives. Instead of having a set of partitioning commands in the kickstart file, include the line:
%include /tmp/part-include
The partitioning commands selected in the script are used.
The pre-installation script section of kickstart cannot manage multiple install trees or source media. This information must be included for each created ks.cfg file, as the pre-installation script occurs during the second stage of the installation process.
15.7. Post-installation Script
You have the option of adding commands to run on the system once the installation is complete. This section must be placed towards the end of the kickstart file, after the kickstart commands described in Раздел 15.4, «Kickstart Options», and must start with the %post command. If your kickstart file also includes a %pre section, the order of the %pre and %post sections does not matter.
This section is useful for functions such as installing additional software and configuring an additional nameserver.
If you configured the network with static IP information, including a nameserver, you can access the network and resolve IP addresses in the %post section. If you configured the network for DHCP, the /etc/resolv.conf file has not been completed when the installation executes the %post section. You can access the network, but you can not resolve IP addresses. Thus, if you are using DHCP, you must specify IP addresses in the %post section.
The post-install script is run in a chroot environment; therefore, performing tasks such as copying scripts or RPMs from the installation media do not work.
--nochroot-
Allows you to specify commands that you would like to run outside of the chroot environment.
The following example copies the file
/etc/resolv.confto the file system that was just installed.%post --nochroot cp /etc/resolv.conf /mnt/sysimage/etc/resolv.conf
--interpreter/usr/bin/python-
Allows you to specify a different scripting language, such as Python. Replace
/usr/bin/pythonwith the scripting language of your choice. --log/path/to/logfile-
Logs the output of the post-install script. Note that the path of the log file must take into account whether or not you use the
--nochrootoption. For example, without--nochroot:%post --log=/root/ks-post.log
with
--nochroot:%post --nochroot --log=/mnt/sysimage/root/ks-post.log
15.7.1. Example
Пример 15.1. Run a script named runme from an NFS share:
mkdir /mnt/temp
mount -o nolock 10.10.0.2:/usr/new-machines /mnt/temp
openvt -s -w -- /mnt/temp/runme
umount /mnt/temp
NFS file locking is not supported while in kickstart mode, therefore -o nolock is required when mounting an NFS mount.
15.8. Making the Kickstart File Available
A kickstart file must be placed in one of the following locations:
-
On removable media, such as a floppy disk, optical disk, or USB flash drive
-
On a hard drive
-
On a network
Normally a kickstart file is copied to the removable media or hard drive, or made available on the network. The network-based approach is most commonly used, as most kickstart installations tend to be performed on networked computers.
Let us take a more in-depth look at where the kickstart file may be placed.
15.8.2. Making the Kickstart File Available on the Network
Network installations using kickstart are quite common, because system administrators can quickly and easily automate the installation on many networked computers. In general, the approach most commonly used is for the administrator to have both a BOOTP/DHCP server and an NFS server on the local network. The BOOTP/DHCP server is used to give the client system its networking information, while the actual files used during the installation are served by the NFS server. Often, these two servers run on the same physical machine, but they are not required to.
Include the ks kernel boot option in the append line of a target in your pxelinux.cfg/default file to specify the location of a kickstart file on your network. The syntax of the ks option in a pxelinux.cfg/default file is identical to its syntax when used at the boot prompt. Refer to Раздел 15.10, «Starting a Kickstart Installation» for a description of the syntax and refer to Пример 15.2, «Using the ks option in the pxelinux.cfg/default file» for an example of an append line.
If the dhcpd.conf file on the DHCP server is configured to point to /tftpboot/pxelinux.0 on the BOOTP server (whether on the same physical machine or not), systems configured to boot over the network can load the kickstart file and commence installation.
Пример 15.2. Using the ks option in the pxelinux.cfg/default file
For example, if foo.ks is a kickstart file available on an NFS share at 192.168.0.200:/export/kickstart/, part of your pxelinux.cfg/default file might include:
label 1
  kernel Fedora17/vmlinuz
  append initrd=Fedora17/initrd.img ramdisk_size=10000 ks=nfs:192.168.0.200:/export/kickstart/foo.ks
15.9. Making the Installation Tree Available
The kickstart installation must access an installation tree. An installation tree is a copy of the binary Fedora DVD with the same directory structure.
If you are performing a DVD-based installation, insert the Fedora installation DVD into the computer before starting the kickstart installation.
If you are performing a hard drive installation, make sure the ISO images of the binary Fedora DVD are on a hard drive in the computer.
If you are performing a network-based (NFS, FTP, or HTTP) installation, you must make the installation tree or ISO image available over the network. Refer to Раздел 5.1, «Preparing for a Network Installation» for details.
15.10. Starting a Kickstart Installation
Firstboot does not run after a system is installed from a Kickstart file unless a desktop and the X Window System were included in the installation and graphical login was enabled. Either specify a user with the user option in the Kickstart file before installing additional systems from it (refer to Раздел 15.4, «Kickstart Options» for details) or log into the installed system with a virtual console as root and add users with the adduser command.
To begin a kickstart installation, you must boot the system from boot media you have made or the Fedora DVD, and enter a special boot command at the boot prompt. The installation program looks for a kickstart file if the ks command line argument is passed to the kernel.
- DVD and local storage
-
The
linux ks=command also works if theks.cfgfile is located on a vfat or ext2 file system on local storage and you boot from the Fedora DVD.
- With Driver Disk
-
If you need to use a driver disk with kickstart, specify the
ddoption as well. For example, if installation requires a kickstart file on a local hard drive and also requires a driver disk, boot the system with:linux ks=hd:
partition:/path/ks.cfg dd - Boot CD-ROM
-
If the kickstart file is on a boot CD-ROM as described in Раздел 15.8.1, «Creating Kickstart Boot Media», insert the CD-ROM into the system, boot the system, and enter the following command at the
boot:prompt (whereks.cfgis the name of the kickstart file):linux ks=cdrom:/ks.cfg
Other options to start a kickstart installation are as follows:
autostep-
Make kickstart non-interactive.
debug-
Start up pdb immediately.
dd-
Use a driver disk.
dhcpclass=<class>-
Sends a custom DHCP vendor class identifier. ISC’s dhcpcd can inspect this value using «option vendor-class-identifier».
dns=<dns>-
Comma separated list of nameservers to use for a network installation.
driverdisk-
Same as ‘dd’.
expert-
Turns on special features:
-
allows partitioning of removable media
-
prompts for a driver disk
-
gateway=<gw>-
Gateway to use for a network installation.
graphical-
Force graphical install. Required to have ftp/http use GUI.
isa-
Prompt user for ISA devices configuration.
ip=<ip>-
IP to use for a network installation, use ‘dhcp’ for DHCP.
ipv6=auto,ipv6=dhcp-
IPv6 configuration for the device. Use
autoto specify automatic neighbor discovery ordhcpfor a stateful configuration with DHCPv6. You cannot specify a static IPv6 address. keymap=<keymap>-
Keyboard layout to use. Valid layouts include:
-
be-latin1— Belgian -
bg_bds-utf8— Bulgarian -
bg_pho-utf8— Bulgarian (Phonetic) -
br-abnt2— Brazilian (ABNT2) -
cf— French Canadian -
croat— Croatian -
cz-us-qwertz— Czech -
cz-lat2— Czech (qwerty) -
de— German -
de-latin1— German (latin1) -
de-latin1-nodeadkeys— German (latin1 without dead keys) -
dvorak— Dvorak -
dk— Danish -
dk-latin1— Danish (latin1) -
es— Spanish -
et— Estonian -
fi— Finnish -
fi-latin1— Finnish (latin1) -
fr— French -
fr-latin9— French (latin9) -
fr-latin1— French (latin1) -
fr-pc— French (pc) -
fr_CH— Swiss French -
fr_CH-latin1— Swiss French (latin1) -
gr— Greek -
hu— Hungarian -
hu101— Hungarian (101 key) -
is-latin1— Icelandic -
it— Italian -
it-ibm— Italian (IBM) -
it2— Italian (it2) -
jp106— Japanese -
ko— Korean -
la-latin1— Latin American -
mk-utf— Macedonian -
nl— Dutch -
no— Norwegian -
pl2— Polish -
pt-latin1— Portuguese -
ro— Romanian -
ru— Russian -
sr-cy— Serbian -
sr-latin— Serbian (latin) -
sv-latin1— Swedish -
sg— Swiss German -
sg-latin1— Swiss German (latin1) -
sk-qwerty— Slovak (qwerty) -
slovene— Slovenian -
trq— Turkish -
uk— United Kingdom -
ua-utf— Ukrainian -
us-acentos— U.S. International -
us— U.S. English
The file
/usr/lib/python2.6/site-packages/system_config_keyboard/keyboard_models.pyon 32-bit systems or/usr/lib64/python2.6/site-packages/system_config_keyboard/keyboard_models.pyon 64-bit systems also contains this list and is part of the system-config-keyboard package. -
ks=nfs:<server>:/<path>-
The installation program looks for the kickstart file on the NFS server
<server>, as file<path>. The installation program uses DHCP to configure the Ethernet card. For example, if your NFS server is server.example.com and the kickstart file is in the NFS share/mydir/ks.cfg, the correct boot command would beks=nfs:server.example.com:/mydir/ks.cfg. ks=http://<server>/<path>-
The installation program looks for the kickstart file on the HTTP server
<server>, as file<path>. The installation program uses DHCP to configure the Ethernet card. For example, if your HTTP server is server.example.com and the kickstart file is in the HTTP directory/mydir/ks.cfg, the correct boot command would beks=http://server.example.com/mydir/ks.cfg. ks=hd:<device>:/<file>-
The installation program mounts the file system on
<device>(which must be vfat or ext2), and looks for the kickstart configuration file as<file>in that file system (for example,ks=hd:sda3:/mydir/ks.cfg). ks=bd:<biosdev>:/<path>-
The installation program mounts the file system on the specified partition on the specified BIOS device
<biosdev>, and looks for the kickstart configuration file specified in<path>(for example,ks=bd:80p3:/mydir/ks.cfg). Note this does not work for BIOS RAID sets. ks=file:/<file>-
The installation program tries to read the file
<file>from the file system; no mounts are done. This is normally used if the kickstart file is already on theinitrdimage. ks=cdrom:/<path>-
The installation program looks for the kickstart file on CD-ROM, as file
<path>. ks-
If
ksis used alone, the installation program configures the Ethernet card to use DHCP. The kickstart file is read from NFS server specified by DHCP option server-name. The name of the kickstart file is one of the following:-
If DHCP is specified and the boot file begins with a
/, the boot file provided by DHCP is looked for on the NFS server. -
If DHCP is specified and the boot file begins with something other than a
/, the boot file provided by DHCP is looked for in the/kickstartdirectory on the NFS server. -
If DHCP did not specify a boot file, then the installation program tries to read the file
/kickstart/1.2.3.4-kickstart, where1.2.3.4is the numeric IP address of the machine being installed.
-
ksdevice=<device>-
The installation program uses this network device to connect to the network. You can specify the device in one of five ways:
-
the device name of the interface, for example,
eth0 -
the MAC address of the interface, for example,
00:12:34:56:78:9a -
the keyword
link, which specifies the first interface with its link in theupstate -
the keyword
bootif, which uses the MAC address that pxelinux set in theBOOTIFvariable. SetIPAPPEND 2in yourpxelinux.cfgfile to have pxelinux set theBOOTIFvariable. -
the keyword
ibft, which uses the MAC address of the interface specified by iBFT
For example, consider a system connected to an NFS server through the eth1 device. To perform a kickstart installation on this system using a kickstart file from the NFS server, you would use the command
ks=nfs:at the<server>:/<path>ksdevice=eth1boot:prompt. -
kssendmac-
Adds HTTP headers to ks=http:// request that can be helpful for provisioning systems. Includes MAC address of all nics in CGI environment variables of the form: «X-RHN-Provisioning-MAC-0: eth0 01:23:45:67:89:ab».
lang=<lang>-
Language to use for the installation. This should be a language which is valid to be used with the ‘lang’ kickstart command.
loglevel=<level>-
Set the minimum level required for messages to be logged. Values for <level> are debug, info, warning, error, and critical. The default value is info.
mediacheck-
Activates loader code to test integrity of install source (if an ISO-based method).
netmask=<nm>-
Netmask to use for a network installation.
nofallback-
If GUI fails exit.
nofb-
Do not load the VGA16 framebuffer required for doing text-mode installation in some languages.
nofirewire-
Do not load support for firewire devices.
noipv6-
Disable IPv6 networking during installation.
During installations from a PXE server, IPv6 networking might become active before anaconda processes the Kickstart file. If so, this option will have no effect during installation.
nomount-
Don’t automatically mount any installed Linux partitions in rescue mode.
nonet-
Do not auto-probe network devices.
noparport-
Do not attempt to load support for parallel ports.
nopass-
Do not pass information about the keyboard and mouse from anaconda stage 1 (the loader) to stage 2 (the installer).
nopcmcia-
Ignore PCMCIA controller in system.
noprobe-
Do not automatically probe for hardware; prompt the user to allow anaconda to probe for particular categories of hardware.
noshell-
Do not put a shell on tty2 during install.
repo=cdrom-
Do a DVD based installation.
repo=ftp://<path>-
Use <path> for an FTP installation.
repo=hd:<dev>:<path>-
Use <path> on <dev> for a hard drive installation.
repo=http://<path>-
Use <path> for an HTTP installation.
repo=nfs:<path>-
Use <path> for an NFS installation.
rescue-
Run rescue environment.
resolution=<mode>-
Run installer in mode specified, ‘1024×768’ for example.
serial-
Turns on serial console support.
skipddc-
Do not probe the Data Display Channel (DDC) of the monitor. This option provides a workaround if the DDC probe causes the system to stop responding.
syslog=<host>[:<port>]-
Once installation is up and running, send log messages to the syslog process on
<host>, and optionally, on port<port>. Requires the remote syslog process to accept connections (the -r option). text-
Force text mode install.
If you select text mode for a kickstart installation, make sure that you specify choices for the partitioning, bootloader, and package selection options. These steps are automated in text mode, and anaconda cannot prompt you for missing information. If you do not provide choices for these options, anaconda will stop the installation process.
updates-
Prompt for storage device containing updates (bug fixes).
updates=ftp://<path>-
Image containing updates over FTP.
updates=http://<path>-
Image containing updates over HTTP.
upgradeany-
Offer to upgrade any Linux installation detected on the system, regardless of the contents or the existence of the
/etc/redhat-releasefile. vnc-
Enable vnc-based installation. You will need to connect to the machine using a vnc client application.
vncconnect=<host>[:<port>]-
Connect to the vnc client named
<host>, and optionally use port<port>.Requires ‘vnc’ option to be specified as well.
vncpassword=<password>-
Enable a password for the vnc connection. This will prevent someone from inadvertently connecting to the vnc-based installation.
Requires ‘vnc’ option to be specified as well.
Глава 16. Kickstart Configurator
Kickstart Configurator allows you to create or modify a kickstart file using a graphical user interface, so that you do not have to remember the correct syntax of the file.
Kickstart Configurator is not installed by default on Fedora 17. Run su - yum install system-config-kickstart or use your graphical package manager to install the software.
To launch Kickstart Configurator, boot your system into a graphical environment, then run system-config-kickstart, or click → → on the GNOME desktop or Kickoff Application Launcher+ → → on the KDE desktop.
As you are creating a kickstart file, you can click → at any time to review your current selections.
To start with an existing kickstart file, select → and select the existing file.
16.1. Basic Configuration
Рисунок 16.1. Basic Configuration
Choose the language to use during the installation and as the default language to be used after installation from the menu.
Select the system keyboard type from the menu.
From the menu, choose the time zone to use for the system. To configure the system to use UTC, select Use UTC clock.
Enter the desired root password for the system in the Root Password text entry box. Type the same password in the Confirm Password text box. The second field is to make sure you do not mistype the password and then realize you do not know what it is after you have completed the installation. To save the password as an encrypted password in the file, select Encrypt root password. If the encryption option is selected, when the file is saved, the plain text password that you typed is encrypted and written to the kickstart file. Do not type an already encrypted password and select to encrypt it. Because a kickstart file is a plain text file that can be easily read, it is recommended that an encrypted password be used.
Choosing Target Architecture specifies which specific hardware architecture distribution is used during installation.
Choosing Target Architecture specifies which specific hardware architecture distribution is used during installation.
Choosing Reboot system after installation reboots your system automatically after the installation is finished.
Kickstart installations are performed in graphical mode by default. To override this default and use text mode instead, select the Perform installation in text mode option.
You can perform a kickstart installation in interactive mode. This means that the installation program uses all the options pre-configured in the kickstart file, but it allows you to preview the options in each screen before continuing to the next screen. To continue to the next screen, click the Next button after you have approved the settings or change them before continuing the installation. To select this type of installation, select the Perform installation in interactive mode option.
16.2. Installation Method
Рисунок 16.2. Installation Method
The Installation Method screen allows you to choose whether to perform a new installation or an upgrade. If you choose upgrade, the Partition Information and Package Selection options are disabled. They are not supported for kickstart upgrades.
Choose the type of kickstart installation or upgrade from the following options:
-
DVD — Choose this option to install or upgrade from the Fedora DVD.
-
NFS — Choose this option to install or upgrade from an NFS shared directory. In the text field for the NFS server, enter a fully-qualified domain name or IP address. For the NFS directory, enter the name of the NFS directory that contains the
variant/mirrors/redhat/i386/Server/, enter/mirrors/redhat/i386/for the NFS directory. -
FTP — Choose this option to install or upgrade from an FTP server. In the FTP server text field, enter a fully-qualified domain name or IP address. For the FTP directory, enter the name of the FTP directory that contains the
variant/mirrors/redhat/i386/Server/, enter/mirrors/redhat/i386/Server/for the FTP directory. If the FTP server requires a username and password, specify them as well. -
HTTP — Choose this option to install or upgrade from an HTTP server. In the text field for the HTTP server, enter the fully-qualified domain name or IP address. For the HTTP directory, enter the name of the HTTP directory that contains the
variant/mirrors/redhat/i386/Server/, enter/mirrors/redhat/i386/Server/for the HTTP directory. -
Hard Drive — Choose this option to install or upgrade from a hard drive. Hard drive installations require the use of ISO images. Be sure to verify that the ISO images are intact before you start the installation. To verify them, use an
md5sumprogram as well as thelinux rd.live.checkboot option as discussed in Раздел 11.6.2, «Verifying boot media». Enter the hard drive partition that contains the ISO images (for example,/dev/hda1) in the Hard Drive Partition text box. Enter the directory that contains the ISO images in the Hard Drive Directory text box.
16.3. Boot Loader Options
Рисунок 16.3. Boot Loader Options
Please note that this screen will be disabled if you have specified a target architecture other than x86 / x86_64.
GRUB is the default boot loader for Fedora on x86 / x86_64 architectures. If you do not want to install a boot loader, select Do not install a boot loader. If you choose not to install a boot loader, make sure you create a boot diskette or have another way to boot your system, such as a third-party boot loader.
You must choose where to install the boot loader (the Master Boot Record or the first sector of the /boot partition). Install the boot loader on the MBR if you plan to use it as your boot loader.
To pass any special parameters to the kernel to be used when the system boots, enter them in the Kernel parameters text field. For example, if you have an IDE CD-ROM Writer, you can tell the kernel to use the SCSI emulation driver that must be loaded before using cdrecord by configuring hdd=ide-scsi as a kernel parameter (where hdd is the CD-ROM device).
You can password protect the GRUB boot loader by configuring a GRUB password. Select Use GRUB password, and enter a password in the Password field. Type the same password in the Confirm Password text field. To save the password as an encrypted password in the file, select Encrypt GRUB password. If the encryption option is selected, when the file is saved, the plain text password that you typed is encrypted and written to the kickstart file. If the password you typed was already encrypted, unselect the encryption option.
Whenever you are required to enter this password, you will also be asked for a username, which is root.
If Upgrade an existing installation is selected on the Installation Method page, select Upgrade existing boot loader to upgrade the existing boot loader configuration, while preserving the old entries.
16.4. Partition Information
Рисунок 16.4. Partition Information
Select whether or not to clear the Master Boot Record (MBR). Choose to remove all existing partitions, remove all existing Linux partitions, or preserve existing partitions.
To initialize the disk label to the default for the architecture of the system (for example, msdos for x86), select Initialize the disk label if you are installing on a brand new hard drive.
Although anaconda and kickstart support Logical Volume Management (LVM), at present there is no mechanism for configuring this using the Kickstart Configurator.
16.4.1. Creating Partitions
To create a partition, click the Add button. The Partition Options window shown in Рисунок 16.5, «Creating Partitions» appears. Choose the mount point, file system type, and partition size for the new partition. Optionally, you can also choose from the following:
-
In the Additional Size Options section, choose to make the partition a fixed size, up to a chosen size, or fill the remaining space on the hard drive. If you selected swap as the file system type, you can select to have the installation program create the swap partition with the recommended size instead of specifying a size.
-
Force the partition to be created as a primary partition.
-
Create the partition on a specific hard drive. For example, to make the partition on the first IDE hard disk (
/dev/hda), specifyhdaas the drive. Do not include/devin the drive name. -
Use an existing partition. For example, to make the partition on the first partition on the first IDE hard disk (
/dev/hda1), specifyhda1as the partition. Do not include/devin the partition name. -
Format the partition as the chosen file system type.
Рисунок 16.5. Creating Partitions
To edit an existing partition, select the partition from the list and click the Edit button. The same Partition Options window appears as when you chose to add a partition as shown in Рисунок 16.5, «Creating Partitions», except it reflects the values for the selected partition. Modify the partition options and click OK.
To delete an existing partition, select the partition from the list and click the Delete button.
16.4.1.1. Creating Software RAID Partitions
To create a software RAID partition, use the following steps:
-
Click the RAID button.
-
Select Create a software RAID partition.
-
Configure the partitions as previously described, except select Software RAID as the file system type. Also, you must specify a hard drive on which to make the partition or specify an existing partition to use.
Рисунок 16.6. Creating a Software RAID Partition
Repeat these steps to create as many partitions as needed for your RAID setup. All of your partitions do not have to be RAID partitions.
After creating all the partitions needed to form a RAID device, follow these steps:
-
Click the RAID button.
-
Select Create a RAID device.
-
Select a mount point, file system type, RAID device name, RAID level, RAID members, number of spares for the software RAID device, and whether to format the RAID device.
Рисунок 16.7. Creating a Software RAID Device
-
Click OK to add the device to the list.
16.5. Network Configuration
Рисунок 16.8. Network Configuration
If the system to be installed via kickstart does not have an Ethernet card, do not configure one on the Network Configuration page.
Networking is only required if you choose a networking-based installation method (NFS, FTP, or HTTP). Networking can always be configured after installation with the Network Administration Tool (system-config-network). Refer to the Fedora Deployment Guide for details.
For each Ethernet card on the system, click Add Network Device and select the network device and network type for the device. Select eth0 to configure the first Ethernet card, eth1 for the second Ethernet card, and so on.
16.6. Authentication
Рисунок 16.9. Authentication
In the Authentication section, select whether to use shadow passwords and MD5 encryption for user passwords. These options are highly recommended and chosen by default.
The Authentication Configuration options allow you to configure the following methods of authentication:
-
NIS
-
LDAP
-
Kerberos 5
-
Hesiod
-
SMB
-
Name Switch Cache
These methods are not enabled by default. To enable one or more of these methods, click the appropriate tab, click the checkbox next to Enable, and enter the appropriate information for the authentication method. Refer to the Fedora Deployment Guide for more information about the options.
16.7. Firewall Configuration
The Firewall Configuration window is similar to the screen in the installation program and the Security Level Configuration Tool.
Рисунок 16.10. Firewall Configuration
If Disable firewall is selected, the system allows complete access to any active services and ports. No connections to the system are refused or denied.
Selecting Enable firewall configures the system to reject incoming connections that are not in response to outbound requests, such as DNS replies or DHCP requests. If access to services running on this machine is required, you can choose to allow specific services through the firewall.
Only devices configured in the Network Configuration section are listed as available Trusted devices. Connections from any devices selected in the list are accepted by the system. For example, if eth1 only receives connections from internal system, you might want to allow connections from it.
If a service is selected in the Trusted services list, connections for the service are accepted and processed by the system.
In the Other ports text field, list any additional ports that should be opened for remote access. Use the following format: port:protocol. For example, to allow IMAP access through the firewall, specify imap:tcp. Numeric ports can also be specified explicitly; to allow UDP packets on port 1234 through the firewall, enter 1234:udp. To specify multiple ports, separate them with commas.
16.7.1. SELinux Configuration
Kickstart can set SELinux to enforcing, permissive or disabled mode. Finer grained configuration is not possible at this time.
16.8. Display Configuration
If you are installing the X Window System, you can configure it during the kickstart installation by checking the Configure the X Window System option on the Display Configuration window as shown in Рисунок 16.11, «X Configuration». If this option is not chosen, the X configuration options are disabled and the skipx option is written to the kickstart file.
Рисунок 16.11. X Configuration
Select whether to start the Setup Agent the first time the installed system boots. The Setup Agent is disabled by default, but the setting can be changed to enabled or enabled in reconfiguration mode. Reconfiguration mode enables the language, mouse, keyboard, root password, security level, time zone, and networking configuration options in addition to the default ones.
16.9. Package Selection
Рисунок 16.12. Package Selection
The Package Selection window allows you to choose which package groups to install.
Package resolution is carried out automatically.
Currently, Kickstart Configurator does not allow you to select individual packages. To install individual packages, modify the %packages section of the kickstart file after you save it. Refer to Раздел 15.5, «Package Selection» for details.
16.10. Pre-Installation Script
Рисунок 16.13. Pre-Installation Script
You can add commands to run on the system immediately after the kickstart file has been parsed and before the installation begins. If you have configured the network in the kickstart file, the network is enabled before this section is processed. To include a pre-installation script, type it in the text area.
To specify a scripting language to use to execute the script, select the Use an interpreter option and enter the interpreter in the text box beside it. For example, /usr/bin/python2.6 can be specified for a Python script. This option corresponds to using %pre --interpreter in your kickstart file.
/usr/bin/python2.6
Only the most commonly used commands are available in the pre-installation environment:
arping, awk, basename, bash, bunzip2, bzcat, cat, chattr, chgrp, chmod, chown, chroot, chvt, clear, cp, cpio, cut, date, dd, df, dirname, dmesg, du, e2fsck, e2label, echo, egrep, eject, env, expr, false, fdisk, fgrep, find, fsck, fsck.ext2, fsck.ext3, ftp, grep, gunzip, gzip, hdparm, head, hostname, hwclock, ifconfig, insmod, ip, ipcalc, kill, killall, less, ln, load_policy, login, losetup, ls, lsattr, lsmod, lvm, md5sum, mkdir, mke2fs, mkfs.ext2, mkfs.ext3, mknod, mkswap, mktemp, modprobe, more, mount, mt, mv, nslookup, openvt, pidof, ping, ps, pwd, readlink, rm, rmdir, rmmod, route, rpm, sed, sh, sha1sum, sleep, sort, swapoff, swapon, sync, tail, tar, tee, top, touch, true, tune2fs, umount, uniq, vconfig, vi, wc, wget, xargs, zcat.
Do not include the %pre command. It is added for you.
The pre-installation script is run after the source media is mounted and stage 2 of the bootloader has been loaded. For this reason it is not possible to change the source media in the pre-installation script.
16.11. Post-Installation Script
Рисунок 16.14. Post-Installation Script
You can also add commands to execute on the system after the installation is completed. If the network is properly configured in the kickstart file, the network is enabled, and the script can include commands to access resources on the network. To include a post-installation script, type it in the text area.
Do not include the %post command. It is added for you.
For example, to change the message of the day for the newly installed system, add the following command to the %post section:
echo "Hackers will be punished" > /etc/motdMore examples can be found in Раздел 15.7.1, «Example».
16.11.1. Chroot Environment
To run the post-installation script outside of the chroot environment, click the checkbox next to this option on the top of the Post-Installation window. This is equivalent to using the --nochroot option in the %post section.
To make changes to the newly installed file system, within the post-installation section, but outside of the chroot environment, you must prepend the directory name with /mnt/sysimage/.
For example, if you select Run outside of the chroot environment, the previous example must be changed to the following:
echo "Hackers will be punished" > /mnt/sysimage/etc/motd16.11.2. Use an Interpreter
To specify a scripting language to use to execute the script, select the Use an interpreter option and enter the interpreter in the text box beside it. For example, /usr/bin/python2.2 can be specified for a Python script. This option corresponds to using %post --interpreter in your kickstart file.
/usr/bin/python2.2
16.12. Saving the File
To review the contents of the kickstart file after you have finished choosing your kickstart options, select => from the pull-down menu.
Рисунок 16.15. Preview
To save the kickstart file, click the Save to File button in the preview window. To save the file without previewing it, select => or press Ctrl+S . A dialog box appears. Select where to save the file.
After saving the file, refer to Раздел 15.10, «Starting a Kickstart Installation» for information on how to start the kickstart installation.
Часть III. After installation
This part of the Fedora Installation Guide covers finalizing the installation, as well as some installation-related tasks that you might perform at some time in the future. These include:
-
using a Fedora installation disk to rescue a damaged system.
-
upgrading to a new version of Fedora.
-
removing Fedora from your computer.
Глава 17. Firstboot
Firstboot is only available on systems after a graphical installation or after a kickstart installation where a desktop and the X window system were installed and graphical login was enabled. If you performed a text-mode installation or a kickstart installation that did not include a desktop and the X window system, the Firstboot configuration tool does not appear.
Firstboot launches the first time that you start a new Fedora system. Use Firstboot to configure the system for use before you log in.
Рисунок 17.1. Firstboot welcome screen
Select Forward to start Firstboot.
17.1. License Agreement
This screen displays the overall licensing terms for Fedora. Each software package in Fedora is covered by its own license. All licensing guidelines for Fedora are located at http://fedoraproject.org/wiki/Legal/Licenses.
Рисунок 17.2. Firstboot license screen
If you agree to the terms of the licence, select Yes, I agree to the License Agreement and click Forward.
17.2. Create User
Create a user account for yourself with this screen. Always use this account to log in to your Fedora system, rather than using the root account.
Рисунок 17.3. Firstboot create user screen
Enter a user name and your full name, and then enter your chosen password. Type your password once more in the Confirm Password box to ensure that it is correct.
Check the Add to Administrators group box if you would like administrative privileges. This will place you in the wheel group, which gives you access to all administrative functions, including installing and updating software, creating and altering configuration files, and administering other users.
To configure Fedora to use network services for authentication of user information, click Use Network Login. Refer to Раздел 17.2.1, «Authentication Configuration» for further details.
To create additional users or customise your first user account, click Advanced to open the User Manager.
Рисунок 17.4. User Manager
In User Manager you can edit various properties, such as a private group for the user, the preferred login shell, and user and group IDs.
If you do not create at least one user account in this step, you will not be able to log in to the Fedora graphical environment. If you skipped this step during installation, refer to Раздел 10.4.3, «Booting into a Graphical Environment».
To add additional user accounts to your system after the installation is complete, choose → → .
17.2.1. Authentication Configuration
If you clicked Use Network Login on the Create User screen, you must now specify how users are to be authenticated on the system. Use the drop-down menu to select from the following types of user database:
-
(for use when the user database on the network is not accessible)
-
(Lightweight Directory Access Protocol)
-
(Network Information Service)
-
(for use with Microsoft Active Directory)
Рисунок 17.5. Firstboot Authentication Configuration screen
When you select the type of user database appropriate for your network, you must provide additional details relevant to that database type. For example, if you select LDAP, you must specify the base distinguished name for LDAP searches, and the address of the LDAP server. You must also select an Authentication Method relevant to the type of user database that you chose, for example, a Kerberos password, LDAP password, or NIS password.
The Advanced Options tab lets you enable other authentication mechanisms, including fingerprint readers, smart cards, and local access control in /etc/security/access.conf.
Рисунок 17.6. Firstboot authentication Advanced Options screen
The Password Options tab lets you set format requirements for user passwords, including minimum length and required character classes such as lower case, upper case, and numbers.
Рисунок 17.7. Firstboot authentication Password Options screen
17.3. Date and Time
Use this screen to adjust the date and time of the system clock. To change these settings after installation, click → → .
Рисунок 17.8. Firstboot date and time screen
Click the Synchronize date and time over the network checkbox to configure your system to use Network Time Protocol (NTP) servers to maintain the accuracy of the clock. NTP provides time synchronization service to computers on the same network. Many public NTP servers are available on the Internet.
17.4. Hardware Profile
Firstboot displays a screen that allows you to submit your hardware information anonymously to the Fedora Project. Developers use these hardware details to guide further support efforts. You can read more about this project and its development at http://smolts.org/.
Рисунок 17.9. Firstboot hardware profile screen
To opt in to this important work, select Send Profile. If you choose not to submit any profile data, do not change the default. Select Finish to continue to the login screen.
To ensure the security of your system, run a package update after the installation completes. Глава 18, Your Next Steps explains how to update your Fedora system.
Глава 18. Your Next Steps
18.1. Updating Your System
The Fedora Project releases updated software packages for Fedora throughout the support period of each version. Updated packages add new features, improve reliability, resolve bugs, or remove security vulnerabilities. To ensure the security of your system, update regularly, and as soon as possible after a security announcement is issued. Refer to Раздел 18.4, «Подписка на объявления и новости Fedora» for information on the Fedora announcements services.
Апплет обновлений устанавливается в Fedora по умолчанию и будет напоминать о наличии доступных обновлений в любых настроенных репозиториях. Этот апплет выполняется в фоновом режиме. При наличии обновлений он покажет уведомление, которое можно просто нажать для их получения.
Чтобы обновить программное обеспечение вручную, используйте
программу обновления:
Рисунок 18.1. Обновление системы
-
В системном меню выберите → → .
-
Нажмите Просмотр для просмотра списка обновленных пакетов.
-
Нажмите Обновить систему, чтобы начать процесс обновления.
-
Если обновления требуют перезагрузки системы, будет показано окно диалога, где можно будет выбрать перезагрузку. В противном случае нажмите кнопку отмены.
-
Если перезагрузка не требуется, после завершения обновления появится окно, сообщающее об этом. Нажмите кнопку Закрыть.
Пакеты можно обновить из командной строки с помощью утилиты
yum. Например, команда полного обновления системы будет выглядеть так:
su -c 'yum update'
По запросу введите пароль пользователя root.
Прежде чем приступить к обновлению, убедитесь, что система подключена к сети, так как в процессе обновления пакеты будут загружаться с сетевых серверов.
18.2. Finishing an Upgrade
После обновления и перезагрузки системы рекомендуется выполнить обновление вручную (см. Раздел 18.1, «Updating Your System»).
If you chose to upgrade your system from a previous release ratherthan perform a fresh installation, you may want to examine the differences in the package set. Раздел 9.14.2, « Upgrading Using the Installer » advised you to create a package listing for your original system. You can now use that listing to determine how to bring your new system close to the original system state.
Most software repository configurations are stored in packages that end with the term release. Check the old package list for the repositories that were installed:
awk '{print $1}' ~/old-pkglist.txt | grep 'release$'
If necessary, retrieve and install these packages from their original sources on the Internet. Follow the instructions at the originating site to install the repository configuration packages for use by yum and other software management tools on your Fedora system.
Then run the following commands to make a list of other missing software packages:
awk '{print $1}' ~/old-pkglist.txt | sort | uniq > ~/old-pkgnames.txtrpm -qa --qf '%{NAME}\n' | sort | uniq > ~/new-pkgnames.txtdiff -u ~/old-pkgnames.txt ~/new-pkgnames.txt | grep '^-' | sed 's/^-//' > /tmp/pkgs-to-install.txt
Now use the file /tmp/pkgs-to-install.txt with the yum command to restore most or all of your old software:
su -c 'yum install `cat /tmp/pkgs-to-install.txt`'Вследствие различий между наборами пакетов в различных версиях Fedora не исключено, что это не восстановит все пакеты. Можно еще раз сравнить перечень пакетов, используя описанную выше методику, и исправить найденные недостатки.
18.3. Switching to a Graphical Login
To switch to a graphical environment, you might need to install extra software from a repository. You can access Fedora repositories through the Internet or use a Fedora installation DVD as a repository. Refer to Раздел 18.3.1, «Активация доступа к репозиториям из командной строки».
If you installed using a text login and wish to switch to a graphical login, follow this procedure.
-
Перейдите в режим
root:su -Provide the administrator password when prompted.
-
При необходимости установите систему X Window и графическое окружение рабочего стола. Например, команда установки GNOME выглядит так:
yum groupinstall "X Window System" DesktopКоманда установки KDE:
yum groupinstall "X Window System" "KDE Desktop"Загрузка и установка дополнительных программ может занять некоторое время. В зависимости от используемого источника установки, возможно, потребуется вставить установочный носитель.
-
Run the following commands to change the run level:
rm -f /etc/systemd/system/default.targetln -s /lib/systemd/system/graphical.target/etc/systemd/system/default.target
Выполните команду reboot для перезагрузки системы.
If you encounter any problems with the graphical login, refer to Глава 10, Диагностика проблем при установке в системах Intel и AMD.
18.3.1. Активация доступа к репозиториям из командной строки
The usual way to install new software on a Fedora system is through a software repository. You can access Fedora repositories through the Internet, or use a Fedora installation DVD as a repository. The software that you access through online repositories is more up-to-date than what is available on an installation DVD. Furthermore, configuring a Fedora system to access online repositories is generally easier than configuring the system to use an installation DVD as a repository, as long as you have an existing, wired network connection available.
18.3.1.1. Активация доступа к репозиториям через Интернет
By default, every Fedora installation is already configured to access Fedora repositories through the Internet. Therefore, all you must do is ensure that the system can access the Internet. If you have an existing, wired network connection available, this process is straightforward:
-
Перейдите в режим
root:su - -
Убедитесь, что компьютер физически подключен к сети. В данном случае сеть может состоять как минимум из самого компьютера и модема или маршрутизатора.
-
Выполните команду
system-config-networkдля запуска утилиты настройки сети. -
Select and press Enter. The network configuration tool displays the Select A Device screen with a list of network interfaces present on your system. The first interface is named
eth0by default. -
Выберите интерфейс и нажмите Enter. Откроется окно настроек.
-
В этом окне можно вручную задать статический адрес IP, шлюз и серверы DNS или оставить поля пустыми и принять стандартные значения. Завершив, нажмите OK, чтобы вернуться к окну выбора устройств.
-
Выберите Сохранить и нажмите Enter для возврата к окну выбора действий.
-
Выберите Сохранить и выйти и нажмите Enter, чтобы завершить работу программы.
-
Выполните команду
ifup, указав только что настроенный интерфейс. Пример:интерфейсifup eth0.
Настройка коммутируемого и беспроводного соединения гораздо сложнее и ее описание выходит за рамки этого руководства.
18.3.1.2. Using a Fedora Installation DVD as a Software Repository
To use a Fedora installation DVD as a software repository, either in the form of a physical disc, or in the form of an ISO image file.
-
If you are using a physical DVD, insert the disc into your computer.
-
Перейдите в режим
root:su - -
Создайте точку подключения (монтирования):
mkdir -p/путь/к/репозиториюукажите путь к репозиторию, например
/mnt/repo -
Mount the DVD on the mount point that you just created. If you are using a physical disc, you need to know the device name of your DVD drive. You can find the names of any CD or DVD drives on your system with the command
cat /proc/sys/dev/cdrom/info. The first CD or DVD drive on the system is typically namedsr0. When you know the device name, mount the DVD:mount -r -t iso9660 /dev/устройство/путь/к/репозиториюПример:
mount -r -t iso9660 /dev/sr0 /mnt/repoНиже приведен пример команды подключения ISO-образа.
mount -r -t iso9660 -o loop/путь/к/образу.iso/путь/к/репозиториюFor example:
mount -r -o loop /home/root/Downloads/Fedora17-Server-i386-DVD.iso /mnt/repoСтоит отметить, что монтирование образа возможно только если смонтировано содержащее его устройство. Например, если файл образа расположен на жестком диске, который не был смонтирован автоматически при загрузке системы, потребуется смонтировать этот диск, после чего можно будет смонтировать образ. Так, например, если жесткий диск
/dev/sdbне был автоматически смонтирован при загрузке, а образ расположен на этом диске в каталогеDownloads, то:mkdir /mnt/tempmount /dev/sdb1 /mnt/tempmkdir /mnt/repomount -r -t iso9660 -o loop /mnt/temp/Downloads/Fedora-17-i386-DVD.iso /mnt/repoЕсли вы не уверены, подключен ли накопитель, выполните команду
mountдля получения списка подключенных устройств. Командаfdisk -lпоможет определить имя устройства и номер раздела. -
Create a new repo file in the
/etc/yum.repos.d/directory. The name of the file is not important, as long as it ends in.repo. For example,dvd.repois an obvious choice.-
Choose a name for the repo file and open it as a new file with the vi text editor. For example:
vi /etc/yum.repos.d/dvd.repo -
Нажмите клавишу I для перехода в режим вставки.
-
Supply the details of the repository. For example:
[dvd]
baseurl=file:///mnt/repo/Server
enabled=1
gpgcheck=1
gpgkey=file:///etc/pki/rpm-gpg/RPM-GPG-KEY-fedora-$basearch
The name of the repository is specified in square brackets — in this example,
[dvd]. The name is not important, but you should choose something that is meaningful and recognizable.The line that specifies the
baseurlshould contain the path to the mount point that you created previously, suffixed with/Serverfor a Fedora server installation DVD, or with/Clientfor a Fedora client installation DVD. -
Нажмите Esc для выхода из режима вставки.
-
Введите
:wqи нажмите Enter, чтобы сохранить изменения и выйти из редактора vi. -
After installing or upgrading software from the DVD, delete the repo file that you created.
-
18.4. Подписка на объявления и новости Fedora
Чтобы получать последнюю информацию об обновлениях пакетов, подпишитесь на RSS-канал или рассылку объявлений.
- Список рассылки объявлений Проекта Fedora
- RSS-каналы Проекта Fedora
Рассылка объявлений также предоставляет новости Fedora и сообщества.
Ключевое слово [SECURITY] в заголовке объявления значит, что обновления пакетов решают проблемы безопасности.
18.5. Документация и поддержка
Сообщество Fedora обеспечивает поддержку посредством почтовых рассылок, Интернет-форумов и пользовательских групп по интересам (ГпИ) по всему миру.
Информационные ресурсы Fedora:
-
- Часто задаваемые вопросы на сайте Fedora
-
- Документация на сайте Fedora
-
- Проект документации Linux
-
- Документация Red Hat Enterprise Linux в большинстве случаев подходит и для Fedora
Many other organizations and individuals also provide tutorials and HOWTOs for Fedora on their Web sites.
Глава 19. Basic System Recovery
When things go wrong, there are ways to fix problems. However, these methods require that you understand the system well. This chapter describes how to boot into rescue mode, single-user mode, and emergency mode, where you can use your own knowledge to repair the system.
19.1. Rescue Mode
19.1.1. Common Problems
You might need to boot into one of these recovery modes for any of the following reasons:
-
Невозможно загрузить Fedora обычным образом (на уровне выполнения 3 или 5).
-
Возникли программные или аппаратные проблемы и необходимо извлечь важные файлы с жесткого диска компьютера.
-
You forgot the root password.
19.1.1.1. Не удается загрузить Fedora
Эта проблема часто возникает в результате установки другой операционной системы после установки Fedora. Некоторые операционные системы предполагают, что никакие другие операционные системы на компьютере не установлены, и переписывают основную загрузочную запись (MBR, Master Boot Record), до этого содержащую загрузчик GRUB. Если загрузчик переписан, вы не сможете загрузить Fedora до тех пор, пока вы не перейдете в режим восстановления и не перенастроите загрузчик.
Another common problem occurs when using a partitioning tool to resize a partition or create a new partition from free space after installation, and it changes the order of your partitions. If the partition number of your / partition changes, the boot loader might not be able to find it to mount the partition. To fix this problem, boot in rescue mode and modify the /etc/grub.d/10_linux file.
Раздел 19.1.2.1, «Reinstalling the Boot Loader» содержит инструкции по переустановке загрузчика GRUB в окружении восстановления.
19.1.1.2. Hardware/Software Problems
В эту категорию входят самые разные ситуации. Например, это может быть сбой жестких дисков или указание неверного ядра или корневого устройства в файле конфигурации загрузчика. В любой из этих ситуаций вы не сможете загрузить Fedora. Но если вы загрузитесь в режиме восстановления системы, возможно, проблему можно будет решить или как минимум создать копии важных файлов.
19.1.1.3. Root Password
What can you do if you forget your root password? To reset it to a different password, boot into rescue mode or single-user mode, and use the passwd command to reset the root password.
19.1.2. Booting into Rescue Mode
Режим восстановления предоставляет возможность загрузить минимальное окружение целиком с CD-ROM или иным способом вместо загрузки с жесткого диска.
Как и следует из названия, этот режим предусмотрен для восстановления в случае сбоя. В штатном режиме система Fedora использует файлы, размещенные на жестком диске компьютера для запуска программ, хранения файлов и прочих операций.
Однако бывают ситуации, когда вы не можете полностью запустить Fedora, и, таким образом, не получаете доступ к файлам на жестком диске компьютера. В режиме восстановления можно обращаться к файлам на жестком диске, даже если вы не смогли запустить Fedora с этого диска.
To boot into rescue mode, you must be able to boot the system using one of the following methods[5]:
-
Загрузка системы с загрузочного диска CD/DVD.
-
By booting the system from other installation boot media, such as USB flash devices.
-
By booting the system from the Fedora installation DVD.
Once you have booted using one of the described methods, add the keyword rescue as a kernel parameter. For example, for an x86 system, type the following command at the installation boot prompt:
linux rescueБудет предложено ответить на некоторые базовые вопросы, в частности, выбрать используемый язык и расположение корректного образа восстановления. Выберите Локальный CD-ROM, Жесткий диск, Образ NFS, FTP или HTTP. В указанном месте должно находиться подходящее дерево установки той же версии Fedora, что и версия на компакт-диске Fedora, с которого вы загрузились. Если вы используете для запуска режима восстановления загрузочный компакт-диск или другой носитель, это должно быть то же дерево установочных каталогов, из которого создавался носитель. За дополнительными сведениями о настройке дерева установки на жестком диске, NFS, FTP или HTTP-сервере, обратитесь к предыдущей секции данного руководства.
If you select a rescue image that does not require a network connection, you are asked whether or not you want to establish a network connection. A network connection is useful if you need to backup files to a different computer or install some RPM packages from a shared network location, for example.
The following message is displayed:
The rescue environment will now attempt to find your Linux installation and mount it under the directory /mnt/sysimage. You can then make any changes required to your system. If you want to proceed with this step choose ‘Continue’. You can also choose to mount your file systems read-only instead of read-write by choosing ‘Read-only’. If for some reason this process fails you can choose ‘Skip’ and this step will be skipped and you will go directly to a command shell.
If you select Continue, it attempts to mount your file system under the directory /mnt/sysimage/. If it fails to mount a partition, it notifies you. If you select Read-Only, it attempts to mount your file system under the directory /mnt/sysimage/, but in read-only mode. If you select Skip, your file system is not mounted. Choose Skip if you think your file system is corrupted.
Once you have your system in rescue mode, a prompt appears on VC (virtual console) 1 and VC 2 (use the Ctrl—Alt—F1 key combination to access VC 1 and Ctrl—Alt—F2 to access VC 2):
sh-3.00b#If you selected Continue to mount your partitions automatically and they were mounted successfully, you are in single-user mode.
Even if your file system is mounted, the default root partition while in rescue mode is a temporary root partition, not the root partition of the file system used during normal user mode (runlevel 3 or 5). If you selected to mount your file system and it mounted successfully, you can change the root partition of the rescue mode environment to the root partition of your file system by executing the following command:
chroot /mnt/sysimage
This is useful if you need to run commands such as rpm that require your root partition to be mounted as /. To exit the chroot environment, type exit to return to the prompt.
If you selected Skip, you can still try to mount a partition or LVM2 logical volume manually inside rescue mode by creating a directory such as /foo
mount -t ext4 /dev/mapper/VolGroup00-LogVol02 /foo
In the above command, /foo/dev/mapper/VolGroup00-LogVol02ext2 or ext3 replace ext4 with ext2 or ext3 respectively.
If you do not know the names of all physical partitions, use the following command to list them:
fdisk -lIf you do not know the names of all LVM2 physical volumes, volume groups, or logical volumes, use the following commands to list them:
pvdisplayvgdisplaylvdisplayFrom the prompt, you can run many useful commands, such as:
-
ssh,scp, andpingif the network is started -
dumpandrestorefor users with tape drives -
partedandfdiskfor managing partitions -
rpmfor installing or upgrading software -
vifor editing text files
19.1.2.1. Reinstalling the Boot Loader
In many cases, the GRUB boot loader can mistakenly be deleted, corrupted, or replaced by other operating systems.
The following steps detail the process on how GRUB is reinstalled on the master boot record:
-
Boot the system from an installation boot medium.
-
Type
linux rescueat the installation boot prompt to enter the rescue environment. -
Type
chroot /mnt/sysimageto mount the root partition. -
Type
/sbin/grub-installto reinstall the GRUB boot loader, wherebootpartbootpartis the boot partition (typically, /dev/sda). -
Review the
/etc/grub.d/10_linuxfile, as additional entries may be needed in the/etc/grub.d/40_customfor GRUB to control additional operating systems. -
Reboot the system.
19.1.3. Booting into Single-User Mode
One of the advantages of single-user mode is that you do not need a boot CD-ROM; however, it does not give you the option to mount the file systems as read-only or not mount them at all.
If your system boots, but does not allow you to log in when it has completed booting, try single-user mode.
In single-user mode, your computer boots to runlevel 1. Your local file systems are mounted, but your network is not activated. You have a usable system maintenance shell. Unlike rescue mode, single-user mode automatically tries to mount your file system. Do not use single-user mode if your file system cannot be mounted successfully. You cannot use single-user mode if the runlevel 1 configuration on your system is corrupted.
On an x86 system using GRUB, use the following steps to boot into single-user mode:
-
Press the Esc key at boot time to load the GRUB splash screen, then press any key to enter the GRUB interactive menu.
-
Выберите Fedora с версией ядра, которую вы хотите загрузить, и нажмите
aдля добавления новой строки. -
Go to the end of the line and type
singleas a separate word (press the Spacebar and then typesingle). Press Enter to exit edit mode.
19.1.4. Booting into Emergency Mode
In emergency mode, you are booted into the most minimal environment possible. The root file system is mounted read-only and almost nothing is set up. The main advantage of emergency mode over single-user mode is that the init files are not loaded. If init is corrupted or not working, you can still mount file systems to recover data that could be lost during a re-installation.
Чтобы загрузиться в аварийном режиме, выполните действия для входа в монопольный режим, описанные в предыдущей секции (см. Раздел 19.1.3, «Booting into Single-User Mode»), но вместо слова single укажите emergency.
19.2. Using rescue mode to fix or work around driver problems
A malfunctioning or missing driver can prevent a system from booting normally. Rescue mode provides an environment in which you can add, remove, or replace a driver even when the system fails to boot. Wherever possible, we recommend that you use the RPM package manager to remove malfunctioning drivers or to add updated or missing drivers. If you cannot remove a malfunctioning driver for some reason, you can instead blacklist the driver so that it does not load at boot time.
Note that when you install a driver from a driver disc, the driver disc updates all initramfs images on the system to use this driver. If a problem with a driver prevents a system from booting, you cannot rely on booting the system from another initramfs image.
19.2.1. Using RPM to add, remove, or replace a driver
In rescue mode, you can use RPM to install, remove, or update packages from the installed system, even though you did not boot the installed system. To remove a malfunctioning driver:
-
Boot the system into rescue mode with the
linux rescuecommand at the boot prompt, or thelinux rescue ddcommand if you need to load a third-party driver from a driver disc. Follow the instructions in Раздел 19.1.2, «Booting into Rescue Mode» and do not choose to mount the installed system as read only. -
Change the root directory to
/mnt/sysimage/:chroot /mnt/sysimage/ -
Use the
rpm -ecommand to remove the driver package. For example, to remove the kmod-foobar driver package, run:rpm -e kmod-foobar -
Exit the chroot environment:
exit
Installing a driver is a similar process, but the RPM package that contains the driver must be available on the system.
-
Boot the system into rescue mode with the
linux rescuecommand at the boot prompt, or thelinux rescue ddcommand if you need to load a third-party driver from a driver disc. Follow the instructions in Раздел 19.1.2, «Booting into Rescue Mode» and do not choose to mount the installed system as read only. -
Make the RPM package that contains the driver available. For example, mount a CD or USB flash drive and copy the RPM package to a location of your choice under
/mnt/sysimage/, for example:/mnt/sysimage/root/drivers/. -
Change the root directory to
/mnt/sysimage/:chroot /mnt/sysimage/ -
Use the
rpm -ivhcommand to install the driver package. For example, to install the kmod-foobar driver package from/root/drivers/, run:rpm -ivh /root/drivers/kmod-foobar-1.2.04.17.el6.i686Note that
/root/drivers/in this chroot environment is/mnt/sysimage/root/drivers/in the original rescue environment.
When you have finished removing and installing drivers, reboot the system.
19.2.2. Blacklisting a driver
As described in Раздел 19.1.2, «Booting into Rescue Mode», the rdblacklist kernel option blacklists a driver at boot time. To continue to blacklist the driver on subsequent boots, add the rdblacklist option to the line in /etc/grub.d/10_linux that describes your kernel. To blacklist the driver when the root device is mounted, add a blacklist entry in a file under /etc/modprobe.d/.
-
Boot the system into rescue mode with the command
linux rescue rdblacklist=, wherename_of_drivername_of_driveris the driver that you need to blacklist. Follow the instructions in Раздел 19.1.2, «Booting into Rescue Mode» and do not choose to mount the installed system as read only. -
Open the
/mnt/sysimage/etc/grub.d/10_linuxfile with the vi text editor:vi /mnt/sysimage/etc/grub.d/10_linux -
Identify the default kernel used to boot the system. Each kernel is specified in the
10_linuxfile with a group of lines that beginsmenuentry. The default kernel is specified by thedefaultparameter in/etc/default/grub. A value of0refers to the first menu entry in the custom script files in/etc/grub.d, a value of1refers to the second menu entry, and higher values refer to subsequent kernels in turn. Check the script prior to10_linux, named00_header, to ensure you specify the correct kernel. -
Edit the
linuxline of the menu entry to include the optionrdblacklist=, wherename_of_drivername_of_driveris the driver that you need to blacklist. For example, to blacklist the driver named foobar:linux /vmlinuz-2.6.32-71.18-2.el6.i686 ro root=/dev/sda1 rhgb quiet rdblacklist=foobar
-
Save the file and exit vi.
-
Create a new file under
/etc/modprobe.d/that contains the commandblacklist. Give the file a descriptive name that will help you find it in future, and use the filename extensionname_of_driver.conf. For example, to continue to blacklist the driver foobar when the root device is mounted, run:echo "blacklist foobar" >> /mnt/sysimage/etc/modprobe.d/blacklist-foobar.conf -
Reboot the system. You no longer need to supply
rdblacklistmanually as a kernel option until you next update the default kernel. If you update the default kernel before the problem with the driver has been fixed, you must edit10_linuxagain to ensure that the faulty driver is not loaded at boot time.
Глава 20. Upgrading Your Current System
В этой главе рассматриваются различные способы обновления предыдущих версий Fedora.
20.1. Determining Whether to Upgrade or Re-Install
Before upgrading to Fedora 17 you should first bring your current version up to date. However, it is not then necessary to upgrade to intermediate versions. For example, you can upgrade from Fedora 14 to Fedora 17 directly.
Такой рекомендуемый способ переустановки поможет достичь максимальной стабильности системы.
If you currently use Fedora 16, you can perform a traditional, installation program-based upgrade.
However, before you chose to upgrade your system, there are a few things you should keep in mind:
-
Individual package configuration files may or may not work after performing an upgrade due to changes in various configuration file formats or layouts.
-
Third party or ISV applications may not work correctly following the upgrade.
-
If you have additional third-party package repositories (such as rpmfusion) enabled, note that software installed from those repositories may not function properly after a system upgrade. Fedora does not maintain third-party packages and cannot guarantee that such repositories are up-to-date.
Upgrading your system installs updated versions of the packages which are currently installed on your system.
The upgrade process preserves existing configuration files by renaming them with an .rpmsave extension (for example, sendmail.cf.rpmsave). The upgrade process also creates a log of its actions in /root/upgrade.log.
As software evolves, configuration file formats can change. It is very important to carefully compare your original configuration files to the new files before integrating your changes.
Рекомендуется создать резервную копию всех данных. Например, при обновлении системы или создании двойной загрузки, следует сделать копию необходимых данных на всех жестких дисках, так как ошибки могут привести к потере всех данных.
Some upgraded packages may require the installation of other packages for proper operation. If you choose to customize your packages to upgrade, you may be required to resolve dependency problems. Otherwise, the upgrade procedure takes care of these dependencies, but it may need to install additional packages which are not on your system.
Depending on how you have partitioned your system, the upgrade program may prompt you to add an additional swap file. If the upgrade program does not detect a swap file that equals twice your RAM, it asks you if you would like to add a new swap file. If your system does not have a lot of RAM (less than 256 MB), it is recommended that you add this swap file.
20.2. Upgrading Your System
В большинстве случае проще всего выполнить модернизацию существующей версии Fedora можно с помощью утилиты preupgrade, которая загрузит все необходимые пакеты и приступит к обновлению.
Установить preupgrade можно с помощью менеджера пакетов или выполнив команду yum install preupgrade.
Для запуска программы preupgrade просто выполните команду preupgrade в строке приглашения.
You can also upgrade a Fedora installation by starting the installation process by any of the methods described in Глава 9, Installing using anaconda. If the installer detects a previous Fedora installation on the system, it will ask you whether you want to upgrade that installation — refer to Раздел 9.14.1, «Экран обновления системы»
The Upgrade Examine screen appears if you have instructed the installation program to perform an upgrade.
Если содержимое файла /etc/fedora-release отличается от стандартного, при попытке обновления до Fedora 17 установка Fedora может быть не найдена.
You can relax some of the checks against this file by booting with the following boot command:
linux upgradeany
Выполните команду linux upgradeany, если при установке Fedora возможность обновления отсутствует.
To perform an upgrade, select Perform an upgrade of an existing installation. Click Next when you are ready to begin your upgrade.
To re-install your system, select Perform a new Fedora installation and refer to Глава 9, Installing using anaconda for further instructions.
Глава 21. Удаление Fedora
Мы уважаем свободу выбора операционной системы для вашего компьютера. В этой секции рассказано, как удалить Fedora.
Если вы хотите сохранить важные данные из удаляемой версии Fedora, создайте их резервную копию. Запишите их на CD, DVD, внешний жесткий диск или другое устройство хранения.
As a precaution, also back up data from any other operating systems that are installed on the same computer. Mistakes do happen and can result in the loss of all your data.
Если вы создаете резервную копию данных Fedorа для их последующего переноса в другую операционную систему, убедитесь, что носитель данных может быть прочитан в новой операционной системе. Например, Microsoft Windows не сможет прочитать внешний диск, если он был отформатирован в Fedora как ext2, ext3, ext4. Для его чтения потребуется установить дополнительные программы.
Чтобы удалить Fedora из систем x86, необходимо удалить информацию загрузчика Fedora из MBR и разделы, содержащие операционную систему. Способы удаления Fedora на разных компьютерах могут отличаться в зависимости от того, является ли Fedora единственной установленной операционной системой или компьютер использует двойную загрузку.
Приведенные инструкции не могут охватить все возможные конфигурации компьютеров. Если ваш компьютер допускает загрузку больше двух операционных систем или его схема разделов довольно специфична, рассматривайте эту информацию лишь как общее руководство по удалению разделов. В таких случаях также потребуется настроить выбранный загрузчик. Приложение E, The GRUB Boot Loader содержит общую информацию, подробное описание выходит за рамки данного документа.
Fdisk, the disk partitioning tool provided with MS-DOS and Microsoft Windows, is unable to remove the file systems used by Fedora. MS-DOS and versions of Windows prior to Windows XP (except for Windows 2000) have no other means of removing or modifying partitions. Refer to Раздел 21.3, «Замена Fedora ранними версиями Microsoft Windows и MS-DOS» for alternative removal methods for use with MS-DOS and these versions of Windows.
21.1. Fedora является единственной операционной системой
If Fedora is the only operating system on your computer, use the installation media for the replacement operating system to remove Fedora. Examples of installation media include the Windows XP installation CD, Windows Vista installation DVD, or the installation CD, CDs, or DVD of another Linux distribution.
Стоит отметить, что некоторые производители компьютеров хоть и включают предустановленную систему Microsoft Windows, но не предоставляют установочный диск Windows, вместо этого предоставляя собственный «диск восстановления системы» или программы для его создания. Иногда для хранения программ восстановления выделяется отдельный раздел. Если вы уверены, был ли предоставлен установочный диск, обратитесь к документации компьютера.
When you have located the installation media for your chosen operating system:
-
Back up any data that you want to keep.
-
Shut down the computer.
-
Boot your computer with the installation disk for the replacement operating system.
-
Следуйте инструкциям процесса установки. Установочные диски Windows, OS X и большинства систем Linux обычно позволяют создавать разделы вручную при установке или предложат удалить все разделы и создать разделы заново. Удалите все существующие разделы или разрешите установщику удалить их автоматически. Диски восстановления систем для компьютеров с предустановленной системой Microsoft Windows могут создать схему разделов автоматически без вашего участия.
If your computer has system restore software stored on a partition on a hard drive, take care when removing partitions while installing an operating system from other media. Under these circumstances, you could destroy the partition holding the system restore software.
21.2. Двойная загрузка: Fedora и другая операционная система
If your computer is configured to dual-boot Fedora and another operating system, removing Fedora without removing the partitions containing the other operating system and its data is more complicated. Specific instructions for a number of operating systems are set out below. To keep neither Fedora nor the other operating system, follow the steps described for a computer with only Fedora installed: Раздел 21.1, «Fedora является единственной операционной системой»
21.2.1. Настроена двойная загрузка (Fedora и Microsoft Windows)
21.2.1.1. Windows 2000, Windows Server 2000, Windows XP, and Windows Server 2003
Once you commence this process, your computer may be left in an unbootable state until you complete the entire set of instructions. Carefully read the steps below before beginning the removal process. Consider opening these instructions on another computer or printing them so that you have access to them at all times during the process.
Восстановление этих систем полагается на среду восстановления Windows, для загрузки которой требуется наличие установочного диска Windows. Если вы начали такое восстановление, но не завершили его, может оказаться так, что компьютер будет невозможно загрузить. Поставляемые с некоторыми компьютерами Windows диски восстановления системы не всегда включают это окружение.
During the process outlined in these instructions, the Windows Recovery Console will prompt you for the Administrator password for your Windows system. Do not follow these instructions unless you know the Administrator password for your system or are certain that an Administrator password has never been created, even by the computer manufacturer.
-
Удалите разделы Fedora
-
Boot your computer into your Microsoft Windows environment.
-
Click Start>Run…, type
diskmgmt.mscand press Enter. The Disk Management tool opens.В окне будет представлена графическая диаграмма диска с разделами. Первый раздел обычно соответствует диску
C:и отмечен какNTFS. Кроме него должно быть показано как минимум два раздела Fedora. Windows не покажет тип файловой системы разделов Fedora, но может назначить букву диска. -
Выберите раздел Fedora и откройте контекстное меню, нажав правую клавишу мыши, выберите пункт Удалить раздел и нажмите Да для подтверждения своего выбора. Повторите эти действия для других разделов. По мере их удаления Windows будет отмечать ранее занятое место как
свободное.
-
-
Разрешите Windows использовать освобожденное после удаления Fedora пространство (необязательно).
Этот шаг не требуется для удаления Fedora. Но если его пропустить, часть пространства на жестком диске будет недоступна Windows.
Decide whether to extend an existing Windows partition to use the extra space, or create a new Windows partition in that space. If you create new a Windows partition, Windows will allocate a new drive letter to it and will interact with it as if it is a separate hard drive.
Extending an existing Windows partition
The diskpart tool used in this step is installed as part of the Windows XP and Windows 2003 operating systems. If you are performing this step on a computer running Windows 2000 or Windows Server 2000, you can download a version of diskpart for your operating system from the Microsoft website.
-
Click Start>Run…, type
diskpartand press Enter. A command window appears. -
Введите
list volumeи нажмите Enter. Будет показан список системных разделов с номерами томов, буквами устройств, метками томов, типами файловых систем и размерами. Найдите в списке раздел Windows, который будет занимать освободившееся после удаления Fedora пространство, и запомните его номер тома (например, «Volume 0»). -
Type
select volume(whereNNis the volume number for the Windows partition that you want to extend) and press Enter. Now typeextendand press Enter. Diskpart now extends your chosen partition to fill the remaining space on your hard drive. It will notify you when the operation is complete.
Adding a new Windows partition
-
In the
Disk Managementwindow, right-click on disk space that Windows labels asunallocatedand selectNew Partitionfrom the menu. The New Partition Wizard starts. -
Follow the prompts presented by the New Partition Wizard. If you accept the default options, the tool will create a new partition that fills all available space on the hard drive, assigns it the next available drive letter, and formats it with the NTFS file system.
-
-
Restore the Windows bootloader
-
Insert the Windows installation disk and restart your computer. As your computer starts, the following message will appear on the screen for a few seconds:
Нажмите любую клавишу для загрузки с CDPress any key while the message is still showing and the Windows installation software will load.
-
When the
Welcome to Setupscreen appears, you can start the Windows Recovery Console. The procedure is slightly different on different versions of Windows:-
On Windows 2000 and Windows Server 2000, press the R key, then the C key.
-
On Windows XP and Windows Server 2003, press the R key.
-
-
The Windows Recovery Console scans your hard drives for Windows installations, and assigns a number to each one. It displays a list of Windows installations and prompts you to select one. Type the number corresponding to the Windows installation that you want to restore.
-
The Windows Recovery Console prompts you for the Administrator password for your Windows installation. Type the Administrator password and press the Enter key. If there is no administrator password for this system, press only the Enter key.
-
At the prompt, type the command
fixmbrand press the Enter. The fixmbr tool now restores the Master Boot Record for the system. -
When the prompt reappears, type
exitand press the Enter key. -
Your computer will restart and boot your Windows operating system.
-
21.2.1.2. Windows Vista and Windows Server 2008
Once you commence this process, your computer may be left in an unbootable state until you complete the entire set of instructions. Carefully read the steps below before beginning the removal process. Consider opening these instructions on another computer or printing them so that you have access to them at all times during the process.
Восстановление этих систем полагается на среду восстановления Windows, для загрузки которой требуется наличие установочного диска Windows. Если вы начали такое восстановление, но не завершили его, может оказаться так, что компьютер будет невозможно загрузить. Поставляемые с некоторыми компьютерами Windows диски восстановления системы не всегда включают это окружение.
-
Удалите разделы Fedora
-
Boot your computer into your Microsoft Windows environment.
-
Click Start then type
diskmgmt.mscinto the Start Search box and press Enter. The Disk Management tool opens.В окне будет представлена графическая диаграмма диска с разделами. Первый раздел обычно соответствует диску
C:и отмечен какNTFS. Кроме него должно быть показано как минимум два раздела Fedora. Windows не покажет тип файловой системы разделов Fedora, но может назначить букву диска. -
Выберите раздел Fedora и откройте контекстное меню, нажав правую клавишу мыши, выберите пункт Удалить раздел и нажмите Да для подтверждения своего выбора. Повторите эти действия для других разделов. По мере их удаления Windows будет отмечать ранее занятое место как
свободное.
-
-
Разрешите Windows использовать освобожденное после удаления Fedora пространство (необязательно).
Этот шаг не требуется для удаления Fedora. Но если его пропустить, часть пространства на жестком диске будет недоступна Windows.
Decide whether to extend an existing Windows partition to use the extra space, or create a new Windows partition in that space. If you create new a Windows partition, Windows will allocate a new drive letter to it and will interact with it as if it is a separate hard drive.
Extending an existing Windows partition
-
In the Disk Management window, right-click on the Windows partition that you want to extend and select Extend Volume from the menu. The Extend Volume Wizard opens.
-
Follow the prompts presented by the Extend Volume Wizard. If you accept the defaults that it offers you, the tool will extend the selected volume to fill all available space on the hard drive.
Adding a new Windows partition
-
In the
Disk Managementwindow, right-click on disk space that Windows labels asunallocatedand selectNew Simple Volumefrom the menu. The New Simple Volume Wizard starts. -
Follow the prompts presented by the New Simple Volume Wizard. If you accept the default options, the tool will create a new partition that fills all available space on the hard drive, assigns it the next available drive letter, and formats it with the NTFS file system.
-
-
Restore the Windows bootloader
-
Insert the Windows installation disk and restart your computer. As your computer starts, the following message will appear on the screen for a few seconds:
Нажмите любую клавишу для загрузки с CD или DVDPress any key while the message is still showing and the Windows installation software will load.
-
In the Install Windows dialog, select a language, time and currency format, and keyboard type. Click Next
-
Click Repair your computer.
-
The Windows Recovery Environment (WRE) shows you the Windows installations that it can detect on your system. Select the installation that you want to restore, then click Next.
-
Click Command prompt. A command window will open.
-
Type
bootrec /fixmbrand press Enter. -
When the prompt reappears, close the command window, then click Restart.
-
Your computer will restart and boot your Windows operating system.
-
21.2.2. Двойная загрузка: Fedora и Mac OS X
Порядок удаления Fedora из таких систем зависит от того, установлен ли Boot Camp:
Если Boot Camp не установлен
-
В
/Applications/Utilitiesоткройте Disk Utility. -
Слева выберите запись тома с Fedora.
-
Перейдите на вкладку разделов в правой части окна.
-
Выберите разделы Fedora и нажмите минус под диаграммой разделов.
-
Измените размер раздела OS X так, чтобы он включал освобожденное место.
Если Boot Camp установлен
-
В
/Applications/Utilitiesоткройте Boot Camp Assistant. -
Выберите опцию создания или удаления раздела Windows и нажмите кнопку продолжения.
-
При наличии единственного внутреннего диска нажмите кнопку восстановления.
-
При наличии нескольких внутренних дисков выберите диск Linux и Restore to a single Mac OS partition. Нажмите кнопку продолжения.
21.2.3. Двойная загрузка: Fedora и другой дистрибутив Linux
Because of the differences between the many different Linux distributions, these instructions are a general guide only. Specific details vary according to he configuration of your particular system and the Linux distribution that dual-boots with Fedora.
-
Процедура 21.1. Удаление разделов Fedora
-
Boot your Fedora installation.
-
As root or with sudo, run mount. Note the partitions that are mounted. In particular, note the partition that is mounted as the root of the filesystem. The output of
mounton a system where the root of the filesystem is on a standard partition such as/dev/sda2might resemble:/dev/sda2 on / type ext4 (rw) proc on /proc type proc (rw) sysfs on /sys type sysfs (rw) devpts on /dev/pts type devpts (rw,gid=5,mode=620) tmpfs on /dev/shm type tmpfs (rw,rootcontext="system_u:object_r:tmpfs_t:s0") /dev/sda1 on /boot type ext4 (rw) none on /proc/sys/fs/binfmt_misc type binfmt_misc (rw) sunrpc on /var/lib/nfs/rpc_pipefs type rpc_pipefs (rw)
The output of
mounton a system where the root of the filesystem is on a logical volume might resemble:/dev/mapper/VolGroup00-LogVol00 on / type ext4 (rw) proc on /proc type proc (rw) sysfs on /sys type sysfs (rw) devpts on /dev/pts type devpts (rw,gid=5,mode=620) tmpfs on /dev/shm type tmpfs (rw,rootcontext="system_u:object_r:tmpfs_t:s0") /dev/sda1 on /boot type ext4 (rw) none on /proc/sys/fs/binfmt_misc type binfmt_misc (rw) sunrpc on /var/lib/nfs/rpc_pipefs type rpc_pipefs (rw)
-
Ensure that any data on this system that you still require is backed up to another system or storage location.
-
Shut down the system and boot the Linux distribution that you want to keep on the system.
-
As root or with sudo, run mount. If any of the partitions that you previously noted as used for Fedora are mounted, review the contents of these partitions. If you no longer require the contents of these partitions, unmount them with the
umountcommand. -
Remove any unwanted and unnecessary partitions, for example, with fdisk for standard partitions, or lvremove and vgremove to remove logical volumes and volume groups.
-
-
Удалите записи Fedora из загрузчика
Приведенные инструкции предполагают, что система использует загрузчик GRUB. За информацией о других загрузчиках (например, LILO) обратитесь к их документации и удалите записи Fedora из списка загрузки.
-
At the command line, type
su -and press Enter. When the system prompts you for the root password, type the password and press Enter. -
Type
gedit etc/grub.d/10_linuxand press Enter. This opens the10_linuxfile in the gedit text editor. -
A typical Fedora entry in the
10_linuxfile consists of four lines:Пример 21.1. Example Fedora entry in
10_linuxmenuentry «Fedora (2.6.32.130.el6.i686)»
set root=(hd0,1)
linux /vmlinuz-2.6.32.130.el6.i686 ro root=UUID=04a07c13-e6bf-6d5a-b207-002689545705 rhgb quiet
initrd /initrd-2.6.32.130.el6.i686.img
Depending on the configuration of your system, there may be multiple Fedora entries in
10_linux, each corresponding to a different version of the Linux kernel. Delete each of the Fedora entries from these filesSave the updated
10_linuxfile and close gedit. -
Type
gedit etc/default/gruband press Enter. -
The file
etc/default/grubcontains a line that specifies the default operating system to boot, in the formatdefault=whereNNis a number equal to or greater than 0. IfNis set to 0, GRUB will boot the first operating system in the list. IfNis set to 1, it will boot the second operating system, and so forth. Alternatively, the default value can be the full menu entry.Identify the entry for the operating system that you want GRUB to boot by default and note its place in the order within the list.
Make sure that the
default=line contains the number one below the number of your chosen default operating system in the list.Save the updated
grubfile and close gedit. If you have Fedora entries in the other script files in the/etc/grub.ddirectory, use this procedure to remove them in the same way.
-
-
Make space available to your operating system
Этот шаг не требуется для удаления Fedora. Но если его пропустить, часть пространства на жестком диске будет недоступна другим операционным системам Linux.
To carry out this step, you require live media for a Linux distribution, for example, the Fedora Live CD or the Knoppix DVD.
Методы освобождения места за счет удаления разделов Fedora, доступных другой операционной системе, отличаются в зависимости от того, установлена ли выбранная операционная система в разделах LVM или нет.
-
If you do not use LVM
-
Boot your computer from Linux live media, and install parted if it is not already present.
-
As root or with sudo, run parted
disk, wherediskis the device name of the disk that contains a partition that you want to resize, for example,/dev/sda. -
At the
(parted)prompt, enterprint. The parted tool displays information about the partitions on your system, including their partition numbers, their sizes, and their positions on the disk. -
At the
(parted)prompt, enterresize, wherenumberstartendnumberis the partition number,startis the location on the disk at which the partition begins, andendis the location on the disk at which you want the partition to end. Use the start position that you previously obtained with theprintcommand, and refer to the parted documentation for different ways to specify the end parameter. -
When parted finishes resizing the partition, enter
quitat the(parted)prompt. -
Run
e2fsck, wherepartitionpartitionis the partition that you just resized. For example, if you just resized/dev/sda3, entere2fsck /dev/sda3.Linux now checks the file system of the newly-resized partition.
-
When the file system check finishes, type
resize2fsat a command line and press Enter, wherepartitionpartitionis the partition that you just resized. For example, if you just resized/dev/sda3, typeresize2fs /dev/sda3.Linux now resizes your file system to fill the newly-resized partition.
-
Restart your computer. The extra space is now available to your Linux installation.
-
-
If you use LVM
-
Boot your computer from Linux live media and install fdisk and lvm2 if they are not already present.
-
Create a new partition in the free space on the disk
-
As root or with sudo, run fdisk
disk, wherediskis the device name of the disk where you want to create new space, for example,/dev/sda. -
At the prompt
Command (m for help):, enternto create a new partition. Refer to the fdisk documentation for options.
-
-
Change the partition type identifier
-
At the prompt
Command (m for help):, entertto change a partition type. -
At the prompt
Partition number (1-4):, type the number of the partition that you just created. For example, if you just created partition/dev/sda3, type the number3and press Enter. This identifies the partition whose type fdisk will change. -
At the prompt
Hex code (type L to list codes):, enter8eto create a Linux LVM partition. -
At the prompt
Command (m for help):, enterwto write the changes to disk and exit fdisk.
-
-
Expand the volume group
-
At the command prompt, type
lvmand press Enter to start the lvm2 tool. -
At the
lvm>prompt, typepvcreateand press Enter, wherepartitionpartitionis the partition that you recently created. For example,pvcreate /dev/sda3. This creates/dev/sda3as a physical volume in LVM. -
At the
lvm>prompt, typevgextendand press Enter, whereVolumeGrouppartitionVolumeGroupis the LVM volume group on which Linux is installed andpartitionis the partition that you recently created. For example, if Linux is installed on/dev/VolumeGroup00, you would typevgextend /dev/VolumeGroup00 /dev/sda3to extend that volume group to include the physical volume at/dev/sda3. -
At the
lvm>prompt, typelvextend -l +100%FREEand press Enter, whereLogVolLogVolis the logical volume that contains your Linux filesystem. For example, to extendLogVol00to fill the newly-available space in its volume group,VolGroup00, typelvextend -l +100%FREE /dev/VolGroup00/LogVol00. -
At the
lvm>prompt, typeexitand press Enter to exit lvm2
-
-
Type
e2fsckat the command line and press Enter, whereLogVolLogVolis the logical volume that you just resized. For example, if you just resized/dev/VolumeGroup00/LogVol00, you would typee2fsck /dev/VolumeGroup00/LogVol00.Linux now checks the file system of the newly-resized logical volume.
-
When the file system check finishes, type
resize2fsat a command line and press Enter, whereLogVolLogVolis the partition that you just resized. For example, if you just resized/dev/VolumeGroup00/LogVol00, you would typeresize2fs /dev/VolumeGroup00/LogVol00.Linux now resizes your file system to fill the newly-resized logical volume.
-
Restart your computer. The extra space is now available to your Linux installation.
-
-
21.3. Замена Fedora ранними версиями Microsoft Windows и MS-DOS
In DOS and Windows, use the Windows fdisk utility to create a new MBR with the undocumented flag /mbr. This ONLY rewrites the MBR to boot the primary DOS partition. The command should look like the following:
fdisk /mbr
If you need to remove Linux from a hard drive and have attempted to do this with the default DOS (Windows) fdisk, you will experience the Partitions exist but they do not exist problem. The best way to remove non-DOS partitions is with a tool that understands partitions other than DOS.
To begin, insert the Fedora DVD and boot your system. When the boot prompt appears, type: linux rescue. This starts the rescue mode program.
Будет предложено выбрать клавиатуру и язык. Определите эти значения так же как и во время установки Fedora.
Затем появится экран, сообщающий, что программа попытается найти установку Fedora для восстановления. Выберите Пропустить.
After selecting Skip, you are given a command prompt where you can access the partitions you would like to remove.
First, type the command list-harddrives. This command lists all hard drives on your system that are recognizable by the installation program, as well as their sizes in megabytes.
Будьте внимательны при удалении разделов Fedora. Случайное удаление других разделов может привести к потере данных или выходу системы из строя.
To remove partitions, use the partitioning utility parted. Start parted, where /dev/hda is the device on which to remove the partition:
parted /dev/hda
Using the print command, view the current partition table to determine the minor number of the partition to remove:
Команда print также покажет тип раздела (например, linux-swap, ext2, ext3, ext4). Это поможет принять решение при удалении разделов.
Remove the partition with the command rm. For example, to remove the partition with minor number 3:
rm 3
The changes start taking place as soon as you press [Enter], so review the command before committing to it.
After removing the partition, use the print command to confirm that it is removed from the partition table.
Once you have removed the Linux partitions and made all of the changes you need to make, type quit to quit parted.
After quitting parted, type exit at the boot prompt to exit rescue mode and reboot your system, instead of continuing with the installation. The system should reboot automatically. If it does not, you can reboot your computer using Control+Alt+Delete .
Часть IV. Technical appendixes
The appendixes in this section do not contain instructions that tell you how to install Fedora. Instead, they provide technical background that you might find helpful to understand the options that Fedora offers you at various points in the installation process.
An Introduction to Disk Partitions
This appendix is not necessarily applicable to non-x86-based architectures. However, the general concepts mentioned here may apply.
This appendix is not necessarily applicable to non-x86-based architectures. However, the general concepts mentioned here may apply.
If you are reasonably comfortable with disk partitions, you could skip ahead to Раздел A.1.4, «Выделение места для Fedora», for more information on the process of freeing up disk space to prepare for a Fedora installation. This section also discusses the partition naming scheme used by Linux systems, sharing disk space with other operating systems, and related topics.
A.1. Hard Disk Basic Concepts
Hard disks perform a very simple function — they store data and reliably retrieve it on command.
При обсуждении таких тем как разбиение диска, важно немного знать об оборудовании, чтобы не запутаться в деталях. Поэтому в этом приложении использована упрощенная схема диска, помогающая понять, что же собственно происходит при разбиении диска. Рисунок A.1, «An Unused Disk Drive» демонстрирует совершенно новый пустой диск.
Рисунок A.1. An Unused Disk Drive
Not much to look at, is it? But if we are talking about disk drives on a basic level, it is adequate. Say that we would like to store some data on this drive. As things stand now, it will not work. There is something we need to do first.
A.1.1. It is Not What You Write, it is How You Write It
Опытные пользователи компьютера понимают это достаточно быстро. Нам нужно отформатировать диск. Форматирование (или «создание файловой системы«) записывает информацию на диск, задавая в пустом месте неформатированного диска определенный порядок.
Рисунок A.2. Disk Drive with a File System
Как демонстрирует Рисунок A.2, «Disk Drive with a File System», такая организация выдвигает некоторые ограничения:
-
Небольшой процент свободного дискового пространства тратится на хранение данных о файловой системе, что является дополнительными накладными расходами.
-
Файловая система разбивает оставшееся место на небольшие сегменты одинакового размера, которые в Linux называются блоками. [6]
Given that file systems make things like directories and files possible, these trade-offs are usually seen as a small price to pay.
It is also worth noting that there is no single, universal file system. As Рисунок A.3, «Disk Drive with a Different File System», shows, a disk drive may have one of many different file systems written on it. As you might guess, different file systems tend to be incompatible; that is, an operating system that supports one file system (or a handful of related file system types) may not support another. This last statement is not a hard-and-fast rule, however. For example, Fedora supports a wide variety of file systems (including many commonly used by other operating systems), making data interchange between different file systems easy.
Рисунок A.3. Disk Drive with a Different File System
Of course, writing a file system to disk is only the beginning. The goal of this process is to actually store and retrieve data. Let us take a look at our drive after some files have been written to it.
Рисунок A.4. Disk Drive with Data Written to It
Как демонстрирует Рисунок A.4, «Disk Drive with Data Written to It», некоторые незаполненные ранее блоки теперь содержат данные. Однако просто посмотрев на этот рисунок, нельзя точно определить, сколько файлов находится на этом диске. Это может быть и один файл, и несколько, так как файлы используют минимум один блок, а могут использовать и больше. Также необходимо заметить, что занятые блоки не должны находиться рядом; занятые и свободные блоки могут перемежаться. Это называется фрагментацией. Фрагментация может сказаться при попытке изменить размер существующего раздела.
As with most computer-related technologies, disk drives changed over time after their introduction. In particular, they got bigger. Not larger in physical size, but bigger in their capacity to store information. And, this additional capacity drove a fundamental change in the way disk drives were used.
A.1.2. Partitions: Turning One Drive Into Many
As disk drive capacities soared, some people began to wonder if having all of that formatted space in one big chunk was such a great idea. This line of thinking was driven by several issues, some philosophical, some technical. On the philosophical side, above a certain size, it seemed that the additional space provided by a larger drive created more clutter. On the technical side, some file systems were never designed to support anything above a certain capacity. Or the file systems could support larger drives with a greater capacity, but the overhead imposed by the file system to track files became excessive.
The solution to this problem was to divide disks into partitions. Each partition can be accessed as if it was a separate disk. This is done through the addition of a partition table.
While the diagrams in this chapter show the partition table as being separate from the actual disk drive, this is not entirely accurate. In reality, the partition table is stored at the very start of the disk, before any file system or user data. But for clarity, they are separate in our diagrams.
Рисунок A.5. Disk Drive with Partition Table
Как демонстрирует Рисунок A.5, «Disk Drive with Partition Table», таблица разделов состоит из четырех секций или четырех основных разделов. Основной раздел — это раздел жесткого диска, содержащий только один логический диск (или секцию). В каждой секции хранится информация, определяющая один раздел, таким образом, в таблице разбиения разделов нельзя определить больше четырех разделов.
Each partition table entry contains several important characteristics of the partition:
-
The points on the disk where the partition starts and ends
-
Определение «активности» раздела
-
Тип раздела
Далее эти параметры будут рассмотрены более конкретно. Координаты начала и конца раздела определяют размер раздела и его расположение на диске. Флаг «активный» используется некоторыми загрузчиками операционных систем. Другими словами, операционная система находится в разделе, помеченном как «активный».
Дополнительного разъяснения требует параметр тип раздела. Тип раздела — это число, определяющее ожидаемое использование раздела. Возможно, это определение покажется немного расплывчатым; причина этого в том, что понятие типа раздела само по себе расплывчато. Некоторые операционные системы используют тип раздела для определения типа файловой системы, другие обозначают, что данный раздел связан с этой операционной системой, а третьи обозначают, что он содержит загружаемую операционную систему. В некоторых же случаях имеет место комбинация всех трех способов.
Ознакомившись с этой таблицей, возможно, вы удивитесь, как вообще можно использовать такую излишне сложную структуру (см. Рисунок A.6, «Disk Drive With Single Partition»).
Рисунок A.6. Disk Drive With Single Partition
In many cases, there is only a single partition spanning the entire disk, essentially duplicating the method used before partitions. The partition table has only one entry used, and it points to the start of the partition.
We have labeled this partition as being of the «DOS» type. Although it is only one of several possible partition types listed in Таблица A.1, «Partition Types», it is adequate for the purposes of this discussion.
Таблица A.1, «Partition Types» содержит список нескольких популярных типов разделов с соответствующими им шестнадцатеричными числовыми значениями.
Таблица A.1. Partition Types
| Partition Type | Value | Partition Type | Value |
|---|---|---|---|
| Empty | 00 | Novell Netware 386 | 65 |
| DOS 12-bit FAT | 01 | PIC/IX | 75 |
| XENIX root | 02 | Old MINIX | 80 |
| XENIX usr | 03 | Linux/MINUX | 81 |
| DOS 16-bit <=32M | 04 | Linux swap | 82 |
| Extended | 05 | Linux native | 83 |
| DOS 16-bit >=32 | 06 | Linux extended | 85 |
| OS/2 HPFS | 07 | Amoeba | 93 |
| AIX | 08 | Amoeba BBT | 94 |
| AIX bootable | 09 | BSD/386 | a5 |
| OS/2 Boot Manager | 0a | OpenBSD | a6 |
| Win95 FAT32 | 0b | NEXTSTEP | a7 |
| Win95 FAT32 (LBA) | 0c | BSDI fs | b7 |
| Win95 FAT16 (LBA) | 0e | BSDI swap | b8 |
| Win95 Extended (LBA) | 0f | Syrinx | c7 |
| Venix 80286 | 40 | CP/M | db |
| Novell | 51 | DOS access | e1 |
| PReP Boot | 41 | DOS R/O | e3 |
| GNU HURD | 63 | DOS secondary | f2 |
| Novell Netware 286 | 64 | BBT | ff |
A.1.3. Partitions within Partitions — An Overview of Extended Partitions
Of course, over time it became obvious that four partitions would not be enough. As disk drives continued to grow, it became more and more likely that a person could configure four reasonably-sized partitions and still have disk space left over. There needed to be some way of creating more partitions.
Enter the extended partition. As you may have noticed in Таблица A.1, «Partition Types», there is an «Extended» partition type. It is this partition type that is at the heart of extended partitions.
When a partition is created and its type is set to «Extended,» an extended partition table is created. In essence, the extended partition is like a disk drive in its own right — it has a partition table that points to one or more partitions (now called logical partitions, as opposed to the four primary partitions) contained entirely within the extended partition itself. Рисунок A.7, «Disk Drive With Extended Partition», shows a disk drive with one primary partition and one extended partition containing two logical partitions (along with some unpartitioned free space).
Рисунок A.7. Disk Drive With Extended Partition
As this figure implies, there is a difference between primary and logical partitions — there can only be four primary partitions, but there is no fixed limit to the number of logical partitions that can exist. However, due to the way in which partitions are accessed in Linux, you should avoid defining more than 12 logical partitions on a single disk drive.
Теперь давайте разберемся, как применить эти знания при установке Fedora.
A.1.4. Выделение места для Fedora
The following list presents some possible scenarios you may face when attempting to repartition your hard disk:
-
Unpartitioned free space is available
-
An unused partition is available
-
Free space in an actively used partition is available
Let us look at each scenario in order.
Не забывайте, что следующие инструкции упрощены для большей ясности и не учитывают точного расположения разделов, которое вы увидите при установке Fedora.
A.1.4.1. Using Unpartitioned Free Space
В этой ситуации уже созданные разделы занимают не весь жесткий диск, оставляя нераспределенным пространство, не относящееся ни к одному из разделов. Рисунок A.8, «Disk Drive with Unpartitioned Free Space» иллюстрирует пример такой ситуации.
Рисунок A.8. Disk Drive with Unpartitioned Free Space
На рисунке (см. Рисунок A.8, «Disk Drive with Unpartitioned Free Space») цифрой 1 обозначена незанятая область диска, а 2 обозначает созданный раздел, занявший эту область.
If you think about it, an unused hard disk also falls into this category. The only difference is that all the space is not part of any defined partition.
In any case, you can create the necessary partitions from the unused space. Unfortunately, this scenario, although very simple, is not very likely (unless you have just purchased a new disk just for Fedora). Most pre-installed operating systems are configured to take up all available space on a disk drive (refer to Раздел A.1.4.3, «Using Free Space from an Active Partition»).
Next, we will discuss a slightly more common situation.
A.1.4.2. Using Space from an Unused Partition
В этом случае, вероятно, у вас есть один или несколько разделов, которые вам больше не нужны. Возможно, вы перестали использовать какую-то операционную систему и выделенные ей разделы. Рисунок A.9, «Disk Drive With an Unused Partition» демонстрирует именно такую ситуацию.
Рисунок A.9. Disk Drive With an Unused Partition
На рисунке 1 обозначает неиспользуемый раздел, а 2 демонстрирует использование этого раздела для Linux (см. Рисунок A.9, «Disk Drive With an Unused Partition»).
If you find yourself in this situation, you can use the space allocated to the unused partition. You first must delete the partition and then create the appropriate Linux partition(s) in its place. You can delete the unused partition and manually create new partitions during the installation process.
A.1.4.3. Using Free Space from an Active Partition
This is the most common situation. It is also, unfortunately, the hardest to handle. The main problem is that, even if you have enough free space, it is presently allocated to a partition that is already in use. If you purchased a computer with pre-installed software, the hard disk most likely has one massive partition holding the operating system and data.
Aside from adding a new hard drive to your system, you have two choices:
-
Создание разделов с разрушением
-
Basically, you delete the single large partition and create several smaller ones. As you might imagine, any data you had in the original partition is destroyed. This means that making a complete backup is necessary. For your own sake, make two backups, use verification (if available in your backup software), and try to read data from your backup before you delete the partition.
If there was an operating system of some type installed on that partition, it needs to be reinstalled as well. Be aware that some computers sold with pre-installed operating systems may not include the CD-ROM media to reinstall the original operating system. The best time to notice if this applies to your system is before you destroy your original partition and its operating system installation.
After creating a smaller partition for your existing operating system, you can reinstall any software, restore your data, and start your Fedora installation. Рисунок A.10, «Disk Drive Being Destructively Repartitioned» shows this being done.
Рисунок A.10. Disk Drive Being Destructively Repartitioned
На рисунке 1 показывает состояние до, а 2 демонстрирует состояние после операции (см. Рисунок A.10, «Disk Drive Being Destructively Repartitioned»).
Как иллюстрирует Рисунок A.10, «Disk Drive Being Destructively Repartitioned», все данные в этом разделе будут потеряны, если вы не создадите резервную копию.
-
Создание разделов без разрушения существующих
-
Here, you run a program that does the seemingly impossible: it makes a big partition smaller without losing any of the files stored in that partition. Many people have found this method to be reliable and trouble-free. What software should you use to perform this feat? There are several disk management software products on the market. Do some research to find the one that is best for your situation.
While the process of non-destructive repartitioning is rather straightforward, there are a number of steps involved:
-
Compress and backup existing data
-
изменение размера существующего раздела;
-
создание новых разделов.
-
Next we will look at each step in a bit more detail.
A.1.4.3.1. Compress existing data
As Рисунок A.11, «Disk Drive Being Compressed», shows, the first step is to compress the data in your existing partition. The reason for doing this is to rearrange the data such that it maximizes the available free space at the «end» of the partition.
Рисунок A.11. Disk Drive Being Compressed
На рисунке 1 показывает состояние до, а 2 демонстрирует состояние после операции.
This step is crucial. Without it, the location of your data could prevent the partition from being resized to the extent desired. Note also that, for one reason or another, some data cannot be moved. If this is the case (and it severely restricts the size of your new partition(s)), you may be forced to destructively repartition your disk.
A.1.4.3.2. изменение размера существующего раздела;
Рисунок A.12, «Disk Drive with Partition Resized» иллюстрирует процесс изменения размера раздела. Хотя окончательный результат уменьшения раздела зависит от используемой программы, в большинстве случаев освобожденное место используется для создания неформатированного раздела того же типа, что и исходный.
Рисунок A.12. Disk Drive with Partition Resized
На рисунке 1 показывает состояние до, а 2 демонстрирует состояние после операции.
It is important to understand what the resizing software you use does with the newly freed space, so that you can take the appropriate steps. In the case we have illustrated, it would be best to delete the new DOS partition and create the appropriate Linux partition(s).
A.1.4.3.3. создание новых разделов.
Как было упомянуто ранее, может потребоваться создать новые разделы. Если используемая вами программа не рассчитана на Linux, скорее всего, понадобится удалить раздел, созданный при уменьшении раздела (см. Рисунок A.13, «Disk Drive with Final Partition Configuration»).
Рисунок A.13. Disk Drive with Final Partition Configuration
На рисунке 1 показывает состояние до, а 2 демонстрирует состояние после операции.
The following information is specific to x86-based computers only.
As a convenience to our customers, we provide the parted utility. This is a freely available program that can resize partitions.
If you decide to repartition your hard drive with parted, it is important that you be familiar with disk storage and that you perform a backup of your computer data. You should make two copies of all the important data on your computer. These copies should be to removable media (such as tape, CD-ROM, or diskettes), and you should make sure they are readable before proceeding.
Если вы решите использовать parted, помните, что после работы parted оставляет два раздела: один, размер которого вы уменьшали, и другой, созданный в освобожденной области. Если вы планируете установить Fedora в этой области, нужно удалить новый раздел либо с помощью программы разбиения дисков в вашей операционной системе, либо при настройке разделов во время установки.
A.1.5. Partition Naming Scheme
Linux обращается к дисковым разделам, используя комбинации букв и цифр, что сначала может показаться странным, особенно если вы представляете диски как диск C, диск D и т.д. В мире DOS/ Windows разделы именуются следующим образом:
-
Тип каждого раздела проверяется на совместимость с DOS/ Windows.
-
Если раздел совместим , ему присваивается буква. Буквы дисков начинаются с «C» и продолжаются по алфавиту.
-
The drive letter can then be used to refer to that partition as well as the file system contained on that partition.
В Fedora используется более гибкая и информативная схема, чем предлагаемая другими операционными системами, которая основана на схеме именования файлов, где имена имеют вид /dev/.
xxyN
Here is how to decipher the partition naming scheme:
/dev/-
This is the name of the directory in which all device files reside. Since partitions reside on hard disks, and hard disks are devices, the files representing all possible partitions reside in
/dev/. xx-
The first two letters of the partition name indicate the type of device on which the partition resides, usually either
hd(for IDE disks) orsd(for SCSI disks). y-
This letter indicates which device the partition is on. For example,
/dev/hda(the first IDE hard disk) or/dev/sdb(the second SCSI disk). N-
The final number denotes the partition. The first four (primary or extended) partitions are numbered
1through4. Logical partitions start at5. So, for example,/dev/hda3is the third primary or extended partition on the first IDE hard disk, and/dev/sdb6is the second logical partition on the second SCSI hard disk.
В этой схеме именования не указан тип раздела; в отличие от DOS/ Windows, в Fedora могут быть идентифицированы все разделы. Конечно, это не означает, что Fedora может обращаться к данным разделов любого типа, но в большинстве случаев получить доступ к данным другой операционной системы все же возможно.
Возьмите эту информацию на заметку, так как это поможет понять, как создавать разделы, необходимые для работы Fedora.
A.1.6. Disk Partitions and Other Operating Systems
Если разделы Fedora расположены на одном диске с разделами, используемыми другими операционными системами, скорее всего, это не вызовет никаких проблем. Однако существуют определенные комбинации Linux и других операционных систем, которые требуют особого внимания.
A.1.7. Disk Partitions and Mount Points
Пользователи, начинающие знакомство с Linux, часто путаются в том, как Linux использует разделы и обращается к ним. В DOS/Windows это относительно несложно: каждому разделу соответствует буква диска. Вы можете использовать соответствующую букву диска для ссылки на файлы и каталоги, расположенные в этом разделе.
This is entirely different from how Linux deals with partitions and, for that matter, with disk storage in general. The main difference is that each partition is used to form part of the storage necessary to support a single set of files and directories. This is done by associating a partition with a directory through a process known as mounting. Mounting a partition makes its storage available starting at the specified directory (known as a mount point).
For example, if partition /dev/hda5 is mounted on /usr/, that would mean that all files and directories under /usr/ physically reside on /dev/hda5. So the file /usr/share/doc/FAQ/txt/Linux-FAQ would be stored on /dev/hda5, while the file /etc/gdm/custom.conf would not.
Continuing our example, it is also possible that one or more directories below /usr/ would be mount points for other partitions. For instance, a partition (say, /dev/hda7) could be mounted on /usr/local/, meaning that /usr/local/man/whatis would then reside on /dev/hda7 rather than /dev/hda5.
A.1.8. How Many Partitions?
На этом этапе подготовки к установке Fedora вы должны определиться с числом и размером разделов, которые будут использоваться новой операционной системой. Вопрос «сколько же разделов создавать?» постоянно поднимается в спорах в Linux-сообществе, и этим спорам не видно конца, поэтому лучше будет просто сказать, что число вариантов разбиения диска равно числу мнений людей, обсуждающих эту тему.
Не забывая об этом, придерживайтесь следующей рекомендации: если вы не видите причин сделать по-другому, создайте как минимум разделы swap, /boot/ и / (корневой).
Раздел 9.17.5, «Recommended Partitioning Scheme» содержит дополнительную информацию.
ISCSI disks
Internet Small Computer System Interface (iSCSI) is a protocol that allows computers to communicate with storage devices by SCSI requests and responses carried over TCP/IP. Because iSCSI is based on the standard SCSI protocols, it uses some terminology from SCSI. The device on the SCSI bus to which requests get sent (and which answers these requests) is known as the target and the device issuing requests is known as the initiator. In other words, an iSCSI disk is a target and the iSCSI software equivalent of a SCSI controller or SCSI Host Bus Adapter (HBA) is called an initiator. This appendix only covers Linux as an iSCSI initiator: how Linux uses iSCSI disks, but not how Linux hosts iSCSI disks.
Linux has a software iSCSI initiator in the kernel that takes the place and form of a SCSI HBA driver and therefore allows Linux to use iSCSI disks. However, as iSCSI is a fully network-based protocol, iSCSI initiator support needs more than just the ability to send SCSI packets over the network. Before Linux can use an iSCSI target, Linux must find the target on the network and make a connection to it. In some cases, Linux must send authentication information to gain access to the target. Linux must also detect any failure of the network connection and must establish a new connection, including logging in again if necessary.
The discovery, connection, and logging in is handled in userspace by the iscsiadm utility, and the error handling is also handled in userspace by iscsid.
Both iscsiadm and iscsid are part of the iscsi-initiator-utils package under Fedora.
B.1. iSCSI disks in anaconda
Anaconda can discover (and then log in to) iSCSI disks in two ways:
-
When anaconda starts, it checks if the BIOS or add-on boot ROMs of the system support iSCSI Boot Firmware Table (iBFT), a BIOS extension for systems which can boot from iSCSI. If the BIOS supports iBFT, anaconda will read the iSCSI target information for the configured boot disk from the BIOS and log in to this target, making it available as an installation target.
-
If you select the Specialized Storage Devices option during installation, the storage device selection screen presents you with an Add Advanced Target button. If you click this button, you can add iSCSI target information like the discovery IP address. Anaconda probes the given IP address and logs in to any targets that it finds. See Раздел 9.11.1.1, « Advanced Storage Options » for the details that you can specify for iSCSI targets.
While anaconda uses iscsiadm to find and log into iSCSI targets, iscsiadm automatically stores any information about these targets in the iscsiadm iSCSI database. Anaconda then copies this database to the installed system and marks any iSCSI targets not used for / so that the system will automatically log in to them when it starts. If / is placed on an iSCSI target, initrd will log into this target and anaconda does not include this target in start up scripts to avoid multiple attempts to log into the same target.
If / is placed on an iSCSI target, anaconda sets NetworkManager to ignore any network interfaces that were active during the installation process. These interfaces will also be configured by initrd when the system starts. If NetworkManager were to reconfigure these interfaces, the system would lose its connection to /.
B.2. iSCSI disks during start up
ISCSI-related events might occur at a number of points while the system starts:
-
The init script in the initrd will log in to iSCSI targets used for
/(if any). This is done using the iscsistart utility (which can do this without requiring iscsid to run). -
When the root filesystem has been mounted and the various service initscripts get run, the iscsid initscript will get called. This script will then start iscsid if any iSCSI targets are used for
/, or if any targets in the iSCSI database are marked to be logged in to automatically. -
After the classic network service script has been run (or would have been run if enabled) the iscsi initscript will run. If the network is accessible, this will log in to any targets in the iSCSI database which are marked to be logged in to automatically. If the network is not accessible, this script will exit quietly.
-
When using NetworkManager to access the network (instead of the classic network service script), NetworkManager will call the iscsi initscript. See:
/etc/NetworkManager/dispatcher.d/04-iscsiBecause NetworkManager is installed in
/usr, you cannot use it to configure network access if/usris on network-attached storage such as an iSCSI target.
If iscsid is not needed as the system starts, it will not start automatically. If you start iscsiadm, iscsiadm will start iscsid in turn.
Disk Encryption
C.1. What is block device encryption?
Block device encryption protects the data on a block device by encrypting it. To access the device’s decrypted contents, a user must provide a passphrase or key as authentication. This provides additional security beyond existing OS security mechanisms in that it protects the device’s contents even if it has been physically removed from the system.
C.2. Encrypting block devices using dm-crypt/LUKS
Linux Unified Key Setup (LUKS) is a specification for block device encryption. It establishes an on-disk format for the data, as well as a passphrase/key management policy.
LUKS uses the kernel device mapper subsystem via the dm-crypt module. This arrangement provides a low-level mapping that handles encryption and decryption of the device’s data. User-level operations, such as creating and accessing encrypted devices, are accomplished through the use of the cryptsetup utility.
C.2.1. Overview of LUKS
-
What LUKS does:
-
LUKS encrypts entire block devices
-
LUKS is thereby well-suited for protecting the contents of mobile devices such as:
-
Removable storage media
-
Laptop disk drives
-
-
-
The underlying contents of the encrypted block device are arbitrary.
-
This makes it useful for encrypting
swapdevices. -
This can also be useful with certain databases that use specially formatted block devices for data storage.
-
-
LUKS uses the existing device mapper kernel subsystem.
-
This is the same subsystem used by LVM, so it is well tested.
-
-
LUKS provides passphrase strengthening.
-
This protects against dictionary attacks.
-
-
LUKS devices contain multiple key slots.
-
This allows users to add backup keys/passphrases.
-
-
-
What LUKS does not do:
-
LUKS is not well-suited for applications requiring many (more than eight) users to have distinct access keys to the same device.
-
LUKS is not well-suited for applications requiring file-level encryption.
-
C.2.2. How will I access the encrypted devices after installation? (System Startup)
During system startup you will be presented with a passphrase prompt. After the correct passphrase has been provided the system will continue to boot normally. If you used different passphrases for multiple encrypted devices you may need to enter more than one passphrase during the startup.
Consider using the same passphrase for all encrypted block devices in a given system. This will simplify system startup and you will have fewer passphrases to remember. Just make sure you choose a good passphrase!
C.2.3. Choosing a Good Passphrase
While dm-crypt/LUKS supports both keys and passphrases, the anaconda installer only supports the use of passphrases for creating and accessing encrypted block devices during installation.
LUKS does provide passphrase strengthening but it is still a good idea to choose a good (meaning «difficult to guess») passphrase. Note the use of the term «passphrase», as opposed to the term «password». This is intentional. Providing a phrase containing multiple words to increase the security of your data is important.
C.3. Creating Encrypted Block Devices in Anaconda
You can create encrypted devices during system installation. This allows you to easily configure a system with encrypted partitions.
To enable block device encryption, check the «Encrypt System» checkbox when selecting automatic partitioning or the «Encrypt» checkbox when creating an individual partition, software RAID array, or logical volume. After you finish partitioning, you will be prompted for an encryption passphrase. This passphrase will be required to access the encrypted devices. If you have pre-existing LUKS devices and provided correct passphrases for them earlier in the install process the passphrase entry dialog will also contain a checkbox. Checking this checkbox indicates that you would like the new passphrase to be added to an available slot in each of the pre-existing encrypted block devices.
Checking the «Encrypt System» checkbox on the «Automatic Partitioning» screen and then choosing «Create custom layout» does not cause any block devices to be encrypted automatically.
You can use kickstart to set a separate passphrase for each new encrypted block device.
C.3.1. What Kinds of Block Devices Can Be Encrypted?
Most types of block devices can be encrypted using LUKS. From anaconda you can encrypt partitions, LVM physical volumes, LVM logical volumes, and software RAID arrays.
C.3.2. Saving Passphrases
If you use a kickstart file during installation, you can automatically save the passphrases used during installation to an encrypted file (an escrow packet) on the local file system. To use this feature, you must have an X.509 certificate available at a location that anaconda can access. To specify the URL of this certificate, add the --escrowcert parameter to any of the autopart, logvol, part or raid commands. During installation, the encryption keys for the specified devices are saved in files in /root, encrypted with the certificate.
You can save escrow packets during installation only with the use of a kickstart file — refer to Глава 15, Kickstart Installations for more detail. You cannot save an escrow packet during an interactive installation, although you can create one on an installed system with the volume_key tool. The volume_key tool also allows you to use the information stored in an escrow packet to restore access to an encrypted volume. Refer to the volume_key manpage for more information.
C.3.3. Creating and Saving Backup Passphrases
If you use a kickstart file during installation, anaconda can add a randomly generated backup passphrase to each block device on the system and save each passphrase to an encrypted file on the local file system. Specify the URL of this certificate with the --escrowcert parameter as described in Раздел C.3.2, «Saving Passphrases», followed by the --backuppassphrase parameter for each of the kickstart commands that relate to the devices for which you want to create backup passphrases.
Note that this feature is available only while performing a kickstart installation. Refer to Глава 15, Kickstart Installations for more detail.
C.4. Creating Encrypted Block Devices on the Installed System After Installation
Encrypted block devices can be created and configured after installation, using either the following method or Disk Utility.
C.4.1. Create the block devices
Create the block devices you want to encrypt by using parted, pvcreate, lvcreate and mdadm.
C.4.2. Optional: Fill the device with random data
Filling <device> (eg: /dev/sda3) with random data before encrypting it greatly increases the strength of the encryption. The downside is that it can take a very long time.
The commands below will destroy any existing data on the device.
-
The best way, which provides high quality random data but takes a long time (several minutes per gigabyte on most systems):
dd if=/dev/urandom of=<device>
-
Fastest way, which provides lower quality random data:
badblocks -c 10240 -s -w -t random -v <device>
C.4.3. Format the device as a dm-crypt/LUKS encrypted device
The command below will destroy any existing data on the device.
cryptsetup luksFormat <device>
For more information, read the cryptsetup(8) man page.
After supplying the passphrase twice the device will be formatted for use. To verify, use the following command:
cryptsetup isLuks <device> && echo Success
To see a summary of the encryption information for the device, use the following command:
cryptsetup luksDump <device>
C.4.4. Create a mapping to allow access to the device’s decrypted contents
To access the device’s decrypted contents, a mapping must be established using the kernel device-mapper.
It is useful to choose a meaningful name for this mapping. LUKS provides a UUID (Universally Unique Identifier) for each device. This, unlike the device name (eg: /dev/sda3), is guaranteed to remain constant as long as the LUKS header remains intact. To find a LUKS device’s UUID, run the following command:
cryptsetup luksUUID <device>
An example of a reliable, informative and unique mapping name would be luks-<uuid>, where <uuid> is replaced with the device’s LUKS UUID (eg: luks-50ec957a-5b5a-47ee-85e6-f8085bbc97a8). This naming convention might seem unwieldy but is it not necessary to type it often.
cryptsetup luksOpen <device> <name>
There should now be a device node, /dev/mapper/<name>, which represents the decrypted device. This block device can be read from and written to like any other unencrypted block device.
To see some information about the mapped device, use the following command:
dmsetup info <name>
For more information, read the dmsetup(8) man page.
C.4.5. Create filesystems on the mapped device, or continue to build complex storage structures using the mapped device
Use the mapped device node (/dev/mapper/<name>) as any other block device. To create an ext2 filesystem on the mapped device, use the following command:
mke2fs /dev/mapper/<name>
To mount this filesystem on /mnt/test, use the following command:
The directory /mnt/test must exist before executing this command.
mount /dev/mapper/<name> /mnt/test
C.4.6. Add the mapping information to /etc/crypttab
In order for the system to set up a mapping for the device, an entry must be present in the /etc/crypttab file. If the file doesn’t exist, create it and change the owner and group to root (root:root) and change the mode to 0744. Add a line to the file with the following format:
<name> <device> none
The <device> field should be given in the form «UUID=<luks_uuid>», where <luks_uuid> is the LUKS uuid as given by the command cryptsetup luksUUID <device>. This ensures the correct device will be identified and used even if the device node (eg: /dev/sda5) changes.
For details on the format of the /etc/crypttab file, read the crypttab(5) man page.
C.4.7. Add an entry to /etc/fstab
Add an entry to /etc/fstab. This is only necessary if you want to establish a persistent association between the device and a mountpoint. Use the decrypted device, /dev/mapper/<name> in the /etc/fstab file.
In many cases it is desirable to list devices in /etc/fstab by UUID or by a filesystem label. The main purpose of this is to provide a constant identifier in the event that the device name (eg: /dev/sda4) changes. LUKS device names in the form of /dev/mapper/luks-<luks_uuid> are based only on the device’s LUKS UUID, and are therefore guaranteed to remain constant. This fact makes them suitable for use in /etc/fstab.
For details on the format of the /etc/fstab file, read the fstab(5) man page.
C.5. Common Post-Installation Tasks
The following sections are about common post-installation tasks.
C.5.1. Set a randomly generated key as an additional way to access an encrypted block device
These sections are about generating keys and adding keys.
C.5.1.1. Generate a key
This will generate a 256-bit key in the file $HOME/keyfile.
		dd if=/dev/urandom of=$HOME/keyfile bs=32 count=1
		chmod 600 $HOME/keyfile
C.5.1.2. Add the key to an available keyslot on the encrypted device
cryptsetup luksAddKey <device> ~/keyfile
C.5.2. Add a new passphrase to an existing device
cryptsetup luksAddKey <device>
After being prompted for any one of the existing passphrases for authentication, you will be prompted to enter the new passphrase.
C.5.3. Remove a passphrase or key from a device
cryptsetup luksRemoveKey <device>
You will be prompted for the passphrase you wish to remove and then for any one of the remaining passphrases for authentication.
Understanding LVM
Преимуществом разделов LVM является то, что они форматируются как
физические тома. Физические тома можно объединить в
группу томов. Общий размер такой группы будет разделен на несколько
логических томов, которые функционируют подобно стандартным разделам, которые можно отформатировать и смонтировать.
To understand LVM better, imagine the physical volume as a pile of blocks. A block is simply a storage unit used to store data. Several piles of blocks can be combined to make a much larger pile, just as physical volumes are combined to make a volume group. The resulting pile can be subdivided into several smaller piles of arbitrary size, just as a volume group is allocated to several logical volumes.
An administrator may grow or shrink logical volumes without destroying data, unlike standard disk partitions. If the physical volumes in a volume group are on separate drives or RAID arrays then administrators may also spread a logical volume across the storage devices.
You may lose data if you shrink a logical volume to a smaller capacity than the data on the volume requires. To ensure maximum flexibility, create logical volumes to meet your current needs, and leave excess storage capacity unallocated. You may safely grow logical volumes to use unallocated space, as your needs dictate.
By default, the installation process creates / and swap partitions within LVM volumes, with a separate /boot partition.
The GRUB Boot Loader
When a computer running Linux is turned on, the operating system is loaded into memory by a special program called a boot loader. A boot loader usually exists on the system’s primary hard drive (or other media device) and has the sole responsibility of loading the Linux kernel with its required files or (in some cases) other operating systems into memory.
E.1. Boot Loaders and System Architecture
Each architecture capable of running Fedora uses a different boot loader. The following table lists the boot loaders available for each architecture:
Таблица E.1. Boot Loaders by Architecture
| Architecture | Boot Loaders |
|---|---|
| AMD® AMD64 | GRUB |
| IBM® eServer™ System p™ | yaboot |
| IBM® System z® | z/IPL |
| x86 | GRUB |
This appendix discusses commands and configuration options for the GRUB boot loader included with Fedora for the x86 architecture.
The GRUB bootloader in Fedora 17 supports only the ext2, ext3, and ext4 (recommended) file systems. You cannot use any other file system for /boot, such as Btrfs, XFS, or VFAT.
E.2. GRUB
The GNU GRand Unified Boot loader (GRUB) is a program which enables the selection of the installed operating system or kernel to be loaded at system boot time. It also allows the user to pass arguments to the kernel.
E.2.1. GRUB and the boot process on BIOS-based x86 systems
This section describes the specific role GRUB plays when booting a BIOS-based x86 system. For a look at the overall boot process, refer to Раздел F.2, «A Detailed Look at the Boot Process».
GRUB consists of the following images:
-
boot.img: the first image to load in GRUB on BIOS-based x86 systems, which is written to either a master boot record (MBR) or the boot sector of a partition.[7].Because a PC boot sector is 512 bytes, the size of this image is exactly 512 bytes.BIOS cannot read partition tables or file systems. It initializes the hardware, reads the MBR, then depends entirely on
boot.imgto continue the boot process. This image is similar to Stage 1 in GRUB Legacy. -
diskboot.img: the first sector of the core image once the system boots from a hard disk. It reads the remaining parts of the core image to memory before initializing the kernel. -
cdboot.img: the first sector of the core image once the system is booted from a CD-ROM drive, similar todiskboot.img. -
core.img: GRUB’s core image, built dynamically by the grub-mkimage program using the kernel image and a list of modules. It typically has sufficent modules to access/boot/grub2, and loads the rest from the file system at run-time. -
kernel.img: the location of GRUB’s basic run-time functions. Although built into all core images, it is rarely used directly. -
*.mod: the remainder of GRUB is located in dynamically loadable modules. These modules load automatically or are built into the core image if they are essential, or can be initialized manually by theinsmodcommand.
The method used to boot Linux is called direct loading because the boot loader loads the operating system directly. There is no intermediary between the boot loader and the kernel.
The boot process used by other operating systems may differ. For example, the Microsoft® Windows® operating system, as well as other operating systems, are loaded using chain loading. Under this method, the MBR points to the first sector of the partition holding the operating system, where it finds the files necessary to actually boot that operating system.
GRUB supports both direct and chain loading boot methods, allowing it to boot almost any operating system.
During installation, Microsoft’s DOS and Windows installation programs completely overwrite the MBR, destroying any existing boot loaders. If creating a dual-boot system, it is best to install the Microsoft operating system first.
E.2.2. GRUB and the boot process on UEFI-based x86 systems
This section describes the specific role GRUB plays when booting a UEFI-based x86 system. For a look at the overall boot process, refer to Раздел F.2, «A Detailed Look at the Boot Process».
GRUB loads itself into memory in the following stages:
-
The UEFI-based platform reads the partition table on the system storage and mounts the EFI System Partition (ESP), a VFAT partition labeled with a particular globally unique identifier (GUID). The ESP contains EFI applications such as bootloaders and utility software, stored in directories specific to software vendors. Viewed from within the Fedora 17 file system, the ESP is
/boot/efi/, and EFI software provided by Red Hat is stored in/boot/efi/EFI/redhat/. -
The
/boot/efi/EFI/redhat/directory contains grub.efi, a version of GRUB compiled for the EFI firmware architecture as an EFI application. In the simplest case, the EFI boot manager selectsgrub.efias the default bootloader and reads it into memory.If the ESP contains other EFI applications, the EFI boot manager might prompt you to select an application to run, rather than load grub.efi automatically.
-
GRUB determines which operating system or kernel to start, loads it into memory, and transfers control of the machine to that operating system.
Because each vendor maintains its own directory of applications in the ESP, chain loading is not normally necessary on UEFI-based systems. The EFI boot manager can load any of the operating system bootloaders that are present in the ESP.
E.2.3. Features of GRUB
GRUB contains several features that make it preferable to other boot loaders available for the x86 architecture. Below is a partial list of some of the more important features:
-
GRUB provides a true command-based, pre-OS environment on x86 machines. This feature affords the user maximum flexibility in loading operating systems with specified options or gathering information about the system. For years, many non-x86 architectures have employed pre-OS environments that allow system booting from a command line.
-
GRUB supports Logical Block Addressing (LBA) mode. LBA places the addressing conversion used to find files in the hard drive’s firmware, and is used on many IDE and all SCSI hard devices. Before LBA, boot loaders could encounter the 1024-cylinder BIOS limitation, where the BIOS could not find a file after the 1024 cylinder head of the disk. LBA support allows GRUB to boot operating systems from partitions beyond the 1024-cylinder limit, so long as the system BIOS supports LBA mode. Most modern BIOS revisions support LBA mode.
-
GRUB can read ext2 partitions. This functionality allows GRUB to access its configuration file,
/boot/grub2/grub.cfg, every time the system boots, eliminating the need for the user to write a new version of the first stage boot loader to the MBR when configuration changes are made. The only time a user needs to reinstall GRUB on the MBR is if the physical location of the/boot/partition is moved on the disk. For details on installing GRUB to the MBR, refer to Раздел E.3, «Installing GRUB».
E.3. Installing GRUB
If GRUB was not installed during the installation process, it can be installed afterward. Once installed, it automatically becomes the default boot loader.
Before installing GRUB, make sure to use the latest GRUB package available or use the GRUB package from the installation DVD. For instructions on installing packages, refer to the chapter titled Package Management with RPM in the Fedora Deployment Guide.
Once the GRUB package is installed, open a root shell prompt and run the command grub-install , where <location><location> is the location that the GRUB Stage 1 boot loader should be installed. For example, the following command installs GRUB to the MBR of the master IDE device on the primary IDE bus:
grub-install /dev/hdaThe next time the system boots, the GRUB graphical boot loader menu appears before the kernel loads into memory.
GRUB cannot construct a software RAID. Therefore, the /boot directory must reside on a single, specific disk partition. The /boot directory cannot be striped across multiple disks, as in a level 0 RAID. To use a level 0 RAID on your system, place /boot on a separate partition outside the RAID.
Similarly, because the /boot directory must reside on a single, specific disk partition, GRUB cannot boot the system if the disk holding that partition fails or is removed from the system. This is true even if the disk is mirrored in a level 1 RAID.
Note that these issues apply only to RAID that is implemented in software, where the individual disks that make up the array are still visible as individual disks on the system. These issues do not apply to hardware RAID where multiple disks are represented as a single device.
E.4. GRUB Terminology
One of the most important things to understand before using GRUB is how the program refers to devices, such as hard drives and partitions. This information is particularly important when configuring GRUB to boot multiple operating systems.
E.4.1. Device Names
When referring to a specific device with GRUB, do so using the following format (note that the parentheses and comma are very important syntactically):
(
<type-of-device><bios-device-number>,<partition-number>)
The <type-of-device> specifies the type of device from which GRUB boots. The two most common options are hd for a hard disk or fd for a 3.5 diskette. A lesser used device type is also available called nd for a network disk. Instructions on configuring GRUB to boot over the network are available online at http://www.gnu.org/software/grub/manual/.
The <bios-device-number> is the BIOS device number. The primary IDE hard drive is numbered 0 and a secondary IDE hard drive is numbered 1. This syntax is roughly equivalent to that used for devices by the kernel. For example, the a in hda for the kernel is analogous to the 0 in hd0 for GRUB, the b in hdb is analogous to the 1 in hd1, and so on.
The <partition-number> specifies the number of a partition on a device. Unlike the <bios-device-number>, most types of partitions are numbered starting at 1. However, BSD partitions are specified using letters, with a corresponding to 1, b corresponding to 2, and so on.
The numbering system for devices under GRUB always begins with 0, not 1. Failing to make this distinction is one of the most common mistakes made by new users.
Fedora 17 incorporates GRUB2, which numbers partitions and devices differently. Instead of 0, partition numbering begins at 1. However, device numbering still begins at 0.
To give an example, if a system has more than one hard drive, GRUB refers to the first hard drive as (hd0) and the second as (hd1). Likewise, GRUB refers to the first partition on the first drive as (hd0,1) and the third partition on the second hard drive as (hd1,3).
In general the following rules apply when naming devices and partitions under GRUB:
-
It does not matter if system hard drives are IDE or SCSI, all hard drives begin with the letters
hd. The lettersfdare used to specify 3.5 diskettes. -
To specify an entire device without respect to partitions, leave off the comma and the partition number. This is important when telling GRUB to configure the MBR for a particular disk. For example,
(hd0)specifies the MBR on the first device and(hd3)specifies the MBR on the fourth device. -
If a system has multiple drive devices, it is very important to know how the drive boot order is set in the BIOS. This is a simple task if a system has only IDE or SCSI drives, but if there is a mix of devices, it becomes critical that the type of drive with the boot partition be accessed first.
E.4.2. File Names and Blocklists
When typing commands to GRUB that reference a file, such as a menu list, it is necessary to specify an absolute file path immediately after the device and partition numbers.
The following illustrates the structure of such a command:
(
<device-type><device-number>,<partition-number>)</path/to/file>
In this example, replace <device-type> with hd, fd, or nd. Replace <device-number> with the integer for the device. Replace </path/to/file> with an absolute path relative to the top-level of the device.
It is also possible to specify files to GRUB that do not actually appear in the file system, such as a chain loader that appears in the first few blocks of a partition. To load such files, provide a blocklist that specifies block by block where the file is located in the partition. Since a file is often comprised of several different sets of blocks, blocklists use a special syntax. Each block containing the file is specified by an offset number of blocks, followed by the number of blocks from that offset point. Block offsets are listed sequentially in a comma-delimited list.
The following is a sample blocklist:
0+50,100+25,200+1This sample blocklist specifies a file that starts at the first block on the partition and uses blocks 0 through 49, 100 through 124, and 200.
Knowing how to write blocklists is useful when using GRUB to load operating systems which require chain loading. It is possible to leave off the offset number of blocks if starting at block 0. As an example, the chain loading file in the first partition of the first hard drive would have the following name:
(hd0,1)+1
The following shows the chainloader command with a similar blocklist designation at the GRUB command line after setting the correct device and partition as root:
chainloader +1E.4.3. The Root File System and GRUB
The use of the term root file system has a different meaning in regard to GRUB. It is important to remember that GRUB’s root file system has nothing to do with the Linux root file system.
The GRUB root file system is the top level of the specified device. For example, the image file (hd1,1)/grub/splash.xpm.gz is located within the /grub/ directory at the top-level (or root) of the (hd1,1) partition (which is actually the /boot/ partition for the system).
Next, the linux command is executed with the location of the kernel file as an option. Once the Linux kernel boots, it sets up the root file system that Linux users are familiar with. The original GRUB root file system and its mounts are forgotten; they only existed to boot the kernel file.
Refer to the root and linux commands in Раздел E.6, «GRUB Commands» for more information.
E.5. GRUB Interfaces
GRUB features three interfaces which provide different levels of functionality. Each of these interfaces allows users to boot the Linux kernel or another operating system.
The interfaces are as follows:
The following GRUB interfaces can only be accessed by pressing any key within the three seconds of the GRUB menu bypass screen.
- Menu Interface
-
This is the default interface shown when GRUB is configured by the installation program. A menu of operating systems or preconfigured kernels are displayed as a list, ordered by name. Use the arrow keys to select an operating system or kernel version and press the Enter key to boot it. If you do nothing on this screen, then after the time out period expires GRUB will load the default option.
Press the e key to enter the entry editor interface or the c key to load a command line interface.
Refer to Раздел E.7, «GRUB Menu Configuration File» for more information on configuring this interface.
- Menu Entry Editor Interface
-
To access the menu entry editor, press the e key from the boot loader menu. The GRUB commands for that entry are displayed here, and users may alter these command lines before booting the operating system by adding a command line (o inserts a new line after the current line and O inserts a new line before it), editing one (e), or deleting one (d).
After all changes are made, the b key executes the commands and boots the operating system. The Esc key discards any changes and reloads the standard menu interface. The c key loads the command line interface.
For information about changing runlevels using the GRUB menu entry editor, refer to Раздел E.8, «Changing Runlevels at Boot Time».
- Command Line Interface
-
The command line interface is the most basic GRUB interface, but it is also the one that grants the most control. The command line makes it possible to type any relevant GRUB commands followed by the Enter key to execute them. This interface features some advanced shell-like features, including Tab key completion based on context, and Ctrl key combinations when typing commands, such as Ctrl+a to move to the beginning of a line and Ctrl+e to move to the end of a line. In addition, the arrow, Home, End, and Delete keys work as they do in the
bashshell.Refer to Раздел E.6, «GRUB Commands» for a list of common commands.
E.5.1. Interfaces Load Order
When GRUB loads its second stage boot loader, it first searches for its configuration file. Once found, the menu interface bypass screen is displayed. If a key is pressed within three seconds, GRUB builds a menu list and displays the menu interface. If no key is pressed, the default kernel entry in the GRUB menu is used.
If the configuration file cannot be found, or if the configuration file is unreadable, GRUB loads the command line interface, allowing the user to type commands to complete the boot process.
If the configuration file is not valid, GRUB prints out the error and asks for input. This helps the user see precisely where the problem occurred. Pressing any key reloads the menu interface, where it is then possible to edit the menu option and correct the problem based on the error reported by GRUB. If the correction fails, GRUB reports an error and reloads the menu interface.
E.6. GRUB Commands
GRUB allows a number of useful commands in its command line interface. Some of the commands accept options after their name; these options should be separated from the command and other options on that line by space characters.
The following is a list of useful commands:
-
boot— Boots the operating system or chain loader that was last loaded. -
chainloader— Loads the specified file as a chain loader. If the file is located on the first sector of the specified partition, use the blocklist notation,</path/to/file>+1, instead of the file name.The following is an example
chainloadercommand:chainloader +1 -
displaymem— Displays the current use of memory, based on information from the BIOS. This is useful to determine how much RAM a system has prior to booting it. -
initrd— Enables users to specify an initial RAM disk to use when booting. An</path/to/initrd>initrdis necessary when the kernel needs certain modules in order to boot properly, such as when the root partition is formatted with the ext3 or ext4 file system.The following is an example
initrdcommand:initrd /initrd-2.6.8-1.523.img -
install— Installs GRUB to the system MBR.<stage-1><install-disk><stage-2>pconfig-file-
<stage-1>(hd1,1)/grub/stage1. -
<install-disk>(hd0). -
<stage-2>(hd1,1)/grub/stage2. -
p<config-file>installcommand to look for the menu configuration file specified by<config-file>(hd0,1)/grub/grub.conf.
The
installcommand overwrites any information already located on the MBR. -
-
linux… — Specifies the kernel file to load when booting the operating system. Replace</path/to/linux><option-1><option-N></path/to/linux>with an absolute path from the partition specified by the root command. Replace<option-1>with options for the Linux kernel, such asset root=/dev/VolGroup00/LogVol00to specify the device on which the root partition for the system is located. Multiple options can be passed to the kernel in a space separated list.The following is an example
kernelcommand:linux /vmlinuz-2.6.8-1.523 ro root=/dev/VolGroup00/LogVol00The option in the previous example specifies that the root file system for Linux is located on the
hda5partition. -
set root=(— Configures the root partition for GRUB, such as<device-type><device-number>,<partition>)(hd1,1), and mounts the partition.The following is an example
rootcommand:set root=(hd0,1)
Other commands are also available; type help --all for a full list of commands. For a description of all GRUB commands, refer to the documentation available online at http://www.gnu.org/software/grub/manual/.
E.7. GRUB Menu Configuration File
The configuration file (/boot/grub2/grub.cfg), which is used to create the list of operating systems to boot in GRUB’s menu interface, essentially allows the user to select a pre-set group of commands to execute. The commands given in Раздел E.6, «GRUB Commands» can be used, as well as some special commands that are only available in the configuration file. Changes to grub.cfg are enacted by editing etc/default/grub and files in the etc/grub.d directory, particularly 10_linux and 40_custom, and then running the grub2-mkconfig command with root privileges.
E.7.1. Configuration File Structure
The GRUB menu interface configuration file is /boot/grub2/grub.cfg.The commands to set the global preferences for the menu interface are placed at the top of the file, followed by stanzas for each operating kernel or operating system listed in the menu.
The following is a very basic GRUB menu configuration file designed to boot Fedora:
menuentry 'Fedora Linux, with Linux 3.1.0-0.rc6.git0.3.fc16.x86_64'
set root='(hd0,1)'
linux /vmlinuz-2.6.27.19-170.2.35.fc10.i686 ro root=UUID=04a07c13-e6bf-6d5a-b207-002689545705 rhgb quiet
initrd /initramfs-3.1.0-0.rc6.git0.3.fc16.x86_64.img
Configuring a GRUB menu configuration file to boot multiple operating systems is beyond the scope of this chapter. Consult Раздел E.9, «Additional Resources» for a list of additional resources.
E.7.2. Configuration File Directives
The following are directives commonly used in the GRUB menu configuration file:
-
chainloader— Loads the specified file as a chain loader. Replace</path/to/file></path/to/file>with the absolute path to the chain loader. If the file is located on the first sector of the specified partition, use the blocklist notation,+1. -
color— Allows specific colors to be used in the menu, where two colors are configured as the foreground and background. Use simple color names such as<normal-color><selected-color>red/black. For example:color red/black green/blue -
default=— Replace<integer><integer>with the default entry title number to be loaded if the menu interface times out. -
fallback=— Replace<integer><integer>with the entry title number to try if the first attempt fails. -
hiddenmenu— Prevents the GRUB menu interface from being displayed, loading thedefaultentry when thetimeoutperiod expires. The user can see the standard GRUB menu by pressing the Esc key. -
initrd— Enables users to specify an initial RAM disk to use when booting. Replace</path/to/initrd></path/to/initrd>with the absolute path to the initial RAM disk. -
linux— Specifies the kernel file to load when booting the operating system. Replace</path/to/linux><option-1><option-N></path/to/linux>with an absolute path from the partition specified by the root directive. Multiple options can be passed to the kernel when it is loaded.These options include:
-
rhgb(Red Hat graphical boot) — displays an animation during the boot process, rather than lines of text. -
quiet— suppresses all but the most important messages in the part of the boot sequence before the graphical boot animation begins.
-
-
password=— Prevents a user who does not know the password from editing the entries for this menu option.<password>Optionally, it is possible to specify an alternate menu configuration file after the
password=directive. In this case, GRUB restarts the second stage boot loader and uses the specified alternate configuration file to build the menu. If an alternate menu configuration file is left out of the command, a user who knows the password is allowed to edit the current configuration file.<password>For more information about securing GRUB, refer to the chapter titled Workstation Security in the Fedora Deployment Guide.
-
map— Swaps the numbers assigned to two hard drives. For example:map (hd0) (hd3) map (hd3) (hd0)
assigns the number
0to the fourth hard drive, and the number3to the first hard drive. This option is especially useful if you configure your system with an option to boot a Windows operating system, because the Windows boot loader must find the Windows installation on the first hard drive.For example, if your Windows installation is on the fourth hard drive, the following entry in
grub.confwill allow the Windows boot loader to load Windows correctly:title Windows map (hd0) (hd3) map (hd3) (hd0) rootnoverify (hd3,0) chainloader +1
-
menuentry— Specifies a title to be used with a particular group of commands used to load a kernel or operating system."title" -
root (— Configures the root partition for GRUB, such as<device-type><device-number>,<partition>)(hd1,1), and mounts the partition. -
rootnoverify (— Configures the root partition for GRUB, just like the<device-type><device-number>,<partition>)rootcommand, but does not mount the partition. -
timeout=— Specifies the interval, in seconds, that GRUB waits before loading the entry designated in the<integer>defaultcommand. -
splashimage=— Specifies the location of the splash screen image to be used when GRUB boots.<path-to-image>
To add human-readable comments to the menu configuration file, begin the line with the hash mark character (#).
E.8. Changing Runlevels at Boot Time
Under Fedora, it is possible to change the default runlevel at boot time.
To change the runlevel of a single boot session, use the following instructions:
-
At boot time, press the Esc key to reach the GRUB splash screen, then press any key to enter the GRUB menu (within the first three seconds).
-
Press the a key to append to the
linuxcommand. -
Add
<space>at the end of the boot options line to boot to the desired runlevel. For example, the following entry would initiate a boot process into runlevel 3:<runlevel>grub append> ro root=/dev/VolGroup00/LogVol00 rhgb quiet 3
E.9. Additional Resources
This chapter is only intended as an introduction to GRUB. Consult the following resources to discover more about how GRUB works.
E.9.1. Installed Documentation
-
/usr/share/doc/grub-— This directory contains good information about using and configuring GRUB, where<version-number>/<version-number>corresponds to the version of the GRUB package installed. -
info grub— The GRUB info page contains a tutorial, a user reference manual, a programmer reference manual, and a FAQ document about GRUB and its usage.
E.9.2. Useful Websites
-
http://www.gnu.org/software/grub/ — The home page of the GNU GRUB project. This site contains information concerning the state of GRUB development and an FAQ.
Boot Process, Init, and Shutdown
An important and powerful aspect of Fedora is the open, user-configurable method it uses for starting the operating system. Users are free to configure many aspects of the boot process, including specifying the programs launched at boot-time. Similarly, system shutdown gracefully terminates processes in an organized and configurable way, although customization of this process is rarely required.
Understanding how the boot and shutdown processes work not only allows customization, but also makes it easier to troubleshoot problems related to starting or shutting down the system.
F.1. The Boot Process
Below are the basic stages of the boot process:
-
The system loads and runs a boot loader. The specifics of this process depend on the system architecture. For example:
-
BIOS-based x86 systems run a first-stage boot loader from the MBR of the primary hard disk that, in turn, loads an additional boot loader, GRUB.
-
UEFI-based x86 systems mount an EFI System Partition that contains a version of the GRUB boot loader. The EFI boot manager loads and runs GRUB as an EFI application.
-
-
The boot loader loads the kernel and a small, read-only filesystem into memory. This filesystem, or initramfs, contains all the tools required for the kernel to continue the boot process.
-
The kernel transfers control of the boot process to the system daemon, systemd.
-
systemd loads needed services and user-space tools, and mounts filesystems listed in
/etc/fstab. -
The user is presented with a login screen for the freshly booted Linux system.
Because configuration of the boot process is more common than the customization of the shutdown process, the remainder of this chapter discusses in detail how the boot process works and how it can be customized to suit specific needs.
F.2. A Detailed Look at the Boot Process
The beginning of the boot process varies depending on the hardware platform being used. However, once the kernel is found and loaded by the boot loader, the default boot process is identical across all architectures. This chapter focuses primarily on the x86 architecture.
F.2.1. The firmware interface
F.2.1.1. BIOS-based x86 systems
The Basic Input/Output System (BIOS) is a firmware interface that controls not only the first step of the boot process, but also provides the lowest level interface to peripheral devices. On x86 systems equipped with BIOS, the program is written into read-only, permanent memory and is always available for use. When the system boots, the processor looks at the end of system memory for the BIOS program, and runs it.
Once loaded, the BIOS tests the system, looks for and checks peripherals, and then locates a valid device with which to boot the system. Usually, it checks any optical drives or USB storage devices present for bootable media, then, failing that, looks to the system’s hard drives. In most cases, the order of the drives searched while booting is controlled with a setting in the BIOS, and it looks for bootable media in the specified order.
A disk may either have a Master Boot Record (MBR) or a GUID Partition Table (GPT). The MBR is only 512 bytes in size and contains machine code instructions for booting the machine, called a boot loader, along with the partition table. The newer GPT serves the same role and allows for more and larger partitions, but is generally used on newer UEFI systems. Once the BIOS finds and loads the boot loader program into memory, it yields control of the boot process to it.
This first-stage boot loader is a small machine code binary on the MBR. Its sole job is to locate the second stage boot loader (GRUB) and load the first part of it into memory.
F.2.2. UEFI-based x86 systems
The Unified Extensible Firmware Interface (UEFI) is designed, like BIOS, to control the boot process (through boot services) and to provide an interface between system firmware and an operating system (through runtime services). Unlike BIOS, it features its own architecture, independent of the CPU, and its own device drivers. UEFI can mount partitions and read certain file systems.
When an x86 computer equipped with UEFI boots, the interface searches the system storage for a partition labeled with a specific globally unique identifier (GUID) that marks it as the EFI System Partition (ESP). This partition contains applications compiled for the EFI architecture, which might include bootloaders for operating systems and utility software. UEFI systems include an EFI boot manager that can boot the system from a default configuration, or prompt a user to choose an operating system to boot. When a bootloader is selected, manually or automatically, UEFI reads it into memory and yields control of the boot process to it.
F.3. The Boot Loader
F.3.1. The GRUB2 boot loader for x86 systems
The system loads GRUB2 into memory, as directed by either a first-stage bootloader in the case of systems equipped with BIOS, or read directly from an EFI System Partition in the case of systems equipped with UEFI.
GRUB2 has the advantage of being able to read a variety of open filesystems, as well as virtual devices such as mdadm RAID arrays and LVM .
GRUB2 mounts a designated partition and load its configuration file — /boot/grub2/grub.cfg (for BIOS) or /boot/efi/EFI/redhat/grub.cfg (for UEFI) — at boot time. Refer to Раздел E.7, «GRUB Menu Configuration File» for information on how to edit this file.
Once the second stage boot loader is in memory, it presents the user with a graphical screen showing the different operating systems or kernels it has been configured to boot (when you update the kernel, the boot loader configuration file is updated automatically). On this screen a user can use the arrow keys to choose which operating system or kernel they wish to boot and press Enter. Typically, if no key is pressed, the boot loader loads the default selection after a configurable period of time has passed.
Once the second stage boot loader has determined which kernel to boot, it locates the corresponding kernel binary in the /boot/ directory. The kernel binary is named using the following format — /boot/vmlinuz- file (where <kernel-version><kernel-version>
The bootloader is also used to pass arguments to the kernel it loads. This allows the system to operate with a specified root filesystem, enable or disable kernel modules and system features, or configure booting to a specific runlevel. For instructions on using the boot loader to supply command line arguments to the kernel, refer to Приложение E, The GRUB Boot Loader. Specific kernel parameters are described in /usr/share/doc/kernel-doc-*/Documentation/kernel-parameters.txt, which is provided by the kernel-doc package. For information on changing the runlevel at the boot loader prompt, refer Раздел E.8, «Changing Runlevels at Boot Time».
The boot loader then places one or more appropriate initramfs images into memory. The initramfs is used by the kernel to load drivers and modules necessary to boot the system.
Once the kernel and the initramfs image(s) are loaded into memory, the boot loader hands control of the boot process to systemd.
For a more detailed overview of the GRUB2 boot loader, refer to Приложение E, The GRUB Boot Loader.
F.3.2. Boot Loaders for Other Architectures
Once the kernel loads and the boot process continues, the process of bringing up the system is the same. The main difference between each architecture’s boot process is in the application used to find and load the kernel.
For example, the IBM eServer pSeries architecture uses yaboot, and the IBM System z systems use the z/IPL boot loader. Configuration of alternative bootloaders is outside the scope of this document.
F.4. The Kernel
When the kernel is loaded, it immediately initializes and configures the computer’s memory and configures the various hardware attached to the system, including all processors, I/O subsystems, and storage devices. It then loads the initramfs image(s) from disk and decompresses it into a tmpfs as the acting root filesystem. The initramfs contains programs and kernel modules required to continue booting the system, such as those used to initialize virtual devices related to file systems, like LVM or software RAID.
The kernel uses the initramfs to continue the boot process, and when the final root device is available, the initramfs is unmounted and the real root filesystem is mounted in its place.
At this point, the kernel is loaded into memory and operational. However, since there are no user applications that allow meaningful input to the system, not much can be done with the system.
To set up the user environment, the kernel executes the system daemon, systemd.
F.5. Booting with systemd
systemd is the first process started by the kernel. It replaces the venerable SysVinit program (also called init) and the newer Upstart init system. systemd coordinates the rest of the boot process and configures the environment for the user.
systemd improves on other init systems with increased parallelization. It starts the process of loading all programs it launches immediately, and manages information between interdependent programs as they load. By dissociating programs and their means of communication, each program is able to load without waiting for unrelated or even dependent programs to load first.
The Boot Process
-
A socket is created for each daemon that will be launched. The sockets allow daemons to communicate with each other and userspace programs. Because the sockets are abstracted from the processes that use them, interdependent services do not have to wait for each other to come up before sending messages to the socket.
-
New processes are started by systemd.The processes are assigned to
Control Groups, orcgroups. Processes in acgroupare isolated to resources allotted by the kernel, and the restrictions are inherited by newly spawned processes. Communication with outside processes will be handled by the kernel through sockets. -
As they load, processes connect to their sockets to receive any waiting messages and communicate with other sockets. systemd handles dependencies between programs, but does not need a preconfigured boot order. Userspace tools are loaded as the devices and services they depend on become available.
-
The user is presented with a login screen for the freshly booted Linux system.
F.6. systemd units
Functions administered by systemd are referred to as units. Each unit has a name and a type, and is described in a file that follows the convention of unit-name.type. The configuration file defines the relationship between a unit and its dependencies. Let’s look at the different types of units:
unit type |
Role |
|---|---|
socket |
These provide an endpoint for interprocess communication. Messages can be transported through files, or network or Unix sockets. Each socket has a corresponding service. |
service |
These are traditional daemons. Service units are described in simple configuration files that define the type, execution, and envoronment of the program, as well as information regarding how systemd should monitor it. |
device |
These are automatically created for all devices discovered by the kernel. These units are provided for services that are dependent on devices, or for virtual devices that are dependent on services, as with a network block device. |
mount |
These units allow systemdto monitor the mounting and unmounting of filesystems, and allow units to declare relationships with the filesystems they use. |
automount |
These units facilitate dynamic mounting of filesystems when their mountpoint is accessed. They are always paired with a mount unit. |
target |
These are logical groupings of units that are required for userspace functionality. Some are large, such as multi-user.target, which defines a full graphical user environment, or more topical, such as bluetooth.target, which provides the services a user expects to be available when using Bluetooth devices. |
snapshot |
snapshots allow the user to save the state of all units with the command systemctl snapshot and return to that state with systemctl isolate. This is useful for temporary adjustments that don’t merit reconfiguration of a target. |
Although systemd units will ultimately be available for all services, it retains support for legacy init scripts. units are dynamically created for services without native configurations, with dependencies inferred from LSB headers in the script. There are drawbacks to this method, so it is best to have a native systemd unit file.
The function and usage of legacy init systems and their configuration files is outside of the scope of this document.
F.7. systemd targets
systemd replaces traditional SysVinit runlevels with predefined groups of units called targets. Targets are usually defined according to the intended use of the system, and ensure that required dependencies for that use are met.
The system boots to the target described in /lib/systemd/system/default.target. This file is a symlink that can be changed when booting to a different target is desired. Appending systemd.unit= to the kernel’s boot arguments will override the default target.
custom.target
The following table shows some standard preconfigured targets, the sysVinit runlevels they resemble and the use case they address.
Таблица F.1. Predefined systemd targets
| Runlevel | Target | Usage |
|---|---|---|
| 1,single | rescue.target | single user mode, for recovery of critical system components or configuration |
| 3 | multi-user.target | Non-graphical multi-user console access, via local TTYs or network. |
| 5 | graphical.target | A GUI session. Typically provides the user with a fully featured desktop environment. |
| 4 |
custom.target
|
systemd allows any number of custom defined targets. |
F.8. Running Additional Programs at Boot Time
Historically, those wishing to execute additional programs at boot could insert commands into /etc/rc.local. While systemd will use this file, writing unit files can be simple, effective, and much more flexible. Consider this example unit file:
Пример F.1. An example of a simple unit file
#cat /lib/systemd/system/example.service
[Unit]
Description=A service that executes a user script on startup
Wants=network.target


[Service]
ExecStart=/opt/domain/bin/example
Type=oneshot

[Install]
WantedBy=multi-user.target
Alias=illustration.service
The [Unit] section has a short description, and dependencies on other targets. The various types of dependencies and attributes used in this section are described in man systemd.unit
The [Service] section establishes the actual command to be executed, and describes how systemd should handle the process. Options for this section are described in man systemd.service.
The [Install] sets relationships with targets and similar behaviors. Options for this section are are also described in man systemd.unit
F.9. Administering services with systemd
The move to systemd also brought new administration utilities to Fedora. Administrators have the ability to start, stop, and restart services as with sysVinit, but also have access to much more information and functionality.
systemctl fully replaces traditional utilites like service and chkconfig. While some services can still be administered with these legacy commands, all services can be administered with systemctl.
/usr/bin/systemctl does most of the heavy lifting when starting and stopping services, or configuring them to run at boot. Let us look at what systemctl can do:
F.9.1. Checking up on services
[root@fedora ~]# systemctl status sshd.service
sshd.service - OpenSSH server daemon
	  Loaded: loaded (/usr/lib/systemd/system/sshd.service; enabled)
	  Active: inactive (dead) since Thu, 20 Sep 2012 22:56:55 -0600; 17s ago
	 Process: 971 ExecStart=/usr/sbin/sshd -D $OPTIONS (code=exited, status=0/SUCCESS)
	 Process: 941 ExecStartPre=/usr/sbin/sshd-keygen (code=exited, status=0/SUCCESS)
	  CGroup: name=systemd:/system/sshd.service

Sep 20 19:17:02 fqdn.fedora.lan sshd[23515]: pam_unix(sshd:auth): authentication ...3
Sep 20 19:17:03 fqdn.fedora.lan sshd[23515]: Failed password for invalid user usr...2
Sep 20 19:17:04 fqdn.fedora.lan sshd[23515]: Received disconnect from 192.168.1.....]
Sep 20 19:17:06 fqdn.fedora.lan sshd[23517]: Invalid user db2inst1 from 192.168.1...]
Sep 20 19:17:06 fqdn.fedora.lan sshd[23517]: input_userauth_request: invalid user...]
Sep 20 19:17:06 fqdn.fedora.lan sshd[23517]: pam_unix(sshd:auth): check pass; use...n
Sep 20 19:17:06 fqdn.fedora.lan sshd[23517]: pam_unix(sshd:auth): authentication ...3
Sep 20 19:17:08 fqdn.fedora.lan sshd[23517]: Failed password for invalid user db2...2
Sep 20 19:17:08 fqdn.fedora.lan sshd[23517]: Received disconnect from 192.168.1.....]
Sep 20 22:56:55 fqdn.fedora.lan sshd[971]: Received signal 15; terminating.
The command systemctl status can tell us much more than if the service is running. In this example with sshd, we can see that the service is sshd.serviceenabled but not active. We know how the service was invoked, what the PID was, and when it was stopped. We can also see the last portion of the service’s log.
F.9.2. Starting and stopping services
systemctl start sshd.servicesystemctl stop sshd.servicesystemctl restart sshd.service
These commands will start, stop, and restart the service. The commands may not report the success or failure of the intended action, so we can check the status of the service with systemctl status. systemctl might report helpful information about a misbehaving application in the status, but the application’s own logs are more relevant.
F.9.3. Running services automatically
systemctl enable sshd.servicesystemctl disable sshd.service
A service that is enabled will start automatically when the system boots. A service that is disabled will not start at boot. These commands are manipulating symbolic links in /lib/systemd/system/ and /lib/systemd/user/ while retaining the relationships with other units established in the .service file. While the symlinks can be manipulated manually, systemctl also rebuilds the systemd configuration, saving the extra step of invoking systemctl daemon-reload.
F.9.4. Killing and Masking services
systemctl kill sshd.servicesystemctl kill -s USR1 daemon.service
With the first command, systemd kills all processes and child processes of the sshd service. The second command demonstrates how any Unix signal can be sent to the processes of a service.
systemctl mask sshd.service
Masking a service prevents the service from being started manually or automatically. For this example, systemctl is creating a symlink from /etc/systemd/system/sshd.service to /dev/null. Targets in /etc/systemd override those provided by packages in /lib/systemd. systemd recognizes the symlink and will not start the service.
F.9.5. Getting more from systemd
systemctl works with not only services but all other unit types, and is a valuable tool when monitoring or troubleshooting a system. It can list all known units, limit the results to a single unit type, show only failed units, or examine unit relationships. The table below shows some useful systemctl features and should help system administrators replace their old workflow in sysVinit.
Таблица F.2. systemd command reference
sysVinit command
|
systemd command
|
Notes |
|---|---|---|
service sshd start
|
systemctl start sshd.service
|
Used to start a service (not reboot persistent) |
service sshd stop
|
systemctl stop sshd.service
|
Used to stop a service. (not reboot persistent) |
service sshd restart
|
systemctl restart sshd.service
|
Used to start and stop a service. |
service sshd reload
|
systemctl reload sshd.service
|
When supported, reloads the config file without interrupting pending operations. |
service sshd condrestart
|
systemctl condrestart sshd.service
|
Restarts if the service is already running. |
service sshd status
|
systemctl status sshd.service
|
Tells whether a service is currently running. |
ls /etc/rc.d/init.d/
|
systemctl list-unit-files --type=service
|
Lists all available services. |
chkconfig sshd on
|
systemctl enable sshd.service
|
Always run the service at this target (runlevel.) |
chkconfig sshd off
|
systemctl disable sshd.service
|
Do not automatically run the service at this target (runlevel.) |
chkconfig --list
|
systemctl list-units -t service --all
|
Print a table of available services and their status. |
chkconfig sshd --list
|
ls /etc/systemd/system/*.wants/sshd.service
|
Lists the targets that will include the service. |
chkconfig sshd --add
|
systemctl daemon-reload
|
Used when you create a service file or modify any configuration. |
telinit 3
|
systemctl isolate multi-user.target
|
Move system into another target (change runlevels.) |
[no comparable command]
|
systemctl show -p "Wants" multi-user.target
|
Lists units pulled in by a given target. |
[no comparable command]
|
systemctl show -p "After" sshd.service
|
Shows dependent services and other targets. |
[no comparable command]
|
systemd --test --system --unit=multi-user.target
|
Simulates booting the system to a given target |
[no comparable command]
|
systemd-analyze plot > boot.svg
|
Generates a diagnostically useful graphical representation of the boot process. |
ps xawf -eo pid,user,cgroup,args
|
systemd-cgls
|
Display control group process tree. |
Logging the Installation
Anaconda tracks all of its activities in logs. This includes:
-
Changing installation steps. The steps roughly correspond to the different screens in the graphical installer.
-
Detection and manipulation of storage devices.
-
Installation media detection.
-
Network initialization.
-
Kernel messages
-
Calls to critical methods within anaconda.
-
Calls to external programs.
G.1. Log files and formats
G.1.1. Logging on the installed system
During the installation, logs are stored in the /tmp directory. After the installation, the files can be found in the /var/log/anaconda directory. Another set of logs is stored in in the /root directory of the target filesystem, and can be found at /mnt/sysimage/root during the installation. Some logs are also written to the virtual terminals.
Таблица G.1. anaconda log files
| Logs in /tmp, /var/log/anaconda | ||
|---|---|---|
| Filename | TTY | Usage |
anaconda.log
|
/dev/tty3
|
General installation information, including the step changes. |
storage.log
|
/dev/tty3
|
Detecton and manipulation of storage devices, including RAID, LVM, and partitioning actions. |
program.log
|
Calls to external programs, and their output. | |
syslog
|
/dev/tty4
|
Messages from the kernel and external programs, such as NetworkManager. |
yum.log
|
Yum‘s internal log. |
| Logs in /root, /mnt/sysimage/root | |
|---|---|
| Filename | Usage |
install.log
|
The log of the package installation process |
install.log.syslog
|
Messages from installation chroot logged through the system’s syslog. Mostly information about users and groups created during yum’s package installation. |
G.2. Remote logging with rsyslog
G.3. Remote logging via virtio
Other Technical Documentation
Системы Fedora и программа anaconda используют стандартный набор программных компонентов. За подробной информацией обратитесь к перечисленным ниже сайтам.
- Boot Loader
- Disk Partitioning
- Storage Management
-
Logical Volume Management (LVM) provides administrators with a range of facilities to manage storage. By default, the Fedora installation process formats drives as LVM volumes. Refer to http://www.tldp.org/HOWTO/LVM-HOWTO/ for more information.
- Audio Support
-
The Linux kernel used by Fedora incorporates
PulseAudio audio server. For more information about PulseAudio, refer to the project documentation: http://www.pulseaudio.org/wiki/Documentation.
- Graphics System
-
Both the installation system and Fedora use the
Xorgsuite to provide graphical capabilities. Components ofXorgmanage the display, keyboard and mouse for the desktop environments that users interact with. Refer to http://www.x.org/ for more information. - Remote Displays
-
Fedora and
anacondaincludeVNC (Virtual Network Computing) software to enable remote access to graphical displays. For more information about VNC, refer to the documentation on the RealVNC Web site: http://www.realvnc.com/documentation.html.
- Command-line Interface
- Remote System Access
-
Fedora incorporates the
OpenSSH suite to provide remote access to the system. The SSH
service enables a number of functions, which include access to the command-line from other systems, remote command execution, and network file transfers. During the installation process
anacondamay use thescp
feature of OpenSSH to transfer crash reports to remote systems. Refer to the OpenSSH Web site for more information: http://www.openssh.com/. - Access Control
-
SELinux предоставляет возможности принудительного управления доступом (MAC, Mandatory Access Control) поверх стандартных механизмов защиты Linux. Подробную информацию можно найти по адресу http://docs.fedoraproject.org/selinux-guide.
- Firewall
-
The Linux kernel used by Fedora incorporates the
netfilterframework to providefirewall features. The Netfilter project website provides documentation for both
netfilter, and theiptablesadministration facilities: http://netfilter.org/documentation/index.html. - Software Installation
- Виртуализация
-
Virtualization provides the capability to simultaneously run multiple operating systems on the same computer. Fedora also includes tools to install and manage the secondary systems on a Fedora host. You may select virtualization support during the installation process, or at any time thereafter. Refer to the Fedora Virtualization Guide available from http://docs.fedoraproject.org/ for more information.
Contributors and production methods
I.1. Contributors
-
Jean-Paul Aubry (translator — French)
-
David Barzilay (translator — Brazilian Portuguese)
-
Subhransu Behera (translator — Oriya)
-
Michał Bentkowski (translator — Polish)
-
Rahul Bhalerao (translator — Marathi)
-
Runa Bhattacharjee (translator — Bengali (India))
-
Vitor Vilas Boas (translator — Brazilian Portuguese)
-
Lucas Brausch (translator — German)
-
Guido Caruso (translator — Italian)
-
Guillaume Chardin (translator — French)
-
Chester Cheng (translator — Chinese (Traditional))
-
Glaucia Cintra (translator — Brazilian Portuguese)
-
Fabien Decroux (translator — French)
-
Claudio Rodrigo Pereyra Diaz (translator — Spanish)
-
Felix I (translator — Tamil)
-
Tony Fu (translator — Chinese (Simplified))
-
Paul Gampe (translator — Japanese)
-
Sree Ganesh (translator — Telugu)
-
Kiyoto James Hashida (translator — Japanese)
-
Severin Heiniger (translator — German)
-
Xi Huang (translator — Chinese (Simplified))
-
Ryuichi Hyugabaru (translator — Japanese)
-
Jayaradha N (translator — Tamil)
-
Chris Johnson (writer)
-
Eunju Kim (translator — Korean)
-
Michelle J Kim (translator — Korean)
-
Alexey Kostyuk (translator — Russian)
-
Daniela Kugelmann (translator — German)
-
Florent Le Coz (translator — French)
-
Erick Lemon (writer)
-
Andy Liu (translator — Chinese (Traditional))
-
Wei Liu (translator — Chinese (Simplified))
-
Yelitza Louze (translator — Spanish)
-
Gan Lu (translator — Chinese (Simplified))
-
Noriko Mizumoto (translator — Japanese)
-
Jeremy W. Mooney (writer)
-
Enikő Nagy (translator — Hungarian)
-
Igor Nestorović (translator — Serbian)
-
John Nguyen (writer)
-
Manuel Ospina (translator — Spanish)
-
Janis Ozolins (translator — Latvian)
-
Ankit Patel (translator — Gujarati)
-
Ani Peter (translator — Malayalam)
-
José Nuno Pires (translator — Portuguese)
-
Piotr Podgórski (translator — Polish)
-
Yulia Poyarkova (translator — Russian)
-
Shankar Prasad (translator — Kannada)
-
Rajesh Ranjan (translator — Hindi)
-
Tim Richert (translator — German)
-
Audrey Simons (translator — French)
-
Keld Simonsen (translator — Danish)
-
Espen Stefansen (translator — Norwegian Bokmål)
-
Timo Trinks (translator — German)
-
Göran Uddeborg (translator — Swedish)
-
Francesco Valente (translator — Italian)
-
Sarah Saiying Wang (translator — Chinese (Simplified))
-
Elizabeth Ann West (editor)
-
Tyronne Wickramarathne (translator — Sinhalese)
-
Ben Wu (translator — Chinese (Traditional))
-
Xiaofan Yang (translator — Chinese (Simplified))
-
Yuan Yijun (translator — Chinese (Simplified))
I.2. Production methods
Writers produce the Install Guide directly in DocBook XML in a revision control repository. They collaborate with other subject matter experts during the beta release phase of Fedora to explain the installation process. The editorial team ensures consistency and quality of the finished guide. At this point, the team of translators produces other language versions of the release notes, and then they become available to the general public as part of Fedora. The publication team also makes the guide, and subsequent errata, available via the Web.
Revision History
| История переиздания | ||
|---|---|---|
| Издание 1.0-0 | Thu Apr 26 2012 | Jack Reed |
|
Updates for Fedora 17 |
Предметный указатель
Символы
- /boot/ partition
-
- recommended partitioning, Recommended Partitioning Scheme
- /root/install.log
-
- install log file location, The Progress Hub
- /var/ partition
-
- recommended partitioning, Recommended Partitioning Scheme
- Разбиение диска на разделы
-
- добавление разделов, Adding Partitions
- аварийный режим, Booting into Emergency Mode
- восстановление системы, Basic System Recovery
-
- типичные проблемы, Common Problems
-
- аппаратные и программные проблемы, Hardware/Software Problems
- переустановка загрузчика, Reinstalling the Boot Loader
- выбор
-
- пакетов, Software Selection
- диагностика проблем, Диагностика проблем при установке в системах Intel и AMD
-
- в процессе установки
-
- завершение создания разделов, Other Partitioning Problems
- использование свободного пространства на диске, Using Remaining Space
- загрузка, Невозможно загрузить Fedora
-
- карты RAID, Are You Unable to Boot With Your RAID Card?
- ошибка signal 11, Is Your System Displaying Signal 11 Errors?
- начало установки, Trouble Beginning the Installation
-
- буфер кадров, отключение, Problems with Booting into the Graphical Installation
- недоступен графический метод установки, Problems with Booting into the Graphical Installation
- после установки, Problems After Installation
-
- ОЗУ не определяется, Is Your RAM Not Being Recognized?
- авторизация, Problems When You Try to Log In
- графический экран GRUB, Trouble With the Graphical GRUB Screen on an x86-based System?
- загрузка графического окружения, Booting into a Graphical Environment
- загрузка окружения GNOME или KDE, Booting into a Graphical Environment
- загрузка системы X Window, Booting into a Graphical Environment
- принтеры, Your Printer Does Not Work
- сбои сервера X, Problems with the X Server Crashing and Non-Root Users
- система X Window, Problems with the X Window System (GUI)
- диск восстановления, Booting Your Computer with the Rescue Mode
- добавление разделов, Adding Partitions
-
- тип файловой системы, File System Types
- дополнительные разделы, Partitions within Partitions — An Overview of Extended Partitions
- жесткий диск
-
- введение в разделы, Partitions: Turning One Drive Into Many
- общие понятия, Hard Disk Basic Concepts
- разбиение, An Introduction to Disk Partitions
- расширенные разделы, Partitions within Partitions — An Overview of Extended Partitions
- типы разделов, Partitions: Turning One Drive Into Many
- форматы файловой системы, It is Not What You Write, it is How You Write It
- журналы, Диагностика проблем при установке в системах Intel и AMD
- загрузка
-
- аварийный режим, Booting into Emergency Mode
- монопольный режим, Booting into Single-User Mode
- режим восстановления, Booting into Rescue Mode
- загрузчик, Upgrading Boot Loader Configuration , Настройка загрузчика на платформах x86, AMD64 и Intel 64
-
- (см. также GRUB)
- GRUB, Настройка загрузчика на платформах x86, AMD64 и Intel 64
- MBR, Advanced Boot Loader Configuration
- настройка, Настройка загрузчика на платформах x86, AMD64 и Intel 64
- обновление, Upgrading Boot Loader Configuration
- пароль, Настройка загрузчика на платформах x86, AMD64 и Intel 64
- менеджер загрузки OS/2, Advanced Boot Loader Configuration
- модем, Network configuration
- монопольный режим, Booting into Single-User Mode
- настройка
-
- GRUB, Настройка загрузчика на платформах x86, AMD64 и Intel 64
- оборудование, System Specifications List
- часовой пояс, Configuring date and time
- часы, Configuring date and time
- обновление, Determining Whether to Upgrade or Re-Install
-
- добавление файла подкачки, Determining Whether to Upgrade or Re-Install
- оборудование
-
- настройка, System Specifications List
- совместимость, Is Your Hardware Compatible?
- образы ISO
-
- загрузка, Получение Fedora
- обратная связь
-
- контактная информация для этого руководства, Нам нужны ваши отзывы!
- основная загрузочная запись, Настройка загрузчика на платформах x86, AMD64 и Intel 64
-
- переустановка, Reinstalling the Boot Loader
- пакеты
-
- выбор, Software Selection
- группы, Software Selection
-
- выбор, Software Selection
- установка, Software Selection
- пароль
-
- загрузчик, Настройка загрузчика на платформах x86, AMD64 и Intel 64
- установка пароля root, Set the Root Password
- пароль root, Set the Root Password
- пароль загрузчика, Настройка загрузчика на платформах x86, AMD64 и Intel 64
- переустановка, Determining Whether to Upgrade or Re-Install
- программа управления разделами parted, создание новых разделов.
- программу обновления, Updating Your System
- разбиение
-
- введение, Partitions: Turning One Drive Into Many
- выделение пространства для разделов, Выделение места для Fedora
- добавление разделов
-
- тип файловой системы, File System Types
- дополнительные разделы, Partitions within Partitions — An Overview of Extended Partitions
- другие операционные системы, Disk Partitions and Other Operating Systems
- имена разделов, Partition Naming Scheme
- использование занятого раздела, Using Free Space from an Active Partition
- использование незанятого раздела, Using Space from an Unused Partition
- использование свободного пространства, Using Unpartitioned Free Space
- нумерация разделов, Partition Naming Scheme
- основные понятия, An Introduction to Disk Partitions
- основные разделы, Partitions: Turning One Drive Into Many
- создание новых разделов
-
- тип файловой системы, File System Types
- создание разделов, Adding Partitions
- типы разделов, Partitions: Turning One Drive Into Many
- точки подключения и, Disk Partitions and Mount Points
- раздел
-
- дополнительный, Partitions within Partitions — An Overview of Extended Partitions
- режим восстановления
-
- доступные утилиты, Booting into Rescue Mode
- определение, Booting into Rescue Mode
- типичные проблемы
-
- забыли пароль root, Root Password
- режим тестирования памяти, Загрузка режима тестирования памяти (ОЗУ)
- создание разделов
-
- с разрушение, Using Free Space from an Active Partition
- схема разделов
-
- без разрушения, Using Free Space from an Active Partition
- типы файловой системы, File System Types
- точки подключения
-
- разделы и, Disk Partitions and Mount Points
- уровень выполнения 1, Booting into Single-User Mode
- установка PXE
-
- выполнение, Performing the PXE Installation
- настройка, PXE Boot Configuration
- настройка сетевого сервера, Setting up the Network Server
- обзор, Manually configure a PXE server
- сообщение загрузки, произвольное, Adding a Custom Boot Message
- установка пакетов, Software Selection
- установка с жесткого диска, Installing from a Hard Drive
-
- подготовка к, Preparing for a Hard Drive Installation
- устройства хранения
-
- специализированные устройства хранения, Устройства хранения
- стандартные устройства хранения, Устройства хранения
- файл подкачки
-
- обновление, Determining Whether to Upgrade or Re-Install
- файловая система
-
- форматы, обзор, It is Not What You Write, it is How You Write It
- файловые системы
-
- ext2, Installing from a Hard Drive
- ext3, Installing from a Hard Drive
- ext4, Installing from a Hard Drive
- vfat, Installing from a Hard Drive
- часовой пояс
-
- настройка, Configuring date and time
- часы, Configuring date and time
- шаги
-
- загрузка с CD или DVD, Choose a boot method
- совместимость оборудования, Is Your Hardware Compatible?
B
- Basic Input/Output System (см. BIOS)
- BIOS
-
- definition of, BIOS-based x86 systems
-
- (см. также boot process)
- BIOS (Basic Input/Output System), Booting the Installer
- BitTorrent, BitTorrent
-
- seeding, BitTorrent
- boot loader
-
- installing on boot partition, Advanced Boot Loader Configuration
- boot loaders, GRUB
-
- (см. также GRUB)
- definition of, The GRUB Boot Loader
- types of
-
- GRUB, Boot Loaders and System Architecture
- yaboot, Boot Loaders and System Architecture
- z/IPL, Boot Loaders and System Architecture
- boot options, Additional Boot Options
-
- mediacheck, Additional Boot Options
- serial mode, Additional Boot Options
-
- UTF-8, Additional Boot Options
- text mode, Additional Boot Options
- boot process, Boot Process, Init, and Shutdown, A Detailed Look at the Boot Process
-
- (см. также boot loaders)
- chain loading, GRUB and the boot process on BIOS-based x86 systems, GRUB and the boot process on UEFI-based x86 systems
- direct loading, GRUB and the boot process on BIOS-based x86 systems, GRUB and the boot process on UEFI-based x86 systems
- for x86, A Detailed Look at the Boot Process
- stages of, The Boot Process, A Detailed Look at the Boot Process, Booting with systemd
-
- boot loader, The GRUB2 boot loader for x86 systems
- EFI shell, UEFI-based x86 systems
- kernel, The Kernel
- booting
-
- installation program
-
- x86, AMD64 and Intel 64, Booting the Installation Program on x86, AMD64, and Intel 64 Systems
C
- canceling the installation, Installing from DVD
- CD/DVD media
-
- booting, Booting the Installer
- downloading, Получение Fedora
-
- (см. также ISO images)
- making, Making Media
-
- (см. также ISO images)
- cgroups
-
- use by systemd, systemd targets
- Chain loading, Окно выбора устройств хранения, Assign Storage Devices , Disk Partitioning Setup, Advanced Boot Loader Configuration
- chkconfig (см. systemctl)
- configuration
-
- clock, Configuring date and time
- consoles, virtual, A Note about Virtual Consoles
D
- DHCP (Dynamic Host Configuration Protocol), Network configuration
- disk partitioning, Disk Partitioning Setup
- disk space, Достаточно ли дискового пространства?
- drivers
-
- adding
-
- rescue mode, Using rescue mode to fix or work around driver problems
- removing
-
- rescue mode, Using rescue mode to fix or work around driver problems
- replacing
-
- rescue mode, Using rescue mode to fix or work around driver problems
- DVD
-
- ATAPI, Installing from DVD
- IDE, Installing from DVD
- installation from, Installing from DVD
- SCSI, Installing from DVD
E
- EFI shell, UEFI-based x86 systems
-
- (см. также boot process)
- Encryption
-
- Backup passphrases
-
- Creating backup passphrases, Creating and Saving Backup Passphrases
- Saving backup passphrases, Creating and Saving Backup Passphrases
- Passphrases
-
- Saving passphrases, Saving Passphrases
- ext2 (см. файловые системы)
- ext3 (см. файловые системы)
- ext4 (см. файловые системы)
- Extensible Firmware Interface shell (см. EFI shell)
F
- FCoE
-
- installation, Advanced Storage Options
- firewall
-
- documentation, Other Technical Documentation
- Firstboot , Firstboot
-
- via Kickstart, Kickstart Options
- FTP
-
- installation, Preparing for a Network Installation, Installing via FTP or HTTP
G
- GPT
-
- definition of, BIOS-based x86 systems
- GRUB, Настройка загрузчика на платформах x86, AMD64 и Intel 64, Boot Loaders and System Architecture
-
- (см. также boot loaders)
- additional resources, Additional Resources
-
- installed documentation, Installed Documentation
- useful websites, Useful Websites
- boot process, GRUB and the boot process on BIOS-based x86 systems, GRUB and the boot process on UEFI-based x86 systems
- Changing Runlevels at Boot Time, Changing Runlevels at Boot Time
- changing runlevels with, GRUB Interfaces
- commands, GRUB Commands
- configuration file
-
- /boot/grub/grub.conf , Configuration File Structure
- structure, Configuration File Structure
- definition of, GRUB
- documentation, Other Technical Documentation
- features, Features of GRUB
- installing, Installing GRUB
- interfaces, GRUB Interfaces
-
- command line, GRUB Interfaces
- menu, GRUB Interfaces
- menu entry editor, GRUB Interfaces
- order of, Interfaces Load Order
- menu configuration file, GRUB Menu Configuration File
-
- directives, Configuration File Directives
- terminology, GRUB Terminology
-
- devices, Device Names
- files, File Names and Blocklists
- root file system, The Root File System and GRUB
- альтернативы, Alternative Boot Loaders
- настройка, Настройка загрузчика на платформах x86, AMD64 и Intel 64
- grub.conf , Configuration File Structure
-
- (см. также GRUB)
- GRUB2, The GRUB2 boot loader for x86 systems
-
- (см. также boot loaders)
- role in boot process, The GRUB2 boot loader for x86 systems
- GUID Partition Table (см. GPT)
I
- install log file
-
- /root/install.log , The Progress Hub
- installation
-
- aborting, Installing from DVD
- disk space, Достаточно ли дискового пространства?
- DVD, Installing from DVD
- FTP, Preparing for a Network Installation, Installing via FTP or HTTP
- GUI, Installing using anaconda
- hard drive, Preparing for a Hard Drive Installation, Installing from a Hard Drive
- HTTP, Preparing for a Network Installation, Installing via FTP or HTTP
- keyboard navigation, Using the Keyboard to Navigate
- kickstart (см. kickstart installations)
- mediacheck, Additional Boot Options
- method
-
- DVD, Selecting an Installation Method
- hard drive, Selecting an Installation Method
- NFS image, Selecting an Installation Method
- selecting, Selecting an Installation Method
- URL, Selecting an Installation Method
- network, Preparing for a Network Installation
- NFS, Preparing for a Network Installation, Installing via NFS
-
- server information, Installing via NFS
- partitioning, Creating a Custom Layout or Modifying the Default Layout
- program
-
- graphical user interface, The Graphical Installation Program User Interface
- starting, Starting the Installation Program
- virtual consoles, A Note about Virtual Consoles
- serial mode, Additional Boot Options
-
- UTF-8, Additional Boot Options
- starting, Installing from DVD
- text mode, Additional Boot Options
- installation method
-
- selecting, Installation Method
- installation program
-
- x86, AMD64 and Intel 64
-
- booting, Booting the Installation Program on x86, AMD64, and Intel 64 Systems
- IPv4, Network configuration
- iscsi
-
- installation, Advanced Storage Options
- ISO images
-
- downloading, Download Files
K
- kernel
-
- role in boot process, The Kernel
- kernel options, Kernel Options
- keyboard
-
- configuration, Keyboard Configuration
- navigating the installation program using, Using the Keyboard to Navigate
- keymap
-
- selecting language, Language Selection, Language Selection
- selecting type of keyboard, Keyboard Configuration
- Kickstart, Automating the Installation with Kickstart
- kickstart
-
- how the file is found, Starting a Kickstart Installation
- Kickstart Configurator , Kickstart Configurator
-
- %post script, Post-Installation Script
- %pre script, Pre-Installation Script
- authentication options, Authentication
- basic options, Basic Configuration
- boot loader, Boot Loader Options
- boot loader options, Boot Loader Options
- Display configuration, Display Configuration
- firewall configuration, Firewall Configuration
- installation method selection, Installation Method
- interactive, Basic Configuration
- keyboard, Basic Configuration
- language, Basic Configuration
- network configuration, Network Configuration
- package selection, Package Selection
- partitioning, Partition Information
-
- software RAID, Creating Software RAID Partitions
- preview, Kickstart Configurator
- reboot, Basic Configuration
- root password, Basic Configuration
-
- encrypt, Basic Configuration
- saving, Saving the File
- SELinux configuration, SELinux Configuration
- text mode installation, Basic Configuration
- time zone, Basic Configuration
- kickstart file
-
- %include , Kickstart Options
- %post, Post-installation Script
- %pre, Pre-installation Script
- auth , Kickstart Options
- authconfig , Kickstart Options
- autopart , Kickstart Options
- autostep , Kickstart Options
- bootloader , Kickstart Options
- CD-ROM-based, Creating Kickstart Boot Media
- clearpart , Kickstart Options
- cmdline , Kickstart Options
- creating, Kickstart Options
- device , Kickstart Options
- diskette-based, Creating Kickstart Boot Media
- driverdisk , Kickstart Options
- firewall , Kickstart Options
- firstboot , Kickstart Options
- flash-based, Creating Kickstart Boot Media
- format of, Creating the Kickstart File
- graphical , Kickstart Options
- halt , Kickstart Options
- ignoredisk , Kickstart Options
- include contents of another file, Kickstart Options
- install , Kickstart Options
- installation methods, Kickstart Options
- iscsi , Kickstart Options
- iscsiname , Kickstart Options
- keyboard, Kickstart Options
- lang , Kickstart Options
- langsupport , Kickstart Options
- logging , Kickstart Options
- logvol , Kickstart Options
- mediacheck , Kickstart Options
- mouse , Kickstart Options
- network , Kickstart Options
- network-based, Making the Kickstart File Available on the Network, Making the Installation Tree Available
- options, Kickstart Options
-
- partitioning examples, Advanced Partitioning Example
- package selection specification, Package Selection
- part , Kickstart Options
- partition , Kickstart Options
- post-installation configuration, Post-installation Script
- poweroff , Kickstart Options
- pre-installation configuration, Pre-installation Script
- raid , Kickstart Options
- reboot , Kickstart Options
- rootpw , Kickstart Options
- selinux , Kickstart Options
- services , Kickstart Options
- shutdown , Kickstart Options
- skipx , Kickstart Options
- sshpw , Kickstart Options
- text , Kickstart Options
- timezone , Kickstart Options
- upgrade , Kickstart Options
- user , Kickstart Options
- vnc , Kickstart Options
- volgroup , Kickstart Options
- what it looks like, Creating the Kickstart File
- xconfig , Kickstart Options
- zerombr , Kickstart Options
- kickstart installations, Kickstart Installations
-
- CD-ROM-based, Creating Kickstart Boot Media
- diskette-based, Creating Kickstart Boot Media
- file format, Creating the Kickstart File
- file locations, Making the Kickstart File Available
- flash-based, Creating Kickstart Boot Media
- installation tree, Making the Installation Tree Available
- LVM, Kickstart Options
- network-based, Making the Kickstart File Available on the Network, Making the Installation Tree Available
- starting, Starting a Kickstart Installation
-
- from a boot CD-ROM, Starting a Kickstart Installation
L
- language
-
- configuration, Language Selection, Language Selection
- log files
-
- kickstart installations, What are Kickstart Installations?
- LVM
-
- documentation, Other Technical Documentation
- with kickstart, Kickstart Options
- группа томов, Understanding LVM
- логический том, Understanding LVM
- понимание, Understanding LVM
- физический том, Understanding LVM
M
- Master Boot Record, Не удается загрузить Fedora (см. MBR)
- MBR
-
- definition of, A Detailed Look at the Boot Process, BIOS-based x86 systems
-
- (см. также boot loaders)
- (см. также boot process)
- установка загрузчика в, Advanced Boot Loader Configuration
- mirror, Зеркало
- Multipath devices
-
- Mixing with non-multipath devices, Disk Partitioning Setup
N
- network
-
- installations
-
- FTP, Installing via FTP or HTTP
- HTTP, Installing via FTP or HTTP
- NFS, Installing via NFS
- network installation
-
- preparing for, Preparing for a Network Installation
- NFS
-
- installation, Preparing for a Network Installation, Installing via NFS
- NTFS partitions
-
- resizing, Prepare for Installation
- NTP (Network Time Protocol), Configuring date and time, Date and Time
O
- OpenSSH, Other Technical Documentation
-
- (см. также SSH)
- OS/400, Boot Loaders and System Architecture
-
- (см. также boot loaders)
P
- partitioning, Creating a Custom Layout or Modifying the Default Layout
-
- automatic, Disk Partitioning Setup
- how many partitions, Partitions: Turning One Drive Into Many, How Many Partitions?
- recommended, Recommended Partitioning Scheme
- Partitioning , Creating a Custom Layout or Modifying the Default Layout
- Passphrases
-
- Block device encryption passphrases
-
- Creating backup block device encryption passphrases, Creating and Saving Backup Passphrases
- Saving backup block device encryption passphrases, Creating and Saving Backup Passphrases
- Saving block device encryption passphrases, Saving Passphrases
- program.log, Диагностика проблем при установке в системах Intel и AMD
- programs
-
- running at boot time, Running Additional Programs at Boot Time
- PulseAudio, Other Technical Documentation
- PXE (Pre-boot eXecution Environment), Booting from the Network using PXE
R
- RAID
-
- hardware, RAID and Other Disk Devices
- kickstart installations, Kickstart Options
-
- Kickstart Configurator, Creating Software RAID Partitions
- software, RAID and Other Disk Devices
- system unbootable after disk failure, Installing GRUB
- проблемы при загрузке с устройства, подключенного к RAID-карте, Are You Unable to Boot With Your RAID Card?
- rc.local
-
- modifying, Running Additional Programs at Boot Time
- rc.serial , Running Additional Programs at Boot Time
-
- (см. также setserial command)
- removing
-
- Fedora
-
- from x86-based systems, Удаление Fedora
- rescue mode, Rescue Mode, Booting Your Computer with the Rescue Mode
- root / partition
-
- recommended partitioning, Recommended Partitioning Scheme
- runlevels, systemd targets
-
- changing with GRUB, GRUB Interfaces
S
- scp, Other Technical Documentation
-
- (см. также SSH)
- screenshots
-
- during installation, Screenshots during installation
- SELinux
-
- документация, Other Technical Documentation
- serial console, Configuring the Interface
- serial ports (см. setserial command)
- service command (см. systemctl)
- setserial command
-
- configuring, Running Additional Programs at Boot Time
- ssh
-
- starting ssh at boot time, Enabling Remote Access with ssh
- SSH (Secure SHell)
-
- documentation, Other Technical Documentation
- starting
-
- installation, Starting the Installation Program, Installing from DVD
- steps
-
- disk space, Достаточно ли дискового пространства?
- storage.log, Диагностика проблем при установке в системах Intel и AMD
- swap partition
-
- recommended partitioning, Recommended Partitioning Scheme
- syslog, Диагностика проблем при установке в системах Intel и AMD, Logging to a Remote System During the Installation
- system recovery
-
- adding drivers, Using rescue mode to fix or work around driver problems
- common problems
-
- unable to boot into Fedora, Не удается загрузить Fedora
- removing drivers, Using rescue mode to fix or work around driver problems
- replacing drivers, Using rescue mode to fix or work around driver problems
- system-config-kickstart (см. Kickstart Configurator )
- systemctl, Administering services with systemd
- systemd
-
- administration utilites, Administering services with systemd
- role in boot process, Booting with systemd
- targets, systemd targets
- units, systemd units
T
- text interface, Configuring the Interface
- tftp , Starting the tftp Server
- traceback messages
-
- saving traceback messages without removable media, Сохранение сообщений отладки
- troubleshooting
-
- after the installation
-
- Apache HTTP Server stops responding during startup, Apache HTTP Server or Sendmail stops responding during startup
- GRUB command line, Blocked by a GRUB command line after upgrading?
- Sendmail stops responding during startup, Apache HTTP Server or Sendmail stops responding during startup
- during the installation, Проблемы во время установки
-
- No devices found to install Fedora error message, Ошибка: Не найдены устройства для установки Fedora
- partition tables, Trouble with Partition Tables
- saving traceback messages without removable media, Сохранение сообщений отладки
- DVD failure
-
- DVD verification, Additional Boot Options
U
- UEFI (Unified Extensible Firmware Interface), Booting the Installer
- uninstalling
-
- from x86-based systems, Удаление Fedora
- USB flash media
-
- making, Making Media
- USB media
-
- booting, Booting the Installer
- USB-носитель
-
- загрузка, Получение Fedora
- user interface, graphical
-
- installation program, The Graphical Installation Program User Interface
V
- vfat (см. файловые системы)
- virtual consoles, A Note about Virtual Consoles
- Virtualization
-
- documentation, Other Technical Documentation
- VNC (Virtual Network Computing), Enabling Remote Access to the Installation System
-
- documentation, Other Technical Documentation
- installing client, Enabling Remote Access to the Installation System
- включение, Enabling Remote Access with VNC
- режим прослушивания, Connecting the Installation System to a VNC Listener
Z
- z/IPL, Boot Loaders and System Architecture
-
- (см. также boot loaders)
Недавно состоялся финальный релиз дистрибутива Fedora 30. В этой версии используется окружение рабочего стола Gnome 3.32, улучшена скорость работы пакетного менеджера DNF, обновлен стек приложений и ядро. Также вместо окружения Gnome появилась возможность установить DeepinDE или Pantheon Desktop из Elementary OS, а ещё уже доступна технология Fedora Silverblue с помощью которой можно делать безопасные обновления с возможностью откатов.
В этой статье мы разберем как установить Fedora 30 на компьютер или ноутбук с помощью флешки. В этом релизе установщик практически не поменялся, но в нём появились небольшие нововведения.
Подготовка к установке
Шаг 1. Загрузка образа
Первым делом вам необходимо скачать установочный образ операционной системы с официального сайта. Для этого откройте страницу https://getfedora.org и нажмите кнопку Скачать сейчас для напротив редакции Workstation.

Это версия для использования на обычных компьютерах с окружением рабочего стола. В следующем окне кликните по кнопке DVD ISO. Далее останется только дождаться окончания загрузки.
Шаг 2. Запись образа на флешку
Для записи образа на флешку в Linux можно использовать утилиту Etcher. Она современная и имеет очень простой интерфейс:
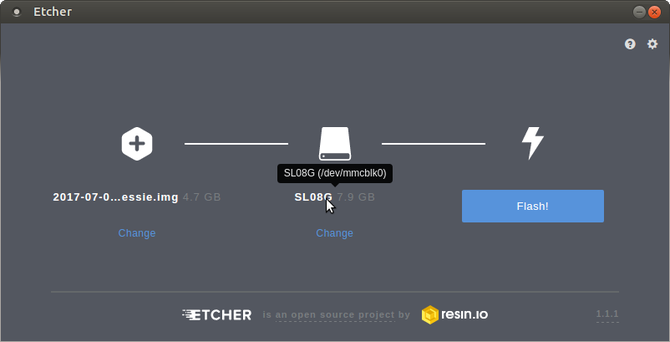
В Windows можно использовать её же или утилиту от самой Fedora — Fedora Image Writer:
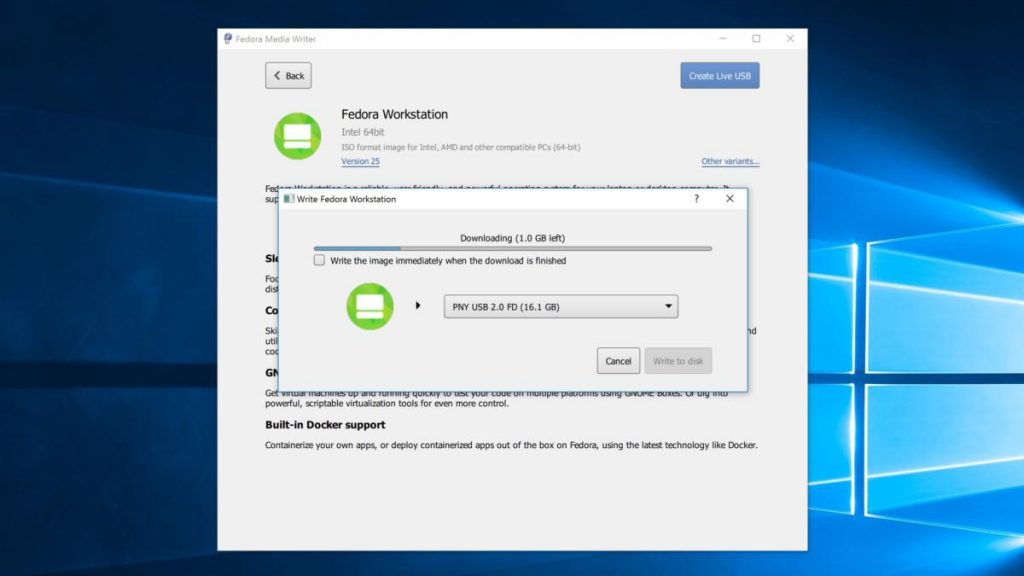
Шаг 3. Настройка BIOS
Когда флешка будет записана, необходимо перезагрузить компьютер и выбрать первым загрузочным устройством вашу флешку. В разных версиях BIOS от разных производителей это делается по разному. В новых BIOS вам нужно открыть вкладку Settings и найти там раздел Boot, а затем установить вашу флешку на первое место в очереди загрузки.
В старых BIOS есть вкладка Boot, где необходимо выбрать пункт Boot Device Priority, а там установить привод жестких дисков на первое место. Затем найдите пункт Hard Disk Priority и установите там на первое место вашу флешку:
После этого перезагрузитесь и сохраните настройки.
Шаг 4. Запуск Live системы
После перезагрузки, если всё было сделано правильно, загрузится такое меню:
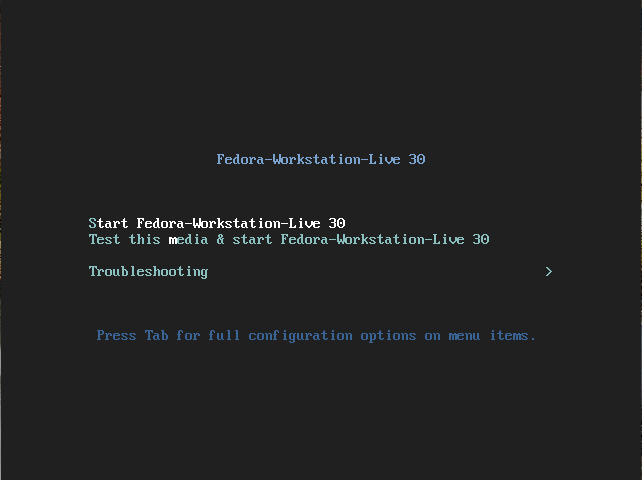
Здесь вы можете проверить правильность записи образа или сразу же перейти к установке. Для этого выберите пункт Start Fedora Workstation Live 30.
Шаг 5. Загрузка
Дождитесь завершения загрузки:

Шаг 6. Запуск установщика
На следующем шаге вы можете запустить Live систему Fedora, чтобы посмотреть как она выглядит или же сразу перейти к установке. Для установки выберите Install to hard disk:

Шаг 7. Язык системы
Выберите язык системы, который вы хотите использовать:
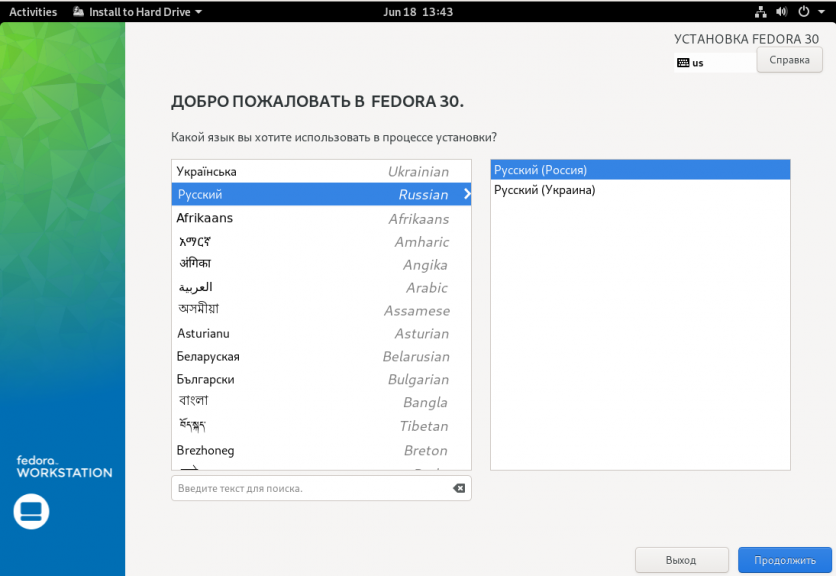
Шаг 8. Настройка установки
В разделе настройка установки fedora вы можете изменить основные параметры установки: раскладку клавиатуры по умолчанию, время и часовой пояс, а также расположение установки. Раскладку клавиатуры я советую оставить английскую, и если часовой пояс был автоматически определен правильно, то вам осталось только выбрать куда устанавливать систему — нажмите Место установки:

Шаг 9. Способ разметки
Вы можете позволить системе разметить диск автоматически или создать разделы для её установки вручную. Для автоматической разметки в разделе Конфигурация устройств хранения оставьте Автоматически, затем нажмите кнопку Далее:
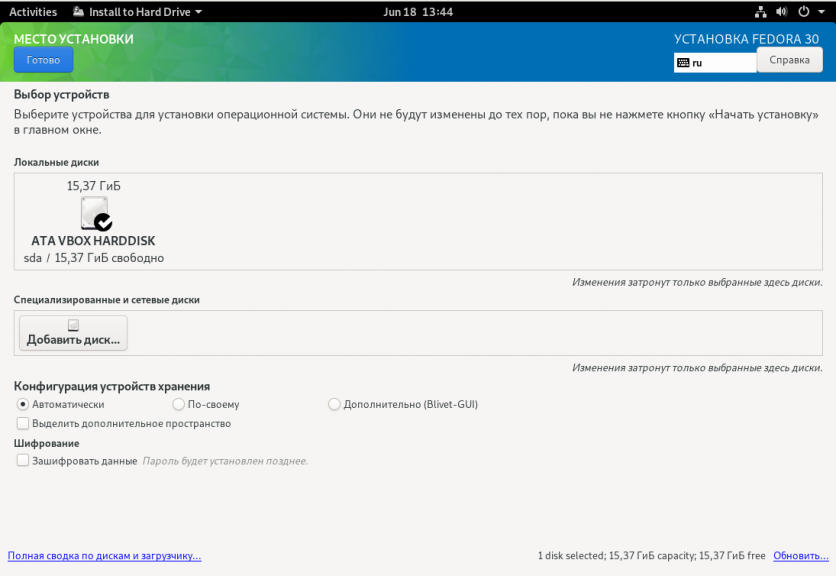
Шаг 10. Создание разделов
Если вы выбрали автоматический вариант, можете пропустить этот шаг. Для ручного варианта нам нужно создать разделы. Если вы передумали создавать их вручную можно нажать ссылку создать их автоматически и система выполнить разметку сама:
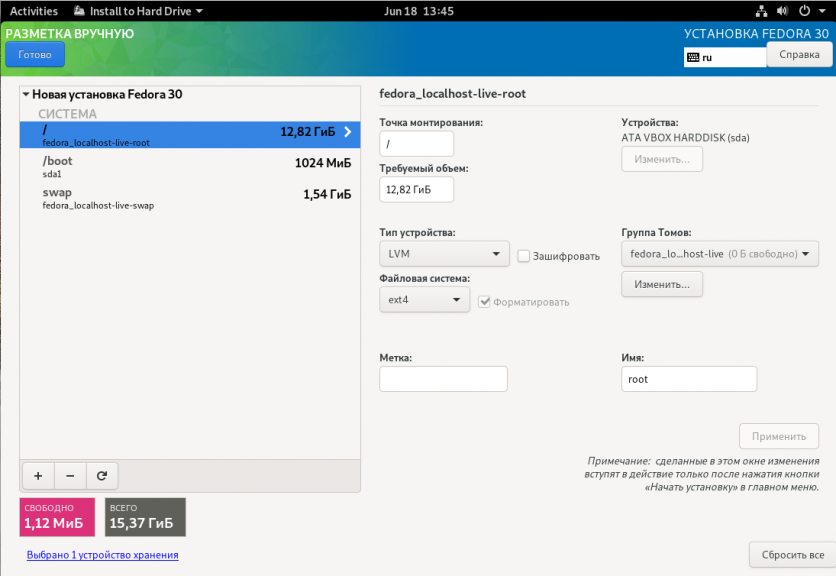
Иначе, выберите тип раздела, который вы будете создавать, по умолчанию Fedora хочет использовать LVM, но вы можете выбрать и Стандартный раздел:
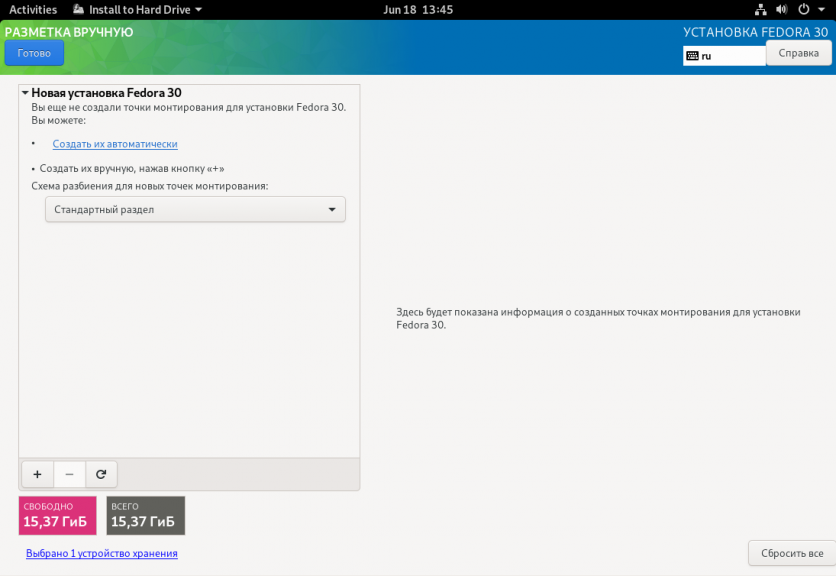
Затем нажмите плюс для создания нового раздела. В открывшемся окне вам нужно указать размер в мегабайтах и точку монтирования для раздела:
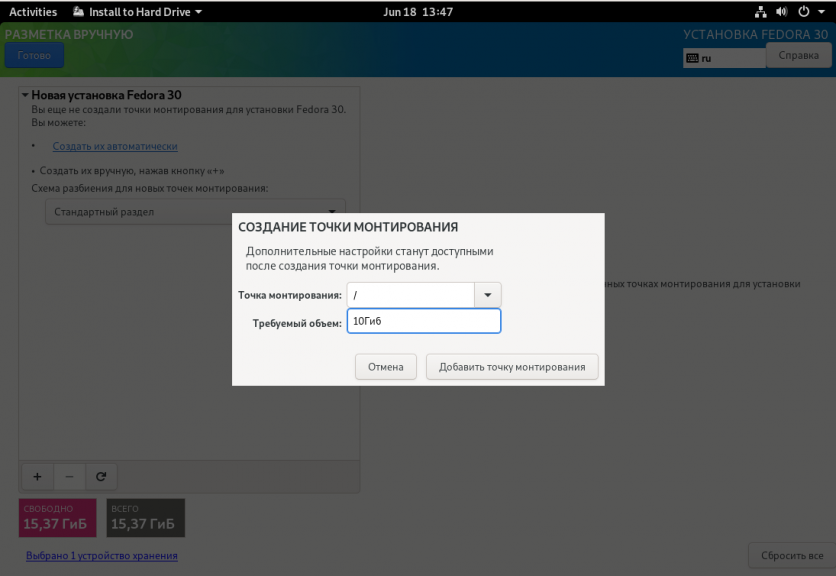
Затем нажмите кнопку Добавить точку монтирования. Вам нужно создать корневой раздел с точкой монтирования /, раздел для загрузчика — /boot и раздел подкачки, для последнего точка монтирования — swap. Размер корневого раздела не менее 10 Гигабайт, для /boot достаточно 1 гигабайта, а swap должен равняться половине размера вашей оперативной памяти, но не меньше четырех гигабайт.
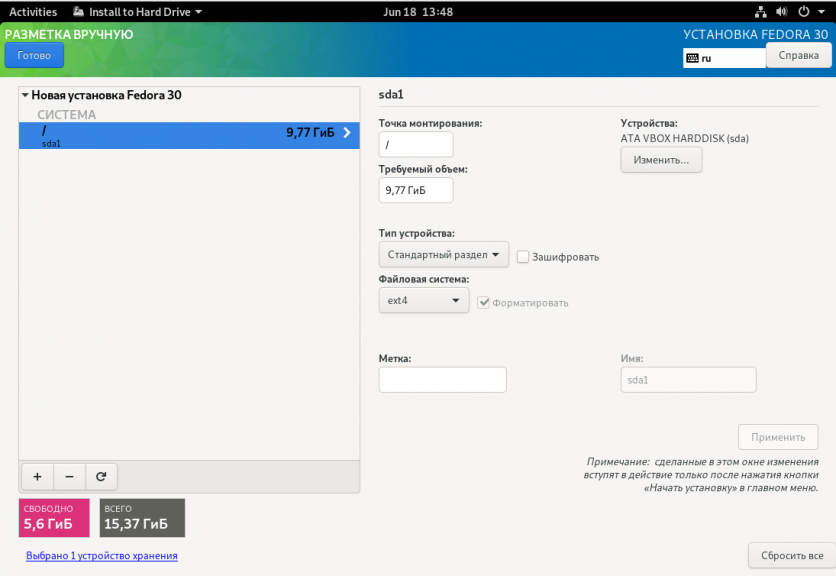
После создания раздела в правой части окна вы можете настроить его файловую систему, метку, точку монтирования и другие параметры.
Шаг 11. Подтверждение разметки
После завершения нажмите кнопку Далее и подтвердите создание форматирование разделов:
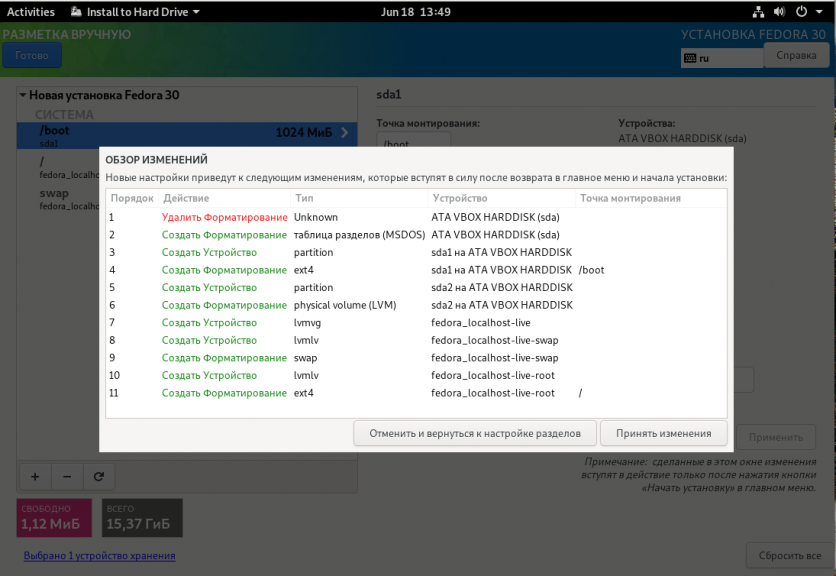
Шаг 12. Запуск установки
Если все настроено правильно и нет сообщений о проблемах нажмите кнопку Начать установку:
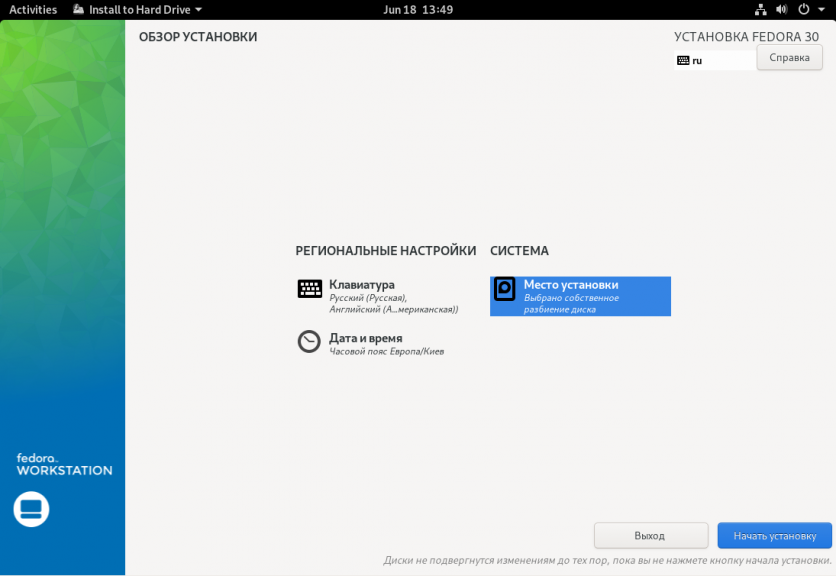
Шаг 13. Установка
Дождитесь пока установка Fedora Linux завершится:
Шаг 14. Перезагрузка
Перезагрузите компьютер нажав кнопку Готово:
Шаг 15. Настройка конфиденциальности
После перезагрузки система предложит настроить основные параметры. Выберите нужно ли включать сервисы определения местоположения и сообщать разработчикам о проблемах с системой:

Шаг 16. Сетевые аккаунты
На этом шаге вы можете привязать к системе аккаунты Google, Facebook и другие:
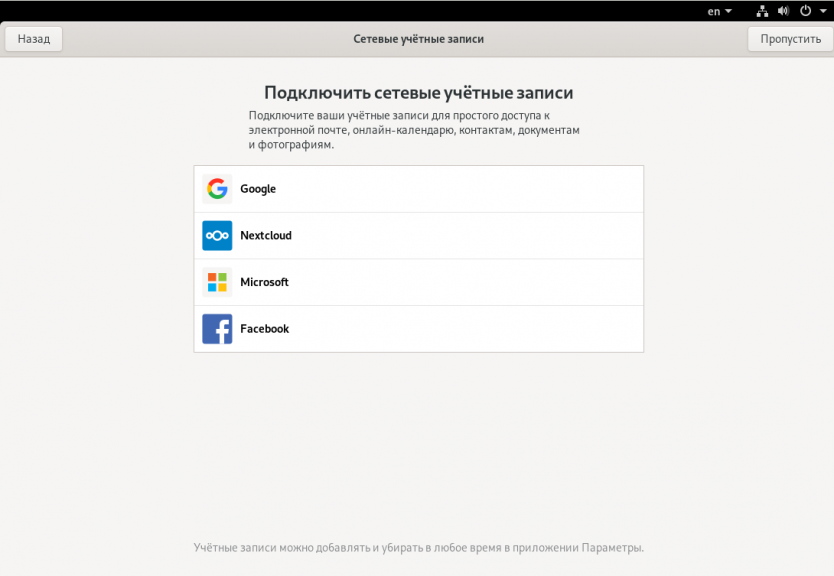
Шаг 17. Создание пользователя
Введите имя пользователя и логин, от имени которого вы будете использовать систему:

Шаг 18. Пароль пользователя
Введите два раза пароль для только что созданного пользователя:
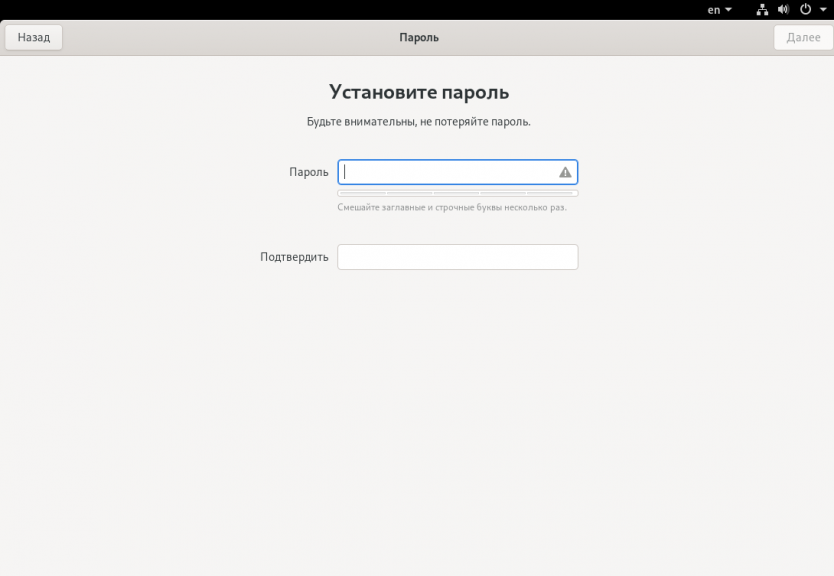
Шаг 19. Готово
Нажмите кнопку Начать работу и через несколько секунд загрузится полноценное рабочее окружение Gnome:
Выводы
В этой статье мы разобрали как выполняется установка Fedora 30 на компьютер. Как видите, в установке системы нет ничего сложного, а сама по себе Fedora очень интересная, так как содержит самые свежие технологии. А что вы думаете о Fedora? Будете ли устанавливать новую версию? Напишите в комментариях!
Обнаружили ошибку в тексте? Сообщите мне об этом. Выделите текст с ошибкой и нажмите Ctrl+Enter.

Статья распространяется под лицензией Creative Commons ShareAlike 4.0 при копировании материала ссылка на источник обязательна .
Установка системы
Как мне создать загрузочную флешку?
См. здесь.
Как загрузить Live образ целиком в память?
Для загрузки Live образа целиком в память, необходимо стрелками выбрать пункт Start Fedora Live, нажать Tab, затем в строке редактирования параметров добавить rd.live.ram через пробел сразу после quiet и после этого нажать Enter.
Есть возможность самому выбрать пакеты для установки?
Да, при помощи netinstall образа, но лишь группами.
Необходим ли доступ в Интернет при установке?
Только для netinstall образа. Все остальные устанавливаются «как есть», т.е. со стандартным набором пакетов.
Могу ли я автоматизировать установку?
Да, посредством Kickstart.
Могу ли я создать свой собственный ISO образ?
Да. Собственный образ можно создать на базе Kickstart файлов. Более подобную информацию можно найти здесь.
Kickstart проекты официальных образов Fedora доступны здесь.
Можно ли установить Fedora на устройство с ARM?
Да. Загрузки доступны для armhfp, а также aarch64.
Поддерживается ли технология Secure Boot?
Да, полностью. В качестве предварительного загрузчика используется shim, подписанный цифровой подписью Microsoft.
В случае использования внешних модулей ядра, поддержка UEFI Secure Boot может быть настроена вручную.
Да. Алгоритм такой:
загрузка с Fedora LiveUSB;
создание разделов для новой установки Fedora посредством GParted или любой другой утилиты разбиения дисков;
монтирование старых и новых разделов;
копирование всех файлов и каталогов со старого накопителя на новый с сохранением прав доступа;
редактирование файла
/etc/fstabнового накопителя так, чтобы в нём были указаны UUID новых разделов;создание в корневом каталоге нового накопителя файла
/.autorelabelдля автоматической установки контекста безопасности SELinux;установка загрузчика (если необходимо).
У меня много оперативной памяти. Нужен ли мне раздел подкачки?
За счёт использования сжатия памяти zram, в современных выпусках Fedora для большинства сценариев использования на рабочих станциях 10+ ГБ оперативной памяти будет вполне достаточно, поэтому раздел подкачки можно не создавать.
Внимание! При отсутствии раздела подкачки перестанет работать функция suspend to disk (гибернация).
Что будет если при отсутствующем разделе подкачки закончится память?
При критическом недостатке оперативной памяти (исчерпании доступных страниц) и при отсутствии подкачки существует риск зависания всей системы.
Таким образом, для данной конфигурации настоятельно рекомендуется использовать любой OOM killer пользовательского режима: earlyoom, systemd-oomd и т.п., чтобы не подвергать систему опасности и не доводить до использования механизма OOM Killer ядра Linux.
Сколько нужно подкачки для работы гибернации?
Для нормальной работы режима suspend to disk размер подкачки должен быть больше, либо равен объёму установленной в ПК или ноутбуке оперативной памяти.
Что быстрее: раздел подкачки или файл подкачки?
Раздел подкачки, т.к. отсутствуют ограничения, накладываемые используемой файловой системой.
Можно ли сделать так, чтобы подкачка использовалась лишь при исчерпании ОП?
Да, это возможно. Откроем терминал и выполним следующие команды:
sudo sysctl -w vm.swappiness=0
sudo sysctl -w vm.watermark_scale_factor=1
Изменения вступят в силу немедленно и сохранятся до перезагрузки системы.
Для того, чтобы сделать эти изменения постоянными, создадим файл конфигурации sysctl.
Как ускорить запуск системы?
Приобрести в компьютер или ноутбук SSD накопитель и установить операционную систему на него. Это даст колоссальный прирост к скорости запуска.
Можно ли не переносить на SSD домашние каталоги пользователей?
Можно, но настоятельно не рекомендуется так делать ибо в таком случае прирост скорости работы системы будет далеко не таким большим, каким мог бы быть, т.к. колонна всегда двигается со скоростью самой медленной машины, а это всегда жёсткий диск.
Большая часть приложений хранят в домашних каталогах пользователей свои файлы конфигурации, а также различные кэши. В итоге, они загрузятся быстро, а затем перейдут в состояние iowait для ожидания этих данных с медленного накопителя.
Таким образом, на быстром SSD накопителе следует размещать как корневой, так и домашние каталоги пользователей.
Нужно ли как-то настраивать Fedora для работы с SSD?
Особой настройки не требуется. Необходимо лишь убедиться, что таймер процедуры TRIM активен:
systemctl status fstrim.timer
Если это не так, активируем его:
sudo systemctl enable fstrim.timer
Процедура TRIM для всех установленных твердотельных накопителей будет выполняться автоматически по расписанию один раз в неделю во время простоя системы.
Возможно ли в Fedora включить TRIM в реальном времени?
Да, это возможно. При использовании классической схемы с обычными разделами необходимо добавить опцию монтирования discard для каждого раздела на SSD в /etc/fstab.
При использовании LVM, следует открыть файл /etc/lvm/lvm.conf в текстовом редакторе и прописать:
При использовании зашифрованных LUKS томов следует в файле /etc/crypttab добавить опцию discard для каждого тома.
Однако следует помнить, что на некоторых накопителях реалтаймовый TRIM может вызвать сбой в работе контроллера и привести к потере всех данных. Именно поэтому он по умолчанию и не применяется.
Все изменения вступят в силу при следующей загрузке системы.
Почему таймер TRIM отключён по умолчанию?
Изначально таймер TRIM активировался автоматически, если установка Fedora производилась на SSD накопитель, но через некоторое время обнаружилась серьёзная проблема с noname-накопителями. Их контроллеры декларировали поддержку процедуры TRIM, однако при её выполнении теряли все данные на носителе.
Из-за достаточно большого количества жалоб на потерю данных с таких дешёвых контрафактных noname накопителей, созданных на базе простейших контроллеров от флешек и микросхем памяти из отбраковки, было решено таймер отключить.
Как улучшить отображение шрифтов в Fedora?
В актуальных релизах Fedora пакет freetype уже собран с поддержкой субпиксельного сглаживания, поэтому, чтобы получить качественный рендеринг шрифтов, необходимо лишь разрешить использование LCD фильтров, создав символическую ссылку на файл 11-lcdfilter-default.conf в каталоге /etc/fonts/conf.d:
sudo ln -s /usr/share/fontconfig/conf.avail/11-lcdfilter-default.conf /etc/fonts/conf.d/
Включим поддержку сглаживания для GTK 4 приложений посредством добавления параметра gtk-hint-font-metrics в файл конфигурации ~/.config/gtk-4.0/settings.ini (при отстутствии – создадим):
[Settings]
gtk-hint-font-metrics=1
Для вступления изменений в силу необходимо повторно войти в систему либо перезагрузить компьютер.
В консолях фреймбуфера отображаются кракозябры. Как это починить?
Способ 1:
Зададим параметр ядра vconsole.font:
vconsole.font=latarcyrheb-sun16
Пересоберём конфиг Grub2.
Способ 2:
Установим пакет шрифтов Terminus:
sudo dnf install terminus-fonts-console
Теперь откроем файл /etc/vconsole.conf в текстовом редакторе:
sudoedit /etc/vconsole.conf
Укажем правильное имя шрифта внутри директивы FONT:
Сохраним изменения в файле и пересоберём initrd.
Какую файловую систему рекомендуется использовать на Fedora?
Начиная с Fedora 33, в редакции Workstation, для установки по умолчанию предлагается BTRFS.
Несмотря на это, мы рекомендуем применять ext4. На наш взгляд, это самая стабильная и популярная файловая система в настоящее время.
Для хранения больших объёмов данных можно использовать XFS. Это также стабильная и быстрая ФС, но следует помнить, что при сбоях электропитания вместо файлов, в которые в этот момент шла запись, могут оказаться нули. Таким образом, XFS следует применять только если есть источник бесперебойного питания (UPS) либо на ноутбуках.
Что вы скажете об установке системы на BTRFS?
Достоинства:
поддержка копирования при записи (COW);
поддержка проверки целостности данных посредством контрольных сумм;
поддержка моментальных снимков системы (snapshot);
отсутствие ограничения на максимальное количество файлов;
поддержка прозрачного сжатия данных с использованием нескольких алгоритмов;
поддержка подтомов (subvolume);
встроенная поддержка клонирования, что полезно при создании резервных копий;
оффлайновая дедупликация записываемых данных.
Недостатки:
ранее была слишком нестабильной и при определённых условиях приводила к потере всех данных на накопителе;
не имеет встроенного полнодискового шифрования;
известны случаи несовместимости с системой внешнего полнодискового шифрования LUKS;
из-за COW очень сильно фрагментируется, поэтому не рекомендуется к использованию на жёстких магнитных дисках (HDD);
без использования флага
nodatacowпроседает производительность баз данных (СУБД), а также виртуальных машин.
Можно ли без потерь данных преобразовать одну файловую систему в другую?
Нет, конвертирование ФС без потери данных не представляется возможным, поэтому для выполнения данной процедуры необходим другой раздел диска подходящего размера с поддержкой прав доступа Unix. Алгоритм следующий:
копирование всех данных на другой раздел с сохранением прав доступа;
форматирование старого раздела с необходимой файловой системой;
возвращение данных на прежнее место;
сброс контекста SELinux.
Как установить Fedora в UEFI режиме?
Загрузка Fedora LiveUSB образа должна производиться исключительно в UEFI режиме. На большинстве материнских плат в меню вариантов загрузки требуется выбрать режим UEFI External Drive или UEFI USB HDD.
Схемой разбиения диска, на который будет установлен дистрибутив, должна быть GPT. Проверить можно посредством выполнения fdisk:
Если используется классический MBR (msdos), необходимо запустить утилиту GParted, выбрать диск из списка, затем в меню Устройство пункт Создать таблицу разделов – GPT и запустить процесс кнопкой Применить изменения. Все данные на диске будут уничтожены.
Теперь можно приступать к установке. Автоматическое разбиение в Anaconda произведёт все действия самостоятельно.
Какой способ разбиения диска лучше выбрать?
Существует 2 способа:
LVM (используется по умолчанию) – динамические разделы, позволяющие изменять разделы на лету в любую сторону, а также поддерживающие функцию моментальных снимков (снапшотов);
классическая схема с физическими разделами.
Если возможности LVM использовать не планируется на ПК или ноутбуке, то рекомендуется применять классическое разбиение, т.к. такая схема работает быстрее и надёжнее.
Как лучше разбить диск самостоятельно?
Если по какой-то причине не хочется доверять автоматическому разбиению, мы рекомендуем следующую конфигурацию (порядок важен):
|
Порядок |
Файловая система |
Размер раздела |
Точка монтирования |
Описание |
|---|---|---|---|---|
|
1 |
efi (vfat) |
200 МБ |
/boot/efi |
Служебный ESP (UEFI) раздел. |
|
2 |
ext4 |
1 ГБ |
/boot |
Раздел для хранения ядер и initrd. |
|
3 |
ext4 или xfs |
20 ГБ |
/ |
Корневой раздел для системы и приложений. |
|
4 |
ext4 или xfs |
всё — swap |
/home |
Раздел для хранения пользовательских файлов. |
|
5 |
swapfs |
= RAM |
swap |
Раздел подкачки (если необходим). |
Здесь RAM – объём установленной оперативной памяти.
Как полностью скрыть меню Grub?
Скрытие меню загрузки:
sudo grub2-editenv - set menu_auto_hide=1
sudo grub2-mkconfig -o /boot/grub2/grub.cfg
Если в дуалбуте установлена ОС Microsoft Windows, но всё равно требуется скрыть меню Grub 2, то вместо menu_auto_hide=1 следует применять menu_auto_hide=2.
Получить доступ к элементам скрытого меню можно посредством зажатия клавиши Shift или F8 во время начальной загрузки системы.
Как отключить скрытие меню Grub?
Отмена скрытия меню загрузки и отображение его при каждой загрузке системы:
sudo grub2-editenv - unset menu_auto_hide
sudo grub2-mkconfig -o /boot/grub2/grub.cfg
После установки Windows был затёрт UEFI загрузчик Fedora. Как его восстановить?
Во время своей установки ОС Microsoft Windows всегда осуществляет форматирование служебного ESP раздела диска, поэтому придётся вручную восстановить загрузчик.
Выполним вход в chroot установленной системы.
Выполним переустановку загрузчиков Grub2 и shim:
dnf reinstall grub2\* shim
Пересоберём конфиг Grub2:
grub2-mkconfig -o /boot/grub2/grub.cfg
Завершим работу chroot окружения:
Можно ли использовать Grub на BTRFS?
Конфигурация, при которой раздел /boot использует файловую систему BTRFS (раздел или подтом) является неподдерживаемой и будет приводить к возникновению ошибки.
При установке не предлагается установить пароль для суперпользователя. Это нормально?
Да. Если при установке системы был создан пользователь-администратор, то пароль для учётной записи суперпользователя (root) не устанавливается.
Для выполнения команд с привилегиями суперпользователя в настоящее время рекомендуется использовать sudo.
Однако если по какой-то причине работающая учётная запись root необходима, можно её активировать, установив пароль.
Как определить точную дату установки ОС?
Т.к. операционная система постоянно обновляется, точную дату установки ОС напрямую получить не представляется возможным. Можно лишь вывести дату последнего форматирования раздела диска, на котором установлена система:
sudo dumpe2fs /dev/sda1 | grep 'Filesystem created:'
Здесь /dev/sda1 – раздел диска с Fedora.
Как определить в каком режиме была произведена установка системы?
Определим режим установки системы (UEFI или Legacy) посредством проверки наличия либо отсутствия каталога /sys/firmware/efi:
test -d /sys/firmware/efi && echo EFI || echo Legacy
Как установить Fedora в dual-boot вместе с другой ОС?
Существует два способа: автоматический и ручной.
Автоматический способ:
Загрузим систему с Fedora LiveUSB, выберем автоматической способ разбиения. Все действия будут выполнены автоматически с настройками по умолчанию.
Ручной способ:
Выполним следующие шаги в строго указанном порядке:
загрузим систему с Live образа;
установим менеджер разделов GParted
sudo dnf install gparted(потребуется доступ к Интернету; в XFCE и LXDE Live он уже присутствует внутри базового образа);запустим GParted, затем уменьшим раздел другой ОС так, чтобы на диске появилось свободное место достаточного объёма;
создадим новые разделы для Fedora;
запустим установку в режиме ручного разбиения диска, затем укажем точки монтирования для созданных разделов;
завершим установку и перезагрузимся в установленную ОС;
в случае если другой ОС является Microsoft Windows, применим следующие оптимизации.
Загрузчик Grub 2 автоматически обнаружит другие операционные системы на устройстве и добавит их в список загрузки.
Как произвести минимальную установку системы?
Если требуется выполнить минимальную установку системы без дополнительного программного обеспечения, но с графической средой Gnome или KDE, выполним следующие шаги в строго указанном порядке:
осуществим загрузку с netinstall-образа;
в списке доступных компонентов выберем «Минимальная система»;
завершим установку в штатном режиме;
загрузимся в установленную систему;
отключим установку слабых зависимостей;
установим графичекую среду:
sudo dnf install gdm gnome-shell(для Gnome 3), либоsudo dnf install sddm plasma-workspace(KDE Plasma);активируем менеджер графического входа в систему:
sudo systemctl enable gdm.service(для Gnome 3), либоsudo systemctl enable sddm.service(KDE Plasma);сделаем графический вход в систему основным:
sudo systemctl set-default graphical.target;осуществим перезагрузку системы:
sudo systemctl reboot.
Минимально возможная установка успешно завершена.
Что необходимо для работы гибернации в Fedora?
Для корректной работы режима гибернации (suspend to disk) необходимо и достаточно выполнение следующих условий:
наличие незашифрованного раздела подкачки (также допускается использование BTRFS subvolume), смонтированного и указанного в
/etc/fstab;отключённое сжатие памяти zram или zswap;
установленный параметр ядра
resume=UUID=XXXXXX, где XXXXXX – это UUID раздела подкачки;интегрированный в initrd модуль
resume.
 9-го декабря вышла новая Fedora 21 Workstation, которую по совокупности параметров можно назвать «самым свежим и стабильным» Линукс-десктопом.
За время использования и тестирования Fedora я проникся к этой платформе глубокой симпатией и хочу поделиться этим теплом и знаниями о ней с вами.
В течение года я наблюдал за её работой в качестве рабочего и игрового места в разных ситуациях — от станций с «умирающим» железом до нового игрового ноутбука Asus G750JM с Nvidia Optimus.
Собранные заметки получились несколько шершавыми, старающимися охватить одновременно и новичков в Линуксе, и опытных пользователей с разработчиками. Прошу простить. Хочу донести большой объем информации в одной статье: и по общей настройке и установке Федоры, и по технологии Nvidia Optimus на ноутбуках, wi-fi с проприетарными драйверами, о настройке симпатичных шрифтов в Java и IDE от JetBrains, запуску игр в Steam на дискретной видеокарте, о результатах сравнительного тестирования игр, графики и браузеров между Федорой и Windows 8.1, и даже об установлении одного «абсолютного» рекорда.
Хочу отметить, что свежие десктопные Линуксы также отличаются качественной поддержкой дисплеев высокого разрешения с хорошей отрисовкой шрифтов и оконных элементов, предоставляют высочайшую степень различных персональных настроек, «хаков» и возможностей оперирования с приложениями. Всё это позволяет не только значительно повысить эффективность своей работы, но и сделать это с комфортом для глаз.
Поскольку темы личной эффективности, комфортной для глаз темизации и различных «хаков» достаточно обширны и специфичны, в будущем я посвящу им две или три углубленных статьи. А в данном документе будет общая выжимка информации именно по настройке и общему использованию Fedora 21.
Содержание
О дистрибутиве Fedora
Установка Fedora 21 Workstation
Последовательная настройка
- Чтобы заработал Wi-Fi на ноутбуке, если он не работает
- Первое — обновляем систему
- Замедлить мышку
- Если ставите Fedora в виртуальную машину (VirtualBox)
Общие настройки системы
- Добавляем себе возможность использовать sudo
- Установка Midnight Commander (mc)
- Шрифт в системной консоли
Gnome 3 — рабочая среда по-умолчанию
- Первым делом — утилита для настройки Gnome 3 и шрифтов
- Сворачивание-разворачивание окон — шоткеи и кнопки
- Удобные дополнения Gnome
- Тонкости файлового менеджера Nautilus
- Добавить средства управления пакетами програм
- Сетевые аккаунты — синхронизация с почтой, контактами и календарем Google
Шрифты
- Заменяем тонкие шрифты в IDE от JetBrains (IntelliJ, PyCharm и другие) и в Java
Среды разработки и редакторы для языка программирования Python
Подключение к репозитариям RPMFUSION
Видео, аудио и книги
- Видеопроигрыватели
- Аудиопрогрыватели + Вконтакте
- Если вашим программам все ещё не хватает кодеков
- Как слушать аудиокниги
- Как читать книги
Установка Дропбокса
Установка мессенджеров
- Skype
- Viber
- Telegram
Установка браузеров и flash
- Google Chrome
- Установка Хромиума
- Flash для браузеров и для системы
Проприетарные видеодрайверы
- Nvidia «обычная»
- Проприетарные драйвера ATI
- Nvidia Optimus — установка Bumblebee
- Как запускать программы и игры в Steam на дискретной карте
Бенчмарки: Fedora 21 Optimus / Primus / Windows 8.1
- Кроссплатформенный бенчмарк GPU — GPUTest
- Кроссплатформенный бенчмарк Geekbench
- Решение проблемы с неработающим WebGL у Хрома
- Бенчмарки для браузеров
- Основная информация по моей системе для уточнения бенчмарков
Steam и игры
Запускаем Windows-игры и Windows-программы
Программы для рисования
KDE
- Офис Calligra
- Настройка KDE
- Синхронизация контактов, календаря и почты Google
- Устранение проблемы многократного запуска некоторых QT-программ
Изучение иностранных языков
- Словарь с произношением — StarDict
- Anki и карточки
Проблема с появившимся тихим шумом в наушниках
Завершение
О дистрибутиве Fedora
Начиная с версии 21 установочный дистрибутив Федора разделен на 3 типа по предназначению: для рабочей станции, сервера и облака. Ознакомиться с ними можно на обновленном сайте Fedora, где это хорошо оформлено и описано: getfedora.org
Официальная информация о релизе Fedora 21: fedoramagazine.org/announcing-fedora-21
Информация о релизе плюс много скриншотов: www.webupd8.org/2014/12/fedora-21-available-for-download.html
Краткий обзор возможностей Gnome 3.14, являющегося основной рабочей средой в Fedora 21 Workstation:
Fedora 21 Workstation сейчас позиционируется как отличная рабочая станция для разработчиков с минимальным отвлечением от работы. В систему включено большое количество необходимых инструментов, а также самый свежий софт для использования, тестов и исследований среды.
Среди заметных плюсов Федоры хочу отметить отсутствие необходимости подключать сторонние ненадежные репозитории для получения свежего программного обеспечения. Подавляющее большинство полезных программ уже находится в репозитарии rpmfusion и неплохо тестируется на совместимость с основным репозитарием Федоры. Это очень хорошо сказывается на стабильности и предсказуемости всей системы.
Конечно надо отметить, что самый свежий софт несет в себе не только новые возможности и плюсы в работе, но и иногда «болеет» проблемами роста (как, например, происходило некоторое время назад с Gnome 3). Однако в большинстве случаев такие проблемы решаются либо использованием альтернативы (в моем случае тогда это был KDE), или другими способами.
Возвращаясь к надежности Федоры: начав работать с ней после других дистрибутивов Линукса вы можете отметить снижение скорости обновления и установки пакетов, т.к. в системе по-умолчанию включены дополнительные шаги проверки до и после установки пакетов. До установки — выполнение тестовых транзакций без внесения изменений на диск, после — верификация выполненной транзакции.
Как я упоминал выше, Федора в целом на мой взгляд очень надежный дистрибутив, и даже в некоторых ситуациях работы на сбойном железе она неплохо на нем выживает.
Также отмечу, что все больше производителей софта в последнее время, в том числе и проприетарного, выпускают готовые пакеты и тестируют их именно для Fedora (а не только для Ubuntu). Среди них Viber, Dropbox и другие.
Установка Fedora 21 Workstation
Скачать торрент со стандартным образом для живого тестирования и установки на рабочую станцию:
для 64-битных систем torrent.fedoraproject.org/torrents/Fedora-Live-Workstation-x86_64-21.torrent
для 32-битных torrent.fedoraproject.org/torrents/Fedora-Live-Workstation-i686-21.torrent
Данный образ базируется на рабочей среде Gnome 3, как основной для Workstation.
Другие варианты скачивания образа Fedora 21 для рабочих станций: getfedora.org/en/workstation/download
Торренты всех доступных вариантов образов Fedora 21, включая так называемые «спины», в которых вместо Gnome используются другие среды рабочего стола: KDE, Xfce, LXDE, Mate и т.д.: torrent.fedoraproject.org
А более подробную информацию о «спинах» можно найти тут: spins.fedoraproject.org
Видео процесса установки Федоры на рабочую станцию и первого знакомства с ней:
Руководство по процессу установки: docs.fedoraproject.org/install-guide
Как сделать загрузочную флешку: docs.fedoraproject.org/en-US/Fedora/20/html/Burning_ISO_images_to_disc/Making_USB_Media.html
Во избежание проблем, которые иногда случаются при записи флешки, и препятствуют нормальному запуску системы с неё, рекомендую по-возможности пользоваться старой надежной dd (/dev/sdc — ваше устройство с флешкой):
sudo dd if=~/Download/Fedora-Live-Workstation-x86_64-21-5.iso of=/dev/sdcНе забудьте перед запуском и установкой с флешки проверить в биосе переменную «Secure Boot Menu» в разделе «Security» — она должна быть выключена для нормальной установки новой системы. Также в биосе для удобной работы с подключенным монитором можете в разделе «Boot» включить опцию «Launch CSM» (Launch Compatibility Support Module). По-крайне мере так эти переменные выглядят на моем ноутбуке.
Если вы хотите проапгрейдить свою Fedora 20 до свежей версии 21 без переустановки:
fedoramagazine.org/upgrading-to-fedora-21-workstation-from-fedora-20
Теперь переходим к последовательной настройке системы и программ в ней.
Последовательная настройка
Чтобы заработал Wi-Fi на ноутбуке, если он не работает
Если ваш чип Wi-Fi относится к сериям Broadcom’s BCM4311-, BCM4312-, BCM4313-, BCM4321-, BCM4322-, BCM43224-, BCM43225-, BCM43227- или BCM43228, то вам потребуется установка проприетарных драйверов, чтобы он заработал корректно.
Посмотреть модель вашей карты в терминале можно командой lspci
У меня стоит Broadcom Corporation BCM4352 802.11ac Wireless Network Adapter (rev 03)
После того как мы убедились, что наша карта относится к вышеуказанным сериям, будем ставить для нее драйвера. Вам потребуется интернет через кабель Ethernet или придется вынимать пакеты вручную через другой компьютер. Ниже я описываю самый простой вариант, когда у вас работает интернет через кабель.
Сперва надо подключить репозиторий rpmfusion — информация об этом находится в статье ниже. После его подключения возвращайтесь обратно сюда.
Итак, рекомендуемый вариант установки драйвера для нашего wi-fi следующий:
su - -c "yum install kmod-wl"Команда спросит пароль рута. На вопрос «установить-ли с зависимостями» отвечаете «y».
Подробнее о данной установке тут: www.cyberciti.biz/faq/fedora-linux-install-broadcom-wl-sta-wireless-driver-for-bcm43228
У меня этого оказалось недостаточно в связи с багом, речь о котором идет тут:
ask.fedoraproject.org/en/question/57806/broadcom-4321-wireless-not-working-in-fedora-21
И потребовалось сделать ещё несколько манипуляций:
su - -c "yum reinstall kmod-wl akmod-wl"
su - -c "yum install akmods kernel-devel"
su - -c "yum update"
Перезагружаемся.
su - -c "akmods" (эта команда заново пересобирает модуль для wi-fi, здесь может потребоваться команда akmodsbuild от пользователя)
Перезагрузиться.
su - -c "modprobe wl"(загружаем модуль для wi-fi)
После этого модуль wi-fi наконец заработал и я смог отсоединить провод Ethernet, почувствовав свободу.
Для информации оставлю здесь одну из свежих, но не проверенных рекомендаций по установке этого-же драйвера:
su - -c "yum install broadcom-wl kmod-wl akmod-wl rfkill"
su - -c "rfkill list"
su - -c "rfkill unblock all"
Дальнейшие действия выполняются после установки Федоры на жесткий диск и загрузки с него.
Первое — обновляем систему
Это важно! Без обновления системы могут получиться неприятности при установке следующих пакетов, необходимых для компиляции доп.модулей и другие нестыковочки.
Для этого нажимаем Win и пишем первый буквы «te» или «те» (Gnome ищет одновременно и по русскому и по английскому названию программ) дальше остаётся нажать Enter и запустить терминал. Это информация для новичков в Gnome 3.
Дальше в нем переходим в выполнение команд от рута:
su -
Вы можете ускорить загрузку пакетов из репозитория, если будут выбираться самые быстрые зеркала.
Для этого достаточно установить дополнение к yum, тестирующее сервера на скорость отклика, и переключающееся на самые быстрые из них:
yum install yum-plugin-fastestmirrorИ, наконец, выполняем обновление всех установленных в системе пакетов:
yum updateЗамедлить мышку
У некоторых из нас мышки поддерживают разное разрешение сенсора (1000…8000 dpi).
В Linux может оказаться, что ваша мышь слишком шустрая, и снизить её скорость обычными средствами настройки в графическом режиме невозможно.
Для этих случаев есть простое решение с замедлением указателя:
надо прописать конфиг для Иксов, в котором указать торможение как постоянную переменную.
В моем случае достаточно двухкратного торможения, отображаемого в значении ConstantDeceleration.
Выглядит вот так:
$ cat /etc/X11/xorg.conf
Section "InputClass"
   Identifier     "Logitech Gaming Mouse G600"
   MatchIsPointer "on"
   MatchProduct   "Logitech Gaming Mouse G600"
   Option         "ConstantDeceleration" "2"
EndSection
Узнать название своей мышки можно вот так:
$ xinput list
⎡ Virtual core pointer                          id=2    [master pointer  (3)]
⎜   ↳ Virtual core XTEST pointer                id=4    [slave  pointer  (2)]
⎜   ↳ Logitech Gaming Mouse G600                id=12   [slave  pointer  (2)]
...
Существует возможность установить замедление и через команду xinput, не прибегая к конфигу иксов, но такой вариант ограничен номерами указателя мыши в системе, которые меняются при перевтыкании мыши в другой порт или иногда при перезагрузке.
Если ставите Fedora в виртуальную машину (VirtualBox)
От рута выполняем:
yum install binutils gcc make patch libgomp glibc-headers glibc-devel kernel-headers kernel-devel dkmsБольше информации по данной теме: www.if-not-true-then-false.com/2010/install-virtualbox-with-yum-on-fedora-centos-red-hat-rhel
Затем в самой виртуалке в меню выбираем Devices — Insert Guest Additional CD image
VirtualBox скачает нужный файл образа дополнений гостевой ОС.
Виртуальная Федора обнаружит «вставленный диск» и предложит автозапуск находящей на ней программы установки.
После запуска этой программы и предложения авторизоваться паролем рут не забудьте, что, возможно, надо переключиться обратно на английскую раскладку (Alt+Shift), т.к. в Федоре будет стоять русский ввод по-умолчанию (теперь при выбранной русской локали при инсталляции русский-же и является языком для ввода с клавиатуры по-умолчанию).
Результаты выполнения программы установки дополнений гостевой ОС выведутся в этом-же терминали.
При успешной установке модулей и после перезагрузки гостевая Федора будет удобная для использования в виртуальной машине — реагировать на изменений размеров её окна, корректно переходить в Fullscreen и т.д.
И можно будет переходить к дальнейшей настройке или экспериментам.
Напоминаю, что в виртуалке переключение по системным консолям производится не привычными Ctrl+Alt+F1..F7, а с помощью хост-клавиши: правый контрол + F1..F7
Общие настройки системы
Добавляем себе возможность использовать sudo
Выполняем от рута
usermod sampleusername -a -G wheel где sampleusername — логин вашего пользователя
Более подробная информация на эту тему: fedoraproject.org/wiki/Configuring_Sudo
После выполнения команды выходим из системы (logout) и входим снова.
Подсказка новичкам:
1. Чтобы выйти из рута в консоли набираем exit, затем или exit ещё раз, или закрываем окно (мышкой или хоткеем Alt+F4).
2. Чтобы выйти из Gnome щелкаем справа вверху по треугольнику или рядом с ним (тоже среагирует выпаданием этого меню), дальше щелкаем по имени нашего пользователя, под ним появляется «Завершить сеанс», кликаем по этому пункту.
3. Чтобы войти и правильно указать пароль, если он у вас в английской раскладке, не забудьте опять на неё переключить по Alt+Shift.
После этого все команды «от рута» можно выполнять через sudo.
Установка Midnight Commander (mc)
Мне очень удобен и привычен MC, поэтому на любой новой системе я начинаю с его установки.
sudo yum install mc
Если пользуетесь MC и привыкли выходить из него по F10, то в терминале Гнома нужно отключить шоткей вызов меню гномовского терминала по F10:
«Правка» — «Параметры» — Включить быструю клавишу доступа к меню (по-умолчанию F10)
Или переназначить её.
Шрифт в системной консоли
Если вы выбрали русский как основной язык системы при установке, значит системная консоль тоже будет с правильным русским.
Однако если вы ставили, выбрав английский, то русские символы в системной консоли будут отображаться квадратиками или кракозябриками.
Чтобы это «вылечить» надо в /etc/profile.local прописать строчку
setfont Cyr_a8x16Gnome 3 — рабочая среда по-умолчанию
Основной распространяемый вариант Fedora 21 Workstation по-умолчанию несет в своей основе рабочую среду Gnome 3.14
У этого решения есть свои плюсы и минусы.
Среди плюсов — интересная для некоторых динамика работы с окнами, рабочими столами, и информацией.
Возможность искать одновременно и программы, и сервисы, и свои контакты, и много другой информации.
Но здесь я опишу что с ней можно сделать для уютного обживания. 
Если Вы не планируете работать с Gnome или воспользовались «спином» с другой рабочей средой, то можете пропустить этот раздел.
Обзоры возможностей последней версии Gnome с картинками и видео вы можете посмотреть тут:
www.opennet.ru/opennews/art.shtml?num=40669
www.webupd8.org/2014/09/gnome-314-released-see-whats-new.html
Первым делом — утилита для настройки Gnome 3 и шрифтов
Устанавливаем:
sudo yum install gnome-tweak-tool
Запускаем:
клавиша Win, затем набираем «tw» или «доп», Enter
Вкладка (кнопка) «Шрифты».
На ней мы можем увеличить все шрифты на 1-2 пункта для лучшей читабельности, а также выбрать вариант сглаживания (хинтинга), который лучше подходит для нашего монитора и личных предпочтений. Я предпочитаю вариант хинтинга «slight».
Скриншот окна найстроки шрифтов с указанными изменениями:
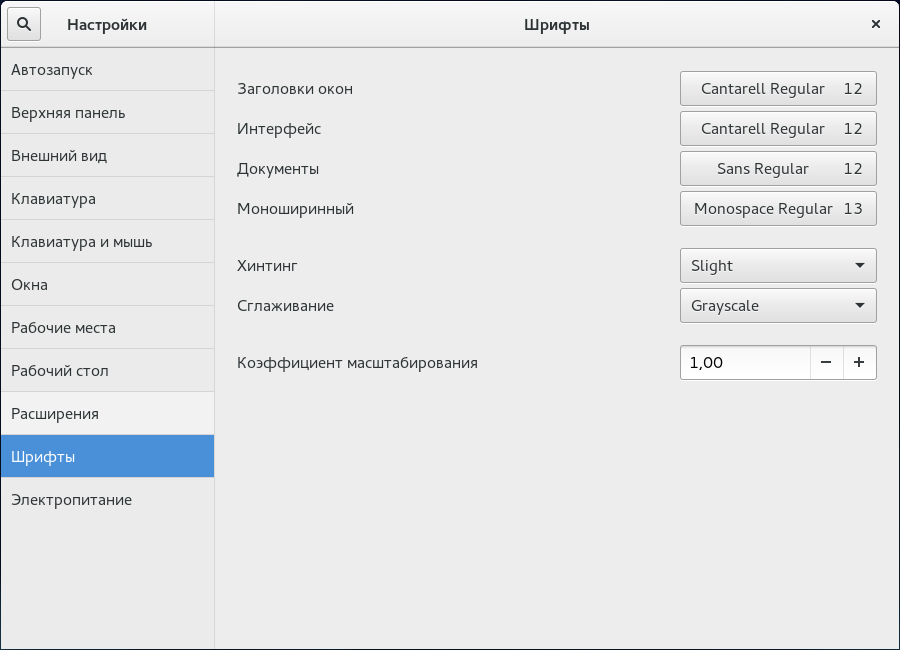
Окно терминала с открытым MC после применения изменений:

Сворачивание-разворачивание окон — шоткеи и кнопки
Установив утилиту «тонкой» настройки Gnome мы можем управлять отображение кнопок в заголовках окон.
В Gnome Tweak Tool (она-же «Дополнительные параметры») в разделе «Окна» можно включить отображение привычных кнопок «Развернуть» и «Свернуть» в заголовке окон, возле кнопки «Закрыть».
Я этими кнопками не пользуюсь. В Гноме стандартный шоткей сворачивания окна: Win+H
У меня он также вызывается и нажатием на дополнительную кнопку мышки.
Также удобно использовать шоткеи Win + стрелка, они разворачивают-восстанавливают окна в разных направлениях.
Удобные дополнения Gnome
Желающие использовать под полезный контент максимум места на экране, особенно владельцы ноутбуков и нетбуков, могут поставить 2 дополнения для Gnome:
1. Maximus Two extensions.gnome.org/extension/844/maximus-two
2. Frippery Move Clock extensions.gnome.org/extension/2/move-clock
Скриншот Firefox в Gnome 3 без указанных дополнений:
И после установки дополнений, расширяющих полезное пространство:

Есть и другие варианты дополнений, аналогичные вышеуказанным.
Вообще, к Гному создано много полезных дополнений. Найти их можно на сайте extensions.gnome.org
Например, «Bumblebee» для владельцев ноутбуков с технологией Optimus, которое иконкой отображает использование дискретной карты в системе (установку, настройку и бенчмарки Nvidia Optimus и Bumblebee я буду рассматривать отдельно ниже). Или дополнение ускоряющее анимацию работы с окнами в Gnome.
Есть обзоры — что именно стоит поставить из дополнений на Gnome 3. Так что если вам симпатичная данная среда — не поленитесь ознакомиться с ними, выйдя на них через искомые для вас ключевые фразы.
Часто, люди используют восстановление привычного вида среды — нижней панели с запущенными программами, обычного трея с кучей иконок запущенных программ и расширенное меню для операций на окном через него.
Мне это не нужно, так как я стараюсь минимизировать любые отвлекающие факторы, и идея спрятать иконки меня вполне устраивает. При этом оповещения в системе сделаны ненавязчиво и доходчиво, их не так легко пропустить.
Тонкости файлового менеджера Nautilus
По-умолчанию сортировка не выставляет папки до списка файлов, отображается всё в перемешку.
Исправляем:
Nautilus — Параметры -> отмечаем чекбокс «Помещать папки перед файлами»
Также, я предпочитаю перемещаться по компьютеру без двойных щелчков мышки. Если вы согласны со мной, что действие в 1 клик приятней — в том-же окне переключитесь на вкладку «Поведение», и отметьте в «Поведение» — «Открывать объекты одним щелчком».
После этого можно закрыть окно настройки.
У файлового менеджера Nautilus есть неочевидная возможность добавлять свои «точки входа» — закладки на нужные вам адреса. Для этого, находясь по нужному адресу или в нужном каталоге, нажимаем Ctrl+D или выбираем мышкой иконку с горизонтальными черточками, и там в меню щелкаем по «Добавить закладку на этот адрес».
После этого слева внизу появится закладка с вашим адресом или папкой. Можете организовать их перетаскиванием мышкой, удалить вызвав контекстное меню, переименовать или производить другие требуемые операции.
Добавить средства управления пакетами програм
Стандартное средство управления программами в Gnome ориентировно не на пакеты а на избранные программы. Чтобы получить возможность более полно изучать репозитарии доступного программного обеспечения и управлять ими, надо установить Yumex или использовать предустановленный Apper в KDE.
Устанавливаем Yumex:
sudo yum install yumexСетевые учетные записи — синхронизация с почтой, контактами и календарем Google
В Гном встроена отличная интеграция с вашими основными данными из аккаунта Гугла, а также с множеством других сетевых сервисов.
Достаточно зайти в главное меню системы и написать «сете» — появится предложение выбрать настройку раздела «Сетевые учетные записи».
Указав свои параметры доступа к Гуглу и подтвердив их кодом (если у вас двухэтапная авторизация), вы получаете интеграцию календаря, задач, контактов и почты со своей системой.
Так, при клике по времени будет появляться информация о ваших ближайших событиях календаря. А при вбивании части имени одного из ваших контактов в главном меню системы его карточка будет появляться у вас прямо перед глазами. Далее вы сможете связаться с ним в 2 клика.
И удобство сетевых записей этим не ограничивается. Попробуйте!
Шрифты
У меня LCD мониторы и я предпочитаю шрифты с легким сглаживанием. Отсюда переменные в следующем конфиге.
Если вам нравится другое значение сглаживания (среднее, сильное или без него)- можете подставить соответствующее значение для переменной hintstyle вместо hintslight: hintmedium, hintfull или hintnone.
Также вам может потребоваться внести изменения и в переменную lcdfilter. Но подробнее об этом вы можете прочитать, например, тут wiki.archlinux.org/index.php/font_configuration
Приведенный ниже текст конфига улучшает шрифты во множестве программ, включая Firefox, KDE со штатной настройкой сглаживания «Как в системе» и в запущенных из-под него программах.
Вам необходимо создать файл /etc/fonts/local.conf со следующим содержимым:
<?xml version='1.0'?>
<!DOCTYPE fontconfig SYSTEM 'fonts.dtd'>
<fontconfig>
 <match target="font">
  <edit mode="assign" name="rgba">
   <const>rgb</const>
  </edit>
 </match>
 <match target="font">
  <edit mode="assign" name="hinting">
   <bool>true</bool>
  </edit>
 </match>
 <match target="font">
  <edit mode="assign" name="hintstyle">
   <const>hintslight</const>
  </edit>
 </match>
 <match target="font">
  <edit mode="assign" name="lcdfilter">
   <const>lcddefault</const>
  </edit>
 </match>
 <match target="font">
  <edit mode="assign" name="autohint">
   <bool>false</bool>
  </edit>
 </match>
 <dir>~/.fonts</dir>
</fontconfig>
После этого выходим из сеанса, и входим заново.
Система теперь полноценно узнала о том, какое сглаживание шрифтов вы хотите использовать.
В некоторых случаях требуется изменение стандартного dpi экрана, чтобы шрифты и графика после приведенных настроек действительно были отличными.
Этот момент я пока оставляю вам на самостоятельную проработку, если поймете, что вам надо его выполнить для обретения счастья на вашей системе.
Заменяем тонкие шрифты в IDE от JetBrains (IntelliJ, PyCharm и другие) и в Java
Хотя некоторым нравятся именно вариант тонких шрифтов, есть большая группа людей, которым нужна более «плотная», весомая отрисовка шрифтов. И если, например, в Eclipse с «плотными» шрифтами все в порядке, то вот популярные среды разработки от JetBrains несут на себе печать Явы и иногда вызывают отторжение своими шрифтами.
Pycharm с дефолтным шрифтом — Gnome 3
Pycharm с дефолтным шрифтом — KDE

Pycharm с описанным ниже изменением шрифта — KDE
Ниже я опишу один из самых рабочих вариантов решения данной проблемы (подходящий и для Мака), в результате чего мы получим в нужных нам программах «плотные» шрифты, которые выглядят по мнению некоторых разработчиков куда лучше, чем в Windows.
Основная идея проста — если Java не обрабатывает инструкции хинтинга шрифта корректно, то надо эти инструкции из шрифта просто удалить.
Вот как это делается:
1. Выбираем любимые шрифты, которые хотим использовать в IntelliJ IDEA и других IDE этой линейки.
Например, Liberation Sans и Liberation Mono.
2. Устанавливаем программу редактирования шрифтов:
sudo yum install fontforge
3. Запускаем её и открываем нужный нам шрифт для изменения.
Например из каталога /usr/share/fonts/liberation/ следующие файлы:
LiberationSans-Regular.ttf
LiberationMono-Regular.ttf
4. Нажимаем Ctrl+A, чем выделяем все символы шрифта. В меню «Хинты» выбираем пункт «Очистить инструкции».
5. В меню «Элемент» — «Информация о шрифте» во все поля названий добавляем цифру «2», чтобы в поле «Название шрифта» стояло «LiberationSans2». Нажимаете Ок. Сразу-же программа сообщит что шрифт не имеет уникального идентификатора, а несет старый. Щелкаете на кнопку «Изменить», и нашему шрифту будет сгенерирован новый UID.
6. Меню «Файл» — «Создать шрифты». В появившемся окне справа щелкаем на иконку гаечного ключа и выбираем опцию «Показывать скрытые файлы». Затем переходим в домашний каталог и создаем в нем папку .fonts (если её там ещё нет). Сохраняем наш шрифт с новым именем (например LiberationSans2.ttf ). Я обычно выбираю тип сохраняемого файла TrueType. Если будут сообщения об ошибках типа самопересечения — жмите Ок. Пусть сохраняет.
Повторяем для другого выбранного шрифта. Затем закрываем оба окошка, отказавшись от сохранения шрифтов в формате sfd.
Теперь в нашей системе появились два наших новых шрифта, которые симпатично выглядят в нужных нам программах. Заходим в настройки IntelliJ и указываем использовать новый шрифт в редакторе.
Краткое сравнение результата с дефолтным шрифтом в Windows:

Полноразмерные скриншоты с шрифтами под Gnome 3 и Windows 8.1
Полноразмерные скриншоты с шрифтами под Gnome 3 и Windows 8.1
Подробнее о методах улучшения шрифтов в Яве тут:
superuser.com/questions/614960/how-to-fix-font-anti-aliasing-in-intellij-idea-when-using-high-dpi/623596#623596
К сожалению, подобная замена шрифтов не работает с популярной программой составления диаграм связи (mind map) — Freemind. Шрифты в ней всё-равно остаются тонкими.
Однако есть хорошая коммерческая альтернатива этой программе, у которой нет проблем со шрифтами — XMind, которой можно пользоваться как бесплатно, так и доплатив за некоторые продвинутые возможности. Ознакомиться с нею можно на сайте www.xmind.net
Если хотите её попробовать — скчайте для Федоры Portable версию программы отсюда www.xmind.net/download/portable
Распакуйте архив, зайдите в созданную папку вида xmind-portable-3.5… затем в папку соответствующую архитектуре вашего дистрибутива (например, в XMind_Linux_64bit ) и запустите файл XMind
Вы можете самостоятельно создать ярлык для меню для этой программы в ~/.local/share/applications по аналогии с ярлыками из /usr/share/applications
Среды разработки и редакторы для языка программирования Python
Так как споры вокруг шрифтов в Linux лично я встречаю в основном в темах по разработке, то сразу привожу небольшую выжимку информации для работающих с Питоном, чтобы они могли проверить шрифты в своих рабочих инструментах. Все эти программы, кроме коммерческих, доступны из основных репозиториев. У всех из них после проведенной настройки с шрифтами все должно быть хорошо.
Те, кому это не актуально — переходите к следующему пункту. Там мы начинаем подготовку к просмотру видео, работе с flash и прочими «полезностями».
Geany
Отличный быстрый редактор / мини-IDE.
sudo yum install geany geany-plugins-common geany-themesВ yumex вы найдете к нему много полезных дополнений. Цветовые схемы и другое настраивается через «Правка» — «Настройки».
Eclipse + pydev
Широко известный, кроссплатформенный пакет с плагином, расширяющим его работу с Питоном.
sudo yum install eclipse-pydev Будет предложено установить также и множество зависимостей. Соглашайтесь.
Настройки всего и вся в «Окно» — «Параметры». Шрифты работают нормально «из коробки».
Есть альтернативная коммерческая сборка от автора pydev — LiClipse www.liclipse.com
Kdevelop + kdev-python
Среда разработки, реализованная под KDE. Отличается шустрой работой, неплохой реализацией работы с Питоном.
sudo yum install kdevelop kdevelop-pythonТакже в комплекте Федоры доступны для установки и другие открытые редакторы и IDE, в которых можно работать с Питоном: ninja-ide, spe, PyPE, spyder, anjuta, eric
Ознакомьтесь с ними, если приведенные выше и ниже решения вам не подходят или вам просто любопытно.
Из коммерческих хочу отметить 4 основных кроссплатформенных решения:
Pycharm
Широко известная IDE для Питона. Многие считают её лучшей. Не отличается высочайшей надежностью и устойчивостью, но зато славится хорошим автодополнением.
www.jetbrains.com/pycharm/download
Есть платный и бесплатный (Community Edition) варианты.
Изменение настроек в «Файл» — «Настройки».
Wing IDE
Кто-то её любит и считает «номером 1», кому-то она совершенно не нравится. Многие обзоры признают её сильные стороны и сохраняют за ней как минимум «номер 2» из коммерческих IDE. Не зависит от Java.
wingware.com/downloads
Есть платный и бесплатный (Wing IDE 101) варианты.
Пару недель назад можно было приобрести коммерческую лицензию всего за 2100 рублей.
Шрифты настраиваются без проблем.
Komodo IDE
Считается более слабой IDE для Питона по сравнению с предыдущими, однако на неё тоже можно обратить внимание и протестировать в работе.
komodoide.com
Sublime Text
Широко известный редактор с возможностью расширения для лучшей работы с Питоном.
www.sublimetext.com/3
Дальше возвращаемся обратно к настройке первоочередных потребностей в Fedora 21.
Подключение к репозитариям RPMFUSION
Чтобы получить возможность ставить в Fedora дополнительные видеоплееры, видеокодеки, flash, несвободные программы и много чего ещё, надо подключиться к основным дополнительным репозиториям: Rpmfusion Free и NonFree
Самый простой вариант — выполнить команду в терминале:
su -c 'yum localinstall --nogpgcheck http://download1.rpmfusion.org/free/fedora/rpmfusion-free-release-$(rpm -E %fedora).noarch.rpm http://download1.rpmfusion.org/nonfree/fedora/rpmfusion-nonfree-release-$(rpm -E %fedora).noarch.rpm'Другие варианты подключения вы можете посмотреть на официальном сайте репозитория в разделе «Настройка» rpmfusion.org/Configuration
Видео, аудио и книги
Видеопроигрыватели
Из видеопроигрывателей я лично предпочитаю MPV — у него выше скорость отклика, меньше задержек при перемотке, визуальный минимализм и при этом достаточный функционал для постоянного использования.
Устанавливается MPV очень легко (должны быть подключены репозитарии rpmfusion):
sudo yum install mpvМой конфиг для mpv, который надо положить по адресу ~/.config/mpv/mpv.conf
# Сохранять позицию, на которой остановились при просмотре
save-position-on-quit=yes

# Запускать просмотр в fullscreen
fs=yes

# Отключить встроенное в программу управление звуком и использовать системный миксер, когда он доступен
softvol=no

# Прогресс-бар делаем тонким, полупрозрачным, и переносим его в низ экрана
osd-bar-align-y=1
osd-bar-h=1
osd-border-size=1
osd-color='#aaaaaaaa'
Подробнее о настройках MPV можно прочитать тут:
wiki.archlinux.org/index.php/Mpv
github.com/mpv-player/mpv/blob/master/etc/example.conf
Шоткеи MPV в целом аналогичны mplayer. Отмечу несколько особо важных для меня:
j — переключение субтитров
# — переключение аудиодорожки
D — включение деинтерлейса (когда видео в горизонтальную полоску по типу ТВ)
Подробнее: manpages.ubuntu.com/manpages/trusty/man1/mpv.1.html
Также можно установить проигрыватели с привычным графическим интерфейсом: smplayer и vlc
sudo yum install smplayer vlcДополнительно к этим проигрывателеям вы можете установить темы и прочие полезности, заглянув в список доступных пакетов.
Указанные выше проигрыватели в зависимостях несут с собой основные кодеки, которые требуются для воспроизведения видео.
Обращу ваше внимание, что иногда программы в процессе установки зависимостей подключают ответвление rpmfusion «rawhide», предназначенное для нестабильной Федоры. Рекомендую не соглашаться на подключение этого репозитория или отключать его в дальнейшем в Yumex, проверяя включены-ли rpmfusion для fedora 21. Вероятно, в ближайших обновлениях эта проблема будет исправлена, но всё-таки будьте внимательны.
Аудиопрогрыватели + Вконтакте
Rhythmbox
Уже есть в установленных по-умолчанию программах в Гноме.
Эквалайзер к плееру ставится отдельно. Смотрите в списке пакетов в yumex или apper.
Плагин Rhytmbox для Вконтакта: github.com/radistmorse/rhythmbox-vk
Немного о нем и его установке на русском: boutnew.ru/tehnika-i-tehnologii/muzyika-s-vk-com-cherez-rhythmbox-na-ubuntu-12-04-12-10-13-04-13-10.html
Плагин простой, есть только общий поиск по всем композициям.
Exaile
www.exaile.org
Ставится из штатных репозитариев.
Есть плагин для Вконтакте. Методы установки плагина оставляю на ваши изыскания.
Clementine
www.clementine-player.org/ru
Ставится из штатных репозитариев.
Вроде, есть плагин для Вконтакте. Методы установки плагина также оставляю на ваши изыскания.
Из плюсов — «легче» следующего Амарока.
Amarok
amarok.kde.org
Имеет смысл ставить при установке KDE (об установке KDE будет ниже). Также идет в штатных репозитариях.
Установка плагина Вконтакте производится в несколько шагов:
1. В настройках Амарок в разделе «Скрипты» щелкаем по кнопке «Управление скриптами»
2. В поле поиска по доступным скриптам вбиваем «vk»
3. Появляется единственный скрипты, он-же нам и нужен. Кликаем по кнопке рядом с ним «Установить».
4. Перезагружаем Амарок
5. В настройках выбираем пукто «Авторизация vk», вбиваем нужные данные.
Можно слушать музыку Вконтакте — как свою так и своих друзей, или воспользоваться поиском по всей доступной.
Если вашим программам все ещё не хватает кодеков
sudo yum install gstreamer1-libav gstreamer1-plugins-bad-free-extras gstreamer1-plugins-bad-freeworld gstreamer1-plugins-good-extras gstreamer1-plugins-ugly gstreamer-ffmpeg xine-lib-extras xine-lib-extras-freeworld k3b-extras-freeworld gstreamer-plugins-bad gstreamer-plugins-bad-free-extras gstreamer-plugins-bad-nonfree gstreamer-plugins-ugly gstreamer-ffmpegКак слушать аудиокниги
С прослушиванием аудиокниг отлично справляется медиаплеер Banshee который входит в стандартный репозиторий Fedora 21:
sudo yum install banshee banshee-community-extensionsПрограмма по своим функциям является аналогом Rhythmbox. Подробнее о ней на banshee.fm
Чтобы прослушать книги надо выполнить 2 шага:
1. Добавить папки с книгами в библиотеку Banshee (как обычную музыку)
2. Затем нужные «альбомы»-книги перетащить мышкой в раздел Аудиокниги.
После вам станет доступно запоминание позиции в книге и прочие приятности.
Как читать книги
fb2 / epub
Calibre (для просмотра есть отдельная программка, идущая в комплекте) или fbreader
sudo yum install calibre fbreaderpdf
Отлично справляются штатные читалки pdf: evince (Gnome) или okular (KDE)
djvu
В Gnome нужно дополнение к evince
sudo yum install evince-djvuа в KDE штатное средство просмотра документов уже умеет работать с этим форматом.
Управление библиотекой и конвертация всего во все — Calibre
Установка Дропбокса
Заходим на www.dropbox.com/install?os=lnx
Скачиваем пакет в подходящем формате.
Устанавливаем (двойной клик мышкой в файловом менеджере и нажатие кнопки «Установить»).
В главном меню запускаем свежеустановленный Dropbox. Даем ему возможность докачать свой установщик. Затем настраиваем привычные параметры своего аккаунта и синхронизации.
Примечание: пока репозитория дропбокса для Fedora 21 не существует, так что придется добавить ему опцию «пропускать, если недоступен»:
sudo yum-config-manager --save --setopt=Dropbox.skip_if_unavailable=trueПозднее он появится, и все будет работать ок.
Установка мессенджеров
Skype
Заходим на офф.сайт, скачиваем для федоры пакет со Скайпом:
www.skype.com/ru/download-skype/skype-for-computer
Затем устанавливаем его двойным кликом и кнопкой «Установить» (или «Ок», если вы уже поставили yumex и он запускается вместо штатного установщика пакетов).
Все зависимости (которых множество, и все обязательно в 32-разрядной архитектуре) будут поставлены вместе со Скайпом, так что доставлять дополнительно, обычно, не нужно.
Для привычной работы со скайпом в Gnome 3 можно установить дополнение, которое добавит иконку скайпа в панель:
extensions.gnome.org/extension/696/skype-integration
или
extensions.gnome.org/extension/192/status-icon-fixer
Если при работе скайпа будут проблемы со звуком, попробуйте запустить его следующей командой:
env PULSE_LATENCY_MSEC=30 skype %U Также, можно попробовать использовать вместо цифры 30 цифру 60.
Если это решает проблему, можете переименовать /usr/bin/skype в /usr/bin/skype2, создать пустой файл /usr/bin/skype и прописать в нем следующие строчки:
#!/bin/sh
env PULSE_LATENCY_MSEC=30 skype2 %1 &
Сохранить и назначить права на выполнение:
sudo chmod +x /usr/bin/skypeПлюс такого варианта — любой запуск скайпа позволит ему нормально работать со звуком.
Или, если вам не нравится предыдущий вариант, можно сделать по-другому:
1.
sudo mcedit /usr/share/applications/skype.desktop2. вместо строки Exec=skype %U записать вышеуказанную
Exec=env PULSE_LATENCY_MSEC=30 skype %U Обычный запуск через иконку будет теперь работать со звуком нормально.
Однако запуск непосредственно команды «skype» так и будет шуметь и хрипеть.
Viber
Скчиваем RPM-пакет с официального сайта viber.com/products/linux
Устанавливаем его (двойной клик мышкой, «Установить»)
Остается только запустить свежеустановленный Вайбер из главного меню.
Telegram
С официального сайта desktop.telegram.org скачиваем пакет, который нам предлагают для Линукса. Распаковываем («Распаковать сюда», например). Заходим в свежесозданную папку «Telegram» и двойным кликом запускаем бинарник с аналогичным названием. Клиент запущен и работает.
Остается его при желании добавить в автозагрузку.
Подсказка:
Сначала создаете новый файл в ~/.local/share/applications по аналогии с файлами из /usr/share/applications
Затем добавляете его в «Дополнительные параметры» — «Автозапуск»
Установка браузеров и flash
Firefox стоит в системе по-умолчанию.
Google Chrome
Для установки скачиваем с официального сайта нужную версию:
Stable www.google.ru/chrome/browser/desktop
Beta www.google.com/chrome/browser/beta.html
Выбираем свою 64- или 32-битный пакет для Fedora. Скачиваем. Устанавливаем двойным кликом.
Все необходимые зависимости подтянутся автоматически.
В комплекте самый свежий флеш, реакция внутри флеша на глобальные шоткеи и т.д.
Если вы, например, установили стабильный Хром, а затем хотите заменить его на бету, сделайте следующее:
1.
sudo yum remove google-chrome2.
sudo yum install google-chrome-betaУстановка Хромиума
Если вас не устраивает Хром от Гугла или хочется чего-то дополнительного в том-же духе.
В силу проблем с лицензиями Хромиума в основных репозиториях для Федоры нет. Однако он есть в неофициальном репозитарии Copr в «русской Федоре». Подробнее об этом copr.fedoraproject.org/coprs/churchyard/chromium-russianfedora
Устанавливается Хромиум так:
1. Сохраняем файл copr.fedoraproject.org/coprs/churchyard/chromium-russianfedora/repo/fedora-21/churchyard-chromium-russianfedora-fedora-21.repo на диск
2. кладем его в каталог /etc/yum.repos.d
3.
sudo yum install chromiumFlash для браузеров и для системы
Для 64bit системы:
sudo yum install http://linuxdownload.adobe.com/adobe-release/adobe-release-x86_64-1.0-1.noarch.rpmДля 32bit:
sudo yum install http://linuxdownload.adobe.com/adobe-release/adobe-release-i386-1.0-1.noarch.rpmДальше для обоих систем:
sudo rpm --import /etc/pki/rpm-gpg/RPM-GPG-KEY-adobe-linux
sudo yum install flash-plugin
Остается только перезапустить браузер (в данном случае предполагается Firefox).
В Хроме свой собственный флеш.
А вот для Хромиума надо дополнительно установить симлинк на флеш руками.
Система 64bit:
sudo ln -s /usr/lib64/mozilla/plugins/libflashplayer.so /usr/lib64/chromium-browser/plugins/libflashplayer.soСистема 32bit:
sudo ln -s /usr/lib/mozilla/plugins/libflashplayer.so /usr/lib/chromium-browser/plugins/libflashplayer.soПодробнее о об установке флеша под Федора: ask.fedoraproject.org/en/question/10217/how-to-install-adobe-flash-on-fedora
Проприетарные видеодрайверы
Указанные ниже драйвера надо ставить после подключения репозиториев rpmfusion (которое было описано раньше).
Nvidia «обычная»
Вариант 1 — совсем простой
yum updateПерегружаемся если было обновлено что-то в системе
yum install akmod-nvidia xorg-x11-drv-nvidia-libs kernel-develИнформация о способе: jsn-techtips.blogspot.ru/2013/12/fedora-20-nvidia.html
Вариант 2 — немного другой
sudo yum install akmod-nvidiaЧтобы работало ускорение в видеоплеере:
sudo yum install vdpauinfo libva-vdpau-driver libva-utilsПри загрузке проверить, чтобы не грузился старый драйвер:
lsmod |grep nouveauЕсли надо удалить старый драйвер Nvidia:
sudo yum remove xorg-x11-drv-nvidia\* Если после установки драйвера Nvidia перестали грузиться иксы:
1. Проверяем ошибку
sudo akmod --force2. Возможно надо установить исходники ядра:
sudo yum install kernel-devel3. Снова запустить
sudo akmod --force4. Если все ок — перезапускаем систему и должно работать.
Как резервный вариант отказа от попытки загрузки с новыми драйверами достаточно просто удалить (переименовать) файл /etc/X11/xorg.conf (сейчас он по-умолчанию в системах отсутствует, а создается инсталляторами типа Nvidia).
Подробнее об установке драйверов для Nvidia разных серий:
blog.xenodesystems.com/2014/12/como-instalar-drivers-propietarios.html
rpmfusion.org/Howto/nVidia
Проприетарные драйвера ATI
Тут я с вашего позволения отделаюсь ссылкой на материалы.
На русском Wiki Федоры и актуальный опыт коллеги из Испании blog.xenodesystems.com/2014/12/como-instalar-drivers-propietarios-ati.html
Nvidia Optimus — установка Bumblebee
Nvidia Optimus это технология, которая позволяет на ноутбуке выбрать видеокарту для работы текущего приложения — интегрированную от Intel (экономичную) или мощную дискретную от NVIDIA.
Ссылка на понятно руководство как ставить и что делать: fedoraproject.org/wiki/Bumblebee
Не забывайте подставлять правильную цифру «21» там, где требуется указание номера Федоры, вместо «20».
Обращаю внимание, что мне пришлось снизить уровень внимательности системы безопасности Linux с «высокого» до «среднего», чтобы у меня заработала вторая (дискретная) видеокарта. Подробнее об этом в самом конце моих злоключений в данном разделе.
Вероятно, упомянутые дополнительные шаги 1..3 можно было и не проходить. Однако привожу эту информацию на случай, если кому-то понадобится сравнить это со своим опытом.
1. Если появляется ошибка при запуске приложения через optirun вида
[ERROR]Cannot access secondary GPU - error: [XORG] (EE) No devices detected.
[ERROR]Aborting because fallback start is disabled.
или
Cannot access secondary GPU - error: [XORG] (EE) systemd-logind: failed to get sessionто вам нужно в настройках проверить правильный BusID вашей Nvidia-карты. Выполните в терминале:
lspci | egrep 'VGA|3D'Пример вывода данной команды:
00:02.0 VGA compatible controller: Intel Corporation 3rd Gen Core processor Graphics Controller (rev 09)
01:00.0 VGA compatible controller: NVIDIA Corporation GF108M [GeForce GT 630M] (rev ff)
Заменив все точки на двоеточия — номера впереди будут обозначать BusID видеокарт, в примере получаем следующий BusID для карты nvidia:
BusID 01:00:0
Дальше правим конфигурационный файл xorg.conf.nvidia:
sudo gedit /etc/bumblebee/xorg.conf.nvidiaВ этом файле приведен закомментированный пример указания BusID, по данному примеру указываем строчкой ниже правильный BusID (если номер BusID примера является правильным, то можно просто данную строчку раскомментировать, убрав ‘#’). В результате получится примерно следующее (в вашем случае номера могут быть другими):
#   BusID "PCI:02:00:0"
	BusID "PCI:01:00:0"
Дополнительная информация на help.ubuntu.ru/wiki/bumblebee
2. В логах появляется следующая ошибка:
[ERROR]Cannot access secondary GPU - error: [XORG] (EE) [drm] failed to open device Если в системе установлен драйвер nvidia и при этом присутствует загруженный модуль nouveau, тогда убедитесь в следующем:
в наличии строчки Driver=nvidia конфигурационного файла /etc/bumblebee/bumblebee.conf
в системе должен присутствовать один из файлов с содержимым blacklist nouveau:
$ grep -R nouveau /etc/modprobe.d/*Больше информации на https://ru.opensuse.org/SDB:Bumblebee
3. Как добавить свободный драйвер в черный список:
setiathome.berkeley.edu/forum_thread.php?id=74094
kaischroed.wordpress.com/howto-install-nvidia-driver-on-fedora-replacing-nouveau
Открываем в редакторе файл
sudo mcedit /etc/modprobe.d/blacklist.confи добавить в конце файла строчку ‘blacklist nouveau’
Если это не изменит ситуации можно удалить свободные драйвера полностью:
sudo yum remove xorg-x11-drv-nouveau.x86_64Затем я оОбнаружил что в данный момент драйвер NVidia в черном списке:
cat /etc/modprobe.d/modprobe.conf
blacklist nvidia
Закомментировал эту строчку и перегрузился, но проблема осталась.
4. Шаг, решивший проблему. Указанные выше ошибки возникают в Fedora из-за SELinux при самом высоком уровне безопасности («enforcing»). Достаточно снизить его до уровня «permissive» и проблема уходит.
Узнать текущие настройки SELinux:
/usr/sbin/getenforce
/usr/sbin/sestatus
Редактируем конфиг:
sudo mcedit /etc/selinux/configв нем находим переменную SELINUX= и выставляем ей следующее значение:
SELINUX=permissiveПерегружаемся.
После перезагрузки оказалось что проблема действительно была в строгой политике SELinux, и что теперь программы отлично запускаются и на второй (мощной) видеокарте.
Более подробная информация об изменении настроек SELinux указана в документации к Федоре.
Как запускать программы и игры в Steam на дискретной карте
Обращаю ваше внимание, что установка Стима и исправление ошибок с его работоспособностью (если вы с такими столкнетесь) описана немного ниже. Для указания параметров запуска игр на дискретной карте из Стима он должен у вас нормально работать.
Заходим в Стим, в свою библиотеку («Library»). На игре кликаем правой кнопкой мышки и выбираем «Свойства» («Properties»). «Установить параметры запуска» («Set Launch Options ..») и указываем следующее:
optirun -b primus %command%Сохраняем. Можно запускать эту игру.
Другие варианты команд запуска игр и сравнение их скорости можно посмотреть по ссылкам:
forum.ubuntu.ru/index.php?topic=209722.0
support.steampowered.com/kb_article.php?ref=6316-GJKC-7437
Бенчмарки: Fedora 21 Optimus / Primus / Windows 8.1
За несколько недель работа с бетой Федоры у меня было достаточно времени, чтобы потестить её в качестве основного рабочего и игрового места, а также сравнить её (условную) производительность с имеющимся на моем игровом ноутбуке Win8.1
Самое первое тестирование — по FPS в Serious Sam 3 на «ультра»-настройках.
В Windows 8.1 видим на выбранной карте средний FPS в районе 30-55. Иногда достигает «предельных» 60.
В Fedora 21 с вышеуказанной командой запуска практически стабильные 60 fps, иногда падающие до 55. В редких случаях удавалось отметить 48.
Верхний предел в 60 объясняется просто — это частота обновления моего монитора, и при обычных настройках большинство программ не генерируют больше этого значения.
Так, в Linux выкрутить FPS в программе на максимум часто позволяет команда запуска
vblank_mode=0 optirun -b primus %command%Однако иногда она работает куда медленнее других вариантов ( optirun или optirun -b primus )
Пояснения по параметру vblank_mode:
askubuntu.com/questions/285342/why-does-vblank-mode-improve-framerate-drastically-in-benchmarks
Кроссплатформенный бенчмарк GPU — GPUTest
Сайт программы: www.geeks3d.com/gputest
Windows, OpenGL 4.4.0
FurMark — 1186 points (FPS: 19)
TessMark X8 — 10306 points (FPS: 171)
TessMark X16 — 9006 points (FPS: 150)
TessMark X32 — 7499 points (FPS: 125)
TessMark x64 — 4460 points (FPS: 74)
GiMark — 1922 points (FPS: 32)
PixMark JuliaFP32 — 9079 points (FPS: 151)
PixMark JuliaFP64 — 765 points (FPS: 12)
PixMark Piano — 443 points (FPS: 7)
PixMark Volplosion — 1412 points (FPS: 23)
Plot3D — 11127 points (FPS: 186)
Итого 57205 очков.
Linux, OpenGL 4.4.0 (команда optirun)
FurMark — 1655 points (FPS: 27)
TessMark X8 — 8914 points (FPS: 148)
TessMark X16 — 8322 points (FPS: 138)
TessMark X32 — 6346 points (FPS: 105)
TessMark X64 — 3598 points (FPS: 59)
GiMark — 1633 points (FPS: 27)
PixMark JuliaFP32 — 5843 points (FPS: 97)
PixMark JuliaFP64 — 612 points (FPS: 10)
PixMark Piano — 355 points (FPS: 5)
PixMark Volplosion — 1065 points (FPS: 17)
Plot3D — 8914 points (FPS: 148)
Итого 47257 очков.
На общем фоне выделяется тест FurMark, в котором под Linux производительность радикально лучше чем в Win. В остальных идет проседание.
Linux, OpenGL 4.4.0 (команда vblank_mode=0 optirun -b primus)
FurMark — 1868 points (FPS: 31)
TessMark X8 — 11448 points (FPS: 190)
TessMark X16 — 11521 points (FPS: 192)
TessMark X32 — 11072 points (FPS: 184)
TessMark X64 — 4831 points (FPS: 80)
GiMark — 1842 points (FPS: 30)
PixMark JuliaFP32 — 9831 points (FPS: 163)
PixMark JuliaFP64 — 625 points (FPS: 10)
PixMark Piano — 357 points (FPS: 5)
PixMark Volplosion — 1153 points (FPS: 19)
Plot3D — 11395 points (FPS: 189)
Итого 65943 очков.
А тут заметны очень забавные результаты на серии TessMark. Есть комментарии по этому поводу?
Особняком идет тест Triangle — в нем под Linux наблюдается провальное отставание:
Win Triangle — 21966 points (FPS: 366)
Lin optirun Triangle — 10179 points (FPS: 169)
Lin vblank_mode=0 optirun -b primus Triangle — 11594 points (FPS: 193)
Кроссплатформенный бенчмарк Geekbench
Взят из магазина Steam. Ниже приведена только итоговая информация, т.к. результат у систем практически одинаковый.
Linux
Integer Score 3651 15278
Floating Point Score 3540 16041
Memory Score 3314 3631
Geekbench Score 3539 13253
Windows
Integer Score 3623 14898
Floating Point Score 3474 15923
Memory Score 3233 3578
Geekbench Score 3485 13044
В Win наблюдается несколько меньшая общая производительность.
Перед переходом к бенчмаркам браузеров мы временно решим проблему Хрома под Линуксом с работой на дискретной карте.
Решение проблемы с неработающим WebGL у Хрома
Чтобы работал WebGL под optirun в Google Chrome обычно советуют в его флагах включить возможность работать с WebGL ( Disable WebGL: Enable → Disable ) или запускать
optirun google-chrome --ignore-gpu-blacklistОдин из советов askubuntu.com/questions/110132/problem-with-running-webgl-with-chrome
Однако у меня optirun google-chrome-beta отказывался запускаться со следующими ошибками:
'librrfaker.so' from LD_PRELOAD cannot be preloaded (cannot open shared object file) Проблема проявлялась несмотря на то, что в системе уже установлены virtualgl обоих архитектур 32-bit и 64-bit (у меня 64-битная система).
Указания в переменной LD_LIBRARY_PATH где искать нужны библиотеки результата не дало.
Пробовал запускать через sudo, на случай если ругается на установленный бит защиты, но и это не возымело действия. Подробнее о ситуации с битом защиты lists.fedoraproject.org/pipermail/scm-commits/Week-of-Mon-20130506/1014107.html
Чтобы детализировать проблему запускал с параметром LIBGL_DEBUG=verbose primusrun…
В результате гугления нашел временное решение проблемы на code.google.com/p/chromium/issues/detail?id=351804
Рекомендуют отключать «песочницу» в Хроме, т.к. она в текущих его версиях с дискретной картой под Линукс работать не может. Для этого надо запускать Хром с флагом —disable-gpu-sandbox
Убеждаемся, что WebGL стал работать: переходим в Хроме по адресу chrome://gpu
WebGL заработал и теперь можно переходить к тестированию и сравнениям.
Бенчмарки для браузеров
По результатам проведенных тестов наблюдается интересная тенденция — браузеры в Linux серьёзно переигрывают своих собратьев, работающих в Widows. Более того Хрому под Линукс удалось показать абсолютно лучший результат в тесте www.wirple.com/bmark который когда-либо был измерен.
Напоминаю, что у меня присутствует Nvidia Optimus, и если не указано иное — браузеры запускались на обычной видеокарте. В противном случае я указываю основные модификаторы запуска, чтобы был понятен контекст замера. Также часто встречалась ситуация когда дискретная карта ничего не изменяла в результатах теста. В этом случае я просто не привожу значения запуска с ней.
Тест 1 — peacekeeper.futuremark.com
Windows
Firefox 34 — 3661
Chrome 40 — 4313
Linux
Firefox 34 — 6433
optirun Firefox 34 — 6441
Chrome — 5837
Варианты запуска Хрома с optirun, vblank или nosandbox только немного ухудшали результат.
Тест 2 — browsermark.rightware.com
Windows
Firefox — 3306
Chrome — 5525
на дискретной карте Chrome — 6527
Linux
Firefox — 5167
optirun Firefox — 5468
nosandbox Chrome — 7138
vblank + nosandbox Chrome — 7223
На эти цифры Хрома тест сообщил мне:
Desktop Linux with Google Chrome 40 is faster than 99% of all Desktops tested so far.
Тест 3 — www.wirple.com/bmark
Windows
Firefox: 1281 (Canvas score — Test 1: 77 — Test 2: 630, WebGL score — Test 1: 274 — Test 2: 300)
Chrome: 3172 (Canvas score — Test 1: 535 — Test 2: 1537, WebGL score — Test 1: 629 — Test 2: 471)
Linux
Firefox: 1116 (Canvas score — Test 1: 188 — Test 2: 354, WebGL score — Test 1: 306 — Test 2: 268)
optirun Firefox: 1546 (Canvas score — Test 1: 466 — Test 2: 372, WebGL score — Test 1: 361 — Test 2: 347)
А вот с параметром vblank произошло снижение производительности.
Chrome: 2506 (Canvas score — Test 1: 629 — Test 2: 614, WebGL score — Test 1: 677 — Test 2: 586)
И вот рекордная команда:
optirun -b primus google-chrome-beta --disable-gpu-sandbox --enable-webgl --ignore-gpu-blacklist Chrome: 4240 (Canvas score — Test 1: 794 — Test 2: 2222, WebGL score — Test 1: 677 — Test 2: 547)
На этот результат тест мне сообщил о победе следующее:
Your results compared to other users:
You score better than 100% of all users so far!
You score better than 100% of the people who use the same browser and OS!
Это лучший результат, который отмечал данный тест за время своего существования.
Добавление к «рекордной» команде параметра vblank_mode=0 сильно ухудшило результат
+vblank_mode Chrome: 3363 (Canvas score — Test 1: 769 — Test 2: 1443, WebGL score — Test 1: 626 — Test 2: 525)
На этом я заканчиваю с информацией о результатах тестирования.
Основная информация о моей системе для уточнения бенчмарков
Ноутбук Asus G750JM
CPU: Intel I7-4710HQ/BGA
RAM: DDR3L 1600 8Gb*2
Nvidia Optimus
Дискретная видеокарта Nvidia GeForce GTX 860M с 2 Гб видеопамяти
Windows 8.1
Nvidia: 344.48
Chrome Beta: 40.0.2214.10
Firefox: 34
Linux 3.17.4-300
Nvidia: 340.46
Firefox: 33.1
Chrome Beta: 40.0.2214.10
Теперь вернемся к настройке и использовании программ в Fedora 21.
Steam и игры
Установка Steam
После включения ранее указанного репозитория RPMFusion выполняем
sudo yum install steamПосле этого рекомендуют перегрузить систему.
Если у вас 64-разрядная система, то для корректной работы Стима придется доустановить 32-битные версии некоторых программ:
1. Чтобы корректно работал flash видео-плеер в магазине Стим:
sudo yum install http://linuxdownload.adobe.com/adobe-release/adobe-release-i386-1.0-1.noarch.rpm
sudo yum install flash-plugin.i386
2. Чтобы корректно работало 3D ускорение для Wine, который используют некоторые программы из Стима а также при получении ошибки:
OpenGL GLX context is not using direct rendering, which may cause performance problems. Надо вернуться к установке драйверов для Nvidia и поставить 32-битную версию:
rpmfusion.org/Howto/nVidia#x86_64_.2864bit.29_users
Например, найти xorg-x11-drv-nvidia-libs для 32bit версии и установить её.
3. При возникновении ошибки
libGL error: Couldn't dlopen libudev.so.1 or libudev.so.0, driver detection may be broken.
Finished uploading minidump (out-of-process): success = no
error: libcurl.so: cannot open shared object file: No such file or directory
/home/vyacheslav/.local/share/Steam/steam.sh: line 730:  3585 Segmentation fault
Нужно поставить вот это:
sudo yum install systemd-libs.i686Подробнее на ask.fedoraproject.org/en/question/54746/steam-wont-run
Запускаем Windows-игры и Windows-программы
Для этого есть отличный пакет PlayOnLinux: www.playonlinux.com/ru
Ставится легко прямо с сайта. Оставляю вам его на самостоятельную проработку.
Программы для рисования
Для редактирования растровых изображений отлично подходит известный GIMP www.gimp.org
sudo yum install gimp gimp-elsamuko gimp-data-extrasТакже есть дополнительные плугины и расширения для GIMP. Посмотрите в yumex/apper.
Для редактирования векторных — Inkscape inkscape.org
sudo yum install inkscape
В рассматриваемой ниже KDE есть также свои варианты программ для растровой и векторной графики:
Krita (растр) и Karbon (вектор). Они входят в офисный пакет KDE — Calligra. Его установка будет рассмотрена ниже.
KDE
Как установить KDE, если по-умолчанию у вас установлена другая рабочая среда:
sudo yum install @kde-desktopТакже устанавливаем KDE-программы для удобной работы с архивами и просмотра pdf:
sudo yum install ark okularПосле установки KDE надо перегрузиться и на экране входа в систему под полем логина щелкнуть по иконке зубчатого колесика. В выпавшем меню выбрать «Рабочий стол Plasma» и выполнить вход.
Если хотите установить любимый многими аудио-плеер Amarok:
sudo yum install amarok
Если хотите не только установить KDE но и переключиться на использование менеджера дисплея KDM, то надо сделать следующее:
1. Устанавливаем KDM:
sudo yum install kdm2. Устанавливаем программу переключения менеджеров дисплея:
sudo yum install system-switch-displaymanager-gnome3. Запускаем программу system-switch-displaymanager и в открывшемся выбираем KDM.
Офис Calligra
В Fedora по-умолчанию установлен LibreOffice. Если вам хочется попробовать чего-то ещё — обратите внимание на офис KDE — Calligra, включающий также программы для рисования в растре (Krita) и векторе (Karbon).
Поставить офис:
sudo yum install calligraВ Calligra входит очень много всего интересного, что не ставится по-умолчанию, так что рекомендую интересующимся поискать эти пакеты со словом «calligra» в Yumex/Apper.
Если вы хотите обойтись только программами для рисования, а не ставить все основные офисные программы Calligra то можно сделать так:
sudo yum install calligra-krita calligra-karbonВ определенном смысле они являются аналогами Gimp и Inkscape.
Подсказка по работе колесика мыши в Krita:
Чтобы вернуть в Krita привычный скроллинг колесиком мыши по вертикали надо зайти в настройки «Settings» — «Configure Krita ..» -> Canvas Input Settings — Zoom Canvas
Для обоих Mouse Wheel два раза щелкнуть по выбранному Input и указать модификатор, например, привычный Ctrl. Таким образом получим приближение и удаление при вращении колесика мыши при зажатом Ctrl. Простое вращение колесика будет скролить картинку вверх и вниз. Нажимаем «Ok» и закрываем окно настроек.
Настройка KDE
Общий интерфейс KDE куда более привычен пользователям чем Gnome 3. Так что остановлюсь только на нескольких моментах, которые меняю у себя в первую очередь.
Шрифты
Главное меню -> Параметры системы -> Оформление приложений (находятся в середине второго раздела иконок). Открываем вкладку «Шрифты».
Для комфортной работы на мониторах с высоким разрешением необходимо увеличить размер всех шрифтов примерно на 1-2 единицы.
Примечание:
Иногда программы QT могут использовать в качестве одного из основных размер шрифта, записанного как «Панель инструментов». Обратите на это внимание при необходимости дополнительно увеличить их шрифт.
Затем надо откорректировать сглаживание шрифтов, чтобы оно распространялось и на Gnome-программы, запущенные из-под KDE: в том-же окне настройки шрифтов в пункте «Использовать сглаживание:» выбираем «включено» и щелкаем кнопку «настроить». Выставляем «использовать межтотечное сглаживание» — rgb и «стиль хинтинга» — легкий (напоминаю, что я предпочитаю легкое сглаживание, а вы можете указать другой).
Синхронизация контактов, календаря и почты Google
Как настроить работу с контактами и календарем Google:
1. Запускаем Kontact, в нем добавляем новый календарь Гугла, там-же добавляем новую адресную книгу из Гугла (задачи Гугла тоже будут проимпортированы)
2. Чтобы можно было искать нужные контакты в строке быстрого поиска Krunner, запускаемого в системе по Alt+F2:
в левой части этой строки поиска нажимаем значок настройки, в появившемся окне отмечаем поиск по контактам и (если хотите) события календаря.
К сожалению, полной поддержки Gmail в Kontact и KMail этой версии KDE сделать пока не успели. Однако разработчики трудятся над этим и обещают скоро выпустить.
Сейчас есть возможность подключиться к Gmail как к обычному IMAP-ящику с периодичностью проверки в 5 минут.
Устранение проблемы многократного запуска некоторых QT-программ
Рекомендую сразу в конце файла ~/.bash_profile прописать следующие строчки:
TMPDIR=/var/tmp
export TMPDIR
После этого выйти из сеанса и зайти заново.
Таким образом решается проблема многократных запусков копий одной и той-же QT-программы.
Например, торрент-клиента qbittorrent при открытии торрентов из Firefox.
Изучение иностранных языков
Словарь с произношением — StarDict
Отличная программа, которая может на лету сканировать все, что вы выделяете мышкой, и тут-же давать под курсором мыши небольшое всплывающее окно с переводом или ещё и воспроизводить произношение данного слова.
Устанавливаем программу:
sudo yum install stardictСкачиваем словари для StarDict на любом известном вам крупном трекере торрентов. Там-же в раздачах есть пояснения — как и куда устанавливать скачиваемые словари.
Кратко об установке в Linux:
1. кладем словари в каталог /usr/share/stardict/dic или ~/.stardict/dic
2. звуковые файлы из архива распаковываются в любую папку на диске, затем открываем Stardict —> Настройки —> Звуки. В поле «RealPeopleTTS search path» прописать путь к каталогу со звуками, например, /home/your_name/.stardict/en_snd/
Перезапустить Stardict. После этого произнесение слов станет доступно.
Anki и карточки
Также в Fedora доступна программа Anki для работы с карточками.
Однако эту тему я оставляю на вашу собственную проработку.
На мой взгляд практика с вышеописанными словарными статьями является более насыщенной, менее трудоемкой, лишенной сторонних ошибок и ограниченности смысловых переводов.
Проблема с появившимся тихим шумом в наушниках
Эта проблема не зависит от Fedora, однако я приведу варианты борьбы с ней.
Среди вариантов решения проблемы появившегося под Linux шума в наушниках можно выделить следующие:
1. Отключение звуковой карты от DVD-привода
2. Отключение системного динамика в BIOS
3. Уменьшение разгона системы (как CPU так и видео)
4. Переназначение выхода на наушники программой hdajackretask
Устанавливаем пакет, содержащий эту программу:
sudo yum install alsa-utils Запускаем hdajackretask и смотрим — что назначено выходу на наушники. Если назначение не верно — можно переназначить и получить звук получше. Подробнее о решении: ubuntuforums.org/showthread.php?t=2249130
5. Замена кабеля у наушников на кабель с высоким сопротивлением (у наушников с малым сопротивлением внутренний усилитель звука может вызывать постоянные тихие шумы, как в моей модели ноутбука)
6. Замена наушников на наушники с высоким сопротивлением
7. Использование внешней аудиокарты или предусилителя для наушников
Завершение
На этом данную статью, составленную из «путевых» заметок моих приключений, я заканчиваю.
Надеюсь, вы отнесетесь с теплом к новой Федоре, попробуете её и напишете об этом пару строк в комментариях.
При желании, в дальнейшем можно будет собрать информацию и для следующей статьи о ней.
This tutorial will show you how to install Fedora 38 to your desktop computer step by step with pictures.

Subscribe to UbuntuBuzz Telegram Channel to get article updates.
Summary
- You will go through five steps.
- You can install Fedora into hard disk (HDD), or any other digital storage like solid state drive (SSD) and USB flash drive.
- You can install it in dualboot method alongside existing Windows or MacOS system.
- You are expected to know basic OS installation and how to boot up a computer.
- You should use GPT partition table on a UEFI-based, 64-bit computer.
Step 1. Begin the installation
Start the installer by clicking Activities -> Install Fedora, and then select English as language.

Step 2. Setup the keyboard and timezone
In this second page, you are asked to do 3 things:
- 1. Choose Keyboard Layout.
- 2. Choose timezone.
- 3. Create disk partitions.

Firstly, select Keyboard option -> choose English (US) -> click Done.
Secondly, select Time & Date option -> choose the country and city where you live in -> click Done.
Thirdly, select Installation Destination.
Step 3. Disk partitioning
In this third page, you will need to create disk partitions for Fedora as the following:
1. An EFI system partition.
2. A swap partition.
3. A root partition (represented by a slash sign).
The initial page will show like below (left, INSTALLATION DESTINATION). In that page, select the hard disk drive (HDD) * meant for Fedora system storage -> select Custom under configuration -> click Done.
Once you clicked Done, you will see the next page as the following (right, MANUAL PARTITIONING). You should read it says «New Fedora 38 Installation» to the top. This is the Custom Disk Partitioning page.

(Left: Installation Destination | Right: Manual Partitioning)
*) Once again, this doesn’t mean it must be a HDD, as you can choose an
SSD or a USB flash drive as a replacement if you want to.
Partitions creation is shown by three pictures below.

1. Create the smallest partition
Click plus button -> a dialog will show -> select mount point /boot/efi -> fill the size 300 -> click Add mount point -> an EFI partition is created.
2. Create the middle partition
Do the same but select ‘swap‘ and fill in 1500 instead.
3. Create the largest partition
Do the same but select ‘slash‘ ( / ) and let it blank instead.

To this point, you have created 3 partitions with one of them formatted as BTRFS filesystem. If you want to change the filesystem format, click the slash ( / ) partition -> see right sidebar -> switch BTRFS to EXT4 or EXT2 or any other filesystem you want. We recommend EXT2 if you install Fedora into a USB flash drive.
Step 4. Begin the installation and reboot
You will go back to Step 2 after partitioning. Now, click Begin Installation -> wait for the process to take place -> once finished, click Finish button -> restart -> remove the installation medium -> computer boots up Fedora Workstation 38.

Step 5. Finish installation
Once booted up into new Fedora Workstation, you will be asked for further configurations:
- Welcome page: click Start Setup
- Privacy page: skip this one, the default options should be fine.
- Repositories page: skip, it can be enabled later anyway.
- Online accounts page: skip, you can configure this later.
- User account page: create your username, password, and name your computer here.
- Click the last button Start Using Fedora GNU/Linux.
Now Fedora 38 is ready to use. Congratulations!

This article is licensed under CC BY-SA 3.0.