Полностью переведенная инструкция по сборке Сатсумы(Quick Reference Chart — Garage Flag Replacement) 1.0 для для My Summer Car » 4Mods.ru
- 17 117
- 31 мар 2021
- 2
![]() Описание
Описание
![]() Скачать
Скачать

Перевел всю инструкцию по сборке сатсумы, дабы новичкам было немного легче определиться куда и что поставить и прикрепить. Пытался делать всё под оригинальный шрифт и размер, и если вы найдете неточность или помарку — пишите в комментариях, всё поправлю по мере возможности. Так же можете предлагать свои идеи, что бы вы хотели увидеть в переводе.

ИНСТРУКЦИЯ ПО УСТАНОВКЕ
1. Перейти по пути (ваше место установки)My Summer Car\Images
2. Перетащите файл из архива в папку и подтвердите замену файла
3. Готово, вы прекрасны!
-
Если Вам нравится эта, или другие работы Kossowade — вы можете поддержать его(ее) творчество:
К сожалению автор в своем профиле не заполнил данные, но вы всегда можете его поддержать, нажав кнопку ПОДДЕРЖАТЬ АВТОРА!

Информация о модификации
Языки
Русский
Версия
1.0
Размер файла
3,53 Mb
Для игры
для My Summer Car
Информация
Посетители, находящиеся в группе Гости, не могут оставлять комментарии к данной публикации.
In this guide, you will find the process of building a Satsuma car in My Summer Car along with the bolt sizes. The guide is complete and constantly updated. Prefer a video tutorial? You will find it in this guide.
First steps and necessary items
- Before you start building a car, check the guide on Start the game – do what is described there first.
- The nuts on the lining/linkage parts must be tightened/unscrewed using flat wrenches (spanner set)
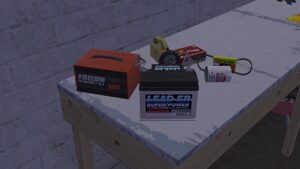
- Before building a car, take the battery and connect it for charging
- The video tutorial can be found at the bottom of the guide
Engine
- Crankshaft -> block
- Main bearings (x3) – 2x9mm
- Pistons (x4) – 2x7mm
- Head gasket -> block
- Cylinder head – 10x7mm
- Adjust valves – screwdriver (you can do it after building the car and starting the engine)
- Rocker shaft – 5x8mm – to properly adjust the rocker shaft, scroll down to the end (20 times) then scroll up 7 times (repeat on each valve). Badly adjusted valves make a ticking sound
- Rocker cover – 6x7mm
- Camshaft – 2x5mm (hole on left side of engine)
- Camshaft gear – 1x10mm – The camshaft gear must be correctly positioned if it goes wrong your engine will be seriously damaged. If after starting the engine you hear a metallic knock, it will mean that you have set the gear position incorrectly.
- Timing chain
- Timing cover – 6x6mm
- Water pump – 5x7mm
- Water pump pulley – 4x7mm
- Crankshaft pulley – 1x11mm
- Headers – 5x8mm
- Carburator – 4x8mm
Airfilter – 2x6mm - Alternator – 1x7mm, 1x10mm, screwdriver – tighten the screws first, then loosen the alternator by hand, put on the Alternator belt and pull it back (to the end, then two turns of the mouse wheel down). If the alternator belt squeals after starting the engine, it is too loose.
- Engine plate
- Starter – 2x7mm
- Flywheel – 6x7mm
- Clutch pressure plate -> clutch cover plate
- Clutch disc -> cover plate
- All Clutch components for Flywheel – 6x6mm
- Oilpan – 8x7mm, 1x13mm
- Gearbox and then Inspection cover – 6x7mm, 1x10mm
- Drive gear – 7x6mm
- Distributor – Screwdriver – to properly adjust the distributor, scroll down to the end and then scroll up 27 times before tightening the screw
- Spark plugs (x4) – you need to tighten with a sparkplug wrench/socket
- Fuel pump – 2x7mm
- Oil filter – Mouse scroll
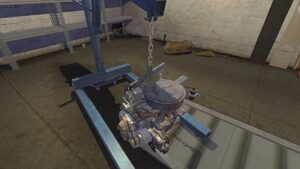
To attach the engine to Satsuma, use Motor Hoist (hook the chains onto the engine and tighten the screws 2x10mm).
Suspension, chassis, body, interior
- Sub frame – 4x10mm
- Steering rack – 4x9mm
- Steering column – 2x8mm
- Wishbones (x2) – 2x10mm
- Spindles (x2) – 1x12mm
- Struts (x2) – 4x9mm, 3x10mm
- Steering rods (x2) – 1x12mm
Now you need to move the engine to the front of the car (you need to aim well so that the screws appear) and tighten – 3x11mm
If you screwed the engine to the subframe, take Electrics and screw it to the vehicle body – 2x8mm
*Don’t worry now about the wiring and battery shown in the picture – the screenshot was taken after the car was completely built
- Disc brakes (x2) and then Halfshafts (x2) – 3x9mm, 1x14mm
- Now you need to adjust the steering rod (x2) so that the car goes straight – 1x14mm
Turn until it stops turning (wheel, steering rod), then turn exactly 60 times in the opposite direction

- Trail arms (x2) – 2x12mm
- Drum brakes (x2) – 1x14mm
- Coil springs (x2)
- Shock absorbers (x2) – 1x12mm, 2x6mm
- Wheels (x4) – 4x13mm
- Fuel strainer – 1x8mm
- Dashboard – 2x10mm (one bolt in glove box)
- Dashboard meters – 2x6mm (glove box)
- Clock gauge – 2x7mm
- Radio
- Steering wheel – 1x10mm
- Gear stick – 3x6mm
- Gear linkage – 3x5mm
- Clutch master cylinder – 1x9mm, 2x8mm
- Brake master cylinder – 1x9mm, 2x8mm
- Clutch lining – 2x7mm
- Brake lining – 11x7mm (6xline nuts,1xbolt in the engine, 4xwheel – at each wheel)
- Handbrake – 4x8mm, 1x5mm
- Radiator – 4x7mm
- Radiator hoses (x3) (You need to screw clamps (5 in total) – use a Screwdriver)
- Fuel tank pipe
- Fuel tank – 7x11mm, 1x12mm (fuel lining)
- Exhaust pipe – 3x7mm
- Exhaust muffler – 1x7mm
- Front seat (x2) – 4x9mm
- Rear seat – 2x9mm
- Car Light Bulb to Headlight
- Headlights (x2) – 2x7mm
- Rear lights (x2)
- Bootlid – 4x6mm
- Hood – 4x6mm
- Back panel or subwoofer panel
- Doors (x2) – 4x10mm
- Fender (x2) – 5x5mm
- Grille – 2x6mm
- Bumpers (x2) – 2x8mm
- Hubcap (x4)
- Mudflap (x4)
- Battery
Now refill the car fluids (brake/clutch oil, engine oil, coolant)
Wiring
Before connecting anything with a wiring mess, remember to disconnect the battery from the power supply – otherwise you may die. You can’t connect the wires badly, so even if you walk and spam the F key, you don’t have to worry about doing something wrong.
The hardest part of building a car, i.e. an electrician, is ahead of you. Sometimes you will have to connect the cables to the same place several times. There are several places in the car where the wiring harness connectors are located – it is from them that you need to connect the electrics of individual elements:
List to connect:
– To the battery (negative and positive terminal):
- Starter – you must unscrew the bolt (1x7mm) before connecting. In second place, after connecting the wires you need to tighten it (1x5mm)
– Regulator:
- Alternator
– Headlights harness connector:
- Headlight right and left (take off the headlights 2x7mm – first remove the Grille – 2x6mm)
- Marker light (you won’t have them at the beginning of the game)
Main harness connector
– Main harness connector:
- Battery
- Electrics
- Radiator
- Regulator
– Rear harness connector:
- Fuel tank
- Rearlight left and right
– Fusebox
- Dashboard (gauges, ignition, hazard, lights)
– Radio harness connector:
- Radio
- Amplifier (you won’t have them at the beginning of the game)
– Dash harness connector:
- Dashboard (wipers, headlights, extra gauge, fuel mixture gauge)
– Amplifier:
- Radio
- Subwoofer left and right
Finally, you need to connect the battery (two clamps, start with the plus (red)) – the first start of the car may take up to 30 seconds, this is normal if the fuel pump is in poor condition.
Video tutorial
Overview
Здесь вы научитесь правильно собирать двигатель, подвеску, салон и корпус Сатсумы.
Важно
Многие фотографии не соответствуют написанному в руководстве, так как оно было несколько раз переписано по просьбе его читателей.
Сбор движка.
Во всех разделах возможно фотографий будет немного, но больше текста. Постараюсь написать всё для вас. И так, начнём. Подготавливаем стол под себя и для начала мы возьмём блок цилиндров и распредвал и присоединив вал к блоку закрутим его ключом на 5. далее берём коленчатый вал и так же присоединяем его к блоку и закручивать его не надо. Далее берём три подшипника и присоединяем их к коленчатому валу и закручиваем ключом на 9. Потом берём четыре поршня и так же подсоединяем их к коленчатому валу, закручиваем ключом на 7. Должно получиться вот так….
 Дальше берём масляный поддон и закрываем вал (присоединяем его) закручивая ключом на 7 и большой болт для слива масла на 13. Далее начнём делать газораспределительную систему нашего двигателя. Берём шестерню распредвала и закручиваем её ключом 10 (я думаю что и так понятно что всё придётся подсоединять). И тут очень важно правильно поставить шестерню по меткам коленчатого вала, если вы выставите метки неправильно, то при запуске машины через минуты 2 у вас просто напросто развалятся клапана и движок накроется. (метки смотрите на фото ниже)
 Далее берём цепь ГРМ (timing chain) и устанавливаем её на шестерню и коленчатый вал. (если я не говорю про болты то их нет) Дальше берём кожух всего этого дела и закрываем им проделанную работу. Крышку закручиваем ключом на 6. Далее берём водяную помпу (WATER PUMP) Закручиваем ключом на 7, после закрутки надеваем шкив водяной помпы на неё. Закручиваем тем же ключом. Потом берём шкив коленчатого вала и закручиваем его ключом на 11. Теперь предстоит сложный квест, вам придется ехать за ремнём ГРМ. Для этого можно воспользоваться мопедом, который стоит неподалёку. За одно купите свечи зажигания, масляный фильтр и не забудьте РЕМЕНЬ ГРМ, без него тачка не заведётся. Остались последние штрихи этой части, ставим генератор. Тут два болта, один из них закручивается ключом на 10, а другой ключом на 7. Так же вы наверно заметили ещё один болт, который закручивается отверткой, но его пока не трогайте. Сейчас ещё непростой квест. водим прицелом по передней части генератора пока не появится вместо прицела значок ладони. Когда вы зафиксировали его то вертите колесико мышки вперёд пока не раскрутите генератор. Затем ставим ремень ГРМ. Когда вы поставили ремень, опять ищите “ладонь” и вертите колёсико мышки назад до упора после этого сделайте два прокрута колёсика мыши вперёд, и закручиваем отвёрткой верхний болт генератора. У вас в итоге должно получиться вот так…..
 И так, идём дальше. Сейчас мы соберём коробку передач. Для начала поставим плату двигателя, чтобы крепить на неё детали…
 Далее ставим маховик (flywheel-если я пишу название детали то это значит что визуально вы её не увидите, так как она будет скрыта за другой деталью и так вы её можете найти в гараже по английскому названию) и закручиваем ключом на 7. Теперь вам придётся собрать три детали воедино (на фото) и, получив в итоге корзину сцепления, прикрепить её на маховик. (при соединении трёх деталей закручивать их не надо. Закручиваем только тогда, когда поставим на маховик)
  После соединения ставим на маховик и закручиваем 6 болтов ключом на 6.Далее берём стартер, который и будет служить основным предметом для запуска Сатсумы. Закрутим стартер ключом на 7. И пока получается так… но это ещё не всё….
 Дальше берём коробку передач и ставим её поверх системы сцепления . Закручиваем ключом на 7. Там есть 7 болтов,6 закручиваем ключом на 7, а седьмой закручиваем ключом на 10 (болт сбоку коробки). Потом берём рулевой привод и устанавливаем на коробку. Закручиваем ключом на 6, 6 болтов. и любуемся собранной коробкой передач !
 И так, мы собрали уже больше половины движка. Но мы идём дальше и собираем голову двигателя.
 Для начала нам нужно установить прокладку ГБЦ. Далее ставим головку цилиндров и закручиваем её ключом на 7. Следом ставим клапанное коромысло и закручиваем его ключом на 8. И накрываем это дело крышкой клапанного коромысла закручиваемой ключом на 7 , куда мы будем в дальнейшем заливать масло. И вот мы уже сделали голову движка. Осталось совсем немного….
 . Далее-Карбюратор. Закручиваем его ключом на 8. Дальше ставим выпускной коллектор и крутим тем же ключом. И последний штрих тут-кастрюля закручиваемая ключом на 6. И так у вас должно получиться….
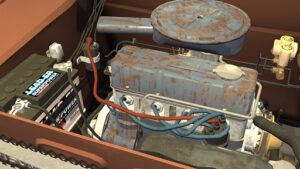
 И так, не будем терять ни минуты, начнём. Для начала мы закрутим свечи зажигания, которые мы купили недавно в магазине. их закручиваем специальным прибором для закручивания свеч. Он есть в вашей ремонтной коробке с ключами. Далее берём трамблёр, его закручивать не надо разве один болт отвёрткой и подсоединяем к нему электронику вместе с катушкой зажигания, закручивая её ключом на 8. Потом берём масляный фильтр и закручиваем его просто рукой, никаких ключей не надо, просто покрути колёсико мышки. И так, Внимание ! Сейчас мы поставим последнюю деталь на весь двигатель и это будет…. Бензонасос! Да, именно так. Ставим его и закручиваем ключом на 7.
 Всё, мы преодолели самое тяжёлое, что может быть в Сатсуме. Я вас поздравляю с полным собранным движком, а что делать дальше, читайте в следующем разделе….

Установка движка и начальной проводки (не полной)
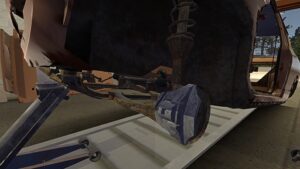
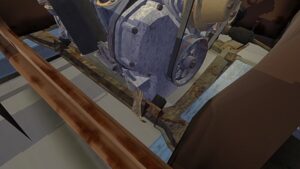
Сначала нужно подготовить машину для поставки двигателя. Для начала нам нужно поставить подрамник (на него будет крепиться движок) закручиваем его ключом на 10. Далее нам нужно проложить тормозные провода (BRAKE LINING), там будет 10 болтов, которые мы закрутим ключом на 7. Далее прокладываем провода сцепления. Там 2 болта и закрутим мы их тем же ключом на 7. Потом ставим топливный фильтр. (Fuel strainer) и закручиваем его ключом на 8. Далее ставим рычаг переключения передач [gear linkage]. Закручиваем три болта ключом на 5. Дальше можно поставить радиатор. Закручиваем его ключом на 7 четыре болта. Далее ставим аккумулятор. закручивать его пока не надо. Это когда мы уже будем проводить проводку в движок, тогда там поставим клеймы и закрутим. Дальше ставим главный тормозной цилиндр. Закручиваем его ключом на 8 два болта. Далее ставим главный цилиндр, отвечающий за сцепление. Закручиваем тем же ключом столько же болтов. И так, моторный отсек готов к приёму двигателя. Теперь нам предстоит установить двигатель, и так, слушайте внимательно но если вы не поняли как это сделать то лучше посмотрите видео на ютубе. Сейчас я постараюсь понятно объяснить, как установить движок не поднимая его на подъёмнике. И так, берём двигатель ровно стороной, где находятся свечи зажигания и несем его в моторный отсек, ставим его ровно ровно по центру и чтобы он не косился в моторном отсеке примерно вот так…. и тут надо посмотреть, если на каркасе появились болты, а их должно быть три, два со стороны свечей и один со стороны карбюратора. (смотрите на фото ниже или справа или слева) то берём и закручиваем их ключом на 11.
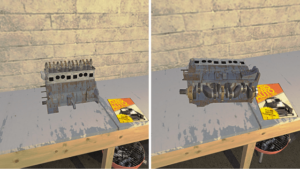
 и осталось поставить последние три детали это три патрубка для того чтобы вода поступала в двигатель. И вот мы уже собрали и поставили двигатель. Вот что получилось….
 В следующем разделе мы поставим подвеску, а в четвёртом запустим нашу “Ласточку”. Cбор проводки [link]
Установка подвески.
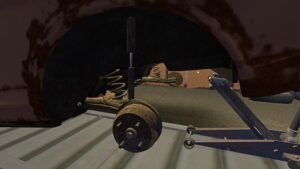
Не буду томить и начнём мы с задней подвески. Для начала мы возьмём тормозные кулаки и прикрепим их с левой и правой стороны. Закрутим ключом на 12. Далее берём тормозные диски и ставим их с обеих сторон. Закручиваем ключом на 14 Потом берём пружины и ставим их на кулаки. . Дальше берём амортизаторы и ставим их так же с обеих сторон. 2 болта закручиваем ключом на 6 и один болт, который находится в багажном отсеке ключом на 12. И мы уже собрали заднюю подвеску.  И быстро перейдём к более тяжёлой-передней подвеске. Для начала возьмём рычаг передней подвески и прикрепим его с обеих сторон. Закрутим её ключом на 10. Далее берём тормозной барабан с колодкой (они изначально вместе) и закручиваем их ключом на 12. Дальше ставим тормозные диски НО НЕ закручиваем их. Сначала поставим полуось тормозной системы И теперь можно закрутить тормозной диск ключом на 14. И по три болта на каждую поставленную только что полуось ключом на 9. Далее мы берём рулевую рейку и закручиваем четыре болта ключом на 9. Дальше берём рулевые тяги и закручиваем их ключом на 12 по одному болту. Теперь берём амортизатор, ступицу амортизатора, пружину амортизатора. Четыре нижних болта закручиваем ключом на 8 и три верхних ключом на 10. И вот мы уже собрали переднюю и впрочем всю подвеску и теперь можем взять колёса и закрутить их ключом на 13.
Коректируем дно. И не только.
Теперь мы будем подкручивать болты и ставить вещи которые мы не могли достать изначально. Для этого нам надо закатить Сатсуму в гараж. И теперь мы начнём работу. Для начала возьмём топливный бак и установим его сзади Сатсумы. Закрутим его ключом на 11. Так же не забудьте закрутить топливную магистраль. Теперь можно поставить выхлопную систему в виде длинной трубы в яме в гараже и глушителя, которые мы закрутим ключом на 7. Дальше мы можем поставить в салон держатель для руля и зажигания. Ключом на на 8 закручиваем его из под капота. Далее поставим трубу по которой бензин будет поступать в топливный бак. Теперь в салон поставим ручник. Ключом на 8 закрутим его. Дальше ставим переключатель передач. Ключом на 6 закрутите его. Вот и всё. Осталось установить только Внешнюю часть машины и салон, чем мы и займёмся в следующей части и скорей всего последней.
Сбор внешней части и салона. (Финал)
Начнём. Для начала поставим передний и задний бампер. Ключом на 8 закрутите его. Потом решётка радиатора ключом на 6 закручиваем. Потом крылья ключом на 5 закрутите их. Дальше двери ключом на 10 закрутим. Далее багажник и капот ключом на 6 закручиваем их. И фары передние ключом на 7, а задние крутить не надо. Теперь салон и сразу установим “торпеду” и закрутим ключом на 10. Теперь установим спидометр тахометр и т.д. Теперь сиденья (я установлю только одно но остальные закручиваются тем же ключом). Ключ на 10 и этим же ключом устанавливаем руль. ииии… Всё, мы получаем готовую Сатсуму которая почти готова к запуску. Осталось только залить жидкости и провести проводку.
Финал
Мы закончили со сбором этой прекрасной машины. Возможно если вы дочитали до конца и сейчас это читаете то вам это показалось быстро. и вы прочитали это за пару минут, а я писал это руководство 3+ дня. Надеюсь вам хоть чем-то помогло моё руководство. Я попытался сделать его максимально понятным для вас. Но если вам всё равно что то не понятно то спрашивайте в комментариях. Пока!
Мои другие руководства…
[link] [link] [link] [link] [link]
МОД ПОЛНОСТЬЮ ПЕРЕВЕДЕННАЯ ИНСТРУКЦИЯ ПО СБОРКЕ САТСУМЫ ДЛЯ MY SUMMER CAR
Перевел всю инструкцию по сборке сатсумы, дабы новичкам было немного легче определиться куда и что поставить и прикрепить. Пытался делать всё под оригинальный шрифт и размер, и если вы найдете неточность или помарку — пишите в комментариях, всё поправлю по мере возможности. Так же можете предлагать свои идеи, что бы вы хотели увидеть в переводе.
Автор мода: DavidTheArgonaut
ТЕГИ:по, Summer, Инструкция, мод, СБОРКЕ, Полностью, Car, САТСУМЫ, для, ПЕРЕВЕДЕННАЯ, my
Last update: 21 August 2019
In this section of our car construction guide to My Summer Car, you will find a step-by-step instructions on how to build an engine. In addition, we explain how to build a gearbox and connect it to the engine. We advise you what keys are needed for this and what is the correct order of joining parts to make the car engine work properly in My Summer Car.
Installation of the engine takes place in the garage on the stand by the wall. You will find all the parts on the shelves and the floor at the back of the garage, and you should buy the alternator belt and oil filter from the store. Remember that the engine won’t break down if it accidentally falls off. Use the option to rotate it and put it in different positions frequently to get the best possible access to hidden screws. To move the engine, you must always click on the BLOCK section. Place the toolbox on the tabletop for easy and quick access.
Start from the main base — engine BLOCK and the CRANKSHAFT. Combine these parts together at your workstation. To twist this pair together you will need three parts called the MAIN BEARING. They are marked consecutively with numbers and each fits only in a specific place — on the outer parts of the block and in the middle.
Crankshaft goes inside the block. The bearings will hold it in three places.
You can find Main Bearings on the shelf.
Each bearing is held in two nuts of size 9.
The bearings are tightened with a 9mm wrench.
It is worthwhile to insert the CAMSHAFT into the block and screw it with two nuts of size 5.
The camshaft is supported by two bolts. You’ll have to tweak it later.
Now it’s time for four PISTONS. Insert them into the round holes in the cylinders of the engine block so that they are adjacent to the crankshaft. Each of them is screwed with two nuts of size 7, visible from the crankshaft side.
The valves have two 7mm screws each.
Then place the HEAD GASKET on the block without any screwing. The CYLINDER HEAD comes on top of it, which you screw with ten size 7 nuts.
Head gasket does not require screws.
CYLINDER HEAD has a lot of them already.
Ten pieces in size of 7mm.
A longitudinal part called ROCKER SHAFT has to be attached to the head. Screw it with five 8mm nuts.
Valves are coming up to the top of the head.
You can tighten five nuts with a 8mm wrench.
Exposed valves are covered with the ROCKER COVER. Tighten them with six 7mm nuts.
Attach the exhaust manifold to the header of the engine. Tighten it with five 8mm nuts.
Attach the CARBURATOR to the exhaust manifold.
Screw it with four 8mm nuts.
Time for CAMSHAFT GEAR and water pump. Turn the engine sideways and attach the CAMSHAFT GEAR. Screw it with a 10mm key. NOTE — in a moment you will have to set it properly.
SETTING — you will find a special marking on the engine block, a blade indicating approximately 10 o’clock. The same blade can be found on the Camshaft gear.
Using the same key as the screw (10mm), use the mouse roll slowly until the marking on the wheel is exactly the same as the marking on the engine block.
Now you can put on the TIMING CHAIN and cover the mechanism with the TIMING COVER, which you can tighten with six 6mm screws.
The timing chain does not require screws.
Timing Cover requires six screws of 6 mm.
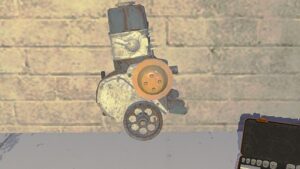
Mount the CRANKSHAFT PULLEY on the cover and tighten it with one screw of 11 mm size.
Install the WATER PUMP above it and screw it with five 7mm nuts.
Mount WATER PUMP PULLEY on the pump and fix it with four 7mm screws.
Rotate the engine with the wider side to yourself. Install the DISTRIBUTOR ignition device on it. Use a screwdriver to tighten this part. Later you will have to adjust the ignition this way.
It’s time for the OIL FILTER. Use a new unit from the store — do not use the used part from the garage. The oil filter does not require keys, mount it using the mouse wheel.
Mount the FUEL PUMP next to it and screw it on with two 7mm nuts.
Insert the spark plugs into the four holes in the head of the engine. You will find them in a sparkplug box that can be purchased in the store. Open the box with the F key each time to remove one spark plug. You can screw them to the block with a special SPARKPLUG WRENCH key.
Press F to remove four spark plugs.
You can tighten them with a special SPARKPLUG WRENCH.
Time for the ALTERNATOR. Install it right next to the water pump. Screw it with two nuts — one 7mm, the other 10mm. There’s a screw to regulate, but don’t touch it yet.
Place the alternator belt on the prepared parts. Stay in hands-on mode. Tighten the roller to its maximum position, then «unscrew» it with two clicks of the mouse roller and tighten the screw with a screwdriver.
Put on the alternator belt.
Move the roll to the right as far as it will go, then move it back two clicks and tighten the screw on top.
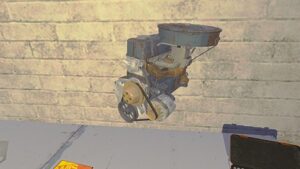
Attach an OIL PAN to the bottom of the engine block. Secure it with eight 7mm and one 13mm nuts, which acts as a drain when replacing the oil. Make sure that it is tightened as much as possible.
Rotate the motor block to the smaller side, and attach the ENGINE PLATE.
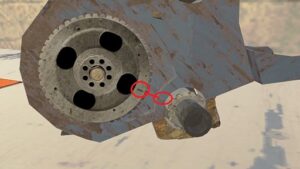
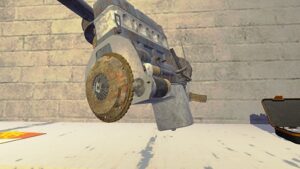
Install the FLYWHEEL. Secure it with six 7mm bolts.
Connect the three clutch parts together without any screws: CLUTCH COVER PLATE, CLUTCH DISC.
Mount the prepared set on the flywheel and tighten it with six 6mm screws.
Attach the STARTER and secure it with two 7mm nuts.
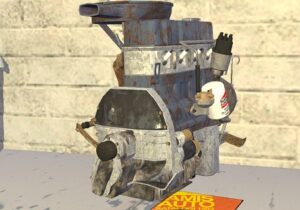
It’s time to install the GEARBOX. Attach a huge element to the engine block and screw it on with six 7mm screws and one 10mm screw.
Mount the DRIVE GEAR to the gearbox and tighten it with seven 6mm screws.
This is it! The complex engine is ready to be installed in the car.