![]()
Download Article
What you need to know about making your first game
![]()
Download Article
- Getting Started
- Importing & Moving Objects
- Building Objects
- Adding & Editing Terrain
- Adding Scripts
- Tesing, Saving, & Publishing
- Video
- Q&A
|
|
|
|
|
|
|
Roblox Studio is a very powerful tool that allows you to create games for the popular online gaming platform Roblox. Unlike other video games that are developed by professional development studios, Roblox games are developed entirely by users. With Roblox Studio, you can build and create, as well as import characters, buildings, objects, vehicles, and more. You can use the Terrain Editor to create an outdoor landscape for your game. You can also use scripting to make the objects in your game interactive. This wikiHow you how to use Roblox Studio.
-

1
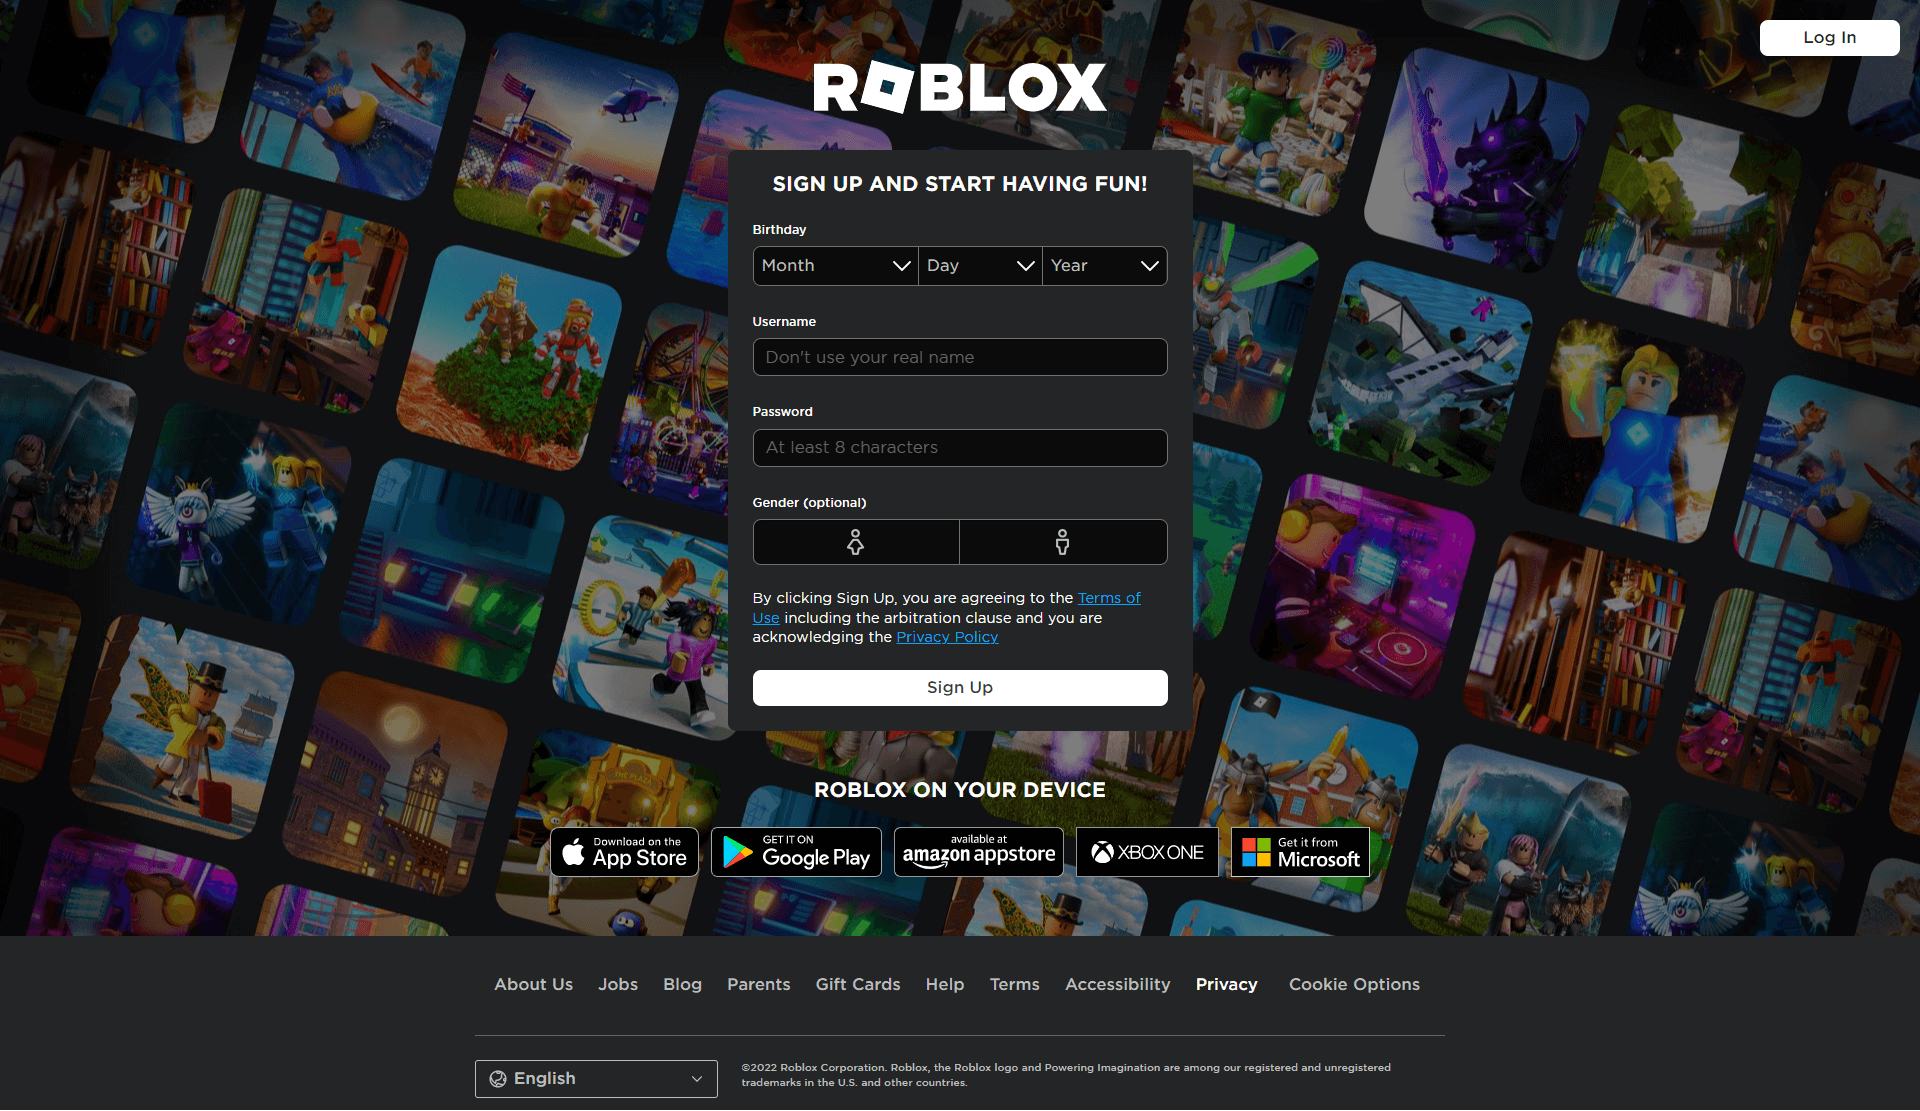
Sign up for a Roblox account. If you haven’t already done so, use the following steps to sign up for a Roblox account:
- Go to https://www.roblox.com/ in a web browser.
- Use the drop-down menus at the top to select the day, month, and year of your birthdate.
- Enter your desired username.
- Enter your desired password.
- Select your gender (optional).
- Click Sign Up.
-
2
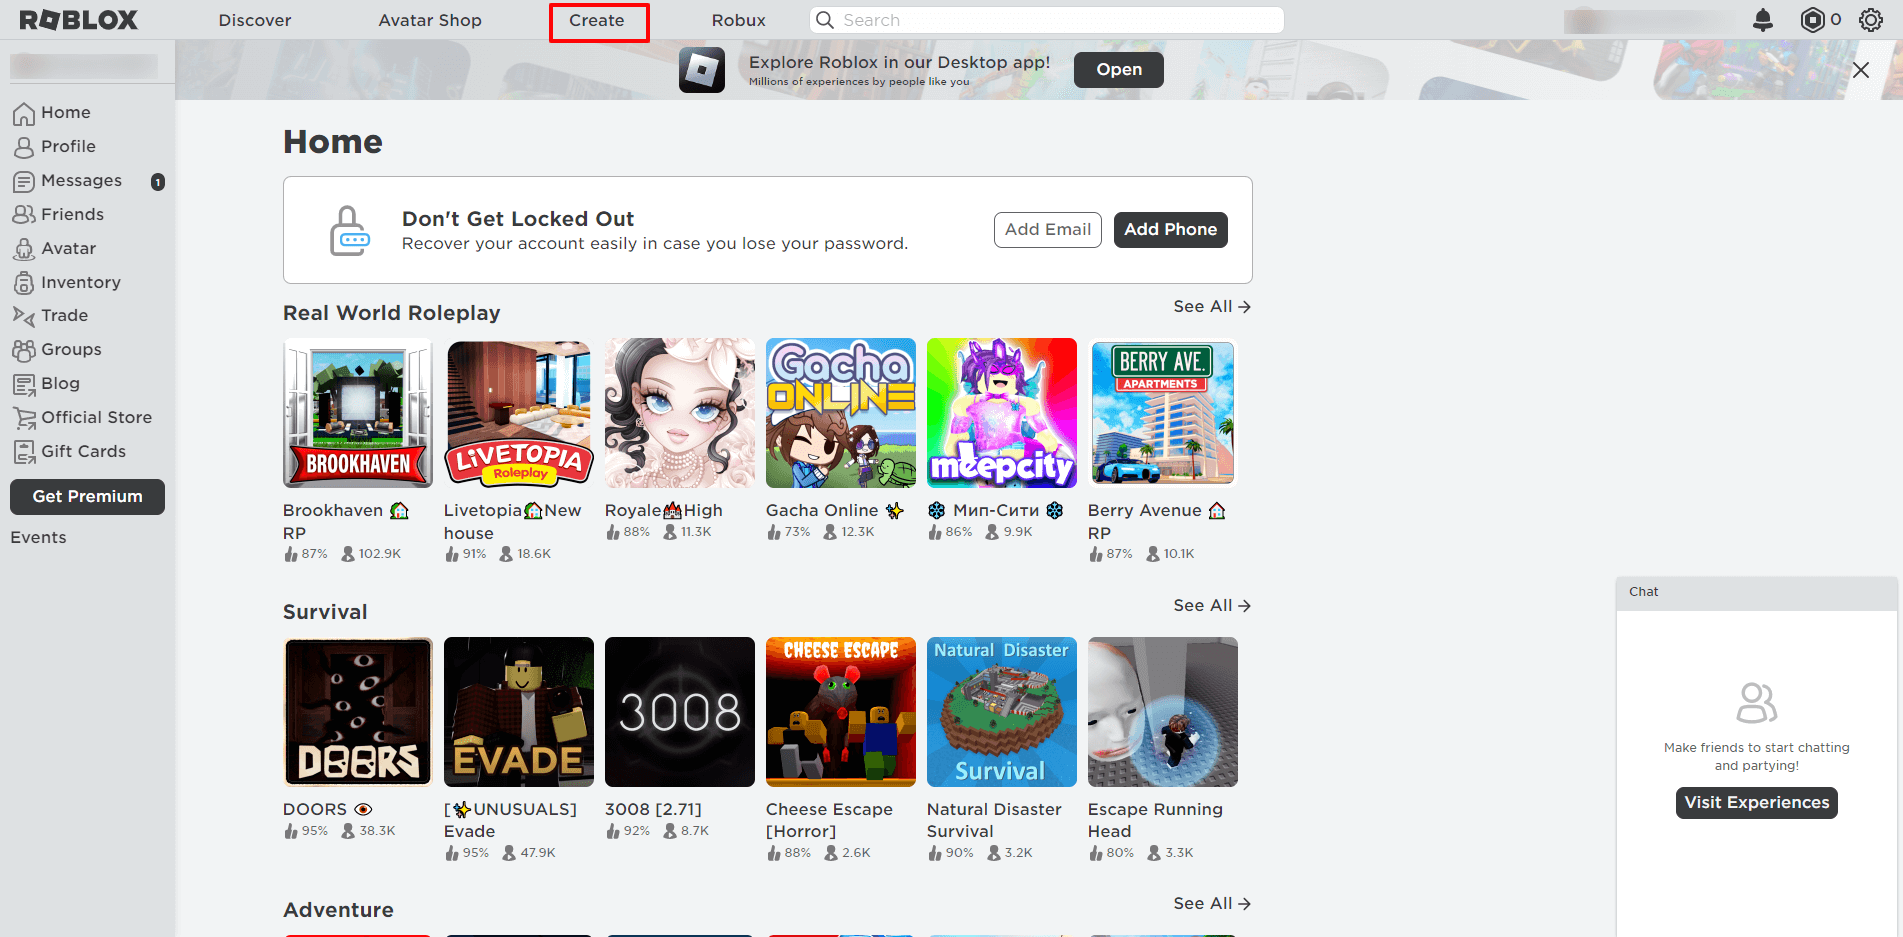
Download Roblox Studio. Use the following steps to download and install Roblox Studio.
- Go to https://www.roblox.com/create in a web browser.
- Click Log In in the upper-right corner.
- Enter your username and password and click Log In.
- Click Start Creating.
- Click Download Studio.
Advertisement
-
3
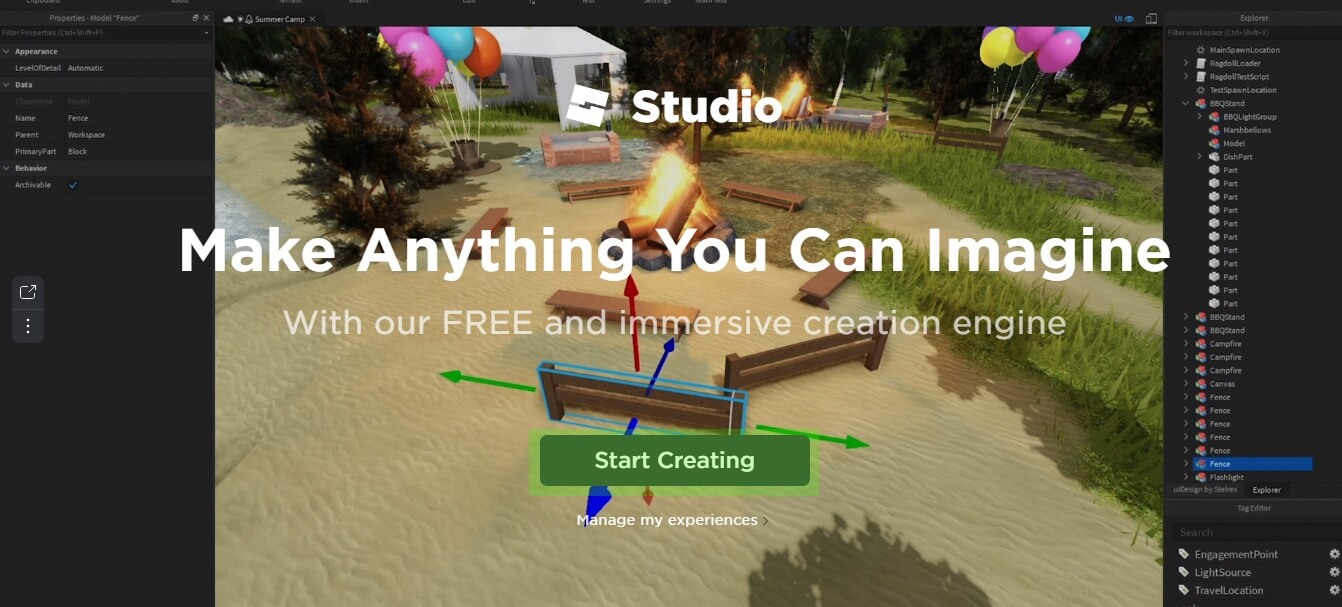
Open Roblox Studio. Roblox Studio has an icon that resembles a blue square. Click the Roblox Studio in the Windows Start menu or the Applications folder on Mac to open Roblox Studio. You can also click Start Creating on the Roblox Create website to open Roblox Studio.
-
4
Click + New. It’s the icon with the plus sign in the upper-right corner. This opens a blank Roblox game canvas.
- Alternatively, you can click one of the pre-made game templates on the main page of Roblox Studio. These include a few game stages, which include a suburb, city, medieval village, western town, castle, and pirate island. It also includes a few pre-made games, which include a racing game, obstacle (obby) course, battle arena, capture the flag, endless running games, and more.


Advertisement
-
1
Click the Home tab. It’s the first tab at the top of the screen next to the playback icons. This displays the object selection and manipulations tools in the panel at the top of the screen.
-
2
Click Toolbox. It’s the tab that has an icon that resembles a toolbox in the panel at the top. This opens the Toolbox panel to the right. The Toolbox panel may already be open by default, but if it is not, this is how you open it.
- Make sure the Marketplace tab at the top of the Toolbox panel is selected.
-
3
Type the name of an object you want to add in the search bar and press ↵ Enter. It’s at the top of the Toolbox. Roblox Studio has a vast library of objects made by other users. You can search for anything including foliage, buildings, vehicles, furniture, decorations, or just about anything.
- You can use the drop-down menu in the upper-left corner of the Toolbox to select what type of object you want to search for. This includes models, meshes, images, audio, video, and plug-ins.
-
4
Click an object you want to add. You will see small thumbnail images of each of the objects from your search results in the Toolbar. Click an object’s thumbnail image or click and drag it into your game to add it.
-
5
Use the Select tool to select an object. To select an object in your game, click the Select tool in the toolbar at the top of the page. It has an icon that resembles a mouse cursor. Then click an object in your game to select it. A selected object will have a blue bounding box surrounding it. You can also move an object by clicking and dragging it with the Select tool.
- If you don’t see the Select, Move, Scale, or Rotate tools in the panel at the top, click the «Home» or «Model» tab at the top of the screen.
-
6
Press Delete to delete a selected object. If you want to delete an object for any reason, use the select tool to select it and then press the Delete key to delete it.
-
7
Use the Move tool to move an object. Click the Move tool in the panel at the top. It has an icon that resembles a cross with arrows on each arm. Then click an object you want to move. Click and drag the red, green, and blue arrows on all sides of the object to move it along a particular axis.
- Additionally, you can use the options in the «Clipboard» menu to cut, copy, or duplicate an object.
-
8
Use the Scale tool to make objects larger or smaller. To change the size of an object, click the Scale tool in the panel at the top It has an icon that resembles a small box inside of another box. Then click an object to select it. Click and drag one of the red, green, or ball icons on the side of each object to change the size of an object. Some objects can be resized along a particular vertical or horizontal axis. Other objects can only be scaled evenly.
-
9
Use the Rotate tool to rotate an object. To rotate an object, click the rotate tool in the panel at the top. It has an icon that resembles a circle-arrow at the top. Then click an object to select it. Click and drag the red, green, or blue rings around the object to rotate the object.


Advertisement
-
1
Click the Model tab. It’s the second tab at the top of the page. This displays the modeling tool panel at the top of the page.
-
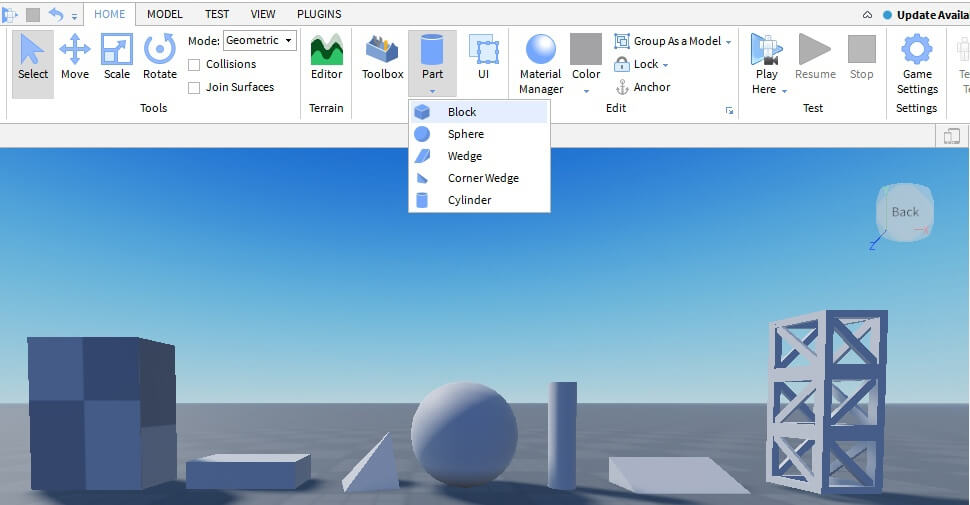
2
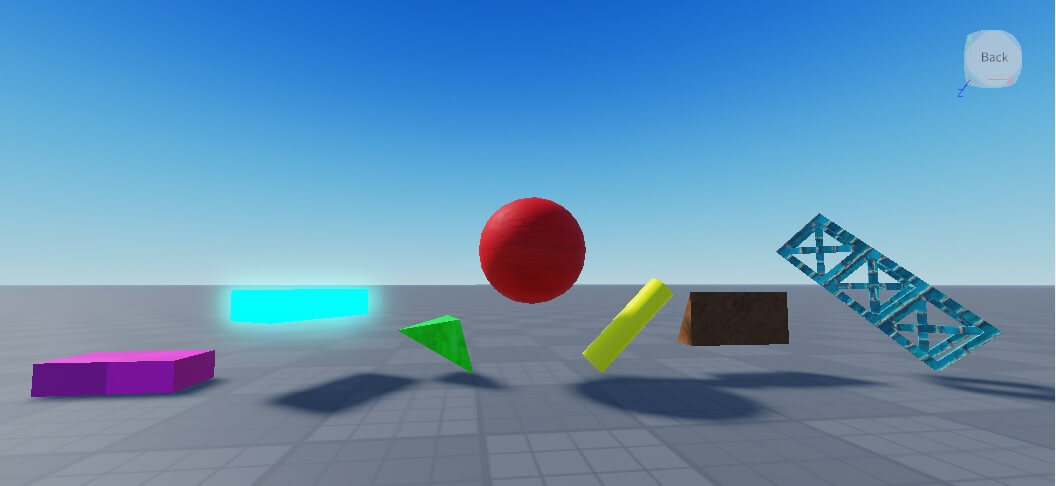
Click Part. It has an icon that resembles a cube. This displays a drop-down menu that allows you to select one of the four shapes you can use to create objects in the game.
-
3
Select a part type. There are four part-types you can select. They are as follows:
- Block: This creates a new rectangular part.
- Sphere: This creates a new object in the shape of a ball.
- Wedge: This creates a new block with an incline.
- Cylinder: This creates a round, pole-shaped object.
-
4
Use the Move, Scale, and Rotate tools to edit a part. You can move and edit parts using the move, enlarge, or rotate tools. The Scale tool manipulates different part types in different ways Some of the following are examples of how you can manipulate a part type with the Scale tool:
- The Scale tool can be used to extend any edge of a block part. This allows you to make a rectangle any dimension you want.
- A sphere can only be scaled uniformly using the Scale tool. You cannot make any side larger than another.
- The Scale tool can be used to change the angle of the incline on a Wedge part. You can also edit the length of the incline.
- The Scale tool can be used to make the circle bigger or smaller as well as make the sides longer or shorter. It cannot be used to make the circle more elliptical.
-
5
Use the Union tool to join parts together. When you have two or more parts touching, you can use the Unite tool to join them together as one shape. The Union Tool has an icon that resembles a cube in the «Shape Modeling» section of the panel at the top. Use the following steps to join two parts together:
- Hold Shift and click the parts you want to unite.
- Click the Union button in the panel at the top.
-
6
Click Separte to break apart united parts. If you want to edit the individual parts of a united part, click the part to select it and then click Separate in the «Shape Modeling» section of the panel at the top to break the part back into individual parts.
-
7
Use the «Negate» tool to cut sections of a part out. The Negate tool can be used to cut out intersecting sections of another part. For example, you can use the Negate tool to hollow out a cylinder using another cylinder to make a wheel. Use the following steps to use the Negate tool to cut out a section of a part:
- Place one so that it intersects with another part.
- Click the intersecting block.
- Click Negate in the «Shape Modeling» section of the panel at the top. The part will turn red.
- Hold Shift and click both parts.
- Click Union in the panel at the top.
-
8
Select the color of a part. To select the color of a part, click the part you want to change the color of. Click Color in the panel at the top. Then click one of the colored-swatches to change the color.
-
9
Select a part’s material. In addition to changing the color of a part, you can also change the material. This allows you to make objects that look like they’re made out of glass, wood, concrete, metal, stone, granite, brick, and more. To change the material of a part, click the part you want to change. Then click Material in the panel at the top. Click the material you want the part to resemble.
-
10
Add an effect to a part. Effects allow you to do things like set a part on fire, make it smoke, emit sparkles, or turn it into a light. To add an effect to a part, click the object you want to add an effect to and then click Effect in the «Gameplay» section of the panel at the top. Click the effect you want to add from the drop-down menu.
-
11
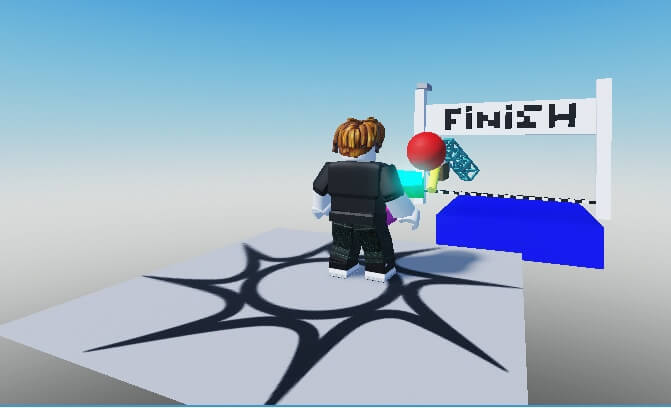
Adding spawn locations and checkpoints. In Roblox, spawn locations indicate where the player starts. Multiple spawn locations act as checkpoints. When a player reaches a spawn location, they will respawn and the last spawn location they touched. To add a spawn location to your game, simply click Spawn Location in the menu at the top.


Advertisement
-
1
Click the Home tab. It’s the first tab at the top of the screen next to the playback icons.
-
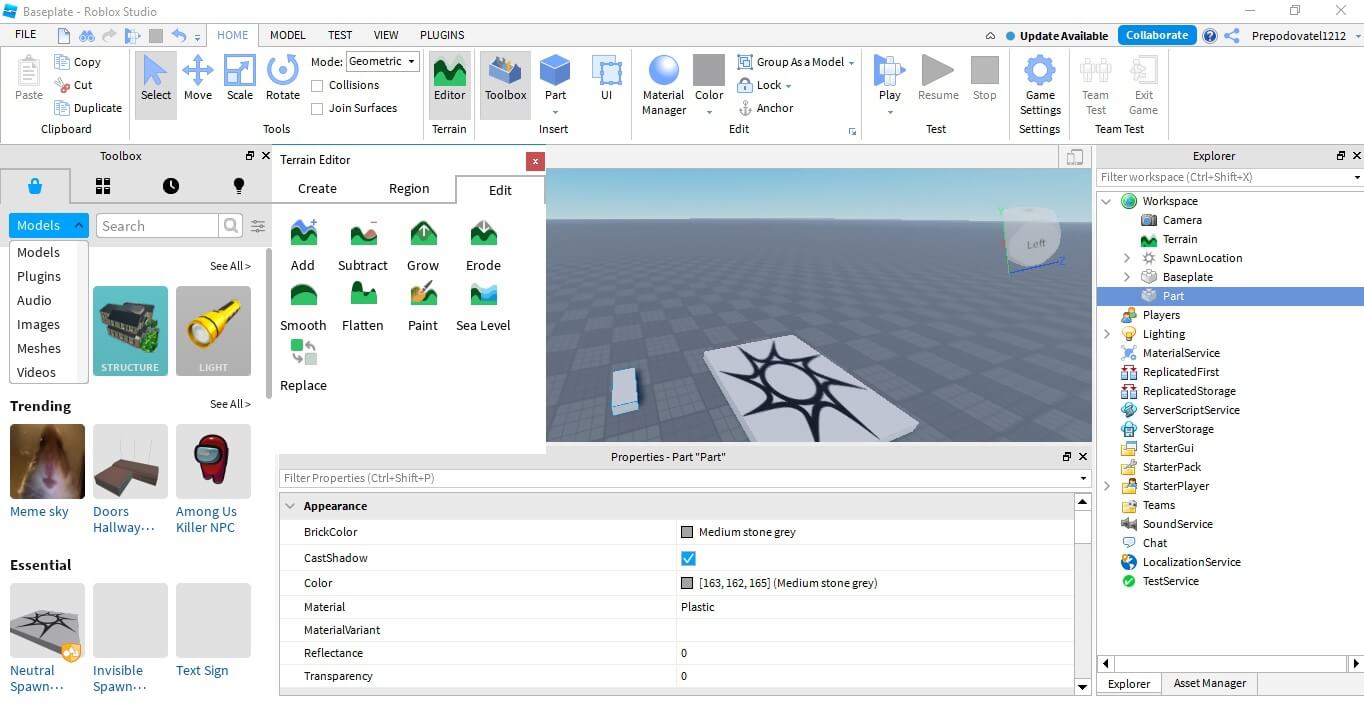
2
Click Editor. It’s in a small section that says «Terrain» in the panel at the top of the Home menu. This opens the Terrain editor. You will see a blue box that indicates the area the terrain will be generated in.
-
3
Adjust the size of the terrain area. To adjust the size of or move the area where the terrain will be generated, simply click and drag the blue balls on all sides of the blue box to move the sides of the terrain area. You can make the terrain area larger or smaller, or move the sides to a new location.
-
4
Select the terrain features you want to generate. The terrain will be generated randomly. To select which features the terrain generator will generate scroll down to the bottom of the Terrain Editor panel to the left. Click the checkboxes next to the features you want to generate. The features include water, plains, dunes, mountains, arctic, canyons, lavascape.
- Use the slider bar below the checkmark boxes to adjust the sizes of the biomes that are generated.
- Click the toggle switch next to Caves to turn cave generation on or off.
-
5
Click Generate. It’s the blue button at the bottom of the Terrain Editor menu. This begins the process of generating the terrain for your level. Allow a few minutes for the terrain to finish generating.
-
6
Click the Edit tab. It’s the third tab at the top of the Terrain editor. This tab contains tools that allow you to edit the terrain.
-
7
Select a tool. There are nine tools to choose from. They are as follows:
- Add: This tool adds new chunks of terrain the exact size and shape of the brush.
- Subtract: This tool deletes chunks of terrain the exact size and shape of the brush.
- Grow: This tool increases the elevation where the brush is clicked.
- Erode: This tool decreases the elevation where the brush is clicked.
- Smooth: This tool smooths the surface where the brush is clicked.
- Flat: This tool flattens the surface of the area you brush over.
- Paint: This tool allows you to change the terrain type. If you select this tool, scroll down to the bottom of the Terrain Editor panel and click the terrain type you want to paint.
- Replace: This tool allows you to replace a specific terrain type with another. To use this tool, select the terrain type you want to change below «Source material» in the Terrain Editor panel. Then select the material you want to change it to below «Target material» at the bottom of the Terrain Editor panel.
-
8
Select the brush shape. This is the shape of the terrain you will create with each click of the brush. You can select a sphere, cube, or cylinder. Click one of the shapes below the tools to select a brush shape.
-
9
Use the slider bar next to «Base size» to adjust the size of the brush. It’s the first slider bar below the brush shapes. You can change the brush size to anything between 1 and 64.
- Some tools also have a slider bar that allows you to adjust the strength of the brush. This allows you to adjust the effectiveness of the brush. You can adjust the strength bar from between .0.1 to 1 with 1 being the strongest.
-
10
Adjust the position of the brush. Click one of the three buttons next to «Pivot position» to adjust the position of the brush. This adjusts where the brush sits on the surface of the terrain. The three options are as follows:
- Bot: This places the bottom of the brush on the top of the terrain surface.
- Cen: This places the center of the brush on top of the terrain surface.
- Top: This places the top of the brush on top of the terrain surface.
-
11
Adjust the brush settings. There are three toggle switches you can use to adjust the brush settings:
- Plane lock: This displays a grid of the plain the brush is locked to and only allows you to move along that plain.
- Snap to grid: This only allows the brush to paint at grid points.
- Ignore water: This instructs the water to ignore water.
-
12
Create Sea Level (optional). Use the following steps to create a sea level that is consistent across a larger area of the terrain.
- Click the Sea Level tool under the «Edit» tab in the Terrain Editor.
- Click and drag the blue bulbs on all sides of the blue box to adjust the size and position of where the sea will be generated.
- Click Generate to create a sea where the blue box is located. Click Evaporate to remove the sea level.


Advertisement
-
1
Click the View tab. It’s the fourth tab at the top in Roblox Studio. This displays the tools for selecting and adding scripts to objects in your game. Scripts allow you to make objects interactive, animate objects, give or take away health points, kill players, and more.
-
2
Click Explorer. It’s the button on the far left of the panel at the top of the menu. This displays the Explorer panel to the right. It contains a list of all objects in your game.
-
3
Navigate to the object you want to add a script to in the Explorer panel. «Workspace» contains the entire game world. All objects within the game are listed as a child object to the Workspace. Other objects may be listed as child objects to other objects. Click the arrow icon to the left of each object to view each of it’s child objects.
-
4
Click + next to an object you want to add a script to. The icon with a plus sign (+) appears when you hover over an object in the Explorer panel. Clicking this button displays a list of frequently used items you can add to an object.
-
5
Click Script. This opens a blank script in the center of the screen.
-
6
Write a script. In Roblox, scripts are written in a language called Lua. You’ll need to learn Lua and have some basic understanding of coding and computer programming in order to effectively script. Roblox offers tutorials on how to script in Roblox. This is a good place to start if you are a beginner to scripting. You can also find many tutorials on YouTube.


Advertisement
-
1
Click the Home tab. It’s the first button at the top of the page. This displays the panel with the playback controls at the top.
-
2
Click the Play icon to test your game. It’s a good idea to test your game frequently to make sure everything works right. Click the icon with the blue Play triangle in the panel at the top to load your game in the center window and allow you to play your game the way anyone who is playing it no Roblox would be allowed to play it.
-
3
Click the Stop icon to resume editing. If you want to stop testing your game and resume editing, click the icon with the red square in the panel at the top to stop your game.
-
4
Click File. It’s the button in the upper-right corner. When you are ready to save or publish your level, click the File button. Saving your level allows you to save your progress so you can continue work on it later. When you are completely finished with your level, you can publish it to Roblox so others can start playing it.
-
5
Click Save to File As. This allows opens a Save menu that allows you to save your game to your computer as a Roblox file.
- Alternatively, you can click Save to Roblox As to save the game to the Roblox server instead of your computer.
-
6
Enter a name for your game and click Save. Enter the name next to where it says «File name». Then click Save in the lower-left corner to save your game.
-
7
Load a game. If you want to continue a game you have previously saved, use the following steps to load a game:
- Click File in the upper-left corner.
- Click Open from File or Open from Roblox.
- Click a Roblox game or file (.rbxl) and click Open.
-
8
Publish a Roblox game. When you are finished editing a game and you are ready for others to start playing it, use the following steps to publish your game to Roblox:
- Click File.
- Click Publish to Roblox As.
- Click an existing game to replace it or click Create new game.
- Enter a name for your game at the top.
- Enter a brief description of your game.
- Select a creator from the drop-down menu.
- Select a genre using the drop-down menu.
- Click the checkbox next to the consoles your game is compatible with.
- Click Create.


Advertisement
Add New Question
-
Question
Can 2 players be in a single Roblox studio?

Yes, in Team Create.
-
Question
How do you rotate the camera?
Right-click, then move the mouse around in the direction you want.
-
Question
How do I allow people to fly and run with the tools in their inventories?
You could search in models for a fly tool. Just make sure it works correctly!

See more answers
Ask a Question
200 characters left
Include your email address to get a message when this question is answered.
Submit
Advertisement
Video
-
Practice to get good at using Roblox Studio.
-
Don’t forget to save your game frequently.
-
Watch as many tutorials and videos about Roblox Studio as you can to learn as much as you can.
Thanks for submitting a tip for review!
Advertisement
-
Get scripts manually from the catalog. If you get them via Roblox studio and you don’t know who’s made it and what it’s like it may contain a virus that can destroy your game or make it lag.
Advertisement
About This Article
Thanks to all authors for creating a page that has been read 168,824 times.
Reader Success Stories
-

Nathan Leonard
Apr 18, 2022
«This thing is very helpful when I finish editing my game. I am going to make a video how to play my game. Thank you…» more
Did this article help you?
Get all the best how-tos!
Sign up for wikiHow’s weekly email newsletter
Subscribe
You’re all set!
—
—

Что бы сделать кастомные звуки ходьбы в Роблокс Студио, необходимо добавить специальный скрипт из библиотеки Роблокс, после чего найти и …

Для того что бы сделать смену дня и ночи в Роблокс Студио, необходимо создать Script в разделе «Workspace» и прописать …

В этом уроке будем делать интерфейс выбора команды в Роблокс студио. Вы можете использовать его в начале игры для распределения …

Что бы отключить абсолютно все тени в Роблокс Студио, необходимо в панели Explorer найти и нажать на вкладку «Lighting«, после …

Проще всего сделать оружие на основе уже существующего, лицензированного оружия. Его можно будет взять за основу и изменить модель (внешний …

Есть огромное множество способов сделать питомца в Роблокс студио, от самых простых где нужно лишь импортировать в систему уже готовую …

Для создания уникальной анимации ходьбы и бега в Роблокс Студио необходимо воспользоваться инструментом Animation Editor, а так же специальным скриптом-моделью, …

Что бы сделать вид от первого лица в Роблокс Студио, необходимо добавить себе в инвентарь специальную модель, найти ее в …

Что бы сделать убивающий блок необходимо создать на карте блок при помощи инструмента Part который находиться во вкладке MODEL. После …

Что бы сделать экран смерти в Роблокс, необходимо воспользоваться окном ToolBox. Внутри окна (в поисковой строке) напишите запрос died gui …
Знакомство с интерфейсом
Глава 1. Первое окно, Baseplate и вкладка Home
В этой главе Вам предстоит начать с основ. Прежде чем создавать те или иные объекты, анимации и игры, нужно знать и понимать как работает программа Roblox Studio и за что отвечают панели и кнопки в интерфейсе.
При открытии Roblox Studio перед Вами появится окно (Рис.1) в котором будет несколько вкладок:

(Рис.1)
Слева, находится голубая панель с 4 вкладками:
-
New/Новый
-
My Games/Мои игры
-
Recent/Недавнее
-
Archive/Архив
Вкладка New
Подразумевает под собой создание нового мира. В ней также есть 3 панели сверху:
-
All Templates/Все шаблоны
-
Theme/Тема
-
Gameplay/Игровой процесс
All Templates, позволяет выбрать уже существующий шаблон мира, который любезно нам предоставляет Roblox Studio.
Theme, позволяет выбрать шаблон мира на определенную тематику из представленных Roblox Studio.
Gameplay, позволяет выбрать шаблон мира с определенным уже готовым игровым процессом.
Вкладка My Games
В этой вкладке Вы можете просмотреть уже созданные Вами игры. Также, в ней есть 3 панели сверху:
-
My Games/Мои игры
-
Group Games/Групповые игры
-
Shared With Me/Поделились со мной
My Games, отображает созданные Вами игры.
Group Games, отображает игры которые созданы от имени Вашей группы на аккаунте Roblox.
Shared With Me, отображает те игры, в которые Вы были приглашены чтобы редактировать их или создавать вместе с другим пользователем.
!Группа в Roblox!
На аккаунте в Roblox можно создать свою группу и от ее имени создавать игры, аксессуары для аватара и прочее. Чтобы создать свою группу в Roblox, нужно открыть nav menu (три полоски в левом верхнем углу сайта Roblox), далее выбрать Groups и нажать на кнопку Create Group. Создание группы не бесплатное, цена — 100 Robux.
Вкладка Recent
В ней будут отображаться те миры, в которые Вы недавно заходили.
Вкладка Archive
В ней будут отображаться те миры, которые Вы перенесли в архив. Обычно, там находятся миры которые временно не редактируются, заброшены и прочее.
Переходим в Baseplate
Изучив меню, давайте создадим наш первый мир. Переходим во вкладку New и выбираем любой из предложенных. Рекомендую выбрать Baseplate.
Как только Вы выберете один из предложенных миров, перед Вами откроется новый интерфейс (Рис.2):
(Рис.2)
Изначально может показаться что в Roblox Studio очень много панелей и все они совершенно не понятны. Но, если немного разобраться не так все и страшно.
Начнем с простого управления мышью:
-
Зажатая ПКМ — позволяет вращать камеру в любую сторону
-
Зажатая ЛКМ — позволяет выделить объекты, которые уже есть в мире
-
WASD или стрелки — позволяют передвигать камеру в любую сторону
-
Прокрутка колесика — приближает и отдаляет камеру
Теперь, перейдем к самому интерфейсу. Начнем с самой верхней панели (Рис.3):
(Рис.3)
Вкладка Home/Дом
С этой вкладкой Вы будете работать чаще всего. Разберем ее подробнее.
-
Select/Выбрать
-
Move/Двигать
-
Scale/Масштаб
-
Rotate/Вращать
-
Editor/Редактор
-
Toolbox/Ящик инструментов
-
Part/Часть
-
UI/ПИ (Пользовательский Интерфейс)
-
Import 3D/Импортировать 3Д объект
-
Material Manager/Менеджер по материалам
-
Color/Цвет
-
Play/Играть
-
Resume/Возобновить
-
Stop/Остановить
-
Game Settings/Настройки игры
-
Team Test/Командный тест
-
Exit Game/Выйти из игры
Select, позволяет выбрать любой объект просто кликнув по нему. Если объект выбран, он будет подсвечен голубой рамкой (Рис.4). Горячее сочетание клавиш Ctrl+1.
(Рис.4)
Move, позволяет двигать выбранный объект с помощью осей X, Y, Z (Рис.5). Горячее сочетание клавиш Ctrl+2.
(Рис.5)
Ось X — красные стрелки
Ось Y — зеленые стрелки
Ось Z — синие стрелки
Scale, позволяет менять масштаб/размер выбранного объекта по осям X, Y, Z (Рис.6). Горячее сочетание клавиш Ctrl+3.
(Рис.6)
Ось X — красные круги
Ось Y — зеленые круги
Ось Z — синие круги
Rotate, позволяет вращать объект по осям X, Y, Z (Рис.7). Горячее сочетание клавиш Ctrl+4.
(Рис.7)
Ось X — красный обруч
Ось Y — зеленый обруч
Ось Z — синий обруч
Editor, позволяет изменять местность Вашего мира. (Об Editor Вы узнаете в следующих уроках)
Toolbox, позволяет брать уже готовые модели, картинки, аудио и т.д. от других пользователей или самого Roblox Studio.
Part, позволяет создать в мире любой из 5 представленных форм. А именно:
-
Block/Блок
-
Sphere/Сфера
-
Wedge/Клин
-
Corner Wedge/Угловой клин
-
Cylinder/Цилиндр
UI, позволяет создать такие вещи как меню, кнопки играть или настройки, кнопку пожертвования (донат) и т.д.
Import 3D, позволяет импортировать объекты из других программ в Roblox Studio. Например, можно создать объект в Blender и импортировать его в Roblox Studio.
Material Manager, позволяет выбрать материал для Вашей модели или блока. Например стекло, асфальт или кирпичная кладка.
Color, позволяет выбрать любой цвет для Вашей модели или блока.
Play, позволяет зайти в режим игры чтобы Вы могли провести тест того, что создали.
Resume, позволяет возобновить игру там, где Вы остановились.
Stop, позволяет остановить режим игры и возвращает Вас в редактор.
Game Settings, позволяет настроить уже готовую игру. Например, изменить главный аватар, добавить бейджи/достижения, добавить описание и название для игры и и т.д.
Team Test, позволяет включить режим группового теста. Т.е. Вы можете создавать мир вместе с другими приглашенными пользователями или пригласить этого пользователя поиграть в тестовом режиме.
Exit Game, позволяет выйти из тестового режима игры когда Вы находитесь в групповом тесте.
В Roblox можно больше, чем просто играть
Научим детей и подростков программировать и создавать миры в Roblox
Что такое Roblox
Roblox Studio — специальная программа для создания игр в Roblox. С её помощью можно играть, общаться и разрабатывать собственные проекты с разными механиками, сложностью и сюжетом. А когда новая игра будет готова, её можно опубликовать на миллионную аудиторию, чтобы помочь найти своих игроков. В общем, то, что нужно юному геймеру и будущему игровому разработчику!
Программа имеет широкую функциональность и способна выполнить множество задач под любые цели. Сделать красивый ландшафт или создать собственный транспорт? Построить корабль или основать целый город? Это и многое другое доступно в Roblox Studio!
Стартуй в программировании прямо сейчас
Реши свою первую настоящую задачу на JavaScript и поделись крутым результатом с друзьями

Как установить Roblox Studio
Прежде чем вы научитесь создавать свои проекты и погрузитесь в мир разработки компьютерных игр, нам нужно разобраться с установкой Roblox Studio. Для начала, если вы всё ещё не зарегистрированы в Roblox, нужно это сделать. Чтобы пройти этот шаг, зайдите на официальный сайт Roblox. Там вы сразу попадёте на форму входа, где нужно заполнить дату своего рождения, пол, придумать логин, пароль и нажать Sign Up.
После этого может появиться небольшая задачка. Она нужна, чтобы система определила, что вы не робот.
Когда вы пройдёте проверку, перед вами откроется главная страница Roblox. В верхней части страницы найдите кнопку Create и нажмите на неё.
Далее появится страница, где можно скачать программу Roblox Studio. Для этого нажимаем на Start Creating.
После этого появится окно с подготовкой для скачивания. Подождите несколько секунд, пока не увидите кнопку Download Studio. Нажмите её и скачайте программу. Когда загрузка завершится, появится программа для установки Roblox Studio. В браузере Google Chrome значок установщика появится в левом нижнем углу экрана.
Кликните на установщик и начните загрузку. Когда она закончится, вам будет нужно авторизоваться в системе: ввести свой логин и пароль. Если всё сделано верно, откроется главная страница Roblox Studio. Теперь мы можем начать создавать свои 3D-игры!
Выберите идеального наставника по программированию
15 000+ проверенных преподавателей со средним рейтингом 4,8. Учтём ваш график и цель обучения
Как начать создавать игры
Чтобы разобраться, как сделать хорошую игру в Roblox, нам нужно для начала ознакомиться с интерфейсом Roblox Studio.
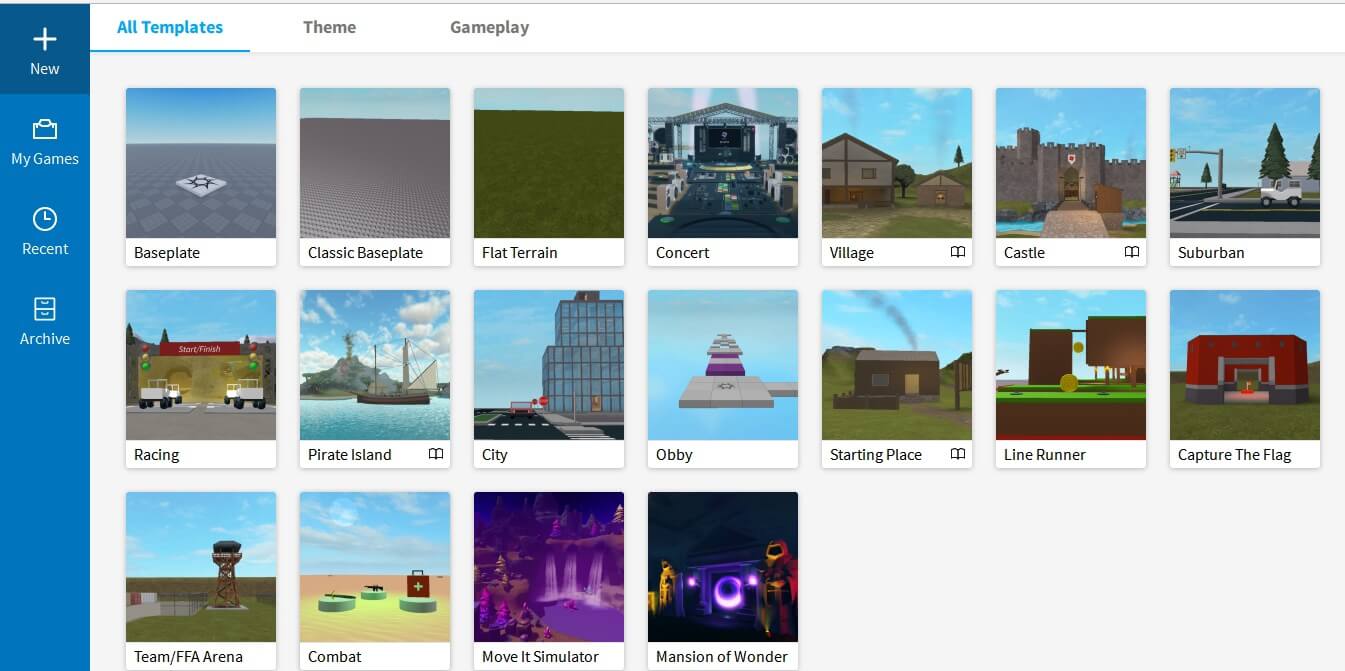
Первое, что мы видим на стартовой странице, — это шаблоны для плейсов. Плейс — игра, созданная игроком и выложенная на Roblox.
Готовые шаблоны разнообразны и делятся не только по тематикам, но и по механике игры. Например, можно использовать шаблон для создания Obby. Это такой тип плейсов, в котором игроку нужно пройти полосу препятствий. Или же создать пиратский корабль и устроить самую настоящую морскую битву!
Также можно выбрать режим игры «захват флага», или же окунуться в атмосферу Средневековья и создать замок. Если же вы хотите создать игру в Roblox с нуля, то нужно выбрать пустой шаблон и начать творить. Но стоить заметить, что для этого вам понадобятся некоторые знания языка программирования Lua.
Немного подробнее про вкладки в главном меню:
-
New — в этой вкладке можно выбрать шаблон для своего будущего плейса.
-
My Games— здесь отображаются все игры, созданные пользователем.
-
Recent— отображает проекты, которые были использованы недавно.
-
Archive— проекты, которые вам пока не нужны, можно отправить в архив.
Интерфейс Roblox Studio
Теперь, когда мы разобрались с главным меню, можем приступать к знакомству с интерфейсом на примере пустого шаблона.
Toolbox — это инструмент, который предоставляет нам быстрый доступ к богатой библиотеке объектов, созданных как разработчиками Roblox, так и другими игроками. Это значит, что любой пользователь, который освоил Roblox Studio, сможет создать свою модель и поделиться с другими игроками! Здесь находятся модели, картинки, плагины и прочие объекты, которые помогают разработчикам делать свои игры лучше.
Explorer отображает все объекты, которые есть в проекте. Это могут быть скрипты, настройки сервера, освещение и другое. Благодаря этому окну намного проще ориентироваться в проекте и находить нужный объект.
Properties отвечает за свойства объекта. Здесь мы можем изменять цвет, материал, тень, прозрачность и многое другое.
Terrain Editor позволяет генерировать и видоизменять ландшафт нашей карты. Можно добавить гору, выкопать яму, или сделать самое настоящее море!
Part в Roblox: создаём игру Obby
Теперь разберёмся, как создать первую игру на компьютер в Roblox. Для этого нам нужно познакомиться с не менее важной частью Roblox Studio — объектами Part и инструментами для работы с ними. Part — важнейший компонент в создании игр, используется для разработки любых моделей. Основные парты — это:
-
block;
-
sphere;
-
wedge;
-
corner Wedge;
-
cylinder.
Чтобы их добавить, необходимо нажать Part на вкладке Home или Model.
Инструменты позволяют работать с партами, изменять их размер, угол наклона и местоположение:
-
Select — выбрать парт.
-
Move — перемещать парт.
-
Scale — измерять и менять размер парта.
-
Rotate — изменять угол наклона парта.
Также, изменяя у парта Color и Material в окне Properties, мы можем сделать, например, красную сферу из дерева или голубоватый неоновый парт!
Теперь, если мы удалим из окошка Explorer платформу Baseplate, а всем партам добавим свойство Anchor, которое позволяет закрепить объекты, то у нас получится наше первое Obby. Вот как просто, оказывается, создать собственную игру в Roblox!
Roblox Studio имеет огромное количество функций, которые позволяют создавать множество своих игр и проектов. Сегодня мы сделали вместе первую игру, но гораздо круче экспериментировать самому. Чтобы полностью погрузиться в мир Roblox, советуем попробовать добавлять парты, изменять их, думать над механикой игры и создавать декорации.
Только создав несколько проектов, вы сможете почувствовать себя самым настоящим разработчиком плейсов! А в этом вам помогут наши преподаватели и курс по созданию игр в Roblox. Там вы научитесь работать с инструментами, создадите 12 разных проектов и сможете опубликовать их на платформе Roblox. Встретимся на первом уроке!
Изображения «Roblox.com» Creative Commons Zero (CC0).
Мы подготовили серию видеоуроков, которые познакомят детей 9-14 лет с созданием игр для Roblox и научат программировать на языке Lua.
Roblox (Роблокс) — это популярная платформа, где каждый может создать и разместить свой проект. Игры для сайта можно разрабатывать с помощью движка Roblox Studio (Роблокс Студио), где используются скрипты на языке Lua. Создавать проекты в Roblox Studio несложно, этому можно научиться даже в 9 лет.
Школа программирования для детей Pixel подготовила серию бесплатных видеоуроков по Roblox Studio для начинающих. Это короткие последовательные уроки, с помощью которых можно разобраться в возможностях программы, а также научиться писать небольшие скрипты на Lua и делать базовые игры: шутеры, Obby, Capture the Flag и др.
Урок 0. Инструкция по установке Roblox Studio
Первым делом нужно скачать программу. Это просто, подробная инструкция в видео.
Урок 1. Интерфейс в Роблокс Студио
Приступим к делу и начнем процесс обучения с изучения интерфейса программы. Чтобы вам было проще разобраться, мы сразу попробуем создать первую карту и добавить на нее разные объекты.
Урок 2. Язык программирования Lua: что он из себя представляет?
Познакомимся с языком Lua: пройдем начальные понятия в Lua и первые команды, которые в будущем будем применять при написании игр. Кстати, уже на этом уроке мы будем программировать игру: попробуем создать спавн.
Урок 3. Система уровней
Постепенно углубляемся в изучение платформы и используемого в ней языка программирования. Практическая часть: мы научимся добавлять уровни в игры и создадим игру LineRunner. Также мы изучим циклы в Lua.
Урок 4. Создание первого уровня игры в Obby
Продолжаем осваивать возможности Роблокс Студио и учиться создавать уровни. На этот раз добавим уровни в проект типа Obby — жанр игры с полосой препятствий. Кроме того, разберемся в таких понятиях, как условия и функции.
Урок 5. Диалоги в Роблокс
Для диалогов нам понадобится еще один или несколько персонажей. После того, как разберемся с системой общения между персонажами, напишем небольшой код.
Урок 6. Компоненты GUI: что это такое?
Простыми словами, GUI — это вспомогательные компоненты, благодаря которым мы сможем создать наше игровое меню. Рассмотрим, что входит в GUI и попробуем создать меню для нашей игры.
Урок 7. Создание игры в жанре Capture the Flag
Мы научимся создавать игру, в которой будет сразу несколько команд. В нашем проекте одновременно начинать игру будут четыре команды. Их задача — достичь вершины раньше всех и дотронуться до специального блока.
Урок 8. Создаем продолжение игры
Улучшим игру из предыдущего урока, добавив в нее несколько новых механик.
Урок 9. Финальный урок. Новая игра
Итак, финальные шаги! Создадим совершенно новую игру и попробуем добавить в нее как можно больше из изученных механик.
***
Материал подготовлен школой программирования для детей Pixel. Мы учим детей и подростков 5-17 лет создавать игры, программировать, делать сайты и блоги и др. Приходите к нам, чтобы познакомить детей с IT и разработкой игр.