
-
Contents
-
Table of Contents
-
Bookmarks
Quick Links
User Guide
AC750 Wireless Dual Band Gigabit Router
Archer C2
REV5.0.0
1910012133
Related Manuals for TP-Link AC750
Summary of Contents for TP-Link AC750
-
Page 1: User Guide
User Guide AC750 Wireless Dual Band Gigabit Router Archer C2 REV5.0.0 1910012133…
-
Page 2: Table Of Contents
Contents About This Guide ………………….1 Chapter 1. Get to Know About Your Router ……2 1.
-
Page 3
4. 7. 2. Port Triggering …………36 4. -
Page 4: About This Guide
• The Quick Installation Guide can be found where you find this guide or inside the package of the router. • Specifications can be found on the product page at http://www.tp-link.com. • A Technical Support Forum is provided for you to discuss our products at http://forum.tp-link.com.
-
Page 5: Chapter 1. Get To Know About Your Router
Chapter Get to Know About Your Router This chapter introduces what the router can do and shows its appearance. It contains the following sections: • Product Overview • Panel Layout…
-
Page 6: Product Overview
Ethernet ports supply high-speed connection to your wired devices. Moreover, it is simple and convenient to set up and use the TP-Link router due to its intuitive web interface and the powerful Tether app.
-
Page 7: The Back Panel
Chapter 1 Get to Know About Your Router LED Explanation Name Status Indication The system has started up successfully. The system is starting up or firmware is being upgraded. Do not Flashing (Power) disconnect or power off your router. Power is off. The 2.4GHz wireless band is enabled.
-
Page 8
Chapter 1 Get to Know About Your Router The following parts (view from left to right) are located on the back panel. Item Description Ethernet Ports (4/3/2/1) For connecting your PCs or other wired network devices to the router. Internet Port For connecting to a DSL/Cable modem, or an Ethernet port. -
Page 9: Chapter 2. Connect To The Internet
Chapter Connect to the Internet This chapter contains the following sections: • Position Your Router • Connect Your Router…
-
Page 10: Position Your Router
Chapter 2 Connect to the Internet 2. 1. Position Your Router • The product should not be located in a place where it will be exposed to moisture or excessive heat. • Place the router in a location where it can be connected to multiple devices as well as to a power source.
-
Page 11
Chapter 2 Connect to the Internet 4 ) Connect the power adapter to the router and turn on the router. 5 ) Verify that the hardware connection is correct by checking these LEDs. Power Internet 2.4G Note: If the 2.4G and 5G Wi-Fi LEDs are off, press and hold the Wi-Fi/WPS button on the rear panel for more than 5 seconds to turn them on. -
Page 12
Chapter 2 Connect to the Internet Note: The WPS function cannot be configured if the wireless function of the router is disabled. Also, the WPS function will be disabled if your wireless encryption is WEP. Please make sure the wireless function is enabled and is configured with the appropriate encryption before configuring the WPS. -
Page 13: Chapter 3. Log In
Chapter Log In This chapter introduces how to log in to the web management page of the router.
-
Page 14
Chapter 3 Log In With the web-based utility, it is easy to configure and manage the router. The web- based utility can be used on any Windows, Macintosh or UNIX OS with a Web browser, such as Microsoft the Internet Explorer, Mozilla Firefox or Apple Safari. Follow the steps below to log in to your router. -
Page 15: Chapter 4. Configure The Router
Chapter Configure the Router This chapter presents how to configure the various features of the router. It contains the following sections: • Status • Parental Controls • Network • Status • Dual Band Selection • Advanced Routing • Wireless (2.4GHz or 5GHz) •…
-
Page 16: Status
Chapter 4 Configure the Router 4. 1. Status 1. Visit http://tplinkwifi.net, and log in with the username and password you set for the router. 2. Go to Status. You can view the current status information of the router. • Firmware Version — The version information of the router’s firmware.
-
Page 17: Network
Chapter 4 Configure the Router • Operation Mode — The current wireless working mode in use. • Wireless Radio — Indicates whether the wireless radio feature of the Router is enabled or disabled. • Name(SSID) — The SSID of the Router. •…
-
Page 18
Chapter 4 Configure the Router Click Renew to renew the IP parameters from your ISP. Click Release to release the IP parameters. • MTU Size — The normal MTU (Maximum Transmission Unit) value for most Ethernet networks is 1500 Bytes. It is not recommended that you change the default MTU size unless required by your ISP. -
Page 19
Chapter 4 Configure the Router • Subnet Mask — Enter the subnet mask in dotted-decimal notation provided by your ISP. Normally 255.255.255.0 is used as the subnet mask. • Gateway — Enter the gateway IP address in dotted-decimal notation provided by your ISP. -
Page 20
Chapter 4 Configure the Router on Demand mode. The internet connection can be disconnected automatically after a specified inactivity period (Max Idle Time) and not be able to re-establish when you attempt to access the internet again. • Authentication Type — Choose an authentication type. -
Page 21
Chapter 4 Configure the Router • User Name/Password — Enter the user name and password provided by your ISP. These fields are case-sensitive. • Addressing Type — Choose the addressing type given by your ISP, either Dynamic IP or Static IP. Click the Connect button to connect immediately. -
Page 22
Chapter 4 Configure the Router Note: Sometimes the connection cannot be terminated although you have specified the Max Idle Time because some applications are visiting the internet continually in the background. PPTP If your ISP provides PPTP connection, please select PPTP. •… -
Page 23: Bigpond Cable
Chapter 4 Configure the Router • Connect Manually — You can click Connect/Disconnect to connect/disconnect immediately. This mode also supports the Max Idle Time function as Connect on Demand mode. The internet connection can be disconnected automatically after a specified inactivity period (Max Idle Time) and not be able to re-establish when you attempt to access the internet again.
-
Page 24: Lan
Chapter 4 Configure the Router • Connect Manually — You can click Connect/Disconnect to connect/disconnect immediately. This mode also supports the Max Idle Time function as Connect on Demand mode. The internet connection can be disconnected automatically after a specified inactivity period (Max Idle Time) and not be able to re-establish when you attempt to access the internet again.
-
Page 25: Dual Band Selection
Chapter 4 Configure the Router • WAN MAC Address — This field displays the current MAC address of the WAN port. If your ISP requires you to register the MAC address, please enter the correct MAC address in this field. Click Restore Factory MAC to restore the MAC address of WAN port to the factory default value.
-
Page 26: Wireless (2.4Ghz Or 5Ghz)
Chapter 4 Configure the Router 4. 4. Wireless (2.4GHz or 5GHz) 4. 4. 1. Wireless Settings 1. Visit http://tplinkwifi.net, and log in with the username and password you set for the router. 2. Go to Wireless (2.4GHz or 5GHz) > Basic Settings (2.4GHz or 5GHz).
-
Page 27: Wps
Chapter 4 Configure the Router 4. 4. 2. WPS (Wi-Fi Protected Setup) can help you to quickly and securely connect to a network. This section will guide you to add a new wireless device to your router’s network quickly via WPS. Note: The WPS function cannot be configured if the wireless function of the router is disabled.
-
Page 28
Chapter 4 Configure the Router 2. Select Enter new device PIN, enter your client device’s current PIN in the filed and click Connect. 3. A success message will appear on the WPS page if the client device has been successfully added to the router’s network. Method THREE: Enter the Router’s PIN 1. -
Page 29: Wireless Security
Chapter 4 Configure the Router 4. 4. 3. Wireless Security 1. Visit http://tplinkwifi.net, and log in with the username and password you set for the router. 2. Go to Wireless (2.4GHz or 5GHz) > Wireless Security. 3. Configure the security settings of your wireless network and click Save.
-
Page 30
Chapter 4 Configure the Router • Disable Wireless Security — The wireless security function can be enabled or disabled. If disabled, wireless clients can connect to the router without a password. It’s strongly recommended to choose one of the following modes to enable security. •… -
Page 31: Wireless Mac Filtering
Chapter 4 Configure the Router 4. 4. 4. Wireless MAC Filtering Wireless MAC Filtering is used to deny or allow specific wireless client devices to access your network by their MAC addresses. I want to: Deny or allow specific wireless client devices to access my network by their MAC addresses.
-
Page 32: Wireless Advanced
Chapter 4 Configure the Router Done! Now only client A and client B can access your network. 4. 4. 5. Wireless Advanced 1. Visit http://tplinkwifi.net, and log in with the username and password you set for the router. 2. Go to Wireless (2.4GHz or 5GHz) >…
-
Page 33: Wireless Statistics
Chapter 4 Configure the Router are the packets sent by the router to synchronize a wireless network. The default value is 100. • RTS Threshold — Here you can specify the RTS (Request to Send) Threshold. If the packet is larger than the specified RTS Threshold size, the router will send RTS frames to a particular receiving station and negotiate the sending of a data frame.
-
Page 34: Guest Network
Chapter 4 Configure the Router • Sent Packets — Packets sent by the wireless client. • SSID — SSID that the station associates with. 4. 5. Guest Network Guest Network allows you to provide Wi-Fi access for guests without disclosing your host network.
-
Page 35: Dhcp
Chapter 4 Configure the Router • Allow Guest To Access My Local Network — If enabled, guests can access the local network and manage it. • Guest Network Isolation — If enabled, guests are isolated from each other. • Enable Guest Network Bandwidth Control — If enabled, the Guest Network Bandwidth Control rules will take effect.
-
Page 36: Dhcp Client List
Chapter 4 Configure the Router • Address Lease Time — The Address Lease Time is the amount of time a network user will be allowed to connect to the router with the current dynamic IP Address. When time is up, the user will be automatically assigned a new dynamic IP address. The range of the time is 1 ~ 2880 minutes.
-
Page 37: Address Reservation
Chapter 4 Configure the Router • Assigned IP — The IP address that the outer has allocated to the DHCP client. • Lease Time — The time of the DHCP client leased. After the dynamic IP address has expired, a new dynamic IP address will be automatically assigned to the user. You cannot change any of the values on this page.
-
Page 38: Virtual Server
Chapter 4 Configure the Router The TP-Link router includes four forwarding rules. If two or more rules are set, the priority of implementation from high to low is Virtual Servers, Port Triggering, UPNP and DMZ. 4. 7. 1. Virtual Server When you build up a server in the local network and want to share it on the internet, Virtual Servers can realize the service and provide it to internet users.
-
Page 39: Port Triggering
Chapter 4 Configure the Router 5. Leave the status as Enabled and click Save. Note: • It is recommended to keep the default settings of Internal Port Protocol if you are not clear about which port and protocol to use. •…
-
Page 40: Dmz
Chapter 4 Configure the Router 4. Leave the status as Enabled and click Save. Note: • You can add multiple port triggering rules as needed. • The triggering ports can not be overlapped. • If the application you need is not listed in the Common Applications list, please enter the parameters manually.
-
Page 41: Upnp
Chapter 4 Configure the Router 3. Go to Forwarding > DMZ. 4. Select Enable and enter the IP address 192.168.0.100 in the DMZ Host IP Address filed. 5. Click Save. Done! You’ve set your PC to a DMZ host and now you can make a team to game with other players.
-
Page 42: Security
Chapter 4 Configure the Router 3. Click Disable Enable according to your needs. 4. 8. Security This function allows you to protect your home network from cyber attacks and unauthorized users by implementing these network security functions. 4. 8. 1. Basic Security 1.
-
Page 43: Advanced Security
Chapter 4 Configure the Router • — VPN Passthrough must be enabled if you want to allow VPN tunnels using IPSec, PPTP or L2TP protocols to pass through the router’s firewall. • PPTP Passthrough — Point-to-Point Tunneling Protocol (PPTP) allows the Point- to-Point Protocol (PPP) to be tunneled through an IP network.
-
Page 44
Chapter 4 Configure the Router • DoS Protection — Denial of Service protection. Select Enable or Disable to enable or disable the DoS protection function. Only when it is enabled, will the flood filters be enabled. Note: Dos Protection will take effect only when the Statistics in System Tool >… -
Page 45: Local Management
Chapter 4 Configure the Router 4. 8. 3. Local Management 1. Visit http://tplinkwifi.net, and log in with the username and password you set for the router. 2. Go to Security > Local Management, and you can block computers in LAN from accessing the router.
-
Page 46: Parental Controls
For example, you want the children’s PC with the MAC address 00-11-22-33-44-AA can access www.tp-link.com on Saturday only while the parent PC with the MAC address 00-11-22-33-44-BB is without any restriction.
-
Page 47: Access Control
If you want to restrict the internet activities of host with MAC address 00-11-22-33-44-AA on the LAN to access www.tp-link.com only, please follow the steps below: 1. Visit http://tplinkwifi.net, and log in with the username and password you set for the router.
-
Page 48
(for example TP-Link) in the Add URL Address field. Note: Any URL address with keywords in it (e.g. www.tp-link.com) will be blocked or allowed. 3 ) Click Save. 4. Go to Access Control >… -
Page 49
Chapter 4 Configure the Router 3 ) Click Save. 5. Go to Access Control > Rule and add a new access control rule. 1 ) Click New. 2 ) Give a name for the rule in the Description field. Select host_1 from the LAN host drop-down list;… -
Page 50: Advanced Routing
Chapter 4 Configure the Router 7. Select Allow the packets specified by any enabled access control policy to pass through the Router as the default filter policy and click Save. Done! Now only the specific host(s) can visit the target(s) within the scheduled time period.
-
Page 51: System Routing Table
Chapter 4 Configure the Router • Subnet Mask — The Subnet Mask determines which portion of an IP address is the network portion, and which portion is the host portion. • Gateway — This is the IP address of the default gateway device that allows the contact between the router and the network or host.
-
Page 52: Bandwidth Control
Chapter 4 Configure the Router 4. 12. Bandwidth Control 4. 12. 1. Control Settings 1. Visit http://tplinkwifi.net, and log in with the username and password you set for the router. 2. Go to Bandwidth Control. 3. Configure the bandwidth as needed and click Save. The values you configure for the Egress Bandwidth and Ingress Bandwidth should be less than 100,000Kbps.
-
Page 53: Ip&Mac Binding
Chapter 4 Configure the Router • Modify — Click Modify/Delete to edit/delete the rule. ¾ To add a Bandwidth control rule: 1. Click New. 2. Enter the information as the figure shown below. 3. Click Save. 4. 13. IP&MAC Binding IP &…
-
Page 54: Arp List
Chapter 4 Configure the Router 3. Enter the MAC address and IP address. 4. Click Save. ¾ To modify or delete an existing entry: 1. Select the desired entry in the table. 2. Click Edit Delete Selected. 4. 13. 2. ARP List To manage a device, you can observe the device on the LAN by checking its MAC address and IP address on the ARP list, and you can also configure the items.
-
Page 55: Dynamic Dns
Chapter 4 Configure the Router Note: An item can not be loaded to the IP & MAC Binding list if the IP address of the item has been loaded before. Error warning will prompt as well. Likewise, Load All only loads the items without interference to the IP & MAC Binding list. 4.
-
Page 56: Comexe Ddns
Chapter 4 Configure the Router No-ip DDNS If the dynamic DNS Service Provider you select is www.noip.com, the following page will appear. To set up for DDNS, follow these instructions: 1. Enter the Domain Name you received from dynamic DNS service provider. 2.
-
Page 57: Ipv6
Chapter 4 Configure the Router To set up for DDNS, follow these instructions: 1. Enter the Domain Name received from your dynamic DNS service provider. 2. Enter the User Name for your DDNS account. 3. Enter the Password for your DDNS account. 4.
-
Page 58: Ipv6 Wan
Chapter 4 Configure the Router • WAN — This section shows the current IPv6 information of the router’s WAN port, including Connection Type, IPv6 Address information, IPv6 Default Gateway, Primary IPv6 DNS Secondary IPv6 DNS. • LAN — This section shows the current IPv6 information of the router’s LAN port, including IPv6 Address Assign Type,…
-
Page 59
Chapter 4 Configure the Router • PPPoEv6 — Connections which use PPPoEV6 that requires a username and password. • Tunnel 6to4 — Connections which use 6to4 address assignment. Dynamic IPv6 • IPv6 Address — The IPv6 address assigned by your ISP dynamically. •… -
Page 60: Static Ipv6
Chapter 4 Configure the Router Static IPv6 • IPv6 Address — Enter the IPv6 address provided by your ISP. • Prefix Length — The length of IPv6 address prefix. • IPv6 Gateway — Enter the default gateway provided by your ISP. •…
-
Page 61
Chapter 4 Configure the Router PPPoEv6 • PPP Username/Password — Enter the User Name and Password provided by your ISP. These fields are case-sensitive. • Authentication Type – Choose one authentication type from AUTO-AUTH, PAP, CHAP and MS-CHAP. • Addressing Type — There are two types of assignation for IPv6 address: SLAAC (Stateless address auto-configuration) and DHCPv6 (Dynamic Host Configuration Protocol for IPv6) Server. -
Page 62: Ipv6 Lan
Chapter 4 Configure the Router Tunnel 6to4 • WAN Connection — Display the available WAN connection. 4. Click Save. 4. 15. 3. IPv6 LAN 1. Visit http://tplinkwifi.net, and log in with the username and password you set for the router. 2.
-
Page 63: System Tools
Chapter 4 Configure the Router • Delegated — Get the IPv6 address prefix from the ISP automatically, and the device will delegate it to the LAN. • Static — Configure the Site Prefix Site Prefix Length manually. Please contact your ISP to get more information before you configure them. Tips: If your IPv6 wan connection type is “Tunnel 6to4”, the Site Prefix Configuration Type should be “Static”…
-
Page 64: Diagnostic
Chapter 4 Configure the Router ¾ To set Daylight Saving Time: 1. Select Enable DaylightSaving. 2. Select the start time from the drop-down list in the Start field. 3. Select the end time from the drop-down list in the field. 4.
-
Page 65: Firmware Upgrade
4. 16. 3. Firmware Upgrade TP-Link is dedicated to improving and richening the product features, giving users a better network experience. We will release the latest firmware at TP-Link official website. You can download the latest firmware file from the…
-
Page 66: Factory Defaults
Chapter 4 Configure the Router 4. 16. 4. Factory Defaults 1. Visit http://tplinkwifi.net, and log in with the username and password you set for the router. 2. Go to System Tools > Factory Defaults. Click Restore to reset all settings to the default values.
-
Page 67: Reboot
Chapter 4 Configure the Router ¾ To backup configuration settings: Click Backup to save a copy of the current settings in your local computer. A “.bin“ file of the current settings will be stored in your computer. ¾ To restore configuration settings: 1.
-
Page 68: System Log
Chapter 4 Configure the Router It is strongly recommended that you change the default username and password of the router, for all users that try to access the router’s web-based utility or Quick Setup will be prompted for the router’s username and password. Note: The new username and password must not exceed 15 characters and not include any spacing.
-
Page 69: Faq
Q1. What should I do if I forget my wireless password? The default wireless password is printed on the label of the router. If the password has been altered, please connect your computer to the router using an Ethernet cable and follow the steps below: 1.
-
Page 70
3 ) Click LAN settings and deselect the following three options, and click OK. -
Page 71
4 ) Go to Advanced > Restore advanced settings, and click to save the settings. • Use another web browser or computer to log in again. • Reset the router to factory default settings and try again. If the login still fails, please contact the technical support. -
Page 72
2 ) Click Save. Note: Log in to the web management page again if the IP address of the router is altered. 3. Survey the SSID to be bridged: 1 ) Go to Wireless > Wireless Settings and click Enable WDS Bridging. -
Page 73
Q5. What should I do if I cannot access the internet even though the configuration is finished? 1. Visit http://tplinkwifi.net, and log in to with the username and password you set for the router. 2. Go to Status to check WAN status: If IP Address is a valid one, please try the methods below and try again: •… -
Page 74
• Modify the LAN IP address of the router. Note: Most TP-Link routers use 192.168.0.1/192.168.1.1 as their default LAN IP address, it may conflict with the IP range of your existent ADSL modem/router. If so, the router is not able to communicate with your modem and cause you can’t access the internet. -
Page 75
• Double check the internet Connection Type. 1 ) Confirm your internet Connection Type, which can be learned from the ISP. 2 ) Visit http://tplinkwifi.net, and log in with the username and password you set for the router. 3 ) Go to Network >… -
Page 76
2 ) Exit the wireless configuration tool (the TP-Link Utility, for example). 3 ) Select and right click My Computer… -
Page 77
2 ) If you cannot find the PIN or PIN failed, you may choose Connecting using a security key instead, and then type in the Wireless Password/Network Security Key. 3 ) If it continues to show note of Network Security Key Mismatch, it is suggested to confirm the wireless password of your wireless router. -
Page 78
Specifications are subject to change without notice. is a registered trademark of TP-Link Technologies Co., Ltd. Other brands and product names are trademarks or registered trademarks of their respective holders. No part of the specifications may be reproduced in any form or by any means or used to make any derivative such as translation, transformation, or adaptation without permission from TP-Link Technologies Co., Ltd. -
Page 79
FCC STATEMENT This equipment has been tested and found to comply with the limits for a Class B digital device, pursuant to part 15 of the FCC Rules. These limits are designed to provide reasonable protection against harmful interference in a residential installation. This equipment generates, uses and can radiate radio frequency energy and, if not installed and used in accordance with the instructions, may cause harmful interference to radio communications. -
Page 80: Ce Mark Warning
CE Mark Warning This is a class B product. In a domestic environment, this product may cause radio interference, in which case the user may be required to take adequate measures. RF Exposure Information This device meets the EU requirements (2014/53/EC Article 3.1a) on the limitation of exposure of the general public to electromagnetic fields by way of health protection.
-
Page 81: Industry Canada Statement
Radiation Exposure Statement: This equipment complies with IC radiation exposure limits set forth for an uncontrolled environment. This equipment should be installed and operated with minimum distance 20cm between the radiator & your body. Déclaration d’exposition aux radiations: Cet équipement est conforme aux limites d’exposition aux rayonnements IC établies pour un environnement non contrôlé.
-
Page 82: Safety Information
Продукт сертифіковано згідно с правилами системи УкрСЕПРО на відповідність вимогам нормативних документів та вимогам, що передбачені чинними законодавчими актами України. Safety Information • When product has power button, the power button is one of the way to shut off the product;…
На чтение 13 мин Просмотров 4.2к.
Роутер TP-Link Archer C2 AC750 работает в двух диапазонах, обеспечивая высокую скорость. Эффективно объединяет домашние или офисные устройства (включая ПК, планшeты, ноутбуки и т. д.) в единую защищенную сеть. Расскажем о настройке маршрутизатора.
Содержание
- Характеристики
- Локальная сеть – настройка подключения
- Подключение к компьютеру
- Авторизация роутера TP-Link Archer C2 AC750
- Настройка пароля на wi-fi
- Настройка PPTP
- Настройка PPTP со статическим IP-адресом
- Настройка L2TP
- Настройка L2TP со статическим IP-адресом
- Настройка PPPOE
- Настройка PPPOE со статическим IP-адресом
- Настройка подключения к wi-fi
Характеристики
- поддерживает стандарт 802.11ac, совместим со 802.11n
- Wi-Fi: 802.11a/b/g/n/ac до 733 Мбит/с
- 4xLAN до 1000 Мбит/сек
Локальная сеть – настройка подключения
Прежде чем мы начнем настраивать роутер, посмотрим, как настроено подключение по локальной сети. Для этого нужно:
Windows 7
1. Нажимаем на “Пуск”, потом “Панель управления“.
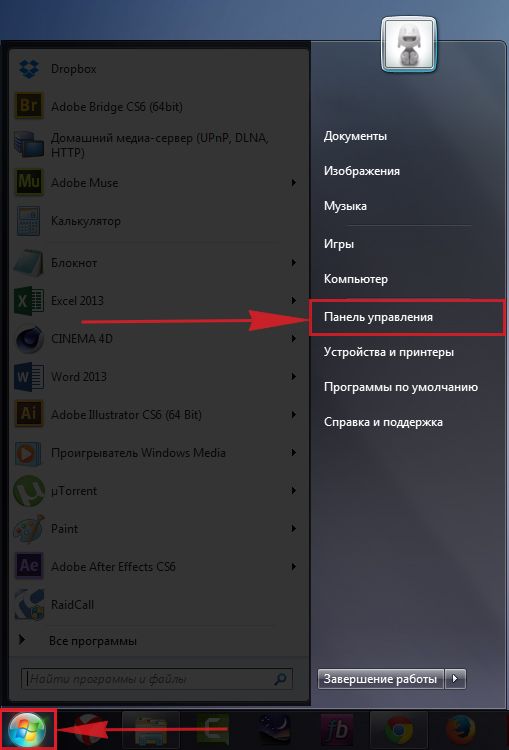
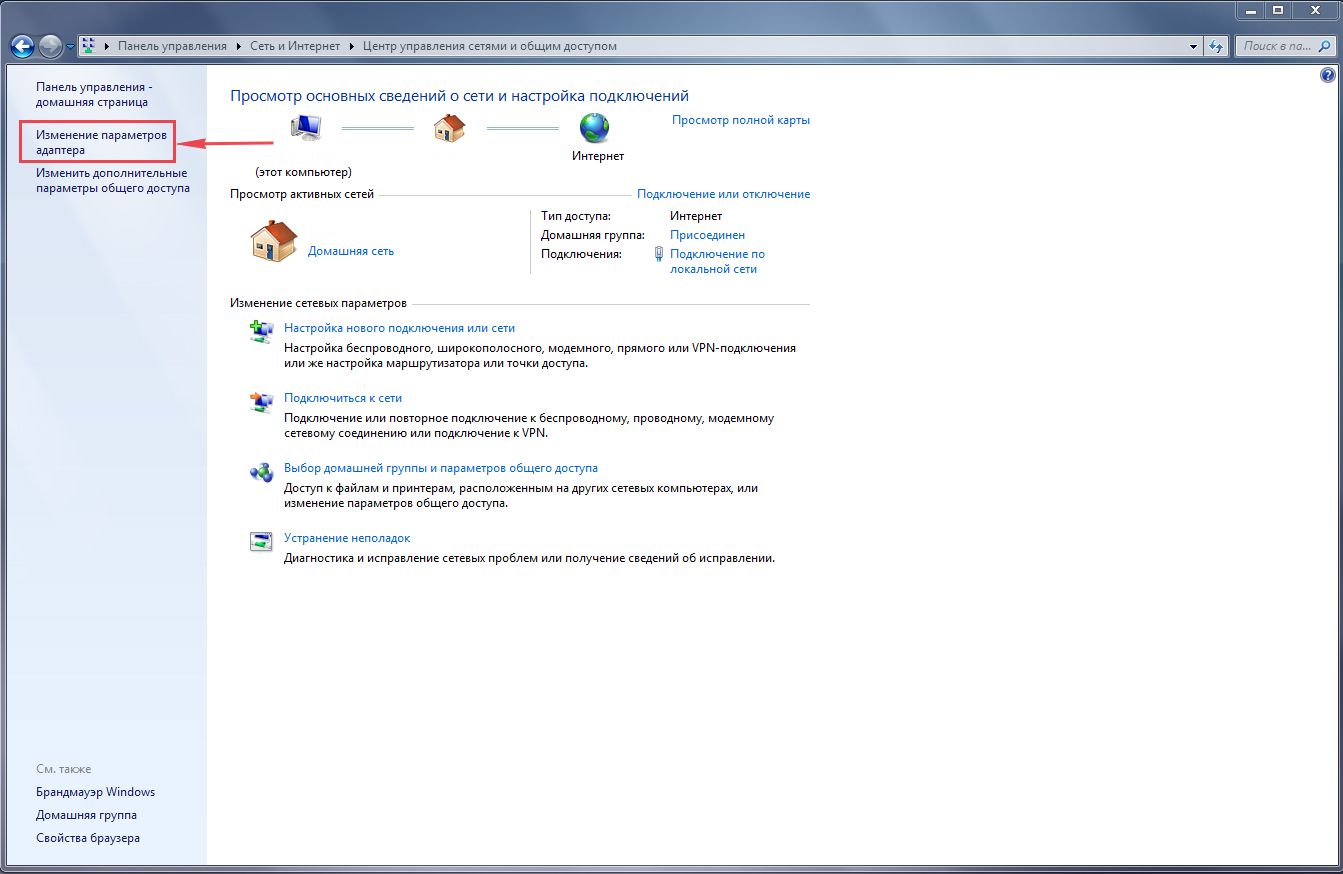
2. Жмём на “Просмотр состояния сети и задач“.

3. Нажимаем на “Изменение параметров адаптера“.
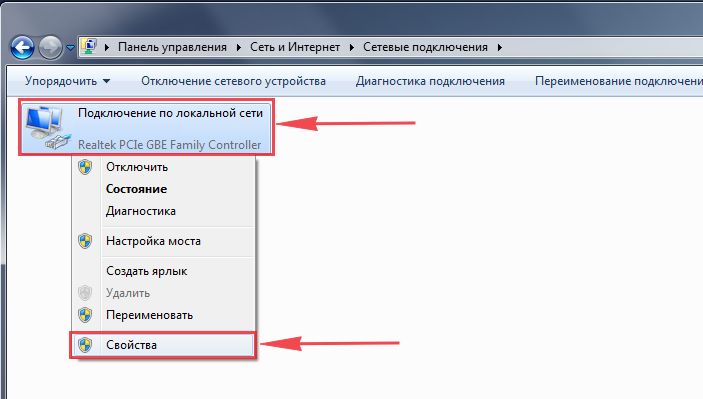
4. Открылось окно – здесь мы видим “Подключение по локальной сети“. Жмём по нему правой кнопкой мыши, и выбираем “Свойство“.
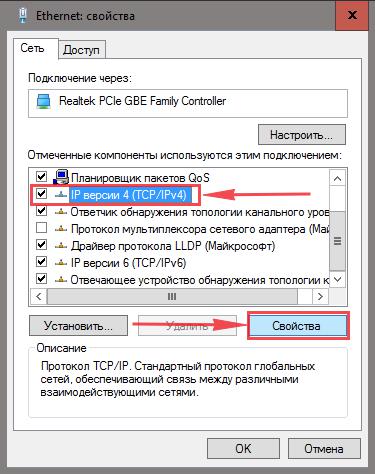
5. Теперь выберем “Протокол Интернета версии 4 (TCP/IPv4)” и жмём “Свойство“.
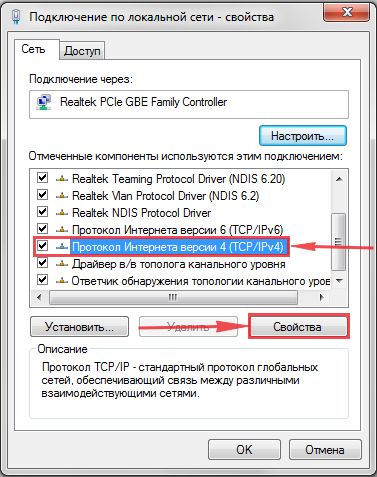
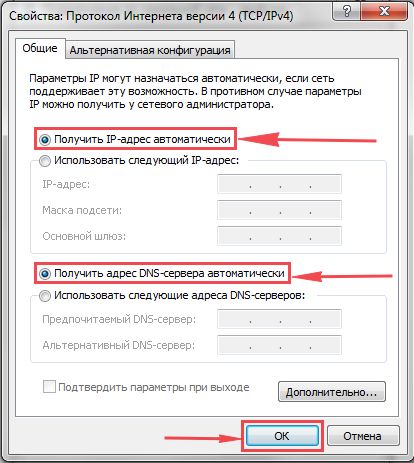
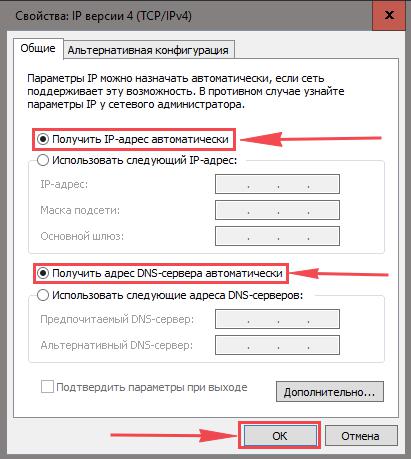
6. Открылось окно – здесь нужно проставить галки “Получить IP-адрес автоматически” и “Получить адрес DNS-сервера автоматически“, после жмём кнопку “Ok“.
Windows 10
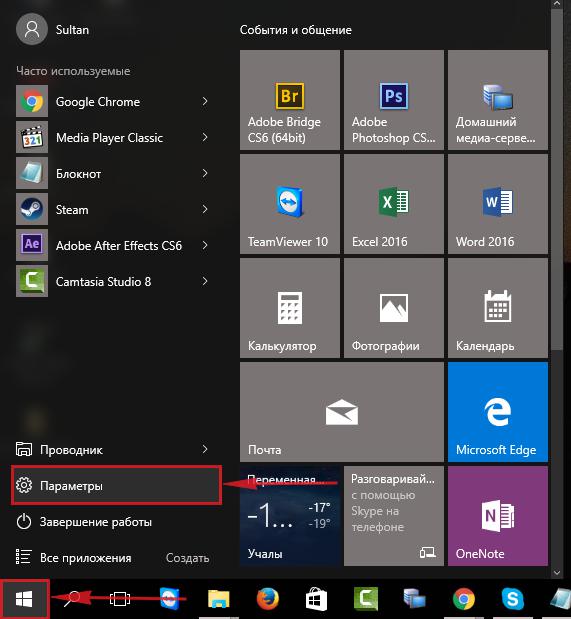
1. Нажимаем на “Пуск” потом “Параметры“.
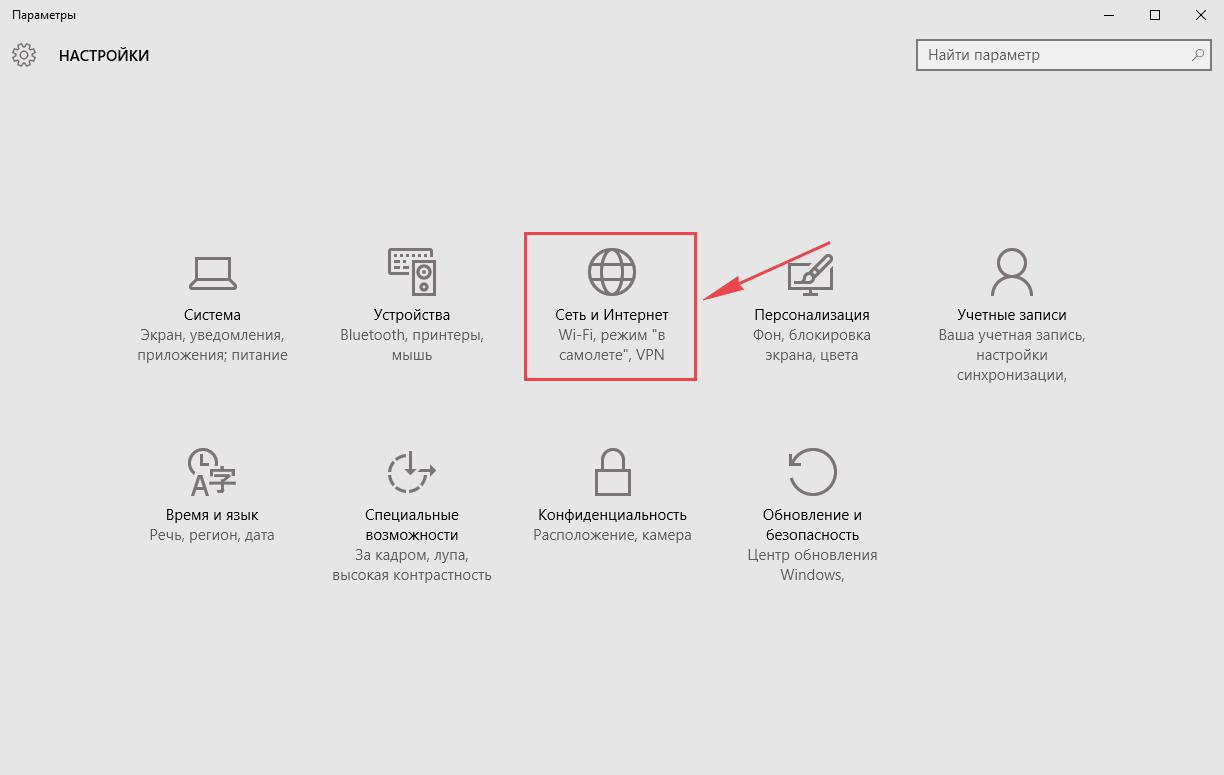
2. Жмём на “Сеть и Интернет“.
3. Выберем “Ethernet” и нажмём на “Настройка параметров адаптера“.

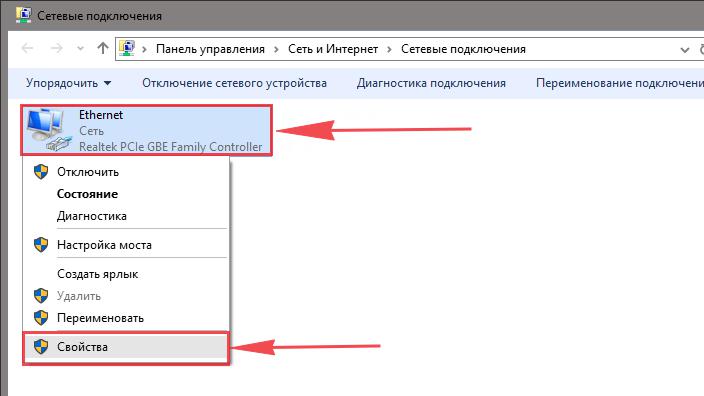
4. Открылось окно – здесь мы видим “Ethernet“. Жмём по нему правой кнопкой мышки, и выбираем “Свойство“.
5. Теперь выбираем “IP версии 4 (TCP/IPv4)” и жмём “Свойство“.
6. Открылось окно – здесь вам нужно проставить галки “Получить IP-адрес автоматически” и “Получить адрес DNS-сервера автоматически“, после жмём кнопку “Ok“.
Подключение к компьютеру
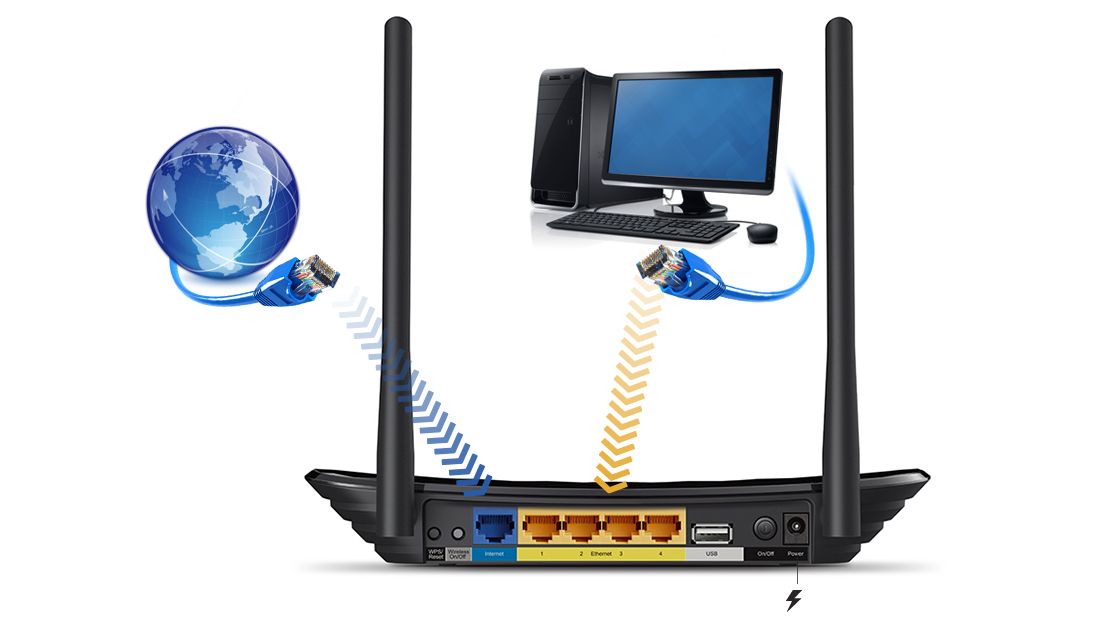
Теперь нам нужно подключить роутер TP-Link Archer C2 AC750 либо к компьютеру, либо к ноутбуку. Чтобы это сделать, вам нужно подсоединить кабель, который был протянут вашим провайдером к синему разъему роутера, где есть надпись “INTERNET”. Берем кабель, шедший вместе с роутером, один конец его подключаем к пк, либо к ноутбуку, другой подсоединяем к одному из желтых портов роутера. Так же, не забываем подключить кабель питания.
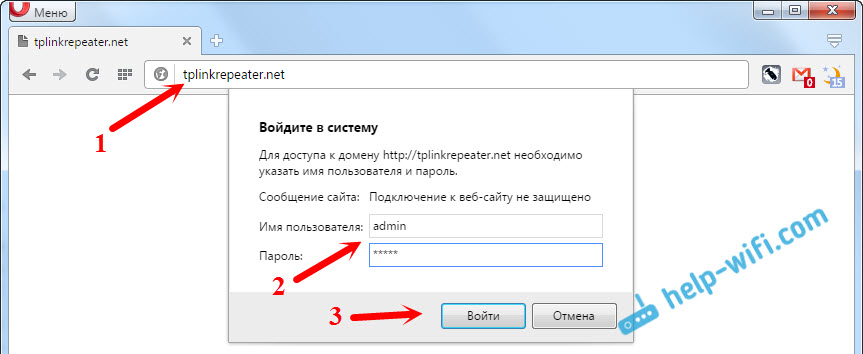
Авторизация роутера TP-Link Archer C2 AC750
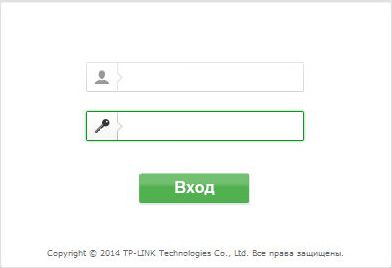
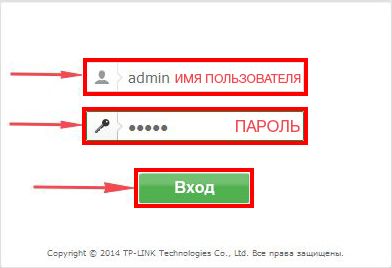
После того, как вы подключили роутер. Нужно через браузер (Mozilla Firefox, Google Chrome, Internet Explorer, Safari и т.д.) войти в его веб-интерфейс и в адресной строке ввести ip-адрес роутера: 192.168.0.1 (не открывается)

Если вы все сделали правильно, то роутер будет запрашивать имя пользователя и пароль. По умолчанию на роутерах tp-link обычно установлены:
- Имя пользователя – admin
- Пароль – admin
Вводим данные и жмём “Вход“
После того как мы попали в веб-интерфейс роутера, нам нужно настроить наше оборудование. Сперва установим пароль на wi-fi, дабы защитить беспроводное соединение. Теперь вам потребуется информация о том, какой тип подключения используется для выхода в интернет – PPOE, L2TP или PPTP . Узнайте это, связавшись с организацией которая предоставила вам услугу интернет, то есть с провайдером. Давайте приступим к настройке роутера.
Настройка пароля на wi-fi
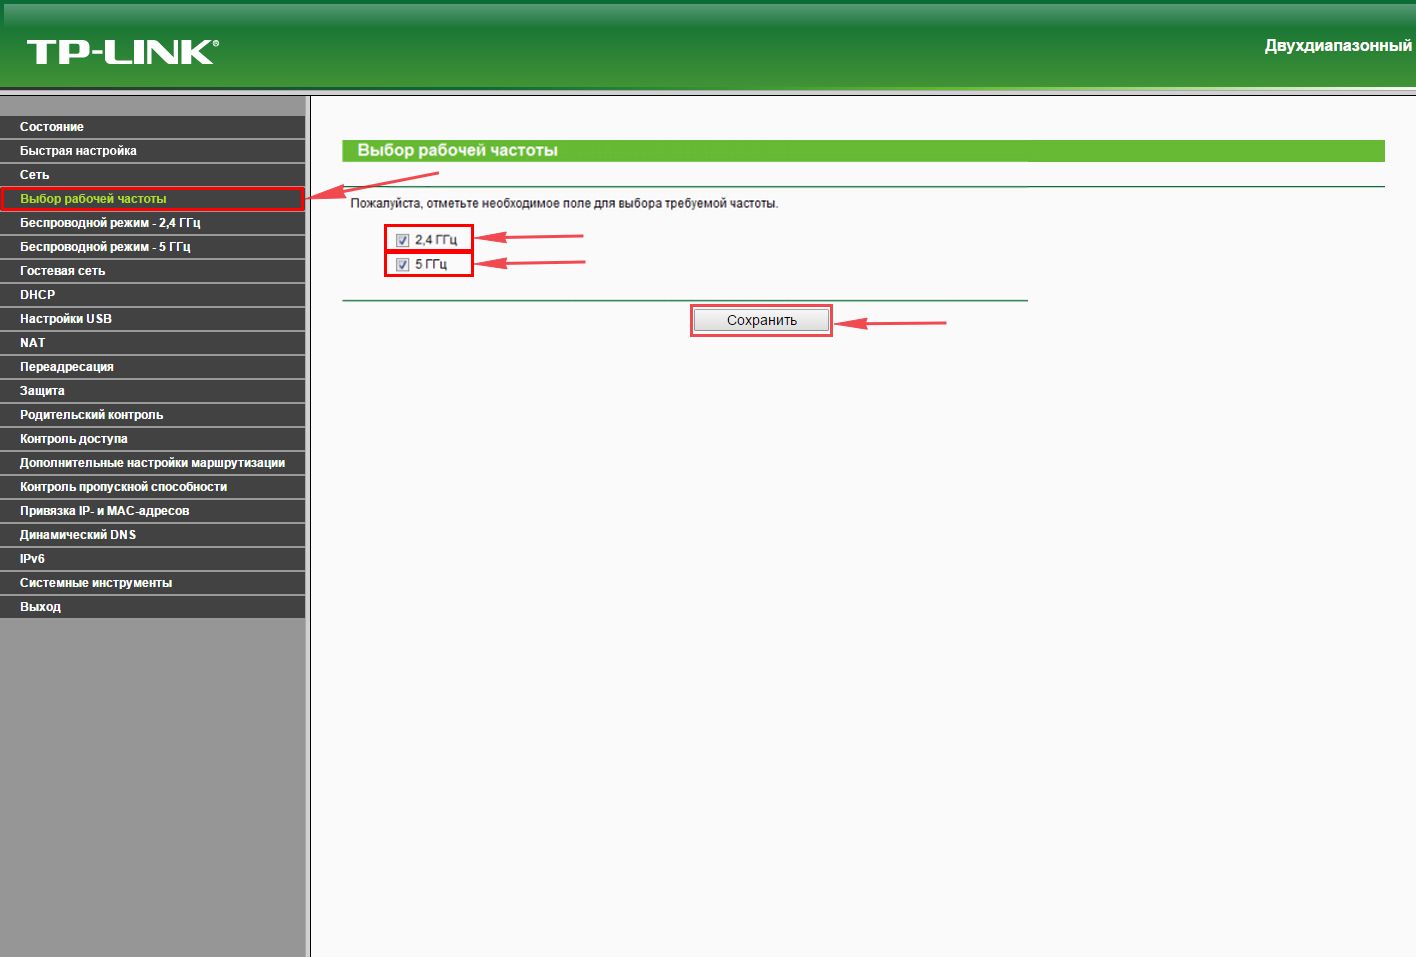
TP-Link Archer C2 AC750 имеет два диапазона, это значит, что он может работать на 2-х частотах сети wi-fi, это 2,4 и 5 ГГц. 2,4 ГГц имеет меньший радиус действия и больше подвержена помехам. 5 ГГц будет поддерживаться не каждым устройством, но пропускная способность у него гораздо больше. Так что какой частотой пользоваться, решать вам. Есть возможность пользоваться обеими частотами сразу и чередовать их в зависимости от того устройства которым пользуетесь. Сегодня мы будем рассматривать вариант использования двух частот одновременно.
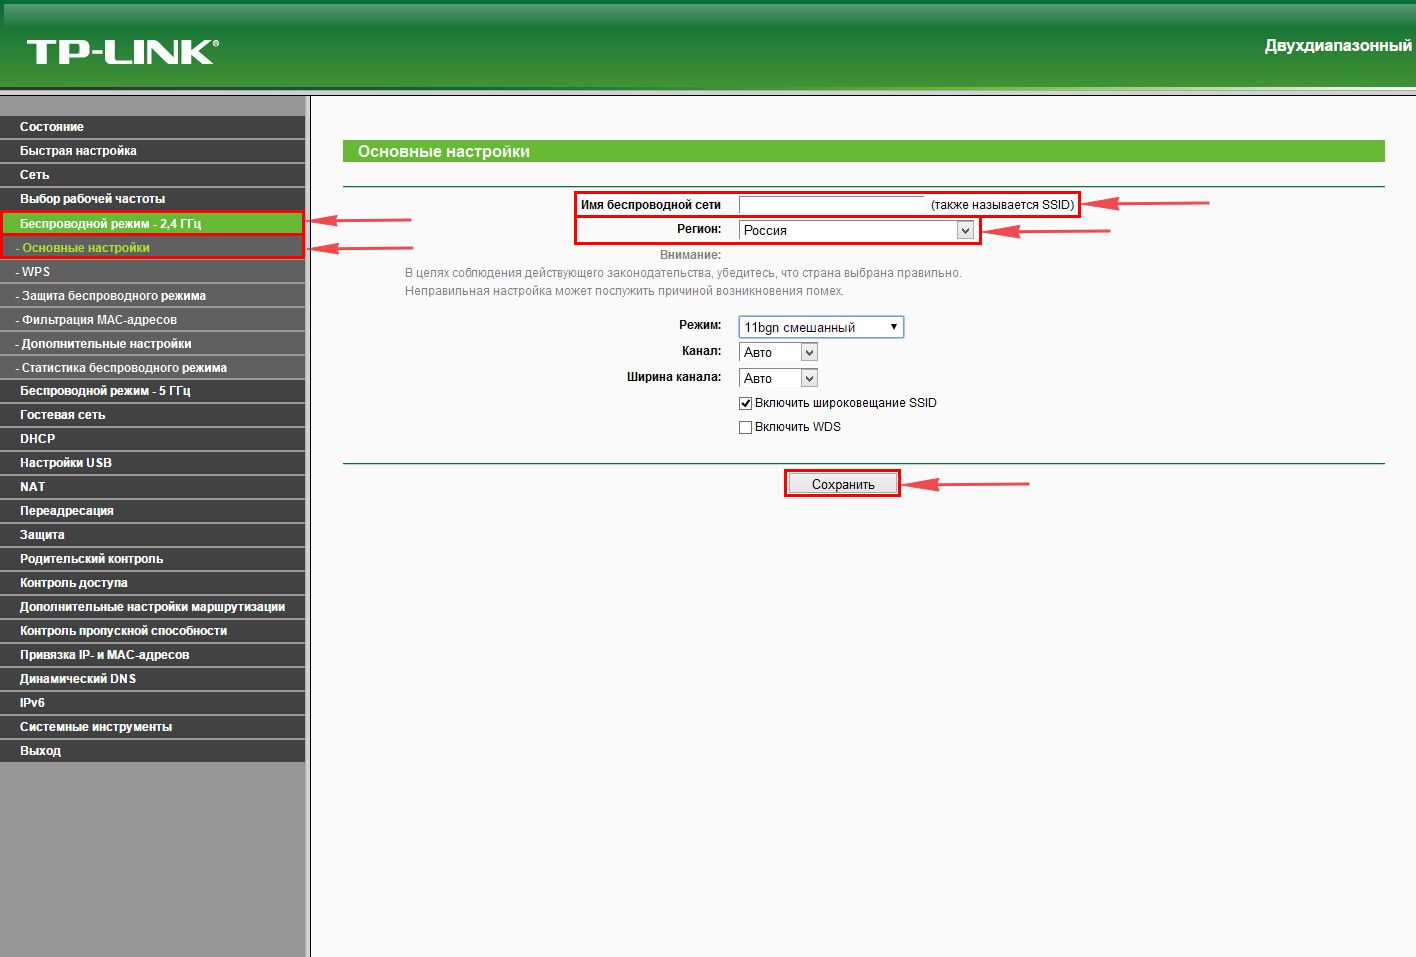
Для начала переходим в веб-интерфейсе во вкладку “Выбор рабочей частоты” и выставляем галки рядом с частотой, какая вам больше подходит, мы же выбираем две сразу и нажимаем “Сохранить“.

Далее переходим во вкладку “Беспроводной режим – 2.4 ГГц” и открываем “Основные настройки“. Теперь нужно в поле “Имя беспроводной сети” придумайте и введите имя Вашей сети wi-fi, это имя в дальнейшем станет выделяться, как только Вы станете подсоединяться к сети.
Небольшой совет: сделайте приписку в виде используемой частоты к имени вашей сети, например: “moya set 2.4”.
Теперь выбираем “Регион” – Россия и жмём “Сохранить“.
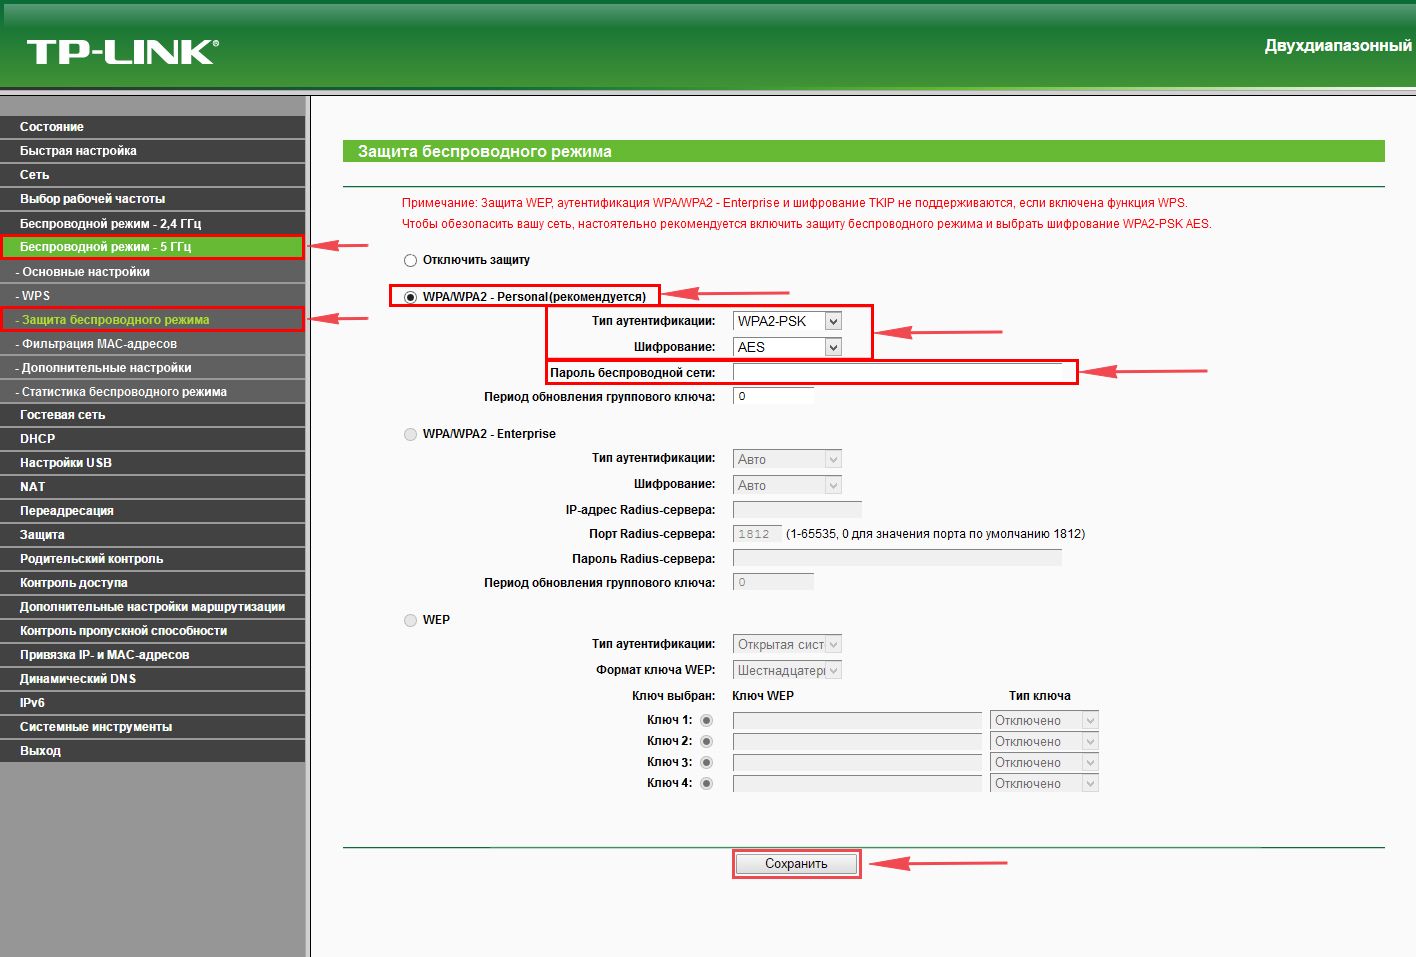
После требуется установить пароль сети wi-fi. Во вкладке “Защита беспроводного режима” нужно выбрать тип шифрования “WPA/WPA2-Personal“, внизу меняем “Тип аутентификации:” на “WPA2-PSK” и “Шифрование:” на “AES“. После в графе “Пароль беспроводной сети:” вводим произвольный пароль и нажимаем “Сохранить“.

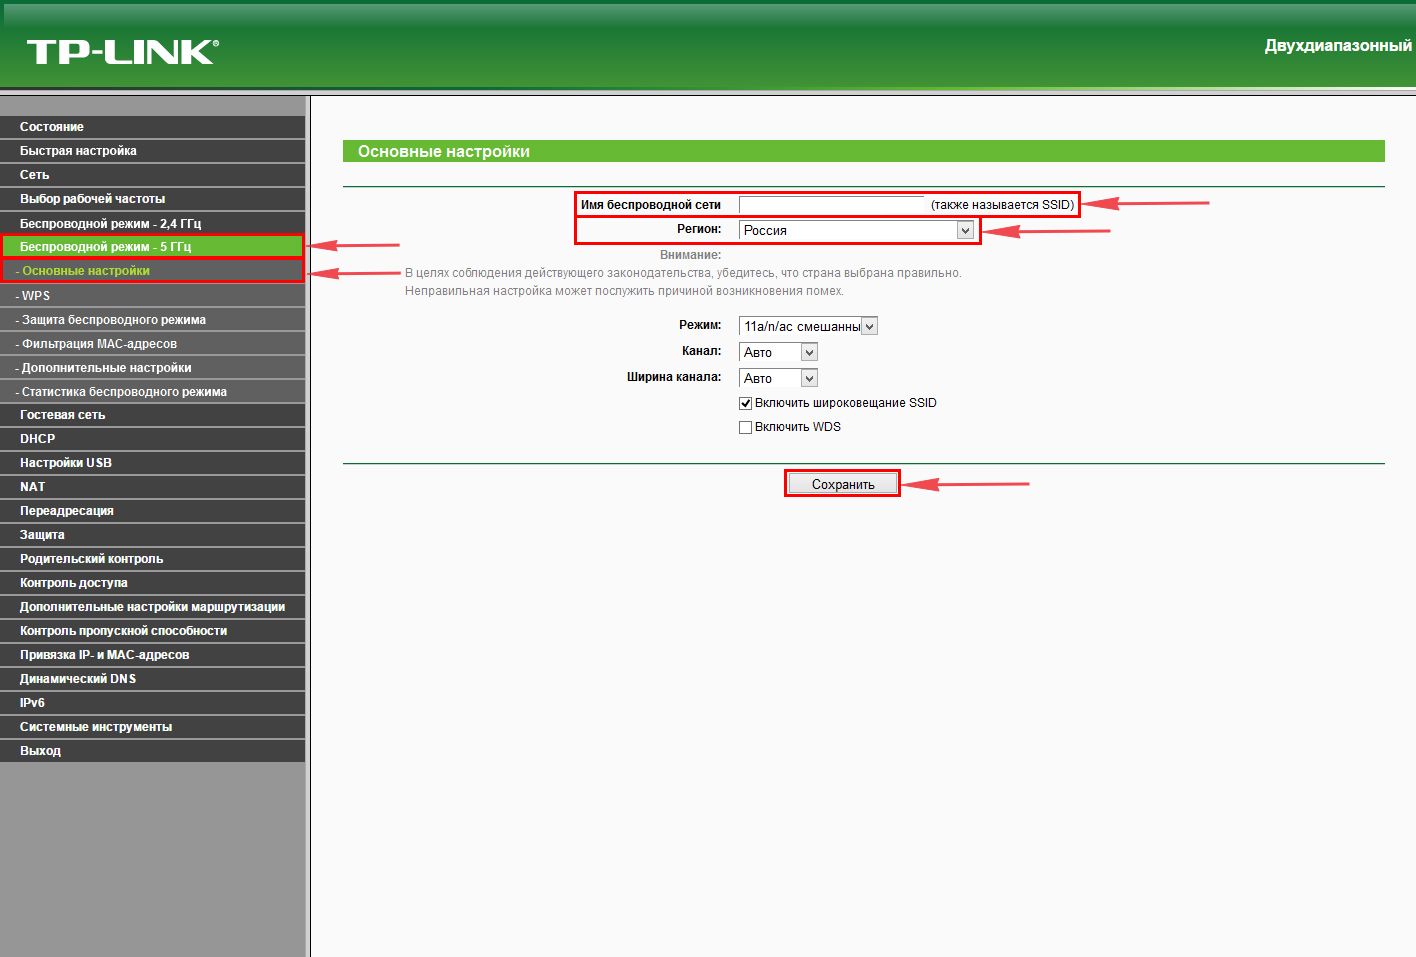
Далее переходим во вкладку “Беспроводной режим – 5 ГГц” и открываем “Основные настройки“. Теперь нужно в поле “Имя беспроводной сети” придумайте и введите имя Вашей сети wi-fi, это имя в дальнейшем станет выделяться, как только Вы станете подсоединяться к сети.
Небольшой совет: сделайте приписку в виде используемой частоты к имени вашей сети, например: “moya set 2.4”.
Теперь выбираем “Регион” – Россия и жмём “Сохранить“.

После требуется установить пароль сети wi-fi. Во вкладке “Защита беспроводного режима” нужно выбрать тип шифрования “WPA/WPA2-Personal“, внизу меняем “Тип аутентификации:” на “WPA2-PSK” и “Шифрование:” на “AES“. После в графе “Пароль беспроводной сети:” вводим произвольный пароль и нажимаем “Сохранить“.

Как только вы нажмете “Сохранить” появится оповещение, что настройки сохранены и роутер нужно перезагрузить. И нажав кнопку “click here” отправляем роутер в reboot(перезагружаем). Когда роутер загрузится, в настройках вашего компьютера отобразится новое имя вашей беспроводной сети.

Настройка PPTP
Настраиваем подключение PPTP на роутере TP-Link Archer C2 AC750.
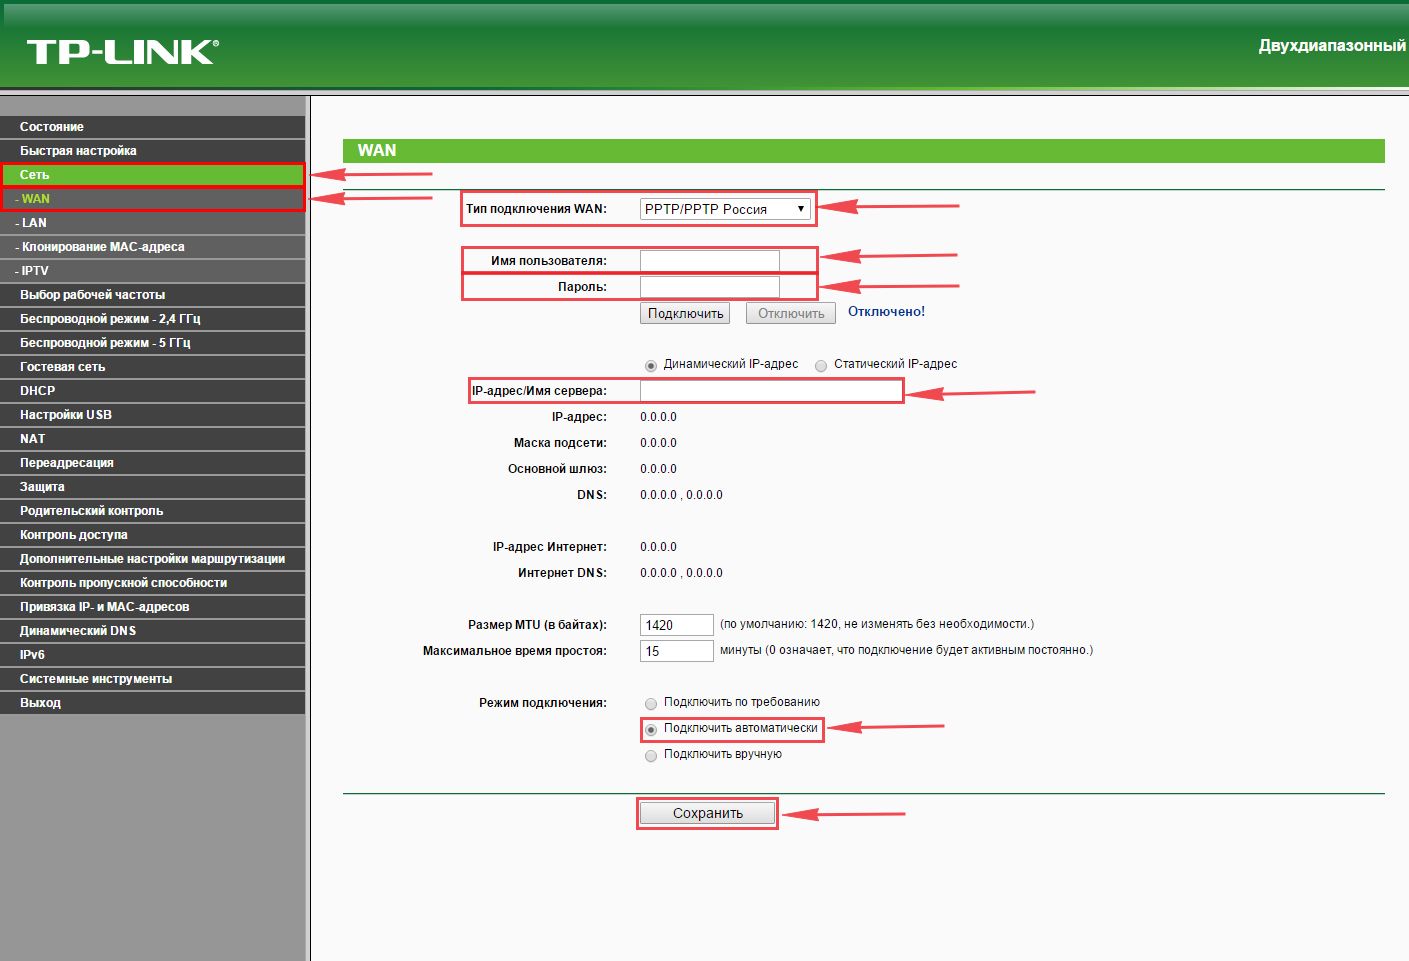
- Заходим во вкладку в меню “Сеть“, после “WAN“.
- Где “Тип подключения WAN:” выберем “PPTP/PPTP Россия“, внизу укажите имя пользователя (в строке “Имя пользователя:“), пароль напишите (в строку “Пароль:“). Теперь нужно ввести ip-адрес сервера (в строке “IP-адрес/Имя сервера:“). Все эти данные должен вам предоставить провайдер, то есть те у кого вы заказали услугу интернет. Проверьте ваш договор с провайдером, эти данные там должны быть. Если их нет, то свяжитесь с ним, например, по телефону и спросите про них.
- После того как вы занесли все данные в поля, нажмите на кружок рядом с “Подключить автоматически” ( Это позволит установить постоянное подключение к интернету, но если у вас тариф с ограниченным трафиком, то лучше поставить отметку напротив “Подключить по требованию“, тогда интернет будет работать только во время его использования ).
- В самом конце нажимаем на кнопку “Сохранить“.

Настройка PPTP со статическим IP-адресом
Настройка подключения PPTP со статическим IP-адресом на роутере TP-Link Archer C2 AC750. Статический ip адрес предоставляется в двух случаях: вы юридическое лицо, либо вы заказали доп. услугу у провайдера.
- Заходим во вкладку “Сеть“, затем “WAN“.
- В “Тип подключения WAN:” выбираем “PPTP/PPTP Россия“, внизу укажем имя пользователя (в строке “Имя пользователя:“), пароль (в строке “Пароль:“).
- Это подключение использует статический ip, поэтому жмите на кружок рядом с “Статический IP-адрес“, потому нужно ввести ip-адрес сервера (в строке “IP-адрес/Имя сервера:“), ip-адрес (в строке “IP-адрес:“), маску подсети (в строке “Маска подсети:“), основной шлюз (в строке “Основной шлюз:“) и DNS (в строке “DNS:“). Все эти данные должен вам предоставить провайдер, то есть те у кого вы заказали услугу интернет.
Проверьте ваш договор с провайдером, эти данные там должны быть. Если их нет, то свяжитесь с ним, например, по телефону и спросите про них. - После того как вы занесли все данные в поля, нажмите на кружок рядом с “Подключить автоматически” ( Это позволит установить постоянное подключение к интернету, но если у вас тариф с ограниченным трафиком, то лучше поставить отметку напротив “Подключить по требованию“, тогда интернет будет работать только во время его использования ).
- В самом конце нажимаем на кнопку “Сохранить“.

Настройка L2TP
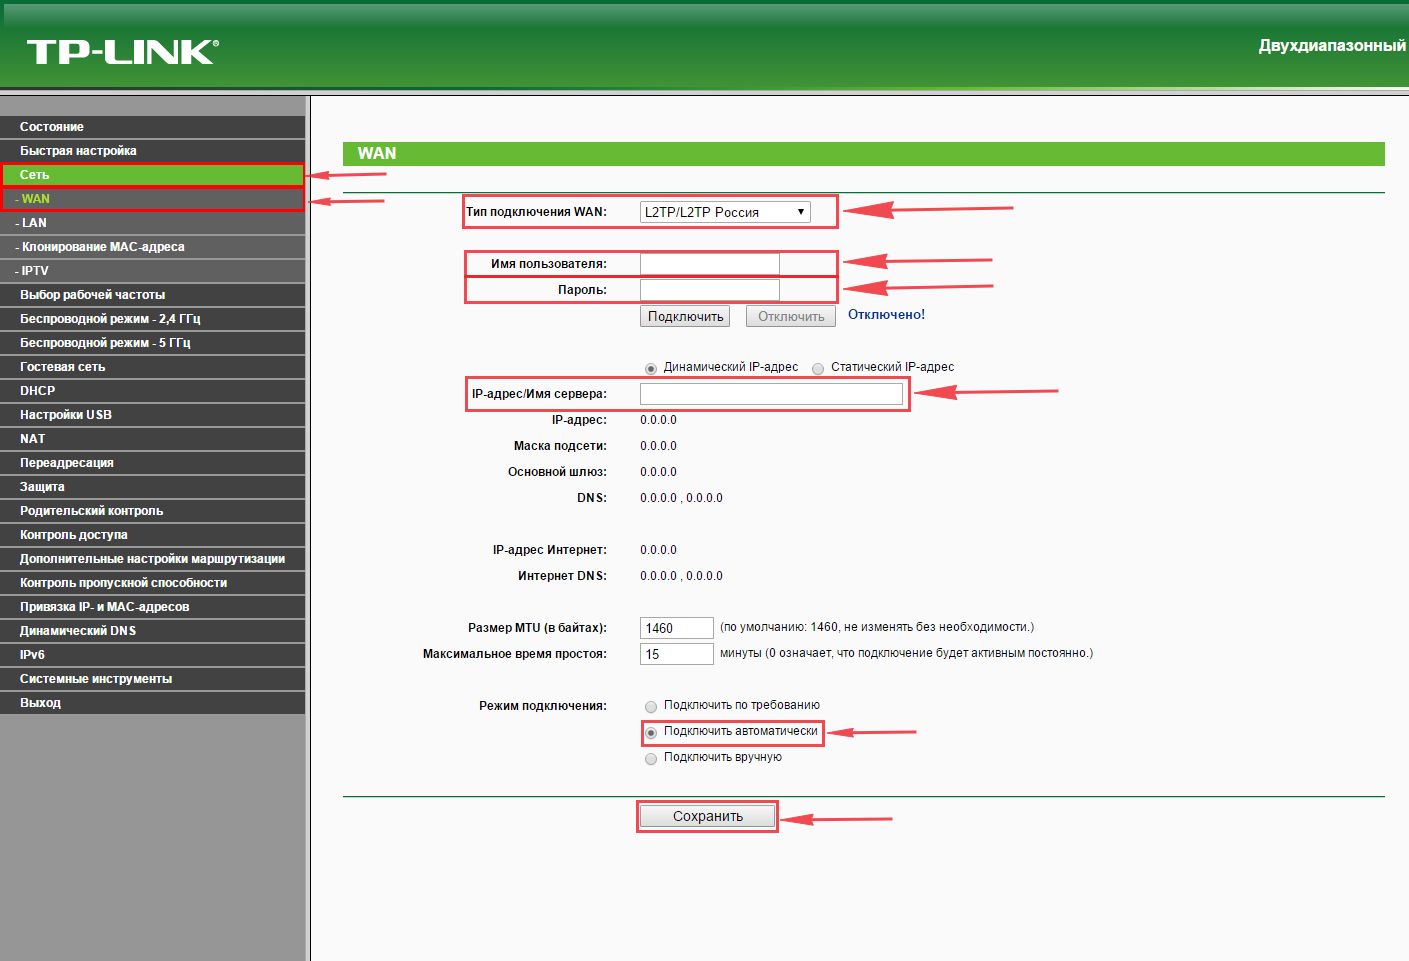
Настраиваем L2TP подключение на роутере TP-Link Archer C2 AC750 .
- Заходим во вкладку в меню “Сеть“, после “WAN“.
- Где “Тип подключения WAN:” выберем “L2T/L2T Россия“, внизу укажите имя пользователя (в строке “Имя пользователя:“), пароль напишите (в строку “Пароль:“).
- Теперь нужно ввести ip-адрес сервера (в строке “IP-адрес/Имя сервера:“). Все эти данные должен вам предоставить провайдер, то есть те у кого вы заказали услугу интернет. Проверьте ваш договор с провайдером, эти данные там должны быть. Если их нет, то свяжитесь с ним, например, по телефону и спросите про них.
- После того как вы занесли все данные в поля, нажмите на кружок рядом с “Подключить автоматически” ( Это позволит установить постоянное подключение к интернету, но если у вас тариф с ограниченным трафиком, то лучше поставить отметку напротив “Подключить по требованию“, тогда интернет будет работать только во время его использования ).
- В самом конце нажимаем на кнопку “Сохранить“.
Настройка L2TP со статическим IP-адресом
Настройка подключения L2TP со статическим IP-адресом на роутере TP-Link Archer C2 AC750. Статический ip адрес предоставляется в двух случаях: вы юридическое лицо, либо вы заказали доп. услугу у провайдера.
- Заходим во вкладку “Сеть“, затем “WAN“.
- В “Тип подключения WAN:” выбираем “L2T/L2T Россия“, внизу укажем имя пользователя (в строке “Имя пользователя:“), пароль (в строке “Пароль:“).
- Это подключение использует статический ip, поэтому жмите на кружок рядом с “Статический IP-адрес“, потому нужно ввести ip-адрес сервера (в строке “IP-адрес/Имя сервера:“), ip-адрес (в строке “IP-адрес:“), маску подсети (в строке “Маска подсети:“), основной шлюз (в строке “Основной шлюз:“) и DNS (в строке “DNS:“). Все эти данные должен вам предоставить провайдер, то есть те у кого вы заказали услугу интернет.
Проверьте ваш договор с провайдером, эти данные там должны быть. Если их нет, то свяжитесь с ним, например, по телефону и спросите про них. - После того как вы занесли все данные в поля, нажмите на кружок рядом с “Подключить автоматически” ( Это позволит установить постоянное подключение к интернету, но если у вас тариф с ограниченным трафиком, то лучше поставить отметку напротив “Подключить по требованию“, тогда интернет будет работать только во время его использования ).
- В самом конце нажимаем на кнопку “Сохранить“.

Настройка PPPOE
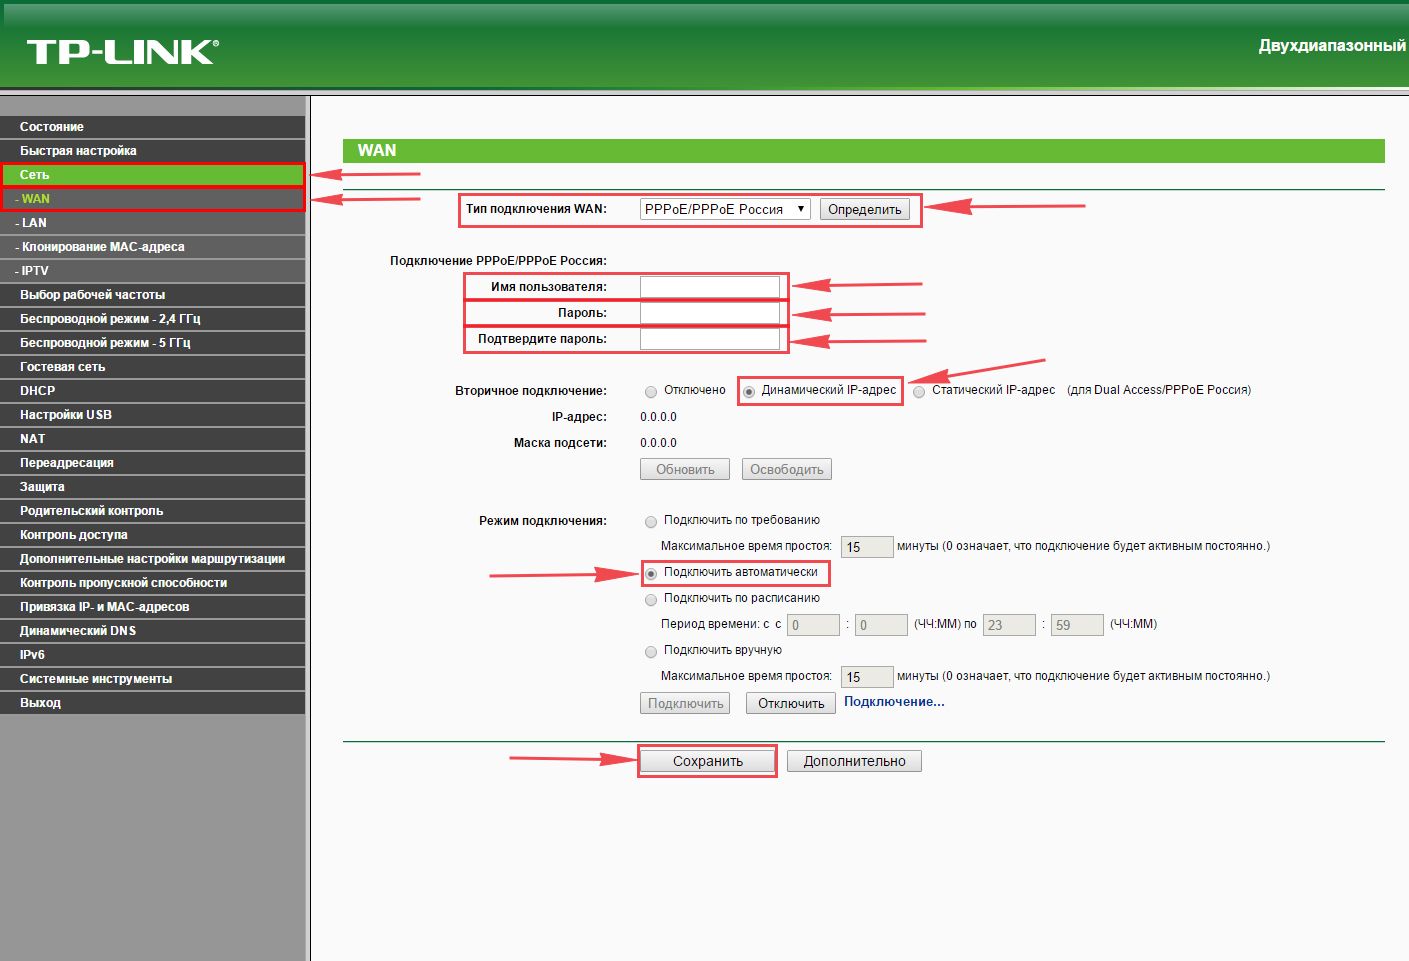
Настройка подключения PPPOE на роутере TP-Link Archer C2 AC750 .
- Заходим во вкладку в меню “Сеть“, после “WAN“.
- Где “Тип подключения WAN:” выберем “PPPOE/PPPOE Россия“, внизу укажите имя пользователя (в строке “Имя пользователя:“), пароль напишите (в строку “Пароль:“).
- Теперь нужно ввести ip-адрес сервера (в строке “IP-адрес/Имя сервера:“). Все эти данные должен вам предоставить провайдер, то есть те у кого вы заказали услугу интернет. Проверьте ваш договор с провайдером, эти данные там должны быть. Если их нет, то свяжитесь с ним, например, по телефону и спросите про них.
- После того как вы занесли все данные в поля, нажмите на кружок рядом с “Подключить автоматически” ( Это позволит установить постоянное подключение к интернету, но если у вас тариф с ограниченным трафиком, то лучше поставить отметку напротив “Подключить по требованию“, тогда интернет будет работать только во время его использования ).
- В самом конце нажимаем на кнопку “Сохранить“.
Настройка PPPOE со статическим IP-адресом
Настройка подключения PPPOE со статическим IP-адресом на роутере TP-Link Archer C2 AC750. Статический ip адрес предоставляется в двух случаях: вы юридическое лицо, либо вы заказали доп. услугу у провайдера.
- Заходим во вкладку “Сеть“, затем “WAN“.
- В “Тип подключения WAN:” выбираем “PPPOE/PPPOE Россия“, внизу укажем имя пользователя (в строке “Имя пользователя:“), пароль (в строке “Пароль:“).
- Это подключение использует статический ip, поэтому жмите на кружок рядом с “Статический IP-адрес“, потому нужно ввести ip-адрес сервера (в строке “IP-адрес/Имя сервера:“), ip-адрес (в строке “IP-адрес:“), маску подсети (в строке “Маска подсети:“), основной шлюз (в строке “Основной шлюз:“) и DNS (в строке “DNS:“). Все эти данные должен вам предоставить провайдер, то есть те у кого вы заказали услугу интернет.
Проверьте ваш договор с провайдером, эти данные там должны быть. Если их нет, то свяжитесь с ним, например, по телефону и спросите про них. - После того как вы занесли все данные в поля, нажмите на кружок рядом с “Подключить автоматически” ( Это позволит установить постоянное подключение к интернету, но если у вас тариф с ограниченным трафиком, то лучше поставить отметку напротив “Подключить по требованию“, тогда интернет будет работать только во время его использования ).
- В самом конце нажимаем на кнопку “Сохранить“.

Настройка подключения к wi-fi
Так как вы подключили и настроили свой роутер, непременно нужно подключить ноутбук или компьютер к wi-fi, теперь давайте рассмотрим подключение к беспроводной сети в двух операционных системах, это Windows 10 и Windows 7:
Windows 7
1. На рабочем столе в нижнем углу справа, вы должны увидеть индикатор беспроводной сети (wi-fi), кликните по нему левой кнопкой мышки.

2. Появится окошко с беспроводными сетями. Выберите ту сеть, которой вы давали имя во время настройки роутера. В моем примере, эта сеть называется “Natsu“.

3. Как только вы выберете сеть, поставьте галку напротив “Подключаться автоматически” и после нажмите
“Подключение“.

4. В любом случае, нужно указать “Ключ безопасности” это пароль wi-fi. Его вы указали при настройке роутера. Как только вы указали ключ, жмите “OK“.
5. Подождите некоторое время, и вы подключитесь к вашей беспроводной сети.

Windows 10
1. На рабочем столе в нижнем углу справа, вы должны увидеть индикатор беспроводной сети (wi-fi), кликните по нему левой кнопкой мышки.
2. Появится окошко с беспроводными сетями. Выберите ту сеть, которой вы давали имя во время настройки роутера. В моем примере, эта сеть называется “Bruh“.

3. Как только вы выберете сеть, поставьте галку напротив “Подключаться автоматически” и после нажмите
“Подключение“.

4. В любом случае, нужно указать “Ключ безопасности” это пароль wi-fi. Его вы указали при настройке роутера. Как только вы указали ключ, жмите “Далее“.

5. Подождите некоторое время, и вы подключитесь к вашей беспроводной сети.

- Настройка подключения по локальной сети
- Подключение роутера TP-Link Archer C2 AC750 к компьютеру
- Авторизация
- Настройка пароля на wi-fi
- Настройка PPTP
- Настройка PPTP со статическим IP-адресом
- Настройка L2TP
- Настройка L2TP со статическим IP-адресом
- Настройка PPPOE
- Настройка PPPOE со статическим IP-адресом
- Смена пароля web-интерфейса
- Сброс пароля web-интерфейса
- Обновление прошивки
- Настройка FTP-сервера на роутере TP-Link Archer C2 AC750
- Настройка медиа-сервера на роутере TP-Link Archer C2 AC750
- Настройка принт-сервера на роутере TP-Link Archer C2 AC750
- Подключение компьютера к wi-fi
Настройка подключения по локальной сети
Перед тем, как приступить к настройке роутера, проверим настройки подключения по локальной сети. Для этого:
Windows 7
1. Нажмем на «Пуск«, «Панель управления«.
2. Нажимаем на «Просмотр состояния сети и задач«.
3. Жмем на «Изменение параметров адаптера«.
4. В открывшемся окне мы видим «Подключение по локальной сети«. Нажимаем по нему правой кнопкой мыши, выбираем «Свойство«.
5. Из списка выбираем «Протокол Интернета версии 4 (TCP/IPv4)» и нажимаем «Свойство«.
6. В открывшемся окне Вам нужно выставить галочки «Получить IP-адрес автоматически» и «Получить адрес DNS-сервера автоматически«, затем нажимаем кнопку «Ok«.
Windows 10
1. Нажмем на «Пуск«, «Параметры«.
2. Нажимаем на «Сеть и Интернет«.
3. Выбираем «Ethernet» и нажимаем на «Настройка параметров адаптера«.
4. В открывшемся окне мы видим «Ethernet«. Нажимаем по нему правой кнопкой мыши, выбираем «Свойство«.
5. Из списка выбираем «IP версии 4 (TCP/IPv4)» и нажимаем «Свойство«.
6. В открывшемся окне Вам нужно выставить галочки «Получить IP-адрес автоматически» и «Получить адрес DNS-сервера автоматически«, затем нажимаем кнопку «Ok«.
Подключение роутера TP-Link Archer C2 AC750 к компьютеру
Следующим шагом будет подключение роутера TP-Link Archer C2 AC750 к Вашему Ноутбуку либо Персональному компьютеру (ПК). Для этого Вам необходимо подключить кабель, который Вам провел провайдер, к синему порту роутера (то есть это тот кабель, который идет в Вашу квартиру, дом, офис, и т.д. из вне), а кабель, который шел в комплекте с роутером, один конец в один из четырех портов, которые обозначены желтым цветом на роутере, а другой конец подключите к Вашему ноутбуку либо ПК. И да, не забудьте подключить кабель питания.
Авторизация роутера TP-Link Archer C2 AC750
Итак, подключили роутер, теперь Вам нужно через любой браузер (будь это Google Chrome, Mozilla Firefox, Internet Explorer, и т.д.) попасть в его web-интерфейс. Для это открываем браузер и в адресной строке вбиваем адрес роутера: 192.168.0.1 и нажимаем кнопку «Enter» на Вашей клавиатуре.

После Мы видим, что роутер требует авторизоваться, т.е. запрашивает имя пользователя и пароль. По умолчанию на роутерах Tp-Link установлены:
- Имя пользователя — admin
- Пароль — admin
Итак, вбиваем данные и нажимаем «Login«
Настройка роутера Tp-Link Archer C2 AC750
И вот наконец мы попали на Web-интерфейс роутера и теперь Вам необходимо произвести настройки оборудования. Первым делом обезопасим беспроводную сеть, установив пароль на wi-fi. Затем Вам необходимо будет узнать какой тип подключения используется для входа в интернет, это PPTP, L2TP либо PPPOE. Узнать можно позвонив Вашему провайдеру (это организация, с которым Вы заключили договор для предоставления услуги интернет). Итак, начнем настройку роутера.
Настройка пароля на wi-fi
Роутер Tp-Link Archer C2 AC750 является двухдиапазонный, это означает, что роутер поддерживает 2 рабочие частоты беспроводного соединения, это 2,4 ГГц и 5 ГГц. 5 ГГц позволяет добиться более высокой пропускной способности, но обладает меньшей дальностью действия чем 2,4 ГГц, 2,4 ГГц более подвержена помехам. 5 ГГц поддерживается далеко не всеми устройствами. Поэтому какую именно частоту выбрать, выбирать Вам. Можно выбрать обе, и в зависимости от обстоятельств менять беспроводное соединение уже на Ваших устройствах. В нашем примере Мы рассмотрим именно этот вариант, когда работают 2 частоты.
1. Переходим на Web-интерфейсе в меню во вкладку «Выбор рабочей частоты» и ставим галочки напротив той частоты, которая больше подходит для Ваших устройств, в нашем случае выбираем обе и нажимаем на кнопку «Сохранить«.
2. Переходим во вкладку «Беспроводной режим — 2.4 ГГц» и попадаем в «Основные настройки«.
3. В графе «Имя беспроводной сети» придумать и указать имя Вашей беспроводной сети, данное имя в дальнейшем будет светиться, когда Вы будите подключаться к сети. Советую обозначить в название сети используемую частоту, к примеру: «imya seti 2.4».
4. Выберем «Регион» — Россия и нажимаем кнопку «Сохранить«.

5. Теперь необходимо поставить пароль на беспроводную сеть. Для этого переходим во вкладку «Защита беспроводного режима» и выбираем тип шифрования «WPA/WPA2-Personal«.
6. Ниже выставляем «Тип аутентификации:» на «WPA2-PSK» и «Шифрование:» на «AES«. Данные настройки рекомендуемые.
7. В поле «Пароль беспроводной сети:» придумываем и вбиваем пароль. После жмем «Сохранить«.

8. Переходим во вкладку «Беспроводной режим — 5 ГГц» и попадаем в «Основные настройки«.
9. В графе «Имя беспроводной сети» придумать и указать имя Вашей беспроводной сети, данное имя в дальнейшем будет светиться, когда Вы будите подключаться к сети. Советую обозначить в название сети используемую частоту, к примеру: «imya seti 5».
10. Выберем «Регион» — Россия и нажимаем кнопку «Сохранить«.
11. Теперь необходимо поставить пароль на беспроводную сеть. Для этого переходим во вкладку «Защита беспроводного режима» и выбираем тип шифрования «WPA/WPA2-Personal«.
12. Ниже выставляем «Тип аутентификации:» на «WPA2-PSK» и «Шифрование:» на «AES«. Данные настройки рекомендуемые.
13. В поле «Пароль беспроводной сети:» придумываем и вбиваем пароль. После жмем «Сохранить«.
14. После того, как мы нажали «Сохранить» над этой кнопкой появится надпись, указывающая на то, что настройки сохранены и теперь нам необходимо перезагрузить роутер. Что мы и делаем, нажав на кнопку «click here» отправив роутер на перезагрузку. После перезагрузки имя Вашей беспроводная сеть появится в настройках сети Вашего компьютера.

Настройка PPTP
Предлагаю Вашему вниманию Видео инструкцию по настройке типа подключения PPTP на роутере Tp-Link Archer C2 AC750 на примере роутера Tp-Link TL-WR1043ND.
Давайте также письменно и иллюстративно рассмотрим настройку подключения PPTP на роутере Tp-Link Archer C2 AC750.
1. Переходим в меню во вкладку «Сеть«, затем «WAN«.
2. В «Тип подключения WAN:» выбираем «PPTP/PPTP Россия«.
3. Ниже Вам предложат указать имя пользователя (в строке «Имя пользователя:«), пароль (в строке «Пароль:«). Также необходимо будет указать ip-адрес сервера (в строке «IP-адрес/Имя сервера:«).
Все вышеперечисленные данные Вам предоставляет провайдер (Организация, которая провела Вам интернет).
Все эти данные обычно прописываются в договоре с провайдером. Если по какой-то причине Вы не смогли их найти, Вам необходимо позвонить на горячую линию Вашего провайдера и узнать как их можно получить.
4. После того, как Вы внесли все необходимые данные ставите галочку напротив «Подключить автоматически» (Данная настройка будет держать подключение к интернету постоянно, поэтому если у Вас НЕ безлимитный тариф рекомендую поставить галочку напротив «Подключить по требованию«, то есть интернет подключается только в том случае, когда Вы начинаете им пользоваться).
5. После всех манипуляций с настройками нажимаем кнопку «Сохранить«.
Настройка PPTP со статическим IP-адресом
Рассмотрим настройку подключения PPTP со статическим IP-адресом на роутере Tp-Link Archer C2 AC750. Обычно статический IP-адрес предоставляется юридическим лицам, либо как дополнительная услуга к основному тарифу физическим лицам.
1. Переходим в меню во вкладку «Сеть«, затем «WAN«.
2. В «Тип подключения WAN:» выбираем «PPTP/PPTP Россия«.
3. Ниже Вам предложат указать имя пользователя (в строке «Имя пользователя:«), пароль (в строке «Пароль:«).
4. Так как подключение использует статический ip-адрес, Вы ставите галочку напротив «Статический IP-адрес«.
5. Указываете ip-адрес сервера (в строке «IP-адрес/Имя сервера:«), ip-адрес (в строке «IP-адрес:«), маску подсети (в строке «Маска подсети:«), основной шлюз (в строке «Основной шлюз:«) и DNS (в строке «DNS:«).
Все вышеперечисленные данные Вам предоставляет провайдер (Организация, которая провела Вам интернет).
Все эти данные обычно прописываются в договоре с провайдером. Если по какой-то причине Вы не смогли их найти, Вам необходимо позвонить на горячую линию Вашего провайдера и узнать как их можно получить.
6. После того, как Вы внесли все необходимые данные ставите галочку напротив «Подключить автоматически» (Данная настройка будет держать подключение к интернету постоянно, поэтому если у Вас НЕ безлимитный тариф рекомендую поставить галочку напротив «Подключить по требованию«, то есть интернет подключается только в том случае, когда Вы начинаете им пользоваться).
7. После всех манипуляций с настройками нажимаем кнопку «Сохранить«.
Настройка L2TP
Рассмотрим настройку подключения L2TP на роутере Tp-Link Archer C2 AC750.
1. Переходим в меню во вкладку «Сеть«, затем «WAN«.
2. В «Тип подключения WAN:» выбираем «L2T/L2T Россия«.
3. Ниже Вам предложат указать имя пользователя (в строке «Имя пользователя:«), пароль (в строке «Пароль:«). Также необходимо будет указать ip-адрес сервера (в строке «IP-адрес/Имя сервера:«).
Все вышеперечисленные данные Вам предоставляет провайдер (Организация, которая провела Вам интернет).
Все эти данные обычно прописываются в договоре с провайдером. Если по какой-то причине Вы не смогли их найти, Вам необходимо позвонить на горячую линию Вашего провайдера и узнать как их можно получить.
4. После того, как Вы внесли все необходимые данные ставите галочку напротив «Подключить автоматически» (Данная настройка будет держать подключение к интернету постоянно, поэтому если у Вас НЕ безлимитный тариф рекомендую поставить галочку напротив «Подключить по требованию«, то есть интернет подключается только в том случае, когда Вы начинаете им пользоваться).
5. После всех манипуляций с настройками нажимаем кнопку «Сохранить«.

Настройка L2TP со статическим IP-адресом
Рассмотрим настройку подключения L2TP со статическим IP-адресом на роутере Tp-Link Archer C2 AC750.
Обычно статический IP-адрес предоставляется юридическим лицам, либо как дополнительная услуга к основному тарифу физическим лицам.
1. Переходим в меню во вкладку «Сеть«, затем «WAN«.
2. В «Тип подключения WAN:» выбираем «L2TP/L2TP Россия«.
3. Ниже Вам предложат указать имя пользователя (в строке «Имя пользователя:«), пароль (в строке «Пароль:«).
4. Так как подключение использует статический ip-адрес, Вы ставите галочку напротив «Статический IP-адрес«.
5. Указываете ip-адрес сервера (в строке «IP-адрес/Имя сервера:«), ip-адрес (в строке «IP-адрес:«), маску подсети (в строке «Маска подсети:«), основной шлюз (в строке «Основной шлюз:«) и DNS (в строке «DNS:«).
Все вышеперечисленные данные Вам предоставляет провайдер (Организация, которая провела Вам интернет).
Все эти данные обычно прописываются в договоре с провайдером. Если по какой-то причине Вы не смогли их найти, Вам необходимо позвонить на горячую линию Вашего провайдера и узнать как их можно получить.
6. После того, как Вы внесли все необходимые данные ставите галочку напротив «Подключить автоматически» (Данная настройка будет держать подключение к интернету постоянно, поэтому если у Вас НЕ безлимитный тариф рекомендую поставить галочку напротив «Подключить по требованию«, то есть интернет подключается только в том случае, когда Вы начинаете им пользоваться).
7. После всех манипуляций с настройками нажимаем кнопку «Сохранить«.

Настройка PPPOE
Предлагаю Вашему вниманию Видео инструкцию по настройке типа подключения PPPOE на роутере Tp-Link Archer C2 AC750 на примере роутера Tp-Link TL-WR1043ND.
Давайте также письменно и иллюстративно рассмотрим настройку подключения PPPOE на роутере Tp-Link Archer C2 AC750.
1. Переходим в меню во вкладку «Сеть«, затем «WAN«.
2. В «Тип подключения WAN:» выбираем «PPPOE/PPPOE Россия«.
3. Ниже Вам предложат указать имя пользователя (в строке «Имя пользователя:«), пароль (в строке «Пароль:«) и подтверждение пароля (в строке «Подтвердите пароль:«).
Все вышеперечисленные данные Вам предоставляет провайдер (Организация, которая провела Вам интернет).
Все эти данные обычно прописываются в договоре с провайдером. Если по какой-то причине Вы не смогли их найти, Вам необходимо позвонить на горячую линию Вашего провайдера и узнать как их можно получить.
4. После того, как Вы внесли все необходимые данные ставите галочки напротив «Динамический IP-адрес» и «Подключить автоматически» (Данная настройка будет держать подключение к интернету постоянно, поэтому если у Вас НЕ безлимитный тариф рекомендую поставить галочку напротив «Подключить по требованию«, то есть интернет подключается только в том случае, когда Вы начинаете им пользоваться, либо «Подключить по расписанию«, то есть интернет работает в определенное, указанное Вами время).
5. После всех манипуляций с настройками нажимаем кнопку «Сохранить«.

Настройка PPPOE со статическим IP-адресом
Рассмотрим настройку подключения PPPOE со статическим IP-адресом на роутере Tp-Link Archer C2 AC750.
Обычно статический IP-адрес предоставляется юридическим лицам, либо как дополнительная услуга к основному тарифу физическим лицам.
1. Переходим в меню во вкладку «Сеть«, затем «WAN«.
2. В «Тип подключения WAN:» выбираем «PPPOE/PPPOE Россия«
3. Ниже Вам предложат указать имя пользователя (в строке «Имя пользователя:«), пароль (в строке «Пароль:«) и подтверждение пароля (в строке «Подтвердите пароль:«).
4. Так как подключение использует статический ip-адрес, Вы ставите галочку напротив «Статический IP-адрес«.
5. Указываете ip-адрес (в строке «IP-адрес:«), маску подсети (в строке «Маска подсети:«).
Все вышеперечисленные данные Вам предоставляет провайдер (Организация, которая провела Вам интернет).
Все эти данные обычно прописываются в договоре с провайдером. Если по какой-то причине Вы не смогли их найти, Вам необходимо позвонить на горячую линию Вашего провайдера и узнать как их можно получить.
6. После того, как Вы внесли все необходимые данные ставите галочку напротив «Подключить автоматически» (Данная настройка будет держать подключение к интернету постоянно, поэтому если у Вас НЕ безлимитный тариф рекомендую поставить галочку напротив «Подключить по требованию«, то есть интернет подключается только в том случае, когда Вы начинаете им пользоваться, либо «Подключить по расписанию«, то есть интернет работает в определенное, указанное Вами время).
7. После всех манипуляций с настройками нажимаем кнопку «Save«.
Смена пароля web-интерфейса
Предлагаю Вашему вниманию Видео инструкцию по смене пароля на web-интерфейс роутера Tp-Link Archer C2 AC750 на примере роутера Tp-Link TL-WR1043ND.
Сброс пароля web-интерфейса
В случае, если Вы поставили пароль на web-интерфейс роутера и забыли его, предлагаю Вашему вниманию посмотреть Видео инструкцию по сбросу пароля web-интерфейса на роутере Tp-Link Archer C2 AC750 на примере роутера Tp-Link TL-WR1043ND.
Обновление прошивки
Предлагаю Вашему вниманию Видео инструкцию по обновлению прошивки на роутере Tp-Link Archer C2 AC750 на примере роутера Tp-Link TL-WR1043ND.
Настройка FTP-сервера на роутере Tp-Link Archer C2 AC750
Предлагаю Вашему вниманию Видео инструкцию по настройка FTP-сервера на роутере Tp-Link Archer C2 AC750 на примере роутера Tp-Link TL-WR1043ND.
Настройка медиа-сервера на роутере Tp-Link Archer C2 AC750
Предлагаю Вашему вниманию Видео инструкцию по настройка медиа-сервера на роутере Tp-Link Archer C2 AC750 на примере роутера Tp-Link TL-WR1043ND.
Настройка принт-сервера на роутере Tp-Link Archer C2 AC750
Предлагаю Вашему вниманию Видео инструкцию по настройка принт-сервера на роутере Tp-Link Archer C2 AC750 на примере роутера Tp-Link TL-WR1043ND.
Подключение компьютера к wi-fi
После подключения и настройки роутера, необходимо подключить компьютер к беспроводной сети (wi-fi), рассмотрим подключение к wi-fi в двух операционных системах, это Windows 7 и Windows 10:
Windows 7
Видео инструкция
1. В правом нижнем углу рабочего стола находим значок беспроводной сети (wi-fi), щелкаем по нему левой кнопкой мыши.
2. Выскакивает окно со списком доступных беспроводных сетей. Выбираем беспроводную сеть, в моем случае это сеть «Sultan» (Вы выбираете ту сеть, название которой давали при настройке роутера).
3. После выбора сети поставьте галочку напротив «Подключаться автоматически» и нажмите
«Подключение«.
4. Указать «Ключ безопасности» это пароль беспроводной сети, который Вы указывали при настройке роутера. После того, как Вы указали ключ, нажимаем «OK«.
5. Ждем, возможно, пару секунд и Вы подключились к Вашей беспроводной сети.

Windows 10
Видео инструкция
1. В правом нижнем углу рабочего стола находим значок беспроводной сети (wi-fi), щелкаем по нему левой кнопкой мыши.
2. Выскакивает окно со списком доступных беспроводных сетей. Выбираем беспроводную сеть, в моем случае это сеть «Sultanova» (Вы выбираете ту сеть, название которой давали при настройке роутера).
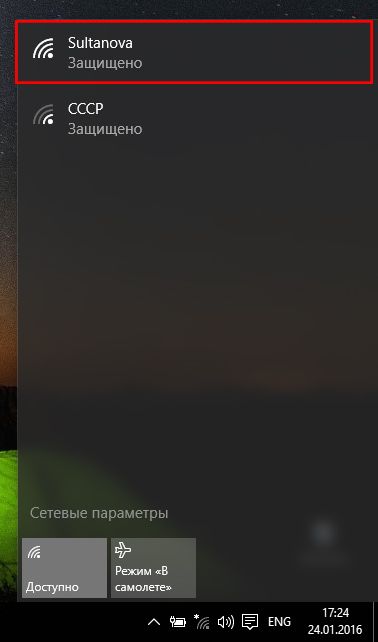
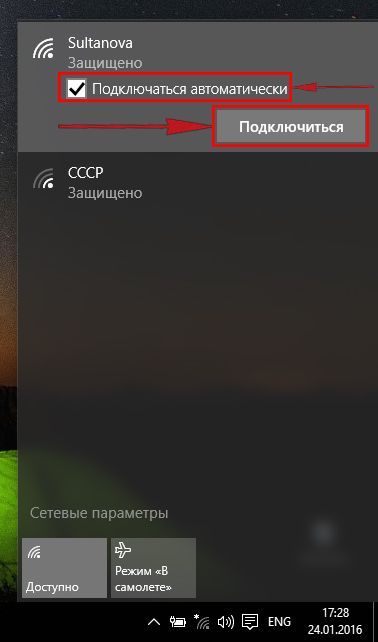
3. После выбора сети поставьте галочку напротив «Подключаться автоматически» и нажмите «Подключиться«.
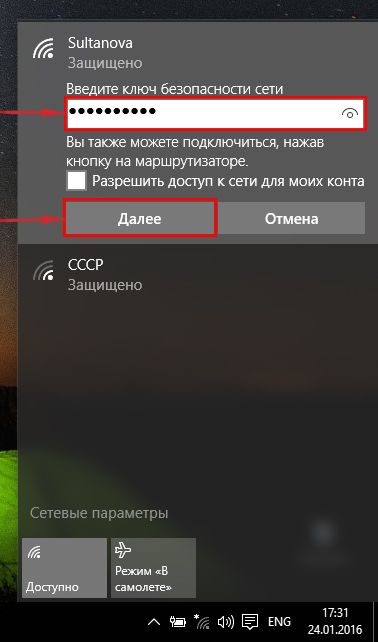
4. Указать «Ключ безопасности» это пароль беспроводной сети, который Вы указывали при настройке роутера. После того, как Вы указали ключ, нажимаем «Далее«.
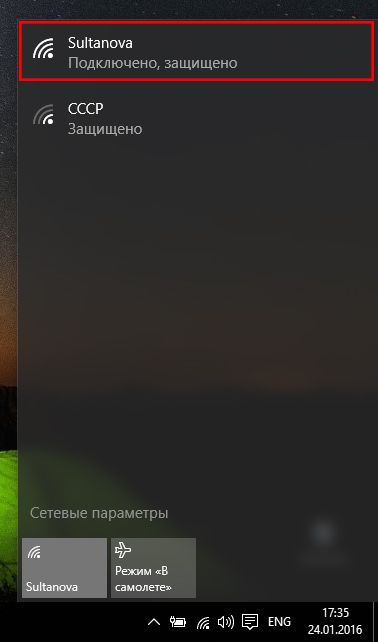
5. Ждем, возможно, пару секунд и Вы подключились к Вашей беспроводной сети.
Не так давно я уже писал о настройке повторителя Wi-Fi сети TP-Link TL-WA850RE. А в этой статье мы будем настраивать репитер TP-Link AC750 RE200. Его основное отличие в том, что это двухдиапазонный усилитель Wi-Fi сети. То есть, он может одновременно расширять покрытие беспроводной сети на двух частотах 2.4GHz, и 5GHz. Модель AC750 RE200 подойдет в том случае, если у вас двухдиапазонный маршрутизатор, и вы одновременно используете есть на обоих частотах. Если же вы только собираетесь покупать повторитель, ищите хорошую модель, и у вас обычный роутер который раздает Wi-Fi на одной частоте (2.4GHz), то можете купить модель TL-WA850RE. Или RE200, с запасом на будущее, если поменяете роутер на двухдиапазонный.
Я настроил свой TP-Link AC750 RE200 за одну минуту. Ровно столько времени нужно для того, чтобы включить репитер в розетку, нажать кнопку WPS на роутере, и на самом репитере. После чего, этот ретранслятор сам подключается к роутеру, и начинает расширять беспроводную сеть. К тому же, у меня таким способом получилось усилить сигнал Wi-Fi сети в двух диапазонах 2.4GHz, и 5GHz. Есть информация, что через кнопку WPS не всегда получается настроить ретранслятор сразу для двух частот, нужно делать это через панель управления. Мы рассмотрим этот вариант в статье. Настраивал я этот репитер с двухдиапазонным роутером TP-Link Archer C20i.
Усиление сигнала Wi-Fi сети на частотах 2.4GHz, и 5GHz с помощью TP-Link RE200
Давайте сначала рассмотрим быструю настройку с помощью кнопки WPS. Скорее всего, на вашем маршрутизаторе есть такая кнопка. Если ее нет, или этот способ не сработает, то ниже я покажу как все настроить через панель управления самого ретранслятора.
Первым делом, включите повторитель в розетку, и подождите секунд 15, пока он загрузится. Затем, на роутере нажмите кнопку WPS. На моем TP-Link Archer C20i она выглядит вот так:

Важно! Не держите кнопку WPS на роутере нажатой слишком долго. Особенно, если она подписана «WPS/Reset». Примерно через 5 секунд после нажатия на кнопку, будут сброшены настройки роутера к заводским.
После нажатия на кнопку на маршрутизаторе, сразу идем, и нажимаем кнопку WPS на репитере TP-Link AC750 RE200.

Как вы можете увидеть на скриншоте выше, у меня загорелись индикаторы возле 5G, и 2.4G. Это значит, что ретранслятор уже усиливает беспроводную сеть в двух диапазонах. Если горит красный индикатор, то это значит, что сигнал от роутера очень слабый, и нужно установить репитер ближе к точке доступа. А если индикатор возле какой-то сети вообще не загорелся, но у вас роутер транслирует сеть на двух частотах, то это значит, что нужно попробовать настроить AC750 RE200 через панель управления. Так как подключится сразу к двум сетям через кнопку WPS, и усиливать их, не всегда получается.
Настройка TP-Link AC750 RE200 через панель управления
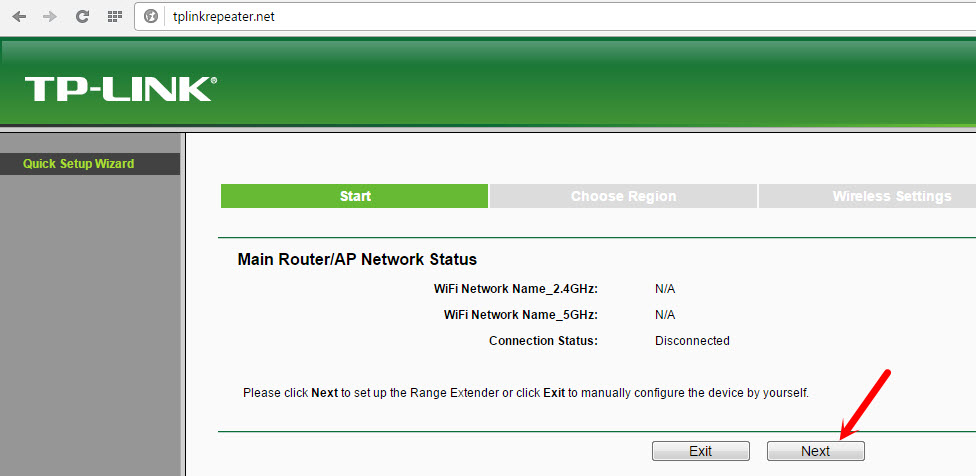
Включите репитер в розетку, и подключитесь к нему по Wi-Fi, или с помощью сетевого кабеля. Откройте браузер, и перейдите по адресу tplinkrepeater.net. Появится страница авторизации. Стандартный пароль и логин: admin и admin. Откроются настройки ретранслятора TP-Link AC750 RE200.
Скорее всего, перед вами сразу появится окно с мастером быстрой настройки (если нет, то перейдите на вкладку Wireless — Connect To Existing Network). Просто нажмите на кнопку «Next».
Выберите свой регион.

Дальше репитер выполнит поиск сетей на частоте 2.4ГГц. Выделите свою сеть, и нажмите кнопку «Next».

В следующем окне нужно только указать пароль от Wi-Fi сети, которую вы хотите расширить.

Дальше репитер начнет поиск сетей на частоте 5GHz.

Подключаемся к своей сети на другом диапазоне точно так же, как я показывал выше. Нужно только выбрать сеть, уже на частоте 5GHz и указать пароль к ней.
В итоге, роутер должен выдать информацию по всем настройкам, и нам нужно только нажать на кнопку «Finish».

Репитер перезагрузится, и начнет усиливать ваши Wi-Fi сети. Обратите только внимание на индикаторы на самом устройстве, которые возле 5G, и 2.4G. Они должны гореть зеленым цветом. Если горят красным, то установите репитер ближе к роутеру. Вообще, советую выбрать такое расположение усилителя, что бы он находился в зоне стабильного сигнала от маршрутизатора, и максимально покрывал сигналом нужную вам площадь.
Несколько полезных советов:
1
После настройки, вы сможете отключать TP-Link AC750 RE200, и включать его в другом месте. Повторно настройку выполнять не нужно, все будет работать. Главное, чтобы повторитель был в зоне покрытия Wi-Fi сети, которую вы хотите усилить.
2
На повторителе есть один Ethernet порт, а в комплекте есть сетевой кабель. Это значит, что вы можете подключить к интернету одно устройство по кабелю (игровую приставку, стационарный компьютер, Smart TV). Устройство, у которого нет возможности подключится к интернету по Wi-Fi.
3
Вы всегда можете сбросить настройки AC750 RE200 и выполнить его повторную настройку. Снизу есть кнопка Reset. Нажмите на нее чем-то острым, подержите примерно 10 секунд, и настройки повторителя будут сброшены к заводским.

4
Если вы заметил какие-то проблемы в работе этого ретранслятора, или у вас не получается что-то настроить, то попробуйте обновить прошивку. Достаточно скачать новую версию прошивки для модели AC750 RE200 с сайта TP-Link, зайти в настройки повторителя на вкладку System Tools — Firmware Upgrade, выбрать файл прошивки с расширением .bin, и запустить процесс обновления. Только смотрите, чтобы скачанная прошивка была для вашей аппаратной версии. Аппаратная версия указана на самом устройстве.
-
Страница 1
Archer C2 AC750 Wireless Dual Band Gigabit Router REV1.0.0 1910010993[…]
-
Страница 2
COPYRIGHT & TRADEMARKS S pecifications ar e subject to change without notice. is a registered trademark of TP-LINK TECHNOLOGIES CO., L TD. Other brands and product names are trademarks or registered trademarks of t heir respective holders. No part of th e specifications ma y be reproduced in any form or by any means or used to make any derivati[…]
-
Страница 3
FCC ST A TEMENT This equipment has been tested and found to comply with the limits for a Class B digital device, pursuant to part 15 of the FCC Rules. These limit s are designed to provide r easonable protection against harmful interference in a residential installation. This equipment generates, uses and can radiate radio frequency energy and, if […]
-
Страница 4
CE Mark W arning This is a class B product. In a domestic environment , this product may cause radio interference, in which case the user may be required to take adequate measures. National Restrictions This device is intended for home and office use in all EU countries (and ot her countries following the EU directive 1999/5/EC) wit hout any limita[…]
-
Страница 5
Cet appareil est conforme aux norms CNR ex emptes de licence d’I ndustrie Canada. Le fonctionnement est soumis aux deux conditions suivantes: (1)cet appareil ne doit pas provoquer d’interférences et (2)cet appareil doit accepter t oute interférence, y compris cell es susceptibles de provoquer un fonctionnement non souhai té de l’appareil. […]
-
Страница 6
安全諮詢及注意事項 ●請使用原裝電源供應器或只能按照本產品注明的電源類型使用本產品。 ●清潔本產品之前請先拔掉電源線。請勿使用液體、噴霧清潔劑或濕布進行清潔。 ●注意防潮,請勿將水或其他液體潑灑到本產品上。 ●插槽與開口供通風使用,以確[…]
-
Страница 7
TP-LINK TECHNOLOGIES CO., L TD DECLARA TION OF CONFORMITY For the following equipment: Product Description: AC750 Wireless Dual Band Gigabit Router Model No.: C2 T rademark: TP-LINK We declare under our own respon sibility that the above products satisfy all the technical regulations applicable to the product with in the scope of Council Directives[…]
-
Страница 8
CONTENTS Package Cont ent s……………………………………………………………………………………….. 1 Chapter 1. Introducti on …………………………………………………………………………….. 2 1.1 Overview of the Router………………………………………………………………….[…]
-
Страница 9
4.7.1 Basic Settings ………………………………………………………………………………….. 48 4.7.2 WPS ………………………………………………………………………………………………. 50 4.7.3 Wireless Se curity ……………………………………………………………………….[…]
-
Страница 10
— III — 4.16.1 S tatic Rout e List ……………………………………………………………………………….. 98 4.16.2 System Routing T able ……………………………………………………………………….. 99 4.17 Bandwid th C ontrol ……………………………………………………………………[…]
-
Страница 11
Archer C2 AC750 Wireless Dual Band Gigabit Router — 1 — Package Contents The following items should be found in your package: Archer C2 AC750 Wireless Dual Band Gigabit Router DC Power A dapter for Archer C2 AC750 Wireless Dual Band Gigabit Router Quick Installation Guide Resource CD for Archer C2 AC750 Wire less Dual Band Gigabit R[…]
-
Страница 12
Archer C2 AC750 Wireless Dual Band Gigabit Router — 2 — Chapter 1. Introduction 1.1 Overview of the Router Th e Archer C2 AC750 Wireless Dual Band Gigabit Router i nte gr ate s 4-port Switch, Fi rew al l, NA T -r ou ter a nd W ire le ss AP . The AC750 Wireless Dual Band Gigabit Router delivers exceptional range and speed, w hic h c an f ul ly m ee […]
-
Страница 13
Archer C2 AC750 Wireless Dual Band Gigabit Router — 3 — 1.2 Conventions The router or Arch er C2 mentio ned in this guid e stands for Arc he r C 2 A C 7 5 0 W i r e l e s s D u a l B a n d Gigabit Router without any explanation. 1.3 Main Features Complies with IEEE 802.1 1ac. One 10/100/1000M Auto- Negotiation RJ45 Internet port, four 10/10[…]
-
Страница 14
Archer C2 AC750 Wireless Dual Band Gigabit Router — 4 — 1.4 Panel Layout 1.4.1 The Front Panel Figure 1-1 LEDs on the front panel The router ’s LEDs are located on the front panel (View from lef t to right). Name Statu s Indication Off Power is off. (Power) On Power is on. Off The wireless function is disabled. (Wireless) On The wireless function[…]
-
Страница 15
Archer C2 AC750 Wireless Dual Band Gigabit Router — 5 — 1.4.2 The Rear Panel Figure 1-2 Rear Panel sketch The following parts are lo cated on the rear panel (View from left to right). WPS/Reset: Pressing this button for less than 5 seconds enabl es the WPS function. If your client devices, such as wireless adapters, support Wi-Fi Protect ed Set[…]
-
Страница 16
Archer C2 AC750 Wireless Dual Band Gigabit Router — 6 — USB: The USB port connect s to a USB storage de vice or a USB printer . Power On/Off: The switch for the power . Power: The Power socket is where you will co nnect the power adapter . Please use the power adapter provided with this Archer C2 AC 750 Wireless Dual Band Gigabit Router[…]
-
Страница 17
Archer C2 AC750 Wireless Dual Band Gigabit Router — 7 — Chapter 2. Connecting the router 2.1 System Requirement s Broadb and Internet Access Service (DSL/Cable/Ethernet) One DSL/Ca ble Modem that has an RJ45 connector (which is not necessary if the router is connected directly to the Ethernet) PCs with a working Ethernet Adapter and an […]
-
Страница 18
Archer C2 AC750 Wireless Dual Band Gigabit Router — 8 — power on the router , please make sure your computer is NOT connected to any other wireless network.) Figure 2-1 Hardware Installation Figure 2-2 USB Installation Note: If you want to use the router to share files or printer , plug the USB storage device to the USB port or connect the prin[…]
-
Страница 19
Archer C2 AC750 Wireless Dual Band Gigabit Router — 9 — Chapter 3. Quick Inst allation Guide This chapter will show you how to configure t he basic functions of y our AC750 Wireless Dual Band Gigabit Router using Quick Setup Wi za rd within minutes. 3.1 TCP/IP Configuration The default IP address of the router is 192.168.0.1 and the default Subnet […]
-
Страница 20
Archer C2 AC750 Wireless Dual Band Gigabit Router — 10 — If the result displayed is similar to Figure 3-2 , it means the connection between your PC and the router failed. Figure 3-2 Failure result of Ping command Please check the connection following these step s: 1. Is the connection bet ween your PC and the router correct? Note: The Ether[…]
-
Страница 21
Archer C2 AC750 Wireless Dual Band Gigabit Router — 1 1 — 3.2 Quick Inst allation Guide With a Web-based utility , it is easy to conf igure and manage the AC750 Wireless Dual Band Gigabit Router . The Web-based ut ility can be used on any Windows, Macintosh or UNIX OS with a Web browser , such as Microsof t Internet Explorer , Mozilla Firefox or Ap[…]
-
Страница 22
Archer C2 AC750 Wireless Dual Band Gigabit Router — 12 — Figure 3-5 Quick Setup 3. Click Next , and then WAN Connecti on Type page will appear, shown in Figure 3-6 . Figure 3-6 WAN Connection Type The router provides Auto-Detec t function and supports five types of WAN co nnection: Dynamic IP , Static IP , PPPoE/Russian PPPoE , L2TP/Russian L2TP , […]
-
Страница 23
Archer C2 AC750 Wireless Dual Band Gigabit Router — 13 — 1) If the connection type detected is Dynamic IP , there will appear the MAC Clone page (as shown in Figure 3-7 ). In most cases, there is no need to clone the MAC address. Y ou can select “ No, I do NOT need to clone MAC address ” and then click Next . If it is necessary in your case, pl[…]
-
Страница 24
Archer C2 AC750 Wireless Dual Band Gigabit Router — 14 — 3) If the connection type detected is PPPoE/Russia PPPoE , the next screen will appear as shown in Figure 3-9 . Configure the following parameters and then click Next to continue. Figure 3-9 Quick Setup – PPPoE/Russia PPPoE User Name / Password — Enter the User Name and Passw ord provid[…]
-
Страница 25
Archer C2 AC750 Wireless Dual Band Gigabit Router — 15 — Select Dy namic IP if none of the above parameters are provide d. Then you just need to enter server IP address or domain name provided by your ISP . 5) If your connection type is PPTP/Russia PPTP , select PPTP/Russia PPTP in Figure 3-6 and the n ext screen will appear as shown in Figure 3- 1[…]
-
Страница 26
Archer C2 AC750 Wireless Dual Band Gigabit Router — 16 — Select Dy namic IP if none of the above parameters are provide d. Then you just need to enter server IP address or domain name provided by your ISP . 5. Af ter finishing the W AN C onnection T ype selection, the Dual Band Selection page will appear as shown in Figure 3-12 . Here we take “2.[…]
-
Страница 27
Archer C2 AC750 Wireless Dual Band Gigabit Router — 17 — Figure 3-13 Quick Setup – Wireless 2.4GHz Wireless Ne twork Name — Also called the SSID (Service Set Identification). Enter a value of up to 32 characters. The same nam e must be assigned to all wireless devices in your network. The default SSID is set to be TP-LINK_2.4GHz_XXXXXX. This […]
-
Страница 28
Archer C2 AC750 Wireless Dual Band Gigabit Router — 18 — Band — This field displaye d the operat ing frequency being configured. Mode — This field determines the wireless mode which the router works on. 11bg mixed — Select if you are using both 802.11b and 802.11g wireless clients. 11bgn mixed — Select if you are using a mix of 802.[…]
-
Страница 29
Archer C2 AC750 Wireless Dual Band Gigabit Router — 19 — your network. The default SSID is set to be TP-LINK_5GHz_XXXXXX. This value is case-sensitive. For example, TEST is NOT the same as test . Region — Select your region from the drop-down lis t. This field specifies the region where the wireless function of the r outer can be used. It may b[…]
-
Страница 30
Archer C2 AC750 Wireless Dual Band Gigabit Router — 20 — Figure 3-15 Quick Setup — Comfirm 9. Click the Finish button to complete the Quick Setup . Figure 3-16 Quick Setup — Finish[…]
-
Страница 31
Archer C2 AC750 Wireless Dual Band Gigabit Router — 21 — Chapter 4. Configuring the router This chapter will show each key function of the Web p age and its configuration method. 4.1 Login After your successful login, you will se e the main menus on the left of the Web-based utility . On the right, there are the corresponding explanations and instr[…]
-
Страница 32
Archer C2 AC750 Wireless Dual Band Gigabit Router — 22 — Figure 4-1 S tatus 4.3 Quick Setup Please refer to 3.2 Quick Installation Guide .[…]
-
Страница 33
Archer C2 AC750 Wireless Dual Band Gigabit Router — 23 — 4.4 Network Figure 4-2 the Network menu There are three submenus under the Network menu (shown in Figure 4-2 ): WA N , LAN and MAC Clone . Click any of them, and you will be able to configure the corresponding function. 4.4.1 WAN Choose menu “ Network → WA N ”, you can configure the IP […]
-
Страница 34
Archer C2 AC750 Wireless Dual Band Gigabit Router — 24 — If you want to do some advanced configurations, please click the Advanced button. MTU(Bytes) — The normal MTU (Maximum T ransmission Unit) value for most Ethernet networks is 1500 Bytes. It is not re commended that you change the default MTU size unless required by your ISP . Enable F[…]
-
Страница 35
Archer C2 AC750 Wireless Dual Band Gigabit Router — 25 — Figure 4-4 W AN — S tatic IP IP Address — Enter the IP address in d otted-decimal notation provided by your ISP . Subnet Mask — Enter the subnet Mask in dotted-decim al notation provided by your ISP , usually is 255.255.255.0. Gatew ay — (Optional) Enter the gateway IP address in […]
-
Страница 36
Archer C2 AC750 Wireless Dual Band Gigabit Router — 26 — Figure 4-5 W AN — PPPoE Username/P assword — Enter the User Name and Password provided by your ISP . These fields are case-sensitive. Secondar y Connection — It’s available only for PPPoE Connection. If your ISP provides an extra Connection type such as Dynamic/S tatic IP to connect[…]
-
Страница 37
Archer C2 AC750 Wireless Dual Band Gigabit Router — 27 — Connect Manuall y — Y ou can click the Connect/Disc onnect button to connect/disconnect immediately . This mode also supports the Max Idle T ime function as Connect on Demand mode. The Internet connection can be disconnected autom atically after a specified inactivity period and re-establ[…]
-
Страница 38
Archer C2 AC750 Wireless Dual Band Gigabit Router — 28 — Dete ct Online Interval — The router will detect Access Conc entrator online at every interval. The default value is “0”. Y ou can input t he value between “0” and “120”. The value “0” means no detect. Primary DNS/Secondary DNS — If your ISP does not automatically assi[…]
-
Страница 39
Archer C2 AC750 Wireless Dual Band Gigabit Router — 29 — NSW / ACT — ns w.bigpond.net.au VIC / T AS / W A / SA / NT — vic.bigpond.net.au QLD — qld.bigpond.net.au MTU(B ytes)- The normal MTU (Maximum T ransmission Unit ) value for most Ethernet networks is 1500 Bytes. It is not recommended that you change the default MTU value unless required by[…]
-
Страница 40
Archer C2 AC750 Wireless Dual Band Gigabit Router — 30 — Figure 4-8 W AN — L2TP/Russia L2TP UserN ame/Password — Enter the User Name and Password provided b y your ISP . These fields are case-sensitive. Addressing T ype — Choose the addressing type given by your ISP , either Dynamic IP or S tatic IP . Click the Connect button to connect imm[…]
-
Страница 41
Archer C2 AC750 Wireless Dual Band Gigabit Router — 31 — again. If you wish to activate Connect on Demand , check the radio button. If you want your Internet connection to remain active at all times, enter 0 in the Max Idle Time field. Otherwise, enter the number of minutes y ou want to have elapsed befor e your Internet connection terminates. […]
-
Страница 42
Archer C2 AC750 Wireless Dual Band Gigabit Router — 32 — Use Name/Passw ord — Enter the User Name and Password provided b y your ISP . These fields are case-sensitive. D ynamic IP/ S tatic IP — Choose the addressing type given by y our ISP , either Dynamic IP or S tatic IP , and enter the ISP’s IP address or the domain name. If you choose[…]
-
Страница 43
Archer C2 AC750 Wireless Dual Band Gigabit Router — 33 — Note: If you don’t know how to choose the appropriate connection type, click the Detect button to allow the router to automatically search your In ternet connection for servers and protocols. The connection type will be reported when an active Inte rnet service is successfully detect[…]
-
Страница 44
Archer C2 AC750 Wireless Dual Band Gigabit Router — 34 — 2) If the new LAN IP Address you set is not in t he same subnet, the IP Address pool of the DHCP server will change accordingly at the same time , while the Virtual Server and DMZ Host will not take ef fect until they are re-configured. 4.4.3 MAC Clone Choose menu “ Netw ork → MAC Clone[…]
-
Страница 45
Archer C2 AC750 Wireless Dual Band Gigabit Router — 35 — Figure 4-12 Dual Band Selection 2.4GHz (802 .1 1b/g/n) — Click the box, and then the router w ill only work in 2.4GHz frequency . Y ou can use the 2.4GHz band to conn ect to many classic wireless devices like gaming consoles, laptops, DVR s, ect. 5GHz (80 2.1 1a/n/ac) — Click the box,[…]
-
Страница 46
Archer C2 AC750 Wireless Dual Band Gigabit Router — 36 — Figure 4-14 Wireless Settings – 2.4GHz Wireless Ne twork Name — Also called the SSID (Service Set Identification). Enter a value of up to 32 characters. The same name must be assigned to all wireless devices in your network. Considering your wireless network security, the default SSID i[…]
-
Страница 47
Archer C2 AC750 Wireless Dual Band Gigabit Router — 37 — 11bgn mixed — Select if you are using a mix of 802.11b, 11g, an d 11n wireless clients. It is strongly recommended that you set the Mode to 802.11bgn mixed , and all of 802.11b, 802.11g, and 802.11n wireless st ations can connect to the router. Channel — This field determines which op[…]
-
Страница 48
Archer C2 AC750 Wireless Dual Band Gigabit Router — 38 — Ke y type — This option should be chosen according to the AP’s security configuration. It is recommended that the security type is the same as your AP’s security type WEP Index — This option should be c hosen if the key type is WEP(ASCII) or WEP(HEX). It indicates the index […]
-
Страница 49
Archer C2 AC750 Wireless Dual Band Gigabit Router — 39 — If the wireless adapter supports Wi-Fi Protected Setup (WPS), you can establish a wireless connection between wireless adapter and router using either Push Button Configuration (PBC) method or PIN method. Note: To build a successful connection by WPS, you s hould also do the corresponding[…]
-
Страница 50
Archer C2 AC750 Wireless Dual Band Gigabit Router — 40 — Step 1: Keep the de fault WPS status as Enabled and click the Add device button in Figure 4-16 , then Figure 4-19 will appear. Figure 4-19 Add A New Device Step 2: Enter the PIN number from the client devic e in the field on the WPS screen above. Then click Connect button. Step 3: “ Connect[…]
-
Страница 51
Archer C2 AC750 Wireless Dual Band Gigabit Router — 41 — Figure 4-20 Wireless Security Disable Wireless Secur ity — If you do not want to use wireless security, check this radio button. But it’s strongly recommended to choose one of the follo wing modes to enable security. WP A/WP A2- Personal — It’s the WPA/WPA2 authentic ation type ba[…]
-
Страница 52
Archer C2 AC750 Wireless Dual Band Gigabit Router — 42 — Note: If you check the WP A/WP A2-Personal radio button and choose TKIP encryption, you wi ll find a notice in red as shown in Figure 4-21 . Figure 4-21 WP A/WP A2 – Personal Wireless Password — You can enter ASCII characters bet ween 8 and 63 c haracters or 8 to 64 Hexadecimal char[…]
-
Страница 53
Archer C2 AC750 Wireless Dual Band Gigabit Router — 43 — Group Key Up date Peri od — Specify the group key update inte rval in seconds. The value should be 30 or above. Ente r 0 to disable the update. WEP — It is based on the IEEE 802.11 standard. If you check this radio button, you will find a notice in red as show in Figure 4-23 . Figure […]
-
Страница 54
Archer C2 AC750 Wireless Dual Band Gigabit Router — 44 — 4.6.4 Wireless MAC Filtering Choose menu “ Wireless 2.4GHz → Wireless MAC Filtering ”, you can control the wireless access by configuring the Wireless MAC Filtering function, shown in Figure 4-24 . Figure 4-24 Wireless MAC Filtering T o filter wireless users by MAC Address, click Enable[…]
-
Страница 55
Archer C2 AC750 Wireless Dual Band Gigabit Router — 45 — To add or modify a MAC Address Filtering entry, follo w these instructions: 1. Enter the appropriate MAC Address into the MAC Address field. The format of the MAC Address is XX:XX:XX:XX:XX:XX (X is any hexadec imal digit). For example: 00:0A:EB:B0:00:0B. 2. Give a simple description for the w[…]
-
Страница 56
Archer C2 AC750 Wireless Dual Band Gigabit Router — 46 — 4.6.5 Wireless Advanced Choose menu “ Wireless 2.4GHz → Wireless Advanced ”, you can configure the adva nced settings of your wireless network. Figure 4-26 Wireless Advanced Transmit Power — Here you can specify the transmit power of router . You can select High, Middle or Low which[…]
-
Страница 57
Archer C2 AC750 Wireless Dual Band Gigabit Router — 47 — DTIM Interval — This value determines the interval of the Delivery Traffic Indication Message (DTIM). A DTIM field is a countdown field informing clients of the next window for listening to broadcast and multicast mess ages. When the router has buffe red broadcast or multicast messages fo[…]
-
Страница 58
Archer C2 AC750 Wireless Dual Band Gigabit Router — 48 — If the numbers of connected wireless st ations go beyond one page, click the Next button to go to the next page and click the Previous button to return the previous page. Note: This page will be refreshed autom atically every 5 seconds. 4.7 Wireless 5GHz Figure 4-28 Wireless menu There ar[…]
-
Страница 59
Archer C2 AC750 Wireless Dual Band Gigabit Router — 49 — Wireless Ne twork Name — Also called the SSID (Service Set Identification). Enter a value of up to 32 characters. The same name must be assigned to all wireless devices in your network. Considering your wireless network security, the default SSID is set to be TP-LINK_5GHz_XXXXXX. This val[…]
-
Страница 60
Archer C2 AC750 Wireless Dual Band Gigabit Router — 50 — Enable WDS Bridging — Check this box to enable WDS. With this function, the router can bridge two or more WLANs. If this checkbox is selected, y ou will have to set the following parameters as shown in Figure 4-30 . Make sure the following settings are correct. Figure 4-30 SSID (to be[…]
-
Страница 61
Archer C2 AC750 Wireless Dual Band Gigabit Router — 51 — Figure 4-31 WPS WPS — Enable or disable the WPS function here. Current PIN — The current value of the r outer’s PIN is displayed her e. The default PIN of the router can be found in the label or User Guide. Restor e PIN — Restore the PIN of the router to its default. Gene[…]
-
Страница 62
Archer C2 AC750 Wireless Dual Band Gigabit Router — 52 — Figure 4-32 Figure 4-33 Add A New Device Step 2: Press and hold the WPS button of the client device directly . Step 3: The Wi-Fi Protected Setup LED flashes for tw o minutes during t he Wi-Fi Protected Setup process. Step 4: When the WPS LED is on, the client device has successfully connected[…]
-
Страница 63
Archer C2 AC750 Wireless Dual Band Gigabit Router — 53 — Step 2: Enter the PIN number from the client devic e in the field on the above WPS screen. Then click Connect button. Step 3: “ Connect successfully ” will appear on the screen of Figure 4-3 4 , which means the client device has successfully connected to the router . III. Enter the router[…]
-
Страница 64
Archer C2 AC750 Wireless Dual Band Gigabit Router — 54 — Figure 4-35 Wireless Security Disable Sec urity — If you do not want to use wireless securi ty, ch eck this radio button. But it’s strongly recommended to choose one of t he following modes to enable security. WP A/WP A2- Personal — It’s the WPA/WPA2 authentic ation type based on […]
-
Страница 65
Archer C2 AC750 Wireless Dual Band Gigabit Router — 55 — Note: If you check the WP A/WP A2-Personal radio button and cho ose TKIP encryption, you will find a notice in red as shown in Figure 4-36 . Figure 4-36 WP A/WP A2 – Personal W ireless Passw ord — You can enter ASCII characters bet ween 8 and 63 characters or 8 to 64 Hexadecimal cha[…]
-
Страница 66
Archer C2 AC750 Wireless Dual Band Gigabit Router — 56 — Radius Server Pass w ord — Enter the password for the Radius server. Group Key Update Period — Specify the group key update interval in seconds. The value should be 30 or above. En ter 0 to disable the update. WEP — It is based on the IEEE 802.11 standard. If you check this radio […]
-
Страница 67
Archer C2 AC750 Wireless Dual Band Gigabit Router — 57 — 4.7.4 Wireless MAC Filtering Choose menu “ Wireless → MAC Filtering ”, you can control the wire less access by configuring the Wireless MAC Filtering function, shown in Figure 4-24 . Figure 4-39 Wireless MAC Filtering T o filter wireless users by MAC Address, click Enable . The default […]
-
Страница 68
Archer C2 AC750 Wireless Dual Band Gigabit Router — 58 — 1. Enter the appropriate MAC Address into the MAC Address field. The format of the MAC Address is XX:XX:XX:XX:XX:XX (X is any hexadec imal digit). For example: 00:0A:EB:B0:00:0B. 2. Give a simple description for the wireless station in the Description field. For example: Wireless station A. 3[…]
-
Страница 69
Archer C2 AC750 Wireless Dual Band Gigabit Router — 59 — 4.7.5 Wireless Advanced Choose menu “ Wireless → Wireless Advanced ”, you can configure the adva nced settings of your wireless network. Figure 4-41 Wireless Advanced Transmit Power — Here you can specify the transmit power of router . You can select High, Middle or Low which you wo[…]
-
Страница 70
Archer C2 AC750 Wireless Dual Band Gigabit Router — 60 — (DTIM). A DTIM field is a countdown field inform ing clients of the next window for listening to broadcast and multicast mess ages. When the router has buffe red broadcast or multicast messages for associated clients, it sends the next DTIM with a DTIM Interval value. You can specify the valu[…]
-
Страница 71
Archer C2 AC750 Wireless Dual Band Gigabit Router — 61 — Note: This page will be refreshed autom atically every 5 seconds. 4.8 Guest Network Choose “ Guest Netw ork ”, and you can configur e the Guest Network Wireless Settings on the page as shown in Figure 4-43 . Figure 4-43 Guest Network Wireless Settings[…]
-
Страница 72
Archer C2 AC750 Wireless Dual Band Gigabit Router — 62 — Allow Guest T o Access My Local Network — If enabled, guests can communicate with hosts. Allow Guest T o Access My USB S torage Sharing — If enabled, guests can access to USB storage sharing servers. Guest Network Isolation -. If enabled, guests are isolated from each other . […]
-
Страница 73
Archer C2 AC750 Wireless Dual Band Gigabit Router — 63 — Figure 4-45 DHCP Settings DHCP Server — Enable or Disable the DHCP server . If you disable the Serve r , you must have another DHCP server within your network , otherwise you must configure the computer manually . Start IP Address — S pecify an IP address for the DHCP Server to start […]
-
Страница 74
Archer C2 AC750 Wireless Dual Band Gigabit Router — 64 — 4.9.2 DHCP Clients List Choose menu “ DHCP → DHCP Client s List ”, you can view the info rmation about the clients attached to the router in the screen as shown in Figure 4-46 . Figure 4-46 DHCP Clients List Client Name — The name of the DHCP client MAC Addre ss — The MAC addres[…]
-
Страница 75
Archer C2 AC750 Wireless Dual Band Gigabit Router — 65 — Figure 4-47 Address Reservation MAC Addre ss — The MAC address of the PC for which you want to reserve an IP address. IP Address — The IP address reserved for the PC by the router. Status — The status of this entry, either Enabled or Disabled . To Reserve an IP address: 1. Click t[…]
-
Страница 76
Archer C2 AC750 Wireless Dual Band Gigabit Router — 66 — 4.10 USB Settings Figure 4-49 The USB Settings menu There are six submenus under t he USB Settings menu (shown in Figure 4-49 ): USB Mass Sto ra ge , User Accounts , S torage Sharing , FTP Server , Media Server and Print Server and. Click any of them, and you will be able to configure the cor[…]
-
Страница 77
Archer C2 AC750 Wireless Dual Band Gigabit Router — 67 — Figure 4-51 User Account Management Only Administrator can use a Web browser to transf er the files from a PC to the Writ able shared volume on the USB drive. T o add a new user account, please follow the step s below : 1. Choose the Index from the drop-down list.. 2. Self-define a User Name […]
-
Страница 78
Archer C2 AC750 Wireless Dual Band Gigabit Router — 68 — 1. Please restart the service for t he new settings to t ake effect. 2. If you cannot use the new user name and password to access the shares, press Win dow s logo + R to open the Run dialog box and type net use 192.168.1.1 /delete /yes and press Enter . (192.168.1.1 is your router’s L[…]
-
Страница 79
Archer C2 AC750 Wireless Dual Band Gigabit Router — 69 — Status — Indicates the shared or non-shared status of the volume. Edit – Click Edit to edit the entry. To add a new folder, follow the instructions below. 1. Click Add New Folder in Figure 4-52 . Figure 4-53 Add or Modify Share Folder 2. Enter display name of the share folder in Sha[…]
-
Страница 80
Archer C2 AC750 Wireless Dual Band Gigabit Router — 70 — 4.10.4 FTP Server Choose menu “ USB Settings → FTP Server ”, you can create an FTP server that can be accessed from the Internet or your local network. Figure 4-54 FTP Server Configuration Server Stat us — Indicates the FTP Server’s current status. Internet Ac cess — Select[…]
-
Страница 81
Archer C2 AC750 Wireless Dual Band Gigabit Router — 71 — 6. Click the Apply button to start the ftp server. To add a new folder, follow the instructions below. 1. Click Add New Folder in Figure 4-54 . Figure 4-55 Add or Modify Share Folder 2. Enter display name of the share folder in Shared Name filed. 3. Click the Brow se button to select the fold[…]
-
Страница 82
Archer C2 AC750 Wireless Dual Band Gigabit Router — 72 — Figure 4-56 Media Server Setting Server Enable — Indicates the Media Serve r’s current status, started or stopped. You can click the Enable button to enable the Medi a Server and click the Disable button to disable it. Server Nam e — The name of this Media Server. Share Name — T[…]
-
Страница 83
Archer C2 AC750 Wireless Dual Band Gigabit Router — 73 — Figure 4-58 Add New Folder Share Name — You can enter a display name for the share folder. Director y — Displays the location of this folder. Brow se – Click the button to sele ct the folder to share. Appl y — Click the button to save your settings. 3. Click the Scan Now but[…]
-
Страница 84
Archer C2 AC750 Wireless Dual Band Gigabit Router — 74 — Offline — Indicates the print service feature is disabled. Y ou can click » St a rt » button to start the print service. 4.11 NA T Choose “ NA T ”, and you can enable o r disable the NAT and Hardware NAT Control feature. The NAT Rules and Hardware NAT will work properly only[…]
-
Страница 85
Archer C2 AC750 Wireless Dual Band Gigabit Router — 75 — 4.12.1 Virtual Servers Choose menu “ Forwarding → Virtual Servers ”, a nd then you can view an d add virtual servers on this page (shown in Figure 4-62 ). Virtual servers can be used fo r se tting up public services on your LAN. A virtual server is defined as a serv ice port, and all re[…]
-
Страница 86
Archer C2 AC750 Wireless Dual Band Gigabit Router — 76 — 4. Select the protocol used for this application in the Protocol drop-down list, either TCP , UDP , or All . 5. Select the Enabl ed option in the Statu s drop-down list. 6. Click the Save button. Figure 4-63 Add or Modify a Virtual Server Entry Note: It is possible that you have a compute[…]
-
Страница 87
Archer C2 AC750 Wireless Dual Band Gigabit Router — 77 — Figure 4-64 Port T riggering T rigger Port — The port for outgoing traffic. An out going connection using this port will trigger this rule. T rigger Protocol — The protocol used for T rigger Ports, either TCP , UDP , or All (all protocols supported by the router). Open Port — The […]
-
Страница 88
Archer C2 AC750 Wireless Dual Band Gigabit Router — 78 — Figure 4-65 Add or Modify a T riggering Entry To modify or delete an existing entry: 1. Find the desired entry in the table. 2. Click Edit or Delete as desired on the Edit column. Click the Enable Selected button to make selected entries enabled. Click the Disable Selected button to make sele[…]
-
Страница 89
Archer C2 AC750 Wireless Dual Band Gigabit Router — 79 — DHCP client function dis abled and should have a new static IP Address assigned to it because its IP Address may be changed wh en using the DHC P function. Figure 4-66 DMZ T o assign a computer or server to be a DMZ server: 1. Click the Enable button. 2. Enter the IP address of a local PC tha[…]
-
Страница 90
Archer C2 AC750 Wireless Dual Band Gigabit Router — 80 — External Port — The port which the router opened for the application. Protocol — The type of protoc ol which is opened. Internal Port — The port which the router opened for local host. IP Address — The IP address of the local host which initiates the UPnP request. Status -[…]
-
Страница 91
Archer C2 AC750 Wireless Dual Band Gigabit Router — 81 — Figure 4-69 Basic Security Firew all — A firewall protects your network from the outside world. Here you can enable or disable the router’s firewall. SPI Fire w all — SPI (Stateful Packet Inspection, also known as dynamic packet filtering) helps to prevent cyber attacks by tracking […]
-
Страница 92
Archer C2 AC750 Wireless Dual Band Gigabit Router — 82 — the use of cryptographic security services. To allow IPSec tunnels to pass through the router, click Enable . ALG — It is recommended to enable Application Lay er Gate way (ALG) because ALG allows customized Network Address T ranslation (NA T) traversal filters to be plugged into the gate[…]
-
Страница 93
Archer C2 AC750 Wireless Dual Band Gigabit Router — 83 — Note: Dos Protection will take ef fect only when the T raffic St ati stics in “ System T ool → St atistics ” is enabled. Enable ICMP-FLOOD Attack Filtering — Enable or Disable the ICMP-FLOOD Attack Filtering. ICMP-FLOOD Packets Threshold (5~3600) — The default value is 50. E[…]
-
Страница 94
Archer C2 AC750 Wireless Dual Band Gigabit Router — 84 — Figure 4-71 Local Management By default, the radio button “ All the PCs on the LAN are allowed to access the Router’s Web-Based Utility ” is checked. If you want to allow PC s with specific M AC Addresses to access the Setup page of the router’s Web-Based Utility locally from in[…]
-
Страница 95
Archer C2 AC750 Wireless Dual Band Gigabit Router — 85 — Figure 4-72 Remote Management Web Management Port — Web browser access normally uses the standard HTTP service port 80. This router’s default re mote management web port number is 80. For greater security, you can change the remote management web p ort to a custom port by entering th[…]
-
Страница 96
Archer C2 AC750 Wireless Dual Band Gigabit Router — 86 — Figure 4-73 Parent Control Settings Parent Control — Check Enable if you want this function to take effec t; otherwise, check Disable .[…]
-
Страница 97
Archer C2 AC750 Wireless Dual Band Gigabit Router — 87 — MAC Address of Parental PC — In this field, enter the MAC address of the controlling PC, or you can make use of the Copy To Above button below. MAC Address of Current PC — This field displays the MA C address of the PC that is managing this router. If the MAC Address of your adapter i[…]
-
Страница 98
Archer C2 AC750 Wireless Dual Band Gigabit Router — 88 — Figure 4-74 Parent Control Settings 4.15 Access Control Figure 4-75 Access Control[…]
-
Страница 99
Archer C2 AC750 Wireless Dual Band Gigabit Router — 89 — There are four submenus unde r the A ccess Control menu: Rule , Host , Ta r g e t and Schedule (as shown in Figure 4-75 ). Click any of them, and you will be able to configure the corresponding function. 4.15.1 Rule Choose menu “ Access Control → Rule ”, and then you can vie w and set A[…]
-
Страница 100
Archer C2 AC750 Wireless Dual Band Gigabit Router — 90 — Delete Selected — Click the Delete Selected button to delete selected entries in the table. How to add a new rule: 1. Click the Add New button and the next screen will pop up as shown in Figure 4-77 . 2. Give a name (e.g. Rule_1) for the rule in the Description field. 3. Select a host fro[…]
-
Страница 101
Archer C2 AC750 Wireless Dual Band Gigabit Router — 91 — 4. Click the submenu Target of Access Control in the left to enter the Target List page. Add a new entry with the Target Description is Target_1 and Domain Name is www.google.com. 5. Click the submenu Schedule of Access Control in the left to enter the Schedule List page. Add a new entry with[…]
-
Страница 102
Archer C2 AC750 Wireless Dual Band Gigabit Router — 92 — Address Info — Here displays the information about the host. It can be IP or MAC. Edit — To modify or delete an existing entry. Click the Delete Selected button to delete the select ed entries in the table. To add a new entry, please follow the steps below. 1. Click the Add New button[…]
-
Страница 103
Archer C2 AC750 Wireless Dual Band Gigabit Router — 93 — 1. Click Add New button in Figure 4-78 to enter the Add or Modify a Host Entry page. 2. In Mode field , select MAC Address from the drop-down list. 3. In Description field, create a unique description for the host (e.g. Host_1). 4. In MAC Address field, enter 00:11:22:33:44:AA. 5. Click Save […]
-
Страница 104
Archer C2 AC750 Wireless Dual Band Gigabit Router — 94 — Figure 4-82 Add or Modify an Access T arget Entry I) In Description field, create a unique description for the target (e.g. Target_1). II) In IP Address field, enter the IP address of the target. III) Specify the Target Port manually. 2 ) If you select MAC Address , the screen shown is Figu[…]
-
Страница 105
Archer C2 AC750 Wireless Dual Band Gigabit Router — 95 — Figure 4-84 Add or Modify an Access T arget Entry I) In Description field, create a unique description for the target (e.g. Target_1). II) In Add URL Address field, enter the domain name, either the full name or the keywords (for example, google) in the bl ank. Any domain name with keywords i[…]
-
Страница 106
Archer C2 AC750 Wireless Dual Band Gigabit Router — 96 — 4.15.4 Schedule Choose menu “ Access Control → Schedule ”, and then you can view and set a Schedule list in the next screen as shown in Figure 4-85 . The Schedule list is necessary for the Access Contro l Rule. Figure 4-85 Schedule Settings Description — Here displa ys the descripti[…]
-
Страница 107
Archer C2 AC750 Wireless Dual Band Gigabit Router — 97 — Figure 4-86 Advanced Schedule Settings For example : If you desire to restrict the inter net activities of host with MAC address 00:11:22:33:44:AA to access www.google.com only from 18:00 to 20:00 on Saturda y and Sunday , you should first follow the settings below: 1. Click Add New button sh[…]
-
Страница 108
Archer C2 AC750 Wireless Dual Band Gigabit Router — 98 — There are two submenus under the Advanced Routing menu as shown in Figure 4-87 : St at ic Route List and System Routing T able . Click any of them, and you w ill be able to configure the corresponding function. 4.16.1 Static Route List Choose menu “ Advanced Routing → S tatic Route List ?[…]
-
Страница 109
Archer C2 AC750 Wireless Dual Band Gigabit Router — 99 — 3. Select Enabled or Disabled for this entry on the Status d rop-down list. 4. Click the Save button to make the entry take effect. Other configurations for the entries: Click the Delete button to delete the entry . Click the Enable Selected button to enable the selected entries. Click the Di[…]
-
Страница 110
Archer C2 AC750 Wireless Dual Band Gigabit Router — 100 — 4.17 Bandwid th Control Figure 4-91 Bandwidth Control Choose menu “ Bandwidth Control ”, and then you can configure t he bandwidth control in the screen as shown in Figure 4-91 . Y ou can configure the Egress Bandwidth and Ingre ss Bandwid th in this page. Their values you configure shou[…]
-
Страница 111
Archer C2 AC750 Wireless Dual Band Gigabit Router — 101 — 1. Click Add New shown in Figure 4-91 , you will see a new screen shown in Figure 4-92 . 2. Enter the information lik e the screen shown below . Figure 4-92 Bandwidth Control Rule Settings 3. Click the Save button. 4.18 IP & MAC Binding Figure 4-93 the IP & MAC Binding menu There are[…]
-
Страница 112
Archer C2 AC750 Wireless Dual Band Gigabit Router — 102 — MAC Addre ss — The MAC address of the controll ed computer in the LAN. IP Address — The assigned IP address of the cont rolled computer in the LAN. Bind — Check this option to enable ARP binding for a specific device. Edit — To edit or delete an existing entry. When you want […]
-
Страница 113
Archer C2 AC750 Wireless Dual Band Gigabit Router — 103 — Figure 4-96 ARP List 1. MAC Address — The MAC address of the contro lled computer in the LAN. 2. IP Address — The assigned IP address of the cont rolled computer in the LAN. 3. Status — Indicates whether or not the MAC and IP addresses are bound. Click the Load Selected button to load the se[…]
-
Страница 114
Archer C2 AC750 Wireless Dual Band Gigabit Router — 104 — Figure 4-97 No-ip.com DDNS Settings To set up for DDNS, follow these instructions: 1. Enter the Domain Name you received from dynamic DNS service provider . 2. Enter the UserName for your DDNS account. 3. Enter the Password for your DDNS account. 4. Enable DDNS. 5. Click the Login button to […]
-
Страница 115
Archer C2 AC750 Wireless Dual Band Gigabit Router — 105 — Figure 4-98 Comexe.cn DDNS Settings To set up for DDNS, follow these instructions: 1. Enter the Domain Name your dynamic DNS service provider gave. 2. Enter the UserName for your DDNS account. 3. Enter the Password for your DDNS account. 4. Enable DDNS. 5. Click the Login button to login the[…]
-
Страница 116
Archer C2 AC750 Wireless Dual Band Gigabit Router — 106 — Figure 4-99 Dyndns.org DDNS Settings To set up for DDNS, follow these instructions: 1. Enter the Domain Name you received from dynamic DNS service provider . 2. Enter the UserName for your DDNS account. 3. Enter the Password for your DDNS account. 4. Enable DDNS. 5. Click the Login button to[…]
-
Страница 117
Archer C2 AC750 Wireless Dual Band Gigabit Router — 107 — 4.20.1 IPv6 Status Figure 4-101 IPv6 S tatus The IPv6 Status page displays the router’s current IPv6 status and configurati on. All information is read-only. WAN Connection Type — The IPv6 connection way for WAN Connection Status — The status of IPv6 connection IPv6 Addr[…]
-
Страница 118
Archer C2 AC750 Wireless Dual Band Gigabit Router — 108 — 4.20.2 IPv6 WAN Figure 4-102 Enable/Disable IPv6 Connection T ype — Choose the correct WAN connec tion type based on you r ISP network topology . D ynamic IPv6 — Connections which use dynam ic IPv6 address assignment. Static IPv6 — Connections which use stat ic IPv6 address assig[…]
-
Страница 119
Archer C2 AC750 Wireless Dual Band Gigabit Router — 109 — 1) Dynamic IPv6 Figure 4-103 Dynamic IPv6 IPv6 Address — The IPv6 address assigned by your ISP dynamically . Prefix Length — The length of IPv6 address prefix. IPv6 Gatew ay — Enter the default gateway provided by your ISP. Addressing T ype — There are two types of assignati […]
-
Страница 120
Archer C2 AC750 Wireless Dual Band Gigabit Router — 1 10 — Figure 4-104 S tatic IPv6 IPv6 Address — Enter the IPv6 address provided by your ISP. Prefix Length — The length of IPv6 address prefix. IPv6 Gatewa y — Enter the default gateway provided by your ISP. IPv6 DNS Server — Enter the DNS IPv6 address provide d by your ISP. Se[…]
-
Страница 121
Archer C2 AC750 Wireless Dual Band Gigabit Router — 1 1 1 — Figure 4-105 PPPoEv6 PPP Usern ame/Password — Enter the User Name and Pass word provided by your ISP. These fields are case-sensitive. Authenticati on Type – Choose one authentication type from A UTO-AUTH , PAP , CHAP and MS-CHAP . Addressing T ype — There are two types of as[…]
-
Страница 122
Archer C2 AC750 Wireless Dual Band Gigabit Router — 1 12 — 4) T unnel 6to4 Figure 4-106 T unnel 6to4 This type is used in the situati on that your W AN connection is IPv4 while LAN connection is IPv6. W AN Connection — Display the available wan connection. Click the Save button to save yo ur settings. 4.20.3 IPv6 LAN Figure 4-107 IPv6 LAN A[…]
-
Страница 123
Archer C2 AC750 Wireless Dual Band Gigabit Router — 1 13 — 4.21 System T ools Figure 4-108 The System T ools menu Choose menu “ System T ools ”, and you can see the submenus under th e main menu: Tim e Settings , Diagnostic , Firm w are Upgrade , Factory Defaults , Backup & Restore , Reboot , Password , Sy stem Log and St atistics . Click a[…]
-
Страница 124
Archer C2 AC750 Wireless Dual Band Gigabit Router — 1 14 — Date — Enter your local date in MM/ DD/YY into the right blanks. Tim e — Enter your local time in HH/MM/SS into the right blanks. Get From PC — Enter your PC’s current time into the right blanks. NTP Server 1 / NTP Server 2 — Enter the address or domain of the NTP Server 1[…]
-
Страница 125
Archer C2 AC750 Wireless Dual Band Gigabit Router — 1 15 — Figure 4-1 10 T ime settings Note: 1. This setting will be used for some time-based fu nctions such as firewall. Y ou must specify your time zone once you login to the router successfully , otherwise, these functions will not take ef fect. 2. The time will be lost if the router is turne[…]
-
Страница 126
Archer C2 AC750 Wireless Dual Band Gigabit Router — 1 16 — Diagnostic T ool — Check the radio but ton to select one diagnostic too. Ping — This diagnostic to ol troublesho ots connectivity , reachability , and name resolution to a given host or gateway . T raceroute — This diagnostic tool tests the performance of a connection. Note:[…]
-
Страница 127
Archer C2 AC750 Wireless Dual Band Gigabit Router — 1 17 — 4.21.3 Firmware Upgrade Choose menu “ System T ools → Firmw are Upgrade ”, and then you can update the latest version of firmware for the router on the following screen. Figure 4-1 13 Firmware Upgrade Firmw are Version — Displays the current firmware version. Hardw are Version[…]
-
Страница 128
Archer C2 AC750 Wireless Dual Band Gigabit Router — 1 18 — 4.21.4 Factory Defaults Choose menu “ System T ools → Factory Defaults ”, and then and you can restore the configurations of the router to factory defaults on the following screen Figure 4-1 14 Restore Factory Default Click the Restore button to reset all configuration settings to the[…]
-
Страница 129
Archer C2 AC750 Wireless Dual Band Gigabit Router — 1 19 — Click the Restore button to update the configurati on with the file whose path is the one you have input or selected in the blank. Note: The current configuration will be covered with the uploading configuration file. Wrong process will lead the device unmanaged. The rest oring proc[…]
-
Страница 130
Archer C2 AC750 Wireless Dual Band Gigabit Router — 120 — Figure 4-1 17 Password It is strongly recommended that you should change the factor y default user name and passwor d of the router, because all users who try to access the router’s Web-based utility or Quick Setup will be prompted for the router’s default user nam e and password. […]
-
Страница 131
Archer C2 AC750 Wireless Dual Band Gigabit Router — 121 — Log Settings — Click to change the log settings . 4.21.9 Statistics Choose menu “ System T ools → St atistics ”, and then you can view the statistics of the router, including total traffic and current traffic of the last Packets Statistic Interval. Figure 4-1 18 S tatistics Sta[…]
-
Страница 132
Archer C2 AC750 Wireless Dual Band Gigabit Router — 122 — Statistics Table: IP/MAC Address The IP and MAC address are displayed with related statistics. Packets The total number of packets received and transmitted by the router. Total Byt es The total number of bytes received and transmitted by the router. Packets The total number of packets receiv[…]
-
Страница 133
Archer C2 AC750 Wireless Dual Band Gigabit Router — 123 — 4.22 Logout Choose ” Logout ”, and you will be back to t he login screen as shown in Figure 4-1 19 . Figure 4-1 19 Logout[…]
-
Страница 134
Archer C2 AC750 Wireless Dual Band Gigabit Router — 124 — Appendix A: F AQ 1. How do I configure the router to access Internet b y ADSL users? 1) First, configure the ADSL Modem configured in RFC1483 bridge model. 2) Connect the Ethernet cable from your ADSL Modem to the Internet port o n the router . The telephone cord plugs into the Line port of […]
-
Страница 135
Archer C2 AC750 Wireless Dual Band Gigabit Router — 125 — 2. How do I configure the router to access Internet b y Ethernet users? 1) Login to the router , click the “Network” menu on the left of your browser , and click «W AN» submenu. On the W AN page, sele ct “Dynamic IP” for «W AN Connection T ype», finish by clicking[…]
-
Страница 136
Archer C2 AC750 Wireless Dual Band Gigabit Router — 126 — Figure A-4 Virtual Servers Figure A-5 Add or Modify a Virtual server Entry Note: Your opposite side should call your WAN IP , which is displayed on the “Status” page. 4) How to enabl e DMZ Host: Log in to the router , click the “ Forwarding ” menu on the left of your browser , an[…]
-
Страница 137
Archer C2 AC750 Wireless Dual Band Gigabit Router — 127 — Figure A-7 Basic Security 4. I want to build a WEB Server on the LAN, what should I do? 1) Because the WEB Server port 80 will inte rfere with the WEB management port 80 on the router , you must change the WEB management port number to avoid interfer ence. 2) T o change the WEB management po[…]
-
Страница 138
Archer C2 AC750 Wireless Dual Band Gigabit Router — 128 — field of the Web browser. If the LAN IP of the modem connected with your router is 192.168.0.x, the def ault LAN IP of the router will autom atically switch from 192.168.0.1 to 192.168.1.1 to avoid IP conflict; in this case, please try http://192.168.1.1:88 . 3) Log in to the router , click […]
-
Страница 139
Archer C2 AC750 Wireless Dual Band Gigabit Router — 129 — Appendix B: Configuring the PC In this section, we’ll introduce how to inst all and configure the TCP/IP correctly in Windows XP . First make sure your Ethernet Adapter is wo rking, refer to the adapter ’s manual if needed. 1. Inst all TCP/IP component 1) On the Windows taskbar , click t[…]
-
Страница 140
Archer C2 AC750 Wireless Dual Band Gigabit Router — 130 — 5) The following TCP/IP Properties window will display and the IP Address tab is open on this window by default. 6) Select Obt ain an IP address automatically and Obt ain DNS server au tomatically , as shown in the Figure below: Figure B-3[…]
-
Страница 141
Archer C2 AC750 Wireless Dual Band Gigabit Router — 131 — Appendix C: S pecifications General S tandards IEEE 802.1 1ac, IEEE 802.1 1n, IEEE 802.1 1g, IEEE 802.1 1b, IEEE 802.1 1a, IEEE 802.1 1e, IEEE 802. 1 1i, IEEE 802.1X, IEEE 802.3X, IEEE 802.3, IEEE 802.3u, IEEE 802.3ab Protocols TCP/IP , PPPoE, DHCP , ICMP , NA T , SNTP , IGMPv3, L2TP , PPTP […]
-
Страница 142
Archer C2 AC750 Wireless Dual Band Gigabit Router — 132 — Appendix D: Glossary 802.11 ac — IEEE 802.11ac is a wireless comput er networking standard of 802.11.This specification will enable multi-stat ion WLAN throughput of at least 1 gigabit per second .This is accomplished by extending the air interface concepts embraced by 802.11n: wider RF […]
-
Страница 143
Archer C2 AC750 Wireless Dual Band Gigabit Router — 133 — MTU ( Maximum Transmission Unit ) — The size in bytes of the largest packet that can be transmitted. NAT ( N etwork A ddress T ranslation) — NAT technology translates IP addresses of a local area network to a different IP address for the Internet. PPPoE ( P oint to P oint P rotoc[…]