This hash board repair guide is suitable for Avalon Miner A1066, A1066pro, A1026, A1046, A1047, etc.
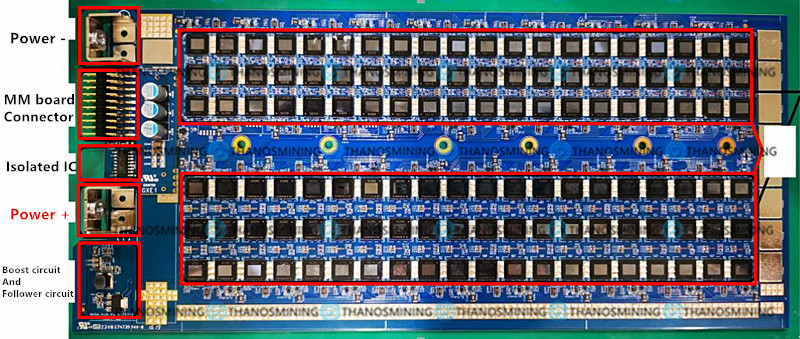
A10 series hash board introduction:
1. Positive and negative poles of the power supply;
2. Communication interface: communicate with MM board;
3. Main chip: ASIC chip;
4. Isolated chip unit;
5. Boost and follower circuit.

A10 series hash board test fixture interface introduction:
1. Connect the positive and negative poles of the Hash board power supply;
2. Connect the data cable of the hash board;
3. It is recommended to install the tooling bottom plate (insulation);
4. MM board with test script program;
5. Adjustable power interface cable;
6. USB to a serial port, connect the USB to the computer, and read the hash board test information through the serial port debugging tool.

Test fixture connection method:
1. The power supply interface of the primary circuit of the power supply, in which black is the main output negative pole, and red is the main output positive pole;
2. The negative interface of the main circuit power supply of the Hash board;
3. Hash board main circuit power supply positive interface;
4. The data protocol interface of the hash board;
5. USB to a serial port, the interface is defined as:
|
Test fixture |
USB to TTL |
|
TX |
TXD |
|
RX |
RXD |
|
GND |
GND |
6. Power supply 12VSB and IIC interface (2*4 interface).
Hash board test method:
①According to the status of the indicator light of the test fixture, to determine the status of the hash board, and to determine whether maintenance is required;
· A green light indicates that the hash board is healthy and does not require maintenance.
· The red light indicates that the hash board is abnormal and needs to be repaired.
②By connecting the serial port debugging tool to the computer screen, determine whether there is a problem with the hash board;
First, set the serial port software debugging parameters: among them, the baud rate is set to 115200, the data bit is 8, and the stop bit is 1.
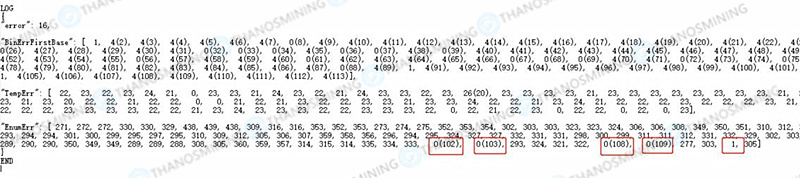
Through the serial port debugging tool, check the LOG information of the hash board running on the computer, as shown in the figure:

Among them, the ASIC count is 120 chips, and the test fixture is bright red, indicating that the test circuit is not working and needs to be repaired. In addition, the 9th item + 7 item + 6 item in the above figure = a total of 22 items, indicating that there are problems with these three indicators, which need to be checked and repaired.
The following figure is the error code comparison table:

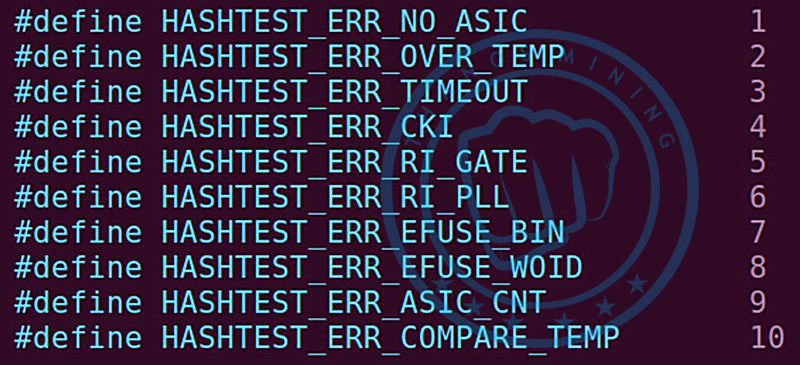
Error code description:
|
Error code |
Describe |
|
1 |
Failed to enumerate ASIC chips |
|
2 |
ASIC chip high temperature (greater than 90°C) |
|
3 |
Test timeout |
|
4 |
CKL signal error |
|
5 |
RI signal error in gate state |
|
6 |
RI signal error at the configured frequency |
|
7 |
ASIC chip BIN information error |
|
8 |
ASIC chip batch number error |
|
9 |
ASIC chip voltage error |
|
10 |
The difference between the maximum and minimum temperature of the ASIC chip is relatively large |
The software can scan the chip, but if the chip is not working, the voltage entry will show 0, and a comma will appear after each voltage value.
If the software does not scan the chip voltage value, the software will automatically fill in 0. It is necessary to check the adjacent chip at the 0 positions during maintenance. Likely, the 0 positions or the adjacent chip does not work.

Hash board voltage test:
The first thing to do is test the power supply’s impedance on the hash board. The resistance values are shown in the table below. If there is a short, you’ll need to inspect parts of the circuit for burnout or solder shorts. After the impedance test is completed, the power-on test is performed to test the power supply voltage of the entire hash board. The test positions and test voltage values are as follows:

The measured position and voltage values are:
|
Test power |
Test location |
Voltage value |
Impedance value |
|
Power voltage |
«-» is in black clip & Vcore+ |
11.15V |
2Ω |
|
Boost circuit voltage |
«-» is on the black clip and the left end of the C399 |
16.28V |
≥60kΩ |
|
Follow circuit voltage |
«-» is at the black clip and U98 pin4 |
12.95V |
≥400Ω |
ASIC chip detection:
If the voltage test passes, the ASIC chip of the hash board needs to be tested. Take the A10 hash board as an example; there are 40 groups of chips connected in series on the hash board, each group of chips is composed of 3 chips in parallel, and each chip includes three power supplies and 4 groups of signals: Vcore, VTOP and VDDIO, the signal is: CKin, Cin, Rin, Din and CKout, Cout, Rout, Dout.
Each group of chips consists of three chips in parallel. The VDDIO and VTOP of each group of chips are powered by 1.8V-LDO and 0.75V-LDO, respectively. In addition, there will be VDDIO and VTOP test points next to each group of chips, which can test the voltage value.
as follows:
|
Chip voltage test, the working voltage value of each chip is: |
|
|
Type |
Voltage value |
|
Vcore |
280mV |
|
VDDIO |
1.8V |
|
VTOP |
0.75V |
Signal test:
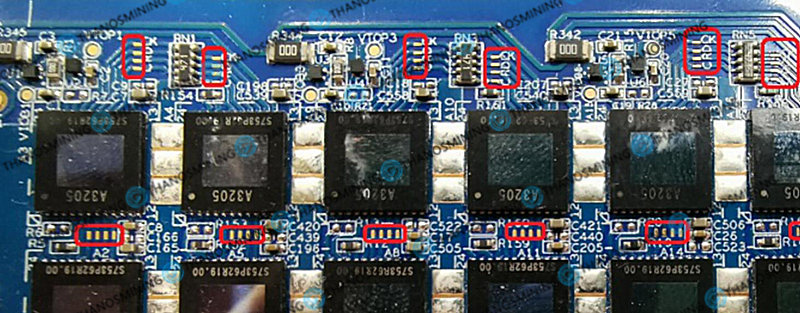
When there is a problem with the hash board, it is necessary to test the chip’s signal and power supply IO and TOP. This is because the chips’ signals on the hash board are connected in series, the signals of each chip are CK, C, R, and D, and each chip needs to test the output signal.

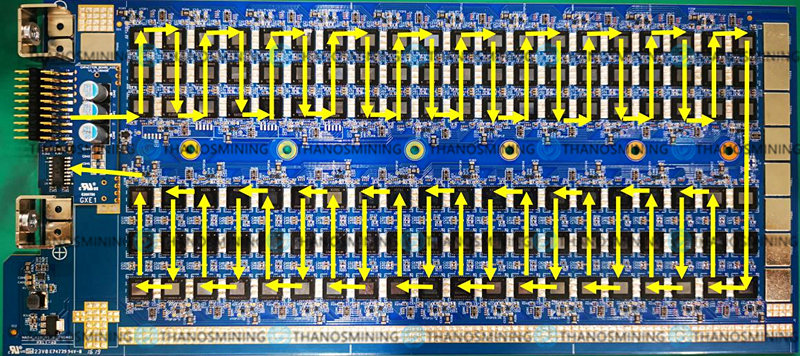
The enlarged hash board is shown in the figure below, where the red box is the test point of the ASIC chip:

Description of the signal transmission direction of the Avalon hash board:
Each group of signals includes four signal test points, they are CK, D, R, and C;
CK: Chip working clock, the frequency is 25MHz;
D: The transmission data signal of the chip;
R: The reset pin of the chip;
C: The transmission clock signal of the chip.

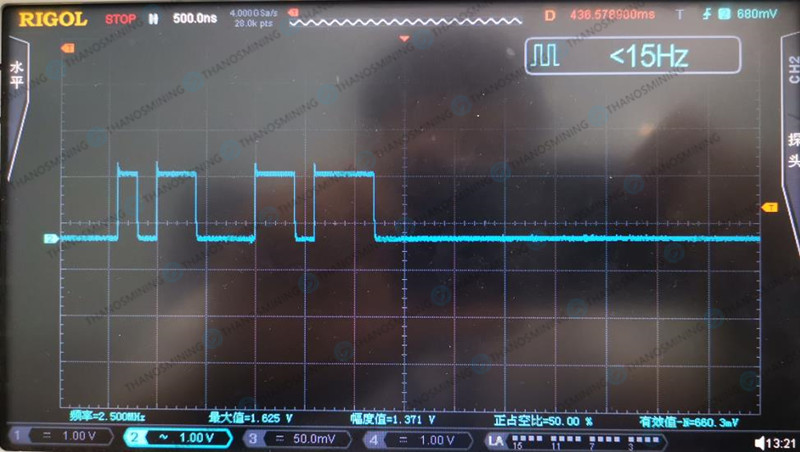
Test the waveform with an oscilloscope to determine whether the chip is abnormal:
The oscilloscope settings are AC position; amplitude is set to 1.00V/div; frequency is set to 500ns/div.
The waveform of the CK signal, the frequency is 25MHz, and the amplitude is 1.5V-1.8V;

The waveform of the C signal, the frequency is 5MHz, and the amplitude is 1.5V-1.8V;

The waveform of the D signal, the amplitude is 1.5V-1.8V

Please use a Fluke multimeter for chips with abnormal waveforms to test their voltage and resistance values. When it is determined that the ASIC chip is damaged, please replace the damaged ASIC chip by yourself.
NOTICE
This is an original piece. Reproduction in whole or part without written permission is prohibited.
AvalonMinerViewer
Автор:
bot
Программа: AvalonMinerViewer
Актуальаня версия: 1.24.45 (изменения читайте внизу)
Разработчик: Бобров А.А.
Требования:
-ОС: Windows 7/8/10/11 РУ/EN + Net 4.8 Runtime-Desktop
-Масштаб экрана — любой
Оплата символическая в виде доната. Файл можно найти на сайте автора.
Программа как есть не делает ни каких изменений в майнере, никаким образом им не управляет.
Программа только визуально оформляет данные с майнеров Avalon 10/11/12 серии полученные по API.
ВНИМАНИЕ: Визуальное отображение состояния чипа(ов) не является поводом для замены чипа или термопасты под радиаторами,
а так-же не призывает к разборке майнера для каких либо необдуманных действий.
Для определения степени неисправности и ремонта майнера необходимо обратиться в специализированный сервис.
Для корректной установки необходимо запускать установку файлом setup.exe.
При запуске этим файлом установщик проверит соответствие системных требований.
1.0.11b — Исправления
— в окне о программе добавлена ссылка на телеграмм канал
— оптимизация интерфейса во время чтения данных с майнера
— при наведении на температуру отображается правильная подсказка
— в поле ввода порт, теперь нельзя ввести буквы
1.0.10b — Исправления
— оптимизация интерфейса во время чтения данных с майнера
— исправление ошибок
1.0.9b — Исправления
— исправлено отображение номера чипов в 10й серии
1.0.8b — Исправления:
— была обнаружена новая ошибка 262144, пока её расшифровка не известна и в выпадающем списке ошибок она обозначена как «Contact the factory».
— если чип еще не определен, то цвет фона не меняется.
— корректное отображение чипов и потока воздуха на моделях 10ХХPro
1.0.7b — Исправления:
— при наведении на данные чипа, выводится подсказка о значении.
1.0.6b — Исправления:
— программа теперь работает при любом масштабе.
1.0.5b — Исправления:
— добавлена возможность читать майнеры 10й серии с прошивками 19-ого года.
— немного смещена температура красного чипа (раньше была 95 градусов, теперь 100 градусов)
1.0.4b — Исправления:
— в отображении времени работы добавлены ведущие нули для удобного отображения.
— добавлена возможность сохранить лог в текстовый файл.
1.0.3b — Исправления:
— исправлена ошибка появляющаяся случае, когда в региональных настройках разделитель дробной и целой части не запятая, а другой знак.
— добавлено отображение количества отработавших дней.
— при сохранении скрина обрезана часть окна сверху, что бы не было рекламы при пересылки скрина в группы.
1.0.2b — общая бета версия.
25 покупок
130 скачиваний

It mainly explains how to repair hash board of Canaan Avalon A10 series, suitable for AvalonMiner A1066, A1066pro, A1026, A1046, A1047 and other models.
A10 series hash board introduction:
1. The positive pole of the power supply and the negative pole of the power supply: connect the positive pole and the negative pole of the power supply;
2. JamLink communication: communicate with MM;
3. Main chip: ASIC chip.
4. Isolated chip unit
5. Boost and follower circuit
A10 series hash board test fixture introduction (official test fixture):
1. Connect the positive and negative poles of the power supply of the hash board;
2. Connect the JamLink data cable of the hash board;
3. It is recommended to install the tooling bottom plate (insulation);
4. MM board with test script program;
5. Kosebao adjustable power interface cable;
6. Connect the USB to serial port, connect the USB to the computer, and the hash board test information can be read out through the serial port debugging tool.

Test fixture connection method:
1. The main circuit power interface of Gaussian power supply, in which black is the main output negative pole, and red is the main output positive pole;
2. Negative interface of the main circuit power supply of the hash board;
3. The positive interface of the main circuit power supply of the hash board;
4. JamLink data protocol interface of hash board;
5. USB to serial port, the interface is defined as:
| Test Fixture | USB to TTL |
| TX | TXD |
| RX | RXD |
| GND | GND |
6. Gospo power supply 12VSB and IIC interface (2×4 interface).
————————————————————
Testing method:
①
Judge the status of the hash board, judge the status of the hash board according to the status of the indicator light of the test fixture, and judge whether it needs repair.
A green light indicates that the hash board is healthy and does not require repair.
A red light indicates that the hash board is abnormal and needs to be repaired.
②
Connect the computer screen through the serial port to determine whether there is a problem with the Hash board, first set the serial port software debugging parameters:
The serial port debugging tool needs to set the serial port number, and the baud rate is set to 115200, the data bit is 8, and the stop bit is 1.
Through the serial port debugging tool, check the LOG information of the hash board running on the computer, as shown in the figure:

Among them, the number of asic counts is 120 chip, and the test fixture is on red, indicating that the test loop is not working and needs to be repaired. The 9th item in the above figure + 7 items + 6 items = total item 22, indicating that there are problems with these three indicators , need to be checked and repaired one by one.
The following figure is the error code comparison table:
Error code explanation:
| Error code | Describe |
| 1 | Failed to enumerate ASIC chip |
| 2 | High temperature of ASIC chip (greater than 90°C) |
| 3 | Test timeout |
| 4 | CKL signal error |
| 5 | RI signal error in gate state |
| 6 | RI signal error at configured frequency |
| 7 | ASIC chip BIN information error |
| 8 | ASIC chip batch number error |
| 9 | ASIC chip voltage error |
| 10 | The difference between the maximum and minimum temperature of the ASIC chip is relatively large |
The software can scan the chip, but the chip does not work, the voltage item will display 0, and a comma will appear after each voltage value.
If the chip voltage value is not scanned, the software will automatically fill in 0. At this time, it will be automatically divided into 3 strings, and a comma will be automatically added after each 3 values. When repairing, it is necessary to check the adjacent chip at the 0 position, jiyou may be 0 position or the adjacent chip is not working.
Hash board voltage test:
First of all, it is necessary to test the impedance of the power supply on the Hash board. The resistance values are shown in the following table. If there is a short circuit, you need to check the part of the circuit to see if there is any burnout or welding short circuit. After the impedance test is completed, the power-on test is performed to test the power supply voltage of the entire Hash board. The test position and test voltage value are as follows:

The measured position and voltage values are:
| Test power | Test location | Voltage value | Impedance value |
| Mains supply voltage | «-» at the black clip&Vcore+ | 11.15V | 2Ω |
| Boost circuit voltage | «-» at the black clip & the left end of C399 | 16.28V | ≥60kΩ |
| Follow circuit voltage | «-» at the black clip & U98 pin4 | 12.95V | ≥400Ω |
————————————————————
ASIC chip detection:
If the voltage test passes, you need to test the ASIC chip of the hash board. Take A10 as an example, there are 40 groups of chips connected in series on the Hash board, each group of chips is composed of 3 chips in parallel, each chip includes three power supplies and 4 groups of signals: Vcore, VTOP and VDDIO, the signals are: CKin, Cin, Rin, Din and CKout, Cout, Rout, Dout.
Each group of chips is composed of three chips in parallel. The VDDIO and VTOP of each group of chips are powered by 1.8V-LDO and 0.75V-LDO respectively. There will be VDDIO and VTOP test points next to each group of chips, which can be tested Voltage value.
As follows:
| Chip voltage test, the working voltage value of each chip is: | |
| Type | Voltage value |
| Vcore | 280mV |
| VDDIO | 1.8V |
| VTOP | 0.75V |
————————————————————
Signal test:
When there is a problem with the hash board, it is necessary to test the signals of the chips on the hash board and the power supply of IO and TOP. The signals of the chips on the hash board are connected in series, and the signals of each chip are CK, C, R, D, Each chip needs to be tested for output signals.

The enlarged picture, the red box is the test point of the ASIC chip:
————————————————————
Signal transmission direction of Avalon Hash board:
Each group of signals includes four signals: CK, D, R, and C:
CK: the working clock of the chip, the frequency is 25MHz;
D: The transmission data signal of the chip;
R: the reset pin of the chip;
C: The transmission clock signal of the chip.
———————————————————
Test the waveform with an oscilloscope to determine whether the chip is abnormal
The oscilloscope settings are:
AC position;
The amplitude is set to 1.00V/div;
The frequency is set to 500ns/div.
The waveform of the CK signal, the frequency is 25MHz, the amplitude is 1.5V-1.8V

C waveform, frequency 5MHz, amplitude 1.5V-1.8V

D waveform, the amplitude is 1.5V-1.8V
For the chip with abnormal waveform, please use a multimeter to test its voltage and resistance value. When it is determined that the ASIC chip is damaged, please replace the ASIC chip by yourself.

Your email address will not be published.Required fields are marked. *
Скачать и просмотреть руководство по ремонту, запуску и обслуживанию асик майнеров AntMiner, Whatsminer, Innosilicon, Avalon онлайн
На этой странице вы можете прочесть и скачать все необходимые руководства.
Но, конечно, вы всегда можете связаться с нами по WhatsApp +79275104327, по электронной почте Этот адрес электронной почты защищен от спам-ботов. У вас должен быть включен JavaScript для просмотра. или оставить сообщение в чате, если у вас есть какие-либо (технические) вопросы о наших продуктах.
Руководство по ремонту [PDF] Antminer
Руководство по ремонту хэш-платы Antminer D3
Руководство по ремонту хэш-платы Antminer S9
Руководство по ремонту хэш-платы Antminer S9K
Руководство по ремонту хэш-платы Antminer S11
Руководство по ремонту хэш-платы Antminer S15 T15
Руководство по ремонту хэш-платы Antminer S17+
Руководство по ремонту хэш-платы Antminer S17E
Руководство по ремонту хэш-платы Antminer S17
Руководство по ремонту хэш-платы Antminer T9
Руководство по ремонту хэш-платы Antminer T17+
Руководство по ремонту хэш-платы Antminer T17
Руководство по ремонту хэш-платы Innosilicon miner
Руководство по ремонту хэш-платы Antminer WhatsMiner M10
Руководство по ремонту хэш-платы Antminer Whatsminer M20S
Инструкция по установке [PDF]
Antminer
Руководство Antminer D3
Руководство Antminer DR3
Руководство Antminer DR5
Руководство Antminer E3
Руководство Antminer L3
Руководство Antminer R4
Руководство Antminer S1
Руководство Antminer S2
Руководство Antminer S3
Руководство Antminer S4+
Руководство Antminer S5+
Руководство Antminer D3
Руководство Antminer S7
Руководство Antminer S9 Hydro
Руководство Antminer S9
Руководство Antminer S9k
Руководство Antminer S9SE
Руководство Antminer S11
Руководство Antminer S15
Руководство Antminer S17+
Руководство Antminer S17E
Руководство Antminer S17
Руководство Antminer S17Pro
Руководство Antminer T17
Руководство Antminer S19
Руководство Antminer S19Pro
Руководство Antminer T9
Руководство Antminer T15
Руководство Antminer T17+
Руководство Antminer T17E
Руководство Antminer T19
Руководство Antminer X3
Руководство Antminer Z9 Mini
Руководство Antminer Z9
Руководство Antminer Z11
Руководство Antminer Z15
Avalon
Avalonminer 1047 Manual
Avalonminer 1066 Manual
Avalonminer 1026 Manual
Avalonminer 1066 Pro Manual
Avalonminer 1146 Pro Manual
Innosilicon
Innosilicon A4+Manual
Innosilicon A6 Manual
Innosilicon A9 Manual
Innosilicon D9 DCR Manual
Innosilicon S11 Sia Manual
Innosilicon T2T 32T Manual
Innosilicon T2TZ 30T Manual
Innosilicon T3+57T Manual
Loveminer
Loveminer A1 Manual
Whatsminer
WhatsMiner D1 Manual
WhatsMiner M3 Manual
WhatsMiner M10 Manual
WhatsMiner M20S Manual
WhatsMiner M21 Manual
WhatsMiner M21S Manual
WhatsMiner M30S Manual
WhatsMiner M31S Manual
WhatsMiner M32 Manual
руководство по блоку питания и руководство по ремонту [PDF]
Руководство Antminer APW3
Руководство Antminer APW5
Руководство по ремонту блоков питания Antminer APW9 и APW9+
Руководства по Antminer, ремонт antminer , ремонт whatsminer, ремонт innosilicon, ремонт avalon, руководство по ремонту асиков
Руководство по ремонту [PDF]
Antminer
- Руководство по ремонту хэш-платы Antminer D3
- Руководство по ремонту хэш-платы Antminer S9
- Руководство по ремонту хэш-платы Antminer S9 K
- Руководство по ремонту хэш-платы Antminer S11
- Руководство по ремонту хэш-платы Antminer S15 T15
- Руководство по ремонту хэш-платы Antminer S17+
- Руководство по ремонту хэш-платы Antminer S17E
- Руководство по ремонту хэш-платы Antminer S17
- Руководство по ремонту хэш-платы Antminer T9
- Руководство по ремонту хэш-платы Antminer T17+
- Руководство по ремонту хэш-платы Antminer T17
- Руководство по ремонту хэш-платы Innosilicon miner
- Руководство по ремонту хэш-платы Antminer WhatsMiner M10
- Руководство по ремонту хэш-платы Antminer Whatsminer M20S
Инструкция по установке [PDF]
Antminer
- Руководство Antminer D3
- Руководство Antminer DR3
- Руководство Antminer DR5
- Руководство Antminer E3
- Руководство Antminer L3
- Руководство Antminer R4
- Руководство Antminer S1
- Руководство Antminer S2
- Руководство Antminer S3
- Руководство Antminer S4+
- Руководство Antminer S5+
- Руководство Antminer D3
- Руководство Antminer S7
- Руководство Antminer S9 Hydro
- Руководство Antminer S9
- Руководство Antminer S9 k
- Руководство Antminer S9 SE
- Руководство Antminer S11
- Руководство Antminer S15
- Руководство Antminer S17+
- Руководство Antminer S17 E
- Руководство Antminer S17
- Руководство Antminer S17 Pro
- Руководство Antminer T17
- Руководство Antminer S19
- Руководство Antminer S19 Pro
- Руководство Antminer T9
- Руководство Antminer T15
- Руководство Antminer T17+
- Руководство Antminer T17 E
- Руководство Antminer T19
- Руководство Antminer X3
- Руководство Antminer Z9 Mini
- Руководство Antminer Z9
- Руководство Antminer Z11
- Руководство Antminer Z15
Avalon
- Avalonminer 1047 Manual
- Avalonminer 1066 Manual
- Avalonminer 1026 Manual
- Avalonminer 1066 Pro Manual
- Avalonminer 1146 Pro Manual
Innosilicon
- Innosilicon A4+Manual
- Innosilicon A6 Manual
- Innosilicon A9 Manual
- Innosilicon D9 DCR Manual
- Innosilicon S11 Sia Manual
- Innosilicon T2T 32T Manual
- Innosilicon T2TZ 30T Manual
- Innosilicon T3+57T Manual
Loveminer
- Loveminer A1 Manual
Whatsminer
- WhatsMiner D1 Manual
- WhatsMiner M3 Manual
- WhatsMiner M10 Manual
- WhatsMiner M20S Manual
- WhatsMiner M21 Manual
- WhatsMiner M21S Manual
- WhatsMiner M30S Manual
- WhatsMiner M31S Manual
- WhatsMiner M32 Manual
руководство по блоку питания и руководство по ремонту [PDF]
- Руководство Antminer APW3
- Руководство Antminer APW5
- Руководство по ремонту блоков питания Antminer APW9 и APW9+
Техническая документация по ремонту автомобилей Toyota Avalon
( все годы выпуска) Бесплатно, без регистрации и СМС

Руководство по ремонту, эксплуатации и техническому обслуживанию Toyota Avalon
— полные технические характеристики Toyota Avalon
— особенности эксплуатации Toyota Avalon
— устранение неисправностей
— цветные электросхемы
СКАЧАТЬ / СКАЧАТЬ С ЗЕРКАЛА
Руководство по эксплуатации Toyota Avalon
— полные технические характеристики Toyota Avalon
— особенности эксплуатации
— устранение неисправностей Toyota Avalon
— цветные электросхемы
СКАЧАТЬ / СКАЧАТЬ С ЗЕРКАЛА
Руководство по ремонту в фотографиях Toyota Avalon
— полные технические характеристики Toyota Avalon
— особенности эксплуатации
— устранение неисправностей
— более 2000 фотографий процесса ремонта Toyota Avalon
СКАЧАТЬ / СКАЧАТЬ С ЗЕРКАЛА
Каталог деталей и сборочных единиц Toyota Avalon
— таблица взаимозаменяемости деталей автомобилей Toyota Avalon
— предназначен для работников СТО и владельцев автомобилей Toyota Avalon
— каталог деталей
СКАЧАТЬ / СКАЧАТЬ С ЗЕРКАЛА
Подробная электросхема Toyota Avalon
— полное описание электрооборудования Toyota Avalon
— подробно описан алгоритм поиска неисправностей электрооборудования (стартер, генератор, система зажигания)
— подробная схема электрооборудования ( электро схема ) Toyota Avalon
СКАЧАТЬ / СКАЧАТЬ С ЗЕРКАЛА
Руководство по ремонту двигателя Toyota Avalon
— полные технические характеристики двигателя Toyota Avalon
— особенности конструкции и ремонта двигателя
— устранение неисправностей двигателя своими руками Toyota Avalon
— подробное описание процессов разборки, дефектовки и сборки двигателя с фотографиями
СКАЧАТЬ / СКАЧАТЬ С ЗЕРКАЛА
Руководство по ремонту коробок передач КПП Toyota Avalon
— полные технические характеристики КПП Toyota Avalon
— особенности конструкции и ремонта КПП Toyota Avalon
— устранение неисправностей КПП
— подробное описание процессов разборки, дефектовки и сборки КПП с фотографиями
Коды ошибок инжектора Toyota Avalon
— описание и схема инжектора
— расшифровка кодов неисправностей двигателя Toyota Avalon
— устранение неисправностей инжектора Toyota Avalon
— цветные электросхемы
Руководство по тюнингу Toyota Avalon
— тюнинг своими руками Toyota Avalon
— тюнинг двигателя
— тюнинг кузова
— тюнинг подвески
а вот здесь можно заработать на новую машину, и тогда старую не придется ремонтировать!!!
Скачать все одним файлом с depositfiles
Скачать все одним файлом с turbobit