Minecraft — это БОЛЬШЕ, чем просто игра. Это — альтернативная Вселенная, в которой можно создавать, исследовать, выживать, искать приключения, вступать в схватки и даже захватить сокровища самого Эндер-дракона. Но туда не надо входить в одиночку, прихватите с собой эту книгу!
Вы узнаете всё о ремеслах и добыче ресурсов, о пещерах и животных, о дружелюбных и враждебных мобах, о фермах и деревнях. Вы освоите хитрые приемы крафта множества необходимых вещей, ведения поединков, окажетесь в подземельях тайных храмов, создадите заклинания немыслимой силы, научитесь выживать там, куда не каждый осмелится отправиться, а также создадите бесчисленное количество собственных миров Minecraft.
Из этого обновленного издания вы узнаете, как:
— Собирать ресурсы, создавать инструменты, строить укрытия.
— Взять кирку и отправиться добывать железную руду, золото, алмазы и красный камень.
— Спастись бегством от всех типов враждебных мобов (или как их победить).
-…
Читать полностью
Укажите регион, чтобы мы точнее рассчитали условия доставки
Начните вводить название города, страны, индекс, а мы подскажем
Например:
Москва,
Санкт-Петербург,
Новосибирск,
Екатеринбург,
Нижний Новгород,
Краснодар,
Челябинск,
Кемерово,
Тюмень,
Красноярск,
Казань,
Пермь,
Ростов-на-Дону,
Самара,
Омск
Intro[]
What’s a Recurrent Complex Maze?[]
Imagine a maze like Lego bricks: You have smaller building blocks — e.g. corridors, rooms and exits, which are randomly connected to form a complete maze.
Each of those building blocks is a separate structure in Recurrent Complex, which contains Maze Generation Info. This info tells the mod exactly how the component should be included in what kind of maze. This makes it easy to expand upon existing mazes as well as create new ones.
In the end, a Maze Generation Script is added to a structure, which tells the mod that a maze should generate here, and in what confines. By defining rooms, exits and connection strategies, it makes it possible to integrate it into a structure.
Design your maze[]
Your maze needs a base room size, a complete maze size, and a selection of two or more exits.
So if your maze components are Legos, we need to decide on a base size of a brick. This would be like those single brick pieces. Each Lego is just that single brick, but resized so you have the 2×1 Lego, the 2×2 Lego, and so on. The same can be done with our maze. For example, lets say our «single brick» is a 7x5x7 room. That is the smallest room we can make.
So, our rooms have to be a multiple of our «single brick», this means that we can change the size of the room, but it has to be multipliable by our X, Y, and Z numbers. So if I wanted a room that was longer, I would need to build a room that is 14x5x7. Or if I wanted it taller, I would need to make it 7x10x7.
When designing your maze, you need to use this grid to decide how large you want your maze to be. This will be important when we go to generate the maze, but we will cover that later on.
Regarding the style — As long as the maze respects the size limits with the walls, we can put whatever we want inside. You can design the maze however you like. For my first maze, I just went with a simple stone brick floor, wood walls, and cobblestone ceiling. I put some chests in some rooms, mob spawners in others, and some decorations like statues and cake tables. The more rooms you design, the more variety your dungeon will have. You don’t want your dungeon to be boring, but you also don’t want it to be overwhelming.
Normally it’s easier to start with 2D mazes to get a feel for how it works. You can make whatever maze you like, but a good place to start is a simple labyrinth. You can make it in any style you want. A hedge maze, a stone walled castle, but just keep it simple for your first maze.
Step 1: Build the building blocks[]
Your building blocks can also be called called components. You need to build all of your components for your maze in game so you can use them in your maze. If you want to spare a lot of work, make sure as many components as possible are marked as ‘rotatable’ (and actually are rotatable…), so the structures can face any direction for the maze.
To make sure the maze gets no random holes, you need components that generate in the maze. Here’s what you might want to add for a basic 2D maze:
- Dead End
- Corridor
- Turn
- T Shape (3 exits)
- Intersection (4 exits)
Once you have built all of your components, its time to start scanning. Get the Block Selector (and/or the Floating Block Selector) and highlight one of your of your buildings and use the /#export command, similarly to building a normal structure. I would recommend that you name all of your components similarly so it is easier to find them later. Something like Maze_MyFirstMaze_DeadEnd or Maze_HedgeMaze_Turn, that way they are easier to /#import, /#edit, ect. Make sure to set your component to active!
After that, head to the Generation tab. Delete the Natural generation and insert a Maze Component and enter it. On this menu you will have a few options. Your MazeID needs to be the same on all of your components. This will be the ID you use to generate the entire maze. The Weight will increase or decrease how likely a component spawns. So if you put it at .5 it will have half the chance to be chosen, If you put it at 2 it will have double the chance, ect.
The Rooms tab is a bit misleading with the name. It decides the size of the component. Do you remember the multiplication of our «building blocks»? (If not scroll up to the Design your maze section), this is where we use that. Keep in mind that we start counting from 0. So for example, if we built that 14x5x7 room, then our Range (x) would be 0-1. If we increased the length further and made it 21x5x7, our Range (x) would be 0-2 and so on. It’s the same for Range (y), and Range (z).
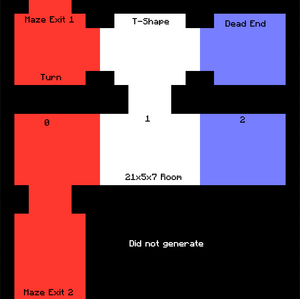
The Exits, in short, are where the holes in the walls that let you walk from room to room. This can include a door if you want. If you have a component that is base size, this is easy! Just add an exit for each hole, and set the Side to wherever the exit is facing. This is easy to do by hitting F3 and looking the out of the exit from inside the room and using the direction from the Facing stat on the left side of the screen. However, if your component is bigger than the base size, then you will need to edit the Position sliders. Lets take a look at a diagram for this. As you can see, the 21x5x7, which has a Range (x) of 0-2 has a south exit in section 0, and a north exit in section 1. So you would set up a north exit at (1,0,0) and a south exit at (0,0,0).
Step 2: Make the entrance[]
Once you have created all the components of the Maze, you now need to make the entrance to it. The entrance will be a normal structure with a Maze Generator block in the lowest corner of where the maze needs to generate. Right click the block to configure it. The first thing you should do is set the MazeID to the maze you’re trying to generate. It should match the MazeID you set all your components to. Then click Edit and set the base room size. My dungeon is 7x5x7, but you should set yours to whatever you decided your base room size should be. You should then open the Maze tab.
In the Rooms section, it is the same weird phrasing. This decides the complete maze size. So, once again starting a 0, you need to decide how many components your maze will be made up of. So if you set Range (x) and Range (z) to 0-2, then you will have a 3×3 grid of components, like in the diagram.
In the Exits section, you will need to define which sections the exits of the maze are in. So, once again looking at the diagram, we have both exits in section 0. One to the north and one to the south. So we have one exit at Section 0 on the X axis and Section 0 on the Z axis. There is another exit in Section 0 on the X axis, and Section 2 on the Z axis. So our exits would be [0, 0, 0] north and [0, 0, 2] south.
Once you finish exits, go back to the menu with MazeID and click the Rules section. This is where you ensure there is a path between your exits. If you have more than 2 exits, you may want to ensure a path between exit 3 and 4, but not between 3 and 1. If you only have 2 exits, though, you should probably have it set to Connect All.
The Last thing you can configure is the Shift. This will move the entire maze by a however many blocks you specify. So if you wanted the whole maze underground, for instance, you would shift the example maze by -5 Y.
Step 3: Test,Test,Test.[]
Export the structure, and simply generate it. If you have not made any mistakes, it should work flawlessly. Otherwise, go back and adjust the correct steps.
Step 4: Add more special rooms[]
Now you can go wild with what you really want your maze to contain. Feel free to go crazy with big rooms, hidden exits, and whatever else.
You can also make the structure bigger than specifically allowed to make it ‘intersect’ with the neighbors (always keep the same expansion to each side — it will center itself automatically). This can be dangerous, but also quite powerful if done right — you could make the door show what room you are entering, for example.
From this point on, you are completely free. You can edit any of these steps to adjust it. You can also add more than one maze to a structure, or even connect them with pre-defined exits for interesting setups.
Minecraft — это БОЛЬШЕ, чем просто игра. Это — альтернативная Вселенная, в которой можно создавать, исследовать, выживать, искать приключения, вступать в схватки и даже захватить сокровища самого Эндер-дракона. Но туда не надо входить в одиночку, прихватите с собой эту книгу!
Вы узнаете всё о ремеслах и добыче ресурсов, о пещерах и животных, о дружелюбных и враждебных мобах, о фермах и деревнях. Вы освоите хитрые приемы крафта множества необходимых вещей, ведения поединков, окажетесь в подземельях тайных храмов, создадите заклинания немыслимой силы, научитесь выживать там, куда не каждый осмелится отправиться, а также создадите бесчисленное количество собственных миров Minecraft.
Из этого обновленного издания вы узнаете, как:
— Собирать ресурсы, создавать инструменты, строить укрытия.
— Взять кирку и отправиться добывать железную руду, золото, алмазы и красный камень.
— Спастись бегством от всех типов враждебных мобов (или как их победить).
-…
Читать полностью
Укажите регион, чтобы мы точнее рассчитали условия доставки
Начните вводить название города, страны, индекс, а мы подскажем
Например:
Москва,
Санкт-Петербург,
Новосибирск,
Екатеринбург,
Нижний Новгород,
Краснодар,
Челябинск,
Кемерово,
Тюмень,
Красноярск,
Казань,
Пермь,
Ростов-на-Дону,
Самара,
Омск
Издательство «Эгмонт Россия» было создано в 1992 году как дочерняя фирма старейшего в Европе датского издательского концерна «ЭГМОНТ ИНТЕРНЭШНЛ ХОЛДИНГ», имеющего более ста представительств в 25 странах мира.
С момента своего возникновения и по сегодняшний день «Эгмонт Россия» специализируется на выпуске книг и журналов для детей. Издательство выпускает детскую литературу различных направлений: художественную, развивающую, образовательную, учебную, а также энциклопедические издания для детей и подростков.
Обладая эксклюзивными правами на издание печатной продукции Уолта Диснея, издательство уже более 10 лет выпускает красочные, прекрасно оформленные книжки по мотивам анимационных диснеевских фильмов. В ассортименте издательства книги, раскраски, сборники кроссвордов и головоломок, книжки с вырубкой, книжки с наклейками с популярными героями диснеевских брендов.
Также «Эгмонт Россия» выпускает уникальные книги таких всемирно известных детских брендов как Barbie, Том и Джерри, Looneу Toons и др.
Мы с Друзьями Прожили Один День в БЕСКОНЕЧНОМ Лабиринте в Майнкрафт..
Руководство по Minecraft
Издательство «Эгмонт Россия» было создано в 1992 году как дочерняя фирма старейшего в Европе датского издательского концерна «ЭГМОНТ ИНТЕРНЭШНЛ ХОЛДИНГ», имеющего более ста представительств в 25 странах мира. С момента своего возникновения и по сегодняшний день «Эгмонт Россия» специализируется на выпуске книг и журналов для детей.
Издательство выпускает детскую литературу различных направлений: художественную, развивающую, образовательную, учебную, а также энциклопедические издания для детей и подростков. Обладая эксклюзивными правами на издание печатной продукции Уолта Диснея, издательство уже более 10 лет выпускает красочные, прекрасно оформленные книжки по мотивам анимационных диснеевских фильмов. В ассортименте издательства книги, раскраски, сборники кроссвордов и головоломок, книжки с вырубкой, книжки с наклейками с популярными героями диснеевских брендов. Также «Эгмонт Россия» выпускает уникальные книги таких всемирно известных детских брендов как Barbie, Том и Джерри, Looneу Toons и др.
Руководство по Minecraft Руководство по Minecraft
Руководство по Minecraft
Источник: www.labirint.ru
Maze Generator [1.19.2]

Maze Generator добавит в игру блок для генерации простых лабиринтов! Просто поставьте его, выберите размер конструкции и активируйте его с помощью сигнала красного камня и у вас появится случайно сгенерированный лабиринт из каменных блоков!
Скриншоты


ПЫТАЮСЬ ВЫЖИТЬ В ЛАБИРИНТЕ В МАЙНКРАФТ | Компот Minecraft
Как установить Maze Generator
- Скачай и установи Fabric
- Скачай мод
- Не распаковывая, скопируй в .minecraftmods
- Готово
Скачать Maze Generator
#СсылкаРазмерДата
| https://minecraft-inside.ru/download/240224/ | 315,30 КБ | 21 октября 2022 |
Источник: minecraft-inside.ru
Тема: Лабиринт в майнкрафте


Предлагаю сделать огромный лабиринт из камня вот заготовочка :
Нужно собрать все точки и выйти из лабиринта.Кто выполнит может получить ценные ресурсы).Нужна помощь.
Последний раз редактировалось Ravven; 27.02.2011 в 13:00 .
27.02.2011, 01:35 #2
Освоившийся Регистрация 17.12.2010 Сообщений 111
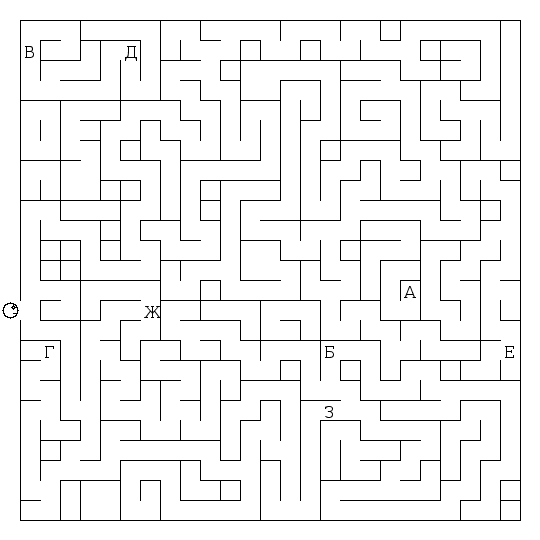
Предлагаю сделать огромный лабиринт из камня вот заготовочка :
Нужно собрать все точки и выйти из лабиринта.Кто выполнит может получить ценные ресурсы).Нужна помощь.

Minecraft: pacman’s reborn?

Собственный идиотизм — имба и не контрится (с)
Источник: forum.sc2tv.ru
Intro
What’s a Recurrent Complex Maze?
Imagine a maze like Lego bricks: You have smaller building blocks — e.g. corridors, rooms and exits, which are randomly connected to form a complete maze.
Each of those building blocks is a separate structure in Recurrent Complex, which contains Maze Generation Info. This info tells the mod exactly how the component should be included in what kind of maze. This makes it easy to expand upon existing mazes as well as create new ones.
In the end, a Maze Generation Script is added to a structure, which tells the mod that a maze should generate here, and in what confines. By defining rooms, exits and connection strategies, it makes it possible to integrate it into a structure.
Design your maze
Your maze needs a base room size, a complete maze size, and a selection of two or more exits.
So if your maze components are Legos, we need to decide on a base size of a brick. This would be like those single brick pieces. Each Lego is just that single brick, but resized so you have the 2×1 Lego, the 2×2 Lego, and so on. The same can be done with our maze. For example, lets say our «single brick» is a 7x5x7 room. That is the smallest room we can make.
So, our rooms have to be a multiple of our «single brick», this means that we can change the size of the room, but it has to be multipliable by our X, Y, and Z numbers. So if I wanted a room that was longer, I would need to build a room that is 14x5x7. Or if I wanted it taller, I would need to make it 7x10x7.
When designing your maze, you need to use this grid to decide how large you want your maze to be. This will be important when we go to generate the maze, but we will cover that later on.
Regarding the style — As long as the maze respects the size limits with the walls, we can put whatever we want inside. You can design the maze however you like. For my first maze, I just went with a simple stone brick floor, wood walls, and cobblestone ceiling. I put some chests in some rooms, mob spawners in others, and some decorations like statues and cake tables. The more rooms you design, the more variety your dungeon will have. You don’t want your dungeon to be boring, but you also don’t want it to be overwhelming.
Normally it’s easier to start with 2D mazes to get a feel for how it works. You can make whatever maze you like, but a good place to start is a simple labyrinth. You can make it in any style you want. A hedge maze, a stone walled castle, but just keep it simple for your first maze.
Step 1: Build the building blocks
Your building blocks can also be called called components. You need to build all of your components for your maze in game so you can use them in your maze. If you want to spare a lot of work, make sure as many components as possible are marked as ‘rotatable’ (and actually are rotatable…), so the structures can face any direction for the maze.
To make sure the maze gets no random holes, you need components that generate in the maze. Here’s what you might want to add for a basic 2D maze:
- Dead End
- Corridor
- Turn
- T Shape (3 exits)
- Intersection (4 exits)
Once you have built all of your components, its time to start scanning. Get the Block Selector (and/or the Floating Block Selector) and highlight one of your of your buildings and use the /#export command, similarly to building a normal structure. I would recommend that you name all of your components similarly so it is easier to find them later. Something like Maze_MyFirstMaze_DeadEnd or Maze_HedgeMaze_Turn, that way they are easier to /#import, /#edit, ect. Make sure to set your component to active!
After that, head to the Generation tab. Delete the Natural generation and insert a Maze Component and enter it. On this menu you will have a few options. Your MazeID needs to be the same on all of your components. This will be the ID you use to generate the entire maze. The Weight will increase or decrease how likely a component spawns. So if you put it at .5 it will have half the chance to be chosen, If you put it at 2 it will have double the chance, ect.
The Rooms tab is a bit misleading with the name. It decides the size of the component. Do you remember the multiplication of our «building blocks»? (If not scroll up to the Design your maze section), this is where we use that. Keep in mind that we start counting from 0. So for example, if we built that 14x5x7 room, then our Range (x) would be 0-1. If we increased the length further and made it 21x5x7, our Range (x) would be 0-2 and so on. It’s the same for Range (y), and Range (z).
The Exits, in short, are where the holes in the walls that let you walk from room to room. This can include a door if you want. If you have a component that is base size, this is easy! Just add an exit for each hole, and set the Side to wherever the exit is facing. This is easy to do by hitting F3 and looking the out of the exit from inside the room and using the direction from the Facing stat on the left side of the screen. However, if your component is bigger than the base size, then you will need to edit the Position sliders. Lets take a look at a diagram for this. As you can see, the 21x5x7, which has a Range (x) of 0-2 has a south exit in section 0, and a north exit in section 1. So you would set up a north exit at (1,0,0) and a south exit at (0,0,0).
Step 2: Make the entrance
Once you have created all the components of the Maze, you now need to make the entrance to it. The entrance will be a normal structure with a Maze Generator block in the lowest corner of where the maze needs to generate. Right click the block to configure it. The first thing you should do is set the MazeID to the maze you’re trying to generate. It should match the MazeID you set all your components to. Then click Edit and set the base room size. My dungeon is 7x5x7, but you should set yours to whatever you decided your base room size should be. You should then open the Maze tab.
In the Rooms section, it is the same weird phrasing. This decides the complete maze size. So, once again starting a 0, you need to decide how many components your maze will be made up of. So if you set Range (x) and Range (z) to 0-2, then you will have a 3×3 grid of components, like in the diagram.
In the Exits section, you will need to define which sections the exits of the maze are in. So, once again looking at the diagram, we have both exits in section 0. One to the north and one to the south. So we have one exit at Section 0 on the X axis and Section 0 on the Z axis. There is another exit in Section 0 on the X axis, and Section 2 on the Z axis. So our exits would be [0, 0, 0] north and [0, 0, 2] south.
Once you finish exits, go back to the menu with MazeID and click the Rules section. This is where you ensure there is a path between your exits. If you have more than 2 exits, you may want to ensure a path between exit 3 and 4, but not between 3 and 1. If you only have 2 exits, though, you should probably have it set to Connect All.
The Last thing you can configure is the Shift. This will move the entire maze by a however many blocks you specify. So if you wanted the whole maze underground, for instance, you would shift the example maze by -5 Y.
Step 3: Test,Test,Test.
Export the structure, and simply generate it. If you have not made any mistakes, it should work flawlessly. Otherwise, go back and adjust the correct steps.
Step 4: Add more special rooms
Now you can go wild with what you really want your maze to contain. Feel free to go crazy with big rooms, hidden exits, and whatever else.
You can also make the structure bigger than specifically allowed to make it ‘intersect’ with the neighbors (always keep the same expansion to each side — it will center itself automatically). This can be dangerous, but also quite powerful if done right — you could make the door show what room you are entering, for example.
From this point on, you are completely free. You can edit any of these steps to adjust it. You can also add more than one maze to a structure, or even connect them with pre-defined exits for interesting setups.