#Руководства
-
0
Поставить будильник одной строкой или стереть важные файлы — решать вам, но эти команды нужно знать.
Иллюстрация: Оля Ежак для Skillbox Media
Востоковед, интересующийся IT. В прошлом редактор раздела «Системный блок» журнала «Fакел», автор журналов Computer Gaming World RE, Upgrade Special, руководитель веб-ресурсов компании 1С-Softclub.
Какой смысл пользоваться терминалом, если дистрибутивы Linux и большинство современных приложений имеют графический интерфейс? На первый взгляд, это удобнее: не надо читать документацию и вбивать команды от руки. Но в Linux только официальных сред рабочего стола более десяти, а неофициальных ещё больше. Они сильно отличаются друг от друга и часто работают по-разному, тогда как команды почти одни и те же.
Затем, если вы программист, вам наверняка придётся удалённо подключаться к серверу под управлением Linux, а там вообще не будет графической оболочки.
Кроме того, даже самая продуманная графическая оболочка никогда не даст вам той гибкости и функциональности, которую предлагает командная строка. Например, возможность составлять и запускать сложные цепочки из нескольких разных команд, писать отложенные сценарии и тому подобное. Открыть терминал и написать команду будет всегда быстрее, чем кликать по меню, выбирая нужную опцию.
Наконец, стоит вспомнить, что Linux — это лишь одна из множества Unix-подобных ОС. Изучив терминал Linux, вы сможете ориентироваться в Unix, BSD-системах и macOS. Другими словами, получите универсальный, быстрый и мощный инструмент для работы.
Прежде чем идти дальше, нужно понять следующие правила:
- Не запускайте команды, которых вы не знаете. Копировать команды из интернета и вводить их в терминал, не понимая, что они делают, — плохая практика.
- Если терминал пишет, что команда не найдена, её можно найти в репозиториях и установить с помощью пакетного менеджера. Как именно — смотрите ниже.
- Читайте руководство. Терминал хорош ещё и тем, что содержит встроенную подробную справку по всем командам — её можно вызвать командами man или help. В общем, старый добрый принцип RTFM (read the fucking manual).
Ctrl + Alt + T — запуск терминала.
Ctrl + Shift + T — открыть новую вкладку.
Ctrl + Shift + W или Ctrl + D — закрыть текущую вкладку (или весь терминал, если вкладка одна).
Ctrl + Shift + N — открыть новое окно терминала.
Ctrl + C — отмена выполнения ранее введённой команды.
clear — очищение окна терминала.
history — история ввода.
Чтобы посмотреть определённое количество введённых ранее команд, нужно добавить к команде history число:
$ history 5
 1010  ip -h monitor
 1011  whatis ls
 1012  nethogs
 1013  clear
 1014  history 5
$
«Листать» введённые ранее команды можно с помощью клавиш со стрелками «вверх» и «вниз».
sleep [number] — отложить выполнение следующей команды. Полезно, когда выполнение следующей команды зависит от успешного завершения предыдущей.
Чтобы указать время, на которое нужно перенести выполнение команды, используют специальные символы:
- s — секунды;
- m — минуты;
- h — часы;
- d — дни.
Следующий пример запустит файл song в программе mplayer через 2 часа 20 мин:
$ sleep 2h 20m && mplayer song.mp3
С помощью командной строки можно быстро получить информацию о программах, состоянии системы и настройках.
man [имя_пакета] — главное руководство по командам Linux.
Даёт подробную информацию по команде и её использованию. У каждой команды есть множество опций, запомнить их все сложно, поэтому стоит научиться пользоваться руководством. Поначалу вывод man кажется запутанным, но стоит с ним разобраться — и необходимость гуглить сведётся к минимуму.
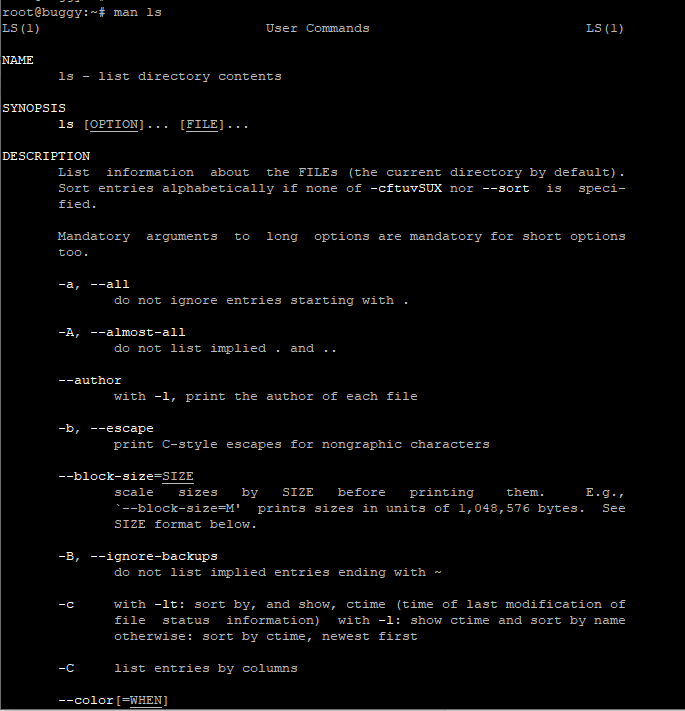
Например, man ls выведет следующую информацию:
LS(1)                                      User Commands                                     LS(1)

NAME
       ls - list directory contents

SYNOPSIS
       ls [OPTION]... [FILE]...

DESCRIPTION
       List  information about the FILEs (the current directory by default). Sort entries alpha‐
       betically if none of -cftuvSUX nor --sort is specified.

       Mandatory arguments to long options are mandatory for short options too.

       -a, --all
              do not ignore entries starting with .

       -A, --almost-all
              do not list implied . and ..

       --author
              with -l, print the author of each file
...
Вывод man включает следующие поля:
- Name — имя команды, которую описывает man-страница.
- Synopsis — краткое описание команды и её синтаксиса.
- Description — объяснение того, что делает программа.
- Options — описание опций командной строки, которые принимает команда, и дополнительная информация.
Самое полезное тут — опции. Например, вы хотите вывести список не только файлов, а ещё и их авторов. Выбираете в man нужную опцию и пишете:
ls --author -l
total 225824
-rw-r--r--.  1 tam tam tam   5615374 Nov 29  2021  1default.png
-rw-r--r--.  1 tam tam tam   5517455 Nov 29  2021  2default.png
-rw-r--r--.  1 tam tam tam   5807674 Nov 29  2021  3default.png
-rw-r--r--.  1 tam tam tam   6155385 Nov 29  2021  4default.png
-rw-r--r--.  1 tam tam tam   6039516 Nov 29  2021  5default.png
-rw-r--r--.  1 tam tam tam   5464565 Nov 29  2021  6default.png
LS (1) в выводе man означает первую страницу. Перемещаться по тексту можно с помощью колеса мыши, стрелок вверх/вниз, клавиши пробел или PgUp/PgDn. Перейти в начало/конец руководства можно с помощью клавиш Home и End.
Если ввести заглавную Н, то появится более детальная подсказка с альтернативными способами передвижения по тексту.
Для поиска конкретного слова в man введите ? [искомое_слово] и жмите Enter.
help — справка.
Если в мануале нет информации по команде или утилите или требуется краткая справка, то help — то, что нужно.
ls --help
Usage: ls [OPTION]... [FILE]...
List information about the FILEs (the current directory by default).
Sort entries alphabetically if none of -cftuvSUX nor --sort is specified.

Mandatory arguments to long options are mandatory for short options too.
  -a, --all                  do not ignore entries starting with .
  -A, --almost-all           do not list implied . and ..
      --author               with -l, print the author of each file
  -b, --escape               print C-style escapes for nongraphic characters
      --block-size=SIZE      with -l, scale sizes by SIZE when printing them;
                             e.g., '--block-size=M'; see SIZE format below
whatis [имя_пакета] — краткое описание утилиты.
$ whatis whatis
whatis (1)           - display one-line manual page descriptions
whoami — информация о текущем пользователе системы.
$ whoami
tam
whereis — путь к программе.
Показывает полный путь к исполняемому файлу.
$ whereis firefox
firefox: /usr/bin/firefox /usr/lib64/firefox /etc/firefox /usr/share/man/man1/firefox.1.gz
lsblk — информация о дисках.
Выводит данные о дисках, разделах и их названия (sda1, sda2 и тому подобное).
$ lsblk
NAME        MAJ:MIN RM   SIZE RO TYPE MOUNTPOINTS
sda           8:0    0 931.5G  0 disk
├─sda1        8:1    0   128G  0 part /run/media/tam/25881-1
└─sda2        8:2    0 803.5G  0 part
zram0       252:0    0     8G  0 disk [SWAP]
nvme0n1     259:0    0 476.9G  0 disk
├─nvme0n1p1 259:1    0   200M  0 part /boot/efi
├─nvme0n1p2 259:2    0     1G  0 part /boot
├─nvme0n1p3 259:3    0 439.1G  0 part /home
└─nvme0n1p4 259:4    0  36.7G  0 part /
df — объём занятого пространства.
Показывает общий объём диска/раздела и свободный.
По умолчанию выводит данные в килобайтах.
Для отображения в мегабайтах добавьте параметр -m.
$ df -m
Filesystem     1M-blocks   Used Available Use% Mounted on
devtmpfs               4      0         4   0% /dev
tmpfs               7896    195      7701   3% /dev/shm
tmpfs               3159      2      3157   1% /run
/dev/nvme0n1p4     36674  20796     13984  60% /
tmpfs               7896     46      7851   1% /tmp
/dev/nvme0n1p2       974    271       636  30% /boot
/dev/nvme0n1p3    441436 349935     69006  84% /home
/dev/nvme0n1p1       200     18       183   9% /boot/efi
tmpfs               1580     12      1568   1% /run/user/1000
du — размер файла или папки.
Показывает, сколько места занимает файл или директория.
Лучше вызывать с параметром -h, чтобы получить информацию в МБ, КБ.
du -h ~/Desktop

15G	/home/tam/Desktop
free — объём ОЗУ.
Показывает объём доступной и занятой оперативной памяти. Для отображения в МБ, вызывайте с параметром -h.
$ free -h
               total        used        free      shared  buff/cache   available
Mem:            15Gi        10Gi       536Mi       1.4Gi       4.3Gi       3.2Gi
Swap:          8.0Gi       6.9Gi       1.1Gi
uname — сведения о системе.
Показывает данные о системе. Для более подробной информации лучше вводить uname -a. Будут выведены имя компьютера и версия ядра.
$ uname -a
Linux fedora 6.1.14-200.fc37.x86_64 #1 SMP PREEMPT_DYNAMIC Sun Feb 26 00:13:26 UTC 2023 x86_64 x86_64 x86_64 GNU/Linux
uptime — время работы системы.
Показывает время непрерывной работы ОС и количество пользователей.
$ uptime
 22:18:30 up 14 days, 21:50,  1 user,  load average: 0.48, 0.53, 0.54
date — вывод даты и времени.
Показания можно форматировать, например установить 12-/ 24-часовой формат, получить наносекунды и тому подобное.
$ date
Tue 21 Mar 22:18:58
cat /etc/*-release — информация о дистрибутиве.
$ cat /etc/*-release
Fedora release 37 (Thirty Seven)
NAME="Fedora Linux"
VERSION="37 (Workstation Edition)"
pwd — «где я?».
Позволяет узнать, в какой папке вы находитесь.
$ pwd
/home/tam
file — определение типа файла.
Покажет, с чем вы имеете дело (текстовый документ, картинка, папка).
$ file Dropbox/
Dropbox/: directory
mount/umount — подключение/отключение дисков.
Используется для монтирования дисков, устройств, файловых систем, ISO-образов. Требуются права суперпользователя.
У команд много опций. Смотрите их описание в руководстве, чтобы выбрать ту, которая подходит под вашу задачу.
$ mount /dev/sdb1 /mnt — эта команда примонтирует флешку.
$ sudo umount /dev/sdb1 — а эта, наоборот, демонтирует её.
ls — просмотр содержимого директории.
По умолчанию показывает текущую папку. Чтобы посмотреть, что внутри другой папки, нужно прописать путь к ней.
ls [адрес_конкретной_папки] — покажет, что в этой папке с аргументом -R выдаст, что лежит в подпапках.
$ ls Desktop


 2014.pdf
 50689841.pdf
 959f945cb24b3d3f7b68306e5ce1b301.jpg
 98551794.pdf
 archive
 dir00
 dir01
 dir02
 dir03
 dir04
 dir05
Полезные опции:
ls -l выводит список содержимого с подробной информацией.
ls -a показывает скрытые файлы.
du — информация о размере файла или папки.
Полезные опции:
-h — выдаёт размеры в лёгком для чтения формате.
-s — выводит минимум данных.
-d — устанавливает глубину рекурсии по папкам.
$ du -h -s Desktop/
15G	Desktop/
df — анализ дискового пространства.
Выдаёт информацию о файловых системах, их размере, использованном и свободном месте.
Полезная опция:
-h — вывод в удобном для чтения формате.
$ df -h
Filesystem      Size  Used Avail Use% Mounted on
devtmpfs        4.0M     0  4.0M   0% /dev
tmpfs           7.8G  212M  7.6G   3% /dev/shm
tmpfs           3.1G  1.9M  3.1G   1% /run
/dev/nvme0n1p4   36G   21G   14G  60% /
tmpfs           7.8G   54M  7.7G   1% /tmp
/dev/nvme0n1p2  974M  271M  636M  30% /boot
/dev/nvme0n1p3  432G  342G   68G  84% /home
/dev/nvme0n1p1  200M   18M  183M   9% /boot/efi
tmpfs           1.6G   12M  1.6G   1% /run/user/1000
cd — навигация по папкам.
cd [адрес_папки] — перемещение в нужную папку.
Вызов без параметров возвращает в домашнюю директорию.
cd .. — выход на уровень вверх.
cd — — возврат в предыдущую папку.
$ cd Desktop/
[tam@fedora Desktop]$
Если нужно посмотреть, куда можно перейти из текущей папки, введите cd + пробел + два раза нажмите Tab.
$ cd +
archive/                             iscan-gt-s600-bundle-2.30.4.x64.rpm/
dir00/                               pics/
dir01/                               OneDrive/
dir02/                               OneDrive-2021/
dir03/                               Photos/
dir04/                               Photos_c/
dir05/                               REACT/
Чтобы узнать, какие папки начинаются, например, с буквы D, введите cd + D + двойной Tab.
cd + D
dir00/ dir01/ dir02/ dir03/ dir04/ dir05/
diff — разница между файлами.
Показывает отличия двух текстовых документов.
$ diff textfile-1.txt textfile-2.txt

1,2c1,2
< Если нужно посмотреть, куда можно перейти из текущей папки, введите cd + пробел + двойной Tab.
< Чтобы узнать, какие папки начинаются, например, с буквы D, введите cd + D + двойной Tab.
---
> diff — разница между файлами.
> Показывает разницу между двумя текстовыми файлами.
mkdir — создание новой папки.
Чтобы создать всю структуру папки с подпапками добавьте параметр -p.
$ mkdir Desktop/myfolder
Команда mkdir -p /home/MyNewFolder/OldFolder создаст папку MyNewFolder в домашней директории и переместит в эту новую папку OldFolder, которая была создана ранее.
Чтобы создать сразу 33 папки, достаточно написать:
$ mkdir dir{00..33}
$ ls
dir00  dir04  dir08  dir12  dir16  dir20  dir24  dir28  dir32
dir01  dir05  dir09  dir13  dir17  dir21  dir25  dir29  dir33
dir02  dir06  dir10  dir14  dir18  dir22  dir26  dir30
dir03  dir07  dir11  dir15  dir19  dir23  dir27  dir31
touch — создание файла.
Изначально команда предназначалась для изменения времени последнего открытия файла или папки, но на практике её чаще используют для создания новых файлов.
$ touch /home/Ivan /myfile.txt
cp — копирование файлов и папок.
Для копирования вложенных папок и файлов нужно добавить параметр -r (Recursive).
$ cp myfile.txt /home/Ivan/Desktop
mv — перемещение/переименование файлов и папок.
В Linux переименование — это как бы перемещение файла в ту же самую папку, но уже под другим именем.
$ mv oldname.txt newname.txt
С помощью этой команды можно переименовать сразу несколько файлов.
$ for f in *.html; do
    mv -- "$f" "${f%.html}.php"
done
Код выше поменяет расширение всех файлов в папке с .html на .php.
Здесь используется цикл for, который проходится по всем файлам с расширением .html. Код во второй строке перемещает каждый элемент списка в новое место (= переименовывает), заменяя .html на .php. Фрагмент ${file%.html} удаляет части имени файла .html. Done в третьей строке означает конец цикла for.
rename — переименование файлов.
Более продвинутая, чем mv, команда. Но она требует знания регулярных выражений. С rename превращение .html в .php будет выглядеть так:
$ rename 's/.html/.php/' \*.html
Здесь s/ (оператор подстановки) отвечает за поиск строки (.html) и её замену на .php. Квантификатор * означает ноль или более повторений.
rm — удаление файлов и папок.
Чтобы удалить вложенные папки и файлы добавьте параметр -r. Важно: rm удаляет файл или папку без возможности восстановления обычными способами.
rm -rf/ — была когда-то одной из самых опасных команд, потому что удаляла всё и навсегда. Вот её расшифровка:
rm — удалить файлы;
-rf — удалить рекурсивно, то есть пройти по вложенным папкам;
/ — начать с корневой директории.
Поскольку были пользователи, которые не читали мануал и страдали из-за шутников, советовавших чинить свою систему с помощью такой команды, в более поздних версиях Linux её разрушительные возможности ограничили. Ну и да — даже когда она работала как часы, её надо было запускать с правами суперпользователя.
ln — создание жёсткой или символической ссылки на файл.
Символическая ссылка — это примерный аналог ярлыка в Windows. Она просто указывает на файл, а жёсткая — ведёт на физический адрес на диске и фактически создаёт копию файла.
Создание жёсткой ссылки:
$ ln /home/ivan/videos/video.mp4 /home/ivan/Desktop/hard_link_to_video_file
Создание символической ссылки:
$ ln -s /home/ivan/video.mp4 soft_link_to_video_file
find — поиск по файловой системе.
Очень полезная команда. Позволяет не только искать файлы и папки по заданным критериям, но и совершать дополнительные действия с ними.
find ./myfolder -name file.txt
find ./myfolder -name *.txt
find ./myfolder -name somefile.txt -exec rm -i {} \
Здесь мы говорим: найди (find) в папке ./myfolder файл с именем (-name) somefile.txt и выполни (-exec) команду удаления (rm) всех файлов {}, спрашивая при этом каждый раз подтверждение (-i).
Опций гораздо больше, см. man.
dd — копирование и преобразование файлов и разделов.
Позволяет копировать и перемещать целые разделы и отдельные файлы.
Нужно указать исходный файл, место, куда копировать и необходимые дополнительные опции.
Часто используется для создания Live USB. Создать образ диска:
$ sudo dd if=/dev/sda of=/tmp/sdadisk.img
wc — статистика по файлу.
Выдаёт количество строк, слов, знаков и байтов.
$ wc ~/Desktop/textfile-1.txt
  2  32 312 /home/tam/Desktop/textfile-1.txt
wget — загрузка файлов из Сети.
Позволяет скачивать изображения, документы, веб-страницы.
$ wget https://www.somesite.ru/some.jpg
$ wget ya.ru
--2023-03-22 00:42:47--  http://ya.ru/
Resolving ya.ru (ya.ru)... 2a02:6b8::2:242, 77.88.55.242, 5.255.255.242
Connecting to ya.ru (ya.ru)|2a02:6b8::2:242|:80... connected.
[...]
Length: 1727 (1.7K) [text/html]
Saving to: 'index.html'

index.html          100%[===================>]   1.69K  --.-KB/s    in 0s

2023-03-22 00:42:48 (69.8 MB/s) - 'index.html' saved [1727/1727]
Многие действия в системе выполняются с правами суперпользователя, например установка обновлений, программ или их удаление.
sudo — получение прав суперпользователя.
Например, с помощью следующей команды мы обновим пакеты в Fedora Linux:
$ sudo dnf update
sudo su — удобная опция, если нужно выполнить сразу много команд от имени суперпользователя. Если ввести это один раз, далее можно писать нужные команды.
Опытные пользователи советуют избегать этой команды из соображений безопасности.
sudo!! — запуск ранее введённой команды с правами администратора.
sudo gksudo — запуск графических утилит от имени суперпользователя. Формат команды такой: sudo gksudo [название приложения, которое нужно запустить].
Но sudo есть по умолчанию не во всех дистрибутивах. Например, в таких дистрибутивах, как Arch Linux, Gentoo и некоторых других, которые позволяют пользователю настраивать систему почти без ограничений, sudo нужно устанавливать отдельно. Но везде есть su.
chmod — изменение прав доступа к файлу.
Можно дать права на чтение, запись и запуск файла.
chmod опции права /[путь_к_файлу].
Есть три основных вида прав:
- r — чтение;
- w — запись;
- x — выполнение.
И три вида пользователей:
- u — владелец файла;
- g — группа файла;
- o — остальные пользователи.
Есть также цифровой формат записи:
- 0 — никаких прав;
- 1 — только выполнение;
- 2 — только запись;
- 3 — выполнение и запись;
- 4 — только чтение;
- 5 — чтение и выполнение;
- 6 — чтение и запись;
- 7 — чтение, запись и выполнение.
$ chmod o+w *.txt
Эта команда разрешит остальным пользователям (всем, кроме владельца файла) чтение и запись в текстовые файлы.
$ chmod -R 777 /
Эта команда даст всем пользователям право читать, писать и запускать файлы в системе.
chown — изменение владельца файла, папки.
Для выполнения этой команды нужно обладать правами суперпользователя.
Чтобы поменять владельца для вложенных файлов и папок, добавьте параметр -R.
В Linux может быть несколько пользователей с разными правами.
useradd/userdel/usermod — добавление, удаление, изменение пользователя.
useradd userName — добавить пользователя.
passwd userName — задать пароль для пользователя. При наборе пароля в терминале не будут отображаться никакие символы, но система учтёт все нажатые клавиши.
userdel userName — удалить учётную запись.
usermod userName — редактировать учётную запись.
hostname — определение домена.
Выводит адрес DNS вашей машины.
$ hostname
fedora
С опцией -i покажет текущий IP-адрес компьютера.
ip — работа с сетью.
Эта команда заменяет множество других команд, которые раньше использовались для настроек сети, например ifconfig, ipconfig, netstat и прочие.
ip -a — информация о сетевых настройках.
$ ip -a
Usage: ip [ OPTIONS ] OBJECT { COMMAND | help }
       ip [ -force ] -batch filename
where  OBJECT := { address | addrlabel | amt | fou | help | ila | ioam | l2tp |
                   link | macsec | maddress | monitor | mptcp | mroute | mrule |
                   neighbor | neighbour | netconf | netns | nexthop | ntable |
                   ntbl | route | rule | sr | tap | tcpmetrics |
                   token | tunnel | tuntap | vrf | xfrm }
       OPTIONS := { -V[ersion] | -s[tatistics] | -d[etails] | -r[esolve] |
                    -h[uman-readable] | -iec | -j[son] | -p[retty] |
                    -f[amily] { inet | inet6 | mpls | bridge | link } |
                    -4 | -6 | -M | -B | -0 |
                    -l[oops] { maximum-addr-flush-attempts } | -br[ief] |
                    -o[neline] | -t[imestamp] | -ts[hort] | -b[atch] [filename] |
                    -rc[vbuf] [size] | -n[etns] name | -N[umeric] | -a[ll] |
                    -c[olor]}
ip address show — выводит сведения о сетевых адресах.
ip route — управление маршрутизацией.
ip -help — узнать все варианты использования.
ping — диагностика сети.
Ping используется для проверки подключения к интернету и тестирования качества связи. Самый простой способ проверить работу сети — ввести ping google.com. Для отмены выполнения команды нажмите Ctrl + C. Также с помощью этой команды можно проверять соединение со своим сервером.
$ ping google.com
PING google.com(lb-in-f101.1e100.net (2a00:1450:4010:c1e::65)) 56 data bytes
64 bytes from lb-in-f101.1e100.net (2a00:1450:4010:c1e::65): icmp_seq=1 ttl=108 time=40.9 ms
traceroute — как ping, но лучше.
Выводит не только маршрут сетевых пакетов, но и данные по узлу и время доставки пакетов.
nethogs — информация о трафике.
Полезная утилита, которая помогает определить, какая программа сколько трафика потребляет. Не во всех системах установлена по умолчанию.
zip — архивирование файла.
Упаковывает файлы в zip-архив.
$ zip my-archive.zip /home/Ivan/file-to-archive.txt
unzip — распаковка архива.
Извлекает файлы из архива.
tar — создание резервных копий.
Утилита tar тоже создаёт архивы, но уже с расширением .tar. В отличие от zip, она не сжимает файлы, поэтому её чаще используют для резервного копирования.
Выполняется с параметрами -cf. Просмотреть содержимое .tar можно с помощью опций -tvf. Для распаковки архива .tar используются опции -xvf.
tar -xvf newark.tar
- -c, —create — создать новый архив;
- -t, —list — вывести список содержимого архива;
- -x, —extract — извлечь файлы из архива;
- -v, —verbose — вывести список с деталями;
- -f, —file — файл (архив).
Для этих целей используются редакторы Nano и Vim, которые запускаются прямо в окне терминала.
nano — запуск текстового редактора Nano.
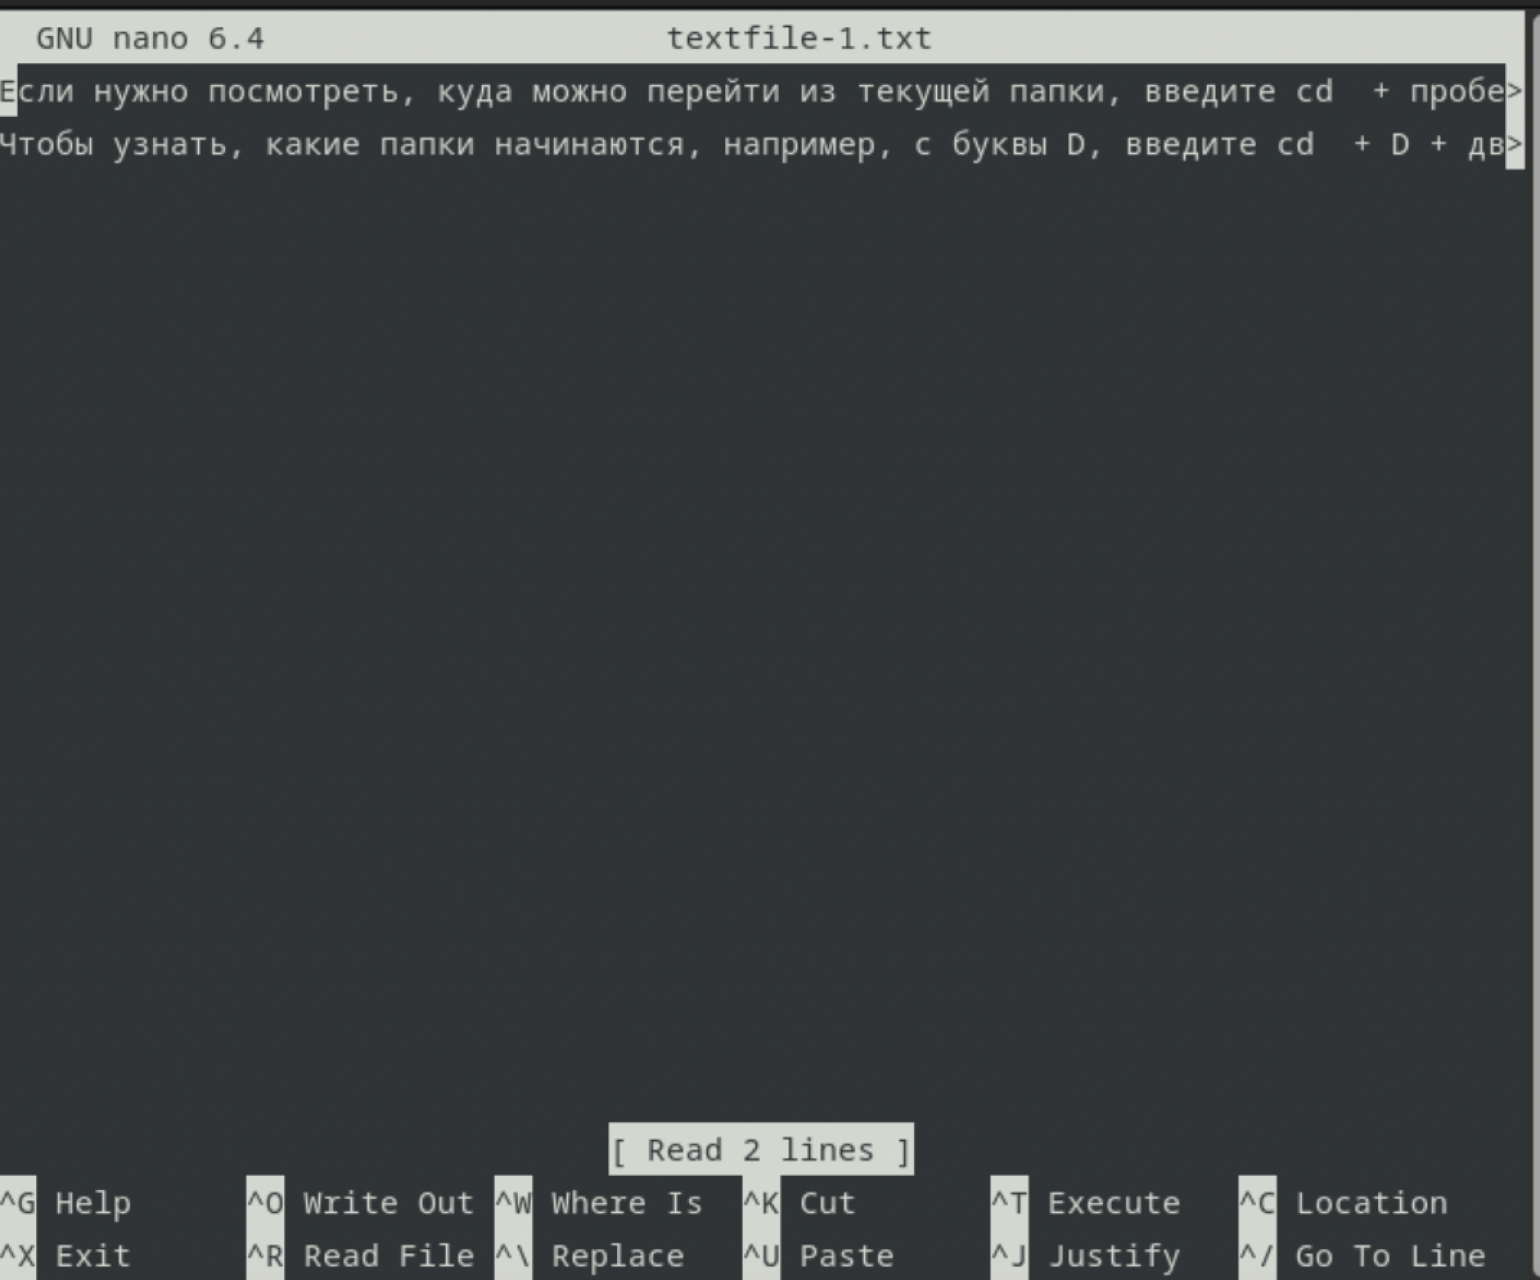
$ nano textfile-1.txt
Скриншот: Skillbox Media
Внизу вы видите подсказки к основным командам редактора. Введя текст, сохраните его, нажав комбинацию клавиш Ctrl + О и выходите с помощью Ctrl + X.
vim — запуск текстового редактора Vim.
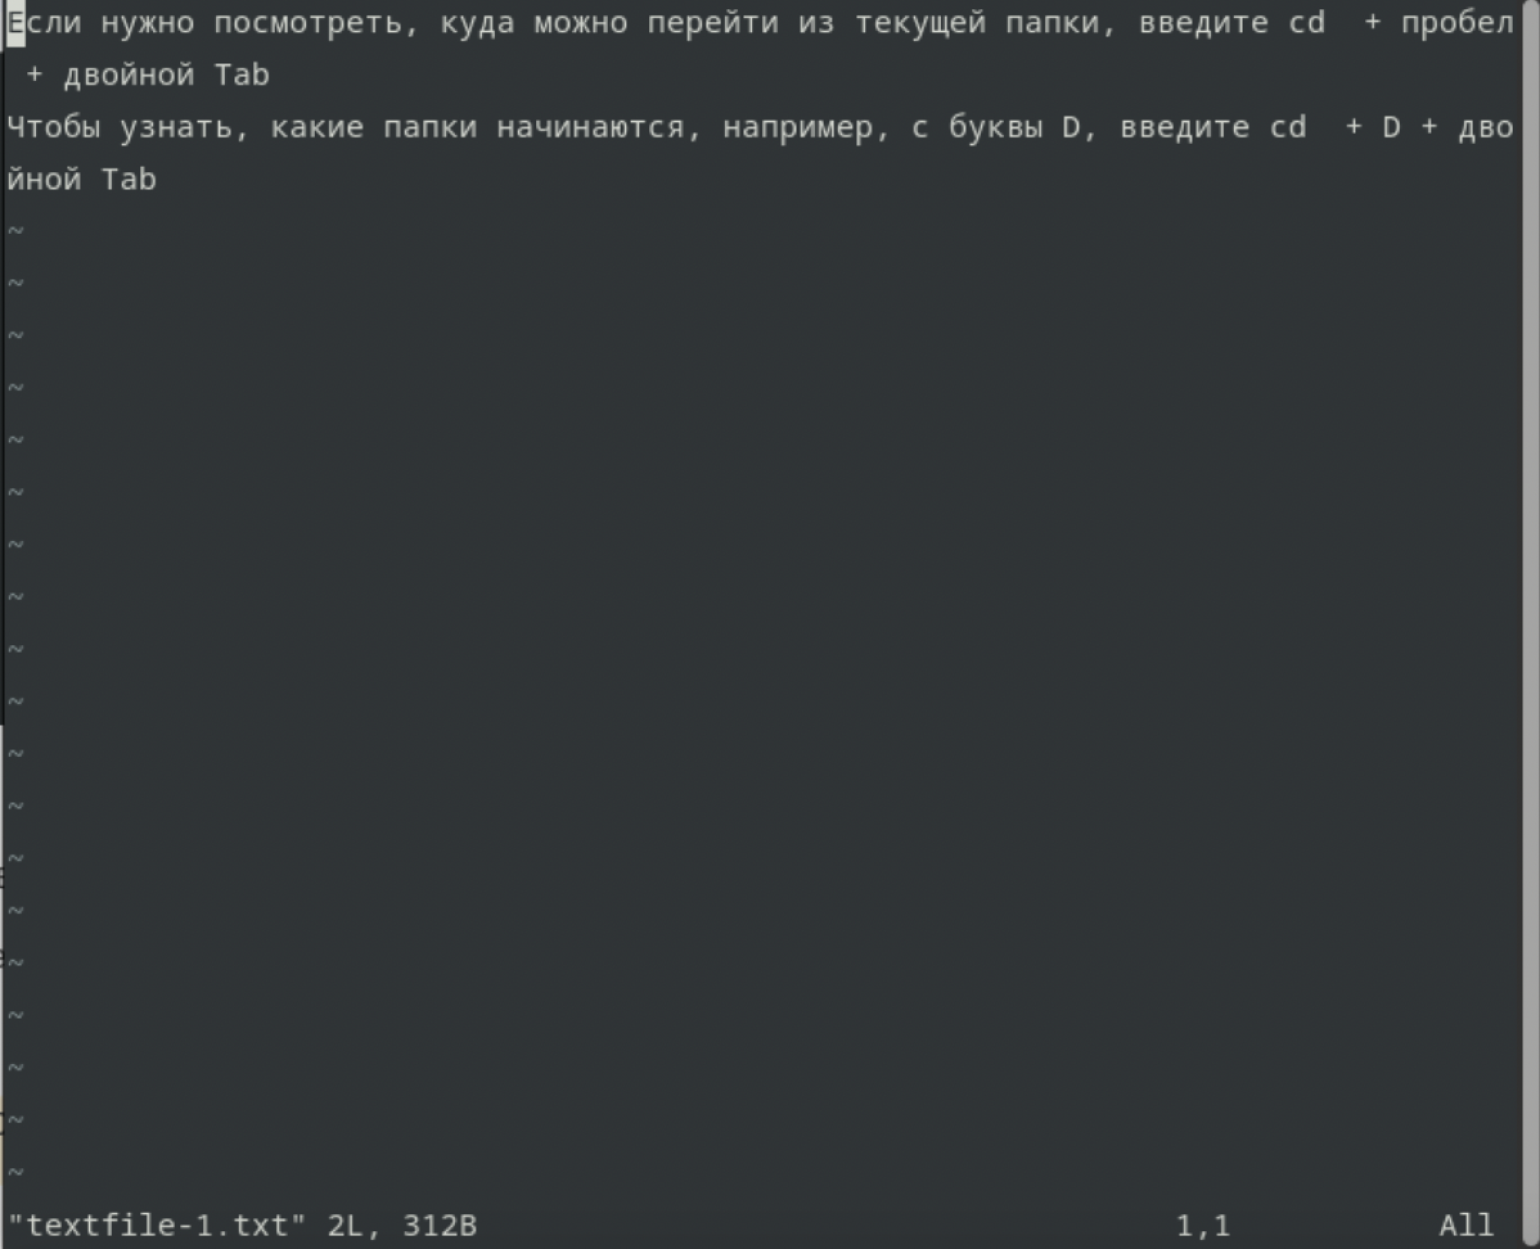
Vim намного мощнее и сложнее Nano, зато Vim можно использовать как полноценную IDE для программирования и/или работы с текстами. Для выхода из редактора введите :q.
Скриншот: Skillbox Media
У нас есть полноценный курс по Vim для начинающих.
echo — вывод строки в терминал.
Простая и популярная команда, используется для вывода текста в терминал или файл.
$ echo Hello, World!
Hello, World!
С помощью опции -e можно запускать специальные последовательности. Например, добавив \n, можно выводить слова на новых строках.
$ echo -e "Hello, \nWorld \n!"
Hello,
World
!
Можно раскрасить вывод в разные цвета, а добавив *, вывести содержимое папки.
$ echo *
dir00 dir01 dir02 dir03 dir04 dir05 dir06 dir07 dir08 dir09 dir10 dir11 dir12 dir13 dir14 dir15 dir16 dir17 dir18 dir19 dir20 dir21 dir22 dir23 dir24 dir25 dir26 dir27 dir28 dir29 dir30 dir31 dir32 dir33 index.html
cat — просмотр содержимого файла.
Команда cat выводит в терминал содержимое файла, который вы укажете в качестве параметра. Вот как она выглядит: cat [путь_к_файлу].
$ cat textfile-1.txt
Если нужно посмотреть, куда можно перейти из текущей папки, введите cd + пробел + двойной Tab.
Чтобы узнать, какие папки начинаются, например, с буквы D, введите cd + D + двойной Tab.
По этой команде выводится содержимое файла, переданного в параметре.
Можно передать сразу несколько файлов.
Можно объединить содержимое нескольких файлов в новом с помощью символа >.
$ cat textfile-1.txt textfile-2.txt > textfile-3.txt
С помощью опции -n (Number) можно вывести определённое количество строк.
grep — поиск по текстовым файлам.
Мощная команда для поиска внутри файлов. Ищет по слову, строке или регулярному выражению.
Чтобы команда вывела найденное в терминал, перед ней нужно ввести cat.
Например, для поиска слова «кот» в файле cats.txt можно ввести:
$ cat cats.txt | grep кот
head — просмотр начала файла.
Похожа на cat, но по умолчанию показывает только первые 10 строк текста.
Для изменения числа выводимых строк есть параметр -n.
head -n 5 ~/Desktop/myfile.txt покажет первые пять строк файла.
$ head -n 5 ~/Desktop/textfile-1.txt
Если нужно посмотреть, куда можно перейти из текущей папки, введите cd + пробел + двойной Tab.
Чтобы узнать, какие папки начинаются, например, с буквы D, введите cd + D + двойной Tab.
tail — просмотр конца файла.
Выводит последние строки текста файла.
С помощью опции -c можно вывести определённое количество байт информации из файла.
$ tail -c 100 textfile-3.txt
ми
Показывает разницу между двумя текстовыми файлами.
Параметр -f позволяет следить за изменениями в файле и выводить их на экран.
more/less — просмотр длинных текстов.
less выводит часть большого текста так, что занимает один экран. С опцией -N показывает номера строк. Ниже — пример работы команды (вчитываться в текст не стоит, он не имеет отношения к самой команде — это просто вывод текстовой информации из случайного текстового файла).
$ less -N textfile-3.txt
1. Если нужно посмотреть, куда можно перейти из текущей папки, введите cd        1 + пробел + двойной Tab.
      2. Чтобы узнать, какие папки начинаются, например, с буквы D, введите cd  +      2  D + двойной Tab.
      3. diff -- разница между файлами.
      4. Показывает разницу между двумя текстовыми файлами.
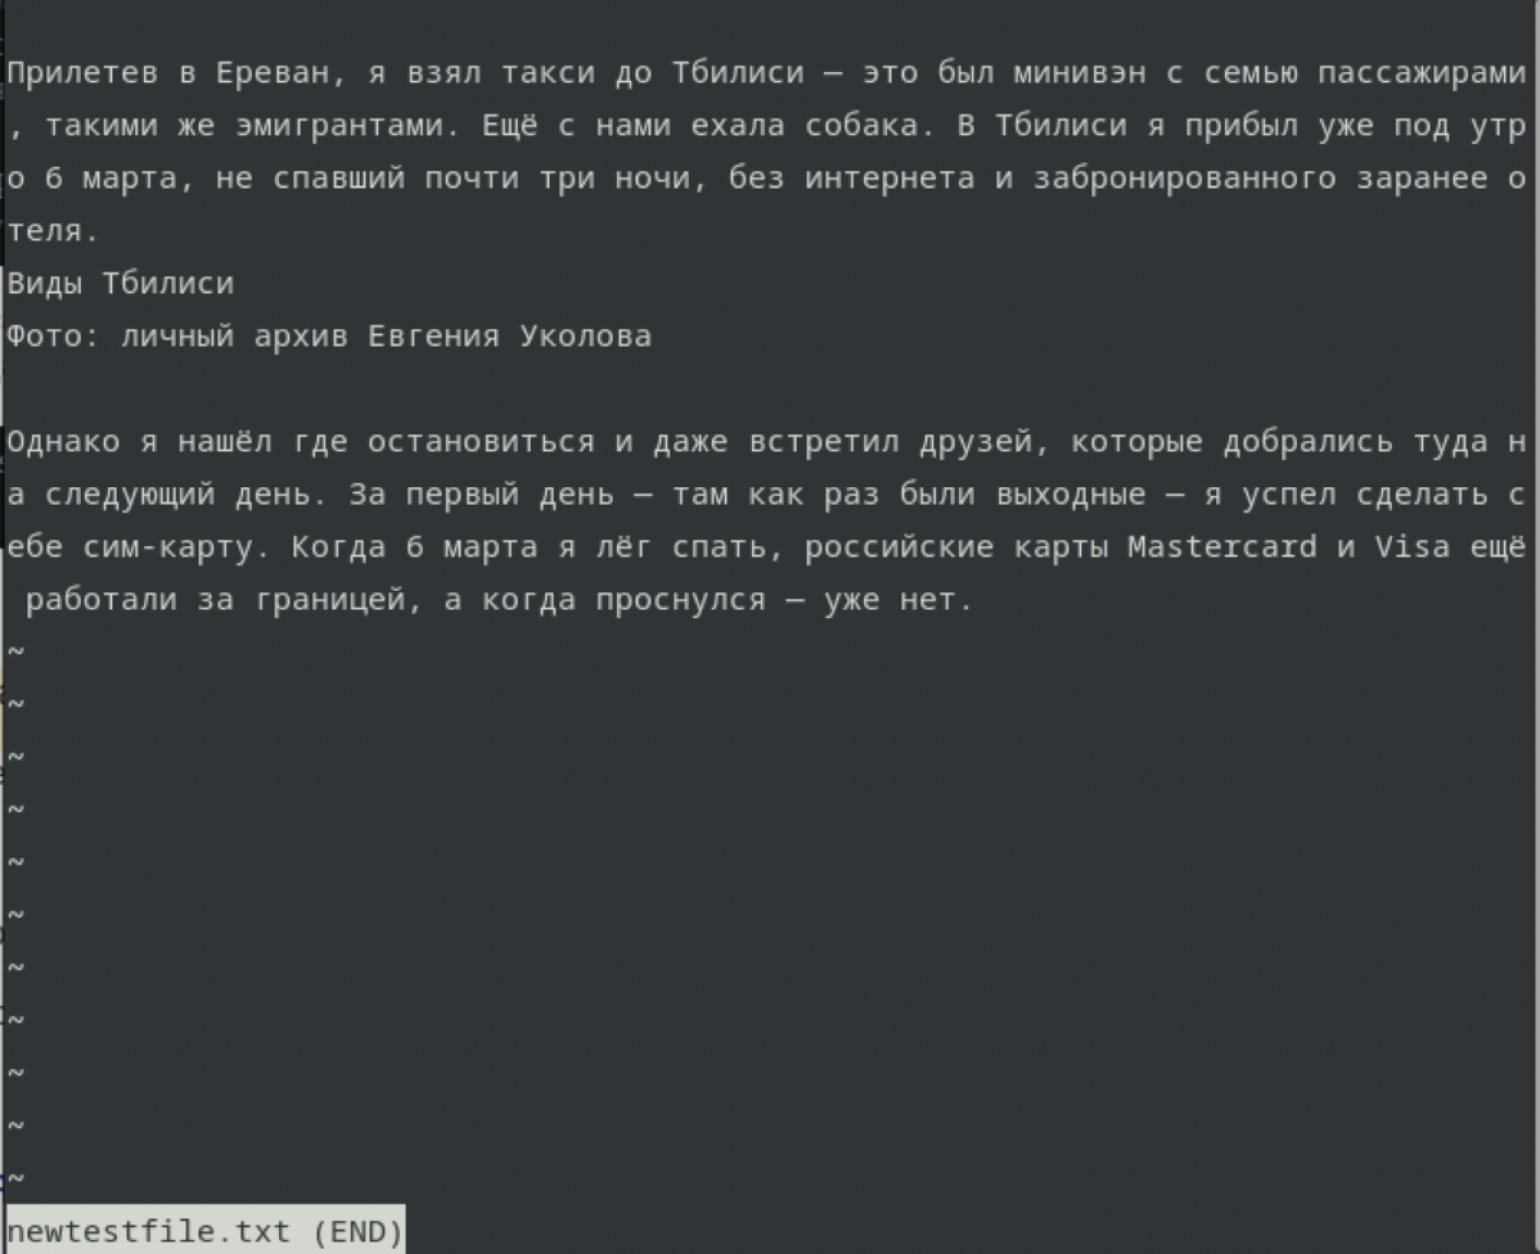
more делает то же самое, что и less, но у неё меньше дополнительных опций. Следующая команда выведет текст, начиная с десятой строки.
$ more +10 newtestfile.txt
Скриншот: Skillbox Media
sort — сортировка строк.
Сортирует строки текста по разным критериям.
Полезные опции
-n (Numeric) — сортировка по числовому значению.
-r (Reverse) — переворачивает вывод.
$ sort text-to-sort.txt
computer
data
GUI
line
linux
mouse
skillbox
terminal
$ sort -r text-to-sort.txt
terminal
skillbox
mouse
linux
line
GUI
data
computer
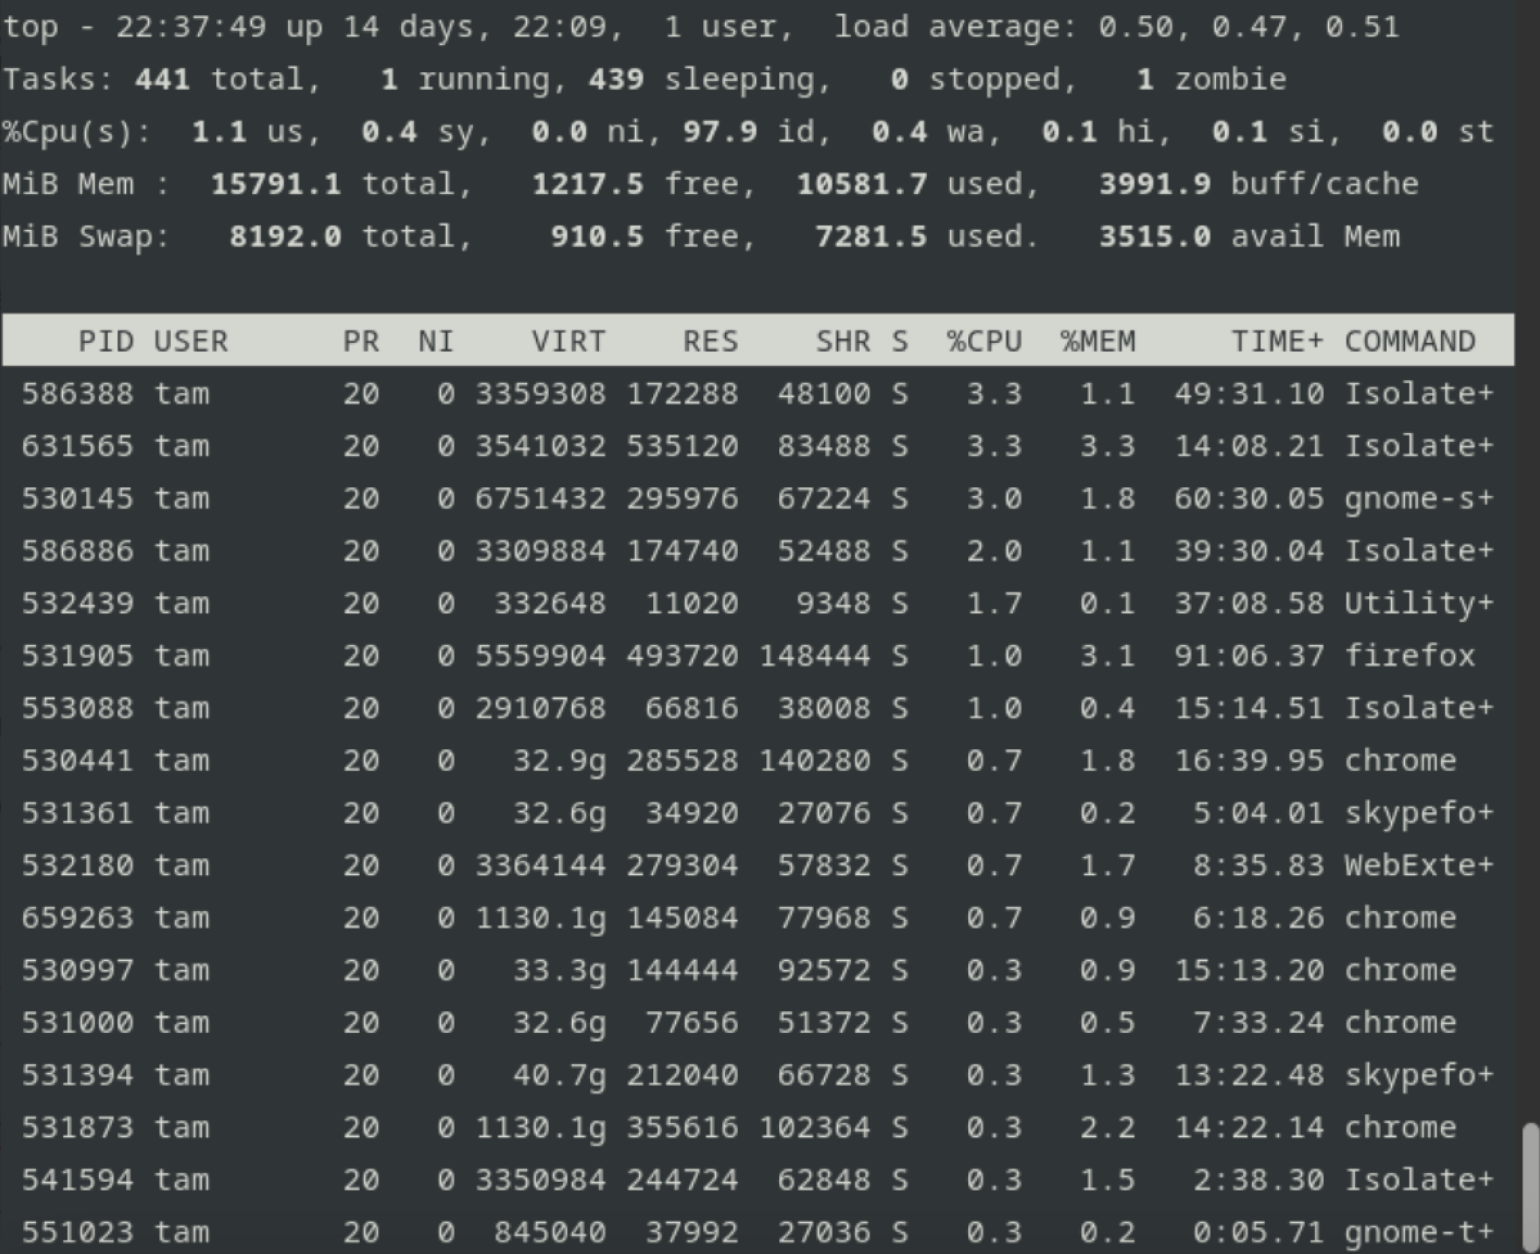
top — отображение процессов.
Эта команда выводит список всех процессов, запущенных в системе.
Альтернативы: atop, xtop или сочетание ps axu | grep [имя_процесса].
$ ps axu | grep firefox
tam       531905  1.0  3.0 5597628 498708 ?      Sl   Mar15  96:44 /usr/lib64/firefox/firefox
tam       531917  0.0  0.0   4808  2320 ?        Ss   Mar15   1:20 /usr/libexec/cgroupify app-gnome-firefox-531905.scope
tam       532027  0.0  0.0 253672 11184 ?        Sl   Mar15   0:00 /usr/lib64/firefox/firefox -contentproc -parentBuildID 20230214102510 -prefsLen 29270 -prefMapSize 240130 -appDir /usr/lib64/firefox/browser {f6b45f8f-ab5a-4190-88dc-cb4e27948d4e} 531905 socket
Ещё вариант: pidof + [имя процесса].
$ pidof firefox
782667 782616 782563 782548 782341 782031 781966 781483 759503 741791 741676 721674 719583 671683 651779 647050 646496 641065 638796 635042 634566 631565 586886 586388 584499 584009 567091 566046 565460 565175 562873 562301 560923 560876 557257 553088 550860 549445 543830 543783 541594 535504 532439 532437 532180 532096 532027 531905
kill, xkill, pkill — принудительное завершение процессов.
Закрыть программу или завершить процесс можно несколькими способами.
С помощью команды kill: kill [ID_процесса].
Чтобы узнать PID (идентификатор процесса), введите команду top.
С помощью команды xkill. После её ввода вместо курсора появится крестик, наведите его на окно программы, которую нужно закрыть.
С помощью команды pkill (завершение процесса по имени).
pkill firefox
killall — завершение всех процессов с указанным именем.
killall firefox
Для установки и удаления приложений и обновлений в Linux используются пакетные менеджеры. В каждом дистрибутиве или семействах дистрибутивов они разные.
В Ubuntu и Debian это APT, в Fedora — DNF, в Arch и Manjaro — Pacman, в Gentoo — Portage, в openSUSE — RPM.
Для установки пакетов нужны права суперпользователя. Примеры команд:
dnf (Fedora).
sudo dnf install [имя_пакета] — установка пакета.
sudo dnf update — обновление сведений о пакетах.
sudo dnf upgrade — обновление пакетов.
sudo dnf remove [имя_пакета] — удаление пакета.
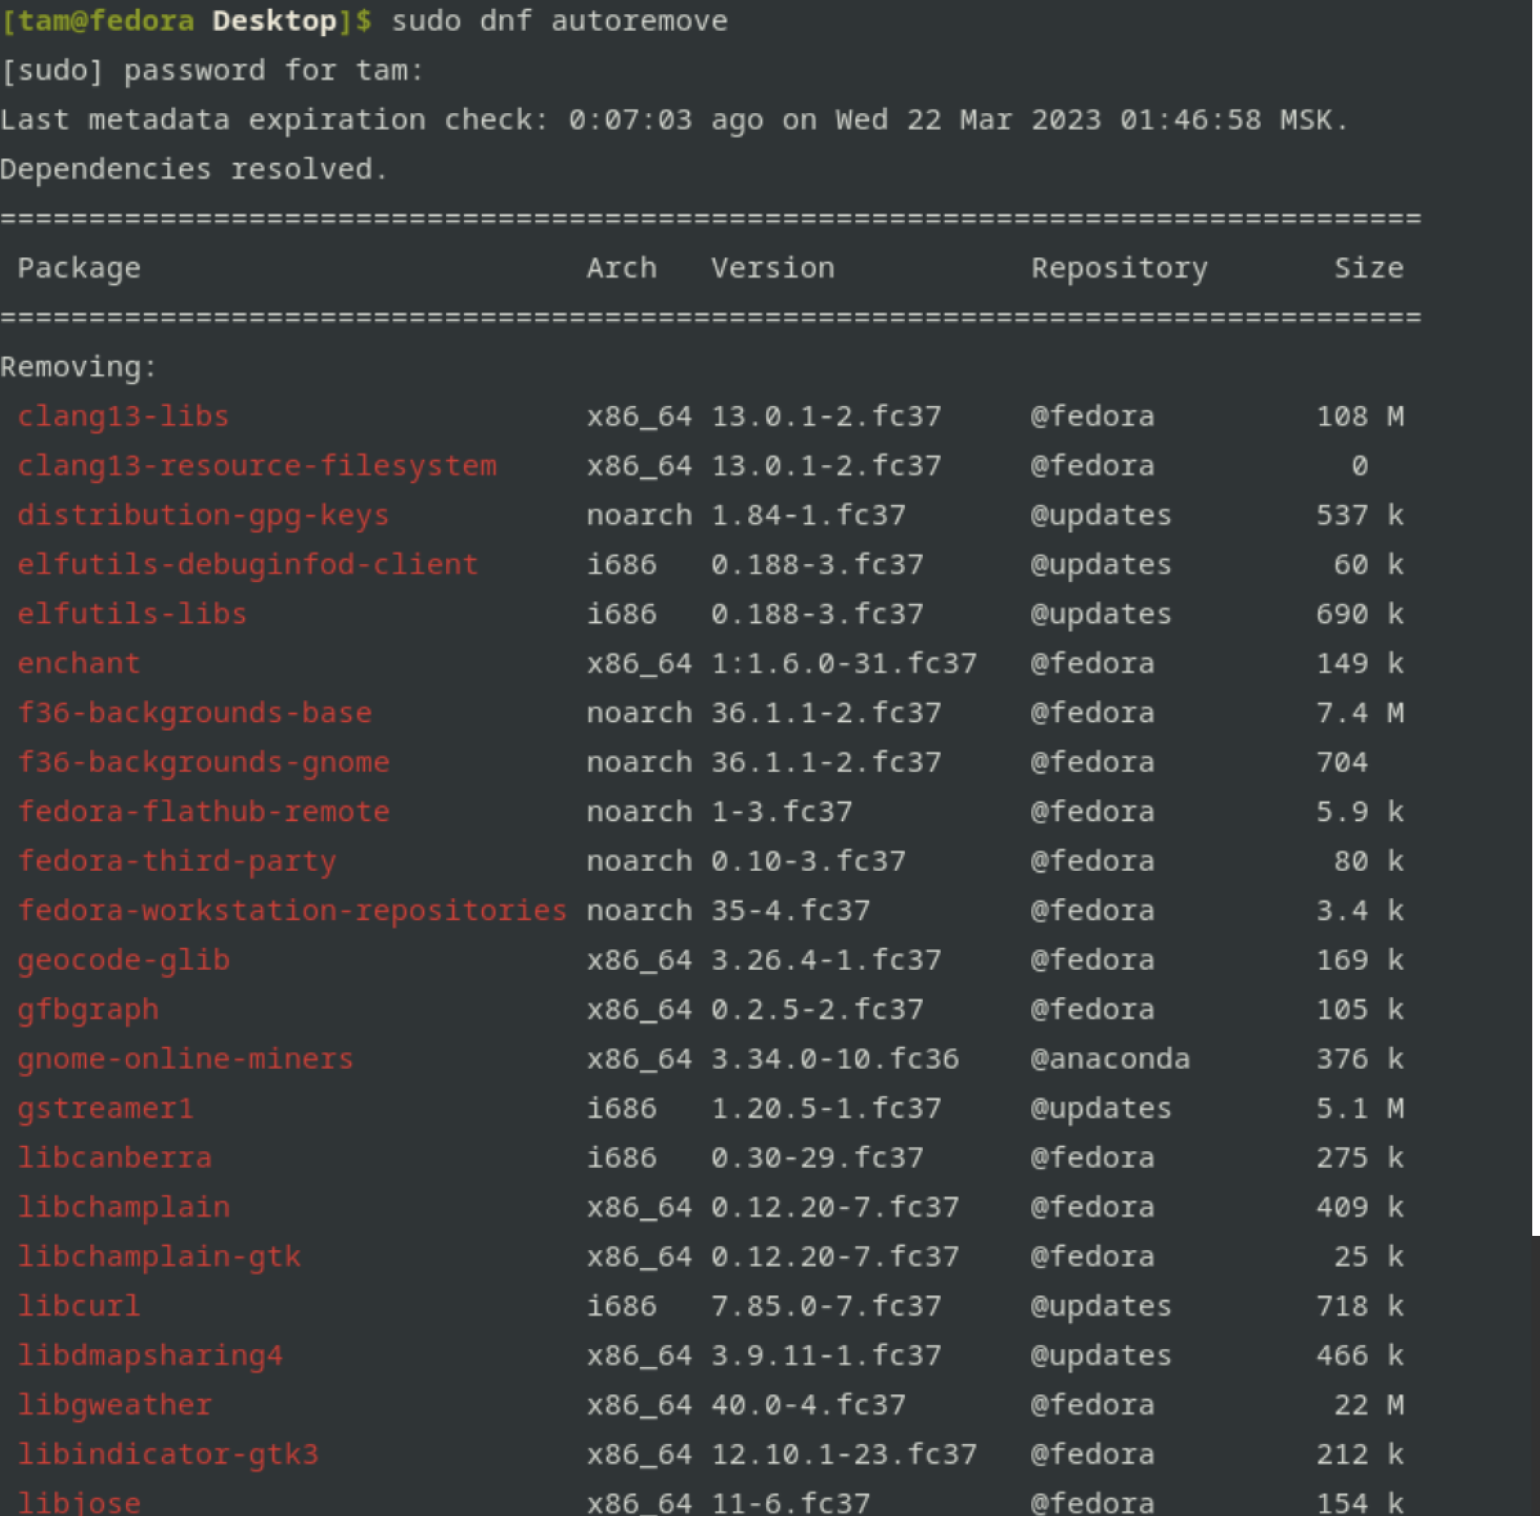
dnf autoremove — автоматическое удаление ненужных файлов с их зависимостями.
Скриншот: Skillbox Media
Узнать, есть ли нужная программа в репозиториях или как она точно называется, можно через поиск. В Fedora это команда dnf search [имя пакета].
$ dnf search firefox
Last metadata expiration check: 3:23:53 ago on Tue 21 Mar 2023 22:33:02 MSK.
========================== Name & Summary Matched: firefox ===========================
firefox.x86_64 : Mozilla Firefox Web browser
firefox-langpacks.x86_64 : Firefox langpacks
firefox-pkcs11-loader.x86_64 : Helper script for Firefox that sets up the browser for
                             : authentication with Estonian ID-card
firefox-wayland.x86_64 : Firefox Wayland launcher.
firefox-x11.x86_64 : Firefox X11 launcher.
============================== Summary Matched: firefox ==============================
icecat.x86_64 : GNU version of Firefox browser
mozilla-https-everywhere.noarch : HTTPS enforcement extension for Mozilla Firefox
mozilla-noscript.noarch : JavaScript white list extension for Mozilla Firefox
mozilla-ublock-origin.noarch : An efficient blocker for Firefox
profile-cleaner.noarch : Script to vacuum and reindex sqlite databases used by Firefox
                       : and by Chrome
textern.x86_64 : Firefox add-on for editing text in your favorite external editor
webextension-token-signing.x86_64 : Chrome and Firefox extension for signing with your
                                  : eID on the web
Можно также скачать файл и установить его через терминал. Программы, совместимые с дистрибутивами на основе Debian, имеют расширение .deb.
Установить такой файл можно командой dpkg: dpkg -i package.deb.
dpkg —remove package — удаление пакета.
dpkg —purge package — удаление пакета со всеми зависимостями.
Linux можно выключить или перезагрузить из терминала. Это незаменимая опция для тех, кто работает без графического окружения, и полезная, если нужно задать разные условия выключения и перезагрузки.
sudo shutdown — выключение системы (обратите внимание, этой программе нужны права суперпользователя).
Полезные опции команды shutdown:
shutdown +[время в 24-часовом формате].
shutdown 05:10 выключит компьютер через 5 часов 10 минут.
shutdown +[время в минутах].
shutdown +7 выключит компьютер через 7 минут.
shutdown +0 или shutdown now — немедленное выключение компьютера.
Tab — автозавершение.
Чтобы не вводить длинные названия файлов и папок или команд, достаточно написать пару первых букв и нажать Tab, система сама дополнит команду или путь к файлу — но только до того символа, с которого начнётся «разветвление». Звучит сложно, но вот пример: если набрать /home/[username]/D, то автокомплит не сработает, потому что по этому пути есть три папки, которые начинаются на букву D — Downloads, Documents и Desktop.
alias — создание синонимов для команд.
С помощью alias можно переименовывать команды или создавать свои. Это удобно, если команда имеет длинное имя, а вы часто ей пользуетесь.
Синтаксис: alias [длинная_команда короткая_команда].
Чтобы узнать, какие алиасы уже есть в системе, введите alias:
$ alias
alias cp='cp -i'
alias df='df -h'
alias egrep='egrep --colour=auto'
alias fgrep='fgrep --colour=auto'
alias free='free -m'
alias grep='grep --colour=auto'
alias ls='ls --color=auto'
alias more='less'
alias np='nano -w PKGBUILD'
Создать алиас для команды clear можно так:
$ alias c='clear'
unalias [alias name] — удалить alias.
Созданным таким образом алиасы сохраняются только до следующей перезагрузки системы. Чтобы сделать алиас постоянным, нужно прописать его в файле ~/.bashrc.
& & — выполнение сразу нескольких команд.
Команды можно связывать и запускать вместе.
[первая_команда] & & [вторая_команда].
| (pipe) — вывод результата первой команды во вторую.
ps axu | grep [имя_процесса].
Ctrl + Shift + T — открыть новую вкладку в терминале.
Ctrl + Shift + C — копировать текст из терминала, аналог Ctrl + C.
Ctrl + Shift + V — вставить текст в терминал, аналог Ctrl + V.
Ctrl + A, Ctrl + E — перемещение в начало/конец строки в терминале.
Alt + B, Alt + F — перемещение по слову назад/вперёд.
Alt + D — удаление следующего слова.
Ctrl + U — удалить всё до начала.
Ctrl + K — удалить всё до конца.
Ctrl + L — очистить экран, не удаляя текущую команду.
Может потребоваться установка пакетов cowsay и fortune (sudo apt-get install fortunes fortune-mod fortunes-min fortunes-ru).
cowsay — говорящая корова.
cowsay + [любое слово/фраза].
Выведет на экран корову, которая произносит введённое слово.
fortune | cowsay — корова поделится умной мыслью или цитатой.
$ fortune | cowsay
 _________________________________________
/ "Call immediately. Time is running out. \
| We both need to do something monstrous  |
| before we die."                         |
|                                         |
| -- Message from Ralph Steadman to       |
\ Hunter Thompson                         /
 -----------------------------------------
        \   ^__^
         \  (oo)\_______
            (__)\       )\/\
                ||----w |
                ||     ||
cowsay -l — список других животных.
Выведет список других существ, которых можно вызвать в терминале.
fortune | cowsay -f [животное].
Выведет животное, произносящее умную мысль или цитату.
- Обратите внимание: команды и их ключи в терминале Linux чувствительны к регистру — постановка прописной или строчной буквы влияет на их работоспособность.
- Навыки работы с командной строкой помогут легко взаимодействовать практически с любой Unix-подобной операционной системой.
- Использование горячих клавиш позволяет значительно ускорить работу с терминалом — собственно, без них работа будет идти довольно медленно.

Как зарабатывать больше с помощью нейросетей?
Бесплатный вебинар: 15 экспертов, 7 топ-нейросетей. Научитесь использовать ИИ в своей работе и увеличьте доход.
Узнать больше
Время на прочтение
14 мин
Количество просмотров 644K
Linux — это операционная система. Как винда (windows), только более защищенная. В винде легко подхватить вирус, в линуксе это практически невозможно. А еще линукс бесплатный, и ты сам себе хозяин: никаких тебе неотключаемых автообновлений системы!
Правда, разобраться в нем немного посложнее… Потому что большинство операций выполняется в командной строке. И если вы видите в вакансии «знание linux» — от вас ожидают как раз умение выполнять простейшие операции — перейти в другую директорию, скопировать файл, создать папочку… В этой статье я расскажу про типовые операции, которые стоит уметь делать новичку. Ну и плюс пара полезняшек для тестировщиков.
Я дам кратенькое описание основных команд с примерами (примеры я все проверяла на cent os, red hat based системе) + ссылки на статьи, где можно почитать подробнее. Если же хочется копнуть еще глубже, то см раздел «Книги и видео по теме». А еще комментарии к статье, там много полезного написали)
Содержание
- Где я? Как понять, где находишься
- Как понять, что находится в папке
- Как перейти в другую директорию
- По абсолютному пути
- По относительному пути
- С автодополнением
- Подняться наверх
- Как создать директорию
- Как создать файл
- Как отредактировать файл
- Как перенести / скопировать файл
- Скопировать файл
- Скопировать директорию
- Переместить файл
- Переместить директорию
- Как удалить файл
- Как изменить владельца файла
- Как установить приложение
- Как запустить приложение
- Как понять, где установлено приложение
- Как создать архив
- Как посмотреть использованные ранее команды
- Как посмотреть свободное место
- Как узнать IP компьютера
- Как узнать версию OS
- Как узнать, как работает команда
- Как создать много тестовых папок и файлов
- Как протестировать IOPS на Linux
- И это все?
- Книги и видео по теме
- Где тренироваться
Где я? Как понять, где находишься
Команда pwd:
pwd   --- мы ввели команду
/home/test   --- ответ системы, мы находимся в домашней директории пользователя test
Очень полезная команда, когда у вас нет ничего, кроме командной строки под рукой. Расшифровывается как Print Working Directory. Запомните ее, пригодится.
Как понять, что находится в папке
Команда ls позволяет просмотреть содержимое каталога:
Хотя лучше использовать команду сразу с флагом «l»:
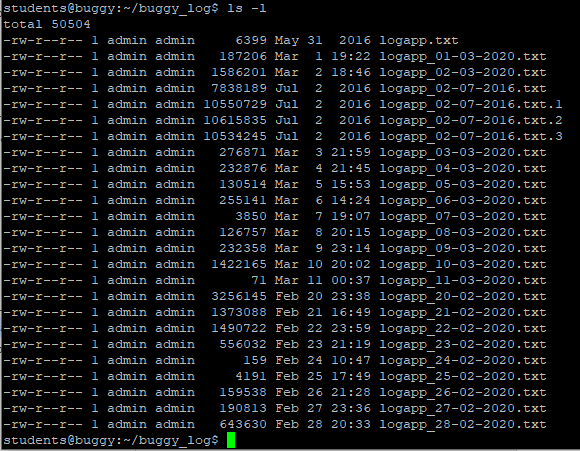
ls -lТакая команда выведет более читабельный список, где можно будет сразу увидеть дату создания файла, его размер, автора и выданные файлу права.
У команды есть и другие флаги, но чаще всего вы будете использовать именно «ls – l».
См также:
Команда ls Linux — подробнее о команде и всех ее флагах
Команда ls – просмотр каталога — о команде для новичков (без перечисления всех флагов)
Как перейти в другую директорию
С помощью команды cd:
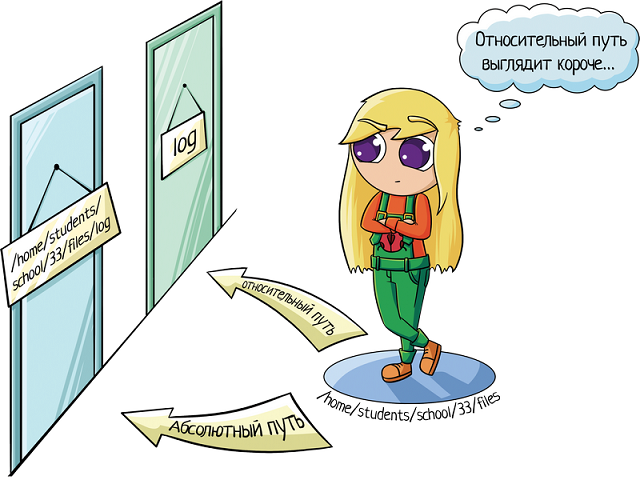
cd <путь к директории>Путь может быть абсолютным или относительным.
По абсолютному пути
Либо у вас где-то записан путь, «куда идти», либо вы подсмотрели его в графическом интерфейсе (например, в WinSCP).
Вставляем путь в командную строку после «cd»
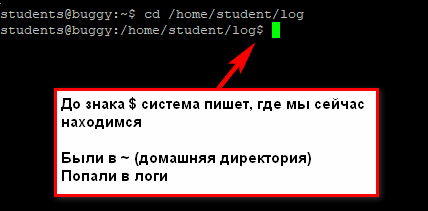
cd /home/student/logНу вот, мы переместились из домашней директории (обозначается как ~) в /home/student/log.
По относительному пути
Относительный путь — относительно вашей текущей директории, где вы сейчас находитесь. Если я уже нахожусь в /home/student, а мне надо в /home/student/log, команда будет такой:
cd log --- перейди в папку log из той директории, где ты сейчас находишьсяЕсли мне надо из /home/student/photo в /home/student/photo/city/msk/2017/cat_1, команда будет такой:
cd city/msk/2017/cat_1Я не пишу /home/student/photo, так как я уже там.
В линуксе можно задавать путь относительно домашней папки текущего пользователя. Домашняя директория обозначается ~/. Заметьте, не ~, а именно ~/. Дальше вы уже можете указывать подпапки:
cd ~/logЭта команда будет работать отовсюду. И переместит нас в /home/user/log.
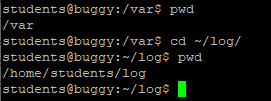
Вот пример, где я вошла под пользователем students. Исходно была в директории /var, а попала в /home/students/log:
С автодополнением
Если вы начнете набирать название папки и нажмете Tab, система сама его подставит. Если просто нажмете Tab, ничего не вводя, система начнет перебирать возможные варианты:
— (cd tab) Может, ты имел в виду папку 1?
— (tab) Нет? Может, папку 2?
— (tab) Снова нет? Может, папку 3?
— (tab) Снова нет? Может, файл 1 (она перебирает имена всех файлов и директорий, которые есть в той, где вы сейчас находитесь)?
— (tab) У меня кончились варианты, поехали сначала. Папка 1?
cd lon(Tab) → cd long-long-long-long-name-folder — начали вводить название папки и система сама подставила имя (из тех, что есть в директории, где мы находимся).
cd (Tab)(Tab)(Tab) — система перебирает все файлы / папки в текущей директории.
Это очень удобно, когда перемещаешься в командной строке. Не надо вспоминать точное название папки, но можно вспомнить первую букву-две, это сократит количество вариантов.
Подняться наверх
Подняться на уровень выше:
cd ..Если нужно поднять на два уровня выше, то
cd ../..И так до бесконечности =) Можно использовать файл, лежащий на уровне выше или просто сменить директорию.
Обратите внимание, что команда для линукса отличается от команды для винды — слеш другой. В винде это «cd ..\..», а в линуксе именно «cd ../..».
См также:
Путь к файлу в linux
Как создать директорию
Используйте команду mkdir:
mkdir test --- создает папку с названием «test» там, где вы находитесьМожно и в другом месте создать папку:
mkdir /home/test   --- создает папку «test» в директории /home, даже если вы
сейчас не там
Когда это нужно? Например, если вам надо сделать бекап логов. Создаете папку и сохраняете туда нужные логи. Или если вы читаете инструкцию по установке ПО и видите там «создать папку». Через командную строку это делается именно так.
См также:
Как создать каталог в Linux с помощью команды mkdir
Как создать файл
Командой touch:
touch app.logТакая команда создаст пустой файл с названием «app.log». А потом уже можно открыть файл в редакторе и редактировать.
Как отредактировать файл
Вот честное слово, лучше делать это через графический интерфейс!
Но если такой возможности нет, чтож… Если использовать программы, которые есть везде, то у вас два варианта:
- nano — более простая программа, рассчитана на новичков
- vim — более сложная, но позволяет сделать кучу всего
Начнем с nano. Указываете имя команды и путь в файлу:
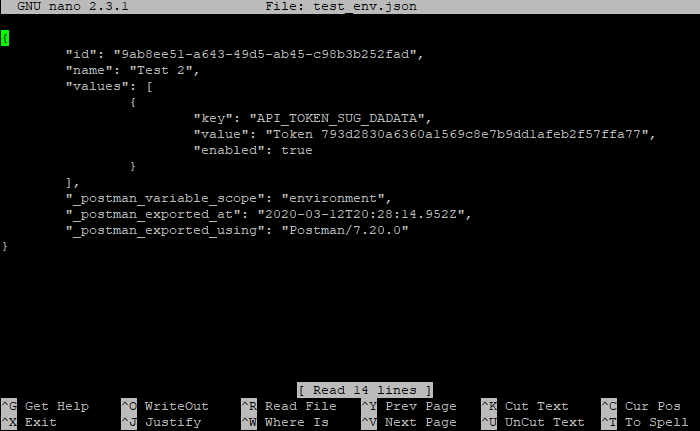
nano test_env.jsonДля перемещения по файлу используйте кнопки со стрелками. После того, как закончите редактировать файл, нажмите:
- Ctrl+O — чтобы сохранить
- Ctrl+X — для выхода
Самое приятное в nano — это подсказки внизу экрана, что нажать, чтобы выйти.
А вот с vim с этим сложнее. В него легко зайти:
vim test_env.json
vi test_env.json     (предшественник vim)
Войти вошли, а как выйти то, аааа? Тут начинается легкая паника, потому что ни одна из стандартных комбинаций не срабатывает: Esc, ctrl + x, ctrl + q… Если под рукой есть второй ноутбук или хотя бы телефон / планшет с интернетом, можно прогуглить «как выйти из vim», а если у вас только одно окно с терминалом, которое вы заблокировали редактором?
Делюсь секретом, для выхода надо набрать:
- :q — закрыть редактор
- :q! — закрыть редактор без сохранения (если что-то меняли, то просто «:q» не проканает)
Двоеточие запускает командный режим, а там уже вводим команду «q» (quit).
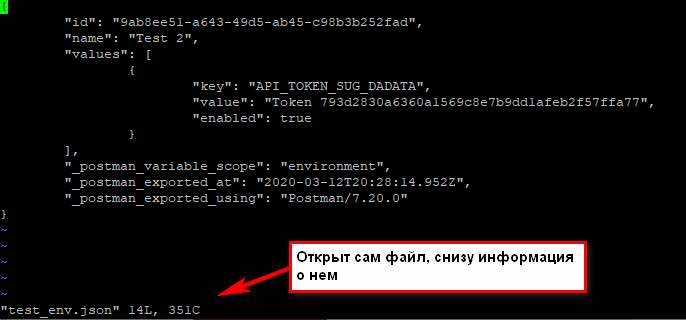
Исходно, когда мы открываем файл через vim, то видим его содержимое, а внизу информацию о файле:
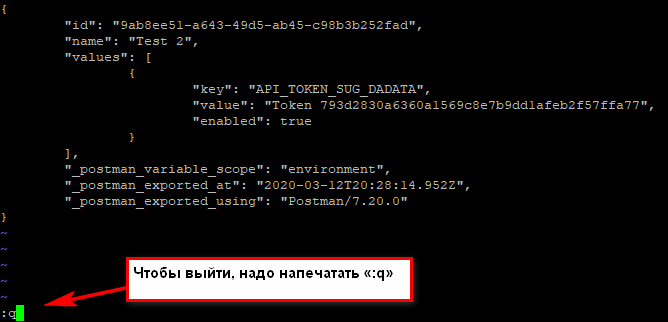
Когда нажимаем двоеточие, оно печатается внизу:
Если не печатается, не паникуем! Тогда попробуйте нажать Esc (вернуться в нормальный режим), потом Enter (подтвердить команду), а потом снова печатайте. Фух, помогло, мы вышли оттуда!!!
На самом деле сейчас всё не так страшно. Даже если вас заслали работать в банк, где нет доступа в интернет, а вы вошли в vi и не знаете как выйти, всегда можно погулить выход с телефона. Слава мобильному интернету! Ну а если вы знаете логин-пароль от сервера, то можно просто закрыть терминал и открыть его снова.
Если нужно выйти, сохранив изменения, используйте команду
:w — сохранить файл;
:q — закрыть редактор;
Ну а про возможности редактирования см статьи ниже =)
См также:
Как редактировать файлы в Ubuntu — подробнее о разных способах
Как пользоваться текстовым редактором vim — подробнее о vim и всех его опциях
Как выйти из редактора Vi или Vim? — зачем нажимать Esc
Как перенести / скопировать файл
Допустим, у нас в директории /opt/app/log находится app.log, который мы хотим сохранить в другом месте. Как перенести лог в нужное место, если нет графического интерфейса, только командная строка?
Скопировать файл
Команда:
cp что_копировать куда_копироватьЕсли мы находимся в директории /opt/app/log:
cp app.log /home/olgaВ данном примере мы использовали относительный путь для «что копировать» — мы уже находимся рядом с логом, поэтому просто берем его. А для «куда копировать» используем абсолютный путь — копируем в /home/olga.
Можно сразу переименовать файл:
cp app.log /home/olga/app_test_2020_03_08.logВ этом случае мы взяли app.log и поместили его в папку /home/olga, переименовав при этом в app_test_2020_03_08.log. А то мало ли, сколько логов у вас в этом папке уже лежит, чтобы различать их, можно давать файлу более говорящее имя.
Если в «куда копировать» файл с таким именем уже есть, система не будет ничего спрашивать, просто перезапишет его. Для примера положим в папку log внутри домашней директории файл «app.log», который там уже есть:
Никаких ошибок, система просто выполнила команду.
См также:
Копирование файлов в linux
Скопировать директорию
Команда остается та же, «cp», только используется ключ R — «копировать папку рекурсивно»:
cp -r путь_к_папке путь_к_новому_местуНапример:
cp /opt/app/log /home/olgaТак в директории /home/olga появится папка «log».
Переместить файл
Если надо переместить файл, а не скопировать его, то вместо cp (copy) используем mv (move).
cp app.log /home/olga
↓
mv app.log /home/olga
Можно использовать относительные и абсолютные пути:
mv /opt/app/logs/app.log /home/olga — абсолютные пути указаны, команда сработает из любого местаМожно сразу переименовать файл:
mv app.log /home/olga/app_2020_03_08.log — перенесли лог в /home/olga и переименовалиПереместить директорию
Аналогично перемещению файла, команда mv
mv /opt/app/log/ /home/olga/bakup/Как удалить файл
С помощью команды rm (remove):
rm test.txt — удалит файл test.txtЕсли нужно удалить все файлы в текущей директории (скажем, вычищаем старые логи перед переустановкой приложения), используйте «*»:
rm * — удалит все файлы в текущей директорииЕсли нужно удалить папку, надо добавить флаг -r (recursive):
rm -r test_folderЕсли вы пытаетесь удалить файлы, которые уже используются в программе или доступны только для чтения, система будет переспрашивать:
А теперь представьте, что вы чистите много файлов. И на каждый система переспрашивает, и надо постоянно отвечать «да, да, да…» (y – enter, y – enter, y – enter)… Чтобы удалить все без вопросов, используйте флаг -f (force):
rm -rf test_folder --- просто все удалит без разговоровНо учтите, что это довольно опасная команда! Вот так надоест подстверждать удаление и введешь «-rf», а директорию неправильно укажешь… Ну и все, прости-прощай нужные файлы. Аккуратнее с этой командой, особенно если у вас есть root-полномочия!
Опция -v показывает имена удаляемых файлов:
rm -rfv test_folder --- удалит папку со всем содержимым, но выведет имена удаляемых файловТут вы хотя бы можете осознать, что натворили )))
См также:
Как удалить каталог Linux
Как изменить владельца файла
Если у вас есть root-доступ, то вы наверняка будете выполнять все действия под ним. Ну или многие… И тогда любой созданный файл, любая папка будут принадлежать root-пользователю.
Это плохо, потому что никто другой с ними работать уже не сможет. Но можно создать файл под root-ом, а потом изменить его владельца с помощью команды chown.
Допустим, что я поднимаю сервис testbase. И он должен иметь доступ к директории user и файлу test.txt в другой директории. Так как никому другому эти файлики не нужны, а создала я их под рутом, то просто меняю владельца:
chown testbase:testbase test.txt — сменить владельца файла
chown -R testbase:testbase user     — сменить владельца папки
В итоге был владелец root, а стал testbase. То, что надо!
См также:
Команда chown Linux
Как установить приложение
Если вы привыкли к винде, то для вас установка приложения — это скачать некий setup файлик, запустить и до упора тыкать «далее-далее-далее». В линуксе все немного по-другому. Тут приложения ставятся как пакеты. И для каждой системы есть свой менеджер пакетов:
- yum — red hat, centos
- dpkg, apt — debian
См также:
5 Best Linux Package Managers for Linux Newbies
Давайте посмотрим на примере, как это работает. В командной строке очень удобно работать с Midnight Commander (mc) — это как FAR на windows. К сожалению, программа далеко не всегда есть в «чистом» дистрибутиве.
И вот вы подняли виртуалку на centos 7, хотите вызвать Midnight Commander, но облом-с.
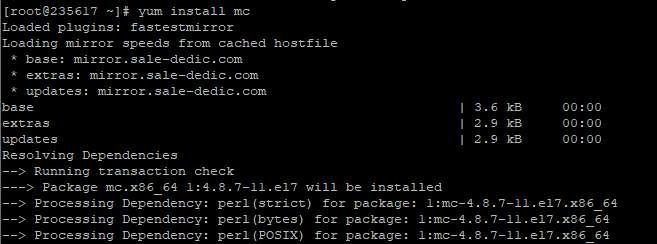
mcНичего страшного, установите это приложение через yum:
yum install mcОн там будет что-то делать, качать, а потом уточнит, согласны ли вы поставить программу с учетом ее размеров. Если да, печатаем «y»:
И система заканчивает установку.
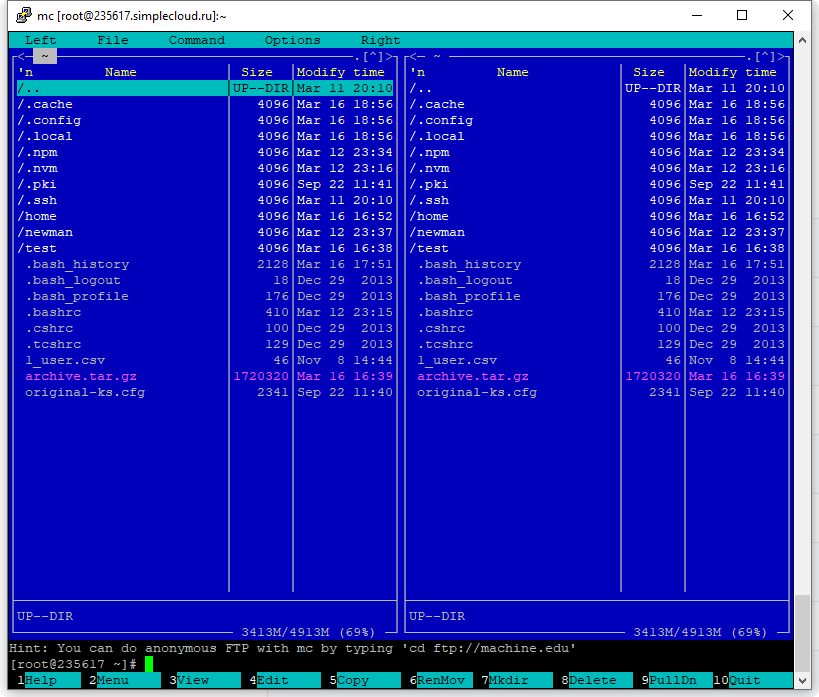
Вот и все! Никаких тебе унылых «далее-далее-далее», сказал «установи», программа установилась! Теперь, если напечатать «mc» в командной строке, запустится Midnight Commander:
См также:
Как устанавливать программы для Linux
Yum, шпаргалка — всякие опции и плагины
Как запустить приложение
Некоторые приложения запускаются через скрипты. Например, чтобы запустить сервер приложения WildFly, нужно перейти в папку bin и запустить там standalone.sh. Файл с расширением .sh — это скрипт.
Чтобы запустить скрипт, нужно указать полный путь к нему:
/opt/cdi/jboss/bin/standalone.sh — запустили скрипт standalone.shЭто важно! Даже если вы находитесь в той папке, где и скрипт, он не будет найден, если просто указать название sh-скрипта. Надо написать так:
./standalone.sh — запустили скрипт, если мы в той же директорииПоиск идет только в каталогах, записанных в переменную PATH. Так что если скрипт используется часто, добавляйте путь туда и вызывайте просто по названию:
standalone.sh --- запустили скрипт standalone.sh, путь к которому прописан в PATHСм также:
Запуск скрипта sh в Linux — подробнее о скриптах
Если же приложение запускается как сервис, то все еще проще:
service test start — запустить сервис под названием «test»
service test stop — остановить сервис
Чтобы сервис test запускался автоматически при рестарте системы, используйте команду:
chkconfig test onОна добавит службу в автозапуск.
Как понять, где установлено приложение
Вот, например, для интеграции Jenkins и newman в Jenkins надо прописать полный путь к ньюману в параметре PATH. Но как это сделать, если newman ставился автоматически через команду install? И вы уже забыли, какой путь установки он вывел? Или вообще не вы ставили?
Чтобы узнать, куда приложение установилось, используйте whereis (без пробела):
whereis newmanКак создать архив
Стандартная утилита, которая будет работать даже на «голой» системе — tar. Правда, для ее использования надо запомнить флаги. Для создания архива стандартная комбинация cvzf:
tar -cvzf archive.tar.gz /home/testВ данном примере мы упаковали директорию /home/test, внутри которой было две картинки — 502.jpg и 504.jpg.
Для распаковки меняем флаг «c» на «x» и убираем «z»:
tar -xvf archive.tar.gzХотя система пишет, что распаковала «/home/test», на самом деле папка «test» появляется там, где мы сейчас находимся.
Давайте разберемся, что все эти флаги означают:
- c — создать архив в linux
- x — извлечь файлы из архива
- v — показать подробную информацию о процессе работы (без него мы бы не увидели, какие файлики запаковались / распаковались)
- f — файл для записи архива
- z — сжатие
Для упаковки используется опция c — Create, а для распаковки x — eXtract.
Если очень хочется использовать rar, то придется изгаляться. Через yum установка не прокатит:
yum install rar
yum install unrar
Говорит, нет такого пакета:
No package rar available.
Error: Nothing to do
Придется выполнить целую пачку команд! Сначала скачиваем, разархивируем и компилируем:
wget http://rarlabs.com/rar/rarlinux-x64-5.4.0.tar.gz
tar xzf rarlinux-x64-5.4.0.tar.gz
cd rar
make install
Устанавливаем:
mkdir -p /usr/local/bin
mkdir -p /usr/local/lib
cp rar unrar /usr/local/bin
cp rarfiles.lst /etc
cp default.sfx /usr/local/lib
И применяем:
unrar x test.rarСм также:
Установка RAR на Linux
Как посмотреть использованные ранее команды
Вот, допустим, вы выполняли какие-то сложные действия. Или даже не вы, а разработчик или админ! У вас что-то сломалось, пришел коллега, вжух-вжух ручками, magic — работает. А что он делал? Интересно же!
Или, может, вы писали длинную команду, а теперь ее надо повторить. Снова набирать ручками? Неохота! Тем более что есть помощники:
↑  (стрелочка «наверх») — показать последнюю команду
history — показать последние 1000 команд
Если надо «отмотать» недалеко, проще через стрелочку пролистать команды. Один раз нажали — система показала последнюю команду. Еще раз нажали — предпоследнюю. И так до 1000 раз (потому что именно столько хранится в истории).
Большой бонус в том, что линукс хранит историю даже при перезапуске консоли. Это вам не как в винде — скопировал текст, скопировал другой, а первый уже потерялся. А при перезагрузке системы вообще все потерялось.
Если тыкать в стрелочку не хочется, или команды была давно, можно напечатать «history» и внимательно изучить команды.
См также:
История команд Linux — больше о возможностях history
Как посмотреть свободное место
Сколько места свободно на дисках
df -hСколько весит директория
du -sh
du -sh *  --- с разбиением
Как узнать IP компьютера
Если у вас настроены DNS-имена, вы подключаетесь к linux-машине именно по ним. Ведь так проще запомнить — это testbase, это bugred… Но иногда нужен именно IP. Например, если подключение по DNS работает только внутри рабочей сети, а коллега хочет подключиться из дома, вот и уточняет айпишник.
Чтобы узнать IP машины, используйте команду:
hostname -IТакже можно использовать ifconfig:
ifconfig — выведет кучу инфы, в том числе ваш внешний IP
ip a — аналог, просто иногда Ifconfig дает очень много результата, тут поменьше будет
См также:
Displaying private IP addresses
Как узнать версию OS
Сидите вы у Заказчика на линуксовой машине. Пытаетесь что-то установить — не работает. Лезете гуглить, а способы установки разные для разных операционных систем. Но как понять, какая установлена на данной машине?
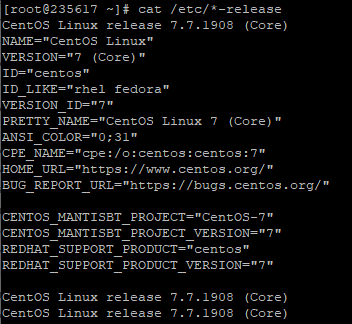
Используйте команду:
cat /etc/*-releaseНа этой виртуалке стоит CentOs 7.
Если нужна версия ядра:
uname -aСм также:
Как узнать версию Linux
Как узнать, как работает команда
Если вы не знаете, как работает команда, всегда можно спросить о ней саму систему, используя встроенную команду man:
man lsЗакрыть мануал можно с помощью клавиши q. Для того, кто первый раз в линуксовой консоли, это совсем не очевидно, а подсказки есть не везде.
Команда удобна тем, что не надо даже уходить из командной строки, сразу получаешь всю информацию. К тому же это всегда актуальная информация. А что вы там нагуглите — неизвестно =))
Хотя лично мне проще какую-то команду прогуглить, ведь так я получу русское описание + сначала самые главные флаги (а их может быть много). Но я сама новичок в линуксе, это подход новичка. А лучше сразу учиться прокачивать навык поиска по man-у. Он вам очень пригодится для более сложных задач!
Если man у программы нет, используйте флаг -h (—help):
ls -hКак создать много тестовых папок и файлов
Допустим, у нас есть некая папка test. Создадим в ней сотню директорий и кучу файликов в каждой:
mkdir -p test/dir--{000..100}
touch test/dir--{000..100}/file-{A..Z}
Вот и все, дальше можно играться с ними!
Теперь пояснения:
- mkdir — создать директорию
- touch — создать файл (или изменить существующий, но если файла с таким именем нет, то команда создаст новый, пустой)
А выражения в скобках играют роль функции, которая выполняется в цикле и делает ручную работу за вас:
- {000..100} — пробежится по всем числам от 0 до 100
- {A..Z} — пробежится по всем буквам английского алфавита от A до Z
Как я пробовала эту команду. Сначала посмотрела, где нахожусь:
$ pwd
/home/test
Символ $ при описании команд означает начало строки, куда мы пишем команду. Так мы отделяем то, что ввели сами (pwd) от ответа системы (/home/test).
Ага, в домашней директории. Создам себе песочницу:
mkdir olgaВот в ней и буду творить!
mkdir -p olga/dir--{000..100}
touch olga/dir--{000..100}/file-{A..Z}
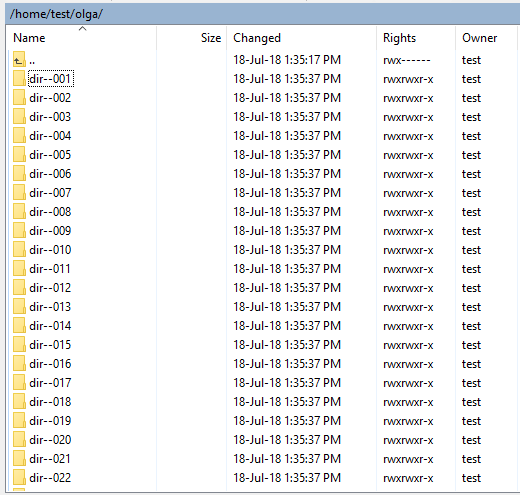
А потом можно проверить, что получилось:
cd olga
ls -l
Как-то так! Имхо, полезные команды.
Я нашла их в книге «Командная строка Linux. Полное руководство», они используются для того, чтобы создать песочницу для прощупывания команды find. Я, как и автор, восхищаюсь мощью командной строки в данном случае. Всего 2 строчки, а сколько боли бы принесло сделать похожую структуру через графический интерфейс!
И, главное, тестировщику полезно — может пригодиться для тестов.
Как протестировать IOPS на Linux
Это очень полезно делать, если машину вам дает заказчик. Там точно SSD-диски? И они дают хороший iops? Если вы разрабатываете серверное приложение, и от вас требуют выдерживать нагрузку, нужно быть уверенными в том, что диски вам выдали по ТЗ.
Наше приложение активно использует диск. Поэтому, если заказчик хочет видеть хорошие результаты по нагрузке, мы хотим видеть хорошие результаты по производительности самих дисков.
Но верить админам другой стороны на слово нельзя. Если приложение работает медленно, они, разумеется, будут говорить, что у них то все хорошо, это «они» виноваты. Поэтому надо тестировать диски самим.
Я расскажу о том, как мы тестировали диски. Как проверили, сколько IOPS они выдают.
Используем утилиту fio — https://github.com/axboe/fio/releases.
1) Скачиваем последнюю версию, распаковываем, переходим в каталог. В командах ниже нужно заменить «fio-3.19» на актуальную версию из списка
cd /tmp
wget https://github.com/axboe/fio/archive/fio-3.19.tar.gz
tar xvzf fio-3.19.tar.gz
rm fio-3.19.tar.gz
cd fio-fio-3.19
2) Должны стоять пакеты для сборки
apt-get install -y gcc make libaio-dev | yum install -y make gcc libaio-devel3) Собираем
make4) Тестируем
./fio -readonly -name iops -rw=randread -bs=512 -runtime=20 -iodepth 32 -filename /dev/sda -ioengine libaio -direct=1Какие должны быть результаты:
- Средний SSD, выпущенный 2-3 года назад — 50 тысяч IOPS.
- Свежий Samsung 960 Pro, который стоит на одной из железок у нас в офисе — 350 тысяч IOPS.
Свежесть определяется на момент написания статьи в 2017 году.
Если должно быть 50 тысяч, а диск выдает сильно меньше, то:
— он не SSD;
— есть сетевые задержки;
— неправильно примонтирован;
— с ними что-то еще плохое случилось и стоит поднять алярм.
И это все?
Разумеется, нет =))
Еще полезно изучить команду find и регулярные выражения. Тестировщику как минимум надо уметь «грепать логи» — использовать grep. Но это уже остается на самостоятельный гуглеж.
База, которая всегда нужна — pwd, cp, mv, mkdir, touch. Остальное можно легко гуглить, как только возникает необходимость.
Вот вам еще пара ссылочек от меня:
- Что значат символы >> и >& в unix/Linux — а то вроде про «>» знаешь еще по винде, а что значит «>>»? Вот в статье и ответ!
- Ахтунг, прод! Как настроить приветствие на Linux — очень полезная штука, если у вас есть доступы на продакшен. Обезопасьте себя )))
Для понимания структуры папок рекомендую статью «Структура папок ОС Linux. Какая папка для чего нужна. Что и где лежит в линуксе»
Книги и видео по теме
Видео:
ПО GNU/Linux — видео лекции Георгия Курячего — очень хорошие видео-лекции
Книги:
Командная строка Linux. Уильям Шоттс
Скотт Граннеман. Linux. карманный справочник
Где тренироваться
Можно поднять виртуалку. Правда, тут сначала придется разбираться, как поднимать виртуалку )))
А можно купить облачную машину. Когда мне надо было поиграться с линуксом, я пошла на SimpleCloud (он мне в гугле одним из первых выпал и у него дружелюбный интерфейс. Но можно выбрать любой аналог) и купила самую дешманскую машину — за 150 руб в месяц. Месяца вам за глаза, чтобы «пощупать-потыркать», и этой машины с минимумом памяти тоже.
У меня был когда-то план самой платить эти 150р за то, чтобы дать машину в общий доступ. Но увы. Как я не пыталась ее огородить (закрывала команды типа ssh, ping и прочая), у меня не получилось. Всегда есть люди, которых хлебом не корми, дай испортить чужое. Выложил в общий доступ пароли? На тебе ддос-атаку с твоего сервера. Ну и сервер блокируют. После N-ой блокировки я плюнула на это дело. Кто хочет научиться, найдет 150р.
Чтобы подключиться к машине, используйте инструменты:
- Putty — командная строка
- WinSCP — графический интерфейс
См также:
WinSCP — что это и как использовать
Welcome to our ultimate guide to the Linux Command Line. This tutorial will show you some of the key Linux command line technologies and introduce you to the Bash scripting language.
What is Bash?
Bash (short for Bourne Again SHell) is a Unix shell, and a command language interpreter. A shell is simply a macro processor that executes commands. It’s the most widely used shell packaged by default for most Linux distributions, and a successor for the Korn shell (ksh) and the C shell (csh).
Many things that can be done Linux operating system can be done via command line. Some examples are…
- Editing files
- Adjusting the volume of the operating system
- Fetching web pages from the internet
- Automating work you do every day
You can read more about bash here, via the GNU Documentation, and via the tldp guide.
Using bash on the command line (Linux, OS X)
You can start using bash on most Linux and OS X operating systems by opening up a terminal. Let’s consider a simple hello world example. Open up your terminal, and write the following line (everything after the $ sign):
zach@marigold:~$ echo "Hello world!"
Hello world!
As you can see, we used the echo command to print the string “Hello world!” to the terminal.
Writing a bash script
You can also put all of your bash commands into a .sh file, and run them from the command line. Say you had a bash script with the following contents:
#!/bin/bash
echo "Hello world!"
It’s worth noting that first line of the script starts with #!. It is a special directive which Unix treats differently.
Why did we use #!/bin/bash at the beginning of the script file?
That is because it is a convention to let the interactive shell know what kind of interpreter to run for the program that follows. The first line tells Unix that the file is to be executed by /bin/bash. This is the standard location of the Bourne shell on just about every Unix system. Adding #!/bin/bash as the first line of your script, tells the OS to invoke the specified shell to execute the commands that follow in the script. #! is often referred to as a “hash-bang”, “she-bang” or “sha-bang”. Though it is only executed if you run your script as an executable. For example, when you type ./scriptname.extension, it will look at the top line to find out the interpreter, whereas, running the script as bash scriptname.sh, first line is ignored.
Then you could run the script like so: For make file executable you should call this command under sudo chmod +x “filename”.
zach@marigold:~$ ./myBashScript.sh
Hello world!
The script only has two lines. The first indicates what interpreter to use to run the file (in this case, bash). The second line is the command we want to use, echo, followed by what we want to print which is “Hello World”.
Sometimes the script won’t be executed, and the above command will return an error. It is due to the permissions set on the file. To avoid that use:
zach@marigold:~$ chmod u+x myBashScript.shAnd then execute the script.
Cat is one of the most frequently used commands in Unix operating systems.
Cat is used to read a file sequentially and print it to the standard output. The name is derived from its function to concatenate files.
Usage
cat [options] [file_names]Most used options:
-b, numer non-blank output lines-n, number all output lines-s, squeeze multiple adjacent blank lines-v, display nonprinting characters, except for tabs and the end of line character
Example
Print in terminal the content of file.txt:
cat file.txtConcatenate the content of the two files and display the result in terminal:
cat file1.txt file2.txtLinux Command Line: Bash cd
Change Directory to the path specified, for example cd projects.
There are a few really helpful arguments to aid this:
.refers to the current directory, such as./projects..can be used to move up one folder, usecd .., and can be combined to move up multiple levels../../my_folder/is the root of your system to reach core folders, such assystem,users, etc.~is the home directory, usually the path/users/username. Move back to folders referenced relative to this path by including it at the start of your path, for example~/projects.
Linux Command Line: Bash head
Head is used to print the first ten lines (by default) or any other amount specified of a file or files. Cat is used to read a file sequentially and print it to the standard output.
ie prints out the entire contents of the entire file. — that is not always necessary, perhaps you just want to check the contents of a file to see if it is the correct one, or check that it is indeed not empty. The head command allows you to view the first N lines of a file.
if more than on file is called then the first ten lines of each file is displayed, unless specific number of lines are specified. Choosing to display the file header is optional using the option below
Usage
head [options] [file_name(s)]Most used options:
-n N, prints out the first N lines of the file(s)-q, doesn’t print out the file headers-v, always prints out the file headers
Example
head file.txtPrints in terminal the first ten lines of file.txt (default)
head -n 7 file.txtPrints in terminal the first seven lines of file.txt
head -q -n 5 file1.txt file2.txtPrint in terminal the first 5 lines of file1.txt, followed by the first 5 lines of file2.txt
Linux Command Line: Bash ls
ls is a command on Unix-like operating systems to list contents of a directory, for example folder and file names.
Usage
cat [options] [file_names]Most used options:
-a, all files and folders, including ones that are hidden and start with a.-l, List in long format-G, enable colorized output.
Example:
List files in freeCodeCamp/guide/
ls                                                                ⚬ master
CODE_OF_CONDUCT.md bin                package.json       utils
CONTRIBUTING.md    gatsby-browser.js  plugins            yarn.lock
LICENSE.md         gatsby-config.js   src
README.md          gatsby-node.js     static
assets             gatsby-ssr.js      translations
Linux Command Line: Bash man
Man, the abbreviation of manual, is a bash command used to display on-line reference manuals of the given command.
Man displays the reletive man page (short for manual page) of the given command.
Usage
man [options] [command]Most used options:
-f, print a short description of the given command-a, display, in succession, all of the available intro manual pages contained within the manual
Example
Display the man page of ls:
man lsLinux Command Line: Bash mv
Moves files and folders.
mv source target
mv source ... directory
The first argument is the file you want to move, and the second is the location to move it to.
Commonly used options:
-fto force move them and overwrite files without checking with the user.-ito prompt confirmation before overwriting files.
That’s all. Go forth and use Linux.
Learn to code for free. freeCodeCamp’s open source curriculum has helped more than 40,000 people get jobs as developers. Get started
1. Overview
The Linux command line is a text interface to your computer. Often referred to as the shell, terminal, console, prompt or various other names, it can give the appearance of being complex and confusing to use. Yet the ability to copy and paste commands from a website, combined with the power and flexibility the command line offers, means that using it may be essential when trying to follow instructions online, including many on this very website!
This tutorial will teach you a little of the history of the command line, then walk you through some practical exercises to become familiar with a few basic commands and concepts. We’ll assume no prior knowledge, but by the end we hope you’ll feel a bit more comfortable the next time you’re faced with some instructions that begin “Open a terminal”.
Originally authored by peppertop.
What you’ll learn
- A little history of the command line
- How to access the command line from your own computer
- How to perform some basic file manipulation
- A few other useful commands
- How to chain commands together to make more powerful tools
- The best way to use administrator powers
What you’ll need
- A computer running Ubuntu or some other version of Linux
Every Linux system includes a command line of one sort or another. This tutorial includes some specfic steps for Ubuntu 18.04 but most of the content should work regardless of your Linux distribution.
2. A brief history lesson
During the formative years of the computer industry, one of the early operating systems was called Unix. It was designed to run as a multi-user system on mainframe computers, with users connecting to it remotely via individual terminals. These terminals were pretty basic by modern standards: just a keyboard and screen, with no power to run programs locally. Instead they would just send keystrokes to the server and display any data they received on the screen. There was no mouse, no fancy graphics, not even any choice of colour. Everything was sent as text, and received as text. Obviously, therefore, any programs that ran on the mainframe had to produce text as an output and accept text as an input.
Compared with graphics, text is very light on resources. Even on machines from the 1970s, running hundreds of terminals across glacially slow network connections (by today’s standards), users were still able to interact with programs quickly and efficiently. The commands were also kept very terse to reduce the number of keystrokes needed, speeding up people’s use of the terminal even more. This speed and efficiency is one reason why this text interface is still widely used today.
When logged into a Unix mainframe via a terminal users still had to manage the sort of file management tasks that you might now perform with a mouse and a couple of windows. Whether creating files, renaming them, putting them into subdirectories or moving them around on disk, users in the 70s could do everything entirely with a textual interface.
Each of these tasks required its own program or command: one to change directories (cd), another to list their contents (ls), a third to rename or move files (mv), and so on. In order to coordinate the execution of each of these programs, the user would connect to one single master program that could then be used to launch any of the others. By wrapping the user’s commands this “shell” program, as it was known, could provide common capabilities to any of them, such as the ability to pass data from one command straight into another, or to use special wildcard characters to work with lots of similarly named files at once. Users could even write simple code (called “shell scripts”) which could be used to automate long series of shell commands in order to make complex tasks easier. The original Unix shell program was just called sh, but it has been extended and superceded over the years, so on a modern Linux system you’re most likely to be using a shell called bash. Don’t worry too much about which shell you have, all the content in this tutorial will work on just about all of them.
Linux is a sort-of-descendent of Unix. The core part of Linux is designed to behave similarly to a Unix system, such that most of the old shells and other text-based programs run on it quite happily. In theory you could even hook up one of those old 1970s terminals to a modern Linux box, and access the shell through that. But these days it’s far more common to use a software terminal: that same old Unix-style text interface, but running in a window alongside your graphical programs. Let’s see how you can do that yourself!
3. Opening a terminal
On a Ubuntu 18.04 system you can find a launcher for the terminal by clicking on the Activities item at the top left of the screen, then typing the first few letters of “terminal”, “command”, “prompt” or “shell”. Yes, the developers have set up the launcher with all the most common synonyms, so you should have no problems finding it.
Other versions of Linux, or other flavours of Ubuntu, will usually have a terminal launcher located in the same place as your other application launchers. It might be hidden away in a submenu or you might have to search for it from within your launcher, but it’s likely to be there somewhere.
If you can’t find a launcher, or if you just want a faster way to bring up the terminal, most Linux systems use the same default keyboard shortcut to start it: Ctrl-Alt-T.
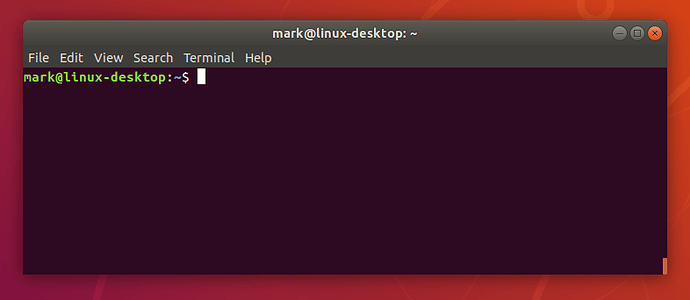
However you launch your terminal, you should end up with a rather dull looking window with an odd bit of text at the top, much like the image below. Depending on your Linux system the colours may not be the same, and the text will likely say something different, but the general layout of a window with a large (mostly empty) text area should be similar.
Let’s run our first command. Click the mouse into the window to make sure that’s where your keystrokes will go, then type the following command, all in lower case, before pressing the Enter or Return key to run it.
pwd
You should see a directory path printed out (probably something like /home/YOUR_USERNAME), then another copy of that odd bit of text.
There are a couple of basics to understand here, before we get into the detail of what the command actually did. First is that when you type a command it appears on the same line as the odd text. That text is there to tell you the computer is ready to accept a command, it’s the computer’s way of prompting you. In fact it’s usually referred to as the prompt, and you might sometimes see instructions that say “bring up a prompt”, “open a command prompt”, “at the bash prompt” or similar. They’re all just different ways of asking you to open a terminal to get to a shell.
On the subject of synonyms, another way of looking at the prompt is to say that there’s a line in the terminal into which you type commands. A command line, if you will. Again, if you see mention of “command line”, including in the title of this very tutorial, it’s just another way of talking about a shell running in a terminal.
The second thing to understand is that when you run a command any output it produces will usually be printed directly in the terminal, then you’ll be shown another prompt once it’s finished. Some commands can output a lot of text, others will operate silently and won’t output anything at all. Don’t be alarmed if you run a command and another prompt immediately appears, as that usually means the command succeeded. If you think back to the slow network connections of our 1970s terminals, those early programmers decided that if everything went okay they may as well save a few precious bytes of data transfer by not saying anything at all.
The importance of case
Be extra careful with case when typing in the command line. Typing PWD instead of pwd will produce an error, but sometimes the wrong case can result in a command appearing to run, but not doing what you expected. We’ll look at case a little more on the next page but, for now, just make sure to type all the following lines in exactly the case that’s shown.
A sense of location
Now to the command itself. pwd is an abbreviation of ‘print working directory’. All it does is print out the shell’s current working directory. But what’s a working directory?
One important concept to understand is that the shell has a notion of a default location in which any file operations will take place. This is its working directory. If you try to create new files or directories, view existing files, or even delete them, the shell will assume you’re looking for them in the current working directory unless you take steps to specify otherwise. So it’s quite important to keep an idea of what directory the shell is “in” at any given time, after all, deleting files from the wrong directory could be disastrous. If you’re ever in any doubt, the pwd command will tell you exactly what the current working directory is.
You can change the working directory using the cd command, an abbreviation for ‘change directory’. Try typing the following:
cd /
pwd
Note that the directory separator is a forward slash («/»), not the backslash that you may be used to from Windows or DOS systems
Now your working directory is “/”. If you’re coming from a Windows background you’re probably used to each drive having its own letter, with your main hard drive typically being “C:”. Unix-like systems don’t split up the drives like that. Instead they have a single unified file system, and individual drives can be attached (“mounted”) to whatever location in the file system makes most sense. The “/” directory, often referred to as the root directory, is the base of that unified file system. From there everything else branches out to form a tree of directories and subdirectories.
Too many roots
Beware: although the “/” directory is sometimes referred to as the root directory, the word “root” has another meaning. root is also the name that has been used for the superuser since the early days of Unix. The superuser, as the name suggests, has more powers than a normal user, so can easily wreak havoc with a badly typed command. We’ll look at the superuser account more in section 7. For now you only have to know that the word “root” has multiple meanings in the Linux world, so context is important.
From the root directory, the following command will move you into the “home” directory (which is an immediate subdirectory of “/”):
cd home
pwd
To go up to the parent directory, in this case back to “/”, use the special syntax of two dots (..) when changing directory (note the space between cd and .., unlike in DOS you can’t just type cd.. as one command):
cd ..
pwd
Typing cd on its own is a quick shortcut to get back to your home directory:
cd
pwd
You can also use .. more than once if you have to move up through multiple levels of parent directories:
cd ../..
pwd
Notice that in the previous example we described a route to take through the directories. The path we used means “starting from the working directory, move to the parent / from that new location move to the parent again”. So if we wanted to go straight from our home directory to the “etc” directory (which is directly inside the root of the file system), we could use this approach:
cd
pwd

cd ../../etc
pwd
Relative and absolute paths
Most of the examples we’ve looked at so far use relative paths. That is, the place you end up at depends on your current working directory. Consider trying to cd into the “etc” folder. If you’re already in the root directory that will work fine:
cd /
pwd
cd etc
pwd
But what if you’re in your home directory?
cd
pwd
cd etc
pwd
You’ll see an error saying “No such file or directory” before you even get to run the last pwd. Changing directory by specifying the directory name, or using .. will have different effects depending on where you start from. The path only makes sense relative to your working directory.
But we have seen two commands that are absolute. No matter what your current working directory is, they’ll have the same effect. The first is when you run cd on its own to go straight to your home directory. The second is when you used cd / to switch to the root directory. In fact any path that starts with a forward slash is an absolute path. You can think of it as saying “switch to the root directory, then follow the route from there”. That gives us a much easier way to switch to the etc directory, no matter where we currently are in the file system:
cd
pwd
cd /etc
pwd
It also gives us another way to get back to your home directory, and even to the folders within it. Suppose you want to go straight to your “Desktop” folder from anywhere on the disk (note the upper-case “D”). In the following command you’ll need to replace USERNAME with your own username, the whoami command will remind you of your username, in case you’re not sure:
whoami
cd /home/USERNAME/Desktop
pwd
There’s one other handy shortcut which works as an absolute path. As you’ve seen, using “/” at the start of your path means “starting from the root directory”. Using the tilde character («~») at the start of your path similarly means “starting from my home directory”.
cd ~
pwd

cd ~/Desktop
pwd
Now that odd text in the prompt might make a bit of sense. Have you noticed it changing as you move around the file system? On a Ubuntu system it shows your username, your computer’s network name and the current working directory. But if you’re somewhere inside your home directory, it will use “~” as an abbreviation. Let’s wander around the file system a little, and keep an eye on the prompt as you do so:
cd
cd /
cd ~/Desktop
cd /etc
cd /var/log
cd ..
cd
You must be bored with just moving around the file system by now, but a good understanding of absolute and relative paths will be invaluable as we move on to create some new folders and files!
4. Creating folders and files
In this section we’re going to create some real files to work with. To avoid accidentally trampling over any of your real files, we’re going to start by creating a new directory, well away from your home folder, which will serve as a safer environment in which to experiment:
mkdir /tmp/tutorial
cd /tmp/tutorial
Notice the use of an absolute path, to make sure that we create the tutorial directory inside /tmp. Without the forward slash at the start the mkdir command would try to find a tmp directory inside the current working directory, then try to create a tutorial directory inside that. If it couldn’t find a tmp directory the command would fail.
In case you hadn’t guessed, mkdir is short for ‘make directory’. Now that we’re safely inside our test area (double check with pwd if you’re not certain), let’s create a few subdirectories:
mkdir dir1 dir2 dir3
There’s something a little different about that command. So far we’ve only seen commands that work on their own (cd, pwd) or that have a single item afterwards (cd /, cd ~/Desktop). But this time we’ve added three things after the mkdir command. Those things are referred to as parameters or arguments, and different commands can accept different numbers of arguments. The mkdir command expects at least one argument, whereas the cd command can work with zero or one, but no more. See what happens when you try to pass the wrong number of parameters to a command:
mkdir
cd /etc ~/Desktop
Back to our new directories. The command above will have created three new subdirectories inside our folder. Let’s take a look at them with the ls (list) command:
ls
If you’ve followed the last few commands, your terminal should be looking something like this:
Notice that mkdir created all the folders in one directory. It didn’t create dir3 inside dir2 inside dir1, or any other nested structure. But sometimes it’s handy to be able to do exactly that, and mkdir does have a way:
mkdir -p dir4/dir5/dir6
ls
This time you’ll see that only dir4 has been added to the list, because dir5 is inside it, and dir6 is inside that. Later we’ll install a useful tool to visualise the structure, but you’ve already got enough knowledge to confirm it:
cd dir4
ls
cd dir5
ls
cd ../..
The “-p” that we used is called an option or a switch (in this case it means “create the parent directories, too”). Options are used to modify the way in which a command operates, allowing a single command to behave in a variety of different ways. Unfortunately, due to quirks of history and human nature, options can take different forms in different commands. You’ll often see them as single characters preceded by a hyphen (as in this case), or as longer words preceded by two hyphens. The single character form allows for multiple options to be combined, though not all commands will accept that. And to confuse matters further, some commands don’t clearly identify their options at all, whether or not something is an option is dictated purely by the order of the arguments! You don’t need to worry about all the possibilities, just know that options exist and they can take several different forms. For example the following all mean exactly the same thing:
# Don't type these in, they're just here for demonstrative purposes
mkdir --parents --verbose dir4/dir5
mkdir -p --verbose dir4/dir5
mkdir -p -v dir4/dir5
mkdir -pv dir4/dir5
Now we know how to create multiple directories just by passing them as separare arguments to the mkdir command. But suppose we want to create a directory with a space in the name? Let’s give it a go:
mkdir another folder
ls
You probably didn’t even need to type that one in to guess what would happen: two new folders, one called another and the other called folder. If you want to work with spaces in directory or file names, you need to escape them. Don’t worry, nobody’s breaking out of prison; escaping is a computing term that refers to using special codes to tell the computer to treat particular characters differently to normal. Enter the following commands to try out different ways to create folders with spaces in the name:
mkdir "folder 1"
mkdir 'folder 2'
mkdir folder\ 3
mkdir "folder 4" "folder 5"
mkdir -p "folder 6"/"folder 7"
ls
Although the command line can be used to work with files and folders with spaces in their names, the need to escape them with quote marks or backslashes makes things a little more difficult. You can often tell a person who uses the command line a lot just from their file names: they’ll tend to stick to letters and numbers, and use underscores («_») or hyphens («-«) instead of spaces.
Creating files using redirection
Our demonstration folder is starting to look rather full of directories, but is somewhat lacking in files. Let’s remedy that by redirecting the output from a command so that, instead of being printed to the screen, it ends up in a new file. First, remind yourself what the ls command is currently showing:
ls
Suppose we wanted to capture the output of that command as a text file that we can look at or manipulate further. All we need to do is to add the greater-than character («>») to the end of our command line, followed by the name of the file to write to:
ls > output.txt
This time there’s nothing printed to the screen, because the output is being redirected to our file instead. If you just run ls on its own you should see that the output.txt file has been created. We can use the cat command to look at its content:
cat output.txt
Okay, so it’s not exactly what was displayed on the screen previously, but it contains all the same data, and it’s in a more useful format for further processing. Let’s look at another command, echo:
echo "This is a test"
Yes, echo just prints its arguments back out again (hence the name). But combine it with a redirect, and you’ve got a way to easily create small test files:
echo "This is a test" > test_1.txt
echo "This is a second test" > test_2.txt
echo "This is a third test" > test_3.txt
ls
You should cat each of these files to check their contents. But cat is more than just a file viewer — its name comes from ‘concatenate’, meaning “to link together”. If you pass more than one filename to cat it will output each of them, one after the other, as a single block of text:
cat test_1.txt test_2.txt test_3.txt
Where you want to pass multiple file names to a single command, there are some useful shortcuts that can save you a lot of typing if the files have similar names. A question mark («?») can be used to indicate “any single character” within the file name. An asterisk («*») can be used to indicate “zero or more characters”. These are sometimes referred to as “wildcard” characters. A couple of examples might help, the following commands all do the same thing:
cat test_1.txt test_2.txt test_3.txt
cat test_?.txt
cat test_*
More escaping required
As you might have guessed, this capability also means that you need to escape file names with ? or * characters in them, too. It’s usually better to avoid any punctuation in file names if you want to manipulate them from the command line.
If you look at the output of ls you’ll notice that the only files or folders that start with “t” are the three test files we’ve just created, so you could even simplify that last command even further to cat t*, meaning “concatenate all the files whose names start with a t and are followed by zero or more other characters”. Let’s use this capability to join all our files together into a single new file, then view it:
cat t* > combined.txt
cat combined.txt
What do you think will happen if we run those two commands a second time? Will the computer complain, because the file already exists? Will it append the text to the file, so it contains two copies? Or will it replace it entirely? Give it a try to see what happens, but to avoid typing the commands again you can use the Up Arrow and Down Arrow keys to move back and forth through the history of commands you’ve used. Press the Up Arrow a couple of times to get to the first cat and press Enter to run it, then do the same again to get to the second.
As you can see, the file looks the same. That’s not because it’s been left untouched, but because the shell clears out all the content of the file before it writes the output of your cat command into it. Because of this, you should be extra careful when using redirection to make sure that you don’t accidentally overwrite a file you need. If you do want to append to, rather than replace, the content of the files, double up on the greater-than character:
cat t* >> combined.txt
echo "I've appended a line!" >> combined.txt
cat combined.txt
Repeat the first cat a few more times, using the Up Arrow for convenience, and perhaps add a few more arbitrary echo commands, until your text document is so large that it won’t all fit in the terminal at once when you use cat to display it. In order to see the whole file we now need to use a different program, called a pager (because it displays your file one “page” at a time). The standard pager of old was called more, because it puts a line of text at the bottom of each page that says “–More–” to indicate that you haven’t read everything yet. These days there’s a far better pager that you should use instead: because it replaces more, the programmers decided to call it less.
less combined.txt
When viewing a file through less you can use the Up Arrow, Down Arrow, Page Up, Page Down, Home and End keys to move through your file. Give them a try to see the difference between them. When you’ve finished viewing your file, press q to quit less and return to the command line.
A note about case
Unix systems are case-sensitive, that is, they consider “A.txt” and “a.txt” to be two different files. If you were to run the following lines you would end up with three files:
echo "Lower case" > a.txt
echo "Upper case" > A.TXT
echo "Mixed case" > A.txt
Generally you should try to avoid creating files and folders whose name only varies by case. Not only will it help to avoid confusion, but it will also prevent problems when working with different operating systems. Windows, for example, is case-insensitive, so it would treat all three of the file names above as being a single file, potentially causing data loss or other problems.
You might be tempted to just hit the Caps Lock key and use upper case for all your file names. But the vast majority of shell commands are lower case, so you would end up frequently having to turn it on and off as you type. Most seasoned command line users tend to stick primarily to lower case names for their files and directories so that they rarely have to worry about file name clashes, or which case to use for each letter in the name.
Good naming practice
When you consider both case sensitivity and escaping, a good rule of thumb is to keep your file names all lower case, with only letters, numbers, underscores and hyphens. For files there’s usually also a dot and a few characters on the end to indicate the type of file it is (referred to as the “file extension”). This guideline may seem restrictive, but if you end up using the command line with any frequency you’ll be glad you stuck to this pattern.
5. Moving and manipulating files
Now that we’ve got a few files, let’s look at the sort of day-to-day tasks you might need to perform on them. In practice you’ll still most likely use a graphical program when you want to move, rename or delete one or two files, but knowing how to do this using the command line can be useful for bulk changes, or when the files are spread amongst different folders. Plus, you’ll learn a few more things about the command line along the way.
Let’s begin by putting our combined.txt file into our dir1 directory, using the mv (move) command:
mv combined.txt dir1
You can confirm that the job has been done by using ls to see that it’s missing from the working directory, then cd dir1 to change into dir1, ls to see that it’s in there, then cd .. to move the working directory back again. Or you could save a lot of typing by passing a path directly to the ls command to get straight to the confirmation you’re looking for:
ls dir1
Now suppose it turns out that file shouldn’t be in dir1 after all. Let’s move it back to the working directory. We could cd into dir1 then use mv combined.txt .. to say “move combined.txt into the parent directory”. But we can use another path shortcut to avoid changing directory at all. In the same way that two dots (..) represents the parent directory, so a single dot (.) can be used to represent the current working directory. Because we know there’s only one file in dir1 we can also just use “*” to match any filename in that directory, saving ourselves a few more keystrokes. Our command to move the file back into the working directory therefore becomes this (note the space before the dot, there are two parameters being passed to mv):
mv dir1/* .
The mv command also lets us move more than one file at a time. If you pass more than two arguments, the last one is taken to be the destination directory and the others are considered to be files (or directories) to move. Let’s use a single command to move combined.txt, all our test_n.txt files and dir3 into dir2. There’s a bit more going on here, but if you look at each argument at a time you should be able to work out what’s happening:
mv combined.txt test_* dir3 dir2
ls
ls dir2
With combined.txt now moved into dir2, what happens if we decide it’s in the wrong place again? Instead of dir2 it should have been put in dir6, which is the one that’s inside dir5, which is in dir4. With what we now know about paths, that’s no problem either:
mv dir2/combined.txt dir4/dir5/dir6
ls dir2
ls dir4/dir5/dir6
Notice how our mv command let us move the file from one directory into another, even though our working directory is something completely different. This is a powerful property of the command line: no matter where in the file system you are, it’s still possible to operate on files and folders in totally different locations.
Since we seem to be using (and moving) that file a lot, perhaps we should keep a copy of it in our working directory. Much as the mv command moves files, so the cp command copies them (again, note the space before the dot):
cp dir4/dir5/dir6/combined.txt .
ls dir4/dir5/dir6
ls
Great! Now let’s create another copy of the file, in our working directory but with a different name. We can use the cp command again, but instead of giving it a directory path as the last argument, we’ll give it a new file name instead:
cp combined.txt backup_combined.txt
ls
That’s good, but perhaps the choice of backup name could be better. Why not rename it so that it will always appear next to the original file in a sorted list. The traditional Unix command line handles a rename as though you’re moving the file from one name to another, so our old friend mv is the command to use. In this case you just specify two arguments: the file you want to rename, and the new name you wish to use.
mv backup_combined.txt combined_backup.txt
ls
This also works on directories, giving us a way to sort out those difficult ones with spaces in the name that we created earlier. To avoid re-typing each command after the first, use the Up Arrow to pull up the previous command in the history. You can then edit the command before you run it by moving the cursor left and right with the arrow keys, and removing the character to the left with Backspace or the one the cursor is on with Delete. Finally, type the new character in place, and press Enter or Return to run the command once you’re finished. Make sure you change both appearances of the number in each of these lines.
mv "folder 1" folder_1
mv "folder 2" folder_2
mv "folder 3" folder_3
mv "folder 4" folder_4
mv "folder 5" folder_5
mv "folder 6" folder_6
ls
Deleting files and folders
Warning
In this next section we’re going to start deleting files and folders. To make absolutely certain that you don’t accidentally delete anything in your home folder, use the pwd command to double-check that you’re still in the /tmp/tutorial directory before proceeding.
Now we know how to move, copy and rename files and directories. Given that these are just test files, however, perhaps we don’t really need three different copies of combined.txt after all. Let’s tidy up a bit, using the rm (remove) command:
rm dir4/dir5/dir6/combined.txt combined_backup.txt
Perhaps we should remove some of those excess directories as well:
rm folder_*
What happened there? Well, it turns out that rm does have one little safety net. Sure, you can use it to delete every single file in a directory with a single command, accidentally wiping out thousands of files in an instant, with no means to recover them. But it won’t let you delete a directory. I suppose that does help prevent you accidentally deleting thousands more files, but it does seem a little petty for such a destructive command to balk at removing an empty directory. Luckily there’s an rmdir (remove directory) command that will do the job for us instead:
rmdir folder_*
Well that’s a little better, but there’s still an error. If you run ls you’ll see that most of the folders have gone, but folder_6 is still hanging around. As you may recall, folder_6 still has a folder 7 inside it, and rmdir will only delete empty folders. Again, it’s a small safety net to prevent you from accidentally deleting a folder full of files when you didn’t mean to.
In this case, however, we do mean to. The addition of options to our rm or rmdir commands will let us perform dangerous actions without the aid of a safety net! In the case of rmdir we can add a -p switch to tell it to also remove the parent directories. Think of it as the counterpoint to mkdir -p. So if you were to run rmdir -p dir1/dir2/dir3 it would first delete dir3, then dir2, then finally delete dir1. It still follows the normal rmdir rules of only deleting empty directories though, so if there was also a file in dir1, for example, only dir3 and dir2 would get removed.
A more common approach, when you’re really, really, really sure you want to delete a whole directory and anything within it, is to tell rm to work recursively by using the -r switch, in which case it will happily delete folders as well as files. With that in mind, here’s the command to get rid of that pesky folder_6 and the subdirectory within it:
rm -r folder_6
ls
Remember: although rm -r is quick and convenient, it’s also dangerous. It’s safest to explicitly delete files to clear out a directory, then cd .. to the parent before using rmdir to remove it.
Important Warning
Unlike graphical interfaces, rm doesn’t move files to a folder called “trash” or similar. Instead it deletes them totally, utterly and irrevocably. You need to be ultra careful with the parameters you use with rm to make sure you’re only deleting the file(s) you intend to. You should take particular care when using wildcards, as it’s easy to accidentally delete more files than you intended. An errant space character in your command can change it completely: rm t* means “delete all the files starting with t”, whereas rm t * means «delete the file t as well as any file whose name consists of zero or more characters, which would be everything in the directory! If you’re at all uncertain use the -i (interactive) option to rm, which will prompt you to confirm the deletion of each file; enter Y to delete it, N to keep it, and press Ctrl-C to stop the operation entirely.
6. A bit of plumbing
Today’s computers and phones have the sort of graphical and audio capabilities that our 70s terminal users couldn’t even begin to imagine. Yet still text prevails as a means to organise and categorise files. Whether it’s the file name itself, GPS coordintates embedded in photos you take on your phone, or the metadata stored in an audio file, text still plays a vital role in every aspect of computing. It’s fortunate for us that the Linux command line includes some powerful tools for manipulating text content, and ways to join those tools together to create something more capable still.
Let’s start with a simple question. How many lines are there in your combined.txt file? The wc (word count) command can tell us that, using the -l switch to tell it we only want the line count (it can also do character counts and, as the name suggests, word counts):
wc -l combined.txt
Similarly, if you wanted to know how many files and folders are in your home directory, and then tidy up after yourself, you could do this:
ls ~ > file_list.txt
wc -l file_list.txt
rm file_list.txt
That method works, but creating a temporary file to hold the output from ls only to delete it two lines later seems a little excessive. Fortunately the Unix command line provides a shortcut that avoids you having to create a temporary file, by taking the output from one command (referred to as standard output or STDOUT) and feeding it directly in as the input to another command (standard input or STDIN). It’s as though you’ve connected a pipe between one command’s output and the next command’s input, so much so that this process is actually referred to as piping the data from one command to another. Here’s how to pipe the output of our ls command into wc:
ls ~ | wc -l
Notice that there’s no temporary file created, and no file name needed. Pipes operate entirely in memory, and most Unix command line tools will expect to receive input from a pipe if you don’t specify a file for them to work on. Looking at the line above, you can see that it’s two commands, ls ~ (list the contents of the home directory) and wc -l (count the lines), separated by a vertical bar character («|»). This process of piping one command into another is so commonly used that the character itself is often referred to as the pipe character, so if you see that term you now know it just means the vertical bar.
Note that the spaces around the pipe character aren’t important, we’ve used them for clarity, but the following command works just as well, this time for telling us how many items are in the /etc directory:
ls /etc|wc -l
Phew! That’s quite a few files. If we wanted to list them all it would clearly fill up more than a single screen. As we discovered earlier, when a command produces a lot of output, it’s better to use less to view it, and that advice still applies when using a pipe (remember, press q to quit):
ls /etc | less
Going back to our own files, we know how to get the number of lines in combined.txt, but given that it was created by concatenating the same files multiple times, I wonder how many unique lines there are? Unix has a command, uniq, that will only output unique lines in the file. So we need to cat the file out and pipe it through uniq. But all we want is a line count, so we need to use wc as well. Fortunately the command line doesn’t limit you to a single pipe at a time, so we can continue to chain as many commands as we need:
cat combined.txt | uniq | wc -l
That line probably resulted in a count that’s pretty close to the total number of lines in the file, if not exactly the same. Surely that can’t be right? Lop off the last pipe to see the output of the command for a better idea of what’s happening. If your file is very long, you might want to pipe it through less to make it easier to inspect:
cat combined.txt | uniq | less
It appears that very few, if any, of our duplicate lines are being removed. To understand why, we need to look at the documentation for the uniq command. Most command line tools come with a brief (and sometimes not-so-brief) instruction manual, accessed through the man (manual) command. The output is automatically piped through your pager, which will typically be less, so you can move back and forth through the output, then press q when you’re finished:
man uniq
Because this type of documentation is accessed via the man command, you’ll hear it referred to as a “man page”, as in “check the man page for more details”. The format of man pages is often terse, think of them more as a quick overview of a command than a full tutorial. They’re often highly technical, but you can usually skip most of the content and just look for the details of the option or argument you’re using.
The uniq man page is a typical example in that it starts with a brief one-line description of the command, moves on to a synopsis of how to use it, then has a detailed description of each option or parameter. But whilst man pages are invaluable, they can also be inpenetrable. They’re best used when you need a reminder of a particular switch or parameter, rather than as a general resource for learning how to use the command line. Nevertheless, the first line of the DESCRIPTION section for man uniq does answer the question as to why duplicate lines haven’t been removed: it only works on adjacent matching lines.
The question, then, is how to rearrange the lines in our file so that duplicate entries are on adjacent lines. If we were to sort the contents of the file alphabetically, that would do the trick. Unix offers a sort command to do exactly that. A quick check of man sort shows that we can pass a file name directly to the command, so let’s see what it does to our file:
sort combined.txt | less
You should be able to see that the lines have been reordered, and it’s now suitable for piping straight into uniq. We can finally complete our task of counting the unique lines in the file:
sort combined.txt | uniq | wc -l
As you can see, the ability to pipe data from one command to another, building up long chains to manipulate your data, is a powerful tool, as well as reducing the need for temporary files, and saving you a lot of typing. For this reason you’ll see it used quite often in command lines. A long chain of commands might look intimidating at first, but remember that you can break even the longest chain down into individual commands (and look at their man pages) to get a better understanding of what it’s doing.
Many manuals
Most Linux command line tools include a man page. Try taking a brief look at the pages for some of the commands you’ve already encountered: man ls, man cp, man rmdir and so on. There’s even a man page for the man program itself, which is accessed using man man, of course.
7. The command line and the superuser
One good reason for learning some command line basics is that instructions online will often favour the use of shell commands over a graphical interface. Where those instructions require changes to your machine that go beyond modifying a few files in your home directory, you’ll inevitably be faced with commands that need to be run as the machine’s administrator (or superuser in Unix parlance). Before you start running arbitrary commands you find in some dark corner of the internet, it’s worth understanding the implications of running as an administrator, and how to spot those instructions that require it, so you can better gauge whether they’re safe to run or not.
The superuser is, as the name suggests, a user with super powers. In older systems it was a real user, with a real username (almost always “root”) that you could log in as if you had the password. As for those super powers: root can modify or delete any file in any directory on the system, regardless of who owns them; root can rewrite firewall rules or start network services that could potentially open the machine up to an attack; root can shutdown the machine even if other people are still using it. In short, root can do just about anything, skipping easily round the safeguards that are usually put in place to stop users from overstepping their bounds.
Of course a person logged in as root is just as capable of making mistakes as anyone else. The annals of computing history are filled with tales of a mistyped command deleting the entire file system or killing a vital server. Then there’s the possibility of a malicious attack: if a user is logged in as root and leaves their desk then it’s not too tricky for a disgruntled colleague to hop on their machine and wreak havoc. Despite that, human nature being what it is, many administrators over the years have been guilty of using root as their main, or only, account.
Don’t use the root account
If anyone asks you to enable the root account, or log in as root, be very suspicious of their intentions.
In an effort to reduce these problems many Linux distributions started to encourage the use of the su command. This is variously described as being short for ‘superuser’ or ‘switch user’, and allows you to change to another user on the machine without having to log out and in again. When used with no arguments it assumes you want to change to the root user (hence the first interpretation of the name), but you can pass a username to it in order to switch to a specific user account (the second interpretation). By encouraging use of su the aim was to persuade administrators to spend most of their time using a normal account, only switch to the superuser account when they needed to, and then use the logout command (or Ctrl-D shortcut) as soon as possible to return to their user-level account.
By minimising the amount of time spent logged in as root, the use of su reduces the window of opportunity in which to make a catastrophic mistake. Despite that, human nature being what it is, many administrators have been guilty of leaving long-running terminals open in which they’ve used su to switch to the root account. In that respect su was only a small step forward for security.
Don’t use su
If anyone asks you to use su, be wary. If you’re using Ubuntu the root account is disabled by default, so su with no parameters won’t work. But it’s still not worth taking the risk, in case the account has been enabled without you realizing. If you are asked to use su with a username then (if you have the password) you will have access to all the files of that user, and could accidentally delete or modify them.
When using su your entire terminal session is switched to the other user. Commands that don’t need root access, something as mundane as pwd or ls, would be run under the auspices of the superuser, increasing the risk of a bug in the program causing major problems. Worse still, if you lose track of which user you’re currently operating as, you might issue a command that is fairly benign when run as a user, but which could destroy the entire system if run as root.
Better to disable the root account entirely and then, instead of allowing long-lived terminal sessions with dangerous powers, require the user to specifically request superuser rights on a per-command basis. The key to this approach is a command called sudo (as in “switch user and do this command”).
sudo is used to prefix a command that has to be run with superuser privileges. A configuration file is used to define which users can use sudo, and which commands they can run. When running a command like this, the user is prompted for their own password, which is then cached for a period of time (defaulting to 15 minutes), so if they need to run multiple superuser-level commands they don’t keep getting continually asked to type it in.
On a Ubuntu system the first user created when the system is installed is considered to be the superuser. When adding a new user there is an option to create them as an administrator, in which case they will also be able to run superuser commands with sudo. In this screenshot of Ubuntu 18.04 you can see the option at the top of the dialog:
Assuming you’re on a Linux system that uses sudo, and your account is configured as an administrator, try the following to see what happens when you try to access a file that is considered sensitive (it contains encrypted passwords):
cat /etc/shadow
sudo cat /etc/shadow
If you enter your password when prompted you should see the contents of the /etc/shadow file. Now clear the terminal by running the reset command, and run sudo cat /etc/shadow again. This time the file will be displayed without prompting you for a password, as it’s still in the cache.
Be careful with sudo
If you are instructed to run a command with sudo, make sure you understand what the command is doing before you continue. Running with sudo gives that command all the same powers as a superuser. For example, a software publisher’s site might ask you to download a file and change its permissions, then use sudo to run it. Unless you know exactly what the file is doing, you’re opening up a hole through which malware could potentially be installed onto your system. sudo may only run one command at a time, but that command could itself run many others. Treat any new use of sudo as being just as dangerous as logging in as root.
For instructions targeting Ubuntu, a common appearance of sudo is to install new software onto your system using the apt or apt-get commands. If the instructions require you to first add a new software repository to your system, using the apt-add-repository command, by editing files in /etc/apt, or by using a “PPA” (Personal Package Archive), you should be careful as these sources are not curated by Canonical. But often the instructions just require you to install software from the standard repositories, which should be safe.
Installing new software
There are lots of different ways to install software on Linux systems. Installing directly from your distro’s official software repositories is the safest option, but sometimes the application or version you want simply isn’t available that way. When installing via any other mechanism, make sure you’re getting the files from an official source for the project in question.
Indications that files are coming from outside the distribution’s repositories include (but are not limited to) the use of any of the following commands: curl, wget, pip, npm, make, or any instructions that tell you to change a file’s permissions to make it executable.
Increasingly, Ubuntu is making use of “snaps”, a new package format which offers some security improvements by more closely confining programs to stop them accessing parts of the system they don’t need to. But some options can reduce the security level so, if you’re asked to run snap install with any parameters other than the name of the snap, it’s worth checking exactly what the command is trying to do.
Let’s install a new command line program from the standard Ubuntu repositories to illustrate this use of sudo:
sudo apt install tree
Once you’ve provided your password the apt program will print out quite a few lines of text to tell you what it’s doing. The tree program is only small, so it shouldn’t take more than a minute or two to download and install for most users. Once you are returned to the normal command line prompt, the program is installed and ready to use. Let’s run it to get a better overview of what our collection of files and folders looks like:
cd /tmp/tutorial
tree
Going back to the command that actually installed the new program (sudo apt install tree) it looks slightly different to those you’ve see so far. In practice it works like this:
-
The
sudocommand, when used without any options, will assume that the first parameter is a command for it to run with superuser privileges. Any other parameters will be passed directly to the new command.sudo‘s switches all start with one or two hyphens and must immediately follow thesudocommand, so there can be no confusion about whether the second parameter on the line is a command or an option. -
The command in this case is
apt. Unlike the other commands we’ve seen, this isn’t working directly with files. Instead it expects its first parameter to be an instruction to perform (install), with the rest of the parameters varying based on the instruction. -
In this case the
installcommand tellsaptthat the remainder of the command line will consist of one or more package names to install from the system’s software repositories. Usually this will add new software to the machine, but packages could be any collection of files that need to be installed to particular locations, such as fonts or desktop images.
You can put sudo in front of any command to run it as a superuser, but there’s rarely any need to. Even system configuration files can often be viewed (with cat or less) as a normal user, and only require root privileges if you need to edit them.
Beware of sudo su
One trick with sudo is to use it to run the su command. This will give you a root shell even if the root account is disabled. It can be useful when you need to run a series of commands as the superuser, to avoid having to prefix them all with sudo, but it opens you up to exactly the same kind of problems that were described for su above. If you follow any instructions that tell you to run sudo su, be aware that every command after that will be running as the root user.
In this section you’ve learnt about the dangers of the root account, and how modern Linux systems like Ubuntu try to reduce the risk of danger by using sudo. But any use of superuser powers should be considered carefully. When following instructions you find online you should now be in a better position to spot those commands that might require greater scrutiny.
8. Hidden files
Before we conclude this tutorial it’s worth mentioning hidden files (and folders). These are commonly used on Linux systems to store settings and configuration data, and are typically hidden simply so that they don’t clutter the view of your own files. There’s nothing special about a hidden file or folder, other than it’s name: simply starting a name with a dot («.») is enough to make it disappear.
cd /tmp/tutorial
ls
mv combined.txt .combined.txt
ls
You can still work with the hidden file by making sure you include the dot when you specify its file name:
cat .combined.txt
mkdir .hidden
mv .combined.txt .hidden
less .hidden/.combined.txt
If you run ls you’ll see that the .hidden directory is, as you might expect, hidden. You can still list its contents using ls .hidden, but as it only contains a single file which is, itself, hidden you won’t get much output. But you can use the -a (show all) switch to ls to make it show everything in a directory, including the hidden files and folders:
ls
ls -a
ls .hidden
ls -a .hidden
Notice that the shortcuts we used earlier, . and .., also appear as though they’re real directories.
As for our recently installed tree command, that works in a similar way (except without an appearance by . and ..):
tree
tree -a
Switch back to your home directory (cd) and try running ls without and then with the -a switch. Pipe the output through wc -l to give you a clearer idea of how many hidden files and folders have been right under your nose all this time. These files typically store your personal configuration, and is how Unix systems have always offered the capability to have system-level settings (usually in /etc) that can be overridden by individual users (courtesy of hidden files in their home directory).
You shouldn’t usually need to deal with hidden files, but occasionally instructions might require you to cd into .config, or edit some file whose name starts with a dot. At least now you’ll understand what’s happening, even when you can’t easily see the file in your graphical tools.
Cleaning up
We’ve reached the end of this tutorial, and you should be back in your home directory now (use pwd to check, and cd to go there if you’re not). It’s only polite to leave your computer in the same state that we found it in, so as a final step, let’s remove the experimental area that we were using earlier, then double-check that it’s actually gone:
rm -r /tmp/tutorial
ls /tmp
As a last step, let’s close the terminal. You can just close the window, but it’s better practice to log out of the shell. You can either use the logout command, or the Ctrl-D keyboard shortcut. If you plan to use the terminal a lot, memorising Ctrl-Alt-T to launch the terminal and Ctrl-D to close it will soon make it feel like a handy assistant that you can call on instantly, and dismiss just as easily.
9. Conclusion
This tutorial has only been a brief introduction to the Linux command line. We’ve looked at a few common commands for moving around the file system and manipulating files, but no tutorial could hope to provide a comprehensive guide to every available command. What’s more important is that you’ve learnt the key aspects of working with the shell. You’ve been introduced to some widely used terminology (and synonyms) that you might come across online, and have gained an insight into some of the key parts of a typical shell command. You’ve learnt about absolute and relative paths, arguments, options, man pages, sudo and root, hidden files and much more.
With these key concepts you should be able to make more sense of any command line instructions you come across. Even if you don’t understand every single command, you should at least have an idea of where one command stops and the next begins. You should more easily be able to tell what files they’re manipulating, or what other switches and parameters are being used. With reference to the man pages you might even be able to glean exactly what the command is doing, or at least get a general idea.
There’s little we’ve covered here that is likely to make you abandon your graphical file manager in favour of a prompt, but file manipulation wasn’t really the main goal. If, however, you’re intrigued by the ability to affect files in disparate parts of your hard drive with just a few keypresses, there’s still a lot more for you to learn.
Further reading
There are many online tutorials and commercially published books about the command line, but if you do want to go deeper into the subject a good starting point might be the following book:
- The Linux Command Line by William Shotts
The reason for recommending this book in particular is that it has been released under a Creative Commons licence, and is available to download free of charge as a PDF file, making it ideal for the beginner who isn’t sure just how much they want to commit to the command line. It’s also available as a printed volume, should you find yourself caught by the command line bug and wanting a paper reference.
Was this tutorial useful?
Thank you for your feedback.

Объем 480 страниц
2012 год

О книге
Уильям Шоттс знакомит вас с истинной философией Linux. Вы уже знакомы с Linux, и настала пора нырнуть поглубже и познакомиться с возможностями командной строки. Командная строка всегда с вами, от первого знакомства до написания полноценных программ в Bash – самой популярной оболочке Linux. Познакомьтесь с основами навигации по файловой системе, настройки среды, последовательностями команд, поиском по шаблону и многим другим.Прочитав эту книгу, вы легко научитесь создавать и удалять файлы, каталоги и символьные ссылки; администрировать систему, включая сетевое оборудование, установку пакетов и управление процессами; редактировать файлы; писать скрипты для автоматизации общих или рутинных задач; выполнять любые работы с текстовыми файлами.Преодолев начальный страх перед оболочкой Linux, вы поймете, что командная строка – это естественный, логичный и простой способ общения с компьютером. И не забывайте протирать пыль с мышки.
Описание книги
Уильям Шоттс знакомит вас с истинной философией Linux. Вы уже знакомы с Linux, и настала пора нырнуть поглубже и познакомиться с возможностями командной строки. Командная строка всегда с вами, от первого знакомства до написания полноценных программ в Bash – самой популярной оболочке Linux. Познакомьтесь с основами навигации по файловой системе, настройки среды, последовательностями команд, поиском по шаблону и многим другим.
Прочитав эту книгу, вы легко научитесь создавать и удалять файлы, каталоги и символьные ссылки; администрировать систему, включая сетевое оборудование, установку пакетов и управление процессами; редактировать файлы; писать скрипты для автоматизации общих или рутинных задач; выполнять любые работы с текстовыми файлами.
Преодолев начальный страх перед оболочкой Linux, вы поймете, что командная строка – это естественный, логичный и простой способ общения с компьютером. И не забывайте протирать пыль с мышки.
Книга Уильяма Шоттса «Командная строка Linux. Полное руководство (pdf+epub)» — скачать в pdf или читать онлайн. Оставляйте комментарии и отзывы, голосуйте за понравившиеся.
Возрастное ограничение:
16+
Дата выхода на Литрес:
23 апреля 2019 г.
Последнее обновление:
2012
Общее кол-во страниц:
480


