Join Gradle, Netflix, Uber, Spotify, Meta, AirBnB and more at DPE Summit in San Francisco, Sept 20-21 for the latest on scaling dev team productivity — Register now
close
Here you can find project-based topical guides to help you learn Gradle through using it. Whether you are new to Gradle or an experienced build master, the guides hosted here are designed to help you accomplish your goals.
Getting Started
Step-by-step lessons on how to use Gradle, both in general and for specific tasks.
Get started with multi-project builds by developing an application that includes two library subprojects.
time
Use the Build Init plugin to create a Java project, build it, run tests and view the test report, generate API docs, and customize the deliverable jar.
time
Use the Build Init plugin to create a Groovy project, build it, run tests and view the test report, and generate API docs.
time
Write a simple library in Kotlin, test it with JUnit and publish it.
time
Use the Build Init plugin to create a Scala project, build it, run tests and view the test report, and generate the API docs.
time
Use the Build Init plugin to create a client-side Java application with a dependency. Use the Application plugin to configure an executable jar. Build the project, run tests and view the test report, then execute the project as a command-line application.
time
Use the Build Init plugin to create a client-side Groovy application with a dependency. Use the Application plugin to configure an executable jar. Build the project, run tests and view the test report, then execute the project as a command-line application.
time
Use the Build Init plugin to create a client-side Kotlin application with a dependency. Use the Application plugin to configure an executable jar. Build the project, run tests and view the test report, then execute the project as a command-line application.
time
Use the Build Init plugin to create a client-side Scala application with a dependency. Use the Application plugin to configure an executable jar. Build the project, run tests and view the test report, then execute the project as a command-line application.
time
Setup a project for building and testing Java Modules for the Java Module System.
time
Learn how to consume external JVM artifacts by building a small Java application.
time
Create a project for C++ language files. Add a C++ source file and header. Use Gradle to generate a command-line application. Run the application and view the results, along with the output of the compiler and linker.
time
Create a project for C++ libraries. Add a C++ source file and header. Use Gradle to generate static-linkable and dynamic linkable libraries. View the outputs of the compiler and linker.
time
Create a project for Swift language files. Add a Swift source file. Use Gradle to generate a command-line application. Run the application and view the results, along with the output of the compiler and linker.
time
Create a project for Swift libraries. Add a Swift source file. Use Gradle to generate static-linkable and dynamic linkable libraries. View the outputs of the compiler and linker.
time
Learn how to configure and execute Gradle builds on Jenkins.
time
Learn how to configure and execute Gradle builds on TeamCity.
time
Learn how to configure and execute Gradle builds on Travis CI.
time
Create a project for Android application. Create a «Hello, World!» project with Android Studio and run it.
time
Topical
In-depth advice from the experts on specific topics of interest.
Properly design Gradle plugins based on established practices, and apply them to your own projects. Focuses on technologies and techniques that support good performance and easy maintenance.
time
Create a Gradle plugin using custom task types, incremental build support, and recommendations for configuration choices.
time
Learn how to effectively test plugins in a manual and automated fashion. Demonstrates the use of composite builds, popular test frameworks and Gradle TestKit.
time
Learn how to publish your own plugins to the free Gradle Plugin Portal. After registering, add your generated keys to your own Gradle properties. Use the publishing plugin with the necessary metadata to publish the results.
time
Learn how to use the Worker API to enable fine-grained parallelism and isolation for your custom tasks. This guide will walk you through the process of converting an existing custom task to use the Worker API.
time
Improve the performance of your build using Build Scan™, dependency resolution strategies, parallel execution, incremental and partial builds, and more. Includes specific recommendations for Java and Android projects.
time
Learn the details of the Gradle build cache to improve performance. Includes solutions for common problems, debugging and diagnosing cache misses, sharing with other developers, and more.
time
Learn how to migrate your build logic from Groovy to Kotlin using the Gradle Kotlin DSL. Discover pain points and discuss migration strategies. Includes solutions for common problems and interoperability recipes.
time
Время на прочтение
9 мин
Количество просмотров 15K
Статья-туториал от ведущего Java-разработчика «ITQ Group» Константина Киселевича.

Дорогой Junior и все, кто занимается copy-past конфигов Gradle.
В этой статье я хочу простым языком рассказать о gradl‘овой конфигурации сборки проекта, чтобы вы не боялись использовать Gradle.
Давайте начнем с того, что после xml’ного Maven'а, действительно, непонятно, что значит каждая строчка из следующего примера:
buildscript {
    ext {
        springBootVersion = '2.7.4'
        lombokVersion = '1.18.24'
        h2Version = '2.1.214'
        orikaCoreVersion = '1.5.4'
        queryDslVersion = '4.2.2'
        javaxVersion = '1.3.2'
        sonarqubeVersion = '3.0'
    }
}

plugins {
    id('java-library')
    id('org.springframework.boot').version("${springBootVersion}").apply(false)
    id('org.sonarqube').version("${sonarqubeVersion}").apply(false)
}

allprojects {
    repositories {
        mavenCentral()
    }
}

subprojects {
    apply(plugin: 'java-library')
    apply(plugin: 'org.sonarqube')

    java {
        toolchain {
            languageVersion = JavaLanguageVersion.of(11)
        }
        withSourcesJar()
        withJavadocJar()
    }

    dependencies {
        api(platform("org.springframework.boot:spring-boot-dependencies:${springBootVersion}"))
        compileOnly("org.projectlombok:lombok:${lombokVersion}")
        annotationProcessor("org.projectlombok:lombok:${lombokVersion}")
    }
}

dependencies {
    implementation(project('deveducate-web'))
}
Почему один dependencies {} вложен в subprojects {}, а второй — не вложен. Что такое buildscript {} и toolchain {}. Вопросов много, ответы в статье, но самый главный вопрос — что за программа этот текст читает и интерпретирует ?
Groovy
Давайте начнем с последнего вопроса и немного углубимся в историю.
Где-то в середине нулевых у программистов Java появились вопросы к языку — почему же так медленно появляются новые фичи? Действительно, посмотрим историю версий Java:
-
J2SE 5.0 сентябрь 2004
-
Java 6 декабрь 2006
-
Java 7 июль 2011
-
Java 8 март 2014
За 10 лет всего 4 версии. Прямо скажем, не так и много, как хотелось.
Ответом на такое медленное развитие стал язык Groovy. Его девиз: release early, release often (внедряй фичи раньше и чаще других).
Некоторые фичи Groovy перекочевали в другие языки:
-
синтаксис для оператора Элвиса «?:» (теперь в PHP и Kotlin);
-
оператор безопасной навигации «?.» (теперь в C#, Swift, Kotlin и Ruby — как &.);
-
оператор <=> (теперь в PHP и Ruby).
Как называется программа ?
Программа называется Gradle. Скачать ее вы можете с сайта по ссылке.
Установка Gradle.
На выбор доступны два варианта работы с Gradle в проекте:
-
через файл gradle;
-
через файл gradlew, где w означает wrapper (обертка).
В чем разница ?
Разница в удобстве для ваших коллег. В случае использования обертки gradlew версия gradle будет одинаковой у всей команды, каждому из коллег не придется вручную качать дистрибутив gradle с сайта и проделывать манипуляции с распаковкой.
Итак.
Представим, что на вас возложили инициативу начать писать код проекта и использовать gradle в качестве сборщика проекта. Это большое доверие 
Выберем директорией проекта C:\doit.
Поскольку вы первый в команде, вам необходимо самостоятельно скачать Gradle. Зайти на сайт по ссылке, скачать релиз и распаковать в какую-нибудь временную директорию вне директории проекта, например, C:\tmp.
Примерное содержание директории должно быть таким:
/bin
/init.d
/lib
README
Нужный нам файл gradle находится в директории /bin.
Вы бережете время коллег, которым предстоит вместе с вами разрабатывать проект, и не хотите заставлять их так же вручную качать более 100мб дистрибутива Gradle и повторять ваши шаги.
Поэтому вы откроете терминал (cmd), зайдете в директорию проекта cd C:\doit и запустите C:\tmp\bin\gradle init.
В предложенных вариантах создания gradle проекта выберете basic. Это пустой проект.
В директории проекта C:\doit появились самые необходимые файлы: gradlew, settings.gradle и build.gradle и даже .gitignore.

В C:\doit\gradle\wrapper\gradle-wrapper.properties указана версия gradle:
distributionUrl=https\://services.gradle.org/distributions/gradle-7.5.1-bin.zipЕсли вы добавите сгенерированные файлы в git, то у всех коллег будет одна и та же версия gradle и дистрибутив автоматически скачается при выполнении любой команды, например,
gradlew helpТаким образом, обертка gradle wrapper позволит всей команде вести разработку под одинаковой версией gradle и сама скачает/распакует дистрибутив в домашнюю директорию пользователя: ~\.gradle\wrapper\dists.
Gradle написан на Groovy + Kotlin.
Выше мы поговорили о скорости развития Groovy. Это важно, но существует еще одна причина в пользу языка.
Почему же Groovy был выбран для написания сценариев сборки проектов?
Ответ заключается в DSL. Groovy позволяет легко создавать новые специфические языки программирования под нужную нам задачу.
В Groovy для создания DSL реализуется концепция Метапрограммирования (по ссылке с диаграммой исполнения missingMethod).
Один из классов этой концепции — DelegatingScript:
Посмотрите пример и вы все поймете. Документация.
Cобственный язык (DSL)
Пример абстрактного файла для нашего выдуманного скриптового языка my.best.dsl.
	foo(1,2) {
	   // код метода
	}

	bar = "Hello world!";
А вот код класса на Groovy, который читает, парсит и выполняет скрипт my.best.dsl:
	/**
     * класс с методом foo() и сеттером setBar()
     */
	class MyDSL {
		public void foo(int x, int y, Closure z) { ... }
		public void setBar(String a) { ... }
	}

	CompilerConfiguration cc = new CompilerConfiguration();
	cc.setScriptBaseClass(DelegatingScript.class.getName());
	GroovyShell sh = new GroovyShell(cl,new Binding(),cc);

	DelegatingScript script = (DelegatingScript)sh.parse(new File("my.best.dsl"))

	script.setDelegate(new MyDSL());
	script.run();
DelegatingScript парсит наш выдуманный язык, на котором мы написали скрипт my.best.dsl.
Но у DelegatingScript нет метода foo или setBar. Поэтому мы подсказываем, что исполнение методов необходимо делегировать объекту new MyDSL() (в строке script.setDelegate(new MyDSL())). То есть вызвать эти методы у объекта new MyDSL()
Заметьте, что метод foo последним аргументом имеет замыкание Closure.
public void foo(int x, int y, Closure z) { ... }
А в нашем придуманном языке вызов метода следующий:
foo(1,2) {
   // код метода
}
Вот так в Groovy можно передавать аргументы: 1, 2 в скобках () и замыкание вне скобок ()если аргумент типа Closure последний в списке аргументов.
Надеюсь, теперь стало чуть понятнее, что такое в build.gradle
dependencies {
   implementation(project('deveducate-web'))
}
dependencies(Closure c) — это метод с одним аргументом — функцией, тело которой содержит вызов метода implementation(...).
Согласитесь, насколько легко реализовать свой скриптовый язык при помощи Groovy.
Создатели сборщика проектов Gradle так же оценили эту возможность и придумали свой довольно простой язык.
Он действительно несложный. В нем, по сути, всего три главных метода: plugins(), buildScript(), task(). Аргументами этих методов являются функции, тело которых вы пишете в фигурных скобках { ... }.
Чуть-чуть подробнее. В примере выше методы foo и setBar принадлежали классу MyDSL. А какому классу/интерфейсу принадлежат plugins и buildScript ?
Они принадлежат интерфейсу org.gradle.api.Project: https://docs.gradle.org/current/javadoc/org/gradle/api/Project.html#buildscript-groovy.lang.Closure-
(Реализует же этот интерфейс класс org.gradle.api.internal.project.DefaultProject. Рекомендую клонировать сорцы gradle https://github.com/gradle/gradle и покопаться в них)
Прокрутите вверх интерфейс Project, указанный в ссылке выше. Посмотрите, сколько еще методов вы можете использовать в своем build.gradle. Документация по методам Gradle доступна на https://docs.gradle.org/current/dsl/index.html
В общем, если в build.gradle вам непонятно какое-то ключевое слово, открывайте интерфейс Project и ищите это ключевое слово там. Если не найдете, то, скорее всего, это название метода/свойства из подключенного вами плагина.
Про плагины Gradle. Зачем они нужны?
Можно, например, в build.gradle вручную на языке Groovyнаписать скрипт сборки jar, прописать директории, в которых ожидается исходный код, запустить команду компиляции, команду тестов и так далее.
Но, к счастью, все это уже написано за нас и упаковано в плагин java-library, который поставляется вместе с Gradle. (Плагин java-library расширяет возможности плагина java, наследует его возможности)
Чистый Gradle без плагинов позволяет запускать следующие задачи:
	c:\doit>gradlew tasks

	> Task :tasks

	------------------------------------------------------------
	Tasks runnable from root project 'doit'
	------------------------------------------------------------

	Build Setup tasks
	-----------------
	init - Initializes a new Gradle build.
	wrapper - Generates Gradle wrapper files.

	Help tasks
	----------
	buildEnvironment - Displays all buildscript dependencies declared in root project 'doit'.
	dependencies - Displays all dependencies declared in root project 'doit'.
	dependencyInsight - Displays the insight into a specific dependency in root project 'doit'.
	help - Displays a help message.
	javaToolchains - Displays the detected java toolchains.
	outgoingVariants - Displays the outgoing variants of root project 'doit'.
	projects - Displays the sub-projects of root project 'doit'.
	properties - Displays the properties of root project 'doit'.
	resolvableConfigurations - Displays the configurations that can be resolved in root project 'doit'.
	tasks - Displays the tasks runnable from root project 'doit'.

	To see all tasks and more detail, run gradlew tasks --all

	To see more detail about a task, run gradlew help --task <task>

	BUILD SUCCESSFUL in 1s
	1 actionable task: 1 executed
Давайте подключим плагин java-library в наш проект: в самом начале build.gradle пропишем:
plugins {
    id('java-library')
}
После подключения плагина появились новые таски для работы с проектом:
	assemble - Assembles the outputs of this project.
	build - Assembles and tests this project.
	buildDependents - Assembles and tests this project and all projects that depend on it.
	buildNeeded - Assembles and tests this project and all projects it depends on.
	check - Runs all checks.
	classes - Assembles main classes.
	clean - Deletes the build directory.
	compileJava - Compiles main Java source.
	compileTestJava - Compiles test Java source.
	jar - Assembles a jar archive containing the main classes.
	javadoc - Generates Javadoc API documentation for the main source code.
	processResources - Processes main resources.
	processTestResources - Processes test resources.
	test - Runs the test suite.
	testClasses - Assembles test classes.
Итак, подключили плагин. А что такое плагин — это класс, реализующий интерфейс Plugin<Project>. Пример плагина HelloPlugin:
class HelloPlugin implements Plugin<Project> {
    void apply(Project project) {
        project.task('hello') {
            doLast {
                println 'Hello from the HelloPlugin'
            }
        }
    }
}
У объекта Project появился новый метод/task hello. Точно так же плагин Java-library добавляет новые методы/таски и многое другое (в том числе и соглашения, например, что исходный код ищется по пути src/main/java).
Смотрите документацию по Java-library на странице https://docs.gradle.org/current/userguide/building_java_projects.html и https://docs.gradle.org/current/userguide/java_library_plugin.html
Плагины Java и Java-library немного отличаются. Второй плагин наследует первый и добавляет, например к implementation() новый метод api().
Теперь вы можете указать в подпроекте implementation("org.apache.commons:commons-lang3:3.5"), если ни один тип или метод из commons-lang не станет частью публичного API.
Теперь, если версия commons-lang изменится на 3.6, то подпроекты, зависимые от текущего подпроекта, не будут перекомпилироваться.
И наоборот для зависимости в api().
Все это ускоряет сборку на больших проектах.
Пример!
Пришла пора создать маленький Java проект из одного класса, выводящего в консоль стандартное Hello world.
Очистим рабочую C:\doit от старых файлов. Запустим в командной строке C:\tmp\bin\gradle init, которая добавит Gradle Wrapper, а так же создаст build.gradle.

В C:\doit появился gradle wrapper.

Осталось добавить Java класс в C:\doit\src\main\java.

Класс HelloWorld:
class HelloWorld {
    public static void main(String[] args) {
        System.out.println("Hello world!");
    }
}
И подключить плагин java-library в build.gradle, как делали выше.
plugins {
    id('java-library')
}
Неплохо, уже можно и собрать наше маленькое приложение. Вспомним про документацию к Java-library https://docs.gradle.org/current/userguide/building_java_projects.html и https://docs.gradle.org/current/userguide/java_library_plugin.html или https://docs.gradle.org/current/dsl/. Поищем что-то по слову jar. Найдем таск jar.
jar - Собирает jar-архив с main классом.Запускаем:
C:\doit>.\gradlew jarГотово — появился C:\doit\build\libs\doit.jar, который можем запустить в командной строке через C:\doit>java -cp "C:\doit\build\libs\doit.jar" HelloWorld
Приходится указывать название класса при запуске jar’ника. Можно переместить название класса в файл манифеста MANIFEST.MF, согласно требованиям Java. Для этого откроем страницу building_java_projects или org.gradle.api.tasks.bundling.Jar и поищем по слову manifest. Находим пример:
jar {
    manifest {
        attributes("Implementation-Title": "Gradle",
                   "Implementation-Version": archiveVersion)
    }
}
Для запуска jar файла из командной строки без указания класса manifest должен содержать строку:
Main-Class: HelloWorldДобавим в build.gradle:
jar {
    manifest {
        attributes 'Main-Class': 'HelloWorld'
        //или равнозначно
		//attributes('Main-Class': 'HelloWorld')
    }
}
Почему такая странная запись через двоеточие? Так представлен элемент HashMap в Groovy, как параметр метода https://docs.gradle.org/current/javadoc/org/gradle/api/java/archives/Manifest.html

Прочтите The Groovy Development Kit https://www.groovy-lang.org/groovy-dev-kit.html
c:\doit>.\gradlew jar
c:\doit>java -jar build\libs\doit.jar
Hello world!
Разобраться несложно. Главное — не копипастить, а проходить каждую строчку в чужих примерах по документации.
Рекомендую статьи:
-
Установка Groovy
-
Примеры наGroovy
-
Подробно о task’ахGradle
Этот урок освещает создание вами простого Java-приложения с использованием Gradle.
Что вы создадите
Вы создадите простое приложение и соберете его с помощью Gradle.
Что вам потребуется
- Примерно 15 минут свободного времени
- Любимый текстовый редактор или IDE
- JDK 6 и выше
Как проходить этот урок
Как и большинство уроков по Spring, вы можете начать с
нуля и выполнять каждый шаг, либо пропустить базовые шаги, которые вам уже знакомы. В любом случае,
вы в конечном итоге получите рабочий код.
Чтобы начать с нуля, перейдите в Настройка проекта.
Чтобы пропустить базовые шаги, выполните следующее:
- Загрузите и
распакуйте архив с кодом этого урока, либо кнонируйте из репозитория с помощью
Git:
git clone https://github.com/spring-guides/gs-gradle.git - Перейдите в каталог
gs-gradle/initial - Забегая вперед, установите Gradle
Когда вы закончите, можете сравнить получившийся результат с образцом в gs-gradle/complete.
Настройка проекта
Для начала вам необходимо настроить Java-проект перед тем, как собрать его Gradle’ом. Т.к. урок посвящен Gradle,
сделаем проект максимально простым, насколько это возможно.
Создание структуры каталогов
В выбранном вами каталоге проекта создайте следующую структуру каталогов; к примеру,
командой mkdir -p src/main/java/hello для *nix систем:
└── src
    └── main
        └── java
            └── hello
Внутри src/main/java/hello директории вы можете создать любые Java-классы, какие вы хотите.
Для простоты и согласованности с остальной частью урока, Spring рекомендует вам создать два класса:
HelloWorld.java и Greeter.java.
src/main/java/hello/HelloWorld.java
package hello;

public class HelloWorld {
    public static void main(String[] args) {
        Greeter greeter = new Greeter();
        System.out.println(greeter.sayHello());
    }
}
src/main/java/hello/Greeter.java
package hello;

public class Greeter {
    public String sayHello() {
        return "Hello world!";
    }
}
Установка Gradle
Теперь, когда у вас есть проект, который вы можете собрать с Gradle, вам нужно установит сам Gradle.
Gradle можно получить, скачав zip-файл с
gradle.org/downloads.
Необходимы только бинарные файлы, так что ищите ссылку на архив с именем gradle-version-bin.zip.
(Вы также можете выбрать gradle-version-all.zip, тем самым получите исходники,
документацию и бинарные файлы.)
Распакуйте архив и добавьте путь к каталогу bin в переменную окружения path.
Чтобы протестировать правильность установки Gradle, запустите в командной строке:
Если всё было сделано правильно, то вы увидите сообщение:
:help

Welcome to Gradle 1.8.

To run a build, run gradle <task> ...

To see a list of available tasks, run gradle tasks

To see a list of command-line options, run gradle --help

BUILD SUCCESSFUL

Total time: 2.675 secs
Теперь у вас есть установленный Gradle.
Что может делать Gradle
Теперь, когда Gradle установлен, посмотрим, что он может делать. Прежде, чем вы создадите
build.gradle для проекта, выможете проверить, какие доступны задачи:
Вы должны увидеть список доступных задач. Если вы запустите Gradle в каталоге,
в котором нет ещё файла build.gradle, то увидите несколько
самых элементарных задач:
:tasks

== All tasks runnable from root project

== Build Setup tasks
setupBuild - Initializes a new Gradle build. [incubating]
wrapper - Generates Gradle wrapper files. [incubating]

== Help tasks
dependencies - Displays all dependencies declared in root project 'gs-gradle'.
dependencyInsight - Displays the insight into a specific dependency in root project 'gs-gradle'.
help - Displays a help message
projects - Displays the sub-projects of root project 'gs-gradle'.
properties - Displays the properties of root project 'gs-gradle'.
tasks - Displays the tasks runnable from root project 'gs-gradle'.

To see all tasks and more detail, run with --all.

BUILD SUCCESSFUL

Total time: 3.077 secs
Не смотря на то, что эти задачи доступны, они не представляют большого значения без конфигурации
для сборки проекта. С build.gradle файлом, некоторые задачи будут более полезны.
Список задач будет увеличиваться при добавлении плагинов в build.gradle, таким
образом вы будете время от времени запускать tasks, чтобы проверить, какие задачи доступны.
Говоря о добавлении плагинов, в следующей части урока вы добавите плагин, который отвечает
за базовую функциональность сборки Java-проектов.
Сборка Java кода
Начнем с простого, создадим очень простой build.gradle в корневой папке проекта(там,
где src), который содержит только одну строчку:
Эта единственная строчка в конфигурации сборки приносит значительную пользу. Запустите gradle tasks
снова и вы увидите новые задачи в списке, включая задачи для сборки проекта, создания JavaDoc и запуска тестов.
Вы будете изпользовать задачу gradle build достаточно часто. Эта задача компилирует, тестирует и
упаковывает код в JAR-файл. Вы можете запустить её таким образом:
Через несколько секунд, «BUILD SUCCESSFUL» будет означать, что сборка прошла успешно.
Чтобы увидеть результаты сборки, посмотрите на содержимое каталога build. Здесь
вы найдете несколько директорий, среди которых три наиболее значимые:
- classes. Скомпилированные .class файлы
- reports. Отчеты в течении сборки(такие как отчеты о тестировании)
- libs. Библиотеки для сборки проекта(обычно в виде JAR и/или WAR файлов)
Классы в каталоге с .class файлами генерируются во время сборки Java-кода. Соответственно,
вы должны найти там HelloWorld.class и Greeter.class.
На данный момент проект не имеет зависимостей от библиотек, поэтому ничего нет в папке dependency_cache.
Каталог отчетов должен содержать отчет о выполнении тестов для проекта. Т.к. проект пока не содержит тестов,
данный отчет будет нам неинтересен.
Каталог библиотек должен содержать JAR-файл с названием каталога проекта. В дальнейшем, вы увидите,
как указывать имя JAR-файла и его версию.
Объявление зависимостей
Простой «Hello World» пример полностью автономный и не зависит от каких-либо дополнительных библиотек.
Однако, большинство приложений зависит от внешних библиотек, с реализацией распостраненного и/или
сложного функционала.
К примеру, предположим, что в дополнение к «Hello World!» вы хотите, чтобы приложение печатало текущую дату и время.
Вы могли бы использовать функциональность из стандартных(native) Java библиотек, но мы можем сделать это
и другими интересными способами, например с помощью Joda Time библиотеки.
Во первых, изменим HelloWorld.java, как показано ниже:
package hello;

import org.joda.time.LocalTime;

public class HelloWorld {
    public static void main(String[] args) {
        LocalTime currentTime = new LocalTime();
        System.out.println("The current local time is: " + currentTime);

        Greeter greeter = new Greeter();
        System.out.println(greeter.sayHello());
    }
}
Здесь HelloWorld использует Joda Time LocalTime класс для получения и печати текущего времени.
Если бы вы запустили gradle build для сборки проекта сейчас, то получили бы ошибку сборки,
потому что вы не объявили Joda Time компилируемую зависимость в сборке.
Во-вторых, вам необходимо добавить источники сторонних библиотек:
repositories {
    mavenLocal()
    mavenCentral()
}
Блок repositories означает, что сборка должна разрешать зависимости из Maven Central
репозитория. Gradle опирается в основном на многие соглашения и возможности, определенные в
инструменте сборки Maven, включая использование Maven Central как источник библиотек зависимостей.
Теперь, когда мы готовы к приему сторонних библиотек, объявим их:
dependencies {
    compile "joda-time:joda-time:2.2"
}
В блоке dependencies вы описываете единственную зависимость Joda Time. В частности,
вы запрашиваете(читаем справа на лево) версию 2.2 библиотеки joda-time в joda-time группе.
Другое, что хотелось бы отметить, это необходимость указания ключевого слова compile, обозначающее
доступность библиотеки во время компиляции(а если бы вы собирали WAR файл, то была бы включена /WEB-INF/libs
папка в WAR). Также существуют другие заметные ключевые слова, среди которых:
providedCompile. Требуемые зависимости для компиляции кода, но которые будут
доступны во время работы кода контейнера(например, Java Servlet API)testCompile. Зависимости, используемые для компиляции и запуска тестов, но не
требуемые для компиляции и запуска кода проекта
И наконец, назначим имя для нашего JAR артефакта.
jar {
    baseName = 'gs-gradle'
    version =  '0.1.0'
}
jar блок определяет, как JAR файл будет назван. В данном случае мы получим gs-gradle-0.1.0.jar.
Теперь, если мы запустим gradle build, Gradle должен будет загрузить Joda Time зависимость из
репозитория Maven Central и успешно собрать проект.
Сборка проекта с Gradle Wrapper
Gradle Wrapper является предпочтительным способом для начала Gradle сборки. Он содержит bat-скрипты для
Windows и shell-скрипты для OS X и Linux. Эти скрипты позволяют вам запускать сборку с Gradle без
необходимости установки самого Gradle в вашу систему. Чтобы это стало возможным, добавьте следующий
блок в конец вашего build.gradle:
task wrapper(type: Wrapper) {
    gradleVersion = '1.11'
}
Запустите следующую команду для загрузки и инициализации wrapper-скриптов:
После того, как задачи отработают, вы заметите несколько новых файлов. Два скрипта в корневом каталоге,
а jar-файл и properties-файл оболочки будут в папке gradle/wrapper.
└── initial
    └── gradlew
    └── gradlew.bat
    └── gradle
        └── wrapper
            └── gradle-wrapper.jar
            └── gradle-wrapper.properties
Gradle Wrapper теперь доступен вам для сборки проекта. Добавьте его в вашу систему контроля версий и
каждый, кто клонирует ваш проект, сможет его собрать точно таким же способом. Gradle Wrapper можно
использовать наравне с установленным Gradle. Pfgecnbnt wrapper-скрипт для выполнения задичи сборки
точно так же, как вы делали ранее:
Ранее, когда вы запускали wrapper с конкретной версией Gradle, он загружал и кешировал бинарники Gradle
для соответствующей версии. Gradle Wrapper спроектирован таким образом, чтобы было возможно
сохранить его в репозитории вашей VCS и любой, кто его клонирует, сможет собрать ваш проект без
необходимости устанавливать и настраивать Gradle определенной версии.
На данном этапе у вас есть собранный ваш код. В результате вы увидете:
build
├── classes
│   └── main
│       └── hello
│           ├── Greeter.class
│           └── HelloWorld.class
├── dependency-cache
├── libs
│   └── gs-gradle-0.1.0.jar
└── tmp
    └── jar
        └── MANIFEST.MF
В сборке содержатся два класса Greeter и HelloWorld, как и ожидалось,
а также JAR-файл. Окиньте беглым взглядом:
$ jar tvf build/libs/gs-gradle-0.1.0.jar
  0 Fri May 30 16:02:32 CDT 2014 META-INF/
 25 Fri May 30 16:02:32 CDT 2014 META-INF/MANIFEST.MF
  0 Fri May 30 16:02:32 CDT 2014 hello/
369 Fri May 30 16:02:32 CDT 2014 hello/Greeter.class
988 Fri May 30 16:02:32 CDT 2014 hello/HelloWorld.class
Это содержимое пакета файлов классов. Важно отметить, что даже, если вы и объявили joda-time как
зависимость, библиотека не включена в пакет. И JAR-файл будет неспособен к выполнению.
Чтобы сделать этот код выполняемым, мы можем использовать плагин application.
Добавьте его в ваш build.gradleфайл.
apply plugin: 'application'

mainClassName = 'hello.HelloWorld'
Затем просто запустите ваше приложение!
$ ./gradlew run
:compileJava UP-TO-DATE
:processResources UP-TO-DATE
:classes UP-TO-DATE
:run
The current local time is: 16:16:20.544
Hello world!

BUILD SUCCESSFUL

Total time: 3.798 secs
Остановимся подробнее на упаковке зависимостей. К примеру, если бы мы собирали WAR-файл,
общепризнанный формат, ассоциирующийся с упаковкой сторонних зависимостей, мы бы могли использовать
WAR плагин.
Если вы используете Spring Boot и хотите получить исполняемый JAR-файл, тогда вам пригодится
spring-boot-gradle-plugin.
На данном этапе, gradle недостаточно знает о выбранной вами системе. Но этого достаточно, чтобы
приступить к работе с gradle.
В конечном счете, у вас должен получиться такой build.gradle файл:
build.gradle
apply plugin: 'java'
apply plugin: 'eclipse'
apply plugin: 'application'

mainClassName = 'hello.HelloWorld'

// tag::repositories[]
repositories {
    mavenLocal()
    mavenCentral()
}
// end::repositories[]

// tag::jar[]
jar {
    baseName = 'gs-gradle'
    version =  '0.1.0'
}
// end::jar[]

// tag::dependencies[]
dependencies {
    compile "joda-time:joda-time:2.2"
}
// end::dependencies[]

// tag::wrapper[]
task wrapper(type: Wrapper) {
    gradleVersion = '1.11'
}
// end::wrapper[]
Здесь присутствует много закомментированных открывающихся и закрывающихся вставок. Они
позволяют разделить на части файл сборки для наглядного объяснения данного урока. Их
необязательно использовать в вашем рабочем файле сборки.
Итог
Поздравляем! Вы создали простой, но эффективный файл сборки Gradle для сборки Java проектов.
С оригинальным текстом урока вы можете ознакомиться на
spring.io.
comments powered by
Contents
- 1 Introduction
- 1.1 Why Gradle?
- 1.2 Requirements
- 2 Basic Project Setup
- 2.1 Simple build files
- 2.2 Project Structure
- 2.2.1 Configuring the Structure
- 2.3 Build Tasks
- 2.3.1 General Tasks
- 2.3.2 Java project tasks
- 2.3.3 Android tasks
- 2.4 Basic Build Customization
- 2.4.1 Manifest entries
- 2.4.2 Build Types
- 2.4.3 Signing Configurations
- 3 Dependencies, Android Libraries and Multi-project setup
- 3.1 Dependencies on binary packages
- 3.1.1 Local packages
- 3.1.2 Remote artifacts
- 3.2 Multi project setup
- 3.3 Library projects
- 3.3.1 Creating a Library Project
- 3.3.2 Differences between a Project and a Library Project
- 3.3.3 Referencing a Library
- 3.3.4 Library Publication
- 3.1 Dependencies on binary packages
- 4 Testing
- 4.1 Unit testing
- 4.2 Basics and Configuration
- 4.3 Resolving conflicts between main and test APK
- 4.4 Running tests
- 4.5 Testing Android Libraries
- 4.6 Test reports
- 4.6.1 Multi-projects reports
- 4.7 Lint support
- 5 Build Variants
- 5.1 Product flavors
- 5.2 Build Type + Product Flavor = Build Variant
- 5.3 Product Flavor Configuration
- 5.4 Sourcesets and Dependencies
- 5.5 Building and Tasks
- 5.6 Multi-flavor variants
- 5.7 Testing
- 5.8 BuildConfig
- 5.9 Filtering Variants
- 6 Advanced Build Customization
- 6.1 Running ProGuard
- 6.2 Shrinking Resources
- 6.3 Setting language level
Introduction
If you are looking for a full list of options available in build.gradle files, please see the DSL reference.
Goals of the new Build System
The goals of the new build system are:
- Make it easy to reuse code and resources
- Make it easy to create several variants of an application, either for multi-apk distribution or for different flavors of an application
- Make it easy to configure, extend and customize the build process
- Good IDE integration
Why Gradle?
Gradle is an advanced build system as well as an advanced build toolkit allowing to create custom build logic through plugins. Here are some of its features that made us choose Gradle:
- Domain Specific Language (DSL) based on Groovy, used to describe and manipulate the build logic
- Build files are Groovy based and allow mixing of declarative elements through the DSL and using code to manipulate the DSL elements to provide custom logic.
- Built-in dependency management through Maven and/or Ivy.
- Very flexible. Allows using best practices but doesn’t force its own way of doing things.
- Plugins can expose their own DSL and their own API for build files to use.
- Good Tooling API allowing IDE integration
Requirements
- Gradle 2.2
- SDK with Build Tools 19.0.0. Some features may require a more recent version.
Basic Project Setup
A Gradle project describes its build in a file called build.gradle located in the root folder of the project. (See Gradle User Guide for an overview of the build system itself.)
Simple build files
The most simple Android project has the following build.gradle:
buildscript {
    repositories {

        jcenter()
}
dependencies {
classpath 'com.android.tools.build:gradle:1.3.1'
}
}
apply plugin: 'com.android.application'
android {
compileSdkVersion 23
buildToolsVersion "23.1.0"
}
There are 3 main areas to this Android build file:
buildscript { … } configures the code driving the build. In this case, this declares that it uses the jCenter repository, and that there is a classpath dependency on a Maven artifact. This artifact is the library that contains the Android plugin for Gradle in version 1.3.1. Note: This only affects the code running the build, not the project. The project itself needs to declare its own repositories and dependencies. This will be covered later.
Then, the
com.android.application plugin is applied. This is the plugin used for building Android applications.
Finally,
android { … } configures all the parameters for the android build. This is the entry point for the Android DSL. By default, only the compilation target, and the version of the build-tools are needed. This is done with the compileSdkVersion and buildtoolsVersion properties.
The compilation target is the same as the target property in the project.properties file of the old build system. This new property can either be assigned a int (the api level) or a string with the same value as the previous target property.
Important: You should only apply the
com.android.application plugin. Applying the java plugin as well will result in a build error.
Note: You will also need a local.properties file to set the location of the SDK in the same way that the existing SDK requires, using the
sdk.dir property.
Alternatively, you can set an environment variable called ANDROID_HOME. There is no differences between the two methods, you can use the one you prefer. Example local.properties file:
sdk.dir=/path/to/Android/Sdk
Project Structure
The basic build files above expects a default folder structure. Gradle follows the concept of convention over configuration, providing sensible default option values when possible. The basic project starts with two components called “source sets”, one for the main source code and one for the test code. These live respectively in:
- src/main/
- src/androidTest/
Inside each of these directories there are subdirectories for each source component. For both the Java and Android plugin, the location of the Java source code and the Java resources are:
- java/
- resources/
For the Android plugin, extra files and folders specific to Android:
- AndroidManifest.xml
- res/
- assets/
- aidl/
- rs/
- jni/
- jniLibs/
This means that *.java files for the main source set are located in src/main/java and the main manifest is src/main/AndroidManifest.xml
Note: src/androidTest/AndroidManifest.xml is not needed as it is created automatically.
Configuring the Structure
When the default project structure isn’t adequate, it is possible to configure it. See this page in gradle documentation for information how this can be done for pure-java projects.
The Android plugin uses a similar syntax, but because it uses its own sourceSets, this is done within the android block. Here’s an example, using the old project structure (used in Eclipse) for the main code and remapping the androidTest sourceSet to the tests folder:
android {
sourceSets {
main {
manifest.srcFile 'AndroidManifest.xml'
java.srcDirs = ['src']
resources.srcDirs = ['src']
aidl.srcDirs = ['src']
renderscript.srcDirs = ['src']
res.srcDirs = ['res']
assets.srcDirs = ['assets']
}
androidTest.setRoot('tests')
}
}
Note: because the old structure put all source files (Java, AIDL and RenderScript) in the same folder, we need to remap all those new components of the sourceSet to the same src folder.
Note: setRoot() moves the whole sourceSet (and its sub folders) to a new folder. This moves src/androidTest/* to tests/* This is Android specific and will not work on Java sourceSets.
Build Tasks
General Tasks
Applying a plugin to the build file automatically creates a set of build tasks to run. Both the Java plugin and the Android plugin do this. The convention for tasks is the following:
- assemble
The task to assemble the output(s) of the project. - check
The task to run all the checks. - build
This task does both assemble and check. - clean
This task cleans the output of the project.
The tasks assemble, check and build don’t actually do anything. They are «anchor» tasks for the plugins to add dependent tasks that actually do the work.
This allows you to always call the same task(s) no matter what the type of project is, or what plugins are applied. For instance, applying the findbugs plugin will create a new task and make check depend on it, making it be called whenever the check task is called.
From the command line you can get the high level task running the following command:
gradle tasks
For a full list and seeing dependencies between the tasks run:
gradle tasks —all
Note: Gradle automatically monitor the declared inputs and outputs of a task.
Running the build task twice without making changes to your project, will make Gradle report all tasks as UP-TO-DATE, meaning no work was required. This allows tasks to properly depend on each other without requiring unnecessary build operations.
Java project tasks
Here are the two most important tasks created by the java plugin, dependencies of the main anchor tasks:
- assemble
- jar
This task creates the output. - check
- test
This task runs the tests.
The jar task itself will depend directly and indirectly on other tasks: classes for instance will compile the Java code. The tests are compiled with testClasses, but it is rarely useful to call this as test depends on it (as well as classes).
In general, you will probably only ever call assemble or check, and ignore the other tasks. You can see the full set of tasks and their descriptions for the Java plugin here.
Android tasks
The Android plugin uses the same convention to stay compatible with other plugins, and adds an additional anchor task:
- assemble
The task to assemble the output(s) of the project. - check
The task to run all the checks. - connectedCheck
Runs checks that requires a connected device or emulator. they will run on all connected devices in parallel. - deviceCheck
Runs checks using APIs to connect to remote devices. This is used on CI servers. - build
This task does both assemble and check - clean
This task cleans the output of the project.
The new anchor tasks are necessary in order to be able to run regular checks without needing a connected device. Note that build does not depend on deviceCheck, or connectedCheck.
An Android project has at least two outputs: a debug APK and a release APK. Each of these has its own anchor task to facilitate building them separately:
- assemble
- assembleDebug
- assembleRelease
They both depend on other tasks that execute the multiple steps needed to build an APK. The assemble task depends on both, so calling it will build both APKs.
Tip: Gradle support camel case shortcuts for task names on the command line. For instance:
gradle aR
is the same as typing
gradle assembleRelease
as long as no other task matches ‘aR’
The check anchor tasks have their own dependencies:
- check
- lint
- connectedCheck
- connectedAndroidTest
- deviceCheck
- This depends on tasks created when other plugins implement test extension points.
Finally, the plugin creates tasks for installing and uninstalling all build types (debug, release, test), as long as they can be installed (which requires signing), e.g.
- installDebug
- installRelease
- uninstallAll
- uninstallDebug
- uninstallRelease
- uninstallDebugAndroidTest
Basic Build Customization
The Android plugin provides a broad DSL to customize most things directly from the build system.
Manifest entries
Through the DSL it is possible to configure the most important manifest entries, like these:
- minSdkVersion
- targetSdkVersion
- versionCode
- versionName
- applicationId (the effective packageName — see ApplicationId versus PackageName for more information)
- testApplicationId (used by the test APK)
- testInstrumentationRunner
Example:
android {
compileSdkVersion 23
buildToolsVersion "23.0.1"
    defaultConfig {

        versionCode 12
versionName "2.0"
minSdkVersion 16
targetSdkVersion 23
}
}
Please see the Android Plugin DSL Reference for a complete list of build properties that can be configured and their default values.
The power of putting these manifest properties in the build file is that the values can be chosen dynamically. For instance, one could be reading the version name from a file or using other custom logic:
def computeVersionName() {
...
}
android {
compileSdkVersion 23
buildToolsVersion "23.0.1"
defaultConfig {
        versionCode 12

        versionName computeVersionName()
minSdkVersion 16
targetSdkVersion 23
}
}
Note: Do not use function names that could conflict with existing getters in the given scope. For instance defaultConfig { ...} calling getVersionName() will automatically use the getter of defaultConfig.getVersionName() instead of the custom method.
Build Types
By default, the Android plugin automatically sets up the project to build both a debug and a release version of the application. These differ mostly around the ability to debug the application on a secure (non dev) devices, and details of how the APK is signed. The debug version is signed with a key/certificate that is created automatically with a known name/password (to prevent required prompt during the build). The release is not signed during the build, this needs to happen after.
This configuration is done through an object called a BuildType. By default, 2 instances are created, a debug and a release one. The Android plugin allows customizing those two instances as well as creating other Build Types. This is done with the buildTypes DSL container:
android {
buildTypes {
debug {
applicationIdSuffix ".debug"
}
jnidebug { initWith(buildTypes.debug)
applicationIdSuffix ".jnidebug"
jniDebuggable true
}
}
}
The above snippet achieves the following:
- Configures the default debug Build Type:
- set its package to be <app appliationId>.debug to be able to install both debug and release apk on the same device
- Creates a new BuildType called jnidebug and configure it to be a copy of the debug build type.
- Keep configuring the jnidebug, by enabling debug build of the JNI component, and add a different package suffix.
Creating new Build Types is as easy as using a new element under the buildTypes container, either to call initWith() or to configure it with a closure. See the DSL Reference for a list of all properties that can be configured on a build type.
In addition to modifying build properties, Build Types can be used to add specific code and resources. For each Build Type, a new matching sourceSet is created, with a default location of src/<buildtypename>/, e.g. src/debug/java directory can be used to add sources that will only be compiled for the debug APK. This means the Build Type names cannot be main or androidTest (this is enforced by the plugin), and that they have to be unique.
Like any other source sets, the location of the build type source set can be relocated:
android {
sourceSets.jnidebug.setRoot('foo/jnidebug')
}
Additionally, for each Build Type, a new assemble<BuildTypeName> task is created, e.g. assembleDebug. The assembleDebug and assembleRelease tasks have already been mentioned, and this is where they come from. When the debug and release Build Types are pre-created, their tasks are automatically created as well. According to this rule, build.gradle snippet above will also generate an assembleJnidebug task, and assemble would be made to depend on it the same way it depends on the assembleDebug and assembleRelease tasks.
Tip: remember that you can type
gradle aJ to run the assembleJnidebug task.
Possible use case:
- Permissions in debug mode only, but not in release mode
- Custom implementation for debugging
- Different resources for debug mode (for instance when a resource value is tied to the signing certificate).
The code/resources of the BuildType are used in the following way:
- The manifest is merged into the app manifest
- The code acts as just another source folder
- The resources are overlayed over the main resources, replacing existing values.
Signing Configurations
Signing an application requires the following (See Signing Your Application for details about signing an APK):
- A keystore
- A keystore password
- A key alias name
- A key password
- The store type
The location, as well as the key name, both passwords and store type form together a Signing Configuration. By default, there is a debug configuration that is setup to use a debug keystore, with a known password and a default key with a known password.
The debug keystore is located in $HOME/.android/debug.keystore, and is created if not present. The debug Build Type is set to use this debug SigningConfig automatically.
It is possible to create other configurations or customize the default built-in one. This is done through the signingConfigs DSL container:
android {
signingConfigs {
debug {
storeFile file("debug.keystore")
}
myConfig {
storeFile file("other.keystore")
storePassword "android"
keyAlias "androiddebugkey"
keyPassword "android"
}
}
buildTypes {
foo {
signingConfig signingConfigs.myConfig
}
}
}
The above snippet changes the location of the debug keystore to be at the root of the project. This automatically impacts any Build Types that are set to using it, in this case the debug Build Type. It also creates a new Signing Config and a new Build Type that uses the new configuration.
Note: Only debug keystores located in the default location will be automatically created. Changing the location of the debug keystore will not create it on-demand. Creating a SigningConfig with a different name that uses the default debug keystore location will create it automatically. In other words, it’s tied to the location of the keystore, not the name of the configuration.
Note: Location of keystores are usually relative to the root of the project, but could be absolute paths, thought it is not recommended (except for the debug one since it is automatically created).
Note: If you are checking these files into version control, you may not want the password in the file. The following Stack Overflow post shows ways to read the values from the console, or from environment variables.
Dependencies, Android Libraries and Multi-project setup
Gradle projects can have dependencies on other components. These components can be external binary packages, or other Gradle projects.
Dependencies on binary packages
Local packages
To configure a dependency on an external library jar, you need to add a dependency on the compile configuration. The snippet below adds a dependency on all jars inside the libs directory.
dependencies {
compile fileTree(dir: 'libs', include: ['*.jar'])
}
android {
...
}
Note: the dependencies DSL element is part of the standard Gradle API and does not belong inside the android element.
The compile configuration is used to compile the main application. Everything in it is added to the compilation classpath and also packaged in the final APK. There are other possible configurations to add dependencies to:
- compile: main application
- androidTestCompile: test application
- debugCompile: debug Build Type
- releaseCompile: release Build Type.
Because it’s not possible to build an APK that does not have an associated Build Type, the APK is always configured with two (or more) configurations: compile and <buildtype>Compile. Creating a new Build Type automatically creates a new configuration based on its name. This can be useful if the debug version needs to use a custom library (to report crashes for instance), while the release doesn’t, or if they rely on different versions of the same library (see Gradle documentation on details of how version conflicts are handled).
Remote artifacts
Gradle supports pulling artifacts from Maven and Ivy repositories. First the repository must be added to the list, and then the dependency must be declared in a way that Maven or Ivy declare their artifacts.
repositories {
jcenter()
}
dependencies {
compile 'com.google.guava:guava:18.0'
}
android {
...
}
Note: jcenter() is a shortcut to specifying the URL of the repository. Gradle supports both remote and local repositories.
Note: Gradle will follow all dependencies transitively. This means that if a dependency has dependencies of its own, those are pulled in as well.
For more information about setting up dependencies, read the Gradle user guide here, and DSL documentation here.
Multi project setup
Gradle projects can also depend on other gradle projects by using a multi-project setup. A multi-project setup usually works by having all the projects as sub folders of a given root project. For instance, given to following structure:
MyProject/
+ app/
+ libraries/
+ lib1/
+ lib2/
We can identify 3 projects. Gradle will reference them with the following name:
:app
:libraries:lib1
:libraries:lib2
Each projects will have its own build.gradle declaring how it gets built. Additionally, there will be a file called settings.gradle at the root declaring the projects. This gives the following structure:
MyProject/
| settings.gradle
+ app/
| build.gradle
+ libraries/
+ lib1/
| build.gradle
+ lib2/
| build.gradle
The content of settings.gradle is very simple. It defines which folder is actually a Gradle project:
include ':app', ':libraries:lib1', ':libraries:lib2'
The :app project is likely to depend on the libraries, and this is done by declaring the following dependencies:
dependencies {
compile project(':libraries:lib1')
}
More general information about multi-project setup here.
Library projects
In the above multi-project setup, :libraries:lib1 and :libraries:lib2 can be Java projects, and the :app Android project will use their jar output. However, if you want to share code that accesses Android APIs or uses Android-style resources, these libraries cannot be regular Java project, they have to be Android Library Projects.
Creating a Library Project
A Library project is very similar to a regular Android project with a few differences. Since building libraries is different than building applications, a different plugin is used. Internally both plugins share most of the same code and they are both provided by the same com.android.tools.build.gradle jar.
buildscript {
repositories {
jcenter()
}
dependencies {
classpath 'com.android.tools.build:gradle:1.3.1'
}
}
apply plugin: 'com.android.library'
android {
compileSdkVersion 23 buildToolsVersion «23.0.1»
}
This creates a library project that uses API 23 to compile. SourceSets, build types and dependencies are handled the same as they are in an application project and can be customized the same way.
Differences between a Project and a Library Project
A Library project’s main output is an .aar package (which stands for Android archive). It is a combination of compile code (as a jar file and/or native .so files) and resources (manifest, res, assets). A library project can also generate a test apk to test the library independently from an application. The same anchor tasks are used for this (assembleDebug, assembleRelease) so there’s no difference in commands to build such a project. For the rest, libraries behave the same as application projects. They have build types and product flavors (see below), and can potentially generate more than one version of the aar. Note that most of the configuration of the Build Type do not apply to library projects. However you can use the custom sourceSet to change the content of the library depending on whether it’s used by a project or being tested.
Referencing a Library
Referencing a library is done the same way any other project is referenced:
dependencies {
compile project(':libraries:lib1')
compile project(':libraries:lib2')
}
Note: if you have more than one library, then the order will be important. This is similar to the old build system where the order of the dependencies in the project.properties file was important.
Library Publication
By default a library only publishes its release variant. This variant will be used by all projects referencing the library, no matter which variant they build themselves. This is a temporary limitation due to Gradle limitations that we are working towards removing. You can control which variant gets published:
android {
defaultPublishConfig "debug"
}
Note that this publishing configuration name references the full variant name. Release and debug are only applicable when there are no flavors. If you wanted to change the default published variant while using flavors, you would write:
android {
defaultPublishConfig "flavor1Debug"
}
It is also possible to publish all variants of a library. We are planning to allow this while using a normal project-to-project dependency (like shown above), but this is not possible right now due to limitations in Gradle (we are working toward fixing those as well).
Publishing of all variants are not enabled by default. The snippet below enables this feature:
android {
publishNonDefault true
}
It is important to realize that publishing multiple variants means publishing multiple aar files, instead of a single aar containing multiple variants. Each aar packaging contains a single variant. Publishing a variant means making this aar available as an output artifact of the Gradle project. This can then be used either when publishing to a maven repository, or when another project creates a dependency on the library project.
Gradle has a concept of default» artifact. This is the one that is used when writing:
dependencies {

    compile project(':libraries:lib2')

}
To create a dependency on another published artifact, you need to specify which one to use:
dependencies {
flavor1Compile project(path: ':lib1', configuration: 'flavor1Release')
flavor2Compile project(path: ':lib1', configuration: 'flavor2Release')
}
Important: Note that the published configuration is a full variant, including the build type, and needs to be referenced as such.
Important: When enabling publishing of non default, the Maven publishing plugin will publish these additional variants as extra packages (with classifier). This means that this is not really compatible with publishing to a maven repository. You should either publish a single variant to a repository OR enable all config publishing for inter-project dependencies.
Testing
Building a test application is integrated into the application project. There is no need for a separate test project anymore.
Unit testing
For the unit testing support added in 1.1, please see this separate page. The rest of this section describes «instrumentation tests» that can run on a real device (or an emulator) and require a separate, testing APK to be built.
Basics and Configuration
As mentioned previously, next to the main sourceSet is the androidTest sourceSet, located by default in src/androidTest/. Using this sourceSet a test APK gets built, which can be deployed to a device to test the application using the Android testing framework. This can contain android unit tests, instrumentation tests, and uiautomator tests. The <instrumentation> node of the manifest for the test app is generated but you can create a src/androidTest/AndroidManifest.xml file to add other components to the test manifest.
There are a few values that can be configured for the test app, in order to configure the <instrumentation> node (see the DSL reference for details)
- testApplicationId
- testInstrumentationRunner
-
testHandleProfiling
-
testFunctionalTest
As seen previously, those are configured in the defaultConfig object:
android {
defaultConfig {
testApplicationId "com.test.foo"
testInstrumentationRunner "android.test.InstrumentationTestRunner"
testHandleProfiling true
testFunctionalTest true
}
}
The value of the targetPackage attribute of the instrumentation node in the test application manifest is automatically filled with the package name of the tested app, even if it is customized through the defaultConfig and/or the Build Type objects. This is one of the reason this part of the manifest is generated automatically.
Additionally, the androidTest source set can be configured to have its own dependencies. By default, the application and its own dependencies are added to the test app classpath, but this can be extended with the snippet below:
dependencies {
androidTestCompile 'com.google.guava:guava:11.0.2'
}
The test app is built by the assembleAndroidTest task. It is not a dependency of the main assemble task, and is instead called automatically when the tests are set to run.
Currently only one Build Type is tested. By default it is the debug Build Type, but this can be reconfigured with:
android {
...
testBuildType "staging"
}
Resolving conflicts between main and test APK
When instrumentation tests are run, both the main APK and test APK share the same classpath. Gradle build will fail if the main APK and the test APK use the same library (e.g. Guava) but in different versions. If gradle didn’t catch that, your app could behave differently during tests and during normal run (including crashing in one of the cases).
To make the build succeed, just make sure both APKs use the same version. If the error is about an indirect dependency (a library you didn’t mention in your build.gradle), just add a dependency for the newer version to the configuration («compile» or «androidTestCompile») that needs it. You can also use Gradle’s resolution strategy mechanism. You can inspect the dependency tree by running ./gradlew :app:dependencies and ./gradlew :app:androidDependencies.
Running tests
As mentioned previously, checks requiring a connected device are launched with the anchor task called connectedCheck. This depends on the task connectedDebugAndroidTest and therefore will run it. This task does the following:
- Ensure the app and the test app are built (depending on assembleDebug and assembleDebugAndroidTest).
- Install both apps.
- Run the tests.
- Uninstall both apps.
If more than one device is connected, all tests are run in parallel on all connected devices. If one of the test fails, on any device, the build will fail.
Testing Android Libraries
Testing Android Library project is done exactly the same way as application projects. The only difference is that the whole library (and its dependencies) is automatically added as a Library dependency to the test app. The result is that the test APK includes not only its own code, but also the library itself and all its dependencies. The manifest of the Library is merged into the manifest of the test app (as is the case for any project referencing this Library). The androidTest task is changed to only install (and uninstall) the test APK (since there are no other APK to install.) and everything else is identical.
Test reports
When running unit tests, Gradle outputs an HTML report to easily look at the results. The Android plugins build on this and extends the HTML report to aggregate the results from all connected devices. All test results are stored as XML files under build/reports/androidTests/ (this is similar to regular jUnit results that are stored under build/reports/tests). This can be configured with:
android {
...
testOptions {
resultsDir = "${project.buildDir}/foo/results"
}
}
The value of android.testOptions.resultsDir is evaluated with Project.file(String)
Multi-projects reports
In a multi project setup with application(s) and library(ies) projects, when running all tests at the same time, it might be useful to generate a single reports for all tests.
To do this, a different plugin is available in the same artifact. It can be applied with:
buildscript {
repositories {
jcenter()
}
dependencies {
classpath 'com.android.tools.build:gradle:0.5.6'
}
}
apply plugin: 'android-reporting'
This should be applied to the root project, ie in build.gradle next to settings.gradle
Then from the root folder, the following command line will run all the tests and aggregate the reports:
gradle deviceCheck mergeAndroidReports —continue
Note: the —continue option ensure that all tests, from all sub-projects will be run even if one of them fails. Without it the first failing test will interrupt the run and not all projects may have their tests run.
Lint support
You can run lint for a specific variant (see below), e.g. ./gradlew lintRelease, or for all variants (./gradlew lint), in which case it produces a report which describes which specific variants a given issue applies to. You can configure lint by adding a lintOptions section like following. You typically only specify a few of these, see the DSL reference for all available options.
android {
lintOptions {
// turn off checking the given issue id's
disable 'TypographyFractions','TypographyQuotes'
// turn on the given issue id's
enable 'RtlHardcoded','RtlCompat', 'RtlEnabled'
// check *only* the given issue id's
check 'NewApi', 'InlinedApi'
}
}
Build Variants
One goal of the new build system is to enable creating different versions of the same application.
There are two main use cases:
- Different versions of the same application
For instance, a free/demo version vs the “pro” paid application. - Same application packaged differently for multi-apk in Google Play Store.
See http://developer.android.com/google/play/publishing/multiple-apks.html for more information. - A combination of 1. and 2.
The goal was to be able to generate these different APKs from the same project, as opposed to using a single Library Projects and 2+ Application Projects.
Product flavors
A product flavor defines a customized version of the application build by the project. A single project can have different flavors which change the generated application.
This new concept is designed to help when the differences are very minimum. If the answer to “Is this the same application?” is yes, then this is probably the way to go over Library Projects.
Product flavors are declared using a productFlavors DSL container:
android {
....
productFlavors {
flavor1 {
...
}
flavor2 {
...
}
}
}
This creates two flavors, called flavor1 and flavor2.
Note: The name of the flavors cannot collide with existing Build Type names, or with the androidTest and test source sets.
Build Type + Product Flavor = Build Variant
As we have seen before, each Build Type generates a new APK. Product Flavors do the same: the output of the project becomes all possible combinations of Build Types and, if applicable, Product Flavors. Each (Build Type, Product Flavor) combination is called a Build Variant. For instance, with the default debug and release Build Types, the above example generates four Build Variants:
- Flavor1 — debug
- Flavor1 — release
- Flavor2 — debug
- Flavor2 — release
Projects with no flavors still have Build Variants, but the single default flavor/config is used, nameless, making the list of variants similar to the list of Build Types.
Product Flavor Configuration
Each flavors is configured with a closure:
android {
...
defaultConfig {
minSdkVersion 8
versionCode 10
}
productFlavors {
flavor1 {
applicationId "com.example.flavor1"
versionCode 20
}
flavor2 {
applicationId "com.example.flavor2"
minSdkVersion 14
}
}
}
Note that the android.productFlavors.* objects are of type ProductFlavor which is the same type as the android.defaultConfig object. This means they share the same properties.
defaultConfig provides the base configuration for all flavors and each flavor can override any value. In the example above, the configurations end up being:
- flavor1
- applicationId: com.example.flavor1
- minSdkVersion: 8
- versionCode: 20
- flavor2
- applicationId: com.example.flavor2
- minSdkVersion: 14
- versionCode: 10
Usually, the Build Type configuration is an overlay over the other configuration. For instance, the Build Type‘s applicationIdSuffix is appended to the Product Flavor‘s applicationId. There are cases where a setting is settable on both the Build Type and the Product Flavor. In this case, it’s is on a case by case basis. For instance, signingConfig is one of these properties. This enables either having all release packages share the same SigningConfig, by setting android.buildTypes.release.signingConfig, or have each release package use their own SigningConfig by setting each android.productFlavors.*.signingConfig objects separately.
Sourcesets and Dependencies
Similar to Build Types, Product Flavors also contribute code and resources through their own sourceSets. The above example creates four sourceSets:
- android.sourceSets.flavor1
Location src/flavor1/ - android.sourceSets.flavor2
Location src/flavor2/ - android.sourceSets.androidTestFlavor1
Location src/androidTestFlavor1/ - android.sourceSets.androidTestFlavor2
Location src/androidTestFlavor2/
Those sourceSets are used to build the APK, alongside android.sourceSets.main and the Build Type sourceSet. The following rules are used when dealing with all the sourcesets used to build a single APK:
- All source code (src/*/java) are used together as multiple folders generating a single output.
- Manifests are all merged together into a single manifest. This allows Product Flavors to have different components and/or permissions, similarly to Build Types.
- All resources (Android res and assets) are used using overlay priority where the Build Type overrides the Product Flavor, which overrides the main sourceSet.
- Each Build Variant generates its own R class (or other generated source code) from the resources. Nothing is shared between variants.
Finally, like Build Types, Product Flavors can have their own dependencies. For instance, if the flavors are used to generate a ads-based app and a paid app, one of the flavors could have a dependency on an Ads SDK, while the other does not.
dependencies {
flavor1Compile "..."
}
In this particular case, the file src/flavor1/AndroidManifest.xml would probably need to include the internet permission.
Additional sourcesets are also created for each variants:
- android.sourceSets.flavor1Debug
Location src/flavor1Debug/ - android.sourceSets.flavor1Release
Location src/flavor1Release/ - android.sourceSets.flavor2Debug
Location src/flavor2Debug/ - android.sourceSets.flavor2Release
Location src/flavor2Release/
These have higher priority than the build type sourcesets, and allow customization at the variant level.
Building and Tasks
We previously saw that each Build Type creates its own assemble<name> task, but that Build Variants are a combination of Build Type and Product Flavor.
When Product Flavors are used, more assemble-type tasks are created. These are:
- assemble<Variant Name>
- assemble<Build Type Name>
- assemble<Product Flavor Name>
#1 allows directly building a single variant. For instance assembleFlavor1Debug.
#2 allows building all APKs for a given Build Type. For instance assembleDebug will build both
Flavor1Debug and Flavor2Debug variants.
#3 allows building all APKs for a given flavor. For instance assembleFlavor1 will build both
Flavor1Debug and Flavor1Release variants.
The task assemble will build all possible variants.
Multi-flavor variants
In some case, one may want to create several versions of the same apps based on more than one criteria.
For instance, multi-apk support in Google Play supports 4 different filters. Creating different APKs split on each filter requires being able to use more than one dimension of Product Flavors.
Consider the example of a game that has a demo and a paid version and wants to use the ABI filter in the multi-apk support. With 3 ABIs and two versions of the application, 6 APKs needs to be generated (not counting the variants introduced by the different Build Types).
However, the code of the paid version is the same for all three ABIs, so creating simply 6 flavors is not the way to go.
Instead, there are two dimensions of flavors, and variants should automatically build all possible combinations.
This feature is implemented using Flavor Dimensions. Flavors are assigned to a specific dimension:
android {
...
flavorDimensions "abi", "version"
productFlavors {
freeapp {
dimension "version"
...
}
paidapp {
dimension "version"
...
}
arm {
dimension "abi"
...
}
mips {
dimension "abi"
...
}
x86 {
dimension "abi"
...
}
}
}
The android.flavorDimensions array defines the possible dimensions, as well as the order. Each defined Product Flavor is assigned to a dimension.
From the following dimensioned Product Flavors [freeapp, paidapp] and [x86, arm, mips] and the [debug, release] Build Types, the following build variants will be created:
- x86-freeapp-debug
- x86-freeapp-release
- arm-freeapp-debug
- arm-freeapp-release
- mips-freeapp-debug
- mips-freeapp-release
- x86-paidapp-debug
- x86-paidapp-release
- arm-paidapp-debug
- arm-paidapp-release
- mips-paidapp-debug
- mips-paidapp-release
The order of the dimension as defined by android.flavorDimensions is very important.
Each variant is configured by several Product Flavor objects:
- android.defaultConfig
- One from the abi dimension
- One from the version dimension
The order of the dimension drives which flavor override the other, which is important for resources when a value in a flavor replaces a value defined in a lower priority flavor.
The flavor dimension is defined with higher priority first. So in this case:
abi > version > defaultConfig
Multi-flavors projects also have additional sourcesets, similar to the variant sourcesets but without the build type:
- android.sourceSets.x86Freeapp
Location src/x86Freeapp/ - android.sourceSets.armPaidapp
Location src/armPaidapp/ - etc…
These allow customization at the flavor-combination level. They have higher priority than the basic flavor sourcesets, but lower priority than the build type sourcesets.
Testing
Testing multi-flavors project is very similar to simpler projects.
The androidTest sourceset is used for common tests across all flavors, while each flavor can also have its own tests.
As mentioned above, sourceSets to test each flavor are created:
- android.sourceSets.androidTestFlavor1
Location src/androidTestFlavor1/ - android.sourceSets.androidTestFlavor2
Location src/androidTestFlavor2/
Similarly, those can have their own dependencies:
dependencies {
androidTestFlavor1Compile "..."
}
Running the tests can be done through the main deviceCheck anchor task, or the main androidTest tasks which acts as an anchor task when flavors are used.
Each flavor has its own task to run tests: androidTest
<VariantName>. For instance:
- androidTestFlavor1Debug
- androidTestFlavor2Debug
Similarly, test APK building tasks and install/uninstall tasks are per variant:
- assembleFlavor1Test
- installFlavor1Debug
- installFlavor1Test
- uninstallFlavor1Debug
- …
Finally the HTML report generation supports aggregation by flavor.
The location of the test results and reports is as follows, first for the per flavor version, and then for the aggregated one:
- build/androidTest-results/flavors/<FlavorName>
- build/androidTest-results/all/
- build/reports/androidTests/flavors<FlavorName>
- build/reports/androidTests/all/
Customizing either path, will only change the root folder and still create sub folders per-flavor and aggregated results/reports.
BuildConfig
At compilation time, Android Studio generates a class called BuildConfig that contains constant values used when building a particular variant. You can inspect the values of these constants to change behavior in different variants, e.g.:
private void javaCode() {

    if (BuildConfig.FLAVOR.equals("paidapp")) {

        doIt();

    else {

        showOnlyInPaidAppDialog();

    }

}
Here are the values that BuildConfig contains:
boolean DEBUG– if the build is debuggable.int VERSION_CODEString VERSION_NAMEString APPLICATION_IDString BUILD_TYPE– name of the build type, e.g. «release»String FLAVOR– name of the flavor, e.g. «paidapp»
If the project uses flavor dimensions, additional values are generated. Using the example above, here’s an example BuildConfig:
String FLAVOR = "armFreeapp"String FLAVOR_abi = "arm"String FLAVOR_version = "freeapp"
Filtering Variants
When you add dimensions and flavors, you can end up with variants that don’t make sense. For example you may define a flavor that uses your Web API and a flavor that uses hard-coded fake data, for faster testing. The second flavor is only useful for development, but not in release builds. You can remove this variant using the variantFilter closure, like this:
android {
productFlavors {
realData
fakeData
}
variantFilter { variant ->
def names = variant.flavors*.name
if (names.contains(«fakeData») && variant.buildType.name == «release») {
variant.ignore = true
}
}
}
With the configuration above, your project will have only three variants:
realDataDebugrealDataReleasefakeDataDebug
See the DSL reference for all properties of variant that you can check.
Advanced Build Customization
Running ProGuard
The ProGuard plugin is applied automatically by the Android plugin, and the tasks are created automatically if the Build Type is configured to run ProGuard through the minifyEnabled property.
android {
buildTypes {
release {
minifyEnabled true
proguardFile getDefaultProguardFile('proguard-android.txt')
}
}
productFlavors {
flavor1 {
}
flavor2 {
proguardFile 'some-other-rules.txt'
}
}
Variants use all the rules files declared in their build type, and product flavors.
There are 2 default rules files
- proguard-android.txt
- proguard-android-optimize.txt
They are located in the SDK. Using getDefaultProguardFile() will return the full path to the files. They are identical except for enabling optimizations.
Shrinking Resources
You can also remove unused resources, automatically, at build time. For more information, see the Resource Shrinking document.
Manipulating tasks
Basic Java projects have a finite set of tasks that all work together to create an output.
The classes task is the one that compile the Java source code.
It’s easy to access from build.gradle by simply using classes in a script. This is a shortcut for project.tasks.classes.
In Android projects, this is a bit more complicated because there could be a large number of the same task and their name is generated based on the Build Types and Product Flavors.
In order to fix this, the android object has two properties:
- applicationVariants (only for the app plugin)
- libraryVariants (only for the library plugin)
- testVariants (for both plugins)
All three return a DomainObjectCollection of ApplicationVariant, LibraryVariant, and TestVariant objects respectively.
Note that accessing any of these collections will trigger the creations of all the tasks. This means no (re)configuration should take place after accessing the collections.
The
DomainObjectCollection gives access to all the objects directly, or through filters which can be convenient.
android.applicationVariants.all { variant ->
....
}
All three variant classes share the following properties:
| Property Name | Property Type | Description |
| name | String | The name of the variant. Guaranteed to be unique. |
| description | String | Human readable description of the variant. |
| dirName | String | subfolder name for the variant. Guaranteed to be unique. Maybe more than one folder, ie “debug/flavor1” |
| baseName | String | Base name of the output(s) of the variant. Guaranteed to be unique. |
| outputFile | File | The output of the variant. This is a read/write property |
| processManifest | ProcessManifest | The task that processes the manifest. |
| aidlCompile | AidlCompile | The task that compiles the AIDL files. |
| renderscriptCompile | RenderscriptCompile | The task that compiles the Renderscript files. |
| mergeResources | MergeResources | The task that merges the resources. |
| mergeAssets | MergeAssets | The task that merges the assets. |
| processResources | ProcessAndroidResources | The task that processes and compile the Resources. |
| generateBuildConfig | GenerateBuildConfig | The task that generates the BuildConfig class. |
| javaCompile | JavaCompile | The task that compiles the Java code. |
| processJavaResources | Copy | The task that process the Java resources. |
| assemble | DefaultTask | The assemble anchor task for this variant. |
The ApplicationVariant class adds the following:
| Property Name | Property Type | Description |
| buildType | BuildType | The BuildType of the variant. |
| productFlavors | List<ProductFlavor> | The ProductFlavors of the variant. Always non Null but could be empty. |
| mergedFlavor | ProductFlavor | The merging of android.defaultConfig and variant.productFlavors |
| signingConfig | SigningConfig | The SigningConfig object used by this variant |
| isSigningReady | boolean | true if the variant has all the information needed to be signed. |
| testVariant | BuildVariant | The TestVariant that will test this variant. |
| dex | Dex | The task that dex the code. Can be null if the variant is a library. |
| packageApplication | PackageApplication | The task that makes the final APK. Can be null if the variant is a library. |
| zipAlign | ZipAlign | The task that zipaligns the apk. Can be null if the variant is a library or if the APK cannot be signed. |
| install | DefaultTask | The installation task. Can be null. |
| uninstall | DefaultTask | The uninstallation task. |
The LibraryVariant class adds the following:
| Property Name | Property Type | Description |
| buildType | BuildType | The BuildType of the variant. |
| mergedFlavor | ProductFlavor | The defaultConfig values |
| testVariant | BuildVariant | The Build Variant that will test this variant. |
| packageLibrary | Zip | The task that packages the Library AAR archive. Null if not a library. |
The TestVariant class adds the following:
| Property Name | Property Type | Description |
| buildType | BuildType | The BuildType of the variant. |
| productFlavors | List<ProductFlavor> | The ProductFlavors of the variant. Always non Null but could be empty. |
| mergedFlavor | ProductFlavor | The merging of android.defaultConfig and variant.productFlavors |
| signingConfig | SigningConfig | The SigningConfig object used by this variant |
| isSigningReady | boolean | true if the variant has all the information needed to be signed. |
| testedVariant | BaseVariant | The BaseVariant that is tested by this TestVariant. |
| dex | Dex | The task that dex the code. Can be null if the variant is a library. |
| packageApplication | PackageApplication | The task that makes the final APK. Can be null if the variant is a library. |
| zipAlign | ZipAlign | The task that zipaligns the apk. Can be null if the variant is a library or if the APK cannot be signed. |
| install | DefaultTask | The installation task. Can be null. |
| uninstall | DefaultTask | The uninstallation task. |
| connectedAndroidTest | DefaultTask | The task that runs the android tests on connected devices. |
| providerAndroidTest | DefaultTask | The task that runs the android tests using the extension API. |
API for Android specific task types.
- ProcessManifest
- File manifestOutputFile
- AidlCompile
- File sourceOutputDir
- RenderscriptCompile
- File sourceOutputDir
- File resOutputDir
- MergeResources
- File outputDir
- MergeAssets
- File outputDir
- ProcessAndroidResources
- File manifestFile
- File resDir
- File assetsDir
- File sourceOutputDir
- File textSymbolOutputDir
- File packageOutputFile
- File proguardOutputFile
- GenerateBuildConfig
- File sourceOutputDir
- Dex
- File outputFolder
- PackageApplication
- File resourceFile
- File dexFile
- File javaResourceDir
- File jniDir
- File outputFile
- To change the final output file use «outputFile» on the variant object directly.
- ZipAlign
- File inputFile
- File outputFile
- To change the final output file use «outputFile» on the variant object directly.
The API for each task type is limited due to both how Gradle works and how the Android plugin sets them up.
First, Gradle is meant to have the tasks be only configured for input/output location and possible optional flags. So here, the tasks only define (some of) the inputs/outputs.
Second, the input for most of those tasks is non-trivial, often coming from mixing values from the sourceSets, the Build Types, and the Product Flavors. To keep build files simple to read and understand, the goal is to let developers modify the build by tweak these objects through the DSL, rather than diving deep in the inputs and options of the tasks and changing them.
Also note, that except for the ZipAlign task type, all other types require setting up private data to make them work. This means it’s not possible to manually create new tasks of these types.
This API is subject to change. In general the current API is around giving access to the outputs and inputs (when possible) of the tasks to add extra processing when required). Feedback is appreciated, especially around needs that may not have been foreseen.
For Gradle tasks (DefaultTask, JavaCompile, Copy, Zip), refer to the Gradle documentation.
Setting language level
You can use the compileOptions block to choose the language level used by the compiler. The default is chosen based on the compileSdkVersion value.
android {
compileOptions {
sourceCompatibility JavaVersion.VERSION_1_6
targetCompatibility JavaVersion.VERSION_1_6
}
}
There are many automated build tools used for building, testing, publishing deployment, and packaging software these days. Apache Ant, Maven, and Gradle are the most popular automated build tools.
Gradle is a build automation tool that helps developers by eliminating the need for unnecessary efforts. Standard directory preparation, compilation, packaging, generating the required artifacts, and other tasks would otherwise waste a lot of time.
The understanding of a concept, determining the lifecycle and phases of Gradle tool, and managing the required libraries and dependencies are the most essential skills that developers look for in a build tool. The video tutorial at the end of this article will help you learn Gradle using audio-visual explanation. The text portion of this tutorial will explain the following concepts:
- What is Gradle?
- How to Install Gradle?
- Basic Example using Gradle Script
- Dependency management using Gradle
- Gradle Tasks
1. What is Gradle?
Gradle is a build automation tool that combines the power and flexibility of Ant with the dependency management and conventions of Maven. This new build tool has become popular among developers. Powered by a Groovy DSL, Gradle provides a declarative way of describing builds through sensible defaults. For example, Spring IO and Maven tool both support the new build. Important points:
- A very general flexible purpose build tool like Ant
- Very powerful support for multi-project builds
- Very powerful dependency management
- Full support for your existing Maven infrastructure
- Support for Ant tasks and builds
- Groovy-based build script
- A rich domain model for describing your build
2. How to install:
- Download the latest Gradle 2.0 binaries.
- Copy the downloaded file and import it to your local directory. For this tutorial, we have used D:\Gradle\gradle-2.0.
- Add Gradle into environment variables as illustrated below.

- Open your command line and type gradle -version to get the version installed on your system.

At this time, you should be ready to use it. Gradle 2.0 was the latest available release when this article was written.
3. Scripts, Basics, and Hello World
Let us make the simplest Gradle build file that can help us understand the basics. You can print a hello, world message using one task or using two different tasks.
- Create an empty file called build.gradle and define the first task you want to execute. Put these files inside an empty folder.
- Define a task to print out the message.
build.gradle
task helloWorld &amp;amp;amp;amp;amp;amp;amp;amp;amp;amp;amp;amp;amp;amp;amp;amp;amp;amp;amp;amp;amp;amp;amp;amp;amp;amp;amp;amp;amp;amp;amp;amp;amp;amp;amp;amp;amp;amp;amp;amp;amp;amp;amp;amp;amp;amp;amp;amp;amp;amp;amp;amp;amp;amp;amp;amp;amp;amp;amp;amp;amp;amp;amp;lt;&amp;amp;amp;amp;amp;amp;amp;amp;amp;amp;amp;amp;amp;amp;amp;amp;amp;amp;amp;amp;amp;amp;amp;amp;amp;amp;amp;amp;amp;amp;amp;amp;amp;amp;amp;amp;amp;amp;amp;amp;amp;amp;amp;amp;amp;amp;amp;amp;amp;amp;amp;amp;amp;amp;amp;amp;amp;amp;amp;amp;amp;amp;amp;lt; {
println 'hello, world'}build.gradle
[code]
task hello &amp;amp;amp;amp;amp;amp;amp;amp;amp;amp;amp;amp;amp;amp;amp;amp;amp;amp;amp;amp;amp;amp;amp;amp;amp;amp;amp;amp;amp;amp;amp;amp;amp;amp;amp;amp;amp;amp;amp;amp;amp;amp;amp;amp;amp;amp;amp;amp;amp;amp;amp;amp;amp;amp;amp;amp;amp;amp;amp;amp;amp;amp;amp;lt;&amp;amp;amp;amp;amp;amp;amp;amp;amp;amp;amp;amp;amp;amp;amp;amp;amp;amp;amp;amp;amp;amp;amp;amp;amp;amp;amp;amp;amp;amp;amp;amp;amp;amp;amp;amp;amp;amp;amp;amp;amp;amp;amp;amp;amp;amp;amp;amp;amp;amp;amp;amp;amp;amp;amp;amp;amp;amp;amp;amp;amp;amp;amp;lt; {
println 'hello, '}
task world(dependsOn:hello) &amp;amp;amp;amp;amp;amp;amp;amp;amp;amp;amp;amp;amp;amp;amp;amp;amp;amp;amp;amp;amp;amp;amp;amp;amp;amp;amp;amp;amp;amp;amp;amp;amp;amp;amp;amp;amp;amp;amp;amp;amp;amp;amp;amp;amp;amp;amp;amp;amp;amp;amp;amp;amp;amp;amp;amp;amp;amp;amp;amp;amp;amp;amp;lt;&amp;amp;amp;amp;amp;amp;amp;amp;amp;amp;amp;amp;amp;amp;amp;amp;amp;amp;amp;amp;amp;amp;amp;amp;amp;amp;amp;amp;amp;amp;amp;amp;amp;amp;amp;amp;amp;amp;amp;amp;amp;amp;amp;amp;amp;amp;amp;amp;amp;amp;amp;amp;amp;amp;amp;amp;amp;amp;amp;amp;amp;amp;amp;lt; {
println 'world'}
[/code]- Navigate to the folder that contains the build.gradle file and execute gradle -q <<taskName>>.


Illustration explanation:
- The build file is not required to include anything and does not rely on external dependencies.
- The execution of two build files causes a “hello world” message to be displayed into your console.
- The second file defines the “world” task as a dependent one. The execution will directly cause the task “hello” to execute. This is a simple example of how to use “dependsOn” for executing the tasks.

Now, build a Java program using the Gradle build. Create a project structure that looks like this:
- Type apply plugin: ‘java’ inside your build.gradle file, located at the same level as your src directory.
- Create your own HelloWorld.java file that contains a simple main method to get the Hello World! message to be displayed.
- From your command console, run Gradle build.
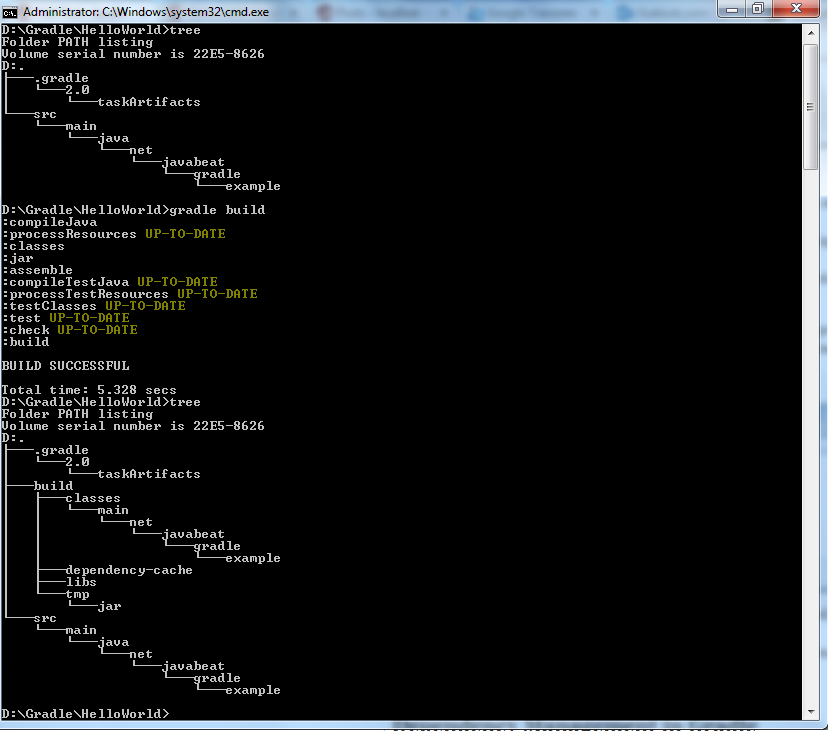
- The new build directory automatically generates after running the command “gradle build”. The build directory contains classes followed by your package, dependency cache, and other directories. This is the result of the conventions of Gradle’s Java plugin. There was no need to make a single entry or write a line of configuration.
- Navigate to your package to see your compiled HelloWorld.class. Type java -cp build/classes/main/ net.javabeat.gradle.example.HelloWorld.

4. Dependency Management
Dependencies are classes, files, and JARs required for building your project and deploying it successfully. Typically, there are two types of dependencies. Your project needs incoming dependencies to build and run. Publications are the outgoings your project produces.
- Dependency Resolution:
- Tell Gradle what dependencies your project needs so it can find and make them available in your build. Dependency resolution finds dependencies, downloads them from different repositories, locates them in the local directories, and brings them from another building project in the same multi-project build.
- Transitive Dependencies:
- In general, dependencies need other dependencies. Gradle finds these transitive dependencies and makes them available.
- Publication:
- Gradle also maintains publication processes.
- Once you declare your publications, Gradle publishes them to your desired location. The desired location can be a local directory, remote repository (Maven and ivy), or direct consuming through multi-project build procedure.
HelloWorld class is supposed to use Apache POI 3.10-FINAL version for creating an excel document. Create a build.gradle file: build.gradle
[code]
apply plugin : 'java'
repositories {
mavenLocal()
mavenCentral()
}
dependencies {
compile 'org.apache.poi:poi:3.10-FINAL'}
[/code]- Gradle provides numerous plugins for you to use. Plugin Java defines a set of tasks from compileJava—which compiles your sources. Java plugin needs a defined set of configurations.
- Repositories should be defined for referencing dependencies. For example, Maven Local repository refers to your local repository defined beneath your home directory/.m2/repository. The dependencies that are not located inside will be downloaded from the maven central one.
- Dependencies closure defines your dependencies. Java plugins define various standard configurations. Compile, runtime, testCompile, and testRuntime define the scopes of your dependencies. Compile specifies the dependencies required to compile project source. Runtime lists what dependencies are required at runtime.
- Executing gradle build causes the program to search mentioned dependencies inside your local repository. Gradle will download them if they are not found. Java plugin executes after Apache Poi downloads the tasks.


- Gradle maintains each downloaded dependency inside its local cache. The dependency downloads from the maven central repository or fetches from a local one.

- HelloWorld class has been changed to contain the Excel workbook.
HelloWorld.java
[code lang="java"]
package net.javabeat.gradle.example;
import org.apache.poi.hssf.usermodel.HSSFWorkbook;

public class HelloWorld {
	public static final void main(String [] args) throws Exception{
		System.out.println("Hello World !");
		HSSFWorkbook book = new HSSFWorkbook();
		System.out.println("Excel Book Created :: "+book);
	}
}
[/code]- Use the plugin “application” to execute your application.
- “gradle tasks” provides a list of the plugin’s tasks.
build.gradle
[code]
apply plugin : 'java'
apply plugin:'application'

mainClassName = "net.javabeat.gradle.example.HelloWorld"

repositories {
	mavenLocal()
	mavenCentral()
}

dependencies {
	compile 'org.apache.poi:poi:3.10-FINAL'
}
[/code]
- Gradle command uses the Java and Application tasks listed directly.
- Type gradle run to execute your Java application.

5. Tasks
Tasks are a fundamental unit of build activity. Tasks are named collections of build instructions Gradle uses to perform a build. Above, we used a direct task definition with HelloWorld task and a pre-defined task with compileJava. You need a task name to declare it. build.gradle
[code]
apply plugin : 'java'
apply plugin:'application'

mainClassName = "net.javabeat.gradle.example.HelloWorld"

task hello

repositories {
	mavenLocal()
	mavenCentral()
}

dependencies {
	compile 'org.apache.poi:poi:3.10-FINAL'
}
[/code]
- To define a hello task, type the keyword followed by the task name.
- Executing gradle tasks prints out all tasks your build file contains, including those defined by the plugins used. Your custom tasks are listed under Other tasks.
If you are executing your hello task using gradle hello command, you will not see any results because it does not define any action. Use left-shift << operator to assign the action into a certain task. It will make your task able to execute specific actions, like the print message.
build.gradle
[code lang="xml"]
apply plugin : 'java'
apply plugin:'application'
mainClassName = "net.javabeat.gradle.example.HelloWorld"
task hello &amp;amp;amp;amp;amp;amp;amp;amp;amp;amp;amp;amp;amp;amp;amp;amp;amp;amp;amp;amp;amp;amp;amp;amp;amp;amp;amp;amp;amp;amp;amp;amp;amp;amp;amp;amp;amp;amp;amp;amp;amp;amp;amp;amp;amp;amp;amp;amp;amp;amp;amp;amp;amp;amp;amp;amp;amp;amp;amp;amp;amp;amp;amp;lt;&amp;amp;amp;amp;amp;amp;amp;amp;amp;amp;amp;amp;amp;amp;amp;amp;amp;amp;amp;amp;amp;amp;amp;amp;amp;amp;amp;amp;amp;amp;amp;amp;amp;amp;amp;amp;amp;amp;amp;amp;amp;amp;amp;amp;amp;amp;amp;amp;amp;amp;amp;amp;amp;amp;amp;amp;amp;amp;amp;amp;amp;amp;amp;lt; {
println 'Hello World !'
}
repositories {
mavenLocal()
mavenCentral()
}
dependencies {
compile 'org.apache.poi:poi:3.10-FINAL'
}
[/code]
- By using the left shift operator, you can define your desired action.
- Executing “hello task” will print out the message you have provided.
- Your desired action is enclosed with two curly brackets, often called Task Closure.
Gradle defines two phases. Configuration and execution mainly initiate configuration task and action task respectively. The following simple example that provides you a mix between action and configuration tasks. build.gradle
[code]
apply plugin : 'java'
apply plugin:'application'
mainClassName = "net.javabeat.gradle.example.HelloWorld"
task hello
hello &amp;amp;amp;amp;amp;amp;amp;amp;amp;amp;amp;amp;amp;amp;amp;amp;amp;amp;amp;amp;amp;amp;amp;amp;amp;amp;amp;amp;amp;amp;amp;amp;amp;amp;amp;amp;amp;amp;amp;amp;amp;amp;amp;amp;amp;amp;amp;amp;amp;amp;amp;amp;amp;amp;amp;amp;amp;amp;amp;amp;amp;amp;amp;lt;&amp;amp;amp;amp;amp;amp;amp;amp;amp;amp;amp;amp;amp;amp;amp;amp;amp;amp;amp;amp;amp;amp;amp;amp;amp;amp;amp;amp;amp;amp;amp;amp;amp;amp;amp;amp;amp;amp;amp;amp;amp;amp;amp;amp;amp;amp;amp;amp;amp;amp;amp;amp;amp;amp;amp;amp;amp;amp;amp;amp;amp;amp;amp;lt; {
println 'Action Time'
print 'Hello'
}
hello &amp;amp;amp;amp;amp;amp;amp;amp;amp;amp;amp;amp;amp;amp;amp;amp;amp;amp;amp;amp;amp;amp;amp;amp;amp;amp;amp;amp;amp;amp;amp;amp;amp;amp;amp;amp;amp;amp;amp;amp;amp;amp;amp;amp;amp;amp;amp;amp;amp;amp;amp;amp;amp;amp;amp;amp;amp;amp;amp;amp;amp;amp;amp;lt;&amp;amp;amp;amp;amp;amp;amp;amp;amp;amp;amp;amp;amp;amp;amp;amp;amp;amp;amp;amp;amp;amp;amp;amp;amp;amp;amp;amp;amp;amp;amp;amp;amp;amp;amp;amp;amp;amp;amp;amp;amp;amp;amp;amp;amp;amp;amp;amp;amp;amp;amp;amp;amp;amp;amp;amp;amp;amp;amp;amp;amp;amp;amp;lt; {
println ' World !'
}
hello {
println 'Configuration Time !'
}
repositories {
mavenLocal()
mavenCentral()
}
dependencies {
compile 'org.apache.poi:poi:3.10-FINAL'
}
[/code]How to work with action and configuration tasks:
- The output of the action task is appended in the Hello World! message.
- Configuration tasks are the same as action tasks. One major difference here is the configuration task has eliminated the left shift operator.
- Configuration block is the place you set up variables and data structures that will be needed by task action when it runs.
Gradle creates an internal object model of your build before it executes. Every task that you declare is a task object within the overall project. By default, each new task receives the type DefaultTask. The main methods Default Task provides are as followed:
- dependsOn(task): adds a task as a dependency of the calling task.
- doFirst(closure): adds a block of executable code to the beginning of a task’s action.
- doLast(closure): adds a block of executable code to the end of a task’s action.
- onlyIf(closure): allows you to express a predicate which determines if a task should be executed. The value of the predicate is the value of the closure.
Below is a simple example of how you can leverage all the inherited methods in your build. build.gradle
[code]
apply plugin : 'java'
apply plugin:'application'
mainClassName = "net.javabeat.gradle.example.HelloWorld"
task preHello
task hello (dependsOn:preHello)
preHello &amp;amp;amp;amp;amp;amp;amp;amp;amp;amp;amp;amp;amp;amp;amp;amp;amp;amp;amp;amp;amp;amp;amp;amp;amp;amp;amp;amp;amp;amp;amp;amp;amp;amp;amp;amp;amp;amp;amp;amp;amp;amp;amp;amp;amp;amp;amp;amp;amp;amp;amp;amp;amp;amp;amp;amp;amp;amp;amp;amp;amp;amp;amp;lt;&amp;amp;amp;amp;amp;amp;amp;amp;amp;amp;amp;amp;amp;amp;amp;amp;amp;amp;amp;amp;amp;amp;amp;amp;amp;amp;amp;amp;amp;amp;amp;amp;amp;amp;amp;amp;amp;amp;amp;amp;amp;amp;amp;amp;amp;amp;amp;amp;amp;amp;amp;amp;amp;amp;amp;amp;amp;amp;amp;amp;amp;amp;amp;lt; {
println 'Action Time'
}
preHello.doFirst{
println 'Do First'
}
preHello.doLast {
println 'Do Last'
}
hello &amp;amp;amp;amp;amp;amp;amp;amp;amp;amp;amp;amp;amp;amp;amp;amp;amp;amp;amp;amp;amp;amp;amp;amp;amp;amp;amp;amp;amp;amp;amp;amp;amp;amp;amp;amp;amp;amp;amp;amp;amp;amp;amp;amp;amp;amp;amp;amp;amp;amp;amp;amp;amp;amp;amp;amp;amp;amp;amp;amp;amp;amp;amp;lt;&amp;amp;amp;amp;amp;amp;amp;amp;amp;amp;amp;amp;amp;amp;amp;amp;amp;amp;amp;amp;amp;amp;amp;amp;amp;amp;amp;amp;amp;amp;amp;amp;amp;amp;amp;amp;amp;amp;amp;amp;amp;amp;amp;amp;amp;amp;amp;amp;amp;amp;amp;amp;amp;amp;amp;amp;amp;amp;amp;amp;amp;amp;amp;lt; {
print 'Hello'
}
hello &amp;amp;amp;amp;amp;amp;amp;amp;amp;amp;amp;amp;amp;amp;amp;amp;amp;amp;amp;amp;amp;amp;amp;amp;amp;amp;amp;amp;amp;amp;amp;amp;amp;amp;amp;amp;amp;amp;amp;amp;amp;amp;amp;amp;amp;amp;amp;amp;amp;amp;amp;amp;amp;amp;amp;amp;amp;amp;amp;amp;amp;amp;amp;lt;&amp;amp;amp;amp;amp;amp;amp;amp;amp;amp;amp;amp;amp;amp;amp;amp;amp;amp;amp;amp;amp;amp;amp;amp;amp;amp;amp;amp;amp;amp;amp;amp;amp;amp;amp;amp;amp;amp;amp;amp;amp;amp;amp;amp;amp;amp;amp;amp;amp;amp;amp;amp;amp;amp;amp;amp;amp;amp;amp;amp;amp;amp;amp;lt; {
println ' World !'
}
hello {
println 'Configuration Time !'
}
repositories {
mavenLocal()
mavenCentral()
}
dependencies {
compile 'org.apache.poi:poi:3.10-FINAL'
}
[/code]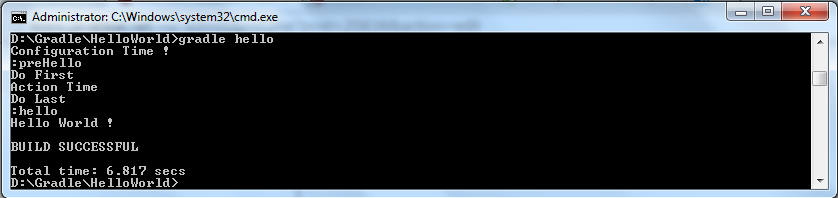 DefaultTask has a defined set of properties that your own custom tasks can use. Here are the provided properties:
- didWork: a boolean property that provides an indicator if a certain task has been completed successfully. didWork property can be accessed by using tasks.<<task-name>>.didWork expression.
- enabled: a boolean property that provides an indicator of when a certain task will be executing. Accessing the enabled indicator can be done using tasks.<<task-name>>.enabled expression.
- path: a string property containing the fully qualified path of a task. If you have written tasks.<<task-name>>.path inside your build file, you will get a colon followed by your written task name, like :task-name which gives you an indicator for this task defined in the top-level build file. Since Gradle supports dependent sub-projects or nested builds, and in case your typed task existed in a nested build called nested.gradle, then the path of it will be :nested:task-name.
- logger: a reference of an implicit logger object. Logging is a common requirement for various types of frameworks and platforms. DEBUG, INFO, LIFECYCLE, WARN, QUIET, and ERROR are levels supported by Gradle. For logging messages, you should use logger.<<LOGGING-LEVEL>> ‘<<Messages>>’ expression.
- logging: a property that gives you access to the log level setting where you can specify all of the logging messages shown. Following the example, a debug logging level has been specified before using logger.debug expression.
- description: a meta-data human-readable property used to describe the purpose of a certain task. The description property is defined at the declaration of a task. Following expression task <<Your-Task>>(description:'<<Your-Description>>’) <<{ … } used to leverage description property.
- temporaryDir: a property used for reference Temporal File Object points to a temporary directory that corresponds to the build file. If you’ve typed expression like println tasks.compileJava.temporaryDir As an example, D:\Gradle\HelloWorld\build\tmp\compileJava path will be shown.
Example of leveraging the above properties inside your build file: build.gradle
[code]
apply plugin : 'java'
apply plugin:'application'
mainClassName = "net.javabeat.gradle.example.HelloWorld"
task preHello
task hello (dependsOn:preHello)
task notifyMe(dependsOn:compileJava) &amp;amp;amp;amp;amp;amp;amp;amp;amp;amp;amp;amp;amp;amp;amp;amp;amp;amp;amp;amp;amp;amp;amp;amp;amp;amp;amp;amp;amp;amp;amp;amp;amp;amp;amp;amp;amp;amp;amp;amp;amp;amp;amp;amp;amp;amp;amp;amp;amp;amp;amp;amp;amp;amp;amp;amp;amp;amp;amp;amp;amp;amp;amp;lt;&amp;amp;amp;amp;amp;amp;amp;amp;amp;amp;amp;amp;amp;amp;amp;amp;amp;amp;amp;amp;amp;amp;amp;amp;amp;amp;amp;amp;amp;amp;amp;amp;amp;amp;amp;amp;amp;amp;amp;amp;amp;amp;amp;amp;amp;amp;amp;amp;amp;amp;amp;amp;amp;amp;amp;amp;amp;amp;amp;amp;amp;amp;amp;lt; {
logging.level = 'DEBUG'
if(tasks.compileJava.didWork){
logger.debug 'Compilation finsihed sucessfully'
}
}
preHello &amp;amp;amp;amp;amp;amp;amp;amp;amp;amp;amp;amp;amp;amp;amp;amp;amp;amp;amp;amp;amp;amp;amp;amp;amp;amp;amp;amp;amp;amp;amp;amp;amp;amp;amp;amp;amp;amp;amp;amp;amp;amp;amp;amp;amp;amp;amp;amp;amp;amp;amp;amp;amp;amp;amp;amp;amp;amp;amp;amp;amp;amp;amp;lt;&amp;amp;amp;amp;amp;amp;amp;amp;amp;amp;amp;amp;amp;amp;amp;amp;amp;amp;amp;amp;amp;amp;amp;amp;amp;amp;amp;amp;amp;amp;amp;amp;amp;amp;amp;amp;amp;amp;amp;amp;amp;amp;amp;amp;amp;amp;amp;amp;amp;amp;amp;amp;amp;amp;amp;amp;amp;amp;amp;amp;amp;amp;amp;lt; {
println 'Action Time'
}
preHello.doFirst{
println 'Do First'
}
preHello.doLast {
println 'Do Last'
}
hello &amp;amp;amp;amp;amp;amp;amp;amp;amp;amp;amp;amp;amp;amp;amp;amp;amp;amp;amp;amp;amp;amp;amp;amp;amp;amp;amp;amp;amp;amp;amp;amp;amp;amp;amp;amp;amp;amp;amp;amp;amp;amp;amp;amp;amp;amp;amp;amp;amp;amp;amp;amp;amp;amp;amp;amp;amp;amp;amp;amp;amp;amp;amp;lt;&amp;amp;amp;amp;amp;amp;amp;amp;amp;amp;amp;amp;amp;amp;amp;amp;amp;amp;amp;amp;amp;amp;amp;amp;amp;amp;amp;amp;amp;amp;amp;amp;amp;amp;amp;amp;amp;amp;amp;amp;amp;amp;amp;amp;amp;amp;amp;amp;amp;amp;amp;amp;amp;amp;amp;amp;amp;amp;amp;amp;amp;amp;amp;lt; {
print 'Hello'
}
hello &amp;amp;amp;amp;amp;amp;amp;amp;amp;amp;amp;amp;amp;amp;amp;amp;amp;amp;amp;amp;amp;amp;amp;amp;amp;amp;amp;amp;amp;amp;amp;amp;amp;amp;amp;amp;amp;amp;amp;amp;amp;amp;amp;amp;amp;amp;amp;amp;amp;amp;amp;amp;amp;amp;amp;amp;amp;amp;amp;amp;amp;amp;amp;lt;&amp;amp;amp;amp;amp;amp;amp;amp;amp;amp;amp;amp;amp;amp;amp;amp;amp;amp;amp;amp;amp;amp;amp;amp;amp;amp;amp;amp;amp;amp;amp;amp;amp;amp;amp;amp;amp;amp;amp;amp;amp;amp;amp;amp;amp;amp;amp;amp;amp;amp;amp;amp;amp;amp;amp;amp;amp;amp;amp;amp;amp;amp;amp;lt; {
println ' World !'
}
hello {
println 'Configuration Time !'
}
repositories {
mavenLocal()
mavenCentral()
}
dependencies {
compile 'org.apache.poi:poi:3.10-FINAL'
}
[/code]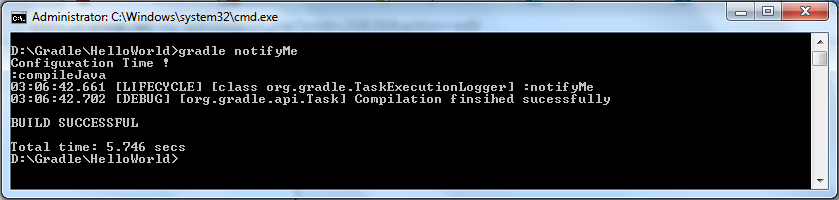 Be sure to remember:
- The compileJava didWork flag will never be flagged true if your classes are compiled before. Execute gradle clean to clean all of your compiled classes.
- NotifyMe task uses didWork flag upon compileJava to determine if the task has accomplished.
- Once compileJava task is done, the didWork flag will be set to true. The logger will then log your desired message.
- Configuration phase is implemented before the phase of execution. It enables you to configure some variables, resources, and so on.
Besides the DefaultTask we explored, there a set of different task types you may need to be aware of:
- Copy: copies files from one place into another.
- Jar: creates a Jar file from your sources. Java Plugin already provides one.
- JavaExec: runs Java class with main() method. Application Plugin already provides one.
6. Build Phases
Gradle executes a build by running through three distinct phases:
- Initialization The first executed phase where Gradle determines the projects that will be participating in the build. Settings.gradle build file is used for initialization phase configuration.
- The configuration The second executed phase in which the build file’s tasks are assembled into an internal object model—usually called DAG (Directed Acyclic Graph). All tasks tagged as Configuration Tasks (Refer above) usually get executed at this phase.
- Execution The last phase executes build tasks in the order arranged by their dependencies relationship. Tasks tagged as Execution Tasks (Refer above) are executed at this phase.
We explored the execution and configuration phases earlier. Now we will take a look at the Initialization phase. The settings file defines all user-defined actions. The following sample shows you the impact of defining a file. settings.gradle
[code]
println 'This message will be printed out as a part of initialization phase'
[/code]
- Initialization phase associates with the settings.gradle file.
- build.gradle script file has not changed from the last one provided.
7. More Information:
Gradle is a build tool. This tutorial provides excellent guidance for you on how to use Gradle and what you need to use it. We explored the phases, tasks, methods, and properties throughout the sections of this tutorial. For more information on these concepts, refer to the Gradle official documentation/reference tutorials that provide more insights.