Мы прекратили активную разработку программы Encore. Версия Encore CS6 была последней версией продукта.
![]()
Руководство пользователя
Получите оперативные ответы на вопросы и ознакомьтесь с пошаговыми инструкциями.
Руководство для начинающих
![]()
Руководства
Устранение неполадок и справка
Мы прекратили активную разработку программы Encore. Версия Encore CS6 была последней.
Мы прекратили активную разработку программы Encore, пробная версия больше не доступна.
Вы можете установить приложение Encore только на два компьютера. Если вы хотите установить приложение на третий компьютер, потребуется деактивировать его на одном из двух предыдущих компьютеров. Узнайте больше об активации и деактивации приложений Adobe.
Сообщество
Примите участие в обсуждении
Связанные приложения и службы
![]()

- Manuals
- Brands
- Adobe Manuals
- Software
- 22030000 — Encore DVD — PC
- User manual
Pc
-
Contents
-
Table of Contents
-
Bookmarks
Quick Links
CS 3
ADOBE
ENCORE
®
®
USER GUIDE
Related Manuals for Adobe 22030000 — Encore DVD
Summary of Contents for Adobe 22030000 — Encore DVD
-
Page 1
CS 3 ADOBE ENCORE ® ® USER GUIDE… -
Page 2
The content of this guide is furnished for informational use only, is subject to change without notice, and should not be construed as a commitment by Adobe Systems Incorpo- rated. -
Page 3: Table Of Contents
…………….38 Adobe Dynamic Link .
-
Page 4
Chapter 7: Timelines and slide shows Timeline basics …………… . . 115 Editing assets in timelines . -
Page 5: Chapter 1: Getting Started
Note: For more information, see the Read Me file on the installation disc. Activate the software If you have a single-user retail license for your Adobe software, you will be asked to activate your software; this is a simple, anonymous process that you must complete within 30 days of starting the software.
-
Page 6: Adobe Help
LiveDocs Help includes all the content from in-product Help, plus updates and links to additional instructional content available on the web. For some products, you can also add comments to the topics in LiveDocs Help. Find LiveDocs Help for your product in the Adobe Help Resource Center, at www.adobe.com/go/documentation. ENCORE CS3…
-
Page 7
• Topics may contain links to the Help systems of other Adobe products or to additional content on the web. • Some topics are shared across two or more products. For instance, if you see a Help topic with an Adobe Photoshop®… -
Page 8
Accessibility features Adobe Help content is accessible to people with disabilities—such as mobility impairments, blindness, and low vision. In-product Help supports these standard accessibility features: • The user can change text size with standard context menu commands. -
Page 9: Resources
The Adobe Creative Suite 3 Video Workshop offers over 200 training videos covering a wide range of subjects for print, web, and video professionals. You can use the Adobe Video Workshop to learn about any Creative Suite 3 product. Many videos show you how to use Adobe applications together.
-
Page 10
When you start the Adobe Video Workshop, you choose the products you want to learn and the subjects you want to view. You can see details about each video to focus and direct your learning. Community of presenters With this release, Adobe Systems invited the community of its users to share their expertise and insights. Adobe and lynda.com present tutorials, tips, and tricks from leading designers and developers such as Joseph Lowery, Katrin… -
Page 11
Extras You have access to a wide variety of resources that will help you make the most of your Adobe software. Some of these resources are installed on your computer during the setup process; additional helpful samples and documents are included on the installation or content disc. -
Page 12
Bridge Home, a new destination in Adobe Bridge CS3, provides up-to-date information on all your Adobe Creative Suite 3 software in one convenient location. Start Adobe Bridge, then click the Bridge Home icon at the top of the Favorites panel to access the latest tips, news, and resources for your Creative Suite tools. -
Page 13: Adobe Design Center
Note: Bridge Home may not be available in all languages. Adobe Design Center Adobe Design Center offers articles, inspiration, and instruction from industry experts, top designers and Adobe publishing partners. New content is added monthly. You can find hundreds of tutorials for design products and learn tips and techniques through videos, HTML…
-
Page 14: Adobe Developer Center
Visit the Adobe Support website, at www.adobe.com/support, to find troubleshooting information for your product and to learn about free and paid technical support options. Follow the Training link for access to Adobe Press books, a variety of training resources, Adobe software certification programs, and more.
-
Page 15: New Features
Adobe Labs fosters a collaborative software development process. In this environment, customers quickly become productive with new products and technologies. Adobe Labs is also a forum for early feedback, which the Adobe development teams use to create software that meets the needs and expectations of the community.
-
Page 16: Chapter 2: Workflow And Workspace
Before you import your content into Encore, combine video clips, add transitions, or create special effects in a video-editing or compositing software, such as Adobe Premiere® Pro CS3 or Adobe After Effects® CS3. You can compile the audio in an audio-editing software, such as Adobe Soundbooth CS3.
-
Page 17
The menus give the viewer access to the content. You can create menus directly in Encore, customize predesigned menus included with the software, or create and edit menus in Adobe Photoshop® CS3. For information, see “About menus” on page 58. -
Page 18
ENCORE CS3 User Guide Library (A) with predesigned menus and Menu Viewer (B) for customizing menus Specify navigation Menus provide the main way for viewers to navigate through the content. In addition to menus, you also use other types of navigation settings, such as end actions and overrides, to guide the viewer. Encore gives you several methods for setting the navigation—you can drag between the elements and buttons in the Menu Viewer, use the Properties panel, or work with navigation in the Flowchart. -
Page 19
Make video and audio compatible (transcoding) If you imported video and audio files that aren’t DVD or Blu-ray Disc-compatible, Encore transcodes the files before you burn the disc. You can let Encore determine the best settings for transcoding or select the options you feel are best for your project. -
Page 20
ENCORE CS3 User Guide Controls in Project Preview window simulating remote control Burn the disc You can build and burn the DVD or Blu-ray disc directly from Encore. Or, if you plan to use a replication facility, you can write to a DLT drive, prepare a folder, or create a DVD or Blu-ray image to give to the replicator. For infor- mation, see “Build a DVD or Blu-ray disc”… -
Page 21: Workspace Basics
Workspace basics About workspaces Adobe video and audio applications provide a consistent, customizable workspace. Although each application has its own set of panels (such as Tools, Properties, Timeline, and so on), you move and group panels in the same way across products.
-
Page 22
As you rearrange panels, the other panels resize automatically to fit the window. You can use floating windows to create a workspace more like those in previous versions of Adobe applications, or to place panels on multiple monitors. -
Page 23
Dragging panel (A) onto docking zone (B) to dock it (C) Grouping zones Grouping zones exist in the middle of a panel or group, and along the tab area of panels. Grouping a panel stacks it with other panels. Dragging panel (A) onto grouping zone (B) to group it with existing panels (C) Dock or group panels If the panel you want to dock or group is not visible, choose it from the Window menu. -
Page 24
When you undock a panel in a floating window, you can add panels to the window or otherwise modify it, as you do the application window. You can use floating windows to make use of a secondary monitor, or to create a workspace like those in earlier versions of Adobe applications. ❖… -
Page 25
To quickly maximize a panel beneath the pointer, press the tilde (~) key. (Do not press Shift.) Press the tilde key again to return the panel to its original size. Do either of the following: • To resize either horizontally or vertically, position the pointer between two panel groups. The pointer becomes a double-arrow •… -
Page 26
Use context, panel, and viewer menus In addition to the menus at the top of your screen, Encore also provides context, panel, and viewer menus. Context menus contain commands relative to the active tool or selection. Panel menus contain commands relevant to the active panel. -
Page 27
For example, if Adobe Premiere Pro creates a conformed audio file, and you import media with that audio into Encore, Encore uses the file from Adobe Premiere Pro instead of creating a new conformed file. The media cache database informs Encore of the conformed file’s location. Click Clean Database to remove any old cached files and free up additional disc space. -
Page 28: Managing Workspaces
Managing workspaces Choose a workspace Each Adobe video and audio application includes several predefined workspaces that optimize the layout of panels for specific tasks. When you choose one of these workspaces, or any custom workspaces you’ve saved, the current workspace is redrawn accordingly.
-
Page 29: Chapter 3: Planning The Project
Chapter 3: Planning the project You can design, author, and build media projects in Adobe Encore CS3 for high-definition Blu-ray Disc and standard- definition DVD. Encore gives you options to burn directly to a disc or other types of output for disc replication. As an added bonus, you can export Blu-ray and DVD projects to Flash format for interactive viewing on the web.
-
Page 30: Balancing File Size And Quality
The Flowchart panel displays project navigation and, when used with the Properties panel, lets you complete a majority of authoring tasks. For a video tutorial about using the Flowchart to plan your projects, see www.adobe.com/go/vid0240. See also “Flowchart overview”…
-
Page 31
You determine the optimal data rate through the process of bit budgeting. To understand bit budgeting, you first need to understand the variables involved: disc size, types and amounts of assets (audio, video, and motion menus), and data rates and transcoding. Once familiar with the variables involved, you’ll be able to produce a bit budget to guide you in producing high-quality projects that fit within the allotted disc space. -
Page 32
If you want to create a dual-sided disc, specify which side this project is for. Close the Build panel and save the project. See also “Check the space remaining on your disc” on page 28 Check the space remaining on your disc The Build panel displays the available space and the used space for the specified disc size during the authoring process. -
Page 33: Bit Budgeting
Although data rates are a general indicator of quality, there are no hard-and-fast rules to equate data rate to quality. That is, a data rate of 4 Mbps may or may not produce a high-quality asset; quality depends on the image data and type of compression used as well as data rate.
-
Page 34
Note: Keep your calculations simple by working with megabits (Mbits) and not megabytes (MB) when bit budgeting. Mbps denotes megabits per second. Also, hard-disk capacity is typically calculated as a power of 2 (1 KB = 2^10 bytes = 1024 bytes) while optical disc (DVD) capacity is labeled as a power of 10 (1 KB = 10^3 bytes = 1,000 bytes). Use the power-of-10 scheme for bit budgeting. -
Page 35
Calculate the data rate of the video. Divide the disc space available for video that you determined in step 2 by the amount of video (in seconds) the project contains. 36,096,000,000 bits / (133 minutes x 60 seconds per minute) = 4,523,308.27 bps. -
Page 36
Space required for the audio, motion menu, and slide show: • 127-minute audio stream with a data rate of 0.192 Mbps = 127 minutes x 60 seconds x 0.192 = 1,463.04 Mbits; divided by 8 bits = 182.88 MB rounded off to 183 MB. •… -
Page 37: Chapter 4: Creating Projects And Importing Assets
Chapter 4: Creating projects and importing assets After planning the navigation of your project and preparing the content, you’re ready to begin. First, you’ll create an Adobe Encore CS3 project and then import the assets. Working with projects About projects Encore files are called projects.
-
Page 38
Create and open projects Before you can import your assets, you need to create or open a project. You can have only one project open at a time. See also “About transcoding” on page 51 “Transcode settings” on page 52 “Preset options for audio”… -
Page 39: Aspect Ratios
Note: When you open a project file you’ve moved, a dialog box may appear if the application can’t locate specific assets. You can either relink them in the dialog box, select Offline to open the project without them, or select Skip Missing Files to temporarily set the assets offline (so that the next time you open the project, Encore prompts you again to locate the assets).
-
Page 40
Most digital still cameras and graphic applications use square pixels. You should set the pixel aspect ratio of still- image assets to square to ensure that they display correctly. An exception to this rule are files created in Adobe Photoshop CS and Adobe Photoshop CS2. Photoshop lets you work in nonsquare pixels when creating images for DVDs and video. -
Page 41
Specify the screen aspect ratio Encore determines the screen aspect ratio for you. You can, however, change it if necessary. The type of asset deter- mines how you specify the screen aspect ratio. For menus, and timelines containing still images but no video, you specify the screen aspect ratio in the Properties panel. -
Page 42: Importing
16:9 NTSC footage A. Original B. Displayed by a DVD player using the original widescreen format on a widescreen TV C. Using automatic pan and scan to crop the image on a 4:3 TV D. Using automatic letterbox to reduce resolution and display the entire image on a 4:3 TV Importing Supported file formats for import Imported files may require transcoding.
-
Page 43
1440 x 1080 1920 x 1080 Supported still-image formats You can import any of the following types of still-image files: • Adobe Photoshop (PSD), RGB color space • Bitmap (BMP) • GIF • JPEG • PICT • Portable Network Graphics (PNG) •… -
Page 44
• Digital Theater Sound (DTS) • mp3 • MPG or M2P (including MPEG-1, MPA, Layer II) • QuickTime (MOV) • WAV (32-bit floating-point files are transcoded; 96-kHz 16/24-bit files are not transcoded) • WMA Note: DTS audio files will not play during Preview in Encore, even though they will play from the burned disc. Advantages of transcoding before or after import A DVD or Blu-ray Disc player can play only video that conforms to certain standards. -
Page 45
You can save a step by importing content directly to a timeline, slide show, or menu. The content must be of the appropriate type to use these shortcuts. While you can import any supported file type as a timeline, you can import only still images as a slide show and only PSD files as a menu. -
Page 46
Importing from Adobe After Effects You can import a file from Adobe After Effects, either as a discrete movie file, or as an Adobe Dynamic Link. The Adobe Dynamic Link option provides the most workflow-friendly import. It lets you import an After Effects compo- sition without rendering it. -
Page 47
Add items or sets to the Library The Library panel contains predesigned templates for menus and other design elements, such as buttons, images, and shapes. If you have still images, logos, buttons, and menus that you use frequently, you can store them in the Library, where you can quickly access them from any project. -
Page 48: Adobe Dynamic Link
• In Adobe Premiere Pro, you can preview the linked composition in the Source Monitor, set In and Out points, add it to a sequence, and use any of the Adobe Premiere Pro tools to edit it. When you add a linked composition that contains both footage and audio layers to a sequence, Adobe Premiere Pro inserts linked video and audio clips in the timeline.
-
Page 49
Link to a new composition with Dynamic Link (Production Premium only) When you link to a new composition from Adobe Premiere Pro or Encore, After Effects starts and creates a new project and composition with the dimensions, pixel aspect ratio, frame rate, and audio sample rate of your Adobe Premiere Pro or Encore project. -
Page 50
Note: If you change the name of the composition in After Effects after you’ve created a dynamic link to it from Adobe Premiere Pro, Adobe Premiere Pro doesn’t update the linked composition name in the Project panel, but retains the dynamic link. -
Page 51: Working In The Project Panel
Project panel with an offline composition. You can temporarily suppress a linked clip in Adobe Premiere Pro by selecting the clip and choosing Clip > Enable. To relink the clip, choose Clip > Enable again (a check mark next to the command indicates that the clip is enabled).
-
Page 52
Project panel A. Preview B. Audio C. Menu D. Timeline E. Still image F. Video G. Toggle display of different item types H. Create a new item (If nothing is selected in the Project panel, Encore uses the default assets from the Library panel.) When you select an asset, a thumbnail preview appears in the upper-left corner of the Project panel. -
Page 53
Displays the asset type. This category is useful for sorting your assets according to their status as Media Category audio or video files, or both. Displays any comments you add to this row. You may type up to 254 characters in the Properties panel. Description Displays date and time of the last modification to the file. -
Page 54
Rename a folder Select a folder in the Project panel and then choose Edit > Rename. Type a new name, and click OK. Show or hide the contents of a folder ❖ Click the triangle to the left of the folder icon. Preview assets in the Project panel You can preview any asset from the Asset Preview thumbnail at the upper-left corner of the Project panel. -
Page 55: Transcoding In Encore
Navigate to the location of the asset you want to use as a replacement, select it, and then click Open. View or edit XMP metadata Metadata is descriptive file information a computer can search and process. The Adobe Extensible Metadata Platform (XMP) lets you embed metadata into a file to provide information about the contents of a document. Appli- cations that support XMP can read, edit, and share this information across databases, file formats, and platforms.
-
Page 56
See also “Transcode assets from the Project panel” on page 52 Transcode settings You can specify an item’s transcode settings (by using a preset) from the DVD Transcode Settings or Blu-ray Transcode Settings columns in the Project panel. (Separate columns, DVD Transcode Status and Blu-ray Transcode Status, display either Transcoded or Untranscoded to show the item’s current state.) When you specify a preset, that preset’s data rate is used, not the data rate you calculated in bit budgeting. -
Page 57
Override the Automatic data rate setting ❖ To specify the maximum audio/video transcoding bit rate that Encore uses automatically, choose File > Project Settings, click the Advanced tab, choose the data rate limit from the Maximum Audio/Video Bitrate menu, and then click OK. -
Page 58
ENCORE CS3 User Guide Project Transcode Presets dialog box A. Source or output image B. Preset settings See also “About transcoding” on page 51 Preset options for video Depending on the preset you’ve selected, the Video tab of the Project Transcode Presets dialog box contains some or all of the following options: Specifies the encoding quality. -
Page 59
data rate. Variable bit rate (VBR) compresses data to fit between a fixed minimum and fixed maximum rate. VBR allows the compression to vary, which can result in better quality than CBR. Specifies the number of Mbps you want the encoded file to have. Only appears if you select CBR as the Bitrate Bitrate Encoding option. -
Page 60
Create a custom preset Choose File > Edit Quality Presets. In the Export Settings section, choose MPEG2 Blu-ray, MPEG2 DVD, or H.264 Blu-ray from the Format menu, and choose the preset you want to edit from the Preset menu. If applicable, type a comment in the Comment box. Click either the Audio or Video tab and adjust an option as desired. -
Page 61
Specify a pre- or post-encoding task Included with the transcode presets are pre- and post-encoding tasks. You can use these tasks to make changes to the asset either before or after it’s transcoded. You can apply a filter to reduce noise in the files before they’re transcoded, or you can specify that a text log of errors, warnings, and settings be saved with the transcoded file. -
Page 62: Chapter 5: Menus
About menus The main menu in an Adobe Encore CS3 project is usually the first screen the viewer sees. Depending upon the complexity of the contents, your project may contain a single menu or multiple menus. Many projects require that buttons on the main menu link to additional menus, called submenus.
-
Page 63
Menu A. Buttons lead to content B. Subpicture highlights button when selected or activated C. Background Types of menus A menu can include text, still images, motion footage, and audio. Depending on its composition, a menu is considered either a still menu or a motion menu: A menu composed of static images. -
Page 64
The Adobe predesigned menus and buttons include subpictures. You can let Encore create subpictures for you by using the Create Subpicture command or the Convert To Button command. You can design your own subpictures in Adobe Photoshop. (See “About creating menus in Photoshop” on page 97.) See also “About button subpictures”… -
Page 65
ENCORE CS3 User Guide Displays remote control routing and button numbers of all buttons in the menu. You can Show Button Routing customize the routing only if the Automatically Route Buttons menu property is turned off. (See “Change the routing order”… -
Page 66: Creating Menus
ENCORE CS3 User Guide The Library panel contains the following controls: Displays the currently selected set. Items in the Library panel are organized into thematic sets, such as Education, Corporate, or Wedding. You can create your own sets or add to the existing sets. Contains commands to add or delete items or sets and to rename existing sets.
-
Page 67
See also “Create menus using predesigned assets” on page 63 “Add objects to a menu” on page 64 “About creating menus in Photoshop” on page 97 Create menus using predesigned assets An easy way to begin a project is to base your menu on the predesigned menus, buttons, images, and shapes found in the Library panel. -
Page 68
Create a menu based on a background and other assets Instead of using a predesigned menu template to create a menu, you can piece together a menu starting with a prede- signed background and then add buttons, images, shapes, and replacement layers included with Encore. These objects are located in the Library panel. -
Page 69
(If you want to use the still image as a button, select the image and choose Object > Convert to Button.) Note: You can also drag an image from Adobe Bridge CS3 directly to the menu. Use guides to position menu items Guides help you position items in menus. -
Page 70
Menu with guides displayed A. Zero point of menu B. Horizontal guide C. Vertical guide The guides you create are specific to that menu. They are saved in the menu and transfer with a menu between Encore and Photoshop. Any changes you make to the guides in either program transfer with the menu. Note: When setting guides to align objects in several menus, it is important to remember that you place guides at the pixel location of the menu, not the screen. -
Page 71
• Click the Show Guides button Name menus and buttons To make menus and buttons easier to identify, you can change their default names in the Properties panel. Properties panel for selected menu (left) and selected button (right) See also “Renumber buttons”… -
Page 72
Choose Edit > Preferences > Menus (Windows) or Encore > Preferences > Menus (Mac OS) to change the default settings of the Set Name From Link and Sync Button Text And Name options. Specify the default button for a menu Each time a menu appears, one button appears highlighted (selected) for the viewer. -
Page 73: Editing Menus
Editing menus Select objects To edit objects on a menu, you need to select them first using one of the selection tools. The Tools panel contains two selection tools for editing objects: Selects an entire button set (a button, its text, and subpictures together) so that it can be manipu- Selection tool lated as a unit.
-
Page 74
Each object you add to a menu appears on a separate layer in the Layers panel. Selecting objects in the Menu Viewer is sometimes easier when you use the Layers panel. Regardless of where an object is in the stacking order, you can quickly select it by selecting its layer in the Layers panel. -
Page 75
Move objects in a menu When a menu contains multiple objects, it’s often difficult to select just the object you want to move. The Layers panel or context menu can help you isolate an object before moving it. Move menu objects or layer sets Open the menu that you want to modify. -
Page 76
In the Menu Viewer or Layers panel, select the objects you want to align. Choose Object > Align > Relative To Safe Areas if you want the objects aligned to the title safe area and the option is not already selected. Note: A check mark next to the Relative To Safe Areas indicates it is turned on. -
Page 77
Change the stacking order of menu objects As in Photoshop, the stacking order in the Layers panel determines whether the content of a layer or layer set appears in front of or behind other elements in the menu. When you create or import a menu, the background is always the bottommost layer. -
Page 78
Move or copy a menu object into another layer set Open the menu that you want to modify. In the Menu Viewer or Layers panel, select the object. For multilayered menus, it is easier to use the Layers panel to select the object. Choose Edit >… -
Page 79: Styling And Transforming Menu Objects
Choose Object > Convert To Object. See also “Convert an object to a button” on page 74 Styling and transforming menu objects About predefined styles Styles let you quickly change the appearance of a layer or object in a menu. Styles are predesigned Photoshop layer effects, such as shadows, glows, bevels, overlays, and strokes, that you can apply to most layers in a menu.
-
Page 80
Apply a style to a button or layer set Select the button in the Menu Viewer or in the Layers panel. In the Styles panel, select the style, and click the Apply Style button If your menu contains a styled layer that you like, you can quickly create a new style by dragging the layer directly to the Styles panel. -
Page 81
To change the other properties of the drop shadow, drag the double-arrow pointer left or right over a value to decrease or increase it. You can click the Preview option off and on to see the before and after effects of each property. Sets the opacity of the shadow. -
Page 82: Adding Text To Menus
Comparison of flipping object horizontally and vertically A. Object as originally placed B. Flipped horizontally C. Flipped vertically Open the menu containing the object you want to flip. In the Menu Viewer or Layers panel, select the object (or objects) you want to flip. Choose either Object >…
-
Page 83
Character panel overview Encore gives you advanced typographic control over your text. Using the Character panel, you can kern, track, shift the baseline, and scale text. You can set type attributes before you enter characters, or you can restyle and reformat existing text. -
Page 84
positive value loosens the space between letter pairs; a negative value tightens the space. Most fonts come with preset kerning values for specific letter pairs. Metric uses the font’s original kerning values. Note: You cannot apply kerning across a range of selected characters. Kerning works only when an insertion point is placed between a pair of characters. -
Page 85
ENCORE CS3 User Guide Alignment options in the Character panel A. Align Left B. Align Center C. Align Right D. Justify Last Left E. Align Top F. Align Center G. Align Bottom H. Justify Last Top Text anti-alias options Anti-aliasing smooths the jagged edges of text by softening the color transition between the edge pixels of the characters and the background pixels. -
Page 86
JIS Weak set Characters that can’t begin a line Characters that can’t end a line Determines spacing between punctuation, symbols, numbers, and other character classes in Japanese Mojikumi type. Encore includes several predefined mojikumi sets. • None turns off the use of mojikumi. •… -
Page 87
Original text (left) and text with rotation applied (right) (Also called kumimoji and renmoji) Changes the orientation of the characters from vertical to Tate-chuu-yoko horizontal. The characters rotate 90º as a group. You can select, edit, and format the rotated text just as you do the vertically-oriented characters. -
Page 88
The text bounding box appears. Note: If you don’t see a bounding box, you entered the text freely and must manually change the line breaks. Position the pointer over a selection handle. When it changes to a double-headed arrow, drag the handle to resize the bounding box. -
Page 89
For more keyboard shortcuts on selecting text, such as entire blocks of text, see “Keys for working with text in menus and subtitles” on page 183. Transform a text block Open the menu that you want to edit. Select the text block by using one of the following techniques: •… -
Page 90: Chapter 6: Menus: Beyond The Basics
(See “About menu display time and looping” on page 90.) If you want a smaller image, consider resizing or masking the video in a video-editing application, such as Adobe Premiere Pro, or masking a portion of the video with a layer in the menu.
-
Page 91
See also “Animate video thumbnail buttons” on page 90 Add audio to a menu ❖ Do one of the following: • Select the menu in the Project panel. Then, in the Properties panel, click the Motion panel and drag the Audio pick whip to the audio file in the Project panel. -
Page 92
Using the chapter property called Poster, you can designate a specific start point or frame to display. Poster frame Otherwise, the thumbnail begins at the first frame of the destination chapter or displays the first bright (nonblack) frame of the chapter if Animate Buttons is turned off for the menu. Video thumbnail button and corresponding button layers in Layers panel Customize predesigned video thumbnail buttons The easiest way to create a video thumbnail button is to drag a button from the Library panel into your menu and… -
Page 93
If you use a shape tool, such as the Rectangle tool, to draw the placeholder, the shape of the layer becomes the mask for the video thumbnail. You can also create a layer, draw a selection with the Rectangular Marquee tool, fill the selection with a color, and then click the Add Layer Mask button in the Layers panel. -
Page 94
Drag the poster frame marker onto its corresponding chapter in the timeline. Animate video thumbnail buttons You can set video thumbnail buttons to be either still or moving using the menu property Animate Buttons. When you select the menu property, you convert all the video thumbnail buttons on the menu to motion buttons. Thus, each time the viewer displays the menu, the video links play in the thumbnails. -
Page 95
A. Menu duration B. Background video C. Loop point A loop point is often used when a menu has been animated in Adobe After Effects CS3. For example, you can create a video in After Effects in which the button images fly in from different points and settle into position after 15 seconds. -
Page 96: Menu Templates
For video tutorials about using Photoshop and After Effects to create and animate menu assets, see www.adobe.com/go/vid0241 and www.adobe.com/go/vid0258. Create menu templates Custom menu templates provide an easy way to create menus that you can use over and over again in your Encore projects.
-
Page 97
Note: The file name you specify for the template does not affect the original file name of the menu, so whenever you reuse the template, the menu’s original name appears in the Project panel (not the template’s file name). Using menu templates on multiple computers When creating a menu template, you can select the Self-Contained option, which determines how the menu template is saved in the folder structure on disk. -
Page 98
Dragging an image to a replacement layer replaces the contents of the layer and scales the imported image to fit within the drop zone. You can add replacement layers to the Library panel, where they’re sorted in their own category. (See “Add items or sets to the Library”… -
Page 99: Chapter Indexes
Other navigation buttons, such as Next and Previous, are also updated automatically. Automatically generated submenus For a tutorial on creating a chapter index, visit Resource Center on the Adobe website. Create a chapter index menu A chapter index menu contains chapter buttons as well as navigation buttons to take the viewer through the menus that comprise the chapter index.
-
Page 100
The Next and Previous buttons are linked automatically when the index chapters are generated. The Next and Previous buttons are hidden on the last and first submenus, respectively. If you do not include Next and Previous buttons on a menu that results in multiple submenus, Next and Previous buttons are created automatically. You can later change the appearance of these buttons. -
Page 101: Using Photoshop To Create Menus
About creating menus in Photoshop Encore is designed to work directly with Adobe Photoshop to build and edit menus and buttons. You can create entire menus or elements for menus (such as buttons and backgrounds) in Photoshop and import them directly into Encore.
-
Page 102
Use a font size of 20 points or greater to ensure that the viewer can comfortably read titles and button text. Font size For a video tutorial on creating menus in Photoshop, see www.adobe.com/go/vid0241. Layer name prefixes for menus For Encore to recognize the components of a menu from Photoshop, you must add predefined prefixes to the layer names. -
Page 103
Menu item Photoshop component Button Name Layer set that contains button compo- nents Chapter button Layer set that links to the chapter in a timeline or slide show when chapter indexes are created See “About chapter indexes” on page 95 Next button Layer set that links to the next submenu when chapter indexes are created… -
Page 104: Using After Effects To Enhance Menus
Photoshop file. For information on creating buttons or layered Photoshop files in After Effects, see “Work with Adobe Encore” in After Effects Help. For a tutorial on using After Effects to create a motion menu, see www.adobe.com/go/vid0258. Overview of animating a menu If you have After Effects 7.0 or later, you can use the Create After Effects Composition command in Encore to quickly…
-
Page 105
A good practice is to create a layer marker in After Effects at the frame where you want the animation to end and the menu looping to begin. Name this marker “Loop Point, ” and set an ending keyframe at this same location for each attribute you plan to animate. -
Page 106: Button Subpictures
The menu saves as a PSD file and opens as a project in After Effects. The layer sets and buttons convert to nested compositions. In After Effects, animate the menu elements as desired. Set keyframes for position, scale, rotation, or any effects at the times when you want the animation to start and stop.
-
Page 107
Button subpictures A. Normal state B. Selected state C. Activated Regardless of how you create your button subpictures—using predesigned buttons from the Library panel, using the Create Subpicture command, or designing your own in Photoshop—you set the colors used for button subpictures in the Color Set dialog box. -
Page 108
Paste an image as a subpicture The Paste As Subpicture command lets you quickly create a single-color subpicture from a layer in the menu. You can create invisible buttons by using the Paste As Subpicture command in a layer without any buttons selected. Open the menu. -
Page 109
You build the image used for the subpicture by creating separate layers for each color. The layer names must include the following prefixes: (=1) for areas using color 1, (=2) for areas using color 2, and (=3) for areas using color 3. (=1) (=2) (=3) -
Page 110
Automatic color set generated from layers subpicture overlay, Encore does create a color set based on those values. By applying the colors you want for the selected state of the button to the three layers, you are able to design the highlight color in Photoshop and save time editing the color set in Encore. -
Page 111: Menu Color Sets
View subpictures You can view the subpictures in the Menu Viewer in each of the button states. These views show the subpictures of all the buttons at the same time using the menu’s assigned color set and each button’s Highlight group. To preview the subpictures with the mouse or a simulated remote control, see “Preview a project”…
-
Page 112
Menu Color Set dialog box A. New Color Set B. Active menu C. Currently applied Color Set (and Color Set menu) D. Normal Group E. Highlight Group 1 and 2 F. Preview state buttons The Menu Color Set dialog box contains the following options: Creates a new color set based on the current color definitions, and adds its name to the Color Set New Color Set pop-up menu. -
Page 113
Click the color swatch of any color you want to change. The Color Picker dialog box appears. If you want to limit your color selection to NTSC-safe colors, choose RGB colors between 16 and 235. Adjust the color using one of the following methods (the color you select appears in the top half of the color swatch;… -
Page 114
Click the New Color Set button Adjust the colors and opacity settings as needed. (See “About color sets for menus” on page 107.) Click OK when you have defined all the colors to your satisfaction. Encore applies the new colors to the menu. To dynamically update the color set to reflect changes you make in Photoshop, switch back to the Automatic color set. -
Page 115: Button Routing
Import a color set Open a menu to which you want to apply the imported color set. Choose Menu > Edit Menu Color Set. Click the Import Color Set button Click OK. Encore applies the color set to the active menu. Button routing Renumber buttons Encore assigns each button a number.
-
Page 116
Comparison of the preset routing options for remote control buttons A. Wrap around left/right, wrap within the same row (default) B. Wrap around left/right, wrap to the next row C. Wrap around up/down, wrap within same column D. Wrap around up/down, wrap to next column Change the routing order When you turn off automatic routing, you can manually set the path for the remote control through the menu buttons. -
Page 117: Creating Styles For Menu Elements
An advanced authoring technique uses multiple versions of a menu that change when the viewer selects certain buttons. Instead of using subpictures to highlight a button, the buttons auto activate when selected and link to another version of the menu. The advantage to this approach is that you can use different images to simulate button selection.
-
Page 118
Create a new style in Photoshop Open Photoshop and create a new image. Set the image size to around 150 x 150 pixels, and delete the background layer to make the image transparent. Type a character or draw a filled pixel shape or a shape layer, depending upon the type of style you want to create (text, image, or vector). -
Page 119: Chapter 7: Timelines And Slide Shows
Chapter 7: Timelines and slide shows Timelines and slide shows bring together the assets of an Adobe Encore CS3 project. After planning the project and importing the assets, you are ready to combine the video clips, still images, audio clips, and subtitles together into timelines or slide shows.
-
Page 120
Timeline Viewer overview A Timeline Viewer displays all of the components of a timeline, including its time ruler, a video track, and optional tracks for audio and subtitles. The time scale used in the ruler depends on the editing timebase of the project: for example, 29.97 fps for NTSC media and 25 fps for PAL media. -
Page 121
ENCORE CS3 User Guide Specifies the location of the current-time indicator within the timeline. The format of the Timeline timecode timecode uses semicolons (hours;minutes;seconds;frames) for NTSC projects and colons (hours:minutes:seconds:frames) for PAL projects. You can edit the timecode to set the current time in the timeline. Specifies the location of the current-time indicator within the video clip (using the video clip’s Source timecode timecode). -
Page 122
The Monitor panel includes the following controls: Moves back to the first frame of the previous subtitle. Previous Subtitle Moves forward to the first frame of the next subtitle. Next Subtitle Trims the subtitle so that it starts on the current frame. Trim Subtitle In-Point To Here Trims the subtitle so that it ends on the current frame. -
Page 123
See also “Trim video and audio clips in timelines” on page 122 “About timelines” on page 115 Add videos or still images to timelines When you add a video or still image asset to an existing timeline, Encore positions it as a new clip at the end of the track adjacent to the last clip and automatically adds a chapter point at the beginning of the new clip. -
Page 124
If the Monitor panel is hidden, choose Window > Monitor. Position the current-time indicator at the location where you want to begin. Click the Track Selector (next to the track name) to activate the audio and subtitle tracks you want to play. Click the Play button to begin viewing the timeline. -
Page 125
Move to the next or previous GOP header Do one of the following: • To move to the next GOP header in MPEG-2 video, Alt-click (Windows) or Option-click (Mac OS) the Skip Forward button in the Monitor panel. (See “About chapter points” on page 132.) •… -
Page 126: Editing Assets In Timelines
You can trim the In point or Out point of a clip, but if you need to remove a section from the middle of a clip or make more advanced edits, use the Edit Original command to edit the clip in Adobe Premiere Pro CS3 or Adobe After Effects CS3.
-
Page 127
• In the Properties panel, select the Duration timecode and type a new timecode to shorten or lengthen the clip. See also “Edit clips in Adobe Premiere Pro and Adobe After Effects” on page 124 Delete video or audio clips from timelines The method you use to delete a video or audio clip determines whether subsequent clips remain in place or shift to the left to fill in the gap. -
Page 128
In the Project panel, select the video file (not the timeline) you want to edit. Choose Edit > Edit Original. Adobe Premiere Pro or After Effects (depending upon which is pointed to in the project link) starts and opens the video project. -
Page 129
Change the display time of still images Although the Slideshow panel is the preferred method for creating a slide show, you can also add still images to a timeline to create a slide show. The default timeline duration for a still image is 6 seconds. You can increase or decrease the duration of any still image after you place it, or you can change the default duration before you place it. -
Page 130: Slide Show Basics
Note: Encore scales or crops the image as a clip in the timeline. It does not affect the original clip in the project or on your hard drive. Each instance of the image in a timeline can have different scale settings. Save frames as still images When you save a frame as a still image, Encore exports the still image as a Photoshop file (.psd).
-
Page 131
Slideshow Viewer A. Slides area B. Audio area C. Slideshow options Create slide shows Do one of the following: • To create a slide show from assets in the Project panel, select the still images and audio clips, right-click (Windows) or Control-click (Mac OS) the selection, and choose New >… -
Page 132: Editing Slide Shows
• Delete a slide by selecting it and pressing Delete. This removes the slide from the slide show, but it does not remove the image from the Project panel. • Adjust the properties of the slide show and individual slides. (See “Changing individual slide settings” on page 128.) Note: It isn’t necessary to use the Slideshow Viewer to create slide shows.
-
Page 133
The audio files are played in order during the slide show. Create a slide show, and import one or more audio clips as assets in the Project panel. Drag the audio assets from the Project panel to the Audio area of the Slideshow Viewer. If necessary, adjust the order in which the audio files are played by dragging them elsewhere in the list. -
Page 134
Apply a pan and zoom effect to slides The pan and zoom effect provides a sense of motion to still images. Panning refers to moving across the image, and zooming refers to changing the image’s magnification. A pan and zoom effect is often used in documentaries to make pictures appear more dynamic. -
Page 135
Create subtitles for slides Adding subtitles to your slide show is easy. Use the name or description of each slide as the subtitle. You can change other options, such as the color group, stroke, and position of the subtitle. The starting time and duration of the subtitle match those of the slide. -
Page 136: Chapter Points
Note: Adobe Premiere Pro and After Effects can export markers in AVI, MOV, MPEG-2, and H.264-Blu-ray files. Encore uses the markers to create chapter points. (See “Importing from Adobe Premiere Pro” on page 42 and “Importing from Adobe After Effects” on page 42.) Add chapter points at specific locations Open the timeline to which you want to add chapter points.
-
Page 137
Choose Window > Monitor to view the video as you add chapter points. Move the current-time indicator to the frame where you want a chapter point. If you are working with MPEG-2 or other video that you have already transcoded for DVD, Alt-click (Windows) or Option-click (Mac OS) either the Skip Forward button or the Skip Backward button see the next GOP header. -
Page 138: Chapter 8: Audio And Subtitles
You can use an audio- editing application, such as Adobe Soundbooth CS3, to combine audio sound effects, music, and dialog into a single audio clip.
-
Page 139
• To add an audio clip to an existing track in the timeline, drag the clip from the Project panel into the track until the pointer changes to a “+” and then release the clip. Adobe Encore CS3 adds the clip to the right of the last clip in the track. -
Page 140: Subtitle Basics For Dvd
In the Timeline Defaults pane, do any of the following, and then click OK: • Specify the default number of audio tracks and the default audio language. • Specify the default number of subtitle tracks, the default subtitle language, and the default subtitle length. (Subtitles are not supported for Blu-ray Disc or Flash export.) Subtitle basics for DVD About subtitles in DVD projects…
-
Page 141
• To add subtitles to an existing track, click the Track Selector (to the left of the subtitle track name) of the desired subtitle track. Choose Window > Monitor to open the Monitor panel, and click the Show Safe Area button to display the safe area guides. -
Page 142
Change any of the following options in the Properties panel: • Choose the desired color group from the Highlight Group menu. (See “About subtitle colors” on page 147.) • Set the desired width option from the Stroke menu. The stroke outlines the type to increase the contrast and improve readability. -
Page 143
• To change the color group, stroke weight, or alignment, click a selection tool, and select the clip in the timeline. Then, change the appropriate option in the Properties panel. (These properties apply to the entire clip, not to individual characters.) Move the current-time indicator to the next subtitle you want to edit, select the subtitle clip, and repeat the previous step. -
Page 144: Subtitle Scripts
Change the default display time of subtitles Choose Edit > Preferences > Timelines (Windows) or Encore > Preferences > Timelines (Mac OS). For Subtitle Duration, type the number of seconds you want subtitles to display, and then click OK. Encore changes the display time of all new subtitles. Existing subtitles remain unchanged. Duplicate entire track of subtitles After you create the first set of subtitles for a timeline, you can duplicate the entire track and use it like a template for other languages you need to create.
-
Page 145
Importing subtitles Note: Subtitles are not supported by Blu-ray Disc or Flash. See also “Structure of script files” on page 144 Import text script files Open the timeline to which you want to add subtitles. Choose Timeline > Import Subtitles > Text Script. You can import directly from the timeline by right-clicking (Windows) or Control-clicking (Mac OS) the subtitle track header and choosing the appropriate import option from the menu. -
Page 146
Import Subtitles (Text Script) dialog box A. Subtitle within bounding box B. Text formatting and alignment options C. Coordinates of the text bounding box D. Options for formatting Chinese, Japanese, and Korean (CJK) characters E. Subtitle track and language F. Color set options G. Timecode offset options H. Text orien- tation I. -
Page 147
ENCORE CS3 User Guide Sets the position of the clip within the bounding box. A value of 0% aligns the Text position within bounding box first line of the subtitle with the top of the bounding box for horizontal text, and with the right edge of the bounding box for vertical text. -
Page 148
Although many professionals obtain image files from a subtitling house or service, you can create your own. As with the subpictures you create to highlight buttons, you achieve the best results by limiting image files to three colors or fewer. Use sharp edges for text and graphics, avoiding gradients, feathering, or anti-aliasing. Image files can be in JPG, GIF, PNG, TIF, or BMP format. -
Page 149
ENCORE CS3 User Guide Important: Regardless of the type of script (text or image based), always save a script as a text file (TXT). To ensure that all the characters are correctly interpreted, choose Unicode UTF-8 or UTF-16 encoding when you save. This encoding option is available for text files in most text editors, such as Microsoft Notepad or TextEdit for Mac OS. -
Page 150
Display_Area (000 000 720 480) Directory C:\Subtitles\Image Files\Caption Inc Images\ (Windows) or directory /Subtitles/Image Files/Caption Inc Images/ (Mac OS) 1 00;00;02;02 00;00;03;15 CATTALESS001.TIF 2 00;00;05;18 00;00;09;20 CATTALESS002.TIF Structure of FAB image scripts FAB image scripts contain separate position information for each image file. Unlike image scripts, you specify where to find the image files when you import a FAB image script. -
Page 151: Subtitle Colors
Subtitle colors About subtitle colors Timeline color sets specify the colors used in subtitles. You can use the same color set for the entire project or define a color set for each timeline. A color set is divided into three groups. You can select the appropriate color group for each clip to ensure maximum visibility or to distinguish, for example, between characters in a film.
-
Page 152
Click OK. The new color replaces the original color in the Timeline Color Set dialog box. Choose the desired opacity level from the Opacity menu adjacent to the color swatch. Repeat steps 5 through 9 for any color you want to change. For any subtitle group, select Create Anti-Alias Color From Fill And Stroke to automatically create an anti-alias color based on the values for Fill and Stroke. -
Page 153: Navigation For Audio And Subtitle Tracks
Change the color group applied to a subtitle clip You can use color groups to vary the subtitles depending upon the background or to help identify or distinguish between subtitles (such as to identify speakers). Open the timeline containing the subtitle colors you want to change. Select the subtitle clip (or clips) that you want to alter in the timeline.
-
Page 154
The default setting for Set Audio and Set Subtitle is No Change, which leaves the audio track as set in the DVD player. For example, if a viewer has a DVD player set to French, and a DVD has a track identified as French, the DVD player chooses the French track automatically if No Change is selected. -
Page 155: Closed Captions Basics
See also “Project navigation and links” on page 152 Indicate the active audio or subtitle track You can indicate to the viewer which audio or subtitle track is currently active when a menu is displayed. For example, if a viewer uses a menu to turn on French subtitles, watches the DVD, and then returns to the menu with subtitle options, the French subtitle option is selected, even if it wasn’t the default.
-
Page 156: Chapter 9: Creating And Managing Links
Adobe Encore CS3 lets you link to practically any destination in the project, whether it be a menu, timeline, slide show, playlist, or chapter playlist. (ROM content is the exception. ROM content must be accessed by using a computer’s desktop.)
-
Page 157
End actions for menus are optional. You use them when you want to control the display if a viewer does not activate a button on the menu. Menu end actions are useful in projects that remain playing in a public place or educational setting. -
Page 158: Setting Navigation And Properties
This dissolve is achieved by playing a video asset that contains the transition frames. Typically, the transition frames are created in an application such as Adobe After Effects CS3 or Adobe Premiere Pro CS3, where they’re rendered as movie files.
-
Page 159
In the Properties panel, choose a destination from the desired link menu (Link, End Action, or Override), and then choose the desired content from the submenu that appears (for example, a specific button, slide, or chapter). The link menus display up to 20 of the most recently used elements (such as menus, timelines, and slideshows). If the element you want is not listed, choose Specify Link (see below). -
Page 160
(Optional) Temporarily changes the end action of the element you chose for First Play. Override Specifies what displays when a viewer presses the Title button on the remote control. You generally set Title Button the Title Button to return the viewer to the main menu of the disc. Identifies the primary feature on the disc. -
Page 161
In the Properties panel, specify a destination for Link. Encore displays the new link in the Properties panel using the format Menu:Button or Timeline:Chapter. (For information on using the pick whip, see “Specify a link” on page 154.) If you want to change the end action for the Link set in step 3, select a destination for Override in the Properties panel. -
Page 162
Selecting multiple menus, timelines, or buttons lets you make global changes to their properties. Click the Project, Timelines, or Menus panel. (The Project panel displays all the elements in a project, while the Timelines and Menus panels only display the single element type.) Select the desired elements. -
Page 163: Playlists And Chapter Playlists
Playlists and chapter playlists Playlists A playlist is a group of timelines, slide shows, or chapter playlists that play sequentially (from each one’s specified chapter) and can include one end action. Playlists provide more efficient navigation possibilities than end action overrides alone.
-
Page 164
Enter a name for the playlist, and click OK. Encore creates a playlist and populates it with the selected assets. Select the playlist in the Project panel, and bring the Playlist Properties panel to the front, if it’s not visible. Edit the list of assets in the Playlist Properties panel as desired, by rearranging the order, or deleting or adding more of the assets. -
Page 165
Drag chapters from Master Timeline panel (A) to Chapter Playlist panel (B) where you can reorder them and change their properties. Create a chapter playlist You can create a chapter playlist to present the chapters of a timeline in a nonsequential order. Choose File >… -
Page 166: Working In The Flowchart
The lines joining the element thumbnails also convey useful link information. By noting the line style, you can differ- entiate between normal links, links that have been overridden, and other useful link attributes. For a video tutorial about using the Flowchart, see www.adobe.com/go/vid0240. ENCORE CS3…
-
Page 167
ENCORE CS3 User Guide Quick glance at section of Flowchart: Main Menu’s thumbnail shows that it’s a menu, indicated by its type icon (A), with default button set to Party Life, indicated by its info badge (B). Party Life button invokes link transition, indicated by link transition icon (C), before it plays Party Life, indicated by arrow (D). -
Page 168
Type icons The icon in the upper left corner of an object’s thumbnail denotes the type of item: menu playlist , chapter playlist , or slide show Info badges The info badge in the upper-right corner of an item’s thumbnail details certain attributes, depending on the type of item. -
Page 169
Set navigation in the Flowchart For smaller projects, you can drag items directly into the Flowchart panel and arrange them manually. For large, complex projects, you can use auto layout, letting Encore position items in the Flowchart. You can also choose to work with a combination of auto and manual layout. -
Page 170
• Drag an element from the Project panel to the Flowchart. Note: If you can’t drag a file from the Project panel, make sure it’s been converted to an element type. For example, you can’t drag a movie file, but you can right-click (Windows) or Control-click (Mac OS) the movie file, choose New Timeline, and then drag the resulting timeline to the Flowchart. -
Page 171: User Operations
You can open elements from the Flowchart directly into their corresponding viewer, start Project Preview mode from any point in the Flowchart, or open a menu from the Flowchart to edit it in Adobe Photoshop CS3. In the Flowchart, do any of the following: •…
-
Page 172
Lets the viewer move among chapters. Previous/Next Chapter Lets the viewer search for a specific chapter. Search For Chapter Lets the viewer use the Title button on the remote control. Title Remote Lets the viewer use the Menu button on the remote control. Menu Remote Note: Blu-ray Disc players (and remote controls) do not support the Menu Remote setting for a timeline. -
Page 173: Chapter 10: Testing And Building The Final Product
Before you build your final project or export it to an Adobe Flash format, it is important to preview and test your project. Previewing allows you to verify your navigation, menus, and buttons. Adobe Encore CS3 can also check your project for broken links, orphaned menus, bit rate problems, and other issues.
-
Page 174
Do any of the following: • To specify the audio output device, click the Audio Output Device button and make your selections in either the ASIO DirectSound Full Duplex Setup dialog box. • To display the Menu Viewer on an attached device, select Show Menu Editor On DV Hardware, choose the attached device from the Device menu, and click OK. -
Page 175
Specifies the magnification of the preview. Display Area Zoom The menu displays the available audio tracks and their language code, highlighting the currently Audio Track selected track. Toggle Subtitle Display On Or Off and their language code, highlighting the currently selected one. Displays the name of the timeline or menu in the first line. -
Page 176
In the Check Project dialog box, deselect any problems you do not want to identify. For example, if you have not set any overrides, you don’t need to check for problems with them. Adobe recommends using the default setting, which checks for all possible problems. -
Page 177: Security And Additional Content
Click Start. The software lists any problems found. You can double-click a problem asset to open it. After you open and fix all the problem items, check the project again to make sure that you’ve corrected all the problems. Note: The Name and Problem columns appear by default. To view additional informational columns (such as Description and Menu), right-click (Windows) or Control-click (Mac OS) a column name and choose the desired column from the Columns menu that appears.
-
Page 178
Specify the copy-protection settings, and then close the Build panel and save the project: Restricts the number of copies that can be made of your disc. Choose No Copies Allowed For CGMS to enable CGMS cascading style sheets (CSS) and Macrovision®. Encrypts the video data, and then includes decryption keys that can only be read from the original disc. -
Page 179: Building The Finished Project
ROM material is only available on personal computers. Furthermore, it’s only available from the desktop, not from the video content of a disc. You can specify a folder of additional ROM content to be added to the disc when Encore builds your project.
-
Page 180
Click Build. Save the project if prompted. If you have any problems in your project, you are prompted to manage them or ignore them. Adobe recommends that you fix all problems, and then click Build again. When writing is complete, click OK. -
Page 181
• Read-only format for computer software, games, and movie distribution BD-ROM Image Type For DVD output, Disc Info also includes the following settings: • The name entered in the Disc Properties panel appears here. To change the disc’s name, enter a new one. -
Page 182: Exporting Projects To Flash Format
Replicating discs To produce multiple copies of your DVD or Blu-ray disc, you can burn them yourself, either in Encore or by using a third-party mastering application. Producing them in Encore works best for limited quantities and requires the appropriate hardware or software. However, if you require a large quantity of discs, use a professional replication facility for mass production.
-
Page 183
4. Adobe Flash Player ignores the Default Button setting in the Menu Properties panel. Consequently, buttons set to appear highlighted by default will not do so in your Flash projects. Also, Flash has no keyboard navigation, so viewers can’t use Enter or arrow keys to select a button. -
Page 184
ENCORE CS3 User Guide See also “Creating menus” on page 62 “Setting navigation and properties” on page 154 “Set disc properties and navigation” on page 155 “Export your current project to Flash” on page 178 “Tips for creating Flash projects” on page 179… -
Page 185: Chapter 11: Keyboard Shortcuts
Chapter 11: Keyboard shortcuts Adobe Encore CS3 provides a set of keyboard shortcuts. Because many commands and buttons have keyboard equiv- alents, you can create a project with minimal use of the mouse. Using keyboard shortcuts Find keyboard shortcuts ❖…
-
Page 186
Keys for working in the Project panel Result Windows shortcut Replace selected asset Alt + Shift + R Open asset Double-click Open selected asset Enter or Return Select asset above current Up Arrow selection Select asset below current Down Arrow selection Duplicate selected asset Ctrl + D… -
Page 187
Result Windows shortcut Replace selected item Alt-double-click an item in the Library panel Replace selected item Alt-drag an item from the Library panel or Windows Explorer onto the item Replace without scale Ctrl-click the Replace button in the Library Replace without scale Ctrl + Alt-double-click an item in the Library Replace without scale… -
Page 188
Result Windows shortcut Move cursor to previous para- Ctrl + Up Arrow graph Move cursor to beginning of Home line Move cursor to end of line Move cursor to beginning of Ctrl + Home text Move cursor to end of text Ctrl + End Increase selection of text Shift-click… -
Page 189
Keys for working in the Timeline Viewer Result Windows shortcut Play/Pause (toggle) Spacebar Ripple delete Shift + Backspace Slip audio or video independently Alt-drag or Alt-click the audio or video portion of the clip with the Selection tool Move current-time indicator to end of last clip in timeline Move current-time indicator to Home… -
Page 190
Result Windows shortcut Zoom out Alt-click with zoom tool Zoom out — (minus) on numeric keypad Zoom out Ctrl + , (comma) Keys for working in the Project Preview window Result Windows shortcut Open Project Preview window Shift + Spacebar Activate current button Enter Activate a specific button… -
Page 191
Reset keys in registry file Ctrl + Shift while Encore starts Keys for working with Adobe Bridge This isn’t a complete list of keyboard shortcuts. This table lists only those shortcuts that aren’t displayed in menu commands or tool tips. -
Page 192
Result Add an item to the selection Display Help Rename next Rename previous Select inverse in Filter panel Clear filter items Display Loupe tool in Preview panel Additional Loupes in Preview panel (multiple selection) Move Loupe tools simultaneously Zoom in with Loupe tool Zoom out with Loupe tool Zoom in with Loupe tool (multiple selec- tion) -
Page 193: Index
Adobe Premiere Pro accessibility of Help 4 activated state, menu 59 Adobe Video Workshop 5 activation of software 1 After Effects. See Adobe After Effects Add Chapter Point command 133 aligning Adobe After Effects converting menus to compositions 101 animating…
-
Page 194
111, 148 remaining space 28 options 108 size, setting 27 subtitles 147 specifying properties for 155 display time offline, with Adobe Dynamic about 90 Link 47 changing 139 setting in menus 92 Display/Hide column, layers 70 distributing objects 72… -
Page 195
134 naming 155 previewing 169 replicating 178 ROM content, specifying 174, 177 viewing free space 28 Dynamic Link. See Adobe Dynamic Folder output for DVD or Blu-ray Link font installation 2 fonts Edit Menu In Photoshop command 99… -
Page 196
Manual layer break setting 177 manual layout 166 display time 90 See also chapter points drop shadows 76 importing from Adobe Premiere duration 90 Pro 42 guides 65 importing from After Effects 42 looping 91 Photoshop, using 99… -
Page 197
95 replacement layers prefixes 98 about 93 converting objects to 94 about 47 creating in Adobe Encore DVD 94 Asset Preview thumbnail 50 creating in Photoshop 94 organizing items in 49 prefixes 98 Transcode Settings column 52 replicating DVDs 176, 178… -
Page 198
Sync Button Text And Name system requirements 1 about 59, 102 tate-chuu-yoko text 82 color sets 107 templates creating in Adobe Encore DVD 103 See also menu templates creating in Photoshop 104 adding to Library panel 43, 93 layer prefixes 98… -
Page 199
text scripts, subtitles 140 tryouts 10 text. See type tsume text 81 thumbnail buttons TV standards creating 87 creating in Photoshop 88 customizing 88 thumbnail videos type animating buttons 90 prefixes 98 time graph. See timelines timecode about 146 moving current-time indicator 121 Timecode Offset, subtitles 143 Timeline Bitrate Too High 172 Timeline Viewer…
![]()
Classroom in a Book®
www.adobepress.com
PeachpitPress/ScottDesign

© 2004 Adobe Systems Incorporated. All rights reserved.
Adobe® Encore DVD™ Classroom in a Book®
This book, as well as the software described in it, is furnished under license and may be used or copied only in accordance with the terms of such license. The content of this book is furnished for informational use only, is subject to change without notice, and should not be construed as a commitment by Adobe Systems Incorporated. Adobe Systems Incorporated assumes no responsibility or liability for any errors or inaccuracies that may appear in this book.
Except as permitted by such license, no part of this documentation may be reproduced, stored in a retrieval system, or transmitted, in any form or by any means, electronic, mechanical, recording, or otherwise, without the prior written permission of Adobe Systems Incorporated.
Please remember that existing artwork, movies, sounds, or images that you may want to include in your project may be protected under copyright law. The unauthorized incorporation of such material into your new work could be a violation of the rights of the copyright owner. Please be sure to obtain any permission required from the copyright owner.
Any references to company names or individual names in sample templates and other project files are for demonstration purposes only and are not intended to refer to any actual organization or person.
Adobe, the Adobe logo, the Adobe Press logo, After Effects, Acrobat, Acrobat Reader, Audition, Classroom in a Book, Adobe Encore, GoLive, Illustrator, Minion, Photoshop, PostScript, and Adobe Premiere are either registered trademarks or trademarks of Adobe Systems Incorporated in the United States and/or other countries. Microsoft and Windows are registered trademarks of Microsoft Corporation in the United States and/or other countries. Apple, Mac OS, and QuickTime are trademarks of Apple Computer, Inc., registered in the United States and other countries. Pentium is a registered trademark of Intel Corporation. MPEG Layer 3 audio compression technology is licensed by Fraunhofer IIS and Thompson. All other trademarks are the property of their respective owners.
Contains an implementation of the LZW algorithm licensed under U.S. Patent 4,558,302.
Music in lessons 1 and 9 courtesy of Jason A. Levine.
Books & Beans video assets in lessons 6 and 8 courtesy of Max Freedman, ASCI Advertising and Publishing, Mountain View, CA.
Lessons developed by Paul Carew and documented by Brie Gyncild.
Written and designed at Adobe Systems Incorporated, 345 Park Avenue, San Jose, California 95110, U.S.A.
www.adobepress.com
Adobe Press books are published by Peachpit Press, Berkeley, California 94710.
To report errors, please send a note to errata@peachpit.com.
Notice to U.S. Government End Users. The Software and Documentation are “Commercial Items,” as that term is defined at 48 C.F.R. §2.101, consisting of “Commercial Computer Software” and “Commercial Computer Software Documentation,” as such terms are used in 48 C.F.R. §12.212 or 48 C.F.R. §227.7202, as applicable. Consistent with 48 C.F.R. §12.212 or 48 C.F.R.
§§227.7202-1 through 227.7202-4, as applicable, the Commercial Computer Software and Commercial Computer Software Documentation are being licensed to U.S. Government end users (a) only as Commercial Items and (b) with only those rights as are granted to all other end users pursuant to the terms and conditions herein. Unpublished-rights reserved under the copyright laws of the United States. Adobe Systems Incorporated, 345 Park Avenue, San Jose, CA 95110-2704, USA. For U.S. Government End Users, Adobe agrees to comply with all applicable equal opportunity laws including, if appropriate, the provisions of Executive Order 11246, as amended, Section 402 of the Vietnam Era Veterans Readjustment Assistance Act of 1974 (38 USC 4212), and Section 503 of the Rehabilitation Act of 1973, as amended, and the regulations at 41 CFR Parts 60-1 through 60-60, 60-250, and 60-741. The affirmative action clause and regulations contained in the preceding sentence shall be incorporated by reference in this Agreement.
ISBN 0-321-20547-2
Printed in the U.S.A.
9 8 7 6 5 4 3 2
PeachpitPress/ScottDesign

iii
Contents
Getting Started
About Classroom in a Book . . . . . . . . . . . . . . . . . . . . . . . . . . . . . . . . . 1
Prerequisites . . . . . . . . . . . . . . . . . . . . . . . . . . . . . . . . . . . . . . . . . . . . . . . 1
Installing the Adobe Encore DVD program . . . . . . . . . . . . . . . . . . . 2
Copying the Classroom in a Book files . . . . . . . . . . . . . . . . . . . . . . . 2
Additional resources . . . . . . . . . . . . . . . . . . . . . . . . . . . . . . . . . . . . . . . 3
Adobe Certification . . . . . . . . . . . . . . . . . . . . . . . . . . . . . . . . . . . . . . . . . 3
|
Lesson 01 |
Creating a Simple DVD |
|
|
Getting started . . . . . . . . . . . . . . . . . . . . . . . . . . . . . . . . . . . . . . . . . . . . |
. 8 |
|
|
Planning your DVD . . . . . . . . . . . . . . . . . . . . . . . . . . . . . . . . . . . . . . . . |
11 |
|
|
Importing files as assets . . . . . . . . . . . . . . . . . . . . . . . . . . . . . . . . . . . . |
12 |
|
|
Creating a timeline . . . . . . . . . . . . . . . . . . . . . . . . . . . . . . . . . . . . . . . . |
12 |
|
|
Adding chapter points . . . . . . . . . . . . . . . . . . . . . . . . . . . . . . . . . . . . . |
15 |
|
|
Importing a layered Photoshop file as a menu . . . . . . . . . . . . . . |
17 |
|
|
Setting start and end behaviors. . . . . . . . . . . . . . . . . . . . . . . . . . . . |
19 |
|
|
Setting behaviors for remote control buttons . . . . . . . . . . . . . . . |
20 |
|
|
Previewing the project . . . . . . . . . . . . . . . . . . . . . . . . . . . . . . . . . . . . . |
21 |
|
|
Burning the DVD . . . . . . . . . . . . . . . . . . . . . . . . . . . . . . . . . . . . . . . . . . . |
22 |
|
|
Review questions . . . . . . . . . . . . . . . . . . . . . . . . . . . . . . . . . . . . . . . . . |
23 |
|
|
Lesson 02 |
Creating Menus in Adobe Encore DVD |
|
|
Getting started . . . . . . . . . . . . . . . . . . . . . . . . . . . . . . . . . . . . . . . . . . . . |
28 |
|
|
About menus . . . . . . . . . . . . . . . . . . . . . . . . . . . . . . . . . . . . . . . . . . . . . . |
29 |
|
|
Creating a new menu . . . . . . . . . . . . . . . . . . . . . . . . . . . . . . . . . . . . . . |
30 |
|
|
Adding text to a menu . . . . . . . . . . . . . . . . . . . . . . . . . . . . . . . . . . . . . |
32 |
|
|
Adding assets to menus . . . . . . . . . . . . . . . . . . . . . . . . . . . . . . . . . . . . |
35 |
|
|
Adding drop shadows to text . . . . . . . . . . . . . . . . . . . . . . . . . . . . . . |
38 |
|
|
Converting text blocks to buttons . . . . . . . . . . . . . . . . . . . . . . . . . . |
40 |
|
|
Adding subpictures to buttons . . . . . . . . . . . . . . . . . . . . . . . . . . . . |
41 |
PeachpitPress/ScottDesign

iv CONTENTS
|
Linking buttons to timelines . . . . . . . . . . . . . . . . . . . . . . . . . . . . . . |
45 |
|
|
Previewing the project . . . . . . . . . . . . . . . . . . . . . . . . . . . . . . . . . . . . |
47 |
|
|
Burning the DVD . . . . . . . . . . . . . . . . . . . . . . . . . . . . . . . . . . . . . . . . . |
. 48 |
|
|
Review questions . . . . . . . . . . . . . . . . . . . . . . . . . . . . . . . . . . . . . . . . . |
49 |
|
|
Lesson 03 |
Designing Menus in Adobe Photoshop |
|
|
Getting started . . . . . . . . . . . . . . . . . . . . . . . . . . . . . . . . . . . . . . . . . . . |
54 |
|
|
Teaming Adobe Encore DVD with Photoshop . . . . . . . . . . . . . . |
55 |
|
|
Creating a menu background in Photoshop. . . . . . . . . . . . . . . . |
56 |
|
|
Creating text in Photoshop . . . . . . . . . . . . . . . . . . . . . . . . . . . . . . . |
. 59 |
|
|
Applying layer styles in Photoshop . . . . . . . . . . . . . . . . . . . . . . . . |
. 65 |
|
|
Creating buttons in Photoshop . . . . . . . . . . . . . . . . . . . . . . . . . . . |
. 69 |
|
|
Importing a menu into Adobe Encore DVD . . . . . . . . . . . . . . . . |
. 75 |
|
|
Editing a menu in Photoshop . . . . . . . . . . . . . . . . . . . . . . . . . . . . . |
. 76 |
|
|
Linking buttons to timelines . . . . . . . . . . . . . . . . . . . . . . . . . . . . . . |
. 78 |
|
|
Repositioning overlapping objects . . . . . . . . . . . . . . . . . . . . . . . . |
. 80 |
|
|
Previewing the project . . . . . . . . . . . . . . . . . . . . . . . . . . . . . . . . . . . |
. 82 |
|
|
Review questions . . . . . . . . . . . . . . . . . . . . . . . . . . . . . . . . . . . . . . . . . |
83 |
|
|
Lesson 04 |
Using Adobe Encore DVD Templates |
|
|
Getting started . . . . . . . . . . . . . . . . . . . . . . . . . . . . . . . . . . . . . . . . . . . |
. 88 |
|
|
Exploring the Library palette . . . . . . . . . . . . . . . . . . . . . . . . . . . . . . |
. 90 |
|
|
Modifying a menu template . . . . . . . . . . . . . . . . . . . . . . . . . . . . . . |
. 93 |
|
|
Creating submenus from the same template. . . . . . . . . . . . . . . |
97 |
|
|
Replacing background elements . . . . . . . . . . . . . . . . . . . . . . . . . . |
. 99 |
|
|
Adding items to the Library palette . . . . . . . . . . . . . . . . . . . . . . . |
101 |
|
|
Linking menus to each other . . . . . . . . . . . . . . . . . . . . . . . . . . . . . |
104 |
|
|
Linking buttons to timelines . . . . . . . . . . . . . . . . . . . . . . . . . . . . . . |
105 |
|
|
Creating a text layer . . . . . . . . . . . . . . . . . . . . . . . . . . . . . . . . . . . . . . |
105 |
|
|
Checking links . . . . . . . . . . . . . . . . . . . . . . . . . . . . . . . . . . . . . . . . . . . |
107 |
|
|
Previewing the project . . . . . . . . . . . . . . . . . . . . . . . . . . . . . . . . . . . |
109 |
|
|
Building a DVD image. . . . . . . . . . . . . . . . . . . . . . . . . . . . . . . . . . . . . |
110 |
|
|
Burning a DVD from a DVD image file . . . . . . . . . . . . . . . . . . . . . |
110 |
|
|
Review questions . . . . . . . . . . . . . . . . . . . . . . . . . . . . . . . . . . . . . . . . . |
111 |
PeachpitPress/ScottDesign

ADOBE ENCORE DVD v
Classroom in a Book
|
Lesson 05 |
Assembling a DVD Quickly |
|
|
Getting started . . . . . . . . . . . . . . . . . . . . . . . . . . . . . . . . . . . . . . . . . . . |
116 |
|
|
Dragging items into the Library palette . . . . . . . . . . . . . . . . . . . |
117 |
|
|
Importing items into the Library palette . . . . . . . . . . . . . . . . . . . |
120 |
|
|
Creating buttons instantly. . . . . . . . . . . . . . . . . . . . . . . . . . . . . . . . |
121 |
|
|
Resizing and positioning buttons . . . . . . . . . . . . . . . . . . . . . . . . . |
123 |
|
|
Editing button text . . . . . . . . . . . . . . . . . . . . . . . . . . . . . . . . . . . . . . . |
125 |
|
|
Adding a title to the menu . . . . . . . . . . . . . . . . . . . . . . . . . . . . . . . |
127 |
|
|
Previewing the project . . . . . . . . . . . . . . . . . . . . . . . . . . . . . . . . . . . |
128 |
|
|
Adding data files to a disc . . . . . . . . . . . . . . . . . . . . . . . . . . . . . . . . |
128 |
|
|
Burning a CD . . . . . . . . . . . . . . . . . . . . . . . . . . . . . . . . . . . . . . . . . . . . . |
129 |
|
|
Review questions . . . . . . . . . . . . . . . . . . . . . . . . . . . . . . . . . . . . . . . . . |
130 |
|
|
Lesson 06 |
Overriding Default Actions |
|
|
Getting started . . . . . . . . . . . . . . . . . . . . . . . . . . . . . . . . . . . . . . . . . . |
134 |
|
|
About overrides . . . . . . . . . . . . . . . . . . . . . . . . . . . . . . . . . . . . . . . . . . |
136 |
|
|
Working with multiple menus . . . . . . . . . . . . . . . . . . . . . . . . . . . . |
137 |
|
|
Setting default end actions. . . . . . . . . . . . . . . . . . . . . . . . . . . . . . . |
138 |
|
|
Setting links for the main menu . . . . . . . . . . . . . . . . . . . . . . . . . . . |
140 |
|
|
Using the pick whip . . . . . . . . . . . . . . . . . . . . . . . . . . . . . . . . . . . . . . |
143 |
|
|
Setting overrides . . . . . . . . . . . . . . . . . . . . . . . . . . . . . . . . . . . . . . . . . |
144 |
|
|
Previewing the project . . . . . . . . . . . . . . . . . . . . . . . . . . . . . . . . . . . |
148 |
|
|
Making a DVD folder . . . . . . . . . . . . . . . . . . . . . . . . . . . . . . . . . . . . . |
149 |
|
|
Review questions . . . . . . . . . . . . . . . . . . . . . . . . . . . . . . . . . . . . . . . . . |
149 |
|
|
Lesson 07 |
Creating Motion Menus |
|
|
Getting started . . . . . . . . . . . . . . . . . . . . . . . . . . . . . . . . . . . . . . . . . . . |
154 |
|
|
Assembling your assets . . . . . . . . . . . . . . . . . . . . . . . . . . . . . . . . . . . |
156 |
|
|
Creating and naming chapter points . . . . . . . . . . . . . . . . . . . . . . |
159 |
|
|
Specifying an end action and a link for a timeline . . . . . . . . . |
162 |
|
|
Adding video to the background of a menu . . . . . . . . . . . . . . . |
164 |
|
|
Previewing the motion menu background . . . . . . . . . . . . . . . . |
166 |
|
|
Transcoding an AVI file from the Project window . . . . . . . . . . |
168 |
|
|
Creating video thumbnail buttons. . . . . . . . . . . . . . . . . . . . . . . . |
170 |
PeachpitPress/ScottDesign

vi CONTENTS
|
Creating animated thumbnail buttons . . . . . . . . . . . . . . . . . . . . |
178 |
|
|
Burning the DVD . . . . . . . . . . . . . . . . . . . . . . . . . . . . . . . . . . . . . . . . . |
180 |
|
|
Review questions . . . . . . . . . . . . . . . . . . . . . . . . . . . . . . . . . . . . . . . . |
180 |
|
|
Lesson 08 |
Working with Adobe Premiere Pro |
|
|
Getting started . . . . . . . . . . . . . . . . . . . . . . . . . . . . . . . . . . . . . . . . . . . |
186 |
|
|
Creating markers in Premiere Pro . . . . . . . . . . . . . . . . . . . . . . . . . |
187 |
|
|
Exporting an MPEG-2 file from Premiere Pro . . . . . . . . . . . . . . . |
189 |
|
|
Importing an MPEG-2 file with markers . . . . . . . . . . . . . . . . . . . . |
191 |
|
|
Linking chapter points to thumbnail buttons . . . . . . . . . . . . . . |
194 |
|
|
Previewing the project . . . . . . . . . . . . . . . . . . . . . . . . . . . . . . . . . . . |
196 |
|
|
Exporting an AVI file from Premiere Pro . . . . . . . . . . . . . . . . . . . |
198 |
|
|
Using the Edit Original command . . . . . . . . . . . . . . . . . . . . . . . . |
200 |
|
|
Using the ripple edit tool in Premiere Pro . . . . . . . . . . . . . . . . . |
201 |
|
|
Updating an AVI file in Adobe Encore DVD . . . . . . . . . . . . . . . . |
202 |
|
|
Creating links and behaviors . . . . . . . . . . . . . . . . . . . . . . . . . . . . . . |
203 |
|
|
Previewing the project . . . . . . . . . . . . . . . . . . . . . . . . . . . . . . . . . . . |
205 |
|
|
Burning the disc . . . . . . . . . . . . . . . . . . . . . . . . . . . . . . . . . . . . . . . . . |
205 |
|
|
Review questions . . . . . . . . . . . . . . . . . . . . . . . . . . . . . . . . . . . . . . . . |
206 |
|
|
Lesson 09 |
Working with Adobe After Effects |
|
|
Getting started . . . . . . . . . . . . . . . . . . . . . . . . . . . . . . . . . . . . . . . . . . |
212 |
|
|
Importing a Photoshop menu . . . . . . . . . . . . . . . . . . . . . . . . . . . . |
213 |
|
|
Modifying a Photoshop file in After Effects. . . . . . . . . . . . . . . . |
215 |
|
|
Animating a menu file in After Effects . . . . . . . . . . . . . . . . . . . . . |
218 |
|
|
Rendering a movie in After Effects . . . . . . . . . . . . . . . . . . . . . . . . |
222 |
|
|
Importing an After Effects movie into Adobe Encore DVD . . |
226 |
|
|
Activating a motion menu . . . . . . . . . . . . . . . . . . . . . . . . . . . . . . . . |
229 |
|
|
Editing a file in After Effects . . . . . . . . . . . . . . . . . . . . . . . . . . . . . . . |
230 |
|
|
Creating links to assets . . . . . . . . . . . . . . . . . . . . . . . . . . . . . . . . . . . |
234 |
|
|
Burning the DVD . . . . . . . . . . . . . . . . . . . . . . . . . . . . . . . . . . . . . . . . . |
236 |
|
|
Review questions . . . . . . . . . . . . . . . . . . . . . . . . . . . . . . . . . . . . . . . . |
236 |
PeachpitPress/ScottDesign

ADOBE ENCORE DVD vii
Classroom in a Book
|
Lesson 10 |
Creating a Slideshow from Still Images |
|
|
Getting started . . . . . . . . . . . . . . . . . . . . . . . . . . . . . . . . . . . . . . . . . . |
240 |
|
|
Assembling components for a slideshow . . . . . . . . . . . . . . . . . |
242 |
|
|
Laying out a slideshow menu . . . . . . . . . . . . . . . . . . . . . . . . . . . . |
243 |
|
|
Copying buttons to other menus . . . . . . . . . . . . . . . . . . . . . . . . . |
246 |
|
|
Linking menus to each other . . . . . . . . . . . . . . . . . . . . . . . . . . . . . |
247 |
|
|
Adding audio to a menu . . . . . . . . . . . . . . . . . . . . . . . . . . . . . . . . . . |
250 |
|
|
Previewing an audio file . . . . . . . . . . . . . . . . . . . . . . . . . . . . . . . . . . |
251 |
|
|
Setting end actions for slideshow menus . . . . . . . . . . . . . . . . . |
252 |
|
|
About creating slideshows with timelines. . . . . . . . . . . . . . . . . |
253 |
|
|
Organizing your assets . . . . . . . . . . . . . . . . . . . . . . . . . . . . . . . . . . . |
254 |
|
|
Creating a timeline from still images . . . . . . . . . . . . . . . . . . . . . . |
256 |
|
|
Setting behaviors for a slideshow. . . . . . . . . . . . . . . . . . . . . . . . . |
258 |
|
|
Previewing the project . . . . . . . . . . . . . . . . . . . . . . . . . . . . . . . . . . . |
260 |
|
|
Burning the DVD . . . . . . . . . . . . . . . . . . . . . . . . . . . . . . . . . . . . . . . . . |
260 |
|
|
Review questions . . . . . . . . . . . . . . . . . . . . . . . . . . . . . . . . . . . . . . . . . |
260 |
|
|
Lesson 11 |
Adding Audio Tracks and Subtitles |
|
|
Getting started . . . . . . . . . . . . . . . . . . . . . . . . . . . . . . . . . . . . . . . . . . . |
266 |
|
|
Including audio tracks in a project . . . . . . . . . . . . . . . . . . . . . . . . |
268 |
|
|
Adding audio tracks. . . . . . . . . . . . . . . . . . . . . . . . . . . . . . . . . . . . . . |
269 |
|
|
Previewing audio tracks . . . . . . . . . . . . . . . . . . . . . . . . . . . . . . . . . . |
271 |
|
|
Linking buttons to audio tracks . . . . . . . . . . . . . . . . . . . . . . . . . . . |
272 |
|
|
Adding a main menu. . . . . . . . . . . . . . . . . . . . . . . . . . . . . . . . . . . . . |
274 |
|
|
Adding a subtitle track . . . . . . . . . . . . . . . . . . . . . . . . . . . . . . . . . . . |
277 |
|
|
Modifying the appearance of subtitles . . . . . . . . . . . . . . . . . . . . |
280 |
|
|
Importing subtitles from a text script . . . . . . . . . . . . . . . . . . . . . . |
283 |
|
|
About subtitle scripts . . . . . . . . . . . . . . . . . . . . . . . . . . . . . . . . . . . . . |
285 |
|
|
Linking buttons to subtitle tracks . . . . . . . . . . . . . . . . . . . . . . . . . |
285 |
|
|
Previewing the project . . . . . . . . . . . . . . . . . . . . . . . . . . . . . . . . . . . |
289 |
|
|
Burning a DVD . . . . . . . . . . . . . . . . . . . . . . . . . . . . . . . . . . . . . . . . . . . . |
289 |
|
|
Review questions . . . . . . . . . . . . . . . . . . . . . . . . . . . . . . . . . . . . . . . . . |
289 |
|
|
Index. . . . . . . . . . . . . . . . . . . . . . . . . . . . . . . . . . . . . . . . . . . . . . . . . . . |
291 |
PeachpitPress/ScottDesign

PeachpitPress/ScottDesign

1
Getting Started
Adobe® Encore™ DVD gives you the tools you need to let you effortlessly create and burn customized DVDs. You can design menus and buttons in Adobe Encore DVD, or use menus and buttons you create in Adobe® Photoshop®. The navigational tools in Adobe Encore DVD give you total control over the viewers’ experience of your DVD. Whether you’re a corporate communications professional or an aspiring videographer, you’ll enjoy the versatility, ease of use, and power of Adobe Encore DVD software.
About Classroom in a Book
Adobe Encore DVD Classroom in a Book® is part of the official training series for Adobe graphics and publishing software developed with the help of experts at Adobe Systems. The lessons are designed to let you learn at your own pace.
Although each lesson provides step-by-step instructions for creating a specific project, there’s room for exploration and experimentation. You can follow the book from start to finish or do only the lessons that correspond to your interests and needs.
Prerequisites
Before beginning to use Adobe Encore DVD Classroom in a Book, you should have a working knowledge of your computer and the Windows operating system. Make sure that you know how to use the mouse and standard menus and commands and that you know how to open, save, and close files. If you need to review these techniques, see the printed or online documentation included with your Windows operating system. It is also helpful, but not necessary, to have experience with Adobe Photoshop, Adobe® Premiere®, and Adobe® After Effects®.
To complete some of the projects, you will need to have Adobe Photoshop, Adobe Premiere Pro, or Adobe After Effects installed on your system.
Note: You can use either Adobe Photoshop 7.0 or Adobe Photoshop CS with Adobe Encore DVD. Where necessary, instructions for each version of Photoshop are written separately.
PeachpitPress/ScottDesign

2
Getting Started
Installing the Adobe Encore DVD program
Before you begin using Adobe Encore DVD Classroom in a Book, make sure that your system is set up correctly and that you’ve installed the required software and hardware. You must purchase the Adobe Encore DVD software separately. For system requirements and complete instructions on installing the software, see the documentation included with your Adobe Encore DVD application DVD.
You must install the application from the Adobe Encore DVD application DVD onto your hard disk; you cannot run the program directly from the DVD-ROM. Follow the onscreen instructions. Make sure the serial number for your Adobe Encore DVD software is accessible before installing the application; you can find the serial number on the back of the DVD case.
Starting Adobe Encore DVD
You start Adobe Encore DVD just as you would any software application. In Windows, choose Start > Programs > Adobe Encore DVD 1.0.
Installing the fonts you’ll use in Classroom in a Book projects
The fonts used in the lessons in this book are included on the Adobe Encore DVD application DVD. Ensure that the fonts are available before you begin working with the lessons. If the fonts are not installed on your system, install them from the Adobe Encore DVD DVD-ROM, following the on-screen instructions.
Copying the Classroom in a Book files
The Adobe Encore DVD Classroom in a Book DVD includes folders containing all the electronic files for the lessons. Each lesson has its own folder, and you must copy the folders to your hard drive to do the lessons. To save room on your drive, you can install only the folder for each lesson as you need it, and remove the folder when you’re done.
To install the Classroom in a Book files:
1Insert the Adobe Encore DVD Classroom in a Book DVD into your DVD-ROM drive.
2Create a folder named Encore_CIB on your hard drive.
3Copy the lessons you want to your hard drive:
PeachpitPress/ScottDesign
![]()
ADOBE ENCORE DVD 3
Classroom in a Book
•To copy all the lessons, drag the Lessons folder from the DVD into the Encore_CIB folder.
•To copy a single lesson, drag the individual lesson folder from the DVD into the Encore_CIB folder.
•If you copied all the lessons to your hard drive, double-click the unlock.bat file in the Encore_CIB/Lessons folder.
Note: As you work through each lesson, you may overwrite the original files. To restore the original files, recopy the corresponding lesson folder from the Classroom in a Book DVD to the Encore_CIB folder on your hard drive.
Additional resources
Adobe Encore DVD Classroom in a Book is not intended to replace documentation that comes with the Adobe Encore DVD program. Only the commands and options used in the lessons are explained in this book. For comprehensive information about program features, refer to these resources:
•The Adobe Encore DVD User Guide, which is included with the Adobe Encore DVD software, contains a complete description of all features in the software.
•Online Help, an online version of the user guide, is accessible by choosing Help > Contents from the Adobe Encore DVD title bar.
•The Adobe Web site (www.adobe.com) can be viewed by choosing Help > Adobe Online if you have a connection to the World Wide Web.
Adobe Certification
The Adobe Training and Certification Programs are designed to help Adobe customers improve and promote their product-proficiency skills. The Adobe Certified Expert (ACE) program is designed to recognize the high-level skills of expert users. Adobe Certified Training Providers (ACTP) use only Adobe Certified Experts to teach Adobe software classes. Available in either ACTP classrooms or on-site, the ACE program is the best way to master Adobe products. For Adobe Certified Training Programs information, visit the Partnering with Adobe Web site at http://partners.adobe.com.
PeachpitPress/ScottDesign
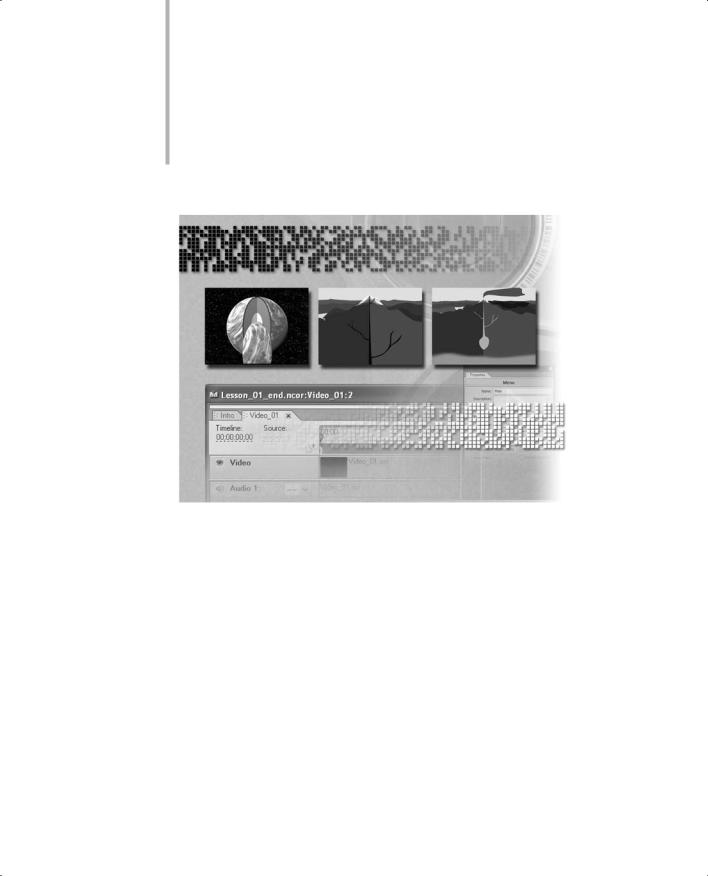
1 Creating a Simple DVD
A DVD project includes video files, audio files, and menus. With Adobe Encore DVD, you can easily put the pieces together to create a simple DVD. In this lesson, you’ll learn about the core tools in Adobe Encore DVD as you create a project from start to finish.
PeachpitPress/ScottDesign

8LESSON 1
Creating a Simple DVD
This lesson introduces the Adobe Encore DVD workspace and basic concepts. In it, you will learn how to do the following:
•Create a new project.
•Import files as assets.
•Import a layered Adobe Photoshop file as a menu.
•Create chapter points.
•Link buttons on a menu to chapter points.
•Set start and end behaviors.
•Set menu and title behaviors.
•Preview a DVD project.
•Burn a DVD.
Getting started
In this lesson, you’ll create an Adobe Encore DVD project from start to finish. You’ll create a new project, import the assets and menu for the project, create links and behaviors, preview the DVD, and burn the DVD. Make sure you know the location of the file you need for Lesson 1. For help, see “Copying the Classroom in a Book files” on page 2.
Viewing the finished Adobe Encore DVD project
To see what you’ll be creating, take a look at the finished project.
1Start Adobe Encore DVD.
2Choose File > Open Project.
3In the Open dialog box, navigate to the Lesson 01 folder. Select Lesson_01_end.ncor, and then click Open.
PeachpitPress/ScottDesign
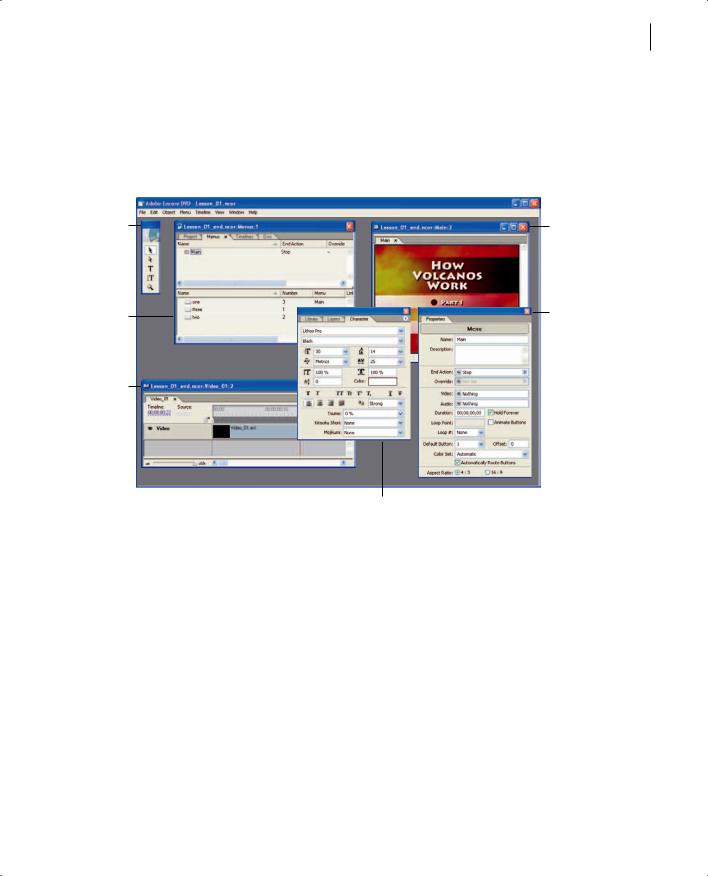
ADOBE ENCORE DVD 9
Classroom in a Book
The Adobe Encore DVD workspace opens. By default, only some of the windows shown below are open. The Project window contains the source files used in the finished DVD project. Notice that there are several different types of files in the project. In Adobe Encore DVD, you can work with many types of audio, video, and still image files.
A
B
C
D
Adobe Encore DVD workspace (not all windows and palettes appear at all times) A. Toolbox B. Project window with Menus tab displayed C. Timeline window
D. Palette window E. Menu Editor window for selected menu F. Properties palette
4 Choose File > Preview.
PeachpitPress/ScottDesign
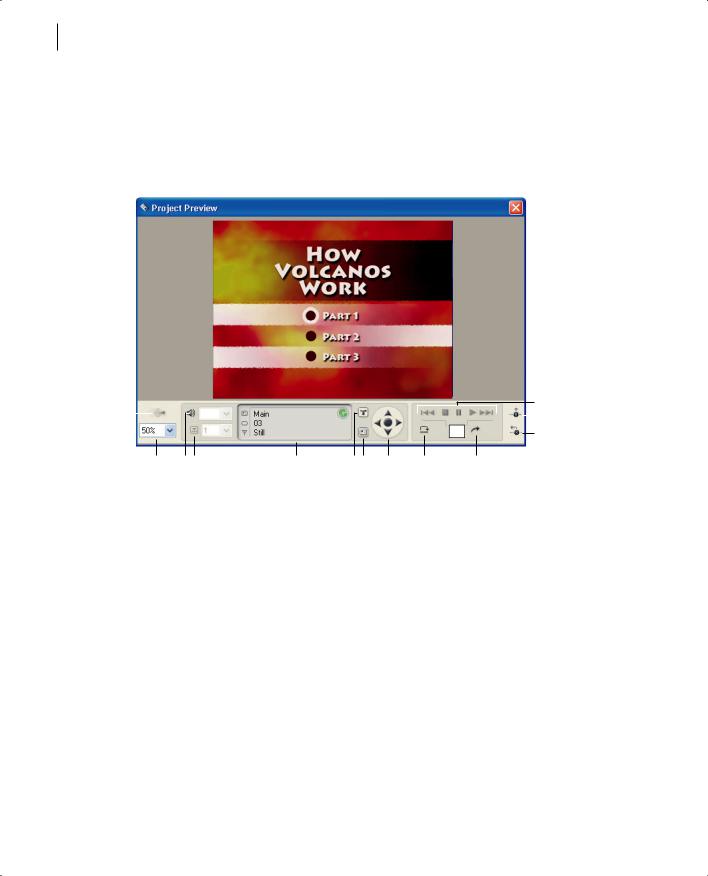
10LESSON 1
Creating a Simple DVD
The Project Preview window opens, and a video plays for a few seconds. Then a DVD menu appears. You can use the Project Preview window to preview a viewer’s experience of a DVD project—including navigation, links, and other behaviors—before you burn a disc.
K
|
A |
L |
|||||||
M
B C D E F G H I J
Project Preview window
A. Render Current Motion Menu B. Display Area Zoom C. Cycle Through Audio Tracks
D. Cycle Through Subtitle Tracks E. Status Area F. Remote Control Title Button G. Remote Control Menu Button H. Arrow and Enter Keys I. Execute End Action J. Go to Entered Chapter K. Playback Controls
L. Exit Here M. Exit and Return
5Move the cursor over the buttons next to the chapter names. As you move the cursor over a button, a white border appears around it.
6Click the Part 1 button.
A video plays for approximately a minute. There are three distinct parts—or chapters— in the video; the menu links to each of them. When the video has finished playing, the menu reappears.
The Project Preview window has controls that represent those found on a television DVD player’s remote control.
7 Click the up and down arrows until the Part 3 button is highlighted. Then click the Part 3 button.
The third part of the video plays. When it is finished, the menu reappears.
PeachpitPress/ScottDesign
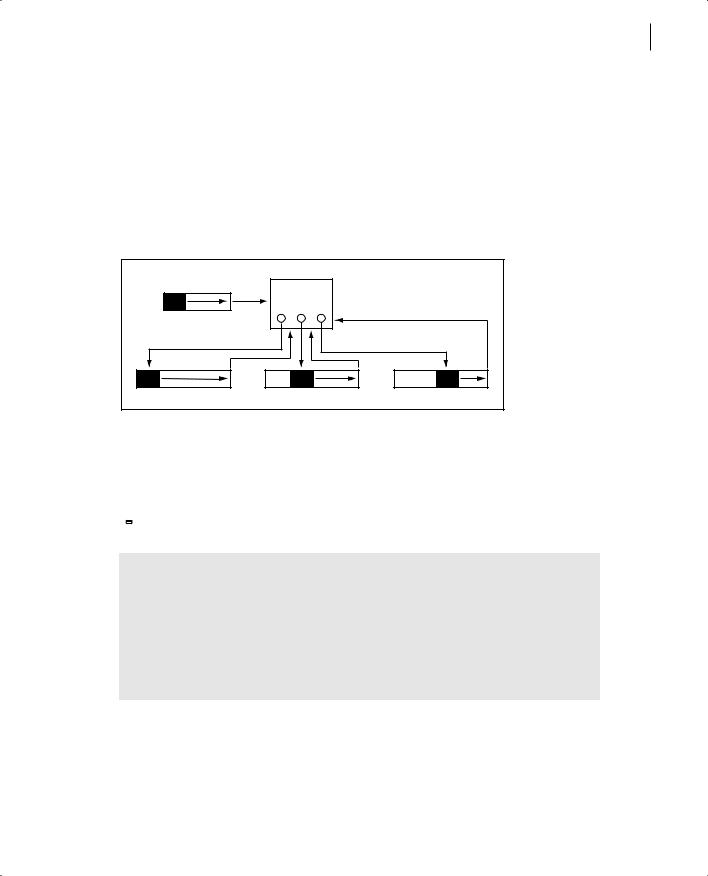
ADOBE ENCORE DVD 11
Classroom in a Book
8 Close the Project Preview window and the Lesson_01_end Project window.
Planning your DVD
Now you’ll create the same DVD project you just previewed. You will import video and audio files as assets, and a layered Photoshop file as a menu. Following the organization shown in the diagram below, you will create links from buttons to chapter points in the video timeline, and then set behaviors for those links.
B
A
C D E
The Introduction timeline (A) plays when the DVD is inserted, and then the Main menu (B) opens. When the first button is activated, the Video_1 timeline (C) plays from beginning to end, and then the Main menu reappears. When the second button is activated, the Video_1 timeline plays from the Chapter 2 marker (D) to the end, and then the Main menu reappears. When the third button is activated, the Video_1 timeline plays from the Chapter 3 marker (E) to the end, and then the Main menu reappears.
 You might find it helpful to organize your project with simple flow charts.
About flow charts
Regardless of the complexity of the project, it is helpful to work through the flow of your project and determine how the elements should link together before you begin creating it. Some DVD authors use flow charts, and some use spreadsheets. However you choose to plan your project, it is valuable to draft possible navigation scenarios and anticipate problems before you start. Sketching each of the elements and drawing the links between them can help you clarify how you want your project to be viewed.
PeachpitPress/ScottDesign
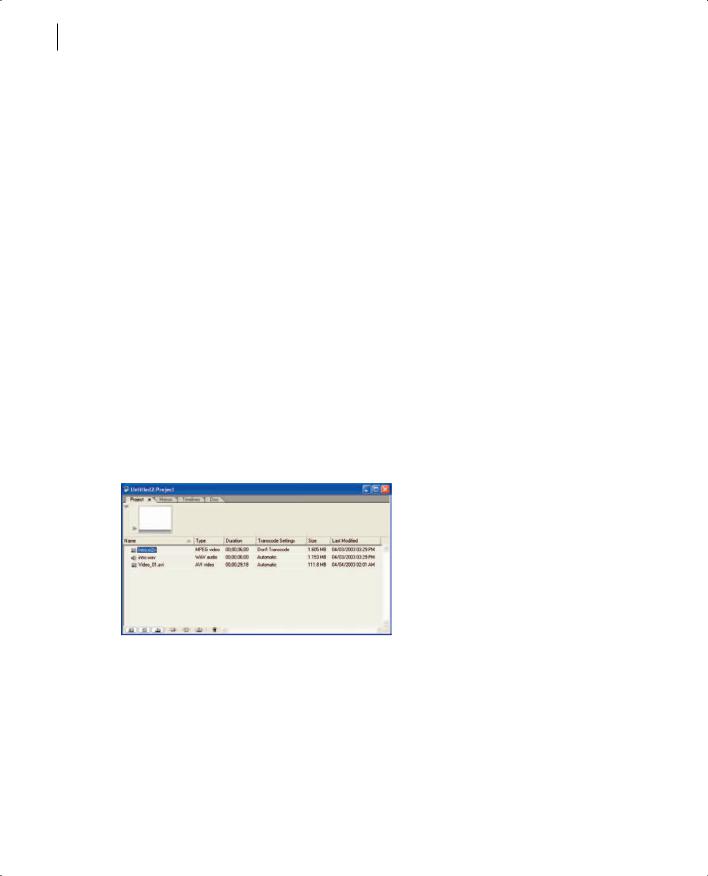
12LESSON 1
Creating a Simple DVD
Importing files as assets
You can use a variety of video, audio, and still image files in Adobe Encore DVD. You can import files into an Adobe Encore DVD project as either assets or menus. Assets are the files that make up the content of the DVD; menus display options to give viewers access to that content. First, you’ll create a new Adobe Encore DVD project.
1Choose File > New Project. Click OK to accept NTSC as the television standard. A new Project window appears. Now you’ll import assets into the Project window.
2Choose File > Import as Asset.
3In the Import as Asset dialog box, navigate to the Lesson 01 folder on your hard drive. Then hold down the Ctrl key while you select Intro.m2v, Intro.wav, and Video_01.avi. (Holding down the Ctrl key lets you select multiple files at once.)
4Click Open.
The files you selected appear in the Project window.
5 Resize the Project window or move the scroll bar at the bottom of the window to view information about the files you imported. By default, the Project window displays the name, file type, size, path, and transcode settings for each file.
6 Choose File > Save As to save the project. Name it Lesson_01.ncor.
Creating a timeline
In Adobe Encore DVD, you assemble video, audio, and subtitle assets into timelines, where you can identify different sections of the video using chapter points. Each timeline contains a single video track. Start the project by creating a timeline for the Intro video.
PeachpitPress/ScottDesign
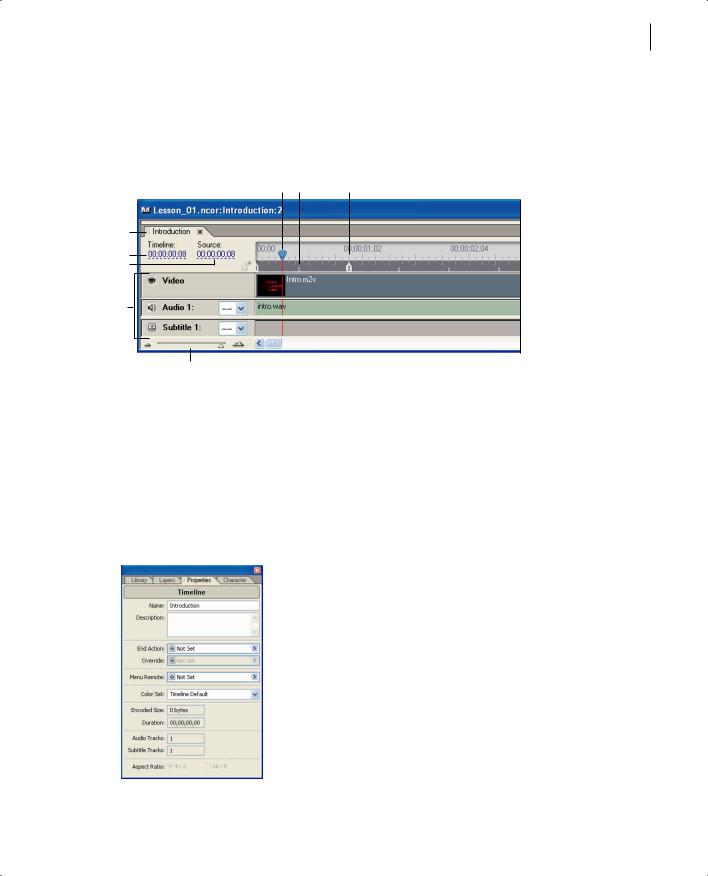
ADOBE ENCORE DVD 13
Classroom in a Book
1 Choose Timeline > New Timeline.
An untitled Timeline window appears, and the Monitor window opens. Notice that the untitled timeline is also listed in the Project window.
A B C
D
E
F
G
H
The Timeline window
A. Current-time indicator B. I-Frames C. Chapter point D. Timeline tabs E. Timeline F. Source
G. Tracks H. Zoom slider
You’ll need to name the timeline. The Properties palette displays the attributes for the item currently selected. If the Properties palette isn’t open, choose Window > Properties.
2 In the Name field of the Properties palette, type Introduction. (If you see attributes for something other than the timeline, click in the Timeline window to make the timeline active.)
PeachpitPress/ScottDesign
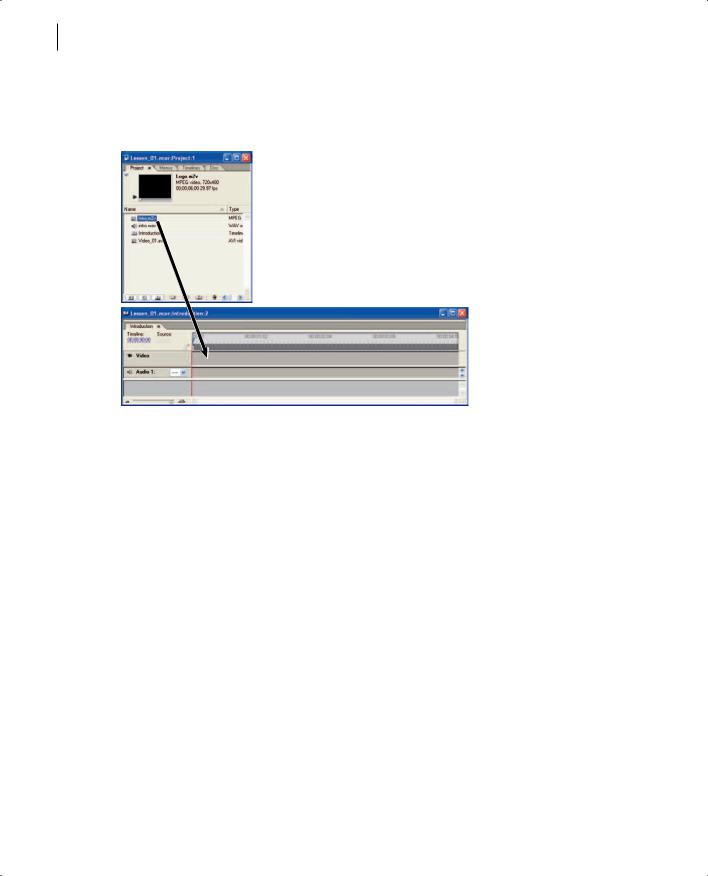
14LESSON 1
Creating a Simple DVD
3 Select the Intro.m2v file in the Project window, and drag it onto the video track in the Timeline window.
4 Select the Intro.wav file in the Project window, and drag it onto the Audio 1 track in the Timeline window.
PeachpitPress/ScottDesign
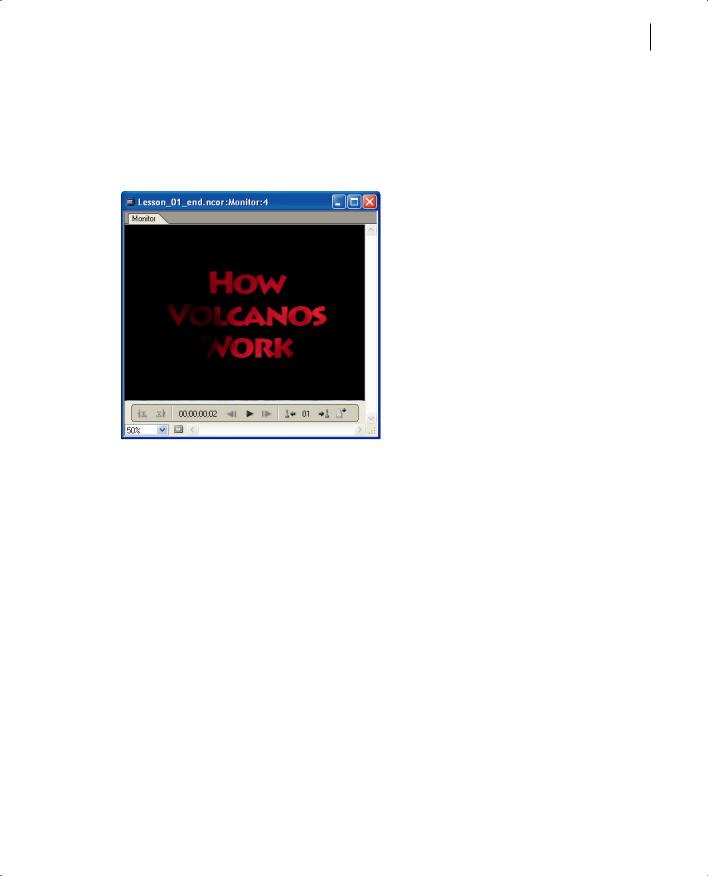
ADOBE ENCORE DVD 15
Classroom in a Book
You can view the current timeline in the Monitor window. Unlike the Project Preview window, the Monitor window displays only the video and audio tracks in the timeline; it does not display the DVD behavior. The Monitor window opens when you create a timeline.
5 Click the Play button ( ) in the Monitor window.
The introductory video plays for about eight seconds, and then ends.
6 Save the project.
Adding chapter points
Chapter points identify locations in the video track to which you want to link buttons or other navigational behaviors. You can add chapter points in the Timeline window.
In this project, you want to create links to three different chapter points in the Video_01 clip, so you need to add chapter points to the clip. First, you will create a new timeline for the Video_01.avi clip.
1 In the Project window, select the Video_01.avi file, and then click the Create a New Timeline button ( ) at the bottom of the Project window.
Adobe Encore DVD creates a new timeline named Video_01, and places the Video_01.avi file in the video and audio tracks.
PeachpitPress/ScottDesign
![]()
16LESSON 1
Creating a Simple DVD
A tab appears at the upper-left side of the Timeline window for each timeline in the project. Click a tab to view the corresponding timeline. For example, if you click the Introduction tab, the Introduction timeline appears.
2Click the Video_01 tab to make sure the Video_01 timeline is active. Then click the Play button in the Monitor window to view the video. When it has finished, leave the Monitor window open.
3Move the current-time indicator to the left edge of the timeline. The time displayed should be 00:00:00:00.
An initial chapter point is automatically created at the beginning of every timeline (that is, at 00:00:00:00).
4 In the Timeline window, move the current-time indicator to the right until the time display shows 00:00:26:00.
To position the current-time indicator quickly, move the scroll bar at the bottom of the Timeline window until the destination time is visible. Then click on the time graph.
5 Choose Timeline > Add Chapter Point.
PeachpitPress/ScottDesign
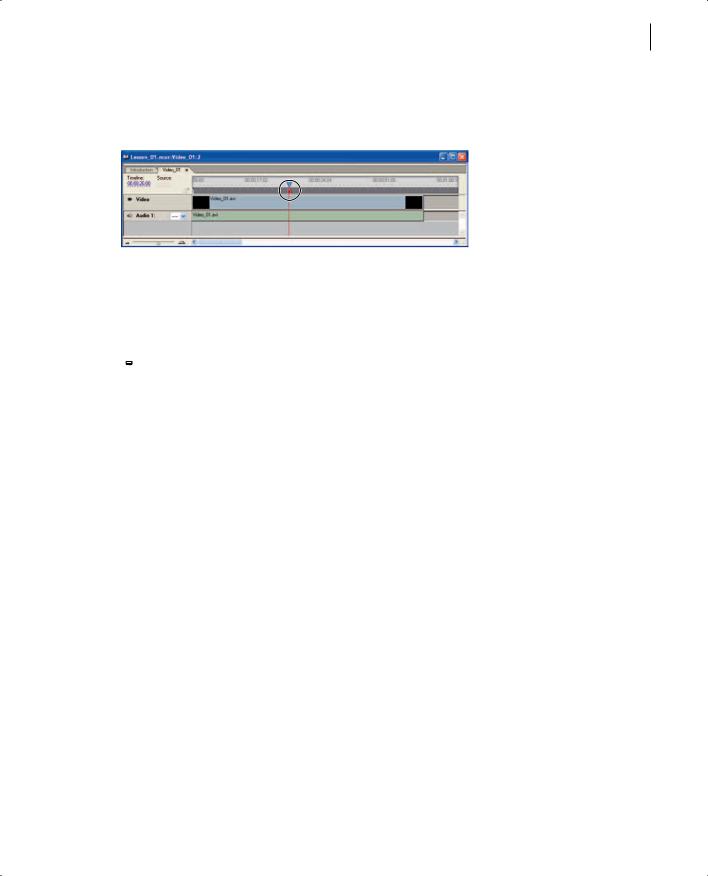
ADOBE ENCORE DVD 17
Classroom in a Book
A chapter point marker with the number 2 appears on the timeline at 00:00:26:00, where the current-time indicator is positioned. The marker is automatically numbered.
6 In the Timeline window, move the current-time indicator to the right until the time displayed is 00:00:48:00. Then choose Timeline > Add Chapter Point again.
A marker with the number 3 appears on the timeline at 00:00:48:00.
 You can also add a chapter point by pressing the asterisk key. This is a great way to add chapter points that correspond with audio cues.
7 Close the Timeline window and save the project. (The Monitor window closes automatically when you close the Timeline window.)
Importing a layered Photoshop file as a menu
One of the most powerful features of Adobe Encore DVD is its ability to import menus created in Photoshop. If you use Adobe Encore DVD naming conventions for layers in a Photoshop image, those layers remain intact when you import the file as a menu. You can make many changes and additions to the file directly in Adobe Encore DVD.
In this lesson, you’ll import a Photoshop image that has already been created with layers using the Adobe Encore DVD naming conventions.
1Choose File > Import as Menu.
2In the Import as Menu dialog box, select Main.psd, and click Open.
PeachpitPress/ScottDesign
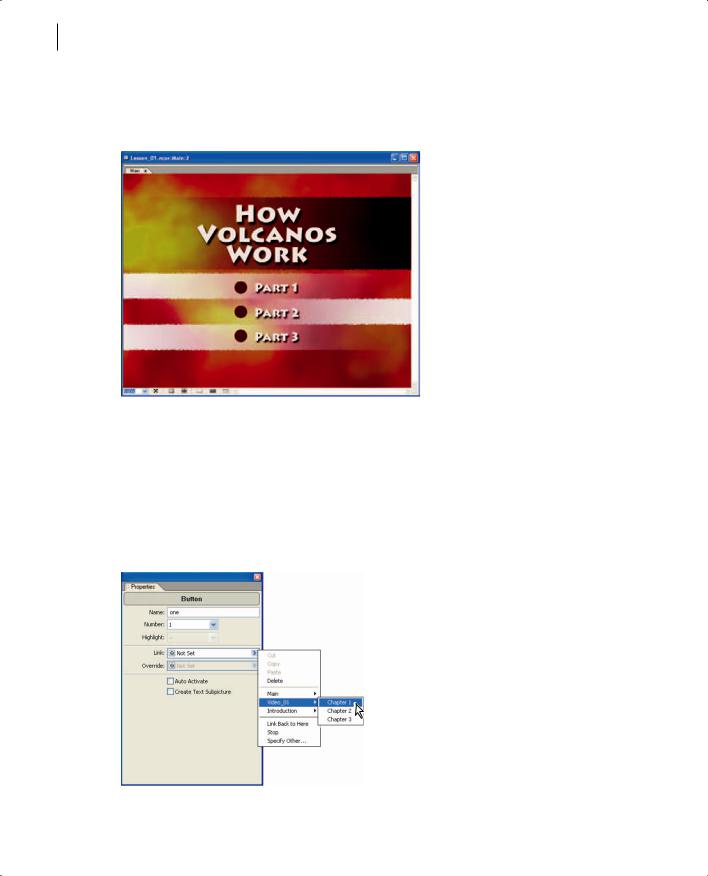
18LESSON 1
Creating a Simple DVD
The Menu Editor window opens, displaying the Main menu you imported. The Photoshop layers are intact. To see them in the Layers palette, choose Window > Layers.
3 Select the selection tool (  ) in the toolbox. Then select Part 1 in the Menu Editor window.
A bounding box appears around the button and the text “Part 1.”
4If the Properties palette is not open, choose Window > Properties to open it. The Button Name field shows the name of the button: One.
5Choose Video_01 > Chapter 1 from the Link pop-up menu.
PeachpitPress/ScottDesign
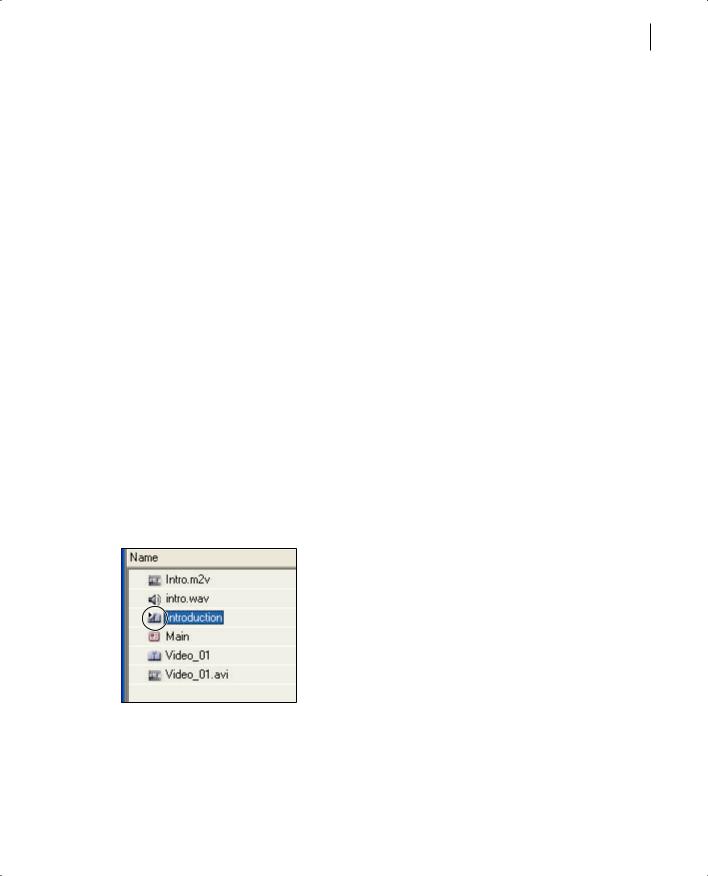
ADOBE ENCORE DVD 19
Classroom in a Book
When the viewer clicks the Part 1 button on the DVD, Video_01 will play, beginning with the first chapter point, which was automatically created at the beginning of the timeline.
6With the selection tool, select Part 2 in the Menu Editor window. In the Properties palette, choose Video_01 > Chapter 2 from the Link pop-up menu.
7Using the same procedure, link the Part 3 button to Video_01 > Chapter 3.
8Save the project.
Setting start and end behaviors
You have set links that viewers can use to start playing the video at specific chapter points. Now you need to define the sequences that aren’t controlled by the viewer. For example, you need to determine which timeline or menu runs when the DVD is first inserted into the player, and which timeline or menu follows it.
For this project, you want the Introduction timeline to run when the viewer inserts the DVD. When it has finished playing, the main menu should appear.
1 In the Project window, select the Introduction timeline.
On the icon next to the Introduction timeline is a small circle with an arrow in it (  ). This symbol indicates that this item plays first when the DVD is inserted into the player.
Note: If the symbol doesn’t appear on the icon next to the Introduction timeline, right-click the Introduction timeline in the Project window, and choose Set as First Play.
2 In the Properties palette, choose Main > One from the End Action pop-up menu.
PeachpitPress/ScottDesign
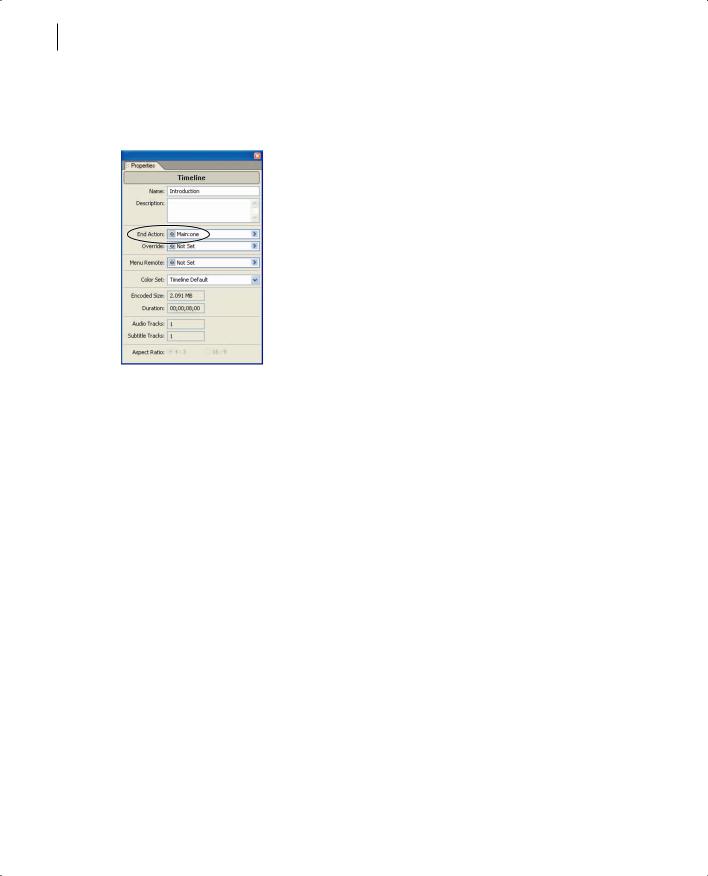
20LESSON 1
Creating a Simple DVD
When the Introduction timeline has finished playing, the Main menu will appear. The Part 1 button will be selected by default.
3 In the Project window, select the Video_01 timeline.
Note: Make sure you select the Video_01 timeline, and not Video_01.avi.
4 In the Properties palette, choose Main > One from the End Action pop-up menu.
When Video_01 has finished playing, the Main menu will appear. The Part 1 button will be selected by default.
5 Save the project.
Setting behaviors for remote control buttons
Next, you will define the behaviors for the Title and Menu buttons on a DVD player’s remote control.
1In the Project window, click an empty space to deselect all assets, timelines, or menus. The Disc attributes should appear in the Properties palette.
2In the Properties palette, choose Introduction > Chapter 1 from the Title Button popup menu.
PeachpitPress/ScottDesign
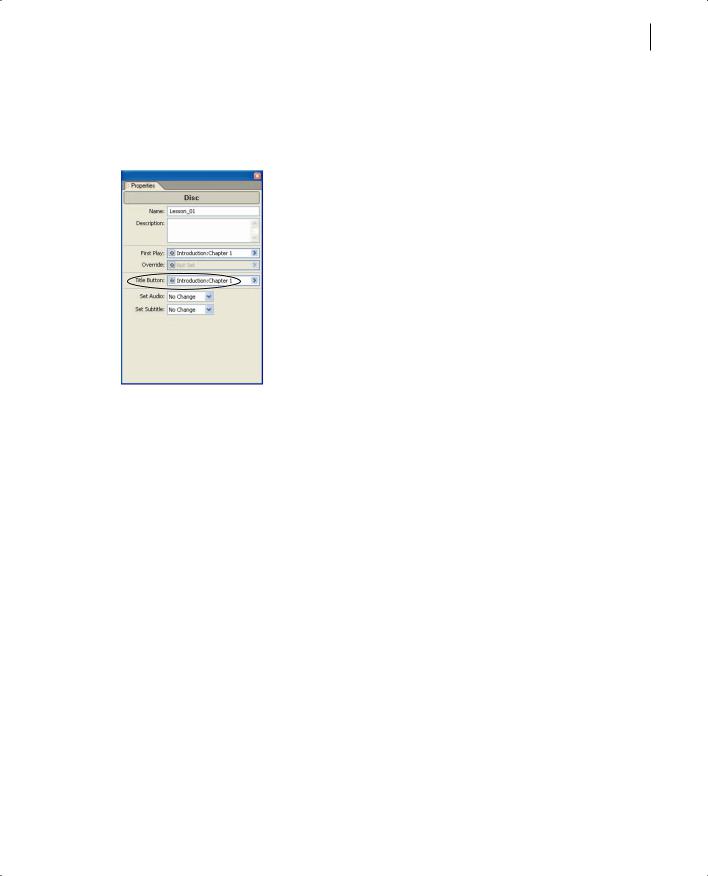
ADOBE ENCORE DVD 21
Classroom in a Book
If the viewer clicks the Title button on the DVD player’s remote control, the Introduction timeline will play. This setting is for the entire disc, no matter what is showing when the Title button is pressed.
3 Select the Introduction timeline in the Project window. In the Properties palette, choose Main > One from the Menu Remote pop-up menu.
If the viewer clicks the Menu button on the DVD player’s remote control while the Introduction timeline is playing, the Main menu will appear, with the Part 1 button selected.
4 In the Project window, select the Video_01 timeline. In the Properties palette, choose Main > One from the Menu Remote pop-up menu.
If the viewer clicks the Menu button on the DVD player’s remote control while the Video_01 timeline is playing, the Main menu will appear, with the Part 1 button selected.
5 Save the project.
Previewing the project
Before burning your DVD project to a disc, it’s a good idea to make sure the project works as you expect it to. When you preview the DVD, you can test its sequencing and navigation, interacting with the DVD exactly as your audience will. The Project Preview window behaves just as if a disc has been inserted into a DVD player.
1 Choose File > Preview.
PeachpitPress/ScottDesign

22LESSON 1
Creating a Simple DVD
If the project is configured correctly, the Introduction timeline plays in the Project Preview window. When it has finished playing, the Main menu appears, and the Part 1 button is highlighted.
2Click a button in the Main menu. The video should play from the appropriate chapter point, and then the Main menu should reappear, with the Part 1 button selected. Click each button to ensure that the video begins playing at the appropriate chapter point.
3While the video is playing, click the Menu button (  ) at the bottom of the Project Preview window. The Main menu should appear.
4While the video is playing, click the Title button (  ) at the bottom of the Project Preview window. The Introduction timeline should play.
5Click the Exit and Return button (  ) to close the Project Preview window and return to your project.
 If you want to go directly from the Project Preview window to the timeline or menu currently displayed, click the Exit Here button (
  ).
).
If the DVD project didn’t behave as described above, return to the project and correct the behavior. Preview the DVD again to ensure that it behaves as expected before continuing.
Burning the DVD
You’re ready to burn the DVD!
1 In the Project window, click the Disc tab.
PeachpitPress/ScottDesign
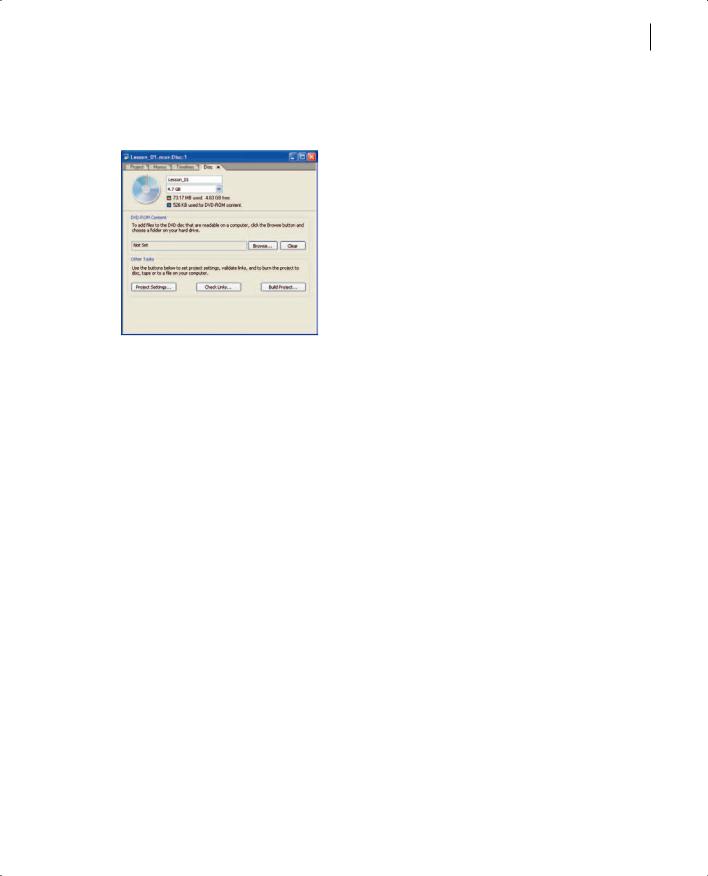
ADOBE ENCORE DVD 23
Classroom in a Book
The Disc tab lists the disc name, the space available on the disc, the type of media, and other information.
2From the pop-up menu beneath the disc name, choose the data size of the disc you’ll be burning.
3Click Build Project.
4In the Make DVD Disc dialog box, choose Current Project from the Create Using popup menu, and choose your DVD recorder from the Recorder pop-up menu.
If your recorder is not listed, verify that it is properly connected and installed. See the documentation for your recorder for assistance.
5 Insert a blank disc into the recorder, and click Next.
Note: If you click Next too quickly, you may see a Device Not Ready dialog box. Click OK to let your computer recognize the disc you inserted.
6 Review the information in the Make DVD Disc Summary dialog box. When you are ready to proceed, click Build.
Burning the disc may take several minutes, depending on the DVD recorder, the computer system, and the size of the media.
Review questions
1What does the Project window show?
2What is the difference between an imported asset and an imported menu?
3Why would you create a chapter point?
PeachpitPress/ScottDesign

24LESSON 1
Creating a Simple DVD
4 How does the Monitor window differ from the Project Preview window?
Review answers
1The Project window shows information about the assets, menus, timelines, and other objects included in the project.
2An imported asset is used as content on the DVD. An imported menu is used as a menu from which viewers can navigate to content.
3Create a chapter point to define a location in a video track to which you want to link a menu button or attach a behavior.
4The Monitor window displays only the selected video track. The Project Preview window plays the entire DVD project, as if you were viewing it on a television DVD player.
PeachpitPress/ScottDesign
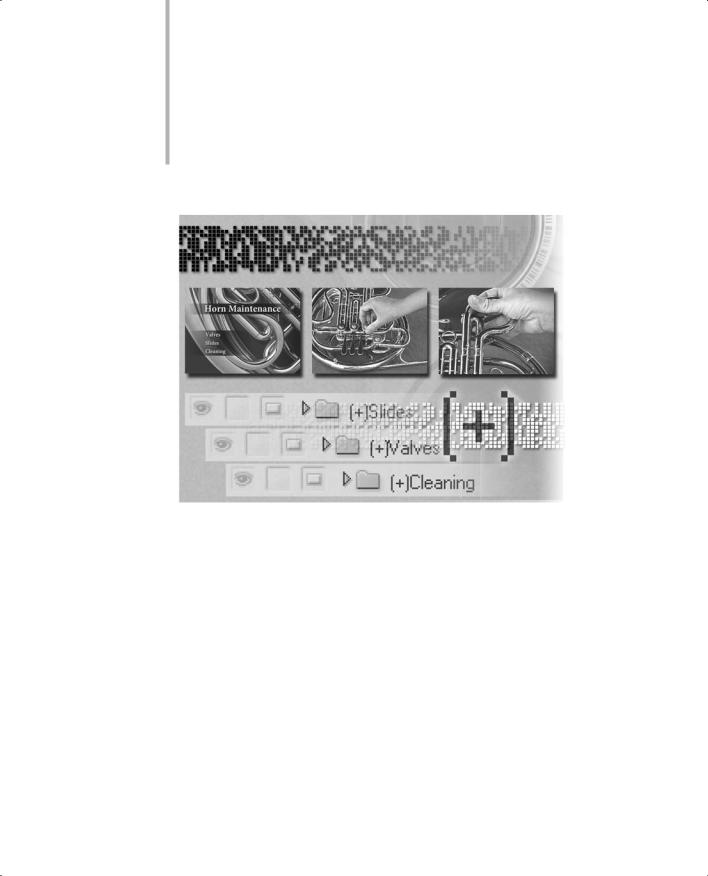
2Creating Menus in Adobe Encore DVD
Menus are the key to most DVD projects. Adobe Encore DVD provides all the tools you need to create menus without ever leaving the application. In this lesson, you’ll type directly onto menus, import backgrounds, add buttons, and more.
PeachpitPress/ScottDesign
![]()
28LESSON 2
Creating Menus in Adobe Encore DVD
In this lesson, you’ll create a simple menu in Adobe Encore DVD, using imported assets as background and button files. You’ll learn how to do the following:
•Create a new menu in Adobe Encore DVD.
•Import background files.
•Type text onto a menu.
•Format text, including font, size, character spacing, and color.
•Move objects on a menu.
•View the Title Safe area for a menu.
•Work with the Layers palette.
•Change the stacking order of layers.
•Add subpictures to your menu.
Getting started
In this lesson, you’ll create a new Adobe Encore DVD project, using graphic and video files included on the Adobe Encore DVD Classroom in a Book DVD. Make sure you know the location of the files you need for Lesson 2. For help, see “Copying the Classroom in a Book files” on page 2.
Viewing the finished Adobe Encore DVD project
To see what you’ll be creating, take a look at the finished project.
1Start Adobe Encore DVD.
2Choose File > Open Project.
3In the Open dialog box, navigate to the Lesson 02 folder. Select Lesson_02_end.ncor, and then click Open.
4Choose File > Preview.
PeachpitPress/ScottDesign

ADOBE ENCORE DVD 29
Classroom in a Book
The Project Preview window opens, and a DVD menu appears. There are three simple buttons.
5 Click the Valves button.
A short video plays. When the video has finished playing, the menu reappears.
6Click each of the other buttons to play the other videos.
7Close the Project Preview window and the Lesson_02_end Project window.
About menus
Menus make it possible to navigate through a DVD’s contents: the video clips, still images, and audio clips. A single menu may serve as a table of contents for the entire disc, or the DVD may include multiple menus, serving different purposes at different points in the viewer’s experience. For example, the main menu may link to menus that let you choose subtitle languages or different chapters in a video.
A menu consists of a background and buttons that link to assets. It may also contain subpictures, which change the appearance of a button when the viewer moves the mouse over it or selects it.
PeachpitPress/ScottDesign

30LESSON 2
Creating Menus in Adobe Encore DVD
Menus can be as simple or as complex as you want them to be. You can create a menu entirely in Adobe Encore DVD, as you will in this lesson, or you can design a menu in Adobe Photoshop and import it into your DVD project. (You’ll use Photoshop to create a menu in Lesson 3.)
Creating a new menu
You’ll create a menu in Adobe Encore DVD. First, you will open a new project, and then you will add the menu.
1Choose File > New Project. Click OK to accept NTSC as the television standard. A new Project window appears. Now you’ll create a new menu.
2Choose Menu > New Menu.
The Menu Editor window appears, displaying the default menu, which is named NTSC_4 x 3 Blank Menu. Notice that the menu is also listed in the Project window.
The Menu Editor window is the work area for creating and editing menus in Adobe Encore DVD. You can place, move, resize, or delete buttons and subpictures in the Menu Editor window, and you can also add and format text. Use the buttons at the bottom of the Menu Editor window to change how the menu is displayed.
PeachpitPress/ScottDesign

ADOBE ENCORE DVD 31
Classroom in a Book
 You can specify the default menu using the Library palette. You’ll have the opportunity to specify the default menu in lesson 4. For this project, we’ll use the menu that is the default when you first start Adobe Encore DVD.
You’ll need to name the menu, using the Properties palette. If the Properties palette isn’t open, choose Window > Properties, or if it’s hidden behind another palette, click the Properties tab to make it active.
3 Click in the Menu Editor window to ensure that it’s active. Then type Maintenance in the Name field of the Properties palette.
4 Click in the Project window. The menu name is automatically updated in both the Project window and the tab in the Menu Editor window.
Note: There should be a circle with an arrow in it (  ) on the icon next to the Maintenance menu in the Project window. This symbol indicates that the Maintenance menu will play first when the disc is inserted into the player. If the symbol isn’t there, right-click the Maintenance menu, and choose Set as First Play.
5 Choose File > Save As to save the project. Name the project Lesson_02.ncor.
PeachpitPress/ScottDesign

32LESSON 2
Creating Menus in Adobe Encore DVD
Adding text to a menu
Adobe Encore DVD provides advanced typographic control. Using the Character palette, you can kern, track, and scale text. You can also shift its baseline. You can set text attributes before you type characters, or you can style and format existing text. Adobe Encore DVD provides two text tools: one creates horizontal text and one creates vertical text. In this project, you’ll type horizontal text directly into the menu, and then move it to the appropriate position.
1Select the text tool (  ) from the toolbox, and click in the Menu Editor window. A blinking insertion point appears.
2Type Horn Maintenance.
3 Choose Edit > Select All to select the text you just typed.
Note: If the text isn’t selected, click in the text and then choose Edit > Select All again.
4Make the Character palette active by clicking the Character tab or, if the palette isn’t open, by choosing Window > Character.
5Choose Minion Pro for the font, Bold for the font style, and 60 for the type size. Click the Align Left option.
PeachpitPress/ScottDesign

ADOBE ENCORE DVD 33
Classroom in a Book
As you specify options in the Character palette, the selected text changes.
6 Click the Color box and select white (in the upper-left corner). Select NTSC Colors Only. Click OK to close the Color Picker.
 The NTSC color set is a subset of colors optimized for television viewing.
You’ve created a text block using the text tool to type and format text. Now you want to position the text block. To manipulate the text block as an object, you’ll use the selection tool.
7 Select the selection tool (  ) in the toolbox.
PeachpitPress/ScottDesign

34LESSON 2
Creating Menus in Adobe Encore DVD
8 Drag the text block to the top center of the menu.
9 Click in the Menu Editor window to deselect the text block.
Changes you make in the Character palette affect only the selected text. If no text is selected when you make the changes, the settings become the default settings for new text. Now you’ll set the defaults for the button text.
10 In the Character palette, choose Minion Pro for the font, Bold Condensed for the font style, and 36 for the type size.
11Select the text tool and click in the Menu Editor window.
12Type Valves, and select the selection tool to deselect the text.
PeachpitPress/ScottDesign

ADOBE ENCORE DVD 35
Classroom in a Book
The Character attributes you set as defaults were automatically applied to the text.
13Select the text tool again, and click an insertion point in the menu. Type Slides, and select the selection tool again.
14Select the text tool again, click an insertion point, and type Cleaning.
You should have three separate text blocks.
15 Choose View > Show Safe Area, or click the Show Safe Area button (  ) at the bottom of the Menu Editor window.
A border appears inside the menu, representing the Title Safe area—the part of the menu that will be visible on a television screen. Keep all the text inside that border to ensure that all viewers can access buttons and read the text.
16 With the selection tool, drag the text blocks you just created toward the lower-left corner of the menu, within the Title Safe area.
17 Save the project.
Adding assets to menus
Menu backgrounds can contain a single layer (such as the menu you used in the first lesson) or multiple layers. When you want to include objects in your menu, import them as assets.
PeachpitPress/ScottDesign

36LESSON 2
Creating Menus in Adobe Encore DVD
1Right-click in the Project window, and select Import as Asset.
2Navigate to the Lesson 02 folder. Then hold down the Ctrl key while you select
Gradients.psd, Valves.avi, Slides.avi, and Cleaning.avi.
 You can use the Shift key to select contiguous files. Click Cleaning.avi, then press the Shift key and click Valves.avi. The files between them are also selected.
3 Click Open.
The files you selected appear in the Project window.
4Enlarge the Menu Editor window until you can see the edges of the menu. (A gray background appears behind the black menu.)
5Drag the Gradients.psd file from the Project window into the Menu Editor window. With the selection tool, position the new layer to fill the menu.
The Gradients.psd file is a Photoshop file with a single layer. As you move the Gradients.psd file over the menu, it retains its transparency, so you can see the default menu and the text you created behind it. Adobe Encore DVD honors transparency in Photoshop files because Adobe Encore DVD and Photoshop use the same graphics engine.
6 Open the Layers palette by choosing Windows > Layers or clicking the Layers tab in the palette set.
PeachpitPress/ScottDesign

ADOBE ENCORE DVD 37
Classroom in a Book
The Layers palette contains several layers. Each text block you created is on its own layer, as is the Gradients.psd file. The Layers palette in Adobe Encore DVD is similar to the Layers palette in Photoshop. You can use it to organize and edit your menu in Adobe Encore DVD at any time until you burn the DVD.
7 Select the Gradients.psd layer in the Layers palette. Then choose Object > Arrange > Send to Back.
The Gradients layer moves beneath the text layers, and its order changes in the Layers palette. Use the Arrange commands to change the stacking order of objects in your menu.
8Open Windows Explorer: right-click the Start menu and choose Explore.
9Arrange your screen so that you can see both Adobe Encore DVD and Windows Explorer.
PeachpitPress/ScottDesign
![]()
38LESSON 2
Creating Menus in Adobe Encore DVD
10 Drag the Background.psd file from the Lesson 02 folder in Windows Explorer into the Menu Editor window in Adobe Encore DVD. Use the selection tool to position the new layer so that it fills the menu.
11 With the Background.psd layer selected, choose Object > Arrange > Send to Back.
 To keep layers from moving after you position them, click the middle box next to the layer name in the Layers palette, so that a padlock icon appears. When a layer is locked, you cannot modify it.
Adding drop shadows to text
You’ll add drop shadows to the title and each of the text buttons. First, you’ll position them within the maroon stripes.
1With the selection tool, position the title in the first maroon stripe.
2With the selection tool, select the three text blocks that you will use as buttons. Press Ctrl to select multiple text blocks.
PeachpitPress/ScottDesign

ADOBE ENCORE DVD 39
Classroom in a Book
3 Position the text blocks within the wide maroon stripe.
4 Select one text layer in the Layers palette, and then press the Ctrl key while you select the others.
Note: There are four text layers. Be sure to select them all.
5 Choose Object > Drop Shadow. Click OK to accept the default settings. Drop shadows appear for all the text in the menu.
6 Save the project.
PeachpitPress/ScottDesign

40LESSON 2
Creating Menus in Adobe Encore DVD
Converting text blocks to buttons
Now you’re ready to create buttons for the menu. In Adobe Encore DVD, you can create buttons from moving or still images you import, or text you type into a menu—or you can use predesigned buttons from the Library palette. For this project, you’ll convert the text blocks you created earlier into buttons.
1With the direct select tool, select the three text blocks. (Press the Ctrl key to select multiple objects.)
2Choose Object > Align > Left.
The text blocks are aligned on the left side, matching the left edge of the first text block you selected.
3 Then choose Object > Distribute > Vertically.
The text blocks are distributed so that the vertical spaces between them are equal.
4 With the text blocks still selected, choose Object > Convert to Button.
PeachpitPress/ScottDesign

ADOBE ENCORE DVD 41
Classroom in a Book
The appearance of the text blocks in the Menu Editor window doesn’t change, but the names of the layers in the Layers palette do. Adobe Encore DVD uses special naming conventions for buttons, which can be linked to timelines or other menus.
5 Save the project.
Adding subpictures to buttons
A subpicture is a graphic overlay that you can use to change the appearance of a button when the viewer moves the mouse over it or selects it. You can create subpictures from buttons in Adobe Encore DVD.
1With the selection tool, select a button in the Menu Editor window.
2Choose Object > Create Subpicture.
Adobe Encore DVD creates a new layer, with the same shape as the button. Its name begins with (=), which indicates that it is a subpicture layer.
PeachpitPress/ScottDesign

42LESSON 2
Creating Menus in Adobe Encore DVD
3Choose View > Show Selected Subpicture to see how the button will look when it’s activated. Or click the Show Selected Subpicture button (  ) on the Menu Editor window.
4Repeat steps 1 and 2 to create subpictures for the other two buttons.
Assigning color groups for subpictures
When you add subpictures to buttons, the default subpicture colors are applied. To apply different colors to the subpictures, first create a new color set, and then assign that color set to the menu. You’ll create a new color set for this menu.
1 Choose Edit > Color Sets > Menu.
PeachpitPress/ScottDesign

ADOBE ENCORE DVD 43
Classroom in a Book
2 In the Menu Color Set dialog box, click the New Color Set button.
3In the New Color Set dialog box, type Horn Color Set, and click OK to return to the Menu Color Set dialog box.
4In the Highlight Group 1 section, click the Color 1 swatch.
The Color Picker opens.
5 Choose a red color, or type 215, 35, and 56 in the R, G, and B fields, respectively. Select NTSC Colors Only. Click OK.
PeachpitPress/ScottDesign

44LESSON 2
Creating Menus in Adobe Encore DVD
6 In the Highlight Group 1 section, choose 80% from the Opacity pop-up menu next to the Color 1 swatch. Click OK.
7In the Project window, select the Maintenance menu to make it active.
8In the Properties palette, choose Horn Color Set from the Color Set pop-up menu.
The new subpicture color appears in the Menu Editor window.
Note: If you don’t see the subpicture color, click the Show Selected Subpicture button on the Menu Editor window.
PeachpitPress/ScottDesign

ADOBE ENCORE DVD 45
Classroom in a Book
Linking buttons to timelines
Now you’ll link the buttons you’ve created to the video clips. First, you’ll create timelines for the video files you imported earlier.
1 Press the Ctrl key while you select the three AVI files in the Project window.
2 Click the New Timeline button ( ) at the bottom of the Project window.
The Timeline window opens, with tabs for three timelines. Each AVI file is automatically placed in its own timeline. The timelines are added to the Project window. The Monitor window also opens.
PeachpitPress/ScottDesign

46LESSON 2
Creating Menus in Adobe Encore DVD
3 In the Project window, select the three timelines. Then open the Properties palette by clicking the Properties tab or choosing Window > Properties.
Note: Make sure you select the timelines, and not the AVI files, in the Project window.
4 In the Properties palette, choose Maintenance > Default from the End Action pop-up menu.
The end action determines what happens after the timeline finishes playing. Here, the DVD will return to the Maintenance menu after each video is finished.
 If you want every timeline to return to the main menu after it finishes playing, you can save time by selecting all the timelines and then setting the end action once. The end action will be applied to all the timelines you’ve selected.
5Use the selection tool to select the Valves button in the Menu Editor window.
6In the Properties palette, choose Valves > Chapter 1 from the Link pop-up menu.
PeachpitPress/ScottDesign

ADOBE ENCORE DVD 47
Classroom in a Book
The button you selected is now linked to the Valves timeline. When the viewer clicks the Valves button, the Valves timeline will play.
Note: The link is assigned to Chapter 1, even though you didn’t create any chapter points in the Valves timeline. Every timeline has a chapter point—named Chapter 1—at its beginning.
7Repeat steps 5–6 for the other two buttons, linking each button to its corresponding timeline.
8Save the project.
Previewing the project
Before you burn a DVD, make sure the project is configured properly. It should look and behave just like the one you previewed at the beginning of this lesson.
1 Choose File > Preview.
If the project is configured correctly, the Maintenance menu appears. The Valves button is selected by default, so its subpicture appears.
2Click one of the buttons. The appropriate video should play, and when it’s finished, you should return to the Maintenance menu.
3Click the other two buttons. Each video should play, and then return you to the Maintenance menu.
4Close the Project Preview window.
PeachpitPress/ScottDesign
 Loading…
- Создание полноценного меню и настройка его цветов
- Создание анимированных кнопок
- Субтитры и меню выбора звуковой дорожки
1. Создание полноценного меню и настройка его цветов
Как вы помните, в первой части вы создали самый простой DVD-видео диск с одной-единственной ссылкой. Несмотря на его работоспособность, получился он неказистым. А ведь воображение растет, как и желание сделать что-нибудь эдакое: так, чтоб всем на зависть!
Более сложный диск будет содержать не только одну ссылку «Play» или «Начать просмотр«, а несколько подменю, и их необходимо сначала создать. Начнем с того, что у вас уже есть начальный или сохраненный проект, в который импортированы клипы, разбитые на главы. Есть в нем и основное меню с единственной ссылкой. Поэтому сделайте еще три меню, которым вы дадите имена чуть позже.
Теперь присвойте кнопкам ссылки. Выделите первую кнопку «Начать просмотр» и присвойте ей ссылку на первую главу — Chapter 1.
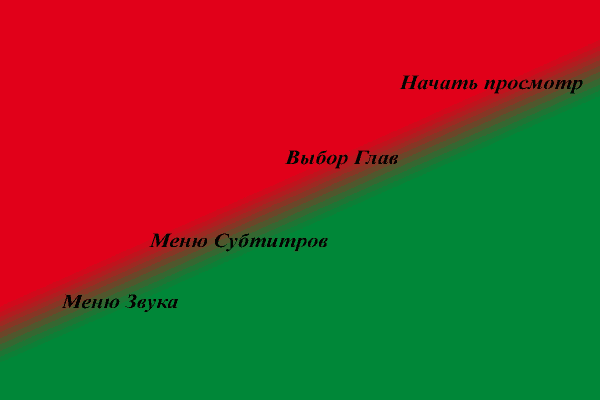
Таким же образом присвойте ссылки остальным пунктам меню. Для того, чтобы проще было работать, в окне Projects поменяйте названия всех созданных вами меню на те, которые вас устраивают — к примеру, на названия ссылок.
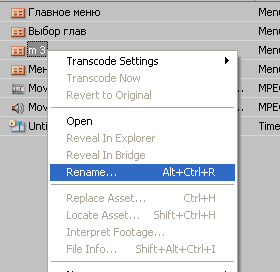
Теперь при создании ссылок вам ничего менять не придется. Кстати, хорошо было бы переименовать и все остальные пункты в окне Projects, в частности, дать имя таймлинии.
Настало время протестировать проект — выполните команду File->Preview или нажмите кнопку Preview.
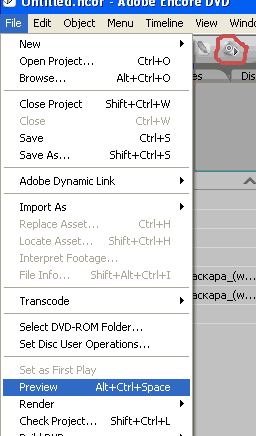
Если сразу после запуска у вас начал проигрываться фильм — не расстраивайтесь! Это произошло потому, что в свойствах диска первым заданием стоит — проигрывать диск. Для того, чтобы это проверить, щелкните в пустом месте окна Project левой кнопкой и обратите внимание на окно свойств диска.

Вас должна интересовать строка First play. Измените ее содержимое на «Главное меню» и запустите Preview. Откроется окно Project preview.
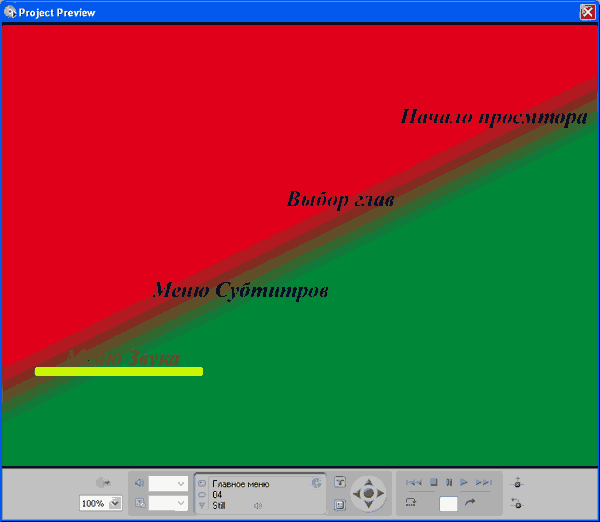
Поводите по экрану курсором мыши, и вы увидите, что текст подчеркивается при наведении мышки, а также появляется линия. Но выглядит это на первый взгляд немного нелепо. Почему? Да потому что: вспомните названия слоев в кнопках. В частности, в названиях присутствуют такие символы как (=Х). Что же это означает? Сейчас увидим.
Откройте окно редактирования цветовой гаммы проекта, выполнив команду Menu->Edit Menu Color Set…
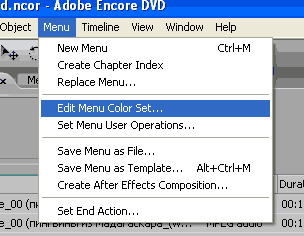
Заметьте — для каждого меню существуют свои настройки Color Set. Поэтому, прежде чем начать работу, выберите необходимое меню.
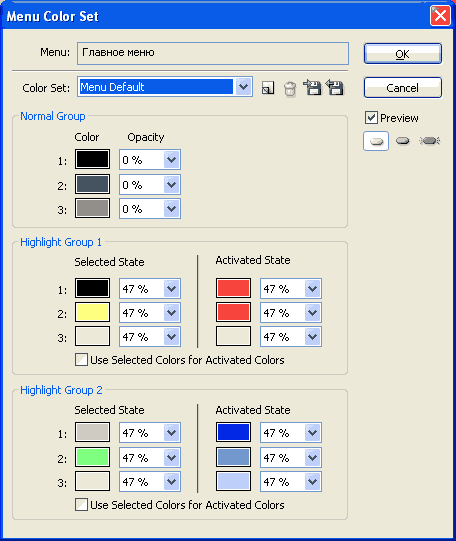
Всегда проверяйте, с каким меню вы работаете — его название отображается в верхней части окна в строке Menu. Выберите в графе Color Set параметр Menu Default, это настройка, которую можно изменить, а потом, вдобавок ко всему, еще и сохранить. После того, как вы выберете Menu Default, у вас появится возможность изменять цвета. В данном окне вы видите три группы: Normal Group, Highlight group 1 и Highlight group 2. По названию несложно догадаться, что это группы цветовых настроек. Рассмотрим для примера группу Normal. Она обозначает те цвета, которые будут иметь кнопки в нормальном, не активированном и не выделенном состоянии. А вот подгруппы 1, 2, 3 обозначают тот самый Х в выражении (=Х). Рядом с цветом можно также поставить прозрачность — это прозрачность цвета для текста или объекта. То есть, если прозрачность нулевая (0%), то какой бы вы цвет ни выбрали, на экране вы ничего не увидите. Далее вы видите две группы Highlight. Вообще достаточно было бы одной такой группы, вторая добавлена лишь ради того, чтобы добавить возможности при работе с цветами. В настройках же самого меню, а именно в окне Basic, вы можете выбрать в строке Color Set цветовые настройки (Automatic или Menu Default, или свои настройки, те самые, которые вы создали и сохранили).
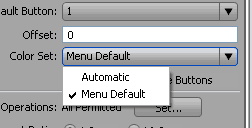
Выберите Automatic, затем щелкните по любой кнопке и обратите внимание на окно свойств, где вы ставили ссылки. Там теперь активна строка Highlight, в которой вы можете выбрать группу (либо Group1, что соответствует Highlight Group 1, либо Group2 — Highlight Group 2).
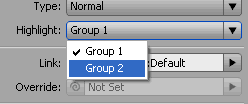
Итак, вернитесь к установкам цветовых настроек. В примере в главном меню воспользуйтесь первой группой и настройте ее по вашему желанию. Если вы хотите, чтобы выделенная и активированная ссылки были одинаковых цветов, то просто отметьте флажком пункт Use Selected Colors for Activated, после чего настройте цвета. Теперь эти цвета станут одинаковы для обоих состояний.
Итак, в примере текст имеет цифру 1 (=1), и, чтобы в выделенном состоянии текст не менял свой цвет, выберите тот же цвет, что и у текста вашей ссылки. В примере использовался черный, поэтому измените цвета на черный. Цифра 2 соответствует цвету линии. Изначально в примере цвет линии желтый. Поставьте синий, а прозрачность оставьте на том же уровне, то есть 47%. Интересно посмотреть, что же получилось. Сейчас необязательно запускать Preview, достаточно отметить флажком пункт Preview и пощелкать по кнопкам, отображающим состояния кнопок меню в разное время. И на экране вы увидите то же самое, что и при просмотре меню в режиме Preview.
Обратите внимание: в силу того, что линии, подчеркивающей текст, вы присвоили прозрачность 47%, произошло смешение цветов фона и тех, которые вы установили.
Основное преимущество одновременной работы с Photoshop в данном случае в том, что вы можете создавать абсолютно любые фигуры и формы, которые по вашему желанию могут появляться исчезать. К сожалению, есть и минусы. Так, если у вас в качестве кнопки присутствует цветная картинка, состоящая из множества разных цветов, и вы при этом выбрали определенный цвет для состояния «выделено», то при переходе в это состояние вся картинка потеряет все свои начальные цвета, став одноцветной. Чтобы этого избежать, попробуйте в том же Photoshop разбить картинку на составляющие по цветам, каждую составляющую перенесите в свой слой и назначьте им разные подгруппы цвета. И последнее замечание, группы цветов 1 и 2 можно присваивать не всему меню, а выбрать их для каждой кнопки отдельно, но, как было уже сказано, цветовая гамма останется для всего меню в целом одинаковая. Основное меню готово. Что же дальше?2. Создание анимированных кнопок
А дальше перейдите в созданное вами меню «Выбор глав«, где вы сейчас создадите двигающееся меню, то есть меню с анимированными кнопками. Меню «Выбор глав» можно выбрать путем двойного щелчка левой кнопкой мыши по нему в окнах Project или Menu. Для создания оригинальных окошек нужно снова воспользоваться Photoshop. Откройте меню для редактирования в Photoshop или нажмите Shift+Сtrl+M. Создайте в Photoshop фон. Создание анимационных кнопок очень похоже на создание обычных кнопок, за исключением некоторых нюансов. Напишите названия всех глав. В примере их пять, под названиями Сhapter1 — Сhapter5 (вы же можете работать с теми именами, которые вы им дали ранее). Вернитесь в Encore.
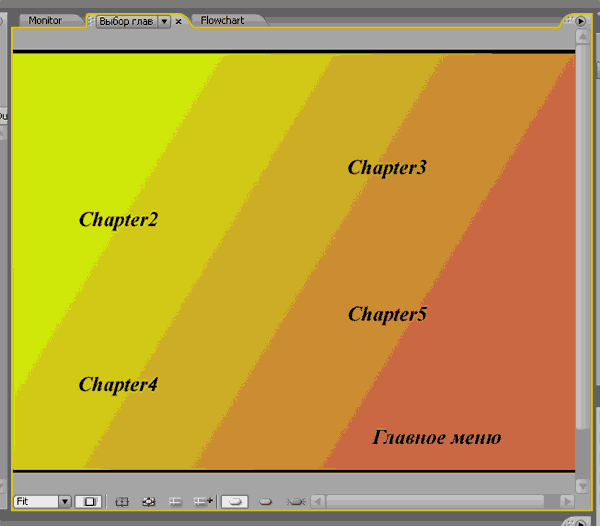
Из каждого текста сделайте кнопки, то есть выделите текст, нажмите Object->Convert to Button, как вы это проделывали в предыдущем меню, и снова вернитесь в Photoshop. Создайте еще по два слоя в каждой из получившихся групп.
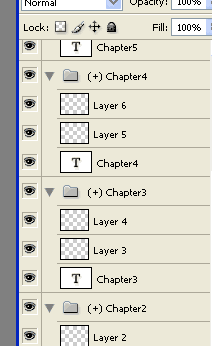
Теперь выберите слой в группе Chapter2. Нарисуйте прямоугольник или любую другую фигуру (фигура должна быть сплошной) над или под текстом.
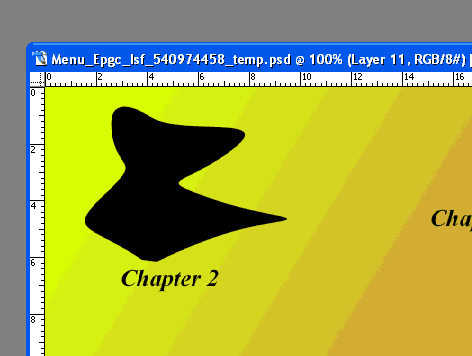
Переименуйте тот слой, на котором у Вас нарисована фигура. Обозначьте его, скажем, Chapter 2, но перед названием вставьте символы (%).
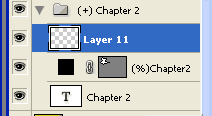
Далее в другом слое нарисуйте обычный прямоугольник вокруг той фигуры, которая уже есть.
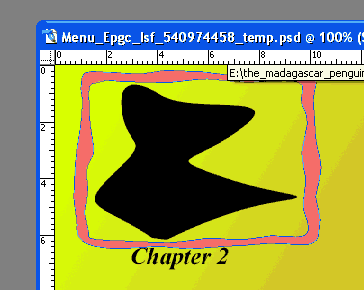
Назовите его (=1)Button Frame, далее создайте третий слой и назовите его (=2)HighLight. Перейдите в Encore и присвойте кнопке ссылку на Chapter 2. Вместо фигуры должен появиться фрагмент фильма. И, если вы правильно выбрали Color Set — Manual default и настроили цвета, у вас получится следующее:
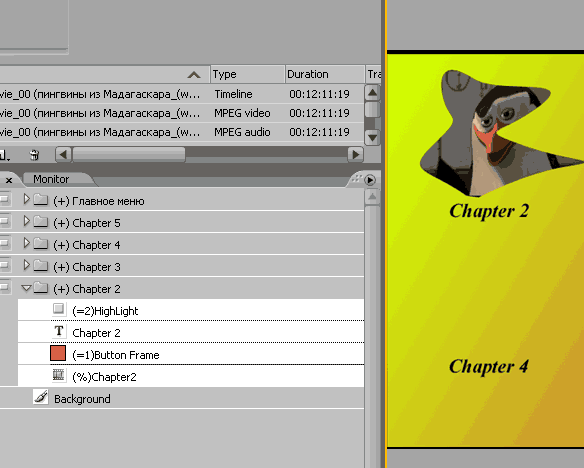
Проделайте то же самое для остальных четырех кнопок, для разнообразия можно нарисовать фигуру и рядом с текстом «Главное меню».
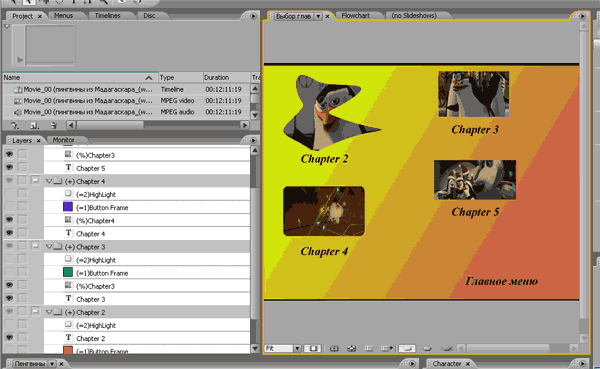
Вернитесь в Encore. Для того чтобы анимировать кнопки (заставить видео проигрываться в них), вы должны попасть в окно свойств меню, а именно — во вкладку Motion.
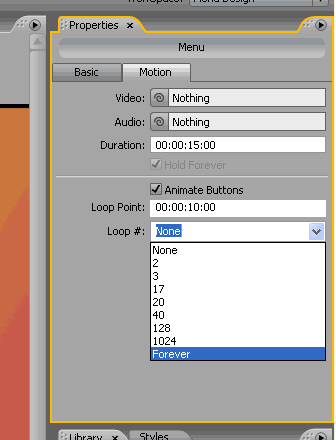
Здесь нужно отметить флажком пункт Animate Buttons, и выбрать длительность показа клипов в строке Duration (для всех кнопок длительность будет одинаковой), выбрать количество повторов проигрывания клипа (от двух до бесконечности), а также точку начала проигрывания клипа — Loop Point. Если в здесь стоит ноль, то началом проигрывания будет начало главы, что не всегда желательно — ведь, как правило, смонтированный материал имеет начальные титры или заставки.
Верхние строки Video и Audio относятся к Background video и audio, то есть к фоновым видео и аудио. Теперь вы должны просчитать (отрендерить) готовое меню. Нажмите File->Render->Motion Menus.
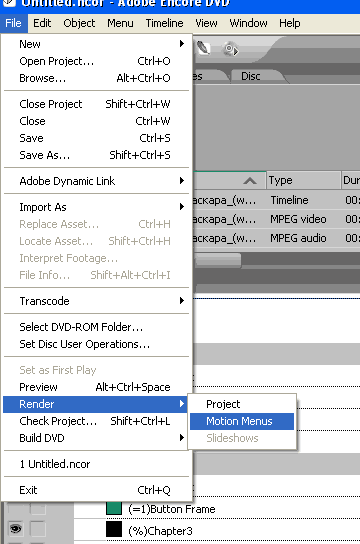
Encore начнет обрабатывать анимированное меню.
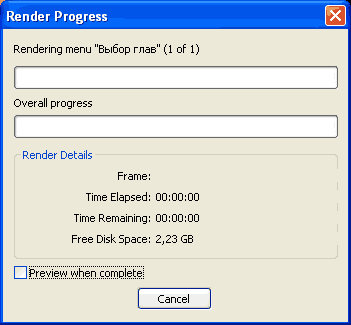
После того как, как просчет закончится, запустите Preview для проверки работы ваших ссылок и анимированного меню.3. Субтитры и меню выбора звуковой дорожки
Помните, ранее вы создали еще два меню, для звуковых настроек и настроек субтитров? Вот теперь они нам и пригодятся. Задача: сделать фоновый звук на одном меню, фоновое видео — на втором, а также присвоить ссылки на настройку звука и субтитров. Итак, откройте пустое пока меню звука. Импортируйте какой-нибудь звуковой файл в окно Project. Простым движением мышки перенесите импортированный звуковой файл на таймлинию (ту, с которой вы работаете).
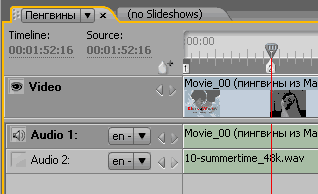
Теперь войдите в свойства будущего диска, то есть щелкните по пустому месту в окне Project и выберите в строке Set Audio тот трек, который станет проигрываться по умолчанию при запуске диска.
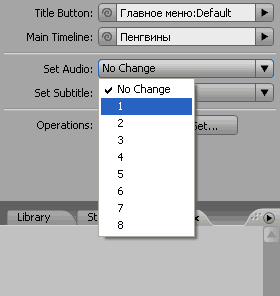
Далее создайте в Photoshop для меню звука фон и несколько ссылок, а именно «Трек 1«, «Трек 2«, ну, и «Главное меню» (по желанию), затем вернитесь в Encore и превратите текст в кнопки. Можно также, вернувшись в Photoshop, нарисовать галочки, которые будут появляться при выборе того или иного пункта (вы это уже проделывали в предыдущих меню). Теперь нужно присвоить кнопкам ссылки, сначала сделайте это для кнопки «Главное меню«. Для того, чтобы присвоить кнопке ссылку на трек, вы должны выделить кнопку и в окне выбора ссылок нажать Specify Link.
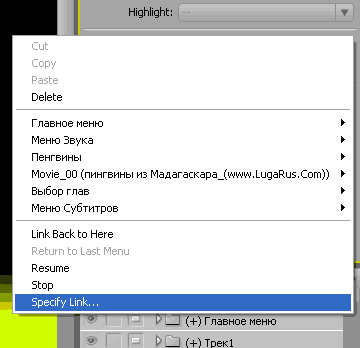
В появившемся окне выберите в строке Audio ту дорожку, которая будет установлена при активации этой кнопки, в примере — это первая дорожка . Выше установите второе действие, которое будет происходить — например, возврат в Главное меню.
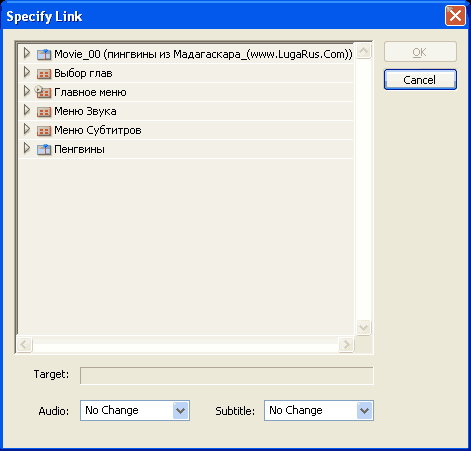
В строке Target вы увидите конечный результат ссылки.
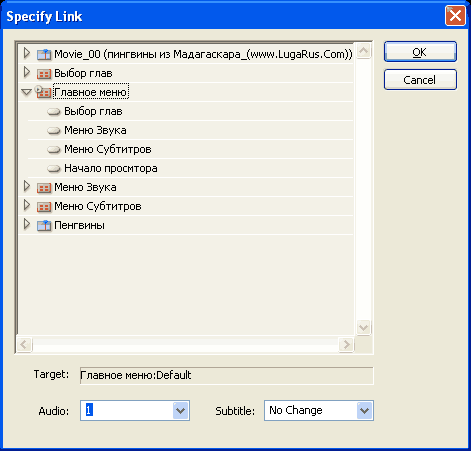
После всего проделанного нажмите ОК, название ссылки может смениться, но его всегда можно изменить на исходное. Произведите те же операции со второй кнопкой, но ссылку присвойте уже на второй трек. После того, как вы все сделали, в строке Link окна свойств кнопки, помимо ссылки на Главное меню, появятся символы A1 или А2, означающие номер аудио трека. То же самое проделайте и с меню субтитров, за исключением того, что вместо Audio нужно выбрать дорожку субтитров, или ON и OFF для их включения или выключения. Для того, чтобы создать дорожку субтитров, нужно на таймлинии щелкнуть правой кнопкой мыши и выбрать Add subtitle track.
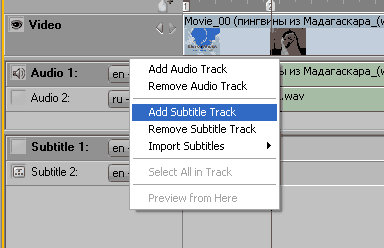
Для того, чтобы создать субтитры, выберите нужный фрагмент на таймлинии и нажмите кнопку Add Subtitle.
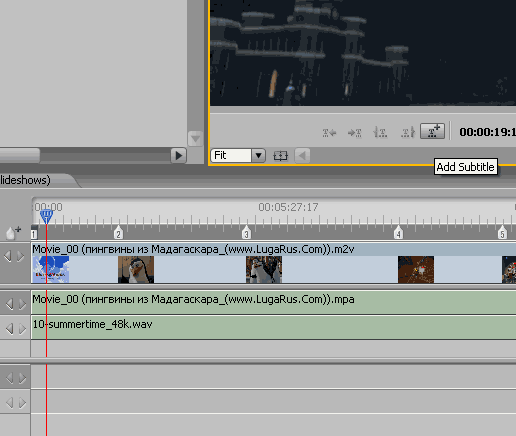
На мониторе появится окно и курсор, где вы можете смело вписывать текст. Здесь вам может понадобиться окно Character.
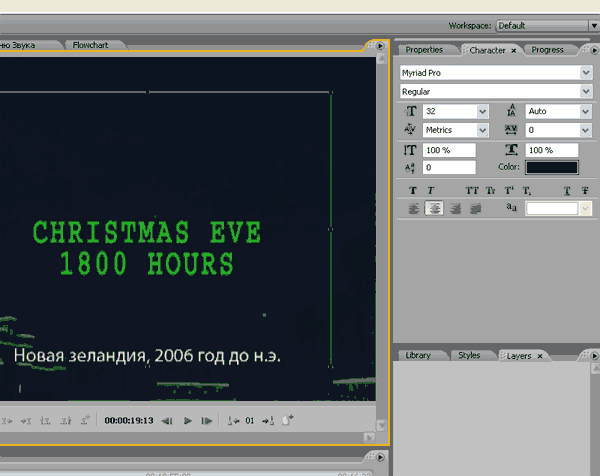
В этом окне вы можете настроить расположение текста, выбрать шрифт, его цвет и т.д. Длительность субтитра создается автоматически, изменить ее можно на той же таймлинии простым движением мыши.
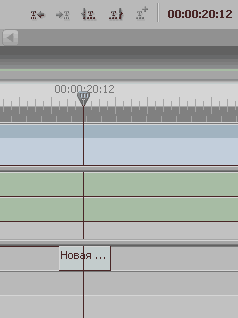
На второй линейке субтитров создайте вторые субтитры, например, на английском языке.
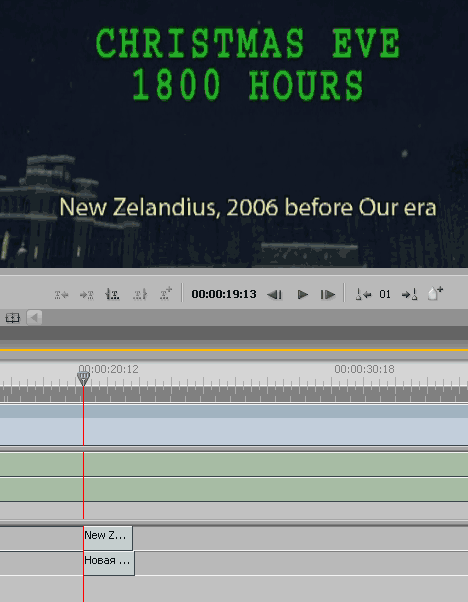
Перейдите к настройке меню. Создайте, как и в меню звука, несколько ссылок. Например, субтитры Off, Субтитры 1 и Субтитры 2. Далее создайте кнопки, а затем присвойте им ссылки.
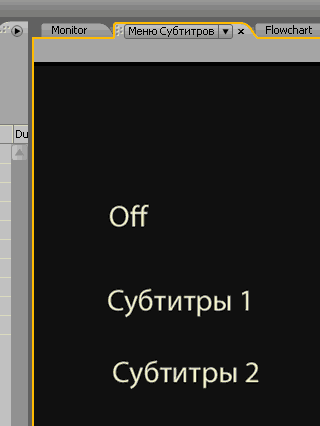
Кнопке «Субтитры 1» нужно присвоить ссылку на трек1 и на Главное меню, кнопке «Субтитры 2» — на трек2 и Главное меню, ну а кнопке «Off«, соответственно — Off и опять же Главное меню. Итак, в строке Link окна свойств должны появиться символы S1 и S2. Настройка субтитров готова.
Выполните вторую часть задачи, а именно: к меню звука добавьте фоновую музыку. Для этого щелкните по меню звука кнопкой мыши и в окне свойств перейдите во вкладку Motion. Как уже говорилось выше, в данной вкладке присутствуют две строки: Audio и Video. Щелкните и удерживайте левой кнопкой мыши значок рядом со строкой Audio и перетяните мышь на требуемый звуковой файл.
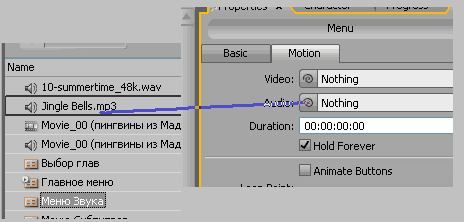
После этого в строке Audio появится название вашего файла. Не забудьте выставить длину звукового файла, а также точку начала проигрывания и количество повторений. Абсолютно таким же образом создается фоновый видеоклип для меню субтитров. Только не забудьте все-таки задать клипу приемлемую длительность, иначе объем получившегося DVD вас неприятно удивит. Для субтитров меню Motion будет выглядеть так.
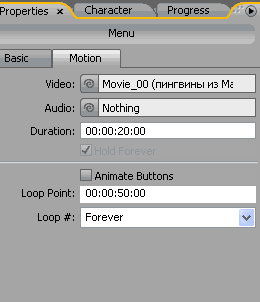
Прежде чем наслаждаться результатом своих трудов, не забудьте повторить Render motion menus. Иначе вы просто ничего не увидите. Результат, как всегда, можно посмотреть, используя Preview.
Напоследок обратим внимание на вкладку Flowchart (схема проекта). Очень полезная вещь. Данный инструмент позволит вам полностью удостовериться в правильности ваших ссылок. Здесь наглядно видно, что за чем следует, здесь можно добавить ссылки или убрать лишние элементы.
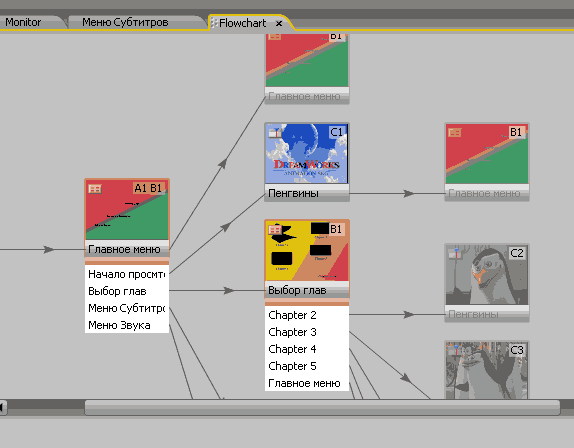
Вот ваш проект и готов, осталось лишь его скомпилировать и записать на диск, однако предварительно хорошо было бы его проверить. Нажмите File-> Check Project.

Появится окно проверки проекта.
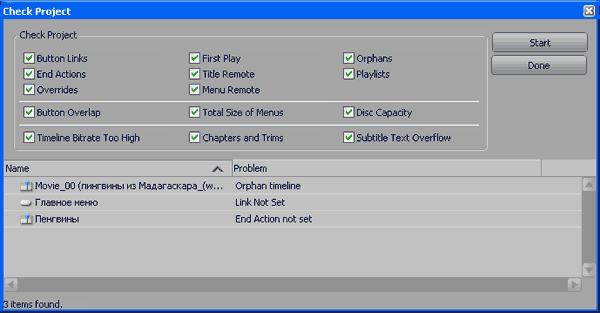
Нажмите кнопку Start, и у вас могут появиться сообщения об ошибках. Исправив все ошибки, например проставив недостающие ссылки, можно приступать к компиляции проекта. Encore позволяет создать папку с файлами DVD-видео, образ диска, или сразу записать диск. Для этого щелкните File->Build DVD->, далее выберите подходящее действие по вашему усмотрению.
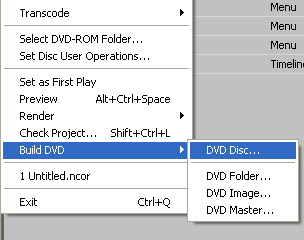
В примере создадим DVD-Folder. При выборе нужного действия появится окно.
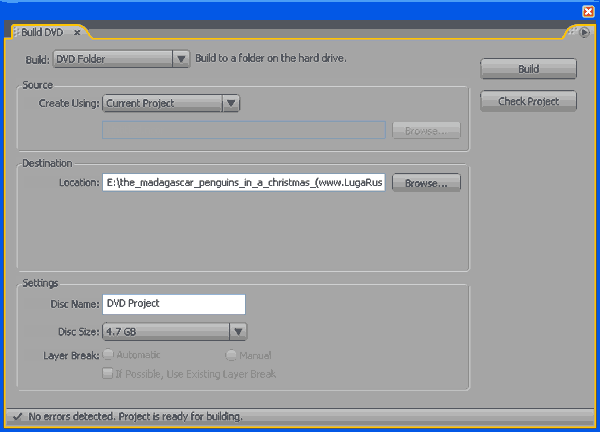
Укажите в строке Location путь к папке, где будут созданы файлы. Нажмите кнопку Build и ждите готовности проекта.
Теперь ваш DVD-видео диск полнофункционален и похож на лицензионный — действительно всем на зависть!
Мы не можем отрицать, что спрос на DVD за последние годы сократился. Одной из причин этого является доступность современного хранилища, которое намного удобнее и совместимо с ноутбуками, экранами телевизоров и даже телефонами. Но вот в чем дело, DVD намного надежнее, если вы хотите предотвратить повреждение данных. Конечно, когда на карту поставлены ваши записанные на камеру воспоминания, вы не хотите, чтобы произошла нежелательная ситуация. Верно?
Оставайтесь с нами, и мы поможем вам как сделать DVD с Adobe Encore.
- Часть 1. Как сделать DVD с помощью Adobe Encore
- Часть 2. Лучшая альтернатива Adobe Encore
- Часть 3. Часто задаваемые вопросы о создании DVD с помощью Adobe Encore
Часть 1. Как сделать DVD с помощью Adobe Encore
Если вы приобрели Adobe Premiere Pro, вы также получите Adobe Encore как часть пакета. Многие рассматривают эту автономную программу как конкурента другим первоклассным инструментам для создания DVD. С другой стороны, он содержит функцию перетаскивания, которая позволяет более эффективно маневрировать вашим проектом.
Далее, если вы хотите создать меню DVD, вы можете сделать это с помощью Encore и Photoshop. Но для этой статьи рассмотрите приведенные ниже шаги по записи файлов на DVD.
Шаг 1
Если ваши видео находятся в Premiere Pro, вам следует сначала экспортировать их. Перейти к Файл > Динамическая ссылка Adobe > Отправить на бис сделать это.
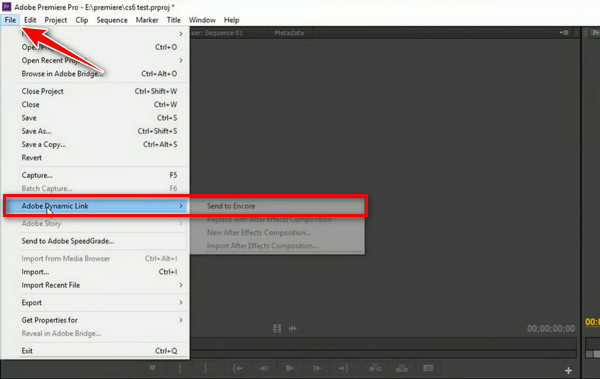
Шаг 2
Затем, когда Adobe Encore запустится, укажите, где вы хотите разместить свой вывод, и поместите заголовок. С другой стороны, отметьте DVD Как ваш Авторский режим. Затем измените Телевизионный стандарт в зависимости от вашей страны, и когда все настроено, нажмите OK.
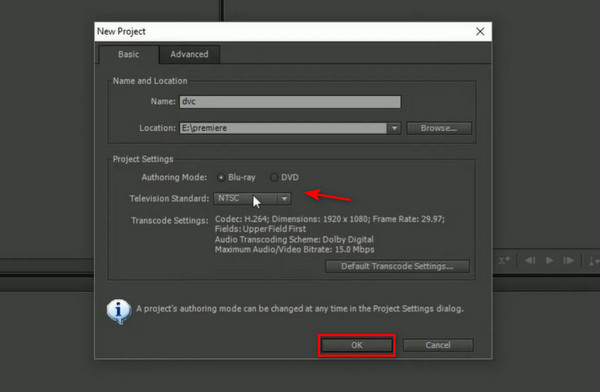
Шаг 3
На этот раз вы уже должны увидеть свой контент из Premiere, загруженный на временную шкалу Adobe Encore. Чтобы начать процесс транскодирования, перейдите в Файл > Экспортировать > Медиа.
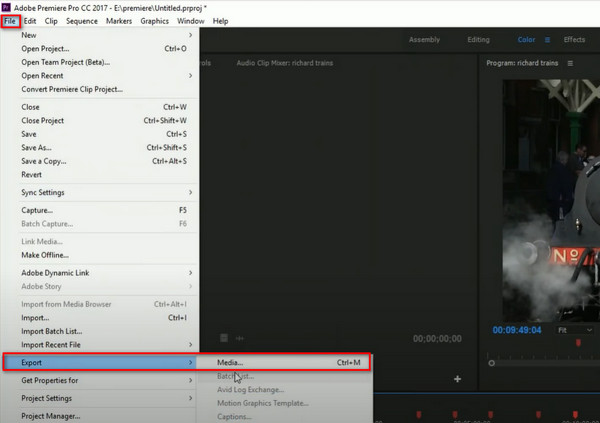
После этого на Настройки экспорта, опустите Формат , а затем выбрать MPEG2-DVD. Сделайте то же самое на Предустановленная и выберите свои предпочтения в опциях. Если вас интересует битрейт, вы также можете изменить его. Когда закончите, нажмите Экспортировать кнопку в нижней части интерфейса.
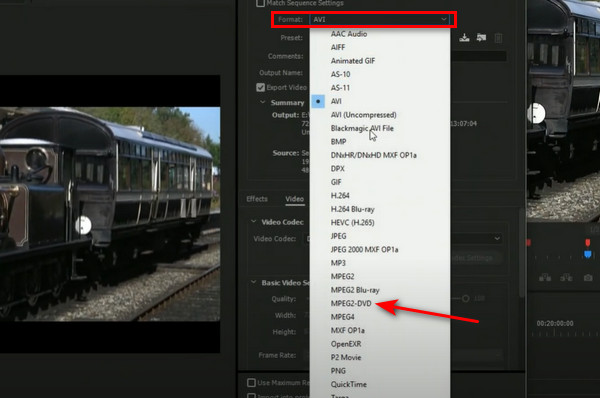
Шаг 4
После перекодирования файла перезапустите Encore и запустите Новый проект. На этот раз вы будете импортировать ранее преобразованные файлы. После загрузки их на временную шкалу перейдите к строить раздел и установите диск на лоток. Затем нажмите на строить кнопку, и процесс начнется.
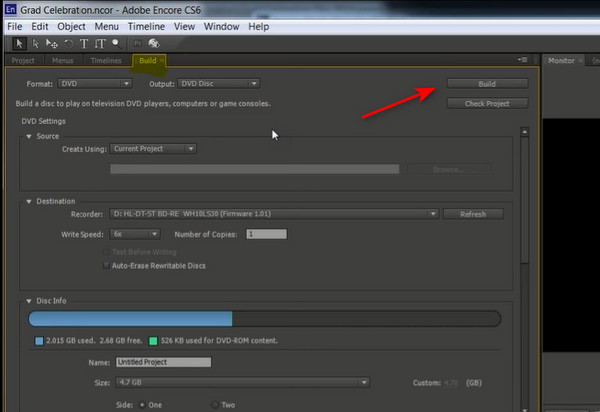
Несомненно, любая программа, выпущенная командой Adobe, отлично подходит для профессиональных услуг. По мере того, как вы будете исследовать дальше, вы обнаружите множество замечательных функций, которыми обладает Adobe Encore. Однако, поскольку этот инструмент больше не является пакетом Adobe Premiere Pro CC, вы не хотите импульсивно обновляться и тратить много денег.
Часть 2. Лучшая альтернатива Adobe Encore
Наоборот, вы можете попробовать инструмент, который одновременно занимается авторингом и редактированием видео. В этом отношении, AnyMP4 DVD Creator это надежный инструмент, который вы можете иметь. Он известен своим удобным интерфейсом, и большинству новичков нравится его опыт. С другой стороны, он поддерживает сотни видеоформатов, включая MOV, MP4, MPEG, AVI FLV и другие, и записывает их на DVD/ISO или Blu-ray.
Еще одна вещь: эта автономная программа также может настроить меню DVD, чтобы сделать ваш DVD более интерактивным и уникальным. AnyMP4 DVD Creator предоставляет вам различные шаблоны, подходящие для любого случая. Ниже наша команда предоставила простые способы записи DVD с использованием лучшего альтернативного инструмента для Adobe Encore.
Шаг 1
Установите лучший альтернативный инструмент
Прежде всего, нажмите кнопку «Бесплатная загрузка» ниже, чтобы получить AnyMP4 DVD Creator. После этого следуйте указаниям мастера установки, чтобы установить программу на свое устройство.
Шаг 2
Импорт файлов для записи
Когда программа запустится, нажмите кнопку DVD-диск как тот, над которым вы будете работать. После этого нажмите на Добавить файл мультимедиа в центре интерфейса. Когда появятся всплывающие окна, выберите файлы, которые вы хотите записать, из папки вашего компьютера и импортируйте их в программу.
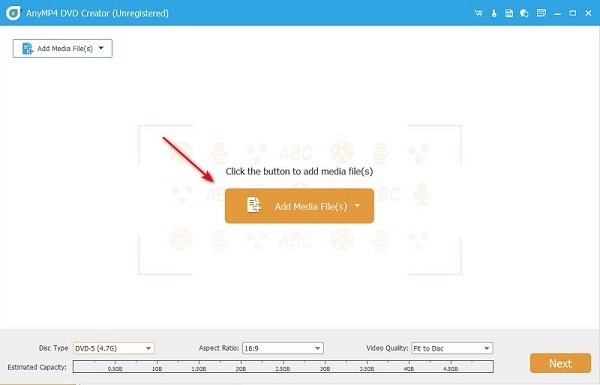
Шаг 3
Настройте DVD
Убедитесь, что вы не пропустите эту часть. В нижней части интерфейса есть индикатор размера файла, который понадобится вашему видео для записи DVD. Поэтому выберите Тип диска соответствует емкости вашего диска (DVD 5 или DVD 9). С другой стороны, вы можете придерживаться значения по умолчанию в Соотношение сторон и Качество видео. После этого нажмите Следующая.
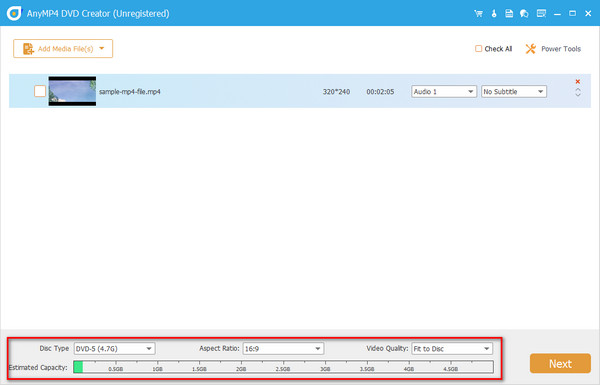
Шаг 4
Настройка меню DVD (необязательно)
Теперь вы окажетесь в разделе, где вы можете создать меню DVD. Если вы хотите его для себя, изучите этот интерфейс и выберите нужный шаблон. Если он вам не нужен, просто отметьте вкладку меню «Нет». После этого нажмите на Гореть кнопку.
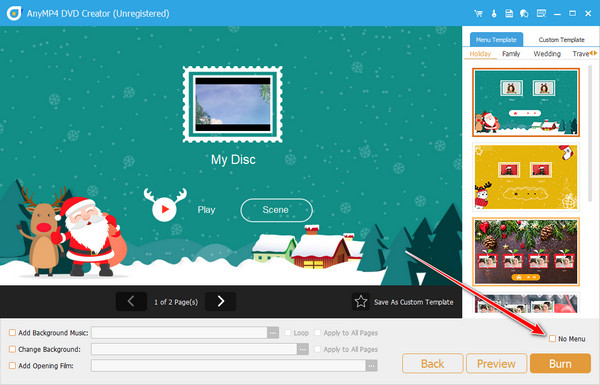
Шаг 5
Начать процесс записи
Наконец, настройте параметры процесса разработки. На Телевизор Стандартный, выберите, используете ли вы PAL or NTSC. Кроме того, выберите, хотите ли вы начать с меню или заголовка. С другой стороны, установите диск на лоток DVD и проверьте, распознает ли его программа. Когда закончите, нажмите Start.
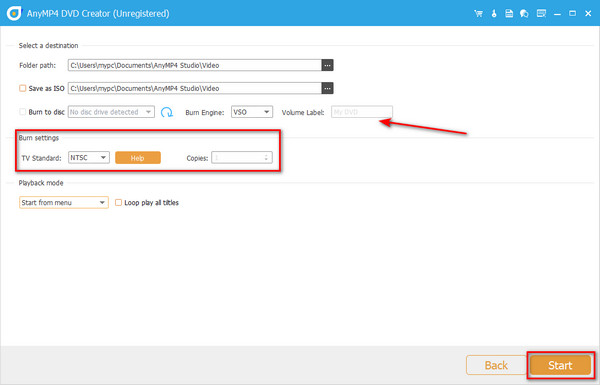
Дальнейшее чтение:
FLV to DVD Creator — Как записать FLV файлы на DVD с легкостью
Как создать DVD из Adobe Premiere Pro (для начинающих)
Часть 3. Часто задаваемые вопросы о создании DVD с помощью Adobe Encore
Могу ли я записать DVD без Encore?
К сожалению, Adobe encore больше не поставляется вместе с Adobe Premiere CC. Однако вы можете создавать видео, пробуя альтернативные приложения.
Могу ли я экспортировать видео из Premiere в Encore?
Определенно да! Вы можете экспортировать свой контент в Premiere, чтобы создавать его в Adobe Encore. На самом деле вам также понадобится Adobe Encoder для преобразования ваших файлов в DVD-совместимый формат, такой как MPEG-2.
В чем разница между NTSC и PAL?
возможно, вы постоянно видите эти две опции в телевизионном стандарте. Выбор того, какой из них выбрать, зависит от страны, в которой вы живете. Обычно NTSC используется в Америке, а PAL — в Азии и Европе.
Заключение
Вуаля! К этому времени вы научились как создать DVD с Adobe Encore и с AnyMP4 DVD Creator. Хотя оба имеют разные функции, вы можете решить, какой из них использовать. Если вы новичок и считаете Encore довольно сложным, вы можете выбрать AnyMP4 DVD Creator. Эта автономная программа очень проста и не требует большого технического мастерства. С другой стороны, если вы получите пакет программ Adobe, как было сказано некоторое время назад, улучшение ваших навыков редактирования видео в Premiere может стать хорошим началом.
Что вы думаете об этом посте.
- 1
- 2
- 3
- 4
- 5
Прекрасно
Рейтинг: 4.9 / 5 (295 голосов)
Создание DVD-видео диска — операция несложная, доступная практически в любом «кухонном» любительском видеоредакторе. Однако, чем проще редактор и чем меньше у него возможностей, тем примитивнее результат работы — вряд ли кто-то оспорит данное утверждение.
Красивый, оригинальный, удобный и не содержащий ошибок интерфейс DVD-видео диска — это как красивая обёртка для дорогого товара. Такой диск не стыдно показать кому угодно, пусть даже собственно фильм и не представляет для постороннего человека никакого интереса — но ведь встречают по одёжке!
Сегодня мы попытаемся создать такой DVD-видео диск. Фильм, который будет на нём представлен, — обыкновенная семейная хроника, от которой у постороннего человека уже через пять минут просмотра сведёт скулы. Впрочем, речь не о художественной ценности материала, а о том, какую обёртку мы для него приготовим.
Итак, перед нами — смонтированный в Adobe Premiere Pro CS4 часовой продолжительности фильм, представляющий собой несложную нарезку из клипов с музыкальным сопровождением и кое-где расставленными поясняющими титрами. Каждый титр означает начало следующей по смыслу фильма главы. Именно поэтому на таймлинии расставлены метки глав точно в тех местах, где расположены титры. Каждая метка главы имеет короткое текстовое описание, просто чтобы нам впоследствии не запутаться.
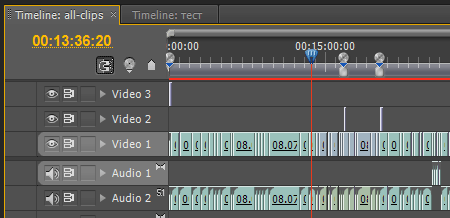
Чтобы весь смонтированный фильм перенести в Adobe Encore, воспользуемся командой File -> Adobe Dynamic Link -> Send to Encore.
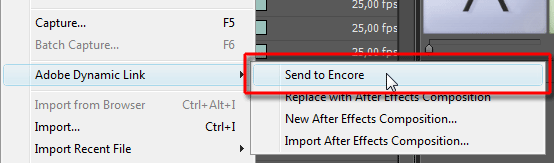
Начнется запуск означенной программы, однако рано закрывать Premiere Pro — он может еще пригодиться, пусть работает свернутым на панель задач.
Как только Encore будет готов к работе, тут же появится диалоговое окно, где вам предстоит выбрать тип создаваемого диска, настроить параметры звука, определить максимальный битрейт видео (в случае, если его необходимо перекодировать).
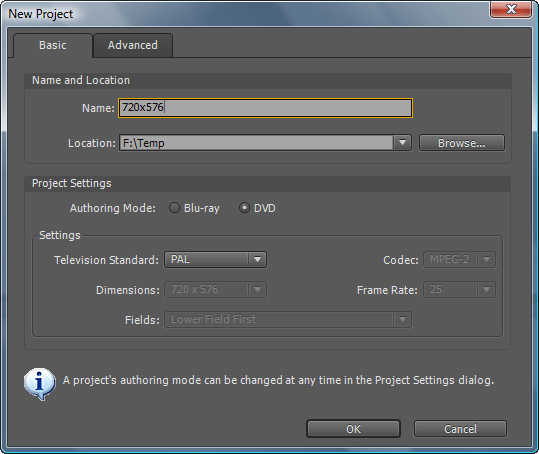
После завершения необходимых настроек, откроется рабочее пространство программы, где во вкладке Project (можно называть её копилкой проекта) находятся два объекта: Timeline с именем проекта, и Premiere Pro Sequence с тем же именем.
Чтобы начать работу с таймлинией, дважды щелкните по строчке Timeline в копилке проекта. Таймлиния развернется в нижнем поле, представляя собой один-единственный клип. Однако, как мы видим, метки глав, которые были расставлены ещё при монтаже в Premiere Pro, никуда не делись — они находятся в верхней части таймлинии.
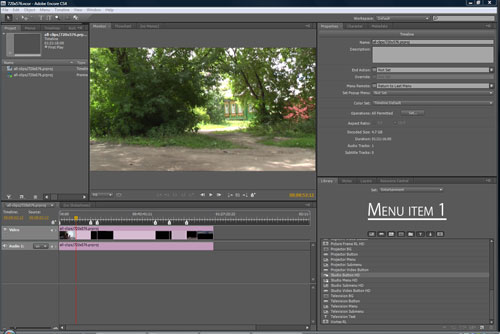
Мы создали проект, импортировав его из Adobe Premiere Pro. Но неужели это единственный способ? Конечно, нет! DVD-видео диск здесь можно создать, импортировав какой угодно материал. Чтобы пополнить копилку проекта новыми файлами, достаточно дважды щелкнуть мышью в пустой области вкладки Project, либо, нажав здесь правой кнопкой мыши, выбрать команду Import as -> Asset…
В данном случае и таймлинию придется создавать вручную, но это не представляет какой-либо сложности: New -> Timeline, либо сочетанием клавиш Ctrl+T. Остается лишь перетащить импортированный видеоматериал из копилки проекта на таймлинию, и можно приниматься за работу.
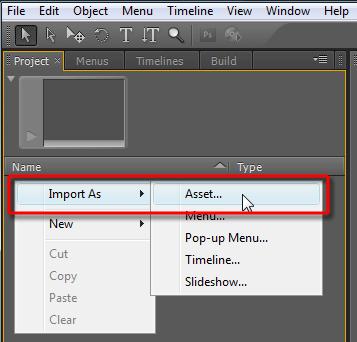
Следующая операция совсем необязательна, она лишь может быть рекомендована для тех случаев, когда фильм — «бессюжетный», представляет собой типичную хронику, интересную лишь ограниченному кругу лиц (семья, коллектив и т.п.). Здесь часто бывает необходимо быстро перемотать фильм на 5-10-15 минут вперед, чтобы показать зевающему зрителю какой-то (возможно, единственный) достойный его внимания сюжет. Конечно, метки глав, которые мы заблаговременно расставили, вполне могут служить такими точками отсчета — но их слишком мало, и необходимость создания промежуточных невидимых глав все-таки возникает.
Проще всего создать такие главы, воспользовавшись командой Add Chapter Points at Intervals… Суть операции понятна из названия — расстановка меток через определенный интервал.
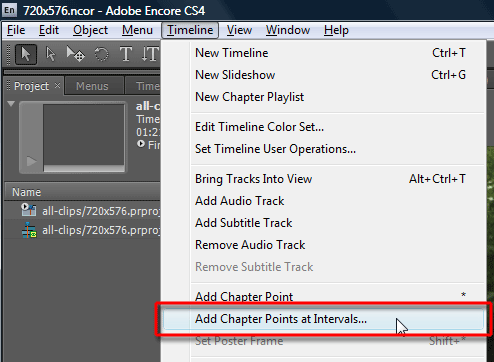
Этот интервал выставляется вручную, по умолчанию он составляет оптимальные 5 минут. Если отметить флажком пункт Remove Existing Chapter Points, то при этом все существующие в проекте метки глав будут удалены, их заменят созданные через выбранный интервал.
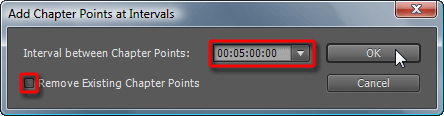
Автоматическая расстановка глав происходит в считанные секунды.
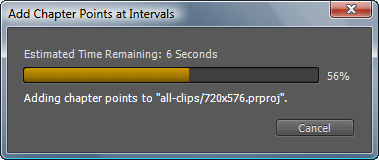
Теперь мы имеем достаточное количество меток по всей продолжительности фильма, что облегчит дальнейшую навигацию по нему (достаточно будет нажать кнопку Next на пульте управления плеером, и вы перескочите вперед на установленные пять минут).
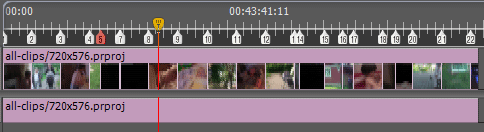
Да, меток действительно много, но как же теперь найти нужные нам, те, которые мы расставили ещё во время монтажа в Premiere Pro?
Если щелкнуть на таймлинии по любой метке, то она окрасится в розовый цвет, при этом во вкладке Properties отобразятся название и другие параметры метки (данная вкладка находится в правой верхней части рабочей области).
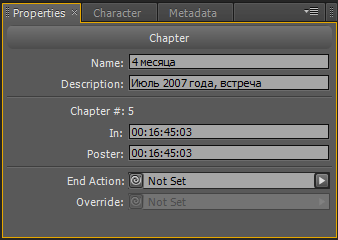
К вкладке Properties мы ещё вернемся, а пока разберемся с отображением имен меток прямо на таймлинии — в самом деле, не щелкать же по каждой из множества меток, чтобы найти нужную?
Чтобы имя метки можно было увидеть прямо на таймлинии, нужно щелкнуть правой кнопкой мыши и выбрать из выпадающего меню пункт Show Chapter Names.
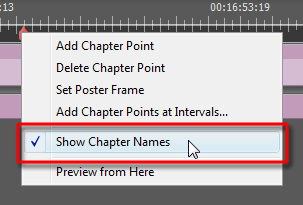
Теперь названия глав появились прямо на таймлинии, справа от меток. Отныне мы всегда сможем отличить метку, установленную вручную (которая в дальнейшем будет играть роль начала главы на диске), от «интервальных» меток, установленных автоматически и носящих стандартные названия Chapter #.
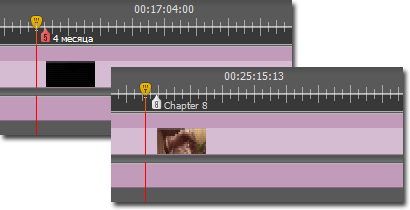
Кажется, пора создавать меню диска. В выборе шаблона меню поможет вкладка Library, вызываемая клавишей F7. Здесь, в выпадающем списке, выберите нужную категорию шаблонов из девяти представленных: Corporate (корпоративный), Education (образование), Entertainment (развлечения), General (общего назначения), Government (правительственно-управленческий), Sports (спортивный), Technology (технический), Travel (путешествия), Wedding (свадебный). Каждая из категорий содержит от пяти до 30 шаблонов меню.

В нашем случае вполне подойдет шаблон New Baby… Пусть вас не смущает буквосочетание HD (High Definition) в названии шаблона, все равно при создании обычного SD DVD размеры меню пересчитаются автоматически вместе с видеоматериалом.
При выделении любого из шаблонов его миниатюра появляется в верхней части вкладки Library.

Двойным щелчком данный шаблон может быть добавлен в копилку проекта как новый элемент, при этом меню тут же откроется для редактирования в окне Menu Edit. Обратите внимание — в Library содержатся два шаблона с названием New Baby. Всё правильно, первый — это основное меню, второй — submenu, дополнительное (подменю), на которое будет осуществлен переход, если зритель не пожелает смотреть фильм целиком, а захочет выбрать сцену, с которой ему начинать просмотр. Поэтому заодно щелкнем и по второму шаблону, добавив и его в копилку проекта.
Поработаем над заглавным меню. Двойной щелчок по строке New Baby Menu HD откроет данное меню для редактирования.
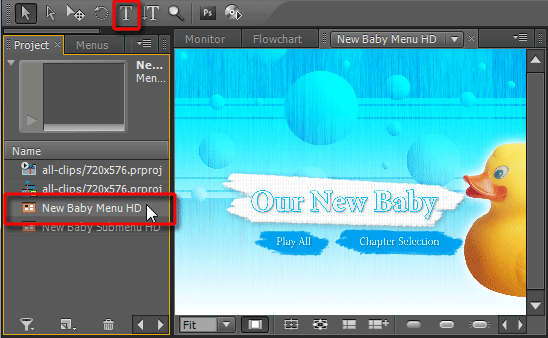
Здесь, как видим, необходимо исправить текст, а затем, расставить ссылки. Займемся первым — активируйте инструмент Text Tool, щелкните по строке, которую требуется изменить, и введите нужный текст.
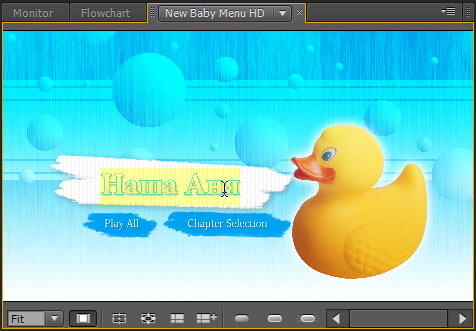
Шрифт, его размер и остальные свойства можно изменить во вкладке Character.
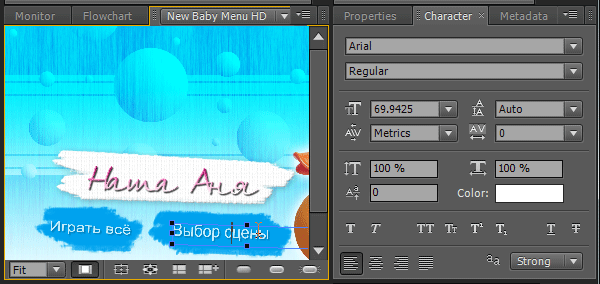
Если требуется изменить стиль шрифта, то к вашим услугам небольшая библиотека текстовых стилей, для их отображения во вкладке Library нужно щелкнуть кнопку «Toggle display of text items»:
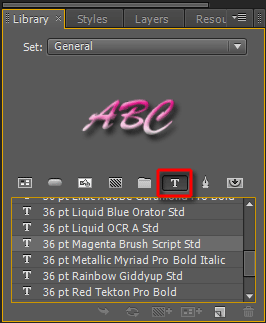
Разобравшись с оформлением, перейдём к ссылкам. В нашем заглавном меню присутствуют два интерактивных элемента — надписи «Играть всё» и «Выбор сцены«. Активируйте инструмент Selection Tool (V), и выделите первую надпись. Откройте вкладку Properties (в дальнейшем эта вкладка будет основным полем деятельности), и обратите внимание на строку Link:
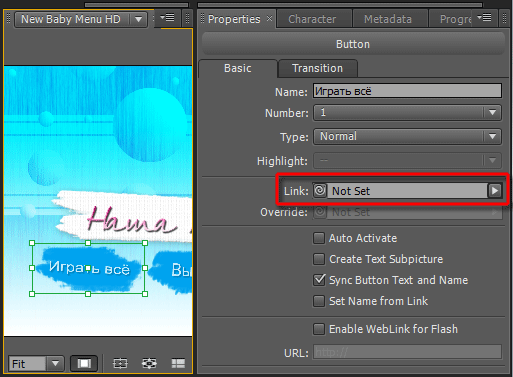
В выпадающем диалоге данной строки перечислен весь импортированный в проект материал, включая и созданные во время работы объекты. Всё, что теперь требуется, — это быть внимательным при выборе нужной ссылки. Поскольку первая наша надпись — «Играть всё» — должна вести к самому началу фильма, то и ссылку поставим соответствующую:
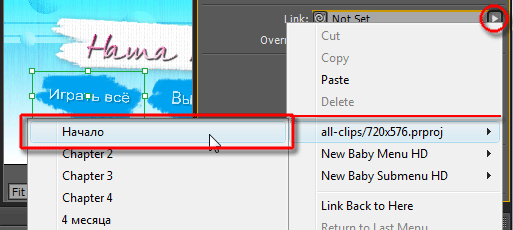
Теперь задачка сложнее — вторая ссылка («Выбор сцены») должна вести на второе меню — Submenu. Активируем надпись, и тем же образом выберем строку New Baby Submenu HD -> Default.
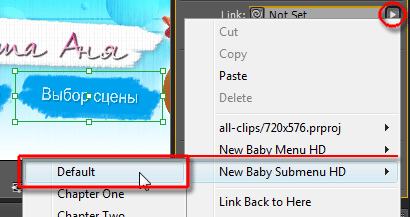
Хорошо, с первым меню разобрались. Щелкнем для редактирования по второму меню в копилке проекта. Здесь тоже требуется изменить текст, а впоследствии расставить ссылки. Изменить текст — не проблема, но со ссылками снова следует быть аккуратнее. Выделим в меню, например, кнопку с названием «4 месяца» — ссылка, которую следует присвоить данной кнопке, будет следующей:
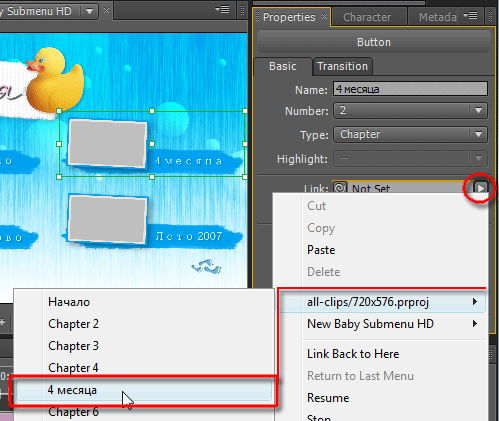
Так же поступим и со всеми остальными ссылками, которые должны вести к меткам глав, расставленных нами вручную. Итак, ссылки расставлены, но что же это? Незадача: вместо миниатюр видео, некоторые кнопки представляют собой черные прямоугольники…

Почему? Сейчас всё станет понятно. Как видно на рисунке, если переместить ползунок таймлинии точно в метку главы №5 с названием «4 месяца», вместо видео мы наблюдаем черный экран. Разумеется, ведь во время монтажа использовались переходы между сценами. В данном случае таким переходом является Deep to Black, представляющий собой затемнение стыкуемых кадров с уходом в чёрное.
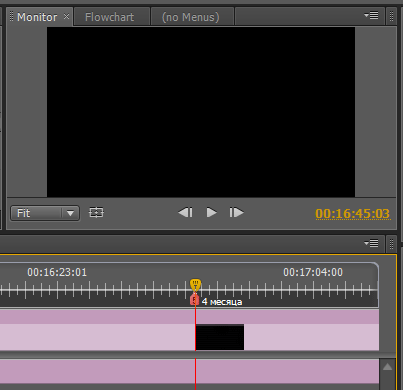
Данная проблема решается просто: выделите проблемную метку главы (которая ведет к кадру, представляющему собой черный фон), так, чтобы она окрасилась розовым. А теперь передвиньте ползунок по таймлинии чуть вправо, при этом следя за изображением в окне Monitor. Передвигайте ползунок до тех пор, пока в этом окне не появится подходящий кадр, который, как вам кажется, является наиболее уместным для обозначения очередной главы фильма.
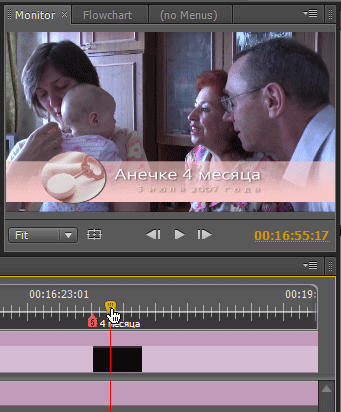
Теперь, не сдвигая курсора, нажмите правую кнопку мыши и выберите из выпадающего меню команду Set Poster Frame. Тем самым мы присвоим метке главы тот кадр, на котором в данный момент стоит ползунок таймлинии.
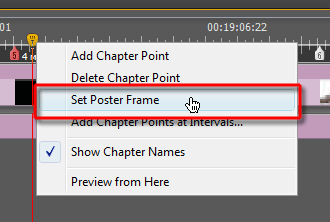
Как только мы присвоили кадр, на таймлинии появилась ещё одна метка, носящая тот же номер, что и предыдущая. Однако приглядитесь — форма метки иная, и представляет собой обыкновенный прямоугольник. Не беспокойтесь, данная метка не войдет в число навигационных ориентиров будущего DVD-диска, это — лишь своеобразная фотография предыдущей навигационной метки.
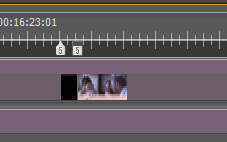
Проделайте то же с остальными метками глав, которые отображаются в нашем меню черными квадратами (перескакивать от метки к метке можно, нажимая Page Up и Page Down). А теперь взгляните на окно редактирования меню. Всё в порядке?
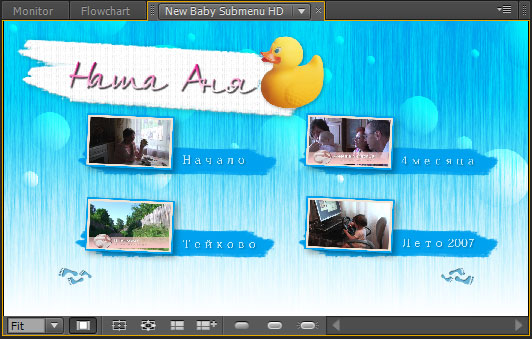
Осталось лишь разобраться, что это за маленькие следы в нижней части меню. Это — навигационные кнопки, которые ведут назад и вперед. Имей наш фильм не четыре, а более частей (глав), то мы создали бы еще одно submenu, соответственно, детские пяточки в правой нижней части меню вели бы на следующее по счету подменю. Поскольку наш фильм разбит лишь на четыре главы, то дополнительное меню нам не нужно, следовательно, эту кнопку можно удалить, как лишнюю. Зато левым пяточкам следует присвоить ссылку, ведущую назад, к главному меню:
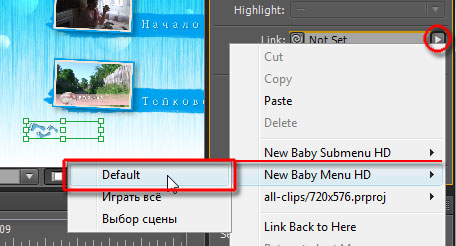
Теперь, кажется, всё в порядке. Стоит проверить работоспособность ссылок, вдруг где-то допущена ошибка. Нажмите Ctrl+Alt+Space, либо, щелкнув по окну редактирования меню правой кнопкой мыши, выберите из выпадающего меню команду Preview from Here. Откроется окно плеера, где созданное нами меню ведет себя так же, как оно будет себя вести при воспроизведении на обыкновенном DVD-проигрывателе. Пощёлкайте по ссылкам, проверьте, не наползают ли какие-либо объекты друг на друга при их активации.

Опять неприятность: при наведении курсора (активации) на кнопку с детскими пяточками вдруг появляется слово Previuos. Конечно, мы не могли его раньше видеть, а точнее — просто не обратили внимания. Как же его изменить, если оно не отображается на экране редактирования меню? К сожалению, без редактирования графики нам тут не обойтись. Данное слово — «Previous» — является ничем иным, как графическим элементом, расположенным в одном из слоёв psd-документа. И чтобы это слово изменить, придется поработать в графическом редакторе, поддерживающем работу с многослойным форматом PSD. Нажмите правой кнопкой мыши в окне редактирования меню, и выберите команду Edit Menu in Photoshop.

Откроется графический редактор, который сопоставлен в вашей системе с данным типом файлов (им может быть любой редактор, необязательно Photoshop). Если вы знакомы с работой в данной программе — тем проще. Впрочем, ничего мудрёного здесь не предвидится — достаточно лишь найти нужный слой в панели Layers (его видимость отключена, поэтому включите её временно), дважды щелкнуть по пиктограмме с буквой T, и в окне редактирования ввести нужный текст. Не забудьте по окончании редактирования вновь отключить видимость слоя, щелкнув по пиктограмме в виде глаза, но ни в коем случае не меняйте название слоя в панели Layers! Сохраните измененный документ (Ctrl+S) и выйдите из программы.
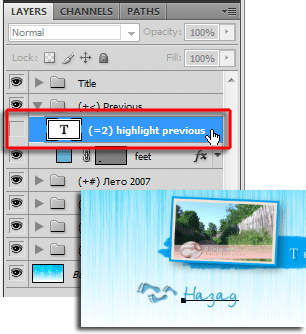
Снова запустите предварительный просмотр (Ctrl+Alt+Space) — теперь совсем другое дело!
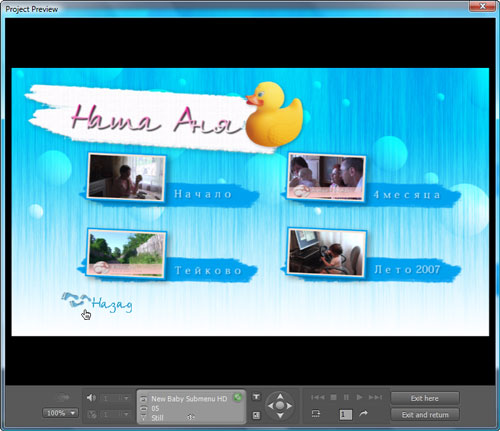
Всё-таки чего-то не хватает. Наверное, движения. Конечно, меню просто необходимо анимировать, так, чтобы видеокадры в кнопках стали «живыми», представляя собой короткие видеоролики. Это делается просто — во вкладке Properties найдите пункт Animate Buttons и отметьте его флажком. В строке, находящейся выше, напечатайте нужную продолжительность анимации (в нашем случае продолжительность составляет 30 секунд). Если вы хотите, чтобы анимация в меню проигрывалась постоянно, то остальные параметры затрагивать не следует.
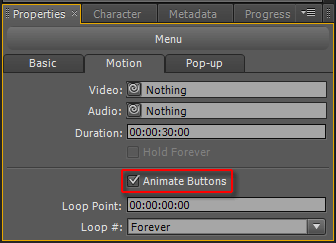
А где видео — там без звука никуда! Озвучим наше меню. Импортируем в копилку проекта подходящую композицию (продолжительность композиции должна составлять те же 30 секунд, в противном случае, длительность анимации меню изменится, сравнявшись с длительностью музыки). Теперь, зацепив кнопку с пиктограммой спирали, перетяните курсор мыши на импортированную музыкальную композицию и отпустите кнопку мыши. Теперь меню озвучено.
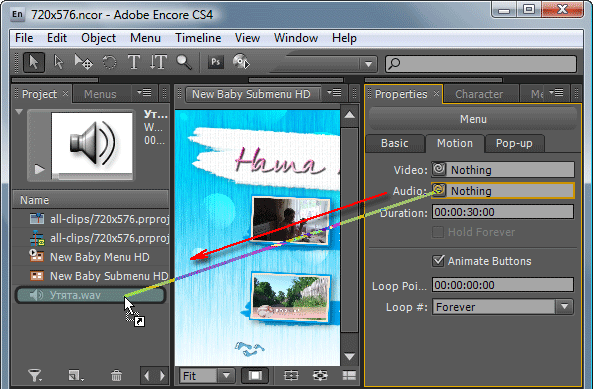
Чтобы наглядно оценить работу получившегося меню, нажмите Ctrl+Alt+Space, и в появившемся окне просмотра запустите просчёт (Render current motion menu or slideshow).
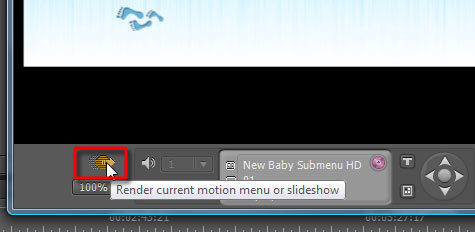
Для просчёта этого 30-секундного ролика (анимированное меню — это, собственно, и есть обыкновенный видеоролик заданной продолжительности) требуется немало времени. Объясняется это просто: представьте себе, сколько работы требуется выполнить программе, чтобы взять из каждой сцены по 30 секунд видео, изменить размер этих роликов, вставить их в кнопки меню, наложить поверх всего нужный текст и графику, и, наконец, сведя все объекты воедино, ещё и закодировать в MPEG-2.

По окончании просчета запустите проигрывание меню, и, если всё в порядке, то работу можно считать почти оконченной. Осталось лишь запустить процесс создания DVD — и можно отдыхать столько времени, сколько потребуется программе для построения структуры диска и перекодирования всего материала в DVD-совместимый MPEG-2.
Прервем ненадолго создание диска, и устроим нашему проекту настоящее испытание: отдадим его на растерзание встроенному в Encore модулю поиска ошибок. Данный модуль запускается кнопкой со скромным названием Check Project, находящейся во вкладке Build. По нажатию этой кнопки появится окно, где пользователь может отметить флажками нужные ему пункты, а лучше — оставить всё так, как есть (по умолчанию активированы все пункты).
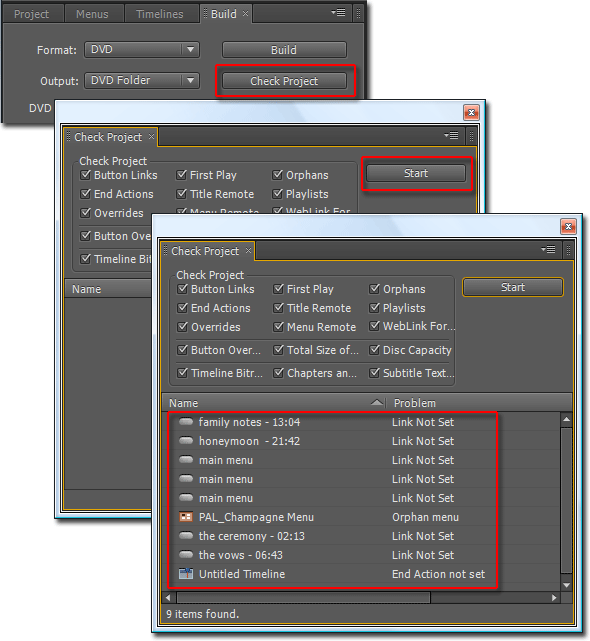
Почти мгновенно модуль выдаст список ошибок, которые пользователь по недосмотру или забывчивости натворил во время работы. Но список этот — непростой. Он интерактивный, что делает данный модуль просто незаменимым. Стоит лишь дважды щелкнуть по любой строке с описанием ошибки, как в окне монитора откроется нужное меню и выделится объект, содержащий эту ошибку. Таким образом вам нет необходимости выискивать такие объекты самостоятельно, нужно всего лишь исправить ошибку в уже найденном и выделенном объекте. Трудно переоценить пользу от такого модуля, особенно, если работа ведется в сложном, содержащем множество объектов и внутренних ссылок, проекте.
Теперь ознакомимся ещё с одним крайне удобным инструментом — Flowchart. В данной вкладке наглядно отображается структура созданного вами диска. Все объекты, участвующие в проекте, представлены здесь в виде связанных между собой деталей конструктора. Щелкнув по любому из них, вы тут же увидите, с чем связан данный объект. Здесь же можно изменить связи, просто перетащив стрелки с одного объекта на другой.
Flowchart — это не новинка, данный инструмент присутствовал и в ранних версиях Adobe Encore. Однако, в отличие от прежних версий, теперь масштаб отображения «конструктора» можно изменить специальным ползунком — ещё одно эргономическое усовершенствование.
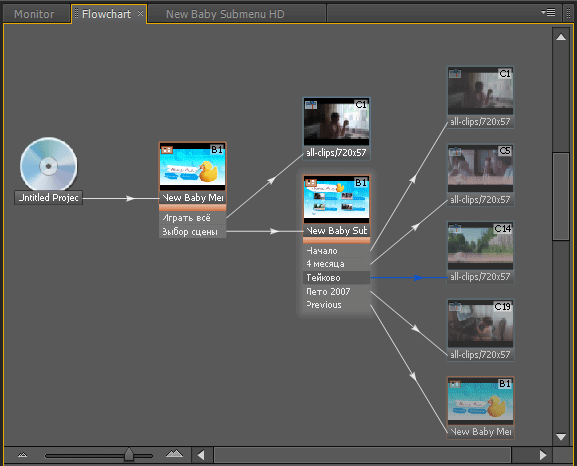
Переходим к созданию DVD-диска. Откройте вкладку Build (F2), здесь необходимо изменить некоторые настройки. Во-первых, не следует сразу записывать DVD на оптический носитель (если вы, конечно, не уверены на 100% в правильности своих действий). Разумнее предварительно создать папку с файлами DVD-видео, для чего в строке Output (1) следует выбрать пункт «DVD Folder». Следующий шаг — выбор папки на жестком диске, где будут созданы эти файлы (2). И нужно не забыть определиться с ёмкостью оптического носителя, куда вы планируете в дальнейшем записать готовый диск (3).
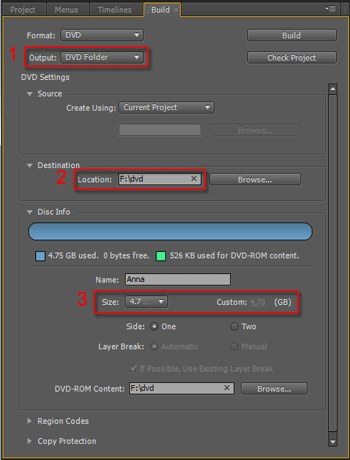
Есть смысл оставить остальные параметры без изменений, если вы, конечно, не хотите включить региональную защиту и защиту от копирования, которые нынче взламываются безо всякого труда.
Закончив с настройками и проверкой, нажмем кнопку Build и дождемся окончания операции.
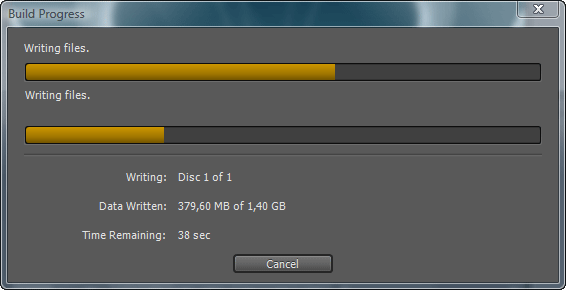
Время просчета целиком и полностью зависит от того, какой видеоматериал импортирован в программу. Если ваше видео требует перекодирования, то, соответственно, время работы увеличится в десятки и более раз. Если в проект был импортирован материал, соответствующий спецификациям DVD-видео и настройкам проекта, то повторного его пересчета не будет — программа всего лишь упакует его в созданную вами красивую DVD-обёртку.
В версии Encore CS4 немного новшеств, из наиболее важных следует отметить исчезновение возможности авторинга Blu-ray дисков объемом с обычный DVD-диск (в последнее время можно было наблюдать данную опцию во многих программах, она удобна как временная альтернатива «блюрейным» носителям — ведь они всё еще очень дорогие). Теперь можно создавать только Blu-ray диски двух видов: 25 и 50 ГБ (однослойный и двухслойный BD, соответственно).
Следующая достойная внимания новинка — это функция автоматического создания многоуровневых меню, вызываемая командой Menu -> Create Chapter Index. Эта команда активна лишь в том случае, если на таймлинии расположен какой-либо материал, а также, если в копилке проекта уже находится меню, в котором присутствует ссылка на первую главу фильма.
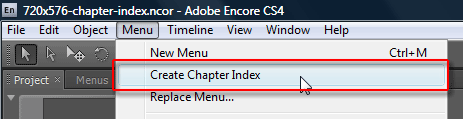
В процессе работы программа определяет количество подменю, необходимых для расставления ссылок на все присутствующие в фильме главы; эта операция занимает считанные секунды.
По окончанию операции обнаруживается, что программа создала необходимое количество подменю, самостоятельно расставив нужные ссылки и поместив миниатюры кадров в рамки кнопок. Всё, что остаётся пользователю, — это лишь изменить текст надписей в каждом меню.
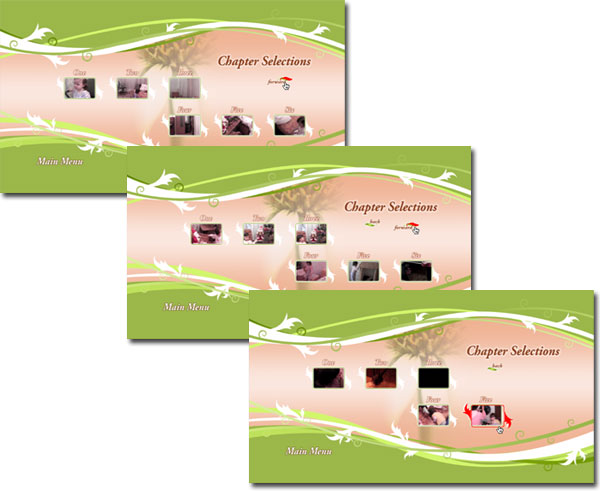
Быстро? Удобно? Без сомнения, но наверняка найдется спорщик, который станет утверждать, что подобная опция слишком напоминает потенциал любительских «однокнопочных» программ. Вполне возможно, он будет прав — да, разработчики Adobe всегда старались угодить всем слоям видеофилов, как профессионалу, так и любителю. В конце концов, для настоящего профессионала существуют мощные, понятные только ему программы для создания видеодисков.
В следующей статье мы пошагово создадим из AVCHD-материала Blu-ray диск с использованием Pop-up Menu и других опций, доступных лишь при авторинге Blu-ray.