Страницы 1 2 3 … 12 Далее
Чтобы отправить ответ, вы должны войти или зарегистрироваться
RSS
Сообщений с 1 по 25 из 294
1 2013-11-23 12:27:59

- admin
- Administrator
- Неактивен
- Имя: Александр

- Откуда: Санкт-Петербург
- Зарегистрирован: 2013-02-10
- Сообщений: 453
- Репутация : [ 7 | 1 ]
Тема: Документация: руководство, каталоги, брошюры и прочее
В этой теме будет выкладываться вся документация по SsangYong Stavic
-
Руководство по эксплуатации SsangYong Stavic 2013. Скачать (9.6 Mb)
-
Рекламная брошюра SsangYong Stavic 2013. Скачать (3.2 Mb)
-
Комплектации и цены SsangYong Stavic 2013. Скачать (178 Kb)
-
Руководство по эксплуатации SsangYong Stavic (Rodius) предыдущего поколения. Скачать (9.9 Mb)
-
Описание основных узлов SsangYong Stavic (Rodius) 2004 (на англ. языке). Скачать (300 Mb)
-
Коробка предохранителей и реле в моторном отсеке Stavic/Rodius (на русском языке). Скачать (349 Kb)
-
Руководство по эксплуатации мультимедиа на SsangYong Stavic (на русском языке). Скачать (1.9 Mb)
-
Каталог запчастей Ставика: http://www.ssangyong.pro/catalog/stavic/
2 Ответ от neogara 2013-12-29 19:30:54

- neogara
- Участник
- Неактивен
- Имя:

- Зарегистрирован: 2013-12-26
- Сообщений: 11
- Репутация : [ 0 | 0 ]
Re: Документация: руководство, каталоги, брошюры и прочее
3 Ответ от andrey_jonson_66 2013-12-29 22:59:20
- andrey_jonson_66
- Участник
- Неактивен
- Имя:
- Зарегистрирован: 2013-11-14
- Сообщений: 498
- Репутация : [ 5 | 0 ]
Re: Документация: руководство, каталоги, брошюры и прочее
neogara пишет:
Схемы электрические и т.д.
Это на машины от 2013 г. или на авто предыдущего поколения.
4 Ответ от Grumbler7 2013-12-29 23:49:05

- Grumbler7
- Участник
- Неактивен
- Имя: Игорь

- Откуда: Москва
- Зарегистрирован: 2013-05-02
- Сообщений: 1,200
- Репутация : [ 39 | 1 ]
Re: Документация: руководство, каталоги, брошюры и прочее
Там есть и на новое и на предыдущие поколения Родиусов-Ставиков
SY Rodius RD400
5 Ответ от Сармат 2014-02-10 10:52:16
- Сармат
- Участник
- Неактивен
- Имя: Виктор
- Откуда: Москва, Зеленоград
- Зарегистрирован: 2013-07-23
- Сообщений: 58
- Репутация : [ 0 | 0 ]
Re: Документация: руководство, каталоги, брошюры и прочее
Уважаемые форумчане! Не смог найти инструкцию на аудиосистему Ссангйонг КСВ- ?, штатную на Элеганс. Поделитесь, если у кого есть.
SY STAVIC Elegance-2013(бордо); SY Action-2007(вишня); 2008-2013 SY Action sport-2008(вишня). В 077 АУ 777
6 Ответ от kandixy 2014-02-10 12:10:52
- kandixy
- Участник
- Неактивен
- Имя:
- Зарегистрирован: 2013-11-24
- Сообщений: 202
- Репутация : [ 6 | 0 ]
Re: Документация: руководство, каталоги, брошюры и прочее
Присоединяюсь к просьбе. Получил машину -выдали только руководство по машине. Не понял, как по блютузу подключать телефон. Открываю руководство, читаю: подробная инструкция — в руководстве к музыке. Мдя…
7 Ответ от telefonist 2014-02-10 12:55:48

- telefonist
- Moderator
- Неактивен
- Имя: Дмитрий

- Откуда: Питер
- Зарегистрирован: 2013-09-15
- Сообщений: 1,447
- Репутация : [ 24 | 0 ]
Re: Документация: руководство, каталоги, брошюры и прочее
А что мешает потребовать описание у дилера? Он же это описание вам просто должен!
SY Rodius Platinum 2012 г. 2,0 л чип 200л.с. 450Нм 11-3=8 мест Корея … второй уже, до этого был Platinum+ 2,7 л 180 л.с.
8 Ответ от kandixy 2014-02-10 14:14:36
- kandixy
- Участник
- Неактивен
- Имя:
- Зарегистрирован: 2013-11-24
- Сообщений: 202
- Репутация : [ 6 | 0 ]
Re: Документация: руководство, каталоги, брошюры и прочее
Абсолютно согласен. Но специально ехать лениво, а до 1-го ТО тянуть тоже не хочу. Да и вопросов много по магнитоле не будет, я думаю. С флэшкой все понятно, радио, эквалайзер — тоже без проблем, а диски как-то и не нужны. Вопрос только один, не могу понять, как входить в режим сопряжения по блютуз.
Кстати, по теме. В прошлом году покупал дочке Субару XV. Получил 2 книжки — Руководство по автомобилю и такое же толстое — по управлению мультимедиа-системой. Во второе — ну да, пару раз заглянул, чтобы убедиться , что установленная навигация — бесполезная хрень. Остальное все было интуитивно понятно.
9 Ответ от Poligon 2014-02-10 15:04:48
- Poligon
- Участник
- Неактивен
- Имя: Сергей

- Откуда: Жуковский М.О.
- Зарегистрирован: 2013-09-02
- Сообщений: 423
- Репутация : [ 15 | 0 ]
Re: Документация: руководство, каталоги, брошюры и прочее
По блютузу.
Включить на телефоне видимость для других устройств.
На магнитоле нажимаем SET выбираем BT выбираем PAIR магнитола покажет ключ сопряжения 4 цифры.
Включаем на телефоне поиск устройств, должено появиться устройство Ssangyong. Нажимаем соединиться и вводим ключ сопряжения.
Магнитола покажет имя телефона и обрамит значек блютуза. Последующие подключения будут автоматическими.
Вроде как-то так.
Бордовый SY Stavic Luxury 2013 г. 
10 Ответ от alexander220365 2014-02-10 15:53:07 (2014-02-10 16:09:27 отредактировано alexander220365)

- alexander220365
- Участник
- Неактивен
- Имя: Александр, 49 лет.

- Откуда: Россия, Липецк
- Зарегистрирован: 2014-01-02
- Сообщений: 136
- Репутация : [ 3 | 0 ]
Re: Документация: руководство, каталоги, брошюры и прочее
kandixy пишет:
Вопрос только один, не могу понять, как входить в режим сопряжения по блютуз.
Вот на английском из описания: (может поможет?)
Stavic 2,0 A/T 4WD белый элеганс 2014
11 Ответ от Демьян 2014-02-10 16:14:55
- Демьян
- Участник
- Неактивен
- Имя:
- Откуда: Санкт-Петербург
- Зарегистрирован: 2013-09-04
- Сообщений: 214
- Репутация : [ 15 | 0 ]
Re: Документация: руководство, каталоги, брошюры и прочее
Чтобы включить блюху нажмите зеленую клавишу ‘вызов’. Чтобы вызвать сопряжение просто подержите эту кнопку несколько секунд и на экране появится соответствующий код.
12 Ответ от telefonist 2014-02-12 10:57:44
- telefonist
- Moderator
- Неактивен
- Имя: Дмитрий
- Откуда: Питер
- Зарегистрирован: 2013-09-15
- Сообщений: 1,447
- Репутация : [ 24 | 0 ]
Re: Документация: руководство, каталоги, брошюры и прочее
Каталог запчастей Ставика: http://www.ssangyong.pro/catalog/stavic/
SY Rodius Platinum 2012 г. 2,0 л чип 200л.с. 450Нм 11-3=8 мест Корея … второй уже, до этого был Platinum+ 2,7 л 180 л.с.
13 Ответ от kandixy 2014-02-13 09:49:37
- kandixy
- Участник
- Неактивен
- Имя:
- Зарегистрирован: 2013-11-24
- Сообщений: 202
- Репутация : [ 6 | 0 ]
Re: Документация: руководство, каталоги, брошюры и прочее
Спасибо, все оказалось довольно просто, да и книжку я нашел в машине(правда на английском). Наверное, не надо пытаться осваивать все на ходу(в прямом смысле), тогда и вопросов буду меньше задавать, постараюсь ограничиться умными.
Сейчас приехал на машине на работу после вчерашней установки подогревателя и сигнализации. Климат не работает, гонит холодный воздух. Выключил вентилятор, доехал так, благо не -15 за бортом. Такое ощущение, что этот самый гидроник не пускает антифриз к печке. Может, причина в обесточивании (сигнализацию ставили после). Попробую в обед почитать инструкцию по эксплуатации, может чего нарою. Если не разберусь, поеду сдаваться установщикам и изложу историю в подходящей теме.
14 Ответ от Lion 2014-04-18 18:20:59
- Lion
- Участник
- Неактивен
- Имя: Андрей
- Откуда: Нижний Новгород
- Зарегистрирован: 2013-11-14
- Сообщений: 266
- Репутация : [ 1 | 0 ]
Re: Документация: руководство, каталоги, брошюры и прочее
Мануал на магнитолу выдали на английском  . На сайте ssangyong.ru есть инструкции на русском, но для моей нет. Почитаю что есть, думаю все похоже…
SY Stavic White 4WD Elegance 2014г.
15 Ответ от санчес 2014-06-16 18:36:01
- санчес
- Участник
- Неактивен
- Имя: Александр
- Откуда: Южное Бутово
- Зарегистрирован: 2014-01-06
- Сообщений: 130
- Репутация : [ 2 | 0 ]
Re: Документация: руководство, каталоги, брошюры и прочее
Сармат пишет:
Уважаемые форумчане! Не смог найти инструкцию на аудиосистему Ссангйонг КСВ- ?, штатную на Элеганс. Поделитесь, если у кого есть.
Так что, ни у кого так и нет?
16 Ответ от MirMur 2014-06-16 18:53:44
- MirMur
- Участник
- Неактивен
- Имя: Дмитрий

- Откуда: Москва, ВАО, Богородское
- Зарегистрирован: 2014-03-30
- Сообщений: 498
- Репутация : [ 26 | 0 ]
Re: Документация: руководство, каталоги, брошюры и прочее
санчес,
В бардачке должна валяться. Там смотрели?
Citroen Space Tourer Business Lounge XL 2018
old Stavic 2,0 A/T 4WD Elegance бордовый 2013г.
old Rexton II 2,7 Xdi A/T Elegance цвет Особое вино 2008г.
17 Ответ от санчес 2014-06-16 19:26:40
- санчес
- Участник
- Неактивен
- Имя: Александр
- Откуда: Южное Бутово
- Зарегистрирован: 2014-01-06
- Сообщений: 130
- Репутация : [ 2 | 0 ]
Re: Документация: руководство, каталоги, брошюры и прочее
MirMur пишет:
санчес,
В бардачке должна валяться. Там смотрели?
Да она есть, но только на английском и корейском языках. Жена уже месяц переводит! Хотелось бы сразу на русском!!
18 Ответ от MirMur 2014-06-16 23:04:12
- MirMur
- Участник
- Неактивен
- Имя: Дмитрий
- Откуда: Москва, ВАО, Богородское
- Зарегистрирован: 2014-03-30
- Сообщений: 498
- Репутация : [ 26 | 0 ]
Re: Документация: руководство, каталоги, брошюры и прочее
А чего там можно переводить?
Там функций никаких нет… 
Citroen Space Tourer Business Lounge XL 2018
old Stavic 2,0 A/T 4WD Elegance бордовый 2013г.
old Rexton II 2,7 Xdi A/T Elegance цвет Особое вино 2008г.
19 Ответ от doktorm2008 2014-06-16 23:23:42 (2014-06-17 01:25:21 отредактировано doktorm2008)
- doktorm2008
- Участник
- Неактивен
- Имя: Андрей
- Откуда: Москва
- Зарегистрирован: 2014-04-06
- Сообщений: 370
- Репутация : [ 0 | 0 ]
Re: Документация: руководство, каталоги, брошюры и прочее
100%. только настройка тембра, блютус — выполняется ручкой настройки, громкость — она и в африке громкость (точнее в корее), да быстрое спаривание телефона — нажатие клавиши с зеленой трубой. все.
SsangYong Stavic бордовый Elegance 2,0 A/T 4WD 2014
Клубная карта 019
Никнейм зарегистрирован:
http://nick-name.ru/sertificates/985413/
20 Ответ от Poligon 2014-06-17 10:51:21
- Poligon
- Участник
- Неактивен
- Имя: Сергей
- Откуда: Жуковский М.О.
- Зарегистрирован: 2013-09-02
- Сообщений: 423
- Репутация : [ 15 | 0 ]
Re: Документация: руководство, каталоги, брошюры и прочее
MirMur⇓ пишет:
А чего там можно переводить?
Например какие флешки читает магнитола, а какие нет 
Бордовый SY Stavic Luxury 2013 г.
21 Ответ от doktorm2008 2014-06-17 13:05:37
- doktorm2008
- Участник
- Неактивен
- Имя: Андрей
- Откуда: Москва
- Зарегистрирован: 2014-04-06
- Сообщений: 370
- Репутация : [ 0 | 0 ]
Re: Документация: руководство, каталоги, брошюры и прочее
пробуйте методом «научного тыка». Зачастую это единственный способ исследования.
SsangYong Stavic бордовый Elegance 2,0 A/T 4WD 2014
Клубная карта 019
Никнейм зарегистрирован:
http://nick-name.ru/sertificates/985413/
22 Ответ от telefonist 2014-06-17 13:20:05
- telefonist
- Moderator
- Неактивен
- Имя: Дмитрий
- Откуда: Питер
- Зарегистрирован: 2013-09-15
- Сообщений: 1,447
- Репутация : [ 24 | 0 ]
Re: Документация: руководство, каталоги, брошюры и прочее
doktorm2008 пишет:
пробуйте методом «научного тыка». Зачастую это единственный способ исследования.
Есть и другие. Например, сканировать текст, перегнать его в Ворд и перевести чем-нибудь автоматическим. Лечить людей я бы по такому переводу не стал, а кнопочки понажимать вполне можно. Есть еще вариант. Сменить это чудо на нечто более качественное и с русским мануалом.
SY Rodius Platinum 2012 г. 2,0 л чип 200л.с. 450Нм 11-3=8 мест Корея … второй уже, до этого был Platinum+ 2,7 л 180 л.с.
23 Ответ от doktorm2008 2014-06-17 13:50:58 (2014-06-17 13:54:22 отредактировано doktorm2008)
- doktorm2008
- Участник
- Неактивен
- Имя: Андрей
- Откуда: Москва
- Зарегистрирован: 2014-04-06
- Сообщений: 370
- Репутация : [ 0 | 0 ]
Re: Документация: руководство, каталоги, брошюры и прочее
да как сканируется, да как прочитает Adobe, да как переведет Word… тот же тык.
Вопрос возник — что там можно МЕСЯЦ переводить? Думаю, тут был использован известный и достаточно популярный литературный прием «гиперболизация», то есть чрезмерное преувеличение — «Да я тебя уже тысячу лет тут стою и жду!!!»
SsangYong Stavic бордовый Elegance 2,0 A/T 4WD 2014
Клубная карта 019
Никнейм зарегистрирован:
http://nick-name.ru/sertificates/985413/
24 Ответ от telefonist 2014-06-17 15:48:46
- telefonist
- Moderator
- Неактивен
- Имя: Дмитрий
- Откуда: Питер
- Зарегистрирован: 2013-09-15
- Сообщений: 1,447
- Репутация : [ 24 | 0 ]
Re: Документация: руководство, каталоги, брошюры и прочее
А еще технический английский освоить можно …
SY Rodius Platinum 2012 г. 2,0 л чип 200л.с. 450Нм 11-3=8 мест Корея … второй уже, до этого был Platinum+ 2,7 л 180 л.с.
25 Ответ от doktorm2008 2014-06-17 18:53:49
- doktorm2008
- Участник
- Неактивен
- Имя: Андрей
- Откуда: Москва
- Зарегистрирован: 2014-04-06
- Сообщений: 370
- Репутация : [ 0 | 0 ]
Re: Документация: руководство, каталоги, брошюры и прочее
а вот такой вопрос — сколько вольт и ампер выдает USB-разъем от магнитолы? кто знает? телефон можно заряжать?
SsangYong Stavic бордовый Elegance 2,0 A/T 4WD 2014
Клубная карта 019
Никнейм зарегистрирован:
http://nick-name.ru/sertificates/985413/
Страницы 1 2 3 … 12 Далее
Чтобы отправить ответ, вы должны войти или зарегистрироваться
Уважаемые читатели. Все книги, размещённые в разделе Библиотека, найдены нами в интернете либо сканированы самостоятельно. Некоторые сканы присланы трудолюбивым и благодарными читателями. Основу Библиотеки составляет историческая и техническая литература середины ХХ века. Мы не можем отследить по каждой из книг то, насколько она попадает под защиту закона Об авторском праве и смежных правах. Поэтому не выкладываем литературу относительно недавних годов выпуска, которую ещё можно встретить в магазинах. Наша Библиотека – это именно библиотека, в ней собраны редкие экземпляры, к которым мы относимся (простите уж) не как к предмету чужого бизнеса, а как информационному достоянию человечества. Что, конечно, не исключает нашей готовности немедленно удалить конкретные книги из общего доступа, если на то поступит сколько-нибудь обоснованное требование со стороны владельца тех самых авторских прав. Мы сделаем это безропотно и немедленно, только скажите.

Руководство по эксплуатации SsangYong Stavic
Скачано: 347

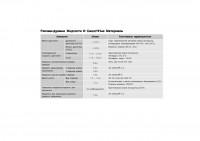
Моторное масло
D20DTR
≒ 6 л
Класс качества: оригинальное моторное масло Ssangyong
(соответствует спецификациям MB Sheet 229.51, SAE 5W30)
G32D
≒ 9 л
Класс качества: оригинальное моторное масло Ssangyong
(соответствует спецификациям MB Sheet 229.1, или 229.3, или
229.31 SAE 5W30)
Охлаждающая жидкость
D20DTR
≒ 11,5 л
Оригинальная охлаждающая жидкость Ssangyong
Антифриз SYC-1025, водный раствор антифриза = 50 : 50
НА ОСНОВЕ ОРГАНИЧЕСКОЙ КИСЛОТЫ, ЦВЕТ: ГОЛУБОЙ
G32D 11,5–12,0 л
Рабочая жидкость автоматической
коробки передач
5-ступ.
АКП
≒ 8,0 л
Оригинальная жидкость Ssangyong (Shell ATF 134 или Fuchs ATF 134)
Масло механической коробки
передач
6-ступ.
МКП
≒ 2,2 л
Оригинальное масло Ssangyong
(HD MTF 75W/85 (SHELL) или HK MTF 75W/85(SK))
Рабочая жидкость раздаточной коробки
≒ 1,4 л
Оригинальная жидкость Ssangyong (ATF DEXRON II или III)
Масло для редукторов ведущих
мостов
Перед-
ний мост
≒ 1,2 л
Оригинальное масло Ssangyong
(SAE 80W/90, API GL-5)
Задний
мост
≒ 1,5 л
Оригинальное масло Ssangyong
(TOTAL-ISU EP-B 85W90)
Рабочая жидкость гидропривода сцепления/
тормозной системы
По мере необхо-
димости
Оригинальная тормозная жидкость Ssangyong (DOT4)
Жидкость гидроусилителя рулевого управления
≒ 1,1 л
Оригинальное масло Ssangyong (S-PSF-3)
*TOTAL FLUIDE DA (только при очень низких температурах)
y Используйте только топливо, жидкости и смазочные материалы, рекомендованные Ssangyong.
y Не смешивайте масла и жидкости различного типа и различных производителей. Это может
стать причиной возникновения неисправностей.
y При замене или проверке поддерживайте указанный уровень масел и рабочих жидкостей.
Руководство на английском языке по техническому обслуживанию и ремонту + схемы электрооборудования автомобилей SsangYong Stavic и SsangYong Rodius c 2005 года выпуска.
- Автор: —
- Издательство: SsangYong
- Год издания: 2005
- Страниц: 1923
- Формат: PDF
- Размер: 269,5 Mb
Сборник руководств по эксплуатации и техническому обслуживанию автомобиля и SsangYong Stavic второго поколения.
- Автор: —
- Издательство: SsangYong
- Год издания: —
- Страниц: 299/338/32
- Формат: PDF
- Размер: 17,5 Mb

-
Contents
-
Table of Contents
-
Bookmarks
Quick Links
Chapters
-
Table of Contents
5 -
Safety Precautions
17 -
Ignition Key,
29 -
Opening and Closing
39 -
Interior Switches
49 -
Instrument Panel
81 -
Transmission and
99 -
Table of Contents
119 -
Seat Belt and Air Bag
139 -
Ventilation, Heating,
157 -
Convenience
181 -
In Case of
201 -
Service and
225 -
Lamps
255
Related Manuals for SSANGYONG STAVIC 2006
Summary of Contents for SSANGYONG STAVIC 2006
-
Page 3
When it comes to service, remember that your SSANGYONG dealer knows your vehicle best and is interested in your complete satisfaction. -
Page 4: Important Notice
NOTE NOTE indicates information to assist maintenance and instructions. We would like to point out that non Ssangyong Genuine parts and accessories have not been examined and approved by Ssangyong, and in spite of continuous market product monitoring, we cannot certify the suitability nor the safety of such products whether they are installed or intended for fitment in our vehicles.
-
Page 5: Table Of Contents
TABLE OF CONTENTS 0. General ………… Section 0 1. Safety Precautions ……… Section 1 2. Ignition Key, Remote Control Key ..Section 2 3. Opening and Closing ……Section 3 4. Interior Switches ……..Section 4 5. Instrument Panel ……..Section 5 6.
-
Page 7
TABLE OF CONTENTS Maintenance Schedule (EU) ……0-2 Maintenance Schedule (General) ….0-3 Recommended Fluids and Lubricants ..0-4 Dimensions ………… 0-5 Specifications ……….0-6 Vehicle Identification ……..0-9 General… -
Page 8: Maintenance Schedule (Eu)
MAINTENANCE SCHEDULE (EU) * Use only approved Ssangyong genuine parts. Daily Weekly Descriptions Service Interval Check Check Engine Oil and Initial check: 5,000 km and replenish if necessary, change every 15,000 km or 12 Diesel Engine – Oil Filter months (But, shorten the service interval under severe condition)
-
Page 9: Maintenance Schedule (General)
MAINTENANCE SCHEDULE (GENERAL) * Use only approved Ssangyong genuine parts. Daily Weekly Descriptions Service Interval Check Check Engine Oil and Initial change: 5,000 km, change every 10,000 km or 12 months (But, shorten the Diesel Engine – Oil Filter service interval under severe condition)
-
Page 10: Recommended Fluids And Lubricants
II, III Power Steering Fluid WARNING • Use only Ssangyong recommended fluids and lubricants. • Do not use any mixed oil with different types of fluids. • Keep the specified levels when adding or replacing the fluids. 0 — 4…
-
Page 11: Dimensions
DIMENSIONS Unit: mm Top View Front View Side View Rear View *( ): Optional 0 — 5…
-
Page 12: Specifications
SPECIFICATIONS ) Optional, [ ] 2WD Descriptions D27DT G32D Engine Numbers of cylinders/ 5 / 18 : 1 6 / 10 : 1 Compression ratio Total displacement (cc) 2,696 3,199 ← DOHC Camshaft arrangement Max. power 165 ps / 4,000 rpm 220 ps / 6,100 rpm 34.7 kg·m / 1,800~3,250 rpm 31.8 kg·m / 4,600 rpm…
-
Page 13
Descriptions 11 Seaters 9 Seaters 7 Seaters ← ← General Overall length (mm) 5,125 (5,220) ← ← Overall width (mm) 1,915 (1,930) ← ← Overall height (mm) 1,820 (1,845) ← Gross vehicle Diesel 3,035 [2,925] 2,850 [2,750] weight (kg) ← Gasoline 2,950 [2,850] 2,850 [2,750]… -
Page 14
Descriptions 11 Seaters 9 Seaters 7 Seaters ← ← Clutch (M/T) Operating type Hydraulic type ← ← Disc type Dry single diaphragm type ← ← Power Steering Type Rack and pinion ← ← Steering angle Inner 37° 22 ‘ ← ←… -
Page 15: Vehicle Identification
VEHICLE IDENTIFICATION 1. Engine Number Gasoline Engine: The engine number is stamped on the lower area of cylinder block in exhaust manifold side. 2. Chassis Number 3. Certification Label Diesel Engine: The engine number is The chassis number is stamped on The certification label is affixed on stamped on the lower area of cylinder the floor under the passenger’s mat.
-
Page 16
MEMO …………………………………………………………………………………………………………………………………………………………………………………………………………………………………………………………………………………………………………………………………………………………………………………………………………………………………………………………………………………………………………………………………………………………………………………………………………………………………………………………………………………………………………………………………………………………………………………………………………………………………………………………………………………………………………………………………………………………………………………………………………………………………………………………………………………………………………………………………………………………………………………………………………………………………………………………………………………………………………………………………… -
Page 17
TABLE OF CONTENTS Checks Before Starting a Journey ….1-2 Starting the Engine and Driving Off the Vehicle …………1-3 Safety Precautions ……..1-5 Direct Injection Type Diesel Engine ..1-10 Safety Precautions… -
Page 18: Safety Precautions
CHECKS BEFORE STARTING A JOURNEY CHECKS BEFORE STARTING A JOURNEY CHECK THE VEHICLE INSIDE CHECK THE VEHICLE OUTSIDE 1. Make sure that all doors including tailgate are properly 1. Check the tyre inflation and wear. closed. 2. Check the engine oil level and other fluid/oil levels in 2.
-
Page 19: Starting The Engine And Driving Off The Vehicle
STARTING THE ENGINE AND DRIVING OFF THE VEHICLE Parking brake release lever Parking brake 1. Apply the parking brake. 3. • Automatic transmission equipped vehicle “P” Move the selector lever to position and depress the 2. Make sure that there are no persons or obstacles in the brake pedal.
-
Page 20
4. • Diesel engine equipped vehicle: 6. Warm up the engine in idling speed. Do not warm up the engine over 2 minutes. Turn the ignition key to “ON” position and check the ap- propriate warning lights are operating. The preglow indi- 7. -
Page 21: Safety Precautions
SAFETY PRECAUTIONS Ignition Key/Remote Control Key Air Bag 1. Never use any duplicated key not provided by Ssangyong. 1. Never impact on the air bag installations by hands or tools. It may cause a fire due to overload in electric circuit.
-
Page 22
Always use only Ssangyong genuine parts for replacement. inoperative. Ssangyong is not liable for any damage caused by the use 3. Make sure that all passengers have their body parts such of non-Ssangyong Genuine parts and accessories. -
Page 23
SAFETY PRECAUTIONS Child Restraint When transporting infants or small children, an appropriate and height and properly fit the car’s seat. Accident statistics child restraint system should always be used. The child re- indicate that children are safer when properly restrained in straint system should be appropriate for your child’s weight the rear seat rather than in the front seat. -
Page 24
SAFETY PRECAUTIONS Starting the Engine Warming Up the Engine 1. Diesel engine equipped vehicle: Turn the ignition key to 1. Warm up the engine with idle speed before driving off the “ON” position and wait until the preglow indicator goes out. vehicle. -
Page 25
SAFETY PRECAUTIONS Cautions While Driving Engine Brake 1. Do not turn off the engine while the vehicle is in motion. When driving down the long slope, use the engine brake ef- The power steering function and the brake assist func- fect by downshifting the transmission in steps according to tion will be deactivated. -
Page 26: Direct Injection Type Diesel Engine
In this mode, the engine driving force may be decreased or the engine may stall. When this happens, have the system checked at the Ssangyong Dealer or Ssangyong Authorized Service Operation. 1-10 SAFETY PRECAUTIONS…
-
Page 27
Operation. WARNING • When engine check warning light comes on, immediately stop driving and have the engine system checked at Ssangyong Dealer or Ssangyong Authorized Service Operation. • Drain the water from fuel filter & water separator immediately after the water separator warning light comes on. The fuel system in engine may get serious damage if you keep driving while the warning light is coming on. -
Page 28
MEMO …………………………………………………………………………………………………………………………………………………………………………………………………………………………………………………………………………………………………………………………………………………………………………………………………………………………………………………………………………………………………………………………………………………………………………………………………………………………………………………………………………………………………………………………………………………………………………………………………………………………………………………………………………………………………………………………………………………………………………………………………………………………………………………………………………………………………………………………………………………………………………………………………………………………………………………………………………………………………………………………………… -
Page 29
TABLE OF CONTENTS Immobilizer Key and Door Remote Control . 2-2 How to Use Door Remote Control ….2-3 Battery Replacement ……..2-4 Key Functions ……….2-5 Cautions when Starting the Engine …. 2-6 Immobilizer System* ……..2-7 Ignition Key, Opening and Closing the Doors with Ignition Key ………. -
Page 30: Immobilizer Key And Door Remote Control
IMMOBILIZER KEY AND DOOR REMOTE CONTROL 3. Panic Button (operative only when the ignition key is inserted) Sounds intermittent buzzer for about 27 seconds 4. Door Unlock (by steps) 1st step : Unlocks the driver’s door 2nd step : Unlocks the other doors and tailgate (press the button again in 1st step) 5.
-
Page 31: How To Use Door Remote Control
HOW TO USE DOOR REMOTE CONTROL Door Unlock Button Door Lock Button 1st step : Unlocks the driver’s door and re- leases the theft deterrent mode If you press this button, all doors are locked and the theft deterrent mode is activated. 2nd step : Unlocks the other doors and tailgate (press the button again in 1st step) Escort Button…
-
Page 32: Battery Replacement
BATTERY REPLACEMENT If the operating distance is shortened, the door remote control does not work properly, or the operating indicator is dimmed out, replace the battery with new one. Battery Specifications Model CR 2032 Battery Replacement Amount 1. Pry off the cover from the door remote control cover by using small flat screwdriver.
-
Page 33: Key Functions
KEY FUNCTIONS ACC Position ON Position • Engine stop. • Electrical accessories are activated. • The ignition key cannot be removed at this position. • Driving or engine running condition. • Steering wheel unlocking. • Some electrical accessories are activated. LOCK Position START Position •…
-
Page 34: Cautions When Starting The Engine
10 • Never use any duplicated key not provided from Ssangyong. It may cause a fire due to overload in elec- seconds. tric circuit. The engine with immobilizer system cannot be started with the duplicated key.
-
Page 35: Immobilizer System
(during engine starting) and goes out after starting the engine. If this indica- tor blinks, it may indicate that there is something wrong in the immobilizer system. Have the sys- tem checked by Ssangyong Dealer or Ssangyong Authorized Service Operation. Illumination Lamp Cover…
-
Page 36
• Do not drop or shock to the transponder in the key, or it could be damaged. • If the transponder has damaged, replace the key from Ssangyong Dealer and register the code to the engine control unit to be started. -
Page 37: Opening And Closing
OPENING AND CLOSING THE DOORS WITH IGNITION KEY Door Locking the door Unlocking the door Tailgate To lock the door: Turn the key to the lock position (toward front of the vehicle) from driver’s door or passenger’s door. All doors except tailgate will be locked.
-
Page 38
MEMO …………………………………………………………………………………………………………………………………………………………………………………………………………………………………………………………………………………………………………………………………………………………………………………………………………………………………………………………………………………………………………………………………………………………………………………………………………………………………………………………………………………………………………………………………………………………………………………………………………………………………………………………………………………………………………………………………………………………………………………………………………………………………………………………………………………………………………………………………………………………………………………………………………………………………………………………………………………………………………………………………… -
Page 39
TABLE OF CONTENTS Opening and Closing Devices ….. 3-2 Doors …………. 3-3 Windows …………3-5 Sunroof …………3-6 Tailgate …………3-7 Engine Hood ……….3-8 Opening and Closing Fuel Filler Door ……….3-9… -
Page 40: Opening And Closing Devices
OPENING AND CLOSING DEVICES Engine Hood Opening Lever Door Lock and Handle Inside Outside Driver’s Door Switch Panel Passenger’s and Rear Door Window Switch Fuel Filler Door Release Lever Tailgate Handle Sunroof Child Safety Door Lock OPENING AND CLOSING…
-
Page 41: Doors
DOORS Driver’s Door (Inside) Passenger’s Door (Inside) The passenger’s door lock/un- lock button and lever have the same functions with those of driver’s door. Rear Right Door (Inside) Door Lock/Unlock Button Lock Rear Left Door (Inside) Door Opening Lever Unlock •…
-
Page 42
Central Door Lock/Unlock Switch Press the section of the switch to lock the doors and tailgate. Press the section of the switch to unlock the doors and tailgate. This switch is not available when any of doors are not fully closed and the vehicle is in theft deter- rent mode. -
Page 43: Windows
WINDOWS Driver’s Door Window Switch • All windows can be operated when the ignition key is at “ON” position. • When the front of the switch is lightly pressed (stage 1), the window will be lowered while the switch is pressed. When pressed to its end (stage 2), the window will open automati- cally until it is fully open.
-
Page 44: Sunroof
SUNROOF * For your safety, never operate the sunroof when the vehicle is moving. CAUTION • The sunroof can be operated when the ignition key is ON position (engine is not running), however, to prevent the bat- tery from discharging, operation under engine running is recommended.
-
Page 45: Tailgate
TAILGATE CAUTIONS FOR OPENING/CLOSING DEVICES • Do not allow children to play with any switch, door lever, and driving equipment. • When closing the windows, sunroof, engine hood, and tailgate, be aware of safety conditions before operation. Parts of the body can be trapped. •…
-
Page 46: Engine Hood
ENGINE HOOD 1. To open the engine hood, pull the release knob located on left lower side of instrument panel to unlatch the engine hood. The engine hood will then be unlocked and partially opened. 2. Push the safety catch WARNING lever located under the •…
-
Page 47: Fuel Filler Door
FUEL FILLER DOOR WARNING • Gasoline vapor is highly flammable. It burns violently and that can cause very bad injuries. • When refueling, • Switch off engine. • No smoking. • No naked flame. • No sparking material. • Using low quality fuel could result in a serious damage to the engine due to the water or impurities in fuel.
-
Page 48
MEMO …………………………………………………………………………………………………………………………………………………………………………………………………………………………………………………………………………………………………………………………………………………………………………………………………………………………………………………………………………………………………………………………………………………………………………………………………………………………………………………………………………………………………………………………………………………………………………………………………………………………………………………………………………………………………………………………………………………………………………………………………………………………………………………………………………………………………………………………………………………………………………………………………………………………………………………………………………………………………………………………………… -
Page 49
TABLE OF CONTENTS Interior Switches ……… 4-2 Light Switch ……….4-4 Wiper and Washer Switch ……4-7 Cruise Control Switch* ……… 4-9 4-Wheel Drive Switch* ……4-13 4WD Check Warning light and Indicator* . 4-15 Switches on Driver’s Door Trim ….4-16 Audio Remote Control Switches on Steering Wheel* …….. -
Page 50: Interior Switches
INTERIOR SWITCHES Front wiper and Trip and reset washer switch switch Rear wiper and washer switch 4-wheel drive Light switch switch Outside rearview mirror control switch Audio remote Air conditioner/ control switch heater switch Headlamp Cigarette lighter leveling switch Power outlet Rear air conditioner control switch Window and door…
-
Page 51
Overhead Console Switches 1. Door coupled front room lamp switch 2. Sunroof switch 3. Door coupled side room lamp switch 4. Front room lamp switch 5. Multimeter mode switch 6. Multimeter control button Center Switch Panel 1. Seat warmer switch (driver’s seat) 5. -
Page 52: Light Switch
LIGHT SWITCH Light Switch Turn the barrel on the end of the lever as shown, then lights will be operated as Stop lamp Rear turn signal lamp follows. Position lamp Position AUTO Headlamp low beam Headlamp Position lamp Tail lamp Headlamp License plate lamp high beam…
-
Page 53
AUTO Light Sensor This senses the ambient illumination intensity to determine the timing for turning the headlamps and tail lamps on or off automatically when the light switch is set to “AUTO”. Front Fog Lamp Switch To turn on the fog lamps, push this switch Headlamp Leveling Switch* while the tail lamps or headlamps are With the low beam switched on, adjust… -
Page 54
Right turn signal lamp “ON” LIGHT SWITCH 1. Headlamp High Beam To turn on the headlamp high beam, push the lever towards the instrument panel with the headlamp low beam on. The headlamp high beam indicator in instrument panel comes on when the headlamp high beam is turned on. -
Page 55: Wiper And Washer Switch
WIPER AND WASHER SWITCH Front Wiper and Washer Switch A. Front wiper and washer switch B. Automatic wiper control switch Rain Sensor* Front Washer Fluid Rear Washer Fluid When the windshield wiper Reservoir Reservoir switch is at “AUTO” position, the rain sensor automatically turns on and off the wiper.
-
Page 56
1. MIST 2. OFF 3. AUTO 4. LO/HI The wiper operates once when Stop the operation. Operates automatically ac- LO: Continuous wipe, slow operation pushing up the lever. The lever cording to the vehicle speed or HI: Continuous wipe, fast operation will return to the “OFF”… -
Page 57: Cruise Control Switch
CRUISE CONTROL SWITCH* CRUISE CONTROL* Setting a Desired Speed Cruise control is an automatic speed control system that maintains a desired driving speed without using the accelerator pedal. The vehicle speed must be greater than 36 km/h to engage cruise control.
-
Page 58
Accelerating with Cruise Control System Decelerating with Cruise Control System • While cruise control system is running • While Cruise control system is running 1. Push up the ACCEL.SET. switch of a cruise control lever 1. Push down the DECEL.SET. Switch of a cruise control le- and hold it until the desired speed is reached without an ver and hold it until the desired speed is reached without a acceleration pedal intervention. -
Page 59
Recovery of Set Speed Normal Cancellation of Cruise Control The cruise control system will be canceled when one or more items of the following conditions is applied; 1. When the brake pedal is depressed. 2. When the cruising speed is downed less than 34 km/h. 3. -
Page 60
But if the cruise control system isn’t recovered, you should contact Ssangyong Dealer for diagnosis of the cruise control system. CAUTION Abnormal changes of the selector lever can damage the engine. -
Page 61: 4-Wheel Drive Switch
4-WHEEL DRIVE SWITCH* Full-Time 4-Wheel Drive Vehicle (TOD)* The vehicle equipped with the TOD 4-wheel drive evenly distributes the driving force to all wheels according to the road conditions. ↔ ↔ ↔ ↔ 4L) Driving Mode Change (4H ↔ 1. Manual Transmission Equipped Vehicle Stop the vehicle on a level ground and place the shift lever into “Neutral”…
-
Page 62
4-Wheel Drive Switch — Part Time* Driving Position The 4WD indicator light illuminates when the 4WD switch is in ‘4H’ or ‘4L’. 1. ‘2H’ (2-Wheel drive) This is rear wheel drive with high speed. Use this for normal driving. This position gives greater economy, quieter ride and least drive train wear. -
Page 63: 4Wd Check Warning Light And Indicator
CAUTION If “4WD CHECK” warning light stays on or “4WD LOW” indicator blinks NOTE continuously, have the 4WD system checked by Ssangyong Dealer or When shifting the driving mode from 4WD LOW to 4WD HIGH, this Ssangyong Authorized Service Operation.
-
Page 64: Outside Rearview Mirror Control Switch
SWITCHES ON DRIVER’S DOOR TRIM OUTSIDE REARVIEW MIRROR CONTROL SWITCH 1. Outside rearview mirror folding switch Outside rearview mirror control switch To fold the outside rearview mirrors, press the switch for more than 0.5 seconds. To unfold the mirrors, press again.
-
Page 65: Audio Remote Control Switches On Steering Wheel
AUDIO REMOTE CONTROL SWITCHES ON STEERING WHEEL* * The audio system equipped in the vehicle can be controlled by the remote control switches on the steering wheel. POWER Audio power on/off when the button is pressed. MODE MUTE Audio mode changes in Stops audio output from au- following order: dio system.
-
Page 66: Center Switch Panel
• If the temperature continues to rise, turn the switch off and have the • Do not operate the seat heater for a long time when the passenger is system checked by Ssangyong Dealer or Ssangyong Authorized Ser- an infant, child, old or handicapped person, person with sensitive skin, vice Operation.
-
Page 67: Fog Lamp Switch & Esp Switch
FOG LAMP SWITCH & ESP SWITCH* Switch If you press the ESP switch, the ESP function stops and the indicator lamp in instrument panel comes on. Press this switch again to resume the ESP function. At this time, the indicator lamp goes out. If the ESP function operates while driving, the indicator lamp flickers and the alarm sounds.
-
Page 68
At this moment, the ABS works in a basic way. However, make sure Basically, the ESP system is advanced vehicle control system to check the vehicle at the nearest Ssangyong Dealer or Ssangyong that integrates the ABS system and vehicle stability control Authorized Service Operation. -
Page 69: Heated Glass Switch
HEATED GLASS SWITCH Windshield heated glass* Avoid wiper frozen Tailgate heated glass Defrost and defog Outside rearview mirror heated glass* Defrost and defog Heated glass indicator Comes on when the windshied, tailgate and outside rearview mir- ror heated glass is operating. Windshield, Tailgate and Outside Rearview Mirror Heated Glass Tailgate and Outside •…
-
Page 70: Switches In Overhead Console And Room Lamp Switches
SWITCHES IN OVERHEAD CONSOLE AND ROOM LAMP SWITCHES Rear room lamp and switch Side room lamp and switch Front room lamp Side Room Lamp Switch Rear Room Lamp Switch Press the lamp body to turn on. Press it again to turn off. •…
-
Page 71: Switches In Overhead Console
SWITCHES IN OVERHEAD CONSOLE Sunroof switch Front Room Lamp Side Room Lamp Coupled Coupled Switch Switch Front room lamps (driver’s and Four side room lamps are turned passenger’s) are turned on when on when opening a rear door with opening one of front doors with this switch pressed in.
-
Page 72: Multi-Meter
MULTI-METER Mode change or Display reset button Function buttons Mode changing sequence when pressing the button: Direction, atmospheric Time and Date pressure, altitude Driving time Average speed Battery voltage Parking Aid Signal “R” (The rearview display is appeared when placing the shift lever to position) The distance from the obstacles can This message appears only when the…
-
Page 73: Time And Date Mode
TIME AND DATE MODE Press and hold : Adjusting mode for time and date Time : AM & PM Press briefly: : Move to another mode Date Month Year MON — TUE — WED — THU — FRI — SAT — SUN Adjusting the Time and Date 1.
-
Page 74: Direction, Atmospheric Pressure, Altitude Mode
DIRECTION, ATMOSPHERIC PRESSURE, ALTITUDE MODE Press and hold the MODE button for more than 1 Electronic second to switch over the compass mode between absolute altimeter and relative altimeter. Increase the altitude in Speed absolute altimeter sensing indicator Decrease the altitude in absolute altimeter Barometer Indication of…
-
Page 75
Electronic Compass Electronic Compass It indicates 8-direction by interval of 45° according to the vehicle’s driving direction. This is available only when the vehicle speed is over 2.8 km/h. Turning Calibration NOTE When the multimeter is installed to the vehicle or the battery •… -
Page 76: Barometer And Altimeter
BAROMETER AND ALTIMETER Barometer and Altimeter (relative altitude, absolute altitude) Barometer It indicates the current atmospheric pressure in range from 720 hpa to 1045 hpa by 1 hpa. Altimeter It indicates the absolute altitude or relative altitude. Press and hold the MODE button for more than 1 second to switch over the mode between absolute altim- eter and relative altimeter in direction/atmospheric pressure/altitude mode.
-
Page 77: How To Use The Altimeter (Example)
HOW TO USE THE ALTIMETER (EXAMPLE) Absolute altimeter: 1,200 m Relative altimeter: 1,000 m Absolute altimeter: 200 m Relative altimeter: 0 m 1,000 m Absolute altimeter: 0 m 200 m 3. Read the indicated altitude after 1. Press the MODE switch arrival.
-
Page 78: Driving Time And Average Speed
DRIVING TIME AND AVERAGE SPEED DRIVING TIME AVERAGE SPEED Driving Time Average Speed It indicates the driving time from start up to now. It indicates the average vehicle speed from start up to now. It can be reset to 0 by using UP or DOWN button. It can be reset to 0 km/h by using UP or DOWN button.
-
Page 79: Battery Voltage
• When starting the engine, the battery voltage is temporarily decreased. • If the charging level in display is not increased even when the engine is running, have the system checked at Ssangyong Dealer or Ssangyong Authorized Service Operation. 4 — 3 1…
-
Page 80
MEMO …………………………………………………………………………………………………………………………………………………………………………………………………………………………………………………………………………………………………………………………………………………………………………………………………………………………………………………………………………………………………………………………………………………………………………………………………………………………………………………………………………………………………………………………………………………………………………………………………………………………………………………………………………………………………………………………………………………………………………………………………………………………………………………………………………………………………………………………………………………………………………………………………………………………………………………………………………………………………………………………………… -
Page 81
TABLE OF CONTENTS Instrument Panel ………. 5-2 Warning Lights and Indicators ….5-3 Meter Cluster ……….5-4 ODOmeter/Trip ODOmeter ……5-5 Brake System Related Warning Lights … 5-11 Water Separator Warning Light ….5-13 Instrument Panel How to Drain the Water from Fuel Filter (EU) ………….. -
Page 82: Instrument Panel
INSTRUMENT PANEL ODOmeter/ Tachometer Trip ODOmeter Speedo meter Fuel gauge Coolant temperature gauge Warning lights and Indicators INSTRUMENT PANEL…
-
Page 83: Warning Lights And Indicators
WARNING LIGHTS AND INDICATORS Right turn signal indicator Auto shift indicator Engine check (for automatic transmission) Winter mode indicator warning light Left turn signal Harzard Glow indicator indicator indicator* Immobilizer indicator Cruise 4WD CHECK control indicator* warning light ESP warning light 4WD HIGH EBD warning light indicator…
-
Page 84: Meter Cluster
METER CLUSTER Coolant Temperature Gauge Fuel Gauge The temperature gauge indicates the temperature of engine This gauge indicates the level of fuel coolant when the ignition switch is in the “ON” position. remaining in the fuel tank. Fill up fuel CAUTION tank before the needle reaches “E”.
-
Page 85: Odometer/Trip Odometer
ODOMETER/TRIP ODOMETER TRIP Button The TRIP button is used for the display mode: ODO (total driving distance), TRIP A, and TRIP B To reset the TRIP ODOmeter to 0 km, press the TRIP button for more than one second. ODOmeter and TRIP ODOmeter Display Driving distance of range B Total driving distance Driving distance of range A…
-
Page 86
Both right and left lights flash when the hazard warning switch is turned WARNING Driving the vehicle with the brake fluid warning light on is dangerous. Have the brake system checked and repaired immediately by near- est Ssangyong Dealer. INSTRUMENT PANEL… -
Page 87
If this light doesn’t go off after engine starting or comes on while driving, it means there is a malfunction in the system. Have the charging system checked by a Ssangyong Dealer or Ssangyong Authorized Service Operation. Seat Belt Reminder… -
Page 88
Have the air bag system • Before driving off, close all doors. checked without delay by a Ssangyong Dealer or Ssangyong Authorized Service Operation. • Check warning light is off. -
Page 89
If “4WD CHECK” warn- mode is selected by pushing 4H switch. ing light stays on, have the 4WD system checked by Ssangyong Shift the driving mode from 2WD to 4WD HIGH only when Dealer or Ssangyong Authorized Service Operation. -
Page 90
When the glow indicator comes on while driving or the engine cannot WARNING be started properly, have the glow plug system checked by Ssangyong When this warning light comes on, the vehicle operates in safety Dealer or Ssangyong Authorized Service Operation. -
Page 91: Brake System Related Warning Lights
• If this light doesn’t come on when the ignition is switched on or if The vehicle equipped with ABS performs self-diagnosis on the sys- this light doesn’t go out, contact your nearest Ssangyong Dealer tem when the engine is started and drives off. During the diagnosis, or Ssangyong Authorized Service Operation.
-
Page 92
If the ESP function operates while driving, the indicator lamp WARNING flickers and the alarm sounds. If the warning light stays on, have the system checked by Ssangyong Dealer or Ssangyong Authorized Service Operation. CAUTION If the ESP warning light comes on, the ESP related system is defective. -
Page 93: Water Separator Warning Light
This warning light goes out when the draining is separator. If the above conditions are still existing after draining completed. the water, have the system checked by Ssangyong Dealer or Ssangyong Authorized Service Operation. • Before starting the engine, press the priming pump until it becomes rigid to fill up the fuel pump with fuel.
-
Page 94: How To Drain The Water From Fuel Filter
DIESEL ONLY HOW TO DRAIN THE WATER FROM FUEL FILTER (EU) 1. Locate the fuel filter ( ) in engine compartment WARNING and place the water container under it. If the priming pump is not properly operated, 2. Disconnect the connector ( ) under the drain plug air may get into the fuel line.
-
Page 95: How To Drain The Water From Fuel Filter (General)
HOW TO DRAIN THE WATER FROM FUEL FILTER (GENERAL) CAUTION Drain the water from fuel filter & water separator immediately after the warning light comes on. If you cannot do that by yourself, visit nearest Ssangyong Dealer or Fuel filter Ssangyong Authorized Service Operation.
-
Page 96
1. Locate the fuel filter ( ) & water separator ( ) in engine compartment. 2. Place the water container under the fuel filter & water separator. 3. Disconnect the connector under the drain plug ( ) of the water separator. 4. -
Page 97
MEMO …………………………………………………………………………………………………………………………………………………………………………………………………………………………………………………………………………………………………………………………………………………………………………………………………………………………………………………………………………………………………………………………………………………………………………………………………………………………………………………………………………………………………………………………………………………………………………………………………………………………………………………………………………………………………………………………………………………………………………………………………………………………………………………………………………………………………………………………………………………………………………………………………………………………………………………………………………………………………………………………………… -
Page 98
MEMO …………………………………………………………………………………………………………………………………………………………………………………………………………………………………………………………………………………………………………………………………………………………………………………………………………………………………………………………………………………………………………………………………………………………………………………………………………………………………………………………………………………………………………………………………………………………………………………………………………………………………………………………………………………………………………………………………………………………………………………………………………………………………………………………………………………………………………………………………………………………………………………………………………………………………………………………………………………………………………………………………… -
Page 99
TABLE OF CONTENTS Shift Lever in Manual Transmission …. 6-2 Cautions …………6-3 Automatic Transmission, Parking Aid System, Brake System …. 6-4 Gear Selector Lever in Automatic Transmission ……….6-5 Mode Switch ……….6-9 Transmission and Shift Lever Lock Release ……6-10 Brake System Safety Mode (Automatic Transmission) .. -
Page 100: Transmission And Brake System
SHIFT LEVER IN MANUAL TRANSMISSION The manual transmission in your vehicle has 5 forward speeds and 1 reverse speed. To change gears, fully depress the clutch pedal. Then, move the gearshift lever. After shifting, release the clutch slowly. 5th Gear Position for very high speed driving on a highway 3rd Gear Position for normal and high speed driving…
-
Page 101: Cautions
CAUTIONS CAUTIONS Downshift On long downhill stretches, downshift in good time and op- • Stop the vehicle completely before shifting into reverse. erate the engine brake to make use of the engine braking effect. • Do not rest your foot on the clutch pedal while driving. The clutch disc will wear prematurely.
-
Page 102: Automatic Transmission, Parking Aid System, Brake System
AUTOMATIC TRANSMISSION, PARKING AID SYSTEM, BRAKE SYSTEM Auto Shift Indicator Parking Aid Display in Multimeter Gear Selector Lever P R N D 1 2 3 4 5 Parking Aid Sensors Brake Pedal and Accelerator Pedal Parking Brake Lever/ Monitor (when reverse driving) Rearview Camera Release Lever — displays rear obstacles…
-
Page 103: Gear Selector Lever In Automatic Transmission
GEAR SELECTOR LEVER IN AUTOMATIC TRANSMISSION To shift into any other position, Mode Switch depress the brake pedal (ignition • W: Winter mode switch: “ON”). • S: Standard mode Use the standard mode in normal Shift lever moves only when driving conditions and use the the brake pedal is depressed.
-
Page 104
R: Reverse position P: Park position • Use this position when the vehicle is parking, starting the • Use this position to reverse the vehicle. engine or stationing the vehicle. To shift into “R” position from “P” or “N” position, completely To shift into any other position, depress the brake pedal stop the vehicle and depress the brake pedal. -
Page 105
N: Neutral position -D+: Drive position • This indicates the neutral position and use this position for • Use this position in normal driving conditions. The trans- temporarily parking. mission is automatically shifted from 1st gear through 5th gear according to the vehicle speed and the acceleration At this position, the engine does not transfer power to the with accelerator pedal. -
Page 106
Adjustment for the shiftable gear in “-D+” position The drive position for driving conditions The shiftable gear is down/up by one step as the lever is moved to left(-)/right(+) in first, second, third and fourth gear. direction. The drive position for driving conditions in first, second and third gear. -
Page 107: Mode Switch
MODE SWITCH How to start off the vehicle with 2nd forward gear 1. Press the “W” portion of the mode switch to select winter mode. 2. Place the selector lever to “D” position and check if the shift lever indicator shows “2”. 3.
-
Page 108: Shift Lever Lock Release
3. Start the engine, release the parking brake, and place the selector lever at “D” position. WARNING Have your vehicle repaired by Ssangyong dealer or Ssangyong Au- thorized Service Operation as soon as possible. 6 — 1 0 TRANSMISSION AND BRAKE SYSTEM…
-
Page 109: Safety Mode (Automatic Transmission)
“D” position or 2nd reverse gear in “R” position) is still exist, • Decreased driving force while driving at high speed have the system checked by Ssangyong dealer or Ssangyong Au- thorized Service Operation. • Fixed gear position during driving •…
-
Page 110: Parking Aid System
PARKING AID SYSTEM* Parking Aid System When the gear selector lever is shifted into “R” position, the parking aid system is activated and the sensors in rear bumper detect the distance to obstacle. You can figure out Multimeter the distance from obstacle to vehicle with the alarming sound and the display in multimeter.
-
Page 111
Rearview Display in Multimeter CAUTION Alarm interval and display changes In the parking lot as shown in the figure, Detecting obstacle the upper portion of the vehicle can be according to the distance: at rear right side hit before the sensor operation, so check with outside rearview mirrors or by turning your head during parking. -
Page 112: Rearview Camera System
REARVIEW CAMERA SYSTEM* This is a supplementary system to show the rear area when the gear selector lever is in “R” position. Rear Monitor Front Monitor If you move the gear selector lever to If you move the gear selector lever to “R”…
-
Page 113
When selecting R position while A/V system is in use • The video mode in front A/V system is changed to rear view monitoring mode. However, the audio mode stays on. • The video mode in front A/V system resumes when shifting out from “R” position. -
Page 114: Brake System
BRAKE SYSTEM switch Parking brake release lever Parking brake Brake pedal 6 — 1 6 TRANSMISSION AND BRAKE SYSTEM…
-
Page 115: System Description
SYSTEM DESCRIPTION Brake Pedal (Foot Brake) Foot brake is designed to decrease the vehicle speed and ABS (Anti-Lock Brake System)? stop the vehicle. Do not continuously apply the brake pedal When you brake abruptly or on the slippery road, the ve- while going down a long hill.
-
Page 116: Parking Brake Operation
• If the brake warning light doesn’t go out after releasing the park- Parking Brake Release ing brake, have the brake system checked by Ssangyong Dealer or Ssangyong Authorized Service Operation. To release parking brake, pull up the parking brake release lever.
-
Page 117
MEMO …………………………………………………………………………………………………………………………………………………………………………………………………………………………………………………………………………………………………………………………………………………………………………………………………………………………………………………………………………………………………………………………………………………………………………………………………………………………………………………………………………………………………………………………………………………………………………………………………………………………………………………………………………………………………………………………………………………………………………………………………………………………………………………………………………………………………………………………………………………………………………………………………………………………………………………………………………………………………………………………………… -
Page 118
MEMO …………………………………………………………………………………………………………………………………………………………………………………………………………………………………………………………………………………………………………………………………………………………………………………………………………………………………………………………………………………………………………………………………………………………………………………………………………………………………………………………………………………………………………………………………………………………………………………………………………………………………………………………………………………………………………………………………………………………………………………………………………………………………………………………………………………………………………………………………………………………………………………………………………………………………………………………………………………………………………………………………… -
Page 119
TABLE OF CONTENTS Seaters …………7-2 Driver’s Seat (Power Seat) ……7-4 Driver’s Seat (Manual Seat) ……7-5 Passenger’s Seat ………. 7-6 Convenience Devices in Front Seats ..7-7 Second Row Seat (7-Seaters) …… 7-8 Seats Second Row Seat (9-Seaters) ….7-10 Third Row Seat (9-Seaters) …… -
Page 120: Seaters
SEATERS 11-SEATERS Second row seat Passenger’s seat Third row seat (right) (right) Fourth row seats Center jump seat Driver’s seat Second row seat Third row seat (left) (left) WARNING • Do not adjust driver’s seat when vehicle is moving. Control of vehicle can be lost. •…
-
Page 121: Second Row Seat
9-SEATERS 7-SEATERS Driver’s seat Passenger’s Driver’s seat Passenger’s seat seat Second row seat Second row seat Second row seat Second row seat (left) (right) (left) (right) Third row seat Third row seat (left) (right) Third row seat Fourth row seats Second Row Seat The second row seats have arm rests at both sides.
-
Page 122: Driver’s Seat (Power Seat)
DRIVER’S SEAT (POWER SEAT) Seat Slide Adjustment Head Restraint Adjustment Seat Heater Seat Height Adjustment To raise the head restraint, pull it up without pressing the release button. To lower the head restraint, press the release button on top of seatback and push the head restraint down.
-
Page 123: Driver’s Seat (Manual Seat)
DRIVER’S SEAT (MANUAL SEAT) Head Restraint Adjustment Seatback Reclining Adjustment To raise the head restraint, pull it up To change the seatback angle, lean for- without pressing the release button. ward slightly and raise the lever. Then, To lower the head restraint, press the lean back to the desired angle and re- release button on top of seatback…
-
Page 124: Passenger’s Seat
PASSENGER’S SEAT Seatback Reclining Adjustment Head Restraint Adjustment To change the seatback angle, To raise the head restraint, pull it lean forward slightly and raise the up without pressing the release lever. Then, lean back to the de- button. To lower the head restraint, sired angle and release the lever.
-
Page 125: Convenience Devices In Front Seats
CONVENIENCE DEVICES IN FRONT SEATS * Locations of cup holder may vary according to the seats. Seatback Table and Cup Holder A table is installed at the rear Seatback Storage Pocket of the front seatback. To do The front seatback storage pocket some temporary jobs and put is provided to store small per- something on it, swing it up.
-
Page 126: Second Row Seat (7-Seaters)
SECOND ROW SEAT (7-SEATERS) * Locations of cup holder may vary according to the seats. Seatback Reclining Adjustment Head Restraint Adjustment To raise the head restraint, pull it up To change the seatback angle, without pressing the release button. lean forward slightly and raise To lower the head restraint, press the the lever .
-
Page 127
Seatback Folding and Unfolding Seat Slide Adjustment Pull up the lever and fold and To move the seat forward or unfold the seatback until it clicks. backward, pull and hold the seat slide lever up and WARNING move the seat as required. Make sure that the seatback is com- Then, release the lever in de- pletely locked. -
Page 128: Second Row Seat (9-Seaters)
SECOND ROW SEAT (9-SEATERS) * Locations of cup holder may vary according to the seats. Seatback Reclining Adjustment Head Restraint Adjustment To change the seatback angle, To raise the head restraint, pull it up lean forward slightly and raise without pressing the release button. To lower the head restraint, press the the lever .
-
Page 129
Seatback Folding and Unfolding Seat Slide Adjustment Pull up the lever and fold and To move the seat forward or unfold the seatback until it clicks. backward, pull and hold the seat slide lever up and WARNING move the seat as required. Make sure that the seatback is com- Then, release the lever in de- pletely locked. -
Page 130: Third Row Seat (9-Seaters)
THIRD ROW SEAT (9-SEATERS) Seatback Reclining Adjustment Head Restraint Adjustment To change the seatback angle, To raise the head restraint, pull lean forward slightly and raise it up without pressing the re- the lever. Then, lean back to the lease button. To lower the head desired angle and release the restraint, press the release lever.
-
Page 131
Seatback Folding and Unfolding Seat Slide Adjustment To move the seat forward or Pull up the lever and fold and backward, pull and hold the unfold the seatback until it clicks. seat slide lever up and WARNING move the seat as required. Then, release the lever in de- Make sure that the seatback is com- sired position. -
Page 132: Second & Third Row Seat (11-Seaters)
SECOND & THIRD ROW SEAT (11-SEATERS) Seatback Reclining Adjustment Head Restraint Adjustment To change the seatback angle, To raise the head restraint, pull lean forward slightly and raise it up without pressing the re- the lever. Then, lean back to the lease button.
-
Page 133
Seatback Folding and Unfolding Seat Slide Adjustment To move the seat forward or Pull up the lever and fold and backward, pull and hold the unfold the seatback until it clicks. seat slide lever up and WARNING move the seat as required. Then, release the lever in de- Make sure that the seatback is com- sired position. -
Page 134: Third Row Seat (7-Seaters)
THIRD ROW SEAT (7-SEATERS) Head Restraint Adjustment To raise the head restraint, pull it up without pressing the release button. To lower the head restraint, press the release button on top of seatback and push the head restraint down. Seat Slide Adjustment Seatback Reclining Adjustment To move the seat forward or backward, pull and hold the seat To change the seatback angle, lean forward slightly and raise…
-
Page 135: Fourth Row Seat (9 & 11-Seaters)
FOURTH ROW SEAT (9 & 11-SEATERS) Seatback Folding and Unfolding Pull up the lever and fold and unfold the seatback until it clicks. WARNING Make sure that the seatback is completely locked. Head Restraint Adjustment To raise the head restraint, pull it up without pressing the release button.
-
Page 136: How To Remove And Install The Third Row Seat (7-Seaters)
HOW TO REMOVE AND INSTALL THE THIRD ROW SEAT (7-SEATERS)* 1. Fold down the seatback of the third row seat while puling 3. Slide the third row seat to its rear end (arrow direction) while up the seatback reclining lever ( ). pulling up the seat sliding lever ( ).
-
Page 137: Making A Luggage Compartment (9 & 11-Seaters)
MAKING A LUGGAGE COMPARTMENT (9 & 11-SEATERS) Making a luggage compartment on the fourth row seat 1. Pull up the fourth seatback folding lever 3. Unfold the cover completely. 2. Release the cover locks and fold the seatback until it clicks. Making a luggage compartment by folding the fourth row seat 1.
-
Page 138
MEMO …………………………………………………………………………………………………………………………………………………………………………………………………………………………………………………………………………………………………………………………………………………………………………………………………………………………………………………………………………………………………………………………………………………………………………………………………………………………………………………………………………………………………………………………………………………………………………………………………………………………………………………………………………………………………………………………………………………………………………………………………………………………………………………………………………………………………………………………………………………………………………………………………………………………………………………………………………………………………………………………………… -
Page 139: Seat Belt And Air Bag
TABLE OF CONTENTS Seat Belt …………8-2 Seat Belt in Front Seats ……. 8-5 How to Fasten the Three Point Seat Belt in Front Seats ………… 8-6 Second Row Seat ……… 8-7 How to Fasten the Seat Belts in Second Row Seat ……… 8-8 Seat Belt and Air Bag Seat Belts in Third and Fourth Row Seat …
-
Page 140: Seat Belt
SEAT BELT 9-SEATERS 7-SEATERS Three point Three point seat Three point Three point seat seat belt belt (passenger’s seat belt belt (passenger’s (driver’s seat) seat) (driver’s seat) seat) Three point Three point Lap belt / three Lap belt / three seat belt seat belt point seat belt…
-
Page 141
• Never use a same seat belt more than one person at a time. • Modifications and improper maintenance for the safety systems could cause serious injury. The safety systems including seat belt should be checked and repaired by only Ssangyong Dealer or Ssangyong Authorized Service Operation. -
Page 142
Three Point Seat Belt Lap Belt The belt is positond across the chest and pelvis. The belt is positiond across the pelvis. The belt is secured at three points in the vehicle The belt is secured at two points in the vehicle body and seat. -
Page 143: Seat Belt In Front Seats
SEAT BELT IN FRONT SEATS Seat Belt Height Adjustment • To raise the seat belt, press the knob and slide up D- ring. • To lower the seat belt, press the knob and slide down D-ring. WARNING • Adjust the seat belt height be- fore driving.
-
Page 144: How To Fasten The Three Point Seat Belt In Front Seats
HOW TO FASTEN THE THREE POINT SEAT BELT IN FRONT SEATS 1. Pull out the latch plate from the 2. Position the shoulder belt across the 4. Pull the latch plate to make sure it is retractor. If the seat belt is locked when body and the lap belt as low as pos- securely locked.
-
Page 145: Second Row Seat
SECOND ROW SEAT * 9-Seaters vehicle does not have the center jump seat in the second row seat. The center jump seat has a lap belt, and both side seats have a lap and three point belt. Use the three point seat belt when the seat is facing forwards, and use the lap belt when the seat belt is facing rearwards.
-
Page 146: How To Fasten The Seat Belts In Second Row Seat
HOW TO FASTEN THE SEAT BELTS IN SECOND ROW SEAT * Refer to the procedures in front seat. Lap Belt in Side Seat Lap Belt in Center Jump Seat 1. Pull out the latch plate 1. Pull out the latch plate from the retractor in- from the retractor in stalled at side bottom of…
-
Page 147: Seat Belts In Third And Fourth Row Seat
SEAT BELTS IN THIRD AND FOURTH ROW SEAT The seat belt fastening procedures in third and fourth row seat are Third Row Seat (11-Seaters) same with that of second row seat. However, both side seats do not have the lap belt. Seat Belt Latch for Center Jump Seat Three point Three seat…
-
Page 148: Seat Belt And Air Bag
Rear three point seat belt (center — EU only) 1. Pull the Mini-latch plate (A) out of the seat belt console installed at the ceiling. 2. Pull the Mini-latch plate (A) across the shoulder on the left and insert it into the buckle (2) until it clicks. 3.
-
Page 149: Child Restraint
CHILD RESTRAINT PREGNANT WOMEN When transporting infants or small children, an appropriate child restraint Ssangyong recommends that pregnant system should always be used. The child restraint system should be ap- women uses a seat belt to lessen the propriate for your child’s weight and height and properly fit the car’s seat.
-
Page 150: Warnings For Seat Belt
The belt may also tighten the Have the seat belt system checked by a Ssangyong Dealer chest which is not as strong as the shoulders. This may or Ssangyong Authorized Service Operation.
-
Page 151
WARNINGS FOR SEAT BELT • Never modify the seat belt. • Keep the buckle clean. • Always keep the seat belts clean and dry. Care should • Seat belts are designed to bear upon the bony structure be taken to avoid contamination of the webbing with of the body, and should be worn low across the front of polishes, oil and chemicals, and particularly battery acid. -
Page 152: Air Bag
Have the air bag sys- seats. It helps the effective operation of the tem checked immediately by a Ssangyong Dealer seat belts and airbags. or Ssangyong Authorized Service Operation.
-
Page 153
OPERATIONS OF AIR BAG AND PRETENSIONER Pretensioner When a strong frontal impact occurs, seat belt pretensioners The pretensioner is a de- rewind the seat belts immedi- vice that retracts the seat ately to restrain the occupants belt to tighten or loosen the to their seats. -
Page 154: Warnings For Air Bag
Operation. or even death. • Replace the steering wheel with only Ssangyong genu- • Hold only the outer rim of the steering so that the air bag ine part. can inflate without any hindrance.
-
Page 155
• When any repairs are needed for the steering wheel, or when an accident occurred without the air bag deployment, have the air bag system checked by Ssangyong Dealer or Ssangyong Authorized Service Operation. • The windshield glass may be broken when the passenger’s air bag is deployed. -
Page 156
MEMO …………………………………………………………………………………………………………………………………………………………………………………………………………………………………………………………………………………………………………………………………………………………………………………………………………………………………………………………………………………………………………………………………………………………………………………………………………………………………………………………………………………………………………………………………………………………………………………………………………………………………………………………………………………………………………………………………………………………………………………………………………………………………………………………………………………………………………………………………………………………………………………………………………………………………………………………………………………………………………………………………… -
Page 157
TABLE OF CONTENTS Ventilation, Heating, Air Conditioning and Air Purification System …….. 9-2 Air Vents …………9-3 Warnings and Cautions …….. 9-4 Supplementary Heating Device ….9-5 Manual Air Conditioner …….. 9-6 Ventilation, Heating, Automatic Air Conditioner* ……9-10 Defogging and Defrosting ……9-15 Air Conditioning and Rear Air Conditioner …….. -
Page 158
VENTILATION, HEATING, AIR CONDITIONING AND AIR PURIFICATION SYSTEM AQS and Ambient Temperature Sensor Sun Sensor Interior Temperature Control Panel and Humidity Sensor (Manual type) Rear Fan Control Control Panel Switch (Auto type) VENTILATION, HEATING, AIR CONDITIONING AND AIR PURIFICATION SYSTEM… -
Page 159: Ventilation, Heating, Air Conditioning And Air Purification System
AIR VENTS Front Vent Front Vent (heating and cooling) (heating and cooling) Down Down Left Right Left Right Rear Vent (cooling) Rear Vent (heating) Air blow direction control Air blow volume control Heating Cooling VENTILATION, HEATING, AIR CONDITIONING AND AIR PURIFICATION SYSTEM…
-
Page 160: Warnings And Cautions
WARNINGS AND CAUTIONS WARNING CAUTION • If you sleep while air conditioner or heater on with all windows • Do not stop the engine when the air conditioner is operating. It closed. You may be suffocated to death. may produce an unpleasant odor trapped in the duct. Turn the fan off and wait for a few minutes in fresh air mode before stopping •…
-
Page 161: Supplementary Heating Device
SUPPLEMENTARY HEATING DEVICE * FFH (Fuel Fired Heater) is optional. • The DI engine equipped vehicle has the supplementary heating devices to increase the heating effect before the engine cool- ant is fully heated. The supplementary heating devices are as follows: (Fuel Fired Heater) (Positive Temperature Coefficient) FFH (Fuel Fired Heater)
-
Page 162: Manual Air Conditioner
MANUAL AIR CONDITIONER Rear air conditioner Air conditioner switch ON/OFF switch Defroster switch Fan control switch Mode switch Rear heater Rear Fan Control Switch switch Temperature Air source selection switch control switch VENTILATION, HEATING, AIR CONDITIONING AND AIR PURIFICATION SYSTEM…
-
Page 163
4 stages Cool OFF switch Fan Control Switch Temperature Control Switch The fan speed can be adjusted in 4 stages. Adjust the temperature of flowing air by turning the dial. CAUTION Red direction: Hot If the air conditioner switch is turned off, the air conditioner does Blue direction: Cool not work even when the fan switch is operated. -
Page 164
Air conditioner ON/OFF switch Defroster switch To turn on the air conditioner, press this switch when the fan When you press the switch, the airflow direction will be speed switch is at any positions except OFF ( ) position. changed to windshield and door glasses, the air conditioner operates automatically and outside air comes in. -
Page 165
Rear air conditioner switch Rear heater switch • Rear air conditioner OFF: • Rear heater ON • Fan speed control: 1, 2, 3 stage • This function is not available when the rear air conditioner switch is at ( ) position. •… -
Page 166: Automatic Air Conditioner
AUTOMATIC AIR CONDITIONER* Ambient Tem- perature Sensor Sun Sensor Air Conditioner Control Panel Fault Code Display This display blinks for about 5 seconds when the system is defective or the engine is started. Auto Button • If the Auto button is pressed, the temperature of the passenger com- Interior Tempera- partment is automatically maintained according to the set temperature.
-
Page 167
Fresh air intake mode indicator Auto mode indicator Defroster indicator Temperature display (ambient Recirculation indicator temperature, set temperature) Ambient temperature display Air flow indicator Air conditioner operating Auto button and tem- indicator perature control switch Fan speed indicator Rear air conditioner Fan speed control and heater switch switch and ambient… -
Page 168
Auto Button And Temperature Control Switch Ambient Temperature Display Button When you press Auto button, the «AUTO» indicator is displayed When you press this button, the «OUTSIDE» indicator appears on the VFD and the temperature of the passenger compartment and the ambient temperature is displayed on the VFD for is automatically maintained according to the set temperature. -
Page 169
Air Conditioner Switch Defroster Switch When you press the switch, the airflow direction will be When you press the switch, the ( ) indicator comes on and changed to windshield and door glasses, the air conditioner the air conditioner starts to operate, however, the «AUTO» in- operates automatically and outside air comes in. -
Page 170
Rear air conditioner switch Rear heater switch • Rear air conditioner OFF: * Rear heater ON • Fan speed control: 1, 2, 3 stage * This function is not available when the rear air condi- tioner switch is at ( ) position. -
Page 171: Defogging And Defrosting
DEFOGGING AND DEFROSTING Inside 1. Press the defroster switch. Automatic air conditioner 2. Adjust the fan speed with the fan speed control speed. 3. To quickly remove the fog on the glass, set the switch at high speed position. 4. To prevent the fog generating on the glass, setting the air source selection switch to the fresh air intake mode is recommended.
-
Page 172: Rear Air Conditioner
REAR AIR CONDITIONER The appearance of rear air conditioner switch in automatic air conditioner equipped vehicle is different from that of manual air conditioner equipped vehicle, but its functions are same. Rear Air Conditioner Rear Fan Speed Control Control Switch Panel Switch Air Condi- Rear Heater…
-
Page 173
1. Position the rear air conditioner control switch to any po- 3. When the rear air conditioner switch is at «R» position, the sition except ( ) position. fan speed can be controlled by this switch. 2. To operate the heater, press «RR HTR» switch. To operate 4. -
Page 174: Air Source Selection And Aqs (Air Quality System) Switch
AIR SOURCE SELECTION AND AQS (AIR QUALITY SYSTEM) SWITCH AQS System? Air Quality System (AQS) automatically changes the air source selection to recirculation mode when polluted air is detected through AQS sensor. The air source se- lection returns back to fresh air intake mode after a specified period or the polluted air is disappeared.
-
Page 175: Replacing Air Conditioner Filter
REPLACING AIR CONDITIONER FILTER Replace the air conditioner filter at every 10,000 km of driving. Auto However, if the vehicle is operated under severe conditions such as dusty road, unpaved road, and excessive air condi- tioner and heater operation, shorten the replacement interval. Manual 1.
-
Page 176
MEMO …………………………………………………………………………………………………………………………………………………………………………………………………………………………………………………………………………………………………………………………………………………………………………………………………………………………………………………………………………………………………………………………………………………………………………………………………………………………………………………………………………………………………………………………………………………………………………………………………………………………………………………………………………………………………………………………………………………………………………………………………………………………………………………………………………………………………………………………………………………………………………………………………………………………………………………………………………………………………………………………………… -
Page 177: Turbocharger System
TABLE OF CONTENTS Cautions in Using the Turbocharger ..10-2 Preventive Maintenance ……10-3 Turbocharger Inspection ……10-4 Turbocharger System…
-
Page 178: Cautions In Using The Turbocharger
CAUTIONS IN USING THE TURBOCHARGER WHAT IS THE TURBOCHARGER? Turbochargers are based on gas turbine en- gine technology, but operate under consider- ably greater pressure. The turbocharger con- sists of two turbo elements, a turbine and a compressor, both of which are driven from the main center shaft.
-
Page 179: Preventive Maintenance
PREVENTIVE MAINTENANCE The vehicle owner should be encouraged to observe the fol- CAUTION lowing precautions to ensure maximum turbocharger service • At low ambient temperature, or when ever the vehicle has not life. been used for a long period, normal engine oil pressure and flow is affected.
-
Page 180: Turbocharger Inspection
TURBOCHARGER INSPECTION Good maintenance practices should be observed, particularly WARNING regarding air filtration, oil quality and filtration. Operating the turbocharger system without the intake and exhaust These areas are important because of a turbo-charger’s speed manifold mounting can result in severe engine damage. of operation.
-
Page 181: Convenience Devices
TABLE OF CONTENTS Storage Boxes and Convenience Devices 11-2 Front Storage Boxes ……..11-4 Sun Visors ………… 11-6 Inside Rearview Mirror …….. 11-7 Tiltable Steering Wheel and Horn ….. 11-8 Front Power Outlet and Cigarette Lighter … 11-9 Assist Grip, Seatback Table, Convenience Seatback Pocket ……..
-
Page 182: Storage Boxes And Convenience Devices
STORAGE BOXES AND CONVENIENCE DEVICES Rear monitor Sunglasses box Driver’s sun visor Passenger’s sun visor Inside rearview mirror Steering wheel tilting lever Flower vase Front monitor Passenger’s CD storage box Cigarette lighter storage box Front cup holde Glove box Driver’s door Passenger’s door map pocket map pocket…
-
Page 183
WARNING • Driving with any storage box open can cause injury in case of an accident or a sudden stop. Keep all the storage boxes closed while driving. • Do not store any flammable items or disposable lighter in the console box or other space. In hot weather, they can explode and cause a fire. •… -
Page 184: Front Storage Boxes
FRONT STORAGE BOXES Sunglasses Storage Box CD Storage Box, Passenger’s Storage Box, Glove Box 11-4 CONVENIENCE DEVICES…
-
Page 185
Front Door Map Pocket Front Cup Holder The map pocket is located on each front door. Map, magazine, newspaper and others can be stored. If you press the front of the cover, the cup holder comes out. To close it, press the cup holder until it clicks. -
Page 186: Sun Visors
SUN VISORS Use the sun visors to block the sunlight. Passenger’s sun visor Driver’s sun visor Inside rearview mirror sensor The passenger’s sun visor has a The driver’s sun visor has a ticket vanity mirror. holder. 11-6 CONVENIENCE DEVICES…
-
Page 187: Inside Rearview Mirror
INSIDE REARVIEW MIRROR The inside rearview mirror can be adjusted up, down or side ways to obtain the best view. ECM (Anti-glare auto adjustment function) Manual Type Inside Rearview Mirror The reflection rate of inside rearview mirror can be automati- Adjustment cally adjusted by the light intensity from a vehicle behind you.
-
Page 188: Tiltable Steering Wheel And Horn
TILTABLE STEERING WHEEL AND HORN Tiltable Steering Wheel The steering wheel can be adjusted up or down to the desired position. To adjust the steering wheel, move the control lever to arrow direction and adjust the wheel up or down to the proper position. To lock the steer- ing wheel at the position, move the control lever to arrow direction WARNING •…
-
Page 189: Front Power Outlet And Cigarette Lighter
• Do not hold the lighter pressed in by hand while heating. • If the lighter does not pop out within 30 seconds, pull it out and have the problem cor- rected by Ssangyong Dealer or Ssangyong Authorized Service Operation. Front Power Outlet An auxiliary power outlet for extra electrical devices is install in the dash panel.
-
Page 190: Assist Grip, Seatback Table, Seatback Pocket
ASSIST GRIP, SEATBACK TABLE, SEATBACK POCKET Coat Hanger Coat Hanger Assist Grip Seatback Storage Seatback Table Pocket * Locations of cup holder may vary according to the seats. The front seatback storage A table is installed at the rear of the WARNING pocket is provided to store front seatback.
-
Page 191: Rear Monitor
REAR MONITOR* Passengers in rear seats can watch TV, DVD, and VCD through the rear monitor. The rear monitor displays the rearview during reverse driving (rearview camera system equipped vehicle). Adjustment of Rear Opening/Closing of Monitor Screen Rear Monitor 1. When you press the open To adjust the monitor screen, use three control dial installed button…
-
Page 192: Rear Cigarette Lighter, Rear Cup Holder
REAR CIGARETTE LIGHTER, REAR CUP HOLDER, REAR STORAGE BOX, REAR POWER OUTLET Rear Cigarette Lighter Cup Holder (Right) (Left side of third row seat) To operate the cigarette lighter, press it in all the way when the ignition switch is in the “ACC” or “ON”…
-
Page 193: Center Console (Storage Boxes, Cd Changer, Dvd Changer)
CENTER CONSOLE (STORAGE BOXES, CD CHANGER, DVD CHANGER) • To open the upper storage box, pull up the lever • To open the lower storage box (or CD/DVD changer), pull up the lever : Storage box : Varies according to option •…
-
Page 194: Removable Center Console
REMOVABLE CENTER CONSOLE Storage Bin and Table When swing the inner cover from The center console cover can be center console cover, it can be used used as a table in second row seats. as a table in front seats. Portable Tray The center console can be used as a portable tray.
-
Page 195: Removal And Installation Of Tray
REMOVAL AND INSTALLATION OF TRAY 1. Open the cover and remove the stor- 2. To release the bottom locks, lift up 3. Open the cover in rear bottom of the age bin. the support from floor and push tray. To release left lock, turn the tray both sides of tray in.
-
Page 196: Audio, Video, Navigation System
AUDIO, VIDEO, NAVIGATION SYSTEM* For details, refer to the separately provided operating manual. Rear Monitor Front Monitor Audio/Video Head Unit CD Changer* (DVD Changer*) DVD Navigation Unit* CD üÀÎÀú 11-16 CONVENIENCE DEVICES…
-
Page 197
DVD Navigation Unit* CD Changer* DVD Changer* CD/DVD changer is installed in the center console. Location of Navigation Unit How to change a CD or DVD The navigation unit is installed behind 1. Open the lower cover in center console. the rear left side cover. -
Page 198: Cautions
CAUTIONS CAUTIONS WHEN USING AUDIO/VIDEO/NAVIGATION SYSTEM* • An illegal copy of CD/DVD may cause a malfunction in the audio/video head unit and an abnormal replay. Use only genu- Usable Discs ine CD/DVD. Navigation Unit • Unusable discs may cause a malfunction in the system due •…
-
Page 199
MEMO …………………………………………………………………………………………………………………………………………………………………………………………………………………………………………………………………………………………………………………………………………………………………………………………………………………………………………………………………………………………………………………………………………………………………………………………………………………………………………………………………………………………………………………………………………………………………………………………………………………………………………………………………………………………………………………………………………………………………………………………………………………………………………………………………………………………………………………………………………………………………………………………………………………………………………………………………………………………………………………………………… -
Page 200
MEMO …………………………………………………………………………………………………………………………………………………………………………………………………………………………………………………………………………………………………………………………………………………………………………………………………………………………………………………………………………………………………………………………………………………………………………………………………………………………………………………………………………………………………………………………………………………………………………………………………………………………………………………………………………………………………………………………………………………………………………………………………………………………………………………………………………………………………………………………………………………………………………………………………………………………………………………………………………………………………………………………………… -
Page 201
TABLE OF CONTENTS Starting the Engine with Jumper Cables .. 12-2 Cautions When a Tyre is Flat ….. 12-4 OVM Tools ……….. 12-5 Changing a Flat Tyre ……..12-6 Cautions when Changing the Tyre … 12-11 When the Engine is Overheating ….. 12-12 In Case of Water Separator Warning Light and Engine Check Warning Light ……… -
Page 202: In Case Of Emergency
STARTING THE ENGINE WITH JUMPER CABLES You can start a vehicle that has a discharged battery by transferring electrical power to it from a battery in another vehicle. • Connect the positive cable Discharged battery Booster battery first when connecting. •…
-
Page 203
7. Connect one end of the second lead of jumper cable to WARNING the negative terminal of the booster battery. • Connecting the jumper cable to the negative terminal of the dis- 8. Make the last connection to a suitable ground, such as a charged battery could result in arcing and possibly a battery steel bracket bolted to the engine block. -
Page 204: Cautions When A Tyre Is Flat
CAUTIONS WHEN A TYRE IS FLAT If a tyre goes flat, follow the safety instructions as below: 1. Turn on hazard flashers. 2. Move off the road to a safe place away from traffic. 3. Park on a firm and level ground. 4.
-
Page 205: Ovm Tools
OVM TOOLS The OVM tool box is located under the fourth row seat. The OVM tool kit consists of: 1. Jack 2. Wheel nut wrench OVM tool box 3. Jack connection 4. Spanner (2) 5. Spare tyre connection 6. Pliers 7.
-
Page 206: Changing A Flat Tyre
CHANGING A FLAT TYRE Close Open 1. Stop your vehicle to a safe place and turn on the hazard 4. Open the tailgate and remove the cap for spare tyre mount- flasher and then apply the parking brake. ing hole with a screwdriver or coin. 2.
-
Page 207
Remove Install 5. Combine the wheel nut wrench and the spare tyre 6. Pry off the wheel cap with a flat blade screwdriver. connection, and insert it into the hole. Turn the wheel nut wrench to counter-clockwise to remove the spare tyre. CAUTION CAUTION When refitting the spare tyre to the carrier, be sure to securely lock… -
Page 208
• Locate the jack at Rear jack up point a correct jack-up point. • The jack-up point is reinforced. Be- fore setting up the jack, check the jack-up point by hands. Jack head Front jack up point Base plate 7. Loosen the wheel nuts one or two turns by turning counter- clockwise with the wheel nut wrench. -
Page 209
9. Combine the wheel nut wrench and the jack connection 12. Fit the spare tyre and temporarily tighten the wheel nuts as shown in figure and hook it into the connecting ring. by hands. Jack up the vehicle by rotating combined wrench clock- 13. -
Page 210
• When the tyre has been replaced, retighten it after 1,000 km of driving. WARNING • As soon as possible, take your vehicle to a Ssangyong dealer or Ssangyong Authorized Service Operation and have the wheel nuts tightened according to Ssangyong specifications. -
Page 211: Cautions When Changing The Tyre
• Never use oil or grease on studs or nuts. It may cause an over tightening of the nuts. After changing the tyre • Check, repair, and retighten the replaced tyre at nearest Ssangyong Authorized Service Operation or qualified tyre shop after emergency change.
-
Page 212: When The Engine Is Overheating
• If the problem continues, have the cooling system checked by 7. Add coolant into the reservoir tank if necessary. If the cool- Ssangyong Dealer or Ssangyong Authorized Service Operation. ant level is normal, have the cooling system checked by Ssangyong Dealer or Ssangyong Authorized Service Operation.
-
Page 213: Water Separator Warning Light And Engine Check Warning Light
In this mode, the engine driving force may be de- creased or the engine may stall. When this happens, have the sys- tem checked at the Ssangyong Dealer or Ssangyong Authorized Ser- vice Operation. 12-13…
-
Page 214: Towing A Disabled Vehicle
TOWING A DISABLED VEHICLE Flat-bed equipment is the best method of moving a disable If not available to use a car carrier, tow the vehicle as vehicle to avoid any damages. The vehicle equipped with the illustrated. full-time four wheel drive (TOD) system should be towed by this way.
-
Page 215: Emergency Towing
EMERGENCY TOWING For emergency towing when a towing service is not available, your vehicle is equipped with the towing hooks under the front and rear of the vehicle for use with a tow rope. When towing your vehicle with the tow rope: •…
-
Page 216
Locations of Towing Hook CAUTION • If you cannot use a professional towing service, get into the dis- abled vehicle during towing. But, never use this emergency tow- ing when the electrical system, steering system, and brake sys- tem are not operative. •… -
Page 217: Trailer Towing
The weight of your loaded trailer (gross trailer weight) should ensure that the correct equipment is fitted to your vehicle. never exceed the specified values. Your Ssangyong Dealer will help supply and install towing The maximum permissible trailer ball weight is 140kg. equipment to suit your requirement.
-
Page 218
Maximum Load Limits (unit: kg) Type Trailer Tongue with brake 2,500 without brake with brake 2,850 without brake The above dimensions are certified data to meet the following conditions. On a 12% of uphill: Capable of 5 starts within 5 minutes (with trailer) On a 18% of uphill: Capable of 5 starts within 5 minutes (without trailer) -
Page 219: Brake Fluid
TYRES WARNING Incorrect loading and crosswinds, large trucks passing or road rough- When towing trailers, be sure your tyres are properly inflated ness can cause swaying or trailer separation. to the inflation pressure. • Adjust ball load by distribution of load in trailer.location. •…
-
Page 220: Automatic Transmission Fluid
AUTOMATIC TRANSMISSION FLUID More frequent maintenance is required if your vehicle tows • Avoid holding the brake pedal down too long or too frequently, trailer frequently. which will cause the brakes to overheat and result in re- duced brake efficiency. TOWING TIPS •…
-
Page 221: Parking On Hills
PARKING ON HILLS WHEN YOU ARE READY TO LEAVE AF- TER PARKING ON A HILL You really should not park your vehicle, with a trailer attached, on a hill. If something goes wrong, your rig could start to move. 1. Apply your regular brakes and hold the pedal down while People can be injured, and both your vehicle and the trailer you: can be damaged.
-
Page 222: Moving Selector Lever From «P» Position And Resetting Safety Mode
If the gear is fixed at 2nd forward gear in “D” position or 2nd re- pedal. verse gear in “R” position, have the system checked by Ssangyong dealer or Ssangyong Authorized Service Operation 2. For your safety, apply the parking brake.
-
Page 223: Warning Triangle
2. Have all passengers get out of the vehicle and stay away from the traffic. When your safety is secured, contact your Ssangyong dealer for your emergency service. CAUTION • Move the vehicle off the traffic to a safe place. Turn on the haz-…
-
Page 224
MEMO …………………………………………………………………………………………………………………………………………………………………………………………………………………………………………………………………………………………………………………………………………………………………………………………………………………………………………………………………………………………………………………………………………………………………………………………………………………………………………………………………………………………………………………………………………………………………………………………………………………………………………………………………………………………………………………………………………………………………………………………………………………………………………………………………………………………………………………………………………………………………………………………………………………………………………………………………………………………………………………………………… -
Page 225: Service And Maintenance
TABLE OF CONTENTS Daily Check List ……… 13-2 Washer Fluid ……….13-23 Locations in Engine Compartment (EU) Wiper Blade Replacement ….. 13-24 …………..13-3 Tyre Inflation Pressure ……13-25 Locations in Engine Compartment Tyre Wear Check and Tyre Rotation ..13-26 (General : Except EU Region) ….
-
Page 226: Daily Check List
5. Check the outside rearview mirrors and license plate for function. dirt or damage. 9. Check the seat belts. CAUTION If in doubt about driving and operating conditions, have your vehicle checked at Ssangyong Dealer or Ssangyong Authorized Service Operation. 13-2 SERVICE AND MAINTENANCE…
-
Page 227: Locations In Engine Compartment (Eu)
DIESEL ENGINE LOCATIONS IN ENGINE COMPARTMENT (EU) Coolant surge tank Relay and Brake and clutch fluid reservoir fuse box (for manual transmission) Engine oil dipstick Front washer fluid reservoir Fuel filter Engine oil filler cap Air cleaner Bat- tery Power steering fluid reservoir 13-3 SERVICE AND MAINTENANCE…
-
Page 228: Locations In Engine Compartment (General : Except Eu Region)
DIESEL ENGINE LOCATIONS IN ENGINE COMPARTMENT (GENERAL : EXCEPT EU REGION) Coolant surge tank Relay and Brake and clutch fluid reservoir fuse box (for manual transmission) Engine oil dipstick Front washer fluid reservoir Engine oil filler cap Air cleaner Battery Fuel filler Power steering fluid reservoir…
-
Page 229: Locations In Engine Compartment
GASOLINE ENGINE LOCATIONS IN ENGINE COMPARTMENT Relay and fuse box Brake and clutch fluid reservoir (for manual transmission) Coolant surge tank Engine oil dipstick Engine oil filler cap Air cleaner Front washer fluid reservoir Power steering Battery fluid reservoir 13-5 SERVICE AND MAINTENANCE…
-
Page 230: Engine Oil
ENGINE OIL Diesel Engine Level Check 1. Park the vehicle on a level ground and apply the parking brake. 2. Stop the engine and wait more than 5 minutes. 3. Remove the dipstick, wipe it clean with cloth. 4. Reinsert it all the way and remove it again. 5.
-
Page 231
* What’s Severe Driving Condition? WARNING • Driving at the high engine speed or at high-speed Use only Ssangyong genuine engine oil and filter. Use of non-rec- • Driving for consecutive two hours at high speed ommended products could cause damage to the engine. -
Page 232
Engine • Use only Ssangyong genuine engine oil. The viscosity should be selected according to outside temperature. Do not • The oil should not go above the upper switch to a different viscosity in the event of brief temperature fluctuations. -
Page 233: Engine Coolant
• When the coolant level is too low, the engine can be overheated. If the coolant temperature gauge in instrument panel goes up abnormally, immediately check the coolant level. • Use only Ssangyong recommended coolant and anti-freeze. Use of non-recommended coolant could cause damage to the cooling system. WARNING •…
-
Page 234: Air Cleaner
AIR CLEANER Diesel Engine Change Change the air cleaner element at every 30,000 km of driving. 1. Unscrew the cover bolts and remove the cover. 2. Replace the air cleaner element with new one. Make sure that the element is correctly installed in the air cleaner housing. 3.
-
Page 235: Power Steering Fluid
POWER STEERING FLUID Diesel Engine Gasoline Engine Power steering Power steering fluid reservoir fluid reservoir Check fluid level on a level ground with engine turned off. The fluid level should be between the MIN and MAX marks on the reservoir cap gauge. If it drops to or below the MIN mark, top up with the specified fluid.
-
Page 236: Diesel Engine
DIESEL ENGINE FUEL FILTER AND PRIMING PUMP (EU) • Change the fuel filter at every 30,000 km of driving. Plug opening direction • Drain the water from fuel filter whenever changing the engine oil. Plug closing direction • After changing the fuel filter or draining the water, perform the pumping Fuel filter operation of the priming pump until it becomes rigid.
-
Page 237: Fuel Filter And Water Separator (General)
DIESEL ENGINE FUEL FILTER AND WATER SEPARATOR (GENERAL) Fuel filler Priming Pump Operating Conditions Priming 1. when completely consumed the fuel pump 2. after draining the water from the fuel filter Water 3. after replacing the fuel filter separator Before starting the engine, perform the pumping operation of priming pump until it becomes rigid to fill up the fuel pump with fuel.
-
Page 238: Fuel Filter
FUEL FILTER • Service Interval Replace every 30,000 km (Draining water from fuel filter: whenever replacing the engine oil) General Replace every 25,000 km (Draining water from fuel filter: whenever replacing the engine oil) Water Separating Function If the water in fuel gets into the engine and fuel system, it may cause serious damage in fuel system.
-
Page 239
WATER SEPARATOR Location: Behind fuel filter (between fuel filter and dashpanel) in engine compartment (engine intake side) Draining The Water From Water Separator Drain the water from water separator whenever replacing the engine oil. After draining the water, press the priming pump until it be- comes rigid. -
Page 240
Replace the fuel filter according to the specified maintemamce schedule. Service Interval Replacement Every 60,000 km CAUTION Replace with a Ssangyong genuine part with specified intervals. 13-16 SERVICE AND MAINTENANCE… -
Page 241: Brake And Clutch Fluid
• The fluid gradually decreases according to the wear of the brake pads. A sudden drop of the fluid level may indicate the leaks in the system. In this case, have the system checked by Ssangyong Dealer or Ssangyong Authorized Service Operation.
-
Page 242: Battery
If the warning light comes on while driving, turn off all unnecessary electrical devices and have the system checked by Ssangyong Dealer or Ssangyong Authorized Service Operation. • The battery terminal should be disconnected when the igni- tion key is removed or placed at “LOCK”…
-
Page 243: Fuse And Relay Box
If any fuse is blown, replace it with a new fuse. CAUTION If a new fuse also opens, have the electrical system checked and re- paired by Ssangyong Dealer or Ssangyong Authorized Service Operation. The underhood fuse box is located in the engine compart- ment on the driver’s side.
-
Page 244: Fuse Replacement
FUSE REPLACEMENT Use only the fuse with same rating. Normal Blown 1. Turn off all electrical equipment and set the ignition switch WARNING to “LOCK”. The use of different types or different rating fuses could cause dam- 2. Locate the defective fuse. Refer to the fuse label in this age to the electrical system and even start a fire.
-
Page 245: Underhood Fuse Box Label
UNDERHOOD FUSE BOX LABEL 13-21 SERVICE AND MAINTENANCE…
-
Page 246: Interior Fuse Box Label
INTERIOR FUSE BOX LABEL 13-22 SERVICE AND MAINTENANCE…
-
Page 247: Washer Fluid
WASHER FLUID Frequently check the washer fluid level and add the speci- Rear Washer Fluid Reservoir fied product as needed. WARNING The washer fluid includes flammable materials to prevent freezing. There could be a fire when di- Front Washer Fluid Reservoir rectly contacted with flames.
-
Page 248: Wiper Blade Replacement
WIPER BLADE REPLACEMENT 1. Lift the wiper arm up from the 2. Press the safety button ( ). 3. Slide the blade down and remove it windshield. from the arm. 4. Install a new blade. 5. Put the wiper arm down to its park- ing position.
-
Page 249: Tyre Inflation Pressure
TYRE INFLATION PRESSURE Under Proper Over inflation inflation inflation Tyre Pressure CAUTION Specification Pressure • Maintaining the specified tyre pressure is essential for driver comfort, Tyre Wheel driving safety and long tyre life. Incorrect inflation pressures will in- crease tyre wear and will impair safety, vehicle handling, comfort 7-Seaters 215/65R16 35 PSI…
-
Page 250: Tyre Wear Check And Tyre Rotation
• Driving on worn or damaged tyre is very dangerous and may cause WARNING an accident. Also, a damaged tyre could burst. • Be sure to replace and rotate the tyres at Ssangyong Authorized Ser- • Check tyres regularly for damage (foreign bodies, punctures, cuts, vice Operation or professional tyre shops.
-
Page 251: Spare Tyre And Winter Tyre
• If a tyre has been impacted by a stone or any others during a • When you didn’t fit the snow tyres before driving on snow or icy driving, have it checked by Ssangyong Dealer or Ssangyong Au- road, drive in 4WD (4L, 4H) mode with low speed.
-
Page 252: Warnings And Cautions When Performing Do-It-Yourself Operation
• Never get under a vehicle when it is jacked up. If the vehicle • Use only Ssangyong genuine oils and fluids. slips off the jack, you could be badly injured. If you have to •…
-
Page 253: Spark Plugs
GASOLINE ENGINE SPARK PLUGS SPARK PLUGS Spark plugs should be inspected periodically for carbon deposits. When carbon accumulates on a spark plug, a strong spark may not be produced. If necessary, clean the electrodes with a fine wire brush and carefully scrape the carbon off the insulator with a small file.
-
Page 254
MEMO …………………………………………………………………………………………………………………………………………………………………………………………………………………………………………………………………………………………………………………………………………………………………………………………………………………………………………………………………………………………………………………………………………………………………………………………………………………………………………………………………………………………………………………………………………………………………………………………………………………………………………………………………………………………………………………………………………………………………………………………………………………………………………………………………………………………………………………………………………………………………………………………………………………………………………………………………………………………………………………………………… -
Page 255: Lamps
TABLE OF CONTENTS Bulb Specifications and Functional Check . 14-2 Location of Exterior Lamps ……. 14-3 Headlamp ………… 14-4 Front Fog Lamp and Side Repeater ..14-5 Rear Combination Lamp ……14-6 Rear Fog Lamp*, Back-up Lamp, Lamps License Plate Lamp ……..14-7 Interior Lamps ……….
-
Page 256: Bulb Specifications And Functional Check
Rear room lamp In this case, wipe the bulb glass with a soft cloth. • Never try to adjust the headlamp aiming by yourself. It should be done by a qualified technician in Ssangyong Dealer or Ssangyong Authorized Service Operation. 14-2…
-
Page 257: Location Of Exterior Lamps
LOCATION OF EXTERIOR LAMPS High mounted stop lamp Front fog lamp License plate lamp Side repeater Side repeater Headlamp Rear Combination Lamp Left Right Low beam Position lamp Stop lamp Stop lamp Rear fog Back-up lamp lamp Turn signal Turn signal Turn signal lamp Tail lamp Tail lamp…
-
Page 258: Headlamp
6. Install the headlamp in the reverse order of removal. WARNING For safety driving, do not adjust the headlamp aiming by yourself. It should be done by a qualified technician in Ssangyong Dealer or Ssangyong Authorized Service Operation. Turn signal lamp 14-4 LAMPS…
-
Page 259: Front Fog Lamp And Side Repeater
FRONT FOG LAMP AND SIDE REPEATER Side Repeater Front Fog Lamp 1. Disconnect the negative cable on the battery. 1. Disconnect the negative cable on the battery. 2. Remove the lamp housing by pushing it to the 2. Disconnect the connector right, then disconnect the connector.
-
Page 260: Rear Combination Lamp
REAR COMBINATION LAMP Turn Signal Lamp, Tail Lamp, Stop Lamp Stop lamp Turn signal lamp Tail lamp 3. Disconnect the connector and 5. Remove the bulb from the lamp 1. Disconnect the negative cable remove the rear combination connector while pushing and on the battery.
-
Page 261: Rear Fog Lamp*, Back-Up Lamp, License Plate Lamp
REAR FOG LAMP*, BACK-UP LAMP, LICENSE PLATE LAMP License Plate Lamp Rear Fog Lamp* / Back-up Lamp 4. Turn the lamp connector to remove 1. Disconnect the negative cable 1. Disconnect the negative cable on on the battery. the battery. 2.
-
Page 262: Interior Lamps
INTERIOR LAMPS Glove Box Lamp Side Room Lamp Door Courtesy Lamp Front Room Lamp Foot Lamp Rear Room Lamp 14-8 LAMPS…
-
Page 263: Glove Box Lamp And Front Room Lamp
GLOVE BOX LAMP AND FRONT ROOM LAMP Glove Box Lamp Front Room Lamp 1. Disconnect the negative cable on the 1. Disconnect the negative cable on the battery. battery. 2. Remove the lamp housing by pushing 2. Pry off the cover with a flat blade the holder.
-
Page 264: Door Courtesy Lamp And Side Repeater
DOOR COURTESY LAMP AND SIDE REPEATER DOOR COURTESY LAMP Side Repeater 1. Disconnect the negative cable on the 1. Disconnect the negative cable on the battery. battery. 2. Pry off the cover with a flat blade 2. Pry off the cover with a flat blade screwdriver.
-
Page 265: Foot Lamp And Rear Room Lamp
FOOT LAMP AND REAR ROOM LAMP Foot Lamp Rear Room Lamp 1. Disconnect the negative cable on 1. Disconnect the negative cable on the the battery. battery. 2. Pry off the cover with a flat blade 2. Pry off the cover with a flat blade screwdriver.
-
Page 266
MEMO …………………………………………………………………………………………………………………………………………………………………………………………………………………………………………………………………………………………………………………………………………………………………………………………………………………………………………………………………………………………………………………………………………………………………………………………………………………………………………………………………………………………………………………………………………………………………………………………………………………………………………………………………………………………………………………………………………………………………………………………………………………………………………………………………………………………………………………………………………………………………………………………………………………………………………………………………………………………………………………………………… -
Page 267: Vehicle Care
TABLE OF CONTENTS Vehicle Care ……….15-2 Running-in Period ………. 15-2 Cleaning Agents ……….15-2 Care and Cleaning of the Interior ….15-3 Glass Surfaces ……….15-4 Care and Cleaning of the Exterior ….15-4 Corrosion Protection ……..15-5 Important Safety Instructions ….. 15-7 Vehicle Care Before Driving ……….
-
Page 268: Vehicle Care
VEHICLE CARE RUNNING-IN PERIOD CLEANING AGENTS Follow the manufacturer’s advice whenever cleaning agents or other chemicals are used, inside or outside the vehicle. Some cleaners may be poisonous or flammable, and im- proper use may cause personal injury or damage. When cleaning the inside or outside of the vehicle, do not use vola- tile cleaning solvents such as: acetone, lacquer thinners, enamel reducers, nail polish removers: or cleaning materi-…
-
Page 269: Care And Cleaning Of The Interior
CARE AND CLEANING OF THE INTERIOR Safety Belt Care • Keep belts clean and dry. • Clean safety belts only with mild soap and lukewarm water. • Do not bleach or dye belts since this may severely weaken them. With the use of modern trim materials, it is very important that you use proper cleaning techniques and cleaners.
-
Page 270: Glass Surfaces
Ssangyong vehicles are designed to operate under normal the outside of the windshield with cleaning powder or an environmental conditions and to withstand the natural equivalent non abrasive cleaner.
-
Page 271: Corrosion Protection
CORROSION PROTECTION Protecting Exterior Bright Metal Parts Your car was designed to resist corrosion. Special materials and protective finishes were used on most parts of your car Bright metal parts should be cleaned regularly to keep their when it was built to help maintain a good appearance, luster.
-
Page 272
Therefore you should use only a filling station or a should be repaired promptly. Bare metal will corrode quickly Ssangyong Distributor who has oil separator equipment in the car and may develop into a major repair expense. Minor chips wash bay. -
Page 273: Important Safety Instructions
IMPORTANT SAFETY INSTRUCTIONS BEFORE DRIVING Take Driver’s Seat and Check the Following: For safe and comfortable driving, check each part of the ve- hicle before starting off your vehicle. • Adjustment of the rearview mirror • Applying the brake and releasing the parking brake CAUTION •…
-
Page 274
Always Using Seatbelt Do Not Leave Children Alone in the Vehicle Driver and all passengers must wear properly fastened When left alone in the car, a child might unintentionally start seatbelts. the engine or start a fire or cause another accident. WARNING WARNING •… -
Page 275: On The Road
(steering wheel shakes up and down / right and left / in circular motion), immediately visit to the nearest CAUTION Ssangyong Dealer or Ssangyong Authorized Service Operation to Repeated application of the accelerator pedal overheats the engine check and repair steering and suspension parts.
-
Page 276
Moving Your Vehicle Only After Starting the Engine When Parking or Stopping in An Enclosed Place Move your vehicle only after having started the engine. When parking or stopping in an enclosed place, turn off the engine. WARNING WARNING Driving the vehicle downhill using the downgrade slope without run- ning the engine might cause an accident. -
Page 277
• Warranty does not cover problems caused by using non- Ssangyong genuine parts. Always Putting Out Cigarettes • You can distinguish an authentic Ssangyong genuine part by its • Make sure you have put out all cigarettes and matches com- hologram. -
Page 278
Driving On A Snowy or Icy Road Driving On Unpaved and Mountain Roads • Shift to the lowest possible gear and drive slowly. • Before driving, check road conditions such as if the road suddenly ends and if there is enough space for a U-turn in •… -
Page 279
Important things to remember when going through Driving On Hill Roads water Position the gearshift lever in accordance with the road • If the engine stops while you are going through water, do conditions. not try to restart. Get your vehicle towed. •… -
Page 280: Prohibition Of Unauthorized Modifications
Modification of Fuses and Circuits • Always respect the speed limit and refrain from speeding. Always use the Ssangyong genuine fuses of the specified ca- • Allow for a safe following distance, avoid sudden steering pacity and do not alter or modify your vehicle’s circuits. It might movements.
-
Page 281: Index
Index…
-
Page 282
4-wheel drive switch* ……. 4-13 4WD check warning light and indicator* Cautions in using the turbocharger 10-2 Emergency towing ……12-15 …………4-15 Cautions when a tyre is flat …. 12-4 Engine coolant ……..13-9 Cautions when changing the tyre .. 12-11 Engine hood …….. -
Page 283: How To Use Door Remote Control
Headlamp ……… 14-4 Light switch ……… 4-4 Parking aid system* ……6-12 Heated glass switch ……4-21 Location of exterior lamps ….14-3 Parking brake operation ….6-18 How to drain the water from fuel filter Locations in engine compartment Passenger’s seat ……
-
Page 284
Seaters ……….7-2 Towing a disabled vehicle …. 12-14 Second & third row seat (11-seaters) Trailer towing* …….. 12-17 …………7-14 Turbocharger inspection ….10-4 Second row seat (7-seaters) …. 7-8 Tyre inflation pressure ….13-25 Second row seat (9-seaters) ..7-10 Tyre wear check and tyre rotation . -
Page 285
150-3, CHILGOI-DONG, PYUNGTAEK-SI GYEONGGI-DO, 459-711 KOREA TELEPHONE : 82-31-610-2740 FACSIMILE : 82-31-610-3762 NOTE: All rights reserved. Printed in SSANGYONG Motor Co., Ltd. No part of this book may be used or reproduced without the written permission of Overseas A/S Team. -
Page 286
EDITION HISTORY CODE NO. PRINTING DATE MODEL YEAR REMARKS LSV1-5OM0E-6C-500C Mar. 2006 2006…