- Manuals
- Brands
- Mercedes-Benz Manuals
- Car Stereo System
- COMAND
- Operator’s manual
Comand
-
Contents
-
Table of Contents
-
Bookmarks
Quick Links
Bild in der Größe
215×70 mm einfügen
COMAND Operator’s Manual
Related Manuals for Mercedes-Benz COMAND
Summary of Contents for Mercedes-Benz COMAND
-
Page 1
Bild in der Größe 215×70 mm einfügen COMAND Operator’s Manual… -
Page 2
We reserve the right to modify the technical details of the COMAND system as given in the data and illustrations of this Operator’s Manual. Press time: 02/23/2004 Reprinting, translation and copying, even of excerpts, is not permitted without prior authorization in writing. -
Page 3
Please make yourself familiar with your we reserve the right to make changes in COMAND control unit and read the instruc- design and equipment. Therefore, informa- tions in this manual before operating the tion, illustrations and descriptions in this COMAND system. -
Page 5: Table Of Contents
Loading CDs ….45 Quick reference COMAND ..27 Switching to CD operation ..49 Switching the COMAND control Telephone* .
-
Page 6
Contents Incoming call….80 Destination input ….100 Last destinations and Outgoing calls . -
Page 7
Contents Tele Aid* ….. . 155 Glossary ….. . 165 Emergency call system . -
Page 8
Contents… -
Page 9: Introduction
If you are operating to adjust COMAND system settings. ne book. COMAND for the first time or if you have rented or borrowed the vehicle, this is the chapter you should read first. Directories…
-
Page 10: Symbols
COMAND system equip- The continuation symbol ment may deviate from some marks an interrupted proce- descriptions and illustrations.
-
Page 11: Operating Safety
COMAND screen to read na- vigational maps, instructions, or downloa- ded information.
-
Page 12
Introduction Operating safety… -
Page 13: At A Glance
At a glance Radio operating elements CD operating elements Satellite radio* operating elements Telephone* operating elements Navigation system operating elements Service operating elements Menu system Quick reference COMAND…
-
Page 14
At a glance Radio operating elements Radio operating elements… -
Page 15
At a glance Radio operating elements Function Page Function Page 1 Audio menu 2 Soft keys Muting (multifunction keys) 7 Volume control 3 Color display with Radio 8 e Switching on and off main menu d and D 4 1 — 0, * Automatic seek tuning Station selection Manual tuning… -
Page 16
At a glance CD operating elements CD operating elements… -
Page 17
At a glance CD operating elements Function Page Function Page Function Page 1 Audio menu d and D 2 Soft keys Ejecting/loading a CD into Track select (multifunction keys) the CD drive Fast forward/reverse 3 Color screen with CD changer* main menu There are two l The status bar indicates buttons. -
Page 18
At a glance Satellite radio* operating elements Satellite radio* operating elements… -
Page 19
At a glance Satellite radio* operating elements Function Page Function Page 1 Satellite radio main menu 7 Volume control 8 e Switching on and off Switching satellite operation on and off d and D 2 Soft keys Previous or next channel (multifunction keys) 3 Color screen with Satellite radio main menu… -
Page 20
At a glance Telephone* operating elements Telephone* operating elements… -
Page 21
At a glance Telephone* operating elements Function Page Function Page Push the joystick to H,h,g,G Telephone menu Function selection Switching telephone Press E to confirm operation on and off Soft keys (multifunction keys) Accepting a call Color screen with Making a call Telephone menu Redialing 1 — 0, # and *… -
Page 22: Navigation Operating Elements
At a glance Navigation operating elements Navigation operating elements…
-
Page 23
At a glance Navigation operating elements Function Page Function Page Function Page Push the joystick to H,h,g,G,F,f Navigation main menu During a voice instruction: Function selection, During route guidance: Muting current voice Scrolling on map Change over to navigation instruction Press E to confirm display Switching off voice… -
Page 24: Service Operating Elements
At a glance Service operating elements Service operating elements…
-
Page 25
3 Color screen with Service main menu The SMS soft key appears if the vehicle is equipped for phone operation and a Mercedes-Benz specified mobile telephone* is inserted in phone cradle*. 4 Push the joystick to Function selection Press E to confirm… -
Page 26: Menu System
Menu system Menu system The menu system allows for easy Calling up main menus Menu display operation of COMAND. A display may consist of three areas. Main function Activating main Main menus are provided for the following Example: FM menu…
-
Page 27
At a glance Menu system Center: Menu functions and submenus The status of the current operating mode Using the soft keys, functions can be A maximum of five soft keys may be or other selectable functions are indicated. switched ON or OFF, or submenus can be displayed on each side of the main area In this example: called up. -
Page 28
At a glance Menu system In some situations, soft keys may not have Exiting from submenus any function and are not operational. A soft key 1 to exit a Use the Back soft key without function appears shaded submenu. The display switches to the next out. -
Page 29: Quick Reference Comand
Turn the key in the starter switch to the volume for telephone and navigation. descriptions and illustrations refer to position 1 or 2 if the COMAND was During a telephone call (talking or ringing), the COMAND. switched off by turning the key in the…
-
Page 30
At a glance Quick reference COMAND Adjusting the volume Automatic volume control At the COMAND, turn the rotary control The automatic volume control feature When the system is switched on again, at the e key. adjusts the volume depending on:… -
Page 31: Balance And Fader
At a glance Quick reference COMAND Push the joystick to H or h. Setting balance and fader Balance and fader In any audio source operation: Move the cross-hairs horizontally and Common balance and fader settings apply adjust the balance. to the following systems: Press the soft key.
-
Page 32: Bass And Treble
(Bass, Treble, Bal/Fad) for the active The new setting is saved. source mode. Activating the Bass or Treble menu Standard: In any audio source operation: COMAND sets the sound linear for the Press the soft key and Bass Treble center of the vehicle.
-
Page 33
At a glance Quick reference COMAND Push the joystick to g or G to Speech: Activating the sound functions* Playback optimized for language select the desired function. In any audio source operation: comprehensibility. Press E. Activate the main menu for the… -
Page 34
At a glance Quick reference COMAND… -
Page 35: Audio
Audio Radio operation CD operation AUX operation…
-
Page 36: Opening The Audio Menu
COMAND. Turn the rotary control at the e key to Bear in mind that at a speed of just 30 mph If an audio submenu is displayed, press adjust the volume.
-
Page 37: Switching To Radio Operation
The frequency will appear in the soft key is available if Sound In the Audio menu, press the Radio display. COMAND is equipped with a sound soft key. Switching back to FM band amplifier*. The Radio main menu will appear. The Press the soft key.
-
Page 38: Selecting A Station
An automatic scan is starting and the The message No channel will appear Manual tuning ( page 37) COMAND plays and displays the if the system could not detect a chan- channel of the first strong WB station. Station selection from the preset menu nel.
-
Page 39
Audio Radio operation Automatic seek tuning Manual tuning (FM, AM) Station selection via direct frequency entry (FM, AM) Press g or h. Activate the desired wave band ( page 35). E.g.: 102.7 MHz in the FM band Press g or h longer than 2 se- Activating the desired wave band Push the joystick to g or G. -
Page 40
Audio Radio operation Enter the desired frequency with the Station selection via number keypad Automatic station scan (FM, AM) number keys within 8 seconds, e.g. (presets) The stations on same band (FM, AM) can 1027 for 102.7 MHz. be scanned one after the other for 8 se- FM- and AM-Bands The station you have selected will conds each. -
Page 41
Audio Radio operation End scan function and play a station Press the Scan soft key again if you hear the desired station. The scan function stops automatically when the first station received has been scanned twice. The scan function will begin. -
Page 42: Memory Functions
Audio Radio operation Saving stations manually (FM, AM) On the memory list Memory functions Activate the desired wave band You can use the following functions: In the Radio main menu ( page 35). Saving stations manually (FM, AM) Activate the desired wave band Press the soft key.
-
Page 43
Audio Radio operation Press E longer than 2 seconds. You will see the Radio main menu You will hear a verification beep if the automatically after 8 seconds beep tones option was activated in the if you press the soft key. Back system settings ( page 162). -
Page 44
Audio Radio operation Saving stations automatically (FM, AM) The autostore function is active. The message Autostore being Activate the desired wave band reloaded will appear. The radio ( page 35). stores the 10 stations with the Press the soft key Autost. -
Page 45
Audio Radio operation Press E. Selecting a station from the preset Selecting a station from the FM/AM menu (FM, AM) autostore presets In both cases, you will see the main Activate the FM or AM memory radio menu Activate the FM or AM autostore preset ( page 40). -
Page 46: Cd Operation
Audio CD operation CD operation General Information on CD operation Health hazard The system may not be able to play CDs with copy protection or Warning The CD drive and CD changer* are Class 1 copied CDs. laser products. There is a danger of invisible In order to avoid distraction which could laser radiation when you open or damage lead to an accident, the driver should insert…
-
Page 47: Tips On Caring For Your Cds
Audio CD operation Ejecting/loading a CD into the CD drive Tips on caring for your CDs Loading CDs Only touch the CD on the sides. Warning Avoid touching the CD surface with There are two l buttons. One is on your fingers.
-
Page 48
Audio CD operation… -
Page 49
Audio CD operation 1 Ejecting audio CD With the COMAND switched on, press Press l on the display unit to return 2 Opening/closing the display unit the display unit to its closed position. 3 Warning message Press EJECT to The display unit moves forward and… -
Page 50
Slide the magazine into the CD You can also slide out the magazine if box. Open panel cover to access the CD changer* until it clicks into place COMAND is switched off. changer*. (listen for the click). However, the l button will not function if the vehicle battery is not connected or discharged. -
Page 51: Switching To Cd Operation
Magaz. Playback locations for audio CDs are: when the CD changer* is active. the CD drive in the COMAND If the CD changer* has already read the the CD changer*. magazine, the Magazine menu will…
-
Page 52: Switching On
No CD inserted will changer* is connected to the appear. CD changer* main menu COMAND. Load an audio CD into the CD drive If the last played CD is not available, the ( page 45). Activate the Audio menu ( page 34).
-
Page 53: Selecting A Cd
With the number keypad Selection is possible if the CD changer* has loaded the magazine (COMAND knows the position of filled The number keys 1 — 6 can be used and empty slots) and at least two audio for direct selection.
-
Page 54: Track Select
Audio CD operation Press a number key, e.g. 2 to select Track select the corresponding CD. The name of the CD instead of e.g. You can select a track: The CD is changed. The selected CD is is displayed if the information is with g or h ( page 52) played back.
-
Page 55
Audio CD operation Previous track or start of title (if more With the number keypad than 10 seconds of playing time has Activate the CD main menu Entries higher than the number of elapsed) ( page 50). tracks available on the CD are not Press g. -
Page 56: Fast Forward/Reverse
Audio CD operation Activating Ending the function Fast forward/reverse Press the Scan soft key. Scan search is running. Fast forward Scan will begin. Press the soft key. Scan Press h longer than 2 seconds and keep it pressed. Press E. Fast reverse Playback will resume with the desired Press g longer than 2 seconds and…
-
Page 57: Muting
Audio CD operation Muting Playback mode COMAND will also deactivate muting if The following options are available: Normal sequence ( page 57) Press J during playback. press A to select another audio Track mix ( page 57) The CD operation is muted and the ß…
-
Page 58
Audio CD operation Activating playback mode Push the joystick to g or G to select the playback mode Repeat E.g.: track Mode Repeat track Press E. Press the soft key. Setting The mode is activated. The CD The setting menu will appear. changer* main menu will then appear. -
Page 59
Audio CD operation Track mix Repeat track Explanation of the playback modes Normal sequence Tracks are played in random order. If The system repeats the current track more than one CD is available, the next until you switch the function off. Tracks are played in ascending order available CD is played when the current (e.g. -
Page 60
For further information please contact nected. an authorized Mercedes-Benz Center. At the COMAND, you can set the following Open the Audio menu ( page 34). for the AUX operation: Press the soft key. -
Page 61
Please make yourself familiar with your we reserve the right to make changes in COMAND control unit and read the instruc- design and equipment. Therefore, informa- tions in this manual before operating the tion, illustrations and descriptions in this COMAND system. -
Page 63
Loading CDs ….45 Quick reference COMAND ..27 Switching to CD operation ..49 Switching the COMAND control Telephone* . -
Page 64
Contents Incoming call….80 Destination input ….100 Last destinations and Outgoing calls . -
Page 65
Contents Tele Aid* ….. . 155 Glossary ….. . 165 Emergency call system . -
Page 66
Contents… -
Page 67: Introduction
If you are operating to adjust COMAND system settings. ne book. COMAND for the first time or if you have rented or borrowed the vehicle, this is the chapter you should read first. Directories…
-
Page 68: Symbols
COMAND system equip- The continuation symbol ment may deviate from some marks an interrupted proce- descriptions and illustrations.
-
Page 69: Operating Safety
COMAND screen to read na- vigational maps, instructions, or downloa- ded information.
-
Page 70
Introduction Operating safety… -
Page 71: At A Glance
At a glance Radio operating elements CD operating elements Satellite radio* operating elements Telephone* operating elements Navigation system operating elements Service operating elements Menu system Quick reference COMAND…
-
Page 72
At a glance Radio operating elements Radio operating elements… -
Page 73
At a glance Radio operating elements Function Page Function Page 1 Audio menu 2 Soft keys Muting (multifunction keys) 7 Volume control 3 Color display with Radio 8 e Switching on and off main menu d and D 4 1 — 0, * Automatic seek tuning Station selection Manual tuning… -
Page 74
At a glance CD operating elements CD operating elements… -
Page 75
At a glance CD operating elements Function Page Function Page Function Page 1 Audio menu d and D 2 Soft keys Ejecting/loading a CD into Track select (multifunction keys) the CD drive Fast forward/reverse 3 Color screen with CD changer* main menu There are two l The status bar indicates buttons. -
Page 76
At a glance Satellite radio* operating elements Satellite radio* operating elements… -
Page 77
At a glance Satellite radio* operating elements Function Page Function Page 1 Satellite radio main menu 7 Volume control 8 e Switching on and off Switching satellite operation on and off d and D 2 Soft keys Previous or next channel (multifunction keys) 3 Color screen with Satellite radio main menu… -
Page 78
At a glance Telephone* operating elements Telephone* operating elements… -
Page 79
At a glance Telephone* operating elements Function Page Function Page Push the joystick to H,h,g,G Telephone menu Function selection Switching telephone Press E to confirm operation on and off Soft keys (multifunction keys) Accepting a call Color screen with Making a call Telephone menu Redialing 1 — 0, # and *… -
Page 80: Navigation Operating Elements
At a glance Navigation operating elements Navigation operating elements…
-
Page 81
At a glance Navigation operating elements Function Page Function Page Function Page Push the joystick to H,h,g,G,F,f Navigation main menu During a voice instruction: Function selection, During route guidance: Muting current voice Scrolling on map Change over to navigation instruction Press E to confirm display Switching off voice… -
Page 82: Service Operating Elements
At a glance Service operating elements Service operating elements…
-
Page 83
3 Color screen with Service main menu The SMS soft key appears if the vehicle is equipped for phone operation and a Mercedes-Benz specified mobile telephone* is inserted in phone cradle*. 4 Push the joystick to Function selection Press E to confirm… -
Page 84: Menu System
Menu system Menu system The menu system allows for easy Calling up main menus Menu display operation of COMAND. A display may consist of three areas. Main function Activating main Main menus are provided for the following Example: FM menu…
-
Page 85
At a glance Menu system Center: Menu functions and submenus The status of the current operating mode Using the soft keys, functions can be A maximum of five soft keys may be or other selectable functions are indicated. switched ON or OFF, or submenus can be displayed on each side of the main area In this example: called up. -
Page 86
At a glance Menu system In some situations, soft keys may not have Exiting from submenus any function and are not operational. A soft key 1 to exit a Use the Back soft key without function appears shaded submenu. The display switches to the next out. -
Page 87: Quick Reference Comand
Turn the key in the starter switch to the volume for telephone and navigation. descriptions and illustrations refer to position 1 or 2 if the COMAND was During a telephone call (talking or ringing), the COMAND. switched off by turning the key in the…
-
Page 88
At a glance Quick reference COMAND Adjusting the volume Automatic volume control At the COMAND, turn the rotary control The automatic volume control feature When the system is switched on again, at the e key. adjusts the volume depending on:… -
Page 89: Balance And Fader
At a glance Quick reference COMAND Push the joystick to H or h. Setting balance and fader Balance and fader In any audio source operation: Move the cross-hairs horizontally and Common balance and fader settings apply adjust the balance. to the following systems: Press the soft key.
-
Page 90: Bass And Treble
(Bass, Treble, Bal/Fad) for the active The new setting is saved. source mode. Activating the Bass or Treble menu Standard: In any audio source operation: COMAND sets the sound linear for the Press the soft key and Bass Treble center of the vehicle.
-
Page 91
At a glance Quick reference COMAND Push the joystick to g or G to Speech: Activating the sound functions* Playback optimized for language select the desired function. In any audio source operation: comprehensibility. Press E. Activate the main menu for the… -
Page 92
At a glance Quick reference COMAND… -
Page 93: Audio
Audio Radio operation CD operation AUX operation…
-
Page 94: Opening The Audio Menu
COMAND. Turn the rotary control at the e key to Bear in mind that at a speed of just 30 mph If an audio submenu is displayed, press adjust the volume.
-
Page 95: Switching To Radio Operation
The frequency will appear in the soft key is available if Sound In the Audio menu, press the Radio display. COMAND is equipped with a sound soft key. Switching back to FM band amplifier*. The Radio main menu will appear. The Press the soft key.
-
Page 96: Selecting A Station
An automatic scan is starting and the The message No channel will appear Manual tuning ( page 37) COMAND plays and displays the if the system could not detect a chan- channel of the first strong WB station. Station selection from the preset menu nel.
-
Page 97
Audio Radio operation Automatic seek tuning Manual tuning (FM, AM) Station selection via direct frequency entry (FM, AM) Press g or h. Activate the desired wave band ( page 35). E.g.: 102.7 MHz in the FM band Press g or h longer than 2 se- Activating the desired wave band Push the joystick to g or G. -
Page 98
Audio Radio operation Enter the desired frequency with the Station selection via number keypad Automatic station scan (FM, AM) number keys within 8 seconds, e.g. (presets) The stations on same band (FM, AM) can 1027 for 102.7 MHz. be scanned one after the other for 8 se- FM- and AM-Bands The station you have selected will conds each. -
Page 99
Audio Radio operation End scan function and play a station Press the Scan soft key again if you hear the desired station. The scan function stops automatically when the first station received has been scanned twice. The scan function will begin. -
Page 100: Memory Functions
Audio Radio operation Saving stations manually (FM, AM) On the memory list Memory functions Activate the desired wave band You can use the following functions: In the Radio main menu ( page 35). Saving stations manually (FM, AM) Activate the desired wave band Press the soft key.
-
Page 101
Audio Radio operation Press E longer than 2 seconds. You will see the Radio main menu You will hear a verification beep if the automatically after 8 seconds beep tones option was activated in the if you press the soft key. Back system settings ( page 162). -
Page 102
Audio Radio operation Saving stations automatically (FM, AM) The autostore function is active. The message Autostore being Activate the desired wave band reloaded will appear. The radio ( page 35). stores the 10 stations with the Press the soft key Autost. -
Page 103
Audio Radio operation Press E. Selecting a station from the preset Selecting a station from the FM/AM menu (FM, AM) autostore presets In both cases, you will see the main Activate the FM or AM memory radio menu Activate the FM or AM autostore preset ( page 40). -
Page 104: Cd Operation
Audio CD operation CD operation General Information on CD operation Health hazard The system may not be able to play CDs with copy protection or Warning The CD drive and CD changer* are Class 1 copied CDs. laser products. There is a danger of invisible In order to avoid distraction which could laser radiation when you open or damage lead to an accident, the driver should insert…
-
Page 105: Tips On Caring For Your Cds
Audio CD operation Ejecting/loading a CD into the CD drive Tips on caring for your CDs Loading CDs Only touch the CD on the sides. Warning Avoid touching the CD surface with There are two l buttons. One is on your fingers.
-
Page 106
Audio CD operation… -
Page 107
Audio CD operation 1 Ejecting audio CD With the COMAND switched on, press Press l on the display unit to return 2 Opening/closing the display unit the display unit to its closed position. 3 Warning message Press EJECT to The display unit moves forward and… -
Page 108
Slide the magazine into the CD You can also slide out the magazine if box. Open panel cover to access the CD changer* until it clicks into place COMAND is switched off. changer*. (listen for the click). However, the l button will not function if the vehicle battery is not connected or discharged. -
Page 109: Switching To Cd Operation
Magaz. Playback locations for audio CDs are: when the CD changer* is active. the CD drive in the COMAND If the CD changer* has already read the the CD changer*. magazine, the Magazine menu will…
-
Page 110: Switching On
No CD inserted will changer* is connected to the appear. CD changer* main menu COMAND. Load an audio CD into the CD drive If the last played CD is not available, the ( page 45). Activate the Audio menu ( page 34).
-
Page 111: Selecting A Cd
With the number keypad Selection is possible if the CD changer* has loaded the magazine (COMAND knows the position of filled The number keys 1 — 6 can be used and empty slots) and at least two audio for direct selection.
-
Page 112: Track Select
Audio CD operation Press a number key, e.g. 2 to select Track select the corresponding CD. The name of the CD instead of e.g. You can select a track: The CD is changed. The selected CD is is displayed if the information is with g or h ( page 52) played back.
-
Page 113
Audio CD operation Previous track or start of title (if more With the number keypad than 10 seconds of playing time has Activate the CD main menu Entries higher than the number of elapsed) ( page 50). tracks available on the CD are not Press g. -
Page 114: Fast Forward/Reverse
Audio CD operation Activating Ending the function Fast forward/reverse Press the Scan soft key. Scan search is running. Fast forward Scan will begin. Press the soft key. Scan Press h longer than 2 seconds and keep it pressed. Press E. Fast reverse Playback will resume with the desired Press g longer than 2 seconds and…
-
Page 115: Muting
Audio CD operation Muting Playback mode COMAND will also deactivate muting if The following options are available: Normal sequence ( page 57) Press J during playback. press A to select another audio Track mix ( page 57) The CD operation is muted and the ß…
-
Page 116
Audio CD operation Activating playback mode Push the joystick to g or G to select the playback mode Repeat E.g.: track Mode Repeat track Press E. Press the soft key. Setting The mode is activated. The CD The setting menu will appear. changer* main menu will then appear. -
Page 117
Audio CD operation Track mix Repeat track Explanation of the playback modes Normal sequence Tracks are played in random order. If The system repeats the current track more than one CD is available, the next until you switch the function off. Tracks are played in ascending order available CD is played when the current (e.g. -
Page 118: Aux Operation
For further information please contact nected. an authorized Mercedes-Benz Center. At the COMAND, you can set the following Open the Audio menu ( page 34). for the AUX operation: Press the soft key.
-
Page 119: Satellite Radio
Satellite radio* Important notes Subscribing Satellite radio operation…
-
Page 120: Important Notes
At time of printing, no date for garages, or within or next to buildings) the availability of optional equipment or near other technologies. required for satellite radio operation had been set. Contact your authorized Mercedes-Benz Center for details and availability for your vehicle.
-
Page 121: Subscribing
Satellite radio* Subscribing Subscribing After the connection is made: Subscribing to satellite radio Follow the instructions given by the Depending on subscription status, soft Press B to switch to satellite radio operator. keys may or may not appear on the left operation.
-
Page 122: Satellite Radio Operation
No Satellite receiver: Sound soft key is available if The message No Satellite Radio COMAND is equipped with a sound will appear in a window. amplifier*.
-
Page 123: Changing The Program Category
Satellite radio* Satellite radio operation Automatic station scan Changing the program category Selecting a station The stations in the selected category can Satellite radio stations are split up into ca- You can use the following functions: be scanned in numerical order for 8 se- tegories.
-
Page 124
Satellite radio* Satellite radio operation Ending scan function and playing a Station selection via direct channel Enter the desired channel number with station entry the number keys, e.g. 24 for chan- nel 24. Press the soft key again. Press *. Scan The channel you have selected will be- The station selected will appear with… -
Page 125: Memory Functions
Satellite radio* Satellite radio operation Saving station manually Memory functions In the Satellite radio main menu There are 10 presets available. Press one of the number keys, e.g. 2, longer than 2 seconds. You can use the following functions: You will hear a verification beep if the Saving stations manually beep tones option was activated in the system settings ( page 162).
-
Page 126: Displaying Information
Satellite radio* Satellite radio operation Selecting a station on the memory list Displaying information In the Satellite radio main menu, press An existing entry is overwritten in the In the Satellite radio main menu, press soft key. memory list when a new input is given. Presets Info soft key.
-
Page 127: Displaying Service Information
Satellite radio* Satellite radio operation Press the Back soft key to switch back Displaying service information Sound settings to the Satellite radio main menu. You can call the provider service center for Refer to chapter “At a glance” on how to questions or releases, whenever you need.
-
Page 128
Satellite radio* Satellite radio operation… -
Page 129: Telephone
Telephone* Important notes Telephone operation…
-
Page 130
Whether or not prohibited by law, for terior antenna that has been approved safety reasons, the driver should not use the by Mercedes-Benz. cellular telephone while the vehicle is in mo- tion. Stop the vehicle in a safe location be- fore answering or placing a call. -
Page 131
Telephone* Important notes If you have a Mercedes-Benz specified In certain menus, the COMAND can integrated mobile telephone (TDMA, display date and time of the calls. CDMA or GSM) and the telephone is The COMAND can display phone inserted in the cradle, the telephone… -
Page 132
Telephone* Important notes Please read the chapter “Telephone” Also make sure that the air vents are In the following situations, it is not possible first before attempting to operate your not pointed in the direction of the or not yet possible to use the telephone: telephone. -
Page 133
Telephone being ac- GSM mobile phone tivated, please wait appears. If the message Please insert SIM COMAND prepares the telephone for card (Emergency Call 911 only use. Select other system functions, e.g. appears: possible with phone) radio, by pressing the corresponding… -
Page 134: Switching Telephone Operation On
Press a. Switching telephone operation off The menu to enter the unlock code Switch the COMAND off ( page 23) or ( page 77) will appear (only if phone turn off the engine. has been locked before).
-
Page 135: Emergency Call «911
Telephone* Telephone operation TDMA or CDMA mobile phone Emergency call “911” Warning The emergency call will also be placed if the phone is locked ( page 76). The 911 emergency call system is a public This function places a call to the local GSM mobile phone service.
-
Page 136
Telephone* Telephone operation Press E to confirm Initiating an emergency call if you want to Press a repeatedly until the place the “911” emergency call. Telephone menu is displayed. Telephone is locked The emergency call will be placed. Press 9, 1 and 1 one after the other. -
Page 137: Entering Codes
Telephone* Telephone operation GSM mobile phone Entering codes Your unlock code prevents unauthori- Entering the PIN code TDMA or CDMA mobile phone zed persons from using your telephone. Be sure to memorize this code, a four di- Entering the unlock code git number, carefully.
-
Page 138: Switching To Telephone Operation
Entering the PUK Switching to telephone operation You will hear a warning sound. The mes- If you enter your PIN incorrectly three When the COMAND is switched on, you sage will appear times in a row, you need to enter the PUK…
-
Page 139
The telephone is using a non home type Your vehicle may not have a mobile phone system cradle* installed and/or the telephone No Serv control unit may not be coded properly. The telephone is not logged into a net- Contact an authorized Mercedes-Benz work Center. -
Page 140: Incoming Call
Telephone* Telephone operation Accepting a call Setting the volume for hands-free ope- Incoming call ration Press k. The system detects an incoming call, the Raising the volume phone rings. Turn the rotary control on the e but- Incoming calls are indicated in a window in Press E to confirm accept ton to the right.
-
Page 141: Outgoing Calls
Telephone* Telephone operation Dialing a telephone number Deleting the last or several digits: Outgoing calls You can use the following functions to Press the Delete soft key once or se- Entering a telephone number make a phone call: veral times. Open the Telephone menu Dialing a telephone number Deleting all digits:…
-
Page 142
The telephone dials the number that the status bar, the off-hook symbol will ap- Press E. was dialed last. pear. COMAND will mute an active audio source. If the person called answers the call, the Press k. Press the Dialed# soft key. -
Page 143
Changing the list display calls list Press the soft key. The COMAND automatically generates a The display changes to numbers. list of the last 10 calls received. The list is sorted chronologically with the most recently received call at the top of the list. -
Page 144
Selecting an entry from the Dialed num- You can select the following functions: bers list Changing the list display ( page 83) The COMAND automatically generates a Selecting an entry and begin dialing list of the last 10 numbers dialed. The list ( page 83) -
Page 145: Active Call
The telephone dials the saved number. You can also use speed-dialing at the Ending a call ( page 82). COMAND (only mobile phone memory locations 1-99). Quick-dialing You can enter up to 2 digits. Quick dialing can be used on memory loca- Open the Telephone menu tions 1-9.
-
Page 146
Telephone* Telephone operation The following functions can be used during Switching hands-free microphone on/ Three-way calling a call: off (available if microphone is switched When a call is active and you receive a se- Ending an active call cond call on your mobile phone, a tone re- The microphone status is indicated by the presenting a second caller can be heard. -
Page 147
Telephone* Telephone operation Making a conference call Use the number key 2 and then TDMA, CDMA To make a conference between to calls press k. (one that is active and one on hold): When a first call is active a second call can The active call is put on hold and the be placed to make a conference call. -
Page 148: Phone Book
Telephone* Telephone operation Entries marked with symbols have been Phone book imported into the phone book from the in- The phone book contains all entries ternal memory of the mobile phone. of the internal memory of the mobile Usable phone number categories: phone (TDMA, CDMA and GSM mobile Symbol : Cell number…
-
Page 149
Others ling the number Changing the phone book display at Here, all entries without names or with the COMAND Open the phone book ( page 88). names starting with a special character (e.g. * or #) are put together. Selecting a phone book entry and… -
Page 150
Telephone* Telephone operation Begin dialing Press E. Press k. Press the Send soft key. -
Page 151: Navigation
Navigation Important notes Navigation main menu Destination input Route guidance During route guidance Last destinations and destination memory POIs Today’s plan Software updates…
-
Page 152: Important Notes
Navigation Important notes Important notes The route calculated by COMAND is a re- Warning Warning commendation on how to best reach your selected destination. For safety reasons, you should only enter a The Navigation DVD module contains a destination when the vehicle is stationary.
-
Page 153: Navigation Dvd
Navigation Important notes Loading/ejecting a DVD Navigation DVD COMAND calculates the route with the DVDs are loaded and ejected at the DVD GPS (Global Positioning System) sig- help of data that is stored on the navigati- Navigation slot. The DVD Navigation slot is nals received make it possible to deter- on DVD.
-
Page 154: Route Guidance After The Vehicle Has Been Transported
Navigation Important notes Switch the COMAND on. Route guidance after the vehicle has been transported Activate the Navigation main menu ( page 96). If your vehicle has been transported (e.g. by a car, train or ferry) the system may The navigation DVD needs to be in the make navigation announcements which do DVD NAVIGATION slot ( page 147).
-
Page 155: Trip Interruption During Route Guidance
Trip is continued within 2 hours: The system will automatically resume Trip interruption means the vehicle is route guidance. parked and COMAND is switched off. Trip is continued after more than Trip continuation means the vehicle is 2 hours: moving and COMAND is switched on again.
-
Page 156: Navigation Main Menu
Navigation Navigation main menu Navigation main menu Selectable Menu Items Activating the Navigation main menu If route guidance is active, a message Continue route guidance Resumes interrupted or aborted route appears instead asking you whether Press b. guidance. you wish to cancel route guidance The Navigation main menu or the ( page 120).
-
Page 157
Navigation Navigation main menu Available soft keys Destination memory Phone number You can select destinations from the You can select a POI by phone number. soft key: Home ( page 136). Brings you to the Destination Memory Enter POI phone You can edit the home address and menu ( page 142). -
Page 158: Setting The Routing Mode
Selectable traffic routes Push the joystick to g or G to Setting the routing mode select a routing mode. Minimize freeways The COMAND calculates the route as The system calculates the route with/ Press E. Fastest route. without minimizing freeways.
-
Page 159: Saving Current Location
Navigation Navigation main menu Saving current location Such destinations are marked in Press c. memory Last destinations The full view of the map appears. You with _. will see the vehicle’s current position. For permanent storage you can save the destination in the regular If route guidance is not active and the Destination memory ( page 135).
-
Page 160: Destination Input
Navigation Destination input Destination input Available soft keys: Activating the Enter street menu soft key: State Activating the Navigation main menu Brings you to the Select state/province ( page 96). menu ( page 101). The currently set state is identifed by the state code in the middle of the screen.
-
Page 161: Destination Input
Navigation Destination input Push the joystick to g or G to Similarly, when in Hawaii, you cannot Selecting the state/province select a state. choose mainland destinations. The message You must change the state Press E. Use the State list for selecting states in or province in order to use that The Enter street menu will reappear will appear in this case, if…
-
Page 162: Entering Destination Address
Push the joystick to F or f to Confirming a street (menu) select characters diagonally. Press E longer than 2 seconds. For quicker input, COMAND offers Press one of the number keys 1 to available characters from the character Select the ( symbol. Push the 9 and 0 to enter digits.
-
Page 163
Navigation Destination input Push the joystick to g or G to Entering a house number select a street. Press the soft key. List Available soft keys: The street list will appear. You can now You can enter an intersection instead select a street. -
Page 164
Select the ( symbol. Push the joystick to h, H, g or G to do The Enter city menu will appear if more For quicker input, COMAND offers than 7 cities share the entered address available numbers from the number information (street name and house Press E. -
Page 165
Navigation Destination input Confirming a city Press E to confirm your selection. Push the joystick to h, H, g or G to select the characters. After each The Start route guidance menu selection, press E. ( page 115) will appear. Push the joystick to F or f to Entering an intersection select characters diagonally. -
Page 166
Destination input Confirming a cross street (menu) Selecting a cross street Press E longer than 2 seconds to For quicker input, COMAND offers confirm your entry. available characters from the character set based on your selections and the names of the streets stored on the Select the ( symbol. -
Page 167
Navigation Destination input Confirming a cross street (list) You can now soft key: List Brings you to a list of cities with the Press E to confirm. entering a city name or previously input street. The Start route guidance menu accepting the city name shown soft key: Delete… -
Page 168
Press E longer than 2 seconds. 9 and 0. Select the ( symbol. Push the For quicker input, COMAND offers If you enter the first character, the joystick to h, H, g or G to do available characters from the character… -
Page 169
Navigation Destination input Available soft keys: Entering a parking Press the soft key. Press the soft key to see all The Start route guidance menu will appear List Details information about the city entry. after entering a destination address. The city list will appear. You can now select a city. -
Page 170
Navigation Destination input Selecting a parking lot Press the soft key to see Details more information about the parking lot. The map is displayed and shows the destination and the available parkings lots. Press E. One of the parking lot is spotlighted. The The Start route guidance menu will name belonging to it is shown on the appear ( page 115). -
Page 171
Navigation Destination input Selecting a destination using the map Available soft keys Press c. Push the joystick to H, h, g, G, soft POIs Memory Display F, f. keys are available if the soft key was pressed. Press the soft key, e.g. in the Start soft key: POIs route guidance menu ( page 115). -
Page 172
Navigation Destination input Push the joystick to H, h, g, G This allows you to select your destination. to move the cross-hairs. Release the button. If you press the soft key, your Back Push the joystick to F or f to move selection will be discarded. -
Page 173: Selecting Home Address
Navigation Destination input Here you can use the following Editing home address Selecting home address functions Press the soft key. Change Activate the Navigation main menu changing to the map ( page 111) ( page 96). The Change home address menu will setting the routing mode appear.
-
Page 174
Navigation Destination input selecting a destination from the Last After entering the address the screen may Press E. destinations memory ( page 134) look as follows The home address is saved. selecting a Point of Interest The Start route guidance menu will ( page 138) appear ( page 115). -
Page 175: Route Guidance
Navigation Route guidance Route guidance Press E. Route calculation can take some time, Starting route guidance depending on the distance to the Route calculation and route guidance Route guidance can be started if the destination and the routing mode. begins. destination input is complete and Start During route calculation, an arrow pointing…
-
Page 176: Voice Instructions
Navigation Route guidance Repeating current voice instructions Further route guidance takes place Voice instructions using only the symbols in the display. If you have not understood a navigation announcement, you can at any time have a If a new route guidance cycle is started, Warning current announcement repeated.
-
Page 177: Navigation Displays
Manual). route calculation. When the display unit is set to miles, the COMAND will indicate distances in miles (mi) or feet (ft). When the display unit is set to km, the COMAND will indicate distances in kilometers (km) or meters (m).
-
Page 178
When the display unit is set to (here: 800 ft). miles, the COMAND will indicate The status bar shows the name of the distances in miles (mi) or feet (ft). street after the driving maneuver, if… -
Page 179: Arriving At Destination
Navigation Route guidance Altering the map scale You can select the map orientation ( page 130). The current map scale is indicated on the If GPS display ( page 130) is active, left side of the status bar. information on your current position is Changing the map display shown on the status bar.
-
Page 180: Cancelling Route Guidance
Navigation Route guidance Continuing route guidance Cancelling route guidance Push the joystick to h to select In navigation mode, press b. Press E. The inquiry menu Cancel route will appear. guidance? Press E to confirm Route guidance is cancelled. The Navigation main menu appears.
-
Page 181: During Route Guidance
Navigation During route guidance During route guidance During route guidance you can use the soft Available soft keys soft key: Display keys to activate additional menus and Brings you to the Display menu soft key: Info displays and make settings. ( page 128).
-
Page 182: Info Menu
Navigation During route guidance Displaying the route list Info menu Display the soft keys. Press the soft key. If a stopover destination has been Rte list entered: Press the soft key. The list of the remaining roads/route Info sections appears. The estimated time of arrival and the The Info menu will appear.
-
Page 183: Selecting A Detour
Complete detour not possible is displayed. Traffic jams are identified by the driver, not by the COMAND. Switching on Activate the soft key display You can now enter the length of the route ( page 121).
-
Page 184
Navigation During route guidance Switching off (remove detour) Push the joystick to g or G to Press E. select Remove detour Activate the soft key display You can now change the length of the ( page 121). Press E. route section to be blocked. Press the soft key. -
Page 185: Stopover Function
Navigation During route guidance soft key: Stopover function Shows a list of parking facilities or the This function allows you to select an map with one parking facility intermediate destination while route spotlighted. guidance is active. A stopover destination soft key: may be a gas station or a restaurant or any Shows a list of ATMs or the map with other place.
-
Page 186
Navigation During route guidance soft key: Press a soft key, e.g. Selecting a POI in a list More If you press this soft key, the One of the following displays will Push the joystick to G or g to Navigation main menu ( page 96) will appear select an entry. -
Page 187
Navigation During route guidance Deleting or replacing a stopover destination Push the joystick to g or G to If no stopover destination has been Activate the soft key display select entered, the full view map appears Change active stopover ( page 121). instead of the menu. -
Page 188: Saving The Current Location
Navigation During route guidance soft key: Icons Saving the current location Defining route guidance displays Brings you to the POI Icons display The system can save the current position Activate the soft key display settings ( page 129). as a destination in the ( page 121).
-
Page 189
Navigation During route guidance Setting POI Icons displays Push the joystick to g or G to Setting personal symbol display select an option. You can set which POIs are shown as After selecting the option, Personal symbols on the map. Press E. -
Page 190
Navigation During route guidance Press the soft key to confirm and You can select the following map Back return to the map. orientations: A symbol is shown on the bottom left Heading Up side of the status bar. Setting map view Dynamic map alignment, map is North symbol Y: displayed facing driving direction… -
Page 191
Navigation During route guidance In the Settings menu ( page 128), Use the joystick to g or G to select In the Settings menu ( page 128), press the soft key. the option with the symbol -. press the soft key. Automap The options are displayed. -
Page 192
The symbol _ indicates the present If you choose this option, the system setting. With this function is active, the COMAND only switches to split screen by Move the E joystick in g or G records a trail every time the vehicle is in pressing c. -
Page 193
Navigation During route guidance Push the joystick to H to select Press E. The trail is deleted. If you don’t want to delete a trail Press E to confirm… -
Page 194: Last Destinations And Destination Memory
Navigation Last destinations and destination memory Last destinations and destination memory Now you can Last destinations memory start route guidance to the selected memory Last destinations entry ( page 135) automatically saves last destinations to which you have started route guidance. add the selected entry to today’s plan The memory can save a maximum of 50 ( page 144)
-
Page 195: Destination Memory
Navigation Last destinations and destination memory Starting route guidance to a last Destination memory destination In the destination memory, you can save Select a destination from the Last destinations under freely assignable memory. destinations names. The memory can save a maximum of 200 destinations.
-
Page 196
Navigation Last destinations and destination memory Create a new name Activating the destination memory Selecting a destination from the destination memory Push the joystick to h, H, g or Activate the Navigation main menu G to select the characters. After each ( page 96). -
Page 197
Navigation Last destinations and destination memory Category Now you can Starting route guidance to a destination Others from the destination memory At the end of the letter list follows the start route guidance to the selected category destination Select a destination from the Others destination memory. -
Page 198: Pois (Points Of Interest)
Navigation POIs (Points of Interest) POIs (Points of Interest) This function allows you to select Points of Selecting a POI category Entering POIs Interest such as gas stations, parking Activating the Navigation main menu facilities or shopping centers. ( page 96). Push the joystick to G to select menu You can also select a POI item…
-
Page 199
Navigation POIs (Points of Interest) Available soft keys Press E to confirm Sort by distance soft key: Name Brings you to the Enter POI menu The Select POI list will appear. ( page 140). Selecting a POI soft key: Details Shows all information about the POI category. -
Page 200
Navigation POIs (Points of Interest) Push the joystick to G or g to Entering a POI by name select the desired POI. In the Select POI category menu, press If menu item is chosen, the By name Press E. softkey. Name corresponding category symbol will appear in first line. -
Page 201: Selecting A Poi On The Map
Navigation POIs (Points of Interest) Press the soft key. Press the soft key if required. POIs Details Selecting a POI on the map One of the POI is spotlighted. The name Details on the POI selected are shown. Press c. belonging to it is shown on the status Press E.
-
Page 202: Entering A Poi By Phone Number
Navigation POIs (Points of Interest) Use the number keys 1 through 0 Entering a POI by phone number to enter the phone number. If a phone number is associated with a POI, the number can be used to select a destination and making a call.
-
Page 203
Call guidance menu. soft key is visible if vehicle is Call equipped for phone operation and Mercedes-Benz specified mobile telephone* is inserted in phone cradle*. Dialing will begin. In the status bar, the off-hook symbol will appear. If the person called answers the call, the call is active. -
Page 204: Today’s Plan
Navigation Today’s plan Today’s plan The today’s plan memory can be used to Press E. save destinations for which routes can be The today’s plan memory will appear. The message Today’s plan is calculated one after the other. The most recent added destination is full.
-
Page 205
Navigation Today’s plan Available soft keys Best way The current vehicle location is placed at the bottom of today’s plan as soft key: Press the soft key in the Bestway Bestway entry. Starting position Sortes entries to obtain the most today’s plan memory. -
Page 206
Navigation Today’s plan Display details for starting position Saving a today’s plan entry in the Deleting all the today’s plan entries destination memory Push the joystick to G to select Activate the today’s plan. Activate the today’s plan. Starting position Press the soft key. -
Page 207: Software Updates
Navigation Software Updates Software Updates…
-
Page 208
The display unit can cause injury if will appear. The navigation module is located contacted when open. Please close after behind the display unit of the COMAND Remove the DVD from the slot. inserting a navigation DVD. ( page 147). -
Page 209
Please wait. beep tones will sound to remind you to appear. After that, the COMAND loads the return the display to its closed position Press l on the display unit to return software on the DVD. by pressing l on the display unit. -
Page 210
Navigation Software Updates… -
Page 211: Tele Aid
Service Service main menu SMS* Tele Aid*…
-
Page 212: Service Main Menu
If a service submenu is displayed, you need to press the soft key. Back soft key is visible if vehicle is equipped for phone operation and Mercedes-Benz specified mobile telephone* is inserted in phone cradle*. soft key: Scr.off Press the soft key.
-
Page 213: Sms
The functions described here apply if If another system is active (e.g. radio), your vehicle is equipped with mobile a window with the message Received phone cradle* and a Mercedes-Benz a new SMS appears when SMS specified mobile phone*. message is coming in.
-
Page 214: Reading Sms Message Received
Service SMS* Press the Detail soft key. Line-by-line scrolling through the message Reading SMS message received text: The list entry will appear in full in a In the SMS Received ( page 153) list, window. Push the joystick to g or G. push the joystick to g or G to highlight the desired message.
-
Page 215: Emergency Call System
All active vehicle Operator’s Manual for additional connections are terminated except information. During the emergency call, Emergency call. Call appears on the status bar. No Connected operation from COMAND is possible, so you cannot disconnect the emergency call.
-
Page 216: Information
Service Tele Aid* Terminating the connection Press K. COMAND reverts to the system last active before Tele Aid was activated. Information A call to the Response Center will be initiated by pressing the corresponding button. Information regarding the opera- tion of your vehicle, the nearest authorized…
-
Page 217
Service Tele Aid* Terminating the connection Press K. COMAND reverts to the system last active before Tele Aid was activated. -
Page 218
Service Tele Aid*… -
Page 219: System Settings
System settings System settings…
-
Page 220: Selecting The Time Zone
System settings System settings System settings In the System settings menu you can: Activating the System settings Selecting the time zone menu select the time zone and daylight You can select the applicable time zone Press C. savings time settings and daylight saving time settings.
-
Page 221: Selecting The Language
System settings System settings Push the joystick to g or G to Selecting the language select the desired entry. The language affects the menu text Daylight Savings Time displays and the voice output during route Changes from summer to winter time guidance.
-
Page 222: Switching Verification And Notification Tones On And Off
Push the joystick to g or G to Option Instr. cluster setting Switching verification and select an entry. COMAND will use the same language as is notification tones on and off Press E. set in instrument cluster. In the System settings menu, press the Push the joystick to g or G to soft key.
-
Page 223: Making Display Settings
System settings System settings Press E. You can use the following functions: Making display settings In the System settings menu, press the set the display dimming characteristics The setting is applied. The System soft key. settings menu will appear. Display adjust the display brightness Adjusting the display brightness Setting the display dimming…
-
Page 224: Resetting All Settings To The Factory Settings
The Reset inquiry menu will appear. The message All data has been is highlighted. Press the Back soft key. reset. COMAND will now will appear. restart. Press E. The brightness setting is applied. The factory settings are: Time — Atlantic Time…
-
Page 225: Glossary
Using it without due cause is a Defines sound-center left/right. Contains all available destination criminal offense. addresses (town, road, intersection, COMAND Fader house number, special destinations) (Cockpit Management and Data Sys- Defines sound-center front/back. and the digital map material for a coun-…
-
Page 226
The Tele Aid system consists of three home type systems. The ROAMING types of response: automatic and ma- Voice output indicator in the COMAND display indi- nual emergency, roadside assistance, During a trip, apart from visual informa- cates that a call is being made using a and information. -
Page 227: Index
27 Adjust main menus 24 CONNECTING 155, 156 balance/fader 29 Cancelling CONTINUE ROUTE GUIDANCE 96 Adjusting route guidance 120 Current vehicle location 117 display brightness 163 volume 28 loading Destination input 100 into the COMAND 45 Destination memory 135…
-
Page 228
Menu destination address 102 Loading functions 25 house number 103 main area 24 parking 109 into the COMAND 45 soft keys area 24 PIN-code 77 status bar 24 PUK 78 into the CD changer* 48 Menu display 24 telephone number 81… -
Page 229
Index Radio station Navigation Phone book 88 saving station manually 40 Important notes 92 PHONE NOT AVAILABLE 73 Reading Navigation displays 117 PHONE NOT INSERTED 73 SMS message received 154 Navigation DVD 93 PHONE OFF 74 Recalculating 115 loading/ejecting 93 PIN BLOCKED. -
Page 230
Sound functions* 30 CD operation destination 135 Speed-dialling 85 CD changer* 50 radio station 40 Starting CD drive in the COMAND 50 Selecting route guidance 115 COMAND 27 an audio source 34 Station hands-free microphone 86 CD (CD changer* only) 51… -
Page 231
Index Voice instructions 116 Volume adjusting at the COMAND 28 automatic volume control 28 Weather Band WB 36… -
Page 232
Index… -
Page 233
Index… -
Page 234
Index… -
Page 235
Index… -
Page 236
Index… -
Page 237
Order-No. 6515 6682 13 Part-No. 209 584 97 82 US Edition A 02/04…
Система Command – уникальная технология фиксации предметов (с помощью крючков, застежек, органайзеров и лент) на плоских поверхностях, применяемых в жилых и офисных помещениях. Адгезивный тип крепления разработан для многоразового пользования. Он легко снимается с поверхностей, не повреждая их.
Стандартные и дизайнерские приспособления
Большой крючок – запатентованная технология крепления Stretch-Release, обеспечивающая простое и надежное размещение верхней одежды аксессуаров. Приспособление монтируется без гвоздей, шурупов и отверстий в стенах. Извлеченный фиксатор вновь готов к применению. В упаковке имеется 1 крючок и 2 полосы. Допустимая нагрузка – 2 250 г.
Средний крючок – инновационная система Command, созданная для удобного размещения кухонных приспособлений на мебели и стенах. Комплектация включает 2 крюка и 4 полосы. Оптимальная нагрузка – 1350 г.
Малое декоративное приспособление служит для столовых принадлежностей и полотенец. В одной упаковке содержится 2 крюка и 4 полосы. Максимальный вес: 450 г.
Приспособление для кухонной утвари обеспечивает доступное расположение половников, лопаток и прихваток. В комплектацию включено 3 фиксатора и 4 полосы. Предельная нагрузка: 225 г.

Дизайнерская система Command – приспособления для размещения халатов и полотенец во влажных помещениях. В коробке находится 2 средних крюка и 4 полосы. Фиксатор имеет прямую форму, предел нагрузки – 1350 г.
Прозрачные крючки для кухонных аксессуаров успешно применяются при размещении ложек, шумовок, черпаков и кисточек. В комплекте содержится 3 крюка и 4 полосы. Допустимый вес: 225 г.
Прозрачные крючки для ключей, кепок, пакетов и прочих мелочей выдерживают вес в 225 г. Упаковка включает 6 крючков и 8 клейких лент.
Декоративные крючки
Зеленый пластиковый крепеж средних размеров хорошо применяется для размещения мелких вещей в комнате для малышей и в столовой. В комплектации содержится 2 крючка и 4 полосы. Предельный вес – 1,35 кг.
Средний, лиловый навесной крепеж удачно вольется в дизайн детской комнаты и кухни.
Система Command поставляется в коробке с 2 фиксаторами и 4 клейкими лентами. Они не повреждают поверхность, не оставляет следов и подходят для большинства покрытий. Масса размещаемых предметов достигает 1,35 кг.

Бирюзовое приспособление чаще всего применяется детской комнате и кухне. В коробке – 2 крепления и 4 полосы. Оптимальный вес – 1,35 кг.
Хромированное крепление используется в жилых помещениях и кухне. Изделие предназначено для размещения предметов массой до 1 кг.
Прозрачный фиксатор отлично справится со своей задачей в ванной, коридоре и гардеробной. Он представлен на рынке аксессуаров в упаковке с 2 крючками и 4 прозрачными лентами. Вес размещаемых предметов составляет 900 г.
Малое прозрачное крепление служит для обустройства детской комнаты и кухни. Поставка продукции рассчитана на 2 крепежа и 4 отреза. Вес размещаемых изделий составляет 450 г.
Монтаж крючков
Система крепления Command наносится на обезжиренные поверхности. Достаточно воспользоваться спиртом и дождаться полной просушки. Не рекомендуется применять бытовые моющие средства.
Для приклеивания крючка удаляется красная полоса. Снимается черная лента, фиксатор придавливается к поверхности (на 10 сек.).
Для максимального эффекта следует отделить основание от крепежа. Основу сильно придавливаем и держим полминуты.
Крючок легко наденется на платформу, а предметы можно разместить через 1 ч.

Удаление крючка
Система крепления Command 3M легко снимается с поверхности, если придерживаться основных рекомендаций:
- Крючок отсоединяется от основы.
- Полоса натягивается ровно, избегая разрывов и остатков клея на поверхности.
- Берется за язычок удаления, чтобы плоская поверхность изделия не нанесла травм, ее верхняя часть придерживается рукой.
- Медленно натягивается язычок ровно вниз по стене. На расстоянии 30 см основание освободится от покрытия.
Органайзеры для проводов
В продажу поступают 3 варианта фиксаторов: декоративные зажимы для проводов сечением до 32 мм, средние крепежи для коаксиального кабеля сечением до 10 мм и крючки с системой крепления Command для гирлянд. Надежное размещение украшений на стенах и полу исключает образование путаницы и провисаний.

Держатели для кабеля позволяют уложить большое количество электропроводов от стереосистем, компьютеров и настольных ламп в белые и прозрачные приспособления. В комплекте поставляется 4 крепления и 5 полос.
Средний держатель служит для скрытого размещения антенн, кабелей (от компьютера, телевизора и домашнего кинотеатра). Современным пользователям предлагается комплектация 4 креплений с 5 лентами.
Клипсы (белые и прозрачные) для гирлянд и проводов лаконично вольются в праздничную и торжественную атмосферу. Если правильно подобрана система крепления Command, отзывы покупателей свидетельствуют о ее удачном применении. Она позволит легко развесить гирлянды, елочные игрушки, флажки или свадебные атрибуты на любой поверхности. В упаковку включено 20 крюков и 24 липких ленты.
Размещение клипс производится в несколько этапов: с клейкой стороны удаляется красная подложка, полоса фиксируется на тыльной части крепежа. Извлекается черная защита, и крепление готово к размещению.

Крепления для рамок
Продукция Command — «умная» система крепления с прокладкой из полипропиленовой ленты и подложкой из липкой бумаги. Коллекция включает два варианта приспособлений:
- Крючки для картинных рам с твердыми петлями хорошо используются для декорирования помещений подвесными фото и картинами. Скрытые приспособления легко приклеиваются и снимаются со стен, идеально держат предметы весом до 2,25 кг.
- Крючки для рам с петлями из веревки. Приспособления для скрытой фиксации настенных украшений выдерживают вес до двух килограмм.
Выбор застежек
Какие еще особенности имеет система крепления Command 3M? Отзывы покупателей позволяют говорить об успешном использовании конструкций в жилых домах, картинных галереях и офисах. Они помогут быстро декорировать помещение к приходу гостей, осуществить ремонтные работы и перестановку мебели без проделывания дыр для размещения любимого фото.

Компактные и удобные приспособления станут незаменимыми помощниками для своих владельцев и позволят часто менять интерьер. А свежевыкрашенные или оклеенные новыми обоями стены останутся в первозданном виде.
Размеры креплений:
- Малые. Одна коробка включает 4 серии застежек (8 полос) для монтажа предметов весом до 450 грамм.
- Средние. Комплектация включает 3 набора застежек (6 полос), выдерживающих до 1 кг.
Если интересует система крепления Command 3M, инструкция по монтажу приспособлений позволит избежать неприятных моментов:
— Для фиксации служит уникальная липкая полоса. Ее закругленный язычок виден из-под прикрепленного приспособления. При снятии крючка или застёжки с вертикального покрытия следует медленно натянуть язычок по вертикали вниз, растягивая полосу на 30 см. Основа освобождается от стены в ровном положении, исключено вытягивание полосы под углом — это увеличивает риск повреждения полоски или стены.
— Клейкие застёжки для рам состоят из двух частей. Размещение одной клипсы производится на стене, а второй — на раме. Соединение крепежей осуществляется посредством мелких зубцов, сцепляющихся между собой. Производителем предусмотрено многоразовое размещение и извлечение застежек для крепления предметов (фото, грамот и настенных часов) в других местах. В комплект входит 4 набора застежек (8 полос).
Клейкие полосы
Клейкие ленты используются для размещения настенных декораций, почтовых открыток, фото и плакатов. В упаковке поставляется 12 креплений. Их расположение легко осуществить, если удалить с полосы красную подложку и закрепить ее клейкую ленту на задней стороне плаката. Затем снять черную цветную основу и прикрепить плакат к стене.
Держатель для зубных щеток
Стакан для зубных щеток имеет плоскую форму и белый оттенок. Он удачно разместится на стене или внешней поверхности шкафчика. Для его изготовления применяется высококачественный материал, легко очищаемый под проточной водой. Универсальный дизайн подходит под любой интерьер ванной комнаты. Клейкая основа предназначена для гладкой поверхности. Конструкция лаконично дополнит современную ванную и обеспечит хранение щеток на удобной высоте.

Мыльница на липучке
Практичная форма изделия в виде полой емкости располагает к удобному размещению и извлечению твердого мыла. Она лаконично вписывается в интерьер кухни или ванной комнаты. Предел нагрузки — от 1300 до 2200 г.
Меры предосторожности и рекомендации
Система Command 3M не применяется:
- при размещении антиквариата;
- при навешивании предметов над изголовьем кровати;
- на непрочных обоях.
Для обеспечения длительного склеивания важно придерживаться ряда правил:
- Хранить изделия в сухом прохладном месте. Исключить попадание прямых солнечных лучей.
- Наносить фиксаторы на стеклянные, окрашенные и керамические поверхности в условиях разного уровня влажности.
- Монтаж крепления проводится при соблюдении температуры от -10 до +50 градусов по Цельсию.
Крепления Command — инновационная разработка компании 3М (США), широко применяемая в современных интерьерах благодаря внедрению уникальной технологии. В основе лежит особое вещество, плотно «приклеивающееся» к любому типу поверхности. Оно легко снимается и применяется длительный период времени.
Крючки, зажимы и органайзеры Command широко используются в современном и классическом интерьере, благодаря возможности обеспечить скрытый монтаж или добавить яркие ноты необычному дизайну помещения. Исходя из назначения, можно удачно подобрать большие, средние и маленькие крепления для детских комнат, кухонь, ванных и прихожих. Фиксаторы часто применяются в офисах и на презентациях.
Система Command – уникальная технология фиксации предметов (с помощью крючков, застежек, органайзеров и лент) на плоских поверхностях, применяемых в жилых и офисных помещениях. Адгезивный тип крепления разработан для многоразового пользования. Он легко снимается с поверхностей, не повреждая их.
Стандартные и дизайнерские приспособления
Большой крючок – запатентованная технология крепления Stretch-Release, обеспечивающая простое и надежное размещение верхней одежды аксессуаров. Приспособление монтируется без гвоздей, шурупов и отверстий в стенах. Извлеченный фиксатор вновь готов к применению. В упаковке имеется 1 крючок и 2 полосы. Допустимая нагрузка – 2 250 г.
Средний крючок – инновационная система Command, созданная для удобного размещения кухонных приспособлений на мебели и стенах. Комплектация включает 2 крюка и 4 полосы. Оптимальная нагрузка – 1350 г.
Малое декоративное приспособление служит для столовых принадлежностей и полотенец. В одной упаковке содержится 2 крюка и 4 полосы. Максимальный вес: 450 г.
Приспособление для кухонной утвари обеспечивает доступное расположение половников, лопаток и прихваток. В комплектацию включено 3 фиксатора и 4 полосы. Предельная нагрузка: 225 г.
Дизайнерская система Command – приспособления для размещения халатов и полотенец во влажных помещениях. В коробке находится 2 средних крюка и 4 полосы. Фиксатор имеет прямую форму, предел нагрузки – 1350 г.
Прозрачные крючки для кухонных аксессуаров успешно применяются при размещении ложек, шумовок, черпаков и кисточек. В комплекте содержится 3 крюка и 4 полосы. Допустимый вес: 225 г.
Прозрачные крючки для ключей, кепок, пакетов и прочих мелочей выдерживают вес в 225 г. Упаковка включает 6 крючков и 8 клейких лент.
Декоративные крючки
Зеленый пластиковый крепеж средних размеров хорошо применяется для размещения мелких вещей в комнате для малышей и в столовой. В комплектации содержится 2 крючка и 4 полосы. Предельный вес – 1,35 кг.
Средний, лиловый навесной крепеж удачно вольется в дизайн детской комнаты и кухни.
Система Command поставляется в коробке с 2 фиксаторами и 4 клейкими лентами. Они не повреждают поверхность, не оставляет следов и подходят для большинства покрытий. Масса размещаемых предметов достигает 1,35 кг.
Бирюзовое приспособление чаще всего применяется детской комнате и кухне. В коробке – 2 крепления и 4 полосы. Оптимальный вес – 1,35 кг.
Хромированное крепление используется в жилых помещениях и кухне. Изделие предназначено для размещения предметов массой до 1 кг.
Прозрачный фиксатор отлично справится со своей задачей в ванной, коридоре и гардеробной. Он представлен на рынке аксессуаров в упаковке с 2 крючками и 4 прозрачными лентами. Вес размещаемых предметов составляет 900 г.
Малое прозрачное крепление служит для обустройства детской комнаты и кухни. Поставка продукции рассчитана на 2 крепежа и 4 отреза. Вес размещаемых изделий составляет 450 г.
Монтаж крючков
Система крепления Command наносится на обезжиренные поверхности. Достаточно воспользоваться спиртом и дождаться полной просушки. Не рекомендуется применять бытовые моющие средства.
Для приклеивания крючка удаляется красная полоса. Снимается черная лента, фиксатор придавливается к поверхности (на 10 сек.).
Для максимального эффекта следует отделить основание от крепежа. Основу сильно придавливаем и держим полминуты.
Крючок легко наденется на платформу, а предметы можно разместить через 1 ч.
Удаление крючка
Система крепления Command 3M легко снимается с поверхности, если придерживаться основных рекомендаций:
- Крючок отсоединяется от основы.
- Полоса натягивается ровно, избегая разрывов и остатков клея на поверхности.
- Берется за язычок удаления, чтобы плоская поверхность изделия не нанесла травм, ее верхняя часть придерживается рукой.
- Медленно натягивается язычок ровно вниз по стене. На расстоянии 30 см основание освободится от покрытия.
Органайзеры для проводов
В продажу поступают 3 варианта фиксаторов: декоративные зажимы для проводов сечением до 32 мм, средние крепежи для коаксиального кабеля сечением до 10 мм и крючки с системой крепления Command для гирлянд. Надежное размещение украшений на стенах и полу исключает образование путаницы и провисаний.
Держатели для кабеля позволяют уложить большое количество электропроводов от стереосистем, компьютеров и настольных ламп в белые и прозрачные приспособления. В комплекте поставляется 4 крепления и 5 полос.
Средний держатель служит для скрытого размещения антенн, кабелей (от компьютера, телевизора и домашнего кинотеатра). Современным пользователям предлагается комплектация 4 креплений с 5 лентами.
Клипсы (белые и прозрачные) для гирлянд и проводов лаконично вольются в праздничную и торжественную атмосферу. Если правильно подобрана система крепления Command, отзывы покупателей свидетельствуют о ее удачном применении. Она позволит легко развесить гирлянды, елочные игрушки, флажки или свадебные атрибуты на любой поверхности. В упаковку включено 20 крюков и 24 липких ленты.
Размещение клипс производится в несколько этапов: с клейкой стороны удаляется красная подложка, полоса фиксируется на тыльной части крепежа. Извлекается черная защита, и крепление готово к размещению.
Крепления для рамок
Продукция Command — «умная» система крепления с прокладкой из полипропиленовой ленты и подложкой из липкой бумаги. Коллекция включает два варианта приспособлений:
- Крючки для картинных рам с твердыми петлями хорошо используются для декорирования помещений подвесными фото и картинами. Скрытые приспособления легко приклеиваются и снимаются со стен, идеально держат предметы весом до 2,25 кг.
- Крючки для рам с петлями из веревки. Приспособления для скрытой фиксации настенных украшений выдерживают вес до двух килограмм.
Выбор застежек
Какие еще особенности имеет система крепления Command 3M? Отзывы покупателей позволяют говорить об успешном использовании конструкций в жилых домах, картинных галереях и офисах. Они помогут быстро декорировать помещение к приходу гостей, осуществить ремонтные работы и перестановку мебели без проделывания дыр для размещения любимого фото.
Компактные и удобные приспособления станут незаменимыми помощниками для своих владельцев и позволят часто менять интерьер. А свежевыкрашенные или оклеенные новыми обоями стены останутся в первозданном виде.
Размеры креплений:
- Малые. Одна коробка включает 4 серии застежек (8 полос) для монтажа предметов весом до 450 грамм.
- Средние. Комплектация включает 3 набора застежек (6 полос), выдерживающих до 1 кг.
Если интересует система крепления Command 3M, инструкция по монтажу приспособлений позволит избежать неприятных моментов:
— Для фиксации служит уникальная липкая полоса. Ее закругленный язычок виден из-под прикрепленного приспособления. При снятии крючка или застёжки с вертикального покрытия следует медленно натянуть язычок по вертикали вниз, растягивая полосу на 30 см. Основа освобождается от стены в ровном положении, исключено вытягивание полосы под углом — это увеличивает риск повреждения полоски или стены.
— Клейкие застёжки для рам состоят из двух частей. Размещение одной клипсы производится на стене, а второй — на раме. Соединение крепежей осуществляется посредством мелких зубцов, сцепляющихся между собой. Производителем предусмотрено многоразовое размещение и извлечение застежек для крепления предметов (фото, грамот и настенных часов) в других местах. В комплект входит 4 набора застежек (8 полос).
Клейкие полосы
Клейкие ленты используются для размещения настенных декораций, почтовых открыток, фото и плакатов. В упаковке поставляется 12 креплений. Их расположение легко осуществить, если удалить с полосы красную подложку и закрепить ее клейкую ленту на задней стороне плаката. Затем снять черную цветную основу и прикрепить плакат к стене.
Держатель для зубных щеток
Стакан для зубных щеток имеет плоскую форму и белый оттенок. Он удачно разместится на стене или внешней поверхности шкафчика. Для его изготовления применяется высококачественный материал, легко очищаемый под проточной водой. Универсальный дизайн подходит под любой интерьер ванной комнаты. Клейкая основа предназначена для гладкой поверхности. Конструкция лаконично дополнит современную ванную и обеспечит хранение щеток на удобной высоте.
Мыльница на липучке
Практичная форма изделия в виде полой емкости располагает к удобному размещению и извлечению твердого мыла. Она лаконично вписывается в интерьер кухни или ванной комнаты. Предел нагрузки — от 1300 до 2200 г.
Меры предосторожности и рекомендации
Система Command 3M не применяется:
- при размещении антиквариата;
- при навешивании предметов над изголовьем кровати;
- на непрочных обоях.
Для обеспечения длительного склеивания важно придерживаться ряда правил:
- Хранить изделия в сухом прохладном месте. Исключить попадание прямых солнечных лучей.
- Наносить фиксаторы на стеклянные, окрашенные и керамические поверхности в условиях разного уровня влажности.
- Монтаж крепления проводится при соблюдении температуры от -10 до +50 градусов по Цельсию.
Крепления Command — инновационная разработка компании 3М (США), широко применяемая в современных интерьерах благодаря внедрению уникальной технологии. В основе лежит особое вещество, плотно «приклеивающееся» к любому типу поверхности. Оно легко снимается и применяется длительный период времени.
Крючки, зажимы и органайзеры Command широко используются в современном и классическом интерьере, благодаря возможности обеспечить скрытый монтаж или добавить яркие ноты необычному дизайну помещения. Исходя из назначения, можно удачно подобрать большие, средние и маленькие крепления для детских комнат, кухонь, ванных и прихожих. Фиксаторы часто применяются в офисах и на презентациях.
Система Command – уникальная технология фиксации предметов (с помощью крючков, застежек, органайзеров и лент) на плоских поверхностях, применяемых в жилых и офисных помещениях. Адгезивный тип крепления разработан для многоразового пользования. Он легко снимается с поверхностей, не повреждая их.
Стандартные и дизайнерские приспособления
Большой крючок – запатентованная технология крепления Stretch-Release, обеспечивающая простое и надежное размещение верхней одежды аксессуаров. Приспособление монтируется без гвоздей, шурупов и отверстий в стенах. Извлеченный фиксатор вновь готов к применению. В упаковке имеется 1 крючок и 2 полосы. Допустимая нагрузка – 2 250 г.
Средний крючок – инновационная система Command, созданная для удобного размещения кухонных приспособлений на мебели и стенах. Комплектация включает 2 крюка и 4 полосы. Оптимальная нагрузка – 1350 г.
Командная строка Windows, хотя и пользуется популярностью у администраторов и опытных пользователей…
Малое декоративное приспособление служит для столовых принадлежностей и полотенец. В одной упаковке содержится 2 крюка и 4 полосы. Максимальный вес: 450 г.
Приспособление для кухонной утвари обеспечивает доступное расположение половников, лопаток и прихваток. В комплектацию включено 3 фиксатора и 4 полосы. Предельная нагрузка: 225 г.

Дизайнерская система Command – приспособления для размещения халатов и полотенец во влажных помещениях. В коробке находится 2 средних крюка и 4 полосы. Фиксатор имеет прямую форму, предел нагрузки – 1350 г.
Прозрачные крючки для кухонных аксессуаров успешно применяются при размещении ложек, шумовок, черпаков и кисточек. В комплекте содержится 3 крюка и 4 полосы. Допустимый вес: 225 г.
Прозрачные крючки для ключей, кепок, пакетов и прочих мелочей выдерживают вес в 225 г. Упаковка включает 6 крючков и 8 клейких лент.
Декоративные крючки
Зеленый пластиковый крепеж средних размеров хорошо применяется для размещения мелких вещей в комнате для малышей и в столовой. В комплектации содержится 2 крючка и 4 полосы. Предельный вес – 1,35 кг.
Обзор системы Asterisk и команд для работы с ней. Консольный ввод и использование удаленного…
Средний, лиловый навесной крепеж удачно вольется в дизайн детской комнаты и кухни.
Система Command поставляется в коробке с 2 фиксаторами и 4 клейкими лентами. Они не повреждают поверхность, не оставляет следов и подходят для большинства покрытий. Масса размещаемых предметов достигает 1,35 кг.

Бирюзовое приспособление чаще всего применяется детской комнате и кухне. В коробке – 2 крепления и 4 полосы. Оптимальный вес – 1,35 кг.
Хромированное крепление используется в жилых помещениях и кухне. Изделие предназначено для размещения предметов массой до 1 кг.
Прозрачный фиксатор отлично справится со своей задачей в ванной, коридоре и гардеробной. Он представлен на рынке аксессуаров в упаковке с 2 крючками и 4 прозрачными лентами. Вес размещаемых предметов составляет 900 г.
Малое прозрачное крепление служит для обустройства детской комнаты и кухни. Поставка продукции рассчитана на 2 крепежа и 4 отреза. Вес размещаемых изделий составляет 450 г.
Монтаж крючков
Система крепления Command наносится на обезжиренные поверхности. Достаточно воспользоваться спиртом и дождаться полной просушки. Не рекомендуется применять бытовые моющие средства.
Для приклеивания крючка удаляется красная полоса. Снимается черная лента, фиксатор придавливается к поверхности (на 10 сек.).
Для максимального эффекта следует отделить основание от крепежа. Основу сильно придавливаем и держим полминуты.
Крючок легко наденется на платформу, а предметы можно разместить через 1 ч.

Удаление крючка
Система крепления Command 3M легко снимается с поверхности, если придерживаться основных рекомендаций:
- Крючок отсоединяется от основы.
- Полоса натягивается ровно, избегая разрывов и остатков клея на поверхности.
- Берется за язычок удаления, чтобы плоская поверхность изделия не нанесла травм, ее верхняя часть придерживается рукой.
- Медленно натягивается язычок ровно вниз по стене. На расстоянии 30 см основание освободится от покрытия.
Органайзеры для проводов
В продажу поступают 3 варианта фиксаторов: декоративные зажимы для проводов сечением до 32 мм, средние крепежи для коаксиального кабеля сечением до 10 мм и крючки с системой крепления Command для гирлянд. Надежное размещение украшений на стенах и полу исключает образование путаницы и провисаний.
Далеко не все пользователи представляют себе, как работает компьютерная система любого ранга. Но…

Держатели для кабеля позволяют уложить большое количество электропроводов от стереосистем, компьютеров и настольных ламп в белые и прозрачные приспособления. В комплекте поставляется 4 крепления и 5 полос.
Средний держатель служит для скрытого размещения антенн, кабелей (от компьютера, телевизора и домашнего кинотеатра). Современным пользователям предлагается комплектация 4 креплений с 5 лентами.
Клипсы (белые и прозрачные) для гирлянд и проводов лаконично вольются в праздничную и торжественную атмосферу. Если правильно подобрана система крепления Command, отзывы покупателей свидетельствуют о ее удачном применении. Она позволит легко развесить гирлянды, елочные игрушки, флажки или свадебные атрибуты на любой поверхности. В упаковку включено 20 крюков и 24 липких ленты.
Размещение клипс производится в несколько этапов: с клейкой стороны удаляется красная подложка, полоса фиксируется на тыльной части крепежа. Извлекается черная защита, и крепление готово к размещению.

Крепления для рамок
Продукция Command — «умная» система крепления с прокладкой из полипропиленовой ленты и подложкой из липкой бумаги. Коллекция включает два варианта приспособлений:
- Крючки для картинных рам с твердыми петлями хорошо используются для декорирования помещений подвесными фото и картинами. Скрытые приспособления легко приклеиваются и снимаются со стен, идеально держат предметы весом до 2,25 кг.
- Крючки для рам с петлями из веревки. Приспособления для скрытой фиксации настенных украшений выдерживают вес до двух килограмм.
Выбор застежек
Какие еще особенности имеет система крепления Command 3M? Отзывы покупателей позволяют говорить об успешном использовании конструкций в жилых домах, картинных галереях и офисах. Они помогут быстро декорировать помещение к приходу гостей, осуществить ремонтные работы и перестановку мебели без проделывания дыр для размещения любимого фото.

Компактные и удобные приспособления станут незаменимыми помощниками для своих владельцев и позволят часто менять интерьер. А свежевыкрашенные или оклеенные новыми обоями стены останутся в первозданном виде.
Размеры креплений:
- Малые. Одна коробка включает 4 серии застежек (8 полос) для монтажа предметов весом до 450 грамм.
- Средние. Комплектация включает 3 набора застежек (6 полос), выдерживающих до 1 кг.
Если интересует система крепления Command 3M, инструкция по монтажу приспособлений позволит избежать неприятных моментов:
— Для фиксации служит уникальная липкая полоса. Ее закругленный язычок виден из-под прикрепленного приспособления. При снятии крючка или застёжки с вертикального покрытия следует медленно натянуть язычок по вертикали вниз, растягивая полосу на 30 см. Основа освобождается от стены в ровном положении, исключено вытягивание полосы под углом — это увеличивает риск повреждения полоски или стены.
— Клейкие застёжки для рам состоят из двух частей. Размещение одной клипсы производится на стене, а второй — на раме. Соединение крепежей осуществляется посредством мелких зубцов, сцепляющихся между собой. Производителем предусмотрено многоразовое размещение и извлечение застежек для крепления предметов (фото, грамот и настенных часов) в других местах. В комплект входит 4 набора застежек (8 полос).
Клейкие полосы
Клейкие ленты используются для размещения настенных декораций, почтовых открыток, фото и плакатов. В упаковке поставляется 12 креплений. Их расположение легко осуществить, если удалить с полосы красную подложку и закрепить ее клейкую ленту на задней стороне плаката. Затем снять черную цветную основу и прикрепить плакат к стене.
Держатель для зубных щеток
Стакан для зубных щеток имеет плоскую форму и белый оттенок. Он удачно разместится на стене или внешней поверхности шкафчика. Для его изготовления применяется высококачественный материал, легко очищаемый под проточной водой. Универсальный дизайн подходит под любой интерьер ванной комнаты. Клейкая основа предназначена для гладкой поверхности. Конструкция лаконично дополнит современную ванную и обеспечит хранение щеток на удобной высоте.

Мыльница на липучке
Практичная форма изделия в виде полой емкости располагает к удобному размещению и извлечению твердого мыла. Она лаконично вписывается в интерьер кухни или ванной комнаты. Предел нагрузки — от 1300 до 2200 г.
Меры предосторожности и рекомендации
Система Command 3M не применяется:
- при размещении антиквариата;
- при навешивании предметов над изголовьем кровати;
- на непрочных обоях.
Для обеспечения длительного склеивания важно придерживаться ряда правил:
- Хранить изделия в сухом прохладном месте. Исключить попадание прямых солнечных лучей.
- Наносить фиксаторы на стеклянные, окрашенные и керамические поверхности в условиях разного уровня влажности.
- Монтаж крепления проводится при соблюдении температуры от -10 до +50 градусов по Цельсию.
Крепления Command — инновационная разработка компании 3М (США), широко применяемая в современных интерьерах благодаря внедрению уникальной технологии. В основе лежит особое вещество, плотно «приклеивающееся» к любому типу поверхности. Оно легко снимается и применяется длительный период времени.
Крючки, зажимы и органайзеры Command широко используются в современном и классическом интерьере, благодаря возможности обеспечить скрытый монтаж или добавить яркие ноты необычному дизайну помещения. Исходя из назначения, можно удачно подобрать большие, средние и маленькие крепления для детских комнат, кухонь, ванных и прихожих. Фиксаторы часто применяются в офисах и на презентациях.
| Каталог товаров |
| АКCЕССУАРЫ К ЛАБОРАТОРИЯМ |
| АККУМУЛЯТОРЫ |
| БАГЕТ |
| БАТАРЕЙКИ |
| ЗАРЯДНЫЕ УСТРОЙСТВА |
| КАНЦЕЛЯРСКИЕ ТОВАРЫ |
| КАРТИНЫ |
| КАРТЫ ПАМЯТИ |
| КЛЕИ |
| КОМПАКТ ДИСКИ |
| КОМПЬЮTЕРНЫЕ АКСЕССУАРЫ |
| ОСВЕЩЕНИЕ |
| ПОДАРОЧНАЯ УПАКОВКА |
| СИСТЕМЫ КРЕПЛЕНИЯ |
| СКИДКИ И РАСПРОДАЖИ |
| СРЕДСТВА ЗАЩИТЫ |
| СУБЛИМАЦИОННАЯ ПЕЧАТЬ |
| СУВЕНИРЫ |
| ФОТОAЛЬБОМЫ |
| ФОТОPАМКИ |
| ФОТОБУМАГА |
| ФОТОБУМАГА ДЛЯ ПРИНТЕРОВ |
| ФОТОХИМИЯ |
| ЧЕРНИЛА |
 |
Command™ — это уникальная адгезивная технология, позволяющая легко и надежно прикреплять разнообразные предметы (крючки, зажимы, держатели) на вертикальные поверхности без шурупов, гвоздей и отверстий в стене. Данная система позволяет также легко снимать прикрепленный аксессуар не оставляя никаких следов, благодаря системе Stretch-Release, при этом снятый аксессуар снова готов к применению.
Благодаря различным аксессуарам и системе крепления Command™, Вы сможете обновить и украсить пространство своего дома, офиса, дачи: повесить картины в гостиной, рамку с фотографией в комнате, освободить полы и стены от множества кабельных проводов в кабинете и офисе. Развивайте свою креативность, делайте жизнь комфортной и лёгкой.
Крючки стандартные с клейкими полосками Command™
Крючки очень часто используются в домашнем хозяйстве для размещения бытовых предметов и одежды. Вы можете разместить на наших легко-прилипаемых и легко-удаляемых крючках и клипсах различные предметы и элементы декора. Выбирайте нужный размер и форму крючка, который нравится Вам.
 |
Легкоудаляемый крючок с системой крепления Command™ малый, 2 шт. |
Выдерживает нагрузку до 450 гр. Упаковка содержит 2 крючка и 4 полоски Command™. Идеальны для ручных полотенец и прихваток. |
 |
Легкоудаляемый крючок с системой крепления Command™ средний , 2 шт. |
Выдерживает нагрузку до 1,35 кг. Упаковка содержит 2 крючка и 4 полоски Command™. Идеальны для ручных полотенец и прихваток. |
 |
Легкоудаляемый крючок с системой крепления Command™ большой, 1 шт. |
Выдерживают нагрузку до 2,25 кг. Упаковка содержит 1 крючок и 2 полоски Command™. Идеальны для сумок и курток. |
Держатели для рамок и постеров Command™
Простой способ закрепить фотографии, почтовые открытки, телефон и другие маленькие предметы на стенах и других поверхностях. Крепежные полоски Command™ легко и бесследно удаляются без ущерба и остатков клея.
 |
Легкоудаляемый крючок для рамок с твердыми петлями с системой крепления Command™, 1 шт. |
Прекрасное решение для украшения помещений картинками в рамках с твердой петлей. Крючки просто приклеивются, надежно держат массу до 2 кг и, в случае необходимости, легко снимаются, не повреждая стен. |
 |
Легкоудаляемый крючок для рамок с веревочными петлями с системой крепления Command™, 1 шт. |
Каждый из таких крючков для картин с веревочными петлями выдерживает массу до 2 кг. Картина, повешенная на один из таких крючков, полностью скрывает сам крючок таким образом, что на стене остается видна только картина. Крючок легко размещается на вертикальной поверхности, без дополнительных инструментов, и также легко удаляется. |
Настенные застежки для картин Command™
Разместите свои любимые фотографии и картинки без дополнительных инструментов и сохраните стены в неприкосновенности! Застежки помогут украсить любое помещение картинами, плакатами. Картины с такими застежками легко заменяются, т.к. при удалении картины нет необходимости полностью удалять застежку с поверхности. Одна застежка крепится на стену, а другая на рамку. Таким образом вы можете вешать и снимать картины, фотографии, настенные часы и другие маленькие предметы декора столько раз, сколько вам хочется. Застежки для картин Command™ легко удаляются не повреждая поверхностей.
 |
Легкоудаляемые сцепляемые клейкие застежки для рамок картин Command™ малые, 4 шт. |
Малые — упаковка содержит 4 комплекта застежек (8 полосок); каждый комплект выдерживает до 450 гр. |
 |
Легкоудаляемые сцепляемые клейкие застежки для рамок картин Command™ средние, 3 шт. |
Средние — упаковка содержит 3 комплекта застежек (6 полосок); каждый комплект выдерживает до 1 кг. |
![]()
Поиск по сайту:
По названию:
По артикулу:
По цене:
от до
По статусу:
Материал:
Вид картона:
Высота четверти, мм:
Высота, мм:
Глубина четверти, мм:
Группа цвета:
Длина рейки, м:
Качество:
Класс:
Класс флэш-карты:
Количество листов:
Количество фотографий:
Материал:
Место для записей, memo:
Модель:
Модель флэш-карты:
Объем:
Объем флэш-карты:
Плотность:
Поверхность бумаги:
Размер:
Размер листа (мм):
Размер листов:
Размер рамки:
Размер фотографии:
Серия:
Состав:
Спецэфекты:
Страна производитель:
Страницы:
Тематика:
Тип бумаги:
Тип переплета:
Толщина листа (мм):
Упаковка:
Цвет :
Цвет:
Цвет среза:
Ширина, мм:
-
0 ₽ 0 товаров
Каталог инструкций по эксплуатации на русском языке
В нашем каталоге более 90.000 инструкций по эксплуатации и руководств пользователя на русском языке к бытовой технике и электронике. Чтобы скачать инструкцию по эксплуатации выберите интересую вас категорию или воспользуйтесь поиском в верхнем правом углу сайта.

Инструкция слухового аппарата (СА) – документ, в котором производителем описаны основные моменты эксплуатации устройства, особенности строения и обслуживания. Ознакомление с такой информацией дает возможность обеспечить длительный период работы прибора и комфорт пользователю.
Обслуживание СА
Систематический правильный уход за слуховым аппаратом – залог его бесперебойной работы. Чтобы срок службы устройства был максимальным стоит придерживаться следующих правил:
- Храните СА в специальном футляре, который размещайте в сухом и прохладном месте.
- Исключайте попадание прямых солнечных лучей, воды (дождь, душ, бассейн) и воздействие высокой температуры от нагревательных приборов (обогреватели, фен).
- Выключайте СА, если им не пользуетесь (например, во время сна).
- Позаботьтесь, чтобы место для хранения устройства были недоступным для детей и питомцев.
- Снимайте прибор при прохождении МРТ, УЗИ, томографии, рентгена и других медицинских процедур. В случае необходимости уточните этот момент у специалиста.
- Следите за гигиеной.
- Исключите протирание аппарата спиртом.
- Не старайтесь самостоятельно разобрать прибор и починить его.
Настройка и обслуживание слуховых аппаратов – дело, которым должны заниматься профессионалы
Как подготовить слуховой аппарат к использованию
Чтобы подготовить к использованию слуховой аппарат достаточно придерживаться следующего алгоритма действий:
- Открыть отсек для батареек.
- Снять защитную пленку с аккумулятора.

- Установить источник питания с учетом полярности – она указана на крышке устройства (+/-).
- Закрыть крышку.

Если батарейка установлена корректно, то отсек для нее закрывается без усилий

- Включить устройство.
- Чтобы выключить СА нужно полностью открыть крышку отсека под элементом питания.
Рекомендации по уходу за СА
Нужно понимать не только, как использовать слуховой аппарат, но и как за ним правильно ухаживать. В данном случае подразумевается ежедневное обслуживание прибора, а также систематическое (углубленное).
СА нужно каждый день обрабатывать специальными чистящими средствами и принадлежностями: высушивающие капсулы и контейнер. Как это делать описано ниже:
- Отсоединяем вкладыш, открываем отсек для батарей и помещаем аппарат в контейнер с капсулой.

- Плотно закрываем крышку приспособления для хранения и оставляем все на ночь.


Использовать капсулу рекомендуют до того момента, пока желтый индикатор не побелеет
Для сушки СА нередко используют и УФ прибор, который работает от электросети. Такие системы позволяют выбирать время сушки. В любом случае, первое, что нужно сделать – изъять элемент питания. Также практически всегда нужно отсоединить индивидуальный вкладыш.

Что еще используют для обслуживания заушных слуховых аппаратов, можно узнать дальше:
- Специальные комплекты от влаги и ветра для защиты микрофонов.
- Демпфер для звукового крючка для защиты СА от попадания воды из трубки-звуковода.
Особенности эксплуатации внутриушных СА
Когда речь идет про внутриушные слуховые аппараты, инструкция по применению, обычно включает важный момент: эти приборы требуют больше ухода, чем их аналоги. Связано это с тем, что они вставляются в ушной канал и тесно взаимодействуют с кожными выделениями.
- Для чистки СА такого типа (вентиляционных, звуковых, микрофонных отверстий) стоит использовать специальную щеточку, а также сухую мягкую ткань. Они, как правило, предоставляются в комплекте с устройством.
- Вентиляционное отверстие чистят с помощью специнструмента – на рисунке показано, как его применить.


Грязь и ушная сера, которые скопились за день возле серного фильтра (в звуковом отверстии), должны удаляться ежедневно. Без исключений. Замена же серного фильтра производится минимум 1 раз в 2 недели – эту процедуру можно делать самостоятельно
Советы по использованию элементов питания
Инструкция эксплуатации слухового аппарата говорит о том, что если СА не используется, то хранить в нем батарейки нельзя. Выньте их, и оставьте отсек открытым.
В случае внезапного отключения системы, нужно проверить состояние элемента питания. Для этого есть специальные тестеры. Чтобы их использовать нужно:
- Разместить батарейки на поверхности тестера, плюсом (+) вверх.
- Сдвинуть тестируемый объект по направлению, которое указывает стрелка. После этого уровень заряда отобразится на дисплее.

Индивидуальные ушные вкладыши
Ушные вкладыши (УВ) – одна из важных для комфорта пользователя комплектующих СА. Чтобы правильно вставить их нужно:
- Присоединить звуковод и УВ к аппарату.
- Осторожно взять вкладыш двумя пальцами и вставить в слуховой канал.
- Чтобы облегчить введение в ухо УВ можно попробовать легко потянуть ушную раковину вверх и назад.
- Если нужно поправить положение вкладыша в ухе, то сначала легко надавите на него своим указательным пальцем. Отсутствие дискомфорта во время проведения таких манипуляций свидетельствует о том, что УВ размещен корректно.

Нужно следить за тем, чтобы трубка-звуковод не перекручивалась и была мягкой – если данная деталь стала жесткой, то ее пора заменить

Специалисты рекомендуют через время изготавливать новые ушные вкладыши. Это нужно для обеспечения максимального комфорта человека, ведь со временем размер и форма ушного канала может меняться.
Как ухаживать за индивидуальными ушными вкладышами
Чтобы звукопроведение было хорошим, а система работала долго без проблем, нужно чистить вкладыши спецсредствами 1-2 раза в течение недели. Чтобы это сделать нужно:
- Отсоединить звуковод от рожка СА.

- Растворить (по инструкции) чистящую таблетку в контейнере.
- Разместить вкладыш и трубку-звуковод в получившемся растворе на 20-30 минут.

- После указанного времени нужно промыть комплектующие в проточной воде и протереть их мягкой сухой тканью.
- Для сушки следует использовать специальный баллончик, с помощью которого можно продуть воздухом и трубку-звуковод.

- После такой чистки нужно просушить элементы ночью.
Для облегчения ухода за рассматриваемыми деталями и системами используют спреи и дезинфицирующие салфетки, которые разработаны для этих целей. Они отлично препятствуют возникновению грибка и размножению бактерий. Нужно обработать поверхности, и оставить на одну минуту для лучшего воздействия веществ. После этого, протереть все элементы насухо. Больше о таких вариантах узнавайте у специалистов.
Остались вопросы по теме или нужна консультация? Обратитесь в Ю-МЕД. Здесь радо помогут каждому.
Дата публикации: 07.10.2019
-
Page 1
Bild in der Größe 215×70 mm einfügen COMAND Operator’s Manual… -
Page 2
We reserve the right to modify the technical details of the COMAND system as given in the data and illustrations of this Operator’s Manual. Press time: 02/23/2004 Reprinting, translation and copying, even of excerpts, is not permitted without prior authorization in writing. -
Page 3
Please make yourself familiar with your we reserve the right to make changes in COMAND control unit and read the instruc- design and equipment. Therefore, informa- tions in this manual before operating the tion, illustrations and descriptions in this COMAND system. -
Page 5: Table Of Contents
Loading CDs ….45 Quick reference COMAND ..27 Switching to CD operation ..49 Switching the COMAND control Telephone* .
-
Page 6
Contents Incoming call….80 Destination input ….100 Last destinations and Outgoing calls . -
Page 7
Contents Tele Aid* ….. . 155 Glossary ….. . 165 Emergency call system . -
Page 8
Contents… -
Page 9: Introduction
If you are operating to adjust COMAND system settings. ne book. COMAND for the first time or if you have rented or borrowed the vehicle, this is the chapter you should read first. Directories…
-
Page 10: Symbols
COMAND system equip- The continuation symbol ment may deviate from some marks an interrupted proce- descriptions and illustrations.
-
Page 11: Operating Safety
COMAND screen to read na- vigational maps, instructions, or downloa- ded information.
-
Page 12
Introduction Operating safety… -
Page 13: At A Glance
At a glance Radio operating elements CD operating elements Satellite radio* operating elements Telephone* operating elements Navigation system operating elements Service operating elements Menu system Quick reference COMAND…
-
Page 14
At a glance Radio operating elements Radio operating elements… -
Page 15
At a glance Radio operating elements Function Page Function Page 1 Audio menu 2 Soft keys Muting (multifunction keys) 7 Volume control 3 Color display with Radio 8 e Switching on and off main menu d and D 4 1 — 0, * Automatic seek tuning Station selection Manual tuning… -
Page 16
At a glance CD operating elements CD operating elements… -
Page 17
At a glance CD operating elements Function Page Function Page Function Page 1 Audio menu d and D 2 Soft keys Ejecting/loading a CD into Track select (multifunction keys) the CD drive Fast forward/reverse 3 Color screen with CD changer* main menu There are two l The status bar indicates buttons. -
Page 18
At a glance Satellite radio* operating elements Satellite radio* operating elements… -
Page 19
At a glance Satellite radio* operating elements Function Page Function Page 1 Satellite radio main menu 7 Volume control 8 e Switching on and off Switching satellite operation on and off d and D 2 Soft keys Previous or next channel (multifunction keys) 3 Color screen with Satellite radio main menu… -
Page 20
At a glance Telephone* operating elements Telephone* operating elements… -
Page 21
At a glance Telephone* operating elements Function Page Function Page Push the joystick to H,h,g,G Telephone menu Function selection Switching telephone Press E to confirm operation on and off Soft keys (multifunction keys) Accepting a call Color screen with Making a call Telephone menu Redialing 1 — 0, # and *… -
Page 22: Navigation Operating Elements
At a glance Navigation operating elements Navigation operating elements…
-
Page 23
At a glance Navigation operating elements Function Page Function Page Function Page Push the joystick to H,h,g,G,F,f Navigation main menu During a voice instruction: Function selection, During route guidance: Muting current voice Scrolling on map Change over to navigation instruction Press E to confirm display Switching off voice… -
Page 24: Service Operating Elements
At a glance Service operating elements Service operating elements…
-
Page 25
3 Color screen with Service main menu The SMS soft key appears if the vehicle is equipped for phone operation and a Mercedes-Benz specified mobile telephone* is inserted in phone cradle*. 4 Push the joystick to Function selection Press E to confirm… -
Page 26: Menu System
Menu system Menu system The menu system allows for easy Calling up main menus Menu display operation of COMAND. A display may consist of three areas. Main function Activating main Main menus are provided for the following Example: FM menu…
-
Page 27
At a glance Menu system Center: Menu functions and submenus The status of the current operating mode Using the soft keys, functions can be A maximum of five soft keys may be or other selectable functions are indicated. switched ON or OFF, or submenus can be displayed on each side of the main area In this example: called up. -
Page 28
At a glance Menu system In some situations, soft keys may not have Exiting from submenus any function and are not operational. A soft key 1 to exit a Use the Back soft key without function appears shaded submenu. The display switches to the next out. -
Page 29: Quick Reference Comand
Turn the key in the starter switch to the volume for telephone and navigation. descriptions and illustrations refer to position 1 or 2 if the COMAND was During a telephone call (talking or ringing), the COMAND. switched off by turning the key in the…
-
Page 30
At a glance Quick reference COMAND Adjusting the volume Automatic volume control At the COMAND, turn the rotary control The automatic volume control feature When the system is switched on again, at the e key. adjusts the volume depending on:… -
Page 31: Balance And Fader
At a glance Quick reference COMAND Push the joystick to H or h. Setting balance and fader Balance and fader In any audio source operation: Move the cross-hairs horizontally and Common balance and fader settings apply adjust the balance. to the following systems: Press the soft key.
-
Page 32: Bass And Treble
(Bass, Treble, Bal/Fad) for the active The new setting is saved. source mode. Activating the Bass or Treble menu Standard: In any audio source operation: COMAND sets the sound linear for the Press the soft key and Bass Treble center of the vehicle.
-
Page 33
At a glance Quick reference COMAND Push the joystick to g or G to Speech: Activating the sound functions* Playback optimized for language select the desired function. In any audio source operation: comprehensibility. Press E. Activate the main menu for the… -
Page 34
At a glance Quick reference COMAND… -
Page 35: Audio
Audio Radio operation CD operation AUX operation…
-
Page 36: Opening The Audio Menu
COMAND. Turn the rotary control at the e key to Bear in mind that at a speed of just 30 mph If an audio submenu is displayed, press adjust the volume.
-
Page 37: Switching To Radio Operation
The frequency will appear in the soft key is available if Sound In the Audio menu, press the Radio display. COMAND is equipped with a sound soft key. Switching back to FM band amplifier*. The Radio main menu will appear. The Press the soft key.
-
Page 38: Selecting A Station
An automatic scan is starting and the The message No channel will appear Manual tuning ( page 37) COMAND plays and displays the if the system could not detect a chan- channel of the first strong WB station. Station selection from the preset menu nel.
-
Page 39
Audio Radio operation Automatic seek tuning Manual tuning (FM, AM) Station selection via direct frequency entry (FM, AM) Press g or h. Activate the desired wave band ( page 35). E.g.: 102.7 MHz in the FM band Press g or h longer than 2 se- Activating the desired wave band Push the joystick to g or G. -
Page 40
Audio Radio operation Enter the desired frequency with the Station selection via number keypad Automatic station scan (FM, AM) number keys within 8 seconds, e.g. (presets) The stations on same band (FM, AM) can 1027 for 102.7 MHz. be scanned one after the other for 8 se- FM- and AM-Bands The station you have selected will conds each. -
Page 41
Audio Radio operation End scan function and play a station Press the Scan soft key again if you hear the desired station. The scan function stops automatically when the first station received has been scanned twice. The scan function will begin. -
Page 42: Memory Functions
Audio Radio operation Saving stations manually (FM, AM) On the memory list Memory functions Activate the desired wave band You can use the following functions: In the Radio main menu ( page 35). Saving stations manually (FM, AM) Activate the desired wave band Press the soft key.
-
Page 43
Audio Radio operation Press E longer than 2 seconds. You will see the Radio main menu You will hear a verification beep if the automatically after 8 seconds beep tones option was activated in the if you press the soft key. Back system settings ( page 162). -
Page 44
Audio Radio operation Saving stations automatically (FM, AM) The autostore function is active. The message Autostore being Activate the desired wave band reloaded will appear. The radio ( page 35). stores the 10 stations with the Press the soft key Autost. -
Page 45
Audio Radio operation Press E. Selecting a station from the preset Selecting a station from the FM/AM menu (FM, AM) autostore presets In both cases, you will see the main Activate the FM or AM memory radio menu Activate the FM or AM autostore preset ( page 40). -
Page 46: Cd Operation
Audio CD operation CD operation General Information on CD operation Health hazard The system may not be able to play CDs with copy protection or Warning The CD drive and CD changer* are Class 1 copied CDs. laser products. There is a danger of invisible In order to avoid distraction which could laser radiation when you open or damage lead to an accident, the driver should insert…
-
Page 47: Tips On Caring For Your Cds
Audio CD operation Ejecting/loading a CD into the CD drive Tips on caring for your CDs Loading CDs Only touch the CD on the sides. Warning Avoid touching the CD surface with There are two l buttons. One is on your fingers.
-
Page 48
Audio CD operation… -
Page 49
Audio CD operation 1 Ejecting audio CD With the COMAND switched on, press Press l on the display unit to return 2 Opening/closing the display unit the display unit to its closed position. 3 Warning message Press EJECT to The display unit moves forward and… -
Page 50
Slide the magazine into the CD You can also slide out the magazine if box. Open panel cover to access the CD changer* until it clicks into place COMAND is switched off. changer*. (listen for the click). However, the l button will not function if the vehicle battery is not connected or discharged. -
Page 51: Switching To Cd Operation
Magaz. Playback locations for audio CDs are: when the CD changer* is active. the CD drive in the COMAND If the CD changer* has already read the the CD changer*. magazine, the Magazine menu will…
-
Page 52: Switching On
No CD inserted will changer* is connected to the appear. CD changer* main menu COMAND. Load an audio CD into the CD drive If the last played CD is not available, the ( page 45). Activate the Audio menu ( page 34).
-
Page 53: Selecting A Cd
With the number keypad Selection is possible if the CD changer* has loaded the magazine (COMAND knows the position of filled The number keys 1 — 6 can be used and empty slots) and at least two audio for direct selection.
-
Page 54: Track Select
Audio CD operation Press a number key, e.g. 2 to select Track select the corresponding CD. The name of the CD instead of e.g. You can select a track: The CD is changed. The selected CD is is displayed if the information is with g or h ( page 52) played back.
-
Page 55
Audio CD operation Previous track or start of title (if more With the number keypad than 10 seconds of playing time has Activate the CD main menu Entries higher than the number of elapsed) ( page 50). tracks available on the CD are not Press g. -
Page 56: Fast Forward/Reverse
Audio CD operation Activating Ending the function Fast forward/reverse Press the Scan soft key. Scan search is running. Fast forward Scan will begin. Press the soft key. Scan Press h longer than 2 seconds and keep it pressed. Press E. Fast reverse Playback will resume with the desired Press g longer than 2 seconds and…
-
Page 57: Muting
Audio CD operation Muting Playback mode COMAND will also deactivate muting if The following options are available: Normal sequence ( page 57) Press J during playback. press A to select another audio Track mix ( page 57) The CD operation is muted and the ß…
-
Page 58
Audio CD operation Activating playback mode Push the joystick to g or G to select the playback mode Repeat E.g.: track Mode Repeat track Press E. Press the soft key. Setting The mode is activated. The CD The setting menu will appear. changer* main menu will then appear. -
Page 59
Audio CD operation Track mix Repeat track Explanation of the playback modes Normal sequence Tracks are played in random order. If The system repeats the current track more than one CD is available, the next until you switch the function off. Tracks are played in ascending order available CD is played when the current (e.g. -
Page 60
For further information please contact nected. an authorized Mercedes-Benz Center. At the COMAND, you can set the following Open the Audio menu ( page 34). for the AUX operation: Press the soft key. -
Page 61
Please make yourself familiar with your we reserve the right to make changes in COMAND control unit and read the instruc- design and equipment. Therefore, informa- tions in this manual before operating the tion, illustrations and descriptions in this COMAND system. -
Page 63
Loading CDs ….45 Quick reference COMAND ..27 Switching to CD operation ..49 Switching the COMAND control Telephone* . -
Page 64
Contents Incoming call….80 Destination input ….100 Last destinations and Outgoing calls . -
Page 65
Contents Tele Aid* ….. . 155 Glossary ….. . 165 Emergency call system . -
Page 66
Contents… -
Page 67: Introduction
If you are operating to adjust COMAND system settings. ne book. COMAND for the first time or if you have rented or borrowed the vehicle, this is the chapter you should read first. Directories…
-
Page 68: Symbols
COMAND system equip- The continuation symbol ment may deviate from some marks an interrupted proce- descriptions and illustrations.
-
Page 69: Operating Safety
COMAND screen to read na- vigational maps, instructions, or downloa- ded information.
-
Page 70
Introduction Operating safety… -
Page 71: At A Glance
At a glance Radio operating elements CD operating elements Satellite radio* operating elements Telephone* operating elements Navigation system operating elements Service operating elements Menu system Quick reference COMAND…
-
Page 72
At a glance Radio operating elements Radio operating elements… -
Page 73
At a glance Radio operating elements Function Page Function Page 1 Audio menu 2 Soft keys Muting (multifunction keys) 7 Volume control 3 Color display with Radio 8 e Switching on and off main menu d and D 4 1 — 0, * Automatic seek tuning Station selection Manual tuning… -
Page 74
At a glance CD operating elements CD operating elements… -
Page 75
At a glance CD operating elements Function Page Function Page Function Page 1 Audio menu d and D 2 Soft keys Ejecting/loading a CD into Track select (multifunction keys) the CD drive Fast forward/reverse 3 Color screen with CD changer* main menu There are two l The status bar indicates buttons. -
Page 76
At a glance Satellite radio* operating elements Satellite radio* operating elements… -
Page 77
At a glance Satellite radio* operating elements Function Page Function Page 1 Satellite radio main menu 7 Volume control 8 e Switching on and off Switching satellite operation on and off d and D 2 Soft keys Previous or next channel (multifunction keys) 3 Color screen with Satellite radio main menu… -
Page 78
At a glance Telephone* operating elements Telephone* operating elements… -
Page 79
At a glance Telephone* operating elements Function Page Function Page Push the joystick to H,h,g,G Telephone menu Function selection Switching telephone Press E to confirm operation on and off Soft keys (multifunction keys) Accepting a call Color screen with Making a call Telephone menu Redialing 1 — 0, # and *… -
Page 80: Navigation Operating Elements
At a glance Navigation operating elements Navigation operating elements…
-
Page 81
At a glance Navigation operating elements Function Page Function Page Function Page Push the joystick to H,h,g,G,F,f Navigation main menu During a voice instruction: Function selection, During route guidance: Muting current voice Scrolling on map Change over to navigation instruction Press E to confirm display Switching off voice… -
Page 82: Service Operating Elements
At a glance Service operating elements Service operating elements…
-
Page 83
3 Color screen with Service main menu The SMS soft key appears if the vehicle is equipped for phone operation and a Mercedes-Benz specified mobile telephone* is inserted in phone cradle*. 4 Push the joystick to Function selection Press E to confirm… -
Page 84: Menu System
Menu system Menu system The menu system allows for easy Calling up main menus Menu display operation of COMAND. A display may consist of three areas. Main function Activating main Main menus are provided for the following Example: FM menu…
-
Page 85
At a glance Menu system Center: Menu functions and submenus The status of the current operating mode Using the soft keys, functions can be A maximum of five soft keys may be or other selectable functions are indicated. switched ON or OFF, or submenus can be displayed on each side of the main area In this example: called up. -
Page 86
At a glance Menu system In some situations, soft keys may not have Exiting from submenus any function and are not operational. A soft key 1 to exit a Use the Back soft key without function appears shaded submenu. The display switches to the next out. -
Page 87: Quick Reference Comand
Turn the key in the starter switch to the volume for telephone and navigation. descriptions and illustrations refer to position 1 or 2 if the COMAND was During a telephone call (talking or ringing), the COMAND. switched off by turning the key in the…
-
Page 88
At a glance Quick reference COMAND Adjusting the volume Automatic volume control At the COMAND, turn the rotary control The automatic volume control feature When the system is switched on again, at the e key. adjusts the volume depending on:… -
Page 89: Balance And Fader
At a glance Quick reference COMAND Push the joystick to H or h. Setting balance and fader Balance and fader In any audio source operation: Move the cross-hairs horizontally and Common balance and fader settings apply adjust the balance. to the following systems: Press the soft key.
-
Page 90: Bass And Treble
(Bass, Treble, Bal/Fad) for the active The new setting is saved. source mode. Activating the Bass or Treble menu Standard: In any audio source operation: COMAND sets the sound linear for the Press the soft key and Bass Treble center of the vehicle.
-
Page 91
At a glance Quick reference COMAND Push the joystick to g or G to Speech: Activating the sound functions* Playback optimized for language select the desired function. In any audio source operation: comprehensibility. Press E. Activate the main menu for the… -
Page 92
At a glance Quick reference COMAND… -
Page 93: Audio
Audio Radio operation CD operation AUX operation…
-
Page 94: Opening The Audio Menu
COMAND. Turn the rotary control at the e key to Bear in mind that at a speed of just 30 mph If an audio submenu is displayed, press adjust the volume.
-
Page 95: Switching To Radio Operation
The frequency will appear in the soft key is available if Sound In the Audio menu, press the Radio display. COMAND is equipped with a sound soft key. Switching back to FM band amplifier*. The Radio main menu will appear. The Press the soft key.
-
Page 96: Selecting A Station
An automatic scan is starting and the The message No channel will appear Manual tuning ( page 37) COMAND plays and displays the if the system could not detect a chan- channel of the first strong WB station. Station selection from the preset menu nel.
-
Page 97
Audio Radio operation Automatic seek tuning Manual tuning (FM, AM) Station selection via direct frequency entry (FM, AM) Press g or h. Activate the desired wave band ( page 35). E.g.: 102.7 MHz in the FM band Press g or h longer than 2 se- Activating the desired wave band Push the joystick to g or G. -
Page 98
Audio Radio operation Enter the desired frequency with the Station selection via number keypad Automatic station scan (FM, AM) number keys within 8 seconds, e.g. (presets) The stations on same band (FM, AM) can 1027 for 102.7 MHz. be scanned one after the other for 8 se- FM- and AM-Bands The station you have selected will conds each. -
Page 99
Audio Radio operation End scan function and play a station Press the Scan soft key again if you hear the desired station. The scan function stops automatically when the first station received has been scanned twice. The scan function will begin. -
Page 100: Memory Functions
Audio Radio operation Saving stations manually (FM, AM) On the memory list Memory functions Activate the desired wave band You can use the following functions: In the Radio main menu ( page 35). Saving stations manually (FM, AM) Activate the desired wave band Press the soft key.
-
Page 101
Audio Radio operation Press E longer than 2 seconds. You will see the Radio main menu You will hear a verification beep if the automatically after 8 seconds beep tones option was activated in the if you press the soft key. Back system settings ( page 162). -
Page 102
Audio Radio operation Saving stations automatically (FM, AM) The autostore function is active. The message Autostore being Activate the desired wave band reloaded will appear. The radio ( page 35). stores the 10 stations with the Press the soft key Autost. -
Page 103
Audio Radio operation Press E. Selecting a station from the preset Selecting a station from the FM/AM menu (FM, AM) autostore presets In both cases, you will see the main Activate the FM or AM memory radio menu Activate the FM or AM autostore preset ( page 40). -
Page 104: Cd Operation
Audio CD operation CD operation General Information on CD operation Health hazard The system may not be able to play CDs with copy protection or Warning The CD drive and CD changer* are Class 1 copied CDs. laser products. There is a danger of invisible In order to avoid distraction which could laser radiation when you open or damage lead to an accident, the driver should insert…
-
Page 105: Tips On Caring For Your Cds
Audio CD operation Ejecting/loading a CD into the CD drive Tips on caring for your CDs Loading CDs Only touch the CD on the sides. Warning Avoid touching the CD surface with There are two l buttons. One is on your fingers.
-
Page 106
Audio CD operation… -
Page 107
Audio CD operation 1 Ejecting audio CD With the COMAND switched on, press Press l on the display unit to return 2 Opening/closing the display unit the display unit to its closed position. 3 Warning message Press EJECT to The display unit moves forward and… -
Page 108
Slide the magazine into the CD You can also slide out the magazine if box. Open panel cover to access the CD changer* until it clicks into place COMAND is switched off. changer*. (listen for the click). However, the l button will not function if the vehicle battery is not connected or discharged. -
Page 109: Switching To Cd Operation
Magaz. Playback locations for audio CDs are: when the CD changer* is active. the CD drive in the COMAND If the CD changer* has already read the the CD changer*. magazine, the Magazine menu will…
-
Page 110: Switching On
No CD inserted will changer* is connected to the appear. CD changer* main menu COMAND. Load an audio CD into the CD drive If the last played CD is not available, the ( page 45). Activate the Audio menu ( page 34).
-
Page 111: Selecting A Cd
With the number keypad Selection is possible if the CD changer* has loaded the magazine (COMAND knows the position of filled The number keys 1 — 6 can be used and empty slots) and at least two audio for direct selection.
-
Page 112: Track Select
Audio CD operation Press a number key, e.g. 2 to select Track select the corresponding CD. The name of the CD instead of e.g. You can select a track: The CD is changed. The selected CD is is displayed if the information is with g or h ( page 52) played back.
-
Page 113
Audio CD operation Previous track or start of title (if more With the number keypad than 10 seconds of playing time has Activate the CD main menu Entries higher than the number of elapsed) ( page 50). tracks available on the CD are not Press g. -
Page 114: Fast Forward/Reverse
Audio CD operation Activating Ending the function Fast forward/reverse Press the Scan soft key. Scan search is running. Fast forward Scan will begin. Press the soft key. Scan Press h longer than 2 seconds and keep it pressed. Press E. Fast reverse Playback will resume with the desired Press g longer than 2 seconds and…
-
Page 115: Muting
Audio CD operation Muting Playback mode COMAND will also deactivate muting if The following options are available: Normal sequence ( page 57) Press J during playback. press A to select another audio Track mix ( page 57) The CD operation is muted and the ß…
-
Page 116
Audio CD operation Activating playback mode Push the joystick to g or G to select the playback mode Repeat E.g.: track Mode Repeat track Press E. Press the soft key. Setting The mode is activated. The CD The setting menu will appear. changer* main menu will then appear. -
Page 117
Audio CD operation Track mix Repeat track Explanation of the playback modes Normal sequence Tracks are played in random order. If The system repeats the current track more than one CD is available, the next until you switch the function off. Tracks are played in ascending order available CD is played when the current (e.g. -
Page 118: Aux Operation
For further information please contact nected. an authorized Mercedes-Benz Center. At the COMAND, you can set the following Open the Audio menu ( page 34). for the AUX operation: Press the soft key.
-
Page 119: Satellite Radio
Satellite radio* Important notes Subscribing Satellite radio operation…
-
Page 120: Important Notes
At time of printing, no date for garages, or within or next to buildings) the availability of optional equipment or near other technologies. required for satellite radio operation had been set. Contact your authorized Mercedes-Benz Center for details and availability for your vehicle.
-
Page 121: Subscribing
Satellite radio* Subscribing Subscribing After the connection is made: Subscribing to satellite radio Follow the instructions given by the Depending on subscription status, soft Press B to switch to satellite radio operator. keys may or may not appear on the left operation.
-
Page 122: Satellite Radio Operation
No Satellite receiver: Sound soft key is available if The message No Satellite Radio COMAND is equipped with a sound will appear in a window. amplifier*.
-
Page 123: Changing The Program Category
Satellite radio* Satellite radio operation Automatic station scan Changing the program category Selecting a station The stations in the selected category can Satellite radio stations are split up into ca- You can use the following functions: be scanned in numerical order for 8 se- tegories.
-
Page 124
Satellite radio* Satellite radio operation Ending scan function and playing a Station selection via direct channel Enter the desired channel number with station entry the number keys, e.g. 24 for chan- nel 24. Press the soft key again. Press *. Scan The channel you have selected will be- The station selected will appear with… -
Page 125: Memory Functions
Satellite radio* Satellite radio operation Saving station manually Memory functions In the Satellite radio main menu There are 10 presets available. Press one of the number keys, e.g. 2, longer than 2 seconds. You can use the following functions: You will hear a verification beep if the Saving stations manually beep tones option was activated in the system settings ( page 162).
-
Page 126: Displaying Information
Satellite radio* Satellite radio operation Selecting a station on the memory list Displaying information In the Satellite radio main menu, press An existing entry is overwritten in the In the Satellite radio main menu, press soft key. memory list when a new input is given. Presets Info soft key.
-
Page 127: Displaying Service Information
Satellite radio* Satellite radio operation Press the Back soft key to switch back Displaying service information Sound settings to the Satellite radio main menu. You can call the provider service center for Refer to chapter “At a glance” on how to questions or releases, whenever you need.
-
Page 128
Satellite radio* Satellite radio operation… -
Page 129: Telephone
Telephone* Important notes Telephone operation…
-
Page 130
Whether or not prohibited by law, for terior antenna that has been approved safety reasons, the driver should not use the by Mercedes-Benz. cellular telephone while the vehicle is in mo- tion. Stop the vehicle in a safe location be- fore answering or placing a call. -
Page 131
Telephone* Important notes If you have a Mercedes-Benz specified In certain menus, the COMAND can integrated mobile telephone (TDMA, display date and time of the calls. CDMA or GSM) and the telephone is The COMAND can display phone inserted in the cradle, the telephone… -
Page 132
Telephone* Important notes Please read the chapter “Telephone” Also make sure that the air vents are In the following situations, it is not possible first before attempting to operate your not pointed in the direction of the or not yet possible to use the telephone: telephone. -
Page 133
Telephone being ac- GSM mobile phone tivated, please wait appears. If the message Please insert SIM COMAND prepares the telephone for card (Emergency Call 911 only use. Select other system functions, e.g. appears: possible with phone) radio, by pressing the corresponding… -
Page 134: Switching Telephone Operation On
Press a. Switching telephone operation off The menu to enter the unlock code Switch the COMAND off ( page 23) or ( page 77) will appear (only if phone turn off the engine. has been locked before).
-
Page 135: Emergency Call «911
Telephone* Telephone operation TDMA or CDMA mobile phone Emergency call “911” Warning The emergency call will also be placed if the phone is locked ( page 76). The 911 emergency call system is a public This function places a call to the local GSM mobile phone service.
-
Page 136
Telephone* Telephone operation Press E to confirm Initiating an emergency call if you want to Press a repeatedly until the place the “911” emergency call. Telephone menu is displayed. Telephone is locked The emergency call will be placed. Press 9, 1 and 1 one after the other. -
Page 137: Entering Codes
Telephone* Telephone operation GSM mobile phone Entering codes Your unlock code prevents unauthori- Entering the PIN code TDMA or CDMA mobile phone zed persons from using your telephone. Be sure to memorize this code, a four di- Entering the unlock code git number, carefully.
-
Page 138: Switching To Telephone Operation
Entering the PUK Switching to telephone operation You will hear a warning sound. The mes- If you enter your PIN incorrectly three When the COMAND is switched on, you sage will appear times in a row, you need to enter the PUK…
-
Page 139
The telephone is using a non home type Your vehicle may not have a mobile phone system cradle* installed and/or the telephone No Serv control unit may not be coded properly. The telephone is not logged into a net- Contact an authorized Mercedes-Benz work Center. -
Page 140: Incoming Call
Telephone* Telephone operation Accepting a call Setting the volume for hands-free ope- Incoming call ration Press k. The system detects an incoming call, the Raising the volume phone rings. Turn the rotary control on the e but- Incoming calls are indicated in a window in Press E to confirm accept ton to the right.
-
Page 141: Outgoing Calls
Telephone* Telephone operation Dialing a telephone number Deleting the last or several digits: Outgoing calls You can use the following functions to Press the Delete soft key once or se- Entering a telephone number make a phone call: veral times. Open the Telephone menu Dialing a telephone number Deleting all digits:…
-
Page 142
The telephone dials the number that the status bar, the off-hook symbol will ap- Press E. was dialed last. pear. COMAND will mute an active audio source. If the person called answers the call, the Press k. Press the Dialed# soft key. -
Page 143
Changing the list display calls list Press the soft key. The COMAND automatically generates a The display changes to numbers. list of the last 10 calls received. The list is sorted chronologically with the most recently received call at the top of the list. -
Page 144
Selecting an entry from the Dialed num- You can select the following functions: bers list Changing the list display ( page 83) The COMAND automatically generates a Selecting an entry and begin dialing list of the last 10 numbers dialed. The list ( page 83) -
Page 145: Active Call
The telephone dials the saved number. You can also use speed-dialing at the Ending a call ( page 82). COMAND (only mobile phone memory locations 1-99). Quick-dialing You can enter up to 2 digits. Quick dialing can be used on memory loca- Open the Telephone menu tions 1-9.
-
Page 146
Telephone* Telephone operation The following functions can be used during Switching hands-free microphone on/ Three-way calling a call: off (available if microphone is switched When a call is active and you receive a se- Ending an active call cond call on your mobile phone, a tone re- The microphone status is indicated by the presenting a second caller can be heard. -
Page 147
Telephone* Telephone operation Making a conference call Use the number key 2 and then TDMA, CDMA To make a conference between to calls press k. (one that is active and one on hold): When a first call is active a second call can The active call is put on hold and the be placed to make a conference call. -
Page 148: Phone Book
Telephone* Telephone operation Entries marked with symbols have been Phone book imported into the phone book from the in- The phone book contains all entries ternal memory of the mobile phone. of the internal memory of the mobile Usable phone number categories: phone (TDMA, CDMA and GSM mobile Symbol : Cell number…
-
Page 149
Others ling the number Changing the phone book display at Here, all entries without names or with the COMAND Open the phone book ( page 88). names starting with a special character (e.g. * or #) are put together. Selecting a phone book entry and… -
Page 150
Telephone* Telephone operation Begin dialing Press E. Press k. Press the Send soft key. -
Page 151: Navigation
Navigation Important notes Navigation main menu Destination input Route guidance During route guidance Last destinations and destination memory POIs Today’s plan Software updates…
-
Page 152: Important Notes
Navigation Important notes Important notes The route calculated by COMAND is a re- Warning Warning commendation on how to best reach your selected destination. For safety reasons, you should only enter a The Navigation DVD module contains a destination when the vehicle is stationary.
-
Page 153: Navigation Dvd
Navigation Important notes Loading/ejecting a DVD Navigation DVD COMAND calculates the route with the DVDs are loaded and ejected at the DVD GPS (Global Positioning System) sig- help of data that is stored on the navigati- Navigation slot. The DVD Navigation slot is nals received make it possible to deter- on DVD.
-
Page 154: Route Guidance After The Vehicle Has Been Transported
Navigation Important notes Switch the COMAND on. Route guidance after the vehicle has been transported Activate the Navigation main menu ( page 96). If your vehicle has been transported (e.g. by a car, train or ferry) the system may The navigation DVD needs to be in the make navigation announcements which do DVD NAVIGATION slot ( page 147).
-
Page 155: Trip Interruption During Route Guidance
Trip is continued within 2 hours: The system will automatically resume Trip interruption means the vehicle is route guidance. parked and COMAND is switched off. Trip is continued after more than Trip continuation means the vehicle is 2 hours: moving and COMAND is switched on again.
-
Page 156: Navigation Main Menu
Navigation Navigation main menu Navigation main menu Selectable Menu Items Activating the Navigation main menu If route guidance is active, a message Continue route guidance Resumes interrupted or aborted route appears instead asking you whether Press b. guidance. you wish to cancel route guidance The Navigation main menu or the ( page 120).
-
Page 157
Navigation Navigation main menu Available soft keys Destination memory Phone number You can select destinations from the You can select a POI by phone number. soft key: Home ( page 136). Brings you to the Destination Memory Enter POI phone You can edit the home address and menu ( page 142). -
Page 158: Setting The Routing Mode
Selectable traffic routes Push the joystick to g or G to Setting the routing mode select a routing mode. Minimize freeways The COMAND calculates the route as The system calculates the route with/ Press E. Fastest route. without minimizing freeways.
-
Page 159: Saving Current Location
Navigation Navigation main menu Saving current location Such destinations are marked in Press c. memory Last destinations The full view of the map appears. You with _. will see the vehicle’s current position. For permanent storage you can save the destination in the regular If route guidance is not active and the Destination memory ( page 135).
-
Page 160: Destination Input
Navigation Destination input Destination input Available soft keys: Activating the Enter street menu soft key: State Activating the Navigation main menu Brings you to the Select state/province ( page 96). menu ( page 101). The currently set state is identifed by the state code in the middle of the screen.
-
Page 161: Destination Input
Navigation Destination input Push the joystick to g or G to Similarly, when in Hawaii, you cannot Selecting the state/province select a state. choose mainland destinations. The message You must change the state Press E. Use the State list for selecting states in or province in order to use that The Enter street menu will reappear will appear in this case, if…
-
Page 162: Entering Destination Address
Push the joystick to F or f to Confirming a street (menu) select characters diagonally. Press E longer than 2 seconds. For quicker input, COMAND offers Press one of the number keys 1 to available characters from the character Select the ( symbol. Push the 9 and 0 to enter digits.
-
Page 163
Navigation Destination input Push the joystick to g or G to Entering a house number select a street. Press the soft key. List Available soft keys: The street list will appear. You can now You can enter an intersection instead select a street. -
Page 164
Select the ( symbol. Push the joystick to h, H, g or G to do The Enter city menu will appear if more For quicker input, COMAND offers than 7 cities share the entered address available numbers from the number information (street name and house Press E. -
Page 165
Navigation Destination input Confirming a city Press E to confirm your selection. Push the joystick to h, H, g or G to select the characters. After each The Start route guidance menu selection, press E. ( page 115) will appear. Push the joystick to F or f to Entering an intersection select characters diagonally. -
Page 166
Destination input Confirming a cross street (menu) Selecting a cross street Press E longer than 2 seconds to For quicker input, COMAND offers confirm your entry. available characters from the character set based on your selections and the names of the streets stored on the Select the ( symbol. -
Page 167
Navigation Destination input Confirming a cross street (list) You can now soft key: List Brings you to a list of cities with the Press E to confirm. entering a city name or previously input street. The Start route guidance menu accepting the city name shown soft key: Delete… -
Page 168
Press E longer than 2 seconds. 9 and 0. Select the ( symbol. Push the For quicker input, COMAND offers If you enter the first character, the joystick to h, H, g or G to do available characters from the character… -
Page 169
Navigation Destination input Available soft keys: Entering a parking Press the soft key. Press the soft key to see all The Start route guidance menu will appear List Details information about the city entry. after entering a destination address. The city list will appear. You can now select a city. -
Page 170
Navigation Destination input Selecting a parking lot Press the soft key to see Details more information about the parking lot. The map is displayed and shows the destination and the available parkings lots. Press E. One of the parking lot is spotlighted. The The Start route guidance menu will name belonging to it is shown on the appear ( page 115). -
Page 171
Navigation Destination input Selecting a destination using the map Available soft keys Press c. Push the joystick to H, h, g, G, soft POIs Memory Display F, f. keys are available if the soft key was pressed. Press the soft key, e.g. in the Start soft key: POIs route guidance menu ( page 115). -
Page 172
Navigation Destination input Push the joystick to H, h, g, G This allows you to select your destination. to move the cross-hairs. Release the button. If you press the soft key, your Back Push the joystick to F or f to move selection will be discarded. -
Page 173: Selecting Home Address
Navigation Destination input Here you can use the following Editing home address Selecting home address functions Press the soft key. Change Activate the Navigation main menu changing to the map ( page 111) ( page 96). The Change home address menu will setting the routing mode appear.
-
Page 174
Navigation Destination input selecting a destination from the Last After entering the address the screen may Press E. destinations memory ( page 134) look as follows The home address is saved. selecting a Point of Interest The Start route guidance menu will ( page 138) appear ( page 115). -
Page 175: Route Guidance
Navigation Route guidance Route guidance Press E. Route calculation can take some time, Starting route guidance depending on the distance to the Route calculation and route guidance Route guidance can be started if the destination and the routing mode. begins. destination input is complete and Start During route calculation, an arrow pointing…
-
Page 176: Voice Instructions
Navigation Route guidance Repeating current voice instructions Further route guidance takes place Voice instructions using only the symbols in the display. If you have not understood a navigation announcement, you can at any time have a If a new route guidance cycle is started, Warning current announcement repeated.
-
Page 177: Navigation Displays
Manual). route calculation. When the display unit is set to miles, the COMAND will indicate distances in miles (mi) or feet (ft). When the display unit is set to km, the COMAND will indicate distances in kilometers (km) or meters (m).
-
Page 178
When the display unit is set to (here: 800 ft). miles, the COMAND will indicate The status bar shows the name of the distances in miles (mi) or feet (ft). street after the driving maneuver, if… -
Page 179: Arriving At Destination
Navigation Route guidance Altering the map scale You can select the map orientation ( page 130). The current map scale is indicated on the If GPS display ( page 130) is active, left side of the status bar. information on your current position is Changing the map display shown on the status bar.
-
Page 180: Cancelling Route Guidance
Navigation Route guidance Continuing route guidance Cancelling route guidance Push the joystick to h to select In navigation mode, press b. Press E. The inquiry menu Cancel route will appear. guidance? Press E to confirm Route guidance is cancelled. The Navigation main menu appears.
-
Page 181: During Route Guidance
Navigation During route guidance During route guidance During route guidance you can use the soft Available soft keys soft key: Display keys to activate additional menus and Brings you to the Display menu soft key: Info displays and make settings. ( page 128).
-
Page 182: Info Menu
Navigation During route guidance Displaying the route list Info menu Display the soft keys. Press the soft key. If a stopover destination has been Rte list entered: Press the soft key. The list of the remaining roads/route Info sections appears. The estimated time of arrival and the The Info menu will appear.
-
Page 183: Selecting A Detour
Complete detour not possible is displayed. Traffic jams are identified by the driver, not by the COMAND. Switching on Activate the soft key display You can now enter the length of the route ( page 121).
-
Page 184
Navigation During route guidance Switching off (remove detour) Push the joystick to g or G to Press E. select Remove detour Activate the soft key display You can now change the length of the ( page 121). Press E. route section to be blocked. Press the soft key. -
Page 185: Stopover Function
Navigation During route guidance soft key: Stopover function Shows a list of parking facilities or the This function allows you to select an map with one parking facility intermediate destination while route spotlighted. guidance is active. A stopover destination soft key: may be a gas station or a restaurant or any Shows a list of ATMs or the map with other place.
-
Page 186
Navigation During route guidance soft key: Press a soft key, e.g. Selecting a POI in a list More If you press this soft key, the One of the following displays will Push the joystick to G or g to Navigation main menu ( page 96) will appear select an entry. -
Page 187
Navigation During route guidance Deleting or replacing a stopover destination Push the joystick to g or G to If no stopover destination has been Activate the soft key display select entered, the full view map appears Change active stopover ( page 121). instead of the menu. -
Page 188: Saving The Current Location
Navigation During route guidance soft key: Icons Saving the current location Defining route guidance displays Brings you to the POI Icons display The system can save the current position Activate the soft key display settings ( page 129). as a destination in the ( page 121).
-
Page 189
Navigation During route guidance Setting POI Icons displays Push the joystick to g or G to Setting personal symbol display select an option. You can set which POIs are shown as After selecting the option, Personal symbols on the map. Press E. -
Page 190
Navigation During route guidance Press the soft key to confirm and You can select the following map Back return to the map. orientations: A symbol is shown on the bottom left Heading Up side of the status bar. Setting map view Dynamic map alignment, map is North symbol Y: displayed facing driving direction… -
Page 191
Navigation During route guidance In the Settings menu ( page 128), Use the joystick to g or G to select In the Settings menu ( page 128), press the soft key. the option with the symbol -. press the soft key. Automap The options are displayed. -
Page 192
The symbol _ indicates the present If you choose this option, the system setting. With this function is active, the COMAND only switches to split screen by Move the E joystick in g or G records a trail every time the vehicle is in pressing c. -
Page 193
Navigation During route guidance Push the joystick to H to select Press E. The trail is deleted. If you don’t want to delete a trail Press E to confirm… -
Page 194: Last Destinations And Destination Memory
Navigation Last destinations and destination memory Last destinations and destination memory Now you can Last destinations memory start route guidance to the selected memory Last destinations entry ( page 135) automatically saves last destinations to which you have started route guidance. add the selected entry to today’s plan The memory can save a maximum of 50 ( page 144)
-
Page 195: Destination Memory
Navigation Last destinations and destination memory Starting route guidance to a last Destination memory destination In the destination memory, you can save Select a destination from the Last destinations under freely assignable memory. destinations names. The memory can save a maximum of 200 destinations.
-
Page 196
Navigation Last destinations and destination memory Create a new name Activating the destination memory Selecting a destination from the destination memory Push the joystick to h, H, g or Activate the Navigation main menu G to select the characters. After each ( page 96). -
Page 197
Navigation Last destinations and destination memory Category Now you can Starting route guidance to a destination Others from the destination memory At the end of the letter list follows the start route guidance to the selected category destination Select a destination from the Others destination memory. -
Page 198: Pois (Points Of Interest)
Navigation POIs (Points of Interest) POIs (Points of Interest) This function allows you to select Points of Selecting a POI category Entering POIs Interest such as gas stations, parking Activating the Navigation main menu facilities or shopping centers. ( page 96). Push the joystick to G to select menu You can also select a POI item…
-
Page 199
Navigation POIs (Points of Interest) Available soft keys Press E to confirm Sort by distance soft key: Name Brings you to the Enter POI menu The Select POI list will appear. ( page 140). Selecting a POI soft key: Details Shows all information about the POI category. -
Page 200
Navigation POIs (Points of Interest) Push the joystick to G or g to Entering a POI by name select the desired POI. In the Select POI category menu, press If menu item is chosen, the By name Press E. softkey. Name corresponding category symbol will appear in first line. -
Page 201: Selecting A Poi On The Map
Navigation POIs (Points of Interest) Press the soft key. Press the soft key if required. POIs Details Selecting a POI on the map One of the POI is spotlighted. The name Details on the POI selected are shown. Press c. belonging to it is shown on the status Press E.
-
Page 202: Entering A Poi By Phone Number
Navigation POIs (Points of Interest) Use the number keys 1 through 0 Entering a POI by phone number to enter the phone number. If a phone number is associated with a POI, the number can be used to select a destination and making a call.
-
Page 203
Call guidance menu. soft key is visible if vehicle is Call equipped for phone operation and Mercedes-Benz specified mobile telephone* is inserted in phone cradle*. Dialing will begin. In the status bar, the off-hook symbol will appear. If the person called answers the call, the call is active. -
Page 204: Today’s Plan
Navigation Today’s plan Today’s plan The today’s plan memory can be used to Press E. save destinations for which routes can be The today’s plan memory will appear. The message Today’s plan is calculated one after the other. The most recent added destination is full.
-
Page 205
Navigation Today’s plan Available soft keys Best way The current vehicle location is placed at the bottom of today’s plan as soft key: Press the soft key in the Bestway Bestway entry. Starting position Sortes entries to obtain the most today’s plan memory. -
Page 206
Navigation Today’s plan Display details for starting position Saving a today’s plan entry in the Deleting all the today’s plan entries destination memory Push the joystick to G to select Activate the today’s plan. Activate the today’s plan. Starting position Press the soft key. -
Page 207: Software Updates
Navigation Software Updates Software Updates…
-
Page 208
The display unit can cause injury if will appear. The navigation module is located contacted when open. Please close after behind the display unit of the COMAND Remove the DVD from the slot. inserting a navigation DVD. ( page 147). -
Page 209
Please wait. beep tones will sound to remind you to appear. After that, the COMAND loads the return the display to its closed position Press l on the display unit to return software on the DVD. by pressing l on the display unit. -
Page 210
Navigation Software Updates… -
Page 211: Tele Aid
Service Service main menu SMS* Tele Aid*…
-
Page 212: Service Main Menu
If a service submenu is displayed, you need to press the soft key. Back soft key is visible if vehicle is equipped for phone operation and Mercedes-Benz specified mobile telephone* is inserted in phone cradle*. soft key: Scr.off Press the soft key.
-
Page 213: Sms
The functions described here apply if If another system is active (e.g. radio), your vehicle is equipped with mobile a window with the message Received phone cradle* and a Mercedes-Benz a new SMS appears when SMS specified mobile phone*. message is coming in.
-
Page 214: Reading Sms Message Received
Service SMS* Press the Detail soft key. Line-by-line scrolling through the message Reading SMS message received text: The list entry will appear in full in a In the SMS Received ( page 153) list, window. Push the joystick to g or G. push the joystick to g or G to highlight the desired message.
-
Page 215: Emergency Call System
All active vehicle Operator’s Manual for additional connections are terminated except information. During the emergency call, Emergency call. Call appears on the status bar. No Connected operation from COMAND is possible, so you cannot disconnect the emergency call.
-
Page 216: Information
Service Tele Aid* Terminating the connection Press K. COMAND reverts to the system last active before Tele Aid was activated. Information A call to the Response Center will be initiated by pressing the corresponding button. Information regarding the opera- tion of your vehicle, the nearest authorized…
-
Page 217
Service Tele Aid* Terminating the connection Press K. COMAND reverts to the system last active before Tele Aid was activated. -
Page 218
Service Tele Aid*… -
Page 219: System Settings
System settings System settings…
-
Page 220: Selecting The Time Zone
System settings System settings System settings In the System settings menu you can: Activating the System settings Selecting the time zone menu select the time zone and daylight You can select the applicable time zone Press C. savings time settings and daylight saving time settings.
-
Page 221: Selecting The Language
System settings System settings Push the joystick to g or G to Selecting the language select the desired entry. The language affects the menu text Daylight Savings Time displays and the voice output during route Changes from summer to winter time guidance.
-
Page 222: Switching Verification And Notification Tones On And Off
Push the joystick to g or G to Option Instr. cluster setting Switching verification and select an entry. COMAND will use the same language as is notification tones on and off Press E. set in instrument cluster. In the System settings menu, press the Push the joystick to g or G to soft key.
-
Page 223: Making Display Settings
System settings System settings Press E. You can use the following functions: Making display settings In the System settings menu, press the set the display dimming characteristics The setting is applied. The System soft key. settings menu will appear. Display adjust the display brightness Adjusting the display brightness Setting the display dimming…
-
Page 224: Resetting All Settings To The Factory Settings
The Reset inquiry menu will appear. The message All data has been is highlighted. Press the Back soft key. reset. COMAND will now will appear. restart. Press E. The brightness setting is applied. The factory settings are: Time — Atlantic Time…
-
Page 225: Glossary
Using it without due cause is a Defines sound-center left/right. Contains all available destination criminal offense. addresses (town, road, intersection, COMAND Fader house number, special destinations) (Cockpit Management and Data Sys- Defines sound-center front/back. and the digital map material for a coun-…
-
Page 226
The Tele Aid system consists of three home type systems. The ROAMING types of response: automatic and ma- Voice output indicator in the COMAND display indi- nual emergency, roadside assistance, During a trip, apart from visual informa- cates that a call is being made using a and information. -
Page 227: Index
27 Adjust main menus 24 CONNECTING 155, 156 balance/fader 29 Cancelling CONTINUE ROUTE GUIDANCE 96 Adjusting route guidance 120 Current vehicle location 117 display brightness 163 volume 28 loading Destination input 100 into the COMAND 45 Destination memory 135…
-
Page 228
Menu destination address 102 Loading functions 25 house number 103 main area 24 parking 109 into the COMAND 45 soft keys area 24 PIN-code 77 status bar 24 PUK 78 into the CD changer* 48 Menu display 24 telephone number 81… -
Page 229
Index Radio station Navigation Phone book 88 saving station manually 40 Important notes 92 PHONE NOT AVAILABLE 73 Reading Navigation displays 117 PHONE NOT INSERTED 73 SMS message received 154 Navigation DVD 93 PHONE OFF 74 Recalculating 115 loading/ejecting 93 PIN BLOCKED. -
Page 230
Sound functions* 30 CD operation destination 135 Speed-dialling 85 CD changer* 50 radio station 40 Starting CD drive in the COMAND 50 Selecting route guidance 115 COMAND 27 an audio source 34 Station hands-free microphone 86 CD (CD changer* only) 51… -
Page 231
Index Voice instructions 116 Volume adjusting at the COMAND 28 automatic volume control 28 Weather Band WB 36… -
Page 232
Index… -
Page 233
Index… -
Page 234
Index… -
Page 235
Index… -
Page 236
Index… -
Page 237
Order-No. 6515 6682 13 Part-No. 209 584 97 82 US Edition A 02/04…
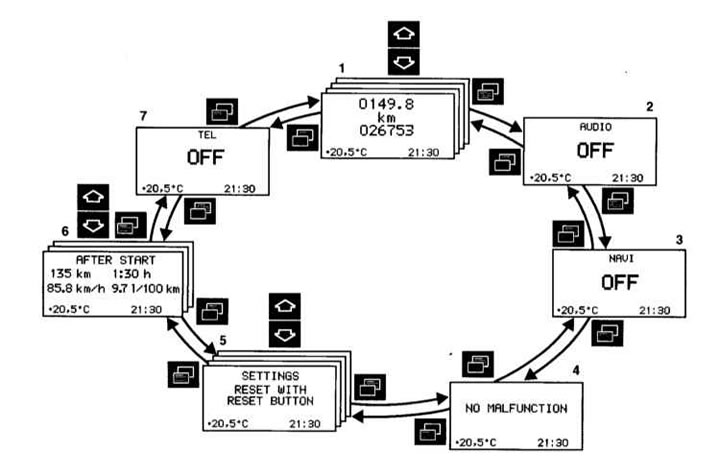
Кнопками на многофункциональном рулевом колесе в зависимости от комплектации Вашего автомобиля может производиться вызов на универсальный дисплей нижеприведенных систем, управление ими и установка их параметров:
- 1 — Измеритель пробега с момента сброса и счётчик общего пробега
- Указатель температуры охлаждающей жидкости
- Цифровая индикация скорости
- Индикатор срока наступления планового ТО (ASSYST)
- Индикация уровня двигательного масла
- 2 — Аудиосистемы
- Радиоприёмник
- Проигрыватель компакт-дисков
- Кассетная дека
- 3 — Навигационная система
- 4 — Память индикации неисправностей
- 5 — Индивидуальная установка
- 6 — Путевой компьютер
- С момента старта
- С момента сброса
- Запас хода
- 7 — Телефон
Кнопку ![]() или
или ![]() нажимайте до тех пор, пока не будет индицирована требуемая система. С каждым новым нажатием кнопки индицируется следующая система.
нажимайте до тех пор, пока не будет индицирована требуемая система. С каждым новым нажатием кнопки индицируется следующая система.
В некоторых системах дополнительный индикации могут вызываться нажатием кнопки ![]() или
или ![]() .
.
Примечание. Индикации на универсальном дисплее, в зависимости от установки, производятся на немецком, английском, французском, итальянском или испанском языках. Переключение на другой язык — см. меню «INSTRUMENT CLUSTER» (ПРИБОРНАЯ ДОСКА) системы «Индивидуальная установка» меню установки «ТЕХТ» (ЯЗЫК ТЕКСТА).
Независимо от установленного языка, на моделях с радиоприёмниками системы Audio 10, Аudio 10 CD или Audio 30 APS индикации аудиосистем (радиоприёмник, проигрыватель компакт-дисков, кассетная дека), а также индикации на телефоне появляются на английском языке.
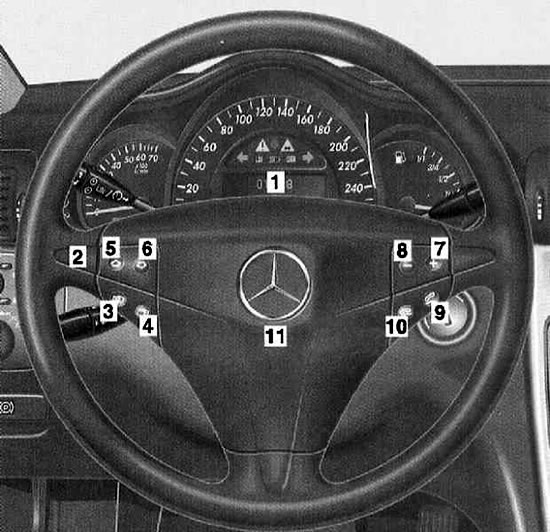
1 — Универсальный дисплей
2 — Многофункциональное рулевое колесо
Поверните ключ в выключателе зажигания в положение 1 или 2.
Нажмите кнопку:
3 — Следующая система
4 — Предыдущая система
5 — Следующая индикация в пределах системы
6 — Предыдущая индикация в пределах системы
7 — Увеличение громкости
8 — Уменьшения громкости
9 — Набор номера телефона, приём поступающего телефонного разговора
10 — Окончание телефонного разговора, отказ от приёма поступающего телефонного разговора
11 — Звуковой сигнал на мягкой крышке
Кнопку ![]() или
или ![]() нажимайте до тех пор, пока не будет индицирована требуемая система.
нажимайте до тех пор, пока не будет индицирована требуемая система.
С каждым новым нажатием кнопки индицируется следующая система.
В некоторых системах дополнительные индикации могут вызываться нажатием кнопки ![]() или
или ![]() .
.
Измерители пробега, индикаторы срока ТО и указатели — скорости, температуры ОЖ и уровня масла
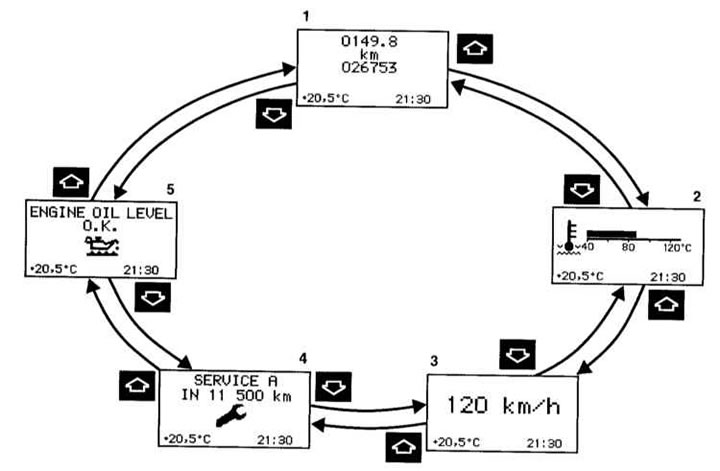
1 — Обнуление измерителя пробега с момента сброса (см. ниже)
2 — Указатель температуры охлаждающей жидкости (см. ниже)
3 — Цифровая индикация скорости — если в системе «Индивидуальная установка» в меню «INSTRUMENT CLUSTERS» (ПРИБОРНАЯ ДОСКА), в меню установки «SELECT DISPLAY» (ВЫБОР ИНДИКАЦИИ), выбрана установка «SPEED» (СКОРОСТЬ) (см. ниже)
Индикация температуры наружного воздуха 1 — если в системе «Индивидуальная установка», в меню «INSTRUMENT CLUSTERS» (ПРИБОРНАЯ ДОСКА), в меню установки «SELECT DISPLAY» (ВЫБОР ИНДИКАЦИИ), выбрана установка «OUTSIDE TEMPERATURE» (ТЕМПЕРАТУРА НАРУЖНОГО ВОЗДУХА) (см. ниже)
4 — Индикатор срока наступления планового ТО (ASSYST) (Глава Текущее обслуживание)
5 — Индикация уровня двигательного масла (Глава Текущее обслуживание)
1 ) За исключением Великобритании
Кнопку ![]() или
или ![]() нажимайте до тех пор, пока не появится индикация измерителя пробега с момента сброса и счётчика общего пробега (1).
нажимайте до тех пор, пока не появится индикация измерителя пробега с момента сброса и счётчика общего пробега (1).
Кнопку ![]() или
или ![]() нажимайте до тех пор, пока не появится требуемая индикация (2, 3, 4, 5, 1).
нажимайте до тех пор, пока не появится требуемая индикация (2, 3, 4, 5, 1).
Нажатием кнопки ![]() или
или ![]() индицируется следующая или предыдущая система.
индицируется следующая или предыдущая система.
Аудиосистемы
В зависимости от включённой аудиосистемы появляется соответствующая индикация на дисплее.
Радиоприёмник — индикация для аудиоприборов и системы COMAND
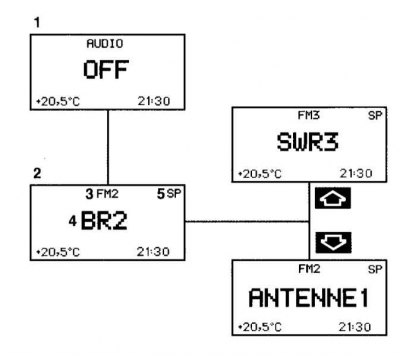
1 — Ни одна аудиосистема не включена
2 — Включён радиоприёмник
3 — Установлена полоса частот и, при необходимости, дополнительно номер ячейки памяти
4 — Название настроенной радиостанции или её частота
5 — «SP» (память) — если в системе «Индивидуальная установка», в меню «VEHICLE» (АВТОМОБИЛЬ), в меню установки «PRESS BUTTON IN AUDIO MODE» (НАЖАТИЕ КНОПКИ В РЕЖИМЕ АУДИО), выбрана установка «MEMORY» (ПАМЯТЬ), А НЕ «STATION SEARCH» (ПОИСК РАДИОСТАНЦИИ)
Включите радиоприёмник (отдельное «Руководство по эксплуатации»).
Кнопку ![]() или
или ![]() нажимайте до тех пор, пока не появится индикация (2).
нажимайте до тех пор, пока не появится индикация (2).
Кнопку ![]() или
или ![]() нажимайте до тех пор, пока не будет индицирована требуемая радиостанция или частота.
нажимайте до тех пор, пока не будет индицирована требуемая радиостанция или частота.
Кнопкой ![]() или
или ![]() могут выбираться частота радиостанции или запомненная радиостанция. Это зависит от установки в меню установок «PRESS BUTTON» «IN AUDIO MODE» (НАЖАТИЕ КНОПКИ В РЕЖИМЕ «АУДИО») (см. «Индивидуальная установка», меню «VEHICLE» (АВТОМОБИЛЬ)
могут выбираться частота радиостанции или запомненная радиостанция. Это зависит от установки в меню установок «PRESS BUTTON» «IN AUDIO MODE» (НАЖАТИЕ КНОПКИ В РЕЖИМЕ «АУДИО») (см. «Индивидуальная установка», меню «VEHICLE» (АВТОМОБИЛЬ)
Нажатием кнопки ![]() или
или ![]() индицируется следующая или предыдущая система.
индицируется следующая или предыдущая система.
Проигрыватель компакт-дисков — индикация для аудиоприборов
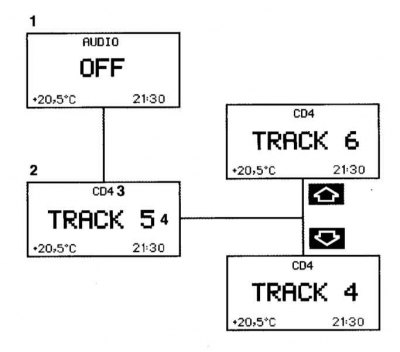
Проигрыватель компакт-дисков — индикация для системы COMAND

1 — Ни одна аудиосистема не включена
2 — Проигрыватель компакт-дисков включён
3 — У СD-чейнджера индицируется номер проигрываемого компакт-диска
4 — Номер музыкального произведения
Включите проигрыватель компакт-дисков (отдельное «Руководство по эксплуатации»).
Кнопку ![]() или
или ![]() нажимайте до тех пор, пока не появится индикация (2).
нажимайте до тех пор, пока не появится индикация (2).
Кнопку ![]() или
или ![]() нажимайте до тех пор, пока не будет индицирован требуемый номер музыкального произведения (4).
нажимайте до тех пор, пока не будет индицирован требуемый номер музыкального произведения (4).
Нажатием кнопки ![]() или
или ![]() индицируется следующая или предыдущая система.
индицируется следующая или предыдущая система.
Кассетный магнитофон — индикация для Audio 10
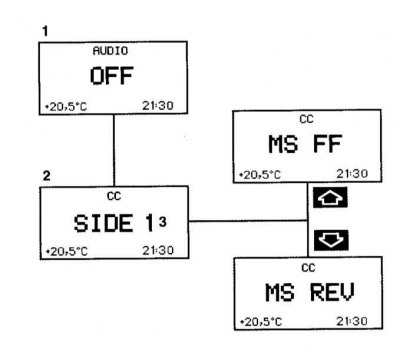
1 — Ни одна аудиосистема не включена
2 — Включена кассетная дека
3 — Проигрываемая сторона
Включите кассетную деку (отдельное «Руководство по эксплуатации»).
Кнопку ![]() или
или ![]() нажимайте до тех пор, пока не появится индикация (2).
нажимайте до тех пор, пока не появится индикация (2).
Нажмите кнопку ![]() — перематывание производится до начала следующего музыкального произведения.
— перематывание производится до начала следующего музыкального произведения.
Нажмите кнопку ![]() — перематывание производится до начала проигрываемого музыкального произведения.
— перематывание производится до начала проигрываемого музыкального произведения.
Нажатием кнопки ![]() или
или ![]() индицируется следующая или предыдущая система.
индицируется следующая или предыдущая система.
Навигационная система — индикация для Audio 30 APS и системы COMAND
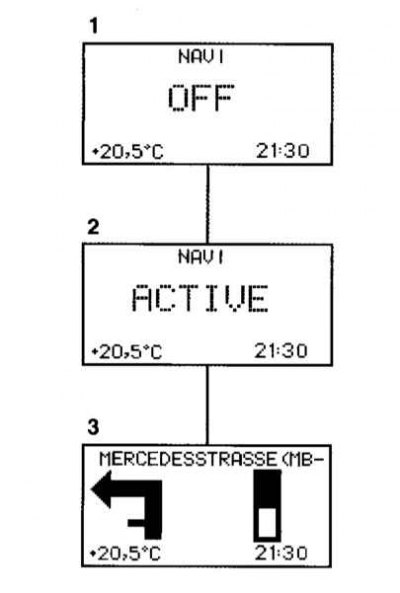
1 — Навигационная система выключена
2 — Навигационная система включена, но сопровождение цели не производится
3 — Навигационная система включена, и активировано сопровождение цели
Кнопку ![]() или
или ![]() нажимайте до тех пор, пока не будет индицирована требуемая система.
нажимайте до тех пор, пока не будет индицирована требуемая система.
(Навигационная система — отдельное «Руководство по эксплуатации» систем COMAND (Cockpit Management and Data System) или Audio 30 APS).
Нажатием кнопки ![]() или
или ![]() индицируется следующая или предыдущая система.
индицируется следующая или предыдущая система.
Память индикации неисправностей
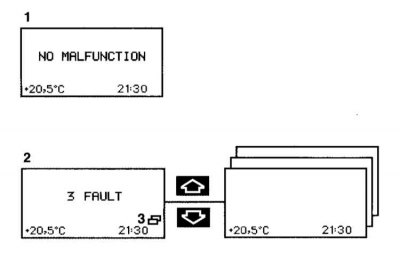
1 — Неисправности отсутствуют
2 — Число неисправностей
3 — В памяти индикации неисправностей запомнены неисправности
Кнопку ![]() или
или ![]() нажимайте до тех пор, пока не будет индицирована память индикации неисправностей.
нажимайте до тех пор, пока не будет индицирована память индикации неисправностей.
Если появится индикация (2), нажмите кнопку ![]() или
или ![]() . После этого производится последовательная индикация неисправностей.
. После этого производится последовательная индикация неисправностей.
(Система оповещения и сигнализация неисправностей — см. Раздел Предупредительные сигнальные и контрольные лампы, а также сообщения информационного дисплея о зарегистрированных неисправностях)
По завершении индикации всех неисправностей снова появляется индикация (2).
Если неисправности возникли во время движения, индикация (2) появляется ещё раз, когда ключ в выключателе зажигания поворачивается в положение 0 или вынимается. Повторную индикацию неисправностей на приборной доске можно вызвать нажатием кнопки сброса показаний (Раздел Приборная доска).
При поворачивании ключа в выключателе зажигания в положение 1 или 2 сбрасывается память индикации неисправностей.
Если неисправностей возникли повторно, то они снова индицируются в памяти индикации неисправностей.
Нажатием кнопки ![]() или
или ![]() индицируется следующая или предыдущая система.
индицируется следующая или предыдущая система.
Индивидуальная установка

1 — Базовая индикация индивидуальной установки
2 — «SETTING» (УСТАНОВКИ) — в этом дополнительном меню можно вызвать требуемое меню: «INSTRUMENT CLUSTER» (ПРИБОРНАЯ ДОСКА) (см. ниже)
«LIGHTING» (ОСВЕЩЕНИЕ) (см. ниже)
«VEHICLE» (АВТОМОБИЛЬ) (см. ниже)
«HEATER» (ОТОПЛЕНИЕ) (см. ниже)
«CONVENIENCE» (КОМФОРТНОЕ УПРАВЛЕНИЕ) (см. ниже)
Каждое меню имеет в свою очередь дополнительные подменю — меню установок. В них могут быть затем произведены соответствующие установки.
3 — Сброс дополнительного меню «SETTINGS» (УСТАНОВКИ), запрос на подтверждение (см. ниже)
4 — Подтверждающее сообщение Кнопку ![]() или
или ![]() нажимайте до тех пор, пока не появится базовая индикация системы «Индивидуальная установка» (1).
нажимайте до тех пор, пока не появится базовая индикация системы «Индивидуальная установка» (1).
Кнопку ![]() или
или ![]() нажимайте до тех пор, пока не будет индицировано дополнительное меню «SETTINGS» (УСТАНОВКИ) (2)
нажимайте до тех пор, пока не будет индицировано дополнительное меню «SETTINGS» (УСТАНОВКИ) (2)
Кнопку ![]() или
или ![]() нажимайте до тех пор, пока не будет отмечено требуемое меню:
нажимайте до тех пор, пока не будет отмечено требуемое меню:
- «INSTRUMENT CLUSTER» (ПРИБОРНАЯ ДОСКА) (см. ниже)
- «LIGHTING» (ОСВЕЩЕНИЕ)
- «VEHICLE» (АВТОМОБИЛЬ) (см. ниже)
- «HEATER» (ОТОПЛЕНИЕ) (см. ниже)
- «CONVENIENCE» (КОМФОРТНОЕ УПРАВЛЕНИЕ) (см. ниже)
Нажатием кнопки ![]() или
или ![]() индицируется следующая или предыдущая система.
индицируется следующая или предыдущая система.
Сброс меню «SETTINGS» (УСТАНОВКИ) (2):
Если Вы производите сброс меню «SETTINGS» (УСТАНОВКИ) (2), то все установки опять становятся заводской установкой.
Вызовите базовую индикацию системы «Индивидуальная установка» (1) или «SETTINGS» (УСТАНОВКИ) (2).
Кнопку сброса показаний на приборной доске (Раздел Приборная доска) нажмите и удерживайте нажатой приблизительно 3 секунды. Появляется индикация (3).
Повторно нажмите кнопку сброса показаний. Для подтверждения появляется индикация (4).
Если кнопка сброса показаний не будет нажата, то приблизительно через 5 секунд появляется базовая индикация системы «Индивидуальная установка» (1). В этом случае меню установок не сброшены.
Примечание. При сбросе показаний во время движения из соображений безопасности в меню «LIGHTING» (ОСВЕЩЕНИЕ) И «VEHICLE» (АВТОМОБИЛЬ) сбрасываются не все меню установок (см. ниже).
Меню «ПРИБОРНАЯ ДОСКА»
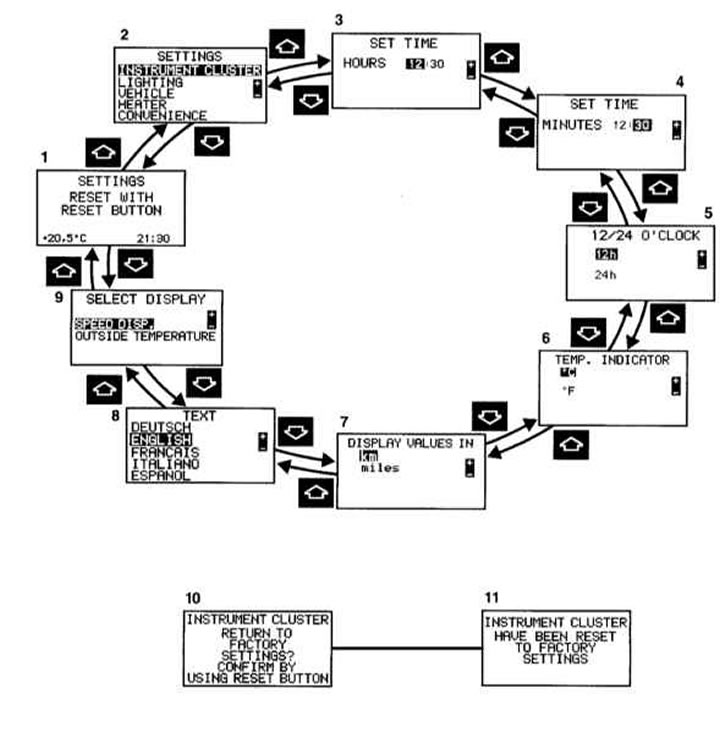
1 — Базовая индикация индивидуальной установки
2 — «SETTINGS» (УСТАНОВКИ) — дополнительное меню для выбора меню
3 — «SET TIME» (УСТАНОВКА ВРЕМЕНИ) «HOURS» (ЧАСЫ) 1
4 — «SET TIME» (УСТАНОВКА ВРЕМЕНИ) «MINUTES» (МИНУТЫ)
5 — «12/24 O’CLOCK» — 12-и или 24-часовая индикация
6 — «TEMP. INDICATOR» (ИНДИКАТОР ТЕМПЕРАТУРЫ) — установленная единица измерения индицируется на индикаторе температуры наружного воздуха на приборной доске, а на моделях с автоматизированным кондиционером воздуха с комфортным управлением также на дисплее этой системы
7 — «DISPLAY VALUES IN» (ЗНАЧЕНИЯ НА ДИСПЛЕЕ В) — установка действительна для всех индикаций на универсальном дисплее (не для спидометра)
8 — «ТЕХТ» (ЯЗЫК ТЕКСТА) — установка языка для индикации на универсальном дисплее
9 — «SELECT DISPLAY» (ВЫБОР ИНДИКАТОРА) 2 — выбранный вариант «SPEED DISP.» (СКОРОСТЬ) или «OUTSIDE TEMPERATURE» (ТЕМПЕРАТУРА НАРУЖНОГО ВОЗДУХА) постоянно индицируется на универсальном дисплее.
«SPEED DISP.» (СКОРОСТЬ), например, может использоваться для дополнительной индикации скорости движения в милях, если меню установок (7) «SPEEDOMETER» (СПИДОМЕТР) установлен на «MILES» (МИЛИ)
10 — Сброс меню «ПРИБОРНАЯ ДОСКА», запрос на подтверждение (см. ниже)
11 — Подтверждающее сообщение
Примечание. На структурной схеме представлен пример возможной установки.
1 Только модели без системы COMAND или без Audio 30 APS. (Система COMAND или Audio 30 APS — отдельное «Руководство по эксплуатации»).
2 За исключением Великобритании.
Кнопку ![]() или
или ![]() нажимайте до тех пор, пока не появится базовая индикация системы «Индивидуальная установка» (1).
нажимайте до тех пор, пока не появится базовая индикация системы «Индивидуальная установка» (1).
Кнопку ![]() или
или ![]() нажимайте до тех пор, пока не будет индицировано дополнительное меню «SETTINGS» (УСТАНОВКИ) (2)
нажимайте до тех пор, пока не будет индицировано дополнительное меню «SETTINGS» (УСТАНОВКИ) (2)
Кнопку ![]() или
или ![]() нажимайте до тех пор, пока не будет отмечено меню «INSTRUMENT CLUSTER» (ПРИБОРНАЯ ДОСКА).
нажимайте до тех пор, пока не будет отмечено меню «INSTRUMENT CLUSTER» (ПРИБОРНАЯ ДОСКА).
Кнопку ![]() или
или ![]() нажимайте до тех пор, пока не будет индицировано требуемое меню установки (2-9).
нажимайте до тех пор, пока не будет индицировано требуемое меню установки (2-9).
В меню установок (3, 4) нажатием на кнопку ![]() или
или ![]() устанавливается время, а в меню установок (5-9) выбирается требуемая установка.
устанавливается время, а в меню установок (5-9) выбирается требуемая установка.
Выбранная установка отмечена.
Произведенные установки запоминаются и немедленно выполняются.
После прохождения всех меню установок снова индицируется базовая индикация системы «Индивидуальная установка» (1).
Нажатием кнопки ![]() или
или ![]() индицируется следующая или предыдущая система.
индицируется следующая или предыдущая система.
Сброс меню «INSTRUMENT CLUSTER» (ПРИБОРНАЯ ДОСКА) (5-9) на заводскую установку:
Вызовите одно из меню установок (5-9).
Кнопку сброса показаний на приборной доске (Раздел Приборная доска), нажмите и удерживайте нажатой приблизительно 3 секунды. Появляется индикация (10).
Повторно нажмите кнопку сброса показаний. Для подтверждения появляется индикация (11).
Если кнопка сброса показаний не будет нажата, то приблизительно через 5 секунд индицируется дополнительное меню «SETTINGS» (УСТАНОВКИ) (2). В этом случае меню установок не сброшены.
Меню «ОСВЕЩЕНИЕ»
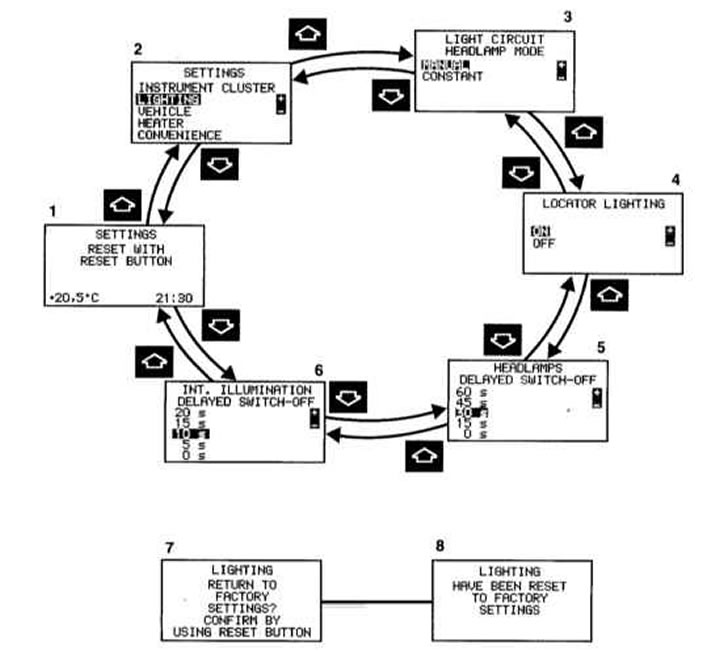
1 — Базовая индикация индивидуальной установки
2 — «SETTINGS» (УСТАНОВКИ) — дополнительное меню для выбора меню
3 — «LIGHT CIRCUIT HEADLAMP MODE» (ПЕРЕКЛЮЧЕНИЕ СВЕТА ФАР) (Раздел Переключатели)
4 — «LOCATOR LIGHTING» (ОСВЕЩЕНИЕ ДЛЯ ОРИЕНТИРОВКИ) (Раздел Переключатели)
5 — «HEADLAMPS DELAYED SWITCH-OFF» (ЗАМЕДЛЕННОЕ ВЫКЛЮЧЕНИЕ СВЕТА ФАР (Раздел Переключатели)
6 — «INT. ILLUMINATION DELAYED SWITCH-OFF» (ОТКЛЮЧЕНИЕ ВНУТРЕННЕГО ОСВЕЩЕНИЯ С ВЫДЕРЖКОЙ ВРЕМЕНИ) (Раздел Стеклоподъёмники, люк крыши)
7 — Сброс меню «LIGHTING» (ОСВЕЩЕНИЕ), запрос на подтверждение (см. ниже)
8 — Подтверждающее сообщение
Примечание. На структурной схеме выше представлен пример возможной установки.
Кнопку ![]() или
или ![]() нажимайте до тех пор, пока не появится базовая индикация системы «Индивидуальная установка» (1).
нажимайте до тех пор, пока не появится базовая индикация системы «Индивидуальная установка» (1).
Кнопку ![]() или
или ![]() нажимайте до тех пор, пока не будет индицировано дополнительное меню «SETTINGS» (УСТАНОВКИ) (2).
нажимайте до тех пор, пока не будет индицировано дополнительное меню «SETTINGS» (УСТАНОВКИ) (2).
Кнопку ![]() или
или ![]() нажимайте до тех пор, пока не будет отмечено меню «LIGHTING» (ОСВЕЩЕНИЕ).
нажимайте до тех пор, пока не будет отмечено меню «LIGHTING» (ОСВЕЩЕНИЕ).
Кнопку ![]() или
или ![]() нажимайте до тех пор, пока не будет индицировано требуемое меню установки (2-6).
нажимайте до тех пор, пока не будет индицировано требуемое меню установки (2-6).
В меню установок (3-6) установка выбирается нажатием кнопки ![]() или
или ![]() . Выбранная установка отмечена.
. Выбранная установка отмечена.
Произведенные установки запоминаются и немедленно выполняются.
После прохождения всех меню установок снова индицируется базовая индикация системы «Индивидуальная установка» (1).
Нажатием кнопки или индицируется следующая или предыдущая система.
Сброс меню «LIGHTING» (ОСВЕЩЕНИЕ) (3-6) на заводскую установку:
Вызовите одно из меню установок (3-6).
Кнопку сброса показаний на приборной доске (Раздел Приборная доска) нажмите и удерживайте нажатой приблизительно 3 секунды. Появляется индикация (7).
Повторно нажмите кнопку сброса показаний. Для подтверждения появляется индикация (8).
Если кнопка сброса показаний не будет нажата, то приблизительно через 5 секунд индицируется дополнительное меню «SETTINGS» (УСТАНОВКИ) (2). В этом случае меню установок не сброшены.
Примечание. При сбросе показаний во время движения из соображений безопасности меню установки «HEADLAMP MODE» (ПЕРЕКЛЮЧЕНИЕ СВЕТА ФАР) не сбрасывается. Появляется сообщение «LIGHTING CANNOT BE COMPLETELY RESET TO FACTORY SETTINGS WHILE DRIVING» (ОСВЕЩЕНИЕ ВО ВРЕМЯ ДВИЖЕНИЯ НЕ СБРОШЕНО ПОЛНОСТЬЮ НА ЗАВОДСКУЮ УСТАНОВКУ).
Меню «АВТОМОБИЛЬ»

1 — Базовая индикация индивидуальной установки
2 — «SETTINGS» (УСТАНОВКИ) — дополнительное меню для выбора меню
3 — «SPEED LIMIT (WINTER TYRES)» (ОГРАНИЧЕНИЕ СКОРОСТИ, ШИНЫ С ЗИМНИМ РИСУНКОМ ПРОТЕКТОРА)»1, — постоянный ограничитель скорости (Раздел Управление автомобилем и вспомогательные системы).
Возможность выбора у моделей с бензиновым двигателем: «Выкл.», «240 км/ч» до «160 км/ч» в шагах по 10 км/ч.
Возможность выбора у моделей с дизельным двигателем: «Выкл.», «210 км/ч», «190 км/ч», «160 км/ч».
4 — «PRESS BUTTON IN AUDIO MODE» (НАЖАТИЕ КНОПКИ В РЕЖИМЕ AUDIO) — установка радиоприёмника
«STACION SEARCH» (ПОИСК РАДИОСТАНЦИИ) — кнопкой ![]() или
или ![]() выбирается частота
выбирается частота
«MEMORY» (ПАМЯТЬ) — кнопкой ![]() или
или ![]() выбирается запомненная радиостанция
выбирается запомненная радиостанция
5 — «AUTOMATIC DOOR CLOCK» (АВТОМАТИЧЕСКОЕ ЗАПИРАНИЕ ДВЕРЕЙ) (Раздел Замки, ключи и запоры. Единый замок)
6 — Сброс меню «АВТОМОБИЛЬ», запрос на подтверждение (см. ниже)
7 — Подтверждающее сообщение
Примечание. На структурной схеме выше представлен пример возможной установки.
Кнопку ![]() или
или ![]() нажимайте до тех пор, пока не появится базовая индикация системы «Индивидуальная установка» (1).
нажимайте до тех пор, пока не появится базовая индикация системы «Индивидуальная установка» (1).
Кнопку ![]() или
или ![]() нажимайте до тех пор, пока не будет индицировано дополнительное меню «SETTINGS» (УСТАНОВКИ) (2).
нажимайте до тех пор, пока не будет индицировано дополнительное меню «SETTINGS» (УСТАНОВКИ) (2).
Кнопку ![]() или
или ![]() нажимайте до тех пор, пока не будет отмечено меню «VEHICLE» (АВТОМОБИЛЬ).
нажимайте до тех пор, пока не будет отмечено меню «VEHICLE» (АВТОМОБИЛЬ).
Кнопку ![]() или
или ![]() нажимайте до тех пор, пока не будет индицировано требуемое меню установки (2-5).
нажимайте до тех пор, пока не будет индицировано требуемое меню установки (2-5).
В меню установок (3-5) требуемая установка выбирается нажатием кнопки ![]() или
или ![]() . Выбранная установка отмечена. Произведенные установки запоминаются и немедленно выполняются.
. Выбранная установка отмечена. Произведенные установки запоминаются и немедленно выполняются.
После прохождения всех меню установок снова индицируется базовая индикация системы «Индивидуальная установка» (1).
Нажатием кнопки ![]() или
или ![]() индицируется следующая или предыдущая система.
индицируется следующая или предыдущая система.
Сброс меню «VEHICLE» (АВТОМОБИЛЬ) (3-5) на заводскую установку:
Вызовите одно из меню установок (3-5).
Кнопку сброса показаний на приборной доске нажмите и удерживайте нажатой приблизительно 3 секунды. Появляется индикация (6).
Повторно нажмите кнопку сброса показаний. Для подтверждения появляется индикация (7).
Если кнопка сброса показаний не будет нажата, то приблизительно через 5 секунд индицируется дополнительное меню «SETTINGS» (УСТАНОВКИ) (2). В этом случае меню установок не сброшены.
Примечание. При сбросе показаний во время движения из соображений безопасности меню установки «SPEED LIMIT (WINTER TYRES)» (ОГРАНИЧЕНИЕ СКОРОСТИ, ШИНЫ С ЗИМНИМ РИСУНКОМ ПРОТЕКТОРА) не сбрасывается. Появляется сообщение «VEHICLE CANNOT BE COMPLETELY RESET TO FACTORY SETTINGS WHILE DRIVING!» (АВТОМОБИЛЬ ВО ВРЕМЯ ДВИЖЕНИЯ НЕ СБРОШЕН ПОЛНОСТЬЮ НА ЗАВОДСКУЮ УСТАНОВКУ).
Меню «Отопление»
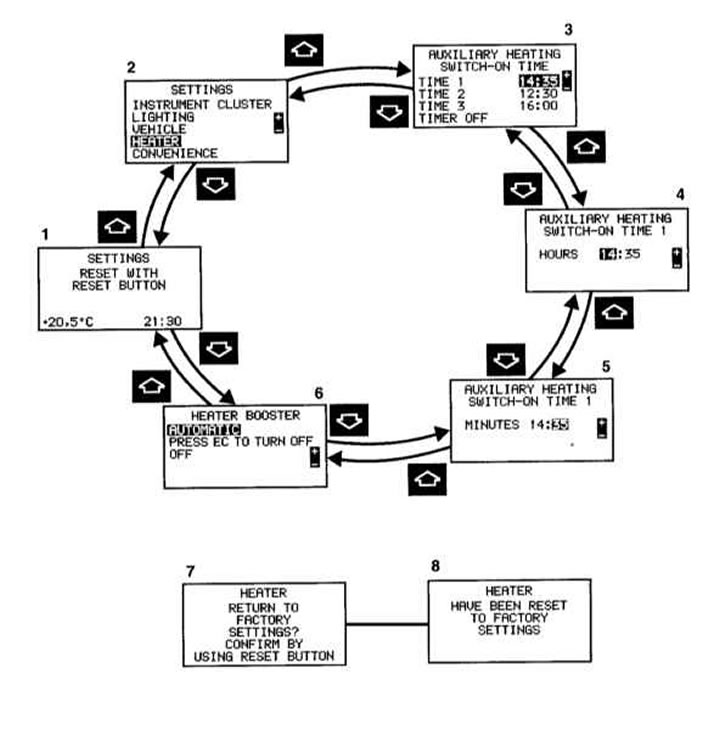
1 — Базовая индикация индивидуальной установки
2 — «SETTINGS» (УСТАНОВКИ) — дополнительное меню для выбора меню
3 — «AUXILIARY HEATING» (НЕЗАВИСИМЫЙ ОТОПИТЕЛЬ)
4 — «AUXILIARY HEATING SWITCH-ON TIME 1 HOURS» (НЕЗАВИСИМЫЙ ОТОПИТЕЛЬ, ВРЕМЯ ВКЛЮЧЕНИЯ 1 — ЧАСЫ) 1, 2
5 — «AUXILIARY HEATING SWITCH-ON TIME 1 MINUTS» (НЕЗАВИСИМЫЙ ОТОПИТЕЛЬ, ВРЕМЯ ВКЛЮЧЕНИЯ 1 — МИНУТЫ)
6 — «HEATER BOOSTER» (ДОПОЛНИТЕЛЬНОЕ ОТОПИТЕЛЬНОЕ УСТРОЙСТВО) 3
7 — Сброс меню «HEATER» (ОТОПЛЕНИЕ), запрос на подтверждение
8 — Подтверждающее сообщение
Примечание. На структурной схеме выше представлен пример возможной установки.
- 1) Только модели с независимым отопителем
- 2) Появляется только в том случае, если в меню установок (3) «AUXILIARY HEATING» (НЕЗАВИСИМЫЙ ОТОПИТЕЛЬ) выбрано «TIME» (ВРЕМЯ).
- 3) Только модели с дизельным двигателем.
Кнопку ![]() или
или ![]() нажимайте до тех пор, пока не появится базовая индикация системы «Индивидуальная установка» (1).
нажимайте до тех пор, пока не появится базовая индикация системы «Индивидуальная установка» (1).
Кнопку ![]() или
или ![]() нажимайте до тех пор, пока не будет индицировано дополнительное меню «SETTINGS» (УСТАНОВКИ) (2).
нажимайте до тех пор, пока не будет индицировано дополнительное меню «SETTINGS» (УСТАНОВКИ) (2).
Кнопку ![]() или
или ![]() нажимайте до тех пор, пока не будет отмечено меню «HEATING» (ОТОПЛЕНИЕ).
нажимайте до тех пор, пока не будет отмечено меню «HEATING» (ОТОПЛЕНИЕ).
Кнопку ![]() или
или ![]() нажимайте до тех пор, пока не будет индицировано требуемое меню установок (2-6).
нажимайте до тех пор, пока не будет индицировано требуемое меню установок (2-6).
В меню установок (4, 5) нажатием на кнопку ![]() или
или ![]() устанавливается время, а в меню установки (3, 6) выбирается требуемая установка. Выбранная установка отмечена.
устанавливается время, а в меню установки (3, 6) выбирается требуемая установка. Выбранная установка отмечена.
Произведенные установки запоминаются и немедленно выполняются.
После прохождения всех меню установок снова индицируется базовая индикация системы «Индивидуальная установка» (1).
Нажатием кнопки ![]() или
или ![]() индицируется следующая или предыдущая система.
индицируется следующая или предыдущая система.
Сброс меню «HEATING» (ОТОПЛЕНИЕ) (3-6) на заводскую установку.
Вызовите одно из меню установок (3-6).
Кнопку сброса показаний на приборной доске (Раздел Приборная доска) нажмите и удерживайте нажатой приблизительно 3 секунды. Появляется индикация (7).
Повторно нажмите кнопку сброса показаний. Для подтверждения появляется индикация (8).
Если кнопка сброса показаний не будет нажата, то приблизительно через 5 секунд индицируется дополнительное меню «SETTINGS» (УСТАНОВКИ) (2). В этом случае меню установок не сброшены.
Меню установки «НЕЗАВИСИМЫЙ ОТОПИТЕЛЬ»
Не включайте независимый отопитель на заправочных станциях и в закрытых помещениях без вытяжки (например, в гаражах).
Установка и выбор требуемого времени включения
Вызовите меню установки (3) «AUXILIARY HEATING» (НЕЗАВИСИМЫЙ ОТОПИТЕЛЬ).
Нажатием на кнопку ![]() или
или ![]() отметьте, например, «TIME 1» (ВРЕМЯ 1).
отметьте, например, «TIME 1» (ВРЕМЯ 1).
Вызовите меню установки (4) «AUXILIARY HEATING» (НЕЗАВИСИМЫЙ ОТОПИТЕЛЬ) «SWITCH-ON TIME 1 HOURS» (ВРЕМЯ ВКЛЮЧЕНИЯ 1, ЧАСЫ) и нажатием кнопки ![]() или
или ![]() установите требуемые часы.
установите требуемые часы.
Вызовите меню установки (5) «AUXILIARY HEATING» (НЕЗАВИСИМЫЙ ОТОПИТЕЛЬ) «SWITCH-ON TIME 1 MINUTES» (ВРЕМЯ ВКЛЮЧЕНИЯ 1, МИНУТЫ) и нажатием кнопки ![]() или
или ![]() установите требуемые минуты.
установите требуемые минуты.
Время включения независимого отопителя установлено и выбрано.
Выбор требуемого времени включения:
Вызовите меню установки (3) «AUXILIARY HEATING» (НЕЗАВИСИМЫЙ ОТОПИТЕЛЬ).
Нажатием на кнопку ![]() или
или ![]() отметьте требуемое меню «TIME» (ВРЕМЯ).
отметьте требуемое меню «TIME» (ВРЕМЯ).
Время включения независимого отопителя выбрано.
Примечание. Всегда может выбираться только одно время включения (дополнительная информация — см. «Независимый отопитель», Раздел Автоматический отопитель и кондиционер воздуха. Вентиляция. Независимый отопитель).
Меню «Комфортное управление» (модели с функцией памяти)
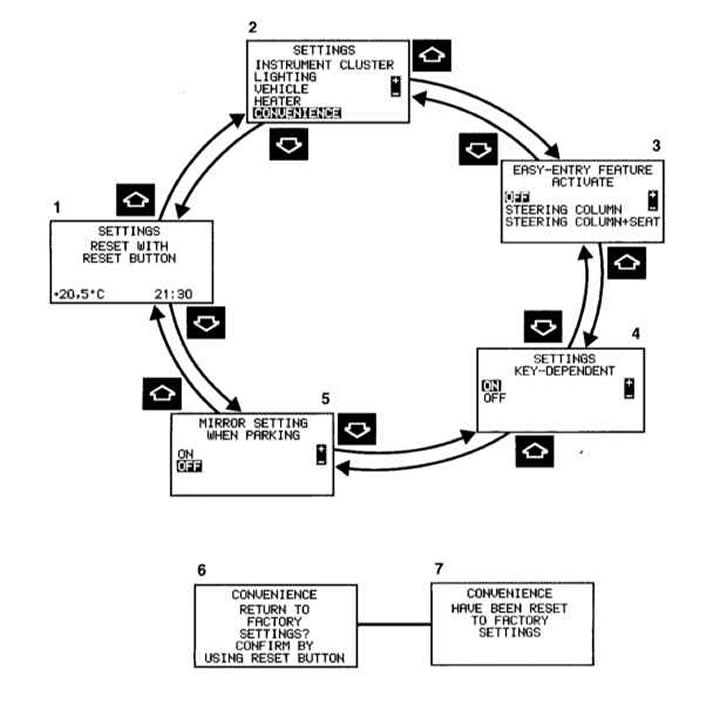
1 — Базовая индикация индивидуальной установки
2 — «SETTINGS» (УСТАНОВКИ) — дополнительное меню для выбора меню
3 — «EASY-ENTRY FEATURE ACTIVATE» (АКТИВИРОВАТЬ СИСТЕМУ СОДЕЙСТВИЯ ПОСАДКЕ) (Раздел Облегчение посадки и высадки из автомобиля)
4 — «SETTINGS» (УСТАНОВКИ) «KEY-DEPENDENT» (В ЗАВИСИМОСТИ ОТ КЛЮЧА) — если выбрана установка «ON» (ВКЛ.), все установки, произведенные в меню системы «Индивидуальная установка», могут вводиться в память в зависимости от ключа. (Функция памяти — см. Раздел Память положений сидений, рулевого колеса и наружных зеркал)
5 — «MIRROR SETTING WHEN PARKING» (РЕГУЛИРОВКА ПОЛОЖЕНИЯ ЗЕРКАЛ ПРИ ПАРКОВКЕ) (Раздел Рулевое колесо, зеркала заднего вида)
6 — Сброс меню «CONVENIENCE» (КОМФОРТНОЕ УПРАВЛЕНИЕ), запрос на подтверждение (см. ниже)
7 — Подтверждающее сообщение
Примечание. На структурной схеме выше представлен пример возможной установки.
Кнопку ![]() или
или ![]() нажимайте до тех пор, пока не появится базовая индикация системы «Индивидуальная установка» (1).
нажимайте до тех пор, пока не появится базовая индикация системы «Индивидуальная установка» (1).
Кнопку ![]() или
или ![]() нажимайте до тех пор, пока не будет индицировано дополнительное меню «SETTINGS» (УСТАНОВКИ) (2).
нажимайте до тех пор, пока не будет индицировано дополнительное меню «SETTINGS» (УСТАНОВКИ) (2).
Кнопку ![]() или
или ![]() нажимайте до тех пор, пока не будет отмечено меню «CONVENIENCE» (КОМФОРТНОЕ УПРАВЛЕНИЕ).
нажимайте до тех пор, пока не будет отмечено меню «CONVENIENCE» (КОМФОРТНОЕ УПРАВЛЕНИЕ).
Кнопку ![]() или
или ![]() нажимайте до тех пор, пока не будет индицировано требуемое меню установки (2-5).
нажимайте до тех пор, пока не будет индицировано требуемое меню установки (2-5).
В меню установок (3-5) требуемая установка выбирается нажатием кнопки ![]() или
или ![]() . Выбранная установка отмечена. Произведенные установки запоминаются и немедленно выполняются.
. Выбранная установка отмечена. Произведенные установки запоминаются и немедленно выполняются.
После прохождения всех меню установок снова индицируется базовая индикация системы «Индивидуальная установка» (1).
Нажатием кнопки ![]() или
или ![]() индицируется следующая или предыдущая система.
индицируется следующая или предыдущая система.
Сброс меню «CONVENIENCE» (КОМФОРТНОЕ УПРАВЛЕНИЕ) (3-5) на заводскую установку:
Вызовите одно из меню установок (3-5).
Кнопку сброса показаний на приборной доске (Раздел Приборная доска) нажмите и удерживайте нажатой приблизительно 3 секунды. Появляется индикация (6).
Повторно нажмите кнопку сброса показаний. Для подтверждения появляется индикация (7).
Если кнопка сброса показаний не будет нажата, то приблизительно через 5 секунд индицируется дополнительное меню «SETTINGS» (УСТАНОВКИ) (2). В этом случае меню установки не сброшены.
Путевой компьютер
1 — «AFTER START» – измеритель пробега с момента запуска
2 — «AFTER RESET» — измеритель пробега с момента сброса
3 — «RANGE» (ЗАПАС ХОДА) — индикация наличия топлива в топливном баке с приблизительным указанием дистанции, которую можно пройти с имеющимся запасом топлива
4 — Пробег с момента запуска или сброса в км «AFTER START» или «AFTER RESET»
5 — Время с момента запуска или сброса «AFTER START» или «AFTER RESET»
6 — Средняя скорость с момента запуска или сброса «AFTER START» или «AFTER RESET»
7 — Средний расход топлива с момента запуска или сброса «AFTER START» или «AFTER RESET»
Кнопку ![]() или
или ![]() нажимайте до тех пор, пока не появится индикация (1, 2 или 3).
нажимайте до тех пор, пока не появится индикация (1, 2 или 3).
Кнопку ![]() или
или ![]() нажимайте до тех пор, пока не появится индикация измерителя пробега с момента запуска «AFTER START» (1), измерителя пробега с момента сброса «AFTER RESET» (2) или индикация резерва топлива (3).
нажимайте до тех пор, пока не появится индикация измерителя пробега с момента запуска «AFTER START» (1), измерителя пробега с момента сброса «AFTER RESET» (2) или индикация резерва топлива (3).
Нажатием кнопки ![]() или
или ![]() индицируется следующая или предыдущая система.
индицируется следующая или предыдущая система.
Примечание. При повторном вызове путевого компьютера всегда появляется индикация измерителя с момента запуска «AFTER START» (1).
Сброс измерителя пробега с момента запуска «AFTER START» (1) или измеритель пробега с момента сброса «AFTER RESET» (2)
Кнопкой ![]() или
или ![]() вызовите соответствующую индикацию (1 или 2) и, нажав кнопку сброса показаний на приборной доске (Раздел Приборная доска), дождаться сброса показаний на «0».
вызовите соответствующую индикацию (1 или 2) и, нажав кнопку сброса показаний на приборной доске (Раздел Приборная доска), дождаться сброса показаний на «0».
Примечание. При поворачивании ключа в выключателе зажигания в положение 0 или его вынимании приблизительно через 4 часа автоматически производится сброс измерителя пробега с момента запуска «AFTER START» (1), если в течение этого времени ключ не поворачивается снова в положение 1 или 2.
Телефон
Телефонная книга — индикация для аудиоприборов
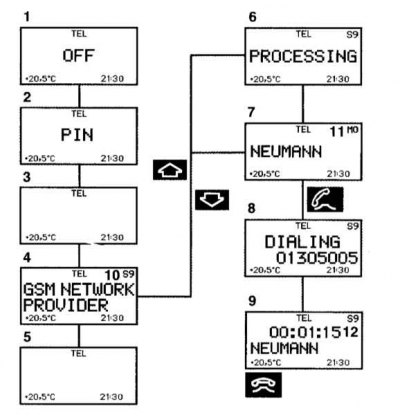
Телефонная книга — индикация для системы COMAND
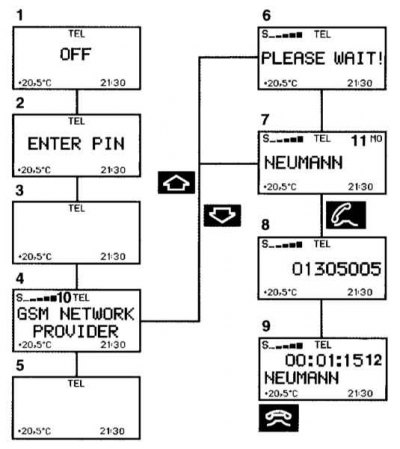
1 — Телефон выключен
2 — Ввод кода PIN (личного идентификационного кода) карточки SIM — отдельное «Руководство по эксплуатации телефона» или соответственно «Руководство по эксплуатации» системы «Linguatronic»
3 — Производится поиск соответствующей телефонной сети
4 — Телефон готов к эксплуатации. Индицируется соответствующий провайдер сети GSM
5 — В настоящее время автомобиль вне диапазона передачи или приёма
6 — Считывается телефонная книга, запомненная на телефонной карточке или в телефоне. Продолжительность — около 30 секунд
7 — Выбранная из телефонной книги фамилия
8 — Номер выбранного абонента, начинается процесс набора номера
9 — Процесс набора номера закончен, и индицируется фамилия. Индикация сохраняется в течение всего телефонного разговора
10 — Сила сигнала — справа на дисплее на моделях с аудиоприборами: чем выше число, тем сильнее принимаемый сигнал сети GSM
Сила сигнала — слева на дисплее на моделях с системой COMAND: чем больше индицируется полос, тем сильнее принимаемый сигнал сети GSM
11 — Номер ячейки памяти
12 — Индикация продолжительности разговора
Должны быть включены телефон и аудиоприбор или система COMAND.
Кнопку ![]() или
или ![]() нажимайте до тех пор, пока не появится соответствующий провайдер сети GSM (4). При появлении индикации (2) сначала введите код PIN (отдельное «Руководство по эксплуатации телефона» или соответственно «Руководство по эксплуатации системы «Linguatronic»).
нажимайте до тех пор, пока не появится соответствующий провайдер сети GSM (4). При появлении индикации (2) сначала введите код PIN (отдельное «Руководство по эксплуатации телефона» или соответственно «Руководство по эксплуатации системы «Linguatronic»).
Нажмите кнопку ![]() или
или ![]() , телефонная книга «пролистывается» по алфавиту вперёд или назад. Соответствующая выбранная фамилия появляется на дисплее.
, телефонная книга «пролистывается» по алфавиту вперёд или назад. Соответствующая выбранная фамилия появляется на дисплее.
Модели с радиоприёмником Audio 10 CD или системой Comand:
Если кнопка ![]() или
или ![]() нажимается дольше одной секунды, то производится ускоренное «пролистывание» телефонной книги.
нажимается дольше одной секунды, то производится ускоренное «пролистывание» телефонной книги.
Примечание. Если Вы решили не звонить, нажмите кнопку . Процесс прерывается, и появляется индикация (4).
Нажмите кнопку ![]() , если на дисплее индицируется фамилия требуемого абонента (7). Набирается номер телефона (8).
, если на дисплее индицируется фамилия требуемого абонента (7). Набирается номер телефона (8).
Если процесс набора номера закончен, индицируется фамилия (9). Индикация (9) сохраняется в течение всего телефонного разговора.
Нажмите кнопку ![]() , телефонный разговор заканчивается, появляется индикация (4).
, телефонный разговор заканчивается, появляется индикация (4).
Нажатием кнопки ![]() или
или ![]() индицируется следующая или предыдущая система.
индицируется следующая или предыдущая система.
Повторный вызов абонента — индикация для аудиоприборов
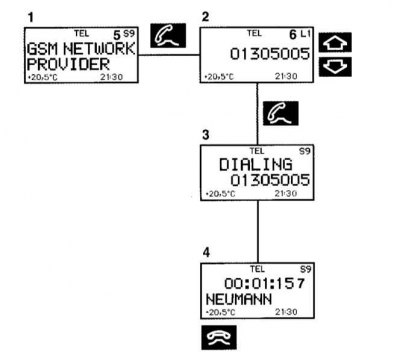
Повторный вызов абонента — индикация для системы COMAND
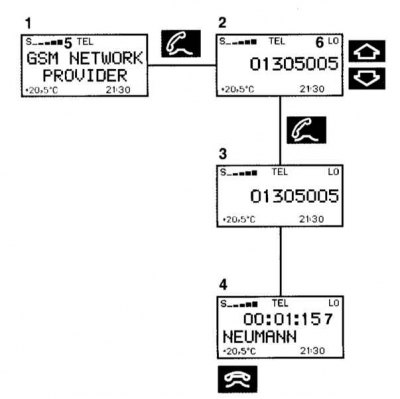
1 — Телефон готов к эксплуатации. Индицируется соответствующий провайдер сети GSM
2 — Номер или фамилия в памяти повторного вызова абонента
3 — Номер в памяти повторного вызова абонента — начат процесс набора номера
4 — Процесс набора номера закончен, и индицируется запомненная в телефонной книге фамилия абонента или же набранный номер, если фамилия абонента не запомнена. Индикация сохраняется в течение всего телефонного разговора
5 — Сила сигнала — справа на дисплее на моделях с аудиоприборами:
чем выше число, тем сильнее принимаемый сигнал сети GSM
Сила сигнала — слева на дисплее на моделях с системой COMAND:
чем больше индицируется полос, тем сильнее принимаемый сигнал сети GSM
6 — Номер ячейки памяти системы COMAND: запоминаются последние 10 набранных номеров.
L0, последний набранный номер,
L1-L9, предыдущие набранные номера
Номер ячейки памяти аудиоприборов:
запоминаются последние 9 набранных номеров,
LO, последний набранный номер,
L1-L9, предыдущие набранные номера
7 — Индикация продолжительности разговора
Должны быть включены телефон и аудиоприбор или система COMAND.
Кнопку ![]() или
или ![]() нажимайте до тех пор, пока не появится соответствующий провайдер сети GSM (1).
нажимайте до тех пор, пока не появится соответствующий провайдер сети GSM (1).
Нажмите кнопку ![]() — активируется память повторного вызова абонента, и индицируется набранный последним номер абонента.
— активируется память повторного вызова абонента, и индицируется набранный последним номер абонента.
Нажмите кнопку ![]() или
или ![]() — память повторного вызова абонента «пролистывается» вперёд или назад. Соответствующий выбранный номер появляется на дисплее.
— память повторного вызова абонента «пролистывается» вперёд или назад. Соответствующий выбранный номер появляется на дисплее.
Примечание. Если Вы решили не звонить, нажмите кнопку . Процесс прерывается, и появляется индикация (1).
Нажмите кнопку ![]() , если на дисплее (2) индицируется требуемый номер или фамилия требуемого абонента.
, если на дисплее (2) индицируется требуемый номер или фамилия требуемого абонента.
Набирается номер телефона (3).
Если процесс набора номера закончен, индицируется фамилия (4), если она запомнена в телефонной книге; в противном случае сохраняется индикация номера телефона. Индикация сохраняется в течение всего телефонного разговора.
Нажмите кнопку ![]() , телефонный разговор заканчивается, появляется индикация (1).
, телефонный разговор заканчивается, появляется индикация (1).
Нажатием кнопки ![]() или
или ![]() индицируется следующая или предыдущая система.
индицируется следующая или предыдущая система.
Поступающий вызов
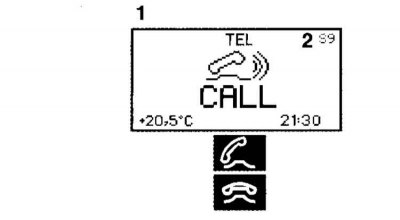

1 — Вам звонят
2 — Сила сигнала — справа на дисплее на моделях с аудиоприборами:
чем выше число, тем сильнее принимаемый сигнал сети GSM
Сила сигнала — слева на дисплее на моделях с системой COMAND:
чем больше индицируется полос, тем сильнее принимаемый сигнал сети GSM.
Телефон доложен быть включён.
Нажмите кнопку ![]() и примите вызов.
и примите вызов.
Нажмите кнопку ![]() — разговор заканчивается, появляется индикация с соответствующей телефонной сетью.
— разговор заканчивается, появляется индикация с соответствующей телефонной сетью.
Примечание. Если Вы не хотите принять поступивший вызов, нажмите кнопку .
Регулировка громкости
Нажмите кнопку ![]() — увеличение громкости,
— увеличение громкости, ![]() — уменьшение громкости.
— уменьшение громкости.
Регулироваться всегда может только громкость активированной или выбранной системы.
Таковыми являются аудиосистемы, телефон, радиослужба информирования о ситуации на дорогах, речевой вывод навигационной системы и речевой вывод системы голосового управления «Linguatronic».
Примечание. На моделях с системой COMAND произведенная регулировка громкости запоминается для каждой системы по отдельности.
Указатель температуры охлаждающей жидкости
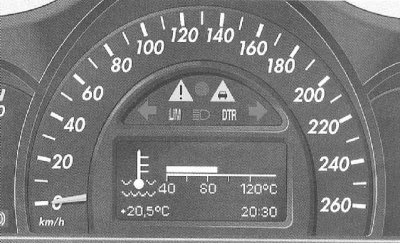
Поверните ключ в выключателе зажигания в положение 1 и 2;
Если не индицированы измеритель пробега с момента сброса и счётчик общего пробега, кнопку ![]() или
или ![]() на многофункциональном рулевом колесе нажимайте до тех пор, пока не появится индикация (см. выше).
на многофункциональном рулевом колесе нажимайте до тех пор, пока не появится индикация (см. выше).
Кнопку ![]() или
или ![]() нажимайте до тех пор, пока не появится индикация температуры охлаждающей жидкости.
нажимайте до тех пор, пока не появится индикация температуры охлаждающей жидкости.
При надлежащей заправке антифризом с антикоррозионными присадками точка кипения охлаждающей жидкости в напорной системе охлаждения достигается при температуре приблизительно 130°С.
При высоких температурах наружного воздуха и при движении в горах допускается повышение температуры охлаждающей жидкости до конца шкалы.
Примечание. Слишком высокая температура охлаждающей жидкости индицируется автоматически (см. «Система оповещения и сигнализация неисправностей», Раздел Предупредительные сигнальные и контрольные лампы, а также сообщения информационного дисплея о зарегистрированных неисправностях).