Opel Corsa

G73
Был 1 день назад
Игорь живу за МКАДом, 44 года
Я езжу на Opel Vectra Две трубы, значит дизель (до этого — 8 машин)
Ульяновск, Россия

Opel Corsa D обслуживание и ремонт(изд. Арус)
346 стр, чб, качество хорошее.
3 декабря 2019
Метки: просто так
44
11
Ранее Помыл машину в праздник.
Далее Литература для скачки 2.Opel Corsa D.
Разместить рекламу
Реклама
Машины в продаже

Шахты
Opel Corsa, 2008
585 000 ₽

Сальск
Opel Corsa, 2007
420 000 ₽

Шахты
Opel Corsa, 2007
565 000 ₽

Шахты
Opel Corsa, 2007
565 000 ₽
Посмотреть больше машин на Дроме
Комментарии
11
Войдите или зарегистрируйтесь, чтобы писать комментарии, задавать вопросы и участвовать в обсуждении.
Войти
Зарегистрироваться

JMachikin
Я езжу на Opel Astra G
Благодарю!
2 года

G73
Автор
Я езжу на Opel Vectra C
О, у меня и такая есть?!
2 года

dentaku
Я езжу на Chevrolet Lacetti 5D
Хорошая книга.
1
3 года

Viorel077
Я езжу на Opel Corsa D
Красава.
А где можно найти такую же книгу только с дизельным двигателем?
3 года
G73
Автор
Я езжу на Opel Vectra C
она вроде на английском, завтра будет пост
3 года
Viorel077
Я езжу на Opel Corsa D
ооооооооооооо буду ждать
3 года
G73
Автор
Я езжу на Opel Vectra C
домашний интернет плоховат
3 года

Nikolai796
Я езжу на Opel Corsa D
🤝
Спасибо
3 года
G73
Автор
Я езжу на Opel Vectra C
Особо и не на чем.
3 года

AlgDandi
Я езжу на Opel Corsa D
Спасибо тебе добрый человек, я уже был близок к ее покупке =)
1
3 года
G73
Автор
Я езжу на Opel Vectra C
на днях будут ещё 3-ри книги. Интернет подвел, не смог загрузить их в «облако»
2
3 года
Руководство на английском языке по техническому обслуживанию и ремонту автомобилей Opel Corsa и Vauxhall Corsa 2006-2010 годов выпуска с бензиновыми и дизельными двигателями.
- Автор: John S. Mead
- Издательство: Haynes Publishing
- Год издания: 2010
- Страниц: 297
- Формат: PDF
- Размер: 184,5 Mb

Руководство на английском языке по техническому обслуживанию и ремонту автомобилей Opel Corsa и Vauxhall Corsa 1997-2000 годов выпуска с бензиновыми двигателями.
- Автор: John S. Mead
- Издательство: Haynes Publishing
- Год издания: 2002
- Страниц: 386
- Формат: PDF
- Размер: 905,9 Mb
Руководство на английском языке по техническому обслуживанию и ремонту автомобилей Opel Corsa и Vauxhall Corsa 2000-2003 годов выпуска с бензиновыми и дизельными двигателями.
- Автор: —
- Издательство: Haynes Publishing
- Год издания: 2004
- Страниц: 388
- Формат: PDF
- Размер: 99,2 Mb
Сборник руководств по эксплуатации и техническому обслуживанию автомобиля Opel Corsa D.
- Автор: —
- Издательство: Opel AG
- Год издания: —
- Страниц: —
- Формат: PDF
- Размер: 45,3 Mb
Руководство по техническому обслуживанию и ремонту автомобиля Opel Corsa 2003-2006 годjd выпуска с бензиновыми и дизельными двигателями.
- Автор: —
- Издательство: Алфамер
- Год издания: —
- Страниц: 384
- Формат: —
- Размер: —
Руководство по техническому обслуживанию и ремонту автомобиля Opel Corsa с 2006 года выпуска с бензиновыми и дизельными двигателями.
- Автор: —
- Издательство: Алфамер
- Год издания: —
- Страниц: 320
- Формат: —
- Размер: —
Руководство по эксплуатации, техническому обслуживанию и ремонту автомобилей Opel Corsa/Combo/Combo Tour/Meriva с 2000 года выпуска с бензиновыми и дизельными двигателями.
- Автор: —
- Издательство: Автоклуб
- Год издания: —
- Страниц: 222
- Формат: —
- Размер: —
Руководство по эксплуатации, техническому обслуживанию и ремонту автомобиля Opel Corsa с 2006 года выпуска с бензиновыми и дизельными двигателями.
- Автор: —
- Издательство: Арго-Авто
- Год издания: —
- Страниц: 400
- Формат: —
- Размер: —

Мультимедийное руководство по техническому обслуживанию и ремонту автомобилей Opel Combo/Corsa/Tigra 1993-2000 годов выпуска.
- Автор: —
- Издательство: —
- Год издания: —
- Страниц: —
- Формат: —
- Размер: 68,1 Mb
Руководство по эксплуатации, техническому обслуживанию и ремонту автомобилей Opel Combo/Corsa/Meriva 2000-2006 годов выпуска.
- Автор: —
- Издательство: Арус
- Год издания: —
- Страниц: 355
- Формат: PDF
- Размер: 32,8 Mb
Мультимедийное руководство по техническому обслуживанию и ремонту автомобиля Opel Corsa C.
- Автор: —
- Издательство: Новая версия
- Год издания: 2007
- Страниц: —
- Формат: —
- Размер: 276,6 Mb

![]()
OPEL Corsa
Owner’s Manual
Back to overview
Downloaded from www.Manualslib.com manuals search engine
Back to overview
Downloaded from www.Manualslib.com manuals search engine

OPEL Corsa
Operation, Safety, Maintenance
Back to overview
Downloaded from www.Manualslib.com manuals search engine

Data specific to your vehicle
Please enter your vehicle’s data here so that it is readily accessible. Please refer to the sections «Servicing and maintenance» and «Technical data» and the identification plate.
Fuel
Designation
Engine oil
Grade
Viscosity
Tyre pressure
|
Tyre size |
Front |
Rear |
|||
|
Summer tyres |
|||||
|
Winter tyres |
|||||
Weights
|
Gross vehicle weight rating |
|
|
– |
EC kerb weight |
|
= |
Loading |
Back to overview
Downloaded from www.Manualslib.com manuals search engine
Introduction
Your vehicle is an intelligent combination of forward-looking technology, impressive safety, environmental friendliness and economy.
It now lies with you to drive your vehicle safely and to see it performs perfectly. This Owner’s Manual provides you with all the necessary information to that end.
Make sure your passengers are aware of the possible risk of accident and injury which may result from improper use of the vehicle.
You must always comply with the specific laws of the country that you are in. These laws may differ from the information in this Owner’s Manual.
When this Manual refers to a workshop visit, we recommend your Opel Service Partner.
All Opel Service Partners provide first-class service at reasonable prices. Experienced mechanics trained by Opel work according to specific Opel instructions.
The Owner’s Manual, infotainment system instructions and the vehicle Service and Warranty Booklet should always be kept ready to hand in the vehicle glove compartment.
Make use of the Owner’s Manual
z The «In Brief» section will give you an initial overview.
zThe table of contents at the beginning of the owner’s manual and within the individual chapters will show you where everything is.
zIts index will help you find what you want.
zYellow arrows in the illustrations serve as points of reference or indicate some action to be performed.
zBlack arrows in the illustrations indicate a reaction or a second action to be performed.
zThis Owner’s Manual depicts left-hand drive vehicles. Right-hand drive vehicles are operated in the same way.
zThe Owner’s Manual uses the internal engine codes. The corresponding sales designations are found in the chapter «Technical data».
zDirectional data, e.g. left or right, or front or back, in the descriptions always relate to the direction of travel.
Symbols
6 Continue reading on next page.
3 signifies equipment not fitted to all vehicles (model variants, engine options, models specific to one country, optional equipment, Genuine Opel Parts and Accessories).
Page references are indicated with 3 . 3 means «see page».
9 Danger, 9 Warning, Caution
9 Danger
Text marked 9 Danger provides information on risk of endangering life. Failure to comply with the instructions could endanger life.
9 Warning
Text marked 9 Warning provides information on risk of accident or injury. Failure to comply with the instructions could lead to injury.
Caution
Text marked Caution provides information on possible damage to the vehicle Failure to comply with the instructions could lead to vehicle damage.
Safe driving!
Adam Opel GmbH
Back to overview
Downloaded from www.Manualslib.com manuals search engine
Back to overview
Downloaded from www.Manualslib.com manuals search engine

Contents
|
In Brief ………………………………………………. |
2 |
|
Keys, doors, windows, sun roof ………… |
26 |
|
Seats, Interior …………………………………… |
48 |
|
Instruments, controls ………………………… |
84 |
|
Lighting …………………………………………. |
108 |
|
Infotainment system ………………………. |
118 |
|
Climate control ……………………………… |
120 |
|
Driving and operation …………………… |
136 |
|
Self-help, vehicle care …………………….. |
190 |
|
Opel Service, maintenance …………….. |
231 |
|
Technical Data ……………………………… |
250 |
|
Index ……………………………………………… |
270 |
Back to overview
Downloaded from www.Manualslib.com manuals search engine
2In Brief
In Brief
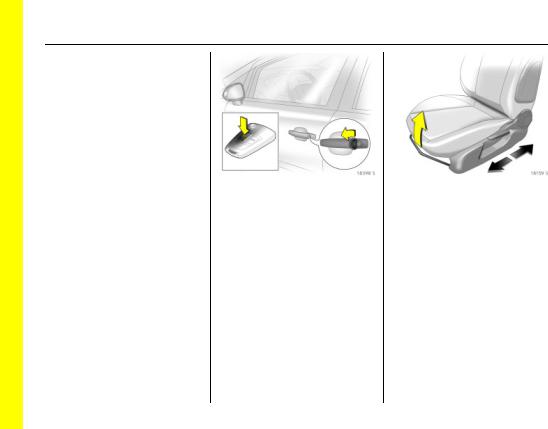
Unlocking the car: Turn the key in the driver’s door lock towards the front or press the button q
Open the door by pulling on the door handle. To open the tailgate, press in the button under the handle recess and pull the tailgate upwards.
Key 3 26,
Electronic immobiliser 3 27, Personalised key 3 39, Central locking with key 3 32, Remote control 31, Central locking 3 32, Anti-theft device 3 3 33, Alarm system 3 37,
Child lock 3 39.
3
To adjust front seat leg room: Pull handle, slide seat, release handle
Seats 3 48, Seat position 3 50.
Back to overview
Downloaded from www.Manualslib.com manuals search engine
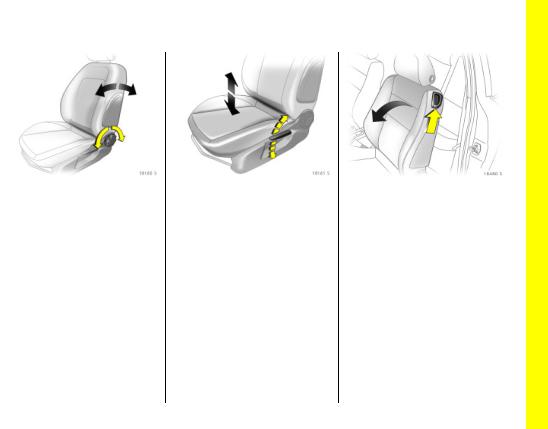
To adjust front seat backrests: Turn handwheel
Do not lean on seat backrest whilst adjusting it.
Seats 3 48,
Seat position 3 50,
Folding down the front passenger seat 3 49.
Front seat height 3: Operate lever on the door side of seat
Pump action of lever Upwards: Seat higher Downwards: Seat lower
Seats 3 49, Seat position 3 50.
To fold the front seat backrests forward 3: Lift the locking lever, fold the backrest forward, lower the locking lever, backrest engages folded forward 3, slide the seat forward 3
To push the seat back to upright, it engages in its original position 3. Lift the locking lever 3, move the backrest back to upright, lower the locking lever, backrest engages.
Folding the backrest forwards is possible only when the backrest is in an upright position.
Front seats 3 48.
Back to overview
Downloaded from www.Manualslib.com manuals search engine
4In Brief
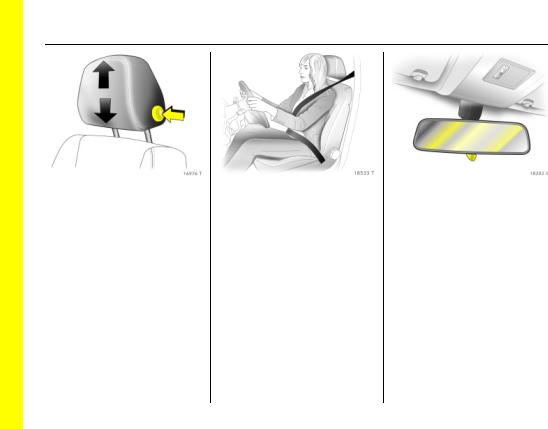
To adjust front seat head restraint height: press button to unlock, adjust height, engage
Head restraint 3 51,
rear head restraint adjustment 3 52, head restraint position 3 52.
Extend the seat belt and clip it into the buckle
The seat belt must not be twisted and must lie snugly against the body. The backrest must not be tilted back too far (maximum approx. 25 ).
To release belt, press red button on belt buckle.
Three-point seat belts 3 59, Airbag system 69,
Seat position 3 50.
To adjust interior mirror by swivelling
Swivel lever on underside of mirror housing to reduce dazzle at night.
Mirrors 3 42,
Autodimming interior mirror 3 44.
Downloaded from www.Manualslib.com manuals search engine
![]()
Exterior mirror adjustment
Select the mirror to be adjusted using the rocker switch and adjust using the four-way switch.
Mirror 3 42,
Aspherical exterior mirrors 3 42, Swinging in exterior mirrors 3 42, Heated exterior mirrors 3 13, 3 43.
Exterior mirror adjustment on vehicle fitted with electronic windows 3
Select the mirror to be adjusted using the rocker switch and adjust using the four-way switch.
Mirror 3 42,
Aspherical exterior mirrors 3 42, Swinging in exterior mirrors 3 42, Heated exterior mirrors 3 13, 3 43.
Steering wheel adjustment: Swivel lever down, adjust height and distance, swivel lever up, engage
Adjust steering wheel only when vehicle is stationary and steering column lock is released.
Airbag system 3 69
Back to overview
Downloaded from www.Manualslib.com manuals search engine

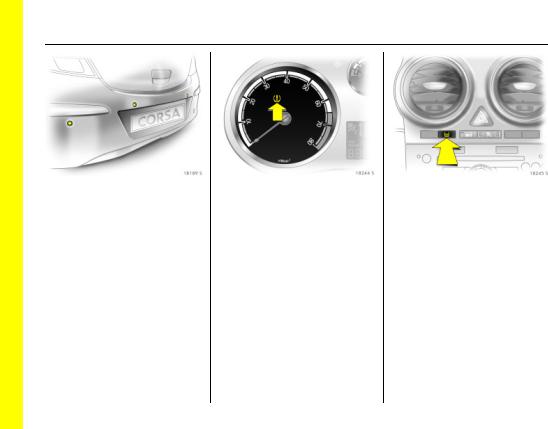
|
1 |
Side air vents ………………………… |
3 120 |
|
2 |
Parking lamps, dipped beam … |
3 106 |
|
Instrument illumination ………….. |
3 112 |
|
|
Fog tail lamp ………………………… |
3 108 |
|
|
Fog lamps …………………………. |
3 108 |
|
|
Headlamp range |
||
|
adjustment 3 ………………………… |
3 109 |
|
|
3 |
3 |
3 11 |
|
Turn signal ………………………………. |
||
|
Headlamp flash |
||
|
dipped beam, main beam ………. |
3 11 |
|
|
Interior lighting …………………… |
3 111 |
|
|
Parking lamps 3 ……………………. |
3 112 |
|
|
Cruise control 3 …………………….. |
3 158 |
4Steering wheel
|
remote3 |
control 3……………………. |
3 116 |
|
|
5 |
Horn ………………………………………… |
3 12 |
|
|
Driver’s airbag …………………………. |
3 67 |
||
|
6 |
Instruments ……………………………… |
3 82 |
|
|
7 |
Windscreen wipers, |
||
|
windscreen washer system, |
|||
|
rear window washer system ……… |
3 12 |
||
|
Trip computer 3 ………………………. |
3 99 |
|
8 Centre air vents …………………….. |
3 120 |
9Central information display for time, date, outside temperature,
|
infotainment system 3, |
||
|
check control 3 ……………………….. |
3 92 |
|
|
Trip computer 3 ………………………. |
3 99 |
|
|
Climate control system 3 ………. |
3 126 |
|
|
10 Left seat heater 3 ……………………. |
3 48 |
|
|
Steering wheel heater 3……………. |
3 49 |
|
|
Tyre pressure loss |
||
|
monitoring system 3 ………………. |
3 162 |
|
|
Central locking button ……………… |
3 32 |
|
|
Warning lights …………………………. |
3 12 |
|
|
Passenger airbag off switch …….. |
3 73 |
|
|
Ultrasonic parking sensor ………. |
3 160 |
|
|
Electronic stability 3 ………………. |
3 157 |
|
|
Right seat heater 3 ………………….. |
3 48 |
|
|
11 |
Front passenger airbag ………….. |
3 67 |
|
12 |
Glove compartment ………………… |
3 80 |
|
13 |
Infotainment system …………… |
3 116 |
|
|
14 |
Climate control …………………….. |
3 118 |
|
|
15 |
Accessory socket 3 ………………….. |
3 78 |
|
|
Cigarette lighter 3 |
………………….. |
3 78 |
|
|
16 |
Ashtray ………………………………….. |
3 79 |
|
|
17 |
3 |
||
|
Ignition switch ………………………………… |
|||
|
with steering wheel lock ………….. |
3 16 |
||
|
18 |
Accelerator pedal……….. |
3 147, 3 148 |
|
|
19 |
Brake pedal …….. |
3 148, 3 163, 3 165 |
|
|
20 |
Clutch pedal 3………………………. |
3 142 |
|
|
21 |
Steering wheel adjustment ……….. |
3 5 |
|
|
22 |
Releasing the bonnet ……………… |
3 188 |
Back to overview
Downloaded from www.Manualslib.com manuals search engine

8In Brief
Back to overview
Downloaded from www.Manualslib.com manuals search engine

6In Brief
Back to overview
Downloaded from www.Manualslib.com manuals search engine

|
1 |
Side air vents ………………………… |
3 120 |
|
2 |
Front passenger airbag …………… |
3 67 |
|
3 |
Left seat heater ……………………. |
3 48 |
|
Steering wheel heater 3……………. |
3 49 |
|
|
Tyre deflation |
||
|
detection system 3………………… |
3 162 |
|
|
Central locking button ……………… |
3 32 |
|
|
3 |
3 12 |
|
|
Warning light …………………………… |
||
|
Passenger airbag off switch ……… |
3 73 |
|
|
Ultrasonic parking sensor ……… |
3 160 |
|
|
Electronic stability3 ………………. |
3 157 |
|
|
Right seat heater 3…………………… |
3 48 |
4Central information display for time, date, outside temperature,
|
infotainment system 3, |
||
|
check control 3 ……………………….. |
3 92 |
|
|
Trip computer 3 ……………………… |
3 99, |
|
|
Climate control system 3 ……… |
3 126 |
|
|
5 |
Centre air vents ……………………. |
3 120 |
|
6 |
Turn signal ………………………………. |
3 11 |
|
Headlamp flash |
||
|
dipped beam, main beam ………. |
3 11 |
|
|
Ambient lighting 3…………………. |
3 111 |
|
|
Parking lamps 3 ……………………. |
3 112 |
|
|
Cruise control 3 …………………….. |
3 158 |
7Steering wheel
|
remote control 3…………………….. |
3 116 |
|
|
8 |
Instruments ……………………………… |
3 82 |
|
9 |
Horn ………………………………………… |
3 12 |
|
Driver’s airbag ………………………… |
3 67 |
|
|
10 |
Windscreen wipers, |
|
|
windscreen washer system, |
||
|
rear window washer system ……… |
3 12 |
|
|
Trip computer 3 ………………………. |
3 99 |
|
|
11 |
Parking lamps, dipped beam …. |
3 106 |
|
Instrument illumination ………….. |
3 112 |
|
|
Fog tail lamp …………………………. |
3 108 |
|
|
Fog lamps 3 ………………………….. |
3 108 |
|
|
Headlamp range |
||
|
adjustment 3 ………………………… |
3 109 |
|
|
12 |
Ignition switch |
|
|
with steering wheel lock ………….. |
3 16 |
|
13 |
Accelerator pedal……….. |
3 147, 3 148 |
|
|
14 |
Brake pedal …….. |
3 148, 3 163, 3 165 |
|
|
15 |
Clutch pedal 3………………………. |
3 142 |
|
|
16 |
Steering wheel adjustment |
……….. 3 5 |
|
|
17 |
Ashtray ………………………………….. |
3 79 |
|
|
18 |
Accessory socket 3 ………………….. |
3 78 |
|
|
Cigarette lighter 3 |
………………….. |
3 78 |
|
|
19 |
Climate control …………………….. |
3 118 |
|
|
20 |
Infotainment system ………….. |
3 116 |
|
|
21 |
Glove compartment ……………….. |
3 80 |
|
|
22 |
Releasing the bonnet ……………… |
3 188 |
|
|
3 |
Back to overview
Downloaded from www.Manualslib.com manuals search engine
|
10 |
In Brief |
|||||||||||
|
Control indicators |
I |
Engine oil pressure, |
q |
Headlamp range adjustment, |
||||||||
|
w |
Deflation detection system 3, |
3 |
86. |
3 |
75. |
|||||||
|
3 |
84, 3 164. |
p |
Alternator, |
8 |
Exterior lights, |
|||||||
|
r |
||||||||||||
|
Ultrasonic parking sensors 3, |
3 |
87. |
3 |
88, 3 108. |
||||||||
|
fault, |
p |
Electro-hydraulic power |
> |
Fog lamps 3, |
||||||||
|
3 |
162. |
|||||||||||
|
B |
assisted steering, |
3 |
88, 3 110. |
|||||||||
|
Adaptive driving light 3, fault, |
3 |
87. |
v |
Airbag systems, belt tensioners, |
||||||||
|
3 |
112, 3 117. |
O |
Turn signal lamps, |
|||||||||
|
j |
3 |
61, 3 74. |
||||||||||
|
Manual transmission |
3 |
11, 3 87. |
X |
Seat belt 3, |
||||||||
|
automated 3, starting the |
Y |
Fuel level, |
||||||||||
|
engine 3, |
3 |
89, 3 62. |
||||||||||
|
3 |
85, 3 137. |
3 |
87, 3 90. |
r |
Fog tail lamp, |
|||||||
|
! |
C |
Main beam, |
||||||||||
|
Preheating system 3, |
3 |
88, 3 110. |
||||||||||
|
Diesel particle filter 3, |
3 |
11, 3 87. |
R |
Brake system, clutch system, |
||||||||
|
3 |
85. |
W |
Coolant temperature, |
|||||||||
|
Z |
3 |
89, 3 167, 3 246. |
||||||||||
|
Exhaust gases 3, |
3 |
87, 3 244. |
u |
Anti-lock brake system, |
||||||||
|
3 |
85, 3 156. |
* |
Deactivate front passenger |
|||||||||
|
A |
3 |
166. |
||||||||||
|
Engine electronics, transmission |
airbag systems, |
v |
Electronic Stability Programme |
|||||||||
|
electronics 3, immobiliser, diesel |
3 |
75. |
||||||||||
|
fuel filter , fault, |
T |
Winter setting for automatic |
(ESP®Plus) 3, |
|||||||||
|
3 |
27, 3 86, 3 142, 3 148, 3 156. |
3 |
151. |
|||||||||
|
transmission 3 or automated |
Cruise control 3, |
|||||||||||
|
S |
3 |
transmission 3, |
m |
|||||||||
|
Engine oil level , |
3 |
140, 3 146. |
3 |
161. |
||||||||
|
3 |
86, 3 242. |
|||||||||||
|
1 |
Manual transmission |
|||||||||||
|
3 |
automated SPORT mode 3, |
|||||||||||
|
3 |
139, 3 146. |
|||||||||||
Back to overview
Downloaded from www.Manualslib.com manuals search engine
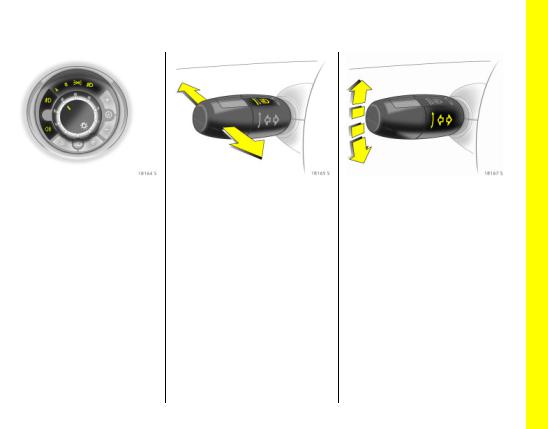
Exterior lights
Rotate
7= Off
8= Parking lamps
9= Dipped or main beam
AAutomatic dipped beam activation 3
Press
>= Fog lamps
r= Fog tail lamp
Lighting 3 108,
headlamp warning device 3 105.
3
|
Headlamp flash, main beam and |
Switch turn signal on |
|||||
|
dipped beam |
Right |
= |
Lever upwards |
|||
|
Headlamp flash |
= |
Pull stalk towards |
Left |
= |
Lever downwards |
|
|
steering wheel |
Turn signals 3 109. |
|||||
|
Main beam |
= |
Push stalk forwards |
||||
|
Dipped beam |
= |
Lever forward again |
||||
|
or toward steering |
||||||
|
wheel |
Main beam, headlamp flash 3 109.
Back to overview
Downloaded from www.Manualslib.com manuals search engine
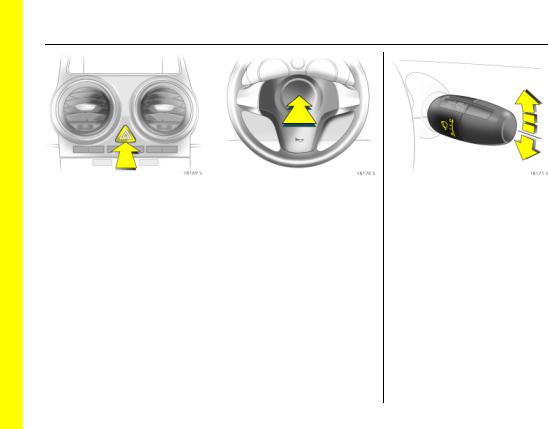
12 In Brief
|
Hazard warning flashers |
Activate horn: |
|
|
Operated with the ¨ button. |
Press j in centre of steering wheel |
|
|
Hazard warning lamps 3 111. |
Airbag system 69, |
|
|
Steering wheel remote control 3 3 118. |
||
|
3 |
||
Windscreen wiper: Gently tap lever upwards
& = Fast
%= Slow
$= Timed interval wipe or automatic wiping with rain sensor 3
§= Off
For a single swipe when the windscreen wipers are off, press the stalk down.
Windscreen wipers 3 106, adjustable intermittent setting 3 106, further information 3 228, 3 248, trip computer 3 92.
Back to overview
Downloaded from www.Manualslib.com manuals search engine
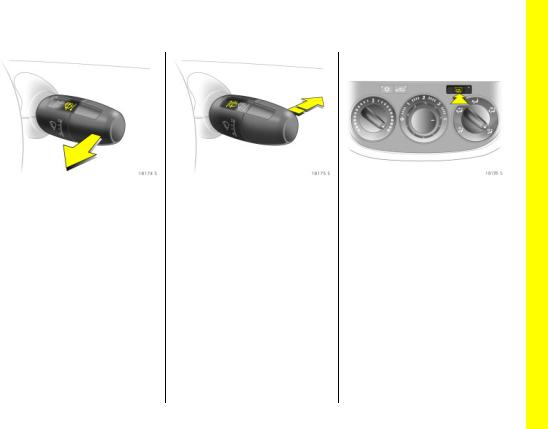
Operating windscreen washer system: Stalk toward steering wheel
Windscreen washer system 3 248, further information 3 228, 3 248.
Rear window wiper 3 and Rear window washer system 3 operation
|
Wiper on |
= |
Push stalk forwards |
|
Wiper off |
= |
Push stalk forwards |
|
again |
||
|
Washing |
= |
Push lever forward |
|
and hold |
Rear window wipers and rear window washer system 3 107,
further information 3 228, 3 248.
Heated rear window, heated exterior mirrors
Operated with the Ü button.
Climate control 3 120, heated rear window 3 46.
Back to overview
Downloaded from www.Manualslib.com manuals search engine

14 In Brief
To clear fogged or icy windows
Air distribution to l, turn rotary switch for temperature and air flow; climate control 3: Button n must also be pressed; automatic climate control 3: button V must also be pressed.
Climate control 3 3 120.
To set automatic mode of climate control system 3
Press AUTO button, select temperature with rotary knob, open air vents.
6 Climate control system 3 3 128.
Manual transmission
Reverse gear: With vehicle stationary, wait 3 seconds after depressing the clutch, then lift the ring below the gear knob and engage gear.
If the gear does not engage, set the lever in neutral, release the clutch pedal and depress again; then repeat gear selection.
Manual transmission 3 144.
Back to overview
Downloaded from www.Manualslib.com manuals search engine
![]()
Before starting off, check
z Tyre pressure and tyre condition 3 169, 3 264.
z Engine oil level and fluid levels in engine compartment, 3 241 to 3 248.
z All windows, mirrors, exterior lighting and number plates are free from dirt, snow and ice and operational.
z Seats, seat belts and mirrors are correctly adjusted 3 48, 3 58, 3 42.
z Check brake function at low speed, particularly if the brakes are wet.
|
Automated manual |
Automatic transmission 3 |
|||||
|
transmission 3 |
P |
= |
Park position |
|||
|
N |
= |
Idling |
R |
= |
Reverse gear |
|
|
o |
= |
Driving position |
N |
= |
Neutral (idling) |
|
|
+ |
= |
Higher gear |
D |
= |
Automatic gear selection |
|
|
— |
= |
Lower gear |
3 |
= 1st to 3rd gear |
||
|
A |
= |
Switch between Automatic and |
2 |
= 1st and 2nd gear |
||
|
R |
Manual mode |
1 |
= |
1st gear |
||
|
= |
Reverse gear (with selector lever |
Only start engine in P or N. To come out |
||||
|
lock) |
||||||
|
of P, turn the ignition, operate the foot |
||||||
|
Always move the selector lever in the |
||||||
|
break and press the button. |
||||||
|
appropriate direction right up to the stop. |
Deactivate the selector lever lock by |
|||||
|
It will automatically return to the neutral |
||||||
|
pressing the button. |
||||||
|
position after each operation. |
||||||
|
6 Automatic transmission 3 144. |
||||||
|
The foot brake must be depressed when |
||||||
|
starting. |
||||||
|
Automated manual transmission 3 3 136. |
||||||
|
3 |
Back to overview
Downloaded from www.Manualslib.com manuals search engine
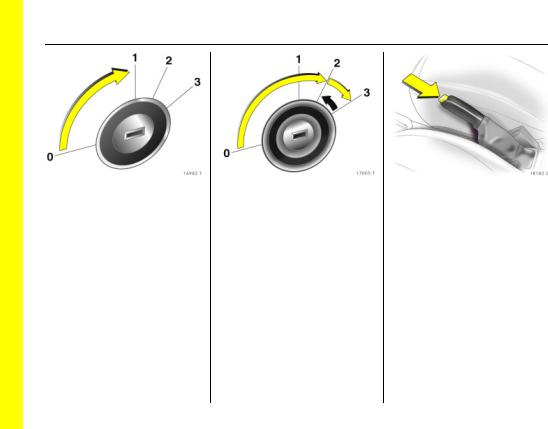
16 In Brief
Steering wheel lock and ignition
Turn key to position 1. Move the steering wheel slightly to release the steering wheel lock.
0= Ignition off
1= Steering free, ignition off
2= Ignition on, with diesel engine: pre-heating
3 = Starting
Starting the engine
Depress clutch and brake pedals, select 3 P or N for automatic transmission, 3 N for manual transmission automated. Do not press the accelerator, in the case of diesel engines, release the key in position 2 until the warning light ! goes out, turn the key to position 3 and release once the engine is running.
Before restarting or switching off the engine, turn key back to 0.
To switch on the ignition, only turn the key to 2.
Releasing the hand brake: Raise lever slightly,
press release button, lower lever fully
Hand brake 3 167.
Back to overview
Downloaded from www.Manualslib.com manuals search engine

Parking the vehicle
z Apply hand brake firmly without operating release button. On a downhill or uphill slope, apply as firmly as possible. Apply foot brake at same time to reduce operating force.
z Switch off engine and ignition. Turn the ignition key to position 0 and pull it out. Turn the steering wheel until it is clear that the steering lock has engaged (anti-theft protection).
On vehicles with automatic transmission 3, the key can only be removed when the selector lever is in the P position.
On vehicles with manual transmission automated 3, control indicator R flashes for a few seconds after the ignition is switched off if the hand brake has not been applied.
z If the vehicle is standing on a level surface or a hill, select first gear before switching the ignition off with manual transmission automated 3, and with automatic transmission 3 move selector lever to P. Also turn front wheels away from kerb if parked on an uphill slope.
If the vehicle is parked on a slope, with manual transmission or manual transmission automated, 3 select reverse gear before switching the ignition off, and with automatic transmission 3 move selector lever to position P. Also turn front wheels towards the kerb.
zLock vehicle with key in lock or button p on the remote key fob.
To activate the anti-theft locking system 3and anti-theft alarm system 3, press button p twice.
Advice when parking
z Do not park the vehicle on an easy flammable surface. The high temperature of the exhaust system could ignite the surface.
zClose the windows and sun roof 3.
zThe engine cooling fans may run after the engine has been switched off 3 241.
zAfter running at high engine speeds or with high engine loads, operate the engine briefly at a low load or run in neutral for approx. 30 seconds before switching off in order to protect the turbocharger 3.
Remote control 3 31, Central locking system 3 32,
Anti-theft alarm system 3 3 37, Vehicle decommissioning 3 249.
Back to overview
Downloaded from www.Manualslib.com manuals search engine

18 In Brief
Interesting functions
|
Airbag system |
Side airbag system 3 |
|
|
The airbag system consists of several |
The side airbag is triggered in the event of |
|
|
a side-on collision to form a safety cushion |
||
|
internal systems. |
||
|
for the driver or front passenger in the |
||
|
Front airbag system 3 |
||
|
respective door area. This substantially |
||
|
The front airbag system will be triggered in |
||
|
reduces the risk of injury to the upper body |
||
|
the event of a serious accident involving a |
||
|
and pelvis. |
||
|
frontal impact and forms safety cushions |
||
|
for the driver and front passenger 3. The |
||
|
forward movement of the driver and front |
||
|
passenger is checked and the risk of |
||
|
injuries to the upper body and head |
||
|
thereby substantially reduced. |
Back to overview
Downloaded from www.Manualslib.com manuals search engine
Curtain airbag system 3
The curtain airbag system triggers in case of a side-on collision and provides a safety barrier in the head area on the respective side of the vehicle. This reduces the risk of injury to the head considerably in case of a side-on collision.
Airbag system 3 69.
Airbag systems which can be deactivated for the front passenger *3
The front and side airbag systems 3 for the front passenger must be deactivated if a child restraint system is to be fitted to the passenger seat. The curtain airbag system 3, the belt tensioners and all driver airbag systems remain active when the systems for the front passenger are deactivated. The passenger airbag systems are active in the as-delivered condition.
Airbag systems which can be deactivated 3 75.
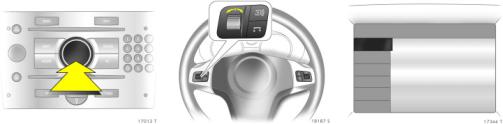
Operating menus via the information display 3
The menu options are selected via the menus and the arrow keys or the multifunction button of the infotainment system 3 or the left adjusting wheel 3 on the steering wheel. The relevant menu options appear on the display.
Selection using arrow keys 3: Press right or left arrow key.
Back to overview
Downloaded from www.Manualslib.com manuals search engine
|
20 |
In Brief |
|||||||
|
Ü Board Computer19,5° |
19:36 |
|||||||
|
BC 1 |
All values |
|||||||
|
BC 2 |
1 |
257.0 km |
||||||
|
Timer |
||||||||
|
Ø |
40 km/h |
|||||||
|
8 |
31.0 Ltr. |
|||||||
|
Ø |
7.0 L/100km |
|||||||
|
Selection using multifunction button 3: |
Selection using left adjusting wheel on |
Trip computer 3 |
||||||
|
rotate and press multifunction button. |
steering wheel 3: Rotate and press knurled |
Functions: |
||||||
|
wheel. |
||||||||
|
To exit a menu, turn the multifunction |
z Range |
|||||||
|
button left or right to Return or Main and |
Information display 3 94. |
z Instantaneous consumption |
||||||
|
select. |
||||||||
|
z Distance travelled |
||||||||
|
z Average speed |
||||||||
|
z Effective consumption |
||||||||
|
z Average consumption |
||||||||
|
z Stop watch |
||||||||
|
Trip computer 3 3 101. |
||||||||
Back to overview
Downloaded from www.Manualslib.com manuals search engine
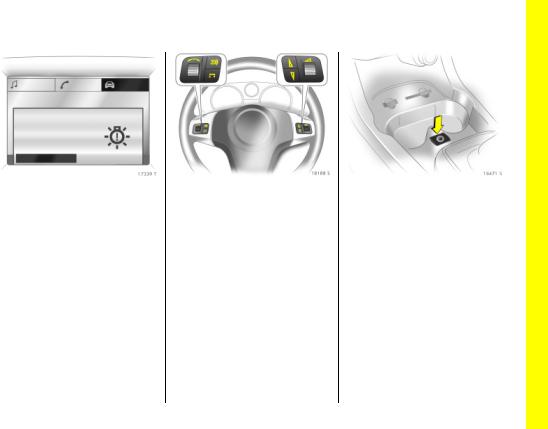
Brakelight check right
OK
Check control 3
The check control software monitors z Remote control battery.
z Important exterior lighting lamps, including cables and fuses.
Check control 3 3 104.
Steering wheel remote control 3
The functions of the infotainment system 3 and the information display can be operated using the buttons and adjusting wheels on the steering wheel.
Further information is available in the infotainment system operating instructions.
Steering wheel remote control 3 3 118, Infotainment system 118.
AUX input 3
An external audio source such as a portable CD player can be connected via the AUX input with a 3.5 mm jack plug.
AUX input 3 3 119.
Downloaded from www.Manualslib.com manuals search engine
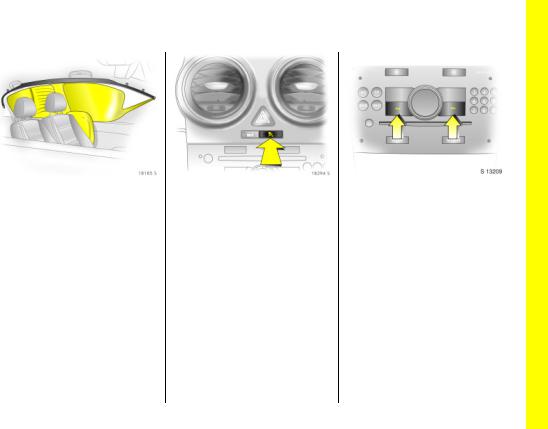
22 In Brief
Ultrasonic parking sensors 3
When reverse gear is selected, the park pilot switches itself on automatically.
Manual activation is possible at speed below 25 km/h by using the r button in the instrument panel.
An acoustic warning sounds when the vehicle approaches an obstacle behind.
Ultrasonic parking sensors 3– page 162.
3
Tyre pressure loss monitoring system (DDS = Deflation Detection System) 3
If a tyre loses pressure, it grows smaller. It then rotates at a different speed than the other tyres. If the system detects a difference in speed, control indicator w illuminates red.
After tyre pressure is corrected or a tyre or wheel is changed, the system must be initialised by pressing the DDS button.
Deflation detection system 3 3 164.
Back to overview
Downloaded from www.Manualslib.com manuals search engine
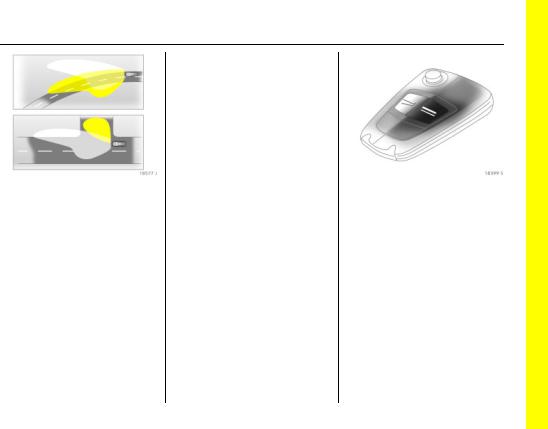
Adaptive Forward Lighting (AFL) 3 ensures better illumination of
z bends (curve lighting),
z crossings and narrow bends (cornering light).
Curve lighting (1)
The light beam pivots based on steering wheel position and speed (from approx. 10 km/h).
Cornering light (2)
An additional lamp throws a beam approx. 90 to the left or right, if the steering-wheel is turned approx. 90 , the turn signal is activated and the speed is below approx. 40 km/h.
Reversing function
If the lights are on, reverse gear is engaged, and the turn signal is activated, the cornering light on the appropriate side is switched on.
Adaptive headlight 3 112.
Personalised key
If the vehicle is used by a number of drivers, each driver can store his or her own preferred settings and vehicle functions using their key. These settings and functions are then activated when the relevant key is used.
A total of up to five vehicle keys can be programmed separately and used.
Personalised key 3 39.
Back to overview
Downloaded from www.Manualslib.com manuals search engine
24 In Brief
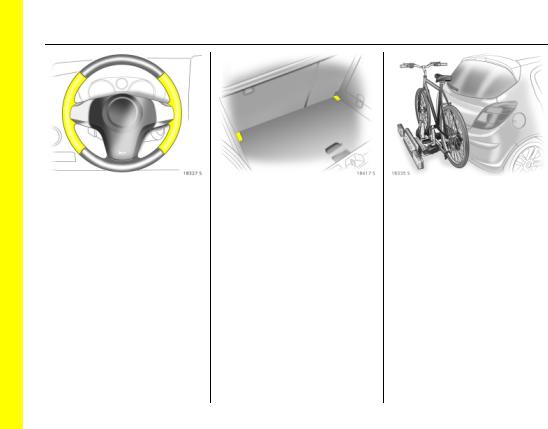
Heated steering wheel 3
Heating of the steering wheel and of the driver’s seat is switched on by a single, or repeated (as appropriate) activation of the switch ß —.
Heating of the steering wheel — the section marked out in the illustration.
Heated steering wheel 3 51.
Double load-bay floor 3
Double load-bay floor, which can be inserted in the baggage compartment in two positions.
If mounted in the upper position, the space between the load-bay floor and the spare wheel well cover 3 can be used as a stowage compartment.
In this position, if the rear seat backrests are folded forwards, an almost completely flat load bay is created.
Double load-bay floor 3 82.
Flex-Fix system 3
The Flex-Fix system allows two bikes to be attached to a pull-out carrier integrated into the vehicle floor.
If not in use, the Flex-Fix system can be collapsed back into the vehicle floor.
Flex-Fix system 3 174.
Back to overview
Downloaded from www.Manualslib.com manuals search engine
![]()
Diesel particle filter 3
The diesel particle filter system filters harmful soot particles out of the exhaust gases. The system includes a self-cleaning function that run automatically during driving. The filter is cleaned by burning off the soot particles at high temperature. This process takes place automatically under set driving conditions and may take up to 25 minutes. Fuel consumption may be higher during this period. The emission of smells and smoke during this process is normal.
Under certain driving conditions, e.g. short journeys, the system may not clean itself automatically.
If the filter requires cleaning and previous driving conditions did not enable automatic cleaning, control indicator ! flashes.
Further instructions 157.
Downloaded from www.Manualslib.com manuals search engine

26 Keys, doors, windows, sun roof
Keys, doors, windows, sun roof
|
Replacement keys …………………………. |
26 |
|
Key with foldaway key section 3……. |
26 |
|
Car Pass………………………………………… |
26 |
|
Electronic immobiliser…………………….. |
27 |
|
Central locking system with key |
|
|
activation 3………………………………… |
28 |
|
Remote control 3…………………………… |
31 |
|
Central locking system with remote |
|
|
control 3…………………………………….. |
32 |
|
Malfunction in remote control………… |
35 |
|
Malfunction in central locking system. |
35 |
|
Luggage compartment………………….. |
36 |
|
Anti-theft alarm system 3 ……………… |
37 |
|
Child safety locks 3……………………….. |
39 |
|
Personalised key……………………………. |
39 |
|
Exterior mirrors………………………………. |
42 |
|
Interior mirror………………………………… |
44 |
|
Manual window operation……………… |
44 |
|
Electric windows 3 on the front doors |
45 |
|
Sun roof 3 …………………………………….. |
46 |
Replacement keys
The key number is specified in the
Car Pass 3.
The key is part of the electronic immobiliser.
Locks 3 230.
Key with foldaway key section 3
Press button to extend. To retract, press button and audibly engage key blade.
Car Pass
The Car Pass contains safety-related vehicle data and should therefore be kept in a safe place.
When the car is taken to a workshop, the Car Pass data is needed in order to perform certain operations.
Back to overview
Downloaded from www.Manualslib.com manuals search engine

|
Keys, doors, windows, sun roof |
27 |
Electronic immobiliser
The system checks whether the vehicle is allowed to start with the key used. Once the transponder in the key is recognised, the vehicle can be started.
The electronic immobiliser activates automatically when the key is removed from the ignition switch.
Control indicator for immobilizer A
Control indicator A illuminates briefly when the ignition is switched on.
If the control indicator flashes when the ignition is on, there is a fault in the system; the engine cannot be started. Switch off the ignition and then repeat the start attempt.
If the control indicator A continues to flash, please try to start the engine using the second key and contact a workshop.
If control indicator A illuminates after the engine has started, there is a fault in the engine electronics or transmission electronics 3 3 142, 3 148, 3 156 or there is water in the diesel fuel filter 3 3 244.
Note
The immobiliser does not lock the doors. You should always lock the vehicle after leaving it and switch on the anti-theft alarm system 3 3 33, 3 37.
Back to overview
Downloaded from www.Manualslib.com manuals search engine

28 Keys, doors, windows, sun roof
Central locking system with key activation 3
Used to unlock and lock doors and luggage compartment.
Central locking system with remote control 3 32.
To unlock
Turn the key in the driver’s door lock to the front: all doors and the luggage compartment will be unlocked.
Pull handle to open doors. Fuel filler cap 3 153.
Open luggage compartment
When the central locking system is unlocked, pull the button beneath the lever.
9 Warning
Do not drive with the tailgate open or ajar, e.g. when transporting bulky objects, since toxic exhaust gas could penetrate the interior.
After fitting certain accessories, it might not be possible to keep the tailgate in the open position.
Back to overview
Downloaded from www.Manualslib.com manuals search engine

|
Keys, doors, windows, sun roof |
29 |
Close luggage compartment
Close the luggage compartment with the handle on the inside of the tailgate.
Do not operate the button beneath the handle when closing. Otherwise the luggage compartment will once again be unlocked.
To lock
Close doors and luggage compartment.
Turn the key in the driver’s door lock towards the rear: all doors and the luggage compartment will be locked.
Fuel filler cap 3 153.
Central locking button for locking and unlocking the doors from inside the vehicle
Press button min the centre console: doors are locked or unlocked.
The LED in the central locking button m comes on for approx. 2 minutes once the vehicle is locked with the key in the driver’s door lock.
If the doors are locked from inside using the central locking button while the vehicle is in motion, the LED m stays on.
If the key is in the ignition, locking is only possible if all doors are closed.
Back to overview
Downloaded from www.Manualslib.com manuals search engine

30 Keys, doors, windows, sun roof
Malfunction in central locking system
To unlock
Turn the key in the driver’s door lock to the front until it stops. Turn the key back and remove it. The other doors can be opened by pulling the handle on the inside of the doors. The luggage compartment and fuel filler cap remain locked.
To lock
Put the key in the opening above the lock on the inside of the door and activate the lock audibly by lifting with the key, then close the door. This procedure must be followed for every door. The driver’s door can also be locked from the outside using the lock. The unlocked fuel filler cap and tailgate or boot lid cannot be locked.
Note
zIf the driver’s door is not closed properly, the central locking system will not lock.
zTo lock the doors from the inside (e. g. to
prevent unwanted entry from outside), press central locking button m in the centre console.
zThe doors can also be opened from the inside by pulling the handle even when the central locking system is locked.
zLocked doors unlock automatically in the event of an accident of a certain severity (to allow external help to gain access). The hazard warning lamps and courtesy lamp also come on. For this to occur, the key must be in the ignition switch.
zIf the central locking system is overloaded as a result of repeated operation at short intervals, the power supply is cut off for a brief period.
Back to overview
Downloaded from www.Manualslib.com manuals search engine

|
Keys, doors, windows, sun roof |
31 |
Remote control 3
Depending on the equipment of the vehicle, one of the remote controls depicted on this page will be used.
The remote control is integrated in the key.
Used to operate:
z central locking system,
zmechanical anti-theft locking system 3,
zanti-theft alarm system 3.
On cars with electric windows, the windows can be opened and closed from outside using the remote control 3 3 45.
The remote control has a range of approx. 5 metres. This range can be affected by outside influences. Aim the remote control at the vehicle to operate. The hazard warning lamps flash to confirm remote control operation.
Handle the remote control with care, protect it from moisture and high temperatures and avoid unnecessary operation.
Fault
If the central locking system cannot be operated with the remote control, it may be due to the following:
z Range exceeded.
z Remote control battery voltage too low. Change battery.
z Frequent, repeated operation of the remote control outside the reception range of the vehicle (e.g. too far from vehicle, remote control is then no longer recognised). Remote control synchronisation.
z If the central locking system is overloaded as a result of repeated operation at short intervals. The power supply is cut off for a brief period.
zInterference from higher-power radio waves from other sources.
Open driver’s door with key 3 35.
Back to overview
Downloaded from www.Manualslib.com manuals search engine

32 Keys, doors, windows, sun roof
Remote control battery replacement
Replace the battery as soon as the range of the remote control begins to shrink.
Batteries do not belong in household waste. They must be disposed of at an appropriate recycling collection point.
Key with foldaway key section Extend the key 3 26. Open the remote control. Replace the battery (battery
type CR 20 32), noting installation position. Close the remote control and synchronise.
Key with fixed key section
Have the battery changed in a workshop.
Synchronise remote control
After replacing the battery, unlock the door with the key in the lock 3 35. The radio remote control will be synchronised when you switch on the ignition.
Central locking system with remote control 3
Used to unlock and lock doors, luggage compartment and fuel filler flap.
Central locking system with key activation 3 28.
Back to overview
Downloaded from www.Manualslib.com manuals search engine

|
Keys, doors, windows, sun roof |
33 |
To unlock
Press button q on radio remote control. Pull handle to open doors.
Selective unlocking 3
You can set the system so that pressing the button q once unlocks just the driver’s door, and pressing the button q twice unlocks the entire vehicle.
This function can be activated and deactivated depending on the key used, see «Personalised key», P5 3 39 3 41.
To lock
Close doors, luggage compartment and tank flap.
Press button p on radio remote control.
Mechanical anti-theft locking system 3
9 Warning
Do not use the system if there are people in the vehicle! The doors cannot be unlocked from the inside.
All doors must be closed.
If the ignition was on, the driver’s door must be opened and closed once so that the vehicle can be secured.
All doors are secured against opening.
Within 10 seconds of locking, press
the p button on the remote control again.
The mechanical anti-theft locking system is switched off when the vehicle is unlocked.
Back to overview
Downloaded from www.Manualslib.com manuals search engine

34 Keys, doors, windows, sun roof
Central locking button for locking and unlocking the doors from inside the vehicle
Press button min the centre console: doors are locked or unlocked.
The LED in the central locking button m comes on for approx. 2 minutes once the vehicle is locked with the remote control.
If the doors are locked from inside using the central locking button while the vehicle is in motion, the LED m stays on.
If the key is in the ignition, locking is only possible if all doors are closed.
The doors cannot be unlocked with this button when the anti-theft locking system 3 is activated.
Note
zIf the driver’s door is not closed properly, the central locking system will not lock.
zThe doors lock again automatically a short time after unlocking the vehicle using the remote control if no door is opened in the meantime.
zTo lock the doors from the inside (e. g. to
prevent unwanted entry from outside), press central locking button m in the centre console.
zThe doors can also be opened from the inside by pulling the handle even when the central locking system is locked.
zLocked doors unlock automatically in the event of an accident of a certain severity (to allow external help to gain access). The hazard warning lamps and courtesy lamp also come on. For this to occur, the key must be in the ignition switch.
Fault
If the central locking system cannot be operated with the remote control, it may be due to the following:
z If the central locking system is overloaded as a result of repeated operation at short intervals. The power supply is cut off for a brief period.
z Faulty fuse in fuse box 3 209.
Please contact a workshop to have the cause of the fault remedied.
Opening driver’s door with key 3 35.
Automatic locking 3
Above a certain speed, the central locking system automatically locks all doors.
This function can be activated and deactivated depending on the key used, see «Personalised key», P4 3 39 3 41.
Back to overview
Downloaded from www.Manualslib.com manuals search engine
![]()
|
Keys, doors, windows, sun roof |
35 |
Malfunction in remote control
To unlock
Turn the key in the driver’s door lock to the front until it stops. Turn the key back and remove it. Open the driver’s door. To open the other doors, switch on the ignition and press the central locking button.
To lock
Open passenger door, close driver’s door, press central locking switch m in centre console. Central locking system locks all doors. Close passenger door.
Malfunction in central locking system
To unlock
Turn the key in the driver’s door lock to the front until it stops. Turn the key back and remove it. The other doors can be opened by pulling the handle on the inside of the doors (not possible if the anti-theft locking system 3has been activated). The luggage compartment and fuel filler cap remain locked. To deactivate the anti-theft alarm system 3, switch on the ignition 16.
3
To lock
Put the key in the opening above the lock on the inside of the door and activate the lock audibly by lifting with the key, close the door. This procedure must be executed for every door. The driver’s door can also be locked from the outside using the lock. The unlocked fuel filler cap and tailgate or boot lid cannot be locked.
Back to overview
Downloaded from www.Manualslib.com manuals search engine

36 Keys, doors, windows, sun roof
Luggage compartment
To unlock
Press button q on the remote control, the luggage compartment and the doors will be unlocked.
To open
The luggage compartment is opened by operating the button beneath the handle.
9 Warning
Do not drive with the tailgate open or ajar, e.g. when transporting bulky objects, since toxic exhaust gas could penetrate the interior.
After fitting certain accessories, it might not be possible to keep the tailgate in the open position.
To close
Close the tailgate using the handle on the inside of the tailgate.
Do not press the release button under the trim strip while closing as this will unlock it again.
Back to overview
Downloaded from www.Manualslib.com manuals search engine

|
Keys, doors, windows, sun roof |
37 |
|||||
|
Anti-theft alarm system 3 |
||||||
|
monitors |
||||||
|
z Doors, tailgate, bonnet, |
||||||
|
z The ignition. |
||||||
|
9 Warning |
||||||
|
Do not use the system if there are people |
||||||
|
in the vehicle! The doors cannot be |
||||||
|
unlocked from the inside. |
||||||
|
To lock |
To activate |
|||||
|
Press button p on radio remote control. |
All doors and the bonnet must be closed. |
|||||
|
Press the remote control button p again at |
||||||
|
the latest 10 seconds after locking. |
||||||
|
If the ignition was switched on, the driver’s |
||||||
|
door must be opened and closed once so |
||||||
|
that the anti-theft alarm system can be |
||||||
|
switched on. |
||||||
Back to overview
Downloaded from www.Manualslib.com manuals search engine

38 Keys, doors, windows, sun roof
Light emitting diode (LED)
During the first 10 seconds of anti-theft alarm system activation:
|
z LED comes on |
= |
Test, delayed |
|
switch-on, |
||
|
z LED flashes |
= |
Door, tailgate or |
|
rapidly |
bonnet open, or |
|
|
system fault. |
After the first 10 seconds of anti-theft alarm system activation:
|
z LED flashes |
= System switched on. |
|
slowly |
Contact a workshop for assistance if problems are encountered.
To deactivate
Press button q on remote control
– or –
Switch on ignition.
In the case of a malfunction in the remote control, use the key to unlock the vehicle 3 35.
If the alarm is triggered when the driver’s door is opened, deactivate the anti-theft alarm system by switching on the ignition.
Alarm
When triggered, the alarm gives off an acoustic signal (horn) and a visual signal (hazard warning flashers). The number and duration of the alarms are stipulated by legislation.
The alarm can be silenced by pressing a button onthe remote control or by switching on the ignition. The anti-theft alarm system is deactivated at the same time.
Back to overview
Downloaded from www.Manualslib.com manuals search engine

|
Keys, doors, windows, sun roof |
39 |
Child safety locks 3
9 Warning
Use the child safety lock whenever children are occupying the rear seats.
Turn rotary knob at rear door lock from vertical position using key: door cannot be opened from the inside.
Personalised key
Store personalised settings or vehicle-specific functions in the vehicle key
If the vehicle is used by a number of drivers, each driver can store his or her own preferred settings and vehicle functions using their key. These settings and functions are then activated when the relevant key is used.
A total of up to five vehicle keys can be programmed separately and used.
Automatically saved settings
The last settings selected
zthe climate control system 3,
zthe information display 3,
zthe infotainment system 3,
zthe instrument illumination,
are automatically stored depending on the vehicle key used.
Different settings are stored for each vehicle key. Use of a specific vehicle key will activate the settings associated with it.
The settings are stored once more every time the vehicle is locked.
Back to overview
Downloaded from www.Manualslib.com manuals search engine

40 Keys, doors, windows, sun roof
Programmable functions
The vehicle-specific functions P1 to P7 listed in the following table can be activated and deactivated.
The setting selected is automatically stored depending on the vehicle key used.
Different settings are stored for each vehicle key. Use of a specific vehicle key will activate the settings associated with it.
A total of up to five vehicle keys can be programmed separately.
Programming permits the technical prerequisite of the relevant function. To activate and deactivate the functions and set the functions, please see the relevant sections. For page references, see the following table.
Programming:
z Turn the ignition off, the key must be in the ignition lock,
z Pull turn signal stalk and wiper stalk simultaneously to the steering wheel until you hear a confirmation signal (approx. 3 seconds),
z The kilometre display shows P1,
z Push the turn signal stalk (left) up or down and select the desired
function P1 — P7, see the following table,
Back to overview
Downloaded from www.Manualslib.com manuals search engine

|
Keys, doors, windows, sun roof |
41 |
z Push the wiper stalk (right) up or down and select status On or OFF, or input a value for speed (P6) or value for volume (P7),
zPull turn signal stalk (left) and wiper stalk (right) simultaneously to the steering wheel until you hear a confirmation signal (approx. 3 seconds).
The selected settings are now stored for the key in the ignition lock. To activate and deactivate the functions and set the functions selected, please see the relevant sections. For page references, see the following table.
Repeat the procedure to program additional keys.
|
Overview of programmable functions |
|||
|
Function |
Function |
Status ex works |
Description |
|
designation |
|||
|
P 1 |
Switch on the external lighting using the |
OFF |
3 113 |
|
remote control (lead-me-to-the-car |
|||
|
lighting function) |
|||
|
P 2 |
Automatic rear windscreen wiper when |
OFF |
3 13 |
|
reverse gear is selected |
|||
|
P 3 |
Lane change indication: three flashes |
On |
3 11 |
|
when the lever is moved slightly |
|||
|
P 4 |
Automatic locking |
OFF |
3 34 |
|
P 5 |
Selective unlocking |
OFF |
3 33 |
|
3 |
Speed warning |
OFF |
3 92 |
|
P 6 |
|||
|
P 7 |
Volume of the acoustic turn signal |
3 |
3 110 |
Back to overview
Downloaded from www.Manualslib.com manuals search engine

42 Keys, doors, windows, sun roof
Exterior mirrors
Setting with switches in the driver’s door console.
Setting with four-way switch in version with manual window operation
Select the mirror to be adjusted using the rocker switch and adjust using the fourway switch.
Setting with four-way switch in version with electronic window operation
Select the mirror to be adjusted using the rocker switch and adjust using the fourway switch.
Aspherical mirror glass 3
The aspherical mirror glass makes the blind angle smaller. The curvature makes objects look smaller, making it more difficult to estimate how far away following vehicles are.
To retract exterior mirrors
The exterior mirrors can be folded in by gently pressing the outer edge of the housing.
Return the mirrors to the driving position before starting off.
Back to overview
Downloaded from www.Manualslib.com manuals search engine

|
Keys, doors, windows, sun roof |
43 |
For the safety of pedestrians, the exterior mirrors will swing out of their normal mounting position if they are bumped with sufficient force. Reposition the mirror by applying slight pressure to the mirror housing.
For the safety of pedestrians, the exterior mirrors of the Corsa OPC are released from the holder if they are bumped. Fit mirror housing to holder with latching lugs and engage by striking gently.
Heated exterior mirrors 3
Heating is activated or deactivated by pressing the Ü button.
Heating works with the engine running and is switched off automatically after a few minutes.
Back to overview
Downloaded from www.Manualslib.com manuals search engine

44 Keys, doors, windows, sun roof
Interior mirror
Swivel mirror housing to adjust.
Manual anti-dazzle interior mirror
To reduce dazzle, swivel the lever on the underside of the mirror housing.
Automatic anti-dazzle interior mirror 3
Dazzling at night is reduced automatically.
The interior mirror does not reduce dazzle when:
z the ignition is switched off,
zreverse gear is engaged or selector lever set to R.
Manual window operation
The door windows can be operated using window winders.
Back to overview
Downloaded from www.Manualslib.com manuals search engine
 Loading…
Opel Corsa D Руководство по эксплуатации, техническому обслуживанию и ремонту: бензиновые двигатели Z10XEP (DOHC 1,0 л); Z12XEP (DOHC 1,2 л); Z14XEP (DOHC 1,4 л) с кузовами трех- и пятидверный хэтчбек. Опель Корса «Д» с 2006 года выпуска пошаговый ремонт в фотографиях
Opel/ Vauxhall Corsa D Petrol/ Turbo-diesel; Hatchback and Corsa Van Service and Repair Manual ЗДЕСЬ
Opel Corsa «D» 2013 Инструкция по эксплуатации
Opel Corsa «D» 2012 Инструкция по эксплуатации
Opel Corsa «D» 2011 Инструкция по эксплуатации
Opel Corsa «D» 2010 Инструкция по эксплуатации
Opel Corsa «D» 2009 Инструкция по эксплуатации
ЕСЛИ ВЫ ВИДИТЕ ОШИБКУ 406 Not Acceptable и не видите документ, то скорей всего у Вас IP РФ и его надо сменить, на любой другой страны, с помощью VPN ( Scribd и SlideShare блокируют посетителей с Российским IP).
Видео Опель Корса «Д» замена ламп передних фар (Corsa D с 06)
Опель Корса «Д» общая информация (Corsa D 2006-2015)
Автомобиль малого класса В (по европейской классификации) Opel Corsa D впервые был представлен в 2006 году на Лондонском автосалоне. Автомобили построены на платформе compact, разработанной совместно компаниями 1944 General Motors и Fiat, и выпускаются с кузовами трех- и пятидверный хэтчбек.
На автомобили устанавливают восемь двигателей, среди которых:
— бензиновые двигатели 1,0 л Z 10 ХЕР (60 л.с.); 1,2 л Z 12 ХЕР (80 л.с.); 1,4 л Z 14 ХЕР (90 л.с.):
— бензиновые двигатели оснащенные системой турбонаддува 1, 6 л Z 16 LEL (150 л.с.) 1,6 л Z 16 LER (192 л.с.) — последний для спортивной модификации автомобиля ОРС,
— дизельные двигатели с системой турбонаддува 1.3 л Z 13 DTJ (75 л.с.) 1,3 л Z 13 DTH (90 л.с.); 1,7 л Z 17 DTR (125 л.с.) Модификацию Opel Corsa ОРС выпускают только с кузовом трехдверный хэтчбек.
Для российского рынка автомобили Opel Corsa комплектуют двигателями Z 10 ХЕР, Z 12 ХЕР и Z 14 ХЕР, оснащенными системой Twinport изменения длины впускного трубопровода, а также двигателями Z 16 LEL, Z 16 LER и Z 13 DTJ В данной книге подробно рассмотрены модификации, оснащенные первыми тремя из перечисленных двигателей. На автомобили устанавливают 5-ступенчатую (автомобили с двигателями Z 10 ХЕР, Z 12 ХЕР, Z 14 ХЕР, Z 13 DTJ) или 6-ступенчатую автомобили с двигателями Z 16 LEL, Z 16 LER, Z 13 DTH и Z 17 DTR) механическую коробку передач, 4-ступенчатую автоматическую коробку передач (только автомобили с двигателями Z 14 ХЕР) и роботизированную механическую коробку передач Easytronic (агрегатируют только с двигателями Z 12 ХЕР и Z 13 DTH).
В России автомобили Opel Corsa предлагают в трех базовых комплектациях: Essentia, Enjoy и Cosmo.
На автомобили в базовой комплектации Essentia все комплектации штатно устанавливают антиблокировочную систему тормозов (ABS), иммобилизатор, подушку безопасности водителя и отключаемую подушку безопасности переднего пассажира, электроусилитель рулевого управления. центральный замок. систему отопления и кондиционирования с пакетами оснащения для холодного климата и с фильтром очистки воздуха салона, регулируемую по углу наклона рулевую колечку, информационный дисплей на панели приборов, полноразмерное запасное колесо, пакет «для курильщика» (прикуриватель и передняя пепельница), аудиоподготовку (антенна и четыре динамика).
В комплектацию Enjoy дополнительно включены центральный замок с дистанционным управлением, пакет опций Comfort (сиденье водителя регулируемое по высоте, рулевая колонка, регулируемая по углу наклона и вылету), пакет опций Electric Comfort (электрические стеклоподъемники передних дверей, центральный замок с дистанционным управлением, один ключ со складным лезвием), солнцезащитный козырек с зеркалом со стороны водителя, двухуровневый пол багажника, заднее сиденье с раздельной спинкой, наружные ручки дверей и молдинги, окрашенные в цвет кузова колесные диски с посадочным диаметром 15 дюймов.
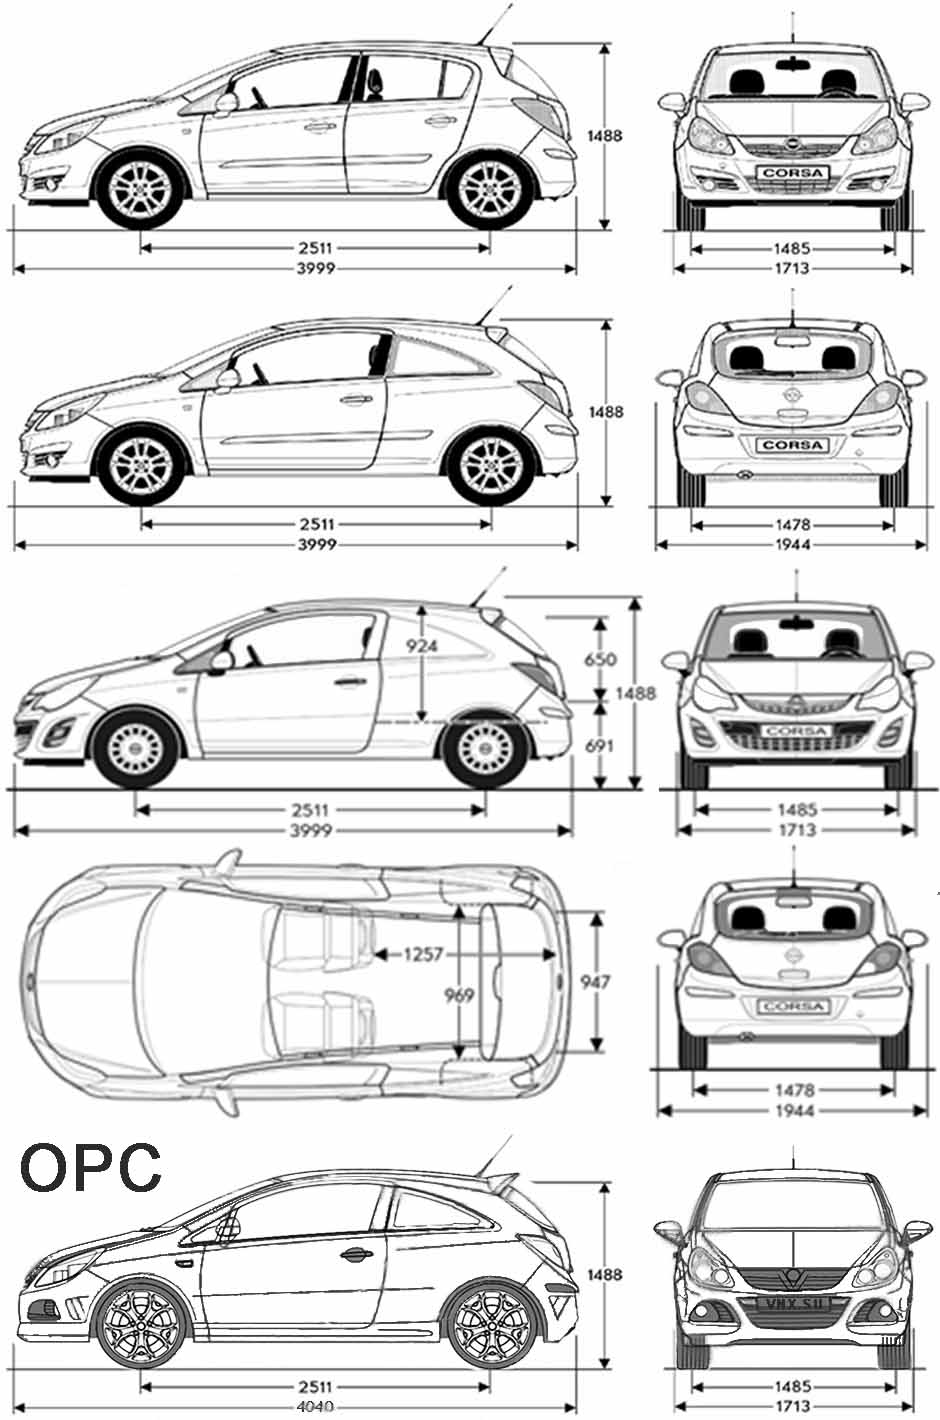
| № | Спецификация / Specs | Данные |
| Габариты (мм/mm) и масса (кг/kg) / Dimensions and Weight | ||
| 1 | Длина / Length | 3999 |
| 2 | Ширина (без/с зеркалами) / Width | 1713/1944 |
| 3 | Высота (загружен/пустой) / Height | 1488 |
| 4 | Колёсная база / Wheelbase | 2511 |
| 5 | Дорожный просвет (клиренс) / Ground clearance | 125 |
| 6 | Снаряжённая масса / Total (curb) weight | 1163 |
| Полная масса / Gross (max.) weight | 1565 | |
|
Двигатель / Engine |
||
| 7 | Тип / Engine Type, Code | Бензиновый, жидкостного охлаждения, четырехтактный, Z14XEP |
| 8 | Количество цилиндров / Cylinder arrangement: Total number of cylinders, of valves | 4-цилиндровый, 16V, рядный, DOHC с верхним расположением двух распределительных валов |
| 9 | Диаметр цилиндра / Bore | 73.4 мм |
| 10 | Ход поршня / Stroke | 80.6 мм |
| 11 | Объём / Engine displacement | 1364 см³ |
| 12 | Система питания / Fuel supply, Aspiration | Распределенный впрыск топлива |
| Атмосферный | ||
| 13 | Степень сжатия / Compression ratio | 10.5:1 |
| 14 | Максимальная мощность / Max. output power kW (HP) at rpm | 67 кВт (90 л.с.) при 5600 об/мин |
| 15 | Максимальный крутящий момент / Max. torque N·m at rpm | 125 Нм при 4000 об/мин |
|
Трансмиссия / Transmission |
||
| 16 | Сцепление / Clutch type | Однодисковое, сухое, с диафрагменной нажимной пружиной и гасителем крутильных колебаний, постоянно замкнутого типа |
| 17 | КПП / Transmission type | МКПП 6 шестиступенчатая механическая, двухвальная, с синхронизаторами на всех передачах переднего хода |
О Книге
- Название: Opel Corsa D Руководство по эксплуатации, техническому обслуживанию и ремонту: с кузовами трех- и пятидверный хэтчбек, пошаговый ремонт в фотографиях
- Бензиновые двигатели: Z10XEP (DOHC 1,0 л); Z12XEP (DOHC 1,2 л); Z14XEP (DOHC 1,4 л)
- Выпуск с 2006 года
- Серия: «Ремонт без проблем»
- Год издания: 2010
- Автор: Коллектив авторов
- Издательство: «Ассоциация независимых издателей»
- Формат: PDF
- Страниц в книге: 383
- Размер: 86.28 МБ
- Язык: Русский
- Количество электросхем: 21
Поиск по сайту
Остались вопросы или пожелания? Пишите на почту: support@vnx.su
")
В данном руководстве представлен автомобиль Opel Corsa оборудованный бензиновыми двигателями: Z10XEP (1,0 л.), Z12XEP (1,2 л.) и Z14XEP (1,4 л.). Книга содержит более 2000 цветных фотографий, подробно отображающих весь процесс пошагового ремонта автомобиля, в том числе ремонт двигателя, полные технические характеристики, электросхемы, перечни возможных неисправностей и рекомендации по их устранению.
В данном руководстве представлен автомобиль Opel Corsa оборудованный бензиновыми двигателями: Z10XEP (1,0 л.), Z12XEP (1,2 л.) и Z14XEP (1,4 л.). Книга содержит более 2000 цветных фотографий, подробно отображающих весь процесс пошагового ремонта автомобиля, в том числе ремонт двигателя, полные технические характеристики, электросхемы, перечни возможных неисправностей и рекомендации по их устранению.
Примеры страниц
Скриншоты
Год выпуска: 2009 г.
Автор: Григорьев М.В., Горлин П.А., Ханов А.И.
Жанр: Руководство по эксплуатации, техническому обслуживанию и ремонту.
Издательство: Третий Рим
ISBN: 978-5-91770-056-4
Серия: 9-785917-700564
Формат: PDF
Количество страниц: 383
Качество: Отсканированные страницы
Язык авто-книги : Русский
The recovery of: 5%
Размер файла: 142.93 Mb
Скачать Opel Corsa выпуск с 2006 г (2009 , PDF, RUS) бесплатно