Руководство по ремонту и эксплуатации.
Войдите или зарегистрируйтесь, чтобы писать комментарии, задавать вопросы и участвовать в обсуждении.
1. ПЕРЕД НАЧАЛОМ ДВИЖЕНИЯ
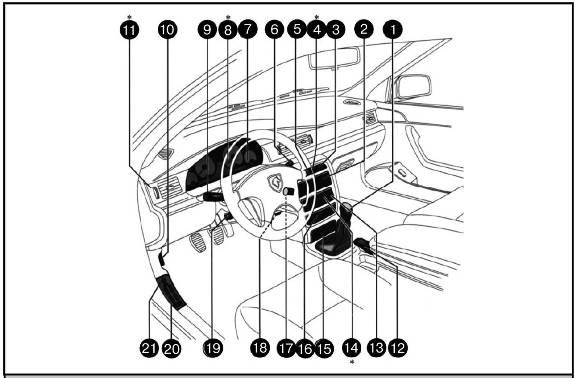
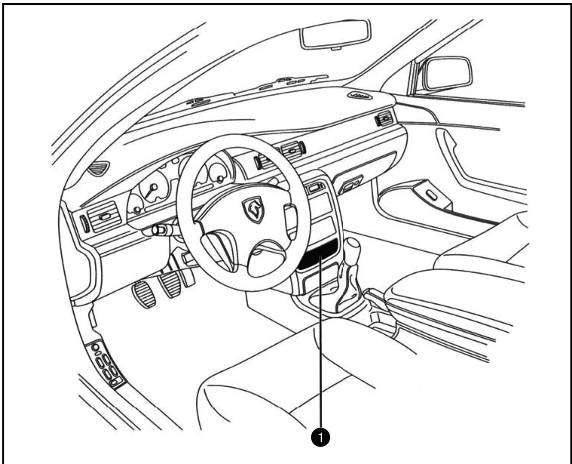
1. Рычаг переключения передач; 2. Рычажки регулировки вентиляции и обогрева; 3. Часы; 4. Кнопка открывания багажного отделения; 5. Кнопка обогрева заднего стекла; 6. Рычаг омывателя ветрового стекла; включение стеклоочистителя; 7. Приборная панель; 8. Передняя панель с цифровыми дисплеями; 9. Рычаг указателя поворотов и включатель/выключатель света; 10. Рычаг открывания капота двигателя; 11. Регулятор открывания воздухозаборных лючков: левого, правого, центрального; 12. Рычаг стояночного тормоза; 13. Аудиосистема; 14. Аудиосистема МР 3 CD player; 15. Пепельница; 16. Дисплей системы предостережений; 17. Замок включения зажигания; 18. Регулятор освещённости приборной панели; 19. Рычаг регулирования высоты рулевой колонки; 20. Кнопки стеклоподъёмников; 21. Кнопка регулирования наружных зеркал заднего вида.
СИСТЕМА ЗАКРЫТИЯ/ОТКРЫТИЯ АВТОМОБИЛЯ КОМПЛЕКТ КЛЮЧЕЙ
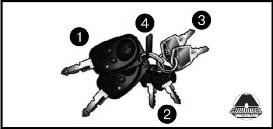
С вашим автомобилем поставляются комплект ключей, состоящий из:
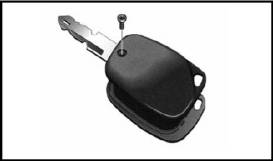
1. Два ключа с дистанционным радиоуправлением (см. рис. 1).
2. Два ключа от замка перчаточного ящика.
3. Два механических ключа для чрезвычайных случаев.
4. Пластина с идентификационным номером ключей. Эта пластина необходима в случае замены имеющихся ключей. Советуем вам хранить её только отдельно от автомобиля в надёжном месте.
ЦЕНТРАЛЬНЫЙ РАДИОУПРАВЛЯЕМЫЙ ЗАМОК
Радиодатчик замка расположен под рулевым колесом. Уловив радиосигнал от пульта дистанционного управления, система центрального замка автоматически приводится в действие.
ЗАПИРАНИЕ И ОТКРЫВАНИЕ ДВЕРЕЙ АВТОМОБИЛЯ ПРИ ПОМОЩИ ПУЛЬТА ДИСТАНЦИОННОГО УПРАВЛЕНИЯ
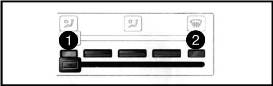
Направьте пульт дистанционного управления в сторону вашего автомобиля и нажимайте кнопки: кнопка 1 для открывания дверей автомобиля (противоугонная система выключается); кнопка 2 — для запирания дверей автомобиля (противоугонная система включается). При каждом из нажатий на ключе загорается красный индикатор, это означает, что радиосигнал послан. Когда нажимаете на кнопку запирания, то одновременно запираются все двери автомобиля, а также дверца багажника и лючок бензобака. При таком положении сохраняется возможность открыть ключом вручную дверцу багажника. Что касается лючка бензобака, то его можно открыть только тогда, когда открыты или все двери автомобиля при помощи центрального замка, или когда открыта дверь водителя при помощи механического ключа.
ЗАМЕНА БАТАРЕЙКИ НА ПАНЕЛИ ДИСТАНЦИОННОГО УПРАВЛЕНИЯ
Если перестаёт мигать лампочка на блоке дистанционного управления или он начинает давать сбои — значит необходимо заменить батарейку. Для этого: Отвёрткой отвинтите винт на обратной стороне панели дистанционного управления и откройте крышку. Затем произведите замену батарейки.
МЕРЫ ПРЕДОСТОРОЖНОСТИ ДЛЯ ПРЕДУПРЕЖДЕНИЯ УГОНА АВТОМОБИЛЯ
1. Полностью поднимайте все стёкла на дверях;
2. Не оставляйте на виду в автомобиле ценных вещей, по крайней мере спрячьте их в багажник;
3. Не оставляйте в автомобиле ключей зажигания;
4. Запирайте замок руля (когда двигатель вашего авто выключен, немного поверните руль, чтобы замок рулевой колонки защёлкнулся);
5. Закрывайте на замок все двери. Помимо предложенных выше мер, вы сами можете предпринять другие дополнительные меры к тому, чтобы уменьшить риск угона вашего автомобиля.
ВНИМАНИЕ
Не оставляйте надолго ваш автомобиль в безлюдном месте; не паркуйте вашу автомашину в тёмных местах; никогда не оставляйте на видном месте, тем более снаружи, инструментальных ключей, других вещей и оборудования автомобиля; пользуйтесь только теми стоянками, в которых вы уверены и никогда не забывайте ключи в автомобиле.
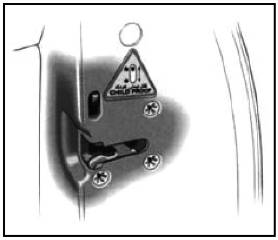
ЗАМКИ БЕЗОПАСНОСТИ ПРИ ПЕРЕВОЗКЕ ДЕТЕЙ
Эти замки установлены на задних дверях автомобиля над основными замками, их невозможно открыть изнутри. Для того, чтобы запереть двери, нажмите вниз выступ на двери (см. рисунок).
ОТПИРАНИЕ ИЛИ ЗАПИРАНИЕ КРЫШКИ БАГАЖНИКА
Для отпирания крышки багажника этой модели дважды коротко (с продолжительностью менее 1 секунды) нажмите кнопку 3 на пульте дистанционного управления, направленном в сторону принимающего сенсора. Если же центральный замок автомобиля закрыт с помощью пульта дистанционного управления, то открыть багажник вышеуказанным способом невозможно, следует нажать на кнопку 1. Для запирания достаточно только закрыть дверцу багажника.
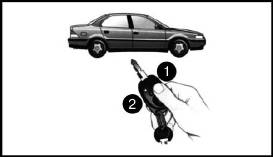
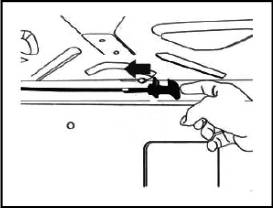
РЫЧАГ И ПРИВОДНОЙ ТРОС КРЫШКИ БАГАЖНИКА
Потяните вниз центральный подлокотник заднего сидения таким образом, чтобы он полностью лёг на заднее сидение, открывая защелку вверху дверцы доступа к багажнику изнутри. Потяните защёлку вниз, чтобы дверца легла на подлокотник. Просуньте руку через эту дверцу внутрь багажного отделения вниз и влево и нащупайте там рычажок с тросом с внутренней стороны багажного отделения. Потяните за этот рычажок в правую сторону с тем, чтобы открыть крышку багажника и иметь к нему доступ в чрезвычайных случаях. К таким случаям могут относиться обесточивание автомобиля, отказ в работе кнопки 3 на пульте дистанционного управления, неработающая кнопка открывания багажника на передней панели автомобиля.
Для того, чтобы багажник хорошо закрывался после его открывания вышеописанным образом, следует аккуратно возвратить всю механическую систему открывания багажника в первоначальное положение.
РЕГУЛИРОВКА ПРОДОЛЬНОГО ПОЛОЖЕНИЯ КРЕСЕЛ
Потяните вверх регулирующую скобу под сидением и двигайте кресло вперёд или назад по вашему усмотрению. Затем отпустите скобу.
ВНИМАНИЕ
Воздержитесь от регулировки продольного положения кресел во время движения автомобиля.
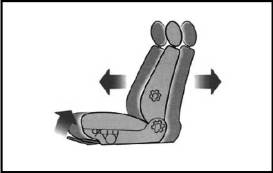
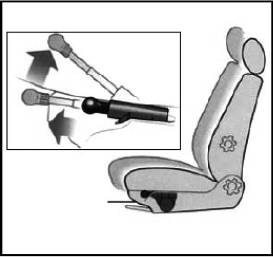
РЕГУЛИРОВКА НАКЛОНА СПИНКИ
Вращайте регулировочный винт в нижней части сидения и отрегулируйте необходимый вам наклон спинки сиденья.
ВНИМАНИЕ
Обращайте внимание, чтобы сидящий рядом с водителем пассажир не спал во время движения, чтобы он был пристёгнут ремнем безопасности, а угол наклона спинки не превышал бы 25 градусов от вертикали.
РЕГУЛИРОВКА ПРОГИБА СПИНКИ
Вращайте регулировочный винт в середине боковой части спинки сидения и установите поясничный прогиб сидения по вашему усмотрению.
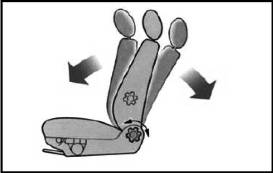
СЕРВОПРИВОД РЕГУЛИРОВКИ СПИНКИ СИДЕНЬЯ
При включённом зажигании нажимайте кнопки на пульте сбоку кресла и установите наклон спинки в соответствие с вашим желанием. Предупреждения относительно угла спинки кресла водителя и пассажира рядом с водителем, указанные выше, остаются в силе.

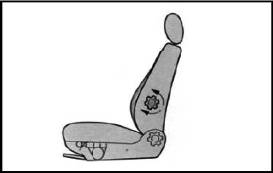
РЕГУЛИРОВКА ВЫСОТЫ КРЕСЛА ВОДИТЕЛЯ
Сядьте на сиденье и потяните за телескопическую рукоятку. Для того, чтобы поднять сиденье — потяните рукоятку вверх. Чтобы опустить сиденье потяните эту рукоятку вниз.
ВНИМАНИЕ
При опускании сиденья вниз следите, чтобы ноги заднего пассажира не оказались под сиденьем.
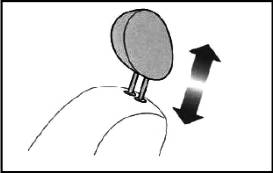
Чтобы отрегулировать по высоте подголовники передних и задних сидений поднимайте их по направляющим вверх или опускайте вниз.
ПРИМЕЧАНИЕ:
Имейте в виду, что вытаскивание подголовника наружу целиком — потребует больших усилий и может повредить кресло.
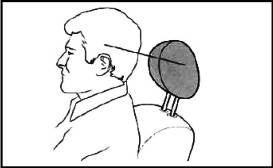
Подголовники предохраняют голову и шею при резких ударах. Регулировка подголовника считается правильной, если его верхний край находится на одном уровне с макушкой головы, как показано на рисунке.
РЕКОМЕНДАЦИИ ПО ПОЛЬЗОВАНИЮ РЕМНЯМИ БЕЗОПАСНОСТИ
Ремни безопасности на вашем автомобиле спроектированы под рост взрослых пассажиров и предназначены каждый для одного человека.
Удостоверьтесь в том, что каждый из ваших пассажиров застегнул ремень безопасности, а также руководствуйтесь следующими мерами предосторожности:
Никогда не разрешайте спать во время движения пассажиру на соседнем с вами кресле.
Ремень безопасности работает наиболее эффективно в тех случаях, когда наклон спинки составляет около 25 градусов от вертикали.
Отрегулируйте ремень безопасности таким образом, чтобы он не был слишком свободным. Во время движения не оттягивайте ремень от тела.
Для правильного функционирования ремень должен быть в постоянном контакте с туловищем.
Нижняя лямка ремня безопасности не должна проходить по животу, правильное её положение в области таза.
Верхняя лямка должна проходить в области ключицы и груди и никогда — через шею.
Прежде чем застегнуть ремень безопасности переложите из одежды в другие места твёрдые или режущие предметы, такие как авторучка, очки, ключи или подобные им.
Ремень безопасности не должен быть скрученным, он должен свободно проходить сквозь все петли.
В обязательном порядке заменяйте ремни безопасности, если они после ДТП потеряли свои свойства.
По мере возможности используйте ремни безопасности для фиксации вещей и грузов, перевозимых на сиденьях.
Дело в том, что при столкновениях свободно лежащие на сидениях тяжёлые вещи могут причинить вашему автомобилю значительные повреждения.
В большинстве государств мира приняты законы, по которым сидящий рядом с водителем пассажир обязан пристёгиваться ремнем безопасности.
Если закон не соблюдён, то в случае дорожного происшествия у пассажира возникают проблемы с медицинской страховкой.
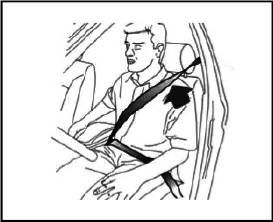
Плавно потяните ремень через ключицу и грудь и проверьте, чтобы ремень не перекрутился. Вставьте металлический язычок ремня в замок до характерного щелчка и удостоверьтесь, что он защёлкнулся. После того как водитель застегнул ремень безопасности, предупреждающая лампочка на приборной доске погаснет.
ВНИМАНИЕ
Проверяйте, правильно ли застёгнут у вас ремень безопасности. Неправильное использование ремня может быть причиной серьёзных травм или даже смерти при столкновении автомобилей.
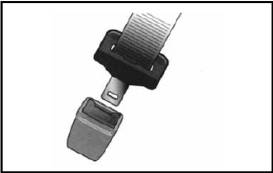
Нажмите красную кнопку замка ремня безопасности. Ремни безопасности спроектированы таким образом, что при несчастных случаях наиболее эффективная защита человеческому скелету, его ключицам, тазу, рёбрам осуществляется при положении спинки кресла близко к вертикальному. Поэтому не разрешайте пассажиру, сидящему рядом с водителем сильно откидывать назад спинку кресла.
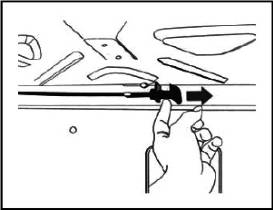
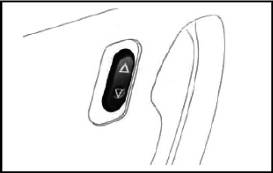
РЕГУЛИРОВКА РЕМНЕЙ ПЕРЕДНИХ КРЕСЕЛ ПО ВЫСОТЕ
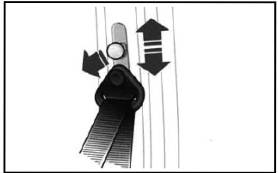
Оттяните наружу рычажок регулятора высоты ремня (см. рисунок) и поднимите или опустите на одну или несколько ступеней по вашему выбору.
ПРИМЕЧАНИЕ:
Остерегайтесь попадания посторонних предметов или клейкого материала в замок ремня безопасности, поскольку это может привести к его неправильной работе. С точки зрения безопасности будет лучше, если ребёнок будет ехать один на заднем сидении.
ПРЕДОСТОРОЖНОСТИ ПРИ ПЕРЕВОЗКЕ МАЛОЛЕТНИХ ДЕТЕЙ
ВНИМАНИЕ
У детей в возрасте до 7-8 лет соотношение веса тела и веса головы весьма значительно, и при резком торможении или ускорении шейные мускулы не обеспечивают, из-за их относительной слабости, правильного положения головы. Это может привести к различным видам повреждения шейных позвонков. Поэтому в целом ряде стран существуют законодательные нормы перевозки детей и подростков.
Для перевозки детей от 9-месячного возраста и весом до 10 килограмм устанавливайте специальные детские кресла. Они устанавливаются спиной к движению и крепятся трехточечными катушечными ремнями безопасности.
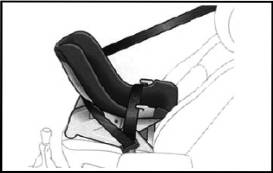
Специальные детские кресла для детей до 3-х лет (вес до 18 кг) устанавливаются на заднем сидении лицом по ходу движения и крепятся двух- или трёхточечным ремнём (простым или катушечным).
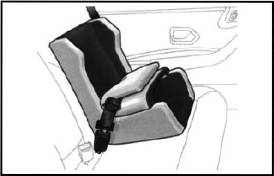
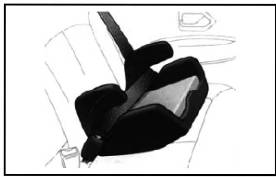
Для детей от 3 лет и более весом от 15 кг можно использовать специальные повышающие подушки-платформы на заднем кресле. Ребёнок сидит лицом вперёд по ходу автомобиля и фиксируется двух или трёхточечным обычным или катушечным ремнём (этот способ перевозки применим к детям в возрасте от 3 до 6 лет). Что же касается крупных по росту и весу детей в возрасте от 3 лет и выше, то их перевозка также осуществляется на специальных повышающих подушках-платформах на заднем кресле несколько другой конструкции (см. рисунок).
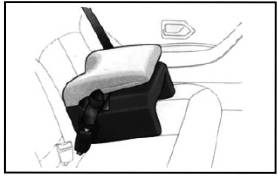
Ребёнок сидит лицом вперёд по ходу автомобиля и фиксируется двух или трёхточечным обычным или катушечным ремнём (этот способ перевозки применим к детям в возрасте от 3 до 6 лет).
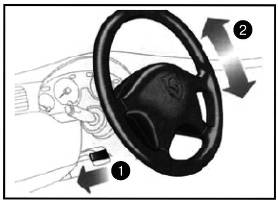
Установите угол наклона рулевой колонки по вашему усмотрению с тем, чтобы обеспечить наивысшую комфортность при вождении автомобиля. Для этого, прежде всего, отрегулируйте ваше сидение таким образом, чтобы показания приборов на передней панели и показания дисплеев читались наиболее удобным для вас образом. После этого установите высоту руля: нажмите вниз рычажок замка колонки руля, чтобы он вышел из фиксатора; установите по вашему усмотрению высоту баранки руля и зафиксируйте её путём подъёма рычажка на прежнее место. Проверьте, чтобы рычажок прочно зафиксировался в замке.
ВНИМАНИЕ
Никогда не регулируйте высоту руля во время движения, это чревато самыми серьёзными авариями.
РЕГУЛИРОВКА НАРУЖНЫХ ЭЛЕКТРИЧЕСКИХ ЗЕРКАЛ ЗАДНЕГО ВИДА
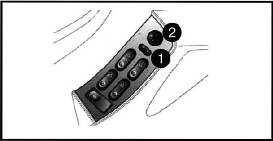
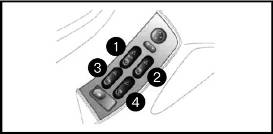
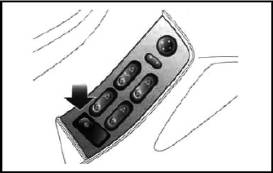
1. При включенном зажигании выберете путём нажатия кнопки 1 (см. рисунок) правое или левое боковое зеркало для регулирования.
2. Нажатием джойстика 2 отрегулируйте выбранное вами зеркало заднего вида, двигая его вверх, вниз, вправо, влево.
ВНИМАНИЕ
Предметы, отраженные в зеркале кажутся более отдаленными, чем на самом деле.
СКЛАДЫВАНИЕ ЗЕРКАЛ ЗАДНЕГО ВИДА
Они спроектированы таким образом, что позволяют складывать их от руки в необходимых случаях, например для проезда в узких местах.
ВНУТРЕННЕЕ ЗЕРКАЛО ЗАДНЕГО ВИДА
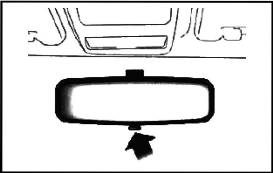
После регулировки кресла водителя и высоты руля, отрегулируйте по вашему усмотрению зеркало заднего вида перед водителем. Чтобы избежать ослепления дальним светом идущей сзади автомашины толкните вперёд в положение НОЧЬ рычажок внизу зеркала. По минованию надобности верните зеркало в прежнее положение.
ВНИМАНИЕ
Установка зеркала заднего вида в положение НОЧЬ приводит к уменьшению интенсивности отражения ослепляющего света идущих сзади автомобилей, однако такое положение может ввести водителя в заблуждение относительно положения и действий идущих сзади автомашин.
Сбоку от водителя имеется пульт управление боковыми стёклами (см. рисунок):
1. Переднее левое стекло
2. Переднее правое стекло
3. Заднее левое стекло
4. Заднее правое стекло
При помощи этого пульта водитель может со своего места управлять поднятием или опусканием стёкол на всех четырёх дверях. Кроме того, водитель со своего места может заблокировать опускание стёкол на задних дверях.
Кнопки подъёма и опускания стёкол на дверях предусматривают, что каждый пассажир по своему желанию может поднять или опустить стекло возле себя.
Но если водитель со своего места заблокировал стёкла задних дверей, то пассажир открыть их не в состоянии, поскольку кнопки на пассажирских местах отключаются. Это сделано в целях безопасности малолетних детей, сидящих на задних креслах.
ВНИМАНИЕ
Просовывание пальцев рук или же головы через стекло с электроподъёмником может привести к весьма негативным последствиям.
Система отопления или вентиляции автомобиля позволяет забирать наружный воздух при помощи сопла перед ветровым стеклом и распространять его по салону автомобиля. Для ветрового стекла, лица и ног переднего пассажира воздух поступает через вентиляционные решётки, а для задних пассажиров воздух поступает через решётки, расположенные на средней консоли. Информация о работе систем вентиляции, отопления и кондиционирования воздуха будет приведена на последующих страницах.
ПРИМЕЧАНИЕ:
Периодически очищайте входные отверстия наружного воздуха от сухих листьев, снега и наледи. Решётку обдува и обогрева заднего стекла (ниже заднего стекла) не загораживайте ничем, чтобы не препятствовать потоку воздуха.

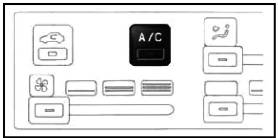
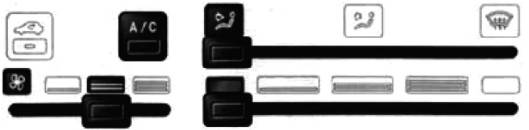
РЕГУЛИРОВКА ТЕМПЕРАТУРЫ В САЛОНЕ АВТОМОБИЛЯ
1. Рычаг регулятора на голубом секторе — температура наружного воздуха.
2. Рычаг на красном секторе — воздух подогревается.
РЕГУЛИРОВКА НАПРАВЛЕНИЯ ПОТОКА ВЕНТИЛИРУЕМОГО ВОЗДУХА
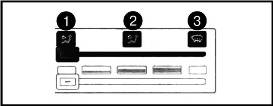
1. Решётки обдува напротив лица;
2. Решётки обдува ног;
3. Решётки обдува ветрового и боковых стёкол.
РЕГУЛИРОВКА СКОРОСТИ РАБОТЫ ВЕНТИЛЯТОРА
Для увеличения скорости работы вентилятора и увеличения потока воздуха в салон двигайте вправо рычаг регулировки скорости потока.
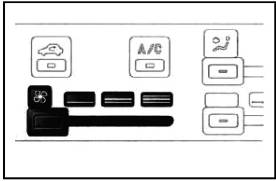
РЕЦИРКУЛЯЦИЯ ВОЗДУХА В САЛОНЕ АВТОМОБИЛЯ
Нажмите соответствующую кнопку (см. рисунок). В этом случае забор наружного воздуха прекращается, и вентилятор гонит только воздух, находящийся в салоне автомобиля. Такой режим вентиляции применяют в двух основных случаях:
1. Когда надо прекратить доступ в салон грязного запыленного или дурно пахнущего воздуха
2. Когда желательно срочно прогреть или охладить воздух в салоне автомобиля.
Следует учесть, что в ряде случаев стёкла автомобиля могут быстро запотеть, поэтому по возможности быстро переведите систему вентиляции воздуха в обычное положение.
При работающем двигателе нажмите на панели соответствующую кнопку (см. рисунок) и включите кондиционер. На кнопке загорится лампочка, что подтверждает начало работы по кондиционированию воздуха в вашем автомобиле.
ПРИМЕЧАНИЕ:
Для лучшей помощи охлаждению воздуха в салоне, система, после включения кулера, переходит в автоматический режим. В случае повышенной влажности воздуха в салоне может наблюдаться явление запотевания стёкол, однако по мере работы кондиционера оно исчезнет само по себе.
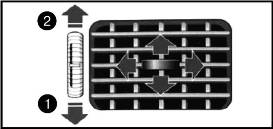
ВЕНТИЛЯЦИОННАЯ РЕШЁТКА ПРОТИВ ЛИЦА
В соответствие с движением регулятора на решётке вверх или вниз сопла подачи воздуха будут открываться или закрываться. Отрегулируйте движением регулятора вверх, вниз и вбок количество, и направление воздушного потока по вашему усмотрению. Если на задних креслах с вами едут пассажиры, то вы можете отрегулировать поток воздуха из боковых решётку передних дверей для переднего пассажира и поток из средней консоли для задних пассажиров.
Примечание:
Нижеследующими действиями вы может добиться наиболее эффективного действия системы вентиляции и отопления.
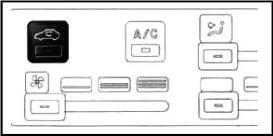
ДЛЯ ОБОГРЕВА И УСТРАНЕНИЯ ЗАПОТЕВАНИЯ СТЁКОЛ
Выберите на панели настройки положение ВЕТРОВОЕ СТЕКЛО. Передвиньте рычаг обогрева на красный сектор. Передвиньте регулятор скорости вентилятора на максимальное значение.
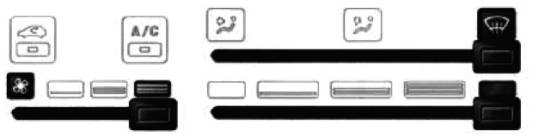
Выберите на панели настройки положение ОБДУВ НОГ. Передвиньте рычаг обогрева на красный сектор. Регулятор скорости вентилятора поставьте в наиболее подходящее положение.
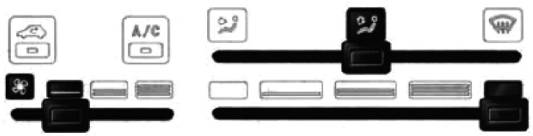
ДЛЯ НАИЛУЧШЕГО ОБДУВА ОХЛАЖДЕННЫМ ВОЗДУХОМ
Выберите на панели настройки положение ОБДУВ ЛИЦА. Убедитесь, что дверцы решётки открыты полностью. Переведите регулятор регулировки температуры в голубой сектор. Поставьте регулятор скорости вентилятора в наиболее подходящее положение. Включите кондиционер.
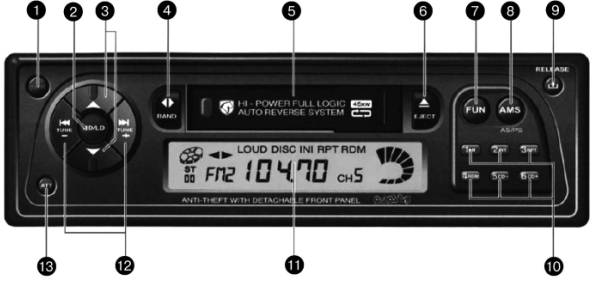
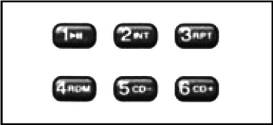
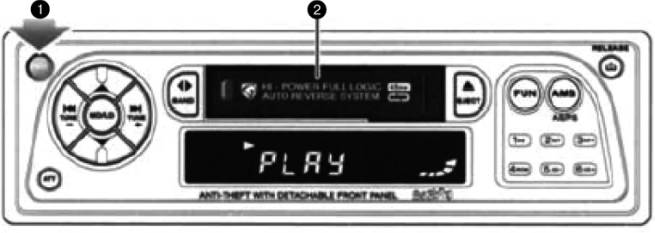
1. Кнопка включения/выключения; 2. Кнопка управления звуком магнитолы (громкость, баланс, «верхи» и «низы»); 3. Настройки качества звучания («верхи», «низы», левые, правые, передние или задние динамики); 4. Кнопка выбора направления движения ленты в кассете. (Реверс возможен только при работающем магнитофоне. Если включено радио, то этой кнопкой можно осуществлять выбор диапазона); 5. Приёмное отделение кассеты; 6. Кнопка выброса кассеты из магнитолы; 7. Кнопка выбора операций (радио, магнитофон, компакт — диск); 8. Кнопка автоматического поиска: для выбора предыдущей или последующей песни на кассете и компакт-диске или автоматического поиска радиостанций; 9. Кнопка снятия передней панели автомагнитолы (в целях предупреждения похищения); 10. Кнопки фиксированной настройки на радиостанции; 11. Цифровое электронное табло; 12. Ручная настройка на станцию/автомат настройки (увеличение или уменьшение радиочастот)/выбор песен (предыдущая или последующая песня при работающем магнитофоне); 13. Кнопка временного уменьшения громкости звука: нажмите эту кнопку, когда хотите, чтобы звук радио или магнитофона стал тише (При вторичном нажатии на эту кнопку громкость звука восстановится до того уровня, который был до первого нажатия кнопки).
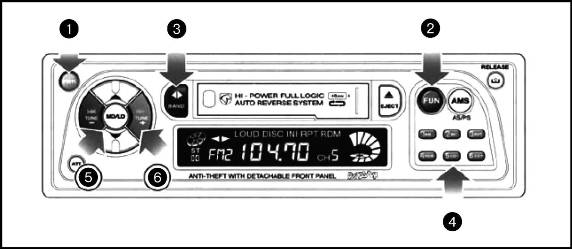
СНИМАЕМАЯ ПЕРЕДНЯЯ ПАНЕЛЬ АВТОМАГНИТОЛЫ
Предназначена для предупреждения хищения системы, поэтому советуем при стоянке автомобиля снимать её и носить с собой. Для её отсоединения:
1. Выключите магнитолу (кнопка 1);
2. Нажмите кнопку 2 отсоединения передней панели;
3. Потяните за правую часть панели и вытащите её наружу.
ПРИМЕЧАНИЕ:
Предохраняйте снятую переднюю панель от ударов или падения на землю. Во время снятия передней панели придерживайте рукой её левую сторону, чтобы панель не упала на пол автомобиля. Когда вы выключаете зажигание, то раздаются три звуковых сигнала за секунду, чтобы напомнить вам, что панель не снята.
УСТАНОВКА ПАНЕЛИ НА МЕСТО
1. Вставьте левую часть панели в гнездо на магнитоле;
2. Правую часть панели поставьте на своё место и защёлкните её.
ВНИМАНИЕ
Не пытайтесь вставить панель, начиная с правой части — это приведёт к поломке. Не прилагайте силы при установке панели на место.
ОБРАЩЕНИЕ С ОТДЕЛЯЕМОЙ ПАНЕЛЬЮ
После того как вы сняли панель с магнитолы, положите её в специальный защитный чехол; протирайте панель только сухой и мягкой тканью; следите, чтобы снимаемая панель, а также дисплей на ней не поцарапались; при установке панели на место беритесь руками только за её боковины; оберегайте снимаемую панель от прямых солнечных лучей, источников высокой температуры или повышенной влажности; не касайтесь руками дисплея и не надавливайте на него; никогда не пытайтесь залезть внутрь панели; никогда не используйте растворитель или другие чистящие средства для чистки панели; не касайтесь контактов сзади отделяемой панели.

1. Нажмите кнопку 1, приёмник включится и радиоантенна автоматически поднимется.
2. Если магнитола не включена на режим радио, то нажмите кнопку FUN и выберите режим радио, магнитофона или компакт-диска. При каждом нажатии на кнопку режимов раздаётся короткий «бип».
3. При нажатии на кнопку BAND вы можете выбрать радиодиапазоны SW1, SW2, MW1, MW2, FM1, FM2. На каждом из этих диапазонов можно зафиксировать 6 Станций.
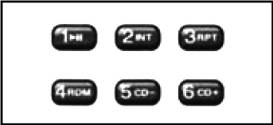
4. Нажатием на кнопки 4 (см. рисунок) можно зафиксировать 36 станций, по 6 в каждом диапазоне.
5. Нажатием кнопки 5 вы можете уменьшать или увеличивать частоту радиосигнала.
АВТОМАТИЧЕСКИЙ ВЫБОР СТАНЦИЙ
1. Нажмите кнопку BAND для выбора диапазонов FM, MW, SW.
2. Нажмите кнопку AMS и держите её нажатой около 1/5 секунды, чтобы зафиксировать настройку станции.
3. Таким образом, у вас на каждом из диапазонов будет зафиксировано по 6 наиболее громких радиостанций.
ПРИМЕЧАНИЕ:
При нажатии кнопки AMS будет слышен голос шести выбранных радиостанций поочерёдно каждой в течение 5 секунд, на дисплее появится значение частоты каждой из них. Для фиксирования выбранной вами станции вторично нажмите кнопку AMS.
1. Выберите диапазон приёма нажатием кнопки BAND.
2. Нажимайте в течение 2-х секунд клавиши TUNE (+) или (-). Система будет перебирать радиочастоту по восходящей или нисходящей пока не дойдёт до первой радиостанции.
3. Если вам не понравилась найденная автоматикой станция — повторите действие 2 до тех пор, пока вы не найдёте понравившуюся вам радиопередачу.
4. Для того, чтобы зафиксировать выбранную вами радиостанцию нажмите кнопку от 1 до 6 на пульте и держите нажатой в течение не менее 2-х секунд.
5. Секундная пропажа звука и короткий «бип» свидетельствуют о том, что станция зафиксирована на выбранной вами кнопке.
НАСТРОЙКА РАДИОПРИЁМНИКА ВРУЧНУЮ
Прерывистыми нажатиями на те же клавиши вы можете вручную перебирать радиочастоту по восходящей или нисходящей, пока не дойдёте до нужной вам радиостанции. Для того, чтобы зафиксировать выбранную вами радиостанцию нажмите кнопку от 1 до 6 на пульте и держите нажатой в течение не менее 2-х секунд.
ОБРАЩЕНИЕ С АВТОМАГНИТОЛОЙ
Используйте только аудиокассеты со временем звучания не более 90 минут (от СЗО до С90). Воздержитесь от употребления кассет со временем звучания 120 минут, поскольку лента на этих кассетах очень тонкая, может растянуться или даже порваться. Перед тем как вставить кассету в магнитофон, проверьте в каком она состоянии. Если лента натянута слабо, то вставьте в катушку карандаш, авторучку и т.д. и подтяните ленту, чтобы она не провисала. Одновременно проверьте лёгкость хода катушки. Если лента загрязнена, то качество звука и его громкость ухудшаются. Поэтому советуем вам после каждых 20 часов прослушивания кассеты почистить головки магнитофона специальной чистящей кассетой.
ПОМНИТЕ:
1. Всегда пользуйтесь только качественными кассетами;
2. Следите, чтобы на поверхности плёнки не было следов жевательной резинки или какого ни будь клейкого вещества;
3. Если не пользуетесь кассетой, то выньте её из магнитофона и положите в коробочку.
4. Никогда не оставляйте кассеты в автомобиле в сильную жару или мороз;
5. Никогда не протирайте головки магнитофона вручную, тем более намагничивающимися предметами;
6. Никогда не смазывайте механизм кассеты или плёнку.
1. Нажмите кнопку включения аудиосистемы.
2. Вставьте кассету в магнитофон. Следите, чтобы кассета шла легко и без перекоса.
3. Кассета автоматически начнёт движение, и на дисплее появится надпись PLAY.
ПРИМЕЧАНИЕ:
Если вы при включённом радиоприёмнике вставляете в магнитофон кассету, радио автоматически выключается и играет кассета, а после извлечения кассеты из магнитофона автоматически включается радио.
Если во время проигрывания кассеты вы выключили магнитолу или выключили зажигание, то кассета остаётся в аппарате в состоянии готовности и немедленно возобновит свою работу после включения зажигания или нажатия кнопки включения автомагнитолы.
ПРОСЛУШИВАНИЕ КОМПАКТ-ДИСКА (CD)
Аудиосистема вашего автомобиля позволяет подсоединить проигрывать несколько компакт-дисков. Для подсоединения проигрывателя компакт-дисков к аудиосистеме в багажнике установлен 8 пиновый коннектор.
ПРИМЕЧАНИЕ:
Объяснения на этой странице имеют силу только в том случае, если в вашем автомобиле установлен проигрыватель компакт дисков.
Для того, чтобы прослушать компакт-диски:
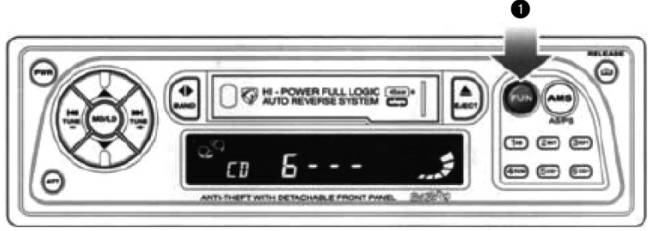
1. Нажмите кнопку FUN. При каждом нажатии этой кнопки выбирается соответственно радиоприёмник, магнитофон и проигрыватель компакт-дисков. При каждом изменении режимов слышится короткий «бип». Когда очередь дойдёт до проигрывателя компакт-дисков, первый из них начнёт сразу же воспроизводиться.
2. Нажатием кнопок или можно осуществлять выбор диска.
3. Нажатием левой или правой кнопки можно выбрать запись на проигрываемом диске.
4. Если вы захотите повторить прослушанную запись, то нажмите кнопку Запись будет повторяться до тех пор, пока вы вторично не нажмёте на ту же кнопку. После повторного нажатия этой кнопки проигрывание компакт-диска перейдёт в обычный режим.
5. При нажатии кнопки выбор записей будет носить случайный характер и будет продолжаться до тех пор, пока вы не нажмёте эту же кнопку вторично. Тогда проигрыватель вернётся в обычный режим.
6. Когда вы нажмёте кнопку то сможете прослушать десятисекундные фрагменты всех записей на конкретном компакт-диске. Для того, чтобы полностью прослушать понравившуюся запись вторично нажмите эту же кнопку во время прослушивания фрагмента. После следующего нажатия этой же кнопки проигрыватель вернётся в обычный режим воспроизведения.
7. Если вы захотите сделать паузу в прослушивании, то нажмите кнопку. Вторичное нажатие этой кнопки запустит воспроизведение с того же места, с которого вы его остановили.
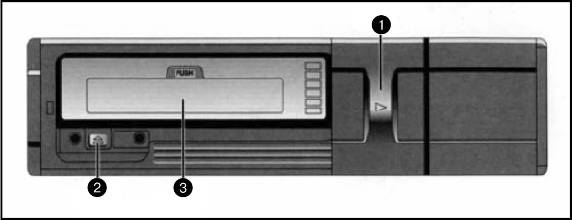
ПРОИГРЫВАТЕЛЬ КОМПАКТ ДИСКОВ (CD)
Крепится в багажнике под дверцей доступа в багажник из салона автомобиля и вмещает для проигрывания до 6 компакт-дисков.
Зарядка проигрывателя дисками: движением вправо полностью откройте закрывающую панель; нажмите кнопку (EJECT) вытащите наружу рамку-магазин.
ВНИМАНИЕ
Будьте особо внимательны когда рамка-магазин находится в выдвинутом положении и обязательно поставьте её на место точно в том же положении, в каком она была раньше.
ВНИМАНИЕ
Возбраняется пользоваться компакт-дисками допускающими перезапись (так называемыми «реврайтерами), поскольку они предназначены для проигрывания в стационарных условиях, а в условиях движения автомобиля они могут стать причиной поломки проигрывателя. Всегда держите дверцы проигрывателя закрытыми, чтобы не допустить проникновение туда пыли и грязи.
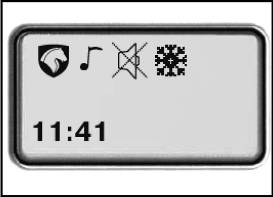
СИСТЕМА ПРЕДУПРЕЖДАЮЩИХ СИГНАЛОВ
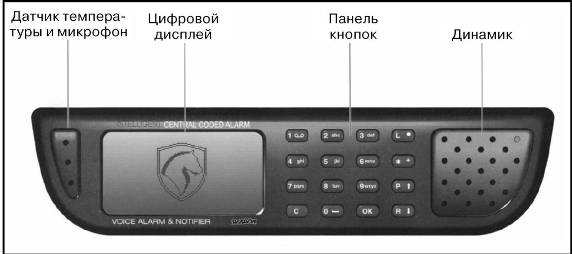
Во время вождения автомобиля на цифровом дисплее появляются предупреждающие надписи, кроме того, из динамика доносятся соответствующие звуковые предостережения. Эта система имеет 10 срочных предупреждений, каждое из которых относятся к своей сфере ответственности. Имеется противоугонная система, включающая четырёхзначный цифровой код и тревожную сирену.
Кнопка предназначена для подтверждения запросов и ввода данных; кнопка для прекращения звукового сигнала и выхода из всех программ; кнопки предназначены для перемещения вверх и вниз, влево или вправо, записи или воспроизведения сообщений, а также для корректировки данных калькулятора; кнопка служит для включения или выключения освещения цифрового дисплея; кнопка служит для прекращения коротких предупреждающих «бипов» при превышении скорости движения 120 км/ час.
После начала движения автомобиля могут возникнуть определённые трудности. Водитель об этих временных трудностях предупреждается двумя путями: звуковыми предупреждениями из динамика или визуальными предупреждениями на цифровом дисплее.
В случае появления после начала движения автомобиля трудностей, на цифровом дисплее могут появиться сообщения о следующих нештатных ситуациях: не полностью закрыта дверь автомобиля не закрыта крышка багажного отделения не закрыт капот двигателя падение давления масла в двигателе повышение температуры охлаждающей жидкости проблемы в системе зарядки аккумуляторной батареи не отпущен рычаг стояночного тормоза низкий уровень тормозной жидкости в системе изношенность тормозных колодок. В случае, если у вас включены фары, при остановке двигателя и вынимания ключа зажигания из замка раздаётся звуковой сигнал, напоминающий о необходимости погасить фары. Сообщение о необходимости замены тормозных колодок появляется на табло каждый час. Для прекращения напоминаний нажмите кнопку на панели, но на дисплее останется соответствующий значок). Вы можете также, нажав кнопку выключить напоминание о необходимости погасить свет фар после остановки двигателя.
Когда центральный замок закрыт сигналом пульта дистанционного управления, то закрываются также двери, багажник, капот двигателя и лючок бензобака. Одновременно на цифровом дисплее появляется надпись «включена противоугонная система», а также начинает мигать лампочка. В случае, если одна из вышеперечисленных дверей не закрыта, или если по кузову автомобиля был нанесён удар — включается тревожная сирена. Попытки несанкционированного снятия системы предупреждения или отсоединения автомобиля от аккумулятора также влекут за собой включение тревожной сирены. При нажатии любой кнопки на пульте дистанционного управления звук сирены выключается, и через 30 секунд после этого противоугонная система автоматически включается.
Противоугонная система оснащена четырёхзначным цифровым шифром, который можно задействовать, но можно его и не активизировать. При сходе автомобиля с конвейера кодовая система не активизирована, но её можно активизировать в случае необходимости. Для того, чтобы её активизировать обратитесь к разъяснению. В то время, когда противоугонная система активизирована, или звучит тревожная сирена — включение двигателя невозможно. Для того, чтобы дезактивировать противоугонную систему нажмите кнопку 1 на пульте дистанционного управления. В случае, если автомобиль закодирован, то необходимо одновременно ввести четырёхзначный цифровой код. Если при введении кода вы трижды допустили ошибку или упустили время ввода шифра включится тревожная сирена. В этом случае нажатие любой кнопки на пульте дистанционного управления повлечёт за собой запирание всех дверей и новое включение противоугонной системы.
Если противоугонная система активизирована, и после нажатия кнопки 1 на пульте дистанционного управления в течение 9 секунд не открыть боковые двери, либо капот двигателя, или крышку багажника, то система вновь автоматически запрёт все эти двери. Точно так же, после начала движения автомобиля и достижения им скорости 20 километров в час система автоматически запрёт все двери автомобиля и отопрёт их после остановки и выключения двигателя.
При активизированной противоугонной системе можно нажать кнопку 1 на пульте дистанционного управления и все фонари автомобиля начнут мигать. Этот приём используется для поиска автомобиля среди других на больших стоянках.

ОБЩИЕ СВЕДЕНИЯ О ПРЕДУПРЕЖДАЮЩЕЙ СИСТЕМЕ
Если скорость автомобиля превысила 120 километров в час, включается предупреждающий звуковой сигнал и по мере увеличения скорости его частота возрастёт. Однако нажатием кнопки на щитке дисплея можно выключить этот звук. Предупреждающая и противоугонная система имеет специальную дополнительную батарею. Если отсоединен контакт с основным аккумулятором, то система будет работать с дополнительной батареей в течение часа. Одновременно с включением фар или подфарников, загорается освещение дисплеев на переднем приборном щитке автомобиля. В обычном режиме при нажатии кнопки 1 на пульте дистанционного управления замки дверей отпираются, а при нажатии кнопки 3 — запираются. Этим можно воспользоваться при случае, когда двери автоматически запираются, как только автомобиль достигнет скорости 20 км/ час. После начала движения автомобиля его скорость будет высвечиваться на цифровом дисплее.
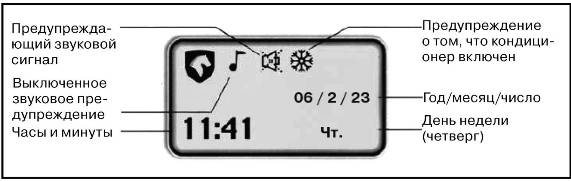
На основном дисплее каждая кнопка имеет своё предназначение:
При нажатии кнопки на основном дисплее прекращается звуковое предупреждение, и на дисплее появляется соответствующая пиктограмма.
При вторичном нажатии кнопки подача предупреждающего звукового сигнала возобновляется. При нажатии кнопки CD прекращается предупреждающий звук «бип», а также прекращается предупреждающий сигнал о превышении скорости 120 километров в час. При повторном нажатии этой же кнопки указанные выше звуковые сигналы возобновляются. При нажатии кнопки освещение дисплея предупреждений гаснет. При вторичном нажатии этой кнопки освещение включается. Нажатием кнопки можно регулировать интенсивность освещения дисплея от нуля до 100%.
На цифровом дисплее можно высветить 10 дополнительных функций. Ввод дополнительных функций осуществляется кнопкой. Выберите кнопками желаемые дополнительные функции и затем введите их в систему нажатием кнопки. После минования в них надобности выведите их нажатием кнопки.
ФУНКЦИЯ РЕГУЛИРОВАНИЯ ТЕМПЕРАТУРЫ
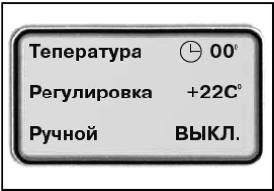
Под словами температура внутри понимается температура внутри автомобиля. Под словами «регулирование температуры» понимается выбранная вами температура. Достичь выбранной температуры можно только при включённом кондиционере воздуха. Нажатием кнопки вы можете уменьшить выбранную температуру. Нажатием кнопки вы можете увеличить выбранную температуру. Нажатием кнопки вы можете выбрать либо автоматическую регулировку температуры, либо вручную. Первоначальное положение выбор вручную. В некоторых случаях в автомобиле работает кондиционер, однако невозможно отрегулировать температуру внутри салона. В автоматическом режиме система охлаждения, включив кондиционер, доведёт температуру в салоне до выбранной вами. Температуру воздуха в салоне автомобиля можно менять с помощью этой системы в пределах от 10 до 40 градусов Цельсия. Следует уточнить, что функция регулирования температуры не будет функционировать при включённом обогревателе.
Изображение вентилятора появляется на дисплее в то время, когда включён кондиционер.
УКАЗАТЕЛЬ ПРОЙДЕННОГО РАССТОЯНИЯ
Нажатием кнопки выберите функцию. В начале движения нажатием кнопок наберите пройденный километраж. Нажатием кнопки введите данные в память компьютера. По окончании поездки введите этими же кнопками (QD IS) новые показания на спидометре. Затем нажмите кнопку и компьютер выдаст вам данные о пройденном расстоянии в километрах. Нажатием кнопки вы можете стереть не нужные вам данные.

ЗАПИСЬ И ВОСПРОИЗВЕДЕНИЕ СООБЩЕНИЙ
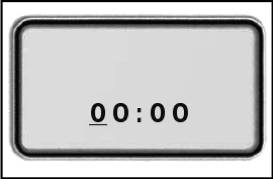
По вашему пожеланию можно записать на дисплее сообщение, которое появится затем в нужное время. Нажатием кнопки выберите положение функции. В этом случае на дисплее появятся сообщения от 1 до 6. Сообщения, которые должны появиться в назначенное время отмечены чёрточками ниже цифры. Для выбора записей пользуйтесь кнопками на щитке цифрового дисплея. Для регулирования времени, когда должно появиться сообщение, пользуйтесь кнопками на щитке цифрового дисплея. Время появления записи исчисляется в часах и минутах. Например, для того, чтобы сообщение было воспроизведено в 10 часов 30 минут, нажмите сначала кнопку затем кнопку, далее соответственно кнопки на табло функций могут быть либо записи, сделанные ранее, либо никаких записей.

Поэтому начните с нажатия кнопки, чтобы убрать ранее сделанные сообщения. После изменения времени воспроизведения сообщения, если оно было написано ранее, сообщение появится на табло цифрового дисплея уже в новое время, назначенное вами. Нажатием кнопки начните вводить сообщение на цифровой дисплей. Максимальное время до начала ввода сообщения — 10 секунд. Нажатием кнопки вы можете проверить на слух правильность сделанной записи. Для выхода из этой функции нажмите кнопку.
Благодаря этой функции вы сможете контролировать сроки замены масла, масляного и воздушного фильтра вашего автомобиля. Каждый раз после того, как вы сменили фильтр вы можете ввести в бортовой компьютер данные о километраже, который прошёл автомобиль на момент замены. Нажатием кнопки выберите функцию. Эта функция имеет два положения «фиксация километража» и «норма работы». Нажатием кнопки выберите положение, например, «фиксация километража», а в нём — подфункцию: масло в двигателе, масляный фильтр, воздушный фильтр. Такой выбор осуществляется кнопками. Затем после введения данных о километраже, который необходимо пройти машине до замены одного из выбранных в подфункции предмета, нажмите кнопку для того, чтобы зафиксировать их в памяти бортового компьютера. Далее переходите к следующей подфункции.
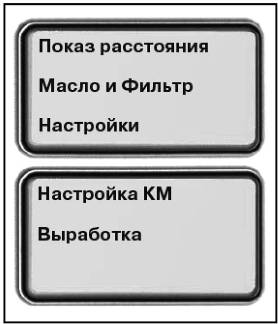
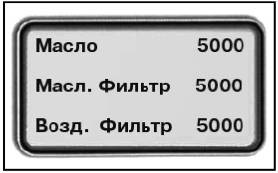
Нажмите кнопку, чтобы стереть предыдущие данные. Нажатием кнопки выберите положение «норма работы». Кнопкой войдите в подфункцию, и на табло появится символ «текущий километраж». Наберите данные о том, сколько километров прошёл к настоящему времени автомобиль и введите их кнопкой. При вторичном нажатии кнопки на дисплее появится расчёт расстояний, прошедших с момента последних замен масла в двигателе, масляного фильтра и воздушного фильтра.

- Manuals
- Brands
- Ikco Manuals
- Automobile
- SAMAND
- Owner’s manual
-
Contents
-
Table of Contents
-
Bookmarks
Quick Links
This manual has been prepared to inform you of how to optimize the use of the
vehicle and contains important notes on safety, operation and maintenance.
Please keep this manual in your car at all times and be diligent in maintaining it.
SAMAND
SAMAND
SAMAND LX
SAMAND EL
Owner’s Manual
Related Manuals for Ikco SAMAND
Summary of Contents for Ikco SAMAND
-
Page 1
SAMAND SAMAND SAMAND LX SAMAND EL Owner’s Manual This manual has been prepared to inform you of how to optimize the use of the vehicle and contains important notes on safety, operation and maintenance. Please keep this manual in your car at all times and be diligent in maintaining it. -
Page 2
In The Name of God OWNER’S MANUAL SAMAND… -
Page 3
Pay special attention to the messages highlighted by these signal words: — In the meanwhile, consumptive material must be provided through authenticated representatives of IKCO. WARNING: Indicates a potential hazard that could result in death or injury. -
Page 4
INDEX SAMAND AT A GLANCE BEFORE DRIVING DRIVING MAINTENANCE TECHNICAL EMERGENCIES TECHNICAL DATA INDEX… -
Page 5
OVERVIEW DOOR LOCKING & UNLOCKING…………………………..22-25 SEAT BELT PRE-TENSIONERS AND FORCE LIMITERS ……………………33 CHILD SAFETY ………………………………34-35 HEATING / VENTILATION …………………………….44-47 WINDOWS DEMISTING / DEFROSTING …………………………47 TRUNK LID ACCESS VENT …………………………….51 INTERIOR EQUIPMENT …………………………….48-53 ALARM (ACU) *……………………………….. 56-73 ANTI THEFT *………………………………… -
Page 6: Table Of Contents
SAMAND AT A GLANCE CONTROLS …………….6 OPENING AND CLOSING THE BOONET ……16 KEYS ………………7 CHILD SAFETY LOCK …………17 STEERING WHEEL ADJUSTMENT ……..17 ANTI-THEFT SECURITY SYSTEM (IMMOBILIZER) ..8 WINDOW REGULATORS & MIRRORS ……..9 CNG FUEL MODE (STARTING/ DRIVING)* ……. 18 INDICATORS &…
-
Page 7: Controls
SAMAND AT A GLANCE 1. Gear lever 2. Heating / Ventilation keys 3. Clock* 4. Fuel type conversion switch* 5. Trunk lid unlock switch* 6. Rear glass heater / Flasher Switch 7. Windshield wiper / Washer Stalk 8. Digital instrument panel 9.
-
Page 8: Keys
SAMAND AT A GLANCE Key set Lock and Unlocking by Remote Note Your car is supplied with a key set, which Controller* There is possibility of breakage for consists of: keep the remote control towards the internal parts of the remote controller in…
-
Page 9: Anti-Theft Security System (Immobilizer)
SAMAND AT A GLANCE Steering wheel lock Open the steering wheel lock, before starting the engine if it’s necessary; Turn the steering wheel gently while you’re rotating the key. It’s recommended to press the clutch at the time of starting so that ignition gets easier.
-
Page 10: Window Regulators & Mirrors
SAMAND AT A GLANCE Electrical window left, then adjust the mirror in four direction (up, Windows switches down, right or left) by pressing switch 6.* Each passenger may open or close the 1) Drivers’s window control: window close to himself.
-
Page 11: Indicators & Windshield Wiper
SAMAND AT A GLANCE Lamp switches indicators & horn Windshield wiper & screen washer 6- Horn 7- Right Indicator 1- Small lights (front/rear) — Instrument 1. off 8- Left Indicator Panel backlight and Center Console. 2. Intermittent wipe (is adjusted according 2- Head lamp main beam / up to the vehicle speed).
-
Page 12: Seats
SAMAND AT A GLANCE * If equipped…
-
Page 13: Heating/ Ventilation
SAMAND AT A GLANCE Center and Side Vents Heating & ventilation* 1) Air intake control 2) Cooler Heating and Ventilation system conducts the fresh Rotate the thumbwheel downer up to close 3) Center and side vents or hot air in the vehicle compartment through the…
-
Page 14: Seat Belt Pre-Tensioners
SAMAND AT A GLANCE 1- Pre-loading System is activated when the key is turned. 2- Belt’s pressure limitors: this mechanism reduces the pressure on passenger’s chest at time of collision. Interjecting (Forward moving) safety belt Warning — Only belts fastened properly and as The safety belt is activated together with tight as possible against passenger’s…
-
Page 15: Airbag
SAMAND AT A GLANCE Airbag restraint (Airbag) Front passenger airbag If your vehicle is equipped with supplemental Deactivating switch of Air bag is located at restraint system (AIR BAG), in addition to the lateral side of Glove box. Warning the seat belts, new version of this system…
-
Page 16: Trunk Lid Access Vent
SAMAND AT A GLANCE Releasing trunk lid lever and cable* To lock well the trunk lid, please put the Access flap to boot* mechanisms lever in the near place. Pull down the armrest located in the The flap is located at back of the rear…
-
Page 17: Opening And Closing The Boonet
SAMAND AT A GLANCE Opening the hood 1- Pull the hood release from the passenger compartment (driver side).The hood gently jumps up 2- Pull the hood safety catch, and raise it up. Closing the hood Replace the supporting rod in the retain clamp.
-
Page 18: Child Safety Lock
SAMAND AT A GLANCE Child safety locks Adjusting steering wheel Positioned under the each rear door lock. Adjust the angle of the steering wheel to The child locks prevent the opening of rear your body position While driving. Therefore, Warning…
-
Page 19: Cng Fuel Mode (Starting/ Driving)
SAMAND AT A GLANCE Just Premium gasoline with Octane 95 Avoid inserting the nozzle completely. The use of supplemental fuel for the car is not allowed. Ignition and driving on CNG fuel mode* Fuel type The engine is always ignited on gasoline.
-
Page 20: Alarm
SAMAND AT A GLANCE FOUR- DIGIT CODE When the alarm system is on and the unlock key (off) is pressed: a) If the four- digit code on the menu 3 is set on the intelligent system( 3), the following message will be appear.
-
Page 22: Before Driving
BEFORE DRIVING LOCKING / UNLOCKING OF DOORS……..22 WINDOW REGULATORS…………40 ANTI-THEFT SECURITY SYSTEM (IMMOBILIZER) ….. 28 STEERING WHEEL ADJUSTMENT……..43 SEATS ………………29 HEATING / VENTILATION…………44 SAFETY BELTS …………….31 INTERIOR EQUIPMENT………….48 PRE-TENSIONER *…………..33 HANDSFREE CELL PHONE*……….54 CHILD SAFETY…………….34 ALARM *………………56 FIRE EXTINGUISHER* …………36 ANTI THEFT * …………….74 MIRRORS………………38 CNG FUEL *…………….76…
-
Page 23: Locking / Unlocking Of Doors
LOCKING AND UNLOCKING OF DOORS Key set Remote keyless entry system* Jack knife keys* Your car is supplied with a key set, which Hold the remote control system in the Pressing the switch 4 (folding switch lock consists of: direction of the vehicle and then press the or Jack Knife) cause the switch blade to 1- Two radio remote controls switches.
-
Page 24: Driving
Note There is possibility of breakage for 2-This feature may be deactivated by tester internal parts of the remote controller in equipment available in IKCO authorized case of sever impact and subsequently dealer also. not functioning of the immobilizer. * If equipped…
-
Page 25
LOCKING AND UNLOCKING OF DOORS Locking/unlocking with the Key Lock/unlocking of the trunk lid* Child safety locks Insert the key into the slot near the driver When the central (door) locking system is Positioned under the each rear door lock. and turn left to unlock and right to lock. -
Page 26
LOCKING AND UNLOCKING OF DOORS Trunk lid lock release* Releasing trunk lid lever and cable* To lock well the trunk lid, please put the mechanisms lever in the place. Hold the remote control towards the radio Pull down the armrest located in the transmitter and press the button twice middle of the rear seat, and release trunk with the trunk lid symbol (button”3”) on the… -
Page 27
BATTERY REPLACEMENT Battery replacement of the remote control Battery Replacement of the Remote switch (Remote keyless entry system switch) Control Switch* 1- Separate the part 1 and 2 with the help of If the indicator light on switch is not blinked Warning hand pressing from the described line. -
Page 28
IMMOBILIZER 2.When delivery the vehicle, there is a card which is shown in left picture with the keys. Caution Existence of this card is necessary in cases — If when starting the vehicle, the engine’s like multiplying the key (from 2 up 5 at max) flashing fault light comes on, do not start or replacement of lost key, replacement of the vehicle again and consult authorized… -
Page 29: Anti-Theft Security System (Immobilizer)
SEATS Moving seat forward / backward Adjusting seatback Backrest power adjustment* 1- Pull up the lever To adjust the seatback angle of the seat, After starting the car with the ignition 2- Slide the seat to the favored position turn the adjusting knob. switch, press the adjustment electrical key (by pressing your weight) (Adjusting the seatbelt is done by a lever…
-
Page 30: Seats
— To open the seat please refer to the authorized dealer of IKCO. — Take care of the seat adjusting rods so as not to be hindered by the cover strings and ties; If you use any fabric slip or cover.
-
Page 31
SEATS Warning To avoid the decrease in efficiency of the safety belt, it should be positioned on your shoulder and make sure the seat back is adjusted in an appropriate and correct position. Head position on the headrest Adjusting headrest height Caution Headrest is designed to restrain rear To adjust the headrest, lift it up to make it… -
Page 32: Safety Belts
SAFETY BELTS Seat belts safety tips Seat belts are designed for people of adult size, and they must be used by only one person at a time. Always make sure that all passengers’ belts are fastened (properly), and consider the following precautions: — Do not let passengers recline the seats extremely rearwards.
-
Page 33
SAFETY BELTS Wearing safety belts Releasing the safety belt Adjusting height of front seat belts Pull the belt across you slowly. Do not let Press the red button on the belt lock. The To adjust belt height, pull out the heigh it get twisted. -
Page 34: Pre-Tensioner
TRACTION SYSTEM A & PRESSURE LIMITER Pre- Tensioner & Pressure Control In case of a front collision, safety of the front Warning seats will improve due to the safety belts -Servicing and checking the belt’s equipped with interjecting and pressure interjecting system and ites wiring restricting systems, and depending on the should be performed by specially…
-
Page 35: Child Safety
CHILD SAFETY Notice: People under the age of 7or 8 considered children because of the different ratio of head to body weights. In violent deceleration, the weight of the head and relatively weakness of neck muscle can make serious spinal injuries. They can be considered as young children till reached 10 years of age or at a height of more than135 centimeters.
-
Page 36
CHILD SAFETY For children (weighing more than 15 kg) For heavy children –whose weight exceeds the limits of standard seat- who are equal or equal or greater than 3 years old (more than 15 Kg), a booster seat can be used in the greater than 3 years old should be seated, rear of the car, facing forward, using a 2 or 3 a forward- facing booster cushion, in the… -
Page 37: Fire Extinguisher
EXTINGUISHER Extinguisher* How to use It is necessary that owners learn about Activation procedure of capsule is written usage of car extinguisher. in English language on it’s body as follow Product Specification: which must be read carefully. 1. This kind of capsule contains dry — Pull out cotter pin chemical powder with 16 gr high pressure — Pull out cap cotter pin upward…
-
Page 38
EXTINGUISHER Important tips 4.During installation inside the car, pay attention that fire extinguisher is well placed 1.Never open discharge valve of fire Caution and it’s plastic mounting belt is properly extinguisher. This cause to lose quality Experience and coolness are two locked, otherwise in case of impact or of material inside fire extinguisher and fundamental skills during usage of fire… -
Page 39: Mirrors
MIRRORS Adjusting Electrical Mirrors* Rear-View Mirror 1. Press button “1” to select left or right Adjust the mirror after seats and steering side mirror after turning the switch on. wheel are adjusted. Press the button Warning 2. Press button “2” in four directions to beneath the mirror, and turn to “night”…
-
Page 40: Vanity Mirror
MIRRORS Vanity mirror Folding exterior mirror (Electrical) * remote control, no need to manual contact. Many of car owners are aware of the Meanwhile, to fold the mirrors after locking Turn the sun visor down to use the vanity advantages of the folding side mirrors the car by remote control, lock button must mirror.
-
Page 41: Window Regulators
WINDOW REGULATORS Side Windows Rear Window Locking Switch* Screen Switches Driver’s side adjusting switches are: 5-The rear windows cannot be operated Any passenger can open or close their 1. Left hand front window by rear switches when locking switch have side window.
-
Page 42
WINDOW REGULATORS Intelligent side windows Anti-Trap safety system* Automatic Order for Movement of the Four Windows The new intelligent windscreen switch This is a safety system which prevents the installed in your vehicle is endowed with body parts from getting caught while the This system will provide the option to an electronic board providing the following windscreen switch is on its upward course. -
Page 43
WINDOW REGULATORS Slow coming to a halt of the Note: This includes the following stages and windscreen at the end of the course* The intelligent windscreen switch is could be easily done by the owner in the equipped with a sensor which precisely following manner: In this system the pace of the window registers the windscreen position at any… -
Page 44: Steering Wheel Adjustment
STEERING WHEEL ADJUSTMENT Adjusting steering wheel WARNING Adjust the angle of the steering wheel — Never adjust your steering wheel while to your body position before driving. driving. This is extremely dangerous. Therefore, you should at first adjust your — For safety reasons, only adjust the seat, and ensure that all the indicator lights steering wheel when the vehicle and dials on the fascia panel are clearly…
-
Page 45: Heating / Ventilation
HEATING / VENTILATION Heating and ventilation The heating and ventilation system provides fresh or heated air to the interior of the car from the intake grille in front of the windshield. Air outlets are provided for the windshield, front passengers face and feet. Also there are air outlets for rear seat passengers on the middle console.* Information concerning the operation of…
-
Page 46
HEATING / VENTILATION Temperature adjustment 1. Blue: Cold air Red: Hot air Air distribution adjustment 2. Center and Side Vents 3. Foot wells 4. Windshield and Side Windows 5. Put the control between 2 and 3 positions to obtain sufficient air flow for center and foot wells. -
Page 47: Air Conditioning
HEATING / VENTILATION 1-Interior air recirculation 2-Air conditioning Center and side vents Press corresponding button until the light Press the switch to start operating when the Rotate the thumbwheel down to close the turns on. In this position air exchange with engine is running.
-
Page 48
HEATING / VENTILATION Maximizing cooling and air flow system The following procedures will enable you when driving. In some cases opening one of to gain maximum benefit from the heating the side windows up to 2 Cm will be useful. -Set the airflow-adjusting key on and ventilation system. -
Page 49: Interior Equipment
INTERIOR EQUIPMENT Front courtesy light Map reading light* Courtesy light* This light provides permanent lighting or 1. Off This light provides permanent lighting or the light comes on when one of the front 2. Driver’s side light is on the light will come on by opening one of or rear doors opens.
-
Page 50
INTERIOR EQUIPMENT Front ashtray Rear ashtray* It is located behind the central console. It is located on the lower side of the front Pull the opening outward to open. console. At first push down the internal compartment 1. Press the cover to open. downward, and pull out to empty as the 2. -
Page 51
INTERIOR EQUIPMENT Cubby box Sun visor — The cubby box is located beneath the Fold down the visor by the hinge to shield central armrest. your eyes from direct sunlight. — Lift the lid to open it. The visor can be used for both the windshield — An electric connection is fitted in cubby box. -
Page 52
INTERIOR EQUIPMENT Rear armrest* Trunk lid access vent* Adjusting instrument panel dimmer* Fold down the armrest from the backseat This hatch is located behind the rear The switch is located below the steering cushion. The armrest provides more armrest, and is used to carry long objects- wheel on the underside of the steering relaxation and comfort when carrying one such as skis so that a part is situated… -
Page 53
INTERIOR EQUIPMENT Glove box opening Cup holder — Pull the handle to open the glove box. Two cups holding recesses appear on — The glovebox is illuminated on opening the glove box lid when it is fully open. and lamp is extinguished on closing. Pay attention not to close the lid in this situation. -
Page 54
INTERIOR EQUIPMENT 1-Trunk lid unlocking key* 4-Central lock button* The vehicle’s doors are locked and unlocked To unlock the trunk lid from inside the vehicle, by each time pushing this button. The indicator push related button for at least 1.5 seconds. on the button comes on when the doors are 2-Rear Screen Heater locked. -
Page 55: Handsfree Cell Phone
ALARM 1- Alarm* * If equipped…
-
Page 56
ALARM Audio – video alarm specification Audio-Visual Alarm Specification hour and to cut the beep sound of keypad. By pressing once again this button the 1. Audio and video capability 1. During the course of driving, warning warning alarm option is turned on. 2. -
Page 57: Alarm
In addition to the usual theft deterrent 7. Change the engine oil means, the intelligent theft deterrent of 8.Change the oil filter Samand is equipped with extra capabilities 9.Change the air filter as follows: a) 4 digit code b) Shock sensor with ability to be set up…
-
Page 58
ALARM Remark: LED remains on, showing a danger till the vehicle starts. 1- Activating siren once means : siren If in theft deterrent position one of the doors works for 20 ms. becomes open, like the previous situation, 2- One time activating of flasher means, siren and flasher are triggered, and the flasher works for 500ms checks the door after 30 seconds. -
Page 59
ALARM Alarm in normal position a) If 4 digit code is activated on the intelligent Four digit code: (menu 3), figure 3 appears, after unlocking When the is not in theft deterrent position, when the vehicle is in theft deterrent mode and opening the door, if at the end of the the following capabilities have been and unlock (Off) button is pressed:… -
Page 60
ALARM Map reading light timer Note: 6- Keyboard keys (except L) In the event of failure of any one 7- Messages display Map reading light control comes on by of the keys (side doors, trunk or hood) or activating intelligent and operates in the shock sensor (if installed on the vehicle) Escorting of driver in darkness following situations:… -
Page 61
ALARM Alarm resetting negative cable and remove the battery For resetting the the battery and siren cap. Then once again, first place the Warning connector should de disconnected and battery cap and tighten its screw, then set None of battery cables should be reconnected. -
Page 62
ALARM Alarm general information If the car speed exceeds 120 KM per hour, warning alarm is heard and beeps increases in number when the car speeds up. The alarm can be turned on / off by pressing button. The keypad lamp and the display screen light up when main headlights are turned on. -
Page 63
ALARM Distance display screen Kilometers adjustment The main menu display is according to (7), we can choose one of the 3 options On this screen the distance is shown in When adjusting oil level, oil filter or air by pressing the keys and kilometers (8). -
Page 64
ALARM Driver information display menus: By pressing buttons choose To change the kilometer setting, the desired menu, and then press the There are 8 sub-menus in the warning. should be pressed and then press key (12). After termination press the By pressing key on adjustments, the to confirm. -
Page 65
ALARM Option Menu1:Temperature setting Option Menu 2: Theft-Deterrent By pressing the key, you can choose (Shock Sensor) “Internal Temperature” indicates the automatic or manual positions. temperature level inside the car. Press this button to navigate to option Default position is manual position. AC will “Temperature Setting”… -
Page 66
ALARM Shock sensor display On the opposite, when the sensitivity is Option menu 3: Security code setting near to 0, the alarm will be activated only By pressing buttons, the Press this button to navigate to Option after a heavy shock and if the “shock shock sensor sensitivity can be altered Menu 3. -
Page 67
ALARM To make any changes in this menu, you must If the correct code is not entered, this If the code is activated (20), you have to enter the four digit code number before enter the correct 4 digit code number (18). message will be displayed:”Security Code is incorrect”… -
Page 68
ALARM For- Digit code number changing You will then be able to enter a new 4 digit After entering the four digits, you will be code number(22). requested to enter the new code number once Pressing this button selects the more. -
Page 69
ALARM Password Time Selection By pressing buttons you In activation mode the start will not operate By pressing button select the can adjust the desired time. until the correct code number is entered “adjusting code duration” mode. By pressing button the selection sign and when exiting the theft deterrent mode, In this way you can change the duration will move to the left and by pressing… -
Page 70
ALARM Option menu 5: Date adjustment In this mode a dark line will appear under By pressing the button the dash sign the time digit (28). By pressing button enter menu 5(30). will move between year, month and day (31). In this menu you can choose the day, By pressing the buttons,… -
Page 71
ALARM Option Menu 6: Contrast Option Menu 7: Change of Language By pressing button the contrast level By pressing button enter menu 6(32) Enter menu 7 by pressing button(34). will decrease (33). In this menu you can adjust the contrast of By pressing button, exit the menu. -
Page 72
ALARM Option Menu 8: Default Settings In this menu you can change the language By selecting this option and pressing the to Farsi, Arabic, English or Russian by button the message “confirm the Enter menu 8 by pressing button(36). using buttons (35). -
Page 73
THEFT DETERENT ALARM Theft deterrent alarm * Alarm will continue for 30 seconds. Then parked in a safe place for a long period of Arming the alarm is stopped for 5 seconds. time and there is worries of unnecessary Should the cause of the alarm situation hearing the noise of alarm (Horn sound). -
Page 74
THEFT DETERENT ALARM 4- If any of the vehicle’s doors (such as trunk lid and engine hood) are open at the time of driving, roof light blinks and informs the driver. Notice -In Case even one of the doors to is open, theft deterrent alarm will not be armed. -
Page 75: Anti Theft
THEFT DETERENT ALARM Safety tips for preventing vehicle theft Always follow the tips mentioned here Caution when you are leaving the vehicle even if for a few minutes: — Avoid parking your car in unattended 1- Close all windows completely. on- street parking spaces.
-
Page 76
CNG FUELING SYSTEM CNG system: Engine compartment overview * Regulator: Reduces pressure from a maximum of 200 bar to 7bar. 2. Hose (transferring gas to fuel rail): Transfers the reduced pressure gas from the regulator to the fuel rail. 3. Fuel Rail: Gas entering the manifold passes through the fuel rail, and enters the manifold when the gas injectors open… -
Page 77: Cng Fuel
CNG FUELING SYSTEM Cng fueling system 1. Tank (Tanks): CNG is contained by 200 bar pressure at highest. 2.Tank Valve: Limits and opens the gas passage at the end of the tank, and includes equipment which evacuate the gas tank when gas pressure and temperature exceeds the standard limit.
-
Page 78
DRIVING DIGITAL INSTRUMENT PANEL ……..78-86 CNG FUELING STEPS* …………98 AUDIO ALARMING ON INSRTRUMENT PANEL* ….80 LAMPS / INDICATORS …………99 CRUISE CONTROL* …………..85 HORN ………………99 STARTING & DRIVING …………90 WINDSCREEN WASHER & WIPER ……..101 MANUAL GEARBOX ………….. -
Page 79: Digital Instrument Panel
INSTRUMENT PANEL Fuel gauge the vehicle immediately considering safety conditions and seek help from qualified The pointer falls to zero when the ignition persons to repair. switch is off, but it shows the tank fuel level Possible causes when the switch gets on. — A faulty fan- Check fuses, and change A warning indicator light in the fuel gauge them if necessary.
-
Page 80
INSTRUMENT PANEL Instrument panel (1) Warning Lamps/Signals Above picture : 1- Low Fuel Level + Warning 2- Fuel Gauge 3- Immoblizer light 4- CNG Fueling indicator* 5- Cruise Control indicator* 6- Head lamp dipped light 7- Head lamp beam light 8- Diagnostic warning lamp 9- Indicator of Cooling system liquid temprature 10- High Coolant Temperature… -
Page 81: Audio Alarming On Insrtrument Panel
7 liters of fuel remains in the effect on the warning light flash frequency. the authorized dealer of IKCO as soon as fuel tank. Refuel as soon as possible. When you turn on the direction lights, lights possible.*…
-
Page 82
INDICATORS OF THE INSTRUMENT PANEL engine or comes on during driving; there and with a “click”, we make sure of its Engine oil level warning may be a problem in the battery charge locking. With this action the indicator on light — red system. -
Page 83
INDICATORS OF THE INSTRUMENT PANEL CNG fuel position indicator Instant stop warning – Green* Should this indicator lights on, The indicator turns on when CNG fuel stop immediately and switch off the position activated. engine. Contact with dealer or authorized If fuel consumption changes from gasoline representative. -
Page 84
INDICATORS OF THE INSTRUMENT PANEL* Instrument panel (1) Instrument panel* Warning and alarm lights 1- Low fuel warning light 2- Fuel level indicator 3- Immobilizer system light 4- Activation of CNG fuel system indicator* 5- Cruise control indicator light* 6- Low beam 7- Head lamp main beam. -
Page 85
Important note: If the vehicle in a low RPM and taken to authorized experiences an excessive speed fall, the representative of IKCO soon. alarm system automatically turns on the flasher for 10 seconds. This is a warning sign for excessive speed fall. -
Page 86: Cruise Control
INSTRUMENT PANEL DISPLAY INDICATORS* Anti – Lock Brake System Service warning light –Orange Warning of driver air bag Warning (ABS) – Orange defect – orange When this light comes on it means It lights up when starting the car and keeps there is a fault in one of the vehicle’s The indicator comes on when you start on for a few seconds, and then it turns off.
-
Page 87: Periodic Maintenance
DIGITAL DISPLAY SCREEN GUIDE* 3-This indicates the pressure Intensity of the Instrument of the gas in the LCD and is Panel illumination made of 6 black stripes. When Small lamps illuminate gas pressure is full the 6 stripes are active instrument Panel.
-
Page 88
DIGITAL DISPLAY SCREEN GUIDE* Battery charge warning Brake Alarm Instant stop warning light This indicator is turned on for a Should this indicator lights on, When the starter switch is few seconds while starting the stop immediately and switch in second position, the light comes on engine and then it turns off, and it turns on off the engine. -
Page 89
INSTRUMENT PANEL AUDIO WARNING SIGNALS* Prioritizing of the instrument panel Audio warning signals Type of Audio Starting Description of function Priority Audio Warning signal warning signal switch Continuous When parking lights are on and driver’s door is open Lights audible warning Ignition off warning signal Continuous… -
Page 90
STARTING / DRIVING Starting the engine Cold weather — Do not push the gas pedal until the end at any speed. 1- Check that the hand brake is pulled, In temperatures less than -10ºC, the car — Do not force the engine at any gear level and the gearbox is in neutral position. -
Page 91: Starting & Driving
STARTING / DRIVING Start switch Position St — The switch can be removed — The steering wheel is locked — Most lighting is opera tableside lights, headlights and flasher. Position A — The steering wheel is unlocked. — Some electrical accessories and equipment operate. Position M Unlocking the steering wheel All equipment, warning lights and electrical circuits operate.
-
Page 92: Manual Gearbox
MANUAL GEARBOX Gear positions while driving. It results in a premature wear out of the clutch system. The gear positions are indicated on the — Do not use half-clutch to hold the car gear lever knob. still on steep roads. It wears the clutch. The gearbox is equipped with synchronization Always use the hand brake.
-
Page 93: Fuel Economy & Environment
FUEL ECONOMY& ENVIROMENT Fuel economy — Press the gas pedal slowly and do not — Use electronic equipment when strictly speed up suddenly.Try to keep a steady necessary. You can reduce environmental pollution speed to reduce not only exhaust pollutants, — Under- inflated or non- standard tires raise and drive more safely and economically by but to prevent mechanical parts erosion.
-
Page 94: Starting & Driving (Cng Mode)
STARTING / DRIVING (CNG MODE) Starting the Engine on CNG Mode* To remind you, this method is used only for special situations like gasoline shortage. Firstturned the switch on, and then press the conversion key for 5 seconds before starting till the gas warning light appears on the instrument panel.
-
Page 95
STARTING / DRIVING (CNG MODE) Conversion from Gasoline to Gas* While the engine is operating on the gasoline Warning mode, by pressing and releasing of fuel Do not change gear position for conversion button, the corresponding indicator braking on slippery roads on the instrument panel LED will start blinking Never select the position “N”… -
Page 96
STARTING / DRIVING (CNG MODE) Conversion from gas to gasoline* Note By pressing the fuel conversion button, in the case that there is no engine failure When the green indicator of CNG Fuel position is on, it means the vehicle is and gasoline in the fuel tank, the director on the instrument panel will light off. -
Page 97: Reversing Gear Alarming
REVERSING LAMP WARNING SYSTEM* Detecting system specification The system installed on Samand vehicle Warning consists of two optical sensors on the rear -This system is dedicated to warn the bumper. driver of the obstacles within 150 cm of the rear bumper while the vehicle…
-
Page 98: Fuel
FUEL SYSTEM Fuel cut-off switch Fuel filler flap It is located in the engine compartment, The fuel filler flap is located on the right Fuel filler cap and on the right inner mudguard. mudguard, and is linked to the central Unscrew the filler cap counter clockwise, During violent accidents, a safety system locking system.
-
Page 99: Cng Fueling Steps
CNG FUELING STEPS* CNG fueling steps:* 1- When positioned in a fueling station, do not smoke cigarettes and do not use your mobile phone. 2- When positioned in a fueling station, make sure the vehicle is fully immobilized and that the engine is turned off ( the handbrake must be pulled) 3- The station operator performs the fueling operation, after controlling the…
-
Page 100: Lamps / Indicators
LAMPS / INDICATORS Direction indicators (left & right) Headlight main / dipped Beams Lighting control switch Position 1: lights off. Move the lever DOWN to indicate a LEFT Put the lever completely towards the Position 2: Small lights (front/rear) — Instrument turn, and UP to indicate a RIGHT turn (the steering wheel to change headlight Panel backlight and center console.
-
Page 101
LAMPS / INDICATORS Front fog lamps* Rear fog lamps Rotate up one level the center part of the Rotate up two levels the center part of the stalk to turn on the front fog lights. The stalk to turn on the front fog lights. The warning indicator on the instrument panel indicator on the instrument panel lights lights up simultaneously when fog lights… -
Page 102: Windscreen Washer & Wiper
WINDSCREEN WASHER & WIPER SYSTEM Windscreen wiper / washer Single movement of wiper (Only Screen wash The vehicle windscreen wipers\ washers Pull the stalk towards the steering wheel. one reciprocating movement) are controlled by the right side stalk, and By pulling the lever each time, the screen Press the stalk downwards only once, and operate only the switch is on.
-
Page 103: Brakes
BRAKES Caution Caution Use the hand brake and turn the — When parking on a steep area move wheel towards the pavement in slope the wheels towards the sidewalk and surfaces. pull the handbrake. When the and STOP icons are -While driving, always make sure that lit, it means that the handbrake hasn’t the handbrake is completely pulled down…
-
Page 104: Anti-Lock Braking (Abs)
ANTI-LOCK BRAKING (ABS) Anti-lock braking (ABS) New navigation and stability system such as ABS prevent wheels from locking in these Anti-lock braking system is one of the car situations, which may cause critical driving control systems preventing the wheels Warning situations.
-
Page 105
ANTI-LOCK BRAKING (ABS) When using a car equipped with anti this situation the car should be directed to system, immediately prevents lock brake system always consider an authorized workshop with precaution. locking the wheel in sudden braking, the following points: — If the handbrake is completely released and EBD ensures the optimized braking — Since the anti lock brake system is only… -
Page 106: Airbag
AIRBAG * Air bag safety * glove box and phrase SRS Air bag is printed Besides the Interjecting safety belt, your vehicle is there to indicate that the vehicle is equipped Warning equipped with air bag safety as well. with air bag system. Should the air bag light on instrument cluster does When the ignition switch is placed in the ON the vehicle’s Air bag is designed so that it only…
-
Page 107
AIRBAG Warning — Only belts tightened as much as possible on the passenger’s body will have the needed effectiveness. Depending on the nature and severity of the blow, the interjecting system will act concurrently with air bags. In case of non-operation in one of the above situations or defects in the system, the The air bag has maximum protective effect Do not, under any circumstances, lean on… -
Page 108: Passenger Air Bag
AIRBAG* Warning — Any servicing on the passenger security system (pre-tensioner, air bag, electronic control unit, wiring) or re-use of this system in another vehicle, even if is the same vehicle, is expressly forbidden. — Use only factory standard steering wheel and never replace it. — Covering of the air bag is expressly forbidden.
-
Page 110: If Equipped
VEHICLE MAINTENANCE MAINTENANCE …………110-112 ENGINE COMPARTMENT ……… 113-119 BATTERY …………….. 120 WINDSCREEN WASHER & WIPER SYSTEM ..121-122 HANDLING METHOD IN CASE OF GAS LEAKAGE* ..123 CLEANING & CARING VEHICLE ……124-129 * If equipped…
-
Page 111: Maintenance
MAINTENANCE Owner Care & Maintenance — Coolant level — Brake fluid level In addition to regular services and checks — Steering wheel hydraulic oil level described before, some simple periodical — Window washer liquid level checks should also be done. you can — Air pressure in tires and their condition perform these checks.
-
Page 112
MAINTENANCE Safety in the garage Poisonous Fluids If you need to carry out maintenance, All fluids used in a car engine are poisonous consider the following safety advices: and should not get any contact with open Warning wounds. These liquids include battery acids, — The cooling fan is an electrical device, — Keep away your hands and clothing from anti-freeze, brake and hydraulic fluids,… -
Page 113
MAINTENANCE Routine Services The safety, reliability and performance of your car is partly dependant on your maintenance skills, and you should become ensured that maintenance operations, oil services, checks, brake fluid and coolant topping up are carried out in accordance with the proposed schedules of the manufacturer if required. -
Page 114: Engine Compartment
ENGINE COMPARTMENT Opening the Hood 1- Pull the hood release from the passenger compartment (driver side). The hood gently jumps up. 2- Pull the hood safety catch, and raise it up. 3- Pull out the hood port rod from rear engine retain 4- Fix the support rod into the slot fitted in the hood.
-
Page 115
ENGINE COMPARTMENT The parts in the engine compartment 1- Brake Fluid Reservoir 2- Oil Dipstick 3- Oil Filler Cap 4- Washer Reservoir 5- The radiator Cap 6- Battery 7- Hydraulic Fluid Reservoir 8- Engine compartment fuse box * 9- Fuse box * Warning Caution Warning… -
Page 116
ENGINE COMPARTMENT Warning — when working on the engine, the radiator fan’s engine may start working at any moment, danger of injury — Adding: when adding oil, take care that it is not spilt on engine parts since there may be risk of fire. Do not forget to close the cap since there will be a danger of fire caused by oil splashing Engine oil fill… -
Page 117
ENGINE COMPARTMENT Anti-Freeze Anti-Freeze contains corrosion inhibitors. Anti freeze content of the coolant should be maintained between 40-50%, not only in cold weather but also all the year. Warning If any part of the cooling system (apart Checking the coolant from the radiator) to open or replace the Notice: If more than one liter is needed to top… -
Page 118
ENGINE COMPARTMENT Brakes Your car’s most important safety section, Warning the braking system is equipped with disc — Brake fluid is highly poisonous, and brakes in front and drum brakes in rear, should be kept out of children reach. and a with dual hydraulic circuit. — Refer to the physician if the fluid When the engine is running, the brake swallowed. -
Page 119
ENGINE COMPARTMENT Hydraulic Steering If the hydraulic steering is correctly operating there is few or no need to top up the Warning reservoir. If there is a sudden or continuous Hydraulic fluid is highly poisonous, and level fall, the car should be checked by an should be kept out of children reach. -
Page 120: Replacing Battery
ENGINE COMPARTMENT Replacing battery Always use batteries of the same type and Warning of the original specification. Other types Batteries contain acid, which is may vary in size or terminal positions, which corrosive and poisonous. Consider the may have fire danger when connecting to following points on leakage: If it spills on the car electrical system.
-
Page 121: Battery
BATTERY 1- Inspection of the dynamo belt and its decomposition, in this case the alternator current falls. 2- Problem in the wiring system, the spark wire has to be tight and cable diameter has to be adequate. 3- In -18ºC do not continue the starting process more than required.
-
Page 122: Windscreen Washer & Wiper System
WINDSCREEN WASHER & WIPER SYSTEM Filling the Windshield Removing Wiper Blades Lift up the wiper arm and turn the blade so that it makes a 90 degree with the arm. Washer Reservoir 1-Detach the sprinkling jet from the wiper 2- Press down the trigger tongue. Every week, check the reservoir liquid level.
-
Page 123
WINDSCREEN WASHER & WIPER SYSTEM Caution — In some systems pressurized water penetrates in the doors and windows sealing during washing the vehicle and causes fault in locks. Never use pressurized water directly on critical parts. -In the very cold temperature, make sure the wiper blades are not frozen 1. -
Page 124: Handling Method In Case Of Gas Leakage
HANDLING METHOD IN CASE OF LEAKAGE* Handling method in case of gas In case of leakage and gas odor from the leakage* trunk or interior, switch to gasoline and close the top lid of the container. Contact Although numerous safety precautions the authorized workshop to fix defect.
-
Page 125: Cleaning & Caring Vehicle
CLEANING & CARING VEHICLE Cleaning the bodywork In order to preserve the car painting finish, please consider the following advices. — Do not use hot water to wash the car. — Use wet linen cloth to clean dirt and dust from the car metallic paint to prevent scratching.
-
Page 126
CLEANING & CARING VEHICLE Use the following materials to wash the exterior of the vehicle: Caution — Car shampoo In some high pressure, water penetrates in doors and windows liners, and cause — Wax polish damages to the locks. Do not use high pressure water on sensitive parts. — Tar remover — Glass cleaner — Rubber protector… -
Page 127
VEHICLE CLEANING & CARE Removing tar spots Mirrors: Wash the mirrors with soapy — Very mild abrasives to remove surface contamination without removing water and use a plastic scraper to defrost Use white spirits to remove the oil and tar damaging the paint. -
Page 128
CLEANING EXTERIOR AND MAINTAINING THE VEHICLE Qualitative Recommendation for — It should be smooth to protect the gloss and chemical solvents and also abrasive vehicle washing and corrosive materials such as chrome against scraping and cracking, preferably use liquid detergent. polishers. -
Page 129
VEHICLE CLEANING & CARE Maintenance of vehicle equipments Wipe off the dust in interior part of vehicle. Warning Plastic parts -Installing Additional equipments Clean with a solution of mild detergent. Use only the approved equipments Then rub the surface with a damp cloth. compatible with vehicle and conform Instrument panel should not be polished. -
Page 130
VEHICLE CLEANING & CARE ..Maintenance of the Vehicle’s Care Of the Fabric Used in Inside If possible, when the vehicle is parked, Natural Leather* leave one of the windows slightly down. Furnishings of the Vehicle* Prevent direct sunlight on the leather Natural leather requires care to keep its This type of fabric, like any other, requires surface for long periods, as much as… -
Page 132
TECHNICAL EMERGENCIES CHANGING WHEELS …………. 133-135 MAINTENANCE & SERVICING OF BATTERY … 136-139 TOWING THE VEHICLE ……….140-141 FUSES …………….142-144 CHANGING LAMPS …………145-152… -
Page 133
TIRE CHANGE Spare Wheel and Its Tools The Spare Wheel Tools 1. Wheel brace Remove the carpet from the bonnet floor Release the supporting strap, and remove 2. Central nipple by lifting up the handle provided. Hook the warning triangle and toolbox including 3. -
Page 134: Positioning The Jack
CHANGING WHEELS Removing the Wheel Cover (only Positioning the Jack Jacking for metallic rings) Put the jack in one of four points to the 1-Slacken the wheel’s four nuts using a Use the hook end of the trim remover to wheel you decide to change.
-
Page 135
TIRE CHANGE — Use the centralizing tool as a guide to Put the wheel cover in place so as to keep place the wheel. the valve in reach of hand. — Screw the three other bolts, and tighten Push the edges of the cover to fix it tightly. Warning the fillet of the fourth one after removing Put the tools in the box and the wheel in… -
Page 136
CHANGING WHEELS Puncture Punctures tire should be taken out and inspected before patching. To avoid further possible damages to the tire, it should be repaired by skilled person. All repairs should be performed by skilled persons who undertake full responsibility of the repair quality. -
Page 137
BATTERY CARE & MAINTENANCE 3- Turn off vehicle’s electrical equipments (audio system, heater, etc.). Switch off the booster vehicle. Make sure both vehicles are set at freewheel, with handbrake on, otherwise there may be damages to electrical equipments which are not covered by Guarantee. -
Page 138
BATTERY CARE & MAINTENANCE B- Charging battery by charging system First disconnect the battery from vehicle in Caution following steps: Caution In case of disconnecting or changing 1- disconnect negative (-) terminal of the Make sure the voltage of both the battery and E.C.U, the vehicle’s battery batteries to be equal (12 V). -
Page 139
BATTERY CARE & MAINTENANCE Battery care & maintenance Battery safety tips such as battery tablets, battery vitamins and… to the battery’s electrolyte. — Do not bang on the battery poles. A) Always keep the battery case clean. — To prevent risk of short circuits, when installing — Prevent short-circuiting of the positive and B) To prevent the poles from becoming sulfated, the battery on the vehicle, first connect the positive… -
Page 140: Towing The Car
TRANSPORTING THE VEHICLE Towing the car Towing the car with a manual gear box (non-automatic) Neutralize the gear and turn on the flashers. Drive carefully and never exceed the speed limit of 50km/hr when being towed Always keep the tow rope stretched by gently applying the brake as necessary.
-
Page 141
TOWING Shipping by Carrier This type of carrying is the recommended to prevent any accident or damage. Rear Towing Avoid suspension towing on front wheels if possible. If it is necessary, tow it at least speed and short distances. The steering should be locked when the wheels are completely ahead. -
Page 142
FUSES Replacing Fuses 1. Turn off the ignition switch and all electrical equipment. 2. Remove the fuse box cover, and then find the defected fuse according to the table. 3. Take out the tweezers(located in the fuse box), and use it to pull out the defected fuse. -
Page 143
FUSES Fuses Amper Function Fuses Amper Function 10 A 20 A Radio & Handsfree* Cigarette Lighter 10 A Control Unit Alarm, Anti-Theft , Audio System Memory 10 A Anti-Lock Brake* Rear Fog Tails Beep Sound, Right Indicators & Lamps Heater/ Display / Radio/ Switch Lights 30 A Air Conditioner Automatic Backrest of Front Seat *… -
Page 144
FUSES Owner should not remove or replace fuse connections and all problems should be checked by qualified technicians. Fuse specification Fuse A / F Fuse function Fan 1 Fan 2 Reserve Spare Fuse Reserve Spare Fuse Shunt Ignition Switch Shunt Main Lamp / Dipped Beam Engine Compartment Fuse Box Warning… -
Page 145
FUSES Fuses Fuses Fuses Fuses function Fuses Fuses function Ampere Ampere 30 A Wiper motor Horn AC compressor Door feeding node Wiper washer Alarm feeding Double relay 2 Double relay 1 Right front fog lamp ABS brake 2 Left front fog lamp ABS brake 1 Left front indicator Fan 1… -
Page 146
FUSES Fuses Fuses Ampere Fuses function Right rear night warning lamp Rear window key regulator lamp RN electricity Left rear indicator Right rear fog lamp Left rear gear lamp Right brake lamp Rear & front roof lamp controlled by doors Left rear night warning lamp RN electricity Electrical motivator of boot… -
Page 147
FUSES Fuses guide table (cabin) FUSE BOX AND DASHBOARD RELAY* The fuse box is located under the dashboardon Fuse No. Rating Fuses function the left. To open, pull the fuse box cover to the 20 A Electric Seat Supply front. Main switch supply (position 2) air bag unit and air conditioning system Relay Main switch supply (position 1) lighter… -
Page 148
FUSES Fuses Guide Table * Fuse Rating Fuses function 40 A Electric supply for ignition switch Relay switch for fog lamp/horn BCM Inside systems electric connection supply BCM Inside systems electric connection supply Fan (High speed) Fan (Low speed) Brake (ABS) Brake (ABS) Engine Compartment Fuse box * Relays Guide Table *… -
Page 149
CHANGING LAMPS Lamp Watt 1- Headlamp-Main Beam 2- Headlamp-Dipped Beam 3- Side Lamp 4- Front Direction Indicator 5- Front Fog Lamp* 6- Rear Lamp/Brake Lamps 21/5 7- Rear Direction Indicator 8- Reversing Lamps 9- Rear Fog Lamp 10- High Mounted Brake Lamp (Third 21/5 Stop Brake Lamp) 11- Side Repeater Lamp… -
Page 150
CHANGING LAMPS Front Lamp / High beam Front Lamp / Dipped beam Small bulbs 1- Unsrew the cover 1- Unsrew the cover Connector of the small bulbs is located 2- Press the spring clamps inward, and lift 2- Disconnect the connector beneath the high beam lamp, inside the it up to release. -
Page 151
CHANGING LAMPS Reverse Gear and Rear Fog Lamps Side Repeater Lamps Front Direction Indicators Unlock the trunk lid, push the two plastic Push the light assembly frontward, and Turn the holder counter clockwise to jag towards inside and remove the holder. pull it out to remove. -
Page 152
CHANGING LAMPS Reverse Gear & Rear Fog Lamps* Rear Direction Indicator & Rear Trunk Lid Lamp (Loadspace Light) Brake Lamps* Unlock the trunk lid, turn the holder counter- Insert a screwdriver carefully into the light clockwise to release and remove it. Lamps From the trunk turn the holder counter- rear slot. -
Page 153
CHANGING LAMPS High mounted stop lamp Rear direction indicator / Brake Front fog lamp* lamps Lift the rear part of the light cover, and You can access the front fog tail through pull it out of the rear shelf. Remove From inside the luggage compartment beneath part of front set. -
Page 154
CHANGING LAMPS Door light* Number plate light Map reading lamp (Middle) Pull out the light carefully from the door. Push the light to the left, and turn it down To replace a map reading lamp, turn the Turn the holder, and remove it. Detach the to remove. -
Page 155
CHANGING LAMPS Vanity Mirror Lamp* Front/Rear Courtesy Lamp * The bulb cannot be replaced.Buy a new Insert a screwdriver carefully in the rear slot replacement sunvisor from an authorized of the light, and lever to remove from the dealer. holder. Hold the light assembly, and open the holder. -
Page 156
TECHNICAL INFORMATION LABLES & PLATES …………156-157 IDENTIFICATIONS …………..158 ENGINE TECHNICAL INFORMATION ……159-163 WEIGHTS …………….164 DIMENSION …………….165 ANTI-POLLUTION …………..166… -
Page 157: Lables & Plates
LABLES & PLATES…
-
Page 158
LABLES & PLATES… -
Page 159: Identifications
IDENTIFICATIONS Identification numbers It is necessary to announce the corresponding number (VIN) if you contact to the authorized dealer regarding the engine or the gearbox. Vehicle Identification number (VIN) The plate with identification numbers stamped on its surface locates in the engine compartment on the upper partition panel.
-
Page 160: Engine Technical Information
ENGINE TECHNICAL INFORMATION Engine EF7NA 1/7i XU7JPL3 1/8i Specification Cubic Capacity (cc) 1645 1761 Combustion Order 1-3-4-2 1-3-4-2 Idle Running 750 rpm 850 rpm Cylinder Bore 78.6 mm 83 mm Piston Stroke 85 mm 81.4 mm Number of Cylinders Number of Valves Compression Ratio 11 + 02:1 9.3:1…
-
Page 161
ENGINE TECHNICAL INFORMATION BATTERY TYPE CAPACITIES Gasoline Tank 66 liters Battery Type: SSB/ SMF CNG Tank 75/100* Voltage 12 v 10 W 40 SL Engine Oil (and filter)** Charging Circuit Alternator 4.75 20 W 50 SL / SJ AIR CONDITIONER(A/C) Gearbox (Dry) 1.9 liters A/C Gas… -
Page 162
TECHNICAL INFORMATION TECHNICAL SPECIFICATIONS OF ENGINE OIL SUITABLE FOR EF7** * ENGINE 10 W 40 API SL Allowed type of engine oil (along with standard and qualitative level of oil) 10 W 40 API SJ With filter Required capacity of engine oil at the time of changing Without filter Easy condition Every 12000 KM… -
Page 163
TECHNICAL INFORMATION GASOLINE CONSUMPTION XU7JPL3 TU5JP4L4 EF7NA IP 16 ENGINE Average consumption (urban & estra-urban) 8.7 liters per 100 km 7.6 liters per 100 km 8.1 liters per 100 km 8.8 liters per 100 km ECER101 Standard Constasnt speed : 90 km/hr 6.8 liters per 100 km 5.8 liters per 100 km 5.8 liters per 100 km 6.7 liters per 100 km ECER84 Standard Constant speed : 120 km/hr… -
Page 164: Fuel Consumption
TECHNICAL INFORMATION Fuel consumption 7- Plan your urban trip to avoid heavy traffic routes/hours Fuel consumption data are obtained 8-Park your vehicle in suitable places in based on the standard and in test rooms various seasons (confined and away from under certain conditions of environment, sun shine areas) controlled wind speed, rood, route and…
-
Page 165: Weights
WEIGHTS SAMAND (KG) GASOLINE (L3) GASOLINE EF7 CNG (EF7) ENGINE TYPE WEIGH (KG) XU7JPL3(BE3) EF7-CNG Approx. Net Vehicle Weight (without Passenger & Auxiliary 1220 1240 ——- Equipments;with a Full Tank Maximum Gross Vehicle Weight; with Full Tank, 75 Liter Volume…
-
Page 166: Dimension
DIMENSION Overall Length 4502 (mm) Overall width including mirrors 1903 (mm) Overall height 1460 (mm) Wheel base 2671 (mm) Front overhang 866 (mm) Rear overhang 965 (mm) Wheels track (Front) 1450 (mm) Wheels track (Rear) 1440 (mm) Steering wheel turn lock to luck Turning circle 11 m 500 Lit.
-
Page 167: Anti-Pollution
ANTI POLLUTION Pollution Control Your vehicle is equipped with pollution control. Catalytic Converter Catalytic converter or Catalyst is used to react on exhausting pollutant to produce least pollution gases. Lead is of the most important factor in breaking or damaging catalyst.
-
Page 168
INDEX… -
Page 169
INDEX Control Switch CNG Fueling Steps (CNG)* Battery Safety Tips CNG Fueling System Parts in Trunk* Adjusting Electric Mirrors* Before Driving CNG Part Series In Engine Compartment Adjusting Headrest Height Body Protection (CNG)* 76-78 Adjusting Height of Front Seat Belts Brake Fluid Conversion From Gas To gasoline (CNG)* 95 Adjusting Instrument Panel Dimmer*… -
Page 170
INDEX Filling The Radiator Handbrake Labels & Warning Notes 156,157 Filling Windshield Washer Handling Method In Case of Gas Leakage Left/Right Side Indicator Reservoir (CNG)* Lighting Control Switch First Aid Kit* Hands Free Mobile* Locking / Unlocking By Key Folding Exterior Mirror (Electrical)* Hazard Warning Triangle Locking / Unlocking By Remote Controller 23 Foot Brake Servo Assistance… -
Page 171
INDEX Screen Switches Seat Belts Safety Tips Qualitative Recommendation In Cleaning Unlocking Of The Steering Wheel Shipping By Carrier Vehicle Exterior Unlocking Of The Trunk Lid* Side Windows Single Movement of Wiper Small Bulbs Rear Ash Tray* Vanity Mirror Spare Wheel & It’s Tools Rear Courtesy Light* Vehicle Identification Number (VIN) Special Conditions… -
Page 172
IRAN KHODRO Company (Public Joint Stock) Gate No. 1, Iran Khodro Blvd, KM.14 Karaj Makhsous Rd, Shahid Lashgari Highway, Tehran, IRAN Postal Code : 1389913657 Tel: (+9821) 48901 Fax: (+9821) 44934000-1 SMS Centre: (+98)30003 E-mail: info@ikco.ir www.ikco.ir…
Руководство по эксплуатации и техническому обслуживанию Iran Khodro Samand/Samand EL/Samand LX.
- Автор: —
- Издательство: Iran Khodro
- Год издания: —
- Страниц: 172
- Формат: PDF
- Размер: 4,9 Mb
Руководство по эксплуатации и ремонту Iran Khodro Samand EL/LX/TU с 2000 года выпуска с бензиновыми двигателями объемом 1,6/1,8 л.
- Автор: —
- Издательство: Монолит
- Год издания: —
- Страниц: 410
- Формат: —
- Размер: —
Руководство по эксплуатации и ремонту Iran Khodro Samand EL/LX/TU с 2004 года выпуска с бензиновыми двигателями объемом 1,6/1,8 л.
- Автор: —
- Издательство: Монолит
- Год издания: 2008
- Страниц: 166
- Формат: —
- Размер: —
