-
Contents
-
Table of Contents
-
Bookmarks
Quick Links
DE LUXE EASY • DE LUXE • EXCELLENT • PRESTIGE • PREMIUM • LANDHAUS
OPERATION GUIDE
GB
Version 02/2014
Related Manuals for Hobby De Luxe Easy
Summary of Contents for Hobby De Luxe Easy
-
Page 1
DE LUXE EASY • DE LUXE • EXCELLENT • PRESTIGE • PREMIUM • LANDHAUS OPERATION GUIDE Version 02/2014… -
Page 2
Dear Caravaner, Congratulations on the purchase of your new HOBBY Caravaner. The trust you have placed in us is both an incentive and an obligation to continuously implement new ideas, technical innovations and fine touches to make our caravans even better. Our fully fitted and highly sophisticated models enable us to offer you the perfect setting for the most enjoyable days of the year. -
Page 3: Table Of Contents
Table of Contents Introduction ……………………..01-1 1.1 General information …………………..01-1 1.2 Markings in these operation instructions …………..01-2 Safety ……………………….02-1 2.1 General information …………………..02-1 2.2 Before each journey ………………….02-2 2.3 Loading ……………………..02-4 2.4 Handling Performance ………………..02-6 2.5 Before each journey ………………….02-8 Chassis and vehicle registration ………………03-1 3.1 General information …………………..03-1 3.2 Drawbars/Longitudinal beams ………………03-1 3.3 Safety coupling WS 3000 ………………..03-2…
-
Page 4
7.3 Electrical supply ………………….07-18 7.4 Electrical system………………….07-24 7.5 External circuit diagram ………………..07-27 7.6 Contact plan for the light control system …………..07-28 7.7 Special Lighting ………………….07-30 Water ………………………..08-1 8.1 General information …………………..08-1 8.2 Water supply ……………………08-2 8.3 Boiler ……………………..08-6 8.4 Water flushing toilet ………………….08-8 Gas system ………………………09-1 9.1 General safety rules for the use of liquid gas facilities ……….09-1 9.2 Gas supply ……………………09-3… -
Page 5: Introduction
1.1 General information Your HOBBY caravan has been built in accor- dance with the latest technology and recognised safety regulations. Despite all of these safety measures, it is possible that people may be hurt…
-
Page 6: Markings In These Operation Instructions
1.2 Markings in these operation instructions Markings in these operation instructions The handbook explains the caravan as follows Texts and illustrations The texts which accompany illustrations are found directly to the right of the illustrations. De- tails in illustrations (here: entry door) are marked with position numbers Lists — Lists are based on key points and are pre-…
-
Page 7
Optional Extras You have selected a caravan that is equipped to taste. This user manual describes all of the models and equipment offered within the same programme. Therefore, it may include equipment that you have not selected. Differences and, thus, all of the optional extras are marked with an asterisk „… -
Page 8: Safety
2. Safety 2.1 General information Keys The following keys are provided with the caravan: — Two keys which fit into the following locks: — entry door, — service flaps, — toilet flap. — gas-bottle container lid — fresh-water tank lid — Rear Storage Locker (Premium) Warnings and information labels are attached both inside and outside the…
-
Page 9: Before Each Journey
Fighting a fire • Evacuate all passengers immediately. • Close the main shut-off valve on the gas bottle as well as the shut-off valves on gas- powered appliances. • Shut off the electrical supply • Sound alarm and call the fire department. •…
-
Page 10
• If necessary, pull the electrical cord to the 230 V mains supply out of the exterior socket. • If necessary, pull the television antenna in- ward as far as possible or fold over the satellite dish. • If necessary, secure the roof load and lash it to prevent slippage. -
Page 11: Loading
2.3 Loading Rules for loading: • Spread the load evenly between the left and right-hand side of the caravan. Heavy or bulky objects belong in the lower storage compart- ments and near the axle. • If your caravan has a tandem axle: distribute the centre of weight between the two axles.
-
Page 12: Drawbar Load
1. Determine the maximum drawbar load of your base vehicle by checking its documentation, the type plate or the drawbar plate. 2. Your HOBBY caravan has a maximum per- missible drawbar load of 100 kg (up to 2,000 kg technically permissible maximum weight) or 150 kg (from 2,200 kg technically permissible maximum weight)..
-
Page 13: Handling Performance
2.4 Handling Performance Driving Take a test drive or a safety training course be- fore the first long drive to better acquaint your- self with the carriage in driving conditions. Rules for driving • Do not underestimate the length of the carriage.
-
Page 14: Driving In Reverse
500 km. Driving in reverse Your HOBBY caravan has a braking system with automatic reverse. It enables you to drive back- wards without applying the brakes, because the overrun coupling does not differentiate between overrunning or reversing the caravan.
-
Page 15
The caravan’s brakes are deactiva- ted when you drive in reverse. Rules for driving in reverse • The caravan tilts in the opposite direction in which you steer. • Use a guide when driving in reverse. Shunting (moving caravan by hand) Your carriage is significantly larger than a car. -
Page 16: Securing The Vehicle
Securing the vehicle Rules for securing the vehicle: • Set the parking brake. • Only extend the rotating stancions as far as necessary so that the axle still bears part of the weight (The crank is located in the bottle container).
-
Page 17: Before Each Journey
Water installation Water left standing in the fresh water tank or the pipes quickly becomes undrinkable. Please empty any residual water from the water tank before filling it with fresh water. Therefore, check the water pipes and the fresh water tank before each drive to ensure they are clean.
-
Page 18: Chassis And Vehicle Registration
For the sake of traffic safety, the vehicle under- carriage must be maintained just as conscienti- ously as the base vehicle itself. This maintenance should be carried out by your HOBBY dealer. If spare parts are required, use only the original parts designated by the manufacturer.
-
Page 19: Safety Coupling Ws 3000
3.3 Safety coupling The caravan has been fitted with a safety cou- pling with tracking stabiliser to prevent it from WS 3000 becoming pendulous or pitching. This system conforms to ISO 11555-1. It has been permitted for use up to a maximum speed of 100 km/h. Please note the additional operating instructions and the manufacturer’s safety instructions.
-
Page 20
Inspection of hitch • The ball coupling is closed when the lever rests in position and the green pin of the hitching display is visible. If the WS 3000 is not properly attached to the coupling ball, the caravan can detach from the base vehicle. -
Page 21: Front Landing Wheel
Controlling the stabilizing device Nach Ankuppeln und Aktivieren der Stabilisierungseinrichtung kann der Zustand der Reibelemente kontrolliert werden: After having hitched and activated the stabilizing device, you can then control the state of the friction pads: If the wear indicator is in the green (OK) zone, the friction pads are suitable for driving.
-
Page 22: Locking Brake Facilities
3.5 Locking brake The components of the brake system, especially the overrun coupling, transmission and wheel facilities brakes have been checked in accordance with the corresponding EU directives and may only be used in the licensed combination. If you alter or modify any components of the brake facilities, the operation permission loses its validity.
-
Page 23: Overrunning Equipment And Wheel Brakes
3.6 Overrunning equipment The overrunning brake facility consists of the overrun coupling, a transmission and the wheel and wheel brakes brakes. Should the caravan bump into the base vehicle, the overrunning brake facility ensures that it will automatically brake. In other words, the overrunning brake facility functions indepen- dently from the base vehicle’s brake system.
-
Page 24
checked every 5,000 km or at least once every year. One sure sign of strong brake lining wear is described in the aforementioned check for the overrunning equipment: if the safety clutch can be pushed in more than approx. 45 mm. Automatic Brake Adjustment (Premium) All Premium models have an automatic brake… -
Page 25: Rotating Stanchions
• Turn the rotating stanchions outward. The rotating stanchions may only be used for support, and not for leveling De Luxe easy out or raising. Turning the rotating stanchions inward • With the crank, turn the rotating stanchions inward to the horizontal position.
-
Page 26: General Inspection
Premium, De Luxe, Excellent, Prestige, Landhaus: The name plate is located in the gas locker box, above the bottle holder. De Luxe easy The name plate is located in the lo- wer front area on the right-hand side wall. Premium, De Luxe,…
-
Page 27
3.10 Fit for a Speed of 60 mph 1. Your HOBBY caravan is technically equipped for a maximum speed of 60 mph. Under no circumstances may this speed be exceeded! 2. Note the permissible maximum speeds for trailer carriages in the country in which you are travelling! 3. -
Page 28: Definition Of Mass
1. Gross vehicle weight rating (g.v.w.r.) The indication of the gross vehicle weight rating is taken directly from the HOBBY factory. These weights were calculated as a result of lengthy and detailed experiments; for safety reasons, they may not be exceeded.
-
Page 29
5. Additional equipment Additional equipment includes all items not part of the standard equipment preinstalled in the HOBBY factory or by the dealer. This also includes installations by special request. The mass in running order refers to the vehicle as originally equipped by the dealer or factory. -
Page 30: Wheels, Tyres
4. Wheels, tyres 4.1 Tyres Only use those tyres designated in the registra- tion documents. Other tyre sizes may only be used with the permission of the manufacturer. • Check tyres regularly to ensure that the tread is worn down evenly; check tread depth; check for external damages.
-
Page 31: Profile Depth And Age Of Tyres
If the tyre pressure is too low, the tyre can overheat. This can result in serious damage. The correct tyre pressure is given in the table on wheels/tyre pressure found under «Technical Information» or on the labels in the gas-bottle container and on the wheel cover.
-
Page 32: Rims
4.4 Rims Only use rims that are covered by the vehicle licence. Should you wish to use other rims, please note the following: Rules for the use of other rims: — Size, — mechanisms, — compression depth and — the load/bearing capacity must be sufficient for the permissible total mass.
-
Page 33: Changing The Tyre
• In the De Luxe easy model, the spare tire is attached by means of a tommy screw to a special holder in the gas bottle container at the front left-hand side of the camper.
-
Page 34
Spare Tyre for De Luxe, Excellent, Prestige, Premium and Landhaus * A spare tire is available as an optional extra for all of the models listed above. It can be mounted underneath the vehicle. To remove the spare tyre, the vehicle must be unhitched and placed on the coupling jaw in order to raise the rear end of the vehicle. -
Page 35
The rotating stanchions may not be used as a jack After changing the tyre, the wheel screws must be examined (after a 50 km drive) to ensure that they are tight enough (tighten if necessary). Changing the wheel • Set the corresponding jack onto the axle pipe of the swinging lever group or on the longitudinal beam in the area of the axle… -
Page 36: Tyre Repair Kit
Tyre repair kit Do not use the tyre repair kit if the tyre was damaged as a result of driving without air. Small cuts, es- pecially in the tyre tread, can be resealed using the tyre repair kit. Do not remove foreign objects (such as screws or nails) from the tyre.
-
Page 37
D Hold the bottle down with the filling tube and then press them together. Press the entire bottle contents into the tyre. Pull the fill hose and screw the valve insert tightly into the tyre valve with the valve-core remover E Open the air hose on the tyre valve. -
Page 38: Exterior Structure
5. Exterior structure 5.1 Ventilation and De-aerating Rules for forced ventilation Proper ventilation and de-aerating of the vehi- cle is a prerequisite for ideal living comfort. A draft-free forced-ventilation system is located in the floor and a forced de-aerating system is located in the ceiling which should not be interfered with.
-
Page 39: Heating Element
Special cover plates should be used during winter operation. You can buy these cover plates from your dealer. We recommend that you remove the ventilation bars when outside tem- peratures are very high. This creates a high air circulation on the refrigera tor and increases cooling capacity.
-
Page 40: Entry Door
5.2 Entry door External entry door To open • Turn the key to the right until you hear the lock open • Turn the key back to an upright position and pull it out. • Pull on the door handle. •…
-
Page 41
Stable entry door The upper and lower parts of the entry door can be opened and closed separately by opening the door and then unlocking the upper part of the door from the lower part. Unlocking the upper part of the door •… -
Page 42: Service Flap
Pull the pleated (upper part of the door) and the insect screen on the entry door to the desired position. Entry step tread When entering and exiting the vehicle: • Place step tread in front of the entry door to the caravan.
-
Page 43: Gas-Bottle Container Flap
5.4 Gas-bottle container flap De Luxe easy To open • Unlatch the lock with the key. • To unlock, turn the knob that pops out in a counter-clockwise direction and open the gas-bottle container lid.
-
Page 44: Toilet Flap
5.5 Rear Storage Compartment Premium To open • Unlatch the lock with the key. • Turn the handle down by 90° to a vertical position. • Slowly lift up the rear storage locker lid. To close • Close the rear storage locker lid and turn the handle by 90°…
-
Page 45: Roof
5.7 Roof The following applies for the roof load • Use only standardised and licensed ladders that can be positioned firmly to climb onto the roof. • The roof has not been made for concentrated loads. Place a large-scale cover over the area you wish to step on before standing on the roof.
-
Page 46
The wheel cover has an integrated keder strip for sliding in the mudguard. Fastening for the outer tent Use the specially developed Hobby Vario Clip as a ridgepole bracket to securely attach an outer tent to the caravan. The clip can be attached without screws and has been specially adapted to the contour of the moulding. -
Page 47: Bicycle Carrier
5.9 Bicycle carrier * De Luxe easy The handling of the caravan changes consi- derably when the bicycle carrier has been loa- ded. You should adjust your speed to take this into consideration: • Ensure that you make full use of the permitted towbar load when the bicycle carrier has been loaded and correct it accordingly.
-
Page 48: Roof Awning
5.10 Roof awning * Appropriate adapters and fitting components are available for subsequent assembly of roof aw- nings. Please speak to your HOBBY dealer. The roof awning should always be assembled by an authorised specialist. The maximum permissible total width and total height may not be exceeded by installing an awning.
-
Page 49
05-12… -
Page 50: Interior Structure
6. Interior structure 6.1 Doors, flaps and drawers Kitchen Wall Cabinet Premium To open • Pull the long edge of the handle forwards and fold it in towards the short edge. • Pull on the handle until the flap opens. To close •…
-
Page 51
Furniture doors with handle Washroom door • Push the handle to open and shut the door. Furniture doors with knob Wardrobe • Turn the knob to open and shut the door. Kitchen drawer/cupboard with pushlock Each individual drawer is secured by a separate pushlock To open •… -
Page 52
Furniture doors with a locking mechanism Wall cabinets in the kitchen for De Luxe easy, De Luxe, Excellent, Prestige, Land- haus To open • Press the release and pull on the handle to open the door. To close • Use the handle to close the door until you can feel it lock into place. -
Page 53: Tv Mount
Carousel in the Corner Kitchen Release the door of the corner base cabinet by pressing the pushlock . Then use the handle to open the door. Pull gently on the two storage shelves to pull them carefully out of the cabinet. Carry out this procedure in reverse order to shut the cabinet.
-
Page 54: Tables
6.3 Tables Elevating table To lower • Turn the locking bolt 180°. • Press on table top to lower the table. • Turn the locking bolt back and secure the table top. To turn • Loosen the knurled screw • Turn the table in the desired (excentric) direction. •…
-
Page 55: Hanging Table
Hanging table To lower • Raise the front end of the table top by approx. 30°. • Pull down the lower part of the table leg fold it over by 90° and lay it alongside. • Fold out the supporting legs by 90°.
-
Page 56: Conversion Of Seats And Beds
Swivelling table To lower • Pull upwards on the bow handle on the right-hand side. • Swivel the table top downwards towards the centre of the vehicle until the handle locks into place. To turn • There are rollers on the table legs, shifted 45°, which enable the table to be turned around its centre point in any desired direction.
-
Page 57
Bed Expansion for Long Beds The bed expansion enables you to widen the two long beds, turning them into a double bed. • Lift up the night table attachment remove it. • Pull on the handle and pull out the slatted frame to its full horizontal position. -
Page 58: Children’s Beds
6.5 Children’s beds • Windows by the children’s beds are secured against accidental opening, to effectively pre vent children from falling out. Be careful when using the upper bed for small children, as there is a danger that they may fall out. Never leave small children unattended in the caravan.
-
Page 59
Pleated Blinds and Shades Pleated Blind or shades are integrated together with the insect screen in the window frame. To close the black-out pleating • Use the handle to pull the plissé up to the desired position and then let go. The shade remains in this position. -
Page 60: Roof Lights
6.7 Roof lights Safety instructions • Never open the roof lights in a strong wind or when it is raining, hailing, etc., or if the outside tem- perature is below -20° C! • Never use force to open the roof lights if they are frozen or cove- red with snow, because you may break the hinges and the opening…
-
Page 61
Small roof light To open the roof light • This roof light can be opened to three different settings in the opposite direction to traffic. Press the locking knob on the side and use the adjusting lever to move the roof light to the desired position;… -
Page 62: Installation Of Electrical Devices
7. Installation of electrical devices 7.1 Safety tips The installation of electrical devices in the HOB- BY caravan has been carried out in accordance with the valid regulations and standards. Please note Do not remove safety tips and war- nings on the electrical equipment. The installation spaces for electrical equipment such as distribution fuse boards, electric power supply, etc.,…
-
Page 63: Control Panel
Water level indicator Main switch Control panel (De Luxe easy) The system consists of control electronics, a standard or LCD panel (model-specific or op- tional extra) with a keypad and several 3-key control panels. It enables you to operate the dif- ferent lamps and several 230 V devices.
-
Page 64
Lighting Kitchen light Ceiling light Outer tent light Ambience 2 Wall light Therme Lighting Ambience 1 Floor heating Lighting Ambience 3 Memory Water level indicator Main switch Standard control panel (De Luxe/Excellent/Prestige) 07-3… -
Page 65
Lighting Kitchen light Ceiling light Outer tent light Ambience 2 Wall light Therme Lighting Ambience 1 Floor heating Lighting Ambience 3 Memory Rotary encoder with keys LCD Display Menu Main switch LCD control panel (Premium/Landhaus models or optional extra) 07-4… -
Page 66
Functions of the main switch • After initially connecting the caravan to the 230 V mains, you must press either the main switch or any other control key in order to activate all of the 12 V electrical devices and the 230 V electrical devices that are switched by the system (e.g. -
Page 67
Ambience (not for De Luxe easy and De Luxe) • Press briefly on the key to switch the electric circuit of each ambience (indirect lighting) on and off. -
Page 68
Kitchen light • Briefly press the key to switch the kitchen lamp on and off. Therme with LED display • Press the key to switch the therme on and off. An illuminated LED signals that the therme has been switched on. •… -
Page 69
Filling level indicator When you press this key, the filling level of the fresh water tank is displayed via an LED chain. The level of the fresh and waste water tanks is displayed in 5 steps: empty only the left red LED lights up left red LED off;… -
Page 70: Remote Control
Children’s switch All of the vehicles with a entry partition have a special switch in the entrance area at a height that can be reached by children. This switch enables them to turn the main lights on and off. Remote control •…
-
Page 71: Main Switch
Standard functions on the LCD Current time Current date display Basic menu • The basic menu appears if you have not pressed a navigation key during the past 30 seconds (approximately). This menu is not illuminated. Time • The current time is displayed in this field. Date Connection to base •…
-
Page 72
Level of the tank • After turning once to the right or left, the menu for displaying the level of the fresh water tank appears. • In the example, the tank is 1/2 full. The values measured and displayed are shown as: empty, 1/4, 1/2, 3/4 and full. -
Page 73
Air conditioning The following functions for the air-conditioning system can be set on the control unit: — On/Off — Cool Mode: cooling and ventilation Cool Low / Cool / Cool High — Fan Mode: ventilation only Fan Low / Fan High The aforementioned functions are only available for air conditioning systems that are CI bus compati-… -
Page 74
Setting the time, alarm clock and date • After pressing the menu button for a longer period of time (approx. 2 seconds) the menu for setting the current time, date, wake-up time and activating or deactivating the alarm clock appears. •… -
Page 75
Battery charge Battery is discharged: Current drain: Remaining time until discharge: 8 h Charge level: Battery is charged: Charging current: Expected recharging time: 4.5 h Charge level: If the charge level indicator does not show a value, the IBS must be recalibrated.Normally, the system does this automatically. -
Page 76
WLAN-Module Hobby’s CI-Bus board management can link together up to 15 devices, enabling you to ope- rate them using just one central control panel that shows their functions on its display. (standard) When coupled to a WLAN module, all of the… -
Page 77
Then select the network, enter the password and click on the “Connect” button to confirm. You can now call up the website http://192.168.0.1 in the Internet browser. By continuing to turn and confirm the rotary en- coder on the control panel, you will reach the Web server data, which is required to open the data in the Web browser. -
Page 78
At present, operation via a surfstick is not yet supported.Please use the WLAN menu in the LCD display to switch WLAN operation on and off. After switching it off, “WLAN shut- down” will be displayed for approx. 60 seconds. When “WLAN: Off” is displayed, the camper’s entire power supply can be switched off. -
Page 79: Electrical Supply
7.3 Electrical supply Electricity for the caravan can be obtained from the following connections: — 230 V mains connection 50 Hz — via the base vehicle if it is connected using the 13-pole plug (limited functions) — via a built-in auxiliary battery Everything that uses 12 V, such as lighting, water supply, etc., is available.
-
Page 80
To disconnect the electric connection • Switch off the automatic circuit breaker pressing the rocker button down • Press the lever in the external socket down. • Remove the CEE plug • Press the cover flap down until it clicks into place. -
Page 81
Operation via base vehicle During the drive, the battery of the base vehi- cle takes over the supply of the 12 V devices if contact 9 of the 13-pole socket system on the base vehicle has been equipped. Use the main switch on the control panel to switch off the 12 V operation during the drive, on longer stopovers and breaks to conserve power in the base vehicle‘s battery. -
Page 82: Residual Current Device
Residual current device The standard version of your vehicle is equipped with a residual current device that will interrupt the electric circuit in case of a possible residual current. This device is built into the clothes cup- board of every vehicle. Repairs must not be carried out on the residual current device.
-
Page 83: Self-Sufficient Package
Operation via auxiliary battery (self-sufficient package) • Only accumulator batteries with bound electrolytes (gel or AGM batteries) may be installed in those positions specified by the manufac- turer. • The installed battery may not be opened. • When changing auxiliary batteries, use only batteries of the same make Charge controller in the clothes cupboard on and capacity.
-
Page 84
An Intelligent Battery Sensor (IBS) has been connected to the battery terminal. It monitors the actual current and the actual voltage in a highly precise manner. It is possible to precisely predetermine the ope- rating time of the battery based on the actual consumption. -
Page 85: Electrical System
• Before each journey, please check that the battery is charged (see p. 07-13). If necessary, connect it to the mains and press the main switch to start charging the battery. • Leave the main switch on whenever the caravan is being used so that the batte- ry is charged regularly.
-
Page 86
Electric circuit 4 (7,5 A): fan, washstand, ambience 3, ambience 1 Electric circuit 5 (7.5 A): water supply, Porta Potti, refrigerator illumination De Luxe easy Electric circuit 1 (7,5 A): ceiling light Electric circuit 2 (7,5 A): dependent on the model… -
Page 87
Your caravan also has a combined external so- cket and antenna terminal in the outer tent (optional extra for De Luxe and De Luxe easy). This can be used, for example, to set up a TV in the outer tent. Depending on how you wire it, the integrated antenna terminal can be used as either an input or an output socket. -
Page 88: External Circuit Diagram
7.5 External circuit diagram 07-27…
-
Page 89: Contact Plan For The Light Control System
7.6 Contact plan for the light control system De Luxe easy S38 to charge controller, 230V current range input 1 charging current (only self-sufficient / 12V) 9 and 13 from car or S40 10/11 from plus connection to charge controller,…
-
Page 90
De Luxe/Excellent/Prestige/Premium/Landhaus S38 to charge controller, input 1 charging current 230V current range (only self-sufficient / 12V) 9 and 13 from car or S40 10/11 from plus connection to charge controller, Therme terminal ignition battery connection for self-sufficient / 12V circuit Fuses S39 to charge controller,… -
Page 91
7.7 Special Lights The switches for the lights described here are located directly on the lights themselves; they are not controlled via the control panel. Corner lights Spotlight and integrated lighting columns can be switched separately. The clothes cupboard light is switched on and off by opening the doors of the cupboard (integrated contact switch — cannot be switched… -
Page 92: Water
8. Water 8.1 General information We recommend that you inspect any water you have left in the tank, this is very critical before using the water again. Please note • Water that is suitable for drinking should always be used with working with food. This also applies to washing your hands and clea- ning the objects that have come into contact with food.
-
Page 93: Water Supply
8.2 Water supply Built-in fresh water tank The tank has a model-specific volume of 25 or 50 litres. The tank is filled with fresh water by means of the filler neck on the side wall. The fresh water filler neck is identified by a blue screw cap as well as a water faucet symbol on the lower edge of the frame.
-
Page 94: Filling The Water System
During the trip, the waste water tank can be stored in the gas-bottle container to save space. Exception: In the Landhaus model, the waste wa- ter tank is stored under the queen-size bed (acces- sible via the service flap). Empty the waste water tank before beginning your journey and then use the belt in the gas-bottle container to secure it.
-
Page 95: Hot Water Supply
To remove water • The water will be mixed to the desired temperature according to the position of the pre-mixing unit. Emptying the water system • Use the control panel to switch off the electrici- ty for the water pump by pressing the main switch for a longer period of time (4 sec.).
-
Page 96
• Empty the therme at the risk of frost. Frozen water can cause the therme to burst! • A depressuriser must be used if the pump is connected to a central water supply, or on stronger pumps. The pressure in the therme may not exceed 1.2 bar. -
Page 97: Boiler
8.3 Boiler The optional boiler holds approx. 14 litres of water. It uses gas to heat the water or, depen- ding on the model, there is also an option to heat it electrically using an integrated heating rod. It replaces the standard Truma therme. Before each journey, make sure the boiler has been switched off and then attach the chimney cap.
-
Page 98
Operating on gas • Remove the chimney cap. Boiler • Open the gas bottle and the emergency shut- off valve on the gas pipe. • Use the rotary switch on the control panel to switch on the boiler. The green control light will shine. -
Page 99
8.4 Toilet Preparing the excrement tank Before you can use the toilet, you must first pre- pare the excrement tank. How to do this is shown in Figures 1 to 11 on the left. Never add sanitary liquids directly through the valve or into the toilet bowl, because this may damage the washer of the valve in the excrement tank. -
Page 100
Using the toilet The toilet can be used when the valve is either open or closed. To open the valve, turn the con- trol knob counter-clockwise or push the lever to the left (depending on your model). Never leave any water in the bowl when the toilet is not being used. -
Page 101
08-10… -
Page 102: Gas System
9. Gas system 9.1 General safety rules for the use of liquid gas facilities The gas operation pressure is 30 mbar. Inspection of the gas facilities • Have the gas facilities checked by an expert before the first use. • The gas facilities should be inspected by an expert every two years.
-
Page 103
• Pressure regulators must have a fixed output pressure of 30 mbar. The requirements of EN 12864, Appendix D, apply accordingly. The regulator must have a rate of flow of 1.2 kg/h. • Connect the regulator knobs very carefully by hand. -
Page 104: Gas Supply
9.2 Gas supply The caravan is equipped with propane gas facilities. These facilities opeate the following devices: cooker refrigerator heating element warm water boiler, if necessary special equipment, if necessary — baking oven, if necessary Bottle container The gas bottle container holds two 11 kg pro- pane cylinders .
-
Page 105
Changing gas bottles Never smoke or light open fires when changing gas bottles. After changing bottles, check whether gas is escaping from the points of attachment by spra- ying these with a leak indicator. • Open the flap of the gas-bottle container. •… -
Page 106
9.3 External gas socket The external gas socket can be used for connec- ting gas devices (such as the barbeque). When hitching, the plug connection is plugged into the safety coupling. The plug connection can only be hitched when the emergency shutoff valve has been closed. -
Page 107
09-6… -
Page 108: Built-In Devices
10. Built-in devices 10.1 General information In this chapter, you will find information on the devices that have been built into the caravan. This information refers only to the operation of these devices. For further information on the individual built-in devices, please refer to the separate operating instructions that have been included in the blue service bag found in the vehicle.
-
Page 109: Hot-Air Heating
10.2 Hot-air heating Heating while driving is forbidden. Place of installation In the closet or the corner of the flue Before first use • Several air outlet nozzles have been built into the caravan. Pipes lead the hot air to the air outlet nozzles.
-
Page 110
• If the flame goes out again, it will immediately be re-ignited during the closing time of the safety pilot (approx. 30 seconds). • If no flame is ignited, the automatic ignitor will continue to work until the operation handle is switched to “0”. -
Page 111
Circulation fan The heating system in your caravan has been fitted with a recirculation air system which distri- butes the hot air throughout the entire interior by means of several air vents. The air vents can be turned and opened individually, enabling the hot air to escape with the corresponding intensity to where it is required. -
Page 112: Electric Auxiliary Heating
10.3 Electric auxiliary heating The electric auxiliary heating (Ultrahe- at) operates only when the caravan is connected to the 230V mains supply. The electric auxiliary heating is integrated in the hot-air heating system. This allows for three pos- sible heating methods: — just the gas heater — gas heater + electric heater — just the electric heater…
-
Page 113: Electrical Floor Heating
To switch on Ultraheat • Set the rotary switch to the desired power set- ting (green indicator light will light up during „Operation“). 2000 • Set the desired room temperature using the rotary switch. To switch off 1000 230 V ~ •…
-
Page 114: Hot-Water Heating System
10.5 Hot-water heating system You are not permitted to operate the hot water heater while driving. The Compact 3010 LPG heater is a hot-water heating system which heats hot water separately (contents: 8.5 l). It is possible to heat up the he- ating system without filling the hot-water heater with fresh water.
-
Page 115
Operating device When in the idle position, the device shows which heating functions have been activated; the background lighting of the display is off. After two minutes, the operating device automa- tically switches from the set position to the idle position if no button has been pressed or if the idle position has been set using the arrows. -
Page 116
Setting the desired temperature (+5°C to +30°C) by pressing – or + in steps of 0.5°C. Hot water (50°C) is always available when this is switched on. The hot-water system is operated electrically or uses LPG. Setting the hot water Should you require more hot water, the tempera- ture can be increased temporarily from 50°C to 65°C. -
Page 117
Activating the Tools menu The Tools menu is used to control the remaining functions of the control unit. To activate the Tools menu, the following icons must be pressed, as shown on the left: Functions of the Tools menu Arrow icons enabling you to switch between the individual Tools fields. -
Page 118
Continuous operation of the pumps to limit the volume of hot water, especially if little heating is required. Pump Auto / 12V – the 230V pump will run if this is set to the auto position; if the 230V electric power supply is interrupted, the 12V pump will start up. -
Page 119
Error messages Error messages are shown on the display (panel in idle state). Battery low: if voltage sinks to under 10.5V, the heating system will switch off. Automatic reset to above 11V. Fan failure: incorrect fan speed. Automatic reset after 5 minutes. Gas failure: gas bottle is empty. -
Page 120: Refrigerator
10.6 Refrigerator Refrigerators made by Dometic will be installed. If the external temperature is high, full refrige- rating capacity can only be ensured by means of sufficient ventilation. If necessary, to achieve better ventilation, the refrigerator’s ventilation grille can be removed at the caravan. Turn on the refrigerator at least 12 hours before putting anything in it and, if possible, store only goods that have…
-
Page 121
• Turn the thermostat up full and keep it pressed down. The refrigerator will either ignite automa- tically or by using the knob for manual ignition (depending on your model). • When it is ignited, let go of the thermostat. Re- peat the previous step if it has not ignited. -
Page 122: Storing Food
Removable freezer (Slim Tower) To make the best use of space, the freezer can be removed. To remove the freezer • Fold down the locking clamps underneath the freezer. • Push both clamps towards the middle. • Pull the freezer slightly out. •…
-
Page 123: Gas Cooker
10.7 Gas cooker The kitchen segment of the caravan is equipped with a 3-flame gas cooker. Before first use: • Open the bottle valve and the quick-close valve in the gas line. • The roof ventilation or the window must be open while operating the gas cooker.
-
Page 124
Operation • Open the cover • Set the turning knob of the desired burner in the ignition position (large flame) and press. • Ignite the burner with gas lighter fluid, a match and/or lighter. • Hold the turning knob in for an additional 10-15 seconds. -
Page 125: Fume Hood
10.8 Fume hood As an option, the kitchen can be fitted with an extractor fan. The built-in fan blows kitchen odours directly outside. Press the right button to turn on the fume hood. Hold the fan button firmly to select the speed of the fan from among 15 different speeds.
-
Page 126
• Never operate the oven when it is empty (i.e., without food that is to be heated). • The grill should never be used for longer than 25 minutes and only operated when the oven door is open. • Never use the oven to heat the caravan. -
Page 127: Microwave
10.10 Microwave The kitchen of your camper can be outfitted with a 230 V microwave, which is installed behind a flap in the kitchen wall cabinet. This device is suitable for defrosting, heating up and cooking food for your personal use. Leave the flap open when operating the microwave.
-
Page 128: Accessories
• Any accessories, add-ons, modifications or mounted parts that have not been approved by HOBBY may cause damage to the vehicle and impair its roadworthiness. Even if an expertise, general type approval or design approval has been provided for these parts, this does not ensure the orderly condition of the product.
-
Page 129
11-2… -
Page 130: Maintenance And Upkeep
Rules for maintenance intervals • Have the first maintenance performed by a HOBBY dealer 12 months after the initial registration. • Havve all further maintenance performed once annually at a HOBBY dealer.
-
Page 131: Drawgear
• Lightly grease the stationary parts on the case of the overrunning equipment after every 5,000 kilometres of driving. IMPORTANT: The friction elements of the WS 3000 safety hitch may NEVER be oiled or greased. • Check from time to time to ensure that the bea- ring surfaces of the thrust rod are not jammed.
-
Page 132
Tension ball coupler Keep the friction linings inside the tension ball coupler clean and free of grease (Fig. 5). When the friction linings are dirty, the surface can be cleaned with 200-240 grain sandpaper. Then clean with petroleum ether or spirit. All movable bearings and bolts are easy to grease. -
Page 133: Brakes
12.3 Brakes Initial inspection The wheel brakes that have been installed are drum brakes that do not adjust automatically. (Exception: Premium) To ensure trouble-free brake performance, the wheel brakes must be adjusted regularly. The brakes must first be inspected after you have driven 500 km.
-
Page 134: Changing The Taillight Bulbs
12.4 Changing the taillight bulbs The following description for changing the rear light bulbs refers to the De Luxe easy model. Different rear lights are used in the Premium and Landhaus models. Unfortunately, it is not possible to replace these light bulbs easily. In…
-
Page 135
The following description for changing the rear light bulbs refers to the De Luxe, Excellent and Prestige models. • Remove the two screws • Remove the rear light from the lighting beam. • Remove the bulb from the socket by turning it. Carry out this procedure in reverse order to install a new bulb and replace the rear light. -
Page 136: Ventilation
Sufficient ventilation and de-aeration of the vehi- 12.5 Ventilation cle interior is essential to maintaining a com- fortable climate. In addition, corrosion damage from sweat residue can be avoided. Sweat residue forms most readily — in tight spaces, — from the breath and perspiration of the passen gers, — by carrying in damp clothing, — when operating the gas cooker.
-
Page 137
Thoroughly dry the light sockets, because water collects there easily. Never use caustic cleaners or clea- ners which contain solvents. Cleaning with a high-pressure cleaner Labels and exterior decorations should not be sprayed directly with a high-pressure cleaner, because they may come off. -
Page 138
Do not use aggressive solvents such as products containing esters or ketone. Rules for damage repair • All damage should be repaired immediately to avoid further damage from corrosion. Con sult your HOBBY dealer. 12-9… -
Page 139: Windows And Doors
Chassis The chassis of the caravan has been specially coated. If the protective coating is damaged, repair it immediately. Coated areas should not be treated with spray oil. The combustion air intake duct for the heating system is located underneath the floor of the vehicle.
-
Page 140: Cleaning The Interior
Cleaning the interior To reduce problems arising from dampness, use water sparingly when cleaning inside. Rules for cleaning seat covers, upholstery covers and curtains • Clean seat covers with a soft brush or vacu- um cleaner. • Have heavily soiled upholstery covers, bed- spreads and curtains dry cleaned;…
-
Page 141
Method B: • Use only mild, water-free solvents for dry cleaning. • Dampen the cloth and proceed as described in method A. This method is particularly suitable for removing: — wax, candles — pencil Chocolate or coffee should only be washed out with luke-warm water. -
Page 142
Rules for cleaning the toilet area • Clean with neutral liquid soap and a non- scouring cloth. • Do not use a vinegar concentrate to clean the toilet and the water system or to decalcify the water system. Vinegar concentrate can dam- age gaskets or parts of the system. -
Page 143: Winter Lay Up For The Caravan
Remove all spray cans with cleaners and polishes from the vehicle after finishing the upkeep! Otherwise, there is a danger of explosion at temperatures over 50° C! 12.7 Winter Lay Up for the Caravan For many people, the camping season ends when the temperature starts to fall.
-
Page 144
Wash the vehicle only in special places provided for this purpose. Use cleaning materials sparingly. Aggressive cleansers, such as wheel rim cleaners, damage the environment. The following applies for tanks and con- tainers: • Clean, disinfect, descale and completely em- pty all water pipes and faucets. -
Page 145: Winter Operation
With regard to camping in winter, we recommend that you optimize your caravan to meet your personal requi- rements. Your Hobby dealer will be pleased to advise you. The following applies for heating: • Both the air intake as well as the exhaust gas…
-
Page 146
The following applies for ventilation: During operation in winter, condensation is caused when using the caravan in low tempera- tures. Sufficient ventilation is extremely impor- tant to ensure that the quality of the air inside the caravan is good and to avoid damages to the vehicle caused by condensation. -
Page 147
12-18… -
Page 148: Waste Disposal And Environmental Protection
13. Waste disposal and environmental protection 13.1 The environment and mobile travel Environmentally sound use By nature of their activities, caravan users bear a considerable responsibility towards the environ- ment. Therefore, you should always use your caravan in an environmentally sound manner. Rules for environmentally sound use •…
-
Page 149
Rules for the disposal of faeces • Only add approved cleaners to the faeces tank. The use of other cleaners can be avoided by the installation of an active charcoal filter system. Apply cleaning fluid very sparingly. Excessive application does not guarantee the prevention of odour build-up! Disposal… -
Page 150: Technical Data
Add. load empty equipment running [kg] [kg] [kg] [kg] order [kg] 400 TB De Luxe easy 1100 400 SF De Luxe easy 1100 400 SFe de Luxe easy 1000 1200 420 KB De Luxe easy 1010 1072 1200 440 SF De Luxe easy…
-
Page 151
Type Weight Basic Mass in g.v.w.r. Add. load empty equipment running [kg] [kg] [kg] [kg] order [kg] 540 KMFe de Luxe 1308 1395 1500 560 FFE de Luxe 1295 1382 1600 545 KMF de Luxe 1361 1432 1600 560 UL de Luxe 1395 1482 1600… -
Page 152: Basic Equipment
14.3 Basic equipment The basic equipment includes all of the equipment objects and fluids that are required for the safe and correct use of the vehicle. This includes the weights of: a) liquid gas supply 400 TB / 400 SFe — 540 — 720 WLU, 400 SF…
-
Page 153: Technical Data
14.4 Technical data Trade Tech- g.v.w.r. Per- Axle(s) Wheel Leading Safety Towbar name nical [kg] mitted brake equip- coupling name axle load ment 400 TB M02B 1100 1100 VGB 13 M 20-2425/1 KFL 12 B WS 3000 H45 One Piece •…
-
Page 154
Rims Tyre Floor Total Track Dis- Length Length Total size [bar] length width tance length Wheel Size Model towbar caravan mounting J x 14 5/112, ET 30 Steel 195/70 R 14 XL 3830 2200 1950 3681 4110 4703 5898 J x 14 5/112, ET 30 Steel 195/70 R 14 XL… -
Page 155
Trade Tech- g.v.w.r. Per- Axle(s) Wheel Leading Safety Towbar name nical [kg] mitted brake equip- coupling name axle load ment 560 KMFe C33B 1600 1600 VGB 16 MV 20-2425/1 KFL 20 A WS 3000 H50 ZHL 15 A • 560 KMFe C33K 1600 1600 VGB 16 MV 20-2425/1… -
Page 156
Rims Tyre Floor Total Track Dis- Length Length Total size [bar] length width tance length Wheel Size Model towbar caravan mounting J x 14 5/112, ET 30 Steel 185 R 14 C 5570 2500 2250 4446 5850 6443 7623 J x 14 5/112, ET 30 Steel 185 R 14 C… -
Page 157: Possibilities For Increasing Loads
14.5 Possibilities for increasing loads Basic version Trade Tech- g.v.w.r. Axle Axle Tyres Brakes Leading Forked name nical [kg] load equip- drawbar name [kg] ment 400 TB M02B • 1100 1100 VGB 13 M 195/70 R 14 XL LI 96 20-2425/1 KFL 12 B One-Piece 400 SF A28B 1100…
-
Page 158
Maximum increased load g.v.w.r. Axle load Axle Additional Wheels Brakes Leading Forked Weight [kg] [kg] New ! rear New ! New ! equipment drawbar crossbar New ! 1350 1350 1350 1350 1350 1350 1500 1500 VGB 15 MV 185 R 14 C LI 102 KFL 20 A 16,4 1350… -
Page 159
Standardausführung Trade Tech- g.v.w.r. Axle Axle Tyres Brakes Leading Forked name nical [kg] load equip- drawbar name [kg] ment 560 UL B24? 1600 1600 VGB 16 MV 185 R 14 C LI 102 20-2425/1 KFL 20 A ZHL 15 A •… -
Page 160
Maximum increased load g.v.w.r. Axle load Axle Additional Wheels Brakes Leading Forked Weight [kg] [kg] New ! rear New ! New ! equipment drawbar crossbar New ! 1750 1750 VGB 18 MV 195/70 R 15 C LI 104 25-2025 28,3 2000 2000 DB 20 MV… -
Page 161: Tyres And Rims
14.6 Tyres and Rims Standard Metal wheel rims for Light alloy rims for version the standard version the standard version Trade Tech- Axle Metal Tyre size Light Light Light Tyre size g.v.w.r. name nical load wheel pressure alloy alloy rim, alloy pres- [kg]…
-
Page 162
Max. increase Metal wheel rims for Light alloy rims for (for increased load) increased load increased load g.v.w.r. Axle Metal Tyre size Light alloy rim, Light Light alloy Tyre size [kg] load wheel rim pressure size alloy rim, rim, colour pres- [kg] (bar) -
Page 163
Standard Metal wheel rims for Light alloy rims for version the standard version the standard version Trade Tech- Axle Metal Tyre size Light Light Light Tyre size g.v.w.r. name nical load wheel pressure alloy alloy rim, alloy pres- [kg] name [kg] (bar) rim,… -
Page 164
Max. increase Metal wheel rims for Light alloy rims for (for increased load) increased load increased load g.v.w.r. Axle load Metal Tyre size Light alloy rim, Light Light alloy Tyre size [kg] [kg] wheel rim pressure size alloy rim, rim, colour pres- (bar) marking… -
Page 165
14-16… -
Page 166: Index
Index Electrical system 07-24 Accessories 11-1 Elevating table 06-5 Emergency equipment 02-1 Additional equipment 03-12 Entry door 05-3 Additional loads 03-12 interior 05-3 Air-circulation fan 10-4 upper part of the door 05-4 Airing 12-7 Auxiliary battery 07-22 Environmental protection 13-1 Fighting a fire 02-2 Basic equipment 03-12, 14-3 First aid kit 02-1…
-
Page 167
Loading 02-4 suitable for a speed of 100 kms 03-10 technical data 14-4 tire pressure 14-1 Maintenance 12-1 tires and rims 14-12 Mass, definition 03-11 weights 14-1 Microwave 10-20 Technically permissible maximum weight 03-12 Therme 08-4 Tire pressure 04-1, 14-1 Oiling 03-1, 12-1 Tire profile depth 04-2 Outer tent light 07-6… -
Page 168
Hobby-Wohnwagenwerk Ing. Harald Striewski GmbH Harald-Striewski-Straße 15 D-24787 Fockbek/Rendsburg www.hobby-caravan.de…
Кузов-фургон. Valdai Next – руководство по эксплуатации.
- Valdai Next – руководство по эксплуатации.
Кузов-фургон.
Автомобиль-фургон представляет собой кузов-фургон закрытого типа панельной конструкции, установленный на шасси и закрепленный к лонжеронам шасси стремянками.
Кузов-фургон состоит из основания и смонтированных на нем панелей и задней двухстворчатой двери.
Основание кузова-фургона состоит из металлического каркаса и настила пола, набранного из досок или фанеры, которые крепятся к каркасу болтовыми соединениями и/или саморезами.
Каркасы панелей изготовлены из стальных профилей.
Наружная обшивка – плакированная сталь. В изотермических фургонах внутренняя обшивка – оцинкованная сталь.
Промтоварные фургоны без утеплителя и без внутренней обшивки. Панели и двери внутри промтоварного фургона защищены деревянными брусками или оцинкованным профилем.
В качестве теплоизоляционного материала для среднего слоя панелей применяется пенополистирол.
Задняя дверь кузова-фургона двухстворчатая, открывается наружу, оборудована штанговыми запорными устройствами, на которых предусмотрена установка замка и пломбы.
Для удобства входа и выхода через заднюю дверь справа внизу кузова-фургона установлена выдвижная подножка, а на правой стойке заднего проема имеется поручень-ручка.
Кузов-фургон имеет искусственное освещение при помощи плафона, расположенного на потолке кузова-фургона.
Поделиться ссылкой:
-
Contents
-
Table of Contents
-
Bookmarks
Quick Links
WWW.SEAGULLMODELS.COM
A S S E M B L Y M A N U A L
» Graphics and specifications may change without notice » .
Code: SEA249
(SEA249M)
Specifications:
Wingspan—————70.9 in (180 cm).
Wing area—————992 sq.in (64 sq.dm).
Weight——————-11 lbs (5.0 kg).
Length——————-58 in (147.3 cm).
Gas Engine—————20cc
Glow Engine————.91 cu.in
Electric Motor———-1500-2000 watt
( Power 60-110)
Radio———————6 channels with 8 servos.
Electric conversion: Optional.
(SEA249D)
www.seagullmodels.com
1
Summary of Contents for Seagull Models VAN’S RV- 8
Кузов-фургон. Valdai Next – руководство по эксплуатации.
- Valdai Next – руководство по эксплуатации.
Кузов-фургон.
Автомобиль-фургон представляет собой кузов-фургон закрытого типа панельной конструкции, установленный на шасси и закрепленный к лонжеронам шасси стремянками.
Кузов-фургон состоит из основания и смонтированных на нем панелей и задней двухстворчатой двери.
Основание кузова-фургона состоит из металлического каркаса и настила пола, набранного из досок или фанеры, которые крепятся к каркасу болтовыми соединениями и/или саморезами.
Каркасы панелей изготовлены из стальных профилей.
Наружная обшивка – плакированная сталь. В изотермических фургонах внутренняя обшивка – оцинкованная сталь.
Промтоварные фургоны без утеплителя и без внутренней обшивки. Панели и двери внутри промтоварного фургона защищены деревянными брусками или оцинкованным профилем.
В качестве теплоизоляционного материала для среднего слоя панелей применяется пенополистирол.
Задняя дверь кузова-фургона двухстворчатая, открывается наружу, оборудована штанговыми запорными устройствами, на которых предусмотрена установка замка и пломбы.
Для удобства входа и выхода через заднюю дверь справа внизу кузова-фургона установлена выдвижная подножка, а на правой стойке заднего проема имеется поручень-ручка.
Кузов-фургон имеет искусственное освещение при помощи плафона, расположенного на потолке кузова-фургона.
Поделиться ссылкой:
Руководства по эксплуатации
Уважаемые посетители!
В данном разделе для Вашего удобства собрана официальная информация о гарантийных условиях; регламенту периодического технического обслуживания; руководства и мануалы по установке,эксплуатации, ремонту и обслуживанию полуприцепов, элементов, узлов и агрегатов компаний-производителей Grunwald, BPW, SAF, Hyva, Hella. Вся информация представлена исключительно в ознакомительных целях.
По всем вопросам, рекомендуем Вам обращаться к официальным представителям компаний-производителей.
Официальная сервисная служба Grunwald Россия: тел.: +7 (915) 122-22-03; e-mail: service@grunwald.ru
|
|
|
|
|
|
|
|
|
|
|
|
|
|
|
|
|
|
|
|
|
|
|
|
|
|


—
Руководство по эксплуатации грузового автомобиля
Грузовой автомобиль – это особенно сложный, с точки зрения эксплуатации и технического обслуживания, вид транспортного средства. Объем работ, которые необходимо проводить для обеспечения безопасности передвижения, гораздо больше, чем у легковых видов автомобильного транспорта. Грузовик крупнее по размеру и габаритам, испытывает намного больше нагрузок, а появление любых неисправностей и поломок влечет за собой серьезные последствия и смертельную опасность для водителя или пассажиров.
Чтобы не подвергать себя риску, обеспечить долгий срок службы транспортного средства, необходимо знать о правилах и особенностях эксплуатации грузового автомобиля как на предприятии так и при использовании в личных целях.
В каком случае не разрешается эксплуатация грузового автомобиля
Для максимального обеспечения безопасности, водитель грузового транспортного средства перед любой поездкой обязан проверить исправность автомобиля. Существуют поломки, при возникновении которых передвижение на грузовике и его эксплуатация категорически запрещены.
Полный список документов, необходимый для оформления карты.
Тормозная система
Чтобы проверить, исправен ли тормоз, необходимо нажать на педаль тормоза при заглушенном двигателе. Она должна остановиться практически сразу и не двигаться, если водитель пытается дожать вперед. В случае, когда педаль начинает заклинивать, тормозная система не может считаться исправной.
Чтобы проверить вакуумный усилитель тормозов, нужно нажать на педаль, а затем, не убирая ноги, завести двигатель. Если педаль при запуске мотора не «провалилась» и вы слышите шипение, значит усилитель подлежит замене.
Для предупреждения неисправности ручного тормоза, поднимите рычаг и сосчитайте количество щелчков, за которое он пришел в вертикальное положение. Их должно быть 3-4.
Рулевое управление
Для проверки необходимо завести мотор и развить небольшую скорость движения – не более 10 км/ч. Повернуть с колеса в одно крайнее положение, затем – в противоположное, при помощи движения рулем. Колеса не должны перемещаться рывками без повышенных усилий со стороны водителя.
Сцепное устройство
Перед поездкой требуется произвести расцепку и сцепку автопоезда. Она должна осуществляться легко и без особых усилий со стороны водителя. Проверить состояние соединительных и фиксирующих элементов на наличие повреждений, осмотреть дышло, крепления.
Фары и габаритные огни
Зажгите и выключите их, прежде чем начать движение. Если на каком-то из устройств перегорела лампочка, ее необходимо заменить. В случаях, когда фары горят, но свет слишком тусклый, проверьте надежно ли закреплена лампа, исправен ли контакт. Также недостаточная освещенность может быть следствием разряжающегося аккумулятора.
Стеклоочиститель
Он обязательно должен быть исправен со стороны водителя, в противном случае можно лишиться обзора на дорогу во время дождя или снега. Если при включении моторчика дворники не приходят в движения, но слышен щелчок – проверить контакты.
Если при проверке этих систем обнаружена неисправность и ее невозможно устранить самостоятельно, ни транспортировать грузы и пассажиров, ни передвигаться на таком автомобиле нельзя. Необходимо обратиться в автосервис и не использовать автомобиль до окончания ремонта.
Цены на карты для тахографов можно узнать — Здесь!
Обстоятельства, влияющие на безопасность эксплуатаци грузового автомобиля
Существуют неисправности, которые ограничивают возможности использования грузового автомобиля. При попадании водителя в определенные условия, они могут спровоцировать аварийную ситуацию
Не работает обогрев
Если перевозка осуществляется в теплом климате, это не страшно. Однако, при сильных морозах окна автомобиля могут покрыться инеем и обзор дороги ухудшится. К тому же, если в салоне будет слишком холодно, водитель не сможет сосредоточиться, внимание может рассеяться, а это повлечет за собой аварию.
Не работает стеклоподъемник
Также зависит от климата. Водитель не сможет выполнять свою работу, если в салоне будет слишком жарко (стекло не опускается) или напротив – ветрено и холодно (стекло заклинило на подъеме).
Не работает звуковой сигнал
Для некоторых водителей такая деталь кажется несущественной и они продолжают ездить на грузовом автомобиле, имеющем данную неисправность. Однако, такая поломка напрямую влияет на безопасность. На дорогах может произойти всякое, и в случае, если возникнет аварийная ситуация и нужно будет подать сигнал, водитель просто не сможет этого сделать.
Правила эксплуатации грузового автомобиля в различных природных условиях
Перевозки грузов при помощи автотранспорта охватывают большую территорию с различными видами местности и климата. В каждом из них использование грузового транспортного средства имеет свои характерные особенности.
В экстремально холодном климате
Это районы, где средняя температура воздуха опускается ниже -60. Такие области занимают более половины территории России. Поэтому для наших водителей вопрос, как эксплуатировать грузовик в условиях холодного климата очень актуален. Если перевозчику предстоит поездка в такую климатическую зону, необходимо помнить о трудностях, с которыми он может столкнуться:
-
ухудшается проходимость топлива через шланги;
-
загустевает машинное масло;
-
снижается герметичность системы тормозов;
-
покрышки быстро приходят в негодность, резина становится жесткой;
-
во внутренних элементах машины скапливается конденсат и образуются ледяные пробки.
Все эти системы необходимо регулярно подвергать проверке во избежании поломок, а также передвигаться по скользким дорогам, льду и снегу с пониженной скоростью.
В пустынно-песчаных областях
В этих районах температура поднимается выше +40. Здесь инструкция по эксплуатации грузового автомобиля также имеет свои характерные черты, связанные с возникающими в этих условиях сложностями:
-
изнашивание элементов автомобиля под воздействием абразивных частиц (песка, пыли);
-
уменьшается мощность мотора;
-
масло окисляется; температура охлаждающей жидкости повышается, она начинает выкипать, в результате чего образуется накипь;
-
снижается упругость и эластичность резиновых элементов автомобиля.
В горной местности
В этих областях особенный климат и дороги, способные вызвать определенные трудности при эксплуатации грузового автомобиля. Чтобы обезопасить себя, водитель должен знать, что происходит с транспортным средством в горах:
-
уменьшается мощность вентилятора при подъеме;
-
быстро изнашиваются тормозные колодки;
-
снижается эффективность работы тормозов при спуске и подъеме;
-
при поездках по извилистому серпантину увеличивается нагрузка на рулевую систему и ее элементы быстрее приходят в негодность.
Оформить заказ на карты для тахографа.
Все правила эксплуатации грузового автотранспорта направлены на предотвращение аварийных ситуаций и снижение риска для здоровья и жизни водителя. Поэтому пренебрегать ими и легкомысленно относиться даже к незначительной поломке не стоит.
У вас остались еще вопросы?
Звоните прямо сейчас 8-800-511-81-93
или пишите нам: cart@rctahograf.ru
вернуться к оглавлению
Узнать еще больше

111 Мб
Электросхемы минивэнов Volkswagen Caddy (2003-)
Формат: pdf
-
Год:
2008
-
Страниц:
36
-
Язык:
русский
-
Размер:
111 Мб
-
Категории:
Европейские Грузовики
5,16 Мб
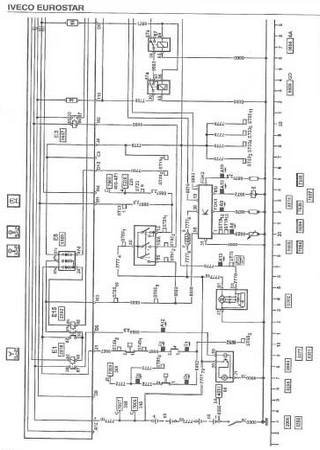
Электросхемы грузовиков Iveco EuroStar
Формат: pdf
-
Год:
2005
-
Страниц:
35
-
Язык:
русский
-
Размер:
5,16 Мб
-
Категории:
Европейские Грузовики
4,64 Мб
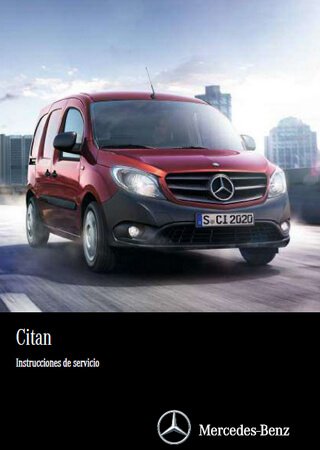
Руководство по эксплуатации автомобиля Mercedes-Benz Citan
Формат: pdf
-
Год:
2015
-
Страниц:
264
-
Язык:
испанский
-
Размер:
4,64 Мб
-
Категории:
Европейские Грузовики
37 Мб
Руководство по эксплуатации автомобиля Renault Trafic II
Формат: pdf
-
Год:
2011
-
Страниц:
254
-
Язык:
словацкий, чешский
-
Размер:
37 Мб
-
Категории:
Европейские Грузовики
24,5 Мб
Руководство по эксплуатации автомобиля Renault Trafic III
Формат: pdf
-
Год:
2018
-
Страниц:
298
-
Язык:
английский
-
Размер:
24,5 Мб
-
Категории:
Европейские Грузовики
45,4 Мб
Руководство по эксплуатации автомобиля Renault Master III
Формат: pdf
-
Год:
2020
-
Страниц:
343
-
Язык:
русский, словацкий, чешский, венгерский, португальский, английский
-
Размер:
45,4 Мб
-
Категории:
Европейские Грузовики
14 Мб
Руководство по эксплуатации автомобиля Renault Master II
Формат: pdf
-
Год:
2005
-
Страниц:
426
-
Язык:
чешский
-
Размер:
14 Мб
-
Категории:
Европейские Грузовики
18,2 Мб
Электросхемы Volkswagen Transporter T4 (California,
Формат: pdf
-
Год:
2002
-
Страниц:
197
-
Язык:
русский, английский
-
Размер:
18,2 Мб
-
Категории:
Европейские Грузовики
0,7 Мб
Электросхема микроавтобуса Volkswagen Transporter T2
Формат: jpg
-
Год:
1970
-
Страниц:
1
-
Язык:
английский
-
Размер:
0,7 Мб
-
Категории:
Европейские Грузовики
4,31 Мб
Руководство по обслуживанию Volkswagen Transporter T2
Формат: pdf
-
Год:
1979
-
Страниц:
100
-
Язык:
английский
-
Размер:
4,31 Мб
-
Категории:
Европейские Грузовики
2,41 Мб
Техническое описание и инструкция по эксплуатации Iveco
Формат: pdf
-
Год:
2007
-
Страниц:
132
-
Язык:
английский
-
Размер:
2,41 Мб
-
Категории:
Европейские Грузовики
74,4 Мб
Руководство по обслуживанию и ремонту Volkswagen
Формат: pdf
-
Год:
2007
-
Страниц:
319
-
Язык:
русский
-
Размер:
74,4 Мб
-
Категории:
Европейские Грузовики
69,1 Мб
Руководство по обслуживанию и ремонту Volkswagen
Формат: pdf
-
Год:
2010
-
Страниц:
342
-
Язык:
русский
-
Размер:
69,1 Мб
-
Категории:
Европейские Грузовики

48,5 Мб
Руководство по обслуживанию и ремонту Volkswagen
Формат: pdf
-
Год:
2004
-
Страниц:
271
-
Язык:
русский
-
Размер:
48,5 Мб
-
Категории:
Европейские Грузовики
43,5 Мб
Руководство по эксплуатации и ремонту Volkswagen Crafter
Формат: pdf
-
Год:
2009
-
Страниц:
552
-
Язык:
русский
-
Размер:
43,5 Мб
-
Категории:
Европейские Грузовики
6,89 Мб
Руководство по эксплуатации грузовика Tatra T815-290N9T
Формат: pdf
-
Год:
2004
-
Страниц:
232
-
Язык:
русский
-
Размер:
6,89 Мб
-
Категории:
Европейские Грузовики
10,4 Мб
Руководство оператора самосвала Volvo A60H
Формат: pdf
-
Год:
2018
-
Страниц:
386
-
Язык:
русский
-
Размер:
10,4 Мб
-
Категории:
Европейские Грузовики

85,1 Мб
Руководство по ремонту грузовика Tatra T163-370SKT
Формат: pdf
-
Год:
2004
-
Страниц:
1410
-
Язык:
русский
-
Размер:
85,1 Мб
-
Категории:
Европейские Грузовики
8,41 Мб
Руководство по ремонту грузовых автомобилей MAN M2000
Формат: pdf
-
Год:
2005
-
Страниц:
201
-
Язык:
русский
-
Размер:
8,41 Мб
-
Категории:
Европейские Грузовики
555 Мб
Руководство по техническому обслуживанию и ремонту Скания
Формат: djvu, pdf, doc
-
Год:
1999
-
Страниц:
930
-
Язык:
русский, английский
-
Размер:
555 Мб
-
Категории:
Европейские Грузовики
В издании имеются детальные описания особенностей техобслуживания и устранения неполадок автомобилей Scania, завоевавших популярность у водителей, благодаря не раз подтвержденным превосходным характеристикам.
1 2
Руководство по эксплуатации и техническому обслуживанию грузовых автомобилей ГАЗон Next.
- Автор: —
- Издательство: ПАО «ГАЗ»
- Год издания: 2017
- Страниц: 172
- Формат: PDF
- Размер: 4,2 Mb
Руководство по эксплуатации и техническому обслуживанию грузовых автомобилей ГАЗон Next оборудованных газовым двигателем для работы на сжатом природном газе.
- Автор: —
- Издательство: ПАО «ГАЗ»
- Год издания: 2016
- Страниц: 30
- Формат: PDF
- Размер: 914 Kb
Руководство по эксплуатации и техническому обслуживанию грузовых фургонов на шасси автомобилей ГАЗон Next.
- Автор: —
- Издательство: ПАО «ГАЗ»
- Год издания: 2019
- Страниц: 16
- Формат: PDF
- Размер: 201 Kb
Руководство по эксплуатации и ремонту автомобиля ГАЗон Next и его модификаций с 2014 года выпуска с дизельными двигателями объемом 3,76/4,43 л.
- Автор: —
- Издательство: Авторесурс
- Год издания: —
- Страниц: 304
- Формат: —
- Размер: —
Руководство по эксплуатации, обслуживанию и ремонту автомобилей ГАЗон Next с 2014 года выпуска с дизельными и газовыми двигателями.
- Автор: —
- Издательство: Третий Рим
- Год издания: —
- Страниц: 228
- Формат: —
- Размер: —

Полезная информация и инструкции
Инструкции, руководства по эксплуатации и другая информация
Для владельцев и водителей SITRAK
Информация об эксплуатации, правила безопасности и техническое обслуживание серии SITRAK -C7H
Руководство по эксплуатации автомобиля SITRAK C7H
Руководство водителя транспортного средства Sitrak C7H
Полное руководство по безопасной и эффективной эксплуатации автомобилей Sitrak C7H
Инструкция по эксплуатации нагревателя серии FGH-4A
Руководство по эксплуатации нагревателя FGH-4A
Руководство по эксплуатации холодильника в автомобиле
Руководство по эксплуатации автомобильного холодильника
Руководство по эксплуатации автобетоносмесителя СІМС
Инструкция по эксплуатации нагревателя серии FGH-4A
Ответы на частые вопросы по эксплуатации
Нужна помощь или дополнительные документы?
Перезвоним через 30 минут, чтобы ответить на ваш вопрос