Infiniti Q70 2014 Factory Service Manual на английском языке.
drive.google.com/file/d/1…J5Gj55AL/view?usp=sharing
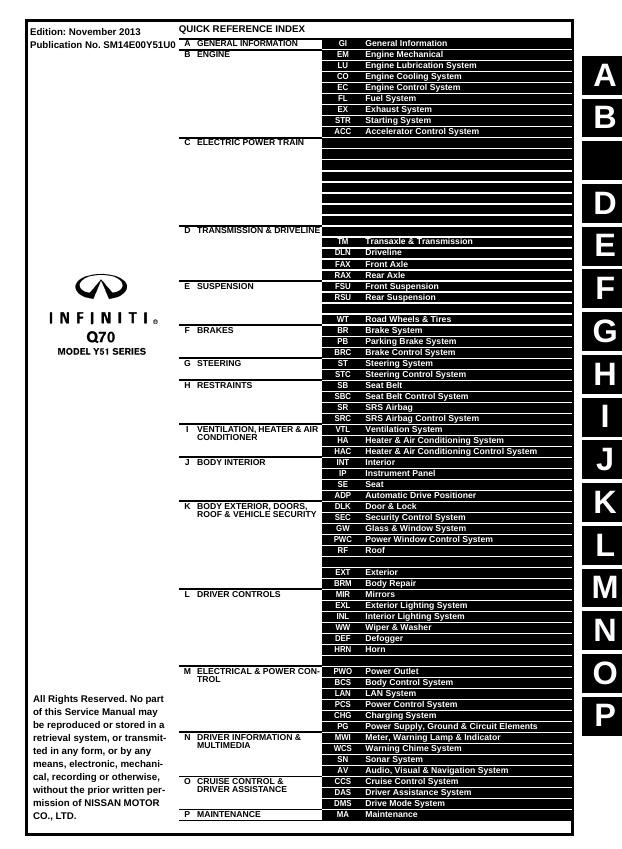
Основные разделы:
Accelerator Control System
Automatic Drive Positioner
Audio, Visual and Navigation System
Body Control System
Brake System
Brake Control System
Body Repair Manual
Cruise Control System
Charging System
Engine Cooling System
Driver Assistance System
Defogger
Door and Lock
Driveline
Engine Control System
Engine Mechanical
Exhaust System
Exterior Lighting System
Exterior
Front Axle
Fuel System
Front Suspension
Intro — Table of Contents
General Information
Glass and Window System
Heater and Air Conditioning System
Heater and Air Conditioning Control System
Horn
Interior Lighting System
Interior
Instrument Panel
LAN System
Engine Lubrication System
Maintenance
Mirrors
Meter, Warning Lamp and Indicator
Parking Brake System
Power Control System
Power Supply, Ground and Circuit Elements
Power Window Control System
Power Outlet
Rear Axle
Roof
Rear Suspension
Seat Belt
Seat Belt Control System
Seat
Security Control System
SRS Airbag
SRS Airbag Control System
Steering System
Steering Control System
Starting System
Transaxle and Transmission
Ventilation System
Warning Chime System
Road Wheels and Tires
Wiper and Washer
Каждый из разделов представлен отдельным PDF-файлом, имена файлов — аббревиатуры названия разделов.
Если у кого-нибудь, есть аналогичный сервис-мануал на русском языке, либо перевод этого мануала, прошу дать ссылку в комментариях. Вместе мы сделаем информацию доступнее.
Всем здоровья и добра!
Посмотреть инструкция для Infiniti Q70 (2018) бесплатно. Руководство относится к категории автомобили, 2 человек(а) дали ему среднюю оценку 7.9. Руководство доступно на следующих языках: английский. У вас есть вопрос о Infiniti Q70 (2018) или вам нужна помощь? Задайте свой вопрос здесь
Не можете найти ответ на свой вопрос в руководстве? Вы можете найти ответ на свой вопрос ниже, в разделе часто задаваемых вопросов о Infiniti Q70 (2018).
Как перевести мили в километры?
1 миля равна 1,609344 километрам, а 1 километр — 0,62137119 милям.
Где я могу узнать идентификационный номер транспортного средства Infiniti?
Место размещения идентификационного номера транспортного средства зависит от марки и типа транспортного средства. Номер может быть выбит на раме транспортного средства или указан на номерном знаке. Чтобы узнать место расположения идентификационного номера транспортного средства лучше всего ознакомиться с руководством по эксплуатации Infiniti Q70 (2018).
Что такое идентификационный номер транспортного средства (VIN)?
Идентификационный номер транспортного средства — уникальный для каждого транспортного средства идентификационный номер. Аббревиатура VIN расшифровывается как «Vehicle Identification Number» (Идентификационный номер транспортного средства).
Когда транспортному средству Infiniti требуется техническое обслуживание?
Регулярное техническое обслуживание необходимо всем транспортным средствам. С информацией о том, как часто необходимо проходить техническое обслуживание и чему именно стоит уделять особое внимание можно ознакомиться в инструкции по техническому обслуживанию. Как правило, транспортное средство требует технического обслуживания каждые 2 года или 30 000 километров пробега.
Когда следует заменять тормозную жидкость на Infiniti?
Тормозную жидкость рекомендуется менять каждые два года.
В чем разница между топливом E10 и E5?
В топливе E10 содержится до десяти процентов этанола, в то время как в E5 содержится менее пяти процентов. Соответственно, топливо E10 менее вредит окружающей среде.
Одна или несколько дверей не открываются изнутри. Что мне делать?
Скорее всего, замок оснащен защитой от детей и поэтому не может быть открыт изнутри. Процедура открытия замка с защитой от детей зависит от марки и типа замка.
Автомобильный радиоприемник не включается, что делать?
Если автомобильный радиоприемник не включен, на него не будет подаваться питание. Убедитесь, что красный провод подключен к контактному источнику питания, а желтый провод — к источнику питания постоянной мощности.
Инструкция Infiniti Q70 (2018) доступно в русский?
К сожалению, у нас нет руководства для Infiniti Q70 (2018), доступного в русский. Это руководство доступно в английский.
Не нашли свой вопрос? Задайте свой вопрос здесь
INFINITI Q70 Owner’s Manuals and Service Manuals for online browsing and download. Search through 2198 INFINITI Manuals online for free. CarManualsOnline.info is the largest free online database of INFINITI user manuals.
INFINITI, Select Model:
All, EX, EX35, FX, FX35, G, G35, G37, G CONVERTIBLE, G-CONVERTIBLE, G COUPE, G-COUPE, G SEDAN, JX, M, M35, M-HEV, M HYBRID, Q40, Q50, Q50 HYBRID, Q50-HYBRID, Q60, Q60 CONVERTIBLE, Q60 COUPE, Q70, Q70 HYBRID, Q70-HYBRID, QX, QX30, QX4, QX50, QX55, QX56, QX60, QX60 HYBRID, QX60-HYBRID, QX70, QX80
INFINITI Q70, Select Model:
- INFINITI Q70 2014
- INFINITI Q70 HYBRID 2014
- INFINITI Q70-HYBRID 2014
- INFINITI Q70 2015
- INFINITI Q70 HYBRID 2015
- INFINITI Q70-HYBRID 2015
- INFINITI Q70 2016
- INFINITI Q70 HYBRID 2016
- INFINITI Q70 2017
- INFINITI Q70 HYBRID 2017
- INFINITI Q70 2018
- INFINITI Q70 HYBRID 2018
- INFINITI Q70-HYBRID 2018
- INFINITI Q70 2019
List of All INFINITI Q70 Manuals:
Recent Searches in INFINITI Manuals
wiper fluid INFINITI QX60 2020 Owner’s Manual, parking brake INFINITI FX35 2004 Service Manual, brake pads INFINITI QX4 2001 Factory Service Manual, oil temperature INFINITI G 2012 Owners Manual, fuel pressure INFINITI M-HEV 2013 Owners Manual, automatic transmission fluid INFINITI G 2012 Owners Manual, belt INFINITI Q50 HYBRID 2014 Consumer Safety And Air Bag Information Guide, service INFINITI G 2012 Owner’s Manual, set clock INFINITI G 2012 Owners Manual
![]()
2018 INFINITI INTOUCH OWNER’S MANUAL
For your safety, read carefully and keep in this vehicle.
INFINITI CONSUMER AFFAIRS DEPARTMENT
For assistance or inquiries about the INFINITI warranty, service or general questions, contact the INFINITI Consumer Affairs Department at:
For U.S. customers
1-800-662-6200
For Canadian customers
1-800-361-4792
INFINITI NAVIGATION SYSTEM HELPDESK CONTACT INFORMATION
For assistance or inquiries about the Infiniti InTouchTM with Navigation system, or to order updated map data, contact the INFINITI NAVIGATION SYSTEM HELPDESK at:
.ADDRESS: P.O. Box 1588 Orem, UT 84059-992
.E-MAIL: infiniti-navi-info@here.com
For U.S. customers
WEB SITE: www.InfinitiNavigation.com
PHONES: 1-888-362-8837
HOURS: Monday – Friday: 8:00 AM — 8:00 PM (Eastern Time) and Saturday: 10:00 AM — 6:00 PM (Eastern Time)
For Canadian customers
WEB SITE: www.infiniti.ca.
PHONES: 1-800-361-4792
HOURS: Monday – Friday: 8:00 AM — 8:00 PM (Eastern Time) and Saturday: 10:00 AM — 6:00 PM (Eastern Time)
INFINITI INTOUCHTM SYSTEM HELPDESK CONTACT INFORMATION
For assistance or inquires about Infiniti InTouchTM system, contact Infiniti Owner Services helpdesk at:
.PHONES: 1-855-444-7244
.E-MAIL: infinitiownerservices@infiniti. com
For U.S. customers
WEB SITE: www.infinitiusa.com/intouch/ support
For Canadian customers
WEB SITE:
English: www.infiniti.ca/infinitiintouch
French: www.infiniti.ca/infinitiintouch/fr
 FOREWORD
Thank you for purchasing an INFINITI vehicle.
This user’s manual is for Infiniti InTouchTM and the systems linked to Infiniti InTouchTM offered in your INFINITI vehicle.
Operation instructions for the following systems are included in this manual.
.Audio
.Hands-Free Phone
.Infiniti InTouchTM Apps
.Infiniti InTouchTM Services
.Navigation
.Voice recognition
.Information and settings viewable on Infiniti InTouchTM
Please read this manual carefully to ensure safe operation of Infiniti InTouchTM.
.Because of possible specification changes and optional equipment, some sections of this manual may not apply to your vehicle.
.All information, specifications and illustrations in this manual are those in effect
at the time of printing. INFINITI reserves the right to change specifications or design at any time without notice.
.Do not remove this manual from the
vehicle when selling this vehicle. The next user of this Infiniti InTouchTM may need the manual.

Table of Contents
 1 Introduction
|
How to use this manual ….. |
1-2 |
|
Safety information …………… |
1-3 |
|
Trademarks ……………………… |
1-4 |
|
Regulatory information …… |
1-5 |
 2 Getting started
Control buttons and touch
|
screen display ………………….. |
2-3 |
|
Displaying |
|
|
operation screen ……………. |
2-12 |
|
Starting system ……………… |
2-13 |
|
Touch panel operation ….. |
2-14 |
|
System status screen ……. |
2-16 |
|
Shortcut menu ……………….. |
2-16 |
|
Map menu (models with |
|
|
navigation system) ………… |
2-17 |
|
Display View Bar (models |
|
|
with navigation |
|
|
system) …………………………… |
2-18 |
|
How to input letters |
|
|
and numbers …………………. |
2-20 |
|
System settings …………….. |
2-21 |
|
Functions disabled |
|
|
while driving ………………….. |
2-30 |
|
Additional |
|
|
system information ……….. |
2-31 |
 3 Audio system
|
Audio |
|
|
operation precautions …….. |
3-2 |
|
Names and functions of |
|
|
audio control buttons …… |
3-14 |
|
Audio operations …………… |
3-17 |
|
Audio settings ……………….. |
3-38 |
|
Disc/USB memory device |
|
|
care and cleaning ………….. |
3-41 |
|
Gracenote® End User |
|
|
License Agreement ……….. |
3-41 |
|
Mobile Entertainment |
|
|
System (MES) |
|
|
(if so equipped) ……………… |
3-42 |
 4 Bluetooth® Hands-Free Phone
|
Bluetooth® Hands-Free |
|
|
Phone System …………………. |
4-2 |
|
Bluetooth® |
|
|
information …………………….. |
4-14 |
 5 Information
|
Information menu ……………. |
5-2 |
|
SiriusXM Traffic |
|
|
information |
|
|
(if so equipped) ……………….. |
5-4 |
|
SiriusXM Travel Link® |
|
|
(if so equipped) ……………….. |
5-8 |
|
Infiniti InTouchTM Services |
|
|
(if so equipped) ……………… |
5-15 |
|
Infiniti InTouchTM Apps … |
5-29 |
 6 Navigation (if so equipped)
|
Safety information ………….. |
6-3 |
|
Map data authentication … |
6-3 |
|
Map operation ………………… |
6-4 |

|
Setting destination ……….. |
6-15 |
|
Route guidance ……………… |
6-31 |
|
Storing |
|
|
a location/route ……………. |
6-47 |
|
Navigation settings……….. |
6-56 |
|
General information ……… |
6-59 |
 7 Voice Recognition
|
INFINITI Voice |
|
|
Recognition System …………. |
7-2 |
 8 Troubleshooting guide
|
Customer assistance ………. |
8-2 |
|
System unit ……………………… |
8-3 |
|
Audio system …………………… |
8-5 |
|
Bluetooth® Hands-Free |
|
|
Phone System ……………….. |
8-15 |
|
Navigation |
|
|
(if so equipped) ……………… |
8-19 |
|
Voice Recognition …………. |
8-27 |
1 Introduction
|
……………………………………………How to use this manual |
1-2 |
………………………………………………………………Trademarks |
1-4 |
|
|
For safe operation |
1-2 |
Regulatory information |
1-5 |
|
|
Reference symbols ………………………………………………. |
1-2 |
Laser product …………………………………………………….. |
1-5 |
|
|
Screen illustrations ………………………………………………. |
1-2 |
Bluetooth® devices …………………………………………… |
1-5 |
|
|
Safety information …………………………………………………… |
1-3 |

1. Introduction
 HOW TO USE THIS MANUAL
This manual uses special words, symbols, icons and illustrations organized by function.
Please refer to the following items and familiarize yourself with them.
FOR SAFE OPERATION
 WARNING
This is used to indicate the presence of a hazard that could cause death or serious personal injury. To avoid or reduce this risk, the procedures must be followed precisely.
 CAUTION
This is used to indicate the presence of a hazard that could cause minor or moderate personal injury or damage to your vehicle. To avoid or reduce this risk, the procedures must be followed carefully.
 NOTE:
NOTE:
This indicates items that help you understand and maximize the performance of your vehicle. Ignoring them may lead to a malfunction or poor performance.
REFERENCE SYMBOLS
 INFO:
INFO:
This indicates information that is necessary for efficient use of your vehicle or accessories.
Reference page:
This indicates the title and page that you should refer to.
<>:
This indicates a control button or a switch.
[]:
This indicates a key/item displayed on the screen.
Voice Command:
This indicates an operation by voice command.
SCREEN ILLUSTRATIONS
The illustrations in this manual are representatives of various models and may not be identical with the design and specifications of your vehicle.
Icons and menu items displayed on the screen may be abbreviated or omitted from the screen illustrations when appropriate. The omitted icons and menu items are described as dotted lines as illustrated.
1-2

1. Introduction
 SAFETY INFORMATION
This system is primarily designed to help you support your pleasant driving as outlined in this manual. However, you, the driver, must use the system safely and properly. Information and the availability of services may not always be up to date. The system is not a substitute for safe, proper and legal driving.
Before using the system, please read the following safety information. Always use the system as outlined in this manual.
 WARNING
.Do not rely on route guidance alone. Always be sure that all driving maneuvers are legal and safe in order to avoid accidents.
.To operate the system, first park the vehicle in a safe location and set the parking brake. Operating the system while driving can distract the driver and may result in a serious accident.
.Exercise extreme caution at all times so full attention may be given to vehicle operation. If the system doesn’t respond immediately, please be patient and keep your eyes on the
road. Inattentive driving may lead to a crash resulting in serious injuries or death.
.Do not disassemble or modify this system. If you do, it may result in accidents, fire or electrical shock.
.If you notice any foreign objects in the system hardware, spill liquid on the system or notice smoke or a smell coming from it, stop using the system immediately and contact an INFINITI retailer. Ignoring such conditions may lead to accidents, fire or electrical shock.
 CAUTION
.Some jurisdictions may have laws limiting the use of video screens while driving. Use this system only where it is legal to do so.
.Extreme temperature conditions [below −4°F (−20°C) and above 158°F (70°C)] could affect the performance of the system.
.The display screen may break if it is hit with a hard or sharp object. If the
display screen breaks, do not touch it. Doing so could result in an injury.
 NOTE:
NOTE:
Do not keep the system running with the engine or the hybrid system stopped. Doing so may discharge the vehicle battery (12V battery). When you use the system, always keep the engine or the hybrid system running.
1-3

1. Introduction
 TRADEMARKS
HD Radio Technology manufactured under license from iBiquity Digital Corporation. U.S. and Foreign Patents. For patents see http://patents.dts.com/. HD Radio and the HD, HD Radio, and “ARC” logos are registered trademarks or trademarks of iBiquity Digital Corporation in the United States and/or other countries.
SiriusXM services require a subscription after trial period and are sold separately or as a package. Our satellite service is available only to those at least 18 and older in the 48 contiguous USA and DC. For more information visit www.siriusxm.com.
Required SiriusXM Satellite Radio and SiriusXM Traffic monthly subscriptions are sold separately. SiriusXM Traffic are only available in select markets. For more information,
see www.siriusxm.com/siriusxmtraffic
Required SiriusXM Satellite Radio and SiriusXM Travel Link monthly subscriptions are sold separately. SiriusXM Travel Link is only available in select markets. For more information,
see www.siriusxm.com/travellink
“Made for iPod®” and “Made for iPhone®” mean that an electronic accessory has been designed to connect specifically to iPod® or iPhone®, respectively, and has been certified by the developer to meet Apple performance standards. Apple is not responsible for the operation of this device or its compliance with safety and regulatory standards. Please note that the use of this accessory with iPod® or iPhone® may affect wireless performance.
Apple, the Apple logo, iPhone®, iPod®, iPod classic®, iPod nano®, and iPod touch® are trademarks of Apple Inc., registered in the U.S. and other countries. LightningTM is a trademark of Apple Inc. App Store is a service mark of Apple Inc.
Music and video recognition technology and related data are provided by Gracenote®. Gracenote is the industry standard in music recognition technology and related content delivery. For more information visit www. gracenote.com.
CD, DVD, Blu-ray Disc, and music and videorelated data from Gracenote, Inc., copyright © 2000 to present Gracenote. Gracenote Software, copyright © 2000 to present Gracenote. One or more patents owned by Gracenote apply to this product and service. See the Gracenote website for a nonexhaustive list of applicable Gracenote patents. Gracenote, CDDB, MusicID, Media-
1-4
![]()
1. Introduction
VOCS, the Gracenote logo and logotype, and the «Powered by Gracenote» logo are either registered trademarks or trademarks of Gracenote in the United States and/or other countries.
The Bluetooth® word mark and logos are registered trademarks owned by Bluetooth SIG, Inc. and any use of such marks by DENSO CORPORATION is under license. Other trademarks and trade names are those of their respective owners.
App StoreSM
Apple and the Apple logo are trademarks of Apple Inc., registered in the U.S. and other countries. App Store is a service mark of Apple Inc.
Google PlayTM
Google Play is a trademark of Google Inc.
© 2012 Google Inc. All rights reserved. Google CalendarTM calendaring application is a trademark of Google Inc.
 REGULATORY INFORMATION
LASER PRODUCT
This Infiniti InTouchTM is certified as a Class 1 laser product.
Infiniti InTouchTM complies with DHHS Rules 21 CFR Chapter 1, Subchapter J.
 WARNING
.Do not disassemble or modify this
system. There are no user serviceable parts in Infiniti InTouchTM.
.If maintenance, adjustments and operations other than those specified in this manual are attempted, injury due to laser radiation and exposure could occur.
BLUETOOTH® DEVICES
FCC Regulatory information
FCC ID: HYQDNNS086
1-5

1. Introduction
NOTE
This device compiles with part 15 of the FCC Rules. Operation is subject to the following two conditions: (1) This device may not cause harmful interference, and (2) this device must accept any interference received, including interference that may cause undesired operation.
FCC WARNING
Changes or modifications not expressly approved by the party responsible for compliance could void the user’s authority to operate the equipment.
CAUTION: Radio Frequency Radiation Exposure
This equipment complies with FCC radiation exposure limits set forth for uncontrolled environment and meets the FCC radio frequency (RF) Exposure Guidelines. This equipment has very low levels of RF energy that it deemed to comply without maximum permissive exposure evaluation (MPE). But it is desirable that it should be installed and operated with at least 20 cm and more between the radiator and person’s body.
Co-location: This transmitter must not be co-located or operated in conjunction with any other antenna or transmitter.
IC Regulatory information
The antenna cannot be removed (and changed) by user.
NOTE
This device complies with Industry Canada license-exempt RSS standard(s). Operation is subject to the following two conditions: (1) This device may not cause interference, and
(2) this device must accept any interference, including interference that may cause undesired operation of the device.
CAUTION: Radio Frequency Radiation Exposure
This equipment complies with IC radiation exposure limits set forth for uncontrolled environment and meets RSS-102 of the IC radio frequency (RF) Exposure rules. This equipment has very low levels of RF energy that it deemed to comply without maximum permissive exposure evaluation (MPE). But it is desirable that it should be installed and operated with at least 20cm and more between the radiator and person’s body.
Co-location: This transmitter must not be co-located or operated in conjunction with any other antenna or transmitter.
This Class B digital apparatus meets all
requirements of the Canadian InterferenceCausing Equipment Regulations.
For Canadian customers:
L’antenne ne peut être enlevée (et modifié) par l’utilisateur.
NOTE
Le présent appareil est conforme aux CNR d’Industrie Canada applicables aux appareils radio exempts de licence. L’exploitation est autorisée aux deux conditions suivantes: (1) l’appareil ne doit pas produire de brouillage, et (2) l’utilisateur de l’appareil doit accepter tout brouillage radioélectrique subi, même si le brouillage est susceptible d’en compromettre le fonctionnement.
1-6
2 Getting started
|
…………….Control buttons and touch screen display |
2-3 |
…………………………………………..Touch panel operation |
2-14 |
|
|
Liquid crystal display |
2-3 |
How to use touch screen |
2-14 |
|
|
Center multi-function control panel (Type A) |
Operating menu screen ………………………………….. |
2-14 |
||
|
(if so equipped) …………………………………………………… |
2-4 |
Scrolling list or message …………………………………. |
2-15 |
|
|
Center multi-function control panel (Type B) |
Selecting item ………………………………………………….. |
2-15 |
||
|
(if so equipped) …………………………………………………… |
2-5 |
Adjusting settings |
2-15 |
|
|
Center multi-function control panel (Type C) |
System status screen |
2-16 |
||
|
(if so equipped) |
2-6 |
|||
|
Shortcut menu |
2-16 |
|||
|
INFINITI controller (if so equipped) |
2-7 |
|||
|
Displaying shortcut menu screen |
||||
|
Steering wheel switches (Type A) |
||||
|
(models with navigation system) |
2-16 |
|||
|
(if so equipped) |
2-8 |
|||
|
Displaying shortcut menu screen |
||||
|
Steering wheel switches (Type B) |
||||
|
(models without navigation system) |
2-17 |
|||
|
(if so equipped) |
2-9 |
|||
|
Edit shortcut menu |
2-17 |
|||
|
Steering wheel switches (Type C) |
||||
|
Map menu (models with navigation system) |
2-17 |
|||
|
(if so equipped) |
2-10 |
|||
|
Displaying map menu |
2-17 |
|||
|
Steering wheel switches (Type D) |
||||
|
Display View Bar (models with |
||||
|
(if so equipped) |
2-11 |
|||
|
navigation system) |
2-18 |
|||
|
Audio accessories |
2-11 |
|||
|
Customizing the Display View Bar |
2-19 |
|||
|
Displaying operation screen |
2-12 |
|||
|
How to input letters and numbers |
2-20 |
|||
|
Control panel operation (models with |
||||
|
Alphanumeric character (letters and numbers) |
||||
|
control panel) |
2-12 |
|||
|
input screen |
2-20 |
|||
|
MENU button operation (models with |
||||
|
System settings |
2-21 |
|||
|
INFINITI controller) |
2-13 |
|||
|
Settings menu |
2-21 |
|||
|
Starting system |
2-13 |
|||
|
Pairing Bluetooth® device |
2-29 |
|||
|
Start-up warning |
2-13 |
|||
|
Functions disabled while driving |
2-30 |
|||
|
Additional system information …………………………….. |
2-31 |
|
Additional help ………………………………………………….. |
2-32 |

2. Getting started
CONTROL BUTTONS AND TOUCH SCREEN DISPLAY
Designs and button layout may vary depending on the specifications and the model.
LIQUID CRYSTAL DISPLAY
The display is a liquid crystal display and should be handled with care.
 WARNING
.Never disassemble the display. Some parts utilize extremely high voltage. Touching them may result in serious personal injury.
.ALWAYS give your full attention to driving.
.Avoid using vehicle features that could distract you. If distracted, you could lose control of your vehicle and cause an accident.
 CAUTION
The glass screen on the liquid crystal display may break if it is hit with a hard or sharp object. If the glass screen breaks, do not touch it. Doing so could result in an
injury.
Characteristics of liquid crystal display
.If the temperature inside the vehicle is especially low, the display will stay relatively dim or the movement of the images may be slow. These conditions are normal. The display will function normally when the interior of the vehicle has warmed up.
.Some pixels in the display are darker or brighter than others. This condition is an inherent characteristic of liquid crystal display, and it is not a malfunction.
.A remnant of the previous display image may remain on the screen. This screen burn is inherent in display, and it is not a malfunction.
Maintenance of display
To clean the display screen, use a dry, soft cloth. If additional cleaning is necessary, use a small amount of neutral detergent with a soft cloth. Never spray the screen with water or detergent. Dampen the cloth first, then wipe the screen.
 CAUTION
.To clean the display, stop the vehicle in a safe location.
.Clean the display with the ignition switch in the OFF position. If the display is cleaned while the ignition switch is in the ON position, unintentional operation may occur.
.To clean the display, never use a rough cloth, alcohol, benzine, thinner and any kind of solvent or paper towel with a chemical cleaning agent. They will scratch or deteriorate the panel.
.Do not splash any liquid such as water or car fragrance on the display. Contact with liquid will cause the system to malfunction.
2-3

2. Getting started
CENTER MULTI-FUNCTION CONTROL PANEL (Type A) (if so equipped)
<CAMERA  >:
>:
Push to operate the Around View® Monitor system. Refer to the vehicle Owner’s Manual.
Push and hold to switch the display brightness to the daytime mode or the nighttime mode, and to adjust the display brightness level using the center dial while the indicator is displayed.
<NAVI>:
When a route is not set, push to display the destination menu screen.
 “Destination screen” (page 6-17)
When a route is set, push to display route information and route editing screen.
 “Route menu screen” (page 6-36)
<APPS>:
Push to display the available Apps.  “Infiniti InTouchTM Apps” (page 5-29)
<STATUS>:
Push to display the current setting of the vehicle information, air conditioner, audio and navigation route information.  “System status screen” (page 2-16)
<AUDIO>:
Push to operate the audio system.
 “Audio operations” (page 3-17)
<MAP>:
Push to display the current location on
the map.
 “Display of current vehicle location” (page 6-59)
Push again to display the Display View Bar.
“Display View Bar (models with navigation system)” (page 2-18)
< BACK>:
Push to return to the previous screen. In a settings screen, this button is also used to apply the setting.
<ENTER>/Center dial/Slide switch:
Push to select the highlighted item on the screen.
If this button is pushed while a map is displayed, the shortcut menu or the map menu screen is displayed.
 “Shortcut menu” (page 2-16)
  “Map menu (models with navigation system)” (page 2-17)
Turn to highlight an item on the screen, to adjust a setting, or to adjust the map scale.
Slide (push upward/downward/leftward/rightward) to highlight an item on the screen or to adjust a setting (volume, brightness, etc.).
2-4

2. Getting started
The map can be scrolled in 8 directions by sliding this switch.
<VOICE>:
Push to repeat the voice guidance for a guide point.
<INFO>:
Push to display the Information menu.  “Information menu” (page 5-2)
<SETTING>:
Push to access the system settings.  “System settings” (page 2-21)
CENTER MULTI-FUNCTION CONTROL PANEL (Type B) (if so equipped)
< OFF>:
OFF>:
Push to switch the display brightness to the daytime mode or the nighttime mode, and to adjust the display brightness level using the center dial while the indicator is displayed.
Push and hold to turn the display on/ off.
<STATUS>:
Push to display the current setting of the vehicle information, air conditioner and audio system.
 “System status screen” (page 2-16)
<ENTER>/Center dial/Slide switch:
Push to select the highlighted item on the screen.
If this button is pushed while the climate screen or status screen is displayed, the shortcut menu screen is displayed.
 “Shortcut menu” (page 2-16)
Turn or slide (push upward/downward/ leftward/rightward) to highlight an item on the screen or to adjust a setting (volume, brightness, etc.).
<APPS>:
Push to display the available Apps.  “Infiniti InTouchTM Apps”
(page 5-29)
< ECON>:
Push to display the fuel economy information.
 “Information menu” (page 5-2)
2-5

2. Getting started
<AUDIO>:
Push to operate the audio system.  “Audio operations” (page 3-17)
< >:
>:
Push to operate the hands-free phone system.
 “4. Bluetooth® Hands-Free Phone”
< BACK>:
Push to return to the previous screen. In a settings screen, this button is also used to apply the setting.
<INFO>:
Push to display the Information menu.  “Information menu” (page 5-2)
<SETTING>:
Push to access the system settings.  “System settings” (page 2-21)
CENTER MULTI-FUNCTION CONTROL PANEL (Type C) (if so equipped)
<CAMERA >:
>:
Push to operate the Around View® Monitor. Refer to the vehicle Owner’s Manual.
Push and hold to switch the display brightness to the daytime mode or the nighttime mode, and to adjust the display brightness level using the center dial while the indicator is displayed.
<NAVI>:
When a route is not set, push to display the destination menu screen.
 “Destination screen” (page 6-17)
When a route is set, push to display route information and route editing screen.
 “Route menu screen” (page 6-36)
<ENTER>/Center dial/Slide switch:
Push to select the highlighted item on the screen.
If this button is pushed while a map is displayed, the shortcut menu or the map menu screen is displayed.
 “Shortcut menu” (page 2-16)
  “Map menu (models with navigation system)” (page 2-17)
Turn to highlight an item on the screen, to adjust a setting, or to adjust the map scale.
Slide (push upward/downward/leftward/rightward) to highlight an item on the screen or to adjust a setting
2-6

2. Getting started
(volume, brightness, etc.).
The map can be scrolled in 8 directions by sliding this switch.
<APPS>:
Push to display the available Apps.  “Infiniti InTouchTM Apps”
(page 5-29)
<STATUS>:
Push to display the current setting of the vehicle information, air conditioner, audio and navigation route information.  “System status screen” (page 2-16)
<AUDIO>:
Push to operate the audio system.  “Audio operations” (page 3-17)
<MAP/VOICE>:
Push to display the current location on the map.
 “Display of current vehicle location” (page 6-59)
Push again to display the Display View Bar.
 “Display View Bar (models with navigation system)” (page 2-18)
Push and hold to repeat the voice guidance for a guide point.
< BACK>:
Push to return to the previous screen. In a settings screen, this button is also used to apply the setting.
<SETTING>:
Push to access the system settings.
 “System settings” (page 2-21)
<INFO>:
Push to display the information menu.
 “Information menu” (page 5-2)
<CLIMATE>:
Push to display the screen for air conditioner operations.
For additional information, refer to the vehicle Owner’s Manual.
INFINITI CONTROLLER (if so equipped)
<MAP/VOICE>:
Push to display the vehicle’s current location on the map.
Push again to display the Display View Bar.
 “Display View Bar (models with navigation system)” (page 2-18)
Push and hold to hear the current guidance for a programmed route.
2-7

2. Getting started
<MENU>:
Push to display the Menu screen. Destination setting, route selection, phone connection, activation and download of applications, information screen display or other settings can be accessed from this screen.
 “MENU button operation (models with INFINITI controller)”
(page 2-13)
< /OK>/Center dial/Slide switch :
Slide or turn to select an item, scroll to the next/previous page or to adjust a setting (volume, brightness, etc.).
When the map is displayed on the screen, turn the center dial to adjust the map scale.
The map can be scrolled in eight directions by sliding this switch.
Push the switch to enter the selected item.
If this switch is pushed while a map is displayed, the shortcut menu or map menu is shown on the display.
 “Shortcut menu” (page 2-16)
  “Map menu (models with navigation system)” (page 2-17)
< >:
>:
Push to go back to the previous screen.
<CAMERA  > (models with Around View® Monitor system) :
Push to view the Around View® Monitor screen.
Push and hold to switch the display to the daytime mode or the nighttime mode, and to adjust the display brightness.
For details of the Around View® Monitor, refer to the vehicle Owner’s Manual.
< > (models without Around View® Monitor system)
Push to switch the display to the daytime mode or the nighttime mode, and to adjust the display brightness. Push and hold to turn the display on/off.
STEERING WHEEL SWITCHES (Type A) (if so equipped)
<ENTER>:
Tilt to highlight an item on the screen or adjust a setting. Push to select the highlighted item.
Audio operations are possible by tilting the switch.
 “Steering wheel mounted audio control buttons (Type A)”
(page 3-15)
Models with navigation system:
If this switch is pushed while a map is displayed, the shortcut menu or the map menu screen is displayed.
 “Shortcut menu” (page 2-16) “Map menu (models with naviga-
2-8
![]()
2. Getting started
tion system)” (page 2-17)
Models without navigation system:
If this switch is pushed while the climate screen or status screen is displayed, the shortcut menu screen is displayed.
 “Shortcut menu” (page 2-16)
< >:
>:
Push to go back to the previous screen.
< >:
>:
Push to adjust the volume.
<SOURCE>:
Push to switch the audio mode (source).  “Steering wheel mounted audio
control buttons (Type A)” (page 3-15)
< >:
>:
Push to start a voice recognition session. During a voice recognition session, pushing this button cancels the voice guidance and you can speak a voice command immediately.
Push and hold to end a voice recognition session.
 “7. Voice Recognition”
< >:
>:
Push to display the hands-free phone
system.
 “4. Bluetooth® Hands-Free Phone”
< >:
>:
This button is used for the vehicle information display operation.
For additional information, refer to the vehicle Owner’s Manual.
 NOTE:
NOTE:
You are unable to operate the touch screen display using the switches on the steering wheel whenever the vehicle information display shows the setting display.
STEERING WHEEL SWITCHES (Type B) (if so equipped)
<ENTER>:
Tilt to highlight an item on the screen or adjust a setting. Push to select the highlighted item.
Audio operations are possible by tilting the switch.
 “Steering wheel mounted audio control buttons (Type B)”
(page 3-16)
Models with navigation system:
If this switch is pushed while a map is displayed, the shortcut menu or the map menu screen is displayed.
 “Shortcut menu” (page 2-16)
  “Map menu (models with navigation system)” (page 2-17)
Models without navigation system:
If this switch is pushed while the climate screen or status screen is displayed, the shortcut menu screen is displayed.
 “Shortcut menu” (page 2-16)
< >:
>:
Push to go back to the previous screen.
< >:
>:
Push to adjust the volume.
2-9

2. Getting started
< >:
>:
Push to start a voice recognition session. During a voice recognition session, pushing this button cancels the voice guidance and you can speak a voice command immediately.
Push and hold to end a voice recognition session.
 “7. Voice Recognition”
< >:
>:
Push to display the hands-free phone system.
 “4. Bluetooth® Hands-Free Phone”
<SOURCE>:
Push to switch the audio mode (source).  “Steering wheel mounted audio
control buttons (Type B)” (page 3-16)
STEERING WHEEL SWITCHES (Type C) (if so equipped)
<SOURCE>:
Push to switch the audio mode (source).
 “Steering wheel mounted audio control buttons (Type C)”
(page 3-16)
<ENTER>:
Tilt to highlight an item on the screen or adjust a setting. Push to select the highlighted item.
Audio operations are possible by tilting the switch.
 “Steering wheel mounted audio control buttons (Type C)”
(page 3-16)
If this switch is pushed while a map is
displayed, the shortcut menu or the map menu screen is displayed.
 “Shortcut menu” (page 2-16)
  “Map menu (models with navigation system)” (page 2-17)
< >:
>:
Push to go back to the previous screen.
< >:
>:
Push to adjust the volume.
< >:
>:
Push to start a voice recognition session. During a voice recognition session, pushing this button cancels the voice guidance and you can speak a voice command immediately.
Push and hold to end a voice recognition session.
 “7. Voice Recognition”
< >:
>:
Push to display the hands-free phone system.
 “4. Bluetooth® Hands-Free Phone”
2-10

2. Getting started
STEERING WHEEL SWITCHES (Type D) (if so equipped)
< >:
>:
Push to enter the Voice Recognition mode.
 “Giving voice commands” (page 7-2)
< >:
>:
End an active call and reject an incoming call.
 “Phone” (page 4-4)
< >:
>:
Push to turn on/off the audio system.  “3. Audio system”
<->/<+>:
Push to adjust the volume.
< >:
>:
Make a call and accept an incoming call.
 “Making a call” (page 4-4)
AUDIO ACCESSORIES
The vehicle is equipped with the USB connection ports and the auxiliary input jacks (if so equipped). When connected, the invehicle audio system can play audio contents from the compatible device.
 INFO:
INFO:
.Even when iPod® and/or iPhone® are connected to both of the two USB/ iPod® connection ports, the system recognizes only one of the connected iPod® or iPhone® at a time.
.Only one of the two connected USB memory devices can be operated by the
Voice Recognition System.
 “Voice Recognition settings” (page 7-14)
Type A (if so equipped):
The USB connection ports and the auxiliary input jacks are located in the center console box.
Auxiliary audio input jack:
Connect an audio player that accepts a 1/8 in (3.5 mm) TRS connector (such as an MP3 player etc.) to play music.
Auxiliary video input jack:
Connect a video player to play a video.
SD card slot (if so equipped):
The card slot is for the map SD card for the navigation system.
 “SD card slot” (page 6-66) USB/iPod® connection ports:
Connect to play media from an iPod®,
2-11

2. Getting started
|
iPhone® or a USB memory device. Refer |
information regarding the proper use |
DISPLAYING OPERATION |
|
|
to the device manufacturer’s owner |
and care of the device. |
SCREEN |
|
|
information regarding the proper use |
|||
|
and care of the device. |
CONTROL PANEL OPERATION |
|
|
NOTE: |
(models with control panel) |
|
|
Depending on the size and shape of USB |
Push the buttons on the control panel to |
|
|
display each operation screen. |
||
|
memory device, the console lid may not fully |
||
|
“Control buttons and touch screen dis- |
||
|
close. Do not force the console lid closed as |
||
|
play” (page 2-3) |
||
|
this may damage the USB memory device. |
||
|
. <NAVI> (if so equipped): |
||
|
Type B (if so equipped): |
||
|
The USB connection ports are located on the |
Push to display the Navigation menu |
|
|
screen. The available functions will vary |
||
|
lower instrument panel. |
||
|
based on the current navigation settings. |
||
|
“Destination screen” (page 6-17) |
||
|
“Route menu screen” (page 6-36) |
||
|
. <APPS>: |
||
|
Push to display the Apps screen. |
||
|
“Infiniti InTouchTM Apps” |
||
|
(page 5-29) |
USB/iPod® connection ports:
Connect to play media from an iPod®, iPhone® or a USB memory device. Refer to the device manufacturer’s owner
.<INFO>:
Push to display the Information menu
screen.
 “Information menu” (page 5-2)
.<SETTING>:
Push to display the Settings menu
screen.
 “Settings menu” (page 2-21)
2-12

2. Getting started
.< > (if so equipped):
Push to display the Phone screen.
 “4. Bluetooth® Hands-Free Phone”
MENU BUTTON OPERATION (models with INFINITI controller)
Push <MENU> to display the Menu screen. Touch the icon on the Menu screen to display various operation screens.
.Navigation:
Touch to display the Navigation menu screen. The available functions will vary
based on the current navigation settings.
 “Destination screen” (page 6-17)
 “Route menu screen” (page 6-36)
.Phone:
Touch to display the Phone screen.
 “Phone” (page 4-4)
.Apps:
Touch to display the Apps screen.
 “Infiniti InTouchTM Apps” (page 5-29)
.Information:
Touch to display the Information menu
screen.
 “Information menu” (page 5-2)
.Settings:
Touch to display the Settings menu
screen.
 “Settings menu” (page 2-21)
 STARTING SYSTEM
The system starts when the ignition switch is placed in the ACC or ON position.
START-UP WARNING
When the ignition switch is placed in the ACC or ON position, the start-up screen is displayed.
Touch [OK] after reading and agreeing to the message. If you do not agree to the message, some of the functions will be disabled.
 NOTE:
NOTE:
Do not keep the Infiniti InTouchTM turned on with the engine or the hybrid system stopped. Doing so may discharge the vehicle battery (12V battery). When you use the Infiniti InTouchTM, always keep the engine or the hybrid system running.
 INFO:
INFO:
Once you select [Decline] on the start-up screen, the [OK]/[Decline] screen will not be displayed for 30 days.
2-13

2. Getting started
 TOUCH PANEL OPERATION
This system is mainly operated with the touch screen display.
HOW TO USE TOUCH SCREEN
Basic operations can be done by touching, swiping and dragging on the screen.
.Touch
Select and execute the selected key on the screen.
.Swipe
Menu screen pages will skip to the next page.
.Drag
Drag scroll bar up or down to scroll the menu screen.
Models with navigation system:
More various operations are possible for a map screen.
 “Map operation” (page 6-4)
OPERATING MENU SCREEN
Touch [<] to scroll to the previous page.
Touch the preferred icon to execute a function and display the next screen.
Indicates the position of the currently displayed page out of the total number of available pages.
Touch [>] to scroll to the next page.
A swipe gesture can also be used to move quickly between pages.
2-14

2. Getting started
SCROLLING LIST OR MESSAGE
Drag the scroll bar up or down to scroll the message or list up or down.
Touch the preferred item.
If a listed item name is not completely displayed (due to length), touch [>] to display the hidden part of the name.
Touch [ ] or [
 ] to scroll the message or list one item at a time.
Touch [ ] or [
 ] to skip to the next or previous page.
When an item is touched, it is executed and the next screen is displayed.
Touch [ ] to return to the previous screen.
ADJUSTING SETTINGS
Level of volume, brightness, etc. can be adjusted.
Touch the adjustment keys, such as [+]/[-], [L]/[R], etc., to adjust each item. Each time a key is touched, the indicator moves along the
2-15

2. Getting started
 SYSTEM STATUS SCREEN
Models with INFINITI controller:
By pushing <STATUS> on the audio system, the current status of the system can be displayed.
Models with control panel:
By pushing <STATUS> on the control panel, the current status of the system can be displayed.
tion screen (models with navigation system).
Models with navigation system:
When no route is set, a compass and the direction of travel are displayed instead of the route information.
 SHORTCUT MENU
DISPLAYING SHORTCUT MENU SCREEN (models with navigation system)
Models with INFINITI controller:
To display the shortcut menu, push < /OK> or touch [
 ] while the current location map screen is displayed.
Models with control panel:
To display the shortcut menu, push <ENTER> or touch [ ] while the current location map screen is displayed.
Available items
 INFO:
INFO:
There are different status screens displayed depending on various factors, such as the currently active mode, whether a destination (models with navigation system) has been set or not, etc.
Touching [<] /[>] can switch air conditioner status screen and navigation route informa-
.[Audio Source]
.[Audio List]
2-16

2. Getting started
.[Call History]
.[Phonebook]
.[Cancel Route]
.[Nearby Places]
.[Store Location]
.[View Settings]
.[Select Add/Edit]
.(Blank)
DISPLAYING SHORTCUT MENU SCREEN (models without navigation system)
To display the shortcut menu, push <ENTER> or touch [ ] while the climate or status screen is displayed.
Available items
.[Audio Source]
.[Audio List]
.[Call History]
.[Phonebook]
.[Select Add/Edit]
.(Blank)
EDIT SHORTCUT MENU
The items on the shortcut menu can be customized to your preference.
The following procedure can be used to edit or sort the shortcut menu.
1.Select [Select Add/Edit] to register a new item to the menu, or to change an existing menu item.
2.Select the preferred setting.
.[Change Order]
Change the order in which shortcut menu items are shown. Touch and hold the [ ] displayed next to the item you wish to relocate. Drag the icon to the position in the list where you wish to insert the item.
.[Edit Shortcut Items]
Select items to be displayed in the shortcut menu.
MAP MENU (models with navigation system)
DISPLAYING MAP MENU
Models with INFINITI controller:
While scrolling the map screen, push < /OK> or touch [
 ] to display the map menu.
Models with control panel:
While scrolling the map screen, push <ENTER> or touch [ ] to display the map menu.
Available items
.[New Destination]
.[Show Current Location]
.[Store Location]
2-17

2. Getting started
.[Nearby Places]
.[Delete Stored Location]
 INFO:
INFO:
[Delete Stored Locations] is available only when aligned the cross pointer over the stored location.
DISPLAY VIEW BAR (models with navigation system)
Various information screens can be shown by selecting from the Display View Bar.
Available views may vary depending on models and specifications.
When the screen displays the current location map, push <MAP>/<MAP/VOICE> to show the Display View Bar.
Select an icon in the Display View Bar. The current view will change and the Display View Bar will be closed.
The following display views are available.
Viewing Split Map:
The map can be displayed on the split screen. Map setting can be adjusted independently.
Viewing Junction/Intersection:
The next junction/intersection is always displayed.
When no route is set, the junction/intersection screen is not displayed and the map is displayed in full screen.
2-18
![]()
2. Getting started
|
Viewing Turn List: |
Viewing Turn by Turn: |
Viewing Eco Drive Report: |
This displays the turn list on the left screen. When approaching a guide point, the left screen automatically switches to an enlarged view of the intersection.
When no route is set, the turn list screen is not displayed and the map is displayed in full screen.
Viewing Where am I ?:
This displays the information about the vehicle location.
This displays a turn point when driving according to route guidance.
When no route is set, the turn by turn screen is not displayed and the map is displayed in full screen.
Viewing Fuel Economy (if so equipped):
This displays the fuel economy information.
Your driving score will be displayed in real time, with 100 points designated as the score for ideal eco-driving.
To improve your score:
.When starting off, depress the accelerator gently.
.When cruising, accelerate and decelerate as little as possible.
.When decelerating, release the accelerator early.
CUSTOMIZING THE DISPLAY VIEW BAR
The menu icons on the Display View Bar can be set to your preference.
1.Display the Settings menu screen.
 “Displaying operation screen” (page 2-12)
2-19

2. Getting started
2.Touch [Navigation] to display the navigation setting screen.
3.Touch [Map & Display View] and touch [Change Order].
4.Change the order of the icons to be displayed on the Display View Bar. Touch and hold the [ ] displayed next to the item you wish to relocate. Drag the icon to the position in the list where you wish to insert the item.
HOW TO INPUT LETTERS AND NUMBERS
ALPHANUMERIC CHARACTER (letters and numbers) INPUT SCREEN
Alphanumeric characters are entered using the keyboard screen.
Touch a character on the displayed keyboard. The selected character is entered.
Entered characters are displayed here.
Touch [Delete] to delete the last character entered.
Touch and hold [Delete] to delete all the characters entered.
The symbol keys are displayed by touching [Symbols]. Touch [A-Z] to return to the alphabet keys.
Touch [Space] to enter a space.
Touch [OK] or [List] to finalize your input.
 INFO:
INFO:
.Touch [CAPS] to toggle uppercase and lowercase characters on the keyboard screen.
.Touch [ ] or [
 ] to move the character input position.
2-20

2. Getting started
 SYSTEM SETTINGS
SETTINGS MENU
The system settings can be changed to your preference.
Available setting items may vary depending on models and specifications.
Select setting item from the Settings menu screen.  “Displaying operation screen” (page 2-12)
|
Setting item |
Result |
|
[Bluetooth] |
Sets the Bluetooth® streaming audio and Phone. |
|
“Bluetooth® settings” (page 2-29) |
|
|
[Phone/Mail] |
Displays the Phone/Mail setting screen. |
|
“Phone and text message assistant settings” (page 4-9) |
|
|
[Vehicle] |
Displays the vehicle settings screen. |
|
“Vehicle settings” (page 2-23) |
|
|
[Navigation] |
Displays the Navigation setting screen. |
|
“Navigation settings” (page 6-56) |
|
|
[Audio] |
Displays the Audio setting screen. |
|
“Audio settings” (page 3-38) |
|
|
[Screen] |
Sets the Screen display to the preferred settings. |
|
“Screen settings” (page 2-24) |
|
|
[Volume Adjustment] |
Sets the Volume Adjustment. |
|
“Volume settings” (page 2-25) |
|
|
[Clock] |
Sets the Clock to your preferred settings. |
|
“Clock settings” (page 2-28) |
|
|
[InTouch Services] |
Sets Infiniti InTouchTM Services to your preferred settings. |
|
“Infiniti InTouchTM Services settings” (page 5-27) |
2-21

2. Getting started
|
Setting item |
Result |
|
|
[Voice Recognition] |
Displays the voice recognition function setting screen. |
|
|
“Voice Recognition settings” (page 7-14) |
||
|
[Camera/Sonar] |
Displays the camera/sonar system setting screen. |
|
|
For additional information, refer to the vehicle Owner’s Manual. |
||
|
[Drive Mode Enhancement] |
Displays the Drive Mode Enhancement setting screen. |
|
|
For additional information, refer to the vehicle Owner’s Manual. |
||
|
[Driver Assistance] |
Displays the Driver Assistance setting screen. |
|
|
For additional information, refer to the vehicle Owner’s Manual. |
||
|
[Other] |
[Language] |
Set the Language to your preferred settings. |
|
“Language setting” (page 2-26) |
||
|
[Language & Units] |
Displays the language and units setting screen. |
|
|
“Language & Units settings” (page 2-27) |
||
|
[Keyboard Type] |
Set the Keyboard Type to [ABC] or [QWERTY]. |
|
|
[Low on Fuel Alert] |
Set the fuel low notification to on/off. |
|
|
[Software Information] |
Display the Software Information. |
|
2-22

2. Getting started
Vehicle settings (if so equipped)
This menu turns the vehicle setting on/off.
Available setting items may vary depending on models and specifications.
1.Display the Settings menu screen.
 “Displaying operation screen” (page 2-12)
2.Touch [Vehicle].
|
Setting item |
Result |
|
[Lamp ON When Door Unlocks] |
When this item is set to on, the interior lights illuminate when any door is unlocked. |
|
[Light Sensitivity] |
Sets the auto light sensitivity. |
|
[Light Off Delay] |
Sets the auto light delay timer. |
|
[Speed Sensing Wiper Interval] |
Sets the wiper interval to be adjusted automatically according to the vehicle speed. |
|
[Selective Door Unlock] |
Sets the selective door unlock. |
|
[Intelligent Key Lock/Unlock] |
When this item is turned on, door lock/unlock function by pushing the door handle request switch will |
|
be activated. |
|
|
[Lift Steering Wheel on Exit] |
Sets the lift steering wheel on exit. |
|
[Slide Driver’s Seat Back on Exit] |
Sets the driver’s seat back on exit. |
|
[Reset Settings] |
All vehicle setting values are returned to the default settings. |
2-23

2. Getting started
Screen settings
This menu turns on/off the display and adjusts the image quality of the screen.
Available setting items may vary depending on models and specifications.
1.Display the Settings menu screen.
 “Displaying operation screen” (page 2-12)
2.Touch [Screen].
|
Setting item |
Action |
|||
|
[Display Settings] |
[Brightness] |
Adjust the brightness. |
||
|
[Contrast] |
Adjust the contrast. |
|||
|
[Black Level] |
Adjust the black level. |
|||
|
[Display OFF] |
Turn the screen on or off. |
|||
|
Push and hold <CAMERA |
>/< |
OFF>/< > for more than 2 seconds to turn |
||
|
the display on. |
||||
|
[Day/Night] |
Adjust the display brightness. Toggle between the daytime screen and nighttime |
|||
|
screen. |
||||
|
[Change Map Color] |
Toggle the map color between the daytime screen and nighttime screen. |
|||
|
[Reset Settings] |
This restores the display settings to the default settings. |
2-24

2. Getting started
Volume settings
This menu turns on/off, as well as adjusts, the volume for various functions and system beeps.
Available setting items may vary depending on models and specifications.
1.Display the Settings menu screen.
 “Displaying operation screen” (page 2-12)
2.Touch [Volume Adjustment].
|
Setting item |
Action |
|
[Audio Volume] |
Adjust the volume level of the audio system. |
|
[Voice Guidance] |
Sets on/off of the voice guidance. |
|
[Guidance Volume] |
Adjust the volume level of guidance voice. |
|
[Ringtone Volume] |
Adjust the volume level of the ringtone. |
|
[Incoming Call Vol.] |
Adjust the incoming call volume. |
|
[Outgoing Call Vol.] |
Adjust the outgoing call volume. |
|
[RDS Volume] |
Adjusts the volume level of the RDS announcement. |
|
[InTouch Services Vol] |
Adjust the volume level of the Infiniti InTouch™ Services information channel. |
|
[Sonar Volume] |
Adjust the volume level of the sonar warning volume. |
|
[Button Beep sound] |
Turn the button beep sound and alarm for a prohibited operation to on/off. |
2-25

2. Getting started
Language setting (if so equipped)
This changes the display language used in the system.
Available setting items may vary depending on models and specifications.
1.Display the Settings menu screen.
 “Displaying operation screen” (page 2-12)
2.Touch [Other].
3.Touch [Language].
|
Setting item |
Action |
|
[System Language] |
Select the language of the display. |
 INFO:
INFO:
.Do not change the ignition switch position while changing the language.
.The Voice Recognition System can be used only if the language is supported by the Voice Recognition System.
.Depending on the language selected, available voice commands for the Voice Recognition System may differ.
2-26

2. Getting started
Language & Units settings (if so equipped)
This changes the display language and measurement unit used in the system.
Available setting items may vary depending on models and specifications.
1.Display the Settings menu screen.
 “Displaying operation screen” (page 2-12)
2.Touch [Other].
3.Touch [Language & Units].
|
Setting item |
Action |
|
[System Language] |
Select the language of the display, voice announcements, and voice recognition functions. |
|
[Fuel Economy Unit Settings] |
Select the preferred fuel economy unit. |
|
[Tire Pressure Units] |
Select the preferred tire pressure unit. |
|
[Temperature Units] |
Select the preferred temperature unit. |
 INFO:
INFO:
.Do not change the ignition switch position while changing the language.
.The Voice Recognition System can be used only if the language is supported by the Voice Recognition System.
.Depending on the language selected, available voice commands for the Voice Recognition System may differ.
2-27

2. Getting started
Clock settings
This changes the clock settings.
Available setting items may vary depending on models and specifications.
1.Display the Settings menu screen.
 “Displaying operation screen” (page 2-12)
2.Touch [Clock].
|
Menu item |
Action |
|
|
[On-Screen Clock] |
Sets the clock display on/off. When this item is on, the clock display appears. |
|
|
[Daylight Savings Time] |
Select the setting for the daylight saving time from ON or OFF. Each time by touching this item |
|
|
changes the setting. |
||
|
[Clock Format (24h)] |
Select the clock format between 12-hour and 24-hour times. When the indicator light illuminates, the |
|
|
clock is set to the 24-hour format. |
||
|
[Time Zone] |
Select an appropriate time zone from the list. When selecting [AUTO], the system selects the time |
|
|
zone automatically. |
||
|
Offset Adjustment |
Adjust the offset value (hour and minutes). |
|
|
[>] |
[Time Adjustment] |
Adjusts the time by increasing or decreasing the value. |
|
[Calendar Adjustment] |
Adjusts the year, month and day. |
|
2-28
![]()
2. Getting started
PAIRING BLUETOOTH® DEVICE
Your vehicle is equipped with a Bluetooth® Hands-Free Phone System and Bluetooth® streaming audio. If you are an owner of a compatible Bluetooth® enabled cellular phone or Bluetooth® streaming audio module, you can set up the wireless connection between your cellular phone and the invehicle phone module, or Bluetooth® streaming audio device and the in-vehicle audio module. With Bluetooth® wireless technology, you can make or receive a telephone call with your cellular phone in your pocket and listen to music on your Bluetooth® streaming audio device via the in-vehicle system.
Pairing cellular phone/audio device
1.Display the Settings menu screen.
 “Displaying operation screen” (page 2-12)
2.Touch [Settings].
3.Touch [Bluetooth] and touch [Connect Device].
4.Touch [Add New (X/5 Free)] to register a device.
5.When a PIN code appears on the screen, operate the compatible Bluetooth® cel-
lular phone to enter the PIN code.
The pairing procedure of the cellular phone varies according to each cellular phone. See the cellular phone Owner’s Manual for the details.
If the registered device has both audio and phone function, the system displays a message asking if you would like to register the device for another function.
The procedure for connecting a cellular phone/audio device varies according to each Bluetooth® device. See the Bluetooth® device Owner’s Manual for details.
 NOTE:
NOTE:
Some cellular phones or other devices may cause interference or a buzzing noise to come from the audio system speakers. Storing the device in a different location may reduce or eliminate the noise.
 INFO:
INFO:
You can also visit www.infinitiusa.com/ bluetooth or call INFINITI Consumer Affairs Department for instructions on pairing INFINITI recommended cellular phones or
audio devices.
Bluetooth® settings
The Bluetooth® settings can be set in detail according to the your preference.
1.Display the Settings menu screen.
 “Displaying operation screen” (page 2-12)
2.Touch [Settings].
3.Touch [Bluetooth].
4.Touch a preferred item.
.[Bluetooth]
Turn the Bluetooth® connection to the vehicle on/off.
.[Connect Device]
Touch this item to connect to the Bluetooth® device. Also, you can delete a registered device and display information of registered device.
.[Select Phone]
Registered Bluetooth® Hands-Free Phones are shown on the list. Select a device from the list to disconnect or connect a Bluetooth® device.
.[Select Audio Device]
Registered Bluetooth® streaming audio
2-29

2. Getting started
players are shown on the list. Select a device from the list to disconnect or connect a Bluetooth® device.
.[Vehicle Bluetooth Device Info.]
The registered device name and the PIN code can be changed.
FUNCTIONS DISABLED WHILE DRIVING
Example
To help ensure safe driving, some functions cannot be operated or have limited operation while the vehicle driving speed is above 5 MPH (8 km/h).
The on-screen text and keys for these restricted functions will be “grayed-out” or muted and cannot be selected while driving. In some cases, a screen message will appear indicating a restricted function.
Restricted functions while driving include:
.Character (letter and number) input screen.
.Scrolling and viewing of certain list screens
.Displaying detail information and touching item on the information screen
2-30

2. Getting started
. Adding/editing home location, address the language setting. book entries and current route (models
with navigation system)
.Making a call by dial number and handset phonebook
.Setting phone, Infiniti InTouchTM Services (models with navigation system) and Bluetooth® functions
These functions will become available again when the vehicle speed is reduced to 5 MPH (8 km/h) or less.
Destination functions (models with navigation system) available while driving include:
.Home
.Nearby Places
.Stored Locations
.Previous Destinations
.Journey Planner
.Stored Routes
.Connected Search
Some of the destination setting functions (models with navigation system) that become unavailable while driving can be operated by Voice Recognition System. Available voice commands may differ depending on
ADDITIONAL SYSTEM INFORMATION
Infiniti InTouchTM uses an operating system like those found on many computers, tablets and cellular phones. Like these devices, processing speed may vary, and system response delays or resets may occur intermittently. This does not indicate a malfunction, and further information on system operation can be found below.
System Start-Up
Due to the large number of features and capabilities that the Infiniti InTouchTM system needs to load on start-up, it may take up to a minute for all functions (such as Apps) to be available. The system will display “Now Loading All Apps…” during this time.
System Response Delay
Infiniti InTouchTM uses an operating system like those found on many computers, tablets and cellular phones. Like these devices, sometimes programs do not respond immediately and this may temporarily delay system use.
In most situations, simply waiting a few moments longer should be sufficient for the pending operations to complete.
2-31

2. Getting started
If the system temporarily does not respond to commands, the system can be easily reset. Simply push down <VOL/ON·OFF> on the audio system for at least 5 seconds. The system will turn off and restart.
After restart, all functions should be available.
Models with navigation system:
If a navigation route was set, the route should resume automatically.
System Reset
As noted above, intermittent system resets may occur during normal operation. You may also wish to reset the system if you find that a particular feature is not loading or responding. Often, a quick system reset will resolve any issue you may be experiencing. After restart, all functions will be available as described above.
System Updates
The Infiniti InTouchTM system is designed to allow software updates for additional enhancements and new features. If you have questions about system performance, contact your retailer to ensure that your vehicle has had the latest available software installed.
Operating Tips
Infiniti InTouchTM provides several methods of operation to suit your preferences. The following are suggested operating tips.
.Operating the INFINITI controller (if so equipped), control panel, Steering Wheel Controls, or other controls too quickly can cause a lag between the control and the display. Operate the controls carefully and allow the system to respond to your request.
.INFINITI recommends using Voice Recognition whenever possible to select options while driving. Some touch screen functionality is intentionally unavailable
during driving. Please view the available
voice commands by pushing < > on the steering wheel and then selecting a category on the display.
.Models with navigation system:
When looking for a street address or Points of Interest (POI), remember that you can use Connected Search and
Destination Assistance features within Infiniti InTouchTM Services to expand your search methods and results. The Voice Recognition System recognizes a defined set of commands. These com-
mands can be viewed in the display by pushing < > on the steering wheel and then selecting a category from the displayed list. The commands can also be found in this manual.
 “Command list” (page 7-7)
.In some situations, the system may not be able to recognize your command even if you say the exact command. This can be due to noise conditions or an accent.
.In some unique cases, the system may expect a word to be spoken as it is spelled as opposed to the way it is normally pronounced.
ADDITIONAL HELP
For additional technical information, visit the following websites or contact the support line.
Websites:
www.infinitiusa.com (for U.S.)
www.infiniti.ca (for Canada)
Support line:
1-855-444-7244
2-32
3 Audio system
|
Audio operation precautions ………………………………….. |
3-2 |
|
Radio ……………………………………………………………………. |
3-2 |
|
Compact Disc (CD) player …………………………………. |
3-4 |
|
Digital Versatile Disc (DVD) player (if |
|
|
so equipped) ………………………………………………………… |
3-5 |
|
USB (Universal Serial Bus) connection port …….. |
3-8 |
|
Compressed Audio Files (MP3/WMA/AAC) ….. |
3-9 |
|
Bluetooth® streaming audio ……………………………. |
3-13 |
|
Names and functions of audio control buttons ….. |
3-14 |
|
Audio main buttons (Type A) (if so equipped) ….. |
3-14 |
|
Audio main buttons (Type B) (if so equipped) …. |
3-15 |
|
Steering wheel mounted audio control buttons |
|
|
(Type A) (if so equipped) ………………………………….. |
3-15 |
|
Steering wheel mounted audio control buttons |
|
|
(Type B) (if so equipped) ………………………………….. |
3-16 |
|
Steering wheel mounted audio control buttons |
|
|
(Type C) (if so equipped) ………………………………….. |
3-16 |
|
Audio operations …………………………………………………… |
3-17 |
|
Audio main operation ………………………………………. |
3-17 |
|
Radio ………………………………………………………………….. |
3-18 |
|
Compact Disc (CD) player ……………………………….. |
3-23 |
|
Digital Versatile Disc (DVD) player (if |
|
|
so equipped) ………………………………………………………. |
3-25 |
|
…..USB (Universal Serial Bus) connection port |
3-28 |
|
|
iPod® player |
3-31 |
|
|
Bluetooth® streaming audio ………………………….. |
3-34 |
|
|
Auxilliary (AUX) devices (if so equipped) ………. |
3-37 |
|
|
Audio settings ……………………………………………………….. |
3-38 |
|
|
Disc/USB memory device care and cleaning ……… |
3-41 |
|
|
Discs …………………………………………………………………. |
3-41 |
|
|
USB memory device ……………………………………….. |
3-41 |
|
|
Gracenote® End User License Agreement …………. |
3-41 |
|
|
Mobile Entertainment System (MES) (if |
||
|
so equipped) ………………………………………………………….. |
3-42 |
|
|
Precautions ……………………………………………………… |
3-43 |
|
|
Technical information …………………………………….. |
3-43 |
|
|
Remote controller and headphones ………………. |
3-52 |
|
|
Rear media interface ………………………………………. |
3-57 |
|
|
Activating rear displays ………………………………….. |
3-57 |
|
|
Operations on rear displays …………………………… |
3-58 |
|
|
Setting and information …………………………………. |
3-59 |
|
|
Controlling the rear system on the |
||
|
front display ……………………………………………………. |
3-60 |
|
|
Operating tips …………………………………………………. |
3-61 |
|
|
Care and maintenance ……………………………………. |
3-63 |

3. Audio system
AUDIO OPERATION PRECAUTIONS
 WARNING
.The driver must not attempt to operate the audio system while the vehicle is in motion, so that full attention may be given to the vehicle operation.
.Park the vehicle in a safe location and apply the parking brake before operating the audio system and playing movies (if so equipped).
 CAUTION
.Operate the audio system only when the engine or the hybrid system is running. Operating the audio system for extended periods of time with the engine or the hybrid system turned off can discharge the vehicle battery (12V battery).
.Do not allow these systems to get wet. Excessive moisture such as spilled liquids may cause the system to malfunction.
RADIO
Place the ignition switch in the ACC or ON position before turning on the radio. If you listen to the radio with the engine or the hybrid system not running, the ignition switch should be placed in the ACC position.
Radio reception is affected by station signal strength, distance from radio transmitter, buildings, bridges, mountains and other external influences. Intermittent changes in reception quality normally are caused by these external influences.
Using a cellular phone in or near the vehicle may influence radio reception quality.
Radio reception
Your radio system is equipped with state-of- the-art electronic circuits to enhance radio reception. These circuits are designed to extend reception range, and to enhance the quality of that reception.
However there are some general characteristics of both FM and AM radio signals that can affect radio reception quality in a moving vehicle, even when the finest equipment is used. These characteristics are completely normal in a given reception area, and do not indicate any malfunction in your radio system.
Reception conditions will constantly change because of vehicle movement. Buildings, terrain, signal distance and interference from other vehicles can work against ideal reception. Described below are some of the factors that can affect your radio reception.
Some cellular phones or other devices may cause interference or a buzzing noise to come from the audio system speakers. Storing the device in a different location may reduce or eliminate the noise.
FM radio reception
Range: the FM range is normally limited to 25 to 30 miles (40 to 48 km), with monaural
3-2

3. Audio system
(single station) FM having slightly more range than stereo FM. External influences may sometimes interfere with FM station reception even if the FM station is within 25 miles (40 km). The strength of the FM signal is directly related to the distance between the transmitter and receiver. FM signals follow a line-of-sight path, exhibiting many of the same characteristics as light. For example they will reflect off objects.
Fade and drift: As your vehicle moves away from a station transmitter, the signals will tend to fade and/or drift.
Static and flutter: During signal interference from buildings, large hills or due to antenna position, usually in conjunction with increased distance from the station transmitter, static or flutter can be heard. This can be reduced by lowering the treble setting to reduce the treble response.
Multipath reception: Because of the reflective characteristics of FM signals, direct and reflected signals reach the receiver at the same time. The signals may cancel each other, resulting in momentary flutter or loss of sound.
AM radio reception
AM signals, because of their low frequency, can bend around objects and skip along the ground. In addition, the signals can bounce off the ionosphere and be bent back to earth. Because of these characteristics, AM signals are also subject to interference as they travel from transmitter to receiver.
Fading: Occurs while the vehicle is passing through freeway underpasses or in areas with many tall buildings. It can also occur for several seconds during ionospheric turbulence even in areas where no obstacles exist.
Static: Caused by thunderstorms, electrical power lines, electric signs and even traffic lights.
HD RadioTM Technology reception (for U.S.)
HD RadioTM Technology reception needs to be activated to receive HD Radio broadcasts.
 “Audio settings” (page 3-38)
This enables you to receive radio broadcasts digitally (where available), providing a better quality sound with clear reception. When this feature is not activated or HD Radio broadcasts are not available, you will receive
analog radio (AM/FM) broadcasts.
Satellite radio reception
When the satellite radio is used for the first time or the vehicle battery (12V battery) has been replaced, the satellite radio may not work properly. This is not a malfunction. Wait more than 10 minutes with the satellite radio ON and the vehicle outside of any metal or large building for the satellite radio to receive all of the necessary data.
The satellite radio mode requires an active SiriusXM Satellite Radio subscription. The satellite service is available only to those at least 18 and older in the 48 contiguous United States and DC.
The satellite radio performance may be affected if cargo carried on the roof blocks the satellite radio signal.
If possible, do not put cargo near the satellite antenna.
A buildup of ice on the satellite radio antenna can affect satellite radio performance. Remove the ice to restore satellite radio reception.
3-3

3. Audio system
COMPACT DISC (CD) PLAYER
.Do not force a compact disc into the CD insert slot. This could damage the CD and/or CD player.
.Trying to load a CD with the CD door closed could damage the CD and/or CD
|
player. |
— Rewritable compact discs (CD-RW) |
||
|
. During cold or rainy weather, the player |
. Do not use the following CDs as they |
||
|
may malfunction due to the humidity. If |
may cause the CD player to malfunction. |
||
|
this occurs, remove the CD and dehumi- |
— 3.1 in (8 cm) discs |
||
|
dify or ventilate the player completely. |
— CDs that are not round |
||
|
. |
|||
|
The player may skip while driving on |
— CDs with a paper label |
||
|
rough roads. |
|||
|
. The CD player sometimes cannot func- |
— CDs that are warped, scratched, or |
||
|
have abnormal edges |
|||
|
tion when the passenger compartment |
|||
|
temperature is extremely high. Decrease |
. This audio system can only play prere- |
||
|
the temperature before use. |
corded CDs. It has no capabilities to |
||
|
. Only use high quality 4.7 in (12 cm) round |
record or burn CDs. |
||
|
discs that have the “COMPACT disc |
. If a CD cannot be played, error messages |
||
|
DIGITAL AUDIO” logo on the disc or |
similar to the following may be displayed. |
||
|
packaging. |
— Disc read error: |
||
|
. Do not expose the CD to direct sunlight. |
Indicates a CLV/Focus, TOC or Ac- |
||
|
cess error. Check and re-insert the |
|||
|
. |
CDs that are of poor quality, are dirty, |
CD. Make sure that it is inserted |
|
|
scratched, or covered with fingerprints, |
correctly. |
||
|
or that have pin holes may not work |
— Eject disc, please: |
||
|
properly. |
|||
|
Indicates a mechanism error. If the |
|||
|
. The following CDs may not work prop- |
CD can be ejected, eject and re-insert |
||
|
the CD. If the CD cannot be ejected, it |
|||
|
erly: |
|||
|
is recommended you contact an |
|||
|
— Copy control compact discs (CCCD) |
|||
|
INFINITI retailer. |
|||
|
— Recordable compact discs (CD-R) |
— Unplayable error: |
||
|
Indicates that no readable files are |
|||
|
found on the inserted CD. Check the |
3-4

3. Audio system
data on your CD.
DIGITAL VERSATILE DISC (DVD) PLAYER (if so equipped)
Copyright and trademark
.The technology protected by the U.S. patent and other intellectual property rights owned by Macrovision Corporation and other right holders is adopted for this system.
.This copyright protected technology cannot be used without a permit from Macrovision Corporation. It is limited to be personal use, etc., as long as the permit from Macrovision Corporation is not issued.
.Modifying or disassembling is prohibited.
.Dolby digital is manufactured under license from Dolby Laboratories, Inc.
.Dolby and the double D mark  are trademarks of Dolby Laboratories, Inc.
.DTS is a registered trademark of DTS,
Inc. and DTS 2.0 “ ” is a trademark of DTS, Inc.
.DTS and DTS Digital Surround “ ” are registered trademarks of DTS, Inc.
Parental level (parental control)
DVDs with the parental control settings can be played with this system. Please use your own judgement to set the parental control with the system.
Disc selection
You can play the following disc formats with the DVD drive:
.DVD-Video
.DVD-VR
.Video-CD
.DTS-CD
Use DVDs with the region code “ALL” or the code applicable to your DVD player. (The region code  is displayed as a small symbol printed on the DVD
  .) This vehicle-installed DVD player can only play DVDs with an applicable region code.
3-5

3. Audio system
Do not use the following DVDs as they may cause the DVD player to malfunction:
.3.1 in (8 cm) discs
.DVDs with incompatible region code
.DVDs that are not round
.DVDs with a paper label
.DVDs that are warped, scratched, or have unequal edges
The following DVDs may not work properly:
.Recordable digital video discs (DVD-R)
.Rewritable digital video discs (DVD-RW)
Specification chart for DVD
Playable media:
The following media can be played on the system.
.DVD+RW
.DVD+R
.DVD+R DL
.DVD-RW (corresponds to CPRM)
.DVD-R (corresponds to CPRM)
.DVD-R DL (corresponds to CPRM)
.DVD-ROM
.Dual DISC (not guaranteed)
Video codec:
The following video codecs are supported by the system.
Video file format
DVD Video
DVD-VR with CPRM
|
VIDEO CD |
Ver. 1.0 |
|
Ver. 1.1 |
|
|
Ver. 2.0 |
|
|
DTS CD |
3-6
 Loading…
Need a manual for your Infiniti Q70 (2014)? Below you can view and download the PDF manual for free. There are also frequently asked questions, a product rating and feedback from users to enable you to optimally use your product. If this is not the manual you want, please contact us.
Is your product defective and the manual offers no solution? Go to a Repair Café for free repair services.
Manual

Rating
Let us know what you think about the Infiniti Q70 (2014) by leaving a product rating. Want to share your experiences with this product or ask a question? Please leave a comment at the bottom of the page.
Are you satisfied with this Infiniti product?
Yes No
Be the first to rate this product
0 votes
Frequently Asked Questions
Our support team searches for useful product information and answers to frequently asked questions. If you find an inaccuracy in our frequently asked questions, please let us know by using our contact form.
My car has a timing chain, what is the replacement interval for it? Verified
With normal use, a timing chain should last the entire lifespan of the car and does not need to be replaced.
This was helpful (2408)
I can’t open one or more of the doors from the inside, why is that? Verified
The child safety lock is probably activated. This can often be deactivated with a mechanism in the door.
This was helpful (760)
How often should I change my oil? Verified
Almost every car has its own exact guideline, but in general it’s wise to change your oil every 10.000 to 15.000 kilometers or once every year. Polluted oil can cause serious damage to the engine over time.
This was helpful (642)
When should the airbag on the side of the passenger seat be switched off? Verified
When driving with a child in a car seat on the passenger seat, the airbag on that side should be switched off. This is also advisable for children up to 12 years old that take place in the passenger seat. This is to prevent injuries in case of an accident.
This was helpful (581)
The car keys won’t unlock the car from a distance anymore, why is that? Verified
Car keys that can unlock from a distance generally work with a battery. When it runs out, the key won’t work anymore. Replace the battery and try again.
This was helpful (572)
Will a lower tire pressure result in more grip when driving in the snow? Verified
No, although the tires will have more surface in contact with the road with a lower pressure, it will nevertheless result in less stability. Always drive with the correct tire pressure!
This was helpful (329)
I filled my car with the wrong fuel, what should I do? Verified
Do not drive! It does not matter wether you put diesel in a gasoline car or gasoline in a diesel car. In both cases it can cause damage to the enige and/or other parts of the car. Contact roadside assistance.
This was helpful (218)
Where can I find the VIN number of my car? Verified
This can vary between brands and models, but on many cars the VIN number can be found on the door jamb, under the hood or on the metal flooring at the front seat.
This was helpful (182)
How often should I replace the blades on my windscreen wipers? Verified
It’s advisable to replace the wiper blades at least once a year. Signs that the blades need to be replaced are streaking, leaving a haze, making noise or the rubber coming off.
This was helpful (160)
How many miles is one kilometer? Verified
One kilometer equals 0,621 mile. Ten kilometers makes 6,21 miles. One mile equals 1,609 kilometer. Ten miles makes 16,09 kilometers.
This was helpful (137)
What is the VIN number? Verified
VIN stands for Vehicle Identification Number and is a unique number that every car has. This makes the car indentifyable after for example a crash or in the case of a recall. It also allows a car to be identified in the case the number plates are missing.
This was helpful (135)
Can I use the windscreen wipers while there is ice on the windscreen? Verified
No, this is not advisable. Ice is sharp and can damage the rubber on the wiper blades.
This was helpful (132)