- Manuals
- Brands
- Ski-Doo Manuals
- Offroad Vehicle
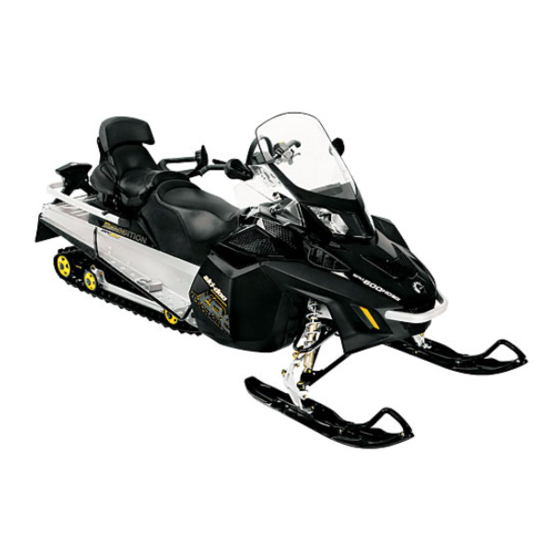
- SCANDIC WT
- Operator’s manual
-
Contents
-
Table of Contents
-
Troubleshooting
-
Bookmarks
Quick Links
Related Manuals for Ski-Doo SCANDIC WT
Summary of Contents for Ski-Doo SCANDIC WT
-
Page 2: Safety Warning
In USA, products are distributed by BRP US Inc. In Canada, products are distribute d by Bombardier Recreational Products Inc. The following are trademarks of Bombardier Recreational Products Inc. or its subsidiaries. ROTAX SKANDIC SKI-DOO ® EXPEDITION DESS XP-S mmo2009-008 AG ®™…
-
Page 3
Bombardier Recre- North American office: ational Products Inc. (BRP) warranty + 1 819 566-3366 and a network of authorized SKI-DOO This guide uses the following safety snowmobile dealers ready to provide alert symbol in conjunction with signal… -
Page 4
Warranty Registration the WARRANTY section in this guide, process. and/or an authorized SKI-DOO dealer. The information and components/ system descriptions contained in this guide are correct at time of publi- cation. BRP, however maintains a… -
Page 5: Table Of Contents
TABLE OF CONTENTS SAFETY INFORMATION INTRODUCTION …………..8 IMPORTANT BASIC SAFETY MEASURES.
-
Page 6
21) Hood Latches …………. . . 41 22) Electric Power Outlet . -
Page 7
® BRP LIMITED WARRANTY USA AND CANADA: 2009 SKI-DOO SNOWMOBILES …………..114 BRP INTERNATIONAL LIMITED WARRANTY: 2009 SKI-DOO ®… -
Page 8
_______________________… -
Page 9: Safety Information
SAFETY INFORMATION ____________ ____________ SAFETY INFORMATION…
-
Page 10: Introduction
We encourage you to have an Annual Safety Inspection of your snowmo- bile. Please contact an authorized SKI-DOO dealer for further details. Finally, we urge you to visit an autho- rized SKI-DOO dealer periodically for regular and safety maintenance, as well as snowmobile accessories you may require.
-
Page 11: Important Basic Safety Measures
IMPORTANT BASIC SAFETY MEASURES Training Basic training is required for the BRP recommends the operator has safe operation of any snowmobile. at least 16 years old of age. Study your Operator’s Guide paying particular attention to cautions and Speed warnings. Join your local snow- Speeding can be fatal.
-
Page 12
Nature is wonderful but don’t let it Venturing out alone with your snow- distract your attention from driving. mobile could also be hazardous. If you want to truly appreciate win- You could run out of fuel, have an ter’s scenery, stop your snowmo- accident, or damage your snowmo- bile on the side of the trail so that bile. -
Page 13
Operation Raising the rear of your snowmobile while the engine is running could Always make a pre-start inspection cause snow, ice or debris to be BEFORE you turn on the ignition. thrown back at an observer. Nev- In an emergency, the snowmobile er raise the rear of the vehicle while engine can be stopped by press- the engine is running. -
Page 14
A poorly maintained snowmobile Always wear a DOT approved hel- itself can be a potential hazard. Ex- met and follow the same dressing cessively worn components could guidelines as those recommended render the vehicle completely in- for the operator and described in operative. -
Page 15: Laws And Regulations
LAWS AND REGULATIONS Know your local laws. Federal, state, provincial and local gov- ernment agencies have enacted laws and regulations pertaining to the safe use and operation of snowmobiles. It is your responsibility as a snowmobiler to learn and obey these laws and reg- ulations.
-
Page 16: Riding The Vehicle
RIDING THE VEHICLE Before venturing on the trails, operate Turning the snowmobile in a restricted flat area Handlebar controls the steering of the until you are completely familiar with vehicle. As the handlebar is rotated to its operation and feel comfortable that right or left, the skis are turned right or you can safely tackle a more demand- left to steer the snowmobile.
-
Page 17
Rubber bottom boots with either a ny- Generally, the riding position for best lon or a leather top, with removable balance and control is sitting. Howev- felt liners are best suited for snowmo- er, the posting, kneeling or standing biling. positions are also used under certain conditions. -
Page 18: Carrying A Passenger
Carrying a Passenger Certain snowmobiles are designed for an operator only, others can allow one passenger only, and others can allow up to two passengers. Refer to the indications on the vehicles to know if any particular snowmobile can accom- modate passengers or not, and if so, how many.
-
Page 19: Terrain/Riding Variations
WARNING WARNING When riding with a passenger: – Passengers must only sit on designated passenger seats. – Braking ability and steering Never allow anyone to sit be- control are reduced. Decrease tween the handlebar and the speed and allow extra space to operator.
-
Page 20
Deep Snow Frozen Water In deep “powder” snow, your vehicle Traveling frozen lakes and rivers can could begin to “bog” down. If this oc- be fatal. Avoid waterways. If you curs, turn in as wide an arc as possi- are in an unfamiliar area, ask the lo- ble and look for a firmer base. -
Page 21
A direct climb could present problems. Slush Choose the standing position, accel- Slush should be avoided at all times. erate before you start the climb and Always check for slush before start- then reduce throttle pressure to pre- ing across any lake or river. If dark vent track slippage. -
Page 22
Unseen Obstruction Turning There may be obstructions hidden Depending on terrain conditions, there beneath the snow. Driving off estab- are two preferred ways to turn or cor- lished trails and in the woods requires ner a snowmobile. For most snow reduced speed and increased vigi- surfaces, “body english”… -
Page 23: Transporting And Towing
Railroad Crossing It is always IMPORTANT to keep a safe distance between each snowmo- Never ride on railroad tracks. It is ille- bile. Always maintain a safe interval gal. Railroad tracks and railroad rights- and allow sufficient stopping distance. of-way are private property. A snow- Don’t be a tailgater.
-
Page 24: Location Of The Important Labels
If missing or damaged, the decals can be replaced free of charge. See an authorized SKI-DOO dealer. Please read the following instructions carefully before operating this snow- mobile. Instruction 4 mmo2008-001-025_a TYPICAL —…
-
Page 25
Instruction 5 Instruction 9 mmo2007-002-002 mmo2009-002-002_a Instruction 10 V800 MODELS Instruction 6 Instruction 11 Instruction 7 Instruction 12 Instruction 8 LIQUID-COOLED MODELS ____________ ___________ SAFETY INFORMATION… -
Page 26
Instruction 13 Instruction 16 vmo2006-005-009_en HANG TAG — NOT SHOWN Instruction 14 Instruction 15 mmo2007-009-070 TYPICAL ___________ ___________ SAFETY INFORMATION… -
Page 27: Environment Information
ENVIRONMENT INFORMATION _____________________…
-
Page 28: General
GENERAL Wildlife compliments your snowmobil- The vast majority respect the law and ing day. Snowmobile tracks provide the environment. Each of us must set firm ground over which animals can an example for those who are new to travel from area to area. Do not vio- the sport, young and old alike.
-
Page 29: Just What Is Light Treading
JUST WHAT IS LIGHT TREADING? The fundamental objective of Light Treading is one of respect for where and how you ride a snowmobile. You’re a light treader when you follow the principles below. Become informed. Obtain maps, regulations and other information from the Forest Service or from other public land agencies.
-
Page 30: Why Is Light Treading Smart
So whether you’re driving a high perfor- mance SKI-DOO, a sporty MX Z snow- mobile or any other make or model, show you know what you’re doing.
-
Page 31: Vehicle Information
VEHICLE INFORMATION _____________________…
-
Page 32: How To Identify Your Snowmobile
These num- bers are required by the authorized SKI-DOO dealer to complete warranty claims properly. No warranty will be allowed by BRP if the engine serial number or vehicle identification num- ber (V.I.N.) is removed or mutilated…
-
Page 33
mmo2007-001-001_a V800 ENGINE TYPE 1. Engine serial number _____________________… -
Page 34: Controls/Instruments/Equipment
CONTROLS/INSTRUMENTS/EQUIPMENT NOTE: Some controls/instruments/equipment do not apply or are optional on some models. In these cases their reference numbers are deliberately missing in the illustrations. mmo2009-002-001_a TYPICAL 28. Hitch 7. Holding strap 29. Shields and guards 18. Fuel tank cap 30.
-
Page 35: Throttle Lever
mmo2008-001-024_a TYPICAL 8. Ignition switch/start button 9. Tether cut-out switch TYPICAL 13. Choke lever 1. Throttle lever 18. Fuel tank cap 2. Brake lever 38. Mechanical fuel level gauge 3. Parking brake lever 5. Gear shift lever 6. Handlebar 7. Holding strap 8.
-
Page 36: Brake Lever
If oil pilot lamp still glows up, stop engine and have lubrication system inspected by an authorized SKI-DOO dealer. mmo2007-009-037_a TYPICAL — ENGAGE MECHANISM Step 1: Squeeze and maintain brake lever DESS Status Step 2: Adjust locking lever 1.
-
Page 37: Gear Shift Lever
See an authorized cle stability and control. Come to SKI-DOO dealer as soon as complete stop before selecting re- possible. verse gear. Wait until the reverse alarm sounds before operating Engine Management System throttle to proceed in reverse.
-
Page 38: Holding Strap
Using electric starter when Handlebar height is adjustable. See an engine has started could damage authorized SKI-DOO dealer. electric starter mechanism. Release the key as soon as the engine 7) Holding Strap starts.
-
Page 39: Tether Cut-Out Switch
Operation nently memorized digital code. Your Attach tether cord eyelet to clothing, authorized SKI-DOO dealer programs then snap cap (DESS key) over post this key in the ECM (Engine Control before starting engine. Module) of your snowmobile to allow…
-
Page 40
Additional DESS Keys The ECM of your snowmobile can be programmed by your authorized SKI-DOO dealer to accept 8 different keys. We recommend the purchase of ad- ditional keys from your authorized SKI-DOO dealer. If you have more than one DESS equipped SKI-DOO… -
Page 41: Engine Cut-Out Switch
If the switch has been used in an emergency caused by a suspect- ed malfunction, the source of the malfunction should be determined and corrected before restarting en- gine. See an authorized SKI-DOO dealer for servicing. A06H1KA 1. OFF 2. Position 2 3.
-
Page 42: Speedometer
NOTE: At vehicle speed of 90 km/h ing procedure or contact an authorized (55 MPH) and more the mode LCD SKI-DOO dealer. screen will show speed only instead of the selected mode. NOTE: Speedometer, odometer and…
-
Page 43: Mode Button
Push and hold mode button for 2 sec- NOTE: Do not sit or lean on seat when onds to reset the hourmeter. fuel tank cap is not properly installed. Multifunction Display Code 19) Heated Grip Switch If your speedometer shows SCALE in Three-position toggle switch.
-
Page 44: Fuses
TYPICAL — ELECTRIC POWER OUTLET malfunction should be determined SWT V800 Models Only and corrected before restarting. See an authorized SKI-DOO dealer With the engine running, use the for servicing. toggle switch mounted on the multi- switch housing to supply current to the rear rack power outlet.
-
Page 45
30 A Engine 20 A Secondary load 5 A Relays Electric Fuel Level Gauge 15 A Lighting (headlamp) Expedition TUV 600 HO SDI Model See an authorized SKI-DOO dealer for fuse replacement. FUSE DESCRIPTION LOCATION Fuse Box 30 A Load… -
Page 46: Front Grab Handles/Front Bumper
24) Front Grab Handles/ 600 Models Front Bumper To be used whenever front of snow- mobile requires manual lifting. WARNING Do not attempt to lift the vehicle by hand alone. Use appropriate lifting device or have assistance to share lifting stress in order to avoid risk of strain injuries.
-
Page 47: Rear Rack
Your snowmobile is provided with a number of shields and guards. Leave these in place on your vehicle as they are designed to keep clothing and hands out of moving parts and away from hot components. Never attempt to make adjustments to any moving part while the engine is running.
-
Page 48: Backrest
Installation is the reverse of removal procedure. Pay attention to the fol- lowing. WARNING Make sure that the passenger seat is locked securely in place before using the snowmobile. mmo2008-001-019_b TYPICAL 1. Seat latch 2. Tip driver seat over Slide the passenger seat forward, then lift to remove.
-
Page 49: Rear Grab Handles/Heated Grips Switch
All Other Models Heated Grips Switch To remove backrest, remove wing Three-position switch. Select the de- screw on both sides. sired position to keep rear passenger’s hands at a comfortable temperature. 34) Tachometer Direct-reading dial indicates the num- ber of thousand of revolutions per minute (RPM) of the engine.
-
Page 50: Temperature Gauge
36) Temperature Gauge Expedition TUV The gauge indicates engine coolant temperature. The needle moves to the normal range as engine warms. Under all riding conditions, the needle should stay within this range. If nee- dle moves into the overheat range, reduce snowmobile speed and run TYPICAL snowmobile in loose snow or stop…
-
Page 51: Recommended Fuel And Oil
RECOMMENDED FUEL AND OIL Recommended Fuel WARNING Use regular unleaded gasoline, avail- Always stop the engine before re- able from most service stations or oxy- fueling. Fuel is flammable and ex- genated fuel containing a maximum plosive under certain conditions. total of 10% of ethanol or methanol Always work in a well ventilated or both.
-
Page 52: Recommended Oil
Always maintain a sufficient amount reservoir. of recommended oil in the injection oil Use only 2-stroke engine injection oil reservoir. sold by authorized SKI-DOO dealers. CAUTION: Check level and refill ev- ery time you refuel. Do not mis- ENGINE TYPE OIL TYPE…
-
Page 53: Break-In Period
During break-in period, maximum first, your snowmobile be checked by throttle should not exceed 3/4 open- an authorized SKI-DOO dealer. This in- ing. However, brief full acceleration spection will also give you the opportu- and speed variations contribute to a nity to discuss the unanswered ques- good break-in.
-
Page 54: Operating Instructions
Replenish as light and the brake light are stan- necessary and see an authorized dard equipment. Be sure lights are SKI-DOO dealer in case of any clear of dirt, slush or snow and are leaks. in good working order or condition.
-
Page 55: Engine Starting Procedure (600 Ho Sdi)
PRE-OPERATION CHECK LIST ✔ ITEM OPERATION Body including seat, Check that there is no snow or ice. footrests, lights, controls and instruments Track and idler wheels Check for free movement. Brake lever Check proper action. Parking device Check proper action. Throttle lever Check proper action.
-
Page 56: Engine Starting Procedure (550F And 600)
Electric Starting NOTE: After the engine is started, let engine warm up at fast idle until – Depressing the START button will engine speed drops. Then, close off engage the electric starter and start choke to ensure proper air-fuel mix- the engine.
-
Page 57: Engine Starting Procedure (V800)
CAUTION: Do not engage electric CAUTION: Do not engage electric starter for more than 10 seconds starter for more than 10 seconds at a time. A rest period should be at a time. A rest period should be observed between the cranking cy- observed between the cranking cy- cles to allow electric starter to cool cles to allow electric starter to cool…
-
Page 58: Shutting Off The Engine
Shut-off the engine and remove the wide-base snowmobile mechanical stand. Skis may be frozen on the ground. Grab both skis one at a time by their loops and lift their front end slightly off the ground. After restarting engine, the vehicle can be driven at low speed for the first 2 or 3 minutes of riding.
-
Page 59: Special Operating Instructions
CAUTION: For colder temperatures than — 20°C (- 4°F), carburetor(s) must be recalibrated to avoid en- gine damage. Refer to an autho- rized SKI-DOO dealer. Emergency Starting mmo2008-005-007 All Models except V800 TYPICAL The engine can be started with the…
-
Page 60: Towing An Accessory
Towing an Accessory Always use a rigid towbar to tow an ac- cessory. Any towed accessory should have reflectors on both sides and at the rear. Check local laws for brake light(s) requirements. WARNING Never tow an accessory with a rope.
-
Page 61: Towing An Heavy Load At Low Speed
Towing an Heavy Load at Low Speed V800 Models Only CAUTION: When towing an heavy load at low speed, engine compart- ment temperature may become hot due to a lack of air circulation. To reduce engine compartment temperature when stopping the ve- hicle, it is always a good practice before removing the tether cord cap (DESS key) to do the following:…
-
Page 62: Suspension Adjustments
SUSPENSION ADJUSTMENTS Snowmobile handling and comfort de- The following is to fine-tune suspen- pends on suspension adjustments. sion. Choice of suspension adjustments The best way to set up a suspension, vary with carrying load, driver’s is to start from factory settings, then weight, personal preference, riding customize each adjustment one at a speed and field condition.
-
Page 63: Rear Springs
1. Rear Springs — REAR SPRINGS ADJUSTMENT Comfort ”C” CAUSE SOLUTION IMPORTANT: Make sure that all ob- 50 to 75 mm jects to be transported are in place in No adjustment required (2 to 3 in) rear rack and under the seat. –…
-
Page 64
mmo2008-001-005_b mmo2008-001-005_b TYPICAL TYPICAL Step 1: Pull on handle Step 1: Pull on handle Step 2: Turn to increase spring preload Step 2: Turn to decrease spring preload Decrease Spring Preload 2. Suspended Extension Adjustment Skandic SWT/WT Only Suspended extension can be adjusted CAUTION: To decrease preload, according to the load and snow condi- always turn the left side adjust-… -
Page 65
3. Shackle Movement CENTER SPRING ADJUSTMENT Limiter HANDLEBAR For deep snow riding, do not install (steering PROBLEM SOLUTION horse shoe washers. attitude) For trail riding with passenger and/or Easy to turn No adjustment required weight, install 1 horse shoe washer (neutral) under each rubber stoppers. -
Page 66: Front Suspension
5. Stopper Strap — Strap Length Adjustment Weight Transfer Skandic WT/SWT – Ride at low speed, then fully accel- erate. – Note steering behavior. – Adjust stopper strap length accord- ingly. CAUTION: Whenever stopper strap length is changed, track tension must be readjusted.
-
Page 67
Decrease Spring Preload WARNING Before proceeding with any sus- pension adjustment, remember: – Park in a safe place. – Remove tether cord cap (DESS key). – Lift rear of vehicle off the ground with suitable lifting de- vice. – Make sure lifting device is stable and secure. -
Page 68: In Deep Snow
PROBLEM CORRECTIVE MEASURES Front suspension – Check ski alignment and camber angle adjustment. wandering See an authorized SKI-DOO dealer. – Reduce ski ground pressure. • Reduce front suspension spring preload. • Increase center spring preload. • Reduce rear spring preload.
-
Page 69: Troubleshooting
1. Engine overheating pilot lamp will light up if engine is too hot. – Reduce snowmobile speed and run snowmobile in loose snow or stop en- gine immediately. – Check for adequate coolant level. See an authorized SKI-DOO dealer. 2. Radiator fan inopenative (V800 models). – Check fuse 10.
-
Page 70
(each piston on multi- cylinder engines). If no pulsating resistance is felt, it suggests a major loss of compression. Contact an authorized SKI-DOO dealer. ENGINE LACKS ACCELERATION OR POWER 1. DESS did not read tether cord cap (DESS key) code. DESS pilot lamp blinks once every 1.5 seconds. -
Page 71
– Clean/verify spark plug gap and identification number. Replace as required. 4. Too much oil supplied to engine (2-stroke). – Improper oil pump adjustment, refer to an authorized SKI-DOO dealer. 5. Water in fuel. – Drain fuel system and refill with fresh fuel. -
Page 72
– See items 1, 2, 6 and 7 of ENGINE LACKS ACCELERATION OR POWER. Engine Management System (EMS) Faults NOTE: For any fault code not listed below, refer to an authorized SKI-DOO dealer. 600 HO SDI Model 2 SHORT BEEPS PER MINUTE. -
Page 73: Specifications
SPECIFICATIONS SKANDIC WT/SUV/SWT MODEL 550F ENGINE Engine type Number of cylinder Bore mm (in) 76 (2.992) Stroke mm (in) 61.00 (2.402) Displacement cm³ (in³) 553.40 (33.771) Maximum horsepower RPM ± 100 RPM 6900 COOLING SYSTEM Type Deflection mm (in) 9.5 ± 1.5 (.37 ± .06) Axial fan belt adjustment Force kgf (lbf)
-
Page 74
SKANDIC WT/SUV/SWT MODEL 550F ELECTRICAL SYSTEM Magneto generator output 340 W @ 6000 RPM Ignition type CDI by Ducati Make and type NGK BR9ES Spark plug mm (in) 0.40 to 0.60 (.016 to .024) Battery 12 V, 18 A•h Headlamp 60/55 (H4) Taillight and stoplight 8/27… -
Page 75
SKANDIC WT/SUV/SWT MODEL 550F DRIVE SYSTEM (cont’d) mm (in) 500 (20) Width mm (in) 600 (24) Track mm (in) 500 (20) Length m (in) 3.968 (156) Profile height mm (in) 31.8 (1.25) Deflection mm (in) 40 to 50 (1.181 to 1.378) Track adjustment Force kgf (lbf) -
Page 76
Measure gap between slider shoe and bottom inside of track when exerting a downward pull to the track. Equal distance between edges of track guides and slider shoes. Drive belt height must be adjusted every time a new drive belt is installed. Confirm drive belt part number application with an authorized SKI-DOO de aler. ______________________… -
Page 77
SKANDIC WT MODEL ENGINE Engine type Number of cylinder Bore mm (in) 76 (2.992) Stroke mm (in) 65.8 (2.591) Displacement cm³ (in³) 597 (36.43) Maximum horsepower RPM ± 100 RPM 7000 COOLING SYSTEM Ethyl glycol and distilled water (50%/50%). Use premix coolant Type from BRP (P/N 219 700 362) or Coolant… -
Page 78
SKANDIC WT MODEL DRIVE SYSTEM Type XP-S synthetic chaincase oil Gearbox oil Quantity ml (U.S. oz) 500 (16.9) 1 : 2.82 1 : 1.70 Gear ratio 1 : 3.44 Drive pulley type TRA III Drive pulley calibration Clutch engagement 2700 ± 100 RPM Driven pulley type 6-K VSA Drive belt… -
Page 79
Measure gap between slider shoe and bottom inside of track when exerting a downward pull to the track. Equal distance between edges of track guides and slider shoes. Drive belt height must be adjusted every time a new drive belt is installed. Confirm drive belt part number application with an authorized SKI-DOO dealer. _____________________… -
Page 80
EXPEDITION TUV MODEL 600 HO SDI ENGINE Engine type 593 HO SDI Number of cylinder Bore mm (in) 72 (2.835) Stroke mm (in) 73 (2.874) Displacement cm³ (in³) 594.40 (36.273) Maximum horsepower RPM ± 100 RPM 8000 COOLING SYSTEM Ethyl glycol and distilled water (50%/50%). -
Page 81
EXPEDITION TUV MODEL 600 HO SDI DRIVE SYSTEM Type XP-S synthetic chaincase oil Gearbox oil Quantity ml (U.S. oz) 500 (16.9) 1 : 2.82 Gear ratio 1 : 1.70 1 : 3.44 Drive pulley type TRA III Drive pulley calibration Clutch engagement 3000 ±… -
Page 82
Measure gap between slider shoe and bottom inside of track when exerting a downward pull to the track. Equal distance between edges of track guides and slider shoes. Drive belt height must be adjusted every time a new drive belt is installed. Confirm drive belt part number application with an authorized SKI-DOO dealer. ______________________… -
Page 83
EXPEDITION TUV/SKANDIC SWT MODEL V800 ENGINE ROTAX V810 Engine type 4-stroke, Single Over Head Camshaft (SOHC), liquid cooled Number of cylinders Number of valves 8 valves (mechanical adjustment) Bore mm (in) 91 (3.58) Stroke mm (in) 61.5 (2.42) Displacement cm³ (in³) 800 (48.82) 7250 Maximum horsepower RPM… -
Page 84
EXPEDITION TUV/SKANDIC SWT MODEL V800 FUEL SYSTEM Gas type Unleaded Inside North America ((R+M)/2) 87 or higher Pump octane number Outside North America (RON) 92 or higher Fuel tank capacity L (U.S. gal) 41 (10.8) ELECTRICAL SYSTEM Magneto generator output 460 @ 6000 RPM CDI (Capacity Discharge Ignition) Ignition type… -
Page 85
EXPEDITION TUV/SKANDIC SWT MODEL V800 DRIVE SYSTEM (cont’d) Deflection mm (in) 32 ± 5 (1.260 ± .197) Drive belt adjustment Force kgf (lbf) 11.30 (24.91) mm (in) 600 (24) Width mm (in) 500 (20) Track Length m (in) 3.968 (156) Profile height mm (in) 31.8 (1.25) -
Page 86
Measure gap between slider shoe and bottom inside of track when exerting a downward pull to the track. Equal distance between edges of track guides and slider shoes. Drive belt height must be adjusted every time a new drive belt is installed. Confirm drive belt part number application with an authorized SKI-DOO dealer. ______________________… -
Page 87: Epa Certified Engines
EPA Emission Regulations Engine Emissions All new SKI-DOO snowmobiles man- Information ufactured by BRP are certified to Manufacturer’s Responsibility the EPA as conforming to the re- quirements of the regulations for the…
-
Page 88
The EC-Declaration of Conformity does not appear in this version of the Operator’s Guide. Please refer to the printed version that was delivered with your vehicle. ddd2009-001… -
Page 89: Maintenance Information
MAINTENANCE INFORMATION _____________________…
-
Page 90: Periodic Maintenance Chart
PERIODIC MAINTENANCE CHART WARNING It is recommended that the assistance of an authorized SKI-DOO dealer be periodically obtained on other components/systems not covered in this guide. Unless otherwise specified, engine must be cold and not running. Remove tether cord cap (DESS key) before performing any maintenance or adjustment, unless otherwise specified.
-
Page 91: 2-Stroke
R: REPLACE EVERY YEAR OR 3200 km (2000 mi) T: PROCEED WITH TASK EVERY 2 YEARS OR 6000 km (3700 mi) *: TO BE PERFORMED BY AN * STORAGE AUTHORIZED SKI-DOO DEALER * PRESEASON PART/TASK LEGEND ENGINE Rewind starter and rope…
-
Page 92
EVERY YEAR OR 3200 km (2000 mi) T: PROCEED WITH TASK EVERY 2 YEARS OR 6000 km (3700 mi) *: TO BE PERFORMED BY AN * STORAGE AUTHORIZED SKI-DOO DEALER * PRESEASON PART/TASK LEGEND FUEL SYSTEM (cont’d) Carburetor (except SDI engine) -
Page 93
R: REPLACE EVERY YEAR OR 3200 km (2000 mi) T: PROCEED WITH TASK EVERY 2 YEARS OR 6000 km (3700 mi) *: TO BE PERFORMED BY AN * STORAGE AUTHORIZED SKI-DOO DEALER * PRESEASON PART/TASK LEGEND STEERING/SUSPENSION Steering and front suspension… -
Page 94: 4-Stroke
R: REPLACE EVERY YEAR OR 3200 km (2000 mi) T: PROCEED WITH TASK EVERY 2 YEARS OR 6000 km (3700 mi) *: TO BE PERFORMED BY AN * STORAGE AUTHORIZED SKI-DOO DEALER * PRESEASON PART/TASK LEGEND ENGINE Engine oil level…
-
Page 95
R: REPLACE EVERY YEAR OR 3200 km (2000 mi) T: PROCEED WITH TASK EVERY 2 YEARS OR 6000 km (3700 mi) *: TO BE PERFORMED BY AN * STORAGE AUTHORIZED SKI-DOO DEALER * PRESEASON PART/TASK LEGEND DRIVE SYSTEM Drive belt condition… -
Page 96
R: REPLACE EVERY YEAR OR 3200 km (2000 mi) T: PROCEED WITH TASK EVERY 2 YEARS OR 6000 km (3700 mi) *: TO BE PERFORMED BY AN * STORAGE AUTHORIZED SKI-DOO DEALER * PRESEASON PART/TASK LEGEND ELECTRICAL SYSTEM EMS fault codes… -
Page 97: Engine System
NOTE: When checking level at low mmr2007-166-011_a temperature it may be slightly lower 1. Air filter installed on top of air silencer than the mark. If additional coolant is necessary or if entire system has to be refilled, refer to an authorized SKI-DOO dealer. _____________________…
-
Page 98: Exhaust System
Exhaust System The tail pipe of the muffler should be centered with the exit hole in the bot- tom pan. It must be free of rust or leaks. Make sure that gear clamps are properly tightened. The exhaust system is designed to re- duce noise and to improve the total performance of the engine.
-
Page 99: Engine Oil Level (4-Stroke Engines)
Engine Oil Level Skandic WT 550F/SWT 550F (4-Stroke Engines) V800 Model CAUTION: Check level frequently and refill if necessary. Do not over- fill. Operating the engine with an improper level may severely dam- age engine. Wipe off any spillage. TYPICAL 1.
-
Page 100
mmo2007-001-003_a 1. Maximum 2. Minimum To add oil, remove dipstick. Place a funnel into the dipstick tube to avoid spillage. Add a small amount of recommended oil and recheck oil level. Repeat the above procedures until oil level reaches the dipstick’s upper mark. -
Page 101: Drive System
No adjustment is provided for hy- securely installed. draulic brake. See an authorized – With hood and/or side panels SKI-DOO dealer if any problems. opened or removed. Never attempt to make adjust- Gearbox Oil Level ments to moving parts while en- To check, pull dipstick.
-
Page 102: Drive Belt Condition
RPM with frozen track, fast starts without warm-up pe- riod, burred or rusty sheave, oil on belt or distorted spare belt. Contact an authorized SKI-DOO dealer. TYPICAL Drive Belt Removal/ 1. Retaining pins Installation V800 Models –…
-
Page 103: Drive Belt Height Adjustment
NOTE: correct adjustment unattainable, contact an authorized SKI-DOO dealer. mmo2008-001-011_a TYPICAL The drive belt cord should be flush Step 1: Slip the belt over the top edge of the with driven pulley edge. Adjust as re- sliding half quired.
-
Page 104: Drive Pulley Adjustment
Adjust drive belt height using Allen MAXIMUM ENGINE screws. Loosen jam nuts then turns HORSEPOWER RPM Allen screws. 550F 6900 RPM (± 100) 7000 RPM (± 100) 600 HO SDI 8000 RPM (± 100) V800 7250 RPM (± 100) NOTE: Use precision digital tachome- ter for engine RPM adjustment.
-
Page 105: Track Condition
With the en- gine off, rotate the track by hand, and inspect condition. If worn or cut, or if track fibers are exposed, or if miss- ing or defective inserts or guides are noted; contact an authorized SKI-DOO dealer. _____________________…
-
Page 106: Track Adjustments
If correct tension is unattain able, con- Allow the suspension to extend nor- tact an authorized SKI-DOO dealer. mally and check gap half-way between front and rear idler wheels. Measure between slider shoe bottom and in- side of track.
-
Page 107
A01F05A 1. Guides A05F0EA 2. Slider shoes 3. Equal distance TYPICAL 1. Adjustment screw To Adjust Track Alignment: 2. Loosen lock nut (on so equipped models) 3. Loosen screw WARNING – Retighten retaining screws and lock Remove tether cord cap (DESS nuts (on so equipped models). -
Page 108
WARNING If lock nuts are not tightened prop- erly, the adjusting screws could loosen causing the track to be- come extremely loose and, under some operating conditions, allow the idler wheels to climb over the track lugs forcing the track against the tunnel causing the track to “lock”. -
Page 109: Electrical System
ELECTRICAL SYSTEM Battery Electrolyte These vehicles are equipped with a maintenance-free battery. Electrolyte level can not be checked. WARNING BLACK negative battery cable must always be disconnected first and connected last. WARNING Never charge or boost battery while installed. Battery electrolyte contains sulfuric acid which is cor- rosive and poisonous.
-
Page 110: Rear Suspension
REAR SUSPENSION Suspension Condition Visually inspect all suspension compo- nents including slider shoes, springs, wheels, etc. NOTE: During normal driving, snow will act as a lubricant and coolant for the slider shoes. Extensive riding on ice or sanded snow, will create exces- sive heat build-up and cause prema- ture slider shoe wear.
-
Page 111: Steering And Front Suspension
SKI-DOO dealer. Wear and Condition of Skis and Runners Check the condition of the skis, ski runners and ski runner carbides. If worn, contact an authorized SKI-DOO dealer. WARNING Excessively worn skis and/or ski runners will adversely affect snow- mobile control.
-
Page 112: Body/Frame
BODY/FRAME Vehicle Cleaning and CAUTION: The snowmobile has to be stored in a cool and dry Protection place and covered with an opaque Remove any dirt or rust. tarpaulin. This will prevent sun To clean the entire vehicle, use only rays and grime from affecting plas- flannel cloths or equivalent.
-
Page 113
Taillight If taillight bulb is burnt, expose the bulb by removing the red plastic lens. To remove, unscrew the 2 lens screws. _____________________… -
Page 114: Storage And Preseason Preparation
CAUTION: Do not run engine dur- ing storage period. Preseason Preparation Refer to an authorized SKI-DOO deal- CAUTION: Have carburetor(s) cleaned-up before restarting en- gine on so equipped models.
-
Page 115: Warranty
WARRANTY _____________________…
-
Page 116: Brp Limited Warranty Usa And Canada: 2009 Ski-Doo
All genuine Ski-Doo parts and accessories, installed by an authorized BRP dealer at the time of delivery of the 2009 Ski-Doo snowmobile, carry the same warranty as that of the snowmobile. 2) LIMITATIONS OF LIABILITY…
-
Page 117
– Damage resulting from removal of parts, improper repairs, service, mainte- nance, modifications or use of parts not manufactured or approved by BRP or resulting from repairs done by a person that is not an authorized servicing BRP dealer; – Damage caused by abuse, abnormal use, neglect, use of the product on sur- faces other than snow, or operation of the product in a manner inconsistent with the recommended operation described in the Operator’s Guide;… -
Page 118
This warranty coverage is available only if each of the following conditions has been fulfilled: – The 2009 Ski-Doo snowmobile must be purchased as new and unused by its first owner from a BRP dealer authorized to distribute Ski-Doo snowmobiles in the country in which the sale occurred (“BRP dealer”);… -
Page 119
BRP’s obligations under this warranty are limited to, at its sole discretion, repair- ing parts found defective under normal use, maintenance and service, or replac- ing such parts with new genuine Ski-Doo parts without charge for parts and labor, at any authorized BRP dealer during the warranty coverage period under the con- ditions described herein. -
Page 120
If the issue has not yet been resolved, please submit your complaint in writing or call the appropriate number below: In Canada BOMBARDIER RECREATIONAL PRODUCTS INC. SKI-DOO Customer Assistance Center 75, J.-A. Bombardier Street Sherbrooke, Québec J1L 1W3 Tel.: 819 566-3366 In USA BRP US INC. -
Page 121: Brp International Limited Warranty: 2009 Ski-Doo
All genuine Ski-Doo parts and accessories, installed by an authorized BRP distributor/dealer at the time of delivery of the 2009 Ski-Doo s nowmobile, carry the same warranty as that of the snowmobile. 2) LIMITATIONS OF LIABILITY…
-
Page 122
– The product must have undergone proper registration by an authorized BRP distributor/dealer; – The 2009 Ski-Doo snowmobile must be purchased in the country in which the purchaser resides; – Routine maintenance outlined in the Operator’s Guide must be timely per- formed in order to maintain warranty coverage. -
Page 123
BRP’s obligations under this warranty are limited to, at its sole discretion, repair- ing parts found defective under normal use, maintenance and service, or replac- ing such parts with new genuine Ski-Doo parts without charge for parts and labor, at any authorized BRP distributor/dealer during the warranty coverage period un- der the conditions described herein. -
Page 124
9) CONSUMER ASSISTANCE In the event of a controversy or a dispute in connection with this limited warran- ty, BRP suggests that you try to resolve the issue at the dealership level. We recommend discussing the issue with the authorized distributor/dealer’s service manager or owner. -
Page 125: Brp Limited Warranty For The European Economic Area: 2009 Ski-Doo ® Snowmobiles
All genuine Ski-Doo parts and accessories, installed by an authorized BRP distributor/dealer (at the time of delivery of the 2009 Ski-Doo snowmobile, carry the same warranty as that of the snowmobile. 2) LIMITATIONS OF LIABILITY…
-
Page 126
This warranty coverage is available only if each of the following conditions has been fulfilled: – The 2009 Ski-Doo snowmobile must be purchased as new and unused by its first owner from a BRP distributor/dealer authorized to distribute Ski-Doo products in the country in which the sale occurred (“BRP distributor/dealer”);… -
Page 127
BRP’s obligations under this warranty are limited to, at its sole discretion, repair- ing parts found defective under normal use, maintenance and service, or replac- ing such parts with new genuine Ski-Doo parts without charge for parts and labor, at any authorized BRP distributor/dealer during the warranty coverage period un- der the conditions described herein. -
Page 128
9) CONSUMER ASSISTANCE In the event of a controversy or a dispute in connection with this limited warran- ty, BRP suggests that you try to resolve the issue at the dealership level. We recommend discussing the issue with the authorized distributor/dealer’s service manager or owner. -
Page 129: Privacy Obligations/Disclaimer
PRIVACY OBLIGATIONS/DISCLAIMER We wish to inform you that your coordinates will be used for safety and warranty purposes. Sometimes, we also use the coordinates of our clients to inform them about our products and to present them offers. Should you prefer not to receive information on our products, services and offers, please let us know by writing to the address below.
-
Page 130: Change Of Address/Ownership
BRP by either: – Mailing one of the following card below; – North America Only: calling at 715 848-4957 (USA) or 819 566-3366 (Canada); – Notifying an authorized SKI-DOO dealer. In Canada In USA BOMBARDIER RECREATIONAL PRODUCTS INC.
-
Page 131
It is the owner’s responsibility to notify BRP. STOLEN UNITS: If your personal vehicle is stolen, you should notify BRP or an authorized SKI-DOO dealer. We will ask you to provide your name, address, phone number, the vehicle identification number and the date it was stolen. -
Page 132
_____________________… -
Page 133
_____________________… -
Page 134
_____________________…

mikelari
Активный участник
- Регистрация
- 27 Авг 2009
- Сообщения
- 361
- Реакции
- 26
- Возраст
- 51
- Местонахождение
-
Краснотурьинск
- Имя
-
Вадим
- Техника
-
BRP Skandic SWT 600 E-TEC
-
#1
Вложения
-
1,3 MB
Просмотры: 3.623 -
8,4 MB
Просмотры: 2.656 -
4,5 MB
Просмотры: 2.443 -
6,5 MB
Просмотры: 3.053 -
2 MB
Просмотры: 2.138
motosemen
Участник
- Регистрация
- 17 Янв 2013
- Сообщения
- 64
- Реакции
- 0
- Местонахождение
-
Пенза
- Имя
-
Семен
- Manuals
- Brands
- BOMBARDIER Manuals
- Snowmobiles
- ski-doo Tundra Skandic SUV 600 2004
Manuals and User Guides for BOMBARDIER ski-doo Tundra Skandic SUV 600 2004. We have 1 BOMBARDIER ski-doo Tundra Skandic SUV 600 2004 manual available for free PDF download: Shop Manual
Руководство на английском языке по эксплуатации снегохода Ski-Doo Alpine 1976 года выпуска.
- Год издания: 1975
- Страниц: 32
- Формат: PDF
- Размер: 1,7 Mb
Руководство на английском языке по эксплуатации снегохода Ski-Doo Citation 3500/4500/SS 1982 года выпуска.
- Год издания: 1981
- Страниц: 50
- Формат: PDF
- Размер: 1,1 Mb
Руководство на английском языке по эксплуатации снегоходов Ski-Doo серии CK3 2000 года выпуска.
- Год издания: 1999
- Страниц: 123
- Формат: PDF
- Размер: 12,4 Mb
Руководство на английском языке по эксплуатации снегохода Ski-Doo Elan 1972 года выпуска.
- Год издания: —
- Страниц: 38
- Формат: PDF
- Размер: 2,8 Mb
Руководство на английском языке по эксплуатации снегохода Ski-Doo Elan 1990 года выпуска.
- Год издания: —
- Страниц: 46
- Формат: PDF
- Размер: 1,7 Mb
Руководство на английском языке по эксплуатации снегохода Ski-Doo Everest 1982 года выпуска.
- Год издания: 1975
- Страниц: 50
- Формат: PDF
- Размер: 1,2 Mb

Сборник руководств по эксплуатации и техническому обслуживанию снегоходов Ski-Doo Expedition/Expedition LE/Expedition SE 2007-2014 годов выпуска.
- Год издания: —
- Страниц: —
- Формат: PDF
- Размер: 69,9 Mb
Руководство по эксплуатации и техническому обслуживанию снегохода Ski-Doo MXZ X-RS 2000 года выпуска.
- Год издания: 1999
- Страниц: 108
- Формат: PDF
- Размер: 5,3 Mb
Руководство на английском языке по эксплуатации снегохода Ski-Doo Nordic 1972 года выпуска.
- Год издания: —
- Страниц: 38
- Формат: PDF
- Размер: 2,4 Mb
Руководство на английском языке по техническому обслуживанию и ремонту снегоходов Ski-Doo серии REV 2005 года выпуска.
- Год издания: 2004
- Страниц: 1429
- Формат: PDF
- Размер: 116,0 Mb
Сборник руководств по эксплуатации и техническому обслуживанию снегоходов Ski-Doo REV-XM/XS/XP/XR 2010-2014 годов выпуска.
- Год издания: 2009-2013
- Страниц: —
- Формат: PDF
- Размер: 170,5 Mb
Руководство на английском языке по эксплуатации снегоходов Ski-Doo Scandic/Tundra R 2002 года выпуска.
- Год издания: 2001
- Страниц: 119
- Формат: PDF
- Размер: 8,1 Mb
Сборник руководств по эксплуатации и техническому обслуживанию снегоходов Ski-Doo Scandic/Scandic 550F WT/SWT 2007-2014 годов выпуска.
- Год издания: 2006-2013
- Страниц: —
- Формат: PDF
- Размер: 94,1 Mb
Сборник руководств по эксплуатации и техническому обслуживанию снегоходов Ski-Doo Tundra 2010-2014 годов выпуска.
- Год издания: 2009-2013
- Страниц: —
- Формат: PDF
- Размер: 50,7 Mb
Сборник руководств на английском языке по эксплуатации, техническому обслуживанию и ремонту снегоходов Ski-Doo 1997 года выпуска.
- Год издания: —
- Страниц: —
- Формат: PDF
- Размер: 227,1 Mb
Руководство на английском языке по техническому обслуживанию и ремонту снегоходов Ski-Doo 2007 года выпуска.
- Год издания: —
- Страниц: 755
- Формат: PDF
- Размер: 210,8 Mb

Сборник руководств на английском языке по эксплуатации, техническому обслуживанию и ремонту снегоходов Ski-Doo 2000 года выпуска.
- Год издания: —
- Страниц: —
- Формат: PDF
- Размер: 432,1 Mb
Сборник руководств на английском языке по эксплуатации, техническому обслуживанию и ремонту снегоходов Ski-Doo 2001 года выпуска.
- Год издания: —
- Страниц: —
- Формат: PDF
- Размер: 399,5 Mb

Сборник руководств на английском языке по эксплуатации, техническому обслуживанию и ремонту снегоходов Ski-Doo 2002 года выпуска.
- Год издания: —
- Страниц: —
- Формат: PDF
- Размер: 296,9 Mb

- Manuals
- Brands
- Ski-Doo Manuals
- Offroad Vehicle
- Skandic WT
- Operator’s manual
-
Contents
-
Table of Contents
-
Troubleshooting
-
Bookmarks
Quick Links
Related Manuals for Ski-Doo Skandic WT
Summary of Contents for Ski-Doo Skandic WT
-
Page 1
6 1 9 9 0 0 2 6 7… -
Page 2
In USA, products are distributed by BRP US Inc. In Canada, products are distributed by Bombardier Recreational Products Inc. The following are trademarks of Bombardier Recreational Products Inc. or its sub- sidiaries. REV-XU™ D.E.S.S.™ HPG™ Ski-Doo ® REV-XP™ TRA™ III Skandic™ ROTAX ®… -
Page 3: Foreword
Bombardier Recreational Products injury. Inc. (BRP) warranty and a network of authorized Ski-Doo snowmobile deal- NOTICE Indicates an instruction ers ready to provide the parts, service which, if not followed, could se- or accessories you may require.
-
Page 4: Table Of Contents
TABLE OF CONTENTS FOREWORD …………….1 Know Before you Go .
-
Page 5
TABLE OF CONTENTS CONTROLS, INSTRUMENTS AND EQUIPMENT (cont’d) 19) 12-Volt Power Outlet …………41 20) Hitch . -
Page 6
SNOWMOBILES …………..112 BRP LIMITED WARRANTY FOR THE EUROPEAN AND THE RUSSIAN ECONOMIC AREAS AND TURKEY ECONOMIC AREA: 2012 SKI-DOO ®… -
Page 7: Safety Information
SAFETY INFORMATION ________ ________ SAFETY INFORMATION…
-
Page 8: General Precautions
Do not stud the track on this model. and doors, carbon monoxide can See your authorized Ski-Doo dealer for rapidly reach dangerous levels. available accessories for your vehicle. – Never run the vehicle outdoors…
-
Page 9: Special Safety Messages
SPECIAL SAFETY MESSAGES SEVERE INJURY OR DEATH can result if you do not follow these instructions: – Always make a pre-ride inspection BEFORE you start the engine. – Throttle mechanism should be checked for free movement and return to idle po- sition before starting engine.
-
Page 10
SPECIAL SAFETY MESSAGES – Speeding can be fatal. In many cases, you cannot react or respond quickly enough to the unexpected. Always ride at a speed which is suitable to the trail, weather conditions and your own ability. Know your local rules. Speed limit may be in effect and meant to be observed. -
Page 11
– E-TEC engines: Never attempt any fuel system or electrical system main- tenance or repair. Any maintenance or repair of these systems must by performed by an authorized Ski-Doo dealer. – Ensure the path behind is clear of obstacles or bystanders before proceeding in reverse. -
Page 12: Riding The Vehicle
Replenish if necessary and those whom you allow to ride or drive. see an authorized Ski-Doo dealer in There may be noticeable handling and case of any leaks. performance differences from one 5.
-
Page 13
RIDING THE VEHICLE Pre-Ride Check List ITEM OPERATION Body including seat, footrests, lights, air Check condition and remove snow or ice. filter, controls and instruments Check for free movement and proper Skis and steering action. Fuel and oil Check for proper level and no leaks. Coolant Check for proper level and no leaks. -
Page 14: How To Ride
RIDING THE VEHICLE How to Ride Rider Position (Forward Operation) Your riding position and balance are Riding Gear the two basic principles of making your Proper snowmobile clothing should snowmobile go where you want it to. be worn. It should be comfortable When turning on the side of a hill, you and not too tight.
-
Page 15: Carrying A Passenger
RIDING THE VEHICLE lowing the legs to absorb the shocks when traveling over uneven terrain. Avoid abrupt stops. mmo2008-003-004 Rider Position (Reverse Operation) We recommend sitting on your snow- mobile when operating in reverse. mmo2008-003-002 Avoid standing up. Your weight could Kneeling shift forward against throttle lever This position is achieved by placing…
-
Page 16: Terrain/Riding Variations
RIDING THE VEHICLE prepare himself accordingly. The oper- WARNING ator also benefits from the support of Any passenger must be able to his grip on the handlebar. In contrast, firmly lay his feet on the footrests the passengers have to rely on the op- and keep his hands on the hand- erator’s careful and safe operation of holds or seat strap at all times…
-
Page 17
RIDING THE VEHICLE Ungroomed Trail tion, inlets, outlets, springs, fast mov- ing currents or other hazards. Never Unless there has been a fresh snow- attempt to operate your snowmobile fall you can expect “washboard” and on ice that may be too weak to sup- snowdrift conditions. -
Page 18
RIDING THE VEHICLE your track. Turn the engine off, free the stable conditions is the key to safe skis by pulling them out and downhill, mountain riding. Probably most impor- place the rear of the snowmobile uphill tant is to be aware of the conditions restart the engine and ease it out with and dangers on a daily basis when in the mountains. -
Page 19
RIDING THE VEHICLE path, rocks, sudden dips, guy wires Jumping a snowmobile is an unsafe and countless other obstacles which and dangerous practice. However, if could result in a termination of your the trail does suddenly drop away from snowmobile ride. Even when fol- you, crouch (stand) towards the rear of the vehicle and keep the skis up lowing existing tracks, be cautious. -
Page 20: Environment
RIDING THE VEHICLE the bank. Stop completely at the top the trail boss or, for that matter, any of the bank and wait for all traffic to other snowmobile. Use down-the-line clear. Judge the drop to the roadway. hand signals to indicate hazards or in- Cross the road at a 90°…
-
Page 21
RIDING THE VEHICLE The guidelines that we support are not to take the lead and take action. It ap- designed to limit your snowmobiling plies to the environment in general, its fun, but to preserve the beautiful free- proper care and maintenance, its natu- dom that you can experience only on ral inhabitants and all enthusiasts and the public at large who enjoy the great… -
Page 22
So whether you’re driving a high perfor- mance Ski-Doo, a sporty MX Z snow- mobile or any other make or model, show you know what you’re doing. -
Page 23: Important On-Product Labels
If missing or damaged, the decals can be replaced free of charge. See an au- thorized Ski-Doo dealer. NOTE: The following illustrations used in this Operator’s Guide are a general representation only. Your model may differ.
-
Page 24
IMPORTANT ON-PRODUCT LABELS mmo2011-007-006_b mmo2009-004-006_b TYPICAL mmo2011-007-009_a _______ ________ SAFETY INFORMATION… -
Page 25
IMPORTANT ON-PRODUCT LABELS 516004652_revB LABEL 1 516004653 LABEL 2 516004566A LABEL 3 516004595A LABEL 4 ________ ________ SAFETY INFORMATION… -
Page 26
IMPORTANT ON-PRODUCT LABELS 516004961 LABEL 6 516003926 LABEL 5 516004960 LABEL 7 mmo2006-003-007_a LABEL 10 — EUROPEAN MODELS 516005043 LABEL 8 mmo2009-004-005_en LABEL 9 _______ ________ SAFETY INFORMATION… -
Page 27
IMPORTANT ON-PRODUCT LABELS mmo2008-003-007 LABEL 14 516003919 ON PULLEY GUARD 516004266 LABEL 11 516003940 IN ENGINE COMPARTMENT — E-TEC MODELS 516004718 LABEL 12 — 600 ACE MODELS mmo2008-008-024 ON FUEL INJECTORS — E-TEC MODELS 516004570 LABEL 13 — E-TEC MODELS ________ ________ SAFETY INFORMATION… -
Page 28: Compliance Labels
IMPORTANT ON-PRODUCT LABELS Compliance Labels Technical Information Labels EPA Compliance Label mmo2011-007-010_b 516005052 IN ENGINE COMPARTMENT mmo2011-007-009_c 516004517B ON TUNNEL — ENGLISH ONLY SSCC Label Safety standards for snowmobiles have been adopted by the Snowmo- bile Safety and Certification Commit- tee (SSCC) of which BRP is a proud participating member.
-
Page 29
IMPORTANT ON-PRODUCT LABELS 516004720 LABEL 2 — 550F MODELS mmo2010-002-014_en LABEL 3 516004303 LABEL 4 ________ ________ SAFETY INFORMATION… -
Page 30
IMPORTANT ON-PRODUCT LABELS This page is intentionally blank _______ ________ SAFETY INFORMATION… -
Page 31: Vehicle Information
VEHICLE INFORMATION _______________…
-
Page 32: Controls, Instruments And Equipment
CONTROLS, INSTRUMENTS AND EQUIPMENT NOTE: Some features may not apply to your model or could be optional. mmo2011-007-005_a mmo2011-007-006_a ______________…
-
Page 33: Handlebar
CONTROLS, INSTRUMENTS AND EQUIPMENT 1) Handlebar When squeezed, the brake is applied. When released, it automatically re- The handlebar controls the steering turns to its the rest position. Braking of the snowmobile. As the handlebar effect is proportional to the pressure is rotated to right or left, the skis are applied on the lever and to the type of turned right or left to steer the snow-…
-
Page 34: Engine Cut-Off Switch
TYPICAL — ENGAGE MECHANISM Your authorized Ski-Doo dealer has pro- Step 1: Apply and hold regular brake Step 2: Lock brake lever using parking brake gramed the D.E.S.S. of your snowmo- lever bile to recognize the D.E.S.S.
-
Page 35: Emergency Engine Stop Switch
Ski-Doo dealer to accept up to 8 differ- gine thereafter. This engine stopping ent keys. procedure will become a reflex and will…
-
Page 36: Gearshift Lever
CONTROLS, INSTRUMENTS AND EQUIPMENT Start Button ENGINE Press to start engine. Refer to STARTING PROCEDURE OPER- in the ATING INSTRUCTIONS subsection. Headlights Dimmer Switch Press to select HI or LOW beam. Lights are automatically ON when the engine is running. mmo2007-003-003_c TYPICAL Heated Grips Switch…
-
Page 37: Front Bumper And Rack Rail
4. Gauge pilot lamps 5. Gauge SET “S” button NOTE: The gauge is factory preset in Imperial units but it is possible to change it to metric units, contact an mmo2011-007-008_a authorized Ski-Doo dealer for unit set- TYPICAL tings. 1. Front bumper _______________…
-
Page 38
CONTROLS, INSTRUMENTS AND EQUIPMENT 1) Speedometer 3) Digital Display Measures vehicle speed (in miles per hour or kilometers per hour depending on the setting). mmo2008-003-013_h 1. Digital display WARNING Never adjust or set functions on the multifunction gauge while rid- ing the vehicle, you could lose con- mmo2008-003-014 trol. -
Page 39
Fill to proper level. 5 minutes If oil level was correct, discontinue use and contact an authorized Ski-Doo dealer. Low fuel level. One (1) bar left in fuel level display. — Replenish fuel tank as soon as possible. -
Page 40
CONTROLS, INSTRUMENTS AND EQUIPMENT Gauge Features AVAILABLE INDICATIONS IN NUMERICAL DISPLAY Functions WT 550F 600 HO E-TEC 600 ACE 600 HO E-TEC 600 ACE A) Odometer B) Trip meter N.A. “A” or “B” C) Trip hour N.A. meter D) Fuel level E) E-TEC engine N.A. -
Page 41: Passenger (1+1) Seat
CONTROLS, INSTRUMENTS AND EQUIPMENT mmo2008-003-013_j mmo2008-003-020_a C) Trip Hour Meter FUEL LEVEL 1. Operating range Records vehicle running time when the electrical system is activated since E) E-TEC Engine Storage Mode it has been reset. Displays OIL when the storage mode Press the SET (S) button to select trip procedure is initiated.
-
Page 42: Passengers Handholds
CONTROLS, INSTRUMENTS AND EQUIPMENT Passenger Seat Installation 1. Place the passenger seat facing for- ward on the storage compartment lid. 2. Slightly incline the passenger seat towards front and engage both seat hooks in the storage compartment lid slots. mmo2011-007-007_b 1.
-
Page 43: Rear Rack
CONTROLS, INSTRUMENTS AND EQUIPMENT 18) Rear Rack WARNING The storage compartment must be WARNING properly latched and must not con- All objects in rear rack must be tain any sharp, heavy or breakable properly latched. Do not carry objects. any breakable objects. Excessive weight in rack may reduce steering To open the lid, pull and hold the rubber ability.
-
Page 44: Hood
CONTROLS, INSTRUMENTS AND EQUIPMENT J-Type Hitch (European Models) Attaching an Equipment mmo2009-004-038_a 1. Rubber tie 3. Slide hood towards front to free the tabs from their slots. mmo2011-007-012_a Hood Installation 1. Hairpin clip 2. Safety tab 1. Engage the tabs located at front and center of the hood into the bottom 1.
-
Page 45: Lower Side Panels
CONTROLS, INSTRUMENTS AND EQUIPMENT mmo2011-006-100_a TYPICAL 1. Console hook 2. Console slot mmo2009-004-040_a 3. Panel center tabs TYPICAL 1. Rubber tie 3. Insert the rear tab into the console slot. 2. Lift the rear portion of panel to free the plastic tab from the console. 3.
-
Page 46: Drive Belt Guard
CONTROLS, INSTRUMENTS AND EQUIPMENT mmo2011-007-004_a mmo2009-004-045_a 1. Panel dowel 1. Clip 2. Tunnel hole 3. Push and hold lock tab in, then pull 5. Lock the clip by turning it 1/4 turn panel up and rearward. clockwise. 24) Drive Belt Guard Drive Belt Guard Removal WARNING NEVER operate engine:…
-
Page 47
CONTROLS, INSTRUMENTS AND EQUIPMENT Lift rear portion of drive belt guard, NOTE: Drive belt guard is purposely then release from front tabs by pivot- made slightly oversize to maintain ten- ing the guard outwards. sion on its pins and retainers prevent- ing undue noise and vibration. -
Page 48: Fuel
FUEL Recommended Fuel Fueling Procedure Use unleaded gasoline available from Unscrew to fill up tank then fully most service stations or oxygenated tighten. fuel containing a maximum total of 10% of ethanol or methanol. The gaso- WARNING line used must have the following rec- –…
-
Page 49: Injection Oil (550F And 600 Ho E-Tec)
INJECTION OIL (550F AND 600 HO E-TEC) Recommended Injection Oil RECOMMENDED INJECTION OIL XPS SYNTHETIC XPS INJECTION XPS SYNTHETIC BLEND OIL (P/N 293 2-STROKE OIL ENGINES 2-STROKE OIL 600 117) (P/N 293 600 132) (P/N 293 600 100) 550F 600 HO E-TEC NOTICE The engine of this snowmobile has been developed and validated using the recommended BRP XPS™…
-
Page 50: Break-In Period
500 km (300 mi) is required for the vehicle. After the break-in period, the vehicle should be inspected by an authorized MAINTE- Ski-Doo dealer. Refer to NANCE section. Engine During the break-in period: – Avoid prolonged full throttle opera- tion.
-
Page 51: Operating Instructions
OPERATING INSTRUCTIONS Engine Starting Procedure 550 F and 600 HO E-TEC Models If the starter does not operate and you Procedure ENGINE have followed the steps in STARTING PROCEDURE 1. Apply parking brake. , start engine with the rewind starter or the emer- 2.
-
Page 52: Vehicle Warm-Up
OPERATING INSTRUCTIONS mmo2008-005-007 3. Attach the other end of emergency mmo2008-005-014_a rope to the starter clip supplied in 6. Pull the rope using a sharp, crisp pull the tool kit. so the rope comes free of the drive pulley. WARNING When starting the snowmobile in an emergency situation, using drive pulley, do not reinstall the…
-
Page 53: Gearbox Operation
OPERATING INSTRUCTIONS NOTICE If vehicle does not move Neutral when throttle is applied, stop en- When set in neutral (N), the gearbox gine, remove tether cord cap from disengages the pulleys from the track. the engine cut-off switch, then do the following.
-
Page 54: Towing An Accessory
OPERATING INSTRUCTIONS Shut off the engine using either the Remove the drive belt, attach the rope emergency engine stop switch or by to the ski legs (spindles), have some- pulling off the tether cord cap from the one sit on the towed snowmobile to ac- engine cut-off switch.
-
Page 55: Tune Your Ride
TUNE YOUR RIDE Rear Suspension WARNING Adjustments Suspension adjustment could af- fect vehicle handling. Always take time to familiarize yourself with the vehicle’s behavior after any suspension adjustment have been made. Snowmobile handling and comfort de- pend upon suspension adjustments. mmo2011-006-005_a Choice of suspension adjustments SC5-U REAR SUSPENSION…
-
Page 56
TUNE YOUR RIDE ACTION RESULT ACTION RESULT Lighter ski pressure Firmer rear suspension under acceleration Increasing Higher rear end Increasing stopper More center spring More bump absorption preload straps travel capability length More bump absorption Heavier steering capability Softer rear suspension Heavier ski pressure under acceleration Decreasing… -
Page 57
Also, since center spring preload ad- able with the original springs, see an justment puts more or less pressure authorized Ski-Doo dealer for other on the front of the track, it has an ef- available springs. fect on the performance in deep snow. -
Page 58
TUNE YOUR RIDE ACTION RESULT RESULT SETTING More track surface on Increasing the ground Allows free movement of preload the suspension extension Less extension lift on its entire stroke Free Better reverse capability General use Decreasing especially in deep snow preload Good reverse capability More extension lift… -
Page 59: Vehicle Behavior Related To Suspension Adjustment
Vehicle Behavior Related to Suspension Adjustment PROBLEM CORRECTIVE MEASURES Check ski alignment and camber angle adjustment. See an authorized Ski-Doo dealer. Front suspension wandering Reduce ski ground pressure. – Increase center spring preload. – Reduce rear spring preload. Reduce rear suspension front arm pressure.
-
Page 60: Vehicle Transportation
VEHICLE TRANSPORTATION Make sure that oil reservoir and fuel tank caps are properly installed. Tilt bed trailers can easily be equipped with a winch mechanism to afford maximum safety in loading. Simple as it may seem, never drive your snow- mobile onto a tilt bed trailer or any other kind of trailer or vehicle.
-
Page 61: Maintenance
MAINTENANCE _______________…
-
Page 62: Break-In Inspection
BREAK-IN INSPECTION We suggest that after the first 10 hours or 500 km (300 mi) of operation, whichever comes first, your vehicle be inspected by an authorized Ski-Doo dealer. The break-in inspection is very important and must not be neglected.
-
Page 63
BREAK-IN INSPECTION BREAK-IN INSPECTION (600 HO E-TEC) Inspect engine motor mounts Inspect exhaust system and check for leaks Tighten exhaust manifold screws to specified torque Check coolant level Inspect fuel lines and connections Inspect throttle cable Inspect drive belt Visually inspect drive pulley Tighten drive pulley retaining screw to specified torque Inspect driven pulley Adjust and align track… -
Page 64
BREAK-IN INSPECTION BREAK-IN INSPECTION (600 ACE) Inspect engine seals and gaskets for leaks Inspect exhaust system and check for leaks Inspect all heat shields Check coolant level Change engine oil and filter Inspect fuel lines and connections Inspect throttle cable Inspect drive belt Visually inspect drive pulley Tighten drive pulley retaining screw to specified torque… -
Page 65: Maintenance Schedule
MAINTENANCE SCHEDULE Maintenance is very important for keeping your vehicle in safe operating condition. Proper maintenance is the owner’s responsibility. The vehicle should be serviced as per maintenance schedule. The maintenance schedule does not exempt the pre-ride inspection. WARNING Failure to properly maintain the vehicle according to the maintenance schedule and procedures can make it unsafe to operate.
-
Page 66
Clean and lubricate rewind starter EVERY 10 000 KM (6,000 MI) OR 3 YEARS (WHICHEVER COMES FIRST) Replace spark plugs must be replaced by an authorized Ski-Doo dealer) Inspect oil pump strainer and clean if needed EVERY 5 YEARS Replace engine coolant… -
Page 67
MAINTENANCE SCHEDULE 600 ACE EVERY 3 000 KM (2,000 MI) OR 1 YEAR (WHICHEVER COMES FIRST) Inspect heat shields Visually inspect and clean drive pulley Tighten drive pulley retaining screw to specified torque Clean driven pulley Check driven pulley preload Adjust and align track Inspect brake hose, pads and disk Inspect steering mechanism… -
Page 68: Maintenance Procedures
If not, see your authorized Ski-Doo dealer. Other important items in the mainte- nance schedule that are more difficult and require special tools are best per- formed by your authorized Ski-Doo mmo2011-007-011_a dealer. 1. Prefilter To remove prefilter, simply pull it out.
-
Page 69: Engine Oil (600 Ace)
MAINTENANCE PROCEDURES If the recommended oil is not available, use SAE 0W40 synthetic-based oil that meets or exceeds the requirements for API service classification SM Engine Oil Level Verification NOTICE Check level every hours of use and refill if necessary. Do not overfill.
-
Page 70: Exhaust System
If any exhaust system component is removed, modified or damaged, severe engine damage may result. Spark Plugs Spark plugs inspection or replacement must be done by an authorized Ski-Doo dealer. Engine Stopper mmo2010-009-001_a (600 HO E-TEC) 1. Opening 2. Feeler gauge Engine Stopper Adjustment 6.
-
Page 71: Brake Fluid
MAINTENANCE PROCEDURES WARNING Use only DOT 4 brake fluid from a sealed container. To avoid serious damage to the braking system, do not use fluids other than the rec- ommended one, nor mix different fluids for topping up. mmo2010-009-002_a NOTICE Brake fluid can damage 1.
-
Page 72: Gearbox Oil
MAINTENANCE PROCEDURES Gearbox Oil CHECK PLUG TORQUE 10 N•m ± 1 N•m (89 lbf•in ± 9 lbf•in) Recommended Gearbox Oil RECOMMENDED GEARBOX OIL Adding Gearbox Oil XPS SYNTHETIC CHAINCASE 1. Remove the check plug located on OIL (P/N 413 803 300) the left side of gearbox.
-
Page 73: Drive Belt
PULLEY EXPANDER INSTALLED ON belt or distorted spare drive belt. Con- ADJUSTER HUB tact an authorized Ski-Doo dealer. 3. Open the driven pulley by screwing the tool in. Spare Drive Belt 4. To remove belt, slip the belt over the…
-
Page 74
MAINTENANCE PROCEDURES 5. If a new drive belt was installed, adjust the drive belt height. Refer DRIVE BELT HEIGHT ADJUST- MENT below. 6. Install drive belt guard and close CONTROLS, side panel. Refer to INSTRUMENTS AND EQUIPMENT Drive Belt Height Adjustment mmo2011-003-011_a The drive belt height must be checked 1. -
Page 75: Drive Pulley
MAINTENANCE PROCEDURES Reverse Activation NOTE: The adjustment has an effect on high RPM only. NOTE: The reverse may not activate or may be harder to activate if the drive There are 6 positions numbered 1 to 6. belt is positioned too high in the driven The calibration screws have 6 different pulley.
-
Page 76: Track
Track Tension and Alignment speed. NOTE: Track tension and alignment See your Ski-Doo dealer to main- are interrelated. Do not adjust one tain or service the drive pulley. Im- without the other. proper servicing or maintenance may affect performance and re- duce drive belt life.
-
Page 77
MAINTENANCE PROCEDURES WARNING To prevent serious injury to indi- viduals near the snowmobile: – NEVER stand behind or near a mmr2009-133-003_b moving track. DEFLECTION SETTING 1. Bottom O-ring – Always use a wide-base snow- mobile stand with a rear deflec- 6. -
Page 78
1. RH adjustment screw nents. 5. If correct tension is unattainable, Track Tension Adjustment contact authorized Ski-Doo 1. Remove the tether cord cap from dealer. engine cut-off switch. 6. Retighten retaining bolts to specifi- 2. Remove rear wheel caps (if so cation. -
Page 79
MAINTENANCE PROCEDURES Track Alignment WARNING Remove the tether cord cap from WARNING engine cut-off switch before per- Before checking track alignment, forming any maintenance or ad- ensure that the track is free of all justment, unless otherwise spec- particles which could be thrown ified. -
Page 80: Suspension
(steering arms, tie rods, ski bolts, ski NOTE: During normal driving, snow legs, etc.). If necessary, contact an au- will act as a lubricant and coolant for thorized Ski-Doo dealer. the slider shoes. Extensive riding on ice or sanded snow, will create exces- Front Suspension Lubrication…
-
Page 81: Skis
Do not use a higher rated fuse. WARNING If fuse has burnt out, source of mal- function should be determined and corrected before restarting. See an authorized Ski-Doo dealer mmo2010-007-014_a for servicing. LH SIDE SHOWN 1. Grease fitting 2. Steering arm…
-
Page 82: Lights
MAINTENANCE PROCEDURES mmo2009-004-036_b mmo2007-009-061_a TYPICAL — PULL STRIP 1. Locking tab 2. Gently pull on multifunction gauge and set aside. mmo2009-004-037_a 1. Fuse box Close upholstery by pushing the strip mmo2007-009-062_a back in the aluminium extrusion. 3. Unplug burnt bulb connector. Re- Lights move the rubber boot.
-
Page 83
MAINTENANCE PROCEDURES Taillight Bulb Replacement 1. Remove taillight housing by care- fully pulling on lens at both ends using an equal force. NOTICE If taillight housing is not removed perpendicularly to the tail- light holder, mounting pins may break and taillight housing will have to be replaced. -
Page 84: Vehicle Care
VEHICLE CARE Post-Operation Care Wax painted portion of the vehicle for better protection. Remove snow and ice from rear sus- pension, track, front suspension, NOTE: Apply wax on glossy finish only. steering mechanism and skis. WARNING Make sure tether cord cap is away from engine cut-off switch before standing in front the vehicle, get- ting close to the track or rear sus-…
-
Page 85: Storage
STORAGE Engine Lubrication During summer, or when a snowmo- bile is not in use for more than three months, proper storage is necessary. Engine Lubrication Procedure (550F) STORAGE NOTICE Fuel stabilizer should Clean the vehicle be added prior to engine lubrica- tion to ensure carburetor protection Protect fuel system by adding fuel against varnish deposits.
-
Page 86
STORAGE 9. Reinstall spark plugs and primary air intake silencer. Engine Storage Mode (E-TEC) Like other engines, the E-TEC has to be properly lubricated at storage for internal parts protection. The E-TEC system offers a built-in engine lubri- cation function can be initiated by the operator. -
Page 87
STORAGE mmr2009-004-003 5. When the gauge displays «PUSH S», release all buttons. 6. Again, press and hold the SET but- ton for 2 — 3 seconds. The gauge will display «OIL» when the engine enters storage procedure (sum- merization feature). mmr2009-004-004 Do not touch anything during engine lu- brication cycle. -
Page 88: Preseason Preparation
PRESEASON PREPARATION PRESEASON PREPARATION (550F) Inspect engine rubber mounts Check exhaust system condition and check for leaks Check exhaust system condition and check for leaks Inspect crankshaft PTO seal Inspect fuel lines and connections Clean, inspect and adjust carburetors Adjust oil injection pump Inspect throttle cable Replace spark plugs after starting the engine with the old spark plugs to burn the excess of storage oil…
-
Page 89
PRESEASON PREPARATION PRESEASON PREPARATION (600 HO E-TEC) Inspect engine rubber mounts Check exhaust system condition and check for leaks Check coolant density Inspect crankshaft PTO seal Inspect fuel lines and connections Clean and inspect throttle body Inspect throttle cable Inspect drive belt (adjust at every drive belt replacement) Clean and visually inspect drive pulley Clean and inspect driven pulley Inspect, adjust and align track… -
Page 90
PRESEASON PREPARATION PRESEASON PREPARATION (600 ACE) Visually inspect engine seals and gaskets and check for leaks Check exhaust system condition and check for leaks Change engine oil and filter Check coolant density Inspect fuel lines and connections Clean and inspect throttle body Inspect throttle cable Inspect drive belt (adjust at every drive belt replacement) Clean and visually inspect drive pulley… -
Page 91: Technical Information
TECHNICAL INFORMATION _______________…
-
Page 92: Vehicle Identification
These numbers are required by the authorized Ski-Doo dealer to complete warranty claims properly. No warranty will be allowed by BRP if the engine identification number or vehicle iden-…
-
Page 93
VEHICLE IDENTIFICATION mmo2011-003-003_a 600 ACE ENGINE 1. Engine identification number _______________… -
Page 94: Ec-Declaration Of Conformity
The EC-Declaration of Conformity does not appear in this version of the Operator’s Guide. Please refer to the printed version that was delivered with your vehicle. ddd2009-001…
-
Page 95: Epa Certified Engines
For more detailed informa- When performing service on a certi- tion on this subject, you may contact fied Ski-Doo snowmobiles that carry the following locations: an emissions control information label, adjustments must be kept within pub- Mail: lished factory specifications.
-
Page 96: Specifications
SPECIFICATIONS SYSTEM MODELS ENGINE 550F Rotax ® 552, fan-cooled (axial fan), Engine type cylinder reed porting Cylinders Displacement 553.4 cm³ (33.8 in³) Bore 76 mm (3 in) Stroke 61 mm (2.4 in) Maximum horsepower RPM 6800 RPM Carburetion 2 x VM-30 Exhaust system Single tuned pipe, baffle muffler XPS INJECTION OIL…
-
Page 97
SPECIFICATIONS SYSTEM MODELS ENGINE (CONT’D) 600 HO E-TEC Ethyl glycol/water mix (50% coolant, 50% distilled water). Use BRP Engine coolant premix coolant or coolant specifically designed for aluminum engines Recommended fuel type Premium unleaded Inside North America (91 (RON + MON)/2) Minimum octane rating Outside North America… -
Page 98
SPECIFICATIONS SYSTEM MODELS DRIVE SYSTEM ALL MODELS 550F eDrive 600 HO Type TRA III™ E-TEC 600 ACE eDrive Drive pulley 550F 2500 ± 100 RPM 600 HO 3000 RPM ± 100 Engagement E-TEC 600 ACE 2200 RPM ± 100 Driven pulley type 550F 600 HO E-TEC… -
Page 99
SPECIFICATIONS SYSTEM MODELS BRAKE SYSTEM ALL MODELS Brake system Hydraulic, REV-XP brake type Brake fluid DOT 4 SUSPENSION ALL MODELS Front suspension REV-XP Front shock Motion control Front suspension max. travel 150 mm (6 in) Rear suspension SC-5U Front arm shock Motion control Rear arm shock Rear suspension max. -
Page 100
SPECIFICATIONS SYSTEM MODELS ELECTRICAL SYSTEM (CONT’D) 600 HO E-TEC F 1: Battery 30 A F 2: Relay 2 coil, start button, gauge Fuses/ F 3: Horn (optional) 10 A Relays/ F 4: Relay 2 power Capacitor 15 A (cooling fan) R 1: Fuse 1, fuse 2, fuse 4 R 2:… -
Page 101
SPECIFICATIONS SYSTEM MODELS ELECTRICAL SYSTEM (CONT’D) 600 ACE Fuse 3, fuse 5, fuse 6, R 1: communication connector R 2: Fuse 8, fuse 9, fuse 10 Relays R 3: Fuse 7 R 4: Cooling fan WEIGHT AND DIMENSIONS ALL MODELS 550F 285 kg (628.3 lb) Dry weight… -
Page 102
SPECIFICATIONS This page is intentionally blank ______________… -
Page 103: Troubleshooting
TROUBLESHOOTING ______________…
-
Page 104: Troubleshooting Guidelines
– If the drive belt has lost more than 3 mm (1/8 in) of its original width, it will af- fect vehicle performance. – Replace drive belt. 6. Incorrect track adjustment. – See MAINTENANCE and/or an authorized Ski-Doo dealer for proper align- ment and tension adjustments. ______________…
-
Page 105
4. Fuel pressure too low. – Contact an authorized Ski-Doo dealer. ENGINE MISFIRES 1. Water in fuel. – Drain fuel system and refill with fresh fuel. 2. RAVE valves malfunction (E-TEC). – Have RAVE valves system inspected by an authorized Ski-Doo dealer. ______________… -
Page 106: Monitoring System
MONITORING SYSTEM Pilot Lamps, Messages and Beeper Codes Gauge pilot lamp(s) will inform you if an anomaly occurs or to inform you of a particular condition. mmo2008-003-024_a TYPICAL — PILOT LAMPS Pilot lamp can flash alone or in combi- nation with another lamp. Beeper codes will be emitted to catch your attention.
-
Page 107
Check coolant level, refer to . If coolant level is correct and overheating persists, contact an 4 short authorized Ski-Doo dealer. Do not run the engine if condition beeps every persists. 30 seconds Reduce speed or stop engine. Let engine cool down and restart. -
Page 108
MONITORING SYSTEM PILOT LAMP(S) BEEPER DESCRIPTION 2 short Good key, vehicle ready to operate. beeps 2 short beeps, Unable to read key (bad connection). Make sure the key is D.E.S.S. repeating clean and correctly snapped on post. slowly Short beeps Invalid key or key not programmed. -
Page 109: Warranty
WARRANTY ______________…
-
Page 110: Brp Limited Warranty Usa And Canada: 2012 Ski-Doo
All genuine Ski-Doo parts and accessories, installed by an authorized BRP dealer (as hereinafter defined) at the time of delivery of the 2012 Ski-Doo snowmobile, carry the same warranty as that of the snowmobile.
-
Page 111
This warranty coverage is available only if each of the following conditions has been fulfilled: – The 2012 Ski-Doo snowmobile must be purchased as new and unused by its first owner from a BRP dealer authorized to distribute Ski-Doo snowmobiles in the country in which the sale occurred (“BRP dealer”);… -
Page 112
– The 2012 Ski-Doo snowmobile must be purchased in the country in which the purchaser resides; and – Routine maintenance outlined in the Operator’s Guide must be timely per- formed in order to maintain warranty coverage. BRP reserves the right to make warranty coverage contingent upon proof of proper maintenance. -
Page 113
9) CONSUMER ASSISTANCE In the event of a controversy or a dispute in connection with this limited warranty, BRP suggests that you try to resolve the issue at the dealership level. We recom- mend discussing the issue with the authorized dealer’s service manager or owner. If the issue has not yet been resolved, please submit your complaint in writing or call the appropriate number below: In Canada… -
Page 114: Brp International Limited Warranty: 2012 Ski-Doo
All genuine Ski-Doo parts and accessories, installed by an authorized BRP distributor/dealer at the time of delivery of the 2012 Ski-Doo snowmobile, carry the same warranty as that of the snowmobile. 2) LIMITATIONS OF LIABILITY…
-
Page 115
– Damage resulting from removal of parts, improper repairs, service, main- tenance, modifications or use of parts or accessories not manufactured or approved by BRP which in its reasonable judgement are either incompatible with the product or adversely affect its operation, performance and durability, or resulting from repairs done by a person that is not an authorized servicing BRP distributor/dealer;… -
Page 116
This warranty coverage is available only if each of the following conditions has been fulfilled: – The 2012 Ski-Doo snowmobile must be purchased as new and unused by its first owner from a BRP distributor/dealer authorized to distribute Ski-Doo snow- mobiles in the country in which the sale occurred (“BRP distributor/dealer”);… -
Page 117
TRANSFER If the ownership of a product is transferred during the warranty coverage period, this warranty shall also be transferred and be valid for the remaining coverage pe- riod provided BRP or an authorized BRP distributor/dealer receives a proof that the former owner agreed to the transfer of ownership, in addition to the co-ordinates of the new owner.
-
Page 118: Brp Limited Warranty For The European And The Russian
All genuine Ski-Doo parts and accessories, installed by an authorized BRP distributor/dealer (at the time of delivery of the 2012 Ski-Doo snowmobile, carry the same warranty as that of the snowmobile.
-
Page 119
This warranty coverage is available only if each of the following conditions has been fulfilled: – The 2012 Ski-Doo snowmobile must be purchased as new and unused by its first owner from a BRP distributor/dealer authorized to distribute Ski-Doo products in the country in which the sale occurred (“BRP distributor/dealer”);… -
Page 120
– The 2012 Ski-Doo snowmobile must be purchased within the EEA by an EEA resident, in the CIS for residents of the countries comprised in such area and in Turkey for residents of Turkey; and – Routine maintenance outlined in the Operator’s Guide must be timely per- formed in order to maintain warranty coverage. -
Page 121
9) CONSUMER ASSISTANCE In the event of a controversy or a dispute in connection with this limited warranty, BRP suggests that you try to resolve the issue at the dealership level. We rec- ommend discussing the issue with the authorized distributor/dealer’s service manager or owner. -
Page 122
This page is intentionally blank ______________… -
Page 123: Customer Information
CUSTOMER INFORMATION ______________…
-
Page 124: Privacy Information
PRIVACY INFORMATION BRP wishes to inform you that your coordinates will be used for safety and war- ranty related purposes. Furthermore, BRP and its affiliates may use its customer list to distribute marketing and promotional information about BRP and related products.
-
Page 125: Change Of Address/Ownership
It is the owner’s responsibility to notify BRP. STOLEN UNITS: If your personal snowmobile is stolen, you should notify BRP or an authorized Ski-Doo dealer. We will ask you to provide your name, address, phone number, the vehicle identification number and the date it was stolen.
-
Page 126
CHANGE OF ADDRESS/OWNERSHIP This page is intentionally blank ______________… -
Page 127
CHANGE OF ADDRESS/OWNERSHIP ______________… -
Page 128
CHANGE OF ADDRESS/OWNERSHIP ______________… -
Page 129
CHANGE OF ADDRESS/OWNERSHIP ______________… -
Page 130
CHANGE OF ADDRESS/OWNERSHIP ______________… -
Page 131
®™ AND THE BRP LOGO ARE TRADEMARKS OF BOMBARDIER RECREATIONAL PRODUCTS INC. OR ITS AFFILIATES. ©2011 BOMBARDIER RECREATIONAL PRODUCTS INC. ALL RIGHTS RESERVED. PRINTED IN CANADA.
ПРЕДОСТЕРЕЖЕНИЕ Несоблюдение инструкций и рекомендаций по мерам безопасности, которые содержатся в Руководстве по эксплуатации, ДЕМОНСТРАЦИОННОМ ВИДЕОФИЛЬМЕ и табличках на корпусе снегохода, может привести к трагическим последствиям, не иск лючая получения травм, увечий и гибели людей.
ПРЕДИСЛОВИЕ Поздравляем вас с приобретением нового снегохода Ski-Doo ®. На данный продукт распространяются гарантийные обязательства BRP, его обслуживание осуществляется сетью авторизованных дилеров готовых обеспечить запасными частями и аксессуарами, а также произвести необходимое техническое
ОГЛАВЛЕНИЕ ПРЕДИСЛОВИЕ ……………………………………………………………………………………………….. 1 Прежде чем приступить к эксплуатации ………………………………………………………………………1 Предупреждения
ОГЛАВЛЕНИЕ ИНЖЕКЦИОННОЕ МАСЛО (600 HO E-TEC) …………………………………………………….. 41 Рекомендуемое инжекционное масло……………………………………………………………………….. 41 Проверка уровня инжекционного масла
ОГЛАВЛЕНИЕ ТЕХНИЧЕСКАЯ ИНФОРМАЦИЯ ИДЕНТИФИКАЦИОННЫЕ НОМЕРА СНЕГОХОДА …………………………………………… 82 Табличка с данными снегохода ………………………………………………………………………………….82 Заводские номера
ИНФОРМАЦИЯ ПО БЕЗОПАСНОСТИ Ski-Doo Skandic WT 2011.indd 5 23.11.2010 12:54:05
ОСНОВНЫЕ МЕРЫ ПРЕДОСТОРОЖНОСТИ Избегайте отравления угарным газом Отработавшие газы всех двигателей содержат оксид углерода (угарный газ), который, в определённых условиях, может представлять смертельную опасность. Вдыхание угарного газа может стать причиной появления головной боли, головокружения,
РЕКОМЕНДАЦИИ ПО МЕРАМ БЕЗОПАСНОСТИ Несоблюдение следующих инструкций может привести к получению СЕРЬЁЗНЫХ ТРАВМ, И ДАЖЕ СТАТЬ ПРИЧИНОЙ ЛЕТАЛЬНОГО ИСХОДА: – Перед выездом ВСЕГДА производите контрольный осмотр снегохода. – Прежде чем запустить двигатель убедитесь, что рычаг дроссельной заслонки
РЕКОМЕНДАЦИИ ПО МЕРАМ БЕЗОПАСНОСТИ – – – – – – – – – – – – – – – – Превышение безопасной скорости может представлять смертельную опасность. При движении на высокой скорости у Вас не остаётся достаточно времени, чтобы адекватно среагировать на изменившуюся ситуацию. Выбирайте такую скорость, которая
РЕКОМЕНДАЦИИ ПО МЕРАМ БЕЗОПАСНОСТИ – – – – – – – – – – – – – – – – – Иногда на лугах встречаются низины, где постоянно держится вода. Зимой она замерзает, образуя открытое зеркало льда. При торможении или повороте на таком льду Вы можете потерять контроль над снегоходом. Если Вы оказались на
УПРАВЛЕНИЕ СНЕГОХОДОМ Водитель, отвечающий за безопасность пассажиров, должен предварительно разъяснить им основные правила поведения при езде на снегоходе. Вы отвечаете за исправное состояние своего снегохода, за предварительный инструктаж и безопасность тех, кто допущен Вами к самостоятельному
УПРАВЛЕНИЕ СНЕГОХОДОМ Контрольный лист проведения осмотра перед выездом УЗЕЛ, СИСТЕМА ОПЕРАЦИЯ Корпус, сиденья, подножки, световые приборы, воздушный фильтр, органы управления и контрольные приборы Проверить состояние и очистить от снега и льда. Лыжи, рулевое управление Проверить работоспособность
УПРАВЛЕНИЕ СНЕГОХОДОМ склоне водитель и пассажир должны быть готовы наклоном тела в соответствующую сторону облегчить поворот снегохода. Водителю и пассажиру запрещается во время движения снегохода снимать ноги с опорных площадок и тормозить или опираться ногами на снег. Тренировки и приобретённый
УПРАВЛЕНИЕ СНЕГОХОДОМ ребёнок на среднем сиденье лучше защищён от ветра и холода. Водитель, отвечающий за безопасность пассажиров, должен предварительно разъяснить им основные правила поведения при езде на снегоходе. ПРЕДОСТЕРЕЖЕНИЕ – – mmo2 008 -003 -004 Посадка (движение назад) Во время движения
УПРАВЛЕНИЕ СНЕГОХОДОМ ПРЕДОСТЕРЕЖЕНИЕ При перевозке пассажира: – управляемос ть снегохода и эффективность торможения снижены. Двигайтесь на по ниженной скорости, помните, что д ля совершения маневров и торможения потребуется большая, чем обычно, дистанция; – отрегулируйте подвеску с учёт о м н а г
УПРАВЛЕНИЕ СНЕГОХОДОМ ния снегохода сила сцепления гусеничной ленты со льдом значительно снижена, поэтому продолжительность преодоления подобных участков трассы многократно возрастает. На льду всегда существует опасность неуправляемого заноса и разворота. Двигаясь по льду, снизьте скорость и будьте
УПРАВЛЕНИЕ СНЕГОХОДОМ Опасность схода лавин При движении в гористой местности Вы не должны забывать об опасности схода снежных лавин. Лавины могут отличаться по размеру и форме и, как правило, образуются на крутых склонах с нестабильным снежным покровом. Снегопад, животные, люди, ветер и снегоходы
УПРАВЛЕНИЕ СНЕГОХОДОМ чистителя или на других незамеченных профильных препятствиях могут представлять опасность. Вы сможете загодя заметить препятствие и своевременно снизить скорость, если будете пользоваться солнцезащитными очками с цветными светофильтрами или защитным щитком для лица. Выполнение
УПРАВЛЕНИЕ СНЕГОХОДОМ те лидера группы и замыкающего. Все участники поездки должны знать предложенный маршрут движения и конечный пункт назначения. Убедитесь в наличии всех необходимых инструментов, запасных частей и достаточного количества топлива и моторного масла. Никогда не обгоняйте на трассе
УПРАВЛЕНИЕ СНЕГОХОДОМ считана на участие всех энтузиастов, кому небезразлично будущее окружающей среды. Мы призываем всех любителей катания на снегоходах помнить, что сохранение природы необходимо не только для развития этого вида спорта и обслуживающей его индустрии, но и в интересах будущих
ПРЕДУПРЕЖДАЮЩИЕ ТАБЛИЧКИ СВЕДЕНИЯ О ДВИГАТЕЛЕ: NER (Нормализованный показатель выброса) = ПО ШКАЛЕ ОТ 0 ДО 10 (0 — САМЫЙ ЧИСТЫЙ ВЫХЛОП) * ПРИ ПРОДАЖЕ СНЕГОХОДА ТАБЛИЧКА НЕ СНИМАЕТСЯ Приведённые ниже предупреж дающие нак лейки должны рассматриваться как неотъемлемая часть снегохода. Если какиелибо
ПРЕДУПРЕЖДАЮЩИЕ ТАБЛИЧКИ ПРЕДОСТЕРЕЖЕНИЕ ПРЕДОСТЕРЕЖЕНИЕ Снегоход предназначен для движения одного (1) водителя и перевозки такого количества пассажиров, которое предусмотрено количеством установленных сидений с ремнями или поручнями (отвечающих требованиям стандартов SSCC). При перевозке
ПРЕДУПРЕЖДАЮЩИЕ ТАБЛИЧКИ ПРЕДОСТЕРЕЖЕНИЕ ПРЕДОСТЕРЕЖЕНИЕ При работе двигателя данный кожух должен быть установлен на место. 516 003 926 ТАБЛИЧКА 5 mmo2 006 -003 -007_a ПРЕДОСТЕРЕЖЕНИЕ ● Не садитесь на данную поверхность. ● Не перевозите груз непосредственно на данной поверхности. ● Для перевозки
ПРЕДУПРЕЖДАЮЩИЕ ТАБЛИЧКИ ПРЕДОСТЕРЕЖЕНИЕ ! ПРЕДОСТЕРЕЖЕНИЕ: Перед УСТАНОВКОЙ топливных форсунок ознакомьтесь с соответствующим разделом «Руководства по ремонту». Форсунки должны устанавливаться в цилиндры, с которых они были сняты. При замене топливной форсунки следуйте указаниям «Руководства по
ПРЕДУПРЕЖДАЮЩИЕ ТАБЛИЧКИ В табличке указано, что независимая испытательная лаборатория подтверждает полное соответствие снегохода требованиям стандартов безопасности SSCC. НА ТОННЕЛЕ ВНИМАНИЕ • В соответствии с требованиями стандартов, регламентирующих уровень шума двигателя, снегоход оборудован
СВЕДЕНИЯ О ТРАНСПОРТНОМ СРЕДСТВЕ Ski-Doo Skandic WT 2011.indd 25 23.11.2010 12:54:06
ОРГАНЫ УПРАВЛЕНИЯ, ПРИБОРЫ, ОБОРУДОВАНИЕ ПРИМЕЧАНИЕ: Некоторые органы управления и приборы поставляются только на заказ и входят в комплект дополнительно приобретаемого оборудования. mmo2 011 -007 -005_a mmo2 011 -007 -006_a 26 Ski-Doo Skandic WT 2011.indd 26 23.11.2010 12:54:06
ОРГАНЫ УПРАВЛЕНИЯ, ПРИБОРЫ, ОБОРУДОВАНИЕ 1) Руль Руль предназначен для изменения направления движения снегохода. Когда Вы поворачиваете руль вправо или влево, в ту же сторону поворачиваются и лыжи, изменяя тем самым направление движения снегохода. Нажатие на рычаг включает тормозной механизм. При
ОРГАНЫ УПРАВЛЕНИЯ, ПРИБОРЫ, ОБОРУДОВАНИЕ ПРЕДОСТЕРЕЖЕНИЕ Перед началом движения убедитесь, что стояночный тормоз отк лючён. При длительном нажатии на рычаг тормоза во время движения снегохода возможно повреж дение тормозной системы, потеря тормозного эффекта и/или возгорание снегохода. Включение
ОРГАНЫ УПРАВЛЕНИЯ, ПРИБОРЫ, ОБОРУДОВАНИЕ mmo2 011 -004 -100_a КОЛПАЧОК ШНУРА БЕЗОПАСНОСТИ 1. Отсутствие загрязнений и снега Дополнительные ключи DESS Система DESS снегохода может быть запрограммирована авторизованным дилером Ski-Doo для работы с 8-ю различными ключами. Мы рекомендуем приобрести у
ОРГАНЫ УПРАВЛЕНИЯ, ПРИБОРЫ, ОБОРУДОВАНИЕ Кнопка START Нажмите данную кнопку, чтобы запустить двигатель. Более подробно процедура запуска двигателя описана в главе «ЗАПУСК ДВИГАТЕЛЯ» раздела «УКАЗАНИЯ ПО ЭКСПЛУАТАЦИИ». Переключатель света фар С помощью данного переключателя осуществляется
ОРГАНЫ УПРАВЛЕНИЯ, ПРИБОРЫ, ОБОРУДОВАНИЕ mmo2 009 -004 -013_a mmo2 008 -003 -061_a ТИПОВОЙ ВАРИАНТ 1. Комплект инструментов 11) Рукоятка/бампер Используются при необходимости поднять снегоход вручную. ОСТОРОЖНО Практикуйте правильную технику подъёма, преимущес твенно исполь зуйте силу ног. Не
ОРГАНЫ УПРАВЛЕНИЯ, ПРИБОРЫ, ОБОРУДОВАНИЕ Спидометр Отображает скорость движения снегохода в километрах или в милях в зависимости от выбранной установки. mmo2 008 -003 -019 ПРАВАЯ ЧАСТЬ ИНФОРМАЦИОННОГО ЦЕНТРА Сигнальные лампы и предупреждающие сообщения mmo2 008 -003 -014 ЛЕВАЯ ЧАСТЬ ИНФОРМАЦИОННОГО
ОРГАНЫ УПРАВЛЕНИЯ, ПРИБОРЫ, ОБОРУДОВАНИЕ Кнопка SET (S) Кнопка используется для просмотра и настройки параметров, отображаемых на многофункциональном дисплее. Для сохранения настроек двигатель должен быть запущен. 13) Пассажирское сиденье (1+1) Пассажирское сиденье (1+1) является стандартным
ОРГАНЫ УПРАВЛЕНИЯ, ПРИБОРЫ, ОБОРУДОВАНИЕ mmo2 009 -004 -023_a ТИПОВОЙ ВАРИАНТ 1. Специальный захват на руле ПРЕДОСТЕРЕЖЕНИЕ Использование захвата для буксировки или подъёма снегохо да, а так же д ля иных непре дусмотренных целей категорически запрещено. Во время движения по ск лону холма одна рука
ОРГАНЫ УПРАВЛЕНИЯ, ПРИБОРЫ, ОБОРУДОВАНИЕ ПРЕДОСТЕРЕЖЕНИЕ Отрег улируйте подвеску в соответствии с нагрузкой. Грузоподъёмность этого багажника ограничена, МАКСИМАЛЬНЫЙ вес груза 30 кг. При перевозке грузов передвигайтесь осторожно. Неровности дороги преодолевайте на малой скорости. Сцепное
ОРГАНЫ УПРАВЛЕНИЯ, ПРИБОРЫ, ОБОРУДОВАНИЕ mmo2 009 -004 -038_a 1. Резиновые фиксаторы 3. Сдвиньте капот вперёд, чтобы вывести фиксаторы из пазов. Установка капота 1. Введите фиксаторы, расположенные в передней и центральной частях капота, в пазы нижнего поддона. mmo2 009 -004 -040_a ТИПОВОЙ ВАРИАНТ
ОРГАНЫ УПРАВЛЕНИЯ, ПРИБОРЫ, ОБОРУДОВАНИЕ mmo2 011 -006 -100_a ТИПОВОЙ ВАРИАНТ 1. Крюк консоли 2. Паз консоли 3. Выступы 3. Вставьте задний выступ в паз консоли. mmo2 009 -004 -045_a 1. Фиксатор 3. Нажмите и удерживайте фиксатор, затем потяните панель вверх и назад. mmo2 011 -007 -002_a mmo2 009
ОРГАНЫ УПРАВЛЕНИЯ, ПРИБОРЫ, ОБОРУДОВАНИЕ Поднимите кожух за его заднюю часть и, повернув наружу, извлеките из передних выступов. Установка защитного кожуха ремня вариатора mmo2 011 -007 -004_a При установке кожуха обратите внимание на то, чтобы его вырез был обращён вперёд. Поместите передний левый
ОРГАНЫ УПРАВЛЕНИЯ, ПРИБОРЫ, ОБОРУДОВАНИЕ ПРИМЕЧАНИЕ: Защитный кожух ремня вариатора специально изготовлен несколько большего размера, чтобы обеспечить натяг в сопряжении с фиксаторами. Это позволяет снизить уровень шума и вибраций. При установке кожуха необходимо сохранить этот натяг. mmo2 008 -003
ТОПЛИВО Рекомендуемое топливо Заправка топливом Пользуйтесь стандартным неэтилированным бензином, который продаётся на автозаправочных станциях, или бензином с кислородными добавками, содержащим не более 10% этилового или метилового спирта. Отверните пробку, заполните бак топливом и надёжно
ИНЖЕКЦИОННОЕ МАСЛО (600 HO E-TEC) Рекомендуемое инжекционное масло ДВИГАТЕЛЬ РЕКОМЕНДУЕМОЕ ИНЖЕКЦИОННОЕ МАСЛО 600 HO E-TEC XPS SYNTHETIC BLEND 2-STROKE OIL (P/N 293 600 100) ВНИМАНИЕ Двигатель снегохода сконструирован и прошёл эксплуатационные испытания с использованием масла BRP XPS Synthetic
ЭКСПЛУАТАЦИЯ В ПЕРИОД ОБКАТКИ Продолжительность периода обкатки МОДЕЛИ С ДВИГАТЕЛЕМ 600 ACE Снегоход требует обкатки в течение 10 моточасов или 500 км пробега. МОДЕЛИ С ДВИГАТЕЛЕМ E-TEC Продолжительность периода обкатки определяется на основании данных о расходе топлива. Для проведения обкатки
УКАЗАНИЯ ПО ЭКСПЛУАТАЦИИ Запуск двигателя 1. Задействуйте стояночный тормоз. 2. Ещё раз проверьте функционирование рычага дроссельной заслонки. 3. Наденьте шлем. 4. Убедитесь, что колпачок шнура безопасности установлен на выключатель и закрепите свободный конец шнура безопасности на одежде. 5.
УКАЗАНИЯ ПО ЭКСПЛУАТАЦИИ mmo2 008 -005 -007 3. Другой конец шнура привяжите к пусковому зажиму, который входит в комплект возимого инструмента. mmo2 008 -005 -014_a 6. Резко дёрните за пусковой шнур так, чтобы он размотался и в конце соскочил с ведущего шкива. ПРЕДОСТЕРЕЖЕНИЕ После пуска двигателя
УКАЗАНИЯ ПО ЭКСПЛУАТАЦИИ ВНИМАНИЕ Если после нажатия р ыч а г а д р о с с е л ьн о й з а с л о н к и снегоход не пришёл в движение, з а гл у ш и т е д в и г а т е л ь , с н и м и т е к о л п ач о к ш н у р а б е з о п а с н о с т и с выключателя и после этого выполните следующее: – Если лыжи
УКАЗАНИЯ ПО ЭКСПЛУАТАЦИИ ПРИМЕЧАНИЕ: Переключение с 1-й передачи на 2-ую возможно только при скорости движения снегохода не более 20 км/ч. Перед переключением передачи следует отпустить рычаг дроссельной заслонки. Остановка двигателя Отпустите рычаг дроссельной заслонки и выждите, пока частота
НАСТРОЙКА ПОДВЕСКИ СНЕГОХОДА ПРЕДОСТЕРЕЖЕНИЕ Регулировка подвески оказывает существенное влияние на управляемос ть снегохода. Уделяйте достаточное время чтобы привыкнуть к управляемости снегохода после того как были произведены какие-либо регулировки подвески. Управляемость и плавность хода Вашего
НАСТРОЙКА ПОДВЕСКИ СНЕГОХОДА ДЕЙСТВИЕ РЕЗУЛЬТАТ ДЕЙСТВИЕ Увеличение длины ленточных ограничителей Увеличение хода центральной пружины Улучшение демпфирования неровностей Уменьшение длины ленточных ограничителей РЕЗУЛЬТАТ Задняя подвеска становится более жёсткой Уменьшение давления лыж при ускорении
НАСТРОЙКА ПОДВЕСКИ СНЕГОХОДА Расстояние «С», мм РЕШЕНИЕ 50—75 Регулировка не требуется более 75 Регулировка слишком мягкая. Увеличить предварительное натяжение менее 50 Регулировка слишком жёсткая. Уменьшить предварительное натяжение ПРИМЕЧАНИЕ: Если указанные значения недостижимы с оригинальными
НАСТРОЙКА ПОДВЕСКИ СНЕГОХОДА mmo2 010 -003 -014_a mmo2 008 -005 -019_a РЕГУЛЯТОР КУЛАЧКОВОГО ТИПА — АМОРТИЗАТОР MOTION CONTROL 1. Кулачок регулировки предварительного натяжения пружины 2. Увеличение предварительного натяжения 3. Уменьшение предварительного натяжения ПРИМЕЧАНИЕ: Для регулировки
НАСТРОЙКА ПОДВЕСКИ СНЕГОХОДА mmo2 010 -007 -023_a УДЛИНИТЕЛЬ ЗАДНЕЙ ПОДВЕСКИ НЕ ЗАФИКСИРОВАН 1. Нижний ограничитель 2. Регулировочный кулачок mmo2 010 -007 -024_a ПЕРЕМЕЩЕНИЕ УДЛИНИТЕЛЯ ЧАСТИЧНО ОГРАНИЧЕНО 1. Нижний ограничитель 2. Регулировочный кулачок mmo2 010 -007 -025_a ПЕРЕМЕЩЕНИЕ УДЛИНИТЕЛЯ
НАСТРОЙКА ПОДВЕСКИ СНЕГОХОДА Советы по настройке подвески снегохода в зависимости от условий эксплуатации ПРОБЛЕМА МЕТОДЫ УСТРАНЕНИЯ «Рысканье» передней подвески Проверьте положение лыж и угол развала. Обратитесь к дилеру Ski-Doo. Уменьшите давление лыж на опорную поверхность – Увеличьте
ТРАНСПОРТИРОВКА СНЕГОХОДА Проверьте плотность затяжки крышек масляного резервуара и топливного бака. Трейлер с наклоняемой платформой, на котором Вы собираетесь перевозить свой снегоход, необходимо оборудовать подъёмным механизмом. Не загоняйте снегоход на платформу собственным ходом — это часто
Ski-Doo Skandic WT 2011.indd 54 23.11.2010 12:54:07
ТЕХНИЧЕСКОЕ ОБСЛУЖИВАНИЕ Ski-Doo Skandic WT 2011.indd 55 23.11.2010 12:54:07
ПОСЛЕ ПРОБЕГА 10 МОТОЧАСОВ Снегоход нуждается в проведении контрольного осмотра после наработки первых 10 моточасов (или после первых 500 километров пробега — в зависимости от того, что наступит раньше). Проведите осмотр у авторизованного дилера Ski-Doo. Проведение контрольного осмотра очень важно
ПОСЛЕ ПРОБЕГА 10 МОТОЧАСОВ ЗАМЕНА РЕГУЛИРОВКА ЗАТЯЖКА РЕГЛАМЕНТ КОНТРОЛЬНОГО ОСМОТРА ПОСЛЕ ЗАВЕРШЕНИЯ ПЕРИОДА ОБКАТКИ СМАЗКА ОЧИСТКА ПРОВЕРКА СИСТЕМА ПРИВОДА Ремень вариатора X Ведущий шкив вариатора X Болт крепления ведущего шкива вариатора Ведомый шкив вариатора и предварительный натяг ведомого
РЕГЛАМЕНТ ТЕХНИЧЕСКОГО ОБСЛУЖИВАНИЯ Проведение регулярного технического обслуживания снегохода является очень важным фактором для поддержания его в технически исправном и безопасном для эксплуатации состоянии. Своевременное проведение технического обслуживания снегохода является областью
РЕГЛАМЕНТ ТЕХНИЧЕСКОГО ОБСЛУЖИВАНИЯ A: С: I: L: R: Еженедельно или каждые 250 км Регулировка Чистка Осмотр Смазка Замена Ежемесячно или каждые 800 км Ежегодно или каждые 3200 км 1 раз в 2 года или 6000 км * выполняется авторизованным дилером Ski-Doo * Хранение * Предсезонная подготовка
РЕГЛАМЕНТ ТЕХНИЧЕСКОГО ОБСЛУЖИВАНИЯ 600 ACE A: С: I: L: R: Еженедельно или каждые 250 км Регулировка Чистка Осмотр Смазка Замена Ежемесячно или каждые 800 км Ежегодно или каждый 3200 км 1 раз в 2 года или 6000 км * выполняется авторизованным дилером Ski-Doo * Хранение * Предсезонная подготовка
РЕГЛАМЕНТ ТЕХНИЧЕСКОГО ОБСЛУЖИВАНИЯ A: С: I: L: R: Еженедельно или каждые 250 км Регулировка Чистка Осмотр Смазка Замена Ежемесячно или каждые 800 км Ежегодно или каждые 3200 км 1 раз в 2 года или 6000 км * выполняется авторизованным дилером Ski-Doo * Хранение * Предсезонная подготовка
ПРОЦЕДУРЫ ТЕХНИЧЕСКОГО ОБСЛУЖИВАНИЯ В настоящем разделе приведены указания для выполнения основных операций технического обслуживания. Вы можете сами выполнять эти процедуры при наличии у Вас необходимых инструментов и навыков механика. В противном случае Вам следует обратиться к дилеру Ski-Doo.
ПРОЦЕДУРЫ ТЕХНИЧЕСКОГО ОБСЛУЖИВАНИЯ Проверка уровня моторного масла ВНИМАНИЕ Проверяйте и при необходимости доводите до нормы уровень моторного масла каждые 10 моточасов пробега. Не переливайте моторное масло. Эксплуатация снегохода с недостаточным или избыточным количеством м ас л а в с и с т ем е
ПРОЦЕДУРЫ ТЕХНИЧЕСКОГО ОБСЛУЖИВАНИЯ ОСТОРОЖНО Моторное масло может быть очень горячим. ПРЕДОСТЕРЕЖЕНИЕ Вытирайте любые подтеки масла. Горячее масло — легковоспламеняемый продукт. Система выпуска отработавших газов Проверка системы выпуска отработавших газов Выхлопная труба глушителя должна
ПРОЦЕДУРЫ ТЕХНИЧЕСКОГО ОБСЛУЖИВАНИЯ ПРЕДОСТЕРЕЖЕНИЕ Пользуйтесь только тормозной жидкостью DOT 4 из герметичной упаковки. Во избежание серьёзного повреждения тормозной системы запрещается использование тормозных жидкостей, не рекомендуемых типов, также запрещается смешивать разные типы жидкости для
ПРОЦЕДУРЫ ТЕХНИЧЕСКОГО ОБСЛУЖИВАНИЯ Масло для коробки передач Долив масла в коробку передач Рекомендуемое масло для коробки передач 1. Выверните пробку контрольного отверстия, расположенную на левой стороне коробки передач. РЕКОМЕНДУЕМОЕ МАСЛО ДЛЯ КОРОБКИ ПЕРЕДАЧ XPS SYNTHETIC CHAINCASE OIL (P/N
ПРОЦЕДУРЫ ТЕХНИЧЕСКОГО ОБСЛУЖИВАНИЯ приморожена, резкое начало движения без прогрева двигателя, наличие задиров, загрязнений или следов коррозии на шкивах вариатора, попадание масла на ремень или деформация запасного ремня. Обратитесь к дилеру Ski-Doo. Замена ремня вариатора Снятие ремня вариатора
ПРОЦЕДУРЫ ТЕХНИЧЕСКОГО ОБСЛУЖИВАНИЯ Регулировка ремня вариатора по высоте осуществляется в следующей последовательности: 1. Снимите колпачок шнура безопасности (ключ DESS) с контактного устройства. 2. Снимите защитный кожух ремня вариатора, см. «ОРГАНЫ УПРАВЛЕНИЯ, ПРИБОРЫ, ОБОРУДОВАНИЕ». 3.
ПРОЦЕДУРЫ ТЕХНИЧЕСКОГО ОБСЛУЖИВАНИЯ МОМЕНТ ЗАТЯЖКИ ФИКСИРУЮЩЕГО ВИНТА (5,5 ± 0,5) Н•м 6. Установите защитный кожух ремня вариатора, см. главу «ОРГАНЫ УПРАВЛЕНИЯ, ПРИБОРЫ, ОБОРУДОВАНИЕ». 7. Закройте боковую панель, см. раздел «ОРГАНЫ УПРАВЛЕНИЯ, ПРИБОРЫ, ОБОРУДОВАНИЕ». ПРИМЕЧАНИЕ: Данные регулировки
ПРОЦЕДУРЫ ТЕХНИЧЕСКОГО ОБСЛУЖИВАНИЯ При повороте рег улировочного болта на одно деление частота вращения коленвала двигателя изменяется на 200 об/мин. Чем больше номер положения регулировочного болта, тем более высокие обороты развивает двигатель, и наоборот. Пример: Регулировочный болт повернут из
ПРОЦЕДУРЫ ТЕХНИЧЕСКОГО ОБСЛУЖИВАНИЯ ПРЕДОСТЕРЕЖЕНИЕ Эксплуатация снегоход а с по вреждённой гусеницей опасна потерей контроля над снегоходом. Натяжение и центровка гусеницы ПРИМЕЧАНИЕ: Операции регулировки натяжения и центровки гусеничной ленты взаимосвязаны. Обе регулировки должны производиться
ПРОЦЕДУРЫ ТЕХНИЧЕСКОГО ОБСЛУЖИВАНИЯ mmr200 9-133-0 03_a СЧИТЫВАНИЕ ЗНАЧЕНИЯ НАГРУЗКИ 1. Верхнее кольцо 10. Полученное значение должно соответствовать данным, приведённым в расположенной ниже таблице. mmr200 8-048-0 08_a РЕГУЛИРОВКА НАТЯЖЕНИЯ ГУСЕНИЦЫ ВЕЛИЧИНА ПРОГИБА, мм 40—50 ПОЛУЧЕННОЕ ЗНАЧЕНИЕ
ПРОЦЕДУРЫ ТЕХНИЧЕСКОГО ОБСЛУЖИВАНИЯ Центровка гусеничной ленты ПРЕДОСТЕРЕЖЕНИЕ Перед проверкой положения гусеницы убедитесь в отсутствии на г усенице посторонних предметов, которые могут вылететь и з н е ё пр и е ё вращении. Сл е дите, чтобы руки, ноги, инструмент или одеж да были подальше от
ПРОЦЕДУРЫ ТЕХНИЧЕСКОГО ОБСЛУЖИВАНИЯ 1 2 mmo2 011 -006 -003_a A05F0EB ТИПОВОЙ ВАРИАНТ 1. Контргайка 2. Болт крепления направляющего катка 6. Пустите двигатель и на малой скорости движения гусеничной ленты проверьте симметричность её положения относительно опорных полозьев. 7. Опустите снегоход на
ПРОЦЕДУРЫ ТЕХНИЧЕСКОГО ОБСЛУЖИВАНИЯ ВНИМАНИЕ Запрещается использовать предохранитель с более высоким номиналом во избежание повреж дения электрических компонентов и/или возможного возгорания. ПРЕДОСТЕРЕЖЕНИЕ mmo2 010 -007 -014_a ЛЕВАЯ СТОРОНА 1. Пресс-маслёнка 2. Рулевой рычаг Лыжи В случае
ПРОЦЕДУРЫ ТЕХНИЧЕСКОГО ОБСЛУЖИВАНИЯ mmo2 009 -004 -037_a 1. Блок предохранителей Установите обивк у на место, зацепив за алюминиевый выступ. mmo2 007 -009 -062_a 3. Разъедините разъём перегоревшей лампы. Снимите резиновый чехол. Световые приборы После замены перегоревшей лампы, всегда проверяйте
ПРОЦЕДУРЫ ТЕХНИЧЕСКОГО ОБСЛУЖИВАНИЯ ВНИМАНИЕ Во избежание повреждения жгута проводов не вытаскив а й т е ко р п ус ф о н а р я с л и ш ко м сильно. mmo2 007 -009 -064_a ИЗВЛЕКИТЕ ЛАМПУ И ЗАМЕНИТЕ ЕЁ 2. Извлеките разъём лампы из корпуса фонаря: 2.1 Поверните разъём против часовой стрелки. 2.2
УХОД ЗА СНЕГОХОДОМ Заключительные операции после поездки Удалите снег и лёд с задней и передней подвесок, гусеницы, рулевого привода и лыж. ПРЕДОСТЕРЕЖЕНИЕ Нанесите защитную восковую пасту на корпус снегохода и все окрашенные детали рамы. ПРИМЕЧАНИЕ: Наносите пасту только на поверхности с
ХРАНЕНИЕ И ПРЕДСЕЗОННАЯ ПОДГОТОВКА ПРЕДОСТЕРЕЖЕНИЕ Авторизованный дилер Ski- Doo должен проверить систему смазки и топливную систему снегохода в ходе выполнения рег улярного техобслуживания. Хранение Снегоход должен быть правильно подготовлен к хранению в летний период. Аналогичные меры следует
ХРАНЕНИЕ И ПРЕДСЕЗОННАЯ ПОДГОТОВКА 7. Когда на дисплее появится надпись «OIL», отпустите кнопку и ждите завершения процедуры. mmr2009-004-004 Во время цикла смазки двигателя ничего не трогайте. Процедура смазки двигателя длится примерно 1 минуту. В этот период обороты вращения двигателя
ТЕХНИЧЕСКАЯ ИНФОРМАЦИЯ Ski-Doo Skandic WT 2011.indd 81 23.11.2010 12:54:07
ИДЕНТИФИКАЦИОННЫЕ НОМЕРА СНЕГОХОДА Табличка с данными снегохода Идентификационный номер снегохода (VIN) Табличка с данными снегохода находится на правой стороне туннеля. Идентификационный номер снегохода (VIN) указан в табличке (см. выше) и выбит на туннеле рядом с табличкой. Номер модели год
ТЕХНИЧЕСКИЕ ХАРАКТЕРИСТИКИ ДВИГАТЕЛЬ Тип Число цилиндров 600 HO E-TEC Rotax® 593, жидкостное охлаждение, w-образный лепестковый клапан, 3D-RAVE 2 Рабочий объём, куб. см 594,4 Диаметр цилиндра, мм 72,0 Ход поршня, мм 73,0 Частота вращения коленчатого вала, при которой двигатель развивает
ТЕХНИЧЕСКИЕ ХАРАКТЕРИСТИКИ Минимальное октановое число 95 RON Ёмкость топливного бака, л 45 СИСТЕМА ПРИВОДА Тип Ведущий шкив Включение, об/мин ВСЕ МОДЕЛИ 600 HO E-TEC 600 ACE TRA IIITM eDrive 600 HO E-TEC 3000 ± 100 600 ACE 2200 ± 100 Ведомый шкив QRS Количество зубьев ведущей звёздочки Масло в
ТЕХНИЧЕСКИЕ ХАРАКТЕРИСТИКИ ЭЛЕКТРООБОРУДОВАНИЕ Мощность системы освещения Лампа фары (дальний/ближний свет) Лампа заднего фонаря Свеча зажигания Предохранители/реле/ конденсатор Зазор, мм 2 x 60/55 Вт (H-4) NGK PZFR6F(2) 0,75 ± 0,05 (не регулируется) F1: Аккумуляторная батарея 30 А F2: Обмотка реле
ТЕХНИЧЕСКИЕ ХАРАКТЕРИСТИКИ МАССА И ГАБАРИТЫ «Сухая» масса, кг 600 ACE 278 600 HO E-TEC 282 Общая длина, cм Общая ширина, см Общая высота, см Колея лыж, см Ширина лыжи, мм (1) (2) ВСЕ МОДЕЛИ 324 107,6 133 97,5—101,8 175 Измеряется меж ду накладкой полоза и внутренней нижней частью гусеницы при
УСТРАНЕНИЕ НЕИСПРАВНОСТЕЙ Ski-Doo Skandic WT 2011.indd 87 23.11.2010 12:54:08
УСТРАНЕНИЕ НЕИСПРАВНОСТЕЙ ЭЛЕКТРИЧЕСКИЙ СТАРТЕР НЕ РАБОТАЕТ 1. Выключатель двигателя установлен в положение «OFF» (выкл.) или колпачок шнура безопасности (ключ DESS) снят с контактного устройства. – Переведите выключатель двигателя в положение «ON» (вкл.) и установите колпачок шнура безопасности
УСТРАНЕНИЕ НЕИСПРАВНОСТЕЙ ХЛОПКИ В СИСТЕМЕ ВЫПУСКА 1. Перегрев двигателя. – См. пункт «ДВИГАТЕЛЬ ПЕРЕГРЕВАЕТСЯ». 2. Нарушен угол опережения зажигания или неисправна система зажигания. – Обратитесь к авторизованному дилеру Ski-Doo. 3. Утечки в системе выпуска отработавших газов. – Обращайтесь к
СИСТЕМА МОНИТОРИНГА Сигнальные лампы, сообщения, звуковые сигналы Сигнальные лампы сообщают Вам об обнаруженных неполадках или о текущем состоянии. mmo2 008 -003 -024_a ТИПОВОЙ ВАРИАНТ — СИГНАЛЬНЫЕ ЛАМПЫ Сигнальная лампа может включаться как одна, так и в сочетании с другой лампой. Звуковые сигналы
СИСТЕМА МОНИТОРИНГА ПРИМЕЧАНИЕ: Некоторые из перечисленных сигнальных ламп доступны не на всех моделях. СИГНАЛЬНАЯ ЛАМПА ЗВУКОВОЙ СИГНАЛ 4 коротких звуковых сигнала с интервалом 30 секунд Короткие, часто повторяющиеся звуковые сигналы ОПИСАНИЕ Перегрев двигателя, снизьте скорость снегохода и
СИСТЕМА МОНИТОРИНГА СИГНАЛЬНАЯ ЛАМПА ЗВУКОВОЙ СИГНАЛ 2 коротких звуковых сигнала DESS ОПИСАНИЕ Верный ключ, снегоход готов к движению. Два коротких звуковых сигнала, повторяющиеся с небольшой частотой Невозможно распознать ключ (плохой контакт). Убедитесь в чистоте ключа и надёжности контакта.
ГАРАНТИЙНЫЕ ОБЯЗАТЕЛЬСТВА Ski-Doo Skandic WT 2011.indd 93 23.11.2010 12:54:08
МЕЖДУНАРОДНАЯ ОГРАНИЧЕННАЯ ГАРАНТИЯ BRP НА СНЕГОХОДЫ SKI-DOO® 2011 1) ПРЕДМЕТ ГАРАНТИЙНЫХ ОБЯЗАТЕЛЬСТВ Компания Bombardier Recreational Products Inc (далее BRP) гарантирует отсутствие дефектов материалов и производственных дефектов в снегоходах Ski-Doo 2011, проданных авторизованным
МЕЖДУНАРОДНАЯ ОГРАНИЧЕННАЯ ГАРАНТИЯ BRP НА СНЕГОХОДЫ SKI-DOO ® 2011 – – – – – – – повреждения, возникшие в результате демонтажа деталей, неправильного ремонта, обслуживания, внесения изменений или использования не рекомендованных или не одобренных к применению деталей или аксессуаров, которые в
МЕЖДУНАРОДНАЯ ОГРАНИЧЕННАЯ ГАРАНТИЯ BRP НА СНЕГОХОДЫ SKI-DOO ® 2011 В случае несоблюдения вышеуказанных условий компания BRP не несёт ответственности по гарантийным обязательствам перед любым пользователем. Указанные ограничения вводятся, чтобы компания BRP имела возможность гарантировать как
ИНФОРМАЦИЯ ДЛЯ ВЛАДЕЛЬЦА Ski-Doo Skandic WT 2011.indd 97 23.11.2010 12:54:08
КОНФИДЕНЦИАЛЬНАЯ ИНФОРМАЦИЯ Все предоставленные Вами сведения личного характера будут использованы только для того, чтобы компания могла выполнять свои гарантийные обязательства, и исключительно с целью обеспечения Вашей безопасности. В некоторых случаях мы используем адресные данные для оповещения
ИЗМЕНЕНИЕ АДРЕСА ВЛАДЕЛЬЦА ИЛИ ПЕРЕПРОДАЖА В случае изменения адреса владельца или если Вы являетесь новым владельцем снегохода заполните приведённую ниже карту и отправьте авторизованному дилеру Ski-Doo. Обязанностью владельца является передача данных в компанию BRP. В случае перепродажи снегохода
Ski-Doo Skandic WT 2011.indd 100 23.11.2010 12:54:08
Ski-Doo Skandic WT 2011.indd 101 23.11.2010 12:54:08
Ski-Doo Skandic WT 2011.indd 102 23.11.2010 12:54:08
СНЕГОХОД МОДЕЛЬ № ТРАНСПОРТНОЕ СРЕДСТВО ИДЕНТИФИКАЦИОННЫЙ НОМЕР (VIN) ДВИГАТЕЛЬ ИДЕНТИФИКАЦИОННЫЙ НОМЕР (EIN) Владелец: СТРАНА Ф.И.О. ПОЧТОВЫЙ ИНДЕКС УЛИЦА Дата продажи: Дата истечения гарантийного срока: ГОРОД № ДОМА № КВАРТИРЫ ГОД МЕСЯЦ ДЕНЬ ГОД МЕСЯЦ ДЕНЬ Заполняется дилером при продаже ШТАМП
!
ПРЕДОСТЕРЕЖЕНИЕ
Несоблюдение инструкций и рекомендаций по мерам безопасности, которые
содержатся в Руководстве по эксплуатации, ДЕМОНСТРАЦИОННОМ ВИДЕО-
ФИЛЬМЕ и на табличках, расположенных на корпусе снегохода, может приве-
сти к трагическим последствиям, не исключая получения травм, увечий и ги-
бели людей.
!
ПРЕДОСТЕРЕЖЕНИЕ
Данный снегоход по своим характеристикам может превосходить другие сне-
гоходы, которыми Вам приходилось управлять ранее. Уделите время для озна-
комления с Вашим новым снегоходом.
В США распространителем продукции является компания BRP US Inc.
в Канаде — Bombardier Recreational Products Inc.
Торговые марки компании Bombardier Recreational Products Inc. или её филиалов:
DESS™
HPG™
REV-XU™
Ski-Doo®
Skandic™
REV-XP™
ROTAX®
TRA™ III
600 ACE™
E-TEC®
eDrive™
АГ75
РОСС С-СH.AГ75.В.21976
с 14.02.2013 по 13.02.2016
† Торговая марка Castrol Limited, используемая по лицензии.
mmo2014-009 en
®™ и логотип BRP торговые марки компании Bombardier Recreational Products Inc. или её филиалов.
© 2013 Bombardier Recreational Products Inc. и BRP US Inc. Все права защищены.
1
ВВЕДЕНИЕ
Deutsch
Dieses Handbuch ist möglicherweise in Ihrer Landessprache verfügbar. Bitte wenden Sie sich an Ihren
Händler oder besuchen Sie: www.operatorsguide.brp.com.
English
This guide may be available in your language. Check with your dealer or go to: www.operatorsguide.
brp.com.
Français
Ce guide peut être disponible dans votre langue. Vérifier avec votre concessionaire ou aller à: www.
operatorsguide.brp.com.
Italiano
Questa guida potrebbe essere disponibile nella propria lingua. Contattare il concessionario o consultare:
www.operatorsguide.brp.com.
日本語
このガイドは、言語によって翻訳版が用意されています。. ディーラーに問い合わ
せるか、次のアドレスでご確認ください: www.operatorsguide.brp.com.
Norsk
Denne boken kan finnes tilgjengelig på ditt eget språk. Kontakt din forhandler eller gå til: www.opera-
torsguide.brp.com.
Suomi
Käyttöohjekirja voi olla saatavissa omalla kielelläsi. Tarkista jälleenmyyjältä tai käy osoitteessa: www.
operatorsguide.brp.com
Svenska
Denna bok kan finnas tillgänglig på ditt språk. Kontakta din återförsäljare eller gå till: www.operators-
guide.brp.com.
Поздравляем, Вы стали владельцем сне-
гохода Ski-Doo®. Вне зависимости от вы-
бранной модели, снегоход обеспечива-
ется гарантией Bombardier Recreational
Products Inc (BRP) и поддержкой дилеров
Ski-Doo, которые всегда готовы обеспе-
чить Вас запасными частями, обслужи-
ванием и аксессуарами.
Дилер заинтересован в удовлетворе-
нии Ваших потребностей. Специалисты
дилера обучены проведению предпро-
дажной подготовки снегохода и выпол-
нению регулировок в соответствии с Ва-
шими антропометрическими данными
и предпочитаемым стилем вождения.
При покупке Вам были разъяснены гаран-
тийные обязательства компании, после
чего Вам было предложено подписать
ПРОВЕРОЧНЫЙ ЛИСТ ПРЕДПРОДАЖ-
НОЙ ПОДГОТОВКИ, удостоверяющий,
что Ваше новое транспортное средство
полностью подготовлено к успешной
эксплуатации.
Прежде чем начать движение
Чтобы снизить риск получения травмы
Вами или другими людьми, а также ис-
ключить возможность летального исхода,
прежде чем приступить к эксплуатации
снегохода, следует ознакомиться со сле-
дующими разделами:
– ИНФОРМАЦИЯ ПО БЕЗОПАСНОСТИ;
– ИНФОРМАЦИЯ О ТРАНСПОРТНОМ
СРЕДСТВЕ.
Также прочитайте предупреждающие
наклейки, расположенные на снегоходе,
и просмотрите ДЕМОНСТРАЦИОННЫЙ
ВИДЕОФИЛЬМ.
Мы настоятельно рекомендуем выбирать
безопасный маршрут. Наличие специаль-
ных трасс и маршрутов Вы можете узнать
у своего авторизованного дилера или
представителей местных органов власти.
Пренебрежение предостережениями,
содержащимися в Руководстве по экс-
плуатации, может стать причиной полу-
чения СЕРЬЁЗНЫХ ТРАВМ и даже ЛЕ-
ТАЛЬНОГО ИСХОДА.
2
Предупреждения
В настоящем Руководстве для выделения
важной информации используются следу-
ющие типы предупреждений:
Данный символ
!
предупреждает
о потенциальной опасности полу-
чения травмы.
!
ПРЕДОСТЕРЕЖЕНИЕ
Информирует о потенциально опас-
ных ситуациях, которые могут стать
причиной получения серьёзной трав-
мы или привести к летальному исходу.
!
ОСТОРОЖНО Информирует о по-
тенциально опасных ситуациях, ко-
торые могут стать причиной получе-
ния травм лёгкой или средней степе-
ни тяжести.
ВНИМАНИЕ
Содержит предупрежде-
ния и инструкции, несоблюдение ко-
торых может стать причиной серьёз-
ных повреждений снегохода или дру-
гого имущества.
О настоящем Руководстве
Руководство по эксплуатации предназна-
чено для ознакомления владельца/води-
теля и пассажира с органами управления,
процедурами обслуживания и правилами
безопасного вождения снегохода.
Храните настоящее Руководство на сне-
гоходе, чтобы при необходимости ис-
пользовать его для решения вопросов,
связанных с обслуживанием, поиском
и устранением неисправностей и экс-
плуатацией.
Настоящее Руководство доступно на нес-
кольких языках. Во всех спорных случаях
трактовки информации предпочтение от-
даётся тексту на английском языке.
Просмотреть или распечатать допол-
нительную копию Руководства по экс-
плуатации можно, перейдя по адресу:
www.rosan.com
Информация, содержащаяся в настоя-
щем Руководстве, достоверна на момент
публикации. Компания BRP придержива-
ется политики постоянного улучшения
своей продукции, но при этом не берет
на себя обязательств модернизировать
соответствующим образом ранее выпу-
щенную продукцию. Вследствие внесе-
ния изменений в конструкцию изделий,
возможны некоторые отличия между из-
делием и его характеристикой, приведён-
ной в данном Руководстве. Компания BRP
оставляет за собой право на изменение
технических характеристик, конструкции,
дизайна и комплектации оборудованием
выпускаемых изделий без каких-либо
обязательств со своей стороны.
Настоящее Руководство и ДЕМОНСТРА-
ЦИОННЫЙ ВИДЕОФИЛЬМ при перепро-
даже должны быть переданы новому вла-
дельцу.
ВВЕДЕНИЕ
8
ИНФОРМАЦИЯ ПО БЕЗОПАСНОСТИ
ОСНОВНЫЕ МЕРЫ ПРЕДОСТОРОЖНОСТИ
Избегайте отравления
угарным газом
Отработавшие газы всех двигателей со-
держат оксид углерода (угарный газ), ко-
торый, в определённых условиях, может
представлять смертельную опасность.
Вдыхание угарного газа может стать при-
чиной появления головной боли, голово-
кружения, сонливости, тошноты, спутан-
ности сознания и, в конечном итоге, ле-
тального исхода.
Угарный газ является веществом без цве-
та, запаха и вкуса, которое может присут-
ствовать в воздухе, даже если Вы не ви-
дите и не ощущаете запаха отработавших
газов. Смертельно опасная концентрация
угарного газа может достигаться доста-
точно быстро, и Вы можете оказаться
в ситуации, в которой не сможете спа-
сти себя самостоятельно. В плохо прове-
триваемых местах опасная концентрация
угарного газа может сохраняться в тече-
ние нескольких часов и даже дней. Если
Вы чувствуете какие-нибудь симптомы
отравления угарным газом, немедлен-
но покиньте опасную область, подышите
свежим воздухом и обратитесь за меди-
цинской помощью.
В целях предотвращения возможности
получения серьёзных травм и летально-
го исхода в результате отравления угар-
ным газом:
– Никогда не эксплуатируйте снегоход
в плохо проветриваемых и частично
закрытых местах. Даже если Вы попы-
таетесь отводить отработавшие газы,
концентрация угарного газа может
быстро достичь опасного уровня.
– Никогда не запускайте двигатель снего-
хода на улице, если отработавшие газы
могут попасть в помещение через от-
крытые окна или двери.
Берегитесь воспламенения
паров бензина и прочих
опасностей
Пары бензина являются легковоспла-
меняемыми и взрывоопасными. Пары
топлива могут распространиться и вос-
пламениться от искры или пламени на до-
статочно большом удалении от двигате-
ля. В целях снижения риска возгорания
или взрыва следуйте приведённым ниже
инструкциям:
– для хранения топлива используйте
только специальные канистры;
– строго следуйте инструкциям, при-
ведённым в параграфе «ЗАПРАВКА
ТОПЛИВОМ»;
– никогда не запускайте двигатель и не
начинайте движение, если не закрыта
крышка топливозаправочной горловины.
Бензин ядовит и может представлять
опасность для здоровья и жизни.
– не допускайте попадания бензина в рот;
– при попадании бензина внутрь или в гла-
за, а также при вдыхании паров бензи-
на обратитесь за медицинской помощью.
При попадании бензина на Вас смойте
его водой с мылом и смените одежду.
Берегитесь ожогов
При функционировании компоненты сис-
темы выпуска отработавших газов и дви-
гателя разогреваются до очень высоких
температур. Для предотвращения ожо-
гов избегайте контактов с ними во вре-
мя эксплуатации и спустя некоторое вре-
мя после её окончания.
Аксессуары и внесение
изменений в конструкцию
Не вносите изменения в конструкцию
снегохода и не используйте дополнитель-
ное оборудование, не одобренное BRP.
Так как подобные изменения не были
протестированы BRP, они могут увели-
чить риск получения травмы или возник-
новения несчастного случая и сделать ис-
пользование снегохода незаконным.
Для приобретения аксессуаров и допол-
нительного оборудования для Вашего
снегохода обращайтесь к официально-
му дилеру Ski-Doo.
Производитель
BRP (Bombardier)
| Описание |
О настоящем Руководстве Настоящее Руководство было подготовлено для ознакомления водителя/пассажира с устройством и органами управления снегохода, правилами безопасной езды и указаниями по проведению технического обслуживания. Храните настоящее Руководство в снегоходе — это позволит получить необходимую информацию о техническом обслуживании и о поиске и устранении неисправностей. Данная инструкция актуальна для следующих моделей: Skandic WT 550F |
Оставить отзыв
Пока нет ни одного отзыва о данном товаре. Ваш отзыв будет первым!
Близкие по цене похожие товары

Код товара:
0003465
Производитель
BRP (Bombardier)
Хит продаж
Другие товары раздела руководства по ремонту снегоходов

Код товара:
0003464
Производитель
BRP (Bombardier)
Хит продаж
Код товара:
0003465
Производитель
BRP (Bombardier)
Хит продаж

Код товара:
0003466
Производитель
BRP (Bombardier)
Хит продаж

Код товара:
0003468
Производитель
BRP (Bombardier)
Хит продаж

Код товара:
0003469
Производитель
BRP (Bombardier)
Хит продаж
Предлагаем Вам купить руководство по эксплуатации снегоходов Skandic WT/SWT 2016 по выгодной цене 100 . Мы очень тщательно следим за качеством реализуемой продукции и отдаем предпочтение только проверенным производителям.
Чтобы купить руководство по эксплуатации снегоходов Skandic WT/SWT 2016 в нашем интернет-магазине Вам достаточно оформить заказ любым удобным способом:
- На сайте. Для этого нужно выбрать понравившиеся Вам товары, положить их в корзину и оформить покупку (не займет много времени).
- По телефонам +7 (987) 290-89-07. Наши операторы проконсультируют Вас по всем вопросам, связанных с товаром, и примут Ваш заказ на обработку.
- По электронной почте zakaz@motorecord.ru. В письме необходимо указать наименования (коды) выбранных Вами товаров и их количество, а также данные о себе: Ф.И.О., контактный телефон и e-mail.
Продолжая использовать наш сайт, Вы принимаете пользовательское соглашение на обработку файлов _COOKIE и пользовательских данных в целях повышения качества функционирования сайта, проведения ретаргетинга и статистических маркетинговых исследований. Если Вы не хотите, чтобы Ваши данные обрабатывались, необходимо соответствующим образом установить настройки браузера или не использовать сайт.
- Manuals
- Brands
- Ski-Doo Manuals
- Offroad Vehicle
- SKANDIC
- Operator’s manual
-
Contents
-
Table of Contents
-
Troubleshooting
-
Bookmarks
Quick Links
Related Manuals for Ski-Doo Skandic
Summary of Contents for Ski-Doo Skandic
-
Page 2: Safety Warning
In USA, products are distributed by BRP US Inc. In Canada, products are distributed by Bombardier Recreational Products Inc. The following are trademarks of Bombardier Recreational Products Inc. or its subsidiaries. ROTAX SKANDIC SKI-DOO EXPEDITION 4-TEC ® DESS XP-S Printed in Canada.
-
Page 3
Bombardier Recre- injury hazard. ational Products Inc. (BRP) warranty and a network of authorized SKI-DOO WARNING snowmobile dealers ready to provide Indicates a potentially hazardous the parts, service or accessories you situation which, if not avoided, may require. -
Page 4
BRP’s demanding standards. A SHOP MANUAL can be obtained for complete service, maintenance and more repair information. For any questions pertaining to the warranty and its application, consult the WARRANTY section in this guide, and/or an authorized SKI-DOO dealer. _______________________… -
Page 5: Table Of Contents
TABLE OF CONTENTS SAFETY INFORMATION INTRODUCTION …………..8 IMPORTANT BASIC SAFETY MEASURES.
-
Page 6
21) Hood Latches …………. . . 44 22) Electric Power Outlet . -
Page 7
STORAGE AND PRESEASON PREPARATION ……. 110 WARRANTY BRP LIMITED WARRANTY NORTH AMERICA: 2007 SKI-DOO ® SNOWMOBILES …………..112 BRP INTERNATIONAL LIMITED WARRANTY: 2007 SKI-DOO ®… -
Page 8
_______________________… -
Page 9: Safety Information
SAFETY INFORMATION ____________ ____________ SAFETY INFORMATION…
-
Page 10: Introduction
We encourage you to have an Annual Safety Inspection of your snowmo- bile. Please contact an authorized SKI-DOO dealer for further details. Finally, we urge you to visit an autho- rized SKI-DOO dealer periodically for regular and safety maintenance, as well as snowmobile accessories you may require.
-
Page 11: Important Basic Safety Measures
IMPORTANT BASIC SAFETY MEASURES Training Basic training is required for the BRP recommends the operator has safe operation of any snowmobile. at least 16 years old of age. Study your Operator’s Guide paying particular attention to cautions and Speed warnings. Join your local snow- Speeding can be fatal.
-
Page 12
Nature is wonderful but don’t let it Venturing out alone with your snow- distract your attention from driving. mobile could also be hazardous. If you want to truly appreciate win- You could run out of fuel, have an ter’s scenery, stop your snowmo- accident, or damage your snowmo- bile on the side of the trail so that bile. -
Page 13
Operation Maintenance Know your snowmobile and treat Always make a pre-start inspection BEFORE you turn on the ignition. it with the respect and care due of any power driven machine. Com- In an emergency, the snowmobile mon sense, proper handling and engine can be stopped by activating routine maintenance will result in the engine cut-out switch, pulling… -
Page 14
Fuel Always stop the engine before refueling. Fuel is flammable and explosive under certain conditions. Always work in a well-ventilated area. Do not smoke or allow open flames or sparks in the vicinity. Open cap slowly. If a differen- tial pressure condition is noticed (whistling sound heard when loos- ening fuel tank cap) have vehicle inspected and/or repaired before… -
Page 15: Laws And Regulations
LAWS AND REGULATIONS Know your local laws. Federal, state, provincial and local gov- ernment agencies have enacted laws and regulations pertaining to the safe use and operation of snowmobiles. It is your responsibility as a snowmobiler to learn and obey these laws and reg- ulations.
-
Page 16: Riding The Vehicle
RIDING THE VEHICLE Before venturing on the trails, operate Turning the snowmobile in a restricted flat area Handlebar controls the steering of the until you are completely familiar with vehicle. As the handlebar is rotated to its operation and feel comfortable that right or left, the skis are turned right or you can safely tackle a more demand- left to steer the snowmobile.
-
Page 17
Rubber bottom boots with either a ny- Generally, the riding position for best lon or a leather top, with removable balance and control is sitting. Howev- felt liners are best suited for snowmo- er, the posting, kneeling or standing biling. positions are also used under certain conditions. -
Page 18: Carrying A Passenger
Posting Standing A semi-sitting position with the body Place both feet on the running boards. off the seat and the feet under the Knees should be flexed to absorb the body in a sort of squatting posture, shock from surface bumps. This is thus allowing the legs to absorb the an effective position to see better and shocks when traveling over uneven…
-
Page 19
On snowmobiles allowing two pas- Riding with passengers on board is sengers, if you have an adult and a different than riding alone. The oper- child for passenger, BRP recommends ator has the benefit of knowing what that the child sits in the center loca- will be the next maneuver and is able tion. -
Page 20: Terrain/Riding Variations
Terrain/Riding Variations Deep Snow In deep “powder” snow, your vehicle Groomed Trail could begin to “bog” down. If this oc- On a maintained trail, sitting is the curs, turn in as wide an arc as possi- most preferred riding position. Do not ble and look for a firmer base.
-
Page 21
Frozen Water A direct climb could present problems. Choose the standing position, accel- Traveling frozen lakes and rivers can erate before you start the climb and be fatal. Avoid waterways. If you then reduce throttle pressure to pre- are in an unfamiliar area, ask the lo- vent track slippage. -
Page 22
Slush Unseen Obstruction There may be obstructions hidden Slush should be avoided at all times. Always check for slush before start- beneath the snow. Driving off estab- ing across any lake or river. If dark lished trails and in the woods requires spots appear in your tracks, get off the reduced speed and increased vigi- ice immediately. -
Page 23
Turning Railroad Crossing Never ride on railroad tracks. It is ille- Depending on terrain conditions, there are two preferred ways to turn or cor- gal. Railroad tracks and railroad rights- ner a snowmobile. For most snow of-way are private property. A snow- surfaces, “body english”… -
Page 24: Transporting And Towing
It is always IMPORTANT to keep a safe distance between each snowmo- bile. Always maintain a safe interval and allow sufficient stopping distance. Don’t be a tailgater. Know the position of the machine ahead. Signals If you intend to stop, raise either hand straight above your head.
-
Page 25: Location Of The Important Labels
If missing or damaged, the decals can be replaced free of charge. See an authorized SKI-DOO dealer. Please read the following instructions SKANDIC WT/SWT 550 F/SUV carefully before operating this snow- mobile. TYPICAL — LOCATION OF IMPORTANT INSTRUCTIONS…
-
Page 26
Instruction 4 EXPEDITION TUV SERIES SKANDIC SWT V-800 SKANDIC WT/SWT/SUV Instruction 2 EXPEDITION TUV SERIES SKANDIC SERIES Instruction 5 V-800 SERIES EXPEDITION TUV SERIES Instruction 6 Instruction 3 ALL MODELS EXCEPT SKANDIC LT ___________ ___________ SAFETY INFORMATION… -
Page 27
Instruction 7 Instruction 10 EXPEDITION TUV SERIES Instruction 11 Instruction 8 EXPEDITION TUV SERIES SKANDIC SWT V-800 Instruction 12 LIQUID-COOLED MODELS Instruction 9 EXPEDITION TUV SERIES SKANDIC SWT V-800 EXPEDITION TUV SERIES ____________ ___________ SAFETY INFORMATION… -
Page 28
Instruction 13 Instruction 16 vmo2006-005-009_en HANG TAG — NOT SHOWN EXPEDITION TUV SERIES SKANDIC SWT V-800 Instruction 14 EXPEDITION TUV SERIES Instruction 15 mmo2006-003-008_A TYPICAL — NOT SHOWN ___________ ___________ SAFETY INFORMATION… -
Page 29: Environment Information
ENVIRONMENT INFORMATION _____________________…
-
Page 30: General
GENERAL Wildlife compliments your snowmobil- The vast majority respect the law and the environment. Each of us must set ing day. Snowmobile tracks provide firm ground over which animals can an example for those who are new to travel from area to area. Do not vio- the sport, young and old alike.
-
Page 31: Just What Is Light Treading
JUST WHAT IS LIGHT TREADING? The fundamental objective of Light Treading is one of respect for where and how you ride a snowmobile. You’re a light treader when you follow the principles below. Become informed. Obtain maps, regulations and other information from the Forest Service or from other public land agencies.
-
Page 32: Why Is Light Treading Smart
So whether you’re driving a high perfor- mance SKI-DOO, a sporty MX Z snow- mobile or any other make or model, show you know what you’re doing.
-
Page 33: Vehicle Information
VEHICLE INFORMATION _____________________…
-
Page 34: How To Identify Your Snowmobile
These num- bers are required by the authorized SKI-DOO dealer to complete warran- ty claims properly. No warranty will be allowed by BRP if the engine se- TYPICAL rial number or vehicle identification 1.
-
Page 35: Engine Serial Number Location
Engine Serial Number Location A25C0MA FAN COOLED MODELS 1. Engine serial number 2-STROKE LIQUID COOLED MODELS 1. Engine serial number mmo2007-001-001_a 4-TEC MODELS 1. Engine serial number _____________________…
-
Page 36: Controls/Instruments/Equipment
16. Trip meter 17. Trip meter reset button TYPICAL — SKANDIC LT/LT E mmo2007-001-015_a EXPEDITION TUV MODELS 4. Pilot lamps 14. Speedometer 15. Odometer 16. Display 17. Mode button TYPICAL — SKANDIC WT/SWT 550 F/SUV 22. Electric power outlet 36. Tachometer ______________________…
-
Page 37: Throttle Lever
Mechanical Brake Skandic LT/LT E TYPICAL — EXPEDITION TUV/SKANDIC To engage mechanism, squeeze SWT V-800 brake lever and maintain while pulling 1) Throttle Lever button with the other hand.
-
Page 38: Pilot Lamps
This lamp will light up to TYPICAL indicate a low battery voltage 1. Locking lever 2. OFF condition. See an authorized 3. ON SKI-DOO dealer as soon as possible. 4) Pilot Lamps Injection Oil Level/Engine Brake/Parking Brake/ Oil Pressure Low Oil Level (Red)
-
Page 39: Gear Shift Lever Or Rer Button
Button apply throttle to move snowmobile, stop vehicle, then try again. Mechanical Reverse Electronic Reverse All Models except Skandic LT/LT E Skandic LT/LT E Only These models are equipped with a Ro- These models are equipped with a tax Electronic Reverse (RER…
-
Page 40: Handlebar
Shifting in Reverse Before using vehicle at high altitude see an authorized SKI-DOO dealer for installation of a high altitude cap. WARNING Shifting to the reverse mode on 6) Handlebar these snowmobiles is done by de- The handlebar controls the steering of pressing the RER button when the the snowmobile.
-
Page 41: Tether Cut-Out Switch
If starter does not operate, check start- ing system fuse condition. Refer to STARTING SYSTEM AND ELECTRIC POWER OUTLET FUSE. Expedition TUV Series/Skandic SWT V-800 TYPICAL To start engine, push START button 1. Snap over post and hold until engine has started.
-
Page 42: Engine Cut-Out Switch
DESS-equipped SKI-DOO snowmobile, each be programmed by your authorized SKI-DOO dealer to accept the other vehicles tether cords. DESS Pilot Lamp Codes A06H1XA DESS pilot lamp blinking slowly (one time per 1.5 seconds) means that a TYPICAL bad connection has been detected.
-
Page 43: Headlamp Dimmer Switch
TYPICAL — SKANDIC LT MODELS A17G1DA 1. ON 2. OFF TYPICAL — SKANDIC WT/SWT 550 F/ SUV MODELS All operators of the snowmobile should familiarize themselves with the function of this device by us- ing it several times on first outing and whenever stopping the engine there-after.
-
Page 44: Speedometer
As soon as the engine starts move the choke lever to position 1 (OFF). Expedition TUV Series/Skandic SWT V-800 14) Speedometer NOTE: At vehicle speed of 90 km/h Direct-reading dial indicates the speed…
-
Page 45: Trip Meter Reset Button/Mode Button
Trip Meter Reset Button from the vehicle. Periodically ver- ify fuel system. Skandic Series except Skandic SWT V-800 NOTE: Do not sit or lean on seat when To reset, push on button until all num- fuel tank cap is not properly installed.
-
Page 46: Hood Latches
22) Electric Power Outlet All Models except Skandic LT A 12-volt electric appliance may be connected to that jack connector. Electric current is supplied when ever engine is running. Maximum output current is 20 amperes. See FUSES A25H05A below for electric power outlet fuse location.
-
Page 47
See an authorized SKI-DOO dealer for servicing. Skandic WT 550/SWT 550 F/LT E 1. Cover tab FUSE FOR ELECTRIC STARTING SYSTEM AND ELECTRIC POWER OUTLET — SKANDIC LT E/WT 550/SWT 1. -
Page 48: Front Grab Handles/Front Bumper
1. Lift seat latch lifting device or have assistance to share lifting stress in order to avoid risk of strain injuries. TYPICAL — SKANDIC SWT 550 F 1. Lift seat latch TYPICAL 1. Front grab handles CAUTION: Do not use skis to pull or lift snowmobile.
-
Page 49: Rear Rack
TYPICAL — EXPEDITION TUV/SKANDIC SKANDIC LT/LT E SWT V-800 1. Spare spark plug holder 1. Lift seat latch Firmly tighten them into the holder 26) Rear Rack with spark plug socket (in tool kit) to ensure that they will not be loosened WARNING by vibrations.
-
Page 50: Windshield
OFF position. NOTE: Fuel shut-off valve is located in the engine compartment. All Models except Skandic LT/LT E Those models are equipped with an auto shut-off valve. 34) Modular Seat…
-
Page 51: Rear Grab Handles/Heating Grip Switch
mmo2007-001-017_b mmo2007-001-017_c TYPICAL TYPICAL 1. Passenger seat 1. Passenger seat hooks 2. Slide seat forward 3. Lift seat to remove 35) Rear Grab Handles/ Heating Grip Switch CAUTION: Take care to store the passenger seat properly to avoid any damages. WARNING NEVER use the hole left by remov- ing the passenger seat to sit a pas-…
-
Page 52
TYPICAL — MULTIPLY THE READING BY 1000 ______________________… -
Page 53: Recommended Fuel And Oil
Always work in a well ventilated Use only two-stroke engine injection area. Do not smoke or allow open oil sold by authorized SKI-DOO deal- flames or sparks in the vicinity. ers. Open cap slowly. If a differen-…
-
Page 54
CAUTION: XP-S synthetic WARNING 2-stroke oil and XP-S 2-stroke syn- Do not overfill. Reinstall cap and thetic blend oil are specially for- fully tighten. Wipe off any oil mulated and tested for the severe spills. Oil is highly flammable. requirements of this engine. Use of any other brand two-stroke oil may void the limited warranty. -
Page 55: Break-In Period
3/4. your snowmobile be checked by an au- However, brief full acceleration and thorized SKI-DOO dealer. This inspec- speed variations contribute to a good tion will also give you the opportunity break-in. to discuss the unanswered questions CAUTION:…
-
Page 56: Operating Instructions
OPERATING INSTRUCTIONS Pre-Operation Check WARNING Throttle lever must operate easi- WARNING ly and smoothly. It must return to idle position when released. The pre-operation check is very important prior to operating the vehicle. Always check the prop- • Check operation of tether and er operation of critical controls, engine cut-out switches, ignition safety features and mechanical…
-
Page 57: Starting The Engine
Clothing forecast. Starting the Engine Choke Equipped Vehicles All Models except Expedition General TUV Series and Skandic • Re-check throttle control lever oper- SWT V-800 ation. • Ensure that the engine cut-out Initial Cold Starting When switch is in the ON position.
-
Page 58: Vehicle Warm-Up
WARNING Do not apply throttle while start- ing. Electric Starting (for models so equipped) On fan cooled models, insert key in A06H1KA ignition switch. 1. OFF On so equipped models, activate the 2. Position 2 choke according to the temperature as 3.
-
Page 59: Shutting Off The Engine
Snowmobile must be securely sup- WARNING ported by the rear bumper using a Always remove tether cord cap wide-base snowmobile mechanical and key when vehicle is not in stand. Track must be 100 mm (4 in) operation in order to prevent acci- off the ground.
-
Page 60
The following is to fine-tune suspen- • From this point, rear of snowmobile sion. should collapse by 50 to 75 mm (2 to 3 in) when driver, passenger (if so The best way to set up a suspension, applicable) and load take place. is to start from factory settings, then •… -
Page 61
Increase Spring Preload Skandic LT/SWT/WT Only CAUTION: To increase preload, al- ways turn the left side adjustment cam in a clockwise direction, and the right side cam in a counterclock- wise direction. Left and right ad- justment cams may be at different settings. -
Page 62
1. Horse shoe washer(s) 2. Nut 3. Lock nut 4. Center Spring — Steering Behavior Skandic LT/SUV/Expedition TUV Only 1. Use adjuster wrench provided in tool • Ride at moderate speed on a trail. kit to increase preload • If handlebar is felt too easy or too… -
Page 63
5. Stopper Strap — Weight Strap Length Adjustment Transfer Skandic WT/SWT • Ride at low speed, then fully accel- erate. • Note steering behavior. • Adjust stopper strap length accord- ingly. CAUTION: Whenever stopper strap length is changed, track tension must be readjusted. -
Page 64
Decrease Spring Preload WARNING Before proceeding with any sus- pension adjustment, remember: – Park in a safe place. – Remove tether cord cap. – Lift rear of vehicle off the ground with suitable lifting de- vice. – Make sure lifting device is stable and secure. -
Page 65
PROBLEM CORRECTIVE MEASURES Front suspension – Check ski alignment and camber angle adjustment. wandering See an authorized SKI-DOO dealer. – Reduce ski ground pressure. • Reduce front suspension spring preload. • Increase center spring preload. • Reduce rear spring preload. -
Page 66: Special Operating Instructions
Do not start the snowmo- bile by the drive pulley unless it is a true emergency situation. Have the snowmobile repaired as soon as possible. SKANDIC WT 550 F/SWT 550 F/SUV 550 F 1. Knot on this side ______________________…
-
Page 67: Towing An Accessory
SKANDIC LT/LT E Towing Another 1. Hook up starter clip Snowmobile If a snowmobile is disabled and must…
-
Page 68: Transporting The Vehicle
Transporting the Vehicle Make sure that oil reservoir and fuel tank caps are properly installed. Tilt bed trailers can easily be equipped with a winch mechanism to afford maximum safety in loading. Simple as it may seem, never drive your snow- mobile onto a tilt bed trailer or any other kind of trailer or vehicle.
-
Page 69: Troubleshooting
– Reduce snowmobile speed and run snowmobile in loose snow or stop en- gine immediately. – Check for adequate coolant level. See an authorized SKI-DOO dealer. FUEL FLOODED ENGINE 1. Never depress throttle while starting engine, even if flooded with gas.
-
Page 70
Start engine with spark plug(s) grounded to engine away from spark plug hole. If no spark appears, replace spark plug. If trou- ble persists, contact an authorized SKI-DOO dealer. 6. Engine compression. – As the engine is pulled over with the rewind starter, “cycles” of resistance should be felt as piston goes past top dead center (each piston on multi- cylinder engines). -
Page 71
– Clean/verify spark plug gap and identification number. Replace as required. 4. Too much oil supplied to engine. – Improper oil pump adjustment, refer to an authorized SKI-DOO dealer. 5. Water in fuel. – Drain fuel system and refill with fresh fuel. -
Page 72: Specifications
SPECIFICATIONS LT/LT E SUV/WT/SWT SKANDIC MODEL 440 F 550 F ENGINE Type Number of cylinder Displacement 436.6 (26.64) 553.4 (33.78) Bore (standard) mm (in) 67.5 (2.6575) 76.00 (2.992) Stroke mm (in) 61.0 (2.402) Maximum power engine ± 100 RPM 6800…
-
Page 73
LT/LT E SUV/WT/SWT SKANDIC MODEL 440 F 550 F SUSPENSION — Type (LT/LT E) Telescopic strut — Telescopic strut Type (WT/SWT) — Type (SUV) SUV trailing arm Front — Travel (LT/LT E) 157.5 mm (6.2 in) Travel — 152.4 mm (6 in) (WT/SWT) —… -
Page 74
LT/LT E SUV/WT/SWT SKANDIC MODEL 440 F 550 F LIQUIDS AND GREASES XP-S synthetic 2-stroke oil OR Engine oil XP-S 2-stroke synthetic blend OR XP-S mineral injection oil Type Regular unleaded gasoline Fuel Inside North America: (87 (R + M)/2) -
Page 75
SKANDIC MODEL V-800 ENGINE Type Number of cylinder Displacement 800 (48.8) Bore (standard) mm (in) 91 (3.58) mm (in) 62 (2.44) Stroke Maximum power engine speed ± 100 RPM 7250 DRIVE BELT Part number 605 348 425 Wear limit width mm (in) 35.5 (1.398) -
Page 76
SKANDIC MODEL V-800 SUSPENSION Type Telescopic strut Front Travel 200 mm (7.9 in) Type Articulating slide Rear Travel 293 mm (11.5 in) TRACK Tension mm (in) 40 — 50 (1-9/16 — 1-31/32) Alignment DIMENSION Dry weight 324 kg (715 lb) -
Page 77
SKANDIC MODEL V-800 CAPACITY Oil change with filter: Engine oil 2 L (2.1 U.S. quarts) Cooling system L (U.S. oz) 4 (135) Fuel tank L (U.S. gal) 40 (10.6) Chaincase/gearbox oil mL (U.S. oz) 400 (13.5) Brake fluid 500 (17) mL (U.S. -
Page 78
WT LC/SUV SKANDIC MODEL ENGINE Type Number of cylinder Displacement 597.0 (36.43) Bore (standard) mm (in) 76.00 (2.992) Stroke mm (in) 65.8 (2.591) Maximum power engine speed ± 100 RPM 7100 DRIVE BELT Part number 417 300 155 Wear limit width mm (in) 32.0 (1-1/4) -
Page 79
WT LC/SUV SKANDIC MODEL DIMENSION WT LC 275 kg (605 lb) Dry mass 291 kg (640 lb) Overall length 3150 mm (124.0 in) Overall width 1100 mm (43.3 in) Overall height 1220 mm (48 in) LIQUIDS AND GREASES XP-S synthetic 2-stroke oil… -
Page 80
EXPEDITION MODEL 600 HO SDI V-800 ENGINE Type 593 HO SDI Number of cylinder Displacement ) 594.40 (36.273) 800 (48.8) Bore (standard) mm (in) 72.00 (2.835) 91 (3.58) Stroke mm (in) 73.00 (2.874) 62 (2.44) Maximum power engine speed ± 100 RPM 8100 7250 DRIVE BELT… -
Page 81
EXPEDITION MODEL 600 HO SDI V-800 ELECTRICAL (cond’t) — 30 A Starter solenoid — Fuel level sensor 0.25 A 20 A — Starting system (includes electric power outlet) — Engine 30 A CAPS (Camshaft — Position Sensor) — Instrumentation MPEM, fuel —… -
Page 82
EXPEDITION MODEL 600 HO SDI V-800 LIQUIDS AND GREASES XP-S synthetic 2-stroke oil XP-S 0W40 Engine oil synthetic XP-S 2-stroke 4-stroke oil synthetic blend Premixed coolant or Coolant ethylene-glycol/water mix (50% coolant, 50% distilled water) Type Regular unleaded gasoline Fuel Inside North America: (87 (R + M)/2) Octane Outside North America: 92 RON… -
Page 83: Maintenance Information
MAINTENANCE INFORMATION _____________________…
-
Page 84: Periodic Maintenance Chart
PERIODIC MAINTENANCE CHART WARNING It is recommended that the assis- tance of an authorized SKI-DOO dealer be periodically obtained on other components/systems not covered in this guide. Unless oth- erwise specified, engine must be cold and not running. Remove tether cord cap or DESS key be-…
-
Page 85: 2-Stroke
R: REPLACE ONCE A YEAR OR EVERY 3200 km (2000 mi) T: PROCEED WITH TASK ONCE A YEAR OR EVERY 6000 km (3700 mi) *: TO BE PERFORMED BY AN * STORAGE AUTHORIZED SKI-DOO DEALER * PRESEASON PART/TASK LEGEND ENGINE I,L,…
-
Page 86
ONCE A YEAR OR EVERY 3200 km (2000 mi) T: PROCEED WITH TASK ONCE A YEAR OR EVERY 6000 km (3700 mi) *: TO BE PERFORMED BY AN * STORAGE AUTHORIZED SKI-DOO DEALER * PRESEASON PART/TASK LEGEND FUEL SYSTEM Add fuel stabilizer… -
Page 87
ONCE A YEAR OR EVERY 3200 km (2000 mi) T: PROCEED WITH TASK ONCE A YEAR OR EVERY 6000 km (3700 mi) *: TO BE PERFORMED BY AN * STORAGE AUTHORIZED SKI-DOO DEALER * PRESEASON PART/TASK LEGEND STEERING/SUSPENSION Steering and front suspension… -
Page 88: 4-Stroke
ONCE A YEAR OR EVERY 3200 km (2000 mi) T: PROCEED WITH TASK ONCE A YEAR OR EVERY 6000 km (3700 mi) *: TO BE PERFORMED BY AN * STORAGE AUTHORIZED SKI-DOO DEALER * PRESEASON PART/TASK LEGEND ENGINE Engine oil level…
-
Page 89
ONCE A YEAR OR EVERY 3200 km (2000 mi) T: PROCEED WITH TASK ONCE A YEAR OR EVERY 6000 km (3700 mi) *: TO BE PERFORMED BY AN * STORAGE AUTHORIZED SKI-DOO DEALER * PRESEASON PART/TASK LEGEND DRIVE SYSTEM Drive belt… -
Page 90
ONCE A YEAR OR EVERY 3200 km (2000 mi) T: PROCEED WITH TASK ONCE A YEAR OR EVERY 6000 km (3700 mi) *: TO BE PERFORMED BY AN * STORAGE AUTHORIZED SKI-DOO DEALER * PRESEASON PART/TASK LEGEND ELECTRICAL SYSTEM EMS fault codes… -
Page 91: Engine System
Remove snow from filter on air intake silencer. TYPICAL — FILTER INSTALLED TYPICAL 1. Snow filter on air silencer Skandic WT/SWT 550 F/SUV Remove filter from air inlet duct. Shake the snow out of filter, then, dry it out. TYPICAL — REMOVING FILTER 1.
-
Page 92: Cooling System
If additional coolant is necessary or if entire system has to be refilled, refer to an authorized SKI-DOO dealer. 1. Air filter installed on top of air silencer Expedition TUV V-800/Skandic SWT V-800 SKANDIC WT 600/SUV 600 1.
-
Page 93: Exhaust System
2. Maximum level: 13 mm (1/2 in) from top The exhaust system is designed to re- duce noise and to improve the total Skandic WT 600/SUV 550 F/ performance of the engine. Modifica- SUV 600 tion may be in violation of local laws.
-
Page 94: Engine Oil Level (4-Stroke Engines)
Reinstall dipstick. 1. Injection oil reservoir Engine Oil Level (4-stroke engines) Expedition TUV V-800/Skandic SWT V-800 Before checking engine oil level, en- gine should not have been running since at least 5 minutes. Snowmobile must be on a level sur- face.
-
Page 95: Epa Certified Engines
EPA Emission Regulations All 2007 SKI-DOO snowmobiles manufactured by BRP are certified to the EPA as conforming to the requirements of the regulations for the control of air pollution from new snowmobile engines. This certification is contingent on certain adjust- ments being set to factory standards.
-
Page 96
The responsibilities listed above are general and in no way a complete listing of the rules and regulations pertaining to the EPA requirements on exhaust emis- sions for snowmobile products. For more detailed information on this subject, you may contact the following locations: REGULAR U.S. -
Page 97: Drive System
DRIVE SYSTEM Brake Fluid Level Brake Adjustment All Models except Skandic Mechanical Brake LT/LT E The brake mechanism is a self- adjusting type. If a quicker brake CAUTION: Vehicle must be on a lev- response is desired, strongly squeeze el surface before checking any fluid the brake lever several times, this will levels.
-
Page 98: Drive Chain Tension
TYPICAL — SKANDIC WT/SWT/SUV/ EXPEDITION TUV 1. Full level mark 2. Lower level mark TYPICAL 1. Dipstick Drive Chain Tension 2. Oil level 3. Level between marks Skandic LT/LT E Only Skandic WT/SWT/SUV/ Remove hair pin. Expedition TUV Fully tighten tensioner adjustment To check, pull dipstick.
-
Page 99: Belt Guard Removal And Installation
– Unhook latch from air silencer. Re- move air silencer. 1. Clip 2. Pin retainer Skandic WT/SWT 550 F/SUV/ Expedition TUV 600 HO SDI – Remove tether cord cap. – Open hood. Remove both retaining mmo2007-001-006_a pins, then belt guard.
-
Page 100: Drive Belt Condition
It is important that this tension be maintained when reinstalling. Drive Belt Condition Inspect belt for cracks, fraying or TYPICAL — SKANDIC LT/LT E abnormal wear (uneven wear, wear 1. Tighten to open pulley on one side, missing cogs, cracked fabric).
-
Page 101: Tra Drive Pulley Adjustment
Pulley flange cleaner (P/N 413 711 horsepower RPM. 809). NOTE: Use precision digital tachome- Skandic LT/LT E ter for engine RPM adjustment. To install the drive belt, first place belt NOTE: The adjustment has an effect between drive pulley sheaves. Then, on high RPM only.
-
Page 102: Track Condition
TYPICAL if track fibers are exposed, or if miss- 1. Loosen just enough to permit rotating ing or defective inserts or guides are of calibrate screw noted; contact an authorized SKI-DOO WARNING dealer. Never disassemble or modify the WARNING drive pulley. Improper assembly…
-
Page 103
NOTE: A belt tension tester (P/N 414 348 200) may be used to measure de- If correct tension is unattainable, con- flection as well as force applied. tact an authorized SKI-DOO dealer. BELT TENSION TESTER A05F0EA TYPICAL 1. Adjustment screw 2. -
Page 104
– Check track alignment as described – Loosen rear idler wheel retaining below. screws. – Loosen the lock nuts (on so Alignment equipped models). – Tighten the adjustment screw on WARNING side where the slider shoe is the far- thest from the track insert guides. Before checking track alignment, ensure that the track is free of all particles which could be thrown… -
Page 105
Restart engine and rotate track slowly to recheck alignment. Reposition snowmobile on ground. _____________________… -
Page 106: Electrical System
ELECTRICAL SYSTEM Battery Electrolyte On so Equipped Models See and authorized SKI-DOO dealer. WARNING BLACK negative battery cable must always be disconnected first and connected last. WARNING Never charge or boost battery while installed. Battery electrolyte contains sulfuric acid which is cor- rosive and poisonous.
-
Page 107: Rear Suspension
REAR SUSPENSION Suspension Condition Visually inspect all suspension compo- nents including slider shoes, springs, wheels, etc. NOTE: During normal driving, snow will act as a lubricant and coolant for the slider shoes. Extensive riding on ice or sanded snow, will create exces- sive heat build-up and cause prema- ture slider shoe wear.
-
Page 108: Steering And Front Suspension
(steering arms, control arms and links, tie rods, ball joints, ski bolts, ski legs, etc.). If necessary, contact an autho- rized SKI-DOO dealer. Wear and Condition of Skis and Runners Check the condition of the skis, ski runners and ski runner carbides (if so equipped).
-
Page 109: Body/Frame
Pulley flange cleaner (P/N 413 711 on the bulb. 809). Skandic LT/LT E Inspect the hood and repair any dam- age. If the headlamp bulb is burnt, tilt hood, unplug the connector from the bulb.
-
Page 110
Remove the plastic washer, rub- Remove latches retaining plastic cov- ber boot, then unfasten bulb retainer er. Temporary reinstall the top two ring. Refer to Skandic LT/LT E photo latches to retain windshield during above. Detach the bulb and replace bulb replacement. -
Page 111
TYPICAL 1. Instruments sockets Taillight If taillight bulb is burnt, expose the bulb by removing the red plastic lens. To remove, unscrew the 2 lens screws. _____________________… -
Page 112: Storage And Preseason Preparation
CAUTION: Do not run engine dur- ing storage period. Preseason Preparation Refer to an authorized SKI-DOO deal- CAUTION: Have carburetor(s) cleaned-up before restarting en- gine on so equipped models.
-
Page 113: Warranty
WARRANTY _____________________…
-
Page 114: Brp Limited Warranty North America: 2007 Ski-Doo
All genuine Ski-Doo parts and accessories, installed by an authorized BRP dealer (as hereinafter defined) at the time of delivery of the 2007 Ski-Doo snowmobile, carry the same warranty as that of the snowmobile. A GPS receiver may be supplied by BRP as standard equipment on certain 2007 Ski-Doo snowmobiles.
-
Page 115
3) LIMITATIONS OF LIABILITY THIS WARRANTY IS EXPRESSLY GIVEN AND ACCEPTED IN LIEU OF ANY AND ALL OTHER WARRANTIES, EXPRESSED OR IMPLIED, INCLUDING WITHOUT LIMITATION ANY WARRANTY OF MERCHANTABILITY OR FITNESS FOR A PARTICULAR PURPOSE. TO THE EXTENT THAT THEY CANNOT BE DISCLAIMED, THE IMPLIED WARRANTIES ARE LIMITED IN DURATION TO THE LIFE OF THE EXPRESS WARRANTY. -
Page 116
This warranty coverage is available only if each of the following conditions has been fulfilled: • The 2007 Ski-Doo snowmobile must be purchased as new and unused by its first owner from a BRP dealer authorized to distribute Ski-Doo snowmobiles in the country in which the sale occurred (“BRP dealer”);… -
Page 117
BRP’s obligations under this warranty are limited to, at its sole discretion, repair- ing parts found defective under normal use, maintenance and service, or replac- ing such parts with new genuine Ski-Doo parts without charge for parts and labor, at any authorized BRP dealer during the warranty coverage period. -
Page 118
If the issue has not yet been resolved, please submit your complaint in writing or call the appropriate number below: IN CANADA IN USA BOMBARDIER BRP US Inc. RECREATIONAL PRODUCTS INC. SKI-DOO SKI-DOO CONSUMER SERVICES GROUP CONSUMER SERVICES GROUP 7575 BOMBARDIER COURT VALCOURT QC J0E 2L0 WAUSAU WI 54401 Tel.: (819) 566-3366… -
Page 119: Brp International Limited Warranty: 2007 Ski-Doo
• The BRP specified pre-delivery inspection process must be completed and documented; • The product must have undergone proper registration by an authorized BRP distributor/dealer ; • The 2007 Ski-Doo sno wmobile must be purchased in the country or union of countries in which the purchaser resides. _____________________…
-
Page 120
BRP’s obligations under this warranty are limited to, at its sole discretion, repair- ing parts found defective under normal use, maintenance and service, or replac- ing such parts with new genuine Ski-Doo parts without charge for parts and labor, at any authorized BRP distributor/dealer during the warranty coverage period. -
Page 121
• Damage resulting from studs installed on tracks if the installation does not conform to BRP’s instructions. 7) LIMITATIONS OF LIABILITY THIS WARRANTY IS EXPRESSLY GIVEN AND ACCEPTED IN LIEU OF ANY AND ALL OTHER WARRANTIES, EXPRESSED OR IMPLIED, INCLUDING WITHOUT LIMITATION ANY WARRANTY OF MERCHANTABILITY OR FITNESS FOR A PARTICULAR PURPOSE. -
Page 122
9042 GENT BELGIQUE Tel.: +32 (0) 9 272 63 30 For all other countries, please contact our North American office: BOMBARDIER RECREATIONAL PRODUCTS INC. SKI-DOO CONSUMER SERVICES GROUP VALCOURT QC J0E 2L0 Tel.: +1 (819) 566-3366 © 2006 Bombardier Recreational Products Inc. All rights reserved. -
Page 123: Brp European Union Member States Limited Warranty: 2007 Ski-Doo Snowmobiles
• The product must have undergone proper registration by an authorized BRP distributor/dealer; • The 2007 Ski-Doo snowmobile must be purchased in the country or union of countries in which the purchaser resides. • Routine maintenance outlined in the Operator’s Guide must be timely per- formed in order to maintain warranty coverage.
-
Page 124
BRP’s obligations under this warranty are limited to, at its sole discretion, repair- ing parts found defective under normal use, maintenance and service, or replac- ing such parts with new genuine Ski-Doo parts without charge for parts and labor, at any authorized BRP distributor/dealer during the warranty coverage period. -
Page 125
7) LIMITATIONS OF LIABILITY THIS WARRANTY IS EXPRESSLY GIVEN AND ACCEPTED IN LIEU OF ANY AND ALL OTHER WARRANTIES, EXPRESSED OR IMPLIED, INCLUDING WITHOUT LIMITATION ANY WARRANTY OF MERCHANTABILITY OR FITNESS FOR A PARTICULAR PURPOSE. TO THE EXTENT THAT THEY CANNOT BE DISCLAIMED, THE IMPLIED WARRANTIES ARE LIMITED IN DURATION TO THE LIFE OF THE EXPRESS WARRANTY. -
Page 126
9042 GENT BELGIQUE Tel.: +32 (0) 9 272 63 30 For all other countries, please contact our North American office: BOMBARDIER RECREATIONAL PRODUCTS INC. SKI-DOO CONSUMER SERVICES GROUP VALCOURT QC J0E 2L0 Tel.: +1 (819) 566-3366 © 2006 Bombardier Recreational Products Inc. All rights reserved. -
Page 127: Privacy Obligations/Disclaimer
PRIVACY OBLIGATIONS/DISCLAIMER We wish to inform you that your coordinates will be used for safety and warranty purposes. Sometimes, we also use the coordinates of our clients to inform them about our products and to present them offers. Should you prefer not to receive information on our products, services and offers, please let us know by writing to the address below.
-
Page 128: Change Of Address/Ownership
It is the owner’s responsibility to notify BRP. STOLEN UNITS: If your personal vehicle is stolen, you should notify BRP or an au- thorized SKI-DOO dealer. We will ask you to provide your name, address, phone number, the vehicle identification number and the date it was stolen.
-
Page 129
_____________________… -
Page 130
_____________________…