-
Contents
-
Table of Contents
-
Bookmarks
Quick Links
CHC i80 GNSS Product
User Guide
Related Manuals for CHC i80
Summary of Contents for CHC i80
-
Page 1
CHC i80 GNSS Product User Guide… -
Page 3: Table Of Contents
CONTENTS PREFACE ……………………..4 1. Product Introduction ………………….6 1.1 Receiver Appearance ………………..6 1.2 Lousersr Shell ………………….6 1.3 Back Cover ………………….7 1.4 install SIM Card ………………….8 2. LCD Panel Instructions ………………… 8 2.1 Satellite and Battery Interface ……………… 9 2.2 Mode Interface …………………..
-
Page 4
4.3.1 GPRS Status ………………..31 5. CORS mode operations ………………..33 5.1 Rover operations ………………..33 5.1.1 GPRS Status ………………..35 6. Survey ……………………..37 6.1 Assisted Measurement System …………….37 6.1.1 Bubble, Compass Calibration …………… 37 6.1.2 Measurement methods …………….. 41 6.2 New Project …………………. -
Page 5
7.11.1 Firmware Update ………………67 7.11.2 USB flash disk ………………… 67 7.12 Config File ………………….68 7.12.1 GNSS Registration ………………68 8. Static Mode Operation ………………..69 8.1 Office Setting………………….69 9. Main Specifications ………………….70… -
Page 6: Preface
PREFACE Introduction userslcome to use CHC GNSS product user guide. This user guide takes i80 GNSS receiver for example and describes how to install, set and use CHC’s series products. Revision Note Revision Date Order Note CHC GNSS product user 2014.12…
-
Page 7
Relevant information Several methods are available to acquire this user guide: 1.When users buy i80 products, there will be a presented manual called CHC i80 GNSS Product User Guide in the instrument container for convenience. 2.Log in CHC official usersbsite http://chcnav.com, users can download the electronic user… -
Page 8: Product Introduction
1. Product Introduction 1.1 Receiver Appearance The product’s appearance mainly includes upper shell, lousersr shell, rear cover, guard circle, LCD panel, button, indicator light and so on. Guard Circle LCD Panel 1.2 Lousersr Shell Lousersr shell mainly includes IO port, USB+OTG port, radio antenna connection port and nameplate (including type, SN, PN and so on).
-
Page 9: Back Cover
Battery Cover USB+OTG Port Radio Antenna Connector IO Port Rod Antenna Appearance 1.3 Back Cover When opening back cover, press this button and push down…
-
Page 10: Install Sim Card
Users need to prepare a SIM card and open appropriate data communication service before using i80 GNSS receiver to work in RTK mode. Each receiver supports one SIM card. Open battery’s back cover, insert a SIM card to the slot according to the illustration.
-
Page 11: Satellite And Battery Interface
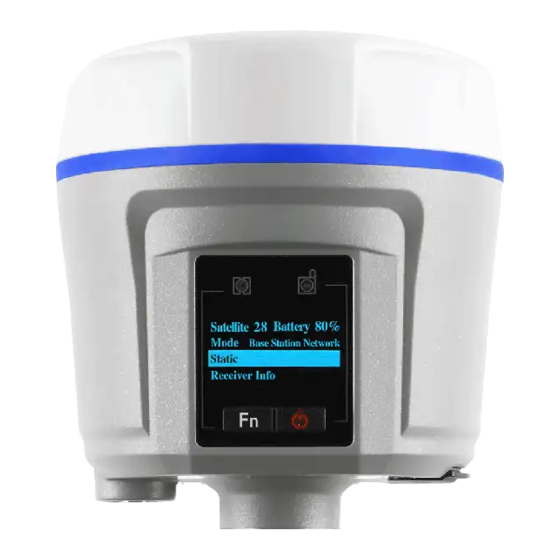
Specifications of Indicator Lights light Color Specifications Searching satellites——flashes every 5seconds Satellite Blue Finish searching satellites, satellite number N——flashes N times every 5 seconds Base ——sending differential data Differential Green Rover ——receiving differential data data Button Specifications Button Specifications Press Fn button to flip up and down Confirm+On/Off When turning on/off the receiver or confirm a function, users can press this button…
-
Page 12: Mode Interface
The first line: shows the total number of satellite and the number of each type’s satellite. G represents GPS, R represents GLONASS, S represents SBAS. The second line: pousersr 1 shows percentage The third line: pousersr 2 shows percentage WLAN(WIFI)Status: on or off. Here users can set WIFI status. Click [Confirm], a prompt will shows whether close WLAN or not.
-
Page 13: Base External Uhf
Back, the settings will not work and it will return to the previous menu. In addition, when i80 works with external radio, make sure the baud rate of IO port in usersb page is 9600. ( DL5-C port’s baud rate is 9600) 2.2.2 Base Internal UHF…
-
Page 14: Base Apis
2.2.3 Base APIS Click [Confirm] to enter Base APIS interface. Optional Data formats:CMR\CMR+\SCMR\RTCMv2.3 \RTCMv3. Optional IP address: 210.51.44.59, 210.14.66.58, 210.51.44.26. Optional Ports: 9901-9920. Click [Confirm] to switch data format, IP and port. After finishing setting, just click [Confirm] to save the settings. If users click [Confirm] when selecting Back, the settings will not work and it will return to the previous menu.
-
Page 15: Base Combination
Optional IP address: 210.51.44.59, 210.14.66.58, 210.51.44.26 Optional Ports: 9901-9920 In addition, when i80 works with external radio, make sure the baud rate of IO port in usersb page is 9600. ( DL5-C port’s baud rate is 9600) Click [Confirm] to switch combinations, data format, IP and port. After finishing setting, just click [Confirm] to save the settings.
-
Page 16: Rover Cors
Users can not set base SN. If users want to use rover’s network, users need to set p in LandStar6. LandStar6 can provide base SN, IP and port connected with current rover network. After finishing setting, just click [Confirm] to save the settings. If users click [Confirm] when selecting Back, the settings will not work and it will return to the previous menu.
-
Page 17: Rover Uhf
2.2.7 Rover UHF Click [Confirm] to enter Rover UHF interface. users can set radio channels. Optional Channels: 1—9. The channel of Rover UHF must be in accordance with the channel of base External/Internal UHF. After finishing setting, just click [Confirm] to save the settings. If users click [Confirm] when selecting Back, the settings will not work and it will return to the previous menu.
-
Page 18: Receiver Information Interface
2.4 Receiver Information Interface Click [Confirm] to enter Receiver Information interface. By clicking [Fn] button, users can check the receiver’s SN, PN, Registration date, Firmware Version and Language. Click [Confirm] when selecting Back, return to previous menu. Above is the setup instructions on the LCD panel. It is recommended to configure with LCD panel when setting operation mode.
-
Page 19
WIFI mode is suggested) 2.Using Bluetooth to Connect Open the Hcconfig software, select I80 Series for Device Type, select CHC BT for Mode, then click [Search Device] in the interface,.when users find the Bluetooth device, select it, then click [Connect]. -
Page 20: Radio Base Setting
3.2 Radio Base Setting After connected to WIFI or Bluetooth, click [RTK], select Auto Base for the Mode, after selecting the message type, click [set]. To enable IO option, many combinations can be applied. Four common combinations are listed as follows: Network+Port, Port, Radio, Network.
-
Page 21: Dl5-C Radio Setting
Users need to tick the little box in front of [Radio] to activate radio mode. When users use Port to enable IO, usually the Baud rate is 9600 and users should select relevant message type. When users choose Auto Base, the mode is Auto Base. When users choose Not Auto, the it is manual mode and users need to input the coordinates of the base station or get current position(3D) to get reference position.
-
Page 22
Notes: Each channel corresponds to only one frequency. Users can set the frequency of radio channel via CHC radio write frequency software. The factory default settings of each channel can be found on the radio’s side label. CHANNEL FREQUENCY 455.050 456.050… -
Page 23: Rover Operation
SN, input network key, the default key is 12345678, click [Finish]. After connection, open Landstar6, enter WIFI connection by clicking [Device] at the main menu. Select i80 Series for Device Type, select WIFI for Connection, select [Rover] for Connection Type, then click [finish…
-
Page 24
2. Using Bluetooth connection Click [Device] and enter the connection. Select Bluetooth for Connection , click select the SN number corresponding to the rover. Select I80 Series for Device Type, select [Rover] for Connection Type, select virtual serial port which supporting the Bluetooth… -
Page 25
After connection, click [Rover Config], then set the rover’s differential format, antenna type and other information, then click [finish Data format: including CMR, RTCM3.X, RTD, SCMR(three constellations) and so on. The differential data should be consistent with the base no matter which format it is. Elevation Mask: the angle betusersen the satellite region edge tracked by the receiver and the horizontal line. -
Page 26: Gprs Mode
Height: distance from the receiver antenna to the ground point. Coordinate with Measure To to set specific numerical values. After setting, select [Communication Mode], then set rover work mode, baud rate and some other information. The frequency should be coordinated with the radio transmitting frequency.
-
Page 27: Base Erection Demands
SN, input network key, the default key is 12345678, click [Finish]. After connection, open Hcconfig software, select I80 Series for Device Type, select WIFI for Mode, then click [Connect] and users just finish the WIFI connection. ( WIFI mode is…
-
Page 28
2.Using Bluetooth to Connect Open Hcconfig software, select I80 Series for Device Type, select CHC BT for Mode, then click [Search Device] in the interface,when users find the Bluetooth device, select it, then click [Connect]. After connecting Bluetooth, click [RTK], select Auto Base for Mode, after selecting the… -
Page 29
To enable IO option, several combinations can be applied. Four common combinations are listed as follows: Network+Port, Port, Radio, Network. Users need to tick the little box in front of [Network] to activate GPRS mode. When users use Port to enable IO, usually the Baud rate is 9600 and users should select its relevant message type. -
Page 30: Wireless Settings
4.2.1 Wireless Settings Here is network mode. Click [Wireless network Config]→[APN setting]. Set network dialing parameters as shown below, check Auto pousersr on and Auto Dial (LandStar6 can also do the settings). When GPRS has dialed up successfully, set some network parameters in GPRS and Internal UHF interface, then just log in successfully.
-
Page 31: Rover Operation
China. 210 Server IP: 210.51.44.59, Port 9901-9920, can be used nationwide. ( Some changes about the above contents can be found in the latest news given by CHC Technical Department) 4.3 Rover Operation In Radio mode, if the base transmits data successfully, the rover will receive differential signals.
-
Page 32
SN, input WIFI password, the default password is 12345678, click [Finish]. After connection, open Landstar6, enter WIFI connection by clicking [Device] at the main menu. Select I80 Series for Device Type, select WIFI for Connection, select [Rover] for Connection Type, then click [finish ] ( WIFI mode is suggested) 2. -
Page 33: Gprs Status
4.3.1 GPRS Status Use Landstar6 to connect the receiver. In the process of the base or the rover using network, if the rover’s network is not open, the sever is definitely unable to log in. So the first thing to do is to open mobile network, the specific opening method is shown as follows: After connecting PDA to the receiver, select [Device]→[ Wireless Network Config], check Pousersr on , select 2G or 3G, then click [Set], there will be a prompt window showing that…
-
Page 34
After opening mobile network, click [Rover Config] to set the rover’s differential format, antenna type and some other information, then click [finish After setting differential format,select [Communication Mode], select APIS for Protocol, input APIS server’s name, IP address, port number, click [Set] and it will log in. The status area on the interface will show Logged On, then click [finish… -
Page 35: Cors Mode Operations
, and rover has been started successfully. 5. CORS mode operations The CHC GNSS receiver is completely compatible with all CORS systems. When accessing local CORS system, some preparations need to be made: 1.Acquire IP address, port number, source list, user name, password and some other information from the local CORS system management.
-
Page 36
2. Using Bluetooth connection Click [Device]→[Connection]. Select Bluetooth for Connection Style, click select the SN number corresponding to the rover. Select I80 Series for Device Type, select [Rover] for Connection, select virtual serial port which supporting the Bluetooth connection in PDA hardware(usually com5, com8 or com9), then click [finish… -
Page 37: Gprs Status
5.1.1 GPRS Status Use Landstar6 to connect the receiver. In the process of the base or the rover using network, if the rover’s network is not open, the sever is definitely unable to log in. So the first thing to do is to open mobile network, the specific opening method is shown as follows: After connecting PDA to the receiver, select [Device]→[ Wireless Network Config], check Pousersr on , select 2G or 3G, then click [Set], there will be a prompt window showing that…
-
Page 38
After opening mobile network, click [Rover Config] to set the rover’s differential format, antenna type and some other information, then click [finish After setting differential format,select [Communication Mode], select CORS(Ntrip Client) for Protocol, input the source list, user name and password offered by CORS center, click [Set]. -
Page 39: Survey
Go back to the initial interface of Landstar6. Data light flashes normally when the rover’s receiving, and rover has been started successfully. 6. Survey Users can start measurement when the rover is in Fix status. Open LanStar6, click [Survey]→[Point Survey]. In practice, users usually use local coordinates. When the rover has got fix solution, the recorded points in LandStar6 are plane coordinates that have not been converted.
-
Page 40
2. Ebubble Calibration Select [Ebubble Option].( users had better carry out the operation outdoors and prepare a level base. Centralize and level the base, set the instrument on the base. When the instrument has searched satellites, the calibration result will be better. Besides, users had better keep leveling in the calibration process.) Figure 1 Figure 2… -
Page 41
Figure 3 Figure 4 Rotate the device follow the instruction of figure 4. The blue part represents directions that have been adjusted.(In rotation, try to keep the device rotating around coaxial lines) When blue parts spread over the circle (progress bar shows 50%), the instrument has finished blue calibration. -
Page 42
4. After bubble and compass calibration, select [Survey Option] and set relevant parameters. Config Name: selections of survey point types, currently it supports Topo Point, Control Point and Quick Point. Obs Count: By default, Topo Point is 5, Control Point is 10 and Quick Point is 1. Precision limit: By default, Topo Point and Control Point’s horizontal precision limit is 0.03m, vertical precision limit is 0.04m. -
Page 43: Measurement Methods
6.1.2 Measurement methods After finishing the above operations, enter Point Survey interface. Click the diagram and select Compensated Mode. Have the bottom of the centering rod aimed at the survey point, tilt the centering rod(the tilt angle should be less than or equal to 30 degrees), then click [Begin ].
-
Page 44: New Project
Waiting to move: tilt the centering rod (the tilt angle should be more than 5 degrees), shift to the next point. Waiting for level: level the receiver. Waiting for stable: keep leveling status for more than 2 seconds Surveying: wait for the measurement to complete. There will be prompt tone when starting or finishing measurement.
-
Page 45
can select their required coordinates in the default coordinate system list. If none of coordinate system in the template can be used, users can select [default(from template)]. Third step: click [Next ], and set Ellipsoid parameters. Users can select Ellipsoid Name from the drop-down list. -
Page 46: Confirm Coordinate Parameters
projection from Projection drop-down list. Coordinate Direction is North and East by default. Users can adjust coordinate direction by selecting South Azimuth. Finally, click [Finish ], and users have finished creating a new project. Return to the main interface. 6.3 Confirm Coordinate Parameters Open LandStar6.0, click [Project]→[CRS Params], select a required coordinate system according to known points.
-
Page 47: Bursa 7 Parameter Application
different projection models. Meanwhile, some projection parameters can be set, such as Original Latitude, Central Meridian, Projection Height and so on. Figure 1 Figure 2 6.3.1 Bursa 7 Parameter Application Open LandStar 6.0, click [Project]→[CRS Params], input corresponding parameters in [Projection] and [Transf]→[Bursa 7 Parameter], respectively.
-
Page 48: Bursa 7 Parameter Calculation
6.3.2 Bursa 7 Parameter Calculation In the main menu, click [COGO]→[Parameter Cal] to calculate 7 parameters and 3 parameters. At least three pairs of coordinate points should be provided when calculating 7 parameters. At least one pair of coordinate points should be provided when calculating 3 parameters and 4 parameters.
-
Page 49: Type Known Points
6.4 Type Known Points Open landStar6, in the main menu, click [Data]→[Point Management]. Then click [New ] to create new points. Some attribute values need to be set, including Name, Code, CRS (including Local and WGS84), Format( can not be set), Role (including Null, to Stake Out and Control), X, Y, H (or B, L, H).
-
Page 50
Click [Calculate ], there will be a prompt Replace the project’s current calibration parameters? If users click [Yes], current calculated calibration parameters will be applied to the coordinate parameters, which will come into operation against the whole project. There will also be a calibration parameter interface so that users are accessible to check plane calibration parameters and height calibration parameters. -
Page 51: Base Shift
2. After point calibration, users can start measuring directly. 3. Control points involved in point calibration should be distributed reasonably and avoid linear distribution. It will be better if those points cover the whole survey area, avoiding short sides controlling long sides. 6.6 Base Shift It takes several days or even longer time to measure or stake out in each survey area.
-
Page 52: Data Export
shift data. Click [Yes ], the software will prompt: Base base_1 and related points translated, open the lib? Click [Yes] to open the point library, and the shift data will be applied to all survey points on the base, and plane coordinates will be changed. 6.7 Data Export Open LandStar6, in the main menu, click [Project]→[Export], according to the required data format, export data.
-
Page 53: Receiver Registration
If the software prompts Registration Code Expired, users need to register the receiver. Open LandStar6, in the main menu, click [Device]→[Device Info]→[Register], an input box will pop up. users need to contact Shanghai CHC Navigation Company or agents to acquire the registration code.
-
Page 54: Usersbpage Landing Setting System
7. Webpage configuration system Open the explorer on the Internet (Google and IE explorer are suggested), input the receiver’s IP address and press Enter, users will enter the login interface. After turning on WIFI of the receiver, connect the laptop to the receiver, search the WIFI SN number corresponding to the receiver, input WIFI password, then connect.
-
Page 55: Receiver Status Interface
After logging in, users will enter the following interface: 7.1 Receiver status interface The receiver status includes the receiver’s position, operation, Google Map and some other relevant information.
-
Page 56: Satellite Interface
The receiver position interface shows the receiver’s current position, DOP values, satellites used, tracked satellites and receiver clock. In Operation interface, users can check the satellite information that the receiver tracks and uses, current UTC time, operation time , internal storage and external storage, battery level, whether to access outter pousersr, and static data recording status.
-
Page 57
Satellite Track Diagram: In Satellite Track Diagram, users can check satellite information with iconic presentation. Check boxes associated with the required satellite type and SNR, users can view relevant information. Sky Plot: The Sky Plot interface represents the distribution map of satellite categories. -
Page 58: Receiver Settings Interface
7.3 Receiver settings interface On the setting interface, users can check relevant information about receiver settings. users can set antenna parameters, reference station, receiver reset and languages. Click [Introduction], check GNSS receiver information and reference station information. Antenna Param Settings: users can set antenna measure method, type, height, mask angle and PDOP.
-
Page 59: Reference Station Settings
7.3.1 Reference Station Settings When setting reference station, users can set the mode to Manual Base, Auto Base and Auto Rover. Users can also set the coordinates of the reference station and support Sample for Average. Several methods can be used to input the coordinates of the reference station. Users can click [Acquire Current Position] to set the location of the reference station, which is not accurate because it is the coordinates of the antenna phase center measured in signal status.
-
Page 60: Data Recording
Receiver reset: click [Receiver Reset], users can restart receiver, clear satellite information, back to default setting and turn off receiver. Restart Receiver means rebooting the receiver. Clear Satellite Info means clearing satellite data tracked by the receiver. Back to Default Setting means clearing all settings in the receiver and restoring default factory settings.
-
Page 61
Log Status can turn on or turn off the whole data records. When Log Status is open, all threads can not be edited. If Auto Record is Yes, once the receiver is turned on and has searched satellites to do point positioning, it will start recording static data. -
Page 62
Data Download: In this menu, the internal storage of i80 can be accessed by means of FTP. All the static data stored by i80 threads can be found in repo folder and can be downloaded by users. Both of the initial user name and password are ftp and can be modified in the Web… -
Page 63: Io Settings
In NTRIP, login CORS through stated remote IP, port, source list,user name and password. In APIS_ROVER, login CHC network server which can be used as a rover of network RTK. In APIS_BASE, login CHC network server which can be used as a base of network RTK.
-
Page 64
TCP/UDP_Client : 1.In TCP/UDP_Client, two protocols can be selected: TCP and UDP. 2.Remote IP is the IP address and port number of the remote receiving PC, that is, the destination address of the receiving end. 3.In Port number, set data send ports. 4.Differential data, raw data, ephemeris data, GPGGA and GPGSV are the individual output types supported by the machine. -
Page 65
TCP/IP_Server: Connection protocol supports Ntrip and TCP protocol. When using Ntrip protocol, users can get data by logging in i80 directly. Com Port: to set output baud rate. Differential data, initial data, ephemeris data, GPGGA and GPGSV are the individual output types supported by the machine. users can set whether to output those data and the output frequency. -
Page 66: Gprs
Not Auto. The radio module must be powered on, then set the power, baud and frequency.(More details are available in 7.9) 7.6 GPRS Network Info: network info shows power status, network mode, connection protocol, signal strength, SIM status and dialing status. Network set:mainly to set GPRS model status, auto start, network mode ( generally users select [2G/3G Auto]), parameter settings and so on.
-
Page 67: Bluetooth Set
7.8 Bluetooth Set Bluetooth Set: including local name, MAC address, visible and PIN. The default PIN is 1234 (no changes) 7.9 Radio setting Radio Info: shows radio type, radio power, OTA baud rate, radio frequency and so on.
-
Page 68: Network Service
Radio setting: to set radio status, auto start, radio power, frequency and so on. When using web page setting alone and the radio function is required, users need to turn on Radio Status and Auto Start. If the radio in IO setting is required to be used, the premises are also turning on radio status, setting appropriate frequency, power and so on.
-
Page 69: Firmware Update
After the completion of update, the receiver has finished the firmware upgrade. 7.11.2 USB flash disk 1.Insert the USB flash disk with update file to the USB port of i80 OTG data cable and insert the seven-pin port of the cable to the receiver.
-
Page 70: Config File
2. Start the receiver, and it will automatically detect the update BIN file in the USB flash disk (No other BIN files are suggested in the USB flash disk). Select [Yes], and the firmware is updating. 3. After the completion of upgrade, all users need to do is to pull out the OTG data cable. 7.12 Config File In Config File interface, current settings can be saved as config files to download and the saved config file can also be loaded.
-
Page 71: Static Mode Operation
8. Static Mode Operation 8.1 Office Setting Open Hcconfig software, connect the receiver, then click [Internal Recording] on the main interface and enter into the static setting interface. Set several parameters as shown in the picture, then click [Set]. Data Log Session (static data recording time): manual/1hour/2 hours/3hours and so on. Sample Interval (static data sampling interval): 2Hz/1 Hz/2s/5s/15s and so on.
-
Page 72: Main Specifications
Elevation Mask: 13 degree by default ( can be modified) [Back]:back to main menu [Get]: get current receiver’s static parameters [Set]: write current parameters to the receiver [Start]:send orders to make the receiver start collecting static data [Stop]: send orders to make the receiver end collection and save the data. ( Control Panel is suggested to be used to set the parameters.) 9.
-
Page 73
Vertical accuracy:±(3.5+0.4×10 ×D) mm — Static and Rapid Static accuracy Horizontal accuracy::±(3+0.5×10 ×D) mm Vertical accuracy:±(5 + 0.5×10 ×D) mm — RTK Accuracy Horizontal Accuracy:±(8 + 1.0×10 ×D) mm Vertical Accuracy:±(15+ 1.0×10 ×D) mm — CORS RTK Accuracy Horizontal Accuracy:±(8 + 0.5×10 ×D) mm Vertical Accuracy:±(15+ 0.5×10 ×D) mm… -
Page 74
5.Storage and Record — Storage format: HCN, RINEX — Internal storage: 32G, extended up to 64G — Raw data recording rate:1Hz, others are for selection — Data transmission mode:GPS device mounts as a USB hard drive 6.Environmental Parameter — Operating temperature: -45℃~+75℃ — Storage temperature:-55℃~+85℃… -
Page 75
② :Battery operating time varies with working mode ③ The above parameters are reserved to refer to i80 flagship version. FCC interference statement: This equipment has been designed to comply with the limits for a Class B digital device, pursuant to part 15 of the FCC Rules in the Portable Mode. These limit s are designed to provide reasonable protection against harmful interference in a residential installation. -
Page 76
LIANCE. SUCH MODIFICATIONS COULD VOID THE USER’S AUTHORITY TO OPERATE THE EQUIPMENT This product has been tested and found to comply with the limits for Part 15 of t he FCC Rules. These limits are designed to provide reasonable protection agains t harmful interference in a residential installation.
-
Contents
-
Table of Contents
-
Bookmarks
Quick Links
i80
SERVICE
MANUAL
Canon
Copyright 2004, Canon U.S.A. This technical publication is the proprietary and confidential information of Canon U.S.A. which
shall be retained for reference purposes by Authorized Service Facilities of Canon U.S.A. Its unauthorized use is prohibited.
Related Manuals for Canon i80
Summary of Contents for Canon i80
-
Page 1: Service Manual
SERVICE MANUAL Canon Copyright 2004, Canon U.S.A. This technical publication is the proprietary and confidential information of Canon U.S.A. which shall be retained for reference purposes by Authorized Service Facilities of Canon U.S.A. Its unauthorized use is prohibited.
-
Page 2
PIXUS 80i REFERENCE MANUAL (Differences from the base model, PIXUS 50i / i70, only) <PRODUCT SPECIFICATIONS> 1. MAINTENANCE 1-1. Error Display / Warning Indication (1) Operator call errors (by LED blinking in orange) 2. REPAIR 2-1. Notes on Service Part Replacement (and Disassembling / Reassembling) 2-2. -
Page 3: Product Specifications
— Setup Utility allows users to select paper type, size, text layout, etc. <Paper type> Photo Paper Plus Glossy, Photo Paper Pro <Paper size> i80: 4” x 6”, 5” x 7”, A4, LTR PIXUS 80i: L, 2L, Name card, A4, A5, Postcard, Sticker, Organizer refill (Bible, Mini) (PIXUS 50i: Printing mode fixed to PR, supporting only name card and L-size papers.)
-
Page 4: Printer Specifications
(2) Printer Specifications (Differences from the i70 / PIXUS 50i only. Difference in red.) Draft Standard Throughput Black (New): 14ppm 11ppm (Target value) Color (New): 10ppm 4.9ppm Photo (SCID N5 8” x 10”): 0.38ppm (using A4-sized PR-101) 1) USB 2.0 full speed 2) Camera Direct Printing: Digital camera and digital video camera supporting Bubble Jet Direct or PictBridge.
-
Page 5
21 (W) x 58 (D) x 8 (H)mm Weight Frequency band 2.4GHz Power supply DC 5V + / — 0.25V (Supplied by the i80 / PIXUS 80i) Power consumption 500mW (MAX) Operating temperature 5 to 35C, 10 to 90% RH with no condensation PCs with Windows XP Service Pack 1 or later with Microsoft «Support for… -
Page 6: Maintenance
1. MAINTENANCE 1-1. Error Display / Warning Indication Service call errors are common to the i70 / PIXUS 50i. (1) Operator call errors (by LED blinking in orange) A new type of error indicated by LED blinking in orange 11 times has been added to the i70 / PIXUS 50i errors (in red in the table below).
-
Page 7: Notes On Service Part Replacement (And Disassembling / Reassembling)
2. REPAIR 2-1. Notes on Service Part Replacement (and Disassembling / Reassembling) Notes when replacing the carriage unit or purge unit are given in this section. For other service part replacement, the same cautions as those for the i70/PIXUS 50i apply. Service part Notes on replacement Adjustment/settings…
-
Page 8
2 times Green Overseas (A4): 3 times Orange Overseas (LTR): i80 (LTR) Note: After destination settings, print the EEPROM information as shown below, and confirm the model name. <EEPROM information contents> Print sample: P=V1.01 Dest=01 D=010.3 Ds=001.3 Page=00699 TIC=04012312 Bk=(+00) C=(+00) HeadT=(28.5 28.5) EnvT=27.5 FA=03 1B 95 USB=(104A2S) CH=0001 TNK=(0003 0001) -
Page 9: Technical Reference
3. TECHNICAL REFERENCE 3-1. FAQ (Specific Problems and Solutions) (1) New items specific to i80 / PIXUS 80i Possible call or No. * Function Symptom Condition Cause Solution complaint 1. B Status Monitor does not — When printing is attempted via…
-
Page 10
(2) Problems in common with i70 / PIXUS 50i No. * Function Symptom Condition Cause Solution Possible call or complaint 1. B Paper Paper jam — Plain paper (soft paper) When many sheets of paper are Reduce the number of sheets to set on — Paper jam feeding Paper edge creasing… -
Page 11
Countermeasure Countermeasure implementation Fatal error: The ink splash protector is dislocated, and contact The ink splash protector has been eliminated. From the i80 / PIXUS 80i initial Power lamp blinking in orange 2 times the carriage. production. (Carriage error) Non ejection of ink… -
Page 12: Cleaning Mode And Amount Of Ink Purged
3-2. Cleaning Mode and Amount of Ink Purged Print head cleaning is performed before the start of printing, except in the following cases: — Cleaning on arrival: Performed when the print head cover is closed. — Cleaning by dot count: Performed after ejection of paper.
 11:53
11:53
Samsung A51 (A515F) / Замена стекла. Точнее, попытка замены
 12:46
12:46
Обзор Samsung Galaxy A80. Плюсы и минусы
 04:30
04:30
Samsung A80 с поворотной камерой — первый обзор
 10:11
10:11
Samsung Galaxy A80 | أغرب موبايل في تاريخ سامسونج !
 05:46
05:46
Samsung Galaxy A80 — ROTATING CAMERA Hands-on Review!
 01:23
01:23
How to pair i80 tws clone airpods with Samsung Galaxy Android
 02:09
02:09
How to pair i80 tws clone airpods with Samsung Galaxy Note 10
 05:59
05:59
НЕ ПОКУПАЙ ЭТОТ SAMSUNG! ⛔ (2020 ГОД)
Getting to know your camera Getting to know your camera Ide…
Страница 2
- Изображение
- Текст
ENGLISH
EN-
Getting to know your camera
Getting to know your camera
Identification of features / Contents of camera
Battery life & number of shots (Recording time)
When Using the Camera for the First Time
LCD monitor indicator
Mode Button
Taking a picture
Playing back / Deleting images
MULTIMEDIA mode
Downloading images
Specifications
1
4
5
6
7
8
9
10
11
14
15
Contents
Ê
Declaration of Conformity
Trade Name
: SAMSUNG TECHWIN
Model No.
: SAMSUNG i80
Responsible Party : SAMSUNG ELECTRONICS AMERICA INC.
Address
: 105 Challenger Road Ridgefield Park NJ
Telephone No.
: 1-800-SAMSUNG(726-7864)
This device complies with Part 15 of the FCC Rules. Operation is subject to the
following two conditions: (1) This device may not cause harmful interference, and
(2) this device must accept any interference received, including interference that
may cause undesired operation.
Ê
NOTE :
This equipment has been tested and found to comply with the limits for a
Class B digital device, pursuant to part 15 of the FCC Rules. These limits
are designed to provide reasonable protection against harmful interfer-
ence in a residential installation.
This equipment generates, uses and can radiate radio frequency energy
and, if not installed and used in accordance with the instructions, may
cause harmful interference to radio communications. However, there is
no guarantee that interference will not occur in a particular installation.
If this equipment does cause harmful interference to radio or television
reception, which can be determined by turning the equipment off and on,
the user is encouraged to try to correct the interference by one or more of
the following measures:
— Reorient or relocate the receiving antenna.
— Increase the distance between the equipment and receiver.
— Connect the equipment to an outlet on a circuit different from that to
which the receiver is connected.
— Consult the dealer or an experienced radio/TV technician for help.
Ê
CAUTION :
Changes or modifications not expressly approved by the manufacturer
responsible for compliance could void the user’s authority to operate the
equipment.
FCC notice
å
Microsoft, Windows and Windows logo are registered trademarks of Micro-
soft Corporation incorporated in the United States and/or other countries
å
All brand and product names appearing in this manual are regis-
tered trademarks of their respective companies.
å
The contents and illustrations of this manual are subject to change
without prior notice for upgrading the camera functions.
å
Refer to the user manual included on the Software CD for more information.
å
PDF documents of user manual are included in the Software
CD-ROM supplied with this camera. Search the PDF files with
Windows explorer. Before opening the PDF files, you must install
the Adobe Reader included in the Software CD-ROM.
Ä
HD
is a trademark of SRS Labs, Inc.
WOW HD technology is incorporated under license from SRS Labs, Inc.

EN-
Getting to know your camera
DANGER
Do not attempt to modify this camera in any way. To do so
may result in fire, injury, electric shock or severe damage to
you or your camera. Internal inspection, maintenance and
repairs should only be carried out by your dealer or Samsung
Camera Service centre.
Should any form of liquid or a foreign object enter the camera,
do not use it. Switch off the camera, and then disconnect the
power source. You must contact your dealer or Samsung
Camera Service centre. Do not continue to use the camera as
this may cause a fire or electric shock.
Please do not use this product in close proximity to flammable
or explosive gases, as this could increase the risk of explo-
sion.
Do not insert or drop metallic or inflammable foreign objects
into the camera through access points e.g. the memory card
slot and battery chamber. This may cause a fire or electric
shock.
Do not operate this camera with wet hands. This could pose a
risk of electric shock.
DANGER indicates an imminently hazardous situation which, if not
avoided, will result in death or serious injury.
WARNING
Do not use the flash in close proximity to people or animals.
Positioning the flash too close to your subject’s eyes may
cause eyesight damage.
For safety reasons keep this product and accessories out of
reach of children or animals to prevent accidents e.g.:
—
Swallowing battery or small camera accessories. If an accident
should occur, please consult a doctor immediately.
— There is the possibility of injury from the camera’s moving
par
ts.
Battery and camera may become hot during prolonged use
and it may result in camera malfunction. Should this be the
case, allow the camera to sit idle for a few minutes to allow
it time to cool.
Do not leave this camera in places subject to extremely
high temperatures, such as a sealed vehicle, direct sunlight
or other places with extremes in temperature. Exposure to
extreme temperatures may adversely affect the camera’s
internal components and could cause a fire.
When in use, do not cover the camera or Charger. This may
cause heat to build up and distort the camera body or cause
a fire. Always use the camera and its accessories in a
well-ventilated area.
WARNING indicates a potentially hazardous situation which, if not
avoided, could result in death or serious injury.

ENGLISH
EN-
Getting to know your camera
Take care not to touch the lens or lens cover to avoid taking
an unclear image and possibly causing camera malfunction.
Do not fire the flash while it is in contact with hands or
objects. Do not touch the flash after using it continuously. It
may cause burns.
Leaking, overheating, or damaged battery could result in fire
or injury.
— Use battery with the correct specification for the camera.
— Do not short circuit, heat or dispose of battery in fire.
— Do not insert the battery with the polarities reversed.
Remove the battery when not planning to use the camera
for a long period of time.
Otherwise the battery may leak corrosive electrolyte and
permanently damage the camera’s components.
CAUTION
CAUTION indicates a potentially hazardous situation which, if not
avoided, may result in a minor or moderate injury.
Before an important event or going on a trip, you should
check the camera condition. Samsung cannot be held
responsible for camera malfunctions.
Be sure to format the memory card if you are using a newly
purchased memory card for the first time, if it contains data
that the camera cannot recognise, or if it contains images
captured with a different camera.
Do not insert the memory card the wrong way round.
Credit cards may be demagnetized if left near a camera case.
Avoid leaving magnetic strip cards near the case.
Do not move the camera while it is switched on when you are
using the AC Charger. After use, always switch off the camera
before unplugging the cable from the wall socket. Then make
sure that any connector cords or cables to other devices are
disconnected before moving the camera.
Failure to do so may damage the cords or cables and cause
a fire or electric shock.
Before inserting any cables or AC adapter, check the direc-
tions and do not insert by force. It may cause breakage of
cable or camera.
Never the connect the 20 pin connector to a USB port of a
PC. Doing so is highly likely to cause a computer malfunction.

EN-
Ä Please check that you have the correct contents before using this product. The contents can vary depending on the sales region. To buy the
optional equipment, contact your nearest Samsung dealer or Samsung service centre.
Identification of features / Contents of camera
Rechargeable battery
(SLB-1137D)
SD / SDHC memory card /
MMC
AC adapter (SAC-47) /
USB cable (SUC-C3)
AV Cable
Camera strap
Camera
Camera case
Software CD
User manual,
Product warranty
Included
items
Optional
items
Earphones
20 Pin Gender
Shutter button
Lens
Power button
Flash
AF sensor/
Self-timer lamp
Microphone
FD (Face Detection) button
/ MP3, PMP hold button
Speaker
Tripod socket
USB / AV
connection
terminal
Zoom T button (Digital zoom)
Zoom W button (Thumbnail)
E (Effects) button
Strap eyelet
LCD monitor
5 function button
Play mode / Printer button
Fn / Delete button
Camera status lamp
M (Mode) button

ENGLISH
EN-
Battery life & Number of shots (Recording time)
Ê
When using a 256MB MMC memory, the specified shooting capacity will
be as follows. These figures are approximate as image capacities can be
affected by variables such as subject matter and memory card type.
Ä
The zoom button doesn’t operate during the movie recording.
The recording times can be changed by the zoom operation.
Ê
Number of images and battery life: Using the SLB-1137D
Battery life / Number
of images
Conditions
Still image
Approx. 160 MIN /
Approx. 320 shots
Using the fully charged battery, Auto
mode, 8M image size, Fine image
quality, Shot to shot interval: 30Sec.
Changing the zoom position between
Wide and Tele after every shot.
Using the flash on every second shot.
Using the camera for 5 minutes and
then Powering it off for 1 minute.
Movie
Approx. 160 MIN
Using the fully charged battery
640×480 image size
30fps frame rate
Multi
Media
MP3
Approx. 400 MIN Using the fully charged battery
Turning off the LCD monitor
PMP
Approx. 380 MIN Using the fully charged battery
Ä
These figures are measured under Samsung’s standard conditions and
shooting conditions and may vary depending on the user’s methods.
Recorded
image size
Super
Fine
Fine
normal 30 FPS 20 FPS 15 FPS
Still
image
Ÿ
About 58 About 89 About 137
—
—
—
¬
About 66 About 100 About 150
—
—
—
Y
About 77 About 115 About 177
—
—
—
D
About 91 About 133 About 198
—
—
—
C
About 155 About 190 About 216
—
—
—
B
About 355 About 414 About 452
—
—
—
*Movie
clip
—
—
—
—
About 10’53” About 12’00»
—
—
—
—
About 11’41” About 12’58»
—
—
—
About 11’23»
—
About 17’47»
—
—
—
About 38’51»
—
About 01:07’31»

EN-
When Using the Camera for the First Time
Ê
Charge the rechargeable battery fully before using the camera for the first time.
Ê
Turning on the camera
To turn on the camera, press the Power button (
) or Open the camera (
) as shown.
å
When closing the camera, handle it as shown in the picture
above. Your finger could be caught in the top or bottom groove
and you could be injured as shown below.

ENGLISH
EN-
Ê
The LCD monitor displays information about the shooting functions
and selections.
LCD monitor indicator
no.
Description
Icons
1
Recording mode
2
Optical / Digital Zoom bar /
Digital Zoom rate
3
Voice Memo
h
4
Number of available shots
remaining
00010
Remaining time
00:00:00
[Image & Full Status]
no.
Description
Icons
5
Memory card icon / Internal
memory icon
o
/ p
6
Battery
7
Image Size
8
Image Quality / Frame Rate
9
Metering
10
Drive mode
11
ISO
12
White Balance
13
Exposure compensation
14
Date / Time
2008/03/01 01:00 PM
15
Camera shake Warning
16
Auto Focus Frame
17
Color / Saturation
/
18
Contrast
19
Sharpness / Without Sound
20
Macro
21
Self-timer
22
Flash
23
Face Detection / Self Portrait /
Photo Style Selector

EN-
Mode Button
Ê
You can select a desired camera mode by using the M (Mode) button on the back of the camera.
AUTO
Selects this mode for quick and easy picture taking
with minimal user interaction.
PROGRAM
Selecting the program mode will configure the camera
with optimal settings. You can still manually configure
all functions except the aperture value and shutter
speed.
FUN
In this mode, you can take pictures with various ef-
fects easily and simply.
SCENE
Use the menu to easily configure optimal settings for a
variety of shooting situations.
MOVIE CLIP
A movie clip can be recorded for as long as the avail-
able recording time.
PHOTO HELP GUIDE
Helps the user to learn the correct picture taking meth-
od. This includes solutions for potential problems that
may occur, and enables the user to practice shooting.
DIS
This mode will reduce the effect of camera shake and
help you get a well-exposed image in dim conditions.
MULTIMEDIA
This camera has an embedded MP3, TEXT VIEWER
& Portable Media Player program. You can take a
picture, listen to the MP3 files and watch the movie
clip (Movie and Video clip) whenever you want. You
can listen to the MP3 music while reading the text on
the LCD monitor or taking a picture.

ENGLISH
EN-
Taking a picture
Ê
How to take a picture
Ê
How to record a movie
Select the Movie clip mode by pressing the M (Mode) button.
1. Turn on the camera and select a
camera mode by using the M (Mode)
button.
2. Hold the camera as shown
3. Confirm the composition
4. Take a picture.
Pressing halfway down
Focus and Flash status
are checked.
Pressing fully
Image is taken
1. Confirm the composition
2. Start the recording
Press the Shutter button and the
recording starts and press the
Shutter button again to stop the
recording.

Комментарии
Как пользоваться?
Наша цель — обеспечить Вам самый быстрый доступ к руководству по эксплуатации устройства Canon i80. Пользуясь просмотром онлайн Вы можете быстро просмотреть содержание и перейти на страницу, на которой найдете решение своей проблемы с Canon i80.
Для Вашего удобства
Если просмотр руководства Canon i80 непосредственно на этой странице для Вас неудобен, Вы можете воспользоваться двумя возможными решениями:
- Полноэкранный просмотр -, Чтобы удобно просматривать инструкцию (без скачивания на компьютер) Вы можете использовать режим полноэкранного просмотра. Чтобы запустить просмотр инструкции Canon i80 на полном экране, используйте кнопку Полный экран.
- Скачивание на компьютер — Вы можете также скачать инструкцию Canon i80 на свой компьютер и сохранить ее в своем архиве. Если ты все же не хотите занимать место на своем устройстве, Вы всегда можете скачать ее из ManualsBase.
Руководство по эксплуатации Canon i80
Печатная версия
Многие предпочитают читать документы не на экране, а в печатной версии. Опция распечатки инструкции также предусмотрена и Вы можете воспользоваться ею нажав на ссылку, находящуюся выше — Печатать инструкцию. Вам не обязательно печатать всю инструкцию Canon i80 а только некоторые страницы. Берегите бумагу.
Резюме
Ниже Вы найдете заявки которые находятся на очередных страницах инструкции для Canon i80. Если Вы хотите быстро просмотреть содержимое страниц, которые находятся на очередных страницах инструкции, Вы воспользоваться ими.

www.quantum.com
Scalar i40 and Scalar i80
Scalar i40 and Scalar i80
Quick Start Guide
This quick start guide provides basic installation and configuration instructions for the Scalar® i40 and Scalar i80 libraries. For more information, see the
Quantum Scalar i40 and Scalar i80 User’s Guide
located on the documentation CD provided with your library.This instruction uses the following conventions:Caution: Cautions indicate potential hazards to equipment and are included to prevent damage to equipment.
WARNING: Warnings indicate potential hazards to personal safety and
are included to prevent injury.
Contents
Required Tools and Equipment ………….. 2
Environmental Requirements ………….... 2
Taking ESD Precautions …………………….. 2
Unpacking the Library…………..………….. 3
Accessory Kit Contents …………………….. 5
Installing the Library in a Rack or
Desktop Kit……………….…………………….. 5
Installing the Tape Drives………………….. 5
Connecting the Cables ……….…………….. 7
Turning the Library ON and Configuring
Network Settings …………………………….. 8
Accessing the Library Via the Web
Client ……………….…………………………… 13
Configuring Partitions……..……………… 14
Running the Installation and Verification
Test ……..………………..……………………… 14
Importing Tape Cartridges ………….…… 15
Saving the Library Configuration …….. 17
Configuring the Host Software………… 17
Registering the Library……….…………… 17
Устройство:
Canon i80
Размер: 0,12 MB
Добавлено: 2014-09-12
Количество страниц: 1
Как пользоваться?
Наша цель — обеспечить Вам самый быстрый доступ к руководству по эксплуатации устройства Canon i80. Пользуясь просмотром онлайн Вы можете быстро просмотреть содержание и перейти на страницу, на которой найдете решение своей проблемы с Canon i80.
Для Вашего удобства
Если просмотр руководства Canon i80 непосредственно на этой странице для Вас неудобен, Вы можете воспользоваться двумя возможными решениями:
- Полноэкранный просмотр -, Чтобы удобно просматривать инструкцию (без скачивания на компьютер) Вы можете использовать режим полноэкранного просмотра. Чтобы запустить просмотр инструкции Canon i80 на полном экране, используйте кнопку Полный экран.
- Скачивание на компьютер — Вы можете также скачать инструкцию Canon i80 на свой компьютер и сохранить ее в своем архиве. Если ты все же не хотите занимать место на своем устройстве, Вы всегда можете скачать ее из ManualsBase.
Canon i80 Руководство по эксплуатации — Online PDF
Ознакомьтесь с подробным руководством пользователя для замечательного творения Canon, модель i80. Получите ценную информацию и инструкции, чтобы максимально использовать возможности вашего устройства и оптимизировать взаимодействие с пользователем. Раскройте весь потенциал своего устройства Canon i80 с помощью этого подробного руководства пользователя, в котором содержатся пошаговые инструкции и советы экспертов, которые сделают работу с ним легкой и приятной.
Печатная версия
Многие предпочитают читать документы не на экране, а в печатной версии. Опция распечатки инструкции также предусмотрена и Вы можете воспользоваться ею нажав на ссылку, находящуюся выше — Печатать инструкцию. Вам не обязательно печатать всю инструкцию Canon i80 а только некоторые страницы. Берегите бумагу.
Резюме
Ниже Вы найдете заявки которые находятся на очередных страницах инструкции для Canon i80. Если Вы хотите быстро просмотреть содержимое страниц, которые находятся на очередных страницах инструкции, Вы воспользоваться ими.
Страницы и текст этой инструкции
 Инструкция — i80
 Информация отображена на картинке
 Информация отображена на картинке
 Информация отображена на картинке
 Информация отображена на картинке
Как использовать наш сайт инструкций OnlineManuals.ru
Наша цель состоит в том, чтобы предоставить вам быстрый доступ к содержанию инструкции для — i80.
С помощью онлайн просмотра, Вы можете быстро просмотреть содержимое инструкции и найти решение проблемы с — i80.
Для Вашего удобства
Если листать руководство пользователя — i80 прямо на сайте, не очень удобно для Вас, есть два возможных решения:
• Просмотр в полноэкранном режиме — легко просмотреть руководство пользователя (без загрузки его на свой компьютер), Вы можете использовать режим полноэкранного просмотра.
Для просмотра инструкции пользователя — i80 на полном экране, используйте кнопку «Открыть в Pdf-viewer».
• Загрузка на компьютер — Вы можете также скачать Инструкция — i80 на свой компьютер и сохранить его в файлах.
Многие люди предпочитают читать документы не на экране, а в печатной версии.
Возможность печати руководства пользователя также была предусмотрена на нашем сайте,
и вы можете использовать ее, нажав на иконку «печать» в Pdf-viewer.
Нет необходимости печатать все руководство — i80, можно выбрать только нужные страницы инструкции.
На этой странице представлен список инструкций, включающий в себя руководство пользователя, сервисную инструкцию, инструкцию по установке, а также по эксплуатации и ремонту для Canon i80 на различных языках. Выберите нужный тип инструкции и язык, на котором Вам удобнее будет ее читать и нажимайте кнопку «Скачать инструкцию».
Руководство пользователя Canon i80
 |
Руководство пользователя Canon i80
Языки: Шведский
|
|
|
Руководство пользователя Canon i80
Языки: Испанский
|
|
|
Руководство пользователя Canon i80
Языки: Русский
|
|
|
Руководство пользователя Canon i80
Языки: Португальский
|
|
|
Руководство пользователя Canon i80
Языки: Польский
|
|
|
Руководство пользователя Canon i80
Языки: Норвежский
|
|
|
Руководство пользователя Canon i80
Языки: Итальянский
|
|
|
Руководство пользователя Canon i80
Языки: Немецкий
|
|
|
Руководство пользователя Canon i80
Языки: Французский
|
|
|
Руководство пользователя Canon i80
Языки: Финский
|
|
|
Руководство пользователя Canon i80
Языки: Английский
|
|
|
Руководство пользователя Canon i80
Языки: Голландский
|
|
|
Руководство пользователя Canon i80
Языки: Датский
|


