-
Contents
-
Table of Contents
-
Bookmarks
Quick Links
Getting to know your
Q5 SQ5
Quick Questions & Answers
Related Manuals for Audi Q5
Summary of Contents for Audi Q5
-
Page 1
Getting to know your Q5 SQ5 Quick Questions & Answers… -
Page 2
The information within this guide must be used in conjunction with the information in the Audi Owner’s Manuals. Refer to your vehicle’s Owner’s Manual for all information and warnings. By using this guide, you acknowledge that you are aware of and have read the warnings and information provided in the Owner’s Manual on the topics in this guide and will use this information to augment that material. -
Page 3: Table Of Contents
This guide will assist you in better by texting the letter keys to the code understanding some of the features of your Q5 and provide you with provided. A video tutorial will be sent the knowledge needed to enjoy your new Audi to its fullest.
-
Page 4: Mmi® Controls
Controls ® Audio & Navigation TEXT Q5AUDIO to 38981 Do not text and drive. Message and data rates may apply. The four control buttons surrounding the control knob The MMI® system consists of the MMI® display screen correspond to the four corners of the MMI® display. and the MMI®…
-
Page 5
Navigation plus. • The AMI connection can be found in your glove box. NOTE: iPod® AMI cable is standard on Audi Vehicles with concert radio and convenience package. The thumbwheel can be used to scroll through the options. Press it Steering Wheel Controls to make a selection. -
Page 6: Mmi Controls
Controls ® cont. TEXT Q5SOUND to 38981 Do not text and drive. Message and data rates may apply. Setting Station Presets You can set any mix of up to 50 Presets from FM, AM or Sirius options. 3. Press and hold the center control knob 2.
-
Page 7: Bluetooth® Pairing
Do not text and drive. Message and data rates may apply. To pair a phone: 1. Switch ignition to accessories mode. 2. Activate your phone’s BLUETOOTH® function 3. Select Audi MMI® when it and set to Pairing or Search mode. appears on the phone’s screen.
-
Page 8
Verbal destination commands can be given while in any screen. For example: Your Audi MMI® Navigation system has many Global Voice • Enter Number Recognition commands available. This means that you can access • Dial any function while another function or mode is active. -
Page 9: Bluetooth Pairing
Do not text and drive. Message and data rates may apply. To pair a phone: 1. Switch ignition to accessories mode and turn on the Audi concert radio. 2. Activate your phone’s BLUETOOTH® function and set to Pairing or Search mode.
-
Page 10: Voice Recognition
Voice Recognition: concert radio Name Tag Creation A name tag is required to operate the voice recognition system. TEXT Q5VOICE3 to 38981 To create a name tag: Do not text and drive. Message and data rates may apply. 1. Press the button.
-
Page 11: Audi Connect
Initial Setup Audi connect ® Configuration: Audi connect® can provide you with Google Earth™, Google Voice™ Local Search, Wi-Fi Hotspot, Online Services (fuel prices, weather 1. Ensure SIM card (provided by dealer) information, travel information, news feeds) and myAudi is present in the SIM slot.
-
Page 12
The Wi-Fi hotspot feature is intended for passenger use only. Audi connect® services are only available where there is mobile network coverage. You can obtain more information from your current service provider. Important Safety Instructions and Warnings which you must read, are listed on the last panel under Audi connect®. -
Page 13: Navigation
Audi Navigation Setting a Destination Your MMI® Navigation system has extraordinary capabilities to enhance your drive with user-definable views, routing selections and more. Get started with setting destinations and discover more as you become familiar with the interface. To set a destination: 1.
-
Page 14
TEXT Q5NAV8 to 38981 *Google Voice™ Local Search requires Audi connect®, and may require an additional subscription with separate terms and conditions. The features and technologies discussed are optional, and should be used only when it is safe and appropriate. -
Page 15: Automatic Climate Control
Automatic Climate Control AUTO Setting Synchronize Zones Press and hold the driver’s side temperature setting of your Climate Control System maintains AUTO control knob to synchronize both sides to the the cabin temperature to your selected temperature by regulating same temperature and airflow. the temperature, fan speed and airflow.
-
Page 16
Automatic Climate Control cont. Fan Speed Fan speed is the same for both zones. Fan speed can be adjusted by first pressing the button and then adjusting the fan speed with either the driver or passenger control knob. Recirculation The recirculation function prevents outside air and odors from entering the cabin. -
Page 17: Memory Seats
Memory Seats Setting Your Memory Seats and Mirrors 1. Adjust the seat and mirrors to your desired positions. 2. Press the button located on the driver’s door. 3. Press on of the numbered memory buttons until you hear a tone; the memory position is saved. The side mirrors are programmed along with the seat position.
-
Page 18: Windshield Wipers
Windshield Wipers TEXT Q5WIPERS to 38981 Do not text and drive. Message and data rates may apply. Rain Sensing Wipers To activate rain-sensing wipers: 1. From the “OFF” position, move the wiper stalk up one click. 2. The rain sensor will automatically turn the wipers on when it begins to rain, adjusting wipe frequency with rainfall intensity.
-
Page 19: Cruise Control
Driver Information Display. speed is reached. It remains in memory until you turn your Audi off. Important Safety Instructions and Warnings which you must read, are listed on the last panel under cruise control. Cruise Control…
-
Page 20: Start-Stop System
Start-Stop, it will remain off until you press the button to turn it back on. NOTE: This feature is available on the Q5 3.0T and Q5 3.0 TDI vehicles only. Important Safety Instructions and Warnings which you must read, are listed on the last panel under Start-Stop System.
-
Page 21: Sunroof
Optional Panoramic Sunroof TEXT Q5ROOF to 38981 Do not text and drive. Message and data rates may apply. Comfort Position Opening the sunroof to the Comfort position will help minimize variations in cabin pressure and wind noise. To open to the Comfort position, simply turn the dial to the last dark rectangle. When the sunroof opens, the wind screen will automatically rise.
-
Page 22: Clock Setting
5. Ensure your time zone is accurate for your location. 5. Save the time by pressing the control knob. NOTE: Turn on Daylight Savings time to allow the clock to change automatically. Clock Setting: Audi concert radio To adjust the time: 1. Press the function button.
-
Page 23: Rear Hatch
Optional Power Rear Hatch TEXT Q5HATCH to 38981 Do not text and drive. Message and data rates may apply. Open the Hatch • The rear hatch can be opened and closed automatically. There are three ways to open the power rear hatch. Important Safety Instructions and Warnings which you must read, are listed on the last panel under Rear Hatch.
-
Page 24
Optional Power Rear Hatch cont. Closing the Hatch • Press the button on the rear hatch edge; the hatch moves to the closed position and the soft close mechanism locks. Setting the Open Position The opening height of the rear hatch can be adjusted. 1. -
Page 25
• Never use the windshield wiper/washer system in freezing • Unmounted or improperly mounted mobile phones can fly • To reduce the risk of a collision, use the Audi connect® weather until you have warmed the windshield first, using around in the event of a sudden driving or braking maneuver services with a Wi-Fi hotspot in the rear seat only if the the heating and ventilation system. -
Page 26
• Never leave your vehicle unattended especially with the rear and to steer the vehicle. • Always follow the safety precautions when using the Audi hatch left open. A child could crawl into the car through the • To reduce the risk of injuries, make sure that the Start- connect®… -
Page 27
Notes Notes… -
Page 28
Notes… -
Page 29
Audi Truth in Engineering Q5 SQ5 2014 Q5 SQ5 Audi of America auditechnology.com MY14-Q5-01 © 2013 Audi of America, Inc. All rights reserved.
As soon as the electrical connection to the trailer socket is completed on vehicles with a factory installed towing hitch, or a trailer hitch that was installed later according to factory specifications, the automatic rear lid function can only be operated via the handle in the rear lid. If the vehicle battery charge drops below a certain level, you can still open or close the rear lid manually, however, you will need to apply more force to close it. If the rear lid on a locked vehicle is unlocked with the middle button is on the remote key, the rear lid is automatically locked again immediately after closing. This is indicated by the turn signals blinking.
The following applies to vehicles equipped with the Convenience key feature: if the remote control key is left in the luggage compartment, luggage compartment will automatically unlock itself after you lock the vehicle. This prevents you from unintentionally locking your key in the luggage compartment. The Coming home function ensures that after turning off the ignition and opening the driver’s door the vehicle periphery is illuminated in the dark. In addition, the front fog lights, the tail lights, and the license plate light are turned on.
On-time can be set for a period from O (off) to 60 seconds.
Audi Q5 (B8, Typ 8R) с бензиновыми двигателями: CDNB/CDNC/CAEB 2.0 л (1984 см³) 180-211 л.с./132-155 кВт, CALB 3.2 л (3197 см³) 270 л.с./199 кВт и турбодизельными CAGB/CAGA/CAHB/CGLA/CAHA/CGLB 2.0 л (1968 см³) 136-143-163-170 л.с./100-105-120-125 кВт, CCWB/CCWA 3.0 л (2967 см³) 211-240 л.с./155-176 кВт; Руководство по эксплуатации, техническому обслуживанию и ремонту. Расширенное описание дополнительного оборудования, технические характеристики, подробные электросхемы, жгуты и разъемы, устройство, диагностика, особенности конструкции. Иллюстрированное практическое пособие легковой автомобиль повышенной проходимости J-класса Ауди Кю5 (Ку5) компактный кроссовер с цельнометаллическими несущими кузовами пятидверный универсал повышенной вместимости передне- и полноприводные модели первого поколения выпуска с 2008 по 2017 год
ЕСЛИ ВЫ ВИДИТЕ ОШИБКУ 406 Not Acceptable и не видите документ, то скорей всего у Вас IP РФ и его надо сменить, на любой другой страны, с помощью VPN ( Scribd и SlideShare блокируют посетителей с Российским IP).
Видео Audi Q5 замена цепи ГРМ и сцепления АКПП S Tronic 0B5 (Ауди Ку5 08-17)
AUDI Q5 общая информация (Ауди Кю5 2008-2017)
СНЯТИЕ НЕСУЩЕГО РЫЧАГА
Снять колесо. Снять шумоизоляцию. На а/м с датчиком дорожного просвета отвернуть гайку. Разъединить болтовое соединение. Открутить гайку пальца наконечника поперечной рулевой тяги до тех пор, пока она не встанет заподлицо с резьбой пальца.
При ослаблении в случае необходимости Для защиты резьбы оставить гайку на пальце привинченной на несколько оборотов. Выпрессовать наконечник поперечной рулевой тяги из корпуса подшипника ступицы с помощью съемника шарового шарнира. Затем открутить гайку. Следить, чтобы оба плеча рычага съемника в момент максимального приложения силы располагались параллельно друг к другу, при необходимости исправить положение.
Разъединить болтовое соединение. Чтобы извлечь болт, в зависимости от стороны а/м повернуть рулевой механизм до упора влево или вправо. Вывести несущий рычаг из крепления и отвести его назад. Вывернуть гайку пальца шарнира шаровой опоры так, чтобы она была заподлицо с резьбой пальца шарнира. При ослаблении в случае необходимости удерживать от проворачивания.
Выпрессовать палец шарнира рычага подвески с помощью съемника шарового шарнира из конического гнезда. Следить, чтобы оба плеча рычага съемника в момент максимального приложения силы располагались параллельно друг к другу, при необходимости исправить положение. При этом не повредить пыльник шарнира! Чтобы не повредить шарниры верхних рычагов подвески, необходимо, например, с помощью подъемника для двигателя и КП, обеспечить опору для корпуса подшипника ступицы против обратного хода амортизаторов. Скрутить гайку с пальца шарнира рычага подвески. Извлечь несущий рычаг.
Установка
Установка в обратном порядке. При этом нужно учитывать моменты затяжки. У сайлент-блоков ограниченный рабочий диапазон скручивания. Поэтому болтовые соединения подвески колес следует затягивать только тогда, когда а/м находится в положении без нагрузки или стандартном положении подвески. Поднять опору колеса при статическом положении подвески на а/м с винтовыми пружинами. При затягивании резьбового соединения несущий рычаг нужно поджимать к внутренней стороне а/м.
Удалить остатки клея с резьбы пальца шаровой опоры. У а/м с автомат, корректором фар выполнить базовую установку фар. После снятия и установки датчика уровня а/м или ослабления тяг на а/м с системой электронного регулирования демпфирования следует заново настроить стандартное положение подвески. После повторной адаптации положения регулировки на а/м с ассистентом движения по полосе следует выполнить повторную калибровку блока управления ассистента движения по полосе. Затянуть колесо. Необходимо отрегулировать углы установки колес.
СНЯТИЕ ШАРНИРА ПОДВЕСКИ
Снятие поперечного рычага. Вывернуть болт. Поместить уплотнительную шайбу или аналогичное уплотнение в паз корпуса ступичного подшипника (уплотнительная шайба или аналогичное уплотнение должны точно подходить для паза данной ширины). Вкрутить болт до касания им задней стороны уплотнительной шайбы или похожей детали. Вкрутить дальше болт (на пол-оборота), чтобы расширить шлиц корпуса подшипника ступицы. Извлечь шаровую опору из корпуса подшипника ступицы.
Установка
Установка в обратном порядке. При этом нужно учитывать следующее: вставить шарнир подвески до опорной поверхности в корпус подшипника ступицы.
Если шарнир подвески не будет касаться опорной поверхности, это может привести к повреждениям в области болтового соединения на корпусе подшипника ступицы. Установить несущий рычаг. Затянуть колесо. Необходимость регулировки углов установки.
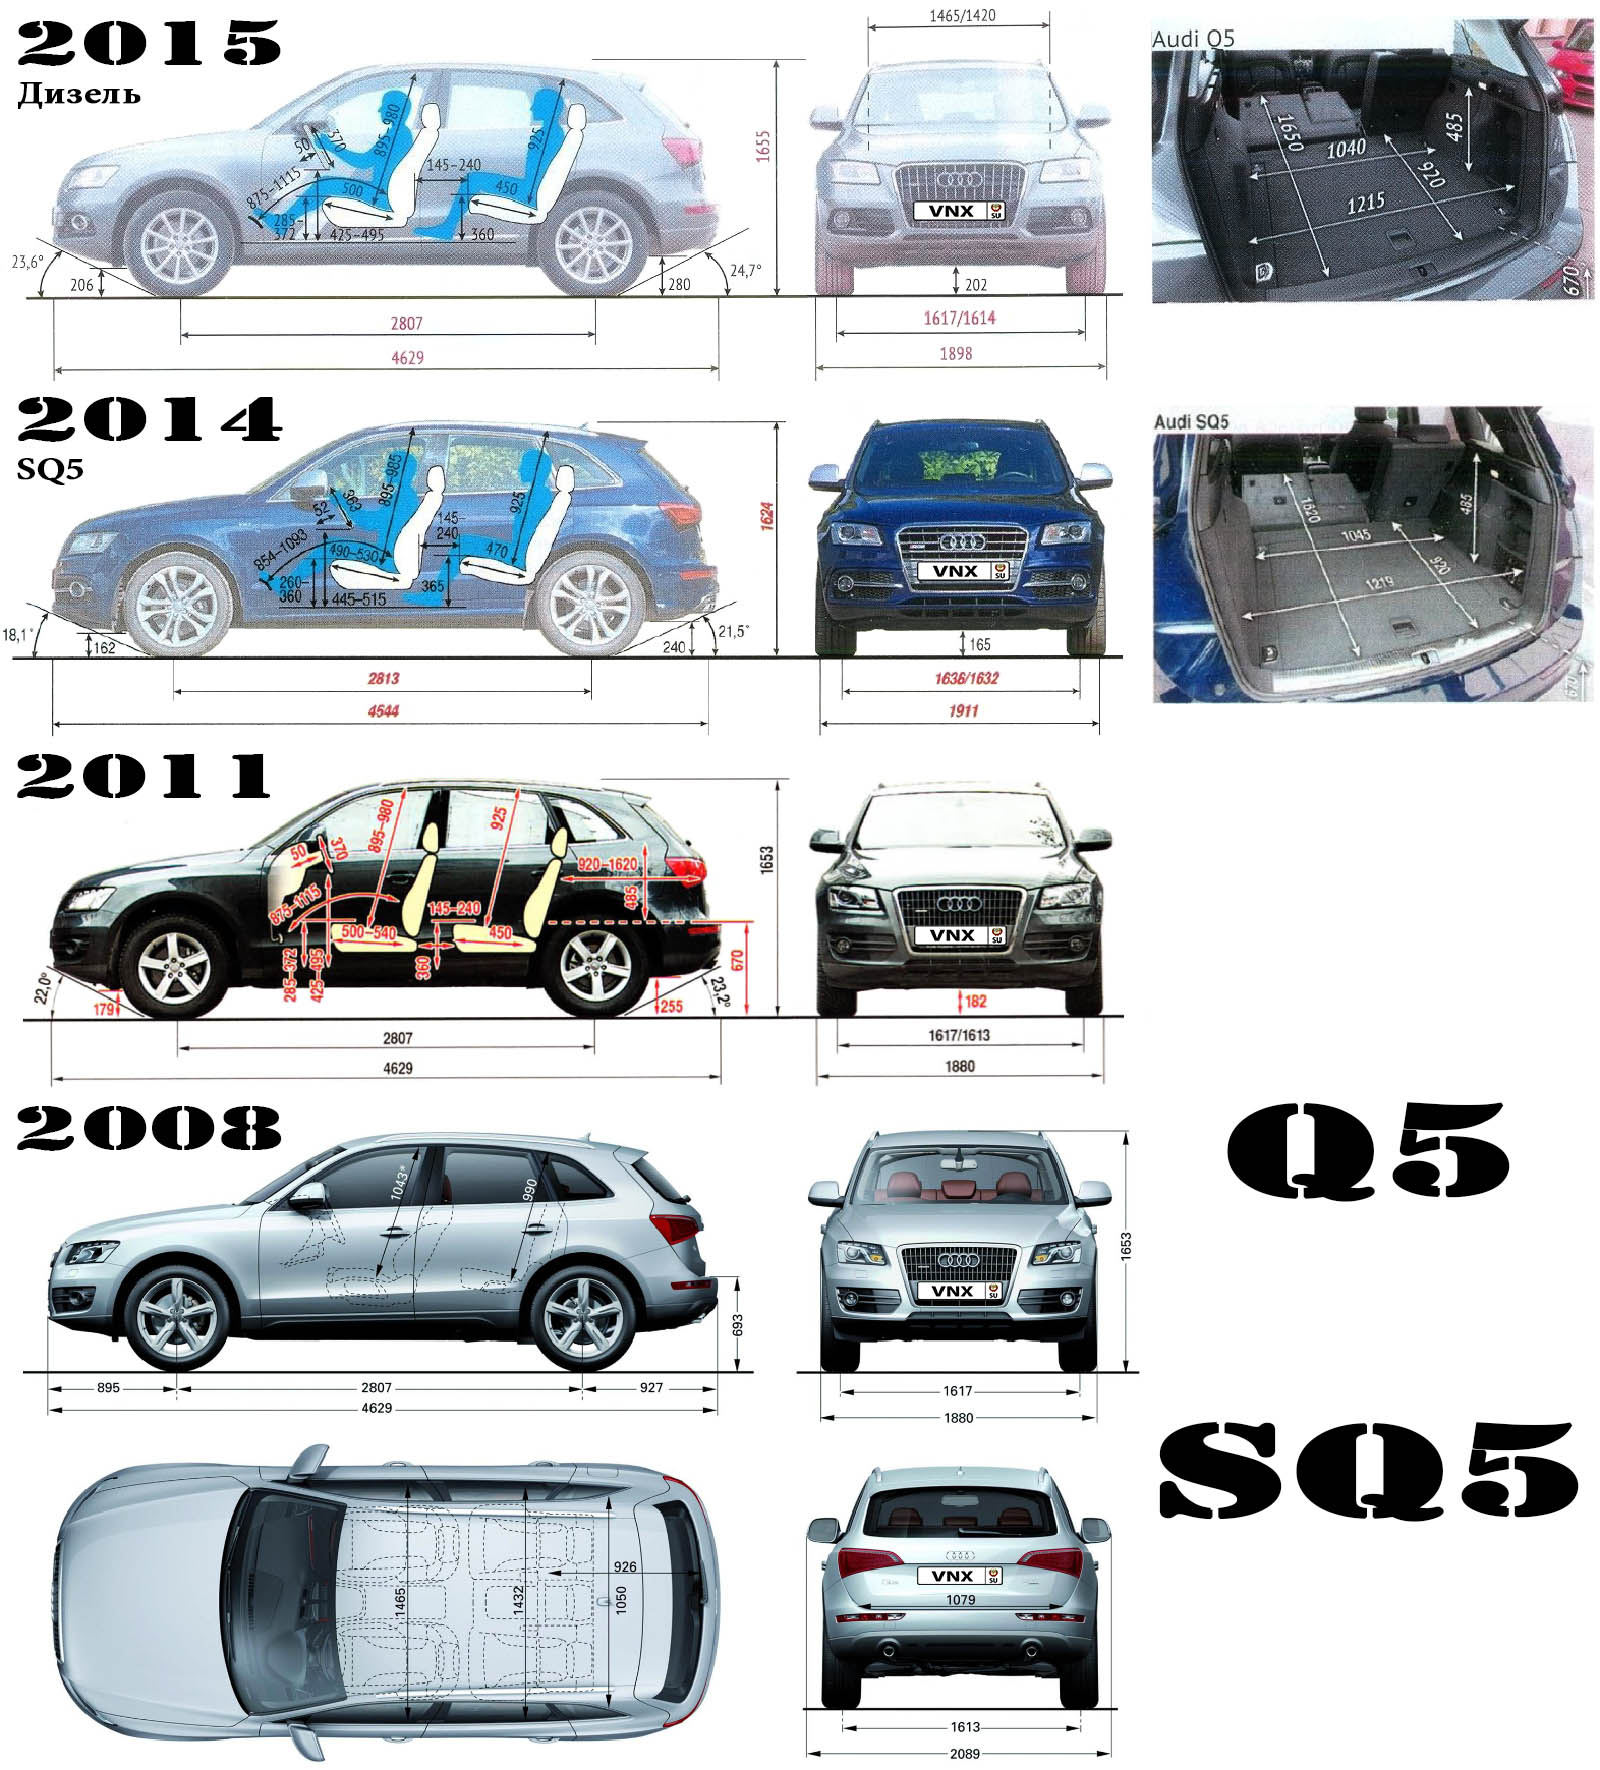
| № | Спецификация / Specs | Данные |
| Габариты (мм/mm) и масса (кг/kg) / Dimensions and Weight | ||
| 1 | Длина / Length | 4629 |
| 2 | Ширина (без/с зеркалами) / Width | 1880/2089 |
| 3 | Высота (загружен/пустой) / Height | 1653 |
| 4 | Колёсная база / Wheelbase | 2807 |
| 5 | Дорожный просвет (клиренс) / Ground clearance | 202⇒182 |
| 6 | Снаряжённая масса / Total (curb) weight | 1795 |
| Полная масса / Gross (max.) weight | 2375 | |
|
Двигатель / Engine |
||
| 7 | Тип / Engine Type, Code | Бензиновый, жидкостного охлаждения, четырехтактный, CALB |
| 8 | Количество цилиндров / Cylinder arrangement: Total number of cylinders, of valves | 6-цилиндровый, 24V, V-образный, DOHC с верхним расположением двух распредвалов |
| 9 | Диаметр цилиндра / Bore | 85.5 мм |
| 10 | Ход поршня / Stroke | 92.8 мм |
| 11 | Объём / Engine displacement | 3197 см³ |
| 12 | Система питания / Fuel supply, Aspiration | Распределенный впрыск топлива FSI «Simos 8.1» |
| Атмосферный | ||
| 13 | Степень сжатия / Compression ratio | 12.5:1 |
| 14 | Максимальная мощность / Max. output power kW (HP) at rpm | 199 кВт (270 л.с.) при 6500 об/мин |
| 15 | Максимальный крутящий момент / Max. torque N·m at rpm | 330 Нм при 3000-5000 об/мин |
|
Трансмиссия / Transmission |
||
| 16 | Сцепление / Clutch type | Два соосных мокрых многодисковых сцепления с электрогидравлическим приводом |
| 17 | КПП / Transmission type | 0B5 S tronic DSG7 «Direct Shift Gearbox» МКПП 7 Роботизированная механическая, семиступенчатая, преселективная |
О Книге
- Название: Автомобиль AUDI Q5 с 2008 г. Руководство по эксплуатации, ремонту и техническому обслуживанию
- Бензиновые двигатели: CDNB/CDNC/CAEB 2.0 л (1984 см³) 180-211 л.с./132-155 кВт, CALB 3.2 л (3197 см³) 270 л.с./199 кВт и турбодизельными CAGB/CAGA/CAHB/CGLA/CAHA/CGLB 2.0 л (1968 см³) 136-143-163-170 л.с./100-105-120-125 кВт, CCWB/CCWA 3.0 л (2967 см³) 211-240 л.с./155-176 кВт
- Выпуск с 2008 года
- Серия: «Ремонт Автомобилей»
- Год издания: 2013
- Автор: Коллектив авторов
- Издательство: «Ассоциация независимых издателей»
- Формат: PDF
- Страниц в книге: 761
- Размер: 482.46 МБ
- Язык: Русский
- Количество электросхем: более 60