Box2D is a 2D rigid body simulation library for games. Programmers can use it in their games to make objects move in realistic ways and make the game world more interactive. From the game engine’s point of view, a physics engine is just a system for procedural animation.
Box2D is written in portable C++. Most of the types defined in the engine begin with the b2 prefix. Hopefully this is sufficient to avoid name clashing with your game engine.
Prerequisites
In this manual I’ll assume you are familiar with basic physics concepts, such as mass, force, torque, and impulses. If not, please first consult Google search and Wikipedia.
Box2D was created as part of a physics tutorial at the Game Developer Conference. You can get these tutorials from the download section of box2d.org.
Since Box2D is written in C++, you are expected to be experienced in C++ programming. Box2D should not be your first C++ programming project! You should be comfortable with compiling, linking, and debugging.
Caution: Box2D should not be your first C++ project. Please learn C++ programming, compiling, linking, and debugging before working with Box2D. There are many resources for this on the net.
Scope
This manual covers the majority of the Box2D API. However, not every aspect is covered. Please look at the testbed included with Box2D to learn more.
This manual is only updated with new releases. The latest version of Box2D may be out of sync with this manual.
Feedback and Bugs
Please file bugs and feature requests here: Box2D Issues
You can help to ensure your issue gets fixed if you provide sufficient detail. A testbed example that reproduces the problem is ideal. You can read about the testbed later in this document.
There is also a Discord server and a subreddit for Box2D.
Core Concepts
Box2D works with several fundamental concepts and objects. We briefly define these objects here and more details are given later in this document.
shape
A shape is 2D geometrical object, such as a circle or polygon.
rigid body
A chunk of matter that is so strong that the distance between any two bits of matter on the chunk is constant. They are hard like a diamond. In the following discussion we use body interchangeably with rigid body.
fixture
A fixture binds a shape to a body and adds material properties such as density, friction, and restitution. A fixture puts a shape into the collision system (broad-phase) so that it can collide with other shapes.
constraint
A constraint is a physical connection that removes degrees of freedom from bodies. A 2D body has 3 degrees of freedom (two translation coordinates and one rotation coordinate). If we take a body and pin it to the wall (like a pendulum) we have constrained the body to the wall. At this point the body can only rotate about the pin, so the constraint has removed 2 degrees of freedom.
contact constraint
A special constraint designed to prevent penetration of rigid bodies and to simulate friction and restitution. You do not create contact constraints; they are created automatically by Box2D.
joint
This is a constraint used to hold two or more bodies together. Box2D supports several joint types: revolute, prismatic, distance, and more. Some joints may have limits and motors.
joint limit
A joint limit restricts the range of motion of a joint. For example, the human elbow only allows a certain range of angles.
joint motor
A joint motor drives the motion of the connected bodies according to the joint’s degrees of freedom. For example, you can use a motor to drive the rotation of an elbow.
world
A physics world is a collection of bodies, fixtures, and constraints that interact together. Box2D supports the creation of multiple worlds, but this is usually not necessary or desirable.
solver
The physics world has a solver that is used to advance time and to resolve contact and joint constraints. The Box2D solver is a high performance iterative solver that operates in order N time, where N is the number of constraints.
continuous collision
The solver advances bodies in time using discrete time steps. Without intervention this can lead to tunneling.
Box2D contains specialized algorithms to deal with tunneling. First, the collision algorithms can interpolate the motion of two bodies to find the first time of impact (TOI). Second, there is a sub-stepping solver that moves bodies to their first time of impact and then resolves the collision.
Modules
Box2D is composed of three modules: Common, Collision, and Dynamics. The Common module has code for allocation, math, and settings. The Collision module defines shapes, a broad-phase, and collision functions/queries. Finally the Dynamics module provides the simulation world, bodies, fixtures, and joints.
Units
Box2D works with floating point numbers and tolerances have to be used to make Box2D perform well. These tolerances have been tuned to work well with meters-kilogram-second (MKS) units. In particular, Box2D has been tuned to work well with moving shapes between 0.1 and 10 meters. So this means objects between soup cans and buses in size should work well. Static shapes may be up to 50 meters long without trouble.
Being a 2D physics engine, it is tempting to use pixels as your units. Unfortunately this will lead to a poor simulation and possibly weird behavior. An object of length 200 pixels would be seen by Box2D as the size of a 45 story building.
Caution: Box2D is tuned for MKS units. Keep the size of moving objects roughly between 0.1 and 10 meters. You’ll need to use some scaling system when you render your environment and actors. The Box2D testbed does this by using an OpenGL viewport transform. DO NOT USE PIXELS.
It is best to think of Box2D bodies as moving billboards upon which you attach your artwork. The billboard may move in a unit system of meters, but you can convert that to pixel coordinates with a simple scaling factor. You can then use those pixel coordinates to place your sprites, etc. You can also account for flipped coordinate axes.
Another limitation to consider is overall world size. If your world units become larger than 2 kilometers or so, then the lost precision can affect stability.
Caution: Box2D works best with world sizes less than 2 kilometers. Use b2World::ShiftOrigin to support larger worlds.
If you need to have a larger game world, consider using b2World::ShiftOrigin to keep the world origin close to your player. I recommend to use grid lines along with some hysteresis for triggering calls to ShiftOrigin. This call should be made infrequently because it is has CPU cost. You may need to store a physics offset when translating between game units and Box2D units.
Box2D uses radians for angles. The body rotation is stored in radians and may grow unbounded. Consider normalizing the angle of your bodies if the magnitude of the angle becomes too large (use b2Body::SetTransform).
Caution: Box2D uses radians, not degrees.
Changing the length units
Advanced users may change the length unit modifying b2_lengthUnitsPerMeter. You can avoid merge conflicts by defining B2_USER_SETTINGS and providing b2_user_settings.h. See the file b2_settings.h for details.
Factories and Definitions
Fast memory management plays a central role in the design of the Box2D API. So when you create a b2Body or a b2Joint, you need to call the factory functions on b2World. You should never try to allocate these types in another manner.
There are creation functions:
And there are corresponding destruction functions:
When you create a body or joint, you need to provide a definition. These definitions contain all the information needed to build the body or joint. By using this approach we can prevent construction errors, keep the number of function parameters small, provide sensible defaults, and reduce the number of accessors.
Since fixtures (shapes) must be parented to a body, they are created and destroyed using a factory method on b2Body:
There is also shortcut to create a fixture directly from the shape and density.
Factories do not retain references to the definitions. So you can create definitions on the stack and keep them in temporary resources.
Box2d
Box2d is a 2d physics simulation library written for C++ and ported to many languages including Javascript.
From Box2d’s Website
Box2D is a feature rich 2D rigid body physics engine, written in C++ by Erin Catto. It has been used in many games, including Crayon Physics Deluxe, winner of the 2008 Independant Game Festival Grand Prize.
Box2d can is used to develop 2d games in various languages. In this tutorial we shall use the Box2d library to write a simple Hello World program.
We shall use the Box2d Javascript port from http://code.google.com/p/box2dweb/. It used version Box2d ver. 2.1 (at the time of writing this article).
Demo
Lets first take a look at what we shall be making in this tutorial. Try clicking anywhere in the white area and a solid object would be created at the point and fall down. The fall would be realistic.
Code
Components of a Box2d Animation
Any Box2d animation or say environment has some components :
1. A World
2. Some Gravity — It can be in any direction , or even absent (like deep space).
3. Some real objects that have properties like density , friction , restitution etc
In the above demo if you click somewhere , objects would appear and start falling down. So the whole area is a world which has a downward gravity (10 m/s2 in this case). And whatever is falling and staying fixed , are objects.
Code
World :
function createWorld()
{
	//Gravity vector x, y - 10 m/s2 - thats earth!!
	var gravity = new b2Vec2(0, -10);

	world = new b2World( gravity , true );
	createGround(world);

	return world;
}
The b2World is a Box2d world, where objects exist and interact with each other. The gravity parameter is a vector which indicates the force magnitude and direction.
Tip :

If you are developing a super mario kind of game then you need a world with normal gravity, so that things fall downwards by default.

If you are writing a car racing game where car move in any direction, then you need to remove the gravity.
Ground :
function createGround(world)
{
	var bodyDef = new b2BodyDef();

	fixDef = new b2FixtureDef;
	fixDef.density = 1.0;
	fixDef.friction = 1.0;
	fixDef.restitution = 0.5;

	fixDef.shape = new b2PolygonShape;

	fixDef.shape.SetAsBox(4.00 , .30);

	bodyDef.position.Set(4.10 , 4.70);

	return world.CreateBody(bodyDef).CreateFixture(fixDef);
}
Ground is a rectangular object , that stays fixed at a place and serves as a ground where other things can fall.
Every object in Box2d has the following parts :
1. Fixture — Defines properties like friction , restitution , density
2. Shape — 2d geometrical shape. Can be circle or polygon (set of vertices).
3. Body — Defines the point where the object is and what is its type — dynamic , static or kinetic
Type of bodies
In box2d there are 3 kinds of bodies
1. Static - These stay fixed at a place and do not move. Like a wall or the floor

2. Kinematic - These move according to their velocity and do not respond to forces acting on it.

3. Dynamic - These are the bodies that move in the simulation according to the forces acting on it. Like the game characters. Dynamic bodies can collide with all other kinds of bodies.
Scale
Box2d uses the unit metre to measure its world and the objects within. Things should be between 0.1 — 10 metre for proper simulation. When drawing on screen , a certain scale is needed to convert from metre to pixels. Over here I have used a scale of 100 , which means , an item 1 metre wide would be drawn as 100 pixels wide.
Simulation
Once everything is setup , its time to make Box2d «run» the world or make it become live. This is achieved by calling the Step method of the world object.
function step(cnt)
{
	//fps = 60 , time steps
	var fps = 60;
	var timeStep = 1.0/fps;

	//move the world ahead , step ahead man!!
	world.Step(timeStep , 8 , 3);
	world.ClearForces();

	//first clear the canvas
	ctx.clearRect( 0 , 0 , canvas_width, canvas_height );

	//redraw the world
	draw_world(world , ctx);

	//call this function again after 10 seconds
	setTimeout('step(' + (cnt || 0) + ')', 10);
}
The world.Step method takes 3 parameters — timestep , velocity iterations , position iterations
The timestep indicates , how much time the world should move ahead by , say 1 second or 0.1 second.
The step method is called again and again using setTimeout so that the world keeps on moving. As the world moves the position , velocity etc of all bodies change according to the laws of physics.
Drawing Shapes
Box2d provides a debugdraw function to draw shapes. It draw the bodies according to their shapes and also marks the radius of circles and joints if any.
First a b2DebugDraw object is created that the box2d world can use to draw itself to.
//setup debug draw
var debugDraw = new b2DebugDraw();
debugDraw.SetSprite(document.getElementById("canvas").getContext("2d"));
debugDraw.SetDrawScale(scale);
debugDraw.SetFillAlpha(0.5);
debugDraw.SetLineThickness(1.0);
debugDraw.SetFlags(b2DebugDraw.e_shapeBit | b2DebugDraw.e_jointBit);

world.SetDebugDraw(debugDraw);
The SetSprite function of b2DebugDraw needs the context to draw on. The scale is the conversion factor that converts box2d units to pixel. A scale of 50 means that 1 metre in box2d would be draw as 50 pixels on the canvas.
There are a few more properties to set the details of which can be found in the documentation.
Now whenever the world needs to draw itself, it can do the following
//convert the canvas coordinate directions to cartesian
ctx.save();
ctx.translate(0 , canvas_height);
ctx.scale(1 , -1);
world.DrawDebugData();
ctx.restore();
The line of interest is only world.DrawDebugData(), however there are few more things that we have done to the canvas context. Most important is the change of coordinate system. Box2d works in cartesian coordinate system which is like a graph with x axis increasing positively rightwards and y axis increasing positively upwards. And the origin is lower left corner.
However the canvas has a different coordinate system. In the canvas the x axis increases to right as usual, but the y axis increases downwards. Means upwards it is negative. And the origin is the top left corner.
To fix this we used a quick trick to make the canvas change its rules.
ctx.translate(0 , canvas_height);
ctx.scale(1 , -1);
The translate brings the origin to the lower left corner. That could be somewhere near 0,500 (in canvas coordinates). The scale changes the direction of the y axis to its opposite, that is, it starts increasing upwards. Now the canvas is more like a cartesian coordinate graph and objects draw would appear correct.
Feel free to experiment with this and see the results.
Final Code
/**
	Box2d basics, uses debugdraw
	Silver Moon
	[email protected]
*/

//Global classnames from Box2d namespace
var b2Vec2 = Box2D.Common.Math.b2Vec2
	, b2AABB = Box2D.Collision.b2AABB
	, b2BodyDef = Box2D.Dynamics.b2BodyDef
	, b2Body = Box2D.Dynamics.b2Body
	, b2FixtureDef = Box2D.Dynamics.b2FixtureDef
	, b2Fixture = Box2D.Dynamics.b2Fixture
	, b2World = Box2D.Dynamics.b2World
	, b2MassData = Box2D.Collision.Shapes.b2MassData
	, b2PolygonShape = Box2D.Collision.Shapes.b2PolygonShape
	, b2CircleShape = Box2D.Collision.Shapes.b2CircleShape
	, b2DebugDraw = Box2D.Dynamics.b2DebugDraw
	, b2Shape = Box2D.Collision.Shapes.b2Shape
	, b2Joint = Box2D.Dynamics.Joints.b2Joint
	, b2Settings = Box2D.Common.b2Settings
	;

var world;
var ctx;
var canvas_width;
var canvas_height;

//box2d to canvas scale , therefor 1 metre of box2d = 100px of canvas :)
var scale = 100;

/*
	Draw a world
	this method is called in a loop to redraw the world
*/
function draw_world(world, context)
{
	//first clear the canvas
	ctx.clearRect( 0 , 0 , canvas_width, canvas_height );

	ctx.fillStyle = '#FFF4C9';
	ctx.fillRect(0,0, canvas_width, canvas_height);

	//convert the canvas coordinate directions to cartesian
	ctx.save();
	ctx.translate(0 , canvas_height);
	ctx.scale(1 , -1);
	world.DrawDebugData();
	ctx.restore();

	ctx.font = 'bold 18px arial';
	ctx.textAlign = 'center';
	ctx.fillStyle = '#000000';
	ctx.fillText("Box2d Hello World Example", 400, 20);
	ctx.font = 'bold 14px arial';
	ctx.fillText("Click the screen to add more objects", 400, 40);
}

//Create box2d world object
function createWorld()
{
	//Gravity vector x, y - 10 m/s2 - thats earth!!
	var gravity = new b2Vec2(0, -10);

	world = new b2World(gravity , true );

	//setup debug draw
	var debugDraw = new b2DebugDraw();
	debugDraw.SetSprite(document.getElementById("canvas").getContext("2d"));
	debugDraw.SetDrawScale(scale);
	debugDraw.SetFillAlpha(0.5);
	debugDraw.SetLineThickness(1.0);
	debugDraw.SetFlags(b2DebugDraw.e_shapeBit | b2DebugDraw.e_jointBit);

	world.SetDebugDraw(debugDraw);

	//createGround(world);
	ground = createBox(world, 4, 1, 4 , 0.5, {type : b2Body.b2_staticBody});

	return world;
}

//Create a ground below the hellow world boxes
function createGround(world)
{
	var bodyDef = new b2BodyDef();

	var fixDef = new b2FixtureDef();
	fixDef.density = 1.0;
	fixDef.friction = 1.0;
	fixDef.restitution = 0.5;

	fixDef.shape = new b2PolygonShape;

	//mention half the sizes
	fixDef.shape.SetAsBox(4.00 , .5);

	//set the position of the center
	bodyDef.position.Set(4.10 , 1);

	return world.CreateBody(bodyDef).CreateFixture(fixDef);
}

//Function to create a ball
function createBall(world, x, y, r, options)
{
	var body_def = new b2BodyDef();
	var fix_def = new b2FixtureDef;

	fix_def.density = 1.0;
	fix_def.friction = 0.5;
	fix_def.restitution = 0.5;

	var shape = new b2CircleShape(r);
	fix_def.shape = shape;

	body_def.position.Set(x , y);

	body_def.linearDamping = 0.0;
	body_def.angularDamping = 0.0;

	body_def.type = b2Body.b2_dynamicBody;
	body_def.userData = options.user_data;

	var b = world.CreateBody( body_def );
	b.CreateFixture(fix_def);

	return b;
}

//Create some elements
function createHelloWorld()
{
	// H
	createBox(world, .5 , 2.2, .1, .2);

	createBox(world, .9 , 2.2 , .1, .2);
	createBox(world, .7 , 1.95 , .3, .05);
	createBox(world, .5 , 1.7 , .1 , .2);
	createBox(world, .9 , 1.7 , .1 , .2);
}

//Create standard boxes of given height , width at x,y
function createBox(world, x, y, width, height, options)
{
	 //default setting
	options = $.extend(true, {
		'density' : 1.0 ,
		'friction' : 1.0 ,
		'restitution' : 0.5 ,

		'linearDamping' : 0.0 ,
		'angularDamping' : 0.0 ,

		'type' : b2Body.b2_dynamicBody
	}, options);

    var body_def = new b2BodyDef();
	var fix_def = new b2FixtureDef();

	fix_def.density = options.density;
	fix_def.friction = options.friction;
	fix_def.restitution = options.restitution;

	fix_def.shape = new b2PolygonShape();

	fix_def.shape.SetAsBox( width , height );

	body_def.position.Set(x , y);

	body_def.linearDamping = options.linearDamping;
	body_def.angularDamping = options.angularDamping;

	body_def.type = options.type;
	body_def.userData = options.user_data;

	var b = world.CreateBody( body_def );
	var f = b.CreateFixture(fix_def);

	return b;
}

/*
	This method will draw the world again and again
	called by settimeout , self looped
*/
function step()
{
	var fps = 60;
	var timeStep = 1.0/fps;

	//move the world ahead , step ahead man!!
	world.Step(timeStep , 8 , 3);
	world.ClearForces();

	draw_world(world, ctx);
}

/*
	Convert coordinates in canvas to box2d world
*/
function get_real(p)
{
	return new b2Vec2(p.x + 0, 6 - p.y);
}

// main entry point
$(function()
{
	var canvas = $('#canvas');
	ctx = canvas.get(0).getContext('2d');

	//first create the world
	world = createWorld();

	//get internal dimensions of the canvas
	canvas_width = parseInt(canvas.attr('width'));
	canvas_height = parseInt(canvas.attr('height'));

	//create the hello world boxes in the world
	createHelloWorld();

	//click event handler on our world
	canvas.click( function(e)
	{
		var p = get_real(new b2Vec2(e.clientX / scale, e.clientY / scale));

		//create shape
		if (Math.random() > 0.5)
		{
			//Square box
			createBox(world, p.x , p.y , .1 , .1);
		}
		else
		{
			//circle
			createBall(world, p.x , p.y, 0.2, {'user_data' : {'fill_color' : 'rgba(204,100,0,0.3)' , 'border_color' : '#555' }});
		}
	});

	 window.setInterval(step, 1000 / 60);
});
Next …
Box2d is a tried and tested library that has been used to develop many popular games like Angry Birds. It is very easy to write a complete game using just box2d and a few graphic sprites. If you wish to build an html5 game with real-world like physics then give box2d a try.
В этой статье описывается библиотека Box2D для C++, которая используется для моделирования физики в реальном времени в 2D играх.
Содержание
- 1 Физика 2d с помощью библиотеки Box2d
- 2 Несколько базовых определений
- 3 Ваша первая симуляция!
- 4 Как работает Box2d?
Физика 2d с помощью библиотеки Box2d
Box2d – это библиотека, написанная на C++, которая позволяет создавать очень реалистичные симуляции двухмерного мира.
Его преимущества – скорость и тот факт, что его можно использовать без каких-либо (выдающихся) навыков физики 😛
Он также имеет порты для других языков (включая Java, JavaScript и Flash).
С помощью Box2d было написано множество игр, включая очень популярную Angry Birds! (Когда вы немного узнаете о боксе, вы поймете, что они вовсе не так уж усердно над ним работали. Все благодаря Box2d!).
Библиотеку можно скачать отсюда: https://code.google.com/p/box2d/downloads/detail?name=Box2D_v2.3.0.7z&can=2&q=
Более новые версии библиотеки могут быть размещены на других серверах.
Несколько базовых определений
- Жесткое тело – тело, которое не может изменить свою форму. Все тела, моделируемые Box2d, являются жесткими телами.
- ограничение (сустава) – действие, которое ограничивает движение тела в той или иной степени
- Статическое тело – тело, не имеющее массы (или имеющее бесконечную массу). На него не действуют никакие силы (включая гравитацию). Он сталкивается с динамическими телами. Он не может самостоятельно изменить свое положение.
- Кинематическое тело – тело, не имеющее массы (или имеющее бесконечную массу). На него не действуют никакие силы (включая гравитацию). Он сталкивается с динамическими телами. Когда ему придается скорость, он не меняет своей скорости.
- Динамическое тело – “нормальное” тело. Оно имеет массу, на него действуют все силы, оно сталкивается со всеми другими телами
Ваша первая симуляция!
Простейший пример симуляции Box2d.
Программа имитирует падение блока на платформу, висящую в воздухе.
Обсуждайте в комментариях.
Code language: PHP (php)
#include <Box2d/Box2d.h> // прикрепляем заголовок // не забывайте о правильных либах! int main() { b2World world( b2Vec2( 0.0f, - 10.0f ) ); // создадим мир с гравитацией 10, направленной вниз. //// // теперь мы создадим "землю" как статичное тело - она будет "висеть" на месте b2BodyDef groundDef; // тела по умолчанию статичны groundDef.position.Set( 0.0f, - 10.0f ); // регулировка положения тела b2Body * ground = world.CreateBody( & groundDef ); // здесь мы создаем тело. Ему еще не присвоена форма. b2PolygonShape groundShape; // и поэтому мы делаем его groundShape.SetAsBox( 100.0f / 2, 20.0f / 2 ); // и задается в виде прямоугольника со сторонами 100 и 20 ground->CreateFixture( & groundShape, 1.0f ); // ...а затем подключаем его к телу. Второй параметр - плотность. //// // мы создаем падающий "блок" как динамическое тело - он сможет нормально двигаться и падать b2BodyDef boxDef; boxDef.type = b2_dynamicBody; // нам нужно сообщить Box2d, что тело должно быть динамическим boxDef.position.Set( 0.0f, 4.0f ); // как и прежде b2Body * box = world.CreateBody( & boxDef ); // любой b2PolygonShape boxShape; boxShape.SetAsBox( 2.0f / 2, 2.0f / 2 ); // как и раньше // Далее мы создадим форму для блока // мы хотим установить дополнительные параметры, такие как трение, поэтому нам нужно использовать более длинный метод, чем раньше b2FixtureDef boxFixDef; // создаем определение фикции (фрагмента тела) boxFixDef.shape = & boxShape; // задаем форму... boxFixDef.density = 1.0f; // ... плотность... boxFixDef.friction = 0.3f; // ... и трение box->CreateFixture( & boxFixDef ); // создаем фикцию. // Отлично, у нас готовы все элементы нашей симуляции! //// float time = 1.0f; // наш мир на секунду смоделирует int steps = 100.0f; // разделим симуляцию на 100 шагов float timeStep = time / steps; // поэтому мы будем обновлять физику каждые 1/100 секунды.. // Эти два значения влияют на точность моделирования. Чем больше число, тем точнее будет физика, но тем медленнее int velocityIt = 8, positionIt = 3; // Автор Box2d рекомендует значения 8 и 3, поэтому мы не будем их менять // Ну, вот и все.! for( int i = 0; i < steps; i++ ) { world.Step( timeStep, velocityIt, positionIt ); // вот волшебная линия. Вот симуляция нашего мира // мы используем уже рассчитанные значения b2Vec2 pos = box->GetPosition(); // получаем положение блока printf( " Шаг %i : %4.2f, %4.2f", i, pos.x, pos.y ); // и распечатываем его } // и все. Класс b2World сам позаботится об удалении наших творений:) }
Результат должен быть примерно таким:
Code language: CSS (css)
Шаг 0 : 0.00, 4.00 Шаг 1 : 0.00, 3.99 Шаг 2 : 0.00, 3.98 ... Шаг 97 : 0.00, 1.25 Шаг 98 : 0.00, 1.13 Шаг 99 : 0.00, 1.01
Только эта строка требует обсуждения:
Code language: JavaScript (javascript)
groundShape.SetAsBox( 100.0f / 2, 20.0f / 2 ); // и задается в виде прямоугольника со сторонами 100 и 20
Ну, метод SetAsBox() берет половину длины сторон прямоугольника. Об этом следует помнить.
Box2d-симуляция представлена миром – класс b2World.
К каждому миру можно добавить тела – класс b2Body (и привязки, но об этом подробнее позже).
Каждое тело состоит из так называемых фикстур – класс b2Fixture
Фигуры – это разные части одного тела. Им можно приписать трение, плотность и сопротивление.
Кроме того, каждый рисунок имеет свою собственную форму.
Фигуры в одном теле не могут перемещаться относительно друг друга.
Это означает, что фикции, прикрепленные к одному телу, движутся вместе.
Все классы Box2d имеют суффикс b2.
Box2d основан на концепции так называемой фабрики.
Это означает, что схема создания ребенка будет выглядеть следующим образом:
Code language: JavaScript (javascript)
Owner wl; // будущий владелец объекта cos classDef cosDef; // класс, содержащий все параметры, необходимые для создания класса Class // заполнение полей cosDef Class * cos = wl.addClass( cosDef ); // и здесь владелец выделяет и создает новый объект Class, используя значение из cosDef //... wl.destroyKlasa( cos ); // после этого владелец уничтожает и разбирается с этим объектом
Симуляция Box2d не является “непрерывной”, а аппроксимируется в дискретные моменты времени с помощью функции b2World::Step().
Обновляет симуляцию на заданное время (приращение времени с момента предыдущего вызова)
Итак, общий план программы, использующей Box2d, выглядит следующим образом:
Code language: JavaScript (javascript)
b2World world( /*...*/ ); // добавление тел, фикций и связей // инициализация других ресурсов программы while( /*...*/ ) // основной цикл { float deltaTime = /*...*/; // приращение времени (в секундах) world.Step( deltaTime, /*...*/ ); // Остальная часть логики программы/игры, рендеринг, обработка событий и т.д. }
Improve this doc
This series of tutorials will explain how to access and use various key features of the Box2D physics engine from within MOAI. It is assumed that you have been through the Moai Basics articles and at least some of the Platform Tutorials, and have at least a basic grasp of things like viewports, props, threads, etc.
Creating a Testbed
In order to learn about Box2D you’ll want to have an environment where you can play around with some of the features, so create a folder somewhere on your machine and place a blank main.lua file there, as well as a copy of cathead.png and the appropriate batch file for your operating system. If you’re unsure about any of this, just copy the contents of one of the Moai samples folders (i.e. anim-basic) into a new folder, blank out the main.lua file and alter the .bat or .sh file so that it points correctly to your Moai.exe.
Here are the first lines of your new main.lua, they should look pretty familiar by now:
----------------------------------------------------------------
--constants
----------------------------------------------------------------
STAGE_WIDTH = 500
STAGE_HEIGHT = 500

----------------------------------------------------------------
--window, viewport, layer
----------------------------------------------------------------
MOAISim.openWindow( "Box2D Testbed", STAGE_WIDTH, STAGE_HEIGHT )

viewport = MOAIViewport.new()
viewport:setSize( STAGE_WIDTH, STAGE_HEIGHT )
viewport:setScale( STAGE_WIDTH, STAGE_HEIGHT )

layer = MOAILayer2D.new()
layer:setViewport( viewport )
MOAISim.pushRenderPass( layer )
You’ll need some space to move objects around, so this window is a bit larger than the standard 320×480 size most of the samples use. Feel free to adjust these constants to whatever size makes sense for your development environment — of course if you do so you’ll also need to adjust the positions of objects so they are visible onscreen.
Optional : The Info Box
As you experiment with Box2D, you may want to be able to view information like object positions, rotations, and velocities in real time. One way to do this is with the code below, which will place a textbox in the upper left quadrant of your Moai window. Later on, you can call setString from within a loop or thread to keep the box populated with current data. Of course, if you have your own preferred solution for viewing debug info you are free to ignore this. Some parts of this tutorial series may prompt you to populate the info box, but these instructions won’t affect how the actual physics code works and you can safely ignore them if desired.
Here’s the code for setting up the info box. Don’t forget to grab the appropriate .ttf and put it in your project folder (the «textBox-alignment» sample folder in the SDK contains a copy of «arial-rounded.TTF» you can grab if you need a font):
----------------------------------------------------------------
--info box
----------------------------------------------------------------
charcodes = "ABCDEFGHIJKLMNOPQRSTUVWXYZabcdefghijklmnopqrstuvwxyz"
            .."0123456789 .,:;!?()&/-"

font = MOAIFont.new()
font:loadFromTTF( "arial-rounded.TTF", charcodes, 7.5, 163 )

infoBox = MOAITextBox.new()
infoBox:setFont( font )
infoBox:setTextSize( font:getScale())
infoBox:setString( "Ready" )
infoBox:setRect(-STAGE_WIDTH/2, 0, 0, STAGE_HEIGHT/2)
infoBox:setYFlip( true )
layer:insertProp( infoBox )
The Box2D World
To create a working Box2D physics simulation in your Moai project, the first thing you’ll need is a «world». A Box2D world is the «boss» entity of the physics simulation. It controls things like creating and removing bodies and joints, as well as gravity and the size and speed of the simulation. Here’s the world setup code:
----------------------------------------------------------------
--box2d world
----------------------------------------------------------------
world = MOAIBox2DWorld.new ()
world:setGravity( 0, -10 )
world:setUnitsToMeters( 1/30 )
world:start()
layer:setBox2DWorld( world )
Units to Meters is an important variable that controls the size of the simulation. Box2D works best on simulated objects between 0.1 and 10 meters in size, or as the manual puts it, «between soup cans and buses». You’ll want to adjust the UnitsToMeters setting until the average pixel size of the objects you are using translates roughly into simulated physics objects of an appropriate size. Not scaling your simulation properly will result in Box2D trying to apply billiard-ball style physics to objects it thinks are the size of ocean liners and office buildings, which will not produce the behavior you want.
This example world’s scale will be set at 30 units to one meter (the name setUnitsToMeters is a little misleading here; with a value of 1/30 it would make more sense as setMetersToUnits). When you create, for example, a circle with a radius of 20 pixels, what Box2D will see is a circle that is (diameter 40 pixels divided by 30 pixels per meter) one and one third meters across, which is a size that Box2D can handle comfortably. Keep in mind also that the only reason we can use «units» and «pixels» interchangeably is that our viewport scale is set to exactly the viewport’s size in pixels; if we were scaling the view we would have to account for that when determining how many pixels are in a meter.
Once you have your scale worked out, you can set the gravity value. Gravity is expressed as the x and y directional movement to be applied «per-second per-second» to each object in the scene that is subject to gravity (more on this under bodies, below). To make this example world fairly realistic, a value of around 10 makes sense (actual gravity is around 9.8 m/s2), and since your bodies are scaled to represent normal-sized objects, they should fall in a reasonably convincing manner.
Finally, world:start puts the simulation in motion, and setBox2DWorld applies the physics simulation to a rendering layer, so the physics objects will be drawn properly.
The Three Types Of Bodies
Bodies in Box2D come in three flavors: Static, Dynamic and Kinematic. Here’s the code to add one of each to your world:
----------------------------------------------------------------
--box2d bodies
----------------------------------------------------------------
--a static body
staticBody = world:addBody( MOAIBox2DBody.STATIC )
staticBody:setTransform( 0, -100 )
--a dynamic body
dynamicBody = world:addBody( MOAIBox2DBody.DYNAMIC )
dynamicBody:setTransform( -50, 0 )
--a kinematic body
kinematicBody = world:addBody ( MOAIBox2DBody.KINEMATIC )
kinematicBody:setTransform( 50, 0 )
If you add this code and run it, you should see … nothing. Why’s that? Well, a Box2D body is an intangible object. It cannot be drawn or interacted with. What you actually see and manipulate are Fixtures, which are attached to bodies and discussed below. So what are bodies? They are containers for information about the physics object, like position (that’s what setTransform is doing in the code above), angle, the speed at which its moving (in a line and/or rotating) and subtler things like inertia. We’ll get to manipulating these properties soon, but for now it’s enough that you understand that you don’t interact directly with bodies, and move on to putting something onscreen you can interact with.
The three types of bodies will make more sense once you see them in action, but for now here’s an overview: Static bodies do not move on their own. They can be placed using setTransform, but they don’t respond to gravity or collisions. Kinematic bodies are also impervious to being affected by other bodies, but they can move under their own power. With dynamic bodies, anything goes, and they will be affected by all forces and other objects they come into contact with, unless you specifically set them up to ignore some forces (doing so is discussed below).
Here’s a simple way to picture the three types: Suppose you are making a platformer game in Box2D. The ground beneath the player will probably be a Static body. The player and any monsters will be represented by dynamic bodies: they can interact and affect one another. A kinematic body would be used to create a floating platform that moves back and forth. It moves under its own power, but it is not affected by gravity or other forces, and there is nothing the player can do to affect its movement.
Fixtures
Time to get some fixtures on-screen. Enter the following code and run the program:
----------------------------------------------------------------
--box2d polys and fixtures
----------------------------------------------------------------
rectFixture = staticBody:addRect( -200, -15, 200, 15 )
circleFixture = dynamicBody:addCircle( 0, 0, 20 )
hexPoly = {
 -10, 20,
 -20, 0,
 -10, -20,
 10, -20,
 20, 0,
 10, 20,
}
hexFixture = kinematicBody:addPolygon( hexPoly )
If everything is in order, you should see a circle, a rectangle, and a hexagon. The circle, affixed to a dynamic body, should immediately drop until it encounters the rectangle, which is attached to the static body. The hexagon (kinematic body) should not move.
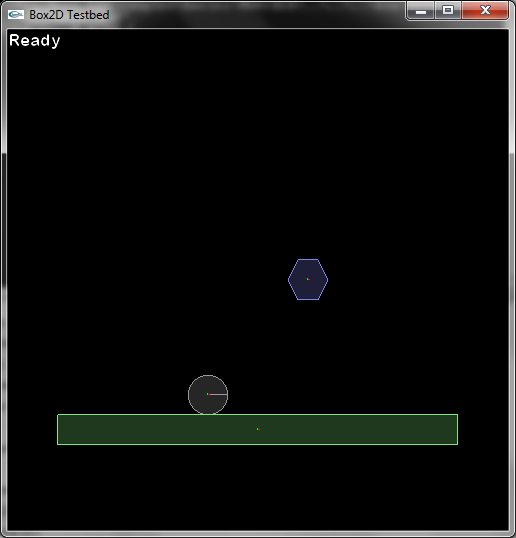
There are a number of things to note in this example. First, Moai provides you with the addRect and addCircle functions for creating simple shapes. For more complex shapes, you’ll need to create a polygon, as is done in the code above, by building a table containing the x and y values of each vertex of the polygon. Box2D only supports convex polygons, meaning that if you were walking around the outside of the polygon, you would always be turning in the same direction. Concave polygons are possible with a little extra code, and will be discussed later.
The parameters of addCircle and addRect control not only the size of the fixture, but the offset from the center of the body. Since multiple fixtures are possible on any body, you can use these offsets to create more complex shapes. For example, replace the previous code with the following code, and you’ll get an idea about how you can build more complex shapes using multiple fixtures:
----------------------------------------------------------------
--box2d polys and fixtures
----------------------------------------------------------------
rectFixture = staticBody:addRect( -200, -15, 200, 15 )
circleFixture = dynamicBody:addCircle( 0, 20, 20 )
hexPoly = {
  -10, 20,
  -20, 0,
  -10, -20,
  10, -20,
  20, 0,
  10, 20,
}
hexFixture = dynamicBody:addPolygon( hexPoly )

Another thing to note is that when your dynamic object hits the «floor» of a static object, it will dim out. The brighter color indicates that the body attached to that fixture is «active». Box2D is getting information about it every time the simulation moves forward by one «step». If the object is no longer moving on its own or being affected by any forces, Box2D will temporarily put that object in a «sleeping» state, in order to conserve processing power by only paying attention to objects currently in action. When something happens to that object, the simulation wakes it up and starts tracking it again. If for some reason you need an object to be permanently awake, you can make use of the setActive function to do this.
Keep in mind that what you are seeing here is the result of Box2D’s built in «debug draw» functionality. In your actual game, you will have props that are attached to your physics objects with setParent, and these luminous squares and circles will be invisible. Controlling the visibility of your physics simulation will be discussed in a future tutorial.
That ends this first article in the series, but there is lots more to learn before you are ready to create a game using Moai and Box2D. Take a moment or two to alter some of the variables in your code and see what kinds of things you can make happen. When you’re ready, continue on to the next tutorial. Below is the complete code from this first tutorial, it will be referenced as a starting point in future installments:
----------------------------------------------------------------
--constants
----------------------------------------------------------------
STAGE_WIDTH = 500
STAGE_HEIGHT = 500

----------------------------------------------------------------
--window, viewport, layer
----------------------------------------------------------------

--[[ DEBUG LINES
MOAIDebugLines.setStyle ( MOAIDebugLines.PROP_MODEL_BOUNDS, 2, 1, 1, 1 )
MOAIDebugLines.setStyle ( MOAIDebugLines.PROP_WORLD_BOUNDS, 2, 0.75, 0.75, 0.75 )
MOAIDebugLines.setStyle ( MOAIDebugLines.TEXT_BOX, 2, 1, 1, 1 )
 --]]

MOAISim.openWindow( "Box2D Testbed", STAGE_WIDTH, STAGE_HEIGHT )

viewport = MOAIViewport.new()
viewport:setSize( STAGE_WIDTH, STAGE_HEIGHT )
viewport:setScale( STAGE_WIDTH, STAGE_HEIGHT )

layer = MOAILayer2D.new()
layer:setViewport( viewport )
MOAISim.pushRenderPass( layer )

----------------------------------------------------------------
--info box
----------------------------------------------------------------
charcodes = "ABCDEFGHIJKLMNOPQRSTUVWXYZabcdefghijklmnopqrstuvwxyz"
            .. "0123456789 .,:;!?()&/-"

font = MOAIFont.new()
font:loadFromTTF( "arial-rounded.TTF", charcodes, 7.5, 163 )

infoBox = MOAITextBox.new()
infoBox:setFont( font )
infoBox:setTextSize( font:getScale ())
infoBox:setString( "Ready" )
infoBox:setRect(-STAGE_WIDTH/2, 0, 0, STAGE_HEIGHT/2)
infoBox:setYFlip( true )
layer:insertProp( infoBox )

----------------------------------------------------------------
--box2d world
----------------------------------------------------------------
world = MOAIBox2DWorld.new()
world:setGravity( 0, -10 )
world:setUnitsToMeters( .10 )
world:start()
layer:setBox2DWorld( world )

----------------------------------------------------------------
--box2d bodies
----------------------------------------------------------------
--a static body
staticBody = world:addBody( MOAIBox2DBody.STATIC )
staticBody:setTransform( 0, -150 )
--a dynamic body
dynamicBody = world:addBody( MOAIBox2DBody.DYNAMIC )
dynamicBody:setTransform( -50, 0 )
--a kinematic body
kinematicBody = world:addBody( MOAIBox2DBody.KINEMATIC )
kinematicBody:setTransform( 50, 0 )

----------------------------------------------------------------
--box2d polys and fixtures
----------------------------------------------------------------
rectFixture = staticBody:addRect( -200, -15, 200, 15 )
circleFixture = dynamicBody:addCircle( 0, 0, 20 )
hexPoly = {
  -10, 20,
  -20, 0,
  -10, -20,
  10, -20,
  20, 0,
  10, 20,
}
hexFixture = kinematicBody:addPolygon( hexPoly )
Время на прочтение
28 мин
Количество просмотров 23K
Вместо предисловия.
Я всегда любил и буду любить компьютерные игры. Есть в них какая-то своя внутренняя магия, которая всегда привлекает и завораживает одновременно. За всю свою жизнь я переиграл в десятки игр, начиная с ветеранов Wolfenstein и Dune 2 и заканчивая современными блокбастерами. И теперь, добивая очередной хит и наблюдая за финальным роликом и титрами, в голове все чаще и чаще мелькает мысть «А что, если?..»
А ведь действительно, что если взять и написать собственную игру? Конечно же понятно, что ААА-тайтл сделать в одиночку не получится, и это годы работы и прочая и прочая, но ведь осилит дорогу идущий? Так уж получилось, что в Desktop-программироании я откровенно слаб, и вариантов для практикующего веб-разработчика не так уж много. Но за последние годы все кардинально изменилось, и теперь уже у браузера много общего с кофеваркой, а javascript может спокойно удовлетворять даже нужды военных ведомств, не то что мои собственные.
Вот как раз во время очередных раздумий и достаточно серьезной простуды мне попалась на глаза статья о Box2d в игрологе Ant.Karlov’а. Зачитавшись и замечтавшись я очень быстро нашел JS-порт этой библиотеки, и старая шальная идея сделать что-то маленькое и, главное — свое, начала донимать меня с новыми силами.
В общем, меньше патетики, больше дела. Надеюсь, вам будет интересно. Да простят меня суровые боги за использование Angry Birds в КПДВ ^_^
Вводная и Disclaimer
Конечная цель всего цикла заметок — сделать полноценный клон Angry Birds, как минимум с 3-мя видами метательного оружия и 5-ю разными уровнями. Да, их и так уже достаточно, и в разных компоновках, и даже самой Angry Birds как минимум 3 версии, но нужно же на чем-то практиковаться? В процессе я постараюсь затронуть все аспекты — сам физический движок, работу с растровой графикой, редактор уровней (а он обязательно понадобится), обвязку в виде меню/credits’ов/настроек, звук и музыку и еще тысячу важных мелочей. Всего этого у меня, на самом деле, самого еще нет, но в процессе написания я буду рассказывать здесь, что и как у меня получилось сделать и к чему это привело.
Некоторые особо длинные куски кода я буду показывать троеточиями. Для особо нетерпеливых в конце заметки есть ссылка на работающий пример.
Единственное но — я не профессиональный гейм-девелопер, многие шаги мне даются при помощи очень больших целебных граблей и набиванием болючих шишек, так что, если я где-то ошибусь — не судите строго и не закидывайте помидорами.
Поехали!
Итак, приступим. Первое, что нам нужно — это создать мир игры, наполнить его тестовым уровнем и попробовать бросить первую «птицу» в первую «свинью». Поскольку в самой Angry Birds мы видели псевдо-реальную физику — нам понадобится физический движок, который будет занят обработкой столкновений и перемещениями птиц, свиней и прочих объектов по игровому миру.
В качестве физического движка я выбрал Box2d по нескольким причинам:
1. У него достаточно сильное Flash-комьюнити, где можно попросить помощи или совета.
2. Библиотека Box2dWeb, которую я решил использовать — прямой порт Box2dAS, так что API Reference, как минимум, уже есть.
3. Достаточно полезной информации, правда на антимонгольском, о процессе разработки и внутренностях движка.
4. Ну и, конечно же, сотни успешных применений.
В общем и целом, движок у нас есть — теперь нужно примерно представить все, что нам нужно и создать наш маленькмй и уютненький мир. Начнем мы, пожалуй, с небольшой HTML-заготовки. Забросим на страничку canvas и создадим базовый объект нашей игры.
<html>
<head>
<title>Angry Birds WRYYYYYYYY!!!!</title>
<script src=«/js/jquery.js» type=«text/javascript»></script>
<script src=«/js/box2d.js» type=«text/javascript»></script><script>
$(document).ready(function(){
new Game();
});
</script>
<body>
<canvas id=«canvas» width=«800» height=«600» style=»background-color:#333333;» ></canvas>
</body>
<script type=«text/javascript»>
Game = function() {
…
}
</script>
</html>
Замечательно, у нас есть шаблон для дальнейших экспериментов. Теперь нужно создать физический мир и начать активно использовать Box2d. Этим мы и займемся.
Game = function() {//Я решил сразу обозначить типы объектов константами
const PIG = 1;
const BIRD = 2;
const PLANK = 3;//Флаг, который нам понадобится при обработке «броска».
isMouseDown = false;//Будущая «резинка» для виртуальной рогатки
mouseJoint = false;//Используется в процессе обработки броска
body = false;
mousePosition = {x:0,y:0};// Все необходимые ресурсы для наших текущих нужд.
// Решил сразу переопределить, чтобы не городить километры непонятного и нечитаемого кода.
// Значение каждого ресурса я попытаюсь объяснить далее в заметке.
b2AABB = Box2D.Collision.b2AABB;
b2World = Box2D.Dynamics.b2World;
b2Vec2 = Box2D.Common.Math.b2Vec2;
b2DebugDraw = Box2D.Dynamics.b2DebugDraw;
b2Body = Box2D.Dynamics.b2Body;
b2BodyDef = Box2D.Dynamics.b2BodyDef;
b2FixtureDef = Box2D.Dynamics.b2FixtureDef;
b2PolygonShape = Box2D.Collision.Shapes.b2PolygonShape;
b2CircleShape = Box2D.Collision.Shapes.b2CircleShape;
b2MouseJointDef = Box2D.Dynamics.Joints.b2MouseJointDef;
b2ContactListener = Box2D.Dynamics.b2ContactListener;// Создаем наш мир.
world = new b2World(
new b2Vec2(0, 10) // Вектор гравитации.
,true // doSleep флаг.
);
init= function() { // Инициализация всего в нашем мире, вызывается при создании объекта
…
}
init();
}
Немного подробнее хотелось бы остановиться на параметрах нашего мира. Первый — это вектор гравитации. Box2d достаточно подробно моделирует физику окружающего мира, поэтому без влияния гравитации тут не обошлось. У нас этим вектором задается ускорение свободного падения, равное 10 виртуальным метрам в секунду по оси Y. Второй параметр: doSleep, разрешает не обсчитывать в текущий момент неактивные элементы. Это очень сильно сказывается на скорости работы и я не советую менять этот параметр.
Так же бы хотелось добавить, что Box2d по умолчанию использует систему координат с началом в левом верхнем углу.
Думаю, все присутствующие здесь в курсе, что обработка экранного полотна в любой игре происходит покадрово, не исключение в этом и Box2d. Поэтому нам необходимо создать для него метод обновления и загнать этот метод в SetTimeout, чтобы он вызывался постоянно для пересчета объектов и перерисовки графики.
Game = function() {
…
init = function() {
window.setInterval(update, 1000 / 60);
}
update= function() {
world.Step(1/60, 10, 10);
world.DrawDebugData();
world.ClearForces();
}
}
В функции update() мы, в первую очередь, задали частоту обновления мира — 60 кадров в секунду, а так же задали предельное количество обрабатываемых событий изменения скорости объектов и их положения на 1 такт работы. При увеличении этих параметров общая скорость реакции будет увеличиваться, но с увеличением количества объектов мы можем уткнуться в системные ресурсы, при уменьшении — получим неправильную обработку объектов от такта к такту. 10 — вполне вменяемое среднее значение.
Ну и, конечно же, теперь стоит привязать нашу канву к обработчику движка, чтобы мы смогли что-то на ней нарисовать.
Game = function() {
…
init = function() {
buildWorld();
initDraw();
window.setInterval(update, 1000 / 60);
}
initDraw= function() {
debugDraw = new b2DebugDraw();
debugDraw.SetSprite(document.getElementById(«canvas»).getContext(«2d»));
debugDraw.SetDrawScale(30.0);
debugDraw.SetFillAlpha(0.5);
debugDraw.SetLineThickness(1.0);
debugDraw.SetFlags(b2DebugDraw.e_shapeBit | b2DebugDraw.e_jointBit);
world.SetDebugDraw(debugDraw);
}
buildWorld= function() {
fixDef = new b2FixtureDef();
fixDef.density = 1.0;
fixDef.friction = 0.5;
fixDef.restitution = 0.2;
}
}
Да, стоит добавить, что для отображения в текущем виде мы будем использовать только Debug mode — т.е. прямое представление объектов в нашем физическом мире без текстур и графики. Что называется — As Is. Именно для этого мы в функции update() вызываем метод DrawDebugData() и именно для этого отображения мы создаем объект b2DebugDraw(). Там же устанавливаем масштаб, полупрозрачность и битами задаем, что именно нам нужно рисовать. Более детально все по b2DebugDraw() достаточно хорошо описано в API Reference.
Так же стоит добавить, что Box2d не оперирует пикселями как данными о координатной сетке. Он изначально пректировался под использование стандарной системы Си — поэтому мы имеем метры, килограммы, секунды, и соответствующие преобразования. Сейчас я не буду углубляться подробно в эту область, просто имейте в виду, что 1 метр в представлении Box2d — это примерно 30 пикселей экранного пространства.
Ну и еще немного добавлю про структуру fixDef() — это набор основных параметров физики объектов. Именно в этой струкруре описываются основные параметры, по которым будет обсчитываться физика процесса взаимодействия объектов. Как видите, мы указали параметры для трения, плотности и упругости объектов.
Рисование
Мы вплотную приблизились к нашей заветной цели — проектированию механики игры, но для начала нужно поместить в наш мир какие-то объекты и уже затем попробовать что-то с ними сделать. Поэтому добавим в наш init() методы построения ограничителей для нашего пространства и, прорисуем наш уровень с прямоугольниками в качестве неразбиваемых досок и кругами в качестве «свиней».
Game = function() {
…
PigData = function() {};
PigData.prototype.GetType = function() {
return PIG;
}
PlankData= function() {}
… // GetType() аналогичный PigData.GetType()
buildWorld= function() {
…
bodyDef = new b2BodyDef();
bodyDef.type = b2Body.b2_staticBody;
fixDef.shape = new b2PolygonShape;
fixDef.shape.SetAsBox(20, 2);
bodyDef.position.Set(10, 600 / 30+1.8);
world.CreateBody(bodyDef).CreateFixture(fixDef);
…//еще 3 стенки
canvasPosition= $(«#canvas»).offset();
}
buildLevel= function() {
createPlank(22, 20, 0.25, 2)
… // Отрисовка еще 8-ми досок
createPig(20,11,0.5);
… // Еще 2 дополнительные свиньи
}
createPlank= function(x,y, width, height) {
bodyDef.type = b2Body.b2_dynamicBody;
fixDef.shape = new b2PolygonShape;
fixDef.shape.SetAsBox (
width
, height
);
bodyDef.position.x = x;
bodyDef.position.y = y;
plank = world.CreateBody(bodyDef);
plank.SetUserData(new PlankData());
plank.CreateFixture(fixDef);
}
createPig= function(x, y, r) {
… // Метод, аналочичный методу createPlank, за исключением того, что используется CircleShape и PigData();
}
}
Box2d позволяет привязывать к любому физическому объекту доподнительный «юзерский» интерфейс, с помощью которого можно непосредственно реализовать игровую логику. Именно поэтому мы добавили 2 объекта — PigData и PlankData, которые возвращают нам тип объекта. Это станет важным чуть позже, когда мы займемся обработкой столкновений.
Структура BodyDef предназначна для описания геометрических характеристик объекта и его общее поведение (FixtureDef же описывает его физические свойства). Именно в BodyDef мы указываем, как будет обсчитан тот или иной блок, будет ли он статическим, или же будет динамическим. Вообще в Box2d, как нам рассказывает документация, есть 3 типа объектов — static, т.е. полностью статические объекты (в DebugView — зеленые объекты), dynamic — полностью независимые динамические объекты, и kinematic — объекты, отвечающие за движение. В качестве примера static — это дорога, dynamic — это подвеска автомобиля и колеса, а kinetic — это двигатель автомобиля.
Там же мы указываем геометрическую форму объекта, положение его левого верхнего угла и размеры. Все в метрах ( Ох как же я долго догадывался, почему у меня размеры и пиксели не совпадают! ).
Ну и в конце мы дорисовываем новый метод drawLevel(), который будет отрисовывать нам весь уровень вместе с досками и свинками.
Рогатка
Самая интересная часть повествования. Сейчас попробуем создать произвольный прототип рогатки, которая будет запускать наших птиц в свиней.
Для этого нам понадобится мышь.
Game = function() {
…
init = function() {
bindMouse();
…
}
bindMouse= function() {
$(document).mousedown(function(e){
isMouseDown = true;
handleMouse(e);
$(document).bind(«mousemove», {}, handleMouse);
});
$(document).mouseup(function(e){
isMouseDown = false;
$(document).unbind(«mousemove»);
});
}
handleMouse= function(e) {
mouseX = (e.clientX — canvasPosition.left) / 30;
mouseY = (e.clientY — canvasPosition.top) / 30;
};
update= function() {
if(isMouseDown) {
if(!(body)) {
mousePosition = {x:mouseX, y:mouseY};
createPig(mouseX, mouseY, 0.40);
body = getBodyAtMouse();
md= new b2MouseJointDef();
md.bodyA = world.GetGroundBody();
md.bodyB = body;
md.target.Set(mousePosition.x, mousePosition.y);
md.collideConnected = true;
md.maxForce = 300.0 * body.GetMass();
mouseJoint = world.CreateJoint(md);
body.SetAwake(true);
}
body.SetPosition(new b2Vec2(mouseX, mouseY));
}if(mouseJoint && !isMouseDown) {
mouseX = mousePosition.x;
mouseY = mousePosition.y;
if(getBodyAtMouse()) {
world.DestroyJoint(mouseJoint);
mouseJoint = null;
body = false;
}
}
…
}
}
Итак, что мы здесь сделали? Первое — это, конечно же, прибили обработчики мыши mousedown и mouseup к нашей маленькой игре. Теперь при нажалии на клавишу мыши в игровом поле будет устанввливаться флаг isMouseDown, ну и при движении мышью координаты, сохраняемые в mouseX и mouseY, будут меняться. Второе, чего мы добились — это динамическое создание объекта при клике мышки, эту часть я вынес в метод update(). Грубо говоря, мы сразу же создаем новую «птичку», если ее не было, хоть она у нас и является объектом с типом «свинья» — летает она не хуже.
Дальше интереснее — при помощи метода GetBodyAtMouse() мы сразу получаем на обработку тело объекта нашей птички и используя MouseJoint привязываем ее к нашему миру. Т.е. именно MouseJoint создает резинку рогатки, которая будет запускать птичку. Там же мы указываем направление действия нашей гибкой сцепки и максимальное усилие.
В примере четко видно, что после нажатия на клавишу мыши появляется новая окружность с характерной голубоватой связкой, прицепленной к центру. Если вы не будете отжимать клавишу мыши — связка так и будет тянуться к центру окружности. Но если отжать…
Если отжать — флаг isMouseDown изменится и начнет работать второе условие, которое с помощью того же метода getBobyAtMouse определяет, пересекло ли тело центр прикрепленной связки, и если пересекло — удаляет связку. В свою очередь тело, т.е. наша птицесвинья, отправляется в свободный полет на страх всем свиньям не летающим ^_^.
На методе GetBodyAtMouse() я хотел бы остановиться поподробнее, уж очень он интересен.
function getBodyAtMouse() {
mousePVec = new b2Vec2(mouseX, mouseY);var aabb = new b2AABB();
aabb.lowerBound.Set(mouseX — 0.001, mouseY — 0.001);
aabb.upperBound.Set(mouseX + 0.001, mouseY + 0.001);
selectedBody= null;
world.QueryAABB(getBodyCallback, aabb);
return selectedBody;
}
getBodyCallback= function(fixture) {
if(fixture.GetBody().GetType() != b2Body.b2_staticBody) {
if(fixture.GetShape().TestPoint(fixture.GetBody().GetTransform(), mousePVec)) {
selectedBody = fixture.GetBody();
return false;
}
}
return true;
}
Первое, что здесь делается — создается новый вектор с текущим положением мыши. Дальше мы создаем структуру, выделяющую часть экранного пространства в системе координат Box2d под указателем мыши, и при помощи getBodyCallback определяем, пересекатся ли область под мышью с каким-либо телом вообще, и если да — устанавливаем новый selectedBody. В принципе, все просто и нетривиально.
Свинки
До этой части, в принципе, все шло достаточно монотонно в канве стандартных примеров. Но для правильной обработки столкновений мне пришлось порядочно зарыться в мануал. Что же теперь необходимо сделать? Всего самую малость — добиться того, чтобы наши свинки, расположенные на уровне, исчезали. Но не просто так от контакта, а от контакта с определенным усилием. Для этого нам будет необходимо переопределить стандартный обработчик контактов и добавить подсчет суммарного импульса, который получила наша свинка в процессе столкновения.
Game = function() {
…
GameContactListener = function() {};
GameContactListener.prototype = b2ContactListener.prototype;
GameContactListener.prototype.PostSolve = function(contact, impulse) {
if(contact.GetFixtureB().GetBody().GetUserData()) {
var BangedBody = contact.GetFixtureB().GetBody();
if(contact.GetFixtureB().GetBody().GetUserData().GetType() == PIG) {
var imp = 0;
for(a in impulse.normalImpulses) {
imp = imp + impulse.normalImpulses[a];
}if(imp > 3) {
destroyedBodies.push(BangedBody);
BangedBody.visible = false;
BangedBody = null;
}
}
}var contactListener = new GameContactListener();
world.SetContactListener(contactListener);
update = function() {
…
destroyedBodies = Array();
…
world.ClearForces(); // ВАЖНО!
while(destroyedBodies.length > 0) {
world.DestroyBody(destroyedBodies.shift());
}
}
}
Первое, что ммы здесь делаем — переопределяем стандартный ContactListener. Это объект, отвечающий за обработку всех столкновений. Там же при помощи нашего метода мы проверяем UserData() и удовлетворяемся тем, что действительно мы ударили свинку, и если нас устраивает импульс, с которым ее ударили — мы скрываем ее с поля боя и заносим в массив на удаление.
Честно посыпаю голову пеплом — силу импульса подобрал наугад, так как уже не было никаких сил считать необходимый импульс усилия вручную. Надеюсь, подобрал оптимальный вариант. Так же это условие важно тем, что при создании мира так же происходят столкновения до тех пор, пока мир не придет в статическое состояние (Возможно, вы наблюдали в некоторых играх на Flash подобной тематики при создании уровня легкое подергивание плит перекрытий? В моем примере это тоже есть. Вот, собственно, чтобы свиньи не исчезали при таких коллизиях — нужна проверка суммарного импульса).
Дальше в конце метода update после вызова ClearForces() мы перевариваем наш массив и удаляем всех свинок, которые были нещадно избиты летающей сестрой. Я специально выделил это место, как важное — у вас не получится удалить ни один объект до тех пор, пока идет процесс обсчета физики. Таковы условия Box2d. Только после того, как все объекты освободились от математики — можно свободно проводить их удаление. Именно поэтому свинки лопаются только после того, как сцена, фактически, завершилась.
Итоги
Фуф, вроде как простыня завершена. Прошу прощения за изобилие кода и возможные ошибки.
Как я и обещал — ссылка на пример, в котором полностью реализовано все то, что я описывал выше.
Ну и скриншот получившегося произведения:
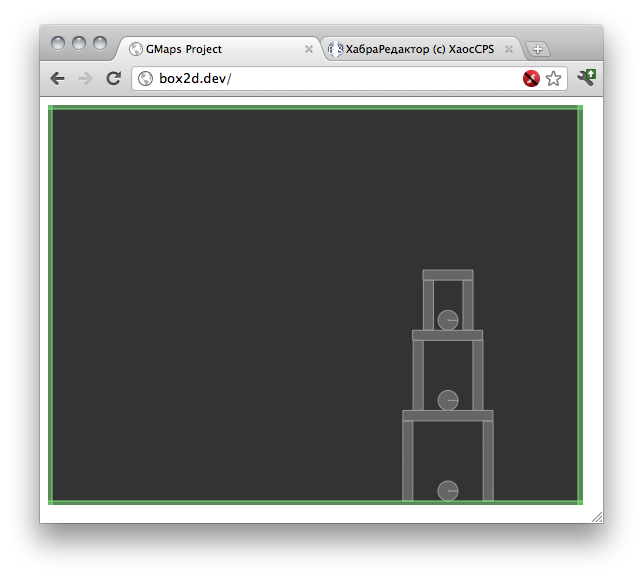
На самом деле сейчас у нас очень много неточностей — запустить птицу можно из любого места мира в любом направлении, сила значительно больше необходимой, нет подсчета очков по факту смерти свинки, есть бага, когда птицу можно запустить мимо пересечения и она не отцепится от связки, да и птица у нас совсем не птица, а свинья! Но тем не менее, нарисовался первый пласт вполне рабочей игровой механики, и допилить в нее некоторые мелочи вполне возможно.
Из планов на ближайшее будущее — изменить логику определения, когда нужно уничтожить сцепку, так как сейчас можно запустить птицу по кругу. Ну и, конечно же, нужно браться за редактор уровней. Но это уже тема для следующей статьи.
Спасибо за внимание, буду раз конструктивной критике ^_^
Список полезного
code.google.com/p/box2dweb — Box2dWeb, порт Box2dAS для Javascript’а.
www.box2dflash.org/docs/2.1a/reference — API Reference на антимонгольском.
docs.google.com/View?id=dfh3v794_41gtqs6wf4&pli=1 — Достаточно полное руководство на русском. Спасибо VirtualMaestro и его блогу — flashnotes.ru. Там же очень много полезного по поводу Box2d.
www.emanueleferonato.com — Очень полезный блог про Box2d в частности и инди в целом.
ant-karlov.ru — блог вдохновителя, если кому-то это будет интересно ^_^