![]()
Download Article
![]()
Download Article
Knowing how to assemble a BMX bike is useful in case you purchase a bike that doesn’t come pre-assembled, if you have to change any components, or in case you have to put your bike back together properly after taking it apart. Whether you are putting together a bike that’s partially assembled or starting from scratch, there may be several components to assemble or install, including the forks, wheels, crankset, peddles, chain, and brakes. You can jump to the appropriate step depending on how much or how little pre-assembly has been done on your bike.
-

1
Assemble your tools. BMX bike models are all slightly different, and will require different tools depending on the style and manufacturer. Some of the tools you many need to assemble your bike include:
- A three-eighths inch (9.525mm) socket with wrench extension
- Sockets in 19mm (three-quarter inch), 17mm (0.686-0.669/eleven-sixteenths inch) 15mm (0.591-0.625/five-eighths inch)
- Allen wrenches in 4mm (0.15748 inch), 5mm (0.19685 inch), 6mm (0.23622 inch), 8mm (0.31496 inch)[1]
- Open-end wrench in 15mm (0.591 inch) or an adjustable wrench
- Wire cutters or scissors
- Grease
- Phillips and flat-blade screwdriver
- Box cutter or knife
- Air pump
- Hammer and rubber mallet
- PVC pipe or old headset cup
-
2
Remove the bike from the box. Using the box cutter or knife, carefully cut the tape or cut the box. Remove all the parts from the box. Cut any zip ties that may be fastening parts together, and remove foam or cardboard that’s wrapped around parts. Lay the parts out on a flat surface so that you can see each one.
Advertisement
-
3
Ensure all your parts are there. Use the instructions as a reference if you are assembling a new bike. Inspect the parts for damage. While most bikes have the same basic components, different manufacturers will ship their bikes in different stages of assembly. Depending on how much pre-assembly has been done, your parts may include the:
- Bike frame
- Saddle (the seat) and seat post
- Handlebars and grips
- Front fork (the Y-shaped part that attaches to the front wheels and handlebars)
- Front brakes, rear brakes, and cables
- Reflectors
- Front and rear wheel assemblies and tires
- Chain
- Peddles
- Additional box or bag of small parts and hardware
-
4
Determine what assembly is required. Most BMX bikes come pre-assembled with the back wheel and front forks already attached to the frame. If you just bought your bike and are assembling it for the first time, skip forward to the appropriate section depending on how much pre-assembly has already been done on your bike.


Advertisement
-
1
Install the crown race onto the fork. The crown race is a circular piece that sits on the bottom of the steering tube (the single tube attached to the fork) where the tube and fork meet. It forms the base of the headset (the component that allows the handlebars to rotate on the fork). Note that some bikes already have the race built in.
- Hold the fork upright so that the bottom of the forks are facing the ground. It’s a common mistake to damage forks during installation, so if you place the forks on the ground, rest them in old shoes or on a mat to protect them. Place the crown race over the steering tube and set it firmly at the base of the steering tube.
-
Crown race installation method A: Since you don’t want to damage the crown race during installation, there are two ways you can put it on without damaging it. The first is to place an old headset cup (the cup-shaped component that makes up part of the headset) over the crown race. Hammer evenly around the headset cup to secure the crown race beneath in place without damaging it.[2]
-
Crown race installation method B: Slide a PVC pipe of the proper diameter over top of the steering tube and rest it on top of the crown race. Make sure the pipe is longer than the steering tube. Now, hammer the top of the pipe until the crown race is secure in place.[3]
-
2
Install the bearing. First, lubricate the top of the crown race by applying a layer of grease. Then, slide a bottom bearing on top of the crown race and apply pressure to set it in place.
- For integrated headsets, bearings are universal, so you don’t need to worry about which one goes on top or on the bottom.[4]
- For integrated headsets, bearings are universal, so you don’t need to worry about which one goes on top or on the bottom.[4]
-
3
Attach the fork and frame. Insert the steering tube into the head tube (the short tube attaching the frame together at the front). Make sure the forks point toward the ground. Slide the top bearing on, making sure that the concave part sits inside the head tube, and apply gentle pressure to set it in place.
-
4
Install the top headset cup. Slide the cup on top of the bearing. It may be slightly difficult to get on, but it’s supposed to be that way. If you’re using them, slide on the spacers next, followed by the gyro (also called the detangler that allows the handlebars to rotate 360 degrees without tangling the brake cables) and the top gyro plate.
- The gyro will slide over the spacers (if you’re using them), the bearing, and the cup, and sit on the head tube where it meets the frame.
- The gyro top plate will sit on top of the spacers if you’re using them; otherwise, it will sit on top of the headset cup.


Advertisement
-
1
Attach the handlebar stem to the frame. The stem is the piece that slides into the steering tube and then attaches to the handlebars. Loosen the bolts on the handlebar stem. Slide the stem on to the top of the steering tube. Center a spacer over the hole. After that:
- Grease the compression bolt (the threaded bolt that screws in and keeps the stem attached to the steering tube), and insert it into the hole in the stem.
- Twist it into place or tighten it on with the appropriate Allen wrench.
- Tighten the bolts that you loosened on the stem, gradually tightening one then the other so they are evenly and snugly attached.[5]
-
2
Affix the stem to the handlebars first as an alternative. You can install the stem on the handlebars separately and then attach the entire assembly to the fork afterward. First, loosen the clamping bolts on the stem and remove the front face plate. Then:
- Place the body of the stem on the ground groove up.
- Rest the handlebars into the groove.
- Replace the face plate so that it wedges the handlebar in between the two stem pieces, and use the bolts to fasten the face plate back to the body of the stem.
- Tighten the bolts in an X pattern, applying even pressure to each bolt.[6]
-
3
Insert the handlebars into the stem. Do this if you attached the stem right to the frame. Center the handlebars, and then attach the face plate to the body of the stem with clamping bolts. Snug them up evenly in an X pattern, but don’t worry about tightening them all the way. You will be properly adjusting the handlebars later, once the bike is more complete. Align the handlebars so they are parallel with the fork.
- If you installed the stem on the handlebars separately, now attach the assembly to the rest of the bike. Position the handlebars and stem onto the steering tube. Grease the compression bolt and insert it. Twist it into place or fasten it with an Allen wrench.[7]
- Install your gyro at this time if you are using one.
- If you installed the stem on the handlebars separately, now attach the assembly to the rest of the bike. Position the handlebars and stem onto the steering tube. Grease the compression bolt and insert it. Twist it into place or fasten it with an Allen wrench.[7]
-
4
Install the seat post. Set the seat post clamp on top of the seat tube. Grease the inside of the seat tube (or the seat post) and insert the seat post into the seat tube. Adjust the seat to the appropriate height. Align the seat so the nose runs parallel with the frame and tighten the bolts on the seat clamp.
- Your seat doesn’t have to be in the perfect position right now, and you can always adjust it later on. But do make sure the maximum height line is below the seat tube, otherwise you risk damaging the stem.


Advertisement
-
1
Flip the bike over so it’s resting on the handlebars and seat. Or, if you have a bike repair stand, mount your bike to it now.
- Bike stands can run you well over $100, but if you work on your bike often, you will help prevent strain on your back and knees by investing in one.
-
2
Install the bottom bracket. The bottom bracket is composed of an internal spacer and two bearings that all hold the crankset. Run the spacer through the bottom bracket shell (the short tube that the seat tube and down tube attach to). Hold one side of the spacer in place with a finger as you set in the bearing on the other side. Once you’ve set the bearing in place, tap it in firmly with a rubber mallet. Repeat to install the bearing on the other side.[8]
-
3
Assemble your right crank. The crankset is what attaches to the chain and the peddles to spin the wheels when you peddle. It’s mainly composed of two crank arms (each one attaches to a peddle), a spindle (a rod that both crank arms attach to), and a sprocket (a wheel with cogs that attaches to the chain).
- Insert the spindle into the right-side crank arm by matching up the splines (grooves) and pushing the spindle in. Screw in the bolt until it won’t twist any more. Slide the sprocket down the spindle, position it on the crank arm, and attach it with the sprocket bolt.[9]
- Depending on the type of crank you’re using, you may have to put the sprocket on first, and then slide the spindle through and fasten it.[10]
- Insert the spindle into the right-side crank arm by matching up the splines (grooves) and pushing the spindle in. Screw in the bolt until it won’t twist any more. Slide the sprocket down the spindle, position it on the crank arm, and attach it with the sprocket bolt.[9]
-
4
Attach the right crank to the bottom bracket. Slide a crank spacer over the spindle so that it sits beside the sprocket. Insert the spindle into the bottom bracket and push it all the way in. Use a rubber mallet to give the crank a gentle tap or two to ensure it is firmly in place. Position the crank so that it is facing down and is perfectly vertical.[11]
-
5
Attach the left crank. Slide a spacer onto the left crank arm and insert it into the bottom bracket, so that it’s vertical and facing upwards. Align the two cranks so that they are even, making sure they form a straight line (with the right crank facing down and the left crank facing the ceiling. Tap the left crank arm gently into place with the rubber mallet.
-
6
Attach the final spindle bolt. Then, tighten the bolts. This will completely lock the cranks onto the spindle.
- Check that both crank arms have approximately the same amount of clearance between them and the frame.[12]
If the clearance isn’t the same, you can adjust one of the crank arms by adding or removing spacers.
- Check that both crank arms have approximately the same amount of clearance between them and the frame.[12]
-
7
Install the pedals. Start by greasing the threads of each peddle. Use either the appropriate Allen wrench or peddle wrench (depending on your peddles) to attach one peddle to each crank arm. Use an open-end wrench if you don’t have a peddle wrench.
- Look for an «L» and «R» on your peddles for guidance about which one’s for the left and right side.
- The peddle on the right will tighten if you turn the wrench clockwise, but the peddle on the left will tighten counter-clockwise, which is the opposite of a regular bolt.[13]


Advertisement
-
1
Mount the front wheel on the fork.Set the front axle into the dropouts. Slide the safety washers over the axle and set them into place by pressing the tab on the washer into the tab hole on the dropouts. Thread the axle nuts on by hand, and then finish tightening them with either a wrench or ratchet and socket.
- To avoid a crooked wheel, tighten each nut a little at a time, as this will help keep the wheel centered.
- If you’re installing pegs, make sure you do this before putting on the axle nuts. Pegs are short metal tubes that extend out from the wheel and act as foot holds for when you’re doing tricks.
- It’s best to start with the front wheel installation because this will help keep the bike balanced as you work.[14]
-
2
Put on the back wheel. Slide the axle into the dropouts.
-
3
Install the chain. Wrap the chain around the back sprocket first, followed by the front sprocket. Then, close the chain by:[15]
- Butting the two ends of the chain together.
- Sliding a master link (the open-faced link that can be connected to attach the chain ends) through each chain end to join them.
- Pressing a plate around the two pins of the master link.
- Sliding the clip over top of the plate and snapping it into place. Use a flat-head screwdriver to snap it in place if necessary.
-
4
Tighten the chain. Loosely install your pegs or axle nuts. Pull the wheel back to tighten the chain, and then tighten the pegs or axle nuts a little more (but not all the way). To make sure your chain isn’t loose, start by tightening the non-drive side of the bike first (the side opposite the chain). Then:
- Straighten out the wheel and tighten the axle nut or peg on the drive side.[16]
Then, snug up each side evenly until the pegs or axle nuts are on properly.
- Straighten out the wheel and tighten the axle nut or peg on the drive side.[16]
-
5
Adjust your handlebars and headset. Once the wheels and chain are on, flip the bike back over again or take it off the bike stand. Loosen the bolts on the stem if necessary and adjust your handlebars so they’re in a comfortable position. When you have the handlebars in the rights place, snug up the bolts in an X pattern. Tighten the compression bolt if the headset is loose.
- Make sure the stem and front tire are aligned before tightening your bolts.


Advertisement
-
1
Install the levers. Slide the levers onto the handlebars and orient them in a position that’s comfortable for you. Tighten the levers with the appropriate Allen wrench. You have flexibility with the lever positioning, so take your time and move them around into different positions until you find the most comfortable one before tightening them up.
- Try sliding the levers closer or farther apart to separate your hands more or bring them closer together. You can also rotate the levers on the handles to see how you like them oriented.
-
2
Install the front brake arms. First, lubricate the brake mounts, which are the little bolts sticking out from the front of the forks. Then, slide one brake arm onto the brake mount, followed by the spring. Loosely tighten the spring bolt with your fingers to ensure the brake arm is in place against the mount. Repeat on the other side.
- Make sure you install the proper brake arms on the proper side of the bike.
-
3
Run your cable. Insert the head of the cable into the lever, leaving the barrel adjuster (the screw mechanism that allows you to control tension) on the lever. Run the cable over the top of the crossbar, down the length of the fork to the wheel, and around the front of the fork and into the brake arm.
- Make sure the cable isn’t so tight that it’s wrapped tightly around the fork, but also not so loose that it will rub against the tire.
-
4
Cut and install the cable. Use wire cutters to make a notch in the cable where it needs to be cut (where it feeds into the brake arm). Pull out the inside cable and cut the outer housing with wire cutters where you made the notch. Feed the inner cable back through the housing. Connect the cable to the brake arm and tighten the bolts.[17]
-
5
Adjust the spring tension. Tighten one side at a time. Loosen the spring bolt with an Allen wrench. Once it’s loosened, adjust the tension with a crescent wrench. When you’ve set the tension, use the Allen wrench to tighten the bolt again while holding it in place with the crescent wrench.[18]
- As you adjust the tension, continue testing the brakes to ensure that they are applying pressure evenly.
-
6
Adjust the brake pads. Hold the brake pad steady and loosen the bolt. Line up the pad so that it’s parallel with the rim. When it’s properly aligned, tighten the bolt again.
- Make sure the brake pad isn’t actually touching the rim; you want it about one mm (0.04 inch) away from the rim.


Advertisement
Ask a Question
200 characters left
Include your email address to get a message when this question is answered.
Submit
Advertisement
Video
-
Don’t over-tighten any of your bolts or clamps.
-
It’s always a good idea to grease and oil parts, especially where metal components meet.
Advertisement
About This Article
Thanks to all authors for creating a page that has been read 73,910 times.
Did this article help you?
Достаточно сложно собрать свой собственный велосипед BMX. Многие части могут не совпадать друг с другом, или вы можете собрать их неправильно, что может повредить запчасти. Этот гид расскажет вам об основах сборки и обслуживания велосипеда BMX.
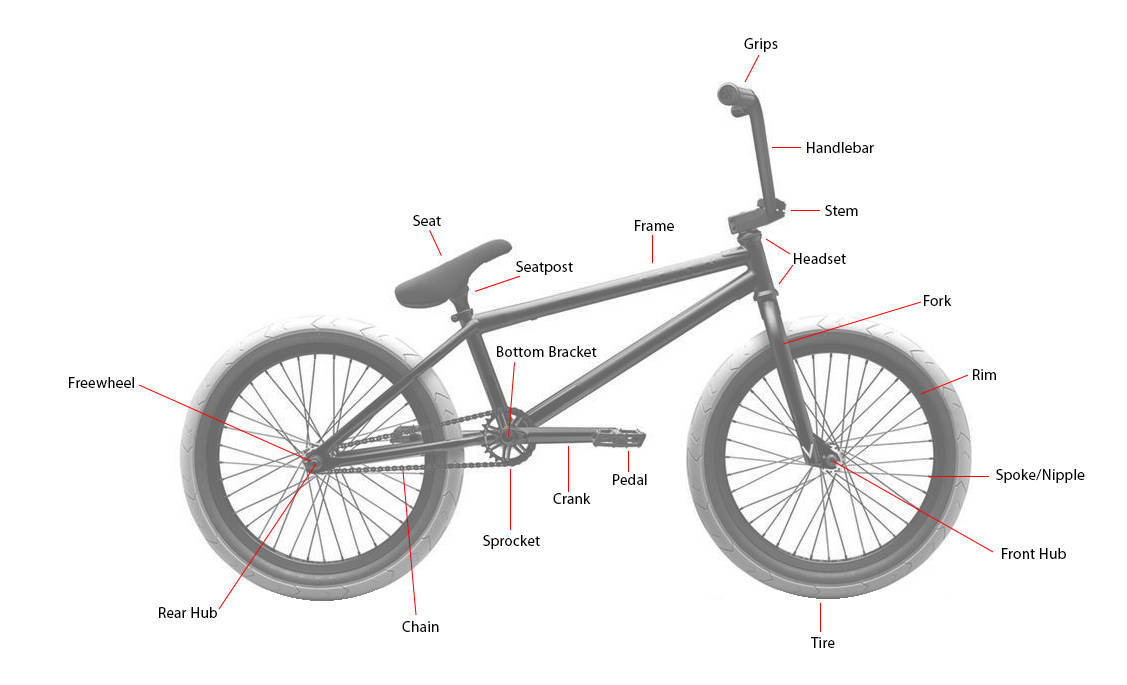
Велосипед BMX состоит из:
| 1x Рама | Включает тормозной тросик, если другого не сказано |
| 1x Руль | Подходит почти ко всем вилкам, если другого не сказано |
| 1x Вынос руля | Существует два вида — топ лоуд и фронт лоуд |
| 1xРулевая колонка | Самые популярные это интегрированная и не интегрированная |
| 1x Спейсер рулевой колонки | Спейсер рулевой колонки помогает отрегулировать высоту руля |
| 1x Вилка | Вилка должна соответствовать размеру колеса |
| 1x Набор грипс | Грипсы подходят всем рулям, если другого не сказано |
| 1x Набор педаль | Педали могут быть сделаны из пластмассы, алюминия и стали |
| 2x Колесо | Существует разница между передним и задним колесом |
| 2x Шина | Помните, что шины продаются поштучно |
| 2x Камера шины | Наши камеры для шин подходят для ширины всех шин, если другого не сказано |
| 1x Система ведущих звезд | Размер оси шатунов может варьироваться между 19, 22, 24 мм. |
| 1x Нижний кронштейн | Важно помнить что нижний кронштейн должен соответствовать размеру оси. |
| 1x Звездочка | Идет с или без болтового крепления |
| 1x Цепь | Не забудьте отрегулировать длину перед установкой |
| 1x Седло | Существуют системы такие как Pivotal и Tripod. |
| 1x Подседельный штырь | Помните, что подседельный штырь должен подходить вашему седлу |
Наименование разных запчастей
Советы и рекомендации от SkatePro
- Попросите помощи со сборкой у взрослого
- Используйте подходящие инструменты (см. снизу, какие инструменты необходимы)
- Примерное время сборки занимает как минимум 1 час (если вы никогда не собирали BMX)
- Если вы выбираете легкие запчасти, то имейте в виду, что они легче ломаются, чем тяжелые запчасти.
- Когда вы получите посылку, проверьте наличие запчастей и их сопоставимость друг с другом. (Вы можете вернуть только новые/неустановленные запчасти)
- Всегда затягивайте все болты и гайки перед катанием и обслуживайте велосипед как показано в инструкции по эксплуатации.
- Избегайте воды, песка и влажных участков.
Какие инструменты необходимы для сборки вашего велосипеда BMX?
Актуально только для сборки целого велосипеда BMX.
Список необходимых инструментов для сборки вашего BMX (они не входят в комплект при покупке BMX в SkatePro):
| 1x 5мм Шестигранный ключ |
| 1x 6мм Шестигранный ключ |
| 1x 15мм Гаечный ключ |
| 1x 17мм или 19мм Гаечный ключ |
| 1x Велосипедный насос |
| 1x Кусачки или ножницы |
Посмотрите наш выбор инструментов для BMX здесь.
Сборка наполовину собранного BMX
Когда вы получите наполовину собранный BMX, в большинстве случаев, вам нужно будет собрать следующие запчасти: руль, переднее колесо, седло и педали.
Инструкция по сборке всегда прилагается к велосипеду.
Не забудьте накачать колеса перед катанием на велосипеде.
![]()
Загрузить PDF
![]()
Загрузить PDF
Вы когда-либо видели по телевизору, как выполняют трюки на мотокроссе (BMX)? У вас было желание попробовать самому? Пришло ваше время. Предоставляем вам инструкцию по трюкам на BMX.
-
1
Начните ехать медленно.
-
2
Поднимите вверх переднее колесо, потянув руль вверх.
-
3
В воздухе толкните руль вперед. Так оторвется от земли и заднее колесо.
- В этот момент весь велосипед должен находиться в воздухе.
-
4
Приземлитесь.
Реклама


-
1
Наберите скорость.
-
2
Приподнимите ступни на педалях.
-
3
Корпусом держите равновесие велосипеда.
-
4
Запрыгните на руль.
Реклама


-
1
Сделайте прыжок на велосипеде с трамплина.
-
2
Наклонитесь назад.
-
3
Выровняйте колени на уровне с сидением.
-
4
Поверните руль вправо или влево, пока руки не скрестятся в виде «X.»
-
5
Перед приземлением верните руль в исходное положение.
Реклама


-
1
Наберите умеренную скорость.
-
2
Поднимите переднее колесо, потянув за руль.
-
3
В воздухе толкните руль вперед.
-
4
Поверните плечи и голову в направлении к заднему колесу.
-
5
Приземлитесь.
- Вы будете смотреть в противоположном направлении.
Реклама


-
1
Наберите умеренную скорость.
-
2
Поднимите переднее колесо, потянув за руль.
-
3
В воздухе толкните руль вперед.
-
4
Поверните голову и плечи в направлении к заднему колесу.
- В это время держите колени согнутыми.
-
5
Приземлитесь.
- Вы должны были сделать полный переворот в воздухе.
Реклама


-
1
Наберите скорость на велосипеде, чтобы вы могли ехать и не крутить педали.
-
2
Слегка зажмите сидение внутренней частью бедер.
- Педали должны быть горизонтально зафиксированы.
-
3
Потяните за руль, чтобы поднять переднее колесо.
-
4
Прокрутите руль, пока переднее колесо в воздухе.
-
5
Поймайте руль, как только он сделает полный поворот.
Реклама


-
1
Наберите умеренную скорость.
-
2
Поднимите одну ногу.
-
3
Поставьте эту ногу на колесо под нижней трубой под углом 50 градусов.
- Заднее колесо поднимется – это завершение трюка.
Реклама


-
1
Едьте на стену с умеренной скоростью.
-
2
Сделайте небольшой bunny hop (см. первый трюк) на стену.
-
3
Подъезжая к стене, крутите педали.
-
4
Отклоните корпус от стены и приземлитесь на землю.
Реклама


Советы
- Прежде чем пытаться выполнять трюки, убедитесь, что ваш велосипед в хорошем состоянии.
- Когда хотите выполнять трюки, наденьте кроссовки или кеды на плоской подошве, чтобы они плотно закреплялись на педалях.
- Перед выполнением трюков наденьте перчатки, полностью покрывающие всю кисть руки.
- Перед выполнением трюков наденьте шлем, закрывающий все лицо.
- Перед выполнением трюков наденьте носки, которые по крайней мере закрывают лодыжки.
Реклама
Об этой статье
Эту страницу просматривали 20 286 раз.
Была ли эта статья полезной?
Собрать свой собственный велосипед БМХ может показаться сложной задачей, однако соответствующие советы и рекомендации помогут вам справиться с этим вопросом. Важно понимать, что правильная сборка БМХ требует некоторых знаний и навыков в области велосипедов. Значительная часть сборки заключается в выборе и установке правильных компонентов, оптимальной настройке и налаживании своего велосипеда. Кроме того, важно понимать основные концепции и принципы, которые лежат в основе сборки БМХ.
Один из первых шагов, которые вам нужно выполнить при сборке БМХ, это выбор подходящего каркаса. Каркас — это основа велосипеда БМХ, и от его качества зависит устойчивость и производительность вашего велосипеда. При выборе каркаса обратите внимание на материал, из которого он сделан, и форму каркаса. Каркас должен быть прочным, легким и иметь оптимальную геометрию, чтобы обеспечивать маневренность и контроль над велосипедом.
Кроме выбора каркаса, очень важно правильно подобрать компоненты для своего велосипеда БМХ. Это включает в себя выбор правильных колес, шин, тормозов, седла и других деталей. Компоненты должны быть не только качественными, но и соответствовать вашим потребностям и стилю катания. Например, если вы предпочитаете скоростной спуск, то выберите колеса большего диаметра и шины с протектором для лучшей амортизации и сцепления с поверхностью.
Основное правило сборки БМХ — не торопитесь и обратите внимание на каждую деталь. Не забывайте о том, что безопасность и комфорт зависят от правильной сборки вашего велосипеда БМХ. Если вы не уверены в своих навыках, лучше обратиться к профессионалам, которые помогут вам собрать ваш идеальный велосипед БМХ!
Содержание
- Выбор подходящего БМХ: основные критерии
- Размер рамы и его связь с ростом
- Материалы рамы и их влияние на характеристики
- Колеса и гарантия комфортного катания
Выбор подходящего БМХ: основные критерии
Первое, на что следует обратить внимание, это размер рамы. Размер рамы должен соответствовать вашему росту и физическим параметрам. Слишком маленькая или слишком большая рама может вызвать дискомфорт и затруднить управление велосипедом.
Второй важный критерий – материал рамы. Рамы БМХ могут быть изготовлены из стали, алюминия или карбона. Рамы из стали обладают высокой прочностью, но отличаются большим весом. Алюминиевые рамы легкие и прочные, но дороже стальных. Карбоновые рамы самые легкие, но и самые дорогие.
Третий критерий – тип и размер колес. Большинство велосипедов BMX имеют колеса диаметром 20 дюймов. Однако, есть и модели с колесами меньшего или большего размера. Выбор зависит от ваших предпочтений и стиля катания.
Четвертый критерий – наличие тормозов. Велосипеды BMX могут иметь ободные тормоза или быть без них. Если вы планируете кататься на улицах или в городе, то наличие тормозов может быть полезным. Если же вы собираетесь заниматься фристайлом или трюками, то некоторые райдеры предпочитают байки без тормозов для большей свободы и удобства при выполнении трюков.
Пятый критерий – наличие прочных и надежных компонентов, таких как втулки, ободья, шатуны, педали и т.д. Это важно для долговечности и надежности велосипеда при интенсивном катании и трюках.
Шестой критерий – стиль дизайна и цветовая гамма. Выбирайте велосипед, который вам нравится и соответствует вашему стилю.
Учитывая эти основные критерии при выборе подходящего БМХ, вы сможете сделать правильный выбор и наслаждаться катанием на велосипеде, который будет отвечать вашим требованиям и желаниям.
Размер рамы и его связь с ростом
При выборе БМХ следует обратить внимание на высоту рамы. Для определения подходящего размера рамы можно воспользоваться формулой: ваш рост (в сантиметрах) умножить на коэффициент.
Коэффициенты для разных моделей велосипедов БМХ обычно варьируются от 0,66 до 0,67. Например, если ваш рост составляет 170 сантиметров, то подходящий размер рамы можно рассчитать следующим образом: 170 см * 0,66 = 112,2 см. Таким образом, для вас подойдет рама высотой около 112 сантиметров.
Помните, что подходящий размер рамы может варьироваться в зависимости от ваших предпочтений и стиля катания. Некоторые райдеры предпочитают немного меньшую раму для большей мобильности, в то время как другие предпочитают более высокую раму для улучшенной стабильности.
Выбор размера рамы является важным фактором при собирании БМХ. Правильно подобранная рама обеспечит правильную посадку и удобство, что поможет вам наслаждаться катанием и выполнять трюки безопасно и эффективно.
Материалы рамы и их влияние на характеристики
| Материал | Преимущества | Недостатки |
|---|---|---|
| Сталь |
|
|
| Алюминий |
|
|
| Карбон |
|
|
Выбор материала рамы зависит от индивидуальных предпочтений и стиля катания. Рамы из стали хороши для начинающих райдеров, так как они обеспечивают хорошую прочность и долговечность по доступной цене. Алюминиевые рамы часто используются профессиональными райдерами, которые ценят легкость и прочность материала. Карбоновые рамы предлагают максимальную жесткость и легкость, но они также являются самыми дорогими.
Важно учитывать, чтонаряду с материалом рамы, другие факторы также могут влиять на характеристики велосипеда BMX. Например, геометрия рамы, угол подседельной трубы и высота задней стойки также могут иметь значительное значение для производительности и комфорта райдера.
Колеса и гарантия комфортного катания
При выборе колес для своего BMX велосипеда, следует обратить внимание на несколько ключевых факторов. Первым и, возможно, самым важным является размер колеса. В зависимости от стиля катания и предпочтений, вы можете выбрать колеса диаметром 20 или 24 дюйма. Колеса диаметром 20 дюймов чаще всего используются для трюкового и street катания, в то время как колеса диаметром 24 дюйма пригодны для катания в парках и на трассах.
Вторым важным фактором при выборе колес является материал, из которого они изготовлены. Колеса для BMX велосипедов могут быть выполнены из алюминия или пластика. Алюминиевые колеса обладают легкостью и прочностью, но более дорогие. Пластиковые колеса легкие и бюджетные, но они могут быть менее прочными и подвержены истиранию на асфальте.
Наконец, при выборе колес следует учесть рисунок протектора. Протектор влияет на сцепление колеса с поверхностью и безопасность катания. Для уличного катания лучше выбирать колеса с мягким и глубоким рисунком протектора, которые обеспечивают хорошую сцепляемость с быстрым разгоном и торможением. Для паркового катания можно выбрать колеса с меньшим рисунком протектора, так как они обеспечивают менее сопротивление и увеличенную скорость.
Правильный выбор колес для BMX велосипеда обеспечит вам не только комфортное и безопасное катание, но и долговечность. Поэтому, не скупитесь на качество и выбираете колеса, которые соответствуют вашим потребностям и стилю катания, чтобы наслаждаться каждой поездкой на своем BMX велосипеде.
BMX Трюки для Начинающих: Упражнения и Советы
Что такое BMX?
BMX – это вид экстремального велоспорта, который основывается на выполнении различных трюков на специальных велосипедах. Для того, чтобы начать осваивать этот вид спорта, необходимо научиться выполнять базовые упражнения, которые можно проводить на любом площадке или специальной трассе.
Как начать тренироваться?
Самый лучший способ начать тренировки – это зарегистрироваться в спортивном клубе и заняться под руководством опытных тренеров. Однако, если вы хотите овладеть BMX самостоятельно, необходимо обратить внимание на следующие упражнения:
Базовые упражнения BMX
Крючок
Эта трюковая фишка включает в себя подъем переднего колеса в почти вертикальном положении, затем выталкивание тела вперед, прежде чем вы вернетесь к обычной езде на BMX.
Manual (Хэндрик)
Во время выполнения этого упражнения вы находитесь на заднем колесе, переднее колесо при этом свободно висит в воздухе. Для начала лучше обучиться держать баланс на заднем колесе, не проваливаясь вперед или назад.
180 градусов поворот
Включает в себя поворот на 180 градусов, при котором вы занимаете новую позицию на BMX.
Советы для начинающих
- Используйте защиту, включая каску и защиту для коленей и локтей.
- Не пытайтесь сразу же выполнять сложные трюки – начните с простых упражнений.
- Подготовьте свой велосипед: убедитесь, что все детали в хорошем состоянии.
- Ограничьте скорость, чтобы избежать травм.
- Не забывайте тянуться и разминаться перед тренировкой.
Заключение
BMX – это захватывающий вид спорта, который требует от трейдеров высокой ловкости и смелости. Однако, с правильными тренировками и подходом к делу, вы можете научиться выполнять различные трюки и увеличить свой уровень мастерства. Не забывайте о безопасности и также получайте удовольствие от процесса тренировок!