Table of Contents
- A Crash Guide On Android App Development Fundamentals
- Android App Components
- Android User Interaction
- Calling an API from Android App
- Introducing the Daily Horoscope App Powered by Aztro API
- 1. Sign up for RapidAPI Account
- 2. Access the Aztro API
- 3. Subscribe to the Aztro API
- 4. Test the aztro API
- How to Build an Android App with an API
-
- Steps to Build the Daily Horoscope App
- Prerequisites
- Step 1: Start a new Kotlin project within the Android Studio.
- Step 2: Add dependencies and additional configuration
- Step 3: Open the MainActivity.kt file
- Step 4: Import the class libraries
- Step 5: Extend the MainActivity class and add instance variables
- Step 6: Define the onCreate( ) function for MainActivity
- Step 7: Implement the selection event handlers
- Step 8: Implement the API call
- Step 9: Display horoscope prediction extracted from the API response
- Step 10: Add the UI View resources for MainActivity
- Step 11: Building and testing the horoscope app
- Conclusion
-
Are you an aspiring Android developer and thinking of building an Android App?
Thousands of developers across the world are launching new apps on the Google play store every day. These apps range across various categories, from business to productivity, to games and utility apps. With over 105 billion app downloads in 2019, your app idea has great potential and a massive audience waiting to be tapped.
As easy as it may sound, building a mobile app still has challenges. Like any software, an app is also a piece of software with many internal components. These components need to be tightly integrated, without straining the mobile device for computation power and memory usage. That is where APIs play a significant role in easing the developer’s pain.
In this blog post, we look at the nuances of building an Android application using an API. Apart from heavy lifting the resource-intensive tasks away from the phone, an API driven Android app embraces modular design. In this way, the responsibilities are shared between the app front end and the back end. Besides that, APIs offer a great way of adding real-time, data-driven features from external sources of information.
View the Best Free APIs List
A Crash Guide On Android App Development Fundamentals
The Android operating system runs on the Linux kernel. For programming an Android app, you can use either Kotlin, Java, or C++. However, as of 2020, Kotlin is the preferred programming language recommended by Google. (Or learn how to build an Android App with Python).
Android App Components
Android has a well defined and modular architecture. It splits an app into different components. There are a few different categories of components defined within the Android environment.
- Activities: Activities represent the core interactions of the app. One activity is associated with a UI screen. An Android app is essentially a set of multiple activities stitched together via user-initiated navigation, to provide the various functions of the app.
- Services: Services are background tasks that perform some behind the scene operations for the app. They may also run while the app is minimized, or when the user is interacting with another app.
- Broadcast receivers: Broadcast receivers are like notifications that you receive on your mobile phone. These can be internally generated within the phone, such as alarm trigger or battery down indication. Broadcast receivers can also be attached to external events such as push notifications received from a cloud service.
- Content Providers: Content providers are the data stores that hold the app data. These can be filesystem resources, a database, or any form of persistent storage provided by the phone hardware.
For more detailed coverage on these components, check out the official application fundamentals guide in the Android developer portal.
Most of the Android apps are built around a series of activities with one screen transitioning to/from the other. Activities are themselves composed of many kinds of UI components. They also follow a strict sequence of lifecycle events, which are triggered as callbacks.

These callbacks provide developers with the means to handle events triggered in the activities. For example, when the app is launched, and the UI screen corresponding to the main activity is displayed, the onCreate( ) callback is triggered on the main activity. Subsequently, when the screen becomes invisible due to the transition to another screen, the onStop( ) callback is triggered.
For a better understanding of all the lifecycle events on an activity, refer to the official documentation on activity lifecycle.
Simple Android apps can be built around a single activity, all other components being optional.
Android User Interaction
User interaction is at the core of any business logic implemented for an Android app.
The Android OS provides a framework for handling events. It provides a set of event listeners that can be registered for UI components. There are different types of event listeners defined for all forms of user inputs, such as click, touch, focus, or key presses.
Here is how you would add a click handler to a button in Kotlin.
val button: Button = findViewById(R.id.corky)
button.setOnClickListener { view ->
    // do something when the button is clicked
}
Additionally, if you are creating your own custom UI components, then you can extend the default event callbacks by subclassing the base UI classes. Some of the most frequently used event callback functions are:
onTouchEvent(MotionEvent) – Called when a touch screen motion event occurs.
onKeyDown(int, KeyEvent) – Called when a new key event occurs.
onKeyUp(int, KeyEvent) – Called when a key up event occurs.
onFocusChanged(boolean, int, Rect) – Called when the view gains or loses focus.
Calling an API from Android App
The Android SDK uses the HTTPURLConnection class from the Java standard library. With this class, you can configure the HTTP specific parameters such as the headers, method, cache, timeout settings, and more.
To invoke an API, you have to use it in conjunction with URL and InputStreamReader.
url = URL("https://api.example.com/blah")

connection = url.openConnection() as HttpURLConnection

connection.requestMethod = "POST"

val `in` = connection.inputStream
val reader = InputStreamReader(`in`)

var data = reader.read()
Introducing the Daily Horoscope App Powered by Aztro API
Learning any new skill is best achieved by doing. Let’s show you how to build an Android app powered by an API. You can follow along the steps to replicate it within your development environment for the Android app.
Connect to the Aztro API
We are going to build a daily horoscope app. This is a simple app that displays the daily horoscope based on a sun sign selection on the app screen.

For this app, we have to rely on an external source for getting the horoscope predictions. APIs come to the rescue here. Using RapidAPI’s search feature, you can look up astrology related APIs for powering this app.

We have chosen the aztro API for this purpose. But before you can start using the API, you have to follow a few steps to signup and activate your subscription.
Connect to the Aztro API
1. Sign up for RapidAPI Account
To access the Aztro API, you’ll first have to sign up for a free RapidAPI developer account. With this account, you get a universal API Key to access all APIs hosted in RapidAPI.
RapidAPI is the world’s largest API marketplace, with over 10,000 APIs and a community of over 1,000,000 developers. Our goal is to help developers find and connect to APIs to help them build amazing apps.
2. Access the Aztro API
Once signed in, log in to your RapidAPI account.
To access the API console of Aztro API, visit the API console here.

3. Subscribe to the Aztro API
Once inside the API console, click on the “Pricing” tab to access the pricing plan.
Aztro API is a free API. You can subscribe to the “Mega” plan to get unlimited free access to the API.
4. Test the aztro API
After subscribing to the API, return to the “Endpoints” tab on the API console.
Now you are ready to test the API. The Aztro API has only one endpoint. It expects a few parameters.

The ‘sign’ parameter indicates the sun sign name whose horoscope prediction you want to fetch from the API. Optionally, you can add value for the ‘day’ parameter to specify the predictions for yesterday, today, or tomorrow. It defaults to the value of “today”.
Trigger the API with the default values, and you will get an API response, somewhat like this.

As you can see, the API returns a few additional helpful pieces of information apart from the prediction.
You are all set to use this API within the Android app.
Connect to the Aztro API
Steps to Build the Daily Horoscope App
Now you are ready to build the Android app. It’s time to start coding.
Prerequisites
Before getting into programming any Android app, you have to take care of a few prerequisites related to the Android app’s development and test setup.
- Install Android Studio: You must have the Android Studio version 3.0 or above, installed on your development computer.
- Install Android SDK: You must have the latest Android SDK (preferably Android 10.0) installed through the Android Studio.
Follow the first step below to set up a new app project within Android Studio. For all the subsequent steps, it is assumed that you have launched the Android Studio and are using it’s IDE interface to write the code.
Step 1: Start a new Kotlin project within the Android Studio.
Create a new project in the Android Studio with an empty activity.
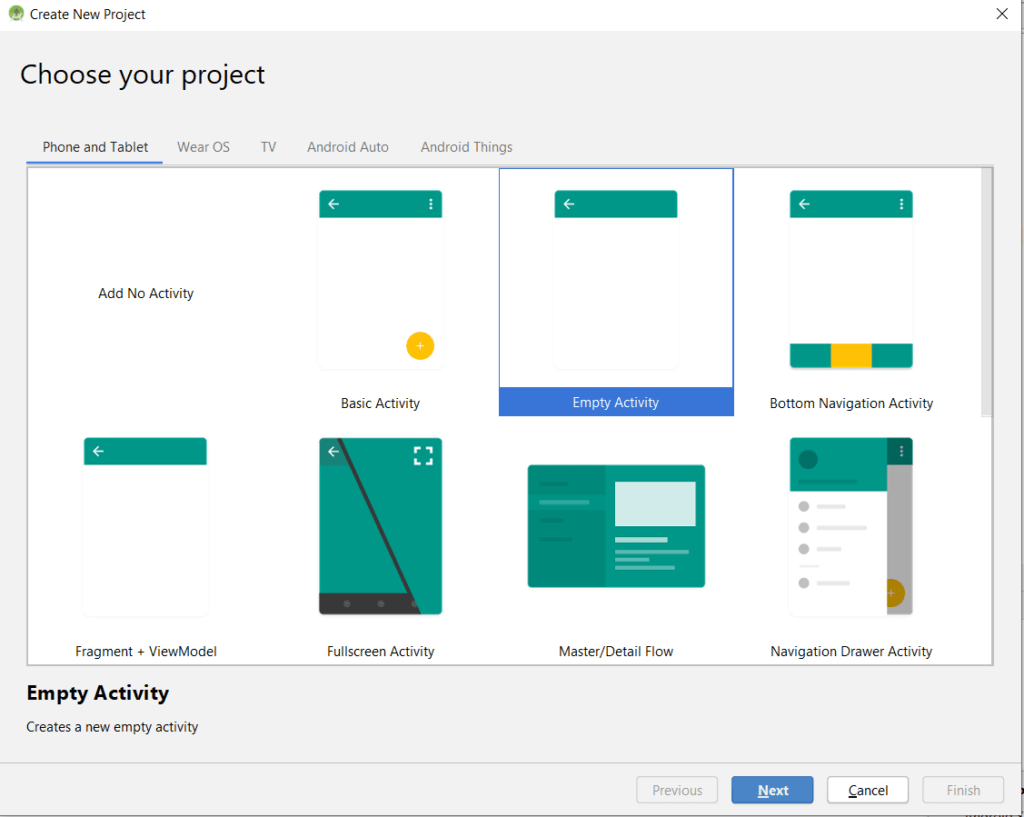
After clicking “Next”, provide the app specific information as shown in the “Configure your project” dialog. Make sure to choose Kotlin as the Language.

The save location can be anything as long as it is a valid path within your development environment.
Wait for a few seconds. The Android Studio IDE will create a new project folder with a file explorer showing the project folder structure,
Step 2: Add dependencies and additional configuration
This app uses the Kotlin coroutines for asynchronous execution. You have to add this as a dependency in the build.gradle(Module:app) file. Locate the file in the Android Studio file explorer, under the “Gradle Scripts” and open it. Add the following line within the “dependencies” section.
dependencies {
   .............
   .............
   implementation 'org.jetbrains.kotlinx:kotlinx-coroutines-android:1.3.7'
}
As a standard practice for Android development, you also need to enable app permission for accessing the Internet to make API calls. Open the manifests/AndroidManifest.xml file and add the following line just after the <manifest> opening tag.
<uses-permission android:name="android.permission.INTERNET" />
Step 3: Open the MainActivity.kt file
The horoscope app has only one activity, which is the default Main activity. The MainActivity.kt is the source file of this activity.
Open this file in the Android Studio editor.

For now, you can keep the auto-generated source code. From the next step onwards, we will modify it as per the horoscope app.
Step 4: Import the class libraries
Add a few more import statements at the top, after the package and existing import statement.
import android.text.method.ScrollingMovementMethod
import android.view.View
import android.widget.*
import kotlinx.android.synthetic.main.activity_main.*
import kotlinx.coroutines.GlobalScope
import kotlinx.coroutines.async
import org.json.JSONObject
import java.io.InputStreamReader
import java.net.HttpURLConnection
import java.net.URL
These import statements are used to import the UI widget and API call handling related classes from the standard library. The Kotlin coroutine is also imported.
Step 5: Extend the MainActivity class and add instance variables
To add event listeners for item selection of sun signs, you need to extend the MainActivity as follows.
class MainActivity : AppCompatActivity(), AdapterView.OnItemSelectedListener{

}
For tracking the user selection and the API response, add two variables, sunSign and resultView.
class MainActivity : AppCompatActivity(), AdapterView.OnItemSelectedListener{

   var sunSign = "Aries"
   var resultView: TextView? = null

     …..
}
Step 6: Define the onCreate( ) function for MainActivity
Now you have to override the default onCreate( ) handler to add app-specific code for initializing the horoscope app.
Clear the default code for onCreate( ) and rewrite it as follows.
override fun onCreate(savedInstanceState: Bundle?) {
   super.onCreate(savedInstanceState)
   setContentView(R.layout.activity_main)

   var buttonView: Button = findViewById(R.id.button)
   button.setOnClickListener {
       GlobalScope.async {
           getPredictions(buttonView)
       }

   }

   val spinner = findViewById<Spinner>(R.id.spinner)
   val adapter = ArrayAdapter.createFromResource(this,R.array.sunsigns,android.R.layout.simple_spinner_item)
   adapter.setDropDownViewResource(android.R.layout.simple_spinner_dropdown_item)
   spinner.adapter = adapter;
   spinner.onItemSelectedListener = this

   resultView = findViewById(R.id.resultView)

}
There are a few UI components added here. This includes a button to trigger the Aztro API, a dropdown spinner for the sun signs, and a result view for displaying the API response.
The click event of the button fires an async operation to call a function getPredictions( ) that you will implement in a little while.
Step 7: Implement the selection event handlers
Since the MainActivity inherited the OnItemSelectionListener interface, you have to override a few of the callback functions to handle sun sign selection.
Add the following code below the onCreate( ) function.
override fun onNothingSelected(parent: AdapterView<*>?) {
   sunSign = "Aries"
}

override fun onItemSelected(parent: AdapterView<*>?, view: View?, position: Int, id: Long) {
   if (parent != null) {
       sunSign = parent.getItemAtPosition(position).toString()
   }
}
The onNothingSelected( ) is the default state of selection, which sets the variable sunSign to a value to “Aries”. The onItemSelected( ) is triggered to set the sunSign value to the one selected by the user.
Step 8: Implement the API call
The API is triggered by a button click whose handler we defined within the onCreate( ) function. Now it’s time to define the function getPredictions( ) and callAztroAPI( ) that triggers the API call.
public suspend fun getPredictions(view: android.view.View) {
   try {
       val result = GlobalScope.async {
           callAztroAPI("https://sameer-kumar-aztro-v1.p.rapidapi.com/?sign=" + sunSign + "&day=today")
       }.await()

       onResponse(result)

   } catch (e: Exception) {
       e.printStackTrace()
   }
}

private fun callAztroAPI(apiUrl:String ):String?{
   var result: String? = ""
   val url: URL;
   var connection: HttpURLConnection? = null
   try {
       url = URL(apiUrl)
       connection = url.openConnection() as HttpURLConnection
       // set headers for the request
       // set host name
       connection.setRequestProperty("x-rapidapi-host", "sameer-kumar-aztro-v1.p.rapidapi.com")

       // set the rapid-api key
       connection.setRequestProperty("x-rapidapi-key", "<YOUR_RAPIDAPI_KEY>")
       connection.setRequestProperty("content-type", "application/x-www-form-urlencoded")
       // set the request method - POST
       connection.requestMethod = "POST"
       val `in` = connection.inputStream
       val reader = InputStreamReader(`in`)

       // read the response data
       var data = reader.read()
       while (data != -1) {
           val current = data.toChar()
           result += current
           data = reader.read()
       }
       return result
   } catch (e: Exception) {
       e.printStackTrace()
   }

   // if not able to retrieve data return null
   return null

}
Add the above two functions within the MainActivity class and replace the placeholder <YOUR_RAPIDAPI_KEY> with your actual subscription key obtained from RapidAPI post the signup and subscription to the AztroAPI.
The getPredictions( ) function involves the callAztroAPI( ) function within the async coroutine and waits for it to return.
The actual API invocation happens within callAztroAPI( ) via the HTTPURLConnection. Before triggering the API, be sure to set the custom request headers “x-rapidapi-host” and “x-rapidapi-key” as per the RapidAPI requirements. Additionally you have to set the “content-type” to “application/x-www-form-urlencoded”.
This is the last piece of code that you have to add. Define two new functions onResponse( ) and setText( ) as follows.
private fun onResponse(result: String?) {
   try {

       // convert the string to JSON object for better reading
       val resultJson = JSONObject(result)

       // Initialize prediction text
       var prediction ="Today's prediction nn"
       prediction += this.sunSign+"n"

       // Update text with various fields from response
       prediction += resultJson.getString("date_range")+"nn"
       prediction += resultJson.getString("description")

       //Update the prediction to the view
       setText(this.resultView,prediction)

   } catch (e: Exception) {
       e.printStackTrace()
       this.resultView!!.text = "Oops!! something went wrong, please try again"
   }
}

private fun setText(text: TextView?, value: String) {
   runOnUiThread { text!!.text = value }
}
The onResponse( ) also gets called from the getPredictions( ). It converts the API response to JSON format, extracts the value of prediction text, and prepares a string.
Finally, the resultView is updated with this string to display prediction on app screen.
Step 10: Add the UI View resources for MainActivity
The MainActivity is also associated with a view that displays the UI on the app screen. The view definition is in the form of XML files.
Expand the res path under the Android Studio’s project file explorer to locate the xml files that you have to modify for this app.

Replace the strings.xml file with the following content.
<resources>
    <string name="app_name">Horoscope App</string>
    <string name="prompt_text">Select the Sun sign</string>
    <string name="submit_button">Get Predictions</string>
    <string name="background_description">Just an image</string>
    <string-array name="sunsigns">
        <item>Aries</item>
        <item>Taurus</item>
        <item>Gemini</item>
        <item>Cancer</item>
        <item>Leo</item>
        <item>Virgo</item>
        <item>Libra</item>
        <item>Scorpio</item>
        <item>Sagittarius</item>
        <item>Capricorn</item>
        <item>Aquarius</item>
        <item>Pisces</item>
    </string-array>
</resources>
This file contains the string constants for identifying all the sun signs. This is referenced in the MainActivity.kt for populating the dropdown.
Now replace the entire activity_main.xml content with the code below.
<?xml version="1.0" encoding="utf-8"?>
<androidx.constraintlayout.widget.ConstraintLayout xmlns:android="http://schemas.android.com/apk/res/android"
    xmlns:app="http://schemas.android.com/apk/res-auto"
    xmlns:tools="http://schemas.android.com/tools"
    android:layout_width="match_parent"
    android:layout_height="match_parent"
    tools:context=".MainActivity">

    <ImageView
        android:id="@+id/backgroundImageView"
        android:layout_width="wrap_content"
        android:layout_height="wrap_content"
        android:contentDescription="@string/background_description"
        android:scaleType="fitXY"
        android:scrollbars="vertical"
        android:visibility="visible"
        app:layout_constraintBottom_toBottomOf="parent"
        app:layout_constraintEnd_toEndOf="parent"
        app:layout_constraintHorizontal_bias="0.0"
        app:layout_constraintStart_toStartOf="parent"
        app:layout_constraintTop_toTopOf="parent"
        app:srcCompat="@drawable/zodiac_portrait" />

    <TextView
        android:id="@+id/promptTextView"
        android:layout_width="296dp"
        android:layout_height="50dp"
        android:layout_marginTop="16dp"
        android:gravity="center_horizontal"
        android:text="@string/prompt_text"
        android:textColor="#FFFFFF"
        android:textSize="30sp"
        android:textStyle="bold"
        app:layout_constraintEnd_toStartOf="@+id/backgroundImageView"
        app:layout_constraintHorizontal_bias="0.5"
        app:layout_constraintStart_toEndOf="@+id/backgroundImageView"
        app:layout_constraintTop_toTopOf="parent" />

    <Spinner
        android:id="@+id/spinner"
        android:layout_width="291dp"
        android:layout_height="48dp"
        android:layout_marginTop="35dp"
        android:background="@android:color/holo_blue_light"
        android:gravity="end"
        app:layout_constraintEnd_toStartOf="@+id/backgroundImageView"
        app:layout_constraintHorizontal_bias="0.5"
        app:layout_constraintStart_toEndOf="@+id/backgroundImageView"
        app:layout_constraintTop_toBottomOf="@+id/promptTextView" />

    <Button
        android:id="@+id/button"
        android:layout_width="179dp"
        android:layout_height="59dp"
        android:layout_marginTop="177dp"
        android:background="#FF9800"
        android:onClick=""
        android:text="@string/submit_button"
        app:layout_constraintEnd_toStartOf="@+id/backgroundImageView"
        app:layout_constraintHorizontal_bias="0.5"
        app:layout_constraintStart_toEndOf="@+id/backgroundImageView"
        app:layout_constraintTop_toTopOf="@+id/backgroundImageView"
        tools:ignore="OnClick" />

        <TextView
            android:id="@+id/resultView"
            android:layout_width="309dp"
            android:layout_height="417dp"
            android:layout_marginTop="260dp"
            android:layout_marginEnd="39dp"
            android:layout_marginRight="39dp"
            android:foregroundGravity="fill_horizontal"
            android:justificationMode="inter_word"
            android:textSize="18sp"
            android:textStyle="bold"
            android:textColor="#FFFFFF"
            android:visibility="visible"
            app:layout_constraintEnd_toEndOf="parent"
            app:layout_constraintEnd_toStartOf="@+id/backgroundImageView"
            app:layout_constraintHorizontal_bias="0.5"
            app:layout_constraintStart_toEndOf="@+id/backgroundImageView"
            app:layout_constraintTop_toTopOf="@+id/backgroundImageView" />

</androidx.constraintlayout.widget.ConstraintLayout>
The activity_main.xml file contains the layout definition of the UI elements and their properties. It also includes their display properties. For a detailed overview of view layouts in Android, take a look at the official layouts guide.
The layout definition contains an XML tag called <ImageView>, representing a background image in the MainActivity. Place the below image inside the res/drawable path within the save location of the app project, and rename it as zodiac_portrait.png.

This image will be referenced by the MainActivity screen and rendered as the app background image.
Android Studio also provides a design preview of your App screen layout based on the layout definition. This preview gives a fair idea about how the screen will appear in runtime.

You are all done with programming the app.
Step 11: Building and testing the horoscope app
Make sure that you save all the files that are modified in the previous steps.
Now it’s time to build and run the app. On the Android Studio, choose the “Run > Run `app`” submenu. This will build the app code and subsequently launch the Horoscope app on a device emulator. The emulator takes some time to initialize the first time.
Once the app is up and running, interact with it, and check out the predictions for different sun signs.
If you want to test this app on a real Android phone, check out the official Android guide on building and running your app, and testing on a hardware device.
Conclusion
Congratulations! You have now mastered the skill of building an Android app powered by an API. Now you can list it on the Google Play Store.
With the help of RapidAPI’s API marketplace, you can look up thousands of APIs that can be integrated with Android apps for performing various utility tasks ranging from language translation, location-based services, weather predictions, and more. So go ahead, explore the APIs, and good luck for your next Android project.
View the Best Free APIs List
() translation by (you can also view the original English article)
Большинство из нас стали весьма жадны до новой информации, что в Интернете является такой важной частью нашей жизни. Поэтому создание приложений Android со статичным контентом может быть плохой идеей. Вместо этого вам следует рассмотреть возможность создания приложений, которые могут отображать свежий контент каждый раз, когда пользователь их открывает.
Это может звучать сложно, но с большим количеством сайтов, которые раскрывают свои ресурсы через REST API, на самом деле это довольно просто. (Смотрите руководство для начинающих по HTTP и REST для примера.)
В этом уроке я расскажу вам, как использовать классы и методы, доступные в Android SDK, для подключения к удаленным веб-серверам и взаимодействия с ними с использованием их REST API.
1. Включение доступа к Интернету
Использование REST API, очевидно, связано с использованием Интернета. Тем не менее, приложения Android могут получить доступ к Интернету только в том случае, если у них есть разрешение android.permission.INTERNET. Поэтому перед началом написания любого сетевого кода вы должны убедиться, что в файле манифеста вашего проекта присутствуют следующие uses-permission теги:
1 |
<uses-permission android:name="android.permission.INTERNET" /> |
Поскольку android.permission.INTERNET не считается опасным разрешением, вам не нужно запрашивать его во время выполнения на устройствах с уровнем API 23 или выше.
2. Создание фоновых потоков
Платформа Android не позволяет выполнять сетевые операции в основном потоке приложения. Поэтому весь ваш сетевой код должен принадлежать фоновому потоку. Самый простой способ создать такой поток — использовать метод execute() класса AsyncTask. В качестве единственного аргумента execute() ожидает объект Runnable.
1 |
AsyncTask.execute(new Runnable() { |
2 |
@Override
|
3 |
public void run() { |
4 |
// All your networking logic
|
5 |
// should be here
|
6 |
}
|
7 |
});
|
Если вы хотите узнать больше о выполнении операций в фоновом потоке, я предлагаю вам прочитать этот учебник о фоновых операциях из серии Android для начинающих.
3. Создание HTTP-соединения
Используя метод openConnection() класса URL, вы можете быстро настроить соединение с любой конечной точкой REST. Возвращаемое значение openConnection() должно быть передано в экземпляр HttpURLConnection или HttpsURLConnection, в зависимости от доступа к конечной точке через HTTP или HTTPS. Оба HttpURLConnection и HttpsURLConnection позволяют выполнять такие операции, как добавление заголовков запросов и чтение ответов.
В следующем фрагменте кода показано, как настроить соединение с корневой конечной точкой API GitHub:
1 |
// Create URL
|
2 |
URL githubEndpoint = new URL("https://api.github.com/"); |
3 |
|
4 |
// Create connection
|
5 |
HttpsURLConnection myConnection = |
6 |
(HttpsURLConnection) githubEndpoint.openConnection(); |
Обратите внимание, что HttpsURLConnection является подклассом класса HttpURLConnection.
4. Добавление заголовков запросов
Большинство веб-сайтов, предлагающих REST API, хотят иметь возможность однозначно идентифицировать ваше приложение. Самый простой способ помочь им сделать это — включить уникальный заголовок User-Agent во все ваши запросы.
Чтобы добавить заголовок User-Agent в ваш запрос, вы должны использовать метод setRequestProperty() объекта HttpURLConnection. Например, вот как вы устанавливаете заголовок User-Agent в my-rest-app-v0.1:
1 |
myConnection.setRequestProperty("User-Agent", "my-rest-app-v0.1"); |
Вы можете добавить несколько заголовков к своему запросу, вызвав несколько раз метод setRequestProperty(). Например, следующий фрагмент кода добавляет заголовок Accept и кастомный заголовок Contact-Me:
1 |
myConnection.setRequestProperty("Accept", |
2 |
"application/vnd.github.v3+json"); |
3 |
myConnection.setRequestProperty("Contact-Me", |
4 |
"hathibelagal@example.com"); |
5. Чтение ответов
После того как вы передали все заголовки запросов, вы можете проверить, есть ли у вас валидный ответ, используя метод getResponseCode() объекта HttpURLConnection.
1 |
if (myConnection.getResponseCode() == 200) { |
2 |
// Success
|
3 |
// Further processing here
|
4 |
} else { |
5 |
// Error handling code goes here
|
6 |
}
|
Если класс HttpURLConnection получает код ответа на перенаправление, например 301, он автоматически обрабатывает его и следует за перенаправлением. Поэтому, как правило, вам не нужно будет писать дополнительный код для проверки перенаправления.
В случае отсутствия ошибок вы можете теперь вызвать метод getInputStream(), чтобы получить ссылку на входящий поток соединения.
1 |
InputStream responseBody = myConnection.getInputStream(); |
Большинство REST API в наши дни возвращают данные, отформатированные как документы JSON. Поэтому, вместо прямого чтения из объекта InputStream, я предлагаю вам создать для него InputStreamReader.
1 |
InputStreamReader responseBodyReader = |
2 |
new InputStreamReader(responseBody, "UTF-8"); |
6. Разбор JSON ответов
Android SDK имеет класс JsonReader, который позволяет легко разбирать документы JSON. Вы можете создать новый экземпляр класса JsonReader, передав объект InputStreamReader его конструктору.
1 |
JsonReader jsonReader = new JsonReader(responseBodyReader); |
То как вы извлекаете определенную часть информации из документа JSON, зависит от его структуры. Например, документ JSON, возвращаемый корневой конечной точкой REST API GitHub, выглядит следующим образом:
1 |
{
|
2 |
"current_user_url": "https://api.github.com/user", |
3 |
"current_user_authorizations_html_url": "https://github.com/settings/connections/applications{/client_id}", |
4 |
"authorizations_url": "https://api.github.com/authorizations", |
5 |
"code_search_url": "https://api.github.com/search/code?q=1{&page,per_page,sort,order}", |
6 |
"emails_url": "https://api.github.com/user/emails", |
7 |
"emojis_url": "https://api.github.com/emojis", |
8 |
"events_url": "https://api.github.com/events", |
9 |
"feeds_url": "https://api.github.com/feeds", |
10 |
"followers_url": "https://api.github.com/user/followers", |
11 |
"following_url": "https://api.github.com/user/following{/target}", |
12 |
"gists_url": "https://api.github.com/gists{/gist_id}", |
13 |
"hub_url": "https://api.github.com/hub", |
14 |
"issue_search_url": "https://api.github.com/search/issues?q=1{&page,per_page,sort,order}", |
15 |
"issues_url": "https://api.github.com/issues", |
16 |
"keys_url": "https://api.github.com/user/keys", |
17 |
"notifications_url": "https://api.github.com/notifications", |
18 |
"organization_repositories_url": "https://api.github.com/orgs/{org}/repos{?type,page,per_page,sort}", |
19 |
"organization_url": "https://api.github.com/orgs/{org}", |
20 |
"public_gists_url": "https://api.github.com/gists/public", |
21 |
"rate_limit_url": "https://api.github.com/rate_limit", |
22 |
"repository_url": "https://api.github.com/repos/{owner}/{repo}", |
23 |
"repository_search_url": "https://api.github.com/search/repositories?q=1{&page,per_page,sort,order}", |
24 |
"current_user_repositories_url": "https://api.github.com/user/repos{?type,page,per_page,sort}", |
25 |
"starred_url": "https://api.github.com/user/starred{/owner}{/repo}", |
26 |
"starred_gists_url": "https://api.github.com/gists/starred", |
27 |
"team_url": "https://api.github.com/teams", |
28 |
"user_url": "https://api.github.com/users/{user}", |
29 |
"user_organizations_url": "https://api.github.com/user/orgs", |
30 |
"user_repositories_url": "https://api.github.com/users/{user}/repos{?type,page,per_page,sort}", |
31 |
"user_search_url": "https://api.github.com/search/users?q=1{&page,per_page,sort,order}" |
32 |
}
|
Как вы можете видеть, ответ — это только один большой объект JSON, содержащий несколько ключей. Чтобы извлечь из него значение с именем organization_url, вам нужно будет написать следующий код:
1 |
jsonReader.beginObject(); // Start processing the JSON object |
2 |
while (jsonReader.hasNext()) { // Loop through all keys |
3 |
String key = jsonReader.nextName(); // Fetch the next key |
4 |
if (key.equals("organization_url")) { // Check if desired key |
5 |
// Fetch the value as a String
|
6 |
String value = jsonReader.nextString(); |
7 |
|
8 |
// Do something with the value
|
9 |
// ...
|
10 |
|
11 |
break; // Break out of the loop |
12 |
} else { |
13 |
jsonReader.skipValue(); // Skip values of other keys |
14 |
}
|
15 |
}
|
Вышеупомянутый код обрабатывает ответ JSON как поток токенов. Поэтому он потребляет очень мало памяти. Однако, поскольку он должен обрабатывать каждый отдельный токен один за другим, он может оказаться медленным при обработке больших ответов.
После того как вы извлечете всю необходимую информацию, вы всегда должны вызвать метод close() для объекта JsonReader, чтобы он освобождал все сохраненные ресурсы.
Вы также должны закрыть соединение, вызвав метод disconnect() объекта HttpURLConnection.
1 |
myConnection.disconnect(); |
7. Использование разных HTTP методов
HTTP-интерфейсы REST используют методы HTTP для определения типа операции, которая должна выполняться над ресурсом. На предыдущих шагах мы использовали метод HTTP GET для выполнения операции чтения. Поскольку класс HttpURLConnection использует по умолчанию метод GET, нам не нужно было его явно указывать.
Чтобы изменить метод HTTP вашего объекта HttpURLConnection, вы должны использовать его метод setRequestMethod(). Например, следующий фрагмент кода открывает соединение с конечной точкой, принадлежащей httpbin.org, и устанавливает свой HTTP-метод в POST:
1 |
URL httpbinEndpoint = new URL("https://httpbin.org/post"); |
2 |
HttpsURLConnection myConnection |
3 |
= (HttpsURLConnection) httpbinEndpoint.openConnection(); |
4 |
|
5 |
myConnection.setRequestMethod("POST"); |
Как вы уже знаете, POST-запросы используются для отправки данных на сервер. При записи в выходной поток соединения вы можете легко добавить любые данные в тело запроса POST. Однако, прежде чем вы это сделаете, вы должны убедиться, что вы вызываете метод setDoOutput() объекта HttpURLConnection и передаете ему значение true.
В следующем фрагменте кода показано, как отправить на сервер простую пару «ключ-значение»:
1 |
// Create the data
|
2 |
String myData = "message=Hello"; |
3 |
|
4 |
// Enable writing
|
5 |
myConnection.setDoOutput(true); |
6 |
|
7 |
// Write the data
|
8 |
myConnection.getOutputStream().write(myData.getBytes()); |
8. Кэширование ответов
Всегда рекомендуется кэшировать ответы HTTP. Таким образом, вы можете не только сократить потребление пропускной способности вашего приложения, но и сделать его более отзывчивым. Начиная с уровня API 13, Android SDK предлагает класс HttpResponseCache, который позволяет легко реализовать кэширование без каких-либо изменений в вашей сетевой логике.
Чтобы установить кэш для вашего приложения, вы должны вызвать метод install() класса HttpResponseCache. Метод ожидает абсолютный путь, указывающий, где должен быть установлен кеш, и число, определяющее размер кеша. Вы можете использовать метод getCacheDir(), если вы не хотите указывать абсолютный путь вручную.
В следующем фрагменте кода устанавливается кеш размером 100 000 байт:
1 |
HttpResponseCache myCache = HttpResponseCache.install( |
2 |
getCacheDir(), 100000L); |
Как только кеш установлен, класс HttpURLConnection начинает использовать его автоматически. Чтобы проверить, работает ли ваш кеш, вы можете использовать его метод getHitCount(), который возвращает количество HTTP-ответов, которые были отправлены из кеша.
1 |
if (myCache.getHitCount() > 0) { |
2 |
// The cache is working
|
3 |
}
|
Заключение
Существуют тысячи REST API-интерфейсов, которые вы можете свободно использовать в своих приложениях для Android. Используя их, вы можете сделать ваше приложение более информативным, интересным и многофункциональным. В этом уроке вы узнали, как использовать класс HttpURLConnection для использования таких REST API. Вы также узнали, как создать кеш ответов HTTP, который снижает использование потребление сетевого трафика вашим приложением.
Если вы считаете, что использование HttpURLConnection слишком сложное, вам следует обратить внимание на сторонние библиотеки, такие как например, Volley. Библиотеки, подобные этой, используют класс HttpURLConnection внутри, но предоставляют множество удобных методов, которые позволяют сделать ваш код более кратким и читаемым.
Чтобы узнать больше о работе с сетью на платформе Android, вы можете обратиться к руководству по сетевым операциям Android.
Часть 1: Создание API

В прошлом году я работал над созданием небольшого приложения для местных фермеров, которое помогло бы покупателям узнать, какие продукты есть в наличии у фермеров и что есть на складе в данный момент. Концепция была проста: информация о фермере будет содержаться в RESTful API, и приложение будет связываться с API, чтобы сделать эту информацию доступной для пользователей.
Когда я начал исследовать этот процесс, я обнаружил, что документация для многих шагов этого процесса часто была запутанной, скудной и трудной для начала, особенно если вы используете Windows (что делают многие новички). В этом уроке я пройду все этапы создания серверной части такого приложения.
Требования
В этом уроке я буду писать только серверную часть для приложения Kotlin в Android Studio. Я буду использовать:
- Visual Studio Code в Windows
- Питон 3.9
- Гит Баш
- Джанго
- Ретрофит
Настройка среды
Сначала создайте каталог для вашего проекта и войдите в него. Я использую Git Bash в качестве предпочтительного терминала, потому что он позволяет мне использовать некоторые учебные пособия и шаблоны на основе Linux, не находя терминологию и команды, специфичные для Windows.
(Обратите внимание, что Django позволяет использовать только буквы, цифры и знаки подчеркивания для имен проектов.)
$ mkdir farmer_database_app
$ cd farmer_database_app
В Python вам понадобится виртуальная среда для каждого проекта, чтобы отслеживать пакеты, которые вы используете, и то, что вы установили. Вы можете сделать это с помощью команды:
$ python -m venv env
Затем активируйте его с помощью файла активации. Найдите файл activate.bat, чтобы узнать, в каком каталоге он находится. В Windows ваш путь, скорее всего, будет env/Scripts/activate. Бегать:
$ source env/Scripts/activate
Настройка базы данных
Сначала установите Django с помощью
$ pip install django
Затем вы можете запустить приложение Django с помощью команд django-admin startproject и startapp:
$ django-admin startproject farmer_database_app .
$ django-admin startapp farmer_database
Это создает два каталога: farmer_database_app и farmer_database соответственно.
- Команда
startprojectсоздает каталог пакета и файлmanage.py. Команда“.”создает их в рабочем каталоге. - Команда
startappсоздает структуру каталогов приложений. Он содержит модели и шаблоны для вашего приложения.
Добавьте приложение в часть INSTALLED_APPS файла settings.py внутри каталога пакета (farmer_database_app):
INSTALLED_APPS = [
    ...,
    'farmer_database'
]
Модели
Django использует для информации классы, называемые «моделями». Чтобы провести параллель с чем-то вроде SQL или таблиц, свойства моделей соответствуют заголовкам столбцов.
Для моей базы данных фермеров мне понадобилось несколько моделей: модель фермера, модель продукта и модель связывания, чтобы связать продукты с фермерами, у которых есть этот продукт.
- Модель фермера нуждается в имени фермера, адресе, по которому его можно найти, и идентификаторе.
- Модель продукта требует тип продукта (например, морковь) и идентификатор
- Затем таблица ссылок берет каждый экземпляр продукта и связывает его с фермером, у которого есть этот продукт, и типом продукта через их идентификаторы. Мы также можем дать ему собственный идентификатор.
Это вводится в файл models.py внутри каталога приложения (farmer_database). Убедитесь, что модуль models импортирован из пакета django.
from django.db import models
# Models
class Farmer(models.Model):
    farmer_id = models.IntegerField()
    name = models.CharField(max_length=256)
    address = models.CharField(max_length=256)
class Product(models.Model):
    product_id = models.IntegerField()
    product_type = models.CharField(max_length=256)
class FPLink(models.Model):
    instance_id = models.IntegerField()
    farmer_id = models.IntegerField()
    product_id = models.IntegerField()`
Затем мы используем manage.py для обновления базы данных, чтобы включить эти модели в миграции.
Во-первых, мы делаем миграции:
$ python manage.py makemigrations farmer_datebase

Затем применяем их к базе данных SQL (по умолчанию это SQLite):
$ python manage.py migrate

Настройка REST-фреймворка
Чтобы сделать эту базу данных доступной в Интернете, нам нужна структура REST. Для этого мы можем использовать REST framework Django. Поскольку наше Android-приложение будет использовать формат JSON, вы можете реализовать это с помощью поддержки JSON:API — спецификации для создания API в стандартном формате JSON.
Сначала установите необходимые пакеты:
$ pip install djangorestframework
$ pip install djangorestframework-jsonapi
$ pip install django-filter
Добавьте ‘rest_framework’ и ‘rest_framework_json_api’ в настройки INSTALLED_APPS:
INSTALLED_APPS = [
    ...,
    'farmer_database',
    'rest_framework',
    'rest_framework_json_api'
]
Затем в документации найдите сегмент Настройки и скопируйте код REST_FRAMEWORK в конец вашего файла settings.py. Это гарантирует, что инфраструктура REST следует формату JSON:API.
Сериализаторы
Теперь, когда у нас есть фреймворк и модели, нам нужно передать модели в фреймворк. Это делается с помощью сериализаторов. Создайте файл serializers.py в каталоге вашего приложения (database_farmers).
В этом файле импортируйте сериализаторы из платформы JSON:API и определенные модели из вашего приложения:
from rest_framework_json_api import serializers
from farmer_database.models import Farmer, Product, FPLink
Затем определите свой класс сериализатора с метаклассом, который имеет два поля: модель и ее поля в виде кортежа.
class FarmerSerializer(serializers.HyperlinkedModelSerializer):
    class Meta:
        model = Farmer
        fields = (‘farmer_id’, ‘name’, ‘address’)
class ProductSerializer(serializers.HyperlinkedModelSerializer):
    class Meta:
        model = Product
        fields = (‘product_id’, ‘product_type’)
class FPLinkSerializer(serializers.HyperlinkedModelSerializer):
    class Meta:
        model = FPLink
        fields = (‘instance_id’, ‘farmer_id’, ‘product_id’)
Просмотры и URL-адреса
Теперь нам нужно предоставить фреймворку представления и пути для HTTP-запросов.
В каталоге приложения уже есть файл views.py, который содержит необходимые для этого классы представления. Однако, поскольку мы используем JSON:API, мы будем использовать подход, отличный от стандартного кода в файле. Удалите существующий код и вместо этого импортируйте новую оставшуюся структуру.
Вам также необходимо импортировать свои модели и сериализаторы.
from farmer_database.models import Farmer, Product, FPLink
from farmer_database.serializers import FarmerSerializer, ProductSerializer, FPLinkSerializer
from rest_framework import viewsets
Затем определите классы для каждой модели. Поля будут представлять собой QuerySet, инструмент абстракции базы данных Django (набор объектов из моделей, очень похожий на SELECT в SQL) и соответствующий сериализатор:
class FarmerViewSet(viewsets.ModelViewSet):
    queryset = Farmer.objects.all()
    serializer_class = FarmerSerializer
class ProductViewSet(viewsets.ModelViewSet):
    queryset = Product.objects.all()
    serializer_class = ProductSerializer
class FPLinkViewSet(viewsets.ModelViewSet):
    queryset = FPLink.objects.all()
    serializer_class = FPLinkSerializer
Теперь мы определяем URL-адреса для доступа к моделям. Это можно сделать в каталоге пакета farmer_database_app в файле urls.py. Здесь мы подключаем пути URL-адресов к соответствующим наборам представлений, поэтому нам нужно импортировать необходимые инструменты URL-адресов, наши инструменты остальной инфраструктуры и наши наборы представлений.
from django.urls import include, path
from rest_framework import routers
from farmer_database import views
Затем определите шаблоны URL:
router = routers.DefaultRouter()
router.register(r'farmers', views.FarmerViewSet)
router.register(r'products', views.ProductViewSet)
router.register(r'fplinks', views.FPLinkViewSet)
urlpatterns = [
    path('', include(router.urls))
]
Это создает методы GET, POST, PATCH и DELETE для всех наших моделей.
В следующем уроке я расскажу, как запустить и протестировать сервер!
Xamarin.Android API Documentation
This repository contains the mdoc(5) format documentation for the
assemblies bundled with Xamarin.Android.
Scripts included in the repository
make all: runmdoc validateto verify the syntax of the documentation
in the repositorymake assemble: Create mdoc documentation bundles for installation.make install: Install the documentation bundles into Mono.framework on OS X.
Visualizing the documentation with macdoc
Run macdoc by passing the absolute path to the en directory
(i.e. where the index.xml file is) preprended with the character +:
/Applications/Xamarin\ Studio.app/Contents/MacOS/MonoDoc.app/Contents/MacOS/macdoc \
'+/path/to/ios-api-docs/en/'
You need a recent macdoc. You can compile it yourself by cloning
https://github.com/mono/monomac and running the build process
there. Macdoc is under the samples directory.
Microsoft Open Source Code of Conduct
This project has adopted the Microsoft Open Source Code of Conduct.
For more information see the Code of Conduct FAQ or contact opencode@microsoft.com with any additional questions or comments.