Привет, читатель! В этом материале мы хотим поделиться руководством по созданию 3D-эскизов, печати и их перевода на кожу, автором которого является тату-мастер Константин Алексеев. В одной из наших статей Костя уже рассказывал, как использование программ помогает ему в работе, поэтому мы уверены, что его инструкция и советы помогут многим, особенно начинающим мастерам, сделать свою работу чуточку проще, а главное — качественнее.
Но, если вы думаете, что этот материал будет полезен только тату-мастерам, вы ошибаетесь! Если вы клиент, и планируете сделать себе объемную и масштабную татуировку (например, рукав или ногав), то смело отправляйте эту статью своему мастеру, чтобы заранее увидеть, как большой эскиз будет выглядеть на вашем теле.
Итак, передаем слово Константину, который щедро делится с вами своим опытом.
Введение
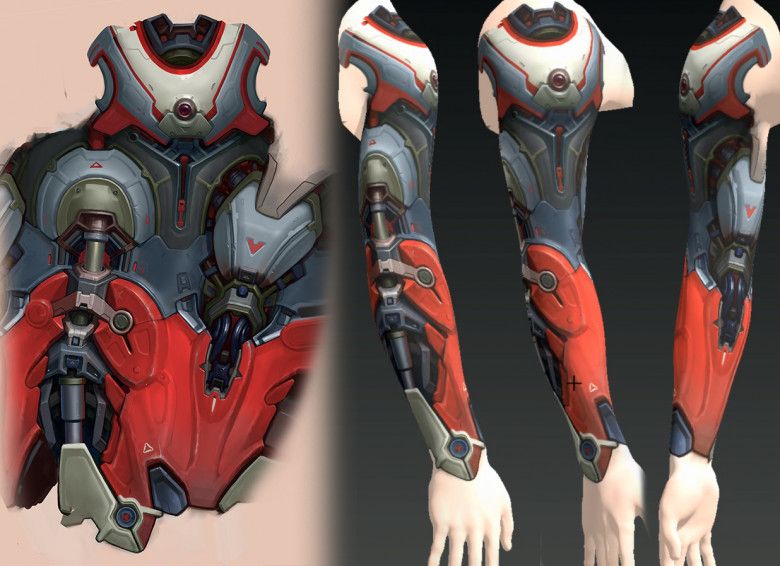
Например, нам нужно сделать эскиз рукава полностью или частично. Предположим, что клиент из другого города, и на такой большой проект нужно готовить эскиз заранее. Мы, конечно, хотим как можно тщательнее продумать весь дизайн. Многим татуировщикам это не составляет труда, но результат был бы лучше, если бы мы сразу могли постепенно создавать дизайн на поверхности реального тела или его модели. Кроме того, это крайне занимает клиента, так как видно заранее, на сколько хорошо татуировка будет смотреться в объеме.
В этом нам помогают компьютерные программы, которые позволяют рисовать или накладывать картинки поверх трехмерной модели человеческого тела. Photoshop, в том числе, имеет такую функцию. Но для меня этот способ оказался не эффективным, и со временем я нашел для себя иной способ, относительно простой, но с большим функционалом и производительностью.
Это программа 3D Coat, в которой можно моделировать, скульптурировать, текстурировать, анимировать и рендерить. Проще говоря — полный профессиональный пакет на русском, если нужно, языке, который можно скачать бесплатно с официального сайта. Данные примеры работ были разработаны подобным образом.

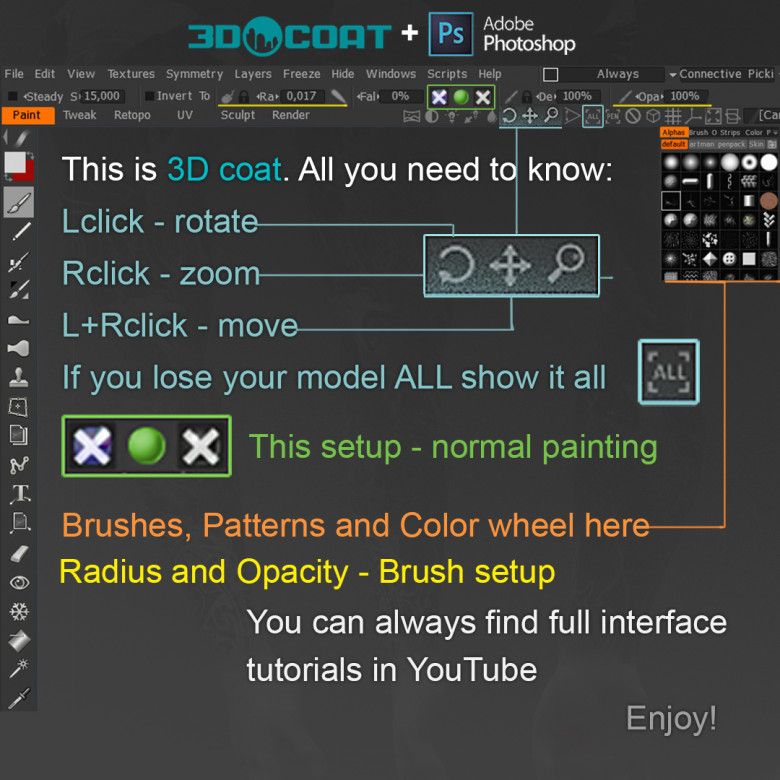
При всей сложности процесса, основные инструменты, которыми я пользуюсь, достаточно просты и многие схожи с Photoshop. Об остальных особенностях и функциях я расскажу подробнее. Не смогу описать здесь все функции интерфейса, многое вы можете найти на Youtube, но дам комментарии к изложенным в картинках шагам. Если что-то не понятно — я с удовольствием отвечу на все вопросы в моём Instagram.
Руководство по созданию 3D-эскизов
Если скачать мой Gumroad туториал, то там будет модель стандартной чуть подкаченной мужской руки. Открываем её в 3D Coat, и первое что мы можем настроить — это разрешение/качество текстуры (2048 или 4096), это зависит от мощности вашего ПК.
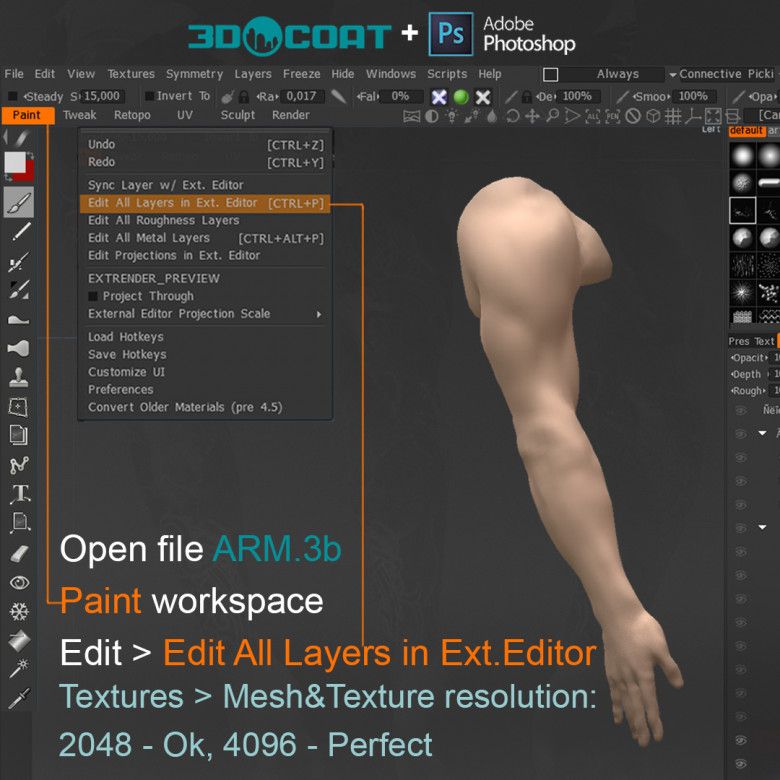
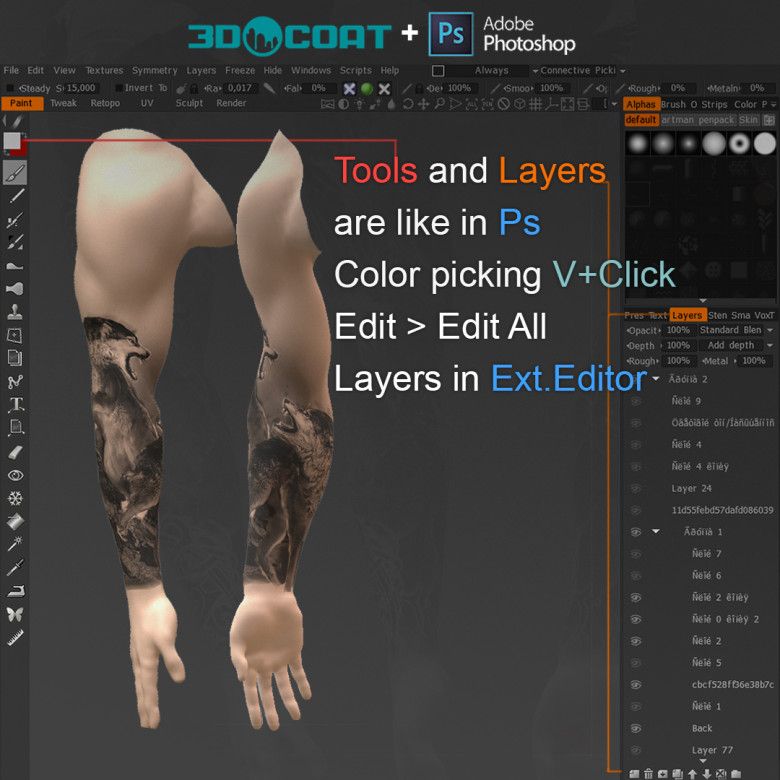
Paint — это одно из рабочих пространств 3D Coat, где мы можем рисовать прямо по модельке, инструменты слева и слои справа очень схожи с Ps.Ext. Editor — это функция связи с Photoshop, и в первый раз вам будет предложено указать .exe файл рабочего Photoshop, а далее эта функция автоматически запускает Ps и загружает в него последнюю версию текстуры из 3D Coat.
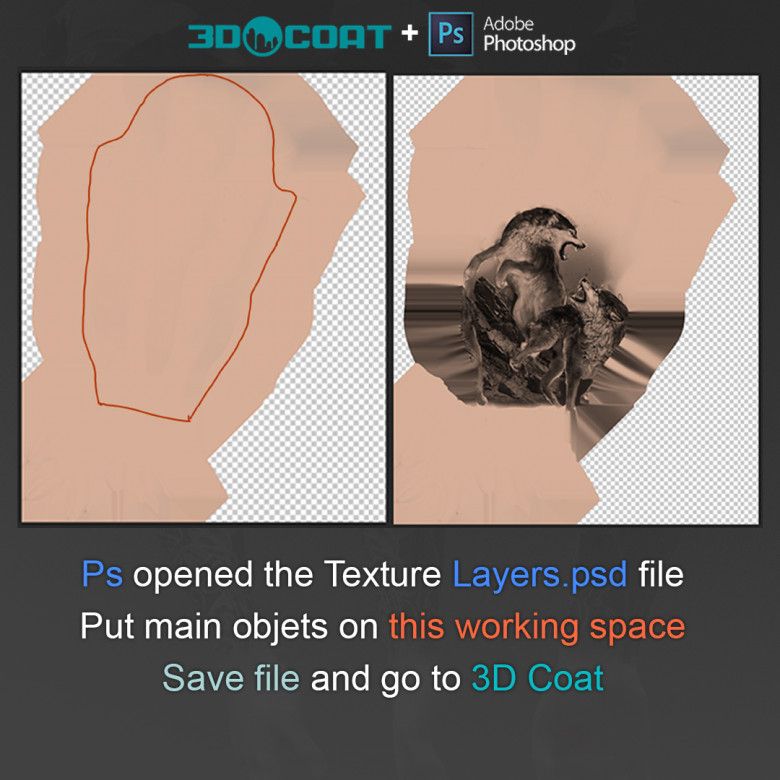
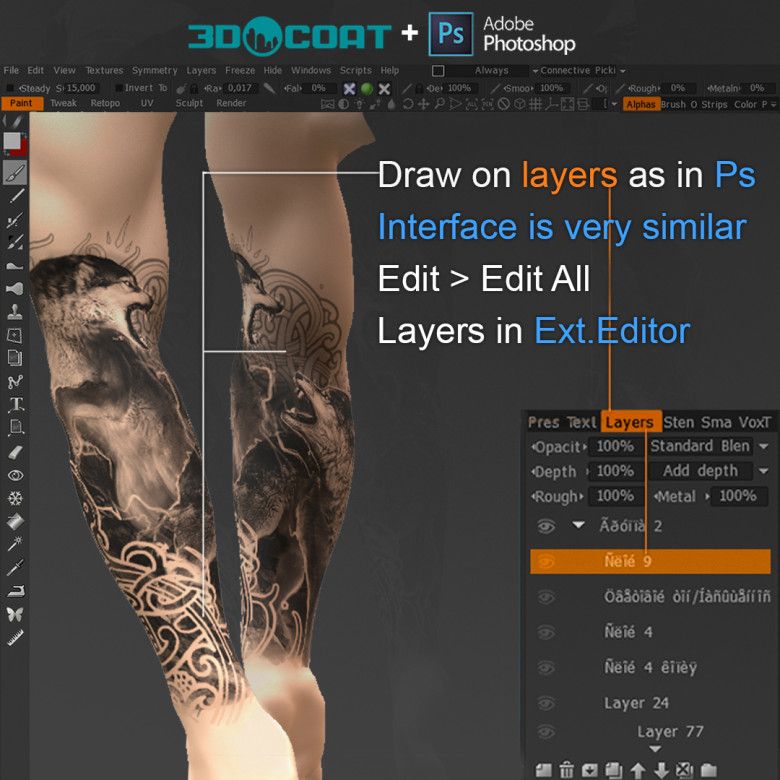
В Photoshop открылся файл со слоями. Если мы хотим расположить картинку на предплечье, то кидаем её в нижнюю половину текстуры, в рамке, отмеченной красным. Сохраняем файл. Переходим в 3D Coat и, если результат размещения оставляет желать лучшего, заходим в Ps и корректируем расположение и размер картинки и снова сохраняем.
Когда картинки оказались в нужных местах, можно приступить к обрисовке фона или других деталей в 3D Coat. Как я и сказал, его интерфейс очень схож с Photoshop, но я советую посмотреть обучающее видео на тему интерфейса и навигации в Youtube хотя бы раз, чтобы это был ваш личный опыт изучения, и вы заметили все необходимые вам функции. Это не сложнее Ps.
Была задача — совместить реализм с кельтскими узорами, и я нарисовал орнаменты, фон, молнии и отделил объекты тенями. Это была одна из первых моих подобных работ и мне понравилось, что я мог видеть дизайн с разных ракурсов и следить за тем чтобы он смотрелся круто с любой стороны.
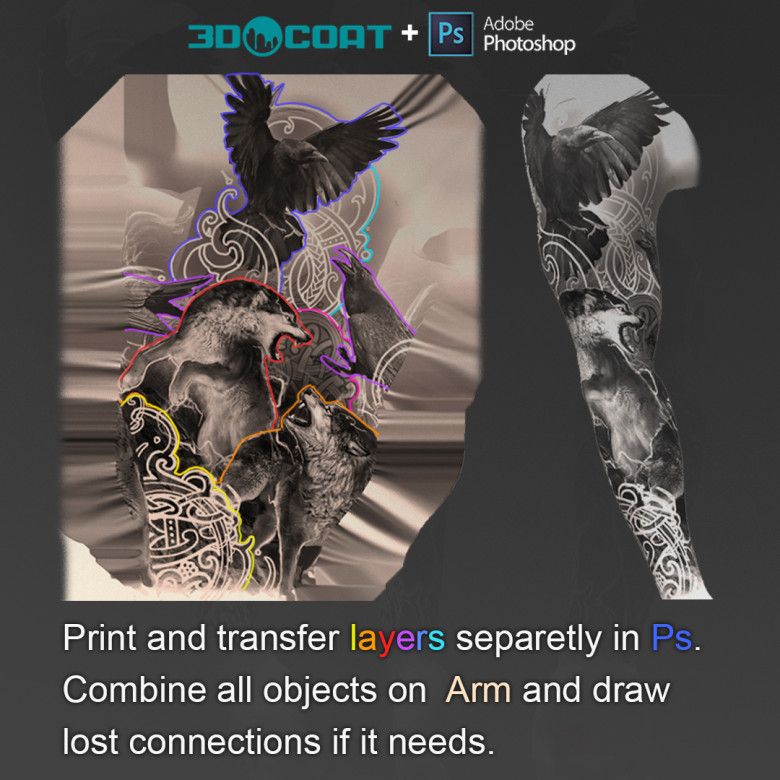
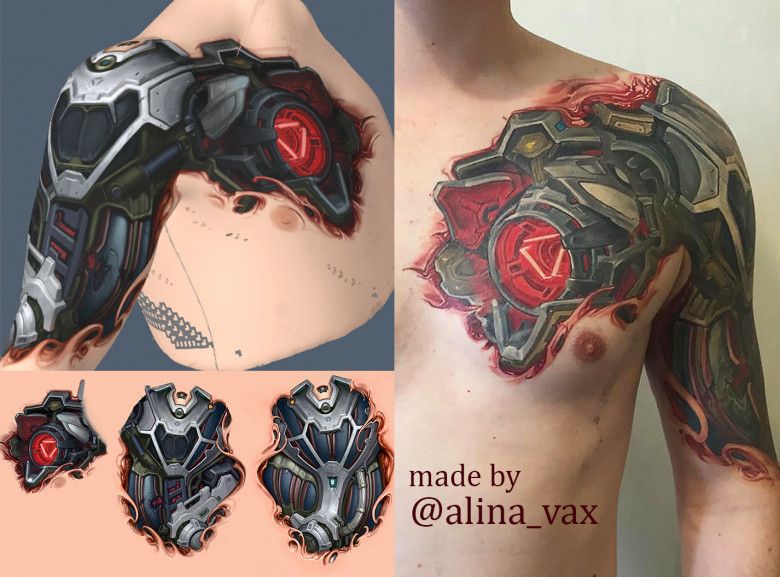
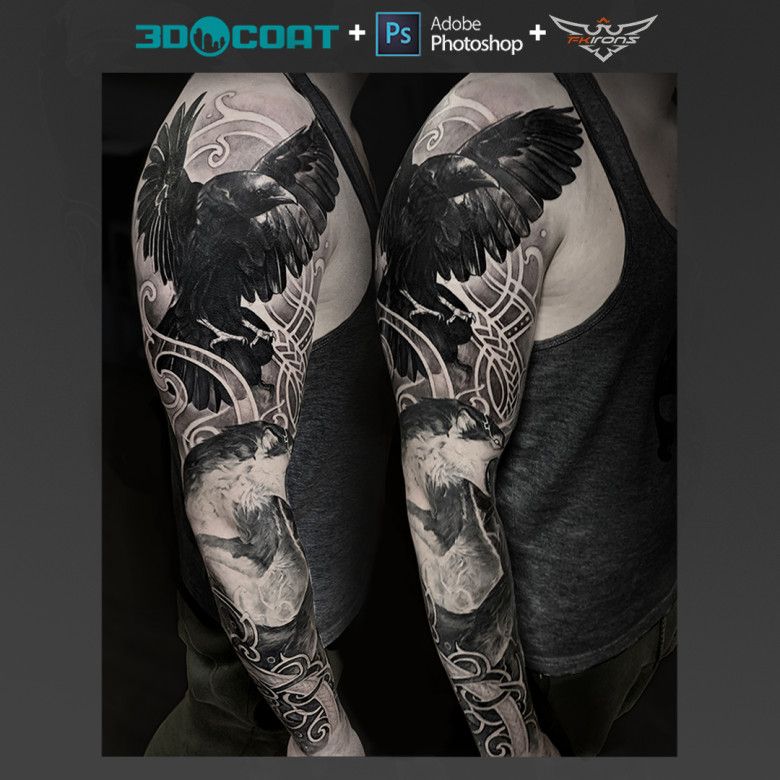
Здесь законченный вариант в Ps. Остаётся только перевести всё на кожу. К моменту, когда нужно примерить это всё на клиента, я разделяю рукав на отдельные элементы снизу вверх. При переводе на кожу, возможно, придется поменять относительные размеры отдельных объектов или их положение, дорисовать недостающие кусочки. Но это всё — ради идеального результата и занимает не так много времени.
Видео финального эскиза в 3D Coat / Автор: koyotsurok
Несколько дополнительных советов
Если вы решили создать эскиз рукава, то начните с базовых линий, отметьте в отдельном слое анатомические кривые, мышцы и косточки. Можно даже накидать предварительную композицию простыми формами, чтобы лучше представлять как выгодней подать идею и отдельные элементы. Это, как минимум, поможет вам правильно расположить фото или картинки на текстурной карте в Ps.
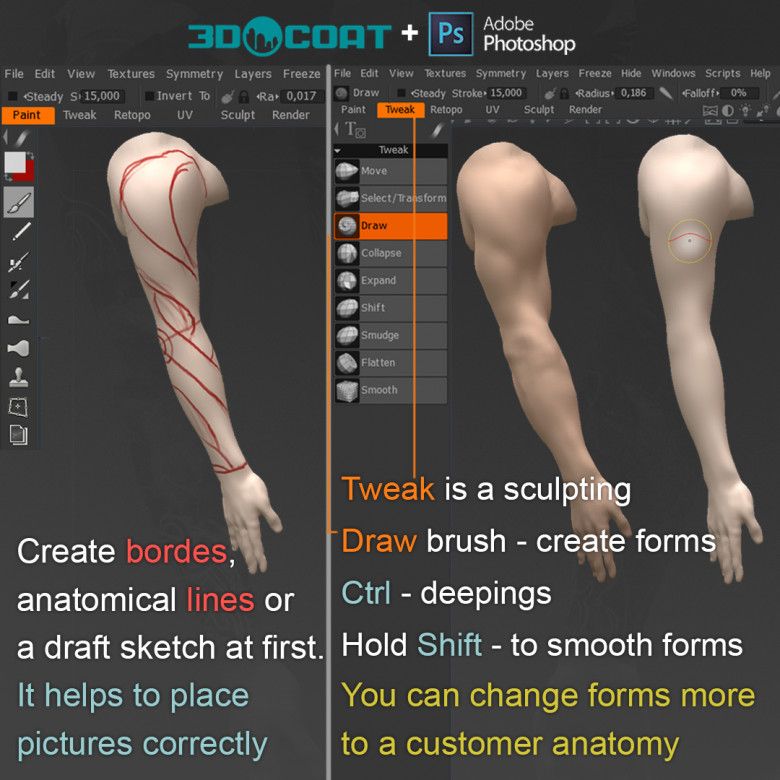
Tweak — это рабочее пространство для скульптинга. Если вы хотите кастомизировать пропорции модели руки под своего клиента, то здесь можно сделать руку тоньше или толще. Опять же, советую посмотреть обучалку на эту тему, но это крайне простое и увлекательное занятие.
Надеюсь всем отважным будет интересно!
Resources3D
Disclosure: This post may contain affiliate links. That means if you buy something we get a small commission at no extra cost to you(learn more)
3D Coat is a 3D asset creation package that focuses on modeling, sculpting, retopology, UV-mapping, and texture painting.
The software is popular for boutique studios and indie developers alike. But it does not have a rigging and animation toolset, although really it doesn’t need one. What 3D Coat does, it does it well.
With the vast 3D software landscape it can get confusing so let’s simplify it: 3D coat is somewhat of a combination between ZBrush, Mari and Substance Painter – at an affordable price. Definitely worth learning if you can use such a sculpting and modeling tool in your arsenal.
3D Coat For Noobs
Check Out This Tutorial
Aimed for all newcomers, this three-part video series will teach you the fundamentals in working with 3D Coat.
It’s actually a funny demonstration where you’re greeted by a 3D mascot that proceeds to explain all the basics of 3D Coat.
The video will guide you with creating high poly sculpting and generating low poly models with retopology. You’ll also UV map your model for preparation in texturing/painting – all within 3D Coat.
The author also clarifies that you have two ways of creating models: either in sculpting or in retopology. Throughout this process you’ll learn several tricks such as creating chains, duplicating objects, and creating masks to isolate a modeling area.
The author also shows common pitfalls for beginners and how to avoid them. Be sure to check part 2 and part 3 for the rest of the series.
Learning The Interface
Check Out This Tutorial
The usual bottleneck for the unsuspecting beginners is not necessarily the software’s features, but actually its interface.
With this tutorial you learn the heart of 3D Coat’s interface: the rooms (or called workspaces in other applications).
You’ll learn about the sculpt, retopology, and UV rooms, among many others. The user interface is dynamic so with every room switch you’ll get different tools and panels.
Later in the video you’ll learn how to customize your interface such as resizing panels and even tearing them off for a floating panel – handy if you have more than one monitor.
Importing Objects For Painting
Check Out This Tutorial
3D Coat offers several importing options on any particular tasks, say for retopology or painting.
And in this case you’ll deal with the latter. While importing is a fairly easy task, the import dialogue box is a bit heavy handed for new users.
This tutorial guides you the pertinent parameters to change(or not to change) such as renaming UV sets, bringing in an external normal map, or changing the map size. You’ll also get some pointers for the paint tools as well.
If you need some practice you can download the project file to follow along.
Hardsurface Design
Check Out This Tutorial
Here you’ll learn how to make a sci-fi gun – a good case study for hard surface design work.
First you’ll import a block out model from Maya. Alternatively you can create the block out in 3D coat with simple primitive tools(if you know what you’re doing).
For the most part though, you’ll create details with voxel sculpting.
You can easily follow along as the author enables a key logger that shows the buttons he presses which is incredibly helpful. You’ll also learn several tips such as cut-off, relocating a selection, and creating rounded corners.
If you want exclusive content from the author you can also check his Patreon page to become a patron.
Sculpting in 3D Coat (Livestreamed)
Check Out This Tutorial
In this detailed live stream you’ll learn how to speed up your workflow with the transform tools.
You’ll also create pipes, bolts, and screws to detail an asset from scratch. The artist also shows handy tricks such as changing views, toggling symmetry on and off, or using the voxel hide tool in a real-world scenario.
Later in the presentation you’ll tackle a complex sci-fi bust and prepare it for exporting to other applications. By the end of the video you’ll pick up a lot of 3D Coat’s advantages over other sculpting tools such as Mudbox.
If you want to stay updated with any future stream content you can check this Streamlabs page.
UV Mapping
Check Out This Tutorial
Generally, UV Mapping is a boring process. It’s the time where you put on your headphones and grind through till the end. It’s really bland.
But it doesn’t have to be.
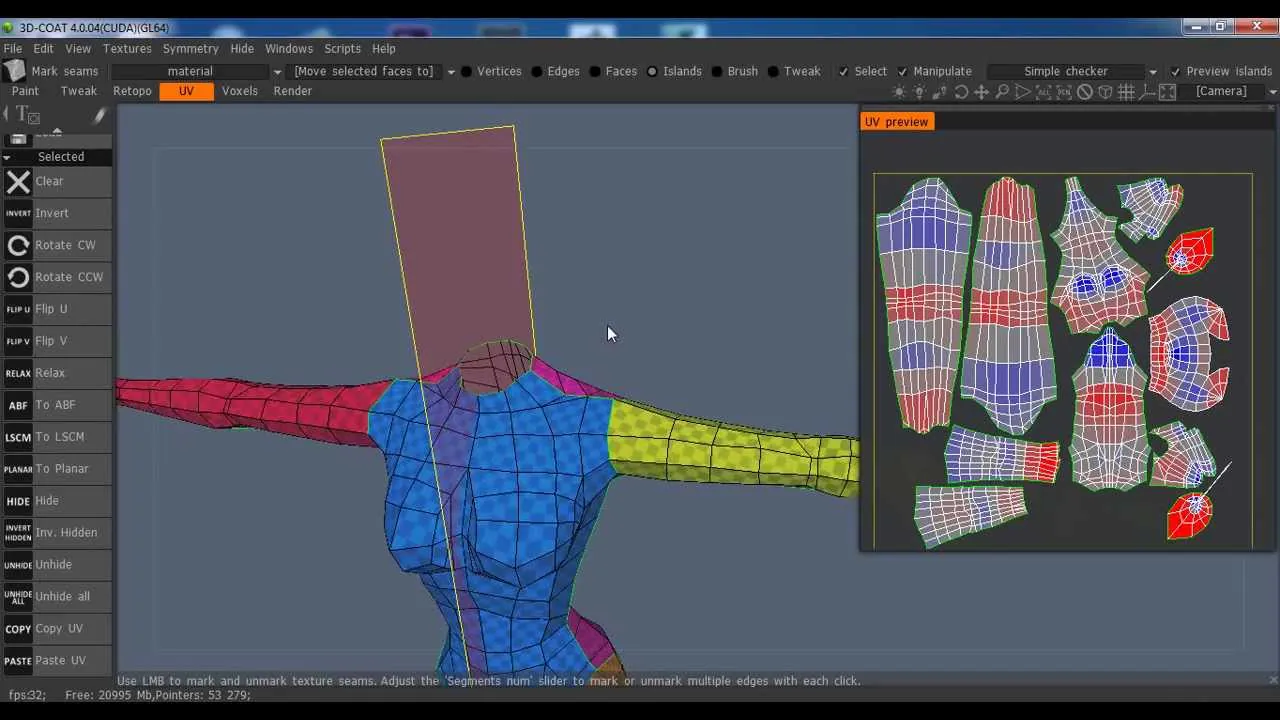
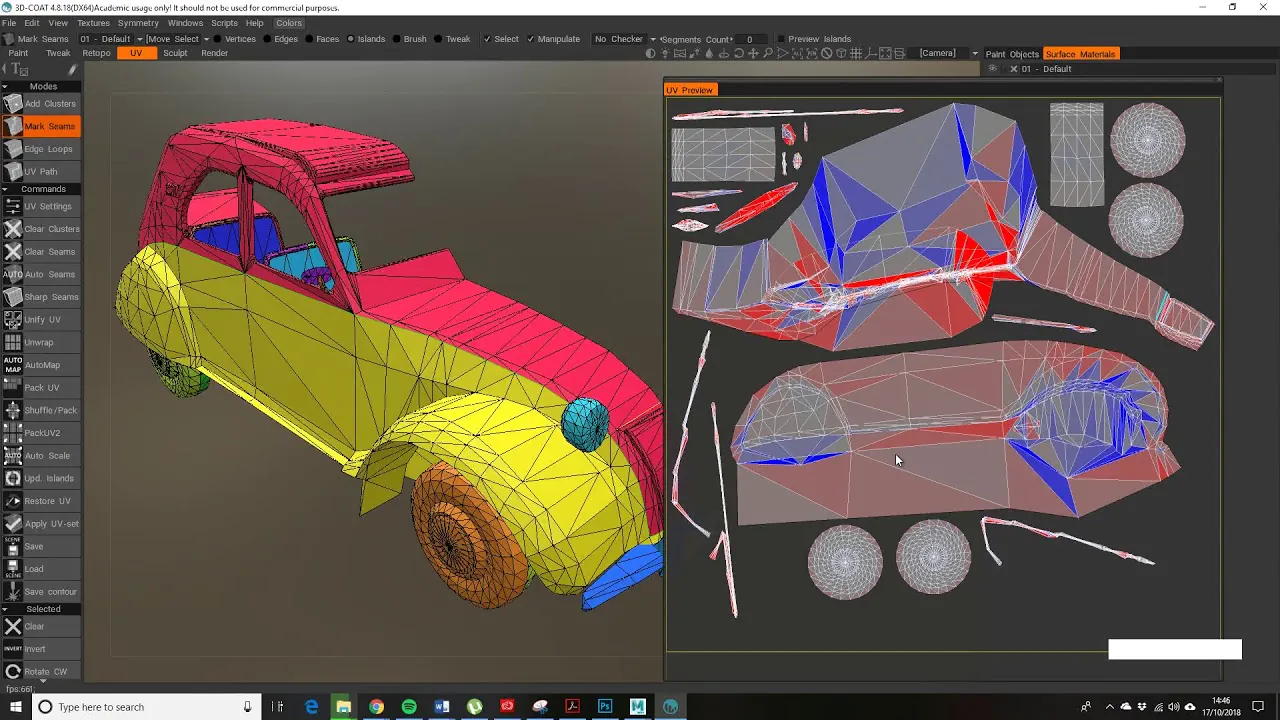
UV Mapping in 3D Coat is surprisingly fun and interactive.
Whenever you create a seam, the UV editor automatically updates both for the 2D and 3D viewer. It will also automatically color in the specific segments.
You’ll even have proper packing features that allow you to pack UV Islands neatly.
And here’s another handy feature not available in other software: when you run a loop seam it knows when to stop when it meets another seam. What a time save!
Even if you bought this software just for UV Mapping it would still be worth the price tag.
Unwrapping and Texturing
Check Out This Tutorial
In this free tutorial you learn how to unwrap an organic object (in this case, a bust) as opposed to a hard surface object(which is what the previous tutorial teaches).
Here you’ll find the process intuitive since symmetry also works in unwrapping.
For the most part you’ll get hands-on for texturing. You’ll also discover the many texturing types 3D Coat offers such as per-pixel painting, micro vertex painting, and vertex painting.
Be sure to check out part 2 of the tutorial to pick up even more tips.
PBR Texturing
Check Out This Tutorial
In recent years Physically Based Rendering (PBR) has been the standard of authoring materials.
Originally popularized in games, it has since been used in all types of production. Fortunately 3D Coat is prepared with a texture toolset specifically for your PBR needs.
To practice your PBR work in this video you’ll texture a screw.
Yes, it’s not super interesting. But the techniques are.
You’ll check your UV map first using a checkerboard. Then you proceed with a base metal layer and an additional layer for the paint. You’ll break up the pattern using several brushes and generate procedural maps such as curvature and ambient occlusions maps.
Needless to say, since you are working on a PBR environment, you can see the results in real time and learn very quickly.
Add Your Own Smart Materials
Check Out This Tutorial
To meet deadlines you’ll often be using presets that you customize for your workflow.
This is where smart materials come in.
It’s technically a material preset but better, as it generates procedural maps automatically. For instance, you can generate the dirt where crevices exist with any model.
3D Coat ships with useful smart materials but the software also provides an option to make your own. You can also alternatively use Photoshop to aid your material creation.
Baking Models For Painting
Check Out This Tutorial
So you’ve got a high-poly mesh. Yet due to its heavy footprint, you can’t use it in a real-time production environment.
A common workflow is to get those high poly details and transfer them all to low poly. This is the process known as baking and it comes in handy a lot.
In this video you’ll learn how to generate complete baked maps for painting.
As a full example you’ll generate a low poly cage that encompasses the high poly object. The author also shows how you can adjust the baked maps in Photoshop with ease.
Column Destruction Sculpting
Check Out This Tutorial
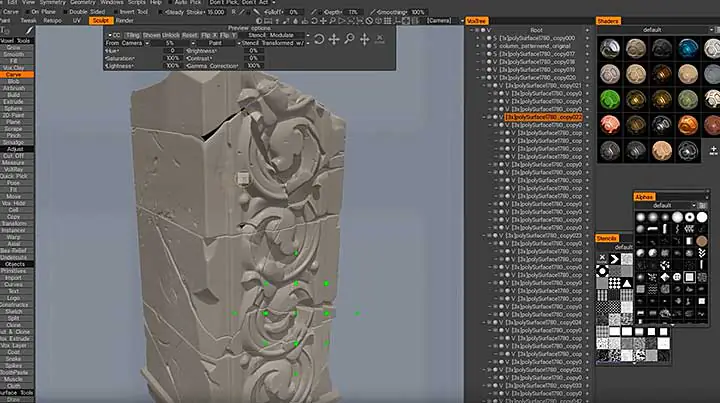
In this tutorial you create a worn out column from start to finish.
It’s not as complicated as it looks – and it certainly doesn’t need any explosions.
You’ll convert your mesh to voxels and slowly chip & chisel the edges with the extrude tool using several alphas and noises.
The author gives a few pointers like when using stencils, you should keep a depth of 1% to 2%. Voxel comes with limitations but the author provides a workaround to still be able to achieve a pretty nice result.
Low Poly Debris Pile
Check Out This Tutorial
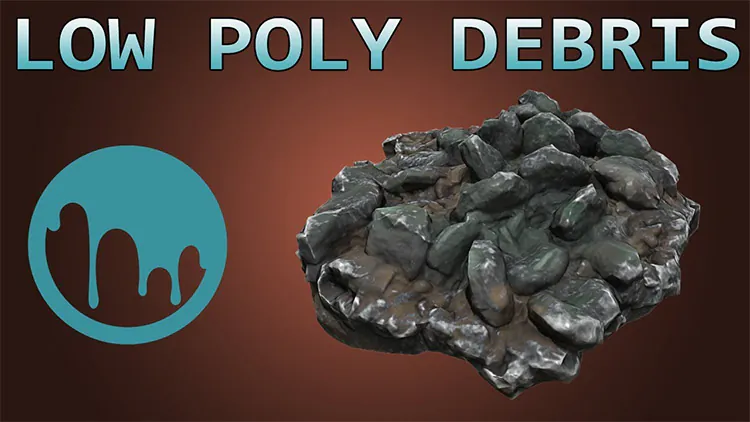
Another easy-to-follow tutorial showing how you can quickly create a debris pile.
These types of assets are essential to set dress your environments.
You’ll start the project by creating a base to scatter your debris. You’ll utilize an object import tool to populate your base too.
This tool is handy as it is just like your painting through the base, but instead of color you’re painting with objects.
The technique can also be used to create a pile of rocks that resembles a letter or logo. At the very end you’ll perform retopology for exporting.
Retopology With 3D Coat
Check Out This Tutorial
Retopology is essential to convert your high poly objects(either from sculpting or photogrammetry) to low poly objects for scene manipulation.
Like UV Mapping, retopology is a bland and tedious process.
Fortunately 3D Coat offers several tools for an efficient workflow.
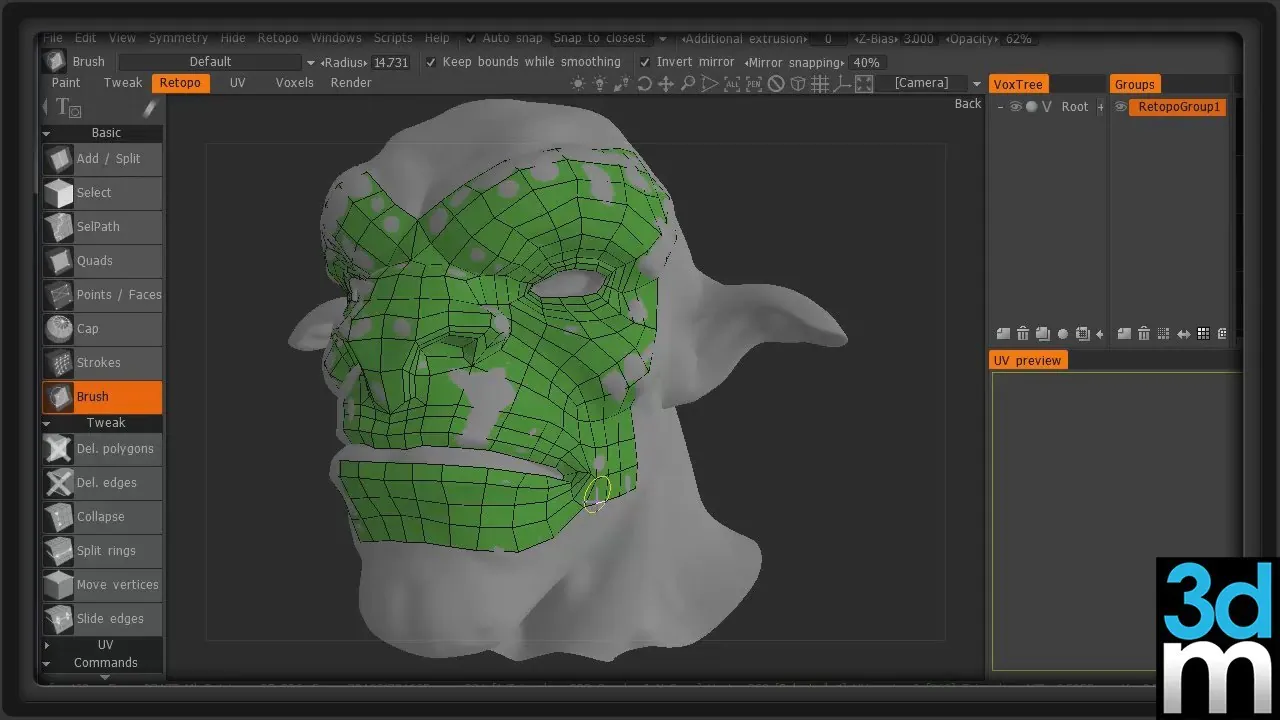
In this tutorial you’ll learn how to retopo a character. For the most part you will be using the add geometry tool.
You’ll also use symmetry to speed up the process.
Using the brush tool you’ll troubleshoot cases where you need to manually modify a point or an edge where 3D Coat’s algorithm fails to detect polygon faces.
3D Coat also offers a relax function to adjust polygon faces resulting in a uniform size. Another handy technique is using strokes that automatically create loops for cylindrical objects such as human arms.
Sculpting a Rocky Floor
Check Out This Tutorial
One more awesome environment tutorial to keep you going: here you’ll be creating a rocky floor.
While the asset is simple, rocks are ubiquitous in any environment so they can always vary quite a bit.
You’ll learn several commands here such as jitter and merge. The author also makes it look so easy by following a workflow using a build brush and chipping away with a scrape brush using an alpha.
You’ll complete the workflow with the retopology, UV mapping, and finally projection painting.
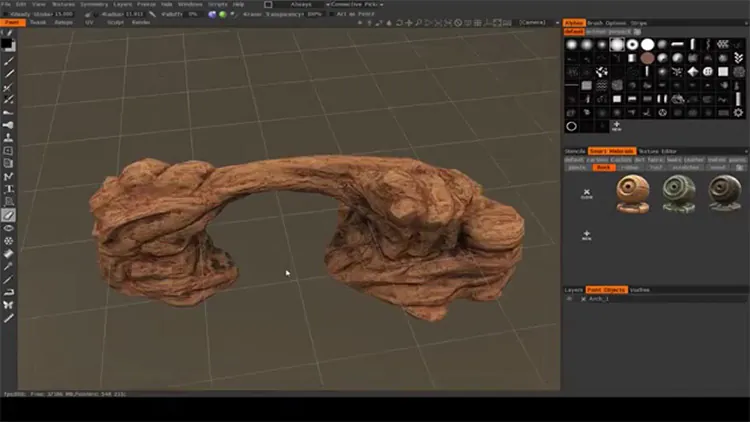
Arid Arch Tutorial
Check Out This Tutorial
In this multi-part series you’ll produce an arid rock arch completely inside of 3D Coat.
You’ll start with the block out using the built-in primitives such as cubes and spheres. Then you’ll convert the primitives to voxels.
With just the use of the scrape tool you’ll be able to create the arch close to completion. Along the process you’ll be using the fill and pose tool since the scrape tool does not work on concave areas.
You can continue with the rest of the series in part 2(Medium Forms) and part 3(Small Forms) where you’ll end up doing the retopology and final texture painting.

Author: Ben Traje
Ben is a stylized character rigger based in Davao City, Philippines. Proficient in Maxon, Cinema4D, and Autodesk Maya, he’s available for remote freelance work with plenty of samples in his portfolio.
20
Jan
Nowadays, viewers can easily interact with the environment and get a glimpse of how the product will appear because of 3D modeling and 3D printing. The use of 3D technology is currently prevalent in numerous industries. It is used by designers, engineers, construction managers, builders, building owners, and many more to market their services and products. It is generally accepted that 3D modeling is a great tool that can be useful for all kinds of organizations and businesses. But here, one question arises? How can one improve their 3D printing or modeling capabilities? The answer is straightforward with 3D software. There is a variety of software to assist with this process. In this article, we will talk about 3D Coat.
What is 3D Modeling?
The method for creating 3D images of spaces or objects made by computer software is referred as 3D modeling. The object is created through 3D creators manipulating vertices or points in an imaginary environment to create a mesh.
Visions can be achieved more quickly thanks to 3D modeling, allowing teams to design any shape they want while preserving the production capabilities. Modern 3D modeling tools offer greater control over the specifics and gives you an astonishing amount of design detail that is impossible to achieve with 2D sketching or sketches. Engineers can explore the physical components of a design without having to be limited by design constraints.
What is a 3D Coat?
3DCoatis a Retopology software that includes all the latest technologies to create a high-quality topology. Retopology can be used for various reasons and purposes. The features and tools it provides can speed up your work significantly.
3DCoat is among the most advanced 3D modeling. The program is accessible in over 70 languages.
While other software applications in this sector tend to focus on a particular task, like Digital Sculpting or Texture Painting, 3DCoat provides High-End capability with a single pipeline for creating assets and 3D visualizations, such as still images.
How to use 3D Coat for 3D Modeling?
Learning The Interface
The main issue for uninitiated novices is not the program’s features. However, it is its interface. This software lets you modify the interface, such as changing the size of panels or even cutting off panels to create floating panels, which is helpful for those with multiple monitors. User interfaces are constantly evolving, so you’ll have different panels and tools for every room switch.

Importing Objects for Painting
3D Coat offers several importing options to perform specific tasks, such as painting or retopology.
In this instance, you’ll be dealing with the latter. Although importing is a simple process, the import dialog box is quite burdensome for those new to the program. It is possible to alter essential parameters, such as changing the name of UV sets, including an external map, or adjusting the size of the map. There are also tips for using the paint tools too.

Hardsurface Design
The first step is importing a block-out model into Maya. Alternatively, you can design the block in 3D Coat with basic tools (if you know how to do it). Most of the time, you’ll make details with Voxel modeling.
UV Mapping
In general, UV Mapping is a tedious procedure. It’s that time when you wear your headphones and work until you get to the close. It isn’t exciting.
However, it doesn’t have to be. UV Mapping within 3D Coat is surprisingly fun and engaging.
If you draw seams when you create a seam, the UV editor will automatically update both for the 3D and 2D viewer. It also colorizes automatically within the specified sections.
Additionally, you’ll have packing options that allow you to store UV Islands efficiently.
Another helpful feature that’s not in any other programs is When you are running loop seams, it will know the moment to stop it when it is in contact with another seam. This is a huge time saver!
Even if you bought the software solely to use it for UV Mapping, it would still be worth the cost.
Unwrapping and Texturing
The process here is easy since symmetry is also used in wrapping and unwrapping. Most of the time, you’ll be able to experience texturing hands-on. There are various types of texturing 3D Coat offers, such as per-pixel painting, micro vertex painting, and vertex painting.
PBR Texturing
In recent times Physically Based Rendering (PBR) has been the norm for making materials.
It was initially popularized for games and is now used in every type of production. Luckily, 3D Coat is prepared with an instrument specifically designed to meet your PBR requirements.
For the practice of your PBR practice, in this video, you’ll be textured and screwed.
Indeed, it could be more fascinating. However, the methods are.
Check your UV map first by using the checkerboard. Then, you’ll use the base metal layer and an additional layer to hold the paint. The pattern is broken down with a range of brushes, and then create procedural maps like curvature maps, and ambient occlusion maps are.
Since you’re working in the PBR setting, you can experience the results in real time and quickly learn.

Add Your Smart Materials
To meet deadlines, you’ll usually utilize presets that can be customized for your specific workflow.
That’s where smart materials are available. This is technically called a material prefix however more effective since it creates procedural mapping in a way that is automatic. For instance, you could create dirt in crevices that are present in any model.
3D Coat ships with useful intelligent materials, but the program offers the option to design your own. It’s also possible to utilize Photoshop to help create materials.
Baking Models for Painting
It’s a high-poly mesh. However, you cannot utilize it in a production environment due to its large footprint. The most common method is to collect those high-poly images and then transfer them all to low-poly. This process is referred to by the term baking and is very useful.
Column Destruction Sculpting
It’s more complex than it appears. It doesn’t require any explosives. Your mesh will be converted to Voxels, and then slowly chip the edges using the extrude tool, using a variety of noises and alphas.
Low Poly Debris Pile
These kinds of assets are crucial for dressing your surroundings. Start by making a base from which you’ll disperse your junk. You’ll use an object import tool to create your base.
This tool is helpful because it’s like painting with the base; instead of using color, you’re painting using things. This technique could be utilized to create a rock pile resembling letters or a logo. Then, at the end of the process, you’ll do retopology to export.
Retopology using 3D Coat
Retopology is the most important way to convert high-poly objects(either from the process of sculpting or photogrammetry) to low-poly objects that can manipulate the scene.
Similar to UV Mapping, retopology is an uninteresting and tedious procedure.
Fortunately, 3D Coat offers several tools to help you run a smooth workflow.
Additionally, you can use symmetry to make the process faster. With the brush tool, you can troubleshoot situations where you’ll need to manually modify edges or points in cases where 3D Coat’s algorithm can’t identify the faces of polygons.
3D Coat also offers a relaxation function that allows you to alter the polygon faces, resulting in uniform size. Another helpful technique is to use strokes that create loops on cylindrical objects like human arms.
Sculpting a Rocky Floor
Another fantastic tutorial on the environment to keep you engaged. Here you’ll create an edgy floor. Although the asset is straightforward rock, they are common worldwide, meaning it can vary quite a bit.
Learn a variety of commands including jitter and merge. It is also possible to create a simple workflow by following a flowchart using a build brush and using a scraping brush with an alpha.
It will conclude using Retopology, UV mapping, and projection painting.

Arid Arch
Start by building the block using built-in primitives, such as cubes, spheres, and cubes. After that, you’ll convert the primitives into Voxels.
Using the scrape tool, you’ll be able to make the arch to a point close to complete. In the process, you’ll use it to fill in and position, as the scraping tool, can’t operate on concave surfaces.
Final Thoughts
Indeed, the advantages that come from 3D modeling are many. But, reducing the number of intermediate prototypes and simplifying the entire process is among the most popular benefits you can enjoy with 3D modeling to design products. Manufacturers also need to identify the flaws in their designs as soon as possible since this allows them to complete the product’s design before production starts.
3DCoat is an application specifically designed for creators and 3D developers that offers an array of options for 3D production. Additionally, it provides an easy retopology tool, which includes an auto-retopology feature that is a leader in the market.
3DCoat is available as a trial version for free. Its full-featured version of the software is available for 30 days, after which specific export formats are eliminated. If you’re looking to create high-quality 3D models, you must test 3DCoat!
Some of my works done in 3d Coat for retopo and texturing. Its fast and easy. This tutorial may not cover all the software features but hope this might help. You can buy or give it a try here. I’ve made the Mustang for this tutorial, please download the Mustang free here
Now after you install the software, All you need to do is import your mesh. You can import it before you unwrapped it but please keep in mind, an automatic unwrap system on 3d Coat may not giving results as you want. This tutorial I using my own model, complete with unwrapped in 3ds Max.
Any mesh you can import from low to high for game or movie whatsoever. If you Photoshop user, then you might not have any technical difficult on 3d Coat, its almost same.
In this case study pretend I want to have this Mustang done for video game assets. So I imported it in .obj format.
Click File > Import > Model for Per Pixel Painting
Next pop-up window is the option whether for texture size or any software preset you need. But this tutorial I leave them as default options checked already and choose 2048 x 2048 for texture size. Hit OK to continue.

UV Set Name from picture above are the same material slot name on 3ds Max or Maya or anything else you using. You can rename it.
After your model appear on the screen, you may have a flat white on it. First thing I usually to do is adding Occlusion to express the shadow around my object.
Click Textures > Calculate Occlusion
Leave the default options but you can change any light count number. I using 1024 will be okay. Then hit OK to continue. Let 3d coat calculate for you for a sec.

And this is my Mustang after occlusion applied.

Pay attention the layer on the right bottom side on your screen (default position), there’s a layer automaticaly added ‘AmbientOcllusion’ since you did previous step. If you need more dark Occlusion then you can add once more or just copy and paste on the layer name ‘AmbientOcclusion’, click Duplicate icon on the layers window below.

New layers added as a copy and your models appears more dark.
Next step I want to add basic color to my car. Add a new layer above ‘layer 1’ by pressing add a new layer next on the trash icon. Double click and rename it ‘base color’. Base color are best to put on the bottom of all layers.
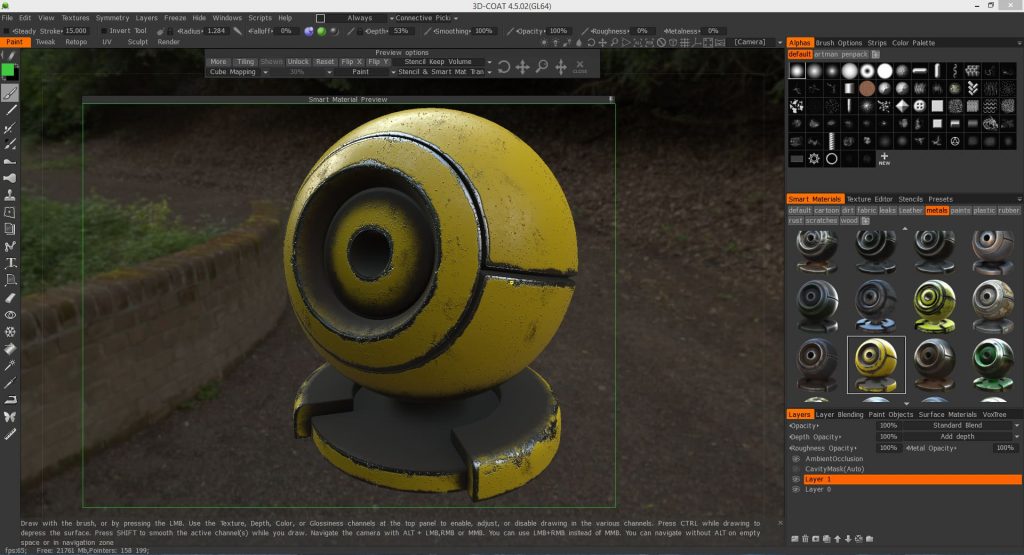
Now before you spill out a base color, make sure you’re not activate any of the smart materials. To do so, just click the ‘X’ close on the Smart Materials tab

Now pay attention on the left bar on your screen. Make sure you activate only the color mode, as seen on image below. This green ball means you only apply colors, no roughness (represented by black ball) and Normals (blue ball).

On the image above, pick color you like. For this example I pick green.
On the same toolbar, pick Fill Tool. This will fill all your car body in one UVW’s.

Click on the car body that you want to fill up. Notice that not all the body covered in green paint when you fill it. This is good because you don’t want your car glasses to be green too right? This fill tools read the same UVW’s, that’s why you need to unwrap before painting in 3d Coat. This is my car progress so far.

Your car is still so dull and flat, even you have painted before. Add new layer above your base color layer and rename it ‘roughness’.

We only add roughness effect on this step, meaning all colors and normal should be off. Make sure you activate the black ball that represent for roughness, than switch off for normal and color ball as seen image below.

Now on the Smart Material tab on the right side, choose anything that represent a glossines of a car. This example I want to make my Mustang looks old, so I pick Copper_old from Smart Material tab. To be honest there’s no car shader available on 3d coat, so you need some research.
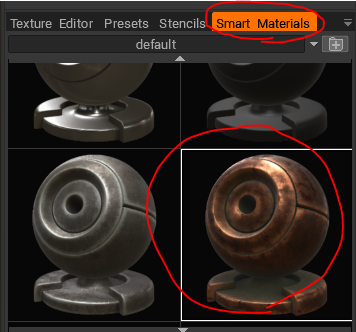
With your Roughness layer selected, paint your car body above the base color. Should look like this.

Your roughness look so bright, so you need to decrease the value of it. To do this, stay at tha Roughness layer, then change your Roughness Opacity value from 100% to 50%

Of course you can add more roughness, depend on your need.
Add more layer for more effects, like tires, glass, plastic or anything that fit on your car. The rest of the process will be the same like we did previous step on this tutorial.
Please keep in mind to stay alert with your layers and always rename anything paint job. Opacity value keep the color bright or dull, Depth Opacity holds Normal map and Roughness Opacity holds how strong the materials.

Before you paint anything to the object, you can also change the size of the texture, rotate or move. To do this, click anything in Smart Material slot and Fill Tool. Then on the toolbox Preview Options appear, you can change by click and dragging

After you done all your paint job. You can change the background or rotate it. To do that, on the toolbar, click tha panorama icon to change the background. Or set the brightness next on the panorama icon. You can also drag the lightning to adjust the position of light source. Anything else on this toolbar can be self explanatory, but for now, save your work.

Here’s my work done all from 3d Coat.

To export all the materials you’ve done, click File > Export object & textures. Change your outpput mesh and textures. Don’t forget to check Color, Roughness, Metallness and AO and hit OK.
In the next tutorial we apply these textures and model to Autodesk Maya. Stay tuned. And thanks for reading.
If you found something useful with this tutorial please donate to : paypal.me/indrapermanahadi
If you’re like us here at InspirationTuts, you must be passionate about 3D, ArchViz, Digital Graphics and anything artistic and inspirational really. When it comes to 3D, however, most of the giant names of the industry keep popping up everywhere: Blender, Maya, 3Ds Max, Houdini…, etc. We cover these a lot ourselves, and there’s nothing wrong with this.
Today, we decided to shed the light on a 3D software that isn’t brought up that often: 3D Coat. Despite the fact that you probably don’t hear this name slided in conversations that frequently, it’s actually pretty impressive. You might be asking yourselves: what is 3D Coat used for? is it really worth it?
3D Coat software is one of the most underrated 3D packages, but it still displays a huge potential that is continuously improved. You can do pretty much anything with it: modeling, sculpting, texturing, retopology…, etc.
Before we dive deeper into the use cases of this software, let’s have a brief overview on what it is in the first place. You can check the video on our YouTube channel to have a closer look at the interface, workflow and the features on a practical level.
3D Coat software is an all-in-one program that allows you to do many tasks including Sculpting, Retopology, Baking, UVing, Texturing… etc. The difference between 3D Coat and the other sculpting programs is that instead of using polygonal meshes it actually uses voxels. Voxels are like 3D equivalents of pixels so you can assume they can create very flexible shapes and models…etc.

How it works? While the term voxel comes from combining the term pixel and volume, it actually produces a virtual grid in the 3D space and the mesh then occupies sections of this grid to form its shape.
Official Website: https://3dcoat.com/
What is 3D Coat used for?
Many people consider 3DCoat to be an excellent software due to the fact that it has many outstanding tools features. Features from modeling, UV Unwrapping, Texturing to others such as the number of brushes that it offers. Also, the way of working with voxels makes the creation of 3D models even easier.
The materials it offers are high quality, in addition to the lighting and the camera settings that make renders look even better by giving you greater control and freedom.
The 3D Viewports feels good, and it is easy to move through the models using the tools the software offer. The interface is also quite beautiful and doesn’t feel crowded but you still have everything on your hand.
Breaking down 3D Coat features
1. PBR Texturing
First of all, it has good Realtime Physically Based Rendering in the viewport. When it comes to materials, it has smart materials with easy set-up options that will allow you to save time and be more efficient. So we can say that this specific task is part of what is 3D Coat used for efficiently.
3D Coat actually texture painting features include a rich toolset for all kinds of painting tasks, and you can rely on it to create high-quality results. There are different approaches to painting in the 3D viewport such as Microvertex, Per-pixel, or Ptex painting approaches.
With the ability to work on Texture size up to 16K of course. It’s fantastic when it comes to working on super-detailed characters or environments with close-up shots.
In addition to that, it has Multiple paint Layers. Popular blending modes. Layer groups. Also a tight interaction with Photoshop which is great if you want to add specific detail especially if you are old school and you know to use it properly.
2. Digital Sculpting

3D sculpting is a fascinating way to bring characters, monsters, and all kinds of organic shapes to life. While many 3D modeling programs focus on precision, 3D sculpting apps are all about turning a piece of visual clay into a stunning 3D print. It can be used to create busts, animals, and other free-form designs. It lends itself well to a number of artistic applications, including game design, character animation, film, engineering, and product design.
3D Coat sculpting features will turn out to be handy and advanced. We can distinguish a few categories that set them apart.
Voxel (volumetric) sculpting key features
Even though 3D Coat is not the best 3D software for sculpting, it can offer you a great experience with No topological constraints. You can Sculpt whatever you like with Clay whether it be characters, animals, monsters you name it.
Interestingly it has Complex boolean operations which will allow you to gain speed and create complex details in no time with the least effort possible.
It has an amazingly Fast kitbashing workflow that allows you to create complex models whether it be vehicles, ships, or even large environments which is usually time-consuming.
Traditional sculpting features
The first thing that is worth mentioning here is the Adaptive dynamic tesselation such as Live Clay. In addition to that, there are Dozens of fast and fluid sculpting brushes that will give you a lot of control and freedom when working on different projects.
Like in Volumetric sculpting, the Boolean operations in traditional sculpting will help you create beautiful shapes with crisp edges.
3. Retopology

3D Coat retopology features include a lot of advanced tools and features that will improve your workflow tremendously. For example, there is Auto-retopology with user-defined edge loops.
There are also extremely fast and easy-to-use manual Retopo tools such as Smart Retopo, which allows you to retopologize by drawing lines and the software will fill surfaces accordingly.
Furthermore, there are Retopo groups with color palettes for better management. This comes in handy when working on complicated models.
You also have the option to use your current low-poly mesh as your Retopo mesh.
In addition to that, there is the possibility to import reference mesh for Retopologization and advanced baking settings dialog and more features and tools as well.
4. UV Mapping

When it comes to UV mapping, 3D Coat has a professional toolset for creating and editing UV sets. This will allow you to create UVs for your models without the need to use third-party plugins or addons.
There is also a Native Global Uniform unwrapping algorithm that helps achieve optimal results automatically. A good thing is that 3D Coat also has Multiple UV-sets support and management. You also have the ability of individual islands tweaking. Lastly, it is fast, easy, and fun to use.
With 3D Coat software, You can choose individual parts of a model and edit them separately if they haven’t quite gone as planned. artists strongly recommend looking into this part of the software since it can really speed up your workflow as you can import models from other programs like 3Ds Max or Maya.
5. Concept Art
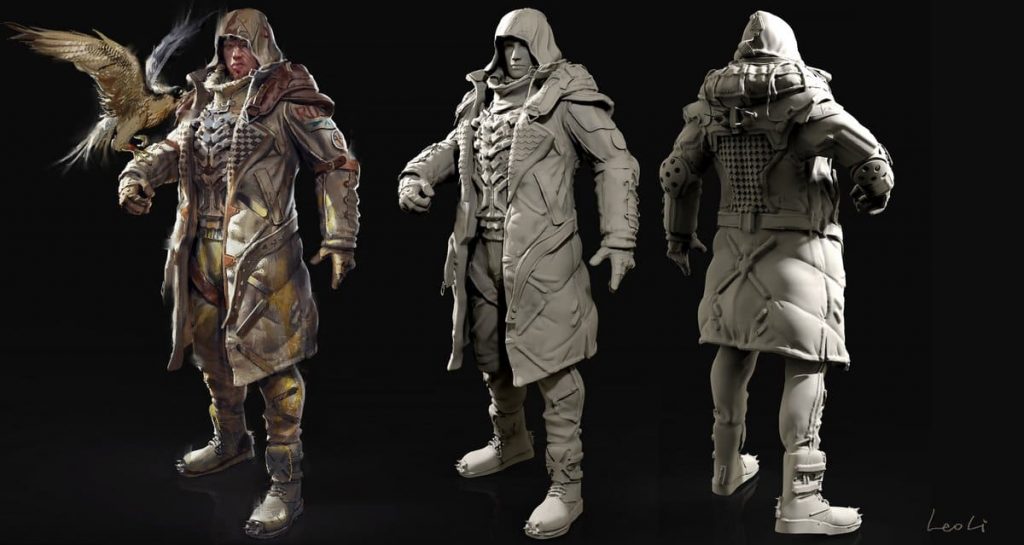
Concept art is actually the starting point in any creative project whether it be video games or movies. Nowadays it is very convenient now to use 3D software in the concept art production pipeline. Usually, it starts with rough or detailed 3D blocks, separate 3D objects, or even complete 3D scenes with later paint over in Photoshop or another 2D image editor.
3D Coat concept art creation features are really something. The software is great for making 3D environments for Concept Art, because it’s fast and has a ton of tools in modeling that makes this possible.
In addition to that, the fact that it’s excellent and fast when it comes to sculpting makes the work of a concept artist even more efficient and easier. Because a concept artist doesn’t care about Topology, UV unwrapping, Polygon count, none of that stuff. Due to the fact that 3D work as we said is going to 2D software for painting and finalizing the concept art.
Texturing is much easier with 3D Coat software and doesn’t need wide technical skills and preparations, which is quite important for concept artists. For example, Substance Painter requires knowledge in game production and the preparation of a model for game engines. In 3D Coat you just need to open a model and draw hand-painted or use PBR textures.
Materials adjustment is quite intuitive – works with moving sliders and changing distribution zones. Note that the Drawing tools are familiar to any CG artist whoever opened Photoshop – brushes, Eraser, Filling, etc.
Easy!? Right! Most artists are quite satisfied with standard materials and their modifications which are enough to work with game sketches and complicated texturing of realistic ZBrush concepts. Combined with ZBrush, 3D Coat is really something!
Conclusion and final thoughts
As with any other 3D program in the world, there are pros and cons. But most of the time, it is just a matter of time to get used to a tool or it will receive updates. 3D Coat software has a nice updating routine, so if you don’t like something today, you might like it with the next update.