Support for SPH-10BT | Pioneer
- Главная
- Продукция
- Автомобильные ресиверы
- Support for SPH-10BT
Support for SPH-10BT
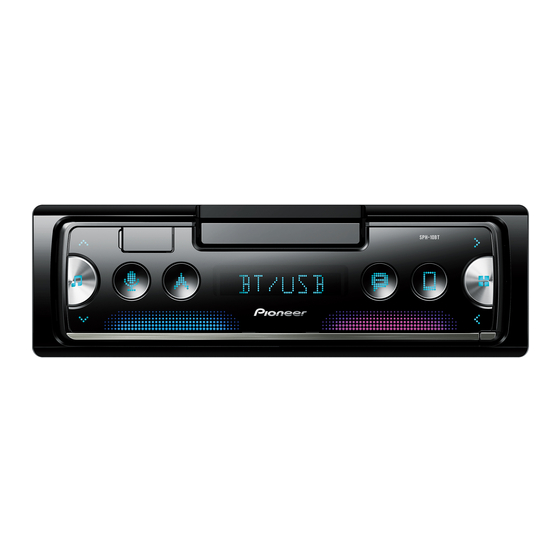
Приемник нового поколения 1-DIN с функциями Bluetooth, USB и Spotify. Совместим с устройствами на базе iPhone и Android.
- Программное обеспечение
- Руководства
- Назад к обзору
Программное обеспечение
Open source notice
This Software includes open source software codes licensed under GNU General Public License 2 and/or GNU Lesser General Public License 2.1. Detailed license notice, full license texts and machine readable copy of the corresponding source code are readily available on our OSS website (*)
* For car navigation products: http://www.oss-pioneer.com/car/navi
* For car multimedia products: http://www.oss-pioneer.com/car/multimedia
You may obtain a complete machine-readable copy of the corresponding source code on a physical medium by contacting customer service center and sending model number or this product’s OSS website information.
This offer is valid to any third party within three years after last shipment of the product.
Costs of physical distribution will be charged.
Disclaimer
To the extent permitted by applicable law, and as provided in the GPL and LGPL, Pioneer and its licensors provide and you accept the firmware «As is» without warranty of any kind, express or implied, including but not limited to any implied warranties of merchantability or fitness for a particular purpose. You accept the entire risk as to the quality and performance of the firmware unless required by applicable law, and as provided in the GPL and LGPL, in no event will Pioneer or its licensors be liable to you or any third parties for damages of any kind arising out of your use or inability to use the firmware, including without limitation any direct, indirect, incidental, special, consequential, punitive or exemplary damages, even if advised of the possibility of such damages.
Руководства
-
Contents
-
Table of Contents
-
Bookmarks
Quick Links
SMARTPHONE RECEIVER
STATION D’ACCUEIL SMARTPHONE
SMARTPHONE RECEIVER
RECEPTOR PARA SMARTPHONE
SMARTPHONE-EMPFÄNGER
SMARTPHONE ONTVANGER
СМАРТ-РЕСИВЕР
SPH-10BT
Manuel d’installation
Manuale d’installazione
Manual de instalacion
Installationsanleitung
Installatiehandleiding
Руководство по установке
Related Manuals for Pioneer SPH-10BT
Summary of Contents for Pioneer SPH-10BT
-
Page 1
SMARTPHONE RECEIVER STATION D’ACCUEIL SMARTPHONE SMARTPHONE RECEIVER RECEPTOR PARA SMARTPHONE SMARTPHONE-EMPFÄNGER SMARTPHONE ONTVANGER СМАРТ-РЕСИВЕР SPH-10BT Installation Manual Manuel d’installation Manuale d’installazione Manual de instalacion Installationsanleitung Installatiehandleiding Руководство по установке… -
Page 2
This unit Power cord Connections/Installation – Place all cables away from hot places, Connections such as near the heater outlet. – Do not connect the yellow cable to the Important battery by passing it through the hole • When installing this unit in a vehicle to the engine compartment. -
Page 3
vehicle. Connect when Pin 5 • When using a subwoofer of 2 Ω, be sure • Optimum performance is is an antenna control type. In another to connect the subwoofer to the violet obtained when the unit is type of vehicle, never connect and violet/black leads of this unit. -
Page 4: Installing The Microphone
Installing the microphone The microphone should be placed directly in front of the driver at a suitable distance to pick up their voice clearly. CAUTION It is extremely dangerous to allow the microphone lead to become wound around the steering column or shift lever. Be sure to install the microphone in such a Microphone clip way that it will not obstruct driving.
-
Page 6
Cela pourrait entraîner la fuite de la Cordon d’alimentation Raccordements/Installation batterie ou un dysfonctionnement de l’appareil. • Le câble noir est la masse. Les câbles de – Fixez les câbles au moyen de serre- Raccordements masse de cet appareil et d’autres câbles ou de ruban adhésif. -
Page 7
Raccordez le et le lorsque la • N’utilisez pas de pièces non autorisées, REMARQUES broche 5 est un type de commande car cela pourrait provoquer des • Modifiez le menu initial de cet appareil. d’antenne. Dans un autre type de dysfonctionnements. -
Page 8: Installation Du Microphone
Anneau de garniture Microphone Pour installer l’appareil sur le • Le détachement de la face avant Pince du microphone pare-soleil permet d’accéder plus facilement à Base du microphone l’anneau de garniture. Installez le microphone sur l’arrière de Faites passer le fil du microphone dans •…
-
Page 10
l’esaurimento della batteria o un Cavo di alimentazione Connessioni/Installazione malfunzionamento. • Il cavo nero è la messa a terra. I cavi di messa a terra per l’unità e per altre intorno cablaggio che entra in contatto Connessioni apparecchiature (in particolare prodotti con le parti metalliche per proteggere i ad alta corrente, come ad esempio cavi. -
Page 11
quando il Pin 5 è di tipo • Non utilizzare parti non autorizzate, in NOTE controllo antenna. In un altro tipo di quanto possono provocare • Cambiare il menu iniziale dell’unità. Fare veicolo, non collegare mai malfunzionamenti. riferimento a [REAR-SP] nelle Blu/bianco •… -
Page 12
installa il microfono sul parasole. In tal caso, installare il microfono sulla colonna di sterzo. Per l’installazione sul parasole Posizionare l’interlinea del microfono nella scanalatura. Anello di rivestimento • Il rilascio del pannello anteriore Interlinea consente un più facile accesso Microfono microfono all’anello di rivestimento. -
Page 14
alto voltaje como amplificadores) deben Cable de alimentación Conexiones/instalación conectarse por separado. De lo contrario, podrían desprenderse por accidente y provocar un incendio o una avería. – Aleje los cables de piezas en Conexiones • El símbolo gráfico colocado en el movimiento, como la palanca de producto significa corriente continua. -
Page 15
vehículo. Conecte cuando la orificios u otras modificaciones en el NOTAS clavija 5 sea de control de antena. En vehículo. • Cambie el menú inicial de esta unidad. otro tipo de vehículo, nunca conecte • No instale esta unidad en los siguientes Consulte [REAR-SP] en los ajustes INITIAL. -
Page 16
instale el micrófono en la columna de Micrófono dirección. Pinza del micrófono Base del micrófono Instalación en la visera Instale el micrófono en la parte posterior de la columna de dirección. Introduzca el cable del micrófono en la ranura. Marco decorativo Cable del •… -
Page 18
• Schließen Sie das blauweiße Kabel Stromkabel Anschlüsse/Einbau niemals am Stromanschluss eines externen Leistungsverstärkers an. Schließen Sie es auch niemals am – Sichern Sie Kabel mit Kabelklemmen Anschlüsse Stromanschluss der Autoantenne an. oder Klebeband. Wickeln Sie Klebeband Dadurch kann es zu Batterieentladung um Kabel, die mit Metallteilen in Wichtig oder Funktionsstörungen kommen. -
Page 19
Blauweiß der Stromversorgungsseite des Einbau Einbau in einer DIN-Halterung Die Polanordnung des ISO-Steckers Feststellbremsenschalters verbunden Schieben Sie den mitgelieferten variiert je nach Fahrzeugtyp. Verbinden werden. Wichtig Montagerahmen in das , wenn Pol 5 zur HINWEISE • Prüfen Sie alle Anschlüsse und Systeme Armaturenbrett. -
Page 20
Befestigungswinkel anzubringen, dass es das Fahren nicht Armaturenbrett oder Konsole behindert. Es wird empfohlen, zum Ordnen des Kabels die Klammern (separat Entfernen des (mit dem erhältlich) zu verwenden. mitgelieferten Montagerahmen HINWEIS eingebauten) Geräts Je nach Fahrzeugmodell ist das Entfernen Sie den Klemmflansch. Mikrofonkabel eventuell zu kurz, wenn Sie dieses an der Sonnenblende montieren. -
Page 22
accu leeglopen of zou er een storing Stroomkabel Verbindingen/installatie optreden. • De zwarte kabel is aarde. Aardingskabels voor dit toestel en andere uitrusting (met kleefband rond bedrading die in Verbindingen name producten die veel stroom trekken contact komt met metalen delen om de zoals eindversterkers) moeten bedrading te beschermen. -
Page 23
De penpositie van de ISO-connector is • Raadpleeg uw verdeler als u voor de OPMERKINGEN afhankelijk van het wagentype. Verbind installatie gaten moet boren of andere • Wijzig het beginmenu van dit toestel. wanneer pen 5 een wijzigingen aan de wagen moet Raadpleeg [REAR-SP] in de INITIAL- antennestuurtype is. -
Page 24
Installeer in dat geval de microfoon op de Microfoonklem stuurkolom. Microfoonvoet Installeer de microfoon aan de Installeren op de zonneklep achterzijde van de stuurkolom. Plaats de microfoondraad in de groef. Microfoondraad Sierkader Groef • Door het voorpaneel los te maken, kunt u gemakkelijker bij het sierkader komen. -
Page 26
автоматической антенны автомобиля Вход для проводного удаленного Подключения/Установка (макс. 300 мА, 12 В пост. тока). Если подключения автомобиль оснащен антенной, Сюда можно подключить проводной встроенной в лобовое стекло, адаптер ДУ (приобретается • Во избежание короткого замыкания, Подключения подключите ее к терминалу питания отдельно). -
Page 27
Выполняйте подключение к Выполняйте подключение к сигналу Усилитель (приобретается отдельно) терминалу, управляемому ключом подсветки автомобиля. Выполните подключение с помощью Оставьте зажигания (12 В пост. тока). Разъем ISO RCA (приобретается отдельно) достаточно 5 см Выполняйте подключение проводов В некоторый автомобилях разъем ISO К… -
Page 28
Установка микрофона Микрофон необходимо устанавливать непосредственно напротив водителя на соответствующем расстоянии для правильного фиксирования голоса. Саморез (5 мм × 9 мм, не прилагается к устройству) ВНИМАНИЕ Крепежный кронштейн Запутывание провода микрофона Приборная панель или консоль вокруг рулевой колонки или рычага Извлечение… -
Page 32
© 2018 PIONEER CORPORATION. All rights reserved. © 2018 PIONEER CORPORATION. Tous droits de reproduction et de traduction réservés. © PIONEER CORPORATION, 2018. Все права защищены. <CRD5084-A> EW…
- Home
- Support
- Manuals for SPH-10BT