Приложение Procreate, обладатель приза Apple Design и удостоенное в App Store категории «Самое необходимое» (Essentials), — это самое мощное приложение для создания набросков, рисования и иллюстрирования среди всех подобных приложений, предназначенных для мобильных устройств и созданных для профессионалов. Приложение содержит полный комплект инструментов художника, помогает вам создавать красивые наброски, вдохновляющие картины и потрясающие иллюстрации, где бы вы ни были. Procreate обладает холстом потрясающего разрешения, комплектом из 136 невероятных кистей, улучшенной системой слоев и теперь работает на основе Siica M, самого быстрого 64-битного движка на iOS.
Скачать Procreate
- Продавец
- Savage Interactive Pty Ltd
- Размер
- 174.5 МБ
- Совместимость
- Требуется iOS 11.1 или более поздняя версия. Совместимо с iPad.
- Языки
- русский, английский, арабский, испанский, итальянский, корейский, немецкий, португальский, традиционный китайский, турецкий, упрощенный китайский, французский, японский
- Copyright
- © Savage Interactive
- Цена
- 749 р. (на момент написания статьи)
Скачать Procreate
Создание нового холста
- О чем вы узнаете
- Ваша Галерея иллюстраций
- Создание нового холста
- Формат файлов Procreate
- Предустановленные размеры холста
- Редактирование / удаление шаблонов холста
- Создание собственного размера холста
- Выберите P3 или SRGB
Основы работы
- Основы работы
- Кисть, Смазывание и Ластик
- Отмена действия
- Повтор действия
- Быстрая Фигура
- Очистка слоя
- Приближение/Отдаление
- Поворот холста
- Подгон по размеру экрана
- Меню Вырезать/ Копировать/ Вставить
- Полноэкранный режим
- Настройте жесты по-своему
Кисти в Procreate
- Кисти в Procreate
- Совершенно новые кисти
- Библиотека кистей
- Навигация по вашей библиотеке кистей
- Перестановка кистей
- Множественный выбор
- Действия с кистями
- Обмен кистью
- Импорт кистей
- Перетаскивание кистей
- Пользовательские наборы
- Пользовательские настройки
Расширенные настройки кисти
- Расширенные настройки кисти
- Свойства штриха
- Конус нажима
- Конус касания
- Настройки формы
- Настройки зерна
- Динамические настройки
- Динамические настройки — глянец
- Динамические настройки — влага
- Настройки карандаша
- Настройки карандаша
- Кривые натиска
- Общие параметры настройки
- Настройки источника
Создание иллюстраций со слоями
- Создание иллюстраций со слоями
- Создание слоя
- Основной и Второстепенный слои
- Выбор слоя
- Группы слоев
- Выбор групп
- Перемещение слоев
- Видимость слоя
- Наложение и непрозрачность
- Сливание слоев
- Щипок для сливания различных слове
- Фоновый цвет
- Экспорт Перетаскиванием
- Перемещайте слои между холстами
Слой маски
- Слой маски
- Обзор
- Создание маски слоя
- Использование оттенков серого для редактирования
- Выбор маски или слоя
- Перемещение слоя с маской
- Удаление маски слоя
Обтравочные маски
- Обтравочные маски
- Обзор
- Создание обтравочной маски
- Использование обтравочных масок
- Трансформация и корректировка
- Перемещение обтравочных масок
- Действия с обтравочной маской
Применение эффекта
- Применение эффекта
- Меню Корректировки
- Отрегулируйте непрозрачность
- Размытие по Гауссу
- Размытие в движении
- Размытие перспективы
- Размытие по позиции перспективы
- Размытие по направлению перспективы
- Резкость
- Шум
- Пластика
- Динамика Пластики
- Регулировка Пластики
Обзор
- Обзор
- Включение режима «Выделение»
- Свободный выбор
- Рисование при помощи выделения
- Отменить и Повторить
Расширенное выделение
- Расширенное выделение
- Добавить выделение
- Удалить из выделения
- Инвертировать выделение
- Дублирование содержимого
- Растушёвка выделения
- Очистка выделения
- Перезагрузка маски
- Выделение содержимого слоя
- Настройка пользовательского интерфейса маски выделения
Создайте новый холст, выберите любую двухтекстурную кисть из обширного набора Procreate — и начинайте рисовать. Приятно отзывчивый инструмент «Растушевка» поможет добиться идеального наложения цвета. Procreate поддерживает создание холстов сверхвысокого разрешения — специально для плакатной печати. Опробуйте в деле мощные инструменты для выделения, трансформации объектов и работы с перспективой, разработанные специально для мультитач-экранов и позволяющие создать в вашей иллюстрации потрясающие эффекты кинематографического качества. Несмотря на огромное богатство функций, интерфейс Procreate интуитивно понятен и никогда не мешает работать.
Обширный набор профессиональных инструментов придется по душе любому художнику.
- Самое важное
- Оптимизация для iPad Pro и Apple Pencil
- Огромные холсты сверхвысокого разрешения, до 16к по 4k на iPad Pro 12.9″ и 10.5”
- Работает на основе Silica M, самого быстрого 64-битного движка
- Потрясающие 64-битные цвета
- Невероятно отзывчивая 64-битная растушевка
- Многопоточность и оптимизация для многоядерных процессоров iPad
- 250 шагов отмены и повтора
- Непрерывное автосохранение — ваша работа не пропадет
- Возможность подключить клавиатуру и пользоваться сочетаниями клавиш
- Меню быстрых действий Quick Menu, повышающее скорость работы с интерфейсом
- Радикально новые кисти
- Содержит комплект из 136 превосходно сделанных кистей
- Уникальные двухтекстурные кисти
- 35 настраиваемых параметров для каждой кисти
- Возможность создавать собственные кисти
- Удобная организация кистей в наборы
- Импорт и экспорт пользовательских кистей
- Продвинутая система слоев:
- Гибкий контроль над отдельными элементами иллюстрации благодаря слоям
- Маски слоев для неразрушающего редактирования
- Организация слоев по группам
- Одновременное выделение нескольких слоев для синхронного перемещения и редактирования объектов
- 17 продвинутых режимов наложения
- Бескомпромиссная мощность цвета
- 64-битный цвет для лучшей цветопередачи
- Поддержка P3 Wide Color
- Бесшовная заливка ColorDrop
- Возможность задавать цвета в RGB или шестнадцатеричном формате
- Богатство спецэффектов:
- Ускорение графического процессора
- Размытие перспективы (эксклюзивная функция Procreate)
- Размытие по Гауссу, размытие движения
- Добавление резкости и шума
- Тон, насыщенность, яркость
- Цветовой баланс, кривые, изменение цвета
- Мощная поддержка видео
- Возможность записать все этапы создания иллюстрации в таймлапс-видео и в любой момент пересмотреть их
- Трансляция происходящего на экране в реальном времени на различные платформы потокового вещания
- Публикация записанного видео в любые подключенные сервисы
- Публикация и интеграция в рабочие процессы
- Изображения, кисти и палитры можно перетаскивать из приложения в приложение
- Импорт и экспорт файлов PSD (формат Adobe® Photoshop®)
- Экспорт в AirDrop, iCloud Drive, Фото, iTunes, Twitter, Dropbox, Google Drive, Facebook и Weibo, отправка по электронной почте
- Экспорт как в нативном формате файла .procreate, так и в PSD, TIFF, transparent PNG, multi-page PDF или web ready JPEG
Источник: https://itunes.apple.com/ru/app/procreate/id425073498?mt=8
- Уроки
- 1 мин на чтение
- 188155
Procreate как никогда популярен среди диджитал-иллюстраторов: множество кистей, возможностей и настроек для создания графики. В этой подборке мы собрали 57 наиболее интересных и полезных уроков для тех, кто хочет освоить Procreate.
- #ipad
- #procreate
- #графический дизайн
- #иллюстрации
- #планшет
- #рисунок
- 0
-
28
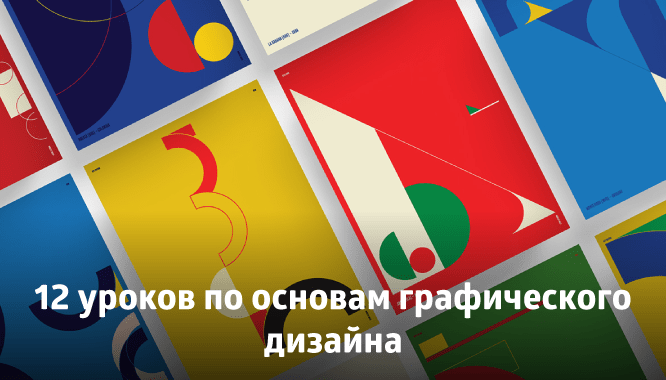
12 уроков по основам графического дизайна
- 1
-
31373
Где брать иллюстрации: 25 бесплатных и платных источников
- 0
-
13408
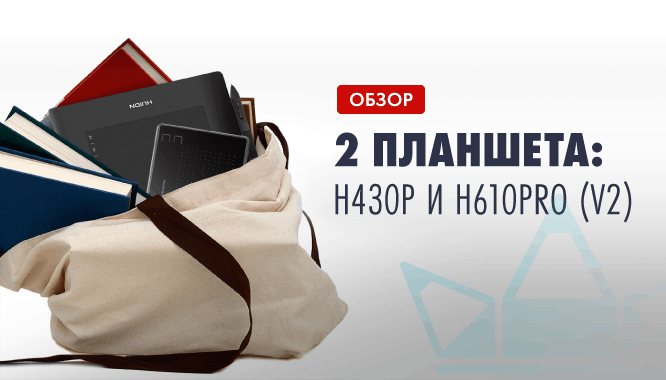
[Обзор] 2 планшета Huion: H430P и H610Pro (v2)
- 2
-
3994
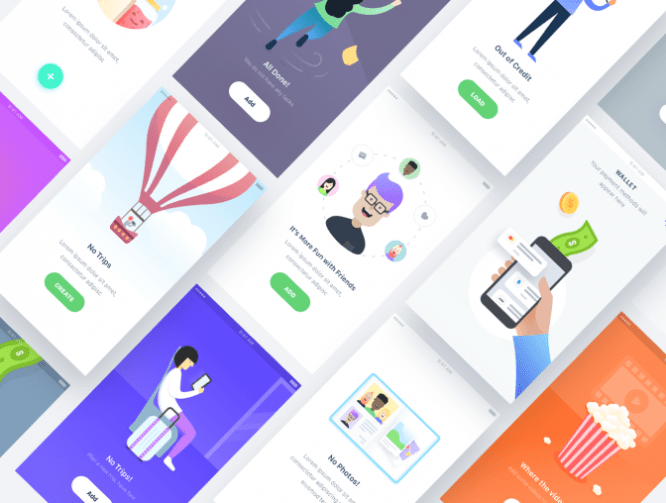
Empty States – Vol 01
- 0
-
3336
Procreate — одна из наиболее популярных программ для рисования и иллюстраций на iPad. Благодаря своей богатой функциональности и интуитивно понятному пользовательскому интерфейсу, Procreate стал незаменимым инструментом для художников, дизайнеров и иллюстраторов.
В этом полном руководстве вы найдете всю необходимую информацию для работы с Procreate на русском языке. Мы покажем вам, как установить программу, освоить основные инструменты и функции, и научим вас создавать профессиональные произведения искусства.
Procreate имеет множество инструментов для создания и редактирования рисунков, включая кисти, слои, эффекты, а также многочисленные настраиваемые параметры.
Мы расскажем вам, как использовать каждый из этих инструментов для создания реалистичных рисунков, абстрактных композиций, иллюстраций и многое другое. Вы научитесь работать с различными типами кистей, управлять слоями для достижения желаемого эффекта, применять специальные эффекты для добавления особого настроения вашим работам.
Если вы хотите научиться использовать Procreate на полную мощность и создавать потрясающие искусственные произведения, этот руководство идеально подойдет для вас. Вскоре вы сможете создавать профессиональные и красочные иллюстрации просто прикоснувшись к экрану вашего iPad.
Содержание
- Установка и настройка Procreate
- Основные инструменты Procreate
- Процесс работы с Procreate
Procreate представляет собой мощное приложение для создания и редактирования рисунков на iPad. Чтобы начать использовать Procreate, следуйте этим шагам по установке и настройке.
1. Ищите в App Store на вашем iPad приложение Procreate.
2. Нажмите на значок приложения Procreate, чтобы начать установку.
3. Дождитесь окончания установки и нажмите на значок приложения для запуска Procreate.
После успешной установки Procreate на вашем iPad вы можете приступить к настройке программы для удовлетворения своих потребностей и предпочтений:
1. После запуска Procreate вы увидите главный экран приложения. Здесь вы можете создавать новые проекты или открывать существующие.
2. Чтобы настроить программу, нажмите на иконку «Настройки» (шестеренка) в левом верхнем углу главного экрана.
3. В разделе «Настройки» вы можете изменить различные параметры программы, такие как язык, цветовую схему и функциональные клавиши. Экспериментируйте с этими настройками, чтобы определить, что подходит вам лучше всего.
Теперь, когда вы установили и настроили Procreate, вы готовы начать экспериментировать и создавать удивительные произведения искусства на своем iPad!
Основные инструменты Procreate
Программа Procreate для iPad предоставляет множество инструментов и функций, которые помогут вам создавать профессиональные цифровые рисунки. В данном разделе мы рассмотрим основные инструменты, которые вы найдете в Procreate.
| Инструмент | Описание |
|---|---|
| Кисть | Производит отрисовку вашего рисунка. Позволяет выбрать различные формы и текстуры кисти, настроить ее размер и прозрачность. |
| Карандаш | Симулирует эффект рисования карандашом на бумаге. Может использоваться для создания более натуральных и реалистичных эскизов. |
| Маркер | Позволяет создавать яркие и насыщенные линии, схожие с маркерами. Имеет возможность изменять толщину и прозрачность линий. |
| Трафареты | Предоставляют набор предустановленных форм, которые вы можете использовать в своих рисунках. Можно применять трафареты для создания различных эффектов и узоров. |
| Ластик | Позволяет стирать части рисунка, возвращая фоновый цвет. Можно настроить размер ластика и его интенсивность. |
| Градиент | Используется для создания плавного перехода между двумя цветами или оттенками. Может быть настроен на радиальный или линейный стиль. |
| Текст | Позволяет добавить текстовую информацию к вашему рисунку. Вы можете выбрать шрифт, размер и цвет текста. |
Это лишь некоторые из основных инструментов, предлагаемых в Procreate. Каждый инструмент имеет свои настройки и параметры, которые можно настроить под ваши потребности. Экспериментируйте и находите свой уникальный стиль работы!
Процесс работы с Procreate
1. Создание нового проекта: В Procreate вы можете создать новый проект, выбрав размер холста и ориентацию. Вы также можете настраивать другие параметры, такие как разрешение и формат файла.
2. Инструменты и кисти: Procreate предлагает широкий выбор инструментов и кистей, которые помогут вам создавать уникальные иллюстрации. Вы можете выбрать кисть и настроить ее параметры, такие как размер, прозрачность и цвет.
3. Рисование и редактирование: В Procreate вы можете свободно рисовать на холсте с помощью Apple Pencil или пальцев. Вы также можете добавлять текст, наполнять цветом и редактировать свои работы с помощью различных инструментов и эффектов.
4. Управление слоями: Слои являются важной частью работы в Procreate. Они позволяют вам разделять элементы иллюстрации и вносить изменения без влияния на остальную работу. Вы можете добавлять, удалять, объединять и изменять порядок слоев в своем проекте.
5. Экспорт и шаринг: После завершения работы с проектом вы можете экспортировать его в различные форматы, такие как JPEG, PNG или PSD. Также вы можете поделиться своими работами на социальных сетях или отправить их другим людям.
Вот основные шаги работы с Procreate. Начните экспериментировать с разными инструментами и функциями приложения, чтобы создавать удивительные иллюстрации и рисунки!
Если вы пытаетесь заняться цифровым искусством, Procreate – отличное место для начала. Procreate считается одним из лучших мобильных приложений для цифрового искусства, и этому есть причина.
Как только вы освоитесь, Procreate станет идеальным инструментом как для профессиональных художников, так и для людей, которые любят рисовать или конструировать в качестве хобби. При этом, если вы ничего не знаете о Procreate, это может стать ошеломляющим, и вы, вероятно, даже не будете знать, с чего начать.
Если вы новичок или просто хотите узнать больше о приложении, вот несколько советов для новичков.
Начнем с основ. Procreate – это приложение для редактирования цифровых изображений и графики, разработанное Savage Interactive. Procreate был впервые выпущен в 2011 году и с тех пор стал популярным приложением для цифровых художников для iPad. Это благодаря его многочисленным функциям, чистому и отзывчивому интерфейсу и простоте использования.
На данный момент вы можете использовать Procreate только для iPad и Procreate Pocket для iPhone. Большинство согласны с тем, что Procreate лучше всего использовать на iPad из-за его размера, а также из-за функций, которыми он поставляется, включая поддержку Apple Pencil.
Давайте рассмотрим основы, чтобы улучшить работу с Procreate, чтобы вы могли начать создавать потрясающее цифровое искусство.
Скачать: Procreate (9,99 долларов США, доступны покупки в приложении)
Скачать: Procreate Pocket (4,99 доллара США, доступны покупки в приложении)
1. Как создать новый холст
Создание нового холста – это первое, что вы должны сделать при запуске Procreate. К счастью, это очень просто, и для этого потребуется всего несколько шагов:
- Запустите приложение Procreate .
- Нажмите на значок плюса ( + ) в правом верхнем углу экрана.
- Появится небольшое окно с некоторыми размерами холста по умолчанию. Выберите размер, который хотите использовать.
2. Создайте собственное полотно.
Procreate предлагает вам на выбор множество различных размеров холста, но если вы не можете найти точный размер, который вам нужен, вы всегда можете создать свой собственный. Вот как:
- В галерее «Создать холст» нажмите значок плюса (+) в правом верхнем углу экрана.
- Затем нажмите значок плюса ( + ) в правом верхнем углу всплывающего окна.
- Настройте размер холста.
- Когда вы закончите, нажмите « Создать» .
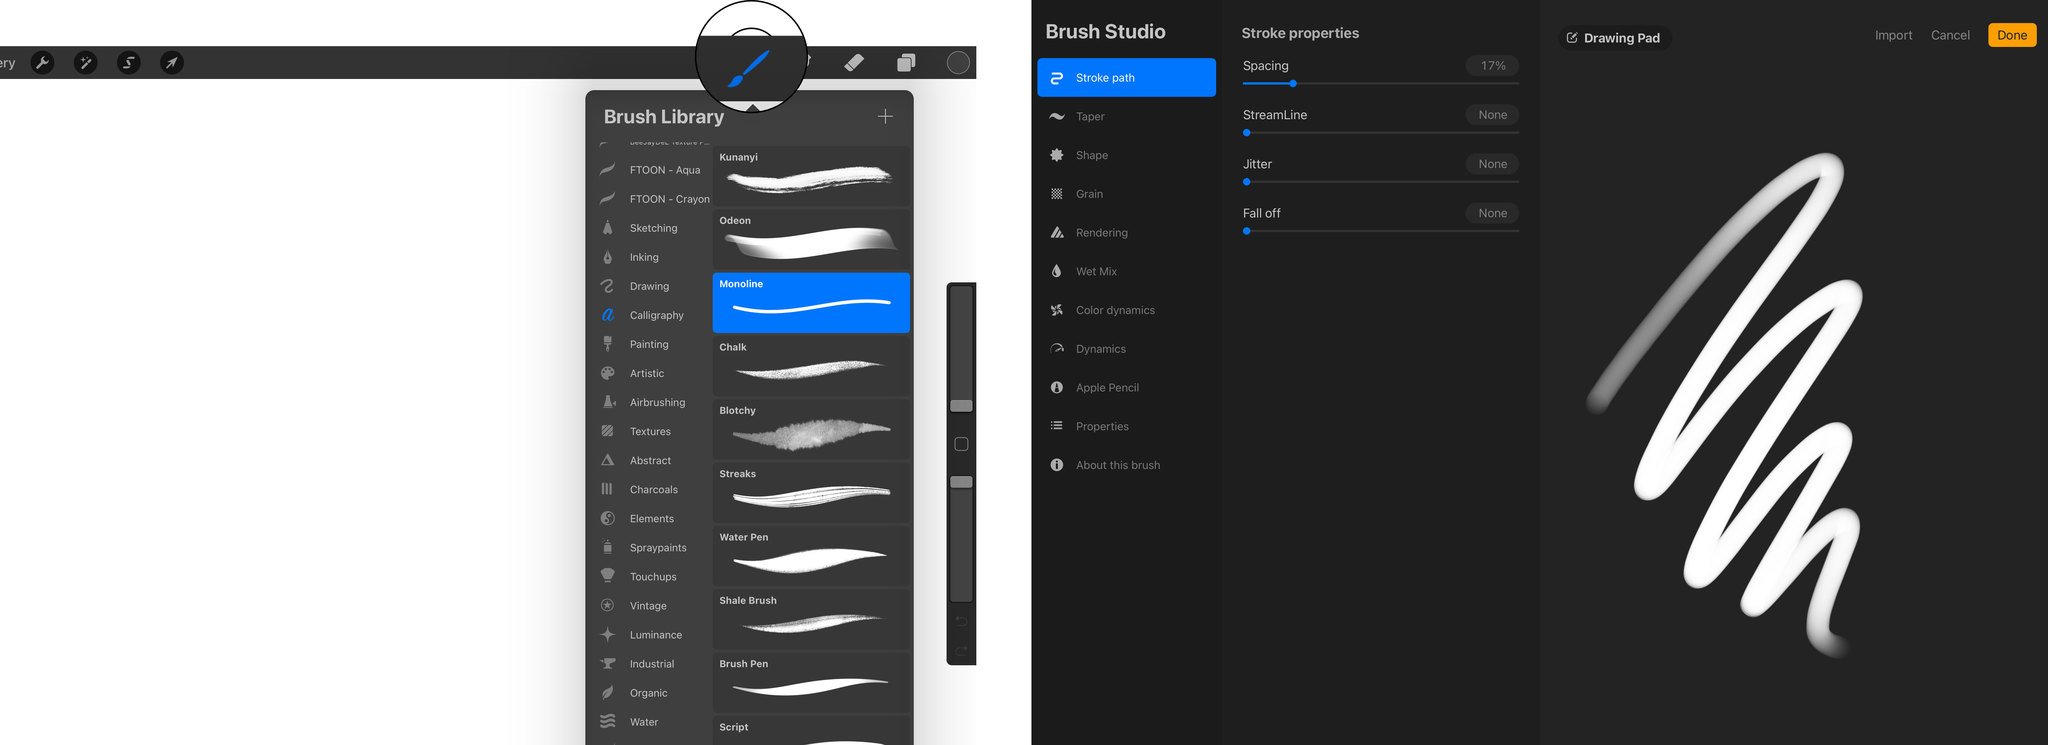
3. Смените кисть или ластик.
Вы можете легко переключать стили перьев и ластика в Procreate. Сделать это довольно просто, и в библиотеке есть из чего выбрать.
- На холсте коснитесь значка кисти в правом верхнем углу.
- Во всплывающем меню вы можете выбрать набор кистей (слева) и кисть (справа).
Вы также можете выполнить следующие действия, чтобы сменить ластик. Есть много вариантов, которые вы можете попробовать, так что вы можете выяснить, какой из них вам больше нравится.
Наш совет? Если вы просто хотите рисовать искусство в мультяшном стиле, вы можете начать с опробования либо монолинии, либо кисти для скриптов . Оба находятся в разделе « Каллиграфия ».
4. Автоматическое создание прямых линий и форм.
Теперь, когда у вас настроен холст, пора приступить к рисованию. Возможно, вы не лучший художник в мире, но Procreate может вам помочь.
Вы можете создавать прямые линии и формы за несколько простых шагов:
- На холсте нарисуйте любую фигуру, какую захотите.
- Когда вы закончите, держите палец или Apple Pencil на холсте на пару секунд.
- Procreate распознает форму и сразу же преобразует ее в идеальную форму.
Вы можете создавать круги, квадраты, прямые линии и многое другое. Но имейте в виду, что вам нужно максимально точно представить форму, чтобы Procreate мог ее распознать.
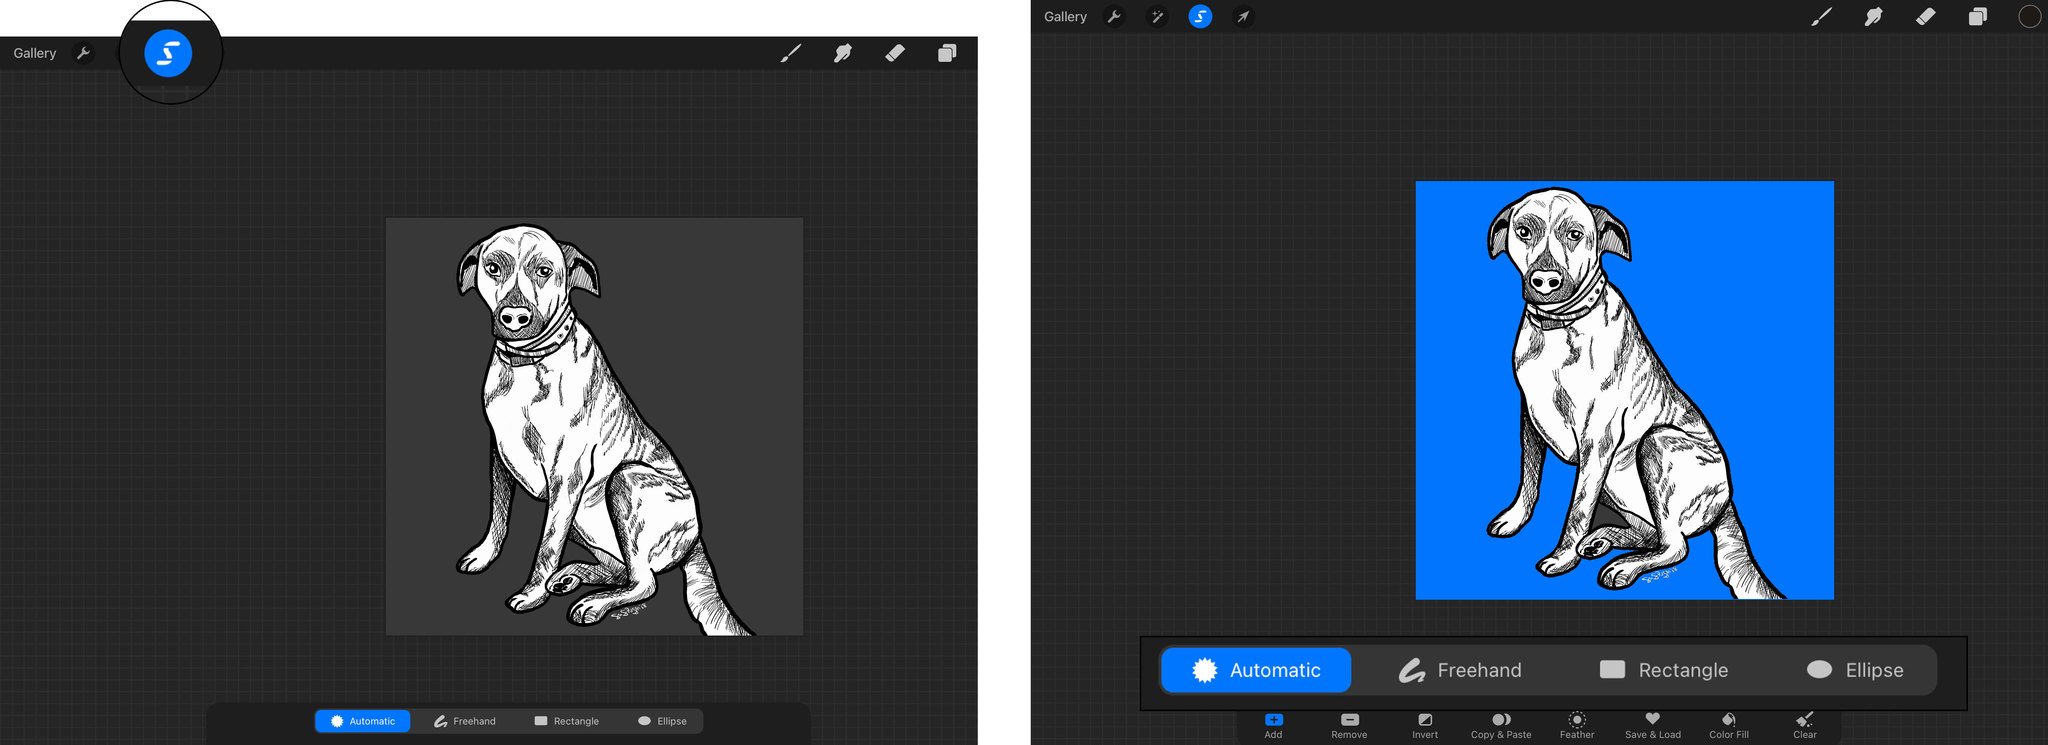
5. Автоматически раскрашивать любую форму
Теперь, когда у вас есть форма, пришло время добавить к ней немного цвета. Не волнуйтесь; красить самому не придется. Procreate сделает это за вас! Просто выполните следующие действия:
- Нажмите и удерживайте цвет в правом верхнем углу холста.
- Перетащите цвет на свою фигуру или рисунок.
- Поднимите палец или карандаш Apple Pencil, и Procreate автоматически заполнит форму этим цветом.
Procreate автоматически закрасит форму, на которой вы отпустите палец. Учтите, что фигуру нужно замкнуть. В противном случае краска покроет все полотно.
6. Создайте новый слой.
Слои помогают художникам разделять и организовывать свои работы. Таким образом, если вы сделаете ошибку на новом слое, это не повлияет на остальную часть вашего рисунка.
Вот как вы можете создавать новые слои:
- На холсте коснитесь значка слоя в правом верхнем углу экрана (он выглядит как два квадрата друг над другом).
- Нажмите на значок плюса ( + ) в правом верхнем углу всплывающего окна.
Procreate создаст новый слой; он будет выбран автоматически. Вы также можете изменять слои в этом окне.
7. Никогда не закрашивайте линии за пределами линий с помощью обтравочных масок.
В Procreate есть удобная функция, которая позволяет рисовать изображения, не выходя за границы. Это называется обтравочной маской, и она в основном позволяет вам обрезать слой в другой, поэтому вы можете рисовать или рисовать только на рисунке, который находится в слое ниже.
Вот как это работает:
- Создайте новый слой, как мы узнали ранее.
- Нажмите кнопку « Новый слой» , и появится небольшое меню.
- Нажмите на обтравочную маску .
- Теперь у вашего нового слоя есть маленькая стрелка, указывающая на слой ниже.
- Войдите в свой холст и начните рисовать или рисовать. Вы увидите только то, что находится внутри рисунка слоя ниже.
Имейте в виду, что это не означает, что ничего, что вы рисуете снаружи, не существует. Это здесь; вы просто не можете этого видеть. Это идеально подходит для добавления оттенка или нового цвета к вашим рисункам, не беспокоясь о выходе за границы линий.
Пришло время рисовать с Procreate
Теперь ваша очередь создавать свое искусство. Вы только что узнали основы создания своего первого холста и рисования в Procreate. Теперь все, что вам нужно сделать, это попрактиковаться и научиться создавать удивительные произведения искусства.
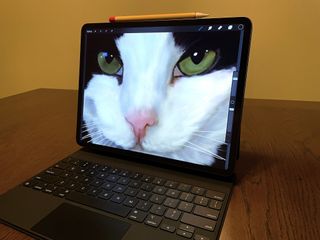
(Image credit: Greg Pugh / iMore)
Procreate is one of the best drawing apps for the artist’s iPad. However, if you’re unfamiliar with art apps, it can be a little overwhelming at first, so here’s a handy guide to get started.
What’s on the Home Screen?
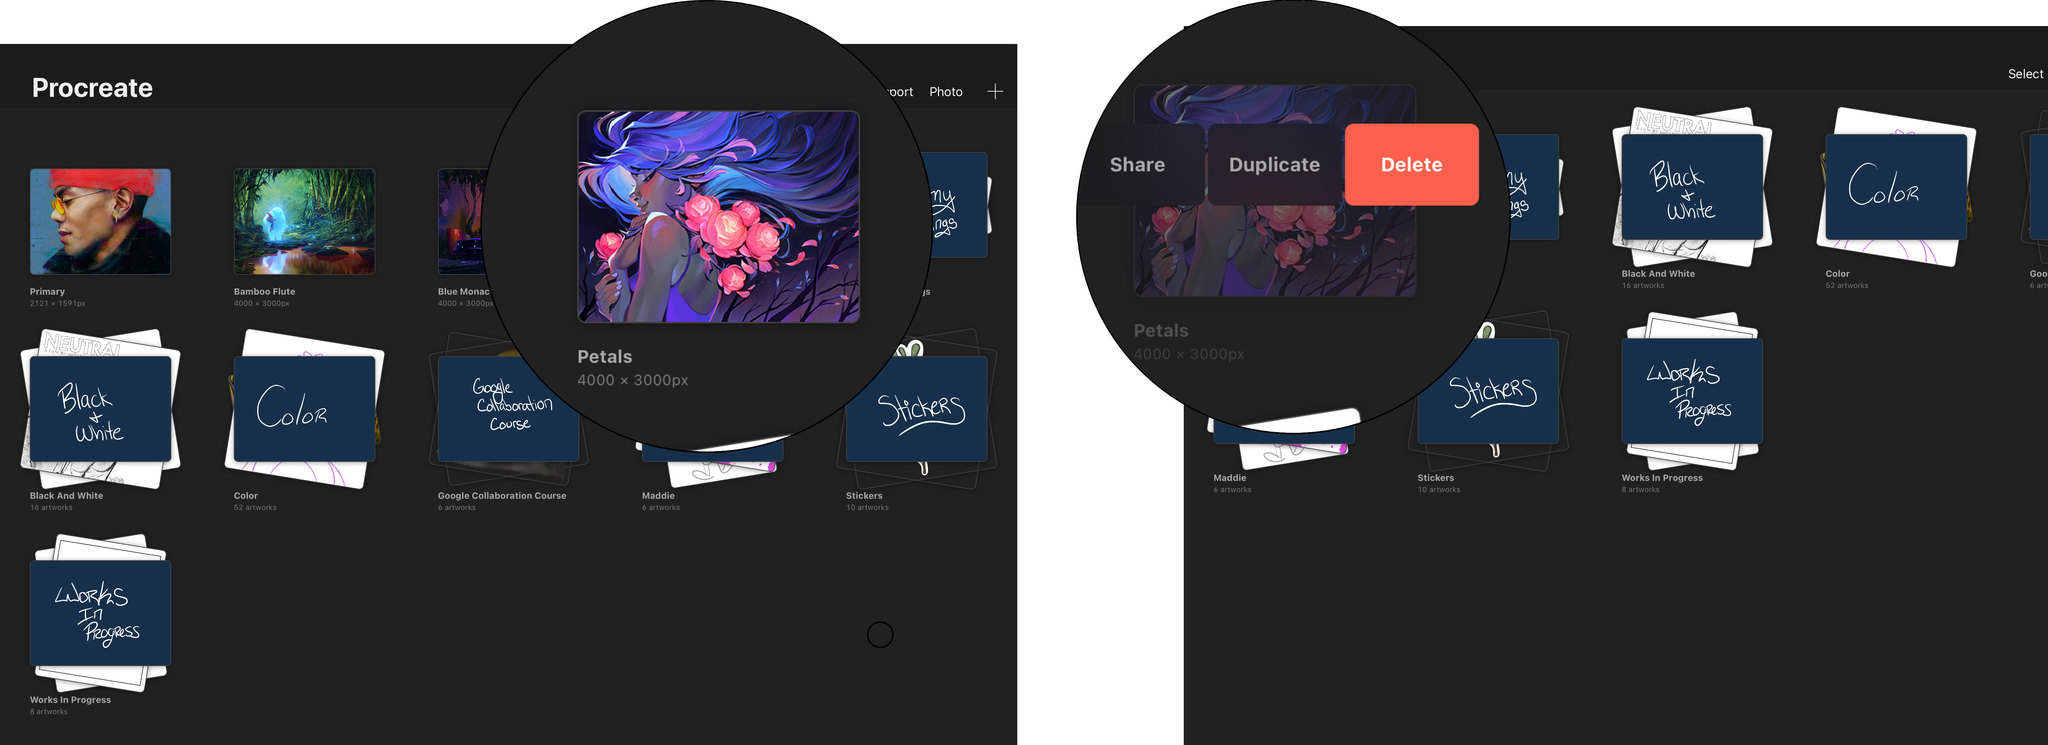
When you start Procreate, you’ll be greeted with some sample artwork that was commissioned by Savage Interactive to show off its latest features. You can tap on these samples to open the files or you can choose to delete them.
How to delete artwork
- Swipe on an artwork from right to left.
- Tap Delete.
To better organize your artwork, you can create folders, or as they are called in Procreate, a Stack.
How to create a new Stack
- Tap and Hold on an artwork.
- Drag onto another artwork until it flashes.
- Release and the artwork will now be grouped together in a Stack.

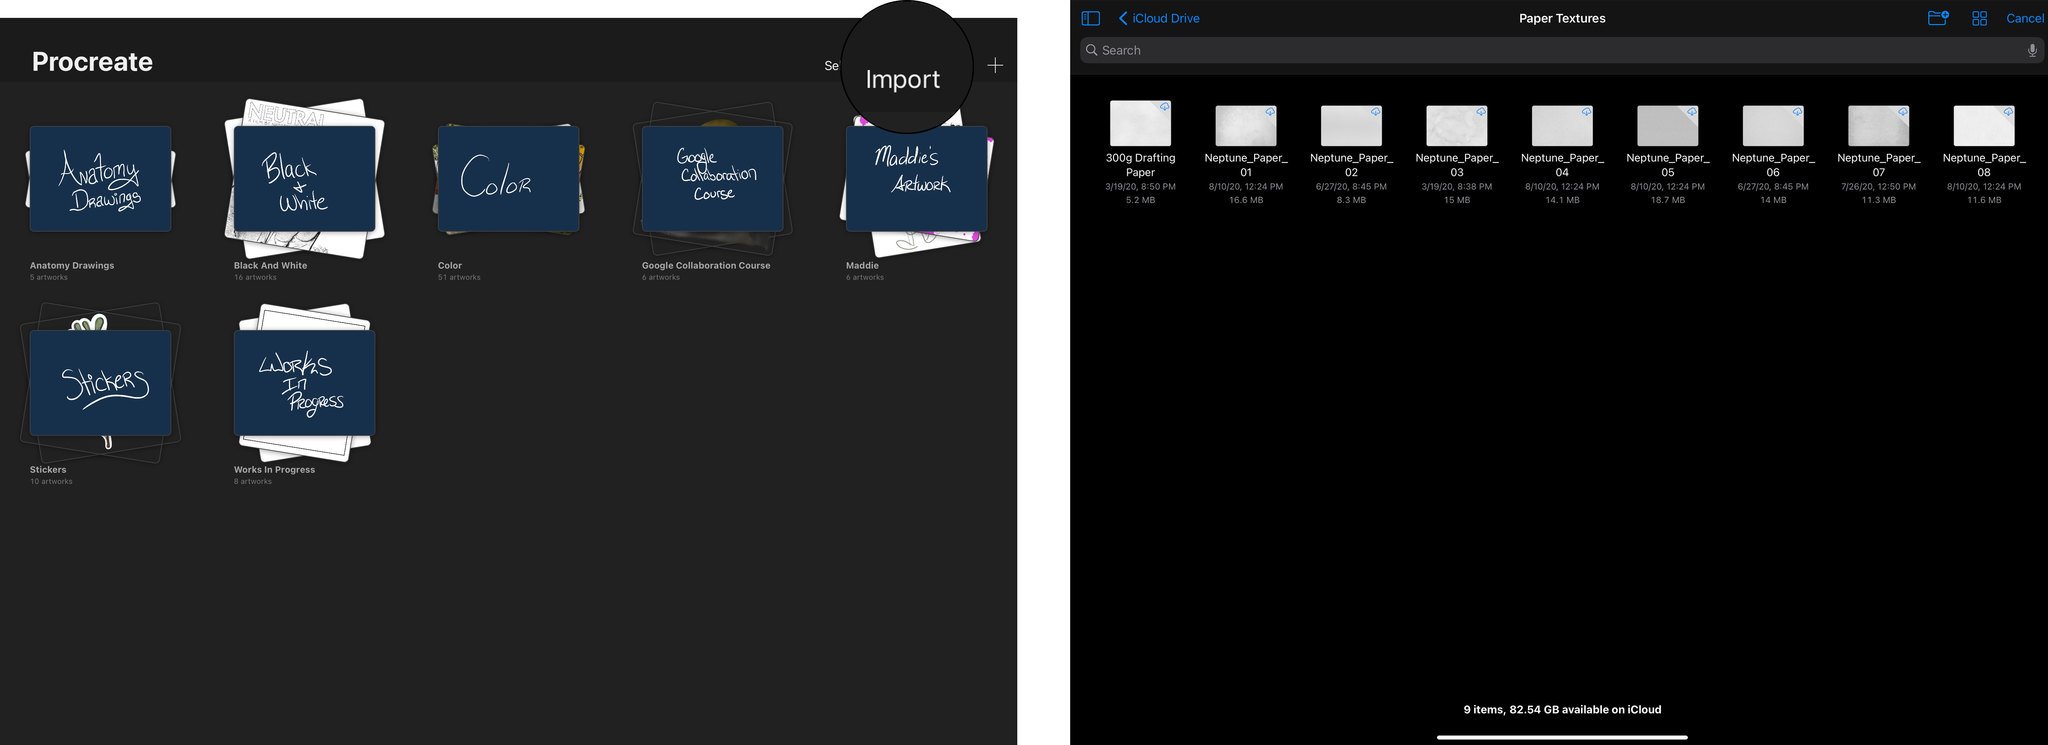
How to import a photo from the Files app
- Tap Import.
- Select the desired image.
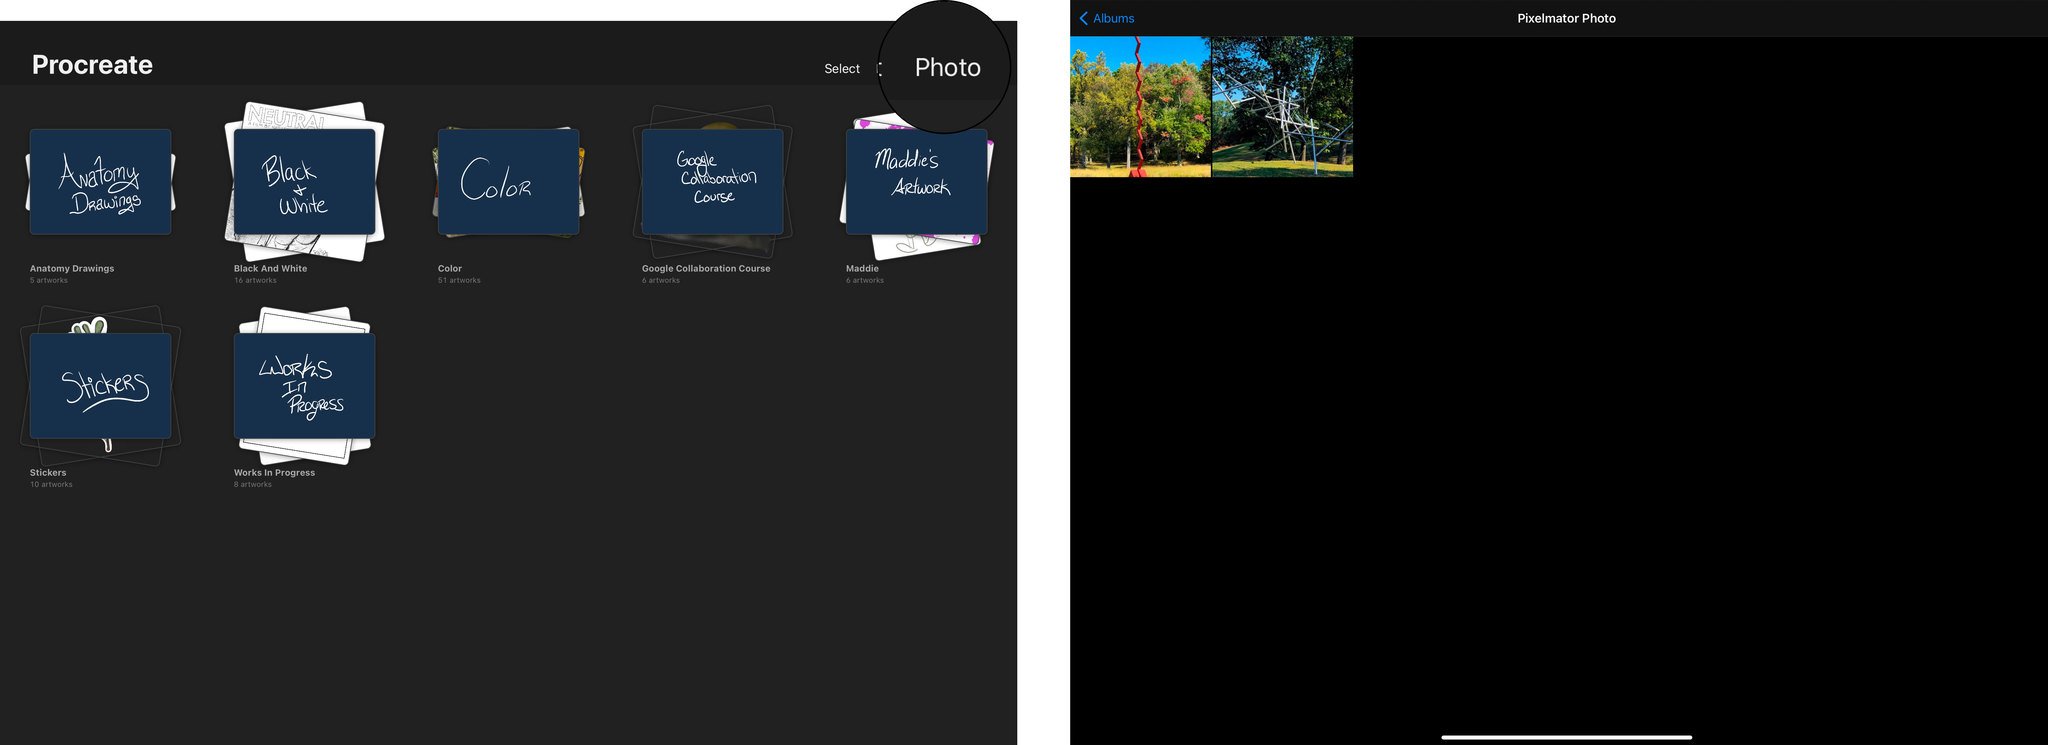
How to start a new project from a Camera Roll photo
- Tap Photo.
- Select the desired image.
How to begin a New Project Canvas
- Tap the + sign to open the New Canvas pane.
- Select from a Preset (e.g. Screen Size, 4K, etc.)
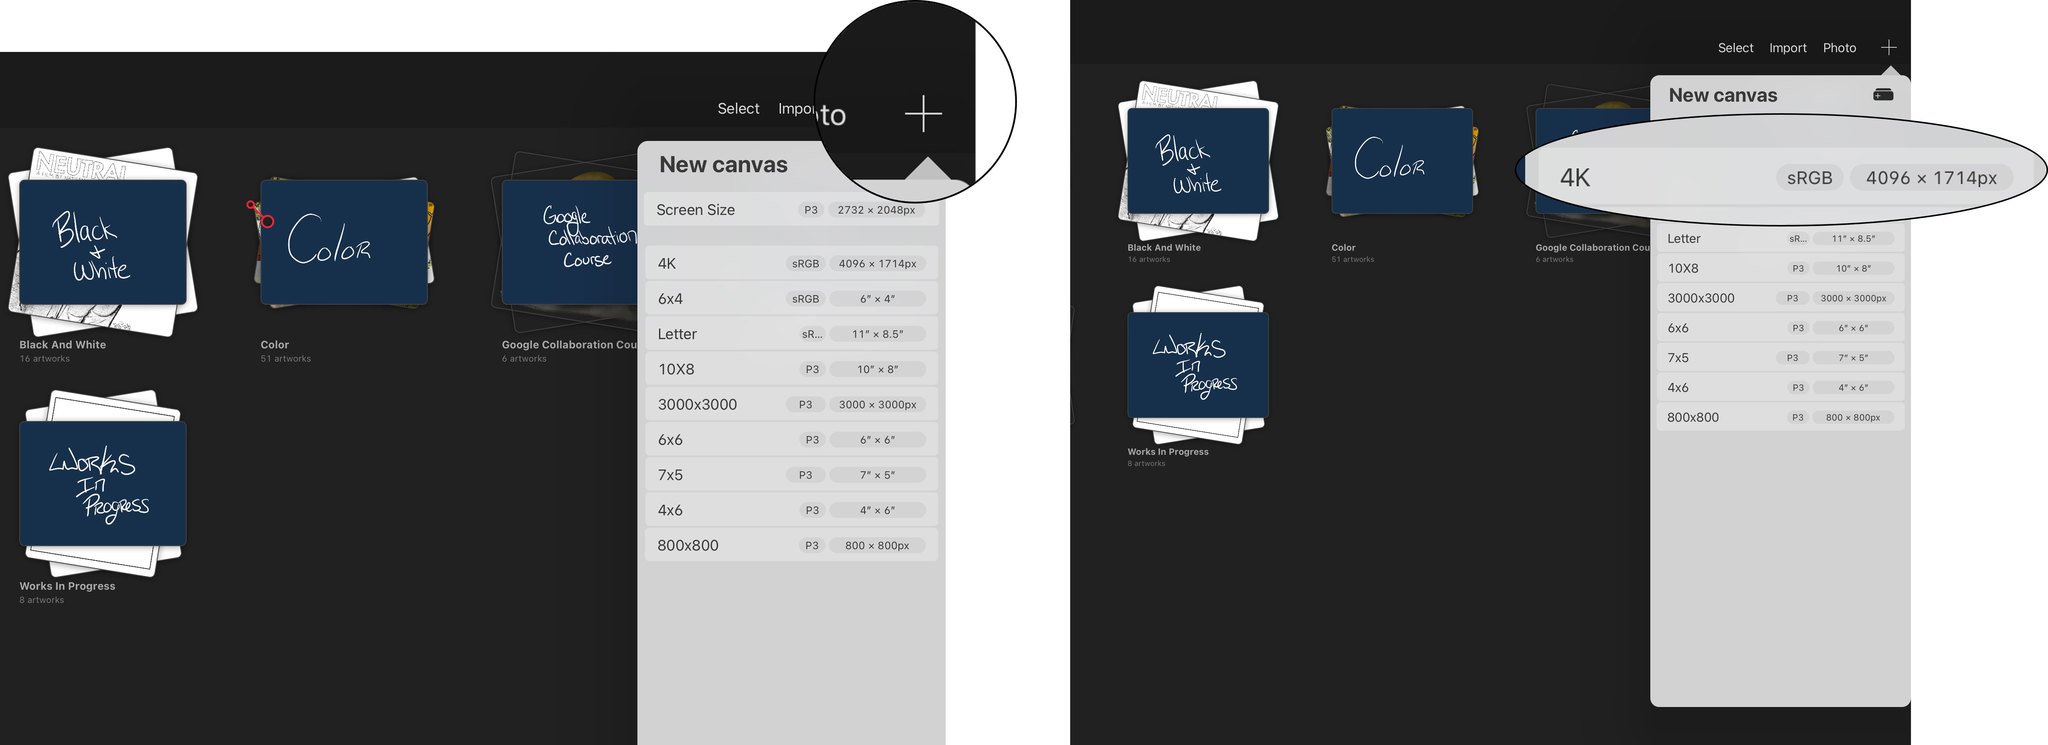
How to create a New Custom canvas
- Tap the + sign to open the New Canvas pane.
- Tap the New Canvas Icon to open the Custom Canvas window.
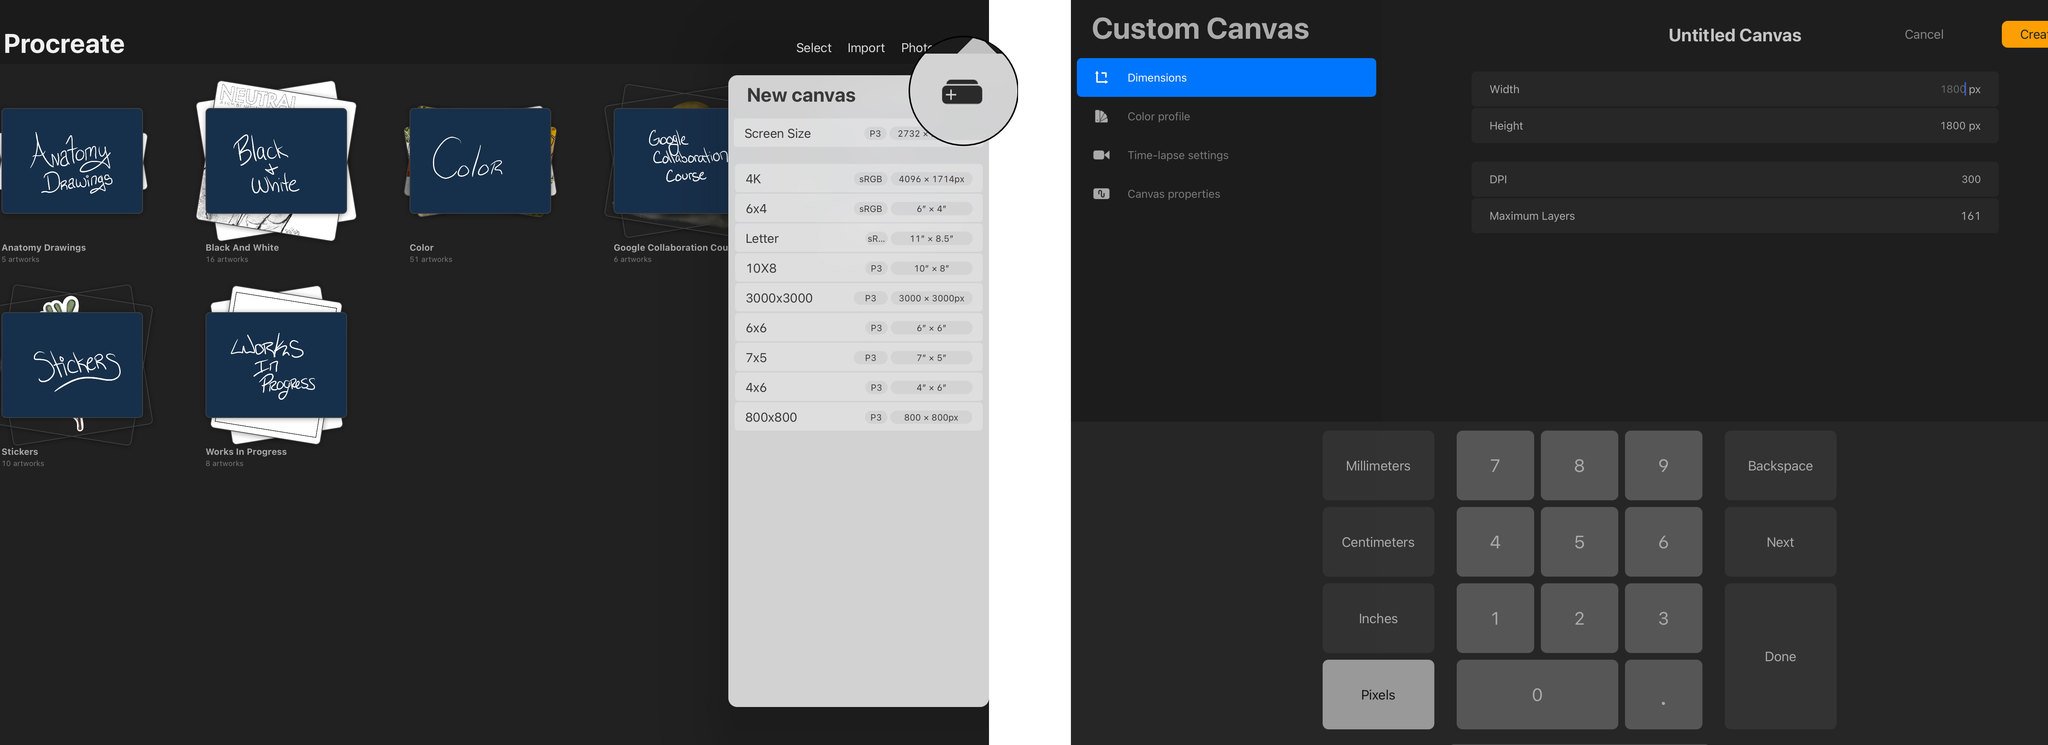
Here you will be able to select the dimensions in millimeters, centimeters, inches, or pixels. The dimensions and your hardware determines the number of layers that you’ll have available in your project.
The smaller the dimensions and the more powerful of an iPad you have, the more layers you’ll have at your disposal. Unless you’re doing a very complex piece, you probably won’t need hundreds of layers. However, if you plan on doing larger artwork with a lot of layers, you may want to consider getting an 12.9-inch iPad Pro since it’ll give you a larger surface area and better hardware specifications.
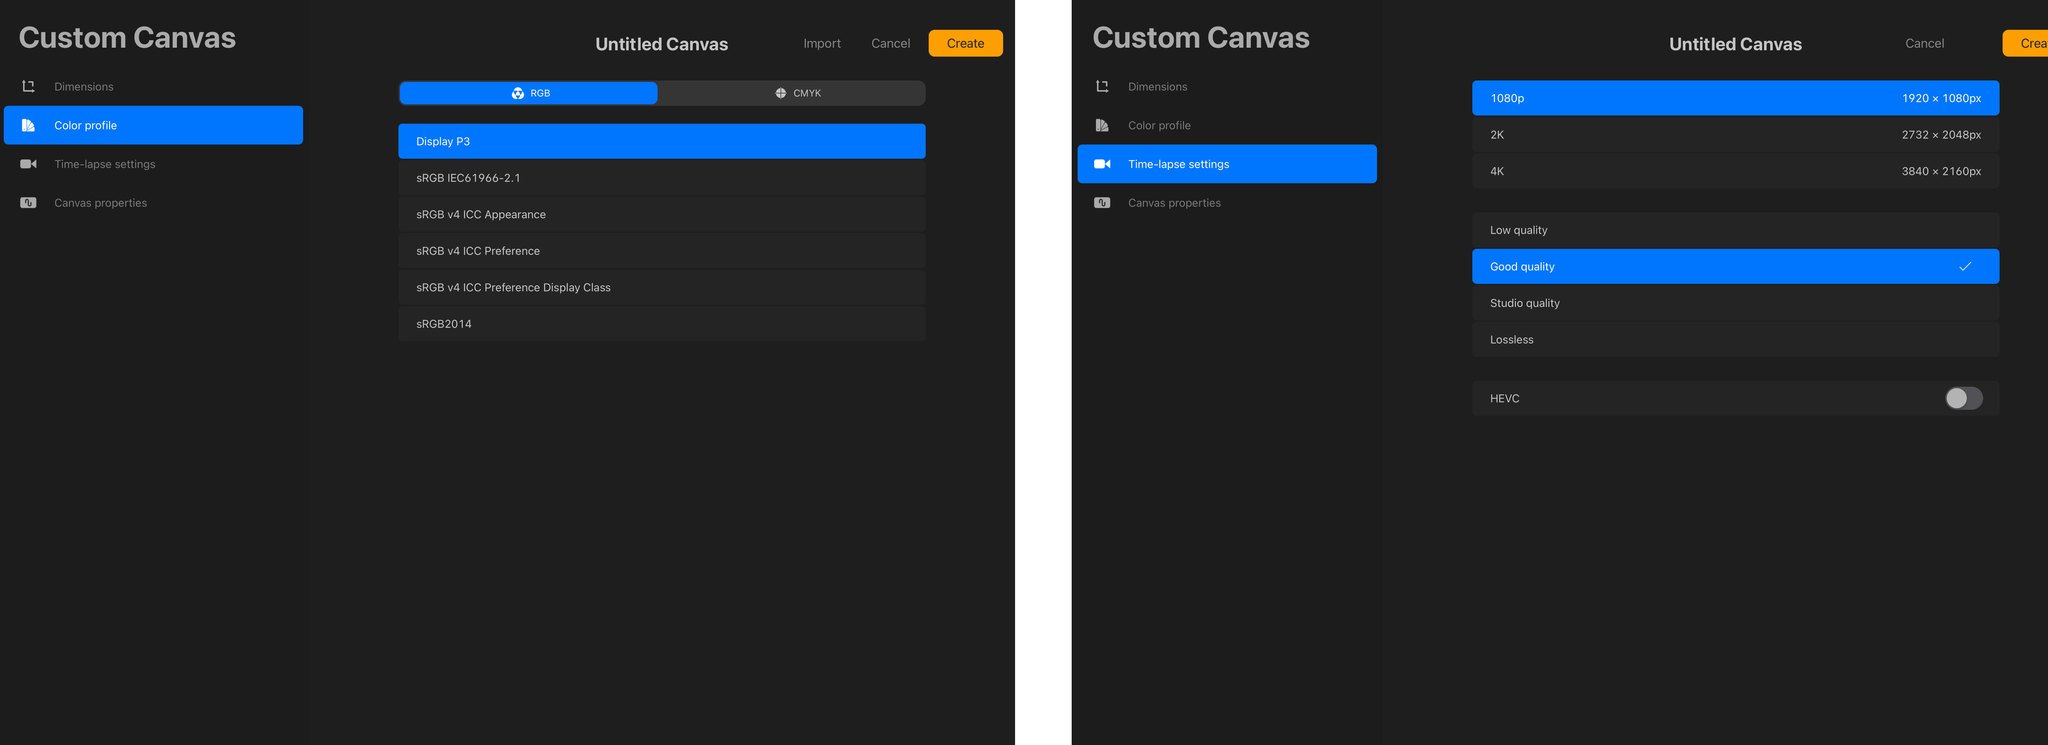
While you’re creating your custom canvas, you can also change things like the Color Profile and settings to the Time-Lapse Video Recording if you want to use this feature.
Setting the stage
Now that you have your canvas created, let’s take a look at all of the menu options available starting in the upper-left.
- Gallery — Takes you back to the Gallery menu screen to choose or start a new artwork.
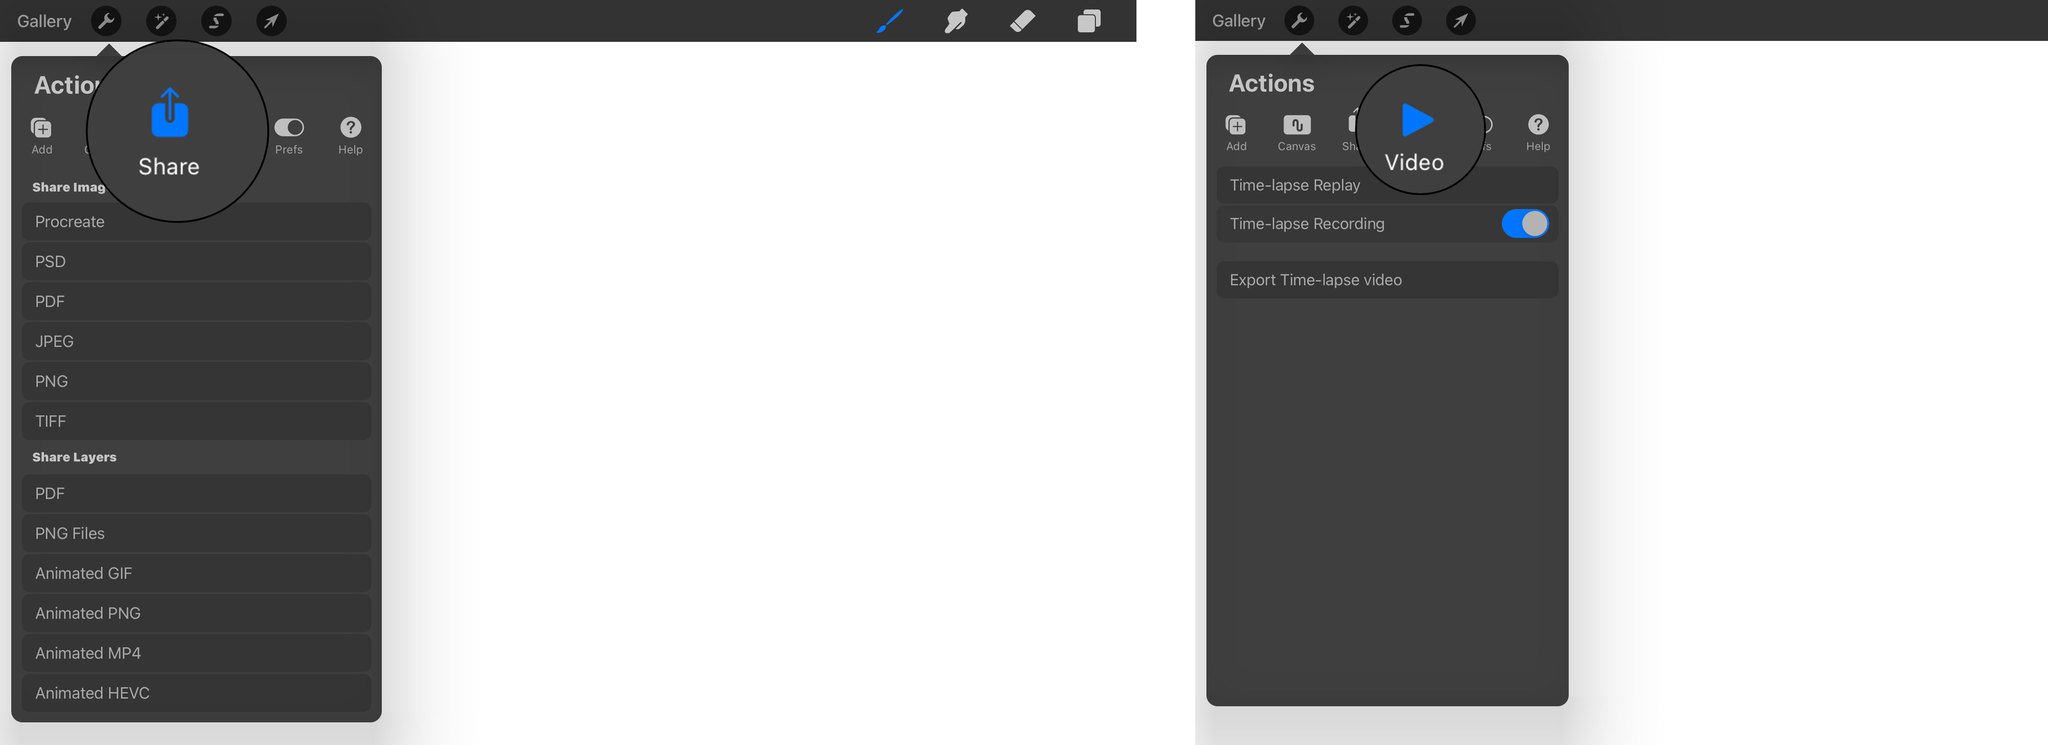
- Actions — Contains submenus for:
- Add — Insert images and text, and copy/cut/paste commands
- Canvas — Adjustments for the canvas, enabling Animation and Drawing Guides, and importing Reference Photos
- Share — Export artwork as an image or a source file (e.g. Photoshop Document)
- Video — Export a Time-lapse recording of your artistic process for each project
- Preferences — Light/Dark mode, user interface options, pressure sensitivity options, and 3rd-party pressure-sensitive stylus options
- Help — Resources from Procreate to get started
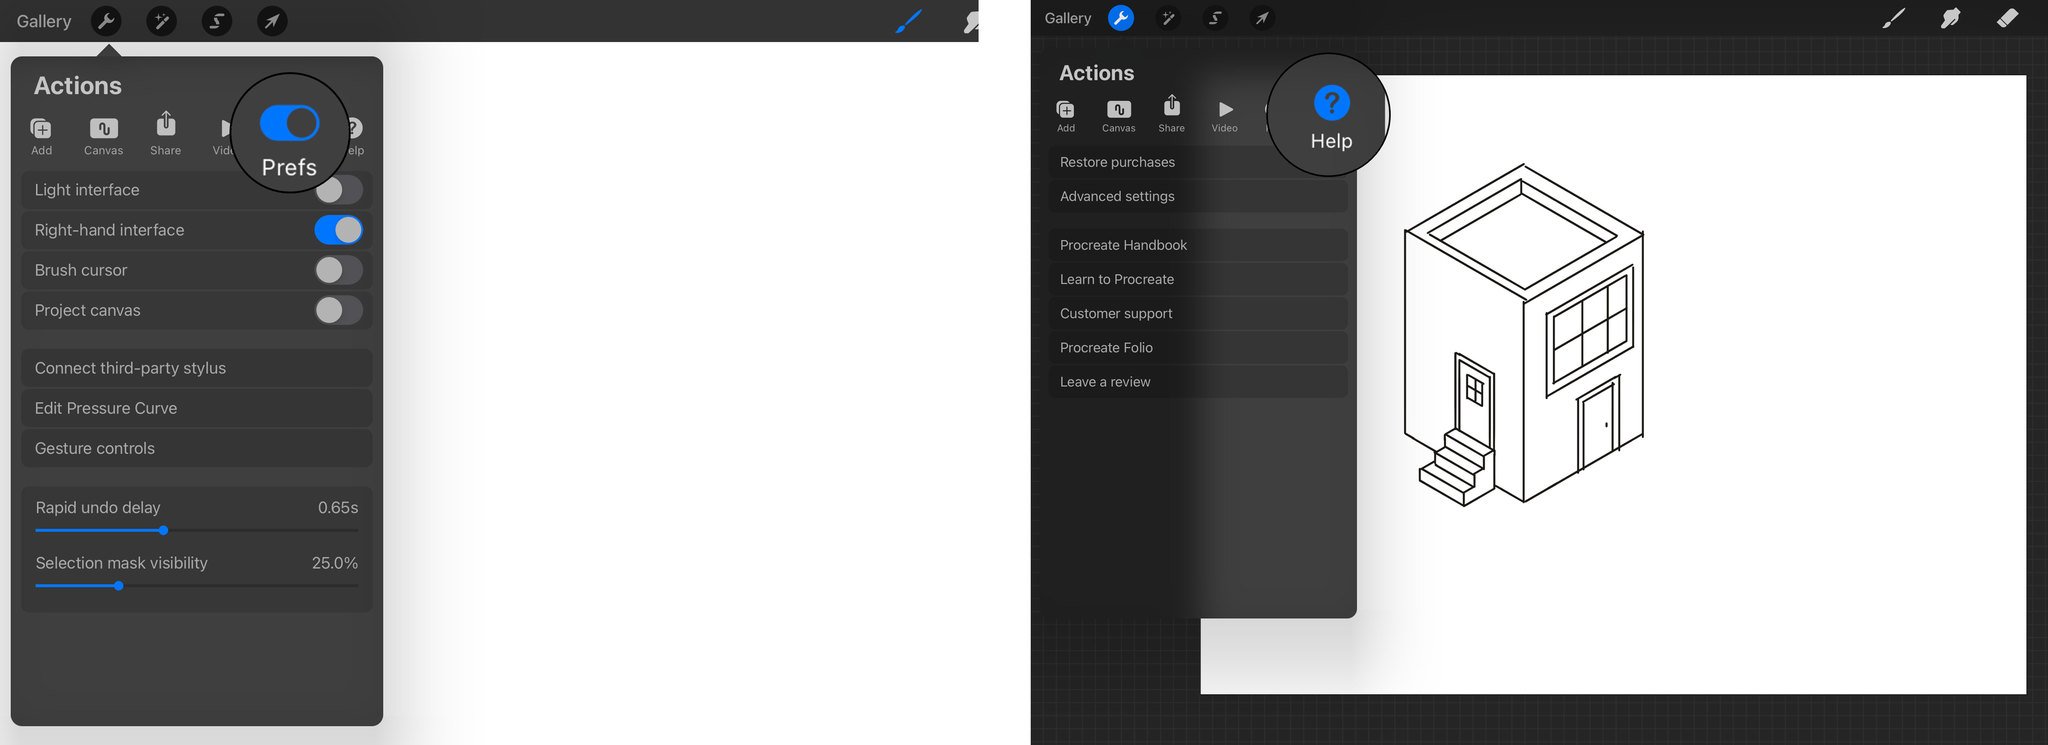
- Adjustments — Contains options for:
- Color and Lighting Adjustments (Hue, Saturation, Brightness, Color Balance, Curves, and Gradient Map)
- Blurring (Gaussian, Motion, and Perspective)
- Special Effects (Noise, Sharpen, Bloom, Glitch, Halftone, Chromatic Aberration, Liquify, and Clone)
- Selection — Allows you to selection portion of your artwork to move and edit using a variety of options
- Move — Allows you to move a selected portion or layer of your artwork
- Brush Library — The digital brushes, pencils, and pens you’ll use to create your artwork
- Smudge — Allows you to smudge or blur portions of your drawing
- Eraser — Used to erase any brush strokes on a selected layer
- Layers — The area of canvas on which you draw; Different blend modes are available for each layer in a project
- Colors/Palettes — Where you can select your brush color and import/create your own color palettes
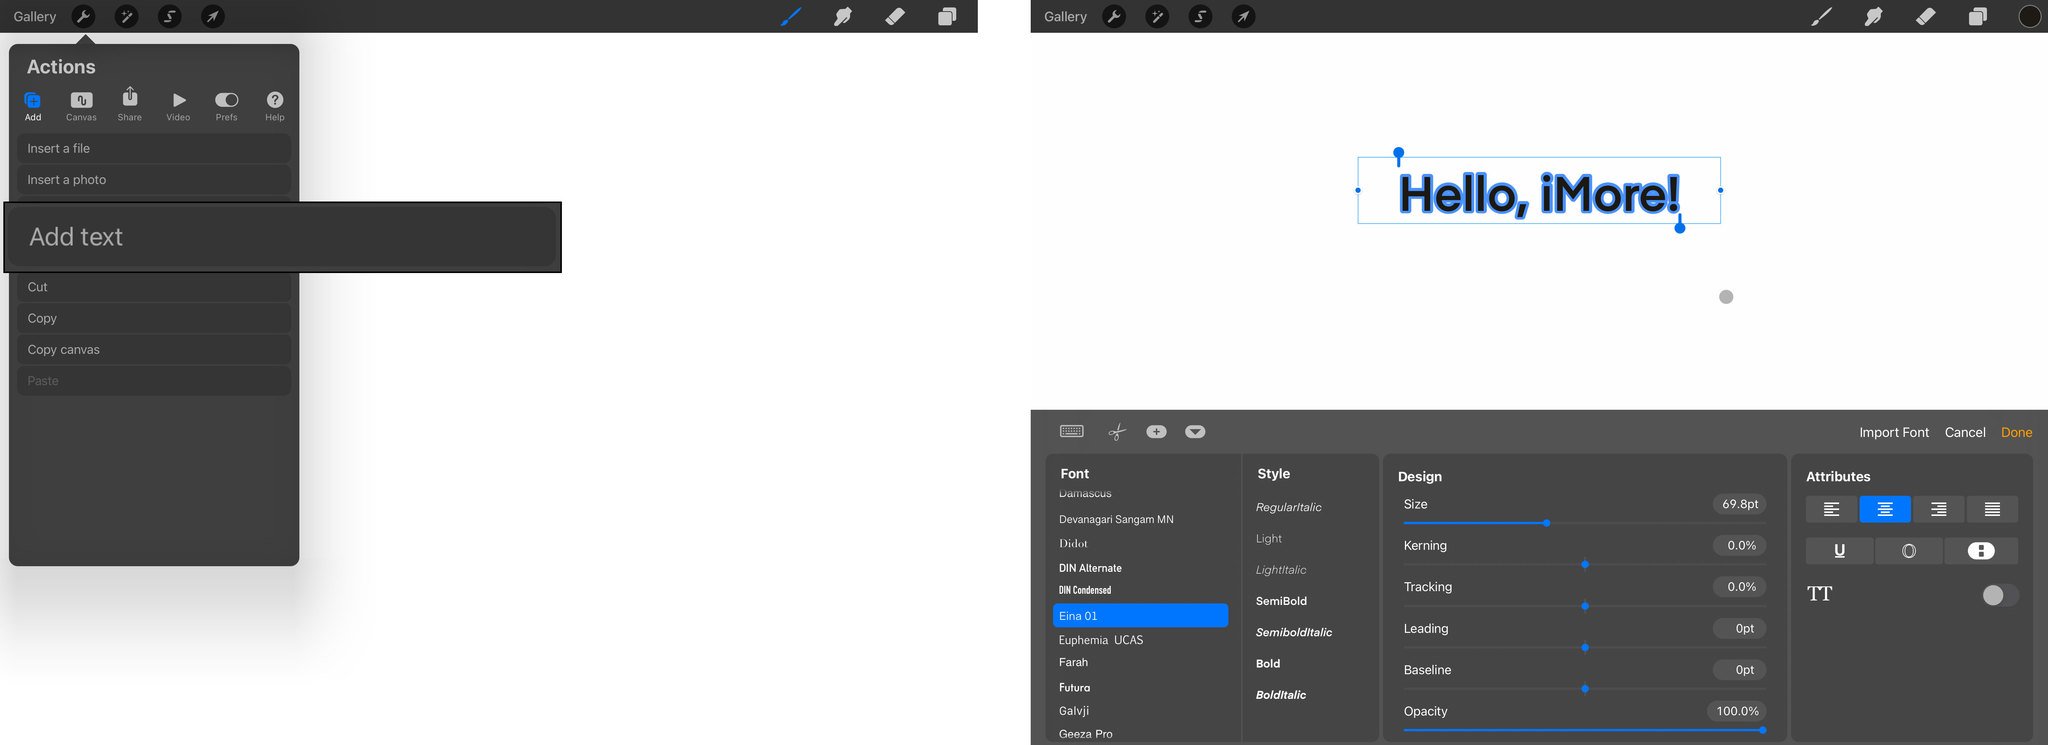
Under the Add menu there are options for inserting files, photos, and text, as well as copying and pasting. Inserting files and images here is pretty much the same thing as creating a canvas from an image in the Gallery menu, but now you can drag and resize the images you’ve inserted. Inserting text provides you with a lot of options to change the style and formatting, as well as import fonts that you may have downloaded online and saved into the Files app.
How to insert an image or text
- Tap the Actions wrench icon.
- Tap Add.
- Choose to insert a File, Photo, or Text.
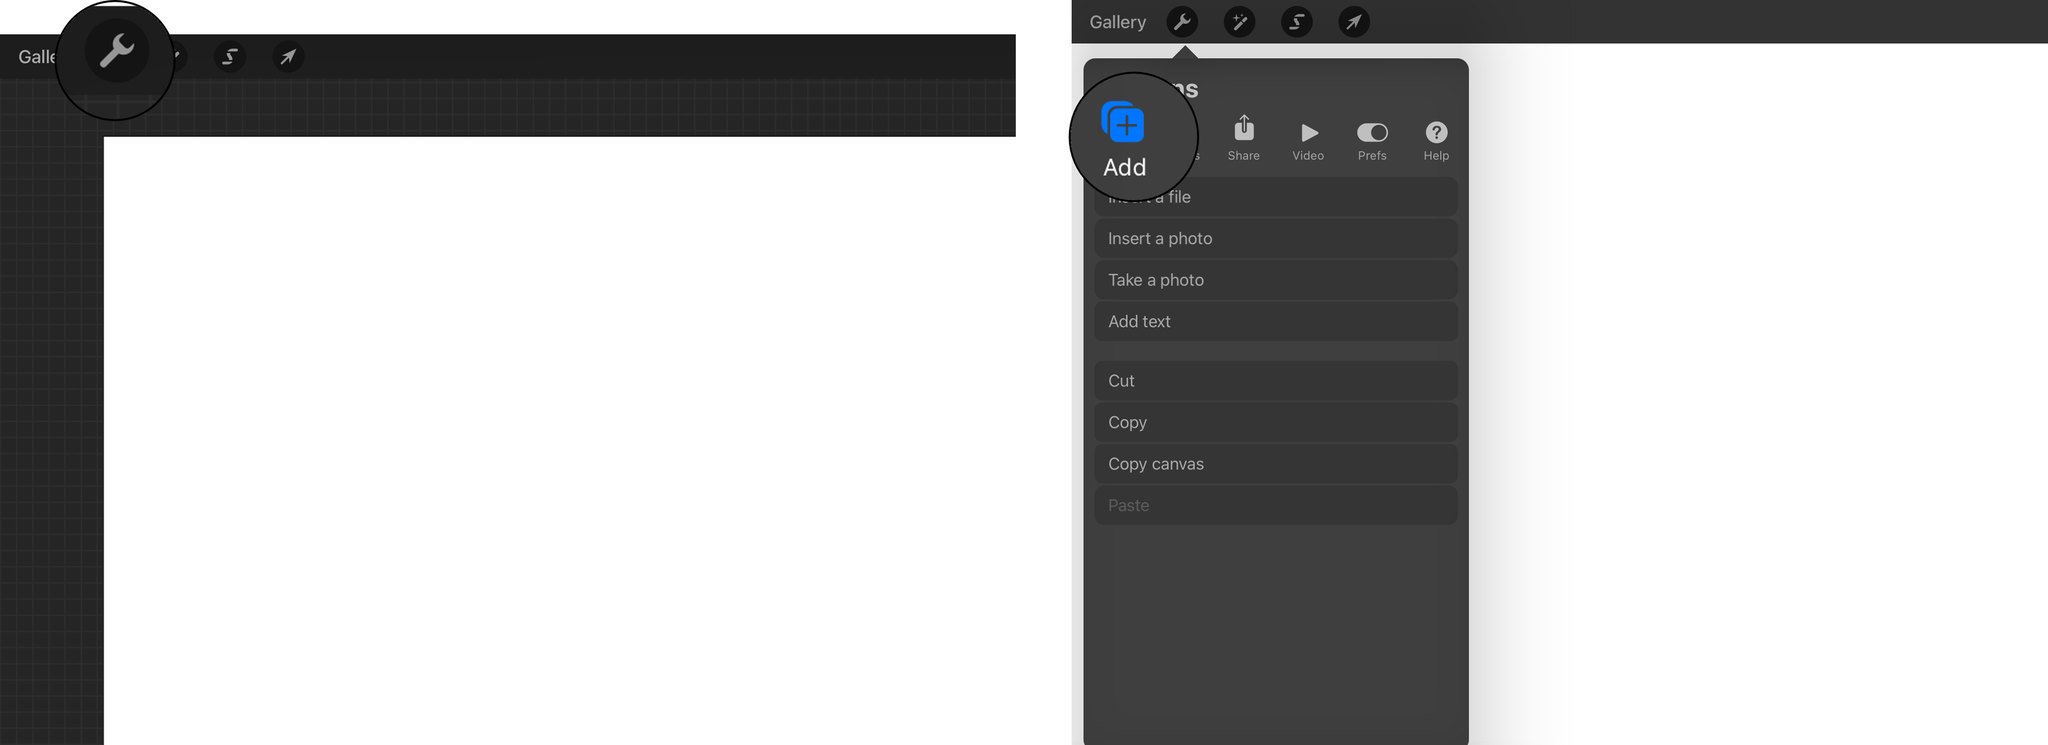
Adding a Photo or File will allow you to drag and size it onto the canvas accordingly. Adding Text will bring up numerous options to edit the style of the text. You can use the onscreen keyboard or one that is paired to your device to type.
How to insert Text
- Tap Add from the Actions menu.
- Select Add Text.
- Type your desired text and adjust via the options accordingly.
Under the Canvas submenu, you can change the properties of your canvas if you decide the ones you chose in the beginning aren’t what you need.
How to add a Drawing Guide
- Select Canvas under the Actions menu.
- Toggle on the Drawing Guide.
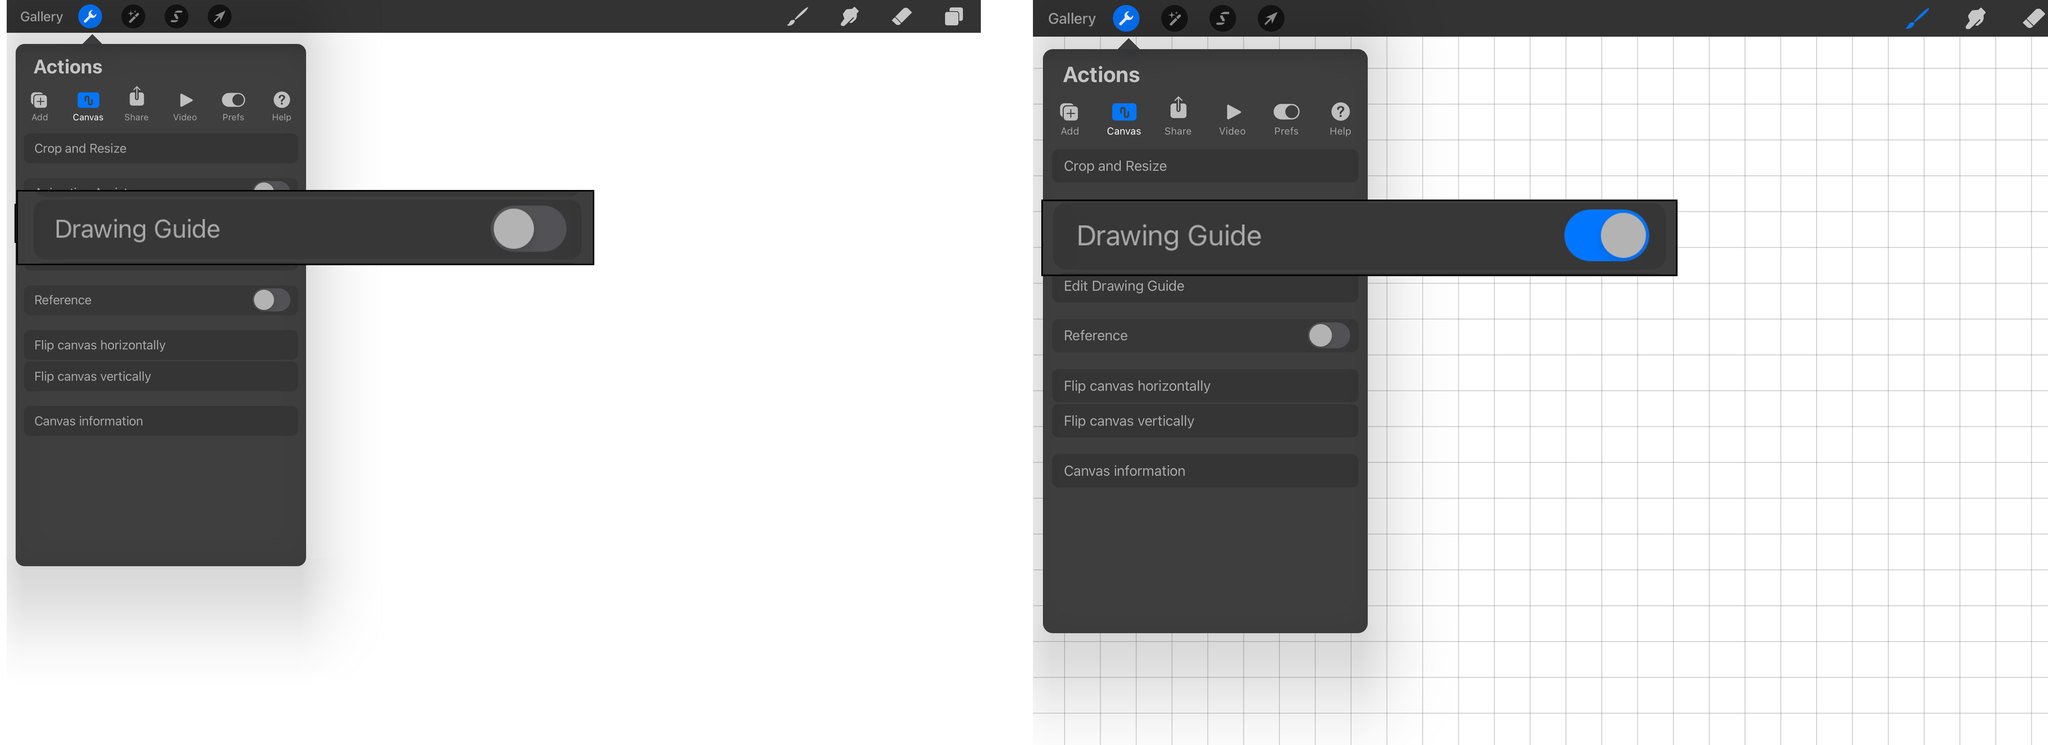
There are four types of drawing guides from which to choose: 2D Grid, Isometric, Perspective, and Symmetry.
How to edit a Drawing Guide
- Tap Edit Drawing Guide under the Canvas submenu.
- Choose 2D Grid, Isometric, Perspective, or Symmetry.
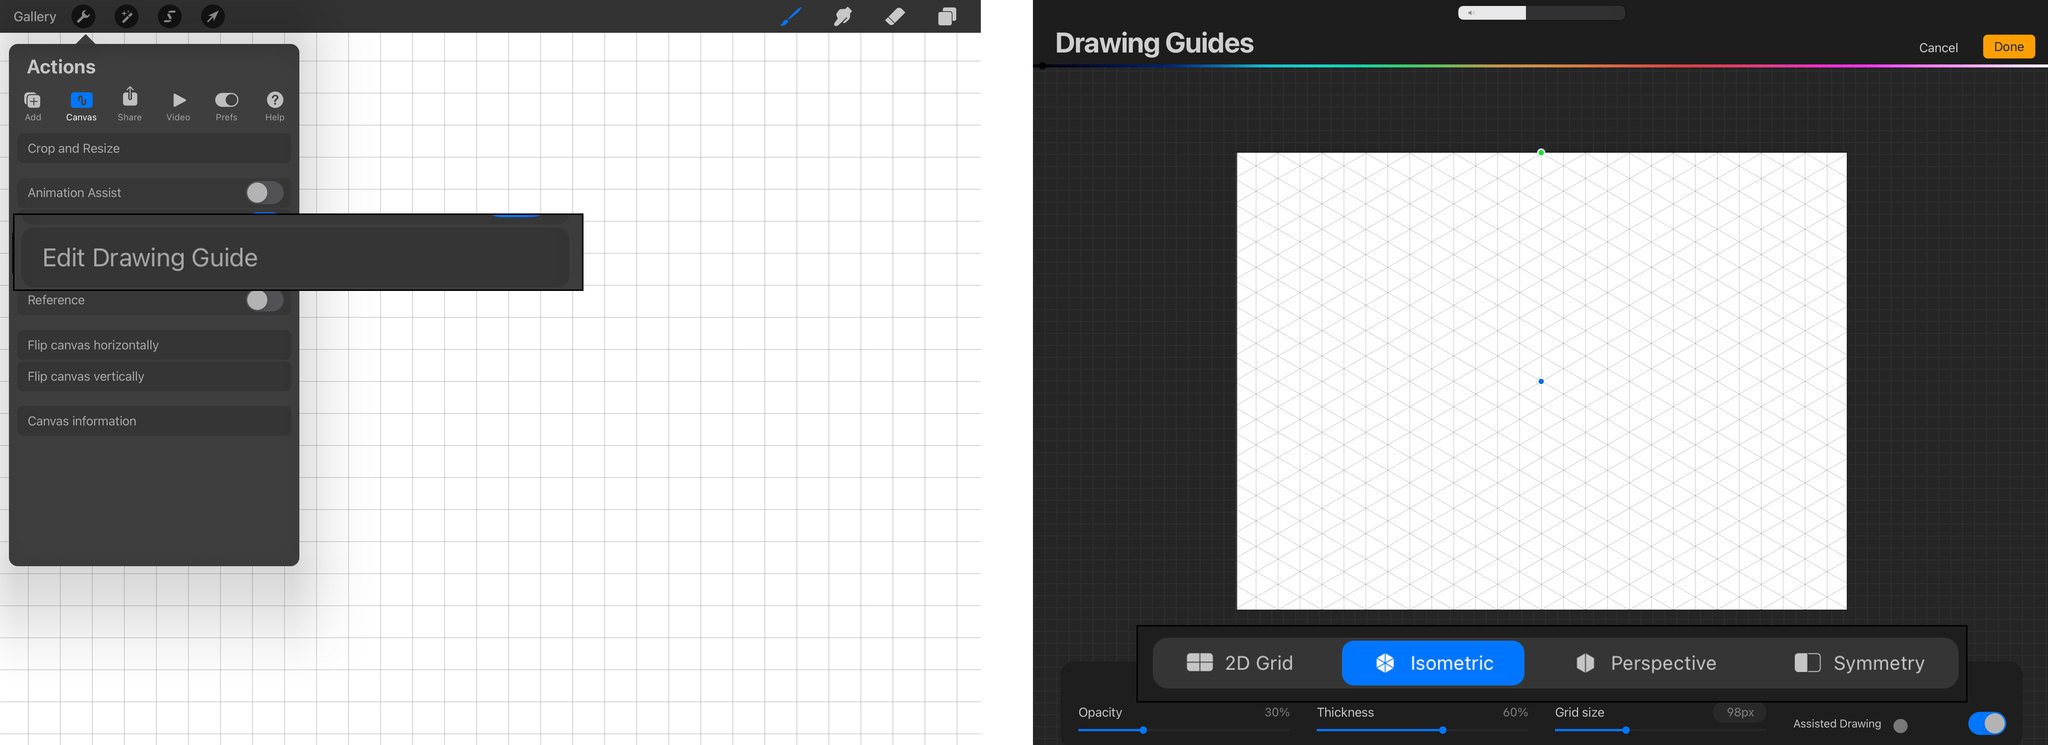
Note: Toggling on the Assisted Drawing option will make your lines snap to the guide you’ve just created. This can be useful if you’re looking to use the guide as a precise way to draw. This can be enabled and disabled later in the Layers menu.
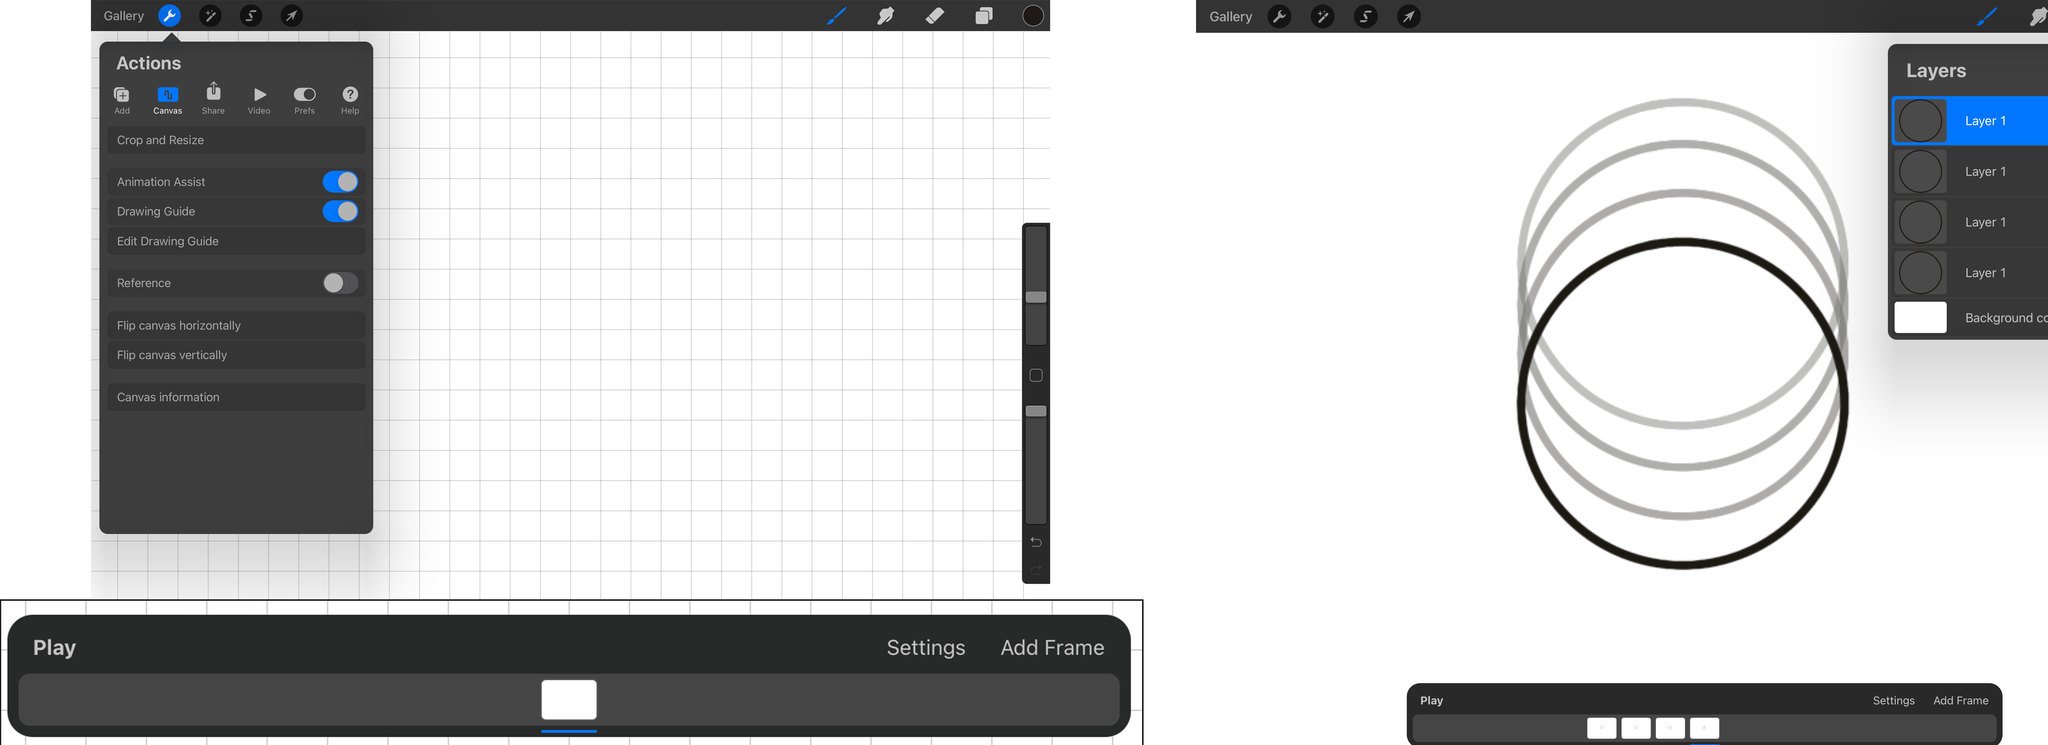
Animation Assist allows you to create animated images by treating each layer as a new page like in a flip book. This feature can be a lot of fun to use, but it can be pretty in-depth and requires its own tutorial.
How to enable Animation Assist
- Tap Animation Assist under the Canvas submenu.
- Now each Layer of your project will be its own frame in the animation.
The next submenu under Actions is Share. This is where you’ll choose the file type you want to export and where to save the image. Procreate is capable of exporting .psd files, which allows you to import your layers and assets into other apps such as Adobe Photoshop/Illustrator/Fresco, Affinity Designer/Photo, or Pixelmator/Pixelmator Photo for further editing.
The Video tab is where you can choose to preview, disable, or export the time-lapse recording of everything you’ve done in that project.
In the Preferences tab, you can choose a light or dark theme, which side you want the user interface controls, connect a 3rd party stylus (ones that are pressure sensitive that aren’t an Apple Pencil), and other program settings.
Finally, under the Help tab, is a list of resources provided by Procreate as well as shortcuts to the iOS Settings app to fine-tune advanced settings.
Adjusting your art
The next panel from the left is Adjustments. Here’s where you can tweak basic things like the hue and contrast, but also add advanced effects like blurring, noise, Glitch, Chromatic Aberration, and the like. Some of these effects are straightforward, but others are more complex and will need to be covered in an advanced tutorial.
How to add an Image Adjustment
- Tap on the Adjustments icon.
- Select any of the Adjustment options.
- For Hue, Saturation, Brightness through Chromatic Aberration, you can choose to apply it to the entire Layer or use an Apple Pencil and precisely draw where you want to adjust.
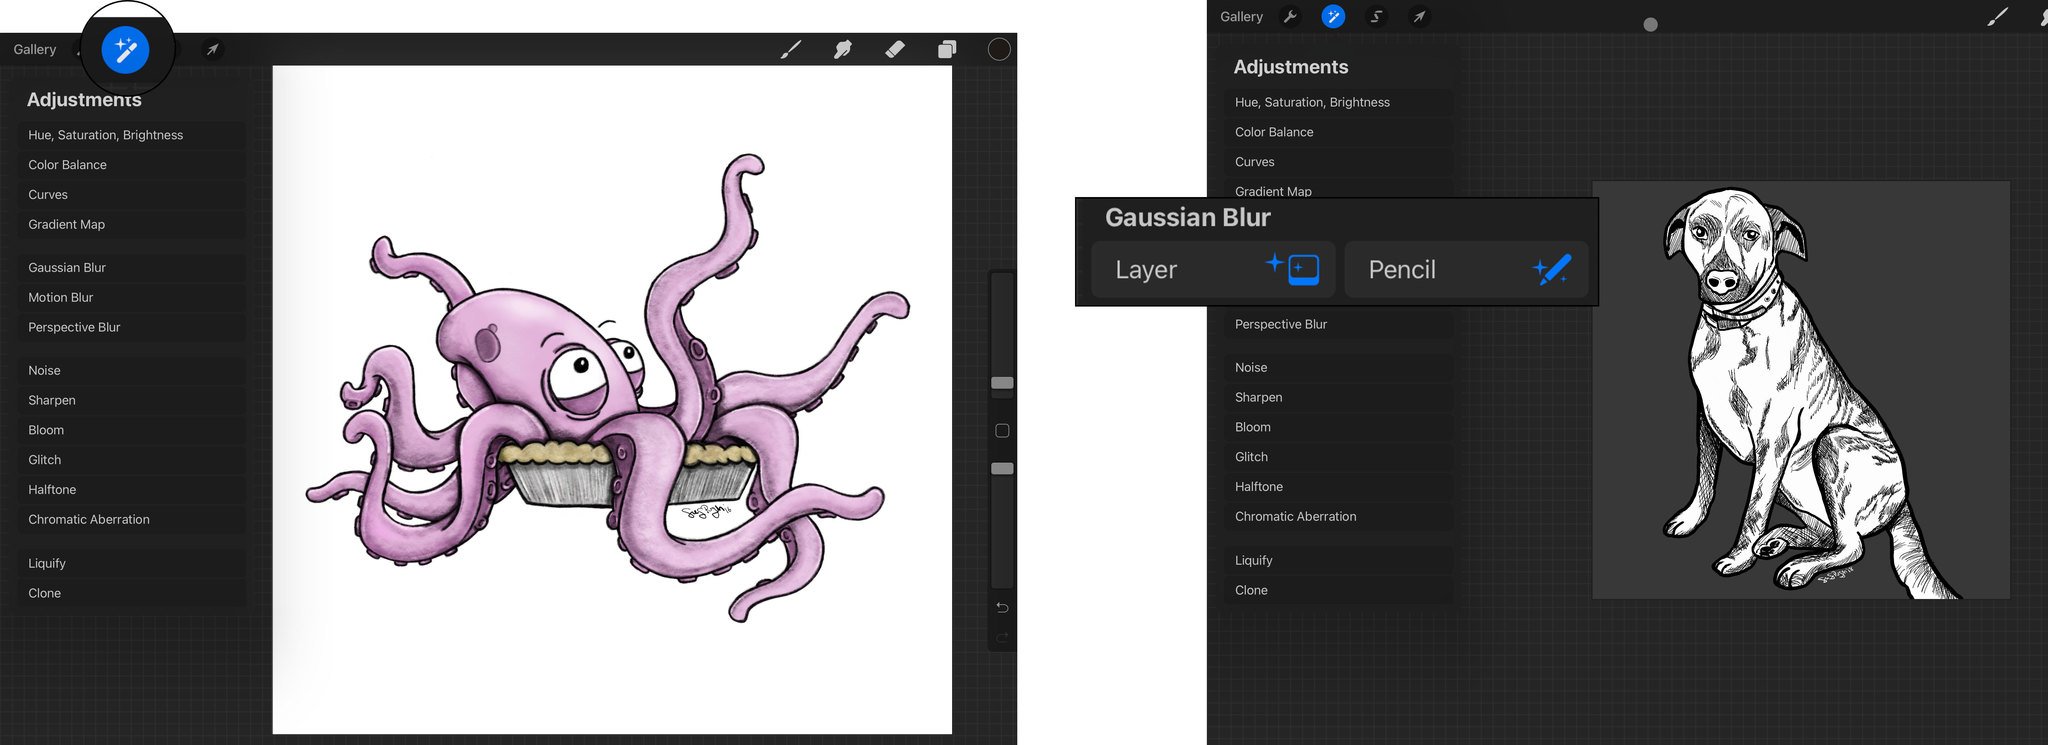
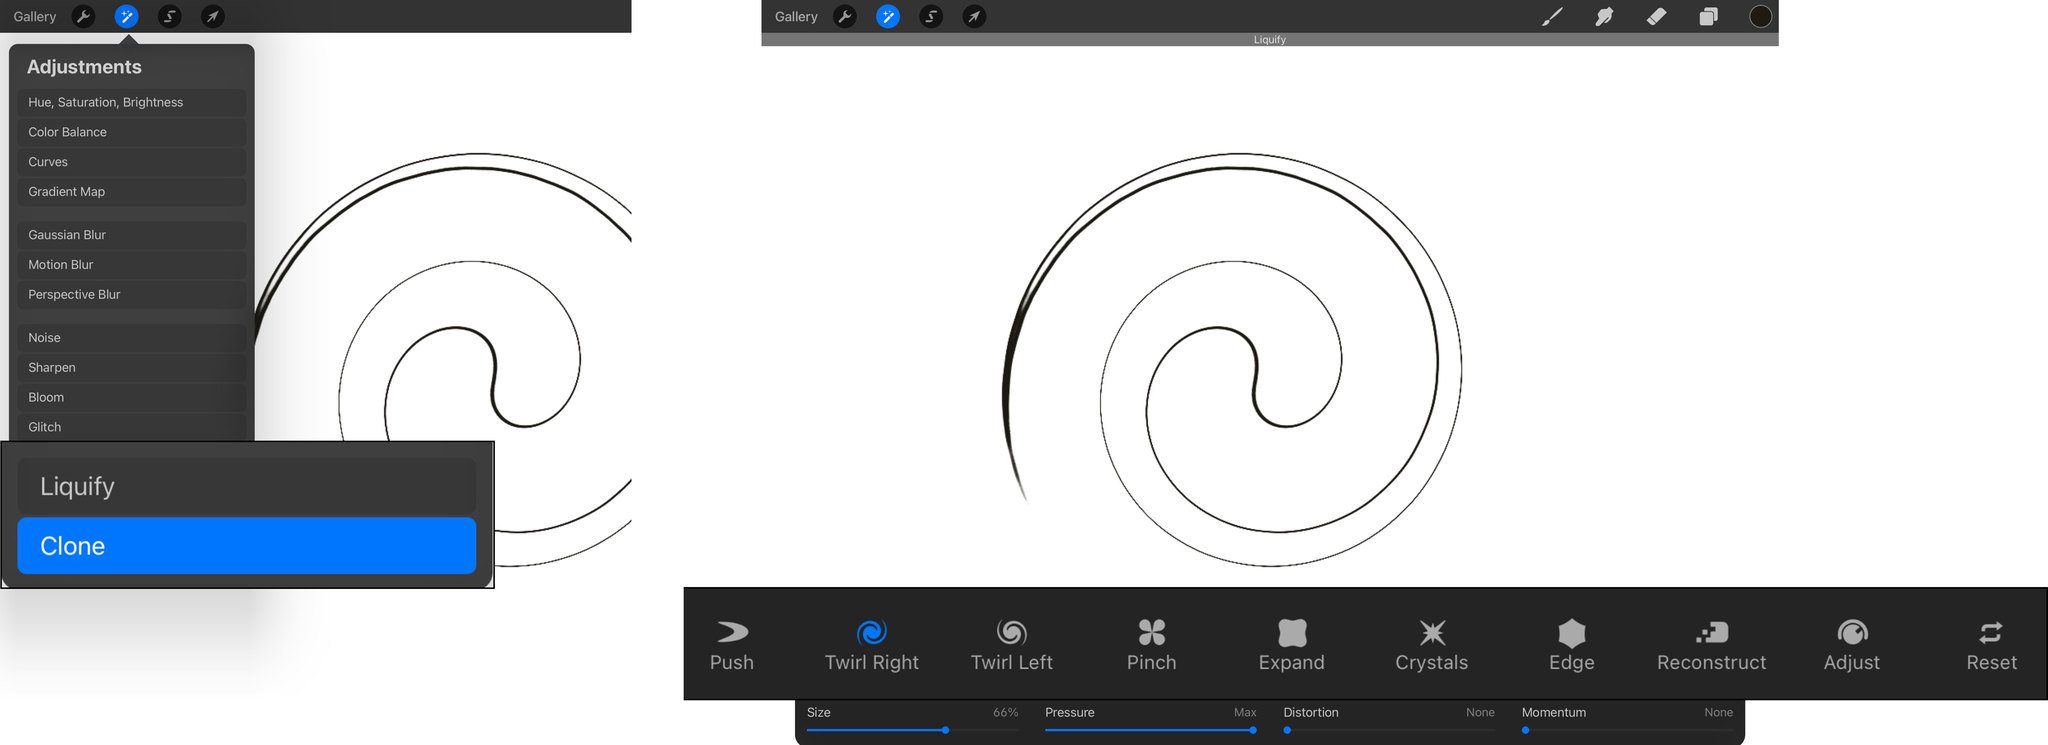
Liquify and Clone are adjustments that can only be adjusted using your finger or stylus. Liquify allows you to distort your image using a variety of options and Clone will duplicate an area of your drawing that you choose (it’s similar to the Rubber Stamp tool in Adobe Photoshop).
After the Adjustments panel is the Selection panel. This is the area you’ll use to select specific portions of your illustration to scale, copy, fill with color, etc. There are four options for selecting portions of your art: Automatic, Freehand, Rectangle, and Eclipse. If you’re familiar with Adobe Photoshop, think of the Automatic option as the Magic Wand tool, Procreate will make a selection based on the area you tap on. Freehand allows you to draw a dashed line selection and gives the most control, and Rectangle and Eclipse select by creating their corresponding shapes.
How to make a Selection
- Tap the Selection tool icon.
- Choose from Automatic, Freehand, Rectangle, or Eclipse.
- If using Automatic, simply tap the part of the artwork you want to select. For the other options, draw where you want to select.
Once you have your Selection made, you can use the Move tool to move, resize, distort, warp, and rotate it.
How to Move your selection
- Select the Move tool.
- Choose from the options how you wish to resize or edit the selection.

Customize all the things
The next menu on the top toolbar, and proply the most important, is the Brush Library. It is here where you’ll choose your digital drawing tool of choice. You can choose from a wide-variety of the stock brushes, you can import new ones from third-parties, and you can even create your own brushes.
How to select or edit a Brush
- Tap on the Brush icon to open the Brush Library.
- Select a Brush from one of the Categories.
- Tap on the Brush to open the Brush Studio to edit the options.
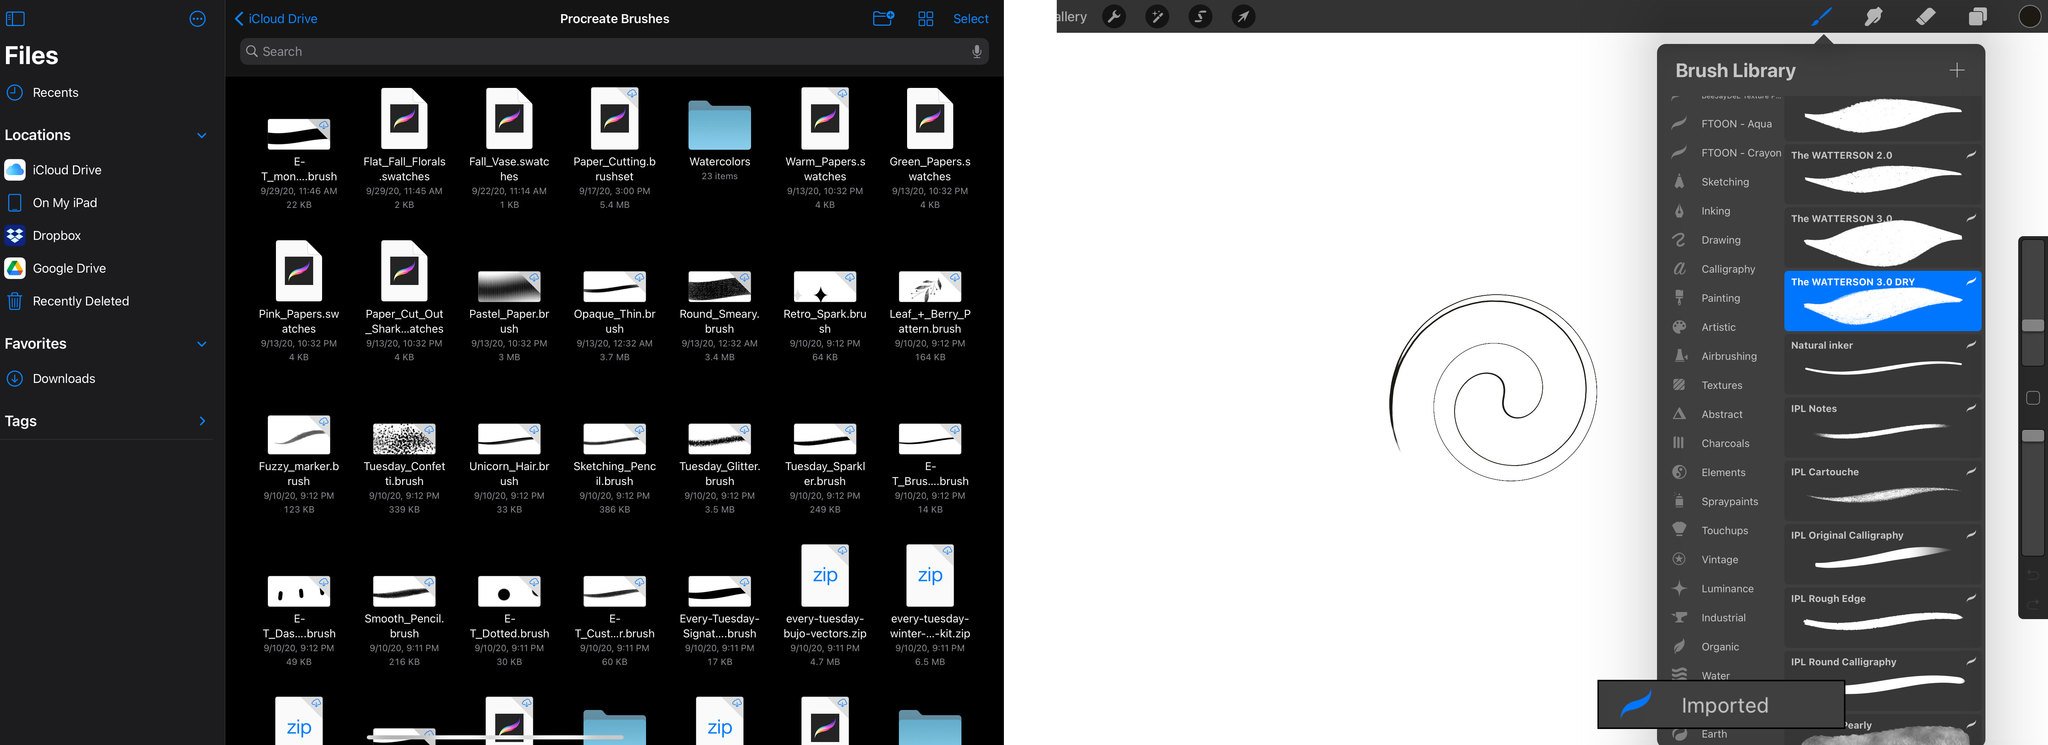
You can also choose to import brushes from 3rd-parties. There are a ton of options that are both free and paid that can be found by doing a web search for «Procreate Brushes.» Once you have them downloaded and saved onto your iPad, you can import them into Procreate and begin using them immediately.
How to import new brushes into Procreate
- Open the Files app and locate where you saved the downloaded .brush files.
- Tap on the file you want to import, it will send it to Procreate automatically.
- Open the Brush Library and select your new brush. If you cannot find it, it may be in a new category folder called «Imported.»
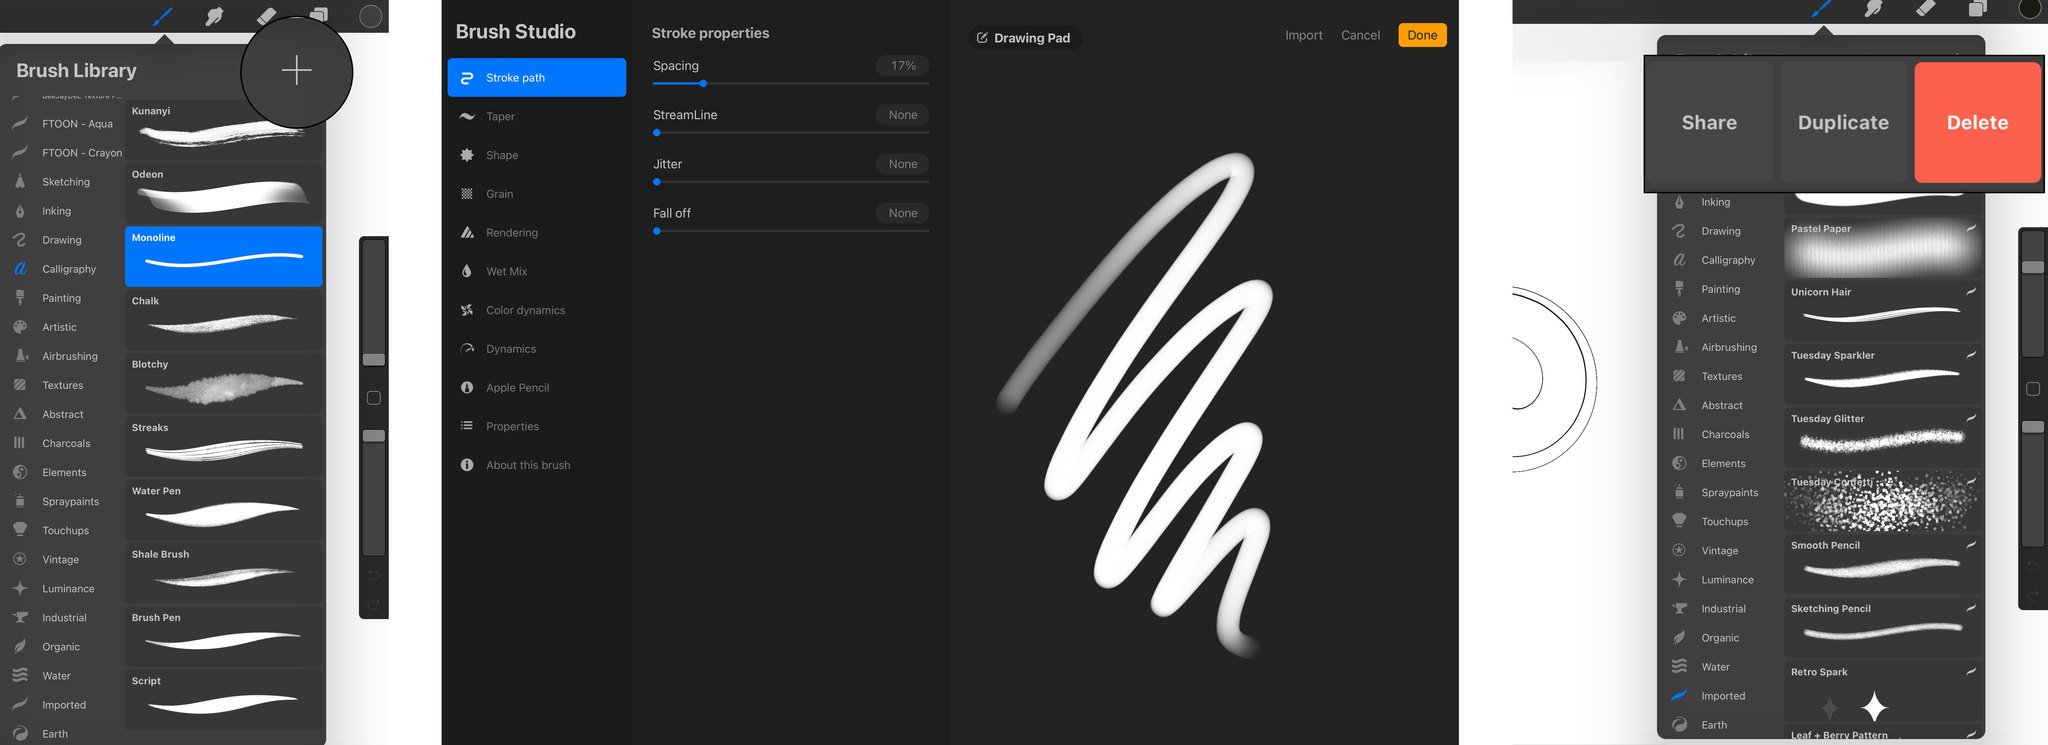
You can also create your own brush from scratch, which gives you endless possibilities. This can be very complicated depending how detailed you want your brush settings to be.
How to create or delete your own custom brushes
- Tap the + in the Brush Library.
- Adjust settings as needed in the Brush Studio and tap Done.
- To Delete, Duplicate, or Share, swipe from right to left on the Brush.
The next two tools are Smudge and the Eraser, which are pretty self-explanatory. The Smudge tool allows you to smear and blend portions of your artwork and the Eraser will…you guessed it, erase.

After the Eraser tool is the Layers panel. This is where you can not only add an additional layer on which to draw (tap on the + sign to add more), but you can also change the Blend Mode and settings for each layer individually. There are a lot of settings available for Layers and an advanced tutorial would be needed to cover all of them in-depth, but here is how to access them.
How to change the Layer settings
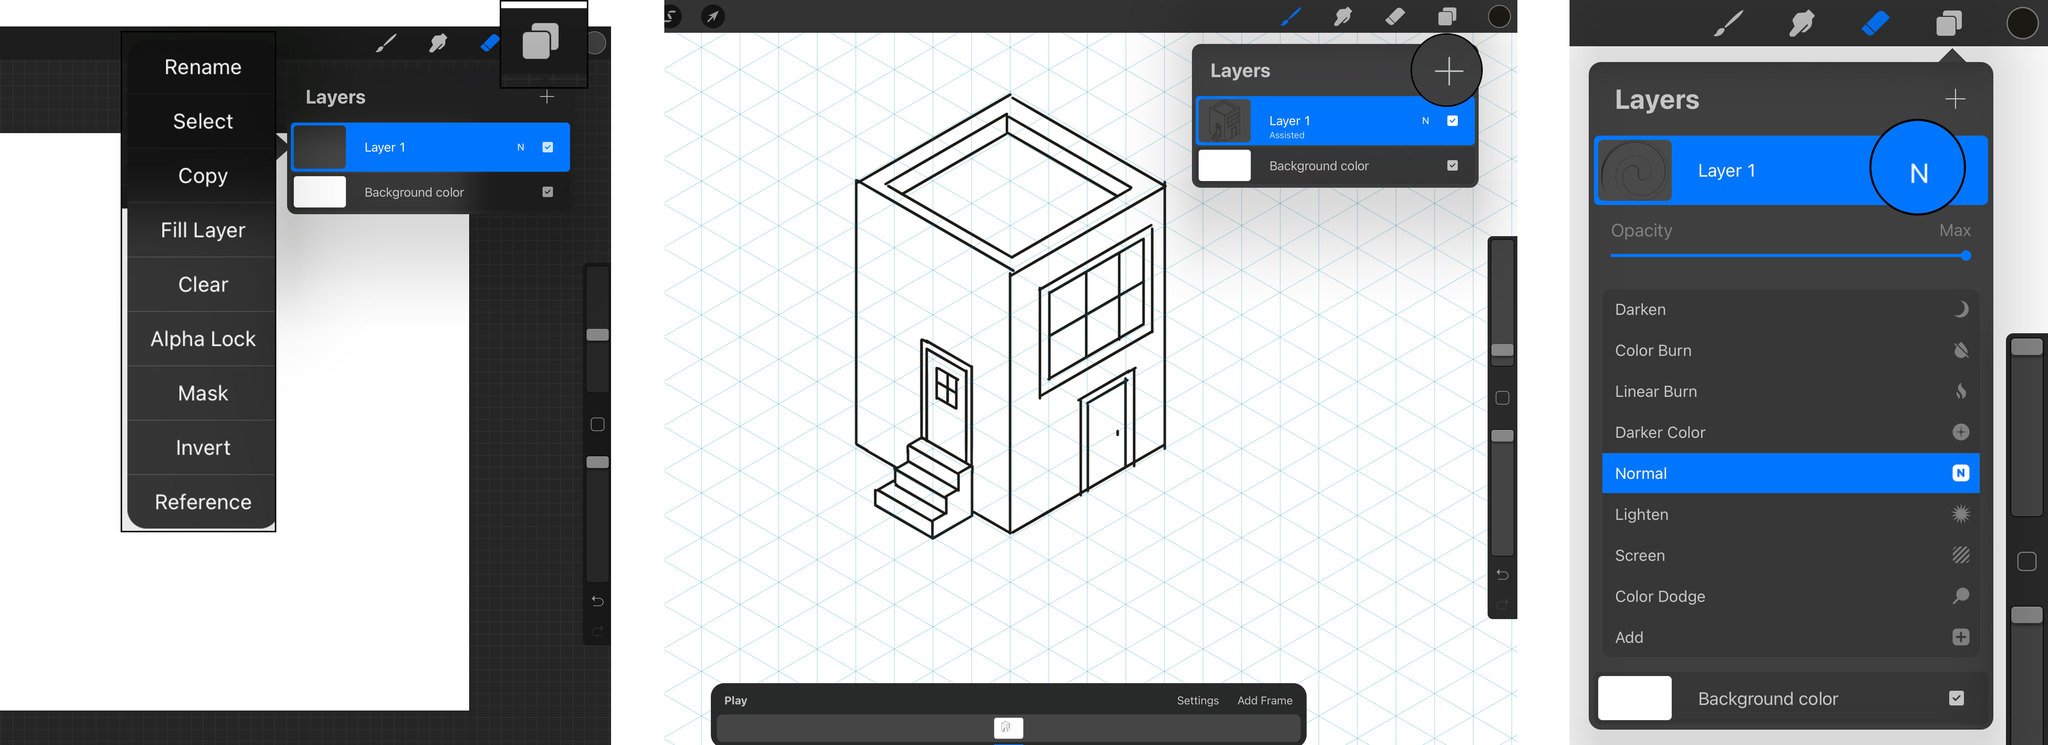
- Tap the Layers icon.
- Tap the rectangular Layer Thumbnail to bring up additional options (e.g. Rename, Select, Copy, Fill Layer, Clear, Alpha Lock, Mask, Invert, Reference).
- Tap N to view Blend Mode options and change Opacity.
Finally, the circular colored icon in the upper-right of the interface is the Colors panel. This is where you can not only choose your colors via a Color Disc, Classic color picker, Harmony, or** Value sliders**, but also create and import Color Palettes.
How to change Colors
- Tap the Colors Circle.
- Select between Disc, Classic, Harmony, or Value and choose a color for your Brush.

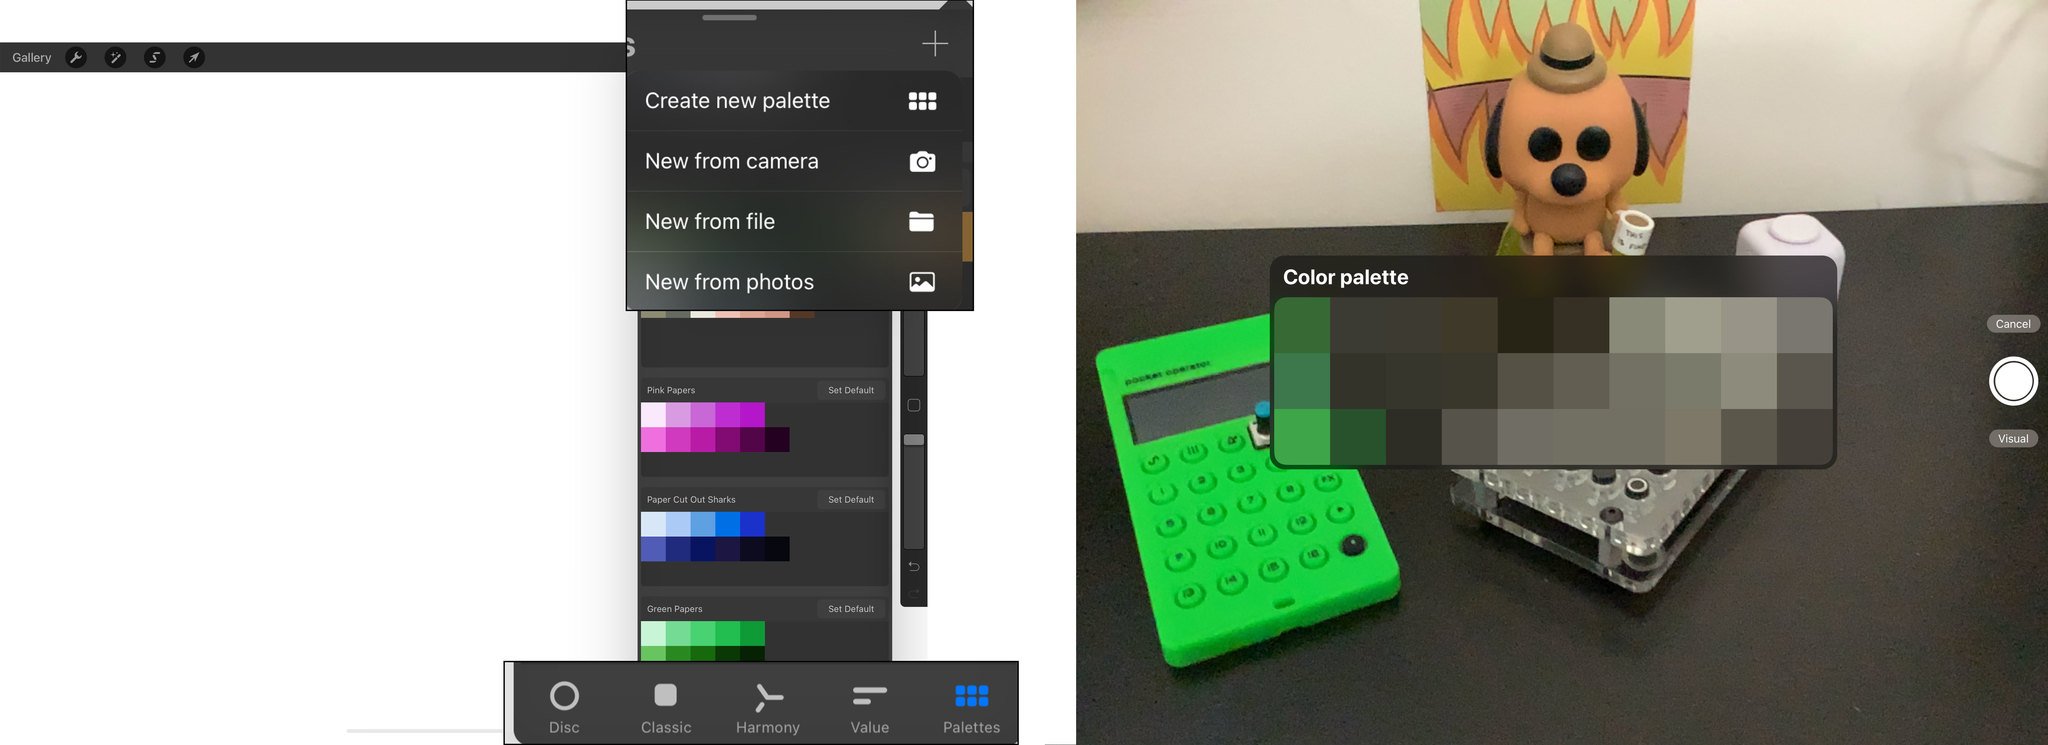
Stock color Palettes are available in Procreate, but like Brushes, you can import them from 3rd-parties in the form of .swatch files. However, you can also easily create your own using your camera, a photo from your camera roll, or your Files app. Using your camera will bring up a 30-swatch overlay to create a Color Palette in real-time that you can save. Using a photo will grab 30 colors from the image.
How to create a new Palette
- Choose Palettes from the bottom of the Colors Menu.
- Tap the + sign.
- Choose to create a new palette from scratch, using a photo/file, or your device’s camera.
Questions on Procreate?
I hope this gives you a good place to start using Procreate. There are tons of advanced features and settings that are too in-depth for a getting started overview, but if you’re interested in more advanced tutorials, let us know!
iMore offers spot-on advice and guidance from our team of experts, with decades of Apple device experience to lean on. Learn more with iMore!