-
Contents
-
Table of Contents
-
Troubleshooting
-
Bookmarks
Quick Links
TABLE OF CONTENTS
1
2
When driving
3
Maintenance
4
and care
When trouble
5
arises
Vehicle
6
specifications
For owners
7
Index
Adjusting and operating features such as door locks, mir-
rors, and steering column.
Driving, stopping and safe-driving information.
Air conditioning and audio systems, as well as other interior
features for a comfortable driving experience.
Cleaning and protecting your vehicle, performing do-it-your-
self maintenance, and maintenance information.
What To Do If the vehicle needs to be towed, gets a flat tire,
or is involved in an accident.
Detailed vehicle information.
structions for Canadian owners
Alphabetical listing of information contained in this manual.
1
Summary of Contents for Lexus IS250 2009
ВЛАДЕЛЬЦАМ
РУКОВОДСТВА ДЛЯ ВЛАДЕЛЬЦА
Ознакомьтесь со всеми функциями и эксплуатационными особенностями автомобиля Lexus в онлайн-версии руководства.
РУКОВОДСТВА ДЛЯ ВЛАДЕЛЬЦА LEXUS UX
РУКОВОДСТВА ДЛЯ ВЛАДЕЛЬЦА LEXUS NX
РУКОВОДСТВА ДЛЯ ВЛАДЕЛЬЦА LEXUS RX
РУКОВОДСТВА ДЛЯ ВЛАДЕЛЬЦА LEXUS GX
РУКОВОДСТВА ДЛЯ ВЛАДЕЛЬЦА LEXUS LX
РУКОВОДСТВА ДЛЯ ВЛАДЕЛЬЦА LEXUS ES
РУКОВОДСТВА ДЛЯ ВЛАДЕЛЬЦА LEXUS LS
РУКОВОДСТВА ДЛЯ ВЛАДЕЛЬЦА LEXUS LC
ПОЧЕМУ ВАЖНО ПРОХОДИТЬ ОБСЛУЖИВАНИЕ У ОФИЦИАЛЬНОГО ДИЛЕРА?
-
ЭКСПЕРТНЫЙ ПОДХОД
Профессионализм специалистов достигается благодаря специальной системе обучения на базе ООО «Тойота Мотор»: все сотрудники дилерского центра проходят тренинги и регулярные переаттестации.
-
СТАНДАРТЫ ГОСТЕПРИИМСТВА
Ваша уверенность в качестве услуг и премиальном обслуживании – основной приоритет, поэтому мы гарантируем максимальный комфорт при посещении дилерских центров.
-
ВЫГОДНЫЕ РЕШЕНИЯ
Программы Lexus позволяют экономить на обслуживании автомобиля и при этом гарантированно получить качественный сервис, продлевающий безупречную надежность вашего автомобиля.

Привет!
Делал подобную заметку для аристы, возникло желание собрать мануалы в одном месте для IS. Кому-то все покажется старо как мир, но всё же не мало людей которые не могут найти каталожный номер запчасти, подобрать резину под диск и «обожемой что-то загорелось на приборке»
Надеюсь заметка будет полезна всем. Запись будет постоянно пополняться, ссылки доступны 24/7
Руководство по ремонту и обслуживанию
В данной редакции есть всё (запустить Home.htm</i>), руководство по ремонту, электросхемы, геометрия кузова, сервисная карта. +Аналогичная книга только на английском (мб более расширенная)
Общие сведения о двигателе 4gr
Хочешь понять, что у тебя под капотом деталях тогда тебе сюда
Предохранители — наглядный, быстрый мануал
Какие лампочки куда
Каталог запчастей
Самый простой и понятный каталог для японцев какой я встречал. Вариации oem номеров по годам и комплектациям+если нажать на парт.номер будет список заменителей от exist
Диагностика
Как и любую тойоту можно диагностировать путем скрепки через OBD2. Но так как наступил 21 век советую использовать диагностический кабель MiniVCI (установка и обновление ПО на русский язык).
Если вышеперечисленное сложное, то идеальная диагностика управляемая с телефона по OBD2 за 800р
И самый главный вопрос сезона «какой ширины резину взять на вот такой диск»
Войдите или зарегистрируйтесь, чтобы писать комментарии, задавать вопросы и участвовать в обсуждении.
инструкцияLexus IS 250 (2008)

TABLE OF CONTENTS
1
1
Before driving
Adjusting and operating features such as door locks, mir-
rors, and steering column.
2
When driving
Driving, stopping and safe-driving information.
3
Interior features
Air conditioning and audio systems, as well as other interior
features for a comfortable driving experience.
4
Maintenance
and care
Cleaning and protecting your vehicle, performing do-it-your-
self maintenance, and maintenance information.
5
When trouble
arises
What to do if the vehicle needs to be towed, gets a flat tire,
or is involved in an accident.
6
Vehicle
specifications
Detailed vehicle information.
7
For owners
Reporting safety defects for U.S. owners and seat belt in-
structions for Canadian owners
Index
Alphabetical li
sting of information contained in this manual.
Посмотреть инструкция для Lexus IS 250 (2008) бесплатно. Руководство относится к категории автомобили, 4 человек(а) дали ему среднюю оценку 8.3. Руководство доступно на следующих языках: английский. У вас есть вопрос о Lexus IS 250 (2008) или вам нужна помощь? Задайте свой вопрос здесь
Главная
Не можете найти ответ на свой вопрос в руководстве? Вы можете найти ответ на свой вопрос ниже, в разделе часто задаваемых вопросов о Lexus IS 250 (2008).
Как перевести мили в километры?
1 миля равна 1,609344 километрам, а 1 километр — 0,62137119 милям.
Где я могу узнать идентификационный номер транспортного средства Lexus?
Место размещения идентификационного номера транспортного средства зависит от марки и типа транспортного средства. Номер может быть выбит на раме транспортного средства или указан на номерном знаке. Чтобы узнать место расположения идентификационного номера транспортного средства лучше всего ознакомиться с руководством по эксплуатации Lexus IS 250 (2008).
Что такое идентификационный номер транспортного средства (VIN)?
Идентификационный номер транспортного средства — уникальный для каждого транспортного средства идентификационный номер. Аббревиатура VIN расшифровывается как «Vehicle Identification Number» (Идентификационный номер транспортного средства).
Когда транспортному средству Lexus требуется техническое обслуживание?
Регулярное техническое обслуживание необходимо всем транспортным средствам. С информацией о том, как часто необходимо проходить техническое обслуживание и чему именно стоит уделять особое внимание можно ознакомиться в инструкции по техническому обслуживанию. Как правило, транспортное средство требует технического обслуживания каждые 2 года или 30 000 километров пробега.
Когда следует заменять тормозную жидкость на Lexus?
Тормозную жидкость рекомендуется менять каждые два года.
В чем разница между топливом E10 и E5?
В топливе E10 содержится до десяти процентов этанола, в то время как в E5 содержится менее пяти процентов. Соответственно, топливо E10 менее вредит окружающей среде.
Одна или несколько дверей не открываются изнутри. Что мне делать?
Скорее всего, замок оснащен защитой от детей и поэтому не может быть открыт изнутри. Процедура открытия замка с защитой от детей зависит от марки и типа замка.
Автомобильный радиоприемник не включается, что делать?
Если автомобильный радиоприемник не включен, на него не будет подаваться питание. Убедитесь, что красный провод подключен к контактному источнику питания, а желтый провод — к источнику питания постоянной мощности.
Инструкция Lexus IS 250 (2008) доступно в русский?
К сожалению, у нас нет руководства для Lexus IS 250 (2008), доступного в русский. Это руководство доступно в английский.
Не нашли свой вопрос? Задайте свой вопрос здесь
![]()
TABLE OF CONTENTS
Before driving
When driving
Interior features
Maintenance and care
When trouble arises
Vehicle specifications
For US owners
Index
Adjusting and operating features such as door locks, mirrors, and steering column.
Driving, stopping and safe-driving information.
Air conditioning and audio systems, as well as other interior features for a comfortable driving experience.
Cleaning and protecting your vehicle, performing do-it-your- self maintenance, and maintenance information.
What to do if the vehicle needs to be towed, gets a flat tire, or is involved in an accident.
Detailed vehicle information.
Reporting safety defects for US owners
Alphabetical listing of information contained in this manual.
i

TABLE OF CONTENTS Index
|
1 |
Before driving |
||
|
1-1. |
Key information ………………………… |
2 |
|
|
Keys ………………………………………………… |
2 |
||
|
1-2. |
Opening, closing and locking |
||
|
the doors and trunk ………………… |
4 |
||
|
Smart access system with |
|||
|
push-button start ……………………….. |
4 |
||
|
Wireless remote control…………… |
16 |
||
|
Doors…………………………………………….. |
19 |
||
|
Trunk…………………………………………….. |
23 |
||
|
1-3. |
Adjustable components ………… |
26 |
|
|
Front seats…………………………………… |
26 |
||
|
Driving position memory …………. |
28 |
||
|
Seat position memory ……………….. |
31 |
||
|
Head restraints…………………………… |
33 |
||
|
Seat belts …………………………………….. |
34 |
||
|
Steering wheel |
|||
|
(manually adjustable type) ……. |
40 |
||
|
Steering wheel |
|||
|
(power-adjustable type)…………. |
41 |
||
|
Anti-glare inside rear view |
|||
|
mirror ………………………………………… |
42 |
||
|
Outside rear view mirrors……….. |
43 |
||
|
1-4. |
Opening and closing the |
||
|
windows and moon roof ………. |
45 |
||
|
Power windows………………………….. |
45 |
||
|
Moon roof ………………………………….. |
48 |
|
1-5. |
Refueling………………………………….. |
51 |
|
Opening the fuel tank cap………… |
51 |
|
|
1-6. |
Anti-theft system ……………………. |
54 |
|
Engine immobilizer system……… |
54 |
|
|
Alarm……………………………………………. |
56 |
|
|
Theft prevention labels |
||
|
(U.S.A.)…………………………………….. |
58 |
|
|
1-7. |
Safety information………………….. |
59 |
|
Correct driving posture …………… |
59 |
|
|
SRS airbags …………………………………. |
61 |
|
|
Front passenger occupant |
||
|
classification system……………….. |
72 |
|
|
Child restraint systems …………….. |
77 |
|
|
Installing child restraints………….. |
80 |
2 When driving
|
2-1. |
Driving procedures………………… |
90 |
|
Driving the vehicle…………………….. |
90 |
|
|
Starting the engine ……………………. |
98 |
|
|
Automatic Transmission …………. |
101 |
|
|
Manual Transmission………………. |
105 |
|
|
Turn signal lever……………………….. |
107 |
|
|
Parking brake …………………………… |
108 |
|
|
2-2. |
Instrument cluster ………………… |
109 |
|
Gauges and meters ………………… |
109 |
|
|
Indicators and warning |
||
|
lights…………………………………………… |
115 |
ii

|
Multi-information display………… |
118 |
|
2-3. Operating the lights and |
|
|
windshield wipers……………….. |
122 |
|
Headlight switch………………………. |
122 |
|
Fog light switch ………………………… |
125 |
|
Windshield wipers and |
|
|
washer……………………………………… |
126 |
|
Headlight cleaner switch ………. |
129 |
|
2-4. Using other driving |
|
|
systems ……………………………….. |
130 |
|
Cruise control ………………………….. |
130 |
|
Dynamic radar cruise |
|
|
control……………………………………… |
133 |
|
Lexus parking assist-sensor…… |
142 |
|
Driving assist systems……………… |
148 |
|
PCS (Pre-Collision |
|
|
System)……………………………………. |
154 |
|
2-5. Driving information ………………. |
157 |
|
Cargo and luggage…………………. |
157 |
|
Vehicle load limits……………………. |
160 |
|
Winter driving tips …………………….. |
161 |
|
Trailer towing……………………………. |
165 |
|
Dinghy towing |
|
|
(vehicles with an automatic |
|
|
transmission)………………………….. |
166 |
|
Dinghy towing |
|
|
(vehicles with a manual |
|
|
transmission)………………………….. |
167 |
3 Interior features
|
3-1. |
Using the air conditioning |
1 |
|
|
system and defogger |
170 |
||
|
Automatic air conditioning |
|||
|
system ……………………………………… |
170 |
||
|
Rear window and outside rear |
2 |
||
|
view mirror defoggers |
178 |
||
|
3-2. |
Using the audio system |
179 |
|
|
Audio system type …………………… |
179 |
3 |
|
|
Using the radio…………………………. |
182 |
||
|
Using the CD player |
189 |
||
|
Playing back MP3 and |
|||
|
WMA discs…………………………….. |
195 |
4 |
|
|
Optimal use of the audio |
|||
|
……………………………………..system |
203 |
||
|
Using the AUX adapter |
206 |
||
|
Using the steering wheel |
5 |
||
|
audio switches ………………………. |
207 |
||
|
3-3. |
Using the interior lights |
209 |
|
|
Interior lights list |
209 |
6 |
|
|
• Interior lights and |
|||
|
………………………….personal lights |
211 |
||
|
3-4. |
Using the storage features….. |
213 |
7 |
|
List of storage features …………… |
213 |
||
|
……………………………….• Glove box |
213 |
||
|
……………………….• Console boxes |
214 |
||
|
• Overhead console ……………….. |
215 |
||
|
• Cup holders……………………………. |
216 |
||
iii
|
TABLE OF CONTENTS |
Index |
|||
|
• Bottle holders/door |
||||
|
pockets ……………………………………. |
218 |
|||
|
3-5. |
Other interior features………… |
219 |
||
|
Sun visors…………………………………… |
219 |
|||
|
Vanity mirror……………………………. |
220 |
|||
|
Clock………………………………………….. |
221 |
|||
|
Satellite switches …………………….. |
222 |
|||
|
Ashtrays ……………………………………. |
225 |
|||
|
Cigarette lighter……………………… |
226 |
|||
|
Power outlet…………………………….. |
227 |
|||
|
Seat heaters……………………………… |
228 |
|||
|
Seat heaters and ventilators … |
230 |
|||
|
Armrest …………………………………….. |
232 |
|||
|
Rear sunshade…………………………. |
233 |
|||
|
Extended trunk………………………… |
235 |
|||
|
Coat hooks ………………………………. |
236 |
|||
|
Floor mat…………………………………… |
237 |
|||
|
Trunk features…………………………. |
238 |
|||
|
Garage door opener………………. |
241 |
|||
|
Compass……………………………………. |
246 |
|||
|
4 |
Maintenance and care |
|||
|
4-1. |
Maintenance and care………… |
252 |
||
|
Cleaning and protecting |
||||
|
the vehicle exterior………………. |
252 |
|||
|
Cleaning and protecting |
||||
|
the vehicle interior ……………….. |
254 |
|
4-2. |
Maintenance………………………… |
257 |
|
|
Maintenance requirements ….. |
257 |
||
|
General maintenance……………. |
259 |
||
|
Emission inspection and |
|||
|
maintenance (I/M) |
|||
|
programs ……………………………….. |
262 |
||
|
4-3. |
Do-it-yourself |
||
|
maintenance………………………. |
263 |
||
|
Do-it-yourself service |
|||
|
precautions……………………………. |
263 |
||
|
Hood………………………………………….. |
266 |
||
|
Positioning the jack ………………… |
267 |
||
|
Engine compartment……………… |
269 |
||
|
Tires ………………………………………….. |
283 |
||
|
Tire inflation pressure…………….. |
293 |
||
|
Wheels………………………………………. |
297 |
||
|
Air conditioning filter……………… |
299 |
||
|
Electronic key battery…………… |
302 |
||
|
Checking and replacing |
|||
|
fuses……………………………………….. |
304 |
||
|
Headlight aim……………………………. |
318 |
||
|
Light bulbs…………………………………. |
319 |
||
|
5 |
When trouble arises |
||
|
5-1. |
Essential information………….. |
328 |
|
|
If your vehicle needs to |
|||
|
be towed ……………………………….. |
328 |
||
|
If you think something is |
|||
|
wrong …………………………………….. |
335 |
iv

|
Fuel pump shut off system …….. |
336 |
|
Event data recorder……………….. |
337 |
|
5-2. Steps to take in an |
|
|
emergency ………………………… |
339 |
|
If a warning light turns on or |
|
|
a warning buzzer |
|
|
sounds… ………………………………… |
339 |
|
If a warning message is |
|
|
displayed………………………………… |
344 |
|
If you have a flat tire……………….. |
358 |
|
If the engine will not start ………. |
366 |
|
If the shift lever cannot be |
|
|
shifted from P………………………… |
367 |
|
If you lose your keys………………. |
368 |
|
When the electronic key |
|
|
does not operate properly …. |
369 |
|
If the vehicle battery is |
|
|
discharged …………………………….. |
372 |
|
If your vehicle overheats ……….. |
375 |
|
If the vehicle becomes |
|
|
stuck………………………………………… |
377 |
6 Vehicle specifications
|
6-1. |
Specifications………………………. |
380 |
|
Maintenance data………………….. |
380 |
|
|
Fuel information………………………. |
395 |
|
|
Tire information………………………. |
398 |
|
|
6-2. |
Customization …………………….. |
406 |
|
Customizable features ………….. |
406 |
|
6-3. Initialization ……………………………. |
411 |
|
Items to initialize ………………………… |
411 |
|
7 |
For US owners |
1 |
|||
|
Reporting safety defects |
|||||
|
……………………….for U.S. owners |
414 |
||||
|
2 |
|||||
|
Index |
|||||
|
3 |
|||||
|
Alphabetical index………………………….. |
416 |
||||
|
What to do if |
425 |
||||
|
4 |
|||||
5
6
7
v
|
Windshield wipers |
||||||||||||||
|
P. 126 |
||||||||||||||
|
Moon roof |
||||||||||||||
|
P. 48 |
||||||||||||||
|
P. 122 |
||||||||||||||
|
Outside rear view |
||||||||||||||
|
mirrors |
||||||||||||||
|
P. 43 |
||||||||||||||
|
P. 266 |
||||||||||||||
|
Side marker lights |
P. 122 |
|
Headlights (low and high beam) |
|
|
P. 122 |
|
|
Fog lights |
P. 125 |
|
Turn signal lights |
P. 107 |
|
Headlights (high beam) |
P. 122 |
vi
|
Rear window defogger |
|||||||||||||
|
P. 178 |
|||||||||||||
|
Side marker lights |
|||||||||||||
|
P. 122 |
|||||||||||||
|
Tail lights |
|||||||||||||
|
Doors |
P. 122 |
||||||||||||
|
Trunk |
|||||||||||||
|
P. 19 |
P. 23 |
||||||||||||
Tires ●Rotation
●Replacement ●Inflation pressure ●Information
|
P. 283 |
|||||||
|
Turn signal lights |
|||||||
|
P. 358 |
P. 107 |
||||||
|
P. 389 |
Fuel filler door |
||||||
|
P. 51 |
|||||||
|
P. 398 |
|||||||
: If equipped
vii

|
Pictorial index |
Interior |
|||
|
AUX adapter |
P. 206 |
|||
|
Seat belts |
P. 34 |
Bottle holders/door pockets |
P. 218 |
|
|
Head restraints |
P. 33 |
Floor mat |
P. 237 |
|
|
Power window |
Driver airbag |
P. 61 |
||
|
switches |
P. 45 |
Knee airbags |
||
|
P. 61 |
||||
|
A |
||||
|
Front passenger |
||||
|
airbag |
P. 61 |
|||
|
Armrest |
P. 232 |
Front seats |
P. 26 |
|
|
Console box |
P. 214 |
Cup holders |
P. 216 |
|
|
Cup holders |
P. 216 |
SRS side airbags |
P. 61 |
|
|
Ashtrays |
P. 225 |
Console box |
||
|
Power outlet |
P. 214 |
|||
|
P. 227 |
||||
|
viii |
|
A |
||
|
Anti-glare inside rear view mirror |
P. 42 |
|
|
Personal lights |
P. 211 |
|
|
Moon roof switch |
P. 48 |
|
|
Interior lights |
P. 211 |
|
|
Personal lights |
P. 211 |
|
|
Interior lights |
P. 211 |
|
|
Coat hooks |
P. 236 |
|
|
SRS curtain shield airbags |
P. 61 |
|
|
Vanity mirrors |
P. 220 |
|
|
Sun visors |
P. 219 |
|
|
Garage door opener switches |
P. 241 |
|
|
Compass |
P. 246 |
|
|
: If equipped |
||
|
ix |
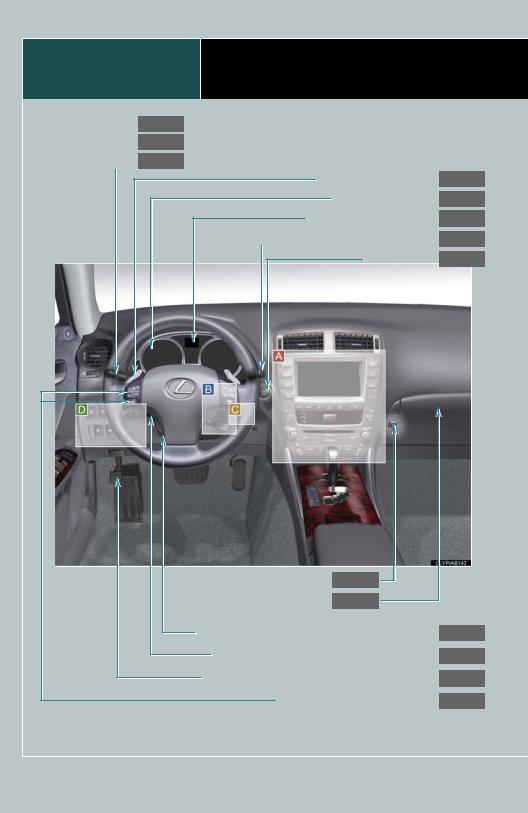
P. 43
B
|
Driving position memory switches |
|||||||||||
|
P. 28 |
|||||||||||
|
Seat position memory switches |
|||||||||||
|
P. 31 |
|||||||||||
|
Door lock switch |
|||||||||||
|
P. 19 |
|||||||||||
 Outside rear view mirror switches
|
Window lock switch |
||||||
|
P. 45 |
||||||
|
Power window switches |
||||||
|
P. 45 |
||||||
x
![]()
|
C |
|||||||||
|
Automatic transmission |
|||||||||
|
Automatic transmission shift lever |
P. 101 |
||||||||
|
Seat heater switches |
P. 228 |
||||||||
|
Seat heater/ventilator switches |
P. 230 |
||||||||
|
Shift lock override button |
P. 367 |
||||||||
|
Cigarette lighter |
P. 226 |
||||||||
|
Ashtrays |
P. 225 |
||||||||
|
Manual transmission |
|||||||||
|
Manual transmission shift lever |
P. 105 |
||||||||
|
Parking brake lever |
P. 108 |
||||||||
|
Seat heater switches |
P. 228 |
||||||||
|
Cigarette lighter |
P. 226 |
Seat heater/ventilator switches |
P. 230 |
||||||
|
Ashtrays |
P. 225 |
||||||||
|
: If equipped |
|||||||||
|
xi |
|
Pictorial index |
Instrument panel |
|||
|
Headlight switch |
P. 122 |
|||
|
Turn signal lever |
P. 107 |
|||
|
Fog light switch |
P. 125 |
Shift paddle switches |
||
|
P. 103 |
||||
|
Gauges and meters |
P. 109 |
|||
|
Multi-information display |
P. 118 |
|||
|
Windshield wipers and washer switch |
P. 126 |
|||
|
Engine switch |
P. 98 |
|||
|
Trunk opener main switch |
P. 23 |
|||
|
Glove box |
P. 213 |
|||
|
Tilt and telescopic steering lock release lever |
P. 40 |
|||
|
Tilt and telescopic steering control switch |
P. 41 |
|||
|
Parking brake pedal (automatic transmission) |
P. 108 |
|||
|
Audio remote control switches |
P. 207 |
|||
|
xii |

A
 Without navigation system
Air conditioning system
P. 170
|
Audio |
|||||||||||
|
system |
|||||||||||
|
P. 179 |
Clock |
||||||||||
|
P. 221 |
|||||||||||
 With navigation system
Navigation system*1
Clock P. 221
Audio system*1
Rear window and out-  side rear view mirror
defoggers P. 178
 Security indicator
P. 54, 56
Emergency flashers
Rear window and outside rear view mirror defoggers*1
Security indicator
P. 54, 56
Air conditioning system*1
Emergency flashers
: If equipped
*1: Refer to “Navigation System Owner’s Manual”.
xiii
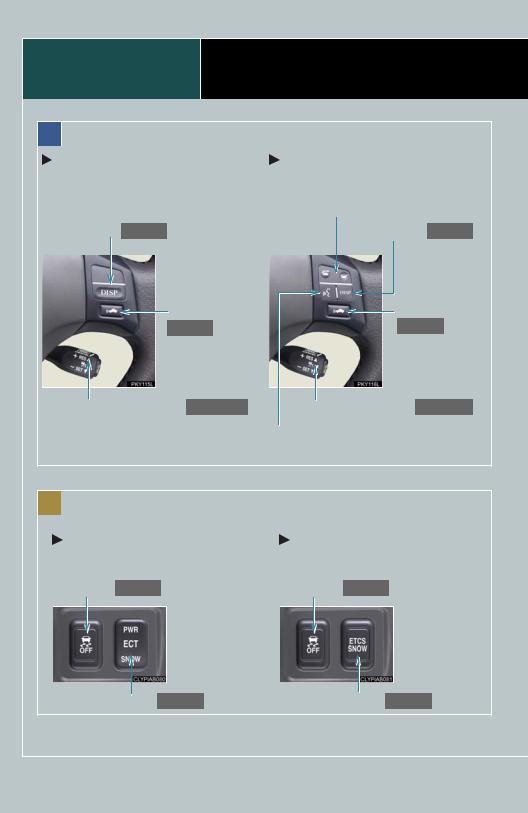
|
Pictorial index |
Instrument panel |
|||
|
B |
||||
|
Without navigation system |
With navigation system |
|||
|
Telephone switch*1 |
||||
|
DISP switch |
P. 119 |
DISP switch |
P. 119 |
|
|
Distance switch |
Distance switch |
|||
|
P. 133 |
P. 133 |
|||
|
Cruise control switch |
P. 130, 133 |
Cruise control switch P. 130, 133 |
||
|
Speech command switch*1 |
||||
|
C |
||||
|
Automatic transmission |
Manual transmission |
|||
|
VSC OFF |
VSC OFF |
|||
|
switch |
P. 150 |
switch P. 150 |
||
|
ECT switch P. 102 |
ETCS switch P. 105 |
|||
|
xiv |
|
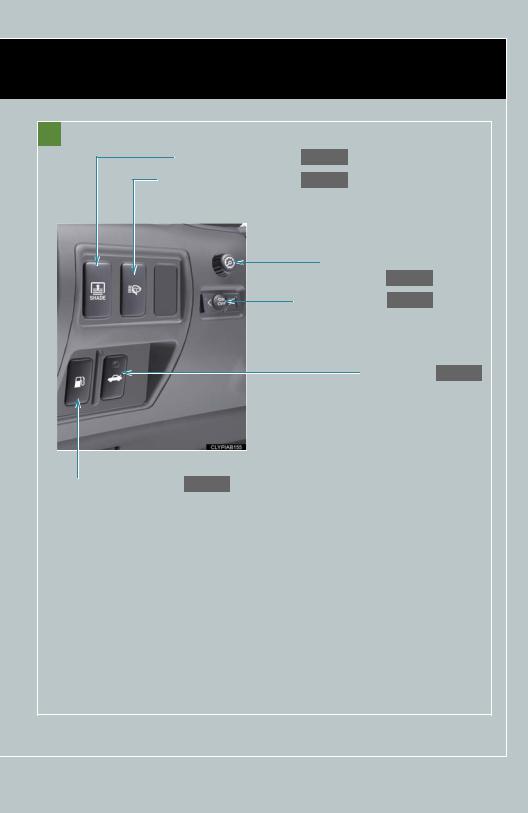
D |
||||
|
Rear sunshade switch |
P. 233 |
|||
|
Headlight cleaner switch |
P. 129 |
|||
|
Instrument panel light |
||||
|
control dial |
P. 110 |
|||
|
Satellite switches |
P. 222 |
|||
|
Trunk opener |
P. 23 |
|||
|
Fuel filler door opener |
P. 51 |
|||
|
: If equipped |
||||
|
*1: Refer to “Navigation System Owner’s Manual”. |
||||
|
xv |

For your information
 Main Owners Manual
Please note that this manual applies to all models and explains all equipment, including options. Therefore, you may find some explanations for equipment not installed on your vehicle.
All specifications provided in this manual are current at the time of printing. However, because of the Lexus policy of continual product improvement, we reserve the right to make changes at any time without notice.
Depending on specifications, the vehicle shown in the illustration may differ from your vehicle in terms of color and equipment.
 Accessories, spare parts and modification of your Lexus
A wide variety of non-genuine spare parts and accessories for Lexus vehicles are currently available in the market. You should know that Toyota does not warrant these products and is not responsible for their performance, repair, or replacement, or for any damage they may cause to, or adverse effect they may have on, your Lexus vehicle.
This vehicle should not be modified with non-genuine Lexus products. Modification with non-genuine Lexus products could affect its performance, safety or durability, and may even violate governmental regulations. In addition, damage or performance problems resulting from the modification may not be covered under warranty.
 Installation of a mobile two-way radio system
As the installation of a mobile two-way radio system in your vehicle could affect electronic systems such as the multiport fuel injection system/sequential multiport fuel injection system, cruise control system, anti-lock brake system, SRS airbag system and seat belt pretensioner system, be sure to check with your Lexus dealer for precautionary measures or special instructions regarding installation.
xvi

 Scrapping of your Lexus
The SRS airbag and seat belt pretensioner devices in your Lexus contain explosive chemicals. If the vehicle is scrapped with the airbags and seat belt pretensioners left as they are, this may cause an accident such as fire. Be sure to have the systems of the SRS airbag and seat belt pretensioner removed and disposed of by a qualified service shop or by your Lexus dealer before you scrap your vehicle.
 CAUTION
■General precautions while driving
Driving under the influence: Never drive your vehicle when under the influence of alcohol or drugs that have impaired you ability to operate your vehicle. Alcohol and certain drugs delay reaction time, impair judgment and reduce coordination, which could lead to an accident that will hurt or kill you, your occupants or others.
Defensive driving: Always drive defensively. Anticipate mistakes that other drivers or pedestrians might make and be ready to avoid accidents.
Driver distraction: Always give your full attention to driving. Anything that distracts the driver, such as adjusting controls, talking on a cellular phone or reading can result in a collision with resulting death or serious injury to you, your occupants or others.
■General precaution regarding children’s safety
Never leave children unattended in the vehicle, and never allow children to have or use the key.
Children may be able to start the vehicle or shift the vehicle into neutral. There is also a danger that children may injure themselves by playing with the cigarette lighter, the windows, the moon roof, or other features of the vehicle. In addition, heat build-up or extremely cold temperatures inside the vehicle can be fatal to children.
xvii

Symbols used throughout this manual
 Cautions & Notices
 CAUTION
This is a warning against anything which may cause injury to people if the warning is ignored. You are informed about what you must or must not do in order to reduce the risk of injury to yourself and others.
 NOTICE
This is a warning against anything which may cause damage to the vehicle or its equipment if the warning is ignored. You are informed about what you must or must not do in order to avoid or reduce the risk of damage to your Lexus and its equipment.
 Safety symbol
Throughout this manual, you will also see the symbol of a circle with a slash through it. This means «Do not», «Do not do this», or «Do not let this happen».
xviii

Before driving |
1 |
||||||
|
1-1. |
Key information………………………. |
2 |
1-4. |
Opening and closing the |
|||
|
Keys………………………………………………. |
2 |
windows and moon roof ……. |
45 |
||||
|
Power windows……………………….. |
45 |
||||||
|
1-2. |
Opening, closing and locking |
Moon roof………………………………… |
48 |
||||
|
the doors and trunk………………. |
4 |
||||||
|
Smart access system with |
1-5. |
Refueling……………………………….. |
51 |
||||
|
push-button start…………………….. |
4 |
Opening the fuel tank cap ……… |
51 |
||||
|
Wireless remote control…………. |
16 |
||||||
|
Doors………………………………………….. |
19 |
1-6. |
Anti-theft system …………………. |
54 |
|||
|
Trunk ………………………………………….. |
23 |
Engine immobilizer system…… |
54 |
||||
|
Alarm ………………………………………… |
56 |
||||||
|
1-3. |
Adjustable components………. |
26 |
Theft prevention labels |
||||
|
Front seats ………………………………… |
26 |
(U.S.A.)…………………………………… |
58 |
||||
|
Driving position memory ………. |
28 |
||||||
|
Seat position memory …………….. |
31 |
1-7. |
Safety information……………….. |
59 |
|||
|
Head restraints………………………… |
33 |
Correct driving posture ………… |
59 |
||||
|
Seat belts ………………………………….. |
34 |
SRS airbags ……………………………….. |
61 |
||||
|
Steering wheel |
Front passenger occupant |
||||||
|
(manually adjustable type) …. |
40 |
classification system……………… |
72 |
||||
|
Steering wheel |
Child restraint systems …………… |
77 |
|||||
|
(power-adjustable type)………. |
41 |
Installing child restraints………… |
80 |
||||
|
Anti-glare inside rear view |
|||||||
|
mirror ……………………………………… |
42 |
||||||
|
Outside rear view mirrors …….. |
43 |
1 |
|||||
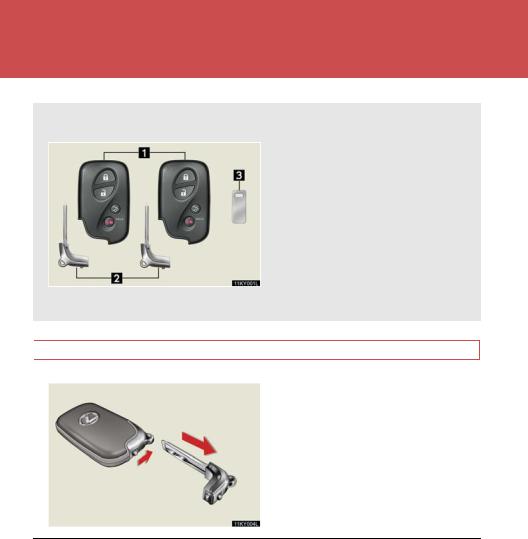
1-1. Key information
Keys
The following keys are provided with the vehicle.
 Electronic keys
• Operating the smart access system with push-button start ( P. 4)
• Operating the wireless remote control function ( P. 16)
 Mechanical keys
  Key number plate
 Using the mechanical key
Take out the mechanical key.
■When required to leave a key to the vehicle with a parking attendant
Turn the trunk opener main switch OFF and lock the glove box as circumstances demand. ( P. 23, 213)
Remove the mechanical key for your own use and provide the attendant with the electronic key only.
■Key number plate
Keep the plate in a safe place such as your wallet, not in the vehicle. In the event that a mechanical key is lost, a new key can be made at your Lexus dealer using the key number plate. ( P. 368)
2
![]()
1-1. Key information
 NOTICE
■To prevent key damage
●Do not subject the keys to strong shocks, expose them to high temperatures by placing them in direct sunlight, or get them wet.
●Do not expose the keys to electromagnetic materials or attach any material that blocks electromagnetic waves to the key surface.
1 Beforedriving
3

1-2. Opening, closing and locking the doors and trunk
Smart access system with push-button start
The following operations can be performed simply by carrying the electronic key on your person, for example in your pocket.
(The driver should always carry the electronic key.)
 Locks and unlocks the doors ( P. 5)
 Unlocks the trunk ( P. 5)
 Starts the engine ( P. 98)
4
1-2. Opening, closing and locking the doors and trunk
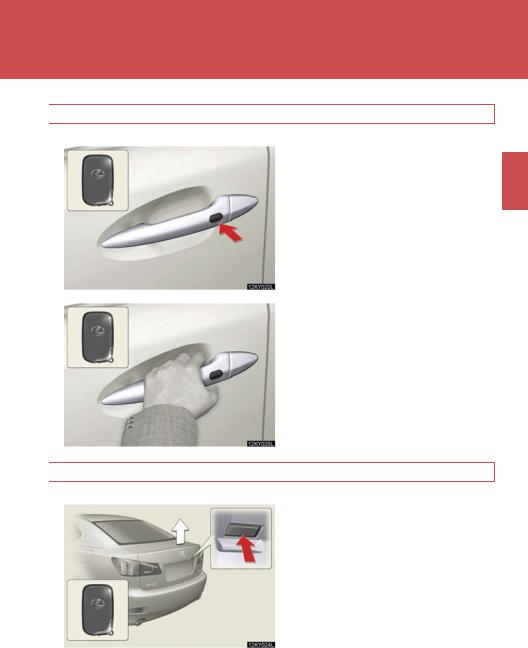
 Locking and unlocking the doors (front door handles only)
Press the lock button to lock the door.
Grip the handle to unlock the door.
Make sure to touch the sensor on the back of the handle.
The door cannot be unlocked for 3 seconds after the door is locked.
1 Beforedriving
 Unlocking the trunk
Press the button to unlock the trunk.
5
1-2. Opening, closing and locking the doors and trunk
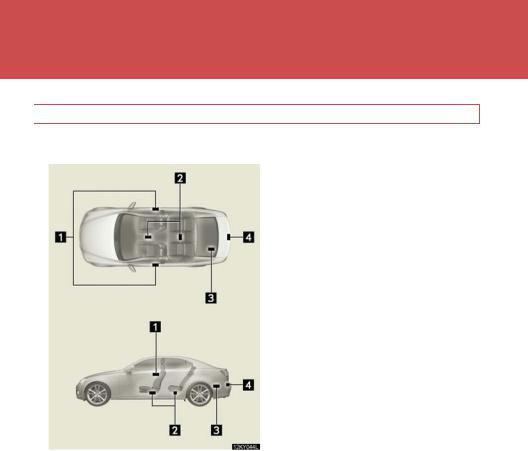
 Antenna location and effective range
■ Antenna location
 Antennas outside cabin
 Antennas inside cabin
 Antenna inside trunk
  Antenna outside trunk
6
1-2. Opening, closing and locking the doors and trunk
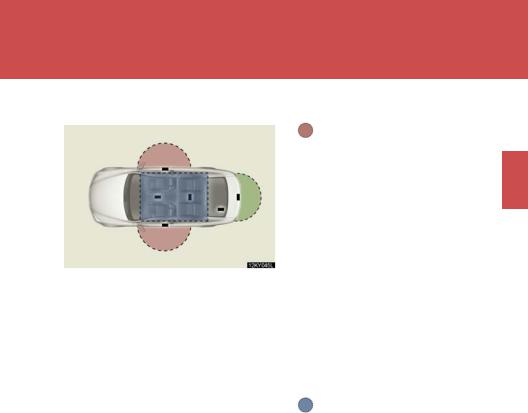
■ Effective range (areas within which the electronic key is detected)
When locking or unlocking the doors
The system can be operated when the electronic key is within about 2.3 ft. (70 cm) to 3.3 ft. (1 m) of either of the outside front door handles. (Only the doors detecting the key can be operated.)
 When unlocking the trunk
The system can be operated when the electronic key is within about 70 cm (2.3 ft.) to 1 m (3.3 ft.) of the trunk release button.
When starting the engine or changing engine switch modes
The system can be operated when the electronic key is inside the vehicle.
1 Beforedriving
7

1-2. Opening, closing and locking the doors and trunk
■Operation signals
A buzzer sounds and the emergency flashers flash to indicate that the doors have been locked/unlocked. (Locked: Once; Unlocked: Twice)
■Conditions affecting operation
The smart access system with push-button start and wireless remote control function may not operate normally in the following situations. (Ways of coping:
P. 369)
●Near a TV tower, radio station, electric power plant, airport or other facility that generates strong radio waves
●When carrying a portable radio, cellular phone or other wireless communication device
●When multiple electronic keys are in the vicinity
●When the electronic key has come into contact with, or is covered by a metallic object
●When a wireless key (that emits radio waves) is being used nearby
●When the electronic key has been left near an electrical appliance such as a personal computer
■Switching the door unlock function
It is possible to set which doors the entry function unlocks. STEP 1 Turn the engine switch OFF.
|
When the |
indicator |
on the key surface is turned off, push and |
|||
|
STEP |
2 |
||||
|
hold |
, |
, or |
for approximately 5 seconds while pushing |
the button on the key.
8

1-2. Opening, closing and locking the doors and trunk
The setting changes each time an operation is performed, as shown below. (When changing the setting continuously, release the buttons, wait for at least 5 seconds, and repeat step 2.)
|
Multi-information |
Unlocking doors |
Beep |
|||
|
display |
|||||
|
Hold the driver’s door handle |
|||||
|
to unlock only the driver’s |
Exterior: Beeps three |
||||
|
door. |
|||||
|
Hold the front passenger’s |
times |
||||
|
Interior: Pings once |
|||||
|
door handle to unlock all |
|||||
|
doors |
|||||
|
Hold either front door handle |
Exterior: Beeps twice |
||||
|
to unlock all doors |
Interior: Pings once |
||||
■Battery-saving function
In the following circumstances, the entry function is disabled in order to prevent the vehicle and electronic key batteries from discharging.
●When the entry function has not been used for 2 weeks or more
●When the electronic key has been left within approximately 3 ft. (1 m) of the vehicle for 10 minutes or more
The system will resume operation when…
●The vehicle is locked using the door handle lock switch.
●The vehicle is locked/unlocked using the wireless remote control function. ( P. 16)
●The vehicle is locked/unlocked using the mechanical key. ( P. 369)
1 Beforedriving
9

1-2. Opening, closing and locking the doors and trunk
■Electronic key battery depletion
●The standard battery life is 1 to 2 years. (The battery becomes depleted even if the electronic key is not used.) If the smart access system with push-button start or the wireless remote control function does not operate, or the detection area becomes smaller, the battery may be depleted. Replace the battery when necessary. ( P. 302)
●To avoid serious deterioration, do not leave the electronic key within 3 ft. (1 m) of the following electrical appliances.
•TVs
•Personal computers
•Recharging cellular phones or cordless phones
•Table lamps
■To operate the system properly
Make sure to carry the electronic key when operating the system. Do not get the electronic key too close to the vehicle when operating the system from the outside of the vehicle.
Depending on the position and holding condition of the electronic key, the key may not be detected correctly and the system may not operate properly. (The alarm may go off accidentally, or the door lock prevention may not function.)
10

1-2. Opening, closing and locking the doors and trunk
■Note for the entry function
●Even when the electronic key is within the effective range (detection areas), the system may not operate properly in the following cases.
•The electronic key is too close to the window or outside door handle, near the ground, or in a high place when the doors are locked or unlocked.
•The electronic key is near the ground or in a high place, or too close to the rear bumper center when the trunk is unlocked.
•The electronic key is on the instrument panel, rear package tray or floor, or in the glove box when the engine is started or engine switch modes are changed.
●As long as the electronic key is within the effective range, the doors may be locked or unlocked by anyone.
●Even if the electronic key is not inside the vehicle, it may be possible to start the engine if the electronic key is near the window.
●The doors may unlock if a large amount of water splashes on the door handle, such as in the rain or in a car wash. (The doors will automatically be locked after approximately 30 seconds if the doors are not opened and closed.)
●Gripping the door handle when wearing a glove may not unlock the door.
●If the wireless remote control is used to lock the doors when the electronic key is near the vehicle, there is a possibility that the door may not be unlocked by the entry function. (Use the wireless remote control to unlock the doors.
■When the vehicle is not driven for extended periods
To prevent theft of the vehicle, do not leave the electronic key within 6 ft. (2 m) of the vehicle.
■Security feature
If a door is not opened within approximately 30 seconds after the vehicle is unlocked, the anti-theft system automatically locks the vehicle again.
1 Beforedriving
11

1-2. Opening, closing and locking the doors and trunk
■Alarms and warning indicators
A combination of exterior and interior alarms as well as warnings displayed on the multi-information display are used to prevent theft of the vehicle and unforeseeable accidents resulting from erroneous operation. Take appropriate measures in response to any warning indications on the multi-information display. ( P. 344)
The following table describes circumstances and correction procedures when only alarms are sounded.
|
Alarm |
Situation |
Correction procedure |
|
|
Tried to lock the doors using |
Retrieve the electronic |
||
|
the entry function while the |
key from the passenger |
||
|
electronic key is still inside |
compartment and lock |
||
|
the passenger compartment |
the doors again. |
||
|
Exterior alarm |
Tried to exit the vehicle with |
Turn the engine switch |
|
|
sounds once for 2 |
the electronic key and lock |
||
|
OFF and lock the doors |
|||
|
seconds |
the doors without first turning |
||
|
the engine switch OFF |
again. |
||
|
Closed the trunk while the |
Retrieve the electronic |
||
|
electronic key is still inside |
key from the trunk and |
||
|
and all doors are locked |
close the trunk lid. |
||
|
Exterior alarm |
Tried to lock the vehicle using |
Close all of the doors |
|
|
sounds once for 10 |
the entry function while a |
and lock the doors |
|
|
seconds |
door is open |
again. |
|
|
Interior alarm |
Tried to open the door and |
||
|
sounds continu- |
exit the vehicle without shift- |
Shift the shift lever to P. |
|
|
ously* |
ing the shift lever to P |
||
12
![]()
1-2. Opening, closing and locking the doors and trunk
|
Alarm |
Situation |
Correction procedure |
|
Switched to ACC mode |
||
|
while the driver’s door is |
Turn the engine switch |
|
|
open (Opened the driver’s |
OFF and close the |
|
|
Interior alarm pings |
door when the engine switch |
driver’s door. |
|
continuously |
is in ACC mode.) |
|
|
Turned the engine switch |
||
|
OFF while the driver’s door is |
Close the driver’s door. |
|
|
open |
*: Vehicles with an automatic transmission only
■When the electronic key battery is fully depleted
●Locking and unlocking the doors and trunk: Use the mechanical key. ( P. 369)
●Starting the engine: P. 98
●Replacing the battery: P. 302
■Customization
It is possible to deactivate systems such as the smart access system with push-but- ton start. ( P. 406)
■Certification for the smart access system with push-button start
 For vehicles sold in the U.S.A.
FCC ID: NI4TMLF-1
NOTE:
This device complies with Part 15 of the FCC Rules. Operation is subject to the following two conditions: (1) This device may not cause harmful interference, and (2) this device must accept any interference received, including interference that may cause undesired operation.
1 Beforedriving
13

1-2. Opening, closing and locking the doors and trunk
NOTICE:
This equipment has been tested and found to comply with the limits for a Class B digital device, pursuant to Part 15 of the FCC Rules. These limits are designed to provide reasonable protection against harmful interference in a residential installation. This equipment generates, uses and can radiate radio frequency energy and, if not installed and used in accordance with the instructions, may cause harmful interference to radio communications. However, there is no guarantee that interference will not occur in a particular installation. If this equipment does cause harmful interference to radio or television reception, which can be determined by turning the equipment off and on, the user is encouraged to try to correct the interference by one or more of the following measures:
●Reorient or relocate the receiving antenna.
●Increase the separation between the equipment and receiver.
●Connect the equipment into an outlet on a circuit different from that to which the receiver is connected.
●Consult the dealer or an experienced radio/TV technician for help.
FCC WARNING:
Changes or modifications not expressly approved by the party responsible for compliance could void the user’s authority to operate the equipment.
 For vehicles sold in Canada
NOTE:
Operation is subject to the following two conditions: (1) this device may not cause interference, and (2) this device must accept any interference, including interference that may cause undesired operation of the device.
14

1-2. Opening, closing and locking the doors and trunk
 CAUTION
■Caution regarding interference with electronic devices
●People with implanted pacemakers or cardiac defibrillators should maintain a reasonable distance between themselves and the smart access system antennas, because the radio waves may affect the operation of such devices.
●Users of any electrical medical device other than implanted pacemakers and implanted cardiac defibrillators should consult the manufacturer of the device for information about its operation under the influence of radio waves.
Radio waves could have unexpected effects on the operation of such medical devices.
If necessary, the entry function can be disabled. Ask your Lexus dealer for details.
1 Beforedriving
15

1-2. Opening, closing and locking the doors and trunk
Wireless remote control
The wireless remote control can be used to lock and unlock the vehicle and the trunk from outside the vehicle.
|
Locks all doors |
|||||
|
Unlocks all doors |
|||||
|
Opens the windows and |
|||||
|
moon roof (push and hold) |
|||||
|
Unlocks the trunk |
|||||
|
(push and hold) |
|||||
|
Sounds alarm |
|||||
|
(push and hold) ( P. 56) |
|||||
|
■2-step unlocking function |
|||||
|
When you push the |
button, the driver’s door is unlocked. Pushing the button |
again within 3 seconds unlocks the other doors.
■Operation signals
Doors: A buzzer sounds and the emergency flashers flash to indicate that the doors have been locked/unlocked. (Locked: Once; Unlocked: Twice)
Trunk: A buzzer sounds to indicate that the trunk has been unlocked.
Windows and moon roof: A buzzer sounds to indicate that the windows and moon roof are operating.
■Door lock buzzer
If a door is not fully closed, a buzzer sounds continuously if an attempt to lock the door is made. Fully close the door to stop the buzzer, and lock the vehicle once more.
■Alarm
Using the wireless remote control to lock the door will set the alarm system.
■Electronic key battery depletion
P. 10
■Security feature
P. 11
16

1-2. Opening, closing and locking the doors and trunk
■When the electronic key battery is fully depleted
P. 13
■Conditions affecting operation
P. 8
■Customization
Settings (e.g. trunk unlocking function) can be changed. ( P. 406)
■Certification for wireless remote control
 For vehicles sold in the U.S.A.
FCC ID: NI4TMLF-1
NOTE:
This device complies with Part 15 of the FCC Rules. Operation is subject to the following two conditions: (1) This device may not cause harmful interference, and (2) this device must accept any interference received, including interference that may cause undesired operation.
NOTICE:
This equipment has been tested and found to comply with the limits for a Class B digital device, pursuant to Part 15 of the FCC Rules. These limits are designed to provide reasonable protection against harmful interference in a residential installation. This equipment generates, uses and can radiate radio frequency energy and, if not installed and used in accordance with the instructions, may cause harmful interference to radio communications. However, there is no guarantee that interference will not occur in a particular installation. If this equipment does cause harmful interference to radio or television reception, which can be determined by turning the equipment off and on, the user is encouraged to try to correct the interference by one or more of the following measures:
●Reorient or relocate the receiving antenna.
●Increase the separation between the equipment and receiver.
●Connect the equipment into an outlet on a circuit different from that to which the receiver is connected.
●Consult the dealer or an experienced radio/TV technician for help.
FCC WARNING:
Changes or modifications not expressly approved by the party responsible for compliance could void the user’s authority to operate the equipment.
1 Beforedriving
17

1-2. Opening, closing and locking the doors and trunk
 For vehicles sold in Canada
NOTE:
Operation is subject to the following two conditions: (1) this device may not cause interference, and (2) this device must accept any interference, including interference that may cause undesired operation of the device.
18

1-2. Opening, closing and locking the doors and trunk
Doors
The vehicle can be locked and unlocked using the entry function, wireless remote control or door lock switch.
■Entry function
P. 5
■Wireless remote control
P. 16
■Door lock switch
 Locks all doors
 Unlocks all doors
■ Inside lock button
 Locks the door
 Unlocks the door
The front doors can be opened by pulling the inside handle even if the lock buttons are in the lock position.
1 Beforedriving
 Locking the front doors from the outside without a key
The door cannot be locked if the engine switch is in ACC or IG-ON mode, or the electronic key is left inside the vehicle.
Depending on the position of the electronic key, the key may not be detected correctly and the door may be locked.
19

1-2. Opening, closing and locking the doors and trunk
 Rear door child-protector lock
 The door cannot be opened from inside the vehicle when the locks are set.
These locks can be set to prevent children from opening the rear doors. Push down on each rear door switch to lock both rear doors.
 Automatic door locking and unlocking systems
The following functions can be set or cancelled:
|
Function |
Operation |
|
|
Shift position linked door |
Shifting the shift lever out of P locks all doors. |
|
|
locking function* |
||
|
Shift position linked door |
Shifting the shift lever to P unlocks all doors. |
|
|
unlocking function* |
||
|
Speed linked door locking |
All doors are locked when the vehicle speed is |
|
|
function |
approximately 12 mph (20 km/h) or higher. |
|
|
Driver’s door linked door |
All doors are unlocked when the driver’s door is |
|
|
opened within 10 seconds after turning the engine |
||
|
unlocking function |
||
|
switch OFF. |
||
|
*: Vehicles with an automatic transmission only |
20

1-2. Opening, closing and locking the doors and trunk
■Setting and canceling the functions
To switch between setting and canceling, follow the procedure below:
STEP 1 Close all the doors and switch the engine switch to IG-ON mode. (Perform the step 2 within 10 seconds.)
STEP 2 Shift the shift lever to P or N, and press and hold the driver’s door lock switch ( or
or  ) for 5 seconds and then release.
The shift lever and switch positions corresponding to the desired function to be set or canceled are shown as follows.
1 Beforedriving
|
Function |
Shift lever position |
Switch position |
||
|
Shift position linked door locking |
||||
|
function |
P |
|||
|
Shift position linked door unlock- |
||||
|
ing function |
||||
|
Speed linked door locking function |
N |
|||
|
Driver’s door linked door unlocking |
||||
|
function |
||||
When the setting or canceling operation is complete, all doors are locked and then unlocked.
21

1-2. Opening, closing and locking the doors and trunk
■Impact detection door lock release system
In the event that the vehicle is subject to a strong impact, all the doors are unlocked. Depending on the force of the impact or the type of accident, however, the system may not operate.
■Using the mechanical key
The doors can also be locked and unlocked with the mechanical key. ( P. 369)
■Customization
Settings (e.g. unlocking function using a key) can be changed. ( P. 406)
 CAUTION
■To prevent an accident
Observe the following precautions while driving the vehicle.
Failing to do so may result in a door opening and an occupant falling out, resulting in death or serious injury.
●Always use a seat belt.
●Always lock all doors.
●Ensure that all doors are properly closed.
●Do not pull the inside handle of the front door while driving.
●Set the rear door child protector locks when children are seated in the rear seat.
22
![]()
1-2. Opening, closing and locking the doors and trunk
Trunk
The trunk can be opened using the trunk opener, entry function or wireless remote control.
■ Trunk opener
Release the trunk lid.
■Entry function
P. 5
■Wireless remote control
P. 16
 Locking the trunk opener feature
Turn the main switch in the glove box OFF to disable the trunk opener.
 ON
ON
 OFF
OFF
The trunk lid cannot be opened even with the wireless remote control or the entry function.
1 Beforedriving
23

1-2. Opening, closing and locking the doors and trunk
■Trunk light
When the trunk light switch is set to ON, the trunk light turns on when the trunk is opened.
 ON
ON
 OFF
OFF
■Trunk handle
Use the trunk handle when closing the trunk.
■Internal trunk release lever
The trunk lid can be opened by pulling down on the glow-in-the-dark lever located on the inside of trunk lid.
The lever will continue to glow for some time after the trunk lid is closed.
■Using the mechanical key
The trunk can be also opened using the mechanical key. ( P. 369)
24

1-2. Opening, closing and locking the doors and trunk
 CAUTION
■Caution while driving
Keep the trunk lid closed.
This not only keeps personal belongings from being thrown out, but also prevents exhaust gases from entering the vehicle.
■When children are in the vehicle
Never leave children unattended in the vehicle as they may lock themselves in the vehicle or trunk, which could cause the child to overheat or suffocate, resulting in death or serious injury.
1 Beforedriving
25

1-3. Adjustable components
Front seats
 Manual seat
 Seat position lever
 Seatback angle lever
 Vertical height adjustment lever
  Seat cushion (front) angle knob
26

1-3. Adjustable components
 Power seat
1 Beforedriving
 Seat position switch
 Seatback angle switch
 Seat cushion (front) angle switch
 Vertical height adjustment switch
 Lumbar support switch
 CAUTION
■Seat adjustment
●Do not recline the seat more than necessary when the vehicle is in motion to reduce the risk of sliding under the lap belt.
If the seat is too reclined, the lap belt may slide past the hips and apply restraint forces directly to the abdomen or your neck may contact the shoulder belt, increasing the risk of death or serious injury in the event of an accident.
●Manual seat only: After adjusting the seat, make sure that the seat is locked in position.
27

1-3. Adjustable components
Driving position memory (if equipped)
Your preferred driving position (the position of the driver’s seat, steering wheel and outside rear view mirrors) can be memorized and recalled with the touch of a button. It is also possible to set this function to activate automatically when the doors are unlocked.
Three different driving positions can be entered into memory.
■Entering a position to memory
Vehicles with an automatic transmission: Check that the shift lever is set in P.
Vehicles with a manual transmission: Check that the parking brake is set.
Switch to IG-ON mode.
Adjust the driver’s seat, steering wheel, and outside rear view mirrors to the desired positions.
While pushing the SET button, push button 1, 2 or 3 until the signal beeps.
If the selected button has already been preset, the previously recorded position will be overwritten.
28

1-3. Adjustable components
■Recalling the memorized position
Vehicles with an automatic transmission: Check that the shift lever is set in P.
Vehicles with a manual transmission: Check that the parking brake is set.
|
STEP |
1 |
Switch to IG-ON mode. |
|
STEP |
2 |
Push button 1, 2 or 3 to recall |
|
the memorized position. |
1 Beforedriving
 Linking driving position memory with door unlock operation
Record your driving position to button 1, 2 or 3 before performing the following.
STEP 1 Turn the engine switch OFF and close the driver’s door.
Press and hold the desired button (1, 2 or 3) while pressing the
or button on the wireless remote control until the signal beeps.
The driving position is recalled when the driver’s door is unlocked using the entry function or wireless remote control and the driver’s door is opened.
29

1-3. Adjustable components
|
■Canceling the linked door unlock operation |
|||||
|
Turn the engine switch OFF and close the driver’s door. |
|||||
|
STEP |
1 |
||||
|
While pushing the SET button, push the |
or |
button on the |
|||
|
STEP |
2 |
||||
|
wireless remote control until the signal beeps. |
■Retained accessory power
Memorized positions (except for the steering wheel positions) can be activated up to 30 seconds after the driver’s door is opened, even after turning the engine switch OFF.
■To cancel seat position recall
Perform any of the following operations.
●Push the SET button.
●Push button 1, 2, or 3.
●Adjust the seat using the switches (only cancels seat position recall).
■If the battery is disconnected
The memorized positions are erased when the battery is disconnected.
 CAUTION
■Seat adjustment caution
Take care during seat adjustment that the seat does not strike the rear passenger or squeeze your body against the steering wheel.
30

1-3. Adjustable components
Seat position memory (if equipped)
Your preferred front passenger seat position can be memorized and recalled with the touch of a button.
Three different seat positions can be entered into memory.
■Entering a position to memory
Vehicles with an automatic transmission: Check that the shift lever is set in P.
Vehicles with a manual transmission: Check that the parking brake is set.
|
STEP 1 |
Switch to IG-ON mode. |
|
STEP 2 |
Adjust the front passenger seat to the desired position. |
|
STEP 3 |
While pushing the SET button, |
|
push button 1, 2 or 3 until the |
|
|
signal beeps. |
|
|
If the selected button has |
|
|
already been preset, the previ- |
|
|
ously recorded position will be |
|
|
overwritten. |
■Recalling the memorized position
Vehicles with an automatic transmission: Check that the shift lever is set in P.
Vehicles with a manual transmission: Check that the parking brake is set.
Push button 1, 2 or 3 to recall the memorized position.
1 Beforedriving
31

1-3. Adjustable components
■Retained accessory power
Memorized position can be activated up to 30 seconds after the front passenger door is opened, even after turning the engine switch OFF.
■To cancel seat position recall
Perform any of the following operations.
●Push the SET button.
●Push button 1, 2, or 3.
●Adjust the seat position using the switches.
■If the battery is disconnected
The memorized positions are erased when the battery is disconnected.
 CAUTION
■Seat adjustment caution
Take care during seat adjustment that the seat does not strike the rear passenger.
32
 Loading…