Модели 2WD и 4WD 1999-2005 г.г. выпуска с бензиновыми двигателями FP-DE (1,8 л) и FS-ZE (2,0 л)
Руководство по ремонту и техническому обслуживанию.
УДК 629.314.6
ББК 39.335.52
М13
Mazda Рrетасу .. Модели 2WD&4WD 1999-2005 гг. выпуска с
бензиновыми двигателями FP-DE (1,8 л) и FS-ZE (2,0 л). Серия «Профессионал».
Руководство по ремонту и техническому обслуживанию.
— М.: Легион-Автодата, 2014. — 352 с.: ил. ISBN 5-88850-279-0 (Код 2797)
В руководстве дается пошаговое описание процедур по эксплуатации, техническому обслуживанию и ремонту
переднеприводных и полноприводных автомобилей Mazda Рrетасу 1999-2005 гг. выпуска, оборудованных
бензиновыми двигателями FP-DE (1,8 л) и FS-ZE (2,0 л).
Издание содержит руководство по эксплуатации, подробные сведения по техническому обслуживанию
автомобиля, ремонту и регулировке элементов систем двигателя (в т.ч. систем впрыска топлива бензинового
двигателя, зажигания, запуска и зарядки), автоматических коробок переключения передач (АКПП), заднего
редуктора, элементов тормозной системы (включая антиблокировочную систему тормозов (ABS) и систему
курсовой устойчивости (DSC)), рулевого управления, подвески, кузовных элементов, систем кондиционирования
и вентиляции (АС), системы пассивной безопасности (SRS).
Приведены инструкции по диагностике 8 электронных систем: управления двигателем, АКПП, ABS / DSC,
кондиционирования, SRS, комбинации приборов и аудиосистемы.
Подробно описаны 186 кодов неисправностей РО, Р1, 81, С1, Flash и возможные причины их возникновения.
Приведены разъемы и процедуры проверки сигналов на выводах блоков управления различными системами
— PiпData.
Представлены 82 подробные электросхемы (51 система) для различных вариантов комплектации автомобилей,
описание большинства элементов электрооборудования.
Информация для профессиональной диагностики и ремонта электрооборудования различных систем
автомобиля представлена в диагностической онлайн-системе MotorData. Используя быстрые переходы
по интерактивным ссылкам, Вы сможете решить проблему быстрее и сэкономить время. Подробности на
MotorData.ru
Приведены возможные неисправности и методы их устранения, сопрягаемые размеры основных деталей
и пределы их допустимого износа, рекомендуемые смазочные материалы, рабочие жидкости, размеры рекомендуемых
и допускаемых шин и дисков.
Книга будет полезна как автовладельцам, начинающим и опытным, так и профессионалам авторемонта и
диагностики. Автовладелец найдет для себя полезными: инструкцию по эксплуатации, техническое обслуживание
(с периодичностью и необходимыми материалами), инструкции по самостоятельному ремонту.
Профессионалам будут полезны: операции по сложному ремонту, допустимые размеры деталей, данные по
диагностике и подробные схемы электрооборудования.
Книги серии «Профессионал» могут выручить Вас в дороге, если Вам придется пользоваться услугами
автосервиса, незнакомого или малознакомого с особенностями модели Вашего автомобиля. Отдавая автомобиль
на СТО, оставьте нашу книгу в автомобиле, и, в случае каких-либо затруднений, автомеханик сможет
воспользоваться ею, что значительно ускорит ремонт Вашего автомобиля. Качественное изложение
материала позволяет сократить время обслуживания автомобиля и сделать его более эффективным.
Книга предназначена для автовладельцев, персонала СТО и ремонтных мастерских. Книги издательства
«Легион-Автодата» серии «Профессионал» рекомендованы к использованию в автосервисах двумя профессиональными
сообществами автомобильных диагностов: Союзом автомобильных диагностов и Ассоциацией
диагностов, автоэлектриков и чиптюнеров — АДАКТ.
На сайт~ www.premacy.ru Вы можете обсудить вопросы эксплуатации, технического обслуживания и ремонта
автомобилей Mazda Premacy.
На сайте www.autodata.ru, в разделе «Форум», Вы можете обсудить профессиональные вопросы
по диагностике различных систем автомобилей.
Mazda Premacy 🐈⬛

maximkk
Был 4 дня назад
Максим Киселев, 25 лет
Я ездил на Mazda Premacy 🐈⬛
Ангарск, Россия

Самое новое издание.
Легион-Автодата 2014 год.
Может кому пригодится.
Ссылка для скачивания:
disk.yandex.ru/i/l6pGQ2n_EjQ7KQ
Цена вопроса: 0 ₽
Пробег: 222 222 км
11 июня 2021
Метки: другое
23
4
Далее Нужен совет, обратите внимание
Разместить рекламу
Реклама
Машины в продаже
Комментарии
4
Войдите или зарегистрируйтесь, чтобы писать комментарии, задавать вопросы и участвовать в обсуждении.
Войти
Зарегистрироваться

Zhorik-san
Я езжу на Mazda Premacy (1G)
Спасибо! Качество офигенное! Нет слов!
1 год

Badj
Я езжу на Brilliance V5
Спасибо!
1

1 год

Konga02
Я езжу на Mazda Axela (2G)
Спасибо огромное, качество супер.
1
1 год

alesbekov
Я езжу на Mazda Premacy (1G)
Спасибо тебе друг! Удачи тебе во всем!
2 года
Mazda
PREMACY
Training
Manual
FOREWORD
This manual explains each component or
system operation and function for
the Mazda PREMACY.
For proper repair and maintenance,
a thorough familiarization with this manual
is important, and it should always be kept
in a handy place for quick and easy
reference.
All the contents of this manual, including
drawings and specifications, are the latest
available at the time of printing.
As modifications affecting repair or
maintenance occur, relevant information
supplementary to this volume will be made
available at Mazda dealers. This manual
should be kept up to date.
Mazda Motor Corporation reserves
the right to alter the specifications and
contents of this manual without obligation
or advance notice.
All rights reserved. No part of this book
may be reproduced or used in any form or
by any means, electronic or
mechanical including photocopying and
recording and the use of any kind of
information storage and retrieval
system without permission in writing.
Mazda Motor Corporation
HIROSHIMA, JAPAN
APPLICATION:
This manual is applicable to vehicles
beginning with the Vehicle Identification
Numbers (VIN), and related materials
shown on the following page.
CONTENTS
Title
General Information
Engine
Lubrication System
Cooling System
Fuel and Emission
Control Systems
Engine Electrical System
Clutch
Manual Transaxle
Automatic Transaxle
Front and Rear Axles
Steering System
Braking System
Suspension
Body
Body Electrical System
Heater and Air Conditioner Systems
2001 Mazda Motor Corporation
PRINTED IN AUSTRALIA, JANUARY 2001
3351-1A-01A
Section
GI
B1
FP
D
E
FP
F1
G
H
F25M-R
J1
K
M
N
P
R
S
T
U
![]()
J54L_8R34_EE_02H.BOOK Page 1 Monday, July 15, 2002 9:03 AM
A Word to Mazda Owners
Thank you for choosing a Mazda. We at Mazda design and build vehicles with complete customer satisfaction in mind.
To help ensure enjoyable and trouble-free operation of your Mazda, read this manual carefully and follow its recommendations.
An Authorised Mazda Dealer knows your vehicle best. So when maintenance or service is necessary, that’s the place to go.
Our nationwide network of Mazda professionals is dedicated to providing you with the best possible service.
We assure you that all of us at Mazda have an ongoing interest in your motoring pleasure and in your full satisfaction with your Mazda product.
Mazda Motor Corporation
HIROSHIMA, JAPAN
Important Notes About This Manual
Keep this manual in the glove box as a handy reference for the safe and enjoyable use of your Mazda. Should you resell the vehicle, leave this manual with it for the next owner.
All specifications and descriptions are accurate at the time of printing. Because improvement is a constant goal at Mazda, we reserve the right to make changes in specifications at any time without notice and without obligation.
Please be aware that this manual applies to all models, equipment and options. As a result, you may find some explanations for equipment not installed on your vehicle.
©2002 Mazda Motor Corporation Printed in Japan Aug. 2002(Print1)
Form No. 8R34-EE-02H

J54L_8R34_EE_02H.BOOK Page 2 Monday, July 15, 2002 9:03 AM
How to Use This Manual
We want to help you get the most driving pleasure from your vehicle. Your owner’s manual, when read from cover to cover, can do that in many ways.
Illustrations complement the words of the manual to best explain how to enjoy your Mazda. By reading your manual, you can find out about the features, important safety information, and driving under various road conditions.
The above symbol in this manual means “Do not do this ” or “Do not let this happen”.
References to left hand and right hand are made as if facing in the same direction the vehicle faces. Although this manual explains a left-hand-drive model, it also applies to right-hand-drive models.
Index: A good place to start is the Index, an alphabetical listing of all information in your manual.
You’ll find several WARNINGs, CAUTIONs, and NOTEs in the manual.
 WARNING
A WARNING indicates a situation in which serious injury or death could result if the warning is ignored.
 CAUTION
A CAUTION indicates a situation in which bodily injury or damage to your vehicle, or both, could result if the caution is ignored.
NOTE
A NOTE provides information and sometimes suggests how to make better use of your vehicle.
The above symbol, located on some parts of the vehicle, indicates that this manual contains information related to the part.
Please refer to the manual for a detailed explanation.
Form No. 8R34-EE-02H

J54L_8R34_EE_02H.BOOK Page 3 Monday, July 15, 2002 9:03 AM
Table of Contents
Interior, exterior views and part identification of your Mazda.
|
Essential Safety Equipment |
2 |
Use of safety equipment, including seats, seat belt system, SRS air bags and child-restraint systems.
Explanation of basic operations and controls; opening/closing and adjustment of various parts.
|
Before Driving Your Mazda |
4 |
||
|
Important information about driving your Mazda. |
|||
|
Driving Your Mazda |
5 |
||
|
Explanation of instruments and controls. |
|||
|
Interior Comfort |
6 |
||
|
Use of various features for drive comfort, including air-conditioning and audio |
|||
|
system. |
|||
|
In Case of an Emergency |
7 |
||
|
Helpful information on what to do in an emergency. |
|||
|
Maintenance and Care |
8 |
||
|
How to keep your Mazda in top condition. |
|||
|
Customer Information |
9 |
||
|
Important consumer information including warranties and add-on equipment. |
|||
|
Specifications |
10 |
||
|
Technical information about your Mazda. |
|||
|
Index |
11 |
||
Form No. 8R34-EE-02H

J54L_8R34_EE_02H.BOOK Page 4 Monday, July 15, 2002 9:03 AM

J54L_8R34_EE_02H.BOOK Page 1 Monday, July 15, 2002 9:03 AM
|
1 |
Your Vehicle at a Glance |
|||||||
|
Interior, exterior views and part identification of your Mazda. |
||||||||
|
Instrument Panel Overview ………………………………………………. |
1- 2 |
|||||||
|
Interior Overview ……………………………………………………………… |
1- 3 |
|||||||
|
Exterior Overview …………………………………………………………….. |
1- 4 |
|||||||
1-1
Form No. 8R34-EE-02H
J54L_8R34_EE_02H.BOOK Page 2 Monday, July 15, 2002 9:03 AM
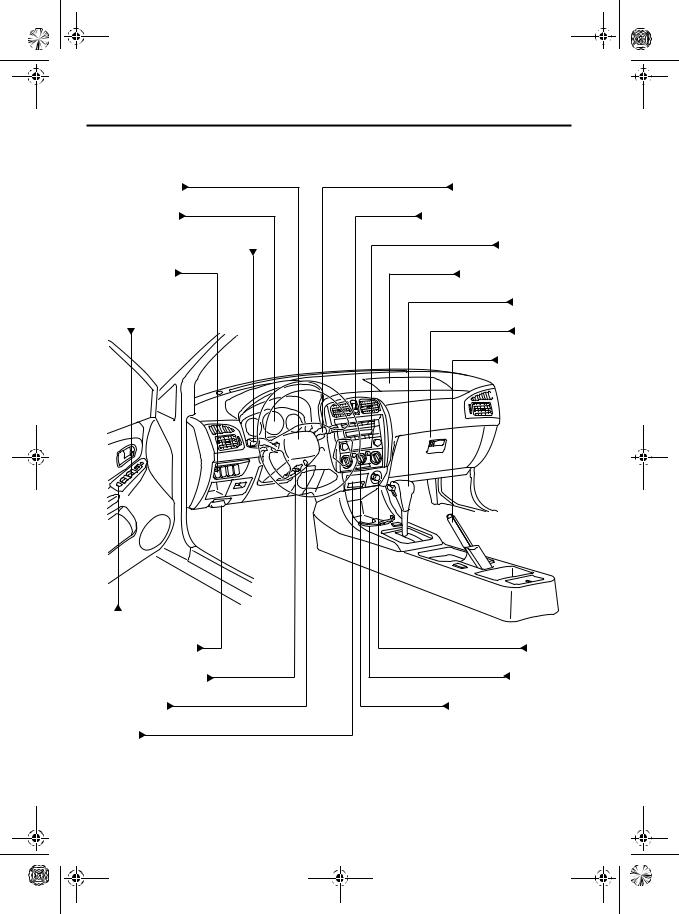
Your Vehicle at a Glance
Instrument Panel Overview
|
Driver-side air bag |
Wiper and washer lever |
|
(page 2-66) |
(page 5-41) |
|
Instrument cluster |
Hazard warning flasher switch |
|
(page 5-20) |
(page 5-45) |
|
Lighting control/Direction indicators |
Audio system |
|
(page 5-38) |
(page 6-16) |
|
Fog lights switch |
Passenger-side air bag |
|
(page 5-40) |
(page 2-66) |
|
Power window switches |
Shift lever |
|
(page 3-12) |
(page 5-11) |
|
Glove box |
|
|
(page 6-59) |
|
|
Parking brake |
|
|
(page 5-6) |
|
|
Power window lock switch |
|
|
(page 3-15) |
|
|
Bonnet release handle |
Lighter |
|
(page 3-16) |
(page 6-55) |
|
Tilt wheel release lever |
Cup holder |
|
(page 3-26) |
(page 6-57) |
|
Ignition switch |
Air-conditioning system |
|
(page 5-2) |
(page 6-2) |
|
Ashtray |
|
|
(page 6-56) |
1-2
Form No. 8R34-EE-02H

J54L_8R34_EE_02H.BOOK Page 3 Monday, July 15, 2002 9:03 AM
Your Vehicle at a Glance
Interior Overview
|
Sunvisors |
|
(page 6-52) |
|
Seat belts |
|
(page 2-36) |
|
Interior light |
|
(page 6-52) |
Third-row seat
(page 2-28)
Rear seat/Second-row seat 
(page 2-19)
|
Map light |
|
(page 6-53) |
|
Rearview mirror |
|
(page 3-29) |
|
Vanity mirror |
|
(page 6-52) |
|
Front seats |
|
(page 2-2) |
|
Side air bags |
|
(page 2-66) |

J54L_8R34_EE_02H.BOOK Page 4 Monday, July 15, 2002 9:03 AM
Your Vehicle at a Glance
Exterior Overview
|
Brake lights/Tail lights |
Child safety locks |
|
(page 8-41) |
(page 3-9) |
|
Rear window defroster |
Outside mirrors |
|
(page 5-43) |
(page 3-26) |
Rear windscreen  wiper blades
(page 8-29)
Liftgate 
(page 3-9)
License plate lights
(page 8-41)
 Tyres
Tyres
(page 8-32)
Rear direction indicator lights 
(page 8-41)
Reverse lights 
(page 8-41)
|
Sunroof |
Aerial |
|
(page 3-17) |
(page 6-16) |
|
Windscreen wiper blades |
|
|
(page 8-27) |
|
|
Washer fluid |
Fuel-filler flap |
|
(page 8-23) |
(page 3-15) |
|
Bonnet |
|
|
(page 3-16) |
|
Front fog lights |
Doors and keys |
|
|
(page 8-39) |
||
|
(page 3-2) |
||
|
Side-direction indicator lights |
||
|
(page 8-39) |
||
|
Parking lights |
||
|
(page 8-39) |
||
|
Front direction indicator lights |
Headlights |
|
|
(page 8-39) |
(page 8-37) |
1-4
Form No. 8R34-EE-02H

J54L_8R34_EE_02H.BOOK Page 1 Monday, July 15, 2002 9:03 AM
|
2 |
Essential Safety Equipment |
|
Use of safety equipment, including seats, seat belt system, SRS air bags and child-restraint systems.
|
………………………………………………………………………………….Seats |
2- |
2 |
||||
|
…………………………………………………………………….Front Seats |
2- |
2 |
||||
|
Rear Seats (5-Passenger Model) ………………………………………. |
2- |
9 |
||||
|
Second-Row Seats (7-Passenger Model) …………………………… |
2-19 |
|||||
|
Third-Row Seat (7-Passenger Model) ………………………………. |
2-28 |
|||||
|
Flat Folding (7-Passenger Model) ……………………………………. |
2-35 |
|||||
|
Seat Belt Systems ………………………………………………………………. |
2-36 |
|||||
|
Seat Belt Precautions ……………………………………………………… |
2-36 |
|||||
|
3-Point Type Seat Belt ……………………………………………………. |
2-40 |
|||||
|
Front Seat Belt Pretensioner and Load Limiting Systems …… |
2-42 |
|||||
|
Rear Centre Position Seat Belt (5-Passenger Model) ………….. |
2-44 |
|||||
|
2-Point Type Seat Belt (7-Passenger Model) |
2-47 |
|||||
|
Seat Belt Warning Light (Except European Model) ……………. |
2-48 |
|||||
|
Child Restraint |
2-49 |
|||||
|
……………………………………………..Child Restraint Precautions |
2-49 |
|||||
|
Categories of Child-Restraint Systems (Europe) ……………….. |
2-52 |
|||||
|
Child-Restraint System Installation Position (Europe) ……….. |
2-53 |
|||||
|
Child-Restraint System Suitability for Various Seat Positions |
||||||
|
Table (Europe) ………………………………………………………………. |
2-58 |
|||||
|
Installing Child-Restraint Systems …………………………………… |
2-59 |
|||||
|
Air Bag Cut-Off System …………………………………………………. |
2-62 |
|||||
|
ISOFIX Bar-Secured Child-Restraint Systems ………………….. |
2-62 |
|||||
|
SRS Air Bags ……………………………………………………………………. |
2-66 |
|||||
|
Supplementary Restraint Systems (SRS) Precautions …………. |
2-66 |
|||||
|
Air Bag System Description ……………………………………………. |
2-70 |
2-1
Form No. 8R34-EE-02H

J54L_8R34_EE_02H.BOOK Page 2 Monday, July 15, 2002 9:03 AM
Essential Safety Equipment
Seats
Front Seats
 WARNING
Securing the Seats:
Adjustable seats and seatbacks that are not securely locked are dangerous. In a sudden stop or collision, the seat or seatback could move, causing injury. Make sure the adjustable components of the seat are locked in place by attempting to slide the seat forward and backward and rocking the seatback.
▼Seat Slide
 WARNING
Driver’s Seat Adjustment: Adjusting the driver’s seat while the vehicle is moving is dangerous. The
driver could lose control of the vehicle and have an accident. Adjust the driver’s seat only when the vehicle is stopped.
To move a seat forward or backward, raise the lever and slide the seat to the desired position and release the lever.
Lever
Make sure the lever returns to its original position and the seat is locked in place by attempting to push it forward and backward.
![]()
J54L_8R34_EE_02H.BOOK Page 3 Monday, July 15, 2002 9:03 AM
Essential Safety Equipment
Seats
▼Seat Recline
 WARNING
Reclining:
Sitting in a reclined position while the vehicle is moving is dangerous because you don’t get the full protection from seat belts. During sudden braking or a collision, you can slide under the lap belt and suffer serious internal injuries. For maximum protection, sit well back and upright.
Unlocked Seatback:
A seatback plays an important role in your protection in a vehicle. Leaving the seatback unlocked is dangerous as it can allow passengers to be ejected or thrown around and baggage to strike occupants in a sudden stop or collision, resulting in severe injury. After adjusting the seatback at any time, even when there are no other passengers, rock the seatback to make sure it is locked in place.
(Type A)
To change the seatback angle, lean forward slightly while rotating the dial. Then lean back to the desired position.
Dial
(Type B)
To change the seatback angle, lean forward slightly while raising the lever. Then lean back to the desired position and release the lever.
Lever
2-3
Form No. 8R34-EE-02H

J54L_8R34_EE_02H.BOOK Page 4 Monday, July 15, 2002 9:03 AM
Essential Safety Equipment
Seats
Make sure the lever returns to its original position and the seatback is locked in place by attempting to push it forward and backward.
 CAUTION
When returning a rear-reclined seatback to its upright position, make sure you support the seatback while operating the seatback lever. If the seatback is not supported, it will flip forward suddenly and could cause injury.
▼Seat Tilt (Driver’s Seat)
The seat-bottom angle can be adjusted by rotating the dial.
Up
Down
Dial
▼Head Restraint
 WARNING
Head Restraints Adjustment: Driving with the head restraints adjusted too low or removed is dangerous. With no support behind your head, your neck could be seriously injured in a collision. Always drive with the head restraints inserted when seats are being used and make sure they are properly adjusted.
Height adjustment
To raise a head restraint, pull it up to the desired position.
To lower the head restraint, press the stopcatch release, then push the head restraint down.
Stop-catch release
Adjust the head restraint so that the top is parallel with the top of the passenger’s ears, never the passenger’s neck.

J54L_8R34_EE_02H.BOOK Page 5 Monday, July 15, 2002 9:03 AM
Essential Safety Equipment
Seats
Removal
To remove the head restraint, press the stop-catch release, then pull up on the head restraint.
Stop-catch release
▼Folding the Passenger’s Seat
The passenger’s seatback can be folded down and used as a table while the vehicle is not moving.
The front and rear passenger’s seatbacks can be folded down for placement of long objects. Make sure the object is secure.
 WARNING
Using Folded Seatback as a Table While the Vehicle is Moving: Using the folded seatback as a table while driving is dangerous. During
sudden braking or a collision, objects placed on the folded seatback could become projectiles that could hit and injure someone. Never use the folded seat as a table while the vehicle is moving.
Unsecured Objects:
Not securing objects placed on the folded seatback is dangerous. During sudden braking or a collision, the objects could hit passengers and cause serious injuries, or the objects could hit the shift lever, forcing you to lose control of the vehicle. When placing objects on the folded seatback, always make sure they are secure.

J54L_8R34_EE_02H.BOOK Page 6 Monday, July 15, 2002 9:03 AM
Essential Safety Equipment
Seats
 WARNING
Passenger on the Folded Seatback: Driving with a passenger on the folded seatback is dangerous. Allowing a child to sit up on the folded seatback while the vehicle is moving is particularly dangerous. In a sudden stop or even a minor collision, a child not in a proper seat or child-restraint system and seat belt could be thrown forward, back or even out of the car resulting in serious injuries or death. The child or other objects in the baggage area could be thrown into other occupants and cause serious injury. Never allow a passenger to sit or stand on the folded seatback while the vehicle is moving.
To fold the seatback
 CAUTION
Folding the seatback without tucking the seat belt buckle down could damage the seatback.
1.Tuck the seat belt buckle all the way down.
Buckle
2.Raise the reclining lever or pull the lean forward lever. Make sure the seatback is at its maximum forward reclined position.
Lever
Lean forward lever
2-6
Form No. 8R34-EE-02H

J54L_8R34_EE_02H.BOOK Page 7 Monday, July 15, 2002 9:03 AM
Essential Safety Equipment
Seats
3.Push the fold-down lever forward and push the seatback all the way down. Make sure the seatback is locked.
Fold-down lever
To return the seatback to the upright position
1.Push the fold-down lever down to unlock the seat.
2.Push the seatback to the upright position. Make sure the seatback is locked.
▼Pull-up Seatback Trays
 WARNING
Using Seatback Trays While Vehicle is Moving
Using the seatback trays while the vehicle is moving is dangerous. During sudden braking or a collision, rear seat passengers could be thrown forward into a tray causing serious injury. Objects placed on a seatback tray could become projectiles that could hit and injure someone. Always collapse and secure the trays before driving the vehicle.
Pull-up trays are available in the seatbacks of the front seats and can be used when the vehicle is parked.
Grasp the front, central part of the tray when setting up or collapsing it.

J54L_8R34_EE_02H.BOOK Page 8 Monday, July 15, 2002 9:03 AM
Essential Safety Equipment
Seats
 CAUTION
•Do not place heavy objects on a seatback tray. Heavy objects could cause the tray to collapse and injure someone.
•Do not recline the front seats when the seatback trays are in use. Hot liquids may cause scalding if spilled, or objects could fall causing injury.
▼Armrest
The armrest can be used or placed upright.
 WARNING
Positioning the Shoulder Belt Over the Armrest:
Positioning the shoulder portion of a front seat belt over the armrest is dangerous as it cannot provide adequate protection in a collision and could result in serious injuries. Never position the shoulder portion of a front seat belt over the armrest.

J54L_8R34_EE_02H.BOOK Page 9 Monday, July 15, 2002 9:03 AM
Essential Safety Equipment
Seats
▼Seat Warmer
The front seats are electrically heated. The ignition switch must be in the ON position.
Press the switch to turn the seat warmer on or off. When the switch is in the ON position, the indicator light will come on.
 ON
ON
OFF
NOTE
The thermostat regulates seat temperature by turning the current on and off.
Rear Seats
(5-Passenger Model)
 WARNING
Stacking Cargo:
Stacking luggage or other cargo higher than the seatbacks, and putting things on the rear package tray is dangerous. During sudden braking or a collision, objects can become projectiles that may hit and injure passengers. Don’t stack things higher than the seatbacks or put things on the rear package tray.
Securing Seats:
Adjustable seats and seatbacks that are not securely locked are dangerous. In a sudden stop or collision, the seat or seatback could move, causing injury. Make sure the adjustable components of the seat are locked in place by attempting to slide the seat forward and backward and rocking the seatback.
Seat Adjustment:
Adjusting the seat while the vehicle is moving is dangerous. Sudden braking or a collision could cause serious injury. Adjust the seat only when the vehicle is stopped.

J54L_8R34_EE_02H.BOOK Page 10 Monday, July 15, 2002 9:03 AM
Essential Safety Equipment
Seats
 WARNING
Unlocked Seatback:
A seatback plays an important role in your protection in a vehicle. Leaving the seatback unlocked is dangerous as it can allow passengers to be ejected or thrown around and baggage to strike occupants in a sudden stop or collision, resulting in severe injury. After adjusting the seatback at any time, even when there are no other passengers, rock the seatback to make sure it is locked in place.
Passenger on the Folded Seatback: Driving with a passenger on the folded seatback is dangerous. Allowing a child to sit up on the folded seatback while the vehicle is moving is particularly dangerous. In a sudden stop or even a minor collision, a child not in a proper seat or child-restraint system and seat belt could be thrown forward, back or even out of the car resulting in serious injuries or death. The child or other objects in the baggage area could be thrown into other occupants and cause serious injury. Never allow a passenger to sit or stand on the folded seatback while the vehicle is moving.
 WARNING
Children and the Folding Rear Seats: Playing with the folding rear seats is dangerous. The folding rear seatbacks cannot be folded down from inside the luggage compartment. Do not give the car keys to children and do not allow them to play in the vehicle.
NOTE
When returning a rear seat to its original position, also replace the seat belt to its normal position. Verify that the seat belt pulls and retracts.
▼Seat Recline
 WARNING
Reclining:
Sitting in a reclined position while the vehicle is moving is dangerous because you don’t get the full protection from seat belts. During sudden braking or a collision, you can slide under the lap belt and suffer serious internal injuries. For maximum protection, sit well back and upright.
2-10
Form No. 8R34-EE-02H

J54L_8R34_EE_02H.BOOK Page 11 Monday, July 15, 2002 9:03 AM
Essential Safety Equipment
Seats
To change the seatback angle, lean forward slightly while pulling the strap. Then lean back to the desired position and release the strap. Make sure the seat is securely latched.
Strap
 CAUTION
•When returning a rear-reclined seatback to its upright position, make sure you support the seatback while operating the strap. If the seatback is not supported, it will flip forward suddenly and could cause injury.
•Reclining the rear seat when the luggage compartment cover is in the first position could damage the seat and cover. Remove the cover or move it to the second position.
▼Head Restraint
 WARNING
Head Restraints Adjustment: Driving with the head restraints adjusted too low or removed is dangerous. With no support behind your head, your neck could be seriously injured in a collision. Always drive with the head restraints inserted when seats are being used and make sure they are properly adjusted.
Height adjustment
To raise a head restraint, pull it up to the desired position.
To lower the head restraint, press the stopcatch release, then push the head restraint down.
Stop-catch release
Adjust the head restraint so that the top is parallel with the top of the passenger’s ears, never the passenger’s neck.
2-11
Form No. 8R34-EE-02H

J54L_8R34_EE_02H.BOOK Page 12 Monday, July 15, 2002 9:03 AM
Essential Safety Equipment
Seats
Removal
To remove the head restraint, press the stop-catch release, then pull up on the head restraint.
Stop-catch release
▼Folding the Centre-Rear Seat
 WARNING
Using Folded Seatback as a Table While the Vehicle is Moving: Using the folded seatback as a table
while driving is dangerous. During a sudden stop or collision, objects placed on the folded seatback could become projectiles that could hit and injure someone. Never use the folded seat as a table while the vehicle is moving.
The centre-rear seatback can be folded down and used as a table while the vehicle is not moving.
 CAUTION
Don’t sit or lie on the folded seatback. The seat could be damaged.
To fold the centre-rear seatback
1.Unfasten the lap portion of the centrerear seat belt (page 2-46).
2.Secure the centre-rear seat belt in the seat belt retainer (page 2-46).
3.Tuck the rear seat’s seat belt buckle down.
2-12
Form No. 8R34-EE-02H
![]()
J54L_8R34_EE_02H.BOOK Page 13 Monday, July 15, 2002 9:03 AM
Essential Safety Equipment
Seats
 CAUTION
Lowering the seatback without tucking the seat belt buckle down could damage the seatback.
4.Pull the strap of the centre-rear seat and lower the seatback forward. Make sure the seatback is locked.
Strap
To return the seatback to the upright position
1.Pull the strap of the centre-rear seat and lift the seatback upright. Attempt to move the seatback forward and backward to make sure it is locked.
2.Fasten the lap portion of the centre-rear seat belt before a passenger sits in the seat (page 2-44).
NOTE
Make sure the centre-rear seat belt is routed between the centre-rear and the left-rear seat.
▼Folding and Stowing Rear Seats
All the rear seats can be flipped and stowed forward to provide more cargo space.
To fold and stow a rear seat
1.Unfasten the lap portion of the centrerear seat belt (page 2-46).
2.Secure the centre-rear seat belt in the seat belt retainer (page 2-46).
3.Remove the head restraint (page 2-11).
4.Tuck the rear seat’s seat belt buckles down.
Strap
2-13
Form No. 8R34-EE-02H

J54L_8R34_EE_02H.BOOK Page 14 Monday, July 15, 2002 9:03 AM
Essential Safety Equipment
Seats
5.Pull the strap and lower the seatback forward. Make sure the seatback is locked.
Strap
6.Work only on one seat at a time to avoid one seat falling while working on another.
7.Pull the strap and raise the entire seat up and forward.
Strap
8.To prevent the rear seats from falling back down, thread the holding strap for each seat around one of the front head restraint uprights and fasten with the buckles.
 WARNING
Loose Seat:
A seat not secured with a holding strap is dangerous. The seat could fall down and cause serious injury. Ensure that each stowed seat is secured with a holding strap.
9.Adjust the holding straps to tighten them securely on the head restraint uprights.
NOTE
When stowing the left-rear or centrerear seats, fasten the holding straps on the head-restraint upright of the leftfront seat.
For the right-rear seat, fasten the holding strap on the head restraint upright of the right-front seat.
2-14
Form No. 8R34-EE-02H

J54L_8R34_EE_02H.BOOK Page 15 Monday, July 15, 2002 9:03 AM
Essential Safety Equipment
Seats
10.Insert the head restraints into the alternate storage holes at the top of the uprighted seat bottom.
To return a rear seat to its original position
1.Remove the head restraint from the back of the uprighted seat bottom.
2.Support the seat while unfastening the holding strap from the head restraint upright so that the seat doesn’t fall down.
3. Tuck the holding strap in the pocket.
4.Carefully lower the seat backward until it locks in place. Attempt to lift the seat up to make sure it is firmly locked down.
2-15
Form No. 8R34-EE-02H

J54L_8R34_EE_02H.BOOK Page 16 Monday, July 15, 2002 9:03 AM
Essential Safety Equipment
Seats
5.Pull the strap and raise the seatback to the upright position. Make sure the seatback is locked.
Strap
6.Reinsert the head restraint to its normal position.
7.Fasten the lap portion of the centre-rear seat belt before a passenger sits in the seat (page 2-44).
NOTE
Make sure the centre-rear seat belt is routed between the centre-rear and left-rear seats.
▼Removal of Rear Seats
All the rear seats can be removed to provide more cargo space.
 WARNING
Seat Removal or Installation While Vehicle is Moving or on a Slope: Removing or installing the rear seats while the vehicle is moving or on a slope is dangerous. The seats are heavier than they appear and could suddenly detach causing serious injury. Remove or install the seats with the vehicle parked on a level surface.
Riding on The Floor Space:
Riding on the floor space created by the removal of the rear seats is dangerous. Sudden braking or a collision could cause serious injury. Do not sit or lie in the floor space for the rear seats while the vehicle is moving. Never ride in a vehicle where you can’t sit in the seat and wear the seat belt.
Pinching Fingers or Hands: Placing your hands around the seat anchors when removing or installing
the rear seats is dangerous. You could pinch your hands or fingers between the seat anchor and the seat. Hold the edge of the seat when lowering it into place. Never place your hands between the seat anchor and the seat.
2-16
Form No. 8R34-EE-02H

J54L_8R34_EE_02H.BOOK Page 17 Monday, July 15, 2002 9:03 AM
Essential Safety Equipment
Seats
 WARNING
Unsecured Seats:
Driving with the seat unsecured is dangerous. The seat may become detached while the vehicle is moving causing serious injury. After installing the seat, attempt to push it forward and backward to make sure it is securely locked.
To remove a rear seat
1.Remove one seat at a time following procedure 1 through 7 of «To fold and stow a rear seat» (page 2-13).
2.While supporting the seat, insert the head restraint into the alternate storage holes at the top of the uprighted seat bottom.
3.Press down each seat lock lever.
4.Remove the seat by tilting it backward to free it from the floor anchors.
Seat lock lever
To install a rear seat
1.If the head restraint is inserted in the seat bottom, pull the head restraint and remove it.
2.Align the seat retaining clamps with the front floor anchors.
Front floor  anchor
Seat retaining clamp
2-17
Form No. 8R34-EE-02H

J54L_8R34_EE_02H.BOOK Page 18 Monday, July 15, 2002 9:03 AM
Essential Safety Equipment
Seats
3.Supporting the seat with your hand, raise the seat lock levers on the left and right to lock it in place.
Seat lock lever
4.Return the rear seat to its original position following procedure 4 through 7 of “To return a rear seat to its original position”
▼Four-Passenger Seating Arrangement
 WARNING
Rear-Passenger Seating and Seat Belts:
Using the centre-rear seat belt while seated in the left-rear or right-rear seat is dangerous. In a collision or sudden stop, the centre-rear seat belt cannot provide protection for a passenger in the left-rear or rightrear seat. When the centre-rear seat is not in use, stow its seat belt in the retainer and use the appropriate leftrear or right-rear seat belt.
If you plan on carrying only four people and will not need the fifth seat during a trip, your Mazda design allows you to give the rear seat passengers a roomier feeling by taking out the centre-rear seat and moving the remaining two seats inboard for a four passenger vehicle. Make sure the seat belt buckles point inboard for the seats to be properly located.
1. Remove all the rear seats (page 2-16).
Right-rear seat
Left-rear seat
2.Align the seat retaining clamps of the outside seats with the front floor anchors. Align the left-rear seat with the second (2) and fourth (4) positions. Align the right-rear seat with the fifth
(5) and seventh (7) positions.
3.Install the left-rear seat and right-rear seats following procedures 1 through 6 of «To install a rear seat» (page 2-17).
Right-rear seat
Left-rear seat
|
(7) |
Seat retaining |
||
|
(5)(6) |
clamp |
||
2-18
Form No. 8R34-EE-02H

J54L_8R34_EE_02H.BOOK Page 19 Monday, July 15, 2002 9:03 AM
Essential Safety Equipment
Seats
Second-Row Seats
(7-Passenger Model)
 WARNING
Stacking Cargo:
Stacking luggage or other cargo higher than the seatback is dangerous. During a sudden stop or collision, objects can become projectiles that could hit and injure passengers. Don’t stack things higher than the seatback.
Securing Seats:
Adjustable seats and seatbacks that are not securely latched are dangerous. In a sudden stop or collision, the seat or seatback could move, causing injury. Make sure the adjustable components of the seat are locked in place by attempting to slide the seat forward and backward and rocking the seatback.
Seat Adjustment:
Adjusting the seat while the vehicle is moving is dangerous. Sudden braking or a collision could cause serious injury. Adjust the seat only when the vehicle is stopped.
 WARNING
Unlocked Seatback:
A seatback plays an important role in your protection in a vehicle. Leaving the seatback unlocked is dangerous as it can allow passengers to be ejected or thrown around and baggage to strike occupants in a sudden stop or collision, resulting in severe injury. After adjusting the seatback at any time, even when there are no other passengers, rock the seatback to make sure it is locked in place.
Passenger on the Folded Seatback: Driving with a passenger on the folded seatback is dangerous. Allowing a child to sit up on the folded seatback while the vehicle is moving is particularly dangerous. During sudden braking or even a minor collision, a child not in a proper seat or child-restraint system and seat belt could be thrown forward, back or even out of the car resulting in serious injuries or death. The child or other objects in the baggage area could be thrown into other occupants and cause serious injury. Never allow a passenger to sit or stand on the folded seatback while the vehicle is moving.
NOTE
When returning a second-row seat to its original position, also replace the seat belt to its normal position. Verify that the seat belt pulls and retracts.
2-19
Form No. 8R34-EE-02H

J54L_8R34_EE_02H.BOOK Page 20 Monday, July 15, 2002 9:03 AM
Essential Safety Equipment
Seats
▼Seat Slide
To move the seat forward or backward, raise the bar and slide the seat to the desired position.
Bar
Make sure the bar returns to its original position and the seat is locked in place by attempting to push it forward and backward.
 CAUTION
Be careful when moving the secondrow seat while a passenger is seated on the third-row seat. The passenger’s legs could be pinched or otherwise injured.
To slide the seat further back, raise the bar and slide the knob to the right at the same time. Slide the seat all the way back, then release the bar and the knob.
▼Seat Recline
 WARNING
Reclining:
Sitting in a reclined position while the vehicle is moving is dangerous because you don’t get the full protection from seat belts. During sudden braking or a collision, you can slide under the lap belt and suffer serious internal injuries. For maximum protection, sit well back and upright.
Reclining the Second-Row Seatback: Reclining the second-row seatback when the third-row seat is occupied is dangerous. The second-row seatback may hit and injure the occupants in the third-row seat. Don’t recline the second-row seatback when the thirdrow seat is occupied.
To change the seatback angle, lean forward slightly while pulling the strap. Then lean back to the desired position and release the strap.
Knob
Strap
2-20
Form No. 8R34-EE-02H

J54L_8R34_EE_02H.BOOK Page 21 Monday, July 15, 2002 9:03 AM
Essential Safety Equipment
Seats
Make sure the strap returns to its original position and the seatback is locked in place by attempting to push it forward and backward.
 CAUTION
When returning a rear-reclined seatback to its upright position, make sure you support the seatback while operating the seatback strap. If the seatback is not supported, it will flip forward suddenly and could cause injury.
▼Head Restraint
 WARNING
Head Restraints Adjustment: Driving with the head restraints adjusted too low or removed is dangerous. With no support behind your head, your neck could be seriously injured in a collision. Always drive with the head restraints inserted when seats are being used and make sure they are properly adjusted.
Height adjustment
To raise a head restraint, pull it up to the desired position.
To lower the head restraint, press the stopcatch release, then push the head restraint down.
Stop-catch release
Adjust the head restraint so that the top is parallel with the top of the passenger’s ears, never the passenger’s neck.
Removal
To remove the head restraint, press the stop-catch release, then pull up on the head restraint.
Stop-catch release
2-21
Form No. 8R34-EE-02H

J54L_8R34_EE_02H.BOOK Page 22 Monday, July 15, 2002 9:03 AM
Essential Safety Equipment
Seats
▼Removing Shoulder Restraint
To fold the second-row seat and the front seats flat, remove the shoulder restraints.
▼Third-row Seat Access
To reach the third-row seat, pull the strap on the second-row seat, fold the seatback forward and slide the seat forward.
Strap
The third-row passengers have a similar strap on the back side of the second-row seat. Pull the strap to fold the seatback of the second-row seat forward and slide the seat forward.
To return the second-row seat to its original position, slide the seat to the desired position and raise the seatback upright.
Strap
▼Folding the Second-Row Seat
 WARNING
Using Folded Seatback as a Table While the Vehicle is Moving: Using the folded seatback as a table
while driving is dangerous. During a sudden stop or collision, objects placed on the folded seatback could become projectiles that could hit and injure someone. Never use the folded seat as a table while the vehicle is moving.
The second-row seatback can be folded down and used as a table when the vehicle is not in motion.
Long objects can be also placed inside when the front passenger seat is folded down as well. Make sure objects are secured.
2-22
Form No. 8R34-EE-02H
![]()
J54L_8R34_EE_02H.BOOK Page 23 Monday, July 15, 2002 9:03 AM
Essential Safety Equipment
Seats
 CAUTION
Don’t sit or lie on the folded seatback. The seat could be damaged.
To fold second-row seat
1.Insert the lap belt into the pocket of the seat bottom.
2.Pull the strap and lower the seatback forward.
3.Raise the seatback to the upright position. Attempt to move the seatback forward and backward to ensure it is locked.
NOTE
If the seatback is not first raised to the upright position, the seatback will not be locked when the seatback is folded forward for other uses.
4.Lower the head restraint to the lowest position (page 2-21).
5.Push the knob on the back of the seatback and fold the seatback forward.
Knob
6. Make sure the seatback is locked.
2-23
Form No. 8R34-EE-02H

J54L_8R34_EE_02H.BOOK Page 24 Monday, July 15, 2002 9:03 AM
Essential Safety Equipment
Seats
To return the seat to the upright position
1.Press and hold the knob on the back of the seatback and lift the seatback upright. Then release the knob and continue pushing the seatback to the upright position. Attempt to move the seatback forward and backward to make sure it is locked.
2.Place the seat belt buckles face up.
To fold and stow second-row seat (European model)
The second-row seat can be flipped forward to provide more cargo space.
1.Fold down the left and right seatbacks to the table position (page 2-22).
2.To unlock the seat, pull the lever on the left or right and raise the rear portion of the seat bottom forward.
Lever
3.To prevent the seat from falling back down, remove the support bar from the pocket.
Support bar
NOTE
The support bar is kept in the pocket under the seat.
2-24
Form No. 8R34-EE-02H

J54L_8R34_EE_02H.BOOK Page 25 Monday, July 15, 2002 9:03 AM
Essential Safety Equipment
Seats
4.Attach the support bar to the floor anchor.
Floor anchor
5.Attach the opposite end of the support bar to the catch on the seat bottom. Attempt to pull the seat towards the rear (liftgate) to make sure the support bar is securely latched.
Catch
To fold and stow second-row seat (Except European model)
The second-row seat can be flipped forward to provide more cargo space.
1.Fold down the left and right seatbacks to the table position (page 2-22).
2.To unlock the seat, pull the lever on the left or right and raise the rear portion of the seat bottom forward.
Lever
3.To prevent the seat from falling back down, attach the holding strap hook to the left head restraint upright.
Holding strap hook
 WARNING
Loose Seat:
A seat not secured with a holding strap is dangerous. The seat could fall down and cause serious injury. Ensure that stowed seats are secured with holding straps.
2-25
Form No. 8R34-EE-02H

J54L_8R34_EE_02H.BOOK Page 26 Monday, July 15, 2002 9:03 AM
Essential Safety Equipment
Seats
4.Adjust the holding strap to tighten it securely on the head restraint upright.
NOTE
The holding strap hook is kept in the pocket under the seat.
To return second-row seat to the original position (European model)
1.To detach the support bar, pull the lever on the left while supporting the seat.
Lever
2. Tuck the support bar in the pocket.
NOTE
The support bar is kept in the pocket under the seat.
3.Carefully lower the seat backward until it locks in place. Attempt to lift the seat up to make sure it is firmly locked down.
4.Press and hold the knob on the back of the seatback and raise the seatback upright. Then release the knob and continue pushing the seatback to the upright position. Rock the seatback to make sure it is locked.
5.Place the seat belt buckles face up.
2-26
Form No. 8R34-EE-02H

J54L_8R34_EE_02H.BOOK Page 27 Monday, July 15, 2002 9:03 AM
Essential Safety Equipment
Seats
To return second-row seat to the original position (Except European model)
1.Support the seat while detaching the holding strap hook from the head restraint upright so that the seat doesn’t fall down.
2.Tuck the holding strap hook in the pocket.
Holding strap hook
3.Carefully lower the seat backward until it locks in place. Attempt to lift the seat up to make sure it is firmly locked down.
4.Press and hold the knob on the back of the seatback and raise the seatback upright. Then release the knob and continue pushing the seatback to the upright position. Rock the seatback to make sure it is locked.
5.Place the seat belt buckles face up.
2-27
Form No. 8R34-EE-02H

J54L_8R34_EE_02H.BOOK Page 28 Monday, July 15, 2002 9:03 AM
Essential Safety Equipment
Seats
Third-Row Seat
(7-Passenger Model)
 WARNING
Stacking Cargo:
Stacking luggage or other cargo higher than the seatback is dangerous. During a sudden stop or collision, objects can become projectiles that could hit and injure passengers. Don’t stack things higher than the seatback.
Securing Seats:
Adjustable seats and seatbacks that are not securely latched are dangerous. In a sudden stop or collision, the seat or seatback could move, causing injury. Make sure the adjustable components of the seat are locked in place by attempting to rock the seatback.
Unlocked Seatback:
A seatback plays an important role in your protection in a vehicle. Leaving the seatback unlocked is dangerous as it can allow passengers to be ejected or thrown around and baggage to strike occupants in a sudden stop or collision, resulting in severe injury. After adjusting the seatback at any time, even when there are no other passengers, rock the seatback to make sure it is locked in place.
 CAUTION
Before using the third-row seat, remove the luggage compartment cover and install the caps. Sitting in the third-row seat without the caps installed could result in injury if you were to hit them.
NOTE
When returning a third-row seat to its original position, also replace the seat belt to its normal position. Verify that the seat belt pulls and retracts.
2-28
Form No. 8R34-EE-02H

J54L_8R34_EE_02H.BOOK Page 29 Monday, July 15, 2002 9:03 AM
Essential Safety Equipment
Seats
▼Head Restraint
 WARNING
Head Restraints Adjustment: Driving with the head restraints adjusted too low or removed is dangerous. With no support behind your head, your neck could be seriously injured in a collision. Always drive with the head restraints inserted when seats are being used and make sure they are properly adjusted.
Height adjustment
(European model)
To use a head restraint, pull it up to the locked position.
To lower the head restraint, press the stopcatch release, then push the head restraint down.
Stop-catch release
(Except European model)
To raise a head restraint, pull it up to the desired position.
To lower the head restraint, press the stopcatch release, then push the head restraint down.
Stop-catch release
Adjust the head restraint so that the top is parallel with the top of the passenger’s ears, never the passenger’s neck.
Removal
To remove the head restraint, press the stop-catch release, then pull up on the head restraint.
Stop-catch release
2-29
Form No. 8R34-EE-02H

J54L_8R34_EE_02H.BOOK Page 30 Monday, July 15, 2002 9:03 AM
Essential Safety Equipment
Seats
▼Folding the Third-Row Seat
The third-row seat can be flipped and stowed forward to provide more cargo space.
 CAUTION
Do not sit or lie on the folded seatback. The seat could be damaged.
To fold and stow third-row seat
1.Slide the second-row seat all the way forward.
2.Remove the head restraint (page 2-29).
3.Push the lever forward to unlock and lower the seatback forward.
4.Reinstall the head restraints of the seat into the back of the seatback.
5.To unlock the seat, pull the handle and raise the rear portion of the seat bottom upright.
Lever
Handle
2-30
Form No. 8R34-EE-02H

J54L_8R34_EE_02H.BOOK Page 31 Monday, July 15, 2002 9:03 AM
Essential Safety Equipment
Seats
6.To prevent the seat from falling back down, attach the holding strap hook to the left head restraint upright of the second-row seat.
Holding strap hook
 WARNING
Loose Seat:
A seat not secured with a holding strap is dangerous. The seat could fall down and cause serious injury. Ensure that the stowed seat is secured with the holding strap.
7.Adjust the holding strap to tighten it securely on the head restraint upright.
NOTE
The holding strap hook is kept in the pocket under the seat.
To return third-row seat to its original position
1.Support the third-row seat while detaching the holding strap hook from the head restraint upright so that the seat doesn’t fall down.
2.Tuck the holding strap hook into its pocket.
Holding strap hook
3.Lower the third-row seat backward. Attempt to lift the seat up to make sure it is firmly locked down.
4. Remove the head restraints from the back of the seatback.
2-31
Form No. 8R34-EE-02H

J54L_8R34_EE_02H.BOOK Page 32 Monday, July 15, 2002 9:03 AM
Essential Safety Equipment
Seats
5.Raise the seatback to its upright position. Make sure the seatback is locked.
6.Reinsert the head restraints to their normal positions.
7.Place the seat belt buckles face up.
▼Removal of Third-Row Seat
The third-row seat can be removed to provide more cargo space.
 WARNING
Seat Removal or Installation While Vehicle is Moving or on a Slope: Removing or installing the third-row seat while the vehicle is moving or on a slope is dangerous. The seat is heavier than it appears and could suddenly detach causing serious injury. Remove or install the seat with the vehicle parked on a level surface.
Riding on the Floor Space:
Riding on the floor space created by the removal of the third-row seat is dangerous. Sudden braking or a collision could cause serious injury. Do not sit or lie in the floor space for the third-row seat while the vehicle is moving. Never ride in a vehicle where you can’t sit in the seat and wear the seat belt.
Pinching Fingers or Hands: Placing your hands around the seat anchors when removing or installing the third-row seat is dangerous. You could pinch your hands or fingers
between the seat anchor and the seat. Hold the edge of the seat when lowering it into place. Never place your hands between the seat anchor and the seat.
2-32
Form No. 8R34-EE-02H
![]()
J54L_8R34_EE_02H.BOOK Page 33 Monday, July 15, 2002 9:03 AM
Essential Safety Equipment
Seats
 WARNING
Unsecured Seats:
Driving with the seat unsecured is dangerous. The seat may become detached while the vehicle is moving causing serious injury. After installing the seat, attempt to push it forward and backward to make sure it is securely locked.
To remove third-row seat
1.Remove the head restraint (page 2-29)
2.Push the lever forward to unlock and fold the seatback forward.
Lever
4.To unlock the seat, pull the handle and raise the rear position of the seat bottom upright.
Handle
5.Supporting the third-row seat with your hand and press down each seat lock lever.
Seat lock lever
3. Reinstall the head restraints of the seat into the back of the seatback.
2-33
Form No. 8R34-EE-02H

J54L_8R34_EE_02H.BOOK Page 34 Monday, July 15, 2002 9:03 AM
Essential Safety Equipment
Seats
6.Remove the seat from the front floor anchors.
To install third-row seat
1.Press the seat lock levers on the left and right all the way down.
Seat lock lever
2.Align the seat retaining clamps with the front floor anchors.
Seat retaining clamp
Front floor anchor
3.Supporting the seat with your hand, raise the seat lock levers on the left and right to lock the seat in place.
Seat lock lever
4. Return the third-row seat to its original position following procedure 3 through 7 of “To return third-row seat to its original position.”
2-34
Form No. 8R34-EE-02H

J54L_8R34_EE_02H.BOOK Page 35 Monday, July 15, 2002 9:03 AM
Essential Safety Equipment
Seats
Flat Folding
(7-Passenger Model)
The second-row and front seats can be folded down for use as beds when the vehicle is safely parked.
 WARNING
Folded-Flat Seats:
Sitting or lying on seats folded flat is a dangerous way to ride. During sudden braking or a collision you could be thrown around inside the vehicle and seriously injured. Don’t ride on seatbacks folded flat.
Removing and Installing Third-Row Seat:
Removing and installing the thirdrow seat alone is dangerous. Because the seat is heavy, you could be injured. Always have the help of at least one other person when removing or installing the seat.
▼To Fold the Seats Flat
1.Remove the third-row seat (page 2-32).
2.Remove the shoulder restraints of the second-row seat (page 2-22).
3.Pull the seat slide bar and slide the second-row seat all the way back (page 2-20).
4.Pull the reclining strap and fold down the second-row seatbacks rearward until they lock (page 2-20).
5.Remove the head restraints from the front seats (page 2-4).
6.Pull the seat slide levers and slide the front seats all the way forward (page 2- 2).
7.Raise the reclining levers and push the front seatbacks as far down as possible (page 2-3).
To return the seats to their road positions, reverse the procedures for folding the second-row and front seats flat.
2-35
Form No. 8R34-EE-02H

J54L_8R34_EE_02H.BOOK Page 36 Monday, July 15, 2002 9:03 AM
Essential Safety Equipment
Seat Belt Systems
Seat Belt Precautions
Seat belts help to decrease the possibility of severe injury during accidents and sudden stops. Mazda recommends that the driver and all passengers always wear seat belts.
The front seats have lap/shoulder belts. These belts have retractors with inertia locks that keep them out of the way when not in use. The locks allow the belts to remain comfortable on users, but they’ll lock in position during a collision.
(5-passenger model)
The rear seats have lap/shoulder belts. These belt retractors operate in two modes, emergency locking mode and, for child-restraint systems, automatic locking mode.
(7-passenger model)
The second-row seat has lap/shoulder belts with retractors, and a manual adjustable lap belt. The second-row seat lap/shoulder belt retractors operate in two modes, emergency locking mode and, for child-restraint systems, automatic locking mode. The lap belt is manually adjusted.
The third-row seat has lap/shoulder belts that have retractors with inertia locks.
 WARNING
Not Wearing Seat Belts:
Not wearing a seat belt is extremely dangerous. During a collision, occupants not wearing seat belts could hit someone or things inside the vehicle or even be thrown out of the vehicle. They could be seriously injured or even killed. In the same collision, occupants wearing seat belts would be much safer. Always wear your seat belt and make sure all occupants are properly restrained.
Seat Belt Damaged During an Accident:
Using a damaged seat belt is dangerous. An accident could damage the belt webbing of the seat belt in use. A damaged seat belt cannot provide adequate protection in a collision. Have an Authorised Mazda Dealer inspect all seat belt systems in use during an accident before they are used again.
2-36
Form No. 8R34-EE-02H

J54L_8R34_EE_02H.BOOK Page 37 Monday, July 15, 2002 9:03 AM
Essential Safety Equipment
Seat Belt Systems
 WARNING
Twisted Seat Belts:
Twisted seat belts are dangerous. In a collision, the full width of the belt isn’t available to absorb the impact. This puts more force on the bones beneath the belt, which could break them or cause other serious injury or death. Don’t wear twisted seat belts.
One Belt, One Passenger:
Using one seat belt for more than one person at a time is dangerous. A seat belt used in this way can’t spread the impact forces properly and the two passengers could be crushed together and seriously injured or even killed. Never use one belt for more than one person at a time.
Instructions for Use of Seat Belt Assemblies:
•Seat belts are designed to bear upon the bony structure of the body, and should be worn low across the front of the pelvis, or the pelvis, chest and shoulders, as applicable; wearing the lap section of the belt across the abdominal area must be avoided.
•Seat belts should be adjusted as firmly as possible, consistent with comfort, to provide the protection for which they have been designed. A slack belt will greatly reduce the protection afforded to the wearer.
•Care should be taken to avoid contamination of the webbing with polishes, oils and chemicals, and particularly battery acid. Cleaning may safely be carried out using mild soap and water. The belt should be replaced if webbing becomes frayed, contaminated, or damaged.
•It is essential to replace the entire assembly after it has been worn in a severe impact even if damage to the assembly is not obvious.
•Belts should not be worn with straps twisted.
•Each seat belt assembly must only be used by one occupant; it is dangerous to put a belt around a child being carried on the occupant’s lap.
•No modifications or additions should be made by the user which will either prevent the seat belt adjusting devices from operating to remove slack, or prevent the seat belt assembly from being adjusted to remove slack.
2-37
Form No. 8R34-EE-02H

J54L_8R34_EE_02H.BOOK Page 38 Monday, July 15, 2002 9:03 AM
Essential Safety Equipment
Seat Belt Systems
 CAUTION
Belt retraction may become difficult if the belts and rings are soiled, so try to keep them clean.
Ring
▼Pregnant Women and Persons with Serious Medical Conditions
Pregnant women should wear seat belts. Ask your doctor for specific recommendations. The lap belt should be worn SNUGLY AND AS LOW AS POSSIBLE OVER THE HIPS. The shoulder belt should be worn across your shoulder properly, but never across the stomach area.
Persons with serious medical conditions also should wear seat belts. Check with your doctor for any special instructions regarding specific medical conditions.
▼Emergency Locking Mode
If the belt has fully retracted, it will always be in the emergency locking mode until you move it into automatic locking mode by pulling the belt all the way out to its full length. In the emergency locking mode, the belt remains comfortable on the occupant and the retractor will lock in position during a collision.
If the belt feels tight and hinders comfortable movement while the vehicle is stopped or in motion, you may be in the automatic locking mode because you have pulled the belt too far out. To return to the more comfortable emergency locking mode, wait until you can stop the vehicle in a safe area, retract the belt fully to convert it back to emergency locking mode and then again extend it around you.
2-38
Form No. 8R34-EE-02H

J54L_8R34_EE_02H.BOOK Page 39 Monday, July 15, 2002 9:03 AM
Essential Safety Equipment
Seat Belt Systems
▼Automatic Locking Mode
Always use the automatic locking mode to keep the child-restraint system from shifting to an unsafe position in the event of an accident. To get the seat belt into the automatic locking mode, pull it all the way out and connect it as instructed on the child-restraint system. It will retract down to the child-restraint system and stay locked on it. See the section on child restraint (page 2-49).
2-39
Form No. 8R34-EE-02H

J54L_8R34_EE_02H.BOOK Page 40 Monday, July 15, 2002 9:03 AM
Essential Safety Equipment
Seat Belt Systems
3-Point Type Seat Belt
NOTE
When using the rear centre seat belt, refer to «Rear Centre Position Seat Belt» (page 2-44).
▼Fastening the Seat Belts
1.Grasp the buckle and tongue.
2.Slowly pull out the lap/shoulder belt.
Belt
Tongue
3.Insert the tongue into the buckle until you hear a click.
Tongue
Buckle
 WARNING
Positioning the Shoulder Portion of the Seat Belt:
Improper positioning of the shoulder portion of the seat belt is dangerous. An improperly positioned belt will provide little or no protection in a collision. Always make sure the shoulder portion of the seat belt is positioned across your shoulder and near your neck, but never under your arm, on your neck, or on your upper arm.
4.Make sure the shoulder belt is snugly fitted against your body.
Take up slack
Keep low on hip bone
Too high
 WARNING
Positioning the Lap Portion of the Seat Belt:
The lap portion of the seat belt worn too high is dangerous. In a collision, this would concentrate the impact force directly on the abdominal area, causing serious injury. Wear the lap portion of the belt snugly and as low as possible.
2-40
Form No. 8R34-EE-02H

J54L_8R34_EE_02H.BOOK Page 41 Monday, July 15, 2002 9:03 AM
Essential Safety Equipment
Seat Belt Systems
▼Unfastening the Seat Belts
Depress the button on the buckle.
NOTE
If a belt does not fully retract, inspect it for kinks and twists.
To secure the outboard-rear seat belts when not in use, insert the belts in their seat belt retainers.
|
5-passenger |
Outside-rear |
|
model |
seat belt |
7-passenger model
|
Seat |
Seat |
|
belt |
belt |
|
retainer |
retainer |
▼Shoulder Belt Adjuster
Adjust the height of the shoulder belt if the seat belt touches your neck, or if it crosses your arm instead of your shoulder. Simply grip and pull the adjuster, move it to the desired position, and then release it. Make sure the adjuster is locked.
Shoulder belt adjuster
Seat belt retainer
2-41
Form No. 8R34-EE-02H

J54L_8R34_EE_02H.BOOK Page 42 Monday, July 15, 2002 9:03 AM
Essential Safety Equipment
Seat Belt Systems
 WARNING
Positioning the Shoulder Portion of the Seat Belt:
Improper positioning of the shoulder portion of the seat belt is dangerous. An improperly positioned belt will provide little or no protection in a collision. Always make sure the shoulder portion of the seat belt is positioned across your shoulder and near your neck, but never under your arm, on your neck, or on your upper arm.
Front Seat Belt
Pretensioner and Load
Limiting Systems
For optimum protection, the driver and front passenger seat belts are equipped with pretensioner and load limiting systems.*1
In moderate or greater frontal or nearfrontal accidents, the front air bag and pretensioner systems deploy simultaneously. The pretensioners take up slack in the front seat belts as the air bags are expanding. The load limiting system releases belt webbing in a controlled manner to reduce belt force on the occupant’s chest.
*1: Some models are equipped with the pretensioner system only, and do not have the load limiting system.
 WARNING
Incorrect Positioning of the Driver and Front Passenger Seat Belts: Incorrect positioning of the driver and passenger seat belts is dangerous. Without proper positioning, the pretensioner and load limiting systems cannot provide adequate protection in an accident and this could result in serious injury. Wear seat belts only as recommended in this owner’s manual.
2-42
Form No. 8R34-EE-02H
 Loading…
-
nekesha
- Администратор
- Сообщения: 1668
- Зарегистрирован: 17 дек 2014, 03:43
- Благодарил (а): 2 раза
- Поблагодарили: 6 раз
Mazda Premacy 1999-2005 / Мазда Премаси 1999-2005
Руководство по эксплуатации, техобслуживанию и ремонту Mazda Premacy / Мазда Премаси
Operation, Maintenance and Repair Manual Mazda Premacy
 9795 просмотров")
- Года выпуска: 1999-2005
Year of release: 1999-2005
Бензиновые двигатели: FP-DE (1,8 л.), FS-ZE (2,0 л.)
Gasoline engines: FP-DE (1.8 l.), FS-ZE (2.0 l.)
- Язык: Русский
Формат: PDF
Размер: 333 Мб
Russian language
Format: PDF
Size: 333 MB
Скачать документацию Mazda Premacy / Мазда Премаси
Download the documentation of Mazda Premacy
для распаковки используйте пароль — avto-ok.info
use the password to unpack — avto-ok.info
краш тест