======
NOTE:
======
While we are hoping that one day DOSBox will run all programs ever made for the PC, we are not there yet.
At present, DOSBox running on a high-end machine will roughly be
the equivalent of a Pentium I PC. DOSBox can be configured to run a wide range of DOS games, from CGA/Tandy/PCjr
classics up to games from the Quake era.
=======
INDEX:
=======
- Quickstart
- Start (FAQ)
- Command Line Parameters
- Internal Programs
- Special Keys
- Joystick/Gamepad
- KeyMapper
- Keyboard Layout
- Serial Multiplayer feature
- How to speed up/slow down DOSBox
- Troubleshooting
- DOSBox Status Window
- The configuration (options) file
- The language file
- Building your own version of DOSBox
- Special thanks
- Contact
==============
1. Quickstart:
==============
Type INTRO in DOSBox for a quick tour.
It is essential that you get familiar with the idea of mounting, DOSBox does not automatically make any drive (or a part of it) accessible to the emulation. See the FAQ entry
«How to start?» as well as the description of the MOUNT command (section 4: «Internal Programs»). If you have your game on a cdrom you may try this guide:
https://www.vogons.org/viewtopic.php?t=8933
===============
2. Start (FAQ):
===============
| START: | How to start? |
| AUTOMATION: | Do I always have to type these «mount» commands? |
| FULLSCREEN: | How do I change to fullscreen? |
| FULLSCREEN: | My fullscreen is too large. |
| CD-ROM: | My CD-ROM doesn’t work. |
| CD-ROM: | The game/application can’t find its CD-ROM. |
| MOUSE: | The mouse doesn’t work. |
| SOUND: | There is no sound. |
| SOUND: | What sound hardware does DOSBox presently emulate? |
| SOUND: | The sound stutters or sounds stretched/weird. |
| KEYBOARD: | I can’t type \ or : in DOSBox. |
| KEYBOARD: | Right Shift and «\» doesn’t work in DOSBox. (Windows only) |
| KEYBOARD: | The keyboard lags. |
| CONTROL: | The character/cursor/mouse pointer always moves into one direction! |
| SPEED: | The game/application runs much too slow/too fast! |
| CRASH: | The game/application does not run at all/crashes! |
| CRASH: | DOSBox crashes on startup! |
| GAME: | My Build game(Duke3D/Blood/Shadow Warrior) has problems. |
| SAFETY: | Can DOSBox harm my computer? |
| OPTIONS: | I would like to change DOSBox’s options. |
| HELP: |
Great Manual, but I still don’t get it. |
START: How to start?
At the beginning you’ve got a Z:\> instead of a C:\> at the prompt. You have to make your directories available as drives in DOSBox by using the «mount»
command. For example, in Windows «mount C D:\GAMES» will give you a C drive in DOSBox which points to your Windows D:\GAMES directory (that was created before).
In Linux, «mount c /home/username» will give you a C drive in DOSBox which points to /home/username in Linux. To change to the drive mounted like above, type «C:».
If everything went fine, DOSBox will display the prompt «C:\>».
AUTOMATION: Do I always have to type these commands?
In the DOSBox configuration file is an [autoexec] section. The commands present there are run when DOSBox starts, so you can use this section for the mounting. Look at
Section 13: The configuration (options) file
FULLSCREEN: How do I change to fullscreen?
Press alt-enter. Alternatively: Edit the configuration file of DOSBox and change the option fullscreen=false to fullscreen=true. If fullscreen looks wrong in your opinion:
Play with the options: fullresolution, output and aspect in the configuration file of DOSBox. To get back from fullscreen mode: Press alt-enter again.
FULLSCREEN: My fullscreen is too large.
This is can be a problem on Windows 10, if you have display scaling
set to a value above 100%. Windows in that case will resize the screen
on top of dosbox resizing the screen, which can happen for the output:
ddraw, opengl, openglnb, overlay. You can disable this Windows behaviour
by enabling a specific compatibility setting:
— Right-click the DOSBox icon and select «Properties».
— Go to the «Compatibility» tab.
— Click on «Change high DPI settings».
— Tick «Override high DPI scaling behaviour» and set it to «Application».
— Apply the changes by clicking on «OK».
Unfortunately, this compatibility option causes some side effects in
windowed mode, and in this case you will need to change the resolution
in the config/Options file for windowresolution (e.g. 1024×768).
Alternatively, you can disable the display scaling and or use a lower
fullresolution value.
CD-ROM: My CD-ROM doesn’t work.
To mount your CD-ROM in DOSBox you have to specify some additional options when mounting the CD-ROM.
To enable CD-ROM support (includes MSCDEX) in Windows:— mount d f:\ -t cdrom
in Linux:
— mount d /media/cdrom -t cdrom
In some cases you might want to use a different CD-ROM interface, for example if CD audio does not work:
To enable SDL-support (does not include low-level CD access!):
— mount d f:\ -t cdrom -usecd 0 -noioctl
To enable ioctl access using digital audio extraction for CD audio (windows-only, useful for Vista):
— mount d f:\ -t cdrom -ioctl_dx
To enable ioctl access using MCI for CD audio (windows-only):
— mount d f:\ -t cdrom -ioctl_mci
To force ioctl-only access (windows-only):
— mount d f:\ -t cdrom -ioctl_dio
To enable low-level aspi-support (win98 with aspi-layer installed):
— mount d f:\ -t cdrom -aspi
explanation:
— d driveletter you will get in DOSBox (d is the best, don’t change it!)
— f:\ location of CD-ROM on your PC. In most cases it will be d:\ or e:\
— 0 The number of the CD-ROM drive, reported by «mount -cd»(note that this value is only needed when using SDL for CD audio,
otherwise it is ignored)
See also the next question: The game/application can’t find its CD-ROM.
CD-ROM: The game/application can’t find its CD-ROM
Be sure to mount the CD-ROM with -t cdrom switch, this will enable the MSCDEX interface required by DOS games to interface with CD-ROMs. Also try adding the correct label
(-label LABEL) to the mount command, where LABEL is the CD-label (volume ID) of the CD-ROM. Under Windows you can specify -ioctl, -aspi or -noioctl. Look at the description
of the mount command in Section 4: «Internal programs» for their meaning and the additional audio-CD related options -ioctl_dx, -ioctl_mci, -ioctl_dio. Try creating
a CD-ROM image (preferably CUE/BIN pair) and use the DOSBox’s internal IMGMOUNT tool to mount the image (the CUE sheet). This enables very good low-level
CD-ROM support on any operating system.
MOUSE: The mouse doesn’t work.
Usually, DOSBox detects when a game uses mouse control. When you click on the screen it should get locked (confined to the DOSBox window) and work. With certain games,
the DOSBox mouse detection doesn’t work. In that case you will have to lock the mouse manually by pressing CTRL-F10.
SOUND: There is no sound
Be sure that the sound is correctly configured in the game. This might be done during the installation or with a setup/setsound utility that accompanies the game. First
see if an autodetection option is provided. If there is none try selecting Soundblaster or Soundblaster 16 with the default settings being «address=220 irq=7 dma=1»
(sometimes highdma=5). You might also want to select Sound Canvas/SCC/MPU-401/General MIDI/Wave Blaster at «address=330 IRQ=2» as music device. The parameters
of the emulated sound cards can be changed in the DOSBox configuration file.If you still don’t get any sound set the core to normal in DOSBox configuration and use some lower fixed cycles value (like cycles=2000). Also
assure that your host operating sound does provide sound. In certain cases it might be useful to use a different emulated sound device
like a soundblaster pro (sbtype=sbpro1 in the DOSBox configuration file) or the gravis ultrasound (gus=true).
SOUND: What sound hardware does DOSBox presently emulate?
DOSBox emulates several legacy sound devices:
- Internal PC speaker/Buzzer
This emulation includes both the tone generator and several forms of
digital sound output through the internal speaker. - Creative CMS/Gameblaster
The is the first card released by Creative Labs(R). The default configuration places it on address 220. It is disabled as default. - Tandy 3 voice
The emulation of this sound hardware is complete with the exception of the noise channel. The noise channel is not very well documented and as such is only a best guess
as to the sound’s accuracy. It is disabled as default. - Tandy DAC
Some games may require turning off sound blaster emulation (sbtype=none) for better tandy DAC sound support. Don’t forget to set the sbtype back to sb16 if you don’t use
tandy sound. - Adlib
This emulation is almost perfect and includes the Adlib’s ability to almost play digitized sound. Placed at address 220 (also on 388). - SoundBlaster 16 / SoundBlaster Pro I & II / SoundBlaster I & II
By default DOSBox provides Soundblaster 16 level 16-bit stereo sound. You can select a different SoundBlaster version in the configuration of DOSBox. AWE32 music is not
emulated as you can use MPU-401 instead (see below). - Disney Sound Source and Covox Speech Thing
Using the printer port, this sound device outputs digital sound only. Placed at LPT1 - Gravis Ultrasound
The emulation of this hardware is nearly complete, though the MIDI capabilities have been left out, since an MPU-401 has been emulated in other code. For Gravis music you
also have to install Gravis drivers inside DOSBox. It is disabled as default. - MPU-401
A MIDI passthrough interface is also emulated. This method of sound output will only work when used with external device/emulator. Every Windows XP/Vista/7 and MAC OS has
got a default emulator compatible with: Sound Canvas/SCC/General Standard/General MIDI/Wave Blaster. A different device/emulator is needed for Roland LAPC/CM-32L/MT-32 compatibility.
SOUND: The sound stutters or sounds stretched/weird.
You may be using too much CPU power to keep DOSBox running at the current speed. You can lower the cycles, skip frames, reduce the sampling rate of the respective sound device,
increase the prebuffer. See section 13: «The configuration (options) file»
If you are using cycles=max or =auto, then make sure that there is no background processes interfering! (especially if they access the harddisk) Also look at Section 10. «How
to speed up/slow down DOSBox»
KEYBOARD: I can’t type \ or : in DOSBox.
This can happen in various cases, like your host keyboard layout does not have a matching DOS layout representation (or it was not correctly detected), or the key mapping
is wrong.
Some possible fixes:
- Use / instead, or ALT-58 for : and ALT-92 for \.
- Change the DOS keyboard layout (see Section 8: Keyboard Layout).
- Add the commands you want to execute to the [autoexec] section of the DOSBox configuration file.
- Open the DOSBox configuration file and change the usescancodes entry.
- Switch the keyboard layout of your operating system.
Note that if the host layout can not be identified, or keyboardlayout is set to none in the DOSBox configuration file, the standard US layout is used. In this configuration
try the keys around «enter» for the key \ (backslash), and for the key : (colon) use shift and the keys between «enter» and «L».
KEYBOARD: Right Shift and «\» doesn’t work in DOSBox. (Windows only)
This may happen if Windows thinks that you have more than one keyboard connected to your PC when you use some remote control devices. To verity this problem run cmd.exe,
navigate to DOSBox program folder and type:set sdl_videodriver=windib
dosbox.execheck whether keyboard started to work properly. As windib is slower it is best to use one of the two solutions provided here: https://www.vogons.org/viewtopic.php?t=24072
KEYBOARD: The keyboard lags
Lower the priority setting in the DOSBox configuration file, for example set «priority=normal,normal». You might also want to try lowering the cycles (use a fixed
cycle amount to start with, like cycles=10000).
CONTROL: The character/cursor/mouse pointer always moves into one direction!
See if it still happens if you disable the joystick emulation, set joysticktype=none in the [joystick] section of your DOSBox configuration file. Maybe also try unplugging
any joystick/gamepad. If you want to use the joystick in the game, try setting timed=false and be sure to calibrate the joystick (both in your OS as well as in the game
or the game’s setup program).
SPEED: The game/application runs much too slow/too fast!
Look at Section 10: «How to speed up/slow down DOSBox» for more information.
CRASH: The game/application does not run at all/crashes!
Look at Section 11: Troubleshooting
CRASH: DOSBox crashes on startup!
Look at Section 11: Troubleshooting
GAME: My Build game(Duke3D/Blood/Shadow Warrior) has problems
First of all, try to find a port of the game. Those will offer a better experience. To fix the graphics problem that occurs in DOSBox on higher resolutions: Open the configuration
file of DOSBox and search for:machine=svga_s3. Change svga_s3 to vesa_nolfb
Change memsize=16 to memsize=63
SAFETY: Can DOSBox harm my computer?
DOSBox can not harm your computer more than any other resource demanding program. Increasing the cycles does not overclock your real CPU. Setting the cycles too high has
a negative performance effect on the software running inside DOSBox.
OPTIONS: I would like to change DOSBox’s options.
Look at Section 13. «The configuration (options) file»
HELP: Great Manual, but I still don’t get it
For more questions read the rest of this Manual. You may also look at:
- The DOSBox Guides: https://www.vogons.org/viewforum.php?f=39
- The DOSBox Wiki: https://www.dosbox.com/wiki/
- The DOSBox Site: https://www.dosbox.com
- The DOSBox Forum: https://www.vogons.org/viewforum.php?f=53
===========================
3. Command Line Parameters:
===========================
An overview of the command line options you can give to DOSBox. Although in most cases it is easier to use DOSBox’s configuration file instead. See: Section 13. «The
configuration (options) file»
To be able to use Command Line Parameters:
(Windows) open cmd.exe or command.com or edit the shortcut to dosbox.exe
(Linux) use console
(MAC OS X) start terminal.app and navigate to:
/applications/dosbox.app/contents/macos/dosbox
The options are valid for all operating systems unless noted in the option description:
dosbox [name] [-exit] [-c command] [-fullscreen] [-userconf]
[-conf congfigfilelocation] [-lang languagefilelocation]
[-machine machine type] [-noconsole] [-startmapper] [-noautoexec]
[-securemode] [-scaler scaler | -forcescaler scaler] [-version]
[-socket socket]
dosbox -version
dosbox -editconf program
dosbox -opencaptures program
dosbox -printconf
dosbox -eraseconf
dosbox -erasemapper
name
If «name» is a directory it will mount that as the C: drive.
If «name» is an executable it will mount the directory of «name»
as the C: drive and execute «name».
-exit
DOSBox will close itself when the DOS application «name» ends.
-c command
Runs the specified command before running «name». Multiple commands can be specified. Each command should start with «-c» though. A command can be:
an Internal Program, a DOS command or an executable on a mounted drive.
-fullscreen
Starts DOSBox in fullscreen mode.
-userconf
Start DOSBox with the users specific configuration file. Can be used together with multiple -conf parameters, but -userconf will always be loaded before them.
-conf configfilelocation
Start DOSBox with the options specified in «configfilelocation». Multiple -conf options may be present. See Section 13 for more details.
-lang languagefilelocation
Start DOSBox using the language specified in «languagefilelocation». See Section 14 for more details.
-machine machinetype
Setup DOSBox to emulate a specific type of machine. Valid choices are:
hercules, cga, ega, pcjr, tandy, svga_s3 (default) as well as the additional svga chipsets listed in the DOSBox configuration file.
svga_s3 enables vesa emulation as well.
For some special vga effects the machinetype vgaonly can be used, note that this disables svga capabilities and might be slower due to the higher emulation precision.
The machinetype affects the video card and the available sound cards.
-noconsole (Windows Only)
Start DOSBox without showing DOSBox Status Window (console). Output will be redirected to stdout.txt and stderr.txt
-startmapper
Enter the keymapper directly on startup. Useful for people with keyboard problems.
-noautoexec
Skips the [autoexec] section of the loaded configuration file.
-securemode
Same as -noautoexec, but adds config.com -securemode at the bottom of AUTOEXEC.BAT (which in turn disables any changes to how the drives are mounted inside DOSBox).
-scaler scaler
Uses the scaler specified by «scaler». See the DOSBox configuration file for the available scalers.
-forcescaler scaler
Similar to the -scaler parameter, but tries to force usage of the specified scaler even if it might not fit.
-version
output version information and exit. Useful for frontends.
-editconf program
calls program with as first parameter the configuration file. You can specify this command more than once. In this case it will move to second program if the first one
fails to start.
-opencaptures program
calls program with as first parameter the location of the captures folder.
-printconf
prints the location of the default configuration file.
-resetconf
removes the default configuration file.
-resetmapper
removes the mapperfile used by the default clean configuration file.
-socket
passes the socket number to the nullmodem emulation. See Section 9: «Serial Multiplayer feature.»
Note:
If a name/command/configfilelocation/languagefilelocation contains a space, put the whole name/command/configfilelocation/languagefilelocation between quotes («command
or file name»). If you need to use quotes within quotes (most likely with -c and mount):
Windows and OS/2 users can use single quotes inside the double quotes.
Other people should be able to use escaped double quotes inside the double quotes.
Windows: -c «mount c ‘c:\My folder with DOS games\'»
Linux: -c «mount c \»/tmp/name with space\»»
A rather unusual example, just to demonstrate what you can do (Windows): dosbox D:\folder\file.exe -c «MOUNT Y H:\MyFolder» This mounts D:\folder as C:\ and runs
file.exe. Before it does that, it will first mount H:\MyFolder as the Y drive. In Windows, you can also drag directories/files onto the DOSBox executable.
=====================
4. Internal Programs:
=====================
DOSBox supports most of the DOS commands found in command.com. To get a list of the internal commands type «HELP» at the prompt.
In addition, the following commands are available:
MOUNT «Emulated Drive letter» «Real Drive or Directory»
[-t type] [-aspi] [-ioctl] [-noioctl] [-usecd number] [-size drivesize]
[-label drivelabel] [-freesize size_in_mb]
[-freesize size_in_kb (floppies)]
MOUNT -cd
MOUNT -u «Emulated Drive letter»
Program to mount local directories as drives inside DOSBox.
«Emulated Drive letter»
The driveletter inside DOSBox (for example C).
«Real Drive letter (usually for CD-ROMs in Windows) or Directory»
The local directory you want accessible inside DOSBox.-t type
Type of the mounted directory. Supported are: dir (default), floppy, cdrom.
-size drivesize
(experts only)
Sets the size of the drive, where drivesize is of the form «bps,spc,tcl,fcl»:bps: bytes per sector, by default 512 for regular drives and 2048 for CD-ROM drives
spc: sectors per cluster, usually between 1 and 127
tcl: total clusters, between 1 and 65534
fcl: total free clusters, between 1 and tcl-freesize size_in_mb | size_in_kb
Sets the amount of free space available on a drive in megabytes (regular drives) or kilobytes (floppy drives). This is a simpler version of -size.
-label drivelabel
Sets the name of the drive to «drivelabel». Needed on some systems if the CD-ROM label isn’t read correctly (useful when a program can’t find its CD-ROM). If
you don’t specify a label and no lowlevel support is selected (that is omitting the -usecd # and/or -aspi parameters, or specifying -noioctl):For Windows: label is extracted from «Real Drive».
For Linux: label is set to NO_LABEL.If you do specify a label, this label will be kept as long as the drive is mounted. It will not be updated !!
-aspi
Forces use of the aspi layer. Only valid if mounting a CD-ROM under Windows systems with an ASPI-Layer.
-ioctl (automatic selection of the CD audio interface)
-ioctl_dx (digital audio extraction used for CD audio)
-ioctl_dio (ioctl calls used for CD audio)
-ioctl_mci (MCI used for CD audio)Forces use of ioctl commands. Only valid if mounting a CD-ROM under a Windows OS which support them (Win2000/XP/NT). The various choices only differ in the way CD audio
is handled, preferably -ioctl_dio is used (lowest workload), but this might not work on all systems, so -ioctl_dx (or -ioctl_mci) can be used.-noioctl
Forces use of the SDL CD-ROM layer. Valid on all systems.
-usecd number
Valid on all systems, under windows the -noioctl switch has to be present to make use of the -usecd switch. Enables to select the drive that should be used by SDL. Use
this if the wrong or no CD-ROM drive is mounted while using the SDL CD-ROM interface. «number» can be found by «MOUNT -cd».-cd
Displays all CD-ROM drives detected by SDL, and their numbers.
See the information at the -usecd entry above.-u
Removes the mount. Doesn’t work for Z:\.
Note: It’s possible to mount a local directory as CD-ROM drive, but hardware support is then missing.
Basically MOUNT allows you to connect real hardware to DOSBox’s emulated PC. So MOUNT C C:\GAMES tells DOSBox to use your C:\GAMES directory as drive C: in DOSBox. MOUNT
C E:\SomeFolder tells DOSBox to use your E:\SomeFolder directory as drive C: in DOSBox.Mounting your entire C drive with MOUNT C C:\ is NOT recommended! The same is true for mounting the root of any other drive, except for CD-ROMs
(due to their read-only nature). Otherwise if you or DOSBox make a mistake you may lose all your files. Also never mount a «Windows» or «Program Files»
folders or their subfolders in Windows Vista/7 as DOSBox may not work correctly, or will stop working correctly later. It is recommended to keep all your dos applications/games
in a simple folder (for example c:\dosgames) and mount that.You should always install your game inside DOSBox. So if you have the game on CD you always (even after installation!) have to mount both: folder as a harddisk drive and
a CD-ROM.
HardDisk should always be mounted as c
CD-ROM should always be mounted as d
Floppy should always be mounted as a (or b)Basic MOUNT Examples for normal usage (Windows):
- To mount a folder as a harddisk drive:
mount c d:\dosgames- To mount your CD-ROM drive E as CD-ROM drive D in DOSBox:
mount d e:\ -t cdrom- To mount your drive a: as a floppy:
mount a a:\ -t floppyAdvanced MOUNT examples (Windows):
- To mount a hard disk drive with ~870 mb free diskspace (simple version):
mount c d:\dosgames -freesize 870- To mount a drive with ~870 mb free diskspace (experts only, full control):
mount c d:\dosgames -size 512,127,16513,13500- To mount c:\dosgames\floppy as a floppy:
mount a c:\dosgames\floppy -t floppyOther MOUNT examples:
- To mount system CD-ROM drive at mountpoint /media/cdrom as CD-ROM drive D in DOSBox:
mount d /media/cdrom -t cdrom -usecd 0- To mount /home/user/dosgames as drive C in DOSBox:
mount c /home/user/dosgames- To mount the directory where DOSBox was started as C in DOSBox:
mount c .
(note the . which represents the directory where DOSBox was started, on Windows Vista/7 don’t use this if you installed DOSBox to your «Program Files» folder)If you want to mount a CD image or floppy image, check IMGMOUNT.
MOUNT also works with images but only if you use external program, for example (both are free):
- Daemon Tools Lite (for CD images)
- Virtual Floppy Drive (for floppy images)
Although IMGMOUNT can give better compatibility.
MEM
Program to display the amount and type of free memory.
VER
VER set major_version [minor_version]
Display the current DOSBox version and reported DOS version (parameterless usage). Change the reported DOS version with the «set» parameter, for example: «VER
set 6 22» to have DOSBox report DOS 6.22 as version number.
CONFIG -writeconf filelocation
CONFIG -writelang filelocation
CONFIG -securemode
CONFIG -set «section property=value»
CONFIG -get «section property»
CONFIG can be used to change or query various settings of DOSBox during runtime. It can save the current settings and language strings to disk. Information about all possible
sections and properties can be found in Section 13: «The configuration (options) file».
-writeconf filelocation
Write the current configuration settings to a file in a specified location. «filelocation» is located on the local drive, not a mounted drive in DOSBox. The
configuration file controls various settings of DOSBox: the amount of emulated memory, the emulated sound cards and many more things. It allows access to AUTOEXEC.BAT
as well. See Section 13: «The configuration (options) file» for more information.-writelang filelocation
Write the current language settings to a file in a specified location. «filelocation» is located on the local drive, not a mounted drive in DOSBox. The language
file controls all visible output of the internal commands and the internal DOS. See Section 14: «The Language File» for more information.-securemode
Switches DOSBox to a more secure mode. In this mode the internal commands MOUNT, IMGMOUNT and BOOT won’t work. It’s not possible either to create a new configfile or
languagefile in this mode. (Warning: you can only undo this mode by restarting DOSBox.)-set «section property=value»
CONFIG will attempt to set the property to new value. Currently CONFIG can not report whether the command succeeded or not.
-get «section property»
The current value of the property is reported and stored in the environment variable %CONFIG%. This can be used to store the value when using batch files.
Both «-set» and «-get» work from batch files and can be used to set up your own preferences for each game. Although it may be easier to use separate DOSBox’s
configuration files for each game instead.Examples:
- To create a configuration file in your c:\dosgames directory:
config -writeconf c:\dosgames\dosbox.conf- To set the cpu cycles to 10000:
config -set «cpu cycles=10000»- To turn ems memory emulation off:
config -set «dos ems=off»- To check which cpu core is being used.
config -get «cpu core»
LOADFIX [-size] [program] [program-parameters]
LOADFIX -f
Program to reduce the amount of available conventional memory. Useful for old programs which don’t expect much memory to be free.
-size
number of kilobytes to «eat up», default = 64kb
-f
frees all previously allocated memory
Examples:
- To start mm2.exe and allocate 64kb memory
(mm2 will have 64 kb less available):
loadfix mm2- To start mm2.exe and allocate 32kb memory:
loadfix -32 mm2- To free previous allocated memory:
loadfix -f
RESCAN
Make DOSBox reread the directory structure. Useful if you changed something on a mounted drive outside of DOSBox. (CTRL — F4 does this as well!)
MIXER
Makes DOSBox display its current volume settings. Here’s how you can change them:
mixer channel left:right [/NOSHOW] [/LISTMIDI]
channel
Can be one of the following: MASTER, DISNEY, SPKR, GUS, SB, FM [, CDAUDIO].
CDAUDIO is only available if a CD-ROM interface with volume control is enabled (CD image, ioctl_dx).left:right
The volume levels in percentages. If you put a D in front it will be in decibel (Example: mixer gus d-10).
/NOSHOW
Prevents DOSBox from showing the result if you set one of the volume levels.
/LISTMIDI
In Windows lists the available midi devices on your PC. To select a device other than the Windows default midi-mapper, change the line ‘midiconfig=’ in the [midi] section
of the configuration file to ‘midiconfig=id’, where ‘id’ is the number for the device as listed by LISTMIDI. eg. midiconfig=2In Linux this option doesn’t work, but you get similar results by using ‘pmidi -l’ in console. Then change the line ‘midiconfig=’ to ‘midiconfig=port’, where ‘port’
is the port for the device as listed by ‘pmidi -l’. eg. midiconfig=128:0
IMGMOUNT
A utility to mount disk images and CD-ROM images in DOSBox.
IMGMOUNT DRIVE [imagefile] -t [image_type] -fs [image_format]
-size [sectorsbytesize, sectorsperhead, heads, cylinders]
IMGMOUNT DRIVE [imagefile1 imagefile2 .. imagefileN] -t cdrom -fs iso
imagefile
Location of the image file to mount in DOSBox. The location can be on a mounted drive inside DOSBox, or on your real disk. It is possible to mount CD-ROM images (ISOs
or CUE/BIN or CUE/IMG) too. If you need CD swapping capabilities, specify all images in succession (see the next entry).
CUE/BIN pairs and cue/img are the preferred CD-ROM image types as they can store audio tracks compared to ISOs (which are data-only). For the CUE/BIN mounting always specify
the CUE sheet.imagefile1 imagefile2 .. imagefileN
Location of the image files to mount in DOSBox. Specifying a number
of image files is only allowed for CD-ROM images.
The CD’s can be swapped with CTRL-F4 at any time.
This is required for games which use multiple CD-ROMs and require the CD
to be switched during the gameplay at some point.-t
The following are valid image types:
floppy:
Specifies a floppy image. DOSBox will automatically identify the disk geometry (360K, 1.2MB, 720K, 1.44MB, etc).
cdrom:
Specifies a CD-ROM image. The geometry is automatic and set for this size. This can be an iso or a cue/bin pair or a cue/img pair.
hdd:
Specifies a harddrive image. The proper CHS geometry must be set for this to work.
-fs
The following are valid file system formats:
iso: Specifies the ISO 9660 CD-ROM format.
fat: Specifies that the image uses the FAT file system. DOSBox will attempt to mount this image as a drive in DOSBox and make the files available from inside
DOSBox.
none: DOSBox will make no attempt to read the file system on the disk. This is useful if you need to format it or if you want to boot the disk using the BOOT
command. When using the «none» filesystem, you must specify the drive number (2 or 3, where 2 = master, 3 = slave) rather than a drive letter.
For example, to mount a 70MB image as the slave drive device, you would type (without the quotes):«imgmount 3 d:\test.img -size 512,63,16,142 -fs none»
Compare this with a mount to be able to access the drive
within DOSBox, which would read as:
«imgmount e: d:\test.img -size 512,63,16,142»-size
The Cylinders, Heads and Sectors of the drive. Required to mount hard drive images.An example how to mount CD-ROM images (in Linux):
- imgmount d /tmp/cdimage1.cue /tmp/cdimage2.cue -t cdrom
or (which also works):
- mount c /tmp
- imgmount d c:\cdimage1.cue c:\cdimage2.cue -t cdrom
(in Windows):
imgmount d f:\img\CD1.cue f:\img\CD2.cue f:\img\CD3.cue -t cdrom
imgmount d «g:\img\7th Guest CD1.cue» «g:\img\7th Guest CD2.cue» -t cdromDon’t forget that you can also use MOUNT with images, but only if you use external program, for example (both are free):
- Daemon Tools Lite (for CD images)
- Virtual Floppy Drive (for floppy images)
Although IMGMOUNT can give better compatibility.
BOOT
Boot will start floppy images or hard disk images independent of the operating system emulation offered by DOSBox. This will allow you to play booter floppies or boot other
operating systems inside DOSBox. If the target emulated system is PCjr (machine=pcjr) the boot command can be used to load PCjr cartridges (.jrc).
BOOT [diskimg1.img diskimg2.img .. diskimgN.img] [-l driveletter]
BOOT [cart.jrc] (PCjr only)diskimg1.img diskimg2.img .. diskimgN.img
This can be any number of floppy disk images one wants mounted after
DOSBox boots the specified drive letter.
To swap between images, hit CTRL-F4 to change from the current disk
to the next disk in the list. The list will loop back from the last
disk image to the beginning.[-l driveletter]
This parameter allows you to specify the drive to boot from. The default is the A drive, the floppy drive. You can also boot a hard drive image mounted as master by specifying
«-l C» without the quotes, or the drive as slave by specifying «-l D»cart.jrc (PCjr only)
When emulation of a PCjr is enabled, cartridges can be loaded with the BOOT command. Support is still limited.
IPX
You need to enable IPX networking in the configuration file of DOSBox.
All of the IPX networking is managed through the internal DOSBox program IPXNET. For help on the IPX networking from inside DOSBox, type «IPXNET HELP» (without
quotes) and the program will list the commands and relevant documentation.With regard to actually setting up a network, one system needs to be the server. To set this up, type «IPXNET STARTSERVER» (without the quotes) in a DOSBox session.
The server DOSBox session will automatically add itself to the virtual IPX network. For every additional computer that should be part of the virtual IPX network, you’ll
need to type «IPXNET CONNECT <computer host name or IP>».
For example, if your server is at bob.dosbox.com, you would type «IPXNET CONNECT bob.dosbox.com» on every non-server system.To play games that need Netbios a file named NETBIOS.EXE from Novell is needed. Establish the IPX connection as explained above, then run «netbios.exe».
The following is an IPXNET command reference:
IPXNET CONNECT
IPXNET CONNECT opens a connection to an IPX tunneling server running on another DOSBox session. The «address» parameter specifies the IP address or host name
of the server computer. You can also specify the UDP port to use. By default IPXNET uses port 213 — the assigned IANA port for IPX tunneling — for its connection.The syntax for IPXNET CONNECT is:
IPXNET CONNECT address <port>IPXNET DISCONNECT
IPXNET DISCONNECT closes the connection to the IPX tunneling server.
The syntax for IPXNET DISCONNECT is:
IPXNET DISCONNECTIPXNET STARTSERVER
IPXNET STARTSERVER starts an IPX tunneling server on this DOSBox session. By default, the server will accept connections on UDP port 213, though this can be changed.
Once the server is started, DOSBox will automatically start a client connection to the IPX tunneling server.The syntax for IPXNET STARTSERVER is:
IPXNET STARTSERVER <port>If the server is behind a router, UDP port <port> needs to be forwarded to that computer.On Linux/Unix-based systems port numbers smaller than 1023 can only be
used with root privileges. Use ports greater than 1023 on those systems.IPXNET STOPSERVER
IPXNET STOPSERVER stops the IPX tunneling server running on this DOSBox session. Care should be taken to ensure that all other connections have terminated as well, since
stopping the server may cause lockups on other machines that are still using the IPX tunneling server.The syntax for IPXNET STOPSERVER is:
IPXNET STOPSERVERIPXNET PING
IPXNET PING broadcasts a ping request through the IPX tunneled network.
In response, all other connected computers will respond to the ping
and report the time it took to receive and send the ping message.The syntax for IPXNET PING is:
IPXNET PINGIPXNET STATUS
IPXNET STATUS reports the current state of this DOSBox session’s IPX tunneling network. For a list of all computers connected to the network use the IPXNET PING command.
The syntax for IPXNET STATUS is:
IPXNET STATUS
KEYB [keyboardlayoutcode [codepage [codepagefile]]]
Change the keyboard layout. For detailed information about keyboard layouts please see Section 8: «Keyboard Layout»
[keyboardlayoutcode] is a string consisting of five or less characters, examples are PL214 (Polish typists) or PL457 (Polish programmers). It specifies the keyboard layout
to be used.
The list of all layouts built into DOSBox is here:
https://www.vogons.org/viewtopic.php?t=21824[codepage] is the number of the codepage to be used. The keyboard layout has to provide support for the specified codepage, otherwise the layout loading will fail. If
no codepage is specified, an appropriate codepage for the requested layout is chosen automatically.[codepagefile] can be used to load codepages that are yet not compiled into DOSBox. This is only needed when DOSBox does not find the codepage. If no codepagefile is specified,
but you place all ten ega.cpx files (from FreeDOS) in the DOSBox program folder, an appropriate codepagefile for the requested layout/codepage is chosen automatically.Examples:
- To load the polish typist keys layout (automatically uses codepage 852):
keyb pl214- To load one of russian keyboard layouts with codepage 866:
keyb ru441 866
In order to type russian characters press ALT+RIGHT-SHIFT.- To load one of french keyboard layouts with codepage 850 (where the
codepage is defined in EGACPI.DAT):
keyb fr189 850 EGACPI.DAT- To load codepage 858 (without a keyboard layout):
keyb none 858
This can be used to change the codepage for the FreeDOS keyb2 utility.- To display the current codepage and, if loaded, the keyboard layout:
keyb
For more information use the /? command line switch with the programs.
================
5. Special Keys:
================
| ALT-ENTER | Switch to full screen and back. |
| ALT-PAUSE | Pause emulation (hit ALT-PAUSE again to continue). |
| CTRL-F1 | Start the keymapper. |
| CTRL-F4 | Change between mounted floppy/CD images. Update directory cache for all drives. |
| CTRL-ALT-F5 | Start/Stop creating a movie of the screen. (avi video capturing) |
| CTRL-F5 | Save a screenshot. (PNG format) |
| CTRL-F6 | Start/Stop recording sound output to a wave file. |
| CTRL-ALT-F7 | Start/Stop recording of OPL commands. (DRO format) |
| CTRL-ALT-F8 | Start/Stop the recording of raw MIDI commands. |
| CTRL-F7 | Decrease frameskip. |
| CTRL-F8 | Increase frameskip. |
| CTRL-F9 | Kill DOSBox. |
| CTRL-F10 | Capture/Release the mouse. |
| CTRL-F11 | Slow down emulation (Decrease DOSBox Cycles). |
| CTRL-F12 | Speed up emulation (Increase DOSBox Cycles)*. |
| ALT-F12 | Unlock speed (turbo button/fast forward)**. |
| F11, ALT-F11 | (machine=cga) change tint in NTSC output modes*** |
| F11 | (machine=hercules) cycle through amber, green, white colouring*** |
*NOTE: Once you increase your DOSBox cycles beyond your computer CPU resources, it will produce the same effect as slowing down the emulation. This maximum will vary
from computer to computer.
**NOTE: You need free CPU resources for this (the more you have, the faster it goes), so it won’t work at all with cycles=max or a too high amount of fixed
cycles. You have to keep the keys pressed for it to work!
***NOTE: These keys won’t work if you saved a mapper file earlier with a different machine type. So either reassign them or reset the mapper.
These are the default keybindings. They can be changed in the keymapper (see Section 7: KeyMapper).
In MAC OS you can try using cmd(applekey) together with Ctrl if the key doesn’t work eg. cmd-ctrl-F1, but some keys may still need remapping (in Linux too).
Saved/recorded files can be found in:
(Windows) «Start/WinLogo Menu»->»All Programs»->DOSBox-0.74-3->Extras
(Linux) ~/.dosbox/capture
(MAC OS X) «~/Library/Preferences/capture»
This can be changed in the DOSBox configuration file.
====================
6. Joystick/Gamepad:
====================
The standard joystick port in DOS supports a maximum of 4 axes and 4 buttons. For more, different modifications of that configuration were used.
To force DOSBox to use a different type of emulated joystick/gamepad, the entry «joysticktype» in the [joystick] section of the DOSBox configuration file can be
used.
| none — | disables controller support. |
| auto — |
(default) autodetects whether you have one or two controllers connected:
|
| 2axis — | If you have two controllers connected, each will emulate a joystick with 2 axes and 2 buttons. If you have only one controller connected, it will emulate a joystick with only 2 axis and 2 buttons. |
| 4axis — | supports only first controller, emulates a joystick with 4 axis and 4 buttons or a gamepad with 2axis and 6 buttons. |
| 4axis_2 — | supports only second controller. |
| fcs — | supports only first controller, emulates ThrustMaster Flight Control System, with 3-axes, 4 buttons and 1 hat. |
| ch — | supports only first controller, emulates CH Flightstick, with 4-axes, 6 buttons and 1 hat, but you cannot press more than one button at the same time. |
You also have to configure controller properly inside the game.
It is important to remember that if you saved the mapperfile without joystick connected, or with a different joystick setting, your new setting will not work properly, or
not work at all, until you reset DOSBox’s mapperfile.
If controller is working properly outside DOSBox, but doesn’t calibrate properly inside DOSBox, try different ‘timed’ setting in DOSBox’s configuration file.
=============
7. KeyMapper:
=============
You start the DOSBox mapper either with CTRL-F1 (see section 5. Special Keys) or -startmapper (see Section 3. Command Line Parameters). You are presented with a virtual keyboard
and a virtual joystick.
These virtual devices correspond to the keys and events DOSBox will report to the DOS applications. If you click on a button with your mouse, you can see in the lower left
corner with which event it is associated (EVENT) and to what events it is currently bound.
Event: EVENT
BIND: BIND (the real key/button/axis you push with your finger/hand)

                                                     Add    Del
mod1  hold                                               Next
mod2
mod3
EVENT
The key or joystick axis/button/hat DOSBox will report to DOS applications. (the event that will happen during the game, (eg. shooting/jumping/walking)
BIND
The key on your real keyboard or the axis/button/hat on your real joystick(s) (as reported by SDL), which is connected to the EVENT.
mod1,2,3
Modifiers. These are keys you need to have to be pressed while pressing BIND. mod1 = CTRL and mod2 = ALT. These are generally only used when you want to change the special
keys of DOSBox.
Add
Add a new BIND to this EVENT. Basically add a key from your keyboard or an event from the joystick (button press, axis/hat movement) which will produce the EVENT in DOSBox.
Del
Delete the BIND to this EVENT. If an EVENT has no BINDS, then it is not possible to trigger this event in DOSBox (that is there’s no way to type the key or use the respective
action of the joystick).
Next
Go through the list of bindings which map to this EVENT.
Example:
Q1. You want to have the X on your keyboard to type a Z in DOSBox.
A. Click on the Z on the keyboard mapper. Click «Add». Now press the X key on your keyboard.
Q2. If you click «Next» a couple of times, you will notice that the Z on your keyboard also produces an Z in DOSBox.
A. Therefore select the Z again, and click «Next» until you have the Z on
your keyboard. Now click «Del».
Q3. If you try it out in DOSBox, you will notice that pressing X makes ZX appear.
A. The X on your keyboard is still mapped to the X as well! Click on the X in the keyboard mapper and search with «Next» until you find the mapped key
X. Click «Del».
Examples about remapping the joystick:
You have a joystick attached, it is working fine under DOSBox and you want to play some keyboard-only game with the joystick (it is assumed that the game is controlled by
the arrows on the keyboard):
- Start the mapper, then click on one of the left keyboard arrow. EVENT should be key_left. Now click on Add and move your joystick in the respective direction, this should
add an event to the BIND. - Repeat the above for the missing three directions, additionally the buttons of the joystick can be remapped as well (fire/jump).
- Click on Save, then on Exit and test it with some game.
You want to swap the y-axis of the joystick because some flightsim uses the up/down joystick movement in a way you don’t like, and it is not configurable in the game itself:
- Start the mapper and click on Y- in the first joystick field. EVENT should be jaxis_0_1-.
- Click on Del to remove the current binding, then click Add and move your joystick downwards. A new bind should be created.
- Repeat this for Y+, save the layout and finally test it with some game.
If you want to remap anything to your d-pad/hat you will have to change ‘joysticktype=auto’ to ‘joysticktype=fcs’ in configuration file. Maybe this will be improved in the
next dosbox version.
If you change the default mapping, you can save your changes by clicking on «Save». DOSBox will save the mapping to a location specified in the configuration file
(the mapperfile= entry). At startup, DOSBox will load your mapperfile, if it is present in the DOSBox configuration file.
===================
8. Keyboard Layout:
===================
To switch to a different keyboard layout, either the entry «keyboardlayout» in the [dos] section of the DOSBox configuration file can be used, or the internal DOSBox
program keyb.com (Section 4: Internal Programs) Both accept DOS conforming language codes (see below), but only by using keyb.com a custom codepage can be specified.
The default keyboardlayout=auto currently works under windows only. The language is chosen according to the OS language, but the keyboard layout is not detected.
Layout switching
DOSBox supports a number of keyboard layouts and codepages by default, in this case just the layout identifier needs to be specified (like keyboardlayout=PL214 in the DOSBox
configuration file, or using «keyb PL214» at the DOSBox command prompt). The list of all layouts built into DOSBox is here: https://www.vogons.org/viewtopic.php?t=21824Some keyboard layouts (for example layout GK319 codepage 869 and layout RU441 codepage 808) have support for dual layouts that can be accessed by pressing LeftALT+RrightSHIFT
for one layout and LeftALT+LeftSHIFT for the other. Some keyboard layouts (for example layout LT456 codepage 771) have support for three layouts, third can be accessed by
pressing LeftALT+LeftCTRL
Supported external files
The FreeDOS .kl files are supported (FreeDOS keyb2 keyboard layoutfiles) as well as the FreeDOS keyboard.sys/keybrd2.sys/keybrd3.sys libraries which consist of all available
.kl files. See http://www.freedos.org/ for precompiled keyboard layouts if the DOSBox-integrated layouts don’t work for
some reason, or if updated or new layouts become available.
Both .CPI (MS-DOS and compatible codepage files) and .CPX (FreeDOS UPX-compressed codepage files) can be used. Some codepages are compiled into DOSBox, so it is mostly not
needed to care about external codepage files. If you need a different (or custom) codepage file, copy it into the directory of the DOSBox so it is accessible for DOSBox. If
you place all ten ega.cpx files (from FreeDOS) in DOSBox folder, an appropriate codepagefile for the requested layout/codepage is chosen automatically.
Additional layouts can be added by copying the corresponding .kl file into the directory of the DOSBox configuration file and using the first part of the filename as language
code.
Example: For the file UZ.KL (keyboard layout for Uzbekistan) specify «keyboardlayout=uz» in the DOSBox configuration file.
The integration of keyboard layout packages (like keybrd2.sys) works similar.
Note that the keyboard layout allows foreign characters to be entered, but there is NO support for them in filenames. Try to avoid them both inside DOSBox as well as in files
on your host operating system that are accessible by DOSBox.
==============================
9. Serial Multiplayer feature:
==============================
DOSBox can emulate a serial nullmodem cable over network and internet. It can be configured through the [serialports] section in the DOSBox configuration file.
To create a nullmodem connection, one side needs to act as the server and one as the client.
The server needs to be set up in the DOSBox configuration file like this:
serial1=nullmodem
The client:
serial1=nullmodem server:<IP or name of the server>
Now start your game and choose nullmodem / serial cable / already connected as multiplayer method on COM1. Set the same baudrate on both computers.
Furthermore, additional parameters can be specified to control the behavior of the nullmodem connection. These are all parameters:
| * port: | — | TCP port number. Default: 23 |
| * rxdelay: | — | how long (milliseconds) to delay received data if the interface is not ready. Increase this value if you encounter overrun errors in the DOSBox Status Window. Default: 100 |
| * txdelay: | — | how long to gather data before sending a packet. Default: 12 (reduces Network overhead) |
| * server: | — | This nullmodem will be a client connecting to the specified server. (No server argument: be a server.) |
| * transparent:1 | — | Only send the serial data, no RTS/DTR handshake. Use this when connecting to anything other than a nullmodem. |
| * telnet:1 | — | Interpret Telnet data from the remote site. Automatically sets transparent. |
| * usedtr:1 | — | The connection will not be established until DTR is switched on by the DOS program. Useful for modem terminals. Automatically sets transparent. |
| * inhsocket:1 | — | Use a socket passed to DOSBox by command line. Automatically sets transparent. (Socket Inheritance: It is used for playing old DOS door games on new BBS software.) |
Example: Be a server listening on TCP port 5000.
serial1=nullmodem server:<IP or name of the server> port:5000 rxdelay:1000
=====================================
10. How to speed up/slow down DOSBox:
=====================================
DOSBox emulates the CPU, the sound and graphic cards, and other peripherals of a PC, all at the same time. The speed of an emulated DOS application depends on how many instructions
can be emulated, which is adjustable (number of cycles).
CPU Cycles (speed up/slow down)
By default (cycles=auto) DOSBox tries to detect whether a game needs to be run with as many instructions emulated per time interval as possible (cycles=max, sometimes this
results in game working too fast or unstable), or whether to use fixed amount of cycles (cycles=3000, sometimes this results in game working too slow or too fast). But you
can always manually force a different setting in the DOSBox’s configuration file.You can force the slow or fast behavior by setting a fixed amount of cycles in the DOSBox’s configuration file. If you for example set cycles=10000, then DOSBox window
will display a line «Cpu Speed: fixed 10000 cycles» at the top. In this mode you can reduce the amount of cycles even more by hitting CTRL-F11 (you can go as low
as you want) or raise it by hitting CTRL-F12 as much as you want, but you will be limited by the power of one core of your computer’s CPU. You can see how much free time
your real CPU’s cores have by looking at the Task Manager in Windows 2000/XP/Vista/7 and the System Monitor in Windows 95/98/ME. Once 100% of the power of your computer’s
real CPU’s one core is used, there is no further way to speed up DOSBox (it will actually start to slow down), unless you reduce the load generated by the non-CPU parts
of DOSBox. DOSBox can use only one core of your CPU, so If you have for example a CPU with 4 cores, DOSBox will not be able to use the power of three other cores.You can also force the fast behavior by setting cycles=max in the DOSBox configuration file. The DOSBox window will display a line «Cpu Speed: max 100% cycles»
at the top then. This time you won’t have to care how much free time your real CPU’s cores have, because DOSBox will always use 100% of your real CPU’s one core. In this
mode you can reduce the amount of your real CPU’s core usage by CTRL-F11 or raise it with CTRL-F12.
CPU Core (speed up)
On x86 architectures you can try to force the usage of a dynamically recompiling core (set core=dynamic in the DOSBox configuration file). This usually gives better results
if the auto detection (core=auto) fails. It is best accompanied by cycles=max. But you may also try using it with high amounts of cycles (for example 20000 or more). Note
that there might be games that work worse/crash with the dynamic core (so save your game often), or do not work at all!
Graphics emulation (speed up)
VGA emulation is a demanding part of DOSBox in terms of actual CPU usage. Increase the number of frames skipped (in increments of one) by pressing CTRL-F8. Your CPU usage
should decrease when using a fixed cycle setting, and you will be able to increase cycles with CTRL-F12. You can repeat this until the game runs fast enough for you. Please
note that this is a trade-off: you lose in fluidity of video what you gain in speed.
Sound emulation (speed up)
You can also try to disable the sound through the setup utility of the game to reduce load on your CPU further. Setting nosound=true in DOSBox’s configuration does NOT
disable the emulation of sound devices, just the output of sound will be disabled.
Also try to close every program but DOSBox to reserve as much resources as possible for DOSBox.
Advanced cycles configuration:
The cycles=auto and cycles=max settings can be parameterized to have different startup defaults. The syntax is
cycles=auto [«realmode default»] [«protected mode default»%] [limit «cycle limit»]
cycles=max [«protected mode default»%] [limit «cycle limit»]
Example:
cycles=auto 5000 80% limit 20000
will use cycles=5000 for real mode games, 80% CPU throttling for protected mode games along with a hard cycle limit of 20000
====================
11. Troubleshooting:
====================
General tip:
Check messages in DOSBox Status Window. See section 12. «DOSBox Status Window»
DOSBox crashes right after starting it:
- use different values for the output= entry in your DOSBox configuration file
- try to update your graphics card driver and DirectX
- (Linux) set the environment variable SDL_AUDIODRIVER to alsa or oss.
Running a certain game closes DOSBox, crashes with some message or hangs:
- see if it works with a default DOSBox installation (unmodified configuration file) try it with sound disabled (use the sound configuration program that comes with the
game, additionally you can set sbtype=none and gus=false in the DOSBox configuration file) - change some entries of the DOSBox configuration file, especially try:
core=normal
fixed cycles (for example cycles=10000)
ems=false
xms=false
or combinations of the above settings, similar the machine settings that control the emulated chipset and functionality:
machine=vesa_nolfb
or
machine=vgaonly - use loadfix before starting the game
The game exits to the DOSBox prompt with some error message:
- read the error message closely and try to locate the error
- try the hints at the above sections
- mount differently as some games are picky about the locations, for example if you used «mount d d:\oldgames\game» try «mount c d:\oldgames\game» and
«mount c d:\oldgames» - if the game requires a CD-ROM be sure you used «-t cdrom» when mounting and try different additional parameters (the ioctl, usecd and label switches, see the
appropriate section) - check the file permissions of the game files (remove read-only attributes, add write permissions etc.)
- try reinstalling the game within DOSBox
=========================
12. DOSBox Status Window:
=========================
DOSBox’s Staus window contains many useful information about your currant configuration, your actions in DOSBox, errors that happened and more. Whenever you have any problem
with DOSBox check these messages.
To start DOSBox Status Window:
(Windows) Status Window is being started together with main DOSBox window.
(Linux) You may have to start DOSBox from a console to see Status Window.
(MAC OS X) Right click on DOSBox.app, choose «Show Package Contents»->enter «Contents»->enter «MacOS»->run «DOSBox»
=====================================
13. The configuration (options) file:
=====================================
The configuration file is automatically created the first time you run DOSBox. The file can be found in:
(Windows) «Start/WinLogo Menu»->»All Programs»->DOSBox-0.74-3->Options
(Linux) ~/.dosbox/dosbox-0.74-3.conf
(MAC OS X) «~/Library/Preferences/DOSBox 0.74-3 Preferences»
The file is divided into several sections. Each section starts with a [section name] line. The settings are the property=value lines where value can be altered to customize
DOSBox.
# and % indicate comment-lines.
An extra configuration file can be generated by CONFIG.COM, which can be found on the internal DOSBox Z: drive when you start up DOSBox. Look in the Section
4: «Internal programs» for usage of CONFIG.COM. You can start DOSBox with the -conf switch to load the generated file and use its settings.
DOSBox will load configuration files that are specified with -conf. If none were specified, it will try to load «dosbox.conf» from the local directory. If there
is none, DOSBox will load the user configuration file. This file will be created if it doesn’t exist.
Important!: In Windows Vista/7 the configuration file won’t work correctly if it is located in «Windows» or «Program Files» folder or their subfolders,
or directly on c:\, so the best place for storing extra configuration files is for example: C:\oldgames
======================
14. The Language File:
======================
A language file can be generated by CONFIG.COM, which can be found on the internal DOSBox Z: drive when you start up DOSBox. Look in the Section 4: «Internal programs»
for usage of CONFIG.COM.
Read the language file, and you will hopefully understand how to change it. Start DOSBox with the -lang switch to use your new language file. Alternatively, you can setup
the filename in the configuration file in the [dosbox] section. There’s a language= entry that can be changed with the filelocation.
========================================
15. Building your own version of DOSBox:
========================================
Download the source.
Check the INSTALL in the source distribution.
===================
16. Special thanks:
===================
See the THANKS file.
============
17. Contact:
============
See the site:
https://www.dosbox.com
for an email address (The Crew-page). ![]()

![]()
Загрузить PDF
![]()
Загрузить PDF
DOSBox — это программа, эмулирующая работу MS-DOS, включая звуки, графическое оформление, ввод и сетевые функции. DOSBox в основном используется для запуска старых игр, написанных под MS-DOS. Программу DOSBox можно скачать бесплатно, она поможет вам запустить множество старых любимых игр.
-

1
Скачайте последнюю версию DOSBox. Вы можете бесплатно скачать эту программу с сайта DOSBox.com.
-
2
Запустите установщик. Измените установочную папку по умолчанию на папку C:\DOSBox.
- Измените локальный диск C: на тот, на который вы хотите установить DOSBox.
-
3
На локальном диске с DOSBох создайте новую папку, в которой будете хранить ваши игры. Эта папка монтируется в DOSBox в качестве виртуального диска.
- Например, если вы установили DOSBox в папку C:\DOSBox\, создайте папку C:\DOSGAMES.
-
4
Скачайте игру с одного из множества сайтов. На них старые игры можно скачать бесплатно и легально. Ищите abandonware — это бесплатные программы, созданные компаниями, которые больше не существуют. Скачанную игру поместите в папку для хранения игр.
- Вы также можете скопировать игру со старой дискеты.
-
5
Запустите DOSBox. Откроется виртуальная командная строка с приглашением Z:\>.[1]
Реклама


Ниже описаны способы монтирования дисков в DOSBox. Монтирование папки с играми позволит вам запускать игры, хранящиеся в этой папке. Монтирование компакт-диска позволит вам запускать игры с CD-диска. Монтирование образа диска (файл ISO) позволит вам открывать образы дисков.
-
1
Смонтируйте папку с играми. Не стоит монтировать весь жесткий диск в DOSBox — смонтируйте только папку с играми, которая будет играть роль виртуального жесткого диска.
- Введите mount C C:\DOSGAMES и нажмите ↵ Enter. Введите C: и нажмите ↵ Enter. Приглашение изменится на C:\>.
- В macOS введите соответствующий путь, например mount C ~/DOSGAMES
-
2
Смонтируйте CD-диск. Вставьте компакт-диск в оптический привод. Введите следующие команды:
- Введите mount D D:\ -t cdrom и нажмите ↵ Enter. Замените D:\ буквой вашего оптического привода. Введите D: и нажмите ↵ Enter. Приглашение изменится на D:\> и вы сможете работать с файлами на компакт-диске.
- cdrom нужно вводить строчными буквами.
-
3
Смонтируйте образ диска (ISO-файл). Если у вас есть ISO-файл с играми, смонтируйте его и работайте с ним как с настоящим диском.
- Введите imgmount D C:\ImagePath\image.iso -t iso и нажмите ↵ Enter. Замените C:\ImagePath\image.iso на путь к вашему ISO-файлу.
-
4
Смонтируйте образ диска (BIN/CUE-файл). Если у вас есть BIN/CUE-файл с играми, смонтируйте его и работайте с ним как с настоящим диском.
- Введите imgmount D C:\ImagePath\image.cue -t iso и нажмите ↵ Enter. Замените C:\ImagePath\image.cue на путь к вашему CUE-файлу. BIN-файл должен иметь то же имя и располагаться в той же папке, что и CUE-файл.
-
5
Смонтируйте дисковод. Если у вас есть дисковод (для дискет), смонтируйте и работайте с ним.
- Введите mount A A:\ -t floppy и нажмите ↵ Enter.
-
6
Настройте автомонтирование (при запуске DOSBox). Для этого в текстовом редакторе (например, в Блокноте) откройте файл dosbox.conf.[2]
- Windows — C:\Users\имя пользователя\AppData\Local\DOSBox\dosbox-версия.conf
- Mac — /Macintosh HD/Users/ имя пользователя/Library/Preferences/DOSBox версия Preferences
- В конце файла dosbox.conf вставьте следующие строки:
MOUNT C C:\DOSGAMES
C:Реклама


-
1
Отобразите список папок. Каждая игра хранится в соответствующей папке, а все игры — в папке DOSGAMES. Введите dir, чтобы отобразить все папки с играми. Если вы смонтировали диск или образ диска, будет отображен список папок на диске.
-
2
Введите .cd directory, чтобы открыть папку с нужной игрой.
-
3
Введите .dir, чтобы отобразить все файлы в папке с нужной игрой.
-
4
Найдите файл, запускающий игру. В большинстве случаев это ЕХЕ-файл, но может быть и СОМ- или ВАТ-файл.
- ЕХЕ-файл, как правило, носит имя самой игры. К примеру, исполняемый файл «Принца Персии» будет называться POP.EXE.
-
5
Запустите игру. Введите имя EXE-, COM- или BAT-файла, включая расширение, и нажмите ↵ Enter.
-
6
Настройте производительность игры при помощи сочетаний клавиш. Помните, что старые игры на новых компьютерах могут работать крайне медленно.
- Нажмите Ctrl+F8, чтобы увеличить число пропускаемых кадров. Это увеличивает производительность игры, но ухудшает качество картинки.
- Нажмите Ctrl+F7, чтобы уменьшить число пропускаемых кадров.
- Нажмите Ctrl+F12, чтобы ускорить игру за счет выделения ей больших ресурсов процессора. Вы можете контролировать ресурсы процессора, нажав Ctrl+⇧ Shift+Esc и перейдя на вкладку «Эффективность». Если после этого вам все еще нужно ускорить игру, увеличьте число пропускаемых кадров.
- Нажмите Ctrl+F11, чтобы замедлить игру за счет сокращения ресурсов процессора.
- Даже после настройки параметров производительности не все игры будут нормально работать в DOSBox.
-
7
Переключитесь в полноэкранный режим. Для этого нажмите Alt+↵ Enter. Чтобы выйти из этого режима, еще раз нажмите Alt+↵ Enter.
Реклама


-
1
Если вы не хотите или не умеете работать с командной строкой, скачайте специальную программу (программу пользовательского интерфейса). Такая программа использует интерфейс Windows, позволяя пользователю загружать, запускать и настраивать игры без использования командной строки.
- Одной из самых популярных программ является D-Fend Reloaded, которую можно скачать на сайте dfendreloaded.sourceforge.net.
- Программа D-Fend Reloaded включает файлы DOSBox.
-
2
Запустите D-Fend Reloaded (после установки этой программы). В левой панели отобразятся установленные игры.
-
3
Добавьте игры. Для этого перетащите архив с игрой в окно D-Fend Reloaded. Архив будет автоматически распакован, а игровые файлы — помещены в нужное место.
-
4
Запустите игру. Для этого дважды щелкните по игре в левой панели. Цветовая схема вашей системы временно изменится, чтобы соответствовать цветам старых игр.[3]
Реклама


Об этой статье
Эту страницу просматривали 138 816 раз.
Была ли эта статья полезной?
В этой инструкции вы найдете несколько простых шагов по установке и настройке DOSBox — эмулятора ПК под управлением старенькой операционной системы MS DOS. Обычно DOSBox включен в комплект поставки игры при её покупке в Steam или GOG. Но если у вас остались старые игры, которые хочется запустить, а сделать это в Windows 10 уже не получается, то настройте эмулятор самостоятельно.
Примечание. Эта инструкция предназначена для пользователей Windows.
Шаг 1. Установка DOSBox
1. Заходим на сайт www.dosbox.com, переходим в раздел Download, находим версию для Windows (Win32 installer), скачиваем её. Скачивание происходит через сервис SourceForge, на котором располагаются многие проекты с открытым исходным кодом.
Примечание: На момент написания обзора актуальная версия эмулятора — 0.74-3. Номер версии меньше единицы не означает, что эмулятор — не законченный проект. DOSBox уже давно работает стабильно и используется, в том числе, для запуска старых игр в Steam и других онлайн-магазинах.
Но ничто не бывает идеальным, и разработчики находят и исправляют ошибки в приложении, так что время от времени следует обновлять DOSBox на своем ПК. Просто установите новую версию эмулятора поверх старой. При необходимости измените файл конфигурации (шаг 3, пункт 7).
2. Запускаем инсталлятор, устанавливаем эмулятор. Инсталлятор создает иконку на рабочем столе, а также добавляет DOSBox в меню «Пуск». Если вы запустите DOSBox сразу после установки, то увидите командную строку.
3. Закройте эмулятор, если вы его запустили. Всю настройку будем производить в Windows.
Шаг 2. Дополнительные инструменты
1. На странице DOSBox размещены также ссылки на различные графические оболочки для эмулятора. Вы можете воспользоваться одной из них. В этом случае читать этот гайд вам не потребуется, но, возможно, придется искать гайд по выбранному вами приложению. Мы предлагаем воспользоваться другим способом работы с DOSBox.
2. Так как планируется самостоятельная установка игр и приложений для MS-DOS, а также их дальнейшая настройка, лучше всего будет «вернуться» в 90-е и создать программную среду, максимально схожую с той, что была в те времена. Драйвера мыши, дополнительной памяти, привода компакт дисков и т. п. нам не потребуются. Все это включено в состав эмулятора. Но для комфортной работы в DOS потребуется файловый менеджер.
3. В качестве файлового менеджера лучше всего воспользоваться известным DOS Navigator, разработанного компанией RitLabs. Версию 1.51 можно скачать с сайта компании, или воспользоваться OpenSource версией, которая доступна на сайте www.dnosp.com (версия DOS/Real Mode).
4. Если у вас отсутствует физический привод компакт-дисков, то DOSBox может подключать их образы без использования сторонних программ (в форматах iso и cue). Или можно воспользоваться любым другим эмулятором приводов CD, в том числе встроенного в Windows 10.
Примечание. При использовании сторонних программ, образы дисков в виртуальном приводе придется менять только при выключенном DOSBox.
Шаг 3. Предварительная настройка
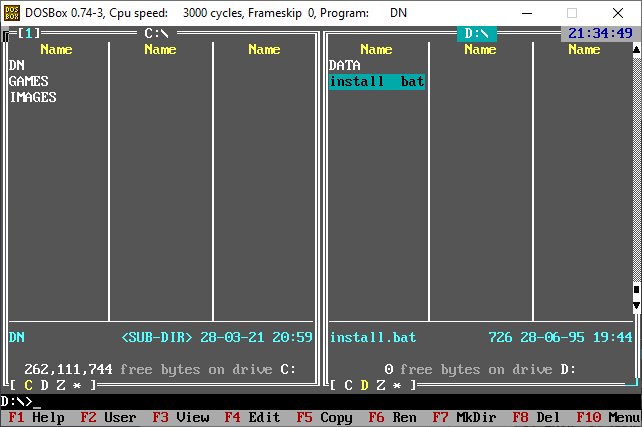
1. Теперь нужно настроить структуру каталогов на жестком диске. В любом удобном месте с помощью проводника Windows необходимо создать каталог DOS (вы можете назвать его иначе, но в этом случае не забудьте изменить команды, которые будете прописывать в конфигурационные файлы). Проще всего его создать в корневом каталоге диска C.
C:\DOS
2. В каталоге DOS создайте подкаталоги DN, GAMES, IMAGES.
C:\DOS\DN
C:\DOS\GAMES
C:\DOS\IMAGES
3. В каталог DN распакуйте из архива DOS Navigator.
4. В каталоге IMAGES разместите снятые образы дисков приобретенных игр. Если игры не требуют установки, то просто скопируйте их файлы в свой каталог в папке GAMES.
5. Самое время настроить DOSBox. Откройте меню «Пуск» и в группе DOSBox запустите DOSBox Options. В Блокноте Windows откроется текстовый конфигурационный файл, и туда нужно будет внести некоторые изменения.
6. Настройки по умолчанию адекватны большинству конфигураций ПК, так что трогать их не стоит. Разве что можно включить полноэкранный режим при запуске. Для этого нужно поменять строку
fullscreen=false
на
fullscreen=true
Но лучше включать полноэкранный режим после запуска кнопками Alt+Enter.
7. В конце файла конфигурации найдите раздел
[autoexec]
и скопируйте под эту строку этот код:
mount C C:\DOS
# Указан путь к физическому или виртуальному приводу CD имеющий в Windows обозначение D:\
# Замените путь к приводу, если он имеет другое обозначение
mount D D:\ -t cdrom
C:
cls
C:\DN\dn.com
exit
Если вы меняли пути расположения каталога DOS, то измените путь на правильный в первой строчке.
Если вы не используете эмулятор привода компакт-дисков, а предпочитаете пользоваться встроенными средствами DOSBox, то строчку
mount D D:\ -t cdrom
замените на такую:
imgmount D C:\DOS\IMAGES\disk1.iso C:\DOS\IMAGES\disk2.iso ... -t cdrom
где C:\DOS\IMAGES\ — путь в Windows, где хранятся ваши образы дисков, а disk1.iso, disk2.iso и т. д. — имена файлов образов, которые вы хотите подключить к виртуальной машине. Переключение между дисками в DOSBox осуществляется клавишами Ctrl+F4.
Примечание. Будьте внимательнее при написании имен файлов и путей. Особое внимание обращайте на расширение файлов iso или img. Ошибка в написании приведет к тому, что команда при запуске DOSBox выполнена не будет, и ни один из образов не будет подключен.
Закройте Блокнот, сохраните файл.
Шаг 4. Устанавливаем, играем
1. Смонтируйте на виртуальный привод нужный вам образ диска или вставьте диск в дисковод, если не используете средства DOSBox и если это требуется для установки или самой игры.
2. Запустите DOSBox. Вы попадете в DOS Navigator. Если вы не знакомы с двухпанельными файловыми менеджерами 90-х, то это не беда.
- Alt+F1 и Alt+F2 — выбор диска на левой и правой панели, соответственно.
- Tab — переключение между панелями.
- Кнопки со стрелками на клавиатуре — перемещение курсора.
- Enter — войти в каталог или запустить приложение. DOS Navigator подсвечивает исполняемые файлы и выводит их в начале списка.
- Alt+X — выйти из приложения (автоматически закроется DOSBox).
- Alt+F9 — играть в лучший тетрис на ПК.
3. Если игра требует установки, то установите её с диска D. В DOS установочная программа, как правило, имеет название файла INSTALL.EXE, в отличие от SETUP.EXE в Windows. Установку производите в каталог C:\GAMES виртуальной DOS-машины.
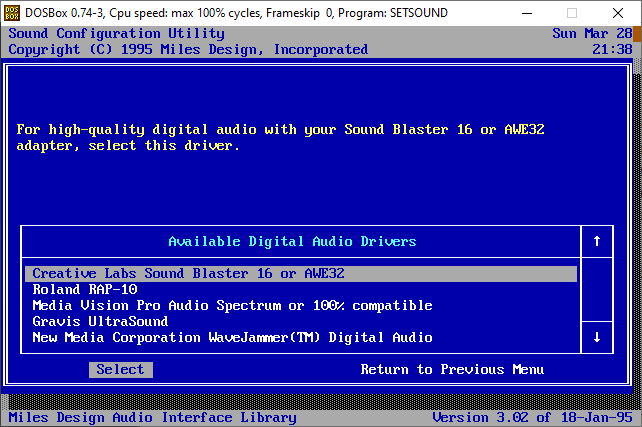
4. После установки нужно настроить звук. Обычно установочная программа предложит это сделать сразу после копирования файлов. Если это не произошло, перейдите в каталог установленной игры, и запустите программу настройки звука (обычно она имеет название SETUP.EXE или SETSOUND.EXE). Настройки необходимо выбрать для драйвера digital audio и драйвера midi audio.
5. DOSBox эмулирует звуковую карту Sound Blaster 16, поэтому при выборе звуковой карты выбирайте эту модель. Если её в списке нет, то можно выбрать обычный Sound Blaster или Pro. Как правило, программы настройки автоматически подбирают правильные параметры карты. Если этого не произошло, их можно ввести в программе настройки вручную:
I/O ADRESS=220
IRQ=7
DMA=1
Эти параметры прописаны в файле конфигурации DOSBox.
6. Найдите в интернете патч с последней версией. При необходимости, обновите игру до последней версии.
7. Все готово! Добро пожаловать в 90-е! Запускайте.
Сейчас на главной
![]()
Download Article
![]()
Download Article
- Installing DOSBox
- Mounting Drives
- Running a Game
- Using a Frontend Program
- Q&A
|
|
|
|
DOSBox is a program that emulates the functions of MS-DOS, including sound, graphics, input, and networking. DOSBox is used primarily to run older video games that were made specifically for the MS-DOS operating system. DOSBox is available for download for free, and can help you easily run almost any of your old favorite games.
-
1
Download the latest version of DOSBox. You can download it for free from DOSBox.com in the Downloads section.
-
2
Run the installer. When installing DOSBox, you may find it easier to change the installation location to C:\DOSBox instead of using the default location.
- Change C: to whatever drive letter you want DOSBox installed on.
Advertisement
-
3
Create a new folder on the same drive for your games. Games that you download will be placed here. This folder will be mounted as a virtual drive in DOSBox.
- For example, if you installed DOSBox at C:\DOSBox\, create a folder in the same location like C:\DOSGAMES
-
4
Download a game. There are tons of sites that host old DOS games that can be downloaded free and legally. Search for «abandonware» sites. «Abandonware» are programs made by companies that no longer exist and that have no retail means to purchase. Place the downloaded files in their own folder inside the games folder you created in the previous step.
- You can also copy the files from old installation disks you may have lying around (if you still have a floppy drive).
-
5
Start DOSBox. You will be taken to the virtual command prompt Z:\>.[1]


Advertisement
Below are several ways that you can mount various media in DOSBox. Mounting your games folder will allow you to run any games that you’ve downloaded and placed in it. Mounting a CD will allow you to run old DOS games off the disc. Mounting a disc image (ISO) allows you to run a CD image files as if the CD was inserted.
-
1
Mount your games folder. It is not safe to mount your entire hard drive in DOSBox, so instead you’ll be mounting your games folder as a virtual drive. The games folder will act as a hard drive.
- Type mount C C:\DOSGAMES and press ↵ Enter. Type C: and press ↵ Enter. Your input will change to C:\>.
- For Macs, change the locations as appropriate (e.g mount C ~/DOSGAMES)
-
2
Mount a CD. Insert the CD into your computer’s disc drive. Type in the following mounting command:
- Type mount D D:\ -t cdrom and press ↵ Enter. Replace D:\ to the drive letter of your disc drive. Type D: and press ↵ Enter. Your input will change to D:\> and you can navigate through the CD’s files.
- cdrom needs to be lowercase.
-
3
Mount an ISO disc image. If you have an ISO file for the game CD you want to play, you can mount it as if it was an actual disc.
- Type imgmount D C:\ImagePath\image.iso -t iso and press ↵ Enter. Replace C:\ImagePath\image.iso with the actual location and filename of the ISO file.
-
4
Mount a BIN/CUE disc image. If you have a BIN/CUE file for the game CD you want to play, you can mount it as if it was an actual disc.
- Type imgmount D C:\ImagePath\image.cue -t iso and press ↵ Enter. Replace C:\ImagePath\image.cue with the actual location and filename of the CUE file. The BIN file needs to have the same name and be in the same location.
-
5
Mount a floppy disk drive. If you have a floppy disk drive installed in your computer, you can mount it so that DOSBox can access it.
- Type mount A A:\ -t floppy and press ↵ Enter.
-
6
Set DOSBox to automount your drive. To save yourself some time when you start DOSBox, you can set it to automatically mount the drive of your choice. To do this, you’ll need to open the dosbox.conf file in a text editor like Notepad.[2]
- Windows — C:\Users\username\AppData\Local\DOSBox\dosbox-version.conf
- Mac — /Macintosh HD/Users/username/Library/Preferences/DOSBox version Preferences
- Add the following lines to the very bottom of the configuration file and then save it:
MOUNT C C:\DOSGAMES
C:


Advertisement
-
1
Display the list of folders. If you’ve mounted your DOSGAMES folder, each of your games will usually be contained in their own folders. Type dir to list all of your game directories. If you mounted a disc or disc image, a list of all the files and folders on the disc will be displayed.
-
2
Type .cd directory to open the directory of the game you want to play.
-
3
Type .dir to display a list of all the files in the game’s directory.
-
4
Look for the game file. Most games start by running an EXE file, though you may need to run a COM or BAT file. This is mainly for older games.
- The EXE file will often have a name similar to the game. For example, Prince of Persia may be called POP.EXE.
-
5
Run the game file. Type the name of the EXE, COM, or BAT file, including the extension, and press ↵ Enter.
-
6
Adjust your game’s performance. There are several keyboard shortcuts that can be used to adjust the performance of your game. These commands can be useful since a lot of old games will not perform properly on modern systems.
- Ctrl+F8 — This increases the amount of frameskip. Frameskip prevents DOSBox from rendering certain frames, which can improve performance but leads to some visual problems.
- Ctrl+F7 — This decreases the amount of frameskip. 0 frameskip means that DOSBox is rendering every frame possible.
- Ctrl+F12 — This will speed up the game by allocating more processor power to DOSBox. You can monitor your processor by pressing Ctrl+⇧ Shift+Esc and selecting the «Performance» tab. If you still need performance increases after maxing out your processor, increase the frameskip.
- Ctrl+F11 — This will slow the game down by reducing the amount of processing power.
- Not all games will run smoothly on DOSBox, even after tweaking performance settings.
-
7
Switch to full screen. If you want the game to take up your entire screen, press Alt+↵ Enter. You can exit full screen mode by pressing the same keys again.


Advertisement
-
1
Download and install a front-end program. If using the command prompt seems a little too complex, you can download a frontend program. These programs use a Windows interface, allowing you to load, start, and adjust games without ever using a command prompt.
- One of the most popular front ends is D-Fend Reloaded, available for free from dfendreloaded.sourceforge.net.
- D-Fend Reloaded includes the DOSBox files.
-
2
Run D-Fend Reloaded. Once it has been installed, you can start D-Fend reloaded to manage your games. Your installed games will be sorted in the left frame.
-
3
Add games. You can easily add DOS games by dragging and dropping an archive file containing the game into the open D-Fend Reloaded window. The game archive will be automatically extracted and the files will be placed in the right place.
-
4
Run a game. Double-click a game from the list to begin playing it. Your Windows color scheme may change temporarily while the game is running to support old DOS colors.[3]


Advertisement
Add New Question
-
Question
Are DOS and command prompt similar?

Yes. The Windows command prompt actually uses a language based on DOS. All the commands that work in DOS will work in Windows.
-
Question
Can I write new programs in DOSBox?
Yes, but you will need a compiler or interpreter. The simplest way it to use QBasic. Set up your compiler similar to how an old game is set up and it should work.
-
Question
I have some QBasic programs from the Windows 98 days. Can I run them with DOSBox?
Yes, just load up the QBasic interpreter and your programs in DOSBox, similar to how old games are loaded up.
See more answers
Ask a Question
200 characters left
Include your email address to get a message when this question is answered.
Submit
Advertisement
Thanks for submitting a tip for review!
References
About This Article
Article SummaryX
1. Download the installer from Dosbox.com.
2. Run the installer.
3. Create a new folder on the same drive for your games.
4. Download and save games to the new folder.
5. Open DOSbox.
6. Mount the folder containing your games.
7. Type «cd GAMEFOLDERNAME
and press Enter.
8. Type the file name of the game and press Enter.
Did this summary help you?
Thanks to all authors for creating a page that has been read 341,735 times.
Is this article up to date?
|
Arik и Alexander Katz (skatz1971@gmail.com) — авторы этой статьи. Вы можете свободно копировать и распространять данный текст, но только при соблюдении условий, что оригинальное авторство и лицензия будут сохранены в производной работе. Текст распространяется под лицензией Creative Commons Attribution-Share Alike (by-sa) 3.0. Разрешается добавлять примечания и исправлять опечатки; остальные действия не рекомендованы. |
Ключи командной строки
Обзор ключей, которые вы можете задать при запуске DOSBox. Хотя в большинстве случаев проще использовать вместо них конфигурационный файл DOSBox. См. раздел «конфигурационный файл»
Чтобы задействовать ключ командной строки:
- Windows: откройте cmd.exe или command.com или отредактируйте ярлык для dosbox.exe
- Linux: используйте консоль
- MAC OS X: запустите terminal.app и перейдите в: /applications/dosbox.app/contents/macos/dosbox
Ключи доступны во всех операционных системах, если в их описании не сказано иначе:
dosbox [директория_или_программа] [-exit] [-c команда] [-fullscreen] [-userconf] [-conf файл_конфигурации] [-lang языковой_файл] [-machine тип_машины] [-noconsole] [-startmapper] [-noautoexec] [-securemode] [-scaler метод_масштабирования | -forcescaler метод_масштабирования] [-version] [-socket номер_сокета]
директория_или_программа
Если это директория, она будет смонтирована как диск C:.
Если это исполняемый файл, будет смонтирована директория в которой находится этот файл как диск C:, и этот файл будет запущен.
-exit
DOSBox закроется, когда DOS приложение «директория_или_программа» закончит работу.
-c команда
Выполняет определенные команды до запуска «директория_или_программа». Может быть выполнено несколько команд. Каждая команда должна начинаться с параметра «-c». Команда может быть: внутренней программой, DOS командой или исполняемым файлом на смонтированном диске.
-fullscreen
Запускает DOSBox в полноэкранном режиме.
-userconf
Запускает DOSBox с конфигурационным файлом из профиля пользователя. Может использоваться совместно с множественными параметрами «-conf файл_конфигурации», но -userconf всегда загружается перед ними.
-conf файл_конфигурации
Запускает DOSBox с настройками, назначенными в файле конфигурации. Может быть несколько «-conf файл_конфигурации».
[1]
Смотрите раздел «конфигурационный файл» для подробностей.
-lang языковой_файл
Запускает DOSBox, используя язык, определенный в языковом файле. См. подробнее в разделе «Языковой файл».
-machine тип_машины
Задает DOSBox эмулировать конкретный тип машины. Доступны для выбора:
hercules, cga, ega, pcjr, tandy, svga_s3 (по-умолчанию), а также дополнительные svga карты, перечисленные в комментариях к конфигурационному файлу DOSBox. svga_s3 также включает эмуляцию vesa.
Для некоторых видео эффектов VGA нужно указать тип vgaonly. помните, что это отключит возможности svga и может быть заметно медленнее из-за большей точности эмуляции.
Тип машины влияет на эмулируемую видео карту и доступные звуковые карты.
-noconsole (Только Windows)
Запускает DOSBox без окна состояния. Вывод будет перенаправлен в stdout.txt и stderr.txt
-startmapper
Войти в режим назначения клавиш непосредственно при старте. Полезно для тех, у кого проблемы с клавиатурой.
-noautoexec
Пропустить секцию [autoexec] загруженного конфигурационного файла(ов).
-securemode
То же, что и -noautoexec, но добавляет «config.com -securemode» в конец AUTOEXEC.BAT (который, в свою очередь, запрещает любые изменения в монтируемых дисках внутри DOSBox).
-scaler метод_масштабирования
Использует метод масштабирования (scaler) определенный параметром «метод_масштабирования». [2]
-forcescaler метод_масштабирования
Подобен параметру -scaler, но пытается принудительно применить указанный метод масштабирования, даже если он может не подойти по размеру окна (то-есть, превышает его).
-version
Вывести информацию о версии и выйти. Полезно для оболочек.
-editconf программа
Запускает указанную программу, передав ей конфигурационный файл в качестве первого параметра. Вы можете задать эту команду несколько раз. В этом случае вторая программа будет запущена, если первая не запустится.
-opencaptures программа
Запускает указанную программу, передав ей путь к папке скриншотов в качестве первого параметра.
-printconf
Выводит расположение конфигурационного файла по умолчанию.
-eraseconf
-resetconf
Удаляет конфигурационный файл по умолчанию.
-erasemapper
-resetmapper
Удаляет файл переназначения клавиш, используемый конфигурацией по-умолчанию.
-socket номер_сокета
Передает номер сокета модулю эмуляции нуль-модема. См. раздел «Сетевая игра через прямое кабельное подключение»
Замечание:
Если имя/команда/конфигурационный файл/языковой файл содержит пробелы внутри, пишите все имя/команда/конфигурационный файл/языковой файл в кавычках («команда или имя файла»). Если вам необходимо использовать кавычки внутри кавычек (обычно в параметре -c и монтировании):
Пользователи Windows и OS/2 могут писать одинарные кавычки внутри двойных. Остальные — комбинации со слешем (\) внутри двойных кавычек.
Windows:
-c "mount c 'c:\program files\'"
Linux:
-c "mount c \"/tmp/name with space\""
Достаточно необычный пример, просто для демонстрации (Windows):
dosbox D:\folder\file.exe -c "MOUNT Y H:\MyFolder"
Будет смонтирована D:\folder как C:\ и запущен file.exe. Но до этого будет смонтирована H:\MyFolder как диск Y.
В Windows вы также можете перетащить папки/файлы на исполняемый файл dosbox.
Внутренние программы
DOSBox поддерживает большинство команд DOS имеющихся в command.com. Для получения списка внутренних команд введите HELP в командной строке. Также в дополнение к ним, доступны следующие команды:
MOUNT
MOUNT [Буква_эмулируемого_диска] [Реальный_диск_или_директория] [-t тип] [-aspi] [-ioctl] [-noioctl] [-usecd номер] [-size геометрия_диска] [-label имя_диска] [-freesize объём_свободного_места]
MOUNT -cd
MOUNT -u Буква_эмулируемого_диска
Программа для монтирования локальных директорий как дисков внутри DOSBox.
Буква_эмулируемого_диска
Буква диска внутри dosbox (например, C).
Реальный_диск_или_директория
Локальная директория, которую вы хотите видеть внутри dosbox.
-t тип
Тип монтируемой директории. Поддерживаются: dir (по-умолчанию, если тип не указан), floppy, cdrom.
-size геометрия_диска (только для опытных пользователей)
Устанавливает геометрию диска, где геометрия диска задается по форме bps,spc,tcl,fcl:
bps: байт в секторе, по-умолчанию 512 для HDD дисков и 2048 для CD-ROM дисков
spc: секторов в кластере, обычно между 1 и 127
tcl: всего кластеров, между 1 и 65534
fcl: всего свободно кластеров, между 1 и tcl
-freesize объём_свободного_места
Устанавливает величину свободного места доступного на диске. для жёстких дисков указывается в мегабайтах, для дискет в килобайтах.
[3] Это упрощенный вариант параметра -size.
-label имя_диска
Устанавливает указанное имя диска. Необходимо некоторым системам, если имя диска не читается корректно (полезно, когда программа не может найти свой CD-ROM).
Если не указано имя и не включена поддержка на низком уровне (не указаны -usecd # и/или -aspi параметры или указано -noioctl):
Для Windows: имя берется с «реального диска». Для Linux: Имя ставится как NO_LABEL.
Если вы укажете имя, это имя будет сохраняться, пока диск смонтирован. Оно не будет обновляться!!
-aspi
Указывает использовать aspi layer. Доступно только если монтируется cdrom под Windows с ASPI-Layer.
-ioctl (автоматический выбор интерфейса CD-аудио)
-ioctl_dx (используется цифровое извлечение аудио для CD-аудио)
-ioctl_dio (используется ioctl для CD-аудио)
-ioctl_mci (используется MCI для CD-аудио)
Указывает использовать ioctl команды. Доступно только если монтируется CD-ROM под Windows, который поддерживает их (Win2000/XP/NT).
Варианты различаются только способом работы с CD-аудио, предпочтительно использовать -ioctl_dio (наименьшая загрузка процессора), но это может работать не на всех системах, тогда следует использовать -ioctl_dx или -ioctl_mci.
-noioctl
Указывает использовать SDL CD-ROM layer. Работает на всех системах.
-usecd номер
Указывает использовать SDL поддержку CD-ROM для диска под указанным номером. Используйте, если при использовании SDL интерфейса монтируется неверный CD-ROM диск (или вообще не монтируется).
Доступно на всех системах, под Windows нужно указать параметр -noioctl чтобы задействовать -usecd.
Номер привода можно узнать при помощи команды «MOUNT -cd».
-cd
Отображает все CD-ROM диски, обнаруженные SDL, и их номера.
См. выше описание параметра -usecd.
-u
Удаляет смонтированный диск. Не работает для Z:\.
Замечание: Возможно смонтировать локальную директорию, как CD-ROM, но аппаратная поддержка в этом случае отсутствует.
Собственно MOUNT позволяет вам соединить реальную аппаратную часть с DOSBox’овой эмуляцией PC. Так MOUNT C C:\GAMES говорит DOSBox использовать директорию C:\GAMES как диск C: в DOSBox. MOUNT C E:\SomeFolde говорит DOSBox использовать директорию E:\SomeFolder как диск C: in DOSBox.
Монтирование всего диска C командой MOUNT C C:\ не рекомендуется! То же относится и к другим дискам, кроме CD-ROM (так как это устройства «только для чтения»).
В противном случае при возникновении ошибки в DOSBox, вы можете потерять все ваши файлы. Также никогда не монтируйте папки «Windows» или «Program Files» (и их подпапки) в системах Windows Vista/7, так как DOSBox в таком случае может работать некорректно (или прекратить корректную работу в дальнейшем). Рекомендуется положить все ваши приложения/игры в простую папку (например, c:\dosgames) и монтировать ее.
Вы должны всегда устанавливать ваши игры внутри DOSBox. И, если ваша игра расположена на CD, вы должны (после установки!) смонтировать папку как жёсткий диск и CD как устройство CD-ROM.
Жёсткий диск всегда должен монтироваться как C. CD-ROM всегда должен монтироваться как D. Дисковод (для гибких дисков) всегда должен монтироваться как a (или b).
Простые примеры команды MOUNT (Windows):
1. Чтобы смонтировать папку как жёсткий диск:
mount c d:\dosgames
2. Чтобы смонтировать устройство CD-ROM E как устройство CD-ROM D в DOSBox:
mount d e:\ -t cdrom
3. Чтобы смонтировать устройство a: как дискету:
mount a a:\ -t floppy
Расширенные примеры команды (Windows):
4. Чтобы смонтировать жёсткий диск с ~870 Мб свободного места (простая версия):
mount c d:\dosgames -freesize 870
5. Чтобы смонтировать устройство с ~870 Мб свободного места (полное управление):
mount c d:\dosgames -size 512,127,16513,13500
6. Чтобы смонтировать c:\dosgames\floppy как дискету:
mount a c:\dosgames\floppy -t floppy
Прочие примеры команды MOUNT:
7. Чтобы смонтировать устройство CD-ROM /media/cdrom как устройство CD-ROM D в DOSBox:
mount d /media/cdrom -t cdrom -usecd 0
8. Чтобы смонтировать /home/user/dosgames как диск C в DOSBox:
mount c /home/user/dosgames
9. Чтобы смонтировать директорию, из которой был запущен DOSBox как диск C в DOSBox:
mount c .
(Обратите внимание на «.», что означает директорию в которой был запущен DOSBox, не используйте её на Windows Vista/7, если вы установили DOSBox в папку «Program Files»)
Если вы хотите смонтировать образ CD или дискеты, смотрите описание команды IMGMOUNT.
MOUNT также может работать с образами, но для этого требуется использование сторонних программ, например (обе бесплатны):
— Daemon Tools Lite (для образов CD),
— Virtual Floppy Drive (для образов дискет).
Хотя использование IMGMOUNT даёт лучшую совместимость.
MEM
Программа для отображения величины свободной памяти.
VER
VER set major_version [minor_version]
Отображает текущую версию DOSBox и сообщаемую программам версию DOS (при вызове без параметров).
Вы можете изменить сообщаемую версию DOS при помощи параметра «set», например «VER set 6 22» заставит DOSBox сообщать версию DOS 6.22.
CONFIG
CONFIG -writeconf файл
CONFIG -writelang файл
CONFIG -securemode
CONFIG -set секция параметр=значение
CONFIG -get секция параметр
CONFIG может быть использован, чтобы менять или узнавать различные настройки для DOSBox во время работы. Она может сохранить текущие настройки и языковые строки на диск. Информация обо всех возможных секциях и параметрах может быть найдена в разделе «конфигурационный файл».
-writeconf файл
Записать текущие конфигурационные настройки в файл в указанном месте. «файл» располагается на реальном диске, а не на смонтированном диске в DOSBox.
Конфигурационный файл управляет различными настройками DOSBox: Размер эмулируемой памяти, эмулируемые звуковые карты и другие вещи.
Он позволяет получить доступ к AUTOEXEC.BAT. См. раздел «Конфигурационный файл».
-writelang файл
Записать текущие языковые настройки в файл в указанном месте. «файл» располагается на реальном диске, а не на смонтированном диске в DOSBox.
Языковой файл определяет все видимые сообщения внутренних команд и внутренней системы DOS. См. раздел «Языковой файл».
-securemode
Переключает DOSBox в «защищённый» режим. В этом режиме внутренние команды MOUNT, IMGMOUNT и BOOT не работают. Также в этом режиме нельзя создать новый конфигурационный файл или языковой.
Предупреждение: отменить этот режим можно только перезапустив DOSBox.
-set секция параметр=значение
CONFIG попытается установить параметру новое значение. На данный момент CONFIG может не сообщать, выполнилась ли команда успешно или нет.
-get секция параметр
Текущее значение параметра выводится и сохраняется в переменной окружения %CONFIG%. Она может быть использована при работе с пакетными файлами (bat).
И «-set» и «-get» работают из пакетных файлов и могут быть использованы для установки своих собственных настроек для каждой игры. Хотя может оказаться проще использовать раздельные конфигурационные файлы для каждой игры.
Примеры:
1. Для создания конфигурационного файла в директории c:\dosgames:
config -writeconf c:\dosgames\dosbox.conf
2. Для установки числа инструкций CPU на 10000:
config -set "cpu cycles=10000"
3. Для отключения эмуляции ems памяти:
config -set "dos ems=off"
4. Для проверки, какое ядро cpu используется:
config -get "cpu core"
LOADFIX
LOADFIX [-size килобайты] [программа | программа -параметр]
LOADFIX -f
Программа для сокращения количества доступной обычной памяти. Полезна для старых программ, которые не понимают большое количество свободной памяти.
-size килобайты
Число килобайт, которые будут «съедены», по-умолчанию = 64kb
-f
Освободить всю предыдущую сокращенную память
Примеры:
1. Чтобы запустить mm2.exe и сократить 64kb памяти (mm2 будет доступно на 64 kb меньше):
loadfix mm2
2. Чтобы запустить mm2.exe и сократить 32kb памяти:
loadfix -32 mm2
3. Чтобы удалить все предыдущие сокращения:
loadfix -f
RESCAN
Заставляет DOSBox перепроверить структуру директории. Полезно, если вы что-то изменили на смонтированном диске вне DOSBox (сочетание клавиш CTRL+F4 сделает то же самое).
MIXER
mixer [канал левый:правый] [/NOSHOW] [/LISTMIDI]
Позволяет изменять уровень громкости каналов звуковых устройств, эмулируемых в DOSBox. Команда, введённая без аргументов, просто выводит текущую громкость каналов, не изменяя их.
канал
Может быть одним из следующих: MASTER, DISNEY, SPKR, GUS, SB, FM, CDAUDIO.
CDAUDIO доступно, только если задействован интерфейс CD-ROM с поддержкой управления громкостью (образ CD-диска, ioctl_dx).
левый:правый
Уровень громкости левого и правого канала звукового устройства в процентах или в децибелах (если перед цифрами напечатаны D+\-). Примеры: mixer fm 106:86, mixer fm d+0.50:-1.30.
/NOSHOW
DOSBox не будет выводить текущую громкость каналов, если вы задали громкость хотя бы одному из них.
/LISTMIDI
В Windows показывает список доступных midi устройств на вашем PC. Для выбора устройства, отличного от установленного по умолчанию в Windows midi-mapper, измените строку «midiconfig=» в секции [midi] в конфигурационном файле на «midiconfig=id» , где «id» — номер устройства, полученный по списку LISTMIDI. Например, midiconfig=2
В Linux этот параметр не работает, но вы можете добиться аналогичных результатов, введя в консоли ‘pmidi -l’. Затем измените строку ‘midiconfig=’ на ‘midiconfig=port’, где ‘port’ — порт устройства, указанный в результатах ‘pmidi -l’, например, midiconfig=128:0
IMGMOUNT
IMGMOUNT [буква_эмулируемого_диска] [образ_диска] [-t тип_образа] [-fs файловая_система] [-size геометрия_образа]
IMGMOUNT [буква_эмулируемого_диска] [образ_диска образ_диска_2 образ_диска_3] [-t cdrom] [-fs iso]
Утилита для монтирования образов дискет, CD, жёстких дисков.
буква_эмулируемого_диска
Буква диска внутри dosbox (например, C).
образ_диска
Расположение файла образа для монтирования в DOSBox. Может быть на смонтированном диске внутри DOSBox или реальном диске. Можно также монтировать образы дисков CD-ROM (ISO или CUE/BIN или CUE/IMG). Если хотите иметь возможность переключать CD, укажите все образы в виде последовательности (см. следующий пункт).
Предпочтительным типом образов дисков CD-ROM является пара CUE/BIN или CUE/IMG, так как она может содержать аудио дорожки в отличие от образов ISO (которые содержат только данные). Для монтирования пары CUE/BIN всегда указывайте файл CUE.
образ_диска образ_диска_2 образ_диска_3
Расположение файлов образов для монтирования в DOSBox. Указывать несколько файлов образов можно только для образов дисков CD-ROM.[4] Они могут быть переключены в любое время сочетанием CTRL+F4. Это требуется для игр на нескольких дисках требующих смены диска во время игры.
CD-ROM образы могут быть смонтированы напрямую. Они не обязательно должны быть на смонтированном диске.
-t тип_образа
Следующие типы являются допустимыми:
floppy: Указание на образ дискеты. DOSBox автоматически определит геометрию диска ( 360K, 1.2MB, 720K, 1.44MB, и т.д.).
cdrom: Указание на ISO образ диска CD-ROM. Геометрия определится автоматически. Поддерживаются образы форматов iso, cue/bin и cue/img.[5]
hdd: Указание на образ жесткого диска. Для этого должна быть указана точная CHS геометрия.
-fs файловая_система
Следующие форматы файловой системы допустимы:
iso: Указывает на ISO 9660 CD-ROM формат.
fat: Указывает на то, что диск использует файловую систему FAT. DOSBox попытается смонтировать этот образ как диск в DOSBox и сделать файлы доступными внутри DOSBox.
none: DOSBox не будет пытаться прочитать файловую систему на диске. Это полезно если его необходимо отформатировать или загрузить диск, используя BOOT команду.
При использовании «none» файловой системы лучше указать номер диска (2 или 3, где 2 = master, 3 = slave) чем букву диска.
Для примера, чтобы смонтировать образ в 70MB как slave диск, необходимо набрать:
imgmount 3 d:\test.img -size 512,63,16,142 -fs none
Сравните это с монтированием для чтения диска внутри DOSBox, что будет выглядеть как:
iimgmount e d:\test.img -size 512,63,16,142
-size геометрия_образа
Цилиндры, головки и сектора диска.
Необходимо указывать при монтировании образов жестких дисков.
Примеры, как монтировать образы CD-ROM (в Linux):
imgmount d /tmp/cdimage1.cue /tmp/cdimage2.cue -t cdrom
mount c /tmp
imgmount d c:\cdimage1.cue c:\cdimage2.cue -t cdrom
(в Windows):
imgmount d f:\img\CD1.cue f:\img\CD2.cue f:\img\CD3.cue -t cdrom
imgmount d "g:\img\7th Guest CD1.cue" "g:\img\7th Guest CD2.cue" -t cdrom
Не забывайте, что вы можете также монтировать образы командой MOUNT, но с использованием сторонних программ, например (обе бесплатны):
— Daemon Tools Lite (для образов CD),
— Virtual Floppy Drive (для образов дискет).
Хотя использование IMGMOUNT даёт лучшую совместимость.
BOOT
BOOT [образ_диска1.img образ_диска2.img .. образ_диска№.img] [-l метка_диска]
BOOT [cart.jrc] (только PCjr)
Boot запустит floppy образы или образы жесткого диска независимо от эмуляции операционной системы предложенной DOSBox. Это позволит вам запускать загрузочные дискеты или загружать другие операционные системы в DOSBox.
Если эмулируемая система PCjr (machine=pcjr), загрузочная команда может быть использована для загрузки картриджей PCjr (.jrc).
образ_диска1.img образ_диска2.img .. образ_диска№
Может быть любое число floppy образов, которое хотите смонтировать после того, как DOSBox загрузит заданную букву диска. Чтобы переключаться между образами нажимайте CTRL+F4. Нажатие заменит текущий диск следующим в списке. Когда будет сменен последний диск, список начнет прокручиваться сначала.
-l метка_диска
Этот параметр позволяет определить диск, с которого необходимо грузиться. По-умолчанию это диск A, floppy диск. Можно также загрузиться с образа жесткого диска, смонтированного как мастер указанием «-l C» без кавычек, или как slave указанием «-l D»
cart.jrc (только PCjr)
Когда включена эмуляция PCjr, можно загружать картриджи командой BOOT. Поддержка пока ограничена.
IPX
Вам нужно разрешить IPX сеть в конфигурационном файле DOSBox.
Все что связано с IPX сетью управляется через внутреннюю программу DOSBox IPXNET. Для помощи по IPX сети внутри DOSBox напишите «IPXNET HELP» (без кавычек) и программа выведет список команд и необходимую документацию.
Как и в реальной сети, одна система должна быть сервером. Чтобы выставить это, нужно написать «IPXNET STARTSERVER» (без кавычек) внутри DOSBox. Серверная DOSBox сессия автоматически добавит себя в виртуальную сеть IPX. Для всех остальных компьютеров чтобы стать частью виртуальной сети IPX необходимо по очереди написать «IPXNET CONNECT <имя главного компьютера или его IP>». Для примера, если ваш сервер на bob.dosbox.com, вы должны написать «IPXNET CONNECT bob.dosbox.com» на каждой системе, которая не является сервером.
Для игр, которым требуется Netbios, необходим файл с именем NETBIOS.EXE из Novell. Установите соединение IPX, как объяснено выше, затем запустите «netbios.exe».
Далее идет перечисление IPXNET команд:
IPXNET CONNECT
Открывает соединение к IPX tunnelling server запущенном на другой сессии DOSBox. Параметр «address» определяет IP адрес или имя хоста серверного компьютера. Можно также определить для использования порт UDP. По-умолчанию IPXNET использует порт 213, назначенный IANA порт для IPX tunnelling, для этого соединения.
IPXNET DISCONNECT
Закрывает соединение к IPX tunnelling server.
IPXNET STARTSERVER <ПОРТ>
Запускает IPX tunneling server в этой сессии DOSBox. По-умолчанию, сервер будет принимать соединение на порту UPD 213, хотя это может быть изменено. Когда сервер запущен, DOSBox автоматически запустит клиентское соединение к IPX tunnelling server.
IPXNET STOPSERVER
Останавливает IPX tunnelling server запущенный в этой сессии DOSBox. Позаботьтесь, чтобы все остальные соединения были завершены, остановка сервера может вызвать блокировку на остальных машинах, все еще использующих IPX tunnelling server.
IPXNET PING
Передает запрос о пинге IPX tunnelled network. В ответ все остальные соединенные компьютеры отреагируют на пинг и сообщат время, когда они получили и послали сообщение о пинге.
IPXNET STATUS
Сообщает текущее состояние данной сессии IPX tunnelling network в DOSBox. Для списка компьютеров, подключенных к сети используйте команду IPXNET PING.
KEYB
KEYB [keyboardlayoutcode [codepage [codepagefile]]]
Изменить раскладку клавиатуры. Для подробной информации о раскладках клавиатуры смотрите раздел «Клавиатурная раскладка».
[keyboardlayoutcode] это строка, состоящая из пяти или менее символов, например, PL214 (Польская пишущая машинка) или PL457 (Польская, программирование).
Она указывает, какая раскладка будет использована.
Список встроенных в DOSBox раскладок приведён в http://vogons.zetafleet.com/viewtopic.php?t=21824
[codepage] это число указывает на кодовую страницу (codepage), которая будет использована. Клавиатурная раскладка должна обеспечивать поддержку указанной кодовой страницы, иначе загрузка раскладки не выполнится.
Если не указана кодовая страница, подходящая страница для запрашиваемой раскладки будет выбрана автоматически.
[codepagefile] файл, который может быть использован для загрузки кодовых страниц, не встроенных в DOSBox. Нужен только если DOSBox не находит кодовую страницу. Если файл кодовой страницы не указан, но вы поместите все десять файлов ega.cpx (взятые из FreeDOS) в папку программы DOSBox, подходящий файл кодовой страницы для пары keyboardlayoutcode/codepage будет загружен автоматически.
Примеры:
1. Чтобы загрузить польскую машинописную раскладку (автоматически использует кодовую страницу 852):
keyb pl214
2. Чтобы загрузить одну из русских раскладок с кодовой страницей 866:
keyb ru441 866
Чтобы печатать русские символы нажмите ALT+RIGHT-SHIFT.
3. Чтобы загрузить одну из французских раскладок с кодовой страницей 850 (где кодовая страница определена в файле EGACPI.DAT):
keyb fr189 850 EGACPI.DAT
4. Чтобы загрузить кодовую страницу 858 (без клавиатурной раскладкой):
keyb none 858
Может быть использовано, чтобы изменить кодовую страницу для утилиты FreeDOS keyb2.
5. Чтобы вывести текущую кодовую страницу и, если загружена, клавиатурную раскладку:
keyb
Для получения большей информации используйте /? параметр командной строки с программами.
Специальные клавиши
ALT+ENTER Переключить на полный экран и обратно.
ALT+PAUSE Приостановить эмуляцию (для продолжения работы еще раз нажмите ALT+PAUSE).
CTRL+F1 Запустить настройщик клавиш.
CTRL+F4 Сменить смонтированный образ диска (CD или дискеты). Обновить кэш директории для всех дисков
CTRL+ALT+F5 Старт/Стоп создания ролика с экрана. (захват видео и запись в avi)
CTRL+F5 Сохранить скриншот. (в формате PNG)
CTRL+F6 Старт/Стоп записи звука в wave файл.
CTRL+ALT+F7 Старт/Стоп записи OPL команд. (в формате DRO)
CTRL+ALT+F8 Старт/Стоп записи MIDI команд.
CTRL+F7 Уменьшить пропуск кадров.
CTRL+F8 Увеличить пропуск кадров.
CTRL+F9 Закрыть DOSBox.
CTRL+F10 Захватить/Отпустить мышь.
CTRL+F11 Замедлить эмуляцию (уменьшить число инструкций DOSBox).
CTRL+F12 Ускорить эмуляцию (увеличить число инструкций DOSBox).[6]
[7]
[8]
[9]
ALT+F12 Убрать ограничение скорости (турбо кнопка/ускорение).
F11, ALT+F11 (machine=cga) смена оттенка в режимах вывода NTSC.[10]
F11 (machine=hercules) переключения цвета между янтарным, зелёным и белым.[11]
Это клавиши по-умолчанию. Вы можете поменять их в настройщике клавиатуры. (См. раздел «Переназначение клавиш»)
В MAC OS можете попробовать задействовать cmd(applekey) вместе с Ctrl, если комбинация не работает, например, cmd+ctrl+F1, но некоторые клавиши всё равно придётся переназначить (как и в Linux).
Сохраненные/Записанные файлы могут быть найдены в:
- Windows: «Меню кнопки Windows/Пуск»->»Программы»->DOSBox-0.74->Extras
- Linux: ~/.dosbox/capture
- MAC OS X: «~/Library/Preferences/capture»
Это может быть изменено в конфигурационном файле DOSBox.
Джойстик/геймпад
Стандартный порт джойстика в DOS поддерживает до 4 осей и 4 кнопок.
Для большего их количества нужны специальные настройки.
Чтобы заставить DOSBox использовать другой тип эмулируемого джойстика/геймпада, используется параметр «joysticktype=» в разделе [joystick] конфигурационного файла DOSBox.
none — отключает поддержку джойстика.
auto — (по-умолчанию) автоматически определяет подключен один или два джойстика: если один — использует значение ‘4axis’, если два — использует значение ‘2axis’.
2axis — Если подключены два джойстика, каждый из них эмулирует джойстик с двумя осями и двумя кнопками. Если подключен только один, он эмулирует джойстик только с двумя осями и двумя кнопками.
4axis — поддерживает только первый джойстик, эмулирует джойстик с четырьмя осями и четырьмя кнопками или геймпад с двумя осями и шестью кнопками.
4axis_2 — поддерживает только второй джойстик.
fcs — поддерживает только первый джойстик, эмулирует ThrustMaster Flight Control System, с тремя осями, четырьмя кнопками и «шапочкой».
ch — поддерживает только первый джойстик, эмулирует CH Flightstick, с четырьмя осями, шестью кнопками и «шапочкой», но вы не можете одновременно нажимать несколько кнопок.
Также вам придётся правильно настроить джойстик в самой игре.
[12]
Важно помнить, что если вы сохранили файл переназначения клавиш при отключенном джойстике или с подключенным другим джойстиком, ваши установки могут работать неправильно или вообще не работать, пока вы не сбросите настройки переназначения.
Если джойстик правильно работает вне DOSBox, но не настраивается внутри DOSBox, попробуйте другие значение свойства ‘timed’ в конфигурационном файле DOSBox.
Переназначение клавиш
Вы можете запустить программу переназначения клавиш DOSBox при помощи комбинации клавиш CTRL+F1 (см. раздел «Специальные клавиши») либо указав параметр -startmapper (см. раздел «Ключи командной строки») при запуске DOSBox. Пред вами появится виртуальная клавиатура и виртуальный джойстик.
Эти виртуальные устройства связываются с клавишами и событиями, о которых DOSBox будет сообщать DOS приложениям. Если вы нажмете на изображенную кнопку мышкой, вы увидите в нижнем левом углу, с каким событием она ассоциирована (EVENT) и с какими событиями связана.
EVENT: Клавиша или ось/кнопка/шапочка джойстика, которую DOSBox будет передавать эмулируемым приложениям. (Событие, которое произойдёт в игре, например, выстрел/прыжок/ходьба)
BIND: Клавиша на вашей реальной клавиатуре или ось/кнопка/шапочка вашего реального джойстика (какую передает SDL), которая соединена с результирующим событием (EVENT).
mod1/2/3: Модификаторы. Это клавиши, которые вам необходимо зажимать при нажатии выбранной кнопки (BIND). mod1 = CTRL, mod2 = ALT и mod3 = Shift. Обычно применяется только если вы хотите поменять специальные кнопки DOSBox.
Add: Добавить новую ПРИВЯЗКУ к этому СОБЫТИЮ (EVENT). Просто добавляет кнопку с вашей клавиатуры или событие с джойстика (нажатие кнопки, движение оси/шапочки) , которые будет производить СОБЫТИЕ в DOSBox.
Del: Удалить ПРИВЯЗКУ к СОБЫТИЮ. Если результирующее СОБЫТИЕ не имеет ПРИВЯЗКИ, это событие вызвать невозможно (нет способа напечатать символ или использовать соответствующее действие джойстика).
Next: Проматывание списка привязок, которые соответствуют данному СОБЫТИЮ.
Пример:
В1. Вы хотите при нажатии X на клавиатуре нажимать Z в DOSBox.
О. Кликните на Z на виртуальной клавиатуре. Кликните «Add». Теперь нажмите X на вашей клавиатуре.
В2. Если вы кликните «Next» несколько раз вы увидите, что Z на вашей клавиатуре «нажимает» Z и в DOSBox.
О. Выберите Z снова и кликайте «Next», пока не дойдете до Z в графе BIND. Теперь кликните «Del».
В3. Если вы продолжите испытания в DOSBox вы заметите, что нажатие X производит появление ZX.
О. X на вашей клавиатуре все еще сопоставлен X! Кликните X на виртуальной клавиатуре и нажимайте «Next» пока не найдете X в графе BIND. Кликните «Del».
Примеры переназначения для джойстика:
У вас подключенный джойстик, он отлично работает под DOSBox, и вы хотите поиграть с джойстиком в игры без его поддержки (положим, игра управляется стрелками на клавиатуре):
1. Запустите mapper (переназначение клавиш), затем кликните на изображение клавиши «стрелка влево». EVENT должен быть key_left. Теперь кликните на Add и подвиньте ваш джойстик в соответствующем направлении, это должно добавить событие в BIND.
2. Повторите описанное выше для трех остальных направлений, дополнительно могут быть также назначены кнопки джойстика (огонь/прыжок).
3. Кликните на Save, затем на Exit и протестируйте в какой-либо игре.
Вы хотите поменять ось-y джойстика, потому что некоторые авиасимуляторы используют инверсное перемещение по вертикали, которое вы не любите, и перенастроить это в игре невозможно:
1. Запустите mapper (переназначение клавиш) и кликните на Y- в первом поле джойстика. EVENT должно быть jaxis_0_1-.
2. Кликните на Del, чтобы удалить текущую привязку, затем кликните Add и подвиньте джойстик вниз. Должна появится новая привязка.
3. Повторите для Y+, сохраните назначение и проверьте в какой-нибудь игре.
Если вы хотите переназначить какие-либо события на d-pad/шапочку, вы должны сменить «joysticktype=auto» на «joysticktype=fcs» в конфигурационном файле. Возможно в следующей версии DOSBox это будет улучшено.
Если вы изменили раскладку по-умолчанию, вы можете сохранить результат нажатием на «Save». DOSBox сохранит раскладку в файл, заданную в конфигурационном файле DOSBox (параметр mapperfile=). При старте DOSBox загрузит вашу раскладку, если это указанно в конфигурационном файле.
Клавиатурная раскладка
Для переключения на другую клавиатурную раскладку может быть использован пункт «keyboardlayout» в секции [dos] конфигурационного файла DOSBox или внутренняя программа DOSBox keyb.com (см. раздел «Внутренние программы»). Оба метода принимают языковые коды определенные в DOS (смотрите ниже), но только при использовании keyb.com можно указывать кодовую страницу.
Значение по умолчанию keyboardlayout=auto в настоящий момент работает только под Windows, язык выбирается на основании языка операционной системы, но клавиатурная раскладка не проверяется.
Переключение раскладки
DOSBox поддерживает некоторое количество клавиатурных раскладок по-умолчанию, для переключения на них нужно задать идентификатор раскладки (например, keyboardlayout=PL214 в конфигурационном файле DOSBox, или напечатать «keyb PL214» в командной строке). Перечень всех встроенных в DOSBox раскладок приведён в: http://vogons.zetafleet.com/viewtopic.php?t=21824
Некоторые клавиатурные раскладки (для примера GK319 codepage 869 и RU441 codepage 808) поддерживают спаренные раскладки, которые можно переключать нажатием LeftALT+RightSHIFT для включения одной раскладки и LeftALT+LeftSHIFT для второй. Некоторые раскладки (например, LT456 с кодовой страницей 771) имеют поддержу трёх раскладок, третью можно включить нажатием LeftALT+LeftCTRL.
Поддерживаемые внешние файлы
Поддерживаются файлы FreeDOS .kl (файлы раскладок утилиты FreeDOS keyb2) и библиотеки FreeDOS keyboard.sys/keybrd2.sys/keybrd3.sys, состоящие из всех доступных файлов .kl.
Смотрите http://www.freedos.org/ для предварительно скомпилированных раскладок, если встроенные DOSBox раскладки не работают по какой-то причине, или обновлены, или стали доступны новые раскладки.
И .CPI (совместимые с MSDOS файлы кодовых страниц) и .CPX (сжатые UPX файлы кодовых страниц FreeDOS) могут быть использованы. Некоторые кодовые страницы включены в DOSBox, так что обычно не нужно беспокоится о внешних файлах раскладок. Если вам нужен другой файл кодовой страницы, скопируйте его в директорию конфигурационного файла DOSBox, чтобы он был доступным в DOSBox.
Если вы поместите все десять файлов ega.cpx (взятых из FreeDOS) в папку программы DOSBox, подходящий для клавиатурной раскладки и кодовой страницы файл будет загружен автоматически.
Дополнительные раскладки могут быть добавлены помещением соответствующих файлов .kl в директорию конфигурационного файла DOSBox и использованием первой части имени файла как языкового кода.
Пример: Для файла UZ.KL (клавиатурная раскладка для Узбекистана) определите «keyboardlayout=uz» в конфигурационным файле.
Интеграция пакетов клавиатурных раскладок (вроде keybrd2.sys) работает идентично.
Обратите внимание, что клавиатурные раскладки позволяют вводить символы других языков, но поддержки их в именах файлов НЕТ. Постарайтесь обойти их использование внутри названий файлов DOSBox и названий файлов вашей операционной системы, которые должны быть доступны в DOSBox.
Сетевая игра через прямое кабельное подключение
DOSBox может эмулировать прямое кабельное подключение (nullmodem) через локальную сеть и интернет. Оно может быть сконфигурировано через секцию [serialports] в конфигурационном файле DOSBox.
Чтобы создать nullmodem соединение, одна сторона должна стать сервером, а вторая — клиентом.
Сервер должен быть настроен в конфигурационном файле DOSBox таким образом:
serial1=nullmodem
Клиент:
serial1=nullmodem server:<IP или имя сервера>
Теперь запустите игру и выберите nullmodem / serial cable / already connected как режим multiplayer на порте COM1. Поставьте одинаковую скорость передачи (baudrate) на обоих компьютерах.
Дополнительные параметры, которые могут быть определены для управления действиями соединения nullmodem. Вот эти параметры:
- port: — номер порта TCP. По-умолчанию: 23
- rxdelay: — как долго (в миллисекундах) задерживать полученные данные, если интерфейс не готов. Увеличьте эту величину, если вы обнаружили увеличивающийся список ошибок в окне состояния DOSBox. По-умолчанию: 100
- txdelay: — как долго собирать данные перед отправкой пакета. По-умолчанию: 12
(уменьшает объем служебной информации)
- server: — Этот nullmodem будет клиентом, соединяющимся с указанным сервером.
(Без аргумента server: будет сервером.)
- transparent:1 — Посылает только последовательные данные, без RTS/DTR установления связи. Используйте это, когда соединяетесь с чем-то иным нежели nullmodem.
- telnet:1 — Интерпретировать данные Telnet с удаленной стороны. Автоматически выставляет transparent.
- usedtr:1 — Соединение не будет установлено, пока DTR не будет выставлен DOS программой. Полезно для модемных терминалов. Автоматически выставляет transparent.
- inhsocket:1 — Использовать сокет, задаваемый DOSBox командной строкой. Автоматически выставляет transparent.
(Наследуемый сокет: Используется для игры в старые DOS игры (так называемые door games) на новом софте BBS.)
Пример: Создать сервер, прослушивающий TCP порт 5000. serial1=nullmodem port:5000 rxdelay:1000
Как ускорить/замедлить DOSBox
DOSBox эмулирует CPU, звуковую и графическую карты, и другие устройства PC в одно и то же время. Скорость эмулируемых приложений DOS зависит от того, сколько инструкций может быть сэмулировано, что является настраиваемым параметром (число инструкций).
Инструкции (циклы) CPU (ускорение/замедление)
По-умолчанию (cycles=auto) DOSBox пытается определить, нужно ли запускать игру с максимально возможным количеством эмулируемых инструкций (cycles=max, иногда это приводит к слишком быстрой или нестабильной работе игры) или же использовать фиксированное число инструкций (cycles=max, иногда это приводит к слишком медленной или слишком быстрой работе игры). Но вы всегда можете указать другое значение в конфигурационном файле DOSBox.
Вы можете заставить DOSBox работать медленнее или быстрее, указав фиксированное значение инструкций в конфигурационном файле. Если, к примеру, указать cycles=10000, то в заголовке окна DOSBox будет отображено «Cpu Speed: fixed 10000 cycles». В этом режиме вы можете дополнительно уменьшить число инструкций, нажимая CTRL+F11 (можете уменьшать,сколько хотите) или увеличить, нажимая CTRL+F12, при этом вы ограничены только производительностью одного ядра процессора в вашем компьютере.
Вы можете посмотреть сколько свободных ресурсов есть у вашего процессора, заглянув в Диспетчер задач в Windows 2000/XP/Vista/7 или в Системный монитор в Windows 95/98/ME.
Когда достигнута 100% загрузка одного из ядер процессора, невозможно далее ускорять работу DOSBox (она будет только замедляться), если только не уменьшить нагрузку создаваемую другими (не эмуляцией процессора) частями DOSBox. DOSBox может использовать только одно ядро вашего процессора, так что если у вас четырехъядерный процессор, DOSBox не сможет задействовать ресурсы остальных трёх.
Вы также можете заставить DOSBox работать быстро, указав cycles=max в конфигурационном файле. В заголовке окна DOSBox появится надпись «Cpu Speed: max 100% cycles». Теперь вы не должны отслеживать сколько свободных ресурсов есть у вашего процессора, так как DOSBox всегда будет использовать 100% ресурсов одного из ядер. В этом режиме вы можете уменьшить объём загрузки ядра процессора, нажав CTRL+F11, или увеличить, нажав CTRL+F12.
Ядра CPU (ускорение)
В x86 архитектурах вы можете попробовать установить использование динамически перекомпилируемого ядра (поставьте core=dynamic в конфигурационном файле DOSBox).
Это обычно дает лучшие результаты, если автоопределение (core=auto) не срабатывает.
Этот тип лучше всего сопровождать cycles=max. Но вы также можете попробовать указать высокое значение числа инструкций (к примеру, 20000 и больше).
Обратите внимание, что могут быть игры, которые хуже работают (или слетают) с динамическим ядром (поэтому чаще сохраняйте игру), или не работают с ним совсем!
Эмуляция графики
VGA эмуляция самая требовательная часть DOSBox с точки зрения загрузки CPU. увеличьте число пропускаемых кадров (увеличивая по одному) нажатием CRTL+F8. Загрузка вашего CPU должна уменьшиться, если выставлен режим фиксированного числа инструкций и вы сможете увеличить число инструкций, нажимая CTRL+F12.
Повторяйте это, пока игра не заработает с приемлемой скоростью. Пожалуйста, помните, что это компромисс: вы теряете в плавности картинки, но получаете скорость.
Эмуляция звука
Вы можете также попробовать отключить звук через setup игры, чтобы еще уменьшить нагрузку на ваш CPU. Установка nosound=true в конфигурационном файле НЕ отключает эмуляцию звуковых устройств, будет отключен только вывод звука.
Также попробуйте закрыть все программы кроме DOSBox, чтобы высвободить как можно больше ресурсов для DOSBox.
Гибкая настройка числа инструкций:
Настройки cycles=auto и cycles=max могут быть параметризованы, чтобы иметь различные значения при старте.
Синтаксис:
cycles=auto [«по-умолчанию для realmode»] [«по-умолчанию для protected mode»%] [limit «лимит инструкций»]
cycles=max [«по-умолчанию для protected mode»%] [limit «лимит инструкций»]
Пример:
cycles=auto 5000 80% limit 20000
будут использованы cycles=5000 для real mode игр, пониженные до 80% CPU для protected mode игр с лимитом числа инструкций 20000
Решение проблем
Общий совет:
Просматривайте сообщения в окне состояния DOSBox. Смотри раздел «Окно состояния DOSBox».
DOSBox вылетает сразу после старта:
— используйте разные значения для параметра output= в конфигурационном файле DOSBox
— попробуйте обновить вашу графическую карту и DirectX
— (Linux) установите переменную среды SDL_AUDIODRIVER в значение alsa или oss.
Запуск определенных игр приводит к закрытию DOSBox, вылету с неким сообщением или зависанию:
— проверьте с начальной установкой DOSBox (немодифицированным конфигурационным файлом)
— попробуйте с отключенным звуком (используйте настроечную программу, которая идет с игрой, в дополнение вы можете выставить sbtype=none и gus=false в конфигурационном файле DOSBox)
— поменяйте некоторые записи в конфигурационном файле DOSBox, главным образом попробуйте:
core=normal
фиксированное число инструкций (для примера cycles=10000)
ems=false
xms=false
или комбинации приведенных настроек, а также установку параметра machine, указывающего эмулируемую видеокарту и функциональность:
machine=vesa_nolfb
или
machine=vgaonly
— используйте loadfix перед запуском игры
Игра вылетает в командную строку DOSBox с некоторым сообщением об ошибке:
— прочтите сообщение об ошибке и попробуйте опознать ошибку
— попробуйте решения из секций выше
— монтируйте различные пути, если игра требовательна к местоположению, например, если вы используете «mount d d:\oldgames\game» попробуйте «mount c d:\oldgames\game» и «mount c d:\oldgames»
— если игра требует использование CD-ROM, убедитесь, что вы используете «-t cdrom», когда монтируете, и попробуйте различные дополнительные параметры (ioctl, usecd и label, смотрите соответствующий раздел)
— проверьте права на файлы игры (уберите атрибуты «только чтение», добавьте права на запись и т.д.)
— попробуйте переустановить игру внутри DOSBox
Окно состояния DOSBox
Окно состояния DOSBox содержит много полезной информации о текущей настройке, ваших действиях в DOSBox, возникающих ошибках и многое другое.
Если у вас возникают какие-либо проблемы, просмотрите эти сведения.
Чтобы увидеть окно состояния DOSBox:
- Windows: Окно состояния открывается вместе с основным окном DOSBox.
- Linux: Возможно, понадобится запустить DOSBox из консоли, чтобы увидеть окно состояния.
- MAC OS X: Щёлкните правой кнопкой на DOSBox.app, выберите «Show Package Contents»->войдите в «Contents»->войдите в «MacOS»->запустите «DOSBox»
Конфигурационный файл
Конфигурационный файл автоматически создаётся при первом запуске DOSBox. Этот файл может быть найден в:
- Windows: «Меню кнопки Пуск/Windows»->»Программы»->DOSBox-0.74->Options
- Linux: ~/.dosbox/dosbox-0.74.conf
- MAC OS X: «~/Library/Preferences/DOSBox 0.74 Preferences»
Этот файл разделён на несколько секций. Каждая секция начинается со строки [имя секции]. Установки представляют из себя строки вида «параметр=значение», где «значение» можно изменять для настройки DOSBox. Символы # и % отмечают (начинают) строки-комментарии.
Дополнительный конфигурационный файл может быть сгенерирован программой CONFIG.COM, расположенной на внутреннем диске DOSBox Z: Смотри раздел «Внутренние программы» для поиска сведений по использованию CONFIG.COM. Вы можете запустить DOSBox с параметром -conf для загрузки сгенерированного файла и использования его установок.
DOSBox загрузит файлы, указанные с параметром -conf. Если не указан ни один, DOSBox попытается загрузить файл «dosbox.conf» в текущей директории. Если такого файла нет, DOSBox загрузит конфигурационный файл из профиля пользователя. Если такого файла нет он будет создан.
Важно!: В Windows Vista/7 конфигурационный файл не будет правильно работать, если он размещён в папках «Windows» или «Program Files» или их подпапках или напрямую в C:\ , поэтому наилучшее место для дополнительного конфигурационного файла — это, к примеру, C:\oldgames
Описание секций, параметров и их значений, конфигурационного файла DOSBox — dosbox.conf, смотрите в отдельной статье Dosbox.conf.
Языковой файл
Языковой файл может быть сгенерирован с помощью программы CONFIG.COM, расположенной на внутреннем диске DOSBox Z: Смотри раздел «Внутренние программы» для поиска сведений по использованию CONFIG.COM. Прочитайте языковой файл и вы, надо надеяться, поймете как его менять. Запустите DOSBox с параметром -lang чтобы переключится на использование вашего нового языкового файла или вы можете настроить имя файла в конфигурационном файле в секции [dosbox]. В параметре language= укажите имя файла.
Примечания
- ↑ Параметры в каждом последующим конфигурационном файле перекрывают параметры предыдущего. Кроме команд в секции [autoexec], команды находящиеся в ней каждого последующего конфигурационного файла, добавляются после команд предыдущего конфигурационного файла.
Внимание, если в последующем конфигурационном файле содержатся только некоторые параметры, обязательно должны содержаться и секции в которых эти параметры находятся, в противном случаи они не будут приняты. пример:[sdl] fullscreen=true fullresolution=original [dosbox] machine=svga_s3 [cpu] core=normal cputype=486_slow cycles=9500
- ↑ Чтобы узнать доступные методы масштабирования смотрите статью Dosbox.conf, раздел [render]
- ↑ то-есть, если тип не указан, или указан как -t dir, -freesize 900 будет считаться как 900 мегабайт свободного места, а если тип указан как -t floppy, будет считаться как 900 килобайт свободного места.
Используйте этот параметр, если инсталлятор игры не может определить наличие свободного места на виртуальном HDD. Не используйте слишком большие значения, задайте свободного места на несколько мегабайт больше чем требуется для установки игры. - ↑ В DOSBox SVN Daum builds можно монтировать по нескольку образов дискет, точно так же как и образы CD. Переключаются аналогично, CTRL+F4.
- ↑ В версии 0.73 и ниже, используется параметр -t iso в место -t cdrom.
- ↑ Если вы увеличите число инструкций DOSBox больше максимальной производительности вашего компьютера, это произведет эффект аналогичный замедлению эмуляции. Этот максимум варьируется от компьютера к компьютеру.
- ↑ Вам понадобятся свободные ресурсы процессора (и чем больше, тем лучше, т.е. быстрее). Поэтому при установке cycles=max или очень большом фиксированном числе инструкций, турбо может не сработать. И клавишу нужно удерживать!
- ↑ При слишком больших циклах эмулируемого ЦП, в играх могут появляться различные баги. Такие как, зависания, вылеты, не срабатывающие скрипты, графические артефакты, притормаживание, плавающая скорость, и многие другие. К примеру:
В Alone in the Dark 1,2,3 при циклах выше 65000 (+core=dynamic), звуковая карта игрой не определяется, и игра запускается без звука. а если запустить настройки игры, не даёт выбрать её в настройках звука.
В Zak McKracken and the Alien Mindbenders при циклах где-то между 1500-1700 зависает на финальной сцене перед эпилогом.
В Terminator: Future Shock при циклах где-то выше 17000, не возможно запрыгнуть на парапет склада возле пивзавода на 7-ом уровне игры, так же не срабатывает скрип на каком то из уровней. в обоих случаях это приводит к непроходимости игры.
Все подобные баги исправляются выставлением подходящего значения фиксированных циклов ЦП. Для каждой игры это значение своё и подбирается в ручную. - ↑ Эквиваленты циклов реальным ЦП, и какие реальные ЦП эквивалент чего могут эмулировать, можно посмотреть тут.
- ↑ Эти клавиши не сработают, если вы сохранили файл переназначения клавиш с другим типом машины. Придётся или переназначить их или сбросить переназначение в начальное состояние (+resetmapper).
- ↑ Эти клавиши не сработают, если вы сохранили файл переназначения клавиш с другим типом машины. Придётся или переназначить их или сбросить переназначение в начальное состояние (+resetmapper).
- ↑ Оси джойстика калибруются (настраиваются) отдельно в каждой игре. Настроить один раз под все дос игры не возможно в принципе! Это вам не Windows. В некоторых же играх приходится настраивать заново при каждом их запуске, и это для них совершенно нормально.
В каких-то играх калибровка джойстика находится в опциях игры, в каких-то предлагает откалибровать при запуске игры, в каких-то калибровка производится в отдельном исполняемом файле, в каких-то калибровка активируется только при нажатии или удержании определенных сочетаний клавиш во время самой игры (в таких играх сочетания клавиш нужно смотреть в руководстве к игре). При калибровке будьте внимательны! В точности следуйте командам на экране!
какие то игры корректно работают с параметром timed=true, какие то с timed=false в секции [joystick] конфигурационного файла. Если вы всё правильно делайте при калибровке, в точности следуя указаниям на экране, и вам ни как не удаётся настроить оси, попробуйте сменить этот параметр.Обратите внимание, что кнопки и оси геймпада можно назначать не только на кнопки и оси виртуального джойстика, но и на кнопки виртуальной клавиатуры. Более того, таким образом можно задействовать более 4-х кнопок геймпада, а также можно задействовать его в играх, где не предусмотрена поддержка джойстика. А если в игре нет аналогового управления, скажем, рулевым колесом автомобиля либо закрылками и элеронами самолета, реализованного с помощью осей джойстика, то и смысла в задействовании геймпада именно через эмуляцию джойстика нету.
См. также
- DOSBox в вопросах и ответах (наиболее часто задаваемые вопросы по программе)
- DOSBox для знатоков (дополнительные руководства)
- Dosbox.conf (описание файла настроек программы)