В этой статье мы будем настраивать очень популярный роутер D-link DIR-615. Писать статью я буду на примере D-link DIR-615/A. А если у вас другая модель, то ничего страшного, там практически все совпадает. Эта инструкция подойдет для многих роутеров компании D-link. Постараюсь написать обо всем подробно и на понятном языке. Рассказывать о самом роутере много не буду, почитать мой отзыв и другую полезную информацию о DIR-615/A, вы можете по ссылке выше. Скажу лишь, что этот роутер хорошо подходит для дома, или небольшого офиса. Он с легкостью обеспечит стабильный доступ к интернету для ваших компьютеров, телефонов, планшетов (по Wi-Fi) и других устройств.
Что касается настройки D-link DIR-615, то там все очень просто. А если ваш провайдер использует технологию соединения Динамический IP, то вам достаточно будет подключить роутер, и интернет уже будет работать. Нужно будет только установить пароль на Wi-Fi сеть и сменить имя сети, если понадобится. Не нравиться мне только то, что настройки в D-link практически в каждой версии меняются (на вид). Я имею введу панель управления роутером. И поэтому, настройки вашего роутера могут отличаться от тех, которые вы увидите в этой статье. Но это может исправить обновление прошивки.
Настраивать D-link DIR-615 будем по такой схеме:
- Подключение и вход в панель управления на D-link DIR-615
- Настройка интернета на D-link DIR-615 (подключения к провайдеру)
- Настройка Wi-Fi сети и смена пароля
А теперь, обо всем подробнее.
Подключаем D-link DIR-615 и заходим в настройки
Подключите к роутеру питание и включите его. Если индикаторы на передней панели роутера не засветились, то проверьте включено ли питание кнопкой на задней панели. Если вы будете настраивать маршрутизатор по кабелю, тогда возьмите сетевой кабель, который идет в комплекте, соедините маршрутизатор с компьютером. Один конец кабеля подключаем в черный LAN разъем (в 1 из 4), а второй конец подключите в сетевую карту компьютера (ноутбука). Кабель от интернет провайдера подключите в желтый WAN разъем.

Если у вас нет компьютера с сетевой картой, или нет кабеля, то настроить все можно и по Wi-Fi. Можно даже с телефона, или планшета.
Дальше, нам нужно зайти в настройки маршрутизатора. Но, перед этим, я советую вам сделать сброс настроек. Это нужно для того, что бы удалить все старые настройки, которые возможно уже заданы. И что бы они нам не помешали, мы просто вернем роутер заводскому состоянию.
Сброс настроек на D-link DIR-615
Делаться все очень просто. Чем-то острым нужно нажать утопленную в корпус кнопку RESET и подержать ее секунд десять. Затем отпустить, и подождать пока роутер перезагрузится.

Теперь можно заходить в настройки. Как это сделать, можете почитать в подробной статье. Или, смотрите ниже.
Откройте любой браузер и перейдите в нем по адресу 192.168.0.1. Появится окно с запросом логина и пароля. По умолчанию, это admin и admin. Вы попадете в настройки своего D-link.

Возможно, у вас настройки будут на английском. Но вы можете сменить язык на русский, или украинский.

Если появится окно с просьбой сменить заводской пароль для входа в настройки, то придумайте и укажите два раза какой-то пароль. Не забудьте его, он будет использоваться для входа в настройки роутера.
Я советую вам сразу обновить прошивку своего роутера, еще до настройки. Как это сделать, я подробно писал в этой стать. Если вы не хотите этого делать, или для вас это слишком сложно, то можете продолжать настройку без обновления программного обеспечения
Все, в панель управления мы зашли, можно приступать к настройке маршрутизатора.
Настройка интернета на D-link DIR-615
Первое, что вам нужно сделать, это узнать какую технологию соединения использует ваш провайдер. Динамический IP, статический, PPPoE (использует Дом.ру и другие провайдеры), L2TP (например, использует провайдер Билайн). Я уже писал, как узнать технологию соединения. Можно просто позвонить в поддержку провайдера и спросить, или посмотреть на официальном сайте.
Если у вас соединение по популярной технологии Динамический IP, то роутер должен раздавать интернет сразу после подключения к нему кабеля от провайдера и вам остается только настроить Wi-Fi сеть (смотрите ниже в статье). Если у вас не Динамический IP, то нужно настраивать.
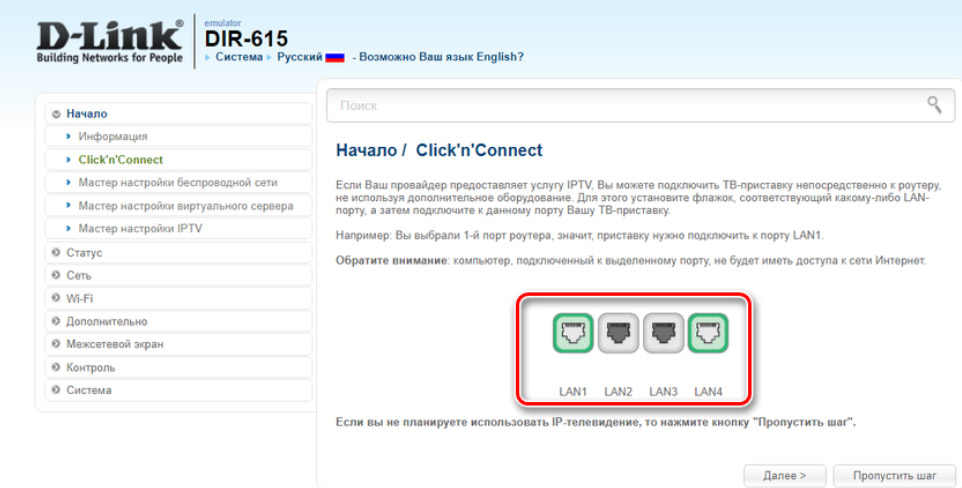
Перейдите на вкладку Начало — Click’n’Connect. Проверьте подключен ли Ethernet кабель и нажмите на кнопку Далее.

Выберите из списка ваше соединение. Если у вас например PPPoE и провайдер предоставляет еще и IP адрес, то выбираем PPPoE+Статический IP. Если IP нет, то выбираем просто PPPoE+Динамический IP. Или точно так же с L2TP.

Дальше укажите параметры IP, которые предоставляет провайдер и если он их предоставляет (у вас этого окна может не быть). Нажмите Далее.

Если появится окно «Адреса локальных ресурсов провайдера», и вы не хотите добавлять адреса, или не знаете что это такое, то просто нажмите Далее. Появится окно, в котором нужно указать имя соединения, логин и пароль. Эту информацию так же предоставляет провайдер. Вы можете нажать на кнопку Подробно, что бы открыть более широкие настройки (MTU и другие).
Дальше будет проверка соединения с интернетом и возможность включить фильтр Яндекс.DNS. Это уже по желанию. В любом случае, вы потом сможете изменить эти настройки. Это я показывал пример настройки PPPoE соединения на D-link DIR-615. У вас же настройки могут отличаться от тех что у меня.
Если после настройки интернет через роутер не работает, статус соединения «без доступа к интернету», или просто не открываться сайты, то проверяйте настройки от провайдера. Возможно, вы неправильно выбрали тип соединения, или неправильно задали какой-то параметр.
Как видите, с PPPoE, L2TP, PPTP и Динамическим IP, заморочек намного больше, чем с технологией Статический IP.
Один важный момент: если у вас на компьютере было высокоскоростное соединение, с помощью которого вы подключались к интернету, то теперь оно не нужно. Это соединение будет устанавливать наш роутер D-link и просто раздавать интернет по кабелю и по Wi-Fi.
Сменить настройки провайдера вы всегда можете через этот же мастер быстрой настройки Click’n’Connect, или на вкладке Сеть — WAN, выбрав и отредактировав нужное соединение.

Желательно сохранить настройки:

Если интернет через роутер уже работает, то можно приступать к настройке Wi-Fi сети.
Настройка Wi-Fi и смена пароля на D-link DIR-615
Все что нам нужно сделать, так это сменить имя Wi-Fi сети и задать новый пароль для защиты нашего Wi-Fi.
Перейдите на вкладку Wi-Fi — Основные настройки. Здесь мы будем менять имя нашего Wi-Fi. В поле SSID укажите название вашей сети. Нажмите кнопку Применить.

Дальше переходим на вкладку Wi-Fi — Настройки безопасности, и в поле «Ключ шифрования PSK» указываем пароль, который будет использоваться для подключения к Wi-Fi. Пароль должен быть минимум 8 символов. Сразу запишите пароль, что бы не забыть его.

Сохраните настройки. Система — Сохранить. Если больше ничего настраивать не будете (на этом настройка D-link DIR-615 может быть закончена), тогда перезагрузите роутер. Система (пункт меню сверху, возле логотипа) — Перезагрузить.
Все, беспроводную сеть настроили. Можете еще посмотреть более подробную статью по настройке Wi-Fi.
Еще можете сменить пароль администратора, который используется для доступа к настройкам роутера. Если вы его не меняли, или меняли, но уже забыли, то сделать это можно на вкладке Система — Пароль администратора.
Укажите два раза новый пароль и нажмите Применить. Не забудьте сохранить настройки.

Обязательно запишите где-то этот пароль. Если вы его забудете, то не сможете зайти в панель управления, и придется делать сброс настроек.
Послесловие
Фух, устал я:) ничего больше писать не буду. Если возникнут вопросы по статье, спрашивайте в комментариях. Надеюсь, у вас получилось настроить свой маршрутизатор.
-
Contents
-
Table of Contents
-
Troubleshooting
-
Bookmarks
Quick Links
Related Manuals for D-Link DIR-615
Summary of Contents for D-Link DIR-615
-
Page 2: Table Of Contents
Initial Router Configuration for Wi-Fi Protection ….60 Firewall & DMZ …………. 34 Setting Up a Configured Router……….. 61 Advanced Wireless …………35 Advanced Network …………37 Changing the Computer Name and Joining a Workgroup … 62 Routing…………….38 D-Link DIR-615 User Manual…
-
Page 3
Configuring the Wireless Network in MAC OS X Snow Leopard (10.6) …………….82 Troubleshooting ……………86 Wireless Basics …………….90 Tips ………………93 Wireless Modes …………..94 Networking Basics …………..95 Check your IP address …………95 Statically Assign an IP address ………..96 Technical Specifications…………97 D-Link DIR-615 User Manual… -
Page 4: Package Contents
• Warranty Card Note: Using a power supply with a different voltage than the one included with the DIR-615 will cause damage and void the warranty for this product. Note: Always attach the power cord plug to the power supply, before inserting the power cord and connected power supply to the wall outlet.
-
Page 5: Features
• Compatible with 802.11b and 802.11g Devices — The DIR-615 is still fully compatible with the IEEE 802.11b and IEEE 802.11g standard, so it can connect with existing 802.11b and IEEE 802.11g PCI, USB and Cardbus adapters.
-
Page 6: Hardware Overview
Receptor for the Power Adapter. The Auto MDI/MDIX WAN LAN Ports port is the connection for Connect Ethernet devices such as the Ethernet cable to the computers, switches, and hubs. Cable or DSL modem. D-Link DIR-615 User Manual…
-
Page 7: Leds And Usb Port
Section 1 — Product Overview Hardware Overview LEDs and USB Port USB Port This USB port supports D-Link A solid green light indicates WLAN LED SharePort function. Connect a the connection on the WAN multi-function printer, scanner, A solid light indicates that the port.
-
Page 8: Installation
If you have DSL and are connecting via PPPoE, make sure you disable or uninstall any PPPoE software such as WinPoet, Broadjump, or Ethernet 300 from your computer or you will not be able to connect to the Internet. D-Link DIR-615 User Manual…
-
Page 9: Wireless Installation Considerations
1. Keep the number of walls and ceilings between the D-Link router and other network devices to a minimum — each wall or ceiling can reduce your adapter’s range from 3-90 feet (1-30 meters.) Position your devices so that the number of walls or ceilings is minimized.
-
Page 10: Wall Mounting Your Device
Section 2 — Installation Wall Mounting Your Device You can mount the DIR-615 to a wall or a partition for easy and convenient placement of your device. To wall mount your device, A. Screw the provided screws with the equipment to the wall or partition where the device to be placed.
-
Page 11: Connect To Cable/Dsl/Satellite Modem
8. Verify the link lights on the router. The power light, WAN light, and the LAN light (the port that your computer is plugged into) should be lit. If not, make sure your computer, modem, and router are powered on and verify the cable connections are correct. 9. Skip to page 16 to configure your router. D-Link DIR-615 User Manual…
-
Page 12: Connect To Another Router
Section 2 — Installation Connect to Another Router If you are connecting the D-Link router to another router to use as a wireless access point and/or switch, you will have to do the following before connecting the router to your network: •…
-
Page 13
7. Connect an Ethernet cable in one of the LAN ports of the router and connect it to your other router. Do not plug anything into the WAN port of the D-Link router. 8. You may now use the other three LAN ports to connect other Ethernet devices and computers. To configure your wireless network, open a web browser and enter the IP address you assigned to the router. -
Page 14: Configuration
Section 3 — Configuration Configuration This section will show you how to configure your new D-Link wireless router using the web-based configuration utility. Web-based Configuration Utility To access the configuration utility, open a web-browser such as Internet Explorer and enter the IP address of the router (192.168.0.1).
-
Page 15: Setup Wizard
Internet Setup window to quickly set up your router. Click Internet Connection Setup Wizard, and the first window of the wizard will open. Click Next to continue. Create a new password, and then click Next to continue. D-Link DIR-615 User Manual…
-
Page 16
ISPs. Enter the static IP address and its subnet mask in the IP Unnumbered Address and IP Unnumbered Netmask. After that enter the start and end LAN IP address in the fields. Click Next to continue. D-Link DIR-615 User Manual… -
Page 17
Click Automatically assign a network key (Recommended) or Manually assing a network key for the wireless security key, and use the check box to select the desired level of wireless security, WEP, WPA. and then click Next to continue. D-Link DIR-615 User Manual… -
Page 18
Save to continue. The Router will save the new settings and reboot. Please allow 1-2 minutes for rebooting. When the router has finished rebooting, the opening Wireless Setup window is displayed. D-Link DIR-615 User Manual… -
Page 19: Internet Setup
Section 3 — Configuration Internet Setup If you want to configure the Router manually without using the wizard, click the Manual Internet Connection Setup button. D-Link DIR-615 User Manual…
-
Page 20: Dynamic Pppoe
Enter a maximum idle time during which the Internet Time: connection is maintained during inactivity. To disable this feature, enable Auto-reconnect. MTU: Maximum Transmission Unit — You may need to change the MTU for optimal performance with your specific ISP. D-Link DIR-615 User Manual…
-
Page 21: Static Pppoe
Enter Start and End LAN IP address. DNS: Click Recieve DNS from ISP to get the DNS automatically. Click Enter DNS Manually to enter the DNS information below. Addresses: Enter the Primary and Secondary DNS Server Addresses. D-Link DIR-615 User Manual…
-
Page 22
Auto-reconnect. MTU: Maximum Transmission Unit — You may need to change the MTU for optimal performance with your specific ISP. 1492 is the default MTU. Connection Mode Select: Select either Always, Manual, or Connect-on demand. D-Link DIR-615 User Manual… -
Page 23: Wireless Setup
WEP, WPA, WPA2, and WPA/WPA2 wireless security mode options. If you want to have more wireless network name, also known as SSID, click the Multiple Wireless network Name Setup button. D-Link DIR-615 User Manual…
-
Page 24
WPA. and then click Next to continue. If selecting Manually assign a network key in the previous window, this window will open. Enter a wireless security password in the Network Key box. Click Next to continue. D-Link DIR-615 User Manual… -
Page 25
Save to continue. The Router will save the new settings and reboot. Please allow 1-2 minutes for rebooting. When the router has finished rebooting, the opening Wireless Setup window is displayed. D-Link DIR-615 User Manual… -
Page 26
Enable Hidden Check this option if you would not like the SSID of your wireless network to be broadcasted by the DIR-615. If this option is Wireless: checked, the SSID of the DIR-615 will not be seen by Site Survey utilities so your wireless clients will have to know the SSID of your DIR-615 in order to connect to it. -
Page 27
Section 3 — Configuration 1. To enable WEP, next to Security Mode, select Enable WEP Wireless Security (basic). 2. Select the Authentication method, WEP Encryption, it’s default and the key value. 3. Click Save Settings to save your settings. D-Link DIR-615 User Manual… -
Page 28
WPA, WPA2, or WPA/WPA2 (whichever of the three options you have selected above) on your adapter and enter the same network key as you did on the router. D-Link DIR-615 User Manual… -
Page 29
5. Next to Port, enter the port you are using with your RADIUS server. 1812 is the default port. 6. Next to Shared Secret, enter the security key. 7. Click Save Settings to save your settings. D-Link DIR-615 User Manual… -
Page 30
Section 3 — Configuration Click the Multiple Wireless Network Name Setup to add or select SSIDs. Wireless Enter wireless network work names (SSIDs) in the field. network Tick the check box to select the SSID. Name: D-Link DIR-615 User Manual… -
Page 31: Lan Setup
Check the box to transfer the DNS server Relay: information from your ISP to your computers. If unchecked, your computers will use the router for a DNS server. Refer to the next page for DHCP information. D-Link DIR-615 User Manual…
-
Page 32: Dhcp Server Settings
Section 3 — Configuration DHCP Server Settings DHCP stands for Dynamic Host Control Protocol. The DIR-615 has a built-in DHCP server. The DHCP Server will automatically assign an IP address to the computers on the LAN/private network. Be sure to set your computers to be DHCP clients by setting their TCP/IP settings to “Obtain an IP Address…
-
Page 33: Time And Date
This section will allow you to configure, update, and maintain the correct time on the internal system clock. Sync: Deselect the Automatically synchronize with D-Link’s Internet time server check box to be able to see the option. Click the Sync. your computer’s time settings button to make the Router’s time same as your computer.
-
Page 34: Parental Control
The schedule of time when the parental control filter will be enabled. The schedule may be set to Always, which will allow the particular service to always be enabled. You can create your own times in the Maintenance > Schedules section. D-Link DIR-615 User Manual…
-
Page 35: Port Forwarding
Start Port/ Enter the port or ports that you want to open. If End Port: you want to open one port, enter the same port in both boxes. Traffic Type: Select TCP, UDP, or Any D-Link DIR-615 User Manual…
-
Page 36: Filter Rules
Deny the network access. Schedule: Select Always to apply for this filter rule all the time, or select one of the scheduled time. The scheduled time should be configured in Maintenance > Schedules section in advance. D-Link DIR-615 User Manual…
-
Page 37: Firewall & Dmz
Service Filter: Service FilterTick the Enable Service Filter Blocking check box to enable the function, and tick the rest of the check boxes to deny the access from various tools. D-Link DIR-615 User Manual…
-
Page 38: Advanced Wireless
Always: CTS will always be used to make sure the wireless LAN is clear before sending data. Auto: CTS will monitor the wireless network and automatically decide whether to implement CTS based on the amount of traffic and collisions that occurs on the wireless network. D-Link DIR-615 User Manual…
-
Page 39
Use the Configure Wireless MAC Filter Rules below drop-down list to select an universal MAC filter rule for the MAC Wireless MAC addresses listed in the fields below. Filter Rule: Enter the MAC address for the rule. The format should be xx:xx:xx:xx:xx:xx. MAC Address: D-Link DIR-615 User Manual… -
Page 40: Advanced Network
Enable Tick the check box to allow multicast traffic to pass Multicast through the router from the Internet. Streams: Wireless Tick the check box to allow wireless multicast Enhance Mode: traffic to pass through the router. D-Link DIR-615 User Manual…
-
Page 41: Routing
The IP address of the packets that will take this route. Subnet Mask: The subnet of the IP address of the packets that will take this route. Gateway: Specifies the next hop to be taken if this route is used. D-Link DIR-615 User Manual…
-
Page 42: Device Administration
This would present a security risk and is not recommended. HTTP Port: The port number used to access the DIR-615. For example: http://x.x.x.x:8080 whereas x.x.x.x is the WAN IP address of the DIR-615 and 8080 is the port used for the Web-Management interface.
-
Page 43: Save And Restore
If you want to save the current router configuration settings, use the Save button above. Reboot: Click the Reboot button on the left side of the window to restart the Router. D-Link DIR-615 User Manual…
-
Page 44: Ddns Setting
Dyn.Dns.org(free), and Dyn.Dns. org(Static). Host Name: Enter the host name of the DDNS server. Username: Enter the username given to you by your DDNS server. Password: Enter the password or key given to you by your DDNS server. D-Link DIR-615 User Manual…
-
Page 45: System Check
Ping Test: The Ping Test is used to send Ping packets to test if a computer is on the Internet. Enter the IP Address that you wish to Ping, and click Ping. D-Link DIR-615 User Manual…
-
Page 46: Schedules
Tick this check box if the new schedule rule applies to the full 24-hour period. Start Time/ If the new schedule rule does not apply to the full End Time: 24-hour period, untick the previous checkbox and then enter a specific beginning and ending time. D-Link DIR-615 User Manual…
-
Page 47: Log Settings
Click on the Save button link on this window to save the log file to your local hard drive. Syslog Server: click the checkbox to save the log in the log server in the LAN side. D-Link DIR-615 User Manual…
-
Page 48: Device Info
Section 3 — Configuration Device Info This window displays the current information for the DIR-615. It will display the LAN, WAN, and Wireless information. If your WAN connection is set up for a Dynamic IP address then a DHCP Release button and a DHCP Renew button will be displayed.
-
Page 49: Log
View the last page of the log. Previous: View the previous page. Next: View the next page. Clear: Clear the log. Link to Log Click this button to go directly to the Log Settings Settings: window (Maintenance > Log Settings). D-Link DIR-615 User Manual…
-
Page 50: Statistics
Section 3 — Configuration Statistics The window below displays the Traffic Statistics. Here you can view the amount of packets that pass through the DIR-615 on both the WAN and the LAN ports. The traffic counter will reset if the device is rebooted.
-
Page 51: Wireless
The wireless client table displays a list of current connected wireless clients. This table also displays the connection time and MAC address of the connected wireless client. Help Click the desired hyperlink to get more information about how to use the Router. D-Link DIR-615 User Manual…
-
Page 52: Wireless Security
Section 4 — Security Wireless Security This section will show you the different levels of security you can use to protect your data from intruders. The DIR-615 offers the following types of security: • WPA2 (Wi-Fi Protected Access 2) • WPA2-PSK (Pre-Shared Key) •…
-
Page 53: Configure Wep
6. Click Save Settings to save your settings. If you are configuring the router with a wireless adapter, you will lose connectivity until you enable WEP on your adapter and enter the same WEP key as you did on the router. D-Link DIR-615 User Manual…
-
Page 54: What Is Wpa
WPA/WPA2 incorporates user authentication through the Extensible Authentication Protocol (EAP). EAP is built on a more secure public key encryption system to ensure that only authorized network users can access the network. D-Link DIR-615 User Manual…
-
Page 55: Configure Wpa-Psk And Wpa2-Psk
6. Click Save Settings to save your settings. If you are configuring the Router with a wireless adapter, you will lose connectivity until you enable WPA-PSK or WPA2-PSK on your adapter and enter the same passphrase as you did on the Router. D-Link DIR-615 User Manual…
-
Page 56: Configure Wpa/Wpa2-Psk
6. Click Save Settings to save your settings. If you are configuring the Router with a wireless adapter, you will lose connectivity until you enable WPA/WPA2-PSK on your adapter and enter the same passphrase as you did on the Router. D-Link DIR-615 User Manual…
-
Page 57: Configure Wpa, Wpa2, And Wpa/Wpa2 (Radius)
RADIUS server. 1812 is the default port. 7. Next to Shared Secret, enter the security key. 8. If you have a secondary RADIUS server, enter its IP address, port, and secret key. 9. Click Save Settings to save your settings. D-Link DIR-615 User Manual…
-
Page 58: Connect To A Wireless Network
Click on a network (displayed using the SSID) and click the Connect button. If you get a good signal but cannot access the Internet, check you TCP/IP settings for your wireless adapter. Refer to the Networking Basics section in this manual for more information. D-Link DIR-615 User Manual…
-
Page 59: Configure Wep
XP Wireless Utility by right-clicking on the wireless computer icon in your system tray (lower-right corner of screen). Select View Available Wireless Networks. 2. Highlight the wireless network (SSID) you would like to connect to and click Connect. D-Link DIR-615 User Manual…
-
Page 60
It may take 20-30 seconds to connect to the wireless network. If the connection fails, please verify that the WEP settings are correct. The WEP key must be exactly the same as on the wireless router. D-Link DIR-615 User Manual… -
Page 61: Configure Wpa-Psk
XP Wireless Utility by right-clicking on the wireless computer icon in your system tray (lower-right corner of screen). Select View Available Wireless Networks. 2. Highlight the wireless network (SSID) you would like to connect to and click Connect. D-Link DIR-615 User Manual…
-
Page 62
It may take 20-30 seconds to connect to the wireless network. If the connection fails, please verify that the WPA-PSK settings are correct. The WPA-PSK passphrase must be exactly the same as on the wireless router. D-Link DIR-615 User Manual… -
Page 63: Setting Up Wi-Fi Protection (Wcn 2.0 In Windows Vista)
(WCN 2.0 in Windows Vista) The DIR-615 supports Wi-Fi protection, referred to as WCN 2.0 in Windows Vista. The instructions for setting this up depend on whether you are using Windows Vista to configure the Router or third party software.
-
Page 64: Setting Up A Configured Router
Wi-Fi protected network. If you are using third party software, run the appropriate Wi-Fi Protected System utility. You will be asked to either use the push button method or to manually enter the PIN. Follow the on-screen instructions. D-Link DIR-615 User Manual…
-
Page 65: Changing The Computer Name And Joining A Workgroup
Section 7 — Changing the Computer Name and Joining a Workgroup Changing the Computer Name and Joining a Workgroup The following are step-by-step directions to change the computer name and join a workgroup. 1. Click on Properties. 2. Click on the Advanced system settings link. D-Link DIR-615 User Manual…
-
Page 66
When you are finished, click the Change button. 4. Go to the Computer Name/Domain Changes window and click the radio button next to the Workgroup you want to join. When you are finished, click the OK button. D-Link DIR-615 User Manual… -
Page 67: Configuring The Ip Address In Vista
The following are step-by-step directions to configure the IP address in Windows Vista. 1. Click on Properties. 2. Go to the Network and Internet window and click the appropriate Local Area Connection icon. 3. Right-click the Local Area Connection icon and then select Properties from the drop-down menu. D-Link DIR-615 User Manual…
-
Page 68
Local Area Connections Properties window and enter the desired IP address in the space offered. Then click the “Use the following DNS server adresses” option on the same tab and enter the desired DNS server information. D-Link DIR-615 User Manual… -
Page 69
7. Go to the Local Area Connection Status window and click the Details button. 8. Confirm your new settings on the Network Connection Status window. When you are finished, click the Done button. D-Link DIR-615 User Manual… -
Page 70: Setting Up A Connection Or Network Wirelessly
2. Go to the Set up a connection or network window and choose the Set up a wireless router or access point Set up a new wireless network for your home or business option. Click the Next button. D-Link DIR-615 User Manual…
-
Page 71
3. Click the Next button on the Set up a wireless router or access point window. 4. The following window displays the system progress. 5. This window confirms that you want to create wireless network settings that are savable to a USB flash drive. D-Link DIR-615 User Manual… -
Page 72
Click the Show advanced network security options link. 8. Select security method on the Choose advanced network security options window in the Set up a wireless router or access point wizard. Click the Next button. D-Link DIR-615 User Manual… -
Page 73
Insert the USB flash drive into this computer window in the Set up a wireless router or access point wizard to select a destination for your network settings. Click the Next button. D-Link DIR-615 User Manual… -
Page 74
13.Once you are finished, the To add a device or computer, follow these instructions window in the Set up a wireless router or access point wizard opens. When you are finished, click the Close button. D-Link DIR-615 User Manual… -
Page 75: Connecting To A Secured Wireless Network (Wep, Wpa-Psk & Wpa2-Psk)
Connecting to a Secured Wireless Network (WEP, WPA-PSK & WPA2-PSK) The following are step-by-step directions to set up a wireless connection. 1. Click on Properties. 2. Click the Manage network connections link in the Network and Sharing Center window. D-Link DIR-615 User Manual…
-
Page 76
4. Select a network to connect to in the Select a network to connect to window in the Connect to a network wizard and then click the Connect button. 5. The following Connect to a network wizard window displays the system progress. D-Link DIR-615 User Manual… -
Page 77
Connect to a network wizard is displayed. Choose to save to the network and/or start the new connection automatically. When you are finished, click the Close button. 8. The successful connection is displayed at the bottom of the Windows start up menu. D-Link DIR-615 User Manual… -
Page 78
Section 10 — Connecting to a Secured Wireless Network (WEP, WPA-PSK & WPA2-PSK) 9. Confirm your new settings by calling up the command prompt and then entering the ipconfig command. 10.To test the new IP address, use the Ping feature of the command prompt. D-Link DIR-615 User Manual… -
Page 79: Connecting To An Unsecured Wireless Network
Connecting to an Unsecured Wireless Network The following are step-by-step directions to set up an unsecured wireless connection. 1. Click on Properties. 2. Go to the Network and Sharing Center window and click the Manage Network Connections link. D-Link DIR-615 User Manual…
-
Page 80
4. Select a network to connect to in the Select a network to connect to window in the Connect to a network wizard and then click the Connect button. 5. Confirm your desire to connect anyway on the following Network Connection Status window. D-Link DIR-615 User Manual… -
Page 81
Connect to a network wizard is displayed. Choose to save to the network and/or start the new connection automatically. When you are finished, click the Close button. 8. The successful connection is displayed at the bottom of the Windows start up menu. D-Link DIR-615 User Manual… -
Page 82
Section 11 — Connecting to an Unsecured Wireless Network 9. Confirm your new settings by calling up the command prompt and then entering the ipconfig command. 10.To test the new IP address, use the Ping feature of the command prompt. D-Link DIR-615 User Manual… -
Page 83: Configuring The Network In Mac Os X Snow Leopard (10.6)
The following are step-by-step directions to configure the network in MAC OS X Snow Leopard (10.6). 1. Click the icon in your Dock to open your System Preferences window. 2. Click the Network icon in System Preferences menu to view the Network menu. D-Link DIR-615 User Manual…
-
Page 84
If you are not using a DHCP capable gateway/router, or you need to assign a static IP address, select Manually from the Configure IPv4 drop-down menu to manually enter the IP address and it’s subnet mask. Click the Apply button to save the settings. D-Link DIR-615 User Manual… -
Page 85: Configuring The Wireless Network In Mac Os X Snow Leopard (10.6)
The following are step-by-step directions to configure the Wireless in MAC OS X Snow Leopard (10.6). 1. Click the icon in your Dock to open your System Preferences window. 2. Click the Network icon in System Preferences menu to view the Network menu. D-Link DIR-615 User Manual…
-
Page 86
4. Make sure the Status is On. If the Status is Off, click the Turn AirPort On button to enable AirPort. 5. Click the Advanced button to see the window. 6. Click the + button to see the window in the next page. D-Link DIR-615 User Manual… -
Page 87
7. Enter the Network Name (SSID) of the Router. 8. Select the Security type of the network from the drop-down list, and security related information below. Click the Add button to add the wireless network in the Preferred Network list. D-Link DIR-615 User Manual… -
Page 88
Section 11 — Connecting to an Unsecured Wireless Network 9. Click OK to proceed. Select the Network Name from the drop-down menu. Click the Apply button to save the settings. D-Link DIR-615 User Manual… -
Page 89: Troubleshooting
1. Why can’t I access the web-based configuration utility? When entering the IP address of the D-Link router (192.168.0.1 for example), you are not connecting to a website on the Internet or have to be connected to the Internet. The device has the utility built-in to a ROM chip in the device itself.
-
Page 90
• Close your web browser (if open) and open it. • Access the web management. Open your web browser and enter the IP address of your D-Link router in the address bar. This should open the login page for your the web management. -
Page 91
• Windows ® ® press Enter (or click OK). • Once the window opens, you’ll need to do a special ping. Use the following syntax: ping [url] [-f] [-l] [MTU value] Example: ping yahoo.com -f -l 1472 D-Link DIR-615 User Manual… -
Page 92
• To change the MTU enter the number in the MTU field and click the Save Settings button to save your settings. • Test your email. If changing the MTU does not resolve the problem, continue changing the MTU in increments of ten. D-Link DIR-615 User Manual… -
Page 93: Wireless Basics
Strictly adhering to the IEEE standard, the D-Link wireless family of products will allow you to securely access the data you want, when and where you want it. You will be able to enjoy the freedom that wireless networking delivers.
-
Page 94
Why D-Link Wireless? D-Link is the worldwide leader and award winning designer, developer, and manufacturer of networking products. D-Link delivers the performance you need at a price you can afford. D-Link has all the products you need to build your network. -
Page 95
Who uses wireless? Wireless technology as become so popular in recent years that almost everyone is using it, whether it’s for home, office, business, D-Link has a wireless solution for it. Home • Gives everyone at home broadband access •… -
Page 96: Tips
The wireless connection in public places is usually called “hotspots”. Using a D-Link Cardbus Adapter with your laptop, you can access the hotspot to connect to Internet from remote locations like airports, hotels, coffee shops, libraries, restaurants, and convention centers.
-
Page 97: Wireless Modes
An Infrastructure network contains an Access Point or wireless router. All the wireless devices, or clients, will connect to the wireless router or access point. An Ad-Hoc network contains only clients, such as laptops with wireless cardbus adapters. All the adapters must be in Ad-Hoc mode to communicate. D-Link DIR-615 User Manual…
-
Page 98: Networking Basics
Check your IP address After you install your new D-Link adapter, by default, the TCP/IP settings should be set to obtain an IP address from a DHCP server (i.e. wireless router) automatically. To verify your IP address, please follow the steps below.
-
Page 99: Statically Assign An Ip Address
2000 — From the desktop, right-click My Network Places > Properties. ® Windows Step 2 Right-click on the Local Area Connection which represents your D-Link network adapter and select Properties. Step 3 Highlight Internet Protocol (TCP/IP) and click Properties. Step 4 Click Use the following IP address and enter an IP address that is on the same subnet as your network or the LAN IP address on your router.
-
Page 100: Technical Specifications
802.11 g : 16QAM / 64QAM / BPSK / QPSK with OFDM • Web-based Internet Explorer v6 or later; Netscape Navigator 802.11 n : 16QAM / 64QAM / BPSK / QPSK with OFDM v6 or later; or other Java-enabled browsers • DHCP Server and Client D-Link DIR-615 User Manual…
-
Page 101
* Maximum wireless signal rate derived from IEEE Standard 802.11b, 802.11g and 802.11n specifications. Actual data throughput will vary. Network conditions and environmental factors, including volume of network traffic, building materials and construction, and network overhead, lower actual data throughput rate. Environmental factors will adversely affect wireless signal range. D-Link DIR-615 User Manual…
В этой инструкции мы объясним, как пользоваться индикаторами, разъемами и кнопками роутера D-Link DIR-615 на примере модели DIR-615S, а также по шагам разберем способы его настройки. Хотя разные версии маршрутизатора DIR-615 отличаются друг от друга по внешнему виду и некоторым функциям, принципы работы, настройки и подключения у них одинаковые. Интерфейсы разных прошивок также отличаются, поэтому если не найдете аналогичную команду в меню, поищите похожую.
Назначение кнопок, разъемов и индикаторов роутера
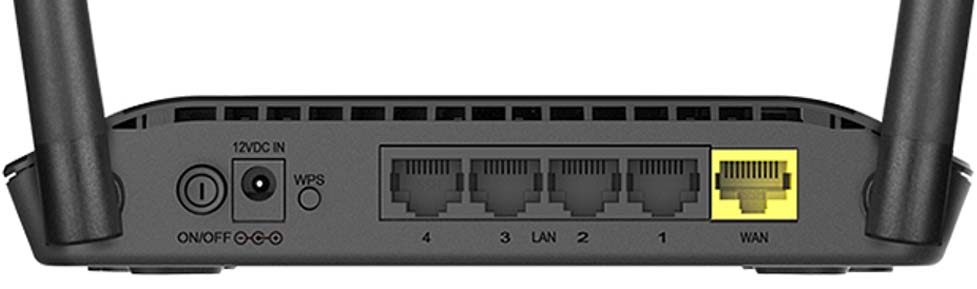
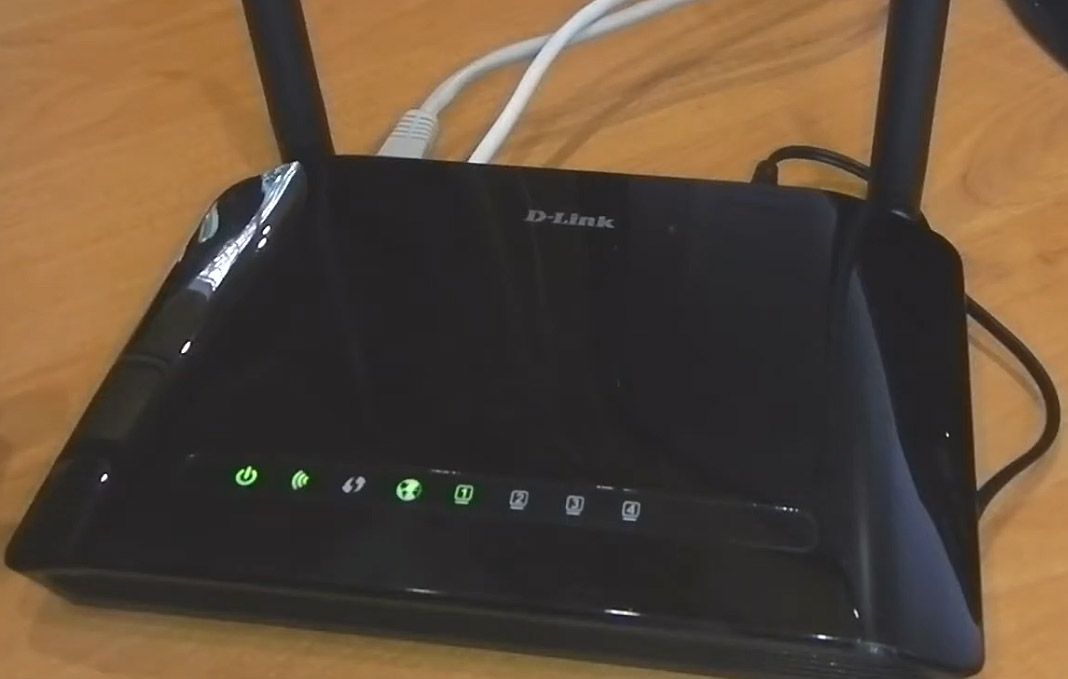
Все базовые элементы маршрутизатора DIR-615S расположены сзади и снизу корпуса, а индикаторы — сверху. Рассмотрим их по порядку (см. картинку ниже). Слева на задней панели находятся кнопка питания ON/OFF и разъем 12VDC IN для подключения кабеля питания. Следом за ними идет кнопка с надписью WPS, которая совмещает в себе два режима. Первый режим — это включение или отключение Wi-Fi-сети. По умолчанию беспроводная сеть будет всегда включена, но если вы захотите лишить окружающих беспроводного интернета, тогда нажмите кнопку WPS и держите ее семь секунд. После этого индикатор беспроводной сети погаснет (см. описание индикаторов ниже). Второй режим — это подключение других устройств по защищенному Wi-Fi. Для подключения к вашему роутеру по WPS, например другого роутера, зажмите кнопку WPS на две секунды и отпустите. При этом вы должны увидеть мигание соответствующего индикатора. После этого нажмите кнопку WPS на втором устройстве.
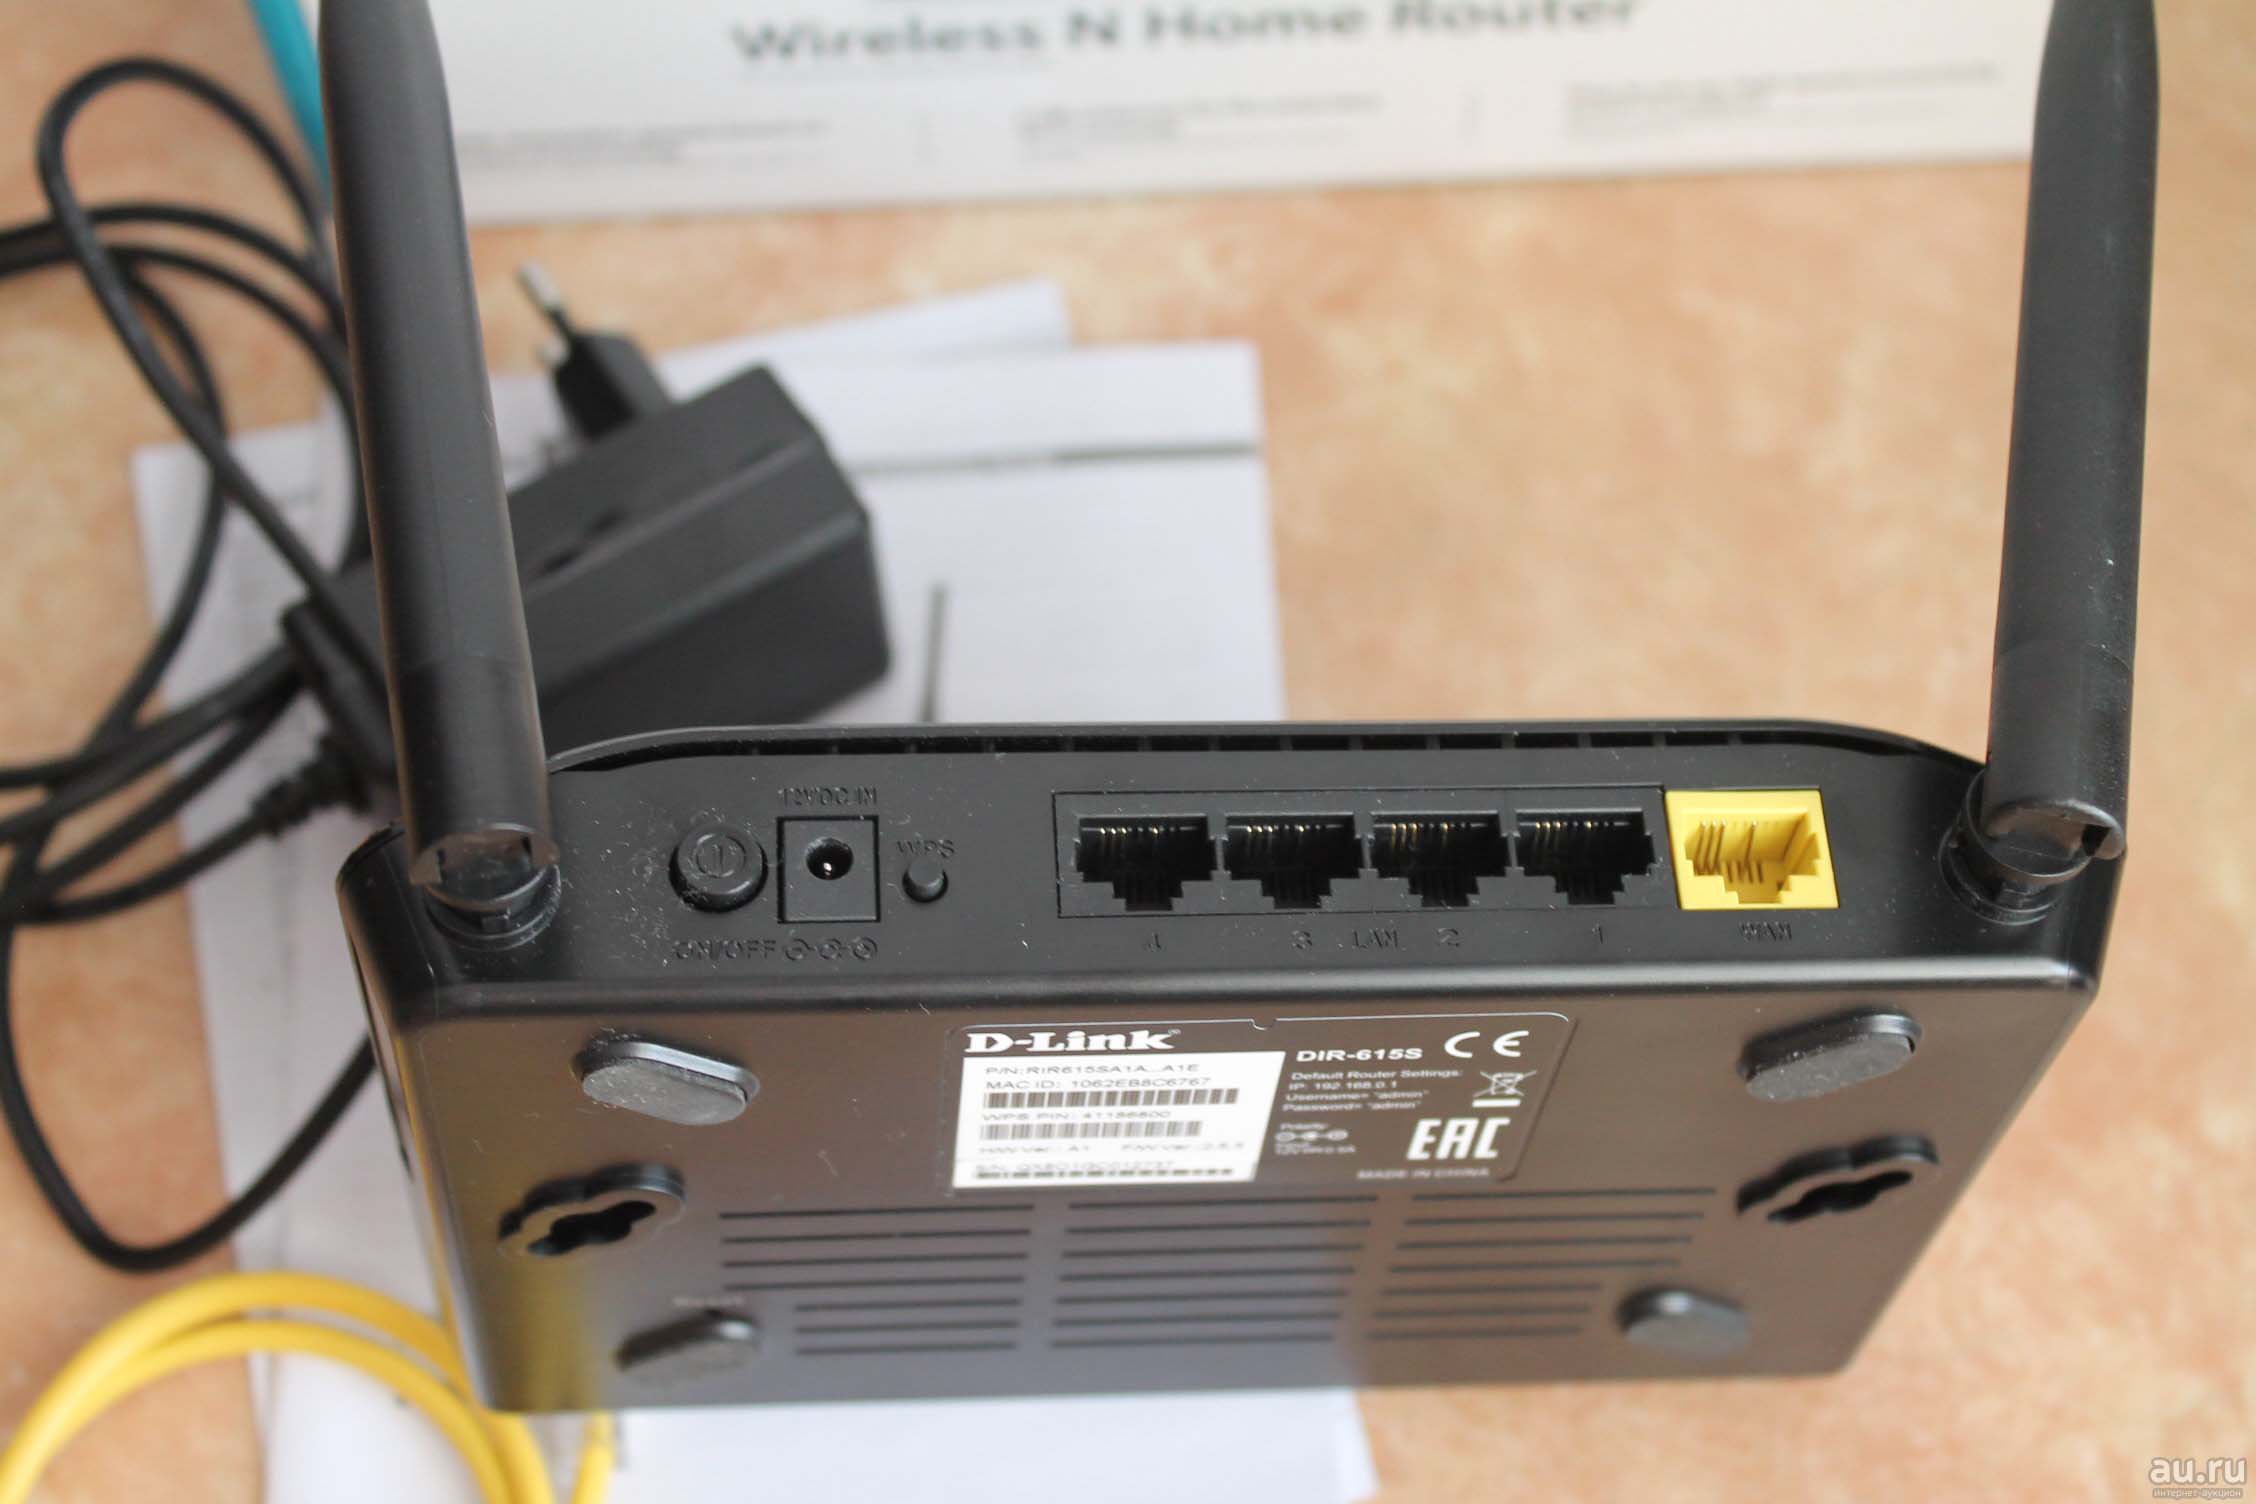 Далее идут четыре темных порта с надписью LAN и цифрами от одного до четырех. Они предназначены для подключения устройств, снабженных сетевыми разъемами. Когда вы подключите роутер к интернету, эти устройства будут получать его от роутера. Также через порт LAN подключается компьютер для изменения настроек или анализа данных роутера. Рядом с портами локальной сети LAN расположился порт интернета WAN. Этот порт нужен, чтобы вы подключили к нему кабель провайдера.
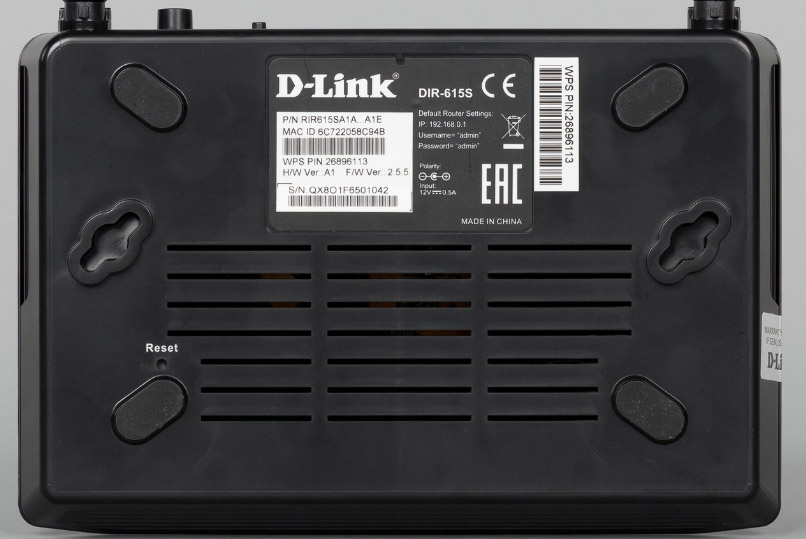
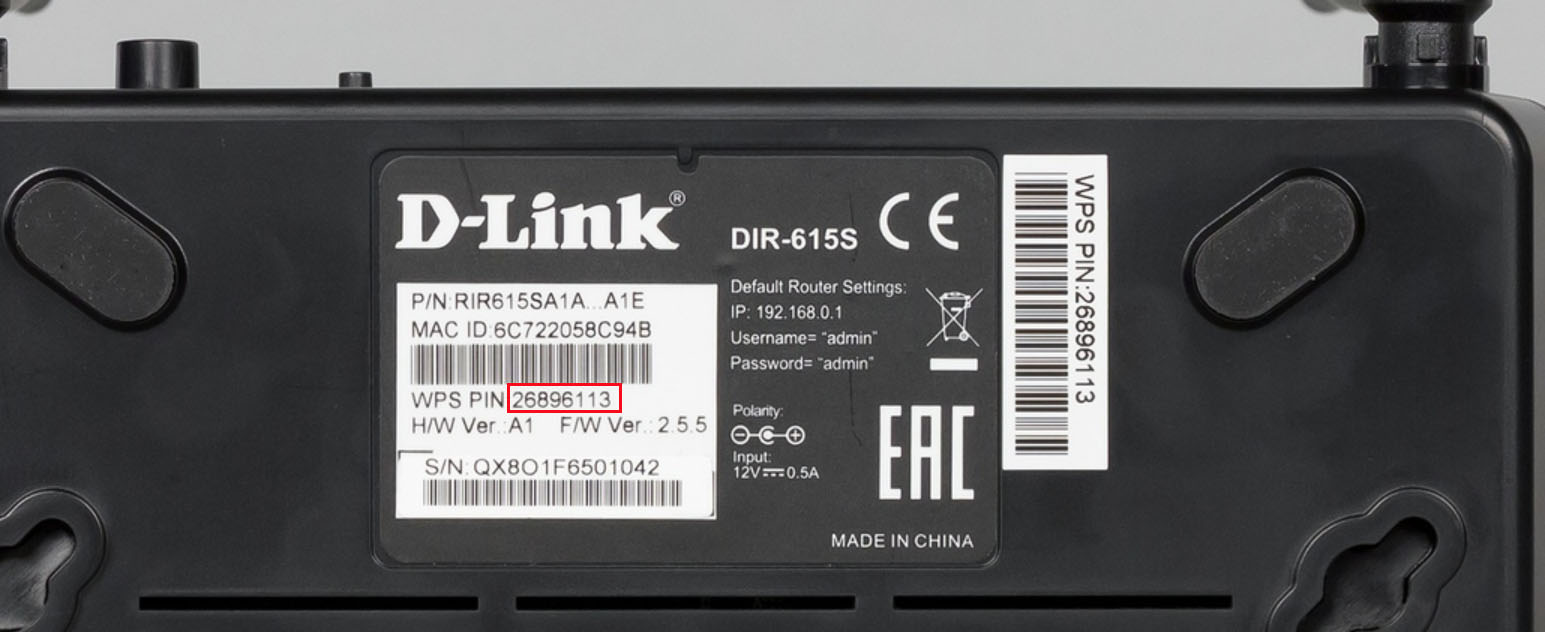
 Теперь переверните корпус маршрутизатора и рассмотрите его нижнюю часть. Помимо четырех ножек и двух отверстий для подвеса к стене вы увидите спрятавшуюся здесь кнопку с надписью Reset. Для снижения риска случайного нажатия детьми кнопка защищена отверстием, да еще и помещена внизу, хотя во многих моделях роутеров она находится на задней панели в общем ряду кнопок. Для сброса настроек кнопку нужно зажать на десять секунд. Не менее важным элементом является стикер, на котором указан номер аппаратной версии, номер прошивки (эти данные нужны для обновления прошивки вручную), IP-адрес роутера, PIN и другая важная информация.
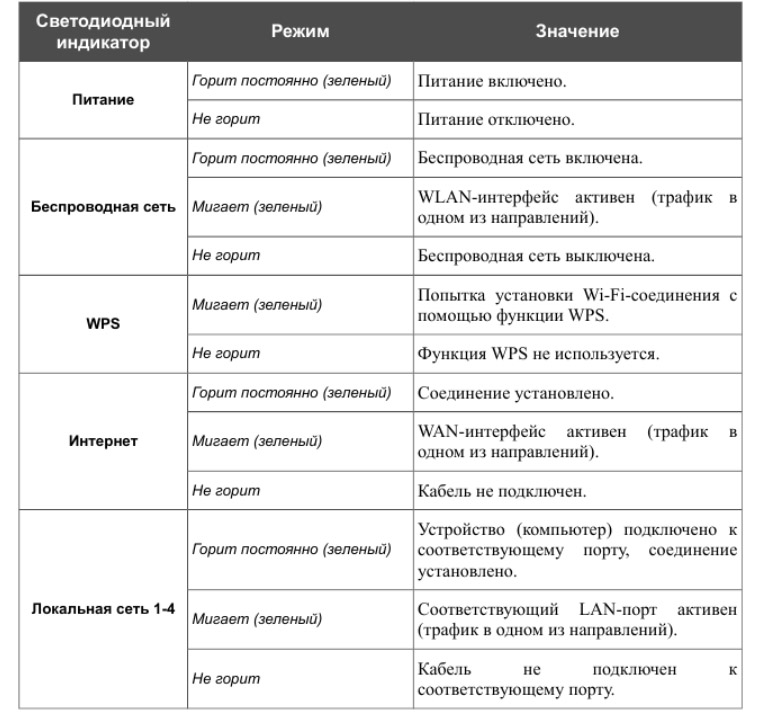
Теперь разберемся с обозначением индикаторов. Пусть вас не смущает большое количество значков, так как четыре крайних справа индикатора обозначают одно и то же — устройства сети LAN. Первым слева вы увидите индикатор питания с двумя стандартными значениями «горит» и «не горит». Второй индикатор относится к беспроводной сети и свидетельствует о ее включении или выключении. Мигание этого индикатора означает, что по сети Wi-Fi идет передача данных в одном из направлений. Третий слева индикатор показывает работу WPS и принимает только два значения: мигает — устройства пытаются подключиться друг к другу по WPS и не горит, если функция не используется.
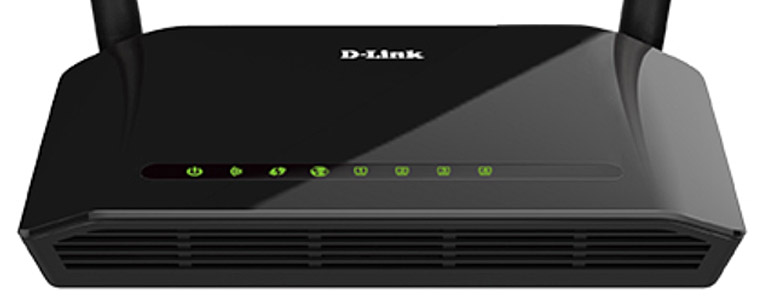 Четвертый значок подскажет, что происходит с вашим интернетом. При его наличии индикатор должен светиться постоянно, при отключении кабеля погаснуть, а при передаче данных будет мигать. И последние четыре значка подскажут, какие из четырех портов LAN в данный момент задействованы. При подключении к одному из портов кабеля и установке соединения загорится индикатор с соответствующей цифрой, при отключении кабеля он погаснет, а при передаче данных по этому порту индикатор будет мигать. Быстро вспомнить обозначение того или иного индикатора вам поможет таблица ниже.
Шаг 1. Подготовка оборудования
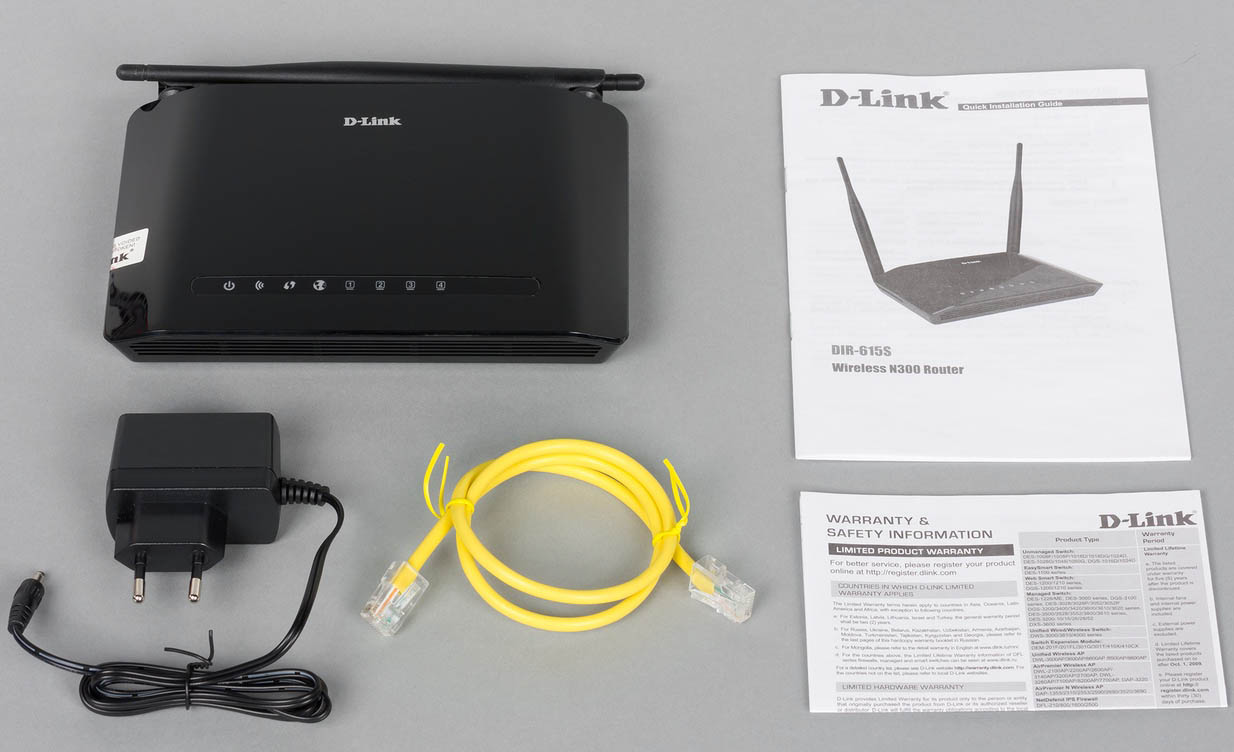
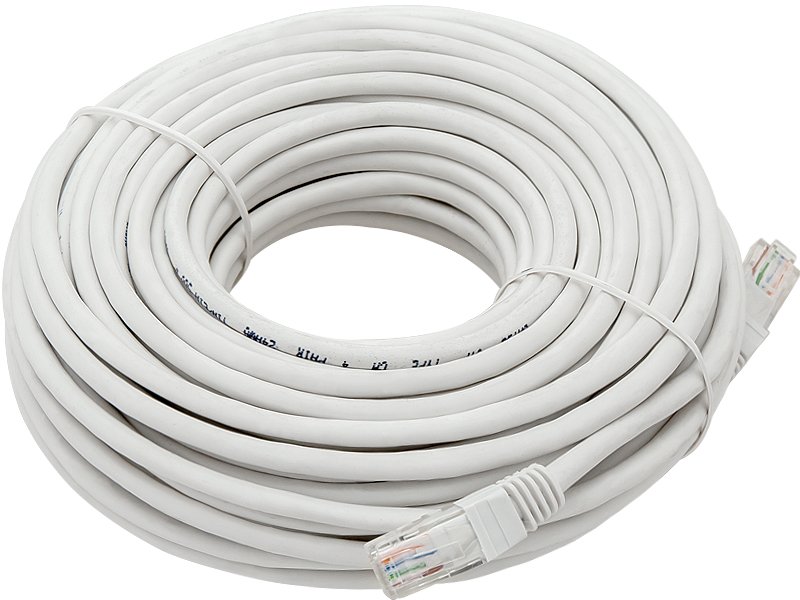
Чтобы Wi-Fi-роутер D-Link раздавал интернет в вашем доме, вам понадобятся определенные устройства, комплектующие и условия. Первым в этом списке является доступ к интернету. В самом простом случае это кабель провайдера, заведенный к вам в дом. Также это может быть модем, к которому подключается телефонный провод или другой кабель поставщика услуг. Второе — устройство с операционной системой для настройки роутера: компьютер, ноутбук, планшет, смартфон или другое. Главное, чтобы оно могло подключиться к роутеру по кабелю (имело сетевой порт) или по Wi-Fi (имело адаптер беспроводной связи). На устройстве также должен быть установлен любой новый браузер (Google Chrome версии 5 и выше, Internet Explorer версии 8 и выше и пр.) с поддержкой jаvascript. При подключении по кабелю вам понадобится Ethernet-кабель (есть в коробке роутера).

Для настройки маршрутизатора этих устройств достаточно, однако для раздачи интернета проводным устройствам также понадобятся Ethernet-кабели нужной длины (длина зависит от месторасположения роутера в доме). Сам роутер лучше всего ставить в центре дома или той его части, где нужен интернет. При этом не размещайте его вблизи больших металлических поверхностей или других устройств, способных создать помехи Wi-Fi-сети.
Шаг 2. Соединение устройств
После подготовки необходимого оборудования вам нужно соединить роутер с устройством, с которого будет вестись настройка. Для примера возьмем ноутбук с сетевым портом, адаптером Wi-Fi и рассмотрим два варианта подключения. При проводном подключении вставьте Ethernet-кабель одним концом в любой из четырех портов LAN, а другим концом в сетевой порт ноутбука. После этого подключите роутер к розетке и загрузите его. Также загрузите ноутбук.
 При беспроводном подключении загрузите роутер и ноутбук, а после их полной загрузки включите адаптер Wi-Fi на ноутбуке (часто по умолчанию он уже включен). После этого вам нужно построить список беспроводных сетей (в разделе «Сеть», «Wi-Fi», «Беспроводные подключения» или похожем), найти в нем сеть DIR-615 и подключиться к ней. При подключении используйте пароль, который прописан на стикере вашего роутера в строке WPS PIN.
 На следующем шаге нужно обеспечить роутеру доступ к интернету. Вы можете сделать это как до входа в панель настроек, так и после этого. Мы рассмотрим первый вариант. Для этого определите, какой у вас тип интернета. В случае кабельного интернета вставьте интернет-кабель в желтый порт роутера с надписью WAN. В случае интернет-розетки (это все тот же интернет-кабель, но спрятанный в стену) соедините порт WAN с розеткой Ethernet-кабелем подходящей длины. В случае использования модема вставьте Ethernet-кабель одним концом в WAN-порт роутера, другим в сетевой порт модема.
Как настроить роутер D-Link DIR-615
Шаг 1. Вход в панель настроек. Пароль по умолчанию
На этикетке вашего роутера указан его IP-адрес. Откройте на подключенном к роутеру ноутбуке браузер и перейдите по этому адресу (обычно это адрес 192.168.0.1). По умолчанию для входа в сервис используется имя admin и пароль admin. Так как такой пароль нельзя считать безопасным, то при первом открывании панели настроек сервис предложит его сменить.
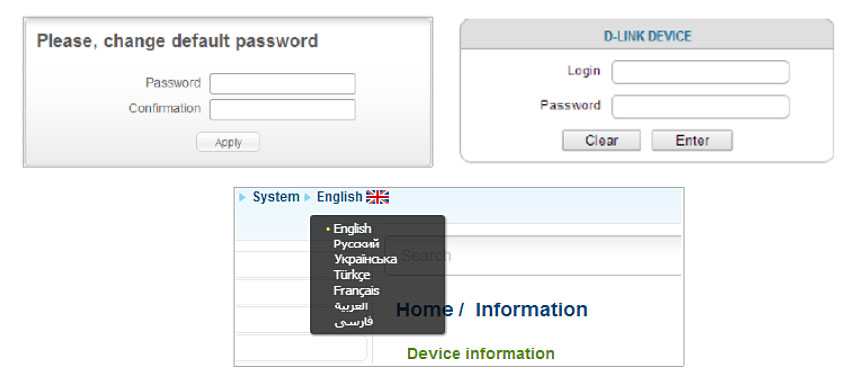
 Если панель управления запустилась на английском языке, вы увидите надпись: Please, change default password. Введите новый пароль в строку Password (пароль) и повторите его в строке Confirmation. Нажмите Apply (готово). Далее войдите в систему, прописав имя admin в строке Login и придуманный вами пароль в строке Password. Нажмите Enter для принятия или Clear для очистки полей. После этого вы попадете на главную страницу панели настроек, где можете при необходимости сменить язык вверху в строке System.
Шаг 2. Настройка роутера
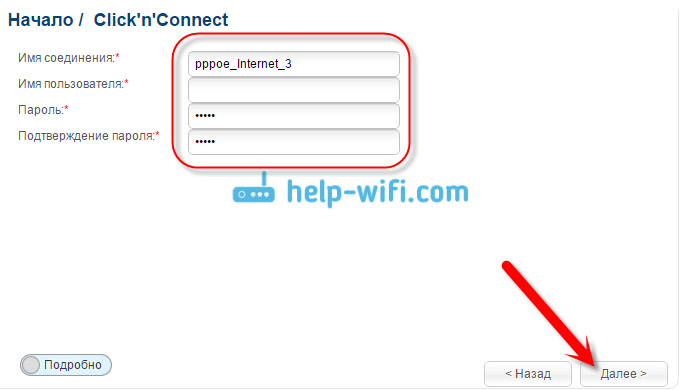
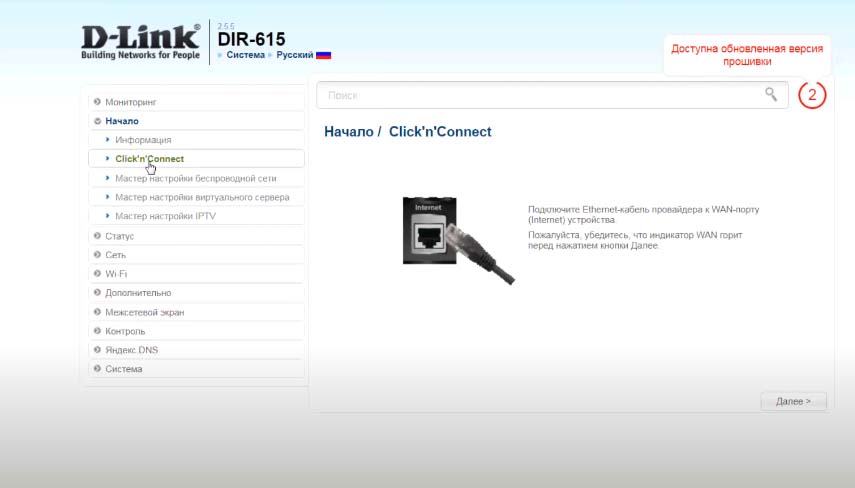
На следующем шаге мы вводим данные провайдера и настраиваем сеть Wi-Fi. Для этого в разделе «Начало» выберите опцию Click’n’Connect. Если до сих пор вы еще не подключали кабель провайдера, то сделайте это и убедитесь в том, что соответствующий индикатор на передней панели горит.
 Дальше переходим к выбору типа соединения и вводу данных. Будьте внимательны, так как на этом этапе чаще всего совершают ошибки. Чтобы не гадать, какой у вас тип соединения, посмотрите договор с провайдером или позвоните ему.
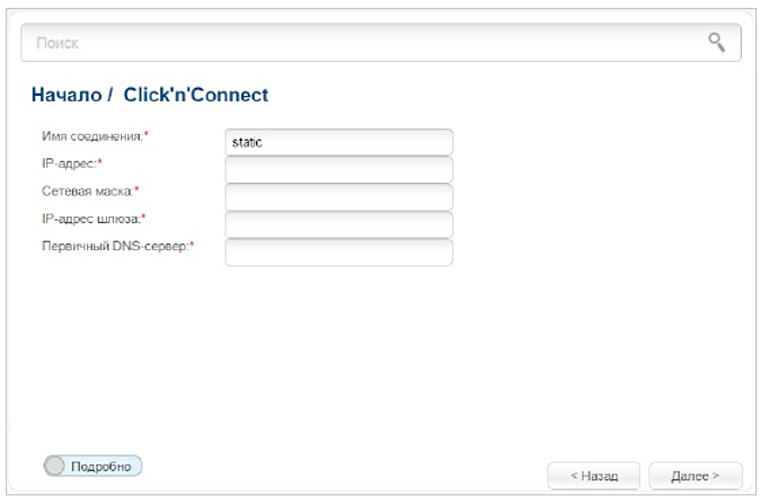
 Если в договоре об этом ничего не сказано, попробуйте вариант «Динамический IP». В зависимости от того, какой вариант вы выберете, дальше откроется своя страница. Например, для типа «Статический IP» вам нужно задать IP-адрес, сетевую маску, IP-адрес шлюза, первичный DNS-сервер и придумать имя соединения. Если у вас нет уверенности в заполнении полей, проконсультируйтесь с поставщиком услуг. После заполнения полей нажмите «Применить» и дождитесь окончания настройки. Вы должны увидеть надпись о том, что подключение к интернету прошло успешно.
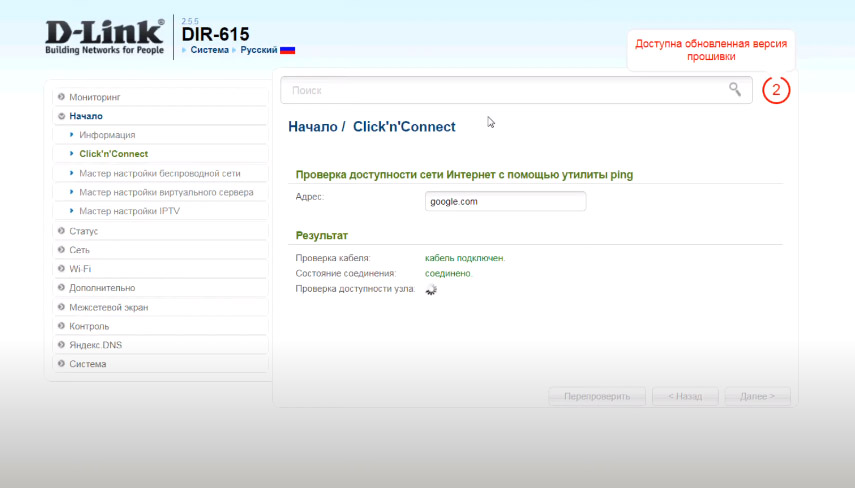
 Проверить работоспособность интернета можно как в самой панели настроек, введя любой адрес для проверки, так и сделать это через браузер.
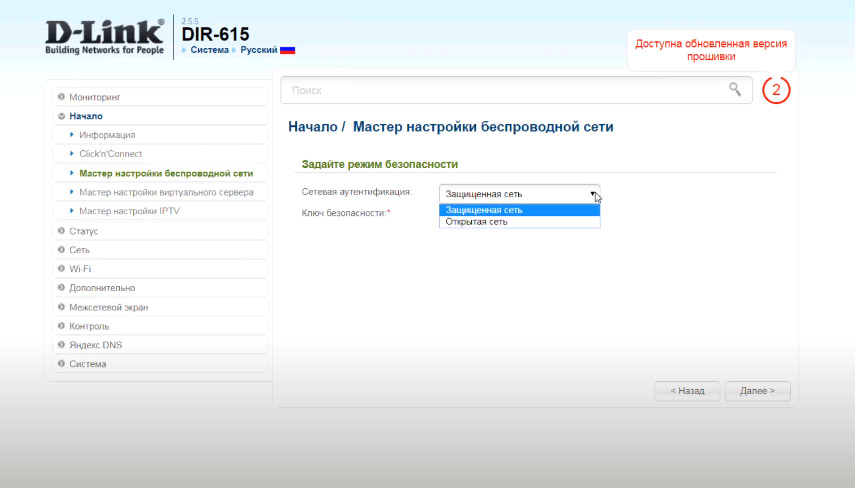
 Далее настроим беспроводную сеть. В том же разделе «Начало» кликните по опции «Мастер настройки беспроводной сети». Оставьте вариант «Точка доступа», который стоит по умолчанию, и нажмите «Далее». Придумайте название для своей Wi-Fi-сети и введите его в строке SSID. На следующем шаге выберите вариант «Защищенная сеть», придумайте и введите пароль в строке «Ключ безопасности» и нажмите «Применить». Запишите все придуманные названия и пароли, так как со временем вы можете их забыть.
Как подключить к роутеру другие устройства
Шаг 1. Подключение по Wi-Fi
Все домашние устройства, имеющие Wi-Fi-адаптер, вы можете подключать к роутеру по беспроводной связи. Хотя на смартфонах, планшетах, Wi-Fi-наушниках и прочих гаджетах команды для подключения отличаются, алгоритм везде одинаковый. Вам нужно включить на устройстве Wi-Fi, построить список доступных беспроводных сетей, найти в нем свою сеть (то имя, которое вы придумали) и подключиться к ней, используя придуманный вами пароль для беспроводной сети (не путайте с паролем к панели настроек).
Шаг 2. Подключение по кабелю
Здесь варианты конкретных команд тоже отличаются для разных ТВ-приставок, игровых консолей и прочих устройств, но алгоритм подключения примерно одинаков. Вам нужно соединить Ethernet-проводом свободный LAN-порт роутера и сетевой порт устройства, а затем зайти в настройки устройства (при подключении ТВ в настройки роутера) и выбрать нужные данные в разделе сетевых подключений. При затруднениях или недостатке данных свяжитесь с поставщиком услуг.
 После успешной настройки роутера рекомендуем запомнить алгоритм настройки и подключения. Это поможет вам в будущем при необходимости настроить интернет заново в своем доме или любом другом.