В данном разделе можно просмотреть руководство с инструкциями, соответствующими прикладной программе.
Руководства к приложениям![]()
- Полезные функции устройства

-
ПечатьВы можете печатать данные, хранящиеся на ПК или мобильном телефоне, непосредственно с устройства.
-
КопированиеМожно копировать фотографии и документы с использованием различных функций.
-
СканированиеДля сканирования фотографий и документов могут использоваться различные приложения.
Условия эксплуатации
Руководство создано так, чтобы корректно отображаться в следующих операционных системах и браузерах.
- Операционные системы
- Веб-браузеры
Windows 8, Windows 7 SP1, Windows 7, Windows Vista SP2, Windows Vista SP1 или Windows XP SP3 (только 32-разрядная)
Internet Explorer 10, Internet Explorer 9 и Internet Explorer 8
Mozilla Firefox 17
Google Chrome 24
* Для обеспечения условий настройки каждого из этих браузеров разрешите использование файлов cookie и включите JavaScript.
* Если в Internet Explorer 8 используется режим совместимости, возможно некорректное отображение некоторых страниц. В этом случае следует отключить настройки режима совместимости.
- Как использовать Онлайн-руководство
- Товарные знаки и лицензии
- Окно, используемое при пояснении операций

- Manuals
- Brands
- Canon Manuals
- All in One Printer
- Pixma MG2400 Series
- Online manual
-
Contents
-
Table of Contents
-
Bookmarks
Quick Links
MG2400 series
Online Manual
Scanning
English
Related Manuals for Canon MG2400 series
Summary of Contents for Canon MG2400 series
-
Page 1
MG2400 series Online Manual Scanning English… -
Page 2: Table Of Contents
Contents Scanning…………4 Scanning from a Computer.
-
Page 3
Basic Mode Tab…………113 Advanced Mode Tab. -
Page 4: Scanning
Scanning Scanning from a Computer Scanning with IJ Scan Utility Scanning with Application Software that You are Using (ScanGear) Useful Information on Scanning Other Scanning Methods Placing Items (When Scanning from a Computer)
-
Page 5: Scanning From A Computer
Scanning from a Computer Scanning with IJ Scan Utility Scanning with Application Software that You are Using (ScanGear) Useful Information on Scanning Other Scanning Methods Placing Items (When Scanning from a Computer)
-
Page 6: Scanning With Ij Scan Utility
Scanning with IJ Scan Utility What Is IJ Scan Utility (Scanner Software)? Starting IJ Scan Utility Easy Scanning with Auto Scan Basic Scanning Photos Scanning Documents Scanning with Favorite Settings Scanning Items Larger than the Platen (Image Stitch) Scanning Multiple Items at One Time Saving after Checking Scan Results Sending Scanned Images via E-mail Extracting Text from Scanned Images (OCR)
-
Page 7: What Is Ij Scan Utility (Scanner Software)
What Is IJ Scan Utility (Scanner Software)? IJ Scan Utility is an application that allows you to easily scan photos, documents, etc. You can complete from scanning to saving at one time by simply clicking the corresponding icon in the IJ Scan Utility main screen. What You Can Do with IJ Scan Utility Scan Easily according to Purposes You can scan by simply clicking an icon such as Auto to scan easily, Photo to scan with…
-
Page 8
Important Some functions are available only when My Image Garden is installed. Note Refer to «Settings Dialog Box» for how to set the applications to integrate with. -
Page 9: Starting Ij Scan Utility
If IJ Scan Utility is not displayed on the Start screen, select the Search charm, then search for «IJ Scan Utility». Windows 7/Windows Vista/Windows XP: From the Start menu, select All Programs > Canon Utilities > IJ Scan Utility > IJ Scan Utility to start IJ Scan Utility.
-
Page 10: Easy Scanning With Auto Scan
Easy Scanning with Auto Scan You can scan easily by automatically detecting the item type. Important The following types of items may not be scanned correctly. In that case, adjust the cropping frames (scan areas) in whole image view of ScanGear (scanner driver) and scan again.
-
Page 11
Scanning with Favorite Settings… -
Page 12: Scanning Photos
Scanning Photos You can scan photos placed on the platen with settings suitable for photos. Place the photo on the platen. Placing Items (When Scanning from a Computer) Start IJ Scan Utility. Click Settings…, select the Settings (Photo Scan) dialog box, then set the paper size, resolution, etc.
-
Page 13: Scanning Documents
Scanning Documents You can scan items placed on the platen with settings suitable for documents. Place the item on the platen. Placing Items (When Scanning from a Computer) Start IJ Scan Utility. Click Settings…, select the Settings (Document Scan) dialog box, then set the paper size, resolution, etc.
-
Page 14: Scanning With Favorite Settings
Scanning with Favorite Settings You can scan items placed on the platen with your favorite settings saved beforehand. This is convenient for saving frequently used settings or when specifying scan settings in detail. Start IJ Scan Utility. Click Settings…, select the Settings (Custom Scan) dialog box, then set the select source, resolution, etc.
-
Page 15: Scanning Items Larger Than The Platen (Image Stitch)
Scanning Items Larger than the Platen (Image Stitch) You can scan the left and right halves of an item larger than the platen and combine them back into one image. Items up to approximately twice as large as the platen are supported. Note The following explains how to scan from the item to be placed on the left side.
-
Page 16
Make sure that Scan from Left is selected in Scan Direction. Place the item that is to be displayed on the left side of the screen face- down on the platen. Click Start Scanning Image 1. -
Page 17
The first item is scanned and appears in 1. Note Click Cancel to cancel the scan. Place the item that is to be displayed on the right side of the screen face- down on the platen. Click Start Scanning Image 2. -
Page 18
The second item is scanned and appears in 2. Note Click Cancel to cancel the scan. Adjust the scanned images as required. Use the Toolbar to rotate or zoom in/out, or drag the images to adjust their positions. Note Select the Adjust cropping frames checkbox to specify the area to be saved. Adjusting Cropping Frames in the Image Stitch Window To scan an item again, select the image in the Preview area or the thumbnail at the top of the screen, then click… -
Page 19
The combined image is saved. Note Refer to «Image Stitch Window» for details on the Image Stitch window. You can make advanced scan settings in the Settings (Scan and Stitch) dialog box displayed by clicking Settings.. -
Page 20: Scanning Multiple Items At One Time
Scanning Multiple Items at One Time You can scan two or more photos (small items) placed on the platen at one time and save each image individually. Important The following types of items may not be scanned correctly. In that case, adjust the cropping frames (scan areas) in whole image view of ScanGear (scanner driver) and scan again.
-
Page 21
The Settings dialog box appears. Click Custom Scan. Select Select Source according to the items to be scanned. -
Page 22
Select Auto scan for Paper Size, then click OK. The IJ Scan Utility main screen appears. Note Refer to the following pages for details on the setting items in the Settings dialog box. Settings (Photo Scan) Dialog Box Settings (Document Scan) Dialog Box Settings (Custom Scan) Dialog Box… -
Page 23
Click Custom. Multiple items are scanned at one time. Note Click Cancel to cancel the scan. Scanned images are saved in the folder set for Save in in the corresponding Settings dialog box displayed by clicking Settings..In each Settings dialog box, you can also make advanced scan settings. -
Page 24: Saving After Checking Scan Results
Saving after Checking Scan Results You can check the scan results, then save the images to a computer. Important You cannot check the scan results before saving when scanned using Auto scan. Note The screens for scanning photos are used as examples in the following descriptions. Start IJ Scan Utility.
-
Page 25
The IJ Scan Utility main screen appears. Note Refer to the following pages for details on the setting items in the Settings dialog box. Settings (Photo Scan) Dialog Box Settings (Document Scan) Dialog Box Settings (Custom Scan) Dialog Box Settings (Scan and Stitch) Dialog Box Settings (ScanGear) Dialog Box Click Photo. -
Page 26
Change the image order or file save options as required. You can change the image order or file save options in the Save Settings dialog box. Note The default save folders are as follows. Windows 8: My Documents folder Windows 7: My Documents folder Windows Vista: Documents folder Windows XP: My Documents folder Click OK. -
Page 27: Sending Scanned Images Via E-Mail
Sending Scanned Images via E-mail You can send scanned images via e-mail. Note The screens for scanning photos are used as examples in the following descriptions. Start IJ Scan Utility. Click Settings..Settings dialog box appears. Click Photo Scan. Select Attach to e-mail in Application Settings, then select an e-mail client.
-
Page 28
Note You can add e-mail clients to use for attachments from the pull-down menu. If None (Attach Manually) is selected, manually attach scanned and saved images to e-mail. Click OK. The IJ Scan Utility main screen appears. -
Page 29
Note Refer to the following pages for details on the setting items in the Settings dialog box. Settings (Auto Scan) Dialog Box Settings (Photo Scan) Dialog Box Settings (Document Scan) Dialog Box Settings (Custom Scan) Dialog Box Settings (ScanGear) Dialog Box Click Photo. -
Page 30: Extracting Text From Scanned Images (Ocr)
Extracting Text from Scanned Images (OCR) Scan text in scanned magazines and newspapers and display it in Notepad (included with Windows). Note You can extract text when scanning via Document, Custom, or ScanGear. The screens for scanning documents are used as examples in the following descriptions.
-
Page 31
Note For Resolution, only 300 dpi or 400 dpi can be set when Start OCR is selected in Application Settings. Select Start OCR for Application Settings, then select the application in which you want to display the result. Note When My Image Garden is specified, after the image is scanned, the text in the image is extracted and appears in Notepad (included with Windows). -
Page 32
The IJ Scan Utility main screen appears. Note Refer to the following pages for details on the setting items in the Settings dialog box. Settings (Document Scan) Dialog Box Settings (Custom Scan) Dialog Box Settings (ScanGear) Dialog Box Click Document. Scanning starts. -
Page 33
Documents containing text with font size outside the range of 8 points to 40 points (at 300 dpi) Slanted documents Documents placed upside down or documents with text in the wrong orientation (rotated characters) Documents containing special fonts, effects, italics, or hand-written text Documents with narrow line spacing Documents with colors in the background of text Documents containing multiple languages… -
Page 34: Ij Scan Utility Screens
IJ Scan Utility Screens IJ Scan Utility Main Screen Settings Dialog Box Settings (Auto Scan) Dialog Box Settings (Photo Scan) Dialog Box Settings (Document Scan) Dialog Box Settings (Custom Scan) Dialog Box Settings (Scan and Stitch) Dialog Box Settings (ScanGear) Dialog Box Settings (General Settings) Dialog Box Data Format Settings Dialog Box Save Settings Dialog Box…
-
Page 35: Ij Scan Utility Main Screen
«IJ Scan Utility». Windows 7/Windows Vista/Windows XP: From the Start menu, select All Programs > Canon Utilities > IJ Scan Utility > IJ Scan Utility to start IJ Scan Utility. You can complete from scanning to saving at one time by simply clicking the corresponding icon.
-
Page 36
Scans items with your favorite settings and saves the images to a computer. The item type can be automatically detected. Scan/save settings and the response after scanning can be specified in the Settings (Custom Scan) dialog box. • Stitch Displays the Image Stitch window in which you can scan the left and right halves of an item larger than the platen and combine the scanned images back into one image. -
Page 37: Settings Dialog Box
Settings Dialog Box There are two tabs in the Settings dialog box: (Scanning from a Computer) and (General Settings). When you click a tab, the view in the red frame switches and you can make advanced settings to functions on each tab. (Scanning from a Computer) Tab You can specify how to respond when scanning from IJ Scan Utility or My Image Garden.
-
Page 38
Settings (Auto Scan) Dialog Box Click Auto Scan on the (Scanning from a Computer) tab to display the Settings (Auto Scan) dialog box. In the Settings (Auto Scan) dialog box, you can make advanced scan settings to scan by automatically detecting the item type. (1) Scan Options Area (2) Save Settings Area (3) Application Settings Area… -
Page 39
Text documents smaller than 2L (5 inches x 7 inches) (127 mm x 178 mm), such as paperback pages with the spine cut off Items printed on thin white paper Long narrow items such as panoramic photos Reflective disc labels may not be scanned as expected. Place items to be scanned on the platen correctly. -
Page 40
Note You can change the data format from Settings..• Settings… Click to display the Data Format Settings dialog box in which you can set the quality of the images to be saved, keyword search of PDF files and their compression type, and the data format in which to save images scanned with Auto Scan. -
Page 41
Saves to the folder specified in Save in. Note Specify the application or folder in the Select Application or Select Destination Folder dialog box displayed by selecting Add… from the pull-down menu. • Instructions Opens this guide. • Defaults You can restore the settings in the displayed screen to the default settings. -
Page 42
Settings (Photo Scan) Dialog Box Click Photo Scan on the (Scanning from a Computer) tab to display the Settings (Photo Scan) dialog box. In the Settings (Photo Scan) dialog box, you can make advanced scan settings to scan items as photos. (1) Scan Options Area (2) Save Settings Area (3) Application Settings Area… -
Page 43
Select the size of the item to be scanned. When you select Custom, a screen in which you can specify the paper size appears. Select a Unit, then enter the Width and Height, and then click OK. Note Click Defaults to restore the specified settings to the default settings. •… -
Page 44
Click to display the Data Format Settings dialog box in which you can set the quality of the images to be saved, keyword search of PDF files and their compression type, and the data format in which to save images scanned with Auto Scan. •… -
Page 45
You can specify the e-mail client you want to start from the pull-down menu. • Do not start any application Saves to the folder specified in Save in. Note Specify the application or folder in the Select Application or Select Destination Folder dialog box displayed by selecting Add… -
Page 46
Settings (Document Scan) Dialog Box Click Document Scan on the (Scanning from a Computer) tab to display the Settings (Document Scan) dialog box. In the Settings (Document Scan) dialog box, you can make advanced scan settings to scan items as documents. (1) Scan Options Area (2) Save Settings Area (3) Application Settings Area… -
Page 47
• Color Mode Select the color mode in which to scan the item. • Paper Size Select the size of the item to be scanned. When you select Custom, a screen in which you can specify the paper size appears. Select a Unit, then enter the Width and Height, and then click OK. -
Page 48
Note Scanning takes longer than usual when you enable this function. • Sharpen outline Emphasizes the outline of the subjects to sharpen the image. • Reduce show-through Sharpens text in an item or reduces show-through in newspapers, etc. • Reduce moire Reduces moire patterns. -
Page 49
Note Scanning takes longer than usual when you enable Correct slanted text document. • Detect the orientation of text document and rotate image Automatically rotates the image to the correct orientation by detecting the orientation of text in the scanned document. Important Only text documents written in languages that can be selected from Document Language in the… -
Page 50
Displays the folder in which to save the scanned images. To change the folder, specify the destination folder in the Select Destination Folder dialog box displayed by selecting Add… from the pull-down menu. The default save folders are as follows. Windows 8: My Documents folder Windows 7: My Documents folder Windows Vista: Documents folder… -
Page 51
You can specify the application from the pull-down menu. • Do not start any application Saves to the folder specified in Save in. Note Specify the application or folder in the Select Application or Select Destination Folder dialog box displayed by selecting Add… from the pull-down menu. •… -
Page 52
Settings (Custom Scan) Dialog Box Click Custom Scan on the (Scanning from a Computer) tab to display the Settings (Custom Scan) dialog box. In the Settings (Custom Scan) dialog box, you can make advanced scan settings to scan according to your preference. (1) Scan Options Area (2) Save Settings Area (3) Application Settings Area… -
Page 53
Important Item types supported by Auto are photos, postcards, business cards, magazines, newspapers, documents, and BD/DVD/CD. To scan the following types of items, specify the item type or size. You cannot scan correctly with Auto. A4 size photos Text documents smaller than 2L (5 inches x 7 inches) (127 mm x 178 mm), such as paperback pages with the spine cut off Items printed on thin white paper Long narrow items such as panoramic photos… -
Page 54
• Resolution Select the resolution of the item to be scanned. The higher the resolution (value), the more detail in your image. Resolution Note Only Auto is available when Select Source is Auto. Only 300 dpi or 400 dpi can be set when Start OCR is selected in Application Settings. -
Page 55
Important The color tone may differ from the source image due to corrections. In that case, deselect the checkbox and scan. Note Scanning takes longer than usual when you enable this function. • Sharpen outline Emphasizes the outline of the subjects to sharpen the image. •… -
Page 56
Documents containing figures/images Hand-written text Documents containing both vertical and horizontal lines (tables) Note Scanning takes longer than usual when you enable Correct slanted text document. • Detect the orientation of text document and rotate image Automatically rotates the image to the correct orientation by detecting the orientation of text in the scanned document. -
Page 57
Note Auto appears only when Auto is selected for Select Source. • Settings… Click to display the Data Format Settings dialog box in which you can set the quality of the images to be saved, keyword search of PDF files and their compression type, and the data format in which to save images scanned with Auto Scan. -
Page 58
Select this when you also want to save the scanned images to a folder other than the one specified in Save in. You can specify the folder from the pull-down menu. • Attach to e-mail Select this when you want to send e-mails with the scanned images attached. You can specify the e-mail client you want to start from the pull-down menu. -
Page 59
Settings (Scan and Stitch) Dialog Box Click Scan and Stitch on the (Scanning from a Computer) tab to display the Settings (Scan and Stitch) dialog box. In the Settings (Scan and Stitch) dialog box, you can make advanced scan settings for scanning items larger than the platen. -
Page 60
Note To reduce moire, set Select Source to Magazine. • Color Mode Select the color mode in which to scan the item. • Resolution Select the resolution of the item to be scanned. The higher the resolution (value), the more detail in your image. Resolution •… -
Page 61
• Data Format Select the data format in which to save the scanned images. You can select JPEG/Exif, TIFF, PNG, PDF, or PDF (Multiple Pages). Important You cannot select JPEG/Exif when Color Mode is Black and White. • Settings… Click to display the Data Format Settings dialog box in which you can set the quality of the images to be saved, keyword search of PDF files and their compression type, and… -
Page 62
• Send to a folder Select this when you also want to save the scanned images to a folder other than the one specified in Save in. You can specify the folder from the pull-down menu. • Do not start any application Saves to the folder specified in Save in. -
Page 63
Settings (ScanGear) Dialog Box Click ScanGear on the (Scanning from a Computer) tab to display the Settings (ScanGear) dialog box. In the Settings (ScanGear) dialog box, you can specify how to save images when scanning items by starting ScanGear (scanner driver) and how to respond after saving them. -
Page 64
Note When PDF or PDF (Multiple Pages) is selected, images up to 9600 pixels x 9600 pixels can be scanned. When the Enable large image scans checkbox is selected in Save Settings, or when Start OCR is selected in Application Settings, you can select JPEG/Exif, TIFF, or PNG. -
Page 65
Important When the Settings dialog box is displayed from My Image Garden, this option does not appear. (2) Application Settings Area • Open with an application Select this when you want to enhance or correct the scanned images. You can specify the application from the pull-down menu. •… -
Page 66
Settings (General Settings) Dialog Box Click the (General Settings) tab to display the Settings (General Settings) dialog box. In the Settings (General Settings) dialog box, you can set the product to use, file size restriction on e-mail attachment, language to detect text in images, and folder in which to save images temporarily. -
Page 67
• Instructions Opens this guide. • Defaults You can restore the settings in the displayed screen to the default settings. -
Page 68: Data Format Settings Dialog Box
Data Format Settings Dialog Box Display the Data Format Settings dialog box by one of the following operations. • Click Settings… of Save Settings on each tab of the Settings dialog box • Click Settings… of Save Settings in the Save Settings dialog box that appears after scanning with the Check scan results checkbox selected in the Settings dialog box In the Data Format Settings dialog box, you can set the quality of the images to be saved, keyword search of PDF files and their compression type, and the data format in which to…
-
Page 69
Note When Black and White is set for Color Mode on the (Scanning from a Computer) tab of the Settings dialog box, PDF files will be saved in Standard even if High is set. • Format for Item Detected as Document in Auto Scan You can specify the data format for automatically saving items detected as documents in Auto Scan. -
Page 70: Save Settings Dialog Box
Save Settings Dialog Box Select the Check scan results checkbox in Save Settings of the Settings dialog box to display the Save Settings dialog box after scanning. You can specify the data format and destination while viewing the thumbnails of scan results.
-
Page 71
(2) Scan Results Area Displays the thumbnails of the scanned images. You can change the save order of images via drag-and-drop. The file names for saving appear below the thumbnails. (3) Save Settings Area • File Name Enter the file name of the image to be saved. When you save a file, the date and four digits are appended to the set file name in the «_20XX0101_0001″… -
Page 72: Image Stitch Window
Image Stitch Window Click Stitch in the IJ Scan Utility main screen to display the Image Stitch window. You can scan the left and right halves of an item larger than the platen and combine the images back into one image. You can scan items up to approximately twice as large as the platen.
-
Page 73
• Full Platen x 2 Scans the left and right halves of an item twice as large as the platen separately. • Scan Direction • Scan from Left Displays the first scanned image on the left side. • Scan from Right Displays the first scanned image on the right side. -
Page 74
• Adjust cropping frames You can adjust the scan area in preview. If no area is specified, the image of the size selected in Select Output Size will be saved. If an area is specified, only the image in the cropping frame will be scanned and saved. -
Page 75
• (Rotate Left) Rotates the preview image 90 degrees counter-clockwise. • (Invert Vertically) Rotates the preview image 180 degrees. • (Rotate Right) Rotates the preview image 90 degrees clockwise. • (Open Guide) Opens this page. (3) Thumbnail View Area • Thumbnail View Area Displays the thumbnails of the scanned images. -
Page 76
The image is scanned in the direction specified in Scan Direction, and 2 appears next to it. • After scanning the second item by clicking Start Scanning Image 2 The two scanned images appear. Related Topic Scanning Items Larger than the Platen (Image Stitch) -
Page 77: Scanning With Application Software That You Are Using (Scangear)
Scanning with Application Software that You are Using (ScanGear) What Is ScanGear (Scanner Driver)? Scanning with Advanced Settings Using ScanGear (Scanner Driver) Starting ScanGear (Scanner Driver) Scanning in Basic Mode Scanning in Advanced Mode Scanning Multiple Documents at One Time with ScanGear (Scanner Driver) Correcting Images and Adjusting Colors with ScanGear (Scanner Driver) ScanGear (Scanner Driver) Screens Placing Items (When Scanning from a Computer)
-
Page 78: What Is Scangear (Scanner Driver)
What Is ScanGear (Scanner Driver)? ScanGear (scanner driver) is software required for scanning documents. It enables you to specify the output size and make image corrections when scanning. ScanGear can be started from My Image Garden or IJ Scan Utility. It can be also started from other applications that are compatible with a standard interface called TWAIN.
-
Page 79
Advanced Mode Use the Advanced Mode tab to specify the color mode, output resolution, image brightness, color tone, etc. when scanning. -
Page 80: Scanning With Advanced Settings Using Scangear (Scanner Driver)
Scanning with Advanced Settings Using ScanGear (Scanner Driver) Starting ScanGear (scanner driver) Starting ScanGear (Scanner Driver) Scanning documents after making simple image corrections Scanning in Basic Mode Scanning documents after making advanced image corrections and brightness/ color adjustments Scanning in Advanced Mode Scanning multiple documents at one time after making image corrections and color adjustments Scanning Multiple Documents at One Time with ScanGear (Scanner Driver)
-
Page 81: Starting Scangear (Scanner Driver)
Starting ScanGear (Scanner Driver) Use ScanGear (scanner driver) to make image corrections and color adjustments when scanning. ScanGear can be started from My Image Garden or an application. Starting from My Image Garden Follow these steps to start ScanGear from My Image Garden. Start My Image Garden.
-
Page 82: Scanning In Basic Mode
Scanning in Basic Mode Use the Basic Mode tab to scan easily by following the on-screen steps. Refer to «Scanning Multiple Documents at One Time with ScanGear (Scanner Driver)» to scan multiple documents at one time. Important The following types of documents may not be scanned correctly. In that case, click (Thumbnail) on the Toolbar to switch to whole image view and scan.
-
Page 83
Click Preview. Preview image appears in the Preview area. Note Colors are adjusted based on the document type selected in Select Source. Set Destination. Set Output Size according to purpose. Output size options vary by the item selected in Destination. Adjust the cropping frames (scan areas) as required. -
Page 84
Related Topic Basic Mode Tab… -
Page 85: Scanning In Advanced Mode
Scanning in Advanced Mode Use the Advanced Mode tab to specify the color mode, output resolution, image brightness, color tone, etc. when scanning. Refer to «Scanning Multiple Documents at One Time with ScanGear (Scanner Driver)» to scan multiple documents at one time. Important The following types of documents may not be scanned correctly.
-
Page 86
Note Settings are not retained when you switch modes. Input Settings according to the document or purpose. Click Preview. Preview image appears in the Preview area. Output Settings. Adjust the cropping frame (scan area), correct image, and adjust colors as required. Adjusting Cropping Frames (ScanGear) Image Settings Color Adjustment Buttons… -
Page 87
Related Topic Advanced Mode Tab… -
Page 88: Scanning Multiple Documents At One Time With Scangear (Scanner Driver)
Scanning Multiple Documents at One Time with ScanGear (Scanner Driver) You can scan two or more photos (small documents) on the Platen at one time on the Basic Mode tab and Advanced Mode tab. This section explains how to scan multiple documents from the Basic Mode tab. Important To scan multiple documents as a single image, scan in whole image view.
-
Page 89
Click Preview. Thumbnails of the preview images appear in the Preview area. Cropping frames are specified automatically according to the document size. Set Destination. Set Output Size according to purpose. Adjust the cropping frames and set Image corrections as required. Note You can correct each image separately. -
Page 90
Scanning Multiple Documents in Whole Image View Select the images you want to scan. Select the checkboxes of the images you want to scan. Click Scan. Scanning Multiple Documents in Whole Image View Follow these steps if thumbnails are not displayed correctly when previewed or if you want to scan multiple documents as a single image. -
Page 91
Set Output Size according to purpose. Invert aspect ratio will be enabled when Output Size is set to anything but Flexible. Click this button to rotate the cropping frame. Click again to return it to the original orientation. Adjust the cropping frames. Adjust the size and position of the cropping frames on the preview image. -
Page 92: Correcting Images And Adjusting Colors With Scangear (Scanner Driver)
Correcting Images and Adjusting Colors with ScanGear (Scanner Driver) Sharpening out-of-focus photos, reducing dust and scratches, and correcting faded colors Correcting Images (Unsharp Mask, Reduce Dust and Scratches, Fading Correction, etc.) Previewing and changing the color tone of the entire image to scan Adjusting Colors Using a Color Pattern Brightening colors that have faded with time or due to colorcast Adjusting Saturation and Color Balance…
-
Page 93: Correcting Images (Unsharp Mask, Reduce Dust And Scratches, Fading Correction, Etc.)
Correcting Images (Unsharp Mask, Reduce Dust and Scratches, Fading Correction, etc.) The Image Settings functions on the Advanced Mode tab of ScanGear (scanner driver) allow you to enhance the outline of the subjects, reduce dust/scratches, and correct faded colors when scanning images. Setting Items Click (Arrow) of a function and select an item from the pull-down menu.
-
Page 94
Adjusting the image brightness and color tone Set Image Adjustment to Auto, Photo, Magazine, or Document according to the document type. None Auto Reducing show-through in text documents or lightening the base color in recycled paper, newspapers, etc. when scanning documents Set Reduce Show-through to ON. -
Page 95
Note Printed photos and pictures are displayed as a collection of fine dots. «Moire» is a phenomenon where uneven gradation or a stripe pattern appears when such photos or pictures printed with fine dots are scanned. Descreen is the function for reducing this moire effect. -
Page 96
Correcting shadows that appear between pages when scanning open booklets Set Gutter Shadow Correction to Low, Medium, or High according to the degree of shadows. None Medium… -
Page 97: Adjusting Colors Using A Color Pattern
Adjusting Colors Using a Color Pattern You can preview color changes and reproduce natural colors by using the color pattern function in ScanGear (scanner driver)’s Basic Mode tab. Color Adjustment Correct colors that have faded with time or due to colorcast. «Colorcast» is a phenomenon where a specific color affects the entire picture due to the weather or ambient strong colors.
-
Page 98
It is recommended that you find a portion in the image where it should be white, and adjust the colors so that the portion turns white. Preview image appears in the center. Preview image colors change as you adjust them. Below is an example of correcting a bluish image. -
Page 99: Adjusting Saturation And Color Balance
Adjusting Saturation and Color Balance In ScanGear (scanner driver)’s Advanced Mode tab, click (Saturation/Color Balance). Note Click Defaults to reset all adjustments in the current window. Saturation Adjust the image’s saturation (vividness). You can brighten colors that have faded with time, etc.
-
Page 100
Color Balance Adjust images that have a colorcast. «Colorcast» is a phenomenon where a specific color affects the entire picture due to the weather or ambient strong colors. Move (Slider) under Color Balance to the left or right to emphasize the corresponding color. -
Page 101: Adjusting Brightness And Contrast
Adjusting Brightness and Contrast In ScanGear (scanner driver)’s Advanced Mode tab, click (Brightness/Contrast). Note Click (Down arrow) to switch to detailed view. Click (Up arrow) to return to the previous view. Click Defaults to reset all adjustments in the current window. Channel Each dot of an image is a mixture of Red, Green, and Blue in various proportions (gradation).
-
Page 102
Adjust the Blue channel. Note Only Grayscale will be displayed in Channel when Color Mode is Grayscale. Brightness Adjust the image brightness. Move (Slider) under Brightness to the left to darken and right to brighten the image. You can also enter a value (-127 to 127). Darkened Original image Brightened… -
Page 103
Note Increasing the contrast is effective in adding a three-dimensional feel to soft images. However, shadows and highlights may be lost if you increase the contrast too much. -
Page 104: Adjusting Histogram
Adjusting Histogram In ScanGear (scanner driver)’s Advanced Mode tab, click (Histogram). Note Click Defaults to reset all adjustments in the current window. Channel Each dot of an image is a mixture of Red, Green, and Blue in various proportions (gradation). These colors can be adjusted individually as a «channel.» •…
-
Page 105
(1) Bright area (2) Dark area (3) Whole image More data is distributed to More data is distributed to Data is widely distributed the highlight side. the shadow side. between the highlight and shadow. Adjusting Histograms (Using the Slider) Select a Channel, then move (Black-point Slider) or (White-point Slider) to specify the level to be set as the shadow or highlight. -
Page 106
Images with widely distributed data Move the Black-point Slider toward the highlight side, and White-point Slider toward the shadow side. Moving the Mid-point Slider Move the Mid-point Slider to specify the level to be set as the middle of the tonal range. Images with more data distributed to the highlight side Move the Mid-point Slider toward the highlight side. -
Page 107
— The point clicked with (Black-point Dropper) will be the darkest point. You can also enter a value (0 to 245). — The point clicked with (Mid-point Dropper) will be the middle of the tonal range. You can also enter a value (5 to 250). — The point clicked with (White-point Dropper) will be the brightest point. -
Page 108: Adjusting Tone Curve
Adjusting Tone Curve In ScanGear (scanner driver)’s Advanced Mode tab, click (Tone Curve Settings). Note Click Defaults to reset all adjustments in the current window. Channel Each dot of an image is a mixture of Red, Green, and Blue in various proportions (gradation).
-
Page 109
Adjusting Tone Curve In Select Tone Curve, select a tone curve from No correction, Overexposure, Underexposure, High contrast, Reverse the negative/positive image, and Edit custom curve. No correction (No adjustment) Overexposure (Convex curve) The midtone data of the input side is stretched toward the highlight of the output side, resulting in a bright-toned image when viewed on a monitor. -
Page 110
Reverse the negative/positive image (Downward-sloping line) The input and output sides are reversed, resulting in a negative-positive inverted image. Edit custom curve You can drag specific points on the Tone Curve to freely adjust the brightness of the corresponding areas. -
Page 111: Setting Threshold
Setting Threshold The brightness of color and grayscale images is expressed in a value between 0 and 255. However, in creating black and white images, all colors are mapped to either black (0) or white (255). «Threshold» is the borderline value that determines a color as black or white. By adjusting the threshold level, you can sharpen text in a document or reduce show-through in newspapers.
-
Page 112: Scangear (Scanner Driver) Screens
ScanGear (Scanner Driver) Screens Basic Mode Tab Advanced Mode Tab Input Settings Output Settings Image Settings Color Adjustment Buttons Preferences Dialog Box Scanner Tab Preview Tab Scan Tab Color Settings Tab…
-
Page 113: Basic Mode Tab
Basic Mode Tab This mode allows you to scan easily by following the on-screen steps. This section describes the settings and functions available on the Basic Mode tab. (1) Settings and Operation Buttons (2) Toolbar (3) Preview Area Note The displayed items vary by document type and view. (1) Settings and Operation Buttons •…
-
Page 114
Note When you select a document type, the unsharp mask function will be active. The image adjustment function which adjusts images based on the document type will also be active. If you select Magazine (Color), the descreen function will be active. •… -
Page 115
Output size options vary by the item selected in Destination. • Flexible Allows you to freely adjust the cropping frames (scan areas). In thumbnail view Drag the mouse over a thumbnail to display a cropping frame. When a cropping frame is displayed, the portion within the cropping frame will be scanned. When no cropping frame is displayed, each frame is scanned individually. -
Page 116
appears in Output Size List. Click Save to save the items listed in Output Size List. Delete To delete an item, select it in Output Size List and click Delete. Click Save to save the items listed in Output Size List. Important You cannot delete predefined output sizes such as A4 and 1024 x 768 pixels. -
Page 117
Sharpens text in a document or magazine for better readability. Important Scanning may take longer than usual when this checkbox is selected. The color tone may change from the source image due to corrections. In that case, deselect the checkbox and scan. Correction may not be applied properly if the scan area is too small. -
Page 118
You can adjust or rotate preview images. The buttons displayed on the Toolbar vary by view. In thumbnail view In whole image view • (Thumbnail) / (Whole Image) Switches the view in the Preview area. (3) Preview Area • (Rotate Left) Rotates the preview image 90 degrees counter-clockwise. -
Page 119
• (Select All Cropping Frames) Available when two or more cropping frames are specified. Turns the cropping frames into thick broken lines and applies the settings to all of them. • (Remove Cropping Frame) Removes the selected cropping frame. • (Information) Displays the version of ScanGear and the current scan settings (document type, etc.). -
Page 120
Note When multiple images are previewed, different outlines indicate different selection status. Focus Frame (thick blue outline): The displayed settings will be applied. Selected Frame (thin blue outline): The settings will be applied to the Focus Frame and Selected Frames simultaneously. You can select multiple images by clicking them while pressing the Ctrl key. -
Page 121: Advanced Mode Tab
Advanced Mode Tab This mode allows you to make advanced scan settings such as the color mode, output resolution, image brightness, and color tone. This section describes the settings and functions available on the Advanced Mode tab. (1) Settings and Operation Buttons (2) Toolbar (3) Preview Area Note…
-
Page 122
Enter Setting Name and click Add; the name appears in Favorite Settings List. When you click Save, the item appears in the Favorite Settings list and can be selected, along with the predefined items. To delete an item, select it in Favorite Settings List and click Delete. Click Save to save the settings displayed in Favorite Settings List. -
Page 123
Note You can also zoom in on an image by double-clicking the frame. Double-click the frame again to return the display to its non-magnified state. In whole image view Rescans the image in the area specified with a cropping frame at higher magnification. Note Zoom rescans the document and displays high-resolution image in Preview. -
Page 124
It will take time to process the images if the total size of the scanned images exceeds a certain size. In that case, a warning message appears; it is recommended that you reduce the total size. To continue, scan in whole image view. •… -
Page 125
Allows you to zoom in on the Preview area by clicking the image. Right-click the image to zoom out. • (Rotate Left) Rotates the preview image 90 degrees counter-clockwise. — The result will be reflected in the scanned image. — The image returns to its original state when you preview again. •… -
Page 126
• (Open Guide) Opens this page. (3) Preview Area • Preview Area This is where a trial image appears after you click Preview. You can also check the results of the settings (image corrections, color adjustments, etc.) made in «(1) Settings and Operation Buttons.»… -
Page 127
Note You can specify the cropping frame on the displayed image. In thumbnail view, you can only create one cropping frame per image. In whole image view, you can create multiple cropping frames. Adjusting Cropping Frames (ScanGear) Related Topic Scanning in Advanced Mode… -
Page 128: Input Settings
Input Settings Input Settings allows you to set the following items: • Select Source The type of document to be scanned is displayed. • Paper Size Select the size of the document to be scanned. This setting is available in whole image view only.
-
Page 129
Select this mode to scan color documents or to create color images. This mode renders the image in 256 levels (8 bit) of R(ed), G(reen), and B(lue). • Grayscale Select this mode to scan black and white photos or to create black and white images. This mode renders the image in 256 levels (8 bit) of black and white. -
Page 130: Output Settings
Output Settings Output Settings allows you to set the following items: • Output Resolution Select the resolution to scan at. The higher the resolution (value), the more detail in your image. Select a resolution from the options displayed by clicking the button, or enter a value within the range of 25 dpi to 19200 dpi (in 1 dpi increments).
-
Page 131
Note To enlarge/reduce the scanned image, enter values into (Width) and (Height) in Output Settings or specify a value (by 1 %) for %. Although the maximum value available for % depends on the Output Resolution, it can be specified for up to 19200 dpi (the maximum available output resolution). •… -
Page 132
Note Save up to 10 items for each destination. An error message appears when you enter a value outside the setting range. Enter a value within the range displayed in the message. Note Refer to «Adjusting Cropping Frames (ScanGear)» for details on cropping frames. For details on whether or how the cropping frame is initially displayed on a preview image, refer to Cropping Frame on Previewed Images in «Preview… -
Page 133: Image Settings
Image Settings Important Do not apply these functions to images without moire, dust/scratches, or faded colors. The color tone may be adversely affected. Image correction results may not be reflected in the preview image. Note Selectable settings depend on Color Mode settings. Scanning may take longer than usual when you use Image Settings.
-
Page 134
• Magazine Applies Image Adjustment suitable for magazines. • Document Applies Image Adjustment suitable for text documents. Important You can set Image Adjustment after preview. You can set this setting when Recommended is selected on the Color Settings tab of the Preferences dialog box. Note If the image is not adjusted properly with Auto, specify the document type. -
Page 135
pictures printed with fine dots are scanned. Descreen is the function for reducing this moire effect. • OFF Moire will not be reduced. • ON Reduces moire. It is recommended that you normally select this setting. Note Even if Descreen is set to ON, some moire effects may remain if Unsharp Mask is set to ON. -
Page 136
Select this to correct a small amount of fading and colorcast. • Medium It is recommended that you normally select this setting. • High Select this to correct a large amount of fading and colorcast. This can affect the tone of the image. -
Page 137
• Low Select this when the effect level is too strong with the medium setting. • Medium It is recommended that you normally select this setting. • High Select this when the effect level is too weak with the medium setting. Important Do not place objects that weigh 4.4 lbs (2.0 kg) or more on the Platen. -
Page 138
Note Cover the document with black cloth if white spots, streaks, or colored patterns appear in scan results due to ambient light entering between the document and the Platen. If the shadow is not corrected properly, adjust the cropping frame (scan area) on the preview image. -
Page 139: Color Adjustment Buttons
Color Adjustment Buttons The Color Adjustment Buttons allow you to make fine corrections to the image brightness and color tones including adjustments to the image’s overall brightness or contrast and adjustments to its highlight and shadow values (histogram) or balance (tone curve). Important The Color Adjustment Buttons are not available when you select Color Matching on the Color Settings tab of the Preferences dialog box.
-
Page 140
Adjusting Brightness and Contrast • (Histogram) A histogram allows you to see the data concentration at each brightness level of an image. You can specify the brightest level (highlight) and darkest level (shadow) within an image, cut the levels and expand the middle of the tonal range of the image. Adjusting Histogram •… -
Page 141
• Custom You can name and save a set of tone curve and threshold settings of the Color Adjustment Buttons. Select Add/Delete… from the pull-down menu; when Color Mode is set to anything but Black and White, the Add/Delete Tone Curve Settings dialog box opens; when Color Mode is Black and White, the Add/Delete Threshold Settings dialog box opens. -
Page 142: Preferences Dialog Box
Preferences Dialog Box Click Preferences… in the ScanGear (scanner driver) screen to open the Preferences dialog box. In the Preferences dialog box, you can make advanced settings to ScanGear functions via the Scanner, Preview, Scan, and Color Settings tabs. Scanner Tab Allows you to set the quiet mode, auto power settings, folder in which to save images temporarily, and music file to play during or at the end of a scan.
-
Page 143: Scanner Tab
Scanner Tab On the Scanner tab, you can specify the following settings. • Auto Power Settings You can set to turn the machine on or off automatically. Click Settings… to display the Auto Power Settings dialog box. Note If the machine is off or bi-directional communication is disabled, a message may appear because the computer cannot collect the machine status.
-
Page 144
Click Settings… to set the quiet mode. Note You can set the quiet mode from the operation panel of the machine, the printer driver, or ScanGear. No matter how the setting is made, it applies to operations from the operation panel of the machine or when printing/scanning from a computer, etc. -
Page 145
— Audio file (*.wav, *.aif, *.aiff) — MP3 file (*.mp3) • Calibration Settings When you set Execute at Every Scan to ON, the scanner will be calibrated every time before previewing and scanning, to reproduce correct color tones in scanned images. Note Even when Execute at Every Scan is set to OFF, the scanner may be calibrated automatically in some cases (such as immediately after you turn the machine on). -
Page 146: Preview Tab
Preview Tab On the Preview tab, you can specify the following settings. • Preview at Start of ScanGear Select what to do with Preview when ScanGear (scanner driver) is started. • Automatically Execute Preview ScanGear will automatically start previewing at startup. •…
-
Page 147
A cropping frame of the same size as the last used cropping frame will be displayed after previewing. • None No cropping frame will be displayed after previewing. • Cropping Size for Thumbnail View Select the cropping size for thumbnails of scanned documents. •… -
Page 148: Scan Tab
Scan Tab On the Scan tab, you can specify the following settings. • Status of ScanGear dialog after scanning Select what to do with ScanGear (scanner driver) after scanning images. • Close ScanGear automatically Select this to return to the original application when scanning is completed. •…
-
Page 149: Color Settings Tab
Color Settings Tab On the Color Settings tab, you can specify the following settings. • Color Adjustment Select one of the following. You can select one when Color Mode is Color or Grayscale. • Recommended Select this to vividly reproduce the tone of a document on the screen. It is recommended that you normally select this setting.
-
Page 150
Note Color Matching is available when ScanGear, monitor, color management-compliant application (such as Adobe Photoshop), and printer are set up correctly. Refer to the corresponding manual for the monitor, printer, and application settings. • Monitor Gamma By setting the gamma value of a monitor, you can adjust the input data to the brightness characteristics of the monitor. -
Page 151: Placing Items (When Scanning From A Computer)
Placing Items (When Scanning from a Computer) Learn how to place items on the platen of your scanner or printer. Place items correctly according to the type of item to be scanned. Otherwise, items may not be scanned correctly. Important Do not place objects on the document cover.
-
Page 152
Important Important Large items (such as A4 size photos) that Refer to «Loading Originals» for your cannot be placed away from the edges/ model from Home of the Online arrow (alignment mark) of the platen may Manual for details on the portions in be saved as PDF files. -
Page 153: Adjusting Cropping Frames (Scangear)
Adjusting Cropping Frames (ScanGear) «Cropping» is the act of selecting the area you want to keep in an image and discarding the rest when scanning it. On the Basic Mode tab and Advanced Mode tab, you can specify cropping frames (scan areas) on the image(s) displayed in the Preview area of the screen.
-
Page 154
(2) Thin cropping frame — In thumbnail view Output size, image corrections, and other settings on the Basic Mode tab or Advanced Mode tab will be applied. — In whole image view Represents an unselected cropping frame. The settings on the Basic Mode tab or Advanced Mode tab will not be applied. -
Page 155
In whole image view Click and drag the mouse in a space outside the existing cropping frame to create a new cropping frame in the Preview area. The new cropping frame will be the active cropping frame, and the old cropping frame will be the unselected cropping frame. You can create multiple cropping frames and apply different scan settings to each cropping frame. -
Page 156
To delete a cropping frame, click an area outside the cropping frame on an image. In whole image view To delete a cropping frame, select it and click (Remove Cropping Frame) on the Toolbar. Alternatively, press the Delete key. When there are multiple cropping frames, all the selected cropping frames (active cropping frame and selected cropping frames) are deleted simultaneously. -
Page 157: General Notes (Scanner Driver)
General Notes (Scanner Driver) ScanGear (scanner driver) is subject to the following restrictions. Keep these points in mind when using it. Scanner Driver Restrictions • When using the NTFS file system, the TWAIN data source may not be invoked. This is because the TWAIN module cannot be written to the winnt folder for security reasons.
-
Page 158
Applications with Restrictions on Use • If you start Media Center included in Windows XP Media Center Edition 2005, you may not be able to scan using the operation panel of the machine. In that case, restart the computer. • You cannot scan images with Media Center included in Windows XP Media Center Edition 2005. -
Page 159: Useful Information On Scanning
Useful Information on Scanning Adjusting Cropping Frames in the Image Stitch Window Resolution Data Formats Color Matching…
-
Page 160: Adjusting Cropping Frames In The Image Stitch Window
Adjusting Cropping Frames in the Image Stitch Window «Cropping» is the act of selecting the area you want to keep in an image and discarding the rest when scanning it. In the Image Stitch window, you can specify a cropping frame on the image displayed in the Preview area.
-
Page 161: Resolution
Resolution The data in the image you have scanned is a collection of dots carrying information about brightness and color. The density of these dots is called «resolution», and resolution will determine the amount of detail your image contains. The unit of resolution is dots per inch (dpi).
-
Page 162
Attaching to e-mail Color, Grayscale, or 150 dpi Black and White Scanning text using OCR Color or Grayscale 300 dpi Important If you double the resolution, the data size of the scanned image quadruples. If the file is too large, the processing speed will slow down significantly, and you will experience inconvenience such as lack of memory. -
Page 163: Data Formats
Data Formats You can select a data format when saving scanned images. You should specify the most suitable data format according to how you want to use the image on which application. Available data formats vary by application and operating system (Windows or Mac OS). See below for the characteristics of each image data format.
-
Page 164: Color Matching
Color Matching «Color Matching» is the act of making adjustments so that the color tones match between the original item, the monitor display, and the color printout. On your scanner or printer, the color tones are adjusted as shown below. Example: When sRGB is selected as the output profile (target) Input Profile (Source) Scanner…
-
Page 165: Other Scanning Methods
Other Scanning Methods Scanning with WIA Driver Scanning Using the Control Panel (Windows XP Only)
-
Page 166: Scanning With Wia Driver
Scanning with WIA Driver You can scan an item from a WIA (Windows Image Acquisition)-compliant application. WIA is a driver model implemented in Windows XP or later. It allows you to scan items without using an application. The procedure varies depending on the application. The following procedures are examples only.
-
Page 167
• Resolution (DPI) Enter the resolution. Specify a value between 50 dpi and 600 dpi. Resolution • Brightness Move the slider to adjust the brightness. Move it to the left to darken and right to brighten the image. You can also enter a value (-100 to 100). •… -
Page 168
Click Adjust the quality of the scanned picture and set the preferences as required. • Brightness Move the slider to adjust the brightness. Move it to the left to darken and right to brighten the image. You can also enter a value (-127 to 127). •… -
Page 169: Scanning Using The Control Panel (Windows Xp Only)
You can scan images via the Control Panel of Windows XP using the WIA driver. From the Start menu, select Control Panel. Click Printers and Other Hardware > Scanners and Cameras, then double-click Canon XXX series (where «XXX» is the model name). The Scanner and Camera Wizard dialog box appears. Click Next.
-
Page 170
Move the slider to adjust the brightness. Move it to the left to darken and right to brighten the image. You can also enter a value (-127 to 127). • Contrast Move the slider to adjust the contrast. Moving it to the left will decrease the contrast of the image, thus softening the image. -
Page 171: Placing Items (When Scanning From A Computer)
Placing Items (When Scanning from a Computer) Learn how to place items on the platen of your scanner or printer. Place items correctly according to the type of item to be scanned. Otherwise, items may not be scanned correctly. Important Do not place objects on the document cover.
-
Page 172
Important Important Large items (such as A4 size photos) that Refer to «Loading Originals» for your cannot be placed away from the edges/ model from Home of the Online arrow (alignment mark) of the platen may Manual for details on the portions in be saved as PDF files.
![]()
MG2400 series
Онлайн-руководство
Устранение неполадок
Русский (Russian)
Содержание
Устранение неполадок. . . . . . . . . . . . . . . . . . . . . . . . . . . . . . . . . . . . . . . . . . . . 5
Проблемы с печатью. . . . . . . . . . . . . . . . . . . . . . . . . . . . . . . . . . . . . . . . . . . . . . . . . . . . . 6
Печать не начинается. . . . . . . . . . . . . . . . . . . . . . . . . . . . . . . . . . . . . . . . . . . . . . . . . . . . . . . . . . . . . . . 7
Замятие бумаги. . . . . . . . . . . . . . . . . . . . . . . . . . . . . . . . . . . . . . . . . . . . . . . . . . . . . . . . . . . . . . . . . . . . 9
Бумага подается неправильно или появилось сообщение об отсутствии бумаги. . . . . . . . . . . . . . 10
Копирование/Печать прерывается, не завершившись. . . . . . . . . . . . . . . . . . . . . . . . . . . . . . . . . . . . 12
Проблемы с качеством печати. . . . . . . . . . . . . . . . . . . . . . . . . . . . . . . . . . . . . . . . . . . . 13
Неудовлетворительные результаты печати. . . . . . . . . . . . . . . . . . . . . . . . . . . . . . . . . . . . . . . . . . . . 14
Не удается напечатать задание до конца. . . . . . . . . . . . . . . . . . . . . . . . . . . . . . . . . . . . . . . . . . 16
Печать не начинается/Нечеткая печать/Неверные цвета/Белые полосы. . . . . . . . . . . . . . . . 17
Неверные цвета. . . . . . . . . . . . . . . . . . . . . . . . . . . . . . . . . . . . . . . . . . . . . . . . . . . . . . . . . . . . . . . 20
Линии не выровнены. . . . . . . . . . . . . . . . . . . . . . . . . . . . . . . . . . . . . . . . . . . . . . . . . . . . . . . . . . . 21
Линия не печатается или печатается частично. . . . . . . . . . . . . . . . . . . . . . . . . . . . . . . . . . . . . 22
Изображение не печатается или печатается частично. . . . . . . . . . . . . . . . . . . . . . . . . . . . . . . 23
Бумага после печати сворачивается или на ней появляются чернильные пятна. . . . . . . . . . 24
Бумага испачкана/Отпечатанная поверхность поцарапана. . . . . . . . . . . . . . . . . . . . . . . . . . . . 25
Обратная сторона бумаги испачкана. . . . . . . . . . . . . . . . . . . . . . . . . . . . . . . . . . . . . . . . . . . . . . 28
Цвета передаются неравномерно. . . . . . . . . . . . . . . . . . . . . . . . . . . . . . . . . . . . . . . . . . . . . . . . 29
Чернила не подаются. . . . . . . . . . . . . . . . . . . . . . . . . . . . . . . . . . . . . . . . . . . . . . . . . . . . . . . . . . . . . . 31
Затруднения со сканированием. . . . . . . . . . . . . . . . . . . . . . . . . . . . . . . . . . . . . . . . . . . . 32
Затруднения со сканированием. . . . . . . . . . . . . . . . . . . . . . . . . . . . . . . . . . . . . . . . . . . . . . . . . . . . . . 33
Сканер не работает. . . . . . . . . . . . . . . . . . . . . . . . . . . . . . . . . . . . . . . . . . . . . . . . . . . . . . . . . . . . 34
Программа ScanGear (драйвер сканера) не запускается. . . . . . . . . . . . . . . . . . . . . . . . . . . . . . 35
Отображается сообщение об ошибке, и окно программы ScanGear (драйвера сканера) не открывается. . . . . . . . . . . . . . . . . . . . . . . . . . . . . . . . . . . . . . . . . . . . . . . . . . . . . . . . . . . . . . . . . . 36
Не удается одновременно отсканировать несколько исходных документов. . . . . . . . . . . . . . 37
Не удается правильно выполнить сканирование с помощью функции автоматического сканирования. . . . . . . . . . . . . . . . . . . . . . . . . . . . . . . . . . . . . . . . . . . . . . . . . . . . . . . . . . . . . . . . . 38
Низкая скорость сканирования. . . . . . . . . . . . . . . . . . . . . . . . . . . . . . . . . . . . . . . . . . . . . . . . . . . 39
Появляется сообщение «Недостаточно памяти.». . . . . . . . . . . . . . . . . . . . . . . . . . . . . . . . . . . 40
Компьютер перестает работать во время сканирования. . . . . . . . . . . . . . . . . . . . . . . . . . . . . . 41
Сканер не работает после обновления Windows. . . . . . . . . . . . . . . . . . . . . . . . . . . . . . . . . . . . 42
Отсканированное изображение не открывается. . . . . . . . . . . . . . . . . . . . . . . . . . . . . . . . . . . . . 44
Неудовлетворительные результаты сканирования. . . . . . . . . . . . . . . . . . . . . . . . . . . . . . . . . . . . . . 45
Плохое качество сканирования (изображение, отображаемое на мониторе). . . . . . . . . . . . . 46
Белые области вокруг отсканированного изображения. . . . . . . . . . . . . . . . . . . . . . . . . . . . . . . 48
Не удается отсканировать изображение в правильном размере. . . . . . . . . . . . . . . . . . . . . . . 49
Исходный документ установлен правильно, но отсканированное изображение наклонено. . 50
Отсканированное изображение на мониторе компьютера увеличено (уменьшено). . . . . . . . 51
Неполадки программного обеспечения. . . . . . . . . . . . . . . . . . . . . . . . . . . . . . . . . . . . . . . . . . . . . . . . 52
Требуемый почтовый клиент не отображается на экране выбора почтового клиента. . . . . . 53
Проблемы с устройством. . . . . . . . . . . . . . . . . . . . . . . . . . . . . . . . . . . . . . . . . . . . . . . . . 54
Питание устройства не включается. . . . . . . . . . . . . . . . . . . . . . . . . . . . . . . . . . . . . . . . . . . . . . . . . . . 55
Устройство неожиданно выключается. . . . . . . . . . . . . . . . . . . . . . . . . . . . . . . . . . . . . . . . . . . . . . . . . 56
Не удается правильно установить соединение с компьютером. . . . . . . . . . . . . . . . . . . . . . . . . . . . 57
Держатель картриджа FINE не встает в положение для замены. . . . . . . . . . . . . . . . . . . . . . . . . . . 58
Не отображается окно монитора состояния принтера. . . . . . . . . . . . . . . . . . . . . . . . . . . . . . . . . . . . 59
Проблемы при установке или загрузке. . . . . . . . . . . . . . . . . . . . . . . . . . . . . . . . . . . . . . 60
Не удается установить драйверы MP Drivers. . . . . . . . . . . . . . . . . . . . . . . . . . . . . . . . . . . . . . . . . . . 61
Не запускается приложение Easy-WebPrint EX или не появляется меню Easy-WebPrint EX. . . . . 64
Об отображаемых ошибках и сообщениях. . . . . . . . . . . . . . . . . . . . . . . . . . . . . . . . . . . 65
Если произошла ошибка. . . . . . . . . . . . . . . . . . . . . . . . . . . . . . . . . . . . . . . . . . . . . . . . . . . . . . . . . . . . 66
Отображается сообщение. . . . . . . . . . . . . . . . . . . . . . . . . . . . . . . . . . . . . . . . . . . . . . . . . . . . . . . . . . . 69
Если не удается устранить неполадку. . . . . . . . . . . . . . . . . . . . . . . . . . . . . . . . . . . . . . 74
Список кодов поддержки. . . . . . . . . . . . . . . . . . . . . . . . . . . . . . . . . . . . . . . . . . 75
Список кодов поддержки (при замятии бумаги). . . . . . . . . . . . . . . . . . . . . . . . . . . . . . . 76
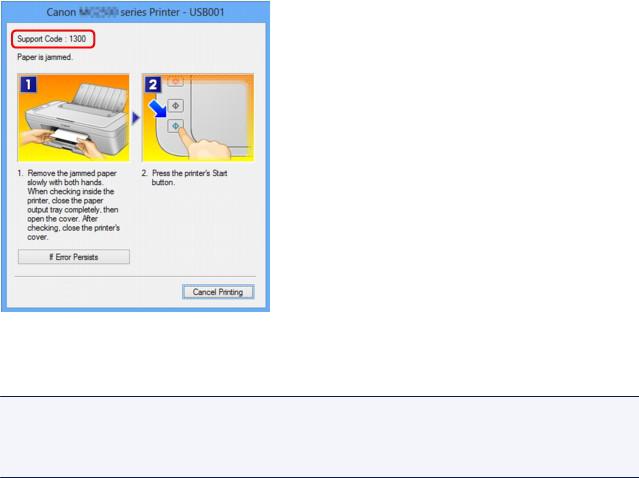
1300. . . . . . . . . . . . . . . . . . . . . . . . . . . . . . . . . . . . . . . . . . . . . . . . . . . . . . . . . . . . . . . . . . . . . . . . . . . . . 77
Бумага застряла внутри устройства. . . . . . . . . . . . . . . . . . . . . . . . . . . . . . . . . . . . . . . . . . . . . . . . . . . 79
В других случаях. . . . . . . . . . . . . . . . . . . . . . . . . . . . . . . . . . . . . . . . . . . . . . . . . . . . . . . . . . . . . . . . . . 82
1000. . . . . . . . . . . . . . . . . . . . . . . . . . . . . . . . . . . . . . . . . . . . . . . . . . . . . . . . . . . . . . . . . . 83 1200. . . . . . . . . . . . . . . . . . . . . . . . . . . . . . . . . . . . . . . . . . . . . . . . . . . . . . . . . . . . . . . . . . 84
1203. . . . . . . . . . . . . . . . . . . . . . . . . . . . . . . . . . . . . . . . . . . . . . . . . . . . . . . . . . . . . . . . . . 85 1401. . . . . . . . . . . . . . . . . . . . . . . . . . . . . . . . . . . . . . . . . . . . . . . . . . . . . . . . . . . . . . . . . . 86 1403. . . . . . . . . . . . . . . . . . . . . . . . . . . . . . . . . . . . . . . . . . . . . . . . . . . . . . . . . . . . . . . . . . 87 1485. . . . . . . . . . . . . . . . . . . . . . . . . . . . . . . . . . . . . . . . . . . . . . . . . . . . . . . . . . . . . . . . . . 88 1682. . . . . . . . . . . . . . . . . . . . . . . . . . . . . . . . . . . . . . . . . . . . . . . . . . . . . . . . . . . . . . . . . . 89 1684. . . . . . . . . . . . . . . . . . . . . . . . . . . . . . . . . . . . . . . . . . . . . . . . . . . . . . . . . . . . . . . . . . 90 1686. . . . . . . . . . . . . . . . . . . . . . . . . . . . . . . . . . . . . . . . . . . . . . . . . . . . . . . . . . . . . . . . . . 91 1687. . . . . . . . . . . . . . . . . . . . . . . . . . . . . . . . . . . . . . . . . . . . . . . . . . . . . . . . . . . . . . . . . . 92 1688. . . . . . . . . . . . . . . . . . . . . . . . . . . . . . . . . . . . . . . . . . . . . . . . . . . . . . . . . . . . . . . . . . 93
1700. . . . . . . . . . . . . . . . . . . . . . . . . . . . . . . . . . . . . . . . . . . . . . . . . . . . . . . . . . . . . . . . . . 94 1701. . . . . . . . . . . . . . . . . . . . . . . . . . . . . . . . . . . . . . . . . . . . . . . . . . . . . . . . . . . . . . . . . . 95 1890. . . . . . . . . . . . . . . . . . . . . . . . . . . . . . . . . . . . . . . . . . . . . . . . . . . . . . . . . . . . . . . . . . 96 2900. . . . . . . . . . . . . . . . . . . . . . . . . . . . . . . . . . . . . . . . . . . . . . . . . . . . . . . . . . . . . . . . . . 97 2901. . . . . . . . . . . . . . . . . . . . . . . . . . . . . . . . . . . . . . . . . . . . . . . . . . . . . . . . . . . . . . . . . . 98 4100. . . . . . . . . . . . . . . . . . . . . . . . . . . . . . . . . . . . . . . . . . . . . . . . . . . . . . . . . . . . . . . . . . 99 4102. . . . . . . . . . . . . . . . . . . . . . . . . . . . . . . . . . . . . . . . . . . . . . . . . . . . . . . . . . . . . . . . . 100 5011. . . . . . . . . . . . . . . . . . . . . . . . . . . . . . . . . . . . . . . . . . . . . . . . . . . . . . . . . . . . . . . . . 101 5012. . . . . . . . . . . . . . . . . . . . . . . . . . . . . . . . . . . . . . . . . . . . . . . . . . . . . . . . . . . . . . . . . 102 5100. . . . . . . . . . . . . . . . . . . . . . . . . . . . . . . . . . . . . . . . . . . . . . . . . . . . . . . . . . . . . . . . . 103 5200. . . . . . . . . . . . . . . . . . . . . . . . . . . . . . . . . . . . . . . . . . . . . . . . . . . . . . . . . . . . . . . . . 104 5400. . . . . . . . . . . . . . . . . . . . . . . . . . . . . . . . . . . . . . . . . . . . . . . . . . . . . . . . . . . . . . . . . 105 5B00. . . . . . . . . . . . . . . . . . . . . . . . . . . . . . . . . . . . . . . . . . . . . . . . . . . . . . . . . . . . . . . . . 106 5B01. . . . . . . . . . . . . . . . . . . . . . . . . . . . . . . . . . . . . . . . . . . . . . . . . . . . . . . . . . . . . . . . . 107 6000. . . . . . . . . . . . . . . . . . . . . . . . . . . . . . . . . . . . . . . . . . . . . . . . . . . . . . . . . . . . . . . . . 108 6800. . . . . . . . . . . . . . . . . . . . . . . . . . . . . . . . . . . . . . . . . . . . . . . . . . . . . . . . . . . . . . . . . 109 6801. . . . . . . . . . . . . . . . . . . . . . . . . . . . . . . . . . . . . . . . . . . . . . . . . . . . . . . . . . . . . . . . . 110 6930. . . . . . . . . . . . . . . . . . . . . . . . . . . . . . . . . . . . . . . . . . . . . . . . . . . . . . . . . . . . . . . . . 111 6931. . . . . . . . . . . . . . . . . . . . . . . . . . . . . . . . . . . . . . . . . . . . . . . . . . . . . . . . . . . . . . . . . 112 6932. . . . . . . . . . . . . . . . . . . . . . . . . . . . . . . . . . . . . . . . . . . . . . . . . . . . . . . . . . . . . . . . . 113 6933. . . . . . . . . . . . . . . . . . . . . . . . . . . . . . . . . . . . . . . . . . . . . . . . . . . . . . . . . . . . . . . . . 114 6936. . . . . . . . . . . . . . . . . . . . . . . . . . . . . . . . . . . . . . . . . . . . . . . . . . . . . . . . . . . . . . . . . 115 6937. . . . . . . . . . . . . . . . . . . . . . . . . . . . . . . . . . . . . . . . . . . . . . . . . . . . . . . . . . . . . . . . . 116 6938. . . . . . . . . . . . . . . . . . . . . . . . . . . . . . . . . . . . . . . . . . . . . . . . . . . . . . . . . . . . . . . . . 117 6940. . . . . . . . . . . . . . . . . . . . . . . . . . . . . . . . . . . . . . . . . . . . . . . . . . . . . . . . . . . . . . . . . 118
6941. . . . . . . . . . . . . . . . . . . . . . . . . . . . . . . . . . . . . . . . . . . . . . . . . . . . . . . . . . . . . . . . . 119 6942. . . . . . . . . . . . . . . . . . . . . . . . . . . . . . . . . . . . . . . . . . . . . . . . . . . . . . . . . . . . . . . . . 120 6943. . . . . . . . . . . . . . . . . . . . . . . . . . . . . . . . . . . . . . . . . . . . . . . . . . . . . . . . . . . . . . . . . 121 6944. . . . . . . . . . . . . . . . . . . . . . . . . . . . . . . . . . . . . . . . . . . . . . . . . . . . . . . . . . . . . . . . . 122 6945. . . . . . . . . . . . . . . . . . . . . . . . . . . . . . . . . . . . . . . . . . . . . . . . . . . . . . . . . . . . . . . . . 123 6946. . . . . . . . . . . . . . . . . . . . . . . . . . . . . . . . . . . . . . . . . . . . . . . . . . . . . . . . . . . . . . . . . 124 B200. . . . . . . . . . . . . . . . . . . . . . . . . . . . . . . . . . . . . . . . . . . . . . . . . . . . . . . . . . . . . . . . . 125 B201. . . . . . . . . . . . . . . . . . . . . . . . . . . . . . . . . . . . . . . . . . . . . . . . . . . . . . . . . . . . . . . . . 126

Устранение неполадок
Питание устройства не включается Печать не начинается
Бумага подается неправильно или появилось сообщение об отсутствии бумаги Неудовлетворительные результаты печати Чернила не подаются Замятие бумаги Если произошла ошибка
Поиск каждой функции
Проблемы с печатью Проблемы с качеством печати Затруднения со сканированием Проблемы с устройством
Проблемы при установке или загрузке Об отображаемых ошибках и сообщениях Если не удается устранить неполадку
5

Проблемы с печатью
Печать не начинается Замятие бумаги
Бумага подается неправильно или появилось сообщение об отсутствии бумаги Копирование/Печать прерывается, не завершившись
6

Печать не начинается
Проверка 1 Убедитесь, что кабель питания надежно подключен, затем включите
устройство кнопкой ВКЛ (ON).
Если индикатор ВКЛ (ON) мигает, устройство инициализируется. Дождитесь, когда индикатор ВКЛ (ON) перестанет мигать и начнет светиться.
 Примечание.
•При печати большого объема данных (например, фотографий или рисунков) требуется больше времени для подготовки к печати. Если мигает индикатор ВКЛ (ON), это значит, что компьютер обрабатывает и отправляет на устройство данные. Дождитесь начала печати.
Проверка 2 Убедитесь, что USB-кабель надежно подключен к устройству и к
компьютеру.
Если устройство подключено к компьютеру с помощью USB-кабеля, проверьте следующее.
•Если используется ретранслятор (например, USB-концентратор), отключите его, подключите устройство напрямую к компьютеру и попробуйте еще раз выполнить печать. Если принтер начал печатать, неполадка связана с ретранслятором. Обратитесь за помощью к поставщику ретранслятора.
•Возможна также неисправность USB-кабеля. Замените USB-кабель и попытайтесь выполнить печать еще раз.
Проверка 3 Если выполняется печать с компьютера и имеются какие-либо ненужные задания печати, удалите их.
 Удаление ненужного задания печати
Проверка 4 Убедитесь, что в диалоговом окне «Печать» выбрано имя устройства.
Правильная работа устройства невозможна при использовании драйвера другого принтера.
Убедитесь, что в диалоговом окне печати выбрано имя устройства.
 Примечание.
•Чтобы задать устройство по умолчанию, выберите пункт Использовать по умолчанию (Set as Default Printer).
Проверка 5 Правильно настройте порт принтера.
Убедитесь в том, что порт принтера настроен надлежащим образом.
1.Войдите в систему с полномочиями администратора.
2.Выберите пункты, как показано ниже.
•В операционной системе Windows 8 выберите Панель управления (Control Panel), нажав чудо-
кнопку Параметры (Settings) на рабочем столе (Desktop), а затем Оборудование и звук
(Hardware and Sound) и Устройства и принтеры (Devices and Printers).
•В ОС Windows 7 выберите пункт Устройства и принтеры (Devices and Printers) в меню Пуск
(Start).
•В ОС Windows Vista выберите меню Пуск (Start) > Панель управления (Control Panel) > Оборудование и звук (Hardware and Sound) > Принтеры (Printers).
7

•В ОС Windows XP выберите меню Пуск (Start) > Панель управления (Control Panel) >
Принтеры и другое оборудование (Printers and Other Hardware) > Принтеры и факсы
(Printers and Faxes).
3.Откройте свойства драйвера принтера для устройства.
•В операционной системе Windows 8 или Windows 7 щелкните правой кнопкой мыши значок «Canon XXX Printer» (где «XXX» соответствует имени устройства), а затем выберите Свойства принтера (Printer properties).
•В Windows Vista или Windows XP щелкните правой кнопкой мыши значок «Canon XXX Printer» (где «XXX» — это имя устройства), затем выберите Свойства (Properties).
4.Щелкните вкладку Порты (Ports) для настройки порта.
Убедитесь, что порт с именем «USBnnn» (где «n» — номер), для которого «Canon XXX Printer» появляется в столбце Принтер (Printer), установлен для параметра Выберите один или несколько портов для печати (Print to the following port(s)).
•Если установлена неправильная настройка:
Переустановите драйверы MP Drivers, используя драйверы установочного компакт-диска или с нашего веб-сайта.
•Печать не начинается, хотя устройство подключено к компьютеру с помощью USB-кабеля и выбран порт «USBnnn»:
Чтобы запустить программу My Printer, в Windows 8 на Начальном (Start) экране выберите My Printer. Если программа My Printer не отображается на Начальном (Start) экране, нажмите чудо-кнопку Поиск (Search), затем введите «My Printer».
Установите правильный порт принтера в Диагн. и исправление принтера (Diagnose and Repair Printer). Установите правильный порт принтера, следуя отображаемым на экране инструкциям, затем выберите имя устройства.
В операционной системе Windows 7, Windows Vista или Windows XP нажмите кнопку Пуск (Start)
и последовательно выберите Все программы (All programs), Canon Utilities, Canon My Printer, Canon My Printer и Диагн. и исправление принтера (Diagnose and Repair Printer).
Установите правильный порт принтера, следуя отображаемым на экране инструкциям, затем выберите имя устройства.
Если проблема не была устранена, переустановите драйверы MP Drivers, используя драйверы установочного компакт-диска или с нашего веб-сайта.
Проверка 6 Объем данных для печати слишком большой?
Щелкните Параметры печати (Print Options) на вкладке Страница (Page Setup) драйвера принтера.
Затем установите для параметра Предотвращение потери данных для печати (Prevention of Print Data Loss) в открывшемся диалоговом окне значение Вкл. (On).
* Если для параметра Предотвращение потери данных для печати (Prevention of Print Data Loss)
выбрано значение Вкл. (On), качество печати может снизиться.
Проверка 7 Если выполняется печать с компьютера, перезагрузите его.
8
Замятие бумаги
Если происходит замятие бумаги, индикатор Аварийный сигнал (Alarm) мигает оранжевым, а на экран компьютера автоматически выводится сообщение с рекомендациями по устранению неполадок. Выполните соответствующие действия, указанные в сообщении.
 Просмотр фильма
Сведения об извлечении замятой бумаги см. в разделе Список кодов поддержки (при замятии бумаги).
 Примечание.
•Действия можно сопоставлять с кодами поддержки на компьютере, найдя нужный код поддержки.
 Щелкните для поиска
9
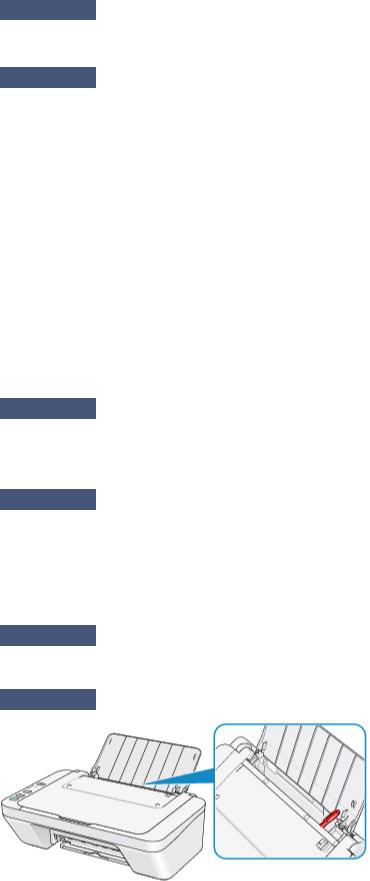
Бумага подается неправильно или появилось сообщение об отсутствии бумаги
Проверка 1 Убедитесь, что бумага загружена.
 Загрузка бумаги
Проверка 2 При загрузке бумаги в принтер выполните указанные ниже действия.
•Перед загрузкой нескольких листов выровняйте их края.
•При закладке нескольких листов убедитесь, что стопка бумаги не превышает отметку максимальной загрузки бумаги.
Однако бумага может подаваться неправильно и при этом количестве в зависимости от ее типа и условий эксплуатации аппарата (высокой температуры/влажности или низкой температуры/ влажности). В таких случаях следует уменьшить количество листов бумаги, загружаемых за один раз, таким образом, чтобы высота стопки была примерно в два раза ниже уровня предельной загрузки бумаги.
•Всегда укладывайте бумагу в книжной ориентации независимо от ориентации печати.
•Бумагу следует загружать стороной для печати вверх. Выровняйте стопку бумаги по правому краю заднего лотка и переместите направляющую бумаги так, чтобы она слегка касалась левого края стопки.
 Загрузка бумаги
Проверка 3 Проверьте, не используется ли слишком плотная или скрученная
бумага.
 Типы носителей, непригодные для использования
Проверка 4 При загрузке конвертов в принтер выполните указанные ниже
действия.
•При печати на конвертах обратитесь к разделу Загрузка бумаги и подготовьте конверты к печати.
После подготовки конвертов загружайте их в книжной ориентации. Конверты, загруженные в альбомной ориентации, будут подаваться неправильно.
Проверка 5 Убедитесь, что параметры типа носителя и размера страницы
соответствуют загруженной бумаге.
Проверка 6 Убедитесь, что в заднем лотке нет посторонних предметов.
Если бумага рвется в заднем лотке, сведения об устранении этой ошибки см. в разделе Замятие бумаги.
10
![]()
При попадании посторонних предметов в задний лоток необходимо выключить устройство, отключить от сети питания, затем удалить посторонний предмет.
Проверка 7 Очистите подающий ролик.
 Очистка подающих роликов
 Примечание.
• Очистка подающего ролика изнашивает его, поэтому делайте это только при необходимости.
11

Копирование/Печать прерывается, не завершившись
Проверка 1 Бумага загружена?
Убедитесь, что бумага загружена.
Если в устройстве закончилась бумага, загрузите ее.
Проверка 2 Выполняется печать документов с большим количеством фотографий
или изображений?
При печати большого объема данных (например, фотографий или рисунков) на их обработку устройством и компьютером требуется определенное время, и может показаться, что устройство простаивает.
Кроме того, при непрерывной печати на обычной бумаге с большим расходом чернил устройство может время от времени останавливаться. В обоих случаях следует дождаться возобновления печати.
 Примечание.
•Если выполняется печать документа с большой областью печати или распечатка большого количества копий, печать может остановиться, чтобы дать высохнуть чернилам.
Проверка 3 Устройство постоянно печатает в течение длительного времени?
Если устройство непрерывно выполняет печать в течение длительного времени, печатающая головка или другие компоненты, расположенные рядом с ней, могут перегреться. Устройство может временно остановить печать в целях защиты печатающей головки и через некоторое возобновить работу.
В этом случае подождите некоторое время, не выполняя никаких операций. Если печать не возобновляется, прервите задание печати в удобное время и выключите устройство по крайней мере на 15 минут.
 Осторожно!
•Печатающая головка и область вокруг нее внутри устройства может сильно нагреться. Не прикасайтесь к печатающей головке и расположенным рядом с ней деталям.
Проверка 4 Если копирование прерывается, не завершившись, повторите попытку.
По прошествии определенного времени после возникновения ошибок копирования устройство прекращает выполнение операции.
12

Проблемы с качеством печати
Неудовлетворительные результаты печати Чернила не подаются
13

Неудовлетворительные результаты печати
В случае неудовлетворительных результатов печати (белые линии, несовмещение линий, неравномерные цвета) в первую очередь проверьте настройки бумаги и качества печати.
Проверка 1 Соответствуют ли параметры размера страницы и типа носителя
размеру и типу загруженной бумаги?
Если эти параметры заданы неправильно, получить требуемый результат печати невозможно.
При печати фотографии или изображения неправильно установленное значение типа бумаги может привести к потере качества цветопередачи.
Кроме того, при печати с неправильно заданным типом бумаги поверхность печати может быть поцарапана.
Проверьте параметры размера страницы и типа носителя в драйвере принтера.
 Печать с применением простой настройки
Проверка 2 Убедитесь, что выбрано соответствующее качество печати с помощью
драйвера принтера.
Выберите вариант качества изображения, подходящий для печати данного изображения на данной бумаге. Если на отпечатке заметны размывание изображения или неравномерная цветопередача, задайте более высокое качество изображения и повторите печать.
Можно проверить параметры качества печати с помощью драйвера принтера.
 Изменение качества печати и коррекция графических данных
Проверка 3 Если неполадка не устранена, у нее могут быть другие причины.
См. также следующие разделы:
 Не удается напечатать задание до конца
 Печать не начинается/Нечеткая печать/Неверные цвета/Белые полосы
 Неверные цвета
 Линии не выровнены
 Линия не печатается или печатается частично
 Изображение не печатается или печатается частично
 Бумага после печати сворачивается или на ней появляются чернильные пятна
 Бумага испачкана/Отпечатанная поверхность поцарапана
 Обратная сторона бумаги испачкана
 Цвета передаются неравномерно
Если бумага после печати утрачивает цвет
При длительном хранении отпечатанных листов цвета могут потускнеть.
Дождитесь полного высыхания бумаги по завершении печати, не подвергайте бумагу воздействию высоких температур, повышенной влажности и прямых солнечных лучей, храните или используйте в помещениях при комнатной температуре и нормальной влажности
14
Рекомендуется хранить бумагу в альбоме, пластиковой папке, фоторамке и т. п., чтобы предотвратить непосредственное воздействие воздуха.
15

Не удается напечатать задание до конца
Проверка 1 Выберите настройку, не допускающую сжатия данных печати.
Если выбрать настройку, не допускающую сжатия данных печати, с используемым приложением, результат печати может улучшиться.
Щелкните Параметры печати (Print Options) на вкладке Страница (Page Setup) драйвера принтера.
Установите флажок Не разрешать прикладной программе сжатие данных печати (Do not allow application software to compress print data), затем нажмите кнопку OK.
* После завершения печати снимите флажок.
Проверка 2 Объем данных для печати слишком большой?
Щелкните Параметры печати (Print Options) на вкладке Страница (Page Setup) драйвера принтера.
Затем установите для параметра Предотвращение потери данных для печати (Prevention of Print Data Loss) в открывшемся диалоговом окне значение Вкл. (On).
* Если для параметра Предотвращение потери данных для печати (Prevention of Print Data Loss)
выбрано значение Вкл. (On), качество печати может снизиться.
Проверка 3 Достаточно ли места на жестком диске компьютера?
Удалите ненужные файлы, чтобы освободить дисковое пространство.
16

Печать не начинается/Нечеткая печать/Неверные цвета/Белые полосы
 Печать не начинается
 Нечеткая печать
 Неверные цвета
 Белые полосы
 Просмотр фильма
17

Проверка 4
Проверка 3
Проверка 1 Вы проверили параметры бумаги и качества печати?
 Неудовлетворительные результаты печати
Проверка 2 Напечатайте образец для проверки сопел и выполните необходимые меры обслуживания, такие как очистка печатающей головки.
Чтобы проверить, правильно ли выполняется подача чернил из сопел печатающей головки, напечатайте образец для проверки сопел.
В разделе Если печать стала бледной или цвета печатаются некорректно изложены процедуры печати образца для проверки сопел, очистки печатающей головки и глубокой очистки печатающей головки.
•Если образец для проверки сопел печатается неправильно:
После очистки печатающей головки напечатайте образец для проверки сопел и оцените его.
•Если проблема не устранена после двукратной очистки печатающей головки:
Выполните глубокую очистку печатающей головки.
Если после глубокой очистки печатающей головки неполадка не устранена, выключите устройство и повторите глубокую очистку печатающей головки через 24 часа.
•Если неполадка не устранена после двукратной глубокой чистки печатающей головки:
Возможно, чернила закончились. Замените картридж FINE.

 Если в картридже FINE закончились чернила, замените его.

 При использовании бумаги, у которой для печати предназначена только одна поверхность, убедитесь, что бумага загружена стороной для печати вверх.
Загружайте бумагу стороной для печати вверх.
Подробные сведения о стороне для печати см. в руководстве, входящем в комплект поставки бумаги.
Проверка 5 Правильно ли установлен картридж FINE?
Если картридж FINE не установлен надежно, чернила могут подаваться неправильно.
Сложите дополнительный лоток приема бумаги и лоток приема бумаги, откройте крышку и извлеките картриджи FINE.
Затем снова установите картриджи FINE. Нажмите на картридж FINE до щелчка.
После проверки правильности установки картриджа FINE закройте крышку.
При копировании см. также следующие разделы:
Проверка 6 Загрязнено ли стекло рабочей поверхности?
18

Очистите стекло рабочей поверхности.
 Очистка стекла рабочей поверхности и крышки сканера
Проверка 7 Убедитесь, что оригинал документа правильно загружен на стекло
рабочей поверхности.
 Загрузка оригиналов
Проверка 8 Расположен ли оригинал на стекле рабочей поверхности стороной для копирования вниз?
Проверка 9 Вы копировали отпечаток, выполненный данным устройством?
Если в качестве оригинала используется распечатка с этого устройства, качество печати может снизиться. Это зависит от состояния оригинала.
Повторите печать с компьютера, если есть такая возможность.
19

Неверные цвета
 Просмотр фильма
Проверка 1 Правильно ли напечатан образец для проверки сопел?
Чтобы проверить, правильно ли выполняется подача чернил из сопел печатающей головки, напечатайте образец для проверки сопел.
В разделе Если печать стала бледной или цвета печатаются некорректно изложены процедуры печати образца для проверки сопел, очистки печатающей головки и глубокой очистки печатающей головки.
•Если образец для проверки сопел печатается неправильно:
После очистки печатающей головки напечатайте образец для проверки сопел и оцените его.
•Если проблема не устранена после двукратной очистки печатающей головки:
Выполните глубокую очистку печатающей головки.
Если после глубокой очистки печатающей головки неполадка не устранена, выключите устройство и повторите глубокую очистку печатающей головки через 24 часа.
•Если неполадка не устранена после двукратной глубокой чистки печатающей головки:
Возможно, чернила закончились. Замените картридж FINE.
Если в картридже FINE закончились чернила, замените его.
Правильно ли установлен картридж FINE?
Если картридж FINE не установлен надежно, чернила могут подаваться неправильно.
Сложите дополнительный лоток приема бумаги и лоток приема бумаги, откройте крышку и извлеките картриджи FINE.
Затем снова установите картриджи FINE. Нажмите на картридж FINE до щелчка.
После проверки правильности установки картриджа FINE закройте крышку.
 Примечание.
•Напечатанные цвета могут отличаться от цветов на экране из-за различий в способах формирования цвета. Параметры управления цветом и условия окружающей среды также могут влиять на цвета, отображаемые на экране. Поэтому цвета результатов печати могут отличаться от цветов на экране.
20
![]()
Линии не выровнены
Проверка 1 Вы проверили параметры бумаги и качества печати?
 Неудовлетворительные результаты печати
Проверка 2 Выполните выравнивание печатающих головок.
При печати прямых линий со смещением или при неудовлетворительных результатах печати необходимо отрегулировать положение печатающей головки.
 Выравнивание печатающей головки
 Примечание.
•Если путем выравнивания печатающих головок проблему устранить не удалось, обратитесь к разделу Выравнивание печатающих головок с компьютера, чтобы выполнить выравнивание печатающих головок вручную.
Проверка 3 Задайте более высокое качество печати и повторите печать.
Результаты печати можно улучшить путем повышения качества печати в драйвере принтера.
21

Линия не печатается или печатается частично
Проверка 1 Выполняется ли печать с функцией разметки страницы или полей
переплета?
Если используются функции разметки страницы или полей переплета, тонкие линии могут не отображаться в печати. Попробуйте сделать линии в документе более толстыми.
Проверка 2 Объем данных для печати слишком большой?
Щелкните Параметры печати (Print Options) на вкладке Страница (Page Setup) драйвера принтера.
Затем установите для параметра Предотвращение потери данных для печати (Prevention of Print Data Loss) в открывшемся диалоговом окне значение Вкл. (On).
* Если для параметра Предотвращение потери данных для печати (Prevention of Print Data Loss)
выбрано значение Вкл. (On), качество печати может снизиться.
22

Изображение не печатается или печатается частично
Проверка 1 Выберите настройку, не допускающую сжатия данных печати.
Если выбрать настройку, не допускающую сжатия данных печати, с используемым приложением, результат печати может улучшиться.
Щелкните Параметры печати (Print Options) на вкладке Страница (Page Setup) драйвера принтера.
Установите флажок Не разрешать прикладной программе сжатие данных печати (Do not allow application software to compress print data), затем нажмите кнопку OK.
* После завершения печати снимите флажок.
Проверка 2 Объем данных для печати слишком большой?
Щелкните Параметры печати (Print Options) на вкладке Страница (Page Setup) драйвера принтера.
Затем установите для параметра Предотвращение потери данных для печати (Prevention of Print Data Loss) в открывшемся диалоговом окне значение Вкл. (On).
* Если для параметра Предотвращение потери данных для печати (Prevention of Print Data Loss)
выбрано значение Вкл. (On), качество печати может снизиться.
23
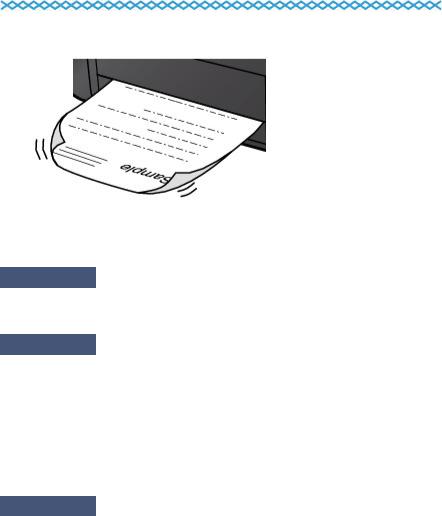
Бумага после печати сворачивается или на ней появляются чернильные пятна
 После печати на бумаге появляются чернильные пятна
 После печати бумага сворачивается
Проверка 1 Вы проверили параметры бумаги и качества печати?
 Неудовлетворительные результаты печати
Проверка 2 Если установлено высокое значение параметра интенсивности, уменьшите его и повторите попытку печати.
При печати изображения на обычной бумаге с высокой интенсивностью бумага может впитать слишком много чернил и стать волнистой, что приведет к ее истиранию.
Можно проверить интенсивность с помощью драйвера принтера.
 Настройка интенсивности
Проверка 3 Используется ли фотобумага для печати фотографий?
При печати фотографий и изображений с высокой цветонасыщенностью рекомендуется использовать бумагу Фотобумага для печати Plus Glossy II или другую специализированную бумагу производства компании Canon.
 Подходящие типы носителей
24

Бумага испачкана/Отпечатанная поверхность поцарапана
 Бумага испачкана
Углы бумаги пачкаются Отпечатанная поверхность испачкана
 Отпечатанная поверхность поцарапана
Проверка 1 Вы проверили параметры бумаги и качества печати?
 Неудовлетворительные результаты печати
Проверка 2 Подходит ли тип бумаги для печати? Проверьте следующее:
Проверьте, используется ли бумага, соответствующая типу печати.
 Подходящие типы носителей
Проверка 3 Распрямив бумагу, загрузите ее.
Рекомендуем убирать неиспользуемую бумагу в упаковку и держать ее на ровной поверхности.
•Для обычной бумаги
Поверните бумагу и уложите ее в принтер другой стороной.
Бумага, пролежавшая в заднем лотке длительное время, может изогнуться. В этом случае уложите бумагу другой стороной вверх. Это может устранить неполадку.
•Для другой бумаги
Если скручивание на углах бумаги превышает 3 мм или 0,1 дюйма (A) в высоту, бумага может пачкаться или неправильно подаваться. В таких случаях для исправления скручивания следуйте приведенным ниже инструкциям.
1.Сверните бумагу в направлении, противоположном направлению скручивания, как показано ниже.
25

2.Убедитесь, что бумага не скручена.
При печати на бумаге с ликвидированным скручиванием рекомендуется подавать по одному листу.
 Примечание.
•В зависимости от типа носителя бумага может пачкаться или неправильно подаваться, даже если она не скручивается внутрь. В таком случае перед печатью следуйте приведенным ниже инструкциям, чтобы скрутить углы бумаги наружу на 3 мм или 0,1 дюйма (B) в высоту. Это может улучшить результаты печати.
(C) Лицевая сторона
Если бумага скручивается наружу, рекомендуется печатать по одному листу.
Проверка 4 Если установлено высокое значение параметра интенсивности,
уменьшите его и повторите попытку печати.
При печати изображения на обычной бумаге с высокой интенсивностью бумага может впитать слишком много чернил и стать волнистой, что приведет к ее истиранию.
Уменьшите значение параметра интенсивности в драйвере принтера и повторите печать.
1.Откройте окно настройки драйвера принтера.
 Как открыть окно настройки драйвера принтера
2.На вкладке Главная (Main) выберите значение Вручную (Manual) для параметра Цвет/
интенсивность (Color/Intensity), а затем нажмите кнопку Задать… (Set…).
3.Перетащите регулятор Интенсивность (Intensity) на вкладке Настройка цветов (Color Adjustment) для выбора интенсивности.
Проверка 5 Выполняется ли печать вне рекомендованной области?
При печати вне рекомендованной области листа на нижнем краю бумаги могут появиться чернильные пятна.
Измените настройки размера источника в соответствующей программе.
 Область печати
Проверка 6 Загрязнено ли стекло рабочей поверхности?
Очистите стекло рабочей поверхности.
 Очистка стекла рабочей поверхности и крышки сканера
26

Проверка 7 Загрязнен ли подающий ролик?
Выполните очистку подающего ролика.
 Очистка подающих роликов
 Примечание.
• Очистка подающего ролика изнашивает его, поэтому делайте это только при необходимости.
Проверка 8 Загрязнена ли внутренняя часть устройства?
При двухсторонней печати внутренние детали устройства могут пачкаться чернилами, в свою очередь пачкая распечатки.
В этом случае почистите внутреннюю часть устройства, выполнив процедуру очистки поддона.
 Очистка внутренних компонентов устройства (очистка поддона)
 Примечание.
•Для предотвращения загрязнения внутренних компонентов устройства чернилами задайте правильный размер бумаги.
Проверка 9 Установите более длительное время высыхания отпечатанной
поверхности.
В этом случае отпечатанная поверхность успевает высохнуть, что предотвращает появление царапин на бумаге и появление на ней пятен чернил.
1.Убедитесь, что устройство включено.
2.Откройте окно настройки драйвера принтера.
 Как открыть окно настройки драйвера принтера
3.Щелкните вкладку Обслуживание (Maintenance), затем Специальные параметры (Custom Settings).
4.Ползунком Задержка на сушку (Ink Drying Wait Time) установите время ожидания, а затем нажмите кнопку OK.
5.Проверьте сообщение и щелкните OK.
27

Обратная сторона бумаги испачкана
Проверка 1 Вы проверили параметры бумаги и качества печати?
 Неудовлетворительные результаты печати
Проверка 2 Почистите внутреннюю часть устройства, очистив поддон.
 Очистка внутренних компонентов устройства (очистка поддона)
 Примечание.
•При двухсторонней печати или при больших объемах печати внутренние детали принтера могут пачкаться чернилами.
28

Цвета передаются неравномерно
 Цвета передаются неравномерно
 Цвета образуют полосы
 Просмотр фильма
Проверка 1 Вы проверили параметры бумаги и качества печати?
 Неудовлетворительные результаты печати
Проверка 2 Напечатайте образец для проверки сопел и выполните необходимые меры обслуживания, такие как очистка печатающей головки.
Чтобы проверить, правильно ли выполняется подача чернил из сопел печатающей головки, напечатайте образец для проверки сопел.
В разделе Если печать стала бледной или цвета печатаются некорректно изложены процедуры печати образца для проверки сопел, очистки печатающей головки и глубокой очистки печатающей головки.
•Если образец для проверки сопел печатается неправильно:
После очистки печатающей головки напечатайте образец для проверки сопел и оцените его.
•Если проблема не устранена после двукратной очистки печатающей головки:
Выполните глубокую очистку печатающей головки.
Если после глубокой очистки печатающей головки неполадка не устранена, выключите устройство и повторите глубокую очистку печатающей головки через 24 часа.
•Если неполадка не устранена после двукратной глубокой чистки печатающей головки:
Возможно, чернила закончились. Замените картридж FINE.
29

Проверка 3 Выполните выравнивание печатающих головок.
 Выравнивание печатающей головки
 Примечание.
•Если путем выравнивания печатающих головок проблему устранить не удалось, обратитесь к разделу Выравнивание печатающих головок с компьютера, чтобы выполнить выравнивание печатающих головок вручную.
30
![]()
Чернила не подаются
Если в картридже FINE закончились чернила, замените его.
Правильно ли установлен картридж FINE?
Если картридж FINE не установлен надежно, чернила могут подаваться неправильно.
Сложите дополнительный лоток приема бумаги и лоток приема бумаги, откройте крышку и извлеките картриджи FINE.
Затем снова установите картриджи FINE. Нажмите на картридж FINE до щелчка.
После проверки правильности установки картриджа FINE закройте крышку.
Проверка 3 Сопла печатающей головки закупорены?
Чтобы проверить, правильно ли выполняется подача чернил из сопел печатающей головки, напечатайте образец для проверки сопел.
В разделе Если печать стала бледной или цвета печатаются некорректно изложены процедуры печати образца для проверки сопел, очистки печатающей головки и глубокой очистки печатающей головки.
•Если образец для проверки сопел печатается неправильно:
После очистки печатающей головки напечатайте образец для проверки сопел и оцените его.
•Если проблема не устранена после двукратной очистки печатающей головки:
Выполните глубокую очистку печатающей головки.
Если после глубокой очистки печатающей головки неполадка не устранена, выключите устройство и повторите глубокую очистку печатающей головки через 24 часа.
•Если неполадка не устранена после двукратной глубокой чистки печатающей головки:
Возможно, чернила закончились. Замените картридж FINE.
31

Затруднения со сканированием
Затруднения со сканированием Неудовлетворительные результаты сканирования Неполадки программного обеспечения
32
Затруднения со сканированием
 Сканер не работает
 Программа ScanGear (драйвер сканера) не запускается
 Отображается сообщение об ошибке, и окно программы ScanGear (драйвера сканера) не открывается
 Не удается одновременно отсканировать несколько исходных документов
 Не удается правильно выполнить сканирование с помощью функции автоматического сканирования
 Низкая скорость сканирования
 Появляется сообщение «Недостаточно памяти.»
 Компьютер перестает работать во время сканирования
 Сканер не работает после обновления Windows
 Отсканированное изображение не открывается
33
Сканер не работает
Проверка 1. Убедитесь, что сканер или принтер включен.
Проверка 2. Подключите USB-кабель к другому USB-порту компьютера.
Проверка 3. Если USB-кабель подключен к USBконцентратору, отсоедините его от USB-концентратора и подключите к USB-порту компьютера.
Проверка 4. Перезагрузите компьютер.
34

Программа ScanGear (драйвер сканера) не запускается
Проверка 1. Убедитесь, что драйверы MP Drivers установлены.
Если драйвер сканера не установлен, установите MP Drivers с установочного компактдиска или с веб-страницы.
Проверка 2. Выберите сканер или принтер в меню приложения.
 Внимание!
 Если название сканера или принтера отображается несколько раз, выберите то из них, которое не включает WIA.
 Примечание.
 В зависимости от используемого приложения, порядок действий может быть различным.
 При сканировании из приложения, совместимого с WIA, используйте WIAдрайвер.
 Сканирование с помощью WIA-драйвера
Проверка 3. Удостоверьтесь, что приложение поддерживает
TWAIN.
Программу ScanGear (драйвер сканера) нельзя запустить из приложений, не поддерживающих TWAIN.
Проверка 4. Отсканируйте и сохраните изображения с помощью программы IJ Scan Utility, а затем откройте файлы в своем приложении.
35

Отображается сообщение об ошибке, и окно программы ScanGear (драйвера сканера) не открывается
Проверка 1. Убедитесь, что сканер или принтер включен.
Проверка 2. Выключите сканер или принтер, затем повторно подсоедините USB-кабель и шнур питания.
Проверка 3. Подключите USB-кабель к другому USB-порту компьютера.
Проверка 4. Если USB-кабель подключен к USBконцентратору, отсоедините его от USB-концентратора и подключите к USB-порту компьютера.
Проверка 5. Убедитесь, что драйверы MP Drivers установлены.
Если драйвер сканера не установлен, установите MP Drivers с установочного компактдиска или с веб-страницы.
Проверка 6. Выберите сканер или принтер в меню приложения.
 Примечание.
 В зависимости от используемого приложения, порядок действий может быть различным.
Проверка 7. Удостоверьтесь, что приложение поддерживает
TWAIN.
Программу ScanGear (драйвер сканера) нельзя запустить из приложений, не поддерживающих TWAIN.
Проверка 8. Закройте программу ScanGear, если она работает с другим приложением.
36
Не удается одновременно отсканировать несколько исходных документов
Проверка 1. Убедитесь, что исходные документы размещены правильно.
 Размещение исходных документов (при сканировании с компьютера)
Проверка 2. Проверьте, можно ли отсканировать надлежащим образом один исходный документ.
Некоторые приложения не поддерживают сканирование нескольких изображений в один прием. В таком случае отсканируйте каждое изображение отдельно.
37
Не удается правильно выполнить сканирование с помощью функции автоматического сканирования
Проверка 1. Убедитесь, что исходные документы размещены правильно.
 Размещение исходных документов (при сканировании с компьютера)
Проверка 2. Сканирование нескольких исходных документов может не поддерживаться.
Некоторые приложения не поддерживают сканирование нескольких изображений в один прием. В таком случае отсканируйте каждое изображение отдельно.
38
 Loading…
Outline
Instructions on printer functions and software are provided in this PDF manual. It is recommended to download this file if you prefer a hard copy (printed) manual.
Update History
[Ver.1.2]
— Misdescription in Number of continuous copies is corrected.
— Restriction on the print area is added.
— A note on the chronological change of ink is added.
[Ver.1.1]
— The incorrect description regarding the paper load limitation have been corrected.
— The incorrect description regarding the aligning the print head position has been corrected.
Setup instruction
Double-click the downloaded dmg. file to decompress it.
The manuals (PDF files) for each function are contained in the folder.
Disclaimer
All software, programs (including but not limited to drivers), files, documents, manuals, instructions or any other materials (collectively, “Content”) are made available on this site on an «as is» basis.
Canon Hongkong Company Limited., and its affiliate companies (“Canon”) make no guarantee of any kind with regard to the Content, expressly disclaims all warranties, expressed or implied (including, without limitation, implied warranties of merchantability, fitness for a particular purpose and non-infringement) and shall not be responsible for updating, correcting or supporting the Content.
Canon reserves all relevant title, ownership and intellectual property rights in the Content. You may download and use the Content solely for your personal, non-commercial use and at your own risks. Canon shall not be held liable for any damages whatsoever in connection with the Content, (including, without limitation, indirect, consequential, exemplary or incidental damages).
You shall not distribute, assign, license, sell, rent, broadcast, transmit, publish or transfer the Content to any other party. You shall also not (and shall not let others) reproduce, modify, reformat, disassemble, decompile or otherwise reverse engineer or create derivative works from the Content, in whole or in part.
You agree not to send or bring the Content out of the country/region where you originally obtained it to other countries/regions without any required authorization of the applicable governments and/or in violation of any laws, restrictions and regulations.
By proceeding to downloading the Content, you agree to be bound by the above as well as all laws and regulations applicable to your download and use of the Content.
Canon Driver Downloads is for the support of Canon Products SOLD IN AUSTRALIA AND NEW ZEALAND ONLY. It includes drivers and demonstration software for Canon brand printers, scanners, cameras and other Canon products.
DISCLAIMER: CANON AUSTRALIA PTY LTD MAKES NO GUARANTEES OF ANY KIND WITH REGARD TO ANY PROGRAMS, FILES, DRIVERS OR ANY OTHER MATERIALS CONTAINED ON OR DOWNLOADED FROM THIS, OR ANY OTHER, CANON SOFTWARE SITE. ALL SUCH PROGRAMS, FILES, DRIVERS AND OTHER MATERIALS ARE SUPPLIED «AS IS.» CANON DISCLAIMS ALL WARRANTIES, EXPRESS OR IMPLIED, INCLUDING, WITHOUT LIMITATION, IMPLIED WARRANTIES OF MERCHANTABILITY, FITNESS FOR A PARTICULAR PURPOSE AND NON-INFRINGEMENT. CANON AUSTRALIA PTY LTD SHALL NOT BE HELD LIABLE FOR ERRORS CONTAINED HEREIN, OR FOR LOST PROFITS, LOST OPPORTUNITIES, CONSEQUENTIAL OR INCIDENTAL DAMAGES INCURRED AS A RESULT OF ACTING ON INFORMATION, OR THE OPERATION OF ANY SOFTWARE, INCLUDED IN THIS SOFTWARE SITE.
Export: Some of the software is subject to export controls under the U.S. Export Administration Regulations (EAR), and anyone receiving the software cannot export the software without a license or other authorisation of the U.S. Canon will not be liable for any loss of whatsoever nature incurred as a result of this prohibition.
Applicable software includes;
— Software using OS created by US companies
— Driver software (printer driver, fax driver),
— Utility software (Network ScanGear),
— Application software (imageWARE products),
— Support tool (SST, NAVI, etc)
— Firmware of the device (main body)
and any further software that may from time to time be added to this list.