
- Manuals
- Brands
- Blackstar Manuals
- Amplifier
- ID:CORE STEREO 10 V3
- Owner’s manual
-
Contents
-
Table of Contents
-
Bookmarks
Quick Links
ID:CORE STEREO 10 V3, ID:CORE STEREO 20 V3,
ID:CORE STEREO 40 V3
Owner’s Manual
Designed and Engineered by
Blackstar Ampli cation UK
Related Manuals for Blackstar ID:CORE STEREO 10 V3
Summary of Contents for Blackstar ID:CORE STEREO 10 V3
-
Page 1
ID:CORE STEREO 10 V3, ID:CORE STEREO 20 V3, ID:CORE STEREO 40 V3 Owner’s Manual Designed and Engineered by Blackstar Ampli cation UK… -
Page 2
IMPORTANT SAFETY INSTRUCTIONS 1. Read these instructions. 2. Keep these instructions. 3. Heed all warnings. 4. Follow all instructions. 5. Do not use this apparatus near water. 6. Clean only with dry cloth. 7. Do not block any ventilation openings. 8. -
Page 3
Before switching the unit on, it is recommended that the unit be allowed to reach room temperature. According to OSHA, any exposure in excess of the above permissible limits could Unauthorised modification of this equipment is expressly forbidden by Blackstar result in some hearing loss. Amplification Ltd. -
Page 4
Blackstar product. and processed audio to a computer for recording purposes. If you like what you hear and want to find out more about the Blackstar range of Blackstar’s ARCHITECT software also includes its new CAB RIG LITE platform, products please visit our website at www.blackstaramps.com. -
Page 5
Factory Reset Front Panel The default factory patches and settings can be restored to your amplifier at any 1. Input time. Simply hold down the MOD, DLY and REV switches simultaneously, whilst Plug your guitar in here. switching on the amplifier. Always use a good quality screened guitar lead. -
Page 6
13. USB Plug a USB cable in here to connect the amplifier to a Windows PC or Mac. This setting is saved when you store a patch. Blackstar’s ARCHITECT software offers a host of features and can be downloaded from: https://architect.blackstaramps.com See the USB Audio section on page 15 for more information. -
Page 7
Default Mode Toggles between 2 patches, Toggles all saved patch effects While in Manual Mode any of the controls can still be modified by the Blackstar selectable via ARCHITECT on/off ARCHITECT software but this means that the sound will not represent the positions… -
Page 8
When in Patch Mode turn the Voice control to choose the desired Voice patch. Always use a good quality screened lead. Patches can also be recalled via the Blackstar ARCHITECT software or a connected Turning the Volume knob will control the Emulated Output level. -
Page 9
Channel 3: Reamping input – Send a pre-recorded unprocessed guitar signal to your amplifier for Reamping, when in Reamping mode. When the amplifier is connected (via USB) to a version of the Blackstar ARCHITECT software containing newer firmware, a message will be displayed prompting you to Channel 4: Unused install the latest files. -
Page 10
Technical Specification ID:CORE STEREO 10 V3 Power: 2 x 5 Watts (Stereo 10 Watts) Weight (kg): 3.7 Dimensions (mm): 340(W) x 265(H) x 185(D) ID:CORE STEREO 20 V3 Power: 2 x 10 Watts (Stereo 20 Watts) Weight (kg): 5.2 Dimensions (mm): 375(W) x 292(H) x 185(D) -
Page 11
Im Inneren von Verstärkern kann sich Kondensfeuchtigkeit bilden, wenn der Verstärker aus einer kalten in eine wärmere Umgebung gebracht wird. Warten Sie vor dem Einschalten, bis das Gerät Raumtemperatur erreicht hat. Unautorisierte Modifikationen am Gerät sind von Blackstar Amplification Ltd. aus- drücklich untersagt. 1½… -
Page 12
Der Voice-Regler bietet sechs unterschiedliche Einstellungen – Clean Warm, Clean Live-Betrieb auf Herz und Nieren getestet, um sicherzustellen, dass sie in puncto Bright, Crunch, Super Crunch, OD 1 und OD 2. In Verbindung mit dem für Blackstar Zuverlässigkeit, Qualität und SOUND absolut kompromisslose Ergebnisse liefern. -
Page 13
Factory Reset Vorderseite Die Werks-Patches und -Einstellungen können im Verstärker zu jeder Zeit wieder- 1. Input hergestellt werden. Halten Sie die Tasten MOD, DLY und REV gleichzeitig gedrückt, Hier schließen Sie Ihre Gitarre an. während Sie den Verstärker einschalten. Verwenden Sie in jedem Fall hochwertige geschirmte Gitarrenkabel. -
Page 14
6. MOD (Modulation) In der Effekt-Tabelle weiter unten sind alle einstellbaren Parameter aufgelistet: Diese Einstellung wird beim Sichern eines Patches gespeichert. Mit diesem Schalter (de-)aktivieren Sie den Modulationseffekt oder wählen ihn zur Editierung aus. Diese Einstellung wird beim Sichern eines Patches gespeichert. 11. -
Page 15
15. Fußschalter (nur ID:CORE STEREO 20 und ID:CORE STEREO 40) Hier schließen Sie ein USB-Kabel an, um den Verstärker mit einem Schließen Sie einen (optional erhältlichen) Blackstar FS-11 Fußschalter an, um Ihren Windows PC oder einem Mac zu verbinden. Die ARCHITECT-Software… -
Page 16
Wenn Sie beispielsweise zu einem anderen Patch wechseln, entsprechen über den Voice-Regler aus. die Regler-Einstellungen auf der Frontseite mit Sicherheit nicht den Einstellungen, Zudem können die Patches über die Blackstar ARCHITECT Software oder einen die Sie hören. angeschlossenen Fußschalter (nur ID:CORE V3 STEREO 20 & ID:CORE STEREO Um unerwünschte Pegelsprünge beim Einstellen der Parameter zu verhindern,… -
Page 17
Reamping ANMERKUNG: Schließen Sie den Verstärker immer über einen Haupt-USB-Port Über die ARCHITECT-Software von Blackstar kann der Verstärker in den Reamping- des Computers an (meist auf der Rückseite zu finden). Modus versetzt werden. Hierbei handelt es sich um eine nicht-programmierbare Einstellung, die deaktiviert wird, wenn wahlweise das USB-Kabel entfernt oder der Der Verstärker erscheint innerhalb der Aufnahme-Software auf dem Computer… -
Page 18
Software, um mit der Firmware-Aktualisierung zu beginnen. ID:CORE Stereo 40 V3 Der Verstärker muss mit der Blackstar ARCHITECT Software verbunden sein, um eine Leistung: 2 x 20 Watt (40 Watt stereo) gültige Firmware zu installieren. Die Aktualisierung wird automatisch ausgeführt, wenn die Blackstar ARCHITECT Software erkennt, dass sich der Verstärker im Update-… -
Page 19
à la température ambiante. 1½ Toute modification non autorisée de cet équipement est expressément interdite par Blackstar Amplification Ltd. ½ ¼ ou moins Ne faites jamais entrer d’objets quels qu’ils soient dans les ouvertures de ventilation du boîtier de l’équipement. -
Page 20
Tous les produits Blackstar sont soumis à des tests complets en laboratoire et en La commande Voice offre six réglages : Clean Warm, Clean Bright, Crunch, Super conditions réelles pour s’affranchir véritablement de tout compromis en termes de Crunch, OD 1, OD 2. -
Page 21
Réinitialisation d’usine Face Avant Les patches et réglages d’usine par défaut peuvent à tout moment être restaurés 1. Input dans votre amplificateur. Il vous suffit de maintenir simultanément pressés les Branchez ici votre guitare. boutons MOD, DLY et REV pendant que vous allumez l’amplificateur. Utilisez toujours un cordon blindé… -
Page 22
6. MOD (Modulation) 10. Niveau d’effet (Level) Pressez ce commutateur afin de mettre l’effet de modulation en/hors service ou de Modifie un paramètre d’effet. Pour les effets de modulation et de retard (delay), tourner la le choisir pour l’éditer. Ce réglage est sauvegardé quand vous mémorisez un patch. commande Level en maintenant enfoncé… -
Page 23
Branchez ici un câble USB pour relier l’amplificateur à un PC sous Windows ou Presser n’importe quel commutateur de la face avant vous fera quitter le mode à un Mac. Le logiciel ARCHITECT de Blackstar peut être téléchargé depuis cette accordeur. -
Page 24
En option, votre ID:CORE V3 peut également être alimenté par la PowerBank PB-1 commandes « Gain » de canal de votre amplificateur pour régler le niveau envoyé de Blackstar (non fournie). Selon l’utilisation, la PB-1 fournit à votre ID:CORE V3 une à votre téléphone. -
Page 25
LED Voice s’allumant successivement pour indiquer le mode de aux utilisateurs chevronnés qui souhaitent tirer le maximum de leur amplificateur. Ces Mise à Jour. L’amplificateur doit être connecté au logiciel ARCHITECT de Blackstar fonctionnalités n’ont pas de commandes propres en face avant de l’amplificateur, pour réinstaller un firmware valable. -
Page 26
Spécifications Techniques ID:CORE STEREO 10 V3 Puissance: 2 x 5 Watts (Stereo 10 Watts) Poids (kg): 3.7 Dimensions (mm): 340(W) x 265(H) x 185(D) ID:CORE STEREO 20 V3 Puissance: 2 x 10 Watts (Stereo 20 Watts) Weight (kg): 5.2 Dimensions (mm): 375(W) x 292(H) x 185(D) Pédalier (non fourni): pédalier de commande FS-11 ou FS-18… -
Page 27
INSTRUCCIONES IMPORTANTES DE SEGURIDAD 1. Lea estas instrucciones. 2. Guarde estas instrucciones. 3. Preste atención a todas las advertencias. 4. Siga todas las instrucciones. 5. No utilice este aparato cerca del agua. 6. Solo limpiar con un trapo seco. 7. No bloquee ninguna salida de ventilación. 8. -
Page 28
Cualquier exposición por encima de los límites mencionados puede provocar para que este alcance la temperatura media del nuevo lugar. pérdidas auditivas. Las modificaciones no autorizadas están expresamente prohibidas por Blackstar Los tapones protectores deben ser utilizados cuando se opere este amplificador Amplification LTD. -
Page 29
última generación que reproduce el sonido y Si le gusta lo que oye y quiere saber más sobre la gama de productos Blackstar, la sensación de las cabinas de los altavoces de las guitarras con un detalle increíble. -
Page 30
Factory Reset Panel frontal Los patches y ajustes de fábrica por defecto pueden restablecerse en su amplificador en cualquier momento. Simplemente mantenga pulsados los interruptores MOD, 1. Input DLY y REV simultáneamente, mientras enciende el amplificador. Conecte su guitarra aquí. Use siempre un cable de guitarra apantallado de buena calidad. -
Page 31
Una vez configurado, el LED de Tap parpadeará a tiempo con la tasa establecida del efecto ‘enfocado’ en ese momento. Mientras se está en Modo Manual cualquiera de los controles puede ser modificado por el software Blackstar Architect, pero esto significa que el sonido no representará… -
Page 32
15. Pedal controlador (solo ID:CORE V3 STEREO 20, 40) adaptador oficial fabricado por Apple para garantizar la compatibilidad). Conecte un pedal controlador FS-11 ó FS-18 de Blackstar (no suministrado) para controlar su ID:CORE V3 en uno de los siguientes modos: 3. -
Page 33
Al almacenar un patch se sobrescribirá cualquier patch anterior en esa ubicación. de grabación / DAW elegido. Los patches también se pueden guardar a través del software Architect de Blackstar. CONSEJO: Para grabar un verdadero sonido con efecto estéreo Super Wide, que se recrea fielmente al reproducir las pistas grabadas en cualquier altavoz estéreo,… -
Page 34
El amplificador puede cambiarse a modo de Reamping a través del software del amplificador no responderán. Los LEDs de Voice del panel frontal harán un ciclo Blackstar Architect. Este es un ajuste no almacenable y se apagará cuando se para indicar la actividad de los datos durante el proceso de actualización. -
Page 35
Especificaciones Técnicas ID:CORE STEREO 10 V3 Alimentación: 2 x 5 Vatios (estéreo 10 Vatios) Peso (kg): 3.7 Dimensiones (mm): 340 (A) x 265 (A) x 185 (P) ID:CORE STEREO 20 V3 Alimentación: 2 x 10 Vatios (estéreo 20 Vatios) Peso (kg): 5.2 Dimensiones (mm): 375 (A) x 292 (A) x 185 (P) Pedal controlador (no suministrado): Pedal controlador FS-11 ó… -
Page 37
な研究開発が形になったものです。 イギリスのノーザンプトンを拠点とするBlackstarチ プのように直感的なコントロール類を備えつつ、 プログラムもできる多様性を備えていま ームのメンバーは、 全員が経験豊富なミュージシャンであり、 その開発プロセスの最大の す。 独自のコントロールにより、 ギタリストは独自のサウンドをカスタムデザインできるよ 目標は、 ギタリストに自己表現のための究極のツールとなる製品を提供することです。 うになっています。 すべてのBlackstar製品は、 信頼性、 品質、 そして何よりもサウンドの面でまったく妥協が VOICEコントロールには、 Clean Warm、 Clean Bright、 Crunch、 Super ないことを確認するために、 実験室だけではなく現場でもテストを行っています。 Crunch、 OD 1、 OD 2という6種類の異なる設定が用意されています。 さらに、 Blackstarの特許取得済みのISFコントロールと併用すると、 思い通りのトーン ID:CORE V3は、 独自のイノベーション、 直感的で従来のコントロールセット、 および を得ることができます。… -
Page 38
工場出荷時設定へのリセット フロントパネル デフォルトの工場出荷時のパッチや設定は、 いつでも復元できます。 復元したい場合に 1.INPUT は、 ID:COREV3アンプのスイッチを入れながら、 MOD、 DLY、 REVスイッチを同時に長 押しします。 ギターを接続します。 高品質のシールドケーブルをお使いになることをお勧めします。 すると、 VOICE LEDが点灯して、 工場出荷時設定へのリセットが始まり、 すべて のLEDが消えたらリセットが完了します。 リセットが完了する前に、 長押ししていた 2.VOICE MOD、 DLY、 およびREVスイッチのいずれかを放した場合、 リセット操作はキャンセルさ れ、 ID:COREV3アンプはリセットされていない状態になります。 VOICEコントロールは、 プリアンプのサウンドをクリーンからオーバードライブまで調整 できます。 ID:COREV3アンプの電源をオフにしてリセットのプロセスを完了します。 再び 電源を入 れると、 ID:COREV3アンプは工場出荷時のデフォルト設定に復元されます。 ■ Clean Warm –プレート リバー ブ 、 そし てダ イ ナミ ッ ク さを備えたク ラ シ ッ ク ク リー ン 。 重要な注意点: ■… -
Page 39
12.POWER (電源) スイッチ ーを変更することができます。 後述するエフェクトテーブルに、 変更可能なパラメーター を示しています。 このスイッチは、 アンプのオンとオフを切り替えます。 白いドット側でオンです。 13. USB ここでの設定は、 パッチを保存するときにも適合されます。 この端子にUSBケーブルを接続して、 ID:COREV3アンプをWindows PCまたはMac 10.LEVEL (エフェクトレベル) に接続します。 BlackstarのArchitectソフトウェアは、 Cab Rig Liteを含む多くの機 能が装備されています。 CabRigLiteは、 www.blackstarinsider.co.ukからダウンロー エフェクトパラメーターを変更します。 モジュレーションエフェクトとディレイエフェクト ドできます。 の場合、 TAPボタン (11) を押しながらレベルコントロールを回すと、 エフェクトのレート/ タイムが変更されます。 詳細については、 15ページの 「USBオーディオ」 セクションを参照してください。 以下のエフェクトテーブルは、 変更可能なパラメーターを示しています。… -
Page 40
16.Line In / Streaming このスイッチは、 パッチモード (LED消灯) とマニュアルモード (LED点灯) を切り替えま 別売りのステレオ3.5mmAUXケーブルを接続して、ID:Core経由でスマホ、MP3プ す。 アンプがマニュアルモードの場合、 サウンドはノブの現在の物理的な位置を反映しま レーヤー、タブレット、またはラップトップからオーディオを再生できます。再生プ す。 これは、 VOICE、 GAIN、 VOLUME、 およびISFノブに適用されます。 アクティブになっ レーヤーの音量をギターの音量に合わせて調整すれば、一緒に演奏できます。 ているエフェクトは、 マニュアルモードに切り替えたときにすべてオフになります。 3.5mm TRRS(4極)ジャックケーブルを使用すると、ID:Core V3をモバイルデ マニュアルモードでも、 Blackstar Architectソフトウェアによってどのコントロールも バイスで再生、ライブストリーミング、練習、録音するためのインターフェイスに 変更できますが、 これは、 サウンドがフロントパネルのノブの位置を表していないことに注 できます。デバイスからヘッドフォンなどにオーディオのみを送信できる標準のオ 意してください。 ーディオ3.5mm TRSジャックケーブルとは異なり、ID:Core V3のTRRSジャック ケーブルでは、オーディオの送受信を同時に行うことができます。これにより、デ ■パッチモード バイスからオーディオを再生し、ID:CoreV3からデバイスにオーディオを送信でき… -
Page 41
パッチは、BlackstarのArchitectソフトウェアを介して保存することもできます。 の高度なアルゴリズムは、ヘッドフォン、録音デバイス、ライブストリーム、PAシ ステム、ミキサーなどに接続して自然なトーンを作り出すことができます。 注意:ID:CORE V3の各パッチは、そのパッチに割り当てられたVOICE設定を使 用する必要があります。つまり、クリーンウォームパッチはクリーンウォームの VOICEを使用します。 スーパーワイドステレオエフェクトを最大限に活用するには、「ステレオ3.5mm ジャックの2つのモノラルジャック」スプリッターケーブルを使用して、録音デバ イスまたはミキサーの2つのチャンネルに接続します。高品質のケーブルを使用す パッチの呼び出し るようにしましょう。VOLUMEつまみを回すとレベルがコントロールできます。 パッチモードにして、VOICEコントロールを回して目的のボイスパッチを選択します。 注意:ケーブルをCab Sim&Phonesジャックに接続すると、アンプのスピーカー はミュートされます。 パッチは、Blackstar Architectソフトウェアまたは接続されたフットコントロー ラー(ID:CORE V3 STEREO 20、40のみ)を使って呼び出すこともできます。 18.リコールインジケーター 注意:パッチを呼び出すには、MANUALの LEDをオフにしてパッチモードにす る必要があります。マニュアルモードのとき、 MANUAL のLEDが点灯している リコールインジケーターは、アンプ内のパラメーターの現在値と選択したパッチと の相違を表示します。たとえば、別のパッチに切り替えたとき、フロントパネルの VOICEコントロールを回すと、指定されたVOICEのみが選択されます。 コントロールは、そのパッチの状態を反映していません。 USBオーディオ 調整しようとしているコントロールが、予期しないレベル変動が起こるのを防ぐた めに、フロントパネルのノブは、そのノブが現在のパラメーター値に達するまでサ アンプをWindows PCまたはMacに接続するには、標準のオーディオドライバ を使用します。特定のドライバーは必要ありません。 ローレイテンシーのUSB ウンドに影響を与えない仕組みになっています。現在のパラメーター値に達する… -
Page 42
る、スーパーワイドステレオ効果のあるサウンドを録音するには、ステレオエミュ レートされた左チャンネルをミックスの100%左にパンし、右チャンネルを100% エフェクトレベルのセクション(10ページを参照)で説明したように、モジュレ 右にパンします。 ーションエフェクトとディレイエフェクトのスピード/タイムは、フロントパネル のエフェクトレベルコントロール(10)を回しながらタップスイッチ(11)を押 ID:CORE V3アンプは、コンピューターからオーディオ入力を受信することもでき し続けることでコントロールできます。 これは、本来のタップスイッチを使用し ます。 て行うよりも、特定のエフェクトテンポを設定するのに非常に便利です。 チャンネル1:ライン入力、左チャンネル–オーディオモニタリングまたはMP3 /バ ファームウェアの更新 ッキングトラックの再生に使用されます。 内蔵スピーカーの左側から再生します。 ファームウェアの更新は、Blackstar Architectソフトウェア経由で行えます。 チャンネル2:ライン入力、右チャンネル–オーディオモニタリングまたはMP3 /バ Blackstar Architectソフトウェアの新しいバージョンは、アップデートが利用可 ッキングトラックの再生に使用されます。 内蔵スピーカーの右側から再生します。 能になるたびにリリースされます。 チャンネル3:リアンプ入力–リアンプモードの場合、リアンプのために、録音済みの 重要な注意:ファームウェアを更新するときは、必ずアンプをメインUSBポート( 未処理のギター信号をアンプに送信します。 通常はコンピューターの背面にあります)に接続してください。 前面に取り付け られたUSBポート、USBハブ、またはUSB延長ケーブルは絶対に使用しないでく チャンネル4:未使用です。 ださい。 これを行うと、更新が失敗しアンプが応答しなくなる可能性があります。 リアンプ I D : C O R E V 3 ア… -
Page 43
仕様 ID:CORE STEREO 10 V3 出力:2 x 5ワット(ステレオ10ワット) 重量(kg):3.7 寸法(mm):340(W)x 265(H)x 185(D) ID:CORE STEREO 20 V3 出力:2 x 10ワット(ステレオ20ワット) 重量(kg):5.2 寸法(mm):375(W)x 292(H)x 185(D) フットコントローラー(オプション):FS-11またはFS-18フットコントローラー ID:CORE STEREO 40 V3 出力:2 x 20(ステレオ40ワット) 重量(kg):6.2 寸法(mm):434(W)x 336(H)x 185(D) フットコントローラー(オプション):FS-11またはFS-18フットコントローラー… -
Page 44
Duration Per Day In Hours Sound Level dBA, Slow Response 1½ ½ ¼ or less Blackstar All electrical and electronic products should be disposed of separately from the municipal waste stream via designated collection facilities appointed by the government or the local authorities. -
Page 45
介绍 特征 感谢您购买此Blackstar ID:CORE V3放大器。与我们的所有产品一样,该放大器 自2007年以来,Blackstar一直引领着吉他放大技术的创新。 ID:CORE V3代表了 是我们世界一流的设计团队经过无数小时艰苦研发的结果。 Blackstar团队总部位 技术研发的高峰。这些放大器具有像传统放大器一样的直观控制集,但具有可编 于英国北安普敦,他们本身都是经验丰富的音乐家,开发过程的唯一目的是为吉 程性。独特的控件使您(吉他手)可以自定义设计自己的声音。 他手提供产品,这些产品是自我表达的最终工具。 音色控制具有六种不同的设置-清音温暖,清音明亮,Crunch,超级Crunch,OD 所有Blackstar产品都经过广泛的实验室和路演测试,以确保它们在可靠性,质量 1,OD2。与Blackstar的专利ISF控件一起使用时,您可以获得想要的确切音色。 以及最重要的TONE方面真正做到不妥协。 效果部分可同时提供录音室质量的超宽立体声调制,延迟和混响效果,您可以将 ID:CORE V3代表了一项真正的突破性成就,它结合了独特的创新,直观的传统 它们与音色一起存储。 控制集以及可编程性的多功能性。 ID:Core是世界上最畅销的数字放大器之一, 使用我们的Architect软件,深度编辑和存储预设很简单。预设可以通过在线社区 为紧凑,功能强大,通用的放大器树立了标准。 共享,上传和下载。通过连接USB电缆,您可以同时将直接和处理后的音频发送 请仔细阅读本手册,以确保您从Blackstar新产品中获得最大收益。 到计算机以进行记录。 如果您喜欢听到的声音并想了解有关Blackstar系列产品的更多信息,请访问我们 Blackstar的ARCHITECT软件还包括Cab Rig Lite,这是我们的下一代高级扬声器模 的网站www.blackstaramps.com。 拟器,可以令人难以置信的细节再现吉他扬声器箱体的声音和感觉。 LINE IN / STREAMING输入可让您将ID:CORE V3连接至音乐设备或鼓机以进行演… -
Page 46
恢复出厂设置 前面板 可以随时将默认的工厂音色预设和设置恢复到您的放大器。 只需同时按住 1.输入 MOD,DLY和REV开关,同时打开放大器即可。 在这里插入吉他。 始终使用高质量的屏蔽吉他连线。 音色LED将倒计时以指示即将恢复出厂设置。 如果在关闭音色LED之前释放了 2.音色 MOD,DLY和REV开关中的任何一个,则操作将被取消,并且放大器将保持不受 音色控制可更改前置放大器的声音,范围从超清音到极度过载音色。 影响。 • 清音 温暖 –带有板混响的经典清音,富有动态 最后,关闭放大器电源以完成该过程。 接通电源后,您的放大器将恢复为出厂默 认设置。 • 清音 明亮-“使用弹簧混响的精品清音”,加大输入时会产生过载音色 重要的提示: • Crunch–具有中等增益过载的经典Crunch声音 此过程将覆盖所有用户保存的音色和设置。 • 超级Crunch –一种现代过载增益,比Crunch更多冲击力 • OD 1 –热推的主音量过载,非常适合那些平滑的独奏 • OD 2 –紧凑的金属节奏音色,带有中等增益的过载音色 存储音色时,将保存此设置。 3.增益… -
Page 47
尺寸 混响电平 板式 尺寸 混响电平 存储音色时,将保存此设置。 12.电源开关 10.效果电平 该开关用于打开和关闭放大器。 白点标记ON位置。 这修改了效果参数。对于调制和延迟效果,在按住“ Tap”按钮(11)的同时转 动“电平”控件可修改效果的速率/时间。 13. USB 在此处插入USB 电缆将放大器连接到Windows PC或Mac。 Blackstar的 下表的效果表显示了可修改的参数。 Architect软件提供了许多功能,包括Cab Lite,可以从以下网站下载: https://www.blackstaramps.com/uk 存储音色时,将保存此设置。 有关更多信息,请参见第15页的USB音频部分。 11. Tap 注意:放大器将作为录制软件中的音频捕获设备出现在个人计算机上。 点击开关用于设置当前“聚焦”效果的速率/时间。每次按下点击按钮之间的时间 定义了速率设置。 14.手动模式 设置后,Tap LED将以当前“聚焦”效果的设置速率及时闪烁。 按此开关可在预置音色和手动模式之间切换。 当放大器处于手动模式时,声音将 反映旋钮的当前物理位置。 这适用于音色,增益,音量和ISF旋钮。 切换到手动 下表列出了可修改的参数: 模式时激活的所有效果都将关闭。… -
Page 48
6. 直接从您的ID:Core V3录制高质量的视频,音频备忘录和实时流(直接指向 Instagram Live,Facebook,YouTube,Twitch等)。 超级Crunch 琴弦4 (G) OD 1 琴弦5 (B) 17.箱体模拟和电话 Cab Rig Lite是我们的下一代DSP扬声器音箱模拟器,可以以令人难以置信的细节 15.脚踏控制器(仅适用于ID:CORE V3 STEREO 20, 40) 重现麦克风拾取的吉他箱体的声音和感觉。 Cab Rig Lite的高级算法为连接耳机, 录音设备,直播,PA系统或调音台提供了自然的音色。 连接Blackstar FS-11或FS-18踏板控制器(未提供)以下列方式之一控制ID:CORE V3: 要充分利用超宽立体声效果,请使用“立体声3.5毫米插孔至两个单声道插孔”分配 FS-11/FS-18 脚踏开关 1 脚踏开关 2 器导线馈入录音设备或混音器的两个通道。 始终使用高质量的屏蔽线。 默认模式 在2个预置音色之间切换,可通过 切换所有已保存的预置音色效 Architect选择 果的开/关… -
Page 49
存储预置音色将覆盖该位置上的所有以前的预置音色。 通道1:左声道的线路输入–用于音频监听或MP3 /背景音乐播放。 通过左内置扬 声器播放。 预置音色也可以通过Blackstar的Architect软件进行存储。 通道2:右声道的线路输入-用于音频监听或MP3 /背景音乐播放。 通过右内置扬 注意:ID:CORE V3上的每个音色必须使用分配给该音色的音色设置,即Clean 声器播放。 Warm音色使用Clean Warm音色。 召回预置音色 通道3:Reamping输入–在Reamping模式下,将预先录制的未处理吉他信号发送 到放大器进行Reamping。 在音色模式下,转动音色控件以选择所需的音色预置。 通道4:未使用。 也可以通过Blackstar Architect软件或连接的脚踏控制器(仅用于ID:CORE V3 STEREO 20、40)调用预置音色。 Reamping 注意:要调出预置音色,“手动” LED必须熄灭以指示预置音色模式。在手动LED点 可以通过Blackstar Architect软件将放大器切换到Reamping模式。 这是不可存储 亮(在手动模式下)时打开音色控制将仅选择指示的音色。 的设置,将在拔下USB电缆或关闭放大器电源时将其关闭。 USB音频 激活后,Reamping模式允许放大器通过USB接收预先录制的干吉他信号,并返回 经过完全处理的音频信号。 然后可以使用连接的PC或Mac上的录制软件捕获此返 标准音频驱动程序用于将放大器连接到PC或Mac。不需要特定的驱动程序。有关 回信号。 低延迟USB记录的指南,请访问:www.blackstaramps.com/usbrecording 高级功能… -
Page 50
技术指标 固件升级 固件更新通过Blackstar Architect软件启动。 只要有可用的更新,就会发布新版本 的Blackstar Architect软件。 ID:CORE STEREO 10 V3 功率:2 x 5瓦(立体声10瓦) 重要说明:更新固件时,始终将放大器连接到主USB端口(通常在PC或Mac背面的 USB端口)。切勿使用前置USB端口,USB集线器或USB延长电缆。这样做可能会导 重量(kg):3.7 致更新失败,从而可能导致放大器无响应。 尺寸(毫米):340(宽)x 265(高)x 185(深) 当放大器(通过USB)连接到包含较新固件的Blackstar Architect软件版本时,将 显示一条消息,提示您安装最新文件。在更新时,放大器控件将无响应。前面板 音色LED会循环闪烁,以指示更新过程中的数据活动。 ID:CORE STEREO 20 V3 固件更新期间,请勿关闭放大器电源。如果在更新期间关闭了放大器,则在重新 功率:2 x 10瓦(立体声20瓦) 接通电源后控件可能无响应,并且放大器将不会发出声音。音色LED指示灯将循 重量(kg):5.2 环闪烁,表示放大器不包含有效的固件。 尺寸(毫米):375(宽)x 292(高)x 185(深) 如果您在固件更新过程中遇到问题,可以强制放大器在更新模式下开机。同时按… -
Page 51
ID:CORE STEREO 10 V3 Front Panel… -
Page 52
ID:CORE STEREO 20 V3 Front Panel… -
Page 53
ID:CORE STEREO 40 V3 Front Panel… -
Page 54
For the latest information go to: www.blackstaramps.com Whilst the information contained herein is correct at the time of publication, due to our policy of constant improvement and development, Blackstar Amplification Ltd reserves the right to alter specifications without prior notice.

ID:CORE STEREO 10, ID:CORE STEREO 20, ID:CORE STEREO 40
Owner’s Manual
Designed and Engineered by
Blackstar Amplification UK

IMPORTANT SAFETY INSTRUCTIONS
1. Read these instructions.
2. Keep these instructions.
3. Heed all warnings.
4. Follow all instructions.
5. Do not use this apparatus near water.
6. Clean only with dry cloth.
7. Do not block any ventilation openings.
8. Install in accordance with the manufacturer’s instructions.
9. Do not install near any heat sources such as radiators, heat registers, stoves, or
other apparatus (including ampliers) that produce heat.
10. Do not defeat the safety purpose of the polarized or grounding-type plug. A
polarized plug has two blades with one wider than the other. A grounding type
plug has two blades and a third grounding prong. The wide blade or the third
prong are provided for your safety. If the provided plug does not t into your
outlet, consult an electrician for replacement of the obsolete outlet.
11. Protect the power cord from being walked on or pinched particularly at plugs,
convenience receptacles, and the point where they exit from the apparatus.
12. Only use attachments/accessories specied by the manufacturer.
13. Unplug this apparatus during lightning storms or when unused for long periods
of time.
14. Refer all servicing to qualied service personnel. Servicing is required when the
apparatus has been damaged in any way, such as power-supply cord or plug is
damaged, liquid has been spilled or objects have fallen into the apparatus, the
apparatus has been exposed to rain or moisture, does not operate normally, or
has been dropped.
“TO COMPLETELY DISCONNECT THIS APPARATUS FROM THE AC MAINS,
DISCONNECT THE POWER-SUPPLY CORD PLUG FROM THE AC RECEPTACLE”.
“WARNING: TO REDUCE THE RISK OF FIRE OR ELECTRIC SHOCK, DO NOT
EXPOSE THIS APPARATUS TO RAIN OR MOISTURE. THE APPARATUS SHALL
NOT BE EXPOSED TO DRIPPING OR SPLASHING AND THAT OBJECTS FILLED
WITH LIQUIDS, SUCH AS VASES, SHALL NOT BE PLACED ON APPARATUS».
USA / Canada
This symbol is intended to alert the user to the presence of important
operation and maintenance (servicing) instructions in the literature
accompanying the appliance.
This symbol is intended to alert the user to the presence of
uninsulated “dangerous voltage” within the product’s enclosure that
may be of sucient magnitude to constitute a risk of electric shock
to persons.
3
English
Warning!
Important safety information!
READ THE FOLLOWING INFORMATION CAREFULLY. SAVE ALL
INSTRUCTIONS FOR FUTURE REFERENCE!
Follow all warnings and instructions marked on the product!
Do not open the equipment case. There are no user serviceable parts in this
equipment. Refer all servicing to qualied service personnel.
Clean only with a dry cloth.
Condensation can form on the inside of an amplier if it is moved from a cold
environment to a warmer location. Before switching the unit on, it is recommended
that the unit be allowed to reach room temperature.
Unauthorised modication of this equipment is expressly forbidden by Blackstar
Amplication Ltd.
Do not expose this apparatus to rain, liquids or moisture of any type.
Do not place this product on an unstable trolley, stand or table. The product may
fall, causing serious damage to the product or to persons!
This unit must only be used in a well ventilated area and never switched on when it
is within a poorly ventilated space, such as a bookcase.
This product should not be placed near a source of heat such as a stove, radiator,
or another heat producing amplier.
Use only the supplied power cord which is compatible with the mains voltage supply
in your area.
Power supply cords should always be handled carefully and should be replaced if
damaged in any way.
Never break o the earth (ground) pin on the power supply cord.
The power supply cord should be unplugged when the unit is to be unused for long
periods of time.
An apparatus with Class I construction should be connected to a mains socket
outlet with a protective earthing connection.
The mains plug of the power supply cord should remain readily accessible.
Before the unit is switched on, the loudspeaker should be connected as described
in the handbook using the lead recommended by the manufacturer.
Always replace damaged fuses with the correct rating and type.
Never disconnect the protective mains earth connection.
High loudspeaker levels can cause permanent hearing damage. You should
therefore avoid the direct vicinity of loudspeakers operating at high levels. Wear
hearing protection if continuously exposed to high levels.
If the product does not operate normally when the operating instructions are
followed, then refer the product to a qualied service engineer.
The U.S. Government’s Occupational Safety and Health Administration (OSHA) has
specied the following permissible noise level exposures:
Duration Per Day In Hours Sound Level dBA, Slow Response
8 90
6 92
4 95
3 97
2 100
1½ 102
1 105
½ 110
¼ or less 115
According to OSHA, any exposure in excess of the above permissible limits could
result in some hearing loss.
Ear plug protectors in the ear canals or over the ears must be worn when operating
this amplication system in order to prevent a permanent hearing loss if exposure is
in excess of the limits as set forth above. To ensure against potentially dangerous
exposure to high sound pressure levels, it is recommended that all persons
exposed to equipment capable of producing high sound pressure levels such as
this amplication system be protected by hearing protectors while this unit is in
operation.
English
All electrical and electronic products should be disposed of separately
from the municipal waste stream via designated collection facilities
appointed by the government or the local authorities.
4
5
English
Introduction
Thank you for purchasing this Blackstar ID:Core amplifier. Like all our products, this
amp is the result of countless hours of painstaking Research and Development by
our world-class design team. Based in Northampton (UK), the Blackstar team are
all experienced musicians themselves and the sole aim of the development process
is to provide guitarists with products which are the ultimate tools for self-expression.
All Blackstar products are subjected to extensive laboratory and road testing to
ensure that they are truly uncompromising in terms of reliability, quality and above
all TONE.
ID:Core represents a truly ground-breaking achievement, combining unique
innovations, an intuitive, traditional control set and the versatility of programmability.
Please read through this handbook carefully to ensure you get the maximum benefit
from your new Blackstar product.
If you like what you hear and want to find out more about the Blackstar range of
products please visit our website at www.blackstaramps.com.
Thanks!
The Blackstar Team
Features
In the seven years since its launch, Blackstar has led the way in the innovation of
guitar amplification. ID:Core represents the culmination of more than seven years
technical Research and Development. These amps have an intuitive control set like
a traditional amp, but have the versatility of programmability. The unique controls
allow you, the guitarist, to custom design your own sound.
The Voice control has six different settings – Clean Warm, Clean Bright, Crunch,
Super Crunch, OD 1, OD 2. When used together with Blackstar’s patented ISF
control you can get the exact tone you’re thinking of.
The effects section delivers studio quality Super Wide Stereo modulation, delay and
reverb effects simultaneously that you can store with your sound.
Deep editing and storing of patches is simple using the Blackstar INSIDER software.
Patches can be shared, uploaded and downloaded via the online community. The
USB connector also allows you to record from your amp directly to your computer.
An emulated output and MP3/line input complete the package.
By using the unique Voice control and the patented ISF, ID:Core Series amplifiers
allow unparalleled flexibility and ease of use, enabling you to design the sound in
your head and deliver it at home, in the studio or in rehearsal.
English
6
7
English
Factory Reset
The default factory patches and settings can be restored to your amplier at any
time. Simply hold down the MOD, DLY and REV switches simultaneously, whilst
switching on the amplier.
The voice LED will count down to indicate that a factory reset is imminent. If any of
the MOD, DLY and REV switches are released before the Voice LEDs have switched
o, then the operation is cancelled and the amplier will remain unaected.
IMPORTANT NOTE:
This process will overwrite any user saved patches and settings.
Front Panel
1. Input
Plug your guitar in here.
Always use a good quality screened guitar lead.
2. Voice
The Voice control changes the preamp voicing, ranging from ultra clean to extremely
overdriven.
Clean Warm – Classic clean, dynamic
Clean Bright – ‘Boutique’, will break up when pushed hard
Crunch – Classic medium gain overdrive
Super Crunch – More gain and punch than Crunch
OD 1 – Hot-rodded Master Volume overdrive
OD 2 – Mid boosted overdrive
This setting is saved when you store a patch.
3. Gain
The Gain control adjusts the amount of overdrive or distortion. Low settings (counter
clockwise) will deliver a clean sound on the edge of break-up. As the Gain control is
turned clockwise the sound will become more overdriven, moving through beautiful
crunch tones until, at its maximum position, a full distorted tone is achieved. This
setting is saved when you store a patch.
4. Volume
This controls the preamp volume. High levels of volume will introduce the effect of
valve power amp distortion and compression. This is a global setting and not saved
when storing a patch.
English
8
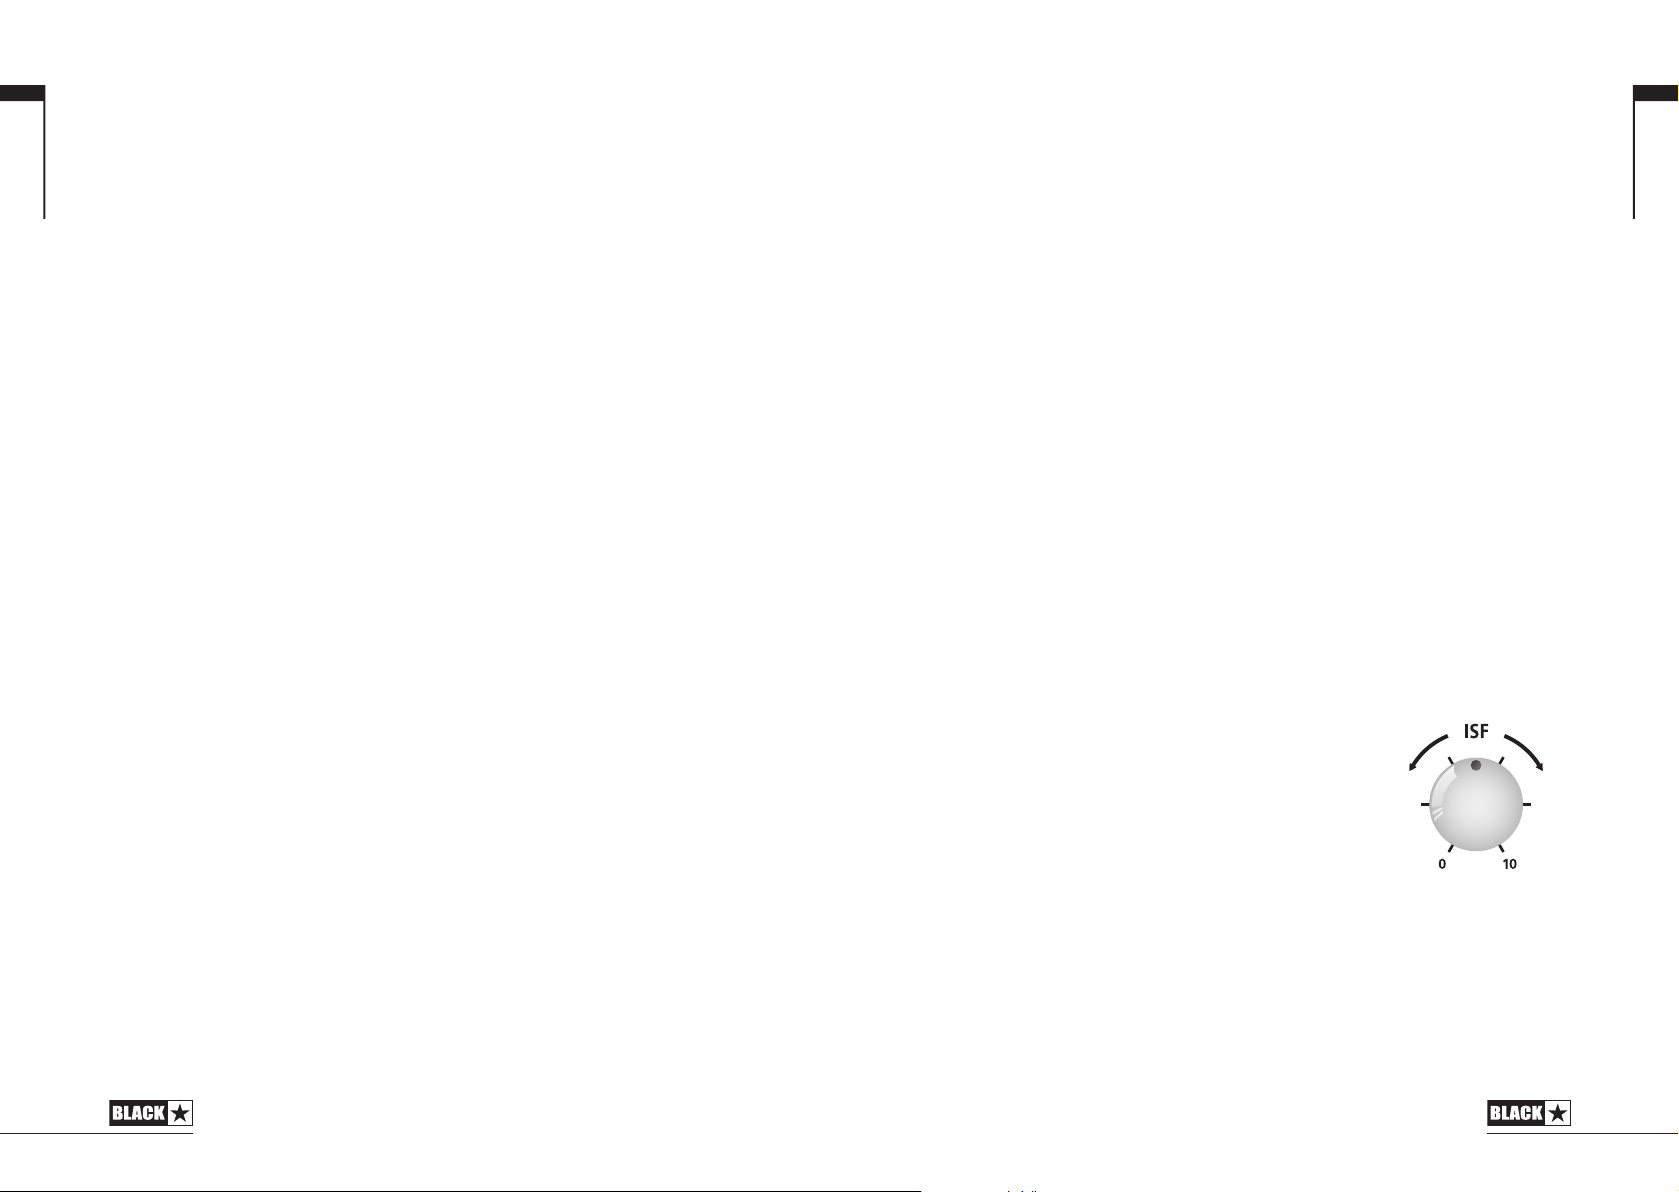
5. ISF
The patented ISF control allows you to choose the
exact tonal signature you prefer. Fully counter clockwise
has a more American characteristic with a tight bottomend and more aggressive middle, and fully clockwise
has a British characteristic which is more ‘woody’ and
less aggressive. This leads to a very familiar, musical
response. This setting is saved when you store a patch.
6. MOD (Modulation)
Press this switch to turn the stereo modulation effect on, off, or focus the effect for
editing. This setting is saved when you store a patch.
7. DLY (Delay)
Press this switch to turn the stereo delay effect on, off, or focus the effect for editing.
This setting is saved when you store a patch.
US
9
English
8. REV (Reverb)
Press this switch to turn the stereo reverb effect on, off, or focus the effect for
editing. This setting is saved when you store a patch.
For all three effect switches/buttons, the LED shows what state the effect is in:
LED Eect State Description
LED not on Eect o Eect not active
LED red Eect on but not ‘focused’ for editing Eect is active, but not aected by the front
LED green Eect on and ‘focused’ for editing Eect active and aected by the front panel
panel eect controls
eect controls
Repeatedly pressing each effect switches on the front panel has the following effect:
Current Eect State Next Eect State
Eect o Turns the eect on and ‘focuses’ the eect. Any previously focused eect
Eect on but not ‘focused’ Focuses the eect. Any previously focused eect reverts to an ‘on’ state
Eect on and ‘focused’ Turns the eect o. If any other eect(s) are on, the previously ‘focused’ eect
reverts to an ‘on’ state
resumes being ‘focused’
NOTE: Only one effect may be ‘focused’ at any time.
9. Effect Type
This changes the effect type and edits a parameter of the currently ‘focused’ effect
(modulation, delay, or reverb).
Each segment represents a different effect (four for each type of effect). An
LED shows which effect type is currently active. The distance travelled through
the ‘segment’ modifies an effect parameter. The Effects Table below shows the
modifiable parameters.
This setting is saved when you store a patch.
11. Tap
The Tap switch is used to set the rate/time of the current ‘focused’ effect. The time
between each press of the tap button defines the rate set.
Once set, the Tap LED will flash in time with the set rate of the currently ‘focused’
effect.
The Effects Table below shows the modifiable parameters:
Effects Table
Eect Segment Parameter Level Parameter Tap Parameter
MODULATION
Phaser Mix Depth Speed
Flanger Feedback Depth Speed
Chorus Mix Depth Speed
Tremolo Frequency modulation depth Amplitude modulation depth Speed
DELAY
Linear Feedback Delay level Time
Analogue Feedback Delay level Time
Tape Feedback Delay level Time
Multi Feedback Delay level Time
REVERB
Room Size Reverb level —
Hall Size Reverb level —
Spring Size Reverb level —
Plate Size Reverb level —
This setting is saved when you store a patch.
English
10. Effect Level
This modifies an effect parameter. For modulation and delay effects, turning the Level
control while holding down the Tap button (11) modifies the rate/time of the effect.
The Effects Table below shows the modifiable parameters.
This setting is saved when you store a patch.
12. Power Switch
This switch is used to turn the amplifier on and off; the white dot marks the ON
position.
13. USB
Plug a USB cable in here to connect the amplifier to a Windows PC or Mac.
Blackstar’s INSIDER software offers a host of features and can be downloaded
from: www.blackstarinsider.co.uk
See the USB Audio section on page 15 for more information.
NOTE: The amplifier will appear on a personal computer as an audio capture device
within recording software.
10
11
English
14. Manual
Press this switch to toggle between Patch and Manual Mode. When the amplifier
is in Manual Mode, the sound will reflect the current physical position of the knobs.
This is applicable to the Voice, Gain, Volume and ISF knobs. Any effects that are
active when switching to Manual Mode will be turned off.
While in Manual Mode any of the controls can still be modified by the Blackstar
INSIDER software but this means that the sound will not represent the positions of
the knobs on the front panel
15. Footcontroller (ID:CORE STEREO 20 and ID:CORE STEREO 40 only)
Connect a Blackstar FS-11 footcontroller (not supplied) to control your ID:Core in
one of the following modes:
FS-11 Switch 1 Switch 2
Default Mode Toggles between 2 patches,
Alternative Mode Patch down Patch up
selectable via INSIDER
Toggles all saved patch eects
on/o
English
Patch Mode
Patch mode is indicated by the Manual LED (14) being unlit. See Programmability
section on page 14 for more information.
Tuner Mode
Holding the Tap (11) and Manual (14) switches together for one second will engage
the tuner. The Recall Indicator LED (18) will flash continuously to indicate the
amplifier is in Tuner Mode. The amplifier output will be muted whilst in Tuner Mode.
The Voice LEDs will indicate the closest note to the note being played.
Clean Warm String 1 (E)
Clean Bright String 2 (A)
Crunch String 3 (D)
Super Crunch String 4 (G)
OD 1 String 5 (B)
The MOD, DLY and REV LEDs act as indicators to show how close the played note
is to the tuned note.
MOD LED red Note is sharp (above pitch)
DLY LED green Note is in tune
REV LED red Note is at (below pitch)
All other LEDs on the front panel will be off in Tuner Mode.
Pressing any button will exit Tuner Mode.
In Alternative Mode (selected via INSIDER) patches will cycle on a ʻloopʼ.
e.g switching up from OD2 will move to Clean Warm.
When in Manual Mode, the effect of any footcontroller switch will depend on its last
state. Pressing Switch 1 will return the amplifier to Patch Mode. Pressing Switch 2
will toggle the effects off and on without returning to Patch Mode.
16. MP3/Line In
Connect the output of your MP3 or CD player here. Adjust the player’s volume to
match that of your guitar to enable you to play along.
17. Emulated/Headphone Out
This output emulates the tonal characteristics of a guitar speaker cabinet and
provides a natural tone for connection to headphones, a recording device, PA
system or mixing desk.
To make full use of the Super Wide Stereo effects, use a ‘stereo 3.5mm jack to
two mono jacks’ splitter lead to feed two channels of the recording device or mixer.
Always use a good quality screened lead.
Turning the Volume knob will control the Emulated Output level.
NOTE: The
Amplifer
speakers will mute when a cable is connected to the Output.
18. Recall Indicator
12
13

English
The Recall Indicator shows if there is a mismatch between the current value of a
parameter within the amplifier and the corresponding physical front panel control.
For example, when you change to a different patch the controls on the front panel
may not always reflect the setting you are hearing.
To prevent unexpected level jumps in the control you are adjusting, the front panel
knobs will have no effect on the sound until the knob reaches the current parameter
value. Once reached the Recall Indicator flashes twice and the knob ‘takes control’
of the value and can increase or decrease the value.
The recall indicator will flash each time the physical knob ‘passes through’ the
currently active value that you are hearing.
Recall is active for Gain and ISF.
When the Tuner is active the Recall Indicator will flash continuously.
Rear Panel
1. DC Input
The supplied detachable DC power supply is connected here. Always ensure the
Power Switch (12) is in the OFF position before connecting the power supply. The
lead should only be connected to a power outlet that is compatible with the voltage,
power and frequency requirements stated on the power supply. If in doubt seek
advice from a qualified technician.
Programmability
Storing Patches
Your ID:Core amplifier stores 6 patches (1 patch per Voice setting).
To store the current sound as a patch press and hold the Manual switch for two
seconds. The currently selected Voice LED will flash to indicate the patch has been
stored.
Storing a patch will overwrite any previous patch in that location.
Patches can also be stored via Blackstar’s INSIDER software.
NOTE: Each patch on your ID:Core must use the Voice setting assigned to that
patch i.e. the Clean Warm patch uses the Clean Warm voice.
Recalling Patches
When in Patch Mode turn the Voice control to choose the desired Voice patch.
Patches can also be recalled via the Blackstar INSIDER software or a connected
footcontroller (ID:CORE STEREO 20 & ID:CORE STEREO 40 only).
NOTE:To recall a patch, the Manual LED must be off to indicate Patch Mode.
Turning the Voice control while the Manual LED is on (in Manual Mode) will only
select the indicated voice.
Standard audio drivers are used to connect the amplifier to a PC or Mac. No specific
drivers are required. For a guide on low-latency USB recording visit:
www.blackstaramps.com/usbrecording
NOTE: Always connect the amplifier via a main USB port, often found on the rear
of the computer.
The amplifier will appear as an audio capture device within recording software.
The output of the audio over USB can be changed via the Blackstar INSIDER
software, and can be one of the following:
Speaker emulated stereo effected audio channels
2 x mono audio channels
— Left – effected amplifier signal
— Right – unprocessed guitar signal
Reamping Mode
Reamping
The amplifier can be switched into Reamping Mode via the Blackstar INSIDER
software. This is a non-storable setting and will be switched off either when the
USB cable is removed, or when the amplifier power is switched off.
When activated, Reamping Mode allows the amplifier to accept a pre-recorded, dry
guitar signal via USB and return a fully processed audio signal. This return signal can
then be captured using recording software on the connected PC or Mac.
Firmware Update
Firmware updates are initiated via the Blackstar INSIDER software. A new version
of the Blackstar INSIDER software will be released whenever an update is available.
When the amplifier is connected (via USB) to a version of the Blackstar INSIDER
software containing newer firmware, a message will be displayed prompting you
to install the latest files. Whilst updating, the amplifier controls will be unresponsive.
Front panel voice LEDs will cycle to indicate data activity during the update process.
The amplifier power should not be switched off during a firmware update. If the
amplifier is switched off during an update, the controls may be unresponsive after
the power is reapplied and the amplifier will produce no sound. The voice LEDs will
cycle to indicate that the amplifier contains no valid firmware.
If you are experiencing problems with the firmware update process the amplifier
can be forced to power up in Update Mode. Hold down the Manual (14) & MOD (6)
switches simultaneously, whilst switching on the amplifer to enter this mode with the
voice LEDs cycling to indicate Update Mode. Connect the amplifier to the Blackstar
INSIDER software to begin a firmware updae.
The amplifier must be connected to the Blackstar INSIDER software to reinstall
valid firmware. The update process will start automatically if the Blackstar INSIDER
software detects that the amplifier is in this state.
English
Technical Specification
USB Audio
14
15
English
ID:CORE STEREO 10
Power: 2 x 5 Watts (Stereo 10 Watts)
Weight (kg): 3.7
Dimensions (mm): 340(W) x 265(H) x 185(D)
ID:CORE STEREO 20
Power: 2 x 10 Watts (Stereo 20 Watts)
Weight (kg): 5.2
Dimensions (mm): 375(W) x 292(H) x 185(D)
Footcontroller (not supplied): FS-11 footcontroller
ID:CORE STEREO 40
Power: 2 x 20 (Stereo 40 Watts)
Weight (kg): 6.2
Dimensions (mm): 434(W) x 336(H) x 185(D)
Footcontroller (not supplied): FS-11 footcontroller
Français
Cet appareil doit être utilisé dans un environnement bien ventilé et ne doit jamais être
mis sous tension si l’endroit est conné.
16
17
Français
La loi américaine sur la santé et la sécurité du travail indique la durée d’exposition
autorisée à différents niveaux sonores:
8 90
6 92
4 95
3 97
2 100
1½ 102
1 105
½ 110
¼ or less 115
Introduction
Merci d’avoir acheté cet amplificateur Blackstar ID:Core. Comme tous nos
produits, cet amplificateur est le résultat d’innombrables heures de recherche et
développement minutieux par notre équipe de conception de classe mondiale.
Français
Basée à Northampton (Royaume-Uni), l’équipe Blackstar est composée de
musiciens chevronnés et l’unique objectif du processus de développement est de
fournir aux guitaristes les outils ultimes pour s’exprimer.
Tous les produits Blackstar sont soumis à des tests intensifs en laboratoire et en
conditions réelles pour s’affranchir véritablement de tout compromis en termes de
fiabilité, de qualité et avant tout de SON.
L’ID:Series est véritablement révolutionnaire, combinant des innovations uniques, un
jeu de commandes intuitives et traditionnelles, et la souplesse de programmation.
Veuillez lire attentivement la totalité de ce mode d’emploi pour tirer le bénéfice
maximal de votre nouveau produit Blackstar.
Si vous aimez ce que vous entendez et voulez en découvrir plus sur la gamme de
produits Blackstar, veuillez visiter notre site web à l’adresse www.blackstaramps.
com.
Merci !
L’équipe Blackstar
Tous les produits électriques et électroniques doivent être jetés
séparément, dans le ux de déchets municipaux, dans les lieux de
collecte désignés par le gouvernement ou les autorités locales.
1918
Français
Caractéristiques
Dans les cinq ans qui ont suivi son lancement, Blackstar a montré la voie de
l’innovation dans l’amplification de guitare. L’ID:Core représente le point culminant
de plus sept ans de recherche et développement techniques. Ces amplis ont le jeu
de commandes intuitif d’un ampli traditionnel, mais offrent une grande souplesse de
programmation. Les commandes uniques vous permettent à vous, le guitariste, de
concevoir votre propre son, de le mémoriser et d’être sûr de la façon dont l’ampli
se comportera en live.
La commande Voice a six réglages différents – Clean Warm, Clean Bright, Crunch,
Super Crunch, OD 1, OD 2. Quand on les utilise avec la commande ISF brevetée de
Blackstar, vous pouvez obtenir exactement le son auquel vous pensiez.
La section d’effets offre simultanément des effets de qualité studio comme la
modulation Stereo Ultra Large, le delay et la reverb, que vous pouvez mémoriser.
L’édition en profondeur et la mémorisation des patches est simple grâce au logiciel
Insider de Blackstar. Les patches peuvent être partagés, mis à disposition et
téléchargés grâce à la communauté en ligne. Le connecteur USB vous permet
aussi d’enregistrer directement de votre ampli vers votre ordinateur.
La Sortie simulateur de HP et l’entrée MP3/ligne complètent l’ensemble.
Avec l’exceptionnelle commande Voice et l’ISF brevetée, les amplificateurs ID:Core
offrent une flexibilité et une simplicité sans égales, vous permettant de concevoir
véritablement le son que vous avez en tête et de le ressortir à la maison, en studio
ou en répétition.
Réinitialisation d’usine
Les patches et réglages d’origine par défaut peuvent être à tout moment
restaurés dans votre amplicateur. Maintenez simplement pressés simultanément
les boutons MOD, DLY et REV, pendant que vous allumez l’amplicateur. Les
LED de la commande ‘Voice’ servant à choisir la tonalité de l’ampli s’allumeront
successivement en rouge pour indiquer l’imminence de la réinitialisation d’usine. Ce
processus prend un total de 2 secondes. Si n’importe lequel des boutons MOD, DLY
ou REV est relâché avant que la LED Bank n’ait passé en revue toutes ces couleurs,
alors l’opération est annulée et l’amplicateur ne subit aucune modication.
NOTE IMPORTANTE:
Ce processus écrasera tout contenu créé par l’utilisateur.
Français
2120
Blackstar ID:CORE Stereo 100 and 150

ВАЖНЫЕ ИНСТРУКЦИИ ПО БЕЗОПАСНОСТИ
- Прочтите эти инструкции.
- Сохраните эти инструкции.
- Обратите внимание на все предупреждения.
- Следуйте всем инструкциям.
- Не используйте это устройство около воды.
- Чистите только сухой тканью.
- Не закрывайте вентиляционные отверстия.
- Устанавливайте в соответствии с инструкциями производителя.
- Не устанавливайте рядом с какими-либо источниками тепла, такими как радиаторы, обогреватели, печи или другие устройства (включая ampлифтеры), выделяющие тепло.
- Не пренебрегайте защитными свойствами вилки поляризованного или заземляющего типа. Поляризованная вилка имеет два контакта, один из которых шире другого. Вилка заземляющего типа имеет два контакта и третий контакт заземления. Широкий контакт или третий контакт предназначены для вашей безопасности. Если вилка из комплекта поставки не подходит к вашей розетке, обратитесь к электрику для замены устаревшей розетки.
- Не наступайте на шнур питания и не защемляйте его, особенно в области вилок, электрических розеток и в местах выхода из устройства.
- Используйте только приспособления / аксессуары, указанные производителем.
- Отключайте устройство от сети во время грозы или когда не используете его в течение длительного времени.
- Поручите все обслуживание квалифицированному обслуживающему персоналу. Обслуживание требуется, если устройство было повреждено каким-либо образом, например, поврежден шнур питания или вилка, пролита жидкость или внутрь устройства упали предметы, устройство подверглось воздействию дождя или влаги, не работает нормально, или был отброшен.
“TO COMPLETELY DISCONNECT THIS APPARATUS FROM THE AC MAINS, DISCONNECT THE POWER SUPPLY CORD PLUG FROM THE AC RECEPTACLE.”
«ВНИМАНИЕ: ВО ИЗБЕЖАНИЕ ПОЖАРА ИЛИ ПОРАЖЕНИЯ ЭЛЕКТРИЧЕСКИМ ТОКОМ НЕ ПОДВЕРГАЙТЕ ЭТО УСТРОЙСТВО ВОЗДЕЙСТВИЮ ДОЖДЯ ИЛИ ВЛАГИ. НА АППАРАТ НЕ ДОЛЖНЫ БЫТЬ ПОДВЕРЖЕНЫ КАПЛЯМ ИЛИ БРЫЗГАМ, И ЧТО ПРЕДМЕТЫ, НАПОЛНЕННЫЕ ЖИДКОСТЬЮ, НАПРИМЕР ВАЗЫ, НЕ ДОЛЖНЫ СТАВИТЬСЯ НА АППАРАТЕ».
 Этот символ предназначен для предупреждения пользователя о наличии важных инструкций по эксплуатации и техническому обслуживанию (ремонту) в документации, прилагаемой к прибору.
 Этот символ предназначен для предупреждения пользователя о наличии неизолированного «опасного объема».tage” within the product’s enclosure that may be of sufficient magnitude to constitute a risk of electric shock to persons.
|
ВНИМАНИЕ! |
|
|
Риск поражения электрическим током |
Внимание!
Важная информация по технике безопасности!
ВНИМАТЕЛЬНО ПРОЧИТАЙТЕ СЛЕДУЮЩУЮ ИНФОРМАЦИЮ. СОХРАНИТЕ ВСЕ ИНСТРУКЦИИ ДЛЯ БУДУЩЕГО ИСПОЛЬЗОВАНИЯ!
Соблюдайте все предупреждения и инструкции, указанные на изделии! Опасность! Высокий внутренний операционный объемtagх годов.
Не открывайте корпус оборудования. В этом оборудовании нет деталей, обслуживаемых пользователем. Поручите все обслуживание квалифицированному обслуживающему персоналу.
Очищайте только сухой тканью.
Конденсат может образовываться внутри ampлегче, если его переместить из холодного помещения в более теплое. Перед включением агрегата рекомендуется дать ему нагреться до комнатной температуры.
Несанкционированная модификация этого оборудования категорически запрещена Blackstar. AmpООО «Лификейшн»
Никогда не вставляйте какие-либо предметы в вентиляционные отверстия на корпусе оборудования.
Не подвергайте устройство воздействию дождя, жидкостей или влаги любого типа.
Не ставьте сосуды, наполненные жидкостью, на верхнюю ampпожизненнее.
Не ставьте этот продукт на неустойчивую тележку, подставку или стол. Изделие может упасть и нанести серьезный ущерб изделию или людям!
Не закрывайте и не блокируйте вентиляционные щели или отверстия.
Этот продукт не следует размещать рядом с источниками тепла, такими как плита, радиатор или другой источник тепла. ampпожизненнее.
Используйте только прилагаемый шнур питания, совместимый с сетевым напряжением.tagЭлектропитание в вашем районе.
Со шнурами питания всегда следует обращаться осторожно, и их следует заменять в случае каких-либо повреждений.
Никогда не отсоединяйте контакт заземления на шнуре питания.
Шнур питания должен быть отключен, если устройство не будет использоваться в течение длительного периода времени.
Перед включением устройства громкоговоритель должен быть подключен, как описано в руководстве, с помощью кабеля, рекомендованного производителем.
Всегда заменяйте поврежденные предохранители на предохранители правильного номинала и типа.
Никогда не отключайте защитное заземление.
Высокий уровень громкости громкоговорителей может привести к необратимому повреждению слуха. Поэтому следует избегать непосредственной близости громкоговорителей, работающих на высокой громкости. При длительном воздействии высоких уровней используйте средства защиты органов слуха.
Если при соблюдении инструкций по эксплуатации изделие не работает нормально, обратитесь к квалифицированному инженеру по обслуживанию.
Управление по охране труда и здоровья (OSHA) правительства США определило следующие допустимые уровни шума:
| Продолжительность в день в часах | Уровень звука дБА, медленный отклик |
|
8 |
90 |
| 6 |
92 |
|
4 |
95 |
| 3 |
97 |
|
2 |
100 |
| 1½ |
102 |
|
1 |
105 |
| ½ |
110 |
|
¼ или меньше |
115 |
Согласно OSHA, любое воздействие, превышающее указанные выше допустимые пределы, может привести к некоторой потере слуха.
При работе с этим наушником необходимо надевать протекторы ушных вкладышей в ушные каналы или поверх ушей. ampсистема лификации, чтобы предотвратить необратимую потерю слуха, если воздействие превышает пределы, указанные выше. Во избежание потенциально опасного воздействия высоких уровней звукового давления рекомендуется, чтобы все лица, работающие с оборудованием, способным производить такие высокие уровни звукового давления, как это ampВо время работы данного устройства система лификации должна быть защищена средствами защиты слуха.
 Все электрические и электронные изделия следует утилизировать отдельно от бытовых отходов через специальные пункты сбора, назначенные правительством или местными властями.
Введение
Thank you for purchasing this Blackstar ID: Core ampпожизненнее. Как и все наши продукты, эта amp is the result of countless hours of painstaking Research and Development by our world class design team. Based in Northampton (Великобритания), команда Blackstar — все сами опытные музыканты, и единственная цель процесса разработки — предоставить гитаристам продукты, которые являются идеальным инструментом для самовыражения.
Все продукты Blackstar проходят обширные лабораторные и дорожные испытания, чтобы гарантировать, что они действительно бескомпромиссны с точки зрения надежности, качества и, прежде всего, ТОНА.
ID: Core represents a truly ground breaking achievement, combining unique innovations, an intuitive, traditional control set and the versatility of programmability.
Внимательно прочтите это руководство, чтобы получить максимальную пользу от своего нового продукта Blackstar.
Если вам нравится то, что вы слышите, и вы хотите узнать больше об ассортименте продукции Blackstar, посетите наш webсайт www.блэкстарamps.com.
Благодаря!
Команда Blackstar
Особенности
Since 2007, Blackstar has led the way in the innovation of guitar amplification. ID: Core represents the culmination of years of technical Research and Development. These amps have an intuitive control set like a traditional amp, but have the versatility of programmability. Designed to be compact and lightweight with high power, the unique controls allow you, the guitarist, to custom design your own sound.
The Voice control has six different settings – Clean Warm, Clean Bright, Crunch, Super Crunch, OD 1, and OD 2, all of which have been enhanced from the original ID: Core voices for an articulate live sound. When used together with Blackstar’s patented ISF control you can get the exact tone you’re thinking of.
The effects section delivers studio quality Super Wide Stereo modulation, delay and reverb effects simultaneously that you can store with your sound.
Deep editing and storing of patches is simple using the Blackstar ARCHITECT software. Patches can be shared, uploaded and downloaded via the online community. The USB connector also allows you to record from your amp прямо на ваш компьютер.
The new built in looper provides both live performance and personal home practice options for players of all skill levels. Whether playing live as a solo artist or as the lone guitarist in a power duo (or trio), the simple and intuitive looper helps you to achieve a stage filling, multiple track sound at the press of a footswitch (included), with unlimited overdubs.
An emulated output, MP3/line input and effects loop complete the package.
By using the unique Voice control and the patented ISF, ID: Core amplifiers allow unparalleled flexibility and ease of use, enabling you to design the sound in your head and deliver it at home, in the studio and live.
Сброс всех настроек
The default factory patches and settings can be restored to your amplifier at any time. Simply hold down the MOD, DLY and REV switches simultaneously, whilst switching on the ampпожизненнее.
The Voice LEDs will count down to indicate that a factory reset is imminent. If any of the MOD, DLY and REV switches are released before the Voice LEDs have switched off, then the operation is cancelled and the amplifier will remain unaffected.
Наконец, переключите amplifier power off to complete the process. When powered on, your amplifier will be restored to the factory default settings.
ВАЖНАЯ ЗАМЕТКА:
This process will overwrite any user saved patches and settings.
Передняя панель
вход
Подключите сюда свою гитару.
Always use a good quality screened guitar lead.
Режимы
The enhanced Voice control changes the preamp voicing, ranging from ultra clean to extremely overdriven.
- Clean Warm — классический чистый, динамичный
- Clean Bright — «Бутик», распадется при сильном нажатии.
- Crunch — классический овердрайв со средним усилением
- Super Crunch – больше усиления и мощности, чем Crunch
- OD 1 – Hot rodded Master Volume overdrive
- OD 2 – Mid boosted overdrive
Эта настройка сохраняется при сохранении патча.
Gain
The Gain control adjusts the amount of overdrive or distortion. Low settings (counter clockwise) will deliver a clean sound on the edge of break up. As the Gain control is turned clockwise the sound will become more overdriven, moving through beautiful crunch tones until, at its maximum position, a full distorted tone is achieved. This setting is saved when you store a patch.
Объём
Это контролирует предварительныйamp volume. High levels of volume will introduce the effect of valve power amp distortion and compression. This setting is saved when you store a patch.
Бас
The bass control adjusts the amount of low end frequencies in your tone. This amp has an advanced tone shaping circuit which allows the tone to be tight and cutting (counter clockwise) to warm and thumping (clockwise). This setting is saved when you store a patch.
средняя
The middle control adjusts the amount of middle frequencies in your tone. The middle frequencies are particularly important in setting the amount of ‘body’ your tone has. With the middle control set to its minimum position (fully counter clockwise) the sound will be aggressive and scooped, a tone ideal for aggressive rhythm playing. As the middle control is increased (clockwise) the amount of ‘body’ is increased, which is more suitable for sustained lead guitar tones. This setting is saved when you store a patch.
Утроить
The treble control allows exact adjustment of the treble frequencies within the sound. At low settings (counter clockwise) the sound will be warm and dark in character. As the treble control is increased (clockwise) the sound will become brighter. At the maximum settings the sound will be aggressive and cutting. This setting is saved when you store a patch.
ISF
The patented ISF control allows you to choose the exact tonal signature you prefer. Fully counter clockwise has a more American characteristic with a tight bottom end and more aggressive middle, and fully clockwise has a British characteristic which is more ‘woody’ and less aggressive. This leads to a very familiar, musical response. This setting is saved when you store a patch.
MOD (Модуляция)
Press this switch to turn the stereo modulation effect on, off, or focus the effect for editing. This setting is saved when you store a patch.
DLY (Delay)
Press this switch to turn the stereo delay effect on, off, or focus the effect for editing. This setting is saved when you store a patch.
REV (Reverb)
Press this switch to turn the stereo reverb effect on, off, or focus the effect for editing. This setting is saved when you store a patch.
For all three effect switches/buttons, the LED shows what state the effect is in:
|
LED |
Effect State | Описание |
| LED not on | Влияние |
Effect not active |
|
Светодиод красный |
Effect on but not ‘focused’ for editing | Effect is active, but not affected by the front panel effect controls |
| Светодиод зеленый | Effect on and ‘focused’ for editing |
Effect active and affected by the front panel effect controls |
Repeatedly pressing each effect switches on the front panel has the following effect:
|
Current Effect State |
Next Effect State |
| Влияние |
Turns the effect on and ‘focuses’ the effect. Any previously focused effect reverts to an ‘on’ state |
|
Effect on but not ‘focused’ |
Focuses the effect. Any previously focused effect reverts to an ‘on’ state |
| Effect on and ‘focused’ |
Turns the effect off. If any other effect(s) are on, the previously ‘focused’ effect resumes being ‘focused’ |
ПРИМЕЧАНИЕ: Only one effect may be ‘focused’ at any time.
Тип эффекта
This changes the effect type and edits a parameter of the currently ‘focused’ effect (modulation, delay, or reverb).
Each segment represents a different effect (four for each type of effect). An LED shows which effect type is currently active. The distance travelled through the ‘segment’ modifies an effect parameter. The Effects Table below shows the modifiable parameters.
Эта настройка сохраняется при сохранении патча.
Уровень эффекта
This modifies an effect parameter. For modulation and delay effects, turning the Level control while holding down the Tap button (14) modifies the rate/time of the effect.
The Effects Table below shows the modifiable parameters.
Эта настройка сохраняется при сохранении патча.
Нажмите
The Tap switch is used to set the rate/time of the current ‘focused’ effect. The time between each press of the tap button defines the rate set.
Once set, the Tap LED will flash in time with the set rate of the currently ‘focused’ effect.
The Effects Table below shows the modifiable parameters:
Effects Table
|
эффект |
Segment Parameter | Level Parameter |
Tap Parameter |
|
МОДУЛЯЦИИ |
|||
|
Pharser |
Микс | глубина | Скорость |
| Припев / Фленджер | Превращаться | Микс |
Скорость |
|
Октавер |
Octave down/up blend | Octaver/original guitar mix | – |
| Тремоло | Frequency modulation depth | Amplitude modulation depth |
Скорость |
|
DELAY |
|||
|
Линейные приводы |
Обратная связь | Delay level | Продолжительность |
| аналоговый | Обратная связь | Delay level |
Продолжительность |
|
лента |
Обратная связь | Delay level | Продолжительность |
| Много | Обратная связь | Delay level |
Продолжительность |
|
Реверберация |
|||
|
Комната |
Размер | Уровень реверберации | – |
| зал | Размер | Уровень реверберации |
– |
|
Весна |
Размер | Уровень реверберации | – |
| Плита | Размер | Уровень реверберации |
– |
Эта настройка сохраняется при сохранении патча.
Master Объём
Это контролирует общую громкость вашего amplifier. Turning it clockwise increases the volume. This is a global setting and is not saved when storing a patch. If the master volume is at zero this allows for silent recording via the Emulated/Headphone Output or USB. The emulated level is controlled via the preamp Объем.
USB
Подключите сюда USB-кабель, чтобы подключить amplifier to a Windows PC or Mac.
Blackstar’s ARCHITECT software offers a host of features and can be downloaded from: www.блэкстарamps.com/uk/architect
See the USB Audio section on page 15 for more information.
ПРИМЕЧАНИЕ: Наблюдения и советы этой статьи мы подготовили на основании опыта команды amplifier will appear on a personal computer as an audio capture device within recording software.
Вручную
Press this switch to toggle between Manual Mode and the current patch. When the amplifier is in Manual Mode, the sound will reflect the current physical position of the knobs. This is applicable to the Voice, Gain, Volume, Bass, Middle, Treble and ISF controls. Any effects that are active when switching to Manual Mode will be turned off. While in Manual Mode any of the controls can still be modified by an external source (Blackstar ARCHITECT software, foot controller), but this means that the sound will not represent the positions of the controls on the front panel.
While in Manual Mode any of the controls can still be modified by the Blackstar ARCHITECT software but this means that the sound will not represent the positions of the knobs on the front panel.
Режим тюнера
Holding the Manual (17) switch for two seconds will engage the tuner. The Recall Indicator LED (20) will flash continuously to indicate the amplifier is in Tuner Mode. The amplifier output will be muted whilst in Tuner Mode.
The Voice LEDs will indicate the closest note to the note being played.
The MOD, DLY and REV LEDs act as indicators to show how close the played note is to the tuned note.
|
MOD LED red |
Note is sharp (above pitch) |
| DLY LED green |
Note is in tune |
|
REV LED red |
Note is flat (below pitch) |
All other LEDs on the front panel will be off in Tuner Mode.
Pressing any switch will exit Tuner Mode.
Банка
Press the Bank switch to scroll through the first three banks of patches.
Bank 1 -> Bank 2
Bank 2 -> Bank 3
Bank 3 -> Bank 1
The green LED indicates you’re in Bank 1, the orange LED indicates you’re in Bank 2 and the red LED indicates you’re in Bank 3.
ПРИМЕЧАНИЕ: The first three banks can be selected from the front panel. When you activate Bank 4 and higher from an external controller (e.g. Blackstar ARCHITECT software, foot controller), the Bank LED will not be lit but the channel LEDs will continue to show you the patch location. For exampль:
Patch 9 – Bank LED red, Channel 3 LED lit.
Pressing Bank UP from an external controller will switch you to Patch 12 – Bank LED off, Channel 3 lit.
The channel will be remembered, therefore the corresponding patch within the current bank will be loaded when scrolling through the banks.
Когда amplifier is in Manual Mode, the Bank LED will not be lit.
Каналы 1-3
Channel 1 activates the first patch within the currently active bank.
Channel 2 activates the second patch within the currently active bank.
Channel 3 activates the third patch within the currently active bank.
Вспоминать Индикаторные
Индикатор отзыва показывает, есть ли несоответствие между текущим значением параметра в amplifier и соответствующий орган управления на передней панели. Для бывшегоample, when you change to a different patch the controls on the front panel may not always reflect the setting you are hearing.
To prevent unexpected level jumps in the control you are adjusting, the front panel knobs will have no effect on the sound until the knob reaches the current parameter value. Once reached the Recall Indicator flashes twice and the knob ‘takes control’ of the value and can increase or decrease the value.
The recall indicator will flash each time the physical knob ‘passes through’ the currently active value that you are hearing.
Recall is active for Gain, Volume, Bass, Middle, Treble and ISF.
When the Tuner is active the Recall Indicator will flash continuously.
When looping, the Recall Indicator will flash once to show when the currently playing loop has restarted. When a loop or overdub is being recorded, the Recall Indicator will flash continuously.
Задняя панель
Выключатель
Этот переключатель используется для включения ampлифтинг включается и выключается.
Вход питания
The supplied detachable mains lead is connected here. Always ensure the Power Switch is in the OFF position before applying mains power. The lead should only be connected to a power outlet that is compatible with the voltagе, требования к мощности и частоте указаны на задней панели. В случае сомнений посоветуйтесь с квалифицированным специалистом.
Emulated/Headphone Output
This output emulates the tonal characteristics of a guitar speaker cabinet and provides a natural tone for connection to a recording device or mixing desk. To make full use of the stereo effects, use a stereo jack to two mono jacks splitter lead to feed two channels of the recording device or mixer. The output will also function into a mono guitar type lead. Always use a good quality screened lead. Turning the Volume knob (4) will control the Emulated Output level. The Master Volume knob only affects the internal speakers.
ПРИМЕЧАНИЕ: To ‘silently’ record or practice via headphones, set the Master Volume to zero.
MP3/Line In
Подключите сюда выход вашего MP3- или CD-плеера. Отрегулируйте громкость проигрывателя в соответствии с громкостью вашей гитары, чтобы вы могли подыгрывать.
Ножной переключатель
Connect your included FS-13 foot controller here, or any other compatible Blackstar foot controller (e.g. FS-12 programmable foot controller). See the Foot controllers section on pages 16-17 for more information.
Петля эффектов
In addition to using the studio quality effects within your amplifier, you can place your own external effects processors and stomp boxes ‘in the loop’ for the best sonic performance. Connect the amplifier ‘Send’ to the input of your effects unit, and connect the output to the ‘Return’. If your effects unit has a stereo output, connect to both ‘Return’ sockets on your amplifier. If your external effect is mono connect the output of your effects unit to only the ‘Return L (Mono)’ socket .
программируемость
Storing Patches
To store the current sound as a Patch:
- Press and hold any of the three Channel switches (19) for one second. All three Channel LEDs will begin to flash.
- Press the Bank switch to scroll through the three banks (green, orange, red) to choose the store location.
- Press any of the three Channel switches once to store the patch in the chosen location.
The LED corresponding to the chosen store location will illuminate and the new patch will be active.
Green bank = Patches 1-3
Orange bank = Patches 4-6
Red bank = Patches 7-9
Наблюдения и советы этой статьи мы подготовили на основании опыта команды amplifier controls can be used to edit the patch at any stage of the store process. Press the Manual switch at any stage to cancel the store process and return the amplifier to the last state.
Storing a patch will overwrite any previous patch in that location. Patches can also be stored using Blackstar’s ARCHITECT software when connected to the ampчерез USB.
Recalling Patches
Press any Channel switch to load that patch. Pressing the Bank switch will cycle through the three banks – green-orange-red. The Channel will be preserved, therefore the corresponding patch within the current Bank will be loaded when scrolling through the Banks. Alternatively, patches can be recalled via Blackstar’s ARCHITECT software or any compatible foot controller.
USB Audio
Standard device drivers are used to connect the amplifier to a PC or Mac, therefore no additional device drivers are required. If your computer’s audio latency is found to be too high a generic ASIO driver can be downloaded and associated with your ampпожизненнее, напримерample ASIO4ALL – www.asio4all.com. For a guide on low latency USB recording visit: www.блэкстарamps.com/usbзапись
ПРИМЕЧАНИЕ: Всегда подключайте ampчерез основной USB-порт, который часто находится на задней панели компьютера.
Наблюдения и советы этой статьи мы подготовили на основании опыта команды amplifier будет отображаться как устройство для захвата звука в записывающем программном обеспечении.
The output of the audio over USB can be changed via the Blackstar ARCHITECT software, and can be one of the following:
- Speaker emulated stereo effected audio channels
- 2 x mono audio channels
- Left – effected amplifier signal
- Right – unprocessed guitar signal
- Reampрежим ing
ReampИНГ
Наблюдения и советы этой статьи мы подготовили на основании опыта команды amplifier can be switched into Reamping Mode via the Blackstar ARCHITECT software. This is a non storable setting and will be switched off either when the USB cable is removed, or when the amplifier power is switched off.
When activated, Reamping Mode allows the amplifier to accept a pre recorded, dry guitar signal via USB and return a fully processed audio signal. This return signal can then be captured using recording software on the connected PC or Mac.
Footcontrollers
FS-13 2-way footcontroller (supplied)
Connect this footcontroller to the Footswitch socket on the rear of your amplifier using any standard mono guitar cable or speaker cable (supplied).
|
Action |
РЕЖИМ ЛУПЕРА | РЕЖИМ ПАТЧА | |
| Переключать |
манускрипт |
||
|
A (press) |
Play/Record/Start and Stop overdub | Patch toggle (CH1 and CH2 of the current BANK) | Patch Down (1-12) |
| B (press) | Stop playback/Cancel | BANK scroll up |
Patch Up (1-12) |
|
B (hold) |
Erase loop memory | – | – |
| A + B (press) | Undo last overdub | – |
– |
|
A + B (hold) |
Switch to PATCH mode | Switch to LOOPER Mode | Switch to LOOPER Mode |
By default, your FS-13 footcontroller will be in Looper Mode (see table above) Switch ‘A’ is used to start and finish recording your loops and overdubs, and switch ‘B’ will stop the loop playback, or cancel the current overdub if still recording. A single press of both switches ‘A’ and ‘B’ simultaneously will undo the last recorded overdub. Holding switch ‘B’ will erase the loop memory.
By holding down both the ‘A’ and ‘B’ switches for 3 seconds you can set your footcontroller to Patch Mode. In this mode, button ‘A’ will toggle between the patches in Channel 1 and Channel 2 of the currently active Bank. Pressing button ‘B’ will scroll ‘up’ through the first 3 Banks of patches, operating in the same way as the BANK switch on the amplifier front panel. The operation of Patch Mode can be changed via the Blackstar ARCHITECT software, as reflected in the table above. Simply hold down both the ‘A’ and ‘B’ switches again for 3 seconds to change back to Looper Mode.
The current mode of the FS-13 footcontroller will be stored when you power off the amplifier, and will be and recalled each time you power on. Upon powering on the amplifier with the FS-13 footcontroller connected (or connecting the FS-13 footcontroller with the amplifier already powered on) the current mode of the footcontroller will be indicated by an animation using the MANUAL, BANK, CH1, CH2 and CH3 LEDs. Looper Mode will be indicated by a ‘looping’ count up of these LEDs, whereas Patch Mode will be indicated by these LEDs flashing simultaneously twice before returning to normal operation.
FS-12 5-way programmable footcontroller (not supplied)
Connect this footcontroller to the Footswitch socket on the rear of your amplifier using any standard mono guitar cable or speaker cable.
Switches ‘A’-‘C’ correspond to the ‘CH 1’ – ‘CH 3’ switches on the front panel of your amplifier. Pressing any of the ‘A’-‘C’ footcontroller switches will recall the corresponding patch within the current Bank. Banks can be navigated by a single press of both switches ‘A’ and ‘B’ simultaneously (Bank down) or a single press of both switches ‘B’ and ‘C’ simultaneously (Bank up). All 36 amplifier patches (12 banks of 3) can be accessed using the FS-12 footcontroller.
Switches ‘D’ and ‘E’ on the FS-12 footcontroller are programmable and can be configured to a number of different functions to suit your preference. By default, Switches ‘D’ and ‘E’ will control the Looper feature of the amplifier, and will behave as described in the following table.
|
Действие |
РЕЖИМ ЛУПЕРА |
| D (press) |
Play/Record/Start and Stop overdub |
|
E (press) |
Stop playback/Cancel |
| E (hold) |
Erase loop memory |
|
D + E (press) |
Undo last overdub |
To change this default setting, connect the amplifier to your computer via USB and use the free Blackstar ARCHITECT software to make your personal selection from various options such as Modulation/Delay/Reverb On/Off, Modulation/Delay Tap Tempo, Super Wide Stereo On/Off, amongst others. Please see the Footcontroller section of the ARCHITECT software for detail of the programmable functions.
Holding down the ‘D’ and ‘E’ switches will activate Tuner Mode of your amplifier. With the multifunctional FS-12 footcontroller you gain access to a fully chromatic tuner with note and cents display information appearing on the footcontroller display and LEDs. Press any switch to exit Tuner Mode.
FS-12 + FS-13 7-way switching
Connect the FS-12 5-way footcontroller to your amplifier as detailed above, then connect your supplied FS-13 2-way footcontroller to the ‘EXT.’ socket of your FS-12 footcontroller, using any standard mono guitar cable or speaker cable.
In this configuration you can add two extra, programmable switches which are configurable via the Blackstar ARCHITECT software. Please see the Footcontroller section of the ARCHITECT software for detail of the programmable functions.
By default, switch ‘A’ on your FS-13 will toggle the current Modulation effect, and switch ‘B’ will toggle the current Delay effect. When using this 7-way switching configuration the two markers at right side of the display of the FS-12 will show the on/off state of the effect for each switch, as shown below.
Расширенные функции
Your ID: Core amplifier has further advanced features which are aimed at more in depth users who enjoy getting the most from their amplifier. These features do not have independent controls on the front panel of the amplifier, but instead are accessed by using the Tap switch (14) as a ‘shift key’ and using other controls to access these features.
Resonance – Tap + Bass
The Resonance control sets the overall bass response. At lower settings the cleans will be tight and funky and overdrives will be focused in their bass response. At increased settings the clean sounds will be become full and warm, whilst the crunch and overdrive tones will be more bass heavy and resonant.
Presence – Tap + Treble
The Presence control sets the overall treble response. Percussive high end can be accentuated on clean sounds and the amount of aggressive treble controlled with crunch and overdrive settings.
USB Recording Level – Tap + Gain
As stated in the USB Audio section (see page 15), the output level of the USB audio signal from your ID: Core amplifier can be controlled independently of your amplifier’s speaker volume by holding down the Tap switch (14) whilst turning the Gain control (3) on the front panel.
Effect Speed/Time – Tap + Effects Level
As stated in the Effect Level section (see page 11), the speed/time of the modulation and delay effects can be controlled by holding down the Tap switch (14) whilst turning the Effect Level control (13) on the front panel. This can be very useful for setting a specific accurate effect tempo instead of using the Tap switch.
Global Emulated Output/Headphones Level – Tap + Volume
This controls the overall output volume of the Emulated Out/Phones connection, allowing you to tailor the level to best suit the connected device, whether audio interface, PA system or headphones of various impedance. This control can both cut and boost the level, with the halfway position of the Volume knob (4) being the default volume.
Обновление прошивки
Firmware updates are initiated via the Blackstar ARCHITECT software. A new version of the Blackstar ARCHITECT software will be released whenever an update is available.
Important note: Always connect the amplifier to a main USB port (usually found on the on the rear of your PC or Mac) when updating the firmware. Never use a front mounted USB port, USB hub or a USB extension cable. Doing so may result in a failed update, which could cause your amplifier to become unresponsive.
Когда amplifier is connected (via USB) to a version of the Blackstar ARCHITECT software containing newer firmware, a message will be displayed prompting you to install the latest files. Whilst updating, the amplifier controls will be unresponsive. Front panel voice LEDs will cycle to indicate data activity during the update process.
Наблюдения и советы этой статьи мы подготовили на основании опыта команды amplifier power should not be switched off during a firmware update. If the amplifier is switched off during an update, the controls may be unresponsive after the power is reapplied and the amplifier will produce no sound. The voice LEDs will cycle to indicate that the amplifier contains no valid firmware.
If you are experiencing problems with the firmware update process the amplifier can be forced to power up in Update Mode. Hold down the Manual (17) & MOD (9) switches simultaneously, whilst switching on the amplifer to enter this mode with the voice LEDs cycling to indicate Update Mode. Connect the amplifier to the Blackstar ARCHITECT software to begin a firmware updae.
Наблюдения и советы этой статьи мы подготовили на основании опыта команды amplifier must be connected to the Blackstar ARCHITECT software to reinstall valid firmware. The update process will start automatically if the Blackstar ARCHITECT software detects that the amplifier is in this state.
Техническая спецификация
ID:CORE STEREO 100
Мощность: 2 x 50 Watts (Stereo 100 Watts)
Вес (кг): 12.5
Габаритные размеры: (mm): 573(W) x 447(H) x 241(D)
Техническая спецификация
ID:CORE STEREO 150
Мощность: 2 x 75 Watts (Stereo 150 Watts)
Вес (кг): 14.5
Размеры (мм): 624 (W) x 486 (H) x 259 (D)
ID:CORE STEREO 100 Front Panel

ID:CORE STEREO 150 Front Panel

ID:CORE STEREO 100 Rear Panel

ID:CORE STEREO 150 Rear Panel

ТЕХНИЧЕСКАЯ ПОДДЕРЖКА
Хотя информация, содержащаяся в настоящем документе, верна на момент публикации, благодаря нашей политике постоянного улучшения и развития, Blackstar Amplification Ltd оставляет за собой право изменять спецификации без предварительного уведомления.
 Разработано и спроектировано
Черная звезда AmpВеликобритания
Черная звезда Amplification Ltd, Beckett House, 14 Billing Road, Northampтонна, NN1 5AW, UK
Для получения последней информации перейдите по ссылке:
www.блэкстарamps.com
Документы / Ресурсы
 |
Blackstar ID:CORE Stereo 100 and 150 [pdf] Руководство пользователя ID CORE Stereo 100 and 150, ID CORE Stereo 100, ID CORE Stereo 150, Stereo 100 and 150, Stereo 100, Stereo 150, ID CORE, Stereo |
Рекомендации
инструкцияBlackstar ID Core Beam

Blackstar Amplification Ltd, Beckett House, 14 Billing Road, Northampton, NN1 5AW, UK
For the latest information go to: www.blackstaramps.com
Whilst the information contained herein is correct at the time of publication, due to our policy of constant improvement
and development, Blackstar Amplification Ltd reserves the right to alter specifications without prior notice.
Designed and Engineered by
Blackstar Amplification UK
HBK-1060 01/15
Owner’s Manual
BLUETOOTH AMPLIFIER
Посмотреть инструкция для Blackstar ID Core Beam бесплатно. Руководство относится к категории гитарные усилители, 3 человек(а) дали ему среднюю оценку 8.2. Руководство доступно на следующих языках: английский. У вас есть вопрос о Blackstar ID Core Beam или вам нужна помощь? Задайте свой вопрос здесь
Blackstar ID Core Beam — это гитарный усилитель с встроенными гитарными эффектами. Этот компактный и портативный усилитель обеспечивает высокое качество звука и является отличным выбором для игроков на любом уровне. Он оснащен мощным двухканальным усилителем класса D мощностью 20 Вт, который достаточно громкий для использования как в домашних условиях, так и на концертах.
Он имеет интегрированные эффекты, включая дисторшн, эквалайзер, задержку, хорус и другие, что делает его прекрасным выбором для тех, кто хочет добиться различных тонов на своей гитаре. Blackstar ID Core Beam также имеет беспроводной Bluetooth-интерфейс, который позволяет подключаться к музыкальным устройствам и проигрывать музыку через его звуковую систему.
Этот усилитель имеет слот для карты памяти SD, который позволяет игрокам записывать свои песни и воспроизводить их через устройство. Усилитель также имеет функцию USB-аудио, позволяющую подключаться к компьютеру и использовать его в качестве домашней студии со своими любимыми программами обработки звука.
Blackstar ID Core Beam — это универсальное решение для музыкантов, которые ищут портативный, но мощный усилитель, который обеспечивает высокое качество звука и множество функций для создания различных тонов и эффектов на своей гитаре.
Главная
Не можете найти ответ на свой вопрос в руководстве? Вы можете найти ответ на свой вопрос ниже, в разделе часто задаваемых вопросов о Blackstar ID Core Beam.
Инструкция Blackstar ID Core Beam доступно в русский?
К сожалению, у нас нет руководства для Blackstar ID Core Beam, доступного в русский. Это руководство доступно в английский.
Не нашли свой вопрос? Задайте свой вопрос здесь
ID:CORE STEREO 10, ID:CORE STEREO 20, ID:CORE STEREO 40
Owner’s Manual
Designed and Engineered by
Blackstar Amplification UK
IMPORTANT SAFETY INSTRUCTIONS
1. Read these instructions.
2. Keep these instructions.
3. Heed all warnings.
4. Follow all instructions.
5. Do not use this apparatus near water.
6. Clean only with dry cloth.
7. Do not block any ventilation openings.
8. Install in accordance with the manufacturer’s instructions.
9. Do not install near any heat sources such as radiators, heat registers, stoves, or
other apparatus (including ampliers) that produce heat.
10. Do not defeat the safety purpose of the polarized or grounding-type plug. A
polarized plug has two blades with one wider than the other. A grounding type
plug has two blades and a third grounding prong. The wide blade or the third
prong are provided for your safety. If the provided plug does not t into your
outlet, consult an electrician for replacement of the obsolete outlet.
11. Protect the power cord from being walked on or pinched particularly at plugs,
convenience receptacles, and the point where they exit from the apparatus.
12. Only use attachments/accessories specied by the manufacturer.
13. Unplug this apparatus during lightning storms or when unused for long periods
of time.
14. Refer all servicing to qualied service personnel. Servicing is required when the
apparatus has been damaged in any way, such as power-supply cord or plug is
damaged, liquid has been spilled or objects have fallen into the apparatus, the
apparatus has been exposed to rain or moisture, does not operate normally, or
has been dropped.
“TO COMPLETELY DISCONNECT THIS APPARATUS FROM THE AC MAINS,
DISCONNECT THE POWER-SUPPLY CORD PLUG FROM THE AC RECEPTACLE”.
“WARNING: TO REDUCE THE RISK OF FIRE OR ELECTRIC SHOCK, DO NOT
EXPOSE THIS APPARATUS TO RAIN OR MOISTURE. THE APPARATUS SHALL
NOT BE EXPOSED TO DRIPPING OR SPLASHING AND THAT OBJECTS FILLED
WITH LIQUIDS, SUCH AS VASES, SHALL NOT BE PLACED ON APPARATUS».
USA / Canada
This symbol is intended to alert the user to the presence of important
operation and maintenance (servicing) instructions in the literature
accompanying the appliance.
This symbol is intended to alert the user to the presence of
uninsulated “dangerous voltage” within the product’s enclosure that
may be of sucient magnitude to constitute a risk of electric shock
to persons.
3
English
Warning!
Important safety information!
READ THE FOLLOWING INFORMATION CAREFULLY. SAVE ALL
INSTRUCTIONS FOR FUTURE REFERENCE!
Follow all warnings and instructions marked on the product!
Do not open the equipment case. There are no user serviceable parts in this
equipment. Refer all servicing to qualied service personnel.
Clean only with a dry cloth.
Condensation can form on the inside of an amplier if it is moved from a cold
environment to a warmer location. Before switching the unit on, it is recommended
that the unit be allowed to reach room temperature.
Unauthorised modication of this equipment is expressly forbidden by Blackstar
Amplication Ltd.
Do not expose this apparatus to rain, liquids or moisture of any type.
Do not place this product on an unstable trolley, stand or table. The product may
fall, causing serious damage to the product or to persons!
This unit must only be used in a well ventilated area and never switched on when it
is within a poorly ventilated space, such as a bookcase.
This product should not be placed near a source of heat such as a stove, radiator,
or another heat producing amplier.
Use only the supplied power cord which is compatible with the mains voltage supply
in your area.
Power supply cords should always be handled carefully and should be replaced if
damaged in any way.
Never break o the earth (ground) pin on the power supply cord.
The power supply cord should be unplugged when the unit is to be unused for long
periods of time.
An apparatus with Class I construction should be connected to a mains socket
outlet with a protective earthing connection.
The mains plug of the power supply cord should remain readily accessible.
Before the unit is switched on, the loudspeaker should be connected as described
in the handbook using the lead recommended by the manufacturer.
Always replace damaged fuses with the correct rating and type.
Never disconnect the protective mains earth connection.
High loudspeaker levels can cause permanent hearing damage. You should
therefore avoid the direct vicinity of loudspeakers operating at high levels. Wear
hearing protection if continuously exposed to high levels.
If the product does not operate normally when the operating instructions are
followed, then refer the product to a qualied service engineer.
The U.S. Government’s Occupational Safety and Health Administration (OSHA) has
specied the following permissible noise level exposures:
Duration Per Day In Hours Sound Level dBA, Slow Response
8 90
6 92
4 95
3 97
2 100
1½ 102
1 105
½ 110
¼ or less 115
According to OSHA, any exposure in excess of the above permissible limits could
result in some hearing loss.
Ear plug protectors in the ear canals or over the ears must be worn when operating
this amplication system in order to prevent a permanent hearing loss if exposure is
in excess of the limits as set forth above. To ensure against potentially dangerous
exposure to high sound pressure levels, it is recommended that all persons
exposed to equipment capable of producing high sound pressure levels such as
this amplication system be protected by hearing protectors while this unit is in
operation.
English
All electrical and electronic products should be disposed of separately
from the municipal waste stream via designated collection facilities
appointed by the government or the local authorities.
4
5
English
Introduction
Thank you for purchasing this Blackstar ID:Core amplifier. Like all our products, this
amp is the result of countless hours of painstaking Research and Development by
our world-class design team. Based in Northampton (UK), the Blackstar team are
all experienced musicians themselves and the sole aim of the development process
is to provide guitarists with products which are the ultimate tools for self-expression.
All Blackstar products are subjected to extensive laboratory and road testing to
ensure that they are truly uncompromising in terms of reliability, quality and above
all TONE.
ID:Core represents a truly ground-breaking achievement, combining unique
innovations, an intuitive, traditional control set and the versatility of programmability.
Please read through this handbook carefully to ensure you get the maximum benefit
from your new Blackstar product.
If you like what you hear and want to find out more about the Blackstar range of
products please visit our website at www.blackstaramps.com.
Thanks!
The Blackstar Team
Features
In the seven years since its launch, Blackstar has led the way in the innovation of
guitar amplification. ID:Core represents the culmination of more than seven years
technical Research and Development. These amps have an intuitive control set like
a traditional amp, but have the versatility of programmability. The unique controls
allow you, the guitarist, to custom design your own sound.
The Voice control has six different settings – Clean Warm, Clean Bright, Crunch,
Super Crunch, OD 1, OD 2. When used together with Blackstar’s patented ISF
control you can get the exact tone you’re thinking of.
The effects section delivers studio quality Super Wide Stereo modulation, delay and
reverb effects simultaneously that you can store with your sound.
Deep editing and storing of patches is simple using the Blackstar INSIDER software.
Patches can be shared, uploaded and downloaded via the online community. The
USB connector also allows you to record from your amp directly to your computer.
An emulated output and MP3/line input complete the package.
By using the unique Voice control and the patented ISF, ID:Core Series amplifiers
allow unparalleled flexibility and ease of use, enabling you to design the sound in
your head and deliver it at home, in the studio or in rehearsal.
English
6
7
English
Factory Reset
The default factory patches and settings can be restored to your amplier at any
time. Simply hold down the MOD, DLY and REV switches simultaneously, whilst
switching on the amplier.
The voice LED will count down to indicate that a factory reset is imminent. If any of
the MOD, DLY and REV switches are released before the Voice LEDs have switched
o, then the operation is cancelled and the amplier will remain unaected.
IMPORTANT NOTE:
This process will overwrite any user saved patches and settings.
Front Panel
1. Input
Plug your guitar in here.
Always use a good quality screened guitar lead.
2. Voice
The Voice control changes the preamp voicing, ranging from ultra clean to extremely
overdriven.
Clean Warm – Classic clean, dynamic
Clean Bright – ‘Boutique’, will break up when pushed hard
Crunch – Classic medium gain overdrive
Super Crunch – More gain and punch than Crunch
OD 1 – Hot-rodded Master Volume overdrive
OD 2 – Mid boosted overdrive
This setting is saved when you store a patch.
3. Gain
The Gain control adjusts the amount of overdrive or distortion. Low settings (counter
clockwise) will deliver a clean sound on the edge of break-up. As the Gain control is
turned clockwise the sound will become more overdriven, moving through beautiful
crunch tones until, at its maximum position, a full distorted tone is achieved. This
setting is saved when you store a patch.
4. Volume
This controls the preamp volume. High levels of volume will introduce the effect of
valve power amp distortion and compression. This is a global setting and not saved
when storing a patch.
English
8
5. ISF
The patented ISF control allows you to choose the
exact tonal signature you prefer. Fully counter clockwise
has a more American characteristic with a tight bottomend and more aggressive middle, and fully clockwise
has a British characteristic which is more ‘woody’ and
less aggressive. This leads to a very familiar, musical
response. This setting is saved when you store a patch.
6. MOD (Modulation)
Press this switch to turn the stereo modulation effect on, off, or focus the effect for
editing. This setting is saved when you store a patch.
7. DLY (Delay)
Press this switch to turn the stereo delay effect on, off, or focus the effect for editing.
This setting is saved when you store a patch.
US
9
English
8. REV (Reverb)
Press this switch to turn the stereo reverb effect on, off, or focus the effect for
editing. This setting is saved when you store a patch.
For all three effect switches/buttons, the LED shows what state the effect is in:
LED Eect State Description
LED not on Eect o Eect not active
LED red Eect on but not ‘focused’ for editing Eect is active, but not aected by the front
LED green Eect on and ‘focused’ for editing Eect active and aected by the front panel
panel eect controls
eect controls
Repeatedly pressing each effect switches on the front panel has the following effect:
Current Eect State Next Eect State
Eect o Turns the eect on and ‘focuses’ the eect. Any previously focused eect
Eect on but not ‘focused’ Focuses the eect. Any previously focused eect reverts to an ‘on’ state
Eect on and ‘focused’ Turns the eect o. If any other eect(s) are on, the previously ‘focused’ eect
reverts to an ‘on’ state
resumes being ‘focused’
NOTE: Only one effect may be ‘focused’ at any time.
9. Effect Type
This changes the effect type and edits a parameter of the currently ‘focused’ effect
(modulation, delay, or reverb).
Each segment represents a different effect (four for each type of effect). An
LED shows which effect type is currently active. The distance travelled through
the ‘segment’ modifies an effect parameter. The Effects Table below shows the
modifiable parameters.
This setting is saved when you store a patch.
11. Tap
The Tap switch is used to set the rate/time of the current ‘focused’ effect. The time
between each press of the tap button defines the rate set.
Once set, the Tap LED will flash in time with the set rate of the currently ‘focused’
effect.
The Effects Table below shows the modifiable parameters:
Effects Table
Eect Segment Parameter Level Parameter Tap Parameter
MODULATION
Phaser Mix Depth Speed
Flanger Feedback Depth Speed
Chorus Mix Depth Speed
Tremolo Frequency modulation depth Amplitude modulation depth Speed
DELAY
Linear Feedback Delay level Time
Analogue Feedback Delay level Time
Tape Feedback Delay level Time
Multi Feedback Delay level Time
REVERB
Room Size Reverb level —
Hall Size Reverb level —
Spring Size Reverb level —
Plate Size Reverb level —
This setting is saved when you store a patch.
English
10. Effect Level
This modifies an effect parameter. For modulation and delay effects, turning the Level
control while holding down the Tap button (11) modifies the rate/time of the effect.
The Effects Table below shows the modifiable parameters.
This setting is saved when you store a patch.
12. Power Switch
This switch is used to turn the amplifier on and off; the white dot marks the ON
position.
13. USB
Plug a USB cable in here to connect the amplifier to a Windows PC or Mac.
Blackstar’s INSIDER software offers a host of features and can be downloaded
from: www.blackstarinsider.co.uk
See the USB Audio section on page 15 for more information.
NOTE: The amplifier will appear on a personal computer as an audio capture device
within recording software.
10
11
English
14. Manual
Press this switch to toggle between Patch and Manual Mode. When the amplifier
is in Manual Mode, the sound will reflect the current physical position of the knobs.
This is applicable to the Voice, Gain, Volume and ISF knobs. Any effects that are
active when switching to Manual Mode will be turned off.
While in Manual Mode any of the controls can still be modified by the Blackstar
INSIDER software but this means that the sound will not represent the positions of
the knobs on the front panel
15. Footcontroller (ID:CORE STEREO 20 and ID:CORE STEREO 40 only)
Connect a Blackstar FS-11 footcontroller (not supplied) to control your ID:Core in
one of the following modes:
FS-11 Switch 1 Switch 2
Default Mode Toggles between 2 patches,
Alternative Mode Patch down Patch up
selectable via INSIDER
Toggles all saved patch eects
on/o
English
Patch Mode
Patch mode is indicated by the Manual LED (14) being unlit. See Programmability
section on page 14 for more information.
Tuner Mode
Holding the Tap (11) and Manual (14) switches together for one second will engage
the tuner. The Recall Indicator LED (18) will flash continuously to indicate the
amplifier is in Tuner Mode. The amplifier output will be muted whilst in Tuner Mode.
The Voice LEDs will indicate the closest note to the note being played.
Clean Warm String 1 (E)
Clean Bright String 2 (A)
Crunch String 3 (D)
Super Crunch String 4 (G)
OD 1 String 5 (B)
The MOD, DLY and REV LEDs act as indicators to show how close the played note
is to the tuned note.
MOD LED red Note is sharp (above pitch)
DLY LED green Note is in tune
REV LED red Note is at (below pitch)
All other LEDs on the front panel will be off in Tuner Mode.
Pressing any button will exit Tuner Mode.
In Alternative Mode (selected via INSIDER) patches will cycle on a ʻloopʼ.
e.g switching up from OD2 will move to Clean Warm.
When in Manual Mode, the effect of any footcontroller switch will depend on its last
state. Pressing Switch 1 will return the amplifier to Patch Mode. Pressing Switch 2
will toggle the effects off and on without returning to Patch Mode.
16. MP3/Line In
Connect the output of your MP3 or CD player here. Adjust the player’s volume to
match that of your guitar to enable you to play along.
17. Emulated/Headphone Out
This output emulates the tonal characteristics of a guitar speaker cabinet and
provides a natural tone for connection to headphones, a recording device, PA
system or mixing desk.
To make full use of the Super Wide Stereo effects, use a ‘stereo 3.5mm jack to
two mono jacks’ splitter lead to feed two channels of the recording device or mixer.
Always use a good quality screened lead.
Turning the Volume knob will control the Emulated Output level.
NOTE: The
Amplifer
speakers will mute when a cable is connected to the Output.
18. Recall Indicator
12
13
English
The Recall Indicator shows if there is a mismatch between the current value of a
parameter within the amplifier and the corresponding physical front panel control.
For example, when you change to a different patch the controls on the front panel
may not always reflect the setting you are hearing.
To prevent unexpected level jumps in the control you are adjusting, the front panel
knobs will have no effect on the sound until the knob reaches the current parameter
value. Once reached the Recall Indicator flashes twice and the knob ‘takes control’
of the value and can increase or decrease the value.
The recall indicator will flash each time the physical knob ‘passes through’ the
currently active value that you are hearing.
Recall is active for Gain and ISF.
When the Tuner is active the Recall Indicator will flash continuously.
Rear Panel
1. DC Input
The supplied detachable DC power supply is connected here. Always ensure the
Power Switch (12) is in the OFF position before connecting the power supply. The
lead should only be connected to a power outlet that is compatible with the voltage,
power and frequency requirements stated on the power supply. If in doubt seek
advice from a qualified technician.
Programmability
Storing Patches
Your ID:Core amplifier stores 6 patches (1 patch per Voice setting).
To store the current sound as a patch press and hold the Manual switch for two
seconds. The currently selected Voice LED will flash to indicate the patch has been
stored.
Storing a patch will overwrite any previous patch in that location.
Patches can also be stored via Blackstar’s INSIDER software.
NOTE: Each patch on your ID:Core must use the Voice setting assigned to that
patch i.e. the Clean Warm patch uses the Clean Warm voice.
Recalling Patches
When in Patch Mode turn the Voice control to choose the desired Voice patch.
Patches can also be recalled via the Blackstar INSIDER software or a connected
footcontroller (ID:CORE STEREO 20 & ID:CORE STEREO 40 only).
NOTE:To recall a patch, the Manual LED must be off to indicate Patch Mode.
Turning the Voice control while the Manual LED is on (in Manual Mode) will only
select the indicated voice.
Standard audio drivers are used to connect the amplifier to a PC or Mac. No specific
drivers are required. For a guide on low-latency USB recording visit:
www.blackstaramps.com/usbrecording
NOTE: Always connect the amplifier via a main USB port, often found on the rear
of the computer.
The amplifier will appear as an audio capture device within recording software.
The output of the audio over USB can be changed via the Blackstar INSIDER
software, and can be one of the following:
Speaker emulated stereo effected audio channels
2 x mono audio channels
— Left – effected amplifier signal
— Right – unprocessed guitar signal
Reamping Mode
Reamping
The amplifier can be switched into Reamping Mode via the Blackstar INSIDER
software. This is a non-storable setting and will be switched off either when the
USB cable is removed, or when the amplifier power is switched off.
When activated, Reamping Mode allows the amplifier to accept a pre-recorded, dry
guitar signal via USB and return a fully processed audio signal. This return signal can
then be captured using recording software on the connected PC or Mac.
Firmware Update
Firmware updates are initiated via the Blackstar INSIDER software. A new version
of the Blackstar INSIDER software will be released whenever an update is available.
When the amplifier is connected (via USB) to a version of the Blackstar INSIDER
software containing newer firmware, a message will be displayed prompting you
to install the latest files. Whilst updating, the amplifier controls will be unresponsive.
Front panel voice LEDs will cycle to indicate data activity during the update process.
The amplifier power should not be switched off during a firmware update. If the
amplifier is switched off during an update, the controls may be unresponsive after
the power is reapplied and the amplifier will produce no sound. The voice LEDs will
cycle to indicate that the amplifier contains no valid firmware.
If you are experiencing problems with the firmware update process the amplifier
can be forced to power up in Update Mode. Hold down the Manual (14) & MOD (6)
switches simultaneously, whilst switching on the amplifer to enter this mode with the
voice LEDs cycling to indicate Update Mode. Connect the amplifier to the Blackstar
INSIDER software to begin a firmware updae.
The amplifier must be connected to the Blackstar INSIDER software to reinstall
valid firmware. The update process will start automatically if the Blackstar INSIDER
software detects that the amplifier is in this state.
English
Technical Specification
USB Audio
14
15
English
ID:CORE STEREO 10
Power: 2 x 5 Watts (Stereo 10 Watts)
Weight (kg): 3.7
Dimensions (mm): 340(W) x 265(H) x 185(D)
ID:CORE STEREO 20
Power: 2 x 10 Watts (Stereo 20 Watts)
Weight (kg): 5.2
Dimensions (mm): 375(W) x 292(H) x 185(D)
Footcontroller (not supplied): FS-11 footcontroller
ID:CORE STEREO 40
Power: 2 x 20 (Stereo 40 Watts)
Weight (kg): 6.2
Dimensions (mm): 434(W) x 336(H) x 185(D)
Footcontroller (not supplied): FS-11 footcontroller
Français
Cet appareil doit être utilisé dans un environnement bien ventilé et ne doit jamais être
mis sous tension si l’endroit est conné.
16
17
Français
La loi américaine sur la santé et la sécurité du travail indique la durée d’exposition
autorisée à différents niveaux sonores:
8 90
6 92
4 95
3 97
2 100
1½ 102
1 105
½ 110
¼ or less 115
Introduction
Merci d’avoir acheté cet amplificateur Blackstar ID:Core. Comme tous nos
produits, cet amplificateur est le résultat d’innombrables heures de recherche et
développement minutieux par notre équipe de conception de classe mondiale.
Français
Basée à Northampton (Royaume-Uni), l’équipe Blackstar est composée de
musiciens chevronnés et l’unique objectif du processus de développement est de
fournir aux guitaristes les outils ultimes pour s’exprimer.
Tous les produits Blackstar sont soumis à des tests intensifs en laboratoire et en
conditions réelles pour s’affranchir véritablement de tout compromis en termes de
fiabilité, de qualité et avant tout de SON.
L’ID:Series est véritablement révolutionnaire, combinant des innovations uniques, un
jeu de commandes intuitives et traditionnelles, et la souplesse de programmation.
Veuillez lire attentivement la totalité de ce mode d’emploi pour tirer le bénéfice
maximal de votre nouveau produit Blackstar.
Si vous aimez ce que vous entendez et voulez en découvrir plus sur la gamme de
produits Blackstar, veuillez visiter notre site web à l’adresse www.blackstaramps.
com.
Merci !
L’équipe Blackstar
Tous les produits électriques et électroniques doivent être jetés
séparément, dans le ux de déchets municipaux, dans les lieux de
collecte désignés par le gouvernement ou les autorités locales.
1918
Français
Caractéristiques
Dans les cinq ans qui ont suivi son lancement, Blackstar a montré la voie de
l’innovation dans l’amplification de guitare. L’ID:Core représente le point culminant
de plus sept ans de recherche et développement techniques. Ces amplis ont le jeu
de commandes intuitif d’un ampli traditionnel, mais offrent une grande souplesse de
programmation. Les commandes uniques vous permettent à vous, le guitariste, de
concevoir votre propre son, de le mémoriser et d’être sûr de la façon dont l’ampli
se comportera en live.
La commande Voice a six réglages différents – Clean Warm, Clean Bright, Crunch,
Super Crunch, OD 1, OD 2. Quand on les utilise avec la commande ISF brevetée de
Blackstar, vous pouvez obtenir exactement le son auquel vous pensiez.
La section d’effets offre simultanément des effets de qualité studio comme la
modulation Stereo Ultra Large, le delay et la reverb, que vous pouvez mémoriser.
L’édition en profondeur et la mémorisation des patches est simple grâce au logiciel
Insider de Blackstar. Les patches peuvent être partagés, mis à disposition et
téléchargés grâce à la communauté en ligne. Le connecteur USB vous permet
aussi d’enregistrer directement de votre ampli vers votre ordinateur.
La Sortie simulateur de HP et l’entrée MP3/ligne complètent l’ensemble.
Avec l’exceptionnelle commande Voice et l’ISF brevetée, les amplificateurs ID:Core
offrent une flexibilité et une simplicité sans égales, vous permettant de concevoir
véritablement le son que vous avez en tête et de le ressortir à la maison, en studio
ou en répétition.
Réinitialisation d’usine
Les patches et réglages d’origine par défaut peuvent être à tout moment
restaurés dans votre amplicateur. Maintenez simplement pressés simultanément
les boutons MOD, DLY et REV, pendant que vous allumez l’amplicateur. Les
LED de la commande ‘Voice’ servant à choisir la tonalité de l’ampli s’allumeront
successivement en rouge pour indiquer l’imminence de la réinitialisation d’usine. Ce
processus prend un total de 2 secondes. Si n’importe lequel des boutons MOD, DLY
ou REV est relâché avant que la LED Bank n’ait passé en revue toutes ces couleurs,
alors l’opération est annulée et l’amplicateur ne subit aucune modication.
NOTE IMPORTANTE:
Ce processus écrasera tout contenu créé par l’utilisateur.
Français
2120
 Loading…