Смартфоны iPhone – популярные и понятные в использовании гаджеты. Но что делать, если вы привыкли к интерфейсу платформы Android и еще не держали в руках яблочный смартфон? Без паники, сегодня вы узнаете, как пользоваться iPhone, и какие фишки есть у нового телефона.

Инструкция для владельцев
Не стоит переживать, если вы чайник, и до этой статьи не разбирались в устройствах на iOs. Статья поможет ознакомиться с главными аспектами.

Первый запуск устройства
Заветная коробочка с аппаратом у вас в руках, возникает логичный вопрос: «Как начать пользоваться Айфоном?». Первым делом аккуратно распакуйте устройство, предварительно сняв защитные пленки, которыми он был обернут. После распаковки установите в телефон сим-карту, используя специальную скрепку, выдвигающую лот для симки.
Включаем новый телефон зажатием кнопки блокировки. У iPhone 4, 5 и 5 SE кнопка сверху, у яблочных смартфонов последующих поколений – сбоку справа. После нажатия появится надпись «iPnone», а снизу стрелка. Потянув ее вправо, разблокируете телефон и приступайте к работе.
Мобильное устройство предложит выбрать язык, страну, разрешить смартфону использовать данные о местонахождении. Таким образом, вы подготовите телефон для работы в штатном режиме. Позже можно вернуться к настройкам и изменить их, если понадобится.
Как начать пользоваться айфоном 5, 5 SE и высше? Сначала скачайте на компьютер программу iTunes или же подключитесь к доступной сети Wi-Fi. Вопросы: «Как пользоваться Айфоном 5?» и «Как пользоваться Айфоном 5S для новичков?» не возникнет у тех, кто уже пользовался телефоном. Поэтому стоит настроить телефон как новый, без синхронизации с данными с прошлого смартфона.

Безопасность
Как защитить технику от поломки.
Нужны ли чехлы для iPhone/iPad
После покупки нового телефона владелец заинтересуется тем, как защитить смартфон от ударов и влаги. Конечно же, с помощью чехла. На каждую модель Айфона на рынке существует огромное количество защитных аксессуаров из различных материалов. Иногда, правда, они выполняют исключительно декоративную функцию. Выбирайте, следуя своим потребностям. Если знаете, что неаккуратно обращаетесь с техникой, желательно купить чехол из силикона, который хорошо пружинит при падении, и приклеить на экран защитное стекло.
Таким образом, вы сможете уменьшить риски даже при неосторожном использовании телефона. Чехол защитит смартфон от царапин, попадания влаги и амортизирует нагрузку при падении.

Активация и настройка iPhone/iPad
Настраиваем главные функции нового смартфона.
Как создать Apple ID
Без учетной записи Apple ID вы не сможете пользоваться многими сервисами смартфона. Привязка к Apple ID позволяет скачивать музыку, фильмы, книги, игры, другие полезные приложения на устройство и пользоваться облаком, куда сохраняются данные. В случае утери или поломки устройства, сохраненная резервная копия поможет начать пользоваться другим аппаратом с сохранением всех прошлых настроек телефона.
При настройке нового мобильного устройства нужно создать Apple ID, давайте пошагово разберем, как это сделать.
- Нажмите «Нет Apple ID».
- На экране устройства появится надпись «Создать Apple ID бесплатно». Также это действие можно осуществить в настройках телефона.
- Укажите свои достоверные данные. Потребуется ваша дата рождения и имя. После ввода данных проверьте их. Если они введены верно, нажмите «Далее».
- Можно выбрать для привязки вашу электронную почту или создать новую на iCloud.
Для использования Apple ID понадобится добавить данные о банковской карте, так как некоторые приложения платные. Деньги снимают после подтверждения покупки платежным паролем или при подтверждении покупки с помощью Touch ID. При каждом скачивании приложений с AppStore Айфон будет запрашивать у вас пароль (даже при установке бесплатных приложений).

Как создать учетную запись iCloud
- Откройте «Настройки» — «Почта, адреса, календари» — «Добавить учётную запись iCloud»
- Нажмите «Создать учётную запись» и далее следуйте инструкции.

Как перенести контакты на iPhone
Как начать пользоваться Айфоном и перенести контакты с Андроида на iOS?
- На прошлом устройстве скачайте на сайте freesoft.ru программу Move to iOS. Подключите оба устройства к доступной Wi-Fi сети, желательно к домашней, чтобы не потерять данные.
- Процесс переноса данных может быть трудоемким для устройств, поэтому нужно подключить их к источникам питания. Поставьте оба устройства на зарядку.
- Проверьте, сколько места занимают данные для переноса с Андроида на Айфон и убедитесь, что на Айфоне хватит свободного места без утери каких-либо данных. Сделать это можно перейдя в «Настройки» – «Основные данные» – «Об этом устройстве».
- Если необходимо перенести данные и избранные страницы из браузера на Android, обновите браузер до последней версии.
- Во вкладке «Программы и данные» найдите пункт «Перенести данные с Android», откройте на прошлом устройстве саму программу Move to iOS, внимательно прочтите условия и положения использования программы. После прочтения согласитесь с условиями использования, нажав «Принимаю», далее появится функция «Поиск кода», с ее помощью вы сможете осуществить сопряжение устройств.
- Оба устройства покажут на экранах код для сопряжения, который нужно ввести, после iPhone покажет надпись «Перенос данных».
- На прошлом смартфоне выберите файлы и контакты, которые хотите сохранить и перенести на новое устройство. Понадобится время для сопряжения устройств, проявите терпение.

AppStore: как им пользоваться
Если до появления яблочного смартфона, вы пользовались устройством на базе Android, значит, знакомы с Google Play. Appstore представляет собой идентичную базу для скачивания игр, приложений на ваш новый смартфон. Простота и удобство AppStore позволяют разобраться в использовании пользователю.
Вкладка «Сегодня» отображает новости и выбранные экспертами и пользователями приложения дня. Вкладка «Игры» включает в себя развлекательные приложения с разделением по жанрам. Даже искушенный любитель стратегий и головоломок и симуляторов найдет для себя там много полезного. Вкладка «Приложения», где можно найти полезные утилиты. «Обновления», где показаны доступные версии прошивки. И последняя вкладка «Поиск», где вы самостоятельно можете найти те приложения или игры, которые хотели бы установить.

Трюки и секреты для новичков
Руководство по грамотной эксплуатации нового устройства.
Заряжаем смартфон быстрее
Как быстро или даже на бегу зарядить телефон, который разрядился в «0»? Что для этого сделать?
Используй мощный адаптер
В комплекте с iPhone идет стандартный адаптер, который не способствует скорейшему заряду устройства. Лайфхак: для зарядки используйте адаптер от iPad или MacBook, в таком случае iPhone зарядится до 100% намного быстрее. Это позволяет сэкономить много времени.

Включи авиарежим
Перед тем как поставить смартфон на зарядку, включите авиарежим. Таким образом, отключатся Bluetooth, Wi-Fi, использование геопозиции и устройство зарядится быстрее. Использование этих функций увеличивает потерю энергии вашего iPhone.

Увеличиваем время автономной работы
После нескольких лет исследования было выяснено, что можно увеличить время работы карманного друга, не прибегая к сложным уловкам. Вот два основных совета, которые реально помогают продлить время без заряда устройства.
Настрой фоновую геопозицию
Многие приложения отслеживают вашу геолокацию на постоянной основе. Во-первых, это небезопасно. Во-вторых, отнимает драгоценные проценты заряда. Зайдите в «Настройки» – «Конфиденциальность» – «Службы геолокации» и отключите эту функцию приложений или ограничьте, разрешив использовать данные только при использовании приложения.

Выключи фоновое обновление приложений
Социальные сети, мессенджеры, новостные приложения и многие другие агрегаторы периодически подгружают информацию, даже когда они неактивны. Это уменьшает время автономной работы iPhone. Для того чтобы приложения не загружали данные, пока вы ими не воспользовались, зайдите в «Настройки» – «Основные» – «Обновление контента».

Делаем систему быстрее и понятнее
Некоторые пользователи Айфонов отмечают, что телефон медлительный и неинтуитивный в использовании, что может показаться странным по началу. Если входите в число таких пользователей, для вас пара советов по ускорению устройства.
Отключи лишние анимации
Для ускорения работы операционной системы перед тем, как начать пользоваться Айфоном 5S для новичков, отключите лишнюю анимацию. Сделать это можно, перейдя в «Настройки» – «Основные» – «Универсальный доступ» – «Уменьшение движения». Сегодня это единственный вариант ускорения работы телефона без проведения джейлбрейка, что не получится сделать на новых моделях.

Добавь форму кнопкам
С выпуском следующих поколений популярного смартфона разработчики все больше приходят к минимализму. Кнопки, на которые можно нажать, указываются простым текстом. Изменить это можно, перейдя в раздел «Настройки» – «Основные» – «Универсальный доступ» – «Формы кнопок».

Настраиваем камеру и учимся ей пользоваться на 100%
Специалисты Apple делают все более современные и профессиональные камеры на выпускаемых устройствах. Такой подход позволяет не заморачиваться с покупкой камеры отдельно от мобильного устройства. Теперь возможно делать красивые фотографии, просто достав из кармана мобильный.

Горизонт
Часто ли вы слышите фразу: «Ты завалил горизонт на фото»? Если да, пора бы узнать маленький секрет. В настройках камеры можно выставить галочку в меню «Сетка», тогда, выстраивая фото по ровным линиям, вы просто не сможете завалить горизонт. Если только не захотите это сделать специально.

Фокус и экспозиция
Чтобы сфокусироваться на определенном предмете на фотографии, нужно просто нажать на него. Долгое зажатие регулирует экспозицию и делает фон ярче.
Делаем скриншоты и записываем видео с экрана
Тем, кто не знает, как пользоваться айфоном 5, непонятны отдельные вещи, которым другие пользователи давно научились.
Когда впервые держишь яблочный смартфон, не совсем понятно, как же на нем делать скриншот экрана. Все проще пареной репы: нужно зажать кнопку блокировки и кнопку «Домой» одновременно. Готово, вы восхитительны! Скриншоты сохраняются в галерее устройства, хранятся в альбоме «Снимки экрана».

На яблочных устройствах можно делать не только снимок экрана, но и видеозапись экрана, при этом производя действия и перемещаясь из приложения в приложение. На прошивке от 11-й версии и более, свайпните вверх – вылезет меню экрана. Снизу иконка с кружочком, нажмите на нее, через 3 секунды начнется запись экрана, о чем сигнализирует красная лента сверху. Остановить запись можно, нажав на эту красную ленту. Запись экрана остается в галерее видеозаписей.

Время на прочтение
12 мин
Количество просмотров 471K
 Итак, о чем и для кого эта статья? Дабы не быть забросанным дискетами, видеокассетами и прочими отходами жизнедеятельности — хочу сразу внести ясность: эта статья не столько для читателей Хабра, сколько для их близких.
Представьте сценарий — кто-то из ваших близких обзавелся iPhone’ом или iPad’ом, но при этом он не из тех, кто будет скурпулезно изучать многостраничное руководство и каждый пункт меню. Вот именно для таких людей я и пишу эту статью.
Конечно, пользоваться ай-гаджетом можно и без инструктажа, но что-то полезное можно при этом упустить.
Но я крайне рекомендую прочитать эту статью целиком. Вряд ли вы запомните как используется весь описанный функционал и сразу побежите все использовать, но у вас отложится в голове, что такой функционал вообще присутствует. И когда вам станет его не хватать — тут-то вы и вспомните об этой статье.
Хоть и хотел я покороче, но нюансов много — так что текст все равно получился объемным… Да, и информация сгруппирована тематически, а не по сложности. Так чо не бросайте на середине  Чтобы было не очень скучно, буду по возможности развлекать вас картинками.
Итак, поехали!
Что там с симкой?
 Если вы не знаете, в айфонах и айпадах используется свой формат симки — microsim. У вас два варианта — либо вооружившись ножницами собственноручно обрезать вашу полноформатную симку до микро-варианта (инструкций по этому поводу — море, например — вот). Только стоит иметь в виду, что даже будучи правильно обрезанной, не каждая симка заработает — некоторые старые не хотят работать.
Либо — просто пойти в салон связи и они выдадут вам микро-симку заблокировав при этом старую. Номер, естественно — сохранится. Не знаю как у других операторов, но у МТС это занимает 2 минуты и бесплатно. Только паспорт захватите.
Как включить?
 Не смейтесь. Купив новый iPhone и нажав «включить», вы обнаружите, что он просит симку и активацию.
С симкой разобрались. Что с активацией?
Для активации вам понадобится компьютер (если телефон на iOS 4), либо же просто WiFi (для iOS 5). Вообще, можно услышать миф — что без компьютера айфоном невозможно пользоваться. Это неправда. Компьютер обязателен только при первом включении девайса на iOS 4. Т.е. если у вас новый iPhone 4S, то даже компьютер не понадобится.
Для активации телефона на iOS 4 — поставьте на компьютер iTunes, подключите телефон к компьютеру, а потом следуйте инструкциям. Там все просто.
Правда, iTunes советую поставить в любом случае, даже если активируете телефон по WiFi. Ибо это — незаменимый инструмент.
Важно.
Сразу замечу несколько моментов, которые могут быть вам интересны:
- Если вы — девушка, то позаботьтесь о приобретении чехольчика для айфона. Он ведь стеклянный с обеих сторон. И стекло это довольно легко царапается (что бы ни уверяли маркетологи). Особенно в женской сумочке

- По поводу защитной пленки на экран — это дело вкуса, конечно. Но имейте в виду, что экран покрыт специальным олеофобным покрытием, которое отталкивает жир. Что позволяет телефону не так заляпываться и легким движением тряпочки — протираться (да и просто — при доставании из кармана / чехла). Если вы наклеите пленку — то лишитесь этого эффекта.
- В качестве подставки/ночной зарядки — советую купить док-станцию (на eBay можно заказать за $3 с доставкой). Только имейте в виду, что подставки с разъемом под наушники как правило переводят телефон в беззвучный режим, когда вы его ставите (если вам это не нравится — это исправляется перерезанием дорожки около единственного резистора внутри подставки).
- Выезжая заграницу — обязательно отключайте «передачу данных». Чтобы не открыть случайно Google Maps или не обновить погоду за большие деньги в роуминге.
Как мне перекинуть контакты со старого телефона?
Синхронизируйте свой старый телефон с Outlook. Для каждой модели телефона это делается своим образом, с помощью специальной программы от производителя.
А потом — уже синхронизируйте контакты Outlook’а с iTunes — и он зальет их на iPhone.
Как скачивать фотки / музыку / видео и т.п.?
Для всего этого служит программа iTunes. Немного тормозная, но таков айтюнз. Да, и процесс скачивания/закачивания называется тут «синхронизация». Вы выбираете в iTunes то, что хотите залить на телефон, а потом нажимаете кнопочку «синхронизировать». Заодно и в обратную сторону — фотки с телефона/планшета копируются на комп.
Кстати, а что там с видео? Я слышал, просто так avi фильм не посмотришь…
Да. Просто так — не посмотришь. Но стоит установить специальный проигрыватель — можно будет смотреть все, что угодно просто скидывая файлы на телефон. Советую AVPlayer. Смотрит все на свете — avi (xvid, divx), mkv и т.п.
Ой, а еще ведь на i-девайсах нет флэша!
Да. Нет флэша. Но я, вот, пользуюсь яблочными устройствами уже не первый год — и ни разу не заметил! Все видео с контакта, youtube, vimeo и т.п. — прекрасно воспроизводится. А то, что я не вижу флэшовых баннеров — это только плюс.
Что такое AppStore? Нужно ли регистрироваться?
 Аппстор — это магазин приложений и игр. Именно отсюда и только отсюда вы можете устанавливать приложения (есть еще неофициальный способ — джейлбрейк, но о нем — ниже).
Так что я настоятельно рекомендую зарегистрироваться в аппсторе, т.к. без него вы теряете минимум половину того, что называется iPhone и 90% того, что называется iPad 
Покупать в аппсторе можно (и нужно) сразу с кредитки. За цены не бойтесь. Большинство полезного — вообще бесплатное или стоит $1.
Если у вас нет кредитки (нужна такая, которой можно было бы платить в инете), то можно зарегистрироваться и без нее — для этого надо попытаться купить бесплатное приложение.
Набор текста и клавиатура.
 «Ъ» на айфоне спрятан на кнопке мягкого знака. Просто подержите ее подольше.
Кроме того, подобным образом можно набрать разные символы типа ₩ ¿ » и т.п. А также, в Safari удерживанием кнопки «.com» можно вызвать список с другими зонами (.net, .org, .ru и т.п.)
Быстрая точка. Очень рекомендую. Это когда набирая два пробела подряд, вы получаете точку и пробел. Включается в настройках: Настройки → Основные → Клавиатура → Быстрая клавиша «.»
Кстати, там же есть резон отключить автокоррекцию. Ибо по умолчанию написав слово, которое девайс считает ошибочным и нажав после него пробел — вы автозамените слово на «правильное». Иногда, когда вы используете слова не из словаря, вы можете обнаружить удивительные результаты уже после отправки сообщения
С запятой сложнее. Либо переключайтесь на символы, набирайте запятую и жмите пробел — раскладка сама вернется к буквам. Либо зажимайте кнопку переключения на символьный регистр и не отрывая ведите пальцем к запятой.
Чтобы включить режим Caps Lock (все заглавные) — дважды нажмите кнопку смены регистра (та, что со стрелкой вверх).
 iPad. Можно разделить клавиатуру на 2 половинки — просто зажмите кнопку с клавиатурой и потяните ее вверх.
Редактирование текста.
Ткните пальцем в текст и курсор переместится в заданное место. Для более точного позиционирования, не отпускайте палец и начните им водить по тексту — появится лупа.

Отменить действие (undo) можно встряхиванием.

Иконки на рабочем столе.
Тут все просто и довольно очевидно. Нажмите на любую иконку и подержите. Через несколько секунд икноки станут дрожать. Теперь их можно перетаскивать. Если бросите одну на другую — они создадут папку. Здесь же можно удалять приложения (тапая по красным минусам в углах). Выход из режима редактирования — Home (1 раз).
Возможно, вы захотите удалить некоторые стандартные иконки (iTunes, FaceTime), чтобы не засорять стол. Их удалить нельзя, но можно отключить в Настройки → Ограничения.
Уведомления.
 Некоторые приложения присылают вам уведомления. Например, клиент ВКонтакте присылает вам все входящие сообщения. То, как отображаются уведомления — всегда можно выбрать в Настройках → Уведомления. Там можно выбрать, будет ли звук, надо ли отображать уведомления сразу на экране (как смс), на заблокированном экране, будут ли они попадать в центр уведомлений и т.п.
Кстати, по поводу центра уведомлений — здесь копятся все ваши уведомления. Чтобы его открыть — потяните верхнюю полоску с часами вниз.
Здесь же может отображаться погода.
Неочевидные кнопки.
Если одновременно нажать кнопку «Home» (круглая, под экраном) и кнопку питания (на верхнем торце) — то вы сделаете снимок экрана.
Длительное нажатие кнопки «Home» — голосовое управление.
Двойное нажатие «Home» на заблокированном телефоне (для iOS версии 5.0) — быстрый вызов камеры (для 5.1 — сдвиг ползунка вверх). Фотографировать можно кнопкой увеличения громкости (в том числе и на гарнитуре, что хорошо чтобы не вносить лишнее дрожание в кадр). Таким, вызывается интерфейс управление проигрывателем музыки (можно управлять проигрыванием не разблокирывая телефон).
Если телефон не отвечает на кнопку выключения и завис, то нажмите Home + Power (как и для снятия скрин-шота) и держите секунд 15. Как только появится яблоко — отпускайте.
Быстрая перемотка вверх.
В записной книжке или в Safari, чтобы быстро вернуться в верх списка (в начало страницы) — нажмите в верхнюю строку с часами.
Звонок.
Если кто-то звонит, но вы не хотите брать трубку — нажмите на кнопку выключения 1 раз. Звонок не сбросится, а телефон продолжит звонить беззвучно.
Второе нажатие — сбросит звонок.
Кроме того, если во время разговора вам понадобилось
поиграть в Angry Birds
порыться в записнушке — можете смело нажимать кнопку «Home». Она даст вам доступ к телефону, а разговор останется.
Кстати, обратите внимание — в верхней части телефона (рядом с динамиком) есть датчик приближения, который гасит экран во время разговора, когда телефон находится близко к голове/щеке (кстати, а теперь вспомните в каком количестве фильмов вы видели, как герой общается по айфону со светящемся экраном! айфон в режиме разговора так делать не будет). Так вот, если во время разговора вы отведете телефон от уха, то датчик сработает — и обратно включит экран (дайте ему на это секунду-другую). Только не загораживайте рукой верхнюю часть телефона, а то экран так и не включится (повторюсь — датчик работает только во время разговора).
Многозадачность. Переключение приложений.
 Нажмите кнопку «Home» два раза подряд и внизу откроется панель с приложениями. Это — приложения, которые были запущены в последнее время. Список листается влево-вправо свайпами (кстати, если листануть его в самое лево, то можно там обнаружить быструю регулировку яркости (для iPad) / громкости (для iPhone) и управление плеером).
Многозадачность в iOS — хитрая. Когда вы сворачиваете приложение, оно не обязательно закрывается. В большинстве случаев оно еще висит в памяти (хоть и не работает). Именно по-этому некоторые приложения при первом запуске запускаются долго, а потом — моментально. Правда, потом, когда система решает, что ей нужна память — она может убить приложение (в списке оно при этом все равно останется).
Есть, правда, категория «неубиваемых» приложений (например, навигаторы) — которые всегда работают в фоне.
Для чего нужен этот список?
Во-первых — вы можете открыть любое из недавних приложений или быстро переключаться между приложениями. Иногда это удобнее, чем искать икноку на рабочем столе.
А во-вторых — вы можете насильно убить любое приложение из памяти. Это может быть полезно, когда речь идет опять-таки о навигаторе (если вы не хотите, чтобы он в фоне жрал батарейку и давал вам указания даже когда вы уже дома). Еще вариант — когда приложение заглючило и вы хотите его полностью перезапустить.
Чтобы закрыть приложение, подержите палец над приложениями в списке снизу (вроде того, как вы делаете на рабочем столе, чтобы перетаскивать иконки). Тогда появятся красные кнопочки «минус» у каждой иконки, с помощью которых и можно их позакрывать.
Так что если у вас есть подозрение, что какое-то приложение сидит в фоне и жрет батарейку используя, например, GPS или интернет трафик — убивайте его!
Как стереть письмо, звонок и т.п.?
Для стирания какого-либо элемента в iOS широко применяется горизонтальный свайп (провести пальцем). Появится кнопка удаления:

Отчет о доставке смс.
Почему-то Apple не включила эту опцию в возможности телефона (видимо, сочла ненужной). Но выход есть. Как правило, чтобы начать получать отчеты о доставке смс, нужно сменить смс-центр и отправить какую-нибудь специальную команду. Все это бесплатно. Что и куда отправлять — зависит от оператора (или даже от региона?). Информацию на эту тему можно найти в интернете. Вот одна из статей: ibobr.ru/manual/iphone-otchet-o-dostavke-sms.html (МТС, Мегафон, Билайн)
Бесплатные смс/ммс и iMessage.
Начиная с 5й версии iOS писалка СМСок слита с сервисом iMessage, позволяющем отправлять текст и картинки по интернету тем, кто тоже пользуется этим сервисом.
По факту — мы получаем копеечные sms’ки (при наличии инета, по цене мобильного трафика) между айфонами.
От вас не требуется ничего. Просто, включите iMessage и все (Настройки → Сообщения → iMessage). И пишите обычные СМСки. Телефон сам разберется — есть ли у адресата на том конце iMessage или нет. И если есть, то отправит ваш текст/картинку через интернет. То, что у вашего собеседника включен iMessage, вы поймете по синей кнопочке «отправить» и по своим синим сообщениям (вместо обычного зеленого).

Что такое iCloud и зачем это мне нужно?
iCloud — это сервис облачного хранения данных (т.е. когда ваши фотки, контакты и т.п. заливаются на сервер Apple и там хранятся (на всякий случай или для синхронизации нескольких i-устройств).
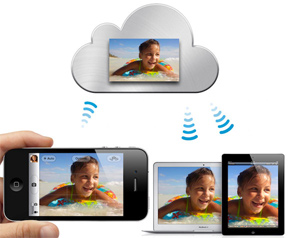 Из удобного и полезного могу отметить сервис «Фотопоток«. Суть такова — все, что вы фотографируете — автоматически заливается в облако и автоматически попадает на все устройства, имеющие к нему доступ. Т.е. если у вас есть iPhone, iPad и обычный компьютер (на Windows или MacOS) — то включив «фотопоток» и сделав снимок на айфоне, он буквально сразу же попадет к вам на айпад и в папочку на компьютере. Никаких проводов и перекачиваний фоток. И естественно это работает только по WiFi. Т.е. телефон не кинется заливать в облако фотку тратя мобильный трафик. Вы погуляли, пофотографировали, пришли домой, телефон поймал домашний WiFi и сам молча скинул все фотки в облако, а от туда они уже попали к вам на компьютер и айпад.
Очень удобно. Все фотки всегда под рукой на всех устройствах. Подключается в «настройках».
Защита от кражи / потери.
Там же, в настройках iCloud советую включить «Найти мой iPhone». Это позволит вам в случае утери/кражи девайса посмотреть, где он находится на карте, удаленно заблокировать его, послать на него сообщение и даже стереть всю информацию.
Только чтобы нашедший/укравший ваше устройство не мог с легкостью отключить эту настройку, то ограничьте ее изменение паролем. Включается это в Настройки → Основные → Ограничения → Учетные записи → Запретить изменение.
Только не обольщайтесь. Это — не панацея. Если человек, в руки которого попало ваше устройство хоть немного «в теме», то он с легкостью обойдет эту защиту путем полной перепрошивки устройства.
Какие приложения поставить?
Приведу список полезных приложений, которые могут понадобиться любому в повседневной жизни.
- Яндекс Карты (бесплатно) — иногда удобнее (и больше адресов/заведений), чем в стандартных Google Maps + автомобильные пробки. Искать телефон какого-нибудь магазина по яндекс-картам — одно удовольствие! Для Питера есть график разводки мостов.
- Если вы за рулем — то однозначно бесплатный Яндекс Навигатор
- Афиша, Киноафиша, Timeout (бесплатно) — посмотреть где какой фильм идет, оценки клубам, кафешками и т.п. Лично я рекомендую Афишу.
- Яндекс Метро (бесплатно) — карта метро с расчетом, сколько времени займет поездка с учетом скорости поездов, пересадок и т.п.
- Яндекс Электрички (бесплатно) — расписание электричек
- Gismeteo lite (бесплатно) — прогноз погоды, угадывает погоду получше встроенной «погоды».
- Фонарик (бесплатно) — светит вспышкой как фонариком, очень ярко. По-любому, надо иметь.
- ВКонтакте (официальное, бесплатно) — любимая соц. сеть всегда под рукой, кроме того — есть возможность настроить уведомления, чтобы все сообщения приходили вам почти сразу же на телефон (как СМСки) и т.п. Только смотрите, не перепутайте — качайте именно официальное приложение от команды ВКонтакте, а не всякие левые, коих с десяток. Не знаю, что там с Одноклассниками, но думаю, что тоже есть свое приложение. Как и у Facebook‘а, конечно же.
- Skype(бесплатно) — Полезно иметь. Даже не обязательно для общения в скайпе. Иногда — незаменимая вещь, например когда вы в роуминге, но есть бесплатный WiFi, то с помощью скайпа можно за копейки звонить на родину.
- AppShopper(бесплатно) — Приложение, которое следит за скидками в AppStore. Очень часто то, что стоит $1 можно урвать бесплатно, а что стоит $5 — за 1 доллар.
- AVPlayer — Всеядный видео-проигрыватель.
- Air Video — Позволяет смотреть видео, хранящееся у вас на компьютере по WiFi. Т.е. если вы любите валяться с айпадом на диване и смотреть фильм, но каждый раз перекачивать видео на сам девайс не хочется — то это для вас.
- Photoshop Express, Instagram (оба бесплатны) — Редакторы фоток — подкрутить яркость, наложить эффекты.
А во что поиграть? Так-то я не играю… но вдруг?
Если вы — не фанат игр, но хотите что-нибудь иметь, чтобы иногда занять 5 минут тырканьем в телефон — то тут я буду не оригинален. (Кстати, многие игры имеют бесплатные lite версии, в которых немного уровней, но с помощью которых можно оценить игрушку)
Советую Angry Birds (их много версий — Space, Rio, Seasons, возьмите обычные для начала).

И Cut the Rope.

Еще советую «Крокодильчика Свомпи» (Where is my water?).
Как не платить за приложения. Джейлбрейк.
 Здесь я не буду вдаваться в подробности, а просто опишу самое важное, что должен знать любой владелец яблочного устройства.
Как я уже говорил, изначально на i-гаджет можно поставить только приложения из AppStore. А это значит, что за платные приложения — вам придется платить. А также, что вы не сможете поставить различные изменялки интерфейса и прочее, что Apple не допустила в свой магазин (Apple категорически против изменения их интерфейса).
Но есть выход — jailbreak (не путать с разлочкой, unlock). Джейлбрейк — это процесс, когда с помощью специальных утилит открывается полный доступ к телефону после чего вы можете без проблем ставить любые приложения/игры (в т.ч. абсолютно бесплатно) и прочие вкусности.
О том, как сделать джейлбрейк — писать не буду. Тут вам поможет специалист или гугл. Расскажу только основные вещи, которые вы должны знать.
- Джейлбрейк восстановим. Т.е. вы всегда сможете откатиться до «официальной» прошивки. Кстати, если у вас брейкнутый девайс — ни в коем случае не обновляете прошивку, т.к. тогда джейл слетит. Кроме того, не для всякой версии прошивки можно сделать джейлбрейк (обычно джейл для новых версий прошивки появляется далеко не сразу).
- Не всякий i-гаджет можно брейкнуть. Например, пока что не существует нормального джейла для iPhone 4S и iPad New. Но хакеры во всю ведут работу
- Джейлбрейк ничуть не мешает продолжать вам пользоваться официальным AppStore и официально покупать там приложения, если хотите.
- Джейлбрейк бывает двух типов — привязанный и непривязанный. Крайне советую пользоваться только непривязанным. «Привязка» означает, что для включения телефона вы должны будете выполнить хитрые манипуляции на компьютере, а значит если вам придется выключить телефон не дома, то обратно вы его уже не включите, пока не доберетесь до компа. Непривязанный джейлбрейк не имеет подобного минуса и не доставляет никакого дискомфорта.
Мне не жалко заплатить $1 за игру, нужно ли мне делать джейлбрейк?
Просто скажу, что джейлбрейк — это не только бесплатная установка приложений.
Джейл позволяет поставить различные изменялки интерфейса (твики).
Из полезного могу порекомендовать:
- SBSettings (быстрые кнопочки для включения/отключения вайфая, сотовых данных и прочего-прочего)
- iBooksFix2 — лечит вылет iBooks после джейла
- KuaiDial — вот это — практически главное, ради чего я делаю джейл. Гибкое изменение звонилки и смсилки. Для меня самые главные функции — это аватарки во всех списках вызова (а не только в «избранных») и в смс чатах. Привык я к ним. (кроме того, там есть возможность черного списка, списка кодов операторов и т.п. — но мне лично это не особо нужно)
Пришло время написать пошаговое учебное пособие для людей, которые держат в руках iPhone впервые в жизни. Меня всегда нервировал тот факт, что многие люди, при покупке телефонов, доверяют выполнение первичной настройки устройства продавцам этих же магазинов.
И все бы ничего, но в большинстве случаев такая услуга оказывается «медвежьей», т.к. впоследствии пользователь остается либо с заблокированным устройством, либо теряет все данные.
Чтобы такого не происходило, сегодня я расскажу как настроить iPhone, и так чтобы все было правильно и работало.
Все мы прекрасно ориентируемся в интерфейсе этого чудо-телефона, но когда дело доходит до каких-либо настроек у многих начинают трястись руки. Да, действительно интерфейс iPhone интуитивно понятен даже маленьким детям, но как правильно настроить iPhone после покупки не знает даже большинство взрослых.
В этой статье я проведу вас за руку через все настройки, которые вы ОБЯЗАНЫ ВЫПОЛНИТЬ. Изначально правильно настроив iPhone, вы избавите себя от проблем с потерей данных и других неприятных ситуаций в будущем.
Скорее всего вы уже выполнили какой-либо из шагов, описанных ниже, но обязательно пройдитесь по каждому из них еще раз и убедитесь что в вашем устройстве активированы все необходимые функции.
Обязательно запоминайте все пароли, которые будете вводить в процессе настройки. Плохо с памятью? – Тогда записывайте в блокнот!
Содержание
- ШАГ 1: Как настроить iPhone при первом запуске
- ШАГ 2: Создаем учетную запись Apple ID
- ШАГ 3: Вводим данные Apple ID в настройки iPhone
- ШАГ 4: Важные настройки iPhone
- ШАГ 5: Функция Найти iPhone (Локатор)
- ШАГ 6: Настройка почты на iPhone
- ШАГ 7: Перенос контактов на iPhone
- ШАГ 8: Устанавливаем свой рингтон
- ШАГ 9: Устанавливаем iTunes на компьютер (Windows/MAC)
- ШАГ 10: Устанавливаем нужные приложения
ШАГ 1: Как настроить iPhone при первом запуске
Я более чем уверен, что вы уже включили свой iPhone и прошли предварительную настройку телефона. Поэтому я не буду подробно останавливаться на выборе языка, страны проживания и других данных.
Вы сможете осилить это и без меня. Хочу обратить внимание лишь на один нюанс: на странице где вас просят ввести Apple ID, просто нажмите пропустить. Мы создадим Apple ID в следующем шаге.
- Если iPhone завис на экране “Сдвиньте для обновления” – читайте эту статью
ШАГ 2: Создаем учетную запись Apple ID
Для того чтобы вы могли пользоваться всеми сервисами Apple, вам необходимо создать свою собственную учетную запись – Apple ID. По сути Apple ID это связка e-mail + пароль, который вы будете использовать для скачивания приложений из App Store, доступа к облачному сервису iCloud и т.п.
На нашем сайте есть подробная инструкция по созданию Apple ID без ввода данных кредитной карты (ссылка ниже). Создавайте ее прямо сейчас и переходите к следующему шагу.
Обязательно ЗАПОМНИТЕ логин, пароль, ответы на контрольные вопросы, дату рождения и резервный e-mail, которые будете вводить при регистрации.
Если плохо с памятью – купите блокнот и все запишите! Гарантирую вам, что без этих данных ваш iPhone в один «прекрасный момент» может превратится в тыкву или кирпич.
Да и еще, никогда и никому не доверяйте данные своего Apple ID, а так же не вводите в свой iPhone чужие Apple ID (iCloud) аккаунты.
Сколько раз ко мне обращались девочки со слезами на глазах и со словами «… пользовалась учеткой подруги, а теперь мы не подруги,… и телефон она мой заблокировала, а пароль поменяла… ой горе-то какое!!!». Ну вы поняли о чем я.
- Как создать Apple ID без банковской карты – инструкция
ШАГ 3: Вводим данные Apple ID в настройки iPhone
После того как вы создали Apple ID, начинается самое интересное. Можно сказать, это самая важная часть в этой статье. Следуйте пунктам ниже и вводите данные вашего нового Apple ID в указанные мной места:
1: Облачные сервисы iCloud
Первое место куда необходимо ввести Apple ID находится здесь: Настройки > iCloud. После ввода логина и пароля Apple ID в соответствующие поля, ваша учетная запись пройдет активацию. От вас необходимо только подтверждения Условий и Положений в появившемся окошке.
- «На этом iPhone активировано предельное количество учетных записей» – читайте здесь
Теперь перед вами должны открыться возможности облачного хранилища iCloud. Из списка опций необходимо активировать переключатели напротив тех данных, которые вы хотите синхронизировать в облако. «Синхронизировать» – означает что данные будут храниться как на вашем iOS устройстве, так и на сервере Apple (в облаке).
Такая себе автоматическая резервная копия. На картинке ниже можно увидеть какие опции активированы у меня. Сделайте примерно так же на своем телефоне. По поводу синхронизации фотографий решайте сами…
Но помните что фотографии очень быстро займут все свободное место (5Гб), выделенных вам в iCloud. Я этот пункт отключил, т.к. мне это не надо.
Необходимые мне фотографии я скидываю на компьютер вручную. Не знаешь как скинуть фотографии с iPhone на компьютер? Вот тебе еще одна инструкция.
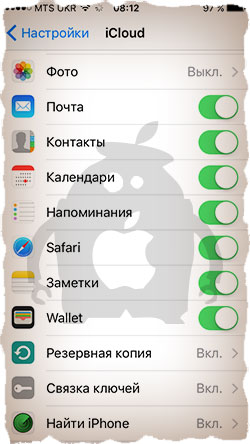
При включении синхронизации напротив Почты или Заметок, от вас потребуют создать почтовый ящик с окончанием @icloud.com. Соглашайтесь и создавайте ящик, следуя подсказкам на экране.
Особое внимание хочу уделить нижнему пункту – «Найти iPhone». Так вот, ОБЯЗАТЕЛЬНО ЕГО ВКЛЮЧИТЕ! Если вы не в курсе, то именно этот пункт дает вам возможность удаленно блокировать iPhone, а также находить его на карте в случае утери (кражи).
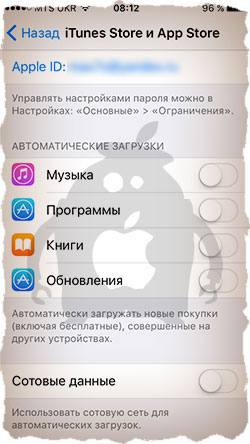
2: Магазины App Store и iTunes Store
Следующий раздел меню Настройки > iTunes Store и App Store. Ввод данных Apple ID в этом месте, как вы уже догадались, даст вам возможность скачивать приложения и другой контент из магазинов App Store и iTunes Store. Вводим данные того же самого Apple ID, который создавали в Шаге 2.
Опять же смотрим на скрин ниже и делаем примерно так как у меня. Я отключил все Автоматические Загрузки, т.к. хочу точно знать что и когда скачивается на телефон. Я считаю что в последнее время телефоны становятся “чересчур умными” и надо их немного ограничивать в возможностях.
3: Активируем iMessage и FaceTime
Apple снабдила свои устройства всем необходимым для бесплатной связи пользователей, даже если они находятся в разных концах земного шара. В вашем распоряжении iMessage для отправки бесплатных сообщений и FaceTime для видео и аудио звонков.
Еще раз повторюсь, эти функции работают только между устройствами Apple посредством интернет.
- Для активации iMessage перейдите в Настройки > Сообщения
- Для активации FaceTime перейдите в Настройки > FaceTime
ШАГ 4: Важные настройки iPhone
Теперь когда с вводом Apple ID покончено, настало время настроить пару функций, которые помогут защитить ваше устройство от взлома и доступа к персональной информации. Как настроить iPhone, чтобы никто кроме вас не смог добраться до персональной информации, я изложил в следующих трех пунктах.
1: Установка пароля (отпечатка пальца Touch ID)
Если у вас модель iPhone 5S и выше, обязательно активируйте функцию разблокировки iPhone при помощи сенсора отпечатка пальцев Touch ID. Делается это вот здесь: Настройки > Пароль, Touch ID.
Если же на вашем iPhone нет сенсора Touch ID, то я настоятельно советую просто установить числовой пароль на разблокировку телефона. По правде говоря, многие владельцы iPhone не пользуются этим средством защиты…
А зря! Нежелание вводить пароль каждый раз при разблокировке iPhone потенциально предоставляет полный доступ к вашей персональной информации чужому человеку.
Не подумайте что я параноик и оглядываюсь сидя в туалете… Но числовой пароль это ОБЯЗАТЕЛЬНЫЙ минимум, который убережет ваши данные. Сначала ввод пароля может напрягать, но через пару дней вы привыкните и будете вводить его «на автомате».
В этом же пункте меню советую активировать переключатель “Выключение телефона только по Touch ID”. Эта функция появилась совсем недавно и, по моему, очень даже в тему. Злоумышленник не сможет выключить ваш iPhone, а значит вы сможете отследить его на карте.
2: Включить Геолокацию
Перейдите в Настройки > Конфиденциальность > Службы геолокации и удостоверьтесь что на вашем iPhone активирован переключатель Службы Геолокации.
Эти службы необходимы для определения местоположения вашего iPhone спутниками системы GPS. Попав в это меню, укажите какие программы по вашему усмотрению должны получать доступ к геолокации, а какие нет.
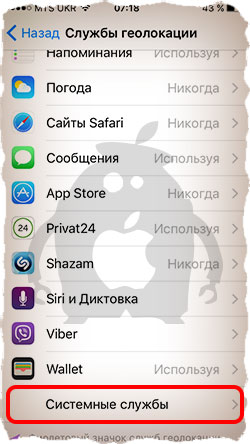
Прокрутив экран ниже, кликните по строке Системные службы. Смотрите на скрин ниже и делайте примерно так как у меня. Самый главный пункт, который надо активировать – “Найти iPhone”.

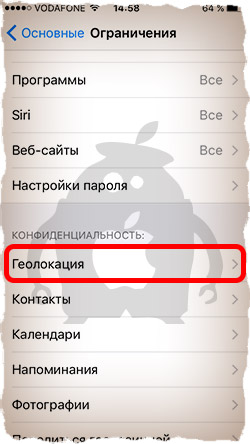
3: Настройка Ограничений
Еще раз оговорюсь – у меня нет мании преследования! … Но я опять буду говорить по поводу защиты информации и телефона в целом. Подумайте и скажите, что первым делом сделает злоумышленник, завладев вашим телефоном? …
Первым делом он захочет его выключить, но об этом мы уже позаботились в предыдущем шаге. Если выключить iPhone не получилось, то злоумышленник, который хоть немного знаком с техникой Apple, скорее всего захочет отключить функцию Найти iPhone.
Без пароля Apple ID отключить Найти iPhone не получится, но можно ведь отключить службы геолокации.
Именно поэтому следующим действием мы ограничим доступ к некоторым функциям Настроек iPhone. Поможет нам в этом целый раздел Ограничения. Переходим в Настройки > Основные > Ограничения.
После активации переключателя вас попросят придумать и ввести четырехзначный пароль. Этот пароль вы будете вводить только тогда, когда захотите вернуться к настройкам ограничений.
Введите что-то простое дабы не забыть… ну например пин код своей банковской карты. Найдите в списке пункт Геолокация и установите галочку напротив Запретить изменения.
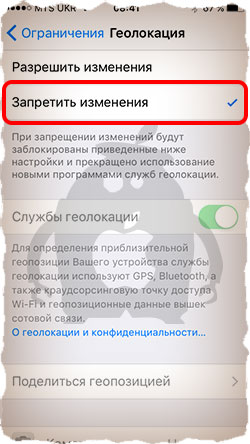
Теперь к настройкам служб Геолокации так просто не доберешься. В меню Настроек все переключатели стали недоступными и подсвечены серым цветом.
Для разблокировки и внесения изменений необходимо снова обратиться в меню Ограничения. Если есть необходимость, то здесь же можно заблокировать доступ к другим функциям вашего iPhone.
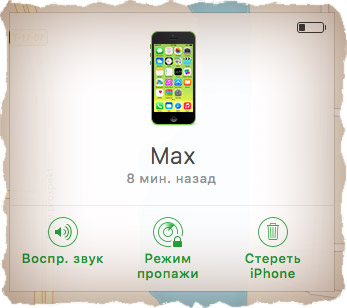
ШАГ 5: Функция Найти iPhone (Локатор)
В ШАГЕ №3 вы должны были активировать функцию “Найти iPhone”, если нет, сделайте это прямо сейчас. Эта функция очень важна, хоть и не видна при ежедневной работе с iPhone.
Что она дает? Основная идея нацелена на сохранность ваших данных. Основная идея в том, чтобы дать вам шанс восстановить контроль над утраченным iPhone.
В случае потери или кражи iPhone, вы должны действовать следующим образом. Заходите на сайт icloud.com под своим Apple ID аккаунтом, выбираете раздел “Найти iPhone” и смотрите на карте мира где находится ваше устройство.
Здесь есть одно условие! Устройство должно быть подключено к интернету, а функция Найти iPhone активирована.
Если же iPhone не подключен к интернету, можно активировать на нем Режим Пропажи, удаленно стереть либо же воспроизвести громкий звук. Любая из этих трех команд будет активирована на утерянном устройстве при следующем его подключении к интернету.
ШАГ 6: Настройка почты на iPhone
В 21 первом веке, электронными почтовыми ящиками пользуются даже бабушки, так что не говори мне что у тебя нет e-mail адреса! Кстати, получать электронные письма сразу не телефон очень удобно…
Для того чтобы настроить почту на iPhone необходимо следовать определенной инструкции. Все зависит от сайта, на котором размещен ваш электронный ящик.
Для настройки почты на iPhone, воспользуйтесь одной из инструкций ниже:
- Rambler
- Яндекс
- Mail.ru
- Gmail
ШАГ 7: Перенос контактов на iPhone
Переезд на новый телефон всегда сопровождается переносом контактов. Если необходимо перенести контакты с iPhone на iPhone, то самым простым способом будет синхронизация их через iCloud.
Если у вас до этого момента не было iPhone, то действовать надо опять по инструкции.
- Как перенести контакты с Android телефона на iPhone – инструкция
- Как перенести .vcf контакты с компьютера на iPhone – инструкция
- Как перенести контакты с SIM карты на iPhone – инструкция
ШАГ 8: Устанавливаем свой рингтон
Если вас не очень устраивают стандартные мелодии звонков, пришло время установить рингтоны на свой музыкальный вкус. Вы ведь должны выделяться из толпы, в конце концов!
На сайте есть отдельная статья, где я просто и доступно описал процесс создания рингтона и установки его на iPhone. На самом деле, все просто. Ссылки на инструкции ниже.
- Как создать свой рингтон для iPhone – читай эту статью
- Как установить рингтон на iPhone – читай эту статью
ШАГ 9: Устанавливаем iTunes на компьютер (Windows/MAC)
Нравится вам это или нет, но для полноценной работы и настройки iPhone вам время от времени прийдется пользоваться программой iTunes.
Именно поэтому скачайте ее с официального сайта и установите на свой компьютер.
- Скачать iTunes с официального сайта – ссылка
- Как устанавливать программы на МАС – инструкция
ШАГ 10: Устанавливаем нужные приложения
В одной из предыдущих статей я писал о том, какие приложения по моему мнению желательно установить на новый MacBook.
Пришла пора написать подобную статью, но теперь про iPhone.
- Мой TOP 21 приложений для iPhone – рекомендую
- Лучшие приложения для iPhone – полный список
Ну вот, наверное, и все настройки iPhone, о которых я хотел вам рассказать. Выполните хотя бы первые пять шагов, и тогда данные на вашем устройстве точно будут в сохранности.
Да, и обязательно поделитесь с друзьями, которые купили, но не знают как настроить iPhone, этим руководством. Давайте остановим произвол барыг из магазинов техники, которые вытряхивают последние монеты из ваших карманов.
Подписывайтесь на наш Telegram, VK.
- Manuals
- Brands
- iPhone Manuals
- Cell Phone
- X
- User manual
-
Contents
-
Table of Contents
-
Bookmarks
Quick Links
iPhone User Guide
Everything you need to know about
iPhone
iPhone X
Say hello to the future
Summary of Contents for iPhone X
-
Page 1
User Guide Everything you need to know about iPhone iPhone X Say hello to the future… -
Page 2
Itʼs all screen With iPhone X, the device is the display—an edge-to-edge screen you can quickly navigate with intuitive gestures. Swipe up from the bottom edge to return to the Home screen, swipe up and pause to see your open apps, or swipe down from the top right to reveal… -
Page 3
Unlock with a glance Use Face ID to unlock your iPhone, authenticate purchases, and use Apple Pay. Itʼs a powerful and secure authentication system thatʼs even more convenient than Touch ID. To set up Face ID, go to Settings > Face ID & Passcode. -
Page 4
, tap Portrait, then drag for Portrait Lighting options like Contour Light or Stage Light (beta). Want to learn more about what you can do with your new iPhone X? Check out Intuitive gestures on iPhone X Get to know iPhone X… -
Page 5
Take your photos to the next level with powerful camera features and editing tools. Donʼt miss it! To quickly open Camera, swipe left from the Lock screen. Frame your shot and tap the Shutter button, or press one of the volume buttons to take the photo. -
Page 6
Frame your shot Choose the right mode for each shot—try Pano for a landscape, or Video to capture the action. If you really want to fine-tune your shot, you can manually adjust the focus and exposure. Tap where you want to set the focus, then slide your finger up or down to change the exposure. -
Page 7
Take amazing portraits If you have iPhone X, iPhone 8 Plus, or iPhone 7 Plus, use Portrait mode to take photos where the background blurs and your subject stays sharp. With iPhone X and iPhone 8 Plus, you can also choose studio-style lighting effects with Portrait Lighting (beta). -
Page 8
Perfect your favorites Tap Edit, then crop , adjust lighting and color , add filters and more. Deciding whether to keep your changes? Just touch and hold the photo to get a peek at the original and see how it compares to your edited version. -
Page 9
Not all features are available for all iPhone models. The gangʼs all here Use iPhone to plan a night out iPhone helps you figure out the details—like where youʼre going to go and how to get there—so you can focus on the fun. -
Page 10
Make a plan Start a group conversation in Messages and begin brainstorming potential activities. When someone suggests a plan you love, respond with a Tapback. Double-tap the message, then give it a thumbs up. -
Page 11
Reserve a table In Maps, pinch open to zoom in on the area you want to search. Tap the search field, tap Food, then tap Restaurants. After reading up on a few spots, choose one and tap Reservations. If you donʼt see a reservation option, just tap to give them a call. -
Page 12
Not all features are available in all areas. Road Trip Bring iPhone along for the ride When youʼre on the road, iPhone can help you find your way, minimize distractions, and keep your hands on the wheel—as you rock out with the perfect road trip playlist. -
Page 13: Safety First
Avoid distractions and focus on the road with Do Not Disturb while driving. Messages and Notifications are silenced, and you can even set iPhone to send an automated reply to people who text you. To customize your settings, go to Settings > Do Not Disturb.
-
Page 14
When you want to rock out to some tunes, Siri can help. Just say, “Hey Siri, play some music.” When you hear something you really like, say, “Hey Siri, play more like this.” Want to learn more about driving with iPhone? Start with Find places in Maps and Do Not Disturb while driving Not all features are available in all areas. -
Page 15
SE iPhone 5s Your features and apps may vary depending on the model of iPhone you have, and on your location, language, and carrier. Note: Apps and services that send or receive data over a cellular network may incur additional fees. -
Page 16
Meet the newest member of the iPhone family and learn what makes it different. Wake iPhone. Raise or tap iPhone. See Wake and unlock iPhone X iPhone X recognizes you. When iPhone X needs to verify your identity, simply glance at it (instead of using a passcode). See Face ID… -
Page 17
Express yourself with Animoji. Create custom animated messages that use your voice and reflect your facial expressions. In a message, tap , choose an Animoji, then tap iMessage apps… -
Page 18
Make easier, safer purchases with Apple Pay. Double-click the side button to display your default credit card, then glance at iPhone X to approve the payment with Face ID. Set up Apple Pay Take selfies with Portrait Lighting. Highlight your face with a stunning effect. In Camera, choose Portrait, then drag to choose the lighting. -
Page 19
Charge wirelessly. Place iPhone X on a Qi wireless charger (available separately). Intuitive gestures on iPhone X… -
Page 20
See Make requests Use Apple Pay. Double-click the side button to display your default credit card, then glance at iPhone X to approve the payment with Face ID. See Set up Apple Pay Use Accessibility Shortcut. Triple-click the side button. See Use accessibility shortcuts Take a screenshot. -
Page 21
8 Plus FaceTime HD camera Side button SIM card tray Home button/Touch ID Lightning connector Volume buttons Ring/Silent switch Dual wide-angle and telephoto rear cameras Quad-LED True Tone flash iPhone 8 FaceTime HD camera Side button SIM card tray… -
Page 22
7 Plus FaceTime HD camera Sleep/Wake button SIM card tray Home button/Touch ID Lightning connector Volume buttons Ring/Silent switch Dual wide-angle and telephoto rear cameras Quad-LED True Tone flash iPhone 7 FaceTime HD camera Sleep/Wake button SIM card tray… -
Page 23
6s Plus and iPhone 6 Plus FaceTime HD camera Sleep/Wake button SIM card tray Home button/Touch ID Lightning connector Headset jack Volume buttons Ring/Silent switch Rear camera True Tone flash iPhone 6s and iPhone 6 FaceTime HD camera Sleep/Wake button… -
Page 24
Accessories included with iPhone The following accessories are included with iPhone: EarPods with Lightning Connector (iPhone X, iPhone 8, iPhone 8 Plus, iPhone 7, and iPhone 7 Plus) or EarPods with 3.5 mm Headphone Plug (other iPhone models). Use the headset to listen to music and videos, and make phone calls. See… -
Page 25: View This User Guide On Iphone
Lightning to USB Cable. Use the cable to connect iPhone to your computer to sync and charge, or to the USB power adapter to charge. Apple USB power adapter. Use the adapter to charge the iPhone battery. The size of your adapter depends on the iPhone model and your region.
-
Page 26: Install The Sim Card
If iPhone doesnʼt turn on, you might need to Charge and monitor the battery Turn off iPhone. Normally, you leave iPhone on all of the time, but if you need to turn it off, go to General > Settings > Shut Down.
-
Page 27: Set Up Iphone
Set up iPhone. Turn on iPhone, then follow the setup assistant. If you have another iPhone, iPad, or iPod touch with iOS 11 or later, you can securely copy many of your settings, preferences, and iCloud Keychain to your new iPhone. Hold your…
-
Page 28
How to unlock your iPhone for use with another carrier Use iPhone for business. If your iPhone is deployed or managed by a company or other organization, see an administrator for setup instructions. For general information, go to Business website… -
Page 29: Configure Settings
Connect to the Internet iPhone connects to the Internet whenever necessary by using Wi-Fi or your carrierʼs cellular network, if available. When an app needs to use the Internet, iPhone tries to do the following, in order: Connects to the most recently used available Wi-Fi network…
-
Page 30: Date And Time
Set up your own Wi-Fi network. If you have an unconfigured AirPort base station turned on and within range, you can use iPhone to set it up. Go to Settings > Wi-Fi, then look for “Set up an AirPort base station.” Tap your base station, and Setup Assistant does the rest.
-
Page 31
Sign in with your Apple ID. If you already have an Apple ID, use it to sign in when you first set up iPhone, and whenever you need to sign in to use an Apple service. If you didnʼt sign in during setup, go to Settings > Sign in to your iPhone. -
Page 32
Apple ID. iCloud is available on devices with iOS 5 or later, on Mac computers with Mac OS X 10.7.5 or later, and on PCs with iCloud for Windows 5 or later (Windows 7 or later is required). -
Page 33: Set Up Other Mail, Contacts, And Calendar Accounts
Move to iOS app, then follow the steps. Note: You can use the Move to iOS app only when you first set up iPhone. If youʼve already finished setup and want to use Move to iOS, you must erase your iOS device and start over, or move your data manually.
-
Page 34: Connect Iphone To Your Computer
Unless iPhone is actively syncing with your computer, you can disconnect it at any time. Look at the top of the iTunes screen on your computer or on iPhone to see if syncing is in progress. If you disconnect iPhone while itʼs syncing, some data may not get synced until the next time you connect iPhone to your computer.
-
Page 35: Back Up Iphone
Back up iPhone You can back up iPhone using iCloud or iTunes. To decide which method is best for you, About backups for iOS devices Tip: If you replace your iPhone, you can use its backup to transfer your information to the new device.
-
Page 36
Connect iPhone to your computer , then open iTunes on your computer. Click the iPhone button, then click Summary in the sidebar. To create a manual backup, click Back Up Now. To turn on automatic iTunes backups, click “This computer.” iTunes automatically backs up iPhone when you connect it to your computer. -
Page 37
Pay friends with a message. (iOS 11.1) Use Apple Pay to send and receive money quickly and easily in Messages. Thereʼs no app to download, and you can use the cards you already have with Apple Pay. See Send and receive money with Apple Pay (U.S. only) Apple Pay Cash. -
Page 38
Take a FaceTime Live Photo. During a FaceTime call, capture a special moment of your conversation. See Make and answer calls A redesigned App Store. See daily stories by experts, a dedicated Games tab, lists for all kinds of apps, and much more in the redesigned App Store. See Find apps and games Ask Siri to do more. -
Page 39
Discover music with a little help from your friends. Your friends can now help you discover new songs and artists. Each of you can have your own profile on Apple Music, where you can see playlists your friends have shared as well as albums and stations they frequently listen to. -
Page 40
See Notifications Do Not Disturb while driving. iPhone can sense when you might be driving and then help you stay focused. When Do Not Disturb while driving is activated, text messages and other notifications are limited, and incoming calls are allowed only when iPhone is connected to a car Bluetooth device or a hands-free accessory. -
Page 41
Type with one hand. (All models except iPhone SE and iPhone 5s) To move the keys closer to your thumb, touch and hold , then slide to choose one of the keyboard layouts. See Type and edit text Move items with drag and drop. With a touch, you can move just about anything within an app—a reminder in a list, a text selection in a note, or a calendar event. -
Page 42
Thereʼs even a dedicated place for your recent files. See View files and folders Quickly set up your new iPhone. Hold your new iPhone near a device with iOS 11 or later to quickly and securely import many of your personal settings and iCloud Keychain passwords. See… -
Page 43
(if you set up iPhone to require a passcode). You can also use Face ID to unlock iPhone X by simply glancing at it. If you didnʼt create a passcode or set up Face ID, go to Settings > Face ID & Passcode. For more information, see… -
Page 44
Lock iPhone X. Press the side button. If you donʼt touch the screen for a minute or so, iPhone locks automatically. (You can also use the side button to wake iPhone.) -
Page 45
You can also use the Touch ID sensor in the Home button to unlock iPhone. If you didnʼt create a passcode or set up Touch ID, go to Settings > Touch ID & Passcode. For more information, see… -
Page 46: Home Screen
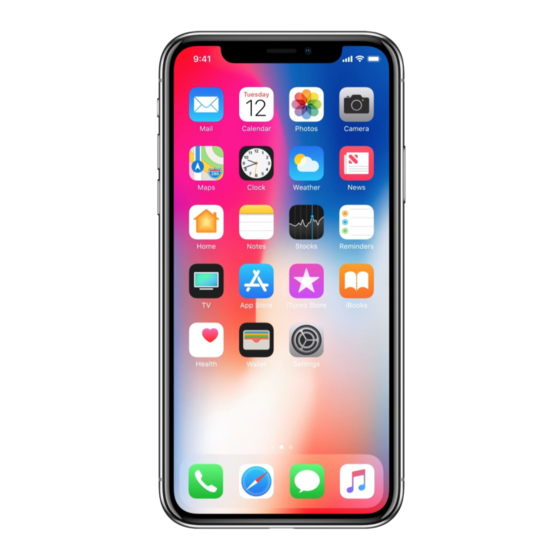
Home screen The Home screen shows all the apps on your iPhone. It consists of multiple pages, added as necessary when you need space for apps. Go to the Home screen. iPhone X: Swipe up from the bottom. Other models: Press the Home button.
-
Page 47
See more of your apps. Swipe left or right to see the apps on other Home screen pages. Some apps may include a badge on their Home screen icon, to let you know how many new items await—for example, the number of new email messages. If thereʼs a problem— such as a message that couldnʼt be sent—an exclamation mark appears on the badge. -
Page 48
Gestures Use a few simple gestures—tap, drag, swipe, and pinch—to control iPhone and its apps. Look around. In an open app, drag a list up or down to see more. Swipe to scroll quickly; touch the screen to stop scrolling. Some lists have an index—tap a letter to jump ahead. -
Page 49
In Maps, double-tap and hold, then drag up to zoom in or drag down to zoom out. 3D Touch 3D Touch gives you another way to interact with iPhone. On supported models, you can press the display to see previews, access useful shortcuts, and more. -
Page 50: Switch Between Apps
Other models: Double-click the Home button. All of your open apps appear in the app switcher. Swipe right to see more. To switch to another app, tap it. Tip: (iPhone X) To quickly switch between open apps, swipe right along the bottom.
-
Page 51: Lock Screen
Choose what you can access from the Lock screen. Go to Settings > Face ID & Passcode (iPhone X) or Settings > Touch ID & Passcode (other models). You can change access to Today View, Recent Notifications, Control Center, and more.
-
Page 52: Control Center
Because Wi-Fi isnʼt turned off when you disconnect from a network, AirPlay and AirDrop still work, and iPhone joins known networks when you change locations or restart iPhone. To turn off Wi-Fi, go to Settings > Wi-Fi. (To turn on Wi-Fi again in Control Center, tap .) For information about turning Wi-Fi on or off in Control Center while in airplane…
-
Page 53
Control Center while in airplane mode, see Travel with iPhone Close Control Center. iPhone X: Swipe up from the bottom. Other models: Swipe down or press the Home button. Turn off access to Control Center in apps. Go to Settings > Control Center. -
Page 54
Set the notification style for an app: Tap the app, then choose from its options. Choose whether to show recent notifications on the Lock screen. Go to Settings > Face ID & Passcode (iPhone X) or Settings > Touch ID & Passcode (other models), then turn on Recent Notifications (below Allow Access When Locked). -
Page 55: Today View
Locations is turned on in Settings > Privacy > Location Services > System Services > Frequent Locations. Choose whether to allow access to Today View when iPhone is locked. Go to Settings > Face ID & Passcode (iPhone X) or Settings > Touch ID & Passcode (other models). Control the volume When youʼre on the phone or listening to songs, movies, or other media, the buttons on…
-
Page 56
Open Control Center, then tap to turn Do Not Disturb on or off. Put iPhone in ring or silent mode. Flip the Ring/Silent switch to put iPhone in ring mode or silent mode In ring mode, iPhone plays all sounds. In silent mode (switch shows orange), iPhone doesnʼt ring or play alerts and other sound effects (but iPhone may still vibrate). -
Page 57: Do Not Disturb
Do Not Disturb To quickly silence iPhone, whether youʼre going to dinner or going to sleep, turn on Do Not Disturb. It silences notifications and calls and prevents them from lighting up the screen. (To help keep calls, text messages, and notifications from distracting you while…
-
Page 58
Use “Do Not Disturb while driving.” If iPhone detects you might might have driven a vehicle before you set up “Do Not Disturb while driving,” iPhone asks if you want to turn it on. Otherwise, go to Settings > Do Not Disturb > Activate, then choose an option:… -
Page 59: Status Icons
Location Services for “Do Not Disturb while driving,” go to Settings > Privacy > Location Services > System Services, then turn off Location-Based Alerts. Status icons The icons in the status bar at the top of the screen give information about iPhone: Status icon What it means Cell signal Youʼre in range of the cellular network and can make…
-
Page 60: Change The Screen Orientation
Wi-Fi iPhone is connected to the Internet over a Wi-Fi network. Connect to Wi-Fi Personal Hotspot iPhone is providing a Personal Hotspot for another device. See Personal Hotspot Syncing iPhone is syncing with iTunes. See Sync iPhone Network activity Shows that thereʼs network activity. Some third-party apps may also use it to show an active process.
-
Page 61
When you use supported models in landscape orientation, some apps have special layouts. These apps include: Mail Calendar Settings Messages Note: These special layouts are not available when Display Zoom is enabled. Lock the screen orientation. Open Control Center, then tap When the screen orientation is locked, appears in the status bar. -
Page 62: Enter Text
Enter text Type and edit text Tap a text field to see the onscreen keyboard, then tap letters to type. If you touch the wrong key, you can slide your finger to the correct key. The letter isnʼt entered until you release your finger from the key.
-
Page 63
Set options for typing or add keyboards. Go to Settings > General > Keyboard. On iPhone 6 and later, the onscreen keyboard includes additional keys, which you can see when you hold iPhone in landscape orientation. You can also use an Apple Wireless Keyboard (available separately) to enter text. See Apple Wireless Keyboard . -
Page 64
Select text. Tap the insertion point to display the selection options. Or double-tap a word to select it. Drag the grab points to select more or less text. In read-only documents, such as webpages, touch and hold to select a word. You can cut, copy, or paste over selected text. -
Page 65: Predictive Text
Undo the last edit. Shake iPhone, then tap Undo. Predictive text As you write, Siri predicts your next word, suggests emoji that could take the place of your word, and makes other suggestions based on your recent activity and information from your apps (not available for all languages).
-
Page 66
When you turn off predictive text, iPhone may still try to suggest corrections for misspelled words. To accept a correction, enter a space or punctuation, or tap return. To reject a correction, tap the “x.” If you reject the same suggestion a few times, iPhone stops suggesting it. -
Page 67: Save Keystrokes
smiley—to insert
frowny—to insert winky—to insert Save keystrokes A shortcut lets you enter a word or phrase by typing just a few characters. For example, type “omw” to enter “On my way!” That oneʼs already set up for you, but you can also add your own. -
Page 68: Move Items
When you search on iPhone, you get results from the Internet, from media and other content on your iPhone, from iTunes and the App Store, and from your apps, like Maps and Contacts. In Settings, you can specify which apps you want to be included in search results.
-
Page 69
Choose which apps to include in search. Go to Settings > Siri & Search, tap an app, then turn Search & Siri Suggestions off or on. Turn off Suggestions in Search. Go to Settings > Siri & Search, then turn off Suggestions in Search. -
Page 70: Voice Control
View more color choices. Tap the current color to view a color palette. Swipe the palette left or right to see more colors. Or, hold iPhone in landscape orientation. Zoom in. Pinch open so you can draw the details, then pinch closed to zoom back out.
-
Page 71
Voice Control (below Press and Hold to Speak). Use Voice Control. Press and hold the side button (iPhone X) or the Home button (other models) until the Voice Control screen appears and you hear a beep, or press and hold the center button on your headset. -
Page 72: Charge And Monitor The Battery
WARNING: For important safety information about the battery and charging iPhone, see Important safety information Charge the battery. Connect iPhone to a power outlet using the included cable and USB power adapter. You can also charge the battery on supported models by placing iPhone face up on a Qi wireless charger.
-
Page 73: Low Power Mode
Sync iPhone . Unless your keyboard has a high-power USB 2.0 or 3.0 port, you must connect iPhone to a USB 2.0 or 3.0 port on your computer. Important: The battery may drain instead of charge if iPhone is connected to a computer thatʼs turned off or is in sleep or standby mode.
-
Page 74: Travel With Iphone
Turn on Share My Location. Go to Settings > [your name] > iCloud > Share My Location. Share your location with a friend. Open Find Friends on iPhone, then tap Add. Select a contactʼs name, or type a name in the To field, then tap Send. Choose how long you want to share your location.
-
Page 75
Turn on Wi-Fi or Bluetooth while in airplane mode. If your airline allows it, you can use Wi-Fi or Bluetooth while in airplane mode. Open Control Center, turn on airplane mode, then tap (for Wi-Fi) or (for Bluetooth). If you turn on Wi-Fi or Bluetooth while in airplane mode, it will be on the next time you return to airplane mode. -
Page 76: Make Requests
To turn Hey Siri on or off, go to Settings > Siri & Search > Listen for “Hey Siri.” Note: On some models, Hey Siri is only recognized when iPhone is connected to a power source.
-
Page 77: Tell Siri About Yourself
Adjust the volume for Siri. Use the volume buttons while youʼre interacting with Siri. For voice feedback options, go to Settings > Siri & Search > Voice Feedback. Prevent access to Siri when iPhone is locked. Go to Settings > Siri & Search > Allow Siri When Locked.
-
Page 78
As Siri learns about you on one device, Siri improves your experience on your other devices. Based on how you use your iPhone, Siri makes suggestions for what you might want to do next. Siri might help when you: Create email and events: When you start adding people to an email or calendar event, Siri suggests the people you included in previous emails or events. -
Page 79: Siri And Apps
& Siri suggestions for specific apps. Siri Eyes Free With Siri Eyes Free, you can use iPhone features in your car without looking at or touching iPhone—you can control it completely by speaking. To talk with Siri, press and hold the voice command button on your steering wheel until you hear the Siri tone. You can ask Siri to call people, select and play music, hear and compose text messages, get directions, read your notifications, find calendar information, add reminders, and more.
-
Page 80: Personalize Your Iphone
To move an app to the Dock: Drag it to the Dock at the bottom of the screen (remove another app first). To finish, tap Done (iPhone X) or press the Home button (other models). Tip: If you have a device with 3D Touch and you canʼt get your apps to jiggle, make sure you are resting your finger on the app lightly and holding it there, not pressing down.
-
Page 81: Remove Apps
When you finish, tap Done (iPhone X) or press the Home button (other models). Tip: If you have a device with 3D Touch and you canʼt get your apps to jiggle, make sure youʼre resting your finger on the app lightly and holding it there, not pressing down.
-
Page 82
To return to the Home screen, where you can drag other apps into the folder or create another folder, tap outside of the folder. To finish, tap Done (iPhone X) or press the Home button (other models). You can have multiple pages of apps in a folder. -
Page 83: Change The Wallpaper
Change the wallpaper Wallpaper settings let you set an image or photo as wallpaper for the Lock screen or Home screen. You can choose from dynamic and still images. Change the wallpaper. Go to Settings > Wallpaper > Choose a New Wallpaper. Tip: If you choose your own image as wallpaper, you can pinch open to zoom in on your selected image, then drag your finger to move the image.
-
Page 84
Settings > Display & Brightness > Night Shift to schedule it to turn on automatically. If you schedule Night Shift to turn on from sunset to sunrise, iPhone uses the data from your clock and your geolocation to determine when itʼs nighttime for you. -
Page 85: Your Iphone Name
Your iPhone name The name of your iPhone is used by iTunes and iCloud. Change the name of your iPhone. Go to Settings > General > About > Name. Set Restrictions You can set restrictions for some apps, and for purchased content. For example, parents can restrict explicit music from appearing in playlists, or disallow changes to certain settings.
-
Page 86: Use International Keyboards
Asian languages and languages written from right to left. For a list of supported keyboards, go to Appleʼs iPhone website , choose your iPhone, click Tech Specs, then scroll to Languages. Manage keyboards. Go to Settings > General > Keyboard > Keyboards.
-
Page 87: Special Input Methods
See 3D Touch As you write character strokes, iPhone recognizes them and shows matching characters in a list, with the closest match at the top. When you choose a character, its likely follow- on characters appear in the list as additional choices.
-
Page 88
You can type some complex characters, such as 鱲 (part of the name for the Hong Kong International Airport), by writing two or more component characters in sequence. Tap the character to replace the characters you typed. Roman characters are also recognized. Type Japanese kana. -
Page 89: Phone Calls
Phone calls Make a call Making a call on iPhone is as simple as choosing a number in your contacts, or tapping one of your favorites or recent calls. WARNING: For important information about avoiding distractions that could lead to…
-
Page 90
Wi-Fi network to make the call. When someone calls Answer an incoming call. Tap Accept (if iPhone is unlocked) or drag the slider (if iPhone is locked). You can also press the center button on your EarPods. -
Page 91
To make calls this way, you need iOS 8 or later, and OS X 10.10 or later. You must be signed in to iCloud and FaceTime on all devices using the same Apple ID as on iPhone, and all devices must be connected to the same Wi-Fi network. -
Page 92
Identify spam calls. Download a spam-blocking app from the App Store, and iPhone alerts you to potential spam calls. To view your spam-blocking apps on iPhone, go to Settings > Phone > Call Blocking and Identification. If you have multiple spam-blocking apps, you can change which one checks an unknown number first. -
Page 93: Conference Calls
Accept. With a CDMA network, tap End and when the second call rings back, tap Accept, or drag the slider if iPhone is locked. With a call on hold, tap Swap to switch between calls, or tap Merge Calls to talk with both parties at once.
-
Page 94: International Calls
For information about making international calls from your home area (including rates and other charges that may apply), contact your carrier. When traveling abroad, you may be able to use iPhone to make calls, send and receive text messages, get visual voicemail, and use apps that access the Internet, depending on available networks.
-
Page 95: Emergency Calls
Turn off the countdown sound. Go to Settings > Emergency SOS. If Countdown Sound is on, iPhone plays a warning sound even in silent mode or when Do Not Disturb is turned Notify your emergency contacts. After an emergency SOS call ends, iPhone alerts your emergency contacts that you made a call and sends them your current location (if available).
-
Page 96: Visual Voicemail
(when applicable) if iPhone does not have a SIM card or the SIM card is PIN-locked. In the U.S., location information (if determinable) may be accessed by emergency service providers when you make an emergency call.
-
Page 97
See Use Contacts from within the Phone See the phone number for your iPhone. Go to Settings > Phone > My Number. 3D Touch. To add a contact from the Home screen, press Phone, then choose the Create New Contact quick action. -
Page 98: Call Forwarding, Call Waiting, And Caller Id
Call Forwarding: appears in the status bar when call forwarding is on. You must be in range of the cellular network when you set iPhone to forward calls, or calls wonʼt be forwarded. Call Waiting: If youʼre on a call and call waiting is turned off, incoming calls go directly to voicemail.
-
Page 99: Browse The Web
Safari Browse the web With Safari on iPhone, you can browse the web, add webpages to your reading list to read later, and add page icons to the Home screen for quick access. If you sign in to iCloud with the same Apple ID on all your devices, you can see pages you have open on other devices, and keep your bookmarks, history, and reading list up to date on your other devices.
-
Page 100
View tabs that are open on your other devices. If you sign in to iCloud with the same Apple ID on all your devices, and you turn on Safari in Settings > [your name] > iCloud on iPhone, you can view tabs that are open on your other devices. Tap , then scroll to the list at the bottom. -
Page 101: Search The Web
Search the web Search the web. Enter a URL or search term in the search field at the top of the page, then tap a search suggestion, or tap Go on the keyboard to search for exactly what you typed. If you donʼt want to see suggested search terms, go to Settings > Safari, then turn off Search Engine Suggestions (below Search).
-
Page 102: Save A Reading List For Later
Choose which favorites appear when you tap the search field. Go to Settings > Safari > Favorites. See your Mac bookmarks on iPhone. Go to Settings > [your name] > iCloud, then turn on Safari. Add an icon for the current page to your Home screen. To quickly access the page from your Home screen, tap , then tap Add to Home Screen.
-
Page 103: Fill In Forms
View your reading list. Tap , then tap Delete an item from your reading list. In your reading list, swipe the item to the left. Automatically save all reading list items to iCloud for offline reading. Go to Settings > Safari, then turn on Automatically Save Offline (below Reading List). Fill in forms When you sign in to a website, sign up for a service, or make a purchase, you can fill in a web form using the onscreen keyboard, or have Safari fill it in for you using AutoFill.
-
Page 104
View your saved passwords. Go to Settings > Accounts & Passwords > App & Website Passwords, then use Face ID (iPhone X) or Touch ID (other models), or enter your passcode. Fill in a form. Tap a field to bring up the keyboard. Tap above the keyboard to move from field to field. -
Page 105
Mode is on, the Safari background is black instead of white, and sites you visit donʼt appear in History on iPhone or in the list of tabs on your other devices. To hide the sites and exit Private Browsing Mode, tap , then tap Private again. -
Page 106: Send And Receive Messages
Messages Send and receive messages Use Messages to send and receive texts, photos, videos, and more through iMessage or SMS/MMS services. With the iMessage service, you can enhance your messages with bubble effects, invisible ink, full-screen effects, your own handwriting, Digital Touch, iMessage apps, stickers, and more.
-
Page 107
Alternatively, to start a conversation from Mail, Calendar, or Notes, touch and hold a phone number, then tap Send Message. 3D Touch. To start a conversation from the Home screen, press the Messages icon, then tap New Message. See 3D Touch Send a message to a group. -
Page 108
Apple service that sends messages over Wi-Fi or cellular connections to other iOS devices (with iOS 5 or later) and Mac computers (with OS X 10.8 or later). These messages donʼt count against your messaging plan. Messages sent via iMessage can include photos, videos, and other info. -
Page 109
If youʼre signed in to iMessage with the same Apple ID on all your devices, all the messages that you send and receive on iPhone can also appear on your other Apple devices. Send a message from whichever device is closest to you, or use Handoff start a conversation on one device and continue it on another. -
Page 110
Messages > Expire (below Audio Messages), then tap Never. Raise iPhone to listen or reply to an audio message. Raise iPhone to your ear to play incoming audio messages; raise it again to reply. To turn this feature on or off, go to Settings >… -
Page 111
Add a comment if you want, then tap to send or to cancel. Express yourself with Animoji. (iPhone X) Tap , choose an Animoji, then tap record your facial expressions and voice. Tap to review your message, then tap send or to cancel. -
Page 112
Decorate with stickers. Tap a stickers app to open it, touch and hold a sticker, then drag it anywhere in the conversation. Before you release, you can: Adjust the angle: Rotate a second finger around the finger dragging the sticker. Adjust the size: Move a second finger closer to or away from the finger dragging the sticker. -
Page 113
Ask Siri. Say something like, “Send 75 dollars to Phillip.” To complete the payment, tap , then: iPhone X: Double-click the side button, then glance at iPhone to approve with Face ID or enter your passcode. Other models: Approve with Touch ID or enter your passcode. -
Page 114
Digital Touch With iMessage, you can use Digital Touch to send sketches, taps, kisses, heartbeats, and more. You can even add a Digital Touch effect to a photo or video. Sketch. Tap , tap , then draw with one finger. You can change the color, then start drawing again. -
Page 115
Handwritten messages With iMessage, you can send a handwritten message. The recipient sees the message animate, just as ink flows on paper. Create and send a handwritten message. In landscape orientation, tap the text field, then tap . Write a message with your finger. Tap Done, then tap to send or cancel. -
Page 116
Use a bubble effect. After you type a message, press (touch and hold on devices without 3D Touch). Tap the choices to preview different bubble effects. Tap to send. Tip: Want to send a personal message? When you use invisible ink, the message remains blurred until the recipient swipes to reveal it. -
Page 117
Messages > Blocked. For more information, see the Apple Support article Block phone numbers and contacts or filter messages on your iPhone, iPad or iPod touch Filter iMessage messages from unknown senders. Go to Settings > Messages, then turn on Filter Unknown Senders. This turns off iMessage notifications from senders who aren’t in your contacts and moves the messages to the Unknown Senders tab in the Messages list. -
Page 118: Music Overview
Music Music overview Use the Music app to enjoy music stored on iPhone as well as music streamed over the Internet. You can also listen to Beats 1 radio, which broadcasts all day, every day from studios in Los Angeles, New York, and London. With an optional Apple Music membership, you can listen to millions of songs recommended by music experts and discover new music together with friends.
-
Page 119: Get Personalized Recommendations
Note: High Quality Streaming uses more cellular data, and songs may take longer to start playing. If youʼre not a member, you can use the Music app to listen to music stored on iPhone, play and download previous iTunes purchases, and listen to Beats 1 for free.
-
Page 120
Library The Library tab includes any added or downloaded music from Apple Music, music and music videos synced to iPhone, TV shows and movies you added from Apple Music, and iTunes purchases. Browse and play your music. Tap a category, such as Playlists or Albums, tap the album art, then tap . -
Page 121: Download Music
On the Now Playing screen, tap Music you add to iPhone is also added to other devices where youʼre signed in to the iTunes Store and App Store using the same Apple ID and have iCloud Music Library turned on.
-
Page 122: Search For Music
3D Touch. Press the song or album, then tap Remove. See 3D Touch To remove all songs or certain artists from iPhone, go to Settings > Music > Downloaded Music, tap Edit, then tap next to All Songs or the artists whose music you want to delete.
-
Page 123
Quickly navigate to the album. Tap the song, artist, or album name in Now Playing. Hide Now Playing. Tap at the top of the Now Playing screen. Share music. Tap , then tap Share Song. Shuffle. Swipe up, then tap to play your songs in random order. -
Page 124
For You In For You, discover playlists created by Apple Music experts, albums based on your tastes, and music your friends are listening to. Play music. Tap a playlist or album, then tap . Tap to shuffle the playlist or album. Tap an album or a playlistʼs album art to view its contents. -
Page 125
Add friends when you set up your profile. Swipe to the bottom of the profile screen, tap Find More Friends, then tap Follow next to those you want to follow. Tap a profile picture, then tap Follow. Tap Search, enter a friendʼs name, tap it in the results, then tap Follow. Note: Your friends must have a profile for you to find them using search. -
Page 126
Create a public playlist. Select a playlist you created, tap Edit, then turn on Public Playlist. Edit a playlist you created on iPhone. Select the playlist, then tap Edit. Add more songs: Tap a playlist, tap Edit, tap Add Music, then choose music from your library. -
Page 127
Delete a playlist. Touch and hold the playlist, then tap Delete from Library. 3D Touch. Press a playlist, then tap Delete from Library. See 3D Touch Browse Get recommendations for great music, music videos, playlists, and more—all tailored for your tastes. Explore new music. -
Page 128: Siri And Voice Control
Listen to live radio. Tap the currently playing Beats 1 program. Note: Because Beats 1 is live radio, you canʼt pause, rewind, or skip songs. Listen to past shows and find out when your favorite shows are on. Tap Beats 1, then tap a show or DJ.
-
Page 129
Browse Apple Music: You can play any Apple Music song by title (“play ‘Old Friendsʼ by Jasmine Thompson”), by artist (“play Daye Jack”), and by chart (“play the top song from March 1991”). Choose music by mood: Say something like “play something happy” or “play some upbeat music.”… -
Page 130: Write Messages
Mail Write messages WARNING: For important information about avoiding distractions that could lead to dangerous situations, see Important safety information Create a message. Tap . Touch and hold to view draft messages youʼve saved. 3D Touch. To create a new message from the Home screen, press Mail, then choose the New Message quick action.
-
Page 131
Add attachments. Double-tap in the message body, tap Add Attachment, then select a document in Files Insert a photo or video. Double-tap in the message body, then tap Insert Photo or Video. Quote some text when you reply. Touch and hold in the message body, then select the text you want to include. -
Page 132: Finish A Message Later
Save a draft for later. If youʼre writing a message and want to finish it later, tap Cancel, then tap Save Draft. To get it back, touch and hold With OS X 10.10 or later, you can also hand off unfinished messages with your Mac. See Handoff…
-
Page 133: Delete Messages
Move to Junk to file it in the Junk folder. If you accidentally move a message, shake iPhone immediately to undo. Make a mailbox a favorite. Favorite mailboxes appear at the top of the Mailboxes list so you can access them easily.
-
Page 134
Recover a deleted message. Go to the accountʼs Trash mailbox, open the message, then tap and move the message. Or, if you just deleted it, shake iPhone to undo. To see deleted messages across all your accounts, add the All Trash mailbox. To add it, tap Edit in the mailboxes list, then select it in the list. -
Page 135: Work With Multiple Messages
Work with multiple messages Move or mark multiple messages. While viewing a list of messages, tap Edit. Select some messages, then choose an action. If you change your mind, shake iPhone immediately to undo. Manage a message with a swipe. While viewing a list of messages, swipe a message to the left to reveal a menu of actions.
-
Page 136: See And Save Addresses
ones you want to use. See the whole conversation. Go to Settings > Mail, then turn on Organize by Thread. Swipe left or right on a message in a thread to reveal actions. To change how threads are displayed, go to Settings > Mail. To change the swipe settings, go to Settings > Mail > Swipe Options.
-
Page 137: Manage Your Calendar
Ask Siri. Say something like: “Whatʼs on my calendar for Friday?” View a weekly calendar. Rotate iPhone sideways. Change your view. Tap a year, month, or day to zoom in or out on your calendar. In week or day view, pinch to zoom in or out.
-
Page 138
View a list of events. In month view, tap to see a dayʼs events. View events sent to you in Mail or other apps. Tap Settings > Calendar > Siri & Search, then turn on Find Events in Other Apps. Adjust an event. -
Page 139: Use Multiple Calendars
Use multiple calendars See multiple calendars at once. Tap Calendars, then select the calendars you want to view. Set a default calendar. Go to Settings > Calendar > Default Calendar. When you add an event using Siri or using other apps, itʼs added to your default calendar. Change the color of a calendar.
-
Page 140: Share Icloud Calendars
Share iCloud calendars You can share an iCloud calendar with other iCloud users so they can view, add, and change events, and share a read-only version that anyone can view. If you set up Family Sharing, a calendar shared with all the members of your family is created automatically. Family Sharing Create an iCloud calendar.
-
Page 141: Photos Overview
With the Photos app you can view, organize, share, and edit your photos and videos. There are many ways to get photos and videos on iPhone: take them with Camera, turn on iCloud Photo Library to sync all your photos and videos on all your Mac and iOS devices, sync them with iTunes from your computer, import them from a camera, save them from an email or a webpage, and more.
-
Page 142: View Photos And Videos
View photos and videos Browse your photos and videos. Tap Photos, then tap a photo. While viewing a photo, swipe the thumbnails to browse photos, then tap a thumbnail to view a photo. Drag down the photo to continue browsing Moments or Albums. Note: By default, Photos displays a representative subset of your photos when you view by year or by collection in the Photos tab.
-
Page 143
Note: On models that support 3D Touch, you can also use a Live Photo as the wallpaper on the Lock screen. See Change the wallpaper View photo and video details. Tap a photo or video, then swipe up to see: Related memories. -
Page 144: Organize Photos And Videos
If you use iCloud Photo Library, albums are stored in iCloud. Theyʼre up to date and accessible on devices where youʼre signed in to iCloud with the same Apple ID—iOS devices with 8.1 or later, Mac computers with OS X 10.10.3 or later, and on iCloud.com Create a new album.
-
Page 145
. To pause, tap the movie, then tap . To switch between portrait and landscape orientation while viewing the movie, rotate your iPhone. Scrub through a Memory movie. Tap a Memory movie while itʼs playing to show the controls, then swipe left or right through the scrubber. -
Page 146
Choose a title image: Tap Title Image, then tap the photo or video you want to use. Choose different music: Tap Music, then choose music from a soundtrack or from your music library (only music you own thatʼs stored on iPhone is available). Choose a custom duration: Tap Duration. -
Page 147
Trim a video in the Memory movie: Tap Photos & Videos, tap a video in the timeline, then trim the video. See Edit photos and trim videos Note: When you tap to rotate a Memory movie youʼre editing, it changes the way the movie is displayed only while youʼre editing it. -
Page 148: Icloud Photo Library
Edit photos and trim videos To use iCloud Photo Library, you need a device with iOS 8.1 or later, a Mac with OS X 10.10.3 or later, or a PC with iCloud for Windows 5 or later. Note: If you turn on iCloud Photo Library, you canʼt use iTunes to sync photos and videos to iPhone.
-
Page 149: My Photo Stream
Originals. Your originals are always stored in iCloud. Download a full-resolution photo or video. If youʼre not storing full-resolution versions on your iPhone, pinch to zoom in to 100%, or tap Edit. The full-resolution photo or video downloads automatically. Note: To always use cellular data to upload and download from iCloud Photo Library, go to Settings >…
-
Page 150: Icloud Photo Sharing
If theyʼre using iCloud Photo Sharing on a device with iOS 6 or later or on a Mac with OS X 10.8 or later, they can view your albums and leave comments. If theyʼre using iOS 7 or later or OS X 10.9 or later, they can add their own photos and videos.
-
Page 151: Other Ways To Share Photos And Videos
Live Photo plays in Photos on any iOS device with iOS 9 or later or a Mac with OS X 10.11 or later. For devices or services that donʼt support Live Photos, a Live Photo is shared as a still photo.
-
Page 152: Edit Photos And Trim Videos
Photo Library, the All Photos album. Edit photos and trim videos You can edit still photos and Live Photos right on iPhone. If your photos are stored in iCloud, your edits are updated across all your devices set up with iCloud, and both your original and edited versions are saved.
-
Page 153
Add a Live Photo effect. Swipe up on a Live Photo and tap an effect. Loop repeats the action in a continuous looping video. Bounce rewinds the action backwards and forward. Long Exposure simulates a DSLR-like long exposure effect by blurring motion. Make a still photo from a Live Photo. -
Page 154: Import Photos And Videos
Trim a video. Tap Edit, drag either end of the frame viewer, tap Done, then tap Save as New Clip. The new video clip is saved in your Videos album (the original video remains unchanged). Set the slow-motion section of a video shot in Slo-mo. Tap Edit, then use the vertical bars beneath the frame viewer.
-
Page 155
1. Insert the camera adapter or card reader into the Lightning connector on iPhone. 2. Do one of the following: Connect a camera: Use the USB cable that came with the camera to connect the camera to the camera adapter. Turn on the camera, then make sure itʼs in transfer mode. -
Page 156: Take Photos
To choose a mode, swipe the screen left or right, or tap Photo, Square, or Pano. On iPhone X, iPhone 8 Plus, and iPhone 7 Plus, you can also choose Portrait mode, which includes a depth effect that focuses on your subject and blurs the background.
-
Page 157
Keep it straight. To display a grid that can help you align shots, go to Settings > Camera, then turn on Grid. Zoom in or out. (iPhone X, iPhone 8 Plus, and iPhone 7 Plus) The Dual 12MP wide-angle and telephoto cameras capture full-resolution video and stills at 1x and 2x zoom. To quickly switch, toggle . -
Page 158
TrueDepth camera, choose Portrait mode, then frame your face. Turn Depth Effect on or off for a photo. (iPhone X, iPhone 8 Plus, and iPhone 7 Plus) In the Photos app, view a photo that was shot in Portrait mode, tap Edit, then tap Portrait to turn the blurred depth effect on or off. -
Page 159
Camera > Preserve Settings, then turn on Camera Mode. You can also preserve Live Photo settings on models that support Live Photos. Compress photos to save space. (iPhone X, iPhone 8, iPhone 8 Plus, iPhone 7, and iPhone 7 Plus) To save space, iPhone captures photos and videos in new high-efficiency formats called HEIF and HEVC automatically. -
Page 160: Adjust For The Perfect Shot
Turn the flash on or off. Tap . The True Tone flash on the back of iPhone also provides extra light when you need it. To use it as a flashlight, open Control Center, then tap the Flashlight button.
-
Page 161
HDR versions of photos are marked with “HDR” in the corner. Turn off Auto HDR. iPhone X, iPhone 8, and iPhone 8 Plus: Go to Settings > Camera, then turn off Auto HDR. (If Auto HDR is turned off in Settings and you want to make sure HDR is turned… -
Page 162: View, Share, And Print
Photo Library to upload photos and videos from your iPhone to iCloud. You can access them on your devices with iOS 8.1 or later where youʼre signed in to iCloud using the same Apple ID. You can also upload and download your photos and videos from the Photos app on iCloud.com.
-
Page 163: Find Places
Maps Find places Move around Maps by dragging the screen. To face a different direction, rotate with two fingers. To return to north, tap Ask Siri. Say something like: “Find coffee near me” “Show me the Golden Gate Bridge” WARNING: For important information about navigation and avoiding distractions that could lead to dangerous situations, see Important safety information Zoom in or out.
-
Page 164
Area (“Greenwich Village”) Landmark (“Guggenheim”) Zip code (“60622”) Business (“movies,” “restaurants San Francisco CA,” “Apple Inc New York”) Maps may also list recent locations, searches, or directions that you can choose from. Change the search area. Zoom in or out, or drag the screen to another area, then tap Search Here. -
Page 165: Share A Location
Help improve Maps. To report an incorrect label, a missing location, or other issue, tap , then tap Report an Issue. Get directions Note: To get directions, iPhone must be connected to the Internet. To get directions involving your current location, Location Services must also be on. (See also Location Services Ask Siri.
-
Page 166
Hear turn-by-turn directions. Find a route to drive, then tap Go. Maps follows your progress and speaks turn-by-turn directions to your destination. When Do Not Disturb while driving is turned on, or if iPhone auto-locks, Maps stays onscreen and continues to announce directions. -
Page 167
Ask Siri. Say something like: “Stop navigating.” Use Maps on your Mac to get directions. Open Maps on your Mac (OS X 10.9 or later), get directions for your trip, then choose File > Share > Send to [your device]. Your Mac and iPhone must both be set up with iCloud using the same Apple ID. -
Page 168: D And Flyover
Tap the name of a city (in Map or Satellite view) or tap the name of a landmark, then tap Flyover in the banner (Flyover Tour on iPhone 6 and iPhone 5s). To return to the map, tap On supported models, view a city or landmark from above: Change viewing direction: Point or tilt iPhone in the direction you want to view.
-
Page 169
Move around: Drag a finger in any direction. To rotate perspective, touch and hold the screen with one finger, then continue holding it in place while you drag another finger around it. Watch an aerial 3D tour: Tap Start Tour in the card at the bottom of the screen. (If you donʼt see the card, tap anywhere on the screen.) Flyover cities are indicated by next to their names in Map view. -
Page 170
Clock See the time in cities around the world Use the Clock app to view the time in various locations around the world. Ask Siri. Say something like: “What time is it?” “What time is it in London?” Manage your World Clock list. In the World Clock tab, tap Edit. Add a city: Tap , then choose a city. -
Page 171
See your sleep history. The Sleep Analysis portion of the Bedtime tab shows your history for the past several days, based on your use of iPhone during those hours. Your sleep history is automatically provided to Health, too, where you can view more data. -
Page 172
Tip: To quickly access the timer, open Control Center, then tap . You can access Timer from Control Center even when iPhone is locked. Measure the duration of an event and track lap times. Tap Stopwatch, then tap Start. Tap Lap to record a lap or split. The timing continues even if you return to the Home screen, open other apps, or press the side button or Sleep/Wake button (depending on your model). -
Page 173
See a detailed forecast. Swipe up to see details such as the times of sunrise and sunset, the chance of rain, and the humidity. Add a city. Tap , then tap . Enter a city or zip code, then tap Search. See the weather in another city. -
Page 174
News Get started with News News collects all the stories you want to read, from your favorite sources, about the topics that interest you most. To personalize News, you can choose from a selection of publications (called channels in News) and topics such as Entertainment, Food, and Science. -
Page 175
For You For You presents the best stories from the channels and topics you follow. For You also includes stories suggested by Siri, breaking news, top stories of the day, trending stories that are popular with other News readers, featured stories selected by Apple News editors, and more. -
Page 176
channels in Following. See stories only from the channels you follow. Go to Settings > News, then turn on Restrict Stories in For You. Note: Restricting stories significantly limits the variety of stories that appear in For You. When you restrict stories, you wonʼt see Top Stories, Trending Stories, and Featured Stories. -
Page 177
Share stories. When viewing a story, tap , then choose a sharing option, such as Message or Mail. To share a story from your list, swipe the story left, tap Share, then choose a sharing option. Report a concern. If you believe that a story youʼre viewing is mislabeled, inappropriate, offensive, or doesnʼt display properly, swipe right, then tap Report. -
Page 178
Explore suggestions. On the Following screen, tap a channel or topic under Suggestions to browse its contents. Tap See All for more suggestions. Tap next to a suggestion to follow it. Tap next to a suggestion to dislike it. Browse a channelʼs stories. Tap a channel or topic to see the most recently published stories. -
Page 179
the channel or topic. View trending topics. Search shows trending topics to get you started. Tap a topic to see search results for that topic, then tap to follow the specific topic or a related topic or channel. Save stories In News you can save stories to read later, online or offline. -
Page 180
Subscriptions in News Subscribe to channels. With News you can read premium stories from select publishers. There are three ways to access subscriptions in News: Subscribe within News: You can purchase a subscription directly in News. In a channel that offers subscriptions, tap the subscription button. Access an existing subscription purchased from iTunes or the App Store: News checks your iTunes Store account for subscriptions you bought as in-app purchases in publishersʼ… -
Page 181
With Home, you can control any “Works with Apple HomeKit” accessory using iPhone. After you set up your home and its rooms, you can control accessories individually, or use scenes to control multiple accessories with one command. -
Page 182: Create And Use Scenes
itself (or its box or documentation). You can assign the accessory to a room, as well as give it a name. The name defines how itʼs shown in the Home app, and also how you control it using Siri. Control an accessory. Tap an accessoryʼs button to quickly turn it on or off, or touch and hold the button until controls appear.
-
Page 183: Control Your Home Using Siri
Make a scene a favorite. Touch and hold a scene, tap Details, then tap Show in Favorites. Favorite scenes appear on the Home tab and are handy for scenes that arenʼt automated. Control your home using Siri You can use Siri to control your accessories and scenes. Here are some of the things you might be able to say to Siri, depending on your accessories, how youʼve named them, and the scenes youʼve created: “Turn off the lights”…
-
Page 184: Share Control With Others
If you have an Apple TV and youʼre signed in using the same Apple ID as your iPhone, it will be paired automatically and enabled for automation. To set up iPad for automation, see the Home chapter of iPad User Guide.
-
Page 185: Take Notes
See the Upgrade your notes website. Store certain notes only on your iPhone. Go to Settings > Notes, then turn on “On My iPhone” Account. Notes in this account appear only on your iPhone. Your notes in iCloud wonʼt be affected.
-
Page 186
Set the default account for adding or editing notes using Siri or Today View. Go to Settings > Notes > Default Account. Tip: If you add the Notes widget to Today View , you can create and view Notes right from there. -
Page 187
Add info from another app. When youʼre in another app and find something that you want to add to Notes (like a location in Maps, a webpage in Safari, or a PDF in Files), tap Share or , then tap Add to Notes. You can create a new note or add the attachment to an existing one. -
Page 188
Edit the suggested note title. (Not available in all languages) If your note starts with handwritten text, scroll to the top of the note to reveal the suggested title, then tap Edit. Search for typed and handwritten text within a note. Tap , tap Find in Note, then type the text youʼre looking for in the search field. -
Page 189
View more color choices. Tap the current color to view the color palette. Swipe the palette left or right to see more colors. Or, hold iPhone in landscape orientation. Draw straight lines. Tap the ruler tool to make it appear on your canvas. Draw a line along the edge of the ruler. -
Page 190: Scan A Document
You can use the camera to scan documents into Notes, then add markup or signatures. Scan documents. Tap , then choose Scan Documents. When you position iPhone so that the document page appears on the screen, iPhone automatically captures the page. Continue to scan more pages or tap Save when youʼre done.
-
Page 191
Tip: To manually capture a page, tap . Tap Keep Scan to save the page or tap Retake to try again. Turn the flash on or off. Tap . Apply a filter. Tap , then choose to scan the page as a color, grayscale, or black and white document, or as a photo. -
Page 192
Ask Siri. Say something like: “Show notes from today.” Pin an important note. To keep a note at the top of the notes list, swipe right on the note in the list, then tap the pin. Your pinned notes show up on all your Apple devices where youʼre signed in to iCloud using the same Apple ID. -
Page 193
Lock notes Secure notes that contain sensitive information with a password, Face ID (iPhone X), or Touch ID (other models). You can lock notes that you want to keep private from anyone who might use your device. Notes uses a single password for all your locked notes, on all of your devices. -
Page 194
Set Face ID or Touch ID to unlock your notes. iPhone X: Go to Settings > Notes > Password, then turn on Use Face ID. Other models: Go to Settings > Notes > Password, then turn on Use Touch ID. -
Page 195
View the summary, chart, or news for a stock. Tap the stock, then swipe left or right below the stock list to change the information displayed. On larger iPhone models, rotate to landscape orientation to see your stock list with news, or with the summary and chart, all at the same time. -
Page 196
See the difference in value over time: Touch and hold the chart with two fingers. Note: Quotes may be delayed 20 minutes or more, depending on the reporting service. Read a news article. Tap a news headline to view the article in Safari. To save an article to your reading list, touch and hold the news headline, then tap Add to Reading List. -
Page 197
Reminders Reminder lists With Reminders you can keep track of all the things you need to do. 3D Touch. To add a reminder from the Home screen, press Reminders, then choose a quick action. See 3D Touch Add a reminder. Tap a blank line in a list. Share a list using iCloud. -
Page 198: Scheduled Reminders
Reminders. Some other types of accounts, such as Exchange, also support Reminders. You can change how reminders in the past are synced in Settings > Reminders. With OS X 10.10 or later, you can hand off reminders youʼre editing between your Mac and iPhone.
-
Page 199
Location-based reminders Be reminded when you arrive at or leave a location. Swipe a reminder to the left, tap More, then turn on “Remind me at a location.” Tap Location, then select a location in the list, or enter an address. After you define a location, you can drag to change the size of the geofence on the map, which sets the approximate distance at which you want to be reminded. -
Page 200
Watch movies and TV shows Use the TV app to discover and watch movies and TV shows from your supported apps in one place. You can continue a movie or show, or go to the next episode in a TV series, even if you started playing on another iOS device or on Apple TV. -
Page 201
Music videos: Open the Music app. Podcasts: Open the Podcasts app. Videos you recorded with your iPhone camera: Open the Photos app. Watch Big Little Lies on HBO NOW with subscription. HBO NOW® is accessible in the U.S. and certain U.S. -
Page 202: Control Playback
Play a movie or show. Tap a title to see the details screen, where you can: Stream the content if iPhone is connected to the Internet: Tap Download the content so you can watch it later when iPhone isnʼt connected to the Internet: Tap Add new movies and shows to your library.
-
Page 203
Open the TV app on Apple TV: The Watch Now section includes the shows and movies youʼve been watching. You must be signed in with the same Apple ID on iPhone and Apple TV. AirPlay to Apple TV: Start playing the video on iPhone, then tap . For more information, see… -
Page 204: Watch Videos
Videos Watch videos Use Videos to watch movies and TV shows on iPhone. In Videos, you can also purchase movies and TV shows from the iTunes Store that can be played on your other devices where youʼre signed in to iCloud with the same Apple ID.
-
Page 205: Add Videos To Your Library
Open Videos on iPhone, then tap Shared. Convert a video for iPhone. If you try to sync a video from iTunes on your computer to iPhone and a message says the video canʼt play on iPhone, you can convert the video.
-
Page 206
Open the TV app on Apple TV: The Watch Now section includes the shows and movies youʼve been watching. You must be signed in with the same Apple ID on iPhone and Apple TV. AirPlay to Apple TV: Start playing the video on iPhone, then tap . For more information, see… -
Page 207: App Store
App Store Find apps and games Use the App Store to find, purchase, and download apps and games to iPhone. Note: You need an Internet connection and an Apple ID to use the App Store. The App Store isn’t available in all areas.
-
Page 208: Purchase, Redeem, And Download
Browse games by category. Tap Games, then scroll down to Top Categories and choose a category—for example, Action, Arcade, or Family. Find a specific app. Tap Search, enter the name in the search field, then tap Search on the keyboard. Ask Siri.
-
Page 209
View and download your previous purchases. Tap Updates, tap your profile picture in the upper right, then tap Purchased. To automatically download apps that you purchase on other Apple devices, go to Settings > [your name] > iTunes & App Store, then turn on Apps (below Automatic Downloads). -
Page 210: Itunes Store
Store Find music, movies, TV shows, and more Use the iTunes Store to add music, movies, TV shows, and ringtones to iPhone. Note: You need an Internet connection and an Apple ID to use the iTunes Store. The iTunes Store isnʼt available in all areas.
-
Page 211: Purchase, Rent, Or Redeem
Rent a movie. Tap the movieʼs rental price, then tap Rent. You can choose to stream the movie to iPhone or download the movie to play when youʼre offline. To start or continue the movie on another iOS device (iOS 10.3 or later), Apple TV (tvOS 10.3 or later), or Mac (with iTunes 12.6 or later), make sure youʼre signed in to the iTunes Store with the same…
-
Page 212
You have 30 days to start watching a rented movie. After you start watching a movie, you can play it as many times as you want during the 48-hour rental period. When the rental period ends, the movie is deleted. Note: Movie rentals and streaming arenʼt available in all areas or for all movies. -
Page 213: Get Books
iBooks Get books Get books from the iBooks Store. In iBooks, use the buttons at the bottom of the screen to access the iBooks Store. Tap Featured to browse the latest releases, or Top Charts to view the most popular. To find a specific book, tap Search. 3D Touch.
-
Page 214
Show the controls. Tap near the center of a page. Not all books have the same controls, but some of the things you can do include searching, viewing the table of contents, and bookmarking the page. Close a book. Tap , or pinch the page. Enlarge an image. -
Page 215: Listen To An Audiobook
Change the brightness. Tap . If you donʼt see , tap first. Dim the screen when itʼs dark. Turn on Auto-Night Theme to automatically change the bookshelf, page color, and brightness when using iBooks in low-light conditions. (Not all books support Auto-Night Theme.) Use study notes and glossary terms In books that support it, you can review all of your highlights and notes as study cards.
-
Page 216: Organize Books
Open an audiobook. Audiobooks are identified by a on the cover. Tap the book you want to listen to. If you donʼt see it in the library, swipe left or right to view other collections. Skip farther forward or back. Touch and hold the arrows, or slide and hold the book cover.
-
Page 217: Read Pdf Documents
Search for a book. Pull down to reveal the Search field at the top of the screen. Searching looks for the title and the authorʼs name. Remove books. Tap Select, select some books, tap Delete, then choose an option. Hide books you havenʼt downloaded. If you see on a cover or next to a title, you can download the book again without charge.
-
Page 218
With Health, you can sign up to be an organ donor, save health records to iPhone, and share your data with family members and healthcare providers. And, Health can display important contacts and medical information on the iPhone Lock screen for emergency responders. -
Page 219: Get Started
Health displays your sleep history. To view your sleep history in Health, tap Health Data, then tap Sleep. Collect data from Apple Watch. After you pair Apple Watch with your iPhone, data is automatically sent to Health. To view your move, exercise, and stand data and goals, tap Health Data, then tap Activity.
-
Page 220: Create A Medical Id
View your Medical ID from the Lock screen. You can see how your Medical ID appears to emergency responders. iPhone X: Press and hold the side button and either volume button until the sliders appear, then drag the slider for Medical ID. When you are finished, tap Done. The next time you unlock iPhone, your passcode is is required to enable Face ID again.
-
Page 221: Manage Health Records
Manage health records A health record typically contains patient information such as medications, immunizations, lab results, and more. If you receive a health record as a CCD file in ZIP or XML format, you can store it in Health. You can also share it with other healthcare providers and family members.
-
Page 222
Wallet Wallet overview Use Wallet to keep cards and passes in one place for easy access: Cards for Apple Pay: (Not available in all areas) Apple Pay Cash, credit, debit, store, and prepaid cards Passes: Boarding passes, movie tickets, coupons, reward cards, and more (The Apple Pay Cash card is available only in the U.S.) -
Page 223: Apple Pay
. You may be asked to sign in to iCloud with your Apple ID. Add a new card: Position iPhone so that your card appears in the frame or enter the card details manually. Add your previous cards: Select the card associated with your Apple ID, Apple Pay cards on your other devices, or cards that youʼve removed.
-
Page 224
Set up Apple Pay Cash. Go to Settings > Wallet & Apple Pay, then turn on Apple Pay Cash. Use Apple Pay Cash. Send and receive money with Apple Pay (U.S. only) Pay at a store Pay in apps or on the web Manage your Apple Pay Cash. -
Page 225
Other models: Place your finger on Touch ID or enter your passcode. Position the top edge of iPhone about an inch (2.5 cm) from the symbol on the reader, until iPhone vibrates. A checkmark on the screen and an audible beep confirm that the payment information has been sent. -
Page 226
Then on iPhone, review the payment summary and authorize the payment. If you donʼt want to use Apple Pay on your iPhone to confirm payments on your Mac, go to Settings > Wallet & Apple Pay, then turn off Allow Payments on Mac. -
Page 227
Specify the shipping address and contact information for purchases. Go to Settings > Wallet & Apple Pay. Prevent cards from appearing when you double-click. Go to Settings > Wallet & Apple Pay. iPhone X: Turn off Double-Click Side Button. Other models: Turn off Double-Click Home Button. -
Page 228
You can also call the issuers of your cards. Note: If you sign out of iCloud in Settings > [your name], all your credit and debit cards for Apple Pay are removed from iPhone. You can add the cards again the next time you sign in to iCloud. -
Page 229
Display a pass based on location. A pass can appear on the Lock screen when you wake iPhone at the right time and place—for example, when you reach the airport for a flight youʼre taking. Make sure Location Services is turned on in Settings > Privacy >… -
Page 230: Make And Answer Calls
Use FaceTime to make video or audio calls to someone whoʼs also using an iOS device or a Mac. With the front-facing camera, you can talk face-to-face; switch to the rear iPhone camera to share what you see around you. To capture a special moment of your conversation, take a FaceTime Live Photo, which takes a still and records a brief video of the moment.
-
Page 231
Canʼt take a call right now? When a FaceTime call comes in, you can answer or choose another option. See the whole gang. Rotate iPhone to use FaceTime in landscape orientation. To avoid unwanted orientation changes, lock iPhone in portrait orientation. See… -
Page 232
Apple Support article Block calls and block or filter messages on your iPhone, iPad, or iPod touch Delete a call from call history. Tap FaceTime to see your call history. Swipe a call to the… -
Page 233: Get Podcasts
Add an episode to your library. For podcasts that you havenʼt subscribed to, tap next to an episode. Play an episode. Tap the episode, then tap . If the episode isnʼt downloaded, itʼs streamed to iPhone. To download the episode so you can play it when youʼre offline, tap…
-
Page 234
Ask Siri. Say something like: “Play podcasts” Resume playing an episode. Tap Listen now. Episodes you havenʼt finished are near the top of the list. Sync your podcast subscriptions on all your devices. Go to Settings > Podcasts, then turn on Sync Podcasts. Control playback Show the playback controls. -
Page 235
Stream the podcast to another device. Tap , then choose a device. For more information, see Stream audio and video to other devices Control playback with Apple EarPods. Pause: Press the center button. Press again to resume playback. Skip to the next episode: Press the center button twice quickly. Return to the previous episode: Press the center button three times quickly. -
Page 236
“Whatʼs 18 percent of 225?” Delete the last digit. Swipe left on Calculatorʼs display. Clear the last entry. Tap the Clear (C) key. Clear the calculation results. Tap the All Clear (AC) key. Use the scientific calculator. Rotate iPhone to landscape orientation. -
Page 238
Files View files and folders Files brings all your documents, presentations, spreadsheets, images, and other files together so that you can browse, search, and organize them in one place, including files in iCloud Drive and other cloud storage providers like Box and Dropbox. View recent files and folders. -
Page 239
Organize files and folders To keep yourself better organized, use Files to create folders and move files between them. Create a folder. Open a folder, drag down from the center of the screen, then tap . (If you donʼt see the New Folder button, you canʼt create a folder in that location.) Copy, duplicate, rename, move, or delete a file or a folder. -
Page 240
Drive, by giving them permission to edit or view the files. You can use iCloud Drive on iOS devices (iOS 8 or later), Mac computers (OS X 10.10 or later), and PCs (iCloud for Windows 5 or later or Windows 7 or later). To access iCloud Drive, you must be signed in to iCloud using your Apple ID. -
Page 241
If you donʼt see Add People, the document may be owned by someone else who shared it with you. Tap Show People to see the ownerʼs name. Important: When you share a file on iCloud Drive, a link to the file (which includes its title) is created on iCloud. -
Page 242
Important: The accuracy of the compass can be affected by magnetic or environmental interference; even the magnets in the iPhone earbuds can cause a deviation. Use the digital compass only for basic navigation assistance. Donʼt rely on it to determine precise location, proximity, distance, or direction. -
Page 243
Compass, then choose the Level quick action. See 3D Touch Hang it straight. Hold iPhone against a picture frame or other object, then rotate them until you see green. For true level, the deviation is displayed on a black background. If the background is red (indicating relative slope), tap the screen to change it to black. -
Page 244: Manage Contacts
Create a new contact. Tap iPhone automatically suggests new contacts from messages you receive in Mail and invitations in Calendar, and from other apps. To turn this feature off, go to Settings >…
-
Page 245
Contact. Add your contact info iPhone uses your Apple ID to create your My Card, but you may need to provide your contact information to complete it. Complete your My Card. Open Contacts, tap My Card at the top of your contacts list, then tap Edit. -
Page 246: Use Contacts From Within The Phone App
Automate dialing an extension or passcode. If the number youʼre calling requires dialing an extension, iPhone can enter it for you. When editing a contactʼs phone number, to enter pauses in the dialing sequence. Tap Pause to enter a two-second pause, which is represented by a comma.
-
Page 247: Hide Duplicate Contacts
Hide duplicate contacts When you have contacts from multiple sources, you might have multiple entries for the same person. To keep redundant contacts from appearing in your All Contacts list, contacts from different sources with the same name are linked and displayed as a single unified contact.
-
Page 248: Voice Memos
Voice Memos Record With Voice Memos you can use iPhone as a portable recording device. Use it with the built-in microphone, an iPhone or Bluetooth headset mic, or a supported external microphone. Record a voice memo. Tap or press the center button on your headset. Tap again to pause or resume.
-
Page 249: Play It Back
When you delete a synced voice memo from iTunes, it stays on the device where it was recorded, but itʼs deleted from any other iPhone or iPod touch you synced. If you delete a synced voice memo on iPhone, itʼs copied back to iPhone the next time you sync with iTunes, but you canʼt sync that copy back to iTunes a second time.
-
Page 250
Sharing Share from apps In many apps, you can tap Share or to choose how to share your information. The choices vary depending on the app youʼre using. Additional options may appear if youʼve downloaded apps with sharing options. For more information, see App extensions Share from the Files app. -
Page 251
(iOS 7 or later). With iOS 8 or later, you can share with Mac computers with OS X 10.10 or later. AirDrop transfers information using Wi-Fi and Bluetooth—both must be turned on. To use AirDrop, you need to be signed in to iCloud using your Apple ID. -
Page 252
Apple ID for everything). Family Sharing is available on iOS devices with iOS 8 or later, Mac computers with OS X 10.10 or later, and PCs with iCloud for Windows 5 or later. You can be part of only one family group at a time. -
Page 253
Create an Apple ID for a child. Go to Settings > [your name] > Family Sharing, then tap Create a Child Account. For more information, see the Apple Support article Family Sharing and Apple ID for your child Accept an invitation to Family Sharing. Tap Accept in your invitation. Or, if you are near the organizer during the setup process, you can enter the Apple ID and password you use for iCloud on the organizerʼs device. -
Page 254
Send and receive messages Keep track of your familyʼs devices. If family members enabled Share My Location in iCloud, you can help them locate missing devices. Open Find iPhone on your device or at iCloud.com. For more information, see Find My iPhone Leave Family Sharing. -
Page 255: Iphone And Other Devices
(iOS 10, macOS Sierra, watchOS 3 required). For more information about setting up AirPods, go to the AirPods Support website Bypass your Bluetooth device for phone calls. To use the iPhone receiver or speaker for calls: Answer a call by tapping the iPhone screen.
-
Page 256
Switch back to iPhone. Tap , then choose your iPhone. You can also connect iPhone to a TV, projector, or other external display using the appropriate Apple cable or adapter. For more information, see the Apple Support article About Apple Digital AV Adapters for iPhone, iPad, and iPod touch… -
Page 257
Cancel a job. Select it in Print Center, then tap Cancel Printing. Apple EarPods The EarPods that come with your iPhone feature a microphone, volume buttons, and the center button. Use the center button to answer and end calls, control audio and video playback, and use Siri, even when iPhone is locked. -
Page 258: Apple Watch
Apple Watch Use the Apple Watch app (not available in all areas) to learn more about Apple Watch, and to pair your Apple Watch with iPhone. Just tap the Apple Watch app, then follow the onscreen instructions. Apple Wireless Keyboard You can use an Apple Wireless Keyboard (available separately) to enter text on iPhone.
-
Page 259: Universal Clipboard
Wi-Fi calling lets you make and receive calls on your iPad, iPod touch, or Mac by relaying calls through your iPhone. To make calls this way, you need iOS 9 or later and OS X 10.10 or later. You must be signed in to iCloud and FaceTime on all your devices using the same Apple ID as on iPhone.
-
Page 260: Instant Hotspot
You can use Instant Hotspot to provide Internet access to your other iOS devices (iOS 8 or later) and Mac computers (OS X 10.10 or later) where youʼre signed in to iCloud with the same Apple ID. Instant Hotspot uses your iPhone Personal Hotspot, without you having to enter a password or even turn on Personal Hotspot.
-
Page 261
Bluetooth device, refer to the documentation that came with your device. Note: When a device is connected, a blue band appears at the top of the iPhone screen. The Personal Hotspot icon appears in the status bar of iOS devices using Personal Hotspot. -
Page 262: About Carplay
CarPlay puts key iPhone apps on your carʼs built-in display. With CarPlay and your iPhone, you can get turn-by-turn directions, make phone calls, exchange text messages, listen to music, and more. CarPlay uses the contacts on your iPhone to help you make calls, send texts, and find destinations.
-
Page 263
Rearrange the icons on the CarPlay Home screen. When youʼre not operating your car, go to Settings > General > CarPlay on your iPhone, then select your car. Touch and hold any icon, then drag it. To remove an icon, tap it. To add it back, tap it again. (An icon that can be removed appears with a gray circle in its upper-left corner.) -
Page 264
You can use other apps even when getting directions. CarPlay lets you know when itʼs time to make a turn. Ask Siri. Say something like: “Take me home” “Get directions to the nearest coffee shop” “Whatʼs my ETA?” “Find a gas station” Display likely destinations. -
Page 265
Music Use Siri or open Music to access your Apple Music membership, For You, New, and the music on your iPhone—including songs, artists, albums, and playlists. Or tune in to Radio. Ask Siri. Say something like: “Play [a specific artist, album, song, playlist, or station].” If Siri doesnʼt find what you asked for, be more specific. -
Page 266: Other Apps
Displays a list of songs queued for playback. (You can select a song from the list to skip the songs that proceed it.) Podcasts Use Siri or open Podcasts to find a podcast on your iPhone and play it with CarPlay. Ask Siri. Say something like: “Play the Freakonomics Radio podcast”…
-
Page 267: Privacy And Security
Privacy and security Privacy Location Services Location Services lets location-based apps such as Reminders, Maps, Camera, and Wallet gather and use data indicating your location. Your approximate location is determined using available information from cellular network data, local Wi-Fi networks (if you have Wi-Fi turned on), and GPS (if available).
-
Page 268
Media & Apple Music Motion & Fitness Review the terms and privacy policy for each third-party app to understand how it uses the data itʼs requesting. For more information, see the Apple Support article About privacy and Location Services Advertising and tracking Turn off location-based ads and offers. -
Page 269
Mail messages and attachments stored on iPhone, using 256-bit AES encryption. (Other apps may also use data protection.) Use Face ID. (iPhone X) Go to Settings > Face ID & Passcode. You can turn on Face ID to unlock iPhone, make purchases, and allow Safari AutoFill. See Face ID Add fingerprints and set options for the Touch ID sensor. -
Page 270: Two-Factor Authentication
> Account Details > Security, then click Get Verification Code. Add another iOS device (iOS 9 or later) or a Mac (OS X El Capitan or later) as a trusted device. After you turn on two-factor authentication, use the same Apple ID to sign in to iCloud on another device.
-
Page 271
Face ID iPhone X With a simple glance, Face ID securely unlocks your iPhone X. You can use it to authorize purchases from the iTunes Store, App Store, iBooks Store, and payments with Apple Pay. Developers can also allow you to use Face ID to sign into their apps. -
Page 272
Face ID also has an accessibility feature to support individuals who are blind or have low vision. If you don’t want Face ID to require that you look with your eyes open at iPhone X, go to Settings > General > Accessibility, then turn off Require Attention for Face ID. This is automatically disabled if you enable VoiceOver during your initial set up of iPhone. -
Page 273
Touch ID Models with the Home button When you set up Touch ID, you can unlock iPhone by placing a finger on the Home button. You can use Touch ID to authorize purchases from the iTunes Store, App Store, iBooks Store, and payments with Apple Pay. Developers can also allow you to use Touch ID to sign into their apps. -
Page 274: Icloud Keychain
Wi-Fi network information up to date across all of your approved devices (iOS 7 or later) and Mac computers (OS X 10.9 or later). iCloud Keychain is secured with 256-bit AES encryption during storage and transmission, and its data cannot be read by Apple.
-
Page 275: Find My Iphone
Allow Find My iPhone to locate your iPhone. Go to Settings > [your name] > iCloud, then turn on Find My iPhone. Also turn on Send Last Location to have iPhone send its last location prior to the battery running out. (See iCloud if you need help setting up iCloud.)
-
Page 276: Restart, Update, Reset, And Restore
, then tap the app. Opening the app again may resolve the problem. Restart iPhone. To turn off iPhone, go to Settings > General, then tap Shut Down. Or: iPhone X: Simultaneously press and hold the side button and either volume button until the sliders appear, then drag the top slider to power off.
-
Page 277: Reset Iphone Settings
Before you update, make a backup of iPhone using iCloud iTunes Update wirelessly on iPhone. If a message says that an update is available, tap Install Now. Or go to Settings > General > Software Update to check for available software updates.
-
Page 278
Reset Location & Privacy: Resets the location services and privacy settings to their defaults. Restore iPhone To restore copies of your content and settings to iPhone, you must first create a backup of your iPhone. See Back up with iCloud Backup Back up iPhone with iTunes If youʼre asked to enter your passcode or Apple ID password and youʼve forgotten either,… -
Page 279
Restore iPhone to factory settings using iTunes. Connect your device to a computer open iTunes on the computer, click the iPhone button near the top of the iTunes window, then click Restore iPhone in the Summary pane. All of the content and settings on iPhone are deleted, and the latest iOS software is installed. -
Page 280
After iPhone restarts, follow the setup assistant to either set up iPhone as new or restore it from an iCloud or iTunes backup. -
Page 281: Accessibility Features
Accessibility Accessibility features iPhone provides many accessibility features to support your vision, interaction, hearing, and learning needs. Vision VoiceOver Zoom Magnifier Display accommodations Speak Selection, Speak Screen, and Typing Feedback Face ID and attention aware features (iPhone X) Large, bold, and high-contrast text…
-
Page 282: Use Accessibility Shortcuts
Siri Use accessibility shortcuts Use iTunes on your computer to configure accessibility on iPhone. In iTunes, you can enable a limited number of accessibility features, including VoiceOver, Zoom, Invert Colors, Speak Auto-text, mono audio, and “Show closed captions when available.” Click Summary, then click Configure Accessibility at the bottom of the Summary screen.
-
Page 283
Use Accessibility Shortcut: Triple-click the Home button. Slow down the double-click or triple-click speed for the Home button: Go to Settings > General > Accessibility > Home Button. Use Control Center. Customize Control Center: Go to Settings > Control Center > Customize Controls, then tap next to accessibility features such as Accessibility Shortcuts, Magnifier, Hearing Aids, Touch Accommodations, and Guided Access. -
Page 284
VoiceOver VoiceOver overview VoiceOver is a gesture-based screen reader that lets you use iPhone even if you donʼt see the screen. Add VoiceOver to Accessibility Shortcut to enable it wherever you are in iOS. Hear a description of whatʼs on your screen, from battery level, to whoʼs calling, to which app your finger is on. -
Page 285
In VoiceOver settings, you can enter a special area where you can practice VoiceOver gestures without affecting iPhone or its settings. Practice VoiceOver gestures. Go to Settings > General > Accessibility > VoiceOver, then tap VoiceOver Practice. When you finish practicing, tap Done. If you donʼt see the VoiceOver Practice button, make sure VoiceOver is turned on. -
Page 286
Unlock iPhone with your passcode. From the Lock screen: iPhone X: Drag up from the bottom edge of the screen until you feel a vibration, then enter your passcode. Other models: Press the Home button, then enter your passcode. -
Page 287
Unlock iPhone with Face ID. (iPhone X) To set up Face ID, go to Settings > Face ID & Passcode. To unlock, wake iPhone and glance at it. If you donʼt want iPhone to require your attention for unlocking, go to Settings > Accessibility, then turn off Require Attention for Face ID. -
Page 288
Search from the Home screen. Tap anywhere on the Home screen outside the status bar, then swipe down with three fingers. Switch apps. iPhone X: Drag up from the bottom edge of the screen until you feel the second vibration. Other models: Double-click the Home button. -
Page 289
Operate the rotor. Rotate two fingers on the screen around a point between them. If you prefer to use one finger on each hand, simultaneously flick up with one finger and flick down with the other. Choose your rotor options. Go to Settings > General > Accessibility > VoiceOver > Rotor, then select the options you want to include in the rotor. -
Page 290
Large Cursor. Adjust the speaking voice. You can adjust the VoiceOver speaking voice: Adjust the volume: Use the volume buttons on iPhone. You can also add volume to the rotor, then swipe up or down to adjust it. See… -
Page 291: Use The Onscreen Keyboard
Edit, tap the Delete button or drag up or down, then tap Done. Set the default voice for the current iPhone language: Go to Settings > General > Accessibility > VoiceOver > Speech > Voice. Download an enhanced quality reading voice: Go to Settings > General >…
-
Page 292
Choose a typing style. Go to Settings > General > Accessibility > VoiceOver > Typing Style. Or, set the rotor to Typing Mode, then swipe up or down. Enter text. Type characters using the onscreen keyboard: Standard typing: Select a key on the keyboard by swiping left or right, then double- tap to enter the character. -
Page 293
Cut, copy, or paste. Set the rotor to Edit, select the text, swipe up or down to choose Cut, Copy, or Paste, then double-tap. Undo. Shake iPhone, swipe left or right to choose the action to undo, then double-tap. Enter an accented character. In standard typing style, select the plain character, then double-tap and hold until you hear a sound indicating alternate characters have appeared. -
Page 294
Settings > General > Accessibility > VoiceOver > Rotor, then add Enter braille. Place iPhone flat in front of you or hold it with the screen facing away, then tap the screen with one or several fingers at the same time. -
Page 295
Turn off Braille Screen Input. Do a two-finger scrub, or set the rotor to another setting. Use VoiceOver with an Apple Wireless Keyboard You can control VoiceOver using an Apple Wireless Keyboard paired with iPhone. See Apple Wireless Keyboard . You activate VoiceOver commands on the Apple Wireless Keyboard with keyboard shortcuts. -
Page 296
Change the label of the selected item: VO-/ Double-tap with two fingers: VO-Hyphen Swipe up or down: VO-Up Arrow or VO-Down Arrow Adjust the rotor: VO-Command-Left Arrow or VO-Command-Right Arrow Adjust the setting specified by the rotor: VO-Command-Up Arrow or VO-Command- Down Arrow Turn the screen curtain on or off: VO-Shift-S Return to the previous screen: Esc… -
Page 297
Go to the top or bottom of the text field: Command-Up Arrow or Command-Down Arrow Select text as you move: Shift + any of the insertion point movement commands above Select all text: Command-A Copy, cut, or paste the selected text: Command-C, Command-X, or Command-V Undo or redo last change: Command-Z or Shift-Command-Z… -
Page 298
Support for braille displays You can use a Bluetooth braille display to read VoiceOver output, and a braille display with input keys and other controls to control iPhone when VoiceOver is turned on. For a list of supported braille displays, go to the Braille Displays for iOS website Connect a braille display. -
Page 299
The current line contains additional text to the right Set the leftmost or rightmost cell to display status information. Go to Settings > General > Accessibility > VoiceOver > Braille > Status Cell, then tap Left or Right. See an expanded description of the status cell. On your braille display, press the status cellʼs router button. -
Page 300
Reduce page clutter for easier reading and navigation. Select the Reader item in the Safari address field (not available for all pages). If you pair an Apple Wireless Keyboard with iPhone, you can use single-key Quick Nav commands to navigate webpages. See… -
Page 301
Get information about a location. With a pin selected, double-tap to display the information flag. Swipe left or right to select the More Info button, then double-tap to display the information page. Edit videos and voice memos with VoiceOver You can use VoiceOver gestures to trim Camera videos and Voice Memo recordings. Trim a video. -
Page 302
Settings > Display & Brightness > View. Magnifier Turn your iPhone into a magnifying glass to zoom in on objects near you. Set up Magnifier. Go to Settings > General > Accessibility > Magnifier, then turn on Magnifier. This adds Magnifier to accessibility shortcuts. -
Page 303
You can also apply these effects to only the contents of the zoom window. See Zoom Speak Selection, Speak Screen, and Typing Feedback Even if VoiceOver is turned off, you can have iPhone speak selected text or the entire screen. iPhone can also provide feedback and speak text corrections and suggestions as you type. -
Page 304: Large, Bold, And High-Contrast Text
Face ID is still secure but requires more consistency in how you look at iPhone X. To set up Face ID, go to Settings > Face ID & Passcode.
-
Page 305: On/Off Switch Labels
Messages, tap Replay below the message bubble. On/off switch labels To make it easier to distinguish whether a setting is on or off, you can have iPhone show an additional label on on/off switches. Add switch-setting labels. Go to Settings > General > Accessibility, then turn on the On/Off Labels switch.
-
Page 306: Switch Control Overview
Control > Switches. If you use only one switch, it is your Select Item switch by default. If youʼre adding an external switch, you need to connect it to iPhone before it will appear in the list of available switches. Follow the instructions that came with the switch. If it…
-
Page 307: Basic Techniques
Settings > Bluetooth, tap the switch, then follow the onscreen instructions. For more information, see Connect Bluetooth devices If you connect a Made For iPhone (MFi) switch, Switch Control sets a Select item switch and enables automatically. Turn on Switch Control. Go to Settings > General > Accessibility > Switch Control. Or, use accessibility shortcuts Scan the keyboard.
-
Page 308
Rotate iPhone to landscape or portrait orientation Flip the Ring/Silent switch Press the volume buttons Press and hold the side button (iPhone X) or Home button (other models) to summon Siri Triple-click the side button (iPhone X) or Home button (other models) -
Page 309: Item Scanning
Use Switch Control on another iOS device. Ensure that you sign in to iCloud with the same Apple ID on the other iOS device, then choose the other device from the menu. Item scanning Item scanning alternately highlights each item or group of items on the entire screen until you trigger your Select Item switch.
-
Page 310: Settings And Adjustments
Settings and adjustments Adjust basic settings. Go to Settings > General > Accessibility > Switch Control, where you can: Add switches and specify their function Choose, create, and edit recipes Choose a scanning style Adjust how rapidly items are scanned Turn off auto scanning (only if youʼve added a Move to Next Item switch) Set scanning to pause on the first item in a group Choose how many times to cycle through the screen before hiding Switch Control…
-
Page 311
Turn off groups to scan items one at a time AssistiveTouch AssistiveTouch helps you use iPhone if you have difficulty touching the screen or pressing the buttons. You can use AssistiveTouch without any accessory to perform gestures that are difficult for you. You can also use a compatible adaptive accessory (such as a joystick) together with AssistiveTouch to control iPhone. -
Page 312
AssistiveTouch > Create New Gesture. On the gesture recording screen that asks you to touch to create a gesture, rotate two fingers on the iPhone screen around a point between them. (You can do this with a single finger or stylus—just create each arc separately, one after the other.) If it doesnʼt turn out quite right, tap Cancel, then try… -
Page 313
Choose how iPhone responds when you press and hold the side or Home button. Go to Settings > General > Accessibility > Side Button (iPhone X) or Home Button (other models), then choose Siri, Voice Control, or Off. -
Page 314: Widescreen Keyboards
On supported models, Reachability brings items at the top of the screen down to the lower half of the screen. Bring the top of the screen into reach. While using iPhone in portrait orientation, lightly double-tap the Home button. To reset the screen, double-tap the Home button again.
-
Page 315
Software and hardware keyboards If you have difficulty distinguishing characters on the iPhone keyboard or manipulating a hardware keyboard, find help by going to Settings > General > Accessibility > Keyboard. You can adjust settings to: Show only uppercase keys on the iPhone keyboard. -
Page 316
Pair with iPhone. If your hearing aids arenʼt listed in Settings > General > Accessibility > MFi Hearing Aids, you need to pair them with iPhone. To start, open the battery door on each hearing aid. Next, on iPhone, go to Settings > Bluetooth, and make sure Bluetooth is turned on. -
Page 317
Use iPhone as a remote microphone. You can use Live Listen to stream sound from the microphone in iPhone to your hearing aids. This can help you hear better in some situations—for example, when having a conversation in a noisy environment. Use Accessibility Shortcut, choose Hearing Aids, tap Start Live Listen, then position iPhone near the sound source. -
Page 318: Mono Audio And Balance
LED Flash for Alerts If you canʼt hear the sounds that announce incoming calls and other alerts, iPhone can flash its LED (next to the camera lens on the back of iPhone). The LED flashes only if iPhone is locked.
-
Page 319: Call Audio Routing
TTY Call or TTY Relay Call, wait for the call to connect, then tap TTY. When making an emergency call in the U.S., iPhone sends out a series of TDD tones to alert the operator. The operatorʼs ability to receive or respond to TDD can vary depending on your location.
-
Page 320: Guided Access
Guided Access screen you can: Turn Guided Access on or off Set a passcode that controls the use of Guided Access and prevents someone from leaving a session; tap Passcode Settings and turn on Face ID (iPhone X) or Touch ID (other models)
-
Page 321
Set a session time limit: Tap Time Limit Options at the bottom of the screen. End the session. iPhone X: Triple-click the side button, then unlock with Face ID (if enabled) or enter the Guided Access passcode. Other models: Triple-click the Home button, then unlock with Touch ID (if enabled) or enter the Guided Access passcode. -
Page 322: Safety, Handling, And Support
(supported models), or cause injury to you. For example, iPhone 7, iPhone 7 Plus, or later, contains one or more lasers that could be damaged during repair or disassembly, which could result in hazardous exposure to infrared laser emissions that are not visible.
-
Page 323
When you use the Apple USB Power Adapter to charge iPhone, make sure the USB cable is fully inserted into the power adapter before you plug the adapter into a power outlet. When using a wireless charger, remove metallic cases and avoid placing metallic foreign objects on the mat (for example, keys, coins, or jewelry), as they may become warm or interfere with charging. -
Page 324
When use is prohibited, such as while traveling in aircraft, or when asked to do so by authorities, turn off iPhone, or use airplane mode or Settings >… -
Page 325: Important Handling Information
Exposure to liquid and dust If liquid splashes on iPhone or dust gets on it, wipe it off with a soft, lint-free cloth (for example, a lens cloth) and ensure that your iPhone is dry and free of dust before opening the SIM tray.
-
Page 326
Lightning connector may help the drying process. Do not dry your iPhone using an external heat source or insert a foreign object into the Lightning connector such as a cotton swab or a paper towel. -
Page 327: Iphone Support Site
Reset the iPhone passcode. If you enter the wrong passcode six times in a row, you’ll be locked out, and a message will say that iPhone is disabled. If you canʼt remember your passcode, you can erase your device , then set a new passcode.
-
Page 328
Note: For help with cellular network services, voicemail, and billing, contact your wireless service provider. If iPhone is connected to the Internet via the cellular data network, the LTE, 4G, 3G, E, or GPRS icon appears in the status bar. -
Page 329
This option is not available in all areas. On iPhone SE, iPhone 6, iPhone 6 Plus, and later, there are options for turning off 4G/LTE or for selecting Voice & Data (VoLTE) or Data Only. -
Page 330: Vpn Settings
You might be asked to install a configuration profile that was sent to you in an email, or one that is downloaded from a webpage. iPhone asks for your permission to install the profile, and displays information about what it contains, when you open the file.
-
Page 331: Fcc Compliance Statement
Settings > General > About. For more information, go to the Apple Support article Find the serial number or IMEI on your iPhone, iPad, or iPod touch Obtaining warranty service First follow the advice in this guide. Then go to…
-
Page 332: Canadian Regulatory Statement
This equipment generates, uses, and can radiate radio frequency energy and, if not installed and used in accordance with the instructions, may cause harmful interference to radio communications. However, there is no guarantee that interference will not occur in a particular installation. If this equipment does cause harmful interference to radio or television reception, which can be determined by turning the equipment off and on, the user is encouraged to try to correct the interference by one or more of the following measures:…
-
Page 333: Class 1 Laser Information
CAN ICES-3 (B)/NMB-3(B) Class 1 Laser Information iPhone X, iPhone 8, iPhone 8 Plus, iPhone 7, and iPhone 7 Plus are classified as Class 1 Laser products per IEC60825-1y2007 and IEC60825-1y2014. These devices comply with 21 CFR 1040.10 and 1040.11 except for deviations pursuant to Laser Notice No. 50, dated June 24, 2007.
-
Page 334
Türkiye Cumhuriyeti: AEEE Yönetmeliğine Uygundur. Battery service The lithium-ion battery in iPhone should be serviced by Apple or an authorized service provider, and must be recycled or disposed of separately from household waste. For more information about battery service and recycling, go to the… -
Page 335
Pro, iPhone, iPod, iPod touch, iTunes, iTunes Pass, iTunes U, Keychain, Keynote, Lightning, Mac, macOS, the Made for iPhone logo, Numbers, OS X, Pages, Podcast Logo, Retina, Safari, Siri, Spotlight, Touch ID, True Tone, watchOS, and the Works with iPhone logo are trademarks of Apple Inc., registered in the U.S. and other countries.
 winky—to insert
Данный раздел представляет большой выбор инструкций по эксплуатации смартфонов фирмы Apple. Если Вы утратили инструкцию из комплекта, то, надеемся, без труда сможете найти ее на нашем сайте и бесплатно скачать.
Если, по каким-то причинам, Вы не смогли найти нужное руководство, не стесняясь пишите запрос нам.
Инструкции по моделям
Вернуться

Смартфоны