
- О Компании
- Контакты
- Новости компании
- Кочевые даты
- Видео
Все права защищены © 1999-2021
россия / Русский/ ru
Tenda Россия, Россия, 143441, Московская обл., Красногорский р-н, п/о Путилково, 72-й км МКАД, Бизнес-парк «Гринвуд», стр. 3, 5 этаж. Телефон
- О Компании
- Контакты
- Новости компании
- Кочевые даты
- Видео
Все права защищены © 1999-2021
россия / Русский/ ru
Tenda Россия, Россия, 143441, Московская обл., Красногорский р-н, п/о Путилково, 72-й км МКАД, Бизнес-парк «Гринвуд», стр. 3, 5 этаж. Телефон
Если одна мысль о подключении роутера вызывает у вас неприятные переживания, эта инструкция поможет вам. В ней рассмотрено устройство роутера Tenda AC6 (AC1200) и
простым языком рассказано, как его подключить и настроить. Статья также подскажет вам полезные в быту настройки и способ возврата устройства к заводским настройкам.
Роутер Tenda AC6 (AC1200) имеет четыре несъемные антенны, расположенные с задней и боковых сторон корпуса. Антенны могут вращаться вокруг своей оси и работают на разных частотах (две на 2,4 ГГц, две на 5 ГГц), что поможет вам точнее настраивать их для направления Wi-Fi сигнала.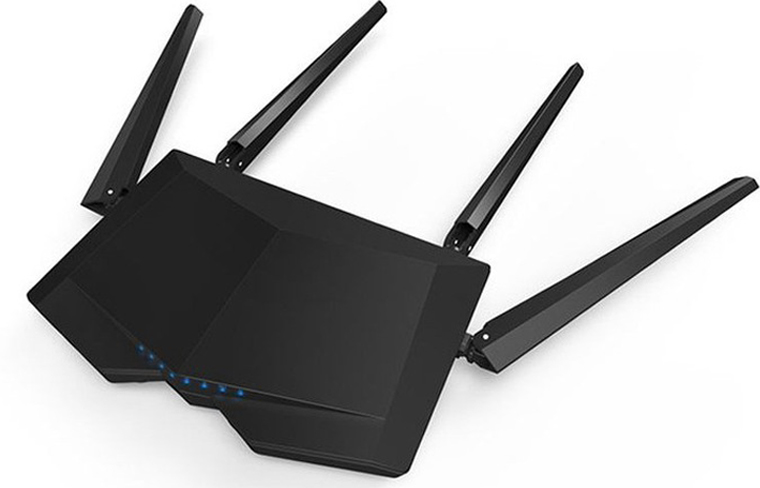
Сзади корпуса производитель расположил разъем питания Power и четыре порта для подключения устройств. Порт с надписью WAN нужен для того, чтобы подключить в него кабель интернет-провайдера, а три другие порта предназначены для подсоединения любых устройств, нуждающихся в интернете. Ими могут быть ноутбуки, игровые приставки, мультимедийные центры и другие девайсы. Третий порт здесь используется также для подключения интерактивного телевидения.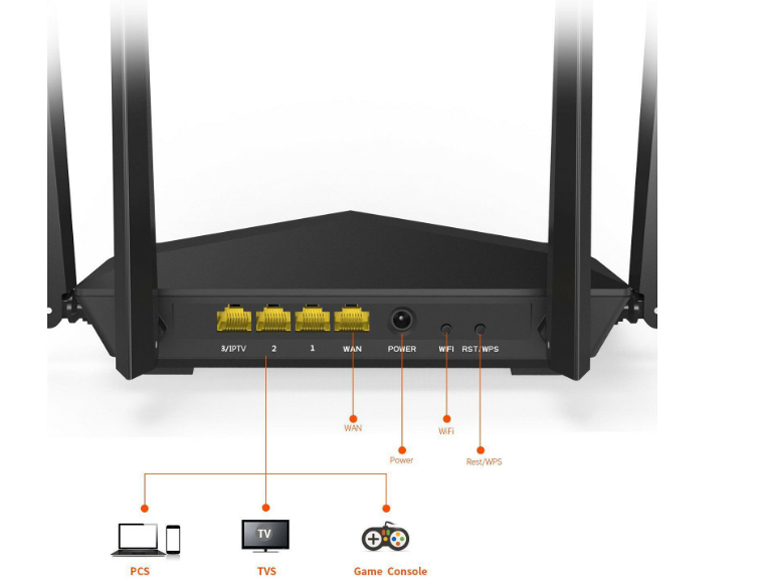
Рядом с разъемом питания расположились кнопки Wi-Fi и RST/WPS. Первая из них включает или выключает беспроводную сеть Wi-Fi, а у второй есть сразу две функции. Первая функция RST (RESET) используется для сброса роутера к заводским настройкам (подробнее о сбросе в конце статьи). Вторая кнопка нужна для активации функции WPS, которая поможет подключить к Wi-Fi другие устройства без ввода пароля. Принцип подключения здесь такой: на роутере Tenda AC6 нажимается и удерживается в течение 1 секунды кнопка WPS, а на клиенте (например, другом роутере или мобильном телефоне) кнопка или функция WPS должна быть нажата не позднее двух минут после этого.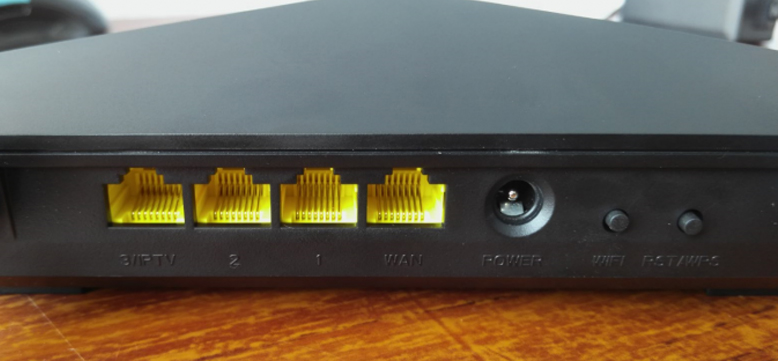
Спереди роутера есть ряд индикаторов, которые помогут вам верно истолковать его роутера. Индикаторы могут работать в нескольких режимах в зависимости от числа функций, которые они отражают. Индикатор SYS демонстрирует работу роутера и в рабочем состоянии устройства должен мигать. У индикаторов 2,4 ГГц и 5 ГГц есть три положения. Если они светятся постоянно, значит, сеть соответствующей частоты работает, не светятся — сеть выключена, мигают — происходит передача данных по соответствующей сети.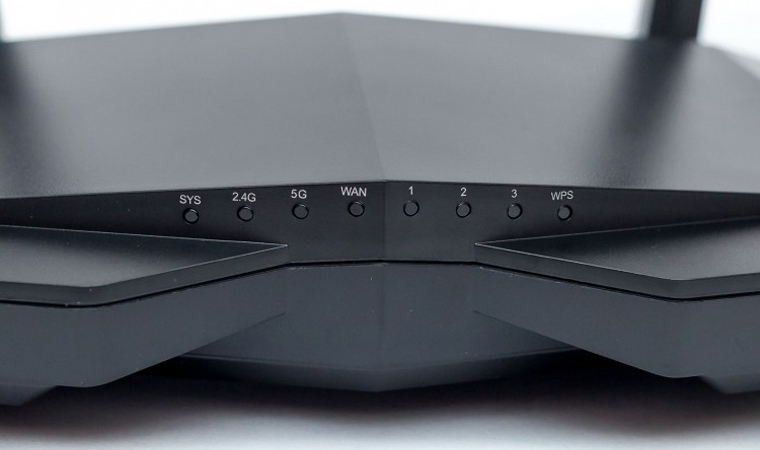
У индикаторов WAN и 1, 2, 3 также есть три режима. Постоянное свечение индикатора означает подключение к порту сетевого устройства, отсутствие индикации — к данному порту ничего не подключено, и мигание говорит о передаче или приеме данных по этому порту. Столько же режимов и у индикатора WPS. Мигание говорит о том, что роутер сопрягается по WPS с беспроводным клиентом (например, другим роутером). Если сопряжение прошло успешно, индикатор будет гореть в течение 2-5 минут, а затем погаснет. Отсутствие свечения может означать несколько вариантов: отключенную функцию WPS, сбой при сопряжении устройств или успешное подключение (тогда индикатор будет вначале гореть несколько минут, а затем погаснет).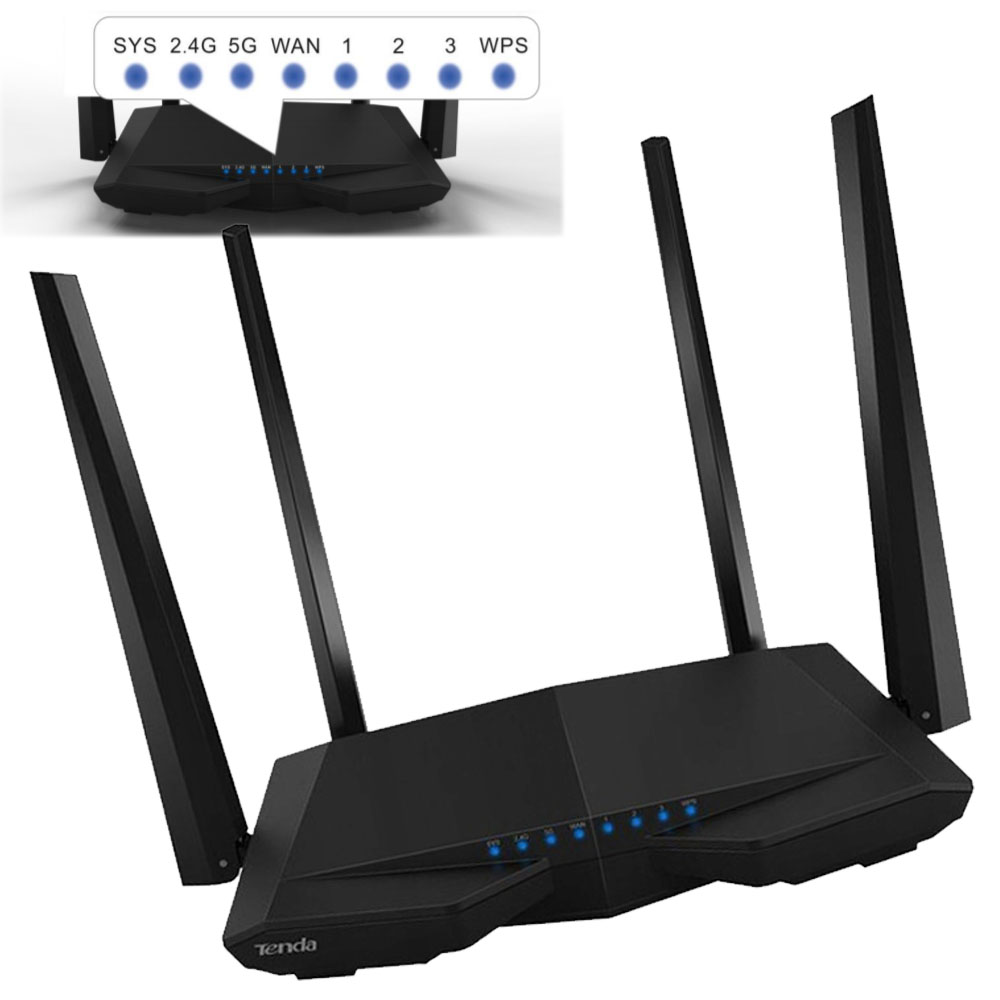
Снизу роутера есть четыре противоскользящих ножки для размещения устройства на горизонтальной поверхности и два ушка для его подвешивания на стену. Здесь же традиционно для роутеров вы найдете этикетку с указанием регистрационной информации.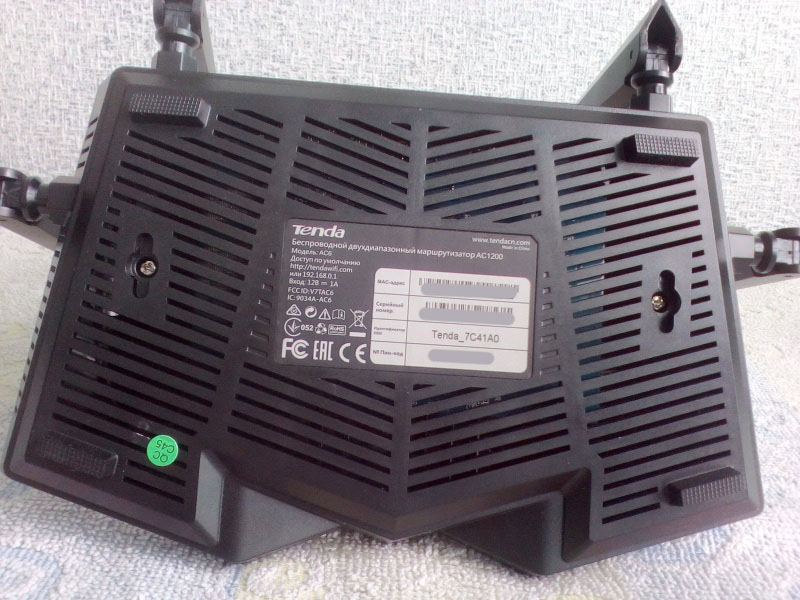
Установка и соединение устройств
Выбор места для роутера
Первым делом рекомендуем вам подобрать такое место в доме для роутера, где он будет обеспечивать наиболее эффективное покрытие. Это может быть как центр квартиры, так и та комната, в которой вы чаще всего пользуетесь Wi-Fi. При этом не размещайте роутер рядом с приборами и материалами, которые могут затруднять передачу сигнала. Ими могут быть большая металлическая дверь, изолированная стена, микроволновая печь, система безопасности и другие.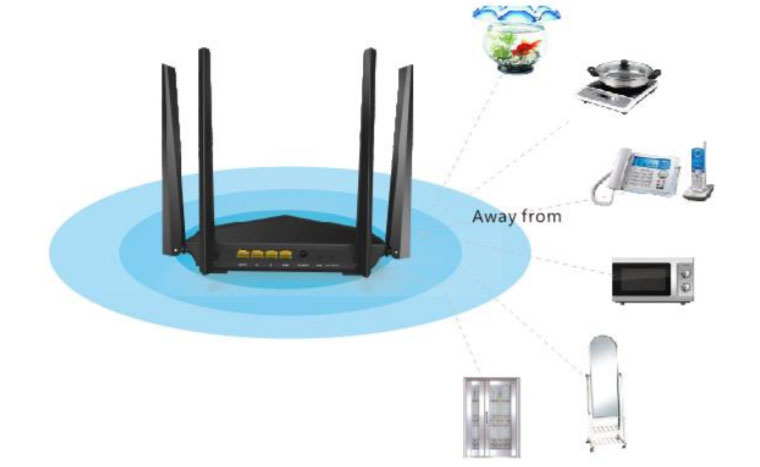
Подключение роутера Tenda AC6 (AC1200) к интернету
Теперь вам нужно подключить роутер к интернету в зависимости от того, какой кабель заведен к вам в дом. Если это витая пара, просто вставьте разъем кабеля в порт WAN роутера. После этого загрузите роутер. Если вы подключаетесь через модем, тогда схема будет такая. Выключите модем, при необходимости вынув из него батарею. Соедините входящим в комплект кабелем порт WAN роутера Tenda и соответствующий порт вашего модема. Сам модем подключите по кабелю (телефонному или иному) к интернету. Включите модем и роутер.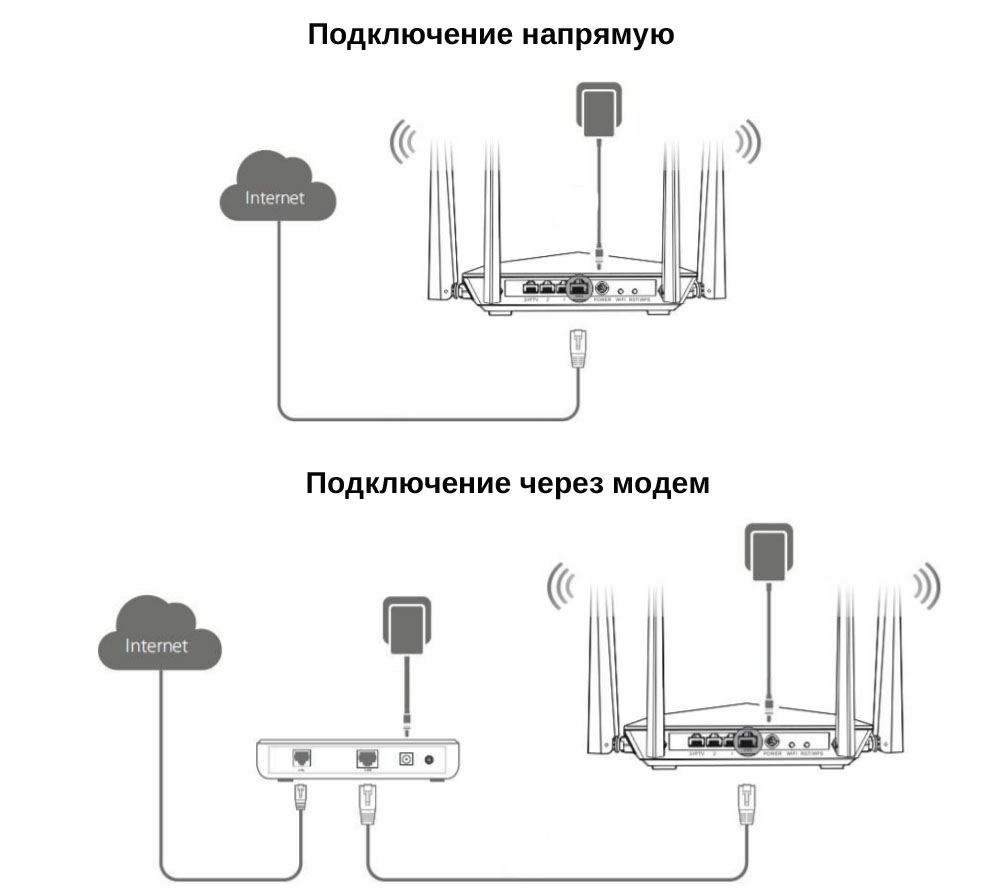
Подключение роутера к управляющему устройству
Осталось подключить роутер к тому устройству, с которого вы будете вести настройки. Чаще всего это ноутбук или компьютер, но можно настраивать и с других беспроводных устройств, например с телефона. Самый простой способ — соединить сетевой порт компьютера с любым из портов 1-3 роутера при помощи кабеля из коробки. Но можно подключить девайсы и при помощи Wi-Fi-связи, если на управляющем устройстве есть модуль Wi-Fi. Для этого включите модуль Wi-Fi (если он выключен) на управляющем устройстве, постройте список сетей и найдите в нем ту сеть, имя которой указано снизу роутера на этикетке в поле SSID. Нажмите «Подключиться» и введите пароль с этикетки (Pin).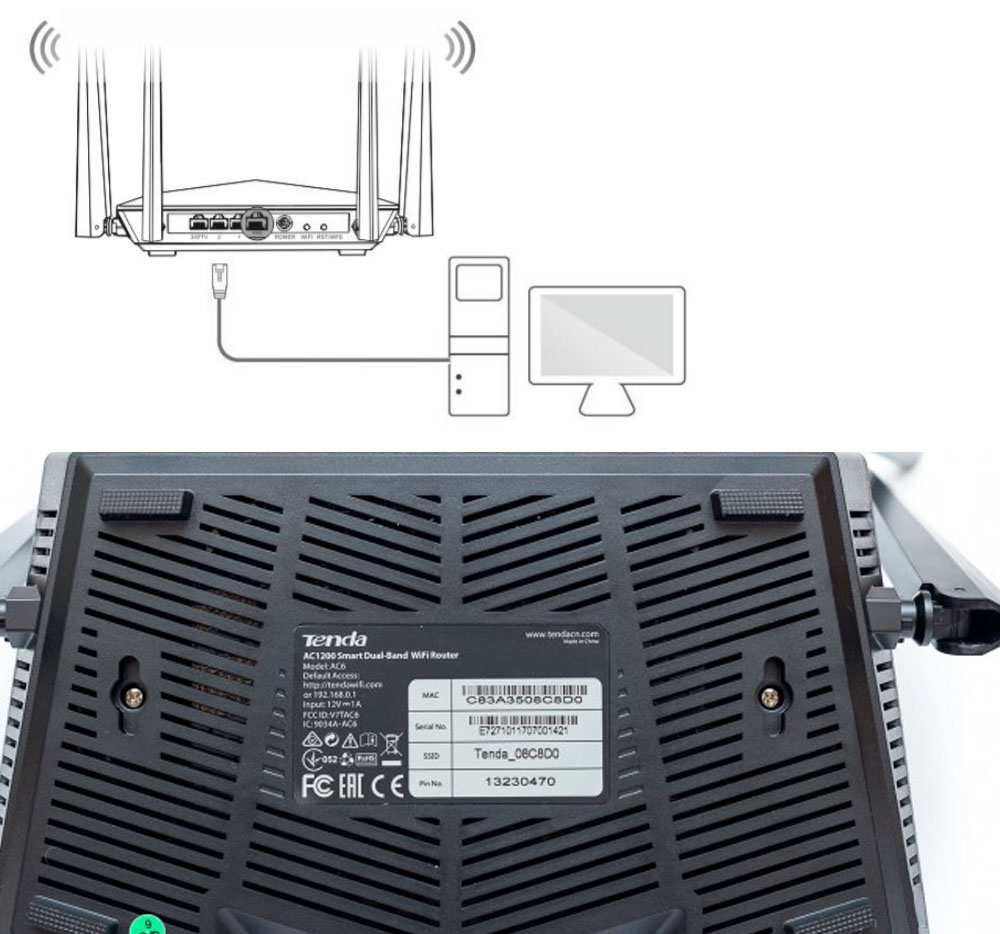
Настройка роутера Tenda AC6 (AC1200)
После всех соединений устройств вам остается открыть панель управления и ввести необходимые сведения, чтобы заработал интернет. Для этого откройте на подключенном к роутеру управляющем устройстве (например, компьютере) любой браузер, вбейте в адресную строку адрес 192.168.0.1 и нажмите Enter. После этого вы увидите мастер быстрой настройки, который по шагам проведет вас по всем важным этапам. Кликните по кнопке «Старт». В случае настроек с телефона установите мобильное приложение Tenda WiFi.
На первых же шагах мастер предложит выбрать тип подключения. Если вы его не знаете, загляните в свой договор с поставщиком интернета. Там может быть прописан тип PPPoE, статический IP, какой-либо другой или вовсе не быть никакого. В последнем случае выбирайте вариант «Динамический IP», а если указанного провайдером типа подключения нет в выпадающем списке мастера настроек, нажмите «Пропустить» и переходите к детальным настройкам. Когда вы выберите тип подключения, откроются соответствующие ему поля. Это может быть маска подсети и шлюз, имя и пароль пользователя и другое. При заполнении строки «MAC-адрес» выберите вариант «По умолчанию» или введите MAC-адрес из вашего договора.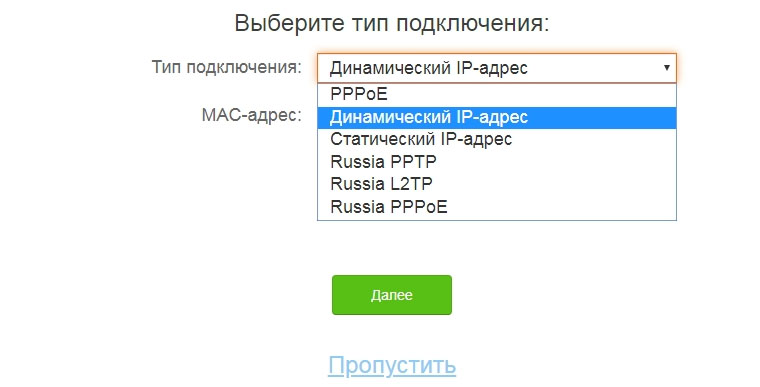
На следующем шаге нужно заполнить информацию о Wi-Fi-сетях. Для этого выберите мощность передачи для сети 2,4 ГГц, придумайте для нее название и пароль, а также придумайте пароль для входа в данную панель управления. Вы можете оставить и то название с паролем, что указаны на этикетке, но задание собственных данных более безопасно. Если вас устроит одинаковый пароль для панели управления и вашей домашней Wi-Fi-сети, тогда поставьте галочку в поле по настройке пароля Wi-Fi в качестве пароля администратора. Не забудьте записать новые данные, иначе при их потере придется сбрасывать роутер до заводских настроек.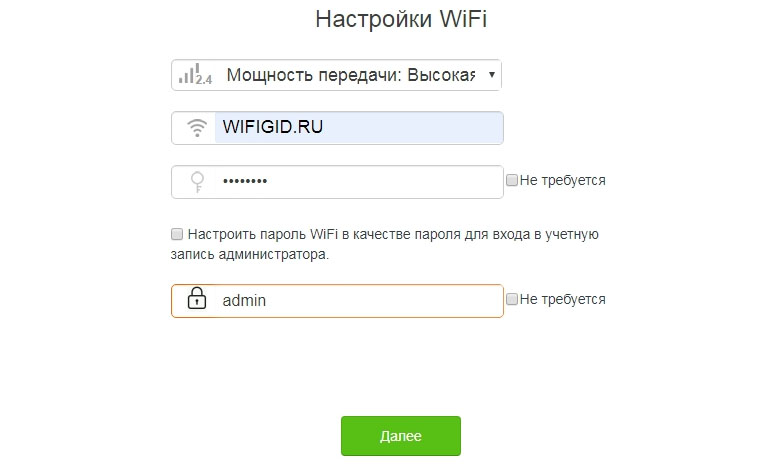
После этого шага вы подключитесь к интернету, то есть в любом открытом браузере уже должны грузиться страницы. Осталось подключиться к сети Wi-Fi со всех устройств в доме: планшетов, телефонов и прочих беспроводных девайсов. При подключении ищите сеть по тому имени, которое задали на предыдущем шаге, и вводите придуманный вами пароль. Рекомендуем также задействовать функцию «Подключаться автоматически» (при ее наличии на подключаемом устройстве).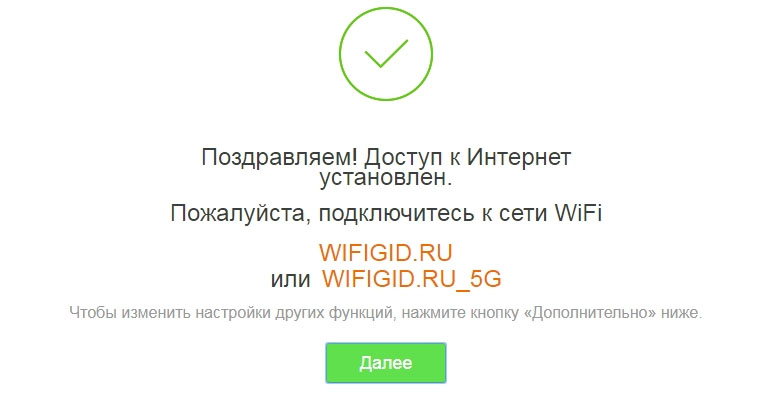
После завершения подключения вы попадете в основное меню панели управления, где при желании можете задать дополнительные настройки. Коротко рассмотрим некоторые из них. Самая верхняя строка меню с названием «Статус подключения к Интернет» покажет вам базовую информацию о том, какова текущая скорость, IP-адрес, сколько подключено устройств онлайн, какова версия прошивки и другое. В разделе «Настройка Интернета» вручную настраивается то, что мы уже обсуждали выше. А в разделе «Настройки WiFi» есть ряд интересных функций.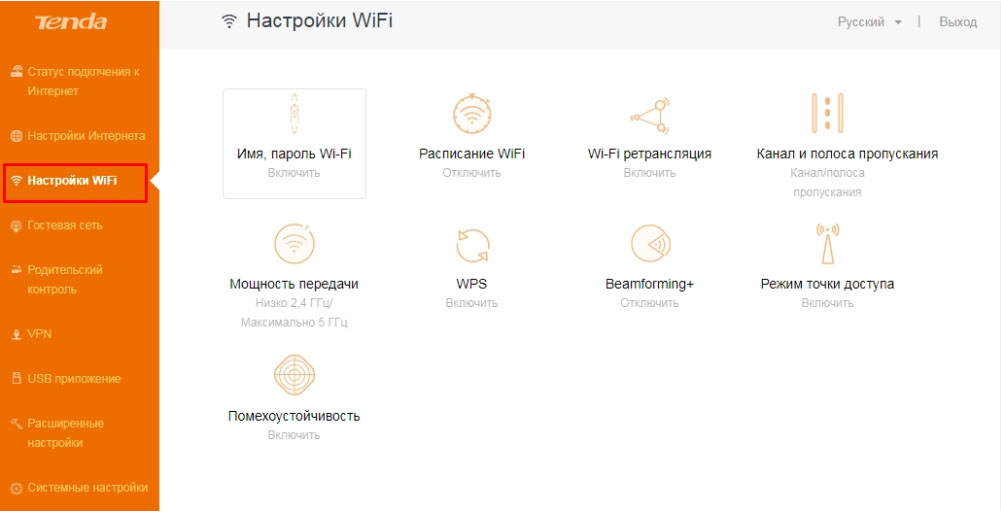
Первым делом это уникальная функция Breamforming, которая запомнит расположение ваших беспроводных устройств и усилит сигнал именно для этих устройств для более эффективной их работы. Улучшению связи способствуют и настройки таких параметров, как помехоустойчивость и мощность передачи. Если вы желаете задать расписание для Wi-Fi-сети, например отключать ее на ночь, чтобы ваши дети не сидели до глубокой ночи в интернете, воспользуйтесь разделом «Расписание WiFi». Здесь же можно настроить роутер в качестве точки доступа или ретранслятора (подробнее с режимами поможет познакомиться статья «Режимы работы роутера ZyXEL Keenetic Lite III»).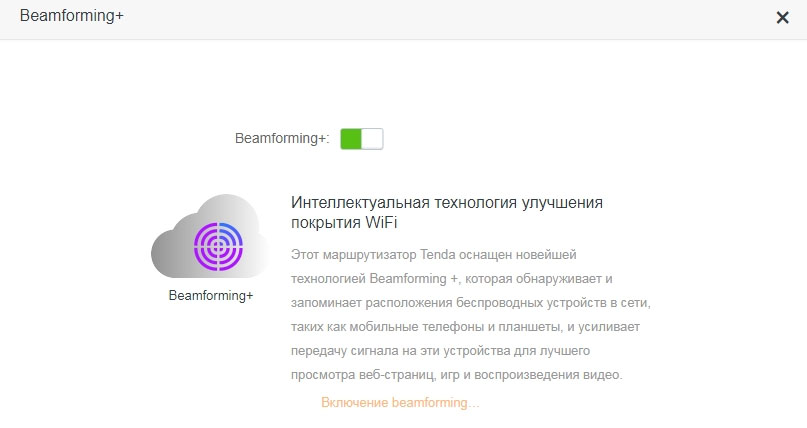
При желании настроить гостевую сеть перейдите в одноименный раздел меню. Здесь вы можете задавать отдельные имена для сетей на частотах 2,4 ГГц и 5 ГГц, пароль (или оставить без пароля), ввести ограничения скорости и период действия сети. Такая сеть пригодится вам, если ваш дом часто посещают гости, если роутер стоит в офисе или другом людном месте или в вашем доме много умных вещей. Дело в том, что при подключении постороннего устройства к вашей обычной сети возникают различные уязвимости: абонент может подключиться к ресурсам вашей локальной сети или у него может быть зараженное устройство, которое пропустит вирус в вашу сеть. Особенно уязвимы к атакам вещи умного дома, не обладающие той же защитой, что и компьютеры.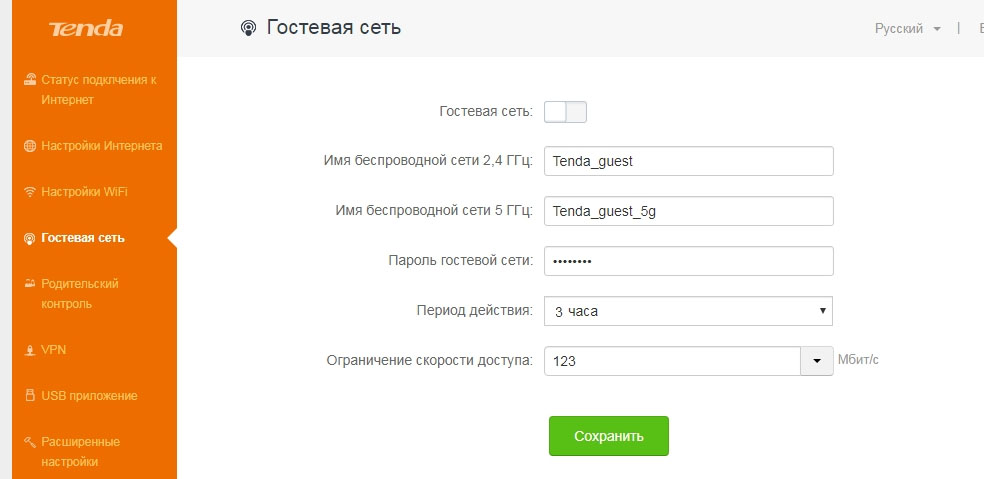
Упомянем и еще одну функцию, которая может быть востребована в семьях с детьми. Это «Родительский контроль», при помощи которого вы можете построить список сайтов, запрещенных для посещения, задать время доступа к интернету для конкретного устройства (по MAC-адресу), а также отслеживать время пребывания в сети этого устройства. Для этого перейдите в одноименный раздел меню и задайте интересующие вас настройки.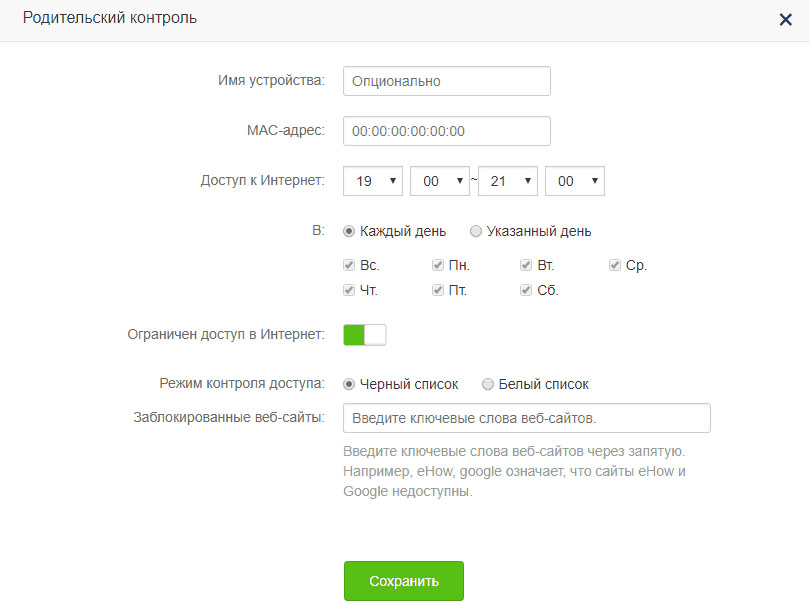
Сброс настроек роутера Tenda
Чтобы вернуть настройки роутера Tenda к заводским, зажмите кнопку RST/WPS примерно на восемь секунд, пока не загорятся все индикаторы на передней панели. После этого роутер перезагрузится и вернется к начальным настройкам. Но помните, что при этом все ранее сделанные настройки, включая имя сети, пароли, расписание и другое будут тоже сброшены. После сброса вам придется подключать и настраивать роутер заново. Этот метод хорош, если вы потеряли пароли или сделали какую-то некорректную настройку. Если вы хотите просто перезагрузить роутер, отключите на время питание и включите снова.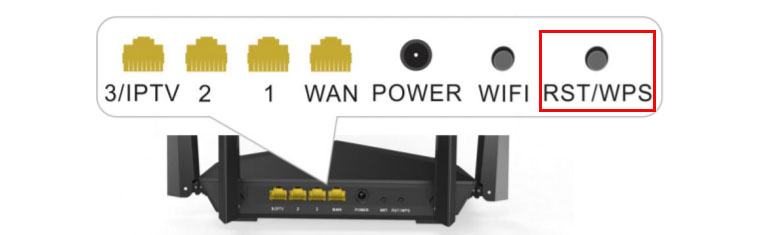
Рассмотренных выше настроек вполне достаточно, чтобы в доме исправно работал интернет. Для более сложных настроек советуем изучить все возможности меню панели управления.
-
Contents
-
Table of Contents
-
Bookmarks
Quick Links
AC1200 Dual-band Router
User Guide
I
Related Manuals for Tenda AC1200
Summary of Contents for Tenda AC1200
-
Page 1
AC1200 Dual-band Router User Guide… -
Page 2: Copyright Statement
Tenda does not assume any liability that may occur due to the use or application of the product described herein. Every effort has been made in the preparation of this document to ensure accuracy of the contents, but all statements, information and recommendations in this document do not constitute the warranty of any kind, express or implied.
-
Page 3: Acronyms And Abbreviations
Preface Thank you for choosing Tenda! Please read this user guide before you start. Conventions This user guide is applicable to the following routers. AC8 is used for illustration in this guide unless it is specified. The contained images and UI screenshots are subject to the actual products.
-
Page 4: Technical Support
If you need more help, contact us by any of the following means. We will be glad to assist you as soon as possible. Global: (86) 755-27657180 (China Time Zone) United States: 1-800-570-5892 (Toll Free: 7 x 24) Hotline Canada: 1-888-998-8966 (Toll Free: Mon — Fri 9 am — 6 pm PST) Hong Kong: 00852-81931998 support@tenda.cn Email…
-
Page 5: Table Of Contents
Content At a glance ……………………….. 4 1.1 Apperance ……………………..4 1.1.1 LED indicator ………………….. 4 1.1.2 Ports and buttons ………………….5 1.1.3 Label ……………………..5 Quick setup ……………………… 7 Web UI ……………………….9 3.1 Logging in to the web UI ………………….9 3.2 Logging out of the web UI ………………..
-
Page 6
6.5 Beamforming+ ……………………40 6.6 WPS ……………………….42 6.6.1 Overview ……………………42 6.6.2 Connecting devices to the WiFi network using WPS ……….42 Bandwidth control ……………………44 7.1 Configuring bandwidth control ……………….. 45 7.2 Blocking a device ……………………45 Parental controls ……………………. 46 8.1 Overview …………………….. -
Page 7
11.1 Overview ……………………..67 11.2 Setting up an internet connection with DHCPv6 …………… 70 11.3 Setting up an internet connection with PPPoEv6 ………….. 71 11.4 Setting up an internet connection with static IPv6 address ……….72 Administration ……………………74 12.1 Login password……………………74 12.2 WAN parameters …………………… -
Page 8: At A Glance
At a glance Apperance 1.1.1 LED indicator LED indicator Status Description Solid on The router is starting or connected to the internet successfully. Slow blinking The router fails to connect to the internet. Fast blinking for A wired device is connected or disconnected to the router. 3 seconds LED indicator Fast blinking for…
-
Page 9: Ports And Buttons
1.1.2 Ports and buttons Button/Port Description WiFi on/off button and reset button. Hold the button down for 1~3 seconds to turn on or off the WiFi network of the router. WPS/RST Hold the button down for about 8 seconds, and release it when the LED indicator blinks …
-
Page 10
IP Address: It is the default address used to log in to the web UI of the router. MAC: It specifies the MAC address of the router. S/N: It is required if you need technical assistance to repair your device. SSID: It specifies the default WiFi name of the router. -
Page 11: Quick Setup
Quick setup This chapter introduces how to quickly set up the router for the first time to access the internet. Step 1 Connect your router. Power on the router using the power adapter included in the package. Use an Ethernet cable to connect an Ethernet jack or a LAN port of your modem to the WAN port of the router.
-
Page 12
—End The following figure displays, and you will be redirected to the home page in 3 seconds. To access the internet, connect wireless devices to the WiFi network of the router again using the WiFi name and password you set, and connect your wired devices to port LAN1/2/3. -
Page 13: Web Ui
Web UI Logging in to the web UI Step 1 Connect your smartphone to the wireless network, or connect your computer to ports LAN1/2/3 of the router. Step 2 Start a web browser on the device connected to the router, visit tendawifi.com or 192.168.0.1.
-
Page 14: Logging Out Of The Web Ui
The following page appears. If the above page doesn’t appear, check whether the computer is obtaining an IP address automatically. Refer to A.1 configuring the computer to obtain an IP address automatically. Logging out of the web UI If you log in to the web UI of the router and perform no operation within 5 minutes, the router logs you out automatically.
-
Page 15: Web Ui Layout
Web UI layout The web UI of the router consists of two sections, including the navigation bar and the configuration area. See the following figure. Name Description Navigation Used to display the function menu of the router. Users can select functions in ❶…
-
Page 16: Status
Status Log in to the web UI of the router and choose Status to enter the page. On this page, you can view the internet connection status of the router, online devices information and system information of the router. Internet connection status If the message “Connected.
-
Page 17: Online Devices And Real-Time Speed
Online devices and real-time speed This section displays the number of online devices and the real-time upload/download speed. To control the bandwidth of online devices, click to enter the configuration page.
-
Page 18: System Information
System information This section displays the basic information of the router, including connection type, connection duration, WAN IP and so on. Parameter description Parameter Description Connection Type It displays the current connection type of the router. It specifies the time that has elapsed since the router connects to the internet Connection Duration successfully.
-
Page 19: Internet Settings
Internet settings On this page, you can complete the internet settings if you did not finish them by the quick setup wizard, or change the settings as well. The router supports Router, WISP, Universal Repeater and AP mode. By default, the router works in router mode. Router mode In router mode, this router can connect to the internet through the WAN port, and provide both wired and wireless network for clients.
-
Page 20: Setting Up An Internet Connection With Pppoe
Parameter Description on the computer using a user name and password provided by your ISP. If you directly connect an Ethernet cable with internet connectivity to your Dynamic IP computer, you can access the internet without configuring your computer. If you can access the internet only after setting static IP address and other related Static IP Address information on your computer, your connection type is static IP address.
-
Page 21: Setting Up An Internet Connection With Dynamic Ip
5.1.2 Setting up an internet connection with dynamic IP Step 1 Choose Internet Settings to access the configuration page. Step 2 Set Operating Mode to Router. Step 3 Set Connection Type to Dynamic IP Address. Step 4 Click OK at the bottom of the page. —End After the settings take effect, check the connection status.
-
Page 22: Setting Up An Internet Connection With Static Ip
5.1.3 Setting up an internet connection with static IP Step 1 Choose Internet Settings to access the configuration page. Step 2 Set Operating Mode to Router. Step 3 Set Connection Type to Static IP Address. Step 4 Set the required parameters provided by your ISP. Step 5 Click OK at the bottom of the page.
-
Page 23: Wisp Mode
WISP mode In WISP mode, this router can connect to a WiFi hotspot provided by ISP in a wireless manner, and provide both wireless and wired network for clients to access internet. Choose Internet Settings to access the configuration page. Configuration procedure: Step 1 Log in to the web UI of the router.
-
Page 24
Step 7 If the wireless network of the upstream device is encrypted, enter the password of the upstream WiFi network. Step 8 Click Connect and wait for the router to reboot. —End… -
Page 25
Wait until the progress bar is complete. Log in to the web UI of the router again. Choose Status > Internet Connection Status to check the connection status An example of configuring WISP mode Application scenario Tom lives in the countryside, and it is not convenient for him to connect the nearest ISP base station using Ethernet cables. -
Page 26
This step applies to the first setup of the router, they are used for you to skip the quick setup page. Step 3 Choose Internet Settings to access the configuration page. Step 4 Set Operating Mode to WISP. Step 5 Select the Connection Type of your ISP hotspot, which is PPPoE in this example. -
Page 27
Step 6 Choose the ISP hotspot, which is ISP_A in this example. Step 7 Enter the password of the WiFi network ISP_A, which is 87654321 in this example. -
Page 28
Step 8 Click Connect. —End Wait until the progress bar is complete. Log in to the web UI of the router again with the domain name tendawifi.com. Choose Status > Internet Connection Status to check the connection status You can check the SSIDs for this router and the upstream device. If you need to change the router’s SSID and password, please go to the Wireless Settings page. -
Page 29: Universal Repeater Mode
Universal repeater mode In universal repeater mode, the router can bridge the upstream wireless signals and expand your wireless network coverage. Choose Internet Settings to access the configuration page. Configuration procedure Step 1 Log in to the web UI of the router. Step 2 (Optional).
-
Page 30
Step 6 If the wireless network of the upstream device is encrypted, set the password of the upstream WiFi network. Step 7 Click Connect and wait for the router to reboot. —End Wait until the progress bar is complete. Log in to the web UI of the router again. Choose Status > Internet Connection Status to check the connection status… -
Page 31
WiFi signal is strong in the main bedroom, but too poor in the dining room and balcony to access the internet. To solve the problem, Tom bought a Tenda AC8 router, and placed it in the living room. -
Page 32
This step applies to the first setup of the router. It is used for you to skip the quick setup page. Step 3 Choose Internet Settings to access configuration the page. Step 4 Set Operating Mode to Universal Repeater. Step 5 Select the WiFi name to be extended, which is Tom’s WiFi in this example. -
Page 33
Step 7 Click Connect. —End Wait until the progress bar is complete. Log in to the web UI of the router again with the domain name tendawifi.com. Choose Status > Internet Connection Status to check the connection status and the SSIDs for this router and the upstream device. To change the router’s SSID and password, please go to the Wireless Settings page. -
Page 34: Ap Mode
AP mode In AP mode, the router connects to the internet using an Ethernet cable and converts wired network into wireless network to provide wireless network coverage. In AP mode, the WAN port also serves as a LAN port. Applicable scenarios are as follows: Gateway Choose Internet Settings to access the configuration page.
-
Page 35
This step applies to the first setup of the router. It is used for you to skip the quick setup page. Step 3 Choose Internet Settings to access the configuration page. Step 4 Set Operating Mode to AP, and click OK at the bottom of the page. Step 5 Click OK in the popup window. -
Page 36
—End When the router completes rebooting, the computer connected to the router by an Ethernet cable can access the internet, and wireless device such as smart phones can connect to the WiFi network of the router to access the internet. In AP mode, the router’s network settings, VPN, parental controls, bandwidth control, virtual … -
Page 37: Wireless Settings
Wireless settings WiFi name and password 6.1.1 Overview This router supports 2.4 GHz and 5 GHz WiFi networks. Features of these two signals are listed as follows: 2.4 GHz signal has longer wireless transmission distance than 5 GHz signal. …
-
Page 38: Customizing Your Wifi Name And Password
Step 1 Click Wireless Settings to enter the page, and locate to WiFi Name and Password module. Step 2 Customize your WiFi name, such as Tenda WiFi. Step 3 Set Security Mode to WPA/WPA2-PSK Mixed for better security and compatibility.
-
Page 39
—End When the configurations complete, you need to re-connect to the new WiFi network with by entering the new password. -
Page 40: Guest Network
Guest network 6.2.1 Overview In this module, you are able to enable/disable the Guest Network function and change guest network’s WiFi name and password. A guest network can be set up with a shared bandwidth limit for visitors to access the internet, and isolated from the main network.
-
Page 41: Setting Up The Guest Network
6.2.2 Setting up the guest network Step 1 Choose Wireless Settings to enter the page, and move to Guest Network module. Step 2 Set Guest Network to Enable. Step 3 Change 2.4 GHz WiFi Name, such as to Tom. Step 4 Change 5 GHz WiFi Name, such as to Tom_5G.
-
Page 42: Wifi Signal Strength
WiFi signal strength In this module, you can adjust the wall-penetration capability and wireless coverage of the router. To access the configuration page, click Wireless Settings and move to WiFi Signal Strength module. Parameter Description The mode of signal strength. The default mode is High. High: It is typically used to meet wireless coverage requirements in small area or …
-
Page 43: Wireless Parameters
Wireless parameters In this section, you are allowed to change network mode, WiFi channel, and WiFi bandwidth of either 2.4 GHz or 5 GHz WiFi network. To access the configuration page, click Wireless Settings and move to Wireless Parameters module. Parameter description Parameter Description…
-
Page 44: Beamforming
Parameter Description It specifies the bandwidth of the WiFi channel of a WiFi network. Change the default settings only when necessary. 20: It indicates that the channel bandwidth of a router is to 20 MHz. 40: It indicates that the channel bandwidth of a router is 40 MHz. …
-
Page 45
The following figure shows the wireless transmission when Beamforming+ is enabled. To access the configuration page, click Wireless Settings and move to the Beamforming+ module. By default, the Beamforming+ function is enabled. -
Page 46: Wps
6.6.1 Overview The WPS function enables wireless devices such as smartphones to connect to WiFi networks of the router quickly and easily. To access the configuration page, click Wireless Settings and move to the WPS module. It is enabled by default. 6.6.2 Connecting devices to the WiFi network using WPS This function is only applicable to WPS-enabled wireless devices.
-
Page 47
Step 2 Set WPS on a smart phone or computer installed with wireless adapter within two minutes. —End Wait until the smart phone or computer is connected to the WiFi network of the router successfully. Method 3: Through pin code of the router WPS connection using pin code is generally applied on a computer with a wireless adapter. -
Page 48: Bandwidth Control
Bandwidth control In this section, you are allowed to view on-line device(s), block unknown device(s), and set maximum download/upload speed for online devices. Click Bandwidth Control to enter the configuration page. Parameter description Parameter Description It displays the information of the online device, including device name, IP address and MAC address.
-
Page 49: Configuring Bandwidth Control
Parameter Description Used to remove a blocked device from the blacklist. After being Unlimit removed from the blacklist, the device can reconnect to the router for internet access. Configuring bandwidth control Step 1 Click Bandwidth Control to enter the configuration page. Step 2 Specify Download/Upload Limit as required.
-
Page 50: Parental Controls
Parental controls Overview The parental controls function allows you to block inappropriate and malicious websites, and control online devices to access allowed websites at allowed time. Choose Parental Controls to enter the configuration page. Parameter description Parameter Description It specifies the name of the online device. Device Name You can click to customize the device name for easier management.
-
Page 51: Setting Up A Parental Controls Rule
Setting up a parental controls rule Configuration procedure: A parental controls rule takes effect based on the IP address. Thus, to ensure that the rule takes effect correctly, you are recommended to use the IP-MAC binding function to bind an IP address to the device you want to control.
-
Page 52: An Example Of Configuring Parental Controls
An example of configuring parental controls Tom uses AC8 to set up a network in his apartment. He wants his daughter Sindy to focus on her homework from 20:00 to 22:00 instead of YouTube video on weekdays. The parental controls function can meet this requirement. Configuration procedure: Step 1 Choose Parental Controls to enter the configuration page.
-
Page 53: Sleeping Mode
Sleeping mode Overview This router supports the Sleeping Mode function. With this function enabled, the router disables the LED indicator and WiFi network to reduce consumption during the specified time. To make the Sleeping Mode function work properly, please ensure the system time is synchronized with the internet time.
-
Page 54: Led Control
LED control This page allows you to turn on and turn off the LED indicator of the router as required. To access the configuration page, click Sleeping Mode, and move to the LED Control module. Parameter description Parameter Description Always open It indicates that the LED indicator works in ordinary states.
-
Page 55: Wifi Schedule
WiFi schedule 9.3.1 Overview This WiFi Schedule function allows you to disable the WiFi network of the router at specified period. By default, this function is disabled. To access the configuration page, click Sleeping Mode, and move to the WiFi Schedule module. Parameter description Parameter Description…
-
Page 56
Step 3 Turn WiFi Off At: Set the period as needed, which is 23:00~07:00 in this example. Step 4 Turn WiFi Off On: Select the schedule type as needed, which is Every Day in this example. Step 5 Click OK at the bottom of the page. —End Verification The WiFi networks are disabled from 23:00 to 07:00 every day. -
Page 57: Advanced
Advanced 10.1 MAC address filter 10.1.1 Overview This function allows you to set a MAC address whitelist or a blacklist to enable or disable users to access the internet through the router. Choose Advance and move to the MAC Address Filter module to access the configuration page. Parameter description Parameter Description…
-
Page 58: An Example Of Setting A Mac Address Filter Rule
Step 6 Click OK at the bottom of the page. —End Deleting a rule Step 1 Click Advanced to enter the configuration page, and move to the MAC Address Filter module. Step 2 Click corresponded to the MAC address filtering rule to be deleted. Step 3 Click OK at the bottom of the page.
-
Page 59
—End After you complete the settings, the unknown device cannot connect to the WiFi network to access the internet. -
Page 60: Iptv
10.2 IPTV 10.2.1 Overview IPTV is the abbreviation of Internet Protocol Television. It is new technology integrating with internet, multimedia, telecommunication and many other technologies, providing interactive services including digital TV to family users by internet broadband lines. IPTV is a service provided by ISP.
-
Page 61: Network Topology
Network topology Internet Ethernet cable Ethernet cable IPTV set-top box Procedure Step 1 Set you router. To access the configuration page, click Advanced Settings, and move to IPTV module. Set IPTV to Enable. Click OK at the bottom of the page. Step 2 Dial up on set-top-box with the account and password provided by ISP.
-
Page 62: Ip-Mac Binding
10.3 IP-MAC binding The IP-MAC Binding function enables clients to obtain a fixed IP address, ensuring that the IP address-based functions, such as port forwarding, DMZ host and other functions of the router can take effect properly. This function is only effective when the DHCP server of the router is enabled. Choose Advanced, and move to the IP-MAC Binding module to access the configuration page.
-
Page 63
Deleting a rule Step 1 Choose Advanced to enter the configuration page, and move to the IP-MAC Binding module. Step 2 Click corresponded to an entry to be deleted. Step 3 Click OK at the bottom of the page. —End… -
Page 64: Port Forwarding
10.4 Port forwarding By default, internet users cannot access any service on any of your local hosts. If you want to enable internet users to access a particular service on a local host, enable this function and specify the IP address and service port of the local host. This can also prevent local network from being attacked when the internal server is opened to the internet users.
-
Page 65
Prerequisites The WAN IP address of the router is a public IP address, which is 102.33.66.88. Computer 1 is assigned a fixed IP address, which is 192.168.0.100 (Refer to the IP-MAC binding function). The internal and external port of the web server is 89. … -
Page 66: Ddns
10.5 DDNS 10.5.1 Overview DDNS is short for Dynamic Domain Name Server. When the DDNS service runs, the DDNS client on the router sends its current WAN port IP address to the DDNS server, and then the server updates the mapping relationship between the domain name and the IP address in the database to achieve dynamic domain name resolution.
-
Page 67: An Example Of Configuring Ddns
The port forwarding function and DDNS function can be enabled to meet the requirement. Assumption DDNS service provider: oray.com Domain name: tenda-winnie.imwork.net Username: tenda-winnie Password: a1234578 Web server IP address: 192.168.0.110…
-
Page 68
Register a DDNS account and memorize your user name, password, and domain name of the account. Enter your DDNS user name, which is tenda-winnie in this example. Enter your DDNS password, which is a12345678 in this example. -
Page 69: Dmz Host
10.6 DMZ host A DMZ host on a LAN can be accessed by the internet users without limit. It is especially used for video conferences and online games. You can set a computer with these requirements as a DMZ host for better user experience. Choose Advanced, and move to the DMZ Host module to access the configuration page.
-
Page 70: Upnp
10.7 UPnP UPnP is short for Universal Plug and Play. This function enables the router to implement automatic port forwarding by automatically detecting UPnP-based application programs and enabling ports on the router for the applications. It is generally used for P2P programs, such as BitComet and AnyChat, and helps increase the download speed.
-
Page 71: Ipv6
IPv6 11.1 Overview Internet Protocol version 6 (IPv6) is the most recent version of the Internet Protocol (IP), the communications protocol that provides an identification and location system for computers on networks and routes traffic across the Internet. IPv6 provides a larger addressing space than Internet Protocol version (IPv4).
-
Page 72
Parameter description Parameter Description Select the internet parameter obtaining method of WAN port. DHCPv6: The router obtains information from the upstream device, and no information is required on this page. PPPoEv6: Your ISP provides you with the PPPoE username and password. … -
Page 73
Parameter Description When you choose Obtain IPv6 Prefix Delegation, the router can obtain an IPv6 Address IPv6 prefix from the upstream DHCP server. It can be enabled only when the Obtaining WAN connection is DHCPv6 or PPPoEv6. It is enabled by default. Method If it is disabled, you need to set IPv6 LAN prefix length manually. -
Page 74: Setting Up An Internet Connection With Dhcpv6
11.2 Setting up an internet connection with DHCPv6 Configuration procedures: Step 1 Click IPv6 to enter the configuration page. Step 2 Switch the IPv6 button from state. Step 3 Select DHCPv6 from the Connection Type drop-down list box. Step 4 Select the IPv6 LAN Address type.
-
Page 75: Setting Up An Internet Connection With Pppoev6
11.3 Setting up an internet connection with PPPoEv6 Configuration procedures: Step 1 Click IPv6 to enter the configuration page. Step 2 Switch the IPv6 button from state. Step 3 Select PPPoEv6 from the Connection Type drop-down list box. Step 4 Enter the PPPoE username provided by your ISP.
-
Page 76: Setting Up An Internet Connection With Static Ipv6 Address
11.4 Setting up an internet connection with static IPv6 address Configuration procedures: Step 1 Click IPv6 to enter the configuration page. Step 2 Switch the IPv6 button from state Step 3 Select Static IPv6 Address from the Connection Type drop-down list box. Step 4 Enter the IPv6 Address provided by your ISP.
-
Page 77
After the settings take effect, check the IPv6 Status. If there are IP addresses of IPv6 WAN address, default IPv6 gateway and related parameters, the router is connected to the internet successfully. -
Page 78: Administration
Administration This section describes how to manage and maintain your router and home network. 12.1 Login password To ensure network security, a complex login password is recommended. A login password consisting of more types of characters, such as uppercase letters and lowercase letters, has higher security.
-
Page 79: Wan Parameters
12.2 WAN parameters In the WAN Parameters module, you can check and modify MTU value, clone MAC address and modify WAN speed. Choose Administration and move to the WAN Parameters module to enter the configuration page. MTU specifies the maximum size of packet that the router can transmit. MTU varies based on connection types.
-
Page 80: Wan Speed
internet. Configuration procedure: Step 1 Choose Administration, and move to the WAN Parameters module to enter the configuration page. Step 2 Set Clone MAC Address to Clone Local Host MAC. Step 3 Click OK at the bottom of the page. —End Scenario 2: The computer used to manage the router is not the computer that used to access the internet.
-
Page 81: Lan Parameters
12.3 LAN parameters In this section, you can view and modify the LAN IP address and DHCP server parameters of the router. The DHCP server can automatically assign IP addresses, subnet masks, gateways and other related parameters to the clients of the router. Choose Administrator, and move to the LAN Parameters module to enter the configuration page.
-
Page 82: Remote Web-Based Management
12.4 Remote web-based management Generally, the web UI of the router can only be accessed on devices that are connected to the router by a LAN port or wireless connection. When you encounter a network fault, you can ask for remote technical assistance, which improves efficiency and reducing costs and efforts.
-
Page 83
Parameter Description It specifies the port number to access the router remotely. It is 80 by default, and can be modified if necessary. Port 1 to 1024 are occupied by well-known services. It is recommended to modify Port the port to be in the range from 1025 to 65535. To access the web UI of the router by the URL: http://WAN IP address:port number. -
Page 84
—End After the configuration is saved, use http://102.105.106.55:8888 to access the web UI of the router on computer 2. -
Page 85: Date & Time
12.5 Date & Time If the system time of the router is incorrect, time-based functions of the router cannot take effect correctly, including the WiFi schedule, parental controls and Automatic Maintenance functions. When the configuration with the Quick Setup Wizard is complete, the router synchronizes its system time with the computer used to configure the router.
-
Page 86: Device Management
Resetting the router is not recommended unless you forget your login password or under the requirement of Tenda technical support. You can access the internet only after reconfiguring the router. Ensure that the power supply of the router is normal when the router is reset.
-
Page 87
configuration page. Step 2 Click Reset. Step 3 Click OK in the popup window. —End Wait for the progress bar to complete. Resetting the Router Using the Reset Button Hold down the WPS/RST button of the router for about 8 seconds and release it when the LED indicator blinks fast. -
Page 88: Upgrade Firmware
Export system log This function logs all key events that occur after the router is started. If you encounter a network fault, you can turn to system logs for fault rectification. Choose Administration, and move to the Device Management module to access the configuration page.
-
Page 89
Local upgrade To enable a successful upgrade, ensure that the firmware is applicable to the router. When you are upgrading a firmware, do not power off the router. Step 1 Go to www.tendacn.com, download a firmware version of the router to your computer and unzip it. -
Page 90
firmware. If you want to upgrade the firmware, click Upgrade and the router upgrades the firmware automatically. Configuration procedure: Step 1 Choose Administration > Device Management on the router web UI. Step 2 Click Online Upgrade. —End Wait until the progress bar is complete. Log in to the web UI of the router again. Choose Status > System Information and check whether the upgrade is successful based on Firmware Version For better performance of the new firmware of the router, you are recommended to reset the router to factory default settings and re-configure the router when the upgrading completes. -
Page 91: Appendix
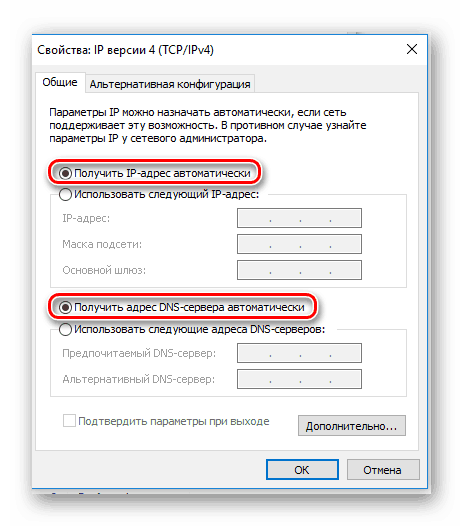
Appendix Configuring the computer to obtain an IP address automatically Perform the configuration procedures corresponding to Windows Windows 7, and Windows 10 as required. A computer installed with a wired network adapter is used as an example to describe the procedures. The procedures for configuring computers installed with a wireless network adapter are similar.
-
Page 92
Step 3 Double-click Internet Protocol Version 4 (TCP/IPv4). Step 4 Select Obtain an IP address automatically and Obtain DNS server address automatically, and click OK. Step 5 Click OK in the Ethernet Properties window. —-End… -
Page 93: Windows 7
Windows 7 A.1.2 Step 1 Click in the lower-right corner of the desktop and choose Open Network and Sharing Center. Step 2 Click Local Area Connection and then Properties.
-
Page 94
Step 3 Double-click Internet Protocol Version 4 (TCP/IPv4). Step 4 Select Obtain an IP address automatically and Obtain DNS server address automatically, and click OK. Step 5 Click OK in the Local Area Connection Properties window. —-End… -
Page 95: Windows 10
Windows 10 A.1.3 Step 1 Click in the lower-right corner of the desktop and choose Network settings. Step 2 Click Change adapter options. Step 3 Right click on the connection which is being connected, and then click Properties.
-
Page 96
Step 4 Double-click Internet Protocol Version 4 (TCP/IPv4). Step 5 Select Obtain an IP address automatically and Obtain DNS server address automatically, and click OK. Step 6 Click Close in the Ethernet Properties window. —-End… -
Page 97: Default Parameters
Default parameters Parameter IP Address 192.168.0.1 Parameters Subnet Mask 255.255.255.0 DHCP Server Enabled Start IP Address 192.168.0.100 DHCP Server End IP Address 192.168.0.200 Preferred DNS Server 192.168.0.1 Operating Mode Router mode Tenda_XXXXXX. XXXXXX indicates the last 6 characters of the WiFi Name Wireless MAC address of the router.
Содержание
- Настраиваем маршрутизатор Tenda
- Как зайти в настройки роутера
- Быстрая настройка
- Ручная настройка
- Дополнительные возможности
- Вопросы и ответы
Продукция китайской компании Tenda относительно недавно начала массовую экспансию на международные рынки. Поэтому, по сравнению с другими популярными брендами, она не так хорошо известна отечественному потребителю. Но благодаря сочетанию доступной цены и высокой степени инновационности, она становится все более популярной. Маршрутизаторы Tenda уже нередко встречаются в домашних сетях и сетях малых офисов. В связи с этим и вопрос о том, как их настраивать, приобретает все большую актуальность.
Простота настройки — еще один конек продукции Tenda. Единственным неудобством в этом процессе можно назвать лишь то, что не у всех моделей роутеров имеется интерфейс на русском языке. Поэтому дальнейшие пояснения будут производиться на примере роутера Tenda AC10U, где русскоязычный интерфейс присутствует.
Как зайти в настройки роутера
Процедура подключения к веб-интерфейсу роутера Tenda ничем не отличается от того, как это делается в устройствах от других производителей. Предварительно нужно выбрать место для маршрутизатора и соединить его через порт WAN с кабелем от провайдера, а через один из портов LAN — с компьютером. После этого:
- Проверить, чтобы настройки сетевого подключения на компьютере были выставлены на автоматическое получение IP-адреса.

- Открыть браузер и ввести адрес роутера. По умолчанию это 192.168.0.1.

- В окне авторизации ввести пароль
admin. Логин по умолчанию — тожеadmin. Он уже обычно прописан в верхней строке.


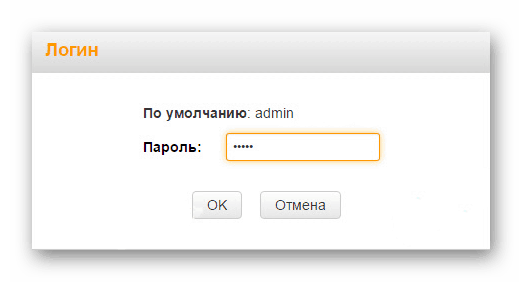
После этого произойдет перенаправление на страницу настроек маршрутизатора.
Быстрая настройка
После того как юзер подключится к конфигурации роутера, автоматически открывается мастер быстрой настройки. Пользоваться им очень просто. Вначале рекомендуется проверить доступность русского языка:
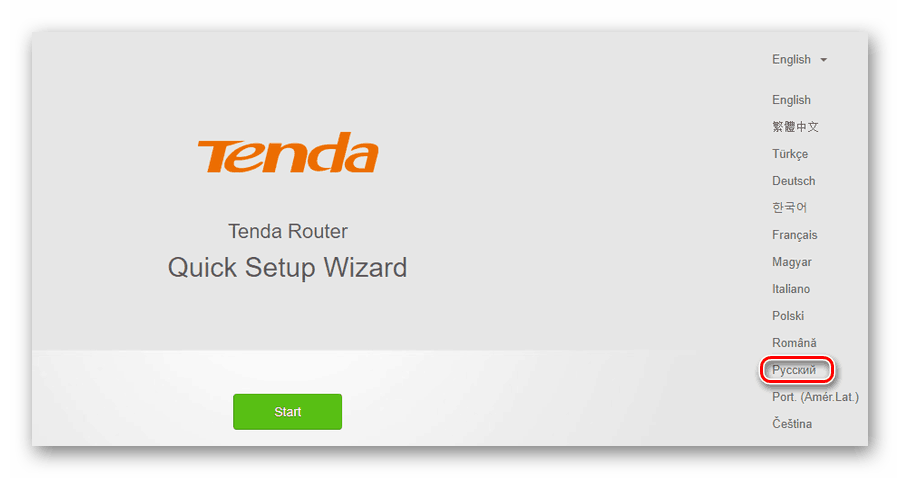
Если этот вопрос не актуален — данный шаг можно пропустить. Затем:
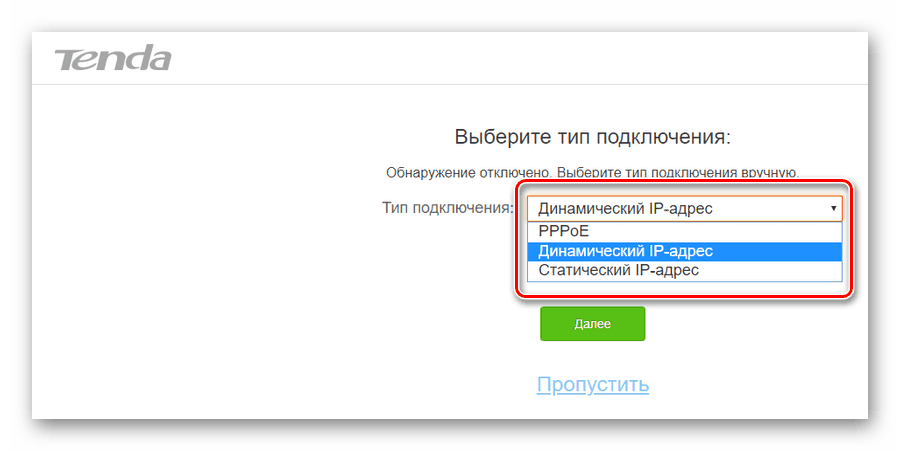
- Нажав на кнопку «Старт», запустить мастер.

- Выбрать тип подключения к интернету согласно договору с провайдером.

- В зависимости от выбранного типа подключения, сделать следующее:

Далее будет необходимо настроить основные параметры Wi-Fi соединения. В этом же окне устанавливается пароль администратора для доступа к веб-интерфейсу роутера.
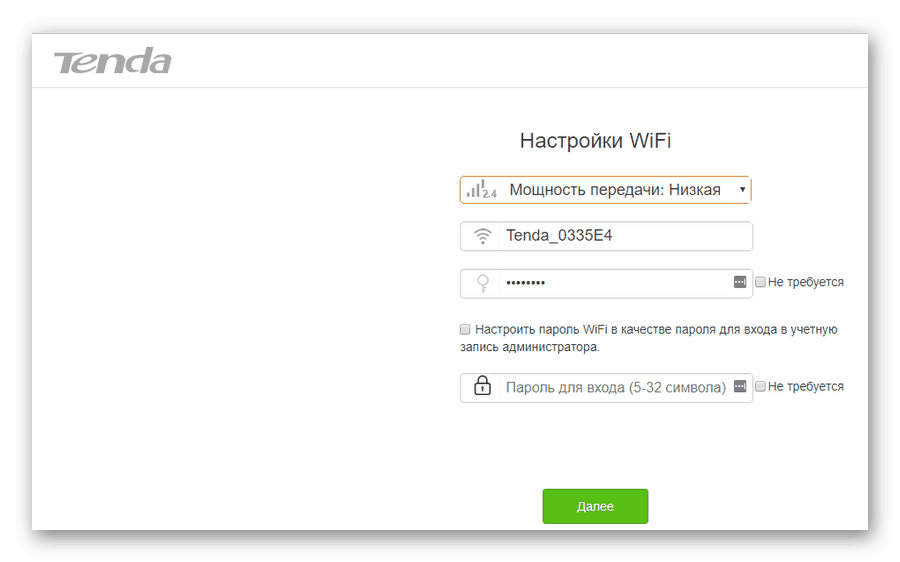
В верхнем поле пользователю предоставляется возможность отрегулировать радиус покрытия беспроводной сети, установив передатчик Wi-Fi на низкую или высокую мощность. Далее идут стандартные параметры имени сети и пароля для подключения к ней. Если отметить галочкой пункт «Не требуется», сеть будет открытой для доступа любого желающего, поэтому стоит серьезно подумать, прежде чем активировать этот параметр.
В последней строке устанавливается пароль администратора, с помощью которого в дальнейшем можно будет подключаться к конфигурации роутера. Там также имеется пункт, предлагающий установить для Wi-Fi и для администратора единый пароль, и отметка «Не требуется», позволяющая оставить доступ к веб-интерфейсу свободным. Целесообразность таких настроек, как и в предыдущем случае, весьма сомнительна и юзер должен осознавать все возможные последствия, прежде чем воспользоваться ими.
После установки параметров беспроводной сети перед пользователем откроется финальное окно мастера быстрой настройки.
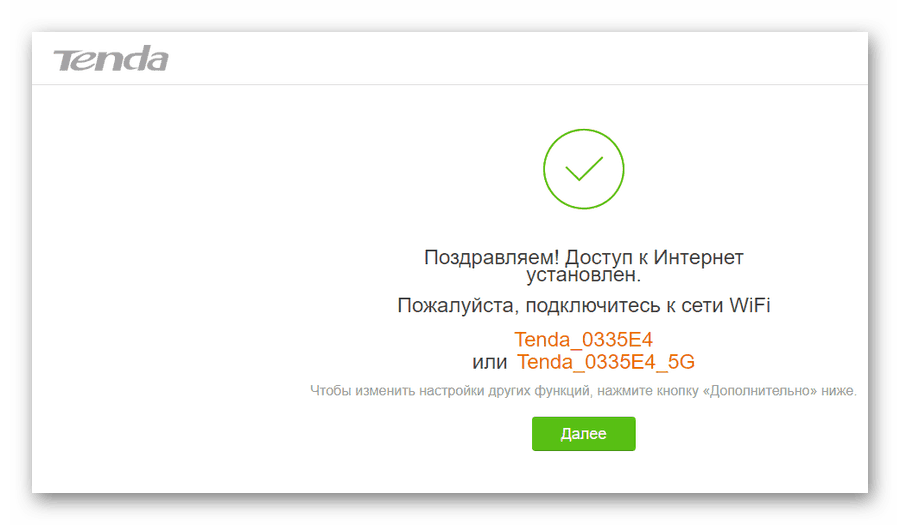
Нажатием на кнопку «Далее», осуществляется переход к установке дополнительных параметров.
Ручная настройка
Зайти в режим ручной настройки роутера Tenda можно, лишь запустив мастер быстрой настройки и на этапе выбора типа подключения щелкнув по ссылке «Пропустить».
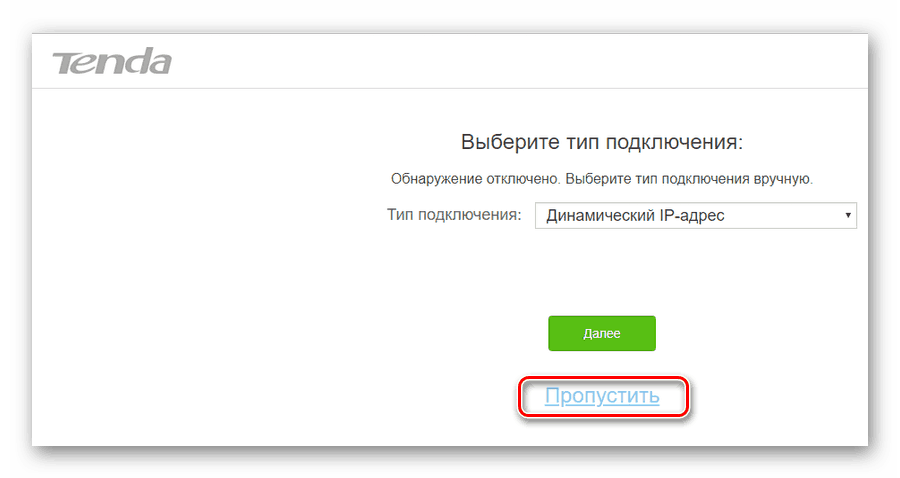
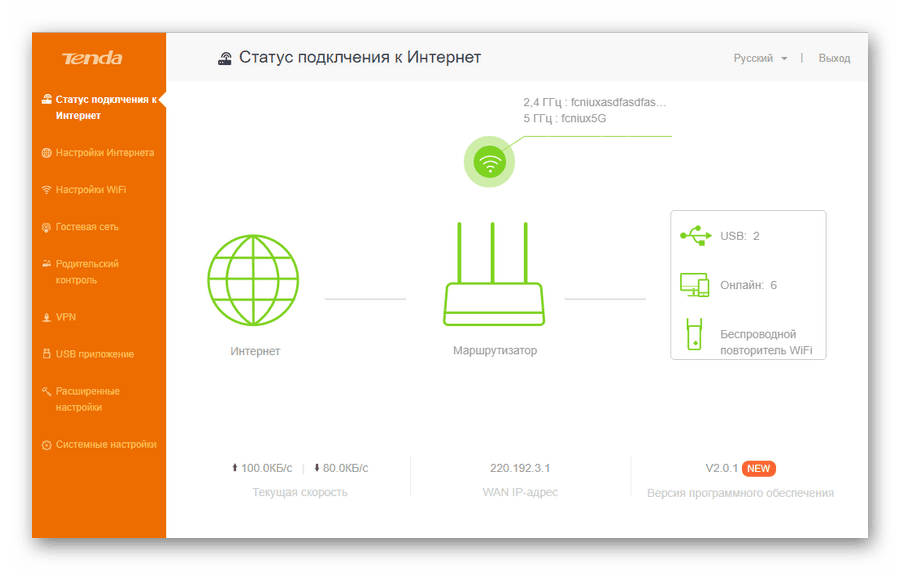
После этого откроется окно настройки беспроводной сети и установки пароля администратора, которое уже было описано выше. Нажав на кнопку «Далее», пользователь попадает на главную страницу конфигурации роутера:
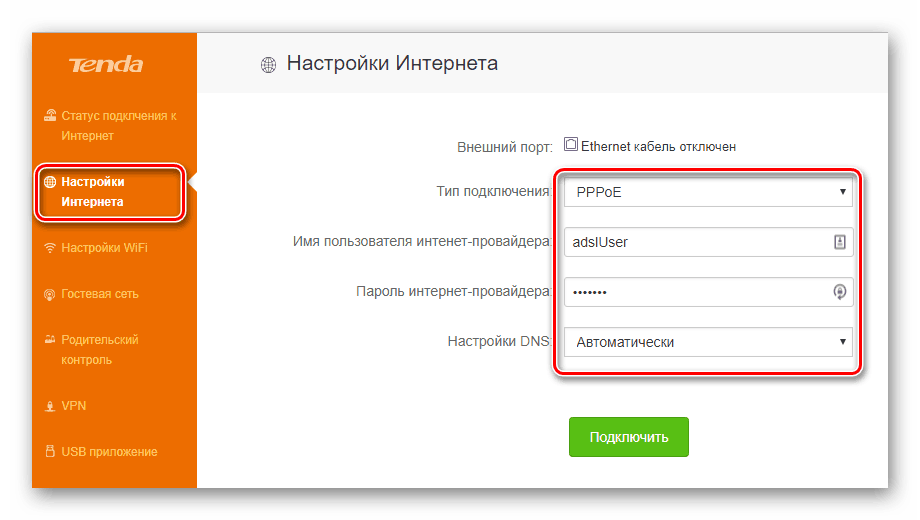
Если говорить о ручной настройке интернет-соединения, то для юзера в ней мало смысла, так как зайдя в соответствующий раздел, можно увидеть точно такие же окна, какие появляются и во время работы мастера быстрой настройки:
Исключением является лишь случай, когда провайдер работает через РРТР или L2TP-соединение, например, Билайн. Сконфигурировать его в режиме быстрой настройки не получится. Чтобы настроить такое соединение, нужно:
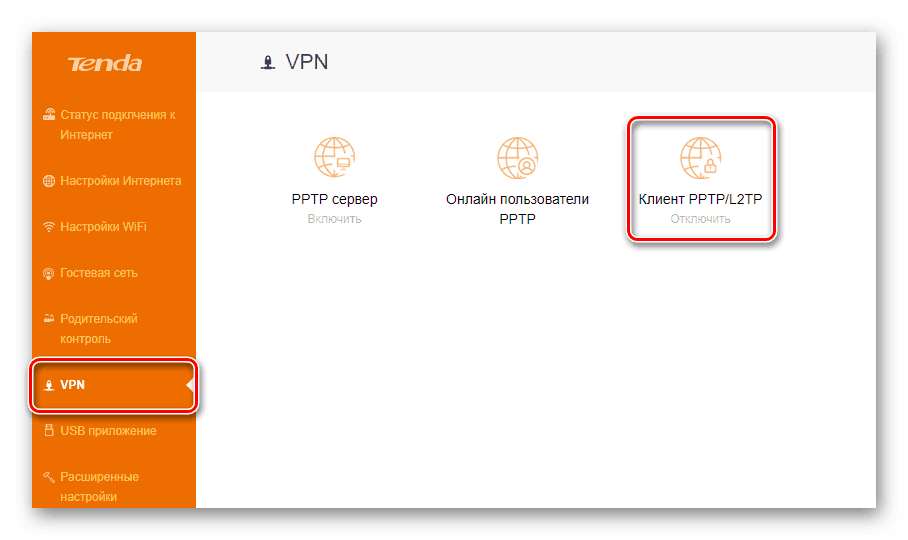
- Перейти в раздел «VPN» и там щелкнуть по пиктограмме «Клиент РРТР/L2TP».

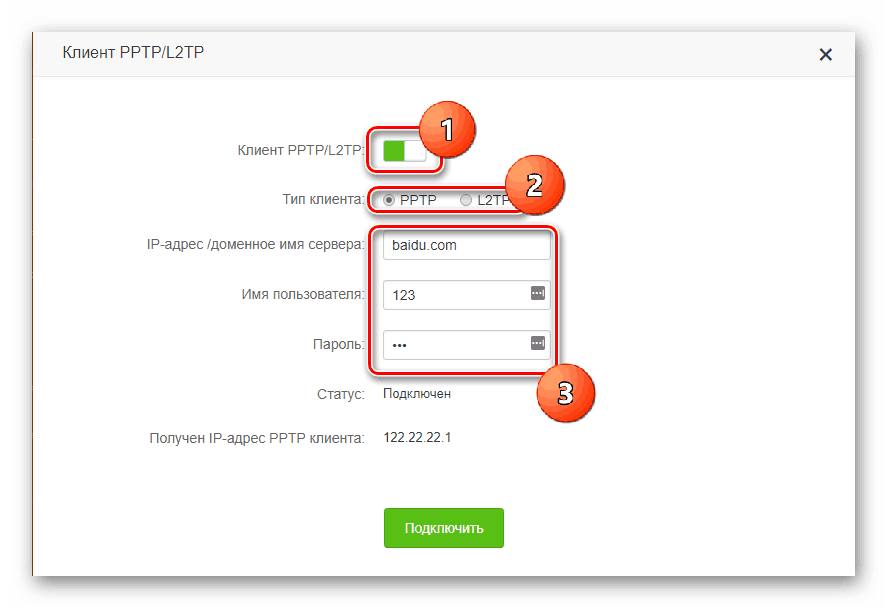
- Убедиться, что клиент включен, выбрать тип подключения РРТР или L2TP и ввести адрес VPN-сервера, логин и пароль согласно данным полученным у провайдера.

Раздел, посвященный настройкам Wi-Fi соединения, имеет более богатое меню:
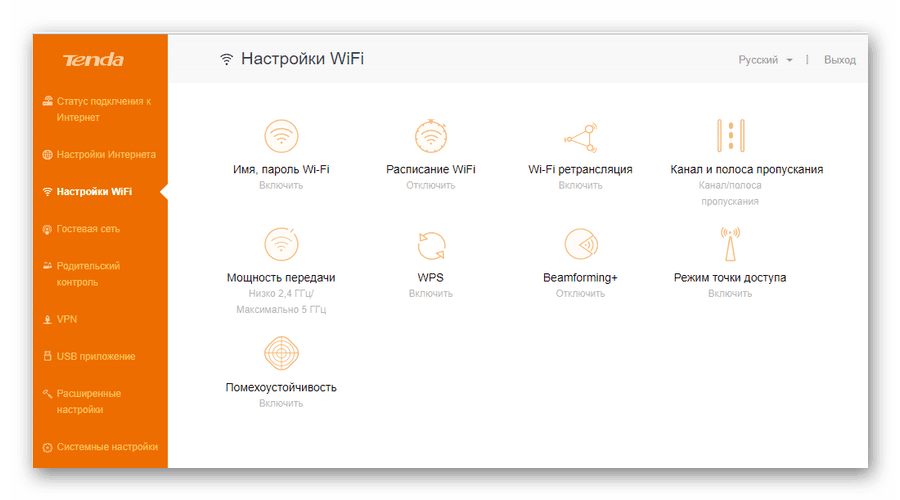
Помимо стандартных параметров, которые доступны в мастере быстрой настройки, там можно установить:
В расширенных настройках беспроводной сети присутствуют и другие интересные функции, набор которых может отличаться в зависимости от модели маршрутизатора. Все пункты меню снабжены подробными объяснениями, что делает настройку беспроводной сети максимально простой.
Дополнительные возможности
Кроме базовых функций, обеспечивающих доступ во всемирную сеть и раздачу Wi-Fi, в роутерах Тенда существует множество дополнительных возможностей, которые делают работу в сети более безопасной и комфортной. Остановимся подробнее на некоторых из них.
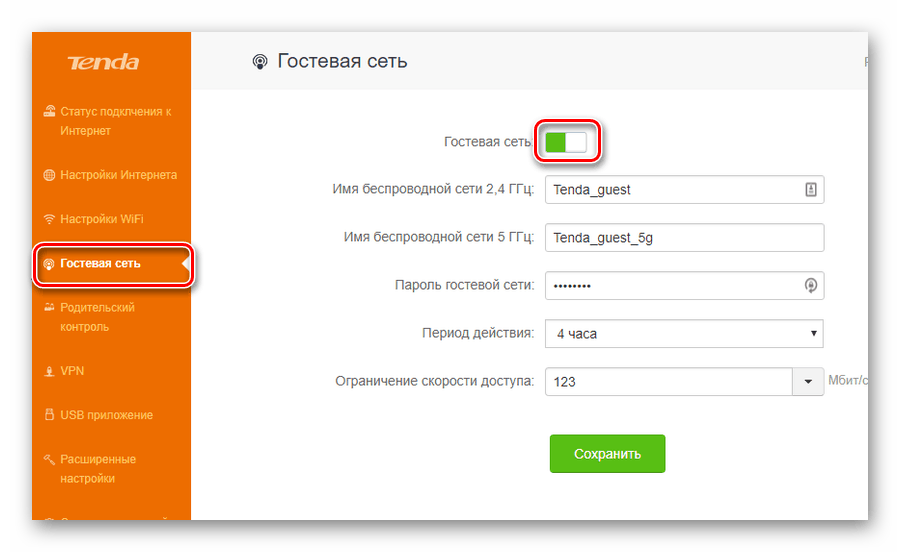
- Гостевая сеть. Активацией данной функции предоставляется доступ в интернет посетителям офиса, клиентам и любым посторонним людям. Этот доступ будет ограниченным и гости не смогут подключаться к ЛВС офиса. Кроме того, позволяется установить ограничения на период действия и скорость интернет-подключения гостевой сети.

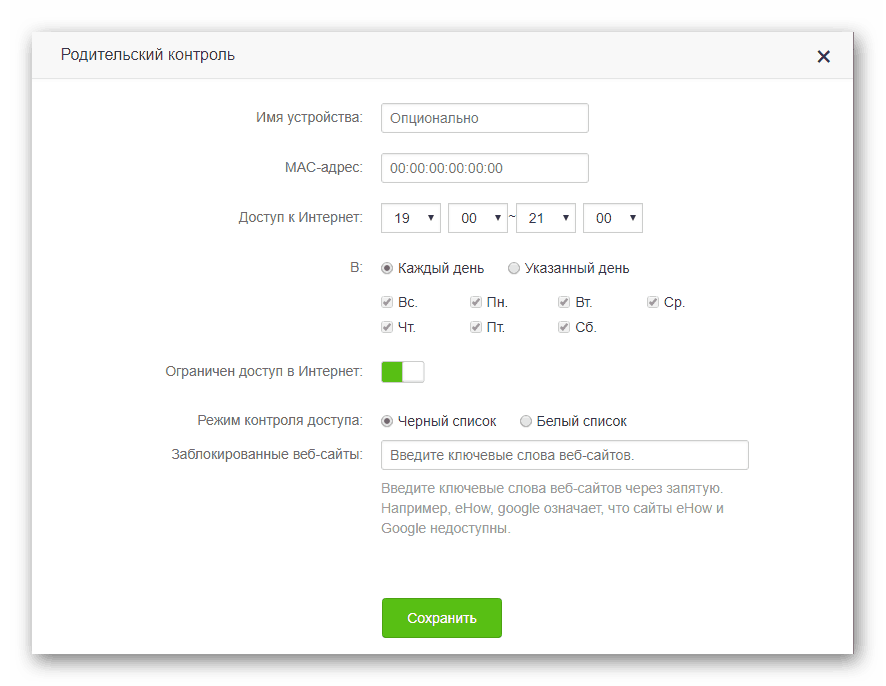
- Родительский контроль. Тем, кто хочет контролировать время нахождения ребенка за компьютером, достаточно в веб-интерфейсе роутера перейти в соответствующий раздел и нажать на кнопку «Добавить». Затем в открывшемся окне ввести МАС-адрес устройства, с которого ребенок выходит в сеть, и установить требуемые ограничения. Они задаются в режиме черного или белого списка по времени суток и дню недели. Кроме того, существует возможность включить запрет на посещение отдельных веб-ресурсов, вписав их имена в соответствующем поле.

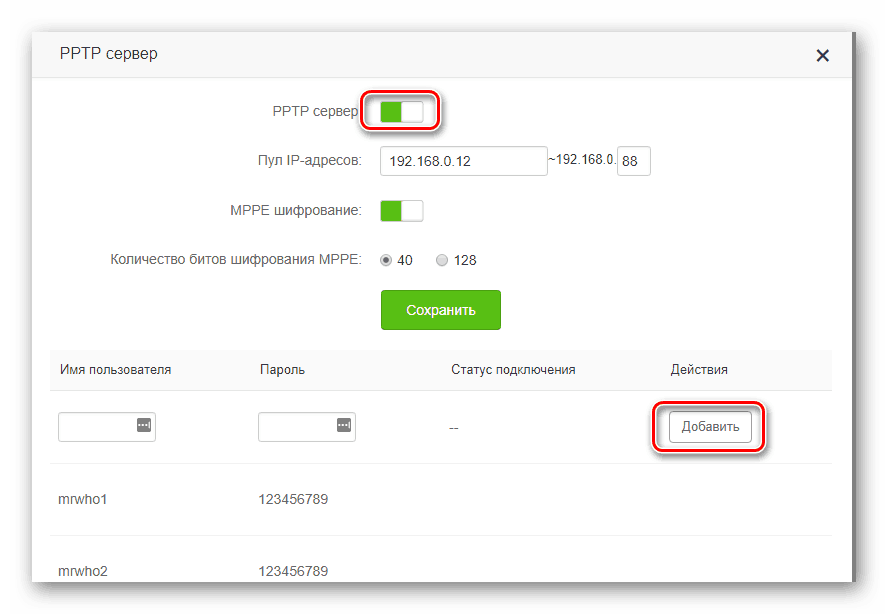
- VPN-сервер. Настройка роутера в данном качестве осуществляется в одноименном разделе конфигурации, о котором уже упоминалось при описании настройки L2TP-соединения. Чтобы активировать функцию VPN-сервера, необходимо перейти в подменю em>»РРТР сервер» и передвинуть виртуальный ползунок во включенное положение. Затем с помощью кнопки «Добавить» нужно ввести логины и пароли пользователей, которым будет разрешено задействовать данную функцию, и сохранить изменения.

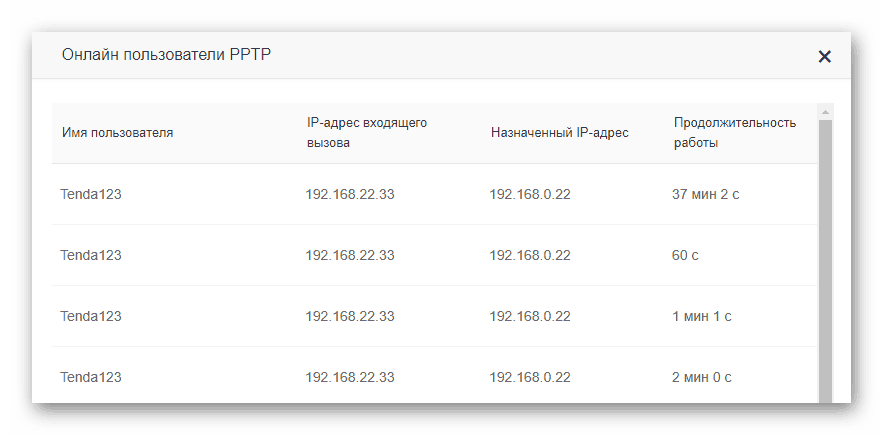
После этого, перейдя по ссылке «Онлайн пользователи РРТР», можно контролировать, кто из юзеров удаленно подключился к сети через VPN и длительность его сеанса.

Описанными выше функциями перечень дополнительных возможностей, предоставляемых роутером Тенда, не ограничивается. Перейдя в раздел «Расширенные настройки», можно осуществить еще целый ряд интересных настроек. Они предельно просты и не требуют дополнительных пояснений. Более подробно можно остановиться разве что на функции Tenda App, которая является своеобразной фишкой компании.

Активировав данную функцию, можно скачать ссылку на установку мобильного приложения Tenda App через предоставленный QR-кодом. После установки этого мобильного приложения, открывается доступ к управлению роутером со своего смартфона или планшета, обойдясь таким образом без компьютера или ноутбука.
На этом обзор настройки роутера Tenda завершается. При этом следует отметить, что веб-интерфейс устройств Tenda F, FH, Tenda N несколько отличается от описанного выше. Но в целом он еще проще и пользователю, ознакомившемуся с данной статьей не составит труда произвести настройку и этих устройств.