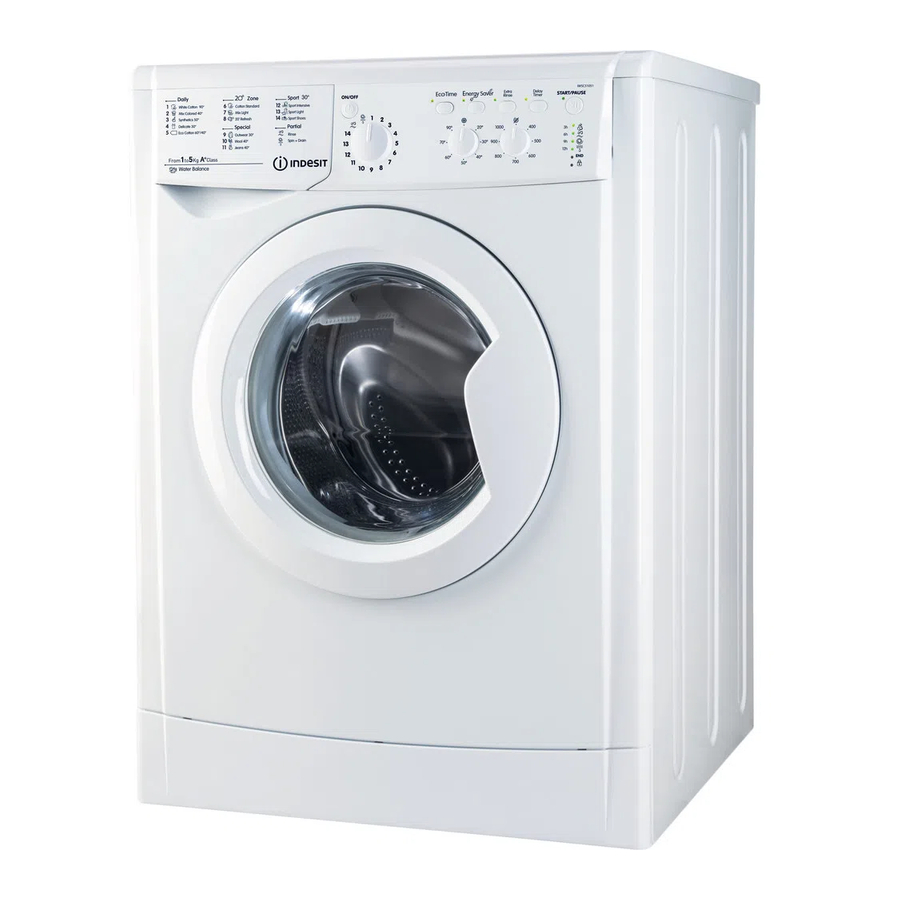
Indesit IWSC 51051 Washing Machine Manual
Installation
This instruction manual should be kept in a safe place for future reference. If the washing machine is sold, transferred or moved, make sure that the instruction manual remains with the machine so that the new owner is able to familiarise himself/herself with its operation and features.
Read these instructions carefully: they contain vital information relating to the safe installation and operation of the appliance.
Unpacking and levelling
Unpacking
- Remove the washing machine from its packaging.
- Make sure that the washing machine has not been damaged during the transportation process. If it has been damaged, contact the retailer and do not proceed any further with the installation process.
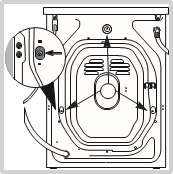
- Remove the 3 protective screws (used during transportation) and the rubber washer with the corresponding spacer, located on the rear part of the appliance (see figure).

- Close off the holes using the plastic plugs provided.
- Keep all the parts in a safe place: you will need them again if the washing machine needs to be moved to another location.
Packaging materials should not be used as toys for children.
Levelling
- Install the washing machine on a flat sturdy floor, without resting it up against walls, furniture cabinets or anything else.
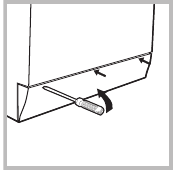
- If the floor is not perfectly level, compensate for any unevenness by tightening or loosening the adjustable front feet (see figure); the angle of inclination, measured in relation to the worktop, must not exceed 2°.

Levelling the machine correctly will provide it with stability, help to avoid vibrations and excessive noise and prevent it from shifting while it is operating. If it is placed on carpet or a rug, adjust the feet in such a way as to allow a sufficient ventilation space underneath the washing machine.
Connecting the electricity and water supplies
Connecting the water inlet hose
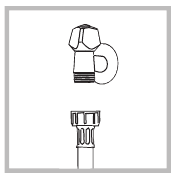
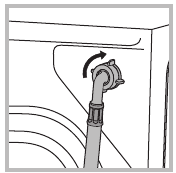
- Connect the supply pipe by screwing it to a cold water tap using a ¾ gas threaded connection (see figure).

Before performing the connection, allow the water to run freely until it is perfectly clear. - Connect the inlet hose to the washing machine by screwing it onto the corresponding water inlet of the appliance, which is situated on the top right-hand side of the rear part of the appliance (see figure).
- Make sure that the hose is not folded over or bent.
The water pressure at the tap must fall within the values indicated in the Technical details table.
If the inlet hose is not long enough, contact a specialised shop or an authorised technician.
Never use second-hand hoses.
Use the ones supplied with the machine.
Connecting the drain hose
Connect the drain hose, without bending it, to a draining duct or a wall drain situated between 65 and 100 cm from the floor;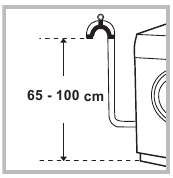
The drain hose may be connected to an under-sink trap. Before connecting the drain hose from the machine ensure that any blanks or removable ends have been taken off the spigot.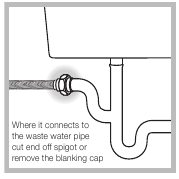
Where it connects to the waste water pipe cut end off spigot or remove the blanking cap
If it is placed over the edge of a basin or sink be sure the free end of the hose should not be underwater.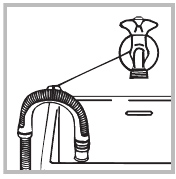
We advise against the use of hose extensions; in case of absolute need, the extension must have the same diameter as the original hose and must not exceed 150 cm in length. Ensure that if the drain hose is pushed into a standpipe, that the end does not go down more than 15cms (6 inches). If the hose is pushed down too far, this may cause the machine to self -syphon ie. continuously empty as it is filling.
Electric connection
Before plugging the appliance into the mains socket, make sure that:
- the socket is earthed and in compliance with the applicable law;
- the socket is able to sustain the appliance’s maximum power load indicated on the Technical Data Plate fixed on the machine;
- the supply voltage is included within the values indicated on the Technical Data Plate fixed on the machine.
- the socket is compatible with the washing machine’s plug. If this is not the case, replace the socket or the plug.
Your appliance is now supplied with a 13 amp fused plug it can be plugged into a 13 amp socket for immediate use. Before using the appliance please read the instructions below.
THIS APPLIANCE MUST BE EARTHED. THE FOLLOWING OPERATIONS SHOULD BE CARRIED OUT BY A QUALIFIED ELECTRICIAN.
Replacing the fuse:
When replacing a faulty fuse, a 13 amp ASTA approved fuse to BS 1362 should always be used, and the fuse cover refitted. If the fuse cover is lost, the plug must not be used until a replacement is obtained.
Replacement fuse covers:
If a replacement fuse cover is fitted, it must be of the correct colour as indicated by the coloured marking or the colour that is embossed in words on the base of the plug. Replacements can be obtained directly from your nearest Service Depot.
Removing the plug:
If your appliance has a non-rewireable moulded plug and you should wish to re-route the mains cable through partitions, units etc., please ensure that either:
the plug is replaced by a fused 13 ampere re-wearable plug bearing the BSI mark of approval.
or:
the mains cable is wired directly into a 13 amp cable outlet, controlled by a switch, (in compliance with BS 5733) which is accessible without moving the appliance.
Disposing of the plug:
Ensure that before disposing of the plug itself, you make the pins unusable so that it cannot be accidentally inserted into a socket.
Instructions for connecting cable to an alternative plug: Important: the wires in the mains lead are coloured in accordance with the following code:
Green & Yellow — Earth
Blue — Neutral
Brown—Live
As the colours of the wires in the lead may not correspond with the coloured markings identifying the terminals in your plug, proceed as follows:
- Connect Green & Yellow wire to terminal marked E or
 or coloured Green or Green & Yellow.
 - Connect Brown wire to terminal marked L or coloured Red. Connect Blue wire to terminal marked N or coloured Black.
- If a 13 amp plug (BS 1363) is used it must be fitted with a 13 amp fuse, either in the plug or adaptor or at the distribution board.
- If you are in any doubt about the electrical supply to your machine, consult a qualified electrician before use.
How to connect an alternative plug:
The wires in this mains lead are coloured in accordance with the following code:
BLUE —NEUTRAL (N)
BROWN — LIVE (L)
GREEN & YELLOW-EARTH (E) 
Disposing of the appliance:
When disposing of the appliance please remove the plug by cutting the mains cable as close as possible to the plug body and dispose of it as described on the previous page.
The washing machine should not be installed in an outdoor environment, not even when the area is sheltered, because it may be very dangerous to leave it exposed to rain and thunderstorms.
When the washing machine is installed, the mains socket must be within easy reach.
Do not use extensions or multiple sockets.
The power supply cable must never be bent or dangerously compressed.
The power supply cable must only be replaced by an authorised serviceman.
The company denies all liability if and when these norms are not respected.
The first wash cycle
Once the appliance has been installed, and before you use it for the first time, run a wash cycle with detergent and no laundry, setting the 90°C programme.
Technical data
| Model | IWSC 51051 |
| Dimensions | width 59.5 cm height 85 cm depth 44 cm |
| Capacity | from 1 to 5 kg |
| Electrical connections | please refer to the technical data plate fixed to the machine |
| Water connection | maximum pressure 1 MPa (10 bar) minimum pressure 0.05 MPa (0.5 bar) drum capacity 40 litres |
| Spin speed | up to 1000 rotations per minute |
| Test wash cycles in accordance with directives 1061/2010 and 1015/2010. | Programme 2: Cotton Standard 60°; Programme 3: Cotton Standard 40°. |
 |
This appliance conforms to the following EC Directives: — 2004/108/EC (Electromagnetic Compatibility) — 2002/96/EC — 2006/95/EC Low Voltage) |
Description of the washing machine and starting a wash cycle
Control panel

Detergent dispenser drawer: used to dispense detergents and washing additives (see «Detergents and laundry»).
ON/OFFbutton: switches the washing machine on and off.
WASH CYCLE knob: programmes the wash cycles. During the wash cycle, the knob does not move.
FUNCTION buttons with indicator light: used to select the available functions. The indicator light corresponding to the selected function will remain lit.
TEMPERATURE knob: sets the temperature or the cold wash cycle (see «Personalisation»).
SPIN SPEED knob: sets the spin speed or exclude the spin cycle completely (see «Personalisation»).
WASH CYCLE PROGRESS/DELAY TIMER indicator lights: used to monitor the progress of the wash cycle. The illuminated indicator light shows which phase is in progress.
If the Delay Timer function has been set, the time remaining until the wash cycle starts will be indicated (see next page).
DOOR LOCKED indicator light: indicates whether the door may be opened or not (see next page).
START/PAUSE button with indicator light: starts or temporarily interrupts the wash cycles.
N.B. To pause the wash cycle in progress, press this button; the corresponding indicator light will flash orange, while the indicator light for the current wash cycle phase will remain lit in a fixed manner. If the DOOR LOCKED ![]() indicator light is switched off, the door may be opened. To start the wash cycle from the point at which it was interrupted, press this button again.
indicator light is switched off, the door may be opened. To start the wash cycle from the point at which it was interrupted, press this button again.
Standby mode
This washing machine, in compliance with new energy saving regulations, is fitted with an automatic standby system which is enabled after about 30 minutes if no activity is detected. Press the ON-OFF button briefly and wait for the machine to start up again.
Consumption in off-mode: 1 W
Consumption in Left-on: 1 W
Indicator lights
The indicator lights provide important information. This is what they can tell you:
Delayed start
If the DELAY TIMER function has been activated (see «Personalisation»), after the wash cycle has been started the indicator light corresponding to the selected delay period will begin to flash
As time passes, the remaining delay will be displayed and the corresponding indicator light will flash:
The set programme will start once the selected time delay has expired.
Wash cycle phase indicator lights
Once the desired wash cycle has been selected and has begun, the indicator lights switch on one by one to indicate which phase of the cycle is currently in progress.
Function buttons and corresponding indicator lights
When a function is selected, the corresponding indicator light will illuminate.
If the selected function is not compatible with the programmed wash cycle, the corresponding indicator light will flash and the function will not be activated. If the selected function is not compatible with another function which has been selected previously, the indicator light corresponding to the first function selected will flash and only the second function will be activated; the indicator light corresponding to the enabled option will remain lit.
Door locked indicator light
![]()
When the indicator light is on, the porthole door is locked to prevent it from being opened; make sure the indicator light is off before opening the door (wait approximately 3 minutes). To open the door during a running wash cycle, press the START/PAUSE button; the door may be opened once the DOOR LOCKED indicator light turns off.
Starting a wash cycle
- Switch the washing machine on by pressing the ON/OFF button. All indicator lights will switch on for a few seconds, then they will switch off and the START/PAUSE indicator light will pulse.
- Load the laundry and close the door.
- Set the WASH CYCLE knob to the desired programme.
- Set the washing temperature (see «Personalisation»).
- Set the spin speed (see «Personalisation»).
- Measure out the detergent and washing additives (see «Detergents and laundry»).
- Select the desired functions.
- Start the wash cycle by pressing the START/PAUSE button and the corresponding indicator light will remain lit in a fixed manner, in green. To cancel the set wash cycle, pause the machine by pressing the START/PAUSE button and select a new cycle.
- At the end of the wash cycle the
 indicator light will switch on. The door can be opened once the DOOR LOCK
  indicator light turns off. Take out your laundry and leave the appliance door ajar to make sure the drum dries completely. Switch the washing machine off by pressing the ON/OFF button.
Wash cycles
Table of wash cycles
| Wash cycles |
Description of the wash cycle | Max. temp. (°C) |
Max. speed (rpm) |
Detergents | Max. load (kg) |
Residual damp- ness % |
Energy consum- ption kWh |
Total water lt |
Cycle dura- tion |
|
| Wash | Fabric softener | |||||||||
| Daily | ||||||||||
| 1 | White Cotton: extremely soiled whites. | 90° | 1000 |  |
|
5 | 62 | 1,57 | 56 | 130′ |
| 2 | Cotton Standard 60° (1): heavily soiled whites and resistant colours. | 60° | 1000 | |
|
5 | 62 | 0,89 | 44 | 165′ |
| 3 | Cotton Standard 40° (2): lightly soiled whites and delicate colours. | 40° | 1000 | |
|
5 | 62 | 0,80 | 61 | 160′ |
| 4 | Synthetics: heavily soiled resistant colours. | 50° | 800 | |
|
2,5 | — | — | — | 95′ |
| 4 | Synthetics (3): lightly soiled resistant colours. | 40° | 800 | |
|
2,5 | 44 | 0,47 | 38 | 90′ |
| 5 | Mix Colored: lightly soiled whites and delicate colours. | 40° | 1000 | |
|
5 | 62 | 0,59 | 48 | 80′ |
| 20° Zone | ||||||||||
| 6 | Cotton Standard 20°: lightly soiled whites and delicate colours. | 20° | 1000 | |
|
5 | — | — | — | 170′ |
| 7 | Mix Light | 20° | 800 | |
|
5 | — | — | — | 120′ |
| 8 | 20′ Refresh | 20° | 800 | |
|
1,5 | — | — | — | 20′ |
| Special | ||||||||||
| 9 | Outwear | 30° | 400 | |
— | 1,5 | — | — | — | 50′ |
| 10 | Wool: for wool, cashmere, etc. | 40° | 800 | |
|
1 | — | — | — | 65′ |
| 11 | Jeans | 40° | 800 | |
|
2,5 | — | — | — | 70′ |
| Sport | ||||||||||
| 12 | Sport Intensive | 30° | 600 | |
|
2,5 | — | — | — | 85′ |
| 13 | Sport Light | 30° | 600 | |
|
2,5 | — | — | — | 60′ |
| 14 | Special Shoes | 30° | 600 | |
|
Max. 2 pairs | — | — | — | 55′ |
| Partial wash cycles | ||||||||||
 |
Rinse | — | 1000 | — | |
5 | — | — | — | 36′ |
 |
Spin + Drain | — | 1000 | — | — | 5 | — | — | — | 16′ |
The length of cycle shown on the display or in this booklet is an estimation only and is calculated assuming standard working conditions. The actual duration can vary according to factors such as water temperature and pressure, the amount of detergent used, the amount and type of load inserted, load balancing and any wash options selected.
- Test wash cycle in compliance with directive 1061/2010: set wash cycle 2 with a temperature of 60°C.
his cycle is designed for cotton loads with a normal soil level and is the most efficient in terms of both electricity and water consumption; it should be used for garments which can be washed at 60°C. The actual washing temperature may differ from the indicated value. - Test wash cycle in compliance with directive 1061/2010: set wash cycle 3 with a temperature of 40°C.
This cycle is designed for cotton loads with a normal soil level and is the most efficient in terms of both electricity and water consumption; it should be used for garments which can be washed at 40°C. The actual washing temperature may differ from the indicated value.For all Test Institutes:
- Long wash cycle for cottons: set wash cycle 3 with a temperature of 40°C.
- Synthetic program along: set wash cycle 4 with a temperature of 40°C.
Personalisation
Setting the temperature
Turn the TEMPERATURE knob to set the wash temperature (see Table of wash cycles).
The temperature may be lowered, or even set to a cold wash  .
.
The washing machine will automatically prevent you from selecting a temperature which is higher than the maximum value set for each wash cycle.
Setting the spin speed
Turn the SPIN SPEED knob to set the spin speed for the selected wash cycle.
The maximum spin speeds available for each wash cycle are as follows:
| Wash cycles | Maximum spin speed |
| Cottons | 1000 rpm |
| Synthetics | 800 rpm |
| Wool | 800 rpm |
The spin speed may be lowered, or the spin cycle can be excluded altogether by selecting the symbol ![]() .
.
The washing machine will automatically prevent you from selecting a spin speed which is higher than the maximum speed set for each wash cycle.
Functions
The various wash functions available with this washing machine will help to achieve the desired results, every time. To activate the functions:
- Press the button corresponding to the desired function;
- the function is enabled when the corresponding indicator light is illuminated.
Note: If the indicator light flashes rapidly, this signals that this particular function may not be selected in conjunction with the selected wash cycle.

Selecting this option enables you to suitably adjust drum rotation, temperature and water to a reduced load of lightly soiled cotton and synthetic fabrics (refer to the «»Table of wash cycles»). «![]() » enables you to wash in less time thereby saving water and electricity. We suggest using a liquid detergent suitably measured out to the load quantity.
» enables you to wash in less time thereby saving water and electricity. We suggest using a liquid detergent suitably measured out to the load quantity. This function may not be used in conjunction with wash cycles 1, 6, 7, 8, 9, 10, 11, 12, 13, 14,


The function saves energy by not heating the water used to wash your laundry — an advantage both to the environment and to your energy bill. Instead, intensified wash action and water optimisation ensure great wash results in the same average time of a standard cycle.
For the best washing results we recommend the usage of a liquid detergent. This function may not be used in conjunction with wash cycles 6, 7, 8, 10, 12, 13, 14,
![]() Extra Rinse
Extra Rinse
By selecting this option, the efficiency of the rinse is increased and optimal detergent removal is guaranteed. It is particularly useful for sensitive skin. It cannot be used in conjunction with the 8,
![]() programmes.
programmes.
![]() Delay Timer
Delay Timer
This timer delays the start time of the wash cycle by up to 12 hours.
Press the button repeatedly until the indicator light corresponding to the desired delay time switches on. The fifth time the button is pressed, the function will be disabled.
N.B. Once the START/PAUSE button has been pressed, the delay time can only be modified by decreasing it until launching the set programme. This option is enabled with all programmes.
Detergents and laundry
Detergent dispenser drawer
Good washing results also depend on the correct dose of detergent: adding too much detergent will not necessarily result in a more efficient wash, and may in fact cause build up on the inside of your appliance and contribute to environmental pollution.
Do not use hand washing detergents because these create too much foam.
Use powder detergent for white cotton garments, for prewashing, and for washing at temperatures over 60°C.
Follow the instructions given on the detergent packaging.
Open the detergent dispenser drawer and pour in the detergent or washing additive, as follows.
Do not pour detergent into the compartment
- Detergent should only be poured into the compartment
- compartment 2: Detergent for the wash cycle (powder or liquid)
Liquid detergent should only be poured in immediately prior to the start of the wash cycle. - compartment 3: Additives (fabric softeners, etc.) The fabric softener should not overflow the grid.
Preparing the laundry
- Divide the laundry according to:
- the type of fabric/the symbol on the label
- the colours: separate coloured garments from whites.
- Empty all garment pockets and check the buttons.
- Do not exceed the values listed in the «Table of wash cycles», which refer to the weight of the laundry when dry.
How much does your laundry weigh?
1 sheet 400-500 g
1 pillow case 150-200 g
1 tablecloth 400-500 g
1 bathrobe 900-1200 g
1 towel 150-250 g
Garments requiring special care
Outwear (wash cycle 9): is studied for washing waterrepellent fabrics and winter jackets (e.g. Gore-Tex, polyester, nylon); for best results, use a liquid detergent and dosage suitable for a half-load; pre-treat necks, cuffs and stains if necessary; do not use softeners or detergents containing softeners. Stuffed duvets cannot be washed with this programme.
Wool: all wool garments can be washed using programme 10, even those carrying the «hand-wash only» ![]() label. For best results, use special detergents and do not exceed 1 kg of laundry.
label. For best results, use special detergents and do not exceed 1 kg of laundry.
Jeans: Turn garments inside-out before washing and use a liquid detergent. Use programme 11.
Sport Intensive (programma 12): is for washing heavily soiled sports clothing fabrics (tracksuits, shorts, etc.); for best results, we recommend not exceeding the maximum load indicated in the «Programme table».
Sport Light (programma 13): is for washing lightly soiled sports clothing fabrics (tracksuits, shorts, etc.); for best results, we recommend not exceeding the maximum load indicated in the «Programme table». We recommend using a liquid detergent and dosage suitable for a half-load.
Special Shoes (programma 14): is for washing sports shoes; for best results, do not wash more than 2 pairs simultaneously.
The 20° wash cycles (Zone 20°) offer effective washing performance at low temperatures, reducing electricity usage and expenditure while benefitting the environment. The 20° wash cycles meet all requirements:
Cotton Standard (programme 6) ideal for heavily soiled cotton loads. The effective performance levels achieved at cold temperatures, which are comparable to washing at 40°, are guaranteed by a mechanical action which operates at varying speed, with repeated and frequent peaks.
Mix Light (programme 7) ideal for mixed loads (cotton and synthetics) with a normal soil level. The effective performance levels achieved at cold temperatures are guaranteed by a mechanical action which operates at varying speed, across set average intervals. 20′ Refresh (programme  ideal for refreshing and washing lightly soiled garments in a few minutes. It lasts just 20 minutes and therefore saves both time and energy. It can be used to wash different types of fabrics together (except for wool and silk), with a maximum load of 1.5 kg.
Load balancing system
Before every spin cycle, to avoid excessive vibrations and to distribute the load in a uniform manner, the drum rotates continuously at a speed which is slightly greater than the washing rotation speed. If, after several attempts, the load is not balanced correctly, the machine spins at a reduced spin speed. If the load is excessively unbalanced, the washing machine performs the distribution process instead of spinning. To encourage improved load distribution and balance, we recommend small and large garments are mixed in the load.
Precautions and tips
This washing machine was designed and constructed in accordance with international safety regulations. The following information is provided for safety reasons and must therefore be read carefully.
General safety
- This appliance is not intended for use by persons (including children) with reduced physical, sensory or mental capabilities, or lack of experience and knowledge, unless they have been given supervision or instruction concerning use of the appliance by a person responsible for their safety. Children should be supervised to ensure that they do not play with the appliance.
- This appliance was designed for domestic use only.
- Do not touch the machine when barefoot or with wet or damp hands or feet.
- Do not pull on the power supply cable when unplugging the appliance from the electricity socket. Hold the plug and pull.
- Do not open the detergent dispenser drawer while the machine is in operation.
- Do not touch the drained water as it may reach extremely high temperatures.
- Never force the porthole door. This could damage the safety lock mechanism designed to prevent accidental opening.
- If the appliance breaks down, do not under any circumstances access the internal mechanisms in an attempt to repair it yourself.
- Always keep children well away from the appliance while it is operating.
- The door can become quite hot during the wash cycle.
- If the appliance has to be moved, work in a group of two or three people and handle it with the utmost care. Never try to do this alone, because the appliance is very heavy.
- Before loading laundry into the washing machine, make sure the drum is empty.
Disposal
- Disposing of the packaging materials: observe local regulations so that the packaging may be re-used.
- The European Directive 2002/96/EC on Waste Electrical and Electronic Equipment, requires that old household electrical appliances must not be disposed of in the normal unsorted municipal waste stream. Old appliances must be collected separately in order to optimise the recovery and recycling of the materials they contain and reduce the impact on human health and the environment. The crossed out «wheeled bin» symbol on the product reminds you of your obligation, that when you dispose of the appliance it must be separately collected.
Consumers should contact their local authority or retailer for information concerning the correct disposal of their old appliance.
Care and maintenance
Cutting off the water and electricity supplies
- Turn off the water tap after every wash cycle. This will limit wear on the hydraulic system inside the washing machine and help to prevent leaks.
- Unplug the washing machine when cleaning it and during all maintenance work.
Cleaning the washing machine
The outer parts and rubber components of the appliance can be cleaned using a soft cloth soaked in lukewarm soapy water. Do not use solvents or abrasives.
Cleaning the detergent dispenser drawer
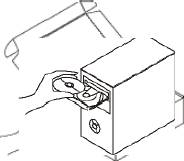
Remove the dispenser by raising it and pulling it out (see figure).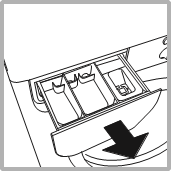
Wash it under running water; this operation should be repeated frequently.
Caring for the door and drum of your appliance
- Always leave the porthole door ajar in order to prevent unpleasant odours from forming.
Cleaning the pump
The washing machine is fitted with a self-cleaning pump which does not require any maintenance. Sometimes, small items (such as coins or buttons) may fall into the prechamber which protects the pump, situated in its bottom part.
Make sure the wash cycle has finished and unplug the appliance.
To access the pre-chamber:
- using a screwdriver, remove the cover panel on the lower front part of the washing machine (see figure);
- unscrew the lid by rotating it anti-clockwise (see figure): a little water may trickle out. This is perfectly normal;
- clean the inside thoroughly;
- screw the lid back on;
- reposition the panel, making sure the hooks are securely in place before you push it onto the appliance.

Checking the water inlet hose
Check the inlet hose at least once a year. If there are any cracks, it should be replaced immediately: during the wash cycles, water pressure is very strong and a cracked hose could easily split open.
Never use second-hand hoses.
Troubleshooting
Your washing machine could fail to work. Before contacting the Technical Assistance Centre (see «Assistance»), make sure that the problem cannot be solved easily using the following list.
| Problem: | Possible causes / Solutions: |
| The machine does not switch on. |
|
| The wash cycle does not start. |
|
| The machine does not fill with water or the indicator light for the first wash cycle stage flashes rapidly. |
|
| The machine continuously fills with water and continually drains away or Water left in the drum or Stuck on wash. |
|
| The machine does not drain or spin. |
|
| The machine does not heat or poor wash results. |
|
| The programme takes too long. |
|
| The machine vibrates a lot during the spin cycle. |
|
| The machine is noisy. |
|
| The machine wont spin properly. |
|
| The machine leaks from the dispenser. |
|
| The machine leaks (other than dispenser). |
|
| The indicator lights on the console are flashing rapidly. |
|
| The machine smells. |
|
| The machine door cannot be opened. |
|
| Door Seal damaged at the bottom. |
|
| The water level is too low when the machine is washing. |
|
| There is too much foam. |
|
| After completing the programme, or before starting a programme, the machine has turned itself off (no lights). |
|
| General. |
|
 position.
Remember, you will be charged for a service call for problems caused by incorrect installation, as listed above.
Not emptying contents from pockets may cause pump or drain blockages, or may damage the machine.
Do not wash items which do not have a wash label, or wash items that are not intended as machine washable.

Documents / Resources
Download manual
Here you can download full pdf version of manual, it may contain additional safety instructions, warranty information, FCC rules, etc.
Download Indesit IWSC 51051 Washing Machine Manual
Руководство по быстрой
установке
DIR—615
БЕСПРОВОДНОЙ МАРШРУТИЗАТОР 802.11N
(проект) ДЛЯ ДОМА
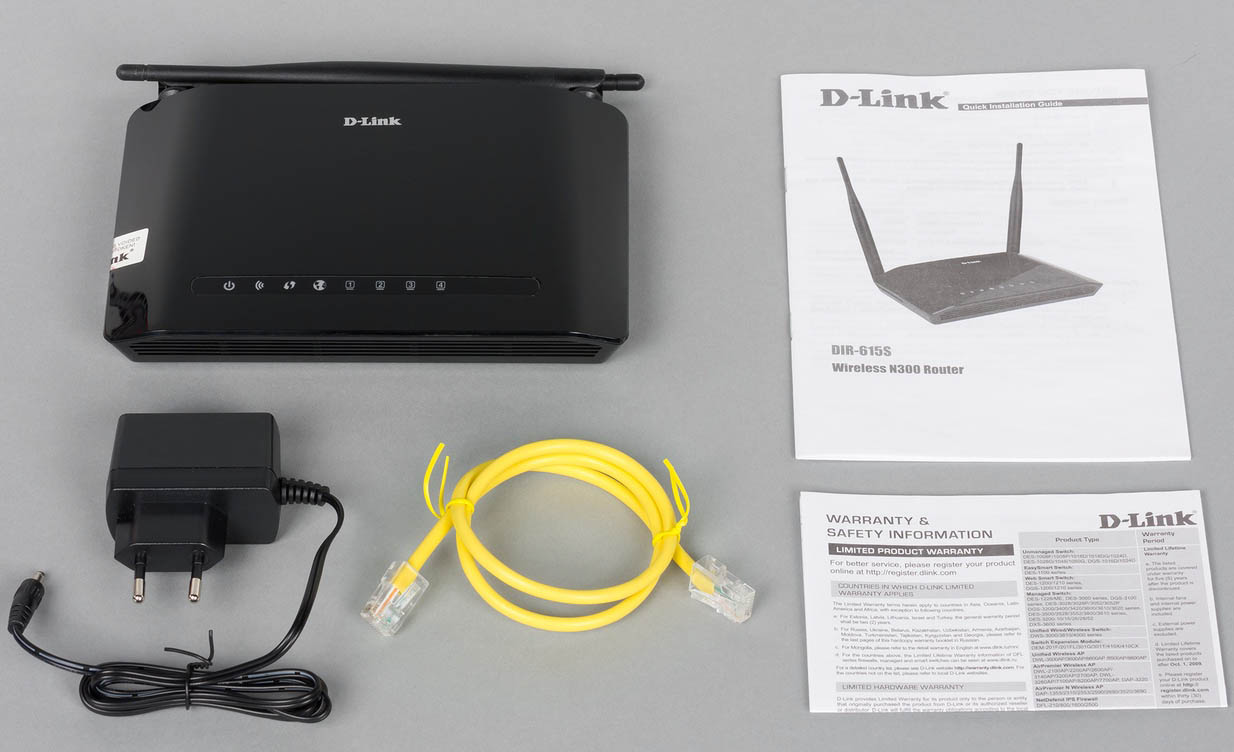
Содержимое комплекта
Если что-либо из содержимого отсутствует, пожалуйста, обратитесь к
Вашему поставщику.
DIR-615
КОМПАКТ-ДИСК
Кабель Ethernet
Адаптер
БЕСПРОВОДНОЙ
(D-Link
(UTP, 5
питания
МАРШРУТИЗАТОР
Click’n’Connect,
категории)
802.11N (проект)
руководство
ДЛЯ ДОМА
пользователя и
гарантия)
IP-адрес по умолчанию:
Примечание:
192.168.0.1
Использование источника питания с
Имя пользователя по
другими характеристиками может
умолчанию: Admin
повлечь выход из строя устройства и
Пароль по умолчанию:
потерю гарантии.
Быстрая
установка
1 Вытащите компакт-
2 A. Убедитесь, что
3 Нажмите
Интернет-соединение
диск из упаковки.
активно. НЕ
ВЫКЛЮЧАЙИЕ
маршрутизатор.
B. Поместите компакт-
диск D-Link Click’n
Connect в привод CD-
ROM компьютера.
Поиск неисправностей
1. Как настроить маршрутизатор при отсутствии компакт-диска DIR-615
или проверить имя беспроводной сети (SSID) и ключ беспроводного
шифрования?
• Подключите компьютер к маршрутизатору с помощью кабеля Ethernet.
• Откройте Web-браузер и введите в адресную строку http://192.168.0.1
• Имя пользователя по умолчанию ‘admin’. Пароль по умолчанию ‘’
(оставьте поле пустым).
• Если вы изменили пароль и забыли его, необходимо перезагрузить
маршрутизатор, чтобы пароль был таким ‘’ (пустое поле).
2. Как восстановить в маршрутизаторе заводские настройки по
умолчанию?
• Убедитесь, что маршрутизатор включен.
• Нажмите и удерживайте кнопку Reset на передней панели устройства в
течение 20 секунд.
Примечание: Восстановление в маршрутизаторе настроек по умолчанию
удалит текущие конфигурационные настройки. Для повторной
конфигурации настроек войдите в маршрутизатор как описано в
вопросе 1, затем запустите мастер установки (Setup Wizard).
3. Как добавить новый беспроводной клиент или компьютер, если я не
помню имени беспроводной сети (SSID) или беспроводного ключа
шифрования?
• При подключении каждого компьютера к беспроводному
маршрутизатору, необходимо убедиться в том, что используется
правильное беспроводное имя сети (SSID) и ключ шифрования.
• С помощью Web-интерфейса (как описано выше в вопросе 1) проверьте
или выберите беспроводные настройки.
• Убедитесь, что параметры записаны заранее, чтобы можно было их
ввести с каждого подключенного беспроводного компьютера. D-Link
предоставляет удобные клеящиеся стикеры для записи параметров и
наклеивания их на маршрутизатор, или в другое удобное месте.
4. Что делать, если маршрутизатор работает неправильно?
• В руководстве пользователя содержится раздел с подробным описанием
поиска неисправностей, его можно скачать с Web-сайта D-Link (см.
ниже), однако существует несколько простых шагов, которые позволят
быстро разрешить любые проблемы:
• Проверьте индикаторы на передней панели маршрутизатора.
Индикаторы Power, Wireless и Internet должны гореть. Один или более
индикаторов LAN должны мигать.
• Проверьте надежность соединения всех кабелей на обоих концах.
• Отключите питание маршрутизатора на 20 секунд, и затем снова
включите питание.
5. Почему Интернет-соединение отсутствует?
• Для пользователей кабельного оборудования: убедитесь, что опция
«Clone MAC address» отмечена галочкой во время работы мастера
установки (или введите зарегистрированный MAC-адрес) и убедитесь,
что функция включена/подключена и работает.
• Для пользователей ADSL-оборудования: пожалуйста, свяжитесь с
провайдером и убедитесь, что сервис был активизирован/подключен
провайдером и, что имя пользователя и пароль, предоставленные
провайдером правильны.
Примечание: Если соединение отсутствует, обратитесь к разделу
«Поиск неисправностей» в руководстве пользователя на компакт диске
D-Link RangeBooster N 650 DIR-615
В этой статье мы будем настраивать очень популярный роутер D-link DIR-615. Писать статью я буду на примере D-link DIR-615/A. А если у вас другая модель, то ничего страшного, там практически все совпадает. Эта инструкция подойдет для многих роутеров компании D-link. Постараюсь написать обо всем подробно и на понятном языке. Рассказывать о самом роутере много не буду, почитать мой отзыв и другую полезную информацию о DIR-615/A, вы можете по ссылке выше. Скажу лишь, что этот роутер хорошо подходит для дома, или небольшого офиса. Он с легкостью обеспечит стабильный доступ к интернету для ваших компьютеров, телефонов, планшетов (по Wi-Fi) и других устройств.
Что касается настройки D-link DIR-615, то там все очень просто. А если ваш провайдер использует технологию соединения Динамический IP, то вам достаточно будет подключить роутер, и интернет уже будет работать. Нужно будет только установить пароль на Wi-Fi сеть и сменить имя сети, если понадобится. Не нравиться мне только то, что настройки в D-link практически в каждой версии меняются (на вид). Я имею введу панель управления роутером. И поэтому, настройки вашего роутера могут отличаться от тех, которые вы увидите в этой статье. Но это может исправить обновление прошивки.
Настраивать D-link DIR-615 будем по такой схеме:
- Подключение и вход в панель управления на D-link DIR-615
- Настройка интернета на D-link DIR-615 (подключения к провайдеру)
- Настройка Wi-Fi сети и смена пароля
А теперь, обо всем подробнее.
Подключаем D-link DIR-615 и заходим в настройки
Подключите к роутеру питание и включите его. Если индикаторы на передней панели роутера не засветились, то проверьте включено ли питание кнопкой на задней панели. Если вы будете настраивать маршрутизатор по кабелю, тогда возьмите сетевой кабель, который идет в комплекте, соедините маршрутизатор с компьютером. Один конец кабеля подключаем в черный LAN разъем (в 1 из 4), а второй конец подключите в сетевую карту компьютера (ноутбука). Кабель от интернет провайдера подключите в желтый WAN разъем.

Если у вас нет компьютера с сетевой картой, или нет кабеля, то настроить все можно и по Wi-Fi. Можно даже с телефона, или планшета.
Дальше, нам нужно зайти в настройки маршрутизатора. Но, перед этим, я советую вам сделать сброс настроек. Это нужно для того, что бы удалить все старые настройки, которые возможно уже заданы. И что бы они нам не помешали, мы просто вернем роутер заводскому состоянию.
Сброс настроек на D-link DIR-615
Делаться все очень просто. Чем-то острым нужно нажать утопленную в корпус кнопку RESET и подержать ее секунд десять. Затем отпустить, и подождать пока роутер перезагрузится.

Теперь можно заходить в настройки. Как это сделать, можете почитать в подробной статье. Или, смотрите ниже.
Откройте любой браузер и перейдите в нем по адресу 192.168.0.1. Появится окно с запросом логина и пароля. По умолчанию, это admin и admin. Вы попадете в настройки своего D-link.

Возможно, у вас настройки будут на английском. Но вы можете сменить язык на русский, или украинский.

Если появится окно с просьбой сменить заводской пароль для входа в настройки, то придумайте и укажите два раза какой-то пароль. Не забудьте его, он будет использоваться для входа в настройки роутера.
Я советую вам сразу обновить прошивку своего роутера, еще до настройки. Как это сделать, я подробно писал в этой стать. Если вы не хотите этого делать, или для вас это слишком сложно, то можете продолжать настройку без обновления программного обеспечения
Все, в панель управления мы зашли, можно приступать к настройке маршрутизатора.
Настройка интернета на D-link DIR-615
Первое, что вам нужно сделать, это узнать какую технологию соединения использует ваш провайдер. Динамический IP, статический, PPPoE (использует Дом.ру и другие провайдеры), L2TP (например, использует провайдер Билайн). Я уже писал, как узнать технологию соединения. Можно просто позвонить в поддержку провайдера и спросить, или посмотреть на официальном сайте.
Если у вас соединение по популярной технологии Динамический IP, то роутер должен раздавать интернет сразу после подключения к нему кабеля от провайдера и вам остается только настроить Wi-Fi сеть (смотрите ниже в статье). Если у вас не Динамический IP, то нужно настраивать.
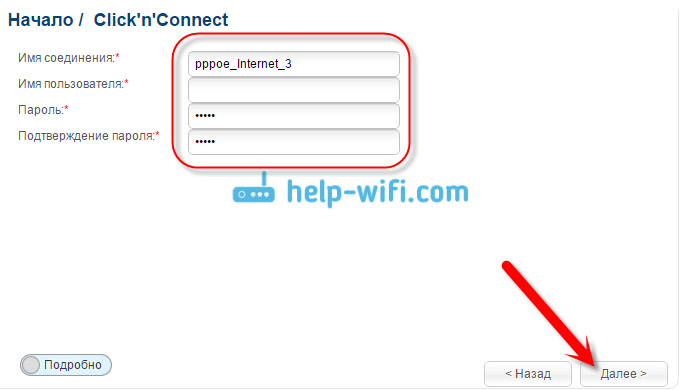
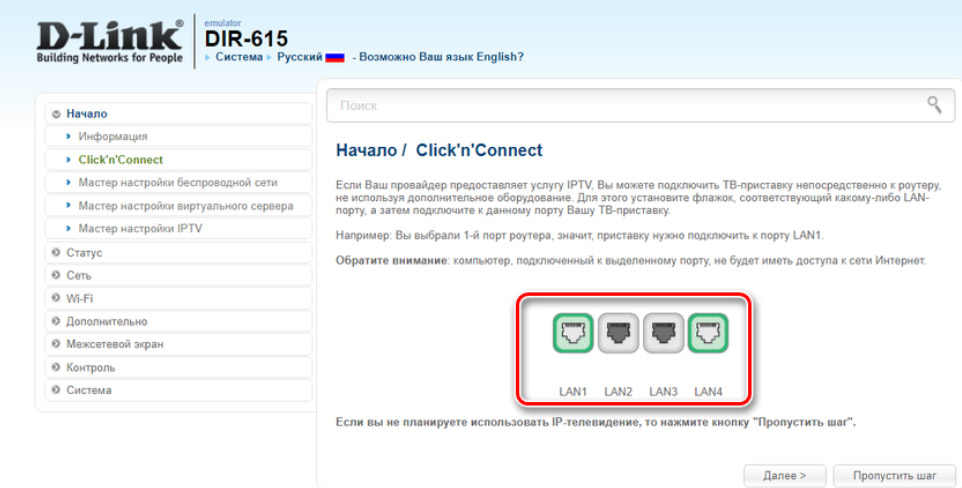
Перейдите на вкладку Начало — Click’n’Connect. Проверьте подключен ли Ethernet кабель и нажмите на кнопку Далее.

Выберите из списка ваше соединение. Если у вас например PPPoE и провайдер предоставляет еще и IP адрес, то выбираем PPPoE+Статический IP. Если IP нет, то выбираем просто PPPoE+Динамический IP. Или точно так же с L2TP.

Дальше укажите параметры IP, которые предоставляет провайдер и если он их предоставляет (у вас этого окна может не быть). Нажмите Далее.

Если появится окно «Адреса локальных ресурсов провайдера», и вы не хотите добавлять адреса, или не знаете что это такое, то просто нажмите Далее. Появится окно, в котором нужно указать имя соединения, логин и пароль. Эту информацию так же предоставляет провайдер. Вы можете нажать на кнопку Подробно, что бы открыть более широкие настройки (MTU и другие).
Дальше будет проверка соединения с интернетом и возможность включить фильтр Яндекс.DNS. Это уже по желанию. В любом случае, вы потом сможете изменить эти настройки. Это я показывал пример настройки PPPoE соединения на D-link DIR-615. У вас же настройки могут отличаться от тех что у меня.
Если после настройки интернет через роутер не работает, статус соединения «без доступа к интернету», или просто не открываться сайты, то проверяйте настройки от провайдера. Возможно, вы неправильно выбрали тип соединения, или неправильно задали какой-то параметр.
Как видите, с PPPoE, L2TP, PPTP и Динамическим IP, заморочек намного больше, чем с технологией Статический IP.
Один важный момент: если у вас на компьютере было высокоскоростное соединение, с помощью которого вы подключались к интернету, то теперь оно не нужно. Это соединение будет устанавливать наш роутер D-link и просто раздавать интернет по кабелю и по Wi-Fi.
Сменить настройки провайдера вы всегда можете через этот же мастер быстрой настройки Click’n’Connect, или на вкладке Сеть — WAN, выбрав и отредактировав нужное соединение.

Желательно сохранить настройки:

Если интернет через роутер уже работает, то можно приступать к настройке Wi-Fi сети.
Настройка Wi-Fi и смена пароля на D-link DIR-615
Все что нам нужно сделать, так это сменить имя Wi-Fi сети и задать новый пароль для защиты нашего Wi-Fi.
Перейдите на вкладку Wi-Fi — Основные настройки. Здесь мы будем менять имя нашего Wi-Fi. В поле SSID укажите название вашей сети. Нажмите кнопку Применить.

Дальше переходим на вкладку Wi-Fi — Настройки безопасности, и в поле «Ключ шифрования PSK» указываем пароль, который будет использоваться для подключения к Wi-Fi. Пароль должен быть минимум 8 символов. Сразу запишите пароль, что бы не забыть его.

Сохраните настройки. Система — Сохранить. Если больше ничего настраивать не будете (на этом настройка D-link DIR-615 может быть закончена), тогда перезагрузите роутер. Система (пункт меню сверху, возле логотипа) — Перезагрузить.
Все, беспроводную сеть настроили. Можете еще посмотреть более подробную статью по настройке Wi-Fi.
Еще можете сменить пароль администратора, который используется для доступа к настройкам роутера. Если вы его не меняли, или меняли, но уже забыли, то сделать это можно на вкладке Система — Пароль администратора.
Укажите два раза новый пароль и нажмите Применить. Не забудьте сохранить настройки.

Обязательно запишите где-то этот пароль. Если вы его забудете, то не сможете зайти в панель управления, и придется делать сброс настроек.
Послесловие
Фух, устал я:) ничего больше писать не буду. Если возникнут вопросы по статье, спрашивайте в комментариях. Надеюсь, у вас получилось настроить свой маршрутизатор.
В этой инструкции мы объясним, как пользоваться индикаторами, разъемами и кнопками роутера D-Link DIR-615 на примере модели DIR-615S, а также по шагам разберем способы его настройки. Хотя разные версии маршрутизатора DIR-615 отличаются друг от друга по внешнему виду и некоторым функциям, принципы работы, настройки и подключения у них одинаковые. Интерфейсы разных прошивок также отличаются, поэтому если не найдете аналогичную команду в меню, поищите похожую.
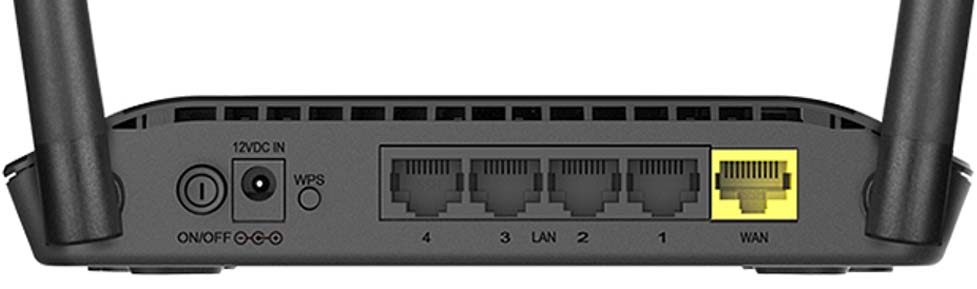
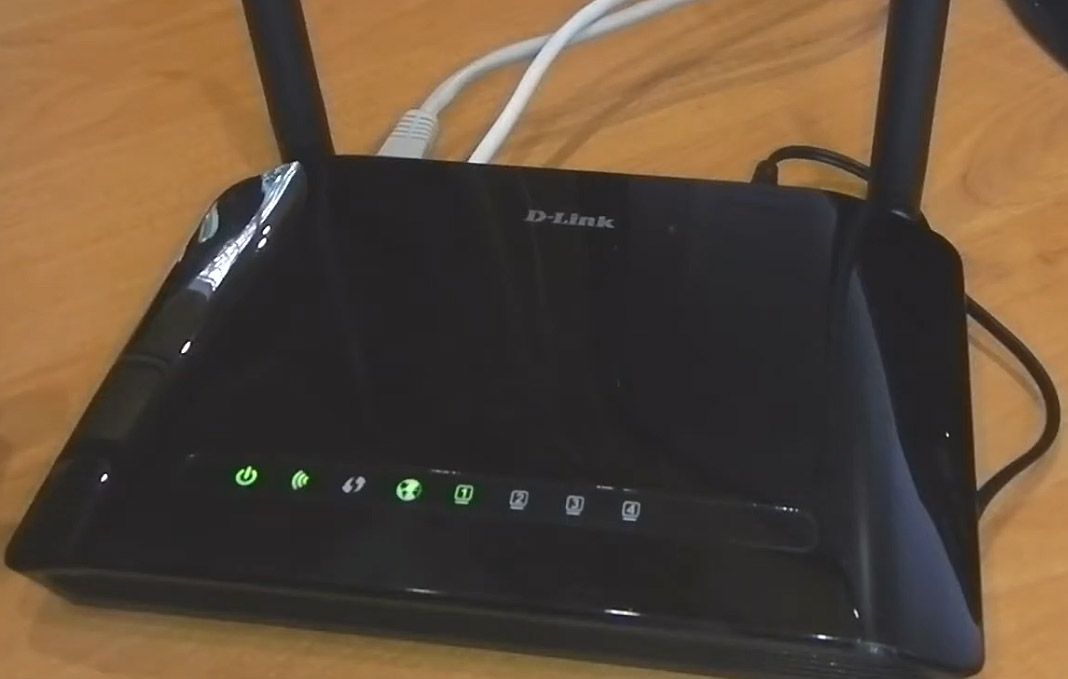
Назначение кнопок, разъемов и индикаторов роутера
Все базовые элементы маршрутизатора DIR-615S расположены сзади и снизу корпуса, а индикаторы — сверху. Рассмотрим их по порядку (см. картинку ниже). Слева на задней панели находятся кнопка питания ON/OFF и разъем 12VDC IN для подключения кабеля питания. Следом за ними идет кнопка с надписью WPS, которая совмещает в себе два режима. Первый режим — это включение или отключение Wi-Fi-сети. По умолчанию беспроводная сеть будет всегда включена, но если вы захотите лишить окружающих беспроводного интернета, тогда нажмите кнопку WPS и держите ее семь секунд. После этого индикатор беспроводной сети погаснет (см. описание индикаторов ниже). Второй режим — это подключение других устройств по защищенному Wi-Fi. Для подключения к вашему роутеру по WPS, например другого роутера, зажмите кнопку WPS на две секунды и отпустите. При этом вы должны увидеть мигание соответствующего индикатора. После этого нажмите кнопку WPS на втором устройстве.
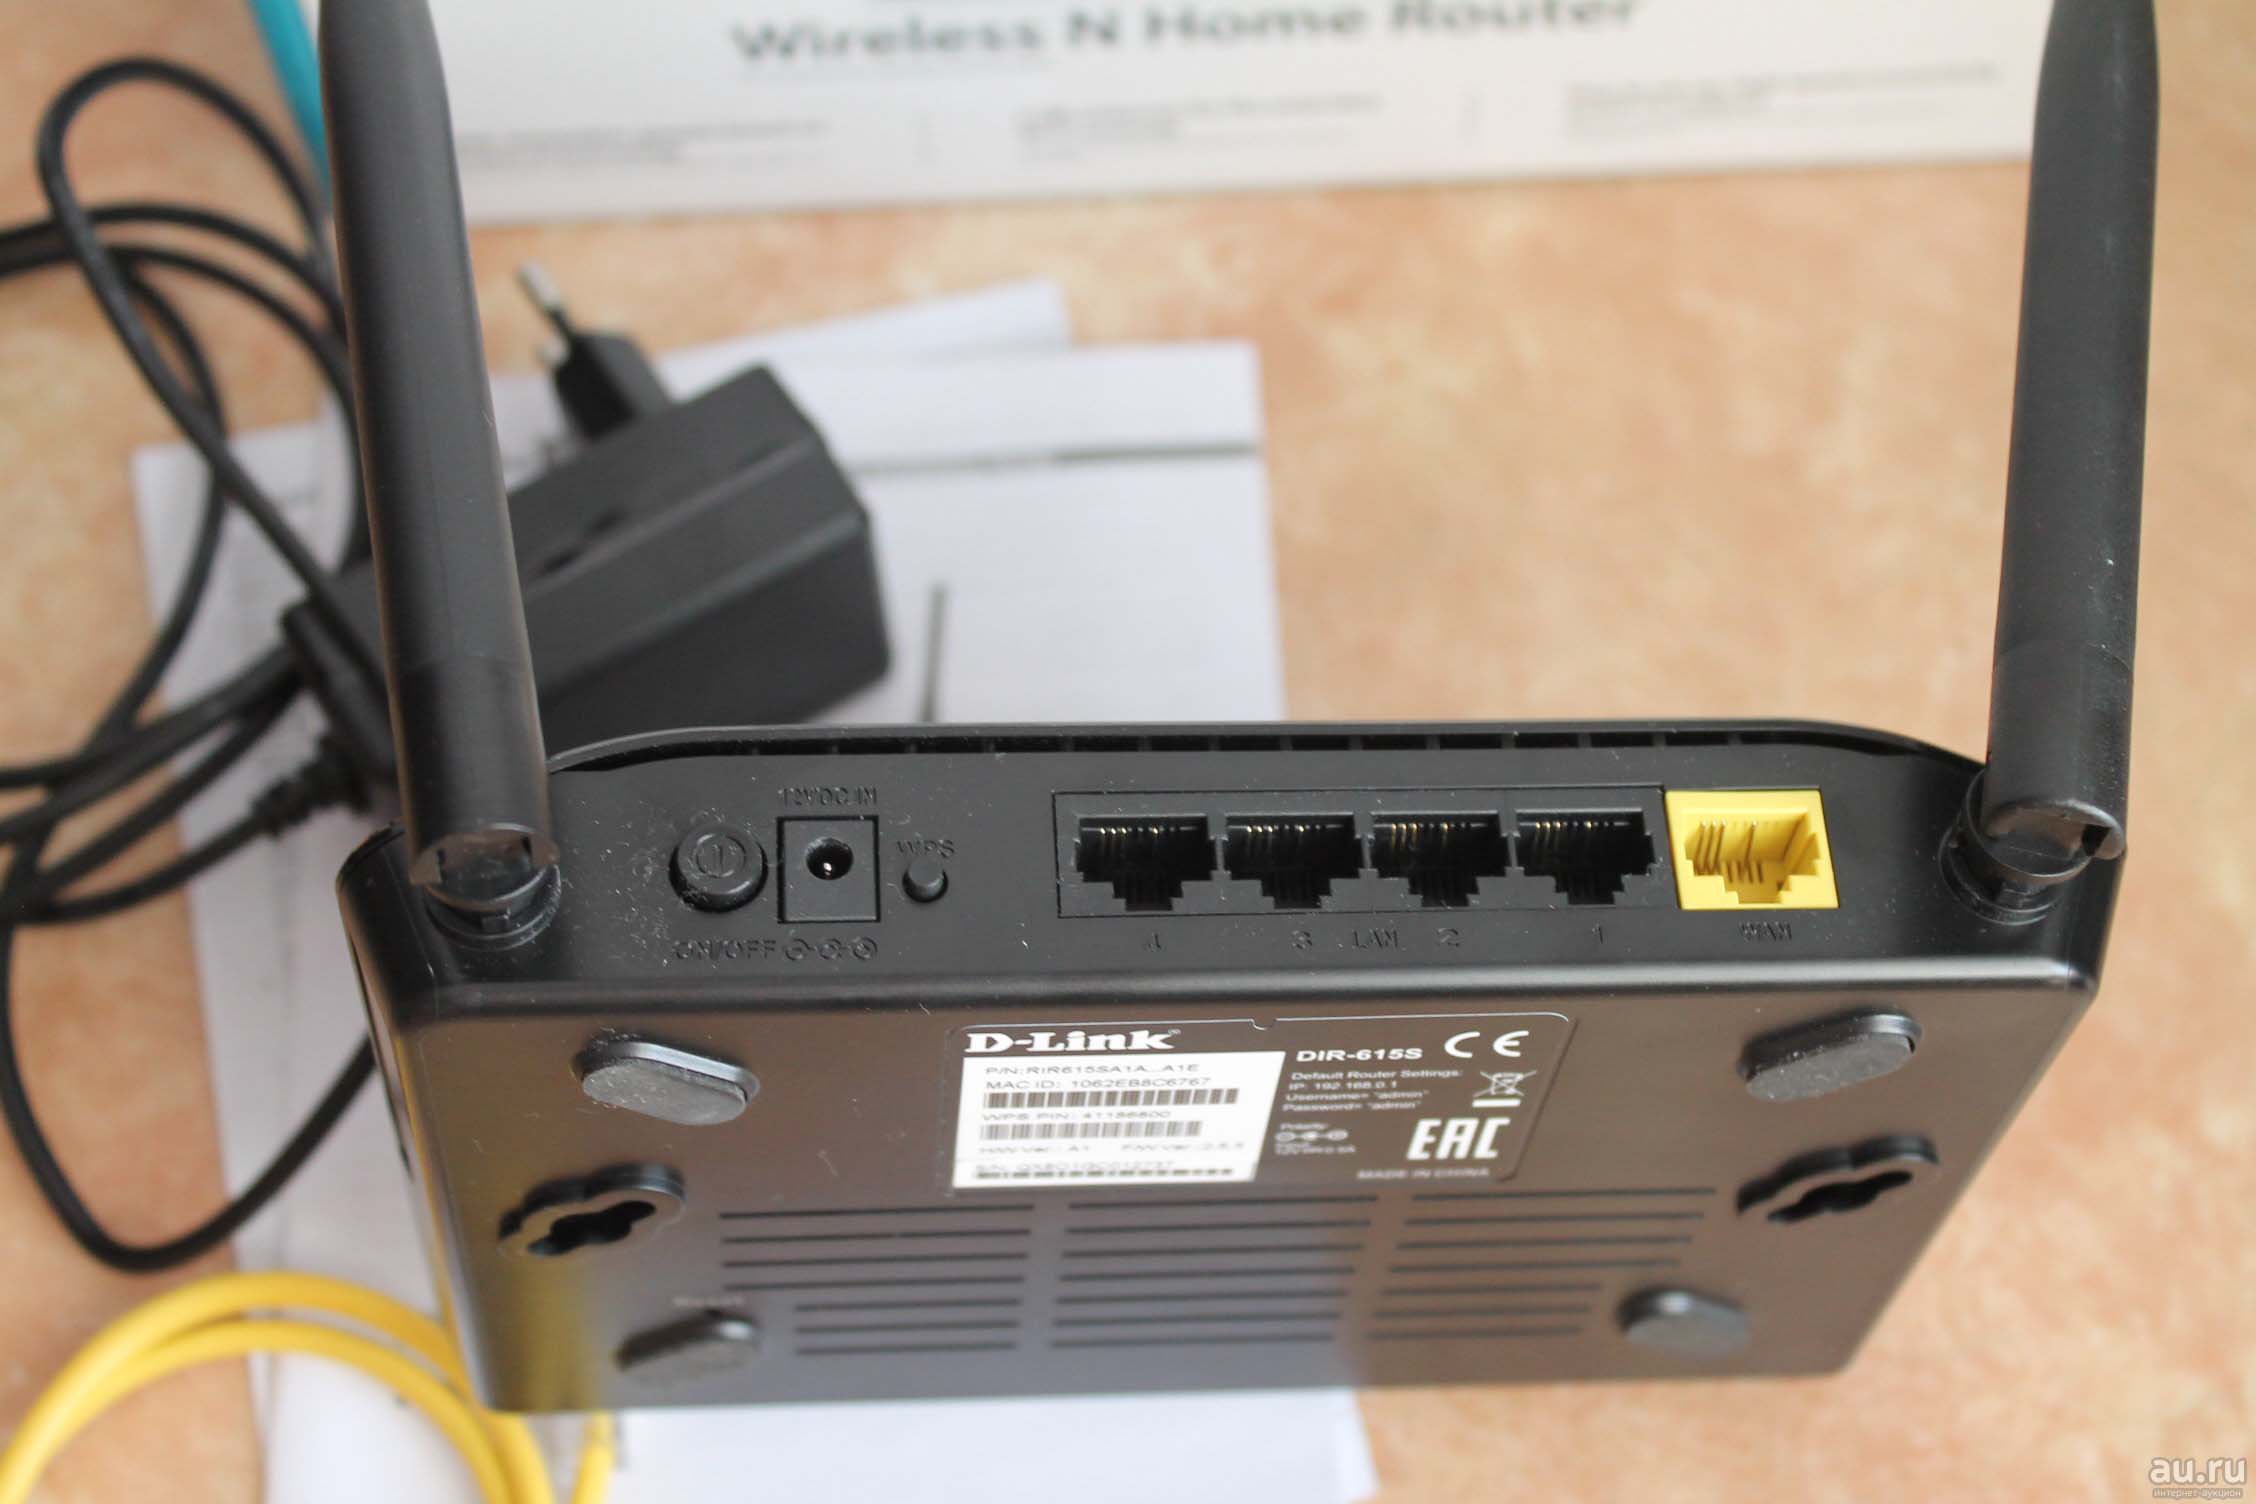 Далее идут четыре темных порта с надписью LAN и цифрами от одного до четырех. Они предназначены для подключения устройств, снабженных сетевыми разъемами. Когда вы подключите роутер к интернету, эти устройства будут получать его от роутера. Также через порт LAN подключается компьютер для изменения настроек или анализа данных роутера. Рядом с портами локальной сети LAN расположился порт интернета WAN. Этот порт нужен, чтобы вы подключили к нему кабель провайдера.
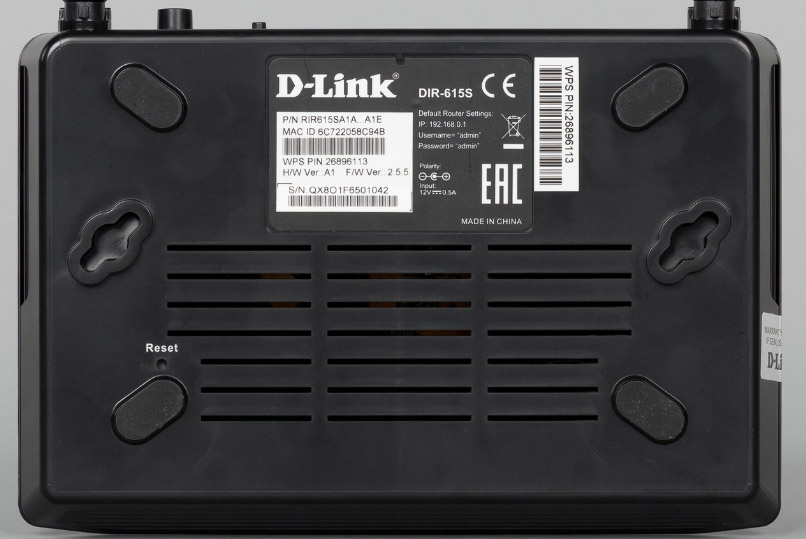
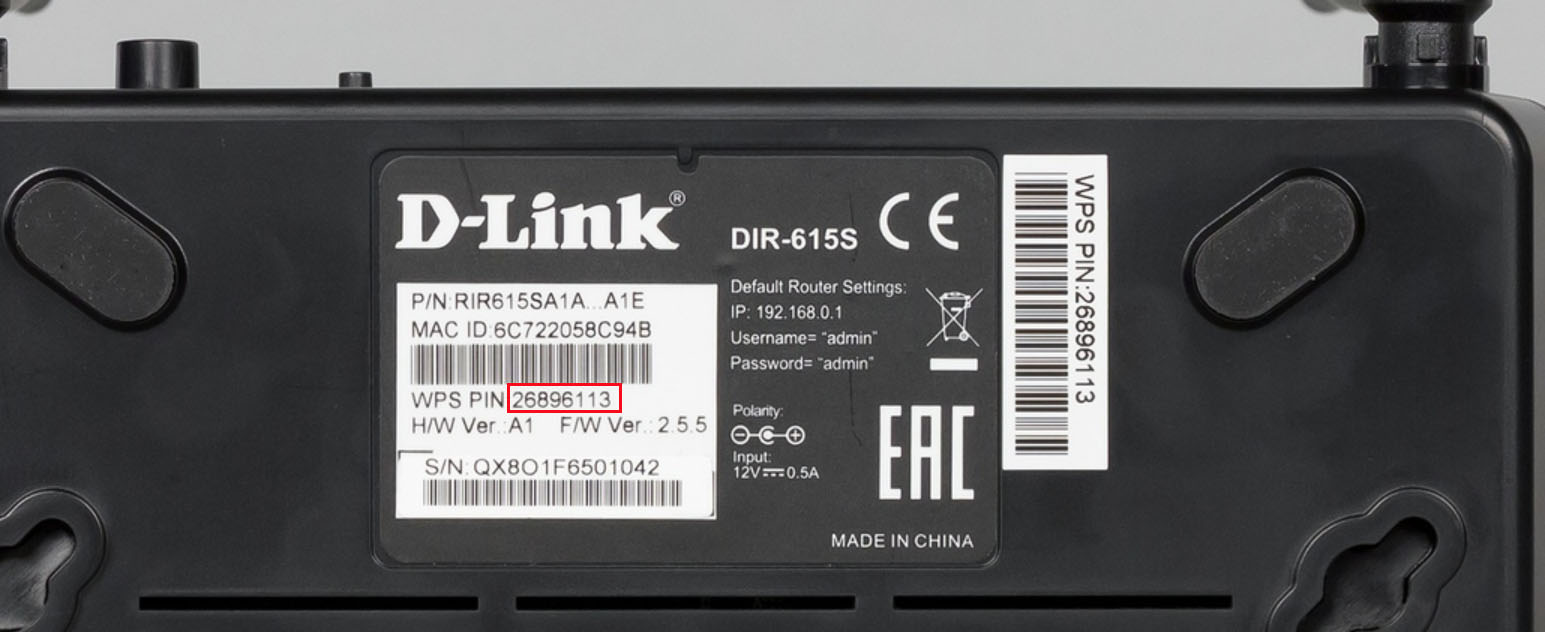
 Теперь переверните корпус маршрутизатора и рассмотрите его нижнюю часть. Помимо четырех ножек и двух отверстий для подвеса к стене вы увидите спрятавшуюся здесь кнопку с надписью Reset. Для снижения риска случайного нажатия детьми кнопка защищена отверстием, да еще и помещена внизу, хотя во многих моделях роутеров она находится на задней панели в общем ряду кнопок. Для сброса настроек кнопку нужно зажать на десять секунд. Не менее важным элементом является стикер, на котором указан номер аппаратной версии, номер прошивки (эти данные нужны для обновления прошивки вручную), IP-адрес роутера, PIN и другая важная информация.
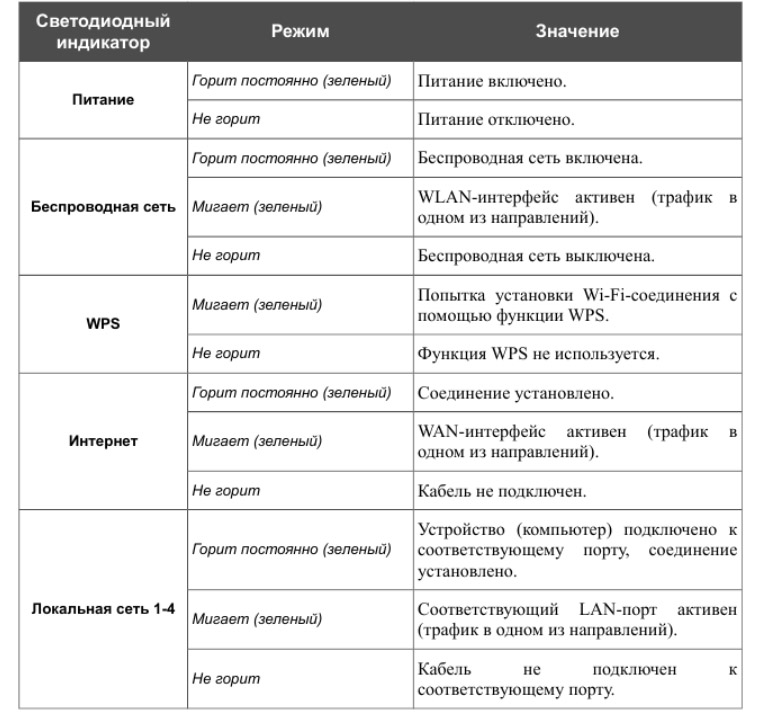
Теперь разберемся с обозначением индикаторов. Пусть вас не смущает большое количество значков, так как четыре крайних справа индикатора обозначают одно и то же — устройства сети LAN. Первым слева вы увидите индикатор питания с двумя стандартными значениями «горит» и «не горит». Второй индикатор относится к беспроводной сети и свидетельствует о ее включении или выключении. Мигание этого индикатора означает, что по сети Wi-Fi идет передача данных в одном из направлений. Третий слева индикатор показывает работу WPS и принимает только два значения: мигает — устройства пытаются подключиться друг к другу по WPS и не горит, если функция не используется.
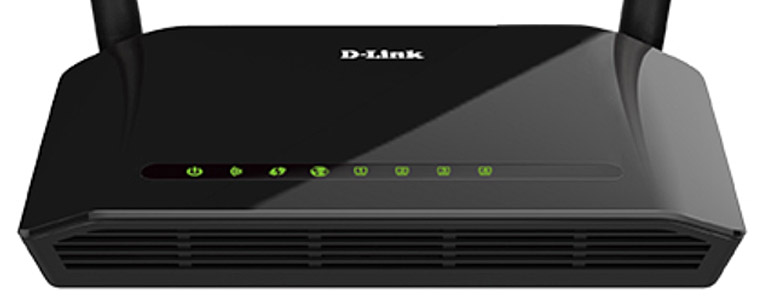 Четвертый значок подскажет, что происходит с вашим интернетом. При его наличии индикатор должен светиться постоянно, при отключении кабеля погаснуть, а при передаче данных будет мигать. И последние четыре значка подскажут, какие из четырех портов LAN в данный момент задействованы. При подключении к одному из портов кабеля и установке соединения загорится индикатор с соответствующей цифрой, при отключении кабеля он погаснет, а при передаче данных по этому порту индикатор будет мигать. Быстро вспомнить обозначение того или иного индикатора вам поможет таблица ниже.
Шаг 1. Подготовка оборудования
Чтобы Wi-Fi-роутер D-Link раздавал интернет в вашем доме, вам понадобятся определенные устройства, комплектующие и условия. Первым в этом списке является доступ к интернету. В самом простом случае это кабель провайдера, заведенный к вам в дом. Также это может быть модем, к которому подключается телефонный провод или другой кабель поставщика услуг. Второе — устройство с операционной системой для настройки роутера: компьютер, ноутбук, планшет, смартфон или другое. Главное, чтобы оно могло подключиться к роутеру по кабелю (имело сетевой порт) или по Wi-Fi (имело адаптер беспроводной связи). На устройстве также должен быть установлен любой новый браузер (Google Chrome версии 5 и выше, Internet Explorer версии 8 и выше и пр.) с поддержкой jаvascript. При подключении по кабелю вам понадобится Ethernet-кабель (есть в коробке роутера).

Для настройки маршрутизатора этих устройств достаточно, однако для раздачи интернета проводным устройствам также понадобятся Ethernet-кабели нужной длины (длина зависит от месторасположения роутера в доме). Сам роутер лучше всего ставить в центре дома или той его части, где нужен интернет. При этом не размещайте его вблизи больших металлических поверхностей или других устройств, способных создать помехи Wi-Fi-сети.
Шаг 2. Соединение устройств
После подготовки необходимого оборудования вам нужно соединить роутер с устройством, с которого будет вестись настройка. Для примера возьмем ноутбук с сетевым портом, адаптером Wi-Fi и рассмотрим два варианта подключения. При проводном подключении вставьте Ethernet-кабель одним концом в любой из четырех портов LAN, а другим концом в сетевой порт ноутбука. После этого подключите роутер к розетке и загрузите его. Также загрузите ноутбук.
 При беспроводном подключении загрузите роутер и ноутбук, а после их полной загрузки включите адаптер Wi-Fi на ноутбуке (часто по умолчанию он уже включен). После этого вам нужно построить список беспроводных сетей (в разделе «Сеть», «Wi-Fi», «Беспроводные подключения» или похожем), найти в нем сеть DIR-615 и подключиться к ней. При подключении используйте пароль, который прописан на стикере вашего роутера в строке WPS PIN.
 На следующем шаге нужно обеспечить роутеру доступ к интернету. Вы можете сделать это как до входа в панель настроек, так и после этого. Мы рассмотрим первый вариант. Для этого определите, какой у вас тип интернета. В случае кабельного интернета вставьте интернет-кабель в желтый порт роутера с надписью WAN. В случае интернет-розетки (это все тот же интернет-кабель, но спрятанный в стену) соедините порт WAN с розеткой Ethernet-кабелем подходящей длины. В случае использования модема вставьте Ethernet-кабель одним концом в WAN-порт роутера, другим в сетевой порт модема.
Как настроить роутер D-Link DIR-615
Шаг 1. Вход в панель настроек. Пароль по умолчанию
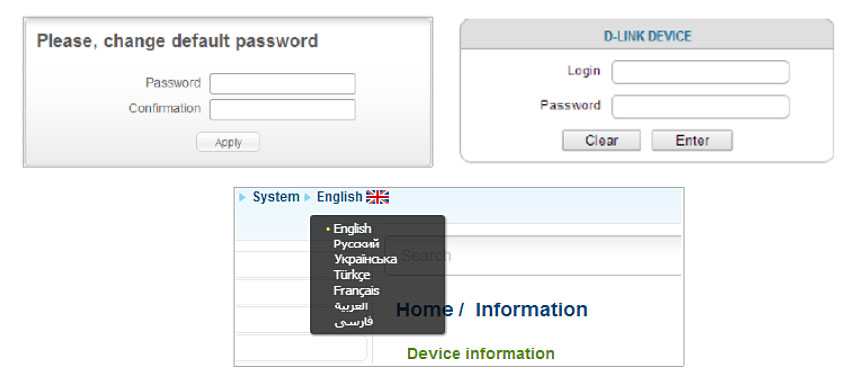
На этикетке вашего роутера указан его IP-адрес. Откройте на подключенном к роутеру ноутбуке браузер и перейдите по этому адресу (обычно это адрес 192.168.0.1). По умолчанию для входа в сервис используется имя admin и пароль admin. Так как такой пароль нельзя считать безопасным, то при первом открывании панели настроек сервис предложит его сменить.
 Если панель управления запустилась на английском языке, вы увидите надпись: Please, change default password. Введите новый пароль в строку Password (пароль) и повторите его в строке Confirmation. Нажмите Apply (готово). Далее войдите в систему, прописав имя admin в строке Login и придуманный вами пароль в строке Password. Нажмите Enter для принятия или Clear для очистки полей. После этого вы попадете на главную страницу панели настроек, где можете при необходимости сменить язык вверху в строке System.
Шаг 2. Настройка роутера
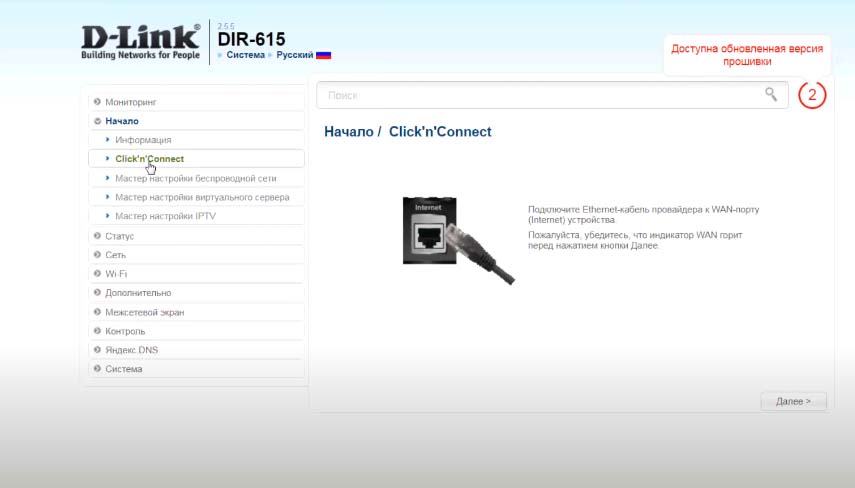
На следующем шаге мы вводим данные провайдера и настраиваем сеть Wi-Fi. Для этого в разделе «Начало» выберите опцию Click’n’Connect. Если до сих пор вы еще не подключали кабель провайдера, то сделайте это и убедитесь в том, что соответствующий индикатор на передней панели горит.
 Дальше переходим к выбору типа соединения и вводу данных. Будьте внимательны, так как на этом этапе чаще всего совершают ошибки. Чтобы не гадать, какой у вас тип соединения, посмотрите договор с провайдером или позвоните ему.
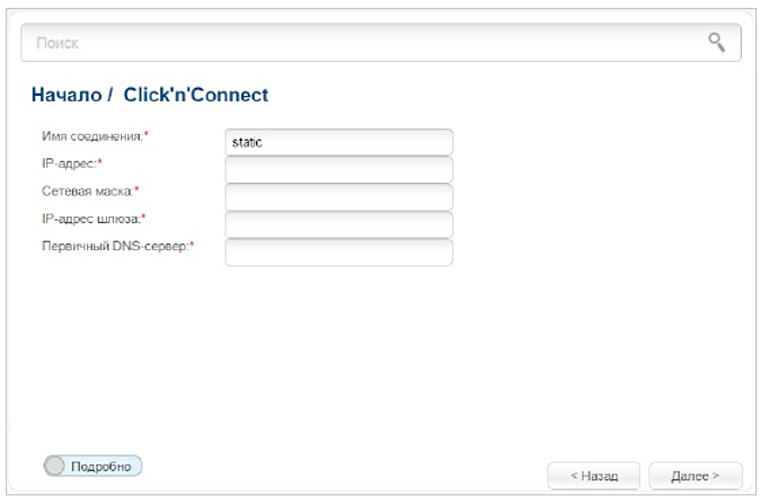
 Если в договоре об этом ничего не сказано, попробуйте вариант «Динамический IP». В зависимости от того, какой вариант вы выберете, дальше откроется своя страница. Например, для типа «Статический IP» вам нужно задать IP-адрес, сетевую маску, IP-адрес шлюза, первичный DNS-сервер и придумать имя соединения. Если у вас нет уверенности в заполнении полей, проконсультируйтесь с поставщиком услуг. После заполнения полей нажмите «Применить» и дождитесь окончания настройки. Вы должны увидеть надпись о том, что подключение к интернету прошло успешно.
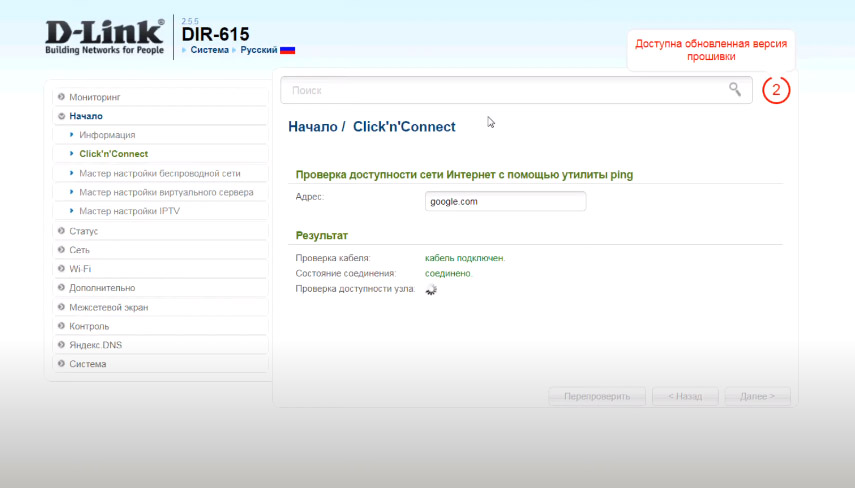
 Проверить работоспособность интернета можно как в самой панели настроек, введя любой адрес для проверки, так и сделать это через браузер.
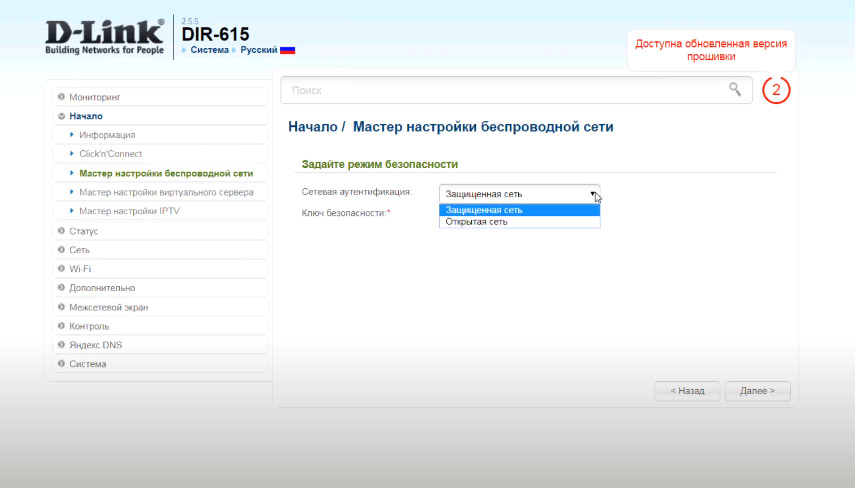
 Далее настроим беспроводную сеть. В том же разделе «Начало» кликните по опции «Мастер настройки беспроводной сети». Оставьте вариант «Точка доступа», который стоит по умолчанию, и нажмите «Далее». Придумайте название для своей Wi-Fi-сети и введите его в строке SSID. На следующем шаге выберите вариант «Защищенная сеть», придумайте и введите пароль в строке «Ключ безопасности» и нажмите «Применить». Запишите все придуманные названия и пароли, так как со временем вы можете их забыть.
Как подключить к роутеру другие устройства
Шаг 1. Подключение по Wi-Fi
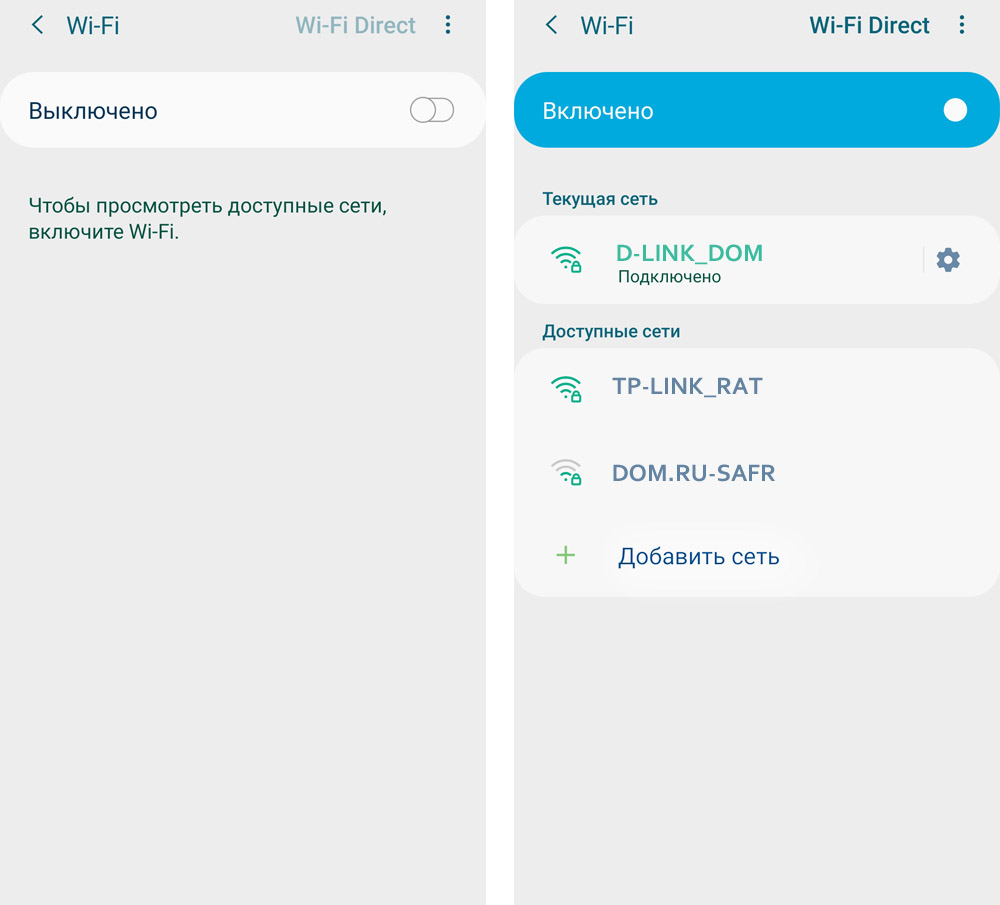
Все домашние устройства, имеющие Wi-Fi-адаптер, вы можете подключать к роутеру по беспроводной связи. Хотя на смартфонах, планшетах, Wi-Fi-наушниках и прочих гаджетах команды для подключения отличаются, алгоритм везде одинаковый. Вам нужно включить на устройстве Wi-Fi, построить список доступных беспроводных сетей, найти в нем свою сеть (то имя, которое вы придумали) и подключиться к ней, используя придуманный вами пароль для беспроводной сети (не путайте с паролем к панели настроек).
Шаг 2. Подключение по кабелю
Здесь варианты конкретных команд тоже отличаются для разных ТВ-приставок, игровых консолей и прочих устройств, но алгоритм подключения примерно одинаков. Вам нужно соединить Ethernet-проводом свободный LAN-порт роутера и сетевой порт устройства, а затем зайти в настройки устройства (при подключении ТВ в настройки роутера) и выбрать нужные данные в разделе сетевых подключений. При затруднениях или недостатке данных свяжитесь с поставщиком услуг.
 После успешной настройки роутера рекомендуем запомнить алгоритм настройки и подключения. Это поможет вам в будущем при необходимости настроить интернет заново в своем доме или любом другом.
Как использовать наш сайт инструкций OnlineManuals.ru
Наша цель состоит в том, чтобы предоставить вам быстрый доступ к содержанию инструкции для Руководство пользователя, руководство по эксплуатации устройства wi-fi, роутера D-Link DIR-615.
С помощью онлайн просмотра, Вы можете быстро просмотреть содержимое инструкции и найти решение проблемы с Руководство пользователя, руководство по эксплуатации устройства wi-fi, роутера D-Link DIR-615.
Для Вашего удобства
Если листать руководство пользователя Руководство пользователя, руководство по эксплуатации устройства wi-fi, роутера D-Link DIR-615 прямо на сайте, не очень удобно для Вас, есть два возможных решения:
• Просмотр в полноэкранном режиме — легко просмотреть руководство пользователя (без загрузки его на свой компьютер), Вы можете использовать режим полноэкранного просмотра.
Для просмотра инструкции пользователя Руководство пользователя, руководство по эксплуатации устройства wi-fi, роутера D-Link DIR-615 на полном экране, используйте кнопку «Открыть в Pdf-viewer».
• Загрузка на компьютер — Вы можете также скачать Руководство пользователя, руководство по эксплуатации устройства wi-fi, роутера D-Link DIR-615 на свой компьютер и сохранить его в файлах.
Многие люди предпочитают читать документы не на экране, а в печатной версии.
Возможность печати руководства пользователя также была предусмотрена на нашем сайте,
и вы можете использовать ее, нажав на иконку «печать» в Pdf-viewer.
Нет необходимости печатать все руководство Руководство пользователя, руководство по эксплуатации устройства wi-fi, роутера D-Link DIR-615, можно выбрать только нужные страницы инструкции.