Руководство пользователя на русском языке для продукта Roland HP305, формат A4, переплёт пластиковая пружина, обложки пластиковые, 89 страниц.
- Артикул: ROLANDHP305OMR
Руководство пользователя на русском языке для продукта Roland FR-7XB, формат A4, переплёт пластиковая пружина, обложки пластиковые, 185 страниц.
- Артикул: ROLANDFR7XBOMR

Руководство пользователя на русском языке для продукта Roland FP-7F, формат A4, переплёт пластиковая пружина, обложки пластиковые, 100 страниц.
- Артикул: ROLANDFP7OMR

Руководство пользователя на русском языке для продукта Roland HPD-15, формат A4, переплёт пластиковая пружина, обложки пластиковые, 152 страницы.
- Артикул: ROLANDHPD15OMR
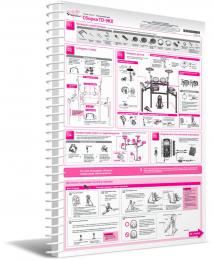
Руководство пользователя на русском языке для продукта Roland TD-9KX, формат A4, переплёт пластиковая пружина, обложки пластиковые, 2 страницы.
- Артикул: ROLANDTD9KXOMR
Руководство пользователя на русском языке для продукта Roland SPD-30, формат A4, переплёт пластиковая пружина, обложки пластиковые, 76 страниц.
- Артикул: ROLANDSPD30OMR
Руководство пользователя на русском языке для продукта Roland VG-99, формат A4, переплёт пластиковая пружина, обложки пластиковые, 191 страница.
- Артикул: ROLANDVG99OMR
Руководство пользователя на русском языке для продукта Roland RMP-5, формат A4, переплёт пластиковая пружина, обложки пластиковые, 32 страницы.
- Артикул: ROLANDRMP5OMR

Руководство пользователя на русском языке для продукта Roland PD-105X, формат A4, переплёт пластиковая пружина, обложки пластиковые, 13 страниц.
- Артикул: ROLANDPD105XOMR

Руководство пользователя на русском языке для продукта Roland LX-15, формат A4, переплёт пластиковая пружина, обложки пластиковые, 61 страница.
- Артикул: ROLANDLX15OMR
Руководство пользователя на русском языке для продукта Roland VR-3, формат A4, переплёт пластиковая пружина, обложки пластиковые, 52 страницы.
- Артикул: ROLANDVR3OMR

Руководство пользователя на русском языке для продукта Roland SPD-SX, формат A4, переплёт пластиковая пружина, обложки пластиковые, 81 страница.
- Артикул: ROLANDSPDSXOMR

Руководство пользователя на русском языке для продукта Roland M-300, формат A4, переплёт пластиковая пружина, обложки пластиковые, 298 страниц.
- Артикул: ROLANDM300OMR
Руководство пользователя на русском языке для продукта Roland FR-8XB, формат A4, переплёт пластиковая пружина, обложки пластиковые, 117 страниц.
- Артикул: ROLANDFR8XBOMR

Руководство пользователя на русском языке для продукта Roland BK-3, формат A4, переплёт пластиковая пружина, обложки пластиковые, 122 страницы.
- Артикул: ROLANDBK3OMR
ГРАФИК РАБОТЫ
- Понедельник-Пятница:
10.00 до 18.00 - Суббота:
———— По договорённости - Воскресенье:
—————- Выходной
ЧТО ИЩУТ
- Manuals
- Brands
- Roland Manuals
- Synthesizer
- FANTOM Series
- Reference manual
-
Contents
-
Table of Contents
-
Troubleshooting
-
Bookmarks
Related Manuals for Roland FANTOM Series
Summary of Contents for Roland FANTOM Series
-
Page 1
Reference Manual © 2019 Roland Corporation… -
Page 2: Table Of Contents
Contents 01: Overview Getting Ready . . . . . . . . . . . . . . . . . . . . . . . . . . . . . . . . . . . . . . : Placing This Unit on a Stand Panel Descriptions .
-
Page 3
Contents 03: Performance Functions 04: Editing Playing Arpeggios Editing a Scene . . . . . . . . . . . . . . . . . . . . . . . . . . . . . . . . . (Zone) . -
Page 4
Contents 05: Sampler 06: Pads Playing Samples Assigning Convenient Functions to the Pads . . . . . . . . . . . . . . . . . . . . . . . . . . . . . . . . . . . . (PAD MODE) . -
Page 5
Contents 09: Settings How to Create a Group . . . . . . . . . . . . . . . . . . . . . . . . . . . : Creating a Group Convenient Functions . -
Page 6
10: Appendix Chord Memory List . . . . . . . . . . . . . . . . . . . . . . . . . . . . . . . . Block Diagram . -
Page 7: 01: Overview
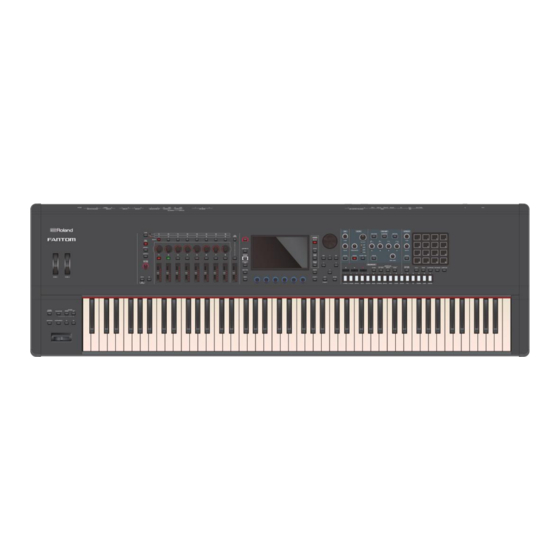
01: Overview Contents Panel Descriptions An Overview of FANTOM . . . . . . . . . . . . . . . . . . . . . . . . . . . . . . . . .
-
Page 8: Panel Descriptions
Panel Descriptions Top Panel Controller section Controller Explanation Various parameters or functions can be assigned to Controller Explanation these knobs . Control knobs [1]–[8] The parameters that can be controlled depend on the You can assign various parameters or functions to these function select buttons located at the left .
-
Page 9
Panel Descriptions Common section ENV/AMP section Controller Explanation Controller Explanation The WRITE screen appears . Use the [A] [D] [S] [R] knobs to edit the pitch envelope [PITCH ENV] button [WRITE] button (time-varying change in pitch) . Saves a scene or tone . Use the [A] [D] [S] [R] knobs to edit the filter envelope The MASTER FX screen appears . -
Page 10: Rear Panel
Panel Descriptions Rear Panel (Connecting Your Equipment) Pin assignment of MIC/LINE INPUT jack Computer USB flash drive Monitor speakers (powered) Headphones MIDI device TIP: 2: HOT 1: GND 1: GND 2: HOT RING: COLD SLEEVE: GND 3: COLD 3: COLD Microphone Synthesizer page…
-
Page 11: Basic Operation
Basic Operation Here we explain basic operation of the buttons and knobs used to operate the FANTOM . Display [VALUE] dial [INC] [DEC] buttons cursor buttons [MENU] button FUNCTION knobs [E1]–[E6] [SHIFT] button [EXIT] button [ENTER] button Editing a Value NUMERIC Window If you hold down the [SHIFT] button and press the [ENTER] button, Use the following methods to modify a setting’s value .
-
Page 12: Moving The Cursor
Basic Operation Moving the Cursor FUNCTION Knobs [E1]–[E6] Multiple setting items (parameters) or selection items are These knobs perform the functions that are assigned to them shown in a single screen or window . To edit them using the in each screen, such as editing parameters or scrolling lists or [INC] / [DEC] buttons or the [VALUE] dial, move the cursor to the tabs .
-
Page 13: Operations In The Display
Basic Operation Operations in the Display ZONE VIEW Scree This unit’s display is a touch panel; you can perform various Touch to move the Touch to turn a switch operations by directly touching the display . There are many cursor . on/off .
-
Page 14: An Overview Of Fantom
An Overview of FANTOM Basic Structure Broadly speaking, this unit consists of four sections: controller, synthesizer, sequencer, and sampler . Synthesizer Sequencer Sampler Controller Synthesizer Sampler This is the section that generates and modifies sound . In The sampler section lets you audio-record (sample) the sound of your response to the performance data from the controller, it keyboard performance or the input sound from an audio device or produces an audio signal that is output from the OUTPUT jacks…
-
Page 15: Units Of Sound
. It is also fused with the PCM ZEN-Core sound engine together with effects (MFX+EQ) . sound engine developed by Roland for many years, supporting even more These are tones that contain a collection of multiple sophisticated sound design .
-
Page 16: About The Effects
An Overview of FANTOM About the Effects The FANTOM is equipped with the following built-in effects, and settings can be made independently for each . Effect type Effect Explanation This is a general-purpose multi-effect that transforms the sound itself, giving it an entirely different character .
-
Page 17: About Memory
Preset rhythm pattern User rhythm group Preset arpeggio style Scene chain Export Import Export Copy Restore Backup USB flash drive ROLAND folder EXPORT SMF file WAV file Sample folder BACKUP folder Backup WAV file Temporary memory Rewritable memory Internal storage This is storage memory inside the FANTOM .
-
Page 18: Getting Ready
* When using the KS-10Z, ensure that the height of the unit is one meter or lower. the FANTOM-6/FANTOM-7 If You’re Using If you want to place the FANTOM-6/FANTOM-7 on a stand, please use the KS-12 or KS-10Z stands manufactured by Roland . * The illustration shows the FANTOM-6. KS-12…
-
Page 19: If You’re Using The Fantom-8
Getting Ready the FANTOM-8 If You’re Using If you want to place the FANTOM-8 on a stand, please use the KS-12, KS-10Z, or KS-G8B stands manufactured by Roland . KS-12 Adjust the horizontal width of the stand so that the rubber feet on…
-
Page 20: Turning The Power On
Getting Ready Turning the Power On Making the Power Automatically Turn off After a Time (Auto Off ) Once everything is properly connected, be sure to follow the procedure below to turn on their power . If you turn on The power to this unit will be turned off automatically after a equipment in the wrong order, you risk causing malfunction or predetermined amount of time has passed since it was last used…
-
Page 21: 02: Performing
02: Performing Contents Selecting a Sound (SCENE/TONE) . . . . . . . . . . . . . . . . . . : Selecting a Scene .
-
Page 22: Selecting A Sound
Selecting a Sound (SCENE/TONE) Menu Beat Tempo Locator Play/Stop Current pad mode Status of each effect Edit Scene Number: Scene Name MEMO Selected scene Show next 16 scenes Quick Edit Here’s how to switch banks . Selecting a Scene Press the [ENTER] button. Press the [SCENE SELECT] button.
-
Page 23: Selecting A Tone
Selecting a Sound (SCENE/TONE) 1 ZONE VIEW 4 ZONE VIEW Back Beat Tempo Locator Play/Stop Current pad mode Scene Number: Scene Name Switch the number Turn each effect on/off Zone Number of zones shown Cursor Tone Number: Tone Name 8 ZONE VIEW ON/OFF ZONE Arpeggio…
-
Page 24: Performing
Performing Playing One Tone in One Zone Layering Zones (Single) (Layer) Most of the scenes provided by the factory settings produce You can layer multiple tones so that they are heard sound using a combination of multiple zones . These are created simultaneously when you play the keyboard .
-
Page 25: Selecting A Tone (Layer)
Performing Selecting a Tone Changing the Keyboard’s Split Point (Layer) Press the [ZONE VIEW] button. While holding down the [SPLIT] button, press the key that is to become the new split point. The ZONE VIEW screen appears . Select the VIEW number as appropriate for the zones that are layered .
-
Page 26: Playing Multiple Zones
Performing Playing Multiple Zones About unlit zones If you play the keyboard when the ZONE INT/EXT button of the current You can use layers and splits together to create and play more zone is unlit, only the current zone is heard regardless of the lit status complex combinations .
-
Page 27: Changing The Keyboard Settings
Changing the Keyboard Settings Raising/Lowering the Key Range in Raising/Lowering the Key Range in Semitone Steps Octaves (Transpose) (Octave) Hold down the [TRANSPOSE] button and press Press the OCTAVE [DOWN] button or [UP] the OCTAVE [DOWN] button or [UP] button. button.
-
Page 28
Memo… -
Page 29: Performance Functions
03: Performance Functions Contents Playing Arpeggios Simultaneously Modifying the Volume of . . . . . . . . . . . . . . . . . . . . . . . . . . . . . . . . . Multiple Zones (Motional Pad) .
-
Page 30: Playing Arpeggios
Playing Arpeggios Using the Arpeggiator MEMO By setting the system parameter “Arpeggio Switch Mode” (p. 113), you can turn the arpeggiator on without accessing the ARPEGGIO screen. The FANTOM has an arpeggiator that can automatically Play a chord on the keyboard. generate arpeggios .
-
Page 31: Holding The Arpeggio
Playing Arpeggios Holding the Arpeggio Parameter Value Explanation (Hold) Sets the order in which notes of the chord will sound . Here’s how to make the arpeggio continue sounding even after Notes you press will be sounded, from low to high .
-
Page 32: Playing Chords (Chord Memory)
Playing Chords (Chord Memory) Performing with the Chord Memory Function MEMO By setting the system parameter “Chord Memory Switch Mode” (p. 113), you can turn chord memory “on” without accessing the Chord Chord memory is a function that lets you register chord forms Memory screen.
-
Page 33: Performing With Rhythm Patterns
Performing with Rhythm Patterns What is a rhythm pattern? Selecting/Playing Rhythm Patterns The FANTOM can automatically play a variety of rhythms while you perform . Press the [RHYTHM PATTERN] button. The performance data for these rhythms are called “rhythm patterns . ” In a band, the drums typically repeat fixed patterns that are one or two measures long .
-
Page 34: Editing A Rhythm Pattern Group
Performing with Rhythm Patterns To stop, touch the icon of the rhythm pattern Saving a Rhythm Pattern Group that’s playing, or press the [STOP] button. The edited rhythm group is temporary, and will be lost when MEMO you turn off the power or select another rhythm group . 5 The length of the pattern is shown below each rhythm pattern name.
-
Page 35: Changing The Tempo Of The Rhythm Pattern
Performing with Rhythm Patterns Changing the Tempo of the Rhythm Pattern Here’s how to change the tempo of the rhythm pattern . MEMO 5 The tempo that you specify here is common with the arpeggio tempo (p. 30) and the sequencer tempo (p. 82). 5 The tempo value is stored in the scene.
-
Page 36: Playing The General-Purpose Controllers
Playing the General-Purpose Controllers When you use a control knob or slider to edit a setting, the Using the Sliders and Control Knobs edited parameter and its value appears in a popup window . The popup window automatically closes after a time . You can use the sliders and control knobs to control the pan For some parameters, a popup window does not appear .
-
Page 37: Using Other General-Purpose Controllers
Playing the General-Purpose Controllers Using Other General-Purpose Parameter Explanation Specifies whether the functions controlled by a pedal Controllers Pedal Assign connected to the PEDAL CTRL 1, 2/L, and 3/C jacks are Source specified by the system settings (SYS) or by the settings of the scene (SCENE) .
-
Page 38: Playing The Edit Knobs
Playing the Edit Knobs ENV/AMP section Using the Edit Knobs This specifies time-varying changes in pitch, tonal character, and volume . You can use the knobs and buttons of the OSC section, FILTER section, ENV/AMP section, and EFFECT section to edit the sound in real time .
-
Page 39: Simultaneously Modifying The Volume Of Multiple Zones
Simultaneously Modifying the Volume of Multiple Zones (Motional Pad) Using the Motional Pad Editing the Motional Pad Settings The motional pad function lets you simultaneously modify the In the MOTIONAL PAD screen, you can change the assigned volume of four zones by dragging in the screen . By using the zones and switch tones .
-
Page 40: Other Settings For Motional Pad
Simultaneously Modifying the Volume of Multiple Zones (Motional Pad) Other Settings for Motional Pad Press the [MOTIONAL PAD] button. The MOTIONAL PAD screen appears . Touch <EDIT>. The MOTIONAL PAD EDIT screen appears . Select the desired parameter, and edit its value.
-
Page 41
04: Editing Contents Editing a Scene Editing the Effects (Zone) . . . . . . . . . . . . . . . . . . . . . . . . . . . . . . . -
Page 42: Editing A Scene (Zone)
Editing a Scene (Zone) Editing the Overall Scene Initializing a Scene (UTILITY) Scene parameters are common to all zones, and apply to the In the SCENE EDIT screen, touch <UTILITY>. entire scene . The UTILITY window appears . Select a scene. Menu Explanation Press the [MENU] button.
-
Page 43: Editing A Zone
Editing a Scene (Zone) Editing a Zone Explanation EXT settings (settings used when controlling an external sound module) Zone parameters are the parameters related to the zones, and Specifies the name of the external sound module being NAME controlled . are set individually for each zone .
-
Page 44: Editing A Scene’s Appearance
Editing a Scene (Zone) Editing a Scene’s Appearance Saving a Scene Here you can use a dedicated screen to make various settings The edited zone and tone settings, and the recorded data, are such as the appearance and a memo for each scene . temporary .
-
Page 45: Editing A Tone
Editing a Tone Basic Tone Editing Menu Explanation [E1] knob Scrolls up or down through the tabs . Here’s how to edit the tone that’s assigned to a zone . Edit the corresponding parameters . (The corresponding [E2]–[E6] knob parameters change depending on the cursor location .) Partial Sw Turn a partial on/off .
-
Page 46: Editing In The Tone Edit Pro Screen
Editing a Tone Editing in the TONE EDIT PRO Screen Drum Kit Tone (TONE TYPE: Drum) The TONE EDIT PRO screen shows all parameters, allowing you to edit in greater detail . Key 88 (Note Number = 108:C8) In the TONE EDIT ZOOM screen, touch <To PRO>.
-
Page 47: V-Piano Tone
Editing a Tone Move the cursor to “Inst Number” and select V-Piano Tone (TONE TYPE: VPno) an instrument. NOTE V-Piano tones can be selected only for ZONE 1 . Change the instrument if necessary . Instruments are preset drum sounds, and changing the instrument affects the Piano parameters below the “INST COMMON”…
-
Page 48: Initializing A Tone
Editing a Tone Saving a Tone Initializing a Tone (Tone Initialize) An edited tone is temporary . It is lost if you turn off the power Here’s how to initialize the settings of the current tone . or select another tone . If you want to keep the edited tone, save the tone .
-
Page 49: Copying A Partial
Editing a Tone Copying a Partial (Partial Copy) Here’s how to copy the settings of a partial (a key) in a ZEN-Core tone or Drum Kit tone . In the TONE EDIT screen, touch <UTILITY>. The UTILITY window appears . Select <PARTIAL COPY>.
-
Page 50: Editing The Effects
Editing the Effects Basic Operation for Effect Editing Editing the Effects of Each Zone The FANTOM is equipped with a variety of effect processors Here’s how to edit the effects that can be specified for each such as the effects for each tone (MFX, Partial EQ, Kit Comp), zone, such as a tone’s MFX or ZONE EQ .
-
Page 51: Editing Effects Shared By All Zones
Editing the Effects DRUM KIT COMP Editing Effects Shared by All Zones Here’s how to edit the effect units that are shared by all zones, such as IFX 1–2, CHORUS, and REVERB . In the EFFECTS EDIT screen, touch the <INTERNAL>…
-
Page 52
Editing the Effects Editing the parameters NOTE The edited effect settings are temporary . They will be lost if you turn off the power, or if you select another scene . If you want to keep the settings, save In the section that you want to edit, touch the scene . -
Page 53: Editing The Analog Filter
Editing the Effects Turning the Analog Filter on/off Editing the Analog Filter In the screen, touch <ANALOG FILTER> to turn The FANTOM is equipped with an analog filter that provides the effect on/off. a wide range of sound-shaping possibilities . The analog filter features a stereo design, and by changing the routing you can flexibly connect a variety of outputs to the analog filter .
-
Page 54: Using The Analog Filter
Editing the Effects If you want to make detailed edits, touch Using the Analog Filter <EDIT> in the section that you want to edit. You can edit the analog filter settings even while you are playing . While playing, press the [ANALOG FILTER] button.
-
Page 55: Editing The System-Wide Effects
Editing the Effects Move the cursor to the desired parameter, and Editing the System-Wide Effects edit the value. Here’s how to edit the MASTER FX (M .COMP, M .EQ) that are If you want to make detailed edits, touch common to the entire system . <EDIT>…
-
Page 56: Editing The Sampling Input Effects
Editing the Effects Editing the Sampling Input Effects Applying Effects to the Sampler Here’s how to edit the effects that are applied to the audio The sampled sounds are assigned to pads [1]–[16], and for each pad you can specify whether it is connected to MASTER FX input when you sample .
-
Page 57: Specifying The Output Destination For Usb Input
Editing the Effects Specifying the Output Destination for USB Input The FANTOM can input three stereo pairs of audio signals via its USB COMPUTER port . Of these, the output destination of USB SUB 1 is fixed as the SUB OUT 1 jacks, and the output destination of USB SUB2 is fixed as the SUB OUT 2 jacks, but you can choose the output destination jacks to which USB MASTER is routed .
-
Page 58: Using The Mixer Screen
Using the Mixer Screen Adjusting the Pan and Volume in the Parameter Value Explanation Specifies the pan (stereo position) of the current PAN [E5] MIXER Screen L64–R63 knob *2 zone . LEVEL [E6] 0–127 Specifies the level (volume) of the current zone . knob *2 The MIXER screen provides unified access to frequently-edited parameters such as each zone’s pan, level, and effects .
-
Page 59: Making Zone Eq Settings In The Mixer Screen
Using the Mixer Screen Making ZONE EQ Settings in the MIXER Screen A simplified EQ curve is shown in the ZONE EQ area, and from here you can access an edit screen and edit the ZONE EQ settings . In the MIXER screen, touch the ZONE EQ field of the zone whose EQ you want to edit.
-
Page 60: Recalling Scenes In The Order Of Songs (Scene Chain)
Recalling Scenes in the Order of Songs (Scene Chain) Using Scene Chain Use the SCENE CHAIN function when you want to recall scenes in the order of the songs that you’ll be playing live . A scene chain lets you specify the desired order of the scenes that you’ll be using, without changing the numbers of the scenes themselves .
-
Page 61: Creating A Chain Set
Recalling Scenes in the Order of Songs (Scene Chain) Select [E6] OK to confirm the selected scene. Creating a Chain Set You return to the SCENE CHAIN EDIT screen . Here’s how to create an original chain set . Note that the selected scene is registered as the first scene . Press the [SCENE CHAIN] button.
-
Page 62: Editing A Chain Set
Recalling Scenes in the Order of Songs (Scene Chain) Editing a Chain Set Here’s how to edit the arrangement of a previously-created chain set . Press the [SCENE CHAIN] button. The SCENE CHAIN screen appears . Select the chain set that you want to edit. Touch <EDIT>.
-
Page 63
05: Sampler Contents Playing Samples Editing a Sample . . . . . . . . . . . . . . . . . . . . . . . . . . . . . . . . . . . . . -
Page 64: Playing Samples
Playing Samples The FANTOM can audio-record (sample) the sound of your Switching Banks keyboard performance or an audio input such as an audio device or mic . You can press the pads to record the recorded The samples are assigned to four banks that each contain 16 samples .
-
Page 65: Moving/Copying A Sample
Playing Samples Moving/Copying a Sample About the SAMPLE PAD Screen You can move or copy a sample to another pad . In the SAMPLE PAD screen, you can view information about the currently selected bank and the samples that are assigned to Moving a Sample each pad in that bank .
-
Page 66: Sampling
Sampling The FANTOM lets you create samples by sampling the following MEMO sounds . If there is already a sample in the pad to which you are sampling, the 5 Keyboard performance message “Sample Already Exists. Overwrite?” appears. Press [E5] OK if you want to overwrite, or press [E6] CANCEL if you want to cancel.
-
Page 67: Sampling
Sampling As appropriate for the device that is connected, set Sampling the “AUDIO IN,” “PARALLEL SW,” “LINE”/”MIC,” and “PHANTOM” settings. When you are finished adjusting the input volume, make sampling settings in the SAMPLING STANDBY screen . Adjust the input volume. Adjust the volume as high as possible without allowing the level Make settings for sampling.
-
Page 68: Importing An Audio File
Sampling Select the file or folder that you want to Importing an Audio File import. In addition to sampling on the FANTOM itself, audio files from The selected file or folder is highlighted . You can use the following controllers to select the file or folder . your computer can be imported as samples via a USB flash drive .
-
Page 69
Sampling To execute IMPORT Touch a file name to select the file that you want to import. To execute IMPORT, select only one file . Select [E6] IMPORT. The SAMPLE IMPORT (SELECT DESTINATION) screen appears . Import-destination pad Touch an icon in the screen to select the import-destination bank and pad. -
Page 70: Editing A Sample
Editing a Sample Here’s how to edit a recorded sample . There are two types of Using Wave Edit editing: “Quick Edit” and “Wave Edit . ” Wave Edit lets you make detailed settings for each sample . Using Quick Edit Hold down the [SHIFT] button and press the Quick Edit lets you make basic settings for each sample .
-
Page 71: Using The Sample Utility Functions
Editing a Sample Using the Sample Utility Functions MEMO As an alternative to using the [E1] [E2] knobs, you can also change the start point and end point by directly dragging the START POINT icon In addition to “Quick Edit” and “Wave Edit, ” you can use the and END POINT icon in the screen to left or right.
-
Page 72: Deleting A Sample
Editing a Sample In the WAVE EDIT screen, specify the start Exporting the Sample in WAV Format point and end point. (EXPORT WAV) Here’s how to export the sample in WAV format . In the SAMPLE PAD screen, touch <SAMPLE UTILITY>.
-
Page 73: Pads
06: Pads Contents Assigning Convenient Functions to the Pads (PAD MODE) ……..: Basic Pad Mode Operation .
-
Page 74: Basic Pad Mode Operation
Assigning Convenient Functions to the Pads (PAD MODE) Basic Pad Mode Operation Playing Samples (Sample Pad) You can assign various useful functions to the 16 pads of the The pads play samples. FANTOM, such as playing samples or muting zones. These functions are called pad modes.
-
Page 75: Controlling A Daw
Assigning Convenient Functions to the Pads (PAD MODE) Specifying the tone played by each pad Controlling a DAW (DAW Control) You can use the pads to control supported DAW software (Logic In the NOTE PAD screen, press a pad to select Pro X/MainStage).
-
Page 76: Switching Zone Mute
Assigning Convenient Functions to the Pads (PAD MODE) Switching Zone Mute Turning the Keyboard Switch Group (Zone Mute) On/Off (Kbd Sw Group) You can use the pads to mute (silence) the Zones (1–16). Pressing a pad switches the mute status of each zone. You can use the pads to switch between pre-assigned keyboard The pad is muted in the “On”…
-
Page 77: Playing Rhythm Patterns
Assigning Convenient Functions to the Pads (PAD MODE) Playing Rhythm Patterns (Rhythm Pattern) You can use the pads to play rhythm patterns. The operation is the same as when you touch the <Intro>–<Ending> icons in the RHYTHM PATTERN screen. Explanation Selects the Intro rhythm pattern.
-
Page 78
Memo… -
Page 79
07: Sequencer Contents How the Sequencer Is Structured How to Create a Group . . . . . . . . . . . . . . . . . . . . . . . . . . . . . . . . . . . . . . . : Pattern : Creating a Group . -
Page 80: How The Sequencer Is Structured
How the Sequencer Is Structured Pattern This unit’s sequencer lets you record and play back using 16 tracks which correspond to the zones . Each track can have up to eight patterns, and these variations are called patterns . For each track, you can switch the variation during playback . Each pattern can be up to 32 measures long, and will play as a loop of the length that is specified for each pattern .
-
Page 81: Playing The Sequencer
Playing the Sequencer In the PATTERN screen you can use the following functions . Playing Pattern Menu Explanation [E1] LOOP SETTING Accesses the LOOP SETTING screen . Select a scene. [E2] PTN UTILITY Accesses the PTN UTILITY screen . Select a scene in which patterns have been created . [E3] MUTE Accesses the MUTE screen .
-
Page 82: Making Loop Settings (Loop)
Playing the Sequencer Making Loop Settings Setting the Tempo (LOOP) For each pattern, you can make detailed settings to specify You can set the tempo of the sequencer . whether and how it loops . MEMO 5 The tempo that you specify here is in common with the arpeggio tempo MEMO (p.
-
Page 83: Muting A Track (Mute)
Playing the Sequencer Muting a Track Soloing a Track (MUTE) (SOLO) For each track, you can mute the pattern playback . You can also You can solo the playback of the selected track . You can also mute during playback . solo during playback .
-
Page 84: Playing Group
Playing the Sequencer Playing Group Playing Song Select a scene. Select a scene. Select a scene in which a song is created . Select a scene in which a song is created . Scenes in which a song is created have a “SONG” indication as Scenes in which a song is created have a “SONG”…
-
Page 85: Song Production Workflow
Song Production Workflow To create a song on the FANTOM, begin by creating patterns which are the smallest structural unit of the song, then combine multiple patterns to create groups, and finally place multiple groups in a desired order to complete a song . 5 This simple flow lets you reach the desired result without getting lost.
-
Page 86: Recording A Pattern
Recording a Pattern Ways to Record a Pattern Recording Value Explanation Parameter Selects the way in which recording is started . There are three ways to record a pattern . Recording begins immediately when you NONE Realtime press the [JPLAY] button . Create a pattern by recording your keyboard performance and recording controller operations just as you perform them .
-
Page 87: Removing Unwanted Data During Recording
Recording a Pattern Recording Playback position Value Explanation Measure indication Parameter indicator Recorded data exists Lets you select the performance data that is recorded during realtime recording . NOTE Note messages CONTROL Control change messages CHANGE <REC EVENT> PITCH BEND Pitch bend messages CHANNEL Channel aftertouch messages…
-
Page 88: (Step Rec)
Recording a Pattern Step Recording Recording (Step REC) Value Explanation Parameter Specifies the note length (step time) of the notes to Press the [7REC] button. Note Type enter . The note length is the length from one note- 1/64 ( )–…
-
Page 89: Step Recording
Recording a Pattern TR-REC How note value and step time are related The following table shows how note value and gate time are related . On the FANTOM’s sequencer, the TPQN (ticks per quarter note) What is TR-REC? resolution is 480 . TR-REC is the method of using the TONE CATEGORY buttons [1]–[16] This means that a quarter note has a gate time of 480 ticks .
-
Page 90
Recording a Pattern 5 For tones other than a drum kit, use the keyboard to specify the pitch Select [E2] TR-REC. that you want to input . The TR-REC screen appears . The [TR-REC] button is lit, and tone 5 When you specify an instrument or pitch, the yellow frame in the screen category buttons [1]–[16] change to functioning as the TR-REC moves correspondingly . -
Page 91: Editing A Pattern
Recording a Pattern Editing a Pattern MEMO The content that you edit using the pattern utility functions is saved in the scene . Convenient Functions (Pattern Utility) Copying a pattern (COPY) By using pattern utility functions, you can copy and paste a Here’s how to copy the selected pattern .
-
Page 92: Applying Various Edits (Modify)
Recording a Pattern Undoing an editing operation (UNDO) Applying Various Edits (MODIFY) Here’s how to cancel the result of an editing operation and The PATTERN UTILITY command MODIFY lets you specify return to the state before that operation was executed (Undo) . parameters for various operations .
-
Page 93
Recording a Pattern Transposing (TRANSPOSE) Parameter Value Explanation Specifies how quantization will occur . This function transposes the notes of the specified region in a Grid quantization is applied during editing . Use this when range of ±24 semitones . you want accurate timing, such as for drums or bass . -
Page 94: Importing Smf As A Pattern (Import)
Recording a Pattern Moving Performance Data Forward or Backward Importing SMF as a Pattern (IMPORT) (SHIFT CLOCK) Here’s how SMF data can be imported as a pattern . The This function moves the timing of performance data in the imported SMF data can be handled as a pattern in the PATTERN specified region forward or backward in units of ticks .
-
Page 95: Exporting A Pattern As Smf
Recording a Pattern Select [E3] RENAME. Exporting a Pattern as SMF (EXPORT) The RENAME screen appears . Here’s how a pattern of the currently selected scene can be Enter a file name as described in the converted into SMF data and exported to a USB flash drive . procedure for the RENAME screen (p.
-
Page 96: How To Create A Group
How to Create a Group Press the [APLAY] button. Creating a Group You can audition the group you created to verify that it is the combination that you chose . In advance, select a scene and create patterns in several tracks as described in the procedure for recording a pattern (p .
-
Page 97: Editing A Group
How to Create a Group Editing a Group Naming a Group (RENAME) You can assign a name to each group . Assigning an informative Even after creating a group, you can edit the structure of the name helps you tell the groups apart without needing to group in the GROUP screen .
-
Page 98: How To Create A Song
How to Create a Song Creating a Song Editing a Song In advance, select a scene, and create patterns and groups as Even after creating a song, you can edit the song structure in described in Recording a Pattern (p . 86) and Creating a Group the SONG screen .
-
Page 99: (Song Edit)
How to Create a Song Moving a group (MOVE) Here’s how to move the selected group . In the SONG EDIT screen, select the move- source group, and then select [E1] MOVE. To clear the Skip function, move to the red frame and press the [ENTER] button once The SONG EDIT (MOVE) screen appears .
-
Page 100: Exporting A Song As Smf
How to Create a Song Making loop settings for an individual group (Repeat) Separately from the loop settings for the entire song, you can make settings for each group to specify the number of times it will play (Repeat) during song playback . For example, in a song that has the playback order A0B0C0D, you can leave the song structure unchanged while easily making only the third group “C”…
-
Page 101
08: Control Contents Connecting a Computer via USB . . . . . . . . . . . . . . : Connecting to Your Computer . -
Page 102: Connecting A Computer Via Usb
Here’s how to make settings for audio that’s input from a USB- connected to your computer . connected computer . MEMO For details on downloading and installing the USB driver, refer to the Roland Press the [USB AUDIO SELECT] button. website . https://www .roland .com/support/ USB Driver Settings Here’s how to specify the USB driver that’s used when…
-
Page 103: Using The Buttons And Sliders To Make Adjustments
Connecting a Computer via USB Using the Buttons and Sliders to Make Adjustments In addition to making settings in the SYSTEM screen, you can also use the panel [USB AUDIO IN/OUT] button and the [USB AUDIO] slider to turn USB input/output on/off and to adjust the input/output levels .
-
Page 104: Controlling An External Midi Device (Ext Midi Out)
Controlling an External MIDI Device (EXT MIDI OUT) Press a function select button to select the Controlling an External MIDI Device parameter that you want to operate. This unit’s knob operations and keyboard performance can be transmitted as MIDI messages from the MIDI OUT connector and from USB MIDI OUT .
-
Page 105: Controlling An Analog Synthesizer
Controlling an Analog Synthesizer (CV/GATE OUT) About the FANTOM’s CV/GATE The FANTOM is equipped with two sets of CV/GATE output jacks, and by connecting these to analog synthesizers that are equipped with CV/GATE input jacks, you can control their note on/off and pitch .
-
Page 106
Memo… -
Page 107: Settings
09: Settings Contents Convenient Functions Settings for the Entire FANTOM (Utility) . . . . . . . . . . . . . . . . . . . . .
-
Page 108: Basic Utility Operations
Convenient Functions (Utility) If you want to rename the file that will be Basic Utility Operations backed up, select [E1] RENAME and assign a name (p. 13). Press the [MENU] button. By default, the file name is “MyBackup . ” The MENU screen appears .
-
Page 109: Convenient Functions (Utility)
If this check box is not selected, the sample data is preserved without change . If you want the contents of internal storage to ROLAND folder The FANTOM’s songs and backup data are saved also be reset to the factory settings, select the here .
-
Page 110: Regarding Folder Structure
Convenient Functions (File Utility) Change the settings as appropriate for the Regarding Folder Structure selected menu item. These functions let you copy, delete, or move files that are saved Menu Explanation in internal storage or a USB flash drive . [E2] RENAME Renames a file or folder .
-
Page 111: Convenient Functions (File Utility)
Convenient Functions (File Utility) Moving a File or Folder (MOVE) Here’s how to move a file or folder to a different location . In the FILE UTILITY screen, select the move- source file or folder, and then execute [E5] MOVE. The FILE UTILITY (MOVE DESTINATION) screen appears .
-
Page 112: Settings For The Entire Fantom
Settings for the Entire FANTOM Basic Procedure for System Settings Saving the System Settings If you want to save the system settings that you changed, Press the [MENU] button. execute the Save operation . The MENU screen appears . In the SYSTEM screen, press the [WRITE] Touch <SYSTEM>.
-
Page 113: Pedal Settings (Pedal)
. If so, choose the easier for people with reduced finger “REVERSE” setting . If you’re using a strength to play the keyboard . Roland pedal (that has no polarity This is the standard keyboard touch switch), choose the “STANDARD” Keyboard Velocity Curve MEDIUM setting .
-
Page 114: Wheel Settings (Wheel 1/2)
Settings for the Entire FANTOM Wheel Settings Slider Settings (WHEEL 1/2) (SLIDER) Parameter Value Explanation Parameter Value Explanation Specifies whether the functions Specifies whether control data of controlled by the wheels are the corresponding position is always Wheel Assign Source SYS, SCENE determined by the system settings output when you move a slider…
-
Page 115: Midi Settings (Midi)
Settings for the Entire FANTOM USB Audio Settings (USB AUDIO) Parameter Value Explanation Specifies whether system exclusive Receive Exclusive OFF, ON messages will be received (ON) or not Parameter Value Explanation be received (OFF) . All audio signals output from the FANTOM are mixed to channels 1–2 .
-
Page 116: Sound Settings (Sound)
Settings for the Entire FANTOM CV/GATE Settings Sound Settings (CV/GATE) (SOUND) Parameter Value Explanation Parameter Value Explanation CV/GATE 1, CV/GATE 2 Enables or disables the connection between the controller section Specifies whether CV/GATE settings (keyboard, pitch bend/modulation CV/Gate 1–2 Assign are determined by the system settings SYS, SCENE lever, panel knobs and buttons,…
-
Page 117: Click Settings (Click)
Settings for the Entire FANTOM Synchronization Settings Control Function Settings (SYNC/TEMPO) (CONTROL) Parameter Value Explanation Parameter Value Explanation The FANTOM will be the Use System Control Source 1–4 for synchronization master . Choose this tone control . Control Source Select setting if you’re using the FANTOM Use the scene’s Tone Control Source SCENE…
-
Page 118
Memo… -
Page 119: Appendix
10: Appendix Contents Chord Memory List . . . . . . . . . . . . . . . . . . . . . . . . . . . . . . . . Block Diagram .
-
Page 120: Chord Memory List
Chord Memory List 01: Pop 1 06: Blues Assign Key Chord Name Constituent Notes of Chord Forms Assign Key Chord Name Constituent Notes of Chord Forms Cadd9 C3, G3, D4, E4 C7(9) C3, A#3, D4, E4 C#maj9 C#3, C4, D#4, F4 C#7(9) C#3, F3, B3, D#4 D3, F4, A3, C4…
-
Page 121
Chord Memory List 11: Pop Min 2 16: 5th Stack Assign Key Chord Name Constituent Notes of Chord Forms Assign Key Chord Name Constituent Notes of Chord Forms C-add9 C3, D4, D#4, G4 C4, G4 Eb7(on Db) C#3, A#3, D#4, G4 C#4, G#4 D-7(b5) D3, G#3, C4, F4… -
Page 122: Block Diagram
Block Diagram Analog Output Sub2 Output Sub1 Output Main Output Mixer to Sub to Sub to AFX to AFX to Rev to Cho to Sub to AFX to Sub to AFX to Rev to Rev to Cho to Cho to Sub to AFX from Rev from Cho…
-
Page 123: Error Message List
Error Message List If an incorrect operation is performed, or if processing could not be performed as you specified, an error message appears . Refer to the explanation for the error message that appears, and take the appropriate action . Message Meaning Action…
-
Page 124: Troubleshooting
Troubleshooting Problem Items to check Action Page Overall problems The FANTOM will automatically be turned off when no operation has been performed for a certain length of time . (At the factory settings, The unit turns off Check the “Auto Off” system setting . p .
-
Page 125
Troubleshooting Problem Items to check Action Page Sound is still heard from the Since the FANTOM’s internal effects are stereo, applying an insert effect opposite side as well even Could effects be applied? will allow effect sound to be heard from the opposite side even if the –… -
Page 126
Troubleshooting Problem Items to check Action Page Try reducing the number of notes that are played . In some cases, sustained notes with a long release might cause The sound will be interrupted if the maximum polyphony – processing to continue even though the notes are no longer actually is exceeded . -
Page 127
Troubleshooting Problem Items to check Action Page Problems with the sampling Can’t sample a stereo Could the Format be set to “MONO”? Set the Format to “STEREO . ” p . 66 waveform If the input level is too high, the sound will distort . If the input level is too low, noise will be obtrusive . -
Page 128: Midi Implementation Chart
MIDI Implementation Chart Sound generator section Date : Sep. 1, 2019 Model FANTOM-6/7/8 Version : 1.00 Transmitted Recognized Remarks Function… Basic Default 1–16 1–16 Channel Changed 1–16 1–16 Default Mode 3 Mode 3 Mode Message Mono, Poly Mode 3, 4 (M=1) Altered ************** 0–127…
-
Page 129
MIDI Implementation Chart Sequencer section Date : Sep. 1, 2019 Model FANTOM-6/7/8 Version : 1.00 Transmitted Recognized Remarks Function… Basic Default All channel All channel There is no speci c basic channel Changed 1–16 Channel Default Message Mode Altered ************** Note 0–127 0–127… -
Page 130: Main Specifications
*1 Use a commercially available USB flash drive . However, we cannot guarantee that all commercially available USB flash drives will work . * This document explains the specifications of the product at the time that the document was issued. For the latest information, refer to the Roland…
-
Page 131
Memo…
Сейчас в базе инструкций для ROLAND насчитывается 154 бесплатных инструкций.