- Manuals
- Brands
- RME Audio Manuals
- Accessories
- Babyface Pro
- User manual
-
Contents
-
Table of Contents
-
Troubleshooting
-
Bookmarks
Quick Links
User’s Guide
Babyface Pro
Crafted with Passion
™
TotalMix
24 Bit / 192 kHz
™
™
SteadyClock
III
SyncCheck
USB 2.0 Digital I/O System
24 Channels Analog / ADAT / SPDIF Interface
24 Bit / 192 kHz Digital Audio
24 x 12 Matrix Router
MIDI I/O
MIDI Remote Control
Stand-Alone Operation
Class Compliant Operation
Related Manuals for RME Audio Babyface Pro
-

Accessories RME Audio Babyface User Manual
Usb 2.0 digital i/o system 22 channels analog / adat / spdif interface 24 bit / 192 khz digital audio 20 x 12 matrix router midi i/o midi remote control stand-alone operation class compliant operation (94 pages)
-
-
-
Accessories RME Audio Fireface 400 User Manual
Firewire 400 digital i/o system 8 + 8 + 2 channels analog / adat / spdif interface 24 bit / 192 khz digital audio 36 x 18 matrix router midi i/o stand-alone operation midi remote control stand-alone midi controlled operation (91 pages)
-
Accessories RME Audio Fireface 400 User Manual
Firewire 400 digital i/o system 8 + 8 + 2 channels analog / adat / spdif interface 24 bit / 192 khz digital audio 36 x 18 matrix router midi i/o stand-alone operation midi remote control stand-alone midi controlled operation (100 pages)
-
Accessories RME Audio Fireface UC User Manual
Usb 2.0 digital i/o system 8 + 8 + 2 channels analog / adat / spdif interface 24 bit / 192 khz digital audio 36 x 18 matrix router 2 x midi i/o stand-alone operation midi remote control (92 pages)
-


-
-
Accessories RME Audio Fireface UFX User Manual
Usb 2.0 / firewire 400 digital i/o system 12 + 16 + 2 channels analog / adat / aes interface 24 bit / 192 khz digital audio 60 x 30 matrix router 2 x midi i/o full stand-alone operation midi remote control (110 pages)
-
-
-
-
-

Summary of Contents for RME Audio Babyface Pro
-
Page 1
User’s Guide Babyface Pro Crafted with Passion ™ TotalMix 24 Bit / 192 kHz ™ ™ SteadyClock SyncCheck USB 2.0 Digital I/O System 24 Channels Analog / ADAT / SPDIF Interface 24 Bit / 192 kHz Digital Audio 24 x 12 Matrix Router… -
Page 2: Table Of Contents
9.9 Clock Modes — Synchronization …….23 Operation under ASIO 10.1 General …………..24 10.2 Channel Count under ASIO ………24 10.3 Known Problems ……….25 Using more than one Babyface Pro ……25 DIGICheck Windows ……….26 Hotline – Troubleshooting……..27 Installation and Operation — Mac OS X Hardware Installation……….30 Driver and Firmware 15.1 Driver Installation ……….30…
-
Page 3
17.2 Repairing Disk Permissions……… 34 17.3 Supported Sample Rates……..34 17.4 Channel Count under Core Audio ……. 34 17.5 Various Information……….35 Using more than one Babyface Pro …… 35 DIGICheck Mac…………36 Hotline – Troubleshooting ……..37 TotalMix FX TotalMix: Routing and Monitoring 21.1 Overview ………….. -
Page 4
26.4 DS – Double Speed ……….79 26.5 QS – Quad Speed……….79 26.6 Noise Level in DS / QS Mode ……80 26.7 SteadyClock …………80 Diagrams 27.1 Block Diagram Babyface Pro …….81 27.2 Connector Pinouts……….82 Stand-Alone and Class Compliant Modus General …………..84 System Requirements for iPad Operation….84 Operation …………..84… -
Page 5: General
User’s Guide Babyface Pro General User’s Guide Babyface Pro © RME…
-
Page 6: Introduction
Windows and Mac computers. The latest Plug and Play technology guarantees a simple installation, even for the inexperi- enced user. Numerous unique features put the Babyface Pro at the very top of the range of computer-based audio interfaces.
-
Page 7: First Usage — Quick Start
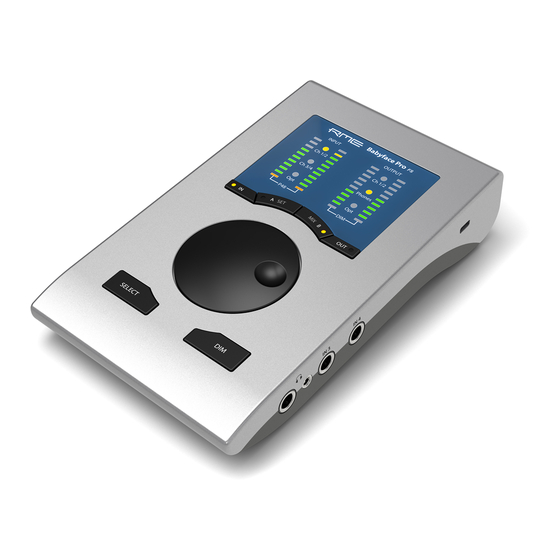
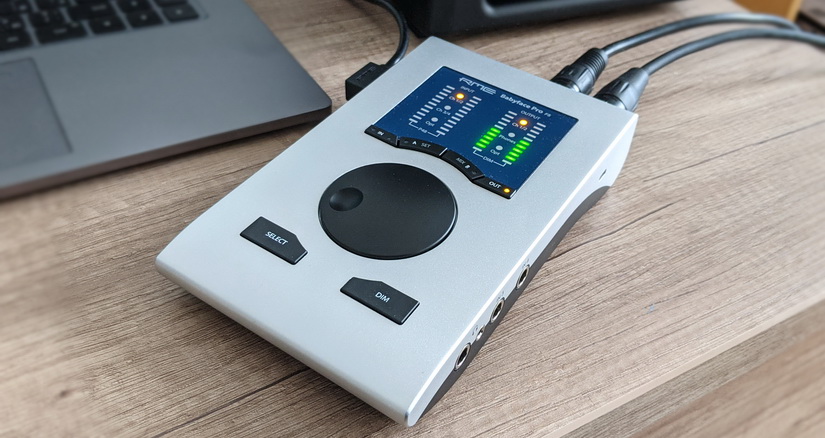
5. First Usage – Quick Start 5.1 Connectors – Controls – Display The top of the Babyface Pro features a hi-precision rotary encoder, 6 buttons, 4 LED bands and 6 status LEDs. The four LED bands show the current gain, the input and output level, and the channel to be set, all dependent on the current mode.
-
Page 8
A connection to ground might cause a decreased THD (higher distortion) and increased power consumption! The Babyface Pro has two analog microphone inputs that can operate as line inputs with lev- els up to +19 dBu, when set to 0 dB gain and PAD active. The electronic input stage uses a servo balanced design which handles unbalanced and balanced signals correctly, automatically adjusting the level reference. -
Page 9: Quick Start
TotalMix or at the Babyface itself to make sure that the loudest signal reaches about -3dBFS. The XLR line inputs of the Babyface Pro can be used with +4 dBu and -10 dBV line signals. The electronic input stage can handle balanced (XLR, TRS jacks) and unbalanced (TS jacks) input signals correctly.
-
Page 10
TotalMix FX in Submix view (default) will highlight the currently selected submix and move the corresponding input fader in sync with the Babyface Pro, so that the ongoing process can be controlled and followed easily at the screen. This helps in setup and understanding of the moni- toring function. -
Page 11: Installation And Operation — Windows
User’s Guide Babyface Pro Installation and Operation – Windows User’s Guide Babyface Pro © RME…
-
Page 12: Hardware Installation
But it will also work the other way round. In case the level meters of the Babyface Pro show CC during power-on: the unit is in Class Compliance mode and will not work under Windows. Remove the USB cable, hold SELECT and DIM button down, plug-in the USB cable or the power supply.
-
Page 13: De-Installing The Drivers
Select Windows Driver Package – RME Fireface USB, then Uninstall. 7.3 Firmware Update The Flash Update Tool updates the firmware of the Babyface Pro to the latest version. It re- quires an already installed driver. Start the program fut_usb.exe. The Flash Update…
-
Page 14: Configuring The Babyface Pro
8. Configuring the Babyface Pro 8.1 Settings Dialog — General Configuration of the Babyface Pro is done via its own settings dialog. The panel ‘Settings’ can be opened: • by clicking on the fire symbol in the Task Bar’s notification area The mixer of the Babyface Pro (TotalMix FX) can be opened: •…
-
Page 15
(Sync). The third column shows the sample frequency detected by the hardware (coarse recognition, 32 kHz, 44.1 kHz, 48 kHz etc.). In Clock Mode the clock reference is shown. See also chapter 26.1. User’s Guide Babyface Pro © RME… -
Page 16: Settings Dialog — Pitch
Synthesizer (DDS). This superior circuitry can generate nearly any frequency with highest pre- cision. DDS has been implemented into the Babyface Pro with regard to the needs of professional video applications, as well as to maximum flexibility. The section Pitch includes both a list of typical video frequencies (so called pull up/pull down at 0.1% and 4%) and a fader to freely…
-
Page 17: Operation And Usage
9. Operation and Usage 9.1 Playback In the audio application being used, Babyface Pro must be selected as output device. It can often be found in the Options, Preferences or Settings menus, as Playback Device, Audio De- vices, Audio etc.
-
Page 18: Dvd-Playback (Ac-3/Dts)
AC-3/DTS capable receiver using the Babyface Pro’s SPDIF output. For this to work, the WDM SPDIF device of the Babyface Pro has to be selected in >Control Panel/ Sounds and Multimedia/ Audio< or >Control Panel/ Sound/Playback<. Also check ‘use preferred device only’.
-
Page 19: Notes On Wdm
9.3 Notes on WDM The driver offers one WDM streaming device per stereo pair, like Analog 3+4 (Babyface Pro). WDM Streaming is Microsoft’s current driver and audio system, directly embedded into the op- erating system. WDM Streaming is hardly usable for professional music purposes, as all data is processed by the so called Kernel Mixer, causing a latency of at least 30 ms.
-
Page 20: Channel Count Under Wdm
9.4 Channel Count under WDM The Babyface Pro’s ADAT optical interface offers sample rates of up to 192 kHz using a stan- dard ADAT recorder. For this to work single-channel data is spread to two or four ADAT chan- nels using the Sample Multiplexing technique. This reduces the number of available ADAT channels from 8 to 4 or 2 per ADAT port.
-
Page 21: Analog Recording
XLR sockets. Phantom power is required for condenser microphones. Input channels 3 and 4 are found as TS jacks on the right side of the Babyface Pro. These Hi-Z universal inputs have an input impedance of 470 kOhm. The input gain is controlled and per- formed digitally and limited to 9 dB.
-
Page 22: Digital Connections
The output signal in TotalMix has to be present on the first ADAT channels, AS 1+2. MIDI Babyface Pro offers one MIDI I/O via two 5-pin DIN jacks. The MIDI ports are added to the sys- tem by the driver. Using MIDI capable software, these ports can be accessed under the name Babyface Pro Midi.
-
Page 23: Clock Modes — Synchronization
— few CD players can be synchronized. The samples will inevitably be corrupted, be- cause the signal from the CD player is read with the clock from the Babyface Pro, being out of sync. In this case, the Clock Source should be set temporarily to Optical In.
-
Page 24: Operation Under Asio
The Babyface Pro supports ASIO Direct Monitoring (ADM). The Babyface Pro MIDI I/O can be used with both MME MIDI and DirectMusic MIDI. 10.2 Channel Count under ASIO At a sample rate of 88.2 or 96 kHz, the ADAT optical input and output operates in S/MUX mode, so the number of available channels is reduced from 8 to 4.
-
Page 25: Known Problems
Lock instead of Sync, the devices have not been set up properly! The same applies when using more than one Babyface Pro — they all have to be in sync. Else a periodically repeated noise will be heard.
-
Page 26: Digicheck Windows
• Hardware Level Meter for Input, Playback and Output. Reference Level Meter freely con- figurable, causing near zero CPU load, because calculated from the Babyface Pro hardware. • Spectral Analyser. World wide unique 10-, 20- or 30-band display in analog bandpass filter technology.
-
Page 27: Hotline — Troubleshooting
• Check that there is a valid signal at the input. If so, the current sample frequency is dis- played in the Settings dialog. • Check whether the Babyface Pro has been selected as recording device in the audio appli- cation.
-
Page 28
User’s Guide Babyface Pro © RME… -
Page 29: Installation And Operation — Mac Os X
User’s Guide Babyface Pro Installation and Operation – Mac OS X User’s Guide Babyface Pro © RME…
-
Page 30: Hardware Installation
USB.pkg. During driver installation the programs Totalmix (TotalMix FX) and Fireface USB Settings are copied to the Applications folder. They will automatically start into the dock if a Babyface Pro is connected. A reboot of the computer is not required.
-
Page 31: De-Installing The Drivers
A progress bar will indicate when the flash process is finished (Verify Ok). After the update the unit needs to be reset. This is done by powering down the Babyface Pro for 5 seconds. A reboot of the computer is not necessary.
-
Page 32: Configuring The Babyface Pro
16.1 Settings Dialog Configuring the Babyface Pro is done via its own settings dialog. Start the program Fireface USB Settings. The mixer of the Babyface Pro (TotalMix FX) can be configured by starting the program Totalmix. The Babyface Pro’s hardware offers a number of helpful, well thought-out practical functions and options which affect how the card operates — it can be configured to suit many different requirements.
-
Page 33: Clock Modes — Synchronization
— few CD players can be synchronized. The samples will inevitably be corrupted, be- cause the signal from the CD player is read with the clock from the Babyface Pro, being out of sync. In this case, the Clock Source should be set temporarily to Optical.
-
Page 34: Midi Doesn’t Work
MIDI devices will solve the problem. The Babyface Pro is class compliant. Therefore it comes without a driver. OS X recognizes it as MIDI device and will be using it with the driver included in the operating system.
-
Page 35: Various Information
Programs that don’t support card or channel selection will use the device chosen as Input and Output in the System Preferences – Sound panel. Via Launchpad – Other – Audio MIDI Setup the Babyface Pro can be configured for the sys- tem wide usage in more detail.
-
Page 36: Digicheck Mac
• Hardware Level Meter for Input, Playback and Output. Reference Level Meter freely con- figurable, causing near zero CPU load, because calculated from the Babyface Pro hardware. • Spectral Analyser. World wide unique 10-, 20- or 30-band display in analog bandpass filter technology.
-
Page 37: Hotline — Troubleshooting
• Check that there is a valid signal at the input. If so, the current sample frequency is dis- played in the Settings dialog. • Check whether the Babyface Pro has been selected as recording device in the audio appli- cation.
-
Page 38
User’s Guide Babyface Pro © RME… -
Page 39: Totalmix Fx
User’s Guide Babyface Pro TotalMix FX User’s Guide Babyface Pro © RME…
-
Page 40: Totalmix: Routing And Monitoring 21.1 Overview
FX adds 3-band parametric equalizer, low cut, echo and reverb. Here are some typical applications for TotalMix: • Setting up delay-free submixes (headphone mixes). The Babyface Pro allows for up to 6 fully independent stereo submixes. On an analog mixing desk, this would equal 12 Aux sends.
-
Page 41
User’s Guide Babyface Pro © RME… -
Page 42: The User Interface
The visual design of the TotalMix mixer is a result of its capability to route hardware inputs and software playback channels to any hardware output. The Babyface Pro has 12 input channels, 12 software playback channels, and 12 hardware output channels: TotalMix can be used in the above view (View Options 2 Rows).
-
Page 43: The Channels
The arrow symbol at the bottom minimizes the channel width to that of the level meters. An- other click maximizes it again. A mouse click with held Ctrl key causes all channels to the right to enlarge and minimize at once. User’s Guide Babyface Pro © RME…
-
Page 44: Settings
The gain (fader knob position) of the currently active routing (the submix selected in the third row) is shown as white triangle. Background: TotalMix has no fixed channel fader. In case of the Babyface Pro there are 6 stereo Aux sends, shown alternately as single fader within the channel strip.
-
Page 45
An example is the stereo mixdown for recording of a live show. With No Trim active, the routing to this output channel is excluded from the Trim Gains function, therefore is not changed unintentionally. User’s Guide Babyface Pro © RME… -
Page 46
Note: TotalMix has an internal headroom of 24 dB. Extreme boosts with overlapping filters can therefore cause an internal overload. In any case such an overload is displayed by the Over LED of the channel’s level meter. User’s Guide Babyface Pro © RME… -
Page 47: Equalizer
Presets have special names. For example Telephone (LC+EQ) will sound much better when the LC has been activated additionally to the EQ, as the LC is set to an unusual high fre- quency of 500 Hz here. User’s Guide Babyface Pro © RME…
-
Page 48: Section Control Room
Out B, and up to two Phones outs. The output for the Cue signal, which is usu- ally Main, can also be set to one of the Phones outputs. This setting also controls the PFL monitoring. User’s Guide Babyface Pro © RME…
-
Page 49: The Control Strip
FX — DSP Meter. Shows the DSP load caused by activated EQs and Low Cuts. The DSP of the Babyface Pro has been designed so that an overload cannot occur. The display therefore is for information purposes only.
-
Page 50: View Options
2 Row. Switches the mixer view to 2 rows. Hardware Inputs and Software Playbacks are placed side by side. This view saves a lot of space, especially in height. Names. Display of the original names of channels when they had been renamed by the user. User’s Guide Babyface Pro © RME…
-
Page 51: Snapshots — Groups
Instead signals can be muted on specific submixes by the push of a button. A solo group operates exactly like the global solo, signals outside the current routing are not affected. User’s Guide Babyface Pro © RME…
-
Page 52: Channel Layout — Layout Presets
Name (User) column. Editing channel names in this dialog is quick, Enter jumps to the next line. The names of the channels in the Control Room section can only be changed this way. User’s Guide Babyface Pro © RME…
-
Page 53: Scroll Location Markers
When the TotalMix FX window is intentionally made small in width, so only a few channels are shown. • When some or all EQ or Dynamics panels are open. Then all relevant settings are always visible, but require a lot of space horizontally. User’s Guide Babyface Pro © RME…
-
Page 54: Reverb And Echo
CPU load. The transmission of the stereo signal FX Send to the computer and the effects signal FX Out back to the Babyface Pro is done by two invisible ASIO channels. The delay (latency) generated by this method is of no consequence for the offered effects reverb and echo.
-
Page 55
Feedback. Feedback to produce further echoes. Width. Adjusts the stereo width of the echo signal from 100 (stereo) to 0 (mono). Volume. Adjusts the level of the echo effects signal sent to the FX return bus. User’s Guide Babyface Pro © RME… -
Page 56
Factory: Includes 10 examples for the configuration of the Reverb Reset: Resets the Reverb or Echo Rename: The Presets 1 to 16 can be renamed. The changes will be shown in both lists Recall and Save to. User’s Guide Babyface Pro © RME… -
Page 57: Preferences
Main Out and all groups of output faders joined by Main, so the current setting for all these is not changed. Device Handling Always init… and Count MADI… are not valid for the Babyface Pro. Disable ASIO Direct Monitoring. Disables ASIO Direct Monitoring (ADM) for the Babyface Pro within TotalMix FX.
-
Page 58: Store For Current User Or All Users (Win)
Pro1.xml, which results in a complete reset to that file’s content whenever TotalMix FX is re- started. The xml-file is updated on exit, so simply set up TotalMix as desired and exit it (right mouse click on the symbol in the notification area). User’s Guide Babyface Pro © RME…
-
Page 59: Settings
TotalMix in a live environment, as it allows to quickly listen/monitor any of the inputs by hitting the Solo button. The monitoring happens on the output set for the Cue signal via the Assign dialog. User’s Guide Babyface Pro © RME…
-
Page 60: Midi Page
TotalMix level meters in the preferences. Note: When MIDI Out is set to NONE then TotalMix FX can still be controlled by Mackie Control MIDI commands, but the 8-channel block is not marked as remote target. User’s Guide Babyface Pro © RME…
-
Page 61: Osc Page
Options Activates Send Peak Level. transmission of the peak level meter data. Peak Hold activates the peak hold function as set up for the TotalMix level meters in the preferences. User’s Guide Babyface Pro © RME…
-
Page 62: Aux Devices
AD- conversion to ADAT, AES/EBU and MADI, plus 4 channels of DA-conversion for monitoring. It can be used as universal front-end for the Babyface Pro and other interfaces. To simplify operation the most important parameters of the XTC (gain, 48V,…
-
Page 63: Hotkeys And Usage
DIGICheck). The dialog Preferences is opened with F3. Alt-F4 closes the current window. Alt and number keys 1 to 8 (not on the numeric keypad!) will load the corresponding Work- space from the Workspace Quick Select feature (hotkey W). User’s Guide Babyface Pro © RME…
-
Page 64: Menu Options
Set inputs mono / outputs stereo (ADM). Preferred setup for best ASIO Direct Monitoring compatibility. In most cases mono hardware outputs will break ADM. Mono inputs are in most cases compatible. If not wrong panning might occur. User’s Guide Babyface Pro © RME…
-
Page 65: Menu Window
A right mouse click on the labels brings up the context menu with the exact same options as in the mixer view: Copy / Mirror / Paste /Clear input channels, submixes and FX settings. User’s Guide Babyface Pro © RME…
-
Page 66: Usage
The easiest and quickest way to delete complex routings is by selection of the according output channel in the mixer view by a right mouse click, and selection of Clear Submix. As TotalMix FX includes an unlimited undo the delete process can be undone without any problem. User’s Guide Babyface Pro © RME…
-
Page 67: Copy And Paste Everywhere
The risk of feedbacks, a basic problem of loopback methods, is low, because the feedback can not happen within the mixer, only when the audio software is switched into monitoring mode. User’s Guide Babyface Pro © RME…
-
Page 68: Ms Processing
Low Cut, Expander, Compressor or Delay. The most basic application is the manipulation of the stereo width: a change of the level of the side channel allows to manipulate the stereo width from mono to stereo up to extended. User’s Guide Babyface Pro © RME…
-
Page 69: Midi Remote Control
Additionally, the stereo output faders (lowest row) which are set up as Main Out in the Control Room section can also be controlled by the standard Control Change Volume via MIDI chan- nel 1. With this, the main volume of the Babyface Pro is controllable from nearly any MIDI equipped hardware device.
-
Page 70: Setup
Mackie compatible remote. Setting the main remote as number 2 and the extender as number 1 will cause the extender to be on the left side. Using this function the remotes will be shown as one fader block and navigate as one. User’s Guide Babyface Pro © RME…
-
Page 71: Midi Control
24.5 MIDI Control The hardware output set up as Main Out can be controlled by the standard Control Change Volume via MIDI channel 1. With this, the main volume of the Babyface Pro is controllable from nearly any MIDI equipped hardware device.
-
Page 72: Loopback Detection
Input Gain control is available via CC9, value range as the gain itself (up to 65). The MIDI channel determines the controlled channel, from 1 to 16 (Babyface Pro: only 1/2/3/4). For this to work, Enable MIDI Control in the Options menu has to be activated.
-
Page 73: Technical Reference
User’s Guide Babyface Pro Technical Reference User’s Guide Babyface Pro © RME…
-
Page 74: Technical Specifications
As DA Line Out, but: • Output: 6.3 mm TRS jack, unbalanced • Output impedance: 10 Ohm • Output level at 0 dBFS, 1 kOhm load: +13 dBu • Max power @ 0.1% THD: 50 mW User’s Guide Babyface Pro © RME…
-
Page 75: Midi
• Quad Speed (S/MUX4) : 2 channels 24 bit 192 kHz SPDIF optical • 1 x optical, according to IEC 60958 • Format Consumer (SPDIF) according to IEC 60958 • Sample rate 28 kHz up to 200 kHz User’s Guide Babyface Pro © RME…
-
Page 76: General
PLL tracks the receiver’s frequency. If an ADAT or SPDIF signal is applied to the Babyface Pro, the corresponding input LED starts flashing. The unit indicates LOCK, i. e. a valid input signal (in case the signal is also in sync, the LED is constantly lit, see below).
-
Page 77: Latency And Monitoring
2 ms. Low Latency! The Babyface Pro uses AD/DA converters with latest digital filters, causing a delay of only a few samples. With 12 samples AD and 7 samples DA the delay caused by the conversion is only about a quarter of previous generations.
-
Page 78: Usb Audio
An additional small Safety Buffer on the playback side has proven to be very efficient and use- ful. The Babyface Pro uses a fixed additional buffer of 32 samples, which is added to the cur- rent buffer size. The main advantage is the ability to use lowest latency at highest CPU loads.
-
Page 79: Ds — Double Speed
26.4 DS — Double Speed When activating the Double Speed mode the Babyface Pro operates at double sample rate. The internal clock 44.1 kHz turns to 88.2 kHz, 48 kHz to 96 kHz. The internal resolution is still 24 bit.
-
Page 80: Noise Level In Ds / Qs Mode
26.6 Noise Level in DS / QS Mode The outstanding signal to noise ratio of the Babyface Pro’s AD-converters can be verified even without expensive test equipment, by using record level meters of various software. But when activating the DS and QS mode, the displayed noise level will rise from -113 dB to -105 dB at 96 kHz, and –79 dB at 192 kHz.
-
Page 81: Diagrams
27. Diagrams 27.1 Block Diagram Babyface Pro User’s Guide Babyface Pro © RME…
-
Page 82: Connector Pinouts
TRS jack/plug. 6-pin Mini-DIN MIDI breakout cable Name GND/Shell/MIDI Out (2) GND/Shell MIDI In (5, -) MIDI Out (5, -) MIDI In (4, +) MIDI Out (4, +) User’s Guide Babyface Pro © RME…
-
Page 83: Stand-Alone And Class Compliant Modus
User’s Guide Babyface Pro Stand-Alone and Class Compliant Mode User’s Guide Babyface Pro © RME…
-
Page 84: General
Sysex capable MIDI I/O. In stand-alone mode the Babyface Pro needs to be powered. You have the choice to use USB bus power by one of the numerous LiPo batteries with USB ports, sold as mobile power for your smartphone and iPad, or an external power supply.
-
Page 85: Useful Hints
In newer iOS versions even the device name and its serial number will be shown. When the power supply for the Babyface Pro is insufficient, iOS will complain about the at- tached unit drawing too much power. When using hard covers as back panel protection for the iPad, the Kit’s/adapter’s plug may not fit completely, causing a loose connection or partial functionality.
-
Page 86: Class Compliant Under Windows/Mac Os X
Device Manager. In the correct mode (PC) and with installed drivers, the full name including RME is shown, without serial number. Windows does not support USB Audio 2.0 directly. The Babyface Pro will be detected when in CC mode, but automatic driver installation will fail.
-
Page 87: Supported Inputs And Outputs
ADAT input signal the Babyface Pro enters master mode and uses the sample rate set by Mac OS X or iOS (the app in use). The Babyface Pro can be set to fixed Master mode as well, but the set sample rate is ignored, as the iPad (the current app) controls the sample rate value.
-
Page 88: Operation At The Unit
Hold down the keys SELECT and DIM while inserting the USB cable. During the boot process the level meters show CC for about 2 seconds, confirming the CC mode has been activated. The Babyface Pro stays in CC mode until this procedure has been performed again, it will then show PC.
-
Page 89
Still the unit can be set into fixed clock mode ‘master’ by selecting one of the Master settings. This setting can be quite useful. When pulling the cable from the iPad, the Babyface Pro imme- diately enters stand-alone mode – and would turn to the user-preferred sample rate. -
Page 90: Application Examples Stand-Alone Mode
XLR and Phones outs. Analog Microphone Preamp Activate phantom power if necessary, then set the Mic gain as needed. Set the Babyface Pro to Master 192 kHz for widest frequency range and lowest delay. Use the internal mixer to send the analog input signal to the analog outputs –…
-
Page 91: Miscellaneous
User’s Guide Babyface Pro Miscellaneous User’s Guide Babyface Pro © RME…
-
Page 92: Accessories
Audio AG does not accept claims for damages of any kind, especially consequential damage. Liability is limited to the value of the Babyface Pro. The general terms of business drawn up by Audio AG apply at all times.
-
Page 93: Appendix
All trademarks, registered or otherwise, are the property of their respective owners. RME, DIGICheck and Hammerfall are registered trademarks of RME Intelligent Audio Solutions. SyncCheck, ZLM, DIGI96, SyncAlign, TMS, TotalMix, SteadyClock and Babyface Pro are trademarks of RME Intelligent Audio Solutions. Alesis and ADAT are registered trademarks of Alesis Corp.
-
Page 94: Declaration Of Conformity
For this the device has to be sent free to the door to: Audio AG Am Pfanderling 60 D-85778 Haimhausen Germany Shipments not prepaid will be rejected and returned on the original sender’s costs. User’s Guide Babyface Pro © RME…
RME – аббревиатура, вызывающая ассоциации с надежностью у всех, кто хоть немного причастен к работе со звуком. Компания прославилась своими аудиоинтерфейсами, заняв на рынке почетное место бренда, производящего безотказное оборудование.
Ко мне в руки попал их ЦАП с усилителем ADI-2 DAC FS, заставивший кусать локти не одного аудиофила, не считавшегося с профессиональным сегментом, а также неповторимый интерфейс Babyface PRO FS, завоевавший доверие профессионалов своей надежностью, качеством и уровнем звучания.
Упаковка и комплектация
Упаковка без излишеств и лоска – все соответствует проф направленности, в которой не приветствуются коробочки из томленого дуба и обилие аксессуаров.
В коробке RME ADI-2 DAC FS, под картонной обложкой с полиграфией, помимо самого ЦАПа, вы обнаружите:
- • внешний блок питания
- • кабель USB Type-B для подключения к ПК
- • пульт управления
- • инструкцию
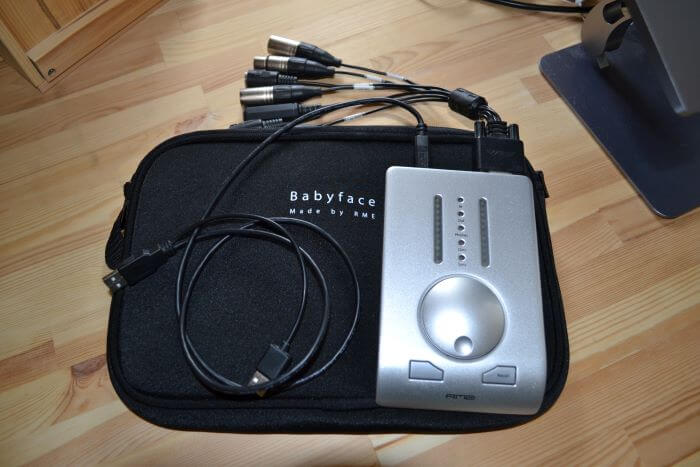
У RME Babyface PRO FS комплектация более функционально насыщенная:
- • защитный транспортировочный кейс из толстого фактурного пластика
- • фирменный кабель USB-B на USB-A
- • кабель для подключения MIDI
И тут по каждому пункту Babyface стоит пройтись отдельно. Транспортировочный кейс добротный и сможет защитить не только от давления, но и, пожалуй, от падения с высоты человеческого роста. Но у него есть один минус, который является одновременно и плюсом, – это защелки, которые невозможно открыть, не оторвав себе пол пальца. С одной стороны, это дает дополнительных баллов в копилку надежности, но с другой, эргономику можно было продумать и получше, так как при частой транспортировке защелки быстро потеряют свой первозданный внешний и, возможно, функциональный вид. Открывать их вы будете исключительно посторонними предметами, а это не очень хорошо сказывается на пластике. В то же время, мало какой производитель вообще снабжает свои интерфейсы подобными кейсами, так что это минус незначительный.
Г-образный кабель тоже о двух концах. Один из которых это минус условной проприетарности, а другой – жирнющий плюс, поскольку такое подключение куда удобнее прямого и, что важно в условиях профессиональной записи, кабель утапливается в корпус, не давая ему случайно выскочить или расшатывать гнездо USB.
И, на мой взгляд, исключительно позитивное решение – это использование переходника для MIDI. Этот интерфейс понемногу уходит в историю, все больше уступая место привычным USB, так что отказ от немаленького входа, значительно увеличивающих корпус, но востребованного все меньшим количеством пользователей, прекрасное решение. При этом производитель не лишает вас возможности подключать ваши рабочие инструменты как вам удобно, что не может не вызывать симпатию.
Дизайн и коммутация
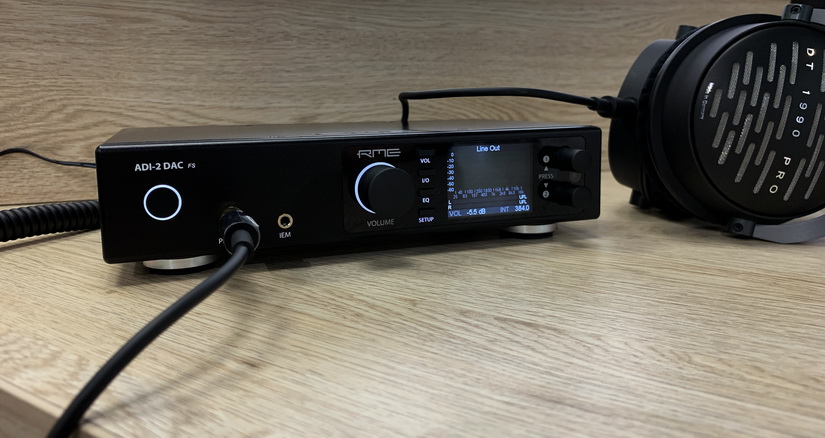
Еще не воткнув RME ADI-2 DAC FS в розетку, вы уже начинаете получать удовольствие. Естественно только в том случае, если вы являетесь приверженцем студийного минимализма, ведь устройство не пестрит деталями и визуальными фишками. Строгий черный ящичек манит всего несколькими элементами: маленький цветной дисплей и световой индикатор вокруг кнопки включения. Индикатор горит всего двумя цветами: красный, если устройство выключено, но подсоединено к сети питания и белый, если ЦАП работает. Главная фишка в дисплее, а точнее в том, что он показывает.
Передняя панель содержит на себе, кроме экрана и кнопки включения, регулятор громкости, нажимаемые регуляторы, служащие навигацией в меню устройства, и два выхода на наушники, за что отдельное спасибо. Большинство производителей не заморачивается такими вещами, но в компании RME знают, что переходники портят звук и что на малоомные внутриканальники нужно подавать меньше тока, чем на студийные полноразмерные наушники, идущие с 6,3 jack. Для кого-то это может показаться незначительной мелочью, но лично для меня, как для владельца нескольких пар мониторов, это является очень важным параметром. Далеко не все модели наушников чувствительны к подключению через переходник, но думаю для всех очевидно, что лучше слушать музыку без него, пускай и с очень качественным.
У RME Babyface PRO FS с эргономикой и дизайном примерно та же история – все собрано и подогнано идеально, корпус интерфейса выточен из алюминия. Регулятор громкости плавный, в наличии два раздельных входа для полноразмеров и внутриканальников. Два инструментальных входа, два микрофонных XLR, выходы на мониторы, USB-B, MIDI, дополнительное питание, замок Кенсингтон и, что самое приятное, ADAT для увеличения каналов записи. Все хотелки пользователей учтены, так что ничего большего и не пожелаешь.
Индикация уровней входящего и исходящего сигналов выполнены в виде полосок, разделенные на отдельные сегменты, что делает ее предельно наглядной и эстетичной. Также на нижней части корпуса расположился переключатель +19 и +4 дБ, что добавляет прямой способ снижения уровня выходного сигнала, во избежание перегрузов.
Управление и программное обеспечение
Эргономика RME ADI-2 DAC FS не на высоте, поскольку все управление осуществляется через 2 крутилки с возможностью нажатия, но, если привыкнуть – это перестает казаться проблемой, как только вы освоите управление и поймете, что ваш ЦАП напичкан такими фичами, о которых вы и не думали, поверхностно оценив устройство. Регулировка частот, эквализация, баланс, тонкая настройка для DSD файлов и самый шик – легендарный кроссфид. Мне давно хотелось опробовать эту функцию, а конкретно с того самого дня как я услышал об усилителях для наушников SPL Phonitor, от не менее легендарного бренда. Одной из главных фишек их устройств является возможность перекрестной подачи сигнала на каналы наушников, имитирующий прослушивание музыки со стационарной акустики.
Смысл подобных ухищрений в том, чтобы иметь возможность прослушать запись так, как она бы звучала в условиях прослушивания не в наушниках, а из полноформатной акустики, частично смешивая сигналы из левого и правого каналов. Казалось бы, зачем это может понадобится, если подавляющее большинство производителей делает упор на «физическое разделение каналов», выпуская устройства с балансными подключениями. Кому может прийти в голову идти в противоположном направлении и загрязнять каналы?
Дело в том, что, когда вы слушаете музыку из колонок, звук из правого канала не идет изолированно в правое ухо, а частично также попадает в левое, и наоборот. В наушниках же мы слышим только один канал, без примеси другого. Это весьма спорная, но интересная технология, почитаемая звукорежиссерами как максимально портативный, хоть и не полноценный, вариант для сведения записей.
И, как оказалось, для потребительского использования эта функция не нужна даром. Вы безусловно услышите разницу, переключаясь между кроссфидом и обычным прослушиванием, но это не та функция, которая улучшает звук, делая его более насыщенным, живым или, наоборот, сухим. Так что с точки зрения простого пользователя, не работающего со звуком – это бесполезная вещь, но с точки зрения профессионала, знающего где и как он будет ее применять, – достаточно весомый повод доплатить за ее наличие. Однако, схожая функция получила реализацию в наушниках Crosszone CZ-1.
Но что же отличает дорогой аудиоинтефейс от дешевого? Правильно, название производителя. Но на самом деле нет, дорогой производитель поместит в свой интерфейс качественные ЦАПы, усилки, платы и подкрепит все это программным обеспечением, без которого современные устройства выеденного яйца не стоят. У RME есть собственная программа TotalMix FX, которая запускается поверх вашей DAW и управляет основными параметрами интерфейса, одновременно являясь драйвером, что в полной мере раскрывает все возможности RME Babyface PRO FS.
Звук
Оба устройства звучат потрясающе, без преувеличений. Это, пожалуй, одни из самых детальных и мониторно звучащих ЦАПов на рынке, в своих ценовых сегментах. Разница лишь в том, что RME Babyface PRO FS это аудиоинтефрейс для работы с записью звука и его воспроизведением, а ADI-2 DAC FS предназначен исключительно для прослушивания.
Babyface в силу своей универсальности больше подойдет для работы, но это не значит, что его нельзя использовать в качестве потрясающе информативного источника. Сам бы я предпочел именно его, учитывая, что я иногда балуюсь звукозаписью и практически не слушаю музыку дома на полноразмерных системах, отдавая предпочтение наушникам.
Но в том случае, если вы являетесь владельцем чего-то более серьезного, чем студийные мониторы среднего сегмента – ваш выбор это ADI-2 DAC FS. Старшая модель имеет куда большие показатели усилительного тракта и гораздо лучше справляется с Hi-Fi акустическими системами, требующими этого усиления. Да и в плане эргономики ADI-2 куда больше годится на роль центра стационарной аудиосистемы, на что намекает пульт управления, идущий в комплекте. Он выдает более детальную звуковую картину, не смотря на уже крайне высокую информативность Babyface.
Если же вы, как и я, предпочитаете прослушивание в наушниках – Бейбифейс будет более практичным вариантом, ввиду своей меньшей стоимости. Выходы на наушники выдают аналогичный звук, так что в этом АДИ-2 не лучше начальной модели от RME.
Для понимания с чем могут работать устройства от неподражаемого немецкого бренда — ниже список техники, с которыми проводилось тестирование героев обзора.
Мониторы ближнего поля:
- • Neumann KH 80 DSP A G
- • Presonus Eris E5 XT
Мониторы от Presonus раскрылись на полную катушку, выдавая свой максимум по построению сцены и объемности, о чем можете почитать в отдельном обзоре на них.
Полноразмерные наушники:
- • Audeze LCD-XC
- • Sennheiser HD 600
- • Beyerdynamic DT 1990 PRO
Внутриканальные наушники:
- • Ambient Acoustics MAD6
- • Astell&Kern Layla AION
- • 64 Audio Nio
ЦАПы максимально универсальные и раскрывают потенциал всего, что вы к ним подключаете, выступая референсным источником звука, по которому можно сравнивать качество тех или иных компонентов вашей аудиосистемы. Ни с одними наушниками не было никаких проблем и RME Babyface PRO FS выжимали все, как из арматурных внутриканалок, так и из предельно требовательных полноразмеров Audeze и Sennheiser.
Длительное время роль аудио-интерфейса в моей студии выполняла карта M-Audio Audiophile 2496. Это полупрофессиональное решение, полностью отвечало требованиям начинающего музыканта. Карточка размещалась на материнской плате с помощью PCI разъема и имела достаточное кол-во разъемов для подключения цифровых входов/выходов, а также MIDI оборудования. Но времена меняются и в 2013 году мне потребовалось портативное, профессиональное решение, которое можно было бы использовать с ноутбуком.
Так, как примерно 70% времени я провожу за написанием музыки, саунд-дизайном и сведением, меня в меньшей степени интересовали кол-во входов и премиум усилители для микрофонов. Особенно важными критериями для меня были:
- стабильность работы;
- портативность;
- кол-во выходов для наушников;
- питание по USB;
- цена.
Я начал внимательно анализировать рынок. Среди интересных предложений присутствовали такие аудио-интерфейсы, как Universal Audio Apollo Twin, RME Fireface, RME Babyface, Steinberg UR, Fucusrite Scarlett. Все интерфейсы от уважаемых производителей отвечали критерию портативности. Увы, Universal Audio Apollo на, тот момент не поддерживал протокол USB поэтому данный интерфейс выбыл из конкурса.
Надо отметить, что в отличии от многих интерфейсов вместе с интерфейсом UAD поставляется набор плагинов для сведения и DSP обработка внутри корпуса, что несколько освобождает ресурсы компьютера. Если этот бонус для Вас важен пристально обратите внимание на данный аудио-интерфейс.
Steinberg и Focusrite именитые компании, с хорошей репутацией. Интерфейсы данных производителей имели отличные характеристики и форм-фактор. Тем интереснее было ознакомиться с отзывами пользователей, как отечественных, так и зарубежных. Я был весьма удивлен количеству жалоб на вышеуказанные бренды (еще раз напомню, на дворе шел 2013 год, думаю сейчас ситуация претерпела значительные изменения). Среди частых проблем, которые упоминались в отзывах: периодические “отваливания” интерфейсов при работе в Ableton Live и Cubase, не стабильная работа в ОС Windows, невозможность корректного выхода из режима гибернации, высокий процент брака. Мне пришлось посмотреть в сторону RME.
Первое поколение RME Babyface выглядело крайне скромно, но при этом стоило порой в два раза дороже аналогов. Сложно было представить, что это устройство справится с возложенными на нее задачами. Однако, комментарии от рядовых пользователей и специалистов внушали оптимизм. Стабильность была важнейшим критерием и нервы хотелось бы тратить не на войну с техникой, а на что-то другое, более полезное. Выбор был сделан и результат был таков: работая в связке Windows 7 и 10 + Ableton Live за годы ежедневного использования (на протяжении 6 лет), интерфейс первого поколения не подвел ни разу! Этот фактор предопределил будущий переход на второе поколение RME Babyface PRO.
Остановлюсь чуть подробнее на преимуществах Babyface PRO, которые я бы особо выделил. Первое: стабильность в работе. Вся линейка продуктов RME имеет единый драйвер. Думаю, именно эта унификация позволила RME разработать и довести до ума их феноменально стабильные драйверы. Babyface PRO продолжает работать (хоть и с дефектами звука) даже при установке в секвенсоре самой низкой задержки. Многие интерфейсы просто зависают при таком стресс тесте. Babyface PRO легко подключается и отключается, используя протоколы USB 2.0, 3.0 при этом не требуя дополнительного питания и так же уверенно вводится, и выводится из режима гибернации. Два выхода на наушники позволяют подключать оборудование с разъемом 3.5 мм (миниджек) и 6.3 мм джек. Усилители на наушники и в целом звук отвечают критерию прозрачности, не окрашенности. Я использую высокоомные Sennheiser HD 650 (импеданс 300 Ом) и карточка уверенно разгоняет их по громкости. Аудио-интерфейс поддерживает функцию Loopback, которая пригодится во многих сценариях. Например, вы можете записать в аудио редактор любой звук с компьютера (например, звук с Youtube).
Еще один сильный инструмент, которым комплектуется Babyface PRO – это микшер TotalMix FX. Насколько мощным является данный инструмент, настолько и сложным он может показаться при первом знакомстве. Действительно, это самый не интуитивный софт микшер, с которым мне приходилось работать. Вам потребуется значительное время, чтобы разобраться в тонкостях его работы. Однако, в качестве утешения, вот несколько причин почему TotalMix FX все-таки полезно освоить:
- встроенные эффекты (реверб, дилей, эквалайзер). На более старших моделях присутствует так же блок динамической обработки (компрессор, экспандер);
- неограниченные возможности по виртуальной коммутации. Каждый выход может иметь отдельный микс, саб-микс;
- встроенный профессиональный аудио анализатор DIGICheck;
- перейдя на технику RME другого уровня, вы будете уверенно себя чувствовать благодаря единой среде TotalMix FX;
Микрофонный предусилитель с фантомным питанием работает очень прозрачно, запас по громкости достаточен для любых профессиональных целей (если же вы хотите теплый окрас при записи голоса или инструментов, то придется раскошелится на ламповый усилитель). Кроме того, Babyface PRO может работать в автономном режиме, как цифровой микшер. Он легко коммутируется с iPad. В App Store есть отдельное приложение для этих целей.
Итак, однажды, познакомившись с техникой RME я по-прежнему верен ей. Первый интерфейс был мною продан и сейчас, спустя 6 лет эксплуатации, продолжает работать в другой небольшой домашней студии. Б/у техника RME весьма цениться на рынке. Очень надеюсь, что RME продолжит держать марку.
Я лишь поделился своим опытом и впечатлениями от работы с RME. Однако, это не единственный бренд, который я мог бы порекомендовать. Благодаря развитию операционных систем и “железа”, почти все аудио-интерфейсы сегодня работают вполне стабильно. Прекрасно себя зарекомендовали интерфейсы Native Instruments Komplete Audio 6, Universal Audio Apollo Twin, Focusrite Scarlett 4i4, Steinberg UR824, Steinberg UR242 и другие.
Выбрать подходящий аудио интерфейс можно в сервисе Яндекс Маркет.
Страница Babyface PRO на сайте RME: https://www.rme-audio.de/babyface-pro-fs.html
Удачи и вдохновения!
RME – аббревиатура, вызывающая ассоциации с надежностью у всех, кто хоть немного причастен к работе со звуком. Компания прославилась своими аудиоинтерфейсами, заняв на рынке почетное место бренда, производящего безотказное оборудование.
Ко мне в руки попал их ЦАП с усилителем ADI-2 DAC FS, заставивший кусать локти не одного аудиофила, не считавшегося с профессиональным сегментом, а также неповторимый интерфейс Babyface PRO FS, завоевавший доверие профессионалов своей надежностью, качеством и уровнем звучания.
Упаковка и комплектация
Упаковка без излишеств и лоска – все соответствует проф направленности, в которой не приветствуются коробочки из томленого дуба и обилие аксессуаров.
В коробке RME ADI-2 DAC FS, под картонной обложкой с полиграфией, помимо самого ЦАПа, вы обнаружите:
- • внешний блок питания
- • кабель USB Type-B для подключения к ПК
- • пульт управления
- • инструкцию
У RME Babyface PRO FS комплектация более функционально насыщенная:
- • защитный транспортировочный кейс из толстого фактурного пластика
- • фирменный кабель USB-B на USB-A
- • кабель для подключения MIDI
И тут по каждому пункту Babyface стоит пройтись отдельно. Транспортировочный кейс добротный и сможет защитить не только от давления, но и, пожалуй, от падения с высоты человеческого роста. Но у него есть один минус, который является одновременно и плюсом, – это защелки, которые невозможно открыть, не оторвав себе пол пальца. С одной стороны, это дает дополнительных баллов в копилку надежности, но с другой, эргономику можно было продумать и получше, так как при частой транспортировке защелки быстро потеряют свой первозданный внешний и, возможно, функциональный вид. Открывать их вы будете исключительно посторонними предметами, а это не очень хорошо сказывается на пластике. В то же время, мало какой производитель вообще снабжает свои интерфейсы подобными кейсами, так что это минус незначительный.
Г-образный кабель тоже о двух концах. Один из которых это минус условной проприетарности, а другой – жирнющий плюс, поскольку такое подключение куда удобнее прямого и, что важно в условиях профессиональной записи, кабель утапливается в корпус, не давая ему случайно выскочить или расшатывать гнездо USB.
И, на мой взгляд, исключительно позитивное решение – это использование переходника для MIDI. Этот интерфейс понемногу уходит в историю, все больше уступая место привычным USB, так что отказ от немаленького входа, значительно увеличивающих корпус, но востребованного все меньшим количеством пользователей, прекрасное решение. При этом производитель не лишает вас возможности подключать ваши рабочие инструменты как вам удобно, что не может не вызывать симпатию.
Дизайн и коммутация
Еще не воткнув RME ADI-2 DAC FS в розетку, вы уже начинаете получать удовольствие. Естественно только в том случае, если вы являетесь приверженцем студийного минимализма, ведь устройство не пестрит деталями и визуальными фишками. Строгий черный ящичек манит всего несколькими элементами: маленький цветной дисплей и световой индикатор вокруг кнопки включения. Индикатор горит всего двумя цветами: красный, если устройство выключено, но подсоединено к сети питания и белый, если ЦАП работает. Главная фишка в дисплее, а точнее в том, что он показывает.
Передняя панель содержит на себе, кроме экрана и кнопки включения, регулятор громкости, нажимаемые регуляторы, служащие навигацией в меню устройства, и два выхода на наушники, за что отдельное спасибо. Большинство производителей не заморачивается такими вещами, но в компании RME знают, что переходники портят звук и что на малоомные внутриканальники нужно подавать меньше тока, чем на студийные полноразмерные наушники, идущие с 6,3 jack. Для кого-то это может показаться незначительной мелочью, но лично для меня, как для владельца нескольких пар мониторов, это является очень важным параметром. Далеко не все модели наушников чувствительны к подключению через переходник, но думаю для всех очевидно, что лучше слушать музыку без него, пускай и с очень качественным.
У RME Babyface PRO FS с эргономикой и дизайном примерно та же история – все собрано и подогнано идеально, корпус интерфейса выточен из алюминия. Регулятор громкости плавный, в наличии два раздельных входа для полноразмеров и внутриканальников. Два инструментальных входа, два микрофонных XLR, выходы на мониторы, USB-B, MIDI, дополнительное питание, замок Кенсингтон и, что самое приятное, ADAT для увеличения каналов записи. Все хотелки пользователей учтены, так что ничего большего и не пожелаешь.
Индикация уровней входящего и исходящего сигналов выполнены в виде полосок, разделенные на отдельные сегменты, что делает ее предельно наглядной и эстетичной. Также на нижней части корпуса расположился переключатель +19 и +4 дБ, что добавляет прямой способ снижения уровня выходного сигнала, во избежание перегрузов.
Управление и программное обеспечение
Эргономика RME ADI-2 DAC FS не на высоте, поскольку все управление осуществляется через 2 крутилки с возможностью нажатия, но, если привыкнуть – это перестает казаться проблемой, как только вы освоите управление и поймете, что ваш ЦАП напичкан такими фичами, о которых вы и не думали, поверхностно оценив устройство. Регулировка частот, эквализация, баланс, тонкая настройка для DSD файлов и самый шик – легендарный кроссфид. Мне давно хотелось опробовать эту функцию, а конкретно с того самого дня как я услышал об усилителях для наушников SPL Phonitor, от не менее легендарного бренда. Одной из главных фишек их устройств является возможность перекрестной подачи сигнала на каналы наушников, имитирующий прослушивание музыки со стационарной акустики.
Смысл подобных ухищрений в том, чтобы иметь возможность прослушать запись так, как она бы звучала в условиях прослушивания не в наушниках, а из полноформатной акустики, частично смешивая сигналы из левого и правого каналов. Казалось бы, зачем это может понадобится, если подавляющее большинство производителей делает упор на «физическое разделение каналов», выпуская устройства с балансными подключениями. Кому может прийти в голову идти в противоположном направлении и загрязнять каналы?
Дело в том, что, когда вы слушаете музыку из колонок, звук из правого канала не идет изолированно в правое ухо, а частично также попадает в левое, и наоборот. В наушниках же мы слышим только один канал, без примеси другого. Это весьма спорная, но интересная технология, почитаемая звукорежиссерами как максимально портативный, хоть и не полноценный, вариант для сведения записей.
И, как оказалось, для потребительского использования эта функция не нужна даром. Вы безусловно услышите разницу, переключаясь между кроссфидом и обычным прослушиванием, но это не та функция, которая улучшает звук, делая его более насыщенным, живым или, наоборот, сухим. Так что с точки зрения простого пользователя, не работающего со звуком – это бесполезная вещь, но с точки зрения профессионала, знающего где и как он будет ее применять, – достаточно весомый повод доплатить за ее наличие. Однако, схожая функция получила реализацию в наушниках Crosszone CZ-1.
Но что же отличает дорогой аудиоинтефейс от дешевого? Правильно, название производителя. Но на самом деле нет, дорогой производитель поместит в свой интерфейс качественные ЦАПы, усилки, платы и подкрепит все это программным обеспечением, без которого современные устройства выеденного яйца не стоят. У RME есть собственная программа TotalMix FX, которая запускается поверх вашей DAW и управляет основными параметрами интерфейса, одновременно являясь драйвером, что в полной мере раскрывает все возможности RME Babyface PRO FS.
Звук
Оба устройства звучат потрясающе, без преувеличений. Это, пожалуй, одни из самых детальных и мониторно звучащих ЦАПов на рынке, в своих ценовых сегментах. Разница лишь в том, что RME Babyface PRO FS это аудиоинтефрейс для работы с записью звука и его воспроизведением, а ADI-2 DAC FS предназначен исключительно для прослушивания.
Babyface в силу своей универсальности больше подойдет для работы, но это не значит, что его нельзя использовать в качестве потрясающе информативного источника. Сам бы я предпочел именно его, учитывая, что я иногда балуюсь звукозаписью и практически не слушаю музыку дома на полноразмерных системах, отдавая предпочтение наушникам.
Но в том случае, если вы являетесь владельцем чего-то более серьезного, чем студийные мониторы среднего сегмента – ваш выбор это ADI-2 DAC FS. Старшая модель имеет куда большие показатели усилительного тракта и гораздо лучше справляется с Hi-Fi акустическими системами, требующими этого усиления. Да и в плане эргономики ADI-2 куда больше годится на роль центра стационарной аудиосистемы, на что намекает пульт управления, идущий в комплекте. Он выдает более детальную звуковую картину, не смотря на уже крайне высокую информативность Babyface.
Если же вы, как и я, предпочитаете прослушивание в наушниках – Бейбифейс будет более практичным вариантом, ввиду своей меньшей стоимости. Выходы на наушники выдают аналогичный звук, так что в этом АДИ-2 не лучше начальной модели от RME.
Для понимания с чем могут работать устройства от неподражаемого немецкого бренда — ниже список техники, с которыми проводилось тестирование героев обзора.
Мониторы ближнего поля:
- • Neumann KH 80 DSP A G
- • Presonus Eris E5 XT
Мониторы от Presonus раскрылись на полную катушку, выдавая свой максимум по построению сцены и объемности, о чем можете почитать в отдельном обзоре на них.
Полноразмерные наушники:
- • Audeze LCD-XC
- • Sennheiser HD 600
- • Beyerdynamic DT 1990 PRO
Внутриканальные наушники:
- • Ambient Acoustics MAD6
- • Astell&Kern Layla AION
- • 64 Audio Nio
ЦАПы максимально универсальные и раскрывают потенциал всего, что вы к ним подключаете, выступая референсным источником звука, по которому можно сравнивать качество тех или иных компонентов вашей аудиосистемы. Ни с одними наушниками не было никаких проблем и RME Babyface PRO FS выжимали все, как из арматурных внутриканалок, так и из предельно требовательных полноразмеров Audeze и Sennheiser.
Посмотреть инструкция для RME Babyface Pro FS бесплатно. Руководство относится к категории DJ-система, 1 человек(а) дали ему среднюю оценку 7.5. Руководство доступно на следующих языках: английский. У вас есть вопрос о RME Babyface Pro FS или вам нужна помощь? Задайте свой вопрос здесь
Не можете найти ответ на свой вопрос в руководстве? Вы можете найти ответ на свой вопрос ниже, в разделе часто задаваемых вопросов о RME Babyface Pro FS.
Когда звук считается слишком громким?
Уровень звука выше 80 децибел может нанести вред слуху. Уровень звука выше 120 децибел может нанести прямое повреждение слуху. Вероятность повреждения слуха зависит от частоты и продолжительности прослушивания.
Инструкция RME Babyface Pro FS доступно в русский?
К сожалению, у нас нет руководства для RME Babyface Pro FS, доступного в русский. Это руководство доступно в английский.
Не нашли свой вопрос? Задайте свой вопрос здесь
![]()
User’s Guide
Babyface Pro FS
Crafted with Passion
|
24 Bit / 192 kHz 9 |
TotalMix™ |
|
SteadyClock FS |
SyncCheck™ |
USB 2.0 Digital I/O System
24 Channels Analog / ADAT / SPDIF Interface
24 Bit / 192 kHz Digital Audio
24 x 12 Matrix Router
MIDI I/O
MIDI Remote Control
Stand-Alone Operation
Class Compliant Operation

|
General |
||
|
1 |
Introduction ……………………………………………………… |
6 |
|
2 |
Package Contents…………………………………………….. |
6 |
|
3 |
System Requirements ………………………………………. |
6 |
|
4 |
Brief Description and Characteristics………………… |
6 |
5First Usage — Quick Start
|
5.1 |
Connectors – Controls – Display ………………………. |
7 |
|
5.2 |
Quick Start …………………………………………………….. |
9 |
|
5.3 |
Operation at the Unit……………………………………….. |
9 |
|
Installation and Operation — Windows |
||
|
6 |
Hardware Installation………………………………………. |
12 |
7Driver and Firmware
|
7.1 |
Driver Installation …………………………………………….. |
12 |
|
7.2 |
De-installing the Drivers……………………………………. |
13 |
|
7.3 |
Firmware Update …………………………………………….. |
13 |
8Configuring the Babyface Pro
|
8.1 |
Settings Dialog – General…………………………………. |
14 |
|
8.2 |
Settings Dialog – Pitch……………………………………… |
16 |
9Operation and Usage
|
9.1 |
Playback…………………………………………………………. |
17 |
||
|
9.2 |
DVD Playback (AC-3 / DTS)……………………………… |
18 |
||
|
9.3 |
Notes on WDM………………………………………………… |
19 |
||
|
9.4 |
Channel Count under WDM………………………………. |
20 |
||
|
9.5 |
Multi-client Operation……………………………………….. |
20 |
||
|
9.6 |
Analog Recording…………………………………………….. |
21 |
||
|
9.7 |
Digital Recording……………………………………………… |
21 |
||
|
9.8 |
Digital Connections………………………………………….. |
22 |
||
|
9.9 |
Clock Modes — Synchronization …………………………. |
23 |
||
|
10 |
Operation under ASIO |
|||
|
10.1 |
General ………………………………………………………. |
24 |
||
|
10.2 Channel Count under ASIO …………………………… |
24 |
|||
|
10.3 |
Known Problems………………………………………….. |
25 |
||
|
11 |
Using more than one Babyface Pro …………………. |
25 |
||
|
12 |
DIGICheck Windows……………………………………….. |
26 |
||
|
13 |
Hotline – Troubleshooting……………………………….. |
27 |
Installation and Operation — Mac OS X
|
14 |
Hardware Installation………………………………………. |
30 |
|
|
15 |
Driver and Firmware |
||
|
15.1 |
Driver Installation …………………………………………. |
30 |
|
|
15.2 |
De-installing the Drivers………………………………… |
31 |
|
|
15.3 |
Firmware Update………………………………………….. |
31 |
|
|
16 |
Configuring the Babyface Pro |
||
|
16.1 |
Settings Dialog – General……………………………… |
32 |
|
|
16.2 |
Clock Modes — Synchronization ……………………… |
33 |
|
|
17 |
Mac OS X FAQ |
||
|
17.1 |
MIDI doesn’t work ………………………………………… |
34 |
|
|
17.2 |
Repairing Disk Permissions…………………………… |
34 |
|
|
17.3 |
Supported Sample Rates………………………………. |
34 |
|
|
17.4 |
Channel Count under Core Audio…………………… |
34 |
|
|
17.5 |
Various Information………………………………………. |
35 |
|
2 |
User’s Guide Babyface Pro FS © RME |

|
18 |
Using more than one Babyface Pro…………………. |
35 |
|
19 |
DIGICheck Mac……………………………………………….. |
36 |
|
20 |
Hotline – Troubleshooting ………………………………. |
37 |
 TotalMix FX
|
21 Routing and Monitoring |
|||
|
21.1 |
Overview…………………………………………………….. |
40 |
|
|
21.2 |
The User Interface……………………………………….. |
42 |
|
|
21.3 |
The Channels………………………………………………. |
43 |
|
|
Settings…………………………………………………….. |
45 |
||
|
Equalizer ………………………………………………….. |
46 |
||
|
21.4 |
Section Control Room…………………………………… |
48 |
|
|
21.5 |
The Control Strip………………………………………….. |
49 |
|
|
21.5.1 |
View Options………………………………………… |
50 |
|
|
21.5.2 |
Snapshots — Groups………………………………. |
51 |
|
|
21.5.3 Channel Layout – Layout Presets……………. |
52 |
||
|
21.5.4 |
Scroll Location Markers …………………………. |
53 |
|
|
21.6 |
Reverb and Echo…………………………………………. |
54 |
|
|
21.7 |
Preferences…………………………………………………. |
57 |
|
|
21.7.1 Store for Current User or all Users (Win) …. |
58 |
||
|
21.8 |
Settings………………………………………………………. |
59 |
|
|
21.8.1 |
Mixer Page…………………………………………… |
59 |
|
|
21.8.2 |
MIDI Page……………………………………………. |
60 |
|
|
21.8.3 |
OSC Page……………………………………………. |
61 |
|
|
21.8.4 |
Aux Devices…………………………………………. |
62 |
|
|
21.9 |
Hotkeys and Usage ……………………………………… |
63 |
|
|
21.10 |
Menu Options………………………………………………. |
64 |
|
|
21.11 |
Menu Window……………………………………………… |
65 |
|
22 The Matrix |
||
|
22.1 |
Overview…………………………………………………….. |
65 |
|
22.2 |
The User Interface……………………………………….. |
65 |
|
22.3 |
Usage…………………………………………………………. |
66 |
|
23 |
Tips and Tricks |
||
|
23.1 |
ASIO Direct Monitoring (Windows)…………………. |
66 |
|
|
23.2 |
Copy a Submix…………………………………………….. |
66 |
|
|
23.3 |
Doubling the Output Signal (Mirror)………………… |
66 |
|
|
23.4 |
Delete a Submix…………………………………………… |
66 |
|
|
23.5 |
Copy and Paste everywhere………………………….. |
67 |
|
|
23.6 |
Recording a Submix — Loopback ……………………. |
67 |
|
|
23.7 |
MS Processing…………………………………………….. |
68 |
|
|
23.8 |
Program start options (Windows) …………………… |
68 |
|
24 |
MIDI Remote Control |
||
|
24.1 |
Overview…………………………………………………….. |
69 |
|
|
24.2 |
Mapping ……………………………………………………… |
69 |
|
|
24.3 |
Setup………………………………………………………….. |
70 |
|
|
24.4 |
Operation ……………………………………………………. |
70 |
|
|
24.5 |
MIDI Control………………………………………………… |
71 |
|
|
24.6 |
Loopback Detection……………………………………… |
72 |
|
|
24.7 |
OSC (Open Sound Control)…………………………… |
72 |
|
|
25 |
DAW Mode……………………………………………………… |
73 |
|
|
26 |
TotalMix Remote …………………………………………….. |
74 |
|
User’s Guide Babyface Pro FS © RME |
3 |

 Technical Reference
|
27 |
Technical Specifications |
||
|
27.1 |
Analog………………………………………………………… |
78 |
|
|
27.2 |
MIDI……………………………………………………………. |
79 |
|
|
27.3 |
Digital …………………………………………………………. |
79 |
|
|
27.4 |
Digital Inputs ……………………………………………….. |
79 |
|
|
27.5 |
Digital Outputs……………………………………………… |
79 |
|
|
27.6 |
General ………………………………………………………. |
80 |
|
28 Technical Background |
||
|
28.1 |
Lock and SyncCheck ……………………………………. |
80 |
|
28.2 |
Latency and Monitoring…………………………………. |
81 |
|
28.3 |
USB Audio…………………………………………………… |
82 |
|
28.4 |
DS – Double Speed ……………………………………… |
83 |
|
28.5 |
QS – Quad Speed………………………………………… |
83 |
|
28.6 |
Noise Level in DS / QS Mode ………………………… |
84 |
|
28.7 |
SteadyClock………………………………………………… |
84 |
|
29 |
Diagrams |
||
|
29.1 |
Block Diagram Babyface Pro FS ……………………. |
85 |
|
|
29.2 |
Connector Pinouts………………………………………… |
86 |
 Stand-Alone and Class Compliant Modes
|
30 |
General…………………………………………………………… |
88 |
|
|
31 |
System Requirements for iPad Operation………… |
88 |
|
|
32 |
Operation ……………………………………………………….. |
88 |
|
|
32.1 |
Useful Hints…………………………………………………. |
89 |
|
|
32.2 Class Compliant under Windows/Mac OS X ……. |
89 |
||
|
33 |
Supported Inputs and Outputs |
||
|
33.1 |
Class Compliant Mode………………………………….. |
90 |
|
|
33.2 |
Stand-Alone Mode ……………………………………….. |
90 |
|
|
34 |
Operation at the Unit……………………………………….. |
91 |
|
|
35 |
Application Examples Stand-Alone Mode………… |
93 |
|
|
36 |
Useful Notes …………………………………………………… |
93 |
 Miscellaneous
|
37 |
Accessories……………………………………………………. |
96 |
|
38 |
Warranty…………………………………………………………. |
96 |
|
39 |
Appendix………………………………………………………… |
97 |
|
40 |
Declaration of Conformity……………………………….. |
98 |
|
4 |
User’s Guide Babyface Pro FS © RME |

User’s Guide
Babyface Pro FS
General
|
User’s Guide Babyface Pro FS © RME |
5 |

1. Introduction
Thank you for choosing RME’s Babyface Pro FS. This unique portable desktop audio interface is capable of transferring analog and digital audio data directly to Windows and Mac computers. The latest Plug and Play technology guarantees a simple installation, even for the inexperienced user. Numerous unique features put the Babyface Pro FS at the very top of the range of computer-based audio interfaces.
The package contains drivers for Windows XP / Vista / 7 / 8 / 10 and Mac OS X x86 (Intel).
Our high-performance philosophy guarantees maximum system performance by executing as many functions as possible not in the driver (i.e. the CPU), but within the audio hardware.
2. Package Contents
xBabyface Pro FS
xCable USB 2.0 with right angle B plug, length 39” (1m)
xMIDI breakout cable
xCarrying box
xManual
3. System Requirements
xWindows XP SP2 or up, Intel Mac OS X (10.6 or up)
x1 USB 2.0 port or USB 3 port
xComputer with at least Pentium Core 2 Duo CPU
4. Brief Description and Characteristics
xHousing machined from a block of aluminium
xIntuitive and efficient user interface
xMic stand thread on the bottom for free positioning
xAll settings can be changed in real-time
xBuffer sizes/latencies from 48 up to 8192 samples selectable
x4 channels 96 kHz/24 bit Record/Playback via ADAT optical (S/MUX)
xClock modes slave and master
xAutomatic and intelligent master/slave clock control
xUnsurpassed Bitclock PLL (audio synchronization) in ADAT mode
xSteadyClock FS: Jitter-immune, super-stable digital clock
xDDS technology for free setting of the sample rate
xSyncAlign guarantees sample aligned and never swapping channels
xSyncCheck tests and reports the synchronization status of input signals
xTotalMix for latency-free submixes and perfect ASIO Direct Monitoring
xTotalMix: 288 channel mixer with 46 bit internal resolution
xTotalMix FX: 3-band EQ, Low Cut, Reverb, Echo
x1 x MIDI I/O, 16 channels high-speed MIDI
x2 digitally controlled microphone inputs in reference quality
x2 balanced line outputs, level +19 dBu
x1 x headphone output with separate driver stages for high and low impedance phones
xDIGICheck DSP: Level meter in hardware, peakand RMS calculation
|
6 |
User’s Guide Babyface Pro FS © RME |
5. First Usage – Quick Start
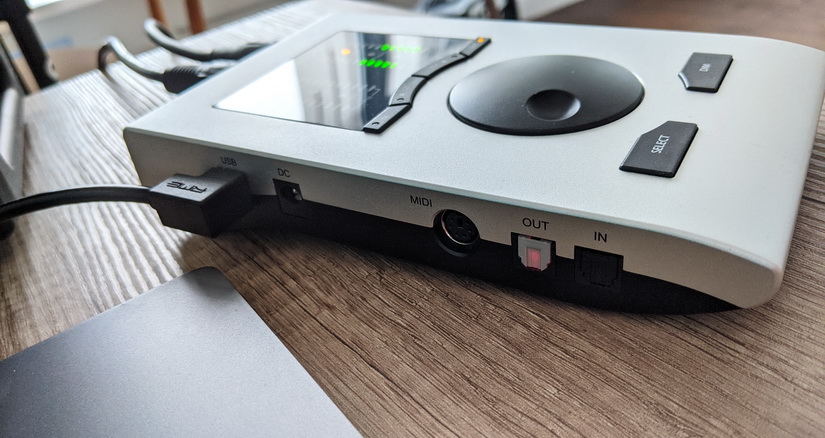
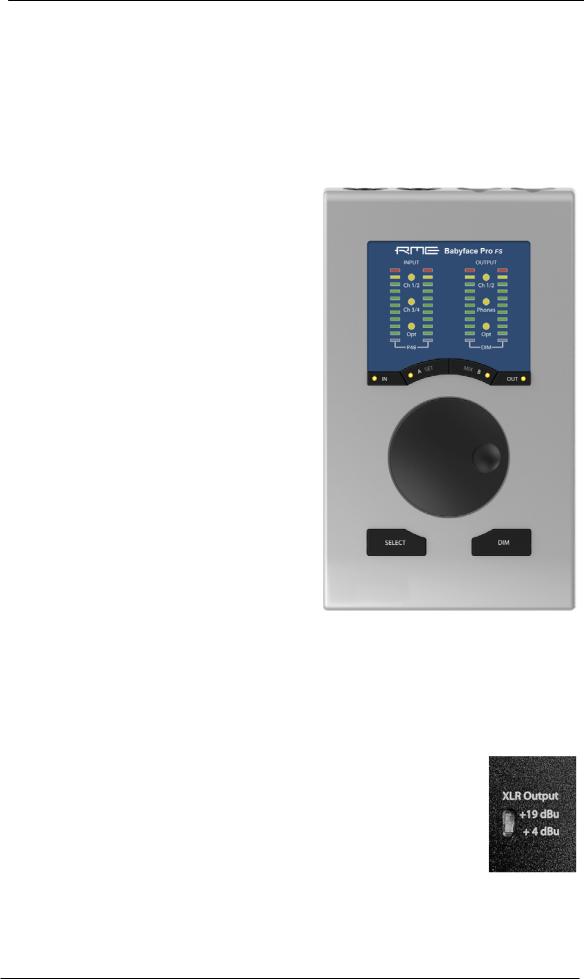
5.1 Connectors – Controls – Display
The top of the Babyface Pro features a hi-precision rotary encoder, 6 buttons, 4 LED bands and 6 status LEDs.
The four LED bands show the current gain, the input and output level, and the channel to be set, all dependent on the current mode. The lowest LEDs signal phantom power (+48 V, orange) and DIM, the highest one overload (clip, red).
The rotary encoder is used to change various parameters directly at the unit. The 4 buttons IN, A (SET), (MIX) B and OUT directly access the respective function.
IN gives access to Gain control and phantom power. Press IN several times to step through the inputs 1/2, 3/4 and Optical (SPDIF/ADAT). Press SELECT several times to step through left, right or both channels, as indicated by flashing LEDs. Then turn the wheel to change the gain, or press SET to activate phantom power (only in standalone mode). Phantom power is signalled by two orange LEDs at the bottom of meters 1 and 2.
OUT gives access to the output volume control. Press OUT several times to step through the outputs 1/2, Phones and Optical (SPDIF/ADAT). Then turn the wheel to change the level. To change the output balance press and hold SELECT before turning the wheel.
DIM activates Dim for the Main Out as defined in
TotalMix FX.
The input LED Opt also serves as synchronisation indicator for the digital input. It stays yellow when the input is selected but has no input signal (No
Lock). It flashes green when the signal has been detected but is not fully synchronous (Lock). When in Sync, the color changes to a constant green. See also chapter 9.9 / 16.2, Clock Modes — Synchronisation.
The button DIM is also used for Recall, to load a specific listening volume for the Main Out that can be defined in TotalMix FX. Pushing the knob SET for 2 seconds when OUT is selected stores the current setting. If the volume (output level) had been changed pressing DIM for two seconds will restore the former value.
On the underside of the Babyface Pro FS there is a 3/8″ thread for mounting the unit on tripods, as well as a recessed slide switch that sets the maximum XLR output level to +19 dBu (default) or +4 dBu. +4 dBu is recommended when connecting sensitive amplifiers or active monitors. It helps to reduce noise and to less lower the fader in TotalMix FX because the output level is then 15 dB lower.
|
User’s Guide Babyface Pro FS © RME |
7 |
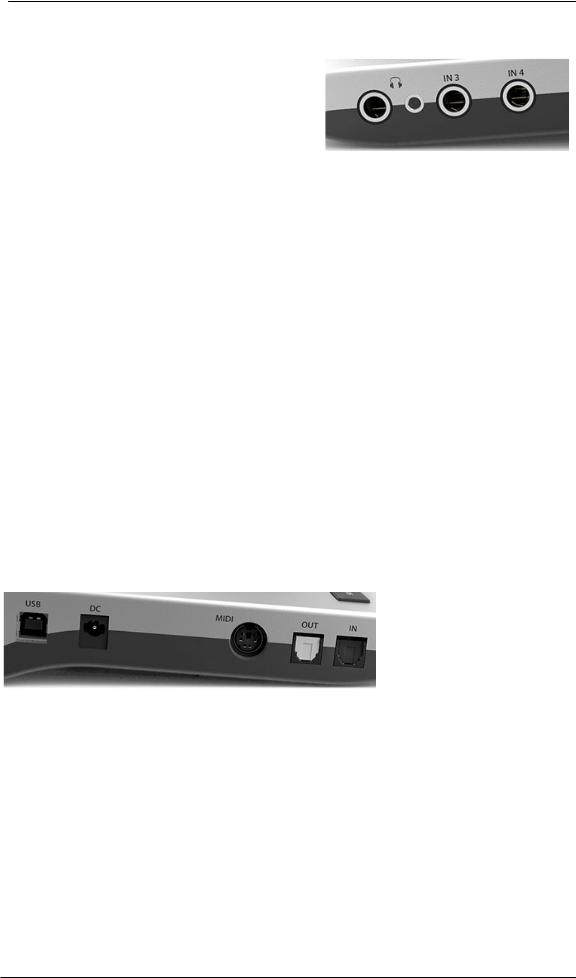
The right side of the Babyface Pro has two instrument/line inputs, two headphone outputs, and a K-slot for theft protection locks/cables.
The analog inputs 3/4 are high impedance, unbalanced multi-purpose inputs with TS jacks. They include 9 dB fine digital gain control, and a choice of +4 dBu or -10 dBV reference level, controlled from the Tools menu of input channels 3 and 4 in TotalMix FX.
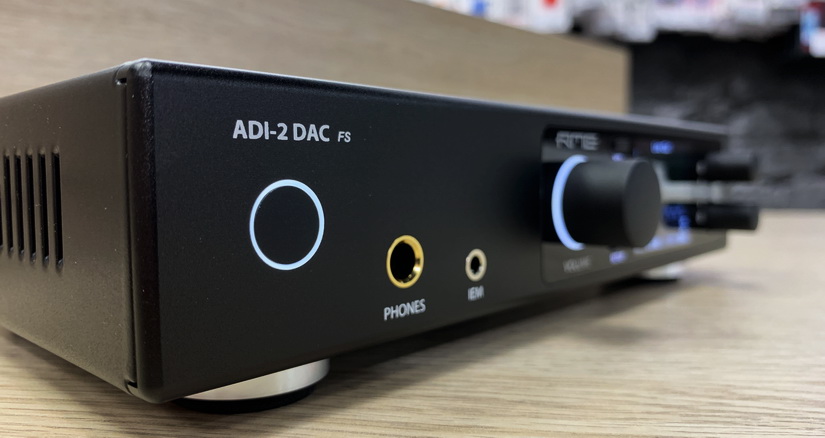
The output channels 3/4 feed two Phones outputs via two independent driver circuits, optimized for high (TRS 1/4”, 6.35mm) and low impedance (TRS 1/8”, 3.5mm) headphones. Their unbalanced output signal is – in terms of quality – identical to the ones at the XLR line outputs, but lower in level.
In case the phones output is to be used as line output an adapter TRS plug to RCA phono plugs, or TRS plug to two TS plugs is required. More on cable codes and pinouts can be found in chapter 29.2.
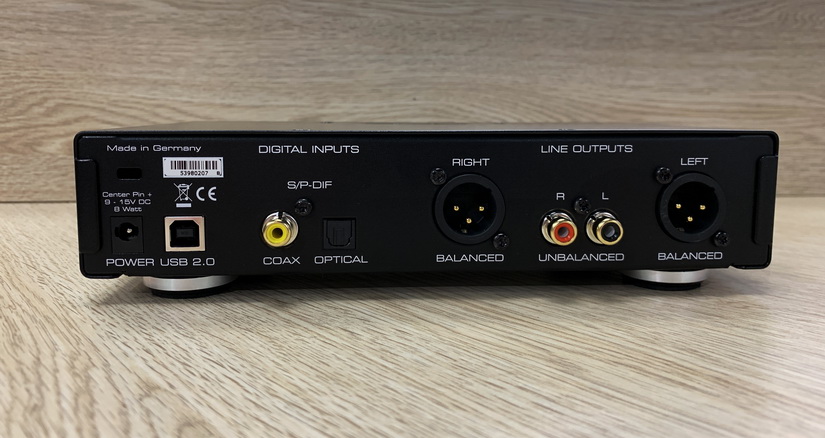
The back of the unit has the XLR inputs and outputs of channels 1/2 (setting the maximum output level is described on page 7)..
!anced! When connecting unbalanced equipment, make sure pin 3 of the XLR output is not connected. A connection to ground might cause a decreased THD (higher distortion) and increased power consumption! XLR line outputs do not operate servo bal-The short circuit protected, low impedance
The Babyface Pro has two analog microphone inputs that can operate as line inputs with levels up to +19 dBu, when set to 0 dB gain and PAD active. The electronic input stage uses a servo balanced design which handles unbalanced and balanced signals correctly, automatically adjusting the level reference.
!When using unbalanced cables with the XLR inputs pin 3 of the XLR jack should be connected to ground. Otherwise noise may occur, caused by the unconnected negative input of the balanced input.
The left side of the Babyface Pro has an optical input and output, a power supply connector, a USB socket and a 6-pin MINI DIN connector for the included MIDI breakout cable.
Optical I/O (TOSLINK): The unit automatically detects SPDIF or ADAT input signals. The optical output can operate as ADAT or SPDIF output, depending on the current setting in the Settings dialog.
USB 2.0: Standard USB socket for connection to the computer. Please make sure the Babyface Pro can have the full voltage/current delivered from the computer by using hi-quality USB cables (like the one included), no USB extension cables and no USB hubs. When connected to USB 3 only the USB 2 protocol will be used.
Socket for power connection. Unburdens the computer’s power supply, or ensures a stable power supply, in case it proves to be insufficient when taken from the computer. This socket supports locking type jacks as found on the optional RME DC power supply. After inserting the connector carefully turn it by 90° so that it locks.
|
8 |
User’s Guide Babyface Pro FS © RME |

5.2 Quick Start
After the driver installation (chapter 7 / 15), connect the inputs to the analog signal source.
The analog input sensitivity can be changed at the unit (IN, SELECT) or in TotalMix FX (Tools, Gain). To achieve the best signal to noise ratio, adjust your analog source to its highest output level and then decrease the input gain in TotalMix or at the Babyface itself to make sure that the loudest signal reaches about -3dBFS.
The XLR line inputs of the Babyface Pro can be used with +4 dBu and -10 dBV line signals. The electronic input stage can handle balanced (XLR, TRS jacks) and unbalanced (TS jacks) input signals correctly.
On the analog playback side (the DA side), an adjustment of the analog output level is available by the rotary encoder (select desired output via OUT), or in TotalMix FX.
The output signal of channels 3/4, Phones, can be set freely using the rotary encoder. These outputs are optimized for headphones, but can also be used as line outputs.
The Babyface Pro digital inputs and output support the formats SPDIF and ADAT optical.
TotalMix FX remembers all settings, and loads these automatically when the Babyface Pro drivers are loaded.
5.3. Operation at the Unit
Operation at the unit in online mode (drivers installed under Windows and Mac OS X, PC mode chosen at the unit) covers the most useful actions and situations in daily operation. Clearly labelled buttons together with an intuitive operation scheme give direct access to volume, monitoring and setup.
Input Gains
The gains of all four analog inputs can be controlled directly by the big encoder knob. Use IN to select input 1/2 or 3/4, then push SELECT several times to step through left channel, right channel or both. The selected channel and amount of gain is shown by a single LED flashing in the left INPUT level meters. Turn the wheel to increase or decrease the gain. The three INPUT LEDs also show overload. Too hot levels will not be missed even if the level meter currently shows a quieter channel.
Output Volume
Select one of the three outputs via OUT, then turn the wheel. The current fader position of TotalMix FX (which moves in sync) is displayed via flashing single LEDs in the output level meter. The three output LEDs also show overload. Too hot levels will not be missed even if the level meter currently shows a quieter channel.
0 dB position: reduce the gain so that the yellow LED just turns off.
OUT can also be reassigned to perform Speaker B switching in the Options/Key Commands dialog in TotalMix FX.
Output Balance
Select one of the three outputs via OUT, then hold down SELECT. The right level meters show two bars, lit up until the yellow LEDs. Turn the wheel to move the stereo image more to the left or right. This setting equals an adjustment of the PAN knob in a stereo hardware output of TotalMix FX, and indeed the knob in the software will move in sync.
|
User’s Guide Babyface Pro FS © RME |
9 |

DIM
Works on the hardware output defined as Main Output in TotalMix FX. Therefore the DIM LEDs will not be lit when stepping through the other two outputs. The applied attenuation is the one defined in TotalMix FX. DIM can also be used as hotkey for many other actions, among the switching to Speaker B or Talkback. Use the Options/Key Commands dialog in TotalMix FX to assign one of them to DIM.
Recall
Pushing DIM for two seconds sets the Main output volume to the value formerly saved for Recall. The Recall value can also be set directly at the unit by holding SET down for two seconds.
Monitoring – MIX
Additionally to the extensive routing and mixing options in TotalMix FX, which provide perfect monitoring solutions, the monitoring level of all three input sources to all three output destinations can be controlled directly at the unit. No need to grab the mouse and bring TM FX into the foreground! Operation is easy and logical:
¾Use OUT to select the output for the monitoring, i.e. where the signal will be routed to
¾Use IN to select the input with the signal that should be monitored
¾Push MIX. The input level LEDs start to flash
¾Use SELECT to choose between left, right or both channels
¾Turn the encoder to set the actual monitoring level
While the setup is simplified (no panorama available) it is still very efficient and will address most needs. Note that direct control covers only channels 1/2 from ADAT.
TotalMix FX in Submix view (default) will highlight the currently selected submix and move the corresponding input fader in sync with the Babyface Pro, so that the ongoing process can be controlled and followed easily at the screen. This helps in setup and understanding of the monitoring function.
Switch digital output format (SPDIF <> ADAT)
Use OUT to select the optical output (Opt.). Push SET. The level meter will signal ADAT mode with 8 LEDs, SPDIF mode with 2 LEDs turned on. Use SELECT to switch between them. This setting is also available in the driver’s Settings dialog.
In stand-alone mode with the input Opt currently active the left level meters will show the status of the incoming optical signal in the same way, on the left level meters.
Hotkeys A (SET) and B (MIX)
In online mode SET and MIX have only one function each (setting the Recall volume and starting the direct monitoring control). Both functions are also available in TotalMix FX at the computer, but both buttons can be reconfigured (like DIM) to perform many other functions, like Talkback, global mute, Mono, External Input, changing Snapshots and Channel Layouts and more. Just select the function that suits your personal workflow best.
LED Brightness
Default brightness is 25%. The LEDs can be changed to 50% and 100% brightness, where 100% obviously will cause a higher power consumption. This might be useful in daylight conditions. The difference between 25% and 100% is 0.5 Watts or 100 mA higher load at 5V bus power with all LEDs lit. To step through the three brightness states hold down SELECT and push IN several times.
|
10 |
User’s Guide Babyface Pro FS © RME |
![]()
User’s Guide
Babyface Pro FS
Installation and Operation – Windows
|
User’s Guide Babyface Pro FS © RME |
11 |

6. Hardware Installation
To simplify installation it is recommended to first install the drivers before the unit is connected to the computer. But it will also work the other way round.
In case the level meters of the Babyface Pro show CC during power-on: the unit is in Class Compliance mode and will not work under Windows. Remove the USB cable, hold SELECT and DIM button down, plug-in the USB cable or the power supply. This procedure changes between CC and normal mode. When the LED Level meters change to PC the normal mode is active.
When using a power supply (stand-alone mode), holding down SELECT and DIM for more than two seconds repeatedly changes between PC and CC. Note that changing the operating mode is not supported during normal USB operation, so any USB connection has to be removed.
Chapter 28.3 explains how to find the ideal USB port.
7. Driver and Firmware
7.1 Driver Installation
RME is constantly updating their drivers, and modern computers mostly do not have a CD drive anymore. Therefore please download the drivers from the RME website at http://rme.to/usbe. Unzip the downloaded file and start the driver installation with rmeinstaller.exe.
Start rmeinstaller.exe and follow the instructions of the installer. After installation connect computer and Babyface Pro. Windows detects the new hardware as Babyface Pro and installs the drivers automatically.
After a reboot, the icons of TotalMix FX and Settings dialog appear in the notification area. Windows might hide them behind the triangle, click on it to access them and to configure their appearance.
Driver Updates do not require to remove the existing drivers. Simply install the new driver over the existing one.
Possible reasons why a Babyface Pro is not found automatically:
xThe Babyface Pro is in Class Compliant mode. See above.
xThe USB port is not active in the system (check the Device Manager)
xThe USB cable is not, or not correctly inserted into the socket
xThe Babyface Pro does not receive any or not enough power. Remove current-consuming hard drives from nearby ports. Avoid USB extension cables and USB hubs. Use an external power supply, any standard one delivering 9 — 14 V DC with at least 1 A will work. The connector needs to have – outside, + inside.
|
12 |
User’s Guide Babyface Pro FS © RME |
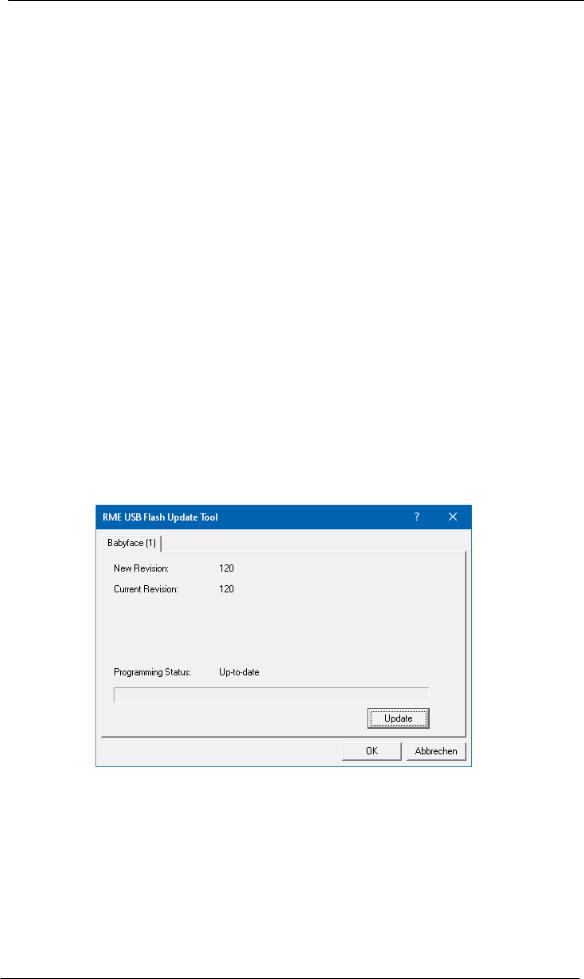
7.2 De-installing the Drivers
A de-installation of the driver files is not necessary. Thanks to full Plug & Play support, the driver files will not be loaded after the hardware has been removed.
Unfortunately Windows Plug & Play methods do not cover the additional autorun entries of TotalMix, the Settings dialog, and the registration of the ASIO driver. These entries can be removed from the registry by a software de-installation request. This request can be found (like all de-installation entries) in Control Panel, Programs and Features (XP: Add or Remove Programs). Click on the entry ‘RME Fireface USB’. Here it is also possible to remove the driver itself. Select Windows Driver Package – RME Fireface USB, then Uninstall.
7.3 Firmware Update
The Flash Update Tool updates the firmware of the Babyface Pro to the latest version. It requires an already installed driver. Please download the FUT from the RME website at http://rme.to/usbe.
Unzip the downloaded file and start the firmware update with fut_usb.exe. The Flash Update Tool displays the current revision of the Babyface Pro’s firmware, and whether it needs an update or not. If so, then simply press the ‘Update’ button. A progress bar will indicate when the flash process is finished (Verify Ok).
After the update the Babyface Pro needs to be reset. This is done by powering down the Babyface Pro for 5 seconds. A reboot of the computer is not necessary.
When the update unexpectedly fails (status: failure), the unit’s Safety BIOS will be used from the next boot on, the unit stays fully functional. The flash process should then be tried again.
|
User’s Guide Babyface Pro FS © RME |
13 |
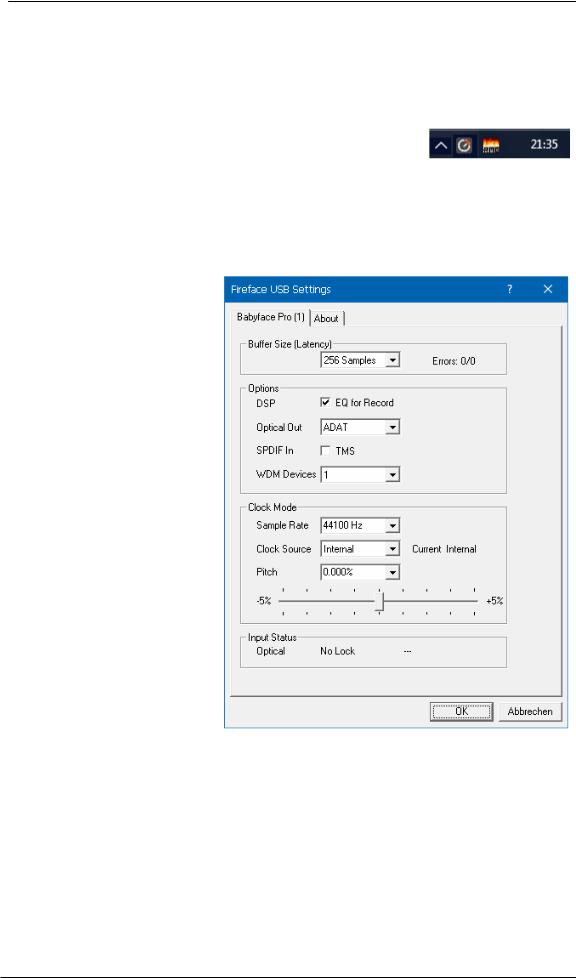
8. Configuring the Babyface Pro
8.1 Settings Dialog — General
Configuration of the Babyface Pro is done via its own settings dialog. The panel ‘Settings’ can be opened:
x by clicking on the fire symbol in the Task Bar’s notification area
The mixer of the Babyface Pro (TotalMix FX) can be opened:
x by clicking on the FX symbol in the Task Bar’s notification area
The hardware of the Babyface Pro offers a number of helpful, well thought-out practical functions and options which affect how the card operates. The following is available in the Settings dialog:
xLatency
xConfiguration of the digital I/O
xCurrent sample rate
xSynchronization behaviour
xState of input and output
Any changes made in the Settings dialog are applied immediately — confirmation (e.g. by clicking on OK or exiting the dialog) is not required.
However, settings should not be changed during playback or record if it can be avoided, as this can cause unwanted noises.
Also, please note that even in ‘Stop’ mode, several programs keep the recording and playback devices active, which means that any new settings might not be applied immediately.
The tab About includes information about the current driver and firmware version plus three more options:
Lock Registry
Default: off. Checking this option brings up a dialog to enter a password. Changes in the Settings dialog are no longer written to the registry. As the settings are always loaded from the registry when starting the computer, this method provides an easy way to define an initial state for the Babyface Pro.
Enable MMCSS for ASIO activates support with higher priority for the ASIO driver. Note: At this time, activating this option seems to be useful only with the latest Cubase/Nuendo at higher load. With other software this option can decrease performance. The change becomes active after an ASIO reset. Therefore it is easy to quickly check which setting works better.
Sort ASIO Devices
Changes the order only of the ASIO channels when using more than one interface.
|
14 |
User’s Guide Babyface Pro FS © RME |

Buffer Size
The setting Buffer Size determines the latency between incoming and outgoing ASIO and WDM data, as well as affecting system stability (see chapter 9.1 / 10).
Errors does not refer to buffer errors, but USB transmission errors. The display will be reset on any start of a playback/record. More information can be found in chapter 28.3.
Options
DSP – EQ for Record
Switches the 3-band EQ and Low Cut of all input channels into the recording path. In case Loopback has been activated the EQ and Low Cut of the Output channel is also placed into the recording path. See also chapter 23.6.
Optical Out
The optical TOSLINK output can operate as ADAT or SPDIF output. The Channel Status is fixed to Consumer state.
Note: The optical input detects the incoming format automatically.
SPDIF In
TMS activates the transmission of Channel Status data and Track Marker information from the SPDIF input signal to a software that supports receiving it. If not needed this option should be turned off.
WDM Devices
Reduce the number of WDM devices to the ones really needed to improve performance of the operating system.
Clock Mode
Sample Rate
Sets the currently used sample rate. Offers a central and comfortable way of configuring the sample rate of all WDM devices to the same value, as since Vista the audio software is no longer allowed to set the sample rate. However, an ASIO program can still set the sample rate by itself.
During record/playback the selection is greyed out, so no change is possible.
Clock Source
The unit can be configured to use its own clock (Internal = Master) or the digital input signal (Optical = Slave). If the external source isn’t available (Input Status No Lock), the unit will change to the internal clock. The current clock source is displayed as Current.
Pitch
More information on Pitch is available in chapter 8.2.
Input Status
Indicates presence of a valid signal at the optical input (Lock, No Lock) and whether the signal is synchronous (Sync). The third column shows the sample frequency detected by the hardware (coarse recognition, 32 kHz, 44.1 kHz, 48 kHz etc.). In Clock Mode the clock reference is shown. See also chapter 28.1.
|
User’s Guide Babyface Pro FS © RME |
15 |

8.2 Settings Dialog — Pitch
Usually soundcards and audio interfaces generate their internal clock (master mode) by a quartz. Therefore the internal clock can be set to 44.1 kHz or 48 kHz, but not to a value in between. SteadyClock, RME’s sensational Low Jitter Clock System, is based on a Direct Digital Synthesizer (DDS). This superior circuitry can generate nearly any frequency with highest precision.
DDS has been implemented into the Babyface Pro with regard to the needs of professional video applications, as well as to maximum flexibility. The section Pitch includes both a list of typical video frequencies (so called pull up/pull down at 0.1% and 4%) and a fader to freely change the basic sample rate in steps of 1 Hz (!) over a range of +/- 5%.
!The Pitch function requires the Babyface Pro to be in clock mode Master (Internal)! The frequency setting will only be applied to this one specific Babyface Pro!
!Changing the sample rate during record/playback often results in a loss of audio, or brings up warning messages of the audio software. Therefore the desired sample rate should be set at least coarsely before starting the software.
Coarse
Coarse modification in steps of 50 Hz is done by clicking with the mouse to the left and right of the fader knob.
Fine
Fine modification in steps of 1 Hz is done by using the left/right cursor keys.
Reset
Ctrl key plus left mouse click.
Application examples
Pitch allows for a simultaneous change of speed and tune during record and playback. From alignment to other sources up to creative effects – everything is possible.
Pitch enables you to intentionally de-tune the complete DAW. This way, the DAW can match instruments which have a wrong or unchangeable tuning.
Pitch allows for the change of the sample rate of all WDM devices at the same time. Since Vista this is no longer possible via the audio program, thus requires a manual reconfiguration of all WDM devices. Changing the sample rate from the Settings dialog solves this problem. As the change within the system requires some time, record/playback should not be started immediately, but only after at least 5 seconds after a change.
Tip: the current CPU load can be used to determine if the audio subsystem has finished the reconfiguration.
|
16 |
User’s Guide Babyface Pro FS © RME |

9. Operation and Usage
9.1 Playback
In the audio application being used, Babyface Pro must be selected as output device. It can often be found in the Options, Preferences or Settings menus, as Playback Device, Audio Devices, Audio etc.
We recommend switching all system sounds off (via >Control Panel /Sound<). Also Babyface Pro should not be the Preferred Device for playback, as this could cause loss of synchronization and unwanted noises. If you feel you cannot do without system sounds, you should consider using the on-board sound device or buying a cheap Blaster clone and select this as Preferred Device in >Control Panel /Multimedia /Audio< or >Control Panel /Sound /Playback<.
The screenshot shows a typical configuration dialog. After selecting a device, audio data is sent to an analog or digital port, depending on which has been selected as playback device.
Increasing the number and/or size of audio buffers may prevent the audio signal from breaking up, but also increases latency i.e. output is delayed. For synchronized playback of audio and MIDI (or similar), be sure to activate the checkbox ‘Get position from audio driver’.
Note: Since Vista the audio application can no longer control the sample rate under WDM. Therefore the driver of the Babyface Pro includes a way to set the sample rate globally for all WDM devices within the Settings dialog, see chapter 8.1.
|
User’s Guide Babyface Pro FS © RME |
17 |

9.2 DVD-Playback (AC-3/DTS)
AC-3 / DTS
When using popular DVD software players like WinDVD and PowerDVD, their audio data stream can be sent to any AC-3/DTS capable receiver using the Babyface Pro’s SPDIF output. For this to work, the WDM SPDIF device of the Babyface Pro has to be selected in >Control Panel/ Sounds and Multimedia/ Audio< or >Control Panel/ Sound/Playback<. Also check ‘use preferred device only’.
The DVD software’s audio properties now show the options ‘SPDIF Out’ or similar. When selecting it, the software will transfer the non-decoded digital multichannel data stream to the Babyface Pro.
Note: This ‘SPDIF’ signal sounds like chopped noise at highest level. Try to avoid mixing and routing the signal to your loudspeakers, as they might get damaged.
Multichannel
PowerDVD and WinDVD can also operate as software decoder, sending a DVD’s multichannel data stream directly to the analog outputs of the Babyface Pro. For this to work select the WDM playback device ’Loudspeaker’ of the Babyface Pro in
XP: >Control Panel/ Sounds and Multimedia/ Audio<, and check ‘Use only default devices’. Additionally the loudspeaker setup, found under >Volume/ Speaker Settings/ Advanced< has to be changed from Stereo to 5.1 Surround.
Since Vista: >Control Panel/ Sound/ Playback < as ‘Standard’. Additionally the loudspeaker setup, found under >Configuration<, has to be changed from Stereo to 5.1 Surround.
PowerDVD’s and WinDVD’s audio properties now list several multichannel modes. If one of these is selected, the software sends the decoded analog multichannel data to the Babyface Pro. TotalMix can then be used to play back via any desired output channels.
The typical channel assignment for surround playback is:
1 — Left
2 — Right
3 — Center
4 — LFE (Low Frequency Effects)
5 — SL (Surround Left)
6 — SR (Surround Right)
Note 1: Selecting the Babyface Pro to be used as system playback device is against our recommendations, as professional interfaces should not be disturbed by system events. Make sure to re-assign the selection after usage or to disable any system sounds (tab Sounds, scheme ‘No audio’).
Note 2: The DVD player will be synced backwards from the Babyface Pro. This means when using AutoSync and/or word clock, the playback speed and pitch follows the incoming clock signal.
|
18 |
User’s Guide Babyface Pro FS © RME |

9.3 Notes on WDM
The driver offers one WDM streaming device per stereo pair, like Analog 3+4 (Babyface Pro). WDM Streaming is Microsoft’s current driver and audio system, directly embedded into the operating system. WDM Streaming is hardly usable for professional music purposes, as all data is processed by the so called Kernel Mixer, causing a latency of at least 30 ms. Additionally, WDM can perform sample rate conversions unnoticed, cause offsets between record and playback data, block channels unintentionally and much more.
Several programs do not offer any direct device selection. Instead they use the playback device selected in Windows under
XP: <Control Panel/ Sounds and Multimedia/ Audio>
Since Vista: <Control Panel/ Sound/ Playback>
Both the rare to find WDM Kernel Streaming and — under Windows 7 to 10 — WASAPI bypass the WDM mixer.
Multi-Channel using WDM
The WDM Streaming device Loudspeaker (Analog 1+2) of the RME driver can operate as usual stereo device, or as up to 8-channel device.
An 8-channel playback using the Windows Media Player requires the speaker setup 7.1 Surround. Configure as follows:
XP: >Control Panel /Sounds and Multimedia /Audio /Volume /Speaker Settings /Advanced <
Since Vista: >Control Panel /Sound /Playback /Loudspeaker /Configure <
|
User’s Guide Babyface Pro FS © RME |
19 |

9.4 Channel Count under WDM
The Babyface Pro’s ADAT optical interface offers sample rates of up to 192 kHz using a standard ADAT recorder. For this to work single-channel data is spread to two or four ADAT channels using the Sample Multiplexing technique. This reduces the number of available ADAT channels from 8 to 4 or 2 per ADAT port.
Whenever the Babyface Pro changes into Double Speed (88.2/96 kHz) or Quad Speed mode (176.4/192 kHz) all devices no longer available vanish automatically.
|
WDM Stereo device |
Double Speed |
Quad Speed |
|
Babyface Pro Analog (1+2) |
Babyface Pro Analog (1+2) |
Babyface Pro Analog (1+2) |
|
Babyface Pro Analog (3+4) |
Babyface Pro Analog (3+4) |
Babyface Pro Analog (3+4) |
|
Babyface Pro AS (1+2) |
Babyface Pro AS (1+2) |
Babyface Pro AS (1+2) |
|
Babyface Pro ADAT (3+4) |
Babyface Pro ADAT (3+4) |
Babyface Pro ADAT (3+4) |
|
Babyface Pro ADAT (5+6) |
Babyface Pro ADAT (5+6) |
Babyface Pro ADAT (5+6) |
|
Babyface Pro ADAT (7+8) |
Babyface Pro ADAT (7+8) |
Babyface Pro ADAT (7+8) |
Note: Since Vista the analog outputs 1/2 show up as Loudspeaker.
9.5 Multi-client Operation
RME audio interfaces support multi-client operation. Several programs can be used at the same time. The formats ASIO and WDM can even be used on the same playback channels simultaneously. As WDM uses a real-time sample rate conversion (ASIO does not), all active ASIO software has to use the same sample rate.
However, a better overview is maintained by using the channels exclusively. This is no limitation at all, because TotalMix allows for any output routing, and therefore a playback of multiple software on the same hardware outputs.
Inputs can be used from an unlimited number of WDM and ASIO software at the same time, as the driver simply sends the data to all applications simultaneously.
RME’s sophisticated tool DIGICheck operates like an ASIO host, using a special technique to access playback channels directly. Therefore DIGICheck is able to analyse and display playback data from any software, no matter which format it uses.
|
20 |
User’s Guide Babyface Pro FS © RME |
![]()
9.6 Analog Recording
For recordings via the analog inputs the corresponding record device has to be chosen (Babyface Pro Analog (x+x)).
Channels 1 and 2 of the Babyface Pro have digitally controlled microphone preamps of the highest quality. The digital control offers a gain setting in steps of 1 dB within a range of 0 dB to +65 dB. The configuration is done either directly at the unit via the rotary encoder, or via the Settings panel of the input channels 1 and 2 in TotalMix, with the knob Gain. The current gain is displayed in dB beside the knob.
Additionally a PAD can attenuate the input signal by 11 dB, to prevent overloads by hard driven microphones or high level line signals. This useful feature extends the gain range and increases the maximum input level from +8 dBu up to +19 dBu at the XLR input.
Above the knob Gain the inputs can be set separately to provide 48V phantom power at the XLR sockets. Phantom power is required for condenser microphones.
Input channels 3 and 4 are found as TS jacks on the right side of the Babyface Pro. These Hi-Z universal inputs have an input impedance of 470 kOhm. The input gain is controlled and performed digitally and limited to 9 dB. An additional hardware-based reference level optimizes the signal to noise ratio. Choices are +4 dBu and -10 dBV.
It often makes sense to monitor the input signal or send it directly to the output. This can be done at zero latency using TotalMix FX (see chapter 21).
An automated control of real-time monitoring can be achieved by Steinberg’s ASIO protocol with RME’s ASIO drivers and any ASIO 2.0 compatible program. When ‘ASIO Direct Monitoring’ has been switched on, the input signal is routed in real-time to the output whenever a recording is started (punch-in).
9.7 Digital Recording
Unlike analog soundcards which produce empty wave files (or noise) when no input signal is present, digital interfaces always need a valid input signal to start recording.
Taking this into account, RME added a comprehensive I/O signal status display to the Babyface Pro, showing sample frequency, lock and sync status in the Settings dialog, and a status LED directly at the unit.
The sample frequency shown in the Settings dialog is useful as a quick display of the current configuration of the unit and the connected external equipment. If no sample frequency is recognized, it will read ‘No Lock’.
This way, configuring any suitable audio application for digital recording is simple. After connection the Babyface Pro displays the current and external sample frequency. This parameter can then be changed in the application’s audio attributes (or similar) dialog.
|
User’s Guide Babyface Pro FS © RME |
21 |

9.8 Digital Connections
ADAT
The ADAT optical input of the Babyface Pro is fully compatible with all ADAT optical outputs. RME’s unsurpassed Bitclock PLL prevents clicks and drop outs even in extreme varipitch operation, and guarantees a fast and low jitter lock to the digital input signal. A usual TOSLINK cable is sufficient for connection. More information on Double Speed (S/MUX) can be found in chapter 28.4.
ADAT In
Interface for a device sending an ADAT signal to the Babyface Pro. Carries the channels 1 to 8. When receiving a Double Speed signal, this input carries the channels 1 to 4, at Quad Speed the inputs 1 and 2.
ADAT Out
Interface for a device receiving an ADAT signal from the Babyface Pro. Transmits channels 1 to 8. When sending a Double Speed signal, this port carries channels 1 to 4, at Quad Speed the channels 1 and 2.
Note: To use the optical output as ADAT port set the option Optical to ADAT in the Settings dialog.
SPDIF
The optical input automatically switches to SPDIF operation when such a signal is detected. The audio information is then shown in TotalMix on the first two ADAT channels, AS 1 and AS 2.
Activating the option TMS in the Windows Settings dialog enables RME’s DIGICheck to analyze the Channel Status of the input signal.
To send out SPDIF from the optical output, select the option Optical – SPDIF in the Settings dialog. The output signal in TotalMix has to be present on the first ADAT channels, AS 1+2.
MIDI
Babyface Pro offers one MIDI I/O via two 5-pin DIN jacks. The MIDI ports are added to the system by the driver. Using MIDI capable software, these ports can be accessed under the name Babyface Pro Midi. Using more than one Babyface Pro, the operating system adds a consecutive number to the port name, like Babyface Pro MIDI (2) etc.
The MIDI ports support multi-client operation. A MIDI input signal can be received by several programs at the same time. Even the MIDI output can be used by multiple programs simultaneously. However, due to the limited bandwidth of MIDI, this kind of application will often show various problems.
|
22 |
User’s Guide Babyface Pro FS © RME |
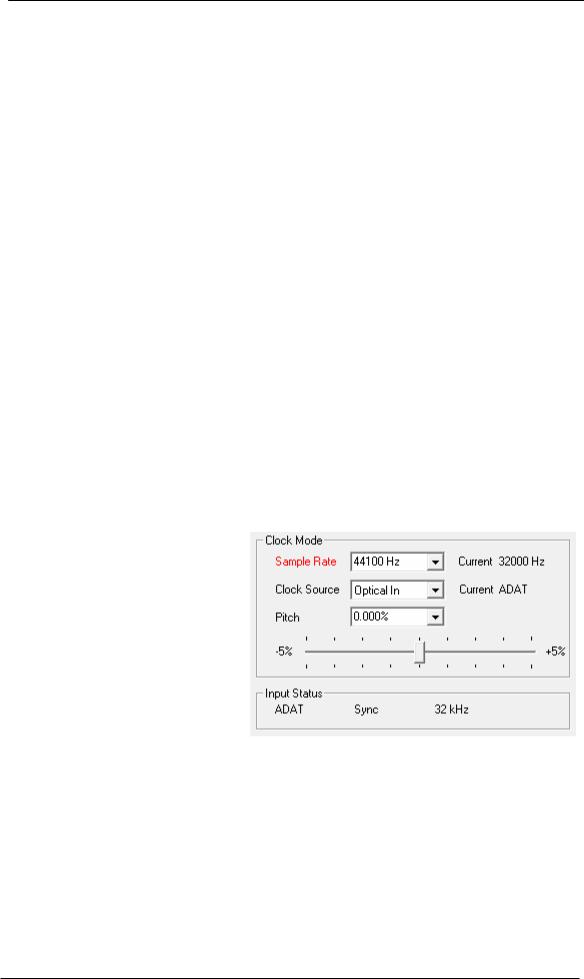
9.9 Clock Modes — Synchronization
In the digital world, all devices must be either Master (clock source) or Slave (clock receiver). Whenever several devices are linked within a system, there must always be a single master clock.
!A digital system can only have one master! If the Babyface Pro’s clock mode is set to ‘Internal’, all other devices must be set to ‘Slave’.
The Babyface Pro utilizes a very user-friendly, intelligent clock control, called AutoSync. Selecting Optical as Clock Source, the system constantly scans the digital input for a valid signal. If any valid signal is found, the Babyface Pro switches from the internal quartz (Clock Mode – Current Internal) to a clock extracted from the input signal (Clock Mode – Current ADAT or SPDIF). The difference to a usual slave mode is that whenever the clock reference fails, the system will automatically use its internal clock and operate in clock mode Master.
AutoSync guarantees that record and record-while-play will always work correctly. In certain cases however, e.g. when the inputs and outputs of a DAT machine are connected directly to the Babyface Pro, AutoSync may cause feedback in the digital carrier, so synchronization breaks down. To solve this problem switch the Babyface Pro clock mode to Master (Clock Source – Internal).
In some situations changing the clock mode can not be avoided. Example: A CD player is connected to the SPDIF input. Try recording a few samples from the CD and you will be disappointed — few CD players can be synchronized. The samples will inevitably be corrupted, because the signal from the CD player is read with the clock from the Babyface Pro, being out of sync. In this case, the Clock Source should be set temporarily to Optical In.
RME’s exclusive SyncCheck technology (first implemented in the Hammerfall) enables an easy to use check and display of the current clock status. Input Status indicates whether there is a valid signal (Lock, No Lock) for the optical input, or if there is a valid and synchronous signal (Sync). In the field Clock Mode the clock reference is shown. See chapter 28.1.
Under WDM the Babyface Pro will (has to) set the sample rate. Therefore the error shown to the right can occur. A stable signal with a sample rate of 32 kHz is detected at the ADAT input (Sync), but Windows audio had been set to 44100 Hz before. The red color of the text label signals the error condition, and prompts the user to set 32000 Hz manually as sample rate. Under ASIO the audio software sets the sample rate, so that such an error can not happen. If the input sample rate is
different then there will be no Sync indication.
With RME’s AutoSync and SyncCheck, finally anyone can master this common source of error, previously one of the most complex issues in the digital studio world.
|
User’s Guide Babyface Pro FS © RME |
23 |
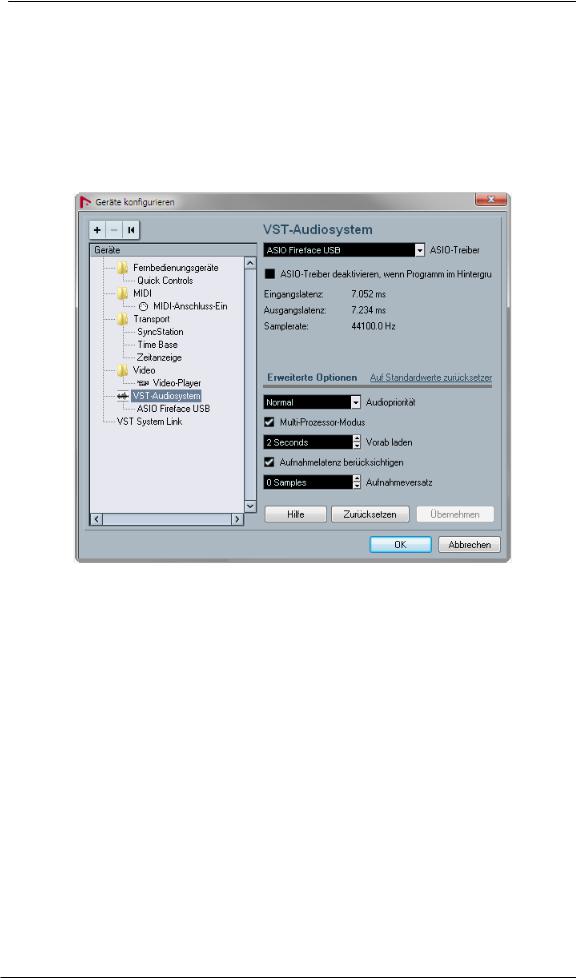
10. Operation under ASIO
10.1 General
Start the ASIO software and select ASIO Fireface USB as the audio I/O device or the audio driver.
The Babyface Pro supports ASIO Direct Monitoring (ADM).
The Babyface Pro MIDI I/O can be used with both MME MIDI and DirectMusic MIDI.
10.2 Channel Count under ASIO
At a sample rate of 88.2 or 96 kHz, the ADAT optical input and output operates in S/MUX mode, so the number of available channels is reduced from 8 to 4.
At a sample rate of 176.4 and 192 kHz, the ADAT optical input and output operates in S/MUX4 mode, so the number of available channels is limited to 2.
Note: When changing the sample rate range between Single, Double and Quad Speed the number of channels presented from the ASIO driver will change too. This may require a reset of the I/O list in the audio software.
|
Single Speed |
Double Speed |
Quad Speed |
|
Babyface Pro Analog 1 to 4 |
Babyface Pro Analog 1 to 4 |
Babyface Pro Analog 1 to 4 |
|
Babyface Pro AS 1 to 2 |
Babyface Pro AS 1 to 2 |
Babyface Pro AS 1 to 2 |
|
Babyface Pro ADAT 3 to 4 |
Babyface Pro ADAT 3 to 4 |
Babyface Pro ADAT 3 to 4 |
|
Babyface Pro ADAT 5 to 6 |
Babyface Pro ADAT 5 to 6 |
Babyface Pro ADAT 5 to 6 |
|
Babyface Pro ADAT 7 to 8 |
Babyface Pro ADAT 7 to 8 |
Babyface Pro ADAT 7 to 8 |
|
24 |
User’s Guide Babyface Pro FS © RME |

10.3 Known Problems
If a computer does not provide sufficient CPU-power and/or sufficient USB-bus transfer rates, then drop outs, crackling and noise will appear. Such effects can be avoided by using a higher buffer setting/latency in the Settings dialog of the Babyface Pro. Furthermore PlugIns should be deactivated temporarily to make sure they do not cause these problems.
More information can be found in chapter 28.3.
Another common source of trouble is incorrect synchronization. ASIO does not support asynchronous operation, which means that the input and output signals not only have to use the same sample frequency, but also have to be in sync. All devices connected to the Babyface Pro must be properly configured for Full Duplex operation. As long as SyncCheck (in the Settings dialog) only displays Lock instead of Sync, the devices have not been set up properly!
The same applies when using more than one Babyface Pro — they all have to be in sync. Else a periodically repeated noise will be heard.
The Babyface Pro supports ASIO Direct Monitoring (ADM). Please note that not all programs support ADM completely or error-free. The most often reported problem is the wrong behaviour of panorama in a stereo channel. Also try to avoid setting the TotalMix FX hardware outputs (third row) to mono mode. This will most likely break ADM compatibility.
In case of a drift between audio and MIDI, or in case of a fixed deviation (MIDI notes placed close before or behind the correct position), the settings in Cubase/Nuendo have to be changed. At the time of print the option ‘Use System Timestamp’ should be activated. The Babyface Pro supports both MME MIDI and DirectMusic MIDI. It depends on the used application which one will work better.
11. Using more than one Babyface Pro
The current driver supports up to three RME USB devices. All units have to be in sync, i.e. have to receive valid digital sync information.
xIf one of the units is set to clock mode Master, all others have to be set to clock mode Slave, and have to be synced from the master by feeding ADAT or SPDIF. The clock modes of all units have to be set up correctly in their Settings dialog.
xIf all units are fed with a synchronous clock, i.e. all units show Sync in their Settings dialog, all channels can be used at once. This is especially easy to use under ASIO, as the ASIO driver presents all units as one.
Note: TotalMix FX is part of the hardware of each RME unit. Up to three mixers are available, but these are separated and can’t interchange data. Therefore a global mixer for all units is not possible.
In real-world an operation of more than one Babyface Pro seems not very useful. The second unit must be synchronized using the optical input. The result is an extension by only 4 analog record and 4 analog playback channels (plus 8 digital via ADAT Out). It makes much more sense to directly connect an 8-channel converter to the ADAT I/O of one Babyface Pro, adding full 8 analog channels of record and playback.
On the other hand the second unit can even be used stand-alone, without any USB connection, and might serve as an emergency replacement in case the main unit fails.
|
User’s Guide Babyface Pro FS © RME |
25 |

12. DIGICheck Windows
The DIGICheck software is a unique utility developed for testing, measuring and analysing digital audio streams. Although this Windows software is fairly self-explanatory, it still includes a comprehensive online help. DIGICheck 5.92 operates as multi-client ASIO host, therefore can be used in parallel to any software, with both inputs and outputs (!). The following is a short summary of the currently available functions:
xLevel Meter. High precision 24-bit resolution, 2/8/12 channels. Application examples: Peak level measurement, RMS level measurement, over-detection, phase correlation measurement, dynamic range and signal-to-noise ratios, RMS to peak difference (loudness), long term peak measurement, input check. Oversampling mode for levels higher than 0 dBFS. Supports visualization according to the K-System.
xHardware Level Meter for Input, Playback and Output. Reference Level Meter freely configurable, causing near zero CPU load, because calculated from the Babyface Pro hardware.
xSpectral Analyser. World wide unique 10-, 20or 30-band display in analog bandpass filter technology. 192 kHz-capable!
xVector Audio Scope. World wide unique Goniometer showing the typical afterglow of a oscilloscope-tube. Includes Correlation meter and level meter.
xTotalyser. Spectral Analyser, Level Meter and Vector Audio Scope in a single window.
xSurround Audio Scope. Professional Surround Level Meter with extended correlation analysis, ITU weighting and ITU summing meter.
xITU1770/EBU R128 Meter. For standardized loudness measurements.
xBit Statistics & Noise. Shows the true resolution of audio signals as well as errors and DC offset. Includes Signal to Noise measurement in dB and dBA, plus DC measurement.
xChannel Status Display. Detailed analysis and display of SPDIF and AES/EBU Channel Status data.
xGlobal Record. Long-term recording of all channels at lowest system load.
xCompletely multi-client. Open as many measurement windows as you like, on any channels and inputs or outputs!
DIGICheck is constantly updated. The latest version is always available on our website www.rme-audio.com, section Downloads / DIGICheck. After download unzip the file and start setup.exe to install DIGICheck.
|
26 |
User’s Guide Babyface Pro FS © RME |

13. Hotline – Troubleshooting
The input signal cannot be monitored in real-time
xASIO Direct Monitoring has not been enabled within the DAW, and/or monitoring has been disabled globally (TotalMix Options).
The 8 ADAT channels don’t seem to work
xThe optical output has been switched to ‘SPDIF’ format. In TotalMix FX all channels and their assignments still exist, but the optical transmitter is then limited to two channels. The ADAT playback devices are still usable by routing and mixing them in TotalMix to other outputs.
Playback works, but record doesn’t
xCheck that there is a valid signal at the input. If so, the current sample frequency is displayed in the Settings dialog.
xCheck whether the Babyface Pro has been selected as recording device in the audio application.
xCheck whether the sample frequency set in the audio application (‘Recording properties’ or similar) matches the input signal.
xCheck that cables/devices have not been connected in a closed loop. If so, set the system’s clock mode to Master.
Crackle during record or playback
xIncrease the number and size of buffers in the ‘Settings’ dialog or in the application.
xTry different cables (optical) to rule out any defects here.
xCheck that cables/devices have not been connected in a closed loop. If so, set the system’s clock mode to ‘Master’.
xCheck the Settings dialog for displayed Errors.
Driver installation and Settings dialog/TotalMix work, but a playback or record is not possible
xWhile recognition and control of the device are low bandwidth applications, playback/record needs the full USB transmission performance. Therefore, defective USB cables with limited transmission bandwidth can cause such errors.
|
User’s Guide Babyface Pro FS © RME |
27 |

|
28 |
User’s Guide Babyface Pro FS © RME |

User’s Guide
Babyface Pro FS
Installation and Operation – Mac OS X
|
User’s Guide Babyface Pro FS © RME |
29 |

14. Hardware Installation
Connect computer and Babyface Pro with the supplied USB cable. Mac OS X detects the new hardware as Babyface Pro (serial number).
In case the level meters of the Babyface Pro show CC during power-on, and Settings dialog and TotalMix FX refuse to start: the unit is in Class Compliance mode. Remove the USB cable, hold SELECT and DIM button down, plug-in the USB cable or the power supply. This procedure changes between CC and normal mode. When the Level meters change to PC the normal mode is active.
When using a power supply (stand-alone mode), holding down SELECT and DIM for more than two seconds repeatedly changes between PC and CC. Note that changing the operating mode is not supported during normal USB operation, so any USB connection has to be removed.
15. Driver and Firmware
15.1 Driver Installation
RME is constantly updating their drivers, and modern computers mostly do not have a CD drive anymore. Therefore please download the drivers from the RME website at http://rme.to/usbe. Unzip the downloaded file and start the driver installation by double-clicking Fireface USB.pkg.
During driver installation the programs Totalmix (TotalMix FX) and Fireface USB Settings are copied to the Applications folder. They will automatically start into the dock if a Babyface Pro is connected. A reboot of the computer is not required.
Driver Updates do not require to remove the existing drivers. Simply install the new driver over the existing one.
Possible reasons why a Babyface Pro is not found after driver installation:
xThe USB port is not active in the system (check in System Profiler, USB)
xThe USB cable is not, or not correctly inserted into the socket
xThe Babyface Pro does not receive any or not enough power. Remove current-consuming hard drives from nearby ports. Avoid USB extension cables or USB hubs. Use an external power supply, any standard one delivering 9 — 14 V DC with at least 1 A will work. The connector needs to have – outside, + inside.
|
30 |
User’s Guide Babyface Pro FS © RME |
 Loading…