- Manuals
- Brands
- Pioneer Manuals
- Av receiver
- VSX-424-K
- Operating instructions manual
-
Contents
-
Table of Contents
-
Troubleshooting
-
Bookmarks
Quick Links
VSX-424
VSX-329
Discover the benefits of registering your product online at
Operating Instructions
-K
AV Receiver
-K
http://www.pioneer.co.uk
(or http://www.pioneer.eu).
Related Manuals for Pioneer VSX-424-K
Summary of Contents for Pioneer VSX-424-K
-
Page 1
VSX-424 AV Receiver VSX-329 http://www.pioneer.co.uk (or http://www.pioneer.eu). Discover the benefits of registering your product online at Operating Instructions… -
Page 2
CAUTION This product is for general household purposes. Any TO PREVENT THE RISK OF ELECTRIC SHOCK, DO NOT failure due to use for other than household purposes REMOVE COVER (OR BACK). NO USER-SERVICEABLE (such as long-term use for business purposes in a PARTS INSIDE. -
Page 3
Information for users on collection and disposal of old equipment and used batteries Symbol for These symbols on the products, packaging, and/or accompanying documents mean equipment that used electrical and electronic products and batteries should not be mixed with general household waste. For proper treatment, recovery and recycling of old products and used batteries, please take them to applicable collection points in accordance with your national legislation. -
Page 4: Table Of Contents
Contents Thank you for buying this Pioneer product. Please read 03 Basic Setup (VSX-424 only) 06 Home Menu through these operating instructions so you will know how to Before setting up (For Australia) ….19 Using the Home Menu .
-
Page 5: Before You Start
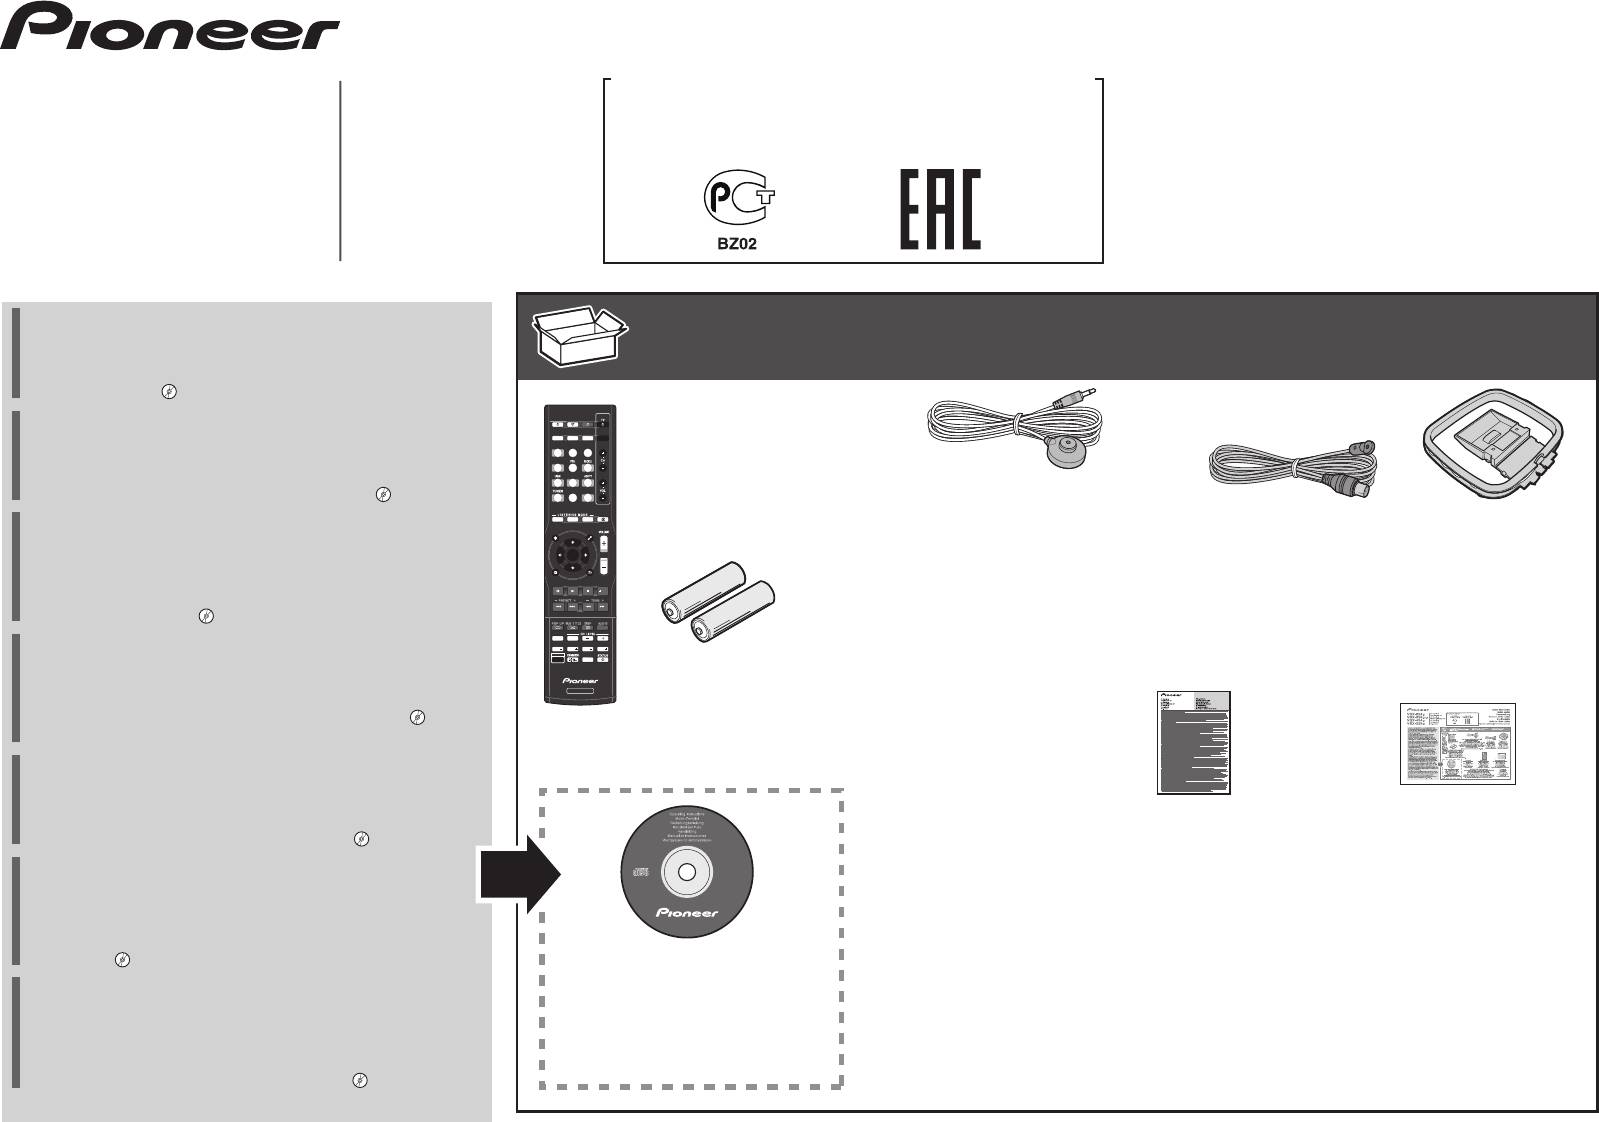
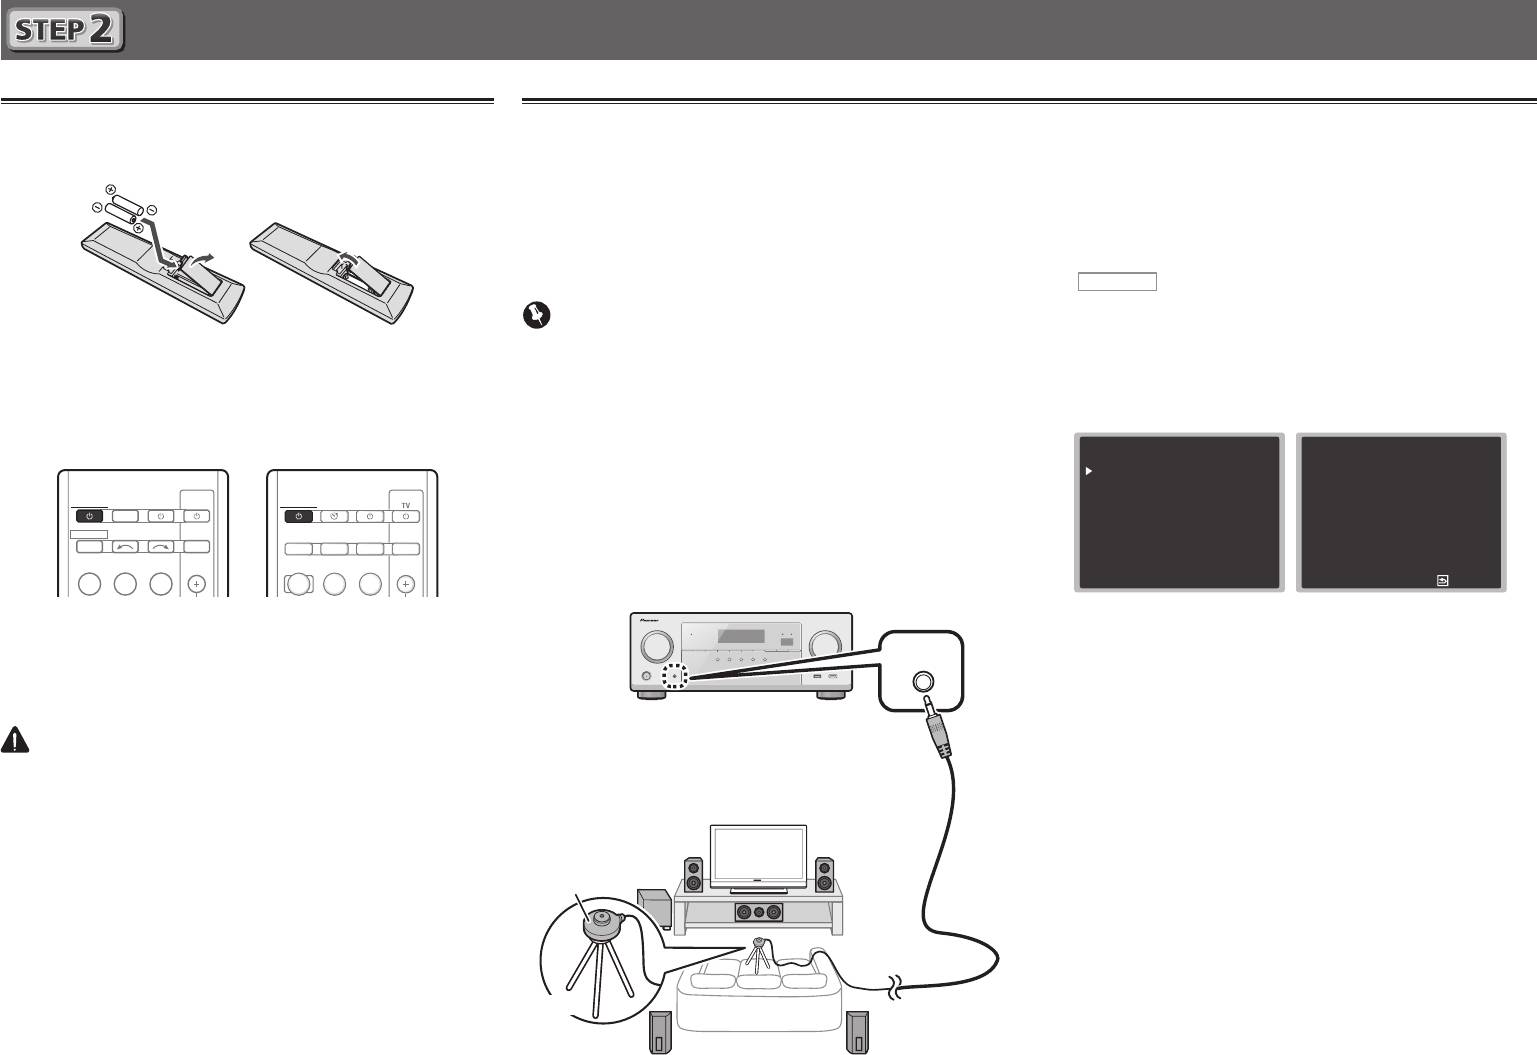
Before you start Flow of settings on the receiver The unit is a full-fledged AV receiver equipped with an Checking what’s in the box abundance of functions and terminals. It can be used easily after following the procedure below to make the connections Please check that you’ve received the following supplied Use the on-screen automatic MCACC setup to set up and settings.
-
Page 6: Controls And Displays
Chapter Controls and displays Front panel VSX-424 11 12 – Use with /, PRESET / INPUT SELECTOR dial TUNER EDIT TUNE PHONES jack Selects an input source (page 22). to memorize and name stations for recall Use to connect headphones. When the headphones are ENTER (page 26).
-
Page 7: Display
Controls and displays iPod iPhone DIRECT CONTROL DTS indicators Change the receiver’s input to the iPod and enable iPod DTS – Lights when a source with DTS encoded audio operations on the iPod (page 24). signals is detected. HD – Lights when a source with DTS-EXPRESS or DTS-HD iPod/iPhone terminal Use to connect your Apple iPod or USB mass storage device encoded audio signals is detected.
-
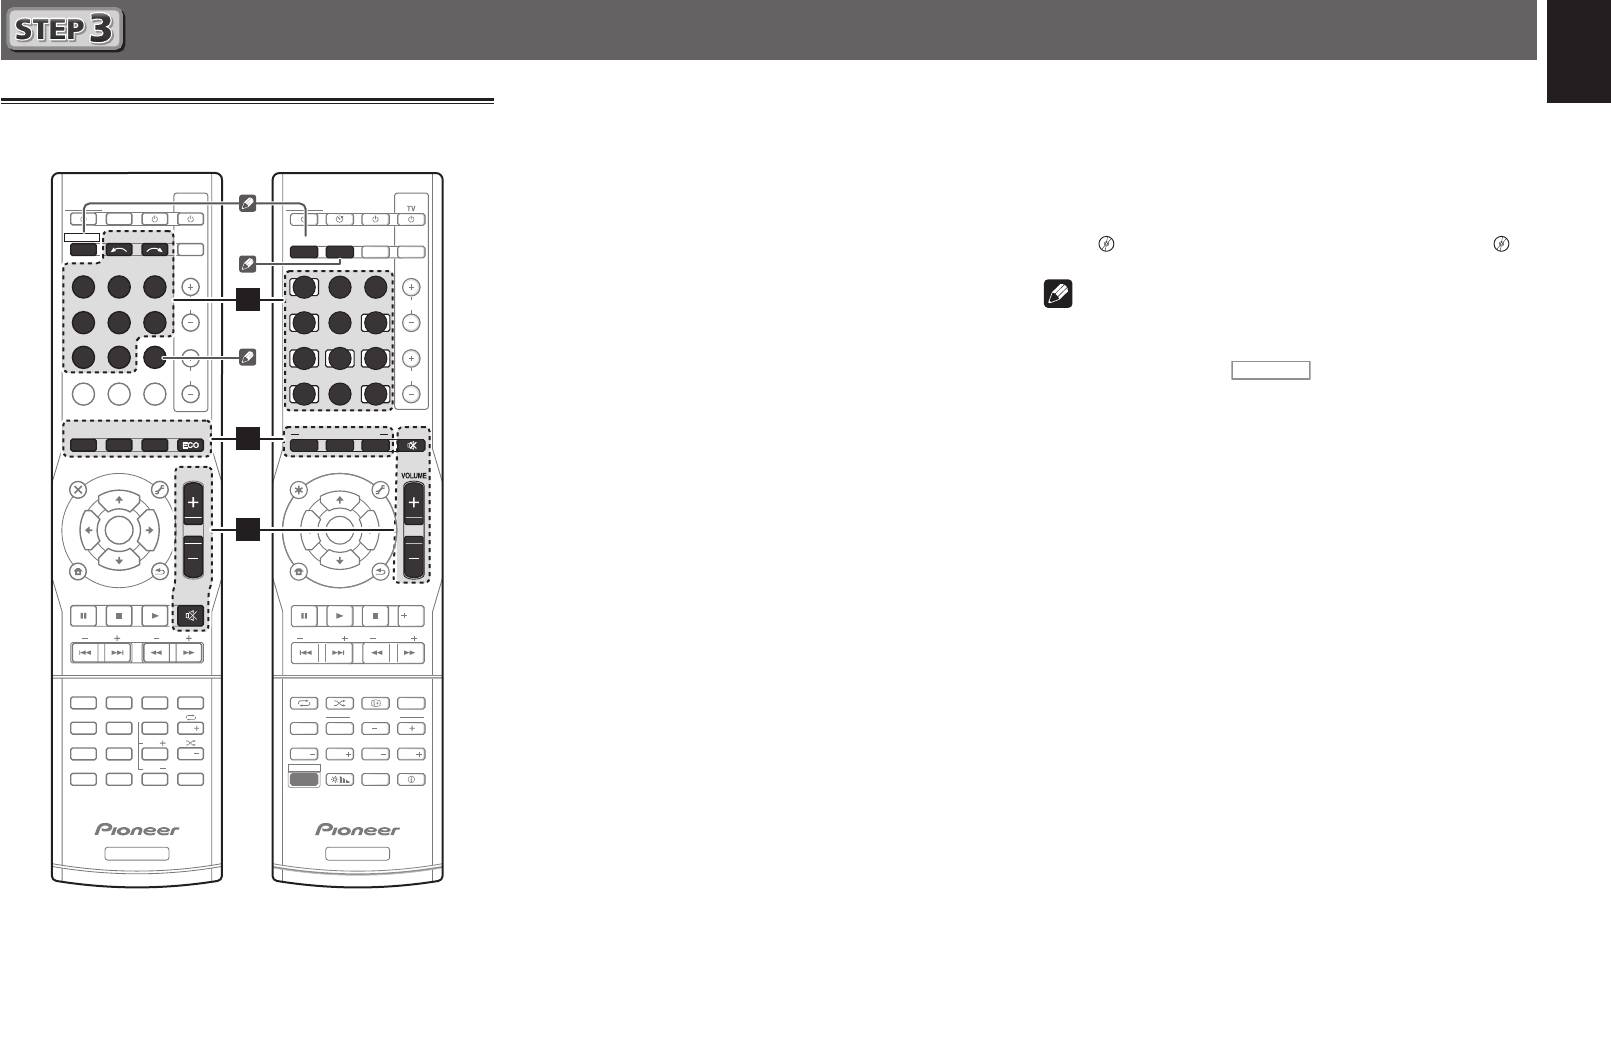
Page 8: Remote Control
Use to select the input source to this receiver (page 22). This MENU PARAMETER MENU will enable you to control other Pioneer components with the Press first to access: TUNER MENU remote control. – Memorizes stations for recall, also used to…
-
Page 9: Loading The Batteries
Never use new and old batteries together. SOURCE Insert the plus and minus sides of the batteries properly Turns on or off the power of the Pioneer DVD/DVR units when according to the marks in the battery case. is selected using the input function buttons.
-
Page 10: Connecting Your Equipment
Chapter Connecting your equipment Hints on the speaker placement Placing the speakers Where you put your speakers in the room has a big effect on the quality of the sound. The By connecting the left and right front speakers (L/R), the center speaker (C), the left and right following guidelines should help you to get the best sound from your system.
-
Page 11: Connecting The Speakers
Connecting your equipment Subwoofer Front right Front left Connecting the speakers Center The receiver will work with just two stereo speakers (the front speakers in the diagram) but using at least three speakers is recommended, and a complete setup is best for surround LINE LEVEL sound.
-
Page 12: Making Cable Connections
Connecting your equipment • If the video signal does not appear on your TV, try adjusting Note Making cable connections the resolution settings on your component or display. Note ®/ • Use a High Speed HDMI ™ Cable. If HDMI cable other that some components (such as video game units) have Make sure not to bend the cables over the top of this unit (as ®/…
-
Page 13: Analog Audio Cables
Connecting your equipment Analog audio cables Standard RCA video cables About video outputs connection Use stereo RCA phono cables to connect analog audio These cables are the most common type of video connection This receiver is not loaded with a video converter. When you components.
-
Page 14: Connecting A Tv And Playback Components
Connecting your equipment Game console HDMI/DVI-compatible components Connecting a TV and playback components DVD player, Blu-ray Disc player, Set-top box HDD/DVD recorder Blu-ray Disc recorder Connecting using HDMI If you have an HDMI or DVI (with HDCP) equipped component (Blu-ray Disc player, etc.), you can connect it to this receiver using a commercially available HDMI cable.
-
Page 15: Connecting Your Component With No Hdmi Terminal
Connecting your equipment Connecting your component with no HDMI terminal DVD player Set-top box This diagram shows connections of a TV and DVD player (or other playback component) with no HDMI terminal to the Select one Select one receiver. VIDEO OUT VIDEO OUT ANALOG AUDIO OUT DIGITAL AUDIO OUT…
-
Page 16: Connecting Antennas
Connecting your equipment Place the AM antenna on a flat surface and in a direction To improve AM reception Connecting antennas Connect a 5 m to 6 m length of vinyl-coated wire to the AM giving the best reception. antenna terminal without disconnecting the supplied AM Connect the AM loop antenna and the FM wire antenna as Connect the FM wire antenna into the FM antenna loop antenna.
-
Page 17: Connecting An Ipod
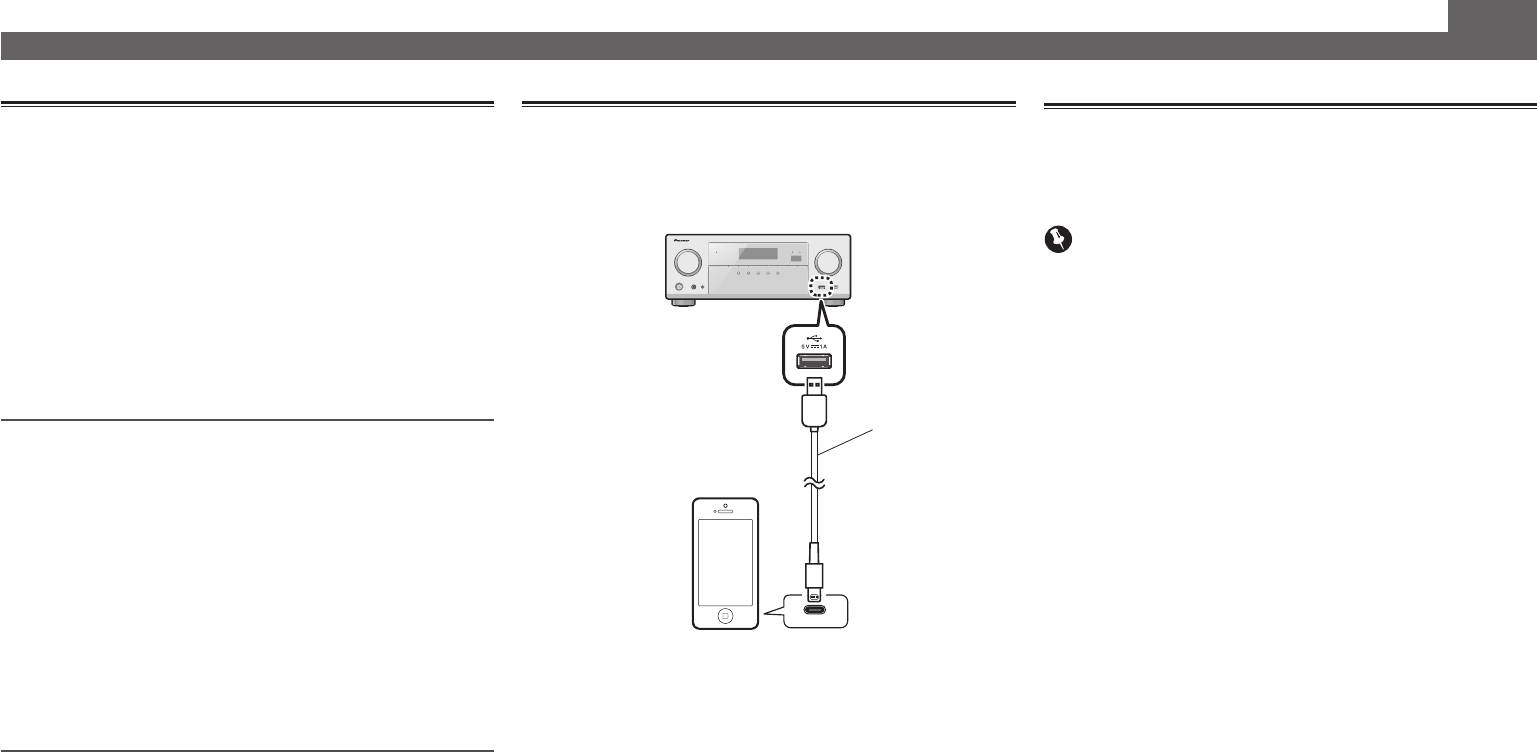
Connecting your equipment Connecting an iPod Connecting a USB device This receiver has a dedicated iPod/iPhone terminal that will It is possible to listen to two-channel audio using the USB allow you to control playback of audio content from your iPod interface on the front of this receiver.
-
Page 18: Plugging In The Receiver
A damaged power cord can cause a fire or give you an electrical shock. Check the power cord once in a while. When you find it damaged, ask your nearest PIONEER authorized service center or your dealer for a replacement.
-
Page 19: Basic Setup (Vsx-424 Only)
Chapter Basic Setup (VSX-424 only) Switch on the receiver and your TV. Before setting up (For Australia) Canceling the Auto Power Down (For Europe, This receiver allows you to adjust the system setup, using the Russia and U.K.) Switch the TV input to the input that connects this on-screen display (OSD) that is shown on the TV screen.
-
Page 20
Basic Setup (VSX-424 only) Press RECEIVER on the remote control, then press the Wait for the test tones to finish. Make sure ‘OK’ is selected, then press ENTER. HOME MENU button. A progress report is displayed on-screen while the If the screen in step 8 is left untouched for 10 seconds ///… -
Page 21: Other Problems When Using The Auto Mcacc Setup
Basic Setup (VSX-424 only) Other problems when using the Auto MCACC setup If the room environment is not optimal for the Auto MCACC setup (too much background noise, echo off the walls, obstacles blocking the speakers from the microphone) the final settings may be incorrect.
-
Page 22: Basic Playback
Chapter Basic playback Press AUTO/DIRECT to select ‘AUTO SURROUND’ and Press SIGNAL SEL to select the audio input signal Playing a source start playback of the source. corresponding to the source component. Here are the basic instructions for playing a source (such as If you’re playing a Dolby Digital or DTS surround sound Each press cycles through the following: a DVD disc) with your home theater system.
-
Page 23
Basic playback • Some DVD players don’t output DTS signals. For more details, refer to the instruction manual supplied with your DVD player. • In order to enjoy the picture and/or sound from devices connected to each terminal, select the input by doing the following. Audio (TV input) Other than TV input… -
Page 24: Playing An Ipod
When your iPod is connected to this receiver, you can browse website of Pioneer to your iPod/iPhone may result in songs stored on your iPod by playlist, artist, album name, This allows you to switch between performing iPod operations incompatibility with this receiver.
-
Page 25: Playing A Usb Device
• MP3 (MPEG-1/2/2.5 Audio Layer 3) – Sampling rates: • Pioneer cannot guarantee compatibility (operation and/or 32 kHz/44.1 kHz/48 kHz; Bit rates: 32 kbps to 320 kbps bus power) with all USB mass storage devices and Basic playback controls (128 kbps or higher recommended);…
-
Page 26: Listening To The Radio
Basic playback Saving station presets Listening to station presets Listening to the radio If you often listen to a particular radio station, it’s convenient You will need to have some presets stored to do this. See The following steps show you how to tune in to FM and AM to have the receiver store the frequency for easy recall Saving station presets above if you haven’t done this already.
-
Page 27: Changing The Radio Frequency Step (For Australia)
Basic playback You can search the following program types: Changing the radio frequency step (For Australia) Searching for RDS programs NEWS – News FINANCE – Stock market If you find that you can’t tune into stations successfully, the You can search for a program type listed above. reports, commerce, trading, AFFAIRS –…
-
Page 28: Displaying Rds Information
Basic playback Displaying RDS information Use the DISP button to display the different types of RDS information available. Press DISP for RDS information. Each press changes the display as follows: • Listening mode • Master volume • Radio Text (RT) – Messages sent by the radio station. •…
-
Page 29: Listening To Your System
Chapter Listening to your system Note Type of surround modes Suitable sources Choosing the listening mode • Stereo surround (matrix) formats are decoded accordingly This receiver offers a variety of listening modes to Two channel sources using NEO:6 CINEMA (see Listening in surround sound accommodate playback of various audio formats.
-
Page 30: Using The Advanced Surround
Listening to your system Note Press S.RETRIEVER to switch the S.RTV (Sound ADVANCED Using the Advanced surround SURROUND • During ECO mode, the brightness switches between 2 ADV SURR Retriever) ON or OFF. levels. If the dimmest level is selected, DIMMER will be The Advanced surround feature creates a variety of surround Note shown on the display.
-
Page 31: Better Sound Using Phase Control
Listening to your system Setting/What it does Option(s) Better sound using Phase Control Setting the Audio options EQ (Acoustic Calibration EQ) (VSX-424 only) This receiver’s Phase Control feature uses phase correction There are a number of additional sound settings you can Switches on/off the effect of Acoustic measures to make sure your sound source arrives at the make using the AUDIO PARAMETER menu.
-
Page 32
Listening to your system Setting/What it does Option(s) Setting/What it does Option(s) DRC (Dynamic Range Control) –3 to +3 DIMEN (Dimension) AUTO Adjusts the level of dynamic range for movie Default: 0 Adjusts the surround sound balance from soundtracks optimized for Dolby Digital, DTS, front to back, making the sound more distant Dolby Digital Plus, Dolby TrueHD, DTS-HD (minus settings), or more forward (positive… -
Page 33: Home Menu
Chapter Home Menu Select the setting you want to adjust. Using the Home Menu Manual speaker setup The following section shows you how to make detailed This receiver allows you to make detailed settings to optimize Ho me Me nu H ome Me nu settings to specify how you’re using the receiver, and also the surround sound performance.
-
Page 34: X.over
Home Menu • Surr – Select LARGE if your surround speakers reproduce X.Over Select ‘Manual SP Setup’ from the Home Menu. bass frequencies effectively. Select SMALL to send bass • Default setting: 100Hz frequencies to the other speakers or subwoofer. If you Select ‘Channel Level’…
-
Page 35: Speaker Distance
Home Menu Adjust the level of each speaker as the test tone is Adjust the distance of each speaker using /. emitted. The Auto Power Down menu You can adjust the distance of each speaker in 0.1 m Set to automatically turn off the receiver after a specified time Note increments.
-
Page 36: The Hdmi Setup Menu
Home Menu When you’re finished, press RETURN. The HDMI Setup menu You return to the Home Menu. If your TV supports an audio return channel (ARC) function, connect your TV and this unit with an HDMI cable and the TV Before starting ARC operation audio will be inputted into this unit via the HDMI terminal When starting ARC operation, put the TV and this unit in…
-
Page 37: Additional Information
Switch the subwoofer setting in Speaker Setting on page 33 power and call a Pioneer authorized independent service YES or PLUS. After using the Auto MCACC setup, the speaker size company.
-
Page 38: Hdmi
Additional information compatible). In this case, connect using the composite video Can’t operate the remote control. Note jacks between source and receiver. Replace the batteries (page • Depending on the component, audio output may be limited If video images do not appear on your TV, try adjusting the …
-
Page 39: About Ipod/Iphone
Additional information Tuner Section Important About iPod/iPhone Frequency Range (FM) ….87.5 MHz to 108 MHz • If the ARC function is ON, you may not be able to initialize Antenna Input (FM) .
-
Page 40: Specifications (Vsx-329)
Additional information Furnished Parts Specifications (VSX-329) Remote control ……..1 Dry cell batteries (AAA size IEC R03).
-
Page 41
253 Alexandra Road, #04-01, Singapore 159936 TEL: 65-6472-7555 PIONEER ELECTRONICS AUSTRALIA PTY. LTD. 5 Arco Lane, Heatherton, Victoria, 3202, Australia, TEL: (03) 9586-6300 PIONEER ELECTRONICS DE MEXICO S.A. DE C.V. Blvd.Manuel Avila Camacho 138 10 piso Col.Lomas de Chapultepec, Mexico, D.F. 11000 TEL: 55-9178-4270 K002_B3_En…
Quick Start Guide
Дополнительная информация для клиентов в Российской Федерации
Guide rapide
AV Receiver
Информация о сертификации
VSX-824-K
Kurzanleitung
Amplificateur AV
Для моделей
Для моделей
AV Receiver
VSX-424-K и VSX-329-K
VSX-824-K и VSX-529-K/S
Guida di avvio rapido
VSX-529—K/-S
Sintoamplificatore AV
Snelstartgids
AV Receiver
VSX-424-K
Guía de inicio rápido
Receptor AV
VSX-329-K
AV—ресивер
Краткое руководство пользователя
Thank you for buying this Pioneer product. This Quick Start
What’s in the box
Contenuto della confezione
Contenido de la caja
Guide includes instructions for basic connections and operations
Contenu du carton d’emballage
Inhoud van de doos
Комплект поставки
to allow simple use of the receiver. For detailed descriptions of
Lieferumfang
the receiver, see the “Operating Instructions” provided on the
included CD-ROM ( ).
VSX-824/
VSX-529
Merci pour l’achat de ce produit Pioneer. Ce guide rapide
STANDBY/ON
SLEEP
SOURCE
Remote Control
contient les instructions relatives aux raccordements et
RECEIVER SIGNAL SEL
CTRL
S.SEL ECO
INPUT
Télécommande
opérations de base permettant une utilisation simple de ce
BD
GAME
HDMI
Fernbedienung
DVD
SAT
MHL
récepteur. Pour des descriptions plus détaillées du récepteur,
Telecomando
iPod
CD
BT
référez-vous au “Mode d’emploi” sur le CD-ROM ( ) fourni.
TUN
TV
NET
Afstandsbediening
Setup microphone (not included for VSX-329)
MUTE
Mando a distancia
Microphone de configuration
Vielen Dank, dass Sie sich für dieses Pioneer-Produkt entschieden
AUDIO P.
AUTOSURR ADV
TOOLS
FM wire antenna
AM loop antenna
MENU
TOP
MENU
Пульт дистанционного
(non inclus pour le modèle VSX-329)
haben. Die Kurzanleitung enthält Anweisungen für grundlegende
управления
Antenne filaire FM
Antenne cadre AM
Mikrofon für die Einstellung (nicht enthalten für VSX-329)
Verbindungen und Bedienvorgänge, um eine einfache Bedienung
ENTER
UKW-Drahtantenne
MW-Rahmenantenne
Impostazione microfono (non incluso per VSX-329)
des Receivers zu ermöglichen. Detaillierte Beschreibungen des
MENU
HOME
Antenna FM a filo
Antenna AM a telaio
BAND PTY
RETURN
Fav
Microfoon voor instellen (niet meegeleverd voor de VSX-329)
Receivers finden Sie in der „Bedienungsanleitung“ auf der
FM-draadantenne
AM-raamantenne
Micrófono de configuración (no incluido para VSX-329)
mitgelieferten CD-ROM ( ).
Antena de hilos de FM
Antena de cuadro de AM
CLR
Установочный микрофон
Vi ringraziamo per avere acquistato questo prodotto Pioneer.
SB CH
CH SEL
Проволочная антенна FM
Рамочная антенна АМ
(не входит в комплект поставки для VSX-329)
SHIFT
BASS
BASS
TRE TRE
Questa Guida di avvio rapido comprende istruzioni per i
SP-A/B
AAA size IEC R03 dry cell batteries x2
collegamenti fondamentali e per le operazioni essenziali di
Piles à anode sèche AAA IEC R03 x 2
RECEIVER
questo ricevitore. Per una descrizione dettagliata del ricevitore,
AAA/IEC/R03 Trockenbatterien x2
vedere le “Istruzioni per l’uso” contenute nel CD-ROM ( )
Pile a secco AAA IEC R03 x2
accluso.
AAA/IEC/R03 drogecelbatterijen x2
Pilas secas AAA, IEC R03 x 2
Hartelijk dank voor de aanschaf van dit Pioneer product. In deze
Сухие батарейки размера AAA IEC R03, 2 шт.
snelstartgids vindt u de instructies voor de basisaansluitingen en
de basisbediening voor een eenvoudig gebruik van de receiver.
Voor meer gedetailleerde informatie wordt u verwezen naar de
Power cord
Safety Brochure
These quick start guide
“Handleiding” die op de bijgeleverde CD-ROM ( ) staat.
Cordon d’alimentation
Brochure sur la Sécurité
Le présent Guide de démarrage
Netzkabel
Sicherheritsbroshüre
Diese Kurzanleitung
Muchas gracias por haber adquirido este producto de Pioneer.
VSX-529-K/-S
VSX-824-K
Cavo di alimentazione
Volantino sulla sicurezza
Guida per l’avvio rapido
Esta Guía de inicio rápido incluye instrucciones para hacer las
VSX-329-K
VSX-424-K
Netsnoer
Veiligheidsbrochure
Deze Quick Start-gids
conexiones y operaciones básicas que le permitirán hacer un uso
Cable de alimentación
Folleto de Seguridad
Esta guía de inicio rápido
sencillo del receptor. Para conocer una descripción detallada del
Кабель питания
Брошюра по безопасноти
Это краткое руководство пользователя
receptor, consulte el “Manual de instrucciones” suministrado con
CD-ROM (Operating instructions)
SPEAKER CAUTION Sheet (English only)
Warranty card
el CD-ROM ( ) incluido.
CD-ROM (Mode d’emploi)
Note d’avertissement relative aux enceintes (en anglais uniquement)
Carte de garantie
Благодарим вас за приобретение данного изделия Pioneer.
CD-ROM (Bedienungsanleitung)
Lautsprecher-Sicherheitshinweise (nur Englisch)
Garantiekarte
В данном Кратком руководстве пользователя содержатся
CD-ROM (Istruzioni per l’uso)
Scheda PRECAUZIONI ALTOPARLANTI (solo inglese)
Tarjeta de garantía
инструкции по основным подключениям и операциям для
CD-ROM (Handleiding)
Informatieblad over SPEAKER CAUTION (alleen Engels)
Documento di garanzia
упрощенного использования ресивера. Подробное
CD-ROM (Manual de instrucciones)
Hoja de PRECAUCIONES ACERCA DE LOS ALTAVOCES (solo en inglés)
Garantiebewijs
описание ресивера см. в «Инструкции по эксплуатации»,
CD-ROM (Инструкции по эксплуатации)
Лист SPEAKER CAUTION (МЕРЫ ПРЕДОСТОРОЖНОСТИ ДЛЯ
Гарантийный сертификат
содержащихся на поставляемом CD-ROM ( ).
ГРОМКОГОВОРИТЕЛЕЙ) (только на английском языке)
Connecting up
After installing the speakers, connect them as shown below.
Connecting the speakers
The receiver will work with just two stereo speakers (the front speakers in the diagram) but using
at least three speakers is recommended, and a complete setup is best for surround sound.
To achieve the best possible surround sound, install your speakers as shown below.
5.1 channel surround system:
L
– Front Left
C
– Center
R
– Front Right
SL
– Surround Left
SR
– Surround Right
SW
– Subwoofer
Connecting the speaker cables
1
Twist exposed wire strands together.
Make sure you connect the speaker on
2
Loosen terminal and insert exposed wire.
the right to the right (
R
) terminal and the
LINE LEVEL
Tighten terminal.
INPUT
speaker on the left to the left (
L
) terminal.
3
Also make sure the positive and negative
(
+/–
) terminals on the receiver match those
on the speakers.
CAUTION
• Before making or changing
connections, switch off the power and
disconnect the power cord from the AC
outlet.
• These speaker terminals carry
HAZARDOUS LIVE
voltage. To prevent
the risk of electric shock when
connecting or disconnecting the
speaker cables, disconnect the power
cord before touching any uninsulated
parts.
2
12 3
10 mm
Connect the center and surround speaker
terminals of VSX-424/VSX-329 as shown below:
1
Twist exposed wire strands together.
2
Push open the tabs and insert exposed
wire.
3
Release the tabs.
12 3
R
VSX-824
L
SW
C
SR
SL
English
Subwoofer
(
SW
)
Front Right (
R
)
C
)
Front Left (
L
)Center (
Surround Right
Surround Left
(
SR
)
(
SL
)
10 mm
The type of center and surround speaker terminals for VSX-424/VSX-329 is different from this
diagram.
You can use speakers with a nominal impedance between 6
W
and 16
W
.
English
Note
Connecting a TV and playback
• Refer to the operating instructions in the included CD-
Français
components
ROM if you wish to connect a TV or playback component
in a method other than an HDMI connection.
• Refer to the operating instructions in the included CD-
ROM for other device connections.
Deutsch
CAUTION
• Handle the power cord by the plug part. Do not pull out
the plug by tugging the cord, and never touch the power
cord when your hands are wet, as this could cause a short
circuit or electric shock. Do not place the unit, a piece of
furniture, or other object on the power cord or pinch the
Italiano
cord in any other way. Never make a knot in the cord or tie
it with other cables. The power cords should be routed so
that they are not likely to be stepped on. A damaged power
cord can cause a fire or give you an electric shock. Check
the power cord once in a while. If you find it damaged,
Nederlands
ask your nearest Pioneer authorized independent service
company for a replacement.
Español
3
VENTILATION CAUTION
Connecting up (continued)
Connecting antennas
21
AM loop antenna
VSX-824
VSX-824
FM wire antenna
B
A
Connecting to the network through
LAN interface
When installing this unit, make sure to leave space around the
OPTICAL
HDMI IN
VIDEO IN
unit for ventilation to improve heat radiation (at least 40 cm at
DIGITAL AUDIO OUT
VSX-824/VSX-529 only
top, 20 cm at rear, and 20 cm at each side).
Internet
HDMI OUT
Modem
Router
WARNING
WAN
Slots and openings in the cabinet are provided for ventilation
to ensure reliable operation of the product, and to protect it
Computer
LAN
from overheating. To prevent fire hazard, the openings should
1
never be blocked or covered with items (such as newspapers,
HDMI/DVI-compatible
HDMI/DVI-compatible TV
2
table-cloths, curtains) or by operating the equipment on thick
Blu-ray Disc player, etc.
3
carpet or a bed.
• VSX-424/VSX-329 only: Composite video cable (
A
)
D3-4-2-1-7b*_A1_En
connection is necessary in order to see the OSD of the
unit on the TV.
LAN cable (sold separately)
• VSX-824/VSX-529 only: The OSD will only be output from the
VSX-824
HDMI OUT terminal.
• If the TV does not support the HDMI Audio Return Channel
function, optical digital cable (
B
) connection is required to
listen to the TV sound over the receiver.
• If the TV supports the HDMI Audio Return Channel
function, the sound of the TV is input to the receiver via the
HDMI terminal, so there is no need to connect an
optical
digital cable
(
B
). In this case, set
ARC
at
HDMI Setup
to
ON
l
“The HDMI Setup menu” on page 36 (VSX-424/VSX-
329), “HDMI Setup” on page 56 (VSX-824/VSX-529).
• Please refer to the TV’s operation manual for directions on
connections and setup for the TV.
Initial Setup
Before you start
Automatically setting up for surround sound (MCACC)
1
Put the batteries in the remote control.
(VSX-824/VSX-529/VSX-424)
The Auto Multi-Channel ACoustic Calibration (MCACC) setup
2
Press BD button on the remote control to
uses the supplied setup microphone to measure and analyze
switch to BD entry.
the test tone that is outputted by the speakers. This setup
enables automatic high precision measuring and settings;
3
Press RECEIVER CTRL (VSX-824/VSX-529),
utilizing it will create an optimum user listening environment.
Important
The batteries included with the unit are to check initial
• Measure in a quiet environment.
operations; they may not last over a long period. We
• If you have a tripod, use it to place the microphone so
recommend using alkaline batteries that have a longer life.
that it’s about ear level at your normal listening position.
Otherwise, place the microphone at ear level using a table
2
Switch on the receiver and your TV.
or a chair.
• Accurate measurements may not be possible if there are
obstacles between the speakers and the listening position
RECEIVER
SOURCESLEEP
CONTROL
TV
STANDBY/ON
(microphone).
SLEEP
SOURCE
• When measuring, step away from the listening position,
RECEIVER
INPUT SELECT
RECEIVER SIGNAL SEL
INPUT
and operate using the remote control from the external
CTRL
S.SEL ECO
INPUT
BD DVD
CD
side of all the speakers.
BD GAME HDMI
1
Connect the supplied setup microphone.
3
Switch the TV input so that it connects to the
receiver.
MCACC
SETUP
MIC
4
Turn the subwoofer on and turn up the
volume.
CAUTION
• Do not use or store batteries in direct sunlight or other
excessively hot place, such as inside a car or near a
heater. This can cause batteries to leak, overheat, explode
or catch fire. It can also reduce the life or performance of
batteries.
• When inserting the batteries, make sure not to damage
the springs on the battery’s
*
terminals. This can cause
batteries to leak or overheat.
• When disposing of used batteries, please comply with
governmental regulations or environmental public
institution’s rules that apply in your country/area.
4
RECEIVER
(VSX-424/VSX-329) on the remote
control, then press the HOME MENU button.
The Home Menu appears on your TV.
4
Select ’Auto MCACC’ from the Home Menu,
then press ENTER.
Automatic measuring will start.
VSX-424/VSX-329 VSX-824/VSX-529
Home Menu
1
. Auto MCACC
1
. Auto MCACC
Now Analyzing
2
. Manual SP Setup
3
. Input Assign
Surround Analyzing
4. Auto Power Down
Speaker System
5. HDMI Setup
X.Over
6. Network Standby
Speaker Distance
7. MHL Setup
Channel Level
8. OSD Setup
Acoustic Cal EQ
Return
VSX-824
• Measuring will take about 3 to 12 minutes.
5
Follow the instructions on-screen.
• Automatic setting is complete when the Home Menu
screen appears.
• If the power is cut off, the protection circuit that activates
when the naked wires of the cable cord is touching the
rear panel or when the naked
and
*
cords are touching
each other may be activated.
Twist back the cable cords of the speakers to the normal
position, and connect, making sure that the naked cable
Microphone
cord cannot be seen from outside the terminal. Do the
same for the connections on the speaker side.
• If
ERR
is displayed, check to make sure that the speakers
are connected correctly.
6
Make sure the setup microphone is
Tripod
disconnected.
English
Basic playback
1
Switch on the playback component.
Method 2:
Change the subwoofer to
PLUS
.
Multichannel playback
The low frequency sound will output from both the front
Français
E.g. Turn the Blu-ray Disc player connected to the
VSX-424/VSX-329 VSX-824/VSX-529
HDMI BD IN
terminal on.
speaker and the subwoofer.
This may lead to excessive low frequency sound.
2
Switch the input of the receiver.
RECEIVER
SOURCESLEEP
CONTROL
TV
STANDBY/ON
SLEEP
SOURCE
If that happens, we suggest you do not change the setting
E.g. Press
BD
to select the
BD
input.
or change to Method 1.
RECEIVER
INPUT SELECT
RECEIVER SIGNAL SEL
INPUT
CTRL
S.SEL ECO
INPUT
l
“Speaker Setting” on page 33 (VSX-424/VSX-329),
3
Press AUTO (VSX-824/VSX-529),
Deutsch
BD DVD
CD
“Speaker Setting” on page 52 (VSX-824/VSX-529).
BD
GAME
HDMI
AUTO/DIRECT (VSX-424/VSX-329) to select
TUNER
iPod/USB SAT/CBL
CH
2
CBL ROKU
CH
’AUTO SURROUND’.
Note
DVD
SAT
MHL
• If not using the remote control to operate:
Also press
SURR
(VSX-824/VSX-529),
ALC/STANDARD
GAMETV
SIGNAL SEL
USB
ADPT
iPod
CD
BT
(VSX-424/VSX-329) or
ADV
(VSX-824/VSX-529),
ADV SURR
– When operating the receiver, press
RECEIVER CTRL
Acous.EQ
S.RETRIEVER
PHASE
VOL
TUNER
VOL
(VSX-424/VSX-329) for multichannel playback. Select your
(VSX-824/VSX-529),
RECEIVER
(VSX-424/VSX-329) and then
Italiano
TUN
TV
NET
preferred listening mode.
operate.
– When operating devices such as
NETWORK
(VSX-
AUTO/
ALC/
DIRECT
STEREO
STANDARD
ADV SURR
LISTENING MODE
MUTE
4
Start the playback component’s playback.
3
824/VSX-529 only),
TUNER
, and
iPod
, press the various
AUTO SURR ADV
E.g. Start playback of the Blu-ray Disc player.
function button (
NET
(VSX-824/VSX-529 only),
TUNER
,
AUDIO
TOOLS
TOP
AUDIO P.
TOOLS
PARAMETER
MENU
VOLUME
MENU
MENU
T
U
E
iPod USB
(VSX-824/VSX-529),
iPod/USB
(VSX-424/VSX-
Use VOLUME +/– to adjust the volume level.
Nederlands
MENU
TOP
N
5
329), etc.) before operating.
E
T
S
R
P
• If no sound comes out of the center speaker or surround
E
R
ENTER
E
S
P
T
E
5
ENTER
• In order to listen to the audio from the source component
speaker, change the listening mode by pressing
SURR
that is connected to this receiver using a coaxial or an
HOME
(VSX-824/VSX-529),
ALC/STANDARD
(VSX-424/VSX-329) or
MENU
PTY
T
U
N
E
optical cable, choose the
C1
(coaxial) or
O1
(optical) input.
iPod CTRL
BAND
RETURN
HOME
RETURN
ADV
(VSX-824/VSX-529),
ADV SURR
(VSX-424/VSX-329).
MUTE
MENU
BAND
PTY
(Press
SIGNAL SEL
.)
Fav
E.g. Repeatedly press
ADV
(VSX-824/VSX-529),
ADV SURR
Español
(VSX-424/VSX-329) to select [
EXT.STEREO
].
BASS
TRE
PRESET TUNE
• If there is no sound from the subwoofer
Cause:
POP UP SUB TITLE DISP
AUDIO
DISP
The front speaker is set to
LARGE
.
1
2
3
CLR
SB CH
CH SELECT
CH LEVEL
(During 2ch audio input, the low frequency sound is
4
5
6
CH
SB CH
CH SEL
MIDNIGHT
SPEAKERS
LEV
output not from the subwoofer but the front speaker)
7
8
9
CH
BASS
BASS
TRE TRE
LEV
DIMMER
SHIFT
DIMMER STATUS
CLR
0
ENTER
SP-A/B
+
10
How to x:
If you want the sound to come from the subwoofer, please
change the speaker setup.
RECEIVER
RECEIVER
(There are 2 following methods)
Method 1:
Change the front speaker to
SMALL
.
The low frequency sound will be output not from the front
speaker but the subwoofer.
We recommend not changing this if the low frequency
function of the front speaker is high.
5
Basic playback (continued)
Listening to the radio
Playing an iPod
Listening to Internet radio stations
• About one minute is required between turning the power
1
Press TUNER to select the tuner.
VSX-824/VSX-529 only
on and completion of startup.
• About one minute is required between turning the power
If necessary, press
BAND
to change the band (FM or AM).
1
Connect your iPod.
on and completion of startup.
2
Press TUNE +/– (VSX-824/VSX-529), TUNE
/
Important
(VSX-424/VSX-329) to tune to a station.
• When using a broadband Internet connection, a contract
• Press and hold
TUNE +/–
(VSX-824/VSX-529),
TUNE
/
with an Internet service provider is required. For more
(VSX-424/VSX-329) for about a second. The receiver will
details, contact your nearest Internet service provider.
start searching for the next station.
• To listen to Internet radio stations, you must have high-
• If you’re listening to an FM station but the reception
speed broadband Internet access. With a 56 K or ISDN
is weak, press
BAND
to select FM MONO and set the
modem, you may not enjoy the full benefits of Internet
receiver to the mono reception mode.
USB cable that
radio.
comes with the iPod
• Access to content provided by third parties requires a
Saving station presets
high speed internet connection and may also require
If you often listen to a particular radio station, it’s convenient to
account registration and a paid subscription. Third
have the receiver store the frequency for easy recall whenever
iPod/iPhone
party content services may be changed, suspended,
you want to listen to that station.
interrupted, or discontinued at any time without notice,
1
Press TOOLS while receiving a signal from the
and Pioneer disclaims any liability in connection with such
occurrences. Pioneer does not represent or warrant that
station you want to store.
content services will continue to be provided or available
The preset number is blinking.
for a particular period of time, and any such warranty,
2
Press PRESET +/– (VSX-824/VSX-529), PRESET
express or implied, is disclaimed.
/l
(VSX-424/VSX-329) to select the station
2
Press iPod USB (VSX-824/VSX-529), iPod/USB
1
Press NET repeatedly to select the NETRADIO
preset you want, then press ENTER.
(VSX-424/VSX-329) to select the iPod/USB
input.
The preset number stop blinking and the receiver stores
input.
It may take several seconds for this receiver to access the
the station.
When the display shows the names of folders and files,
network.
you’re ready to play music from the iPod.
Use
Listening to station presets
2
/
to select the Internet radio station to
3
Use
/
to select a category, then press
You will need to have some presets stored to do this.
play back, and then press ENTER.
ENTER to browse that category.
Press PRESET +/– (VSX-824/VSX-529), PRESET
• To return to the previous level any time, press
RETURN
.
/l
(VSX-424/VSX-329) to select the station
preset you want.
4
Use
/
to browse the selected category (e.g.,
albums).
• Use
/l
to move to previous/next levels.
5
Continue browsing until you arrive at what
you want to play, then press
to start
playback.
6

English
Basic playback (continued)
To enjoy the many functions of the
Français
unit to the fullest extent
Load the CD-ROM into your computer and download the
Operating Instructions (PDF) from the menu screen to
Deutsch
read.
Functions
Italiano
■
Playing a USB device
l
page 25 (VSX-424/VSX-329), page 28 (VSX-824/VSX-529)
■
Music playback using Bluetooth wireless technology
l
page 31 (VSX-824 only)
Nederlands
■
Bluetooth ADAPTER for Wireless Enjoyment of Music
l
page 33 (VSX-529 only)
■
Playback with NETWORK features
l
page 41 (VSX-824/VSX-529 only)
Español
■
Setting the Audio options
l
page 31 (VSX-424/VSX-329), page 39 (VSX-824/VSX-529)
■
Using the Home Menu
l
page 33 (VSX-424/VSX-329), page 52 (VSX-824/VSX-529)
Troubleshooting
l
page 37 (VSX-424/VSX-329), page 58 (VSX-824/VSX-529)
Note
• VSX-824/VSX-529 only: This unit supports AirPlay. For
details, see page 41 of the operating instructions and the
Apple website (http://www.apple.com).
• VSX-824/VSX-529 only: This unit’s software can be updated
(page 46 of the operating instructions). With Mac OS, it
can be updated using Safari (page 47 of the operating
instructions).
© 2014 PIONEER HOME ELECTRONICS CORPORATION.
All rights reserved.
7
-
Инструкции по эксплуатации
1

Pioneer VSX-424 инструкция по эксплуатации
(42 страницы)
- Языки:Русский
-
Тип:
PDF -
Размер:
11.71 MB -
Описание:
5.1 канальный AV ресивер с HD Audio
Просмотр
На NoDevice можно скачать инструкцию по эксплуатации для Pioneer VSX-424. Руководство пользователя необходимо для ознакомления с правилами установки и эксплуатации Pioneer VSX-424. Инструкции по использованию помогут правильно настроить Pioneer VSX-424, исправить ошибки и выявить неполадки.
Узнавай о новинках и акциях первым
Вы успешно зарегистрированы на сайте.
Вам доступен личный кабинет пользователя.
Перейти к покупкам
Ваш пароль воcстановлен!
Теперь вы можете полноценно пользоваться
всеми возможностями нашего интернет-магазина.
Здравствуйте, Ваша претензия принята и зарегистрирована.
В течение 3-х рабочих дней Вам, на электронную почту, будет дан письменный ответ. В случае возникновения дополнительных вопросов, менеджер претензионного отдела свяжется с Вами.
Перейти к покупкам

Ваше сообщение об ошибке на сайте успешно отправлено.
Большое спасибо!
Добавить отзыв о магазине
Торг для данного товара сейчас не возможен!
Сколько вы готовы заплатить за этот товар?
Введите ваше ценовое предложение
Мы согласны с вашим предложением
Мы принимаем вашу цену, и вы можете купить товар по цене:
0 руб.
Страницы и текст этой инструкции
 Инструкция ресивера и усилителя Pioneer VSX-329 / VSX-424
 Информация отображена на картинке
 Информация отображена на картинке
 Информация отображена на картинке
 Информация отображена на картинке
Как использовать наш сайт инструкций OnlineManuals.ru
Наша цель состоит в том, чтобы предоставить вам быстрый доступ к содержанию инструкции для ресивера и усилителя Pioneer VSX-329 / VSX-424.
С помощью онлайн просмотра, Вы можете быстро просмотреть содержимое инструкции и найти решение проблемы с ресивера и усилителя Pioneer VSX-329 / VSX-424.
Для Вашего удобства
Если листать руководство пользователя ресивера и усилителя Pioneer VSX-329 / VSX-424 прямо на сайте, не очень удобно для Вас, есть два возможных решения:
• Просмотр в полноэкранном режиме — легко просмотреть руководство пользователя (без загрузки его на свой компьютер), Вы можете использовать режим полноэкранного просмотра.
Для просмотра инструкции пользователя ресивера и усилителя Pioneer VSX-329 / VSX-424 на полном экране, используйте кнопку «Открыть в Pdf-viewer».
• Загрузка на компьютер — Вы можете также скачать Инструкция ресивера и усилителя Pioneer VSX-329 / VSX-424 на свой компьютер и сохранить его в файлах.
Многие люди предпочитают читать документы не на экране, а в печатной версии.
Возможность печати руководства пользователя также была предусмотрена на нашем сайте,
и вы можете использовать ее, нажав на иконку «печать» в Pdf-viewer.
Нет необходимости печатать все руководство ресивера и усилителя Pioneer VSX-329 / VSX-424, можно выбрать только нужные страницы инструкции.