
ICF-C1_RU5 [GB/RU] 4-480-527-62(1)
English
Before operating the unit, please read this
guide thoroughly and retain it for future
reference.
WARNING
To reduce the risk of fire, do not cover the
ventilation opening of the appliance with
newspapers, tablecloths, curtains, etc. Do not
expose the appliance to naked flame sources
(for example, lighted candles).
To reduce the risk of fire or electric shock, do
not expose this apparatus to dripping or
splashing, and do not place objects filled with
liquids, such as vases, on the apparatus.
Do not install the appliance in a confined
space, such as a bookcase or built-in cabinet.
Do not expose batteries or apparatus with
battery-installed to excessive heat such as
sunshine, fire or the like.
Do not ingest the battery, Chemical Burn
Hazard
(The remote control supplied with) This product
contains a coin/button cell battery. If the coin/
button cell battery is swallowed, it can cause
severe internal burns in just 2hours and can
lead to death.
Keep new and used batteries away from
children.
If the battery compartment does not close
securely, stop using the product and keep it
away from children.
If you think batteries might have been
swallowed or placed inside any part of the
body, seek immediate medical attention.
As the main plug is used to disconnect the unit
from the mains, connect the unit to an easily
accessible AC outlet. Should you notice an
abnormality in the unit, disconnect the main
plug from the AC outlet immediately.
The unit is not disconnected from the AC
power source (mains) as long as it is connected
to the wall outlet, even if the unit itself has
been turned off.
The nameplate and important information
concerning safety are located on the bottom
exterior.
CAUTION
Danger of explosion if battery is incorrectly
replaced. Replace only with the same type.
The validity of the CE marking is restricted to
only those countries where it is legally
enforced, mainly in the countries EEA
(European Economic Area) and Switzerland.
Production Date
The date of manufacture is specified on the
barcode label on the carton after the word
“Produced” in the following format: MM-YYYY,
where MM-month and YYYY-the year of
manufacturing.
Disposal of waste batteries and electrical and electronic equipment (applicable in the European Union and other European countries with separate collection systems)
The Sony ICF-C1 is an FM and AM radio with a
built-in clock.
Precautions
Operate the unit on the power sources
specified in “Specifications.”
To disconnect the power cord (mains lead),
pull it out by the plug, not the cord.
Do not leave the unit under lighting
equipment, in a location near a heat source,
such as a radiator or airduct, or in a place
subject to direct sunlight, excessive dust,
mechanical vibration, or shock.
Allow adequate air circulation to prevent
internal heat build-up. Do not place the unit
on a surface (a rug, blanket, etc.) or near
materials (a curtain) that might block the
ventilation holes.
Should any solid object or liquid fall into the
unit, unplug the unit and have it checked by
a qualified personnel before operating it any
further.
To clean the casing, use a soft dry cloth. Do
not use any type of solvent, such as alcohol
or benzine, which may damage the finish.
Do not connect the antenna lead to the
external antenna.
NOTES ON LITHIUM BATTERY
Battery may explode if handled incorrectly.
Do not recharge, disassemble or dispose of
in fire.
Dispose of used battery promptly. Keep the
lithium battery out of the reach of children.
Should the battery be swallowed,
immediately consult a doctor.
Wipe the battery with a dry cloth to assure a
good contact.
Be sure to observe the correct polarity when
installing the battery.
Do not hold the battery with metallic
tweezers, otherwise a short-circuit may
occur.
Batteries have a recommended use-by date
for proper use. When replacing the battery,
check the expiration date of the new battery
indicated on the package, etc.
If you have any questions or problems
concerning your unit, please consult your
nearest Sony dealer.
Getting Started
Connecting to an AC
power source
Connect the AC power cord to a wall outlet.
To wall outlet
About the battery as a
backup power source
This unit needs a CR2032 battery (supplied) as
a backup power source to keep the clock
operating during a power interruption.
When to replace the
battery
When the battery is discharged, “” appears
on the display.
If a power interruption occurs while the battery
is discharged, the current time and alarm will
be erased.
Installing and replacing
the backup battery
1 Keep the AC plug connected to the
wall outlet and remove the battery compartment on the bottom of the unit by pulling it up while sliding the tab. (See Fig. —.)
2 Insert a new battery into the battery
compartment with the side facing
up.
To remove the battery from the battery
compartment, push it out from the side
marked PUSH. (See Fig. —.)
3 Insert the battery compartment back
into the unit along the groove and push it from above until it clicks. (See Fig. —.)
The tab locks the battery compartment.
4 Press RADIO to remove “
” from the display.Notes
When you replace the battery, do not
disconnect the AC plug from the wall outlet.
Otherwise, the current date, current time and
alarm will be erased.
If the unit will be left unplugged for a long
time, remove the battery to avoid any
damage that may be caused by leakage or
corrosion.
Setting the clock
1 Press and hold ENTER/TIME SET for
more than 2 seconds.
You will hear a beep and the last two digits
of the year will start to flash on the display.
2 Press + or – repeatedly to select the
year, and then press ENTER/TIME SET.
3 Repeat step 2 to set the month, day
and time.
After setting the time, two short beeps will
sound and the seconds will start
incrementing from zero.
Note
If you do not press any button for about 1
minute while setting the clock, clock setting
mode will be canceled.
To change the display to
indicate daylight saving time
(summer time)
Change the daylight saving time (summer
time) adjustment setting according to the
following procedure.
Press and hold DST for more than 3 seconds.
“DST” appears on the display and the clock
display switches to daylight saving time
(summer time).
To deactivate the daylight saving time (summer
time) adjustment, press and hold DST for more
than 3 seconds again.
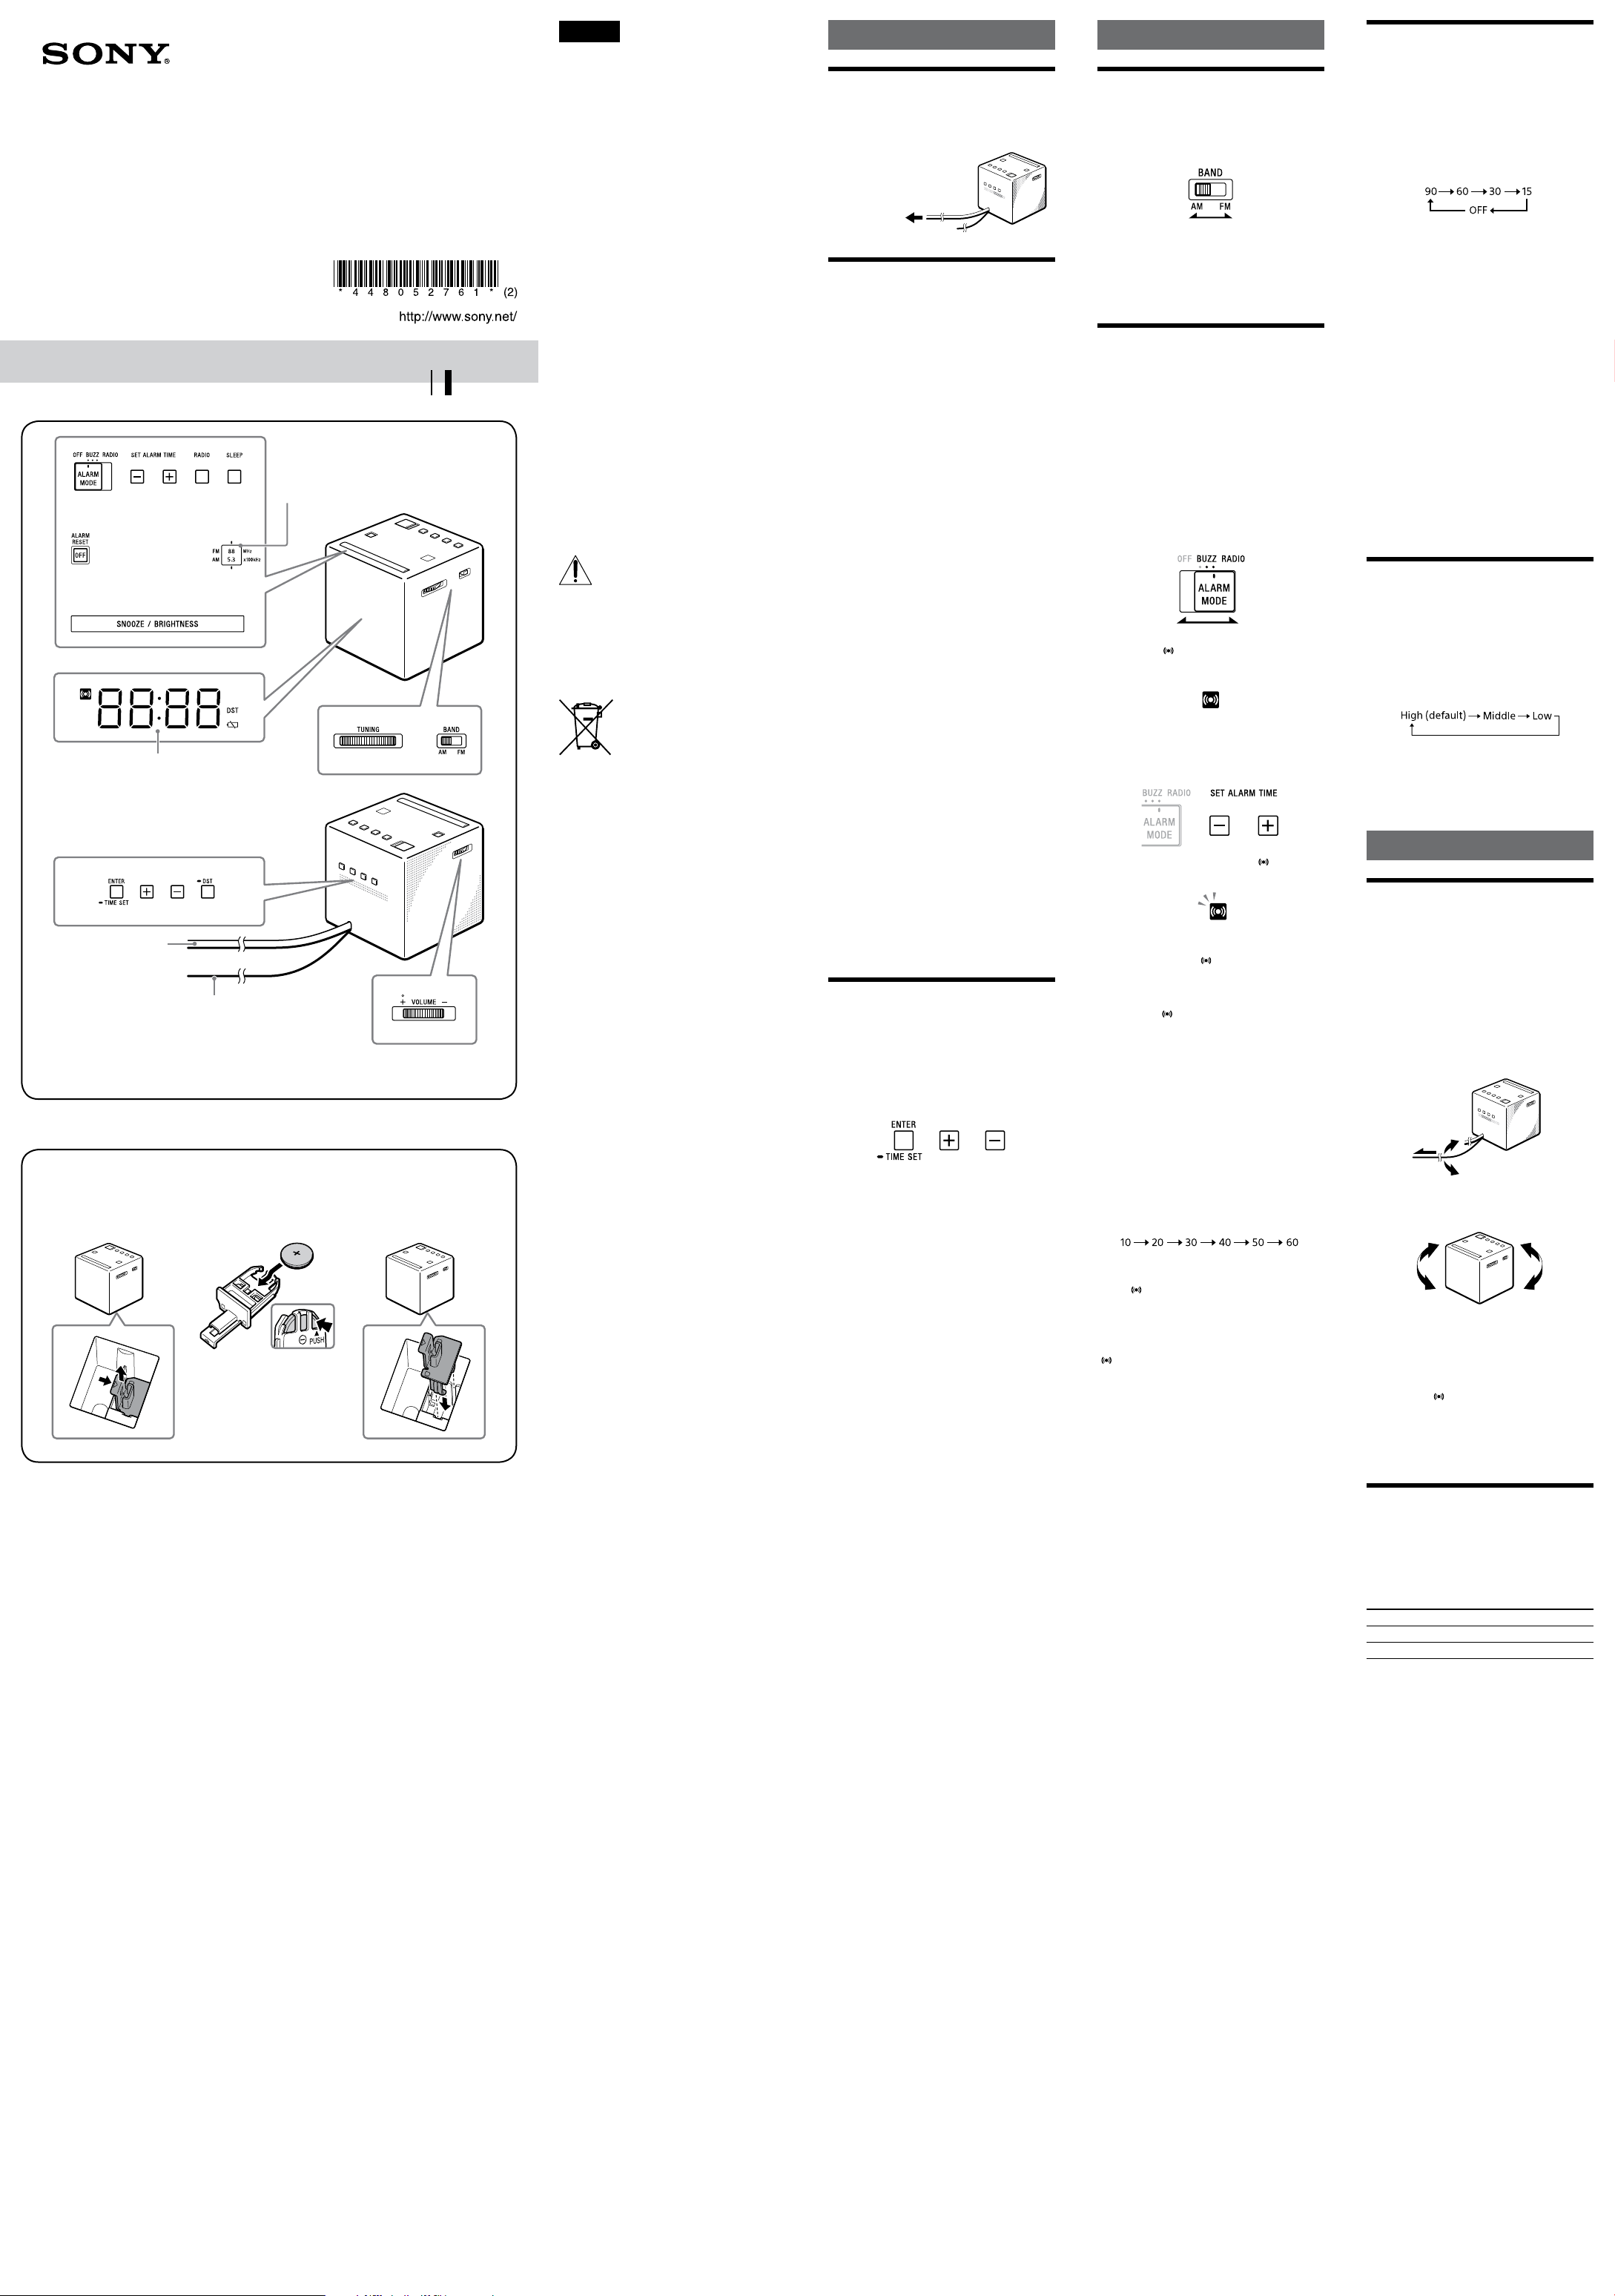
AC power cordThe frequency of the current radio station is displayed as a rough guide.DisplayThere is a tactile dot beside VOLUME + to show the direction to go to turn up the volume.
Operations
Playing the radio
1 Press RADIO to turn on the radio.
2 Set BAND to the desired band (AM or
FM).
3 Tune to the desired station using
TUNING.
4 Adjust the volume using VOLUME +/–.
To turn off the radio, press ALARM RESET/
OFF.
Setting the alarm
The alarm sound can be selected from RADIO
(radio) or BUZZ (buzzer).
Before setting the alarm
Make sure to set the clock. (See “Setting the
clock.”)
To set the radio alarm, first tune to a station
and adjust the volume. (See “Playing the
radio.”)
To set the alarm
1
Set ALARM MODE to the desired alarm sound (RADIO or BUZZ).
The alarm time appears for a few seconds,
and then “
” appears on the display. (It
does not appear when the switch is set to
OFF.)
2 Press SET ALARM TIME + or –
repeatedly to set the desired time while the alarm time appears on the display.
While setting the alarm time, “ ” flashes on
the display.
When the alarm time setting operation is
complete, the clock display returns after a
few seconds and “
” changes from flashing
to fully lit.
At the set time, the radio will turn on, or the
buzzer will sound gradually increasing in
volume. (“
” flashes on the display.)
To stop the alarm
Press ALARM RESET/OFF to turn off the alarm.
The alarm will sound again at the same time
the next day.
To doze for a few more minutes
Press SNOOZE/BRIGHTNESS.
The sound turns off, but will automatically
come on again after about 10 minutes.
Each time you press SNOOZE/BRIGHTNESS,
the snooze time changes as follows:
The display shows the snooze time for about
4seconds and returns to show the current
time. (“
” flashes on the display.)
To deactivate the alarm
Set ALARM MODE to OFF.
“ ” disappears from the display.
Notes
The alarm time setting cannot be changed if
ALARM MODE is set to OFF. If SET ALARM
TIME + or – is pressed, “OFF” appears on the
display for about 0.5 seconds.
ENTER/TIME SET and DST are unavailable
while the alarm is sounding or the snooze
function is turned on.
If no operation is performed while the alarm
is sounding, the alarm will stop after about
60 minutes.
Notes on the alarm in the event of a power interruption
If the set alarm time comes in the event of a
power interruption or a power interruption
occurs while the alarm is sounding, the display
will turn off and the alarm will not sound, and
the alarm status will be as follows:
If power returns within 60 minutes from the
alarm set time, the alarm will sound.
If the power interruption occurred while the
snooze function was operating, the snooze
function will continue.
If the snooze time had passed when the
power interruption occurred, the alarm will
sound after power returns.
In this status, if “” does not light up, ALARM
RESET/OFF, SNOOZE/BRIGHTNESS and alarm
mode functions are available. The snooze time
will be fixed to only 10 minutes if SNOOZE/
BRIGHTNESS has been pressed.
Setting the sleep
timer
You can fall asleep to the radio using the sleep
timer, which turns off the radio automatically
after a preset duration.
Press SLEEP.
The radio turns on. Each time you press SLEEP,
the duration (in minutes) changes as follows:
The radio will play for the duration you set,
then shut off.
To deactivate the sleep timer, press SLEEP
repeatedly to set the sleep timer to “OFF.”
To turn off the radio before the
preset time
Press ALARM RESET/OFF.
To use both the sleep timer and
alarm
You can fall asleep to the radio and also be
awakened by the radio or buzzer alarm at the
preset time.
Set the alarm, then set the sleep timer.
Note
When the alarm is set to sound during the
sleep timer duration, the sleep timer will be
deactivated automatically when the alarm
sounds.
Setting the brightness
of the display
Three levels of brightness are available.
Press SNOOZE/BRIGHTNESS.
Each time you press SNOOZE/BRIGHTNESS,
the brightness of the display changes as
follows:
Note
When the alarm is sounding or the snooze
function is active, the brightness of the
display cannot be changed.
General information
Troubleshooting
Should any problems persist after you have
made the following checks, consult your
nearest Sony dealer.
The clock flashes “0:00” after a power interruption.
The battery is discharged. Remove the old
battery and insert a new one.
Unsatisfactory reception
Extend the FM wire antenna fully to increase
reception sensitivity.
Rotate the unit horizontally for optimum
reception. A ferrite bar AM antenna is built
into the unit.
Do not operate the unit over a steel desk or
metal surface, as this may lead to
interference.
The radio or buzzer alarm does not sound at the preset alarm time.
Check that “
” appears on the display.
The radio alarm is activated but no sound is emitted at the preset alarm time.
Adjust the volume using VOLUME +/–.
Specifications
Time display
24-hour system
Frequency range
Band Frequency
FM 87.5 MHz – 108 MHz
AM 531 kHz – 1,602 kHz
Speaker
Approx. 6.6 cm dia., 8 Ω
Power output
100 mW (at 10% harmonic distortion)
Power requirements
230 V AC, 50 Hz
For power backup: 3 V DC, one CR2032 battery
Dimensions
Approx. 101 mm 102 mm 101 mm (w/h/d)
including projecting parts and controls
Mass
Approx. 480 g (including CR2032 battery)
Supplied contents
Main unit: ICF-C1 (1)
CR2032 battery (1)
Operating Instructions (this manual) (1)
Design and specifications are subject to
change without notice.
FM wire antenna4-480-527-62(1)ICF-C1
FM/AM Clock Radio
Operating InstructionsИнструкция по эксплуатации (Переход назад)©2014 Sony Corporation Printed in China
FM/AM Clock Radio
Operating Instructions
©2014 Sony Corporation
Printed in China
ICF-C1
Before operating the unit, please read this
guide thoroughly and retain it for future
reference.
For customers who purchased this
product in the USA
Please register this product on line at
http://www.sony.com/productregistration.
Proper registration will enable us to send
you periodic mailings about new products,
services, and other important
announcements. Registering your product
will also allow us to contact you in the
unlikely event that the product needs
adjustment or modification. Thank you.
NOTE
WARNING
This equipment has been tested and found to
To reduce the risk of fire or electric shock, do
comply with the limits for a Class B digital
not expose this apparatus to rain or
device, pursuant to Part 15 of the FCC Rules.
moisture.
These limits are designed to provide
reasonable protection against harmful
To reduce the risk of fire, do not cover the
interference in a residential installation. This
ventilation of the apparatus with newspapers,
equipment generates, uses and can radiate
tablecloths, curtains, etc. And do not place
radio frequency energy and, if not installed and
lighted candles on the apparatus.
used in accordance with the instructions, may
To reduce the risk of fire or electric shock, do
cause harmful interference to radio
not expose this apparatus to dripping or
communications. However, there is no
splashing, and do not place objects filled with
guarantee that interference will not occur in a
liquids, such as vases, on the apparatus.
particular installation. If this equipment does
Do not install the appliance in a confined
cause harmful interference to radio or
space, such as a bookcase or built-in cabinet.
television reception, which can be determined
Do not expose batteries or apparatus with
by turning the equipment off and on, the user
battery-installed to excessive heat such as
is encouraged to try to correct the interference
sunshine, fire or the like.
by one or more of the following measures:
— Reorient or relocate the receiving
As the main plug is used to disconnect the unit
antenna.
from the mains, connect the unit to an easily
— Increase the separation between the
accessible AC outlet. Should you notice an
equipment and receiver.
abnormality in the unit, disconnect the main
— Connect the equipment into an outlet on
plug from the AC outlet immediately.
a circuit different from that to which the
receiver is connected.
The unit is not disconnected from the AC
— Consult the dealer or an experienced
power source (mains) as long as it is connected
radio/TV technician for help.
to the wall outlet, even if the unit itself has
been turned off.
WARNING
The nameplate and important information
concerning safety are located on the bottom
Do not ingest battery, chemical burn
exterior.
hazard.
You are cautioned that any changes or
This product contains a coin/button cell
modifications not expressly approved in this
battery. If the coin/button cell battery is
manual could void your authority to operate
swallowed, it can cause severe internal burns in
this equipment.
just 2 hours and can lead to death.
Keep new and used batteries away from
CAUTION
children. If the battery compartment does not
Danger of explosion if battery is incorrectly
close securely, stop using the product and keep
replaced. Replace only with the same type.
it away from children.
If you think batteries might have been
swallowed or placed inside any part of the
body, seek immediate medical attention.
Important Safety Instructions
1) Read these instructions.
2) Keep these instructions.
3) Heed all warnings.
4) Follow all instructions.
5) Do not use this apparatus near water.
6) Clean only with dry cloth.
7) Do not block any ventilation openings.
Install in accordance with the
manufacturer’s instructions.
 Do not install near any heat sources such as
radiators, heat registers, stoves, or other
apparatus (including amplifiers) that
produce heat.
9) Do not defeat the safety purpose of the
polarized or grounding-type plug. A
4-480-527-11(1)
polarized plug has two blades with one
wider than the other. A grounding type
plug has two blades and a third grounding
prong. The wide blade or the third prong
are provided for your safety. If the provided
plug does not fit into your outlet, consult an
electrician for replacement of the obsolete
outlet.
10) Protect the power cord from being walked
on or pinched particularly at plugs,
convenience receptacles, and the point
where they exit from the apparatus.
11) Only use attachments/accessories specified
by the manufacturer.
12) Use only with the cart, stand, tripod,
bracket, or table specified by the
manufacturer, or sold with the apparatus.
When a cart is used, use caution when
moving the cart/apparatus combination to
avoid injury from tip-over.
13) Unplug this apparatus during lightning
storms or when unused for long periods of
time.
14) Refer all servicing to qualified service
personnel. Servicing is required when the
apparatus has been damaged in any way,
such as power-supply cord or plug is
damaged, liquid has been spilled or objects
This symbol is intended to alert the
user to the presence of uninsulated
have fallen into the apparatus, the
«dangerous voltage» within the
apparatus has been exposed to rain or
product’s enclosure that may be of
moisture, does not operate normally, or has
sufficient magnitude to constitute a
been dropped.
risk of electric shock to persons.
This symbol is intended to alert the
For the state of California, USA
user to the presence of important
operating and maintenance (servicing)
only
instructions in the literature
Perchlorate Material –special handling may
accompanying the appliance.
apply, See
www.dtsc.ca.gov/hazardouswaste/perchlorate
Perchlorate Material: Lithium battery contains
perchlorate
Precautions
Operate the unit on the power sources
specified in «Specifications.»
To disconnect the power cord (mains lead),
pull it out by the plug, not the cord.
Do not leave the unit in a location near a
heat source, such as a radiator or airduct, or
in a place subject to direct sunlight, excessive
dust, mechanical vibration, or shock.
Allow adequate air circulation to prevent
internal heat build-up. Do not place the unit
on a surface (a rug, blanket, etc.) or near
materials (a curtain) that might block the
ventilation holes.
NOTES ON LITHIUM BATTERY
Wipe the battery with a dry cloth to assure a
good contact.
Be sure to observe the correct polarity when
installing the battery.
Do not hold the battery with metallic
tweezers, otherwise a short-circuit may
occur.
Do not expose the battery to excessive heat
such as direct sunlight, fire or the like.
If you have any questions or problems
concerning your unit, please consult your
nearest Sony dealer.
General information
Troubleshooting
Should any problems persist after you have
made the following checks, consult your
nearest Sony dealer.
The clock flashes «AM 12:00» after a
power interruption.
The battery is discharged. Remove the old
battery and insert a new one.
Unsatisfactory reception
The AC power cord functions as an FM
antenna. Extend the AC power cord fully to
increase reception sensitivity.
Rotate the unit horizontally for optimum
reception. A ferrite bar AM antenna is built
into the unit.
About the battery as a
backup power source
This unit contains a CR2032 battery as a backup
power source to keep the clock operating
during a power interruption.
Do not operate the unit over a steel desk or
When to replace the
metal surface, as this may lead to
interference.
battery
The radio or buzzer alarm does not
When the battery is discharged, «» appears
sound at the preset alarm time.
on the display.
Check that » » appears on the display.
If a power interruption occurs while the battery
is discharged, the current time and alarm will
The radio alarm is activated but no
be erased.
sound is emitted at the preset alarm
time.
Note
Adjust the volume using VOLUME +/–.
If «AM 12:00» flashes on the display when the
unit is connected to an AC outlet for the first
When daylight saving time (summer
time, the battery may be discharged. In this
time) begins, the clock does not switch
case, consult your nearest Sony dealer.
to daylight saving time (summer time)
automatically.
Make sure the clock is set correctly.
When «Aut On» appears on the display
after pressing and holding DST for more than
3 seconds, the Automatic DST/summer time
function becomes active.
Specifications
Time display
12-hour system
Frequency range
Band
Frequency
FM
87.5 MHz – 108 MHz
AM
530 kHz – 1,710 kHz
Speaker
Approx. 6.6 cm (2 5/8 inches) dia., 8 Ω
Power output
100 mW (at 10% harmonic distortion)
Power requirements
120 V AC, 60 Hz
For power backup: 3 V DC, one CR2032 battery
Dimensions
Approx. 101 mm 102 mm 101 mm (w/h/d)
(4 inches 4 inches 4 inches) including
projecting parts and controls
Mass
Approx. 480 g (1 lb 1 oz) including CR2032
battery
Design and specifications are subject to
change without notice.
Replacing the backup
battery
1
Keep the AC plug connected to the
wall outlet, loosen the screw that
secures the battery compartment on
the bottom of the unit, and remove
the battery compartment. (See Fig.
-.)
2
Insert a new battery into the battery
compartment with the side facing
up.
To remove the battery from the battery
compartment, push it out from the side
marked PUSH. (See Fig. -.)
3
Insert the battery compartment back
into the unit and secure it with the
screw. (See Fig. -.)
4
Press RADIO to remove » » from the
display.
Notes
When you replace the battery, do not
disconnect the AC plug from the wall outlet.
Otherwise, the current date, current time and
alarm will be erased.
If the unit will be left unplugged for a long
time, remove the battery to avoid any
damage that may be caused by leakage or
corrosion.

Sony ICF-C1 Радиобудильник со светодиодной подсветкой, черный

Характеристики
- BRAND: Sony
- ЦВЕТ: Black
- ФОРМА: Квадратный
- ИСТОЧНИК ПИТАНИЯ: Переменный ток и батарея
- ТЕМА: Фантазия
- МАТЕРИАЛ РАМЫ: пластик
- ТИП ДИСПЛЕЯ: ЖК-дисплей
- ВОЗРАСТНОЙ ДИАПАЗОН (ОПИСАНИЕ): Для взрослых
- ТИП МОНТАЖА: Стол
- РЕЖИМ РАБОТЫ: Electrical
- ВЫХОД НА ДИНАМИК: 100 мВт (при 10% гармонических искажений)
- ЧАСЫ: 12-часовая система
- ТРЕВОГА: Одиночный будильник (на выбор: радио или зуммер)
- ТЕХНОЛОГИЯ АВТОЧАСОВ: Автоматическая установка времени и автоматическая настройка летнего времени
- ОТДЕРЖКА С РАСШИРЕННОЙ ОТДЕРЖКОЙ: Расширяемая система повтора с 10 до 60 минут
- ЧАСЫ ТАЙМЕРА: ТАЙМЕР СОНА: 15 мин./30 мин./60 мин./90 мин.
- ЦВЕТ ПОДСВЕТКИ: Amber
- ФУНКЦИЯ ДЕНЬ/НОЧЬ: 3-ступенчатая регулировка яркости (высокий, средний, низкий режим)
- DISPLAY: Большой, легко читаемый ЖК-дисплей с желтой подсветкой и затемненным ЖК-дисплеем с регулировкой яркости
- РЕЗЕРВНОЕ ПИТАНИЕ: 3 В постоянного тока, одна литиевая батарея CR2032
- ТРЕБОВАНИЯ К ПИТАНИЮ: 120 В переменного тока, 60 Гц
- ДИАПАЗОН ЧАСТОТ: FM: 87.5 МГц – 108 МГц, шаг 0.1 МГц
- AM: 530 кГц – 1710 кГц. Шаг 10 кГц
- РАЗМЕРЫ ДИНАМИКОВ: Диаметр приблизительно 6.6 см (2 5/8 дюйма), 8 Ом
- ТЮНИНГ: Аналоговый AM/FM-тюнер
- РАЗМЕРЫ (ПРИБЛ.): 4″x 4″x4″ (101x102x101 мм), не включая выступающие части и элементы управления
- ВЕС (ПРИБЛ.): 1 фунт 13 унций (490 г.) включая батарею CR2032
Введение
С радио-будильником Sony вставай и иди. Резервный аккумулятор также присутствует, чтобы гарантировать, что вы никогда больше не забудете важную встречу или встречу, а огромный, простой для чтения ЖК-дисплей с подсветкой и гигантскими светодиодами позволяет легко считывать время с другого конца комнаты! На большом легко читаемом ЖК-дисплее с подсветкой вы можете четко видеть время. Даже без очков читать время легко благодаря большим ярко-оранжевым светодиодам. Обычные будильники обычно имеют предустановленный уровень, который либо слишком низок, чтобы разбудить вас, либо слишком громок, чтобы разбудить вас внезапно. Функция постепенного пробуждения постепенно повышает громкость с низкого, деликатного уровня до умеренно громкого, чтобы мягко разбудить вас ото сна. С регулируемой регулировкой яркости вы можете быть уверены, что можете легко видеть дисплей в течение дня и не будете отвлекаться при попытке заснуть ночью из-за яркости дисплея. Благодаря встроенному аналоговому FM/AM-тюнеру вы можете выбирать из огромного выбора радио, разговорных и музыкальных программ.
Используйте запрограммированный таймер сна, чтобы переключиться на радио. Есть кнопка повтора, чтобы вы могли немного поспать по утрам, когда вы просто не можете встать с постели. Примерно через 10 минут звук автоматически возобновляется после выключения. Даже в случае сбоя питания часы продолжают работать благодаря дополнительному резервному аккумулятору. Более того, внутренний календарь распознает дату и делает соответствующие корректировки для перехода на летнее или стандартное время. Простота сборки! Вам нужно только подключить C1 и выбрать правильный часовой пояс, потому что он уже настроен на стандартное восточное время (EST).
ПРОДУКТ ВЫШЕVIEW


ПРЕДУПРЕЖДЕНИЕ
- Чтобы снизить риск возгорания, не закрывайте вентиляционное отверстие устройства газетами, скатертями, шторами и т. Д. Не подвергайте устройство воздействию источников открытого огня (например,ampле, зажженные свечи).
- Чтобы снизить риск возгорания или поражения электрическим током, не подвергайте это устройство воздействию капель или брызг, а также не ставьте на него предметы, наполненные жидкостью, например вазы.
- Не устанавливайте прибор в ограниченном пространстве, например в книжном шкафу или встроенном шкафу.
- Не подвергайте батареи или устройство с установленными батареями чрезмерному нагреванию, например, солнечному свету, огню и т.п.
- Не глотайте батарею, опасность химического ожога
- (Пульт дистанционного управления входит в комплект) Этот продукт содержит батарейку типа «таблетка». Проглатывание батарейки типа «таблетка» может вызвать серьезные внутренние ожоги всего за 2 часа и привести к смерти.
- Храните новые и использованные батареи в недоступном для детей месте.
- Если батарейный отсек закрывается ненадежно, прекратите использование продукта и храните его в недоступном для детей месте.
- Если вы считаете, что батарейки могли быть проглочены или помещены в какую-либо часть тела, немедленно обратитесь за медицинской помощью.
- Поскольку сетевой штекер используется для отключения устройства от сети, подключайте его к легкодоступной розетке переменного тока. Если вы заметили неисправность в устройстве, немедленно отключите сетевую вилку от розетки переменного тока.
- Устройство не отключается от источника питания переменного тока (сети), пока оно подключено к розетке, даже если само устройство было выключено.
- Паспортная табличка и важная информация по безопасности расположены снизу снаружи.
ВНИМАНИЕ!
- Опасность взрыва при неправильной замене батареи. Заменять только на такой же.
- Маркировка CE действует только в тех странах, где она обязательна по закону, в основном в странах ЕЭЗ (Европейская экономическая зона) и Швейцарии.
МЕРЫ ПРЕДОСТОРОЖНОСТИ
- Не оставляйте устройство под осветительным оборудованием, вблизи источников тепла, таких как радиаторы или воздуховоды, а также в местах, подверженных воздействию прямых солнечных лучей, сильной запыленности, механической вибрации или ударам.
- Обеспечьте адекватную циркуляцию воздуха для предотвращения внутреннего перегрева. Не ставьте устройство на поверхность (коврик, одеяло и т. Д.) Или рядом с материалами (занавеской), которые могут блокировать вентиляционные отверстия.
- Если какой-либо твердый предмет или жидкость попали внутрь устройства, отключите устройство от сети и проверьте его с помощью квалифицированного персонала перед дальнейшей эксплуатацией.
- Для очистки корпуса используйте мягкую сухую ткань. Не используйте какие-либо растворители, например спирт или бензин, так как они могут повредить покрытие.
- Не подключайте провод антенны к внешней антенне.
ПРИМЕЧАНИЯ ПО ЛИТИЕВОЙ БАТАРЕИ
- Аккумулятор может взорваться при неправильном обращении. Не перезаряжайте, не разбирайте и не бросайте в огонь.
- Немедленно утилизируйте использованную батарею. Храните литиевую батарею в недоступном для детей месте.
- В случае проглатывания батареи немедленно обратитесь к врачу.
- Протрите аккумулятор сухой тканью, чтобы обеспечить хороший контакт.
- При установке батареи обязательно соблюдайте полярность.
- Не держите аккумулятор металлическим пинцетом, иначе может произойти короткое замыкание.
- Батареи имеют рекомендуемый срок годности для правильного использования. При замене батареи проверьте срок годности новой батареи, указанный на упаковке и т. д.
- Если у вас есть какие-либо вопросы или проблемы относительно вашего устройства, обратитесь к ближайшему дилеру Sony.
НАЧАЛО РАБОТЫ
ПОДКЛЮЧЕНИЕ К ИСТОЧНИКУ ПИТАНИЯ ПЕРЕМЕННОГО ТОКА
Подключите шнур питания переменного тока к сетевой розетке.
О БАТАРЕЕ КАК РЕЗЕРВНОМ ИСТОЧНИКЕ ПИТАНИЯ
Этому устройству требуется батарея CR2032 (входит в комплект) в качестве резервного источника питания, чтобы часы продолжали работать во время сбоя питания.
КОГДА ЗАМЕНЯТЬ БАТАРЕЮ
Когда батарея разряжена, на дисплее появляется значок ”LOW BATTERY”. Если произойдет прерывание питания, когда батарея разряжена, текущее время и будильник будут стерты.
УСТАНОВКА И ЗАМЕНА РЕЗЕРВНОЙ БАТАРЕИ
- Держите вилку переменного тока подключенной к настенной розетке и извлеките батарейный отсек в нижней части устройства, потянув его вверх, сдвинув язычок.
- Вставьте новую батарею в батарейный отсек стороной вверх. Чтобы извлечь батарею из батарейного отсека, выдвиньте ее со стороны с надписью PUSH.
- Вставьте батарейный отсек обратно в устройство по канавке и надавите на него сверху до щелчка.
- Нажмите RADIO, чтобы убрать значок «LOW BATTERY» с дисплея.
ПРИМЕЧАНИЯ
- При замене батареи не отсоединяйте вилку переменного тока от настенной розетки. В противном случае текущая дата, текущее время и будильник будут стерты.
- Если устройство будет оставаться отключенным от сети в течение длительного времени, извлеките аккумулятор, чтобы избежать повреждений, которые могут быть вызваны утечкой или коррозией.
НАСТРОЙКА ЧАСОВ
- Нажмите и удерживайте кнопку ENTER/TIME SET более 2 секунд. Вы услышите звуковой сигнал, и на дисплее начнут мигать две последние цифры года.
- Несколько раз нажмите + или –, чтобы выбрать год, а затем нажмите ENTER/TIME SET.

- Повторите шаг 2, чтобы установить месяц, день и время. После установки времени прозвучат два коротких сигнала, и секунды начнут отсчитываться с нуля.

ЗАМЕТКА
- Если вы не нажмете ни одну кнопку в течение примерно 1 минуты во время установки часов, режим установки часов будет отменен.
ПЕРЕКЛЮЧЕНИЕ ДИСПЛЕЙ НА ЛЕТНЕЕ ВРЕМЯ (ЛЕТНЕЕ ВРЕМЯ)
- Измените настройку настройки летнего времени (летнего времени) в соответствии со следующей процедурой.
- Нажмите и удерживайте DST более 3 секунд.
- На дисплее появляется «DST», и дисплей часов переключается на летнее время (летнее время).
- Чтобы деактивировать настройку летнего времени (летнего времени), снова нажмите и удерживайте DST более 3 секунд.
ОПЕРАЦИИ
ВОСПРОИЗВЕДЕНИЕ РАДИО
- Нажмите RADIO, чтобы включить радио.
- Установите BAND на нужный диапазон (AM или FM).

- Настройтесь на нужную станцию с помощью TUNING.
- Отрегулируйте громкость с помощью VOLUME +/–. Чтобы выключить радио, нажмите ALARM RESET/OFF.

УСТАНОВКА БУДИЛЬНИКА
Звук будильника можно выбрать из RADIO (радио) или BUZZ (зуммер).
ПЕРЕД УСТАНОВКОЙ БУДИЛЬНИКА
- Не забудьте настроить часы. (См. «Настройка часов».)
- Чтобы установить радиобудильник, сначала настройтесь на станцию и отрегулируйте громкость. (См. «Воспроизведение радио».)
ЧТОБЫ УСТАНОВИТЬ БУДИЛЬНИК
ВЫКЛЮЧИТЬ БУДИЛЬНИК
- Нажмите ALARM RESET/OFF, чтобы выключить будильник.
- Будильник снова прозвучит в то же время на следующий день.
ВСПОМИНАТЬ ЕЩЕ НЕСКОЛЬКО МИНУТ
- Нажмите SNOOZE/BRIGHTNESS.
- Звук выключится, но автоматически включится снова примерно через 10 минут.
- Каждый раз, когда вы нажимаете SNOOZE/BRIGHTNESS, время повтора изменяется следующим образом:

- Дисплей показывает время повтора в течение примерно 4 секунд и возвращается к отображению текущего времени. (« » мигает на дисплее.)
ДЛЯ ОТКЛЮЧЕНИЯ БУДИЛЬНИКА
Установите РЕЖИМ БУДИЛЬНИКА на ВЫКЛ. исчезает с дисплея.
ПРИМЕЧАНИЯ
- Настройка времени будильника не может быть изменена, если для параметра РЕЖИМ БУДИЛЬНИКА установлено значение ВЫКЛ. Если нажать SET ALARM TIME + или –, на дисплее примерно на 0.5 секунды появится надпись «OFF».
- ENTER/TIME SET и DST недоступны, пока звучит будильник или включена функция повтора.
- Если во время срабатывания будильника не выполняется никаких действий, он отключится примерно через 60 минут.
ПРИМЕЧАНИЯ О СИГНАЛИЗАЦИИ В СЛУЧАЕ ПЕРЕРЫВА ЭЛЕКТРОПИТАНИЯ
Если установленное время будильника наступает в случае прерывания питания или прерывание питания происходит во время звучания будильника, дисплей выключается и будильник не звучит, а состояние будильника будет следующим:
- Если питание вернется в течение 60 минут после установленного времени будильника, сработает будильник.
- Если прерывание питания произошло во время работы функции повтора, функция повтора продолжится.
- Если время повтора прошло, когда произошло прерывание питания, сигнал тревоги прозвучит после восстановления питания.
В этом состоянии, если значок «НИЗКИЙ АККУМУЛЯТОР» не загорается, доступны функции СБРОС/ВЫКЛ БУДИЛЬНИКА, ОТМЕНА/ЯРКОСТЬ и режим будильника. Время повтора будет установлено только на 10 минут, если была нажата кнопка SNOOZE/BRIGHTNESS.
УСТАНОВКА ТАЙМЕРА СНА
- Вы можете засыпать под радио с помощью таймера сна, который автоматически выключает радио по истечении заданного времени.
- Нажмите СОН.
- Радио включается. Каждый раз, когда вы нажимаете SLEEP, продолжительность (в минутах) изменяется следующим образом:

- Радио будет играть в течение установленного вами времени, а затем выключится.
- Чтобы отключить таймер сна, нажмите SLEEP
- несколько раз, чтобы установить таймер сна на «ВЫКЛ.».

ВЫКЛЮЧИТЬ РАДИО ДО ПРЕДУСТАНОВЛЕННОГО ВРЕМЕНИ
Нажмите СБРОС БУДИЛЬНИКА/ВЫКЛ.
ДЛЯ ИСПОЛЬЗОВАНИЯ ТАЙМЕРА СНА И БУДИЛЬНИКА
Вы можете заснуть под радио, а также проснуться от радио или зуммера в настоящее время. Установите будильник, затем установите таймер сна.
ЗАМЕТКА
- Если будильник настроен на звучание в течение времени таймера сна, таймер сна будет автоматически отключен, когда сработает будильник.
НАСТРОЙКА ЯРКОСТИ ДИСПЛЕЯ
- Доступны три уровня яркости.
- Нажмите SNOOZE/BRIGHTNESS.
- При каждом нажатии кнопки SNOOZE/BRIGHTNESS яркость дисплея изменяется следующим образом:


ЗАМЕТКА
- Когда звучит будильник или активна функция повтора, яркость дисплея изменить нельзя.
Часто задаваемые вопросы
- Что означает DST на будильнике от Sony?
Дисплей часов переключается на летнее время, как только на нем появляется «DST» (летнее время). - Как отключить радио на моем Sony ALARM?
Нажмите кнопку ALARM RESET/OFF [РИС. 1] в верхней части радиочасов, чтобы отключить функцию радио (см. раздел «Продукты» ниже). Нажмите кнопку FM, расположенную слева от кнопки ALARM RESET/OFF, чтобы возобновить использование радио. - Что означает DST на часах?
Чтобы предоставить людям дополнительный час дневного света во второй половине дня и вечером в теплые месяцы года, летнее время (DST) — это практика перевода часов вперед по мере приближения более теплой погоды и назад по мере того, как становится холоднее. - Что означает демонстрационный режим радио?
Бытовая электроника иногда имеет функцию, известную как демонстрационный режим, что означает «демонстрационный режим», но также иногда упоминается как напольный режим или режим киоска. Прошивка напольной модели обычно содержит демонстрационный режим, доступ к которому можно получить, нажав набор клавиш или запустив программу. - Кнопка перехода на летнее время: что это такое?
Чтобы включить или отключить переход на летнее время, нажмите кнопку перехода на летнее время в верхней части радиочасов. ПРИМЕЧАНИЯ: Индикатор перехода на летнее время на передней панели радиочасов загорается, когда активирована функция перехода на летнее время. - Автопереход на летнее время: что это такое?
Переход на летнее время (DST) осуществляется автоматически. Эти настенные часы AllSet® с питанием от батареек и механизмом автоматического перехода на летнее время имеют ударопрочный черный пластиковый корпус. Корректировка летнего времени производится автоматически, потому что в часах есть микрочип с внутренней батареей, который отслеживает текущую дату и время. - У моих радиочасов есть будильник, как его отключить?
Нажмите кнопку ALARM SET A или ALARM SET B на радиочасах AM/FM, чтобы выключить будильник. ALARM A или ALARM SET B больше не будут активны, когда индикатор ALARM A или ALARM SET B исчезнет из верхнего левого угла дисплея. - Как изменить яркость на моей Sony Dream Machine?
Когда будильник не звучит и все работает нормально, вы можете переключаться между настройками яркости дисплея, включая отключение дисплея, нажимая и отпуская кнопку повтора/диммера дисплея. При включении устройство всегда будет запускаться с максимальной (самой яркой) настройкой дисплея. - Как установить время на моем Sony Dream Machine ICF cd815?
На дисплее начнет мигать час. Пока не появится нужный час, нажимайте TIME SET + или -. Удерживайте кнопку TIME SET + или –, чтобы быстро установить час. Выберите БУДИЛЬНИК A или B. - Есть ли аккумулятор в Sony Dream Machine?
Начните с удаления винта, удерживающего компонент батареи на задней панели устройства, с помощью небольшой отвертки Phillips.
English
Before operating the unit, please read this
guide thoroughly and retain it for future
reference.
WARNING
To reduce the risk of fire, do not cover the
ventilation of the apparatus with newspapers,
tablecloths, curtains, etc. And do not place
lighted candles on the apparatus.
To reduce the risk of fire or electric shock, do
not expose this apparatus to dripping or
splashing, and do not place objects filled with
liquids, such as vases, on the apparatus.
Do not install the appliance in a confined
space, such as a bookcase or built-in cabinet.
Do not expose batteries or apparatus with
battery-installed to excessive heat such as
sunshine, fire or the like.
As the main plug is used to disconnect the unit
from the mains, connect the unit to an easily
accessible AC outlet. Should you notice an
abnormality in the unit, disconnect the main
plug from the AC outlet immediately.
The unit is not disconnected from the AC
power source (mains) as long as it is connected
to the wall outlet, even if the unit itself has
been turned off.
The nameplate and important information
concerning safety are located on the bottom
exterior.
CAUTION
Danger of explosion if battery is incorrectly
replaced. Replace only with the same type.
This symbol is intended to alert the
user to the presence of important
operating and maintenance (servicing)
instructions in the literature
accompanying the appliance.
Disposal of waste batteries and
electrical and electronic equipment
(applicable in the European Union and
other European countries with separate
collection systems)
This symbol on the product, the
battery or on the packaging
indicates that the product and the
battery shall not be treated as
household waste. On certain
batteries this symbol might be used
in combination with a chemical symbol. The
chemical symbols for mercury (Hg) or lead (Pb) are
added if the battery contains more than 0.0005%
mercury or 0.004% lead. By ensuring these
products and batteries are disposed of correctly,
you will help prevent potentially negative
consequences for the environment and human
health which could otherwise be caused by
inappropriate waste handling. The recycling of the
materials will help to conserve natural resources.
In case of products that for safety, performance or
data integrity reasons require a permanent
connection with an incorporated battery, this
battery should be replaced by qualified service
staff only. To ensure that the battery and the
electrical and electronic equipment will be treated
properly, hand over these products at end-of-life to
the applicable collection point for the recycling of
electrical and electronic equipment. For all other
batteries, please view the section on how to
remove the battery from the product safely. Hand
the battery over to the applicable collection point
for the recycling of waste batteries. For more
detailed information about recycling of this product
or battery, please contact your local Civic Office,
your household waste disposal service or the shop
where you purchased the product or battery.
WARNING
Battery may explode if handled incorrectly.
Do not recharge, disassemble or dispose of
in fire.
Dispose of used battery promptly and in
accordance with local environmental laws
and guidelines. Keep away from children.
Precautions
Operate the unit on the power sources
specified in “Specifications.”
To disconnect the power cord (mains lead),
pull it out by the plug, not the cord.
Do not leave the unit in a location near a
heat source, such as a radiator or airduct, or
in a place subject to direct sunlight, excessive
dust, mechanical vibration, or shock.
Allow adequate air circulation to prevent
internal heat build-up. Do not place the unit
on a surface (a rug, blanket, etc.) or near
materials (a curtain) that might block the
ventilation holes.
Should any solid object or liquid fall into the
unit, unplug the unit and have it checked by
a qualified personnel before operating it any
further.
To clean the casing, use a soft dry cloth. Do
not use any type of solvent, such as alcohol
or benzine, which may damage the finish.
Do not connect the antenna lead to the
external antenna.
NOTES ON LITHIUM BATTERY
Dispose of used battery promptly. Keep the
lithium battery out of the reach of children.
Should the battery be swallowed,
immediately consult a doctor.
Wipe the battery with a dry cloth to assure a
good contact.
Be sure to observe the correct polarity when
installing the battery.
Do not hold the battery with metallic
tweezers, otherwise a short-circuit may
occur.
Do not expose the battery to excessive heat
such as direct sunlight, fire or the like.
If you have any questions or problems
concerning your unit, please consult your
nearest Sony dealer.
Getting Started
Connecting to an AC
power source
Connect the AC power cord to a wall outlet.
To wall outlet
About the battery as a
backup power source
This unit needs a CR2032 battery (supplied) as
a backup power source to keep the clock
operating during a power interruption.
When to replace the
battery
When the battery is discharged, “” appears
on the display.
If a power interruption occurs while the battery
is discharged, the current time and alarm will
be erased.
Installing and replacing
the backup battery
1 Keep the AC plug connected to the
wall outlet and remove the battery
compartment on the bottom of the
unit by pulling it up while sliding the
tab. (See Fig. —.)
2 Insert a new battery into the battery
compartment with the side facing
up.
To remove the battery from the battery
compartment, push it out from the side
marked PUSH. (See Fig. —.)
3 Insert the battery compartment back
into the unit along the groove and
push it from above until it clicks. (See
Fig. —.)
The tab locks the battery compartment.
4 Press RADIO to remove “
” from the
display.
Notes
When you replace the battery, do not
disconnect the AC plug from the wall outlet.
Otherwise, the current date, current time and
alarm will be erased.
If the unit will be left unplugged for a long
time, remove the battery to avoid any
damage that may be caused by leakage or
corrosion.
Setting the clock
1 Press and hold ENTER/TIME SET for
more than 2 seconds.
You will hear a beep and the last two digits
of the year will start to flash on the display.
2 Press + or – repeatedly to select the
year, and then press ENTER/TIME SET.
3 Repeat step 2 to set the month, day
and time.
After setting the time, two short beeps will
sound and the seconds will start
incrementing from zero.
Note
If you do not press any button for about 1
minute while setting the clock, clock setting
mode will be canceled.
To change the display to
indicate daylight saving time
(summer time)
Change the daylight saving time (summer
time) adjustment setting according to the
following procedure.
Press and hold DST for more than 3
seconds.
“DST” appears on the display and the clock
display switches to daylight saving time
(summer time).
To deactivate the daylight saving time (summer
time) adjustment, press and hold DST for more
than 3 seconds again.
AC power cord
The frequency of the current radio
station is displayed as a rough guide.
Display
There is a tactile dot beside VOLUME + to show the direction to go to turn up the
volume.
Operations
Playing the radio
1 Press RADIO to turn on the radio.
2 Set BAND to the desired band (AM or
FM).
3 Tune to the desired station using
TUNING.
4 Adjust the volume using VOLUME +/–.
To turn off the radio, press ALARM RESET/
OFF.
Setting the alarm
The alarm sound can be selected from RADIO
(radio) or BUZZ (buzzer).
Before setting the alarm
Make sure to set the clock. (See “Setting the
clock.”)
To set the radio alarm, first tune to a station
and adjust the volume. (See “Playing the
radio.”)
To set the alarm
1
Set ALARM MODE to the desired
alarm sound (RADIO or BUZZ).
The alarm time appears for a few seconds,
and then “
” appears on the display. (It
does not appear when the switch is set to
OFF.)
2 Press SET ALARM TIME + or –
repeatedly to set the desired time
while the alarm time appears on the
display.
While setting the alarm time, “ ” flashes on
the display.
When the alarm time setting operation is
complete, the clock display returns after a
few seconds and “
” changes from flashing
to fully lit.
At the set time, the radio will turn on, or the
buzzer will sound gradually increasing in
volume. (“
” flashes on the display.)
To stop the alarm
Press ALARM RESET/OFF to turn off the
alarm.
The alarm will sound again at the same time
the next day.
To doze for a few more minutes
Press SNOOZE/BRIGHTNESS.
The sound turns off, but will automatically
come on again after about 10 minutes.
Each time you press SNOOZE/BRIGHTNESS,
the snooze time changes as follows:
The display shows the snooze time for about
4seconds and returns to show the current
time. (“
” flashes on the display.)
To deactivate the alarm
Set ALARM MODE to OFF.
“ ” disappears from the display.
Notes
The alarm time setting cannot be changed if
ALARM MODE is set to OFF. If SET ALARM
TIME + or – is pressed, “OFF” appears on the
display for about 0.5 seconds.
ENTER/TIME SET and DST are unavailable
while the alarm is sounding or the snooze
function is turned on.
If no operation is performed while the alarm
is sounding, the alarm will stop after about
60 minutes.
Notes on the alarm in the event of a
power interruption
If the set alarm time comes in the event of a
power interruption or a power interruption
occurs while the alarm is sounding, the display
will turn off and the alarm will not sound, and
the alarm status will be as follows:
If power returns within 60 minutes from the
alarm set time, the alarm will sound.
If the power interruption occurred while the
snooze function was operating, the snooze
function will continue.
If the snooze time had passed when the
power interruption occurred, the alarm will
sound after power returns.
In this status, if “” does not light up, ALARM
RESET/OFF, SNOOZE/BRIGHTNESS and alarm
mode functions are available. The snooze time
will be fixed to only 10 minutes if SNOOZE/
BRIGHTNESS has been pressed.
Setting the sleep
timer
You can fall asleep to the radio using the sleep
timer, which turns off the radio automatically
after a preset duration.
Press SLEEP.
The radio turns on. Each time you press SLEEP,
the duration (in minutes) changes as follows:
The radio will play for the duration you set,
then shut off.
To deactivate the sleep timer, press SLEEP
repeatedly to set the sleep timer to “OFF.”
To turn off the radio before the
preset time
Press ALARM RESET/OFF.
To use both the sleep timer and
alarm
You can fall asleep to the radio and also be
awakened by the radio or buzzer alarm at the
preset time.
Set the alarm, then set the sleep timer.
Note
When the alarm is set to sound during the
sleep timer duration, the sleep timer will be
deactivated automatically when the alarm
sounds.
Setting the brightness
of the display
Three levels of brightness are available.
Press SNOOZE/BRIGHTNESS.
Each time you press SNOOZE/BRIGHTNESS,
the brightness of the display changes as
follows:
Note
When the alarm is sounding or the snooze
function is active, the brightness of the
display cannot be changed.
General information
Troubleshooting
Should any problems persist after you have
made the following checks, consult your
nearest Sony dealer.
The clock flashes “0:00” after a power
interruption.
The battery is discharged. Remove the old
battery and insert a new one.
Unsatisfactory reception
Extend the FM wire antenna fully to increase
reception sensitivity.
Rotate the unit horizontally for optimum
reception. A ferrite bar AM antenna is built
into the unit.
Do not operate the unit over a steel desk or
metal surface, as this may lead to
interference.
The radio or buzzer alarm does not
sound at the preset alarm time.
Check that “
” appears on the display.
The radio alarm is activated but no
sound is emitted at the preset alarm
time.
Adjust the volume using VOLUME +/–.
Specifications
Time display
24-hour system
Frequency range
Band Frequency
FM 87.5 MHz – 108 MHz
AM 531 kHz – 1,602 kHz
Speaker
Approx. 6.6 cm dia., 8 Ω
Power output
100 mW (at 10% harmonic distortion)
Power requirements
230 V AC, 50 Hz
For power backup: 3 V DC, one CR2032 battery
Dimensions
Approx. 101 mm 102 mm 101 mm (w/h/d)
including projecting parts and controls
Mass
Approx. 480 g including CR2032 battery
Supplied accessories
CR2032 battery (1)
Design and specifications are subject to
change without notice.
FM wire antenna
4-480-527-61(2)
ICF-C1
FM/AM Clock Radio
Operating Instructions
Инструкция по эксплуатации (Переход назад)
©2014 Sony Corporation Printed in China
ICF-C1_RU5 [GB/RU] 4-480-527-62(1)
English
Before operating the unit, please read this
guide thoroughly and retain it for future
reference.
WARNING
To reduce the risk of fire, do not cover the
ventilation opening of the appliance with
newspapers, tablecloths, curtains, etc. Do not
expose the appliance to naked flame sources
(for example, lighted candles).
To reduce the risk of fire or electric shock, do
not expose this apparatus to dripping or
splashing, and do not place objects filled with
liquids, such as vases, on the apparatus.
Do not install the appliance in a confined
space, such as a bookcase or built-in cabinet.
Do not expose batteries or apparatus with
battery-installed to excessive heat such as
sunshine, fire or the like.
Do not ingest the battery, Chemical Burn
Hazard
(The remote control supplied with) This product
contains a coin/button cell battery. If the coin/
button cell battery is swallowed, it can cause
severe internal burns in just 2hours and can
lead to death.
Keep new and used batteries away from
children.
If the battery compartment does not close
securely, stop using the product and keep it
away from children.
If you think batteries might have been
swallowed or placed inside any part of the
body, seek immediate medical attention.
As the main plug is used to disconnect the unit
from the mains, connect the unit to an easily
accessible AC outlet. Should you notice an
abnormality in the unit, disconnect the main
plug from the AC outlet immediately.
The unit is not disconnected from the AC
power source (mains) as long as it is connected
to the wall outlet, even if the unit itself has
been turned off.
The nameplate and important information
concerning safety are located on the bottom
exterior.
CAUTION
Danger of explosion if battery is incorrectly
replaced. Replace only with the same type.
The validity of the CE marking is restricted to
only those countries where it is legally
enforced, mainly in the countries EEA
(European Economic Area) and Switzerland.
Production Date
The date of manufacture is specified on the
barcode label on the carton after the word
“Produced” in the following format: MM-YYYY,
where MM-month and YYYY-the year of
manufacturing.
Disposal of waste batteries and electrical and electronic equipment (applicable in the European Union and other European countries with separate collection systems)
The Sony ICF-C1 is an FM and AM radio with a
built-in clock.
Precautions
Operate the unit on the power sources
specified in “Specifications.”
To disconnect the power cord (mains lead),
pull it out by the plug, not the cord.
Do not leave the unit under lighting
equipment, in a location near a heat source,
such as a radiator or airduct, or in a place
subject to direct sunlight, excessive dust,
mechanical vibration, or shock.
Allow adequate air circulation to prevent
internal heat build-up. Do not place the unit
on a surface (a rug, blanket, etc.) or near
materials (a curtain) that might block the
ventilation holes.
Should any solid object or liquid fall into the
unit, unplug the unit and have it checked by
a qualified personnel before operating it any
further.
To clean the casing, use a soft dry cloth. Do
not use any type of solvent, such as alcohol
or benzine, which may damage the finish.
Do not connect the antenna lead to the
external antenna.
NOTES ON LITHIUM BATTERY
Battery may explode if handled incorrectly.
Do not recharge, disassemble or dispose of
in fire.
Dispose of used battery promptly. Keep the
lithium battery out of the reach of children.
Should the battery be swallowed,
immediately consult a doctor.
Wipe the battery with a dry cloth to assure a
good contact.
Be sure to observe the correct polarity when
installing the battery.
Do not hold the battery with metallic
tweezers, otherwise a short-circuit may
occur.
Batteries have a recommended use-by date
for proper use. When replacing the battery,
check the expiration date of the new battery
indicated on the package, etc.
If you have any questions or problems
concerning your unit, please consult your
nearest Sony dealer.
Getting Started
Connecting to an AC
power source
Connect the AC power cord to a wall outlet.
To wall outlet
About the battery as a
backup power source
This unit needs a CR2032 battery (supplied) as
a backup power source to keep the clock
operating during a power interruption.
When to replace the
battery
When the battery is discharged, “” appears
on the display.
If a power interruption occurs while the battery
is discharged, the current time and alarm will
be erased.
Installing and replacing
the backup battery
1 Keep the AC plug connected to the
wall outlet and remove the battery compartment on the bottom of the unit by pulling it up while sliding the tab. (See Fig. —.)
2 Insert a new battery into the battery
compartment with the side facing
up.
To remove the battery from the battery
compartment, push it out from the side
marked PUSH. (See Fig. —.)
3 Insert the battery compartment back
into the unit along the groove and push it from above until it clicks. (See Fig. —.)
The tab locks the battery compartment.
4 Press RADIO to remove “
” from the display.Notes
When you replace the battery, do not
disconnect the AC plug from the wall outlet.
Otherwise, the current date, current time and
alarm will be erased.
If the unit will be left unplugged for a long
time, remove the battery to avoid any
damage that may be caused by leakage or
corrosion.
Setting the clock
1 Press and hold ENTER/TIME SET for
more than 2 seconds.
You will hear a beep and the last two digits
of the year will start to flash on the display.
2 Press + or – repeatedly to select the
year, and then press ENTER/TIME SET.
3 Repeat step 2 to set the month, day
and time.
After setting the time, two short beeps will
sound and the seconds will start
incrementing from zero.
Note
If you do not press any button for about 1
minute while setting the clock, clock setting
mode will be canceled.
To change the display to
indicate daylight saving time
(summer time)
Change the daylight saving time (summer
time) adjustment setting according to the
following procedure.
Press and hold DST for more than 3 seconds.
“DST” appears on the display and the clock
display switches to daylight saving time
(summer time).
To deactivate the daylight saving time (summer
time) adjustment, press and hold DST for more
than 3 seconds again.
AC power cordThe frequency of the current radio station is displayed as a rough guide.DisplayThere is a tactile dot beside VOLUME + to show the direction to go to turn up the volume.
Operations
Playing the radio
1 Press RADIO to turn on the radio.
2 Set BAND to the desired band (AM or
FM).
3 Tune to the desired station using
TUNING.
4 Adjust the volume using VOLUME +/–.
To turn off the radio, press ALARM RESET/
OFF.
Setting the alarm
The alarm sound can be selected from RADIO
(radio) or BUZZ (buzzer).
Before setting the alarm
Make sure to set the clock. (See “Setting the
clock.”)
To set the radio alarm, first tune to a station
and adjust the volume. (See “Playing the
radio.”)
To set the alarm
1
Set ALARM MODE to the desired alarm sound (RADIO or BUZZ).
The alarm time appears for a few seconds,
and then “
” appears on the display. (It
does not appear when the switch is set to
OFF.)
2 Press SET ALARM TIME + or –
repeatedly to set the desired time while the alarm time appears on the display.
While setting the alarm time, “ ” flashes on
the display.
When the alarm time setting operation is
complete, the clock display returns after a
few seconds and “
” changes from flashing
to fully lit.
At the set time, the radio will turn on, or the
buzzer will sound gradually increasing in
volume. (“
” flashes on the display.)
To stop the alarm
Press ALARM RESET/OFF to turn off the alarm.
The alarm will sound again at the same time
the next day.
To doze for a few more minutes
Press SNOOZE/BRIGHTNESS.
The sound turns off, but will automatically
come on again after about 10 minutes.
Each time you press SNOOZE/BRIGHTNESS,
the snooze time changes as follows:
The display shows the snooze time for about
4seconds and returns to show the current
time. (“
” flashes on the display.)
To deactivate the alarm
Set ALARM MODE to OFF.
“ ” disappears from the display.
Notes
The alarm time setting cannot be changed if
ALARM MODE is set to OFF. If SET ALARM
TIME + or – is pressed, “OFF” appears on the
display for about 0.5 seconds.
ENTER/TIME SET and DST are unavailable
while the alarm is sounding or the snooze
function is turned on.
If no operation is performed while the alarm
is sounding, the alarm will stop after about
60 minutes.
Notes on the alarm in the event of a power interruption
If the set alarm time comes in the event of a
power interruption or a power interruption
occurs while the alarm is sounding, the display
will turn off and the alarm will not sound, and
the alarm status will be as follows:
If power returns within 60 minutes from the
alarm set time, the alarm will sound.
If the power interruption occurred while the
snooze function was operating, the snooze
function will continue.
If the snooze time had passed when the
power interruption occurred, the alarm will
sound after power returns.
In this status, if “” does not light up, ALARM
RESET/OFF, SNOOZE/BRIGHTNESS and alarm
mode functions are available. The snooze time
will be fixed to only 10 minutes if SNOOZE/
BRIGHTNESS has been pressed.
Setting the sleep
timer
You can fall asleep to the radio using the sleep
timer, which turns off the radio automatically
after a preset duration.
Press SLEEP.
The radio turns on. Each time you press SLEEP,
the duration (in minutes) changes as follows:
The radio will play for the duration you set,
then shut off.
To deactivate the sleep timer, press SLEEP
repeatedly to set the sleep timer to “OFF.”
To turn off the radio before the
preset time
Press ALARM RESET/OFF.
To use both the sleep timer and
alarm
You can fall asleep to the radio and also be
awakened by the radio or buzzer alarm at the
preset time.
Set the alarm, then set the sleep timer.
Note
When the alarm is set to sound during the
sleep timer duration, the sleep timer will be
deactivated automatically when the alarm
sounds.
Setting the brightness
of the display
Three levels of brightness are available.
Press SNOOZE/BRIGHTNESS.
Each time you press SNOOZE/BRIGHTNESS,
the brightness of the display changes as
follows:
Note
When the alarm is sounding or the snooze
function is active, the brightness of the
display cannot be changed.
General information
Troubleshooting
Should any problems persist after you have
made the following checks, consult your
nearest Sony dealer.
The clock flashes “0:00” after a power interruption.
The battery is discharged. Remove the old
battery and insert a new one.
Unsatisfactory reception
Extend the FM wire antenna fully to increase
reception sensitivity.
Rotate the unit horizontally for optimum
reception. A ferrite bar AM antenna is built
into the unit.
Do not operate the unit over a steel desk or
metal surface, as this may lead to
interference.
The radio or buzzer alarm does not sound at the preset alarm time.
Check that “
” appears on the display.
The radio alarm is activated but no sound is emitted at the preset alarm time.
Adjust the volume using VOLUME +/–.
Specifications
Time display
24-hour system
Frequency range
Band Frequency
FM 87.5 MHz – 108 MHz
AM 531 kHz – 1,602 kHz
Speaker
Approx. 6.6 cm dia., 8 Ω
Power output
100 mW (at 10% harmonic distortion)
Power requirements
230 V AC, 50 Hz
For power backup: 3 V DC, one CR2032 battery
Dimensions
Approx. 101 mm 102 mm 101 mm (w/h/d)
including projecting parts and controls
Mass
Approx. 480 g (including CR2032 battery)
Supplied contents
Main unit: ICF-C1 (1)
CR2032 battery (1)
Operating Instructions (this manual) (1)
Design and specifications are subject to
change without notice.
FM wire antenna4-480-527-62(1)ICF-C1
FM/AM Clock Radio
Operating InstructionsИнструкция по эксплуатации (Переход назад)©2014 Sony Corporation Printed in China
ICF-C1_RU5 [GB/RU] 4-480-527-
61(2)
English
Before operating the unit, please read this
guide thoroughly and retain it for future
reference.
WARNING
To reduce the risk of fire, do not cover the
ventilation of the apparatus with newspapers,
tablecloths, curtains, etc. And do not place
lighted candles on the apparatus.
To reduce the risk of fire or electric shock, do
not expose this apparatus to dripping or
splashing, and do not place objects filled with
liquids, such as vases, on the apparatus.
Do not install the appliance in a confined
space, such as a bookcase or built-in cabinet.
Do not expose batteries or apparatus with
battery-installed to excessive heat such as
sunshine, fire or the like.
As the main plug is used to disconnect the unit
from the mains, connect the unit to an easily
accessible AC outlet. Should you notice an
abnormality in the unit, disconnect the main
plug from the AC outlet immediately.
The unit is not disconnected from the AC
power source (mains) as long as it is connected
to the wall outlet, even if the unit itself has
been turned off.
The nameplate and important information
concerning safety are located on the bottom
exterior.
CAUTION
Danger of explosion if battery is incorrectly
replaced. Replace only with the same type.
This symbol is intended to alert the
user to the presence of important
operating and maintenance (servicing)
instructions in the literature
accompanying the appliance.
Disposal of waste batteries and
electrical and electronic equipment
(applicable in the European Union and
other European countries with separate
collection systems)
This symbol on the product, the
battery or on the packaging
indicates that the product and the
battery shall not be treated as
household waste. On certain
batteries this symbol might be used
in combination with a chemical symbol. The
chemical symbols for mercury (Hg) or lead (Pb) are
added if the battery contains more than 0.0005%
mercury or 0.004% lead. By ensuring these
products and batteries are disposed of correctly,
you will help prevent potentially negative
consequences for the environment and human
health which could otherwise be caused by
inappropriate waste handling. The recycling of the
materials will help to conserve natural resources.
In case of products that for safety, performance or
data integrity reasons require a permanent
connection with an incorporated battery, this
battery should be replaced by qualified service
staff only. To ensure that the battery and the
electrical and electronic equipment will be treated
properly, hand over these products at end-of-life to
the applicable collection point for the recycling of
electrical and electronic equipment. For all other
batteries, please view the section on how to
remove the battery from the product safely. Hand
the battery over to the applicable collection point
for the recycling of waste batteries. For more
detailed information about recycling of this product
or battery, please contact your local Civic Office,
your household waste disposal service or the shop
where you purchased the product or battery.
WARNING
Battery may explode if handled incorrectly.
Do not recharge, disassemble or dispose of
in fire.
Dispose of used battery promptly and in
accordance with local environmental laws
and guidelines. Keep away from children.
Precautions
Operate the unit on the power sources
specified in “Specifications.”
To disconnect the power cord (mains lead),
pull it out by the plug, not the cord.
Do not leave the unit in a location near a
heat source, such as a radiator or airduct, or
in a place subject to direct sunlight, excessive
dust, mechanical vibration, or shock.
Allow adequate air circulation to prevent
internal heat build-up. Do not place the unit
on a surface (a rug, blanket, etc.) or near
materials (a curtain) that might block the
ventilation holes.
Should any solid object or liquid fall into the
unit, unplug the unit and have it checked by
a qualified personnel before operating it any
further.
To clean the casing, use a soft dry cloth. Do
not use any type of solvent, such as alcohol
or benzine, which may damage the finish.
Do not connect the antenna lead to the
external antenna.
NOTES ON LITHIUM BATTERY
Dispose of used battery promptly. Keep the
lithium battery out of the reach of children.
Should the battery be swallowed,
immediately consult a doctor.
Wipe the battery with a dry cloth to assure a
good contact.
Be sure to observe the correct polarity when
installing the battery.
Do not hold the battery with metallic
tweezers, otherwise a short-circuit may
occur.
Do not expose the battery to excessive heat
such as direct sunlight, fire or the like.
If you have any questions or problems
concerning your unit, please consult your
nearest Sony dealer.
Getting Started
Connecting to an AC
power source
Connect the AC power cord to a wall outlet.
To wall outlet
About the battery as a
backup power source
This unit needs a CR2032 battery (supplied) as
a backup power source to keep the clock
operating during a power interruption.
When to replace the
battery
When the battery is discharged, “
” appears
on the display.
If a power interruption occurs while the battery
is discharged, the current time and alarm will
be erased.
Installing and replacing
the backup battery
1
Keep the AC plug connected to the
wall outlet and remove the battery
compartment on the bottom of the
unit by pulling it up while sliding the
tab. (See Fig.
-.)
2
Insert a new battery into the battery
compartment with the
side facing
up.
To remove the battery from the battery
compartment, push it out from the side
marked
PUSH. (See Fig.
-.)
3
Insert the battery compartment back
into the unit along the groove and
push it from above until it clicks. (See
Fig.
-.)
The tab locks the battery compartment.
4
Press
RADIO to remove “” from the
display.
Notes
When you replace the battery, do not
disconnect the AC plug from the wall outlet.
Otherwise, the current date, current time and
alarm will be erased.
If the unit will be left unplugged for a long
time, remove the battery to avoid any
damage that may be caused by leakage or
corrosion.
Setting the clock
1
Press and hold
ENTER/TIME SET for
more than 2 seconds.
You will hear a beep and the last two digits
of the year will start to flash on the display.
2
Press
+ or – repeatedly to select the
year, and then press
ENTER/TIME SET.
3
Repeat step
2 to set the month, day
and time.
After setting the time, two short beeps will
sound and the seconds will start
incrementing from zero.
Note
If you do not press any button for about 1
minute while setting the clock, clock setting
mode will be canceled.
To change the display to
indicate daylight saving time
(summer time)
Change the daylight saving time (summer
time) adjustment setting according to the
following procedure.
Press and hold
DST for more than 3
seconds.
“DST” appears on the display and the clock
display switches to daylight saving time
(summer time).
To deactivate the daylight saving time (summer
time) adjustment, press and hold
DST for more
than 3 seconds again.
AC power cord
The frequency of the current radio
station is displayed as a rough guide.
Display
There is a tactile dot beside
VOLUME + to show the direction to go to turn up the
volume.
Operations
Playing the radio
1
Press
RADIO to turn on the radio.
2
Set
BAND to the desired band (AM or
FM).
3
Tune to the desired station using
TUNING.
4
Adjust the volume using
VOLUME +/–.
To turn off the radio, press
ALARM RESET/
OFF.
Setting the alarm
The alarm sound can be selected from
RADIO
(radio) or
BUZZ (buzzer).
Before setting the alarm
Make sure to set the clock. (See “Setting the
clock.”)
To set the radio alarm, first tune to a station
and adjust the volume. (See “Playing the
radio.”)
To set the alarm
1
Set
ALARM MODE to the desired
alarm sound
(RADIO or BUZZ).
The alarm time appears for a few seconds,
and then “ ” appears on the display. (It
does not appear when the switch is set to
OFF.)
2
Press
SET ALARM TIME + or –
repeatedly to set the desired time
while the alarm time appears on the
display.
While setting the alarm time, “ ” flashes on
the display.
When the alarm time setting operation is
complete, the clock display returns after a
few seconds and “ ” changes from flashing
to fully lit.
At the set time, the radio will turn on, or the
buzzer will sound gradually increasing in
volume. (“ ” flashes on the display.)
To stop the alarm
Press
ALARM RESET/OFF to turn off the
alarm.
The alarm will sound again at the same time
the next day.
To doze for a few more minutes
Press
SNOOZE/BRIGHTNESS.
The sound turns off, but will automatically
come on again after about 10 minutes.
Each time you press
SNOOZE/BRIGHTNESS,
the snooze time changes as follows:
The display shows the snooze time for about
4 seconds and returns to show the current
time. (“ ” flashes on the display.)
To deactivate the alarm
Set
ALARM MODE to OFF.
“ ” disappears from the display.
Notes
The alarm time setting cannot be changed if
ALARM MODE is set to OFF. If SET ALARM
TIME + or – is pressed, “OFF” appears on the
display for about 0.5 seconds.
ENTER/TIME SET and DST are unavailable
while the alarm is sounding or the snooze
function is turned on.
If no operation is performed while the alarm
is sounding, the alarm will stop after about
60 minutes.
Notes on the alarm in the event of a
power interruption
If the set alarm time comes in the event of a
power interruption or a power interruption
occurs while the alarm is sounding, the display
will turn off and the alarm will not sound, and
the alarm status will be as follows:
If power returns within 60 minutes from the
alarm set time, the alarm will sound.
If the power interruption occurred while the
snooze function was operating, the snooze
function will continue.
If the snooze time had passed when the
power interruption occurred, the alarm will
sound after power returns.
In this status, if “
” does not light up, ALARM
RESET/OFF, SNOOZE/BRIGHTNESS and alarm
mode functions are available. The snooze time
will be fixed to only 10 minutes if
SNOOZE/
BRIGHTNESS has been pressed.
Setting the sleep
timer
You can fall asleep to the radio using the sleep
timer, which turns off the radio automatically
after a preset duration.
Press
SLEEP.
The radio turns on. Each time you press
SLEEP,
the duration (in minutes) changes as follows:
The radio will play for the duration you set,
then shut off.
To deactivate the sleep timer, press
SLEEP
repeatedly to set the sleep timer to “OFF.”
To turn off the radio before the
preset time
Press
ALARM RESET/OFF.
To use both the sleep timer and
alarm
You can fall asleep to the radio and also be
awakened by the radio or buzzer alarm at the
preset time.
Set the alarm, then set the sleep timer.
Note
When the alarm is set to sound during the
sleep timer duration, the sleep timer will be
deactivated automatically when the alarm
sounds.
Setting the brightness
of the display
Three levels of brightness are available.
Press
SNOOZE/BRIGHTNESS.
Each time you press
SNOOZE/BRIGHTNESS,
the brightness of the display changes as
follows:
Note
When the alarm is sounding or the snooze
function is active, the brightness of the
display cannot be changed.
General information
Troubleshooting
Should any problems persist after you have
made the following checks, consult your
nearest Sony dealer.
The clock flashes “0:00” after a power
interruption.
The battery is discharged. Remove the old
battery and insert a new one.
Unsatisfactory reception
Extend the FM wire antenna fully to increase
reception sensitivity.
Rotate the unit horizontally for optimum
reception. A ferrite bar AM antenna is built
into the unit.
Do not operate the unit over a steel desk or
metal surface, as this may lead to
interference.
The radio or buzzer alarm does not
sound at the preset alarm time.
Check that “ ” appears on the display.
The radio alarm is activated but no
sound is emitted at the preset alarm
time.
Adjust the volume using VOLUME +/–.
Specifications
Time display
24-hour system
Frequency range
Band
Frequency
FM
87.5 MHz – 108 MHz
AM
531 kHz – 1,602 kHz
Speaker
Approx. 6.6 cm dia., 8 Ω
Power output
100 mW (at 10% harmonic distortion)
Power requirements
230 V AC, 50 Hz
For power backup: 3 V DC, one CR2032 battery
Dimensions
Approx. 101 mm
102 mm 101 mm (w/h/d)
including projecting parts and controls
Mass
Approx. 480 g including CR2032 battery
Supplied accessories
CR2032 battery (1)
Design and specifications are subject to
change without notice.
FM wire antenna
4-480-527-
61(2)
ICF-C1
FM/AM Clock Radio
Operating Instructions
Инструкция по эксплуатации (Переход назад)
©2014 Sony Corporation Printed in China
FM/AM Clock Radio
Operating Instructions
©2014 Sony Corporation
Printed in China
ICF-C1
Before operating the unit, please read this
guide thoroughly and retain it for future
reference.
For customers who purchased this
product in the USA
Please register this product on line at
http://www.sony.com/productregistration.
Proper registration will enable us to send
you periodic mailings about new products,
services, and other important
announcements. Registering your product
will also allow us to contact you in the
unlikely event that the product needs
adjustment or modification. Thank you.
NOTE
WARNING
This equipment has been tested and found to
To reduce the risk of fire or electric shock, do
comply with the limits for a Class B digital
not expose this apparatus to rain or
device, pursuant to Part 15 of the FCC Rules.
moisture.
These limits are designed to provide
reasonable protection against harmful
To reduce the risk of fire, do not cover the
interference in a residential installation. This
ventilation of the apparatus with newspapers,
equipment generates, uses and can radiate
tablecloths, curtains, etc. And do not place
radio frequency energy and, if not installed and
lighted candles on the apparatus.
used in accordance with the instructions, may
To reduce the risk of fire or electric shock, do
cause harmful interference to radio
not expose this apparatus to dripping or
communications. However, there is no
splashing, and do not place objects filled with
guarantee that interference will not occur in a
liquids, such as vases, on the apparatus.
particular installation. If this equipment does
Do not install the appliance in a confined
cause harmful interference to radio or
space, such as a bookcase or built-in cabinet.
television reception, which can be determined
Do not expose batteries or apparatus with
by turning the equipment off and on, the user
battery-installed to excessive heat such as
is encouraged to try to correct the interference
sunshine, fire or the like.
by one or more of the following measures:
— Reorient or relocate the receiving
As the main plug is used to disconnect the unit
antenna.
from the mains, connect the unit to an easily
— Increase the separation between the
accessible AC outlet. Should you notice an
equipment and receiver.
abnormality in the unit, disconnect the main
— Connect the equipment into an outlet on
plug from the AC outlet immediately.
a circuit different from that to which the
receiver is connected.
The unit is not disconnected from the AC
— Consult the dealer or an experienced
power source (mains) as long as it is connected
radio/TV technician for help.
to the wall outlet, even if the unit itself has
been turned off.
WARNING
The nameplate and important information
concerning safety are located on the bottom
Do not ingest battery, chemical burn
exterior.
hazard.
You are cautioned that any changes or
This product contains a coin/button cell
modifications not expressly approved in this
battery. If the coin/button cell battery is
manual could void your authority to operate
swallowed, it can cause severe internal burns in
this equipment.
just 2 hours and can lead to death.
Keep new and used batteries away from
CAUTION
children. If the battery compartment does not
Danger of explosion if battery is incorrectly
close securely, stop using the product and keep
replaced. Replace only with the same type.
it away from children.
If you think batteries might have been
swallowed or placed inside any part of the
body, seek immediate medical attention.
Important Safety Instructions
1) Read these instructions.
2) Keep these instructions.
3) Heed all warnings.
4) Follow all instructions.
5) Do not use this apparatus near water.
6) Clean only with dry cloth.
7) Do not block any ventilation openings.
Install in accordance with the
manufacturer’s instructions.
Do not install near any heat sources such as
radiators, heat registers, stoves, or other
apparatus (including amplifiers) that
produce heat.
9) Do not defeat the safety purpose of the
polarized or grounding-type plug. A
4-480-527-11(1)
polarized plug has two blades with one
wider than the other. A grounding type
plug has two blades and a third grounding
prong. The wide blade or the third prong
are provided for your safety. If the provided
plug does not fit into your outlet, consult an
electrician for replacement of the obsolete
outlet.
10) Protect the power cord from being walked
on or pinched particularly at plugs,
convenience receptacles, and the point
where they exit from the apparatus.
11) Only use attachments/accessories specified
by the manufacturer.
12) Use only with the cart, stand, tripod,
bracket, or table specified by the
manufacturer, or sold with the apparatus.
When a cart is used, use caution when
moving the cart/apparatus combination to
avoid injury from tip-over.
13) Unplug this apparatus during lightning
storms or when unused for long periods of
time.
14) Refer all servicing to qualified service
personnel. Servicing is required when the
apparatus has been damaged in any way,
such as power-supply cord or plug is
damaged, liquid has been spilled or objects
This symbol is intended to alert the
user to the presence of uninsulated
have fallen into the apparatus, the
«dangerous voltage» within the
apparatus has been exposed to rain or
product’s enclosure that may be of
moisture, does not operate normally, or has
sufficient magnitude to constitute a
been dropped.
risk of electric shock to persons.
This symbol is intended to alert the
For the state of California, USA
user to the presence of important
operating and maintenance (servicing)
only
instructions in the literature
Perchlorate Material –special handling may
accompanying the appliance.
apply, See
www.dtsc.ca.gov/hazardouswaste/perchlorate
Perchlorate Material: Lithium battery contains
perchlorate
Precautions
Operate the unit on the power sources
specified in «Specifications.»
To disconnect the power cord (mains lead),
pull it out by the plug, not the cord.
Do not leave the unit in a location near a
heat source, such as a radiator or airduct, or
in a place subject to direct sunlight, excessive
dust, mechanical vibration, or shock.
Allow adequate air circulation to prevent
internal heat build-up. Do not place the unit
on a surface (a rug, blanket, etc.) or near
materials (a curtain) that might block the
ventilation holes.
NOTES ON LITHIUM BATTERY
Wipe the battery with a dry cloth to assure a
good contact.
Be sure to observe the correct polarity when
installing the battery.
Do not hold the battery with metallic
tweezers, otherwise a short-circuit may
occur.
Do not expose the battery to excessive heat
such as direct sunlight, fire or the like.
If you have any questions or problems
concerning your unit, please consult your
nearest Sony dealer.
General information
Troubleshooting
Should any problems persist after you have
made the following checks, consult your
nearest Sony dealer.
The clock flashes «AM 12:00» after a
power interruption.
The battery is discharged. Remove the old
battery and insert a new one.
Unsatisfactory reception
The AC power cord functions as an FM
antenna. Extend the AC power cord fully to
increase reception sensitivity.
Rotate the unit horizontally for optimum
reception. A ferrite bar AM antenna is built
into the unit.
About the battery as a
backup power source
This unit contains a CR2032 battery as a backup
power source to keep the clock operating
during a power interruption.
Do not operate the unit over a steel desk or
When to replace the
metal surface, as this may lead to
interference.
battery
The radio or buzzer alarm does not
When the battery is discharged, «» appears
sound at the preset alarm time.
on the display.
Check that » » appears on the display.
If a power interruption occurs while the battery
is discharged, the current time and alarm will
The radio alarm is activated but no
be erased.
sound is emitted at the preset alarm
time.
Note
Adjust the volume using VOLUME +/–.
If «AM 12:00» flashes on the display when the
unit is connected to an AC outlet for the first
When daylight saving time (summer
time, the battery may be discharged. In this
time) begins, the clock does not switch
case, consult your nearest Sony dealer.
to daylight saving time (summer time)
automatically.
Make sure the clock is set correctly.
When «Aut On» appears on the display
after pressing and holding DST for more than
3 seconds, the Automatic DST/summer time
function becomes active.
Specifications
Time display
12-hour system
Frequency range
Band
Frequency
FM
87.5 MHz – 108 MHz
AM
530 kHz – 1,710 kHz
Speaker
Approx. 6.6 cm (2 5/8 inches) dia., 8 Ω
Power output
100 mW (at 10% harmonic distortion)
Power requirements
120 V AC, 60 Hz
For power backup: 3 V DC, one CR2032 battery
Dimensions
Approx. 101 mm 102 mm 101 mm (w/h/d)
(4 inches 4 inches 4 inches) including
projecting parts and controls
Mass
Approx. 480 g (1 lb 1 oz) including CR2032
battery
Design and specifications are subject to
change without notice.
Replacing the backup
battery
1
Keep the AC plug connected to the
wall outlet, loosen the screw that
secures the battery compartment on
the bottom of the unit, and remove
the battery compartment. (See Fig.
-.)
2
Insert a new battery into the battery
compartment with the side facing
up.
To remove the battery from the battery
compartment, push it out from the side
marked PUSH. (See Fig. -.)
3
Insert the battery compartment back
into the unit and secure it with the
screw. (See Fig. -.)
4
Press RADIO to remove » » from the
display.
Notes
When you replace the battery, do not
disconnect the AC plug from the wall outlet.
Otherwise, the current date, current time and
alarm will be erased.
If the unit will be left unplugged for a long
time, remove the battery to avoid any
damage that may be caused by leakage or
corrosion.