-
Contents
-
Table of Contents
-
Troubleshooting
-
Bookmarks
Quick Links
For the following languages, a PDF version of the Owner’s Manual can be found on the CD-ROM.
Deutsch, Français, Italiano, Español, Português, Nederlands
Related Manuals for Roland Quad-Capture
Summary of Contents for Roland Quad-Capture
-
Page 1
For the following languages, a PDF version of the Owner’s Manual can be found on the CD-ROM. Deutsch, Français, Italiano, Español, Português, Nederlands… -
Page 2
Ableton Live, GarageBand, Logic, etc. Set the input/output audio device on the DAW (p. 24, p. 27). Connect a guitar or microphone to the QUAD-CAPTURE (p. 25). Adjust the input gain level. QUAD-CAPTURE (p. 25) Control panel (p. 29) Adjust the preamp or compressor (p. -
Page 3: Using The Unit Safely
Refer all servicing to your retailer, sound levels that could cause permanent the nearest Roland Service Center, or an hearing loss. Do not operate for a long authorized Roland distributor, as listed on period of time at a high volume level, or the “Information”…
-
Page 4
• Try to prevent cords and cables from and request servicing by your retailer, becoming entangled. Also, all cords and the nearest Roland Service Center, or an cables should be placed so they are out of authorized Roland distributor, as listed on the reach of children. -
Page 5: Important Notes
Such noise could occur when receiving we regret that it may not be possible to restore such or initiating a call, or while conversing. Should you data, and Roland assumes no liability concerning such experience such problems, you should relocate such loss of data.
-
Page 6
Copyright © 2011 ROLAND CORPORATION All rights reserved. No part of this publication may be reproduced in any form without the written permission of ROLAND CORPORATION. Roland is a registered trademark of Roland Corporation in the United States and/or other countries. -
Page 7: Table Of Contents
Contents USING THE UNIT SAFELY ….. Checking the Driver Settings ……. 35 Viewing the Control Panel in the Foreground …………35 IMPORTANT NOTES ……Checking the Version of the Control Panel …………..35 Contents of the Package ….. Troubleshooting……… Panel Descriptions ……Problems When Installing the Driver ..
-
Page 8: Contents Of The Package
USB cable Use this cable to connect the QUAD-CAPTURE to the USB connector of your computer. * Please use only the included USB cable. If you require a replacement due to loss or damage, please contact the nearest Roland Service center, or an authorized Roland distributor, as listed on the “Information”…
-
Page 9: License Agreement
Contents of the Package License agreement This agreement allows you to use certain software whose copyright is the property of Roland Corporation. You must read this before opening the CD-ROM. You’ll need to provide the following items • External amplifier, speakers, headphones, etc., for listening to the sound that is output via the QUAD-CAPTURE • Microphone, guitar, etc., for inputting audio to the QUAD-CAPTURE…
-
Page 10: Panel Descriptions
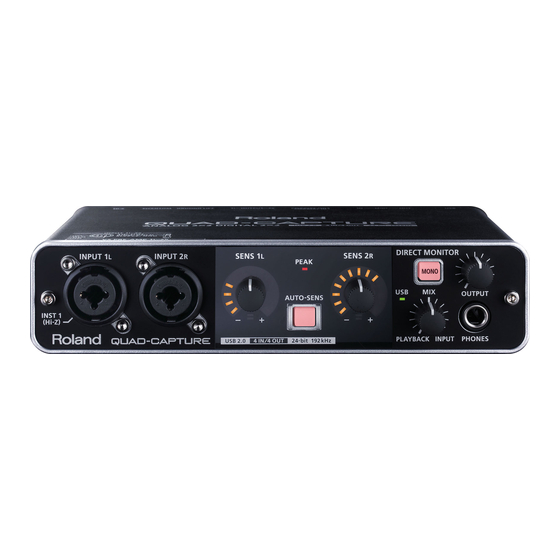
Panel Descriptions Note Do not connect the QUAD-CAPTURE to the computer until the driver has been installed (p. 14). Front Panel 1. INPUT 1L jack, INPUT 2R jack (Combo input jacks) These are analog audio input jacks with microphone preamps.
-
Page 11
The AUTO-SENS setting allows you to optimize the input level by analyzing the input audio signal (p. 26). 6. USB indicator Lights up when the QUAD-CAPTURE is connected to a computer and the computer has detected the QUAD-CAPTURE. 7. [MONO] button… -
Page 12: Rear Panel
The COAXIAL IN (3/4) jack inputs the digital audio signal. The COAXIAL OUT (3/4) jack outputs the digital audio signals. * While the QUAD-CAPTURE is synchronized with external digital equipment, a small pop noise may be heard, but this does not indicate a malfunction.
-
Page 13
For details on the requirements of your microphone, refer to its owner’s manual. * QUAD-CAPTURE’s phantom power supply: DC 48 V, 6 mA maximum 17. [Hi-Z (INPUT 1)] switch Switches the impedance of the INPUT 1L jack. You can select high impedance (Hi-Z) or low impedance (Lo-Z) as appropriate for the connected equipment. -
Page 14: Driver Installation
Mac OS X Note Do not connect the QUAD-CAPTURE to the computer until you are directed to do so. A “driver” is software that transfers data between the QUAD-CAPTURE and application software running on your computer when your computer and the QUAD-CAPTURE are connected.
-
Page 15
Driver Installation Windows 5. When a confirmation screen regarding user account control appears, click [Yes] or [Continue]. 6. When “The QUAD-CAPTURE Driver will be installed on your computer.” appears, click [Next]. 7. Click [Next] again. Windows 8.1/8/7/Windows Vista If a dialog box regarding Windows security appears, click [Install]. -
Page 16
If you cannot select the QUAD-CAPTURE, refer to “Problems When Using the QUAD-CAPTURE” (p. 37). If the QUAD-CAPTURE is selected as the output device, the computer’s audio alerts will be played using the QUAD-CAPTURE; they will not be heard from the computer’s speakers. -
Page 17
If you cannot select the QUAD-CAPTURE, refer to “Problems When Using the QUAD- CAPTURE” (p. 37). If the QUAD-CAPTURE is selected as the output device, the computer’s audio alerts will be played using the QUAD-CAPTURE; they will not be heard from the computer’s speakers. -
Page 18
If you cannot select the QUAD-CAPTURE, refer to “Problems When Using the QUAD-CAPTURE” (p. 37). If the QUAD-CAPTURE is selected as the output device, the computer’s audio alerts will be played using the QUAD-CAPTURE; they will not be heard from the computer’s speakers. -
Page 19
16. Confirm that [QUAD-CAPTURE] appears in the “MIDI Studio” window or the “Audio MIDI Setup” dialog box. If [QUAD-CAPTURE] does not appear or if it is grayed out, it means that the QUAD-CAPTURE is not being detected properly. Click [Rescan MIDI]. Also try disconnecting and reconnecting the QUAD-CAPTURE’s USB cable. -
Page 20
21, 23 21. Click [Test Setup]. If you have a sound module connected to the QUAD-CAPTURE’s MIDI OUT connector, the following step will cause it to produce a fairly laud sound, so please reduce the volume of your sound module before continuing. -
Page 21: Confirm That Sound Can Be Heard
Driver Installation Confirm that Sound can be Heard Windows Mac OS X 1. Connect the headphones or amplified speakers as shown in the figure. Headphones Amplified speakers Front panel Rear panel * To prevent malfunction and/or damage to speakers or other devices, always turn down the volume, and turn off the power on all devices before making any connections.
-
Page 22
Use the QUAD-CAPTURE’s [OUTPUT] knob to adjust the volume. If the sample file can be heard, the computer and QUAD-CAPTURE are connected properly and the driver has been successfully installed. If you cannot hear the sample file, refer to “Problems When Using the QUAD-CAPTURE” (p. 37). -
Page 23: Basic Use
After exiting the DAW software, disconnect the QUAD-CAPTURE. • Select the QUAD-CAPTURE for the DAW software’s audio device setting. • The QUAD-CAPTURE will not operate in the Mac OS X Classic environment. Use the QUAD- CAPTURE when the Classic environment is not running.
-
Page 24: Output Device Settings
Basic Use Output Device Settings To play audio and MIDI data on your DAW software, select the QUAD-CAPTURE as the audio and MIDI output device. For details about settings, refer to the documentation for your DAW software. Audio Output Device MME, 44.1 kHz–…
-
Page 25: Setup For Recording
Basic Use Setup for Recording Audio signals from the INPUT 1L jack, INPUT 2R jack, and COAXIAL IN (3/4) jack can be sent to your DAW software and recorded. When connecting equipment to the INPUT 1L jack and INPUT 2R jack, check the setting of the [PHANTOM] and [Hi-Z (INPUT 1)] switches (p.
-
Page 26: Adjusting The Input Level Automatically
Basic Use Adjusting the Input Level Automatically The AUTO-SENS setting allows you to have the optimum input level be set automatically, based on an analysis of the audio signal being input. 1. Connect equipment to the INPUT 1L or INPUT 2R jack. 2. Press the [AUTO-SENS] button.
-
Page 27: Input Device Settings
Basic Use Input Device Settings To record audio and MIDI data on your DAW software, select the QUAD-CAPTURE as the audio and MIDI input device. For details about settings, refer to the documentation for your DAW software. Audio Input Device MME, 44.1 kHz–…
-
Page 28: Setting From The Control Panel
Access the QUAD-CAPTURE control panel as follows. Windows Open the “Control Panel” and double-click the [QUAD-CAPTURE] icon. If you don’t see the QUAD-CAPTURE icon, switch to Icon view (Windows 8.1/8/7) or Classic view (Windows Vista/Windows XP). Mac OS X Open the [Applications] folder, then double-click [QUAD-CAPTURE Control Panel].
-
Page 29: Setting The Preamp
Phase Inverts the phase of the input signal. Adjusts the input gain over a range of 0–54 dB, in steps of 1 dB. The input level indicator of the QUAD-CAPTURE varies according to the gain setting. Input gain When setting the input gain from the control panel, the [AUTO-SENS] button lights up.
-
Page 30: Setting The Compressor
Setting from the Control Panel Setting the Compressor Screen Indication Setting Description Gate Mutes signals below a specified level (in dB). When set to off, the compressor is enabled. When set to on, the Bypass compressor is disabled. Specifies the signal level (in dB) at which the compressor begins Threshold operating.
-
Page 31: Setting The Input Mixer
Adjusting the monitor level does not affect the recording level. Setting the Sampling Rate The sampling rate setting of the QUAD-CAPTURE automatically changes to match the rate of the audio data that is played, or the rate that your DAW software is set to when recording.
-
Page 32: Selecting The Sound Output From The Coaxial Out (3/4) Jack
* No sound is output from the COAXIAL OUT (3/4) jack when operating at a sampling rate of 192 kHz. Saving and Loading Your Settings From the QUAD-CAPTURE control panel, you can save the current settings as a file, or load previously saved settings from a file. The following settings are saved.
-
Page 33: Initializing The Settings
A digital signal that is input from the COAXIAL IN (3/4) jack will be received. AUTO The QUAD-CAPTURE will switch to the same sampling rate as the incoming digital signal. The digital signal that is input from the COAXIAL IN (3/4) jack will not be received.
-
Page 34: Changing The Auto-Sens Setting Method
The maximum value for the recording level is set at -12 dBFS. The recording level will be reduced. Checking Synchronization with Other Digital Equipment You can check the synchronization status in the CLOCK area of the QUAD-CAPTURE control panel. Indication Description INTERNAL The QUAD-CAPTURE’s internal clock is used.
-
Page 35: Checking The Driver Settings
From the “QUAD-CAPTURE Control Panel” menu, select [Driver Settings]. Viewing the Control Panel in the Foreground You can set the software so the QUAD-CAPTURE control panel always appears in the foreground. Windows From the “Driver” menu, select [Always on top].
-
Page 36: Troubleshooting
Follow step 9 of the driver installation procedure (p. (Windows XP) 17) and install the driver. If you connect the QUAD-CAPTURE to a different USB connector than the one you used when Numeral such as installing the driver, a numeral may appear with the “2-”…
-
Page 37: Problems When Using The Quad-Capture
Problem Confirmation Resolution Is the driver installed? Install the driver (p. 14). Make sure that the QUAD-CAPTURE is connected to the computer correctly. Is the QUAD-CAPTURE’s USB indicator off? If the problem is not resolved, reinstall the driver (p. 49).
-
Page 38
If the sound in your headphones is inaudible or too soft, check the other troubleshooting items. Is the [OUTPUT] knob of the QUAD- CAPTURE turned down? Use the QUAD-CAPTURE’s [OUTPUT] knob or [MIX] knob to adjust the volume. Also, is the [MIX] knob of the QUAD- Sound played by CAPTURE turned to “INPUT”… -
Page 39
If you’ve connected the device to the INPUT 1L or INPUT 2R jack, try turning the [SENS 1L] or [SENS The volume level Is the input level too low? 2R] knob of the QUAD-CAPTURE toward the right to of the instrument increase the input level (p. 10). connected to… -
Page 40
Use the [SENS 1L] or [SENS 2R] knob of the QUAD-CAPTURE to adjust the input level. If your Is the input level appropriate? software has an input level adjustment, check the Recorded sound input level setting. -
Page 41
Problem Confirmation Resolution Is the driver installed? Install the driver (p. 14). If the QUAD-CAPTURE’s sampling rate is set to 192 Is the QUAD-CAPTURE’s sampling rate kHz, the COAXIAL IN (3/4)/OUT (3/4) jacks cannot set to 192 kHz? be used. -
Page 42
Are you playing or recording audio data? change the sampling rate in the Driver Settings dialog box. Is there another program using the Exit the program that is using the QUAD-CAPTURE. Cannot change QUAD-CAPTURE? the sampling Set the sampling rate setting of the software… -
Page 43: Limitations When Using The 192 Khz Setting
Troubleshooting Limitations When Using the 192 kHz Setting If the QUAD-CAPTURE’s sampling rate is set to 192 kHz, its operation will be limited as follows. • The COAXIAL IN (3/4)/OUT (3/4) jacks cannot be used. • The 3-4 port of the audio output device and the 3-4 port and MAIN port of the audio input device…
-
Page 44: Changing Computer Settings To Avoid Problems
Changing Computer Settings to Avoid Problems Changing these computer settings can help you avoid the problems described in “Problems When Installing the Driver” (p. 36) and “Problems When Using the QUAD-CAPTURE” (p. 37). Driver Signing Options Setting (Windows XP) If the “Driver Signing Options” setting is set to [Block], you cannot install the driver. Configure as follows.
-
Page 45: Power Management Settings
Troubleshooting Power Management Settings If the sound is interrupted during a performance or if sounds are missing, you may be able to resolve the problem by changing the computer’s power management settings. Windows 8.1/8/7/Windows Vista 1. Open the “Control Panel,” click [System and Security] or [System and Maintenance], and then click [Power Options].
-
Page 46: System «Performance» Settings (Windows)
Troubleshooting System “Performance” Settings (Windows) If the sound is interrupted during a performance or if sounds are missing, you may be able to solve the problem by changing the “Performance” setting of the system as described below. Windows 8.1/8/7/Windows Vista 1. Open the “Control Panel,” click [System and Security] or [System and Maintenance], and then click [System].
-
Page 47: Setting The System Volume
If you have selected Classic view, double-click [Sounds and Audio Devices]. 2. Click the [Audio] tab. 3. In the “Sound playback” area, make sure that [1-2 (QUAD-CAPTURE)] is selected as the “Default device,” and click [Volume]. 4. When the volume control appears, adjust the “Wave” volume.
-
Page 48: Voice Communication Software Settings (Windows 8.1/8/7)
1. Open the “Control Panel,” click [Hardware and Sound], and then click [Sound]. If you have selected Icon view, click [Sound]. 2. In the “Recording” area, click the QUAD-CAPTURE’s [1-2 (QUAD-CAPTURE)], and then click [Properties]. 3. Click the “Listen” tab and clear the [Listen to this device] check box.
-
Page 49: Reinstalling The Driver
2. Install the driver again as described in “Driver Installation” (p. 14). Deleting the Driver If the computer does not detect the QUAD-CAPTURE correctly, use the following procedure to delete the driver, and then install the driver again as described in “Driver Installation” (p. 14).
-
Page 50
2. Insert the included CD-ROM into the computer’s DVD-ROM drive. 3. Double-click [Uninstaller] in the [MacDriver] folder on the included CD-ROM. 4. When “This uninstalls QUAD-CAPTURE driver from this Mac.” appears, click [Uninstall]. If other messages appear, follow the instructions on the screen. -
Page 51: Advanced Driver Settings
To use Cakewalk software, such as SONAR, with WDM/KS mode, select this check box. [Use Multichannel WDM Audio Port] * The modified setting will take effect after you turn the power of the QUAD-CAPTURE check box (Windows off, then on again.
-
Page 52
Audio Buffer Size * After adjusting the buffer size, make sure to restart all programs that are using the QUAD-CAPTURE. If using software that has an “audio device test” function, run the test function. If audio drops out or if noise is heard, even if you have adjusted the buffer size setting Recording Margin in the software and adjusted the “Audio Buffer Size”… -
Page 53: Main Specifications
Main Specifications USB Audio Interface: Roland QUAD-CAPTURE UA-55 Sampling Rate: 96 kHz, 48 kHz, 44.1 kHz Record: 4 channels Playback: 4 channels Number of Audio Record/ Playback Channels Sampling Rate: 192 kHz Record: 2 channels Playback: 2 channels PC interface: 24 bits…
-
Page 54
Main Specifications XLR type (balanced, phantom power: +48 V, 6 mA Max) * Current value per channel. Input jacks 1–2 1/4-inch TRS phone type (balanced) * INPUT 1 supports high impedance Headphones jack (Stereo 1/4-inch phone type) Connectors OUTPUT jacks 1–2 (1/4-inch TRS phone type (balanced)) COAXIAL IN connector COAXIAL OUT connector MIDI connectors (In, Out) -
Page 55: Index
Initializing ……..33 QUAD-CAPTURE control panel ….. . 28 Loading .
-
Page 56
For EU Countries For China… -
Page 57: Declaration Of Conformity
Compliance Information Statement Model Name : UA-55 Type of Equipment : USB Audio Interface Responsible Party : Roland Corporation U.S. Address : 5100 S. Eastern Avenue, Los Angeles, CA 90040-2938 Telephone : (323) 890-3700 For EU Countries This product complies with the requirements of EMC Directive 2004/108/EC.
-
Page 59
MEMO…
![]()
Аудиоинтерфейс USB 2.0

Алгоритм подготовки к записи на QUAD-CAPTURE
Аббревиатура DAW (Digital Audio Workstation) обозначает программы для создания музыки, такие как SONAR, и т. д.
Установите драйвер (стр. 14).
|
Используется ли DAW? |
||||
|
Да |
Нет |
|||
|
Windows |
Mac OS X |
Установите программу
Cakewalk SONAR X1 LE Установите программу DAW, например,
GarageBand, Logic, и т. д.
Зарегистрируйте Cakewalk SONAR X1 LE.
Настройте входные/выходные устройства DAW (стр. 24, 27).
|
См. документа |
Подключите гитару/микрофон к QUAD-CAPTURE (стр. 25). |
|
цию на Cakewalk |
|
|
SONAR X1 LE. |
Установите входной уровень. |
|
QUAD-CAPTURE (стр. 25) |
|
|
Панель управления (стр. 29) |
|
|
Настройте предусилитель или компрес- |
|
|
сор (стр. 29, 30). |
Запись

Техника безопасности
Перед началом использования прибора внимательно прочтите разделы “Техника безопасности” и “Важные замечания”. В них содержится важная информация относительно правильного использования устройства. Для того чтобы максимально эффективно использовать все функциональные возможности прибора, внимательно прочтите данное руководство целиком. Сохраните руководство, оно может пригодиться в дальнейшем.
•Не вскрывайте прибор и не производите какие-либо модификации внутри него.
•Не производите самостоятельно ремонт прибора и не заменяйте детали внутри него (за исключением случаев, описанных
вруководстве). По вопросам обслуживания обращайтесь в сервисный центр или к официальному дистрибьютору Roland.
•Не храните и не используйте прибор в условиях:
•Экстремальных температур (на солнечном свете, в закрытом автомобиле, вблизи отопительных приборов, на генерирующем тепло оборудовании и т.п.);
•Влажности (в ванных комнатах, прачечных, на мокром полу);
•Задымленности;
•С высоким уровнем испарений;
•Сырости;
•Где он может попасть дождь;
•Запыленности;
•С высоким уровнем вибрации.
•Не устанавливайте прибор на шатающиеся стойки или на наклонные поверхности, не обеспечивающие его устойчивое размещение.
•Данный прибор, по отдельности или в комбинации с усилителем и наушниками или динамиками, может производить звук такого уровня громкости, который способен привести к длительной потере слуха. Не играйте долго с высоким или дискомфортным уровнем громкости. Если наблюдается снижение слуха или появился звон в ушах, немедленно выключите аппаратуру, а затем проконсультируйтесь с врачом.
•Не допускайте попадания внутрь инструмента посторонних предметов (например, огнеопасных материалов, монет, булавок) или жидкостей (воды, напитков, и т.д.). Это может привести к короткому замыканию или сбоям в работе.
3

Техника безопасности
•Немедленно отключите кабель USB
иобратитесь по месту приобретения аппаратуры, в ближайший сервисный центр или к уполномоченному дистрибьютору Roland, если:
•Внутрь прибора попали посторонние предметы или пролита жидкость;
•Появился дым или необычный запах;
•Прибор попал под дождь (или намок по иной причине);
•Прибор не работает в нормальном режиме, или в его работе обнаружились существенные изменения.
•Там, где есть маленькие дети, взрослые должны наблюдать за ними до тех пор, пока ребенок не будет в состоянии соблюдать все правила, необходимые для безопасной эксплуатации прибора.
•Оберегайте прибор от сильных ударов, не роняйте его!
•НЕ воспроизводите прилагаемый диск СD-ROM на бытовом CD-проигрывателе. Высокий уровень громкости может повредить слух, вывести из строя динамики или другие части аудиосистемы.
• Не перегибайте шнуры и кабели. Кроме того, все шнуры и кабели должны быть проложены в недоступном для детей месте.
• Не садитесь на прибор и не кладите на него тяжелые предметы.
•Перед перемещением прибора отсоедините все кабели, коммутирующие его с внешним оборудованием.
•Всегда отключайте фантомное питание при коммутации с любым оборудованием, кроме конденсаторных микрофонов, в которых оно используется. Если подать фантомное питание на динамические микрофоны, аудиопроигрыватели или другие устройства, не предусматривающие его использование, то можно вывести их из строя. Перед подключением любого микрофона ознакомьтесь с его техническими характеристиками, которые размещены в соответствующем руководстве пользователя.
Фантомное питание прибора: 48 В, 6 мА максимум
4

Важные замечания
Питание
•Прежде чем коммутировать прибор с другими устройствами, отключите электропитание всей аппаратуры. Это позволит избежать повреждения динамиков или других устройств.
Размещение
•При использовании аппаратуры рядом с мощными усилителями (или оборудованием, содержащим крупные трансформаторы), могут возникнуть наводки. Чтобы разрешить эту проблему, измените ориентацию аппаратуры в пространстве или удалите ее от источника помех.
•Прибор может являться источником помех для теле- и радиоприемников. Не устанавливайте его вблизи такого оборудования.
•Если рядом с прибором находятся беспроводные средства связи (например, мобильные телефоны), при входящем или исходящем сигнале, а также во время разговора может появиться шум. При возникновении подобных проблем необходимо перенести такие устройства подальше от прибора или выключить их.
•Не размещайте прибор в зоне прямого попадания солнечных лучей, около источников тепла, внутри закрытого автомобиля и не подвергайте воздействию перепадов температуры. Иначе корпус прибора может деформироваться или изменить свой цвет.
•При перемещении прибора из одного места в другое, если в них наблюдается значительный перепад температуры и/или влажности, внутри могут образоваться капли воды (конденсат). Если использовать прибор в таком состоянии, может возникнуть неисправность или сбои в работе. Поэтому, прежде чем приступить к эксплуатации аппаратуры, необходимо подождать несколько часов, чтобы конденсат высох.
•В зависимости от материала и температуры поверхности, на которой стоит прибор, его резиновые ножки могут изменить цвет или испортить поверхность. Чтобы избежать этого, можно поместить под ножки кусок войлока или ткани. При этом следите, чтобы прибор случайно не соскользнул с поверхности.
•Не ставьте на прибор емкости с водой (например, вазы с цветами). Также избегайте распыления вблизи прибора инсектицидов, парфюмерии, спирта, лака для волос, и т.д. Вытирайте попавшую на корпус жидкость мягкой сухой тканью.
Уход
•Для ухода за прибором используйте мягкую чистую ткань или аналогичный материал, слегка смоченный водой. Для удаления грязи используйте ткань, смоченную слабым неабразивным моющим средством. Затем протрите прибор мягкой сухой тканью.
•Использование бензина, растворителя или алкоголя запрещается. Это может привести к изменению цвета и/или деформации корпуса прибора.
Ремонт и данные
•Помните, что все данные, хранящиеся в памяти инструмента, могут быть потеряны в случае его ремонта. Важную информацию следует записывать на бумаге (при возможности). Во время ремонта делается все для того, чтобы сохранить информацию. Однако иногда (например, при сбоях в схемах памяти), к сожалению, восстановить потерянные данные не представляется возможным. Компания Roland ответственности, связанной с последствиями потери информации, не несет.
5

Важные замечания
Меры предосторожности
•Помните, что в результате поломки или несоблюдения правил эксплуатации прибора содержимое памяти может быть безвозвратно потеряно. Для того чтобы снизить риск потери данных, рекомендуется периодически делать архивную копию содержимого памяти.
•Возможны ситуации, в которых восстановить данные внутренней памяти прибора не представляется возможным. Компания Roland ответственности за сохранность данных не несет.
•Обращайтесь аккуратно с кнопками, регуляторами и другими контроллерами. Небрежное обращение может привести к повреждению аппаратуры.
•При подсоединении/отсоединении кабелей никогда не тяните за шнур. Беритесь только за сам разъем, чтобы не повредить внутренние элементы кабеля.
•Чтобы не вызывать недовольства окружающих, постарайтесь устанавливать разумный уровень громкости. А чтобы не думать об этом вовсе (особенно ночью), лучше использовать наушники.
•При транспортировке прибора используйте оригинальную заводскую упаковку (включая прокладочный материал для смягчения ударов) или аналогичные материалы.
•Некоторые коммутационные кабели содержат резисторы. С данной аппаратурой их использовать нельзя. Это может привести к тому, что уровень звука будет либо чрезвычайно низким, либо его невозможно будет слушать. За информацией о характеристиках соединительных кабелей обращайтесь к их производителям.
Обращение с дисками CD
•Не прикасайтесь и не царапайте блестящую (рабочую) поверхность диска. Поврежденный или загрязненный диск будет работать со сбоями. Чистите диски с помощью специальных средств.
•Microsoft, Windows и Windows Vista являются зарегистрированными торговыми марками Microsoft Corporation.
•Официальным названием Windows® является: «Операционная система Microsoft® Windows®».”
•Cakewalk является торговой маркой Cakewalk Inc в США.
•VST является торговой маркой Steinberg Media Technologies GmbH.
•ASIO является торговой маркой Steinberg Media Technologies GmbH.
•Все названия продуктов, упоминаемые в данном документе, являются торговыми марками или зарегистрированными торговыми марками соответствующих владельцев.
•MMP (Moore Microprocessor Portfolio) обозначает портфолио патента микропроцессорной архитектуры, разработанной Technology Properties Limited (TPL). Компания Roland получила лицензию на данную технологию у TPL Group.
Copyright © 2011 ROLAND CORPORATION
Все права защищены. Воспроизведение данного материала в любой форме без письменного разрешения ROLAND CORPORATION запрещено. Roland является зарегистрированной торговой маркой ROLAND Corporation в США и/или других странах.
6

Содержание
|
Техника безопасности………………….. |
3 |
|
Важные замечания……………………….. |
5 |
|
Комплектация……………………………….. |
8 |
|
Описание панелей………………………. |
10 |
|
Лицевая панель………………………………………… |
10 |
|
Тыльная панель………………………………………… |
12 |
|
Установка драйвера……………………. |
14 |
|
Проверка звучания.………………………………… |
21 |
|
Основные операции…………………… |
23 |
|
Установки для воспроизведения…………. |
23 |
|
Выходные установки…………………….. |
24 |
|
Установки для записи……………………………… |
25 |
|
Настройка входного уровня.……… |
25 |
|
Автоматическая установка |
|
|
уровня записи………………………………… |
26 |
|
Входные установки……………………….. |
27 |
|
Панель управления…………………….. |
28 |
|
Запуск панели управления.…………………… |
28 |
|
Секция предусилителя…………………………… |
29 |
|
Секция компрессора.……………………………… |
30 |
|
Секция входного микшера…………………….. |
31 |
|
Частота дискретизации.…………………………. |
31 |
|
Выбор выходного сигнала для |
|
|
разъема COAXIAL OUT (3/4).………………….. |
32 |
|
Сохранение и загрузка установок……….. |
32 |
|
Инициализация установок…………………….. |
33 |
|
Просмотр блок-схемы…………………………….. |
33 |
|
Установки для входа COAXIAL IN (3/4).………. |
33 |
|
Режим работы функции AUTO-SENS.……….. |
34 |
|
Синхронизация с внешним |
|
|
оборудованием………………………………………… |
34 |
|
Установки драйвера………………………………… |
35 |
|
Отображение поверх экрана………………… |
35 |
|
Просмотр версии панели управления………. |
35 |
|
Неисправности……………………………. |
36 |
|
Проблемы с установкой драйвера………. |
36 |
|
Проблемы при использовании |
|
|
QUAD-CAPTURE…………………………………………. |
37 |
|
Проблемы с SONAR LE…………………………….. |
43 |
|
Ограничения использования |
|
|
установки 192 kHz……………………………………. |
43 |
|
Изменение установок компьютера……….. |
44 |
|
Установка цифровой подписи |
|
|
драйвера (Windows XP).………………. |
44 |
|
Установки схемы управления |
|
|
питанием…………………………………………. |
45 |
|
Системные установки |
|
|
“Performance” (Windows).…………….. |
46 |
|
Установки системной |
|
|
громкости.………………………………………. |
47 |
|
Установки голосовой связи |
|
|
(Windows 7).……………………………………. |
48 |
|
Установки функции |
|
|
мониторинга (Windows 7)……………. |
48 |
|
Переустановка драйвера………………………. |
49 |
|
Удаление драйвера……………………….. |
49 |
|
Установки драйвера………………………………… |
51 |
|
Технические характеристики…….. |
53 |
7

 Комплектация
После вскрытия упаковки проверьте наличие следующих элементов. При отсутствии какоголибо из них обратитесь к продавцу товара.
 QUAD-CAPTURE
 Руководство пользователя
Это — данный документ. Всегда держите его под рукой.
 CD-ROM с драйвером QUAD-CAPTURE CD-ROM
Содержит драйверы и демо-пьесы для QUAD-CAPTURE.
*НЕ воспроизводите прилагаемый диск CD-ROM на бытовом CD-проигрывателе. Высокий уровень воспроизведения может повредить слух, вывести из строя динамики или другие компоненты аудиосистемы.
*Перед началом работы с прилагаемым CD-ROM необходимо ознакомиться с “лицензионным соглашением”. Продолжение работы возможно только после согласия со всеми его пунктами.
 Cakewalk SONAR X1 LE DVD-ROM (Windows)
Содержит программное обеспечение Cakewalk SONAR X1 LE.
• Программы DAW обеспечивают весь необходимый инструментарий для создания музыки.
Подробные сведения о программе содержатся в сопутствующей документации, находящейся на диске или в экранной справке самой программы.
*Не прикасайтесь и не царапайте рабочую сторону (поверхность с кодированными данными) диска. Поврежденный или загрязненный диск будет работать со сбоями. Чистите диски с помощью специальных средств.
*Программы DAW для Mac OS X в комплект поставки не входят.
 Кабель USB
Данный кабель служит для подключения QUAD-CAPTURE к разъему USB компьютера.
*Используйте только прилагаемый кабель USB. Для его замены вследствие порчи или утери обращайтесь в сервисный центр или к авторизированному дистрибьютеру Roland.
8

Комплектация
 Лицензионное соглашение
Данное соглашение распространяется на программное обеспечение, являющееся собственностью Roland Corporation.
Перед работой с CD-ROM с ним необходимо ознакомиться.
9

 Описание панелей
Note
Перед первым подключением QUAD-CAPTURE к компьютеру, в последний требуется установить драйвер (стр. 14).
Лицевая панель
|
1 |
4 |
6 |
7 |
9 |
|||||||||
1.Комбинированные входы INPUT 1L, INPUT 2R
Аналоговые аудиовходы с микрофонными предусилителями. Поскольку они совместимы с разъемами XLR и джек, можно использовать любую коммутацию. Поддерживается работа как с симметричными, так и несимметричными устройствами.
|
XLR: |
-60 |
– -6 dBu |
|
Джек: |
-50 |
– +4 dBu |
Для согласования с различными источниками сигнала предусмотрены селекторы [Hi-Z (INPUT 1)] (стр. 13) и [PHANTOM] (стр. 13).
XLR
|
Джек (несим- |
Джек TRS |
|
|
метричный) |
||
|
(симмет- |
||
|
ричный) |
*Вход INPUT 2R является низкоимпедансным. При непосредственном подключении к нему гитары или бас-гитары громкость аудиосигнала будет сижком низкой.
*Прибор оборудован симметричными разъемами XLR/TRS. Схема их распайки приведена на рисунке. Всю коммутацию осуществляйте в
соответствии с распайкой подключаемого оборудования.
|
1: Земля |
Земля (экран) |
|
|
2: «+» |
«+»(наконечник) |
|
|
3: «-« |
||
|
«-» (кольцо) |
2.Регуляторы [SENS 1L], [SENS 2R] (регуляторы чувствительности)
Устанавливают уровни аудиосигналов, поступающих со входов INPUT 1L или INPUT 2R.
3.Индикатор входного уровня
Отображает уровень входного аудиосигнала.
Отображает значение входной чувствительности при включенной установке AUTO-SENS (стр. 26), когда в течение заданного времени на входе отсутствует аудиосигнал.
10
![]()
Описание панелей
4.Индикатор PEAK
Загорается при слишком высоком уровне входного сигнала. Регуляторами [SENS 1L] и [SENS 2R] уменьшите уровень входного сигнала, чтобы индикатор PEAK не загорался.
5.Кнопка [AUTO-SENS]
Включает/отключает установку AUTO-SENS.
Установка AUTO-SENS помогает оптимизировать уровень входного аудиосигнала, анализируя его громкость (стр. 26).
6.Индикатор USB
Загорается при подключении QUAD-CAPTURE к компьютеру, после того как компьютер распознал QUAD-CAPTURE.
7.Кнопка [MONO]
Выбирает режим мониторинга (моно или стерео) входных сигналов с разъемов INPUT 1L и INPUT 2R.
Если к разъему INPUT 1L подключена гитара или бас, а разъем INPUT 2R не задействован, выберите режим моно (кнопка [MONO] горит).
|
Кнопка [MONO] |
Сигнал мониторинга |
|
Не горит |
Стерео |
|
Горит |
Моно |
Даже в режиме моно (кнопка [MONO] горит) поступающий из компьютера по USB аудиосигнал будет звучать в стерео.
|
8. Регулятор [MIX] |
Громкость |
|||
|
Устанавливает громкость мониторинга. |
100% |
|||
|
INPUT |
||||
|
При вращении регулятора влево (в |
||||
|
0% |
||||
|
сторону PLAYBACK) уровень сигнала со |
100% |
|||
|
всех входов будет уменьшаться. При |
PLAYBACK |
|||
|
вращении регулятора вправо (в сторону |
||||
|
INPUT) будет уменьшаться уровень |
0% |
|||
сигнала с компьютера. При установке регулятора в центральное положение сигналы с входов и сигналы с компьютера будут иметь громкость 100%.
9. Регулятор [OUTPUT]
Устанавливает громкость аудиосигналов
на разъемах PHONES, OUTPUT 1L и OUTPUT 2R.
10.Разъем PHONES
Служит для подключения наушников. На данный разъем поступает сигнал, аналогичный сигналу на выходах OUTPUT 1L и OUTPUT 2R. Даже при подключении наушников сигнал будет выводиться через разъемы OUTPUT 1L и OUTPUT 2R тыльной панели.
11

Описание панелей
Тыльная панель
11 12
|
14 |
15 |
16 |
17 |
11.Разъем USB
Служит для коммутации с компьютером.Перед первым подключением QUAD-CAPTURE к компьютеру в последний необходимо установить драйвер (стр. 14).
12.Разъемы MIDI OUT/IN
Разъем MIDI OUT служит для подключения к звуковому MIDI-модулю. Разъем MIDI IN служит для подключения MIDI-клавиатуры или MIDI-контроллера.
13.Разъемы COAXIAL IN (3/4)/OUT (3/4)
COAXIAL IN (3/4) служит для приема цифрового аудиосигнала. COAXIAL OUT (3/4) является выходом цифрового аудиосигнала.
* В момент синхронизации QUAD-CAPTURE с внешним цифровым устройством возможно возникновение слабого щелчка, что не является признаком неисправности.
14.Разъемы OUTPUT 1L/2R (симметричные джеки TRS)
Аналоговые аудиовыходы.
*Прибор оборудован симметричными разъемами TRS. Схема их распайки приведена на рисунке ниже. Всю коммутацию осуществляйте в соответствии с распайкой подключаемого оборудования.
Земля (экран)
«+» (наконечник)
«-» (кольцо)
12

Описание панелей
15.Селектор [GROUND LIFT]
Стандартно устанавливается в положение “NOR” (NORMAL).
Если вследствие образования земляной петли или аналогичного явления возникает фон, попробуйте перевести этот селектор в положение “LIFT”, при котором происходит отсоединение контакта «Земля (экран)» разъема OUTPUT 1L/2R от корпуса прибора.
Разъемы OUTPUT  1L/2R (TRS)
NOR LIFT
16.Селектор [PHANTOM]
Включает/отключает подачу фантомного питания на разъемы XLR входов INPUT 1L иINPUT 2R.
|
Подключенное оборудование |
Положение селектора [PHANTOM] |
||
|
Конденсаторный микрофон |
48V |
||
|
Прочее оборудование |
OFF |
||
*Всегда отключайте фантомное питание при коммутации с любым оборудованием, кроме конденсаторных микрофонов, в которых предусмотрено его использование. Если подать фантомное питание на динамические микрофоны, аудиопроигрыватели или другие устройства, не рассчитанные на его использование, можно вывести их из строя. Перед подключением микрофона ознакомьтесь с его техническими характеристиками, которые размещены в прилагаемом к нему руководстве пользователя.
*QUAD-CAPTURE обеспечивает фантомное питание 48 В постоянного тока, 6 мА максимум
17.Селектор [Hi-Z (INPUT 1)]
Переключает импеданс (входное сопротивление) входа INPUT 1L. Выбирайте высокий (Hi-Z) или низкий (Lo-Z) импеданс в зависимости от подключаемого оборудования.
|
Подключенное оборудование |
Положение селектора [Hi-Z (INPUT 1)] |
||
|
Гитара или бас |
ON |
||
|
Прочее оборудование |
OFF |
||
13

Установка драйвера
Note
Не подключайте QUAD-CAPTURE к компьютеру до завершения установки драйвера.
Драйвер представляет собой программу, обеспечивающую обмен данными между устройством QUAD-CAPTURE и программными приложениями при коммутации QUADCAPTURE с компьютером по USB.
1.Запустите компьютер, не подключая QUAD-CAPTURE.
Отключите все кабели USB (кроме клавиатуры и мыши, при их наличии).
Windows
Войдите в систему с привилегиями администратора.
2.Закройте все приложения.
3.Вставьте прилагаемый диск CD-ROM в привод компьютера.
Windows
После открытия окна автозагрузки нажмите [Open folder to view files].
4.На CD-ROM перейдите в соответствующую папку и дважды нажмите на указанный ниже файл для запуска программы установки.
|
ОС |
Файл |
||
|
Windows |
[Setup] в папке [WinDriver] |
||
|
Mac OS X |
[QuadCapture_USBDriver.mpkg] в папке [MacDriver] |
||
Дополнительная информация находится на веб-сайте Roland. http://www.roland.com/
14

Установка драйвера
Windows
5.После того как выведется экран управления пользовательскими записями, нажмите [Yes] или [Continue].
6.После того как выведется сообщение “The QUAD-CAPTURE Driver will be installed on your computer.”, нажмите [Next].
7.Нажмите [Next] еще раз.
Windows 7/WindowsVista
Если откроется диалоговое окно Windows Security, нажмите [Install].
Windows XP
Если откроется диалоговое окно “Software Installation”, нажмите [Continue].
Если продолжение невозможно, нажмите [OK] для отмены процедуры. Измените установку цифровой подписи драйвера (стр. 44) и повторите установку драйвера.
8.После появления сообщения “Ready to install the driver.” кабелем USB подключите QUAD-CAPTURE к компьютеру.
* Перед коммутацией кабеля USB установите в минимум громкость всех периферийных устройств.
* Данный прибор оборудован схемой защиты, поэтому вход в рабочий режим осуществляется с задержкой в несколько секунд после включения питания.
*Перед включением питания всегда устанавливайте громкость в минимум. Однако, даже при этом в момент включения питания может быть слышен небольшой призвук, что не является признаком неисправности.
Установка драйвера может занять несколько минут.
Windows 7/WindowsVista
При появлении другого сообщения выполните предлагаемые в нем инструкции. Драйвер установится автоматически.
Windows XP
В правом нижнем углу экрана выведется сообщение “Found new hardware”.
Windows 7/WindowsVista См. стр. 16  Windows XP См. стр. 17
15

Установка драйвера
Windows 7/WindowsVista
9. После того как выведется сообщение “Installation has been completed.”, нажмите [Close].
Если появится диалоговое окно “System Settings Change”, нажмите [Yes] для перезагрузки Windows.
10.Откройте «Control Panel», нажмите [Hardware and Sound] и нажмите [Sound].
Если выбрано Icon view или Classic view, дважды нажмите [Sound].
11.На ярлыке [Playback] выберите QUAD-CAPTURE [1-2] и нажмите [Set Default].
12.Нажмите [OK].
16

Установка драйвера
Windows XP
9.При запросе на соединение с узлом Windows Update выберите [No, not this time] и нажмите [Next].
10.Выберите [Install the software
automatically (Recommended)] и нажмите [Next].
11.Если откроется диалоговое окно «Hardware Installation», нажмите [Continue Anyway] для продолжения установки.
12.Когда выведется сообщение «Completing the Found New Hardware Wizard», нажмите [Finish].
13.Когда выведется сообщение “Installation has been completed”, нажмите [Close].
Если откроется диалоговое окно «System Settings Change», нажмите [Yes] для перезагрузки Windows.
14.Откройте «Control Panel», нажмите [Sounds, Speech, and Audio Devices] и затем нажмите [Sounds and Audio Devices].
Если выбрано Classic view дважды нажмите на иконку [Sounds and Audio Devices].
15.Нажмите ярлык Audio и в секции Sound playback выберите [1-2 (QUAD-CAPTURE)].
При подключении внешнего звукового MIDI-модуля в области [Sound playback] выберите [MIDI (QUAD-CAPTURE)].
16.Нажмите [OK].
17

Установка драйвера
Mac OS X
Если при установке откроется диалоговое окно Authenticate или «Installer requires that you type your password», введите пароль и нажмите [OK].
5.На экран выведется сообщение «Welcome to the QUAD-CAPTURE Driver Installer». Нажмите [Continue].
6.Если выведется сообщение «Select a Destination», нажмите на привод, на котором установлена ОС, чтобы выбрать его, затем нажмите [Continue].
7.На экран выведется сообщение «Easy Install» или «Standard Install». Нажмите [Install] или [Upgrade].
8.На следующем экране нажмите [Continue Installation].
9.По окончании установки нажмите [Restart] для перезагрузки Macintosh.
Перезагрузка компьютера может занять некоторое время.
10.После перезагрузки Macintosh подключите
к нему QUAD-CAPTURE кабелем USB.
* Перед коммутацией кабеля USB установите в минимум громкость всех периферийных устройств.
* Данный прибор оборудован схемой защиты, поэтому вход в рабочий режим осуществляется с задержкой в несколько секунд после включения питания.
*Перед включением питания всегда устанавливайте громкость в минимум. Однако, даже при этом в момент включения питания может быть слышен небольшой призвук, что не является признаком неисправности.
11.В [System Preferences] нажмите [Sound].
12.Нажмите ярлык [Output] и выберите [QUAD-CAPTURE].
13.По окончании установок закройте [System Preferences].
Если выбор QUAD-CAPTURE невозможен, см. стр. 37.
Если в качестве устройства по умолчанию выбрать «QUAD-CAPTURE», системные звуки Windows будут воспроизводиться через QUAD-CAPTURE, а не через динамики компьютера.
18
 Loading…
- Автор записи:alterak
- Запись опубликована:20.08.2014
- Рубрика записи:Инструкции
- Комментарии к записи:комментария 2
- Запись изменена:20.08.2014
Инструкция пользователя внешней звуковой usb карты Roland QUAD-CAPTURE (UA-55)

Скачать
Метки: roland, внешняя звуковая карта, звуковая карта, Инструкция Roland QUAD-CAPTURE (UA-55)
У этой записи 2 комментариев
-

Владимир
18.12.2018Ответить
Спасибо за инструкцию на русском
-
Уведомление: Quad capture roland мануал — Информационный портал

Добавить комментарий
Комментарий
Введите свое имя или имя пользователя, чтобы прокомментировать
Введите свой email-адрес, чтобы прокомментировать
Введите URL вашего веб-сайта (необязательно)
Сохранить моё имя, email и адрес сайта в этом браузере для последующих моих комментариев.
Table of Contents for Roland Quad-Capture:
-
12 Panel Descriptions Rear Panel 11 12 14 15 16 1714 12 13 11. USB connector Connects the QUAD-CAPTURE to a computer that is compatible with USB 2.0. Before connecting, you must install the driver (p. 14). 12. MIDI OUT/IN connectors Connect the MIDI OUT connector to your MIDI sound module, etc. Connect the MIDI IN connector to your MIDI keyboard or MIDI controller. 13. COAXIAL
-
36 Troubleshooting If you experience problems, read this chapter rst. It contains tips for solving most problems. If this chapter cannot help you solve a problem, please refer to the support section of our website. If the problem is not resolved, refer to the contact information listed at the end of this document. Roland support website: http://www.roland.com/ Problems When Installing the Driver Problem C
-
23 Basic Use This section explains the basic connections and data ow of the QUAD-CAPTURE. Refer also to the block diagram on the back cover. Precautions Concerning the Use of DAW Software Before using the DAW software, please note the following points. • Connect the QUAD-CAPTURE to the computer before starting the DAW software. • Do not disconnect the QUAD-CAPTURE from the computer while the DAW software is running. After exiting the DAW software, disconnect the QUAD-CAPTURE. • Select the QUAD-CAPTURE for the DAW software’s audio device setting. • T
-
58
-
31 Setting from the Control Panel Setting the Input Mixer You can control the monitor level of the audio data being input via the INPUT 1L jack, INPUT 2R jack, or COAXIAL IN (3/4) jack. Adjusting the monitor level does not aect the recording level. Setting the Sampling Rate The sampling rate setting of the QUAD-CAPTURE automatically changes to match the rate of the audio data that is played, or the rate that your DAW software is set to when recording. You can also change the sampling ra
-
47 Troubleshooting Setting the System Volume If the playback volume is too loud or too quiet, try adjusting the system volume. Windows 8.1/8/7 1. Open the “Control Panel” and set the display mode to “Category.” 2. Click [Hardware and Sound], and then click [Adjust system volume]. 3. After the volume mixer appears, select the QUAD-CAPTURE’s [1-2 (QUAD-CAPTURE)] from the “Device” pull-down menu and adjust the volume. Windows Vista 1. Open the “Control Panel” and click [Hardware and Sound]. If you have selected Classic view,
-
16 Driver Installation Windows 8.1/8/7/Windows Vista 9. When “Installation has been completed.” appears, click [Close]. If the “System Settings Change” dialog box appears, click [Yes] to restart Windows. 10. Open the “Control Panel,” click [Hardware and Sound], and then click [Sound]. If you have selected Icon view or Classic view, double-click [Sound]. 11. Click the [Playback] tab, select the QUAD-CAPTURE’s [1-2
-
17 Driver Installation Windows XP 9. If a dialog box that asks whether you want to connect to Windows Update appears, select [No, not this time] and click [Next]. 10. Select [Install the software automatically (Recommended)] and click [Next]. 11. If the “Hardware Installation” dialog box appears, click [Continue Anyway] to proceed with the installation. 12. When “Completing the Found New Hardware Wizard” appears, click
-
10 Panel Descriptions Note Do not connect the QUAD-CAPTURE to the computer until the driver has been installed (p. 14). Front Panel 1 2 4 5 6 7 8 91 2 3 3 10 1. INPUT 1L jack, INPUT 2R jack (Combo input jacks) These are analog audio input jacks with microphone preamps. They accommodate both XLR type and phone type plugs, allowing you to use the type appropriate for the equipment you’re connecting. They also support either balanced or unbalanced connections. XLR type: -60– -6 dBu Phone type: -50–+4 dBu Switch the [Hi-Z (INPUT 1)] switch (p. 13) or [PHANTOM] switc
-
41 Troubleshooting Problem Conrmation Resolution Cannot play back or record Is the driver installed? Install the driver (p. 14). Is the QUAD-CAPTURE’s sampling rate set to 192 kHz? If the QUAD-CAPTURE’s sampling rate is set to 192 kHz, the COAXIAL IN (3/4)/OUT (3/4) jacks cannot be used. Are the software’s input device and output device congured? Select the QUAD-CAPTURE as the input and output device (p. 24, p. 27). Is the QUAD-CAPTURE’s USB indicator o?
-
8 Contents of the Package After you open the package, please check that all items are present. (If any accessories are missing, please contact the place of purchase.) QUAD-CAPTURE Owner’s Manual This is the document you’re reading. Keep it at hand for reference when needed. QUAD-CAPTURE Driver CD-ROM This CD-ROM contains the QUAD-CAPTURE drivers and demo songs. * Do not play a CD-ROM disc on a conventional audio CD player. T
-
29 Setting from the Control Panel Setting the Preamp Screen Indication Setting Description Low cut Enables the low-cut lter for the input. The cuto frequency is 100 Hz. Phase Inverts the phase of the input signal. Input gain Adjusts the input gain over a range of 0–54 dB, in steps of 1 dB. The input level indicator of the QUAD-CAPTURE varies according to the gain setting. When setting the input gain from the control panel, the [AUTO-SENS] button lights up. (This indicates that the input gain value diers from the position of the [S
-
24 Basic Use Output Device Settings To play audio and MIDI data on your DAW software, select the QUAD-CAPTURE as the audio and MIDI output device. For details about settings, refer to the documentation for your DAW software. Audio Output Device Device name MME, WDM/KS ASIO Core Audio 44.1 kHz– 96 kHz 192 kHz QUAD-CAPTURE 1-2 (QUAD-CAPTURE) 1-2 1, 2 ✓ ✓ 3-4 (QUAD-CAPTURE) 3-4 3, 4 ✓ MIDI Output Device Device name QUAD-CAPTURE
-
Recording Flowchart: Using the QUAD-CAPTURE for Recording DAW (Digital Audio Workstation) is the generic term used for music creation software. Install the driver (p. 14). Windows/Mac OS X Prepare the DAW software, such as Ableton Live, GarageBand, Logic, etc. Yes. No. Set the input/output audio device on the DAW (p. 24, p. 27). Connect a guitar or microphone to the QUAD-CAPTURE (p. 25). Adjust the input gain level. QUAD-CAPTURE (p. 25) Control panel
-
+48V Hi-SPEED USB IN 1/2 MAIN OUT 1/2 IN 3/4 OUT 3/4 IN OUT MIDI AUDIO DIRECT MIXER D/A INPUT OUTPUT INPUT 1L INPUT 2R COAXIAL IN (3/4) MIDI IN MIDI OUT COAXIAL OUT (3/4) OUTPUT 1L OUTPUT 2R PHONES DIGITAL OUT SELECTOR MIXER MONO/ STEREO MIX Hi-Z/ Lo-Z COMP PHASE SENS A/D HPF 100Hz COMP PHASE SENS A/D HPF 100Hz For the following languages, a PDF version of the Owner’s Manual can be found on the CD-ROM. Deutsch, Français, Italiano, Español, Português, Nederlands * 5 1 0 0 0 4 2 9 9 1 — 0 5 *
-
48 Troubleshooting Voice Communication Software Settings (Windows 8.1/8/7) If you are using voice communication software, the volume of the audio device can be adjusted automatically to suit the conversation. Use the following procedure to disable automatic volume adjustment. 1. Open the “Control Panel,” click [Hardware and Sound], and then click [Sound]. If you have selected Icon view, click [Sound]. 2. In the [Communications]
Questions, Opinions and Exploitation Impressions:
You can ask a question, express your opinion or share our experience of Roland Quad-Capture device using right now.
(Ocr-Read Summary of Contents of some pages of the Roland Quad-Capture Document (Main Content), UPD: 27 June 2023)
-
30, 30 Setting from the Control Panel Setting the Compressor Screen Indication Setting Description Gate Mutes signals below a specied level (in dB). Bypass When set to o, the compressor is enabled. When set to on, the compressor is disabled. Threshold Species the signal level (in dB) at which the compressor begins operating. Ratio Species the compression ratio by which the audio signal is to be compressed. Attack Time Species the time (in msec) from when the input lev…
-
41, Roland Quad-Capture 41 Troubleshooting Problem Conrmation Resolution Cannot play back or record Is the driver installed? Install the driver (p. 14). Is the QUAD-CAPTURE’s sampling rate set to 192 kHz? If the QUAD-CAPTURE’s sampling rate is set to 192 kHz, the COAXIAL IN (3/4)/OUT (3/4) jacks cannot be used. Are the software’s input device and output device congured? Select the QUAD-CAPTURE as the input and output …
-
14, Roland Quad-Capture 14 Note Do not connect the QUAD-CAPTURE to the computer until you are directed to do so. A “driver” is software that transfers data between the QUAD-CAPTURE and application software running on your computer when your computer and the QUAD-CAPTURE are connected. 1. Start up the computer without the QUAD-CAPTURE connected. Disconnect all USB cables other than those for a USB keyboard and/or USB mouse (if used). Windows Log on to the computer with a u…
-
44, 44 Troubleshooting Changing Computer Settings to Avoid Problems Changing these computer settings can help you avoid the problems described in “Problems When Installing the Driver” (p. 36) and “Problems When Using the QUAD-CAPTURE” (p. 37). Driver Signing Options Setting (Windows XP) If the “Driver Signing Options” setting is set to [Block], you cannot install the driver. Congure as follows. 1. Open the “Control Panel,” clic…
-
6, 6 IMPORTANT NOTES Additional Precautions • Please be aware that contents in memory can be irretrievably lost as a result of a malfunction, or improper operation of the unit. To protect yourself against the risk of loosing important data, we recommend that you periodically save a backup copy of important data you have stored in the unit’s memory. • Unfortunately, it may be impossible to restore the contents of data that was stored in the un…
-
29, 29 Setting from the Control Panel Setting the Preamp Screen Indication Setting Description Low cut Enables the low-cut lter for the input. The cuto frequency is 100 Hz. Phase Inverts the phase of the input signal. Input gain Adjusts the input gain over a range of 0–54 dB, in steps of 1 dB. The input level indicator of the QUAD-CAPTURE varies according to the gain setting. When setting the input gain from the control panel, the …
-
16, 16 Driver Installation Windows 8.1/8/7/Windows Vista 9. When “Installation has been completed.” appears, click [Close]. If the “System Settings Change” dialog box appears, click [Yes] to restart Windows. 10. Open the “Control Panel,” click [Hardware and Sound], and then click [Sound]. If you have selected Icon view or Classic view, double-click [Sound]. 11. Click the [Playback] tab, select the QUAD-CAP…
-
40, 40 Troubleshooting Problem Conrmation Resolution Sound is interrupted during playback or recording, sound drops out Are you using the included USB cable? You must use the included USB cable. Some commercially available USB cables do not meet the requirements of the USB standard, and this may prevent the QUAD-CAPTURE from operating correctly. Is the monitoring function of Windows enabled? (Windows 8.1/8/7) Disable the monitoring function (p. 48). Did you try to pl…
-
35, 35 Setting from the Control Panel Checking the Driver Settings You can check or modify the driver settings. For details, refer to “Advanced Driver Settings” (p. 51). Windows From the “Driver” menu, select [Driver Settings]. Mac OS X From the “QUAD-CAPTURE Control Panel” menu, select [Driver Settings]. Viewing the Control Panel in the Foreground You can set the software so the QUAD-CAPTURE control panel always appears in the foreground. Windows From …
-
42, 42 Troubleshooting Problem Conrmation Resolution Cannot play back or record Is it possible that the digital signal arriving as input has a dierent sampling rate than the rate you’ve selected within your software? Set the sampling rate setting of the software to match the sampling rate of the equipment connected to the COAXIAL IN (3/4) jack. When you are not using digital input, be sure to disconnect an…
-
7, Roland Quad-Capture 7 Contents USING THE UNIT SAFELY …………………3 IMPORTANT NOTES …………………………5 Contents of the Package …………………8 Panel Descriptions ………………………..10 Front Panel …………………………………………………. 10 Rear Panel …………………………………………………… 12 Driver Installation …………………………14 Conrm…
-
27, 27 Basic Use Input Device Settings To record audio and MIDI data on your DAW software, select the QUAD-CAPTURE as the audio and MIDI input device. For details about settings, refer to the documentation for your DAW software. Audio Input Device Device name MME, WDM/KS ASIO Core Audio 44.1 kHz– 96 kHz 192 kHz QUAD-CAPTURE 1-2 (QUAD-CAPTURE) 1-2 1, 2 ✓ ✓ 3-4 (QUAD-CAPTURE) 3-4 3, 4 ✓ MAIN (QUAD-CAPTURE) MAIN 5, 6 ✓ MIDI Input Device Device name QUAD-CAPTU…
-
3, 3 USING THE UNIT SAFELY • Do not open or perform any internal modications to the unit. • Do not attempt to repair the unit, or replace parts within it (except when this manual provides specic instructions directing you to do so). Refer all servicing to your retailer, the nearest Roland Service Center, or an authorized Roland distributor, as listed on the “Information” page. • Never install the uni…
-
54, Roland Quad-Capture 54 Main Specications Connectors Input jacks 1–2 XLR type (balanced, phantom power: +48 V, 6mA Max) * Current value per channel. 1/4-inch TRS phone type (balanced) * INPUT 1 supports high impedance Headphones jack (Stereo 1/4-inch phone type) OUTPUT jacks 1–2 (1/4-inch TRS phone type (balanced)) COAXIAL IN connector COAXIAL OUT connector MIDI connectors (In, Out) USB connector Interface USB 2.0 (Hi-Speed) Digital input/…
-
47, 47 Troubleshooting Setting the System Volume If the playback volume is too loud or too quiet, try adjusting the system volume. Windows 8.1/8/7 1. Open the “Control Panel” and set the display mode to “Category.” 2. Click [Hardware and Sound], and then click [Adjust system volume]. 3. After the volume mixer appears, select the QUAD-CAPTURE’s [1-2 (QUAD-CAPTURE)] from the “Device” pull-down menu and adjust the volume. Windows Vista 1. Open the “Control Panel”…
-
10, 10 Panel Descriptions Note Do not connect the QUAD-CAPTURE to the computer until the driver has been installed (p. 14). Front Panel 1 2 4 5 6 7 8 91 2 3 3 10 1. INPUT 1L jack, INPUT 2R jack (Combo input jacks) These are analog audio input jacks with microphone preamps. They accommodate both XLR type and phone type plugs, allowing you to use the type appropriate for the equipment you’re connecting. They also suppor…
-
12, 12 Panel Descriptions Rear Panel 11 12 14 15 16 1714 12 13 11. USB connector Connects the QUAD-CAPTURE to a computer that is compatible with USB 2.0. Before connecting, you must install the driver (p. 14). 12. MIDI OUT/IN connectors Connect the MIDI OUT connector to your MIDI sound module, etc. Connect the MIDI IN connector to your MIDI keyboard or MIDI controller. 13. COAXIAL IN (3/4)/OUT (3/4) jacks The COAXIAL…
-
2, Recording Flowchart: Using the QUAD-CAPTURE for Recording DAW (Digital Audio Workstation) is the generic term used for music creation software. Install the driver (p. 14). Windows/Mac OS X Prepare the DAW software, such as Ableton Live, GarageBand, Logic, etc. Yes. No. Set the input/output audio device on the DAW (p. 24, p. 27). Connect a guitar or microphone to the QUAD-CAPTURE (p. 25). Adjust the input gain level. QUA…
-
34, 34 Setting from the Control Panel Changing the AUTO-SENS Setting Method You can choose whether to have the AUTO-SENS setting (p. 26) nish automatically or manually, and you can set the maximum value for the recording level. The recording level will be set automatically according to the maximum volume that was input during the AUTO-SENS setting time. 1. From the “Device” menu, select [Device settings]. 2. From the items in …
-
5, 5 IMPORTANT NOTES Power Supply • Before connecting this unit to other devices, turn o the power to all units. This will help prevent malfunctions and/or damage to speakers or other peripheral devices. Placement • Using the unit near power ampliers (or other equipment containing large power transformers) may induce hum. To alleviate the problem, change the orientation of this unit; or move it farther away from the source of interference. • This devic…