-
Bookmarks
Quick Links
ACCOLADE 2 LRF
XP50 PRO
Thermal Imaging
Binoculars
USER
MANUAL
Related Manuals for Pulsar ACCOLADE 2 LRF XP50 PRO
Summary of Contents for Pulsar ACCOLADE 2 LRF XP50 PRO
-
Page 1
ACCOLADE 2 LRF USER XP50 PRO MANUAL Thermal Imaging Binoculars… -
Page 2
The product design improvements are possible to make it more appealing for the consumer. Repair of the device is possible within 5 years. Detailed product description and complete user manual are available for download on our official web-page: https://www.pulsar-nv.com/glo/products/33/thermal-imaging-binoculars/accolade-version-2-lrf/ XP50 PRO Thermal Imaging… -
Page 3
Specifications Package Contents MODEL XP50 PRO • Accolade 2 LRF Pro Thermal Imaging Binoculars 77461 • Carrying case MICROBOLOMETER • IPS7 Battery Pack Type uncooled • Battery charger with mains charger Resolution, pixels 640×480 • Micro USB cable Pixel Pitch, µm NETD, mK <… -
Page 4
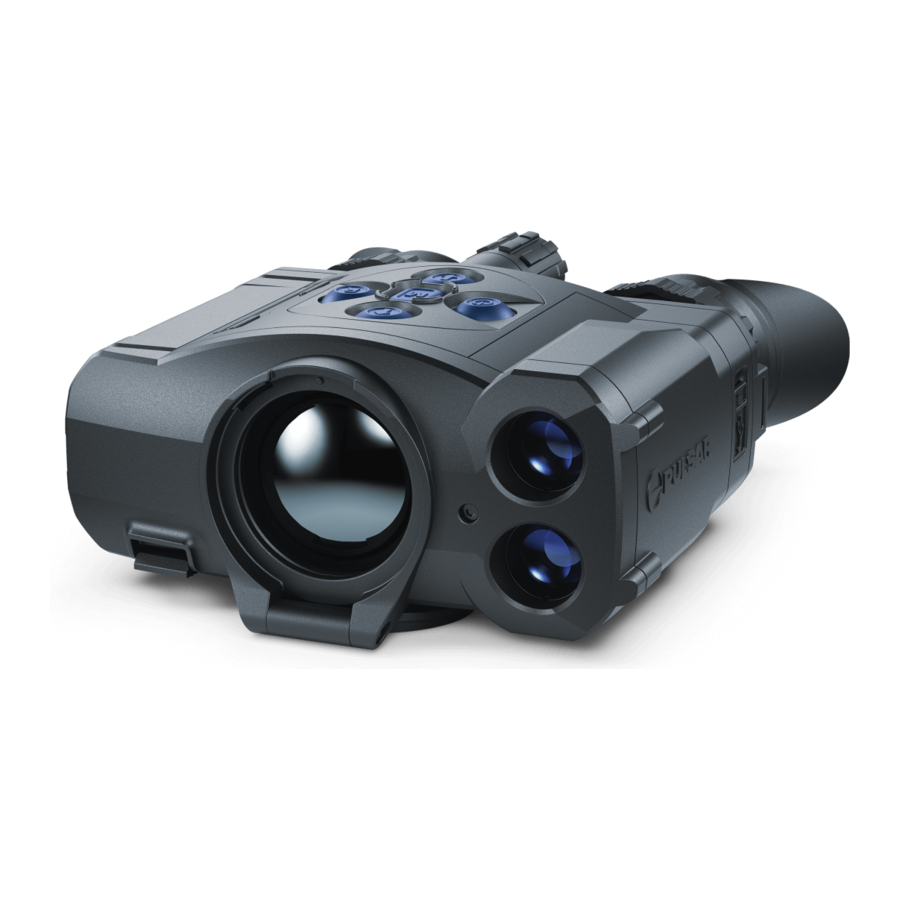
Components and Controls Power ON/OFF/Calibration button Navigation button UP Button MENU Recording button REC Navigation button DOWN Interpupillary distance adjustment rings Diopter adjustment rings Lens focusing ring Battery Pack Battery Pack latch Tripod mount Radiator cooling system Lens cover Objective lens MicroUSB port MicroUSB cable Integrated laser rangefinder… -
Page 5
Button Operation Using the Battery Pack Accolade 2 LRF Pro thermal imaging binoculars are supplied with a rechargeable Li-Ion Battery Pack IPS7 which OPERATION BUTTON allows operation for up to 9 hours. Please remember to charge the Battery Pack before first use. Power device on short press Battery Charging… -
Page 6
Safety Measures • Select the desired observation mode (Forest, Rocks, Identification or User) by a long press of the DOWN (5) button or in the main menu. User mode allows you to configure and save custom • Only use the charger supplied with your device. •… -
Page 7
Image Detail Boost Main Menu Functions The Image Detail Boost function increases the sharpness of the contours of heated objects, which Enter the Main Menu increases their detail. The result of the function depends on the selected mode and observation conditions: •… -
Page 8
• Wi-Fi Press and hold down the МENU (3) button to enter the main menu. Color Modes Default color mode is White Hot. Activation • Select the Wi-Fi Activation menu option with the UP (2)/DOWN (5) buttons. To select another palette: •… -
Page 9
Wi-Fi Settings This menu option allows you to set up your device for operation in a Wi-Fi network. General Time Time setup Settings • • Press and hold down the МENU (3) button to enter the main menu. Select option Time with UP (2)/DOWN (5) buttons. -
Page 10
General Format Remote Remote control activation (bought separately) This item allows you to format the Flash-card (memory card) of the device Settings Control (this will delete all files from the memory card). Before operating the remote control (RC), remember to activate it as follows: •… -
Page 11
Photo mode. Capturing an image Defective Pixel Restore Default Pixel Map Repair This option allows you to cancel deletion of the defective pixels and return them to the • Switch to the Photo mode with a long press of the REC (4) button. original state. •… -
Page 12
The device keeps running. • if your Pulsar device is not connected to your phone but it’s already in the “My Devices” section, you may use • When the device is on, hold down the ON/OFF (1) button. Display goes out, Wi-Fi to download update. -
Page 13
USB Connection Wireless Remote Control • Connect one end of the USB cable (16) to the Micro-USB (15) port of your device, and the other end to the USB (Bought separately) port of your PC/laptop. Wireless remote control (RC) duplicates the power on function, digital zoom, rangefinder control, and menu •… -
Page 14
Troubleshooting PROBLEM POSSIBLE CAUSE SOLUTION The device does not turn on The Battery Pack is empty. Charge the battery pack. The device does not operate on USB cable is damaged. Replace USB cable. external power supply The external power supply is Charge the external power supply. -
Page 15
pulsar-vision.com…
Посмотреть инструкция для Pulsar Accolade 2 LRF XP50 Pro бесплатно. Руководство относится к категории бинокли, 3 человек(а) дали ему среднюю оценку 9.5. Руководство доступно на следующих языках: русский, английский. У вас есть вопрос о Pulsar Accolade 2 LRF XP50 Pro или вам нужна помощь? Задайте свой вопрос здесь
Не можете найти ответ на свой вопрос в руководстве? Вы можете найти ответ на свой вопрос ниже, в разделе часто задаваемых вопросов о Pulsar Accolade 2 LRF XP50 Pro.
Инструкция Pulsar Accolade 2 LRF XP50 Pro доступно в русский?
Да, руководствоPulsar Accolade 2 LRF XP50 Pro доступно врусский .
Не нашли свой вопрос? Задайте свой вопрос здесь
File Specifications:2012/2012047-accolade_2_lrf_xp50_pro.pdf file (23 Jul 2023) |
Accompanying Data:
Pulsar ACCOLADE 2 LRF XP50 PRO Binocular PDF Operation & User’s Manual (Updated: Sunday 23rd of July 2023 12:10:13 PM)
Rating: 4.5 (rated by 94 users)
Compatible devices: Expert VM 8×40, Accolade XQ38, 2 Pro, Edge GS 1×20, ACCOLADE 2 LRF, LRF 8×40, Edge GS 2.7×50, Accolade LRF XQ38.
Recommended Documentation:
Operation & User’s Manual (Text Version):
(Ocr-Read Summary of Contents of some pages of the Pulsar ACCOLADE 2 LRF XP50 PRO Document (Main Content), UPD: 23 July 2023)
-
2, Attention! Accolade thermal imaging binoculars require a license if exported outside your country. Electromagnetic compliance. This product complies with EU Standard EN 55032:2015, Class A. Warning! Operation of this equipment in a residential environment could cause radio interference. The product design improvements are possible to make it more appealing for the consumer. Repair of the device is possible within 5 years. Detailed product description and complete user manual …
-
3, 3 Specications MODEL XP50 PRO SKU 77461 MICROBOLOMETER Type uncooled Resolution, pixels 640×480 Pixel Pitch, µm 17 NETD, mK < 25 Frame rate, Hz 50 Optical Characteristics Magnication, x 2.5 Continuous digital zoom, x 2.5-20 Digital zoom 2x/4x/8x Objective lens 1:1.2 Close-up range, m / y 3 / 3.28 Exit pupil diameter, mm 5 Field of view (HxV), degrees / m@100m 12.4 / 21.8 Diopter adjustment, D ±5 Interpupillary…
-
4, Pulsar ACCOLADE 2 LRF XP50 PRO 4 Components and Controls 1. Power button 2. Navigation button UP 3. Button MENU 4. Recording button REC 5. Navigation button DOWN 6. Interpupillary distance adjustment rings 7. Diopter adjustment rings 8. Lens focusing ring 9. Battery Pack 10. Battery Pack latch 11. Tripod mount 12. Radiator cooling system 13. Lens cover 14. Objective lens 15…
-
5, 5 Button Operation OPERATION BUTTON Power device on short press Power device off long press for 3 secs Turn display off long press for less than 3 secs Turn display on short press Calibrate the microbolometer short press Control discrete digital zoom short press Change observation modes long press VIDEO RECORDER BUTTON Start/pause/resume video recording short press Stop video recording long press Switch to video / photo long press Capture Photo short press MAIN MENU BUTTON Enter main menu lo…
-
6, 6 Safety Measures • Only use the charger supplied with your device. • The battery should be partially charged for long-term storage – 50 to 80 %. • Do not charge the battery immediately after bringing the battery from cold environment to a warm one. Wait for 30 — 40 minutes for the battery to get warm. • Charge the Battery Pack at a temperature from 0 °C to +35 °C. Otherwise, batter’s life will decrease signicantl…
-
7, Pulsar ACCOLADE 2 LRF XP50 PRO 7 Image Detail Boost TheImage Detail Boost function increases the sharpness of the contours of heated objects, which increases their detail. The result of the function depends on the selected mode and observation conditions: the higher the contrast of objects, the more noticeable the effect. This option is enabled by default, but can be disabled in the main menu. Status Bar 1 2 3 4 5 6 7 The status bar is l…
-
8, 8 Activation • Press and hold down the button to enter the main menu. • Select the menu option with the UP (2)/DOWN (5) buttons. • Turn Wi-Fi on/off with a short press of the button. Image Detail Boost Turn on/off Image Detail Boost: • Press and hold down the button to enter the main menu…
-
9, Pulsar ACCOLADE 2 LRF XP50 PRO 9 This menu option allows you to set up your device for operation in a Wi-Fi network. • Press and hold down the button to enter the main menu. • Select the menu option with the UP (2)/DOWN (5) buttons. • Press briey the button to enter submenu. • Select the desired menu item with the UP (2)/DOWN (…
-
10, 10 Settings This item allows you to format the Flash-card (memory card) of the device (this will delete all les from the memory card). • Select option with UP (2)/DOWN (5) buttons. • Press briey the button to conrm. • With a short press of the UP (2)/DOWN (5) buttons select “Yes” to format the memory card or “No” to return to the submenu. • Conrm sele…
-
11, 11 Defective Pixel Repair Restore Default Pixel Map This option allows you to cancel deletion of the defective pixels and return them to the original state. • Press and hold down the button to enter the main menu. • Select the Defective Pixel Repair menu item with the UP (2)/DOWN (5) buttons. • Press briey the button to open the submenu. • Select Restore Default Pixel Map menu item with the UP (2)/DOWN (5) buttons. • …
-
12, 12 Built-In Laser Rangender The binoculars are equipped with a built-in rangender(17), allowing you to measure distance to objects up to 1000m away. • Turn on the device, set up image according to section Powering On and Image Setting. • Press theUP (2)orbutton on remote control — rangending r…
-
13, USB Connection • Connect one end of the USB cable(16)to the Micro-USBport of your device, and the other end to the USB port of your PC/laptop. • Turn the device on with a short press of thebutton (device that has been turned off cannot be detected by your computer). • Your device will be detected by the computer automatically; no drivers need to be installed. • Two connection modes will appear on the display:�…
-
14, Troubleshooting PROBLEM POSSIBLE CAUSE SOLUTION The device does not turn on The Battery Pack is empty. Charge the battery pack. The device does not operate on external power supply USB cable is damaged. Replace USB cable. The external power supply is discharged. Charge the external power supply. The image is blurry, with vertical stripes and uneven background Calibration is required. Carry out calibration according to Microbolometer Calibrationsection. Colored lines ap…
-
Pulsar ACCOLADE 2 LRF XP50 PRO User Manual
-
Pulsar ACCOLADE 2 LRF XP50 PRO User Guide
-
Pulsar ACCOLADE 2 LRF XP50 PRO PDF Manual
-
Pulsar ACCOLADE 2 LRF XP50 PRO Owner’s Manuals
Recommended: BMC255SS, SWEEP AWAY, MK3008GAL, HLT-1500 V
Links & Tools
Operating Impressions, Questions and Answers:
Цена по запросу
Нужны дополнительные вводные для просчета цены, закажите звонок или напишите менеджеру в WhatsApp:
Спасибо за заявку
Наш менеджер свяжется с вами в ближайшее время
Узнать цену в WhatsApp
- Наличие
- уточняйте
- Гарантия
- 12
- Самовывоз
-
Тюмень
- Возможна доставка до адреса
-
Способы оплаты
Описание
Характеристики
Комплектация
- Тепловизионный прибор
- Чехол для транспортировки и хранения
- Аккумуляторная батарея IPS5
- Зарядное устройство с сетевым кабелем
- Кабель microUSB
- Шейный ремень
- Салфетка для чистки оптики
- Упаковочная коробка
- Инструкция по эксплуатации
- Гарантийный талон
Файлы

Оформить заказ
Экспертные мнения
Экспертные мнения
Купить Тепловизор Pulsar Accolade LRF XP50 в Тюмени легко — просто позвоните по телефону:: 8-800-551-11-01
Navigation
2
button UP
Button ON/OFF
1
Navigation
5
button DOWN
Interpupillary
6
distance
adjustment
rings
Buttons Operation
Button ON/OFF (1)
Record button REC (4)
Navigation button
UP (2)
MENU button (3)
Navigation button
DOWN (5)
Battery Pack Charging
Lift up the lever (11) of the charger (9).
•
Install the Battery Pack (9) into the charger as far as it can go.
•
Lower the lever (11).
•
8
Lens focusing ring
Dioptre
7
adjustment rings
Short press
Turning on device / Image
calibration
Video recording on/ pause/
continue recording video/ Take
a photo
Turning on rangefinder/
measuring distance
Access the quick menu /
Confirm selection
Change value of discrete zoom Toggle between
Button MENU
3
4
Recording button REC
9
Battery Pack
Interpupillary
6
distance
adjustment
rings
7
Long press
Turning off device/
display
Photo mode on/ video
recording off/ video
mode on
Choose color palettes/
SCAN mode On/ Off
Log in/ out main menu
observation modes
10
Lens cover
2
ENGLISH