Всем привет!
Подскажите где можно найти полное руководство по настройке Proxmox на русском языке в pdf или в бумажно виде. Выдел 3-е издание но оно только на англ.(((
-
Вопрос задан
-
2401 просмотр
Пригласить эксперта
Проксмокс это небольшая надстройка на квм и контейнерами там книгу не о чем писать, изучается за несколько дней почти все
На русском есть частичто только How to…
Так тчо ставим и разбираемся)
Только сейчас осознал, что почти одинаково легко читаю английские howto и русские. Как говорится: спасибо за любовь к англ. языку. И согласен с автором поста про «нечего там особенно читать». Ставьте prox и шаг за шагом на практике.
-
Показать ещё
Загружается…
24 сент. 2023, в 22:45
1000 руб./за проект
22 сент. 2023, в 23:29
10000 руб./за проект
24 сент. 2023, в 19:30
2000 руб./за проект
Минуточку внимания
Proxmox VE administration guide R 6.0
![]()
Proxmox VE Administration Guide
Release 6.0
July 15, 2019
Proxmox Server Solutions Gmbh
www.proxmox.com
- Copyright © 2019 Proxmox Server Solutions Gmbh
- Permission is granted to copy, distribute and/or modify this document under the terms of the GNU Free
Documentation License, Version 1.3 or any later version published by the Free Software Foundation; with
no Invariant Sections, no Front-Cover Texts, and no Back-Cover Texts.
A copy of the license is included in the section entitled «GNU Free Documentation License».
Оглавление
- Введение
- Установка Proxmox VE
- Администрирование host системы
- Гиперконвергентная инфраструктура
- Графический интерфейс пользователя
- Менеджер кластера
- Файловая система кластера Proxmox (pmxcfs)
- Хранилище Proxmox VE
- Репликация хранилищ
- Виртуальные машины Qemu/KVM
- Инструменты контейнеров Proxmox
- Proxmox VE Firewall
- User Management
- High Availability
- Backup and Restore
- Important Service Daemons
- Useful Command Line Tools
- Frequently Asked Questions
- Bibliography
- Command Line Interface
- Service Daemons
- Configuration Files
- Firewall Macro Definitions
- GNU Free Documentation License
![]()
Комментариев нет:
Отправить комментарий
Главная страница
Подписаться на:
Сообщения (Atom)
Mastering Proxmox – Third Edition: Build virtualized environments using the Proxmox VE hypervisor
Discover real world scenarios for Proxmox troubleshooting and become an expert cloud builder
About This Book
- Formulate Proxmox-based solutions and set up virtual machines of any size while gaining expertise even on the most complex multi-cluster setups
- Master the skills needed to analyze, monitor, and troubleshoot real-world virtual environments
- This is the most up-to-date title on mastering Proxmox, with examples based on the new Linux Kernel 4.10.15 and Debian Stretch (9.x)
Who This Book Is For
This book is for Linux and system administrators and professionals working in IT teams who would like to design and implement an enterprise-quality virtualized environment using Proxmox. Some knowledge of networking and virtualization concepts is assumed.
What You Will Learn
- Install basic Proxmox VE nodes and get to know the Proxmox GUI
- Get to know Proxmox’s internal structure and mechanics
- Create and manage KVM or LXC-based virtual machines
- Understand advanced virtual networks
- Configure high availability Proxmox nodes
- Integrate Ceph big data storage with the Proxmox hypervisor
- Plan a large virtual environment for cloud-based services
- Discover real-world scenarios for Proxmox troubleshooting
In Detail
Proxmox is an open source server virtualization solution that has enterprise-class features for managing virtual machines, for storage, and to virtualize both Linux and Windows application workloads.
You’ll begin with a refresher on the advanced installation features and the Proxmox GUI to familiarize yourself with the Proxmox VE hypervisor. Then, you’ll move on to explore Proxmox under the hood, focusing on storage systems, such as Ceph, used with Proxmox. Moving on, you’ll learn to manage KVM virtual machines, deploy Linux containers fast, and see how networking is handled in Proxmox. You’ll also learn how to protect a cluster or a VM with a firewall and explore the new high availability features introduced in Proxmox VE 5.0. Next, you’ll dive deeper into the backup/restore strategy and see how to properly update and upgrade a Proxmox node. Later, you’ll learn how to monitor a Proxmox cluster and all of its components using Zabbix. Finally, you’ll discover how to recover Promox from disaster strikes through some real-world examples.
By the end of the book, you’ll be an expert at making Proxmox work in production environments with minimal downtime.
Style and approach
This book walks you through every aspect of virtualization using Proxmox using a practical, scenario-based approach that features best practices and all the weaponry you need to succeed when building virtual environments with Proxmox 5.0.
Table of Contents
Chapter 1. Understanding Proxmox VE and Advanced Installation
Chapter 2. Creating a Cluster and Exploring the Proxmox GUI
Chapter 3. Proxmox under the Hood
Chapter 4. Storage Systems
Chapter 5. Installing and Configuring Ceph
Chapter 6. KVM Virtual Machines
Chapter 7. LXC Virtual Machines
Chapter 8. Network of Virtual Networks
Chapter 9. The Proxmox VE Firewall
Chapter 10. Proxmox High Availability
Chapter 11. Monitoring the Proxmox Cluster
Chapter 12. Proxmox Production-Level Setup
Chapter 13. Back Up and Restore Virtual Machines
Chapter 14. Updating/Upgrading Proxmox
Chapter 15. Proxmox Troubleshooting
Chapter 16. Rescuing Proxmox

Облачные технологии дают возможность развертывать на одном физическом сервере несколько полноценных виртуальных машин и использовать на них любую операционную систему без каких-либо ограничений. Значительно упростить централизованное управление виртуализацией позволяют программные продукты вроде Proxmox. Заодно подобные решения экономят ресурсы компании, ведь системный администратор видит все VM с единого рабочего места.
Основная информация
В случае небольшого опыта, как подобрать сервер для виртуализации и настроить его, объяснят специалисты технической поддержки провайдера timeweb.cloud. Но и самому желательно разбираться в терминах и технологиях, применяемых на удаленных серверах. Это упростит задачу перехода с физической на облачную IT-инфраструктуру или изначально развернуть мощности на базе удаленного ЦОД. Плюс позволит общаться с технарями провайдера на «одном языке».
Основные термины:
- Гипервизор. Специальные программы, предназначенные для создания виртуальных машин, их настройки, запуска, резервного копирования, восстановления, переноса на другой сервер. В качестве гипервизора Proxmox использует KVM и LXC.
- Виртуальная машина. Система, представляющая собой программный сервер с собственным набором «железа» (процессором, оперативной памятью, накопителем, сетевой картой и т.д.). При функционировании занимает часть реальных мощностей физического сервера. Такие системы принято сокращенно называть VM.
- Хост виртуализации. Непосредственно тот самый физический сервер, на базе которого будет проведено развертывание виртуальной машины или нескольких VM. От его параметров зависит, насколько мощными станут логические компьютеры. Например, если на нем стоит 24-ядерный процессор, есть возможность создания такого же количества 1-ядерных систем.
Обязательное требование к хостам — их процессор должен поддерживать хотя бы одну технологию виртуализации: Intel VT или AMD-V (это аппаратная поддержка выделения ресурсов на логические компьютеры). Интересная особенность такой системы заключается в прямом доступе ко всему имеющемуся «железу» из любой VM. При этом они остаются изолированными друг от друга, имеют индивидуальные настройки.
Возможности решения
Если объяснять виртуализацию проще, для чайников, то стоит упомянуть, что гипервизор играет роль «контроллера». Программа распределяет аппаратные ресурсы, приоритеты между VM, эмулирует необходимое с учетом стандартов, принятых в установленной операционной системе. Никаких ограничений по выбору операционной системы с Proxmox VE нет (Windows 7/10, Linux и т.д.).
Особенности виртуальных машин:
- Критический сбой, ошибки в работе одной VM никак не влияют на остальные.
- Масштабирование осуществляется простым копированием виртуального сервера
- Поломка «железа» не влияет на сохранность системы, главное — иметь резервную копию.
- Одну и ту же VM легко развернуть на сервере любого производителя.
Последнее заметно упрощает задачу по модернизации оборудования ЦОД. Провайдер меняет любое «железо» на более современное без необходимости учитывать совместимость с ПО. За счет применения тех же дисковых массивов вроде RAID 5, Proxmox вообще не заметит замену одного или несколько накопителей. Виртуализация физических серверов работает бесшовно, чтобы обеспечить заявленную доступность уровня Tier 3 (не менее 99,9%).
Пользуются популярностью несколько гипервизоров: VMware ESXi, Microsoft Hyper-V, Oracle VM VirtualBox, Open Virtualization Alliance KVM. Каждый продукт имеет свои особенности и различную стоимость. При сравнении цена играет важную роль, здесь однозначно выигрывает KVM в составе готового решения на базе Debian Linux — это Proxmox Virtual Environment или Proxmox VE. Отчасти потому, что оно полностью бесплатно, да еще и имеет открытый исходный код.
Процедура установки продукта Proxmox обычно не вызывает вопросов. Инсталлятор работает через стандартный графический интерфейс, и пользователю остается лишь выбирать нужные настройки из выпадающих списков или вручную вносить наименования, пароли и т.д. Скачивать образ диска с новой версией программы рекомендуется с официальной страницы разработчика. Затем его или монтируют из консоли KVM, или развертывают на любой внешний диск.
Последовательность действий:
- Заказать аренду выделенного сервера у провайдера.
- Смонтировать скачанный образ в качестве сменного диска.
- Выбрать диск, куда будет произведена установка продукта.
- В разделе Option задать дополнительные параметры (по необходимости).
- Внести региональные настройки, в нашем случае – Russia.
- Задать пароль для авторизации суперпользователя, указать email.
- Указать домен, IP-адрес сервера, маску подсети, основной шлюз и DNS-сервер.
- Перезагрузить компьютер кликом на кнопку Reboot.
Если речь идет о развертывании системы из ISO-образа на базе Debian, а не инсталляции файлом Proxmox Debian Install, последний пункт обязателен. В любом случае лучше это сделать, чтобы исключить вероятные сбои из-за другого софта, который пользователь ставил в ту же сессию. Остается запустить Proxmox и заняться настройкой виртуальной машины. Адрес веб-интерфейса выглядит следующим образом:
https://IP_адрес_сервера:8006Первые действия после установки
Перед эксплуатацией продукта рекомендуется провести обновление до актуальной версии и внести настройки безопасности. Это обеспечит наличие всех предусмотренных разработчиком функций и отсутствие проблем (релизы как раз и обновляют ради добавления новых возможностей, устранения выявленных ошибок в коде).
Обновление приложения
Первое, что рекомендуется сделать — это отключить от системы платный репозиторий. Он установлен по умолчанию, но требует приобретения платной подписки. Без нее пользователь увидит ошибку при скачивании новых источников пакетов. Выполнить отключение можно действиями:
1. Открыть консольное окно и следом файл конфигурации apt на редактирование:
nano /etc/apt/sources.list.d/pve-enterprise.list2. Поставить символ # перед единственной строчкой, внесенной в него:
#deb https://enterprise.proxmox.com/debian/pve stretch pve-enterprise3. Выйти из редактора комбинацией клавиш <CTRL + X>, ответив Y на запрос о принятии изменений.
Теперь можно выполнить обновление источников пакетов:
apt updateРекомендуется скачивать новые версии всех имеющихся пакетов:
apt -y upgradeБезопасность сетевого соединения
Шаг следующий — позаботиться о безопасности Proxmox Virtualization Environment. Все-таки VM чаще всего используют юридические лица, а у них масса информации, которую желательно хранить вне публичного доступа (коммерческие, персональные данные клиентов и т.д.). Как минимум нужно обезопасить систему от взлома путем перебора паролей, так называемого брутфорса. Эту задачу решит популярная утилита Fail2Ban.
Принцип работы такой защиты основан на контроле количества попыток авторизации. Если некто превысит указанный лимит, его IP-адрес заблокируется. Число попыток и период бана системный администратор указывает в конфигурационном файле. Существует статистика: всего за 7 дней работы сервера с открытым портом 22 и внешним IP-адресом происходит до 5 000 попыток подбора пароля.
Последовательность действий при установке Fail2Ban:
1. Открыть серверную консоль в браузере или в приложении SSH.
2. Обновить источники пакетов:
apt update3. Инсталлировать саму программу:
apt install fail2ban4. Открыть файл конфигурации для изменения содержимого:
nano /etc/fail2ban/jail.conf5. Изменить переменные bantime – период в секундах для блокировки IP-адреса злоумышленника, и maxretry – число попыток авторизоваться. По каждому сервису это делается отдельно.
6. Выйти из редактора с сохранением изменений. Выполняется операция нажатием клавиш <CTRL + X> и подтверждением кнопкой Y.
7. Перезапустить службу:
systemctl restart fail2banОстается проверить текущий статус утилиты. Сделать это можно снятием статистики блокировок IP-адресов удаленных хостов, откуда предпринимались попытки взлома. Проверка доступна после ввода команды:
fail2ban-client -v status sshdОтвет выглядит следующим образом:
root@hypervisor:~# fail2ban-client -v status sshd
INFO   Loading configs for fail2ban under /etc/fail2ban
INFO     Loading files: ['/etc/fail2ban/fail2ban.conf']
INFO     Loading files: ['/etc/fail2ban/fail2ban.conf']
INFO   Using socket file /var/run/fail2ban/fail2ban.sock
Status for the jail: sshd
|- Filter
|  |- Currently failed: 4
|  |- Total failed:     4327
|  `- File list:        /var/log/auth.log
`- Actions
|- Currently banned: 0
|- Total banned:    516
`- Banned IP list:
Начало работы
Программное обеспечение Proxmox сразу готово к виртуализации машин на базе Windows Server, Ubuntu, CentOS 8 или других платформ. Но ряд настроек рекомендуется все-таки сделать до того, как будет развернута первая VM. Например, рационально саму программу и созданные виртуальные машины хранить на разных накопителях. Такой шаг повышает отказоустойчивость системы, дает возможность немного увеличить производительность комплекса.
Настройка дисковых накопителей
То же относится к хранению резервных копий. Их важно размещать отдельно от других файлов, это позволит оперативно восстанавливать VM даже при серьезных аппаратных сбоях на физическом сервере. Таковые практически исключены благодаря использованию дисковых массивов типа RAID 5 и 10, но лучше предусмотреть дополнительную защиту от рисков потери данных. Тестировать нижеприведенные команды лучше на платформе, где еще нет важной информации.
В качестве примера возьмем систему с двумя дисками. Пусть на /dev/sda будет установлен гипервизор Proxmox, а /dev/sdb останется пустым, на нем пользователь развернет виртуальные машины. При настройке разделения рекомендуется подключить хранилище в виде обычной директории.
Последовательность действий:
1. Разметить диск созданием на нем нового раздела:
fdisk /dev/sdb2. Нажать клавишу O для его разметки в систему MBR или G для выбора GBT.
3. Нажатием кнопки N создать новый раздел.
4. Кнопкой W сохранить внесенные изменения.
5. Создать файловую систему ext4:
mkfs.ext4 /dev/sdb16. Сгенерировать директорию, куда будет смонтирован раздел:
mkdir /mnt/storage7. Открыть конфигурацию для изменения содержимого редактором:
nano /etc/fstab8. Внести в него новую строчку со следующим содержимым:
/dev/sdb1 /mnt/storage ext4 defaults 0 09. Сохранить изменения нажатием комбинации <CTRL + X> с подтверждением операции за счет клика по Y.
10. Отправить сервер на перезагрузку для принятия новых настроек:
shutdown -r now11. Проверить ранее подключенные разделы:
df -HПоследняя команда должна отобразить информацию, что /dev/sdb1 был смонтирован в директорию /mnt/storage. Если все нормально, можно продолжать работу.
Подключение нового хранилища данных
Теперь новое хранилище нужно подключить к программе Proxmox. Процедура выполняется через панель управления. В ней нужно зайти в раздел «Директория», он находится по пути «Датацентр» – «Хранилище – «Добавить».
После открытия окна нужно заполнить несколько полей:
- ID – наименование подключаемого хранилища.
- Директория – внести значение /mnt/storage.
- Содержимое – выделить все предлагаемые варианты, последовательно кликнув на каждый из них.
Завершающий шаг включает нажатие на кнопку «Добавить». Теперь можно приступать к развертыванию виртуалки с выбранной операционной системой.
Создание виртуальной машины
Предварительно понадобится скачать ISO-образ с нужной операционкой (из любого источника). Его желательно проверить локально, чтобы убедиться в работоспособности и по необходимости приобрести лицензионный ключ для активации после установки. Затем образ следует смонтировать в систему через меню «Хранилище». В нем нужно нажать «Содержимое» – «Загрузить», затем выбрать файл и кликнуть «Загрузить».
Следующие шаги:
- Нажать «Создать VM».
- Заполнить параметры: имя, ISO-Image, размер и тип жесткого диска, количество процессоров, объем оперативной памяти, сетевой адаптер.
- После заполнения указанных полей нужно нажать на «Завершить» и убедиться в том, что после этого в списке появилась только что созданная виртуальная машина.
- Выбрать ее и нажать «Запуск».
- Перейти в пункт «Консоль» и выполнить инсталляцию операционной системы в такой же последовательности, как при установке на физический сервер.
Процедуру можно повторить сколько угодно раз и создать необходимое количество VM с нужными операционными системами. После запуска любой из них будет возможность установить требуемые прикладные программы, загружать на внутренние накопители пользовательские файлы.
Настройка автозапуска
По умолчанию гипервизор Proxmox не запускает VM автоматически, а это желательно, чтобы при перезапуске сервера виртуальная машина стартовала вместе с другим установленным софтом. Сделать это легко – достаточно выбрать виртуальную машину из списка, выбрать вкладку «Опции», а в ней «Запуск при загрузке». В открывшемся окне нужно поставить галочку напротив соответствующей надписи. Это включит автозагрузку, перезапуск программы или сервера не требуется.
Если в гипервизоре установлено несколько виртуальных машин, есть возможность указать, в какой последовательности их запускать после перезагрузки сервера (эти настройки скрыты в разделе Start/Shutdown). Например, программа позволяет указать время задержки в секундах между стартом каждой следующей VM. То же относится к выключению систем, потому что операционка не всегда успевает корректно завершить все процессы, и требуется чуть продлить время отключения.
Настройка сети
В официальной документации к Proxmox предлагается настройка сети виртуальных машин в двух вариантах: с использованием моста и маршрутизации. Все сетевые параметры настраиваются на уровне ноды, для этого нужно перейти на нужный сервер, открыть меню «Система» – «Сеть». Именно там и скрыты сетевые параметры. По умолчанию в VM используется конфигурация «Внешняя сеть», и она оправдывает свое применение.
Пользователь обращается к виртуальным машинам как к самому обычному узлу локальной сети – от просмотра содержимого дисков до копирования, создания, удаления и редактирования файлов. База всех виртуальных сетей в Proxmox — сетевой мост (Linux Bridge) vmbr. Он допускает создание до 4095 таких устройств, подключение физических и виртуальных адаптеров. Все сетевые настройки осуществляются внутри VM, как будто на физическом сервере.
Пользователю нужно назначить IP-адрес интерфейсу моста, не забыв указать и адрес шлюза, опцию автозапуска и краткий комментарий о назначении сетевого узла. Настройка DNS осуществляется в отдельном пункте: «Система» – «DNS». После сохранения изменений останется внутри виртуальной машины выбрать нужный мост и задать ему подходящие сетевые настройки. Например, указать, что их следует получать автоматически от DHCP-сервера внешней сети.
Заключение
Вот и все основы работы с гипервизором Proxmox VE. Их достаточно начинающим специалистам, чтобы опробовать технологию виртуализации на практике. На первый взгляд, технология может показаться сложной, и, конечно, всегда можно купить виртуальную машину или несколько у провайдера и объединить их в локальную сеть. Однако развертывание VM на собственном арендуемом сервере даст вам больше свободы в управлении.
Proxmox VE, несмотря на бесплатность, считается довольно мощным и удобным инструментом. Главное, самому разобраться во всех тонкостях настройки системы и не бояться экспериментировать (естественно, на тестовой платформе, с обязательным резервированием основных VM).
Home
Cloud & Networking
Mastering Proxmox — Third Edition

Book
Subscription
FREE
eBook + Subscription
$15.99
eBook
$35.99
Print + eBook
$43.99
READ FOR FREE
Free Trial for 7 days. $15.99 p/m after trial. Cancel Anytime!
BUY NOW
BUY NOW
BUY NOW
What do you get with a Packt Subscription?
![]()
This book & 7000+ ebooks & video courses on 1000+ technologies

60+ curated reading lists for various learning paths

50+ new titles added every month on new and emerging tech

Early Access to eBooks as they are being written

Personalised content suggestions

Customised display settings for better reading experience

50+ new titles added every month on new and emerging tech

Playlists, Notes and Bookmarks to easily manage your learning

Mobile App with offline access
What do you get with a Packt Subscription?
![]()
This book & 6500+ ebooks & video courses on 1000+ technologies
60+ curated reading lists for various learning paths
50+ new titles added every month on new and emerging tech
Early Access to eBooks as they are being written
Personalised content suggestions
Customised display settings for better reading experience
50+ new titles added every month on new and emerging tech
Playlists, Notes and Bookmarks to easily manage your learning
Mobile App with offline access
What do you get with eBook + Subscription?

Download this book in EPUB and PDF formats
![]()
This book & 6500+ ebooks & video courses on 1000+ technologies
60+ curated reading lists for various learning paths
50+ new titles added every month on new and emerging tech
Early Access to eBooks as they are being written
Personalised content suggestions
Customised display settings for better reading experience
50+ new titles added every month on new and emerging tech
Playlists, Notes and Bookmarks to easily manage your learning
Mobile App with offline access
What do you get with a Packt Subscription?
![]()
This book & 6500+ ebooks & video courses on 1000+ technologies
60+ curated reading lists for various learning paths
50+ new titles added every month on new and emerging tech
Early Access to eBooks as they are being written
Personalised content suggestions
Customised display settings for better reading experience
50+ new titles added every month on new and emerging tech
Playlists, Notes and Bookmarks to easily manage your learning
Mobile App with offline access
What do you get with eBook?
Download this book in EPUB and PDF formats

Access this title in our online reader

DRM FREE — Read whenever, wherever and however you want
Online reader with customised display settings for better reading experience
What do I get with Print?

Get a paperback copy of the book delivered to your specified Address*
Download this book in EPUB and PDF formats
Access this title in our online reader
DRM FREE — Read whenever, wherever and however you want
Online reader with customised display settings for better reading experience
What do you get with video?
Download this video in MP4 format
Access this title in our online reader
DRM FREE — Watch whenever, wherever and however you want
Online reader with customised display settings for better learning experience
What do you get with Audiobook?

Download a zip folder consisting of audio files (in MP3 Format) along with supplementary PDF
READ FOR FREE
Free Trial for 7 days. $15.99 p/m after trial. Cancel Anytime!
BUY NOW
BUY NOW
BUY NOW
Subscription
FREE
eBook + Subscription
$15.99
eBook
$35.99
Print + eBook
$43.99
What do you get with a Packt Subscription?
![]()
This book & 7000+ ebooks & video courses on 1000+ technologies
60+ curated reading lists for various learning paths
50+ new titles added every month on new and emerging tech
Early Access to eBooks as they are being written
Personalised content suggestions
Customised display settings for better reading experience
50+ new titles added every month on new and emerging tech
Playlists, Notes and Bookmarks to easily manage your learning
Mobile App with offline access
What do you get with a Packt Subscription?
![]()
This book & 6500+ ebooks & video courses on 1000+ technologies
60+ curated reading lists for various learning paths
50+ new titles added every month on new and emerging tech
Early Access to eBooks as they are being written
Personalised content suggestions
Customised display settings for better reading experience
50+ new titles added every month on new and emerging tech
Playlists, Notes and Bookmarks to easily manage your learning
Mobile App with offline access
What do you get with eBook + Subscription?
Download this book in EPUB and PDF formats
![]()
This book & 6500+ ebooks & video courses on 1000+ technologies
60+ curated reading lists for various learning paths
50+ new titles added every month on new and emerging tech
Early Access to eBooks as they are being written
Personalised content suggestions
Customised display settings for better reading experience
50+ new titles added every month on new and emerging tech
Playlists, Notes and Bookmarks to easily manage your learning
Mobile App with offline access
What do you get with a Packt Subscription?
![]()
This book & 6500+ ebooks & video courses on 1000+ technologies
60+ curated reading lists for various learning paths
50+ new titles added every month on new and emerging tech
Early Access to eBooks as they are being written
Personalised content suggestions
Customised display settings for better reading experience
50+ new titles added every month on new and emerging tech
Playlists, Notes and Bookmarks to easily manage your learning
Mobile App with offline access
What do you get with eBook?
Download this book in EPUB and PDF formats
Access this title in our online reader
DRM FREE — Read whenever, wherever and however you want
Online reader with customised display settings for better reading experience
What do I get with Print?
Get a paperback copy of the book delivered to your specified Address*
Download this book in EPUB and PDF formats
Access this title in our online reader
DRM FREE — Read whenever, wherever and however you want
Online reader with customised display settings for better reading experience
What do you get with video?
Download this video in MP4 format
Access this title in our online reader
DRM FREE — Watch whenever, wherever and however you want
Online reader with customised display settings for better learning experience
What do you get with Audiobook?
Download a zip folder consisting of audio files (in MP3 Format) along with supplementary PDF
About this book
Proxmox is an open source server virtualization solution that has enterprise-class features for managing virtual machines, for storage, and to virtualize both Linux and Windows application workloads.
You’ll begin with a refresher on the advanced installation features and the Proxmox GUI to familiarize yourself with the Proxmox VE hypervisor. Then, you’ll move on to explore Proxmox under the hood, focusing on storage systems, such as Ceph, used with Proxmox. Moving on, you’ll learn to manage KVM virtual machines, deploy Linux containers fast, and see how networking is handled in Proxmox. You’ll also learn how to protect a cluster or a VM with a firewall and explore the new high availability features introduced in Proxmox VE 5.0. Next, you’ll dive deeper into the backup/restore strategy and see how to properly update and upgrade a Proxmox node. Later, you’ll learn how to monitor a Proxmox cluster and all of its components using Zabbix. Finally, you’ll discover how to recover Promox from disaster strikes through some real-world examples.
By the end of the book, you’ll be an expert at making Proxmox work in production environments with minimal downtime.
- Publication date:
- November 2017
- Publisher
- Packt
- Pages
- 494
- ISBN
- 9781788397605
Chapter 1. Understanding Proxmox VE and Advanced Installation
Virtualization, as we all know today, is a decades-old technology that was first implemented in the mainframes of the 1960s. Virtualization was a way to logically divide the mainframe’s resources for different application processing. With the rise in energy costs, running under-utilized server hardware is no longer a luxury. Virtualization enables us to do more with less, thus saving energy and money while creating a virtual green data center without geographical boundaries.
A hypervisor is a piece of software, hardware, or firmware that creates and manages virtual machines. It is the underlying platform or foundation that allows a virtual infrastructure to be built. In a way, it is the very building block of all virtualization. A bare metal hypervisor acts as a bridge between physical hardware and the virtual machines by creating an abstraction layer. Because of this unique feature, an entire virtual machine can be moved over a vast distance over the internet and be made available to function exactly the same. A virtual machine does not see the hardware directly; instead, it sees the layer of the hypervisor, which is the same no matter what hardware the hypervisor has been installed on.
The Proxmox Virtual Environment (VE) is a cluster-based hypervisor and one of the best-kept secrets in the virtualization industry. The reason is simple. It allows you to build an enterprise business-class virtual infrastructure at a small business-class price tag without sacrificing stability, performance, and ease of use. Whether it is a massive data center to serve millions of people, or a small educational institution, or a home serving important family members, Proxmox can handle configuration to suit any situation.
If you have picked up this book, you are no doubt familiar with virtualization, and perhaps well versed with other hypervisors, such as VMware, Xen, Hyper-V, and so on. In this chapter and upcoming chapters, we will see the mighty power of Proxmox from the inside out. We will examine scenarios and create a complex virtual environment. We will tackle some heavy day-to-day issues and show resolutions that might just save the day in a production environment. We will also learn how to deploy a highly redundant storage system using Ceph to store virtual machines. So strap yourself in and let’s dive into the virtual world with the mighty hypervisor, Proxmox VE.
Understanding Proxmox features
Before we dive in, it is necessary to understand why one should choose Proxmox over the other mainstream hypervisors. Proxmox is not perfect, but stands out among other contenders with its hard-to-beat features. The following are some of the features that make Proxmox a real game changer.
It is free!
Yes, Proxmox is free! To be more accurate, Proxmox has several subscription levels, among which the community edition is completely free. One can simply download the Proxmox ISO at no cost and raise a fully functional cluster without missing a single hypervisor feature and without paying anything. The main difference between the paid and community subscription level is that the paid subscription receives updates, which go through additional testing and refinement. In a production cluster with a real workload, it is highly recommended to purchase a subscription from Proxmox or Proxmox resellers.
Built-in firewall
Proxmox VE comes with a robust firewall ready to be configured out of the box. This firewall can be configured to protect the entire Proxmox cluster down to a virtual machine. The per-VM firewall option gives you the ability to configure each VM individually by creating individualized firewall rules, a prominent feature in a multi-tenant virtual environment. We will learn about this feature in detail in Chapter 9, The Proxmox VE Firewall.
Open vSwitch
Licensed under Apache 2.0, Open vSwitch is a virtual switch designed to work in a multi-server virtual environment. All hypervisors need a bridge between VMs and the outside network. Open vSwitch enhances the features of the standard Linux bridge in an ever-changing virtual environment. Proxmox fully supports Open vSwitch which allows you to create an intricate virtual environment, all the while reducing virtual network management overhead. For details on Open vSwitch, refer to http://openvswitch.org/.
We will learn about Open vSwitch management in Proxmox in Chapter 8, Network of Virtual Networks.
The graphical user interface
Proxmox comes with a fully functional graphical user interface (GUI) out of the box. The GUI allows an administrator to manage and configure almost all the aspects of a Proxmox cluster. The GUI has been designed keeping simplicity in mind, with functions and features separated into menus for easier navigation. The following screenshot shows an example of the Proxmox GUI dashboard:
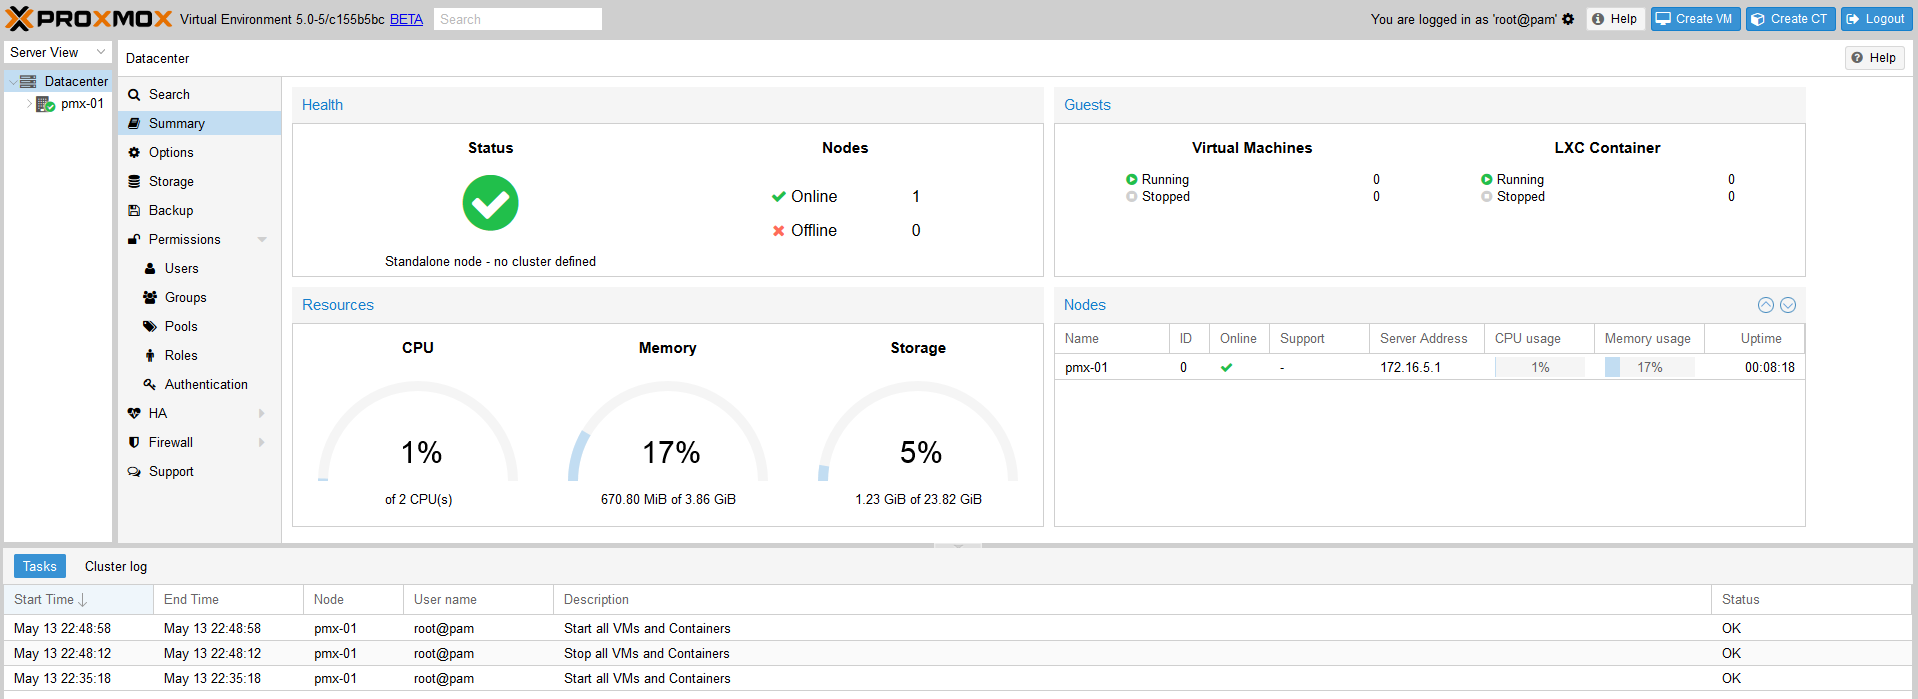
We will dissect the Proxmox GUI dashboard in Chapter 2, Creating a Cluster and Exploring the Proxmox GUI.
KVM virtual machines
A Kernel-based Virtual Machine (KVM) is a kernel module that is added to Linux for full virtualization to create isolated, fully independent virtual machines. KVMs are not dependent on the host operating system in any way, but they do require the virtualization feature in BIOS to be enabled. A KVM allows a wide variety of operating systems for virtual machines, such as Linux and Windows. Proxmox provides a very stable environment for KVM-based VMs. We will learn how to create KVM VMs and also how to manage them in Chapter 6, KVM Virtual Machines.
Linux containers, or LXC
Introduced in Proxmox VE 4.0, Linux containers, or LXCs, allow multiple Linux instances on the same Linux host. All the containers are dependent on the host Linux operating system and only Linux flavors can be virtualized as containers. There are no containers for the Windows operating system. LXC replaces prior OpenVZ containers, which were the primary containers in the virtualization method in the previous Proxmox versions. If you are not familiar with LXC or want details on it, refer to https://linuxcontainers.org.
We will learn how to create LXC containers and manage them in Chapter 7, LXC Virtual Machines.
Storage plugins
Out of the box, Proxmox VE supports a variety of storage systems to store virtual disk images, ISO templates, backups, and so on. All plugins are quite stable and work great with Proxmox. Being able to choose different storage systems gives an administrator the flexibility to leverage the existing storage in the network. As of Proxmox VE 5.0, the following storage plugins are supported:
- The local directory mount points
- LVM
- LVM thin
- NFS
- iSCSI
- GlusterFS
- Ceph RADOS Block Devices (RBD)
- ZFS over iSCSI
- ZFS
We will learn the usage of different storage systems and the types of files they can store in detail in Chapter 4, Storage Systems.
Vibrant culture
Proxmox has a growing community of users who are always helping others learn Proxmox and troubleshoot various issues. With so many active users around the world, and through active participation of Proxmox developers, the community has now become a culture of its own. Feature requests are continuously being worked on, and the existing features are being strengthened on a regular basis. With so many users supporting Proxmox, it sure is here to stay.
The basic installation of Proxmox
The installation of a Proxmox node is very straightforward. Simply accept the default options, select localization, and enter the network information to install Proxmox VE. We can summarize the installation process in the following steps:
- Download the ISO from the official Proxmox site and prepare a disc with the image (http://proxmox.com/en/downloads).
- Boot the node with the disc and hit Enter to start the installation from the installation GUI, as shown in the following screenshot:
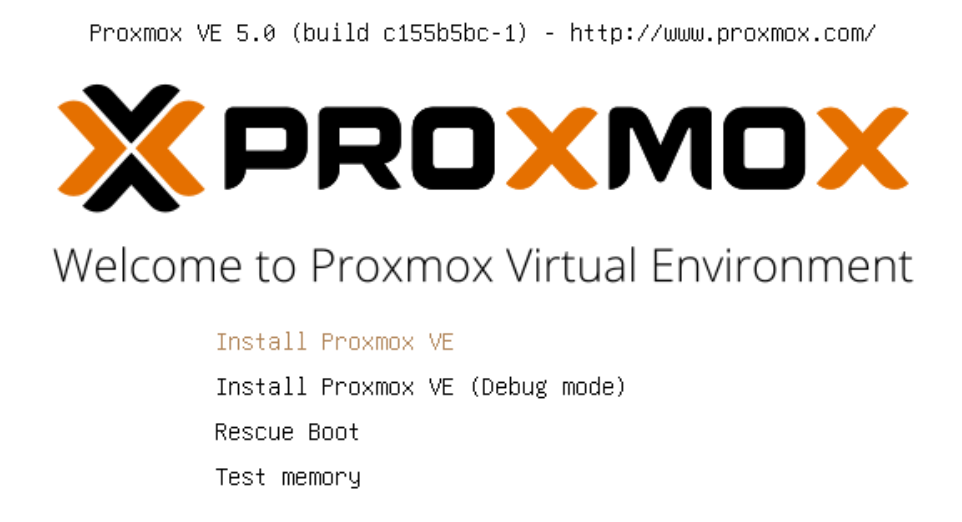
If an optical drive to use the installation disc is unavailable, we can also install Proxmox from a USB drive.
- Progress through the prompts to select options or type in information.
- After the installation is complete, access the Proxmox GUI dashboard using the IP address, as
https://<proxmox_node_ip>:8006.
In some cases, it may be necessary to open the firewall port to allow access to the GUI over port 8006.
The advanced installation option
Although the basic installation works in all scenarios, there may be times when the advanced installation option is necessary. Only the advanced installation option provides you the ability to customize the main OS drive.
A common practice for the operating system drive is to use a mirror RAID array using a controller interface. This provides drive redundancy if one of the drives fails. This same level of redundancy can also be achieved using a software-based RAID array, such as ZFS. Proxmox now offers options to select ZFS-based arrays for the operating system drive right at the beginning of the installation. For details on ZFS, if you are not familiar, refer to https://en.wikipedia.org/wiki/ZFS.
Note
It is common to ask why one should choose ZFS software RAID over tried-and-tested hardware-based RAID. The simple answer is flexibility. Hardware RAID is locked, or fully dependent, on the hardware RAID controller interface that created the array, whereas ZFS creates software-based RAID which is not dependent on any hardware, and the array can easily be ported to different hardware nodes. Should a RAID controller failure occur, the entire array created from that controller is lost unless there is an identical controller interface available for replacement. The ZFS array is only lost when all the drives or a maximum tolerable number of drives are lost in the array.
Besides ZFS, we can also select other filesystem types, such as ext3, ext4, or xfs, from the same advanced option. We can also set the custom disk or partition sizes through the advanced option. The following screenshot shows the installation interface with the target hard disk selection page:
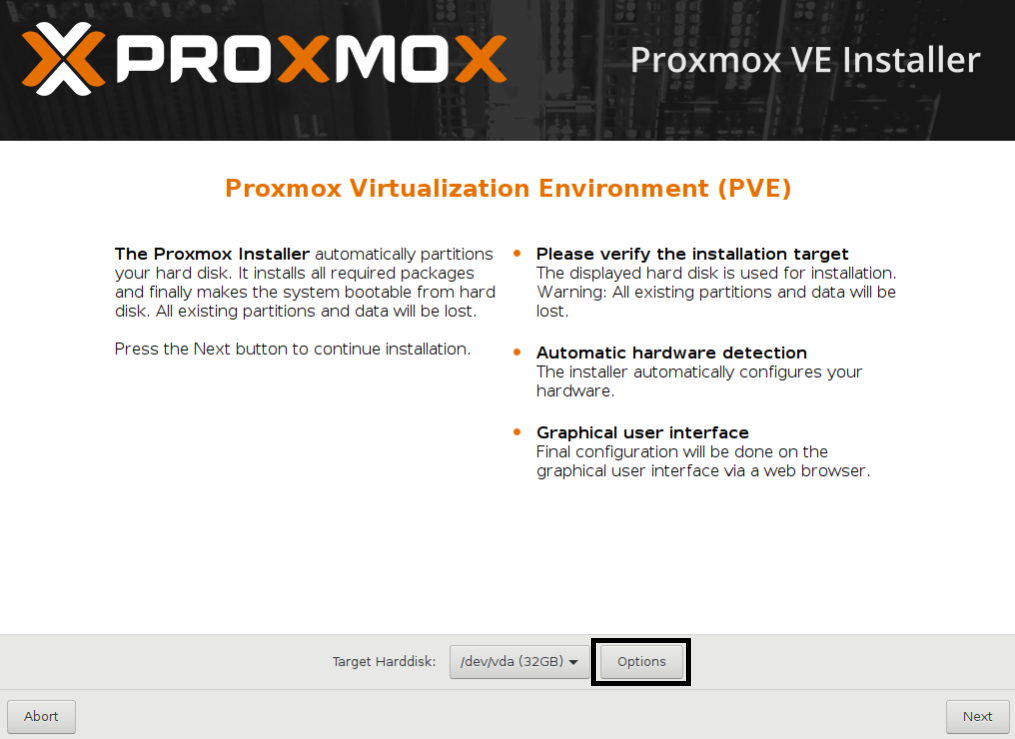
Click on Options, as shown in the preceding screenshot, to open the advanced options for the hard disk. The following screenshot shows the option window with supported filesystem drop-down menu:
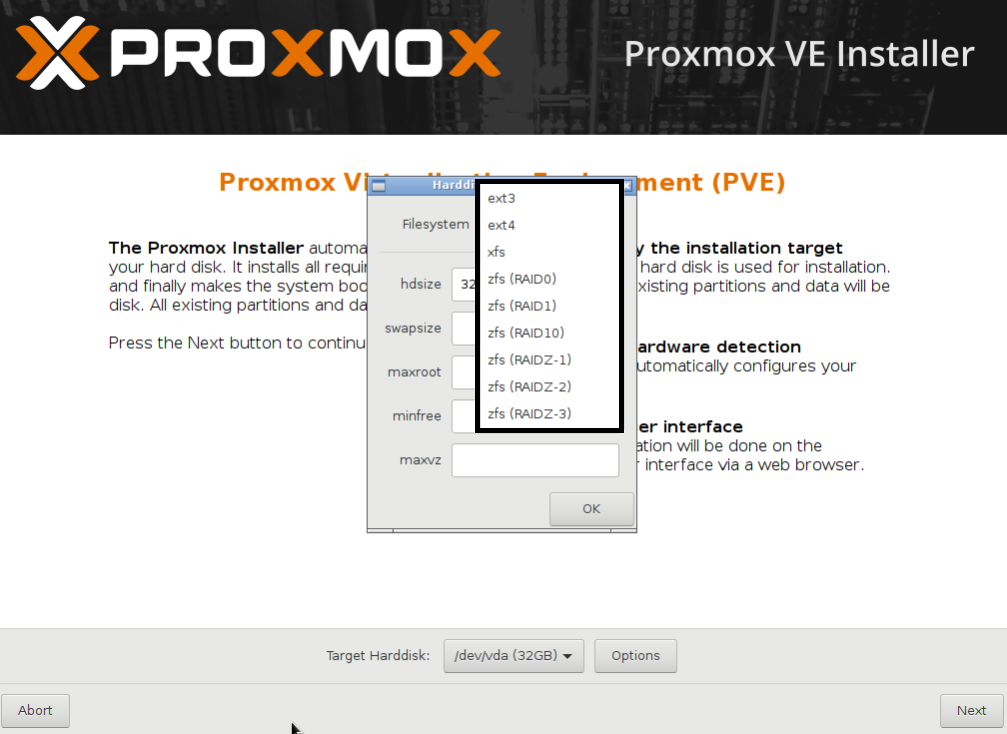
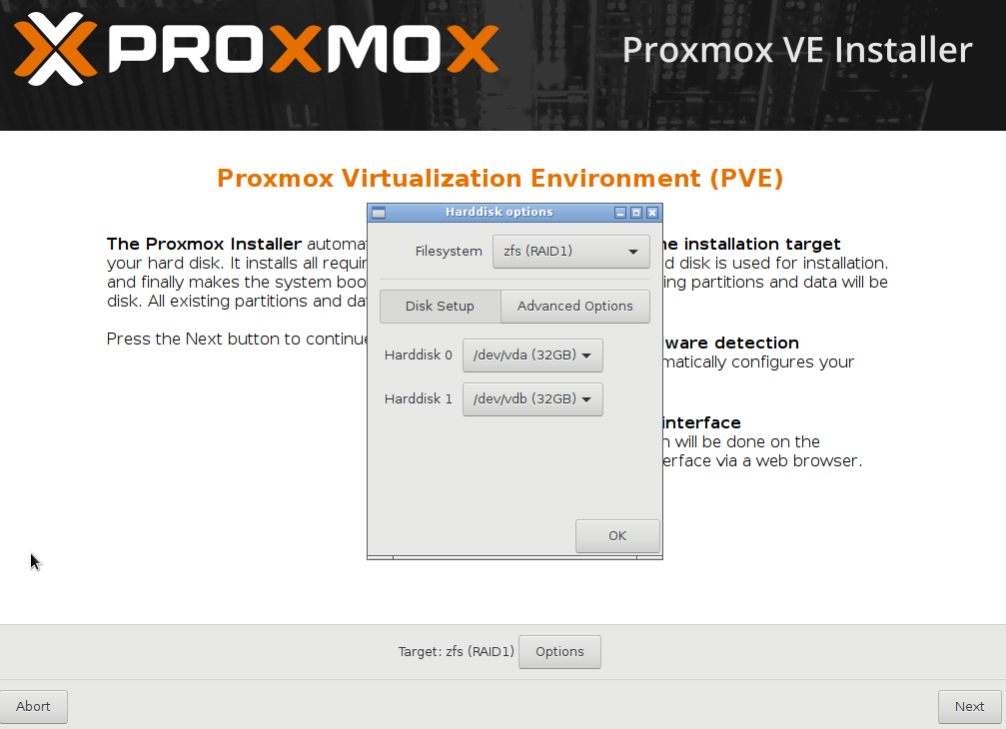
We are going to select the ZFS mirror or RAID1, for the purpose of this book, in order to create a demo cluster from scratch. In the preceding screenshot, we selected zfs (RAID1) for mirroring, and the two drives, Harddisk 0 and Harddisk 1, to install Proxmox. The installer will auto-select the installed disk drive, as shown in the following screenshot:
The Advanced Options include some ZFS performance-related configurations such as compress, checksum, and ashift or alignment shift, as shown in the following screenshot:
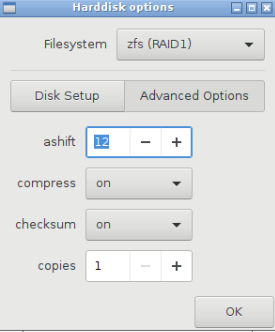
For most environments, this configuration can be left as default.
If you are unfamiliar with ZFS advanced tuning, then the following link may be helpful to get some insight on ZFS performance tuning options:
http://open-zfs.org/wiki/Performance_tuning#Alignment_Shift_.28ashift.29
If we pick a filesystem such as EXT3, EXT4, or XFS instead of ZFS, the Harddisk options dialog box will look like the following screenshot, with a different set of options:
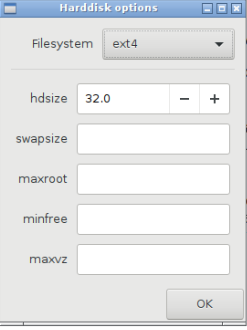
Selecting a filesystem gives us the following advanced options:
hdsize: This is the total drive size to be used by the Proxmox installation.swapsize: This defines the swap partition size.maxroot: This defines the maximum size to be used by the root partition.minfree: This defines the minimum free space that should remain after the Proxmox installation.maxvz: This defines the maximum size for the data partition. This is usually/var/lib/vz.
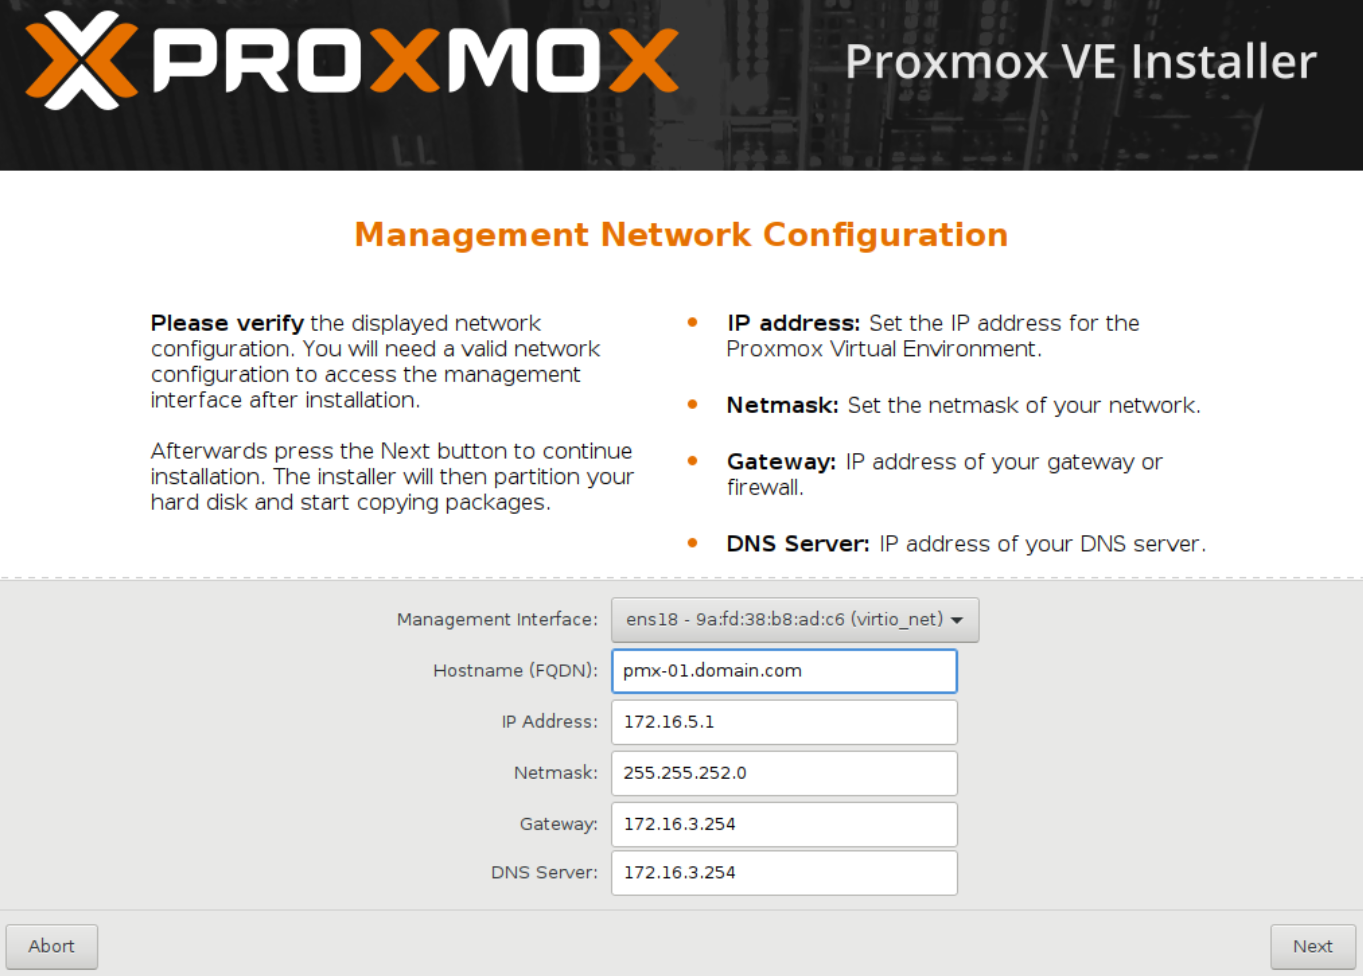
From Proxmox VE version 5, we can select the interface that will be used for management. This is very useful when a node has multiple network interfaces and we want to intentionally use a particular interface for cluster management. The following screenshot shows the management network interface selection screen during Proxmox installation:
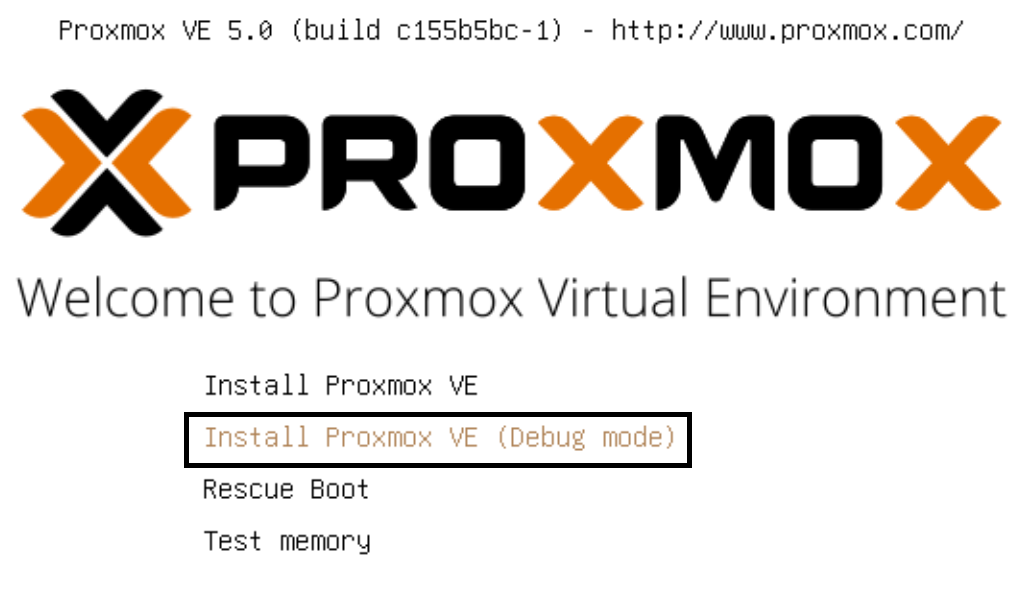
Debugging the Proxmox installation
Debugging features are part of any good operating system. Proxmox has debugging features that will help you during a failed installation. Some common reasons are unsupported hardware, conflicts between devices, ISO image errors, and so on. Debugging mode logs and displays installation activities in real time. When the standard installation fails, we can start the Proxmox installation in debug mode from the main installation interface, as shown in the following screenshot:
The debug installation mode will drop us in the prompt, as shown in the following screenshot:

To start the installation, we need to press Ctrl + D. If there is an error during the installation, we can simply press Ctrl + C to get back to this console to continue with our investigation. From the console, we can check the installation log using the following command:
# cat /tmp/install.log
At times, it may be necessary to edit the loader information when normal booting does not function. This is a common case when Proxmox is unable to show the video output due to UEFI or a nonsupported resolution. In such cases, the booting process may hang. From the main installation menu, we can press E to enter edit mode to change the loader information, as shown in the following screenshot:
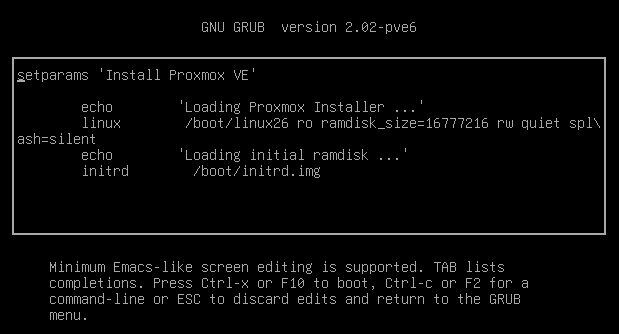
One way to continue with booting is to add the nomodeset argument by editing the loader. The loader should look as follows after the edit:
linux/boot/linux26 ro ramdisk_size=16777216 rw quiet nomodeset
Proxmox subscription and repositories
Proxmox itself is completely free to download and deploy without any cost. But a subscription offers an added level of stability to any node used in a production environment. Both free and subscribed versions have separate repositories and receive updates differently.
Updates or packages released through the subscribed or Enterprise repository go through additional testing and debugging before they are released. This is not to say the updates or packages in the free repository are full of bugs and are released without testing. All Proxmox patches, updates, and packages are taken through the complete development cycle, including testing, before they are released. But Enterprise packages go through much more comprehensive debugging and testing. This level of tests is mandatory for an enterprise-class network environment where a small issue can cost a company a lot of money. A highly stable environment is usually not needed in a home-based platform or small business environment. The subscription menu allows you to activate a purchased subscription on a node. So from a stability point of view, the enterprise version is without a doubt the best choice for any production environment cluster. The price of an enterprise subscription varies depending on the level of Proxmox support provided through tickets, portal, and phone.
Free repository users can only reach out for support through the official Proxmox forum. Proxmox developers quite often lend their expertise to address issues posted on the forum by users. There is no portal or ticket system available for free users. Since this is a free community forum, some issues may not get answered in time.
Note
Even with the free version, Proxmox is still very stable. Do not let the subscription level fool you into thinking that the free version is not even worth considering.
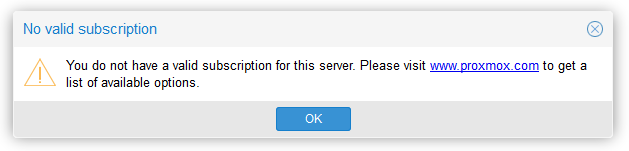
Both free and enterprise versions can be mixed in the same environment. For example, some critical nodes actively serving users can be on the enterprise version, while any non-critical nodes, such as nodes used for testing, backup, and so on, can be on the free version. Upon logging in through the free non-subscription Proxmox node through the GUI, we will be presented with the following notification:
There are three package repositories for Proxmox:
- Proxmox VE Enterprise repository
- Proxmox VE No-Subscription or Free repository
- Proxmox VE Test repository
Proxmox VE Enterprise repository
As the name suggests, this repository is for nodes with paid subscriptions. By default, the Enterprise Repository is enabled in Proxmox. The repository information is in the file /etc/apt/sources.list.d/pve-enterprise.list. We can disable the Enterprise Repository by simply commenting it out with the # symbol in the following line:
deb https://enterprise.proxmox.com/debian jessie pve-enterprise
When disabling the Enterprise Repository, the No-Subscription Repository must be enabled in order to receive updates, patches, and packages. If you’re using the Enterprise Repository on a mission-critical node and a subscription has been purchased, the subscription key can be uploaded through the Proxmox GUI by clicking on the Upload Subscription Key button under the Node | Subscription menu, as shown in the following figure:
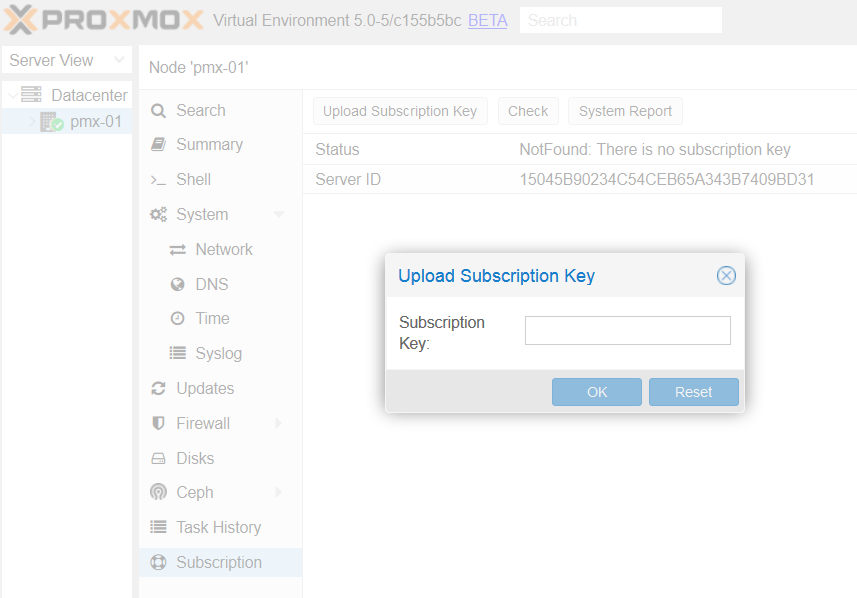
Copy and paste the subscription key and then click on OK. Proxmox will automatically check the validity of the key and activate the subscription for the node. A fully subscribed node appears similarly to the following screenshot, under subscriptions in the GUI:
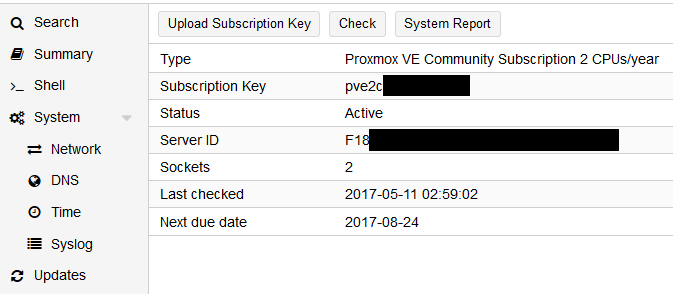
Let’s look at the details provided through the Subscription page.
Type
This shows the name of the Proxmox subscription level. There are four levels of subscription available: Community, Basic, Standard, and Premium. The higher the level, the more support add-ons are included.
Subscription key
This is the alphanumeric subscription key the customer receives after purchasing any subscription. The key is formatted in two parts: pveXx-XXXXXXXXXX. The first portion of the key indicates which level of subscription this key belongs to and for how many server sockets. For example, in the previous screenshot, the subscription key is for a Community-level subscription for a server with two sockets. If this were the Premium-level subscription for a server with four sockets, the key would appear as pve4p-XXXXXXXX.
All letters and numbers after the - are unique to each key and should not be shared with unauthorized personnel or made public.
Status
This shows the current status of the subscription key.
Server ID
This uniquely generated ID belongs to one node only. When a subscription key is activated on a particular server, the key gets associated with this unique ID. When a node needs to be reinstalled without any hardware changes in it, the key can be reapplied to the server without being reissued or reactivated. But if the key is to be applied to other server hardware or if any major component (such as the CPU, motherboard, or memory) in the server has been changed, then a new unique ID will be generated. In that case, the key will need to be reissued or reactivated. This reissuing can be done by the user on the Proxmox customer site or by the authorized reseller from whom the subscription key has been purchased.
Sockets
This shows the physical CPU socket count of the server node.
Last checked
This shows the date and time of the last key validation check performed automatically by the node or manually by the user.
Next due date
This shows the expiration date of the subscription key, by which the key needs to be renewed. If the key is not renewed and expires, the Proxmox node will still continue to function properly. But it will not receive any updates from the Enterprise Repository.
Proxmox VE No-Subscription repository
This repository includes updates and packages free of cost. If using this repository, changes must be made to activate it. After disabling the Enterprise Repository, by following the instructions in the previous section, add the following line to the file /etc/apt/sources.list:
deb http://download.proxmox.com/debian jessie pve-no-subscription
Proxmox VE Test repository
This repository largely contains packages for testing purposes only. It is mainly used by Proxmox developers to test new packages and allow interested users to test them as well. Under no circumstances should this repository be used in a production environment. To enable this repository, add the following line to /etc/apt/sources.list:
deb http://download.proxmox.com/debian jessie pvetest
Note
Proxmox has the very best prices per subscription in the virtualization product industry. The operating cost of a Proxmox cluster is minimal as compared to a giant virtual product, such as VMWare. Proxmox provides big-business virtualization at a small-business cost. For details of different subscription levels, refer to http://proxmox.com/proxmox-ve/pricing.
Summary
In this chapter, we looked at why Proxmox is a better option as a hypervisor, what advanced installation options are available during an installation, and why we choose software RAID for the operating system drive. We also looked at different subscription levels and their benefits. We learned about the presence of the debugging features to investigate when an installation does not proceed as usual.
In next chapter, we will take a closer look at the Proxmox GUI and see how easy it is to centrally manage a Proxmox cluster from a web browser.
About the Author
-
Wasim Ahmed
Wasim Ahmed, born in Bangladesh and now a citizen of Canada, is a veteran of the IT world. He first came into close contact with computers in 1992 and never looked back. Wasim has a deep understanding of networks, virtualization, big data storage, and network security. By profession, Wasim is the CEO of a global IT support and cloud service provider based in Calgary, Alberta. He serves many companies and organizations through his company on a daily basis. Wasim’s strength comes from his experience, which comes from learning and serving continually. Wasim strives to find the most effective solution at the most competitive price. He has built over 20 enterprise production virtual infrastructures using Proxmox and the Ceph storage system. Wasim and his team are notorious for not simply accepting a technology based on its description alone, but putting it through rigorous testing to check its validity. Any new technology that his company provides goes through months of continuous testing before it is accepted. Proxmox made the cut superbly.
Browse publications by this author
Ciekawa książka w przystępnej cenie, natychmiastowa dostępność książki (pdf) po zakupie.
todavia no lo termine de leer..pero hasta ahora cumple todas mis expectativas.
Best pricing during super discount