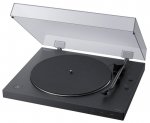
Sony PS-LX310BT — виниловый проигрыватель, который позволит вернуть к жизни ваши старые пластинки. Устройство позволяет получить оригинальный звук виниловых пластинок, насладиться их естественным звучанием. Особенность модели в поддержке интерфейса Bluetooth, позволяющего подключить к проигрывателю наушники или беспроводные динамики для вывода звука. Для вывода звука также используется аналоговый разъем RCA. Это позволяет прослушивать пластинки на ваших любимых устройствах.
Виниловый проигрыватель выполнен в компактном корпусе и поддерживает автовоспроизведение − функцию, которая способствует удобному пользованию: при нажатии кнопки автовоспроизведения устройство опускает самостоятельно тонарм на пластинку, что позволяет сразу же начать прослушивание пластинок, используя смартфон или другое устройство, подключенное по Bluetooth. Конструкция проигрывателя предусматривает наличие крышки, что позволяет сохранить устройство. Диаметр опорного диска проигрывателя достигает 296 мм, а скорость вращения составляет 45 об/мин и 33 об/мин.
Основные характеристики:
- Тип привода — ременной
- Картридж в комплекте — есть
- Тонарм в комплекте — есть
- Крышка — в комплекте
- Встроенный фонокорректор — есть
- Тип тонарма — поворотный
- Материал тонарма — алюминий
- Материал диска — алюминий
- Диаметр диска — 296 мм
- Тип выходных разъемов — кабель с RCA-коннекторами
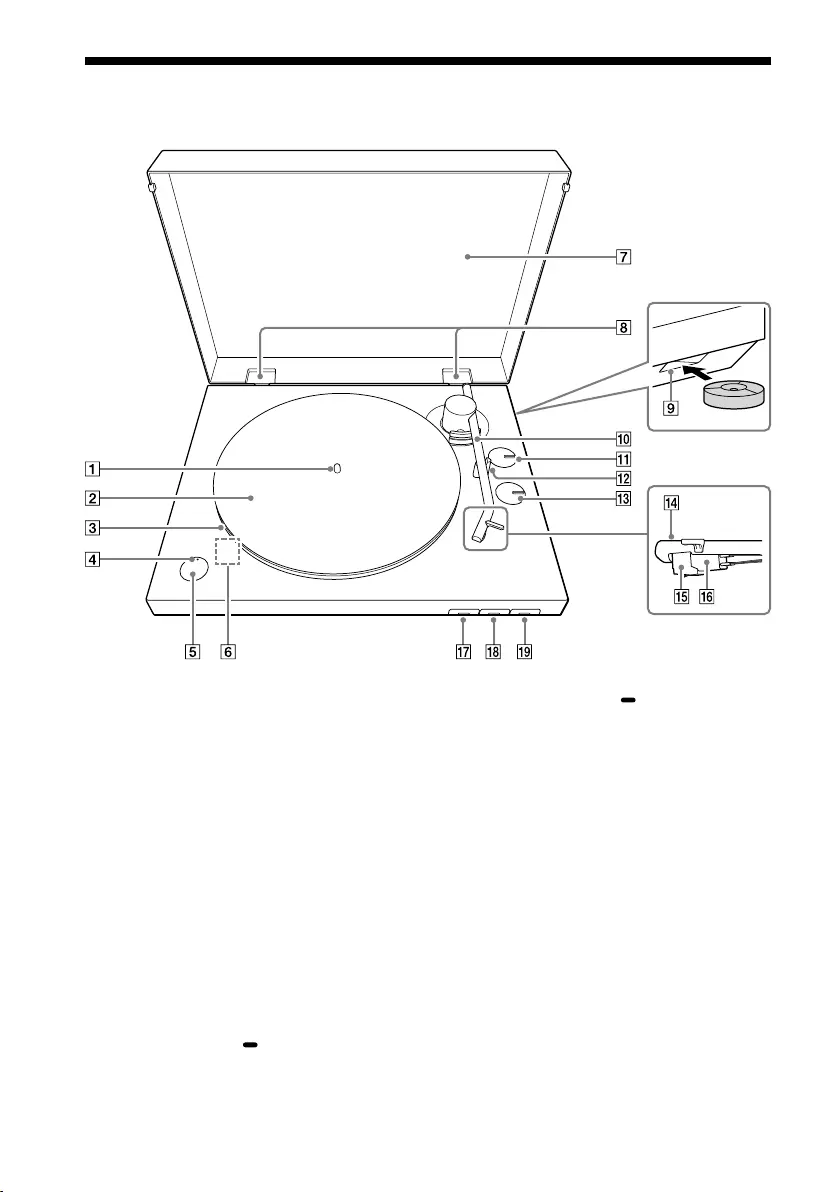
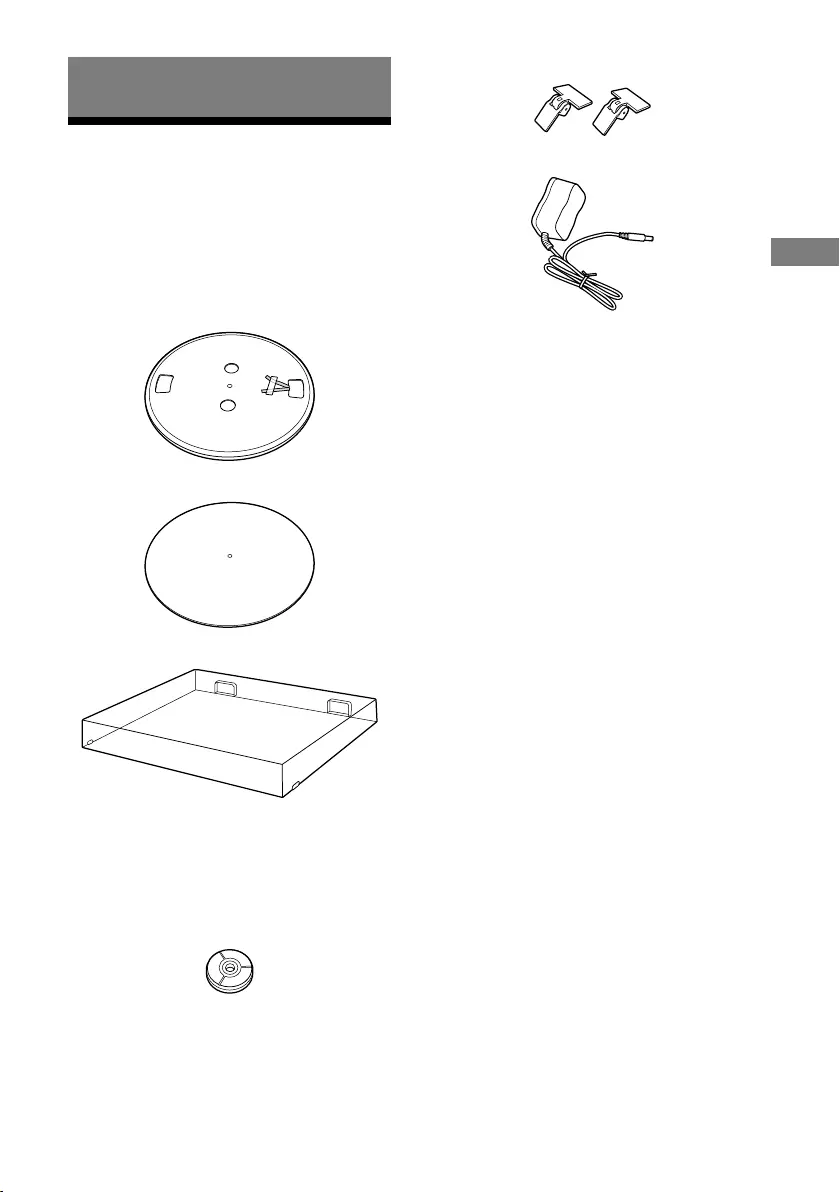
Устройство Sony PS-LX310BT

- Шпиндель
- Коврик для опорного диска
- Опорный диск.
Поместите опорный диск на шпиндель во время сборки проигрывателя. С его задней стороны намотан приводной пассик. - Индикатор BLUETOOTH
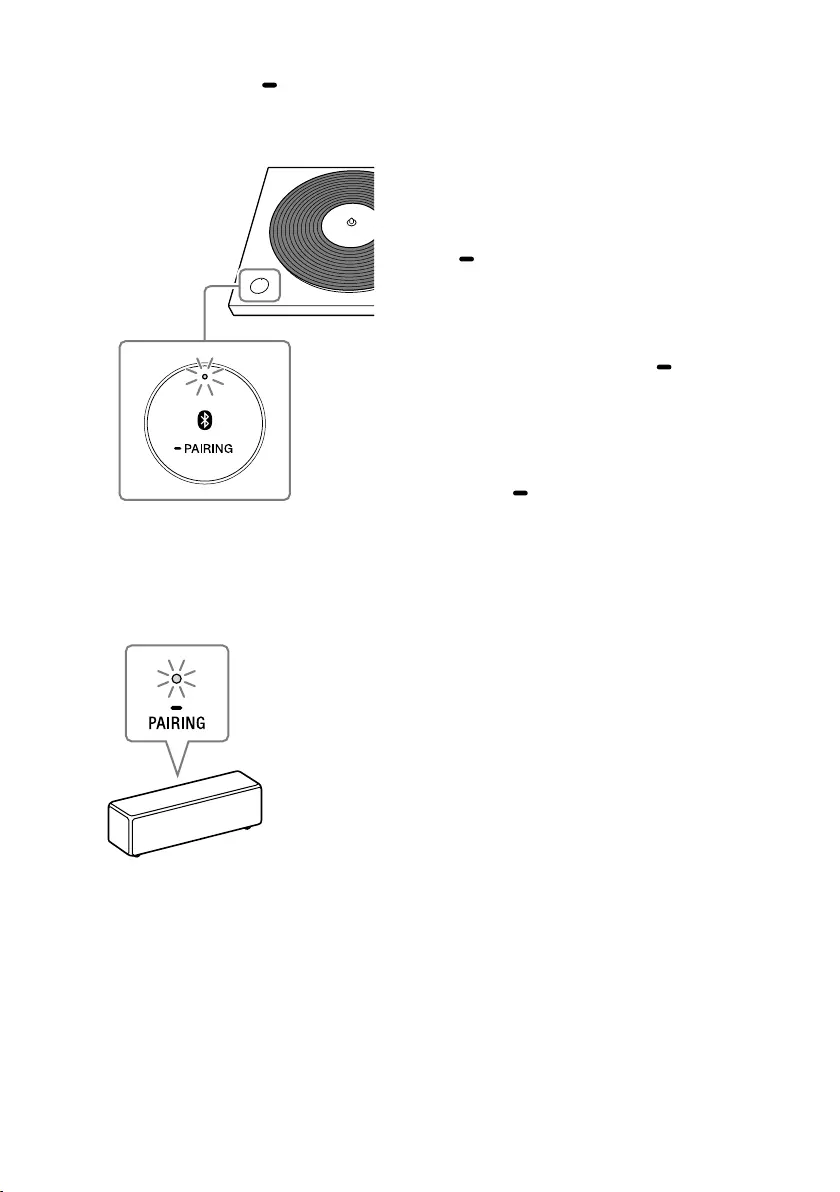
Данный индикатор горит синим цветом, пока проигрыватель подключен к устройству воспроизведения, поддерживающему технологию BLUETOOTH, с помощью функции BLUETOOTH, быстро мигает синим цветом, пока проигрыватель находится в режиме сопряжения, и выключен, когда функция BLUETOOTH отключена. Если поблизости нет устройств, с которыми уже выполнено сопряжение, при нажатии кнопки BLUETOOTH / кнопки PAIRING с отключенной функцией BLUETOOTH индикатор загорится оранжевым цветом и проигрыватель перейдет в режим ожидания. - Кнопка BLUETOOTH / кнопка PAIRING
Включение/отключение функции BLUETOOTH. Нажмите примерно на 2 секунды и отпустите для включения режима сопряжения проигрывателя. - Micro USB-порт
Находится с внутренней стороны проигрывателя при снятом опорном диске. При наличии обновлений подключите проигрыватель к компьютеру с помощью micro USB-кабель (не прилагается) и обновите встроенное программное обеспечение. - Пылезащитная крышка
- Шарниры пылезащитной крышки
- Отверстие для хранения адаптера 45 об/мин
Здесь можно хранить адаптер 45 об/мин, когда он не используется. - Тонарм
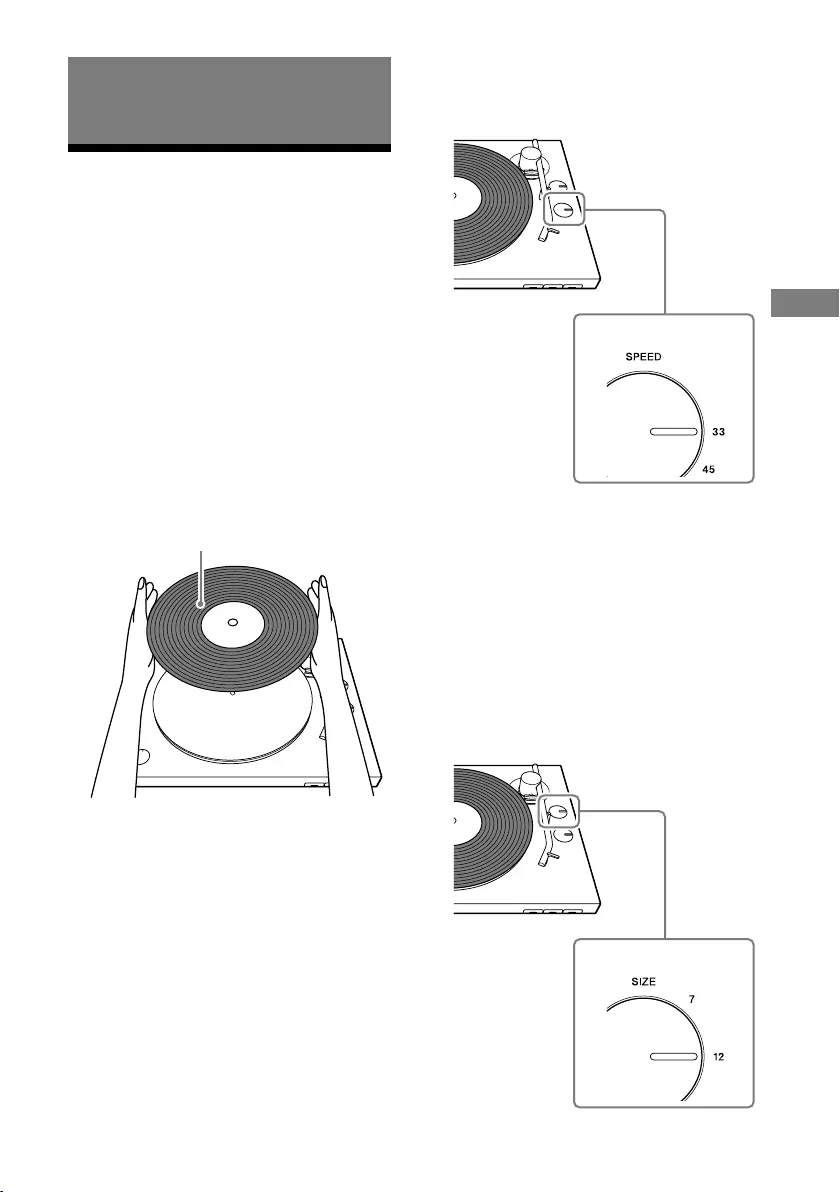
- Ручка поворотного переключателя SIZE
Поворачивайте для установки соответствующего размера воспроизводимого винилового диска. - Подъемный рычаг тонарма
Используйте данный рычаг для подъема или опускания тонарма. Тонарм опускается медленно.Внимание! С нижней стороны опоры тонарма имеется отверстие. Пропустите веревку сквозь отверстие и зафиксируйте тонарм и опору тонарма перед переноской проигрывателя.
- Ручка поворотного переключателя SPEED
Поворачивайте для установки соответствующих оборотов воспроизводимого винилового диска. - Головка звукоснимателя
- Игла звукоснимателя
Защитная крышка иглы звукоснимателя была прикреплена во время приобретения проигрывателя. Прикрепляйте крышку при монтаже проигрывателя и когда проигрыватель не используется в течение длительного времени.Внимание! Игла звукоснимателя является высокоточным компонентом. Обращайтесь с ней осторожно во избежание повреждения.
- Корпус картриджа
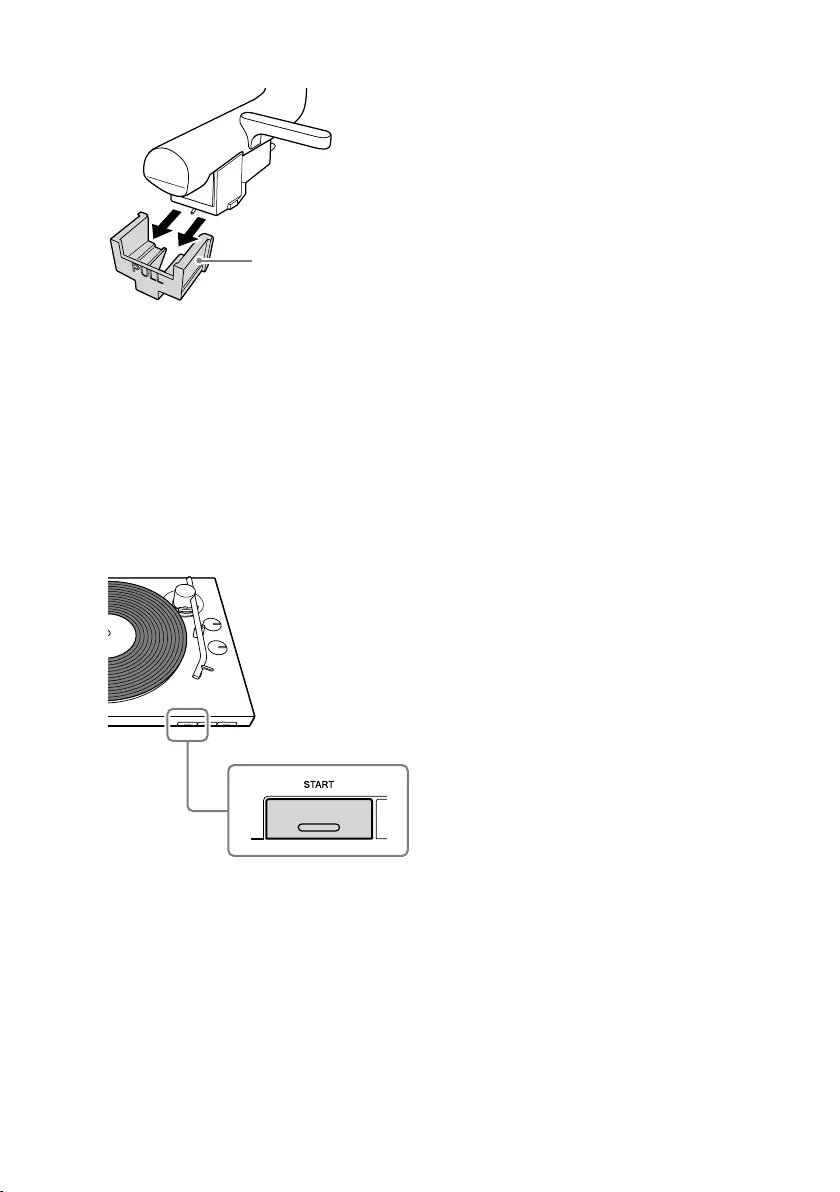
- Кнопка START
- Кнопка STOP
- Кнопка UP/DOWN
Вид сзади
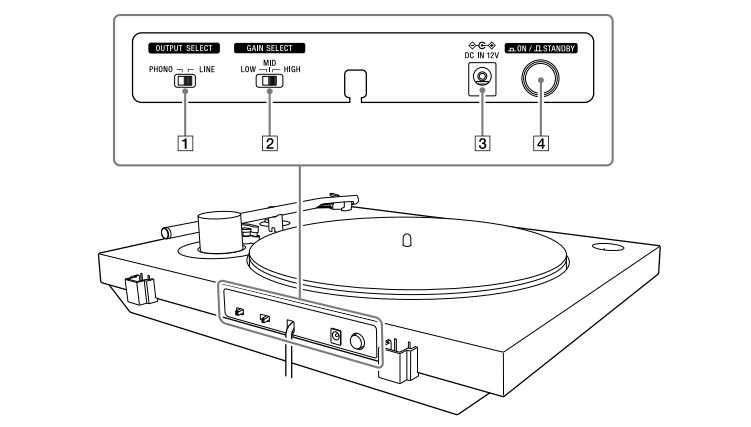
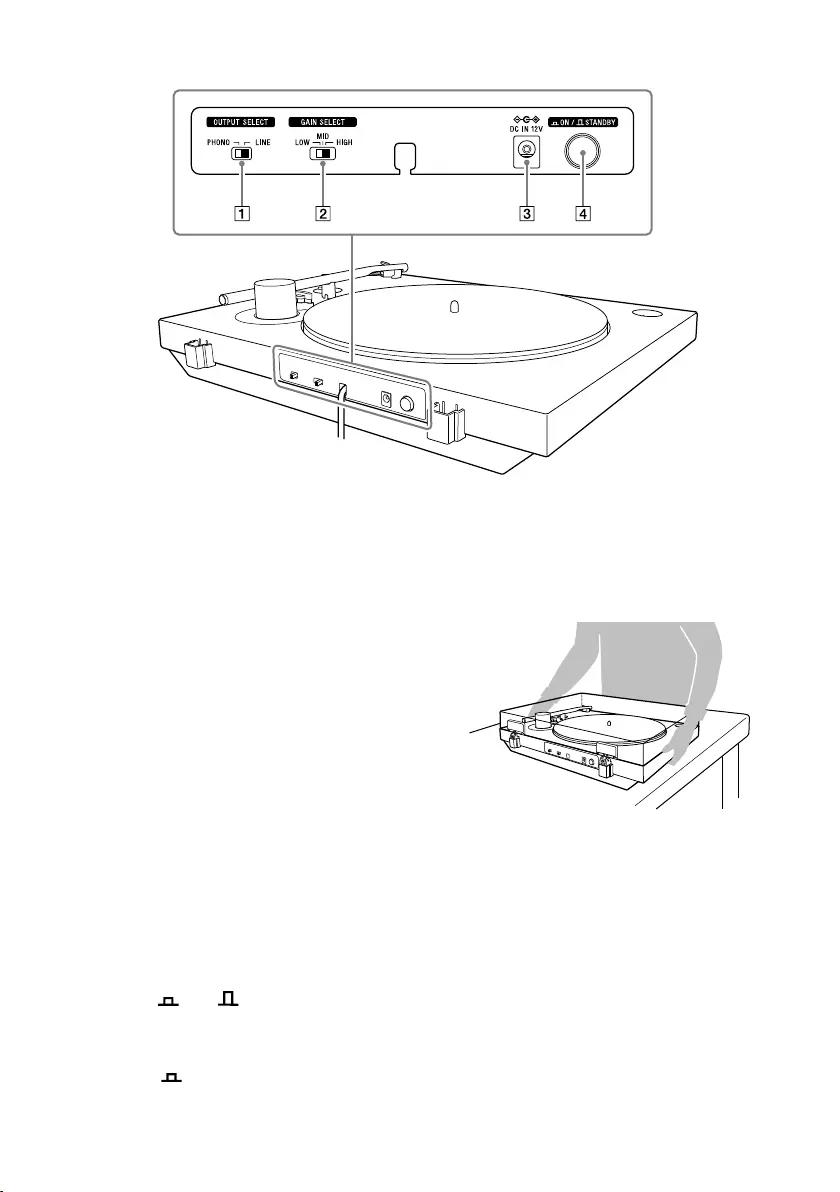
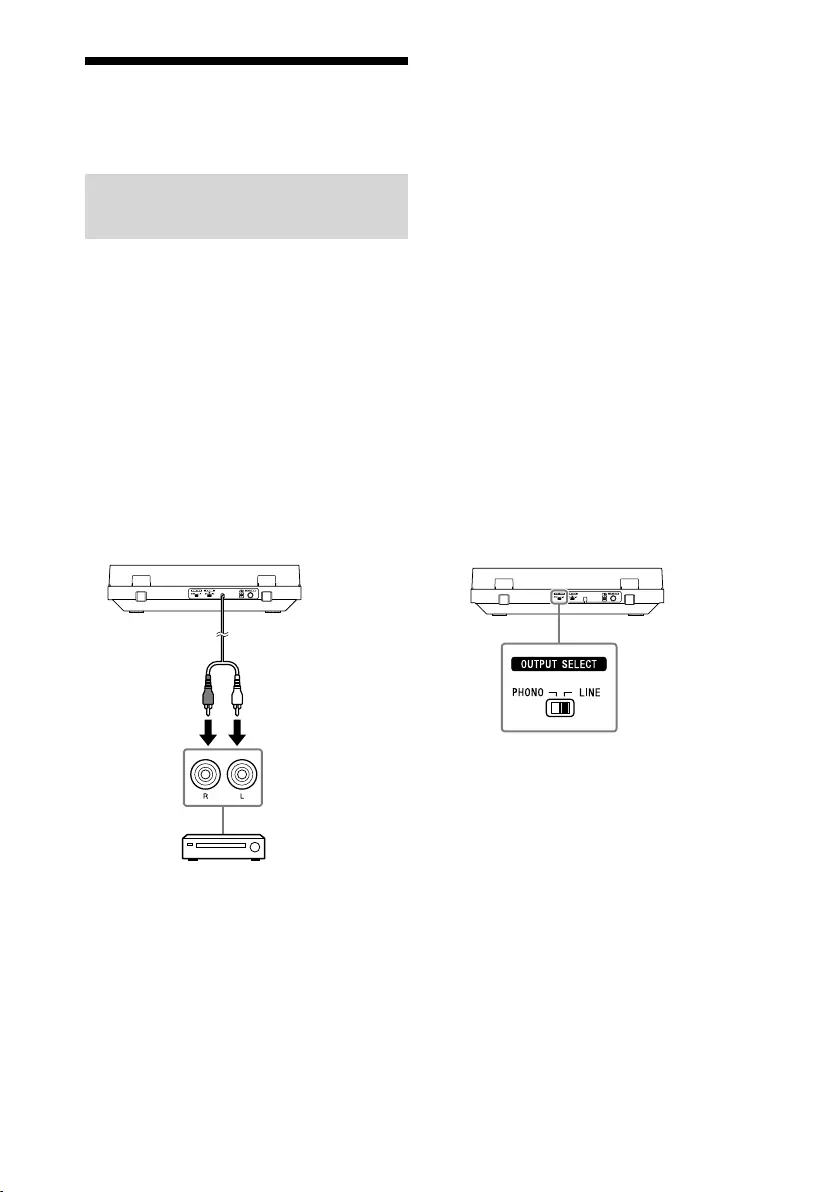
- Переключатель OUTPUT SELECT
Если подключено аудиоустройство, например стереосистема или усилитель, переключите на соответствующий формат выходного сигнала используемого устройства. - Переключатель GAIN SELECT
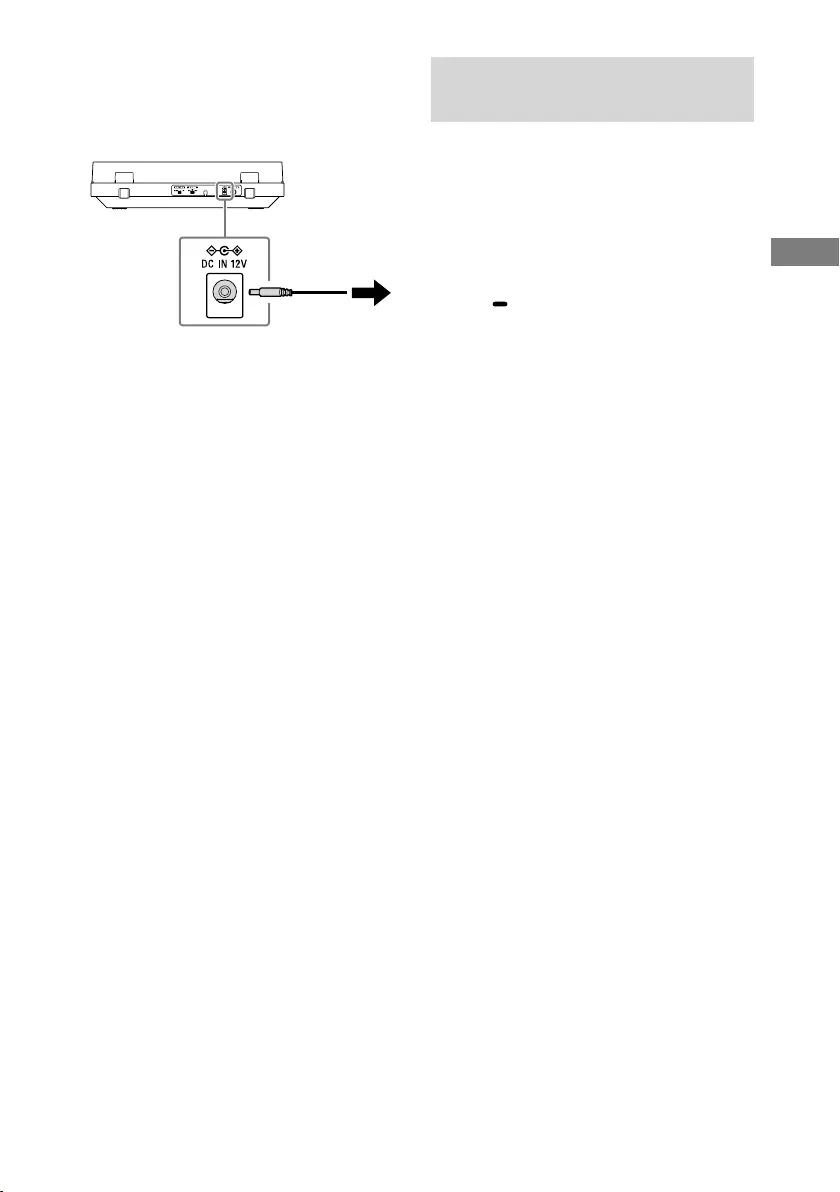
Во время воспроизведения отрегулируйте разницу уровней громкости виниловых дисков. Если аудиодорожка была записана на виниловый диск с низкой громкостью, установите его в HIGH для воспроизведения с соответствующей громкостью. Если аудиодорожка была записана на виниловый диск с высокой громкостью, при воспроизведении винилового диска с установкой HIGH возможно искажение звука. Измените настройки на соответствующие для винилового диска. Регулировка громкости эффективна для выходного аудиосигнала, когда переключатель OUTPUT SELECT установленв LINE, и громкости воспроизведения в случае подключений по BLUETOOTH. Она не эффективна для выходного аудиосигнала, когда переключатель OUTPUT SELECT установлен в PHONO. - Гнездо DC IN 12V
- Кнопка питания ON/ STANDBY
Включение/выключение проигрывателя. Если воспроизведение не начинается даже при нажатии кнопки START, убедитесь, что питание установлено в ON.
Примечание по переноске данного изделия
При переноске данного изделия убедитесь в том, что вы надежно поддерживаете изделие снизу, как показано на рисунке ниже. При ненадлажащей поддержке изделие можно уронить, что приведет к неисправностям или травмам.
-
Bookmarks
Quick Links
User Manual of Product 1:
Sony PS-LX310BT Belt Drive Turntable: Fully Automatic
Wireless Vinyl Record Player with Bluetooth and USB Output
Black
User Manual of Product 2:
Sony S100F 2.0ch Soundbar with Bass Reflex Speaker,
Integrated Tweeter and Bluetooth, (HTS100F), easy setup,
compact, home office use with clear sound black
Related Manuals for Sony PS-LX310BT
Summary of Contents for Sony PS-LX310BT
-
Page 1
User Manual of Product 1: Sony PS-LX310BT Belt Drive Turntable: Fully Automatic Wireless Vinyl Record Player with Bluetooth and USB Output Black User Manual of Product 2: Sony S100F 2.0ch Soundbar with Bass Reflex Speaker, Integrated Tweeter and Bluetooth, (HTS100F), easy setup,… -
Page 2
4-748-755-12 (1) Stereo Turntable System Getting Started Listening to a Vinyl Record Operating Instructions Recording a Vinyl Record Maintenance Additional Information PS-LX310BT… -
Page 3
To reduce the risk of fire, do not cover the firmware by downloading updates provided ventilation opening of the appliance with on the Sony Support Page when the updates newspapers, tablecloths, curtains, etc. are available. Do not expose the appliance to naked flame sources (for example, lighted candles). -
Page 4
This equipment generates, uses and can Model Name : PS-LX310BT radiate radio frequency energy and, if not Responsible Party : Sony Electronics Inc. installed and used in accordance with the Address : 16535 Via Esprillo, San Diego, CA instructions, may cause harmful interference 92127 USA to radio communications. -
Page 5
If you have any question or problem concerning your unit that is not covered in This equipment complies with ISED radiation this manual, please consult your nearest Sony exposure limits set forth for an uncontrolled dealer. environment and meets RSS-102 of the ISED… -
Page 6
Features PS-LX310BT is a stereo turntable system designed for analog playback of vinyl records. Assemble your turntable to use it for the first time. Your turntable does not have built-in speakers. To listen to audio on vinyl records, either use an audio cable to connect to an audio device or use the BLUETOOTH®… -
Page 7
Table of Contents Owner’s Record ……. 2 Precautions ……..4 Features ……….. 5 Parts and Controls ……7 Getting Started Checking the Supplied Items ..10 Assembling the Turntable ….11 Connecting Your Turntable …. 13 Listening to a Vinyl Record Playing a Vinyl Record ….16 Recording a Vinyl Record Recording Audio Tracks onto a Computer ……..19… -
Page 8
Parts and Controls Front/Side Spindle (page BLUETOOTH button/ PAIRING button (page Mat for the platter (page 10, 12 Enables/disables the BLUETOOTH function. Press for about 2 seconds and release to turn Platter (page 10, 11 on your turntable’s pairing mode. Place the platter on the spindle while you are … -
Page 9
Tone arm (page Stylus (page 21) The stylus’s protective cover was attached SIZE rotary switch knob (page when you purchased your turntable. Attach the cover when assembling your turntable and Rotate to set to the appropriate size of the when you are not using your turntable for a vinyl record to be played. -
Page 10
Rear OUTPUT SELECT switch (page 13) Power STANDBY button (page 19) Switch to the appropriate output format of the device you are using when an audio device, Turn on/off your turntable. such as a stereo system or an amplifier, is If playback does not start, even when you connected. -
Page 11
• Dust cover hinges (2)* Getting Started Checking the Supplied • AC adaptor (1) Items Make sure that you have all of the supplied accessories listed below. If you find anything missing, contact your dealer or the customer support website. (See page •… -
Page 12
Attaching the platter Assembling the Turntable Place the platter on the spindle. Keep the platter level while placing it on Note the spindle. • When you purchased your turntable, a stylus’s protective cover was attached to the stylus. Leave on the cover as you assemble your turntable. -
Page 13
Peel off the adhesive tape, pull and • Use your hand to slowly rotate the platter clockwise 10 times. hold the red ribbon, and then hook • Press the UP/DOWN button to lower the drive belt around the motor pulley. the tone arm. -
Page 14
Switch the OUTPUT SELECT switch Connecting Your on the back of the turntable Turntable according to the connected audio device’s jack. • If the audio device has a PHONO input jack (connected to the PHONO Connecting via the audio input jack) cable Set the switch to PHONO. -
Page 15
Connecting with the The OUTPUT SELECT switch is set to LINE at the BLUETOOTH function time of purchase. Connect the AC adaptor. You can enjoy playing vinyl records by using your turntable’s BLUETOOTH function to connect wirelessly to a playback device (not supplied) that supports BLUETOOTH wireless technology, such as BLUETOOTH speakers or BLUETOOTH headphones. -
Page 16
Press and hold your turntable’s Note BLUETOOTH button/ PAIRING button If you are only using the BLUETOOTH connection and not connecting your turntable to another for about 2 seconds, and then release it. device using the audio cable, set the OUTPUT The BLUETOOTH indicator rapidly flashes blue. -
Page 17
Use the SPEED rotary switch knob to Listening to a Vinyl select the rotation speed Record appropriate for the vinyl record. Playing a Vinyl Record Note • Before you play a vinyl record, turn down the audio device’s volume. The loud, crackling noise made by the tone arm descending and the stylus coming into contact with the vinyl record could damage the speakers or audio device. -
Page 18
Remove the stylus protective cover. Adjust the volume using the audio device. To stop playback Press the STOP button. The tone arm returns to the tone arm rest. The platter stops rotating. To pause playback Stylus protective Press the UP/DOWN button to raise the cover stylus off the vinyl record. -
Page 19
Playing via a BLUETOOTH connection To connect your turntable for the first time to a playback device that supports BLUETOOTH wireless technology using the BLUETOOTH function, you must register (pair) the device in advance. (See page 14.) First, turn on the playback device and make it ready to receive data through a BLUETOOTH connection. -
Page 20
(not included). You can also use freeware, such as Audacity®. Download Audacity from the following URL. http://www.audacityteam.org/ Sony does not offer support for this software. • The USB output signals can be used only for To the USB recording, not for playback. -
Page 21
• When you do not intend to record audio Note tracks onto a computer, it is recommended Selecting [USB Audio CODEC] on the [Playback] that you disconnect the USB cable from your tab sets your turntable as a device for sound turntable. -
Page 22
Hold the cartridge body () with Maintenance one hand, grasp the stylus with the other, and then pull the stylus in the direction of the arrow to remove it Cleaning the Stylus from the cartridge body. The stylus is a high precision component. Handle it with care to avoid damage. -
Page 23
Turn the platter upside down and Replacing the Drive Belt remove the drive belt. The drive belt will wear or may even break over time. In such a case, replace it with a new one. To obtain a spare drive belt, contact your dealer or the customer support website. -
Page 24
You hear rumbling or low-frequency Additional Information howling noises*. Your turntable is placed too close to speakers. Move the turntable away from the speakers. Troubleshooting * This phenomenon, called “acoustic feedback,” occurs when vibrations that travel through the air or solid objects (such as shelves, a cabinet, or the When you find your turntable not working floor) from speakers are picked up by the stylus, properly, first review the following… -
Page 25
Spare components retention period: turned on and connected to the turntable Sony retains functional turntable components automatically. If this occurs, change the for repair (components required to maintain device’s setting not to turn on by the… -
Page 26
BLUETOOTH section Specifications Communication system BLUETOOTH Specification version 4.2 Output Motor and Platter BLUETOOTH Specification Power Class 2 Drive system Maximum communication range Belt-drive Line of sight approx. 10 m (33 feet)* Motor Frequency band DC motor 2.4 GHz band Platter Modulation method 296 mm dia. -
Page 27
• The BLUETOOTH® word mark and logos are registered trademarks owned by the Bluetooth SIG, Inc. and any use of such marks by Sony Corporation is under license. • All other trademarks and registered trademarks are trademarks or registered trademarks of their respective holders. In… -
Page 29
© 2019 Sony Corporation Printed in China… -
Page 30
Sound Bar Sound Bar Operating Instructions Manuel d’instructions http://www.sony.net/ ©2018 Sony Corporation Printed in China 4-727-410-61(1) HT-S100F HT-S100F… -
Page 31
WARNING Do not install the appliance in a confined space, such as a bookcase or built-in cabinet. To reduce the risk of fire, do not cover the ventilation opening of the appliance with newspapers, tablecloths, curtains, etc. Do not expose the appliance to naked flame sources (for example, lighted candles). -
Page 32
Troubleshooting Table of Contents Troubleshooting ……25 Resetting the System ….29 Additional Information Startup Guide Basic Setup (separate Specifications …….30 document) Playable Types of Files (USB Input) ……31 About These Operating Supported Input Audio Formats Instructions ……3 (HDMI OUT (TV (ARC)) or TV IN What’s in the Box ……4 (OPTICAL)) …… -
Page 33
• WALL MOUNT TEMPLATE (1) What’s in the Box • Bar Speaker (1) • Startup Guide • Remote control (1) • Operating Instructions • R03 (size AAA) battery (2) • Optical digital cable (1) • AC power cord (mains lead) (1) -
Page 34
What You Can Do with the System “Listening to a TV and Other Devices” (page 15) Blu-ray Disc™ player, cable box, satellite box, etc. Connecting the TV (refer to “Startup Guide” (separate document)) “Using the Control for HDMI Function” (page 23) “Listening to Music on a USB Device”… -
Page 35
Guide to Parts and Controls Details are omitted from the illustrations. Bar Speaker Front Remote control sensor +/– (volume) buttons Point the remote control at the Indicators remote control sensor to operate For details, see “About the the system. -
Page 36
About the indicators on the Bar Speaker Lighting and flashing of the indicator(s) on the Bar Speaker indicate the input or status of the input device. Indicators Status • Lights: TV input is selected. • Lights in blue: BLUETOOTH connection is established (BLUETOOTH input is selected). -
Page 37
The indicators flash while adjusting the volume level. Indicators Status • Flashes once: The volume level is low. • Flash once: The volume level is medium. • Flash once: The volume level is high. • Flash repeatedly: The sound is muted. •… -
Page 38
Rear AC IN terminal HDMI OUT (TV (ARC)) jack Connect a TV that has an HDMI input jack with an HDMI cable. The system is compatible with Audio Return Channel (ARC). ARC is the function that sends TV sound to an AV device such as the system from the TV’s HDMI jack. -
Page 39
Remote Control INPUT (page 15) Some buttons function differently depending on how long the button is Selects the playback source. When pressed. The icons below indicate how you press INPUT once, the current long to press the button. input indicator flashes. •… -
Page 40
/ (previous/next) (page 16, 20) Pressing the button shortly goes to the beginning of the previous or next file. Pressing and holding searches backward or forward (rewind/fast forward). (power) Turns on the system or sets it to standby mode. -
Page 41
Install the speakers horizontally, hung by screws in studs in a continuous flat section of the wall. • Have the installation done by a Sony dealer or licensed contractor and pay special attention to safety during the Adhesive tape, WALL MOUNT installation. -
Page 42
Note Fasten the screws into the marks on SCREW LINE () of WALL When sticking WALL MOUNT TEMPLATE, MOUNT TEMPLATE as the smooth it out fully. illustration below. 228.5 mm 228.5 mm Screws Marks 6 mm to 7 mm Remove WALL MOUNT TEMPLATE. Hang the Bar Speaker on the screws. -
Page 43
When the TV Remote Control does not Work When the Bar Speaker obstructs the remote control sensor of the TV, the TV remote control may not work. In that case, enable the IR repeater function of the system. You can control the TV with the TV remote control by sending the remote signal from the rear of the Bar Speaker. -
Page 44
TV input • TV that is connected to the TV IN Listening to the Sound (OPTICAL) jack • TV compatible with the Audio Return Channel (ARC) function that is Listening to a TV and connected to the HDMI OUT (TV (ARC)) jack Other Devices When you connect the TV to both the… -
Page 45
Connect the USB device to the Listening to Music on a (USB) port. USB Device You can play music files stored on a connected USB device. For playable types of files, see “Playable Types of Files (USB Input)” (page 31). Notes •… -
Page 46
Other operations Information of USB Device Do this on the TV Screen Pause or resume Press playback Press /. Select the previous or next track Search backward or Press and hold /. forward (rewind/fast forward) Notes • Do not remove the USB device during operation. -
Page 47
Press VOICE to set the function to on AUTO SOUND or off. You can enjoy the sound with Sony- recommended sound mode. The sound Voice mode on mode is automatically optimized according The TV indicator flashes twice. -
Page 48
Note Making Sound with Low To receive a Dolby Digital signal, you need Volume Easy to Hear by to connect a TV or other devices to the TV Compressing Dynamic IN (OPTICAL) jack with the optical digital Range cable (supplied) or the HDMI OUT (TV (ARC)) jack with an HDMI cable (not This function works only when playing supplied). -
Page 49
On the mobile device, turn on the BLUETOOTH function, and then Listening to Music/Sound with the select “HT-S100F” after searching BLUETOOTH® Function for it. If a Passkey is requested, enter “0000.” Listening to Music from Make sure that the BLUETOOTH a Mobile Device indicator on the Bar Speaker lights in blue. -
Page 50
Start audio playback with the Listening to Music from the music app on the connected Paired Mobile Device mobile device. Sound is output from the Bar Speaker. Adjust the volume. • Adjust the volume by pressing INPUT +/– on the remote control. •… -
Page 51
Turning the System On Turning the BLUETOOTH by Operating the Function Off BLUETOOTH Device You can turn the BLUETOOTH function off. When the system has pairing Press and hold , , and – on the information, you can turn the system on Bar Speaker for 10 seconds to set the and listen to music from a BLUETOOTH function to on or off. -
Page 52
TV. Note Notes These functions may work with devices other than those manufactured by Sony, • Sound is only output from the TV if an but operation is not guaranteed. input other than the TV input is selected… -
Page 53
Notes on HDMI Connections Saving Power in Standby Mode • Use an HDMI-authorized cable. • Use a Sony High Speed HDMI Cable To save power consumption during the with the Cable Type Logo. standby mode, set the BLUETOOTH • We do not recommend using an standby mode (page 22) and Control for HDMI-DVI conversion cable. -
Page 54
TV is turned off. repairs. Should any problem persist, Check the setting of the Control for consult your nearest Sony dealer. HDMI function (page 23). To turn the system off automatically regardless of the input when you turn off the TV,… -
Page 55
Disconnect the cables that are The system supports the Dolby Digital connected between the TV and the and PCM audio formats (page 31). system, then connect them firmly When you playback unsupported again. Disconnect the AC power cords format, set the digital audio out of the TV and the system from the AC setting of the TV (BRAVIA) to “PCM.”… -
Page 56
move the device away from this USB Device Connection system. Pairing may not be possible if other The USB device is not recognized. BLUETOOTH devices are present Try the following: around the system. In this case, turn Turn the system off. off the other BLUETOOTH devices. -
Page 57
Remove any obstacles in the path – Playback devices (Blu-ray Disc between the remote control and the player, DVD player, etc.): up to 3 system. devices Replace both batteries in the remote – Tuner-related devices: up to 4 control with new ones, if they are devices weak. -
Page 58
The system does not work properly. The system may be in demo mode. To Resetting the System cancel demo mode, reset the system. Press and hold (power), +, and If the system still does not operate on the Bar Speaker for more than 5 properly, reset the system as follows. -
Page 59
Transmission range (A2DP) 20 Hz — 20,000 Hz (Sampling frequency Additional Information 32 kHz, 44.1 kHz, 48 kHz) The actual range will vary depending on factors such as obstacles between Specifications devices, magnetic fields around a microwave oven, static electricity, cordless phone use, reception Amplifier section sensitivity, the operating system,… -
Page 60
Playable Types of Files Supported Input Audio (USB Input) Formats (HDMI OUT (TV (ARC)) or TV IN (OPTICAL)) Codec Extension Audio formats supported by this system MP3 (MPEG-1 Audio .mp3 Layer III) are as follows. • Dolby Digital WMA9 Standard .wma •… -
Page 61
BLUETOOTH other obstruction is between the technology. devices with a BLUETOOTH • Sony cannot be held liable in any way connection for damages or other loss resulting – Locations where a wireless LAN is from information leaks during… -
Page 62
If you have any question or problem rear and bottom rises considerably. To concerning your system, please consult avoid burning yourself, do not touch the your nearest Sony dealer. system. On placement • Place the system in a location with… -
Page 63
® The BLUETOOTH word mark and logos are registered trademarks owned by Bluetooth SIG, Inc. and any use of such marks by Sony Corporation is under license. Other trademarks and trade names are those of their respective owners. “BRAVIA” logo is a trademark of Sony Corporation. -
Page 65
Pour l’enceinte-barre AVERTISSEMENT La plaque signalétique est située sur le dessous de l’enceinte-barre. N’installez pas l’appareil dans un espace confiné, tel qu’une bibliothèque ou un meuble encastré. Pour réduire le risque d’incendie, n’obstruez pas l’orifice de ventilation de l’appareil avec un journal, une nappe, une tenture, etc. -
Page 66
Utilisation des différentes Table des matières fonctions Utilisation de la fonction Commande pour HDMI ..23 Guide de Économie d’énergie ….25 Configuration démarrage de base (document Dépannage séparé) Dépannage ……..26 À propos de ce mode d’emploi ..3 Réinitialisation du système .. -
Page 67
• CALIBRE DE MONTAGE MURAL (1) Contenu de l’emballage • Enceinte-barre (1) • Guide de démarrage • Télécommande (1) • Mode d’emploi • Pile R03 (taille AAA) (2) • Câble numérique optique (1) • Cordon d’alimentation secteur (1) -
Page 68
Ce que vous pouvez faire avec le système « Écoute d’une TV et autres dispositifs » (page 15) Lecteur Blu-ray Disc™, décodeur câble ou satellite, etc. Raccordement de la TV (voir « Guide de démarrage » (document séparé)) « Utilisation de la fonction Commande pour HDMI »… -
Page 69
Guide des pièces et des commandes Certains détails ne figurent pas sur les illustrations. Enceinte-barre Avant Capteur de télécommande Touches +/– (volume) Dirigez la télécommande vers le Témoins capteur de télécommande afin Pour plus de détails, reportez-vous d’utiliser le système. -
Page 70
À propos des témoins de l’enceinte-barre L’illumination et le clignotement de témoin(s) sur l’enceinte-barre indique l’entrée ou l’état du dispositif d’entrée. Témoins État • Allumé : l’entrée TV est sélectionnée. • Allumé en bleu : la connexion BLUETOOTH est établie (l’entrée BLUETOOTH est sélectionnée). -
Page 71
Les témoins clignotent pendant le réglage du niveau de volume. Témoins État • Clignote une fois : le niveau de volume est bas. • Clignote une fois : le niveau de volume est moyen. • Clignote une fois : le niveau de volume est élevé. •… -
Page 72
Arrière Borne AC IN Prise HDMI OUT (TV (ARC)) Raccordez un téléviseur possédant une prise d’entrée HDMI avec un câble HDMI. Le système est compatible avec Audio Return Channel (ARC). ARC est une fonction qui envoie le son du téléviseur vers un dispositif AV tel que le système, à… -
Page 73
Télécommande INPUT (page 15) Certaines touches fonctionnent différemment selon la durée d’appui. Sélectionne la source de lecture. Les icônes ci-dessous désignent la Quand vous appuyez une fois sur durée d’appui de la touche. INPUT, le témoin de l’entrée en •… -
Page 74
/ (précédent/suivant) (page 16, 20) Un appui bref accède au début du fichier précédent ou suivant. Le maintien enfoncé effectue une recherche vers l’arrière ou l’avant (recul/avance rapide). (alimentation) Met le système sous tension ou en mode de veille. … -
Page 75
Ruban adhésif, CALIBRE DE • Confiez l’installation à un revendeur Sony etc. MONTAGE MURAL ou à un entrepreneur agréé et soyez particulièrement attentif à la sécurité… -
Page 76
Remarque Serrez les vis dans les repères de la LIGNE DE VIS () du CALIBRE DE Lorsque vous collez le CALIBRE DE MONTAGE MURAL tel qu’illustré MONTAGE MURAL, aplanissez-le complètement. ci-dessous. 228,5 mm 228,5 mm Repères 6 mm à 7 mm Retirez le CALIBRE DE MONTAGE MURAL. -
Page 77
Lorsque la télécommande du téléviseur ne fonctionne La télécommande du téléviseur risque de ne pas fonctionner quand l’enceinte- barre fait obstruction devant le capteur de télécommande du téléviseur. Dans ce cas, activez la fonction IR repeater du système. Vous pouvez commander le téléviseur avec la télécommande du téléviseur en envoyant le signal de télécommande depuis l’arrière de l’enceinte-barre. -
Page 78
Écoute du son Écoute d’une TV et autres dispositifs Entrée TV INPUT • Téléviseur qui est connecté à la prise TV IN (OPTICAL) • Téléviseur compatible avec la fonction Audio Return Channel (ARC) qui est connecté à la prise HDMI OUT (TV (ARC)) Lorsque vous raccordez le téléviseur à… -
Page 79
Connectez le dispositif USB au Écoute de la musique port (USB). stockée sur un dispositif Vous pouvez lire des fichiers de musique stockés sur un dispositif USB connecté. Pour connaître les types de fichiers compatibles, reportez-vous à « Types de fichiers compatibles (entrée USB) » (page 33). -
Page 80
Autres opérations Informations relatives au Pour Procédez dispositif USB affichées sur comme suit l’écran du téléviseur Suspendre ou Appuyez sur redémarrer la lecture Sélectionner la plage Appuyez sur /. précédente ou suivante Effectuer une Appuyez sur / et recherche vers l’arrière ou l’avant maintenez (recul/avance rapide) -
Page 81
Vous pouvez rendre les dialogues plus audibles en activant le mode Voix. AUTO SOUND Vous pouvez profiter du son avec le mode Son recommandé par Sony. Le mode Son est Appuyez sur VOICE pour activer ou optimisé automatiquement en fonction du désactiver la fonction. -
Page 82
Secondaire Faciliter l’écoute du son à Reproduit uniquement le canal secondaire. faible volume en Le témoin USB clignote une fois. comprimant la plage Principal/Secondaire dynamique Le son principal est reproduit à partir de l’enceinte gauche et le son secondaire, à partir de l’enceinte droite. -
Page 83
Sur le dispositif mobile, activez la fonction BLUETOOTH, puis Écoute de la musique et du son sélectionnez « HT-S100F » après avec la fonction BLUETOOTH® l’avoir recherché. Si une clé d’accès est demandée, saisissez « 0000 ». Écoute de la musique Assurez-vous que le témoin d’un dispositif mobile BLUETOOTH de l’enceinte-barre… -
Page 84
Démarrez la lecture audio à l’aide Écoute de la musique d’un de l’application musicale du dispositif mobile jumelé dispositif mobile connecté. Le son est reproduit par l’enceinte- barre. Réglez le volume. INPUT • Réglez le volume en appuyant sur +/– sur la télécommande. •… -
Page 85
Mise sous tension du Désactivation de la système à partir du fonction BLUETOOTH dispositif BLUETOOTH Vous pouvez désactiver la fonction BLUETOOTH. Lorsque le système possède des informations de jumelage, vous pouvez Appuyez sur , et – sur le mettre sous tension et écouter de la l’enceinte-barre et maintenez enfoncé… -
Page 86
Sony, mais leur fonctionnement n’est le système se met automatiquement pas garanti. sous tension en même temps que le * Commande pour HDMI est une norme téléviseur. -
Page 87
• Utilisez un câble agréé HDMI. • Selon les réglages du téléviseur, la • Utilisez un câble Sony High Speed fonction Commande du son du système HDMI avec le logo du type de câble. peut ne pas être disponible. Pour plus de •… -
Page 88
Économie d’énergie Pour utiliser le système en économisant de l’énergie, modifiez les réglages suivants. Désactivation du système par la détection de l’état d’utilisation Lorsque vous activez la fonction Mise en veille auto, le système passe automatiquement en mode de veille lorsque vous n’utilisez pas le système pendant 20 minutes environ et que le système ne reçoit pas de signal… -
Page 89
Commande pour HDMI (page 23). avant de demander une réparation. Si le Lorsque la fonction Commande pour problème persiste, consultez votre HDMI est activée, le système se revendeur Sony le plus proche. désactive automatiquement lorsque vous éteignez le téléviseur, indépendamment de l’entrée. Alimentation Le système ne se met pas hors… -
Page 90
Appuyez sur INPUT à plusieurs vous que le câble est correctement inséré. reprises pour sélectionner l’entrée TV (page 15). Augmentez le volume du téléviseur ou annulez le silencieux. Selon l’ordre dans lequel vous avez Aucun son du téléviseur n’est raccordé… -
Page 91
Vérifiez si tous les câbles ainsi que Connexion d’un dispositif tous les cordons du système et du mobile dispositif connecté sont correctement insérés. Si le dispositif connecté prend en Impossible de mener à bien la charge la fonction d’échantillonnage, connexion BLUETOOTH. -
Page 92
Si un dispositif qui émet un La télécommande du téléviseur ne rayonnement électromagnétique, fonctionne pas. notamment un dispositif LAN sans fil, Installez l’enceinte-barre de manière d’autres dispositifs BLUETOOTH ou à ne pas obstruer le capteur de un four à micro-ondes se trouvent à télécommande du téléviseur. -
Page 93
– Dispositifs de lecture (lecteur Blu- Pour plus d’informations sur le ray Disc, lecteur DVD, etc.) : jusqu’à positionnement des capteurs et du 3 dispositifs récepteur de télécommande, – Dispositifs avec tuner : jusqu’à 4 reportez-vous au mode d’emploi dispositifs fourni avec le téléviseur. -
Page 94
Réinitialisation du système Si le système ne fonctionne toujours pas correctement, réinitialisez-le comme suit. Maintenez enfoncées les touches , + et de l’enceinte-barre pendant plus de 5 secondes. Tous les témoins de l’enceinte- barre clignotent 3 fois, puis les réglages retrouvent leur état initial. Débranchez le cordon d’alimentation secteur. -
Page 95
Codec pris en charge Plage de transmission (A2DP) Informations complémentaires 20 Hz — 20 000 Hz (fréquence d’échantillonnage de 32 kHz, 44,1 kHz, Spécifications 48 kHz) La plage réelle varie selon des facteurs tels que les obstacles présents entre les Section amplificateur dispositifs, les champs magnétiques PUISSANCE DE SORTIE (nominale) -
Page 96
Types de fichiers Formats audio en entrée compatibles (entrée USB) pris en charge (HDMI OUT (TV (ARC)) ou TV IN Codec Extension (OPTICAL)) MP3 (MPEG-1 Audio .mp3 Layer III) Ce système prend en charge les formats Norme WMA9 .wma audio suivants. LPCM (2 canaux) .wav •… -
Page 97
à l’aide de la d’autres ondes électromagnétiques technologie BLUETOOTH. • Les dispositifs BLUETOOTH et le LAN • Sony décline toute responsabilité en sans fil (IEEE 802.11 b/g/n) utilisent la cas de dégâts ou de pertes résultant même gamme de fréquences de fuites d’informations pendant une… -
Page 98
Pour toute question ou tout problème vérifier par un technicien qualifié avant de concernant votre système, consultez continuer à l’utiliser. votre revendeur Sony le plus proche. • Ne grimpez pas sur l’enceinte-barre, car vous risqueriez de tomber et de vous blesser ou d’endommager le système. -
Page 99
à Si vous remarquez une Bluetooth SIG, Inc. et leur utilisation par irrégularité des couleurs sur un Sony s’effectue sous licence. Les autres marques commerciales et noms écran de téléviseur proche commerciaux appartiennent à leurs Les irrégularités de couleurs peuvent être propriétaires respectifs. -
Page 100
Corporation. L’utilisation ou la distribution de cette technologie en dehors du cadre de ce produit est interdite sans une licence concédée par Microsoft ou une filiale autorisée de Microsoft. Toutes les autres marques commerciales appartiennent à leurs propriétaires respectifs. -
Page 102
تحت مجوز می باشد. سایر عالمت های Corporation تجاری و نام های تجاری متعلق به مالکان مربوط به .آنهاست یک عالمت تجاری از شرکت لوگوی «BRAVIA» .می باشد Sony Corporation صوتی و حقوق ثبت فناوری کدگذاری MPEG Layer-3 .هستند و تحت مجوز Thomson Fraunhofer IIS عالمت… -
Page 103
.تماس بگیرید نزدیک ترین فروشنده مالحظه ای باال می رود. ب ر ای اجتناب از سوختن، به سیستم Sony .دست نزنید در مورد مکان ب ر ای جلوگیری از اف ز ایش ح ر ارت، سیستم ر ا در محیطی با… -
Page 104
BLUETOOTH هنگامی که فرد، جسم فلزی، دیوار یا سایر موانع در هیچ حالتی در قبال آسیب ها یا ضررهای – Sony • بین دستگاه های دا ر ای اتصال دیگری که در نتیجه انتشار اطالعات در طول برق ر اری… -
Page 105
فرمت های صوتی ورودی ورودی نوع فایل های قابل پخش پشتیبانی شده HDMI( )USB یا TV IN OUT )TV )ARC(( پسوند کدک ))OPTICAL( .mp3 MP3 )MPEG-1 Audio Layer III( .wma WMA9 Standard فرمت های صوتی پشتیبانی شده با این سیستم به ق ر ار کاناله… -
Page 106
کدک پشتیبانی شده سایر اطالعات محدوده انتقال (A2DP) فرکانس نمونه هرتز هرتز 20,000 مشخصات کیلوهرتز ،کیلوهرتز ،کیلوهرتز محدوده واقعی بسته به عواملی مانند موانع بین بخش آمپلی فایر دستگاه ها، میدان های مغناطیسی اط ر اف اجاق رتبه بندی شده خروجی… -
Page 107
.سیستم به درستی کار نمی کند بازنشانی سیستم ممکن است سیستم در حالت نمایش ق ر ار داشته باشد. ب ر ای لغو کردن حالت نمایشی، سیستم ر ا اگر سیستم هنوز به درستی عمل نمی کند، سیستم ر ا به روی… -
Page 108
تمام نشانگرهای روی بلندگوی نواری چشمک می .کنترل از ر اه دور تلویزیون کار نمی کند زنند، صدا خاموش است و دکمه های روی کنترل از بلندگوی نواری را نصب کنید تا مانع حسگر کنترل از )(خاموش و روشن ر اه دور یا بلندگوی نواری بجز … -
Page 109
متصل از صدای دستگاه هم ر اه BLUETOOTH به درستی به درگاه مطمئن شوید دستگاه .سیستم پخش نمی شود صفحه وصل شده باشد (USB) روی مطمئن شوید که نشانگر یا کابل ر ا از نظر آسیب مورد بررسی دستگاه BLUETOOTH صفحه… -
Page 110
صدا هم از سیستم و هم از تلویزیون خارج می شود به زمانی که تلویزیون و سیستم با یک کابل HDMI .هم وصل هستند، موارد زیر ر ا بررسی کنید .سیستم یا تلویزیون ر ا بی صدا کنید تلویزیون متصل دا ر ای برچسب فیش… -
Page 111
زیر برخورد کردید، قبل از درخواست ب ر ای تعمیر از .این ر اهنمای عیب یابی ب ر ای رفع مشکل استفاده کنید سیستم خاموش نمی شود حتی زمانی که تلویزیون تماس اگر مشکل ادامه دارد با نزدیکترین مرکز Sony .خاموش است .بگیرید ر ا بررسی تنظیم عملکرد… -
Page 112
،ب ر ای ذخیره مصرف انرژی در طول حالت آماده به کار HDMI • با لوگوی نوع با سرعت باالی از کابل صفحه حالت آماده به کار Sony HDMI • ) BLUETOOTH .کابل استفاده کنید ر ا روی صفحه و عملکرد… -
Page 113
ممکن است این عملکردها با دستگاه هایی به جز آنچه انتخاب شده باشد صدا فقط از ورودی بجز ورودی تولید کرده است کار کنند ولی کارکرد آنها تضمین Sony تلویزیون پخش می شود. وقتی عملکرد تصویر دوقلو ر ا .نمی شود .غیرفعال کنید، صدا از سیستم پخش می شود… -
Page 114
خاموش کردن عملکرد روشن کردن سیستم با عملکرد دستگاه BLUETOOTH BLUETOOTH .ر ا خاموش کنید می توانید عملکرد BLUETOOTH زمانی که سیستم دا ر ای اطالعات جفت سازی باشد، می توانید سیستم ر ا روشن کنید و از دستگاه ، ب… -
Page 115
گوش دادن به موسیقی از دستگاه هم ر اه با برنامه موسیقی موجود در دستگاه هم ر اه جفت شده .متصل، پخش صدا ر ا شروع کنید .صدا از بلندگوی نواری پخش می شود .می ز ان صدا ر ا تنظیم کنید روی… -
Page 116
در دستگاه هم ر اه، عملکرد BLUETOOTH ر ا پس از ر ا روشن کنید سپس صدا با عملکرد گوش دادن به موسیقی «HT-S100F» .جستجوی آن انتخاب کنید BLUETOOTH® ر ا وارد ،اگر کلید عبور درخواست شد «0000» .کنید گوش دادن به موسیقی از یک دستگاه روی… -
Page 117
با فشرده سازی محدوده پویا، صدا با می ز ان توجه ، الزم است ب ر ای دریافت سیگنال Dolby Digital صدای پایین ر ا به ر احتی بشنوید ا ر ائه تلویزیون یا سایر دستگاه ها ر ا با کابل دیجیتال نوری یا… -
Page 118
هنگام انتخاب حالت صدا، نشانگر AUTO SOUND می توانید از صدا لذت با حالت صدای پیشنهادی Sony ببرید. حالت صدا مطابق با عملکرد و محتوای پخش به .صورت خودکار بهینه می شود CINEMA صداها با جلوه های ف ر اگیر پخش می شوند و قدرتمند و… -
Page 119
عملکردهای دیگر روی صفحه تلویزیونUSB اطالعات دستگاه این کار ر ا انجام دهید ب ر ای مکث یا ادامه پخش .ر ا فشار دهید انتخاب ت ر اک قبلی یا بعدی ر ا فشار / .دهید جستجو به سمت عقب یا جلو ر… -
Page 120
.وصل کنید ر ا به درگاه دستگاه )USB( گوش دادن به موسیقی از یک دستگاه می توانید فایل های موسیقی ذخیره شده روی یک .متصل ر ا پخش کنید دستگاه ب ر ای انواع فایل قابل پخش، به «نوع فایل های قابل .رجوع… -
Page 121
ورودی متصل تلویزیونی که به فیش TV IN (OPTICAL) • گوش دادن به صدا .است تلویزیونی سازگار با عملکرد Audio Return • گوش دادن به تلویزیون و سایر که به فیش HDMI OUT Channel (ARC) متصل است دستگاه ها (TV (ARC)) هنگامی… -
Page 122
زمانی که کنترل از ر اه دور تلویزیون کار نمی کند هنگامی که بلندگوی نواری مانع حسگر کنترل از ر اه تلویزیون شود، کنترل از ر اه دور تلویزیون ممکن است سیستم کار نکند. در این صورت، عملکرد تک ر ار کننده .ر… -
Page 123
توجه پیچ ها ر ا در محل عالمت های روی خط هنگام ق ر ار دادن الگوی نصب تلویزیون روی دیوار، آن ر ا الگوی نصب تلویزیون روی دیوار پیچ )( .کام ال ً صاف کنید .مانند تصویر زیر محکم کنید میلی… -
Page 124
پیوسته از دیوار نصب و از پیچ های درون داربست ها .آوی ز ان کنید نصب ر ا از طریق پیمانکار دا ر ای مجوز یا فروشنده Sony • انجام دهید و در طول نصب به موارد ایمنی توجه کامل… -
Page 125
، صفحه بعدی قبلی ( / فشار دادن مختصر دکمه به آغاز فایل قبلی یا .بعدی می رود فشار دادن و نگه داشتن به سمت عقب یا جلو جلو بردن سریع عقب بردن جستجو می کند خاموش روشن ( سیستم… -
Page 126
کنترل از ر اه دور برخی از دکمه ها بسته به مدت زمان فشار دادن دکمه صفحه ( INPUT عملکردی متفاوت دارند. نمادهای زیر نشان می دهند منبع پخش ر ا انتخاب می کند. زمانی که INPUT .که ب ر ای چه مدتی دکمه ر ا فشار دهید را… -
Page 127
پشت پایانه AC IN فیش HDMI OUT )TV )ARC(( تلویزیونی را متصل کنید که دا ر ای فیش ورودی .باشد و کابل HDMI HDMI سیستم با Audio Return Channel (ARC) عملکردیست که صدای .سازگار است مانند سیستم فیش تلویزیون… -
Page 128
.نشانگرها هنگام تنظیم می ز ان صدا چشمک می زنند وضعیت نشانگرها .می ز ان صدا پایین است یک بار چشمک می زند • .می ز ان صدا متوسط است یک بار چشمک می زند • .می ز ان صدا باال است یک… -
Page 129
درباره نشانگرهای روی بلندگوی نواری .روی بلندگوی نواری ورودی یا وضعیت دستگاه ورودی ر ا نشان می دهد های روشن شدن و چشمک زدن نشانگر وضعیت نشانگرها .ورودی تلویزیون انتخاب شده است روشن می شود • انتخاب ورودی برق ر ار شده است اتصال… -
Page 130
ر اهنمای قطعات و کنترل ها .جزئیات از تصاویر حذف می شوند بلندگوی نواری جلو می ز ان صدا دکمه حسگر کنترل از ر اه دور ( +/– کنترل از ر اه دور ر ا به طرف حسگر کنترل از ر اه نشانگرها… -
Page 131
با سیستم چه کاری می توانید انجام دهید «»گوش دادن به تلویزیون و سایر دستگاه ها صفحه ، پخش کننده Blu-ray Disc™ .جعبه کابل، جعبه ماهواره و غیره در حال اتصال تلویزیون م ر اجعه کنید سند جداگانه «به » ر اهنمای ر اه اندازی صفحه… -
Page 132
الگوی نصب تلویزیون روی دیوار • چه چیزی درون جعبه ق ر ار دارد بلندگوی نواری • ر اهنمای ر اه اندازی • کنترل از ر اه دور • دستو ر العمل های عملکرد • نوع اندازه باتری (2) R03 (AAA •… -
Page 133
عیب یابی فهرست مطالب …………عیب یابی ……….بازنشانی سیستم ر اهنامی ر اه اندازی تنظیم اولیه سایر اطالعات سند جداگانه …………مشخصات ….درباره این دستو ر العمل های عملکرد ..ورودی نوع فایل های قابل پخش (USB ……چه چیزی درون جعبه ق ر ار دارد فرمت… -
Page 134
هشدار این وسیله ر ا در یک مکان محدود مانند یک قفسه کتاب .یا کابینت توکار نصب نکنید به منظور کاهش ریسک آتش سوزی، دهانه تهویه وسیله .ر ا با روزنامه، رومیزی، پرده و غیره نپوشانید مانند وسیله ر ا در معرض منابع شعله آ ز اد ق ر ار ندهید شمع… -
Page 136
والشعا ر ات هي عالمات عالمة الكلمة BLUETOOTH® تجارية مسجلة تمتلكها شركة Bluetooth SIG, Inc. واي استعمال لهذه العالمات بواسطة شركة Sony هو تحت ترخيص. العالمات التجارية Corporation .واألسماء التجارية األخرى خاصة بمالكيها المعنيين هو عالمة تجارية لشركة Sony «BRAVIA»… -
Page 137
إذا كان لديك أي سؤال أو مشكلة تتعلق بنظامك، فيرجى حول ازدياد الح ر ارة .القريب منك استشارة وكيل شركة Sony على الرغم من سخونة النظام أثناء التشغيل إال أن ذلك ال .يعد خل ال ً وظيف ي ً ا إذا كنت تستخدم هذا النظام بمستوى صوت كبير بشكل… -
Page 138
، بأي حال من ال يمكن أن تتحمل شركة Sony • حول اتصال BLUETOOTH األحوال، مسؤولية األض ر ار أو الخسائر األخرى الناتجة عن تس ر ّ ب المعلومات أثناء االتصال باستخدام تقنية داخل مسافة ينبغي استخدام أجهزة BLUETOOTH •… -
Page 139
تنسيقات صوت اإلدخال المدعومة أنواع الملفات القابلة للتشغيل أو مدخل HDMI OUT )TV )ARC((( )USB )TV IN )OPTICAL( رمز تعريف الملف برنامج الترميز طبقة الصوت .mp3 MPEG-1( MP3 .فيما يلي صيغ الصوت المدعومة على هذا النظام )III Dolby Digital • معيار… -
Page 140
برنامج الترميز المدعوم معلومات إضافية نطاق اإلرسال )A2DP( كيلو تردد العينة هرتز هرتز 000 — المواصفات كيلو هرتز ،كيلو هرتز ،هرتز يختلف المدى الحقيقي وف ق ً ا لعوامل مثل العوائق بين قسم مضخم الصوت األجهزة والمجاالت المغناطيسية حول فرن ميكروويف مع… -
Page 141
.النظام ال يعمل بشكل صحيح إعادة ضبط النظام قد يكون النظام في الوضع التجريبي. إللغاء الوضع التجريبي، أعد ضبط النظام. اضغط مع االستم ر ار على إذا استمر النظام في العمل بشكل غير صحيح، فقم على مكبر الصوت الطويل و و… -
Page 142
،تومض جميع المؤش ر ات على مكبر الصوت الطويل .وحدة التحكم عن بعد الخاصة بالتلفزيون ال تعمل ر ك ِّ ب مكبر الصوت الطويل بحيث ال ي ُ عيق مستشعر ويتم كتم الصوت، وال تعمل األز ر ار الموجودة على وحدة… -
Page 143
المحمول ال يتم إخ ر اج صوت جهاز متصل بشكل محكم بمنفذ تأكد من أن جهاز BLUETOOTH صفحة .المتصل من النظام ( )USB( .أو الكابل تال ف ً ا تحقق مما إذا كان جهاز على مكبر تأكد من إضاءة مؤشر BLUETOOTH .قيد… -
Page 144
.يتم إصدار الصوت من كل من النظام والتلفزيون ، تحقق عند توصيل النظام والتلفزيون بكابل HDMI .مما يلي .قم بكتم صوت النظام أو التلفزيون للتلفزيون المتصل ملصق عليه مقبس HDMI – ال يسمع أي صوت أو يسمع صوت بمستوى منخفض «ARC»… -
Page 145
إج ر اء عمليات إصالح. إذا استمرت أية مشكلة، فارجع إلى . إليقاف تشغيل النظام تلقائ ي ً ا بصرف صفحة .القريب منك وكيل Sony ،النظر عن اإلدخال عند إيقاف تشغيل التلفزيون على وضع اضبط وظيفة Control for HDMI الطاقة… -
Page 146
HDMI توفير الطاقة في وضع االستعداد .معتم د ًا استخدم كابل HDMI • لتوفير استهالك الطاقة أثناء وضع االستعداد، اضبط بشعار عالي السرعة من استخدم كابل Sony HDMI • ووظيفة صفحة وضع استعداد ( BLUETOOTH .نوع الكابل على إيقاف صفحة… -
Page 147
قد تعمل هذه الوظائف مع أجهزة أخرى غير مصنعة .إخ ر اج الصوت من النظام .، ولكن ال يمكن ضمان تشغيلها بواسطة شركة Sony يتم عرض الرقم الخاص بمستوى صوت النظام على شاشة • .التلفزيون وف ق ً ا للتلفزيون… -
Page 148
إيقاف تشغيل وظيفة تشغيل النظام بتشغيل جهاز BLUETOOTH BLUETOOTH يمكنك تشغيل وظيفة عندما يحصل النظام على معلومات االقت ر ان، يمكنك BLUETOOTH تشغيل النظام واالستماع إلى الموسيقى من جهاز و– على مكبر و اضغط مع االستم ر ار على حتى… -
Page 149
االستماع إلى الموسيقى من الجهاز المحمول ابدأ تشغيل الصوت باستخدام تطبيق الموسيقى المقترن .بالجهاز المحمول المتصل .يخرج الصوت من مكبر الصوت الطويل .اضبط مستوى الصوت اضبط مستوى الصوت بالضغط على +/– • .في وحدة التحكم عن بعد INPUT على و… -
Page 150
على الجهاز المحمول، قم بتشغيل وظيفة بعد ثم حدد الصوت باستخدام االستماع إلى الموسيقى «HT-S100F» BLUETOOTH .البحث عنه وظيفة BLUETOOTH® إذا ط ُ لب منك إدخال مفتاح المرور، فأدخل «0000» االستماع إلى الموسيقى من جهاز على مكبر تأكد من أن مؤشر BLUETOOTH محمول… -
Page 151
جعل الصوت منخفض المستوى سهل السماع مالحظة ، تحتاج إلى توصيل الستقبال إشارة Dolby Digital بضغط النطاق الديناميكي تلفزيون أو أجهزة أخرى بمقبس TV IN )OPTICAL( أو مقبس مرفق باستخدام الكابل الرقمي البصري ال تعمل هذه الوظيفة إال عند تشغيل إشارة Dolby غير… -
Page 152
AUTO SOUND وضع الصوت متوقف عن التشغيل يمكنك االستمتاع بالصوت باستخدام وضع الصوت .مرة واحدة يومض مؤشر Sony- . يتم تحسين وضع الصوت تلقائ ي ً ا وفق recommended .محتوى التشغيل والوظيفة CINEMA يتم تشغيل األصوات بمؤث ر ات صوت محيط، وتكون واقعية… -
Page 153
عمليات أخرى على شاشة التلفزيون معلومات جهاز عليك بغرض إيقاف التشغيل مؤق ت ًا أو الضغط على استئنافه الضغط على تحديد المسار السابق أو التالي / الضغط مع االستم ر ار البحث للخلف أو األمام على ترجيع/تقديم سريع / مالحظات… -
Page 154
بمنفذ قم بتوصيل جهاز )USB( االستماع إلى الموسيقى الموجودة على جهاز يمكنك تشغيل ملفات الموسيقى المخزنة على جهاز .متصل للتعرف على أنواع الملفات القابلة للتشغيل، انظر «أنواع صفحة » مدخل الملفات القابلة للتشغيل )USB مالحظات على شاشة التلفزيون، تأكد من لعرض… -
Page 155
مدخل التلفزيون المتصل بمقبس TV IN )OPTICAL( • االستماع إلى الصوت التلفزيون المتوافق مع وظيفة Audio Return • المتصل بمقبس HDMI OUT Channel )ARC( االستماع إلى التلفزيون واألجهزة )TV )ARC(( األخرى عند توصيل التلفزيون بكل من مقبسي HDMI OUT ، تكون األولوية و… -
Page 156
عندما ال تعمل وحدة التحكم عن بعد الخاصة بالتلفزيون عندما ي ُ عيق مكبر الصوت الطويل مستشعر وحدة التحكم عن بعد الخاصة بالتلفزيون، قد ال تعمل وحدة التحكم عن بعد للتلفزيون. وفي هذه الحالة، قم بتمكين وظيفة .مكرر األشعة تحت الحم ر اء للنظام يمكنك… -
Page 157
مالحظة اربط البرغيين بالعالمتين الموجودتين على .عند تثبيت قالب التثبيت الجداري، قم بتثبيته بالكامل برفق لقالب التثبيت الجداري خط البرغي )( .كما هو موض َّ ح أدناه مم مم البرغيان العالمتان مم مم إلى .قم بإ ز الة قالب التثبيت الجداري .ع… -
Page 158
بتركيب مكب ر ات الصوت أفق ي ً ا، ومعلقة بواسطة الب ر اغي في مواقع المسامير عديمة الرأس على قسم مسطح متواصل .من الحائط أو مقاول مرخص له يجب التركيب من ق ِ بل وكيل Sony • .وإيالء اهتمام خاص للسالمة أثناء التركيب المسؤولية عن الحوادث أو األض ر ار ال تتحمل شركة… -
Page 159
، صفحة التالي السابق ( / يؤدي الضغط على الزر إلى االنتقال لبداية الملف .السابق أو التالي يؤدي الضغط مع االستم ر ار إلى البحث للخلف أو تقديم سريع ترجيع األمام التشغيل ( .لتشغيل النظام أو ضبطه على وضع االستعداد STANDARD … -
Page 160
وحدة التحكم عن بعد تؤدي بعض األز ر ار وظيفة مختلفة حسب طول مدة صفحة ( INPUT الضغط عليها. تشير الرموز أدناه إلى طول مدة الضغط يحدد مصدر التشغيل. عند الضغط على INPUT .على الزر .مرة واحدة، يومض مؤشر المدخل الحالي .اضغط… -
Page 161
منظر خلفي طرف توصيل AC IN مقبس HDMI OUT )TV )ARC(( قم بتوصيل تلفزيون به مقبس مدخل HDMI بكابل HDMI النظام متوافق مع Audio Return هي الوظيفة التي Channel )ARC( ت ُ رسل صوت التلفزيون إلى جهاز عرض صوت .بالتلفزيون… -
Page 162
.تومض المؤش ر ات أثناء ضبط مستوى الصوت الحالة المؤش ر ات .مستوى الصوت منخفض يومض مرة واحدة • .مستوى الصوت متوسط تومض مرة واحدة • .مستوى الصوت مرتفع تومض مرة واحدة • .الصوت مكتوم تومض بشكل متكرر • .األدنى تم… -
Page 163
حول المؤش ر ات على مكبر الصوت الطويل .المؤش ر ات الموجودة على مكبر الصوت الطويل ووميضها إلى إدخال جهاز المدخل أو حالته تشير إضاءة المؤشر الحالة المؤش ر ات .مدخل التلفزيون محدد يضيء • محدد مدخل تم إنشاء اتصال يضيء… -
Page 164
دليل األج ز اء وأز ر ار التحكم .تم حذف التفاصيل من الرسوم التوضيحية مكبر الصوت الطويل منظر أمامي مستوى الصوت ز ر ا مستشعر وحدة التحكم عن بعد ( +/– قم بتوجيه وحدة التحكم عن بعد ناحية مستشعر المؤش… -
Page 165
ما يمكنك فعله باستخدام النظام «االستماع إلى التلفزيون واألجهزة صفحة »األخرى أو جهاز الكابل مشغل Blu-ray Disc™ .أو جهاز القمر الصناعي، وما إلى ذلك توصيل التلفزيون وثيقة منفصلة »ر اجع «دليل بدء التشغيل صفحة » «استخدام وظيفة Control for HDMI «االستماع… -
Page 166
قالب التثبيت الجداري • الملحقات المرفقة مكبر الصوت الطويل • دليل بدء التشغيل • وحدة التحكم عن بعد • تعليمات التشغيل • بحجم بطارية )2( )AAA ( R03 • كابل رقمي بصري • سلك طاقة التيار المتردد •… -
Page 167
معلومات إضافية جدول المحتويات …………المواصفات ..مدخل أنواع الملفات القابلة للتشغيل )USB دليل بدء التشغيل اإلعداد األسايس تنسيقات صوت اإلدخال المدعومة وثيقة منفصلة أو TV IN HDMI OUT )TV )ARC((( ……… ))OPTICAL( …….. حول تعليمات التشغيل هذه ……حول… -
Page 168
تحذير ال تر ك ّب الجهاز في مكان محصور، مثل خ ز انة الكتب او .كابينة داخلية لتقليل خطر نشوب حريق، ال تغطي فتحات تهوية الجهاز .بورق الصحف، اغطية المائدة، الستائر، الخ على سبيل ال تع ر ّ ض الجهاز الى مصادر اللهب المكشوفة المثال،…
Посмотреть инструкция для Sony PS-LX310BT бесплатно. Руководство относится к категории проигрыватели, 5 человек(а) дали ему среднюю оценку 8.4. Руководство доступно на следующих языках: русский. У вас есть вопрос о Sony PS-LX310BT или вам нужна помощь? Задайте свой вопрос здесь
Sony PS-LX310BT — это проигрыватель виниловых пластинок от Sony, который доступен по доступной цене. Он оснащен беспроводным Bluetooth-подключением, что позволяет пользователю наслаждаться музыкой с помощью беспроводных наушников или колонок. Кроме того, он имеет функцию автоматического подъема тонарма по окончании проигрывания, что предотвращает царапины на дисках и продлевает их срок службы.
Sony PS-LX310BT имеет легкий корпус и мощный двигатель, что делает его идеальным домашним проигрывателем виниловых пластинок. Он также оснащен стереофоническим выходом, который позволяет подключать его к аудиоусилителю или системе мультимедиа для усиления звука.
Калибровка тонарма на Sony PS-LX310BT позволяет достичь наилучшего качества звука и минимизировать шумы или деформации звука, воспроизведенного прежде на других проигрывателях.
Общая длина проигрывателя составляет 430 мм, ширина — 108 мм, а высота — 367 мм. Он поставляется со стабилизатором вращения и фоно-кабелем.
Sony PS-LX310BT — это надежный и качественный проигрыватель виниловых пластинок, который предоставляет возможность наслаждаться винильными записями в особенности благодаря беспроводному подключению Bluetooth и наличию функции автоматического подъема тонарма.
Главная
| Sony | |
| PS-LX310BT | MPC_HP_TURNTABLESUK_CES3_VII_08012019_0001 | |
| проигрыватель | |
| 5013493371347 | |
| русский | |
| Руководство пользователя (PDF), Техническая спецификация (PDF) |
Не можете найти ответ на свой вопрос в руководстве? Вы можете найти ответ на свой вопрос ниже, в разделе часто задаваемых вопросов о Sony PS-LX310BT.
Как лучше всего выполнять чистку проигрыватель?
Для удаления отпечатков пальцев лучше всего использовать слегка влажную салфетку для уборки или мягкую чистую ткань. Пыль в труднодоступных местах лучше всего удаляется потоком сжатого воздуха.
Инструкция Sony PS-LX310BT доступно в русский?
Да, руководствоSony PS-LX310BT доступно врусский .
Не нашли свой вопрос? Задайте свой вопрос здесь
|
Код: 111534 Извините, товара сейчас нет в наличии
Бесплатная доставка
Извините, товара сейчас нет в наличии Сравнить Новости интернет-магазина «Лаукар»:28.03.2023 22.02.2023 13.02.2023 Дополнительная информация в категории Виниловый проигрыватель:Таблица Авторизованных сервисных центров по брендам. Описание Инструкция Отзывы (0) В интернет-магазине бытовой техники «Лаукар» Вы можете скачать инструкцию к товару Виниловый проигрыватель Sony PS-LX310BT совершенно бесплатно. Все инструкции, представленные на сайте интернет-магазина бытовой техники «Лаукар», предоставляются производителем товара. Для того чтобы скачать инструкцию, Вам необходимо нажать на ссылку «скачать инструкцию», расположенную ниже, а в случае, если ссылки нет, Скачать инструкцию Смотреть инструкцию
Фирма-производитель оставляет за собой право на внесение изменений в конструкцию, дизайн и комплектацию товара: Виниловый проигрыватель Sony PS-LX310BT. Пожалуйста, сверяйте информацию о товаре с информацией на |


Stereo Turntable System
Operating Instructions
PS-LX310BT
Getting Started
Listening to a Vinyl Record
Maintenance
Additional Information
4-748-755—31 (2)

2
WARNING
The AC adaptor is for use in dry, indoor
locations.
To reduce the risk of fire, do not cover the
ventilation opening of the appliance with
newspapers, tablecloths, curtains, etc.
Do not expose the appliance to naked flame
sources (for example, lighted candles).
To reduce the risk of fire or electric shock,
do not expose this appliance to dripping or
splashing, and do not place objects filled
with liquids, such as vases, on the appliance.
Do not install the appliance in a confined
space, such as a bookcase or built-in cabinet.
The AC adaptor must not be covered over
by anything and should only be used in an
ambient temperature of up to 45 °C.
The unit is not disconnected from the mains
as long as it is connected to the AC outlet,
even if the unit itself has been turned off.
As the main plug of AC power adaptor is
used to disconnect the AC power adaptor
from the mains, connect it to an easily
accessible AC outlet.
Should you notice an abnormality in it,
disconnect it from the AC outlet immediately.
For models with the CE marking
located on the unit
The validity of the CE marking is restricted
to only those countries where it is legally
enforced, mainly in the countries EEA
(European Economic Area) and Switzerland.
Recommended cables
Properly shielded and grounded cables and
connectors must be used for connection to
host computers and/or peripherals.
The AC adaptor is not available for repair and
its use should be terminated immediately
when the AC adaptor is found damaged or
defective.
CAUTION: RISK OF ELECTRIC SHOCK
DRY LOCATION USE ONLY
Polarity of DC output of the AC adaptor
For the stereo turntable system
The name plate is located on the bottom of
the stereo turntable system.
About the AC adaptor
The model name of the AC adaptor is
located at the bottom of the AC adaptor.
To check the firmware version of your
turntable
You can check the firmware version of your
turntable on the computer. Update the
firmware by downloading updates provided
on the Sony Support Page when the updates
are available.
For the customers in Europe
Notice for customers: the following
information is only applicable to
equipment sold in countries applying EU
directives.
This product has been manufactured by or
on behalf of Sony Corporation.
EU Importer: Sony Europe Limited.
Inquiries to the EU Importer or related to
product compliance in Europe should be
sent to the manufacturer’s authorized
representative, Sony Belgium, bijkantoor van
Sony Europe Limited, Da Vincilaan 7-D1, 1935
Zaventem, Belgium.
Hereby, Sony Corporation declares that this
equipment is in compliance with Directive
2014/53/EU.
The full text of the EU declaration of
conformity is available at the following
internet address:
http://www.compliance.sony.de/
This equipment has been tested and found
to comply with the limits set out in the EMC
regulation using a connection cable shorter
than 3 meters.

3
This radio equipment is intended to be used
with the approved version(s) of software
that are indicated in the EU Declaration of
Conformity. The software loaded on this
radio equipment is verified to comply with
the essential requirements of the Directive
2014/53/EU.
Disposal of old electrical
& electronic equipment
(applicable in the European
Union and other countries
with separate collection
systems)
This symbol on the product or on its
packaging indicates that this product shall
not be treated as household waste. Instead
it shall be handed over to the appropriate
collection point for the recycling of electrical
and electronic equipment. By ensuring
that this product is disposed of correctly,
you will help to prevent potential negative
consequences for the environment and
human health, which could be caused
by inappropriate waste handling of this
product. The recycling of materials will
help to conserve natural resources. For
more detailed information about recycling
of this product, please contact your local
Civic Office, your household waste disposal
service or the shop where you purchased the
product.
Precautions
On safety
• Before operating the unit, check that the
operating voltage of your unit is identical
with that of your local power supply.
• Should any solid object or liquid fall into the
cabinet, unplug the unit and have it checked
by qualified personnel before operating it
any further.
• Unplug the unit from the wall outlet if it is
not to be used for an extended period of
time. To disconnect the cord, pull it out by
the plug.
Never pull the cord itself.
On repacking
Keep the carton and packing materials. They
provide an ideal container to transport the
unit. If you have any question or problem
concerning your unit that is not covered in
this manual, please consult your nearest Sony
dealer.
4
Features
PS-LX310BT is a stereo turntable system designed for analog playback of vinyl records.
Assemble your turntable to use it for the first time.
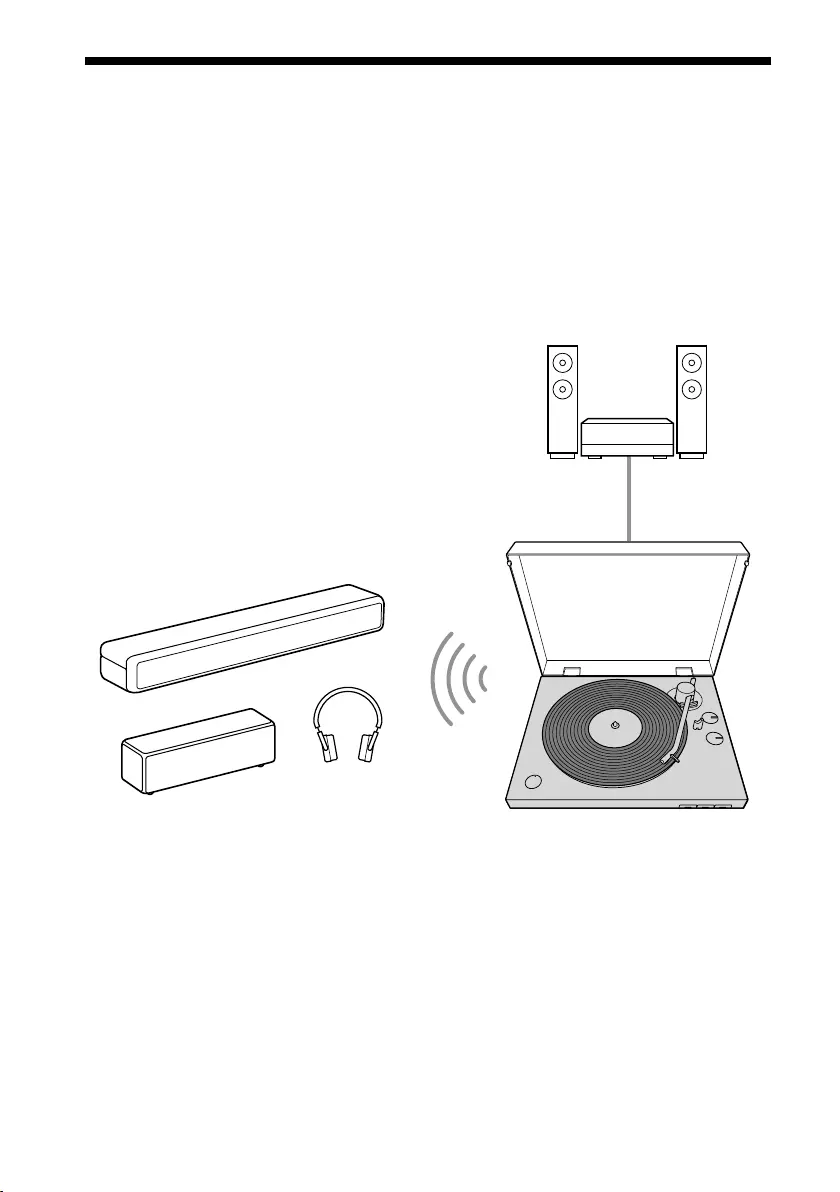
Your turntable does not have built-in speakers.
To listen to audio on vinyl records, either use an audio cable to connect to an audio device or
use the BLUETOOTH® function to connect to a BLUETOOTH wireless technology enabled
audio device, such as wireless speakers or wireless headphones.
“Connecting via the audio cable”
(page 12)
“Connecting with the BLUETOOTH function”
(page 13)
Audio cable
Note
• Be sure to connect to and use a BLUETOOTH wireless technology enabled audio device with a volume
adjustment function. Audio tracks may be played at very loud volumes if you connect your turntable to a
device from which you cannot adjust the volume.
• Devices, including TVs, smartphones, and computers, cannot receive streams that are sent from your
turntable if the turntable is connected to a BLUETOOTH device.
• Your turntable is not an analog record player designed for DJ (Disk Jockey) use. Stopping or reversing the
rotation of the vinyl record by hand will cause malfunctions.

5
Table of Contents
Precautions ……………………………….. 3
Features ……………………………………. 4
Parts and Controls ……………………… 6
Getting Started
Checking the Supplied Items ………. 9
Assembling the Turntable …………..10
Connecting Your Turntable …………12
Listening to a Vinyl Record
Playing a Vinyl Record ………………..15
Maintenance
Cleaning the Stylus …………………….18
Replacing the Stylus ………………….. 18
Replacing the Drive Belt ……………..19
Cleaning the Dust Cover and the
Turntable Body ………………………….19
Additional Information
Troubleshooting ………………………. 20
Repair Services ………………………….21
Specifications ……………………………22
Customer Support Websites ……….23
Trademarks ……………………………….23
Index ………………………………………..23
6
Parts and Controls
Front/Side
1
Spindle (page 10)
Mat for the platter (page 9, 11)
Platter (page 9, 10)
Place the platter on the spindle while you are
assembling your turntable. It has a drive belt
wound around on the back side.
BLUETOOTH indicator
The indicator lights blue while the turntable is
connected to the BLUETOOTH wireless
technology enabled playback device with the
BLUETOOTH function, rapidly flashes blue
while the turntable is in pairing mode, and
turns off when the BLUETOOTH function is
disabled. If there are no devices nearby that
have already been paired when you press the
BLUETOOTH button/ PAIRING button with
the BLUETOOTH function disabled, the
indicator lights orange and the turntable goes
into standby.
BLUETOOTH button/ PAIRING button
(page 13)
Enables/disables the BLUETOOTH function.
Press for about 2 seconds and release to turn
on your turntable’s pairing mode.
Micro USB port
This is on the inside of your turntable when
the platter is removed.
When the updates are available (page 2),
connect your turntable to the computer via a
micro USB cable (not supplied) and update the
firmware.
Dust cover (page 9, 11)
Dust cover hinges (page 9, 11)
Storage hole for the 45 rpm adaptor
(page 9, 15)
You can store the 45 rpm adaptor when you
are not using it.

7
Tone arm (page 15)
SIZE rotary switch knob (page 15)
Rotate to set to the appropriate size of the
vinyl record to be played.
Tone arm rest (page 16)
Place the tone arm here while you are not
playing a vinyl record.
Note
There is a hole on the lower side of the tone
armrest. Pass a string through the hole and fix
the tone arm and the tone arm rest before
carrying your turntable.
SPEED rotary switch knob (page 15)
Rotate to set to the appropriate rpm of the
vinyl record to be played.
Headshell
Stylus (page 18)
The stylus’s protective cover was attached
when you purchased your turntable. Attach the
cover when assembling your turntable and
when you are not using your turntable for a
long time.
Note
The stylus is a high precision component.
Handle it with care to avoid damage.
Cartridge body (page 18)
START button (page 16)
STOP button (page 16)
UP/DOWN button (page 16)
8
Rear
OUTPUT SELECT switch (page 12)
Switch to the appropriate output format of the
device you are using when an audio device,
such as a stereo system or an amplifier, is
connected.
GAIN SELECT switch
When playing, adjust the difference of the
volume of the vinyl records. If the audio track
was recorded on the vinyl record at a quiet
volume, set this to HIGH to play at the
appropriate volume. If the audio track was
recorded on the vinyl record at a loud volume,
the sound may become distorted if you play
the vinyl record with this set to HIGH. Change
the settings to be appropriate for the vinyl
record.
Volume adjustment is effective for audio
output when the OUTPUT SELECT switch is set
to LINE and the playback volume on
BLUETOOTH connections. It is ineffective for
audio output when the OUTPUT SELECT switch
is set to PHONO.
DC IN 12V jack
Power ON/ STANDBY button
Turn on/off your turntable.
If playback does not start, even when you
press the START button, check that the power
is set to ON.
Note on carrying this product
When you carry this product, make sure that you
firmly hold the bottom of the product as
illustrated below. Inappropriate holding may
cause you to drop the product, resulting in
malfunctions or injuries.
9
Getting Started
Getting Started
Checking the Supplied
Items
Make sure that you have all of the supplied
accessories listed below. If you find
anything missing, contact your dealer or the
customer support website. (See page 23.)
• Platter (with drive belt) (1)
• Mat for the platter (1)
• Dust cover (1)
• 45 rpm adaptor (1)*
Place the 45rpm adaptor on the spindle
to play a 7 in (17 cm) vinyl record (EP
record).
When you are not using the 45rpm
adaptor, keep it in its storage hole.
• Dust cover hinges (2)*
• AC adaptor (1)
• Operating Instructions (this manual)
* The 45rpm adaptor and dust cover hinges are
attached to a side surface of your turntable’s
packaging material.
Note
Keep the packaging materials in case you need to
transport your turntable for repair.
10
Assembling the
Turntable
Note
• When you purchased your turntable, a stylus’s
protective cover was attached to the stylus.
Leave on the cover as you assemble your
turntable.
• Do not connect your turntable to a power outlet
with the AC adaptor until you are finished with
assembly.
• The stylus is a high precision component. Do not
touch the stylus while handling it. Touching the
stylus with your fingers, or banging the stylus
into the platter, may cause damage to the stylus.
• To move your turntable after assembling the
turntable,
– attach the stylus’s protective cover,
– remove the platter, and
– pass a string through the hole in the tone arm
rest and fix the tone arm and the tone arm
rest.
Precautions on placement
• Place the unit on a level surface.
• Avoid placing the unit near electrical
appliances (such as a television, hair
dryer, or fluorescent lamp) which may
cause hum or noise.
• Place the unit where it will not be subject
to any vibration, such as from speakers,
slamming of doors, etc.
• Keep the unit away from direct sunlight,
extremes of temperature, and excessive
dust and moisture.
• Keep the unit away from electronic
devices that may emit radio waves or
electromagnetic noise.
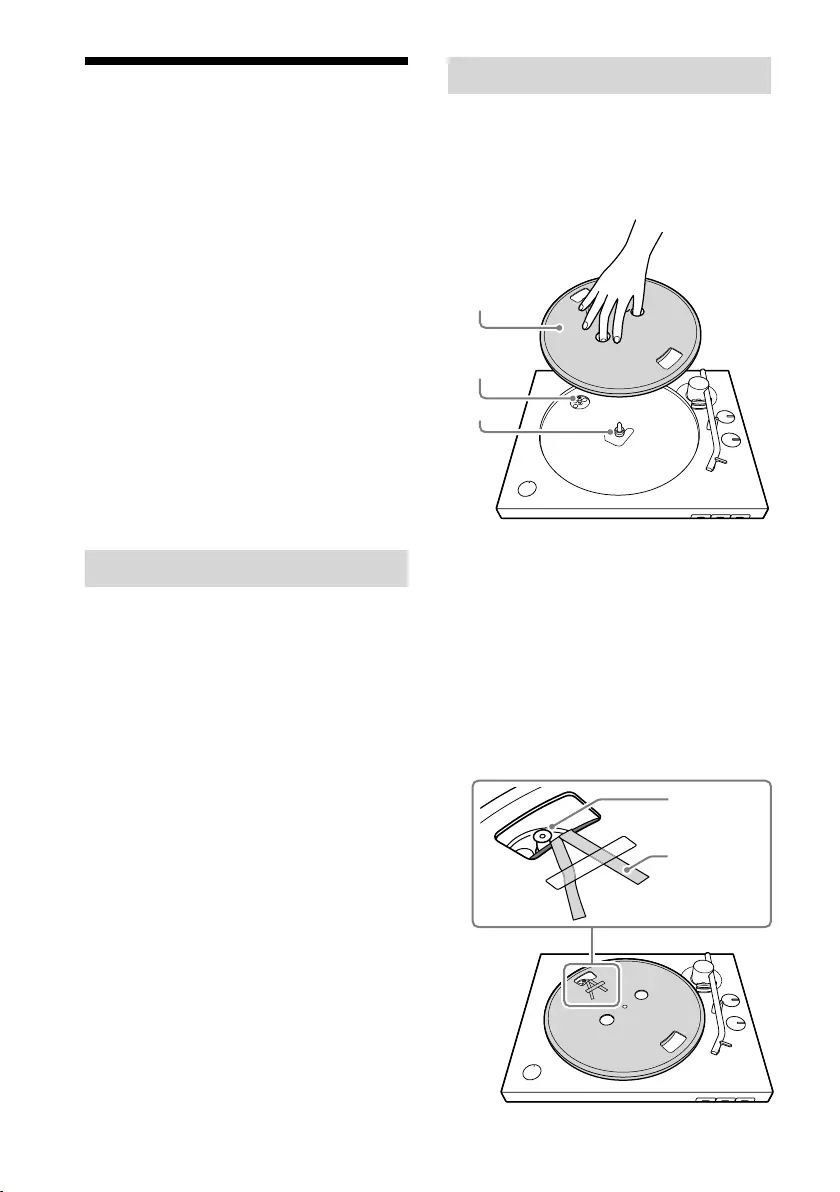
Attaching the platter
1 Place the platter on the spindle.
Keep the platter level while placing it on
the spindle.
Spindle
Platter
Motor
pulley
Note
Hold the platter firmly so as not to drop the
platter as it may cause personal injuries or
damage to your turntable.
2 Turn the platter to the position
where you can see the motor pulley
through the rectangular hole with
the tips of the red ribbon taped on
the platter.
Motor pulley
Red ribbon
11
Getting Started
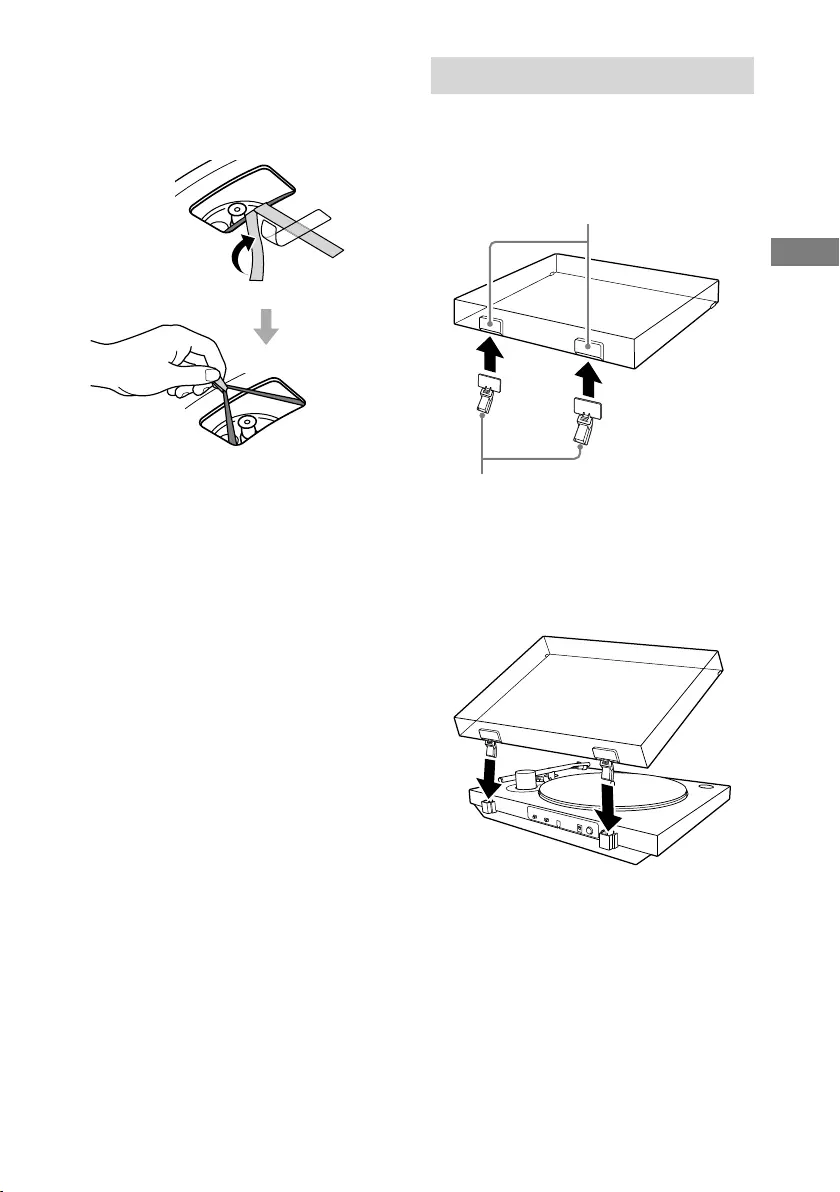
3 Peel off the adhesive tape, pull and
hold the red ribbon, and then hook
the drive belt around the motor
pulley.
Note
• Be careful to not let the drive belt twist. If the
drive belt is twisted while placing it around
the motor pulley, the speed will become
unstable and the platter will stop after it
begins rotating. If this happens, place the
drive belt around the motor pulley again.
• When placing the drive belt around the
platter, do not stretch the drive belt roughly.
Doing so degrades the drive belt, which
causes the sound’s pitch to fluctuate and be
too high.
• If the drive belt comes off of the platter’s
inner circle while you are placing the drive
belt around it, temporarily remove the
platter. Turn the platter over and wind the
drive belt around the circumference of the
inner circle. Then, start again from the
beginning of the procedure.
• Be sure to remove the red ribbon after you
place the drive belt around the motor pulley.
The red ribbon is intended to help you with
this work. Placing the drive belt around the
motor pulley is still possible without the red
ribbon. The red ribbon is no longer needed
once you have attached the platter.
4 Place the mat for the platter onto
the platter.
Attaching the dust cover
1 Insert the supplied dust cover
hinges to the hinge pockets on the
dust cover.
Hinge pockets
Dust cover hinges
2 Align the attached hinges with the
hinge pockets on the rear of your
turntable and push in the dust
cover.
Tip
To remove the dust cover from the turntable,
fully open the dust cover, grasp both sides
near the bottom of the cover, and then gently
pull it out in the upward direction.
12
Connecting Your
Turntable
Connecting via the audio
cable
Note
• Be sure to turn off the audio device, such as a
stereo system or an amplifier, before connection.
• Be sure to make all the connections before you
connect the AC adaptor to a power outlet.
1 Connect the audio cable, which
comes out from the back of the
turntable, to the PHONO input jack,
AUX input jack, or analog input jack
for the audio device.
Connect the white plug to the white (L)
jack and the red plug to the red (R) jack.
Note
Be sure to insert the plugs firmly into the jacks.
Loose connection will cause playback noises.
2 Switch the OUTPUT SELECT switch
on the back of the turntable
according to the connected audio
device’s jack.
• If the audio device has a PHONO
input jack (connected to the PHONO
input jack)
Set the switch to PHONO. An audio
signal from the MM cartridge is output
from the audio cable without passing
through the phono preamp built into
the turntable. The phono preamp for
the audio device is used.
• If the audio device does not have a
PHONO input jack (connected to the
AUX input jack, VIDEO input jack,
etc.)
Set the switch to LINE. The audio signal
that passes through the phono
preamp built into the turntable is
output from the audio cable.
Note
• If you are only using the BLUETOOTH
connection and not connecting the turntable
to another device using the audio cable,
place the audio cable so that its metal tips
do not touch each other or any metallic parts
from racks or other devices. Then, set the
OUTPUT SELECT switch to LINE to use the
turntable.
• Connecting the audio cable to the PHONO
input jack and setting the OUTPUT SELECT
switch to LINE may produce a very loud
sound that may break the amp or speaker.
Always set the switch to PHONO when
connecting to the PHONO input jack.
Connecting the audio cable to an analog
input jack, such as an AUX input jack, and
setting the OUTPUT SELECT switch to PHONO
produces only a very quiet sound. Always set
the switch to LINE when connecting to the
analog input jack.
13
Getting Started
Tip
The OUTPUT SELECT switch is set to LINE at the
time of purchase.
3 Connect the AC adaptor.
Note
To avoid noise interference, place the AC
adaptor body away from your turntable as far
as possible.
Connecting with the
BLUETOOTH function
You can enjoy playing vinyl records by using
your turntable’s BLUETOOTH function to
connect wirelessly to a playback device (not
supplied) that supports BLUETOOTH
wireless technology, such as BLUETOOTH
speakers or BLUETOOTH headphones.
The jolts from pressing the BLUETOOTH
button/ PAIRING button while playing a
vinyl record may cause the stylus to skip.
We recommend connecting to BLUETOOTH
before playing a vinyl record.
Note
Do not connect to headphones for which you
cannot adjust the volume. Audio tracks may be
played at very loud volumes.
Registering (pairing) devices to your
turntable
When you first connect your turntable to a
playback device that supports BLUETOOTH
wireless technology, you must pair it with
the device.
Because your turntable can register
information for up to 8 paired devices, you
do not have to pair the next or subsequent
times you connect the device to the
turntable.
1 Place the playback device that supports
BLUETOOTH wireless technology, to
which you want to connect, as close to
your turntable as possible.
14
2 Press and hold your turntable’s
BLUETOOTH button/ PAIRING button
for about 2 seconds, and then release it.
The BLUETOOTH indicator rapidly flashes blue.
3 Turn on the pairing mode for the
playback device that supports
BLUETOOTH wireless technology, to
which you want to connect.
The above illustration is one example of
a device that is connecting.
For how to turn on the pairing mode for
the device to which you want to connect,
refer to the user’s instructions supplied
with the device.
The BLUETOOTH indicator stops flashing
blue and remains lit when pairing is
complete.
Note
If you are only using the BLUETOOTH connection
and not connecting your turntable to another
device using the audio cable, set the OUTPUT
SELECT switch on the back of the turntable to LINE
to use the turntable.
Tip
• Once you have paired your turntable and device,
you can connect to the paired device simply by
giving a short press to the BLUETOOTH button/
PAIRING button to enable your turntable’s
BLUETOOTH function. You can also connect to
the paired device and play vinyl records by
pressing the START button on the front of the
turntable when the BLUETOOTH indicator is lit
orange (in standby).
• Press the BLUETOOTH button/ PAIRING
button to disengage from the BLUETOOTH
connection. The BLUETOOTH indicator turns off.
• You can register information for a maximum of
8 devices paired to your turntable.
You can delete all information for paired devices
by pressing and holding the BLUETOOTH
button/ PAIRING button for about 10 seconds,
and then releasing it.
If you cannot register (pair) devices
• If there are playback devices, which
support BLUETOOTH wireless technology
nearby, that have the BLUETOOTH
function enabled, but some of them are
not the device with which you want to
pair, disable their BLUETOOTH function
and try pairing again.
• With the pairing operation, the device
with which you do not want to pair may
be turned on and connected to the
turntable automatically. If this occurs,
change the device’s setting not to turn on
by the BLUETOOTH connection, turn off
the device, and try pairing again.
• You cannot pair your turntable with
smartphones, TVs, or computers. The
turntable can use the BLUETOOTH
function to send data to playback devices
that support BLUETOOTH wireless
technology; however, because the
turntable cannot receive data from
smartphones, TVs, or computers, the
turntable cannot pair with them.
15
Listening to a Vinyl Record
Listening to a Vinyl
Record
Playing a Vinyl Record
Note
• Before you play a vinyl record, turn down the
audio device’s volume. The loud, crackling noise
made by the tone arm descending and the
stylus coming into contact with the vinyl record
could damage the speakers or audio device.
Wait until the stylus has completely descended,
and then adjust the volume.
• Even new vinyl records may produce a crackling
noise when you play them. Please note that this
noise is a characteristic of playing vinyl records.
Also, be aware of the storage practices for vinyl
records, as dust and dirt that stick to the vinyl
records when they are taken out of their sleeves
may cause noise.
1 Place a vinyl record onto the platter.
Vinyl record
Note
Place only one vinyl record on the platter at a
time.
To play 7 in (17 cm) vinyl records (EP
records)
Place the supplied 45 rpm adaptor on the
spindle to play 7 in (17 cm) vinyl records (EP
record).
When you have finished using the 45 rpm
adaptor, keep it in its storage hole.
2 Use the SPEED rotary switch knob to
select the rotation speed
appropriate for the vinyl record.
SPEED rotary switch
knob
Tip
The rotation speed is usually printed on the
center label of the vinyl record or the record
jacket.
3 Use the SIZE rotary switch knob to
select the size (in inches) of the
vinyl record.
Set it to “12” for LP records, or “7” for EP
records.
SIZE rotary switch knob
16
4 Remove the stylus protective cover.
Stylus protective
cover
Note
Remove the stylus protective cover with care
so as not to damage the stylus.
5 Press the START button.
Playback begins when the tone arm
automatically descends to its position,
which was set using the SIZE rotary
switch knob, at the beginning of the
vinyl record.
Note
• When closing the dust cover, close it slowly
to avoid making physical force that may
cause the stylus to skip.
• During playback, keep your hands away from
the tone arm and the turning vinyl record.
• During playback, do not change the settings
with the switches on the rear of your
turntable.
6 Adjust the volume using the audio
device.
To stop playback
Press the STOP button. The tone arm
returns to the tone arm rest. The platter
stops rotating.
To pause playback
Press the UP/DOWN button to raise the
stylus off the vinyl record. The platter keeps
rotating.
When playback is finished
The tone arm returns to the tone arm rest
automatically, then the platter stops
rotating.
To play a different part of the vinyl
record
1 After performing step 4, press the UP/
DOWN button to lift the tone arm.
Move the tone arm to the position you desire.
2 Press the UP/DOWN button.
The tone arm descends to the vinyl record,
then playback starts.

17
Listening to a Vinyl Record
Playing via a BLUETOOTH
connection
To connect your turntable for the first time to
a playback device that supports BLUETOOTH
wireless technology using the BLUETOOTH
function, you must register (pair) the device
in advance. (See page 13.)
1 First, turn on the playback device and
make it ready to receive data through
a BLUETOOTH connection. Then,
press the BLUETOOTH button/
PAIRING button on your turntable
to enable the BLUETOOTH function.
If the BLUETOOTH connection is
successful, your turntable’s BLUETOOTH
indicator lights blue.
2 Do steps 1 through 5 of “Playing a
Vinyl Record” to play a vinyl record.
Tip
If you disable the BLUETOOTH function of the
playback device connected via BLUETOOTH wireless
technology, your turntable’s BLUETOOTH indicator
lights orange and the turntable goes into standby.
In standby, the turntable automatically connects to
the playback device if the playback device’s
BLUETOOTH function is re-enabled and the
turntable is playing.
To switch playback devices
To switch to another playback device that
supports BLUETOOTH wireless technology,
which has already been paired, turn off the
playback device that is playing, and then
enable the BLUETOOTH function for the
playback device you want to use.
To switch to a new device that has not been
paired, turn off the device that is playing,
and then follow the procedure in “Registering
(pairing) devices to your turntable” to finish
pairing.
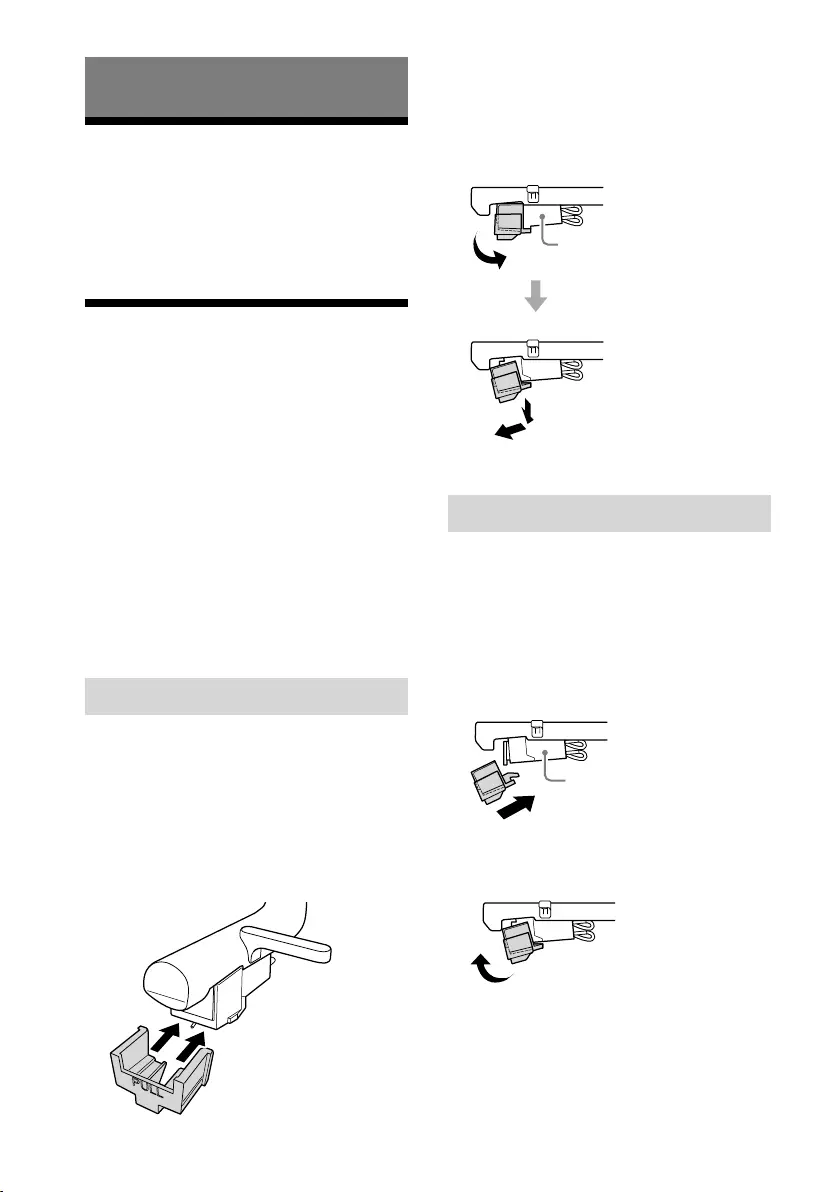
18
Maintenance
Cleaning the Stylus
The stylus is a high precision component.
Handle it with care to avoid damage.
Use a commercial cleaning product for
cleaning the stylus.
Replacing the Stylus
The stylus may become worn out, damaged,
or dirty beyond cleaning depending on
your use case. In such a case, replace the
stylus.
To obtain a spare stylus, contact your dealer
or the customer support website. (See page
23.)
Note
• Do not use a replacement stylus made by
another company.
• Be sure to attach the stylus protective cover
before you replace the stylus so as not to harm
your fingertips or damage the stylus.
To remove the stylus
1 Turn off your turntable and the
connected audio device and unplug
the AC adaptor from the power
outlet.
2 Attach the stylus protective cover to
the stylus.
3 Hold the cartridge body () with
one hand, grasp the stylus with the
other, and then pull the stylus in the
direction of the arrow to remove it
from the cartridge body.
To attach the stylus
1 Attach the stylus protective cover to
the spare stylus.
2 Hold the cartridge body () with
one hand and then insert the tab on
the spare stylus into the receptacle
on the cartridge body.
3 Push the stylus in the direction of
the arrow until it clicks into place.

19
Maintenance
Replacing the Drive Belt
The drive belt will wear or may even break
over time. In such a case, replace it with a
new one.
To obtain a spare drive belt, contact your
dealer or the customer support website.
(See page 23.)
1 Turn off your turntable and the
connected audio device and unplug
the AC adaptor from the power
outlet.
2 Remove the mat for the platter.
3 Unhook the drive belt from the
motor pulley.
4 Put your finger and thumb into the
platter’s round holes to hold the
platter and remove the platter.
5 Turn the platter upside down and
remove the drive belt.
6 Wind a new drive belt around the
platter while keeping it untwisted.
Follow the steps in “Assembling the
Turntable” to finish assembly. (See page
10.)
Note
Spare drive belts do not have the red
indication ribbon attached.
Cleaning the Dust Cover
and the Turntable Body
Use a dry, soft cloth to clean the dust cover
and the turntable body.
When it is hard to wipe off the soil, use a
cloth moistened with a mild detergent
solution. Do not use any chemical solution,
such as alcohol, benzine, or paint thinner,
that damages the finish.

20
Additional Information
Troubleshooting
When you find your turntable not working
properly, first review the following
suggestions before you consider requesting
for repair. If they do not help solving your
problem, contact your dealer or the
customer support website. (See page 23.)
Vinyl record playback
The tone arm skips or skates.
• Your turntable is not positioned level. Place
the turntable on a level surface.
• The vinyl record is dusty or scratched. Clean
the surface with a commercial record
cleaning product or replace the vinyl record.
You experience sound problems.
• If the dirty stylus is causing frequent noises,
clean the stylus with a commercial stylus
cleaning product. If the stylus is worn out,
replace the stylus. (See page 18.)
• If the sound pitch is unstable, the drive belt
may be worn out. Replace the drive belt. (See
page 19.)
• If the dusty vinyl record is causing frequent
noises, clean the surface with a commercial
record cleaning product.
• The stylus is worn out. Replace it with a new
one. (See page 18.)
You hear rumbling or low-frequency
howling noises*.
Your turntable is placed too close to speakers.
Move the turntable away from the speakers.
* This phenomenon, called “acoustic feedback,”
occurs when vibrations that travel through the air
or solid objects (such as shelves, a cabinet, or the
floor) from speakers are picked up by the stylus,
amplified and reproduced through the speakers.
You hear noises.
• Make sure that the OUTPUT SELECT switch
on the rear of your turntable is set to LINE. If
the PHONO/LINE switch is set to PHONO
when the turntable is connected to any
other input jacks than the PHONO input
jacks on the audio device, you may hear
playback noises. When the PHONO/LINE
switch is set to LINE, do not connect the
turntable to the PHONO input jacks on the
audio device.
The sound pitch is too high or low.
• A wrong rotation speed is selected. Check
the center label of the vinyl record or the
record jacket for the rotation speed and
select the appropriate one. Rotate the SPEED
rotary switch knob to select “33” for
331/3rpm records or “45” for 45rpm
records.
• The drive belt may be twisted or worn out.
Untwist the drive belt. (See page 19.)
The sound pitch fluctuates.
The stylus is worn out. Replace it with a new
one. (See page 18.)
The drive belt is worn out or broken.
Replace the drive belt. (See page 19.) To
obtain a spare drive belt, contact your dealer
or the customer support website. (See page
23.)
The platter does not turn.
• Make sure that the AC adaptor is firmly
connected to a power outlet and the DC IN
12V jack on your turntable.
• Make sure that the drive belt is completely
hooked around the motor pulley. (See page
11.)
Playback sound is too low in volume or
distorted.
Make sure that the OUTPUT SELECT switch
selection on your turntable matches the type of
the input jacks on the audio device used for
connection with the turntable. (See page 12.)

21
Additional Information
BLUETOOTH connections
You cannot pair via the BLUETOOTH
wireless technology.
• If there are playback devices, which support
BLUETOOTH wireless technology nearby, that
have the BLUETOOTH function enabled, but
some of them are not the device with which
you want to pair, disable their BLUETOOTH
function and try pairing again.
• With the pairing operation, the device with
which you do not want to pair may be
turned on and connected to the turntable
automatically. If this occurs, change the
device’s setting not to turn on by the
BLUETOOTH connection, turn off the device,
and try pairing again.
• The procedure for turning on the pairing
mode differs depending on the playback
device that supports BLUETOOTH wireless
technology. For details, refer to the user’s
instructions supplied with the device.
You cannot connect your turntable to the
playback device, which supports
BLUETOOTH wireless technology, to which
you want to connect.
If there are playback devices, which support
BLUETOOTH wireless technology nearby, that
have the BLUETOOTH function enabled, but some
of them are not the device to which you want to
connect, disable their BLUETOOTH function.
You cannot connect your smartphone, TV,
or computer.
Your turntable can use the BLUETOOTH
function to send data to playback devices that
support BLUETOOTH wireless technology;
however, because your turntable cannot
receive data from smartphones, TVs, or
computers, your turntable cannot connect to
them.
The BLUETOOTH wireless communication
range is short.
Try the following.
• If there are other electronic devices
connected to your turntable and the
playback device, disconnect them.
• Connect the turntable to a power outlet to
which a microwave is not connected.
• Place the turntable on a table not made of
metal.
Repair Services
When you find your turntable not working
properly, first review the suggestions listed in
“Troubleshooting” to find out if your problem
needs repair.
If the suggestions do not help solving the
problem, contact your dealer or the customer
support website. (See page 23.)
Spare components retention period:
Sony retains functional turntable components
for repair (components required to maintain
the turntable functions) for at least eight years
after discontinuation of the product, as
instructed by the Ministry of Economy, Trade
and Industry of Japan, and will provide repair
services during this retention period.
Depending on the component that needs
repair, however, repair services may still be
provided beyond the retention period. For
more information, contact the customer
support website. (See page 23.)
Before you contact your dealer or the customer
support website (page 23), you are advised
to have the following information at hand:
• Model number: PS-LX310BT
• Serial number at the bottom of your
turntable:
• Description of the defect(s): Please describe
as much as you can.
• Date of your purchase:
• Your dealer name:
If the stylus or the drive belt is damaged or
worn out due to improper use, repair services
will be provided at your expense.

22
Specifications
Motor and Platter
Drive system
Belt-drive
Motor
DC motor
Platter
296 mm dia. (aluminum die-cast)
Speeds
33 1/3 and 45 rpm, 2 speed
Wow and flutter
0.1% (WRMS)
S/N ratio
More than 50 dB (DIN-B) with the
supplied cartridge
Tone Arm
Type
Dynamic balanced J shaped arm
Effective arm length
197 mm
Cartridge
Type
MM
Stylus pressure
3 g
Output level
2.5 mV
General
Power supply
DC 12 V 0.8 A (AC adaptor)
Power consumption
1.8 W
Dimensions
430mm x 108mm x 367mm
(width/height/depth)
Weight
Approx. 3.5 kg
AC adaptor
Input
AC 100-240 V 0.35 A 50/60 Hz
Output
DC 12 V 0.8 A (AC adaptor)
BLUETOOTH section
Communication system
BLUETOOTH Specification version 4.2
Output
BLUETOOTH Specification Power
Class2
Maximum communication range
Line of sight approx. 10m*1
Frequency band
2.4 GHz band (2.402 GHz — 2.480 GHz)
Maximum output power
≤ 4 dBm
Modulation method
FHSS
Compatible BLUETOOTH profiles*2
A2DP 1.3
Supported Codecs*3
SBC*4, Qualcomm® aptX™ audio
Transmission range (A2DP)
20 Hz — 20,000 Hz (Sampling frequency
48kHz)
*1 The actual range will vary depending on factors
such as obstacles between devices, magnetic fields
around a microwave oven, static electricity, cordless
phone, reception sensitivity, antenna’s performance,
operating system, software application, etc.
*2 BLUETOOTH standard profiles indicate the purpose
of BLUETOOTH communication between devices.
*3 Codec: Audio signal compression and conversion
format
*4 Subband Codec
Design and specifications are subject to
change without notice.

23
Additional Information
Customer Support
Websites
For information about purchasing spare
components, accessories, and other support
services, visit the customer support website
designated to your area of residency.
For customers in Europe:
http://www.sony.eu/support
For customers in the U.S.A.:
http://esupport.sony.com/US
For customers in Canada:
http://esupport.sony.com/CA/
For customers in other countries/
regions:
http://www.sony-asia.com/support
Trademarks
• IBM and PC/AT are registered trademarks of
International Business Machines Corporation.
• Microsoft, Windows and Windows Media are
either trademarks or registered trademarks
of Microsoft Corporation in the United States
and/or other countries.
• Mac, Mac OS and macOS are trademarks of
Apple Inc., registered in the U.S. and other
countries.
• Qualcomm aptX is a product of Qualcomm
Technologies International, Ltd.
• Qualcomm is a trademark of Qualcomm
Incorporated, registered in the United States
and other countries, used with permission.
aptX is a trademark of Qualcomm
Technologies International, Ltd., registered
in the United States and other countries,
used with permission.
• The BLUETOOTH® word mark and logos are
registered trademarks owned by the
Bluetooth SIG, Inc. and any use of such
marks by Sony Corporation is under license.
• All other trademarks and registered
trademarks are trademarks or registered
trademarks of their respective holders. In
this manual, ™ and ® marks are not specified.
Index
45 rpm adaptor …………………………………9, 15
audio cable ………………………………………….12
cartridge body …………………………………. 7, 18
dust cover hinges …………………………..6, 9, 11
headshell……………………………………………… 7
mat for the platter ………………………….6, 9, 11
noise …………………………………………………..20
platter …………………………………….. 6, 9, 10, 20
pulley…………………………………………….. 10, 19
rotation speed………………………………………15
spindle …………………………………………….6, 10
tone arm………………………………… 7, 15, 16, 20

© 2019 Sony Corporation Printed in China