-
Contents
-
Table of Contents
-
Troubleshooting
-
Bookmarks
Quick Links
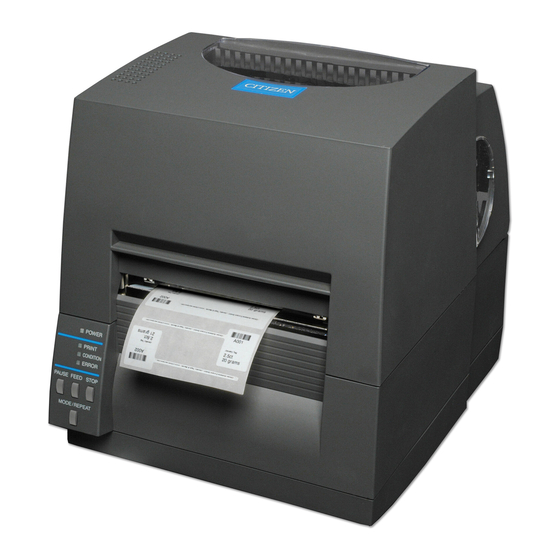
Thermal Transfer Barcode & Label Printer
CL-S621 & CL-S631
U
M
SER’S
ANUAL
Related Manuals for Citizen CL-S621
Summary of Contents for Citizen CL-S621
-
Page 1
Thermal Transfer Barcode & Label Printer CL-S621 & CL-S631 SER’S ANUAL… -
Page 2: Table Of Contents
CONTENTS Before Operation INTRODUCTION ——————————————————————— 3 COMPLIANCE STATEMENT FOR EUROPEAN USERS —————————— 4 GS MARK STATEMENT ————————————————————— 4 FCC COMPLIANCE STATEMENT FOR AMERICAN USERS ———————— 4 EMI COMPLIANCE STATEMENT FOR CANADIAN USERS ———————— 5 ETAT DE CONFORMITE EMI A L’USAGE DES UTILISATEURS CANADIENS —— 5 IMPORTANT SAFETY INSTRUCTIONS ——————————————— 6 NOTICE ——————————————————————————- 7 SAFETY INSTRUCTIONS ———————————————————— 8…
-
Page 3: Introduction
INTRODUCTION Thank you for purchasing a Citizen CL-series label printer offering high performance thermal transfer printing on media up to 4.1 inches wide. Main Features <High-speed, high-quality printing> This printer can be used for high-speed high-quality printing thanks to its direct thermal method and thermal transfer method that use a line thermal printhead together with its 32 bit RISC CPU and its ‘history control IC’.
-
Page 4: Compliance Statement For European Users
COMPLIANCE STATEMENT FOR EUROPEAN USERS CE marking shows conformity to the following criteria and provisions: Low Voltage Directive (2006/95/EC, formerly 73/23/EEC)/EN60950-1 EMC Directive (2004/108/EC, formerly 89/336/EEC)/EN55022, EN55024, EN61000-3-2 & EN61000-3-3 GS MARK STATEMENT This product has been tested under EN ISO 7779 and has an acoustic level output no higher than 55db(A).
-
Page 5: Emi Compliance Statement For Canadian Users
EMI COMPLIANCE STATEMENT FOR CANADIAN USERS This Class A digital apparatus complies with Canadian ICES-003. This equipment generates and uses radio frequency energy and if not installed and used properly, that is, in strict accordance with the manufacturer’s instructions, may cause interference to radio and television reception.
-
Page 6: Important Safety Instructions
IMPORTANT SAFETY INSTRUCTIONS Read all of these instructions and save them for later reference. Follow all warnings and instructions marked on the product. Unplug this product from the wall outlet before cleaning. Do not use liquid or aerosol cleaners. Use a damp cloth for cleaning.
-
Page 7: Notice
Please contact us if there are any mistakes or ambiguities within this manual. If there are missing or incorrectly collated pages in this manual, contact us to obtain a new manual. CITIZEN is a registered trademark of CITIZEN HOLDINGS CO., Japan. CITIZEN es una marca registrada de CITIZEN HOLDINGS CO., Japón.
-
Page 8: Safety Instructions
SAFETY INSTRUCTIONS which must be strictly observed ! To prevent personal injury or property damage, the following shall be strictly observed. The degree of possible injury and damage due to incorrect use or improperly following instructions is described below. Indicates a situation which, if not observed and handled Warning properly, could result in death or serious injury.
-
Page 9: General Precautions
General Precautions Caution Prior to operation, read the safety instructions carefully and observe them. Do not drop or put foreign matter such as clips and pins into the printer. This may cause problems. Be careful when moving or carrying the printer. Dropping the printer may cause injury or property damage.
-
Page 10: Chapter 1 Setup
Setup Confirmation of Carton Contents Removing the Packing Material The printer is shipped with adhesive tape in place to hold the top cover closed. Simply remove the two pieces of tape on either side of the top cover. Then simply open the cover by lifting up and tipping it backwards. There is another strip of adhesive tape that must be removed which holds the mechanism closed for shipping.
-
Page 11: Part Names And Functions
Setup Caution Be careful when moving or carrying the printer and when taking the printer out of the carton. The printer may cause injury or property damage if dropped. Be sure to grip the printer housing firmly when taking it out of the carton. Do not grip the printer by the foam packing material which may break, causing the printer to drop.
-
Page 12: Inside The Printer
Setup Part Names and Functions Inside the printer 1 Ribbon drive unit 2 Head close knob Push the head close knob to lock the mechanism closed. If you push on another part of the mechanism, the printer may not lock closed correctly. 3 Ribbon holder It is used to attach the ribbon and paper core.
-
Page 13
Setup Part Names and Functions Ribbon Tension Adjustment 1 Front (winding side) ribbon tension adjustment knob (p.50) This is adjusted according to the width of the ribbon that is used. It is also used when the ribbon is wrinkled or slips. Ribbon Balance Adjustment 2 Front (winding side) ribbon left-right balance adjustment knob (p.51) -
Page 14
Setup Part Names and Functions 1 Thermal printhead This is the printhead. Avoid touching this with your fingertips and leaving grease or dirt on the printhead surface. 2 Sensor arm The media can be installed by raising this arm. The media can be held in place by lowering this arm. 3 Upper sensor (3-1) and bottom sensor (3-2) Setting sensor positions (p.24) -
Page 15: Operation Panel
Setup Part Names and Functions Operation Panel LED Functions (p.21) 1 POWER LED This is lit when the printer power is on. (green) 2 PRINT LED This is lit when the printer is able to print. (green) 3 CONDITION LED This is on when selecting settings.
-
Page 16
Setup Part Names and Functions Rear View 1 Serial interface (RS232C) Serial Interface (p.59) This receives serial transmission of data from a host computer. 2 USB interface USB Interface (p.61) This receives USB transmission of data from a host computer. Power ON/OFF (p.19) 3 Power switch The is the power switch for the printer. -
Page 17: Connection To Power
Setup Connection to Power 1. Check that the power switch to the printer is turned OFF. 2. Connect the connector of the power cord to the power cord inlet on the printer. 3. Insert the plug of the power cord in the AC outlet. Power Switch AC Outlet Power Cord Inlet…
-
Page 18: Connection To A Computer
Serial Interface (p.59) USB Interface (p.61) Serial Interface Cable USB Interface Cable Note: If an optional Ethernet, an IEEE1284 Parallel or Wireless LAN port is used, contact your Citizen Systems dealer.
-
Page 19: Chapter 2 Printer Operation
Printer Operation Printer Operation Power ON/OFF Turning on the power 1. Turn on the power switch on the back of the printer. 2. The POWER and PRINT LED are lit. Operation Panel Power Switch Turning off the power 1. Turn off the power switch on the back of the printer. 2.
-
Page 20: Normal Operating Mode
Printer Operation Normal Operating Mode When the power is turned on, the printer enters normal operating mode. Menu Setup Mode (p.31) The control keys activate the following functions. 1 PAUSE key: Temporarily pauses printing • When this key is pushed once, the PRINT LED turns off and the printer temporarily pauses.
-
Page 21: Led Functions
Printer Operation Normal Operating Mode LED Functions 1 POWER LED It lights up when printer power is turned on. (green) 2 PRINT LED This is lit when the printer is able to print. (green) 3 CONDITION LED This is on when selecting settings. (orange) 4 ERROR LED This is lit or flashes when the printer is…
-
Page 22: Media Sizes
Printer Operation Setting the Media Media Sizes The position of label and tag media is sensed by either a transparent sensor or a reflective sensor. Transparent sensor: Detects the gaps between label media and notches of tag media Reflective sensor: Detects the black mark Continuous media Label media…
-
Page 23
Printer Operation Setting the Media Installing the Media 1. Push the large blue-head open lever to release the head unit, and then lift the sensor arm by hand as shown below. Head unit Sensor arm Large blue-head open lever 2. Firstly, slide the two black plastic parts of the media holder assembly together. -
Page 24
Printer Operation Setting the Media 6. Setting sensor positions. Quick Sensor Selection Method When using a transparent sensor (Transparent Reflective) Move the bottom sensor close to the center of the width of the media, (p.45) then align the upper sensor marker and the bottom sensor marker (white) Adjusting the Transparent using the movable media guide. -
Page 25
Printer Operation Setting the Media 7. Align the media with the left fixed media guide, align the right movable media guide with the media width, and lower the sensor arm. Fixed media guide Movable media guide Sensor arm Media Thickness Adjustment 8. -
Page 26: Setting The Ribbon
Printer Operation Setting the Ribbon The following kinds and sizes of ribbons can be used. Types …………Inside wound and outside wound ribbon Max. ribbon width ……. 1 14.0 mm (4.50 inch) Min. ribbon width …….. 25.4 mm (1.00 inch) Max.
-
Page 27
Printer Operation Setting the Ribbon 3. Install the unused ribbon and holder in to the rear ribbon drive unit. The splines on the ribbon drive gear mechanism engage with the end of the ribbon holder. 4. Push the large blue-head open lever to release the head unit. Pull out the ribbon from the bottom of the head unit to the ribbon winding side. -
Page 28
Printer Operation Setting the Ribbon 6. Set the ribbon holder on which the paper core has been set in the ribbon drive unit, then rotate it in the direction shown by the arrow to remove slack and wrinkles from the ribbon. Ribbon Tension Adjustment (p.50) 7. -
Page 29: Mode Settings
Printer Operation Mode Settings Operation Panel (p.15) Turning on the power while pressing keys in the following combinations starts various functions. Mode Key operation HEX dump mode Turning power on while pushing the STOP key. Self print mode Turning power on while pushing the FEED key. Menu setting mode Turning power on while pushing the MODE/REPEAT key.
-
Page 30
Printer Operation Mode Settings Self Print Mode Performing a self test print is an easy way to check on the state of printer setting and printing quality. Install the media as explained in “Installing the Media” and then operate the printer as follows. Setting the Media (p.22) Case of label media Turn on printer power while… -
Page 31
Printer Operation Mode Settings Menu Setup Mode If the printer power is turn on while the MODE/REPEAT key is pressed, the printer enters menu setup mode. In this mode, the printer’s configuration can be changed using the VuePrint Menu System. During menu setting mode, the PRINT LED and CONDITION LED are on. -
Page 32
Printer Operation ® Mode Settings [Datamax Emulation] Menu Setting Flow Chart The following is a flow chart showing the CL-S621/CL-S631 VuePrint menu system. 7 Datamax ® Emulation Operation Panel Menu Setup Mode (p.31) MODE/REPEAT key + Power on Press FEED key for 3 seconds Do you Printing during top menu… -
Page 33
Printer Operation ® Mode Settings [Zebra Emulation] 7 Zebra ® Emulation Operation Panel Menu Setup Mode (p.31) MODE/REPEAT key + Power on Press FEED key for 3 seconds Do you Printing during top menu Initialization of the EXIT want to reset this content of the settings Are you sure? printer to factory… -
Page 34
Printer Operation Mode Settings This particular example is changing the print speed and print darkness then continues through the remainder of the “Print Setup” menu. The actual output from the printer is «vertically reversed» due to the way the printer outputs the menu options. Please look at the example below to see how the output changes. -
Page 35
* The settings of the Symbol Set can be changed only by a command. Note: Citizen continually enhances its printers with new options and settings based on our customer’s requests. Extra or changed menu items may appear on the above print out in some case. -
Page 36
Printer Operation Mode Settings ® [Datamax Emulation] Menu Setting Table Global Config menu — allows you to switch between 3 complete ‘config sets’ contained within the printer. Page Setup Menu — allows you to change settings related to the media or print quality. System Setup Menu — allows you to change settings for the printer hardware and basic control systems. -
Page 37
Printer Operation Mode Settings ® [Datamax Emulation] Top Menu Sub Menu Default Menu Remarks Keyboard Lock Prevents the control panel from affecting the printer’s configuration. (User «lock-out») Control Code Selects between the Standard STX control code or the «Alternative» code. Sometimes ALT-2 called «AS400 mode». -
Page 38
Printer Operation Mode Settings ® [Datamax Emulation] Top Menu Sub Menu Default Menu Remarks RS-232C Parity None None Sets the communication parity of the serial interface. Even RS-232C Length 8 bits 8 bits Sets the character length of the serial 7 bits interface. -
Page 39
Printer Operation Mode Settings ® [Zebra Emulation] 7 Zebra ® Emulation Top Menu Sub Menu Default Menu Remarks Global – Config Set 1 Config Set 1 Sets the Config Set. configuration Config Set 2 Config Set 3 Page Setup Print Speed 4 IPS 2 to 6 IPS [For CL-S621]… -
Page 40
Printer Operation Mode Settings ® [Zebra Emulation] Top Menu Sub Menu Default Menu Remarks ® ® Emulation Select ZPI2 Selects DataMax /Zebra compatibility ® DM4: DataMax ® DMI: DataMax IClass ® ® ZPI2 DPP: DataMax Prodigy Plus ® ZPI2: Zebra Emulation ®… -
Page 41
Printer Operation Mode Settings ® [Zebra Emulation] Top Menu Sub Menu Default Menu Remarks RS-232C Stop bit 1 bit 1 bit Sets the stop bit of the serial interface. 2 bits RS-232C X-ON Selects the X-ON flow control of the serial interface. -
Page 42: Quick Setup Of The Print Method
Printer Operation Quick Setup of the Print Method Menu Setup Mode (p.31) The print method (thermal transfer method/direct thermal method) can be set using operation panel in addition to menu setting mode. Caution Be sure to always shut off the operation of print before changing a setting.
-
Page 43: Selecting The Ribbon Winding Direction
Printer Operation Selecting the Ribbon Winding Direction Besides the Menu Setup Mode, you can also select the ribbon winding direction (outside-wound / inside-wound) by using the keys on the Operation Panel. Outside-wound and inside-wound will switch from one to another each time you press the PAUSE key for 4 seconds or more while pressing the MODE/ REPEAT key when not printing.
-
Page 44: Manually Selecting The Printer Emulation
Printer Operation Manually Selecting the Printer Emulation Menu Setting Table To manually choose between Datamax ® and Zebra ® emulations, you can use (p.37, p.40) the VuePrint menu system. The Emulation Select option in the System Setup menu allows you to do this. Alternatively, you can use the “Quick Switch”…
-
Page 45: Chapter 3 Printer Adjustments
Printer Adjustments Printer Adjustments Sensor Adjustments The sensing level of both the transparent (see thru) and reflective sensors is adjusted separately and independently. Firstly, the sensor type must be selected either using the VuePrint menu system or the Sensor Method Selection shown below.
-
Page 46
Printer Adjustments Sensor Adjustments Adjusting the Transparent sensor Installing the Media (p.24) 1. Push the large blue-head open lever to open the head unit and sensor arm, then return only the sensor arm to its original position. Align the upper sensor marker and the bottom sensor marker (white) using the movable media guide. -
Page 47
Printer Adjustments Sensor Adjustments Adjusting the Reflective sensor 1. Open the printhead and the sensor arm, then align the position of the sensor marker of the bottom sensor is at the center of the black mark on the media. Black mark Media Bottom sensor Black mark… -
Page 48: Media Thickness Adjustment
Printer Adjustments Media Thickness Adjustment Installing the Media (p.25) It may be necessary to adjust the printer according to the thickness of the media being used. This can be done easily by rotating the media adjustment dial to improve the print quality. •…
-
Page 49: Media Width Adjustment
Printer Adjustments Media Width Adjustment Installing the Media (p.25) The head pressure varies according to the width of the media being printed. The head pressure balance must be adjusted according to media width so that constant head pressure is applied to the head. With this printer, it can be adjusted easily by turning the media width adjustment dial.
-
Page 50: Adjusting The Ribbon
Printer Adjustments Adjusting the Ribbon Setting the Ribbon (p.26) When using narrow-width ribbons or very specialist thermal ribbon material, it may be necessary to adjust the ribbon tension and ribbon balance adjustments to avoid ribbon wrinkle or slippage. Front ribbon tension adjustment knob Back ribbon tension adjustment knob…
-
Page 51
Printer Adjustments Adjusting the Ribbon Ribbon Balance Adjustment Do this adjustment by turning the front and back balance adjustment knobs. Self Print Mode (p.30) If the ribbon is wrinkled, adjust it as follows. The scale is usually aligned with the center. Adjustment procedure 1. -
Page 52: Cleaning
Printer Adjustments Cleaning Wipe off any foreign matter such as media dust, dirt and adhesive substances built up around the printhead with the head cleaning pen (head cleaner) provided, and use a soft cloth soaked in ethyl alcohol for the platen etc. It is particularly important to clean the thermal printhead after printing on thermal media for long periods, which will guarantee the print quality and extend the life of the thermal printhead.
-
Page 53: Chapter 4 Troubleshooting
Troubleshooting Troubleshooting This chapter explains corrective actions taken when the printer malfunctions or when an error message is displayed. Items to check when a malfunction occurs When the printer malfunctions during operation, take corrective action with reference to the following table. If the corrective action does not solve the problem, consult with the service personnel at the dealer where you purchased the printer.
-
Page 54: Troubleshooting
Troubleshooting Check Indication Corrective action 4) Is the thermal printhead The printer is not 4) If it is dirty, remove the dirt with the printing neatly. dirty? attached head cleaner. Is a label stuck to the head. If a label is stuck to the head, remove Note: Do not use a metal object to remove a label stuck to the inside of the printer.
-
Page 55: Appendixes
Appendixes Appendixes Specifications Item Description Printing Printing method Thermal transfer/Direct thermal Resolution Main scanning line density: 203 dots/inch (8 dots/mm) (CL-S621) 300 dots/inch (1 1.8 dots/mm) (CL-S631) Sub- scanning line density: 203 dots/inch (8 dots/mm) (CL-S621) 300 dots/inch (1 1.8 dots/mm) (CL-S631) Head 864 dots (printable dots: 832 dots) (CL-S621) Head 1275 dots (printable dots: 1240 dots) (CL-S631) Max.
-
Page 56
Appendixes Specifications Item Description Bar code One-dimension • Code 3 of 9 • UPC-A • UPC-E • EAN-13 (JAN-13) ® (for Datamax emulation) • EAN-8 (JAN-8) • Interleaved 2 of 5 • Code 128 • HIBC (Modulus 43-used code 3 of 9) • Codabar (NW-7) •… -
Page 57
Appendixes Specifications Item Description Media detection Transparent sensor Detects media gap between labels, notches on tags, and media out sensors Reflective sensor Detects reflective mark on back of media and media out Label peeling sensor Communication Serial 2400 4800 9600 19200 38400 57600 1 15200bps interfaces FULL Speed USB1.1 Communication… -
Page 58
Appendixes Item Description Weight Approx. 4.9 kg (10.8 lb.) Accessories Test label media, Test ribbon, CD-ROM (User’s Manual), Quick start guide, Head cleaner, Power cord, Media holder bar and Media holder guide, Ribbon holder, Paper core Option Auto-cutter unit, Peeler unit, IEEE1284 Parallel interface board, Ethernet interface board and wireless LAN interface board. -
Page 59: Interfaces
Appendixes Interfaces This printer is connected to a computer and prints according to commands sent from the computer. There are three types of computer interfaces, and these are connected to devices suited to each type of interface. The printer can also be connected to a computer by the optional Ethernet.
-
Page 60
Appendixes Interfaces XON/XOFF Protocol Requirements to output X-ON code • Communication is possible when the power is on. • When the receive buffer has less than 128 byte available, XOFF code is output, then the receive buffer has at least 1024 bytes available. Requirements to output the X-OFF code •… -
Page 61: Usb Interface
Appendixes Interfaces USB Interface Specifications Standards Complies with Universal Serial Bus Specification Transmission speed Compatible with 12Mbps (full speed) transmission Receive buffer 16kB Connector DUSB DUSB-BRA42-T1 1(DDK) Signal line and pin arrangement Pin No. Signal code Signal Function VBUS USB power USB power (+5V) Signal line + + signal line…
-
Page 62
Appendixes Interfaces Parallel Interface (Option) Specifications Transmission mode 8-bit parallel data Receive buffer size 16kB Transmission modes Compatible mode It is an asynchronous forward direction of the byte width (from host to printer) channel, and the interface line of the data is operated in accordance with signal line definitions of Centronics. -
Page 63
Appendixes Interfaces Parallel port status signals when an error occurs The status of a signal line will not be changed in bi-directional mode such as nibble or ECP mode. Error Change in the status of a signal line in compatible mode Paper end Busy PError : L… -
Page 64
Appendixes Interfaces [While receiving INIT signal] Min. 10 to 15 sec *Init BUSY *Ack *Fault SELECT Note: If the *Init signal does not have width of 10 to 15 µ sec or more, it cannot act as an Init signal. If it is lower, the *Init signal is ignored. BUSY starts up when the *Init signal is perceived. -
Page 66
363 Van Ness Way, Suite 404 Torrance, CA 90501. USA Tel: (310) 781-1460 Fax:(310) 781-9152 http://www.citizen-systems.com Mettinger Strasse 11 Park House, 643-651 Staines Road D-73728, Esslingen Feltham, Middlesex, TW14 8PA Germany United Kingdom Tel: +49 (0) 711 3906 400 Tel: +44 (0) 20 8893 1900…
This manual is also suitable for:
Cl-s631
-
Страница 1
CL-S621 & CL-S631 Thermal T ransfer Barcode & Label Printer U SER’S M ANUAL[…]
-
Страница 2
2 CONTENTS Befor e Oper ation INTR ODUCTION ——————————————————————— 3 COMPLIANCE ST A TEMENT FOR EUR OPEAN USER S —————————— 4 GS MARK ST A TEMENT ————————————————————— 4 FCC COMPLIANCE ST A TEMENT F OR AMERICAN USERS ———————— 4 E[…]
-
Страница 3
3 ❚❚❚ Main Features ❚❚❚ <High-speed, high-quality printing> This print er can be used for high-speed high-qualit y printing thanks to its dir ect thermal method and thermal tr ansfer method that use a line thermal printhead t ogether with its 3 2 bit RISC CPU and its ‘hist ory control IC’. <Easy operation> • It i[…]
-
Страница 4
4 COMPLIANCE S T A TEMENT F OR EUR OPEAN USER S CE marking sho ws conformit y t o the following crit eria and pr ovisions: Lo w V olt age Directiv e (2 00 6/9 5/EC, formerly 7 3/2 3/EEC)/EN6 0 9 5 0-1 EMC Dir ective (2 00 4/1 0 8/EC, formerly 8 9/3 3 6/EEC)/EN5 5 0 2 2, EN5 5 0 2 4, EN6 1 000-3-2 & EN6 1 000-3-3 GS MARK S T A TEMENT This pr odu[…]
-
Страница 5
5 EMI COMPLIANCE S T A TEMENT F OR CANADIAN USER S This Class A digit al appar atus complies with Canadian ICES-00 3. This equipment gener at es and use s radio fr equency ener gy and if not inst alled and used properl y , that is, in strict accor dance with the manufactur er’s instructions, may cause int erference t o r adio and t elevision r[…]
-
Страница 6
6 IMPOR T ANT S AFETY INS TR UCTIONS • R ead all of the se instructions and sav e them for lat er refer ence. • F ollo w all warnings and instructions marked on the pr oduct. • Unplug this product fr om the wall outle t before cleaning. Do not use liquid or aer osol cleaners. Use a damp cloth for cleaning. • Do not use this pr oduct near wa[…]
-
Страница 7
7 NO TICE • Before use, be sur e t o read this manual. And k eep it handy for refer ence when needed. • The cont ents of this manual ma y change without prior notice. • R epr oduction, transfer , or transmission of the cont ents of this manual without prior consent is strictl y prohibit ed. • We are no t liable for any damage r esulting fro[…]
-
Страница 8
8 Indicat es a situation which, if not observ ed and handled pr operly , could r esult in death or serious injury . Indicat es a situation which, if not observ ed and handled pr operly , could r esult in injury . S AFETY INS TR UCTIONS which must be stric tly observ ed ! Caution • To pre vent personal injury or pr oper t y damage, the following s[…]
-
Страница 9
9 • Prior t o oper ation, r ead the safet y instructions carefull y and observe them. • Do not dr op or put foreign ma t ter such a s clips and pins into the print er . This ma y cause pr oblems. • Be car eful when moving or carrying the print er . Dr opping the print er may cause injury or pr opert y damage. • Make sur e if you open the t […]
-
Страница 10
1 Se tup 10 C onfirmation of Car t on Cont ents Not e: The empt y carton and packing ma terials should be st ored for futur e shipping of the print er . R emoving the P acking Ma terial The print er is shipped with adhesive t ape in place t o hold the top cov er closed. Simply r emov e the tw o pieces of tape on either side of the t op co ver . The[…]
-
Страница 11
11 Setup Pa rt Names and F unc tions Fr ont V iew 3 1 2 4 5 Operation Panel (p.15) 1 T op cov er Is opened v er tically t o set media or ribbon. 2 Heat dischar ge vent It allo ws warm air t o vent fr om the printer . Be sur e not to block it with media e tc. 3 Oper ation panel This is used t o make changes and adjustment s to the print er and its c[…]
-
Страница 12
1 Se tup 12 2 1 4 3 Pa rt Name s and Functions 1 Ribbon drive unit 2 Head close knob Push the head close knob t o lock the mechanism closed. If you push on another part of the mechanism, the print er may no t lock closed correctly . 3 Ribbon holder It is used t o at t ach the ribbon and paper core. 4 Fr ont co ver It is remo ved t o install op tion[…]
-
Страница 13
13 Setup 3 2 5 6 7 4 1 Pa rt Name s and Functions 1 Fr ont (winding side) ribbon t ension adjustment knob This is adjust ed according t o the width of the ribbon that is used. It is also used when the ribbon is wrinkled or slips. 2 Fr ont (winding side) ribbon left -right balance adjustment knob It is used t o per form an adjustment when the ribbon[…]
-
Страница 14
1 Se tup 14 -1 -1 -2 -2 2 3 4 1 3 4 5 7 8 6 Pa rt Name s and Functions 1 Thermal printhead This is the printhead. Av oid touching this with y our fingertips and leaving grea se or dir t on the printhead surface. 2 Sensor arm The media can be installed b y r aising this arm. The media can be held in place b y lowering this arm. 3 Upper sensor ( 3 -1[…]
-
Страница 15
15 Setup Pa rt Name s and Functions Oper ation P anel 1 2 3 4 5 6 8 7 1 PO WER LED This is lit when the print er pow er is on. (green) 2 PRINT LED This is lit when the print er is able to print. (gr een) 3 CONDITION LED This is on when selecting set tings. (or ange) 4 ERR OR LED This is lit or flashe s when the printer is in an alarm or err or stat[…]
-
Страница 16
1 Se tup 16 Pa rt Name s and Functions 1 2 3 4 R ear V iew 1 Serial int erface (RS2 3 2C) This receiv es serial tr ansmission of dat a from a host comput er . 2 USB int erface This receiv es USB tr ansmission of dat a from a host comput er . 3 Po w er switch The is the pow er switch for the printer . 4 Po w er cord inlet The connect or of the enclo[…]
-
Страница 17
17 Setup C onnec tion t o P o wer 1. Check that the po wer switch t o the printer is turned OFF . 2. C onnect the connect or of the pow er cord t o the power cor d inlet on the print er . 3. Insert the plug of the pow er cor d in the AC outlet. Caution Use an A C outlet that accept s a three-pr onged plug. Otherwise, static electricit y may be gene[…]
-
Страница 18
1 Se tup 18 C onnec tion t o a C omput er This product ha s tw o int er faces tha t can be used to r eceive printing dat a: a serial port (RS2 3 2C) and a USB por t (USB1.1). An o p tional internal Ethernet, an IEEE1 2 8 4 Par allel or Wir eless LAN port can be added b y your dealer . W ith the e xception of a wir eless LAN connection, an int er fa[…]
-
Страница 19
19 Print er Oper ation Po w er ON/OFF T urning on the pow er 1. T urn on the pow er switch on the back of the printer . 2. The PO WER and PRINT LED are lit. T urning off the pow er 1. T urn off the pow er switch on the back of the printer . 2. The PO WER and PRINT LED go off. P ow er Switch P ow er Switch Oper ation P anel 2 Print er Oper ation[…]
-
Страница 20
2 Print er Oper ation 20 1 PA USE k e y: T empor arily pauses printing • When this ke y is pushed once, the PRINT LED turns off and the print er t empor arily pauses. • When it is pushed during printing, the print er pauses aft er the label curr ently being printed is issued. Pr essing the k ey a second time r estart s printing and the r emaini[…]
-
Страница 21
21 Print er Oper ation LED F unc tions 1 PO WER LED It lights up when print er pow er is turned on. (gr een) 2 PRINT LED This is lit when the print er is able to print. (green) 3 CONDITION LED This is on when selecting set tings. (or ange) 4 ERR OR LED This is lit or flashes when the print er is in err or st atus. (red) T able of Alarm and Error In[…]
-
Страница 22
2 Print er Oper ation 22 Set ting the Media Media Sizes The position of label and t ag media is sensed by either a tr anspar ent sensor or a r eflective sensor . Tr ansparent sensor: Detect s the gaps bet ween label media and notche s of t ag media R eflectiv e sensor: Det ects the black mark * Use a tr ansparent sensor for label media gaps and med[…]
-
Страница 23
23 Print er Oper ation Media holder bar Media holder guide Sensor arm Lar ge blue-head open lev er Head unit 2. Fir stly , slide the t wo black plastic parts of the media holder a ssembly t ogether . Ensure corr ect alignment of the guide with the bar as it can onl y be installed in one dir ection. 3. Slide the r oll of media over the media bar . T[…]
-
Страница 24
2 Print er Oper ation 24 6. Set ting sensor positions. When using a tr ansparent sensor Mov e the bot tom sensor close t o the cent er of the width of the media, then align the upper sensor marker and the bo t t om sensor marker (whit e) using the mov able media guide. When using media that is 4 inches wide, position the upper sensor and the bot to[…]
-
Страница 25
25 Print er Oper ation 7. Align the media with the left fix ed media guide, align the right mov able media guide with the media width, and low er the sensor arm. 8. Push the head close knob t o low er and lock the head unit. Be sur e to alw ay s push the head close knob to lock the head unit. Align it with the width of the media that ha s been set,[…]
-
Страница 26
2 Print er Oper ation 26 Set ting the Ribbon The following kinds and size s of ribbons can be used. T ypes ……………………………………………… Inside w ound and outside wound ribbon Max. ribbon width …………………………. 1 1 4. 0 mm (4.5 0 inch) Min. ribbon width ………………………….. 2 5.4 mm (1.00 inch) Ma[…]
-
Страница 27
27 Print er Oper ation 4. Push the lar ge blue-head open lev er to r elease the head unit. Pull out the ribbon fr om the bot t om of the head unit to the ribbon winding side. Winding side ribbon holder Winding side ribbon holder 3. Install the unused ribbon and holder in t o the rear ribbon driv e unit. The splines on the ribbon driv e gear mechani[…]
-
Страница 28
2 Print er Oper ation 28 7. Push the head close knob to lo wer and lock the head unit. Be sur e to al wa ys push the head close knob t o lock the head unit. If the ribbon is wrinkled, push the FEED k ey until the wrinkles disappear . If the wrinkle s do not disappear or if it slips, perform ribbon balance adjustment and ribbon t ension adjustment. […]
-
Страница 29
29 Print er Oper ation Mode Se t tings Mode K ey oper ation HEX dump mode T urning po wer on while pushing the ST OP ke y . Self print mode T urning po wer on while pushing the FEED ke y . Menu set ting mode T urning po wer on while pushing the MODE/REPEA T ke y . HEX Dump Mode When using label media T urn on print er pow er while pushing the S[…]
-
Страница 30
2 Print er Oper ation 30 Self Print Mode Pe r forming a self te st print is an eas y wa y to check on the st at e of printer set ting and printing qualit y . Install the media as e xplained in “Installing the Media” and then oper at e the printer a s follow s. Case of label media T urn on print er power while pushing the FEED ke y . When th[…]
-
Страница 31
31 Print er Oper ation Menu Setup Mode If the print er pow er is turn on while the MODE/REPEA T k ey is pr essed, the print er enter s menu setup mode. In this mode, the print er’ s configur ation can be changed using the V uePrint Menu Sy st em. During menu set ting mode, the PRINT LED and CONDITION LED ar e on. Media must be inst alled in the p[…]
-
Страница 32
2 Print er Oper ation 32 Menu Set ting Flow Chart The following is a flo w chart showing the CL -S6 2 1/CL -S6 3 1 VuePrint men u sy stem. 7 Dat amax ® Emulation YES Pre ss FEED key for 3 seconds NO NO NO YES YES NO NO SAVE SAVE SAVE SAVE SAVE SAVE YES YES / Select / Sa ve NO / Next It em / Change V alue Next Digit Exit t o previous men u NO EXIT […]
-
Страница 33
2 Print er Oper ation 33 7 Zebr a ® Emulation YES Pre ss FEED key for 3 seconds NO NO NO YES YES NO NO SAVE SAVE SAVE SAVE SAVE SAVE YES YES / Select / Sa ve NO / Next It em / Change V alue Next Digit Exit t o previous men u NO EXIT EXIT EXIT EXIT EXIT EXIT EXIT EXIT EXIT EXIT YES YES Change V alue Change V alue Change V alue NO NO YES NO YES • […]
-
Страница 34
2 Print er Oper ation 34 Printing during sub menu set ting Printing during t op menu set ting This particular ex ample is changing the print speed and print darkness then continues thr ough the remainder of the “Print Se tup” menu. The actual output fr om the printer is «v ertically re versed» due t o the w a y the print er outputs th[…]
-
Страница 35
35 Print er Oper ation Machine Information Model Number : CL-S631 Boot V ersion : X.X ROM V ersion : XXXXXXXX ROM Date (DD//MM//YY) : XX/XX/XX ROM Check Sum : XXXX Head Check : OK Print Counter : 0000.872 km Service Counter : 0000.872 km Cut Counter : 83 Sensor Monitor : 2.56 V Option Interface : None Current Menu Setting [Global Config Menu] Confi[…]
-
Страница 36
2 Print er Oper ation 36 Menu Set ting T able Global Config menu — allo ws y ou to switch be tw een 3 complet e ‘config sets’ cont ained within the printer . P age Se tup Menu — allow s you t o change set tings relat ed t o the media or print quality . Sy st em Setup Menu — allo ws y ou to change se t tings for the print er hardw are and basic […]
-
Страница 37
37 Print er Oper ation T op Menu Sub Menu Default Menu Remarks Ke yboard Lock Off On Pr event s the control panel fr om affecting Off the printer’s configur a tion. (User «lock-out») Control Code STD STD Selects bet ween the St andard STX contr ol AL T code or the «Alt ernative» code. Sometime s AL T -2 called «AS4 00 […]
-
Страница 38
2 Print er Oper ation 38 T op Menu Sub Menu Default Menu R emarks R S-2 3 2C Parit y None None Sets the comm unication parity of the serial Odd int er face. Even R S-2 3 2C Length 8 bits 8 bits Sets the char act er length of the serial 7 bits interface. R S-2 3 2C Stop bit 1 bit 1 bit Sets the st op bit of the serial int er face. 2 bits R S-2 3 2C […]
-
Страница 39
39 Print er Oper ation 7 Zebr a ® Emulation Mode Set tings [Zebr a ® Emulation] T op Menu Sub Menu Default Menu Remarks Global – Config Set 1 Config Set 1 Sets the Config Se t. configur ation Config Set 2 Config Set 3 P age Se tup Print Speed 4 IPS 2 to 6 IPS [F or CL -S6 2 1] Printing speed set ting. (5 or 6 IPS only in Dir ect Thermal mode.) […]
-
Страница 40
2 Print er Oper ation 40 T op Menu Sub Menu Default Menu R emarks Emulation Select ZPI2 DM4 Selects Dat aMax ® /Zebr a ® compatibilit y DMI DM4: Da taMax ® 40 0 DPP DMI: Dat aMax ® IClass ZPI2 DPP: Dat aMax ® Prodigy Plus ® ZPI2: Zebr a ® Emulation Emulation Aut o On On Selects the de tection of Dat amax ® and Det ect Off Zebr a ® emulatio[…]
-
Страница 41
41 Print er Oper ation Mode Set tings [Zebr a ® Emulation] T op Menu Sub Menu Default Menu Remarks R S-2 3 2C Stop bit 1 bit 1 bit Set s the st op bit of the serial interface. 2 bits R S-2 3 2C X-ON Y es Y es Select s the X-ON flo w control of the serial No int er face. IEEE1 2 8 4 ON ON Enable or disables the ‘enhanced’ feature s of OFF[…]
-
Страница 42
2 Print er Oper ation 42 Quick Se tup of the Print Method The print method (thermal tr ansfer method/dir ect thermal method) can be set using oper ation panel in addition t o menu set ting mode. Set ting method Each time you push the P AUSE k ey while pushing the MODE/REPEA T k ey , a buzzer sounds and the print er switches bet ween thermal tr ansf[…]
-
Страница 43
43 Print er Oper ation Menu Setting Table (p.37, p.40) Selec ting the Ribbon W inding Dir ec tion Besides the Men u Setup Mode, you can also select the ribbon winding direction (out side-wound / inside-w ound) by using the k ey s on the Oper ation P anel. Outside-w ound and inside-wound will switch fr om one to ano ther each time y ou pr ess the P […]
-
Страница 44
2 Print er Oper ation 44 Manually Selec ting the Print er Emulation To manually choose be tw een Datamax ® and Zebr a ® emula tions, you can use the V uePrint menu s yst em. The Emulation Select option in the S yst em Setup menu allo ws y ou to do this. Alt ernativel y , you can use the “Quick Switch” op tion as follow s: 1. T urn on the prin[…]
-
Страница 45
45 Print er Adjustments Sensor Adjustment s The sensing le vel of both the tr anspar ent (see thru) and reflective sensor s is adjust ed separ atel y and independently . Firstl y , the sensor t ype must be select ed either using the V uePrint menu sy stem or the Sensor Me thod Selection shown belo w . Then the adjustment and calibr ation of the sen[…]
-
Страница 46
3 Print er Adjustment s 46 Adjusting the T r anspar ent sensor 1. Push the lar ge blue-head open lev er to open the head unit and sensor arm, then r eturn only the sensor arm to it s original position. Align the upper sensor mark er and the bot t om sensor marker (whit e) using the mo vable media guide. Upper sensor Bot tom sensor Mov able media gu[…]
-
Страница 47
47 Print er Adjustments Adjusting the R eflec tive sensor 1. Open the printhead and the sensor arm, then align the position of the sensor mark er of the bot t om sensor is at the cent er of the black mark on the media. Black mark Media Bot tom sensor Reflectiv e sensor marker Black mark Black mark Label Liner media Bot tom sensor 4. If the P A USE […]
-
Страница 48
3 Print er Adjustment s 48 Media Thickne ss Adjustment It ma y be necessary t o adjust the printer accor ding to the thickne ss of the media being used. This can be done easil y b y rot ating the media adjustment dial t o impro ve the print qualit y . •P oor print qualit y across the comple te print out means wrongl y set media thickness. See thi[…]
-
Страница 49
49 Print er Adjustments Media W idth Adjustment Caution When using narro w media, be sure t o MAKE this adjustment. (If y ou do not, the head ma y be damaged b y jamming, etc.) 9 Media width adjustment dial The head pr essur e varies accor ding t o the width of the media being print ed. The head pre ssure balance must be adjust ed accor ding to med[…]
-
Страница 50
3 Print er Adjustment s 50 Front ribbon left-right balance adjustment knob Back ribbon left-right balance adjustment knob Front ribbon tension adjustment knob Back ribbon tension adjustment knob A djusting the Ribbon When using narr ow -width ribbons or very specialist thermal ribbon ma terial, it ma y be necessary t o adjust the ribbon tension and[…]
-
Страница 51
51 Print er Adjustments Ribbon Balance Adjustment Do this adjustment b y turning the front and back balance adjustment knobs. If the ribbon is wrinkled, adjust it as follo ws. The scale is usually aligned with the cent er . Adjustment pr ocedure 1. Check bet ween the suppl y side ribbon and the back balance adjustment knob t o find out on which sid[…]
-
Страница 52
3 Print er Adjustment s 52 Cleaning W ipe off any for eign mat ter such a s media dust, dir t and adhesiv e substances built up ar ound the printhead with the head cleaning pen (head cleaner) pr ovided, and use a soft cloth soak ed in eth yl alcohol for the platen e tc. It is particularly import ant to clean the thermal printhead aft er printing on[…]
-
Страница 53
53 Tr o u bleshooting Indication The LED do not light up when print er pow er is connected. P aper is feeding, but nothing is print ed. The printer is no t printing neatly . Correctiv e action 1) Insert the plug of the pow er cord corr ectly in the electric outlet. 2) Insert the connect or of the power cor d correctl y into the po wer inlet of the […]
-
Страница 54
4 Tr ouble shooting 54 Indication The print er is not printing neatly . The printing position changes. The ribbon is wrinkled The ribbon slips (ribbon dirt is produced.) The ribbon does not wind. Check 4) Is the thermal printhead dirt y? Is a label stuck t o the head. 5) Is the recommended ribbon or a ribbon of the same t ype used? 6) Is the therma[…]
-
Страница 55
55 Appendix es It em Description Printing Printing method Thermal tr ansfer/Direct thermal Re solution Main scanning line densit y: 2 0 3 dots/inch (8 dots/mm) (CL -S6 2 1) 3 00 dots/inch (1 1.8 dots/mm) (CL -S6 3 1) Sub- scanning line densit y: 2 0 3 dots/inch (8 dots/mm) (CL -S6 2 1) 3 00 dots/inch (1 1.8 dots/mm) (CL -S6 3 1) Head 8 6 4 dots (pr[…]
-
Страница 56
Appendix es 56 Specifications It em Description Bar code One-dimension • Code 3 of 9 • UPC-A • UPC-E • EAN-1 3 (JAN-1 3) (for Dat amax ® emulation) • EAN-8 (JAN-8) • Int erleav ed 2 of 5 • Code 1 2 8 • HIBC (Modulus 4 3-used code 3 of 9) • Codabar (NW -7) • Int 2 of 5 (Modulus1 0-used Interlea ved 2 of 5) • Ple ssey • Case […]
-
Страница 57
57 Appendix es Specifications 0 53 5 30 40 80 40 Humidity % Operating assurance temperature Printing assurance temperature Temperature °C -20 60 5 85 Humidity % Temperature °C Conditions assuring oper ation and printing St orage a ssurance t emperatur e It em Description Media det ection T ranspar ent sensor Det ects media gap bet ween labels, no[…]
-
Страница 58
Appendix es 58 It em Description W eight Appro x. 4.9 kg (1 0.8 lb.) A ccessories T est label media, T est ribbon, CD-R OM (User’ s Manual), Quick start guide, Head cleaner , P ower cor d, Media holder bar and Media holder guide, Ribbon holder , Paper cor e Option Aut o-cut ter unit, P eeler unit, IEEE1 2 84 P ar allel interface boar d, Ethernet […]
-
Страница 59
59 Appendix es Int erfaces This print er is connected t o a comput er and prints according t o commands sent fr om the comput er . Ther e are thr ee t ypes of comput er interfaces, and the se are connect ed to device s suited t o each t ype of int er face. The print er can also be connected to a comput er by the op tional Ethernet. Sy st em Start/s[…]
-
Страница 60
Appendix es 60 Int erfaces X ON/X OFF Prot ocol R equir ements t o output X -ON code • Communication is possible when the po wer is on. •W hen the receiv e buffer has less than 1 2 8 byt e a vailable, X OFF code is output, then the r eceive buffer has a t least 1 0 2 4 byt es a vailable. R equir ements t o output the X -OFF code • When the r […]
-
Страница 61
61 Appendix es USB Int erface Specifications Standar ds Complie s with Universal Serial Bus Specifica tion Tr ansmission speed Compatible with 1 2Mbps (full speed) transmission R eceiv e buffer 1 6kB Connect or DUSB DUSB-BR A4 2- T1 1(DDK) Pin No. Signal code Signal Function 1V BUS USB pow er USB power (+5V) 2D + Signal line + + signal line 3D – […]
-
Страница 62
Appendix es 62 Pa r allel Int erface (Option) Specifications Tr ansmission mode 8-bit parallel da ta R eceiv e buffer size 1 6kB Tr ansmission modes C ompatible mode It is an as ynchronous forw ard direction of the b yte width (fr om host to print er) channel, and the interface line of the dat a is opera ted in accor dance with signal line definiti[…]
-
Страница 63
63 Appendix es Int erfaces Error Change in the status of a signal line in compatible mode P aper end Busy : L H PError : L H Select : H L nF ault : H L Err or other than paper end Busy : L H • Head open PErr or : L unchanged • Other Select : H L nF ault : H L Conditions for Busy • R eceive buffer full • Dat a[…]
-
Страница 64
Appendix es 64 R ela tion of the timing of the BUS Y signal and the *ACK signal [Cent er – A CK] [While r eceiving INIT signal] Not e: If the *Init signal does not ha v e width of 1 0 to 1 5 µ sec or more, it cannot act as an Init signal. If it is lo wer , the *Init signal is ignored. BU SY starts up when the *Init signal is per ceived. BUSY *AC[…]
-
Страница 65
65[…]
-
Страница 66
JM74983-10F PMC-1011 363 V an Ness W ay , Suite 404 T orrance, CA 90501. USA T el: (310) 781-1460 Fax: (310) 781-9152 http://www .citizen-systems.com Mettinger Strasse 11 Park House, 643-651 Staines Road D-73728, Esslingen Feltham, Middlesex, TW14 8P A Germany United Kingdom T el: +49 (0) 711 3906 400 T el: +44 (0) 20 8893 1900 Fax: +49 (0) 711 390[…]
инструкцияCitizen CL-S621

CL-S621 & CL-S631
Thermal Transfer Barcode & Label Printer
USER’S MANUAL
Посмотреть инструкция для Citizen CL-S621 бесплатно. Руководство относится к категории принтеры для этикеток, 2 человек(а) дали ему среднюю оценку 7.4. Руководство доступно на следующих языках: английский. У вас есть вопрос о Citizen CL-S621 или вам нужна помощь? Задайте свой вопрос здесь
- COVER
- CONTENTS
- Before Operation
- Setup
- Printer Operation
- Printer Adjustments
- Troubleshooting
- Appendixes
Принтер Citizen CL-S621 — это надежный и эффективный принтер для печати этикеток. Он имеет максимальное разрешение в 203 DPI, что обеспечивает высокое качество печати. Скорость печати составляет 100 мм/сек, что делает этот принтер очень быстрым и производительным.
Принтер использует технологии прямой термопередачи и термотрансфера для печати, что позволяет выбрать наиболее подходящий метод для конкретной задачи печати. Стандартные интерфейсы USB 1.1 и Serial обеспечивают легкую и быструю связь с компьютером.
Этот принтер имеет встроенную память на 16 МБ и флэш-память на 4 МБ. Он также имеет возможность дополнительной связи через Ethernet, параллельный, и беспроводной LAN, что делает его еще более универсальным и гибким.
Принтер Citizen CL-S621 имеет размеры 231 мм в ширину, 289 мм в глубину и 270 мм в высоту. Он весит 4500 грамм, что делает его достаточно легким и удобным для переноски. Совместимость с операционными системами Windows, XP, 2003, 2008, Vista и Windows 7 позволяет использовать этот принтер на широком спектре компьютеров.
Он также имеет RS-232 порт для быстрого подключения к другим устройствам. Принтер Citizen CL-S621 — это отличное решение для печати профессиональных этикеток, которые будут сохранять свое качество и четкость надолго благодаря использованию высококачественных материалов и технологий.
Главная
Печать
| Максимальное разрешение | 203 DPI |
| Скорость печати | 100 мм/с |
| Технология печати | Прямая термопечать / термоперенос |
Порты и интерфейсы
| Стандартные интерфейсы | USB 1.1, Serial |
| Опциональное соединение | Ethernet, Parallel, Wireless LAN |
| Технология подключения | Проводная |
| RS-232 интерфейс | Да |
| RS-232 порты | 1 |
Производительность
| Оперативная память | 16 MB |
| Флэш-память | 4 MB |
Вес и размеры
| Ширина | 231 mm |
| Глубина | 289 mm |
| Высота | 270 mm |
| Вес | 4500 g |
Системные требования
| Совместимые операционные системы | Windows, XP, 2003, 2008, Vista, Windows 7 |
Прочие свойства
Типы и характеристики бумаги
| Максимальный диаметр рулона | 125 mm |
| Толщина носителей | 0.0635 — 0.254 mm |
| Поддерживаемая ширина бумаги | 12.5 — 118.1 mm |
| Максимальная длина носителя | 1625.6 mm |
Содержимое упаковки
Дизайн
показать больше
Не можете найти ответ на свой вопрос в руководстве? Вы можете найти ответ на свой вопрос ниже, в разделе часто задаваемых вопросов о Citizen CL-S621.
Какой вес Citizen CL-S621?
Citizen CL-S621 имеет вес 4500 g.
Что означает аббревиатура DPI?
DPI обозначает Dots Per Inch и представляет собой количество капель чернил (на дюйм), которые подаются на бумагу при печати.
Какая высота Citizen CL-S621?
Citizen CL-S621 имеет высоту 270 mm.
Какая ширина Citizen CL-S621?
Citizen CL-S621 имеет ширину 231 mm.
Какая толщина Citizen CL-S621?
Citizen CL-S621 имеет толщину 289 mm.
Инструкция Citizen CL-S621 доступно в русский?
К сожалению, у нас нет руководства для Citizen CL-S621, доступного в русский. Это руководство доступно в английский.
Не нашли свой вопрос? Задайте свой вопрос здесь
Устройство:
Citizen CL-S621
Размер: 3,05 MB
Добавлено: 2014-06-20
Количество страниц: 66
Как пользоваться?
Наша цель — обеспечить Вам самый быстрый доступ к руководству по эксплуатации устройства Citizen CL-S621. Пользуясь просмотром онлайн Вы можете быстро просмотреть содержание и перейти на страницу, на которой найдете решение своей проблемы с Citizen CL-S621.
Для Вашего удобства
Если просмотр руководства Citizen CL-S621 непосредственно на этой странице для Вас неудобен, Вы можете воспользоваться двумя возможными решениями:
- Полноэкранный просмотр -, Чтобы удобно просматривать инструкцию (без скачивания на компьютер) Вы можете использовать режим полноэкранного просмотра. Чтобы запустить просмотр инструкции Citizen CL-S621 на полном экране, используйте кнопку Полный экран.
- Скачивание на компьютер — Вы можете также скачать инструкцию Citizen CL-S621 на свой компьютер и сохранить ее в своем архиве. Если ты все же не хотите занимать место на своем устройстве, Вы всегда можете скачать ее из ManualsBase.
Citizen CL-S621 Руководство по эксплуатации — Online PDF
Ознакомьтесь с подробным руководством пользователя для замечательного творения Citizen, модель CL-S621. Получите ценную информацию и инструкции, чтобы максимально использовать возможности вашего устройства и оптимизировать взаимодействие с пользователем. Раскройте весь потенциал своего устройства Citizen CL-S621 с помощью этого подробного руководства пользователя, в котором содержатся пошаговые инструкции и советы экспертов, которые сделают работу с ним легкой и приятной.
Печатная версия
Многие предпочитают читать документы не на экране, а в печатной версии. Опция распечатки инструкции также предусмотрена и Вы можете воспользоваться ею нажав на ссылку, находящуюся выше — Печатать инструкцию. Вам не обязательно печатать всю инструкцию Citizen CL-S621 а только некоторые страницы. Берегите бумагу.
Резюме
Ниже Вы найдете заявки которые находятся на очередных страницах инструкции для Citizen CL-S621. Если Вы хотите быстро просмотреть содержимое страниц, которые находятся на очередных страницах инструкции, Вы воспользоваться ими.
![]()
Не готовы сразу приобрести банковский терминал?
Банковский терминал в аренду
Аренда
- 1119visibility

share
Руководство пользователя для принтера Citizen CL-S6621
Это может быть интересно
more_vert PB22 без блока питания Bluetooth")
308660Тг
star_borderstar_borderstar_borderstar_borderstar_border
подробнее
more_vert
510620Тг
star_borderstar_borderstar_borderstar_borderstar_border
подробнее
more_vert")
99000Тг
star_borderstar_borderstar_borderstar_borderstar_border
подробнее
Чековый принтер IKKM (USB+Ethernet)close
Чековый принтер IKKM (USB+Ethernet)
снабжен автообрезчиком гильотинного типа, имеет интерфейс USB, высокую скорость печати и низкий уровень шума при работе. Имеет компактный размер и можно ..
more_vert
70400Тг
star_borderstar_borderstar_borderstar_borderstar_border
подробнее
more_vert
82940Тг
star_borderstar_borderstar_borderstar_borderstar_border
подробнее
more_vert")
66000Тг
star_borderstar_borderstar_borderstar_borderstar_border
подробнее