Hansa
НАЙДИТЕ РУКОВОДСТВО ПО ЭКСПЛУАТАЦИИ СВОЕГО ПРОДУКТА HANSA
Пожалуйста, выберите название модели или категорию продукта из меню и нажмите на документ, который вы желаете просмотреть.
Бытовая техника торговой марки Hansa является доступной и комфортной в применении, обладает высоким качеством и надежностью. Чтобы понять, как пользоваться посудомоечной машиной Hansa, с ее инструкцией необходимо внимательно ознакомиться.

Монтаж и подключение
В применении посудомоечная машина Ханса достаточно проста. Соблюдая несложные правила и рекомендации по установке, можно обеспечить долгую работоспособность.

Основные правила установки посудомоечной машины:
- При получении, доставке проверить целостность.
- Перед включением обязательно выполнить заземление розетки, для этого вызвать мастера.
- Провести проверку показаний электросети.
- В процессе монтажа отключить питание и подачу воды (перекрыть вентиль).
Нельзя использовать удлинитель, необходима оригинальная вилка для подключения в розетку.
Есть ряд важнейших рекомендаций производителя, обеспечивающих долговечность машины:
- Перед использованием внимательно изучить руководство встраиваемой посудомоечной машины и технику безопасности.
- Ограничить доступ к машине людям с умственными, физическими отклонениями, детям.
- Острые приборы располагать горизонтально или вертикально острым концом вниз, чтобы предупредить травмы.
- Во избежание поломок нельзя ставить тяжелые предметы на машину.

Для устранения поломок лучше обращаться в сертифицированные центры к профессионалам.
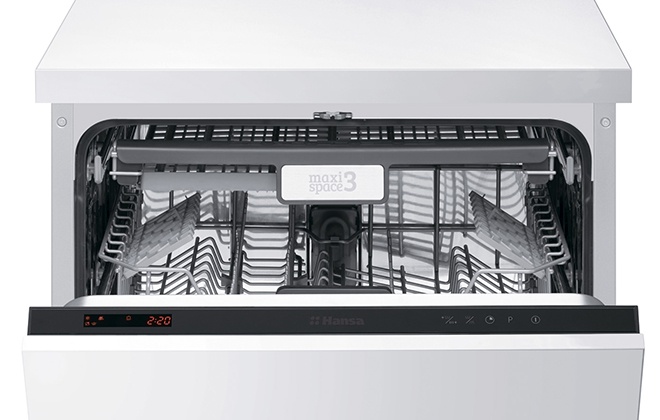
Устройство
Каждая модель, предлагаемая торговой маркой Hansa, имеет свои особенности, но в основном схема ПММ следующая:
- панель управления, оборудованная дисплеем;
- корзины для посуды (верхняя, нижняя);
- полка для чашек;
- отсек для приборов;
- дозаторы для чистящего средства, ополаскивателя, соли;
- фильтры и распылители внутри рабочего пространства;
- сливной шланг;
- внутренняя трубка;
- шланг для подачи воды.

Некоторые модели могут отличаться комплектацией, дополнены другими элементами или опциями.
Как пользоваться
Основными правилами использования являются следующие:
- Верхняя корзина предназначена для расположения столовой посуды легкой степени загрязнения, выполненной из хрупкого стекла, фарфора. Здесь лучше всего размещать бокалы, чашки, а между ними класть горизонтально столовые приборы.
- Тарелки и чашки необходимо расставлять таким образом, чтобы они не задели фильтры и разбрызгиватели.
- Нижняя корзина предназначается для сильно грязных тарелок, чашек, например, противни, пиалы, салатники. Производитель рекомендует ставить тарелки вверх дном, чтобы на всю поверхность попадала вода.
- Специальные лотки (есть в некоторых моделях) разработаны специально для размещения ложек, вилок.
Индикаторы
В каждой машине Ханса имеются следующие значки на панели:
- Электропитание — горит, когда техника включена в розетку.
- Индикатор половинной загрузки.
- Индикатор уровня раствора для чистки и блеска (если горит — нужно добавить).
- Датчик наличия/отсутствия соли (если горит — нужно добавить соль).
Кнопки
На корпусе ПММ располагаются следующие кнопки:
- «Вкл/Выкл» для прекращения или подачи электропитания;
- кнопка выбора программы, цикла чистки;
- кнопка половинной загрузки, если накопилось менее 7 комплектов посуды;
- перезагрузка и старт.
Программы
Стандартно техника Hansa имеет следующие режимы чистки посуды:
- Стандартная мойка для повседневного применения, используется для посуды без засохшей грязи.
- Интенсивный режим, который дает возможность отчистить даже застаревшую грязь с посуды.
- Деликатный режим — используется для бокалов, стаканов без сильных загрязнений.
- Цикл «час», разработан для посуды с небольшим загрязнением, нет сушки посуды.
- Предварительное замачивание — требуется для сильно загрязненной посуды, используется перед основной мойкой.
- Режим «экочистки» предназначен для столовой посуды из хрусталя, фарфора для обеспечения деликатной мойки, предотвращения сколов и трещин.
Включать машину необходимо только после того, как будут загружены все отсеки.
Техникой какого производителя пользуетесь дома?
Как включить
ПММ Hansa достаточно просты в обращении, для того чтобы включить посудомоечную машину, необходимо:
- Включить шнур электропитания в розетку, проверить открыт ли вентиль подачи воды.
- Загрузить посуду, очищающее средство и закрыть дверцу.
- Выбрать программу, режим и нажать соответствующую кнопку.
- Нажать «Старт».
Первый запуск
Первый запуск режима мойки необходимо проводить согласно следующим рекомендациям:
- Загрузить посуду в рабочую плоскость устройства и по возможности сдвигать ее к задней стенке.
- Добавить таблетку, порошок и соль, влить ополаскиватель.
- После загрузки и выбора кнопки «Старт» машина начнет работу спустя 10 минут.

Если нужно срочно остановить работу машины и поменять режим чистки, сделать это можно до того, как устройство начнет вымывать моющее средство из специализированных отсеков. Для этого можно открыть дверцу, и тогда техника Hansa автоматически выполнит остановку функционирования. После этого переключить режим мойки, снова закрыть дверцу, подождать 10 минут — машина начнет работу.
Как слить воду
Если фильтр засорился и вода из машины полностью не вытекает, слить воду из посудомоечной машины Hansa необходимо самостоятельно:
- На панели управления выбрать программу ручного слива воды.
- Проконтролировать процесс.
- Обесточить технику.
- Перекрыть вентиль подачи воды.
- Под устройство подстелить тряпки, которые впитают остатки воды из рабочей зоны.
- Выкрутить крышку фильтра внизу корпуса и крышку отсека для соли.
- Наклонить на один бок машину, чтобы стекли остатки воды.
- Вымыть насухо устройство изнутри, оставить на 10-15 минут дверцу открытой, чтобы она внутри хорошо просохла, чтобы предупредить неприятный, затхлый запах.

Если ПММ используется только летом в неотапливаемом помещении, то оставлять ее с водой на зиму опасно. Когда вода замерзает внутри, она разрывает пластиковые патрубки, что требует дорогостоящего ремонта.
Проблемы и решения
Из-за неправильного подключения и эксплуатации нередко пользователи сталкиваются с проблемами и поломками.
Неполадки заливной системы
Подобные проблемы всегда связаны с засорами, поэтому следует знать, как их устранить:
- Повернуть вентиль подачи воды в положение «Выкл», отключить машину от сети.
- Отсоединить шланг для подачи воды от корпуса, проверить нет ли там пробок, мусора. Проделать такие же действия с фильтром и сеточкой.
- Чтобы удалить застоявшийся мусор, поместить фильтр в воду с лимонной кислотой.
- Выполнить диагностику клапанов, прозвонив катушки, если есть необходимость — провести замену износившихся элементов.
Проверка циркуляционного насоса
Проверку циркуляционного насоса лучше проводить, когда нет нагнетания воды и она не поступает в рабочее пространство машины, т. к. за счет циркуляционного насоса в коромысла протекает вода и активизируется функция мытья посуды. Провести диагностику и ремонт понадобится, если слышится стук, жужжание, появились шумы.

Для ремонта необходимо:
- Обеспечить нормальный доступ ко дну рабочего пространства и убрать нижнюю панель корпуса.
- Убрать крепежные элементы и сливной насос, повернув помпу по часовой стрелке.
- Снять разводным ключом специальные зажимы и отсоединить насос, заменить нерабочее оборудование.
- Зажимы и крепежный болт со старого насоса перенести на новый элемент и выполнить такую же сборку, только в обратном порядке.
Неисправности сливной системы
Если после мойки посуды вода полностью не уходит из рабочего пространства и скапливается внизу — значит, есть неполадки в работе сливной системы. Часто это связано с застрявшим и скопившимся мусором, для устранения проблемы необходимо сделать следующее:
- Убрать все тарелки, бокалы из машины и потянуть на себя нижнее коромысло, аккуратно открутить верхнее коромысло.
- Проверить разбрызгиватели на предмет мусора. Если необходимо, провести очистку форсунок с помощью зубочистки.
- Сливной фильтр и металлическую сеточку внизу рабочей зоны также осмотреть и очистить.
- Если в процессе мытья были сколы бокалов, тарелок, может быть, осколок заблокировал помпу; надев перчатки, необходимо провести диагностику.
Замена датчика уровня
В посудомоечной технике датчик уровня называется переостатом, его функция — отслеживание уровня воды в баке. Поломка этого элемента может заключаться в физическом износе, засоре, неисправности электронной части.
Перед полной заменой необходимо проверить элемент на предмет засора. Для этого снизу машины нужно открутить 2 винта, крепежный хомут, продуть трубку. Электронную часть можно диагностировать с применением мультиметра.
Диагностика нагревательного элемента
Основой нагревательной системы служит проточный нагреватель, необходимый для увеличения температуры воды при чистке посуды. Его поломка может быть связана с неработоспособностью ТЭНа, располагающегося под днищем посудомоечной машины Hansa. Установку ТЭНа лучше доверить специалисту, при самостоятельном ремонте требуется:
- Отсоединить нагревательный элемент с насосом.
- Открутить крепежные элементы помпы, повернув их по часовой стрелке, и снять уплотнительную резинку.
- Убрать все трубки и патрубки, провести замену неработающей части и собрать все заново в обратном порядке.
Протечка
Для устранения протечек необходимо выявить точную причину и место, для этого происходит:
- Тщательно осмотреть внутри и снаружи посудомоечную машину.
- Провести проверку качества закрытия дверей и надежность уплотнителей на дверцах, если есть необходимость — произвести замену.
- Осмотреть уплотнительные резинки на сливном насосе, их износ также может привести к протечке. В таком случае необходимо будет заменить уплотнитель или насос полностью.
- Провести диагностику шланга на входе и выходе, если нужно, подтянуть затяжные элементы или заменить шланг.
ПММ бренда Hansa — надежные, удобные и функциональные, для простого и долгого использования к каждой модели прилагается подробная и понятная инструкция.
- Manuals
- Brands
- Hansa Manuals
- Dishwasher
- ZIM466ELH
- Operating instructions manual
-
Contents
Table of Contents -
Bookmarks
Quick Links
OPERATING
INSTRUCTIONS
EN
ZIM466ELH
ONL Y USE THE APPLIANCE WHEN YOU
IO-DWS-2537
HAVE READ AND UNDERSTAND
(12.2020/1)
THE OPERATING INSTRUCTIONS
Related Manuals for Hansa ZIM466ELH
Summary of Contents for Hansa ZIM466ELH
-
Page 1
OPERATING INSTRUCTIONS ZIM466ELH ONL Y USE THE APPLIANCE WHEN YOU IO-DWS-2537 HAVE READ AND UNDERSTAND (12.2020/1) THE OPERATING INSTRUCTIONS… -
Page 2: Table Of Contents
CONTENTS WE ARE ENVIRONMENTALL Y FRIENDL Y BASIC INFORMATION SAFETY INSTRUCTIONS INSTALL THE APPLIANCE DESCRIPTION OF THE APPLIANCE CLEANING AND MAINTENANCE INSTALL THE APPLIANCE IN A CABINET In accordance with European Directive 2012/19/EU and Polish legislation regarding used electrical and electronic goods, this appliance is marked with the symbol of the crossed-out waste container.
-
Page 3: We Are Environmentall Yfriendl Y
WE ARE ENVIRONMENTALL Y FRIENDL Y For many years, Hansa has consistently pursued pro-ecological policy. Concern for the environment is as important for us as the use of modern technology. The development of technology has enabled our factories to become more environmentally friendly –…
-
Page 4
Dear customer! Thank you for choosing an Hansa product. For years we have deliv- ered high-quality appliances, so that household chores become a real pleasure. Before being packaged and leaving the manufacturer, this appliance was thoroughly checked with regard to safety and functionality. -
Page 5: Basic Information
BASIC INFORMATION Carefully read the operating instructions before plugging dishwasher to a power outlet and using the appliance. Operating instruction include tips that will help you avoid the risk of injury and damage to the appliance. Keep dishwasher documentation in a safe place for possible future use. These operating instructions have been prepared for a range of applianc- es and some features described herein may not apply to your appliance.
-
Page 6: Safety Instructions
SAFETY INSTRUCTIONS FOR USE Before you install the Check the appliance for transport appliance damage. Never install or use a dam- aged appliance. If in doubt, contact your seller. Before first use See installation notes (below). Refer the grounding system instal- lation to a qualified electrician.
-
Page 7
SAFETY INSTRUCTIONS FOR USE Before first use This appliance can be used by children aged 8 years and older or persons with physical, mental or sensory handicaps, or those who are inexperienced or unfa- miliar with the appliance, provided they are supervised or have been instructed how to safely use the appliance and are familiar with the associated risks. -
Page 8
SAFETY INSTRUCTIONS FOR USE Dishwasher water is not suitable Child safety for drinking. Danger of injury from the caustic chemicals. When you open the door during a programme, be careful as water temperature is high. To avoid injury always place long and sharp/pointed items (e.g. -
Page 9
SAFETY INSTRUCTIONS FOR USE In case of problems Refer repair and modifications of the appliance to qualified techni- cians only. In the event of problems or repairs, unplug the appliance from the wall outlet: Unplug the appliance by pulling the plug, Turn off the circuit breaker. -
Page 10
SAFETY INSTRUCTIONS FOR USE Dishes and utensils that Ashtrays, candles, cleaning are not suitable for pastes, paints, chemicals, ferro- dishwashers. alloys; Forks, spoons and knives with a handle made of wood, ivory or Nacre, glued items, items con- taminated with abrasive powders, acid or base Plastic dishes that are not resist- ant to high temperature, contain-… -
Page 11
SAFETY INSTRUCTIONS FOR USE Packaging and some parts of the RECYCLING appliance are made of materials suitable for recycling. They are marked with the recycling symbol and information about the type of material. Before using the appliance re- move all packaging and dispose of it in accordance with the regu- lations. -
Page 12
SAFETY INSTRUCTIONS FOR USE SCRAPPING OF AN OLD The materials used in making of APPLIANCE this appliance can be reused, as indicated. By reusing or recycling the materials or parts, you will be playing an important part in pro- tecting our environment. Information about the relevant disposal points for worn-out elec- trical goods is available from your… -
Page 13: Install The Appliance
INSTALL THE APPLIANCE PLACE YOUR APPLIANCE When choosing the place of installation, make sure you will be able to easily load and remove dishes and utensils from the dishwasher. Do not place the appliance in a room where the temperature can fall below 0°C. Before installing unpack the appliance following the instructions on the packaging.
-
Page 14
NOTE: Aquastop water supply is used in some dishwasher models. Dangerous voltage could occur with Aquastop. Do not cut the Aquastop water supply. Do not allow it to bend or twist Note: For safety reasons, close the water tap after every wash THE DRAIN HOSE The drain hose can be connected directly to a water drain or kitchen sink stub pipe. -
Page 15
Always use the plug provided with the appliance. When you operate the appliance at lower voltage the dishwashing efficiency will deteriorate and may damage the appliance. The power cord may only be replaced by authorized service or a qualified electrician. Failure to comply with these rules may lead to an accident. -
Page 16: Description Of The Appliance
FEATURES AND COMPONENTS DESCRIPTION OF THE APPLIANCE The features and components of the appliance (fig. 1): Top spray arm Inner pipe Lower spray arm Salt container Filter assembly Dispenser Cutlery rack Lower basket Cup rack Upper spray Upper basket NOTE: Figures are for illustrative purposes only Individual models may vary.
-
Page 17
DISPLA Y AND CONTROL PANEL Operation (Button) 1. Power Press this button to turn on your dishwasher, the screen lights up. 2. Program Press this button to select the appropriate washing program, the selected program indicator will be lit. 3. Function Press the button to select a function, corresponding indicator will be lit. -
Page 18
7. Program Hygiene indicator With the Sanitize option selected, the water temperature is increased to 70 ˚C for high temperature sanitization. 1 hour For normally soiled loads that need quick wash. This is the standard program suitable for normally soiled loads, such as pots, plates, glasses and lightly soiled pans. -
Page 19
PREPARE THE APPLIANCE FOR OPERATION Before first use Before using the appliance, verify that the data given on the rating plate matches that of local power outlets. Remove all packing materials from inside of the appliance. Prepare special salt (water softener). Pour water into the special salt dispenser and then add about 1.5 kg of special salt (dishwasher salt). -
Page 20
The test strip The dishwashing effectiveness is linked to water hardness. Therefore, the appliance is equipped with a system to reduce the hardness of the water supply. The dishwashing effectiveness is improved when the system is set correctly. To check water hardness contact the municipal water company or determined the water hardness using test strip (if available). -
Page 21
Fill the detergent dispenser Open the detergent dispenser flap by pressing the detergent dispenser tab to release the lock as shown in the figure. The detergent dispenser features volume marking. Using these markings (lines) you can measure the correct amount of detergent. The dispenser can ac- commodate a maximum of 30g of detergent. -
Page 22
Multi-component (multitab) detergents (eg. 2-in-1, 3-in-1, etc.) There are three types of detergents: 1. Containing phosphates and chlorine, 2. Containing phosphates and no chlorine, 3. Containing no phosphates and no chlorine. The latest tablets are generally phosphate-free. Since phosphates have water softening properties, we recommend adding salt to the container even if the water hardness is only 6°dH. -
Page 23
Stop using multi-component detergents Add special salt and rinse aid to dispensers. Set the water hardness to the highest level (6) and run an empty dishwasher. Adjust the water hardness. Adjust rinse aid setting. Add rinse aid to the dispenser and adjust setting Use rinse aid to prevent the formation of white water drops, lime scale spots, white streaks that may occur on the dishes, as well as to improve the drying process. -
Page 24
Warning: Use only rinse aid designed for domestic dishwashers. Wipe up spilled rinse aid with a cloth as it will cause the formation of large amounts of foam, and thus will reduce the dishwashing effectiveness. Water hardness table German French British Special salt Water hard-… -
Page 25
LOAD DISHES INTO DISHWASHER Upper basket The upper basket is designed for washing delicate dishes such as glasses, cups, plates, etc. Dishes that are placed in the upper basket should be less soiled than dishes in the lower basket. You can place long forks, knives and spoons horizontally on shelves so as not to obstruct the spray arms. -
Page 26
Lower basket Put plates, bowls, pots, etc. in the lower basket. Make sure that dishes in the lower basket do not block the spray arm and it can rotate freely. Place large pans and heavily soiled items such as pots, pans, lids, dishes, etc. in the lower basket. Place dishes upside down, so that water does not collect inside. -
Page 27
The standard load and test results Capacity: The upper and lower basket: 10 place settings. Set the upper basket to the upper posi- tion. Place the cups on the shelves. Detergent/rinse aid 5+25g, in accordance with the EN 50242 international standards/rinse aid dose: max Test programme Eco, in accordance with the EN 50242 international standard Upper basket… -
Page 28
Cutlery basket Place knives and forks separately from each other, and make sure they do not touch as this may cause poor washing results. For best washing results place knives and forks in the cutlery basket, and make sure: they do not touch and place objects in the middle. -
Page 29
The standard load and test results Capacity: The upper and lower basket: 10 place settings. Set the upper basket to the upper posi- tion. Place the cups on the shelves. Detergent/rinse aid 4+18g, in accordance with the EN 60436 international standards/rinse aid dose: max Test programme Eco, in accordance with the EN 60436 international standard Upper basket… -
Page 30
Cutlery basket Place knives and forks separately from each other, and make sure they do not touch as this may cause poor washing results. For best washing results place knives and forks in the cutlery basket, and make sure: they do not touch and place objects in the middle. -
Page 31
TURN ON THE APPLIANCE AND SELECT PROGRAMME Turn on the appliance 1. Draw out the lower and upper basket, load the dishes and push them back. It is commended to load the lower basket first, then the upper one. 2. Pour in the detergent. 3. -
Page 32
The dishwashing programme completes Press on/off button to turn off the appliance. Close water supply tap and open the dish- washer door. Wait a few minutes before unloading the dishwasher. Allow dishes to cool. Hot dishes are more susceptible to breakage. Also the dishes will dry. Turn off the dishwasher The programme is completed only when the programme indicator is on, but not flashing. -
Page 33: Cleaning And Maintenance
CLEANING AND MAINTENANCE Clean external surfaces Door and door seal To remove food residue, clean the door gasket regularly with a soft, moist cloth. When loading dishes into the dishwasher, food and drink residue may deposit on the sides of the dishwasher door. These surfaces are outside the dishwasher compartment and the water from the spray arms does not reach them.
-
Page 34
TROUBLESHOOTING 3. Larger residues can be rinsed under running water. Clean the filter completely with a soft, clean brush. 4. Install the filters in reverse order, place the filter insert and turn clockwise as indicated by the arrow. WARNING Do not overtighten the filters. Carefully replace the filters and install in place. Otherwise, contaminants can enter the dishwasher’s systems and cause clogging. -
Page 35
Clean the dishwasher Frost protection In winter, the dishwasher must be protected against freezing temperature. After each wash: 1. Disconnect the dishwasher from power. 2. Turn off the water supply and disconnect the water inlet hose from the water valve. 3. -
Page 36
ERROR CODES AND TROUBLESHOOTING In the event of a fault, the dishwasher displays error codes that identify the problem: DESCRIPTION OF THE ERROR CODE ACTION FAUL T Faucets is not opened, or water Longer inlet time. intake is restricted,or water pressure is too low. -
Page 37
Problem Possible cause Solution The dishwasher will not The dishwasher will not The dishwasher door is open — close the door. start start The appliance is not Close the door carefully, make sure it is closed fully connected to the mains power The Delay start function is selected Child Lock is enabled… -
Page 38
Problem Possible cause Solution The dishwasher will not The dishwasher will not Close the door carefully, make sure it is closed start fully start The appliance is not Check the connection to the power supply connected to the mains power The Delay start function is selected To change the setting, refer to the Start Delay section in the operating instructions… -
Page 39
Problem Possible cause Solution The dishwasher does The drain is clogged Check the air trap. drain the water properly The drain hose is bent Make sure that the drain hose is correctly con- nected to the drain Foam in the dishwasher The wrong detergent Make sure that the detergent used is suitable for was used… -
Page 40
INSTALL THE APPLIANCE IN A CABINET 1. Place your appliance Place the appliance in the desired location. The back should rest against the wall and the sides should be against adjacent cabinets or walls. The dishwasher is equipped with water supply and drainage hoses, which can be placed on the right or left side to facilitate the installation. -
Page 41
Recommended weight of front panel: *For appliances 45 cm in width with completely covered front door panel — 3,2-5kg *For appliances 45 cm in width with revealed front control panel — 3,2-5kg Recommended weight of front panel: *For appliances 60 cm in width with completely covered front door panel — 3,2-7kg *For appliances 60 cm in width with revealed front control panel —… -
Page 42
max 720 mm 20 mm NOTE: Due to the design of some built-in furniture you may need to trim the base strip. -
Page 43
Install the appliance under the counter (Install the appliance under the counter) In most modern kitchens there is worktop under which all the electrical appliances and cabinets are arranged. In this case, remove the dish- washer worktop by undoing the bolts under the rear edge of the worktop (a). Note When you remove the countertop, the bolts MUST be screwed under the rear edge of the worktop (b). -
Page 44
2. When installing the dishwasher in the corner cupboard, leave room for the door to open. Cabinet Dishwasher Dishwasher door The minimum clearance *NOTE: Depending on the location of the wall electrical socket, you may need to cut the opening in the cabinet rear wall. -
Page 45
*Step 2. The cabinet door dimensions, install cabinet door The cabinet door should be installed in accordance with the installation drawing. Install the hook on the decorative wooden panel (see figure 4A) and place the hook in the socket on the dishwasher door (see Figure 4B). When the panel is aligned, press it from the top so that the plastic hooks snap shut. -
Page 46
*Built-in model Install the hook on the decorative wooden panel and place the hook in the socket on the dishwasher door (see Figure A). After adjusting the wooden door, fasten it to the dishwasher door using screws and bolts (see figure B). 1. -
Page 47
Step 4. Dishwasher installation steps For other installation steps please see the installation instruction drawings 1. Place the condensation strip under the cabinet worktop. Make sure that the condensation strip is flush with the edge of the worktop. (Step 2). 2. -
Page 48
Step 5. Level the dishwasher The dishwasher must be properly levelled to operate correctly. Place the spirit level on the door and the basket guides inside the dish washer to ensure the unit is level. Level the dishwasher by adjusting the three levelling feet separately. Be careful not to topple the dishwasher when levelling. -
Page 49
Height [mm] [H] 815 mm Width [mm] [W] 448 mm Depth [mm] [D1] 550 mm (with doors closed) Depth [mm] [D2] 1150 mm (with 90� doors open) -
Page 50
For more information about the product, please refer to the EU EPREL Product Database at https://eprel.ec.europa.eu. For more informa- tion, please use your mobile device to scan the QR code on the energy label or enter the product model listed on the energy label in the EPREL search engine https://eprel.ec.europa.eu/ WARRANTY AND AFTER SALES SERVICE… -
Page 51
12.2020./1…